

Page 1
USERGUIDE
UGH003-0102
Thermolater® vacuTrac
Positive/Negative Pressure Water Temperature
Controller with TW-1 or TW-2 Microprocessor
www.conairgroup.com
Corporate Office: 724.584.5500 Instant Access 24/7 (Parts and Service): 800.458.1960 Parts and Service: 814.437.6861
Page 2

Please record your equipment’s
model and serial number(s) and
the date you received it in the
spaces provided.
It’s a good idea to record the model and serial number(s) of your equi pment and the date you
received it in the User Guide. Our service department uses this information, along with the manual
number, to provide help for the specific equipment you installed.
Please keep this User Guide and all manuals, engine ering prints and parts lists together for
documentation of your equipment.
Date:
ual Number: UGH003-0102
Man
Serial Number(s):
Model Number(s)
DISCLAIMER: Conair shall not be liable for errors contained in this User Guide or for incidental, consequential
damages in connection with the furnishing, performance or use of this information. Conair makes no warranty
of any kind with regard to this information, including, but not limited to the implied warranties of
merchantability and fitness for a particular purpose.
Copyright 2002 l Conair l All rights reserved
Corporate Office: 724.584.5500 Instant Access 24/7 (Parts and Service): 800.458.1960 Parts and Service: 814.437.6861
Page 3
TEMPERATURE CONTROL UNITS
Thermolator®vacuTrac (VTR1-DI and VTR2-DI)
Positive/Negative Pressure
One Conair Drive ● Pittsburgh, PA 15202 ● 412-312-6000 ● FAX 412-312-6227 ● www.conairnet.com
TPHM011/1101
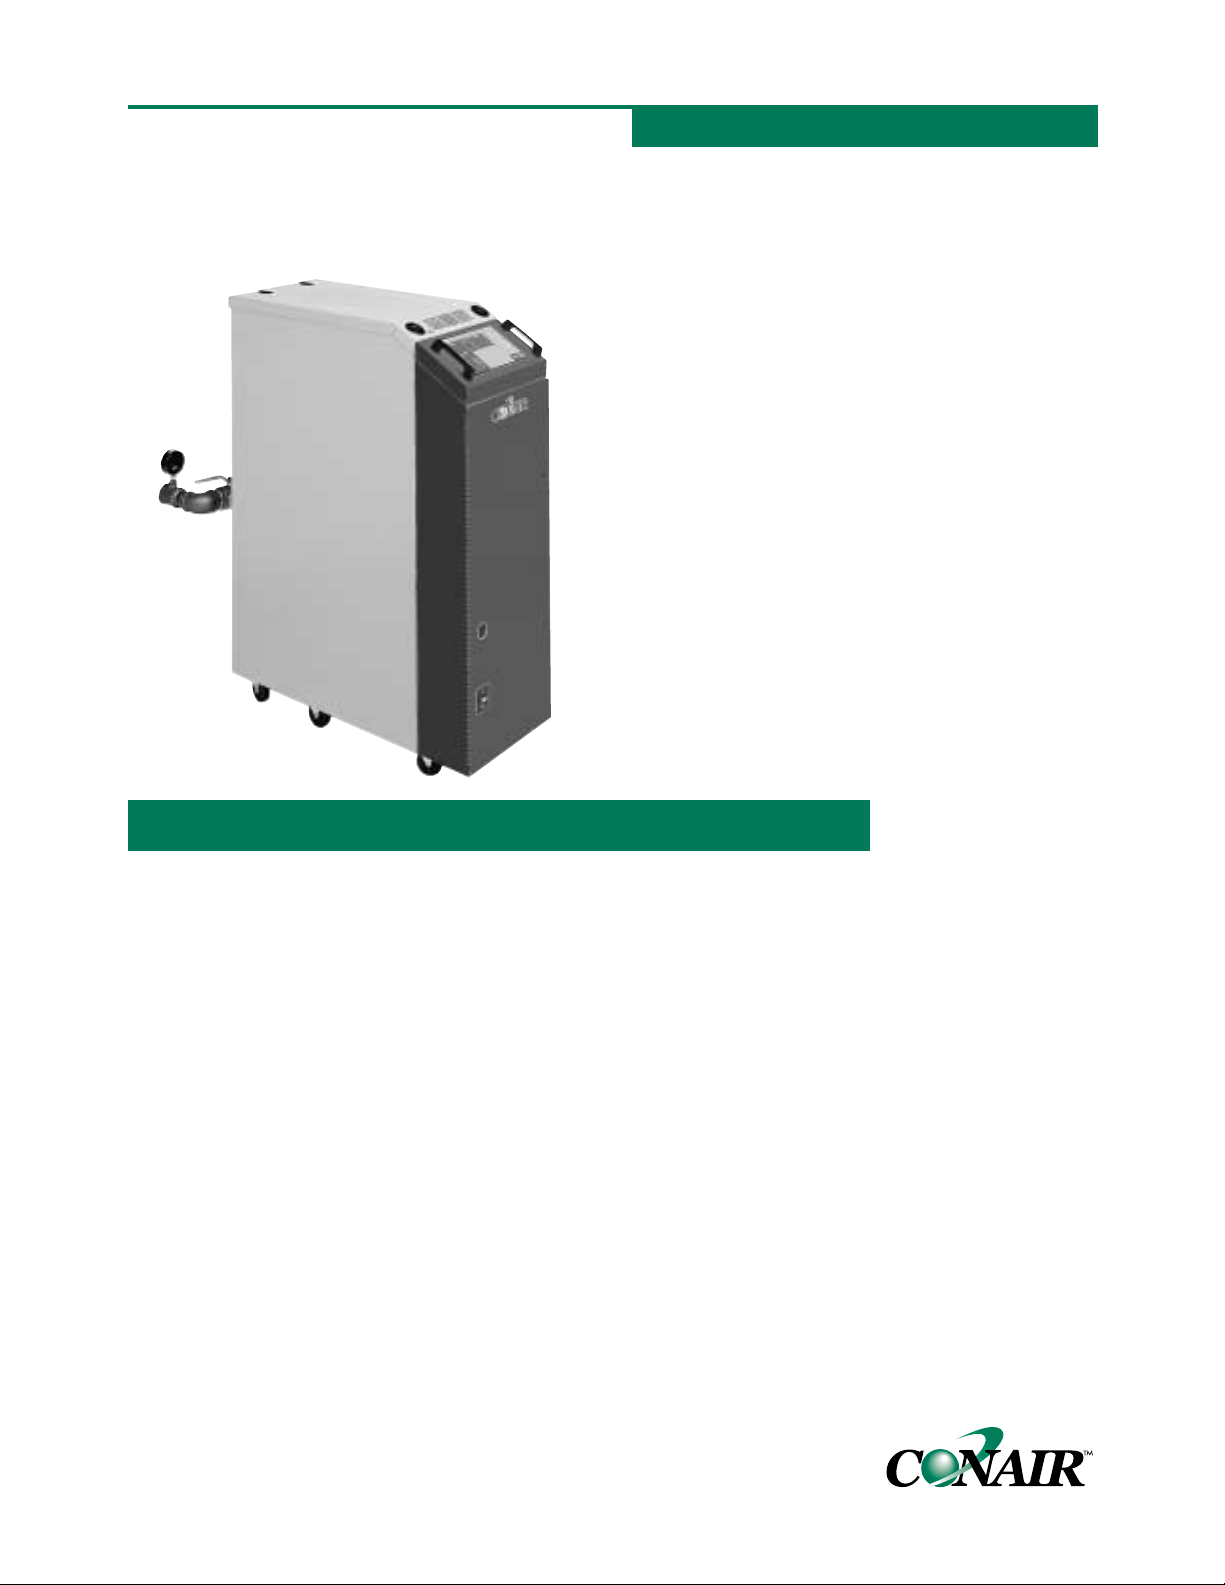
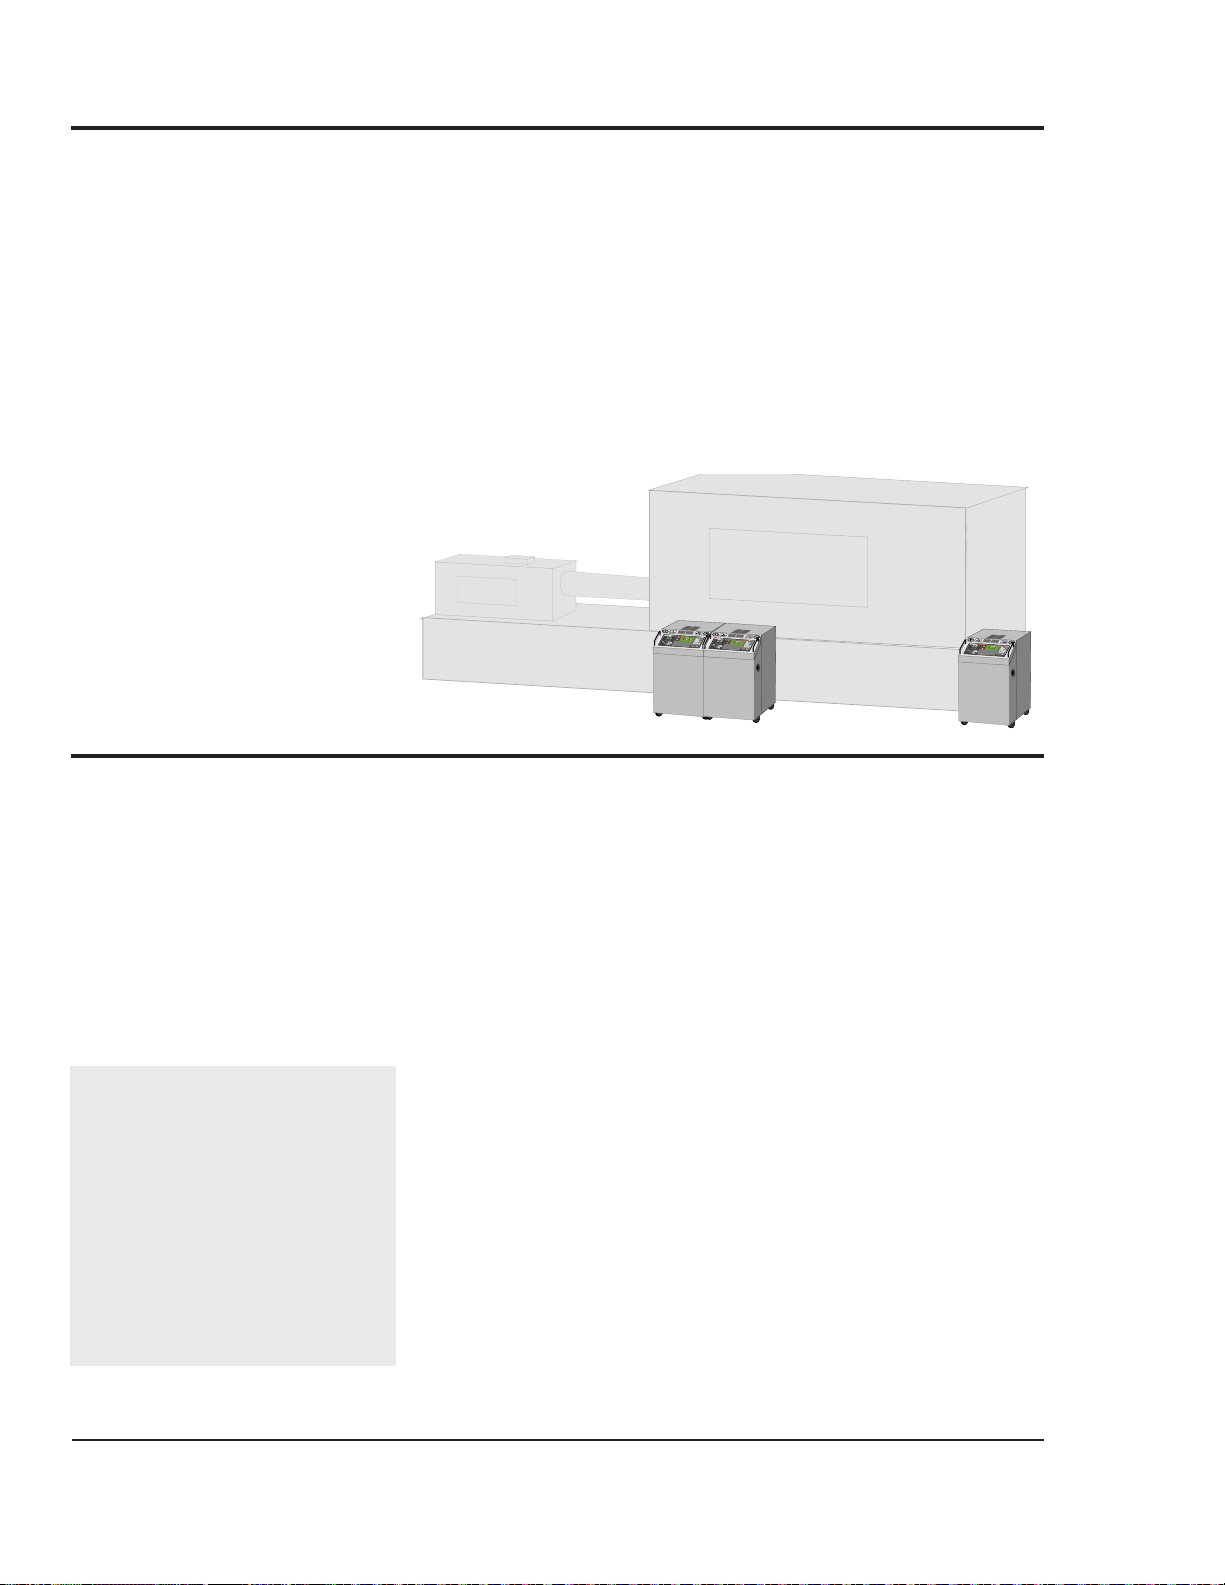
Keep your operation up and running with the
Thermolator vacuTrac water temperature controller. This
positive/negative pressure unit can be used as a temporary fix for a leaky mold or bad O-rings.
The vacuTrac is equipped with a manual three-way
ball valve that allows you to change the unit from positive pressure to negative pressure by moving the valve
handle on the back of the unit counterclockwise.
Changing the unit to operate with negative pressure
allows the unit to draw air into the mold effectively stopping leaks.
■ INCOLO Y HEATERS
Standard on the vacuTrac, Incoloy heaters resist damage
from high temperatures and chemicals.
■THREE-WAY B ALL VALVE
Quick and easy changeover from standard positive pressure
to negative pressure operation.
■ LIFT-OFF ACCESS PANELS
Convenient, tool-free access to internal components.The
cabinet lifts away for easy maintenance and servicing.
■ STA TE-OF-THE-ART CONTROLS
Easy to use microprocessor controls provide accurate temperature control. Auto-tuning of the PID control parameter
provides uniform temperature control regardless of light or
heavy external loading.
■COMP ACT ,STURDY DESIGN
Small footprint. Designed for efficient use of your valuable
floor space.
CONTROL
TEMPERATURE
AND STOP
MOLD LEAKS
Single or dual zone models available
Use the vacuTrac to produce negative pressure in the from process
lines. Otherwise, the unit functions
like a direct injection temperature
control unit and can be used when
your application requires process
temperatures up to 180° F.
The unit is equipped with a highcapacity, heavy-duty jet pump/venturi. Choose 9 or 12 kW heaters
and pumps from 2 to 7.5 Hp.
Specify single zone if you need
one temperature throughout your
mold, or dual zone if two different
setpoints are required.
You have a choice of two
advanced microprocessor control
systems. Other options include bell,
strobe or piezo horn for alarm conditions.
Page 4
TPHF017/1101
FEATURES
One Conair Drive ● Pittsburgh, PA 15202 ● 412-312-6000 ● FAX 412-312-6227 ● www.conairnet.com
TEMPERATURE CONTROL UNITS
Thermolator®vacuTrac (VTR1-DI and VTR2-D2)
Positive/Negative T emperature Controller
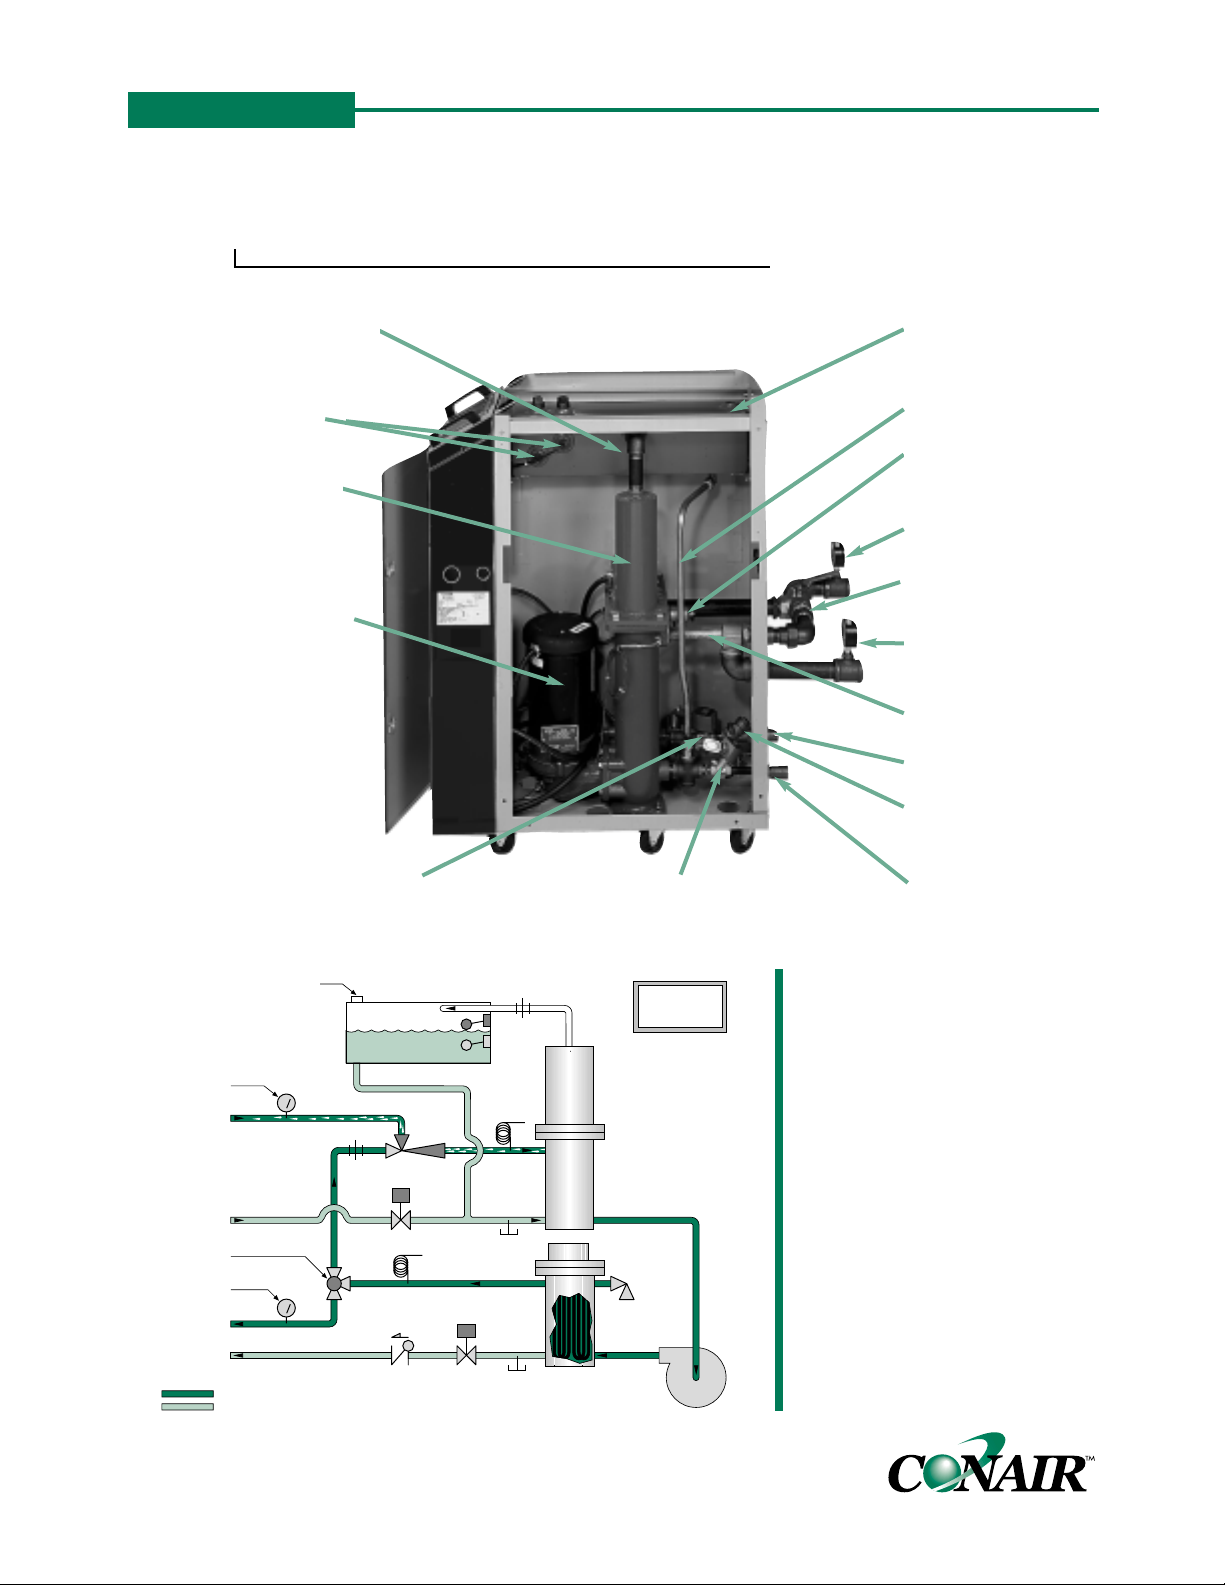
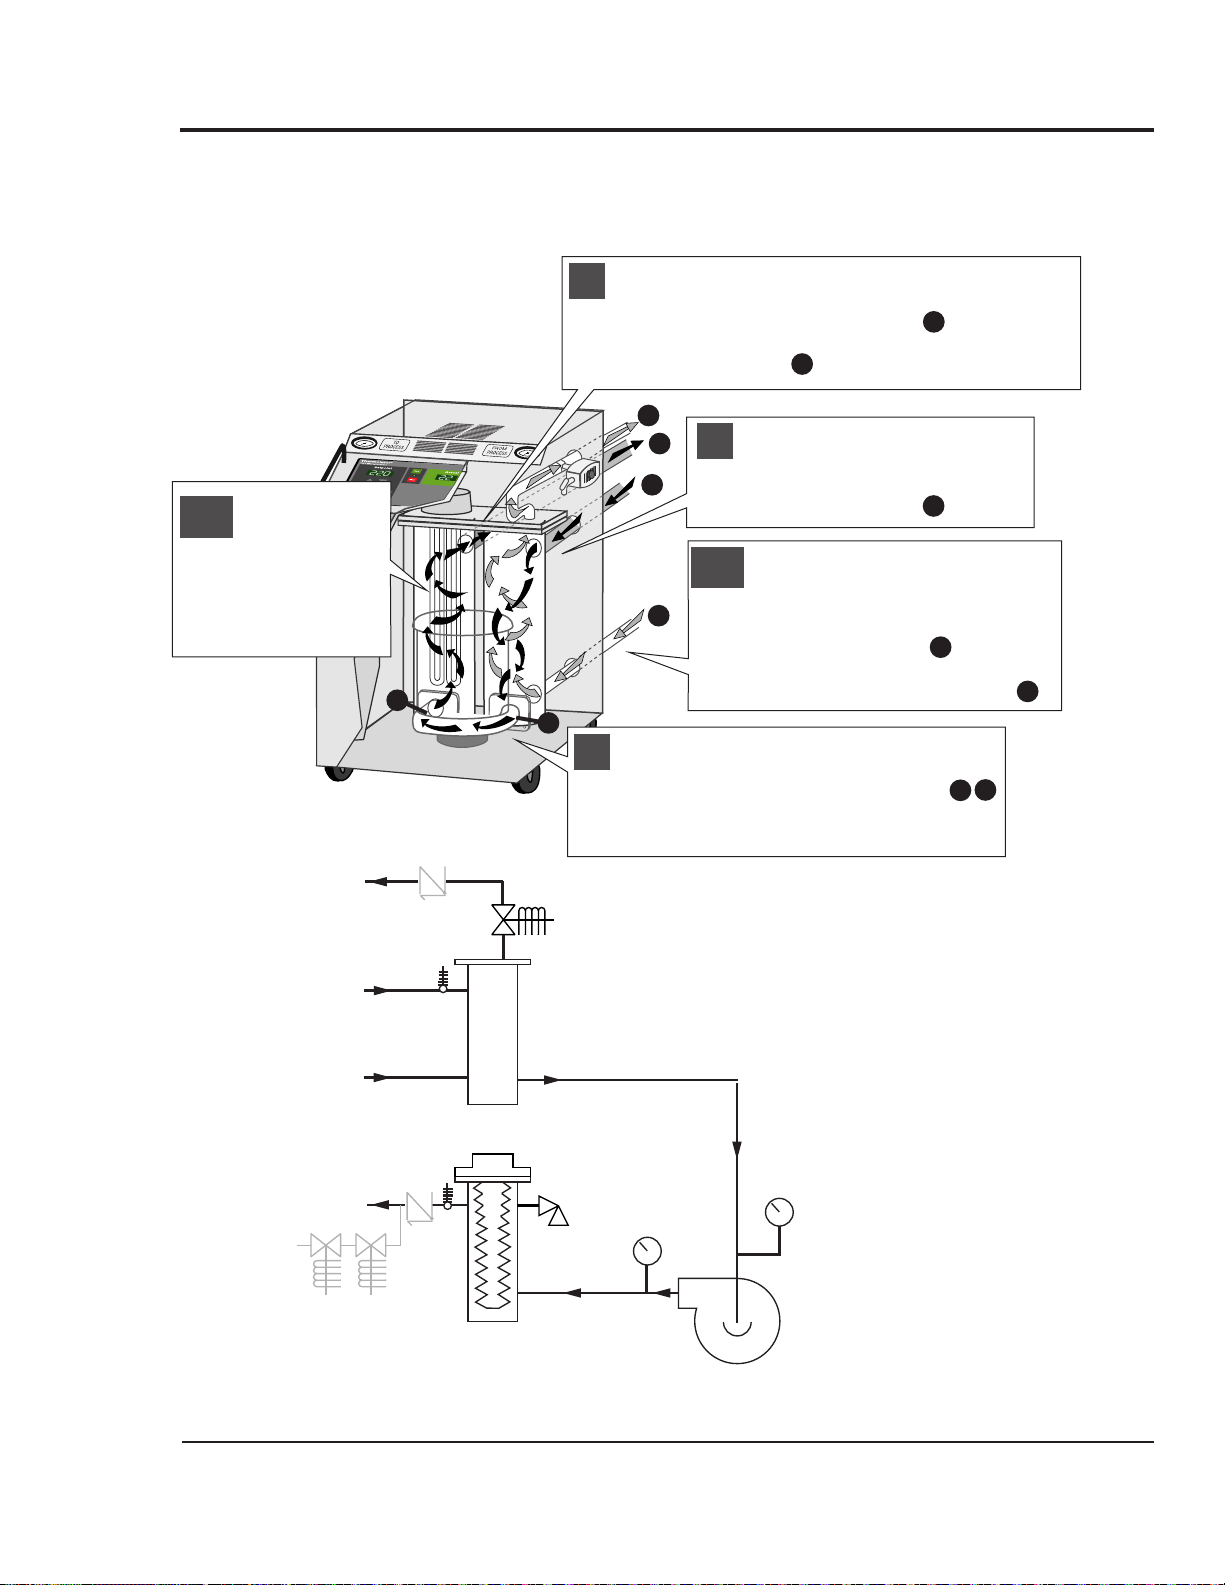
FEATURES
Expansion/fluid reservoir
accepts thermal expansion
of fluid when heated.
High efficiency pump
pushes fluid through
the system.
Air/water separation
tank allows entrapped
air to escape to the
expansion tank.
Pressure relief valve
prevents system
over pressurization.
Venting line prevents
trapped air in system.
Cooling check valve
prevents coolant back
flow into the vacuTrac.
Level switches
control tank fluid level.
Make-up solenoid valve
maintains tank level.
Cooling solenoid valve
lets hot fluid out of system.
Vacuum generating jet
pump/venturi
To process
pressure gauge
Three-way ball valve
diverts flow to
generate vaccuum.
From process
pressure gauge
Overflow connection
relieves system static
pressure.
Cooling water outlet
Cooling water inlet
Positive/negative pressure
units use a jet pump/venturi to
produce negative pressure in
the “from process” lines.
Water at positive pressure
will leak out of mold cracks or
bad o-rings. During negative
pressure operation, however,
air is drawn through the lines,
and the mold operates without
leaking. A manual three-way
ball valve can be closed to
make these units into standard direct injection units.
Because the units use water
and vent to the atmosphere,
they have a maximum process
temperature of 180° F.
From Process
Pressure Gauge
From Process
Cooling In
and Make-Up
Manual Three-Way
Ball Valve
To Process
Pressure Gauge
To Process
Cooling Out
Vent and Overflow
Connection
3 Gallon
Reservoir
Union
Make-Up Solenoid
Process Piping
Cooling Water/Make-Up Piping
Make-Up Switch
Low Level Switch
Jet Pump/
Venturi
Valve
Supply
Temperature
Thermocouple
Check
Valve
Cooling
Solenoid
Valve
Union
Return
Temperature
Thermocouple
Drain
Drain
Air
Vent
Line
Air/Water
Separation
Tank
Pressure
Relief
Valve
Heater Tank
(9 or 12 kW)
Pump
Note:
Maximum Set
Point is 180°F
Page 5
TPHO017/1101
FEATURES
One Conair Drive ● Pittsburgh, PA 15202 ● 412-312-6000 ● FAX 412-312-6227 ● www.conairnet.com
TEMPERATURE CONTROL UNITS
Thermolator® vacuTrac (VTR1-DI and VTR2-D2)
Positive/Negative Pressure
CONTROLS
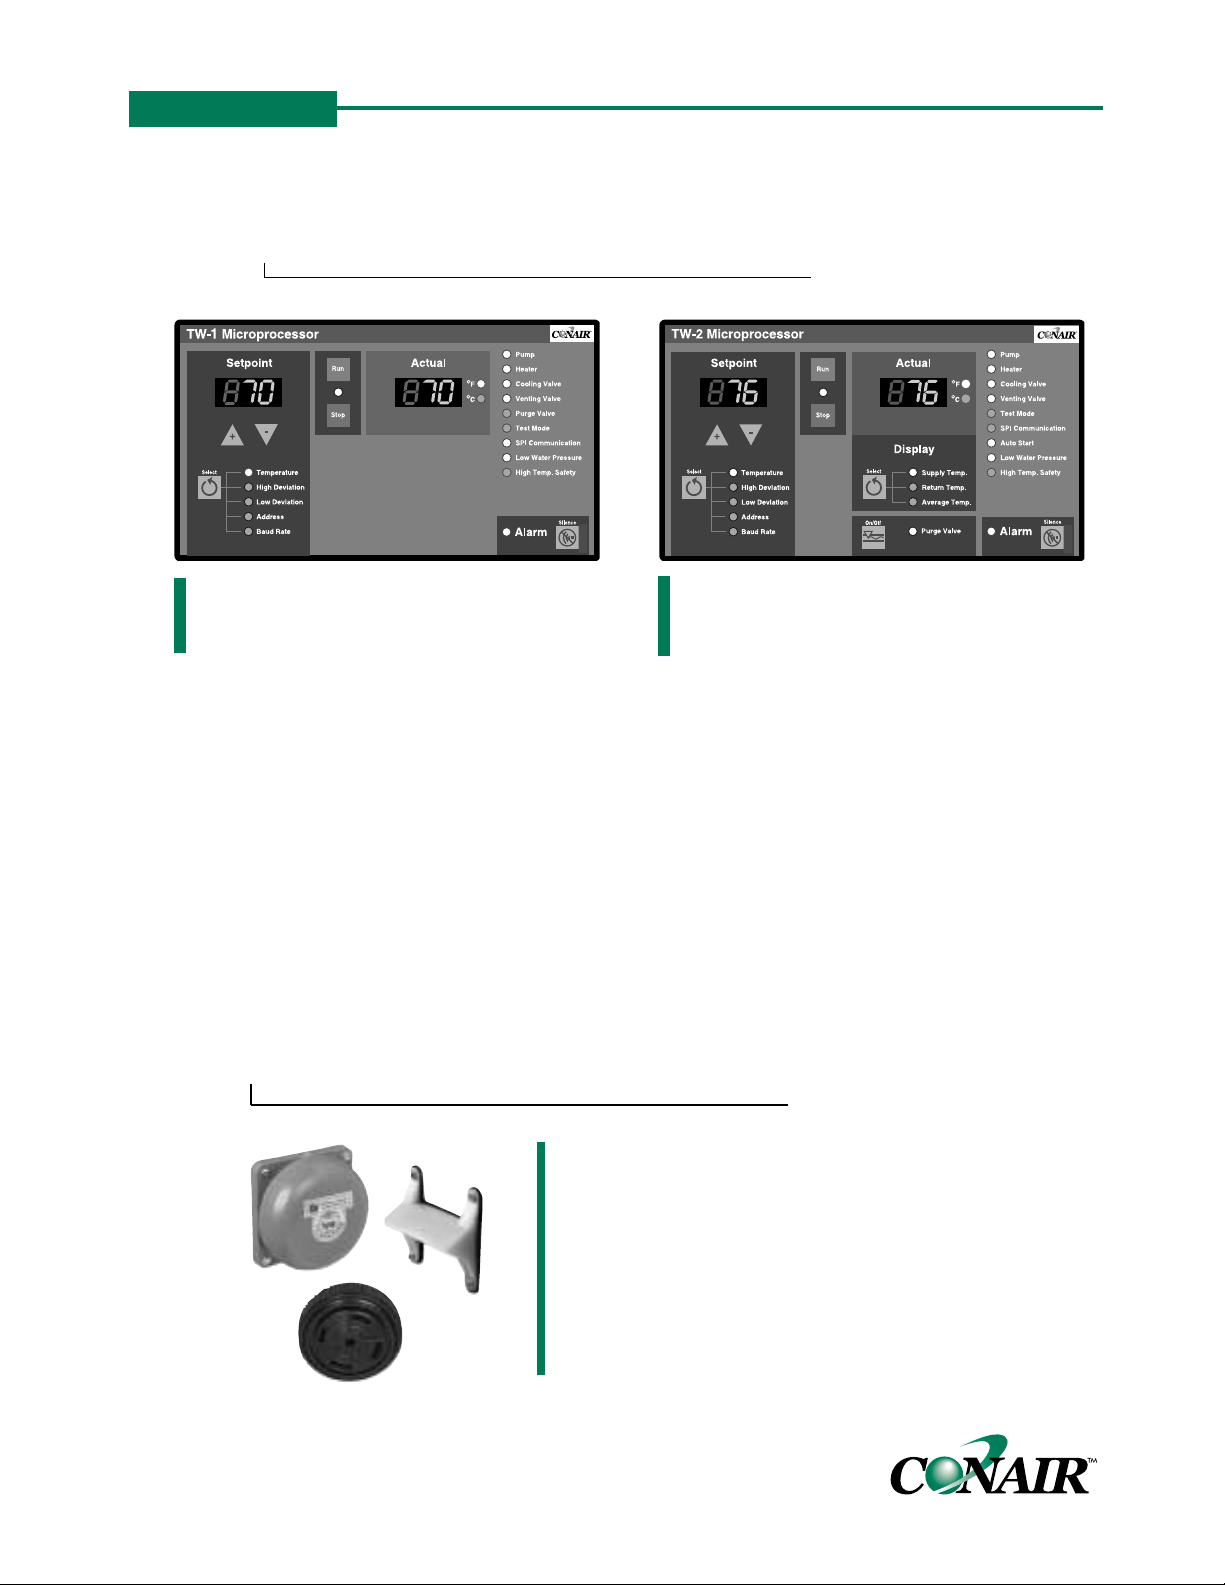
vacuTrac Plus Control (TW-2)
Includes all of the features of the standard
vacuTrac control, PLUS:
● Autostart capability for convenient pre-
heating of molds.Works with external
timers or switches.
● Choice of temperature control points
allows you to monitor and control from the
process supply or process return temperature, or from an average of the two.
● Phase detection circuit indicates incorrect
pump rotation or an open electrical leg.
● Remote control up to 50 feet.Magnetic
panel back allows you to place the controls
where you need them. Comes with 15-foot
cable.Lengths of 30 or 50 feet optional.
Note:The purge option is not available on
the vacuTrac positive/negative pressure
water temperature controllers.
vacuTrac Control (TW-1)
Our waterproof, durable control is operator
friendly and smart. Standard features:
● Automatic fine-tuning of PID control para-
meters provides uniform temperature control
regardless of external loading.
● Adjustable high/low deviation warnings
track with your setpoint temperature. Preprogrammed acceleration feature speeds up
setting parameters.
● 18 operating and fault indicator lights,
including 7 bi-color LEDs, tell you the status
of critical components and parameters.
● Password entr y prevents unauthorized or
accidental changes to operating parameters.
● RS485 communication using SPI protocol.
Baud rates and addresses are programmable on the operator panel.
OPTIONS
Alarm packages
Call attention to alarm conditions
with a light and horn package.
Page 6
One Conair Drive ● Pittsburgh, PA 15202 ● 412-312-6000 ● FAX 412-312-6227 ● www.conairnet.com
TPHS017/1101
SPECIFICATIONS
TEMPERATURE CONTROL UNITS
Thermolator®vacuTrac (VTR1-DI and VTR2-DI)
Positive/Negative Pressure
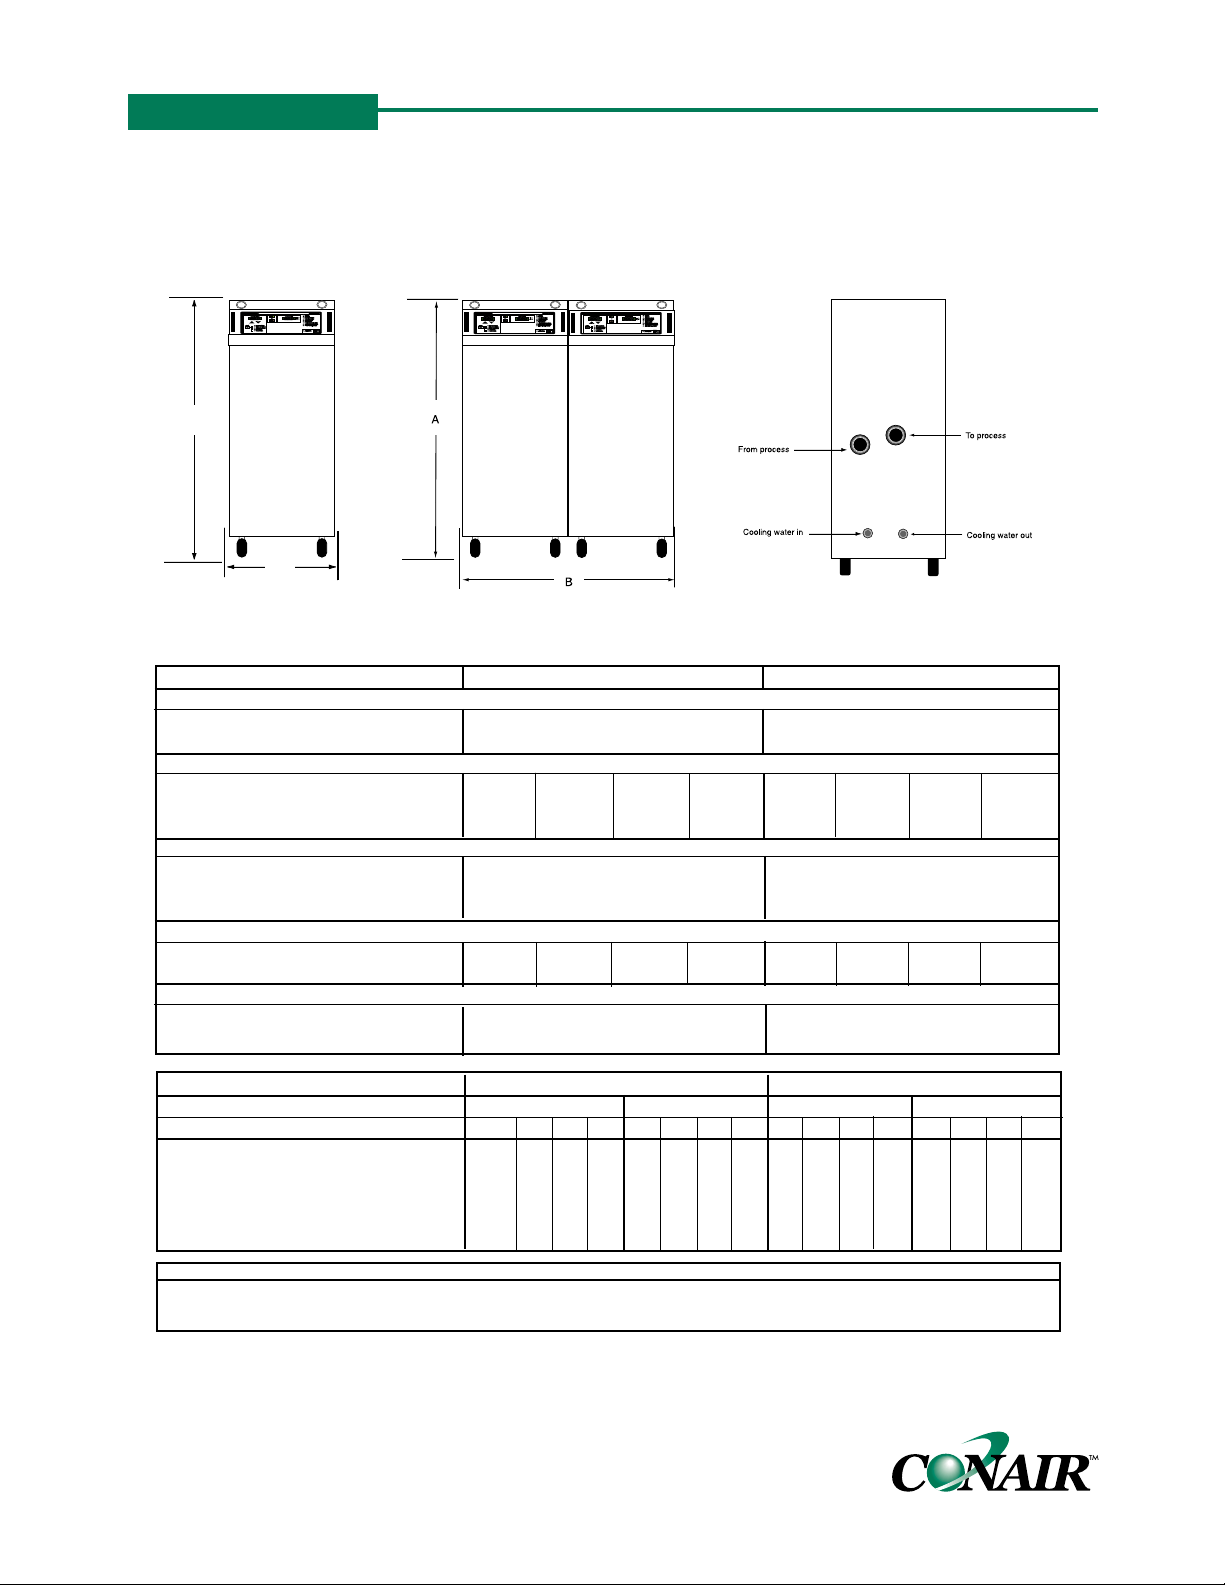
VTR1-DI (single zone) VTR2-DI (dual zone)
VTR1-DI rear view and connections
MODELS
VTR1-DI VTR2-DI
Performance Characteristics
Minimum setpoint 32 °F {0 °C} 32 °F {0 °C}
Maximum setpoint 180 °F {82 °C} 180 °F {82 °C}
Pump Performance per zone
Pump Size Hp {kW}
2 {1.49} 3 {2.24} 5 {3.73} 7.5 {5.59} 2 {1.49} 3 {2.24} 5 {3.73} 7.5 {5.59}
Nominal flow gpm {l/min}
55 {208} 80 {303} 100 {379} 115 {435} 55 {208} 80 {303} 100 {379} 115 {435}
Pressure @ nominal flow psi {bar}
31 {2.2} 35 {2.5} 43 {3} 51 {3.6} 31 {2.2} 35 {2.5} 43 {3} 51 {3.6}
Dimensions inches {mm}
A -Height
43 {1090} 43 {1090}
B- Width
14 {355} 28 {710}
C- Depth
31.5 {800} 31.5 {800}
Weight Ib {kg}
Operating
300 {136} 305 {138} 310 {141} 320 {145} 600 {272} 610 {277} 620 {281} 640 {290}
Shipping
470 {213} 475 {216} 480 {218} 490 {222} 770 {349} 780 {354} 790 {358} 810 {367}
Water Connections NPT inches (Female)
To/From Process 1.25 1.25
Cooling Water Inlet/Outlet 0.75 0.75
ELECTRICAL REQUIREMENTS - full load amps
†
VTR1-DI VTR2-DI
Heater 9 kW 12 kW 9 kW 12 kW
Voltage
208V 230V 460V 575V 208V 230V 460V 575V 208V 230V 460V 575V 208V 230V 460V 575V
Pump sizes
2 Hp {1.49 kW} 31.8 28.8 14.4 11.5 40.2 36.4 18.2 14.6 63.6 57.6 28.8 23.0 80.4 72.8 36.4 29.1
3 Hp {2.24 kW} 34.7 31.4 15.7 12.6 43.1 39.0 19.5 15.6 69.3 62.8 31.4 25.1 86.1 78.0 39.0 31.2
5 Hp {3.73 kW} 38.5 34.8 17.4 13.9 46.8 42.4 21.2 17.0 76.9 69.9 34.8 27.8 93.7 84.8 42.4 33.9
7.5 Hp {5.59 kW} 45.7 41.4 20.7 16.6 54.1 49.0 24.5 19.6 91.5 82.8 41.4 33.1 108.3 98.0 49.0 39.2
SPECIFICATIONS NOTES:
†
All voltages are 3 phase, 60 Hz.
Specifications can change without notice. Check with a Conair representative for the most current information.
A
B
Page 7

CONAIR THERMOLATOR VTR POSITIVE/NEGATIVE OPERATION
1.0 PROCESS WATER CONNECTIONS
PROCESS CONNECTIONS
Connect the FROM PROCESS and TO PROCESS connections on the back of the Thermolator using 1-
1/4”
NPT piping. Viewed from the rear, the FROM PROCESS connection is located on the left hand side of the
unit, and is clearly marked “FROM PROCESS”. The TO PROCESS connection is located on the right hand
side of the unit, and is marked “TO PROCESS” in close proximity on the back panel.
OVERFLOW/VENT CONNECTION
Connect the OVERFLOW/VENT piping on the reservoir tank, located at the top rear of the unit, to an open
drain or vented, covered container. This connection must be piped with a clean break in order to prevent
back flow and pressure in the PROCESS piping. This is where a VTR vents air out of the PROCESS piping
since the unit is operating at times in a vacuum mode, and can be introducing small amounts of air into
the PROCESS piping.
Note: Always use a back-up wrench to support the piping when making connections to the unit.
1.1 COOLING/MAKE-UP WATER CONNECTIONS
COOLING CONNECTIONS
Connect the COOLING WATER IN /MAKE-UP and COOLING WATER OUT piping to the Thermolator using ¾”
NPT pipe. Viewed from the rear, the COOLING IN /MAKE-UP hookup is in the lower left hand side through
the back panel and is marked “COOLING WATER IN”. The COOLING WATER OUT hookup is in the lower
right hand side through the back panel and is marked “COOLING WATER OUT”.
Note: The cooling water out connection is piped with a swing check that must not be turned on to its
side when the connection is made.
1.2 COOLING/MAKE-UP WATER PRESSURES
COOLING /MAKE-UP SUPPLY & RETURN WATER PRESSURES
Cooling /make-up SUPPLY and RETURN water pressure must have net pressures of between 25 PSI and 75
PSI. A net pressure less than 25 PSI may not provide sufficient cooling for the process. The net pressure
is the difference between the cooling SUPPLY and RETURN pressures.
1.3 SEQUENCE OF OPERATION
SEQUENCE OF OPERATION
VTR1 units control process water temperature. When the controller signals the unit to heat, the electric
immersion heater is energized raising the PROCESS water temperature. When the controller signals the
unit to cool, the COOLING WATER OUT (1/4”) solenoid valve is energized. This allows the hot PROCESS
water out of the process piping. When sufficient water has been pumped out of the unit, the MAKE-UP
Page 8

water level float switch will make, opening the COOLING/MAKE-UP (3/8”) solenoid valve, replacing the
hot discharged water with cooler water.
This unit’s operation is similar to a TW-DI unit except that a VTR unit has a reservoir tank that is open to
the atmosphere, which allows a maximum 180° F PROCESS water temperature.
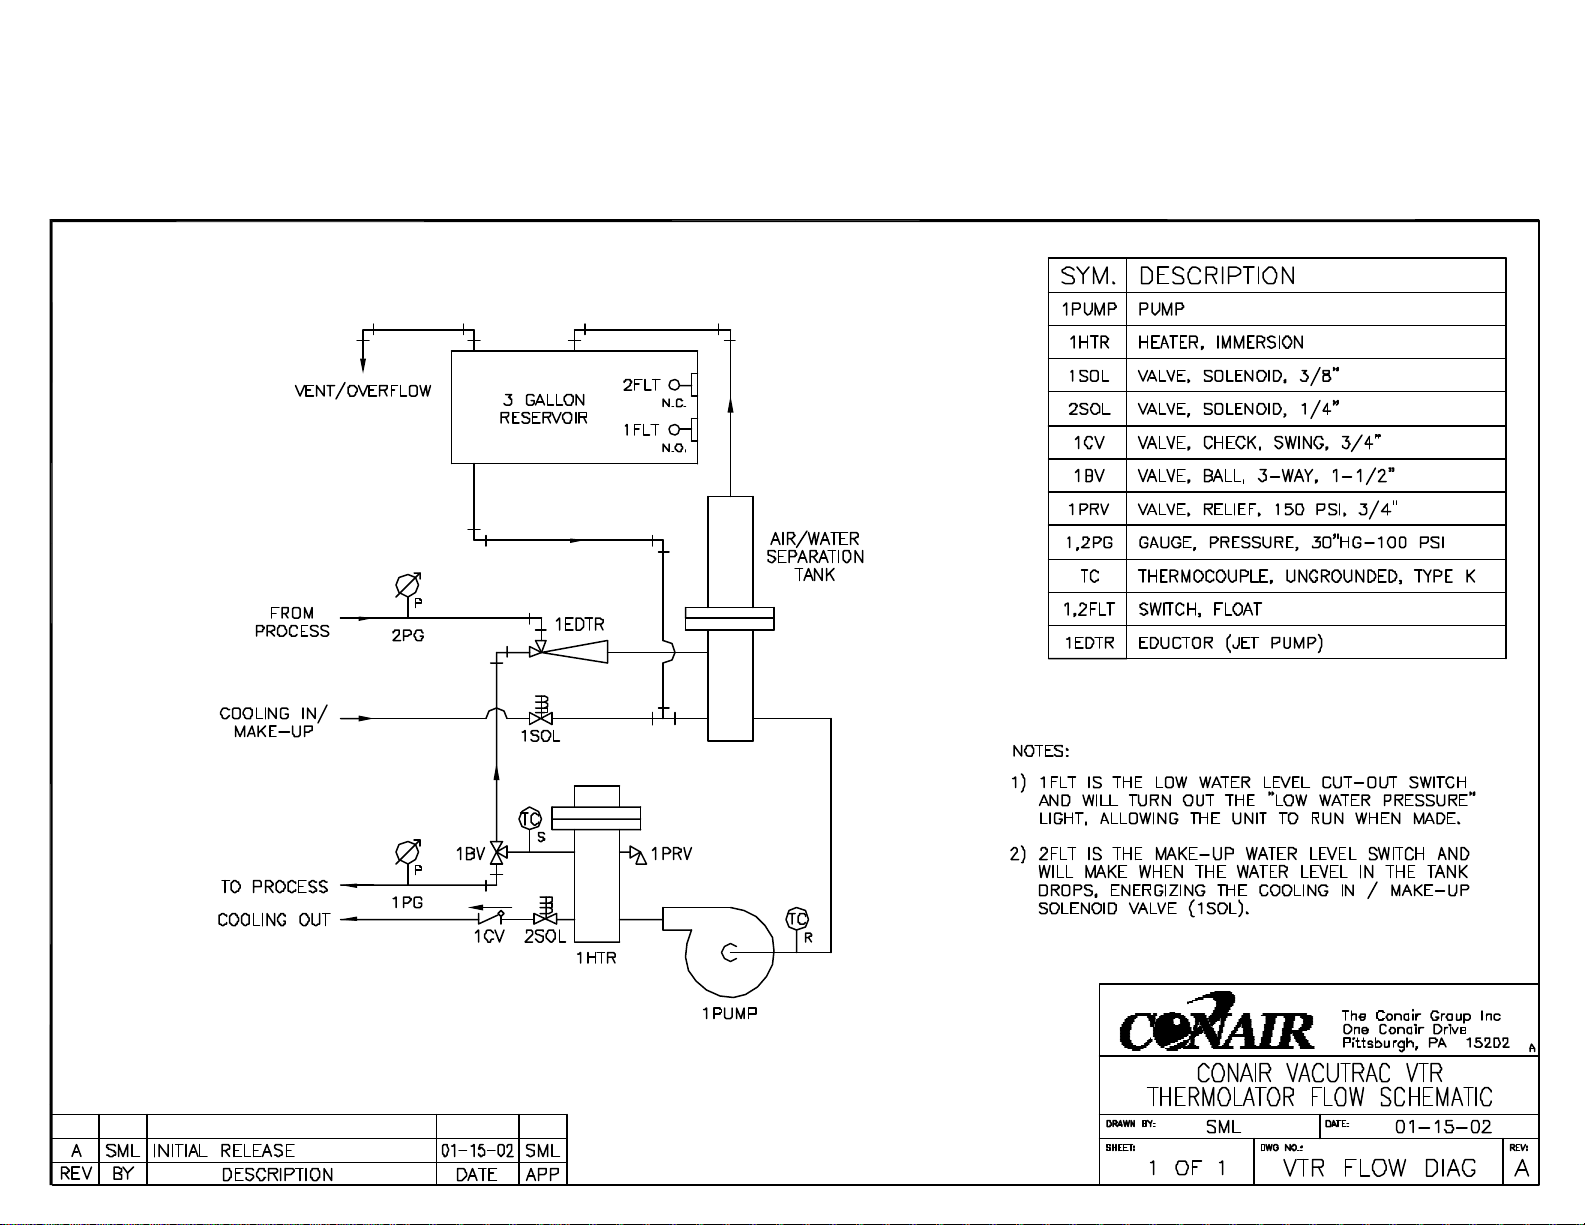
Notes: 1. The DIN units do not have pressure switches. They use float switches instead
2. The make up water level float switch is the higher one in the reservoir tank. The low
water level cut-out float switch is the lower one in the reservoir tank.
3. Anytime the three phase power is turned on to the unit the cooling/make-up water is
(3/8”) solenoid valve may energize.
The VTR unit operates in either a positive or negative pressure mode. Upon energizing the unit, if the
make-up level float switch is in the made position, the COOLING/MAKE–UP water in (3/8”) solenoid valve
will open and begin to fill the unit’s PROCESS piping and reservoir tank. As the water level rises in the
reservoir tank, or if it is sufficiently full to begin with, the low water level float switch will make, turning
off the (LOW WATER PRESSURE) light on the operator panel.
STARTING UP THE UNIT
The start button may now be pressed to energize the unit. The negative pressure mode of operation is
initiated by turning the 3-way valve (See Figure 1.) at the back of the unit counter clock-wise. Negative
pressure in the process piping is caused by diverting some of the flow from the pump through the eductor.
The water bypassed to the eductor creates a high velocity flow at the eductor nozzle which then causes a
suction on the from process line.
Never turn the valve all the way to “negative” (counter clockwise), because all the flow will bypass the
process, and there will be no temperature control of the mold. When the unit is running in a negative
pressure mode, any leak that was in the system will now be drawing air in to the process piping.
The air and water mixture is separated in the separation tank located on the suction side of the pump. The
air is vented from the unit through the overflow connection on the back of the reservoir tank. If this vent
becomes plugged, the unit will not work properly.
1.4 TROUBLESHOOTING A VTR UNIT
A few things may cause the VTR unit to act erratically. If glycol is present in a heavy concentration
within the process water, it may foam and back up into the reservoir tank. This can cause the reservoir
tank to overflow, or the float switches to stick. This problem may be eliminated by using an anti-foaming
agent in the water, and periodically opening the (1”) pipe plugs on top of the tank to clean the switches
with a soft haired paint brush.
An inability to get desired cooling can be a problem with a VTR unit. If the cooling water out line
pressure is greater than the unit’s pump discharge pressure, there is no way for the unit to cool. A change
in the installation will be required in order to provide a reduced cooling water out line pressure.
If the reservoir tank continuously overflows there is a chance that either a float switch has stuck or the
cooling/make-up valve has stuck open from a piece of dirt.
Page 9
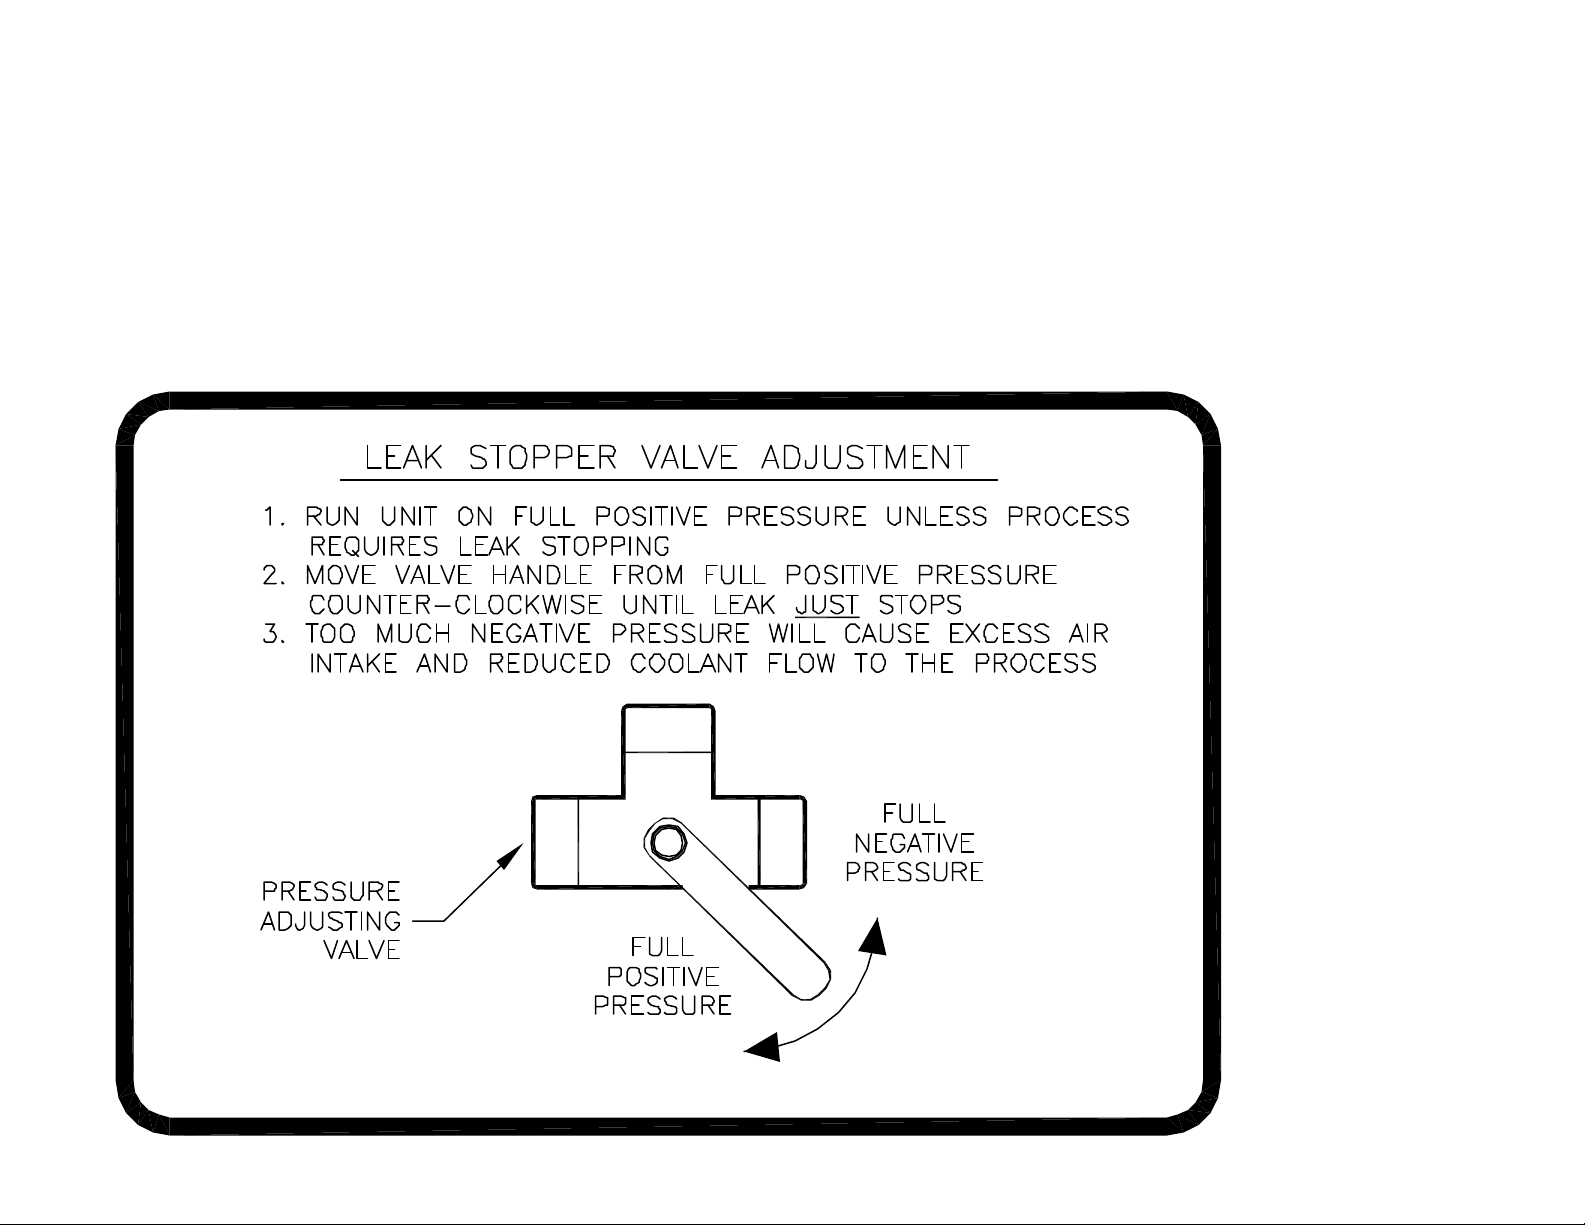
Figure 1.
Page 10
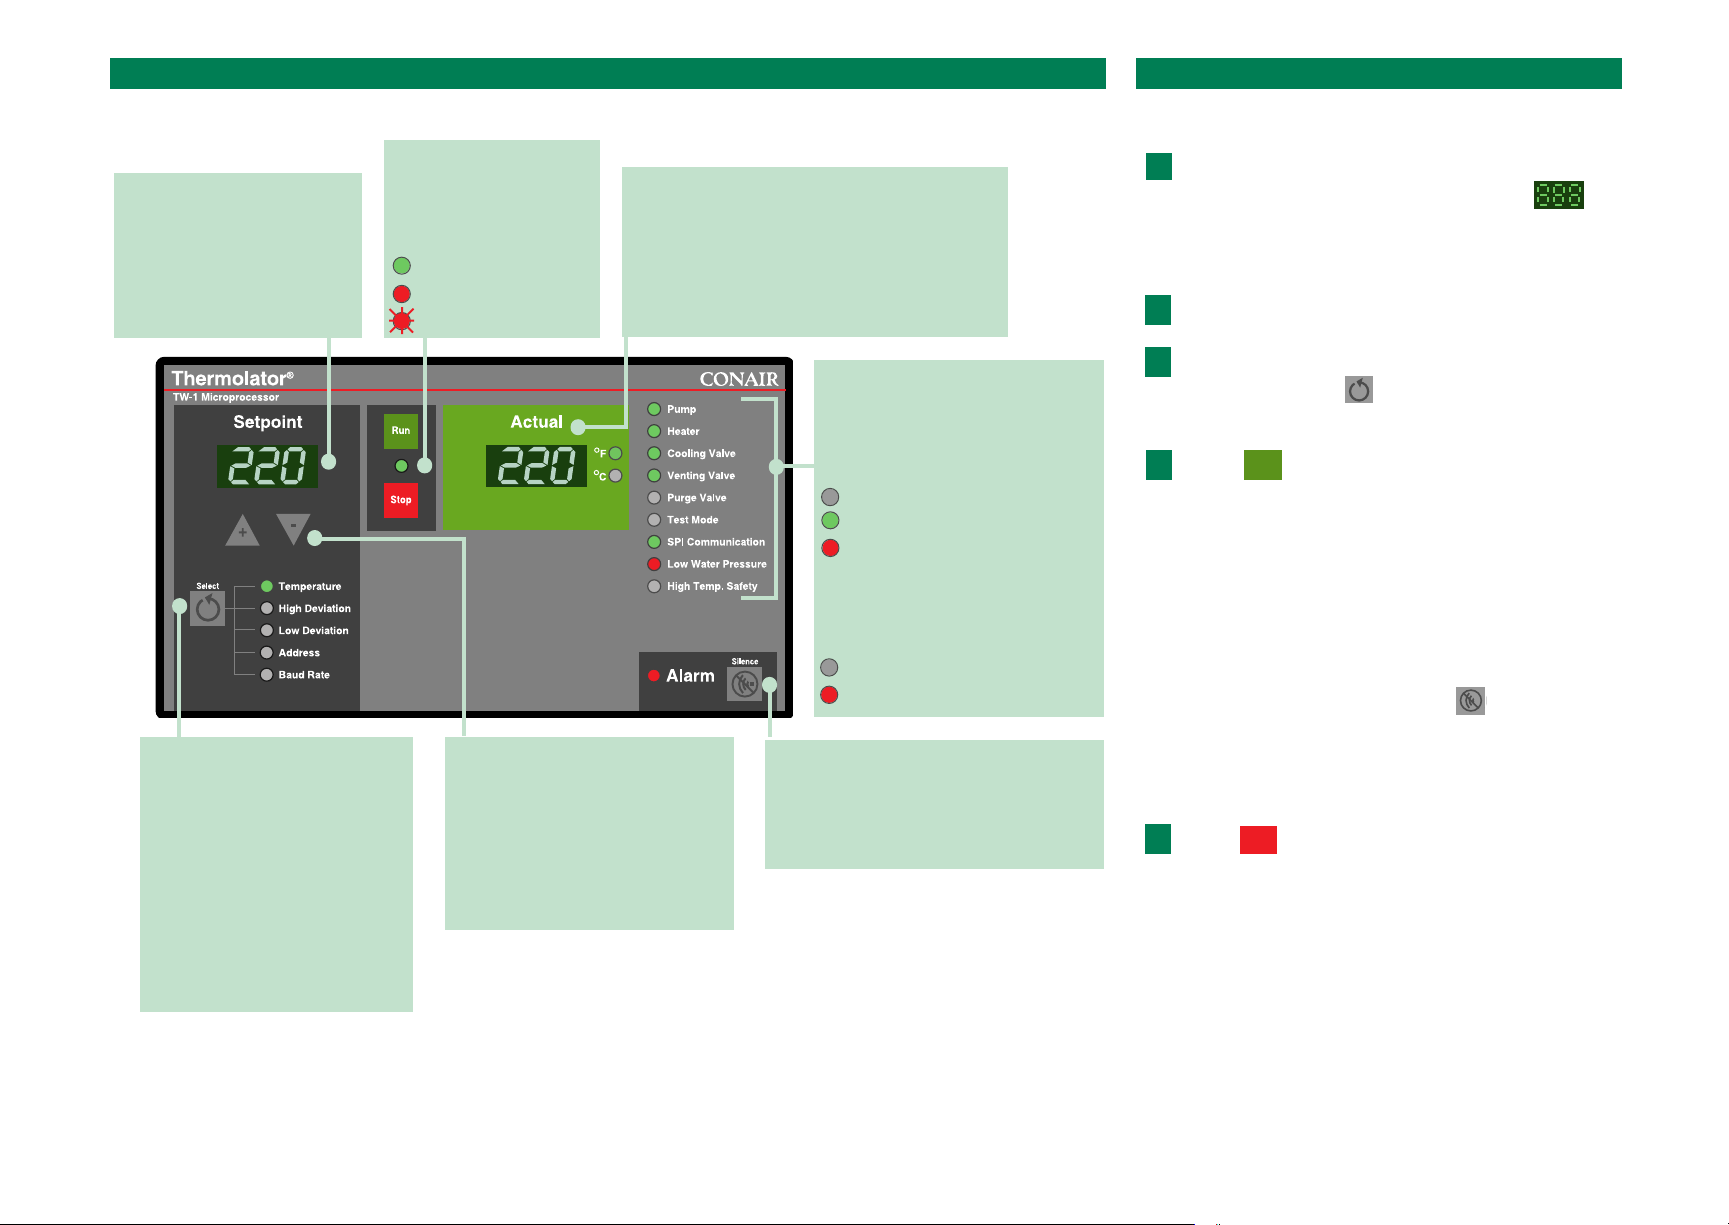
OPERATIONTHE TW-1 CONTROL
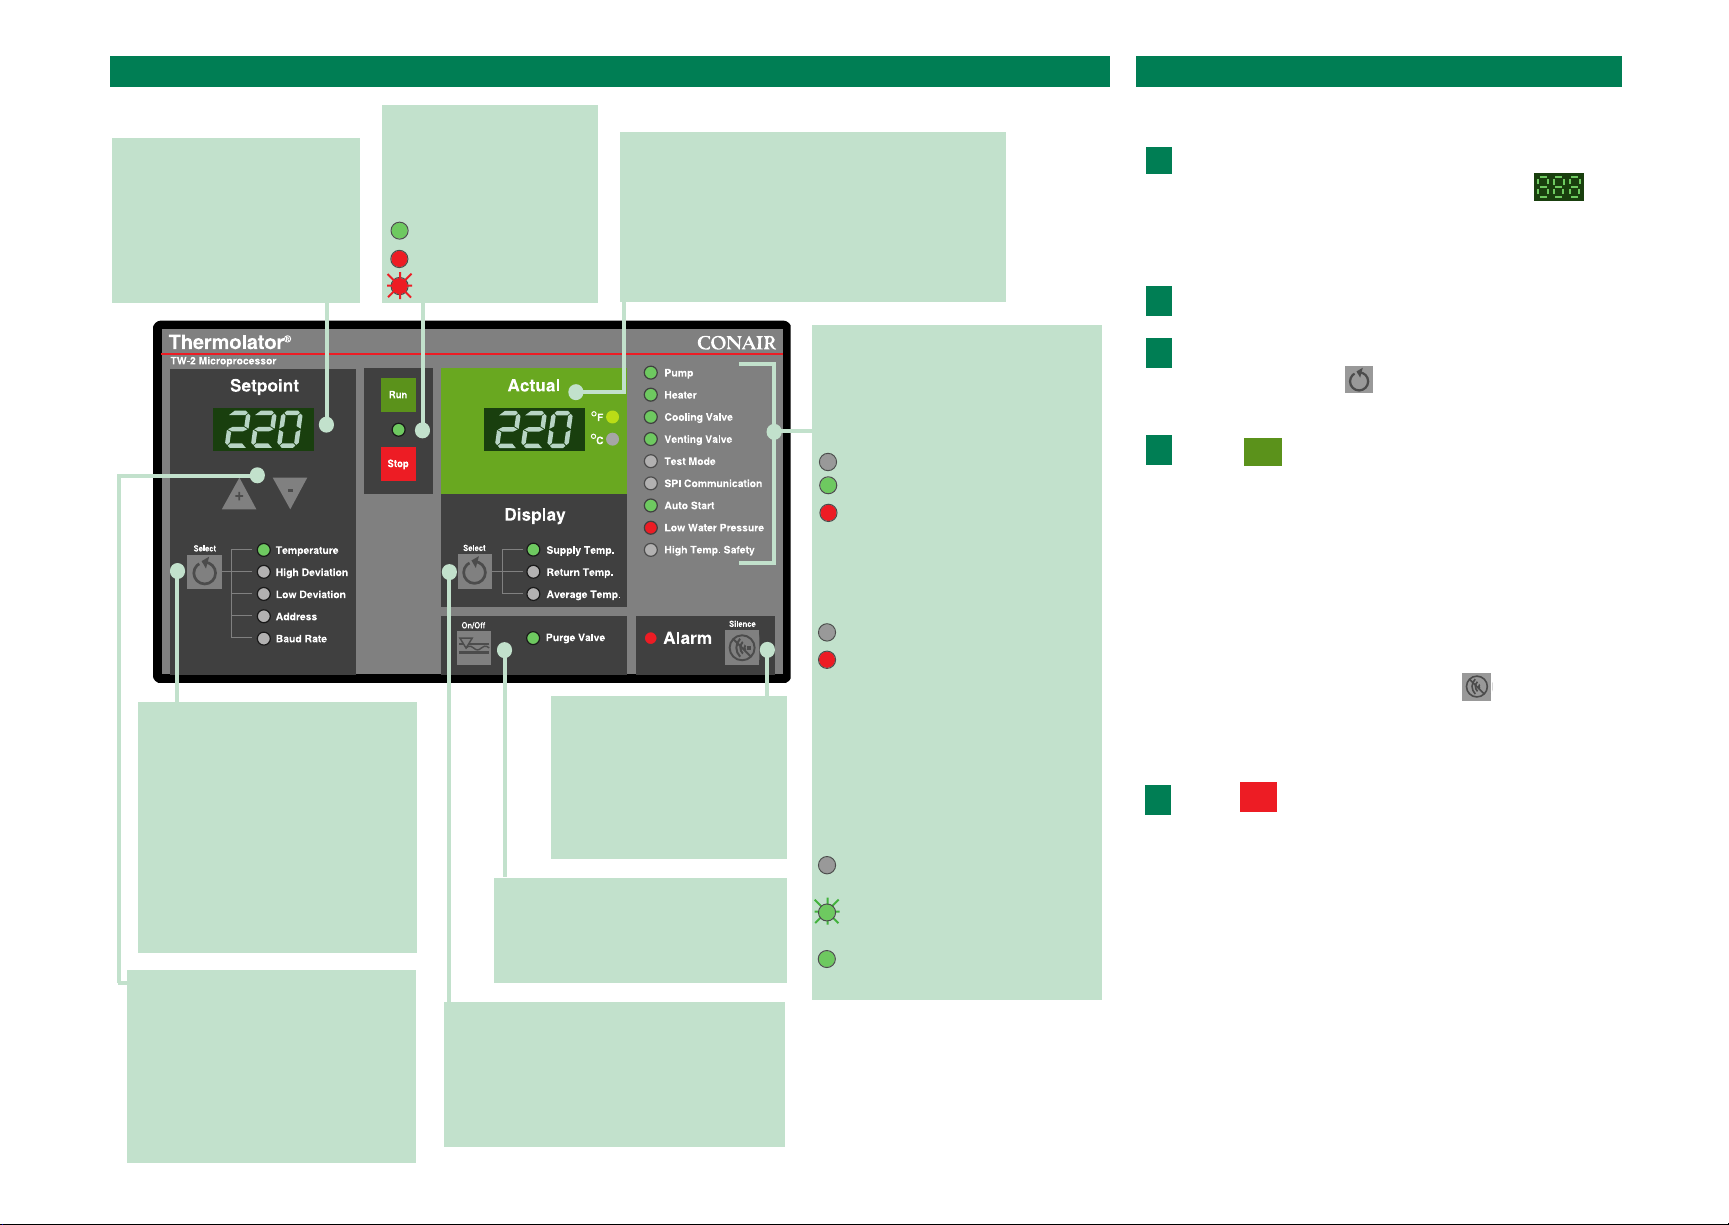
Actual values display
The green window displays the temperature
at the middle of the mold. This temperature
is calculated as an average of the temperatures of the supply water and return water.
The lights indicate whether the temperature
is in degrees Fahrenheit or Celsius.
Alarm
Press to acknowledge the alarm light
and silence the optional audible alarm.
The alarm light will flash until the
cause of the alarm condition is fixed.
Starting the Thermolator®.
Turn on main power to the Thermolator®.
◆ Setpoint and actual windows display for
three seconds, then display the most recently
entered setpoint temperature and the current
actual temperature.
◆ Indicator lights blink green, then red.
Turn on water supply to the unit.
If the water supply is on, go to Step 3.
Enter the temperature setpoint.
Press the Setpoint until the green light appears
next to Temperature. Press
▲ to increase the set-
point or
▼ to decrease.
Press .
◆ The RUN/STOP light turns green.
◆ The unit initiates a 60-second venting
sequence. Cooling and venting valves are
active for 60 seconds. The pump is active for
the final 30 seconds.
◆ Normal operation begins. The heater turns on
if the actual temperature is below setpoint.
The cooling valve remains active if the actual
temperature is above setpoint.
If the Alarm light turns on, press to silence an
audible alarm and go to the Troubleshooting section.
Stopping the Thermolator®.
Press .
◆ The RUN/STOP light turns red.
Setpoint display
The window displays the
setpoints entered for the
fluid temperature, the high
and low temperature deviation alarms, the SPI baud
rate and the SPI address.
1
2
3
Status lights
The lights indicate the operating
status of the listed components.
Except in Test Mode and Auto
Start, the lights indicate:
= Off or inactive
= On or active
= Alarm condition
Test Mode is used for initial programming. When test mode is
enabled, normal operation is
disabled.
= Test Mode off
= Test Mode on; unit dis-
Setpoint Select button
Press repeatedly until a green
light appears next to the parameter you want to program or
view.
NOTE: Default settings for the deviation setpoints are:
High = setpoint + 10˚ F
Low = setpoint - 10˚ F
A warning alarm occurs (indicator
light turns red) whenever the actual
temperature is outside this setpoint
range. Recommend setting: ± 2-10˚.
Setpoint adjustment
buttons
Press ▲ or ▼ to enter temperature and SPI parameters. Press
▲ to increase a value. Press ▼
to decrease a value.
TIP: Press and hold the button for
faster scrolling speed.
Run/Stop
Press the RUN button to
start normal operation.
Press STOP to stop the
temperature control unit.
= Running
= Stopped
= Alarm (flashing)
4
Run
Stop
1
Page 11
Actual temperature of water supplied to the mold is
higher than the setpoint deviation limit allows.
1. High deviation temperature is set too low. Increase.
2. Water has stopped flowing between supply outlet and
return inlet. Check for plugged pipe or failed cooling
valve.
3. The heater contact failed. Replace the contactor.
4. The heater and lines may be too
large for this application.
Actual temperature of water supplied to
the mold is higher than the programmed
190˚ F safety limit.
1. Water has stopped flowing between supply outlet and
return inlet. Check for closed valve or plugged line.
2. The heater contactor failed. Replace contactor.
Actual temperature of water supplied to
the mold is below the programmed 20˚ F
safety limit.
1. The cooling valve is stuck open. Clean valve.
2. The heater has failed. Check for a bad heating element,
or a heater contact that failed in the open position.
The incoming power is out of phase. A
leg may have failed or is disconnected.
1. The pump is rotating in the wrong direction. Reverse any
two leads on the power connection.
2. Check fuses or circuits at the main power supply.
The return line temperature probe failed.
Check for loose connections, or replace.
The supply line temperature probe failed.
Check for loose connections, or replace.
The pump fuse failed.
Replace the fuse on the motherboard.
NOTE: See the Thermolator User Guide for additional alarm messages regarding fuses and controller errors.
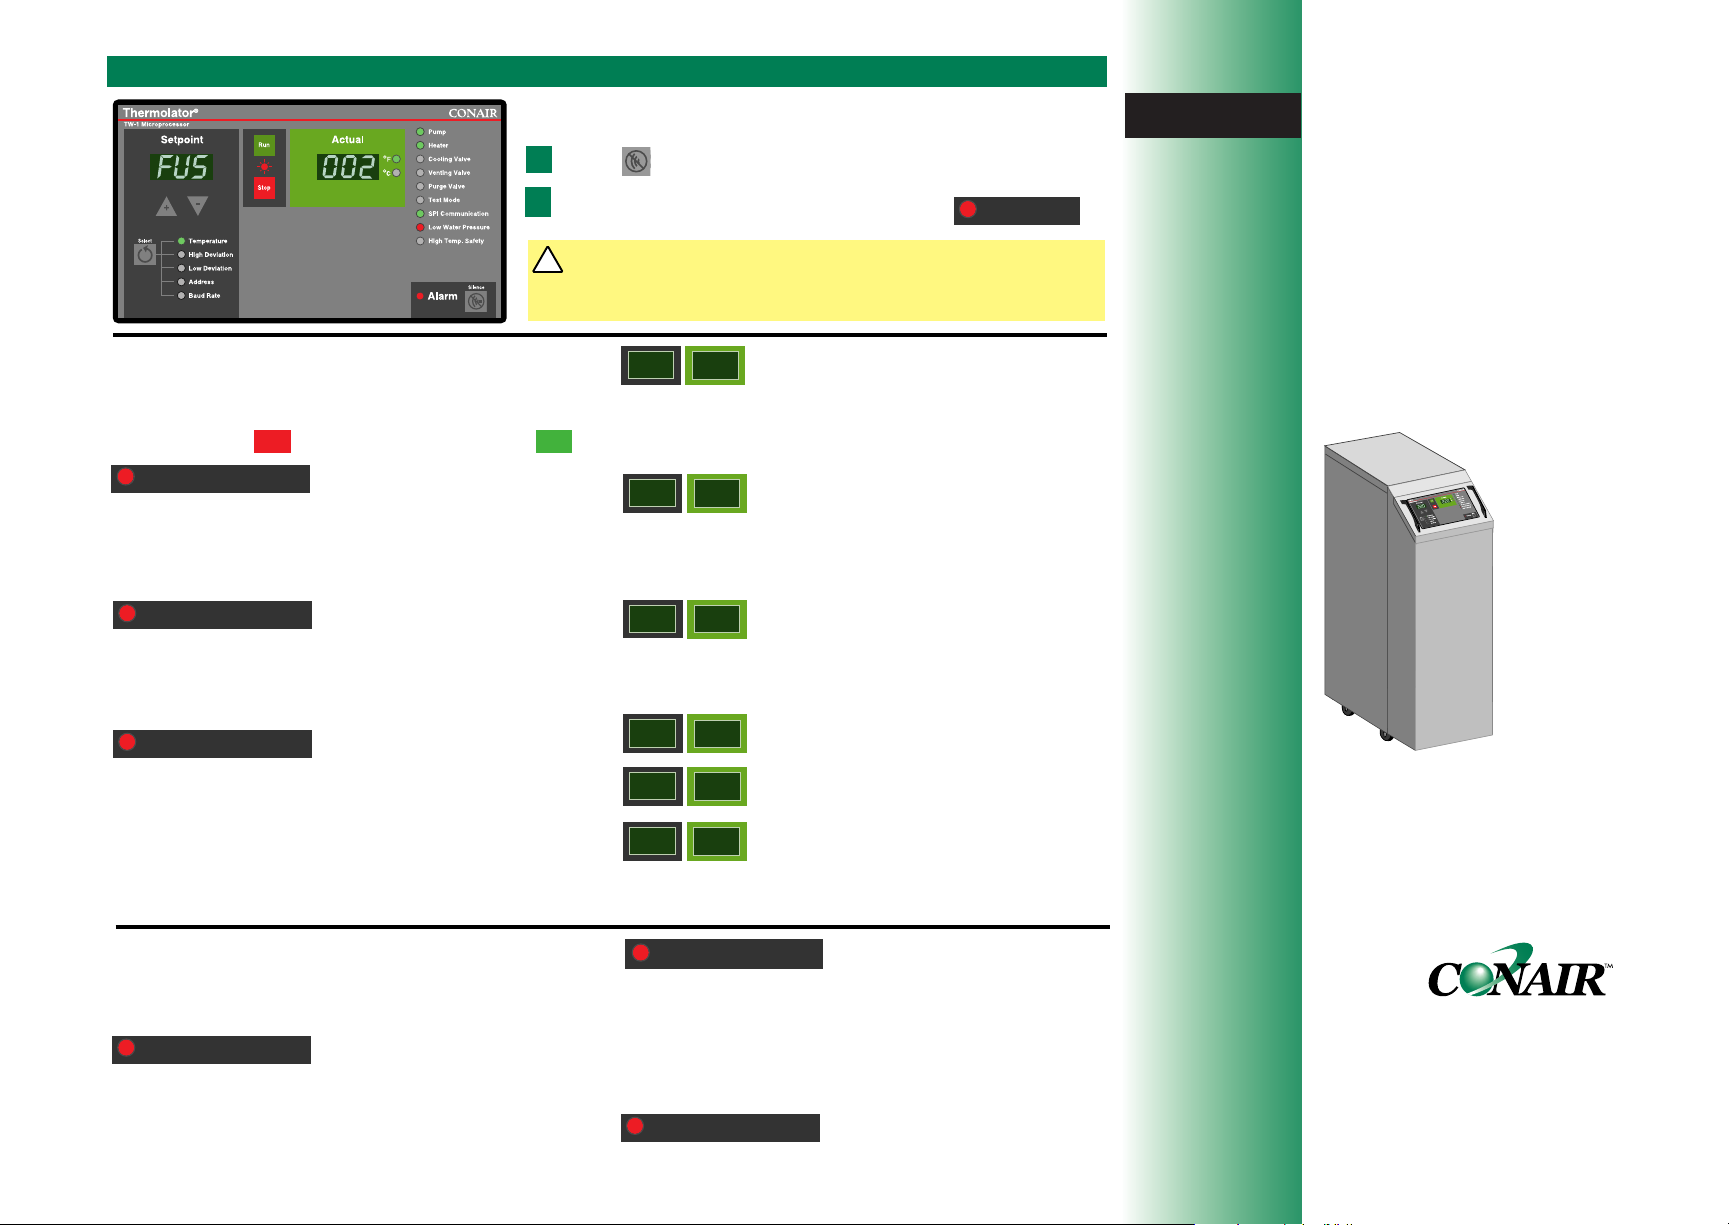
TROUBLESHOOTING
Shut down alarms
The Thermolator has shut down automatically to prevent
damage to equipment or personnel. To resume normal
operation, press , fix the problem, then press .
The pump overload has tripped. Contact is open.
1. Verify that the correct voltage is supplied to the motor.
2. Water flow may be more than the pump can handle.
Check current draw against motor rating. Decrease flow
as needed.
The supply water level is low.
1.Verify that the water supply is turned on.
NOTE: The low water pressure alarm does not require manual
reset. It will reset automatically when the water level is sufficient.
The actual temperature of water supplied to the mold
exceeds the 190˚ F temperature safety switch limit.
1. The unit is not running. Start the Thermolator.
2. Water has stopped flowing between supply outlet and
return inlet. Check for closed valve or plugged line.
3. The heater contactor failed. Replace contactor.
If there is a problem, the Thermolator®activates the red Alarm light
and changes the RUN/STOP light from green to flashing red.
Press to silence the optional audible alarm.
Check the indicator lights and messages
to help determine the cause of the problem.
Warning alarms
The Thermolator continues operating, but this problem
could lead to a shutdown condition if not corrected.
Actual temperature of water supplied to the mold is
lower than the setpoint deviation limit allows.
1. Low deviation temperature is set too low. Increase.
2. The heater failed. Check for a bad heating element or a
heater contact that failed in the open position.
3. The cooling valve is stuck open. Clean valve as needed.
Stop Run
WARNING: Before servicing the Thermolator
®
Allow the unit to cool to below 100˚ F. Disconnect and lockout
the main power source. Disconnect water and air supply lines.
!
1
2
Low Deviation
High Deviation
SPI Communication
FUS
002
PbS
Err
Pbr
Err
Hi
SAF
Lo
SAF
PHS
Err
Pump
Pump
High Temp. Safety
Low Water Pressure
QCH005/1197 © 1997
Positive/Negative Water
Temperature Controller
with TW-1 Microprocessor
Quick Card
Thermolator
®
vacuTrac
The Conair Group, Inc.
One Conair Drive
Pittsburgh, PA 15202
Phone: (412) 312-6000
Fax: (412) 312-6001
Basic
Operation
Troubleshooting
Instant Access Parts
& Service:
(800) 458-1960
(814) 437-6861
www.conairnet.com
Page 12
Page 13
OPERATIONTHE TW-2 CONTROL
Actual values display
The green window displays the temperature
at the middle of the mold. This temperature
is calculated as an average of the temperatures of the supply water and return water.
The lights indicate whether the temperature
is in degrees Fahrenheit or Celsius.
Alarm
Press to acknowledge the
alarm light and silence the
optional audible alarm.
The alarm light will flash
until the cause of the
alarm condition is fixed.
Starting the Thermolator®.
Turn on main power to the Thermolator®.
◆ Setpoint and actual windows display for
three seconds, then display the most recently
entered setpoint temperature and the current
actual temperature.
◆ Indicator lights blink green, then red.
Turn on water supply to the unit.
If the water supply is on, go to Step 3.
Enter the temperature setpoint.
Press the Setpoint until the green light appears
next to Temperature. Press
▲ to increase the set-
point or
▼ to decrease.
Press .
◆ The RUN/STOP light turns green.
◆ The unit initiates a 60-second venting
sequence. Cooling and venting valves are
active for 60 seconds. The pump is active for
the final 30 seconds.
◆ Normal operation begins. The heater turns on
if the actual temperature is below setpoint.
The cooling valve remains active if the actual
temperature is above setpoint.
If the Alarm light turns on, press to silence an
audible alarm and go to the Troubleshooting section.
Stopping the Thermolator®.
Press .
◆ The RUN/STOP light turns red.
Setpoint display
The window displays the
setpoints entered for the
fluid temperature, the high
and low temperature deviation alarms, the SPI baud
rate and the SPI address.
1
2
3
Status lights
The lights indicate the operating
status of the listed components.
Except in Test Mode and Auto
Start, the lights indicate:
= Off or inactive
= On or active
= Alarm condition
Test Mode is used for initial programming. When test mode is
enabled, normal operation is
disabled.
= Test Mode off
= Test Mode on; unit disabled
Auto Start allows you to start
and stop the Thermolator
®
from
a remote switching or timing
device, such as the processing
machine control. This feature
can only be enabled by configuring a dip switch on the control
motherboard.
= Disabled; Auto Start not
available
=
(flashing) Enabled; unit can
start at any time
= On and under control of
Setpoint Select button
Press repeatedly until a green
light appears next to the parameter you want to program or view.
NOTE: Default settings for the deviation setpoints are:
High = setpoint + 10˚ F
Low = setpoint - 10˚ F
A warning alarm occurs (indicator
light turns red) whenever the actual
temperature is outside this setpoint
range. Recommend setting: ± 2-10˚.
Setpoint adjustment
buttons
Press ▲ or ▼ to enter temperature and SPI parameters. Press
▲ to increase a value. Press ▼
to decrease a value.
TIP: Press and hold the button for
faster scrolling speed.
Run/Stop
Press the RUN button to
start normal operation.
Press STOP to stop the
temperature control unit.
= Running
= Stopped
= Alarm (flashing)
4
Display Select button
Press repeatedly until a green light
appears next to the parameter you want
to program or view in the Actual values
window. See the User Guide for programming information.
Run
Purge On/Off
The purge option is not available
on positive/negative pressure
water temperature controllers.
Stop
1
Page 14

Actual temperature of water supplied to the mold is
higher than the setpoint deviation limit allows.
1. High deviation temperature is set too low. Increase.
2. Water has stopped flowing between supply outlet and
return inlet. Check for plugged pipe or failed cooling
valve.
3. The heater contact failed. Replace the contactor.
4. The heater and lines may be too
large for this application.
Actual temperature of water supplied to
the mold is higher than the programmed
190˚ F safety limit.
1. Water has stopped flowing between supply outlet and
return inlet. Check for closed valve or plugged line.
2. The heater contactor failed. Replace contactor.
Actual temperature of water supplied to
the mold is below the programmed 20˚ F
safety limit.
1. The cooling valve is stuck open. Clean valve.
2. The heater has failed. Check for a bad heating element,
or a heater contact that failed in the open position.
The incoming power is out of phase. A
leg may have failed or is disconnected.
1. The pump is rotating in the wrong direction. Reverse any
two leads on the power connection.
2. Check fuses or circuits at the main power supply.
The return line temperature probe failed.
Check for loose connections, or replace.
The supply line temperature probe failed.
Check for loose connections, or replace.
The pump fuse failed.
Replace the fuse on the motherboard.
NOTE: See the Thermolator User Guide for additional alarm messages regarding fuses and controller errors.
TROUBLESHOOTING
Shut down alarms
The Thermolator has shut down automatically to prevent
damage to equipment or personnel. To resume normal
operation, press , fix the problem, then press .
The pump overload has tripped. Contact is open.
1. Verify that the correct voltage is supplied to the motor.
2. Water flow may be more than the pump can handle.
Check current draw against motor rating. Decrease flow
as needed.
The supply water level is low.
1.Verify that the water supply is turned on.
NOTE: The low water pressure alarm does not require manual
reset. It will reset automatically when the water level is sufficient.
The actual temperature of water supplied to the mold
exceeds the 190˚ F temperature safety switch limit.
1. The unit is not running. Start the Thermolator.
2. Water has stopped flowing between supply outlet and
return inlet. Check for closed valve or plugged line.
3. The heater contactor failed. Replace contactor.
If there is a problem, the Thermolator®activates the red Alarm light
and changes the RUN/STOP light from green to flashing red.
Press to silence the optional audible alarm.
Check the indicator lights and messages
to help determine the cause of the problem.
Warning alarms
The Thermolator continues operating, but this problem
could lead to a shutdown condition if not corrected.
Actual temperature of water supplied to the mold is
lower than the setpoint deviation limit allows.
1. Low deviation temperature is set too low. Increase.
2. The heater failed. Check for a bad heating element or a
heater contact that failed in the open position.
3. The cooling valve is stuck open. Clean valve as needed.
Stop Run
WARNING: Before servicing the Thermolator
®
Allow the unit to cool to below 100˚ F. Disconnect and lockout
the main power source. Disconnect water and air supply lines.
!
1
2
Low Deviation
High Deviation
SPI Communication
FUS
002
PbS
Err
Pbr
Err
Hi
SAF
Lo
SAF
PHS
Err
Pump
Pump
High Temp. Safety
Low Water Pressure
QCH006/1197 © 1997
Positive/Negative Water
Temperature Controller
with TW-2 Microprocessor
Quick Card
Thermolator
®
vacuTrac
The Conair Group, Inc.
One Conair Drive
Pittsburgh, PA 15202
Phone: (412) 312-6000
Fax: (412) 312-6001
Basic
Operation
Troubleshooting
Instant Access Parts
& Service:
(800) 458-1960
(814) 437-6861
www.conairnet.com
Page 15
Page 16
Page 17

Thermolator
®
TW-1 and TW-2
Instant Access
Parts and Service
(800) 458-1960
(814) 437-6861
www.conairnet.com
The Conair Group, Inc.
One Conair Drive
Pittsburgh, PA 15202
Phone: (412) 312-6000
Fax: (412)-312-6320
Water Temperature Control Units
UGH015/0100
Installation
Operation
Maintenance
Troubleshooting
Page 18

It’s a good idea to record the model and serial number(s) of
your equipment and the date you received it in the User
Guide. Our service department uses this information, along
with the manual number, to provide help for the specific
equipment you installed.
Please keep this User Guide and all manuals, engineering
prints and parts lists together for documentation of your
equipment.
Date:
Manual Number: UGH015/0100
Serial number(s):
Model number(s):
DISCLAIMER: The Conair Group, Inc., shall not be liable for errors
contained in this User Guide or for incidental, consequential damages in connection with the furnishing, performance or use of this
information. Conair makes no warranty of any kind with regard to
this information, including, but not limited to the implied warranties
of merchantability and fitness for a particular purpose.
Please record your
equipment’s model and
serial number(s) and
the date you received it
in the spaces provided.
Copyright 1999
All rights reserved
THE CONAIR GROUP, INC.
Page 19

UGH015/0100 Thermolator TW-1 and TW-2
TABLE OF
CONTENTS
INTRODUCTION . . . . . . . . . . . . . . . . . . .1-1
Purpose of the User Guide . . . . . . . . . . . . . . . . . . . . . . . . .1-2
How the guide is organized . . . . . . . . . . . . . . . . . . . . . . . .1-2
Your responsibility as a user . . . . . . . . . . . . . . . . . . . . . . .1-2
ATTENTION: Read this so no one gets hurt . . . . . . . . . . .1-3
D
ESCRIPTION . . . . . . . . . . . . . . . . . . . .2-1
What is the Thermolator TW Series? . . . . . . . . . . . . . . . . .2-2
Typical applications . . . . . . . . . . . . . . . . . . . . . . . . . . . . . .2-2
How it works: Direct Injection . . . . . . . . . . . . . . . . . . . . . .2-3
How it works: Closed Circuit . . . . . . . . . . . . . . . . . . . . . . .2-4
How it works: Isolated Circuit . . . . . . . . . . . . . . . . . . . . . .2-5
Specifications . . . . . . . . . . . . . . . . . . . . . . . . . . . . . . . . . .2-6
Features and options . . . . . . . . . . . . . . . . . . . . . . . . . . . . .2-8
INSTALLATION . . . . . . . . . . . . . . . . . . . .3-1
Unpacking the boxes . . . . . . . . . . . . . . . . . . . . . . . . . . . . .3-2
Preparing for installation . . . . . . . . . . . . . . . . . . . . . . . . . .3-3
Connecting the water supply . . . . . . . . . . . . . . . . . . . . . . .3-4
Optional purge valve hookups . . . . . . . . . . . . . . . . . . . . . .3-5
Connecting the main power . . . . . . . . . . . . . . . . . . . . . . . .3-6
Testing the installation . . . . . . . . . . . . . . . . . . . . . . . . . . . .3-7
Initial setup . . . . . . . . . . . . . . . . . . . . . . . . . . . . . . . . . . . .3-8
Changing temperature units . . . . . . . . . . . . . . . . . . . . . . . .3-9
Enabling and disabling passcode protection . . . . . . . . . . .3-10
Selecting the temperature control point
(TW-2) . . . . . . . . . .3-12
Entering setpoint deviation parameters . . . . . . . . . . . . . . .3-14
Activating SPI communication . . . . . . . . . . . . . . . . . . . . .3-15
Enabling the Auto Start feature
(TW-2) . . . . . . . . . . . . . . . .3-16
OPERATION . . . . . . . . . . . . . . . . . . . . . .4-1
TW-1 control features . . . . . . . . . . . . . . . . . . . . . . . . . . . .4-2
TW-2 control features . . . . . . . . . . . . . . . . . . . . . . . . . . . .4-3
Positioning the control panel . . . . . . . . . . . . . . . . . . . . . . .4-4
Starting the Thermolator . . . . . . . . . . . . . . . . . . . . . . . . . .4-5
Entering passcodes . . . . . . . . . . . . . . . . . . . . . . . . . . . . . . .4-6
Stopping the Thermolator . . . . . . . . . . . . . . . . . . . . . . . . .4-7
Using the manual purge option . . . . . . . . . . . . . . . . . . . . .4-8
Using the TW-2 purge feature . . . . . . . . . . . . . . . . . . . . . .4-9
Performing an Auto Tune . . . . . . . . . . . . . . . . . . . . . . . . .4-10
MAINTENANCE . . . . . . . . . . . . . . . . . . . .5-1
Preventative maintenance schedule . . . . . . . . . . . . . . . . . . .5-2
To access the Thermolator enclosure . . . . . . . . . . . . . . . . .5-3
Checking fluid level in the reservoir
(IC) . . . . . . . . . . . . . . .5-4
i
Page 20

Thermolator TW-1 and TW-2 UGH015/0100
TABLE OF
CONTENTS
MAINTENANCE . . . . . . . . . . . . . . .(continued)
Performing System Tests . . . . . . . . . . . . . . . . . . . . . . . . . .5-5
The Key/Display Test . . . . . . . . . . . . . . . . . . . . . . . . . . . . .5-6
Input Test . . . . . . . . . . . . . . . . . . . . . . . . . . . . . . . . . . . . . .5-7
Output Test . . . . . . . . . . . . . . . . . . . . . . . . . . . . . . . . . . . .5-8
Disabling and Enabling Outputs . . . . . . . . . . . . . . . . . . . . .5-9
Calibrating Temperature Sensors . . . . . . . . . . . . . . . . . . .5-10
Logging Operating Hours . . . . . . . . . . . . . . . . . . . . . . . .5-11
T
ROUBLESHOOTING . . . . . . . . . . . . . . . .6-1
Before Beginning . . . . . . . . . . . . . . . . . . . . . . . . . . . . . . . .6-2
A Few Words of Caution . . . . . . . . . . . . . . . . . . . . . . . . . .6-2
How to Identify the Cause of a Problem . . . . . . . . . . . . . . .6-3
DIAGNOSTICS
Shut Down Alarms . . . . . . . . . . . . . . . . . . . . . . . . . . . . . . .6-4
Warning Alarms . . . . . . . . . . . . . . . . . . . . . . . . . . . . . . . . .6-8
System Alarms . . . . . . . . . . . . . . . . . . . . . . . . . . . . . . . . .6-11
Thermolator Will Not Power Up . . . . . . . . . . . . . . . . . . .6-12
REP
AIR
Checking and Replacing Fuses . . . . . . . . . . . . . . . . . . . . .6-13
Resetting and Replacing Overloads . . . . . . . . . . . . . . . . .6-14
Replacing the Motherboard . . . . . . . . . . . . . . . . . . . . . . .6-15
Replacing the Heater Contactor . . . . . . . . . . . . . . . . . . . .6-16
Checking and Replacing Thermocouples . . . . . . . . . . . . .6-17
Repairing Solenoid Valves . . . . . . . . . . . . . . . . . . . . . . . .6-18
Replacing Heater Elements . . . . . . . . . . . . . . . . . . . . . . .6-20
Removing the Pump . . . . . . . . . . . . . . . . . . . . . . . . . . . . .6-22
Disassembling and assembling 3/4 to 2 HP Pumps . . . . . .6-23
Disassembling and assembling 3 to 7.5 HP Pumps . . . . . .6-24
APPENDIX
Customer Service Information . . . . . . . . . . . . . . . . . . . . . .A-1
Warranty/Guarantee Information . . . . . . . . . . . . . . . . . . . .A-2
Plumbing Diagrams . . . . . . . . . . . . . . . . . . . . . . . . . . . . . .B-1
Technical Information . . . . . . . . . . . . . . . . . . . . . . . . . . . .C-1
Thermolator SPI commands . . . . . . . . . . . . . . . . . . . . . . .D-1
PARTS/DIAGRAMS
Spare Parts Lists . . . . . . . . . . . . . . . . . . . . . . . . . . . . . . .PD-1
TW-1 Wiring . . . . . . . . . . . . . . . . . . . . . . . . . . . . . . . . . .PD-5
TW-1 Circuit Board . . . . . . . . . . . . . . . . . . . . . . . . . . . .PD-6
TW-2 Wiring . . . . . . . . . . . . . . . . . . . . . . . . . . . . . . . . . .PD-7
TW-2 Circuit Board . . . . . . . . . . . . . . . . . . . . . . . . . . . .PD-8
ii
Page 21

1-1
UGH015/0100 Thermolator TW-1 and TW-2
●●
Purpose of the User Guide . . . .1-2
●●
How the guide is organized . . . .1-2
●●
Your responsibilities as a user .1-2
●●
ATTENTION: Read this so
no one gets hurt . . . . . . . . . . .1-3
INTRODUCTION
Page 22
Thermolator TW-1 and TW-2 UGH015/0100
1-2 INTRODUCTION
This User Guide describes the Conair Thermolator®TW-1 and
TW-2 water temperature control units and explains step-bystep how to install, operate, maintain and repair this equipment.
Before installing this product, please take a few moments to
read the User Guide and review the diagrams and safety information in the instruction packet. You also should review manuals covering associated equipment in your system. This
review won’t take long, and it could save you valuable installation and operating time later.
Symbols have been used to help organize the User Guide and
call your attention to important information regarding safe
installation and operation.
Symbols within triangles warn of conditions that could
be hazardous to users or could damage equipment.
Read and take precautions before proceeding.
Numbers within shaded squares indicate tasks or steps
to be performed by the user.
A diamond indicates the equipment’s response to an
action performed by the user.
An open box marks items in a checklist.
A shaded circle marks items in a list.
You must be familiar with all safety procedures concerning
installation, operation and maintenance of this equipment.
Responsible safety procedures include:
● Thorough review of this User Guide, paying particular
attention to hazard warnings, appendices and related diagrams.
● Thorough review of the equipment itself, with careful
attention to voltage requirements, intended uses and
warning labels.
● Thorough review of instruction manuals for associated
equipment.
● Step-by-step adherence to instructions outlined in this
User Guide.
P
URPOSE OF
T
HE USER
GUIDE
HOW THE
G
UIDE IS
ORGANIZED
1
◆
❒
●
YOUR
RESPONSIBILITY
ASAUSER
Page 23
UGH015/0100 Thermolator TW-1 and TW-2
INTRODUCTION 1-3
We design equipment with the user’s safety in mind. You can
avoid the potential hazards identified on this machine by
following the procedures outlined below and elsewhere in the
User Guide.
ATTENTION:
READ THIS SO NO
ONE GETS HURT
CAUTION: Hot surfaces
Surface temperatures inside the Thermolator
can exceed 250° F (121° C). Always allow the
unit to cool to below 100° F (38° C) before
opening, servicing or disassembling the unit.
WARNING: Electrical shock hazard
This equipment is powered by three-phase
main voltage, as specified on the machine serial tag and data plate.
Always disconnect and lock out the incoming
main power source before opening the electrical enclosure or performing non-standard operating procedures, such as troubleshooting or
maintenance. Only qualified personnel should
perform procedures that require access to the
electrical enclosure while power is on.
WARNING: Improper installation,
operation or servicing may result in
equipment damage or personal injury.
This equipment should be installed, adjusted,
and serviced by qualified technical personnel
who are familiar with the construction, operation and potential hazards of this type of equipment.
All wiring, disconnects and fuses should be
installed by qualified electrical technicians in
accordance with electrical codes in your region.
Always maintain a safe ground. A properly
sized conductive ground wire from the incoming
power supply must be connected to the chassis
ground terminal inside the electrical enclosure.
Improper grounding can result in personal
injury and erratic machine operation.
Do not operate the equipment at power levels
other than what is specified on the the equipment serial tag and data plate.
Page 24
WARNING: Hazardous substance
The electrical contactors in the
Thermolator have mercury contactors.
Mercury is considered a hazardous substance and must be dealt with accordingly. Material Safety Data Sheet (#7439-
97) has been included in the instruction
packet. This sheet explains the potential
hazards, how to avoid them and how to
clean up and dispose of the mercury if it
spills.
ATTENTION:
R
EAD THIS SO NO
ONE GETS HURT
Thermolator TW-1 and TW-2 UGH015/0100
1-4 INTRODUCTION
Page 25

2-1
UGH015/0100 Thermolator TW-1 and TW-2
●●
What is the Thermolator
TW Series?
. . . . . . . . . . . . . . .2-2
●●
Typical applications . . . . . . . . . .2-2
●●
How it works:
Direct Injection (DI) models . . .2-3
●●
How it works:
Closed Circuit (CC) models . . .2-4
●●
How it works:
Isolated Circuit (IC) models . . .2-5
●●
Specifications . . . . . . . . . . . . . .2-6
●●
Features and options . . . . . . . . .2-8
DESCRIPTION
Page 26
The Thermolator TW models circulate water at a temperature
higher than the available water supply, to add or remove heat
as needed to maintain a uniform temperature setpoint in the
process. The TW-2 offers an enhanced control, with additional
diagnostic features and autostart capabilities.
Both the TW-1 and TW-2 models are available in single or
multiple-zone configurations, using direct injection or closed
circuit process heating and cooling. Multiple-zone models can
control up to three temperatures at different locations in the
process. Two- and three-zone models have common cooling
water manifolds and electrical connections.
The best model for your application depends on the process
temperature you need to maintain and the quality of the cooling water supply.
Direct injection (DI) models control the temperature by
discharging heated process water and adding cooling water
directly from the water supply. DI models are designed for:
● Process temperatures up to 250°F (121°C).
● Use with chiller water or properly treated and filtered tower
or city water.
Closed circuit (CC) models add cooling water to the process
loop only during the initial filling or when make-up water is
needed. CC models are recommended for:
● Process temperatures 180°F (82°C) to 250°F (121°C).
● Use with contaminated cooling water, or with properly
treated and filtered tower or city water..
Isolated circuit (IC) models separate the cooling water from
the process fluid, which is held in a reservoir. IC models are
recommended for:
● Process temperatures up to 180°F (82°C).
● Use with contaminated cooling water or a process fluid
mixture of water and glycol.
WHAT IS THE THERMOLATOR ?
Thermolator TW-1 and TW-2 UGH015/0100
2-2 DESCRIPTION
T
YPICAL
A
PPLICATIONS
IMPORTANT: Do not use
deionized water or glycol
mixtures containing additives
in a Thermolator. Softened
water or glycol mixtures with
additives, such as automotive fluids, can damage the
Thermolator. Glycol/water
process loop mixtures should
use industrial-grade ethylene
glycol only.
Page 27
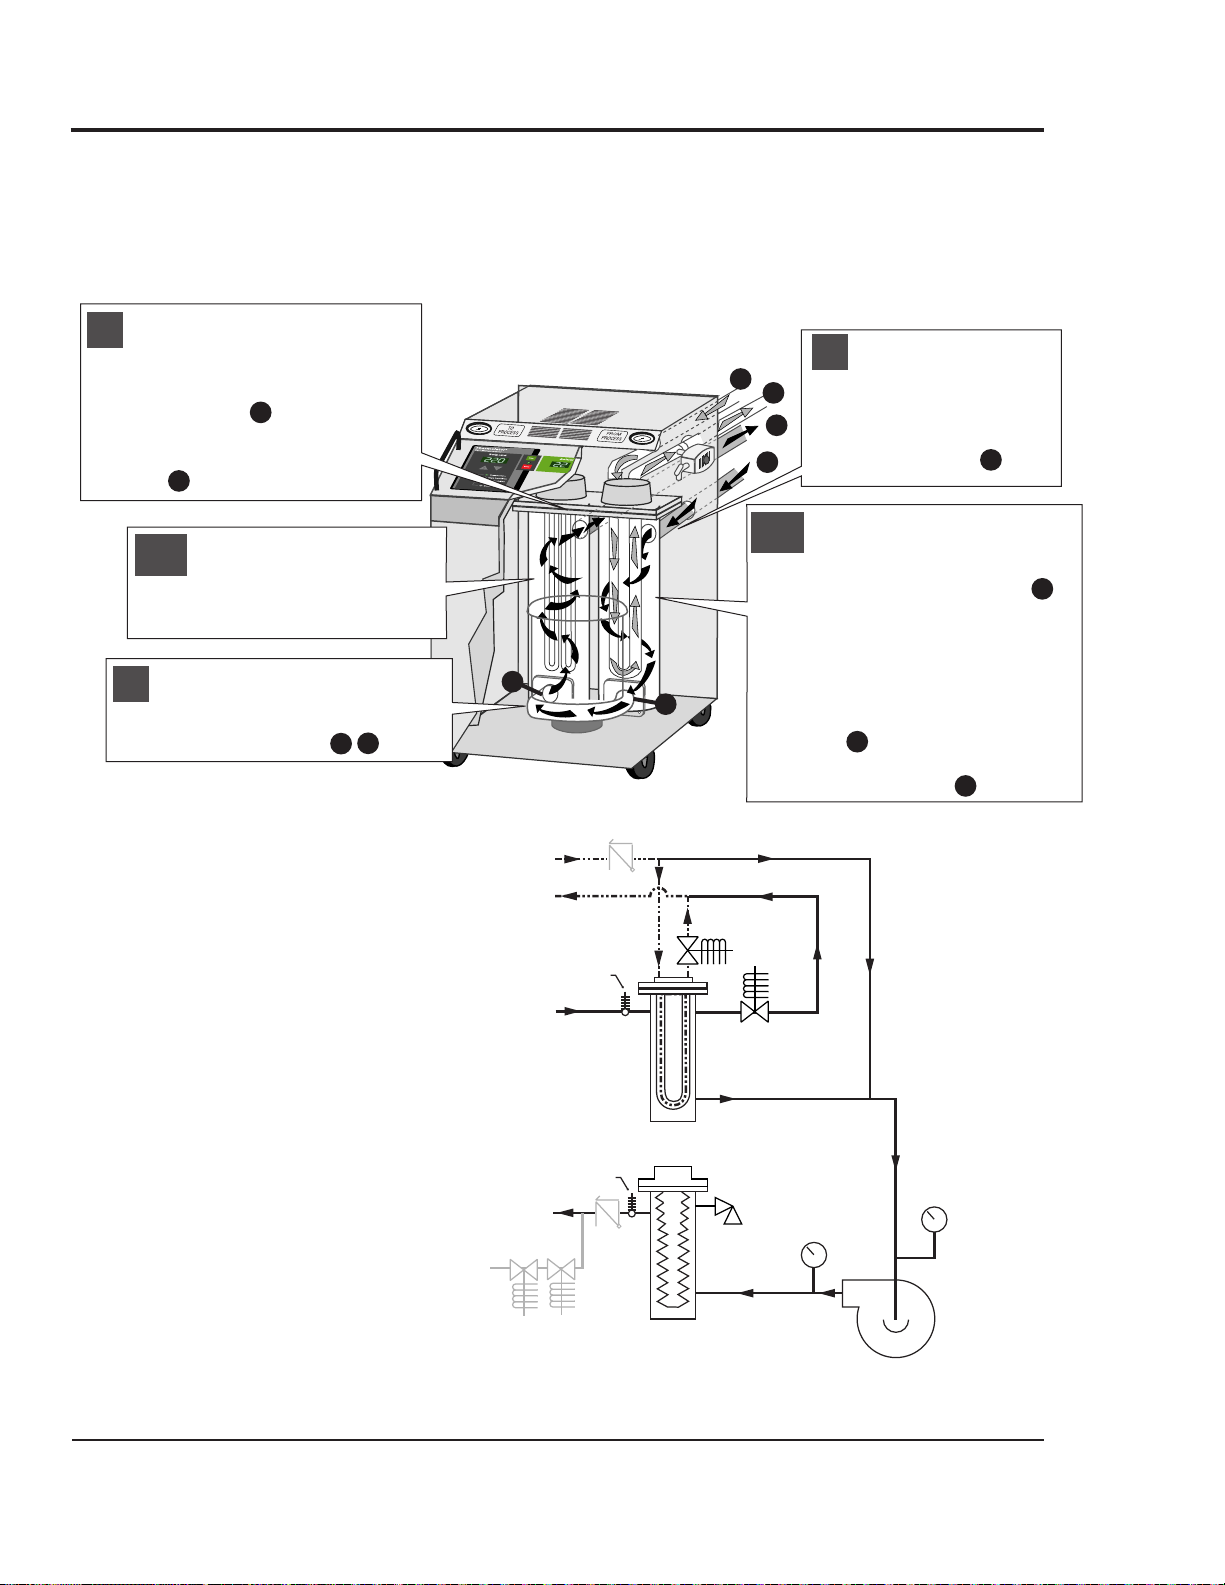
Direct injection models maintain the process temperature
by electrically heating and injecting cool water supplied to
the Thermolator by a chiller, tower or other water source.
HOW IT WORKS:
D
IRECT INJECTION
UGH015/0100 Thermolator TW-1 and TW-2
DESCRIPTION 2-3
A
B
The temperature of the process fluid is measured
as it leaves the unit’s heater tank. The fluid then
flows through the “To Process” line to the mold
or process. The fluid returns to the unit through the
“From Process” line for reheating or cooling.
1
A
B
C
D
If the process
temperature is
below the setpoint, the heater
elements inside
the heater tank
are energized.
E
F
4
The pump moves water from the mixing
tank to the heater tank. Pressure is
measured before and after the pump .
NOTE: Some higher kW models have an
additiona heater in the mixing tank
E
F
The temperature of the process
fluid is measured as it flows into
the mixing tank through the
“From Process” line .
2
B
If the average temperature is
above the setpoint value, the cooling valve opens. Cool water enters
the bottom of the mixing tank via
the “Cooling In” line . Warm
water flows out of the top of the
tank via the “Cooling Out” line .
C
D
3b
3a
Cooling Water Out
From Process
Cooling Water In
To Process
Purge Valve
(optional)
Check
Valve
Thermocouple
Thermocouple
Check
Valve
Cooling
Valve
Mixing
Tank
Heater
Supply
Pressure
Relief
Valve
Gauge
Direct Injection
Check valves included only with
optional mold purge.
Return
Pressure
Gauge
Pump
Page 28
HOW IT WORKS:
C
LOSED CIRCUIT
Thermolator TW-1 and TW-2 UGH015/0100
2-4 DESCRIPTION
A
B
The temperature of the process
fluid is measured as it leaves
the unit’s heater tank. The fluid
then flows through the “To
Process” line to the mold or
process. The fluid returns to the
unit through the “From Process”
line for reheating or cooling.
1
A
B
C
D
3b
If the process temperature
is below the setpoint, the
heater elements inside the
heater tank are energized.
E
F
4
The pump moves water from the
mixing tank to the heater tank.
Pressure is measured before
and after the pump .
E
F
The temperature of
the process fluid is
measured as it flows
into the cooling tank
through the “From
Process” line .
2
B
3a
If the temperature is above
the setpoint value, the cooling
valve opens. Cool water
enters the cooling piping
and circulates through a tube
heat exchanger to cool the
process fluid. The cooling
valve allows warm fluid to
escape through the process
vent line via the “Cooling Out”
line and cooling make-up
water to enter through the
“Cooling In” line .
C
D
Closed Circuit models maintain the process temperature by
heating and cooling fluid for the process circuit. Cooling
water supplied by a chiller, tower or other water source, is
mixed with the process fluid only during the initial filling
or when water is needed to make up process fluid loss.
C
Cooling Water In
Cooling Water Out
Check
Valve
Process Vent/Fill Line
Process Vent Line
Cooling
Valve
Return Thermocouple
From Process
Vent
Valve
Cooling Heat
Exchanger
Heater
Relief
Valve
Supply
Pressure
Gauge
Compressed
Air Connection
Supply Thermocouple
To Process
Check
Valve
Mold Purge
Solenoid Valves
(optional)
Closed Circuit
Check valves included only with
optional mold purge.
Return
Pressure
Gauge
Pump
Page 29
HOW IT WORKS:
I
SOLATED CIRCUIT
UGH015/0100 Thermolator TW-1 and TW-2
DESCRIPTION 2-5
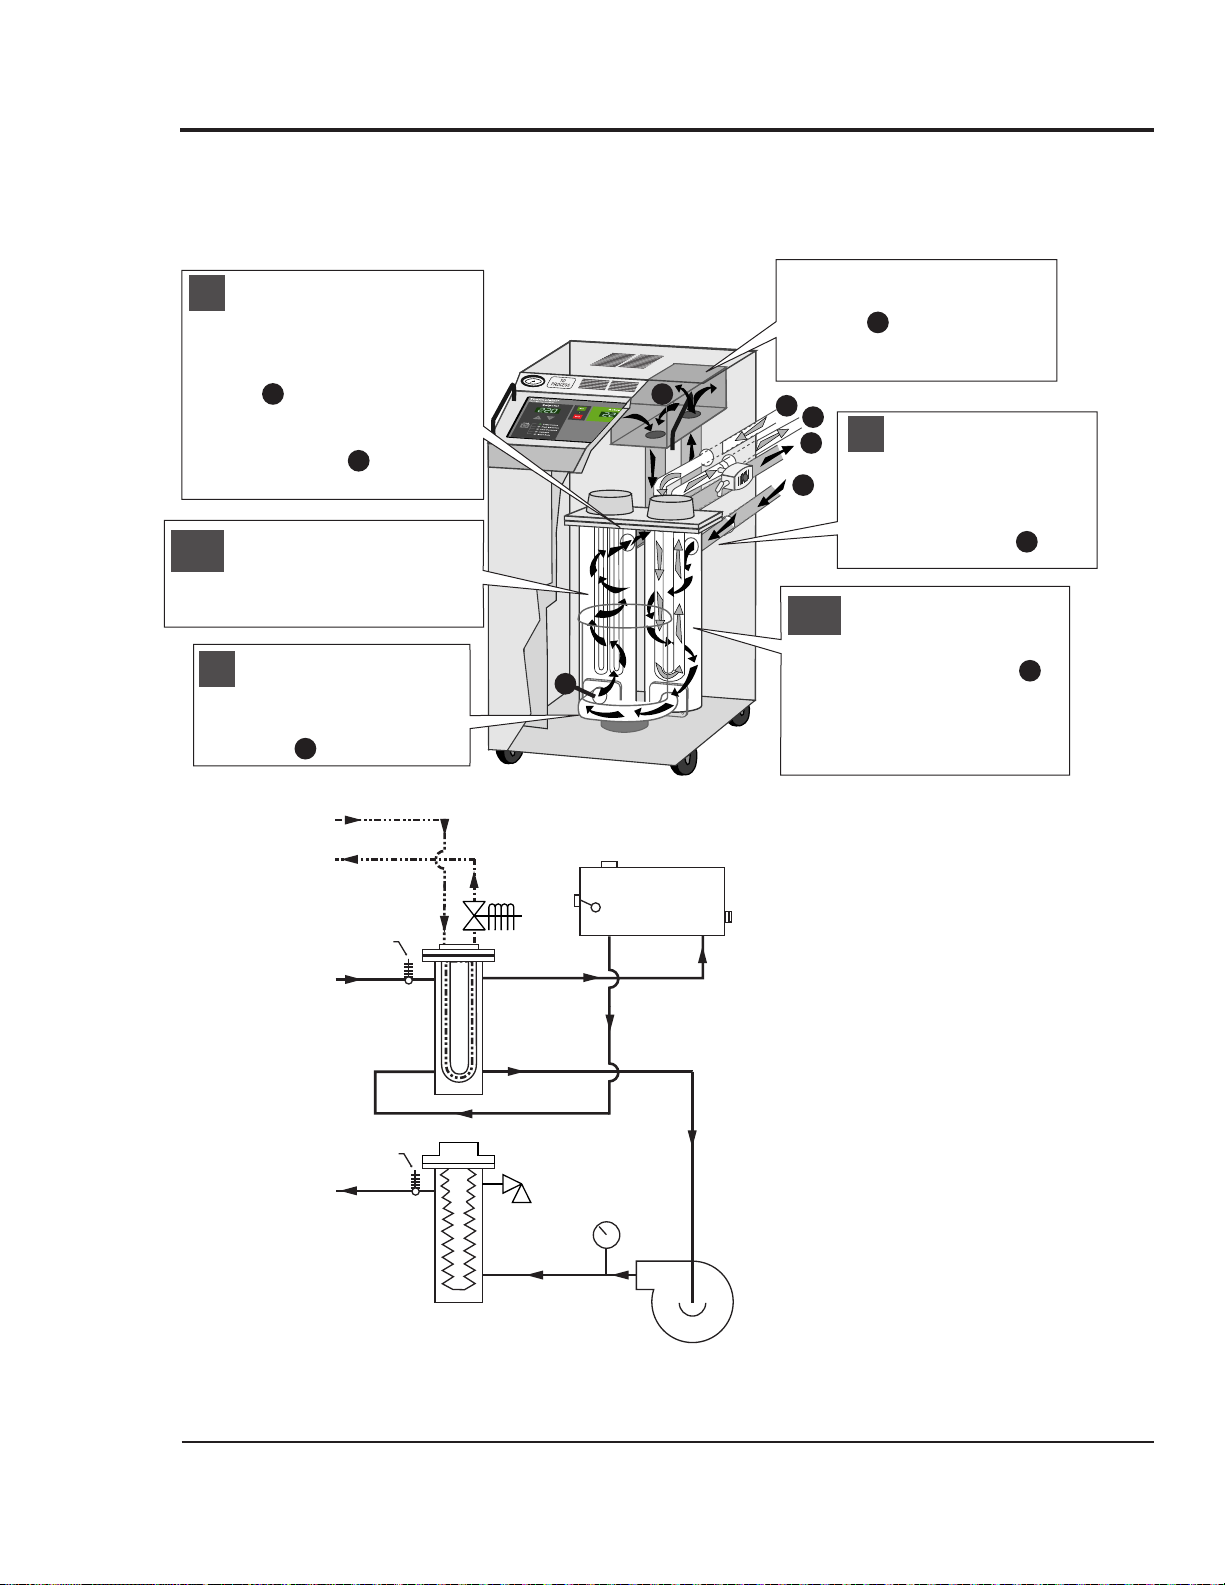
Isolated Circuit models maintain the process temperature
by heating and cooling fluid for the process circuit. The
process fluid, which is stored in a reservoir, is isolated from
cooling water supplied by a chiller, tower or other source
A
B
The temperature of the
process fluid is measured
as it leaves the unit’s heater
tank. The fluid then flows
through the “To Process”
line to the mold or
process. The fluid returns to
the unit through the “From
Process” line for reheating or cooling.
1
A
B
C
D
If the process temperature
is below the setpoint, the
heater elements inside the
heater tank are energized.
E
4
The pump moves water
from the mixing tank to
the heater tank. Pressure
is measured after the
pump .
E
The temperature of
the process fluid is
measured as it flows
into the cooling tank
through the “From
Process” line .
2
B
If the temperature is
above the setpoint
value, the cooling valve
opens. Cool water
enters the cooling piping
and circulates through a
tube heat exchanger to
cool the process fluid.
C
G
The vent line allows warm
process fluid to expand to the
reservoir . The reservoir
supplies process fluid through
a make-up line as needed.
G
3b
3a
Cooling Water In
Cooling Water Out
Return Thermocouple
From Process
Cooling
Valve
Vent Line
Manual Fill
and Vent Port
3 Gal. Reservoir
Low Level
Switch
Level
Sight Glass
Cooling Heat
Exchanger
Make-Up Line
Supply Thermocouple
To Process
Heater
Relief
Valve
Supply
Pressure
Gauge
Pump
Isolated Circuit
NOTE: There is a 180˚ F operating temperature
limit on isolated circuit units.
Page 30
SPECIFICATIONS
Thermolator TW-1 and TW-2 UGH015/0100
2-6 DESCRIPTION
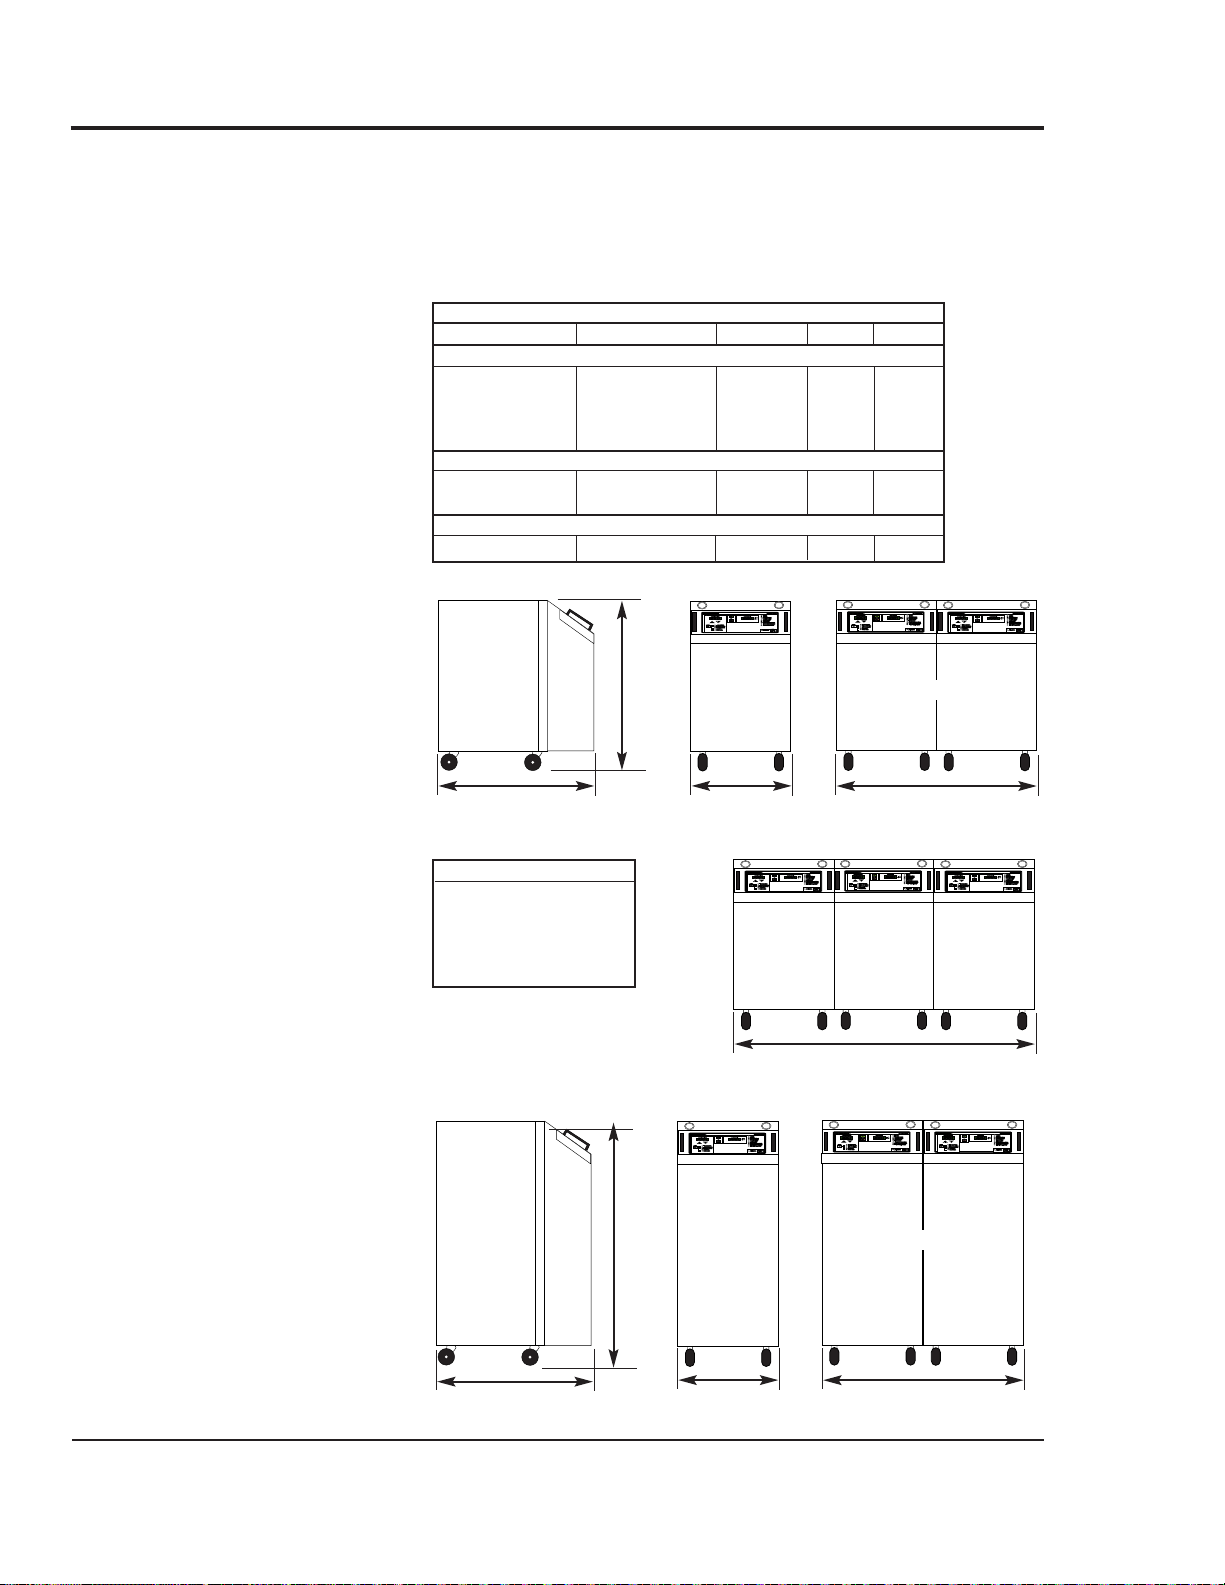
CABINET STYLE REFERENCE
Heater Voltage Selection Single Zone 2 Zone 3 Zone
Direct Injection (DI)
9, 12, 18 or 24 kW 208, 230, 460, 575 A B C
36 kW 208 or 230 D E N/A
36 kW 460 or 575 A B C
48 kW 208, 230, 460, 575 D E N/A
Closed Circuit (CC)
9 or 12 kW 208, 230, 460, 575 A B C
18 or 24 kW 208, 230, 460, 575 D E N/A
Isolated Circuit (IC)
9, 12, 18 or 24 kW 208, 230, 460, 575 D E N/A
A
B
C
D
E
Dimensions and performance characteristics vary according to
the model, voltage and components selected. See the cabinet
style reference chart to determine dimensional information for
your specific model. Additional technical information can be
found in the Appendix of this User Guide.
Height
Width
Single Zone
Width
2- Zone
Width
3-Zone
Depth
Width
Single Zone
Width
2- Zone
Height
Depth
NOTE: 2-zone and 3-zone
models have common wiring
and plumbing.
WATER CONNECTIONS
All models
NPT inches (female)
From process 1.25
Cooling water in/out 0.75
Page 31

SPECIFICATIONS
UGH015/0100 Thermolator TW-1 and TW-2
DESCRIPTION 2-7
TW1
TW2
Zones
(1, 2 or 3)
Direct Injection (DI)
Closed Circuit (CC)
Isolated Circuit (IC)
PERFORMANCE CHARACTERISTICS -
*Lower operating temperatures can be obtained with larger cooling valves. Consult your Conair representative.
Models TW1 -DI or TW2 -DI TW1 -CC or TW2 -CC TW1 -IC or TW2 -IC
Minimum Setpoint Temperature °F {°C} 32 {0} 32 {0} 32 {0}
Maximum Setpoint Temperature °F {°C} 250 {121} 250 {121} 180 {82}
Minimum Operating Temperature °F {°C} Approximately 20° {11°} above the cooling water inlet temperature*
Standard Cooling Valve Size inches {mm} 1/4 {6.35} 3/4 {19.05} 3/4 {19.05}
Available pump sizes 0.75, 1, 2, 3, 5 or 7.5 Hp {0.56, 0.75, 1.49, 2.24, 3.73 or 5.59 kW}
Available heater sizes 9, 12, 18, 24, 36 or 48 kW 9, 12, 18 or 24 kW
PUMP PERFORMANCE - Consult your Conair representative for pump performance characteristics at other operating points.
Pump 3/4 HP {0.56 kW} 1 HP {0.75 kW} 2 HP {1.49 kW} 3 HP {2.24 kW} 5 HP {3.73 kW} 7.5 HP {5.59 kW}
Nominal Flow gpm {lpm} 40 {151} 45 {170} 55 {208} 80 {303} 100 {379} 115 {435}
Pressure@ Nominal Flow psi {kg/cm2} 17 {1.2} 18 {1.3} 31 {2.2} 35 {2.5} 43 {3} 51 {3.6}
TOTAL FULL LOAD AMPS PER ZONE All voltages are 3 phase, 60 Hz.
Heater 9 kW 12 kW 18 kW 24 kW 36 kW 48 kW
Voltage
208V 230V 460V 575V 208V 230V 460V 575V 208V 230V 460V 575V 208V 230V 460V 575V
Pump
0.75 HP {0.56 kW} 28.9 26.2 13.1 10.5 37.3 33.8 16.9 13.5 54.0 48.8 24.4 19.5 70.7 64.0 32 25.6
1 HP {0.75 kW} 29.4 26.6 13.3 10.6 37.8 34.2 17.1 13.7 54.4 49.2 24.6 19.7 71.2 64.4 32.2 25.8
2 HP {1.49 kW} 31.8 28.8 14.4 11.5 40.2 36.4 18.2 14.6 56.8 51.4 25.7 20.6 73.6 66.6 33.3 26.6
3 HP {2.24 kW} 34.7 31.4 15.7 12.6 43.1 39.0 19.5 15.6 59.7 54.0 27.0 21.6 76.5 69.2 34.6 27.7
5 HP {3.73 kW} 38.5 34.8 17.4 13.9 46.9 42.4 21.2 17.0 63.4 57.4 28.7 23 80.2 72.6 36.3 29.0
7.5 HP {5.59 kW} 45.7 41.4 20.7 16.6 54.1 49.0 24.5 19.6 70.7 64.0 32.0 25.6 87.5 79.2 39.6 31.7
SHIPPING WEIGHT RANGES lbs {kg} Weights vary depending on cabinet size and cooling type (DI, CC or IC).
Single Zone 2 Zone 3 Zone
Pump Min Max Min Max Min Max
0.75 HP {0.56 kW} 240 {109} 300 {136} 480 {218} 600 {272} 720 {327} 840 {381}
1 HP {0.75 kW} 240 {109} 300 {136} 480 {218} 600 {272} 720 {327} 840 {381}
2 HP {1.49 kW} 250 {113} 310 {141} 500 {226} 620 {282} 750 {336} 870 {396}
3 HP {2.24 kW} 260 {118} 320 {145} 520 {236} 640 {290} 780 {354} 900 {408}
5 HP {3.73 kW} 270 {122} 330 {150} 540 {244} 660 {300} 810 {366} 930 {423}
7.5 HP {5.59 kW} 280 {127} 340 {154} 560 {254} 680 {308} 840 {381} 960 {435}
DIMENSIONS in. {mm}
Cabinet Style A B C D E
Height 28.0 {710} 28.0 {710} 28.0 {710} 43.0 {1090} 43.0 {1090}
Depth 22.5 {570} 22.5 {570} 22.5 {570} 31.5 {800} 31.5 {800}
Width 13.75 {350} 27.5 {700} 41.25 {1050} 14.0 {355} 28.0 {710}
208V 230V 460V 575V 208V 230V 460V 575V
104.0 94.0 47.0 37.6 137.0 124.0 62.1 49.7
104.3 94.4 47.2 37.8 137.7 124.6 62.3 49.6
106.7 96.6 48.3 38.6 140 126.8 63.4 50.7
109.6 99.2 49.6 39.7 143 129.4 64.7 51.8
113.4 102.6 51.3 41.0 146.7 132.8 66.4 53.1
120.7 109.2 54.6 43.7 154 139.4 69.7 55.8
MODEL DESIGNATIONS
TOTAL FULL LOAD AMPS PER ZONE All voltages are 3 phase, 60 Hz.
Heater 0 heaters
Voltage
208V 230V 460V 575V
Pump
0.75 HP {0.56 kW} 3.9 3.6 2.3 1.5
1 HP {0.75 kW} 4.4 4.0 2.5 1.6
2 HP {1.49 kW} 6.8 6.2 3.6 2.5
3 HP {2.24 kW} 9.7 8.8 4.9 3.6
5 HP {3.73 kW} 13.5 12.2 6.6 4.9
7.5 HP {5.59 kW} 20.7 18.8 9.9 7.6
NOTE: Thermolators
can be ordered
without heaters for
certain applications.
Page 32

High efficiency pumps
from 3/4 to 7.5 Hp. Silicon
carbide seals are standard.
Pump seal flush line
continuously cleans the
pump seal for extended life.
Incoloy heaters
minimize chemical and
high temperature damage
Built-in sediment trap
settles contaminants away
from the pump seals.
Motor drip cover
protects motor windings
from moisture damage.
Two-piece cast
construction
Alarm packages
The Thermolator control includes an output
relay that can be connected to an optional
external alarm package to call attention to
alarm conditions.
Motorized Cooling Valve
Eliminates thermal shock from your process
circuit by modulating the cooling water.
Compressed Air Mold Purge
Quickly evacuates fluid from the process
circuit, allowing for faster, cleaner disconnection of the temperature controller from
molds and hoses.
Stacking Rack
Save floor space by stacking Thermolators
two-high. The stacking rack can be used
only with single-zone models in 28-inch
high cabinets.
OPTIONS
Thermolator TW-1 and TW-2 UGH015/0100
2-8 DESCRIPTION
FEATURES AND OPTIONS
Page 33

3-1
UGH015/0100 Thermolator TW-1 and TW-2
●●
Unpacking the boxes . . . . . . . . .3-2
●●
Preparing for installation . . . . . .3-3
●●
Connecting the water supply . .3-4
●●
Optional purge valve hookups .3-5
●●
Connecting the main power . . .3-6
●●
Testing the installation . . . . . . . .3-7
●●
Initial setup . . . . . . . . . . . . . . . .3-8
●●
Changing temperature units . . .3-9
●●
Enabling and disabling
passcode protection . . . . . . .3-10
●●
Selecting the temperature
control point
(TW-2)
. . . . . . . . .3-12
●●
Entering setpoint
deviation parameters . . . . . . .3-14
●●
Activ
ating SPI
comm
unication . . . . . . . . . . . .3-15
●●
Installing the Auto Start
feature . . . . . . . . . . . . . . . . . .3-16
INSTALLATION
Page 34

UNPACKING THE BOXES
Thermolator TW-1 and TW-2 UGH015/0100
3-2 INSTALLATION
Carefully remove the Thermolator and compo-
nents from their shipping containers, and set upright.
Remove all packing material, protective paper,
tape, and plastic. Check inside the electrical enclosure
and behind the side panels for accessories or hardware
that may have been placed there for shipping.
Carefully inspect all components to make sure no
damage occurred during shipping, and that you have all
the necessary hardware. If damage is found, notify the
freight company immediately.
Take a moment to record serial numbers and
specifications in the blanks provided on the back of the
User Guide’s title page. The information will be helpful if
you ever need service or parts.
You are now ready to begin installation.
Complete the preparation steps on the next page.
Remote control cord
(TW-2 only)
Thermolator
1
2
3
4
5
Thermolator TW models come fully assembled. If they were
specified at the time of the order, the optional purge valve or
motorized cooling valve is factory-installed.
Motorized cooling valve
(optional)
Compressed air mold purge
(optional)
Page 35

UGH015/0100 Thermolator TW-1 and TW-2
INSTALLATION 3-3
The Thermolator is easy to install, if you plan the location and
prepare the area properly.
Position the Thermolator as close to the process
machine as possible.
Make sure the installation area provides:
❒❒
A three-phase power source supplying the correct
current for your Thermolator model. Check the serial tag
on the side of the electrical enclosure for the required voltage, phase, frequency, full load amps, disconnect fuse size
and minimum wire connection size. Field wiring should be
completed by qualified personnel to the planned location
for the Thermolator. All electrical wiring should comply
with your region’s electrical codes.
❒❒
A clean, well-ventilated environment.
The room temperature should not exceed 120° F (48° C)
with 95% non-condensing humidity and should not fall
below 32° F (0° C).
❒❒
Minimum clearance for safe operation and
maintenance. The diagram at right shows
minimum clearance for operation. You also
need enough clearance in the rear for
water hookups. For maintenance, you
should move the Thermolator to
provide at least 36 inches on any side
of the Thermolator.
❒❒
A source of water for cooling.
City, tower or chiller water may be used, as long as the
supply pressure is at least 25 psi and not more than 85 psi.
Install plumbing for process and cooling lines.
You will need two 1
1
/
4
-inch NPT male fittings for the
process inlet and outlet and two 3/4-inch NPT male fittings for the cooling inlet and outlet. Larger line sizes are
acceptable as long as they are reduced at the Thermolator
connections. Smaller line sizes are not recommended.
PREPARING FOR INSTALLATION
1
2
Process machine
Thermolator
Alternate
locations
3
12 inches
(305 mm)
12 inches
(305 mm)
20 inches
(508 mm)
Page 36

Motorized Cooling Valve
If you have the optional motorized
cooling valve, connect the cooling
water supply to the female
3
/
4
inch
NPT fitting on the valve. except as
noted, all other connections should
be made as described above.
The Thermolator process inlets and outlets must be connected
to the plumbing that will circulate the temperature-controlled
water or fluid through the process. Cooling water inlets and
outlets are connected to the cooling water supply.
Remove the shipping pipe plug from the female
connections on the back of the Thermolator.
Install pipe to the rear of the Thermolator.
Use male 1
1
/
4
-inch NPT piping for process connections
and male
3
/
4
inch NPT piping for water connections. Pipe
and pipe threads must be clean and new. Clean threads
with solvent, removing all oil, grease and dirt. Allow the
threads to dry before proceeding.
Coat the pipe threads with thread sealant.
Follow the sealant manufacturer’s directions.
Connect the male pipe to the appropriate
female connection on the back of the unit
. Start
by hand until the threads engage, then use a pipe wrench
to tighten the connection only enough to prevent leaks.
Do not over-tighten!
CONNECTING PROCESS AND WATER SUPPLY LINES
Thermolator TW-1 and TW-2 UGH015/0100
3-4 INSTALLATION
1
2
3
4
Tools for installation:
❒ Pipe wrench large enough
for a 2-inch pipe
❒ Premium quality Teflon
thread sealant
NOTE: We recommend
that you install an
external ball valve on
the cooling water inlet
of the Thermolator. This
valve is required when
the purge valve option
is installed.
From
process
To
process
From
process
To
process
Cooling water out
Cooling water out
Cooling water in
Cooling water out
Cooling water in
DIRECT INJECTION
CLOSED CIRCUIT
ISOLATED CIRCUIT
From
process
To
process
Page 37

A purge valve is available as an option on Direct Injection and
Closed Circuit units only. This valve quickly evacuates fluid
from the process circuit, allowing faster disconnection of the
temperature controller from molds and hoses. An optional
manual purge button controls this valve on TW-1 models.
TW-2 models have a purge button on the control panel.
If this option is ordered with the Thermolator, purge control
wiring and installation of the valve on the process line outlet
of the unit is completed at the factory. You still must connect
process and cooling water inlets and outlets, as well as a supply of non-lubricated compressed air.
Remove the shipping pipe plug from the female
connections on the back of the Thermolator.
Install an external ball valve on the cooling
water inlet of the Thermolator.
This valve is
required when a purge valve is used.
Install pipe to the rear of the Thermolator.
Use male 1
1
/
4
-inch NPT piping for process connections
and male
3
/
4
inch NPT piping for water connections. Pipe
and pipe threads must be clean and new. Clean threads
with solvent, removing all oil, grease and dirt. Allow the
threads to dry before proceeding.
Coat the pipe threads with thread sealant.
Follow the sealant manufacturer’s directions.
Connect the male pipe to the appropriate
female connection on the back of the unit
.
Connect cooling water lines as indicated on the previous
page. Connect process lines as indicated below. Start by
hand until the threads engage, then use a pipe wrench to
tighten the connection only enough to prevent leaks. Do
not over-tighten!
Connect the purge
valve to the compressed
air supply.
The air pressure
should not exceed 100 psi.
UGH015/0100 Thermolator TW-1 and TW-2
O
PTIONAL
PURGE VALVE
HOOKUPS
INSTALLATION 3-5
From
process
To
process
Compressed air
fitting
1
2
3
4
5
6
Page 38

Thermolator TW-1 and TW-2 UGH015/0100
Before beginning, note the electrical specifications on the
nameplate mounted to the side of the unit. The electrical
hookup must match these specifications with +/- 10% maximum voltage variance. An improper power supply could
damage the unit as well as seriously injure an operator.
The electrical hookup also should run through a fused disconnect sized for the nameplate amperage and conforming to
Article 250 of the National Electrical Code.
Open the unit’s electrical enclosure.
Insert the main power wire
through the knockout
hole in the right side of the enclosure.
Secure the power wire with a rubber compression fitting or strain relief.
Connect the power wires to the terminals.
Connect the three hot
wires to L1, L2, and L3
on the terminal block.
Connect the ground
wire
to the copper
grounding mount.
If you have installed a
disconnect device, follow
the manufacturer’s wiring
instructions.
1
2
3
4
5
CONNECTING
T
HE MAIN
POWER
SUPPLY
3-6 INSTALLATION
WARNING: Electrical shock hazard
This equipment is powered by three-phase main
voltage. Always disconnect and lock out the main
power source before performing any work
involving electrical connections. All wiring,
disconnects and fusing should conform to your
region’s electrical codes and should be installed
only by qualified personnel.
IMPORTANT: Always refer
to the wiring diagrams that
came with your temperature
control unit before making
electrical connections. The
diagrams show the most
accurate electrical component information.
IMPORTANT! Before initiating
power to the unit:
❒ Check the system for leaks.
❒ Verify that the voltage, phase,
frequency, amperage, disconnect fuse
and minimum wire size meet the
specifications stated on the nameplate mounted on the side of the unit.
❒ Verify that resistance to ground on
each phase is at least 1 meg ohm.
Page 39

UGH015/0100 Thermolator TW-1 and TW-2
INSTALLATION 3-7
Turn on the cooling water supply and check for
leaks.
If any leaks appear, stop the test and fix the problem before continuing. The cooling water must be at least
25 PSI or the unit will not function. The LOW WATER
PRESSURE light will come on when power is applied.
The light goes off when the pressure is correct.
Apply power to the unit.
◆ Indicator lights on the control panel blink green, then
red, to test operation of the LEDs.
◆ Setpoint and actual windows will display for
three seconds, followed by the software version. The
windows then display the factory default setpoint of
100° F and the actual temperature.
Check the rotation of the pump. Remove the top
access panel and the pump motor drip cover. Verify that
the pump rotation matches the direction indicated on the
rotation sticker on top of the pump.
NOTE: If the rotation is incorrect, stop the test and
disconnect power to the unit. Open the electrical
enclosure and switch any two of the three power
source wires on the terminal block. Return to Step 2
and check rotation again.
Replace the drip cover and top access panel.
Press the RUN key to start the unit.
If everything is working correctly:
◆ The RUN/STOP light turns green.
◆ The unit initiates a 60-second venting sequence.
Cooling and venting valves are active for 60 seconds.
The pump is active for the final 30 seconds. Indicator
lights will energize when the device is active.
◆ Normal operation begins. The heater turns on if the
actual temperature is below setpoint. The cooling valve
is active if the actual temperature is above setpoint.
The test is over. Proceed to initial setup if the unit operated
normally; refer to the
T
ROUBLESHOOTING
section if it did not.
TESTING THE INSTALLATION
1
2
3
4
5
WARNING: Only qualified personnel
should perform this procedure.
Parts of this test require opening the unit while it is
energized. Only qualified personnel who have been
trained in the use of electrical testing devices and
in avoiding the safety hazards involved in safely
troubleshooting this type of equipment should perform this test procedure.
Page 40

Thermolator TW-1 and TW-2 UGH015/0100
3-8 INSTALLATION
INITIAL
SETUP
The factory-set parameters and operating modes will satisfy
most applications. But you can change some settings and
enable or disable features as needed.
You can modify the parameters for high and low process temperature deviation warnings from the control panel. See
S
ETTINGSETPOINTDEVIATIONPARAMETERS
.
Dip switches on the motherboard inside the TW-1 and
TW-2 electrical enclosure allow you to:
❒ Select the units of measure for tem-
perature displays.
❒ Enable password protection.
❒ Enable the Auto Tune.
❒ Enable the Auto Start feature.
❒ Enable the Test Mode.
❒ Select the source point of tempera-
ture control.
To change the dip switch settings, see the appropriate topic
on the following pages.
Dipswitch Configuration
No. OFF ON
1 Display units in °F Display units °C
2 Auto Tune disabled Auto Tune enabled
3 Passcode protect Password reset/modify
4 * Auto Start disabled Auto Start enabled
5 * Control point protect Control point source select
6 Test Mode disabled Test mode enabled
7
†
Controller type selection Controller type selection
8
†
Controller type selection Controller type selection
* Available only on TW-2 models.
† Switches 7 and 8 must be ON for Direct Injection and Closed Circuit
models. Switches 7 and 8 must be OFF for Isolated Circuit models. Do
not change these settings.
WARNING: Electric shock hazard
This equipment is powered by high voltage. Always
disconnect and lock out the main power source
before opening the unit or the electrical enclosure to
modify factory settings. Failure to disconnect and
lock out the main power source can result in severe
personal injury.
NOTE: All dip switch illustrations in this manual show
switches 7 and 8 set to ON.
If you have an Isolated
Circuit model, these switches should be set to OFF. Do
not change the factory settings of these dip switches.
876
54321
Page 41

UGH015/0100 Thermolator TW-1 and TW-2
CHANGING TEMPERATURE UNITS
The temperature units are factory-set as degrees Celsius or
degrees Fahrenheit, as specified when the unit was ordered.
When the Thermolator is on, the indicator lights to the right
of the Actual temperature display on the control panel will
show which temperature unit has been set.
To change this setting, move Dip Switch 1 on the control
circuit board.
Disconnect and lock out main power to the
Thermolator.
Open the electrical enclosure.
Change Dip Switch 1 to:
OFF for °F ON for °C
Close the electrical enclosure and restore main
power to begin operating.
1
2
3
4
I
NSTALLATION 3-9
WARNING: Electric shock hazard
This equipment is powered by high voltage. Always
disconnect and lock out the main power source
before opening the unit or the electrical enclosure to
modify factory settings. Failure to disconnect and
lock out the main power source can result in severe
personal injury.
NOTE: All dip switch illustrations in this manual show
switches 7 and 8 set to ON.
If you have an Isolated
Circuit model, these switches should be set to OFF.
54321
876
876
54321
Page 42

Thermolator TW-1 and TW-2 UGH015/0100
The TW-1 and TW-2 Thermolators provide the ability to protect system parameters from unauthorized changes during normal operating mode. When system passcode protection is
enabled, the following parameters cannot be changed unless
you enter the correct passcode:
● The Process Setpoint
● High Deviation Alarm Setpoint
● Low Deviation Alarm Setpoint
● Baud Rate selection for serial communications
● Address selection for serial communications
When the unit is turned on for the first time, passcode protection is disabled. To enable passcode protection:
Disconnect and lock out main power to the unit.
Open the electrical enclosure.
Set dip switch 3 to ON
and switches 5 and 6
to OFF.
Close the electrical enclosure and restore
power to the unit.
Press any
button when
the control displays “Pas rSt”
(Passcode Reset).
The control will
display the last
passcode used.
Select a new passcode using the ▲▲and
▼▼
setpoint adjustment buttons.
Stop pressing the setpoint buttons when the passcode you
want appears in the setpoint display window. Selecting
“OFF” as the passcode will disable the passcode feature.
ENABLING AND DISABLING PASSCODE PROTECTION
3-10 INSTALLATION
WARNING: Electric shock hazard
This equipment is powered by high voltage. Always
disconnect and lock out the main power source
before opening the unit or the electrical enclosure to
modify factory settings. Failure to disconnect and
lock out the main power source can result in severe
personal injury.
1
2
3
4
5
6
NOTE: All dip switch illustra-
tions in this manual show
switches 7 and 8 set to ON.
If you have an Isolated
Circuit model, these switches should be set to OFF.
Continued on next page
876543
21
Page 43

UGH015/0100 Thermolator TW-1 and TW-2
Press the RUN button to save the passcode.
◆◆
The control will display “Pr OFF” to prompt you to
remove power to the unit.
IMPORTANT: If RUN is not pressed, the new
passcode will not be saved.
Turn off power to the unit. Disconnect and lock out
the main power supply.
Open the electrical
enclosure.
Set dip switch 3 to OFF.
Close the electrical enclosure and restore
power to the unit.
A passcode now is required to change system parameters.
INSTALLATION 3-11
7
8
9
10
11
ENABLING AND
DISABLING
PASSCODE
PROTECTION
Disabling Passcode Protection
To disable passcode
protection and allow
universal access to
system parameters:
Follow Steps 1
through 5
in the
previous section
on enabling passcode protection.
Hold down the
▼▼
setpoint adjustment button
to select “OFF” as the new passcode.
Follow steps 7 through 11 in the previous section.
1
2
3
876543
21
Page 44

Thermolator TW-1 and TW-2 UGH015/0100
TW-1 models control the process temperature based upon the
average of the temperatures recorded at the supply (to process)
and return (from process) thermocouples.
TW-2 models allow you to select how the unit will measure
and control the process temperature. The control point can be
selected as the supply, the return or the average of the the two
temperatures.
To select the control point source on TW-2 models:
Disconnect and lockout power to the unit.
Open the electrical enclosure.
Set dip switches 3 and
6 to the OFF position.
Set dip switch 5 to the
ON position.
Close the electrical enclosure and restore
power to the unit.
Press any button when the control displays
“Cnt Pt”.
The controller will
display “Sel CnP”
and flashes the LED
for the current control point.
Select a new control point using the Display
button.
Stop pressing the select button until the indicator light next
to the control point you want illuminates.
3-12 INSTALLATION
1
2
3
4
5
6
WARNING: Electric shock hazard
This equipment is powered by high voltage. Always
disconnect and lock out the main power source
before opening the unit or the electrical enclosure to
modify factory settings. Failure to disconnect and
lock out the main power source can result in severe
personal injury.
SELECTING THE
TEMPERATURE
CONTROL POINT
(TW-2 ONLY
)
7
NOTE: All dip switch illustra-
tions in this manual show
switches 7 and 8 set to ON.
If you have an Isolated
Circuit model, these switches should be set to OFF.
Continued on next page
876543
21
Page 45

UGH015/0100 Thermolator TW-1 and TW-2
SELECTING THE
TEMPERATURE
CONTROL POINT
(TW-2 ONLY
)
INSTALLATION 3-13
Press the RUN button to save the control point.
◆◆
The control will display “Pr OFF” to prompt you to
remove power to the unit.
IMPORTANT: If RUN is not pressed, the new
control point source will not be saved.
Turn off power to the unit. Disconnect and lock out
the main power supply.
Open the electrical
enclosure.
Set dip switch 5 to
OFF.
Close the electrical enclosure and restore
power to the unit.
The Thermolator will now control the process temperature
based on actual temperatures recorded at the new control
point source.
8
9
10
11
12
876
54321
Page 46

Thermolator TW-1 and TW-2 UGH015/0100
3-14 INSTALLATION
You can establish a normal operating range around the process
temperature setpoint using the high and low deviation parameters. If the process temperature exceeds the high deviation
limit, or falls below the low deviation limit for longer than 15
minutes, the Thermolator will alert you to the unacceptable
temperature variation with an alarm light.
These temperature deviation limits will adjust automatically
relative to the process temperature setpoint.
The factory default setting is the process temperature setpoint
± 25° F (4° C). This parameter is adjustable to establish a narrower or wider acceptable temperature range for normal operation. The Low Deviation cannot be set to fall below the factory-set Low Safety temperature. The High Deviation cannot be
set to exceed the factory-set High Safety temperature.
To change the temperature deviation settings:
Press the Setpoint Select
button to select the deviation
parameter you want to
change.
Use the ▲ and ▼ setpoint
buttons to enter the deviation
temperature.
The setting is
stored in memory even when the
power is turned off. The recommended setting is ± 2-10° F.
E
NTERING
S
ETPOINT
DEVIATION
P
ARAMETERS
1
FACTORY DEFAULT SETTINGS
Model DI and CC IC
Process Setpoint 100° F (38° C) 100° F (38° C)
High Safety 260° F (127° C) 190° F (88° C)
Low Safety 22° F (-6° C) 22° F (-6° C)
2
NOTE:
If you enabled passcode protection, you must
enter the passcode to change this parameter. Too enter
the passcode:
Hold down the Setpoint Select button for 5 seconds.
When the control displays “ 1 PaS”, use the setpoint
adjustment buttons to enter the passcode. Press the
Setpoint Select button again. If the correct passcode
was entered the controller will display ACC PAS for 3
seconds. If the passcode was incorrect, the controller
will display rEJ PAS (rejected passcode).
Access to system parameters remain until power is
cycled or the RUN or STOP button is pressed.
Page 47

UGH015/0100 Thermolator TW-1 and TW-2
INSTALLATION 3-15
TW-1 and TW-2 Thermolators provide SPI compatible support
for RS-485 serial communications with a host machine. You
can use SPI communication to change or monitor the:
● Process temperature setpoint
● High and low temperature deviation alarms
● Process status (run and alarm conditions)
● Machine 1 status
● Machine 2 status
● Actual temperature to process
● Actual temperature from process
To use the SPI communication option, you must connect the
Thermolator to the host machine and set the communication
baud rate and node address using the setpoint select and
adjustment buttons on the control panel.
Connect the host machine to the unit.
Plug the male DB9 connector into the serial communications port on the Thermolator.
Apply power to the Thermolator.
Enter the passcode, if necessary.
Hold the Setpoint Select button for 5 seconds. When the
control displays 1 PaS, use the setpoint adjustment buttons to enter the passcode.
Enter the node address.
Press the Setpoint Select button to choose
Address. Then press the setpoint ▲ or ▼
arrow until the address you want appears in
the setpoint display. The address may be set
to any number from 32 to 254 (a hexadecimal integer between 20 and FE), as long as
that number has not been assigned to another
machine connected to the same network.
Set the baud rate to 12, 24, 48 or 96.
The Thermolator must be set to send and
receive data at the same baud rate as the host
machine. Press the setpoint ▲ or ▼ arrow
until the baud rate you want appears in the
setpoint display window.
12 = 1200 bps 48 = 4800 bps
24 = 2400 bps 96 = 9600 bps
The green SPI status light on the control panel should flash
when the unit is communicating. The LED will turn red, indicating an alarm, if SPI communication is not properly set up.
1
2
3
4
ACTIVATING SPI
C
OMMUNICATION
5
NOTE:
To disable SPI, use
the setpoint
▲
or ▼arrow to
select Address. Press the
▼
arrow until OFF is displayed in
the sepoint window.
See the A
PPENDIX
for additional
SPI programming information.
Page 48

If you have a TW-2 model, you can automatically start and
stop the Thermolator from a remote switching or timing
device that has power contacts rated 110VAC, such as the
process machine control.
Wiring the device to the Thermolator is accomplished through
a dry contact to the appropriate terminals on the motherboard.
After wiring the device to the unit, Auto Start must be
enabled by configuring a dip switch on the motherboard.
Disconnect and lockout power to the unit.
Open the electrical enclosure.
Punch a small hole in the left side of the
electrical enclosure.
The hole must be large enough to
accommodate conduit for the power contact wires from
your switching or timing device.
Insert the two power leads from the device
through the conduit into the electrical enclosure.
Connect the 110VAC device contact wires to
the Auto Start terminals.
Make sure terminals are
screwed tight.
Thermolator TW-1 and TW-2 UGH015/0100
INSTALLING THE
AUTO START
FEATURE
(TW-2 ONLY
)
3-16 INSTALLATION
1
2
3
4
5
WARNING: Electric shock hazard
This equipment is powered by high voltage. Always
disconnect and lock out the main power source
before opening the unit or the electrical enclosure to
modify factory settings. Failure to disconnect and
lock out the main power source can result in severe
personal injury.
IMPORTANT:
Always
refer to the wiring diagrams
that came with your temperature control unit before making electrical connections. The
diagrams show the most
accurate electrical component
information.
Device contacts
Continued on next page
65432
F1
LLS/WPS
LLS/WPS
AC IN 4
AC IN + 3
AC OUT 2
AC OUT + 1
AUTOSTART
HPS/LPS
AUTOSTART
1
HPS/LPS
432
OPS
OPS
FS TAT
1
FS TAT
Page 49

Set dip switch 4 to the
ON position.
Close the electrical
enclosure and restore
power to the unit.
When Auto Start is enabled:
◆ The Auto Start indicator light flashes to indicate that the
Thermolator can start at any time. The Thermolator will
start whenever the remote switching or timing device sends
a signal to start processing.
◆ The Auto Start indicator light is on whenever the
Thermolator is under the control of the remote device.
To disable Auto Start:
Repeat steps 1,2 and 7, setting dip switch 4 to the OFF instead
of the ON position.
INSTALLING THE
AUTO START
FEATURE
(TW-2 ONLY
)
UGH015/0100 Thermolator TW-1 and TW-2
INSTALLATION 3-17
6
NOTE:
All dip switch illustrations in this manual show
switches 7 and 8 set to ON.
If you have an Isolated
Circuit model, these switches should be set to OFF.
7
876
54321
Page 50

Page 51

4-1
UGH015/0100 Thermolator TW-1 and TW-2
●●
TW-1 control . . . . . . . . . . . . . . . .4-2
●●
TW-2 control . . . . . . . . . . . . . . . .4-3
●●
Mounting the TW-2 control
in a remote location . . . . . . . .4-4
●●
Entering a passcode . . . . . . . . .4-5
●●
Starting the Thermolator . . . . . .4-6
●●
Stopping the Thermolator . . . . .4-7
●●
Using the manual purge
option . . . . . . . . . . . . . . . . . . .4-8
●●
Using the TW-2 purge feature . .4-9
●●
Performing an Auto Tune . . . . .4-10
OPERATION
Page 52

All normal operating functions can be controlled from the
TW-1 control panel. If you have the optional manual mold
purge, the control button is located on the side of the
Thermolator electrical enclosure.
TW-1 C
ONTROL
Thermolator TW-1 and TW-2 UGH015/0100
4-2 OPERATION
Setpoint adjustment buttons
Press ▲ or ▼ to enter the process
temperature setpoint, SPI parameters
and passcodes.
Press ▲ to increase a value.
Press ▼ to decrease a value.
TIP: Press and hold the button for
faster scrolling speed.
NOTE: Passcode protection prevents
accidental or unauthorized changes to
all operating parameters. If passcode
protection has been enabled, you must
enter the correct passcode to change
the process temperature setpoint.
Actual values display
The green window displays the temperature
at the middle of the mold. This temperature
is calculated as an average of the temperatures of the supply water and return water.
The lights indicate whether the temperature
is in degrees Fahrenheit or Celsius. See the
I
NSTALLATION
section for instructions on how
to change the temperature units.
Setpoint display
The Setpoint display shows the
setpoints entered for fluid temperature, high and low temperature
deviation alarms, the SPI baud
rate, and the SPI address.
Setpoint and Actual value display
windows also display some alarm
codes and setup instructions.
Run/Stop
Press RUN button to
start normal operation.
Press STOP to stop the
temperature control unit.
= Running (green)
= Stopped (red)
= Alarm (red, flashing)
Status lights
The lights indicate the operating status of the listed
components. Except in Test
Mode, the lights indicate:
= Off or inactive
= On or active (green)
= Alarm condition (red)
Test Mode is used for testing displays, keys and
input/output functions. When
test mode is enabled, normal operation is disabled.
= Test Mode off
= Test Mode on (red);
unit disabled
Alarm
Press to acknowledge the
alarm light and silence the
optional audible alarm. The
alarm light will flash until the
cause of the alarm condition
is fixed. See Troubleshooting
for alarm descriptions and
remedies.
Setpoint Select button
Press repeatedly until a green light appears
next to the parameter you want to program
or view.
NOTE: Default settings for the
deviation setpoints are:
High = setpoint + 25° F
Low = setpoint - 25° F
A warning alarm occurs (indicator light red)
whenever the actual temperature is outside
this setpoint range for more than 15 minutes. Recommended setting: ± 2-10° F.
Page 53

TW-2 CONTROL
UGH015/0100 Thermolator TW-1 and TW-2
OPERATION 4-3
Purge Valve
The light indicates the operating
status of the purge valve. Except in
Test Mode and Auto Start, the light
indicates:
= Off or inactive
= On or active
Display Select button
Press repeatedly until a green light
appears next to the parameter you want
to program or view.
All normal operating functions can be controlled from the
TW-2 control panel, including the optional mold purge.
Status lights
The lights indicate the operating status of the listed
components. Except in Test
Mode and Auto Start, the
lights indicate:
= Off or inactive
= On or active (green)
= Alarm condition (red)
Test Mode is used for testing
displays, keys and input/output functions. When test
mode is enabled, normal
operation is disabled.
= Test Mode off
= Test Mode on (red);
unit disabled
Auto Start allows you to start
and stop the TW-2 from a
remote switching
or timing device, such as the
processing machine control.
This feature can only ben
enabled by configuring a dip
switch on the control motherboard.
= Disabled; Auto Start
not available
= Enabled
(flashing green)
;
unit can start any time
= On and under control of
the remote device
Actual values display
The green window displays the temperature
at the middle of the mold. This temperature
is calculated as an average of the temperatures of the supply water and return water.
The lights indicate whether the temperature
is in degrees Fahrenheit or Celsius. See the
I
NSTALLATION
section for instructions on how
to change the temperature units.
Setpoint display
The Setpoint display shows the
setpoints entered for fluid temperature, high and low temperature
deviation alarms, the SPI baud
rate, and the SPI address.
Setpoint and Actual value display
windows also display some alarm
codes and setup instructions.
Run/Stop
Press RUN button to
start normal operation.
Press STOP to stop the
temperature control unit.
= Running (green)
= Stopped (red)
= Alarm (red, flashing)
Setpoint adjustment buttons
Press ▲ or ▼ to enter the process
temperature setpoint, SPI parameters
and passcodes.
Press ▲ to increase a value.
Press ▼ to decrease a value.
TIP: Press and hold the button for
faster scrolling speed.
Alarm
Press to acknowledge the
alarm light and silence the
optional audible alarm. The
alarm light will flash until the
cause of the alarm condition
is fixed. See Troubleshooting
for alarm descriptions and
remedies.
Setpoint Select button
Press repeatedly until a green light
appears next to the parameter you
want to program or view.
NOTE: Default settings for the
deviation setpoints are:
High = setpoint + 25° F
Low = setpoint - 25° F
A warning alarm occurs (indicator light
red) whenever the actual temperature
is outside this setpoint range for more
than 15 minutes.
Recommended setting: ± 2-10° F.
Page 54

Thermolator TW-1 and TW-2 UGH015/0100
4-4 OPERATION
MOUNTING THE
TW-2 C
ONTROL
IN A
REMOTE
LOCATION
CAUTION: Improper use of the swiveling
control panel can damage the unit.
● Do not use the control panel handles or
control cables to move the Thermolator. The
handles are designed only for orientation of
the control panel.
● Do not mount the detached TW-2 control
panel to a hot surface.
The TW-2 control panel can be mounted up to 50 feet from
the unit, using a remote control cable and the magnetic back
on the back of the panel.
Do not stretch the cable. The cable is available in various
lengths so that you can order the appropriate cable for your
installation.
To detach the TW-2 control panel:
Grasp the black control panel
handles and pull upward.
Use the magnetic back to mount
the control panel in the remote
location. Connect the remotemounted control to the unit with
the cable provided.
Page 55

UGH015/0100 Thermolator TW-1 and TW-2
OPERATION 4-5
TW-1 and TW-2 Thermolators have a security feature that prevents accidental or unauthorized changes to the setpoint temperature, high and low deviation limits, SPI address, and baud
rate.
If passcode protection is enabled, you must enter the correct
passcode to change these parameters. To enter the passcode:
Press and hold the Setpoint Select button
for 5 seconds.
The control will display 1 PaS to indi-
cate a passcode is needed.
Press the Select ▲ button until the correct
passcode appears in the display.
Press again to enter the passcode.
If the passcode is correct, the control displays ACC PAS
for 3 seconds. If the passcode is incorrect, the control displays rEJ PAS (rejected passcode).
Press Setpoint to select the parameter you
want to change.
You will have access to the system parameters until:
● The power is cycled off and on.
● The RUN or STOP button is pressed.
● No key has been pressed for 30 seconds.
NOTE: Pressing the STOP or RUN key while you are
entering a passcode will abort the passcode entry
sequence
ENTERING A
P
ASSCODE
1
2
3
4
Page 56

Thermolator TW-1 and TW-2 UGH015/0100
4-6 OPERATION
Before starting the Thermolator, verify that the system has
been installed correctly for your application. See the
I
NSTALLATION
section.
If Passcode Protection has been enabled, you must enter the
correct passcode before you can change or enter any of the
operating parameters, including the temperature setpoint.
Turn on the water supply to the Thermolator.
The supply must be at least 25 psi. Check for leaks in the
cooling water and process fluid lines before continuing.
Turn on main power to the Thermolator.
The control initiates a brief self test.
◆ Indicator lights blink green, then red.
◆ Setpoint and actual windows will display for
three seconds, followed by the software version. The
windows then display the factory default setpoint of
100° F and the actual temperature.
Enter the passcode,
if necessary.
Hold the
Setpoint Select button for 5
seconds. When the control
displays 1 PaS, use the setpoint
adjustment buttons to enter the
passcode. Press the Setpoint
Select button again.
Enter the temperature
setpoint.
Press the Setpoint
Select button until the green
light appears next to
Temperature. Press
▲ to
increase or
▼ to decrease the
temperature setting.
Press to start normal operation.
◆ The RUN/STOP light turns green.
◆ The unit initiates a 60-second venting sequence.
Cooling and venting valves are active for 60 seconds.
The pump is active for the final 30 seconds.
◆ Normal operation begins. The heater turns on when the
actual temperature is below setpoint. The cooling valve
turns on if the actual temperature is above the setpoint.
If the Alarm light turns on, press to silence the option-
al audible alarm. Then see the
T
ROUBLESHOOTING
section.
STARTING THE THERMOLATOR
1
2
3
Run
IMPORTANT:
If you are
operating the Thermolator
for the first time since
installation, you should
perform an Auto Tune after
two hours of normal operation. You should perform the
Auto Tune periodically to
ensure that the control correctly calculates how much
heat and cooling should be
applied to maintain the
process setpoint. See
“Performing an Auto
Tune.”
5
4
Page 57

UGH015/0100 Thermolator TW-1 and TW-2
OPERATION 4-7
STOPPING THE THERMOLATOR
You must shut down the Thermolator whenever you:
● Change the water hookups.
● Shut down the process machine.
● Purge the process circuit of the water or fluid.
● Run the unit’s diagnostic tests.
● Perform routine or preventative maintenance.
● See an alarm condition that requires troubleshooting.
● Relocate, ship or store the unit.
To shut down the unit for purging the process lines, diagnostic testing, routine maintenance or troubleshooting, press the
Stop button. Then refer to the appropriate topic or section in
this User Guide.
To shut down the unit to change water hookups:
Press and drain the unit
of all water or fluid.
Drain the unit using the two drain
plugs on the back of the unit.
Once the unit is cool, remove
the water hookups.
To shut down the unit for relocation or storage:
Press and drain the unit of all fluid.
Drain the unit using the two drain plugs.
Disconnect the power supply and all water feeds.
Position the control panel to rest flush with the unit.
In shipment or storage, the Thermolator can withstand an
environment between -40° F (-40° C) and 150° F (65° C)
with 95% relative humidity non-condensing.
WARNING: Electrical shock and
hot surface hazards
Before attempting maintenance of any kind
on the Thermolator, you must stop the unit;
disconnect and lockout the main power
supply; and allow the unit to cool to less than
100° F (38° C).
Stop
1
2
Drain plug
Stop
1
2
3
Page 58

Thermolator TW-1 and TW-2 UGH015/0100
4-8 OPERATION
TW-1 and TW-2 direct injection and closed circuit models can
be ordered with an optional purge valve, which clears the
process lines of fluid using compressed air. The valve is operated by a manual purge switch on the side of the unit.
IMPORTANT:
Before purging the process lines, be sure
that the cooling water source feed is closed. If the feed is
open and the air line has a higher pressure than the cooling
water, air may be injected into the cooling water system. If
the cooling water pressure is higher than the air line, cooling
water may be injected into the air line.
Press to shut down the Thermolator.
◆ The RUN/STOP LED turns red.
Turn off the cooling water supply to the unit.
Press and hold the manual purge switch to start
purging.
◆ The Purge Valve LED lights.
◆ The Vent and Cool outputs are activated.
◆ The STOP and RUN buttons are deactivated during the
purge or when the cool delay off timer is active.
The time required to clear the process lines of fluid will
vary according to the length of the process piping and the
size of the tooling.
Release the purge switch to stop purging.
USING THE MANUAL PURGE OPTION
Stop
1
2
3
4
NOTE:
The purge operation will terminate immediately if
the unit detects a blown fuse in the Vent or Cool output.
The unit will alarm and shut down.
See the T
ROUBLESHOOTING
section for instructions on how
to clear the alarm and fix the problem.
Page 59

UGH015/0100 Thermolator TW-1 and TW-2
OPERATION 4-9
The TW-2 direct injection models can be ordered with an
optional purge valve, which clears the process lines of fluid
using compressed air. The valve is operated by a purge button
on the control panel.
IMPORTANT:
Before purging the process lines, be sure
that the cooling water source feed is closed. If the feed is
open and the air line has a higher pressure than the cooling
water, air may be injected into the cooling water system. If
the cooling water pressure is higher than the air line, cooling water may be injected into the air line.
Press to shut down the Thermolator.
◆ The RUN/STOP light turns red.
Turn off the cooling water supply to the unit.
Press to open the valve and start purging.
◆ The Purge Valve LED lights.
◆ The Vent and Cool outputs are activated.
◆ The STOP and RUN buttons are deactivated during the
purge or when the cool delay off timer is active.
The time required to clear the process lines of fluid will
vary according to the length of the process piping and the
size of the tooling.
Press to close the valve and stop purging.
◆ The Vent and Cool solenoids remain energized for 5
seconds after the purge is terminated.
U
SING THE TW-2
P
URGE FEATURE
Stop
1
2
3
4
NOTE:
The purge operation
will terminate immediately if the
unit detects a blown fuse in the
Vent or Cool output. The unit
will alarm and shut down.
See the T
ROUBLESHOOTING
section for instructions on how to
clear the alarm and fix the
problem.
CAUTION: Gases Under Pressure
Do not disconnect the mold lines until you
varify pressure in the cooling water return
line is low. Compressed gases can blast
liquid at high pressure at the operator, possibly causing serious injury. Check the
pressure gauge before disconnecting lines.
Page 60

You should perform an Auto Tune after the first two hours of
operation and whenever process variables change (changes in
cooling water pressure, piping or molds; large ambient
swings; new setpoint temperature) to ensure that the control
continues to obtain good approximations of the PID constants
used to compensate for the thermal lag of the system.
To ensure a successful Auto Tune, verify that:
❒ The Auto Tune feature has been enabled. Auto Tune is
enabled or disabled via dip switch 2 on the motherboard.
❒ The process value is stable. A fluctuating process value
will fool the software into making inaccurate tuning decisions. The software waits 5 minutes for the process value to
stabilize before it starts the Auto Tune process. If the
process value still fluctuates after 5 minutes, the Auto Tune
terminates and the control displays the “At ti” error.
❒ The control is in STOP mode and the process value is in
ambient temperature. This allows the software to obtain
good approximations of process parameters, which are critical for performing an accurate tune. If this requirement is
not met, then a good tune cannot be guaranteed.
❒ The setpoint/process deviation is at least 25° F. If the
absolute value of setpoint - process temperature is not
greater than or equal to 25° F, the Auto Tune will terminate.
The control will display an “At dEV” error.
Press to shut down the Thermolator.
Disconnect and lock out main power to the unit.
Enable Auto Tune.
Open the electrical enclosure.
Set dip switch 2 to ON.
Close the electrical enclosure
and restore power to the unit.
Restore power to the unit.
PERFORMING AN AUTO TUNE
Thermolator TW-1 and TW-2 UGH015/0100
4-10 OPERATION
WARNING: Electric shock hazard
This equipment is powered by high voltage. Always
disconnect and lock out the main power source
before opening the unit or the electrical enclosure to
modify factory settings. Failure to disconnect and
lock out the main power source can result in severe
personal injury.
1
2
3
4
Stop
Continued on next page
876
54321
Page 61

Press and (the Setpoint Select button)
simultaneously to begin the Auto Tune.
The Actual display will flash “At” and the current process
temperature to indicate that an Auto Tune is underway.
If Auto Tune is successful, the controller automatically
starts controlling using the new PID parameters.
If you press the STOP button or a fault occurs during the
Auto Tune, the control enters stop mode and Auto Tuning
immediately terminates. The actual display stops flashing
“At.” If a fault occurred, the control will display the appropriate error message.
PERFORMING AN
AUTO TUNE
UGH015/0100 Thermolator TW-1 and TW-2
OPERATION 4-11
Run
ERROR MESSAGE ERROR DESCRIPTION
Insufficient setpoint/process deviation.
If the absolute value of (setpoint - process
value) is less than 25° F. The Auto Tune cannot be started until the temperature
difference is at least 25° F.
Auto Tune timed out. Auto Tune will time out
if a stable process value cannot be obtained
5 minutes into the tune, or if the tuning
process takes longer than 30 minutes. If this
error occurs, verify that you followed every
requirement under “To ensure a successful
Auto Tune” and perform a second tune.
Invalid PID constants were generated.
The most likely causes of this error is a tune
started inappropriately or an external element (i.e., loose thermocouple) that upset
the process while tuning was in progress.
Verify that you followed every requirement
under “To ensure a successful Auto Tune”
and perform a second tune.
dEv
At
tI
At
bad
At
5
Page 62

Page 63

5-1
UGH015/0100 Thermolator TW-1 and TW-2
●●
Maintenance schedule . . . . . . . .5-2
●●
Accessing the Thermolator
enclosure . . . . . . . . . . . . . . . . .5-3
●●
Checking fluid level in the
reservoir
(IC models)
. . . . . . . . . .5-4
●●
Performing system tests . . . . . .5-5
●●
Key/Display Test . . . . . . . . . . . . .5-6
●●
Input Test . . . . . . . . . . . . . . . . . .5-7
●●
Output Test . . . . . . . . . . . . . . . . .5-8
●●
Disabling or enabling
output monitors . . . . . . . . . . .5-9
●●
Calibrating temperature
sensors . . . . . . . . . . . . . . . . . .5-10
●●
Logging operating hours . . . . .5-12
MAINTENANCE
Page 64

Thermolator TW-1 and TW-2 UGH015/0100
5-2 MAINTENANCE
PREVENTATIVE MAINTENANCE SCHEDULE
Thermolator TW-1 and TW-2 water temperature controllers
are essentially maintenance-free. However, to maintain the
best performance, we recommend the following maintenance
schedule.
●●
Whenever process variables change
❒❒
Perform an Auto Tune.
The Auto Tune ensures that the control continues to
obtain good approximations of the PID constants used
to compensate for the thermal lag of the system.. You
should perform an Auto Tune after the first two hours of
operation and whenever the process changes, such as
after a mold change; installation of different pipe sizes;
or change in process setpoint. See
P
ERFORMING AN
A
UTOTUNE
in the
O
PERATION
section.
●●
Daily
❒❒
Check for leaks in cooling and process lines.
Before and during operation, you should inspect the
unit and all plumbing lines for leaks. If a leak develops,
stop the Thermolator and repair it.
❒❒
Keep the unit and the area around it clean.
Check for and remove lint, dust or other obstructions on
the unit, especially around air intake areas. Keep the
floor around the unit dry.
❒❒
Check the process fluid level (IC models).
Isolated circuit models have an internal reservoir that
contains the process fluid. Check the level indicator on
the back of the unit to make sure the reservoir contains
an adequate amount of process fluid. Refill as needed.
●●
Monthly, or as often as needed.
❒❒
Inspect the fluid reservoir (IC models only).
For at least the first three months of operation, check
the level switches in the process fluid reservoir for
debris or deposits that could interfere with proper
operation. Flush and clean the reservoir, if necessary.
●●
Quarterly (every 3 months)
❒❒
Inspect power cords, wires and electrical
connections.
Check for loose or frayed wires, burned contacts, and
signs of overheated wires. Check exterior power cords
to the main power source and from the electrical box to
the pump and heating elements. Check the ground wire
and thermocouple connections. Replace any wire that
appears damaged or has worn or cracked insulation.
Page 65

PREVENTATIVE
MAINTENANCE
SCHEDULE
UGH015/0100 Thermolator TW-1 and TW-2
MAINTENANCE 5-3
●●
Annually (every 12 months)
❒❒
Test and calibrate the unit’s control systems.
The Thermolator’s Test Mode checks the operation
of displays, control buttons, inputs and outputs. You
can also calibrate the supply and return thermocouples.
See
P
ERFORMINGSYSTEM
T
ESTS
in this section.
WARNING: Electrical shock and
hot surface hazards
Before attempting maintenance of any kind
on the Thermolator, you must stop the unit;
disconnect and lockout the main power
supply; and allow the unit to cool to less than
100° F (38° C)
To access the Thermolator enclosure:
Remove the top access panel by lifting straight up.
Remove the side panels by lifting straight up.
ACCESSING THE
T
HERMOLATOR
ENCLOSURE
Page 66

The isolated, or totally closed, circuit models separate the
cooling water from the process fluid, which is held in a reservoir inside the unit. This reservoir should be kept at least
three-quarters full of the process fluid.
You can check the fluid level
in the reservoir using the sight
glass on the back of the
Thermolator.
To fill the reservoir:
Disconnect and lockout power, and remove the
top panel of the Thermolator.
Locate the reservoir near the top of the unit.
Locate the fill port at the top of the reservoir.
Refill the reservoir. Monitor the level using the sight
glass on the back of the unit. Because IC units can use
pure water or glycol mixtures, make sure you are adding
the correct fluid for your application.
Replace the top panel of the Thermolator.
CHECKING THE
FLUID LEVEL IN
THE
RESERVOIR
(IC MODELS ONLY
)
Thermolator TW-1 and TW-2 UGH015/0100
5-4 MAINTENANCE
1
2
3
4
5
IMPORTANT: Do not use deionized water or gly-
col mixtures containing additives in a Thermolator.
Softened water or glycol mixtures with additives,
such as automotive fluids, can damage the
Thermolator. Glycol/water process loop mixtures
should use industrial-grade ethylene glycol only.
Sight glass
Page 67

TW-1 and TW-2 Thermolators provide a Test Mode that tests
displays and keys on the control panel, as well as inputs and
outputs. The Test Mode also allows calibration of the supply
and return line thermocouples.
System tests and calibration should be performed annually.
To enable Test Mode:
Press to shut down the Thermolator.
Disconnect and lock out main power to the unit,
then open the electrical enclosure.
Set dip switches 3 and
5 to OFF.
Set dip switch 6 to ON.
Close the electrical enclosure and restore
power to the unit.
◆ The control displays “tSt.”
◆ The Test Mode LED lights.
Press any button to display the first test menu.
Test mode provides the following menus:
● Key/Display Test
● Input Test
● Output Test
● Calibration
● Total Operating Hours
● Output Monitor Enable/Disable
After performing each test, hold the Setpoint
for 3 seconds to index to the next test menu.
The procedure for each test is described on the following
pages.
P
ERFORMING
S
YSTEM TESTS
UGH015/0100 Thermolator TW-1 and TW-2
MAINTENANCE 5-5
Stop
1
2
3
4
5
6
7
IMPORTANT: All normal
operating functions are
disabled while Test Mode is
enabled. To return to normal
operation, you must disable
Test Mode.
To disable Test Mode,
repeat steps 2 through 5,
setting dip switch 6 to OFF
instead of ON.
54321
876
Page 68

The Key/Display Test verifies the function of displays, LEDs
and buttons on the control panel.
Enable Test Mode.
Press any key.
If necessary, index to the Key/Display menu.
Press and hold the Setpoint key for 3 seconds to index
to each test menu until the controller displays “dSP”.
Press any key to clear all displays.
Repeatedly press any key to test displays.
With each key press, a new segment of all six 8-segment
LEDs and a select group of LED indicator lights will illuminate.
Exit the test and enter the next test.
Press and hold the Setpoint key for 5 seconds to exit
and index to the next test.
KEY/DISPLAY TEST
Thermolator TW-1 and TW-2 UGH015/0100
5-6 MAINTENANCE
1
2
3
4
5
6
Page 69

The Input Test verifies the function of inputs available on the
various TW-1 and TW-2 models. Not all inputs are used on all
models. The performance evaluation of the inputs is based on
the voltage sensing device (VSD).
Connect all inputs to the system.
Press any key to display the first test menus.
Select the Input Test menu.
Press and hold the Setpoint key for 3 seconds to index
to each test menu until the controller displays “InP”.
Repeatedly press and release any key to test.
With each key press and release, the left display will indicate the number of the input being tested (v1, v2, v3, etc.).
The right display indicates either “1” for voltage present
or “O” for an absence of voltage.
Only inputs that are actually used by the particular model
will be tested.
Exit the test and enter the next test.
Press and hold the Setpoint key for 3 seconds to exit
and index to the next test.
INPUT TEST
UGH015/0100 Thermolator TW-1 and TW-2
MAINTENANCE 5-7
1
2
3
4
5
Page 70

OUTPUT TEST
Thermolator TW-1 and TW-2 UGH015/0100
5-8 MAINTENANCE
The Output Test verifies the function of outputs available on
the various TW-1 and TW-2 models. Not all outputs are used
on all models. The performance evaluation of the inputs is
based on the output monitors (OM).
Connect all outputs to the system.
Enable Test Mode.
Press any key to display the first test menus.
Select the Output Test menu.
Press and hold the Setpoint key for 3 seconds to index
to each test menu until the controller displays “oUt”.
Repeatedly press and release any key to test.
With each key press and release, the left display will indicate the number of the output being tested (oS1= OM1;
oS2 = OM2; etc.). The right display indicates either “1”
for a good output or “O” for a failed output.
Only outputs that are actually used by the particular model
will be tested.
Exit the test and enter the next test.
Press and hold the Setpoint key for 3 seconds to exit
and index to the next test.
IMPORTANT: Testing each output requires the firing of the associated solid state relay. Make sure an
output device is connected to the controller, otherwise the test result will be erroneous.
1
2
3
4
5
6
Page 71

All output monitors on the Thermolator can be enabled or disabled permanently through the OM Enable/Disable Menu in
Test Mode.
You need to use this feature if you have replaced the motherboard, or if dip switches 7 and 8 have been changed erroneously. This will enable any required output monitors that
were disabled and give fuse failures.
Enable Test Mode.
Press any key to display the first test menus.
Select the OM Enable/Disable menu.
Press and hold the Setpoint key for 3 seconds to index
to each test menu until the controller indicates “oS1” in
the actual display and the status of the selected output in
the Select display.
Press the Setpoint ▲▲or ▼▼key to change the
status.
Each press of the key changes the output status
from ON to OFF or OFF to ON.
Press the Setpoint to select the next output.
Repeat Step 4 to change the status of the output, or press
any key to continue indexing through the outputs.
Save changes and exit the output menu.
Press and hold the Select key for 3 seconds to save the
changes and exit.
DISABLING OR
ENABLING
OUTPUT
MONITORS
UGH015/0100 Thermolator TW-1 and TW-2
MAINTENANCE 5-9
1
2
3
4
5
6
OUTPUT MONITOR SELECTION GUIDE
MODEL TYPE DI CC IC (TCC)
OM1 Pump ON ON ON
OM2 Heat ON ON ON
OM3 Cool ON ON ON
OM4 Vent OFF ON OFF
OM5 Purge (TW-2 option only) ON ON OFF
Page 72

TW-1 and TW-2 Thermolators use type “K” thermocouples to
sense the temperature in the return and supply process lines.
These thermocouples should be calibrated annually, or when a
new thermocouple is installed, to ensure correct operation.
The Thermolator’s Calibration Mode provides zero and span
calibration of both the supply and return line thermocouples.
You access the Calibration Mode while in Test Mode.
Enable Test Mode.
See
P
ERFORMINGSYSTEM
T
ESTS
.
Press any button to display the first test menu.
Select the Calibration Mode menu.
Press and hold the Setpoint key for 3 seconds to index
to each test menu until the controller indicates “SC.L” in
the Actual display.
Release the Setpoint key.
You are now in calibration mode. Each press and release
of this key will exit the current calibration and start the
next calibration. The table below lists the calibrations that
will be performed.
Using the thermocouple calibrator, apply the
appropriate temperature to the control input.
CALIBRATING TEMPERATURE SENSORS
Thermolator TW-1 and TW-2 UGH015/0100
5-10 MAINTENANCE
Special Tools Needed:
❒ type K thermocouple
calibrator
1
2
3
4
5
SETPOINT ACTUAL
CALIBRATION DISPLAY DISPLAY
Zero Calibrate Supply Sensor 32° F (0° C) SC.L
Zero Calibrate Return Sensor 32° F (0° C) rC.L
Span Calibrate Supply Sensor 510° F (266° C) SC.H
Span Calibrate Return Sensor 510° F (266° C) rC.H
Continued on next page
Page 73

Press the up ▲▲key to begin calibrating.
The controller displays the name of the current calibration
(examples: 32 SC.L; 32 rC.L; 510 SC.H; or 510 rC.H).
Wait until the control displays “don” or “bad.”
A “don” message in the Setpoint display indicates the calibration was successful. A “bad” message in the Setpoint
display indicates a bad calibration.
Press Select to start the next calibration.
Pressing and releasing the Select key at the end of a
calibration tells the controller to perform the next calibration.
Exit Calibration Mode.
Press and hold the Select key for 3 seconds to exit the
Calibration Mode.
You can now proceed to the next test in Test Mode, or
disable Test Mode and resume normal operation.
CALIBRATING
TEMPERATURE
SENSORS
UGH015/0100 Thermolator TW-1 and TW-2
MAINTENANCE 5-11
6
7
NOTE: The original calibration value stored in
EEProm can be restored for the current calibration
by pressing the STOP key at any time.
8
TO DISABLE TEST MODE, complete steps 2
through 5 in “Performing System Tests”, setting dip
switch 6 to OFF instead of ON.
9
Page 74

You can see the total numbers of operation by accessing the
Total Operating Hours Log in Test Mode.
Enable Test Mode.
Press any key to display the first test menus.
Index through test menus to the operating log.
Press and hold the Setpoint key for 3 seconds to index
to each test menu until the Actual display indicates “Log”.
The Setpoint display indicates the total number of operating hours in 100-hour units.
Exit the Operating Hours Log.
Press and hold the Select key for 3 seconds to exit and
index to the next test.
You can now proceed to another menu in Test Mode, or
disable Test Mode and resume normal operation.
LOGGING OPERATING HOURS
Thermolator TW-1 and TW-2 UGH015/0100
5-12 MAINTENANCE
1
2
3
4
TO DISABLE TEST MODE, complete steps 2
through 5 in “Performing System Tests”, setting dip
switch 6 to OFF instead of ON.
Page 75

6-1
UGH015/0100 Thermolator TW-1 and TW-2
●●
Before beginning . . . . . . . . . . . .6-2
●●
A few words of caution . . . . . . .6-2
●●
Ho
w to identify the cause
of a pr
oblem . . . . . . . . . . . . . . .6-3
D
IAGNOSTICS
●●
Shut down alarms . . . . . . . . . . .6-4
●●
Warning alarms . . . . . . . . . . . . .6-8
●●
System alarms . . . . . . . . . . . . .6-11
●●
Thermolator will not power up .6-12
R
EPAIR
●●
Checking and replacing fuses .6-13
●●
Resetting overloads . . . . . . . . .6-14
●●
Replacing the pump overload .6-14
●●
Replacing the motherboard . . .6-15
●●
Replacing the heater
contactor . . . . . . . . . . . . . . . .6-16
●●
Checking and replacing
thermocouples . . . . . . . . . . .6-17
●●
Repairing solenoid valves . . . .6-18
●●
Replacing heater elements . . .6-20
●●
Removing the pump . . . . . . . . .6-22
●●
Disassembling and assemb
ling
3/4 - 2 HP pumps
. . . . . . . . . .6-23
●●
Disassembling and assemb
ling
3 - 7.5 HP pumps
. . . . . . . . . .6-24
TROUBLESHOOTING
Page 76

You can avoid most problems by following the recommended
installation, operation and maintenance procedures outlined in
this User Guide. If you do have a problem, this section will
help you determine what caused it and tell you how to fix it.
Before you begin troubleshooting:
❏ Find the wiring, plumbing and other diagrams
that were shipped with your equipment.
These
diagrams are the best reference for correcting a problem.
The diagrams also will note any custom features, such as
special wiring, control or plumbing options, not covered in
this User Guide.
❏ Verify that you have manuals for other equip-
ment in the process line.
Solving problems may
require troubleshooting malfunctions or incorrect operating
procedures on other pieces of equipment.
❏ If an alarm is present, note any indicator lights
and messages shown on the control panel.
These
indicators will help you discover the cause of the problem
more quickly.
The Thermolator is equipped with many safety devices. Do
not remove or defeat them. Improper corrective action can
lead to hazardous conditions, and should never be attempted
to sustain production.
Thermolator TW-1 and TW-2 UGH015/0100
6-2 TROUBLESHOOTING
B
EFORE
B
EGINNING
A FEW WORDS
OF
C
AUTION
WARNING: Hot surfaces and liquids
Allow the Thermolator to cool to below
100° F (38° C) before servicing the unit.
WARNING: This machines should be
adjusted and serviced only by qualified technical personnel who are familiar with construction and operation of this type of equipment.
DANGER: Voltage hazard.
Troubleshooting the electrical system of this
equipment requires use of precision electronic
measuring equipment, and may require access
to the electrical enclosure while power is on.
Exposure to potentially fatal voltage levels may
be unavoidable. These troubleshooting procedures should be performed only by qualified
electrical technicians who know how to use
this precision electronic equipment and who
understand the hazards involved.
Page 77

UGH015/0100 Thermolator TW-1 and TW-2
TROUBLESHOOTING 6-3
A status light
that turns from
green to red
indicates an
alarm condition.
Most Thermolator malfunctions are indicated by an illuminated alarm light and error codes displayed on the control panel.
A problem can trigger three types of alarms:
●●
Shut Down Alarms: The Thermolator detected a problem
that caused it to shut down automatically to prevent equipment damage or personal injury.
●●
Warning Alarms: The Thermolator continues to operate,
but warns of a problem that could lead to a condition that
will shut down the unit.
●●
System Errors: The system error codes indicate a non-
recoverable problem with the microprocessor control.
When the Thermolator control detects a problem, the red
Alarm light is activated and the RUN/STOP light changes
from green to flashing red.
When an Alarm condition occurs:
Press to silence any optional audible
alarm.
◆ The RUN/STOP light changes from flashing red to
steady red.
Note any indicator lights or error messages to
help determine the cause of the problem.
Find the alarm or error code in the diagnostics
tables
in the TROUBLESHOOTING section of this manual.
Press to clear the alarm and shut down
the Thermolator to correct the problem.
Press to resume normal operation after
the problem is corrected.
HOW TO IDENTIFY
THE
CAUSE OF A
P
ROBLEM
1
2
3
Stop
WARNING:
Disconnect and lockout
the main power source
before opening the
Thermolator or its electrical enclosure for servicing. Disconnect air and
water supply lines as
needed.
4
Run
Page 78

Thermolator TW-1 and TW-2 UGH015/0100
6-4 TROUBLESHOOTING
SHUT DOWN ALARMS
Alarm
The cooling water
pressure is less than
25 psi.
Note: The unit will
re-start automatically
after a two-second
delay if the water
pressure returns to at
least 25 psi.
The pump motor
overload has
tripped. The
contact is open.
WARNING:
Only qualified electrical service personnel
should examine and
correct problems that
require opening the
unit's electrical
enclosure or checking
electrical current to
diagnose the cause of
a problem.
Possible cause
Is the water supply pressure at least 25 psi?
Did the pressure switch
fail?
Did the cooling valve fail?
Is the correct voltage
supplied to the pump
motor?
Is the required water flow
greater than the pump’s
capacity?
Is the motor overload
faulty or set incorrectly?
Is the pump working
properly?
Solution
Verify that the water supply is
on and delivering water at a
pressure of at least 25 psi.
Check for closed valve or faulty
pump in the supply circuit.
Watch gauges while turning
cooling water on and off. If
pressure vents automatically,
check vent or cooling valve.
Check the cooling valve. See
Repairing Solenoid Valves or
the Motorized Cooling Valve
instructions.
Supply voltage should match
the rating on the pump name
plate. If voltage is correct,
check wiring connections.
❒
Review pump sizing
for the application.
❒
Decrease the water flow
from the process.
Disconnect the power and open
the electrical enclosure. Verify
that the overload is set to trip at
the proper amperage, which
should not exceed the FLA.
Manually trip and reset the
overload. If the problem continues, replace the overload. See
Resetting and Replacing
Overloads.
Replace the pump if supply
voltage, wiring and overload
settings are correct, but the
pump continues to draw excessive current.
The Thermolator has detected a problem that could lead to equipment damage or personal injury if it is not corrected.
◆ The Alarm LED lights and the STOP/RUN LED flashes red.
◆ The Thermolator automatically shuts down.
◆ The control displays a red LED or alarm code indicating the
source of the problem.
Low Water Pressure
Pump
Page 79

UGH015/0100 Thermolator TW-1 and TW-2
TROUBLESHOOTING 6-5
Alarm
The actual temperature of water
supplied to the
process exceeds the
260° F safety switch
limit.
WARNING:
Only qualified electrical service personnel
should examine and
correct problems that
require opening the
unit's electrical
enclosure or checking
electrical current to
diagnose the cause of
a problem.
The actual temperature of water
supplied to the
process exceeds the
programmed 260° F
safety limit.
WARNING:
Only qualified electrical service personnel
should examine and
correct problems that
require opening the
unit's electrical
enclosure or checking
electrical current to
diagnose the cause of
a problem.
Possible cause
Has water stopped flowing through the unit or
between the supply outlet
and return inlet?
Is the optional electromechanical safety switch
improperly set or
defective?
Has the heater contactor
failed?
Has water stopped flowing through the unit or
between the supply outlet
and return inlet?
Has the heater contactor
failed?
Solution
❒ Verify that the unit is run-
ning and that the pump is
working.
❒ Check for closed or defec-
tive cooling or vent valves
and plugged lines. See
Repairing Solenoid Valves.
Check the switch setting. A
too-low setting will cause
nuisance trips. Check the
switch and replace if defective.
See Checking and Replacing
Switches.
Replace the contactor if
defective. See Replacing
the Heater Contactor.
❒ Verify that the unit is run-
ning and that the pump is
working.
❒ Check for closed or defec-
tive cooling or vent valves
and plugged lines. See
Repairing Solenoid Valves.
Replace the contactor if
defective. See Replacing
the Heater Contactor.
High Temp. Safety
S
HUT DOWN
ALARMS
The Thermolator has detected a problem that could lead to equipment damage or personal injury if it is not corrected.
◆ The Alarm LED lights and the STOP/RUN LED flashes red.
◆ The Thermolator automatically shuts down.
◆ The control displays a red LED or alarm code indicating the
source of the problem.
SAF
Hi
Page 80

Thermolator TW-1 and TW-2 UGH015/0100
6-6 TROUBLESHOOTING
Alarm
Actual temperature
of water supplied to
the process is below
the programmed
20° F safety limit.
The thermocouple
in the process
return line failed.
The thermocouple
in the process
supply line failed.
Possible cause
Is the cooling valve stuck
open?
Has the heater failed?
Is the thermocouple
loose?
Has the thermocouple
failed?
Is the thermocouple
loose?
Has the thermocouple
failed?
Solution
Disassemble the cooling valve
and check for particles blocking the valve seat. Check the
valve seat for excessive wear.
Replace parts as required using
a valve repair kit. See
Repairing Solenoid Valves.
Check for a bad heating
element, or a heater contactor
that failed in the open position.
See Replacing the Heater
Contactor and Replacing
Heater Elements.
Check for a loose thermocouple or loose wire connections
to the thermocouple.
Check the thermocouple and
replace if necessary. See
Checking and Replacing
Thermocouples.
Check for a loose thermocouple or loose wire connections
to the thermocouple.
Check the thermocouple and
replace if necessary. See
Checking and Replacing
Thermocouples.
SAF
Lo
Err
Pbr
SHUT DOWN
ALARMS
The Thermolator has detected a problem that could lead to equipment damage or personal injury if it is not corrected.
◆ The Alarm LED lights and the STOP/RUN LED flashes red.
◆ The Thermolator automatically shuts down.
◆ The control displays a red LED or alarm code indicating the
source of the problem.
Err
PbS
Page 81

UGH015/0100 Thermolator TW-1 and TW-2
TROUBLESHOOTING 6-7
SHUT DOWN
ALARMS
The Thermolator has detected a problem that could lead to equipment damage or personal injury if it is not corrected.
◆ The Alarm LED lights and the STOP/RUN LED flashes red.
◆ The Thermolator automatically shuts down.
◆ The control displays a red LED or alarm code indicating the
source of the problem..
Alarm
The incoming
power is out of
phase. A leg may
have failed or is
disconnected.
NOTE: This alarm
is available only on
TW-2 models.
Pump fuse.
Heater fuse.
Cooling valve fuse.
Vent valve fuse.
Purge valve fuse.
Possible cause
Is the pump rotating in
the wrong direction?
Has one of the main supply wire leads become
disconnected?
Has the indicated device
blown a fuse?
Is the correct device
being used for this fuse
location?
Has the motherboard
output channel at the
designated fuse failed?
Solution
Check pump rotation against
the arrow stamped on the
pump. If the pump is rotating
in the wrong direction, disconnect and lockout the main
power source. Open the electrical enclosure, and reverse
any two leads on the power
connection.
Disconnect power and open
the electrical enclosure. Check
for loose connections in main
supply and on motherboard.
Disconnect and lockout the
main power. Open the electrical enclosure. Check for loose
wires and incorrectly installed
jumpers or terminal blocks
associated with the fuse error.
Replace the fuse, if necessary.
See Checking and Replacing
Fuses.
Replace the fuse, then enter
Test Mode. Turn off the Output
Monitor associated with the
fuse location and test outputs.
See Performing System Tests
and Disabling or Enabling
Output Monitors in the
M
AINTENANCE
section.
Replace the motherboard. See
Checking and Replacing the
Motherboard.
Err
PHS
002
FUS
003
FUS
004
FUS
005
FUS
006
FUS
Page 82

Thermolator TW-1 and TW-2 UGH015/0100
6-8 TROUBLESHOOTING
WARNING
A
LARMS
Alarm
The Thermolator
will not heat to the
setpoint temperature,
or takes too long to
reach the setpoint
temperature. The
actual temperature of
fluid supplied to the
process is lower than
the setpoint deviation allows.
WARNING:
The Thermolator should
be tested and repaired
only by qualified technicians equipped with the
correct tools and trained
in the maintenance and
repair of electrical systems and industrial
appliances.
Possible cause
Is the cooling valve stuck
open or leaking water?
Did a heater element fail?
Did a heater contactor
fail?
Is the low deviation temperature set too low?
Is the Thermolator correctly sized for the application?
Solution
Disassemble the cooling valve
and check for particles blocking the valve seat. Check the
valve seat for excessive wear.
Replace as required using a
valve repair kit. See Repairing
Solenoid Valves.
With the unit powered down:
Check for loose connections.
Check resistance between the
phase legs on the output side
of the heater contactor.
Readings should be within
0.25 ohms of each other.
Replace the heater, if necessary. See Replacing Heater
Elements.
With power on and the
Heater LED lit: Check the
amp draw on each of the three
phase legs to the heater. All
should match the FLA listed
for the heater on the unit
nameplate. Replace the heater
contactor if there is a voltage
imbalance greater than 10%.
See Replacing the Heater
Contactor.
Increase the low deviation setting. The recommended setting
is 2° F to 10° F below the
process setpoint.
Review specifications and
selection guidelines that apply
to heater and pump sizes in
temperature control units.
Low Deviation
The Thermolator has detected a problem that could lead to a shut
down condition if it is not corrected.
◆ The Alarm LED lights.
◆ The Thermolator continues operating.
◆ The control displays a red LED or alarm code indicating the
source of the problem.
Page 83

UGH015/0100 Thermolator TW-1 and TW-2
TROUBLESHOOTING 6-9
WARNING
ALARMS
Alarm
The Thermolator
will not cool down,
or takes too long to
cool down. The actual temperature of
fluid supplied to the
process is higher
than the setpoint
deviation allows.
WARNING:
The Thermolator should
be tested and repaired
only by qualified technicians equipped with the
correct tools and trained
in the maintenance and
repair of electrical systems and industrial
appliances.
Possible cause
Has water stopped flowing between supply outlet
and return inlet?
Did the cooling valve fail?
Is the temperature difference between the cooling
water supply and the setpoint too small?
Did a heater contactor
fail?
Is the cooling valve the
wrong size?
Is the high deviation temperature set too low?
Solution
Check for a plugged pipe or
closed valve.
Check the cooling valve. See
Repairing Solenoid Valves or
the Motorized Cooling Valve
instructions.
The temperature difference
should be at least 25° F to
achieve proper cooling. Increase
the process setpoint, decrease
the cooling water supply temperature. or increase cooling
water supply pressure.
With power on and the Heater
LED lit: Check the amp draw
on each of the three phase legs
to the heater. All should match
the FLA listed for the heater on
the unit nameplate. Replace the
heater contactor if there is a
voltage imbalance greater than
10%. See Replacing the Heater
Contactor.
Check the cooling load (Btu/hr)
for which the valve was specified.
Increase the high deviation setpoint. The recommended setting
is the setpoint + 2° F to 10° F .
High Deviation
The Thermolator has detected a problem that could lead to a shut
down condition if it is not corrected.
◆ The Alarm LED lights.
◆ The Thermolator continues operating.
◆ The control displays a red LED or alarm code indicating the
source of the problem.
Page 84

WARNING
ALARMS
Thermolator TW-1 and TW-2 UGH015/0100
6-10 TROUBLESHOOTING
The Thermolator has detected a problem that could lead to a shut
down condition if it is not corrected.
◆ The Alarm LED lights.
◆ The Thermolator continues operating.
◆ The control displays a red LED or alarm code indicating the
source of the problem.
Alarm
The SPI communication link has failed.
Possible cause
Is the unit connected to a
host machine?
Are the network address
and baud rate correct?
Is something wrong with
the cable?
Solution
If the Thermolator is not connected to a host device, set the
SPI address to OFF using the
Setpoint adjustment buttons on
the control panel.
❒ Check the network address.
The address may be set to
any number from 32 to 254
(a hexadecimal integer
between 20 and FE), as long
as that number has not been
assigned to another machine
connected to the same network.
❒ Make sure the baud rate
(9600, 4800, 2400, or 1200)
matches the host machine.
Check the communication
cable condition and connections. The cable must conform
to SPI standards. Check for
loose connections on the
motherboard.
SPI Communication
Page 85

SYSTEM
ALARMS
UGH015/0100 Thermolator TW-1 and TW-2
TROUBLESHOOTING 6-11
Alarm
RAM hardware
failure.
ROM, checksum
failure.
COP failures.
Illegal Opcode.
through
Software cannot
write to CPU nonvolatile memory.
Cause
Electrical noise or failed
CPU on the motherboard
caused system write tests
do fail during power up.
The CPU and/or PROM
chip (U1 or U2) is not
making good contact with
its socket, or the PROM
chip has failed.
A failed CPU, failed motherboard, software bug or
electrical noise caused an
internal software error.
The CPU tried to execute
an illegal software instruction due to electrical noise
or a failed motherboard.
A failed CPU, failed motherboard, software bug or
electrical noise caused an
internal software error.
The memory has exceeded
its usable life or there is a
software bug. This error
occurs only after changes
have been made to nonvolatile memory either
through the operator panel
or SPI.
Solution
Make sure all connections on
the motherboard are solid.
Operate unit in a noise free
environment. If error persists,
contact Conair service.
Make sure the CPU and PROM
chips are seated correctly in the
sockets. If error persists, contact
Conair service.
Cycle power to the unit. If the
problem persists, contact Conair
service technicians. You may
need to replace the motherboard.
Make sure all connections to
the motherboard are solid and
that the unit is operating in a
noise free environment. If error
persists, contact Conair service.
Cycle power to the unit. If the
problem persists, contact Conair
service technicians. You may
need to replace the motherboard.
Cycle power to the unit.
Contact Conair service if an
operating parameter such as the
setpoint is not being saved or if
this error persists.
The Thermolator has detected a non-recoverable error involving he microprocessor control.
◆ The Alarm LED lights and the STOP/RUN LED flashes red.
◆ The Thermolator shuts down or will not start.
◆ The control displays an error code indicating the source of
the problem.
001
ERR
003
ERR
002
ERR
004
ERR
006
ERR
005
ERR
015
ERR
014
ERR
016
ERR
Page 86

Thermolator TW-1 and TW-2 UGH015/0100
6-12 TROUBLESHOOTING
THERMOLATOR WILL NOT POWER UP
If you apply power to the Thermolator and the control panel does
not light, you have a problem with the main power circuit or the
unit’s microprocessor board.
WARNING: Electrical Shock Hazard
Disconnect and lockout the main power supply
before proceeding.
Symptom
Applying power
does not turn on
the Thermolator or
light the control
panel.
The control panel is
lit, but the
Thermolator will
not operate when
RUN is pressed.
Possible cause
Is power reaching the
Thermolator?
Has the unit blown a
fuse?
Is the correct voltage
reaching the
Thermolator?
Is the unit in Test Mode?
Solution
❒ Verify that the main power
supply and any customerinstalled electrical disconnect or emergency stop
devices are in the ON position.
❒ Verify correct electrical con-
nections between the unit
and the control, and
between the unit and the
power supply. Replace any
damaged wires or cables.
Check Fuse 1 on the motherboard and any fuses or breakers
associated with customerinstalled disconnect devices.
Replace or reset as required.
Identify the cause of the ground
fault and correct it. See Check-
ing and Replacing Fuses.
Check the electrical requirements on the unit nameplate.
Verify correct main supply
voltage to the unit and the secondary voltage supply from the
transformer to unit components. Replace the transformer,
if necessary.
If the Test Mode LED is lit,
you must disable Test Mode on
the motherboard before resuming operation. See Performing
System Tests in the
M
AINTENANCE
section.
Page 87

UGH015/0100 Thermolator TW-1 and TW-2
TROUBLESHOOTING 6-13
CHECKING AND REPLACING FUSES
IMPORTANT:
Always
refer to the wiring diagrams that came with
your Thermolator to
locate specific electrical
components. Illustrations
in the User Guide are
intended to be representative only.
This procedure covers the factory-installed fuses on the unit’s
motherboard. If you have installed an electrical disconnect or
emergency stop switch, additional fuses and/or breakers may
have been used elsewhere in the in the main power circuit.
To replace a blown fuse:
Disconnect and lockout the main power.
Open the electrical enclosure door.
Turn the screw
on the front panel counterclockwise to open.
Replace the fuse. The fuses are located on the mother-
board and are labeled and identified on the orange shield.
Close the electrical enclosure and restart the unit.
If fuses continue to fail:
❒ Verify that the unit is receiving the correct voltage.
Check the voltage, phasing and amperage ratings on
the unit’s nameplate.
❒ Verify that the unit’s transformer is operating correctly.
Check for proper voltage (120V 10%) to the voltage
sensing device for the fuse location.
❒ Check all wiring referencing the fusing location for
loose connections, damage or improper grounding.
Verify that the correct device is being used for this fuse
location. See Disabling or Enabling Output
Monitors in the
M
AINTENANCE
section.
1
2
3
4
Fuse 1
Control
power
Fuse 5
Vent valve
Fuse 4
Cooling valve
Fuse 2
Pump
Fuse 3
Heater
Fuse 6
Purge valve
WARNING:
Shock Hazard
Only qualified service
personnel familiar with
electrical testing and
industrial equipment
should examine and
correct problems that
require opening the
unit with power on to
diagnose the cause of
a problem.
432
AUTOSTART
78
1
HPS/LPS
OPS
OPS
FSTAT
HPS/LPS
1 23456
(-2) CONTROL
OPER PNL CABLE
1
FSTAT
UNLDR 1/ VENT 2 SOL +
UNLDR 1/ VENT 2 SOL
UNLDR 2/ COOL 1 SOL +
UNLDR 2/ COOL 1 SOL
LLS/PURGE 3SOL
LLS/PURGE 3SOL +
TCPL'S
SUP RET
Y
65432
F1
LLS/WPS
LLS/WPS
AC IN 4
AUTOSTART
AC IN + 3
AC OUT 2
AC OUT + 1
OFF
ON
CONFIGURATION
DIP SWITCH
+ 120 Ohm
+ TR
TR
GND
GND
+ TR
TR
120 Ohm
1 2 3 4 5 6 7 8 1 2 3 4
L1
L2
3 PHASE INPUT
F5
F4
PUMP OL
PUMP OL
F2
PMP AUX
PMP AUX
1FS/ COMP AUX
1FS/ COMP AUX
PUMPDOWN
PUMPDOWN
HEAT/COMP
HEAT/COMP
HTS/COMP OL
HTS/COMP OL
F3
ALARM
PURGE 4SOL
PURGE 4 SOL +
Y
R
R
PUMP
PUMP
110V
L3
4
3
2
1
4
3
2
1
6
5
4
3
2
1
4
3
2
1
6
N
5
C
4
NC
NO
C
F6
3
2
1
4
3
2
1
Page 88

Disconnect and lockout the main power.
Open the electrical enclosure door.
Turn the screw
on the front panel counterclockwise to open.
Locate the pump overload module attached
to the pump motor starter.
Disconnect the three power leads from the over-
load module to the pump motor. Note the placement of
each lead and label as needed.
Disconnect auxiliary wiring on
the overload module.
Remove the overload module.
Loosen the three screws that connect
the overload module to the motor contactor. Pull the overload module down
to release it from the starter.
Reverse these steps to install
the new overload module.
Set the module reset mode to
M for manual.
Set the proper FLA trip point.
Do not exceed the FLA for the pump
motor.
Thermolator TW-1 and TW-2 UGH015/0100
6-14 TROUBLESHOOTING
RESETTING OVERLOADS
8
9
The pump motor overload is located inside the unit’s electrical enclosure.
Disconnect and lockout the main power.
Open the electrical enclosure door.
Turn the
screw on the front panel counterclockwise to open.
Check the overload.
If the yellow button is out, the
overload has tripped. Press the
blue button to reset the overload.
Verify that the overload trip point
does not exceed the FLA for the
pump.
1
2
3
Motor contactor
Motor overload
REPLACING THE PUMP OVERLOAD
1
2
3
4
5
6
7
Page 89

UGH015/0100 Thermolator TW-1 and TW-2
TROUBLESHOOTING 6-15
REPLACING THE MOTHERBOARD
IMPORTANT:
Always
refer to the wiring diagrams that came with
your Thermolator to locate
specific electrical components. Illustrations in the
User Guide are intended
to be representative only.
Disconnect and lockout the main power supply.
Open the electrical enclosure door.
Turn the screw
on the front panel counterclockwise to open.
Mark or label each wire
connected to the motherboard.
The orange shield is
labeled with the connection
information. You must label the
wires to ensure they are connected to the correct terminals
on the new motherboard.
Disconnect the wires
from the motherboard by
pulling the terminal
blocks up.
Loosen the screws holding the orange shield.
Remove the motherboard and shield
from the
electrical enclosure as a unit.
Remove the motherboard from the shield
and replace with the new
motherboard.
Reattach the shield and
new motherboard
in the
electrical enclosure. Tighten
the screws.
Reconnect the terminal
blocks and wires to the
new board.
Make sure you align the terminal blocks with the correct
pins on the board. Push the terminal blocks onto the pins,
taking care not to bend any pins.
Set dip switches 7 and 8 to the correct unit type.
Set ON for DI and CC models; set off for IC models.
Program output monitors on the new board.
See Disabling or Enabling Output Monitors in the
M
AINTENANCE
section.
1
2
3
4
5
6
7
8
9
10
11
432
1
65432
1
AC IN 4
AC IN + 3
AC OUT 2
F1
AC OUT + 1
LLS/WPS
LLS/WPS
OPS
OPS
FSTAT
FSTAT
HPS/LPS
HPS/LPS
AUTOSTART
AUTOSTART
OFF
1 23456
78
ON
CONFIGURATION
DIP SWITCH
+ 120 Ohm
1 2 3 4 5 6 7 8 1 2 3 4
+ TR
AC IN 4
TR
AC IN + 3
GND
GND
AC OUT 2
AC OUT + 1
(-2) CONTROL
OPER PNL CABLE
+ TR
TR
120 Ohm
65432
OPS
LLS/WPS
LLS/WPS
OPS
HPS/LPS
HPS/LPS
AUTOSTART
AUTOSTART
F1
OFF
ON
CONFIGURATION
DIP SWITCH
1 23456
(-2) CONTROL
+ 120 Ohm
+ TR
TR
OPER PNL CABLE
GND
GND
+ TR
TR
120 Ohm
1 2 3 4 5 6 7 8 1 2 3 4
L1
3 PHASE INPUT
F5
UNLDR 1/ VENT 2 SOL +
UNLDR 1/ VENT 2 SOL
UNLDR 2/ COOL 1 SOL +
UNLDR 2/ COOL 1 SOL
F4
F2
1FS/ COMP AUX
1FS/ COMP AUX
PUMPDOWN
PUMPDOWN
HEAT/COMP
HEAT/COMP
HTS/COMP OL
HTS/COMP OL
F3
ALARM
LLS/PURGE 3SOL
LLS/PURGE 3SOL +
PURGE 4SOL
PURGE 4 SOL +
TCPL'S
SUP RET
Y
Y
R
R
432
1
FSTAT
FSTAT
UNLDR 1/ VENT 2 SOL +
UNLDR 1/ VENT 2 SOL
UNLDR 2/ COOL 1 SOL +
UNLDR 2/ COOL 1 SOL
78
L2
L3
PUMP
PUMP
PUMP OL
PUMP OL
PMP AUX
PMP AUX
N
C
NC
NO
C
110V
F6
1
L1
3 PHASE INPUT
F5
F4
F2
1FS/ COMP AUX
1FS/ COMP AUX
PUMPDOWN
PUMPDOWN
HEAT/COMP
HEAT/COMP
HTS/COMP OL
HTS/COMP OL
F3
ALARM
LLS/PURGE 3SOL
LLS/PURGE 3SOL +
PURGE 4SOL
PURGE 4 SOL +
TCPL'S
SUP RET
Y
Y
R
R
4
3
2
1
4
3
2
1
6
5
4
3
2
1
4
3
2
1
6
5
4
3
2
1
4
3
2
1
L2
PUMP OL
PUMP OL
PMP AUX
PMP AUX
L3
4
3
2
1
4
PUMP
PUMP
110V
N
C
NC
NO
C
F6
3
2
1
6
5
4
3
2
1
4
3
2
1
6
5
4
3
2
1
4
3
2
1
Page 90

Thermolators use mercury displacement heater contactors.
The heater contactors should be replaced if:
● You have checked the amp draw on each of the three-phase
legs and discovered a voltage imbalance greater than 10%.
● You have checked the continuity and found that ohms at
the coil equal zero.
To replace the heater contactor:
Disconnect and lockout the main power.
Open the electrical enclosure door.
Turn the
screw on the front panel counterclockwise to open.
Disconnect the wires from the heater contactor
contactor.
Make sure you label the wires to ensure you
can connect them correctly to the new contactor.
Remove the contactor
by removing the screws that
hold it in place.
Discard the old contactor using the proper
disposal procedure.
See
Material Safety Data Sheet
#7439-97 in the
A
PPENDIX
.
Reverse this procedure
to install the new contactor.
Make sure the wires
are connected correctly
.
Thermolator TW-1 and TW-2 UGH015/0100
6-16 TROUBLESHOOTING
1
2
3
4
5
WARNING: Hazardous Substance
Thermolators use mercury displacement contactors. Mercury is considered a hazardous substance
and must be dealt with accordingly. See Material
Safety Data Sheet #7439-97-6 for information on
the how to avoid the potential hazards and how to
clean up and dispose of mercury if it spills.
IMPORTANT:
Always
refer to the wiring diagrams that came with
your Thermolator to
locate specific electrical
components. Illustrations
in the User Guide are
intended to be representative only.
WARNING:
Electrical Shock Hazard
Only qualified service personnel who have been
trained on electrical testing and the procedures for
avoiding the hazards should diagnose or correct problems that require opening the unit with power on.
6
REPLACING THE HEATER CONTACTOR
Heater contactor
Page 91

UGH015/0100 Thermolator TW-1 and TW-2
TROUBLESHOOTING 6-17
The Thermolator uses two type ‘K’ thermocouples
to monitor supply and return process temperatures. One thermocouple is installed in the wall of the heater tank at the “to
process” outlet. The other thermocouple is installed in the wall
of the cooling tank at the “from process” inlet.
To check a thermocouple after a probe error:
Disconnect and lockout the main power.
Open the electrical enclosure door.
Turn the screw
on the front panel counterclockwise to open.
Unplug the appropriate thermocouple from the
motherboard and install a jumper on the leads.
Refer to the wiring diagrams that came with your unit.
Restart the Thermolator.
◆ If error message disappears, replace the thermocouple.
◆ If error message does not disappear, replace the mother-
board. See Replacing the Motherboard.
To replace a thermocouple:
Disconnect and lockout the main power.
Shut off the cooling water infeed and drain the
unit.
Drain all water using the drain plugs located the
bottom of the unit.
Remove the unit’s top panel
and open the electrical enclosure
Remove the thermocouple.
Loosen the compression nut to slide
the thermocouple out of the casing.
Disconnect the thermocouple wires
at the motherboard.
Install the new thermocouple.
Insert the tip of the new thermocouple at least 1 inch into the tank.
tighten the compression nut. Thread
the leads through the raceway leading to the electrical enclosure. Attach
the thermocouple leads to the motherboard.
1
2
3
4
CHECKING THERMOCOUPLES
1
2
3
4
5
REPLACING THERMOCOUPLES
Thermocouple
Nut
WARNING:
Hot surfaces
Allow the Thermolator
to cool to below 100° F
(38° C) before servicing
the unit.
Page 92

Thermolator TW-1 and TW-2 UGH015/0100
6-18 TROUBLESHOOTING
Every Thermolator has a solenoid valve assembly that controls
the cooling water out flow. Closed circuit (CC) and Isolated
Circuit (IC or TCC) units also have a vent valve assembly.
Solenoid valves also are found on the optional purge valve.
Shut off the cooling
water infeed.
Drain the unit of all
water
through the
draing plugs in the rear
of the unit.
Remove the cooling
water out feed.
For
closed and isolated circuit models, also remove
the cooling water in feed.
Disconnect and lockout main power.
Remove the top and
side panels of the
Thermolator.
Lift the
top panel straight up, then
lift the side panels up.
Remove the solenoid
valve from the cooling water out line.
Disassemble the solenoid valve.
(See exploded views on next page.)
Inspect and clean or repair the valve body
assembly.
Remove foreign particles and replace dam-
aged parts as necessary.
REPAIRING SOLENOID VALVES
Drain
plugs
Cooling
water in
1
2
3
4
5
WARNING:
Electrical shock and
hot surface hazards
Before attempting maintenance of any kind
on the Thermolator, you must stop the unit;
disconnect and lockout the main power supply;
and allow the unit to cool to 100° F (38° C)
DIRECT INJECTION
CLOSED CIRCUIT
ISOLATED CIRCUIT
Cooling water out
Cooling water out
Cooling water in
6
7
8
Page 93

UGH015/0100 Thermolator TW-1 and TW-2
TROUBLESHOOTING 6-19
Reassemble the valve and other components.
Reassemble in reverse order. Seal all pipe fittings
with pipe sealant. Check that all flows are in the correct
direction. Check for leaks before resuming operation.
R
EPAIRING
S
OLENOID
VALVES
Nameplate
Cover*
Yo k e *
Housing*
7/8" Dia. Hole
for 1/2" Conduit
Solenoid Base
Sub-Assembly
0.9375-26 UNS-2A
Thread
Core (AC)
Tapped Hole in Core
0.250-28 UNF-2B
0.38 Minimum Full Thread
or
Retaining Clip*
Retaining Cap*
Sleeve*
Grounding Wire
(Not present on all constructions)
Insulating Washer
Sleeve*
Spring
Washer
*
Housing*
with Nameplate*
*Indicates Parts Supplied
in Solenoid Enclosure Kit
Alternate Construction with
Nameplate on Housing
Coil
Insulating Washer
9
*Indicates Parts Supplied
in Solenoid Enclosure Kit
Cover*
Yo k e *
7/8" Dia. Hole
for 1/2" Conduit
Solenoid Base
Sub-Assembly
0.9375-26 UNS-2A
Thread
Core (AC)
Tapped Hole in Core
0.250-28 UNF-2B
0.38 Minimum Full Thread
or
Retaining Clip*
Sleeve*
Grounding Wire
(Not present on all constructions)
Sleeve*
Coil
Page 94

Thermolator TW-1 and TW-2 UGH015/0100
6-20 TROUBLESHOOTING
Disconnect and lockout the main power.
Remove the top panel of the Thermolator.
Remove the heater cap.
Use a 1/4-inch open-end
wrench to remove the three
bolts that hold the cap to the
heater tank.
Remove the heater
wiring harness.
Label the wiring layout of the
heater terminals; wires are
labeled 2T1, 2T2, 2T3 and
GND.
The wiring layout will be one of the following:
Then unscrew the locking screws on the wiring harness
and remove the wires.
Shut off the cooling water infeed.
Drain the Thermolator using the drain plugs
located at the rear of the unit.
Remove the four bolts that hold the heater element in place.
Use a 15/16-inch socket with 1/2-inch
drive.
1
2
3
4
5
6
WARNING:
Electrical shock and
hot surface hazards
Before attempting maintenance of any kind
on the Thermolator, you must stop the unit;
disconnect and lockout the main power
supply; and allow the unit to cool to less than
100° F (38° C)
REPLACING HEATER ELEMENTS
IMPORTANT:
Always
refer to the wiring diagrams that came with
your Thermolator to
locate specific electrical
components. Illustrations
in the User Guide are
intended to be representative only.
HEATER TERMINAL CONNECTIONS
Heater
cap
7
Continued on next page
Parallel Delta
230/3/60
2T2
GND
GND
2T1
2T3
Series Delta
460/3/60
2T2
2T1
2T3
Page 95

UGH015/0100 Thermolator TW-1 and TW-2
TROUBLESHOOTING 6-21
Lift the heating element out of the heater tube.
Lift the element straight up.
Replace the heater gasket if it is worn or cracked.
Use a high termpertaure Teflon paste to ensure a good
seal.
Reverse these steps to install the new heater
element and reassemble the unit.
REPLACING
HEATER
ELEMENTS
Heater cap
Heater element
Heater gasket
8
9
10
Page 96

Disconnect and lockout the main power.
Shut off the cooling water in feed.
Drain the unit of
all fluid.
Remove
the drain plugs at the
rear of the unit
.
Remove the top
and side panels of
the Thermolator.
Remove the seal flush
line.
Use a 1/2-inch open-end
wrench to remove the vent
line from the connection on
the pump adapter.
Remove the pump
assembly bolts.
Use a
9/16-inch open-end box
wrench to remove the bolts
holding the pump to the
volute case. The bolt in the rear
will require a 9/16-inch crows
foot wrench.
Lift the pump assembly
straight up to remove.
The pump can now be replaced
or disassembled for repair.
Reverse the steps to
reassemble the unit.
NOTE:
Before restarting, close all drain openings using
sealant on the threads and reprime the pump. Do not start
until the pump is completely filled with water.
Thermolator TW-1 and TW-2 UGH015/0100
6-22 TROUBLESHOOTING
REMOVING
THE
PUMP
1
2
3
4
5
6
7
8
Drain
plugs
Cooling
water in
DIRECT INJECTION
CLOSED CIRCUIT
ISOLATED CIRCUIT
Cooling water out
Cooling water out
Cooling water in
WARNING:
Electrical shock and
hot surface hazards
Before attempting maintenance of any kind
on the Thermolator, you must stop the unit;
disconnect and lockout the main power
supply; and allow the unit to cool to less than
100° F (38° C)
Pump seal flush line
Pump
assembly
bolts
Page 97

To replace a failed seal, you must disassemble the pump.
Remove the impeller nut. Insert a screwdriver in one
of the impeller waterway passages and back off the
impeller nut.
Remove the impeller. Insert a screwdriver in the slot
of the motor shaft. Unscrew the impeller while holding the
shaft against the rotation.
Remove the seal, gasket case, adapter and
flinger.
See the exploded view for detail.
Clean the gasket and flange faces, seal seat cavity and shaft.
The shaft shoulder that fits against the
impeller must be clean.
Replace the flinger. Lubricate the seal seat cavity of
the adapter and the flinger with soapy water solution
before pressing the flinger squarely into the cavity. Do not
chip or scratch the lapped seat face.
Remount the adapter to the motor. Make sure the
motor shaft does not dislocate or chip the seat of the seal.
Replace the remaining seal components. Apply a
soapy water solution to the motor shaft and the rubber bellows of the rotating seal. Be sure the rotating seal face
stays in the holding collar during installation. Do not chip
or scratch the lapped seat faces.
Reassemble the remaining components, holding
the shaft against rotation as previously described. Remove
any burrs caused by the screwdriver on the impeller.
Reattach the pump to the volute case. Make sure
you replace any damaged gasket or O-ring between the
pump assembly and volute case. Check for free rotation
after assembly is completed.
DISASSEMBLING
AND
ASSEMBLING
3
/4- 2 HP PUMPS
UGH015/0100 Thermolator TW-1 and TW-2
TROUBLESHOOTING 6-23
Pump motor
Flinger*
Pump adapter
Gasket, case*
Seal*
Impeller
D washer*
Impeller nut*
*Indicates Parts Supplied
in the Seal Repair Kit
1
2
3
4
NOTE:
Before restarting,
close all drain openings using
sealant on the threads and
refill the unit with fluid. Do not
start the the pump when the
unit is dry.
5
6
7
8
9
Page 98

To replace a failed seal, you must disassemble the pump.
Remove the impeller retaining assembly. Insert a
screwdriver in one of the impeller waterway passages to
hold the impeller steady while removing the retainer.
Remove the impeller. Be careful not to lose the key,
spring and seal retainer. If the impeller is difficult to
remove, you may need to use a bearing puller.
Remove the seal, adapter, shaft and flinger. See
the exploded view for detail.
Clean the gasket and flange faces, seal seat cavity, shaft sleeve and motor shaft.
Replace the shaft
sleeve if it is damaged or worn.
Replace the flinger. Lubricate the seal seat cavity of
the adapter and the flinger with soapy water solution
before pressing the flinger squarely into the cavity. Do not
chip or scratch the lapped seat face.
Remount the adapter to the motor. Make sure the
motor shaft does not dislocate or chip the seat of the seal.
Replace the remaining seal components. Apply a
soapy water solution to the motor shaft and the rubber bellows of the rotating seal. Slide the rotating member of the
seal over the shaft sleeve. Replace the seal spring and seal
retainer, making sure the rotating seal face stays in the
holding collar during installation. Do not chip or scratch
the lapped seat faces.
Place the key in the key seat and slide the
impeller on the shaft.
Replace the impeller retaining
nut. Remove any burrs caused by the screwdriver on the
impeller.
Thermolator TW-1 and TW-2 UGH015/0100
6-24 TROUBLESHOOTING
1
2
3
Pump motor
Flinger*
Pump adapter
Gasket, case*
Seal*
Impeller
O-ring, shaft*
Impeller
retainer*
*Indicates Parts Supplied
in Repair Kit
Shaft* sleeve
Seal
retainer*
Key*
Wear ring
DISASSEMBLING
AND
ASSEMBLING
3 - 7.5 HP PUMPS
4
5
6
7
8
Continued on next page
Page 99

UGH015/0100 Thermolator TW-1 and TW-2
TROUBLESHOOTING 6-25
Reattach the pump to
the volute case.
Make
sure you replace any damaged gasket or O-ring
between the pump assembly
and volute case. Check for
free rotation after assembly is
completed.
NOTE:
Before restarting, close all drain openings using
sealant on the threads and and refill the unit with fluid.
Do not start the the pump when the unit is dry.
DISASSEMBLING
AND
ASSEMBLING
3 - 7.5 HP PUMPS
9
Page 100

 Loading...