

Page 1
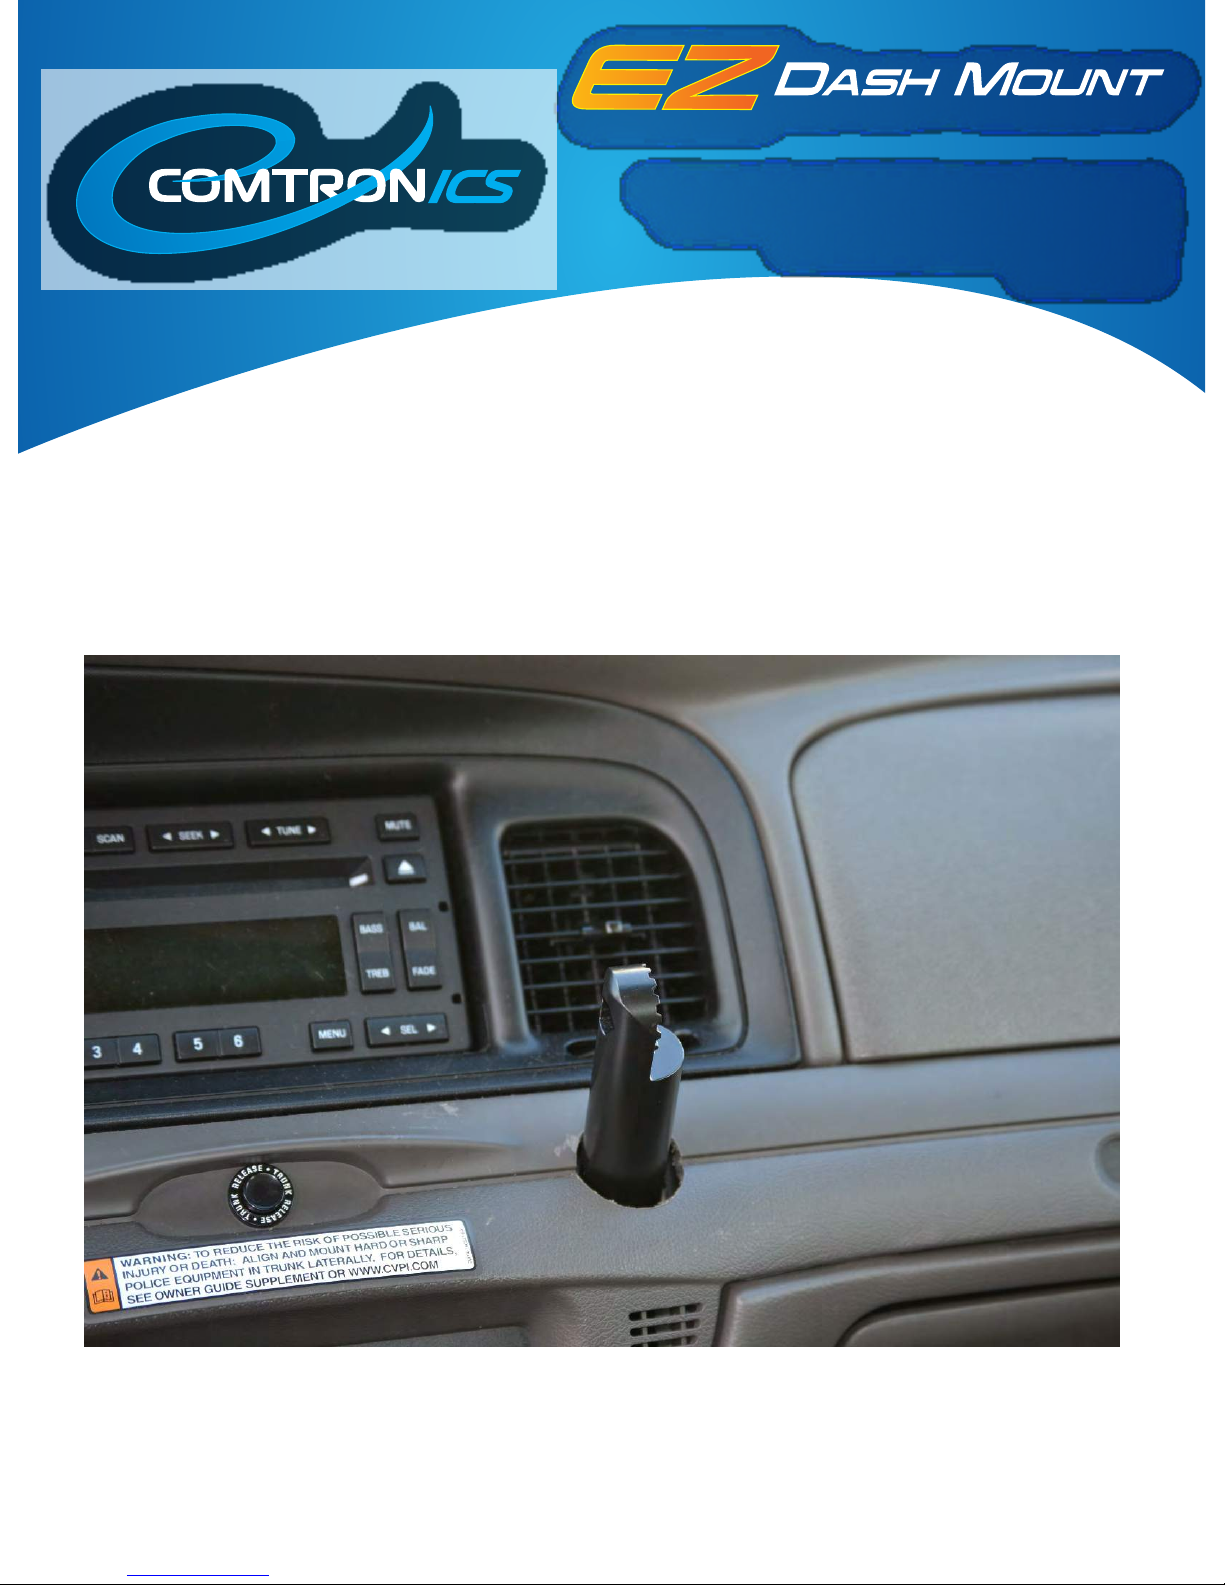
246559 - Center Dash Shelf Mount
Ford Crown Victoria Police Interceptor 1995-2012
Installaon Instrucons
ComtronICS CobaltAV | 2350 Fortune Drive, Lexington KY 40509
USTF: 1.800.264.6021 | PH: 859.299.9494 | FAX: 859.299.9334
Email: [email protected] | www.comtronicsnow.com
©2015 ComtronICS Cobalt AV. All rights reserved.
With ComtronICS’ new EZ Dash Mount, your tablet is securely
mounted on the vehicle’s dash, adjusts for mulple viewing
posions, and frees up valuable space in your
vehicle’s interior.
By ProClip USA
Page 2
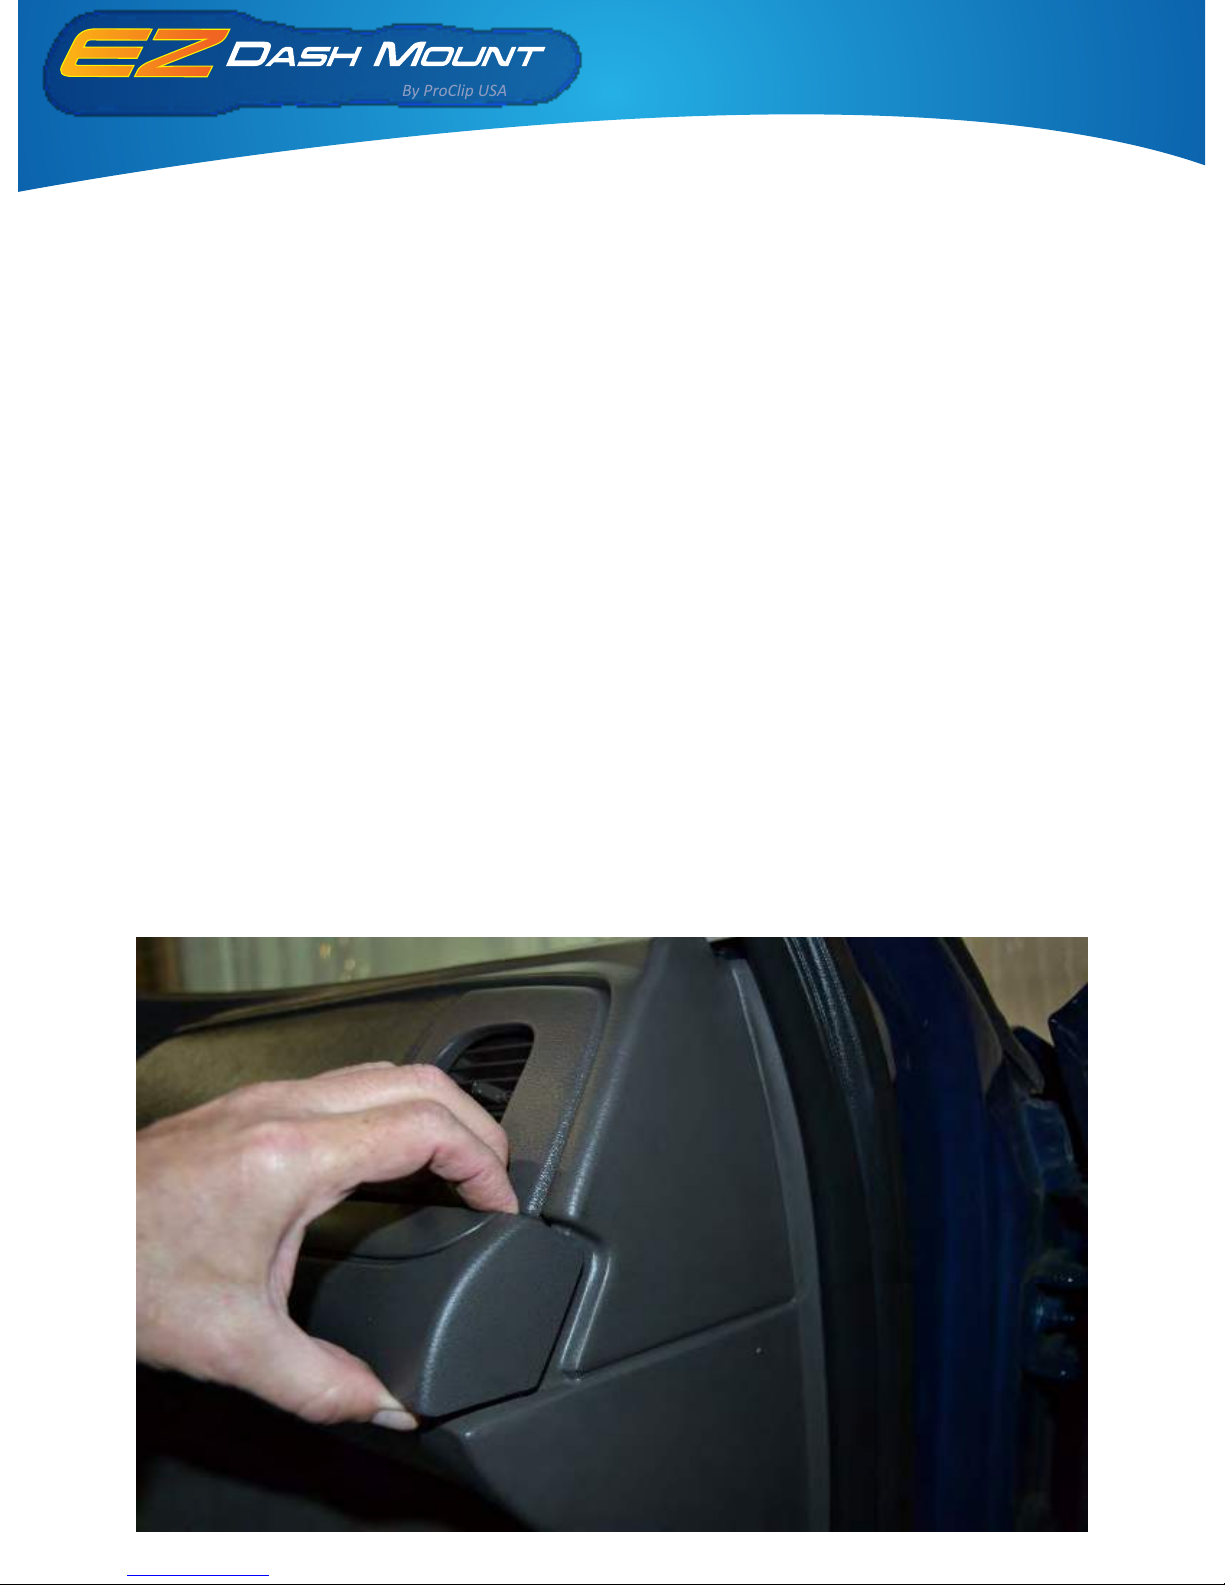
1. Remove the front panel that the trunk release buon is located on.
2. Start at the right side and work your way le. Unplug the trunk release wires to completely
remove the panel. Set the panel aside.
Ford Crown Victoria
Police Interceptor 1995-2012
Installaon Instrucons
By ProClip USA
Page 3
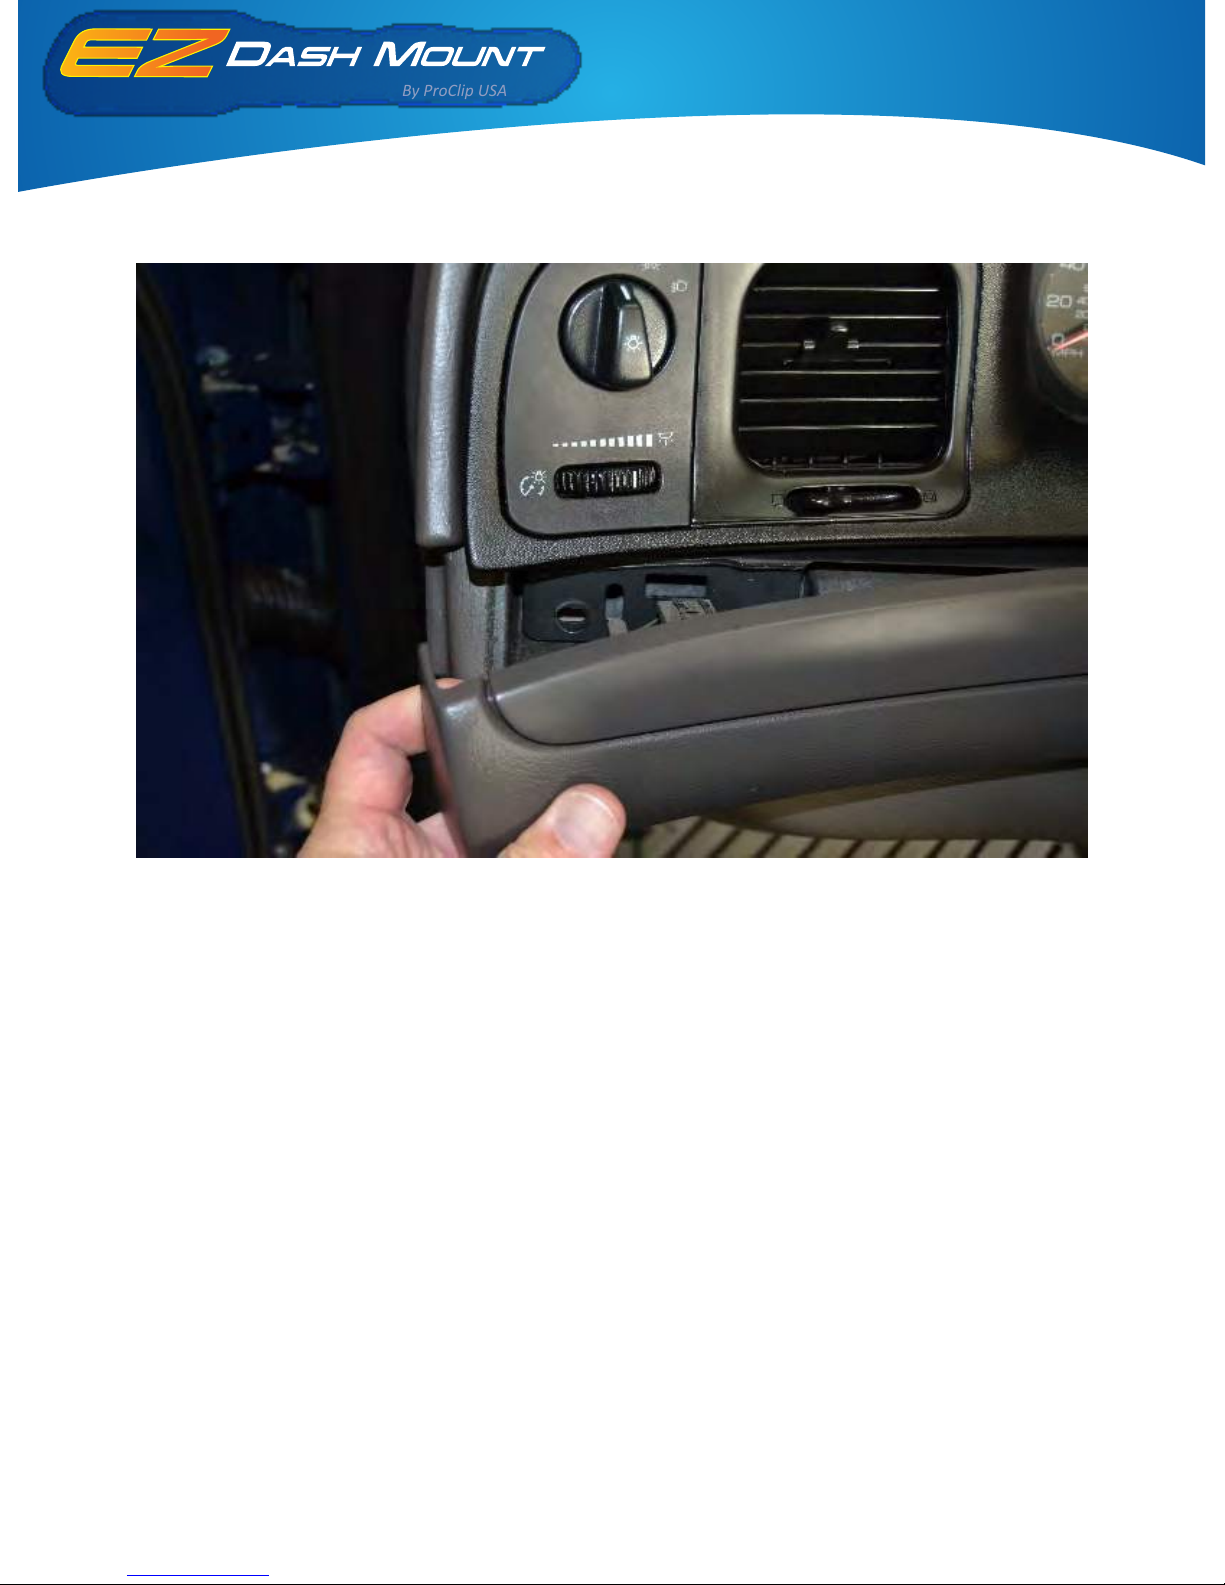
3. Remember to also remove the short panel on the le side of the steering wheel. Start with the far
le side of the panel.
4. Once the lower panels have been removed, take out the eight screws that fasten the frame
around the radio and instruments. Remember the two above the speedometer.
Ford Crown Victoria
Police Interceptor 1995-2012
Installaon Instrucons
By ProClip USA
Page 4
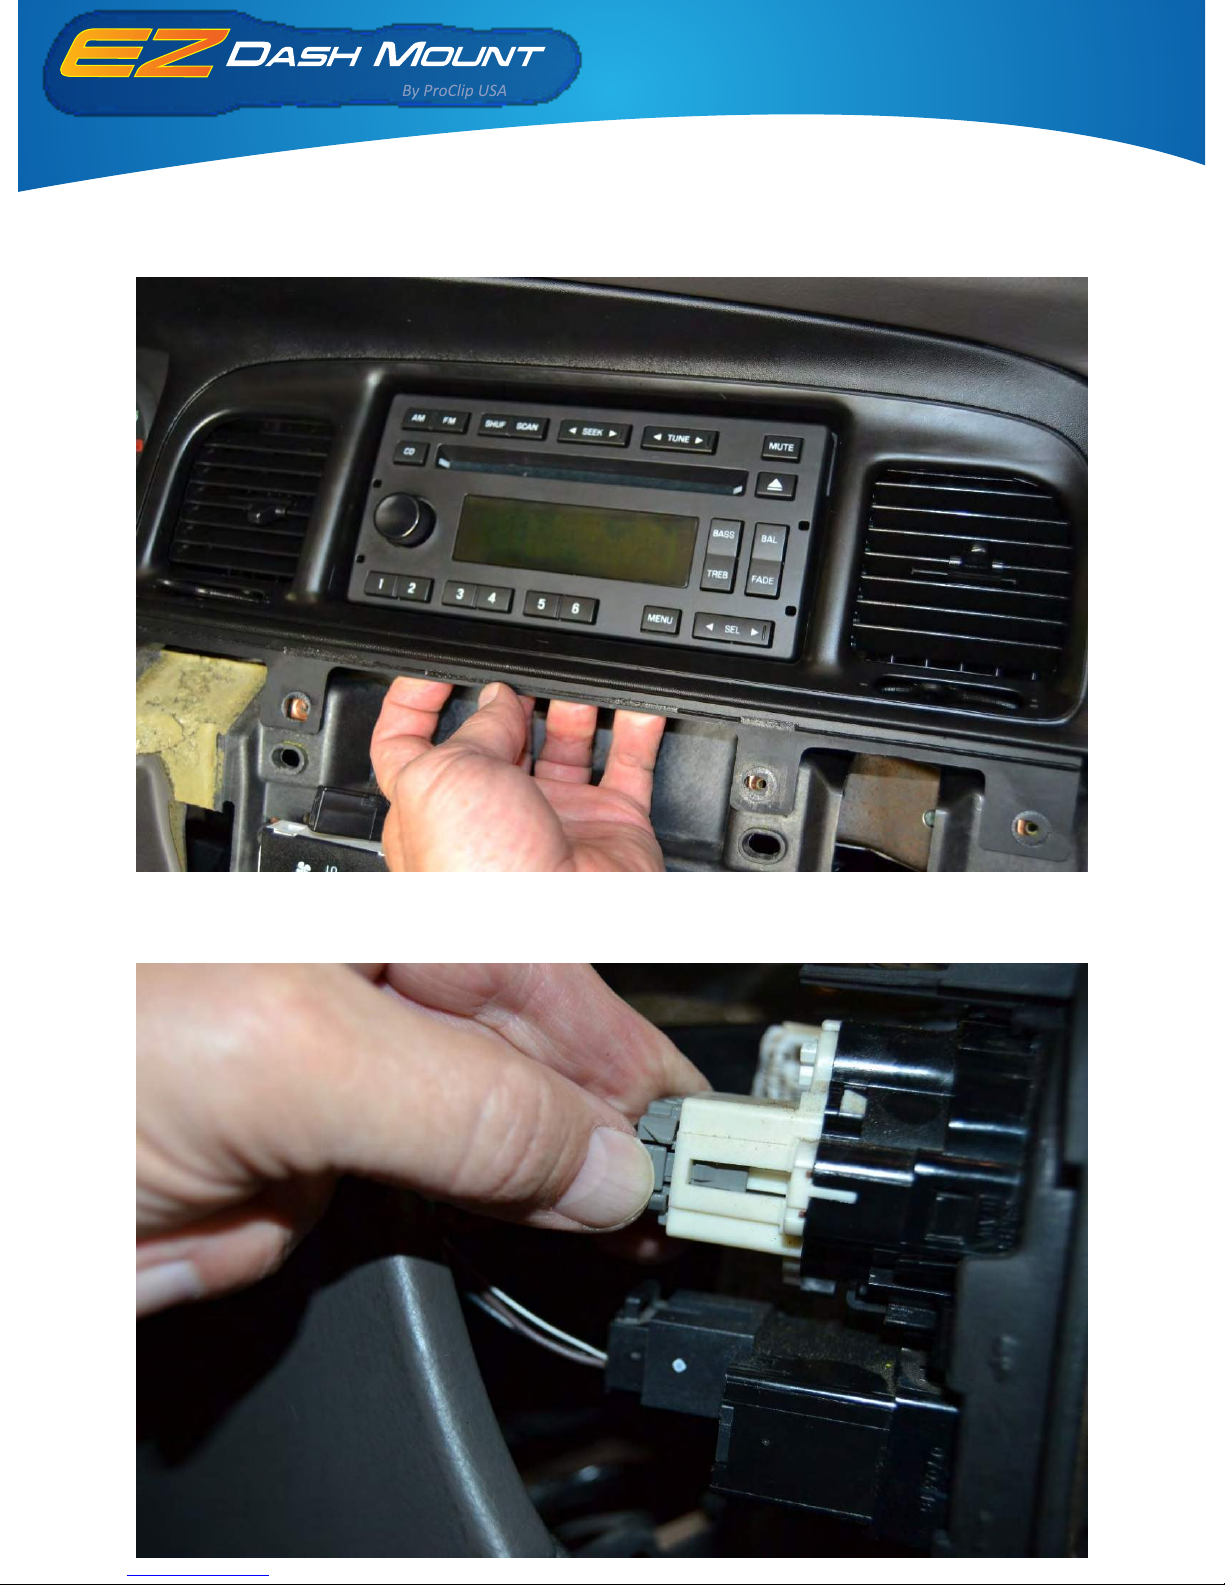
5. Pull out the instrument panel starng under the radio area. Detach the wires behind the radio.
Remember to also lt the steering wheel all the way down to remove the instrument panel.
6. Detach the wires from the light switches on the far le. Once the wires are detached, remove the
switches from the panel by pressing forward on the switch panel.
Ford Crown Victoria
Police Interceptor 1995-2012
Installaon Instrucons
By ProClip USA
Page 5
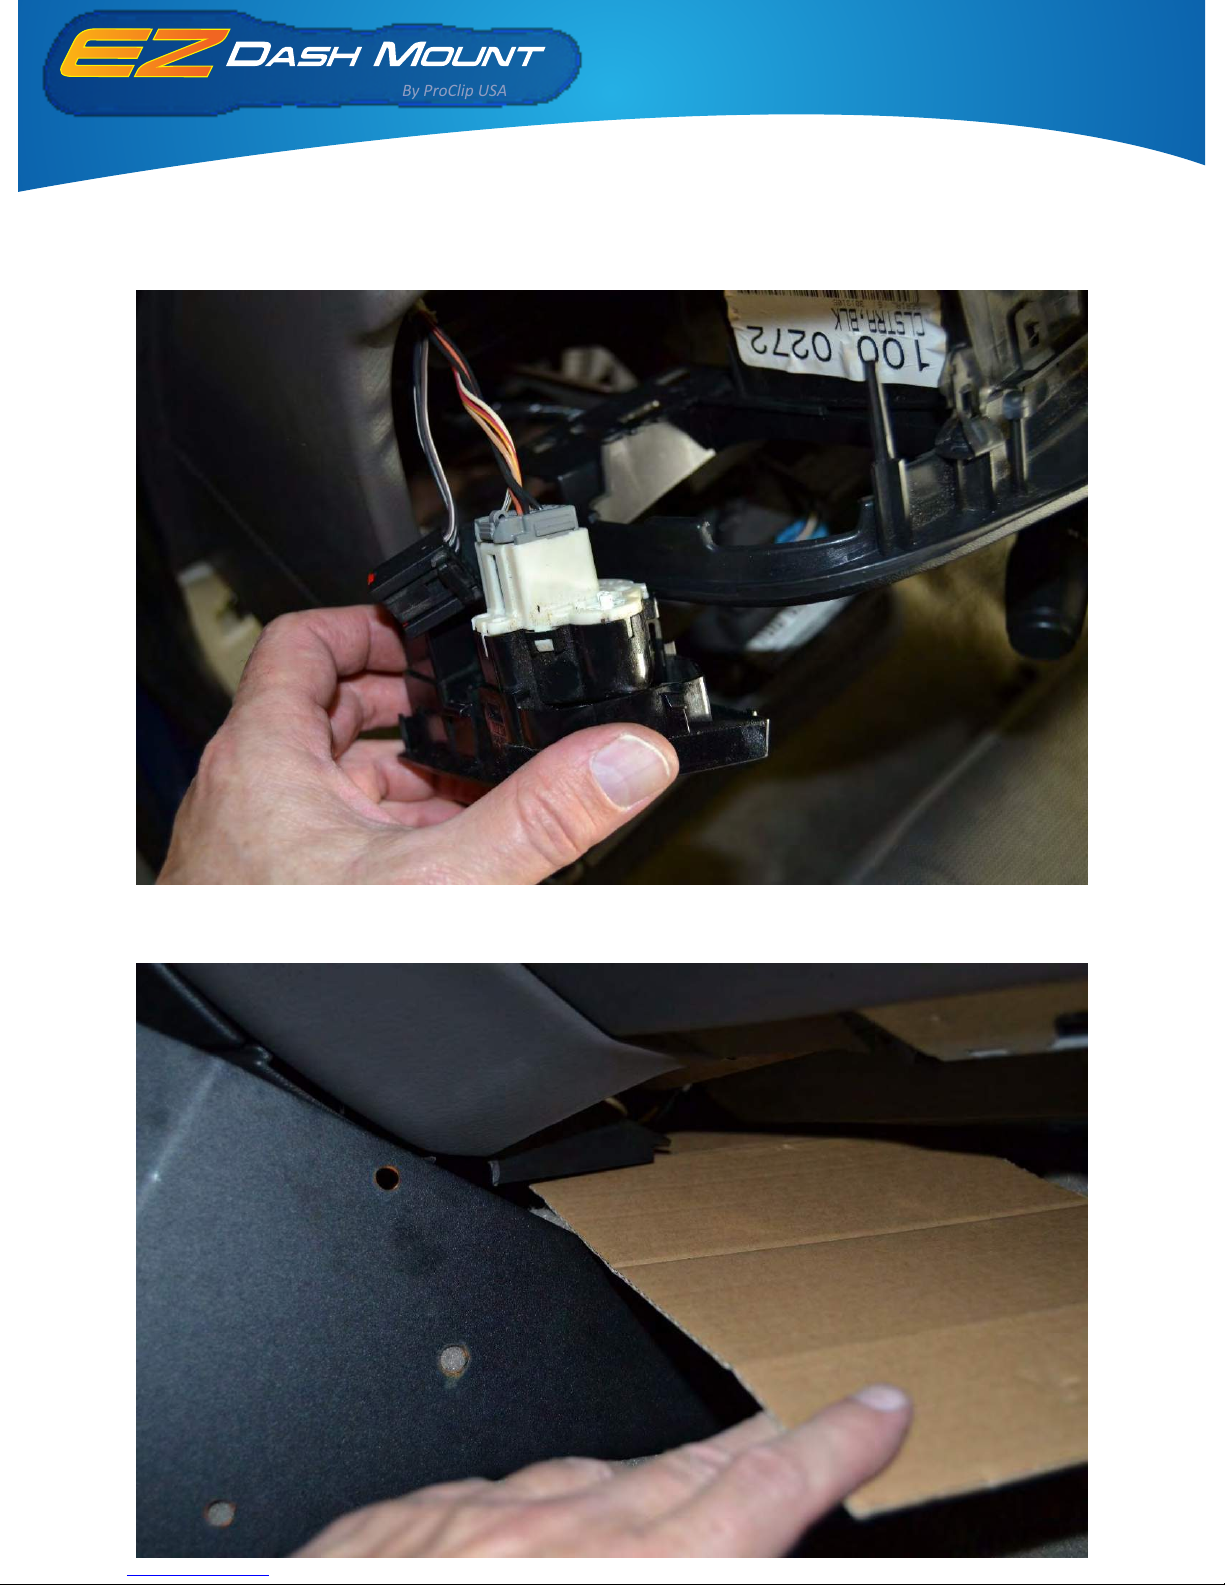
7. Once the switch panel is removed from the instrument panel, plug the wires back into the
switches. This will quiet the connuous beeping from the light switch sensor.
8. Completely remove the instrument frame from the vehicle.
9. Cover the opening in the carpet under the center console area. This will reduce the chances of
losing nuts and bolts that might drop into the area.
Ford Crown Victoria
Police Interceptor 1995-2012
Installaon Instrucons
By ProClip USA
Page 6
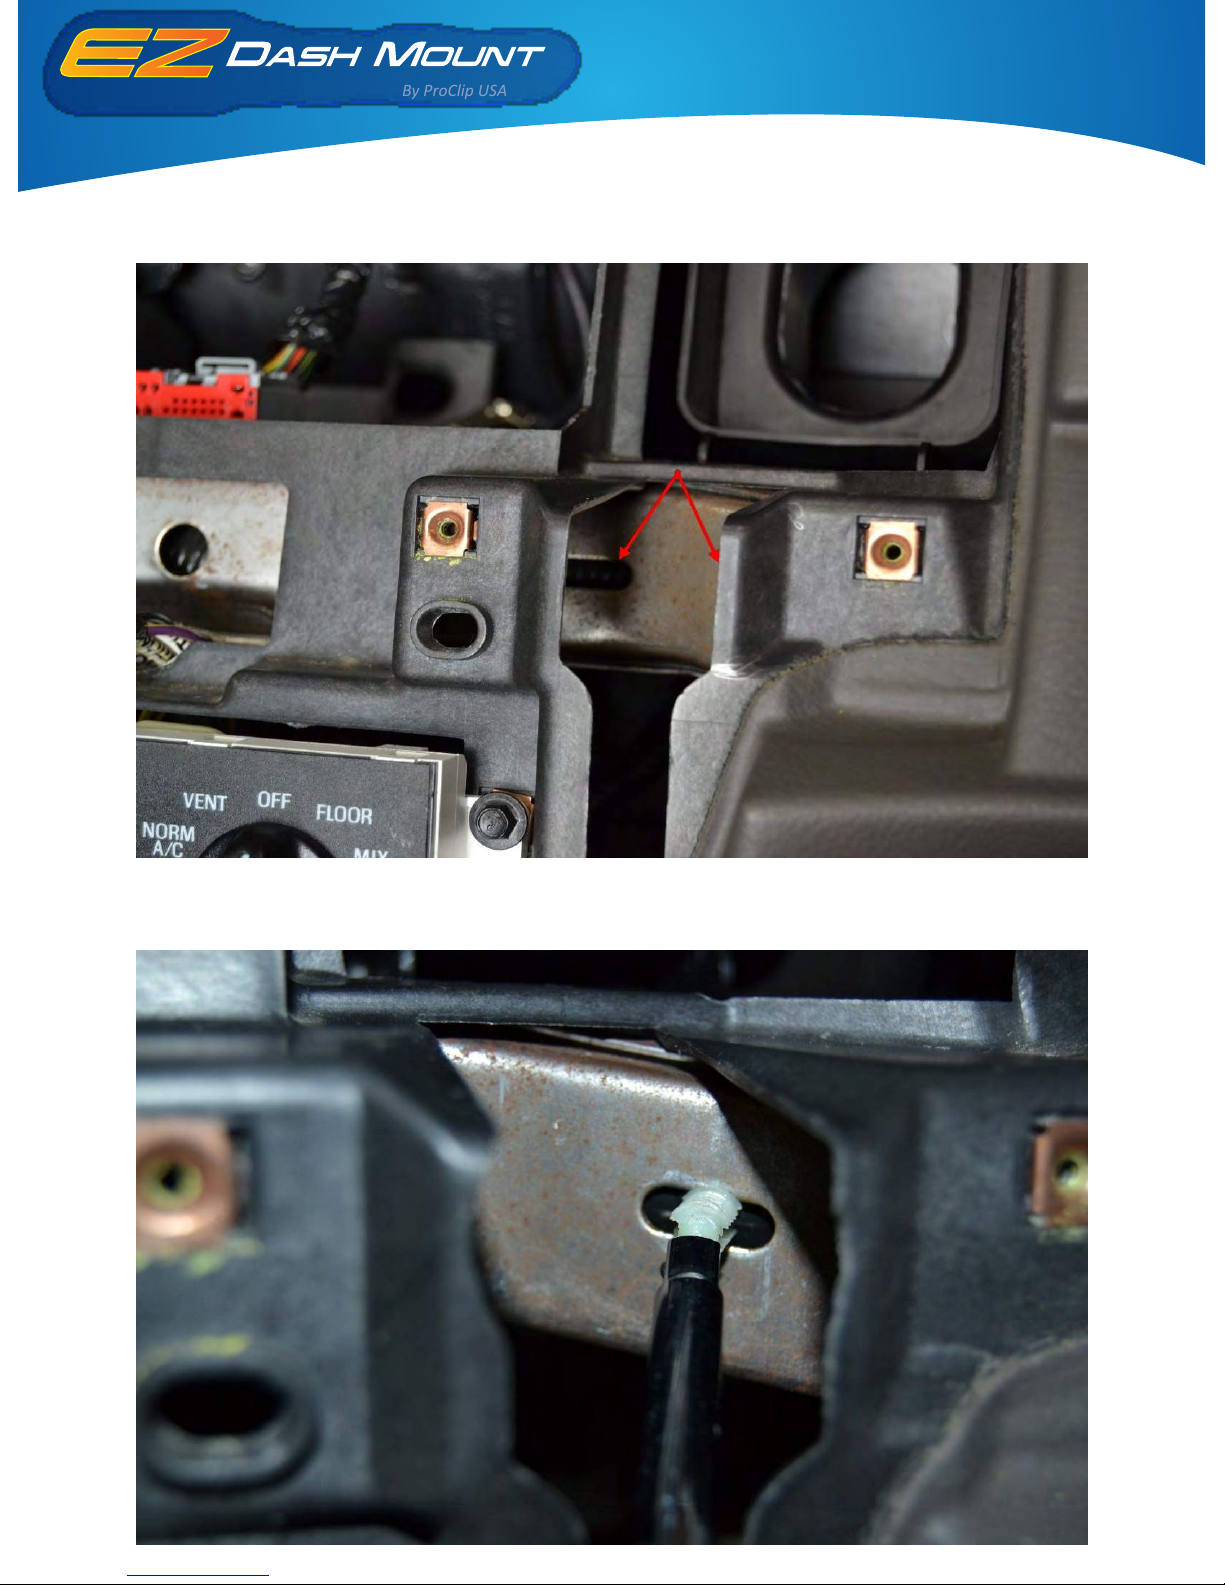
10. The connecng block will aach to the slots on the steel dash frame behind this opening. (See
arrows)
11. Push out the plasc clips holding on the wire harness and press the wire harness back or out of
the way of the slots in the steel frame.
Ford Crown Victoria
Police Interceptor 1995-2012
Installaon Instrucons
By ProClip USA
Page 7
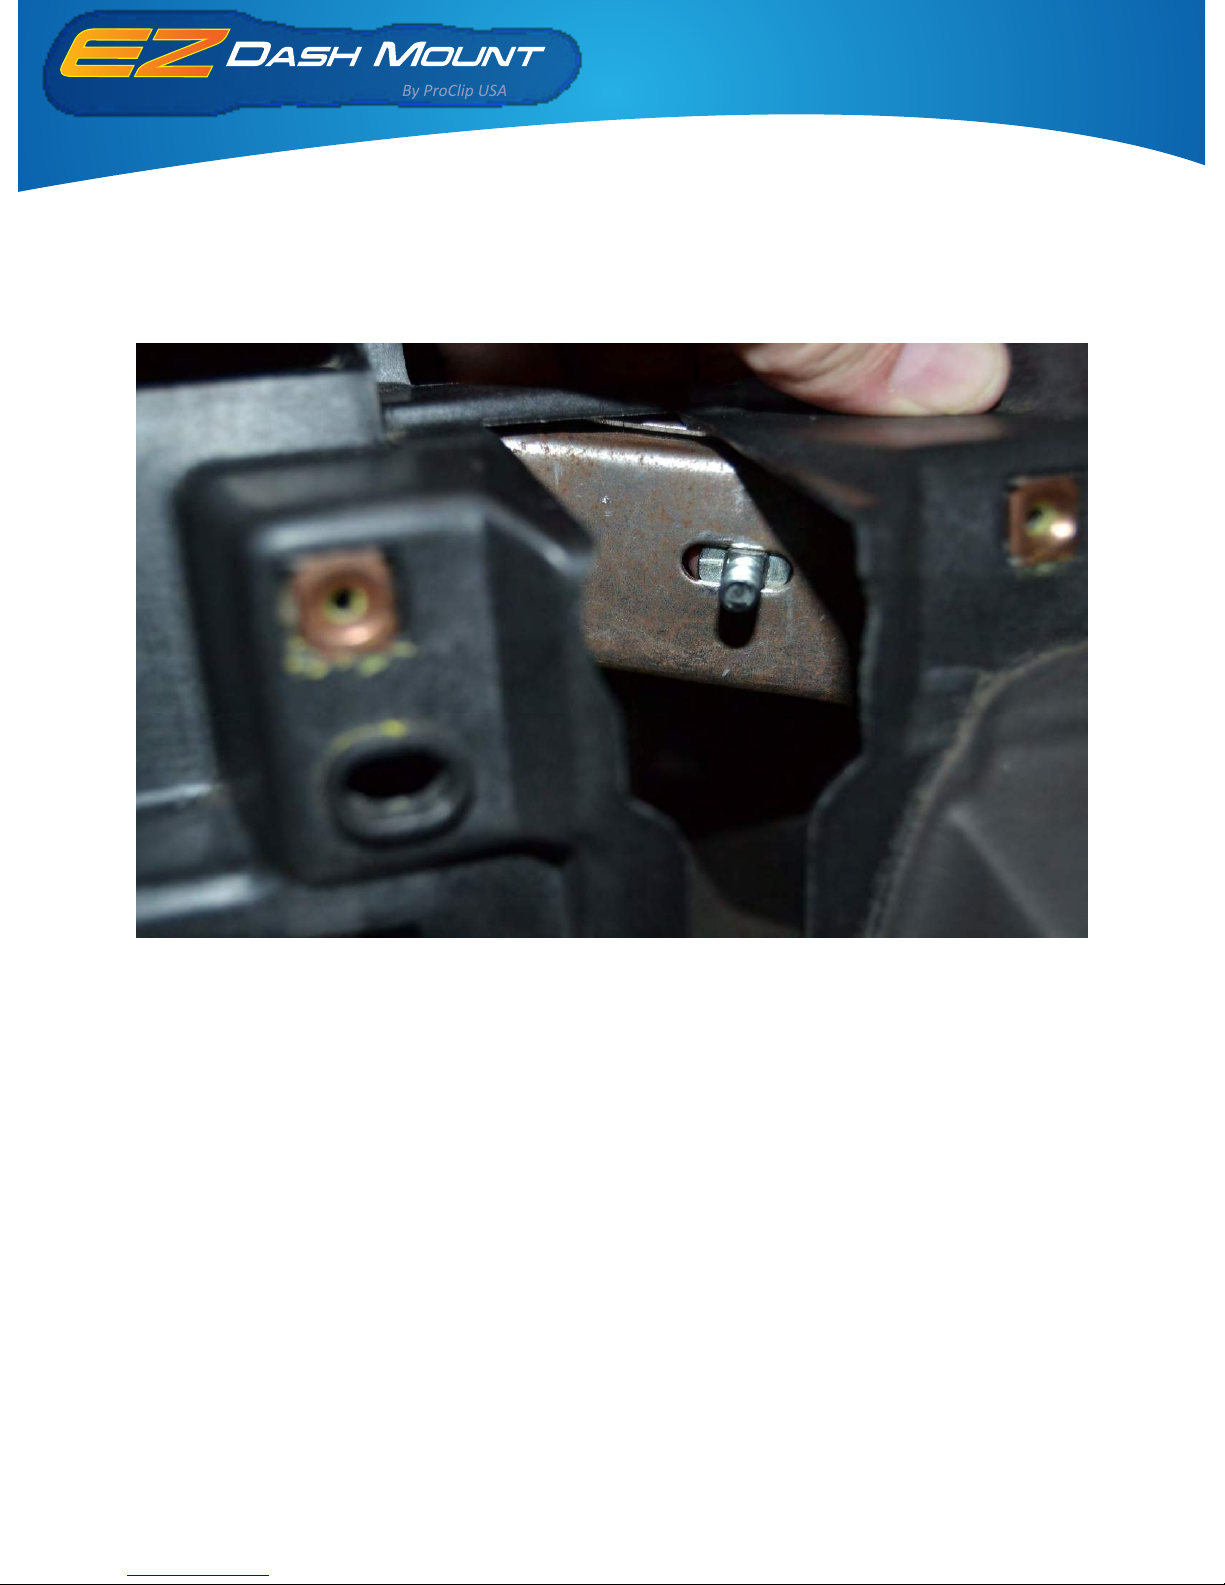
12. Insert the included “T” bolts with a square neck into the back of the right slot on the steel frame
in the opening. (Tip: It will be easier to loosely aach only the right side of the block first. Also, it
might be helpful to tape the “T” bolts in from the back side.)
Ford Crown Victoria
Police Interceptor 1995-2012
Installaon Instrucons
By ProClip USA
Page 8
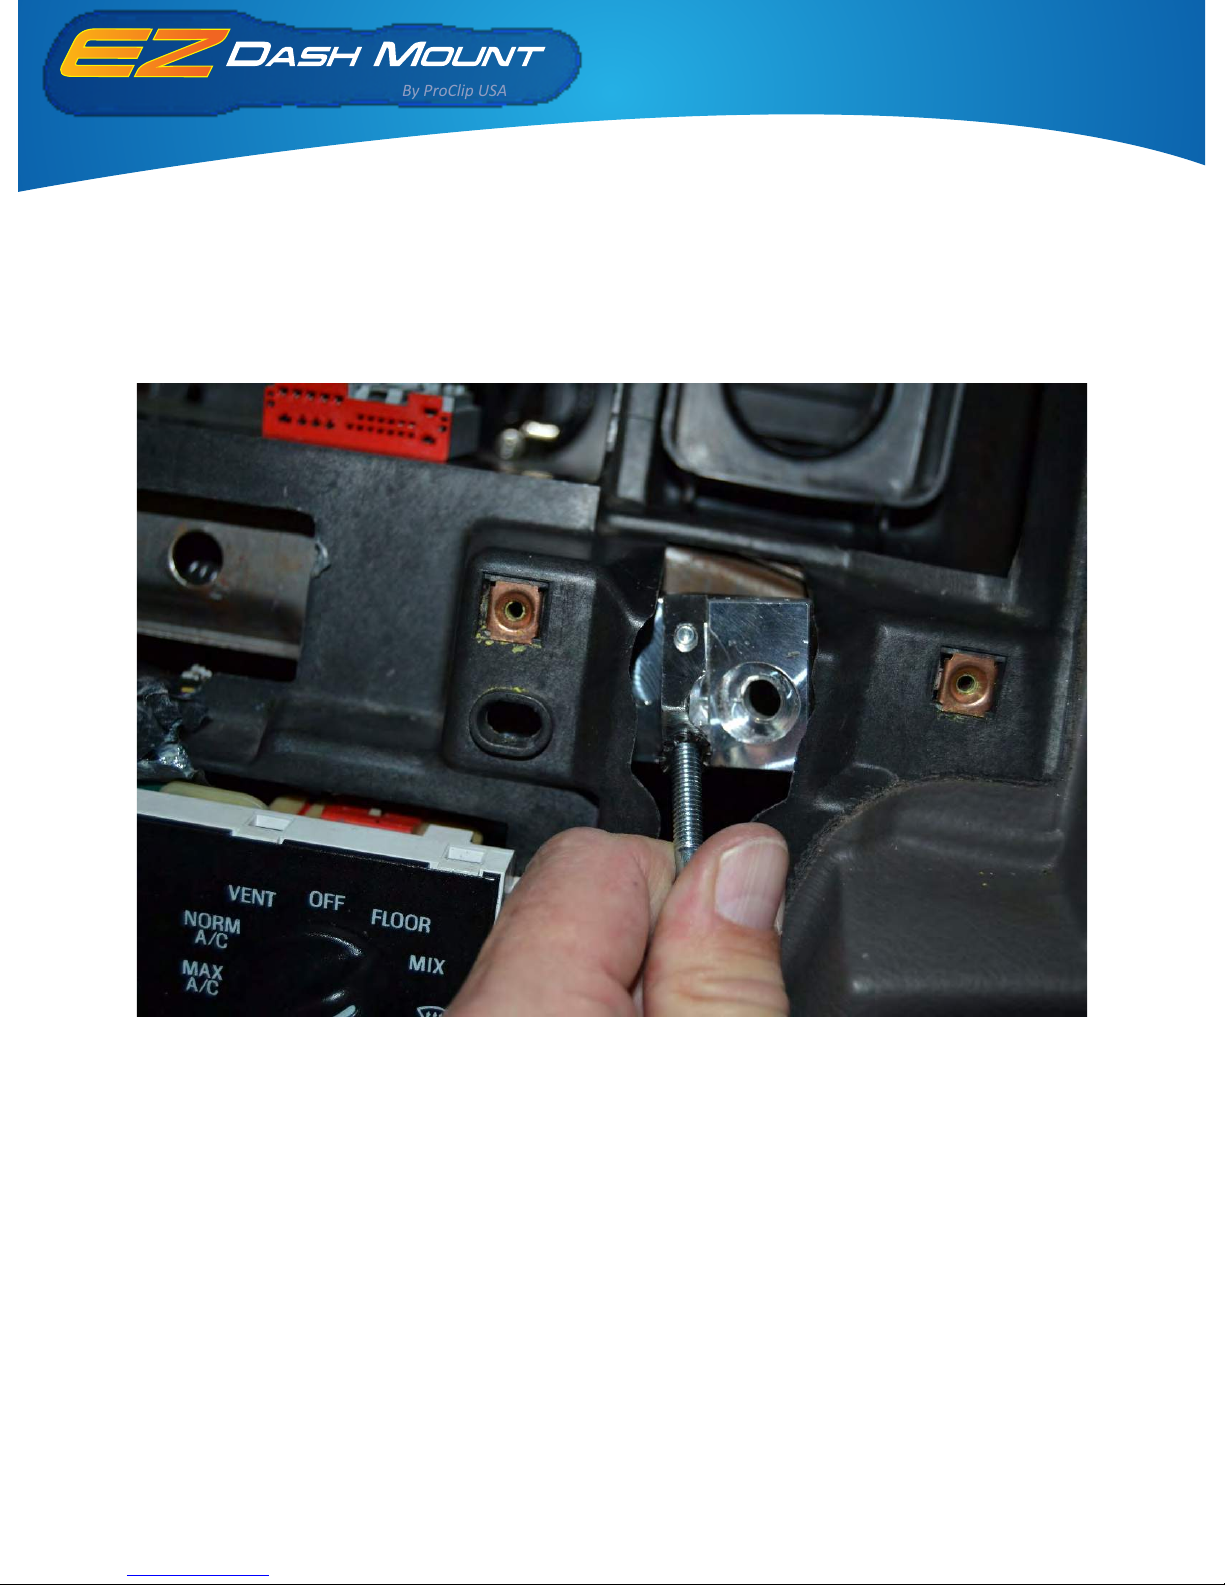
13. When aaching the connecng block, the threaded hole for the connecng screw on the
connecng block should be facing downward. Fasten onto the “T” bolt with the included nut and lock
washer. (Tip: It will be easier to hold the connecng block when the screw is inserted into the
threaded hole.)
Ford Crown Victoria
Police Interceptor 1995-2012
Installaon Instrucons
By ProClip USA
Page 9
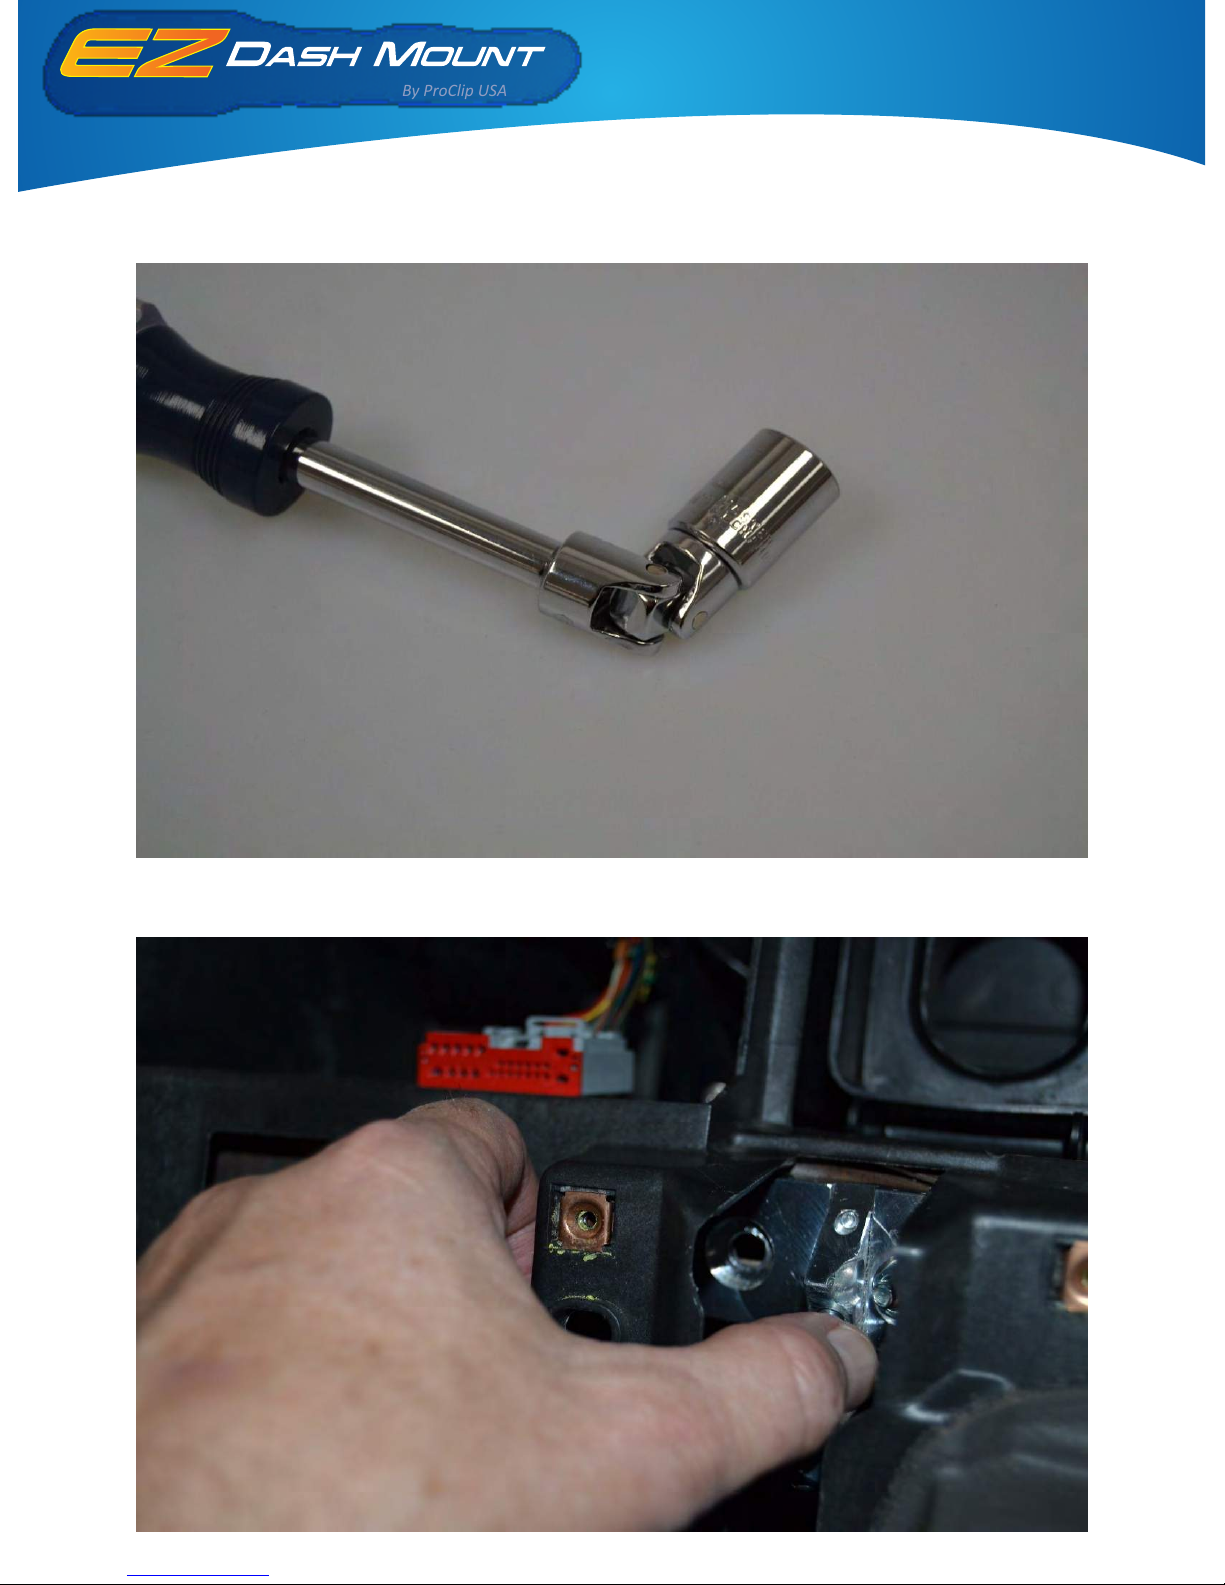
14. A very helpful tool will be a “universal” aached to a driver or socket wrench. This tool will assist
in fastening the nuts onto the “T” bolts in the connecng block.
15. Align the le hole up with the le slot in the steel dash frame.
Ford Crown Victoria
Police Interceptor 1995-2012
Installaon Instrucons
By ProClip USA
Page 10
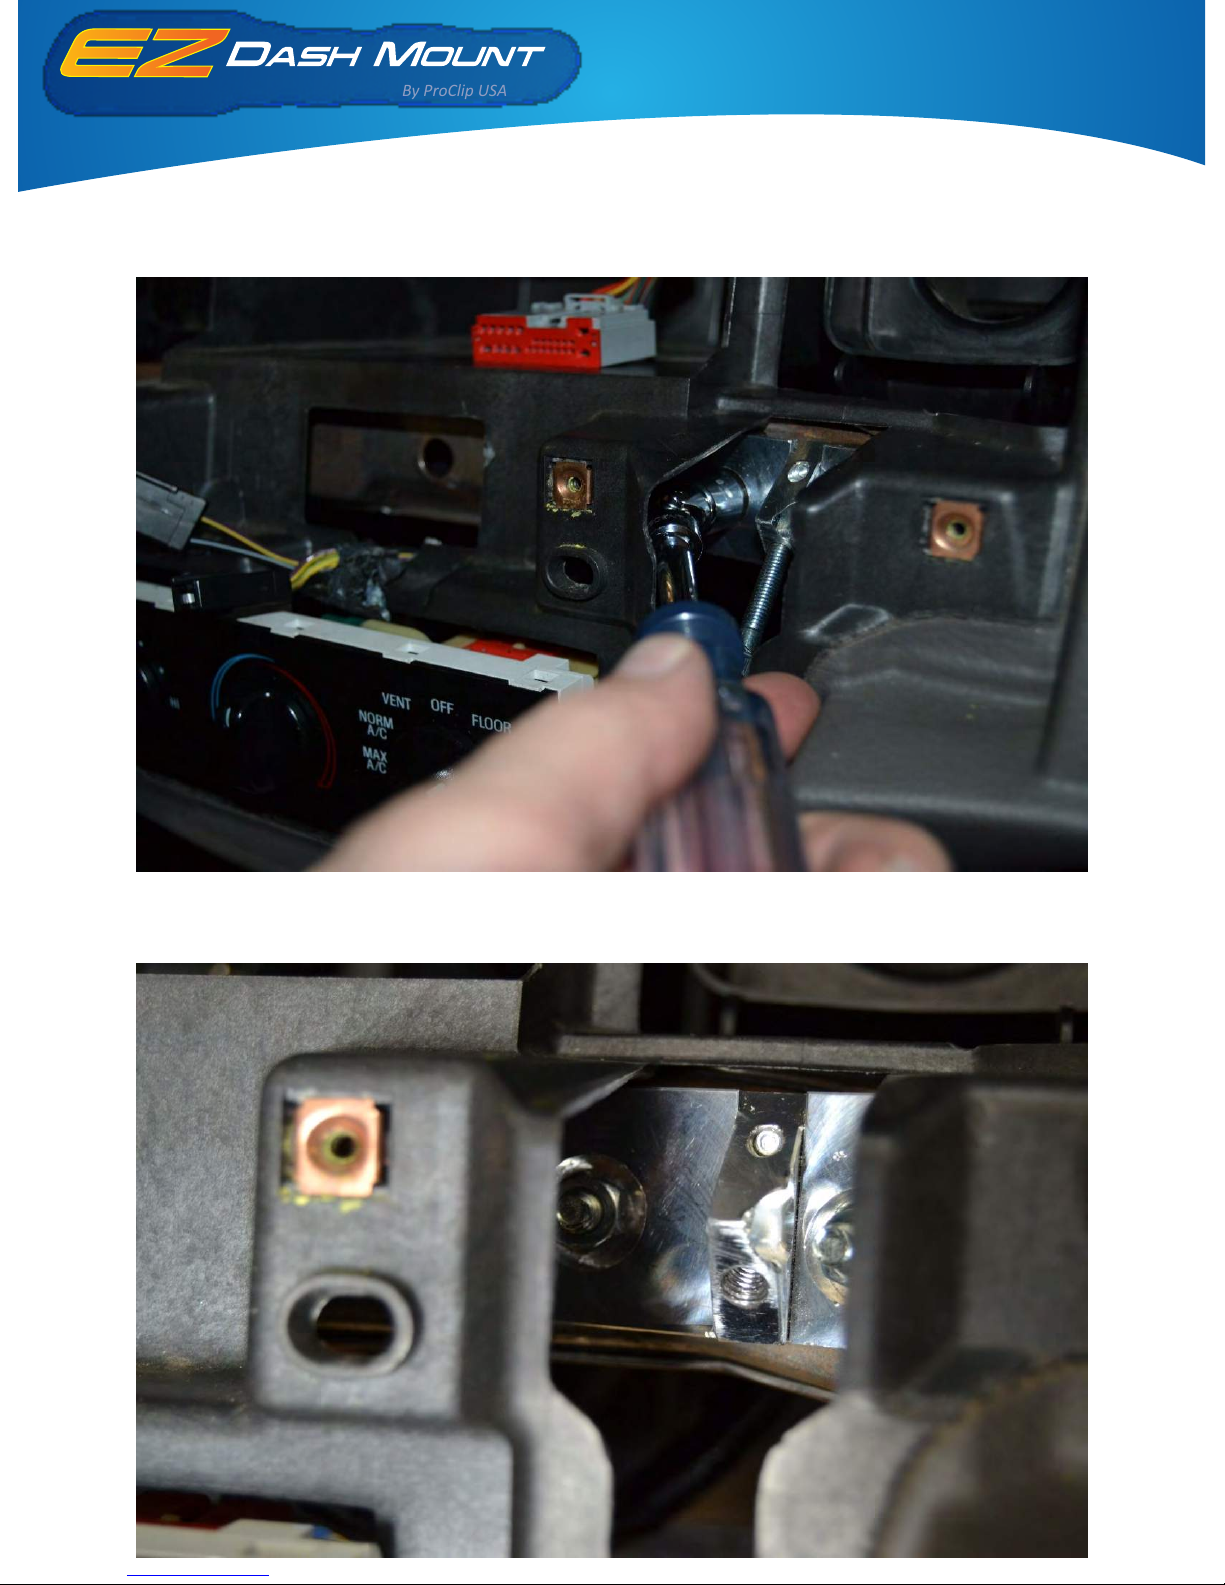
16. Insert the included “T” bolts with a square neck into the back of the le slot on the steel frame in
the opening. Fasten with the included nut and lock washer. (Tip: Again, it might be helpful to tape the
“T” bolt in from the back side.)
17. Above, the connecng block aached. (Tip: keep the connecng block towards the right in the
slots.)
Ford Crown Victoria
Police Interceptor 1995-2012
Installaon Instrucons
By ProClip USA
Page 11
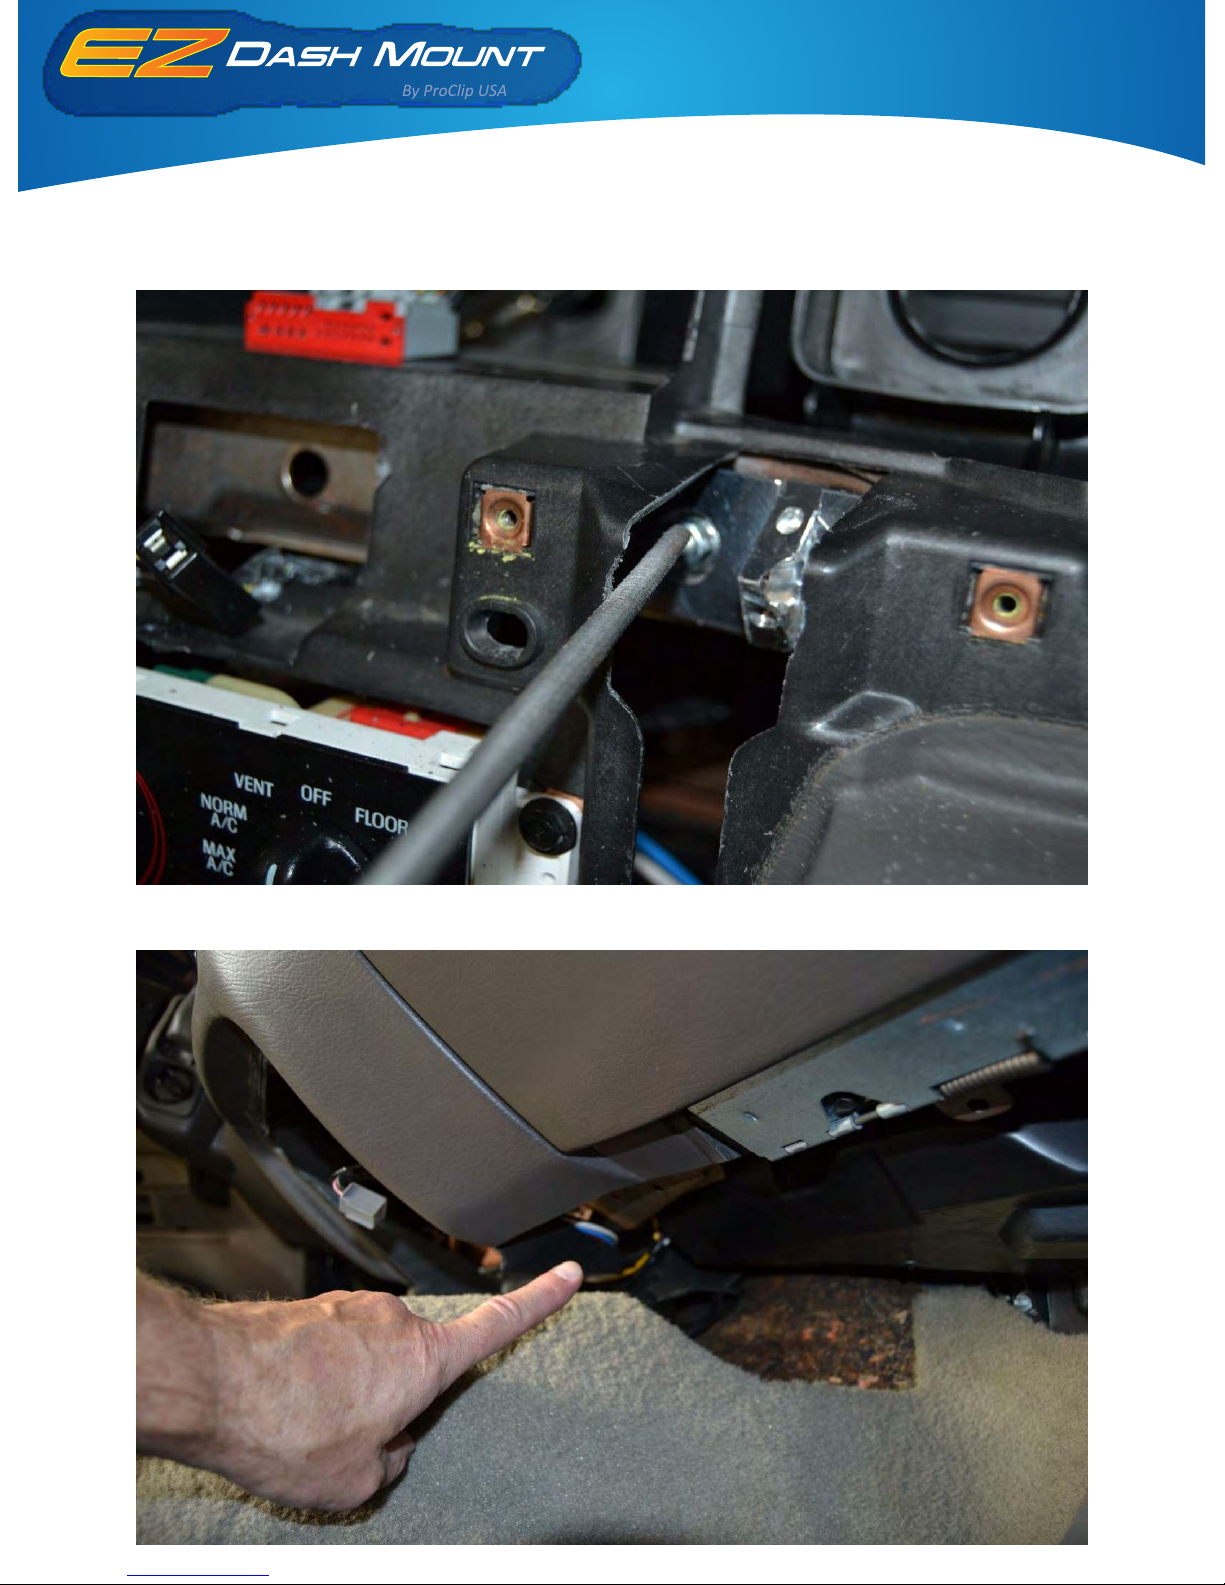
18. To avoid any possible future rales, file off about 1/8 inch around the opening where the
pedestal mount will come out from the dash. (Tip: This can be done prior to aaching the connecng
block.)
19. Under the center console area there are two holes in the steel dash frame.
Ford Crown Victoria
Police Interceptor 1995-2012
Installaon Instrucons
By ProClip USA
Page 12
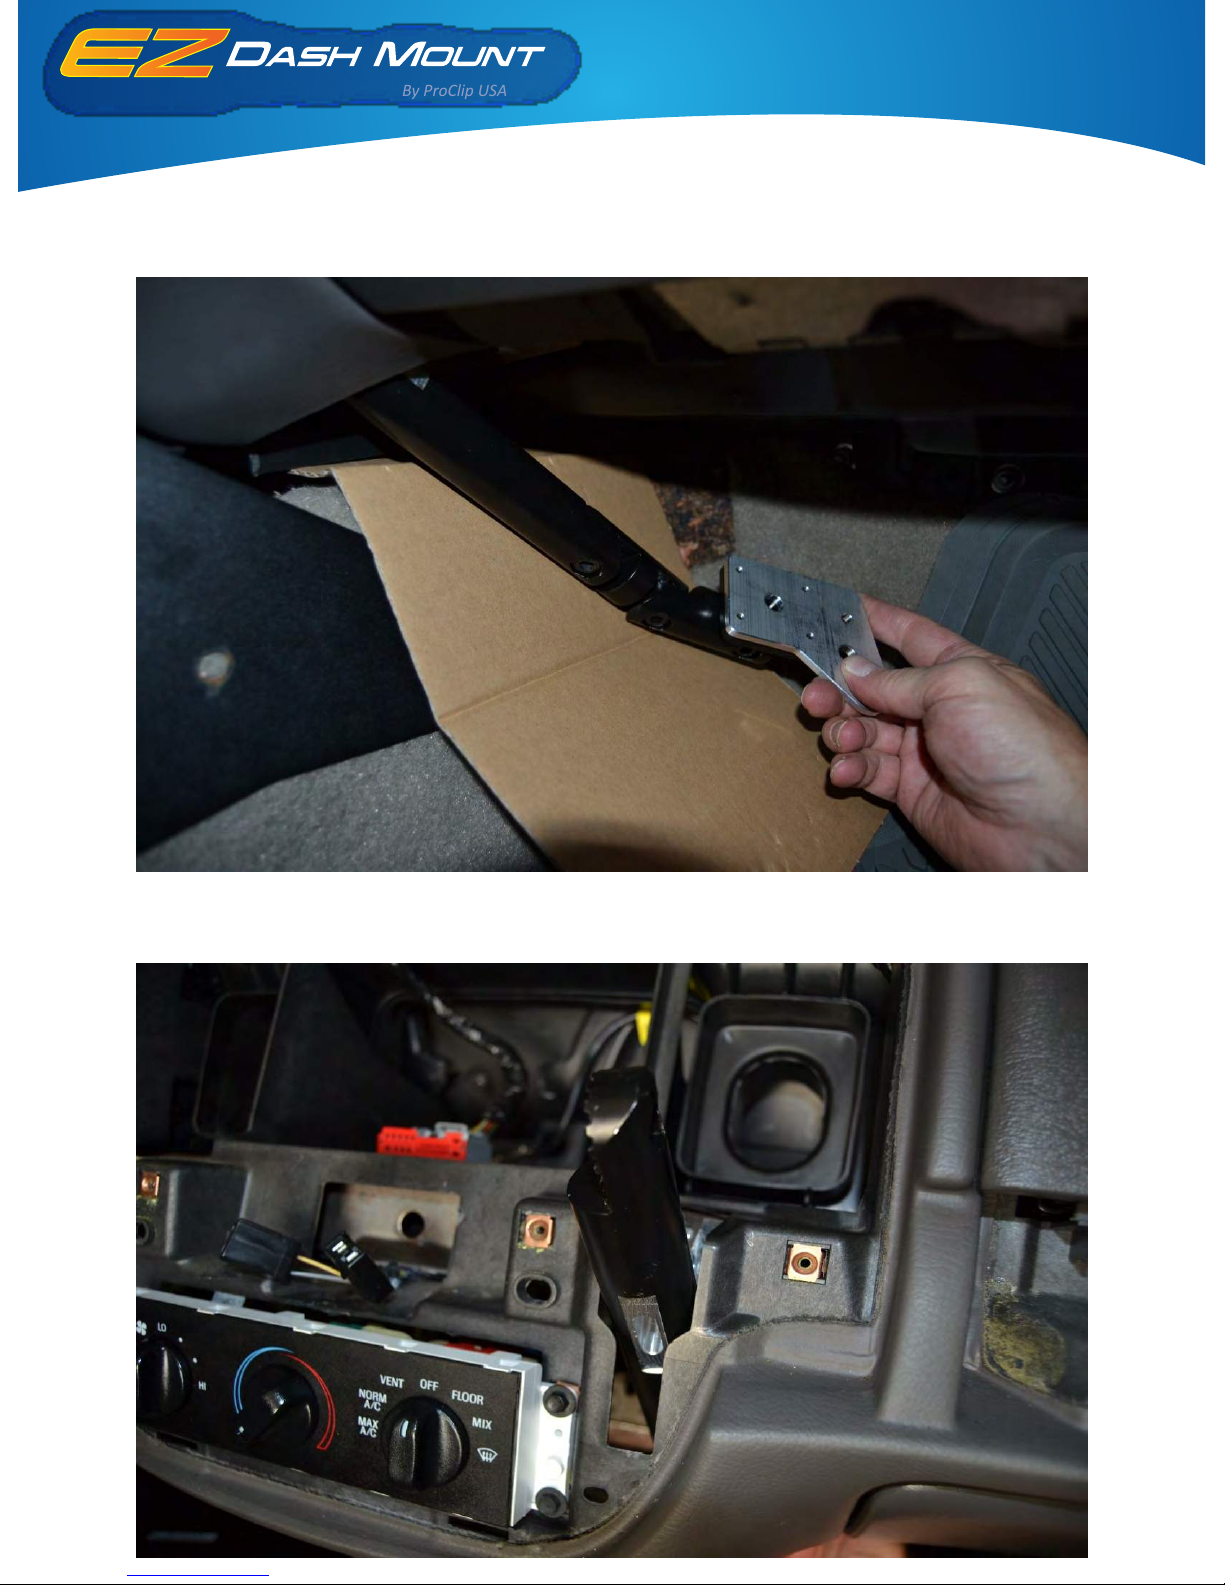
20. Insert the pedestal mount upward through an opening inside of the dash in front of the two holes
in the frame.
21. The top of the pedestal mount should come out above through the opening in the dash under the
connecng block.
Ford Crown Victoria
Police Interceptor 1995-2012
Installaon Instrucons
By ProClip USA
Page 13
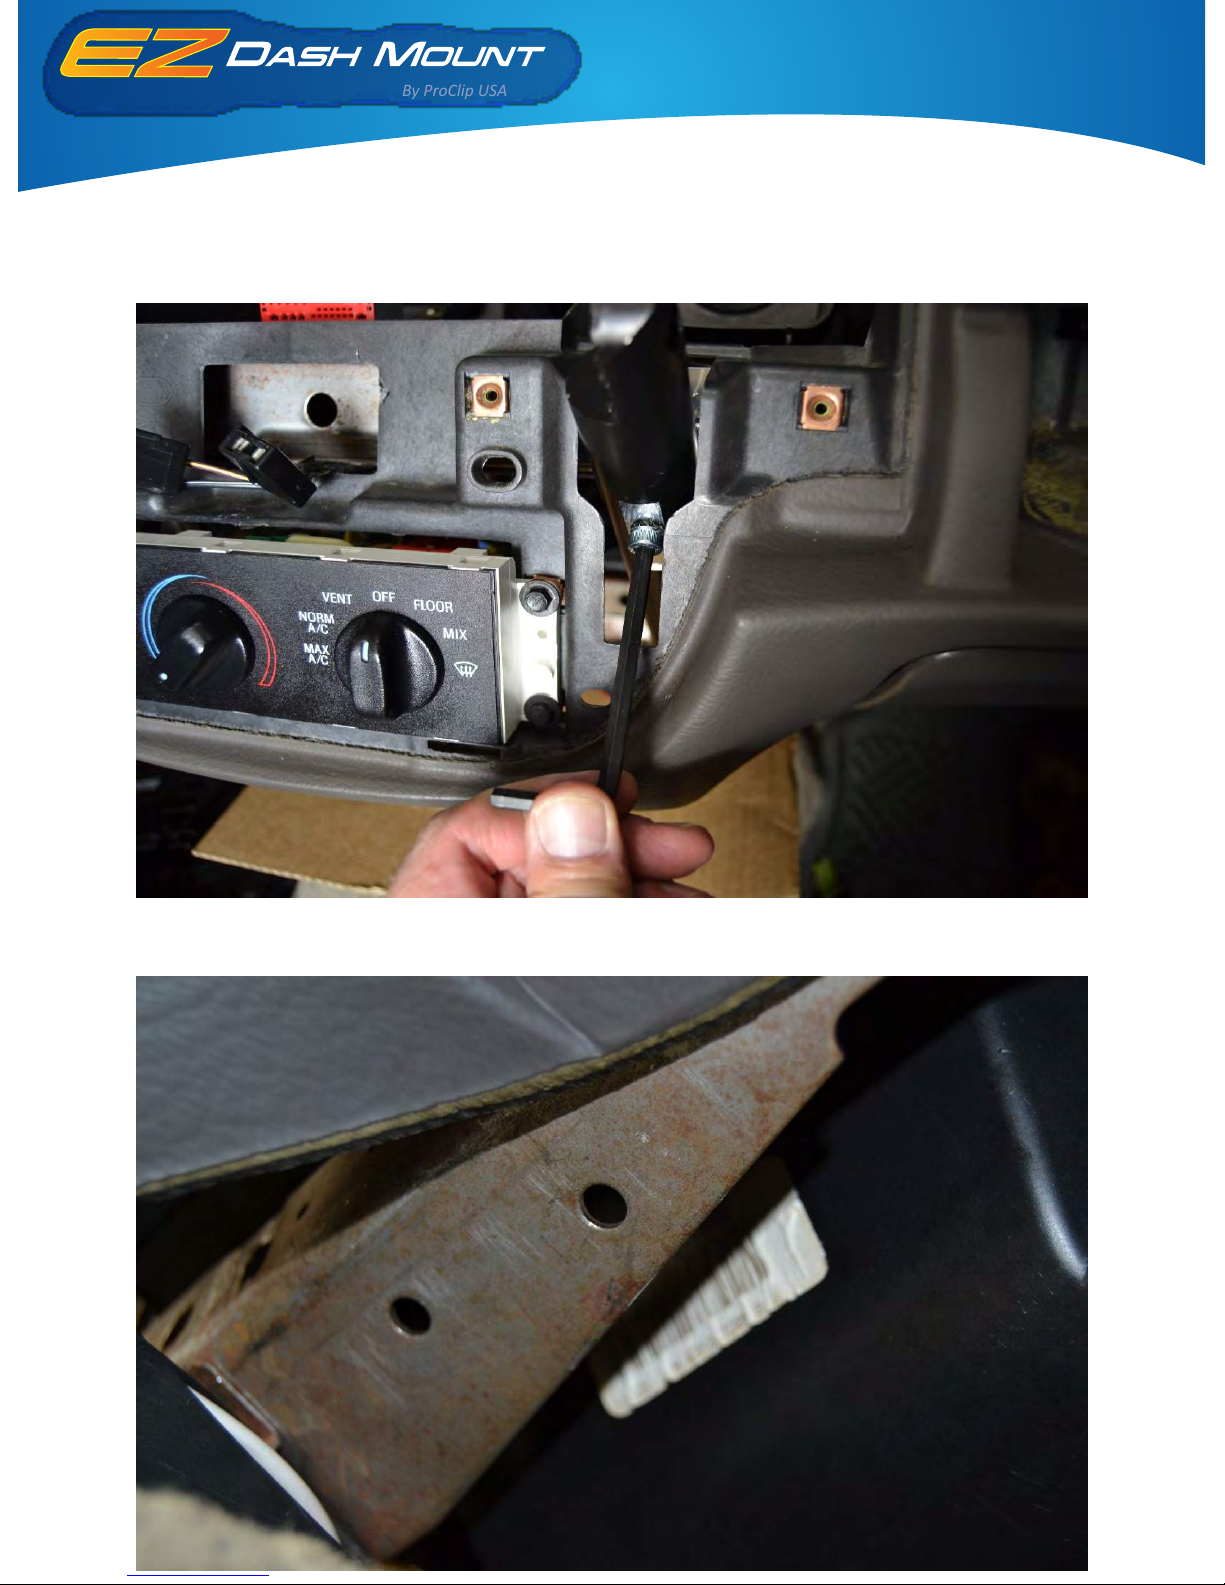
22. Using the included Allen wrench and screw, aach the upper part of the pedestal mount onto the
connecng block. Do not fasten it ghtly yet. Tighten the lower two nuts and bolts aaching the
lower pedestal plate to the lower steel dash frame first. Then go back and ghten the connecng
block screw.
23. These are the two holes in the steel dash frame under the center console area. Insert the two
included hex bolts down through the holes from the top.
Ford Crown Victoria
Police Interceptor 1995-2012
Installaon Instrucons
By ProClip USA
Page 14
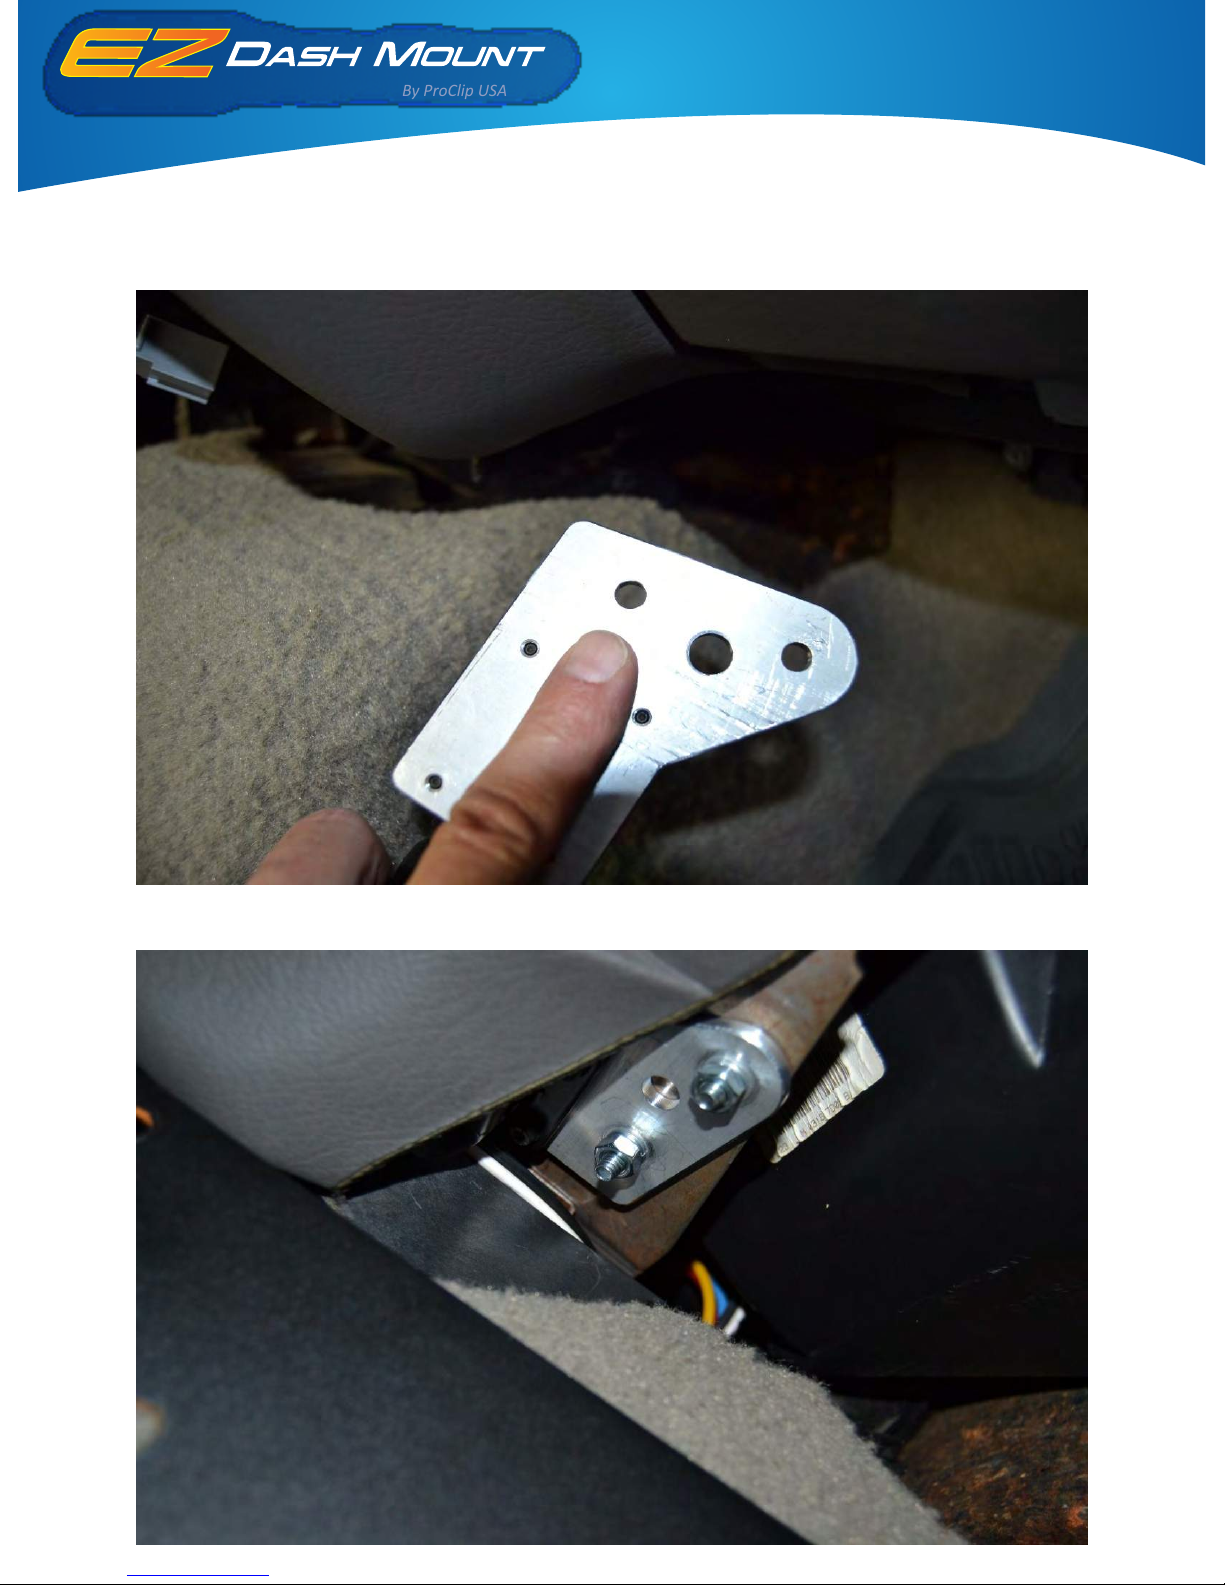
24. The holes in the plate at the boom of the pedestal mount should go onto the hex bolts in the
lower steel dash frame. Tightly fasten the pedestal plate to the steel dash frame with the included
lock washers and nuts.
25. The pedestal base plate fastened to the steel dash frame.
Ford Crown Victoria
Police Interceptor 1995-2012
Installaon Instrucons
By ProClip USA
Page 15
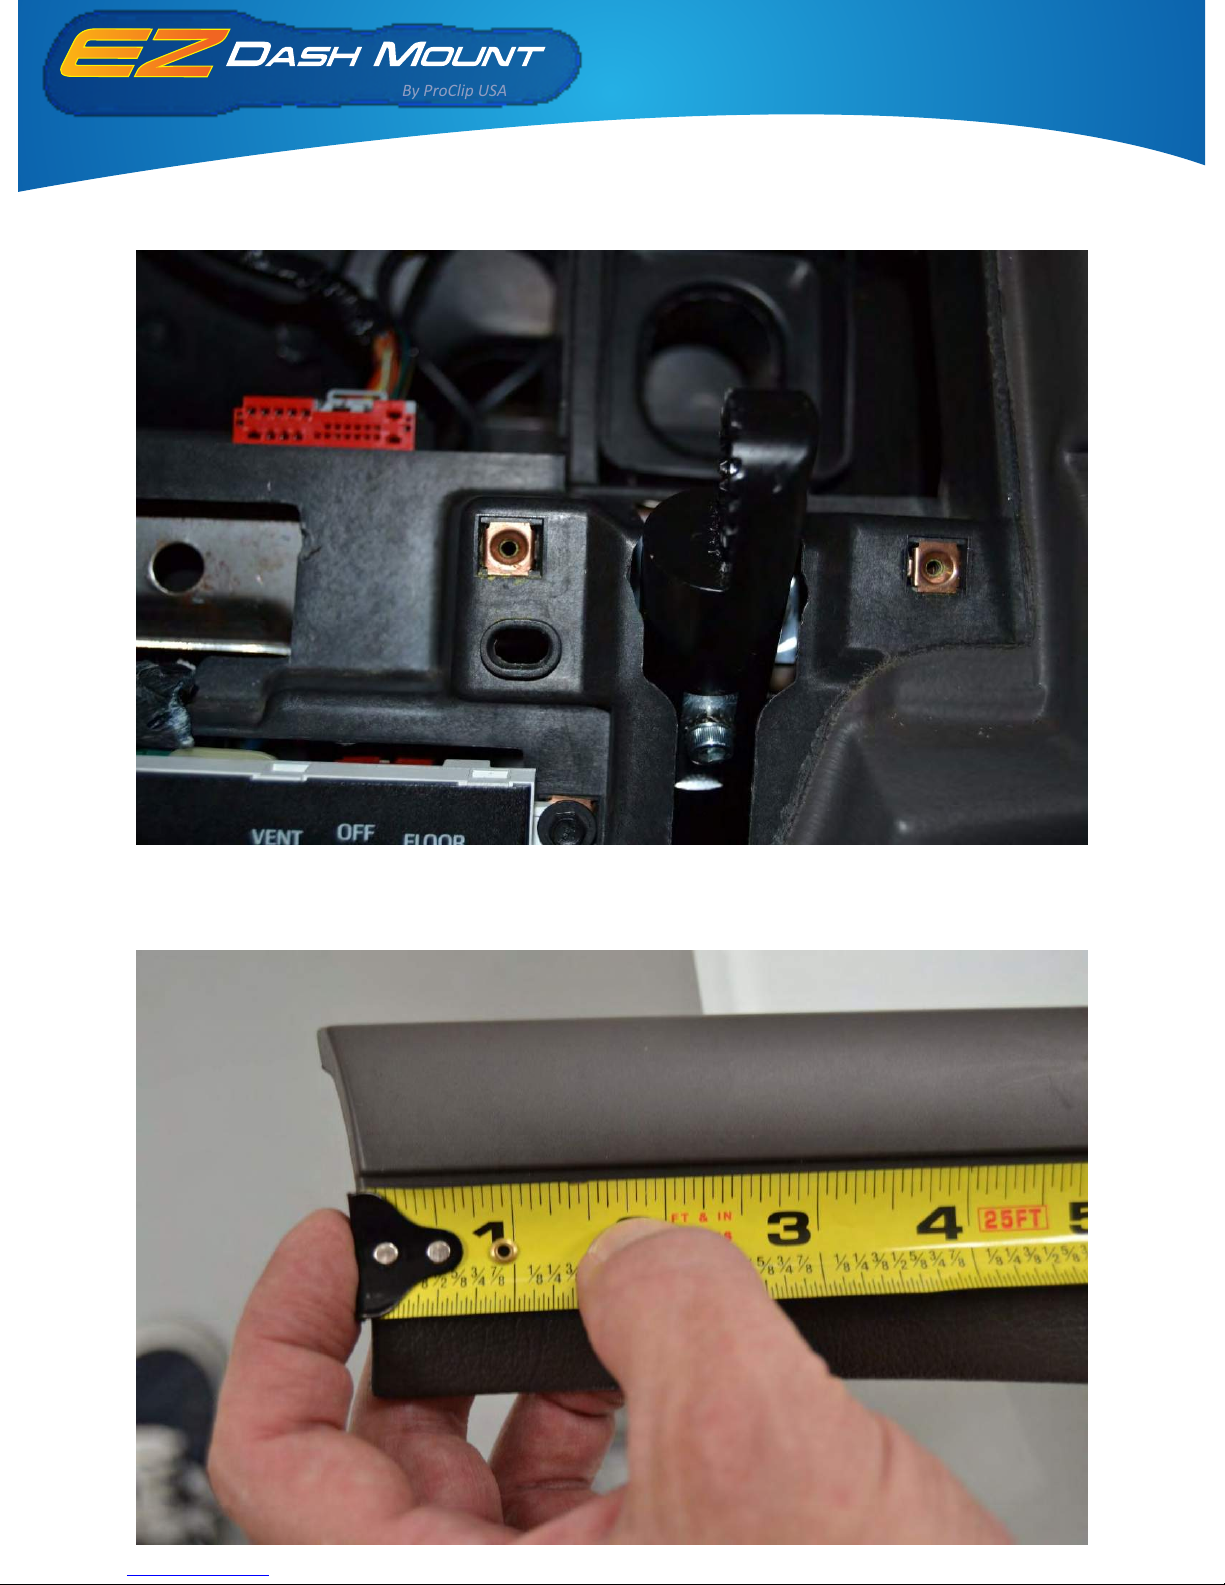
26. Now go back and securely ghten the connecng block screw.
27. Take the set aside interior panel, with the trunk lid opener, and place a tape measure at the le
side of the grooved notch in the vercal center of the panel.
Ford Crown Victoria
Police Interceptor 1995-2012
Installaon Instrucons
By ProClip USA
Page 16
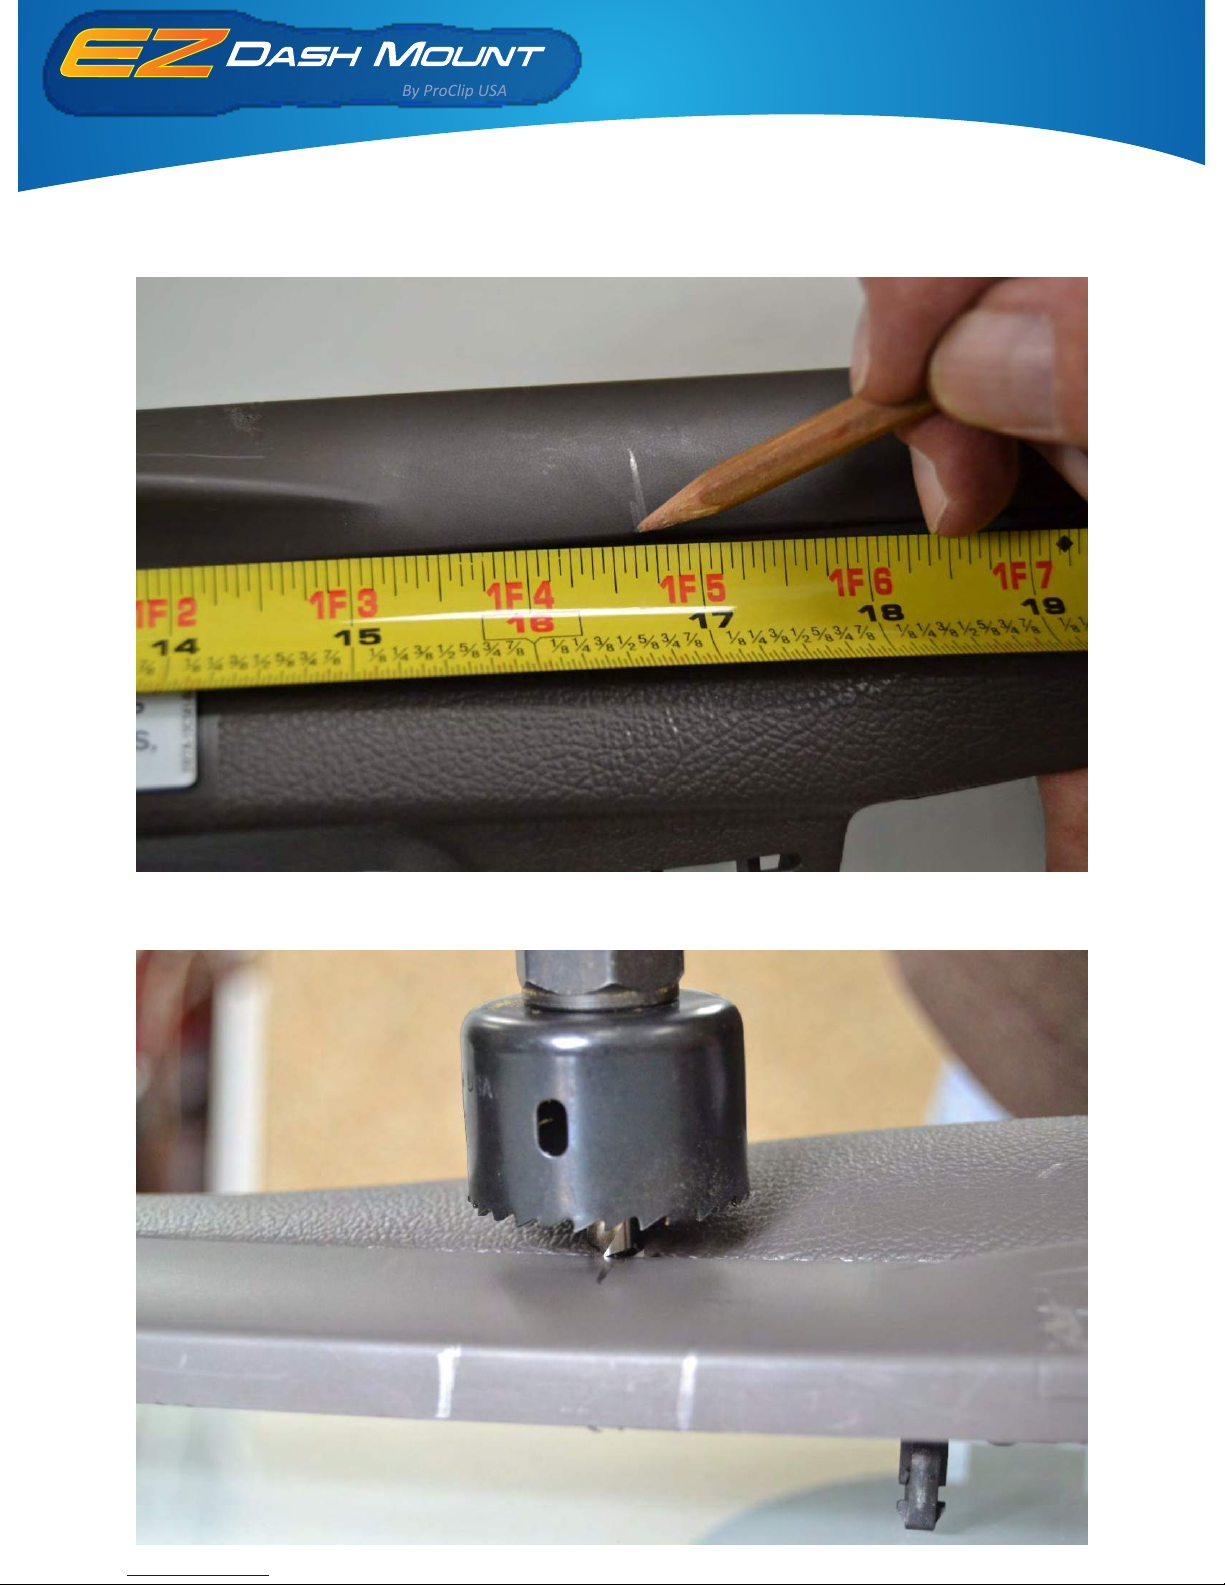
28. From the le, measure 16 5/8 inches to the right and make a mark. The mark should be 1/8 inch
above the grooved notch in the vercal center of the panel.
29. Using a 1¼ inch hole saw, cut a hole through the panel.
Ford Crown Victoria
Police Interceptor 1995-2012
Installaon Instrucons
By ProClip USA
Page 17
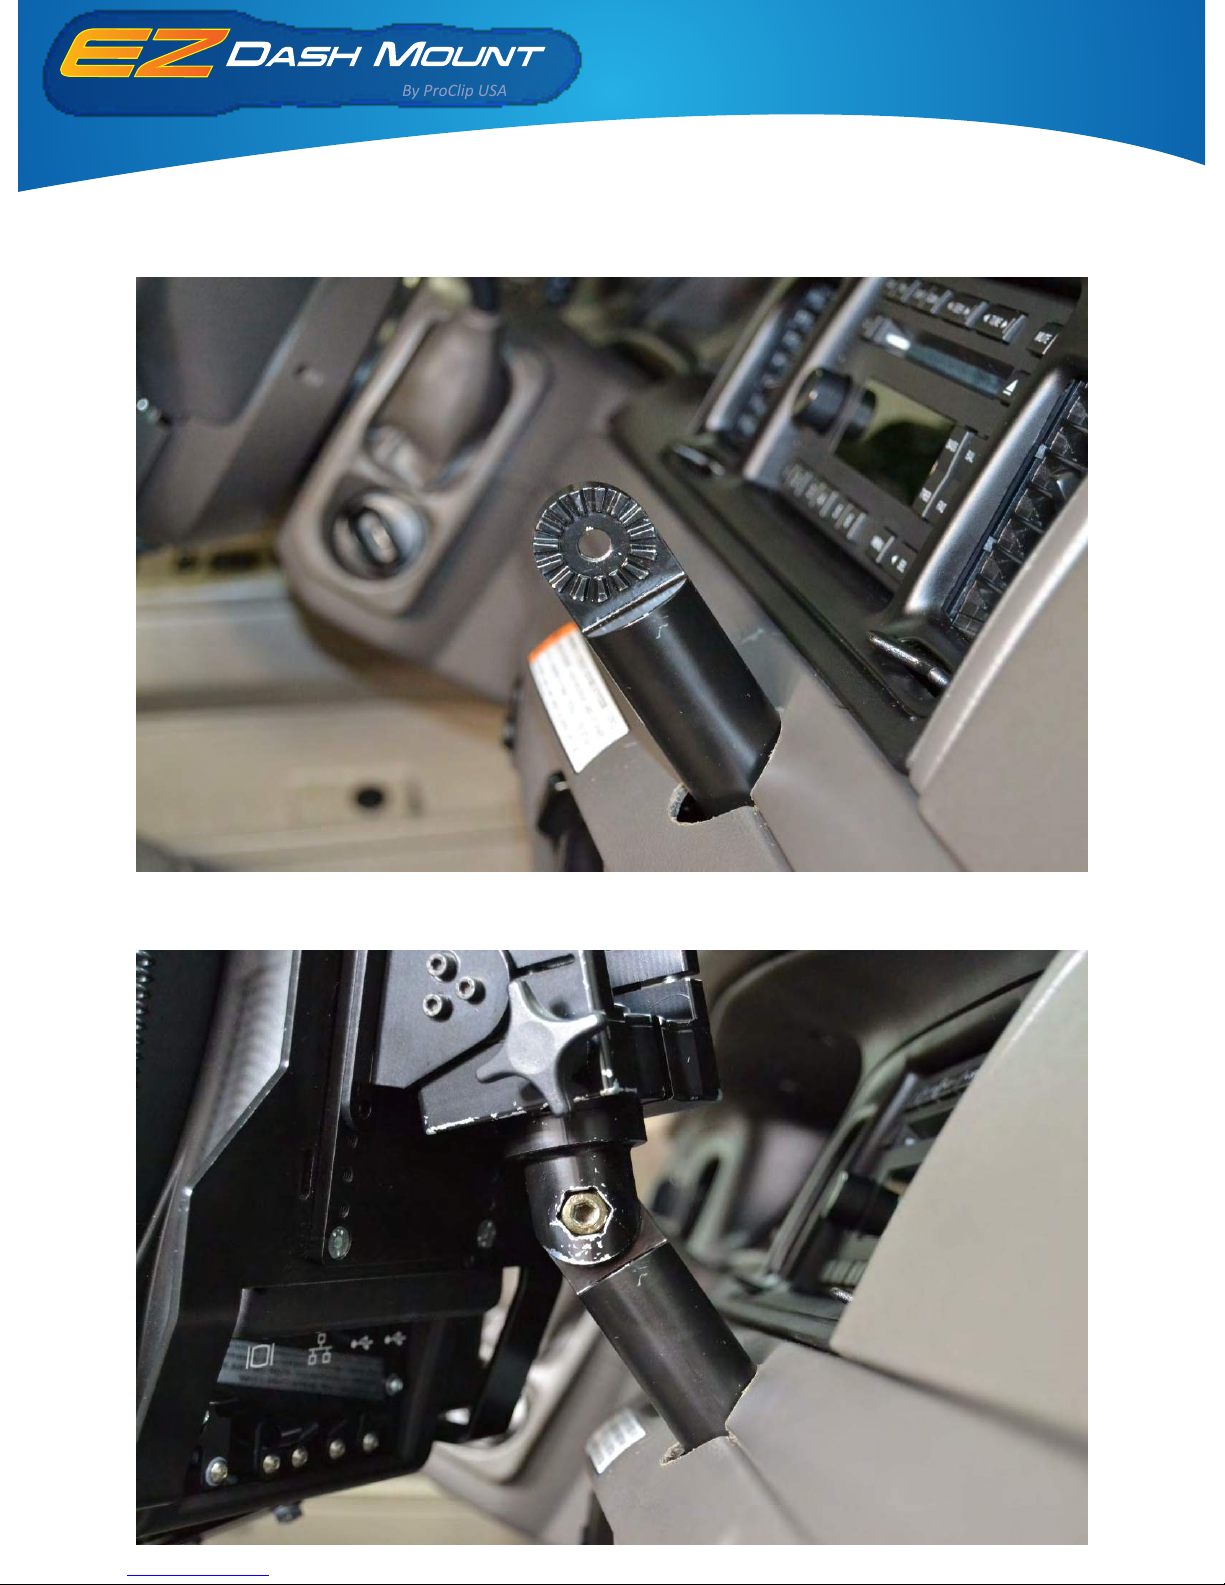
30. Reaach the instrument panel. Then reaach the panel with the trunk release buon. Make sure
to reaach all the wires that were removed from the lights and radio.
31. When aaching the upper lt swivel mount, keep the mount straight up and down. If it is
angled, it can create an undesirable angle when swiveling.
Ford Crown Victoria
Police Interceptor 1995-2012
Installaon Instrucons
By ProClip USA
Page 18

ComtronICS CobaltAV | 2350 Fortune Drive, Lexington KY 40509
USTF: 1.800.264.6021 | PH: 859.299.9494 | FAX: 859.299.9334
Email: [email protected] | www.comtronicsnow.com
©2015 ComtronICS Cobalt AV. All rights reserved.
Ford Crown Victoria
Police Interceptor 1995-2012
By ProClip USA
Returns, Limited Warranty, and Liabilies
Returns
No products shipped hereunder may be returned without ComtronICS’ prior approval. In order to return a product, Buyer must obtain
an RMA (Return Merchanidise Authorizaon) Number. All returns must be made within thirty (30) days of the invoice date and include
proof of purchase. The product must be in undamaged and unused condion, meaning NO screw can be screwed into any product, not
even the pre-drilled holes. NO holes may be punched through a product, NO scratches or screw marks upon the product, and NO
velcro tape marks, etc. We reserve the right to withhold a refund if we deem the product is damaged. A copy of your original order or
invoice must accompany return. ALL COMPONENTS PERTAINING TO THE ORINGINAL PART MUST BE RETURNED.
Limited Warranty and Liabilies
ComtronICS warrants that the Products will be free of defects in materials and workmanship for a period of one (1) year from the date
of purchase. If any Product should become defecve during the warranty period, ComtronICS, at its opon, will replace it, repair it, or
refund the purchase price. Repair or replacement parts or Products will be furnished on an exchange basis and will either be new or
recondioned. All replaced Products shall become the property of ComtronICS. Warranty service is available to you by delivering the
Product during the warranty period to the company it was purchased from, or to ComtronICS at: 2350 Fortune Drive, Lexington KY
40509 USA, and providing proof of purchase, price, and date of purchase. If shipped to ComtronICS, the Buyer must first call Comtron-
ICS at 1.800.264.6021, or email ComtronICS at [email protected] to obtain a returns approval and return number. Buyer will
bear all shipping, packaging, and insurance costs, and all other costs, excluding labor and parts necessary to effectuate repair, replacement or refund under this warranty. For more informaon on how to obtain warranty service, write, email or call ComtronICS at: 2350
Fortune Drive, Lexington KY 40509, Tel. 1.800.264.6021, or Email: [email protected].
THIS LIMITED WARRANTY DOES NOT EXTEND TO ANY PRODUCT WHICH HAS BEEN DAMAGED AS A RESULT OF ACCIDENT, MISUSE,
ABUSE, OR AS A RESULT OF UNAUTHORIZED SERVICE. THIS WARRANTY IS IN LIEU OF ALL OTHER EXPRESS WARRANTIES FOR THIS
PRODUCT. IMPLIED WARRANTIES, INCLUDING THOSE OF MERCHANTABLITIY, FITNESS FOR A PARTICULAR PURPOSE, AND NON-INFRINGLMENT SHALL NOT HAVE A GREATER DURATION THAN 1 YEAR FROM THE DATE OF PURCHASE. IN THE EVENT THIS PRODUCT BECOMES
DEFECTIVE DURING THE WARRANTY PERIOD, THE BUYER’S EXCLUSIVE REMEDY SHALL BE REPAIR, REPLACEMENT OR REFUND AS
PROVIDED ABOVE.
IN NO EVENT SHALL COMTRONICS BE LIABLE FOR INCIDENTAL OR CONSEQUENTIAL DAMAGES, INCLUDING WITHOUT LIMITATION LOSS
OF PROPERTY, ARISING FROM BREACH OF ANY EXPRESSED OR IMPLIED WARRANTY.
COMTRONICS DISCLAIMS ALL WARRANTIES, EXPRESS OR IMPLIED, OTHER THAN THOSE SET FORTH ABOVE.
IN NO EVENT WILL COMTRONICS BE LIABLE TO THE BUYER OR ANY THIRD PARTY FOR ANY INCIDENTAL OR CONSEQUENTIAL DAMAGES,
INCLUDING WITHOUT LIMITATION, INDIRECT, SPECIAL, PUNITIVE, OR EXEMPLARY DAMAGES, INCLUDING ATTORNEY FEES ARISING OUT
OF THE USE, OR THE INABILITY TO USE THE PRODUCTS, OR FOR ANY CLAIM BY ANY OTHER PARTY, EVEN IF COMTRONICS HAS BEEN
ADVISED OF THE POSSIBIITY OF SUCH DAMAGES.
 Loading...