

Page 1
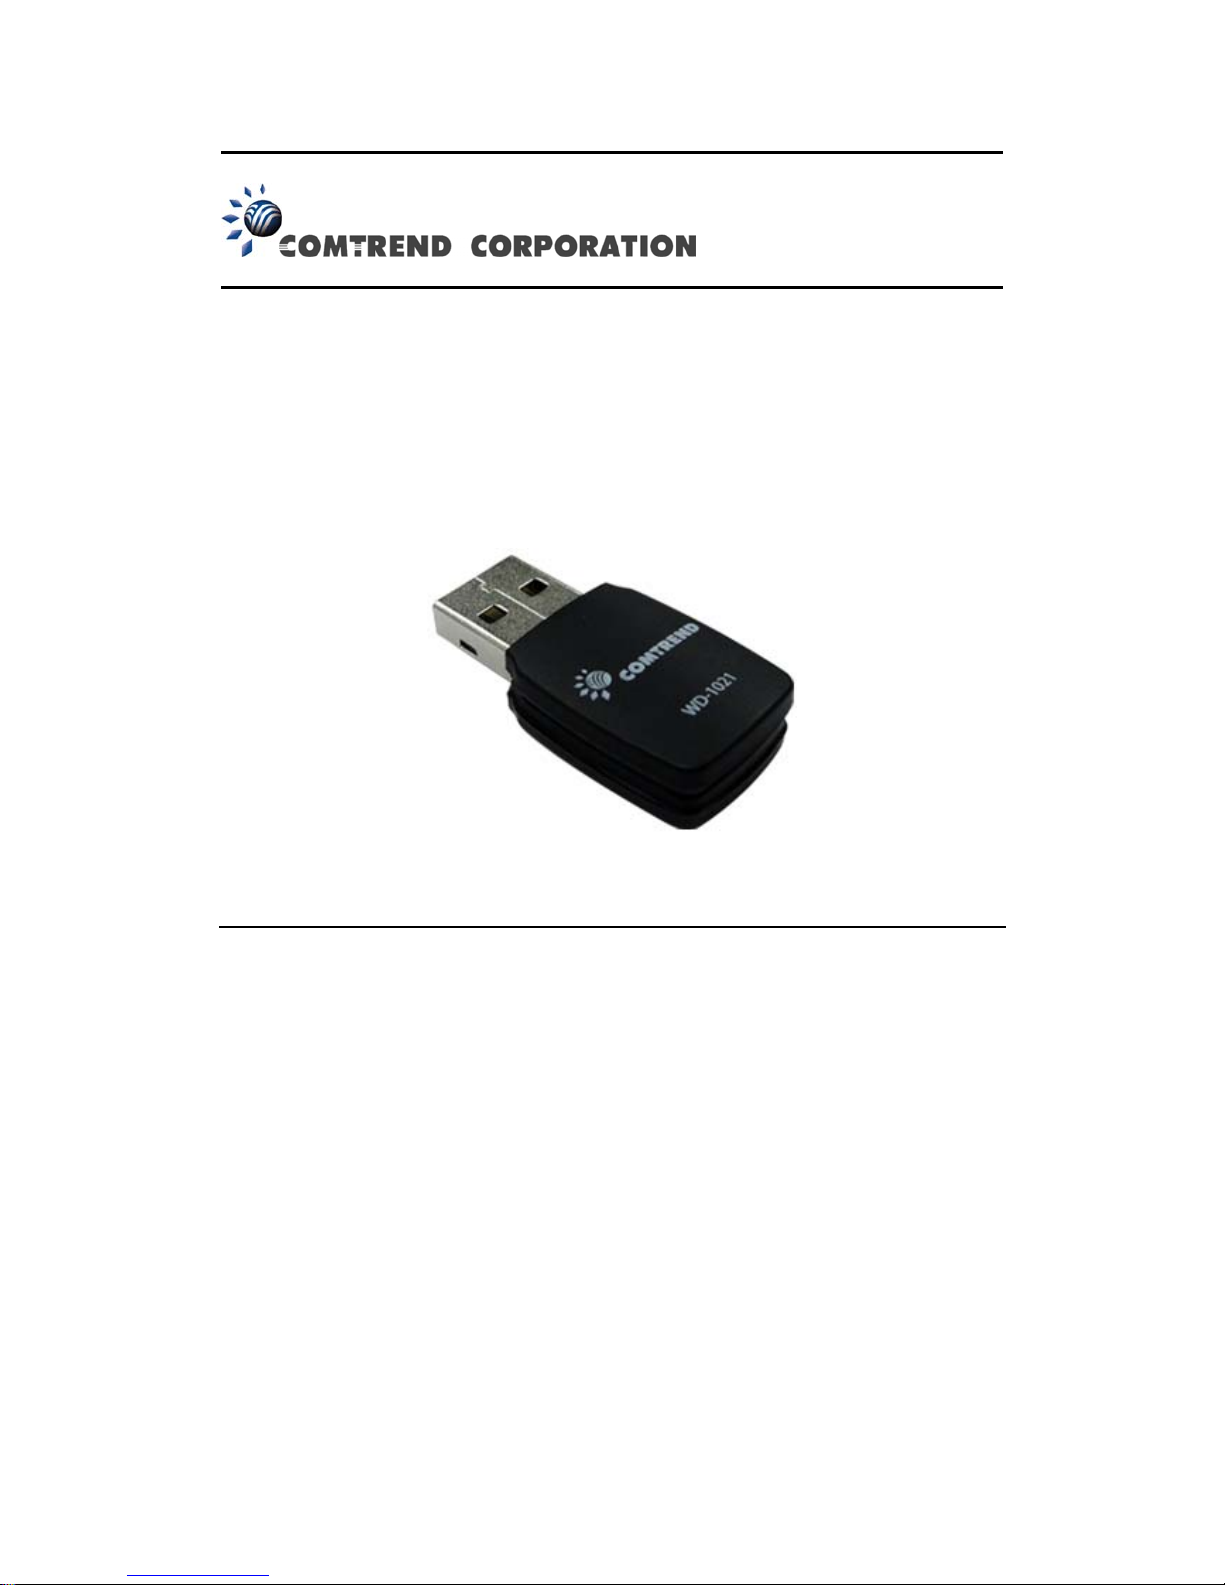
Wireless-N USB Adapter
User Manual
Version A1.0, March 25, 2013
Page 2

Preface
This manual provides information related to the installation and operation of this
device. The individual reading this manual is presumed to have a basic
understanding of home networking terminology and concepts.
If you find the product to be inoperable or malfunctioning, please contact technical
support for immediate service by email at HU[email protected]
For product updates, new product release, manual revision, or software upgrades,
please visit our website at
HUhttp://www.comtrend.comU
Copyright
Copyright© 2013 Comtrend Corporation. All rights reserved. The information
contained herein is proprietary to Comtrend Corporation. No part of this document
may be translated, transcribed, reproduced, in any form, or by any means without the
prior written consent of Comtrend Corporation.
NOTE: This document is subject to change without notice.
Protect Our Environment
This symbol indicates that when the equipment has reached the end of
its useful life, it must be taken to a recycling center and processed
separate from domestic waste.
The cardboard box, the plastic contained in the packaging, and the parts that make up
this device can be recycled in accordance with regionally established regulations.
Never dispose of this device along with your household waste; you may be subject to
penalties or sanctions under the law. Instead, please be responsible and ask for
disposal instructions from your local government.
1
Page 3

2
Table of Contents
Cha pter I: Product Information......................................................................3
1‐1Introduction..........................................................................................................................3
1‐2SystemRequirements ......................................................................................................4
1‐3PackageContents ...............................................................................................................5
1‐4Getfamiliarwithyournewwirelessnetworkadapter.......................................6
CHA PTER II: Driver Installation and Configuration............................... 7
2‐1NetworkAdapterInstallation........................................................................................7
2‐2Howto ...............................................
13connecttoawirelessaccesspoint............
2-2-1 UsingtheComtrendConfigurationUtility.......................................13
2-2-2 Using Windows Zero Configuration ................................................. 18
2‐3ConnectionProfileManagement ..............................................................................
23
.
2-3-1 How to add a new profile...................................................................24
2-3-2 How to remove an existing profile.....................................................27
2-3-3 .......................................28How to Edit an existing profile...................
2-3-4 Howtomakeacopyofanexistingprofile.......................................29
2-3-5 How to set as a default profile........................................................... 30
2‐4Howtoviewgeneralinformation,statusandnetworkstatistics................ 31
.
2-4-1 General Information...........................................................................31
2-4-2 Status..................................................................................................32
2-4-3 View Network Statistics.....................................................................33
2‐5MiscellaneousSettings.................................................................................................. 34
2‐6EstablishasecureconnectionwiththeAPbysoftwareWPS ......................
36
2-6-1 PIN Code............................................................................................38
2-6-2 Push Button........................................................................................40
CHA PTER III: Soft-AP Function.................................................................41
3‐1HowtoswitchtoAPModeandStationMode ...................................................... 41
3-1-1 How to configure SSID and Channel.................................................44
3-1-2 How to Setup Soft-AP Security..........................................................46
3‐2AdvancedSettings ..........................................................................................................48
3‐3WirelessStatistics ........................................................................................................... 49
3‐4InternetConnectionSharing(ICS).......................................................................... 50
CHA PTER IV: Appendix............................................................................51
4‐1HardwareSpecification................................................................................................ 51
Page 4

3
Chapter I: Product Information
2B1‐1Introduction
This network adapter is compact in size and you can plug it into the USB
port of your computer, acting like an embedded network card. In addition
to common wireless standards 802.11b/g, this wireless network adapter is
also 802.11n compatible, supporting data transfer rates up to 300Mbps.
Other features of this device include:
IEEE 802.11b/g/n compatible.
QoS function (WMM feature): controls the bandwidth required
for different applications.
Supports major encryption methods like WEP, WPA, and WPA2
encryption.
WPS configuration
USB 2.0 interface
Supports software AP function.
Green Power Saving: supports smart transmit power control and
auto-idle state adjustment.
Page 5

4
3B1‐2SystemRequirements
An available USB 2.0 port
Windows XP, Vista, or W indows 7 operating system
CD-ROM drive
At least 100MB of available disk space
Page 6

4B1‐3PackageContents
Before you start using this wireless network adapter, please check if
there’s anything missing in the package, and contact your place of
purchase to claim missing items:
* 1 - CD-ROM (Driver/Utility/QIG/User Manual) (1)
* 1 - USB Wireless Network Adapter (2)
* 1 - USB Cable (3)
* 1 - Printed QIG (4)
1
2
3 4
5
Page 7

5B1‐4Getfamiliarwithyournewwirelessnetworkadapter
1. USB connector
2. Link/Activity LED (Under the case)
3. WPS Button
6
1
2
3
LED Name Light Status Description
Off No wireless network adapter is installed.
On A solid light for 5 seconds means the WPS
connection is established successfully.
Link/
Activity
Blinking The wireless network adapter is transferring
or receiving data.
Fast Blinking (three times per second) means
the WPS is activated. The network adapter
will wait for 2 minutes to establish a WPS
connection.
Page 8

CHAPTER II: Driver Installati
6B2‐1NetworkAdapterInstallation
on and Configuration
Follow the instructions below to install your new wireless network
adapter:
Warning: If you have any other wireless utilities or adapters running on
your computer, please close or uninstall them prior to installing the
Comtrend Wireless Utility and Adapter in order to avoid any conflict.
1. Insert the CD into the CD/DVD ROM drive of your computer and click
the “Driver Install” button to install the software program and drivers.
7
Page 9

For Windows Vista / Windows 7 OS, you’ll be prompted to confirm
installation. Click ‘Install this driver software anyway’ to continue.
Note: if the following Window pops up during the installation process,
click the ‘Continue Anyway’ button.
8
Page 10

2. Select the language you wish to use, and then click ‘Next’.
9
3. Click ‘Next’
to start installation. The installation procedure needs few
moments to complete.
Page 11
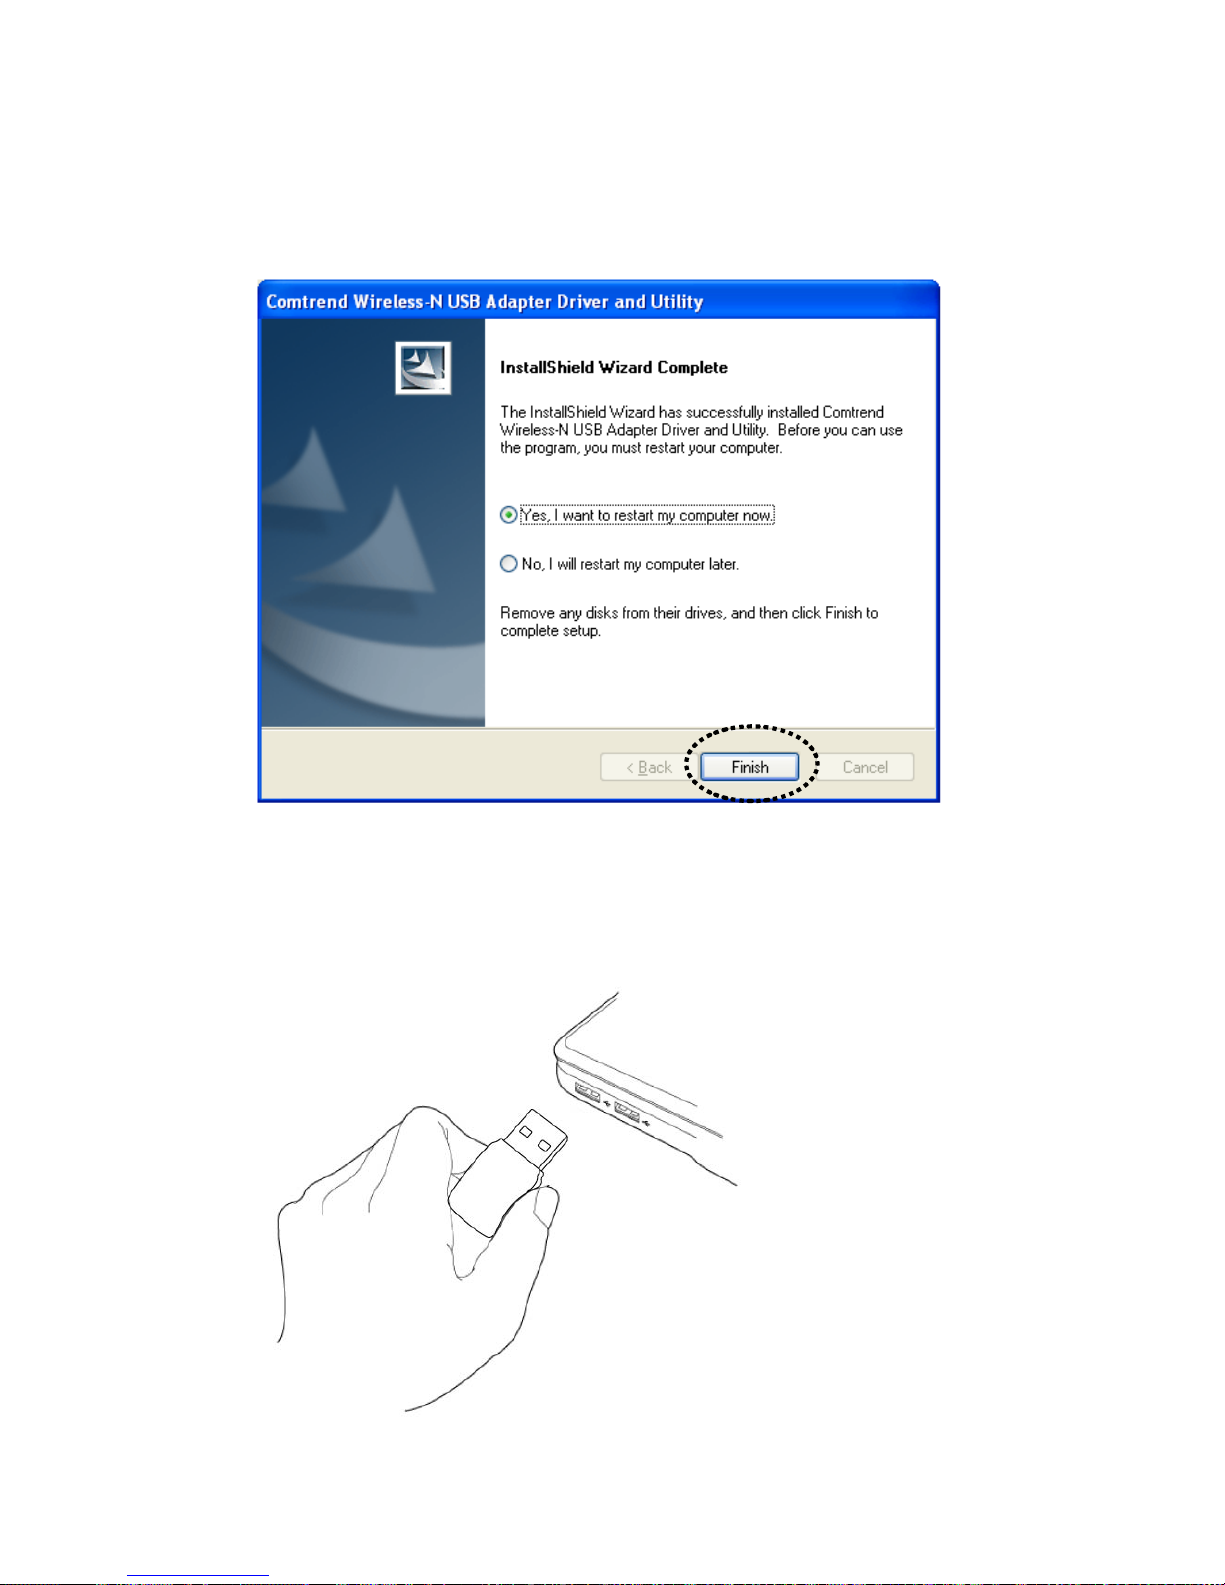
4. Click ‘Finish’ to reboot your computer to complete the installation
procedure. This is required before you can use your new USB wireless
network adapter.
5. After your computer is rebooted, insert the USB wireless network
adapter into an available USB 2.0 port of your computer. Never use force
to insert the adapter. If you feel it’s stuck, flip it over and try again.
10
Page 12
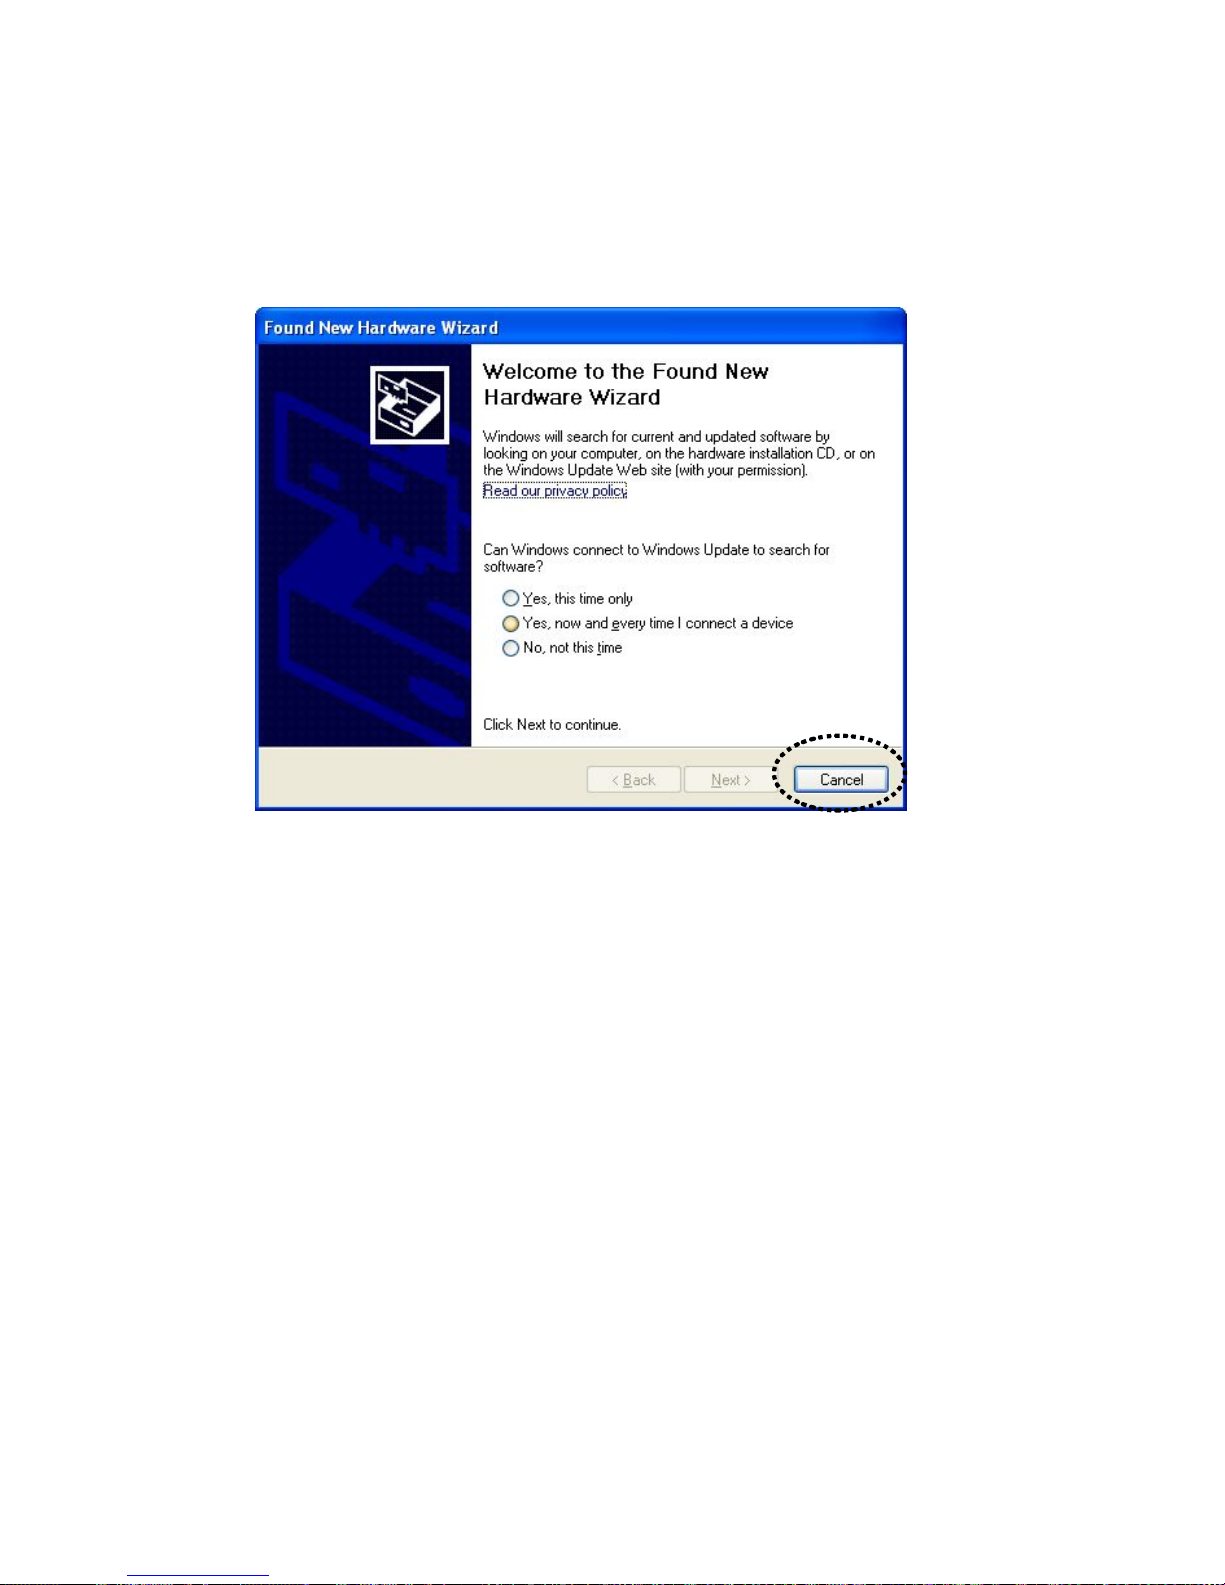
6. The following message will appear on your computer, click ‘Cancel’ to
proceed with the installation.
11
Page 13

7. After the installation is complete, the Comtrend wireless configuration
utility will be shown on your computer’s desktop automatically. You will
also see an icon in the lower-right corner of your Windows toolbar. You
can click the icon to open the configuration utility.
You can refer to the icon to see the status of your wireless connection:
Wireless network adapter not detected
No connection with access point is established (red)
Connection with access point has been established (green)
For detailed instructions about the wireless network configuration utility,
see the next chapter.
12
Page 14

7B2‐2Howtoconnecttoawirelessaccesspoint
To use the wireless network, you need to connect to a wireless access
point first. You can either use the Comtrend configuration utility (which
comes with the network adapter driver), or the Windows Zero
Config perating system). uration utility (comes with the Windows o
2-2-1 UsingtheComtrendConfigurationUtility
Follow the instructions below to use the Comtrend configuration utility to
connect to a wireless access point.
1. Click the Comtrend configuration utility icon located at the
lower-right corner of the computer desktop, and configuration menu
will appear:
2. Click the ‘A
vailable Network’ tab to search for wireless access points
nearby.
13
Page 15
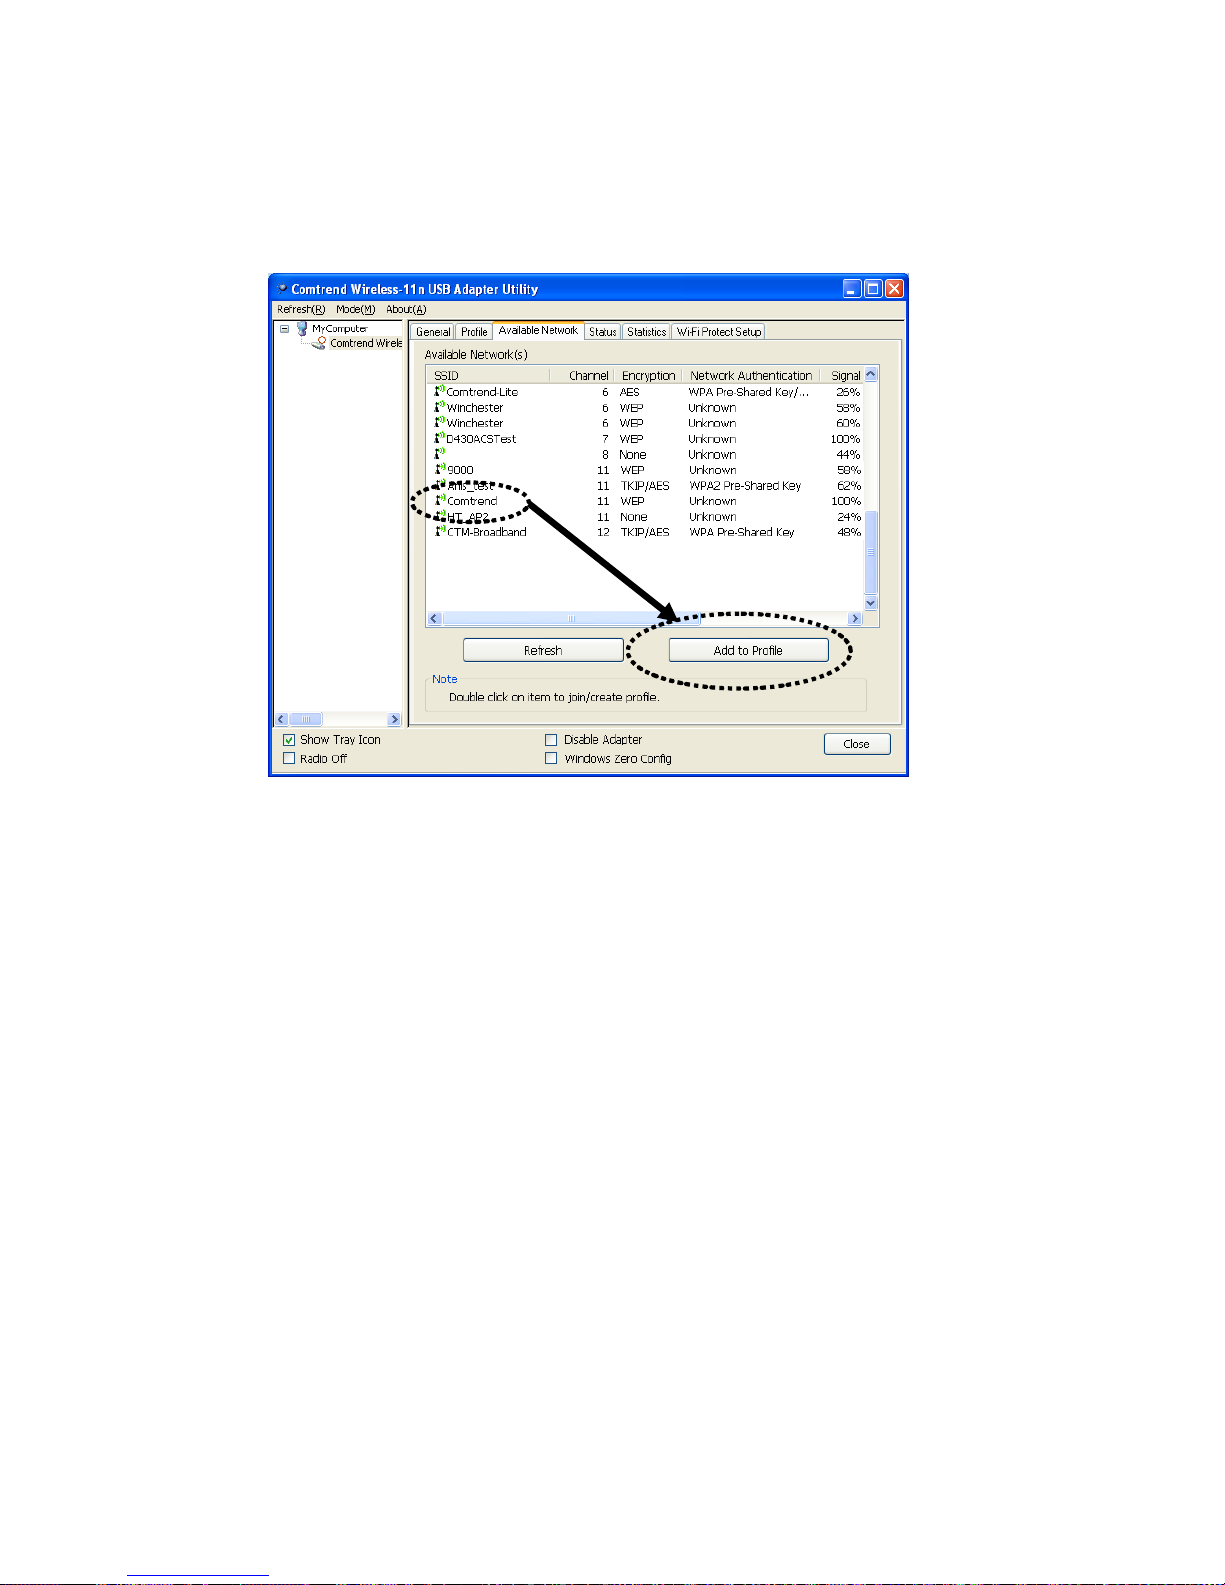
3. All available wireless access points that are within range of the
wireless network adapter and computer will be displayed.
If the wireless access point you wish to connect to does not appear
here, you can click the ‘Refresh’ button to scan for wireless access
points again; if the wireless access point you’re looking for still
doesn’t appear, try to move the computer closer.
When the access point you’re looking for is on the list, double click it
or select it and click the ‘Add to Profile’ button.
4. If a password is required to access the wireless network, input it in the
‘Network key’
field and input it again in the ‘Confirm network key’
field for confirmation. Click ‘OK’ when the password is properly
inputted.
NOTE: Network security type (‘Network Authentication’ and ‘Data
encryption’) will be selected automatically based on the wireless
access point’s security setting. You do not need to change these
settings by yourself.
14
Page 16

Click ‘OK’ when ready.
All options in this page will be filled automatically according to the
access point you wish to add to the profile. However, you can still
modify them to meet your requirements.
Profile Name You can give a name to this profile, so you
can remember its purpose or location. It can
be any phrase to help you remember.
Network Name
(SSID)
SSID (Service Set IDentifier, i.e. access
point’s name). This field will be listed as the
access point you selected when the SSID is
not hidden and grayed out. If the SSID is
hidden, you have to input the correct SSID
yourself.
This is a
computer-to-computer
(ad hoc) network
Check this box if you wish to connect to
another computer / network device by ad hoc
method. When not accessing a wireless access
point, you need to check this box.
Channel Select the wireless channel for ad hoc
connection. This option only appears when
you’re using an ad hoc connection.
15
Page 17

16
Network
Authentication
Select the network authentication type from
the drop-down menu.
This setting must be identical to the setting of
the wireless access point you wish to connect
to.
Data encryption Select the data encryption type from the
drop-down menu. This setting must be
identical to the setting of the wireless access
point you wish to connect to.
ASCII /
PASSPHRASE
When the encryption type is ‘WEP’, you need
to input a ‘passphrase’ to connect to the
wireless access point. Check ‘ASCII’ or
‘PASSPHRASE’ depending on the security
setting of the access point, and input it in the
box; if you select ‘PASSPHRASE’ you also
need to select the length of the key.
The passphrase must be identical to the
setting of the wireless access point you wish
to connect to.
Key index Select WEP key index. For most access points
you can select ‘1’, but please refer to the
setting of the access point.
Network key /
Confirm network key
When the encryption type is ‘WPA’ or
‘WPA2-PSK’, you need to input a
‘passphrase’ to connect to the wireless access
point. Input the same passphrase in two boxes
for confirmation.
EAP TYPE / Tunnel /
Provision Mode
When authentication type is 802.1X, you need
to select EAP type, tunnel, and provision
mode from the drop-down menu. This setting
must be identical to your 802.1x
authentication server.
Username / Identity /
Domain / Password
Input 802.1x related authentication
information here.
Certificate If certification is required to authenticate with
the 802.1x authentication server, select a local
certificate from the drop-down list.
Page 18

PAC Check this box and PAC (Privilege Access
Certificate) will be automatically selected.
5. The network adapter will attempt to connect to the access point; this
may require a few moments. When the ‘Status’ becomes ‘Associated’,
your computer is connected to the access point you selected. Click
‘Close’ to close the configuration menu.
NOTE: If you connected to an access point but the connection dropped
soon after, check the security settings and re-check your password
spelling/input.
17
Page 19
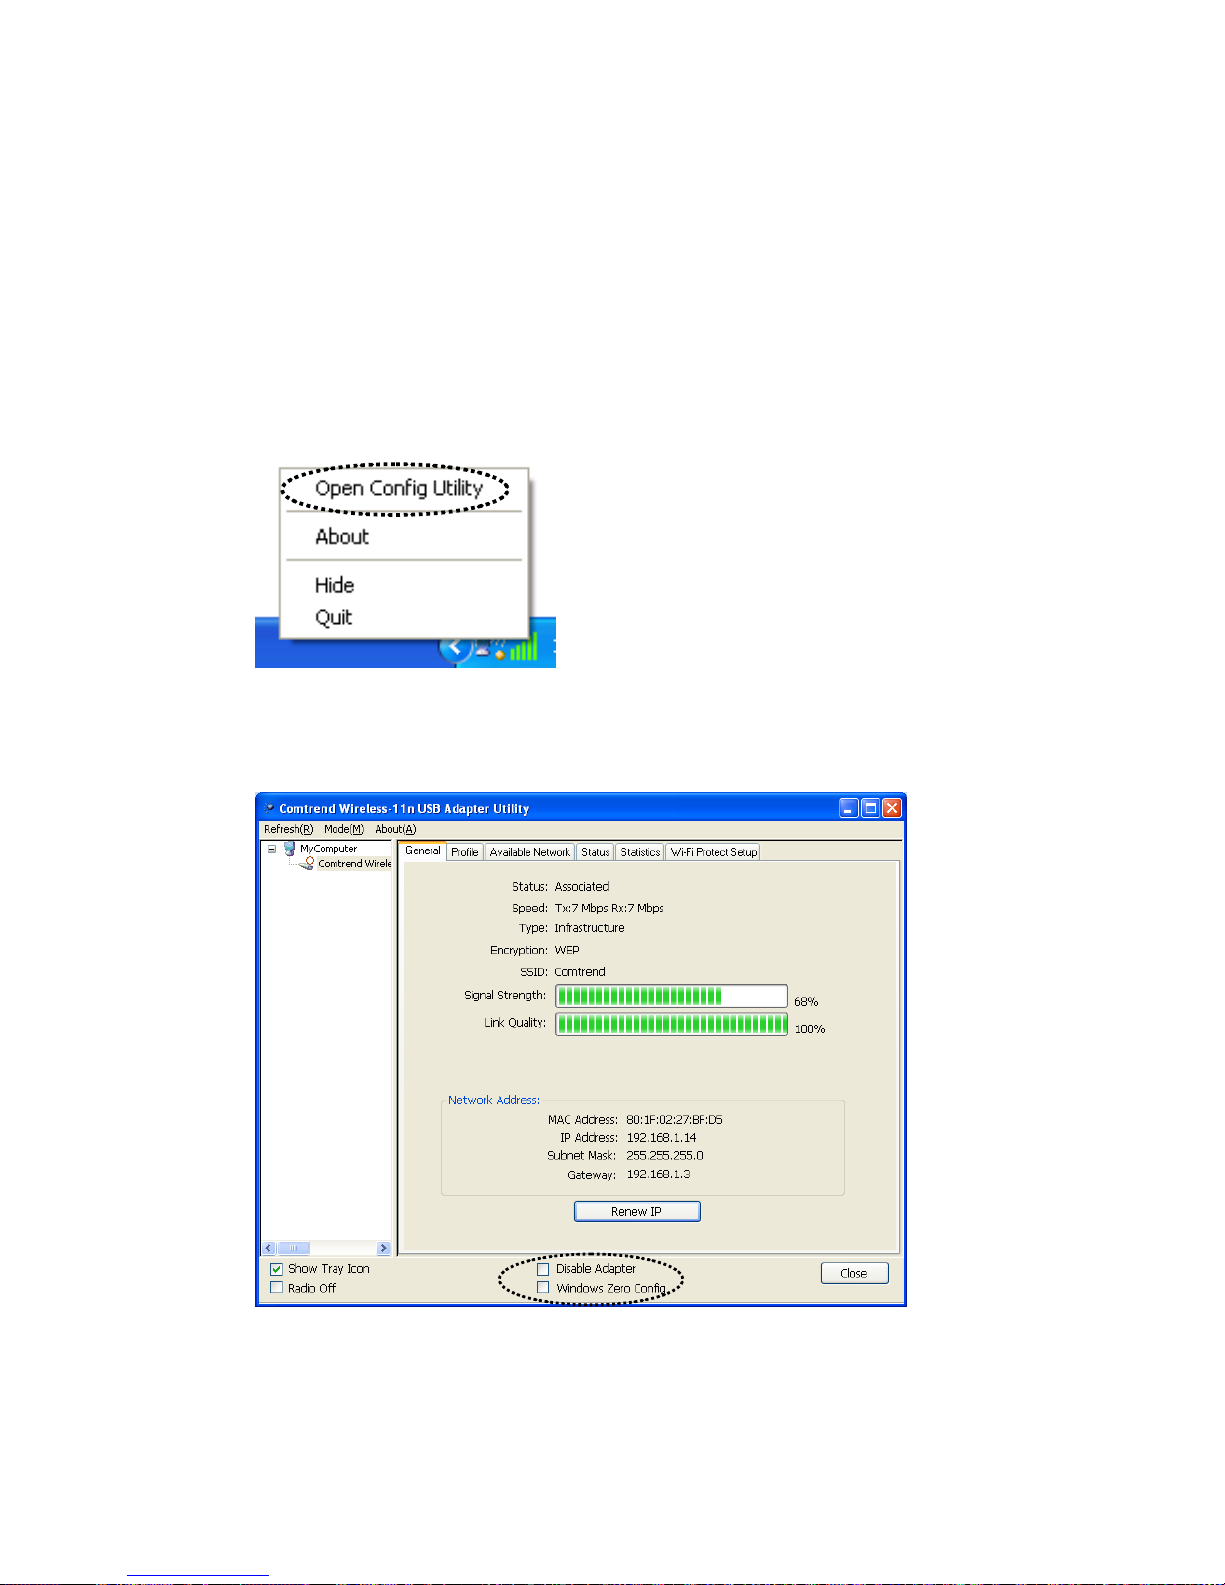
2-2-2 Using Windows Zero Configuration
Windows XP and Vista have a built-in wireless network configuration
utility, called the ‘Windows Zero Configuration’ (WZC). You can also use
WZC to configure your wireless network parameters:
1. Right-click the Comtrend configuration utility icon, and click ‘Open
Config Utility.’
2. Check the ‘W
indows Zero Config’ box.
18
Page 20

3. A message indicating that you’ve been switched to Windows Zero
Configuration mode will appear. Click ‘OK’ to continue.
NOTE: To return to the Comtrend utility, uncheck the ‘Windows Zero
Config’ box.
4. Click the ‘Start’ button (should be located at the bottom-left corner of
windows desktop); click ‘Control Panel’, then click ‘Network and
Internet Connections’ in the Control Panel.
19
Page 21

5. Double click ‘Network Connections’.
6. Right-click ‘Wireless Network Connection’ (it may have a number as
a suffix if you have more than one wireless network adapter, please
make sure you right-click the ‘Comtrend 802.11n Wireless LAN
Adapter), then select ‘View Available Wireless Networks’.
20
Page 22

7. All wireless access points in proximity will be displayed here. If the
access point you want to use is not displayed here, try to move your
computer closer to the access point, or you can click ‘Refresh network
list’ to rescan for access points. Click the access point you want to use
if it’s shown, then click ‘Connect.’
8. If the access point is protected by encryption, you need to input its
security key or passphrase here. It must match the encryption setting
on the access point.
If the access point you selected does not use encryption, you won’t be
prompted to input a security key or passphrase.
21
Page 23

9. If you can see the ‘Connected’ message, the connection between your
computer and wireless access point is successfully established.
22
Page 24

8B2‐3ConnectionProfileManagement
If you need to connect to different wireless access points at different
times, like the access point of your home, office, cybercafe, or public
wireless service, you can store the connection parameters (encryption,
passphrase, security etc, etc.) as a profile for every access point so you
don’t have to input these parameters every time when you want to
connect to a specific wireless access point.
To manage profiles, right-click the configuration utility icon located in
the lower-right corner of your computer desktop, and then click ‘Open
Config Utility.’
Click the ‘Profile’
tab.
23
Page 25
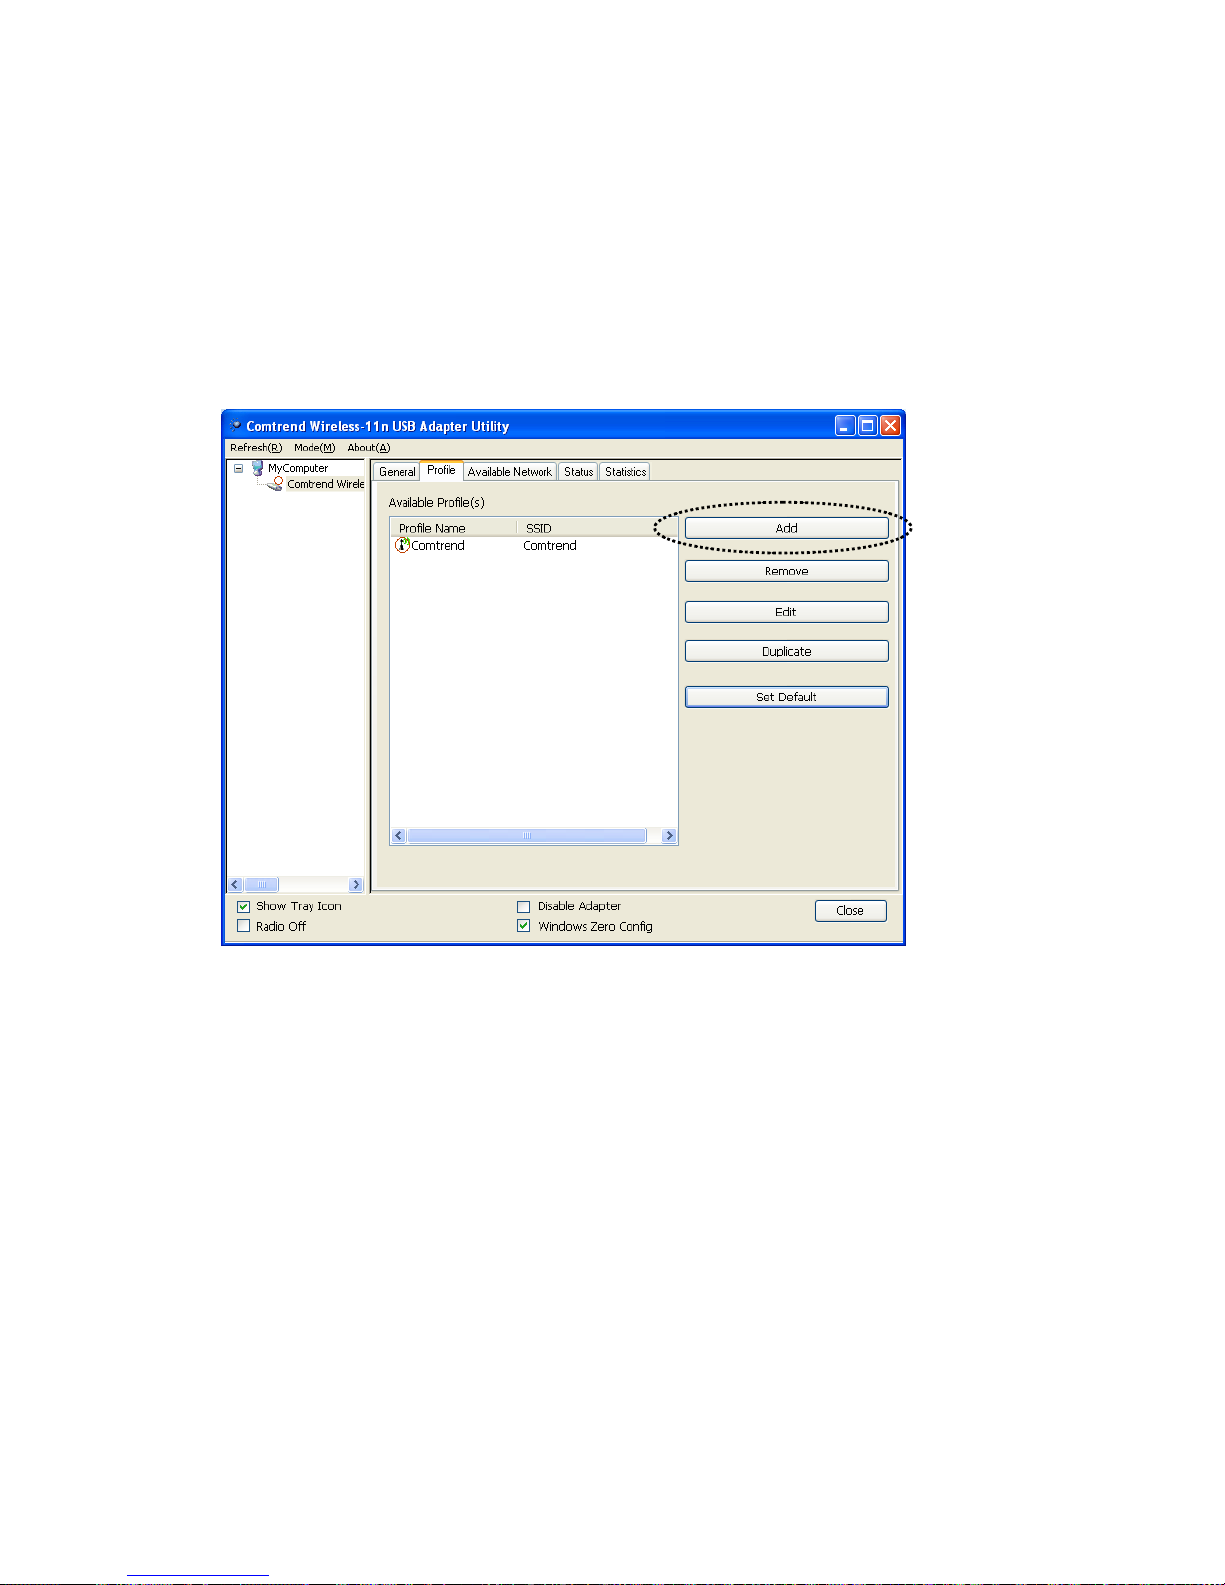
2-3-1 How to add a new profile
This function allows you to setup connection parameters for a specific
wireless access point in advance, without connecting to it first.
If you want to create a new profile, click the ‘Profile’ tab, then click the
‘Add’ button.
24
Page 26

You’ll be prompted to input the connection parameters for the wireless
access point you wish to connect to:
Required parameters are:
Profile name You can give a name to this profile so you can
remember its purpose easily. It can be any
phrase to help you remember.
Network Name
(SSID)
SSID (Service Set IDentifier, i.e. access
point’s name). This must be identical to the
SSID of the access point you wish to connect
to.
This is a
computer-to-computer
(ad hoc) network
Check this box if you wish to connect to
another computer / network device by ad hoc
method. When not accessing a wireless access
point, you need to check this box.
Channel Select the wireless channel for ad hoc
connection. This option only appears when
you’re using an ad hoc connection.
Network
Authentication
Select the network authentication type from
the drop-down menu. This setting must be
identical to the setting of the wireless access
point you wish to connect to.
25
Page 27

26
Data encryption Select the data encryption type from
drop-down menu. This setting must be
identical to the setting of the wireless access
point you wish to connect to.
ASCII /
PASSPHRASE
When the encryption type is ‘WEP’, you need
to input a ‘passphrase’ to connect to the
wireless access point. Check ‘ASCII’ or
‘PASSPHRASE’ depending on the security
setting of the access point, and input it in the
box; if you select ‘PASSPHRASE’ you also
need to select the length of the key.
The passphrase must be identical to the
setting of the wireless access point you wish
to connect to.
Key index Select the WEP key index. For most of access
points you can select ‘1’, but please refer to
the setting of the access point.
Network key /
Confirm network key
When the encryption type is ‘WPA’ or
‘WPA2-PSK’, you need to input a set of
‘passphrase’ to connect to the wireless access
point. Input the same passphrase in two boxes
for confirmation.
EAP TYPE /
Tunnel /
Provision Mode
When the authentication type is 802.1X, you
need to select EAP type, tunnel, and provision
mode from the drop-down menu. This setting
must be identical to your 802.1x
authentication server.
Username / Identity /
Domain / Password
Input the 802.1x related authentication
information here.
Certificate If certification is required to authenticate with
the 802.1x authentication server, select a local
certificate from the drop-down list.
PAC Check this box and PAC (Privilege Access
Certificate) will be automatically selected.
When all required parameters are set, click ‘OK’ to create and save a new
profile.
Page 28

2-3-2 How to remove an existing profile
When you no longer need an existing profile, you can remove it.
If you want to remove a profile, click the ‘Profile’ tab, then select an
existing profile that you wish to remove, and then click the ‘Remove’
button.
27
Page 29

16B2-3-3 How to Edit an existing profile
If you have added a profile before, and you wish to change the content of
the profile, you can use this function. Select a profile from the list first,
and then click the ‘Edit’ button. You’ll be provided with the contents of
the selected profile, and you can edit them. Click ‘OK’ to save the
changes, or click ‘Cancel’ to discard the changes.
28
Page 30

2-3-4 Howtomakeacopyofanexistingprofile
If you need to make a copy of a specific profile, you can use this option.
This function is very convenient when you need to build a new profile
whose parameters are similar to any existing profile.
To do this, select an existing profile, and then click the ‘Duplicate’ button.
Y
ou’ll be prompted to input a profile name. Use a name that does not
exist in the profile list.
29
Page 31
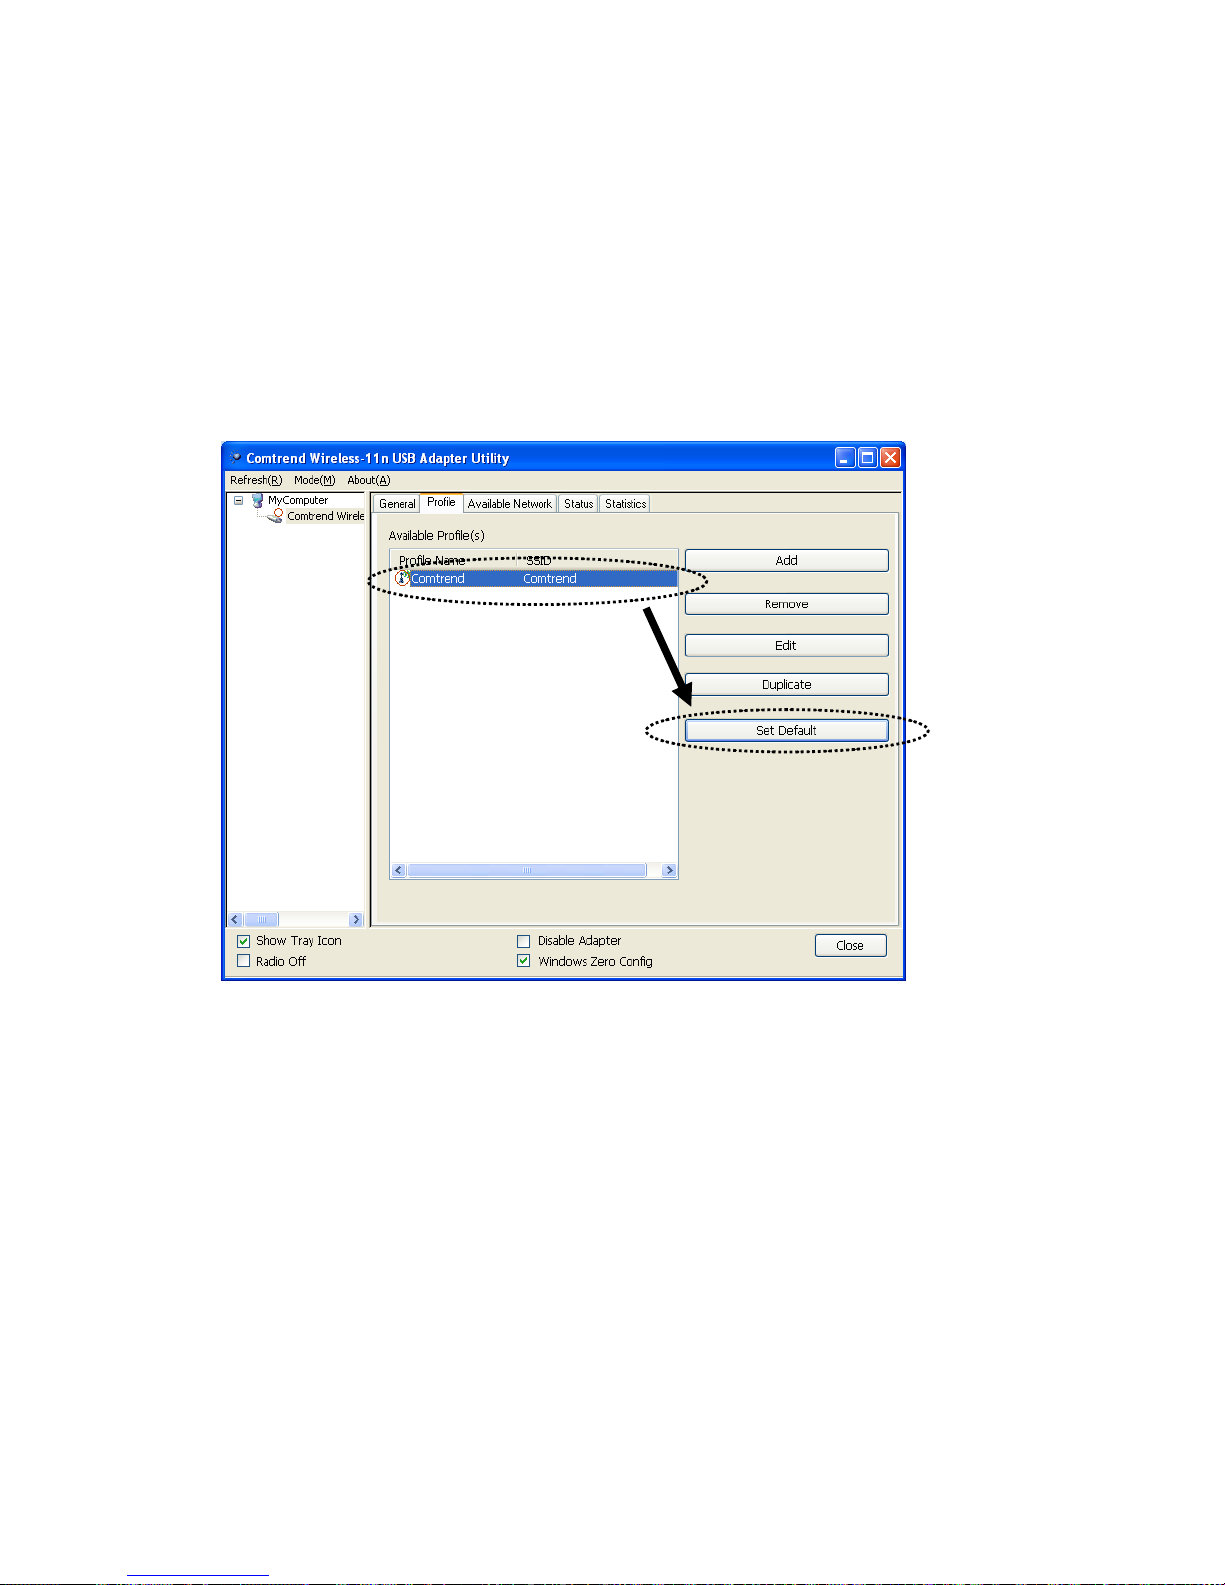
17B2-3-5 How to set as a default profile
If you wish to use a specific profile as the default connection, you can
select a profile in the list, and click ‘Set Default.’ The selected profile will
become the default selection and the configuration utility will attempt to
connect to the selected access point.
30
Page 32

9B2‐4Howtoviewgeneralinformation,statusandnetworkstatistics
The Comtrend configuration utility provides information about network
statistics and link status. If you want to know how your wireless network
adapter works, you can use these functions to get detailed information
about the wireless connection you’re using.
2-4-1 General Information
If you want to know the general information of the access point you’re
connected to, click the ‘General’ tab:
All general information like signal strength and link quality will be
displayed here. This information is very useful when you encounter some
problems connecting to an access point.
If you wish to get a new IP address from the DHCP server, you can click
the ‘Renew IP’ button.
31
Page 33
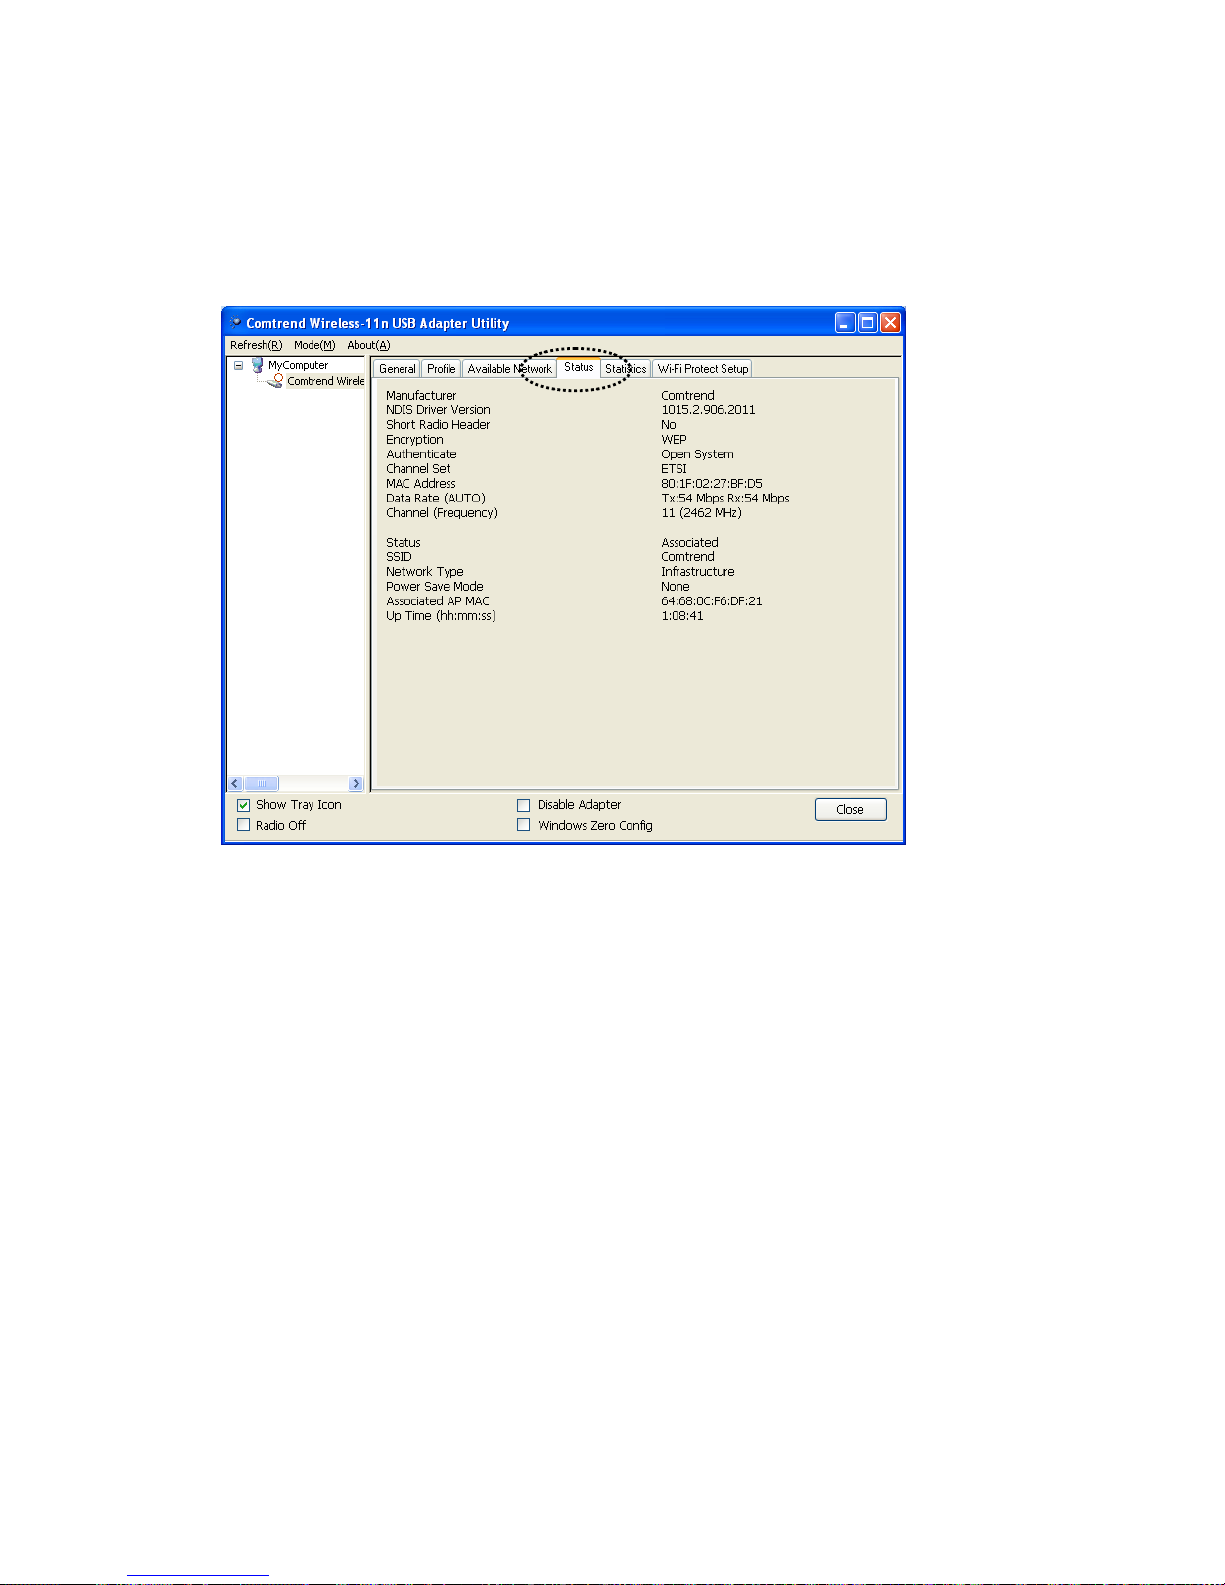
2-4-2 Status
If you want to know the status of your wireless network adapter, click the
‘Status’ tab:
32
Page 34

18B2-4-3 View Network Statistics
To view the statistical data of the wireless network adapter, click the
‘Statistics’ tab, and the statistics of the wireless connection will be
displayed:
All connection-related statistics are displayed here. You can click the
‘Reset’ button, to reset the statistics of all items back to 0.
33
Page 35

10B2‐5MiscellaneousSettings
There are a few functions provided by the Comtrend configuration utility
that you can access at the bottom of the configuration menu:
The descriptions of these functions are listed as follows:
Show Tray Icon Check this box to show an icon on the system
tray.
Uncheck this box to hide it.
Radio Off Check this box to switch the wireless radio
off. W ireless network functionality will be
disabled.
34
Page 36

35
Disable Adapter Check this box to disable the wireless network
adapter. All functionalities of the configration
menu will disappear. To resume, unckeck the
‘Disable Adapter’ box.
Windows Zero Config Use the W indows Zero Configuration
Utility to manage the wireless connections.
See section 2-2-2.
Page 37

11B2‐6EstablishasecureconnectionwiththeAPbysoftwareWPS
Wi-Fi Protected Setup (WPS) is the latest wireless network technology,
which makes wireless network setup very simple. If you have a
WPS-enabled wireless access point or Router, and you want to establish a
secure connection to it, you don’t have to configure the wireless access
point and setup the data encryption by yourself.
To use this function, the wireless access point you wish to connect to
must support the WPS function too. Follow the instructions below to
establish a secure connection between the WPS-enabled wireless access
point and your wireless network adapter.
This wireless network adapter supports 2 options for WPS: PIN code and
Push-Button (either directly from the WD-1021 or via the Comtrend
configuration utility).
To connect to a wireless router (or access point) via the WPS Hardware
button:
1) Press and hold the button on the WD-1021 for 2 seconds.
2) Press the WPS button on the access point you wish to connect
within 2 minutes. A solid light on your WD-1021 for 5 seconds
means the WPS connection has established successfully.
Follow the instructions below to setup WPS:
1. Right-click the Comtrend configuration utility icon, and click ‘Open
Config Utility’.
36
Page 38
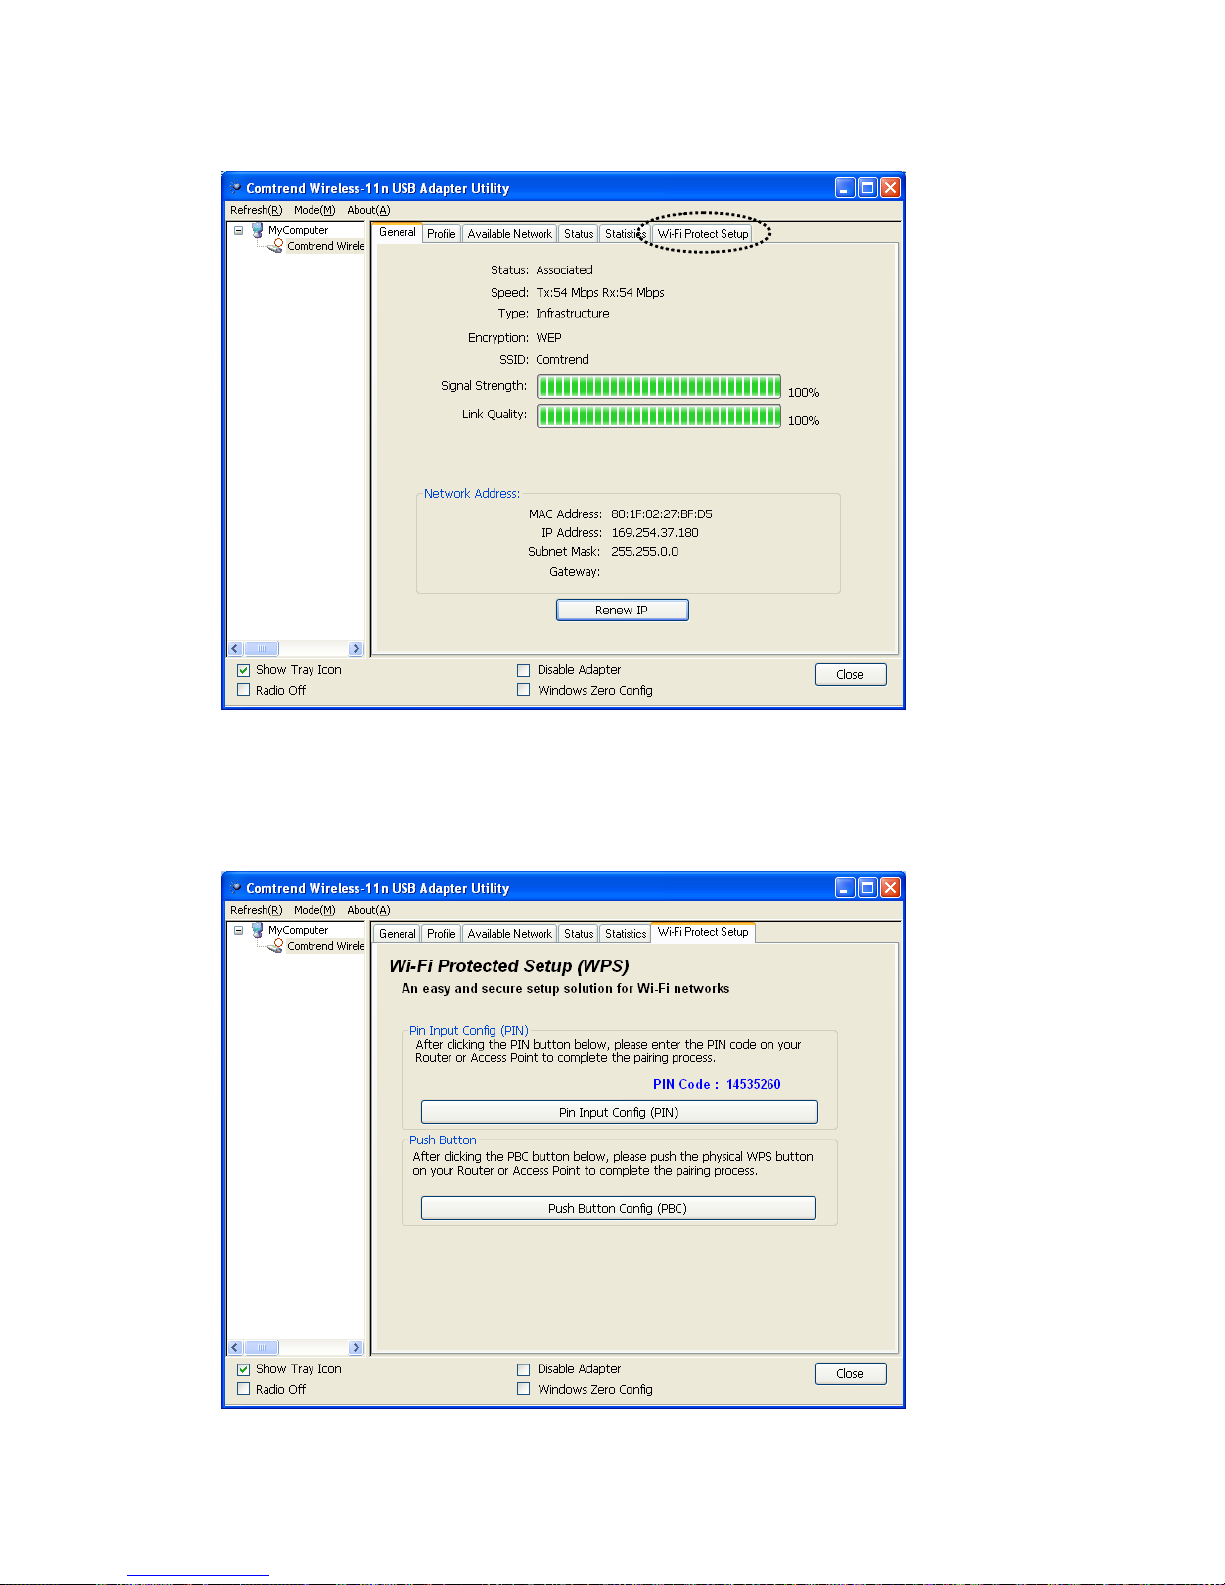
2. Click the ‘Wi-Fi Protect Setup’ tab.
3. You can use PIN code or Push-Button configuration, and the
WPS-compatible wireless access point must use the same type of WPS.
For instructions on the setup for each type of WPS, see the next 2
sections for detailed instructions.
37
Page 39
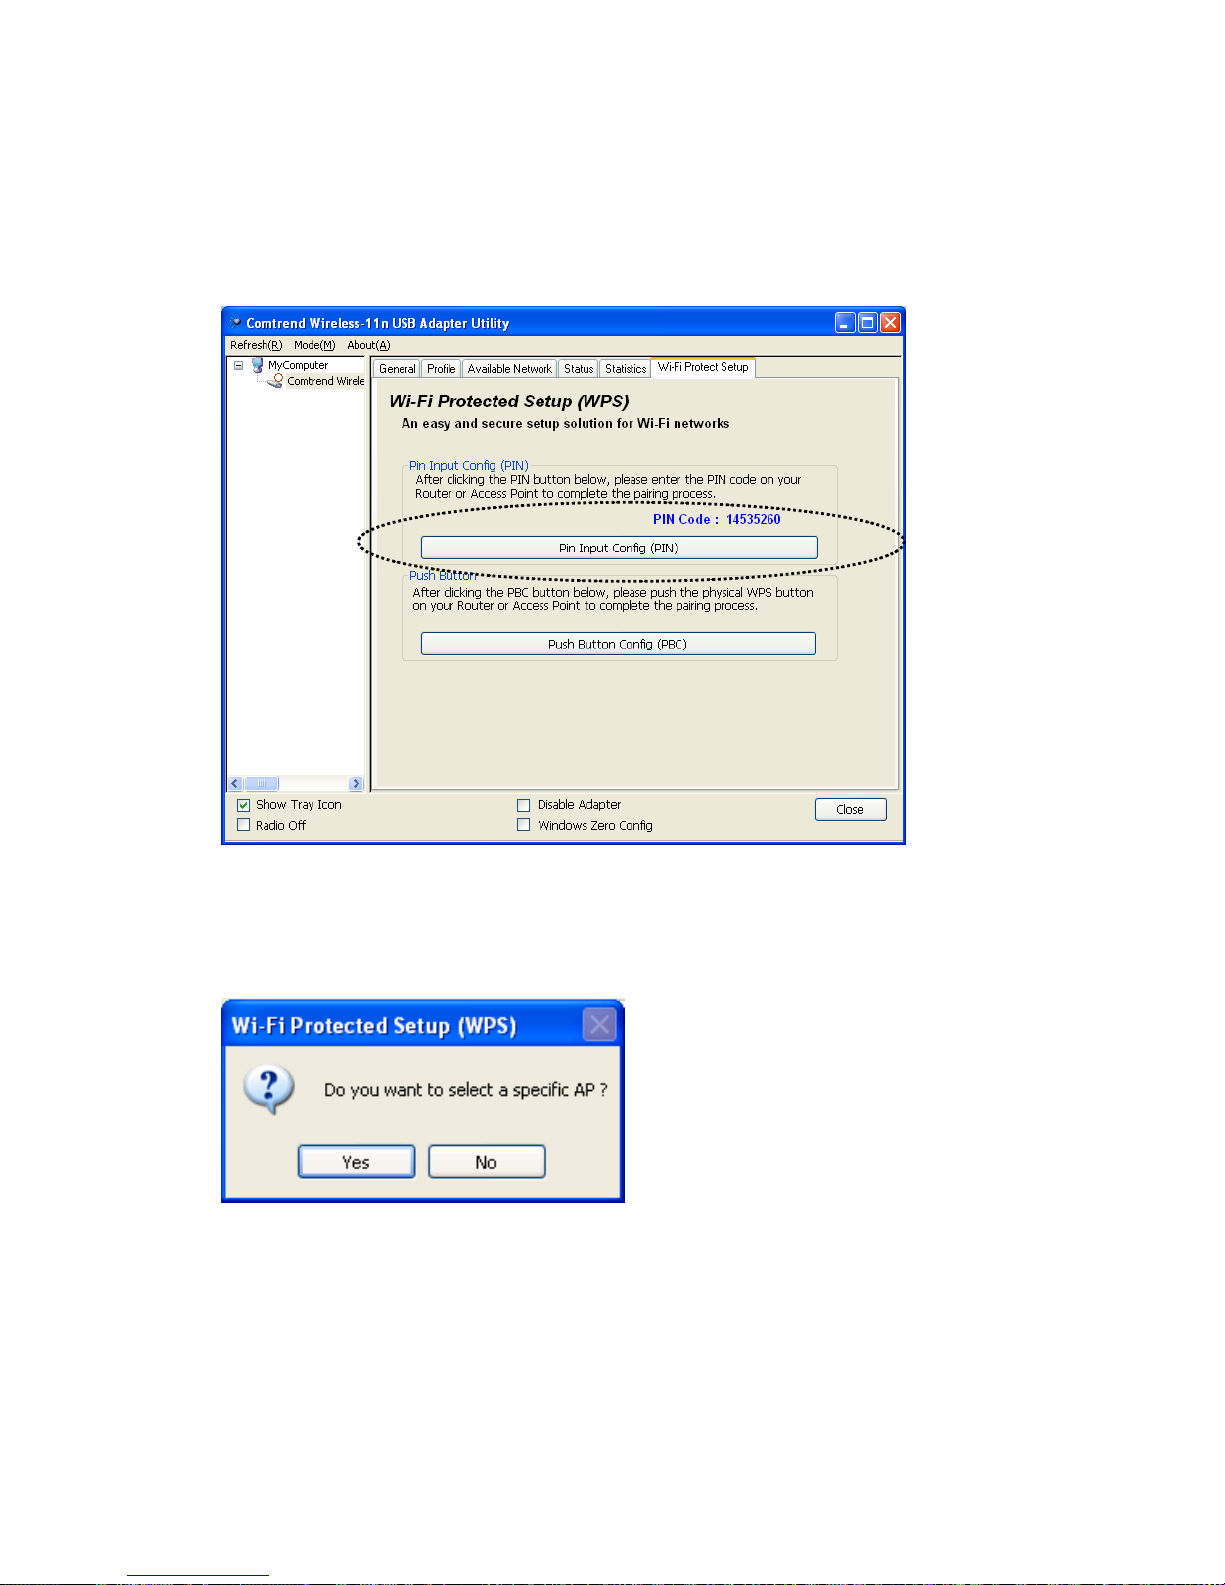
2-6-1 PIN Code
To use PIN Code, click the ‘Pin Input Config (PIN)’ button:
You’ll be prompted to select an access point you wish to connect to. If
you know its SSID, click ‘Yes’, otherwise click ‘No’.
If you select ‘Yes’, a list of all WPS-compatible APs nearby will be
displayed; you can click the ‘Refresh’ button to rescan, then select an AP
and click the ‘Select’ button.
38
Page 40

If you select ‘No’, the wireless network adapter will prompt you to enter
an 8-digit PIN code into your AP, without selecting an AP in advance.
After you select ‘Yes’ or ‘No’ in the previous step, the network adapter
will attempt to connect to the WPS-compatible AP, and an 8-digit number
will appear. Input this number to AP’s configuration menu within 2
minutes, and the network adapter will establish a secure connection with
the AP automatically.
To stop this procedure before connection is established, click ‘Cancel’.
39
Page 41

19B2-6-2 Push Button
To use Push-Button WPS configuration, click the ‘Push Button Config
(PBC)’ button. This is the easiest way to establish a secure connection by
WPS, but if there is more than one WPS-compatible AP using
Push-Button config, please use the PIN Code method instead.
After you click the ‘Push Button Config’, a message box will appear:
Activate the WPS Push-Button function on the wireless access point, and
the wireless network adapter will establish a secure connection with the
access point within a few moments.
40
Page 42

0BCHAPTERIII:SoftAPFunction
Apart from becoming a wireless client of other wireless access points,
this wireless adapter can also act as a wireless access point. You can
switch this wireless adapter’s operating mode to ‘AP’ mode to simulate
the function of a real wireless access point via the software, and all other
computers and wireless devices can connect to your computer wirelessly,
and even share the Internet connection you have.
The instructions in the following sections explain how to use the AP
function of your wireless adapter.
3‐1HowtoswitchtoAPModeandStationMode
The default operating mode of the wireless adapter is ‘Station Mode’
(becoming a client of other wireless access points).
Follow the instructions below to switch to AP mode:
1. Right-click Comtrend configuration utility icon, and click ‘Open
Config Utility’.
41
Page 43

2. Select the tab ‘Mode’, and then select ‘Access Point’ from the
drop-down menu.
It requires a few moments to switch to AP mode, please be patient.
42
Page 44

After the mode switch is complete, you’ll see general information about
the software AP, which shows the AP’s SSID and connected wireless
clients.
43
Page 45

20B3-1-1 How to configure SSID and Channel
To configure a software AP, click the ‘Config’ button:
44
Page 46
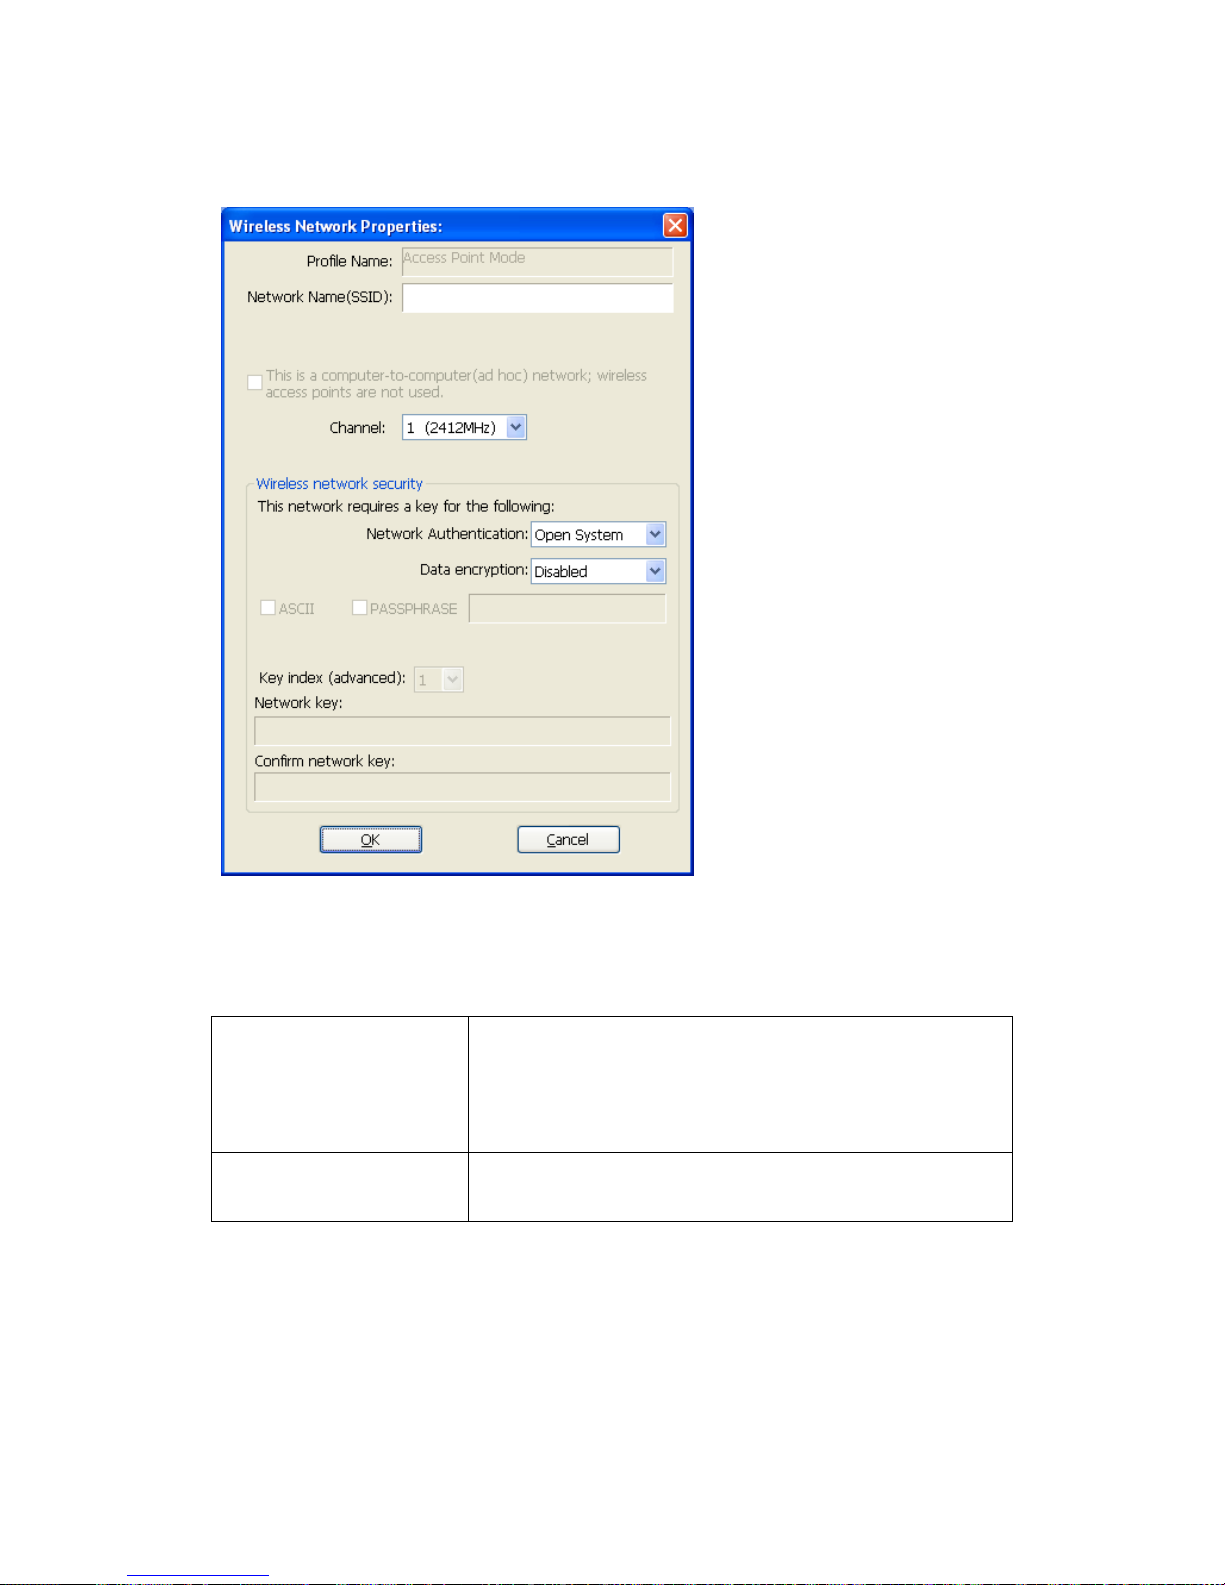
The ‘Wireless Network Properties’ will be displayed.
Note that Ad-Hoc mode is not available when the network adapter is in
AP mode. The description of the major setup items are listed below:
Network Name
(SSID)
Input the SSID (the name used to identify this
wireless access point) here. Up to 32 numerical
characters can be accepted here.
Channel Select the wireless channel you wish to use, from
1 to 11.
To save changes, click ‘OK’; otherwise click ‘Cancel’ to leave this menu
and keep settings unchanged.
45
Page 47

21B3-1-2 How to Setup Soft-AP Security
To setup security options for AP mode, configure the ‘Wireless Network
Security’ section as follows:
The descriptions are listed below:
46
Network
Authentication
Select the network authentication m
ode from the
drop-down menu.
Data Encryption Select the data encryption method from the
drop-down menu.
ASCII /
PASSPHRASE
If the encryption method is WEP, check either the
‘ASCII’ or ‘PASSPHRASE’ box and input it in
the box as the WEP passphrase.
Key Index Select the WEP key index (1-4). If you don’t
know which one you should use, select 1.
Page 48

47
Network key /
Confirm network key
If the network authentication mode is WPA, input
the WPA passphrase in both boxes.
To save changes, click ‘OK,’ otherwise click ‘Cancel’ to leave this menu
and keep settings unchanged.
Page 49

12B3‐2AdvancedSettings
If you want to setup the advanced settings of the software access point,
select the ‘Advanced’ tab. If you don’t know the meaning and affects of
these settings, keep them unchanged.
The descriptions of all the setup items are listed below:
Beacon Interval Input the wireless beacon time interval here.
DTIM Period Input the DTIM (Delivery Traffic Indication
Message) here.
Preamble Mode Select wireless frame preamble mode (long or
short) from the drop-down menu.
Set Defaults Reset all settings back to factory default value.
Apply Save changes.
If you changed any setting here and it caused problems communicating
with wireless clients, click ‘Set Defaults’ to reset all settings back to the
default setting.
48
Page 50
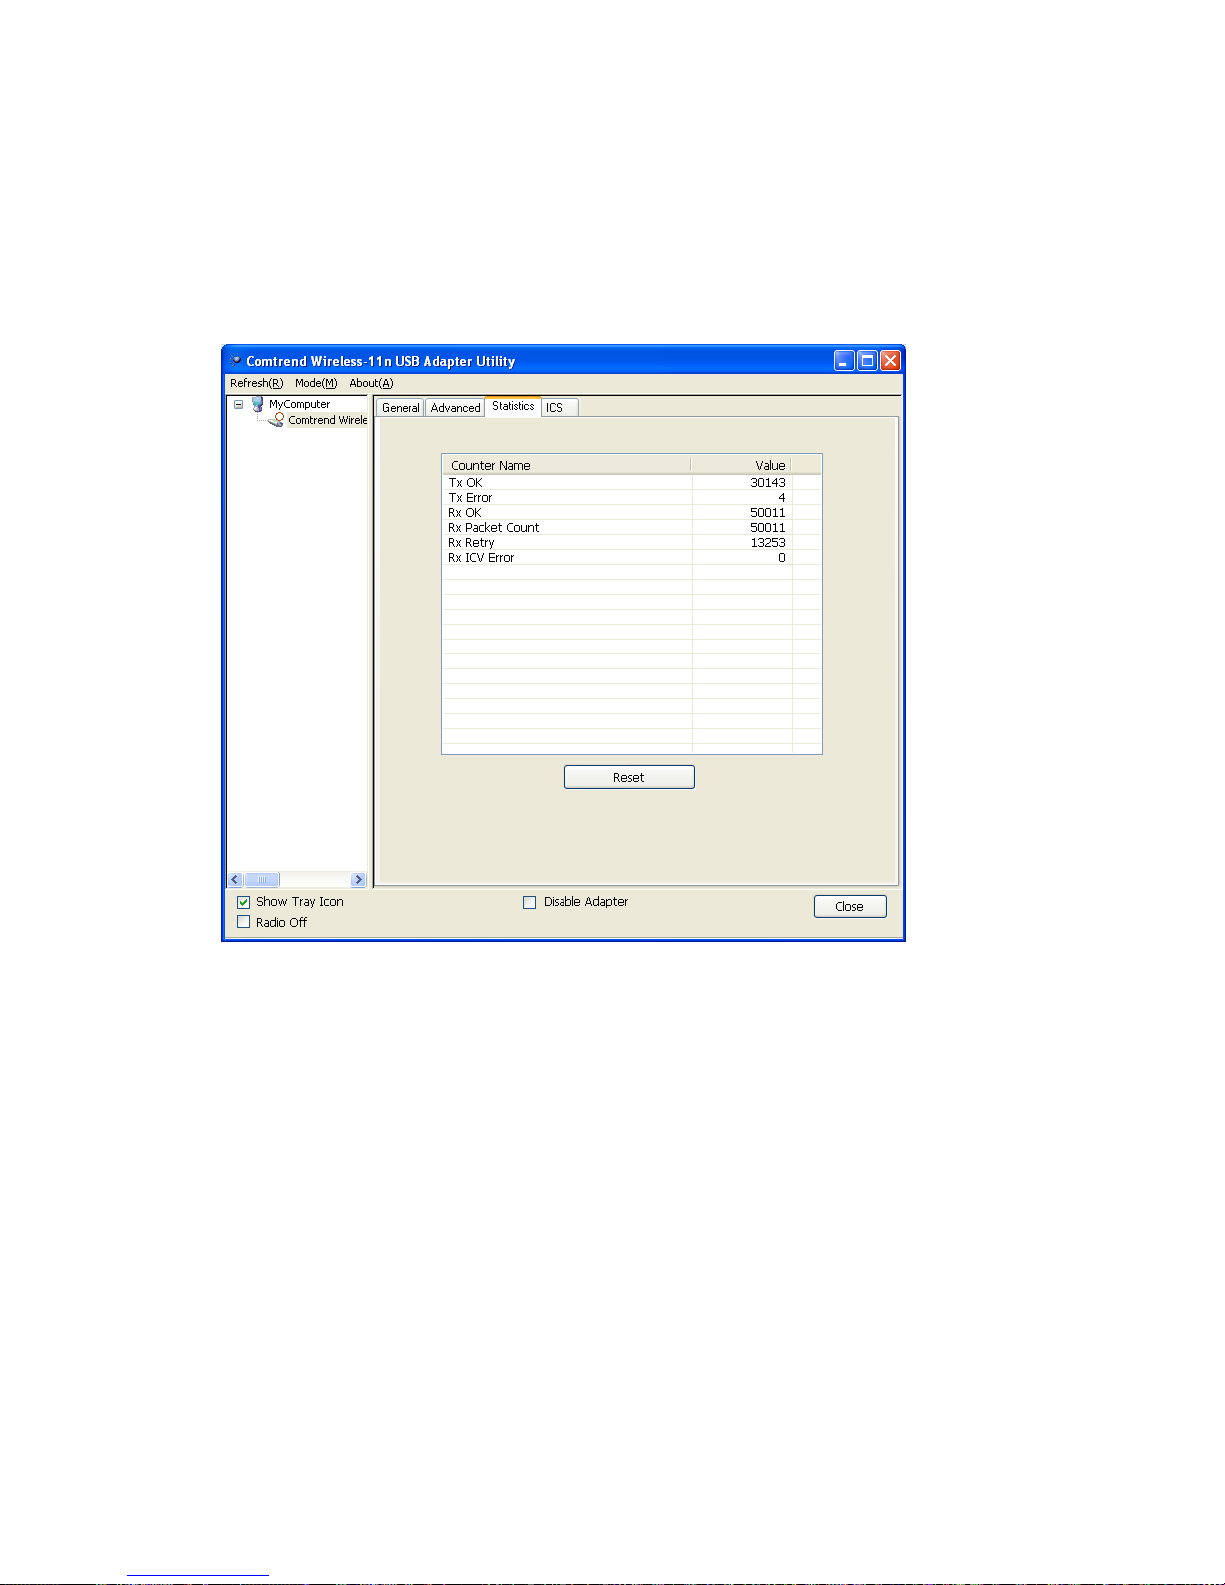
13B3‐3WirelessStatistics
Select the ‘Statistics’ tab and the data statistics for the software access
point will be displayed.
Click ‘Reset’ to reset the value of every item back to ‘0’.
49
Page 51

14B3‐4InternetConnectionSharing(ICS)
In this page, you can assign a network adapter installed on your computer
as the path for all wireless clients to get connected to the Internet.
If you have only one network adapter (except this software access point),
you don’t have to select the network adapter here; if you have more than
one network adapter, select the one you wish to be used as the Internet
gateway.
Click ‘Apply’ to save the changes (‘Apply’ is grayed out when no
changes are made in this page).
50
Page 52

51
1BCHAPTERIV:Appendix
15B4‐1HardwareSpecification
Standards: IEEE 802.11b/g/n
Interface: USB 2.0 (USB 1.1 Compatible)
Frequency Band: 2.4000 ~ 2.4835GHz
Data Rate: 11b: 1/2/5.5/11Mbps
11g: 6/9/12/24/36/48/54Mbps
11n (20MHz): MCS0-15 (Up to 144Mbps)
11n (40MHz): MCS0-15 (Up to 300Mbps)
Security: WEP 64/128, WPA, WPA2 and IEEE 802.1x
Antenna: Internal Antenna (2T2R)
Drivers: Windows XP/Vista/Windows 7
LED: Link/Activity
Transmit Power: 11b: 16±1.5dBm , 11g: 14±1.5dBm, 11n: 13±1.5dBm
Dimension: 9.1(H) x 17.8(W) x 35.8(D) mm
Temperature: 32~104˚F (0 ~ 40˚C)
Humidity: 10-95% (Non-Condensing)
Certification: FCC
 Loading...