

Page 1
CT-2400_Manual_04.pdf 1 28/4/14 6:03 pm
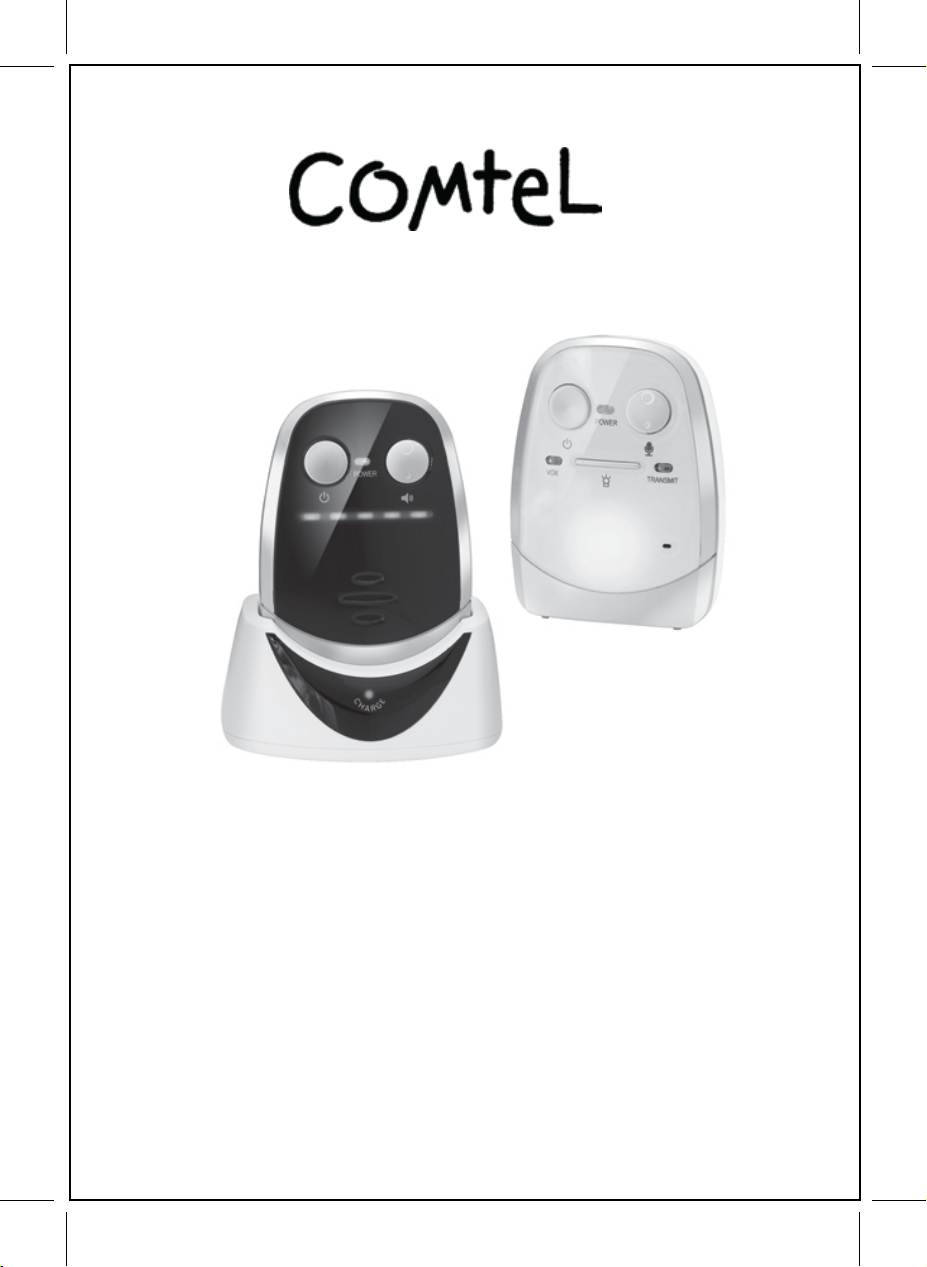
CT-2400
Bedienungsanleitung
Mode d’emploi
Istruzioni per l’uso
Instruction manual
01-11
12-21
22-30
31-40
Page 2
CT-2400_Manual_04.pdf 2 28/4/14 6:03 pm
DC6V
50
0mA
9
15
DC6V
500mA
16
17
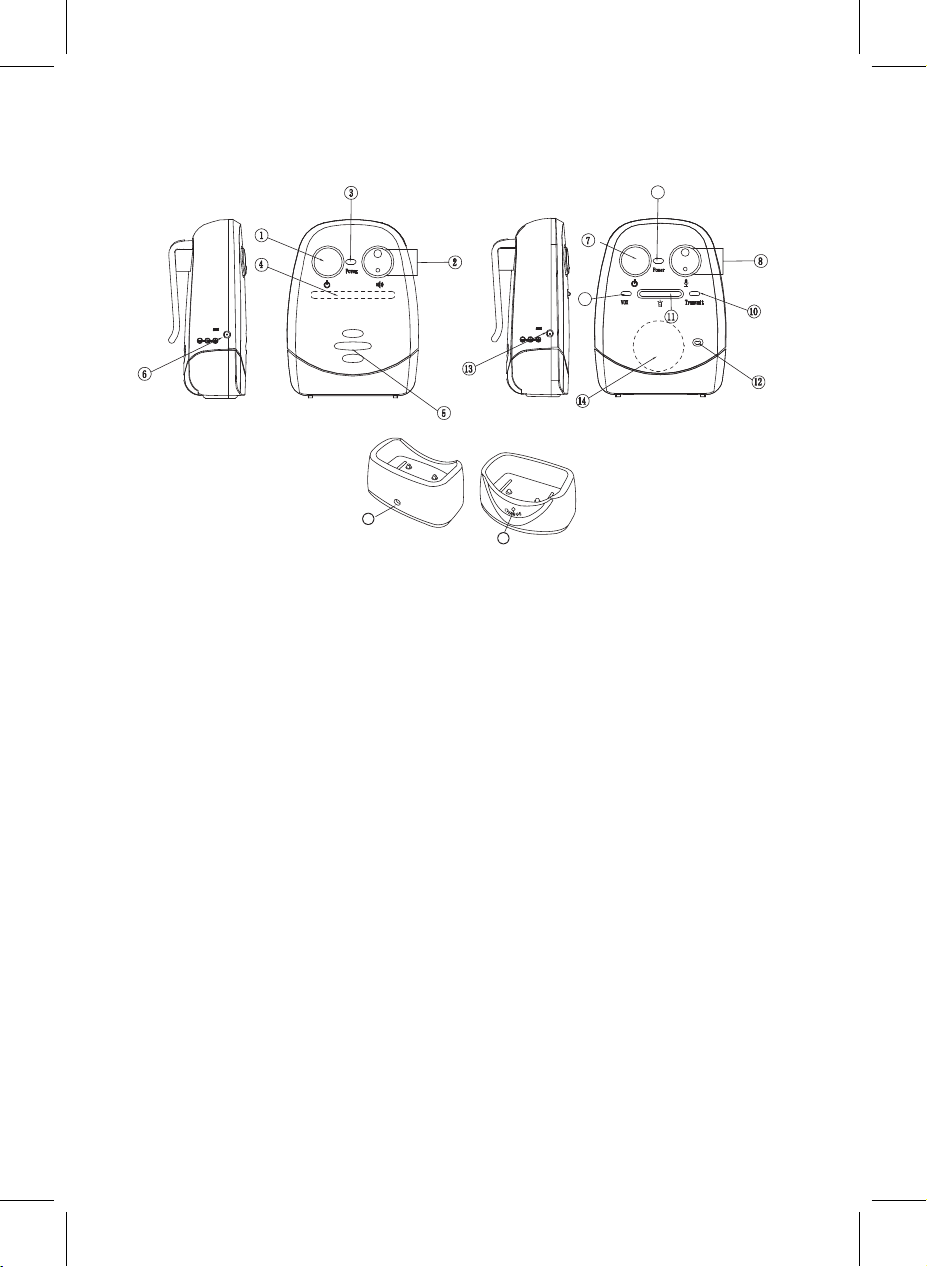
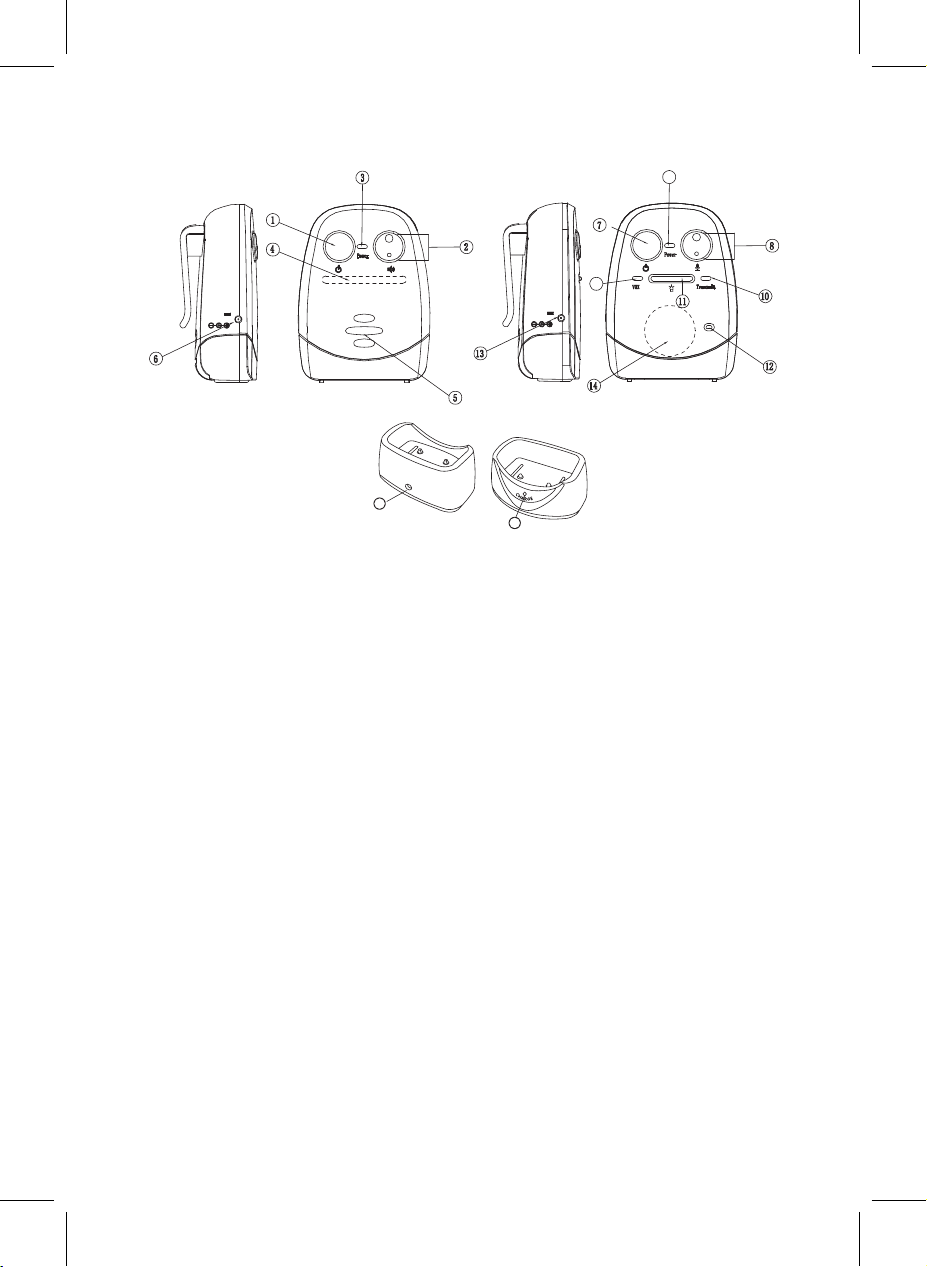
1. Power ON/OFF Taste
2. Taste auf/ab +/-
3. Power ON/OFF - Batteriestand Anzeige
4. LED Empfangsanzeige
5. Lautsprecher
6. Anschluss für Netzadapter
7. Power ON-OFF Taste
8. Taste auf/ab +/-
9. Power ON/OFF Batteriestand-Anzeige
10. Sende Anzeige
11. Schalter für Nachtlicht
12. Mikrofon
13. Anschluss für Netzadapter
14. Nachtlicht
15. Anzeige Nachtlicht sprachgesteuert
16. Anschluss für Netzadapter
17. Ladeanzeige
Wir bedanken uns für Ihren Kauf des COMTEL CT-2400
Babyüberwachungsgerätes. Ihr Gerät wurde nach den neuesten Erkenntnissen
der Technik hergestellt. Jedes Modell wurde einer strikten Qualitätskontrolle
unterzogen. Sollten Sie widererwarten trotzdem einen Defekt feststellen, bitten
wir Sie, sich direkt an Ihre Verkaufsstelle oder an unser Service-Center zu
wenden.
Bitte lesen Sie diese Bedienungsanleitung aufmerksam durch, um ein Optimum
an Leistung und Lebensdauer zu erhalten.
2
Page 3

CT-2400_Manual_04.pdf 3 28/4/14 6:03 pm
Eigenschaften
• Digitale Technik im Frequenzbereich von 863-870MHz ohne jegliche
Störungen
• Automatische Kanalsuche
• Reichweite bis zu 600m bei Sichtverbindung und optimalen Verhältnissen
• Äusserst niedrige Abstrahlung (nur 10% eines normalen DECT-; bzw. 40%
eines DECT ECO Gerätes!)
• Nachtlicht im Babygerät
• Akustischer und optischer Reichweitenalarm im Elterngerät
• LED Empfangsanzeige im Elterngerät
• Warnung bei schwacher Batterie im Eltern- und Babygerät
• Mikrofonempfindlichkeits- Regulierung im Babygerät
• Ladestation und aufladbare Li-Polymer Batterie für Elterngerät
WARNUNG
Das COMTEL CT-2400 darf nicht als medizinisches Überwachungsgerät eingesetzt werden. Frühgeburten sowie alle Babys, wo ein gewisses Gesundheitsrisiko besteht, sollten unter der ärztlichen Aufsicht oder von professionellen
Pflegepersonen stehen.
Auch bei der Benützung des COMTEL CT-2400 empfehlen wir ausdrücklich, in
regelmässigen Abständen die Überwachung durch eine verantwortliche
Person vorzunehmen.
DIGITAL TECHNOLOGIE
Dieses Babyüberwachungsgerät bietet die neuste digitale Technologie und
eine störungsfreie Übertragung. Mehr Leistung – weniger Belastung durch
Elektrosmog!
Das Gerät sucht automatisch einen freien Kanal, oder wechselt auf einen
freien Kanal während der Übertragung, um Störungen, welche durch andere
Geräte verursacht werden zu vermeiden.
3
Page 4
CT-2400_Manual_04.pdf 4 28/4/14 6:03 pm
STROMVERSORGUNG
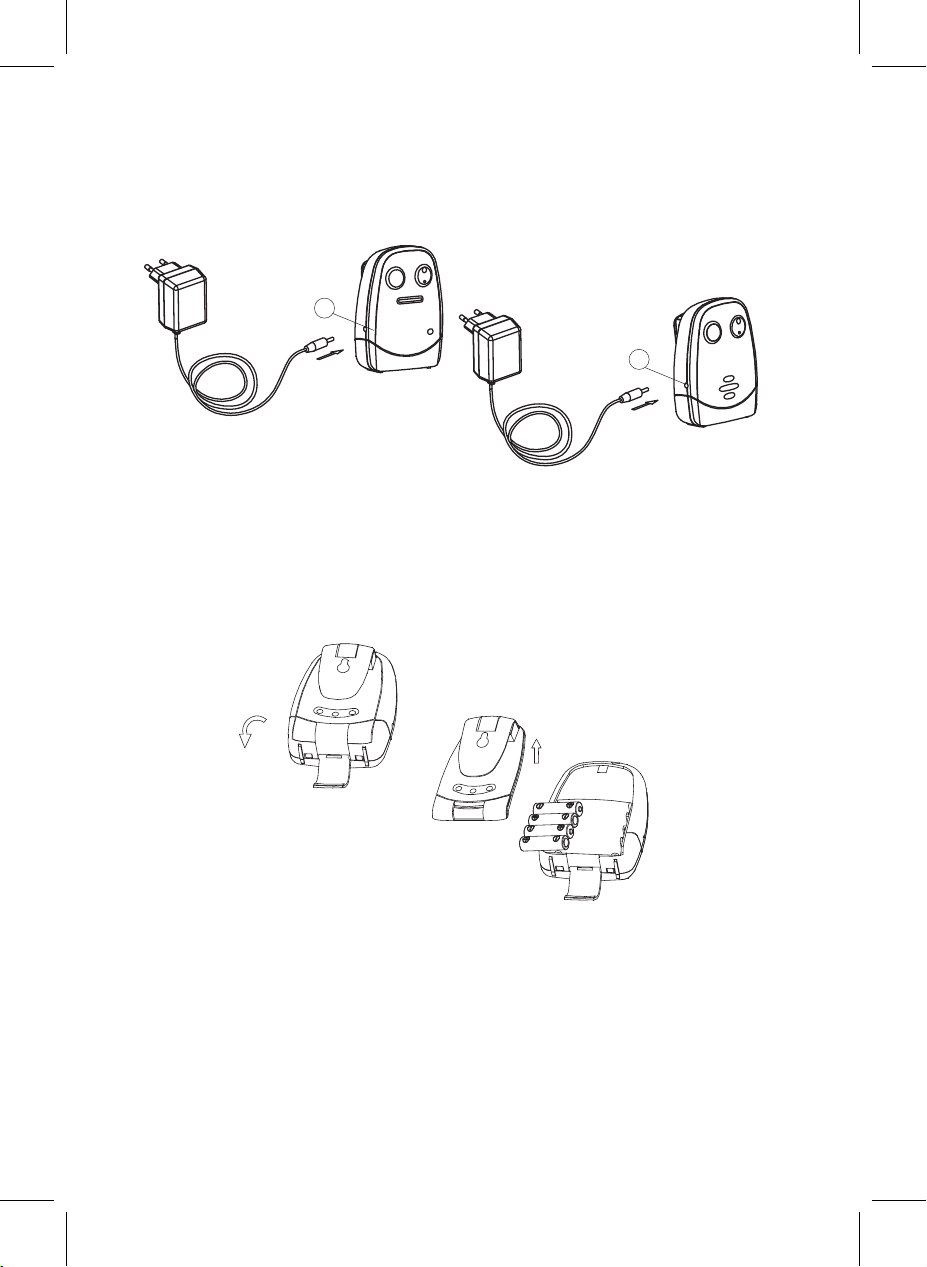
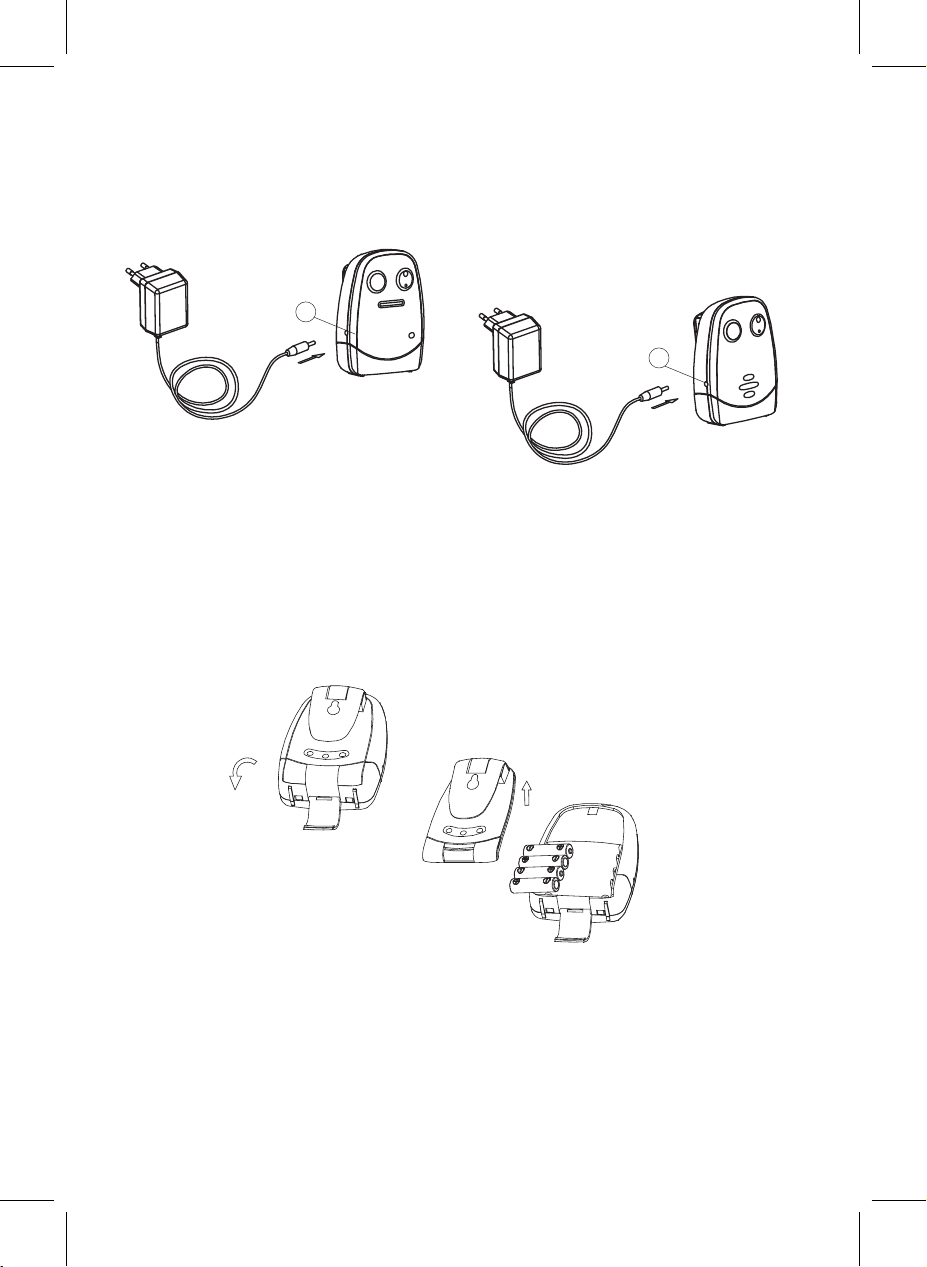
(A) Babygerät (Sender) ausgerüstet mit Netzadapter
1. Betrieb mit Netzadapter (empfehlenswert)
6
13
Den Sender mit dem mitgelieferten 6V Netzadapter und einer 220V Buchse
verbinden. 6
Die Batteriezufuhr wird dabei automatisch abgeschaltet, sobald sich der
Stecker des Netzteils im Gerät befindet.
2. Betrieb mit Batterien
Schieben Sie den Batteriedeckel in die angezeigte Richtung und öffnen Sie
das Batteriefach. Legen Sie 4 x AAA (UM-4) Alkalie Batterien ein. Beachten
Sie unbedingt die richtige Polarität!
P.S. Mischen Sie nicht verschiedene Batteriearten und ersetzen Sie alle
Batterien gleichzeitig.
Sofern Sie den Sender mit Batterien betreiben, wird die maximale Reichweite verkürzt
4
Page 5
CT-2400_Manual_04.pdf 5 28/4/14 6:03 pm
(B) Elterngerät (Empfänger) ausgerüstet mit wieder aufladbarer
Li-Polymer Batterie und Ladestation
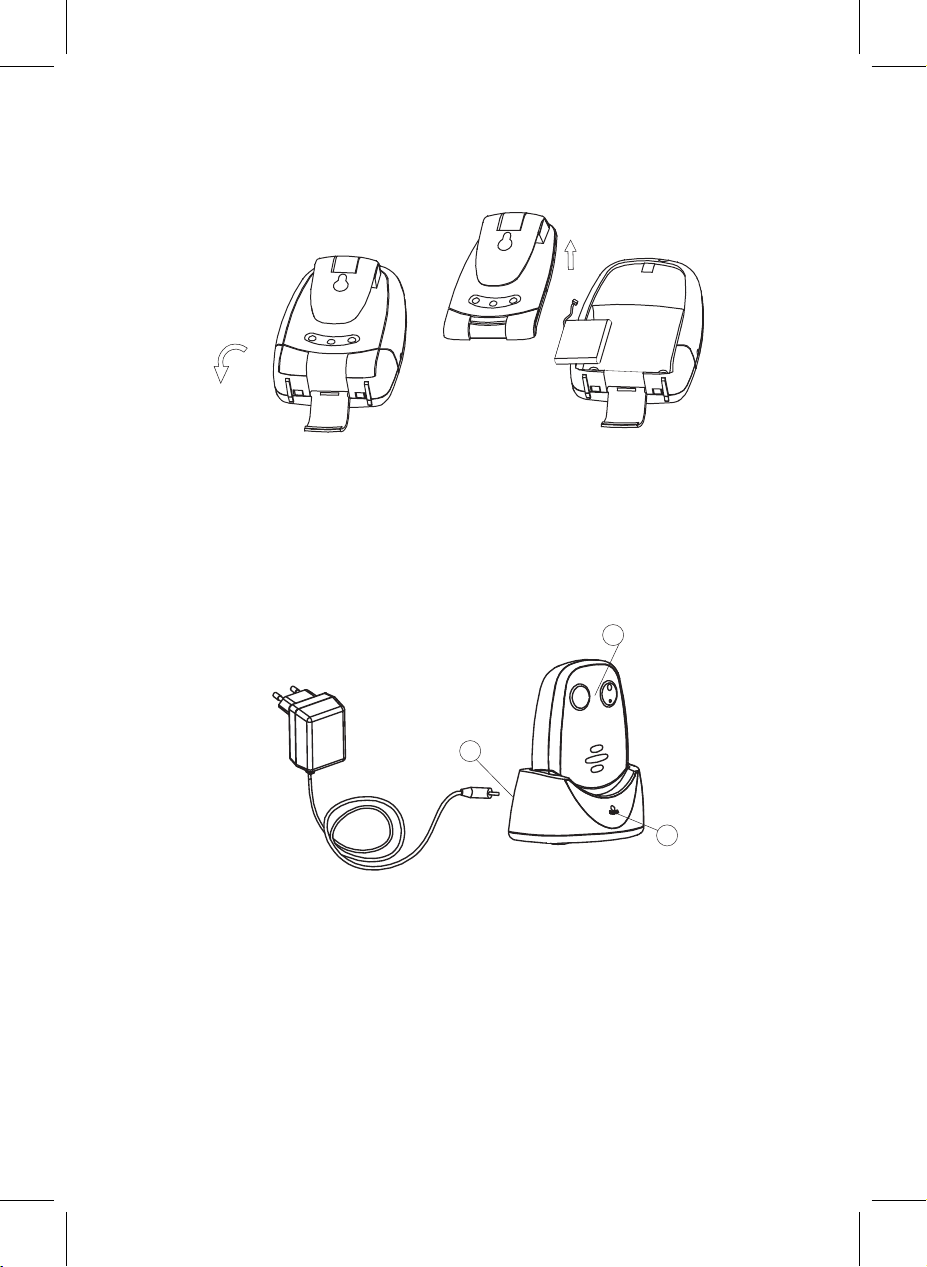
1. Betrieb mittels Li-Polymer wieder aufladbarer Batterie
Die Li-Polymer wieder aufladbare Batterie ist bereits im Gerät installiert und
teilweise aufgeladen. Zum Auswechseln der Batterie öffnen Sie das
Batteriefach wie abgebildet, ziehen Sie den Stecker aus der Buchse und
setzen einen neuen Akku ein.
2. Betrieb mit Netzteil über Ladestation
3
16
17
Verbinden Sie den Stecker des 6V Netzteils mit der Buchse 16 der
Ladestation.
Legen Sie das ausgeschaltete Elterngerät in die Ladestation. Die
Kontrollanzeige 17 wird rot aufleuchten, wenn das Gerät richtig aufgelegt
wurde.
Überprüfen Sie die Position des Elterngerätes, sofern die Anzeige nicht
aufleuchtet.
5
Page 6

CT-2400_Manual_04.pdf 6 28/4/14 6:03 pm
Während der Ladung wird die LED Anzeige 3 abwechselnd rot/grün blinken.
Nach ca. 4 Stunden ist der Akku vollständig aufgeladen und die LED Anzeige
wird konstant grün aufleuchten.
Nun kann das Elterngerät für den Betrieb eingeschaltet werden. Entweder
nehmen Sie dieses nun aus der Ladestation oder belassen es dort – es kann
keine Beschädigung der Batterie durch Überladen erfolgen.
Sofern in der Ladestation belassen, wird die Batterie automatisch wieder
aufgeladen, wenn die Spannung auf ein gewisses Niveau fällt.
Anmerkung: Laden Sie das Elterngerät vor der 1. Inbetriebnahme für
mindestens 4 Stunden auf. Vergewissern Sie sich, dass das Gerät vor der
Aufladung abgeschaltet wurde.
INBETRIEBNAHME
Baby Gerät (Sendegerät)
1.Drücken Sie länger auf die Power ON-OFF Taste 7 auf Position ON um das
Gerät einzuschalten. Die Power Anzeige 9 wird rot aufleuchten
Stellen Sie das Gerät ca. 1m vom Babybettchen auf. Mikrofon in Richtung
Baby.
2.Stellen Sie die Mikrofonempfindlichkeit mit der Taste 8 (+/-) ein damit das
Mikrofon 12 die Geräusche nach Ihrem gewünschten Level erkennt und
überträgt. Die TX Sendeanzeige 10 wird immer blinken, wenn diese Tasten
gedrückt werden. Umso mehr diese aufblinken, heisst dies, umso
empfindlicher das Mikrofon eingestellt ist (Maximum ist 5x blinken / Minimum
1 x blinken)
Drücken Sie die Taste, um die Empfindlichkeit zu erhöhen, oder zu
verringern.
3.Wenn das Gerät übermittelt, wird die TX Sendeanzeige 10 rot auf-leuchten.
Das Gerät wird in den Bereitschaftsmodus zurückkehren, nachdem das
Mikrofon 12 keine Geräusche mehr aufgenommen hat und die TX
Sendeanzeige 10 wird erlöschen.
4.Das Nachtlicht 14 kann für Dauerbetrieb, oder auf Sprachsteuerung eingestellt
werden indem die Taste 11 folgendermassen betätigt wird.
short press
OFF
short press short press
Night light ON
Intensity level 1
vox
Intensity level 3
short press
Night light ON
Intensity level 2
Night light ON
Intensity level 3
short
press
6
Page 7

CT-2400_Manual_04.pdf 7 28/4/14 6:03 pm
Im sprachgesteuertem Modus wird die Anzeige 15 des Nachtlichtes
aufleuchten. Sobald das Mikrofon 12 ein Geräusch erkennt, wird das
Nachtlicht 14 leuchten und wird wieder ablöschen, sobald das Mikrofon 12
keine Geräusche mehr übermittelt.
Eltern Gerät (Empfänger)
1.Drücken Sie länger auf die Power ON-OFF Taste 1 um das Gerät
einzuschalten. Die Power Anzeige 3 wird grün aufleuchten. Wenn die
Anzeige zu flackern beginnt, ist die Batterie zu schwach. Verbinden Sie den
Empfänger mit dem Netzadapter und legen Sie das Gerät zum Aufladen in
die Ladestation. Die LED Anzeige 4 wird Ihnen nach dem Einschalten des
Gerätes während ca. 3 Sekunden den Batteriestand anzeigen. Danach wird
der Empfang des Babygerätes angezeigt. Durch kurzes Drücken auf die
Taste 1 können Sie jederzeit den Batteriestand auf der LED Anzeige 4
ablesen.
2.Stellen Sie das Elterngerät in einem vernünftigen Abstand zum Babygerät
auf, um eine Rückkopplung zu vermeiden. Eine zu nahe Distanz wird ein
Pfeifen im Lautsprecher 5 verursachen.
3.Sobald das Elterngerät ein Signal empfängt, wird die LED
Empfangsanzeige 4 aufleuchten. Umso lauter die Geräusche sind, umso
mehr der LED Anzeigen werden aufleuchten. Diese Funktion ist nützlich,
wenn die Eltern die Lautstärke des Gerätes reduzieren, um eine ruhige
Umgebung zu haben.
4.Die Lautstärke kann mit der Taste 2 (+/-) eingestellt werden. Die LED
Anzeige 4 zeigt die Einstellung an. Umso mehr LEDs aufleuchten, desto
höher ist die Lautstärke 5 eingestellt. (max. 5 LED) Sofern kein LED
aufleuchtet, ist die Lautstärke stumm geschaltet. Drücken Sie die Taste
um die Lautstärke zu erhöhen; bzw. zu verringern.
5.Wenn sich das Elterngerät für mehr als 30 Sekunden ausserhalb der
Reichweite des Babygerätes befindet, wird der Reichweitenalarm ertönen
und die LED Anzeige 4 beginnt zu blinken. Der Alarm wird aufhören, sobald
sich das Elterngerät wieder im Empfangsbereich des Babygerätes befindet.
P.S. Dieser Alarm wird ebenfalls ertönen, wenn das Babygerät abgeschaltet
ist, die Batterien zu schwach sind, bei Stromunterbruch, und wenn die
Paarung nicht erfolgreich war.
7
Page 8

CT-2400_Manual_04.pdf 8 28/4/14 6:03 pm
6.Jedes Mal, wenn Sie die Taste 8 drücken, wird dies mittels Beep-Ton
bestätigt. Sowohl Baby- wie auch Elterngerät können mittels Gurt Clip
getragen werden. Den Clip können Sie gemäss nachstehender Abbildung
entfernen.
VORSICHTSMASSNAHMEN
• Benützen Sie immer den mitgelieferten Netzadapter. Andere Netzadapter
können das Überwachungsgerät möglicherweise beschädigen.
• Wenn Sie das Überwachungsgerät über eine längere Zeit nicht brauchen,
empfehlen wir, alle Batterien zu entfernen um ein allfälliges Auslaufen zu
verhindern.
• Entfernen Sie den Netzadapter vom Strom, wenn das Gerät nicht
gebraucht wird.
• Das Überwachungsgerät bringt die beste Leistung in einem
Temperaturbereich zwischen -9 C und +50 C.
• Setzen Sie das Überwachungsgerät nicht über längere Zeit direkter
Sonneneinstrahlung, Wärmequellen, feuchter oder staubiger Umgebung
aus.
• Öffnen Sie nicht das Gehäuse. Es befinden sich dort keine Serviceteile.
8
Page 9
CT-2400_Manual_04.pdf 9 28/4/14 6:03 pm
PAAREN
Dieser Prozess ermöglicht es, das Eltern- mit dem Babygerät zu paaren,
sofern diese nach Inbetriebnahme NICHT miteinander kommunizieren
sollten.
Baby- und Elterngerät wurden bereits ab Fabrik mit einem Code gepaart und
sind grundsätzlich betriebsbereit.
1.Drücken und halten Sie zuerst die (down) Taste 2 des Elterngerätes.
up botton
down botton
2.Schalten Sie das Gerät ein, indem Sie länger auf die Taste 1 drücken.
Die Power Anzeige 3 beginnt grün zu blinken. Lassen Sie beide Tasten
los.
3.Drücken und halten Sie jetzt die (down) Taste 8 des Babygerätes.
4.Schalten Sie das Babygerät ein, indem Sie länger auf die Taste 7
drücken. Die Power Anzeige 9 beginnt grün zu blinken. Lassen Sie beide
Tasten los.
5.Drücken Sie nun nochmals die Taste 8 des Babygerätes. Wenn die
Paarung erfolgreich war, hören Sie im Elterngerät 2 Beep-Töne. Die
Power Anzeigen beider Geräte 3 und 9 sollten nun konstant grün
aufleuchten.
6.Das Babyüberwachungsgerät ist nun für den Betrieb vorbereitet.
Möglicherweise hören Sie einen Pfeifton (Rückkopplung) aus dem
Lautsprecher 5, wenn die beiden Geräte zu Nahe voneinander aufgestellt
sind.
7.Sollten das Eltern- und Babygerät nicht miteinander kommunizieren
können, wiederholen Sie den Paarungsvorgang nochmals wie
beschrieben.
9
Page 10
CT-2400_Manual_04.pdf 10 28/4/14 6:03 pm
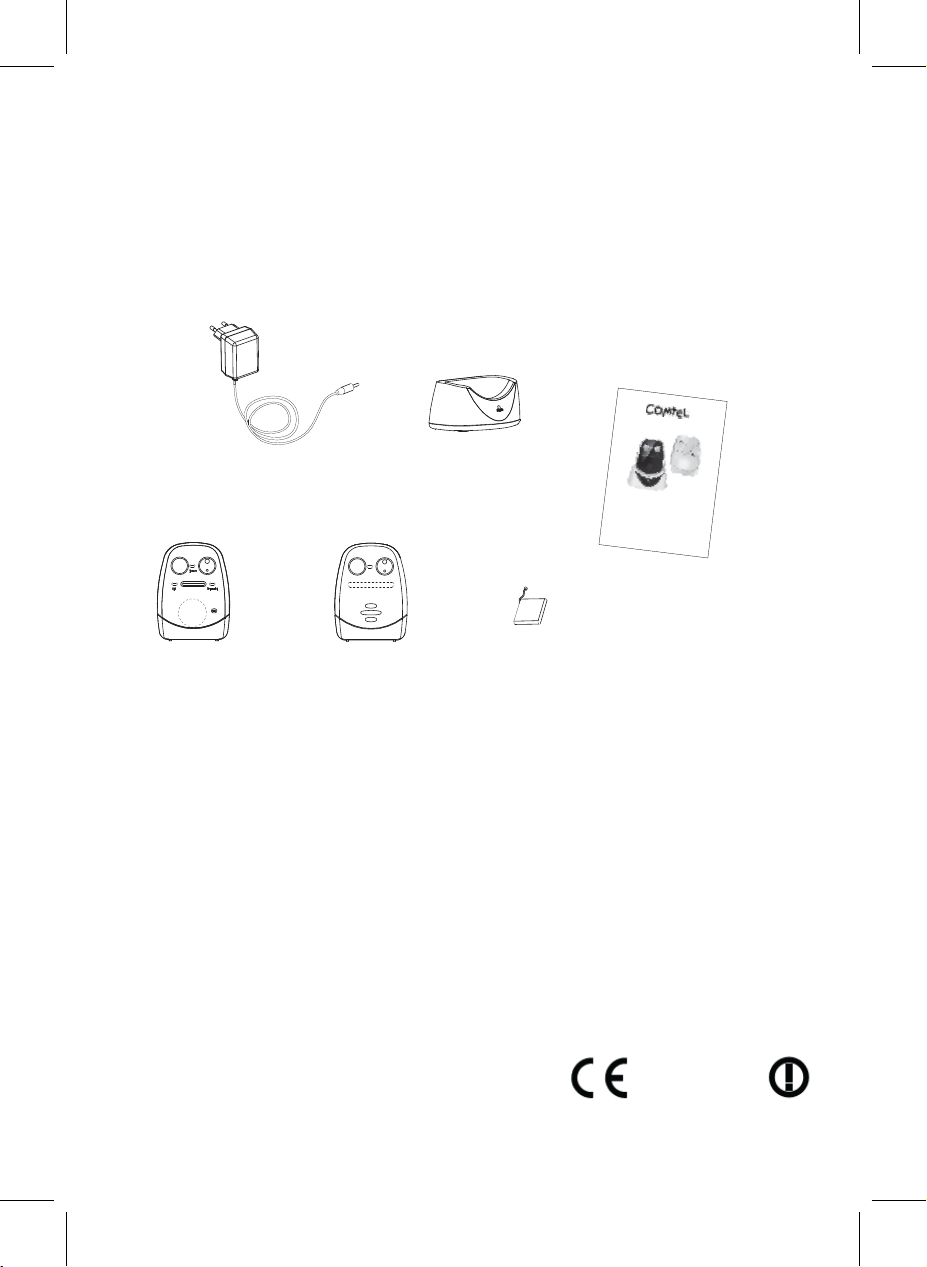
STANDARD ZUBEHÖR
a. 6V AC Netzadapter 2 x
b. Ladestation
c. Babygerät
d. Elterngerät
e. 3.7V Li-Polymer aufladbare Batterie
f. Bedienungsanleitung
CT-2400
a.
b.
Bedienungsanleitung
Mode d’emploi
Istruzioni per l’uso
Instruction manual
01-11
12-21
22-30
31-40
f.
c. d. e.
Garantie*
Siehe Garantiebedingungen auf der mitgelieferten Garantiekarte.
*gilt nur für den Verkauf in der Schweiz. Im Ausland gelten die
Garantiebestimmungen des jeweilgen Händlers; bzw. Vertriebspartners.
Diese Anlage entspricht der europäischen R&TTE Richtlinie.
COMTEL AG, Rotzbergstrasse 7, CH-6362 Stansstad
Tel. 041 610 72 72 Fax: 041 610 72 74
www.comtel.ch
E-Mail: [email protected]
© Copyright by COMTEL AG – Switzerland
10
1177
Page 11

CT-2400_Manual_04.pdf 11 28/4/14 6:03 pm
FEHLERBESCHREIBUNG
Problem Mögliche Ursache Lösung
Sender hat keine
Übertragung
Batterie ist zu schwach oder
Babygerät sendet
immer
Reichweitenalarm ertönt
immer
Distanz zwischen Baby- und Eltern-
Paarung war nicht erfolgreich Paaren Sie die Geräte erneut
Zeigt immer schwache
Batterie an
Keine Batterie im Elterngerät Legen Sie die Batterien in das
Wieder aufladbare Batterien sind
Kurze Betriebsdauer mit
Batterien
Vibrationsalarm eingeschalten Schalten Sie den Alarm aus
Starkes Rauschen und
Interferenzen
Zu kurze Reichweite Eisenkonstruktionen und Mauern
Batterien im Babygerät sind leer Ersetzen Sie die Batterien oder
Mikrofonempfindlichkeit
ist zu niedrig
Netzadapter nicht richtig
angeschlossen
Mikrofonempfindlichkeit ist zu hoch Stellen Sie die Empfindlichkeit
Batterien im Babygerät sind zu
schwach
Ist ausserhalb des Bereiches
Batterie ist zu schwach Laden Sie die Batterie mit Hilfe
defekt
Nachtlicht ist ständig eingeschalten Schalten Sie das Nachtlicht aus
Babygerät ist zu nahe an anderen
elektrischen Geräten aufgestellt
zwischen Baby- und Elterngerät
Stellen Sie die Empfindlichkeit
mittels der Taste 8 höher
Ersetzen Sie die Batterien oder
überprüfen Sie den Anschluss
mittels der Taste 3 tiefer
Ersetzen Sie die Batterien oder
benützen Sie den Netzadapter
Stellen Sie das Babygerät näher
an das Elterngerät
des Ladegerätes auf oder
ersetzen Sie die Batterien oder
benützen Sie den Netzadapter
Elterngerät
Ersetzen Sie diese mit neuen
wieder aufladbaren Batterien
Entfernen Sie die elektrischen
Geräte oder stellen Sie das
Babygerät weiter von diesen auf
Stellen Sie die Geräte an einen
anderen Ort hin
benützen Sie den Netz Adapter
11
Page 12
CT-2400_Manual_04.pdf 12 28/4/14 6:03 pm
FRANCAIS Composants
DC6V
50
0mA
9
15
DC6V
500mA
16
17
1.Power ON/OFF
2.Touche haut/bas +/-
3.Power ON/OFF – batterie faible
4.Indicateur de réception du son LED
5.Hautparleur
6.Connexion sur le courant
7.Power ON/ FF
8.Touche haut/bas +/-
9.Power ON-OFF – batterie faible
10.Indicateur de transmission
11.Interrupteur veilleuse
12.Microphone
13.Connexion sur le courant
14.Veilleuse
15.Contrôle de la veilleuse – activé par voix
16.Connexion sur le courant
17.Indicateur de charge
Nous vous remercions pour l’achat de l’appareil de surveillance Baby COMTEL
CT-2400. Votre appareil a été conçu selon une technique nouvelle. Nous vous
prions de lire très attentivement cette utilisation de service de manière de
pouvoir profiter au maximum de votre appareil. Si malgré tout vous avez
constaté une défectuosité ou une faute, alors nous vous prions de vous adresser à notre magasin de vente ou directement chez nous dans notre centre de
service.
12
Page 13

CT-2400_Manual_04.pdf 13 28/4/14 6:03 pm
Caractéristiques
• Technique digitale avec une plage de fréquence de 863 – 870MHZ sans
aucune perturbation
• Recherche de canal automatique
• Portée d’émission jusqu’à 600m ceci avec une bonne vue et des conditions
optimales
• Très peu de radiations (seulement 10% d’un DECT normal; resp. 40% d’un
appareil ECO DECT)
• Veilleuse de nuit sur l’appareil de l’enfant
• Sur l’appareil des parents, alarme optique et acoustique de la portée d’émis-
sion
• Sur l’appareil des parents, indication LED de la réception
• Avertissement en cas de faibles batteries sur l’appareil des parents et celui
de l’enfant
• Réglage de la sensibilité du microphone sur l’appareil de l’enfant
• Station de charge et batterie Li-Polymère rechargeable pour l’appareil des
parents
ATTENTION
Le COMTEL CT-2400 Babyphone été développé exclusivement pour la
surveillance de votre bébé et petits enfants. Il ne remplace pas une surveillance
parentale. Il n’est également pas conçu pour une utilisation de contrôle médical.
TECHNOLOGIE DIGITALE
Cet appareil de surveillance pour enfants vous offre une toute nouvelle technologie digitale et une transmission sans perturbation. Plus de puissance et moins
de smog électrique!
Cet appareil cherche automatiquement un canal libre, ou change sur un canal
libre pendant la transmission, ceci afin d’éviter des dérangements produits par
d’autres appareils.
13
Page 14
CT-2400_Manual_04.pdf 14 28/4/14 6:03 pm
SOURCES D’ALIMENTATION
(C) EMETTEUR
1. Fonctionnement avec adaptateur de courant (recommandé)
6
13
Branchez l’adaptateur de courant avec la prise secteur, ensuite introduire la
fiche dans l’appareil de surveillance 6. Si vous utilisez l’adaptateur, alors il
est conseillé de retirer les batteries de l’appareil. Avec l’adaptateur de
courant, la portée d’émission de l’émetteur sera supérieur à une utilisation
avec batteries..
2. Fonctionnement avec des batteries non rechargeables
Ouvrez le couvercle au dos de l’émetteur comme sur l’illustration, placez 4
batteries de 1.5V AAA LR03 et vérifiez que la polarité soit correcte. Fermez
à nouveau le couvercle.
Attention: Utilisez toujours les mêmes types de batteries – ceci veut
dire toutes des batteries Alcalis ou tous des accumulateurs
rechargeables. Ne jamais mélanger les types différants.
14
Page 15
CT-2400_Manual_04.pdf 15 28/4/14 6:03 pm
(B) RÉCEPTEUR
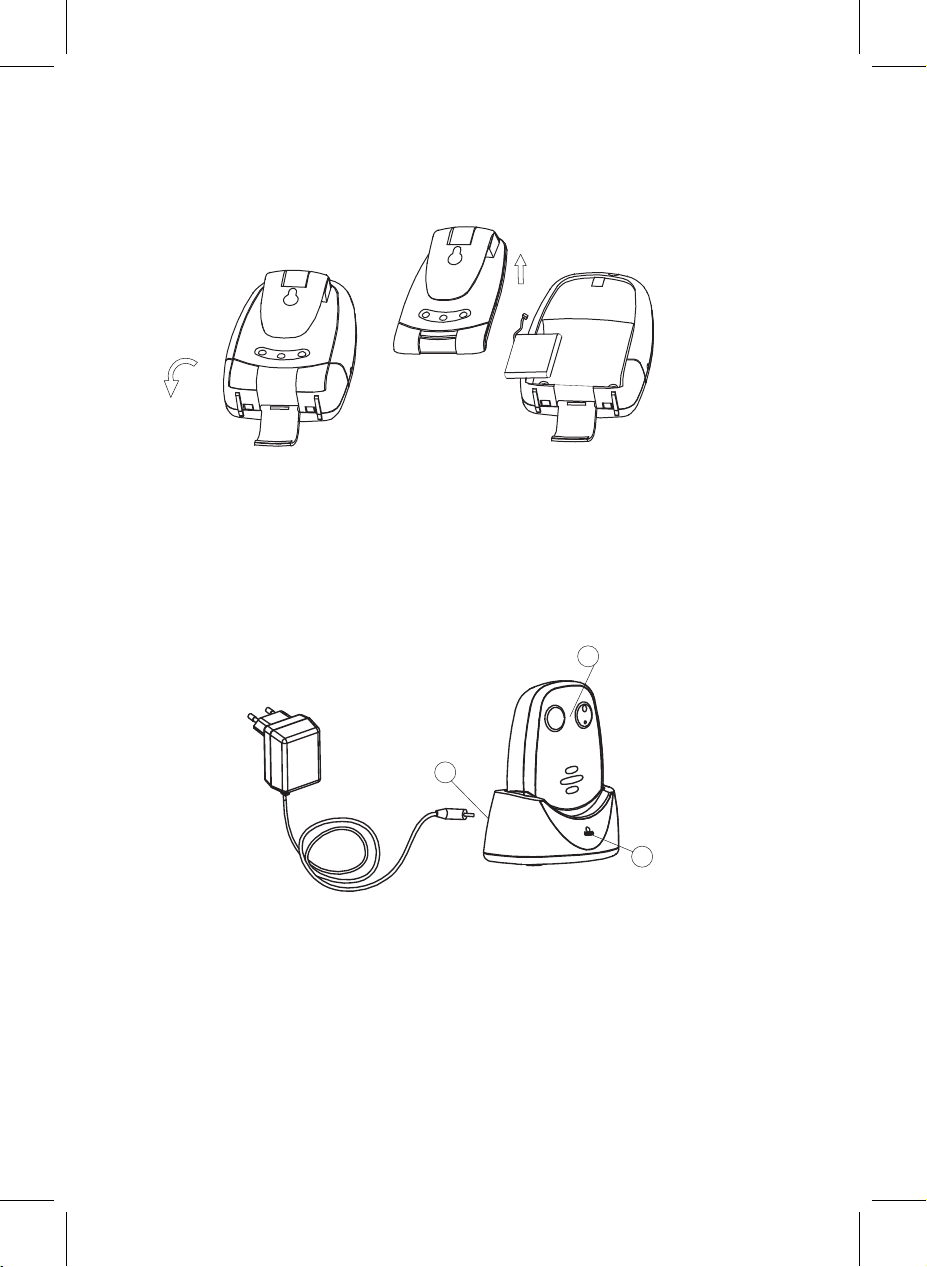
1. Fonctionnement avec batterie Li-Polymère rechargeable
La batterie rechargeable Li-Polymère est déjà installée dans l’appareil, elle
est en partie rechargée. Pour changer la batterie, ouvrez le casier de la
batterie comme indiquer sur l’illustration, enlevez la fiche de la douille et
placez une nouvelle batterie.
2. Recharger la batterie
16
3
17
Raccordez la fiche de 6V de l’appareil d’alimentation avec la douille 16 de la
station de charge.
Placez l’appareil déclenché des parents dans la station de charge. L’indication de contrôle 17 est allumée en rouge si l’appareil est correctement placé
sur la station.
15
Page 16

CT-2400_Manual_04.pdf 16 28/4/14 6:03 pm
Si l’indication n’est pas allumée, alors contrôler la position correcte de l’appareil des parents sur la station. Pendant la charge, l’indication LED 3 clignote
alternativement rouge/vert. Après environ 4 heures, l’accumulateur est complètement rechargé et l’indication LED vert reste constamment allumée.
Maintenant, l’appareil des parents peut être enclenché pour la mise en
service. Vous pouvez le laisser sur l’appareil de charge ou le sortir de celui-ci
– il n’y a pas de risque de surcharge de la batterie.
Si vous laissez l’appareil dans la station de charge, alors la batterie sera au
moment ou la charge tombe à un certain niveau, automatiquement rechargée.
Attention
Avant la première utilisation de la batterie rechargeable dans le récepteur, il
faut impérativement la recharger durant 4 heures de suite au minimum.
Assurez-vous que l’appareil est bien déclenché avant de le mettre en charge.
Fonctionnement
Mise en marche de l’émetteur
1.Pressez longuement sur la touche 7 Power ON-OFF en position ON de
manière d’enclencher l’appareil. L’indication Power 9 s’allume en rouge,
placez l’appareil à environ 1m du petit lit d’enfant. Le microphone dans la
direction du Baby.
Sensibilité du microphone MIC/SENS
2.Réglez la sensibilité du microphone avec la touche 8 ( +/- ) de manière que
le microphone 12 enregistre le niveau désiré de transmission. L’indication
10 de transmission TX clignotera toujours lorsque ces touches sont appuyées. Plus l’indication clignote rapidement – plus sensible réagit le microphone ( Maximum 5x clignotements / Minimum 1x ). Pressez sur la touche
aade manière d’augmenter la sensibilité, ou pour la réduire.
3.Lorsque l’appareil transmet, l’indication 10 d’émission TX s’allume en rouge.
L’appareil retournera automatiquement en position de mode veille au
moment ou le microphone 12 n’enregistrera plus de bruit et l’indication 10
d’émission TX s’éteindra.
4.La veilleuse de nuit 14 peut être réglée en service constant, ou commander
pa r la voix, ceci en utilisant la touche 11 de la manière suivante.
16
Page 17

CT-2400_Manual_04.pdf 17 28/4/14 6:03 pm
En modus de commandement par la voix, l’indication 15 de la veilleuse sera
allumée. Au moment où le microphone 12 enregistre un bruit, la veilleuse de
nuit 14 s’allume et elle s’éteint à nouveau au moment ou le microphone 12
ne reçoit plus de transmission de bruit.
L’appareil des parents (Récepteur)
1. Pour enclencher l’appareil, pressez longuement sur la touche 1
ON-OFF l’indication 3 Power sera allumée en vert. Lorsque l’indication
commence à clignoter, la batterie est alors trop faible. Raccordez le récep-
teur avec l’adaptateur de courant et placez l’appareil à recharger dans la
station de charge.
Après avoir enclenché l’appareil, l’indication LED 4 vous montrera pendant
environ 3 secondes la capacité restante de la batterie. Ensuite elle
indiquera la réception de l’appareil Baby. En pressant rapidement sur la
touche 1 , vous pouvez à tous moments consulter l’état de la batterie sur
l’indication LED 4
2.Placez l’appareil des parents à une distance raisonnable de l’appareil de
l’enfant, ceci afin d’éviter une réaction acoustique. Si la distance est trop
courte, alors un sifflement dans le haut-parleur 5 se fera entendre.
3.Au moment où l’appareil des parents reçoit un signal, l’indication de récep-
tion LED 4 s’allume. Plus le bruit est fort et plus fort l’indication LED
s’allumera.
Cette fonction est utile lorsque les parents réduisent le volume de l’appareil
de manière d’avoir un agréable environnement.
4.Le volume peut être réglé avec la touche 2 (+/-). L’indication LED 4 vous
indique ce réglage. Plus il y a des LED allumées plus le réglage du volume
5 est haut (max 5 LED). Si aucune LED est allumée, alors le volume est
placé sur muet. Pressez sur la touche pour augmenter le volume; respectivement sur pour le diminuer.
5.Lorsque l’appareil des parents se trouve plus de 30 secondes en dehors de
la portée d’émission de l’appareil Baby, un ton d’alarme se fait entendre et
l’indication LED 4 commence à clignoter. L’alarme s’arrêtera au moment où
l’appareil des parents se trouve à nouveau dans la plage de réception de
l’appareil Baby.
short press
OFF
short press short press
Night light ON
Intensity level 1
vox
Intensity level 3
short press
Night light ON
Intensity level 2
Night light ON
Intensity level 3
short
press
17
Page 18

CT-2400_Manual_04.pdf 18 28/4/14 6:03 pm
PS) Cette alarme se fera également entendre; si l’appareil Baby est
déclenché, si les batteries sont trop faibles, en cas de coupure de courant
ou encore si l’accord entre les deux appareils n’est pas correcte.
6.Chaque fois que vous pressez sur la touche 8 -
ceci sera confirmé par un ton Beep.
L’appareil Baby comme l’appareil des parents
peuvent être portés avec un clip ceinture.
Enlevez le clip ceinture selon illustration
ci-dessous.
MESURES DE SECURITE
• Utilisez seulement l’adaptateur de courant livré avec. Un autre adaptateur de
courant pourrait produire des dégâts à l’appareil de surveillance.
• Si l’appareil de surveillance n’est pas utilisé pendant un certain temps, alors
nous vous conseillons de sortir les batteries de manière d‘éviter des dégâts
d’écoulement d’acide.
• Si l’appareil n’est pas utilisé, alors d’ébrancher l’adaptateur de courant de la
prise électrique.
• L’appareil de surveillance vous donne les meilleurs résultats dans une plage
de température entre -9C et +50C.
• Ne pas exposer trop longtemps l’appareil de surveillance aux rayons
solaires, sources de chaleur ou encore dans des endroits humides ou poussiéreux.
• Ne pas ouvrir le boîtier. Vous ne trouverez là-dedans aucune pièce de
rechange!
18
Page 19

CT-2400_Manual_04.pdf 19 28/4/14 6:03 pm
ACCORDEMENT
Ce procès rend possible d’accorder l’appareil des parents avec l’appareil Baby,
ceci se fait seulement si les deux appareils ne peuvent PAS communiquer
ensemble.
L’appareil de l’enfant et celui des parents sont par la fabrique avec un code
accordé ensemble et sont en principe près à être utilisés.
1.En premier, appuyez et maintenez enfoncé la touche 2 (down) de
l’appareil des parents.
up botton
down botton
2.Enclenchez l’appareil en pressant longuement sur la touche 1
L’indication Power 3 commence à clignoter vert. Relâchez les deux
touches.
3.Appuyez et maintenez enfoncé la touche 8 (down) de l’appareil Baby.
4.Enclenchez l’appareil Baby en appuyant longuement sur la touche 7.
L’indication Power 9 commence à clignoter vert. Relâchez les deux
touches.
5.Appuyez encore une fois sur la touche 8 de l’appareil Baby. Lorsque
l’accord est bien réussi entre les deux appareils, 2 tons Beep se font
entendre sur l’appareil des parents. L’indication Power 3 et 9 des deux
appareils reste constamment allumée vert.
6.L’appareil de surveillance Baby est maintenant prêt à l’emploi. Il est
possible que vous entendez un sifflement (réaction acoustique) dans le
haut-parleur 5, ceci veut dire que les deux appareils sont trop prêt l’un de
l’autre.
7.Si l’appareil des parents et celui de l’enfant ne peuvent pas encore
communiquer ensemble, alors il faudra à nouveau refaire les points 1 – 6.
Cette installation correspond aux normes européennes R&TTE
La déclaration de conformité peut être demandée auprès de:
19
Page 20
CT-2400_Manual_04.pdf 20 28/4/14 6:03 pm
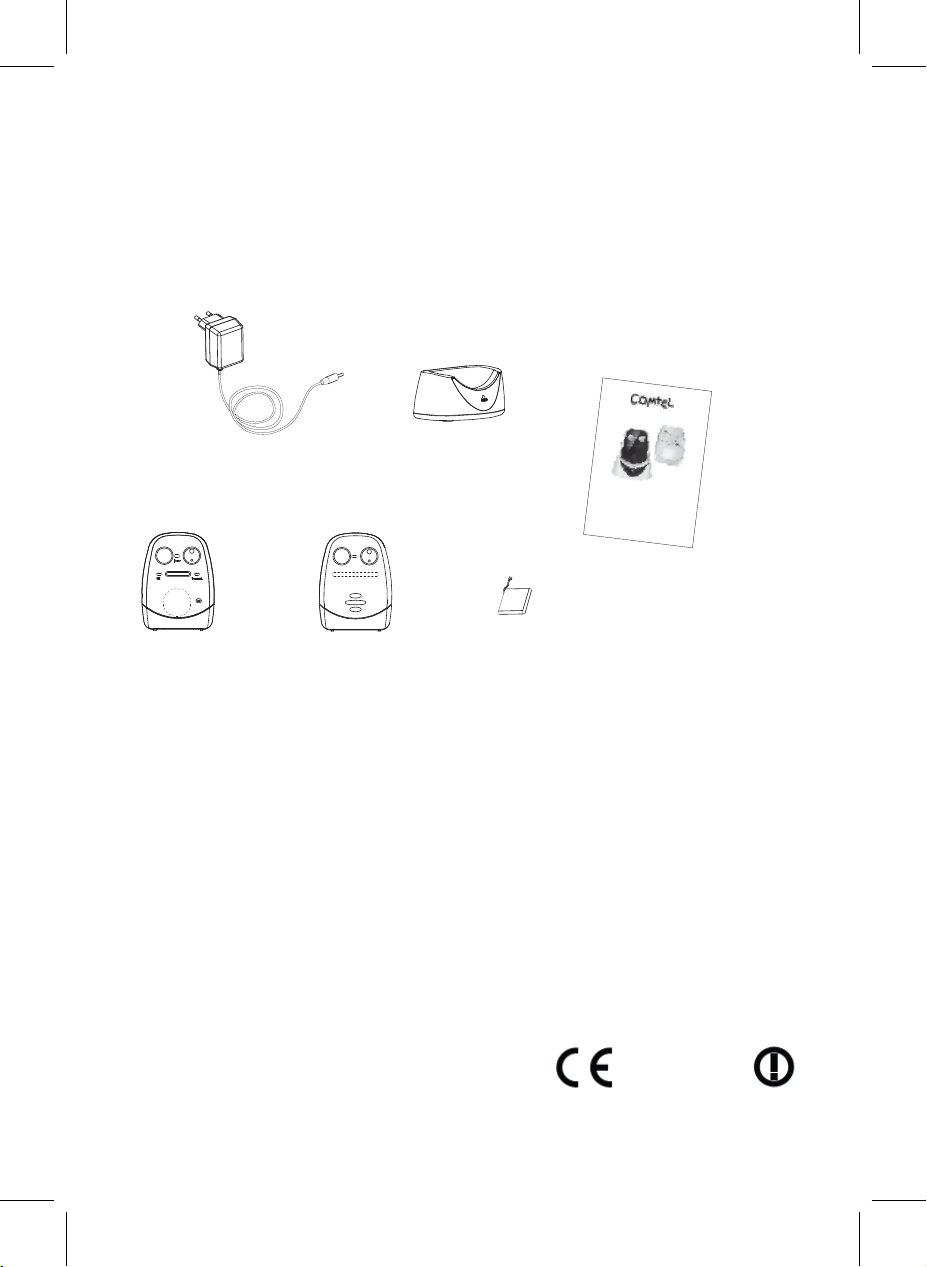
Accessoires standards
a. 6V AC/DC adaptateur 2 x
b. Station de charge
c. Emetteur
d. Récepteur
e. Batterie rechargeable 3.7V Li-Polymère
f. Instruction de service allemand/français/italien/anglais
CT-2400
a.
b.
Bedienungsanleitung
Mode d’emploi
Istruzioni per l’uso
Instruction manual
01-11
12-21
22-30
31-40
f.
c. d. e.
Garantie*
Voir les conditions de garantie sur la carte de garantie livrée avec l’appareil.
Les accumulateurs ou batteries rechargeables ne font pas partie de la garantie,
ceux-ci sont considérés comme matériel d’emploi.
En cas de défectuosité, nous vous prions de bien vouloir prendre contact avec
votre agent commercial ou directement à l’adresse indiquée ci-dessous. Pour
plus d’informations sur votre appareil, voir notre Site:
www.comtel.ch
* Est seulement valable pour la Suisse. A l’étranger, la détermination de la
garantie est donnée par le commerçant; respectivement par l’agent
commercial.
COMTEL AG, Rotzbergstrasse 7, CH-6362 Stansstad
Tel. 041 610 72 72 Fax: 041 610 72 74
www.comtel.ch
E-Mail: [email protected]
1177
© Copyright by COMTEL AG – Suisse
20
Page 21

CT-2400_Manual_04.pdf 21 28/4/14 6:03 pm
Problème Cause possible Solution
Pas de transmission de
l‘émetteur
La batterie est trop faible ou
L’appareil Baby
transmet constamment
L’alarme de la portée
d’émission reste en
marche
La distance entre l’appareil des
L’accord ne peut pas se faire. Refaire l’accord des appareils
Indique toujours batterie
trop faible.
Pas de batterie dans l’appareil des
Les batteries rechargeables sont
Le temps de mise en
service des batteries est
trop court.
Beaucoup de bruits et
interférences.
La portée d’émission
est trop courte.
Les batteries de l’appareil de l’enfant
La sensibilité du microphone est trop
faible.
l’adaptateur d’alimentation n’est pas
correctement raccordé.
La sensibilité du microphone est trop
haute.
La batterie est trop faible. Charger les batteries avec
parents et celui de l’enfant est en
dehors de la portée d’émission.
La batterie est trop faible. Charger les batteries avec
parents.
défectueuses.
La veilleuse de nuit reste
constamment enclenchée.
L’appareil de l’enfant est trop près
d’un autre appareil électrique.
Entre les deux appareils se trouvent
des constructions métalliques ou des
murs.
sont épuisées.
Augmentez la sensibilité du
microphone
Changez les batteries ou contrôlez
le raccordement.
Réduire la sensibilité avec la
touche 3.
l’appareil de charge ou changer
les batteries ou encore utiliser
l’adaptateur d’alimentation
Placer l’appareil de l’enfant plus
près de l’appareil des parents.
l’appareil de charge ou changer
les batteries ou encore utiliser
l’adaptateur d’alimentation.
Placer les batteries rechargeables
dans l’appareil des parents.
Echanger les batteries
rechargeables.
Déclencher la veilleuse de nuit.
Enlever les appareils électriques
ou laisser plus de distance entre
les deux appareils.
Placer les appareils dans un autre
endroit.
Echanger les batteries ou utiliser
l’adaptateur d’alimentation.
21
Page 22
CT-2400_Manual_04.pdf 22 28/4/14 6:03 pm
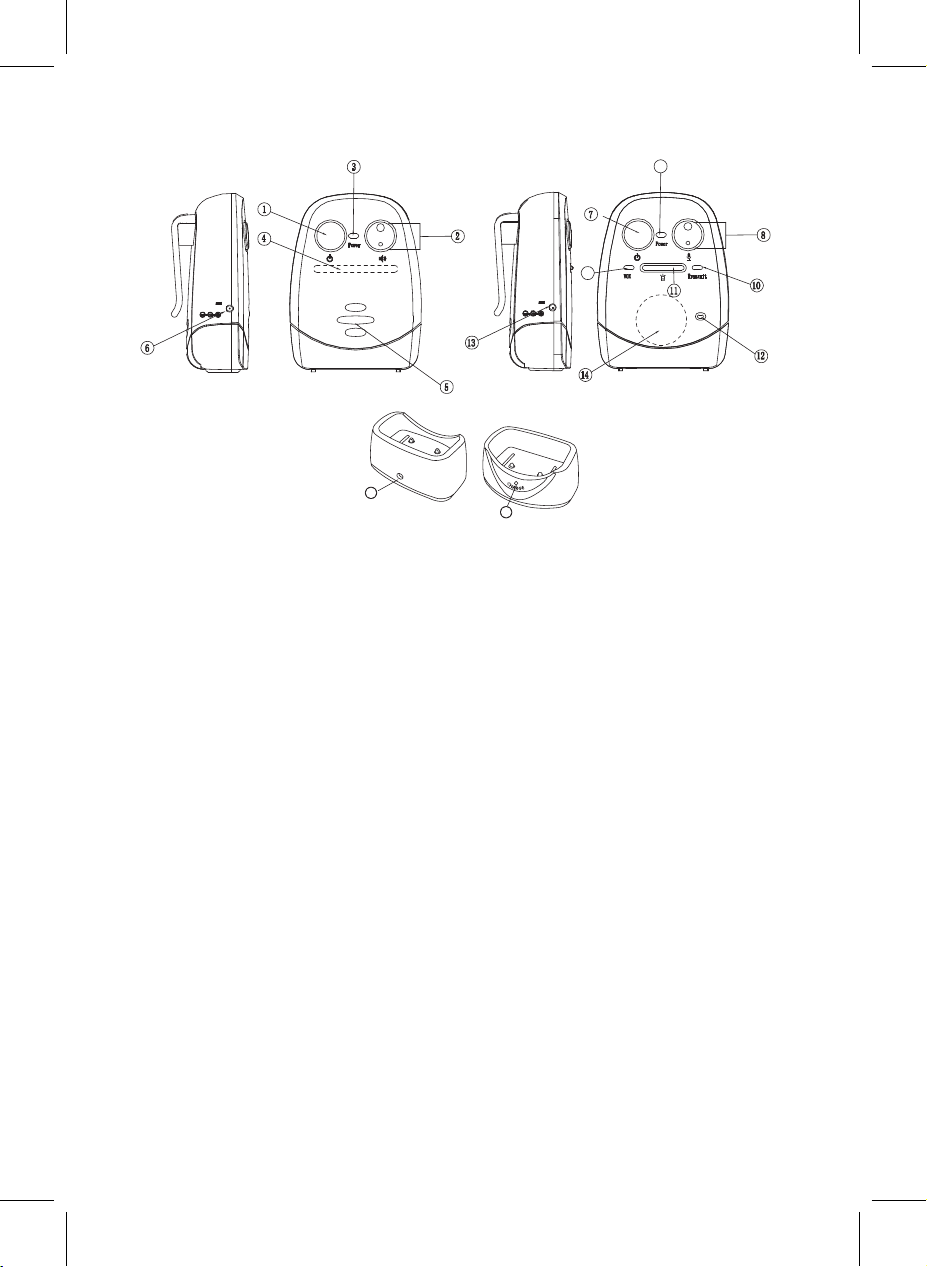
ITALIANO Componenti
DC6V
50
0mA
9
15
DC6V
500mA
16
17
1. Power ON/OFF
2.Tasto up/down +/- (volume)
3.Power ON/OFF – batteria scarica
4.Indicatore ricezione suono LED
5.Altoparlante
6.Collegamento alla corrente elettrica
7.Power ON-OFF
8.Tasto up/down +/- (sensibilità microfono)
9.Power ON/OFF – batteria scarica
10.Indicatore di trasmissione
11.Interruttore luce notturna
12.Microfono
13.Collegamento alla corrente elettrica
14.Luce notturna
15.Indicatore luce notturna comando a voce
16.Collegamento alla corrente elettrica
17.Indicatore di carica
La ringraziamo per aver acquistato l’apparecchio di controllo COMTEL CT-2400,
uno strumento prodotto con le tecniche più moderne. Ogni apparecchio è stato
sottoposto a un severo controllo di qualità. Se il Suo apparecchio dovesse tuttavia
avere un qualche difetto, La preghiamo di rivolgersi al Suo rivenditore oppure di
contattare direttamente il nostro centro di servizio. La preghiamo di leggere attentamente queste istruzioni per poter garantire una prestazione ottimale e il massimo di durata del Suo apparecchio.
22
Page 23

CT-2400_Manual_04.pdf 23 28/4/14 6:03 pm
Caratteristiche
• Tecnica digitale nella gamma di frequenze da 863 a 870MHz senza disturbi
• Ricerca automatica del canale
• Portata fino a 600m con contatto a vista e in condizioni ottimali
• Radiazione radioelettrica estremamente bassa
(solo il 10% di un normale apparecchio DECT; e il 40% di un DECT ECO!)
• Luce notturna sull’unità baby
• Allarme acustico e ottico di fuori portata sull’unità genitori
• Indicatore LED di ricezione sull’unità genitori
• Indicatore di batterie scariche sull’unità genitori e baby
• Regolazione della sensibilità del microfono sull’unità baby
• Base di ricarica rapida e batteria ricaricabile Li-Po per l’unità genitori
ATTENZIONE
La preghiamo di notare che questo babyphone è concepito per la sorveglianza di
neonati e bambini piccoli, tuttavia non può sostituire completamente la
supervisione dei genitori. Inoltre non è previsto come apparecchio di controllo
medico. Si prega di utilizzare esclusivamente gli accessori inclusi nella fornitura.
TECNOLOGIA DIGITALE
Questo apparecchio di controllo offre la più moderna tecnologia digitale e una
trasmissione senza disturbi. Maggiore potenza – minore inquinamento da
elettrosmog!
L’apparecchio cerca automaticamente un canale libero o passa automaticamente
a un canale libero durante la trasmissione, per evitare i disturbi causati da altri
apparecchi.
23
Page 24
CT-2400_Manual_04.pdf 24 28/4/14 6:03 pm
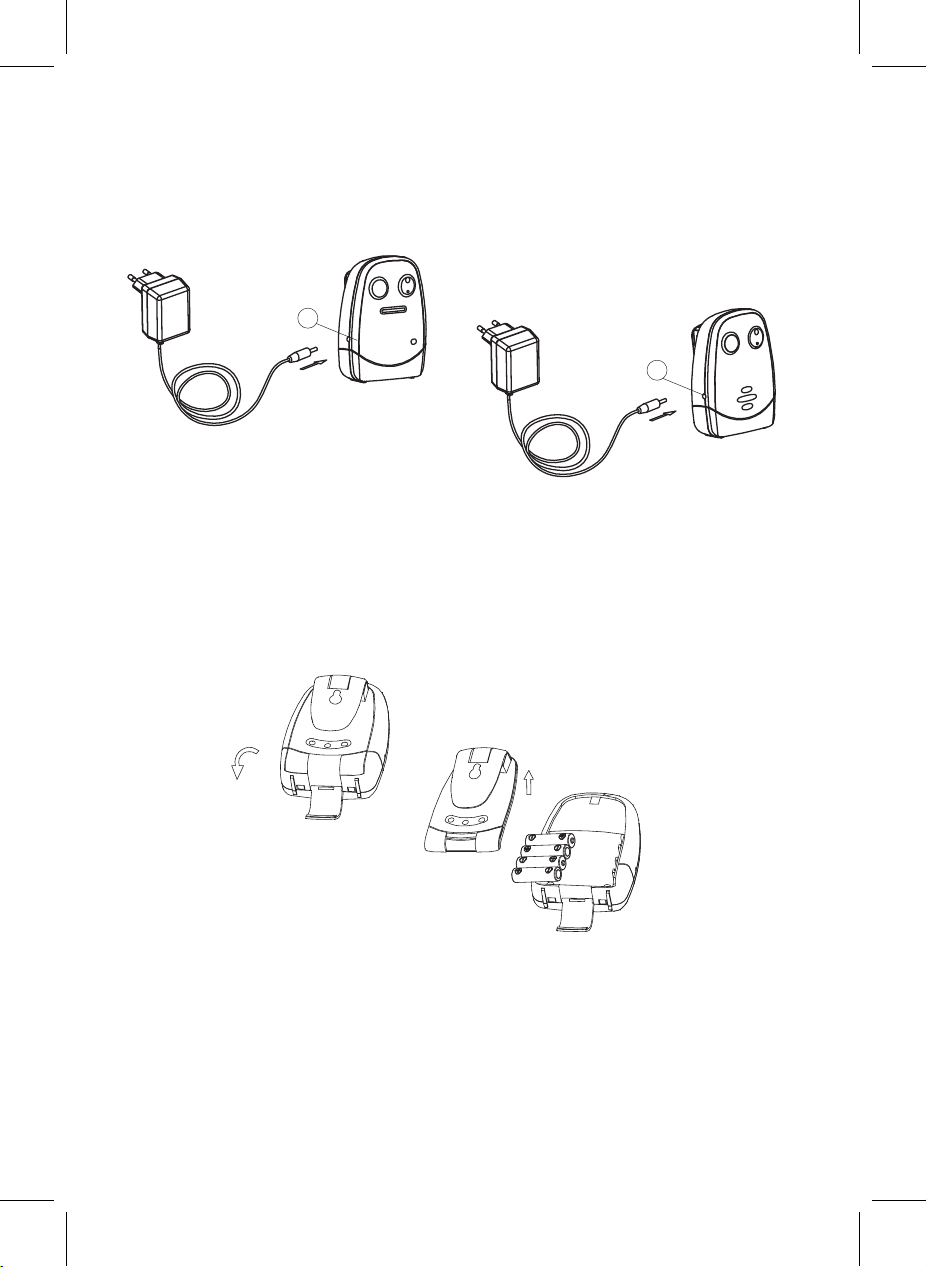
Fonti di alimentazione
(D) Trasmettitore
1. Funzionamento con adattatore di corrente (consigliato)
6
13
Collegare l’adattatore prima al trasmettitore 6 e poi alla presa di corrente. Se si
utilizza la corrente elettrica si raccomanda di rimuovere le pile dal trasmettitore.
Il raggio di copertura della trasmissione è maggiore se il trasmettitore viene
alimentato tramite la rete elettrica piuttosto che con le pile.
2. Funzionamento con pile non ricaricabili
Aprire l’alloggiamento posteriore del trasmettitore e inserire 4 pile da 1.5V AAA
LR03 verificando la corretta polarità. Richiudere con il coperchio.
P.S. Non mischiare diversi tipi di batterie e sostituire tutte le batterie
contemporaneamente.
Se il trasmettitore è alimentato a batterie, si riduce la portata massima.
24
Page 25
CT-2400_Manual_04.pdf 25 28/4/14 6:03 pm
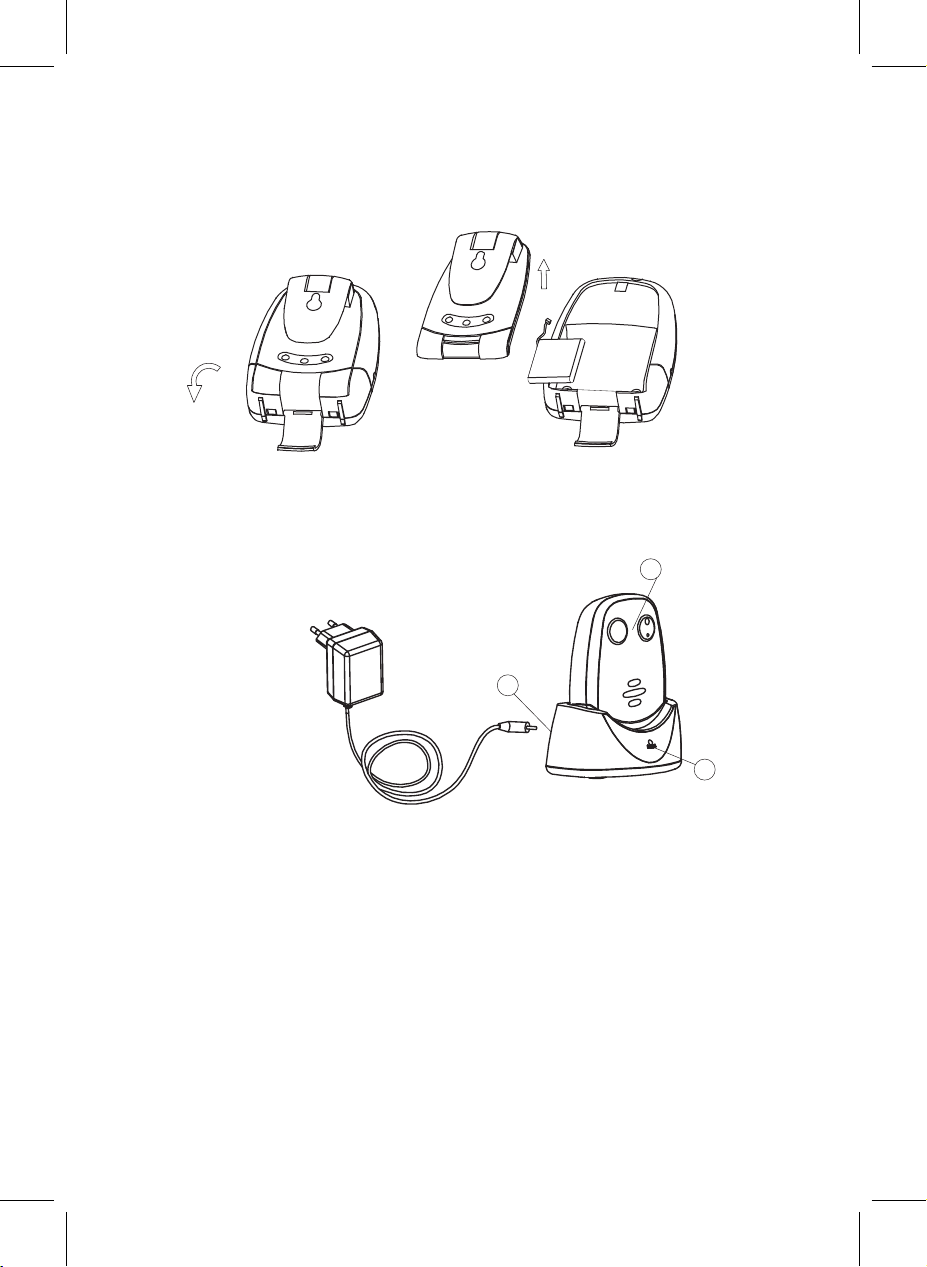
(B) Unità genitori (ricevitore) con batteria ricaricabile Li-Po
e base di ricarica
(B) Ricevitore
1. Funzionamento con batteria ricaricabile Li-Po
La batteria ricaricabile Li-Po è già inserita nell’apparecchio ed è parzialmente
carica. Per cambiare la batteria, aprire l’alloggiamento posteriore come
indicato nella figura, staccare la spina dalla presa e inserire un nuovo
accumulatore.
2. Ricaricare la batteria
3
16
17
Inserire l’unità genitori spenta nella base di ricarica. Se l’apparecchio è inserito
correttamente si illumina la spia rossa di controllo dell’indicatore 17.
Se la spia rossa non si illumina, verificare la posizione dell’unità genitori.
Durante la ricarica lampeggiano in alternanza la spia rossa e verde
dell’indicatore LED 3. Dopo circa 4 ore la carica dell’accumulatore è completa
e rimane accesa la spia LED verde.
Ora è possibile accendere e utilizzare l’unità genitori. La si può rimuovere o
lasciare nella base di ricarica – non c’è pericolo di danneggiare la batteria con
una ricarica eccessiva.
Se si lascia l’unità nella base, la batteria si ricarica automaticamente quando la
tensione scende al di sotto di un determinato livello.
Avvertenza: prima di utilizzarla per la prima volta, caricare l’unità genitori per
almeno 4 ore. Prima di caricarla, accertarsi che l’unità sia spenta.
25
Page 26

CT-2400_Manual_04.pdf 26 28/4/14 6:03 pm
Funzionamento
Accensione del trasmettitore (Baby)
1.Per accendere l’unità tenere premuto il tasto 7 Power ON-OFF sulla
posizione ON. Si illumina la spia rossa dell’indicatore Power 9.
Posizionare l’unità a circa 1m di distanza dal lettino con il microfono rivolto
verso il bambino.
2.Regolare la sensibilità del microfono con il tasto 8 (+/-), in modo che il
microfono 12 riconosca e trasmetta i suoni a partire dal livello sonoro
desiderato. L’indicatore di trasmissione 10 lampeggia sempre quando si
premono questi tasti. La frequenza è tanto maggiore quanto più alta è la
sensibilità del microfono (massimo: lampeggia 5x / minimo: 1x)
Premere il selettore per aumentare o per diminuire la sensibilità.
3.Quando l’unità trasmette, si illumina la spia rossa dell’indicatore di
trasmissione 10.
Se il microfono 12 non registra nessun suono, l’unità torna in modalità
standby e l’indicatore di trasmissione 10 si spegne.
4.La luce notturna 14 può essere impostata su accensione continua o
attivata dalla voce premendo il tasto 11 come descritto qui di seguito.
short press
OFF
short press short press
Night light ON
Intensity level 1
vox
Intensity level 3
short press
Night light ON
Intensity level 2
Night light ON
Intensity level 3
short
press
Nella modalità comando a voce si illumina l’indicatore 15. La luce notturna
14 si accende non appena il microfono 12 riconosce un suono, e si
rispegne non appena il microfono 12 cessa di trasmettere suoni.
Unità genitori (ricevitore)
1.Per accendere l’unità tenere premuto il tasto 1 Power ON-OFF . Si
illumina la spia verde dell’indicatore Power 3. Quando la spia comincia a
vacillare, significa che la batteria è quasi scarica. Collegare il ricevitore
all’adattatore per la corrente e inserirlo nella base di ricarica.
All’accensione dell’unità la spia LED 4 indica il livello di carica della
batteria per ca. 3 secondi per poi passare al livello di ricezione dell’unità
baby. Premendo brevemente il tasto 1 si può controllare il livello di
carica della batteria sull’indicatore LED 4 in qualsiasi momento.
26
Page 27
CT-2400_Manual_04.pdf 27 28/4/14 6:03 pm
2.Posizionare l’unità genitori a una distanza appropriata dall’unità baby per
evitare una controreazione. Se la distanza è insufficiente, l’altoparlante 5
emetterà un fischio.
3.Non appena l’unità genitori riceve un segnale, si illumina l’indicatore di
ricezione LED 4. Quanto più intensi sono i suoni, tanto più si illuminano le
spie LED. Questa funzione è utile se i genitori abbassano il volume
dell’apparecchio, per mantenere un ambiente silenzioso.
4.Il volume si regola con il tasto 2 (+/-). L’indicatore LED 4 mostra
l’impostazione. Quanti più LED si illuminano, tanto più alto è il volume 5
(max. 5 LED). Se non è illuminato nessun LED, l’apparecchio è muto.
Premere il selettore per alzare o per abbassare il volume.
5.Se l’unità genitori si trova per più di 30 secondi al di fuori della portata
dell’unità baby, si attiva l’allarme sonoro di fuori portata e l’indicatore LED
4 comincia a lampeggiare. L’allarme si spegne non appena l’unità genitori
rientra nel campo di ricezione dell’unità baby.
P.S. questo allarme si attiva se l’unità baby è spenta, se il livello di carica
delle batterie è troppo basso, se manca la corrente e se non funziona
l’accoppiamento.
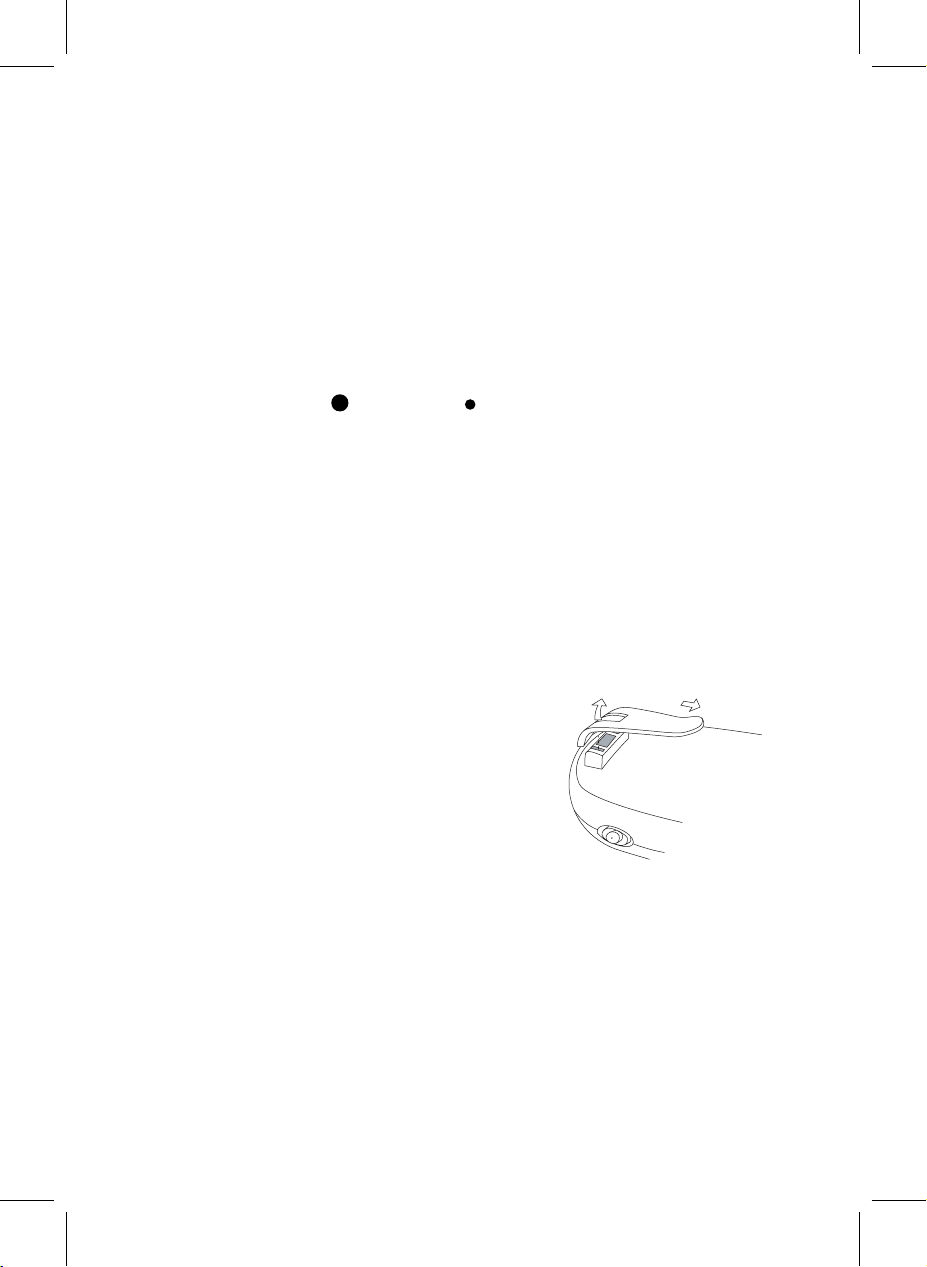
6.Ogni volta che si preme il tasto 8, l’impostazione è
confermata con un suono. Entrambe le unità possono
essere fissate alla cintura mediante una clip.
La clip può essere rimossa come indicato nella
figura seguente.
PRECAUZIONI
• Utilizzare sempre l’adattatore per la corrente incluso nella fornitura. Altri
adattatori potrebbero danneggiare l’apparecchio baby control.
• Se l’apparecchio rimane inutilizzato per un lungo periodo, consigliamo di
rimuovere tutte le batterie, per evitare eventuali perdite.
• Quando l’apparecchio non è in uso, staccare l’adattatore dalla presa della
corrente.
27
Page 28
CT-2400_Manual_04.pdf 28 28/4/14 6:03 pm
• L’apparecchio funziona al meglio se tenuto a una temperatura tra -9 C e
+50 C.
• Non esporre l’apparecchio per lungo tempo alla radiazione solare diretta o
a fonti di calore e non utilizzarlo in un ambiente umido o polveroso.
• Non aprire il contenitore. Non vi sono parti che richiedono manutenzione.
ACCOPPIAMENTO
Questo procedimento permette di accoppiare l’unità genitori con l’unità baby
se, dopo la messa in funzione, le unità non dovessero comunicare l’una con
l’altra.
L’unità baby e l’unità genitori sono fornite dalla fabbrica accoppiate con un
codice e sono già pronte per l’uso.
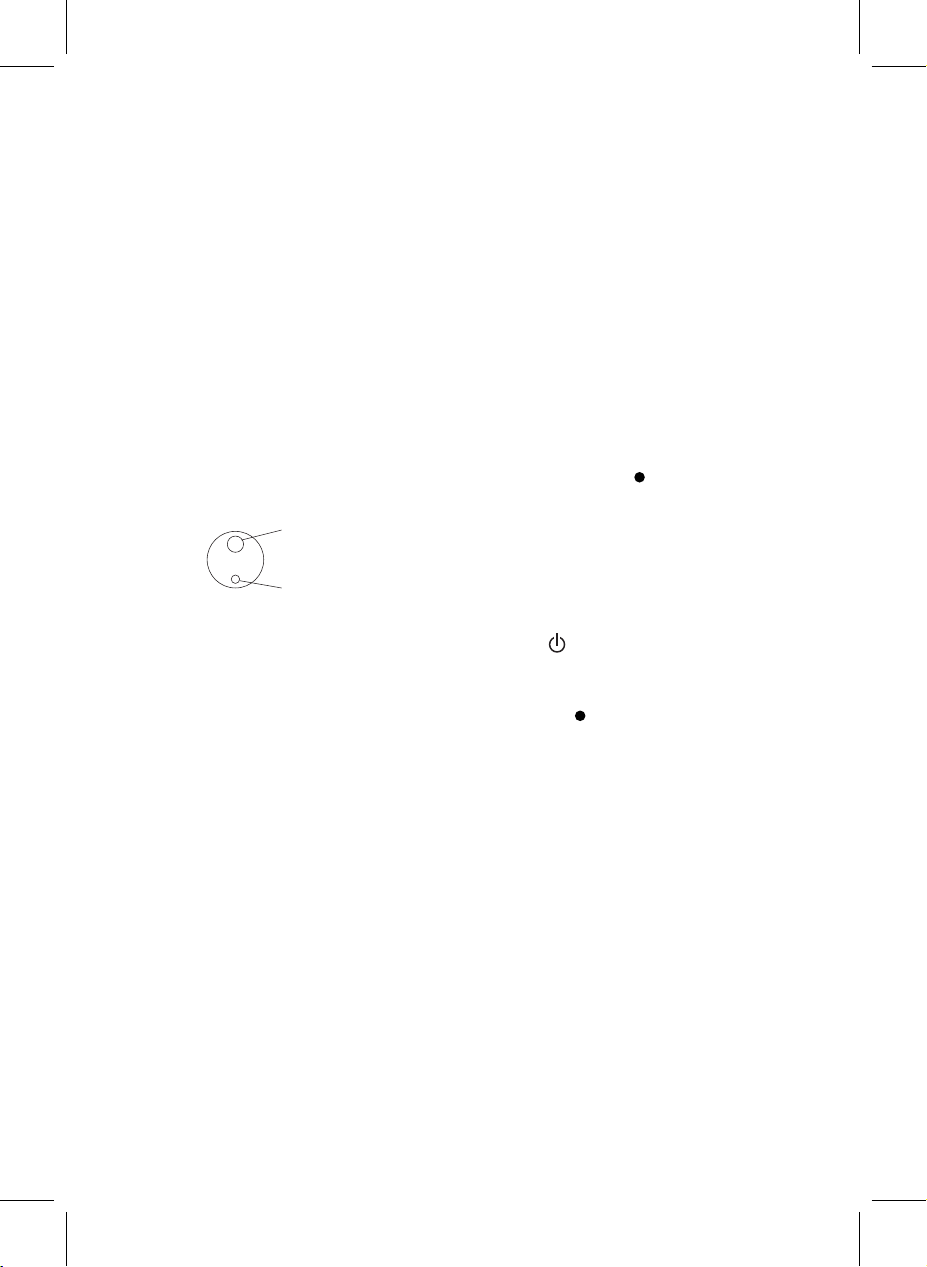
1. Dapprima premere e tenere premuto il tasto 2 (down) dell’unità genitori.
up botton
down botton
2.Accendere l’unità tenendo premuto il tasto 1. La spia verde
dell’indicatore POWER 3 comincia a lampeggiare. Rilasciare i due tasti.
3.Ora premere e tenere premuto il tasto 8 (down) dell’unità baby.
4.Accendere l’unità baby tenendo premuto il tasto 7. La spia verde
dell’indicatore POWER 9 comincia a lampeggiare. Rilasciare i due tasti.
5.Premere di nuovo il tasto 8 dell’unità baby. Se l’accoppiamento è riuscito,
l’unità genitori emette 2 brevi suoni. Le spie verdi degli indicatori Power 3
e 9 delle due unità sono illuminate costantemente.
6.L’apparecchio baby control è ora pronto per l’uso. Eventualmente
l’altoparlante 5 emette un fischio (controreazione) se le due unità sono
troppo vicine.
7.Se le unità genitori e baby non riescono a comunicare l’una con l’altra,
ripetere le operazioni 1 – 6.
28
Page 29
CT-2400_Manual_04.pdf 29 28/4/14 6:03 pm
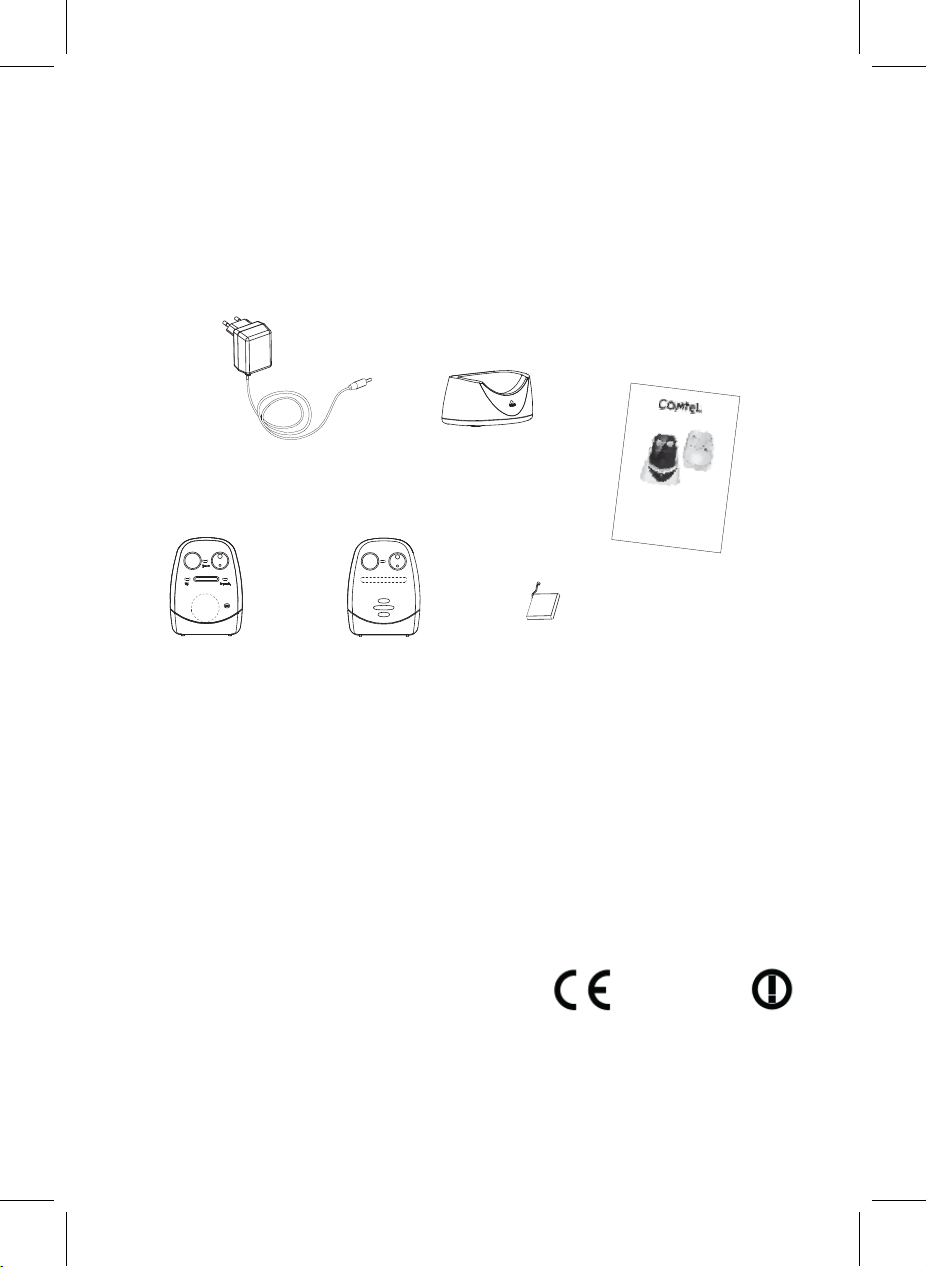
Dotazione standard
a. Adattatore AC/DC da 6V 2 x
b. Caricabatteria
c. Trasmettitore
d. Ricevitore
e. Accumulatore ricaricabile da 3.7V Li-Polymer per il ricevitore
f. Istruzioni per l’uso in tedesco/francese/italiano/inglese
CT-2400
a.
b.
Bedienungsanleitung
Mode d’emploi
Istruzioni per l’uso
Instruction manual
01-11
12-21
22-30
31-40
f.
c. d. e.
Vedere le condizioni di garanzia sul tagliando di garanzia allegato.
*vale solo per la vendita in Svizzera. All’estero valgono le disposizioni di
garanzia del rivenditore o del distributore.
Questo apparecchio è conforme alla norma europea R&TTE.
La dichiarazione di conformità può essere richiesta a:
COMTEL AG, Rotzbergstrasse 7, CH-6362 Stansstad
Tel. 041 610 72 72 Fax: 041 610 72 74
www.comtel.ch
e-mail: [email protected]
1177
Con esplicita riserva di modifiche tecniche e del design.
© Copyright by COMTEL AG – Svizzera
29
Page 30

CT-2400_Manual_04.pdf 30 28/4/14 6:03 pm
ERRORI DI FUNZIONAMENTO
Problema Possibile causa Soluzione
Il trasmettitore non
trasmette
La sensibilità del microfono è
troppo bassa
Aumentare la sensibilità con
il tasto 8
Le batterie sono quasi scariche
o l’adattatore non è collegato
Sostituire le batterie o
controllare il collegamento
correttamente alla corrente
L’unità baby
trasmette
La sensibilità del microfono è
troppo alta
Diminuire la sensibilità con il
tasto 8
ininterrottamente
L’allarme di fuori
portata suona
Le batterie nell’unità baby sono
scariche
Sostituire le batterie o
utilizzare l’adattatore
ininterrottamente
La distanza tra unità baby e
Avvicinare le unità
unità genitori è al di fuori della
portata
Accoppiamento non riuscito Accoppiare nuovamente gli
apparecchi
Indicatore batterie
scariche sempre
acceso
Le batterie sono scariche Caricare la batteria con la
base di ricarica o sostituire
le batterie o utilizzare
l’adattatore
Non ci sono batterie nell’unità
genitori
Inserire la batteria
ricaricabile nell’unità genitori
La batteria ricaricabile è
difettosa
Breve durata di
funzionamento a
La luce notturna è sempre
accesa
Sostituirla con una nuova
batteria ricaricabile
Spegnere la luce notturna
batterie
Forte fruscio e
interferenze
L’unità baby è posizionata
troppo vicino ad altri
apparecchi elettrici
Rimuovere gli apparecchi
elettrici o allontanare l’unità
baby
Portata troppo corta Costruzioni in ferro e muri si
trovano tra l’unità baby e l’unità
Spostare gli apparecchi in
un altro luogo
genitori
Le batterie nell’unità baby sono
scariche
Sostituire le batterie o
utilizzare l’adattatore
30
Page 31

CT-2400_Manual_04.pdf 31 28/4/14 6:03 pm
ENGLISH
Thank you for purchasing our CT-2400 digital baby monitor. Your unit has
been manufactured and checked under the strictest possible quality control to
ensure that each monitor leaves the factory in perfect condition. In the unlikely
event you find any defects or have any problem, please contact our dealer or
service center.
Please read this manual carefully to obtain maximum performance and
extended service life from the unit.
Features
-Full digital technique operating in the 863-870MHz with zero interference
-Automatic hop and search for free channel
-Operating range 800m in open space
-Low radiating power (only 10% of normal DECT or 50% of ECO DECT)
-Night light on baby unit
-Low battery alert on both baby and parent unit
-Digitally adjustable microphone sensitivity
-Audio and visual alert for out of range
-Digital volume control
-LED sound level meter
-Optional Li battery and charger stand for parent unit
WARNING
The CT-2400 should not be regarded as a medical device. Premature babies or
those considered to be at risk should be under the supervision of your doctor or
health personnel.
Direct supervision of your baby at a regular interval by a responsible adult is
strongly recommended in addition to using the CT-2400.
POWER SUPPLY
( A ) Baby Unit (BU) and Parent unit (PU)
31
Page 32
CT-2400_Manual_04.pdf 32 28/4/14 6:03 pm
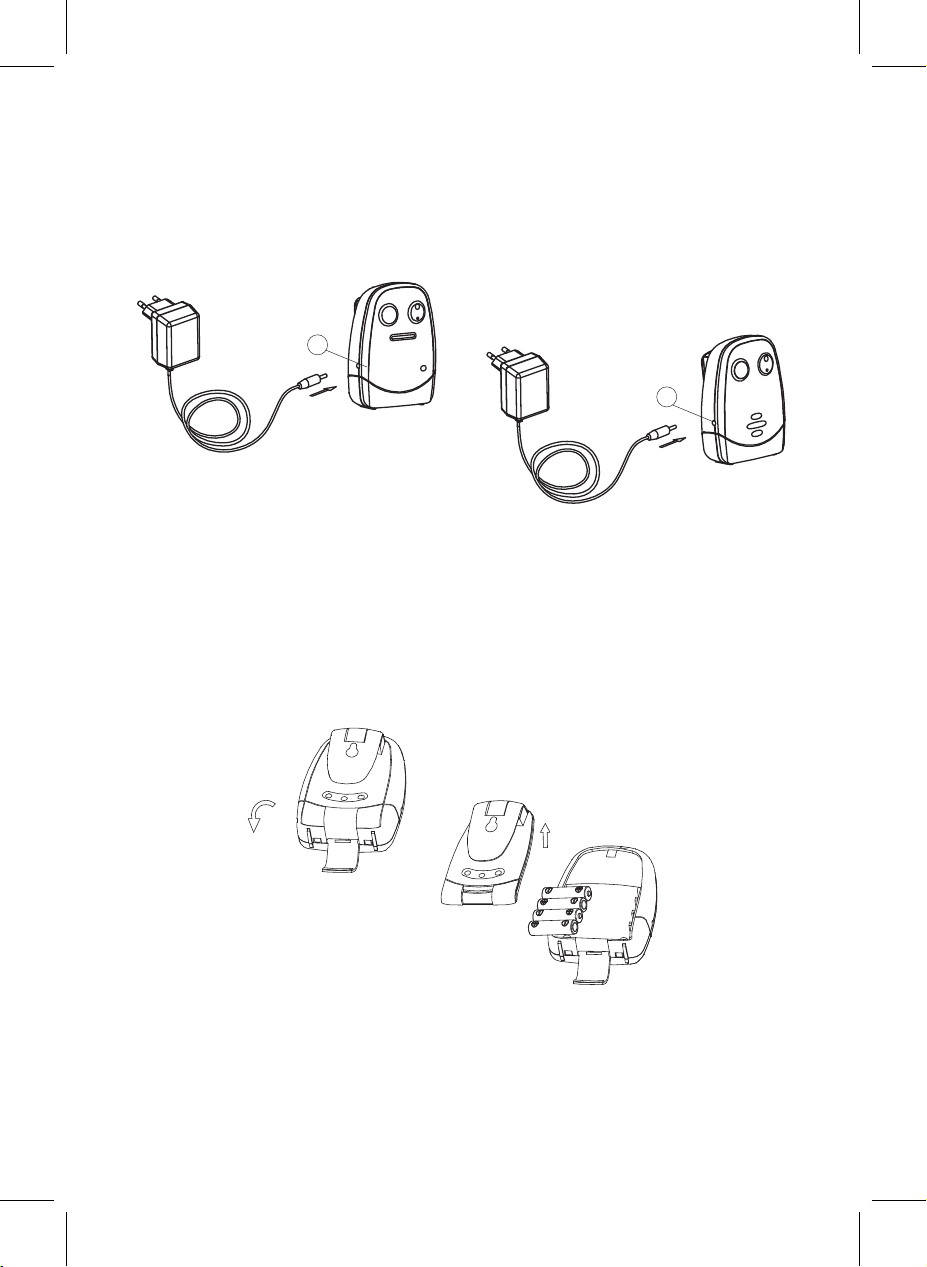
1. Operation from batteries
Slide open the battery door. Insert 4 pieces AAA size (UM-3) alkaline
batteries into the compartment. Observe correct polarities indication.
N.B. For best performance, do not mix use old and new batteries or alkaline
and rechargeable batteries.
6
13
2. Operation using AC adapter
The unit can be operated on AC mains using the supplied 6V AC adapter.
Connect the output plug of adapter to DC jack 6 or 13, make sure the
polarity is correct. The power supply from the battery will be cut off once the
adapter’s output plug is inserted into DC jack.
(B) Parent Unit (PU) equipped with Li battery
1. Operation from battery pack
The Li polymer battery pack is partially charged and already installed in the
unit.
32
Page 33
CT-2400_Manual_04.pdf 33 28/4/14 6:03 pm
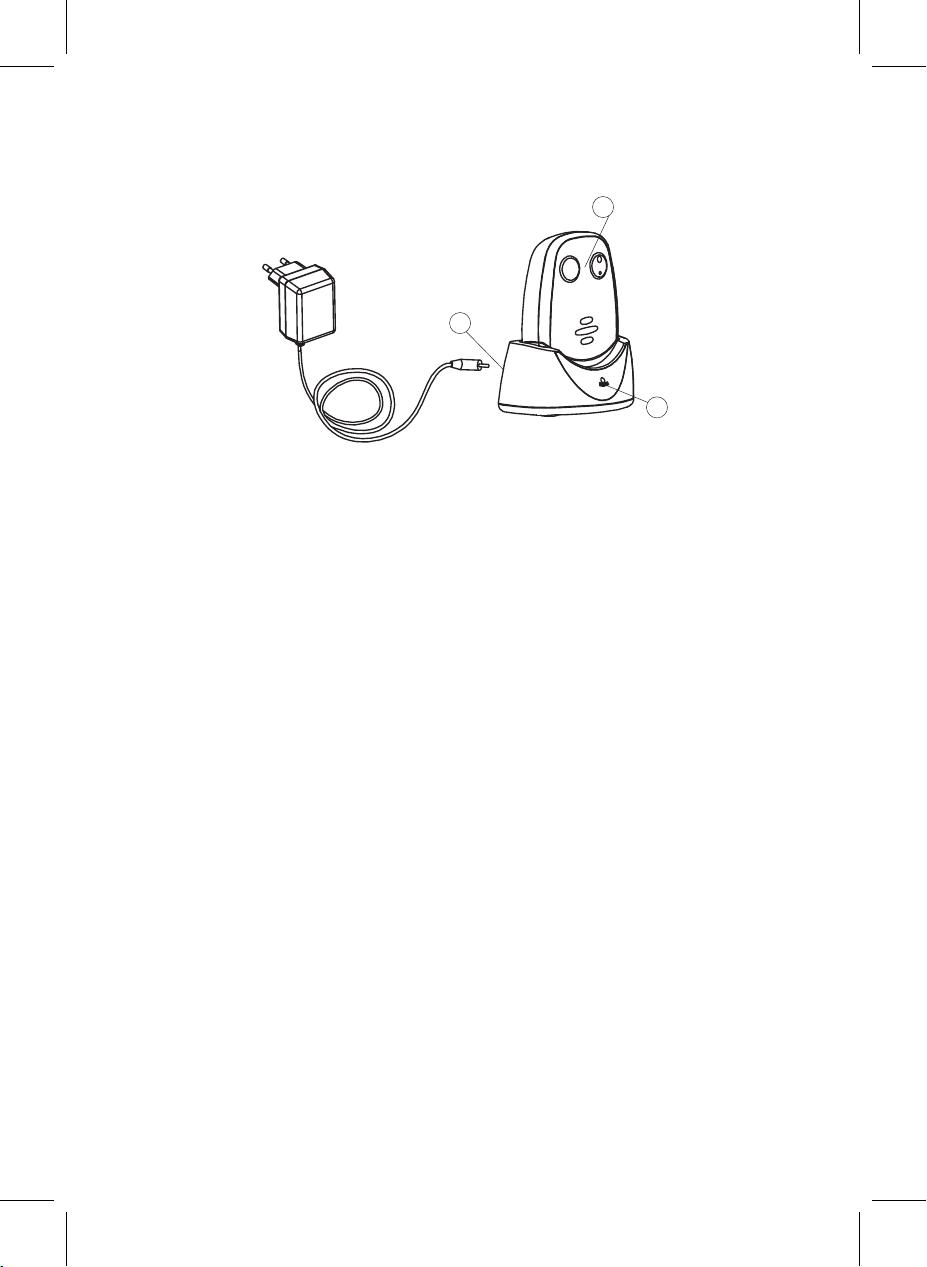
To exchange battery pack, slide open the battery door in direction as shown,
take out the battery pack and disconnect from socket.
3
16
17
2. Operation from AC mains using the charger stand
Connect the output plug of supplied 6V AC adapter to DC jack 16 of charger
stand, make sure the polarity is correct. With the unit being switched on,
place it into the charger stand. The charging indicator 17 should light up red.
Adjust the position of unit in case the indicator 17 does not light up. During
charging, the power indicator 3 will have both red and green colour light up.
Once the battery is fully charged up (normally it takes around 4 hours), the
indicator 3 turns steady green only. Either you can take the unit out or
keeping placing it in the charger stand will cause no damage to the battery.
In the latter case, when the battery is being consumed and voltage falls to a
certain level, the charger stand will automatically start charging up the
battery again.
Note: Before using the parent unit for the first time, charge up the Li polymer
battery for at least four hours.
CAUTION: BESURE THE BATTERY IN THE PARENT UNIT IS
RECHARGEABLE TYPE BEFORE PLACING IT IN THE CHARGER
STAND, OTHERWISE EXPLOSION MAY RESULT.
33
Page 34
CT-2400_Manual_04.pdf 34 28/4/14 6:03 pm
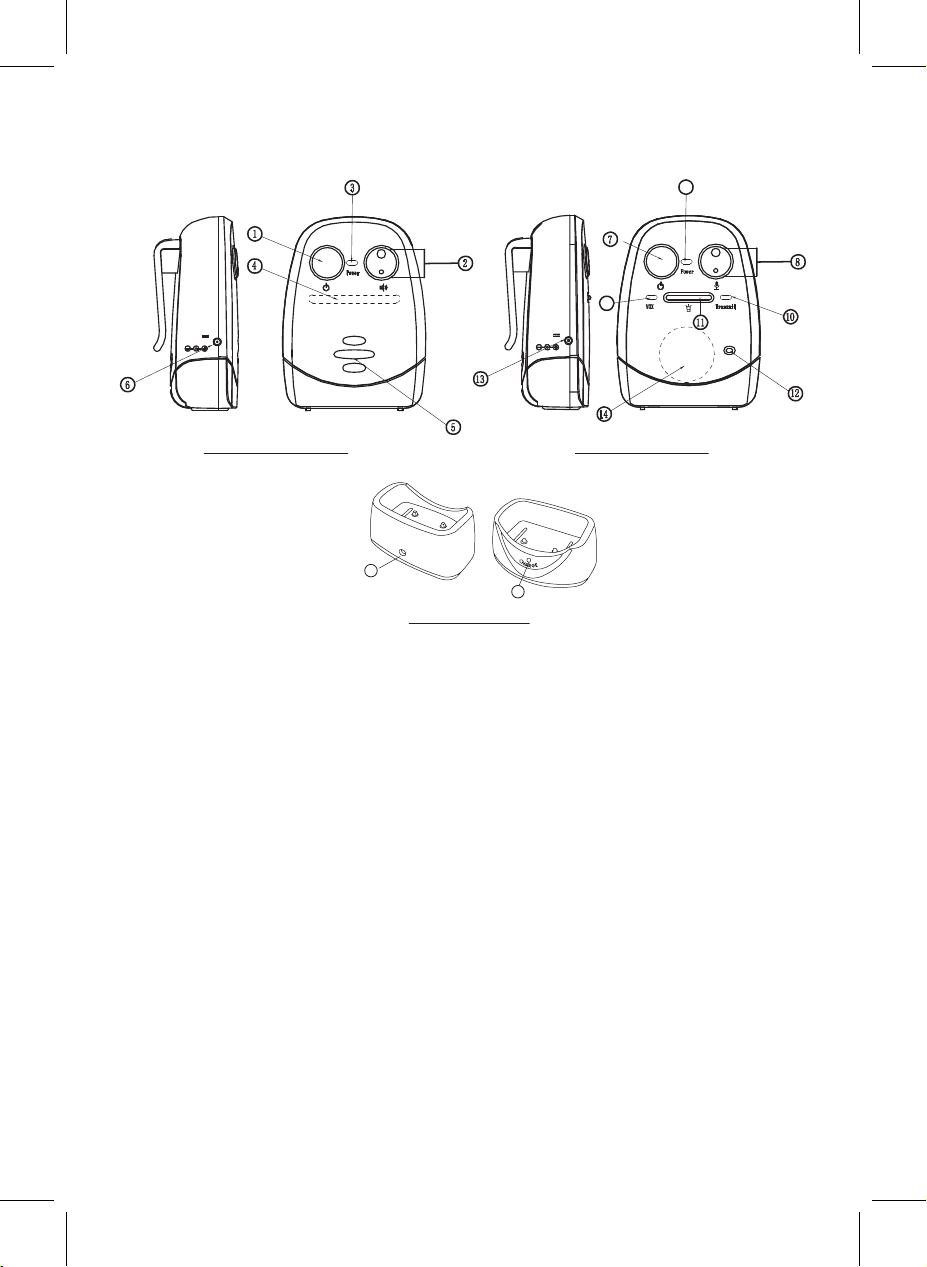
CONTROLS LAYOUT
DC 6V
50
0mA
Parent Unit ( PU ) Baby Unit ( BU )
16
17
Charger Stand
9
15
DC 6V
500mA
• Power ON/OFF switch
• Up /Down button
• Power/battery low indicator
• LED level meter
• Speaker
• DC jack
• Power ON/OFF switch
• Up/Down button
• Power/battery low indicator
• Transmit indicator
• Night light switch
• Microphone
• DC jack
• Night light
• Night light vox indicator
• DC jack
• Charging indicator
34
Page 35

CT-2400_Manual_04.pdf 35 28/4/14 6:03 pm
PAIRING
This process is to match the PU with BU so that they can communicate with
each other while no other devices (even baby monitor of identical model) can
interfere withyou or receiving your signal.
The PU and BU are already paired when they are shipped from factory.
However, in case you still encounter interference, perform pairing again to
achieve better privacy
1. Press and hold the down button 2 of PU.
2. Switch on the unit by long press of button 1. The power indicator 3 should
start flashing green. Release both buttons.
3. Press and hold the down button 8 of BU.
4. Switch on the unit by long press of button 7. The power indicator 9 should
start flashing green. Release both buttons.
5. Now press again down button 8 of BU, if pairing is successful, two beep
sound will be heard in PU. The power indicator 3 and 9 of both BU and PU
should show steady green.
6. The baby monitor is now ready for operation and probably a feedback noise
will be heard in speaker 5 of PU.
7. In case the PU and BU cannot communicate with each other, repeat pairing
process again.
OPERATION
Baby unit (BU)
1. Place the BU about 1 m from the crib with the microphone 12 facing towards
the baby. Switch on the unit by long press of button 7, the power indicator
9 will show steady green. If this indicator starts flashing green, the battery
level becomes low. Either replace with new battery or change using the
supplied AC adapter as power supply.
2. Adjust the microphone sensitivity using the button 8 such that the unit will be
set to transmit whenever the microphone 12 picks up a sound at your
desirable loudness level. The transmit indicator 10 will blink every time these
buttons are pressed, more number of blinks means the microphone is more
sensitive to sound (maximum is 5 blinks and minimum is 1 blink). Press to
increase and to reduce microphone sensitivity.
35
Page 36

CT-2400_Manual_04.pdf 36 28/4/14 6:03 pm
3. Once BU is in transmit mode, the transmit indicator 10 will light up red. The
unit will return standby mode a few seconds after the microphone 12 stops
picking up any sound and the transmit indicator 10 goes off.
4. The night light 14 can be set to permanently ON or vox (voice activated) by
short press of the button 11 in following manner:
short press
OFF
short press short press
Night light ON
Intensity level 1
vox
Intensity level 3
short press
Night light ON
Intensity level 2
Night light ON
Intensity level 3
short
press
Under VOX mode, the night light vox indicator 15 will light up. Once the
microphone 12 picks up a sound, the night light 14 will be turned on and will
fade off automatically a few seconds after the microphone 12 stops picking
up any sound.
Parent unit (PU)
1. Switch on the unit by long press of button 1. The power indicator 3 will
show steady green. If this indicator starts flashing green, the battery level
becomes low.
Either replace with new battery or change using the supplied AC adapter as
power supply. (For PU equipped with Li battery, place it inside the supplied
charger stand to charge up the battery).
The LED level meter 4 will show the battery status for around 3 sec whenever
the power is switched on, then it resumes to show the received signal level
from baby unit.
Under normal operation, short press of the button 1 at any time will show the
battery status on the LED level meter 4.
2. Place the PU at a reasonable distance away from BU to avoid feedback. Too
close a distance will create a screeching sound at the speaker 5.
3. Once the PU receives a signal, the LEDs in the level meter 4 will light up.
The louder the baby’s voice, the more number of LED will be lighted up. This
feature is useful to alert the parents of baby’s cry in case the volume of
speaker 5 is turned low to keep the environment quiet,
4. The speaker volume can be adjusted using the button 2. The LED level
meter 4 will show the setting. More LEDs light up means higher volume
(maximum 5 LED).
36
Page 37

CT-2400_Manual_04.pdf 37 28/4/14 6:03 pm
When no LED lights up, the speaker 5 is totally muted. Press button to
increase and button to reduce volume.
5. Once the PU is beyond the communication range of the BU for over 30 sec,
an out of range alarm will be heard together with all LEDs of level meter 4
start flashing to alert the parents. The alarm will only go off when the PU
falls back within the communication range of BU.
To turn off the alarm sound, press either or of button 2. The LEDs of
level meter 4 still keep flashing until the PU falls within the communication
range of BU.
N.B. This alarm will also be heard in case the BU is switched off, or its
battery has run down, or its power is cut off.
6. Each time button 8 is pressed, a beep tone will be heard to validate your
entry being recognized by the unit.
Both the BU and PU can be carried be around using the belt clip. To remove
the clip, follow diagram as shown.
PRECAUTIONS
- Use only the supplied AC adapters, use of other adapters may cause
damage to the CT-2400 baby monitor.
- When not using the monitor for a long period of time, remove all batteries
from the PU and BU to avoid damage due to battery leakage.
- Disconnect the AC adapter from the wall outlet when the monitor is not to
be operated.
- The CT-2400 is best performed within a temperature range of 0°C to
+50°C
- Do not leave the monitor expose to strong sunlight for a long time or
nearby any heat source, moisture and excessive environment.
- Do not open the cabinet, no serviceable parts inside.
37
Page 38
CT-2400_Manual_04.pdf 38 28/4/14 6:03 pm
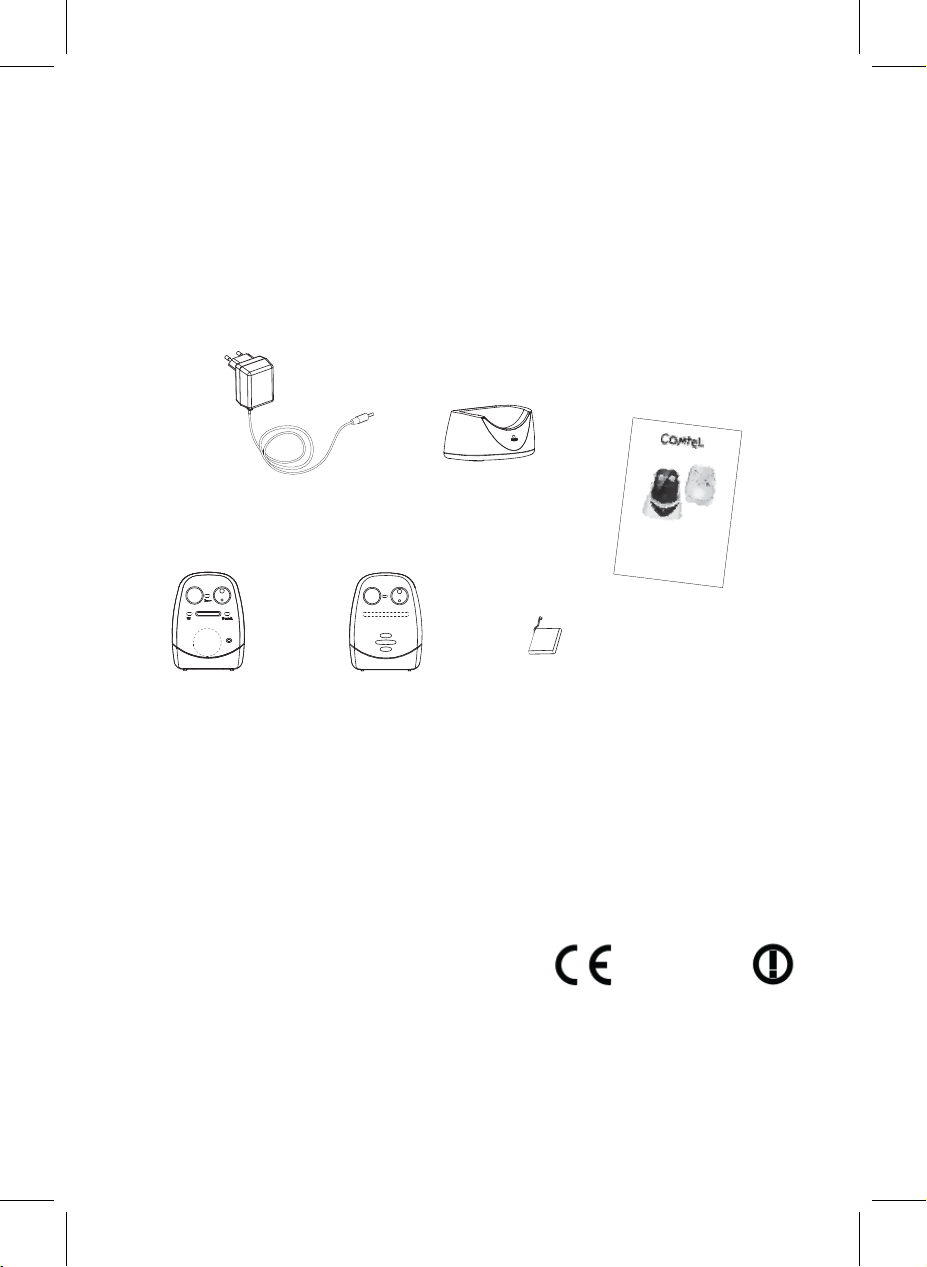
STANDARD ACCESSORIES
a. 6V AC adapters x 2
b. Charger stand for PU (optional)
c. Baby unit
d. Parent unit
e. 3.7V Li polymer rechargeable battery pack
f. User manual
CT-2400
a.
b.
c. d. e.
COMTEL AG, Rotzbergstrasse 7, CH-6362 Stansstad
Tel. 041 610 72 72 Fax: 041 610 72 74
www.comtel.ch
E-Mail: [email protected]
© Copyright by COMTEL AG – Switzerland
Bedienungsanleitung
Mode d’emploi
Istruzioni per l’uso
Instruction manual
01-11
12-21
22-30
31-40
f.
1177
38
Page 39

CT-2400_Manual_04.pdf 39 28/4/14 6:03 pm
TROUBLE SHOOTING GUIDE
Problem Possible Causes Solution
BU has no
transmission
BU always on Mic sensitivity is too high Adjust mic sensitivity lower
Out -of-range alarm
always on
Always showing low
battery alert
Battery life is short Night light is permanently switched
Many static noise and
interference
Too short
communication range
Mic sensitivity is too low Adjust mic sensitivity higher
Battery has run down or switching
power supply improperly connected
BU battery has run down Replace with new battery or use
Distance between BU and PU
exceeds the operating range
Pairing is not successful Perform pairing again
Battery has run down Recharge battery using charger
No battery inside PU Put battery pack into battery
Battery pack is damaged Replace with new battery pack
on
BU is located near other electrical
appliances
Many steel structures between BU
and PU
BU battery has run down Replace with new battery or use
using up button 8
Replace with new battery or
check connection
using down button 8 such that
transmitter become voice
activated
switching power supply
Move the BU and PU closer
together
stand or replace with new
battery or use AC adapter
compartment
Switch off night light
Remove the electrical
appliances or re -locate the BU
far away from source of
interference
Re -locate BU & PU
AC adapter as power supply
39
Page 40

CT-2400_Manual_04.pdf 40 28/4/14 6:03 pm
CE-Konformitätserklärung
Wir,
Comtel AG
Rotzbergstrasse 7
6362 Stansstad / Schweiz
erklären, dass das Produkt
Comtel CT-2400
Babyüberwachungsgerät
Den Schutzanforderungen entspricht, die in der Richtlinie des Rates zur
Angleichung der Rechtsvorschriften der Mitgliederstaaten über
elektromagnetische Verträglichkeit R&TTE (1999/5/EC) festgelegt sind.
Zur Beurteilung wurden folgende Normen herangezogen:
EN 62311:2008
EN 301 489
EN 301 489 -3 V1.4.1:2002 -08
EN 300 220 -1 V2.4.1:2012 -05
EN 300 220 -2 V2.4.1:2012 -05
EN 55014-1:2006+A1:2009+A2:2011
EN 55014-2:1997+A1:2001+A2:2008
EN 61000-3:2006+A1:2009+A2:2009
EN 61000-3-3:2008
-1 V1.9.2:2011 -09
Die Prüfung wurde durchgeführt von:
Timco Engineering Inc.
P.O.Box 370
NEWBERRY, FL32669
Notied body ID-No.
1177
Geschäftsführer Tony Blunschy
8. April 2014
U.S.A
40
 Loading...