

Page 1
®
ComSifter
protect web users now!
User Guide
Model CS-8D Pro
Version March 26, 2012 0326121500
Page 2

The products described in this User's Guide are licensed products of Comsift, Inc. This User's Guide contains proprietary information
protected by copyright, and this User's Guide is copyrighted.
Comsift, Inc., hereafter referred to as Comsift, does not warrant that the product will work properly in all environments and applications,
and makes no warranty and representation, either implied or expressed, with respect to the quality, performance, merchantability, or
fitness for a particular purpose.
Comsift has made every effort to ensure that this manual is accurate. However, information in this User's Guide is subject to change
without notice and does not represent a commitment on the part of Comsift. Comsift makes no commitment to update or keep current
the information in this User's Guide, and reserves the right to make changes to this User's Guide and/or product without notice. Comsift
assumes no responsibility for any inaccuracies and omissions that may be contained in this User' s Guide. If you find information in this
User's Guide that is incorrect, misleading, or incomplete, we would appreciate your comments.
No part of this User's Guide may be reproduced or transmitted in any form or by any means, electronic or mechanical, including
photocopying, recording, or information storage and retrieval s ystems, for any purpose other than the purchaser's personal use, without
the express written permission of Comsift.
Comsift, ComSifter, CSphrase and the Comsift logo are trademarks of Comsift, Inc.
All other trademarks or registered trademarks listed belong to their respective owners.
Copyright 2003-2011 Comsift, Inc.
All rights reserved.
FCC STATEMENT
This product has been tested and found to comply with the limits for a Class B digital device, pursuant to Part 15 of the FCC Rules.
These limits are designed to provide reasonable protection against harmful interference in a residential installation. This equipment
generates, uses, and can radiate radio frequency energy and, if not installed an d used according to the instructions, may cause harmful
interference to radio communications. However, there is no guarantee that interference will not occur in a particular installation. If this
equipment does cause harmful interference to radio or television reception, which is found by turning the equipment off and on, the user
is encouraged to try to correct the interference by one or more of the following measures:
Reorient or relocate the receiving antenna
Increase the separation between the equipment or device
Connect the equipment to an outlet other than the receivers
Consult a dealer or an experienced radio/TV technician for assistance
Page 3

TABLE OF CONTENTS
T able of Contents
Table of Contents ................................................................................................................................................i
Introduction and Getting Started ..................................................................................................................1–1
Features..........................................................................................................................................................................1–1
How ComSifter Works...................................................................................................................................................1–2
Overview.......................................................................................................................................................................1–3
Internet Gateway ..........................................................................................................................................................1–3
Non-Stop Operation......................................................................................................................................................1–3
Firewall .........................................................................................................................................................................1–3
Filtering System............................................................................................................................................................1–3
Navigating Through This User Guide...........................................................................................................................1–4
Conventions in This User’s Guide................................................................................................................................1–4
Installing ComSifter........................................................................................................................................2–1
Installation......................................................................................................................................................................2–3
Security Considerations................................................................................................................................................ 2–3
Location/Placement......................................................................................................................................................2–3
AC Power......................................................................................................................................................................2–3
Network Connections....................................................................................................................................................2–3
Power On and Indicator Lights.....................................................................................................................................2–3
Windows 2000/XP/Vista/7 ............................................................................................................................................ 2–5
Making a secure connection.........................................................................................................................................2–7
Quick Start Guide...........................................................................................................................................................2–9
How will the ComSifter Connect to the Network?.........................................................................................................2–9
Do I need only one filter or multiple filters? .................................................................................................................. 2–9
Do I need Proxy or Transparent Mode?.......................................................................................................................2–9
How will I identify and authenticate a user?.................................................................................................................2–9
How will the ComSifter get a list of my users?...........................................................................................................2–10
How many filters will I need?......................................................................................................................................2–10
What filter will each user be assigned to?..................................................................................................................2–10
Network Worksheet .....................................................................................................................................................2–11
Pre-Install Preparation................................................................................................................................................2–11
Installation, Phase 1, Initial Connectivity....................................................................................................................2–12
Installation, Phase 2, Determining the Authentication Method...................................................................................2–12
Installation, Phase 3, Tuning the Filters ..................................................................................................................... 2–12
Installation, Phase 3, Finishing Up.............................................................................................................................2–12
Authentication Methods (Quick Setup).......................................................................................................................2–13
BASIC Only.................................................................................................................................................................2–13
Prerequisites............................................................................................................................................................2–13
i
Page 4

TABLE OF CONTENTS
Quick Setup.............................................................................................................................................................2–13
NTLM..........................................................................................................................................................................2–14
Prerequisites............................................................................................................................................................2–14
Quick Setup.............................................................................................................................................................2–14
IDENTD Only..............................................................................................................................................................2–15
Prerequisites............................................................................................................................................................2–15
Quick Setup.............................................................................................................................................................2–15
IP Only........................................................................................................................................................................2–16
Prerequisites............................................................................................................................................................2–16
Quick Setup.............................................................................................................................................................2–16
Configuring ComSifter ...................................................................................................................................3–1
Configuration Overview ................................................................................................................................................3–1
Admin..............................................................................................................................................................................3–1
Understanding Modules and Categories...................................................................................................................3–1
Security Configuration..................................................................................................................................................3–2
Login..........................................................................................................................................................................3–2
ComSifter Admins.........................................................................................................................................................3–3
Overview....................................................................................................................................................................3–3
Setting the Username and Password........................................................................................................................3–4
Assigning Module Rights...........................................................................................................................................3–4
Remote Administration .................................................................................................................................................3–8
IP Access Control......................................................................................................................................................3–8
Deny from all IP’s...................................................................................................................................................3–9
Allow from all IP’s...................................................................................................................................................3–9
Allow from only listed IP’s ......................................................................................................................................3–9
Follow My IP..............................................................................................................................................................3–9
Disable ................................................................................................................................................................... 3–9
Follow the listed IP...............................................................................................................................................3–10
System Logs...............................................................................................................................................................3–11
Access Log..............................................................................................................................................................3–12
Status Messages..................................................................................................................................................3–12
Firewall....................................................................................................................................................................3–14
DHCP Non-Stop......................................................................................................................................................3–16
Duplicate IP Notification.......................................................................................................................................3–17
Security Log.............................................................................................................................................................3–18
Top Sites Log ..........................................................................................................................................................3–19
Network.........................................................................................................................................................................3–20
ADSL Client................................................................................................................................................................3–21
Dynamic DNS Provider...............................................................................................................................................3–22
Add an entry............................................................................................................................................................3–22
ii
Page 5

TABLE OF CONTENTS
Create runtime program..........................................................................................................................................3–22
Update All................................................................................................................................................................3–23
Firewall Advanced ......................................................................................................................................................3–24
Overview..................................................................................................................................................................3–24
Masquerading (SNAT).............................................................................................................................................3–25
Firewall Rules..........................................................................................................................................................3–26
Create Firewall Rules..............................................................................................................................................3–27
Action ...................................................................................................................................................................3–27
Logging.................................................................................................................................................................3–27
Source Zone.........................................................................................................................................................3–28
Destination Zone..................................................................................................................................................3–28
Protocol................................................................................................................................................................3–28
Source Ports ........................................................................................................................................................3–28
Destination Ports..................................................................................................................................................3–28
Common Rules........................................................................................................................................................3–29
DNS......................................................................................................................................................................3–29
Client Email (POP3, IMAP, SMTP)......................................................................................................................3–30
FTP.......................................................................................................................................................................3–31
ICQ/IM..................................................................................................................................................................3–32
Laplink™ ..............................................................................................................................................................3–33
MSN™ Messenger...............................................................................................................................................3–34
PCAnywhere™.....................................................................................................................................................3–36
Ping and Traceroute.............................................................................................................................................3–37
PPTP....................................................................................................................................................................3–38
Telnet ...................................................................................................................................................................3–40
VNC......................................................................................................................................................................3–41
Yahoo™ Chat.......................................................................................................................................................3–42
Web Access (browsing) .......................................................................................................................................3–43
Apply Configuration.................................................................................................................................................3–45
Stop Firewall............................................................................................................................................................3–45
Check Firewall.........................................................................................................................................................3–45
Backup.....................................................................................................................................................................3–45
Restore....................................................................................................................................................................3–45
Firewall Basic (Templates).........................................................................................................................................3–46
Template 1, High Security.......................................................................................................................................3–46
Template 2, High – Medium Security......................................................................................................................3–46
Template 3, Medium Security..................................................................................................................................3–46
Template 4, Medium – Low Security.......................................................................................................................3–47
Template 5, Low Security........................................................................................................................................3–47
Network Configuration................................................................................................................................................3–48
iii
Page 6

TABLE OF CONTENTS
Network Interfaces (IP Address Configuration).......................................................................................................3–48
Interfaces Active Now ..........................................................................................................................................3–49
Interfaces Active at Boot Time.............................................................................................................................3–49
WAN Interface Settings (eth0).............................................................................................................................3–49
LAN Interface Settings (eth1)...............................................................................................................................3–50
Virtual Interfaces......................................................................................................................................................3–51
Routing and Gateways............................................................................................................................................3–52
DNS.........................................................................................................................................................................3–53
Completing the DNS/Gateway Configuration..........................................................................................................3–54
Recovering a lost IP address ..................................................................................................................................3–54
Network Utilities..........................................................................................................................................................3–55
Network Wizards.........................................................................................................................................................3–56
Static IP...................................................................................................................................................................3–57
External IP............................................................................................................................................................3–57
External Subnet Mask..........................................................................................................................................3–57
External Gateway.................................................................................................................................................3–57
Internal IP.............................................................................................................................................................3–57
Internal Subnet Mask...........................................................................................................................................3–58
Primary DNS........................................................................................................................................................3–58
Secondary DNS ...................................................................................................................................................3–58
DHCP Server for Local LAN.................................................................................................................................3–59
Firewall Template.................................................................................................................................................3–59
Non-Stop Relationship.........................................................................................................................................3–59
Non-Stop Peer IP.................................................................................................................................................3–59
Dynamic IP..............................................................................................................................................................3–60
Bridge......................................................................................................................................................................3–61
PPPoE.....................................................................................................................................................................3–62
User Name...........................................................................................................................................................3–62
Password..............................................................................................................................................................3–62
Current Network Settings........................................................................................................................................3–63
Non-Stop/DHCP Configuration...................................................................................................................................3–64
Using the ComSifter DHCP Server .........................................................................................................................3–64
Information...............................................................................................................................................................3–65
List Leases...........................................................................................................................................................3–65
Non-Stop Status...................................................................................................................................................3–67
Non-Stop Configuration (Primary)...........................................................................................................................3–69
Non-Stop Configuration (Secondary)......................................................................................................................3–71
Subnets and Shared Networks................................................................................................................................3–73
Edit Client Options ...............................................................................................................................................3–75
Address Pool in Subnet........................................................................................................................................3–76
iv
Page 7

TABLE OF CONTENTS
Host and Host Groups.............................................................................................................................................3–77
Starting and Stopping the Non-Stop/DHCP Server.................................................................................................3–78
Quality of Service (QOS)............................................................................................................................................3–79
Overview..................................................................................................................................................................3–79
Determining the True Connection Speed................................................................................................................3–80
Configure QOS........................................................................................................................................................3–81
Connection Speed................................................................................................................................................3–81
Queue Rate and Ceiling.......................................................................................................................................3–81
Destination Ports..................................................................................................................................................3–82
Destination IP’s....................................................................................................................................................3–82
Viewing Queue Status.............................................................................................................................................3–82
Maintenance .................................................................................................................................................................3–83
Backup/Restore..........................................................................................................................................................3–84
Creating a Backup...................................................................................................................................................3–84
Restoring the Backup..............................................................................................................................................3–85
ComSifter Status.........................................................................................................................................................3–86
Active Directory Last Resync ..................................................................................................................................3–86
CPU Load Average .................................................................................................................................................3–86
Content Filter Service..............................................................................................................................................3–86
DHCP Available Leases..........................................................................................................................................3–86
DHCP Server...........................................................................................................................................................3–86
DNS Resolving........................................................................................................................................................3–87
Hardware Health .....................................................................................................................................................3–87
Internet Connected..................................................................................................................................................3–87
Non-Stop Operation ................................................................................................................................................3–87
Proxy Server Service...............................................................................................................................................3–87
Hours of Operation..................................................................................................................................................3–87
Denied Access Page ..................................................................................................................................................3–88
Overview..................................................................................................................................................................3–88
Local Message ........................................................................................................................................................ 3–88
Download/Install IDENTD...........................................................................................................................................3–89
File Manager...............................................................................................................................................................3–90
Information..................................................................................................................................................................3–91
ComSifter Information .............................................................................................................................................3–91
ComSifter Release Notes........................................................................................................................................3–92
Internet Connection Test............................................................................................................................................3–93
System Name.............................................................................................................................................................3–94
System Time...............................................................................................................................................................3–95
Utilities........................................................................................................................................................................3–96
Advanced Network diagnostics...............................................................................................................................3–96
v
Page 8

TABLE OF CONTENTS
Email Notification Parameters.................................................................................................................................3–96
Restart Services......................................................................................................................................................3–98
Rebuild ComSifter Proxy Cache..............................................................................................................................3–98
Restart ComSifter....................................................................................................................................................3–98
Clear all log files......................................................................................................................................................3–98
Clear DHCP Lease Database .................................................................................................................................3–98
Filter Setup......................................................................................................................................................4–1
Filter Overview ...............................................................................................................................................................4–1
Before you start ............................................................................................................................................................4–1
Master Filter....................................................................................................................................................................4–2
Full Exception Domain List...........................................................................................................................................4–3
Add............................................................................................................................................................................4–3
Delete........................................................................................................................................................................4–4
Full Exception URL List ................................................................................................................................................ 4–4
Add............................................................................................................................................................................4–4
Delete........................................................................................................................................................................4–4
Partial Exception Domain List.......................................................................................................................................4–5
Add............................................................................................................................................................................4–5
Delete........................................................................................................................................................................4–5
Partial Exception URL Filter List...................................................................................................................................4–5
Add............................................................................................................................................................................4–5
Delete........................................................................................................................................................................4–5
Banned Domain List.....................................................................................................................................................4–6
Delete........................................................................................................................................................................4–6
Banned URL List...........................................................................................................................................................4–6
Add............................................................................................................................................................................4–6
Delete........................................................................................................................................................................4–6
Banned CSphrase Filter Groups ..................................................................................................................................4–7
Activating Filters........................................................................................................................................................4–7
Deactivating Filters....................................................................................................................................................4–8
Weighted CSphrase Filter Groups................................................................................................................................4–9
Blacklist Domain Filter Groups ...................................................................................................................................4–10
Blacklist URL Filter Groups ........................................................................................................................................4–10
Filter Logging Options ................................................................................................................................................4–11
Enable Full Logging.................................................................................................................................................4–11
Enable Exception Logging.......................................................................................................................................4–11
Length of URL Logged in Access Log.....................................................................................................................4–12
Inactivity Timeout.....................................................................................................................................................4–12
Change Filter Names..................................................................................................................................................4–13
Clear Filter..................................................................................................................................................................4–14
vi
Page 9

TABLE OF CONTENTS
Search ........................................................................................................................................................................4–15
Exact Match.............................................................................................................................................................4–15
Begins With .............................................................................................................................................................4–17
Any match................................................................................................................................................................4–18
Restart ComSifter Filter..............................................................................................................................................4–19
Display Summary........................................................................................................................................................4–20
Individual Filters ..........................................................................................................................................................4–21
Regular Expression (RegEx)......................................................................................................................................4–22
Explanation of RegEx Modifiers..............................................................................................................................4–22
Examples of RegEx Modifiers.................................................................................................................................4–24
Hours of Operation .....................................................................................................................................................4–25
Normal Operation....................................................................................................................................................4–25
Permanently Off.......................................................................................................................................................4–25
Permanently On.......................................................................................................................................................4–26
Warn-and-Go..............................................................................................................................................................4–27
Enable .....................................................................................................................................................................4–27
Disable.....................................................................................................................................................................4–27
Change Sensitivity......................................................................................................................................................4–28
Sensitivity Level Guidelines.....................................................................................................................................4–28
Copy Filter ..................................................................................................................................................................4–29
Whitelist......................................................................................................................................................................4–30
Setup a whitelist filter: .............................................................................................................................................4–30
Add specific site exception to be whitelisted:..........................................................................................................4–30
Blocking External IP Addresses .................................................................................................................................4–30
Words/Phrases................................................................................................................................................5–1
Overview.........................................................................................................................................................................5–1
Configuring Words/Phrases..........................................................................................................................................5–3
Restart ComSifter Filter................................................................................................................................................5–3
Editing Banned Words/Phrases....................................................................................................................................5–4
Add............................................................................................................................................................................5–4
Delete........................................................................................................................................................................5–4
Editing Weighted Words/Phrases.................................................................................................................................5–5
Add............................................................................................................................................................................5–5
Delete........................................................................................................................................................................5–5
Search ..........................................................................................................................................................................5–6
Users................................................................................................................................................................6–1
Overview.........................................................................................................................................................................6–1
Block User or Computer ...............................................................................................................................................6–2
Block User.................................................................................................................................................................6–2
Enable Block..........................................................................................................................................................6–2
vii
Page 10

TABLE OF CONTENTS
Disable Block .........................................................................................................................................................6–3
Block Computer.........................................................................................................................................................6–4
Enable Block..........................................................................................................................................................6–4
Disable Block .........................................................................................................................................................6–4
Bypass User or Computer ............................................................................................................................................ 6–6
Bypass User..............................................................................................................................................................6–6
Enable Bypass.......................................................................................................................................................6–6
Remove Bypass.....................................................................................................................................................6–6
Bypass Computer......................................................................................................................................................6–8
Enable Bypass.......................................................................................................................................................6–8
Remove Bypass.....................................................................................................................................................6–8
User List........................................................................................................................................................................6–10
Display user list by filter...........................................................................................................................................6–11
Display user list alphabetically ................................................................................................................................6–11
User Management Utilities..........................................................................................................................................6–12
Understanding and Determining Transparent and Proxy Modes...............................................................................6–15
Background information ..........................................................................................................................................6–15
Transparent Mode...................................................................................................................................................6–15
Proxy Mode .............................................................................................................................................................6–15
Authenticating Proxy Mode .....................................................................................................................................6–16
Which is the right solution for our network?.........................................................................................................6–16
Proxy Configuration (Group Policy rule)..................................................................................................................6–17
Disabling Local Client Computer Access to Browser Proxy Settings ..................................................................6–18
Authentication Method (Step 1)..................................................................................................................................6–20
Authentication Methods (Pros and Cons)...................................................................................................................6–22
Authentication Methods Explained.............................................................................................................................6–23
BASIC ONLY...........................................................................................................................................................6–23
NTLM with FALLBACK TO BASIC..........................................................................................................................6–24
IDENTD ONLY ........................................................................................................................................................6–25
Download/Install IDENTD ....................................................................................................................................6–26
Port 113 Exception...............................................................................................................................................6–27
Windows Firewall (local rule for XP) ....................................................................................................................6–27
Windows Firewall (Group Policy rule)..................................................................................................................6–31
Install IDENTD .....................................................................................................................................................6–33
IDENTD location ..................................................................................................................................................6–34
Comsift Service Local Install................................................................................................................................6–36
Comsift Service Domain Automated Install (preferred) .......................................................................................6–37
IP ONLY ..................................................................................................................................................................6–39
NO AUTHENTICATION ..........................................................................................................................................6–40
Join ComSifter to AD Domain (Step 2).......................................................................................................................6–41
viii
Page 11

TABLE OF CONTENTS
Join ComSifter to the AD Domain........................................................................................................................6–41
Full Name of the AD Domain ...............................................................................................................................6–41
Workgroup Name.................................................................................................................................................6–42
Password Server..................................................................................................................................................6–42
Enter Username Authorized to Join the Domain..................................................................................................6–42
Enter Password....................................................................................................................................................6–42
Administer/Retrieve Usernames from Active Directory (Step 3a) ..............................................................................6–43
Preparing Active Directory for Synchronization.......................................................................................................6–43
Administer/Retrieve Usernames from Active Directory...........................................................................................6–46
Populate the user list by a LDAP query to the AD Domain Controller Users and Computers.............................6–46
Host/Domain Name..............................................................................................................................................6–47
Distinguished Name............................................................................................................................................. 6–47
AD User Name.....................................................................................................................................................6–47
AD User Password...............................................................................................................................................6–47
Administer/Retrieve Usernames from ComSifter Username Database (Step 3b) .....................................................6–48
Adding a new User...............................................................................................................................................6–48
Modifying a User..................................................................................................................................................6–50
Deleting a User ....................................................................................................................................................6–51
Administer/Retrieve User IP’s from ComSifter IP Database (Step 3c).......................................................................6–52
Adding a new IP...................................................................................................................................................6–52
Modifying an IP ....................................................................................................................................................6–54
Deleting an IP.......................................................................................................................................................6–55
Administer/Retrieve Usernames by merging Usernames from an external file (Step 3d)..........................................6–56
Enable/Disable Automatic Proxy Configuration (Step 4a)..........................................................................................6–57
Enable/Disable Automatic Proxy Configuration.......................................................................................................6–57
Overwrite pac/WPAD File........................................................................................................................................6–57
Edit Proxy File proxy.pac/wpad.dat (Step 4b)............................................................................................................6–58
Client Program/Application Bypass (Step 4c) ............................................................................................................6–59
Adding a new Domain/URL..................................................................................................................................6–60
Deleting a Domain/URL .......................................................................................................................................6–60
Merging with Comsift-Maintained Bypass List.....................................................................................................6–62
Turning Off Merge with Comsift-Maintained Bypass List.....................................................................................6–62
Merging with Exception Domain List....................................................................................................................6–64
Turning off Merge with Exception Domain List.....................................................................................................6–64
Client Program/Application Debug Mode (Step 4d) ...................................................................................................6–66
Enable Debug Mode................................................................................................................................................6–66
Raw Data for DENIEDs...........................................................................................................................................6–67
Delete All Usernames from ComSifter........................................................................................................................6–68
Display Summary........................................................................................................................................................6–69
ComSifter Operation.......................................................................................................................................7–1
ix
Page 12

TABLE OF CONTENTS
Network Flow..................................................................................................................................................................7–2
How ComSifter Filters ...................................................................................................................................................7–2
Order of Precedence ....................................................................................................................................................7–2
Categories.................................................................................................................................................................7–3
Blacklist Update.........................................................................................................................................................7–3
CSphrase Filter Technology.........................................................................................................................................7–3
Contact Information............................................................................................................................................1
Location............................................................................................................................................................................1
Phone ...............................................................................................................................................................................1
Sales.................................................................................................................................................................................1
Technical Support............................................................................................................................................................. 1
Specifications .....................................................................................................................................................2
Configuration ....................................................................................................................................................................2
Network.............................................................................................................................................................................2
Number of Computers ...................................................................................................................................................... 2
Throughput .......................................................................................................................................................................2
Typical Access Time.........................................................................................................................................................2
Caching Proxy ..................................................................................................................................................................2
Blacklist Update and Bypass List Update.........................................................................................................................2
Mechanical & Environmental............................................................................................................................................3
Filter Defaults......................................................................................................................................................4
License & Warranty............................................................................................................................................6
x
Page 13

INSTALLING COMSIFTER
Chapter 1
Introduction and Getting Started
ComSifter™ stops the pornography, on-line gambling, and the hate sites at the Internet gateway—before the
offensive material reaches web users. You do not have to worry about web users surfing the Internet. With
ComSifter, if they accidentally misspell a word or use a search word that takes them to the “dark side,” they will
see a friendly message telling them the site has inappropriate content.
Features
ComSifter offers the following features:
Two physically separated, but logically connected, ComSifters o ffer Non-Stop operation in the event of either
unit failing or either Internet connection failing.
Automatic IP-based load sharing splits Internet load across each ComSifter.
Highly integrated configuration and logging engine allow s control over both ComSifters fro m either unit.
High performance destination-based firewall and content filter.
Stops unauthorized programs from accessing the Internet.
Stops access to pornography, hate, and gambling sites.
Blocks downloading of harmful and illegal files, including MP3 m usic files.
Filters networks with hundreds of computers.
Intelligent filtering with CSphrase™ Filtering Technology is a ble to filter based on good words and bad words
found on a web page.
Eight individually configurable filters. Users may be set to the filt er that best fi ts their filterin g needs.
Active Directory integration.
Gigabit Ethernet speeds.
High-performance SSD hard drive.
Advanced authentication methods, including Basic, NTLM, IdentD, and IP.
Automatic Browser Configuration.
Bridge Mode.
Support for YouTube for Schools.
Advanced re-write capabilities.
800,000+ sites Blacklist updated daily or weekly.
Built-in DHCP server, DNS forwarding, and caching proxy.
Easy to install—no required maintenance.
Unlimited licensing is standard.
User Guide | ComSifter CS-8D Pro 1–1
Page 14
INSTALLING COMSIFTER
User Guide | ComSifter CS-8D Pro 1– 2
How ComSifter Works
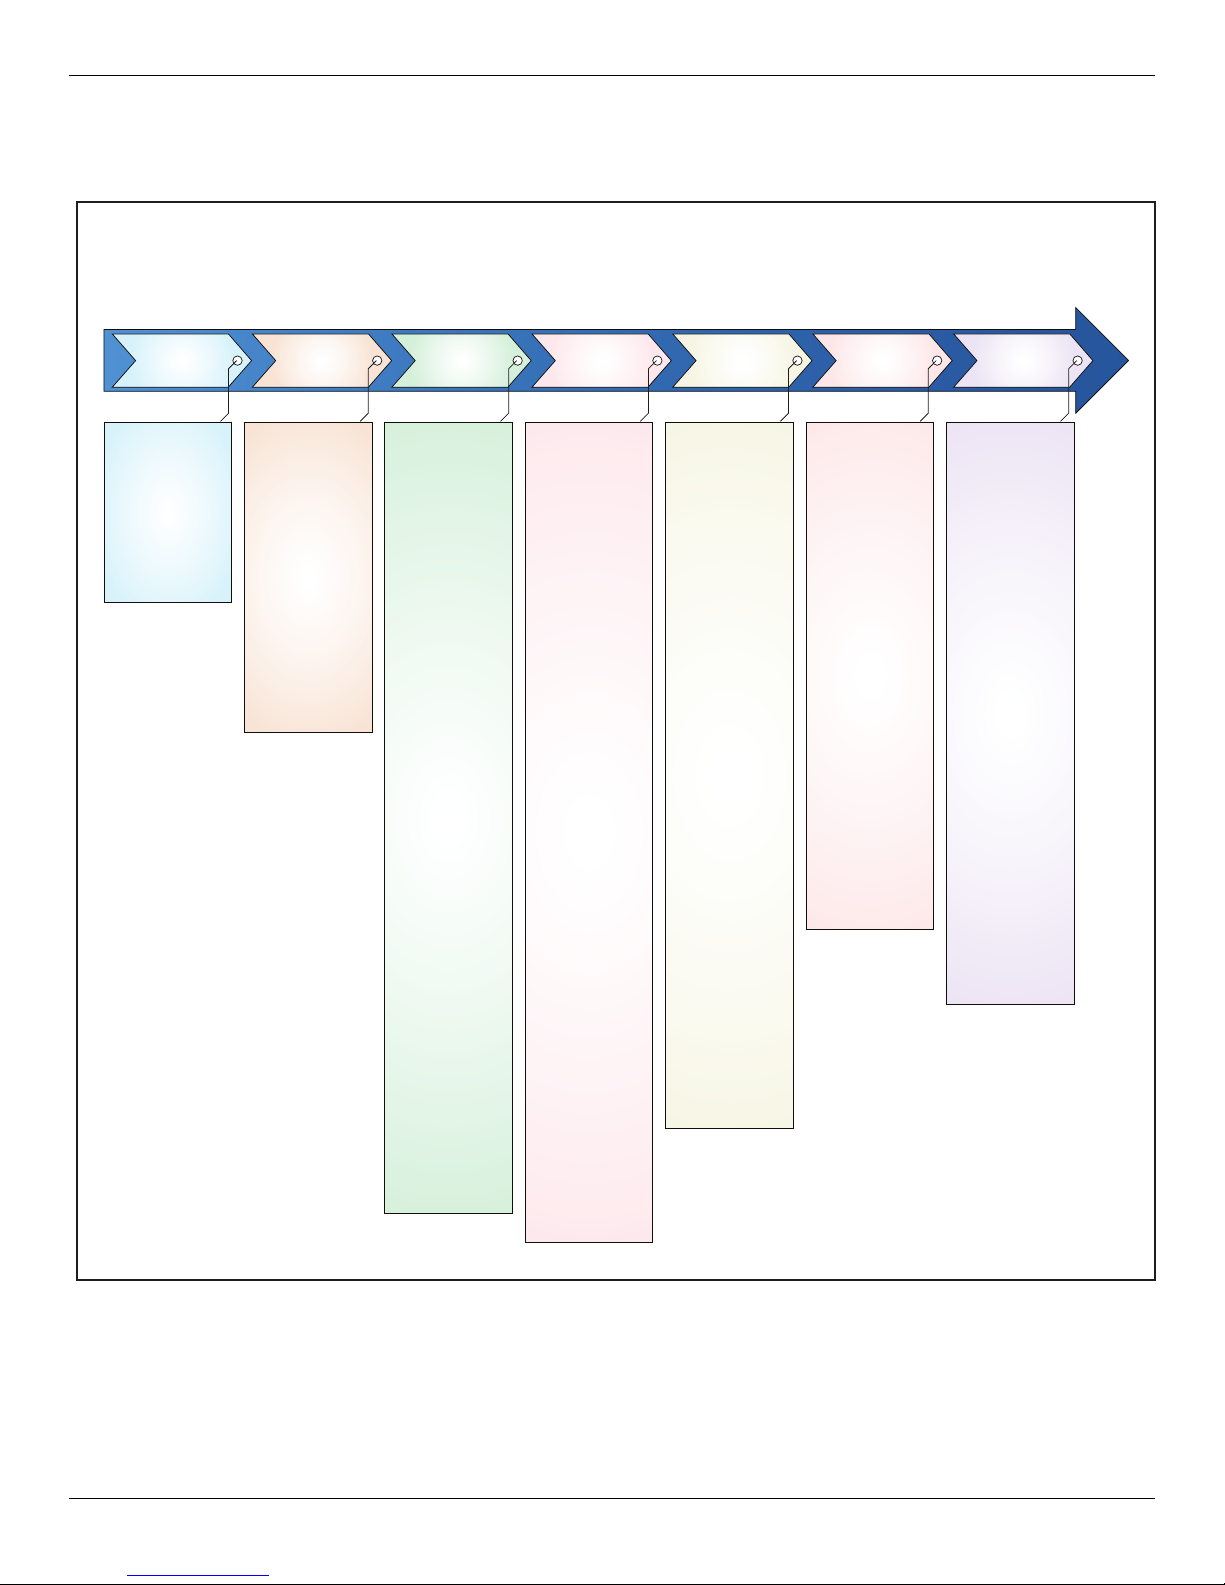
Figure 1-1: ComSifter Architecture
ComSifter Architecture
Firewall
(loc)
Firewall
(net)
DHCP/DNS
Services
Proxy
Service
Content
Filtering
Comsift
Engine
Connection
Manager
Outbound
Rules
Look at the
outbound packs
to see if any
rules are
matched. If not,
reject the
packets.
DHCP Server
If enabled, gives
out IP addresses
to client
computers
DNS For warding
Always enabled.
If a DNS request
is received, it is
forwarded to the
DNS Ser vers
listed in the
Network
Wizards.
Inbound Rules
Examine
inbound packets
for rules match.
Drop packet if no
match.
Remote
Administration
Keep list of
allowed IP
addresses. If
packet IP
matches, let it in.
Follow My IP
Keep list of
FQDNs. Ever y
15 mi nutes,
check if IP of
FQDN has
changed.
Dynamic DNS
Every 15
minutes, monitor
IP of ComSifter.
If it changes,
update new IP
info to Dynamic
DNS site.
DHCP Client
Get WAN IP
from upstream
device
PPPoE Client
Get WAN IP
from upstream
device
Static
Use internal
WAN setting to
communicate
with upstream
device.
Heartbeat
Monitor the
connec tion by
downloading a
heartbeat file
every five (5)
minutes. If
heartbeat fails,
go into Non-Stop
mode.
Configuration
Allows the
ComSifter to be
configured by
way of a browser
Logging
Logs user
activity, firewall
(packet) activity,
system
messages, and
Top Si tes .
User Database
Maintains
usernames and
filter mappings.
Active
Directory Sync
If part of a
domain, maintain
binding with
domain. Update
domain user list
every 15
minutes.
Blacklist
Updates
Daily or weekly
blacklist updates
Software Check
Daily check for
software
updates.
Authorization
The user is
authenticated,
what are they
authorized to do
(filter mapping)?
Bypass/Block
User/Computer
See if the
user/computer is
in a block or a
bypass rule
Time of Day
Is the filter the
user is mapped
to active?
Exception List
Is the requested
site on an
exception list?
Blacklist
Is the requested
site on a
Blacklist?
Words/Phrases
Run the
requested page
through
Words/ Phrases
Matched
If any of the
above is
matched, give
the user a
Denied Access
page; otherwise,
give the user the
page.
Identify and
Authenticate
User or
Computer
(Authentication
Method)
We need to
identif y and
authenticate who
is asking to
come through
ComSifter.
NTLM, IdentD,
Basic, and IP
methods are
supported.
Not Authenticated
If the user is not
authenticated, is
the URL on the
Proxy Bypass
List?
Fetching
Once authenticated, the
ComSifter gets
the requested
page from the
Internet and
presents it to the
Content Filter.
Caching
Check the
headers for
caching status. If
allowed, save to
local storage for
subsequent use.
Client Computers Internet
Page 15

INSTALLING COMSIFTER
Overview
ComSifter is a standalone appliance that connects your internal LAN to the Internet while seamlessly offering
firewall and content filtering.
Internet Gateway
ComSifter is the gateway device from a private LAN to the public Internet. It is able to operate as a standard
router or in a Network Address Translation (NAT) mode. In the NAT mode, ComSifter converts internal IP
addresses to a public IP, effectively isolating your private network from the Internet.
Non-Stop Operation
Two ComSifter Non-Stop units, in conjunction with two Internet connections, offer a reliable Internet connection
for organizations that cannot afford any down time. A state-of-the-art failover-enabled DHCP server performs
IP/gateway-based load balancing while instructing client computers that there are two gateways to the Internet.
Each ComSifter performs a series of steps every five minutes to determine if a valid Internet connection is
available. If not, the ComSifter will shut down its LAN interface. This shutdown will trigger Dead Gateway
Detection on client computers using this gateway. Client computers will then switch to the other ComSifter.
This same process will occur if either ComSifter is lost due to a hardware failure.
Firewall
An industrial strength, rules-based stealth firewall is included in ComSifter. The firewall allows complete control
of all ports from the Internet to the LAN and from the LAN to the Internet. The resolution of the firewall is such
that a single port on a single computer on the LAN can be allowed to a single port on a single IP on the
Internet. The firewall can block internal port hopping programs, has log rate limiting, and does not over react to
Denial of Service attacks. Full logging of every transaction is available.
Filtering System
ComSifter CS-8D Pro incorporates eight individual filters. Each filter may be individually configured for the user
computers that access the filter. Additionally, a global filter allows configuration system wide.
When the user computer accesses a filter, two types of filtering are performed:
First, ComSifter compares the requested site with its blacklist to determine if the address has already
been deemed inappropriate. If the site is blacklisted, the user will receive a Denied Access Page, and
will not be able to view the site.
Second, if the site is not blacklisted, ComSifter will scan every word on the Internet page, using its
CSphrase Filtering Technology, looking for words that indicate inappropriate content. The context of
these words is analyzed to determine if the page should be blocked. This greatly reduces the number of
false positives while blocking those pages that are offensive. This feature accounts for ComSifter’s
remarkable accuracy.
If the content passes through both types of filtering, ComSifter allows the page to be loaded on the user’s
computer. If either of the filters disallow, a “Denied Access Denied” page is sent to the user’s computer. All this
is done in a fraction of a second, with no delay seen by the user.
User Guide | ComSifter CS-8D Pro 1–3
Page 16
INSTALLING COMSIFTER
Using This Guide
This User Guide is designed for the technical person that will be installing, configuring and operating the
ComSifter network content filtering device.
The following list summarizes the chapters and appendixes that follow this chapter.
Chapter 2, I
Chapter 3, Configuring
administrators, configuring network and firewall settings, and describing maintenan ce items.
Chapter 4, F
Chapter 5, Words/Phra
Chapter 6, Users — de
Chapter 7, ComSifter Operation
Appendix A, Contact Inf
hours of operation.
Appendix B, Specif
Appendix C, Filter De
Appendix D, Licen
nstalling ComSifter — describes how to install and physically connect ComSifter to your network.
ComSifter — describes how to configure ComSifter. This includes setting up
ilter Setup — describes how to configure the Master Filter and each individual filter .
ses — describes the configuration of ComSifter’s CSphrase filter.
scribes how to Add/Modify/Delete users to the database.
— describes the operation of ComSifter.
ormation —provides contact information including telephone nu mbers, address, email and
ications — provides technical information about the ComSifter.
faults — provides default information for the eight filters.
se and Warranty — provides information about ComSifter’s licensing and warranty.
Navigating Through This User Guide
This User’s Guide contains all the information you need to install, use, and troubleshoot ComSifter. To assist
you in navigating through this document, we have added blue-colored hot links to the Table of Contents, index,
chapters, and appendixes in this User’s Guide. Clicking one of these hot links automatically moves you to that
location in this User’s Guide. For example, if you click one of the blue-colored chapter or appendix titles in the
previous section, you automatically move to the first page in that chapter or appendix.
Conventions in This User’s Guide
This User’s Guide uses the following conventions:
NOTES are information requiring extra attention.
TIPS are helpful procedures or shortcuts for simplifying a task.
IMPORTANT is information that, if not followed, may affect the proper operation of th e product.
WARNING is information that if not followed or understood, may affect the op eration of the produ ct, the
operating system, or the system configuration.
Bold is used to denote an item that is to be clicked or selected.
Note: If you wish to print a hard copy of this guide, it has been formatted to fit on
standard letter-sized 8.5x11” paper.
User Guide | ComSifter CS-8D Pro 1–4
Page 17
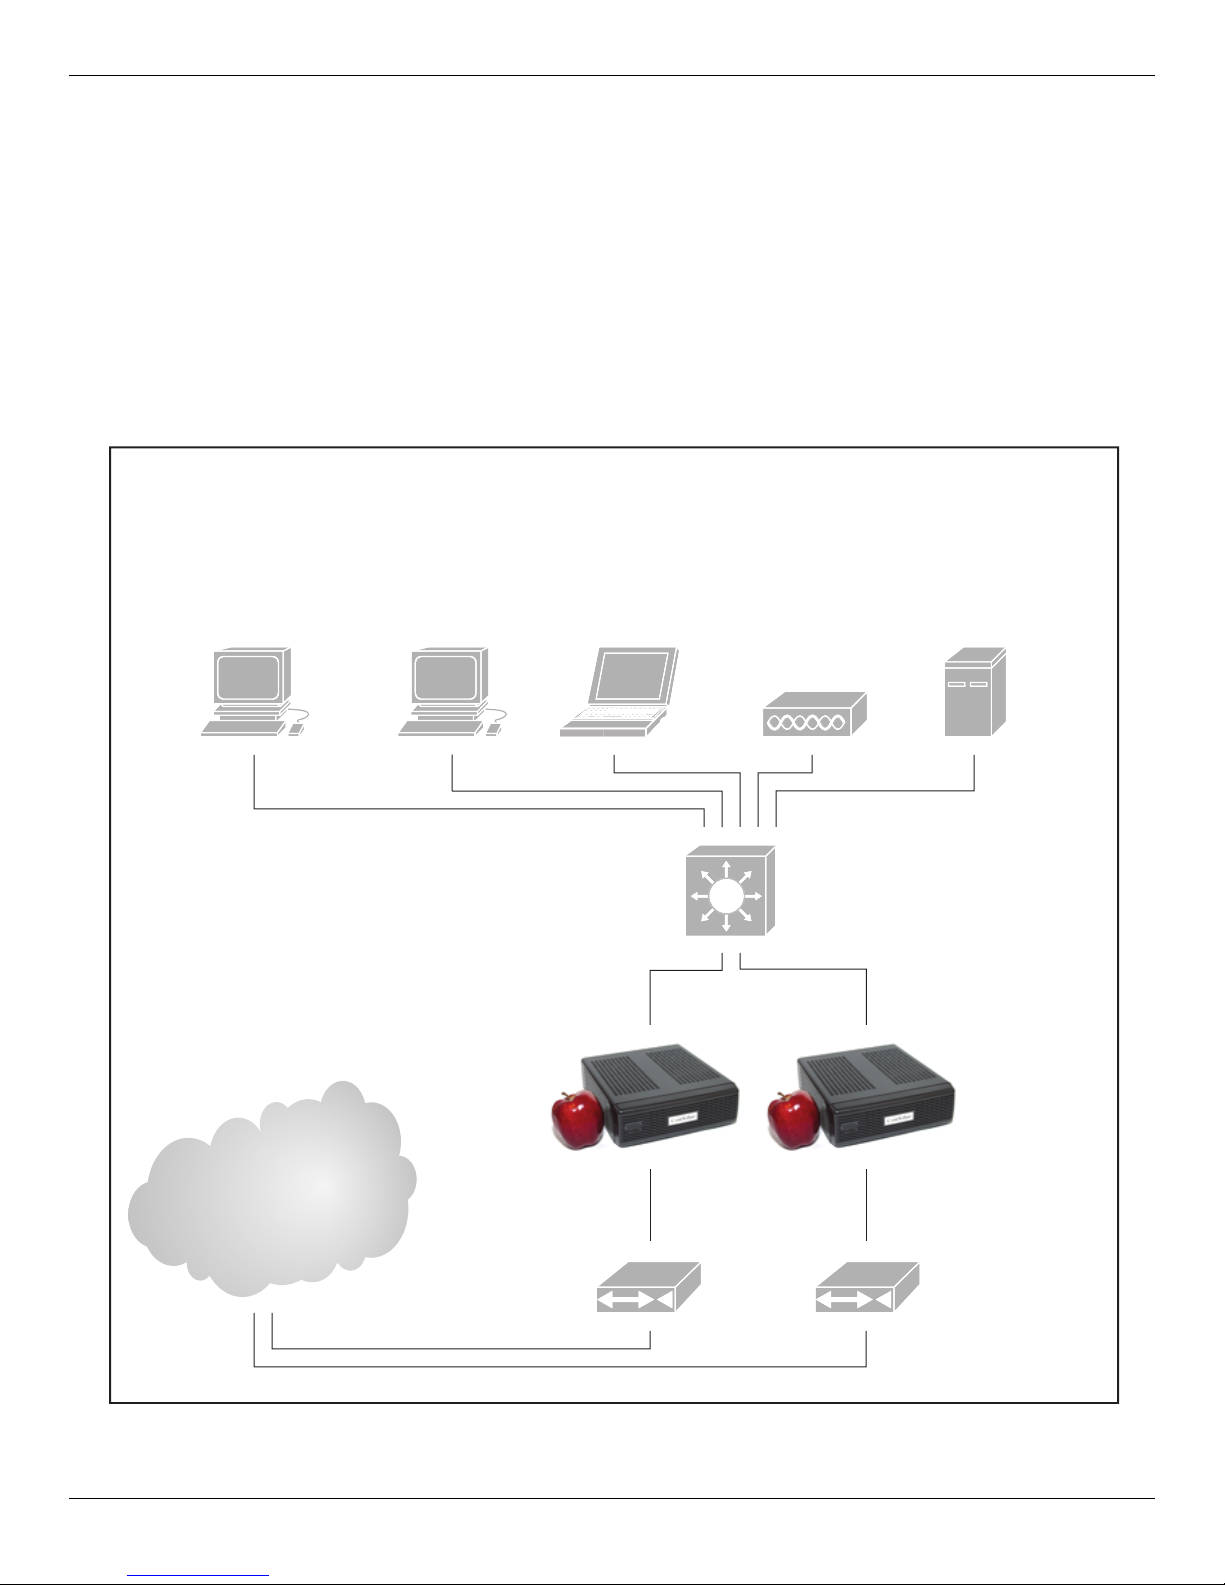
INSTALLING COMSIFTER
User Guide | ComSifter CS-8D Pro 2– 1
Chapter 2
Installing ComSifter
This section of the guide is designed to be used as a Quick Start Guide. The guide will assist you in configuring
your ComSifter and will give time estimates for each procedure.
In this chapter, we will discuss the physical installation of ComSifter and how to connect a browser to
ComSifter in preparation for configuration. ComSifter installs between your connection to the Internet and
Internal LAN as shown in the diagrams below.
Figure 2-1: ComSifter(s) in the Network
Internet
CONNECTION TO
INTERNET SERVICE
PROVIDER(S)
Client/User
INTERNAL IP
192.168.1.20
GATEWAYS
192.168.1.1
192.168.1.2
INTERNAL IP
192.168.1.2
ComSifter
Secondary
Optional
ComSifter
Primary
or Single
Cable/DSL/T1
Modem
Cable/DSL/T1
Modem
EXTERNAL IP
INTERNAL IP
192.168.1.1
EXTERNAL IP
Client/User
INTERNAL IP
192.168.1.21
GATEWAYS
192.168.1.2
192.168.1.1
Client/User
INTERNAL IP
192.168.1.23
GATEWAYS
192.168.1.1
192.168.1.2
Wireless Access
Point
INTERNAL IP
192.168.1.24
GATEWAYS
192.168.1.2
192.168.1.1
10/100/1000
BASE-T Switch
Server/Domain
Controller
INTERNAL IP
192.168.1.25
GATEWAYS
192.168.1.1
192.168.1.2
Page 18
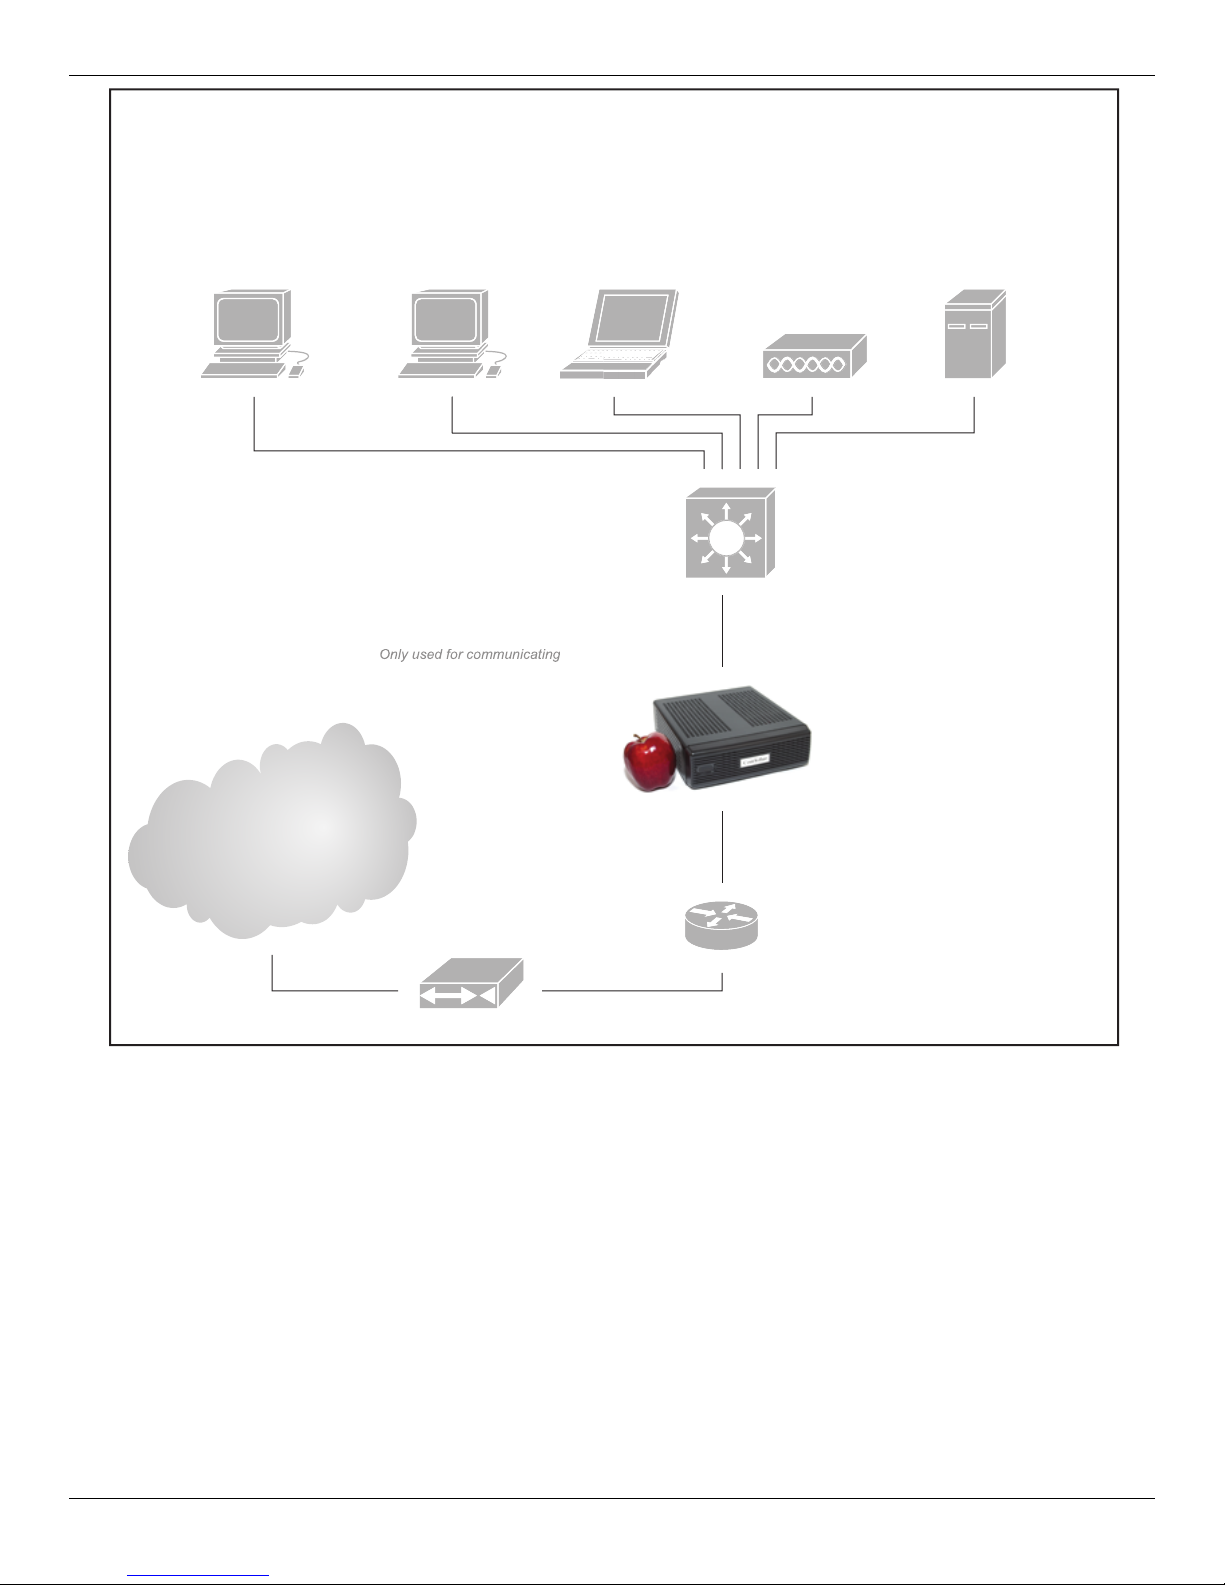
INSTALLING COMSIFTER
User Guide | ComSifter CS-8D Pro 2– 2
Figure 2-2: ComSifter in Bridge mode
Internet
CONNECTION TO
INTERNET SERVICE
PROVIDER
Client/User
INTERNAL IP
192.168.100.20
GATEWAY
192.168.100.1
ComSifter
in Bridge Mode
Cable/DSL/T1
Modem
Router
INTERNAL IP
192.168.100.9
w
ith the ComSifte
r
INTERNAL IP
192.168.100.1
Client/User
INTERNAL IP
192.168.100.21
GATEWAY
192.168.100.1
Client/User
INTERNAL IP
192.168.100.23
GATEWAY
192.168.100.1
Wireless Access
Point
INTERNAL IP
192.168.100.24
GATEWAY
192.168.100.1
10/100/1000
BASE-T Switch
Server/Domain
Controller
INTERNAL IP
192.168.100.25
GATEWAY
192.168.100.1
Page 19
INSTALLING COMSIFTER
Installation
Security Considerations
ComSifter should be placed in a location that meets the security considerations of your organization. A
possible consideration for a pair of Non-Stop ComSifters is to place them in two different physical locations.
This will reduce the risk of a local environmental condition affecting both ComSifters.
Location/Placement
ComSifter should be installed in a clean, dry location located near your DSL, cable, or T1 modem connection.
The location must be within the operating temperature range of ComSifter (50–95°F or 10–35°C).
Note: If the unit becomes overheated, the unit will sound an audible tone—a constant
beep—until the condition is cleared.
The preferred placement of a ComSifter unit is in the horizontal position. If vertical placement is required, then
attach the included rubber feet to the left side surface of the ComSifter (the side closest to the power button).
One (1) inch clearance is required on the sides and top, regardless of the placement orientation.
AC Power
Connect the supplied AC power cord to the ComSifter power adapter and a properly grounded 115VAC
outlet. Connect the power supply output cable to the ComSifter. Although not required, best practices would
suggest that ComSifter be placed on a UPS system. This will protect ComSifter from most external power
fluctuations and allow continued operation in the event of a momentary power outage.
Network Connections
ComSifter requires two network connections. Connect the Ethernet connector, marked “WAN,” to your DSL,
cable, or T1 modem (or, if in Bridge Mode, connect it to your router). Connect the Ethernet connector, marked
“LAN,” to your internal LAN switch. Either Ethernet connector may use 10BASE-T, 100BASE-T, or 1000BASET.
Power On and Indicator Lights
After all connections are made, ComSifter may be powered on by pressing the power switch on the front of the
unit. The blue indicator light indicates that ComSifter is powered on and functioning normally.
Note: After powering on, ComSifter will take approximately one (1) minute before it is
ready for operation.
To power off ComSifter, press the power button. All indicator lights will extinguish.
User Guide | ComSifter CS-8D Pro 2–3
Page 20
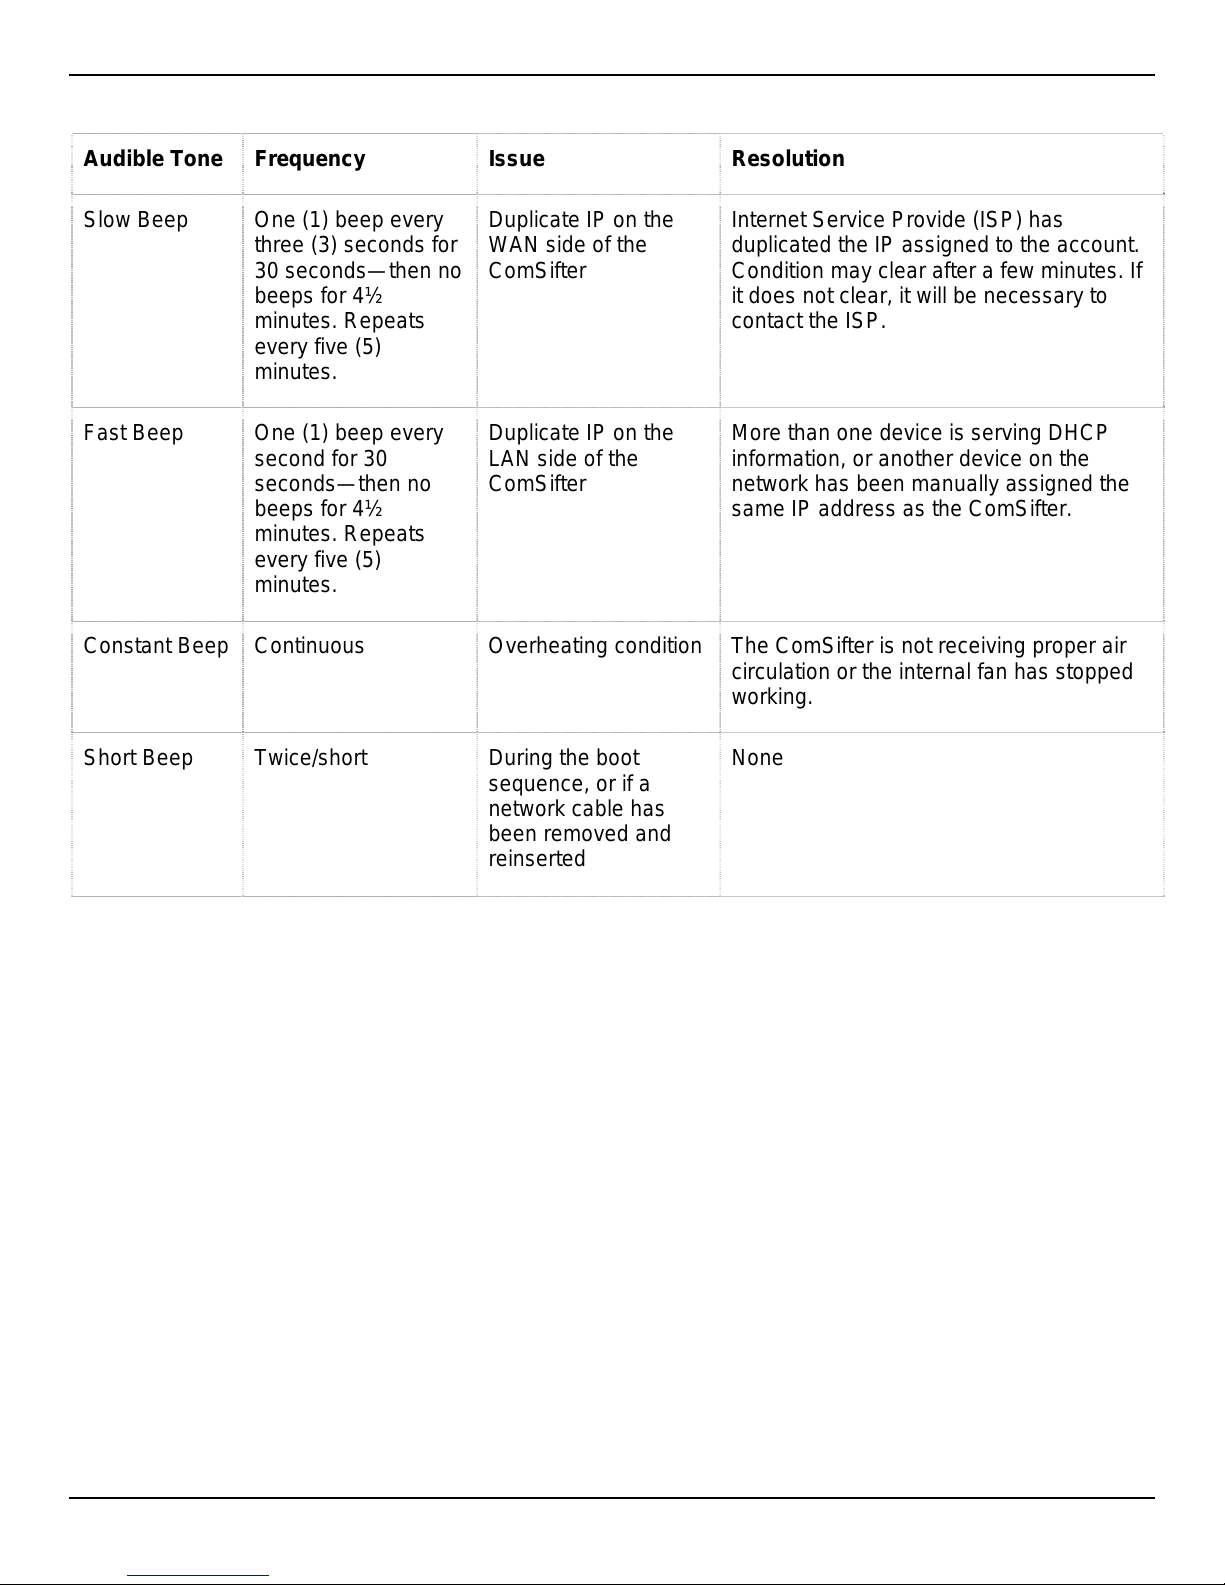
Audible Tones
Audible Tone Frequency Issue Resolution
INSTALLING COMSIFTER
Slow Beep One (1) beep every
three (3) seconds for
30 seconds—then no
beeps for 4½
minutes. Repeats
Duplicate IP on the
WAN side of the
ComSifter
Internet Service Provide (ISP) has
duplicated the IP assigned to the account.
Condition may clear after a few minutes. If
it does not clear, it will be necessary to
contact the ISP.
every five (5)
minutes.
Fast Beep One (1) beep every
second for 30
seconds—then no
beeps for 4½
Duplicate IP on the
LAN side of the
ComSifter
More than one device is serving DHCP
information, or another device on the
network has been manually assigned the
same IP address as the ComSifter.
minutes. Repeats
every five (5)
minutes.
Constant Beep Continuous Overheating condition The ComSifter is not receiving proper air
circulation or the internal fan has stopped
working.
Short Beep Twice/short During the boot
None
sequence, or if a
network cable has
been removed and
reinserted
User Guide | ComSifter CS-8D Pro 2–4
Page 21
INSTALLING COMSIFTER
Connecting a Browser to ComSifter
Configuration of ComSifter is done by way of TCP/IP using a browser. Internet Explorer 4 or newer, Opera,
and Safari have been tested with ComSifter.
Note: Although ComSifter may be configured from a computer using Windows
ME/2000/XP/Vista 7, Mac OS X, or Linux as its operating system, the preferred
arrangement is Windows 2000/XP/Vista/7 using Internet Explorer 5+ with a
screen resolution of 1024x768 pixels or greater.
Additionally, the File Manager and System Time modules require the use of
Java™. If you need to obtain Java, it is available for download courtesy of
Oracle Corporation at www.java.com.
Windows 98 and Windows 95 should not be used to configure ComSifter. If you
must use Windows 95 or Windows 98 to configure ComSifter, please contact
Comsift Technical Support. This warning does not apply to ComSifters ability to
filter, only to its configuration.
ComSifter is configured from the factory for the 192.168.100.1/255.255.255.0 subnet. If your network is
already using this subnet then you are ready to configure ComSifter.
If your network is not using this subnet then you will need to configure the computer that will configure
ComSifter to temporarily reflect a static IP on the 192.168.100.x network. This is done as follows:
Windows 2000/XP/Vista/7
1. Right click My Network Places (manage network connections in Vista)
2. Click Properties of the Local Area Network you are using.
3. Double click Internet Protocol.
4. Set the IP address as shown in Fig 2-2.
User Guide | ComSifter CS-8D Pro 2–5
Page 22
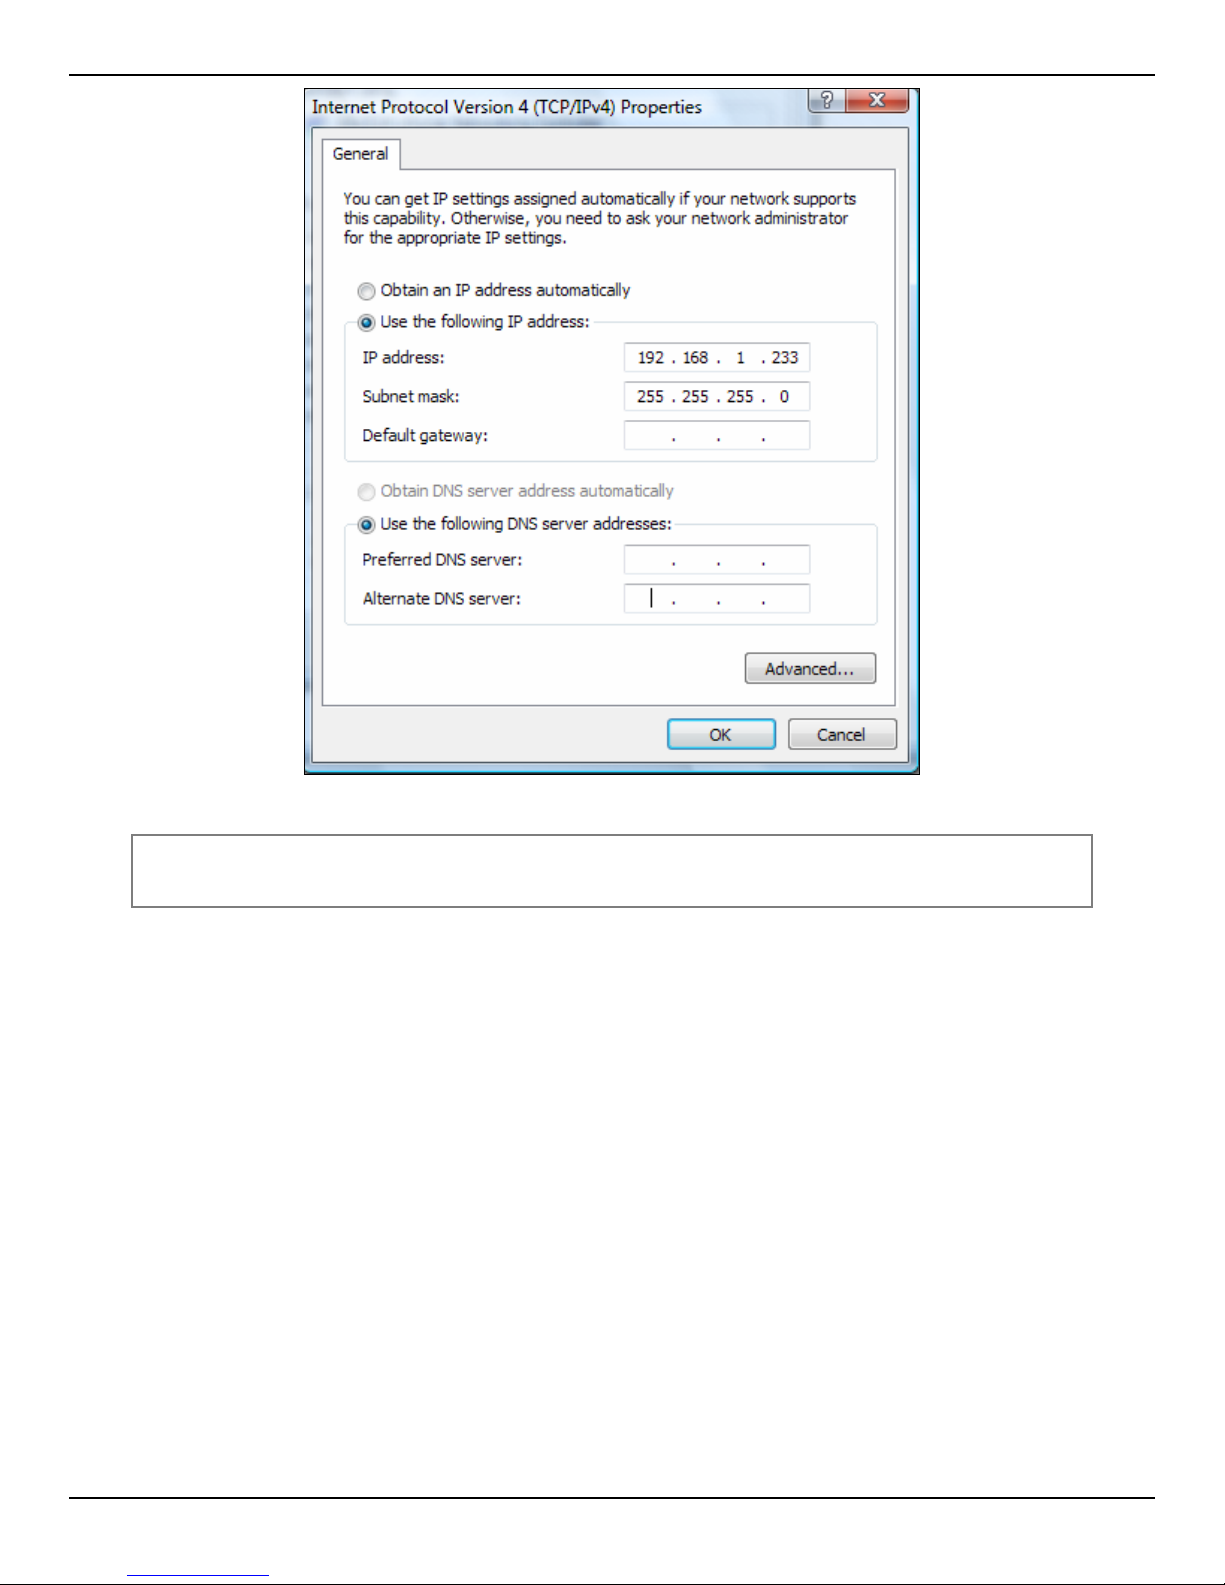
INSTALLING COMSIFTER
Figure 2-3: Setting Windows2000/XP/Vista/7 IP Address
Note: After configuring ComSifter to your network subnet, you may then set your
computer back to its original network settings.
User Guide | ComSifter CS-8D Pro 2–6
Page 23
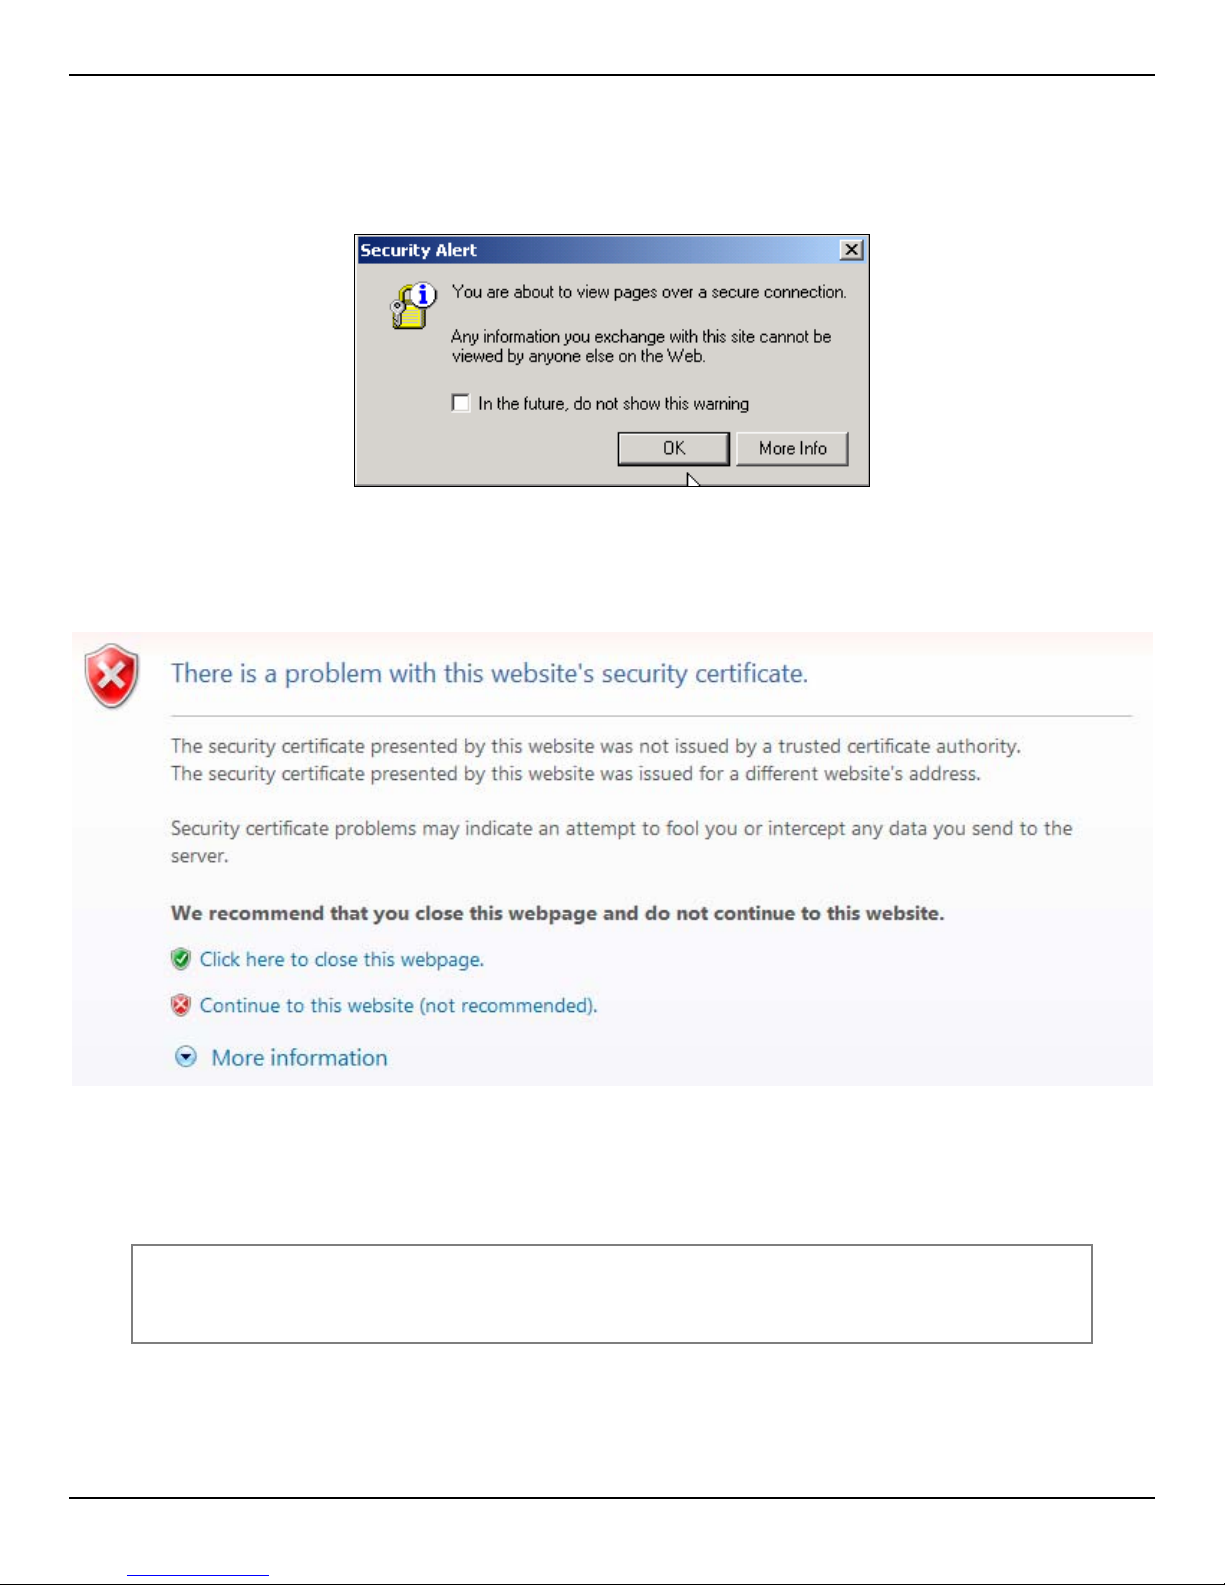
INSTALLING COMSIFTER
Making a secure connection
All configuration of ComSifter is done over a secure, encrypted channel. This channel is accessed by pointing
your browser to https://192.168.100.1:10000—or the IP you have assigned to ComSifter. Upon a
successful connection, you may see:
Figure 2-4: Security Alert
Accept this information by clicking OK
Upon clicking OK, you will be presented with ComSifter’s self-signed security certificate.
Figure 2-5: Security Certificate via Internet Explorer 9
This certificate will allow the communication link to be encrypted. You may click Yes to continue or you may
install the certificate by clicking View Certificate and follow the instructions for installing certificates for you
browser.
Note: Different browsers (Apple Safari, Mozilla Firefox, Google Chrome, etc.) may
show the security certificate in a different manner (dialog box, main screen,
different verbiage, etc.).
After accepting the certificate, you will be presented with ComSifter’s login screen.
User Guide | ComSifter CS-8D Pro 2–7
Page 24
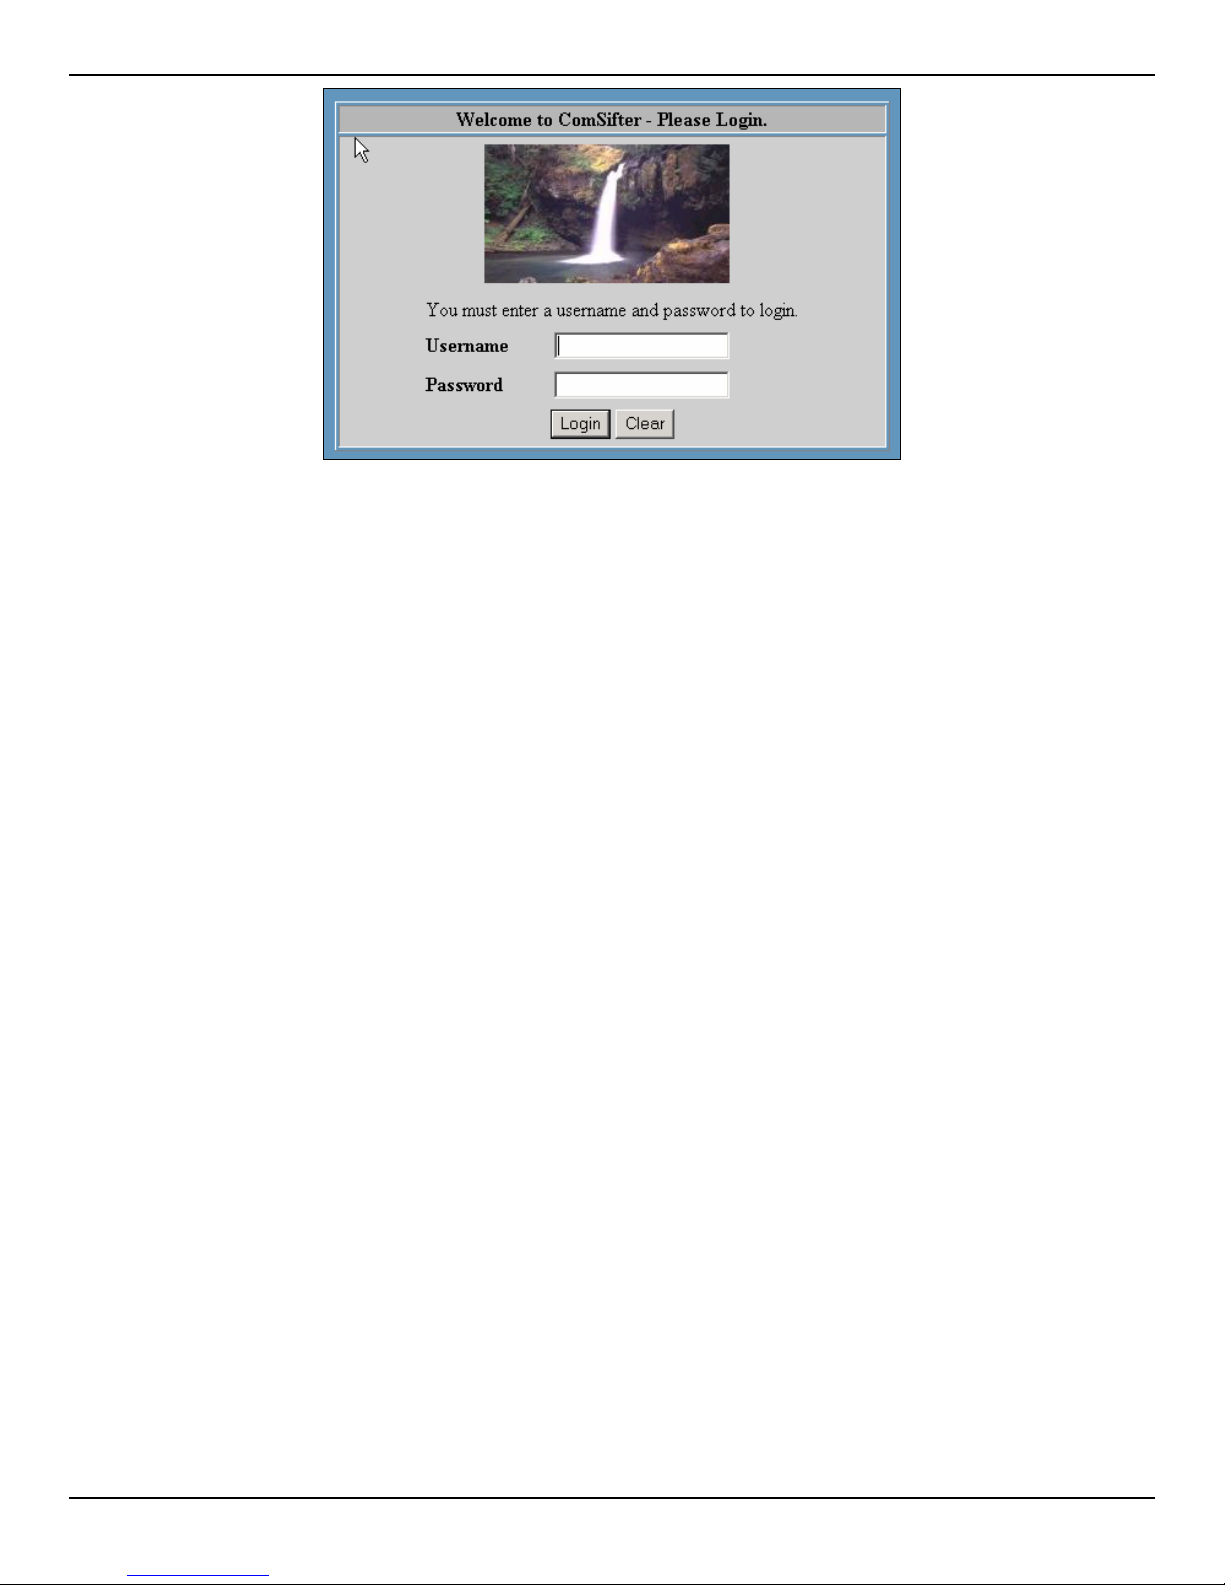
The default Username is: admin
The default Password is: admin
INSTALLING COMSIFTER
Figure 2-6: ComSifter Login
You are now ready to configure ComSifter as described in the next chapter.
User Guide | ComSifter CS-8D Pro 2–8
Page 25
INSTALLING COMSIFTER
Quick Start Guide
The ComSifter, in its simplest configuration, should take no more that 15 minutes to install. Conversely, in its
most complex configuration, should not take more than two (2) hours to install.
Before installing and configuring your new CS-8D Pro Internet filter, you will need to spend a few minutes
deciding how certain basic functions will be performed in your unit.
The first question that needs to be answered is:
How will the ComSifter Connect to the Network?
There are two major methods that can be used for the ComSifter to connect to the network: Router Mode or
Bridge Mode. In Router Mode, the ComSifter acts as the edge device connecting your internal LAN to the
Internet. When your Internet connection was provisioned by your Internet Service Provider (ISP), you were
given a choice as to how your external IP is determined. Typically, these choices are Static (where the ISP
assigns you a non-changing public IP) or Dynamic (where the ISP gives you a public IP but there is no
guarantee if the IP will stay the same). Before installing your ComSifter, you must know which of these
methods has been chosen. If static was chosen, then you will need to know the IP, subnet, gateway, and DNS
settings. If Dynamic, then the ComSifter will be given these setting automatically from the ISP’s modem.
The other method of connecting is Bridge Mode. In Bridge Mode, the ComSifter will be installed between your
existing router and the distribution switch. In this mode, you will need to assign the ComSifter an IP, Subnet,
gateway, and DNS compatible with your internal LAN.
Note: Bridge Mode does not replace the firewall in your router, and will not protect you
from external probes into your network.
Do I need only one filter or multiple filters?
A filter defines how your users will be filtered. Do you want all your users to have the same rule set or would
you like different rules for different groups—i.e. a filter for students and a filter for teachers, or a filter for nonmanagement personnel and a different filter for management.
If you only need one filter, then the ComSifter, in its default configuration, is ready to go. Follow the steps,
beginning with the Network Worksheet of the Quick Start Guide of the
User Guide to start installing the
ComSifter on your network.
If you need more than one filter then the next question that needs to be answered is:
Do I need Proxy or Transparent Mode?
You need to determine if your user’s browsers will be using transparent, standard proxy, or authenticating
proxy. Refer to User Management Utilities > Understanding and Determining Transparent and Proxy Modes for
explanation of all three (
3) modes.
Once you have determined which mode, the next question is:
How will I identify and authenticate a user?
In this step, we determine who is the user and whether we believe that the user is who they say they are.
The ComSifter offers many ways to identify and authenticate users. We refer to this as the Authentication
Method. This includes: by IP, by using a client program called Identd, by using an industry standard method
called Basic, and a Windows-centric method referred to as NTLM. Please refer to User Management Utilities >
Authentication Methods (Pros and Cons) and User Management Utilities > Authentication Methods Explained
of this docu
ment that explains how each method is used, a practical application of the method, and a listing of
pros and cons for each method. If you are unsure as to the best method for your network, please give Comsift
Technical Support a call. We will be pleased to help you.
User Guide | ComSifter CS-8D Pro 2–9
Page 26
INSTALLING COMSIFTER
Warning: A good understanding of each method is advised, as this will not be easy to
change once you have started installing and configuring your ComSifter.
Once the Authentication Method has been chosen, you will then need to determine:
How will the ComSifter get a list of my users?
In this step, you will determine how the ComSifter will get a list of your users. This list may be generated from a
flat file, entered into a database in the ComSifter itself, or retrieved from your Active Directory if your network is
Active Directory-based. User Management Utilities (refer to t
he table outlining Steps 3a through 3d) explains in
detail the different methods that are used to determine your usernames.
After usernames are entered, the next question is:
How many filters will I need?
Next you will need to determine how many filters you will need, how to label those filters, and how those filters
will need to be configured. Chapter 4, Filter Setup explains t
his in detail.
The final question is:
What filter will each user be assigned to?
Next, we need to assign users to filters. This may be done using the ComSifter’s own database, an external flat
file, or by way of Active Directory.
Warning: Special care should be taken in this area, as how users are assigned to a filter
may be dependent on the Authentication Method you have chosen.
You are now ready to begin installing and configuring your ComSifter.
User Guide | ComSifter CS-8D Pro 2–10
Page 27

INSTALLING COMSIFTER
Network Worksheet
Pre-Install Preparation
Comsift suggests that the following order of installation and configuration is followed.
1. Have the following information available when installing and configuring the ComSifter.
External IP _________________________
e.g. 63.195.80.100
External subnet mask _________________________
e.g. 255.255.255.0
External Gateway _________________________
e.g. 63.195.80.1
Primary DNS _________________________
Secondary DNS _________________________
Internal IP _________________________
e.g. 192.168.0.1
External subnet mask _________________________
e.g. 255.255.255.0
Non-Stop Relationship _________________________
e.g. primary, secondary
Continued…
User Guide | ComSifter CS-8D Pro 2–11
Page 28

Installation, Phase 1, Initial Connectivity
2. Physically install and power up ComSifter as described in Chapter 2, Inst alling ComSifter. Estim ated
time, 5 minutes.
3. Configure ComSifter Network Settings using Network Wizards as describe d in Chapter 3, Configuring
ComSifter, N
4. Test if ComSifter can connect with the Interne t by executing the Internet Connect ions Test described in
Chapter 3, Configuring ComSifter, Internet Connection Test. E
5. Perform an initial client connectivity test by visiting two or three well-known websites. Estimated time 2
minutes.
6. Configure the ComSifter firewall for any inbound services that your site suppo rts such as Remote
Desktop, internal web server, or internal mail server. Samples of firewall rules are describ ed in Chapter 3,
Configur
rule.
7. Change Admin password as described in Chapter 3, Configuring ComSifter, Admin, Comsift Admin s,
Setting
Best Practice Upon completion of the previous steps your ComSifter will be able to filter your
etwork Wizards. Estimated time, 5 minutes.
ing ComSifter, Network, Firewall Advanced, Common Rules. Estim ated time is 5 minutes per
Username and Password. Estimated time, 5 minutes.
client computers.
If you had previously determined that you only needed one (1) filter, then skip
the following section on Authentication Methods and proceed to Step 4,
Finishing Up.
If you have selected multiple filters, then you will need to proceed to the next
step. Before proceeding further, best practices would suggest running your
ComSifter as a single filter unit for a short period of time (one day to one week).
This period of time can be used to ensure that your new configuration is stable,
Access speed is as expected and your user are being properly configured.
INSTALLING COMSIFTER
stimated time 2 minutes.
Installation, Phase 2, Determining the Authentication Method
1. After reviewing the attached description of Authent ication Methods, determine which met hod you will use
for your network. Follow the steps outlined in the worksheet for your method. When com plete return to
this section.
Installation, Phase 3, Tuning the Filters
1. Adjust individual Filter Options for your installation a s described in Chapter 4, Filter setup.
2. Adjust Words and Phrases for your installation as described in Chapter 5, Words/Phrases.
Installation, Phase 3, Finishing Up
1. Review QOS, and if appropriate for your network, set it up as de scribed in Chapter 3, Network, QOS.
3. If you need to add more administrators to the ComSifter, this is accomplishe d in Chapter 3, Admins,
ComSifter Admins.
4.
To allow remote access to the ComSifter for yourself or other administr ators, follow the in structions in
Chapter 3, Admins, Remote Administration.
Change the Access Denied Page to reflect your message by following the pr ocedure outlined in Chapter
5.
3, Mainte
6. Set System Time as described in Chapter 3, Maintenance, System Time.
Set System Name as described in Chapter 3, Maintenance, System Name.
7.
nance, Denied Access Page.
User Guide | ComSifter CS-8D Pro 2–12
Page 29

INSTALLING COMSIFTER
Authentication Methods (Quick Setup)
BASIC Only
Refer to User Management Utilities > Authentication Method (Step 1) > Authentication Methods Explained >
Basic Only for more information on the pros and cons, as well as practical applications of this authentication
method.
Prerequisites
Required Data
1. Usernames, passwords, and filter mappings for all user s.
Hardware
1. None
Quick Setup
Refer to the section User Management Utilities o
f the User Guide for the following steps.
1. Select the Authentication Method. Go to Users > User Management Utilities and se lect Step 1,
Authentication Method. Once in Authentication Method, sele ct and execute “ 1-Basic Only (proxy)”
2. Enter the Usernames and Passwords for the users. Go to User Management Utilit ies and select “3bAdminister/Retrieve Usernames from ComSifter Username Database” Enter the usernames, passwor ds, and
filter mappings for users that will be filtered.
3. Automatic Proxy Configuration. Determine if you will need Automatic Proxy Configuration. Best pra ctices
would suggest setting a Group Policy in the Domain Controller to force browsers int o Proxy Mode. Refer to
User Management Utilities > Understanding and Determining T
ransparent and Proxy Modes > Proxy
Configuration (Group Policy rule) for an example of this rule. If you do not want to define a Group Policy, then
the browser must be set to proxy mode either manually or using the ComSifter. If you de cide to use the
ComSifter, then a prerequisite is that the ComSifter must be supplying DHCP server functionality to your
network. Before continuing, ensure that you have set up DHCP server as described in the Getting Started >
Network worksheet. Once DHCP has been configured properly, then go to User Management and select
“Step 4a-Enable/Disable Automatic Proxy Configuration” and enable and execute automatic configuration.
4. Edit proxy/WPAD file. Optional. Go to User Management and select “Step 4b-Edit Proxy File
proxy.pac/wpad.dat.” Review and, if necessary, make any changes require d for you network.
User Guide | ComSifter CS-8D Pro 2–13
Page 30

INSTALLING COMSIFTER
NTLM
Refer to User Management Utilities > Authentication Method (Step 1) > Authentication Methods Explained >
NTLM with Fallback to Basic for more information on the pros and cons, as well as practical applications of this
authentication method.
Prerequisites
Required Data
1. IP address of the Domain Controller
2. Fully qualified name of your domain
3. A user and password qualified to join a computer to the domain
Hardware
1. Properly configured Domain Controller that includes ComSifter filter s and a ComSifter use rname and
password. Refer to User Management Utilities > Administer/Retrieve Use
3a) > Preparing Active Directory for Synchronization of the User Guide.
2. Optional. Properly configured ComSifter DHCP server. Refer to Network > Non-Stop/DHCP Configuration >
Using
the ComSifter DHCP Server (if the ComSifter DHCP Server has not been enabled via the Network
Wizard) of the User Guide for ComSifter DHCP Server setup and User Management Utilities >
Enable/D
isable Automatic Proxy Configuration (Step 4a).
rnames from Active Directory (Step
Quick Setup
Refer to the section User Management Utilities o
f the User Guide for the following steps.
1. Select the Authentication Method. Go to Users > User Management Utilities and se lect Step 1,
Authentication Method. Once in Authentication Method, select and execute “ 2-NTLM, fallback to Basic
(proxy)”
2. Join ComSifter to the AD Domain. Go to User Management Utilities and select “Step 2- Join
ComSifter to AD Domain.” Enter the specifics for your domain and then execute. The ComSifter will
report if it has successfully bound with your domain. Do not continue unless a successful binding has
been confirmed.
3. Retrieve user names from AD. Go to User Management and select “Step 3a-Administer/Retrieve
User Names from Active Directory.” Enter the specifics for your domain and then execute. The
ComSifter will report if it has successfully bound with your domain. Do not continue unless a successful
binding has been confirmed.
4. Automatic Proxy Configuration. Determine if you will need Automatic Proxy Configuration. Best
practices would suggest setting a Group Policy in the Domain Controller to force browsers into Proxy
Mode. Refer to User Management Utilities > Understanding and Determining Transparent and Proxy
Modes > Proxy
Configuration (Group Policy rule) for an example of this rule. If you do not want to
define a Group Policy, then the browser must be set to proxy mode either manually or using the
ComSifter. If you decide to use the ComSifter, then a prerequisite is that the ComSifter must be
supplying DHCP server functionality to your network. Before continuing, ensure that you have set up
DHCP server as described in the Getting Started > Network worksheet. Once DHCP has been
configured properly, then go to User Management and select “Step 4a-Enable/Disable Automatic Proxy
Configuration” and enable and execute automatic configuration.
5. Edit proxy/WPAD file. Optional. Go to User Management and select “Step 4b-Edit Proxy File
proxy.pac/wpad.dat.” Review and, if necessary, make any changes required for you network.
User Guide | ComSifter CS-8D Pro 2–14
Page 31

INSTALLING COMSIFTER
IDENTD Only
Refer to User Management Utilities > Authentication Method (Step 1) > Authentication Methods Explained >
IdentD Only for more information on the pros and cons, as well as practical applications of this authentication
method.
Prerequisites
Required Data
1. Determine and implement how IdentD will be installed on client computers. Refer to User Management
s > Authentication Methods Explained > IdentD Only > Download/Install IdentD on how to install
Utilitie
IdentD.
2. Determine and implement how port 113 will be opened on client computer firewalls. Refer to User
Management Utilities
client computers.
Hardware
1. If using Group Policy via Active Directory to implement IdentD, setup Group Policie s on the server. R efer to
User Management Utilities > Authentication Methods Explained
Automated Install on how to use Group Policies via Active Directory.
2. If using Group Policy via Active Directory to implement port 113, setup Gro up Policies on the server. Refer to
User Management Utilities > Authentication Methods Explained
Policy rule) on how to use Group Policies via Active Directory.
> Authentication Methods Explained > Port 113 Exception on how to open port 113 on
> IdentD Only > Comsift Service Domain
> IdentD Only > Windows Firewall (Group
Quick Setup
Refer to the section User Management Utilities o
f the User Guide for the following steps.
1. Select the Authentication Method. Go to Users > User Management Utilities and se lect Step 1,
Authentication Method. Determine if you are going to run the ComSifter in transparent or proxy mode, then
set the Authentication Mode accordingly. Refer to User Management Utilitie s > Understanding and
Determining Transparent and Proxy Modes for explanation of transparent and proxy modes. Once in
Authentication Method, select and execute “4-IdentD Only (transparen t)” or “5-IdentD Only (proxy)”
2. Retrieve user names from AD. Go to User Management and select “Step 3a-Administer/Retrieve
User Names from Active Directory.” Enter the specifics for your domain and then execute. The
ComSifter will report if it has successfully bound with your domain. Do not continue unless a successful
binding has been confirmed.
—OR—
3. Enter the Usernames and Passwords for the users. Go to User Management Utilit ies and select “3bAdminister/Retrieve Usernames from ComSifter Username Database” Enter the usernames, passwor ds, and
filter mappings for users that will be filtered.
4. Automatic Proxy Configuration. Optional. Determine if you will need Automatic Proxy Configurat ion. Best
practices would suggest setting a Group Policy in the Domain Controller t o force browsers into Proxy Mode.
Refer to User Management Utilities > Understanding and Deter
mining Transparent and Proxy Modes >
Proxy Configuration (Group Policy rule) for an example of this rule. If you do not want to define a Gro up
Policy, then the browser must be set to proxy mode either manually or using the ComSift er. If you decide to
use the ComSifter, then a prerequisite is that the ComSifter must be supplying DHCP server functionality to
your network. Before continuing, ensure that you have set up DHCP server as described in the Getting
Started > Network worksheet. Once DHCP has been configured properly, then go to User Management and
select “Step 4a-Enable/Disable Automatic Proxy Configuration” and enable and execute a utomatic
configuration.
5. Edit proxy/WPAD file. Optional. Go to User Management and select “Step 4b-Edit Proxy File
proxy.pac/wpad.dat.” Review and, if necessary, make any changes require d for you network.
User Guide | ComSifter CS-8D Pro 2–15
Page 32

INSTALLING COMSIFTER
IP Only
Refer to User Management Utilities > Authentication Method (Step 1) > Authentication Methods Explained > IP
Only for more information on the pros and cons, as well as practical applications of this authentication method.
Prerequisites
Required Data
1. IP address of client computers and filter mappings.
Hardware
1. None
Quick Setup
Refer to the section User Management Utilities o
f the User Guide for the following steps.
1. Select the Authentication Method. Go to Users > User Management Utilities and se lect Step 1,
Authentication Method. Determine if you are going to run the ComSifter in transparent or proxy mode, then
set the Authentication Mode accordingly. Refer to User Management Utilitie s > Understanding and
Determining Transparent and Proxy Modes for explanation of transparent and proxy modes. Once in
Authentication Method, select and execute “6-IP Only (transpar ent)” or “7-IP Only (proxy)”
2. Enter the Usernames and Passwords for the users. Go to User Management Utilit ies and select “3cAdminister/Retrieve User IPs from ComSifter IP Database” Enter the IP addresses and f ilter mappings for
client computers that will be filtered.
3. Automatic Proxy Configuration. Optional. Determine if you will need Automatic Proxy Configurat ion. Best
practices would suggest setting a Group Policy in the Domain Controller t o force browsers into Proxy Mode.
Refer to User Management Utilities > Understanding and Deter
mining Transparent and Proxy Modes >
Proxy Configuration (Group Policy rule) for an example of this rule. If you do not want to define a Gro up
Policy, then the browser must be set to proxy mode either manually or using the ComSift er. If you decide to
use the ComSifter, then a prerequisite is that the ComSifter must be supplying DHCP server functionality to
your network. Before continuing, ensure that you have set up DHCP server as described in the Getting
Started > Network worksheet. Once DHCP has been configured properly, then go to User Management and
select “Step 4a-Enable/Disable Automatic Proxy Configuration” and enable and execute a utomatic
configuration.
4. Edit proxy/WPAD file. Optional. Go to User Management and select “Step 4b-Edit Proxy File
proxy.pac/wpad.dat.” Review and, if necessary, make any changes require d for you network.
User Guide | ComSifter CS-8D Pro 2–16
Page 33
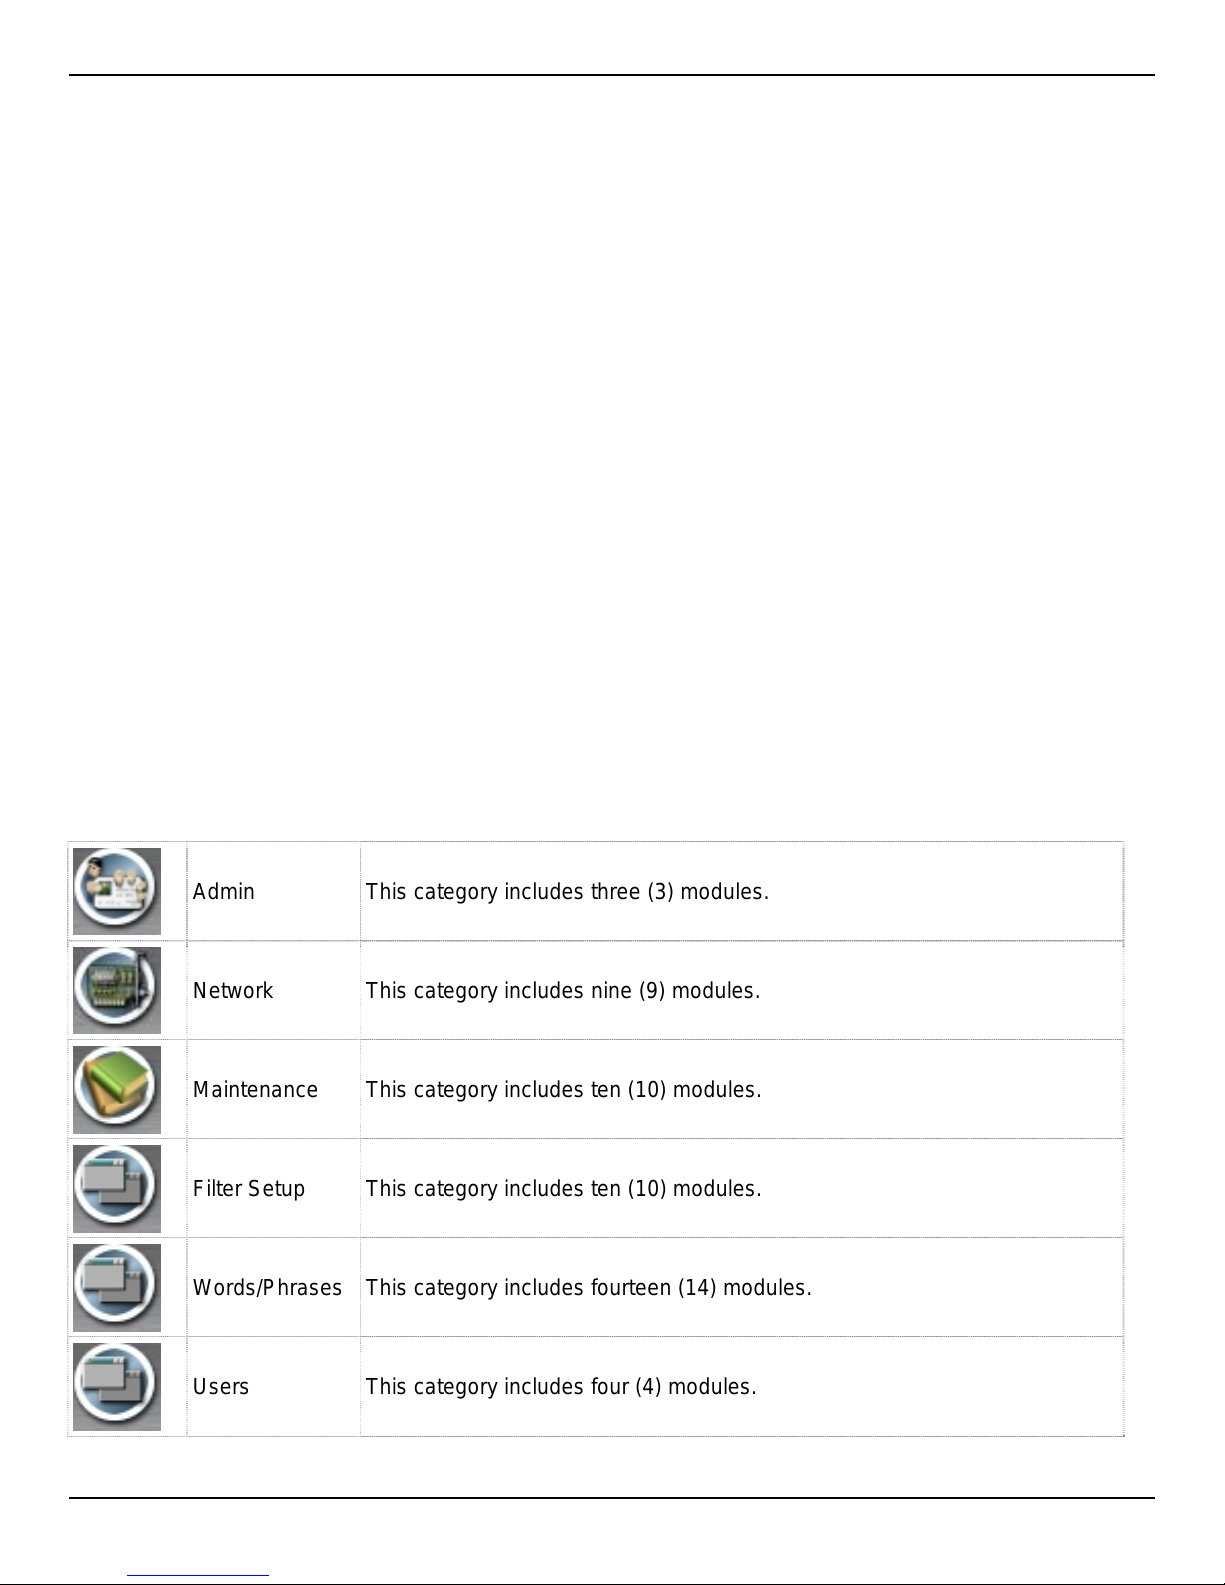
CONFIGURING COMSIFTER
Configuring ComSifter
Configuration Overview
ComSifter is designed to be flexible and secure. As an administrator, you may define:
Computer IP addresses that may configure ComSifter.
Administrators that may configure ComSifter.
Assign different responsibilities to each Administrator
Add/Delete users to the User Database
Assign a filter to each user.
Configure the Filter Groups that are enabled in each filter.
Perform Maintenance functions.
Chapter 3
Admin
Understanding Modules and Categories
ComSifter uses a module concept to allow certain functions to be performed by different ComSifter
administrators. A module may contain one or more “commands” that may be performed by the ComSifter
administrator configuring the system. Modules are grouped within Categories. Categories are represented by
Icons at the top of each page. There are six categories:
Admin This category includes three (3) modules.
Network This category includes nine (9) modules.
Maintenance This category includes ten (10) modules.
Filter Setup This category includes ten (10) modules.
Words/Phrases This category includes fourteen (14) modules.
Users This category includes four (4) modules.
User Guide | ComSifter CS-8D Pro 3–1
Page 34
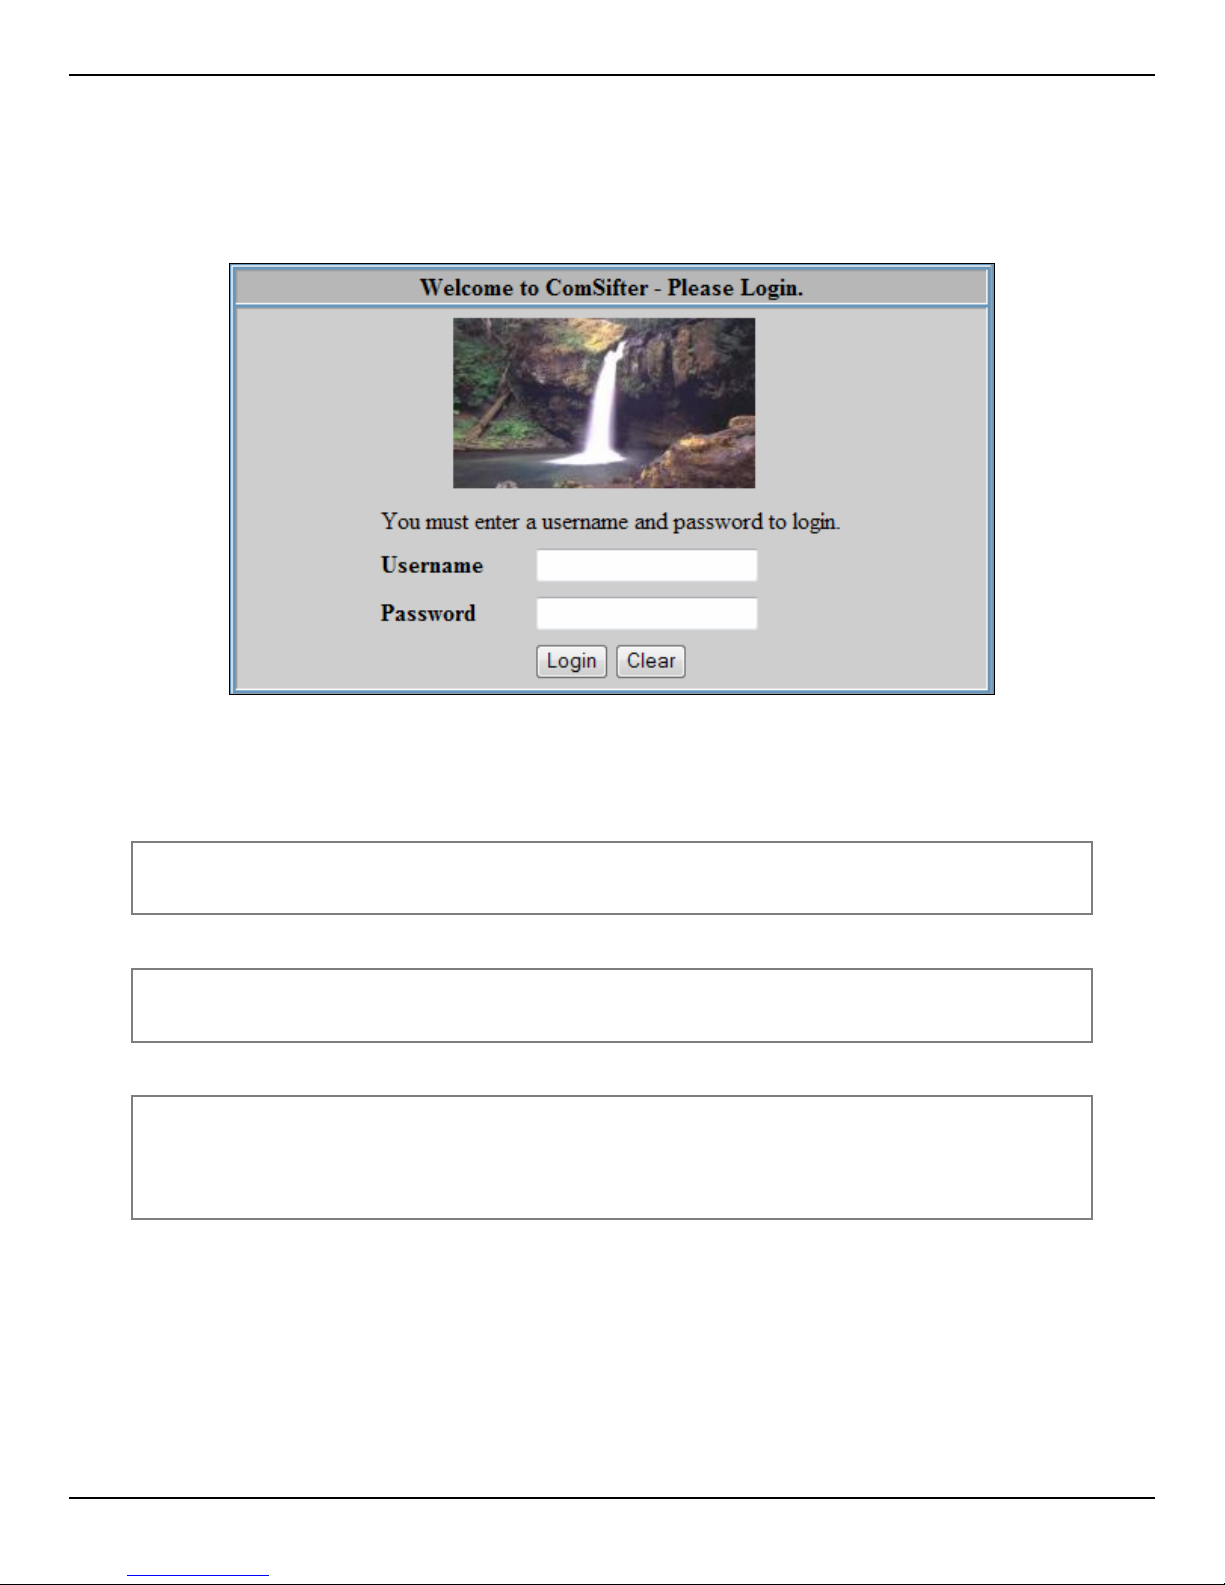
Security Configuration
Login
Upon connection to ComSifter, you will be presented with a login screen.
CONFIGURING COMSIFTER
Figure 3-1: ComSifter Login Screen
The default Username is: admin
The default Password is: admin
Note: ComSifter will allow five (5) failed login attempts, and then will not allow further
attempts for 10 minutes.
Note: It is recommended that you immediately change the default password to a
password of your own choosing as described below.
Note: Administration of the ComSifter may be performed by only one user at a time.
Any subsequent attempts to login to ComSifter by other users will be rejected. If
the current user forgets to logout of ComSifter, it may take up to 10 minutes for
the inactivity timer to logout the previous user.
Upon successful login, you will be presented with the initial ComSifter display. Refer to Maintenance >
ComSifter Status for detailed information about this display.
User Guide | ComSifter CS-8D Pro 3–2
Page 35
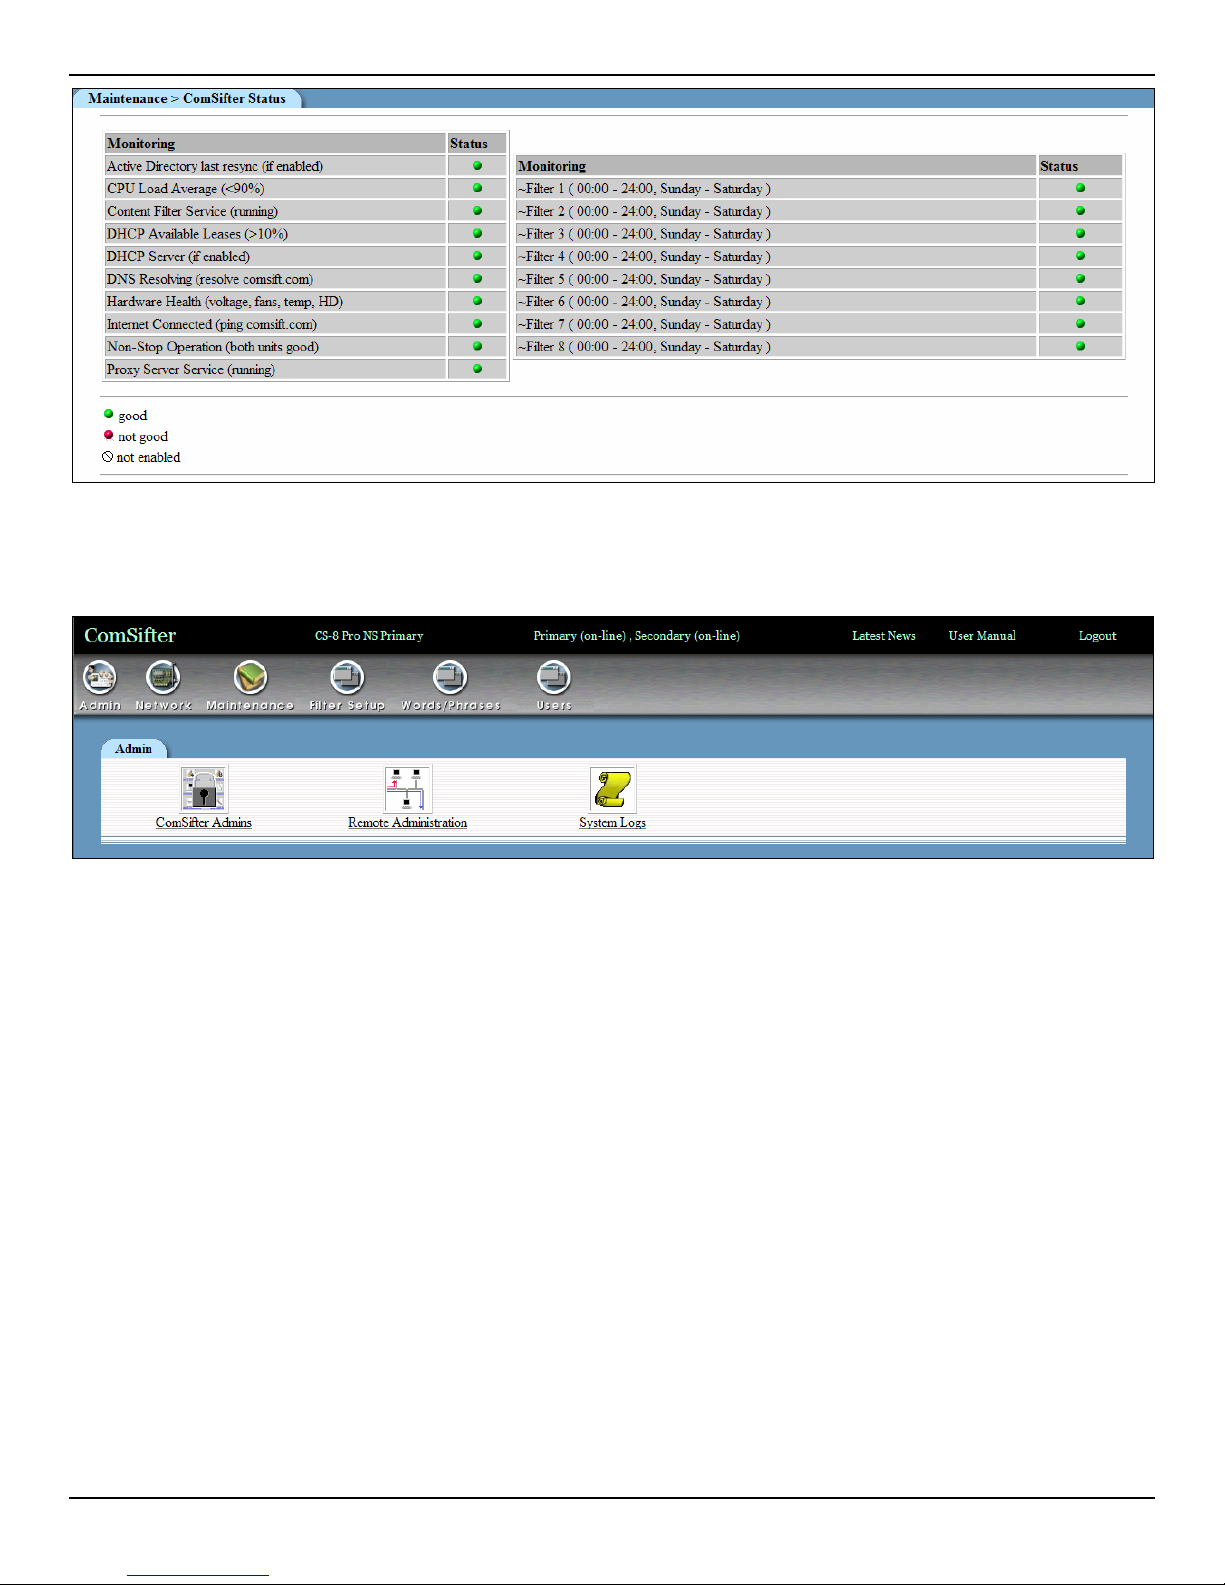
CONFIGURING COMSIFTER
Figure 3-2: Initial display after login
By clicking on Admin you will be presented with the Admin Modules. Clicking on ComSifter Admins will bring
up the ComSifter Admins menu.
Figure 3-3: Select ComSifter Admins
ComSifter Admins
Overview
ComSifter Admins are personal that will be configuring ComSifter. Ten (10) ComSifter Admins have been predefined. A special ComSifter Admin, “Admin,” is designated as the System Administrator. Admin may edit the
username and password of other ComSifter Admins and assign responsibilities to them by assigning Modules.
User Guide | ComSifter CS-8D Pro 3–3
Page 36
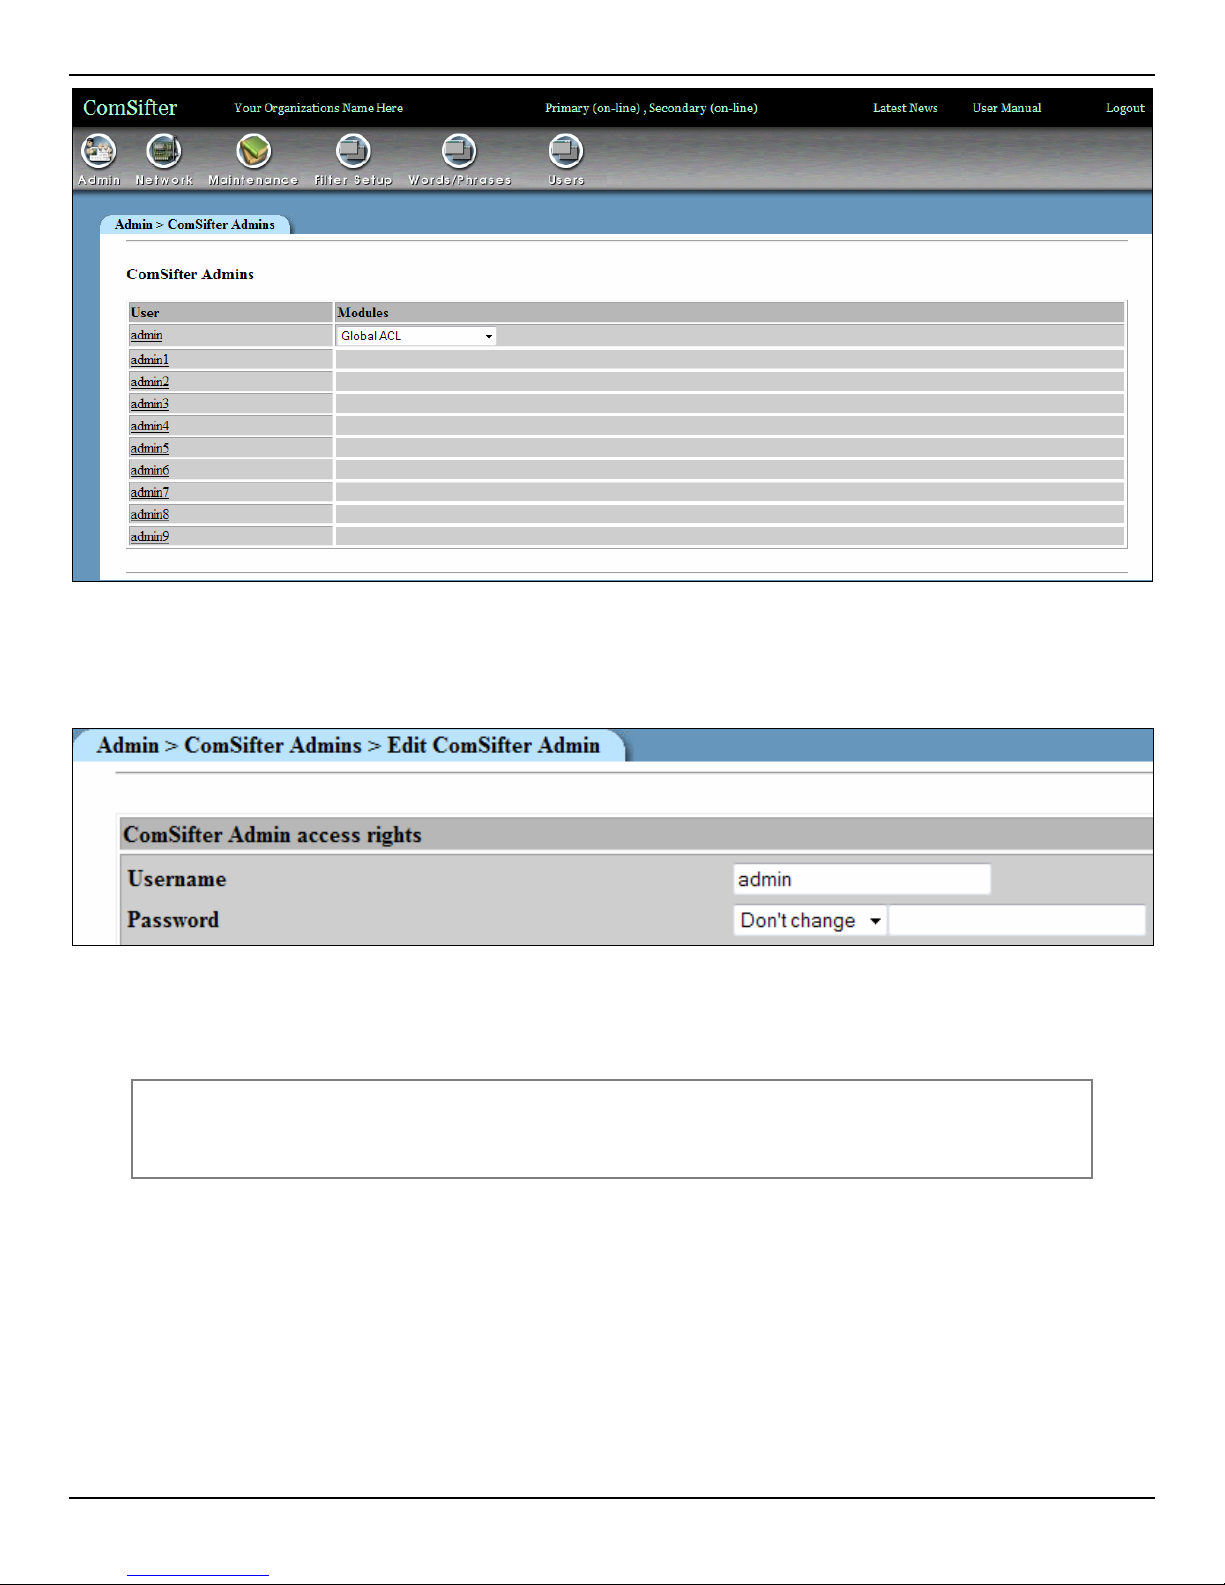
Figure 3-4: ComSifter Admin Screen
CONFIGURING COMSIFTER
Setting the Username and Password
By clicking on admin you will be able to change the default password.
Figure 3-5: Changing Default Password
To change the default password enter the new password, change the Password drop down selection to set to,
enter the new password, click on Save.
Warning: Do not forget your password. You will not be able to configure ComSifter if the
password is forgotten. ComSifter does not have any “back-door” or hidden
passwords.
Assigning Module Rights
As Admin you may define new ComSifter Admins and grant them access to all or selected modules. In the
following example. username Admin1 was changed to Operator. Operator is given rights to access
modules that allow computers to be blocked or bypassed and to administer the User List.
User Guide | ComSifter CS-8D Pro 3–4
Page 37
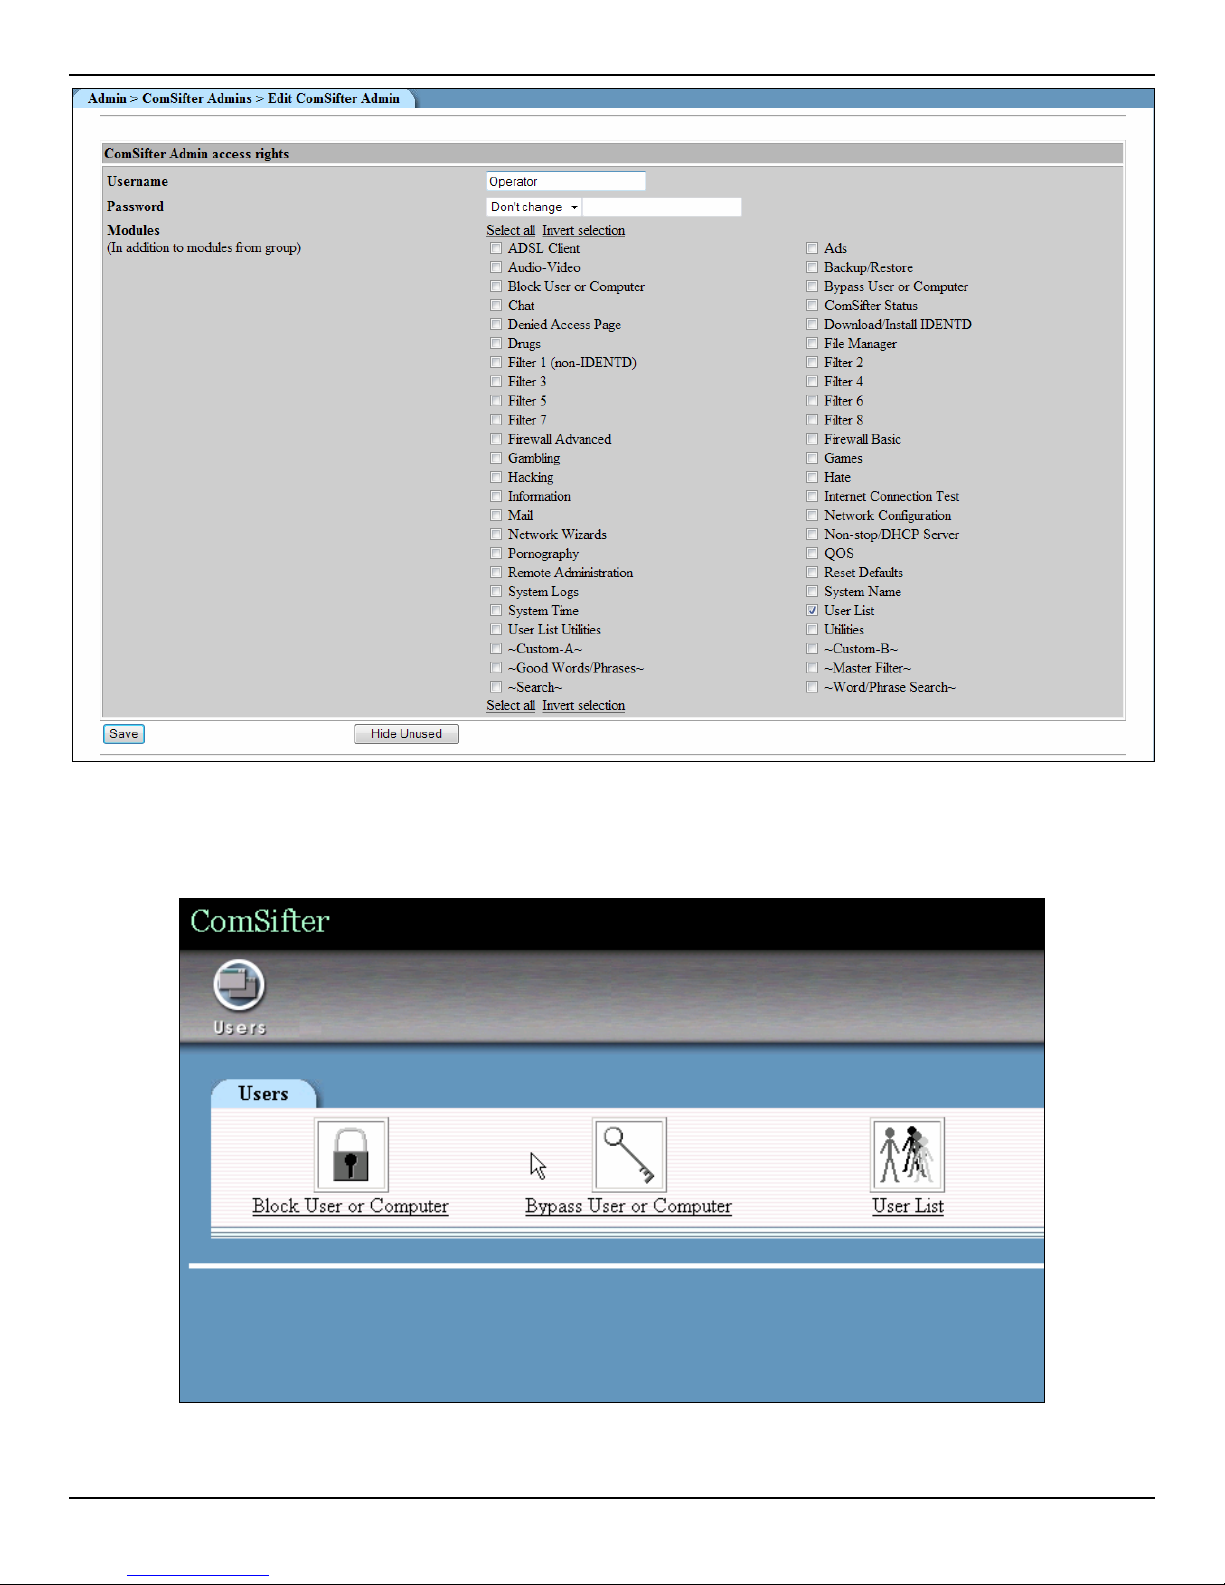
CONFIGURING COMSIFTER
Figure 3-6: Assigning Module Rights
When Operator logs into ComSifter they will only see the Modules and Categories that they have been
granted rights to as shown in the example below.
User Guide | ComSifter CS-8D Pro 3–5
Figure 3-7: Operator Admin Screen
Page 38
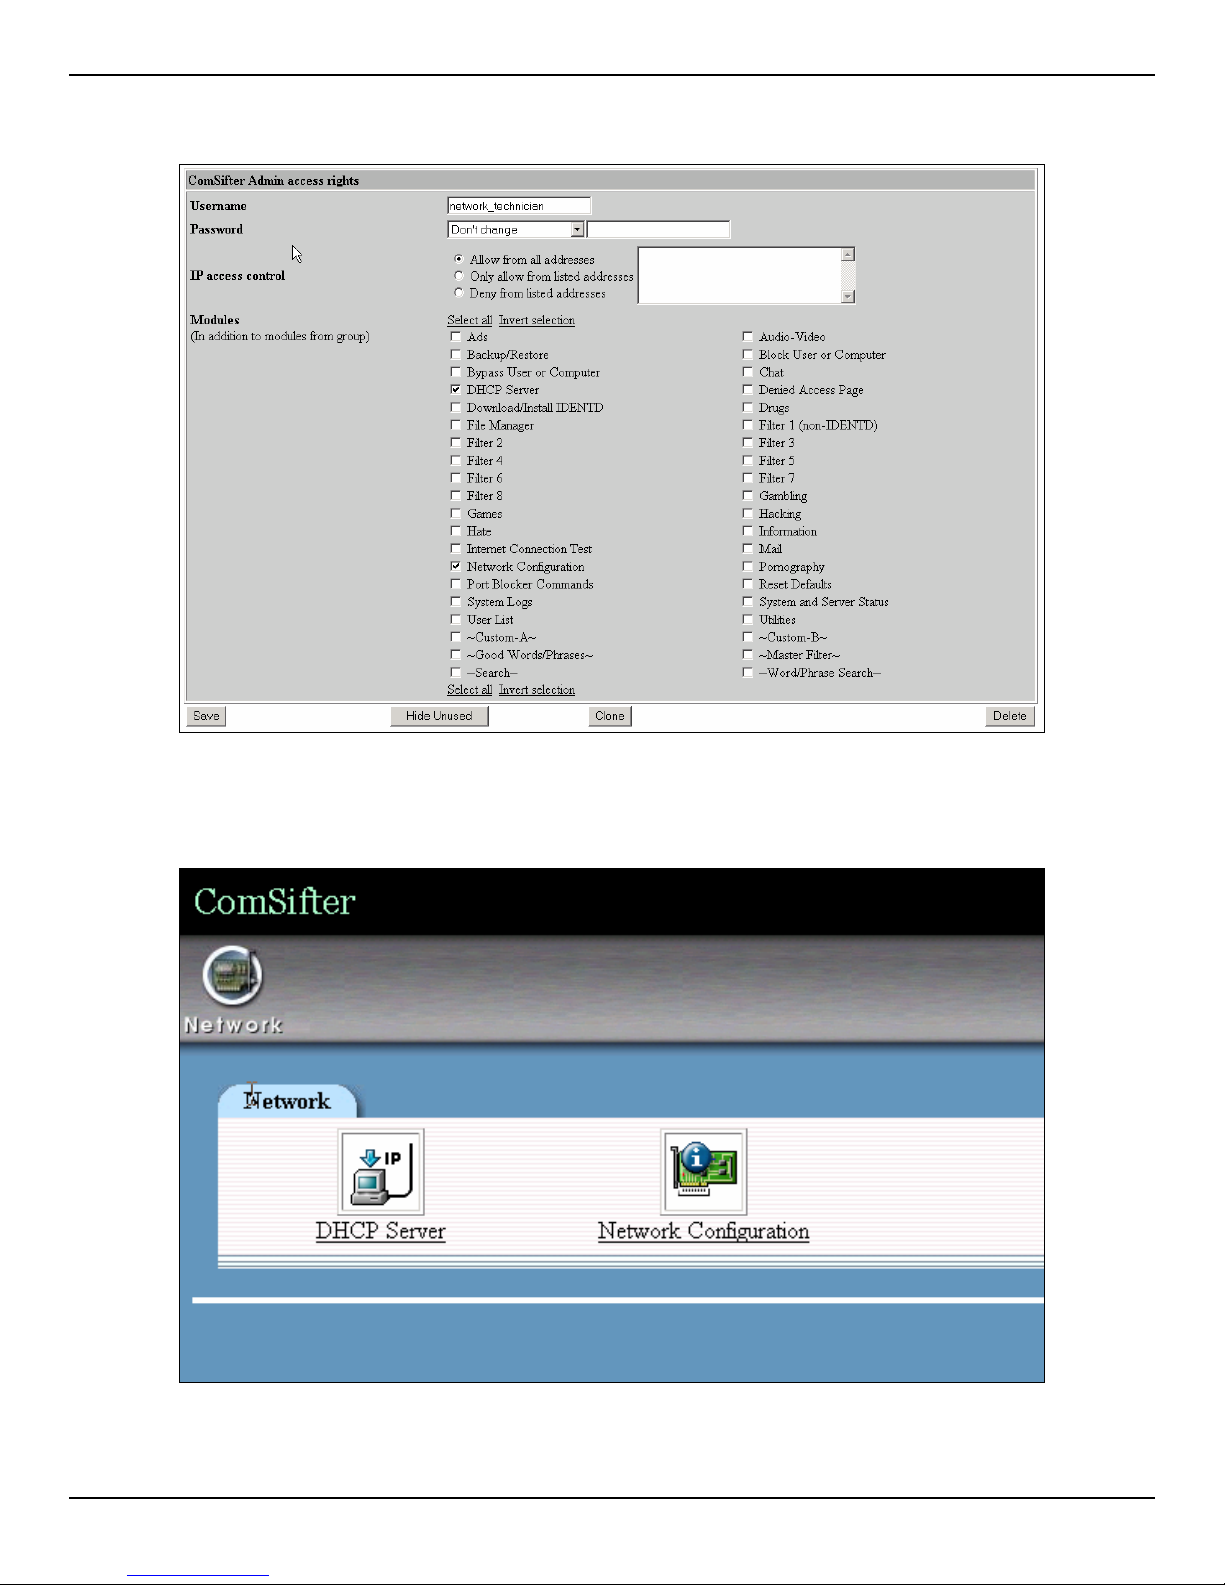
CONFIGURING COMSIFTER
In the next example, username Admin2 was changed to network_technician. network_technician is
allowed access to the DHCP and Network Configuration Modules.
Figure 3-8: Assign Module Rights
When network_technician logs into ComSifter they will only see the Modules and Categories that they
have been granted rights to as shown in the example below.
Figure 3-9: network_technician Admin Screen
User Guide | ComSifter CS-8D Pro 3–6
Page 39
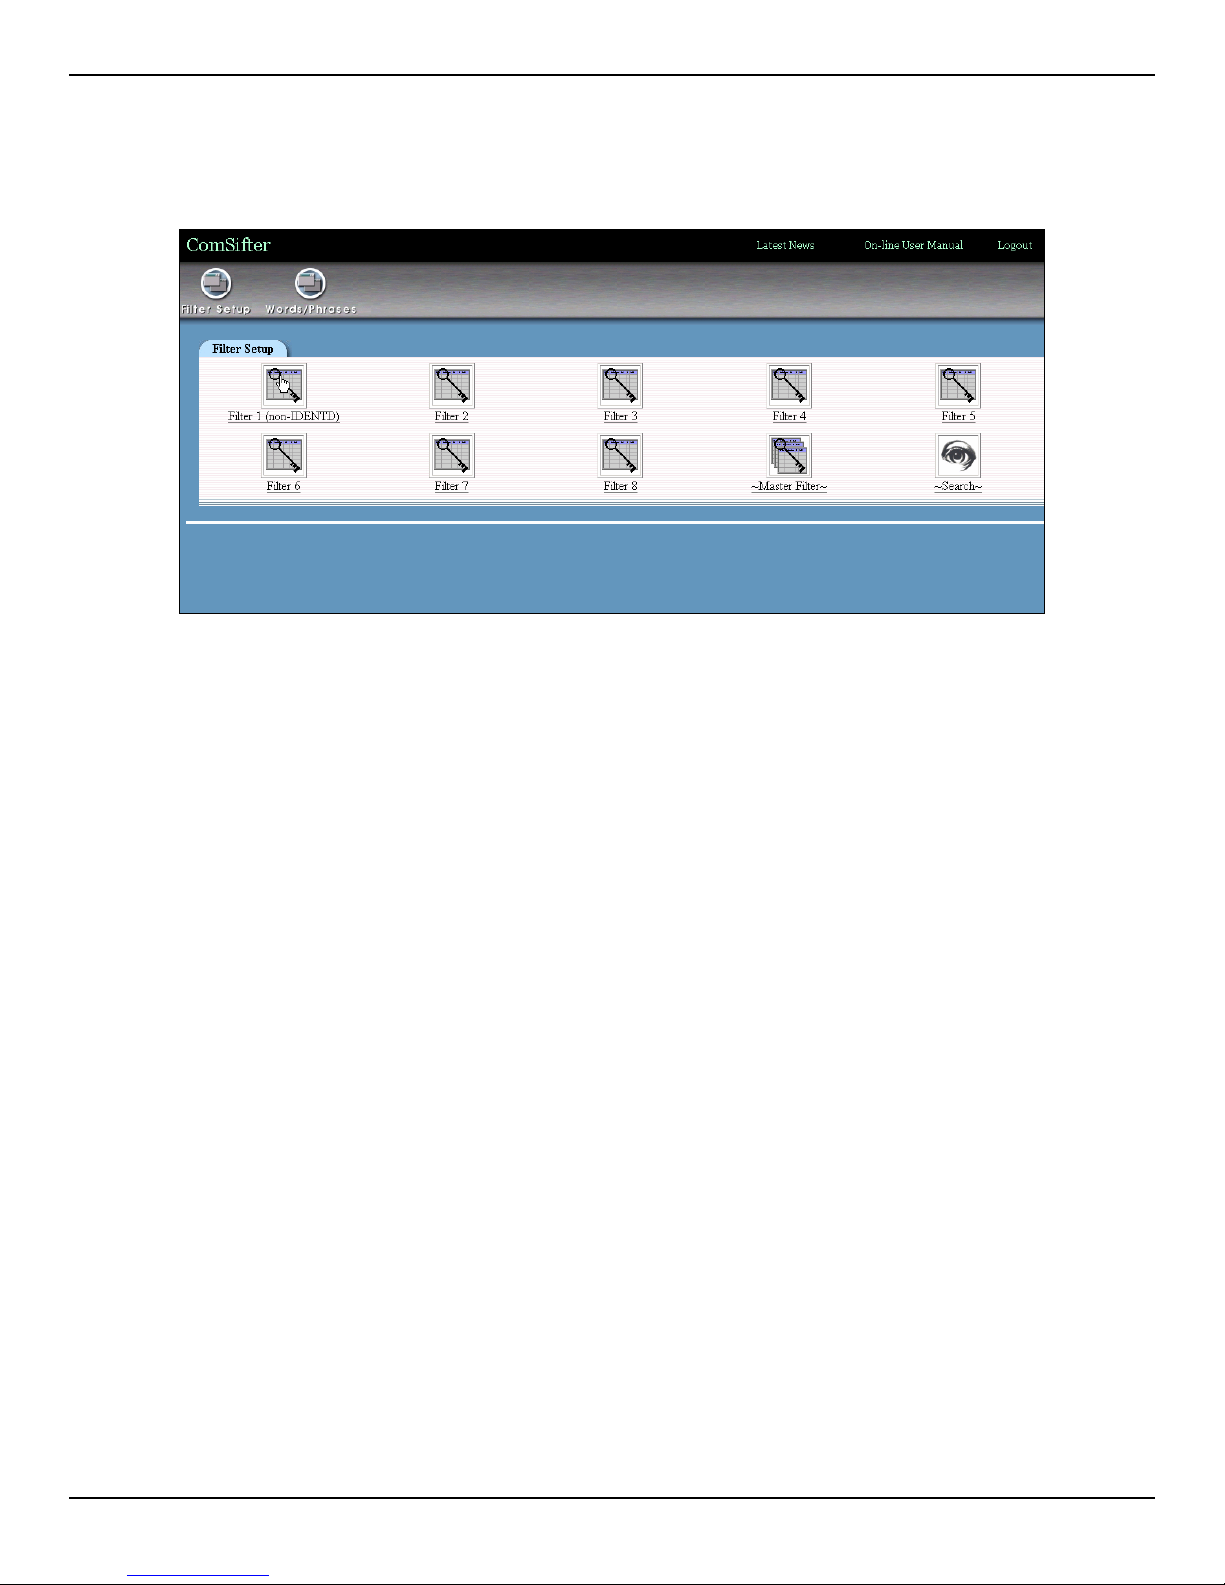
CONFIGURING COMSIFTER
In the final example, a ComSifter Admin with the username filter_specialist is defined. This admin is
allowed only in to the Filter Setup and Words/Phrases Modules.
When filter_specialist logs into ComSifter they will only see the Modules and Categories that they have
been granted rights to as shown in the example below.
Figure 3-10: filter_specialist Admin Screen
User Guide | ComSifter CS-8D Pro 3–7
Page 40
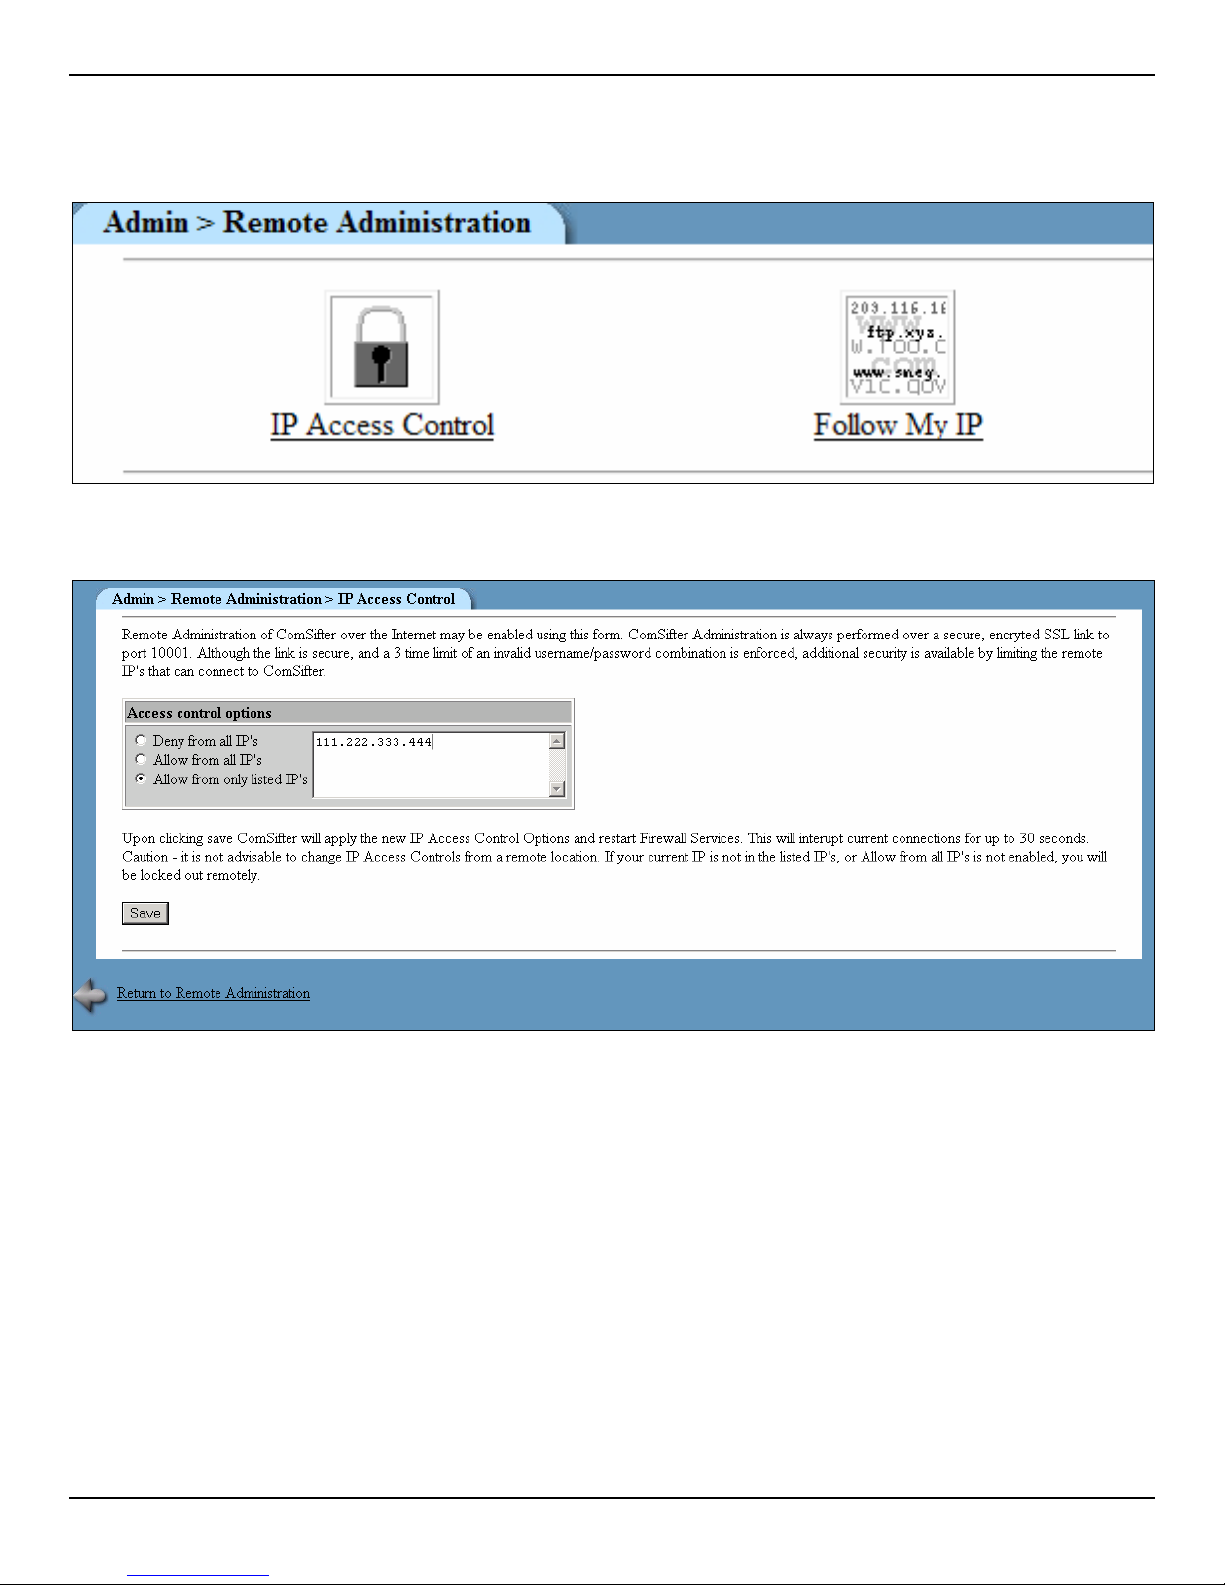
CONFIGURING COMSIFTER
Remote Administration
ComSifter supports remote administration over the Internet using an encrypted SSL link to port 10000.
Additional security is attained by limiting Remote Administration by IP.
Figure 3-11: Remote Administration
IP Access Control
User Guide | ComSifter CS-8D Pro 3–8
Figure 3-12: IP Access Control
Page 41
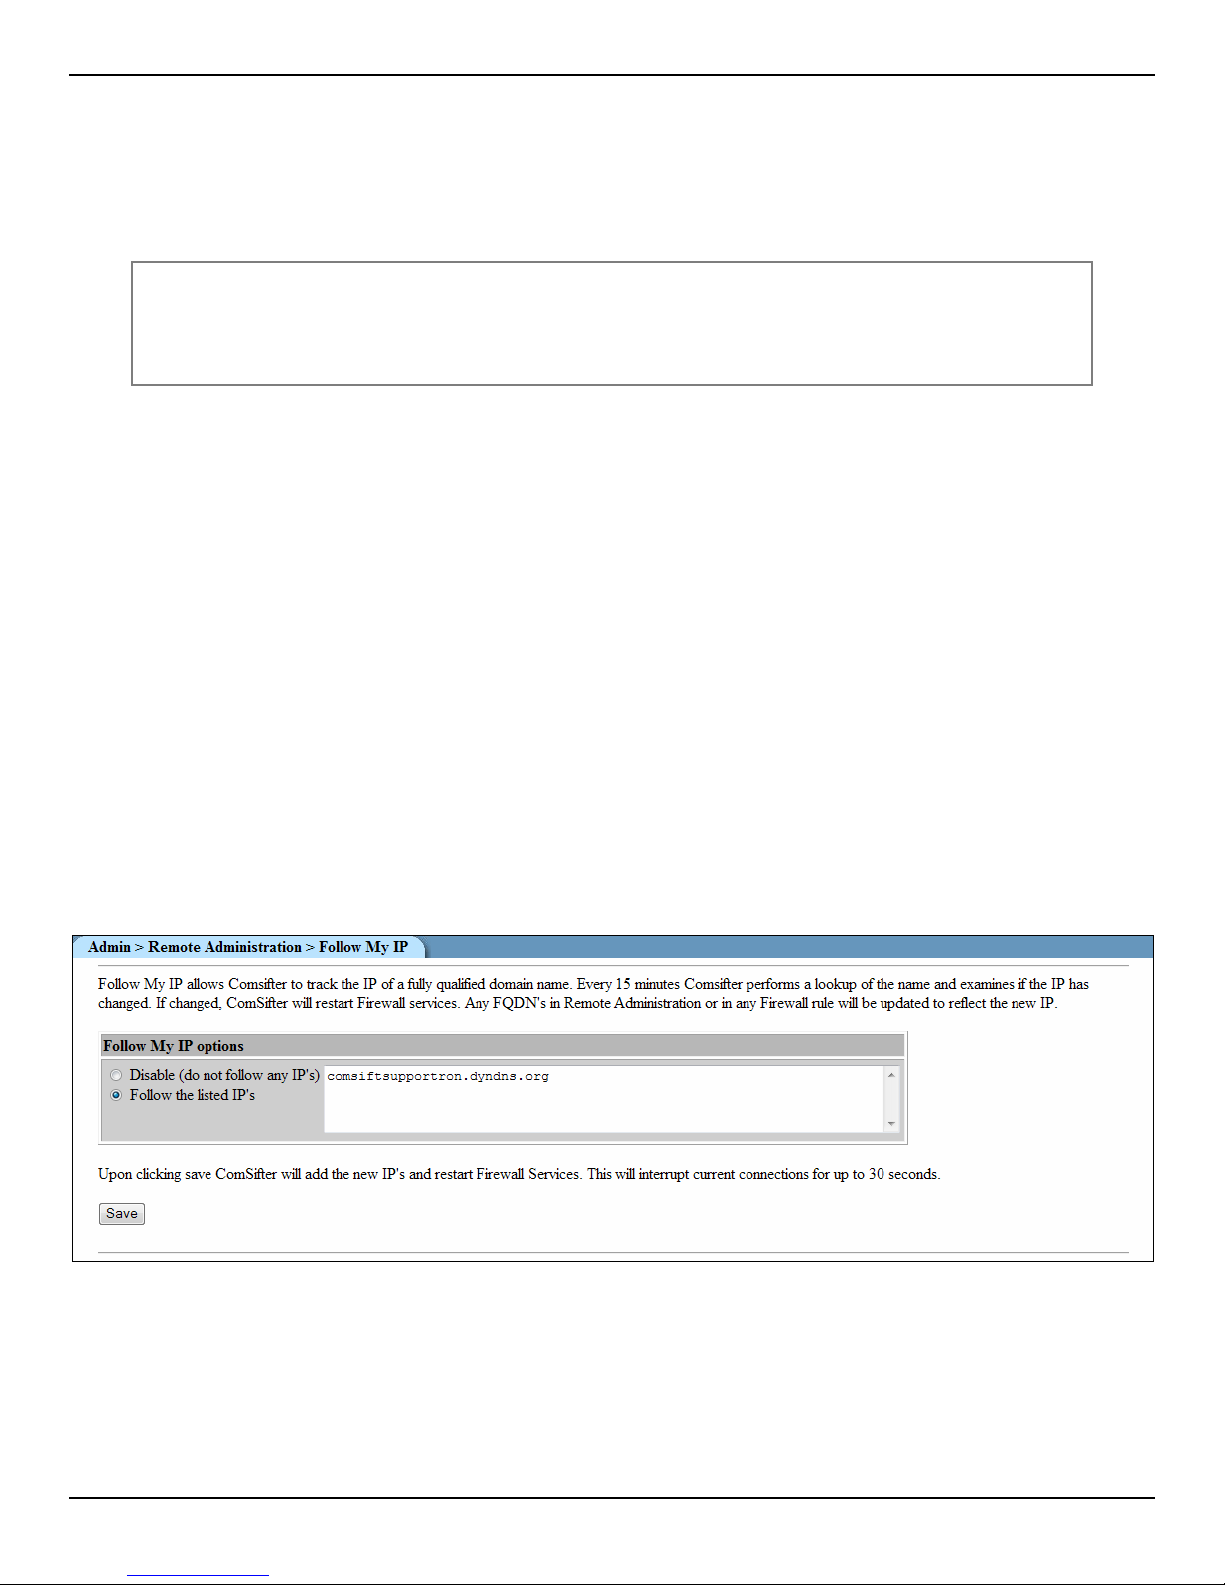
CONFIGURING COMSIFTER
Deny from all IP’s
Enabling Deny all IP’s will disable the Remote Administration function. This is the default setting.
Allow from all IP’s
Enabling Allow from all IP’s will allow any IP from the Internet to connect to Port 10000.
Warning: Although further authentication is required before access to the ComSifter is
granted, this setting is not advisable due to potential security risks. In the event
of a username/password breach, the ComSifter would be accessible. Use this
setting only if the ComSifter is inside of a trusted LAN or for testing purposes.
Allow from only listed IP’s
Enable this setting to limit Remote Administration to the listed IP addresses. This is the preferred setting for
Remote Administration and offers excellent security. To gain access remotely the following conditions must be
met:
1. The access must be from the listed IP.
2. The access must be to port 10000.
3. SSL must be supported.
4. The security certificate must be accepted.
5. A proper username/password must be entered.
Follow My IP
Overview
As an added security feature ComSifter has the ability to track the changing IP of a FQDN (Fully Qualified
Domain Name). This allows Dynamic DNS to be used instead of IP’s. An example of this feature would be a
traveling ComSifter Administrator. At each location, the administrators Dynamic DNS would be updated. Every
15 minutes ComSifter does a name lookup to see if the administrator’s FQDN IP has changed. If so, ComSifter
will change the IP that is allowed to administer the ComSifter
Figure 3-13: Follow My IP
Disable
Selecting Disable will disable the feature.
User Guide | ComSifter CS-8D Pro 3–9
Page 42
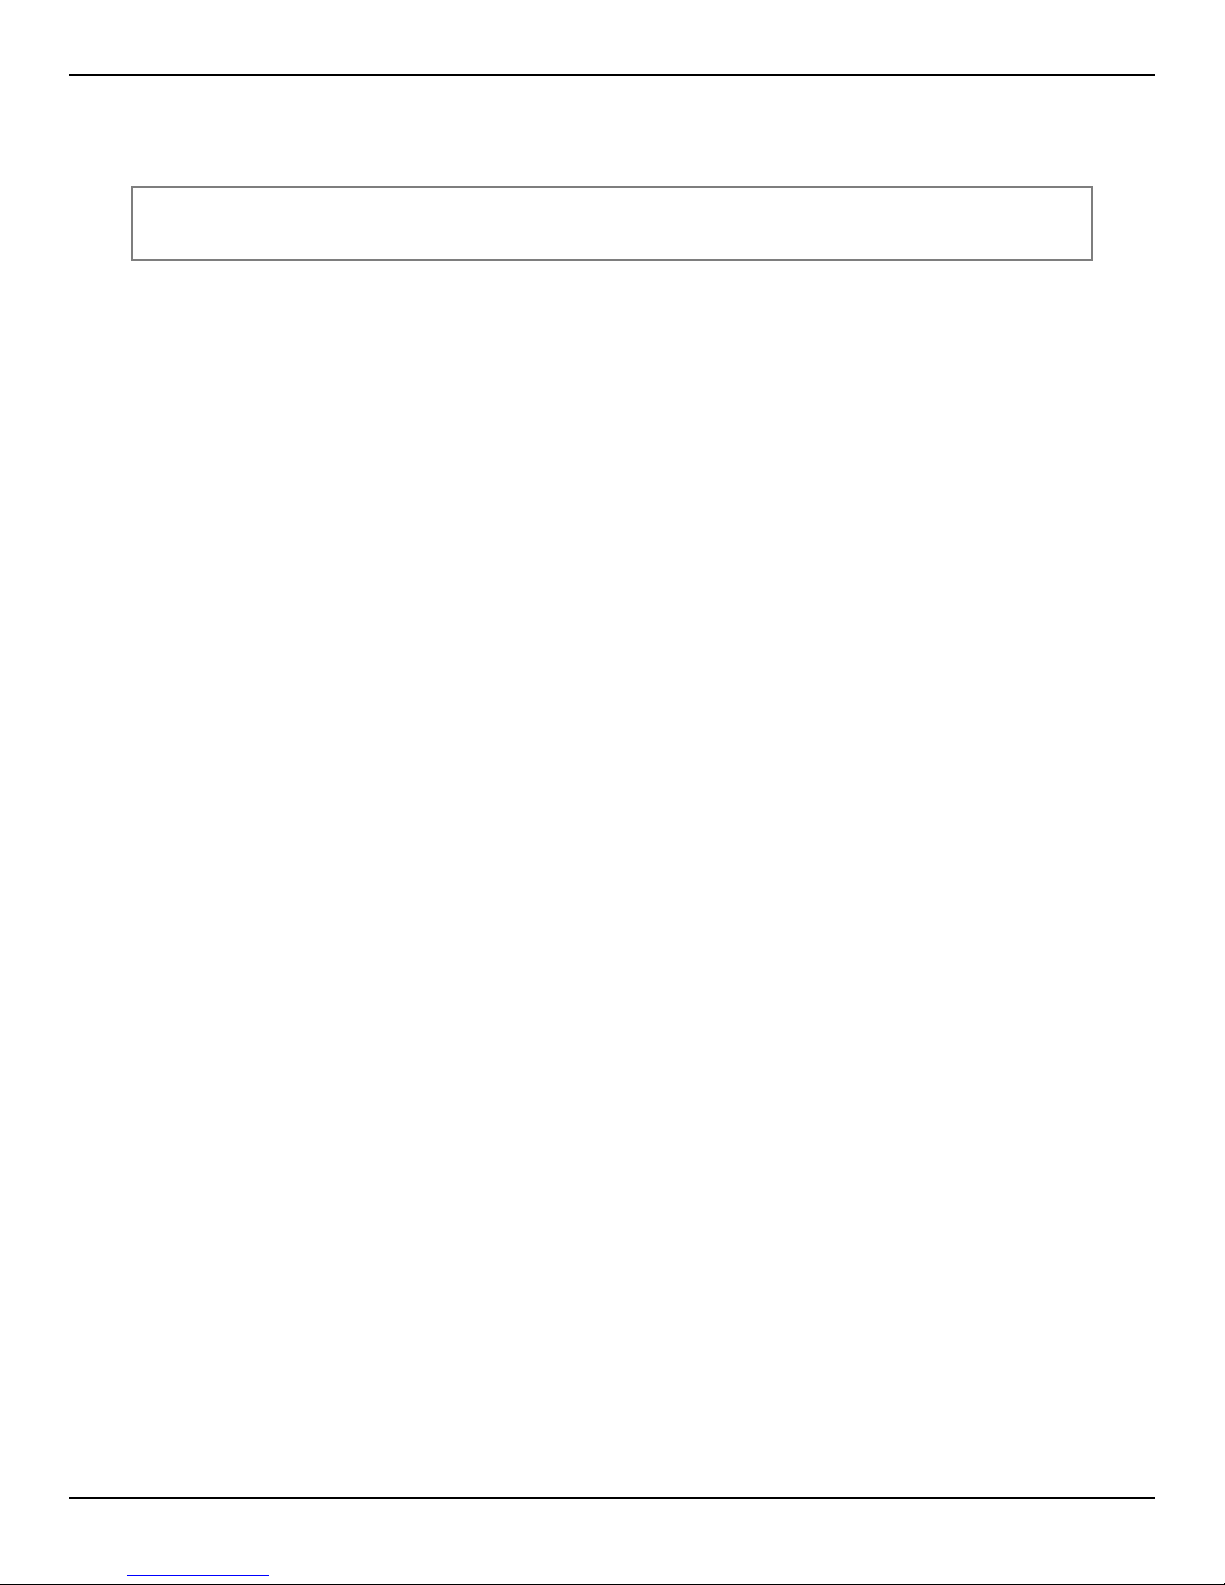
CONFIGURING COMSIFTER
Follow the listed IP
This selection will enable the Following of the IP of any domain entered in the text box.
Note: Upon clicking save ComSifter will add the new IP's and restart Firewall Services.
This will interrupt current connections for up to 30 seconds.
User Guide | ComSifter CS-8D Pro 3–10
Page 43
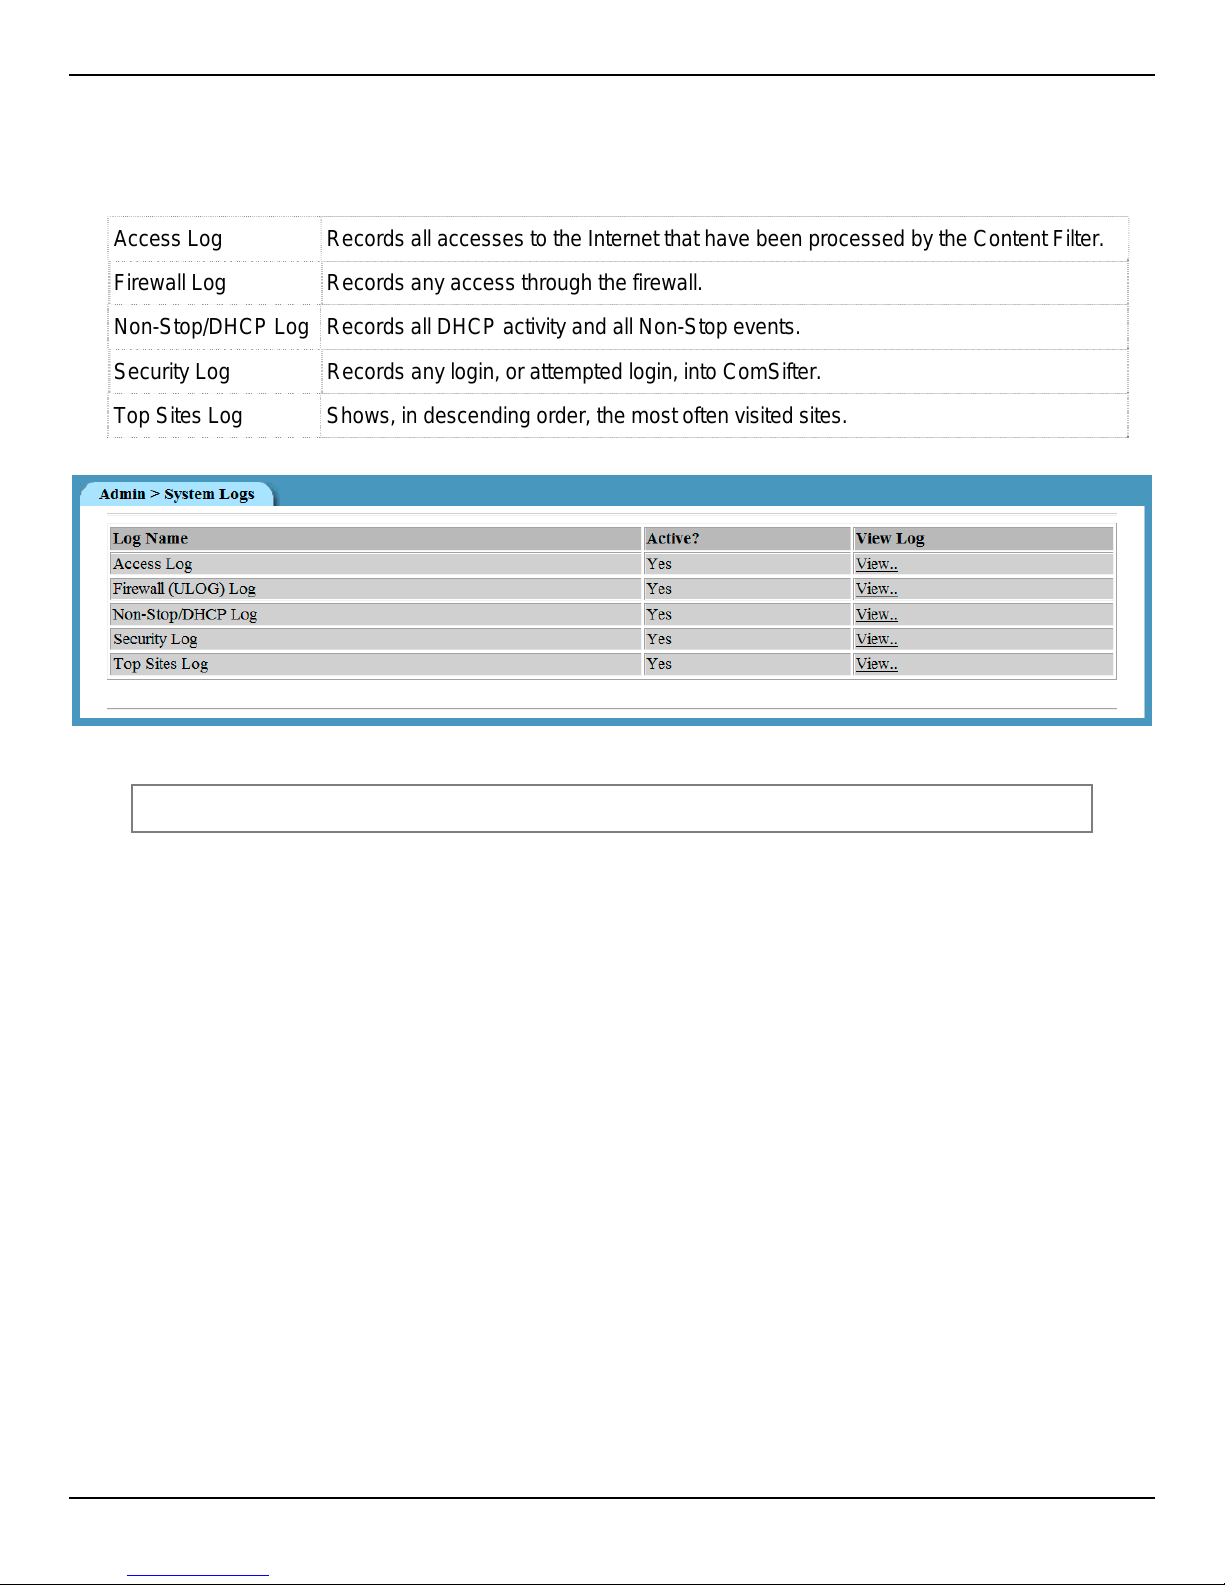
CONFIGURING COMSIFTER
System Logs
ComSifter records six types of events in its log files. These are:
Access Log Records all accesses to the Internet that have bee n processed b y the Content Filter.
Firewall Log Records any access through the firewall.
Non-Stop/DHCP Log Records all DHCP activity and all Non-Stop events.
Security Log Records any login, or attempted login, into ComSifter.
Top Sites Log Shows, in descending order, the most often visited sites.
Figure 3-14: System Logs
Note: ComSifter keeps the last seven (7) days of data in its logs.
User Guide | ComSifter CS-8D Pro 3–11
Page 44
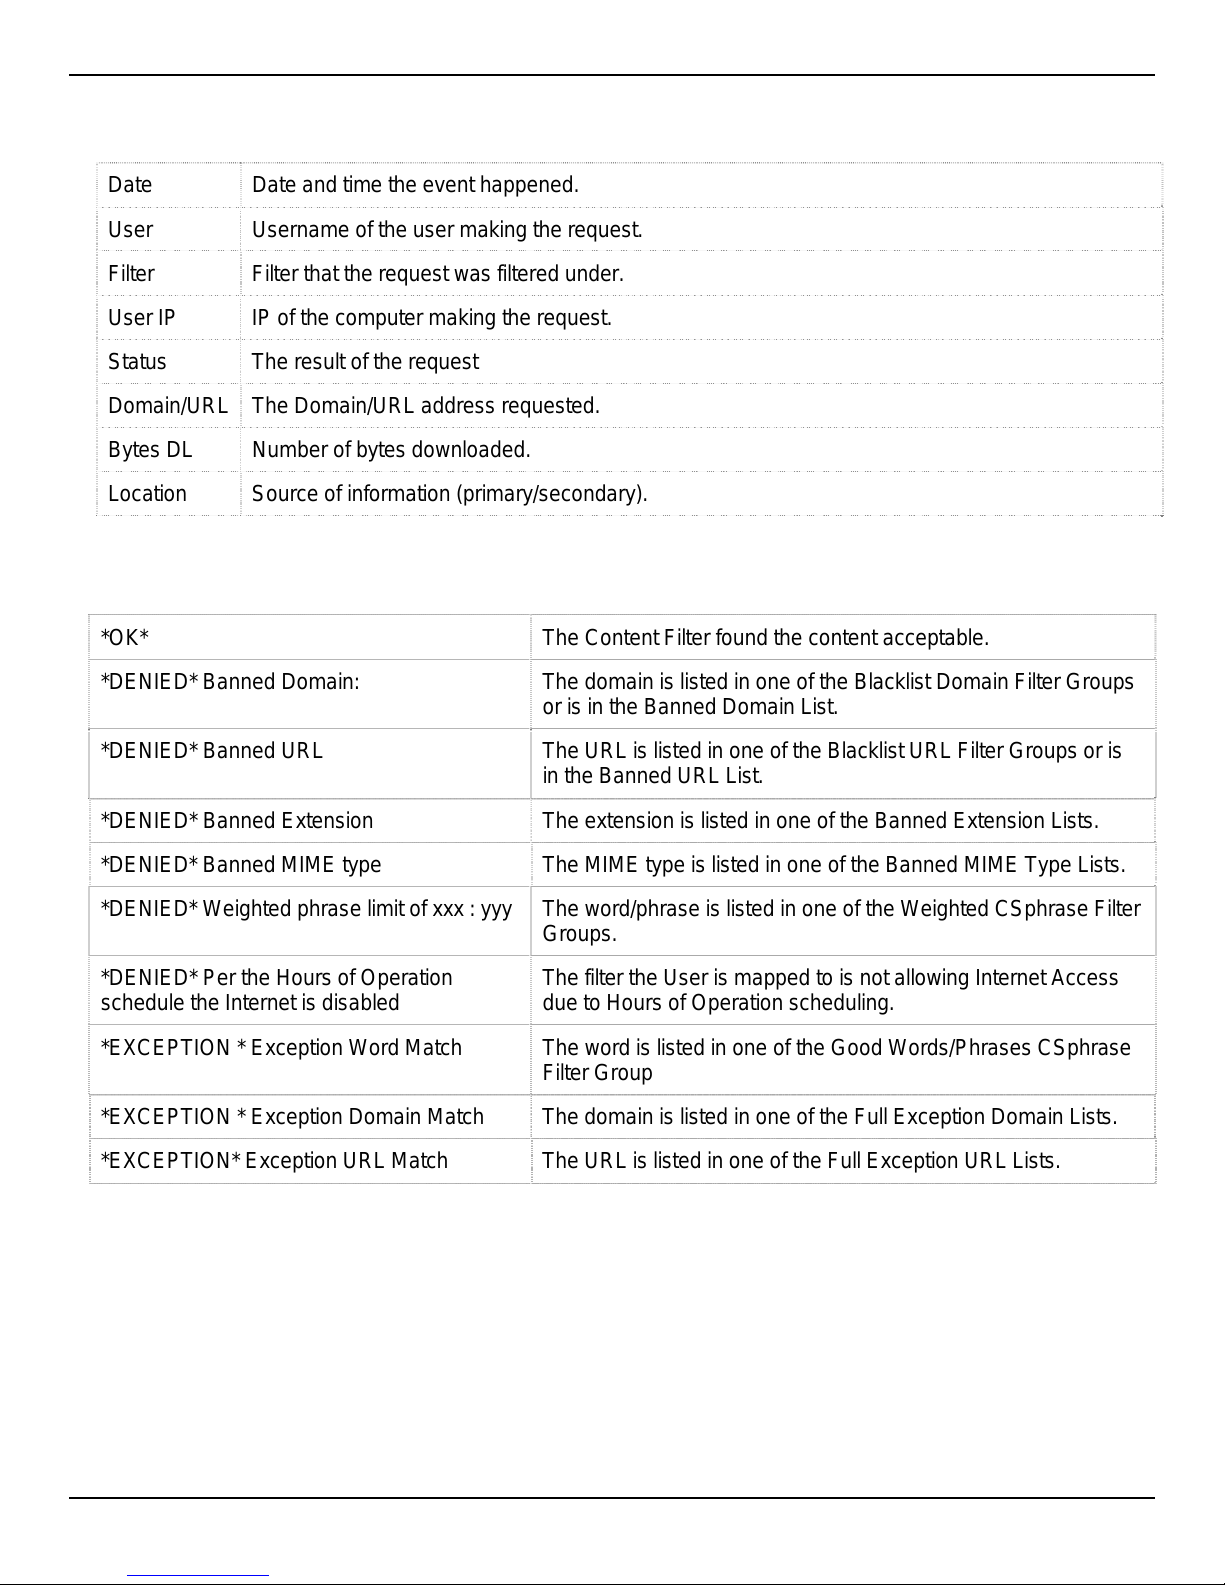
CONFIGURING COMSIFTER
Access Log
The Access Log records each request to the Internet processed by the Content Filter. The log shows:
Date Date and time the event happened.
User Username of the user making the request.
Filter Filter that the request was filtered under.
User IP IP of the computer making the request.
Status The result of the request
Domain/URL The Domain/URL address requested.
Bytes DL Number of bytes downloaded.
Location Source of information (primary/secondary).
Status Messages
Possible Status Messages in the log are:
*OK* The Content Filter found the content acceptable.
*DENIED* Banned Domain: The domain is listed in one of the Blacklist Domain Filter Groups
or is in the Banned Domain List.
*DENIED* Banned URL The URL is listed in one of the Blacklist URL Filter Groups or is
in the Banned URL List.
*DENIED* Banned Extension The extension is listed in one of the Banned Extension Lists.
*DENIED* Banned MIME type The MIME type is listed in one of the Banned MIME Type Lists.
*DENIED* Weighted phrase limit of xxx : yyy The word/phrase is listed in one of the Weighted CSphrase Filter
Groups.
*DENIED* Per the Hours of Operation
schedule the Internet is disabled
The filter the User is mapped to is not allowing Inter net Access
due to Hours of Operation scheduling.
*EXCEPTION * Exception Word Match The word is listed in one of the Good Words/Phrases CSphrase
Filter Group
*EXCEPTION * Exception Domain Match The domain is listed in one of the Full Exception Domain Lists.
*EXCEPTION* Exception URL Match The URL is listed in one of the Full Exception URL Lists.
User Guide | ComSifter CS-8D Pro 3–12
Page 45
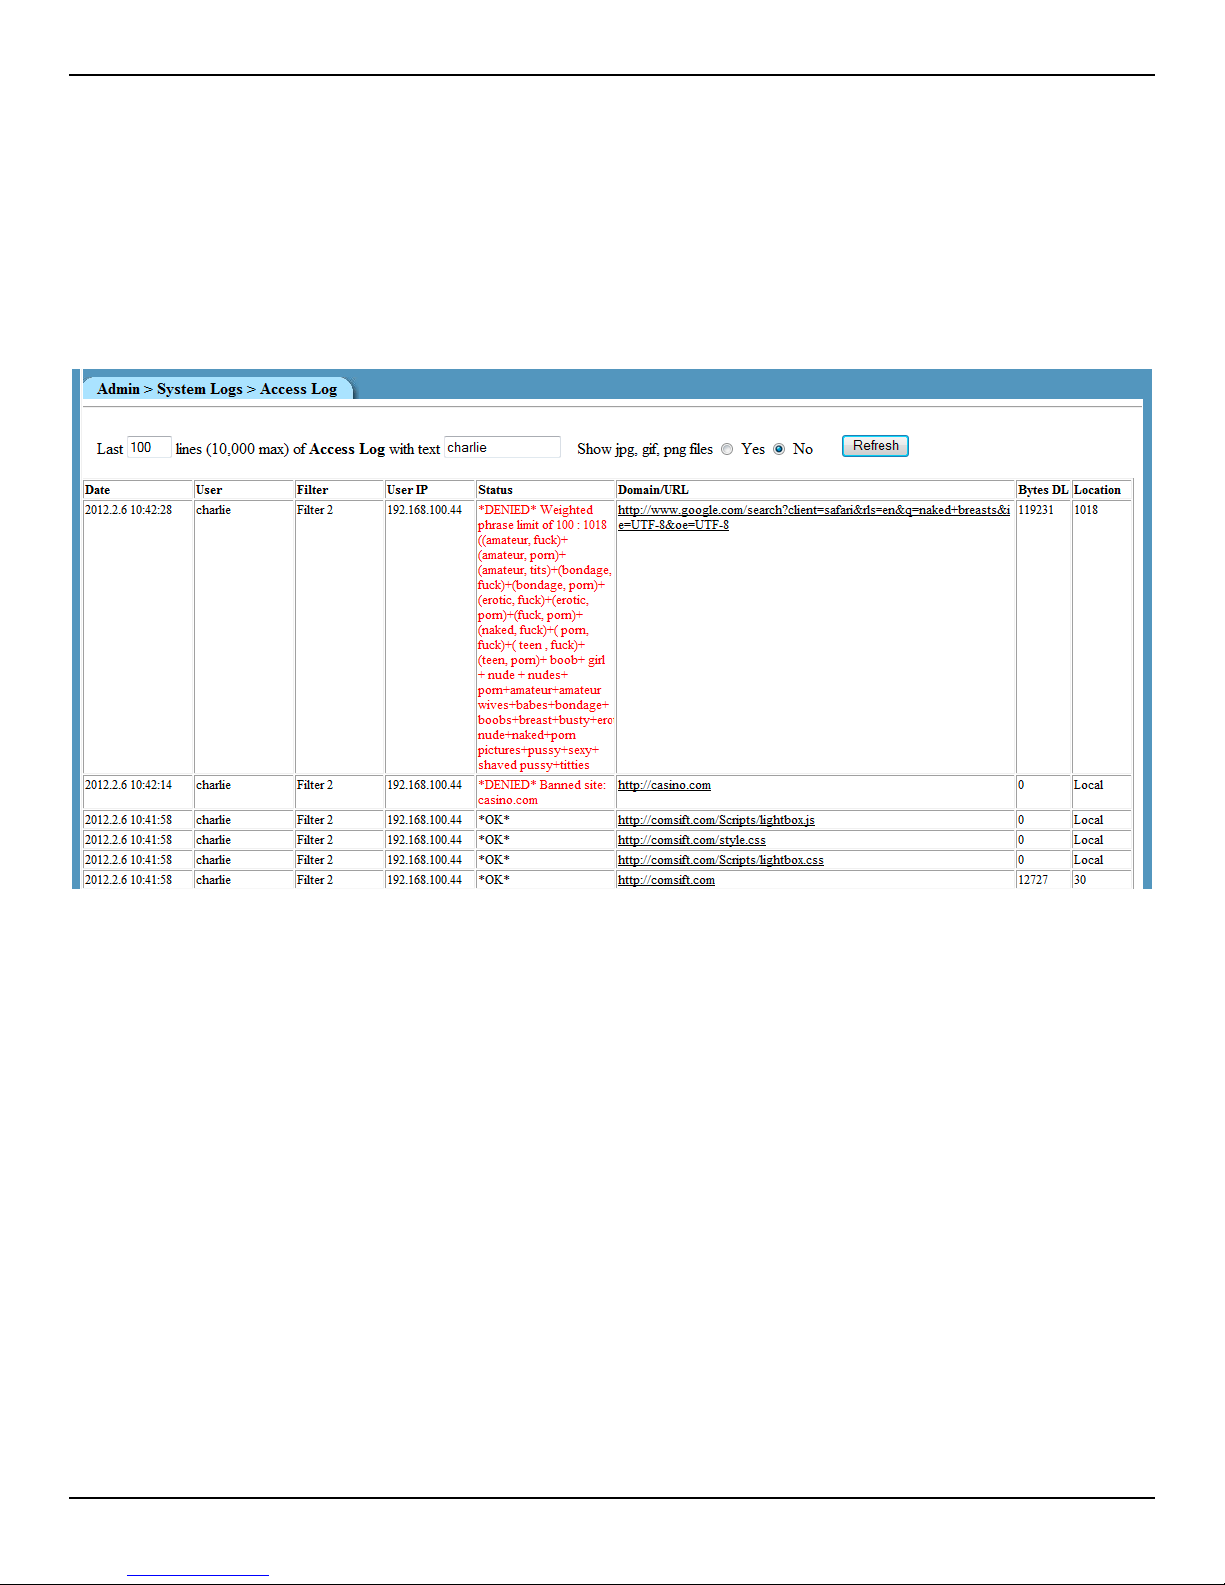
CONFIGURING COMSIFTER
In the following example, we see that user charlie, at IP 192.168.1.111;
Accessed comsift.com. This domain was in the Full Exception list of the filter he was connected to and
thus allowed him full access to the site regardless of the content.
Then he tried to access casino.com. This site was in the Blacklist of the filter h e was connected to and thus
he was *DENIED* from viewing the site.
Next Charlie tried a Google search for naked breasts. This search exceeded th e Sensitivity Level f or his
filter and he was *DENIED* from viewing the site. The entry in the log sh ows the Sensitivity Level for his f ilter
was 150 and the actual calculated level was 821.
Figure 3-15: Access Log
User Guide | ComSifter CS-8D Pro 3–13
Page 46
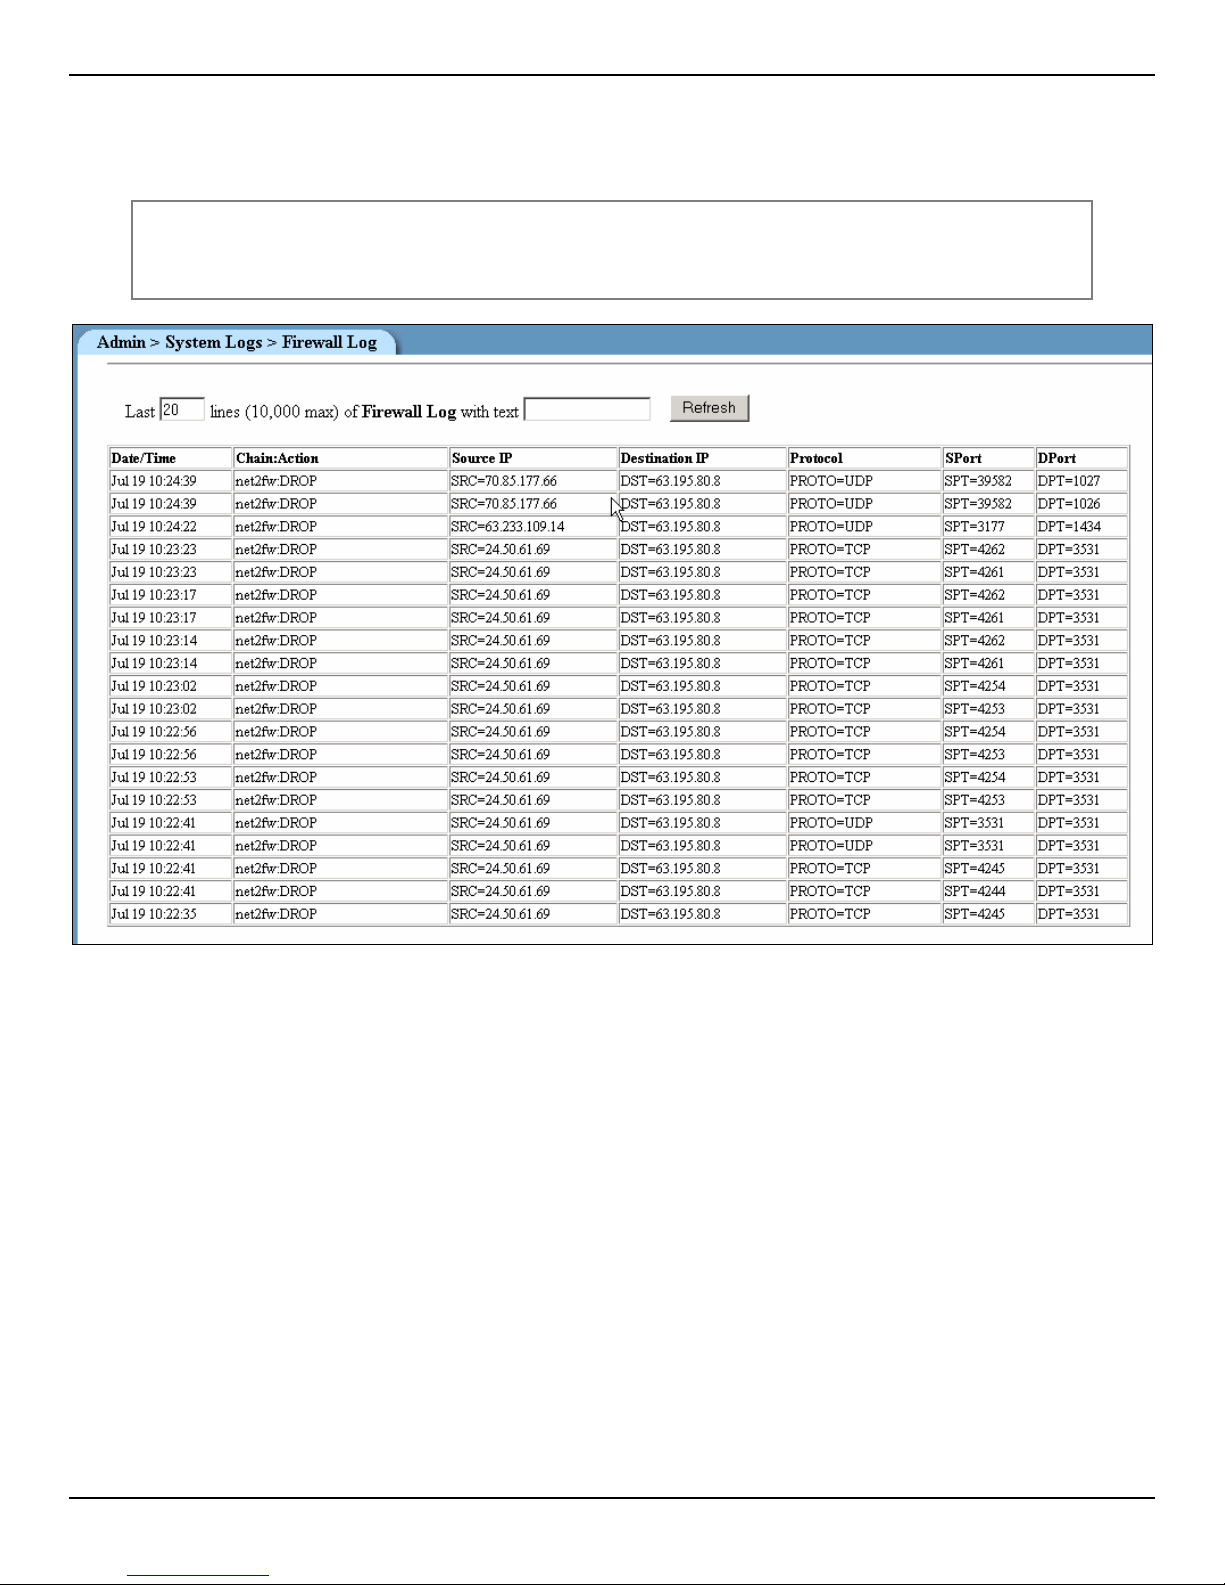
CONFIGURING COMSIFTER
Firewall
The Firewall Log shows all access to the Firewall from inside and out side of the local ne twork and is dependent upon
the logging settings that were defined when setting up th e Firewall.
Note: The CS-8D Pro only shows the Firewall entries for the local machine. Merging
the Firewall entries from the primary and secondary ComSifters would serve no
purpose and could hinder troubleshooting.
Figure 3-16: Firewall Log
The Firewall Log shows the following:
1. Date/Time – the Date/Time the event happened.
2. Chain/Action – shows the Chain (direction) of the event and what Action was taken.
Possible Chains are:
a. loc2fw – the packet was traversing from the internal LAN to the ComSifter. Typically these
packets will be DHCP (port 66, 67) DNS (port 53) related, i.e. an internal computer is asking
ComSifter for DNS or DHCP information
b. loc2net – the packet was traversing from the internal LAN to the Internet.
c. fw2lan – the packet was traversing from the ComSifter to the LAN
d. fw2net – the packet was traversing from the ComSifter to the Internet
e. net2fw – the packet was traversing from the Internet to the ComSifter.
f. net2lan – the packet was traversing from the Internet to the LAN.
Possible Actions are:
a. Accept – a firewall rule was matched and the packet was accepted.
User Guide | ComSifter CS-8D Pro 3–14
Page 47

b. Drop – a firewall rule was not found or an explicit rule to drop the packet was found. The
packet is silently dropped.
c. _redirect and _dnat – a matching rule was found to DNAT or Redirect the packet.
3. Source IP – The IP the packet originated from.
4. Destination IP – The IP the packet is destined for.
5. Protocol – The protocol the packet is using.
6. Sport – the port the packet originated from.
7. DPort – the port the packet is destined for.
CONFIGURING COMSIFTER
User Guide | ComSifter CS-8D Pro 3–15
Page 48
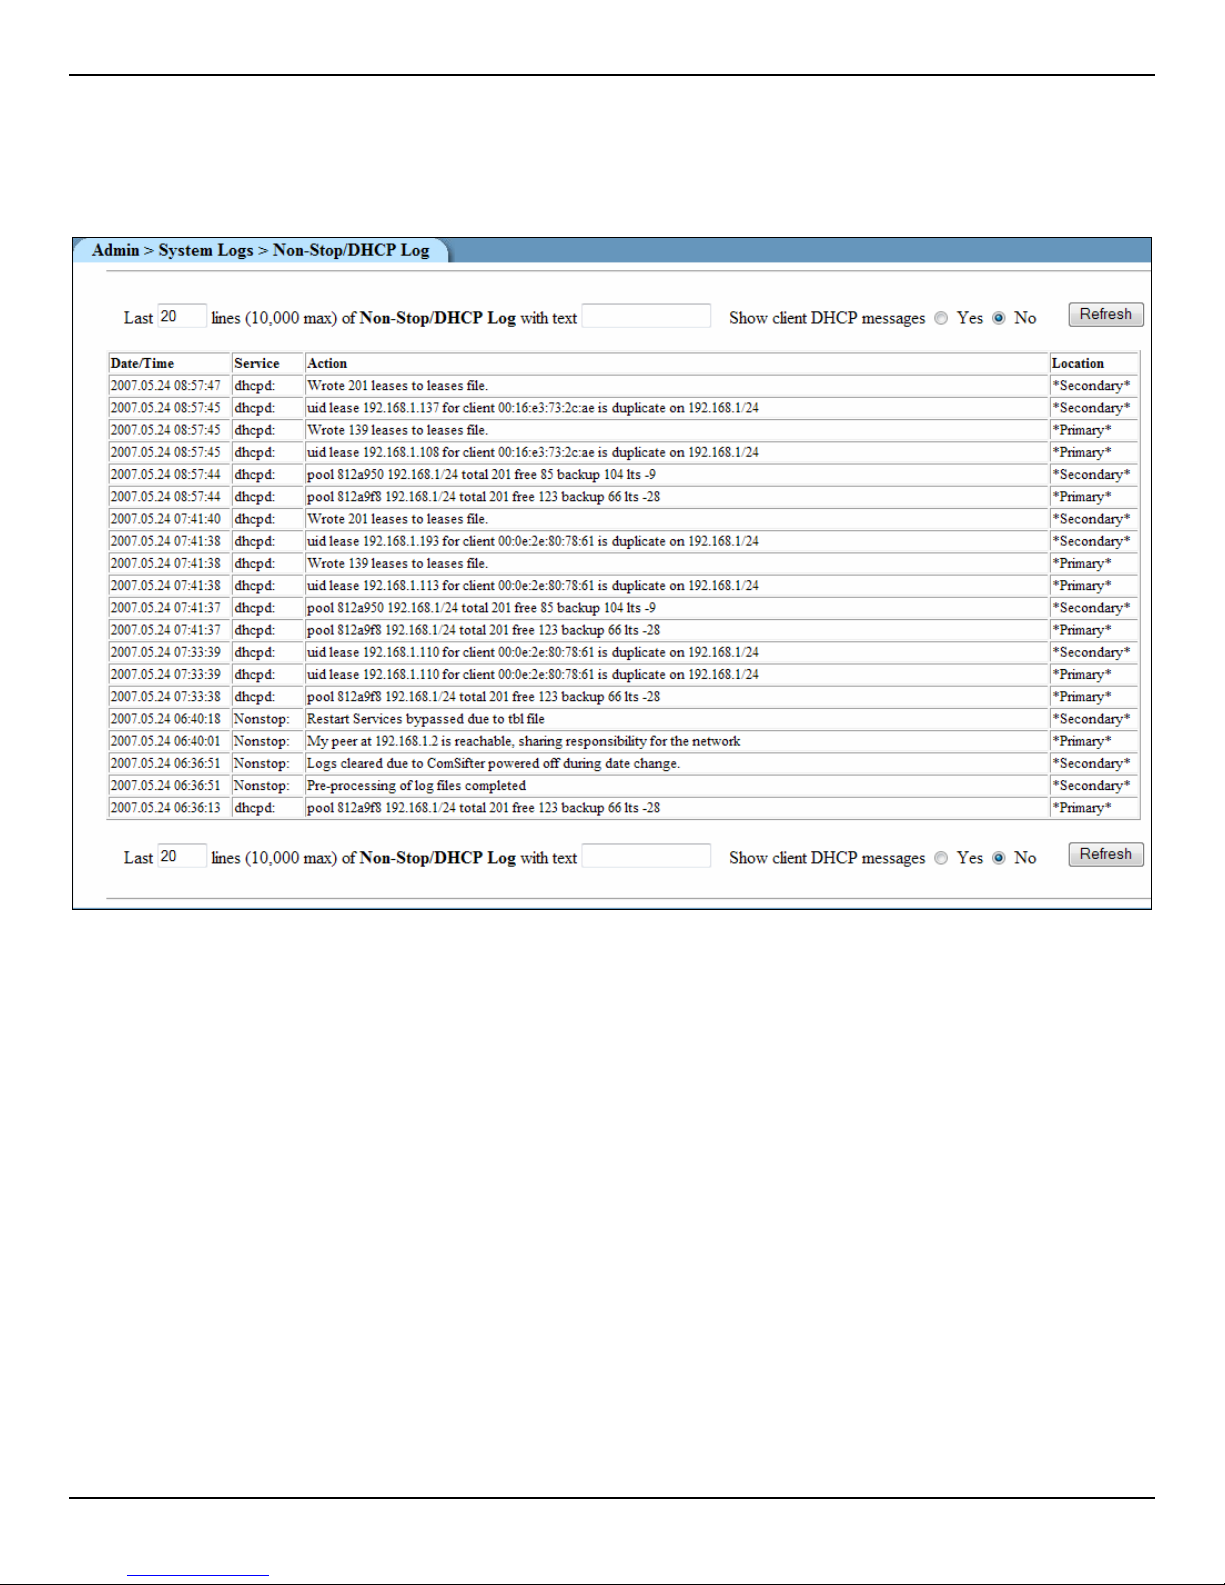
CONFIGURING COMSIFTER
DHCP Non-Stop
All DHCP activity and Non-Stop events are logged. Messages are self-explanatory. In the following example,
we see a number of DHCP messages and a number of Non-Stop messages. For debugging purposes, you
may select “Show client DHCP messages.” When “Yes” is selected, all client DHCP requests will be shown.
Figure 3-17: Non-Stop/DHCP Log
User Guide | ComSifter CS-8D Pro 3–16
Page 49
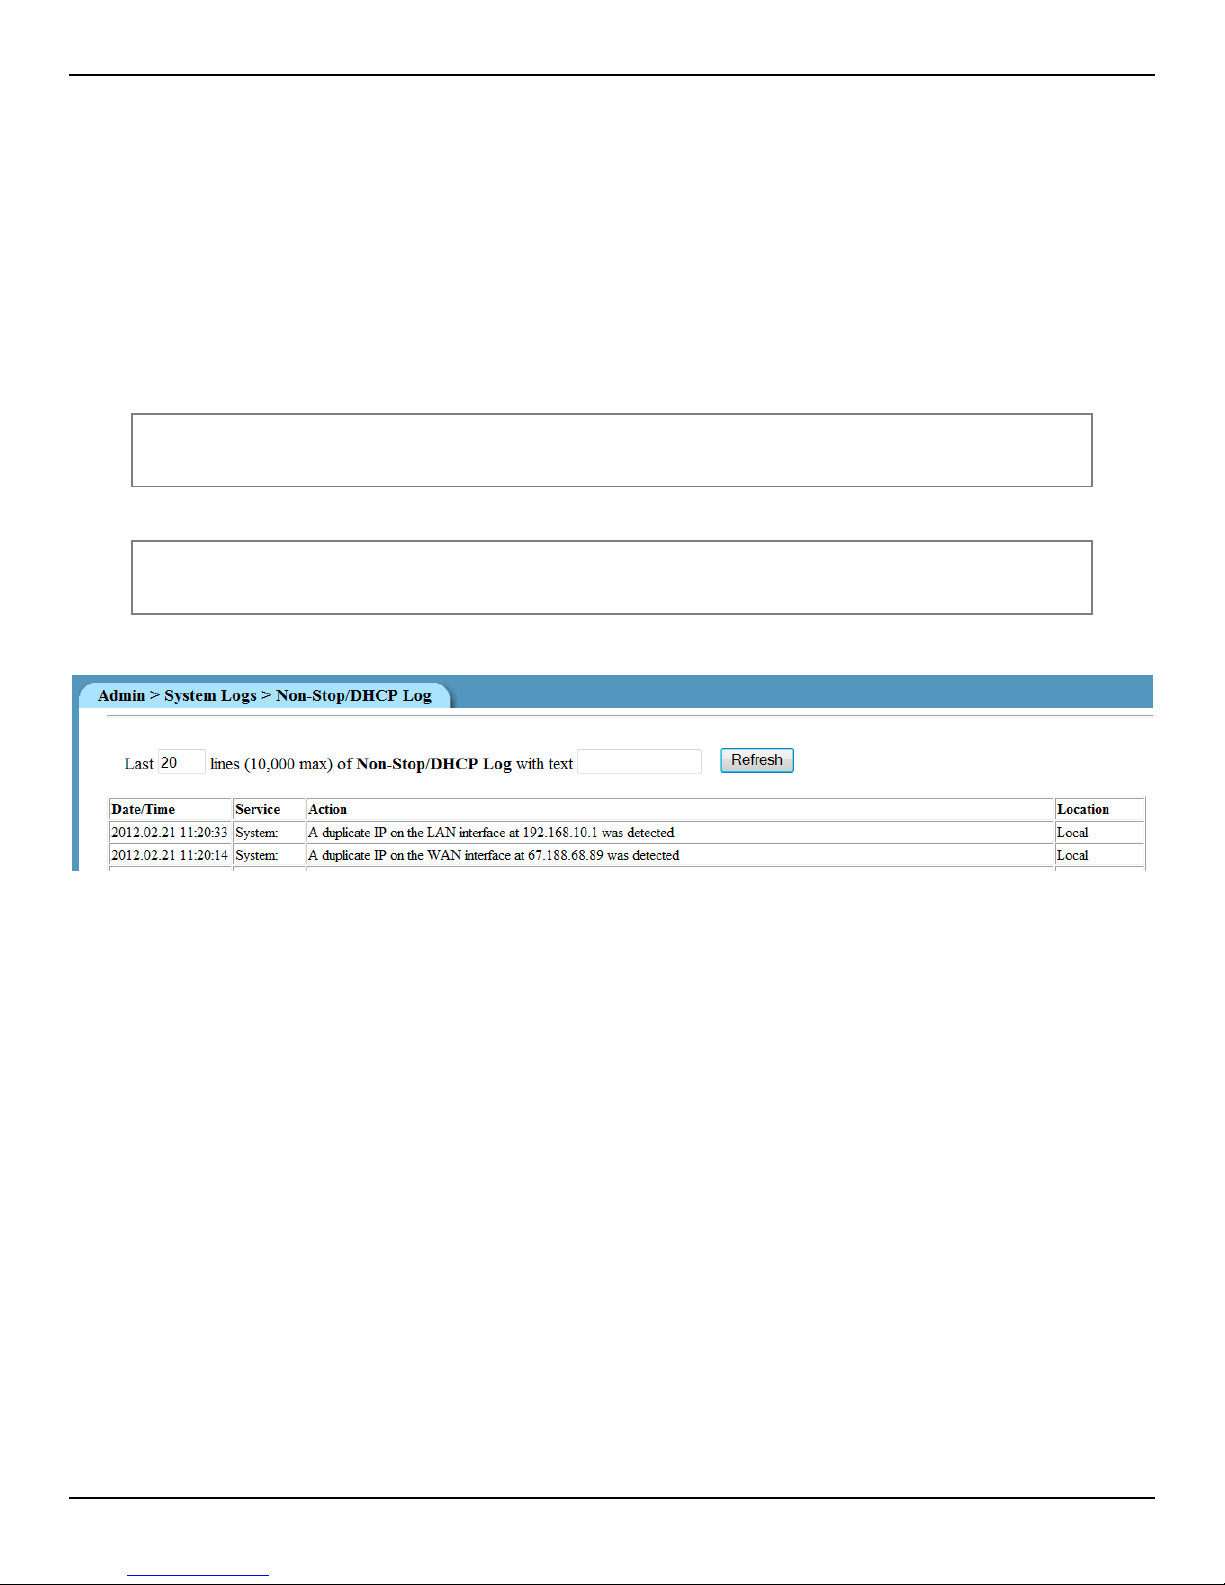
CONFIGURING COMSIFTER
Duplicate IP Notification
The ComSifter will check every five (5) minutes to see if there is a duplicate IP with its WAN and LAN ports (or
the single IP if in Bridge mode). If the ComSifter detects a duplicate IP, the ComSifter will:
Send an email every five (5) minutes if the condition is still activ e. (There is no “all clear” n otification—the
ComSifter will just stop sending the email.)
While the condition is still active, an entry is made in the Non-Stop/DHCP log every five (5) minutes.
If the duplicate IP is on the WAN interface, there will be a slow audib le beep—one beep every three (3)
seconds for 30 seconds, then no beeps for 4½ minutes.
If the duplicate IP is on the LAN interface, there will be a fast audible beep—one beep every second for 30
seconds, then no beeps for 4½ minutes.
Note: Using the audible beep, the appropriate interface cable can be unplugged to
cease the beeping until the duplicate IP issue is resolved.
Note: Email notifications can only be sent if an address has been entered. See
Maintenance > Utilities > Email Notification Parameters.
Figure 3-18: Duplicate IP Notification log entries
User Guide | ComSifter CS-8D Pro 3–17
Page 50
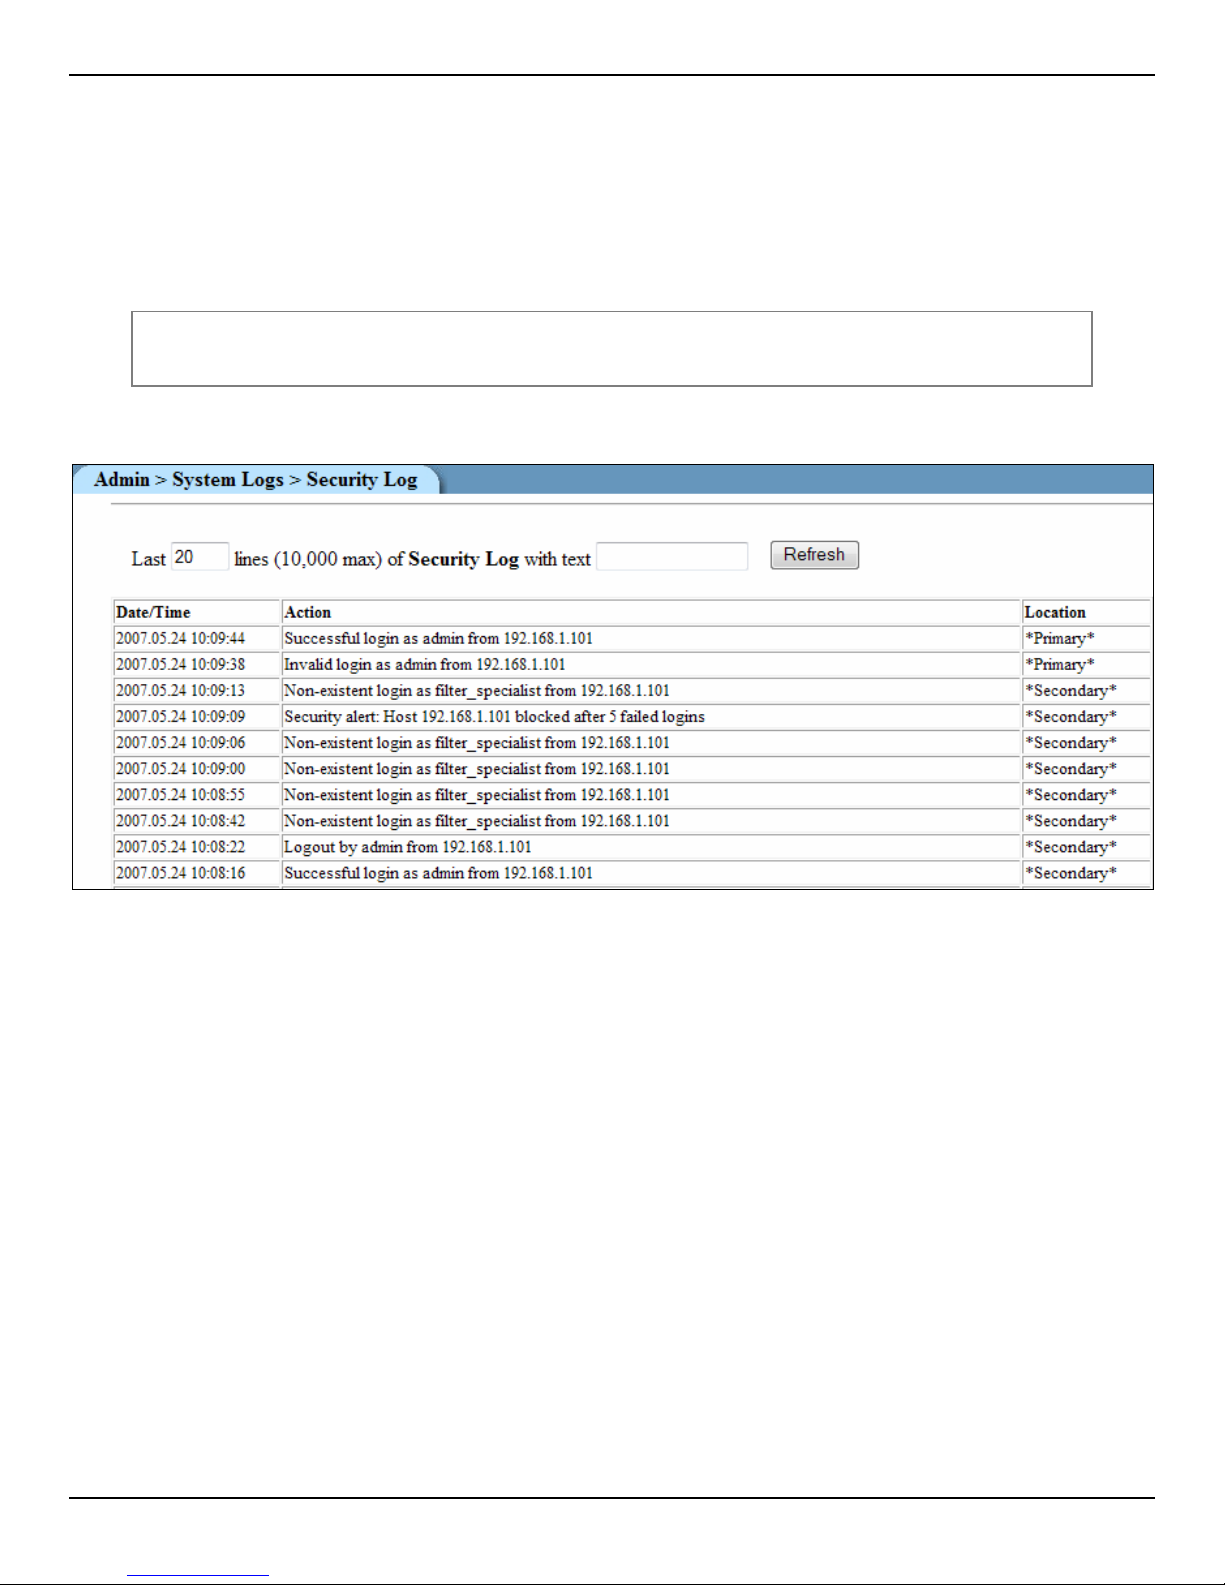
CONFIGURING COMSIFTER
Security Log
Any access by a ComSifter Admin, or any other attempted login to ComSifter, will be logged. In the following
example, we see that:
ComSifter Admin “admin” logged into the *Secondary* successfully at 10:08:16.
Non-existent ComSifter Admin filter_specialist tried to login five times into the *Secondary*
ComSifter and was locked out on the fifth try.
Note: A lock out lasts for 10 minutes. The lock out is by IP address. In this example, IP
192.168.1.101 will be locked out for 10 minutes.
At 10:09:38 ComSifter Admin admin tried to log into the *Primary* ComSifter, but forgot their password.
Figure 3-19: Security Log
User Guide | ComSifter CS-8D Pro 3–18
Page 51
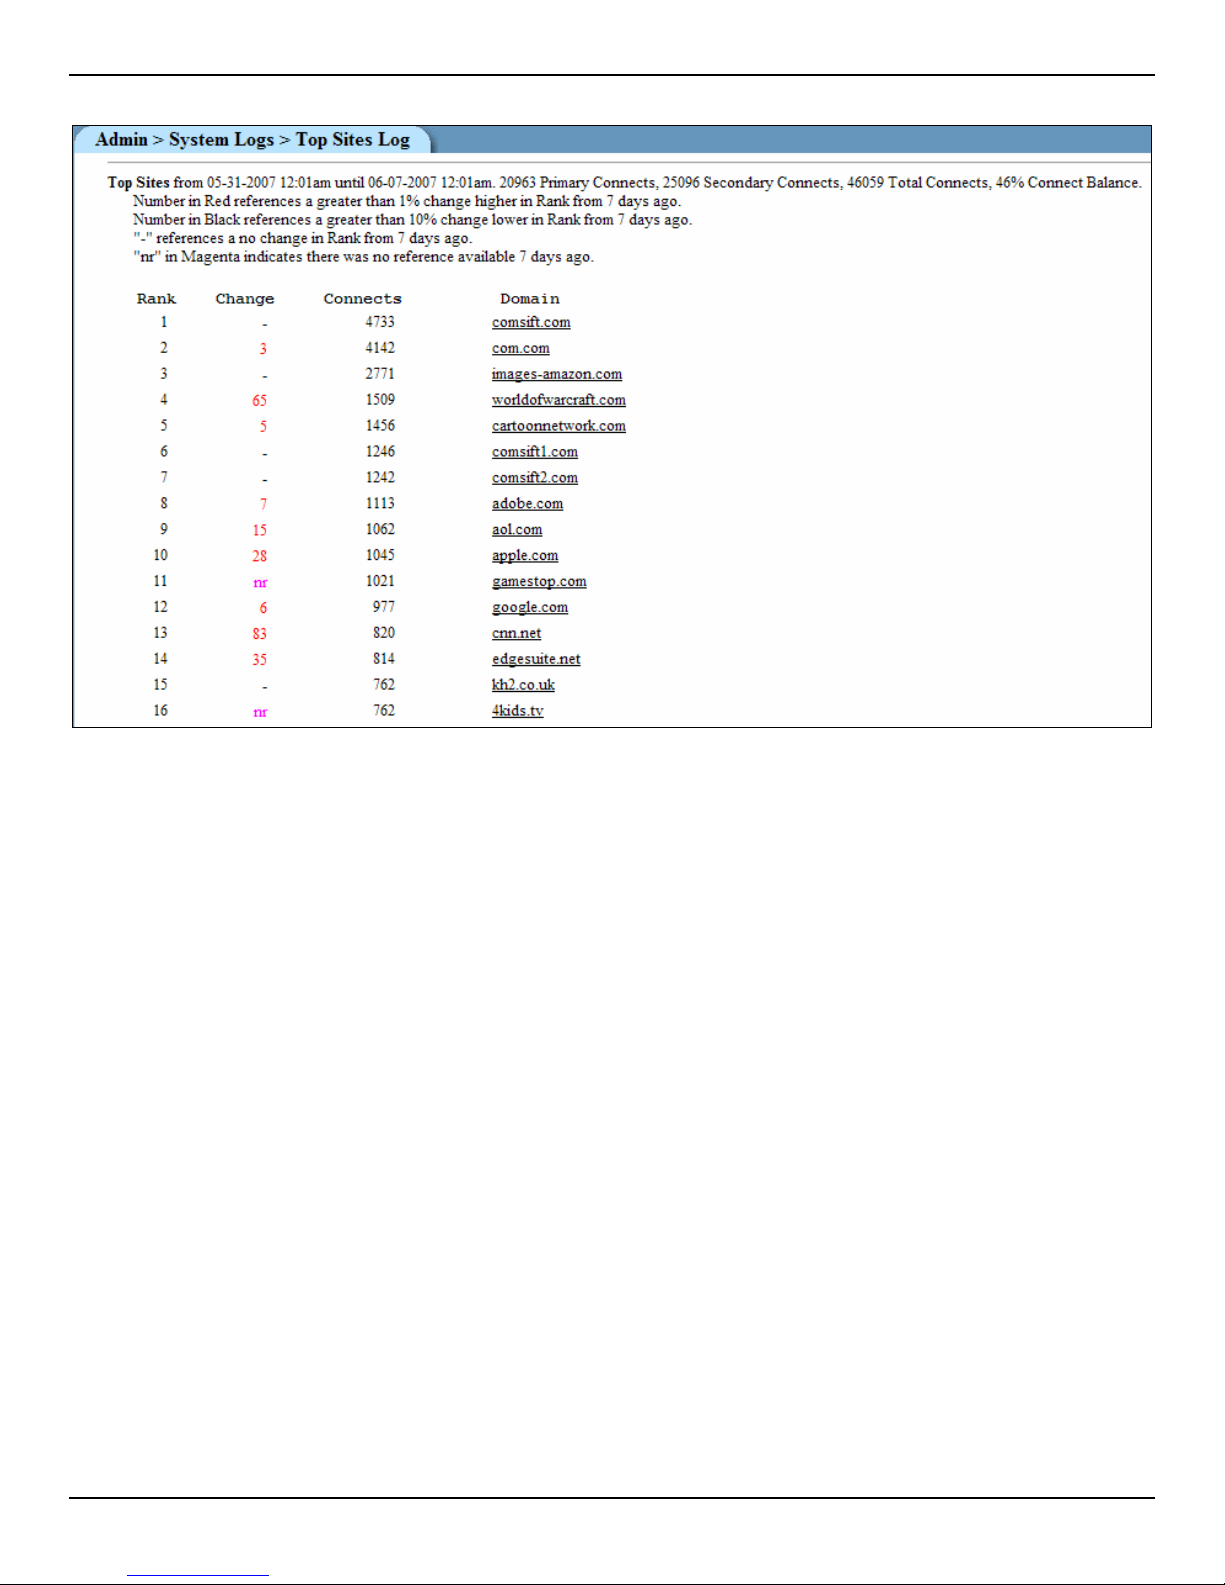
Top Sites Log
CONFIGURING COMSIFTER
Figure 3-20: Top Sites Log
Top Sites shows the most frequently visited domains. Due to the large number of entries the Top Sites report is
created at 12:05AM every morning. It is static until it is recreated the following morning. When the log is
created, ComSifter converts every entry in its Access Log (both primary and secondary) to the root Domain,
and then totals the number of accesses to individual domains.
This log can quickly show the domains that are most frequented by your users. In the above example, we see
sites that are used for on-line purchasing and children’s games being accessed frequently. If accessing these
sites is not suitable for your environment then you can take steps to ban these sites.
The Top Site Report shows the following information:
Rank – Sites with the most connects are shown in descending order. A site must have at least 10 connects
to be shown on the Top Site Log.
Change – Change shows the relative change referenced to 7 d ays ago. Possible cond itions are:
1. Number in Red – a greater than 1% change higher in Rank fr om 7 days ago.
2. Number in Black – a greater than 10% change lower in Rank from 7 days ago.
3. "-" references a no change in Rank from 7 days ago.
4. "nr" in Magenta indicates there was no reference available 7 day s ago.
Connects – This is the total number of connects between the primary and se condary ComSifter’s for the
listed domain.
Domain – All connects are stripped to their top-level domain. For instan ce, if you went to
http://comsift.com/servicesintro.htm it would be stripped to comsift.com.
In the above example, we see a popular game site ranking raised 65 places to the number four position in the
past seven days. We also see another popular game site has risen to the number 11 position. It has done this
in one week as 7 days ago there was no reference. A popular news organization raised 83 places in the past
week to number 13. The rapid rise in use of these sites would signal that maybe a closer look is warranted.
User Guide | ComSifter CS-8D Pro 3–19
Page 52
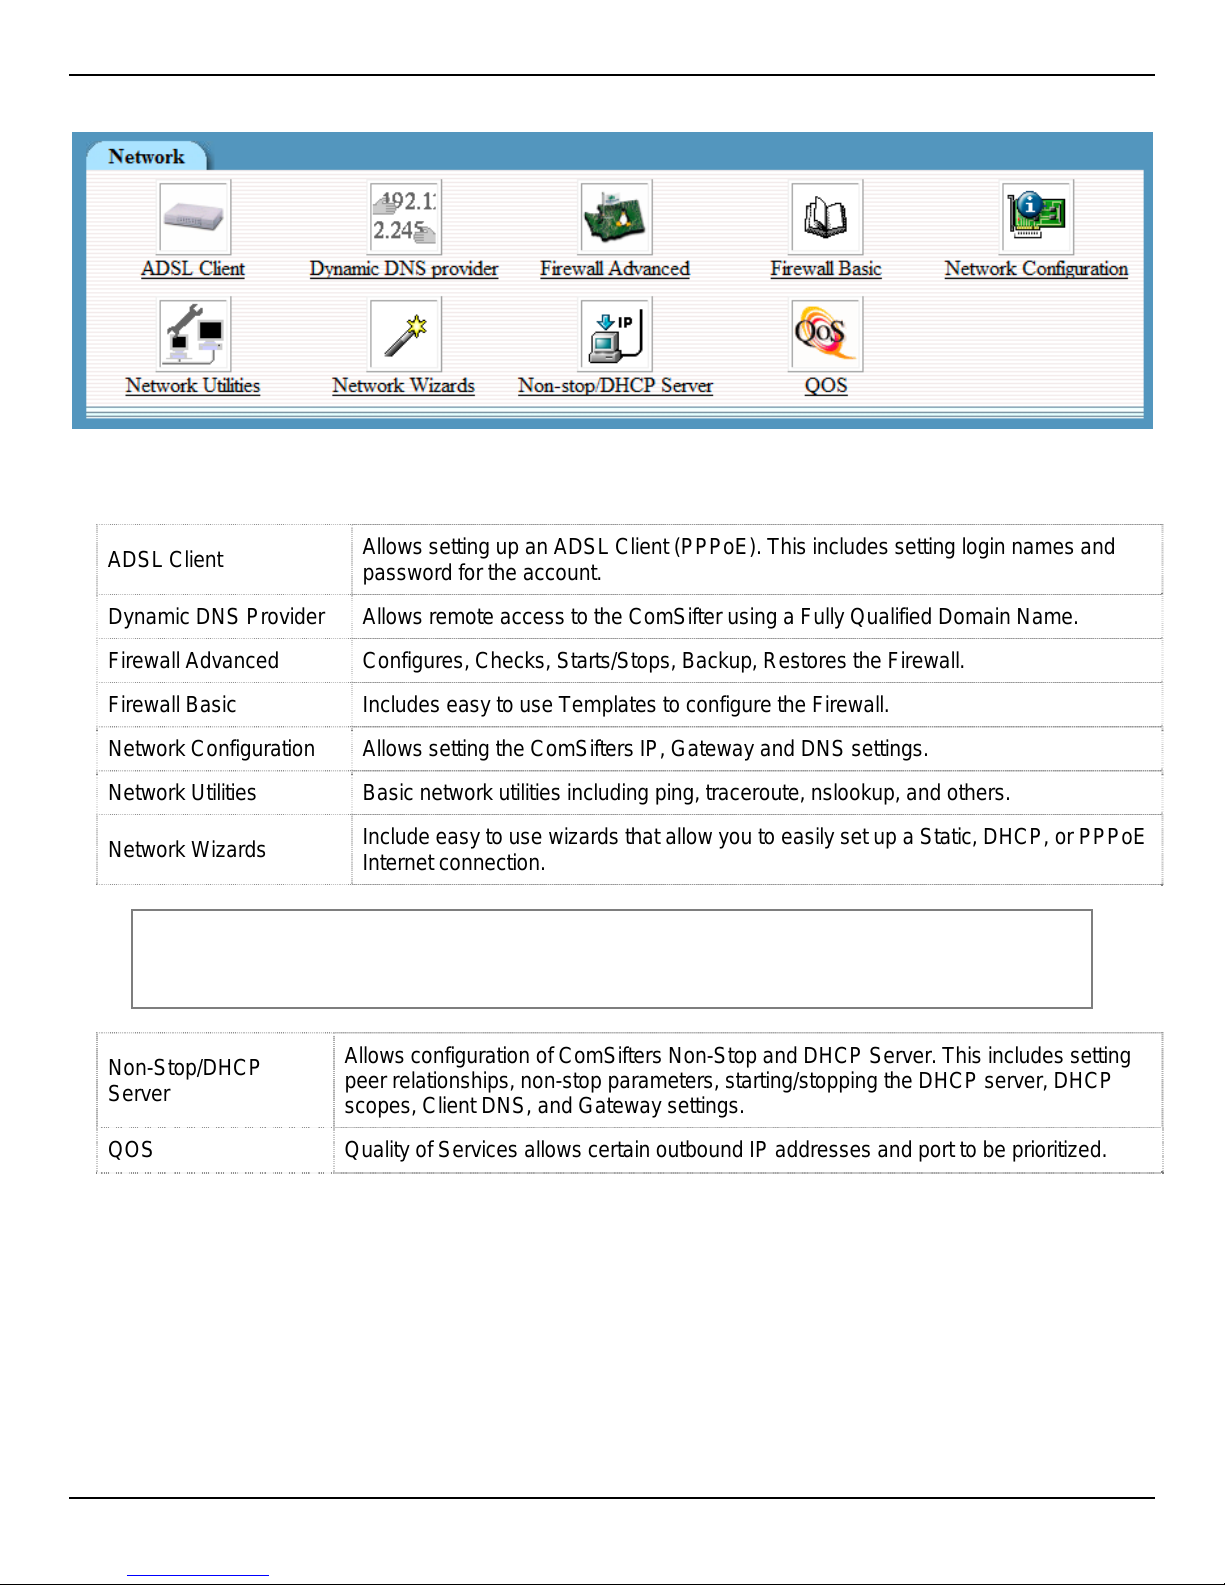
CONFIGURING COMSIFTER
Network
Figure 3-21: Network Category
Network allows configuration of all the parameters in ComSifter that relate to networking. This includes:
ADSL Client
Allows setting up an ADSL Client (PPPoE). This includes sett ing login names and
password for the account.
Dynamic DNS Provider Allows remote access to the ComSifter using a Fully Qualified Domain Name.
Firewall Advanced Configures, Checks, Starts/Stops, Backup , Restores the Firew all.
Firewall Basic Includes easy to use Templates to configure the Firewall.
Network Configuration Allows setting the ComSifters IP, Gateway and DNS settings.
Network Utilities Basic network utilities including ping, traceroute, nslookup, and others.
Network Wizards
Include easy to use wizards that allow you to easily set up a Static, DHCP, or PPPoE
Internet connection.
Note: It is suggested that you start with the Network Wizards. The Wizard can
configure your ComSifter to your Internet Connection type, set a basic Firewall
configuration, set up your internal LAN and optionally enable the DHCP Server.
Non-Stop/DHCP
Server
Allows configuration of ComSifters Non-Stop and DHCP Server. This include s setting
peer relationships, non-stop parameters, starting/stopping the DHCP server, DHCP
scopes, Client DNS, and Gateway settings.
QOS Quality of Services allows certain outbound IP addresses and port to be pr ioritized.
User Guide | ComSifter CS-8D Pro 3–20
Page 53
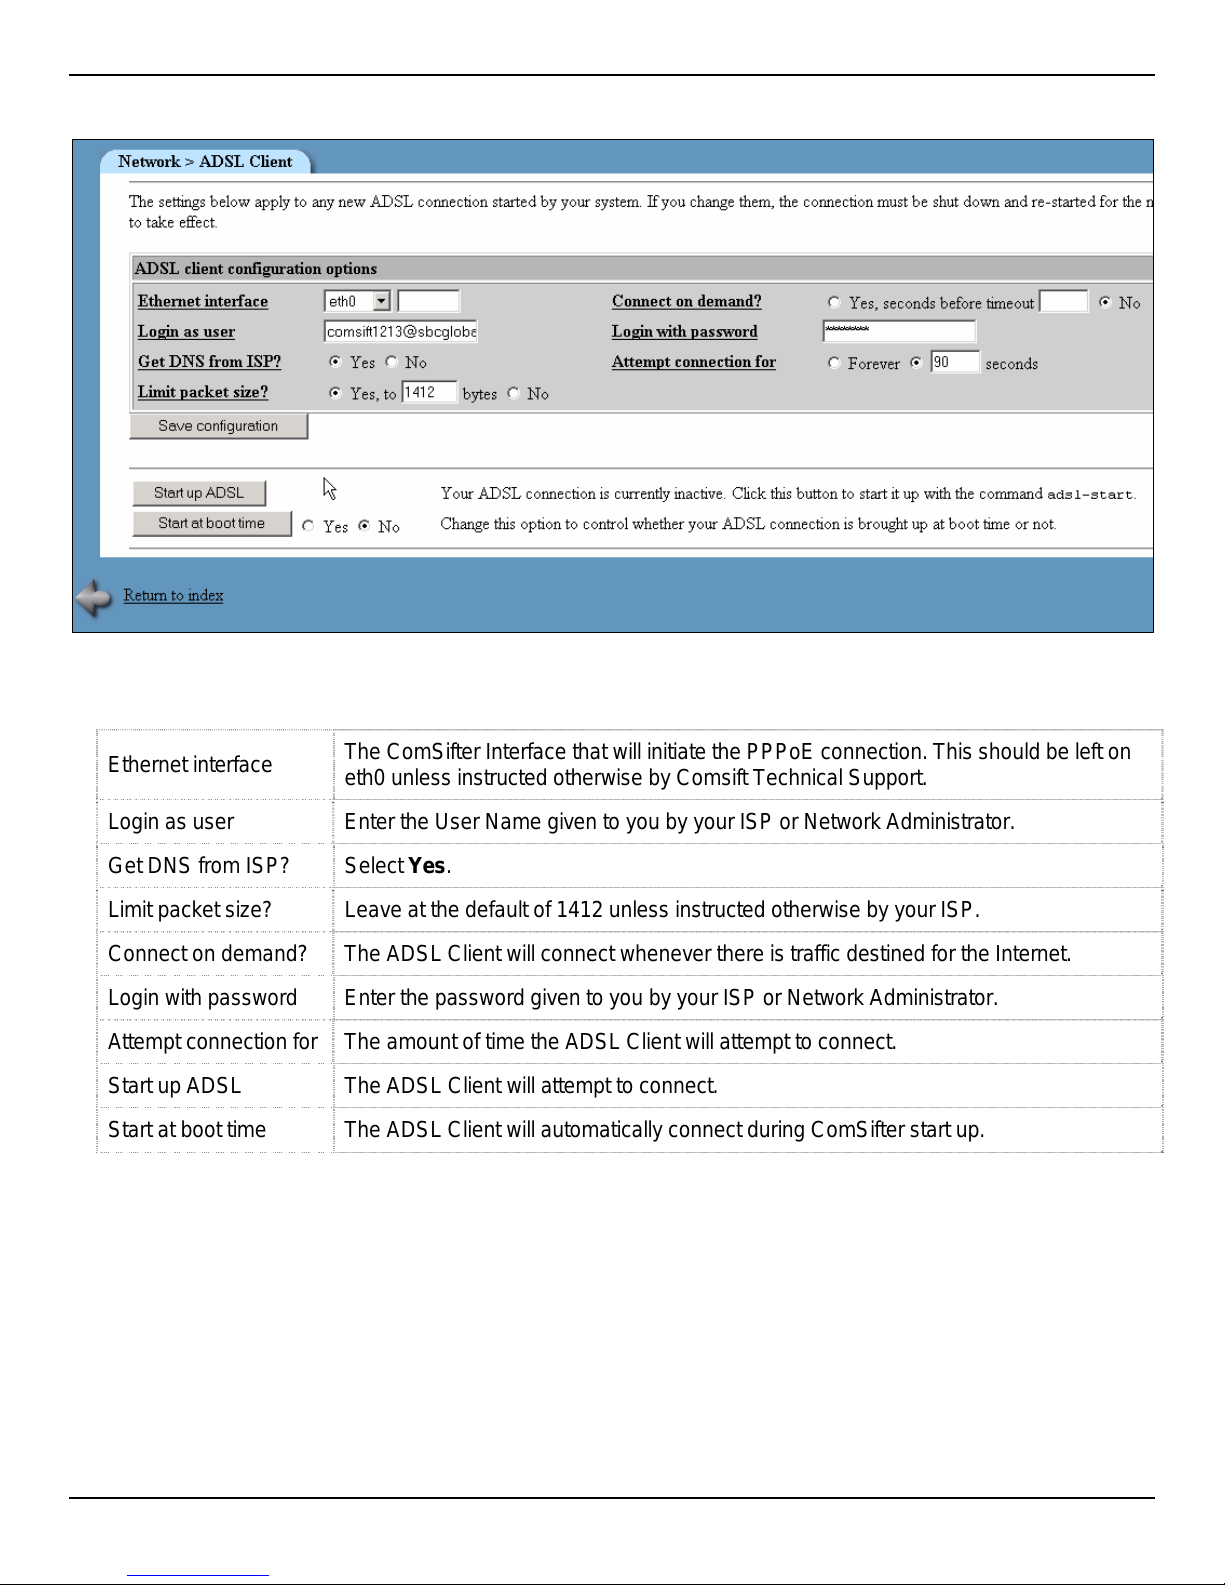
ADSL Client
CONFIGURING COMSIFTER
Figure 3-22: ADSL Client
ADSL Client is used to configure the parameters necessary to create, login, and maintain a PPPoE connection.
Ethernet interface
The ComSifter Interface that will initiate the PPPoE connection. This should be left on
eth0 unless instructed otherwise by Comsift Technical Support .
Login as user Enter the User Name given to you by your ISP or Network Administrator.
Get DNS from ISP? Select Yes.
Limit packet size? Leave at the default of 1412 unless instructed otherwise by your ISP.
Connect on demand? The ADSL Client will connect whenever there is tra ffic destined for the Internet.
Login with password Enter the password given to you by your ISP or Network Administrator.
Attempt connection for The amount of time the ADSL Client will attempt to connect.
Start up ADSL The ADSL Client will attempt to connect.
Start at boot time The ADSL Client will automatically connect during ComSifter start up.
User Guide | ComSifter CS-8D Pro 3–21
Page 54
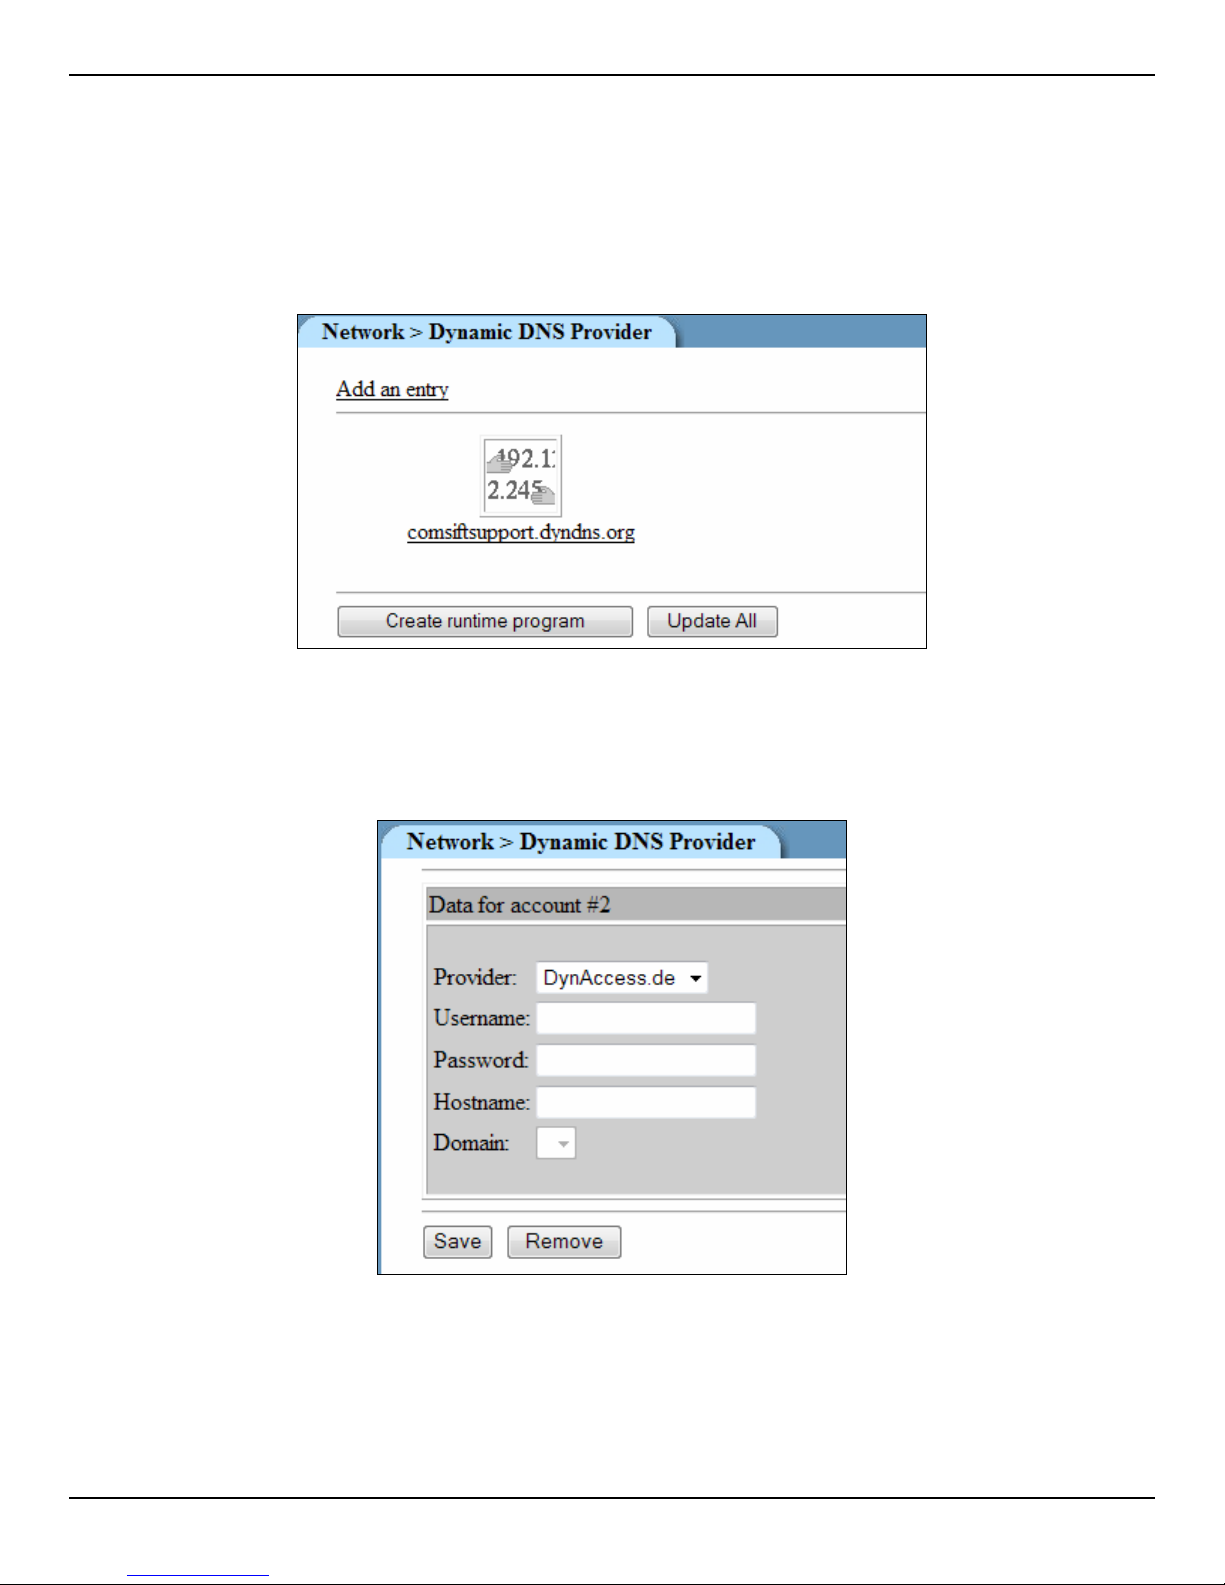
CONFIGURING COMSIFTER
Dynamic DNS Provider
Overview
Dynamic DNS allows ComSifter to use dynamically assigned IP addresses, but have a FQDN (Fully Qualified
Domain Name). This feature allows remote access to the ComSifter using a domain name, instead of a
possibly changing IP. Every 15 minutes, ComSifter looks up the IP of its FQDN. If the IP has changed,
ComSifter will automatically update the records of supported Dynamic DNS providers.
Figure 3-23: Dynamic DNS Provider
Add an entry
This form is used to enter the specific account information for the Dynamic DNS provider. Comsift supports
dyndns.com and no-ip.com. Your account information from these providers is entered in this form.
Create runtime program
After you have created or changed your entries, you must create a runtime program. This is accomplished by
clicking the Create Runtime Program Button.
User Guide | ComSifter CS-8D Pro 3–22
Figure 3-24: Add an Entry
Page 55
CONFIGURING COMSIFTER
Update All
This function causes ComSifter to update all the entries that were compiled into the Create Runtime Program.
Warning: Use caution when clicking Update All. Dynamic DNS providers ask that updates
are only performed when your IP is changed. The provider may terminate your
account if to many updates without an IP change is performed. ComSifter will
automatically perform this function when the external IP changes.
User Guide | ComSifter CS-8D Pro 3–23
Page 56
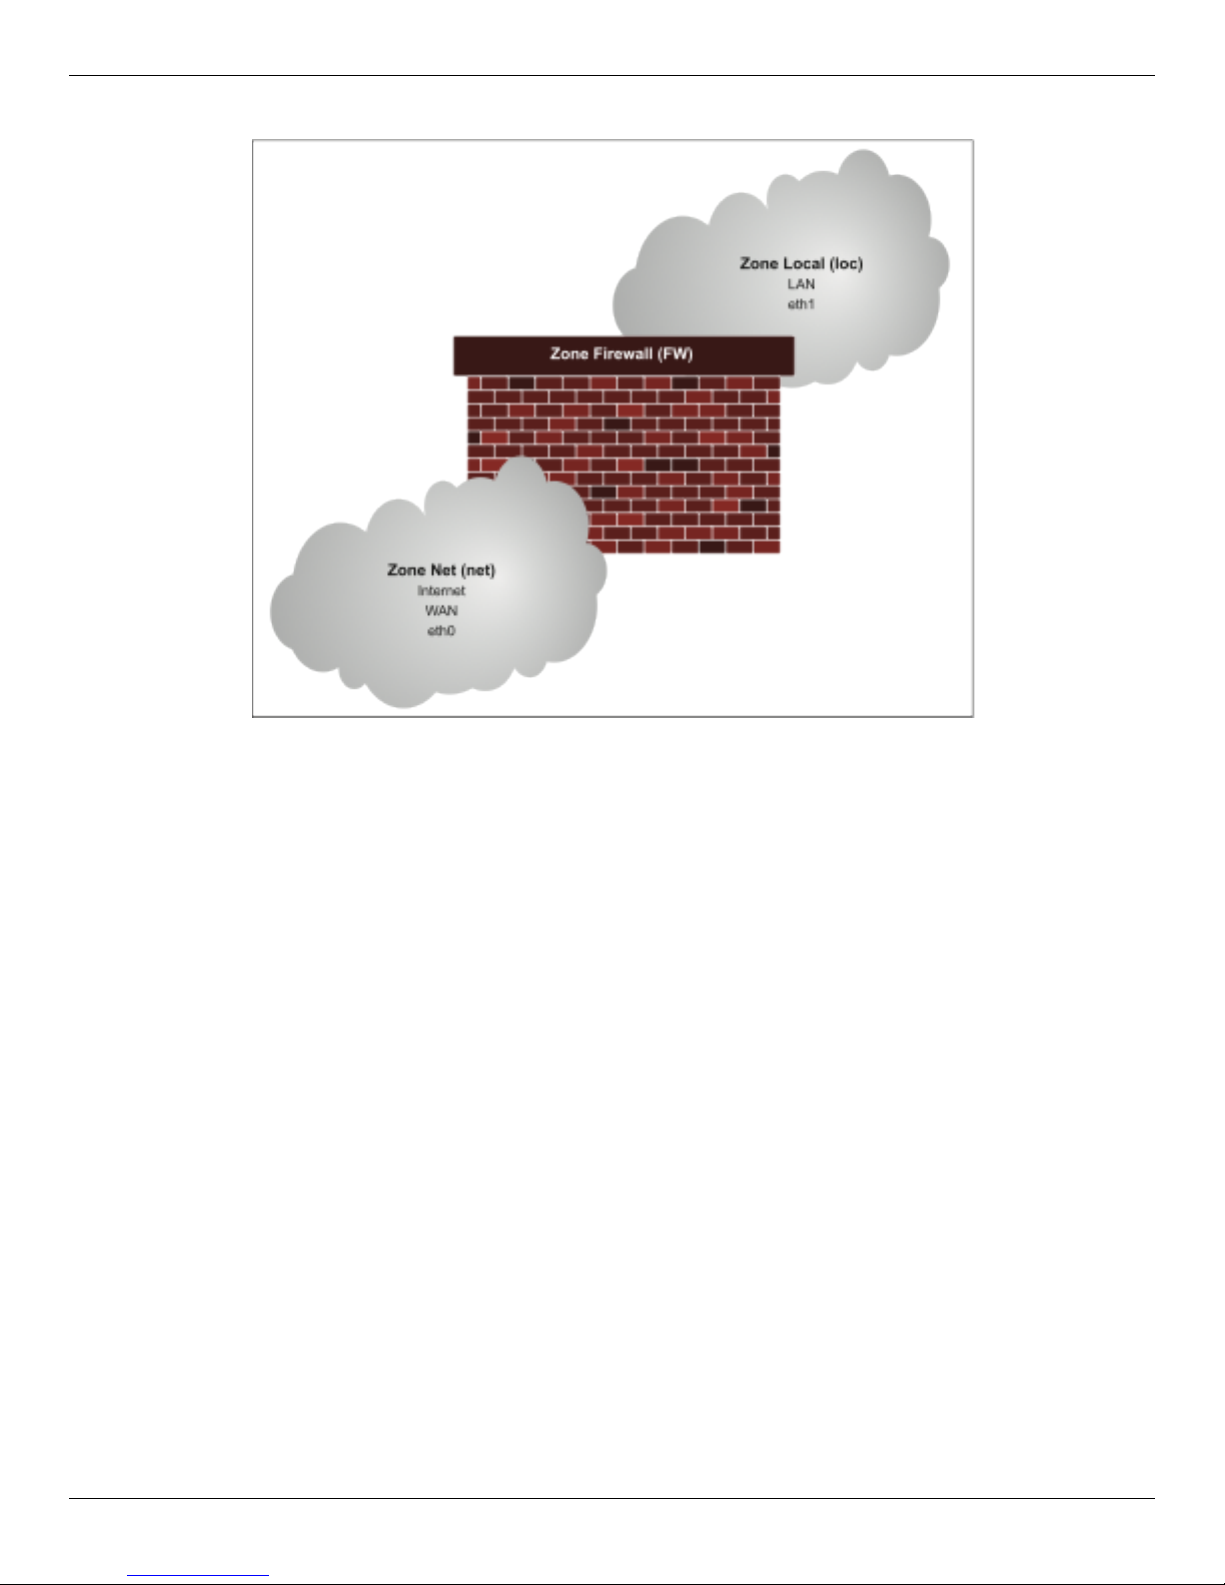
CONFIGURING COMSIFTER
User Guide | ComSifter CS-8D Pro 3 – 24
Firewall Advanced
Figure 3-25: Firewall Zones
Overview
ComSifter’s Firewall is based on a zone concept. There are three zones.
Loc – is connected to the Ethernet interface eth1 and connects to your internal LAN (Local Area Network).
Net – is connected to Ethernet interface eth0, and connects to your external WAN (Wide Area Network).
FW – is the firewall itself.
The responsibility of the firewall is to block all traffic from the Internet to your LAN and vice-versa—unless a
rule explicitly allows the traffic to pass.
In this section, we will discuss how these rules are created and what rules to use to allow different applications
to access the Internet or the LAN.
Upon selecting the Network icon, you will be presented with the Firewall Advanced screen. From this menu,
you will be able to:
• Enable/disable Masquerading (NAT).
• Create Firewall rules.
• Apply the Firewall Configuration.
• Stop the Firewall.
• Check a new Firewall configuration.
• Backup the existing Firewall.
• Restore a previously backed up configuration.
Page 57
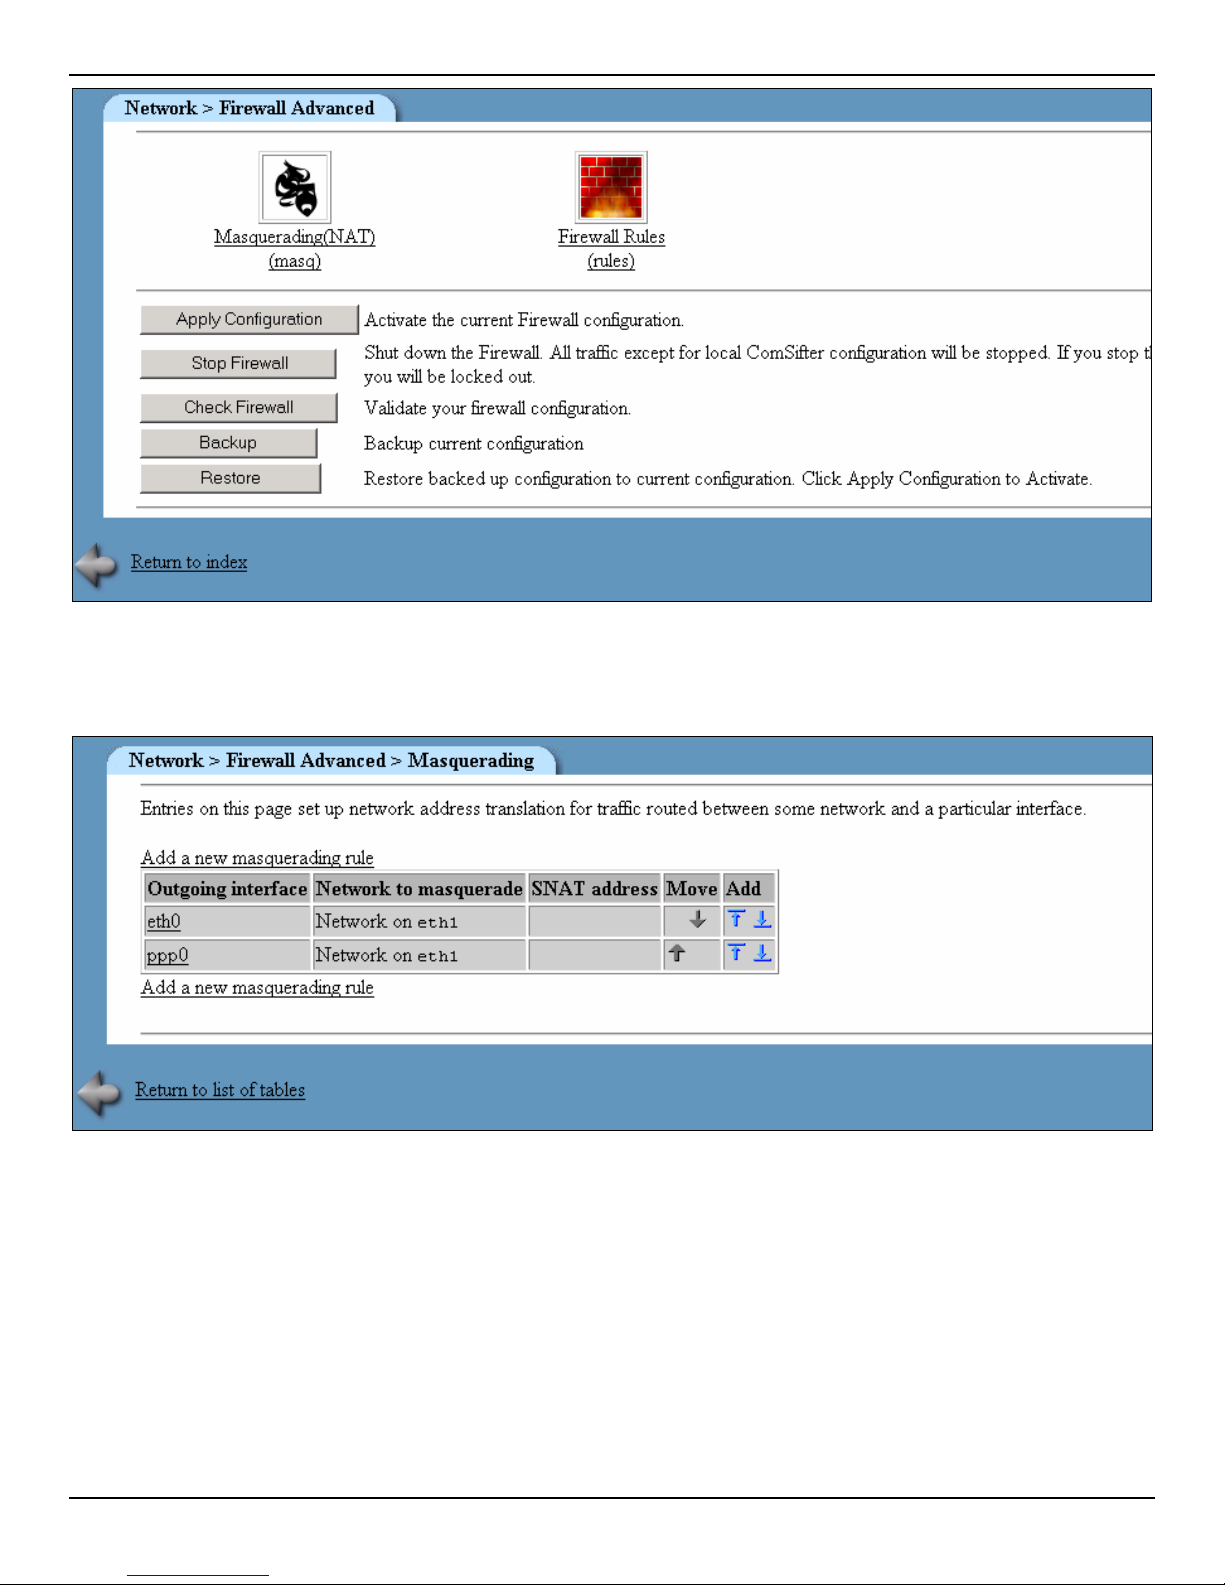
Figure 3-26: Firewall Advanced
CONFIGURING COMSIFTER
Masquerading (SNAT)
Figure 3-27: Masquerading
Masquerading, or Network Address Translation (NAT), allows the internal network to use a non-routable IP
range (i.e. 192.168.1.0) and removes the complexity of obtaining and maintaining a public Class A, B or C
network.
The non-routable range is translated to the external (public) IP. Traffic from the LAN appears to be coming only
from the public IP. This is a very secure way of hiding your internal LAN from the Internet (thus the name
masquerading). All traffic into and out of the LAN is by way of the public IP.
The above example is default for the ComSifter and should not be changed unless you are using a public
Class A, B, or C network. If so, you may disable Masquerading by selecting each of the interfaces and deleting
the masquerading rule for that interface.
User Guide | ComSifter CS-8D Pro 3–25
Page 58
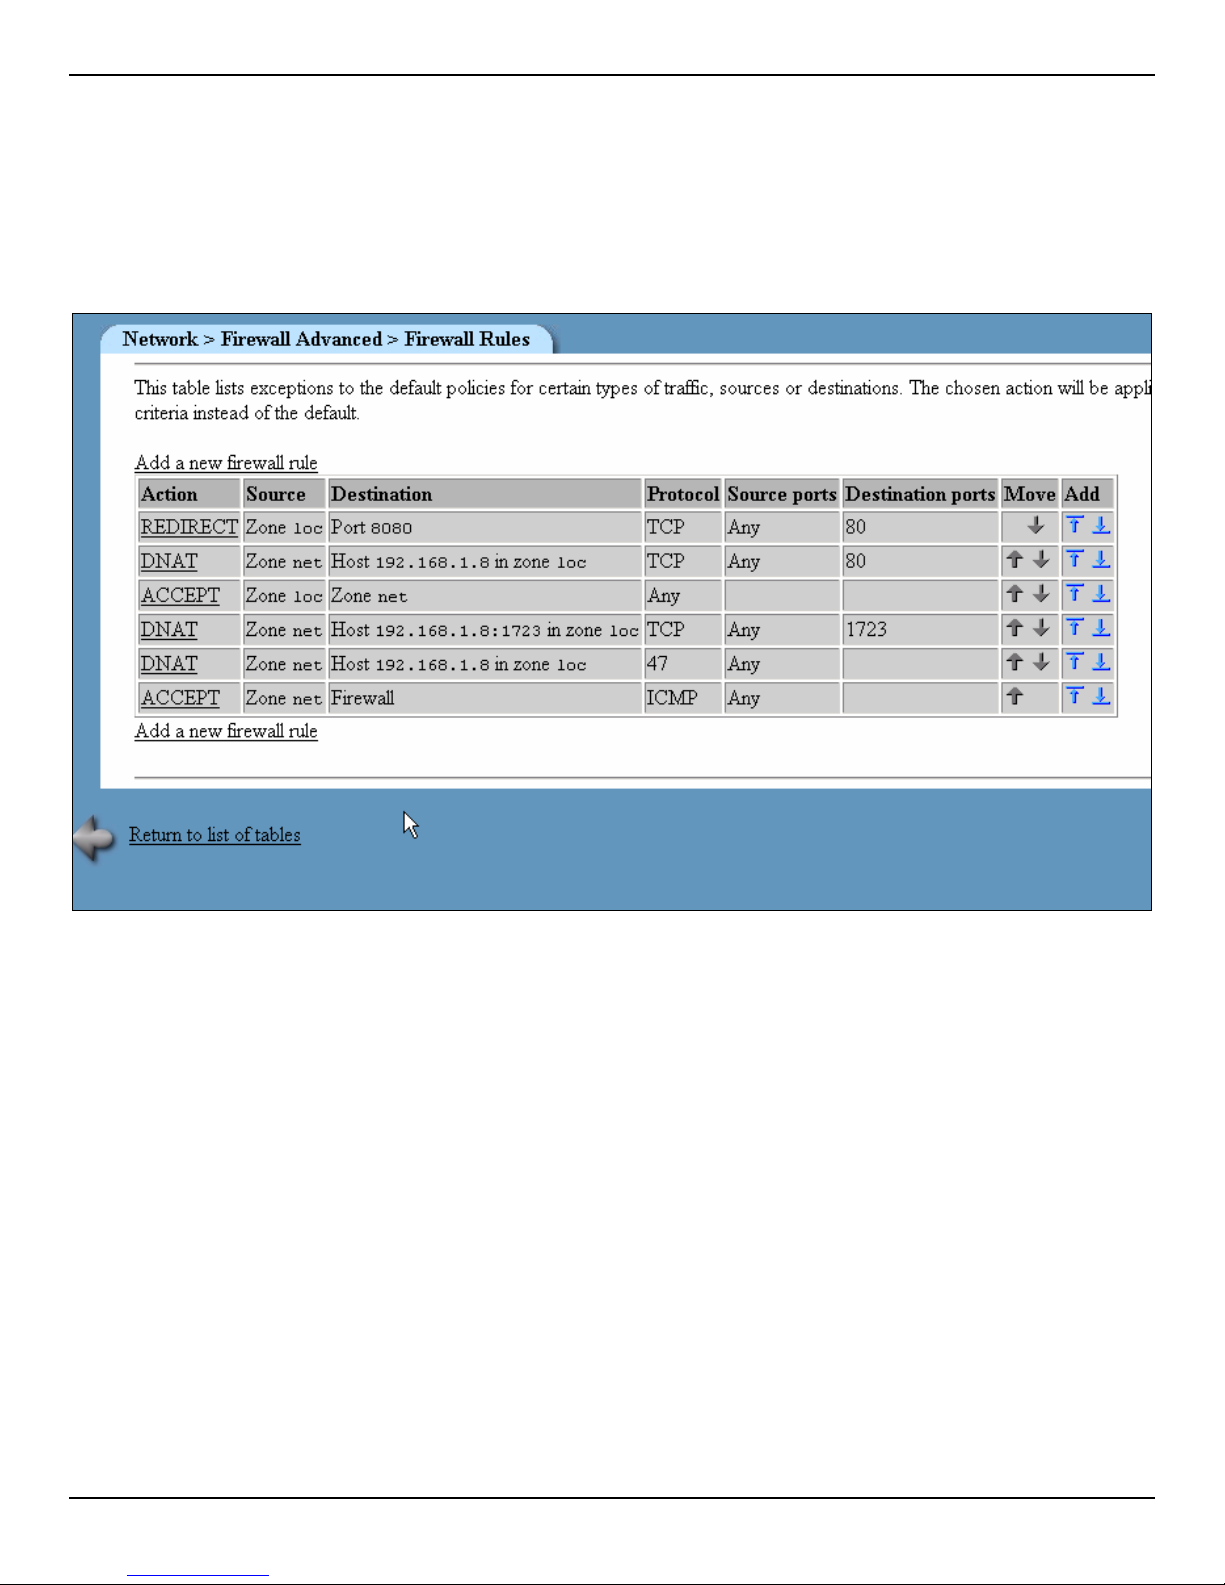
CONFIGURING COMSIFTER
Firewall Rules
Firewall rules allow ports to be opened or closed. This allows various user applications to be allowed to either
communicate over the Internet or be denied access to the Internet. By default, ComSifter does not allow any
access from the Internet to the Local Area Network (LAN). By default, ComSifter will allow access from
anywhere on the LAN to the Internet.
Each packet that reaches the firewall will be examined in order by the Firewall Rules. If a match is found, then
the packet will be acted on according to the rule. If a rule is not found, the packet will be dropped.
Figure 3-28: Firewall Rules
ComSifter includes templates located in Basic Firewall that can dramatically limit access from the LAN to the
Internet. These templates may be used as a starting point and then modified as needed for your network.
In the preceding example we have a group of rules that:
The first rule, a REDIRECT, takes any TCP packet from the Local Zone destined for P ort 80 and redirects it
to Port 8080. This rule is used to intercept LAN traffic that is de stined for web sit es (port 80) and redirect that
traffic to port 8080. ComSifter filtering service is listening on por t 8080.
The next rule, a DNAT, takes any TCP packet from the Internet destined for p ort 80, and forwards it to an
internal IP 192.169.1.11 port 80. A web server is installed at this IP. This may also be called Port Forwa rding.
The next rule, an ACCEPT, allows any traffic from the LAN, not matching the rule s above, to acce ss the
Internet.
The next two rules, both DNAT rules, allow traffic from the Internet to access an internal PPTP server located
at 192.168.1.7. The first of these rules allows the T CP protocol to connect; the se cond allows the specialized
protocol used by PPTP, type 47 (GRE).
The last rule, an ACCEPT, allows ping and traceroute request s from the Internet to the ComSifter firewall to
be answered.
User Guide | ComSifter CS-8D Pro 3–26
Page 59
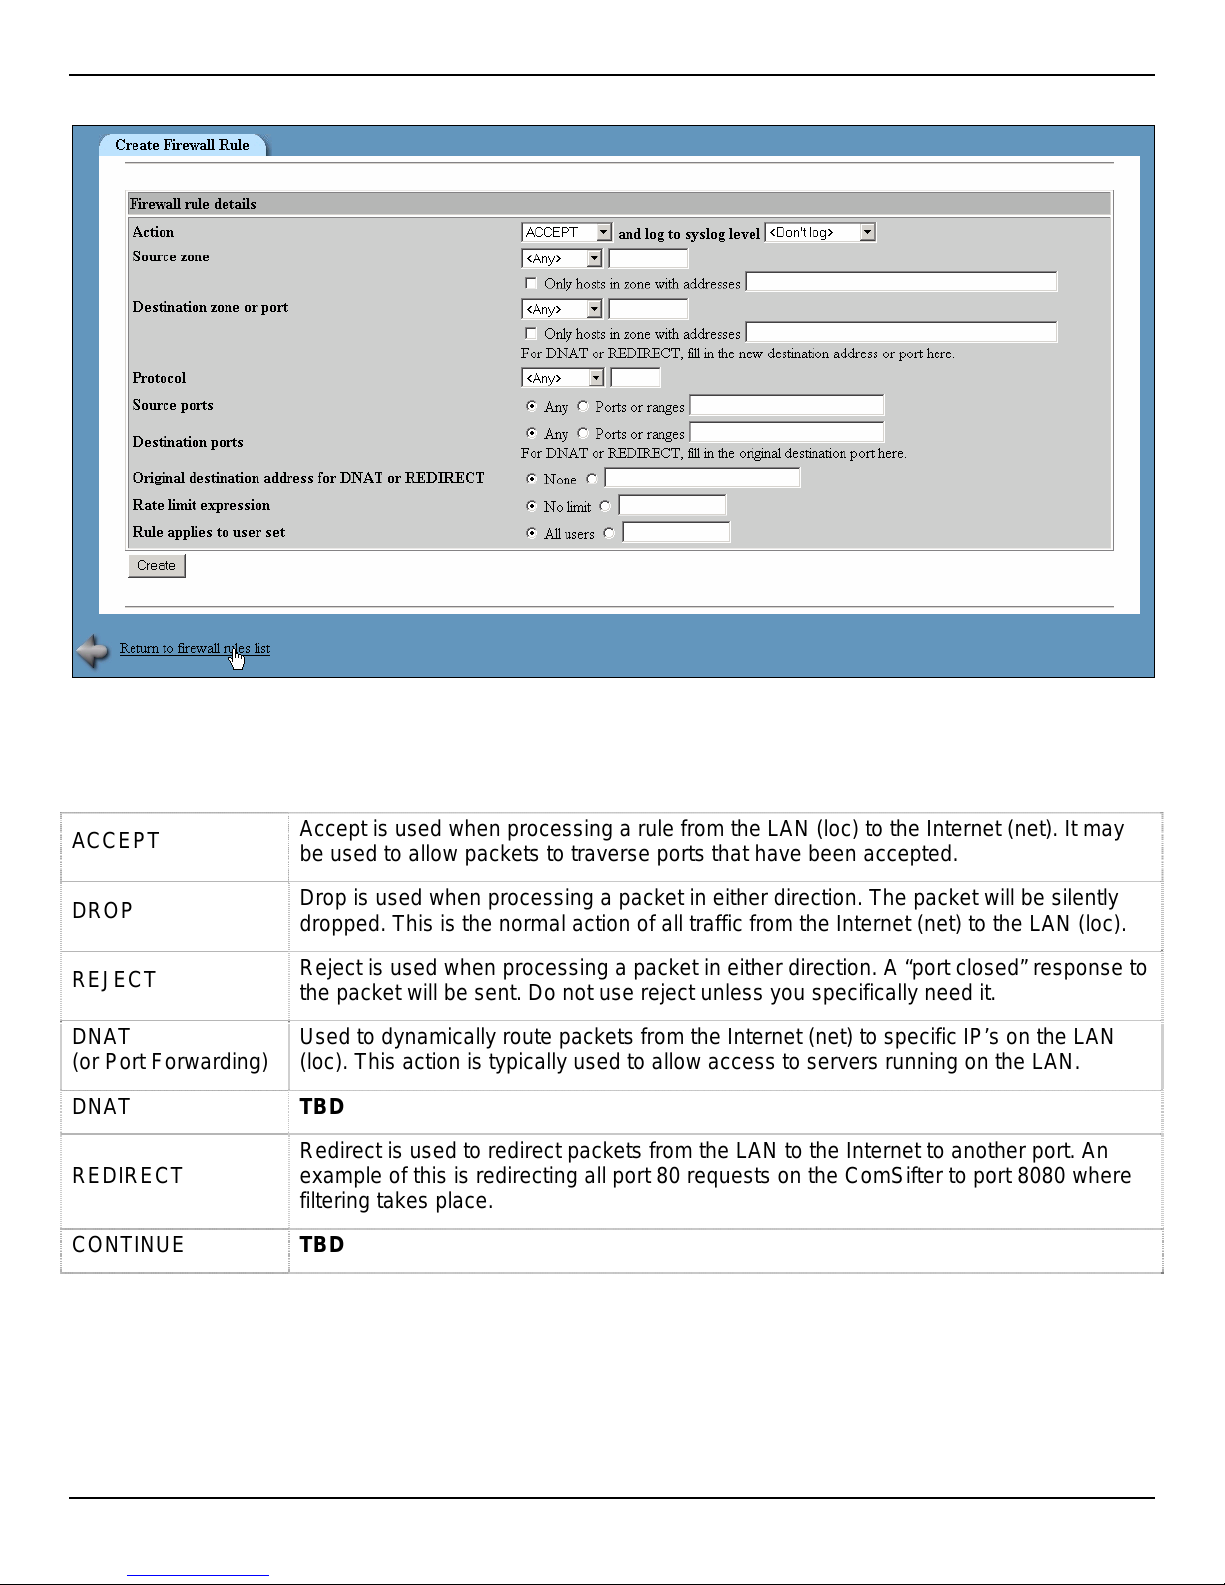
Create Firewall Rules
CONFIGURING COMSIFTER
Figure 3-29: Create Firewall Rule
Action
Actions determine what ComSifter will do with a packet that matches a rule. Possible actions are:
ACCEPT
DROP
REJECT
DNAT
(or Port Forwarding)
DNAT
Accept is used when processing a rule from the LAN (loc) to the Internet (net). It may
be used to allow packets to traverse ports that have been accepted.
Drop is used when processing a packet in either direction. The packet will be silently
dropped. This is the normal action of all traffic from the Internet (net) to the LAN (loc).
Reject is used when processing a packet in either direction. A “port closed” response to
the packet will be sent. Do not use reject unless you specifically need it.
Used to dynamically route packets from the Internet (net) to specific IP’s on the LAN
(loc). This action is typically used to allow access to servers running on the LAN.
TBD
Redirect is used to redirect packets from the LAN to the Internet to another port. An
REDIRECT
example of this is redirecting all port 80 requests on the ComSifter to port 8080 where
filtering takes place.
CONTINUE
TBD
Logging
This setting determines if ComSifter will log the action to the Firewall Log. It is suggested that logging be on for
any action from the Internet (net) to the LAN (loc) as these actions may point to your firewall being scanned.
User Guide | ComSifter CS-8D Pro 3–27
Page 60
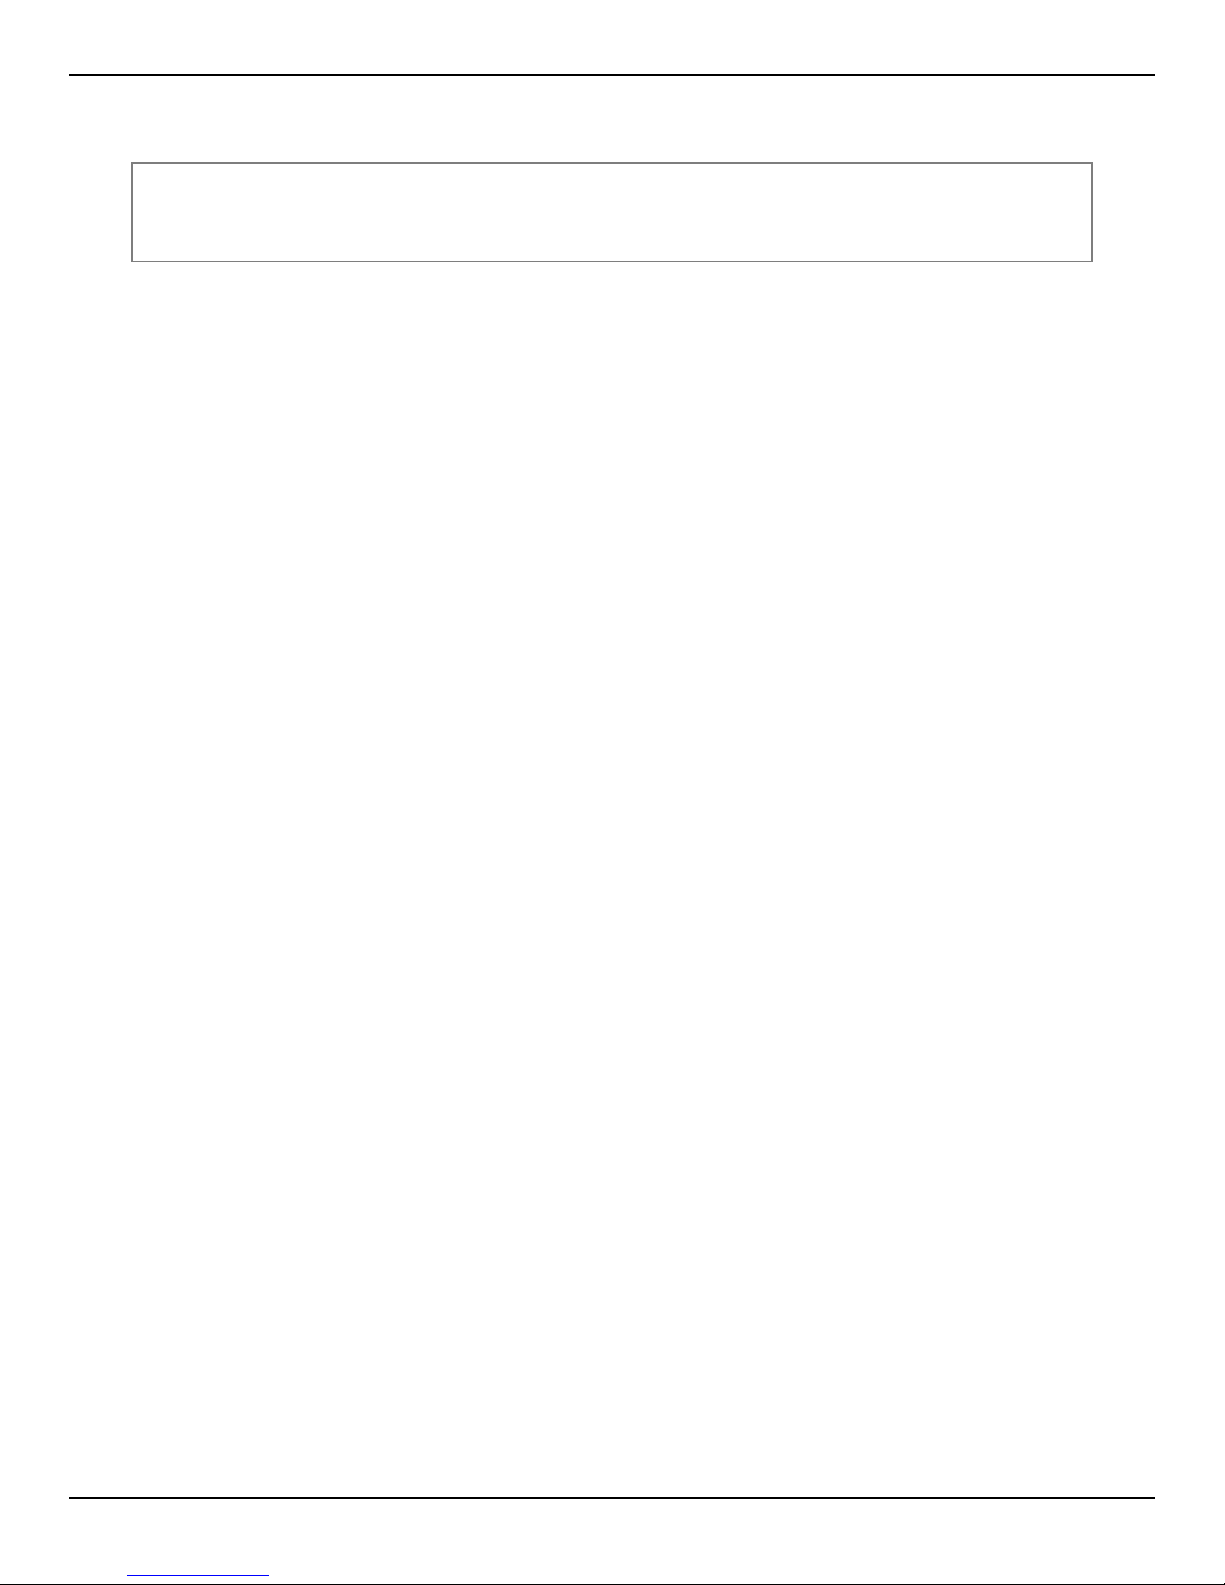
CONFIGURING COMSIFTER
It is further suggested that normal port 80 traffic (redirected to 8080) not be logged due to the large volume of
data that will be logged from outbound traffic.
Note: By default, for each log rule, ComSifter limits logging to 300 entries per minute.
This is to reduce the chance that a Denial of Service (DOS) attack from the
Internet to the firewall will overload the ComSifter, thus denying legitimate traffic.
Source Zone
Source Zone is the zone that the packet will originate from.
This may be further refined by selecting Only hosts in zone with address. IP addresses may be entered in
this field. Multiple IP addresses may be entered by separating each address by a space. A “not” function may
be entered by using the “!” character in front of the first IP address.
Destination Zone
Destination Zone is the zone that the packet is destined for.
This may be further refined by selecting Only hosts in zone with address. IP addresses may be entered in
this field. Multiple IP addresses may be entered by separating each address by a space. A “not” function may
be entered by using the “!” character in front of the first IP address.
Protocol
Protocol is the protocol that the packet will use. Valid Protocols are:
Any
TCP
UDP
ICMP
47 (GRE)
Source Ports
Source Port is the port that the packet will originate from.
Destination Ports
Destination Port is the port that the packet is destined for.
User Guide | ComSifter CS-8D Pro 3–28
Page 61
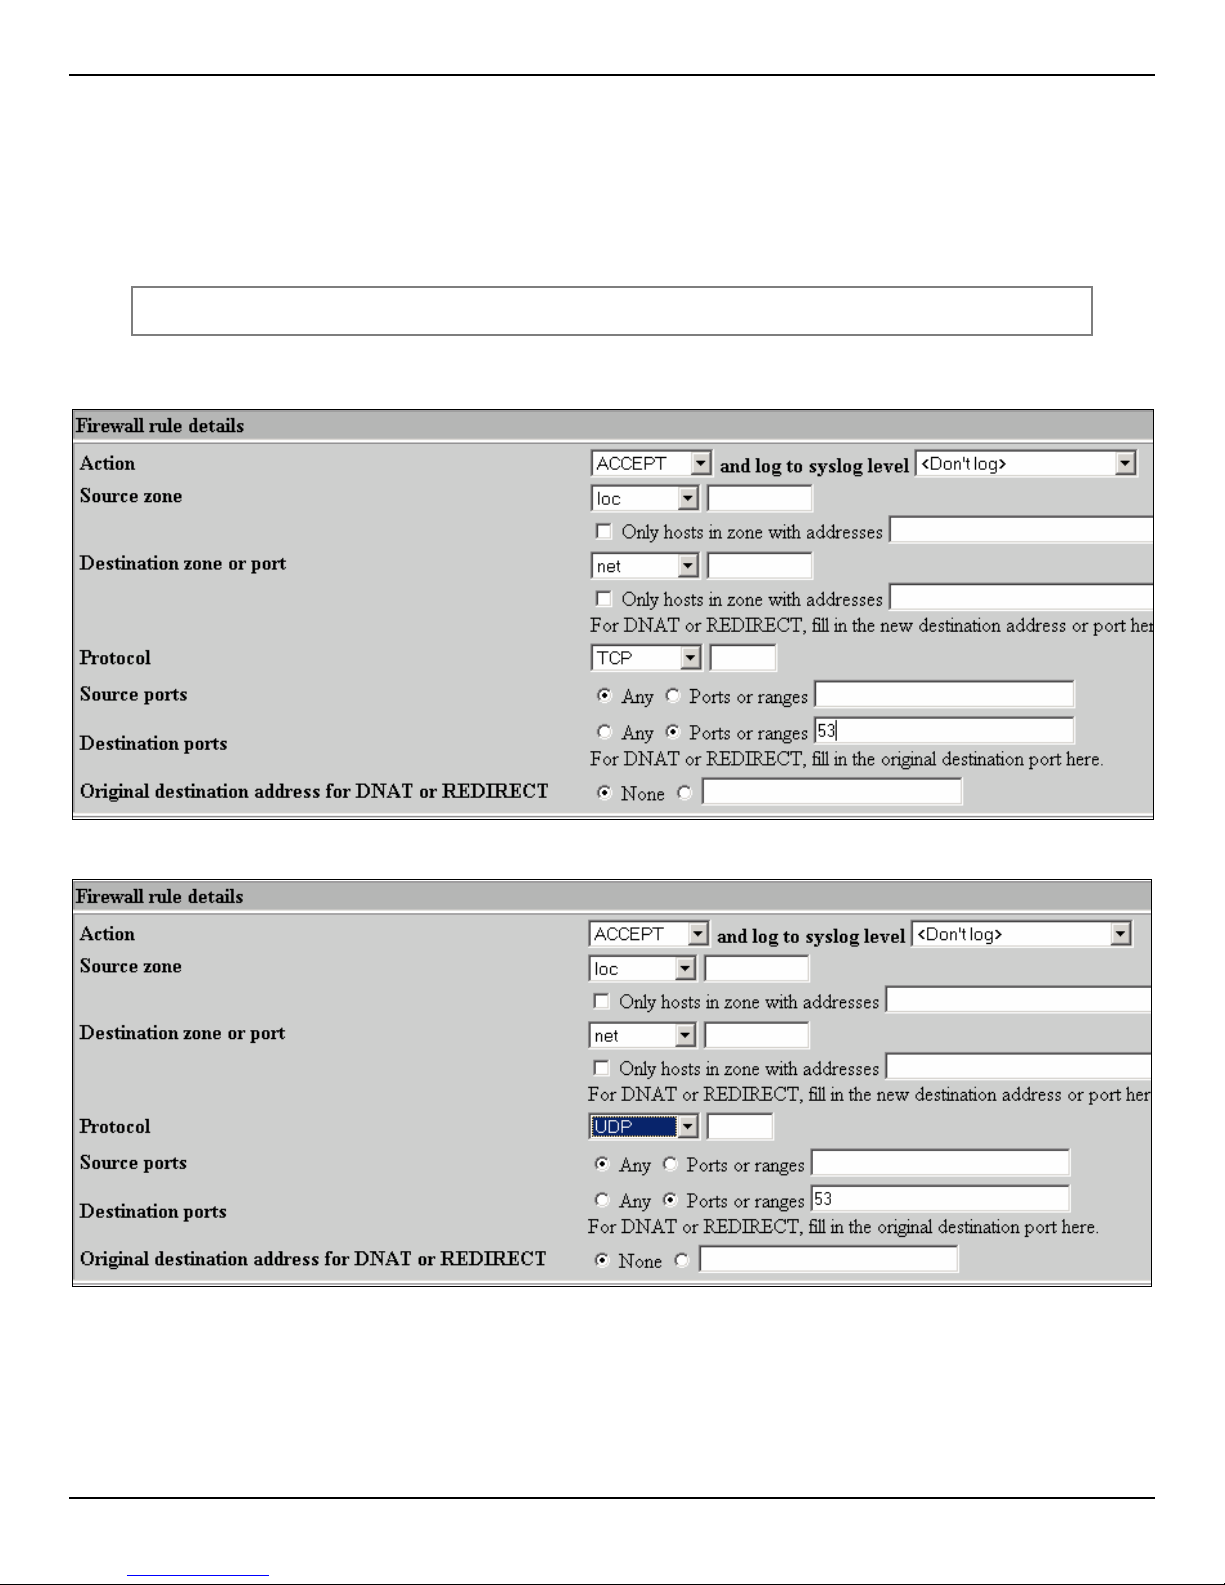
CONFIGURING COMSIFTER
Common Rules
The following rules are examples of how to configure the firewall for some of the most common applications
that access the Internet. If your application is not listed, then you will need to consult the documentation for the
application to determine what ports are required.
DNS
Ports 53 (TCP UDP)
To allow client access from the LAN to the Internet use the following two rules:
Figure 3-30: Client Access to DNS (TCP)
Figure 3-31: Client Access to DNS (UDP)
User Guide | ComSifter CS-8D Pro 3–29
Page 62
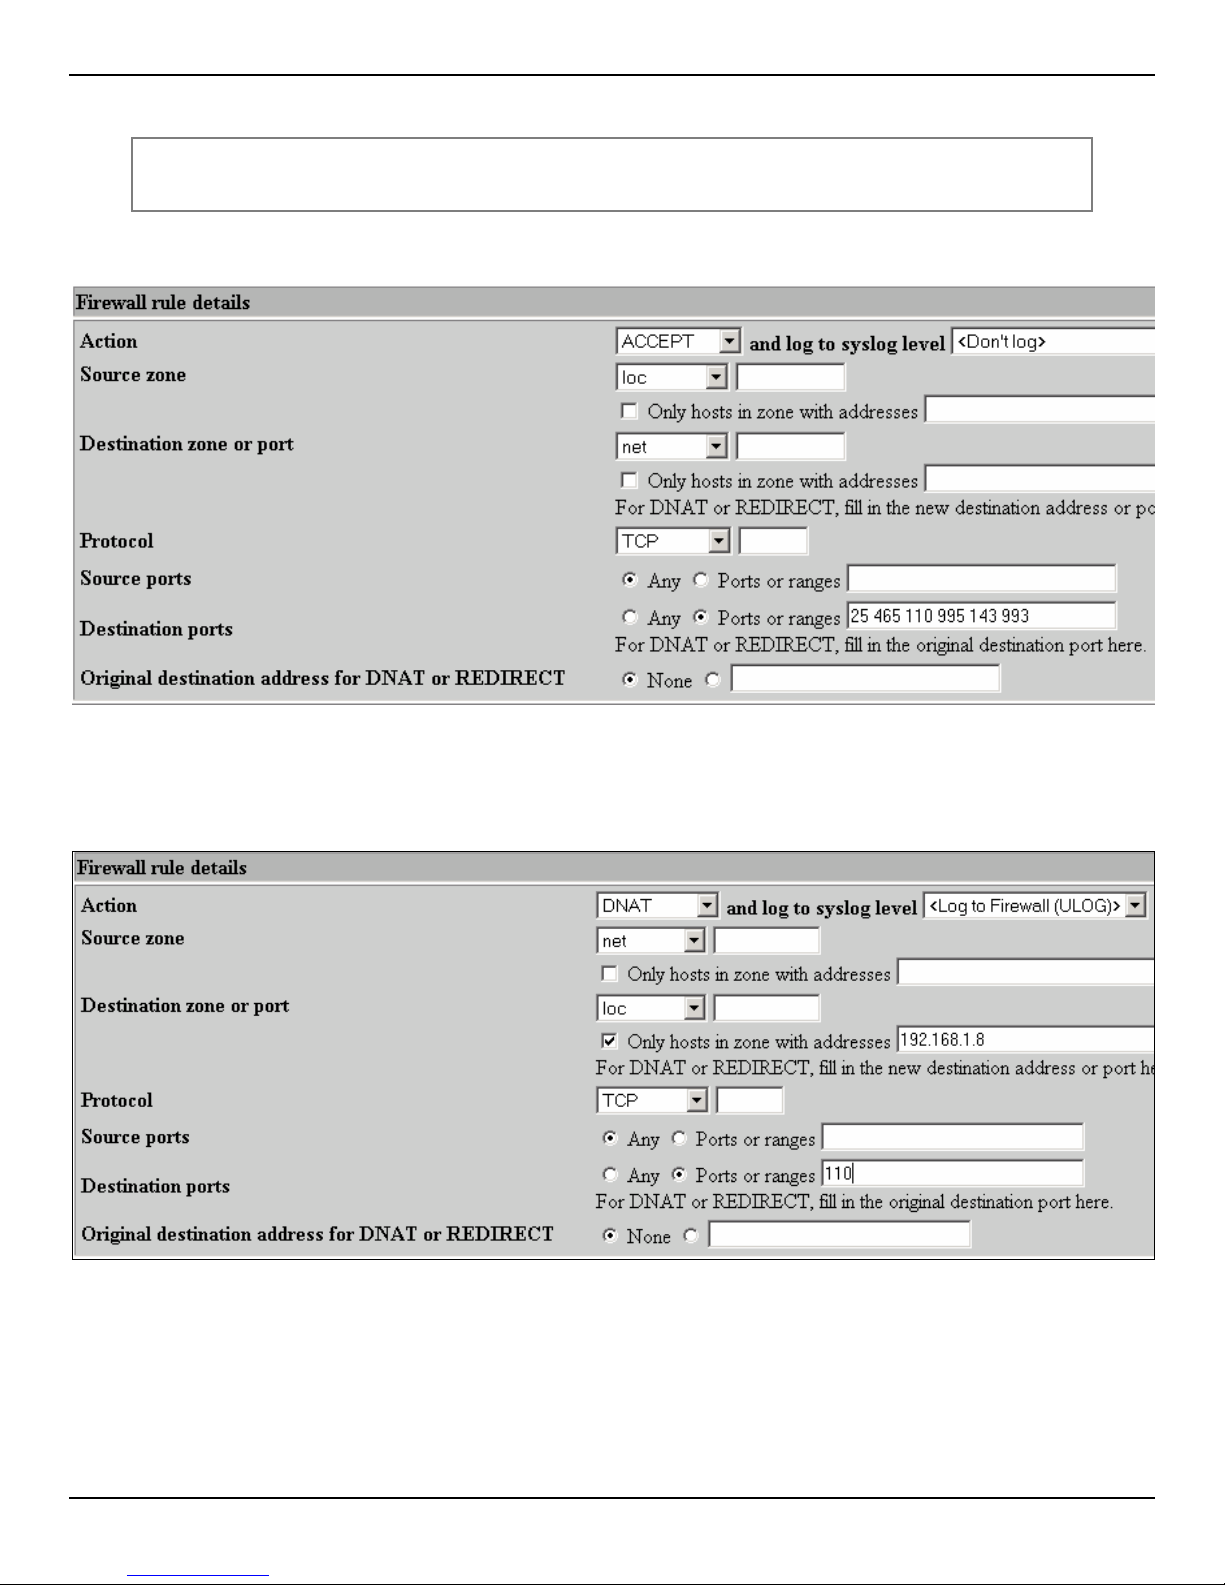
Client Email (POP3, IMAP, SMTP)
Ports POP3 unsecure 110 (TCP), POP3 Secure 995 (TCP), IMAP unsecure 143
(TCP), IMAP secure 993 (TCP), SMTP 125 (TCP)
To allow client access from the LAN to the Internet use the following rule:
CONFIGURING COMSIFTER
Figure 3-32: Client Email
If you have an internal mail server and you wish to allow client access from the Internet to the LAN use the
following rule:
Figure 3-33: Internet Access to Email Server
In this example, we have a POP3 email server at 192.168.1.8 port 110.
User Guide | ComSifter CS-8D Pro 3–30
Page 63
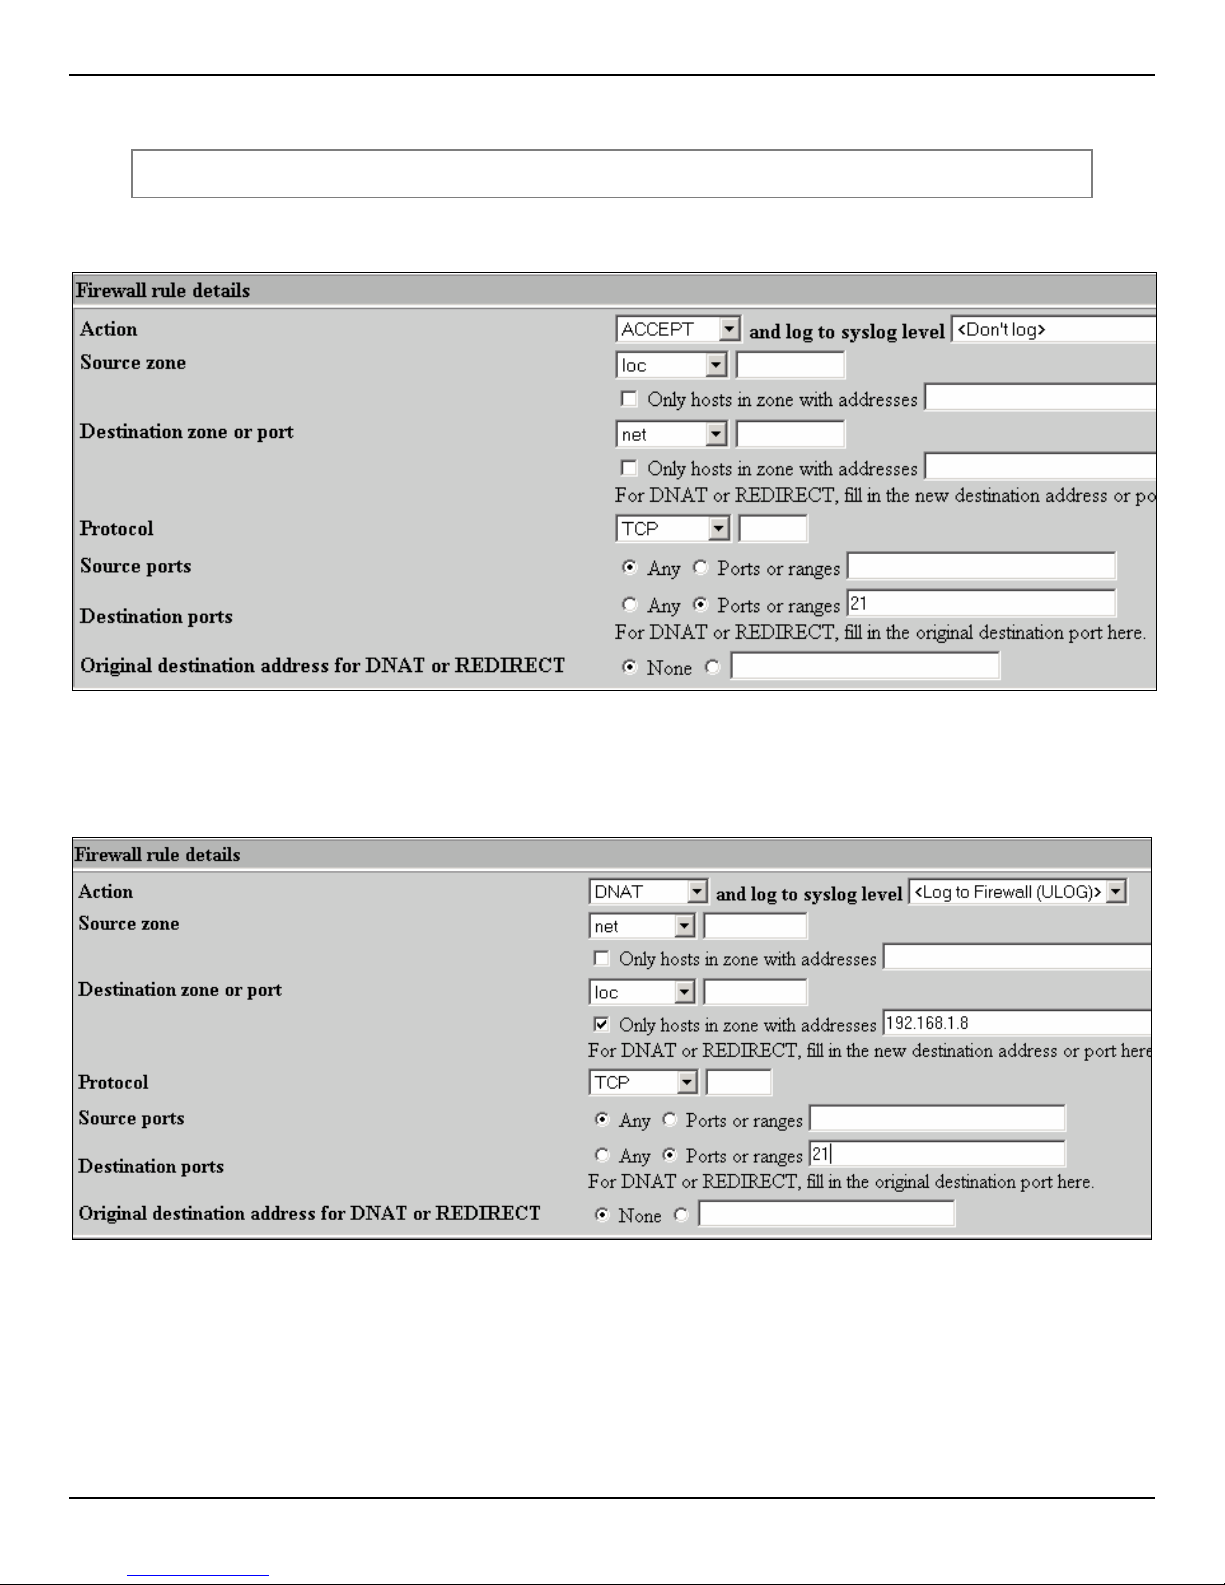
FTP
Ports 21 (TCP)
To allow client access from the LAN to the Internet use the following rule:
CONFIGURING COMSIFTER
Figure 3-34: Client FTP Access
If you have an internal FTP server and you wish to allow client access from the Internet to the LAN use the
following rule:
Figure 3-35: Access to Internal FTP Server
In this rule, any packet from the Internet destined for port 21 will be routed to the FTP server located at
192.168.1.8.
User Guide | ComSifter CS-8D Pro 3–31
Page 64
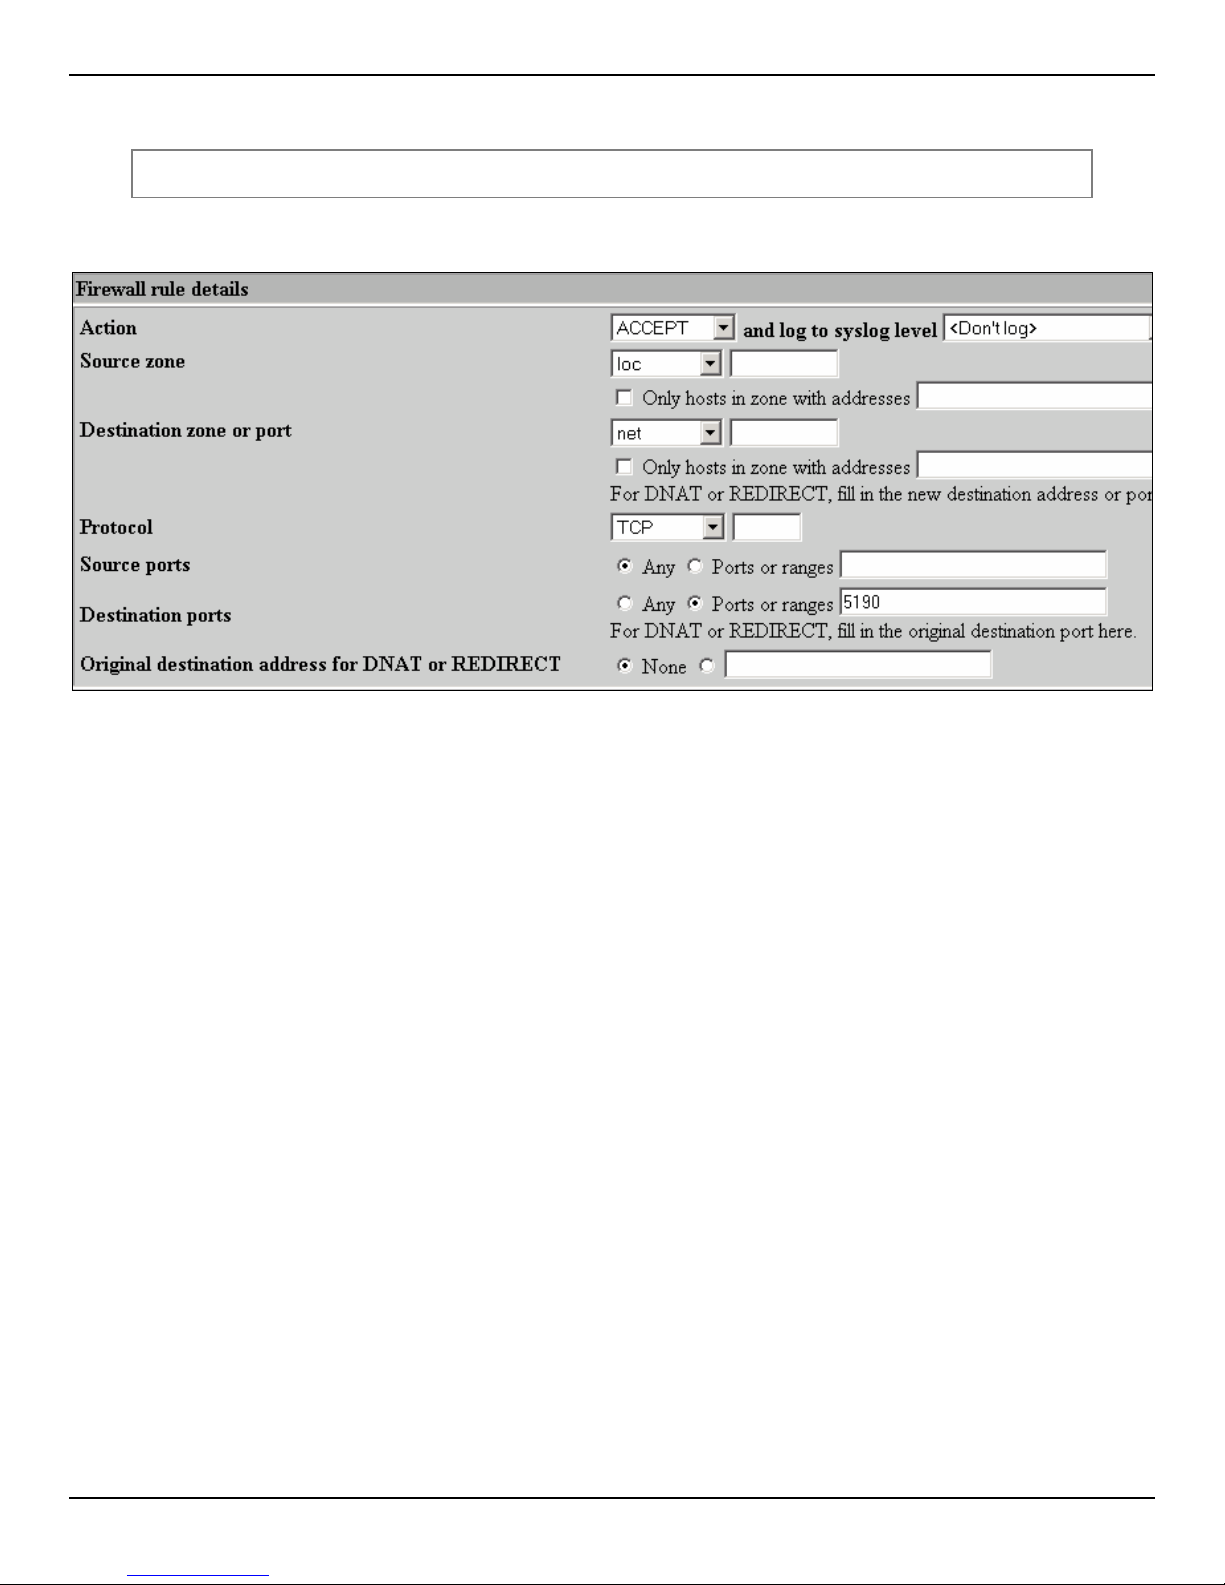
ICQ/IM
Ports 5190 (TCP)
To allow client access from the LAN to the Internet use the following rule:
CONFIGURING COMSIFTER
Figure 3-36: ICQ/AOL Client Access
User Guide | ComSifter CS-8D Pro 3–32
Page 65
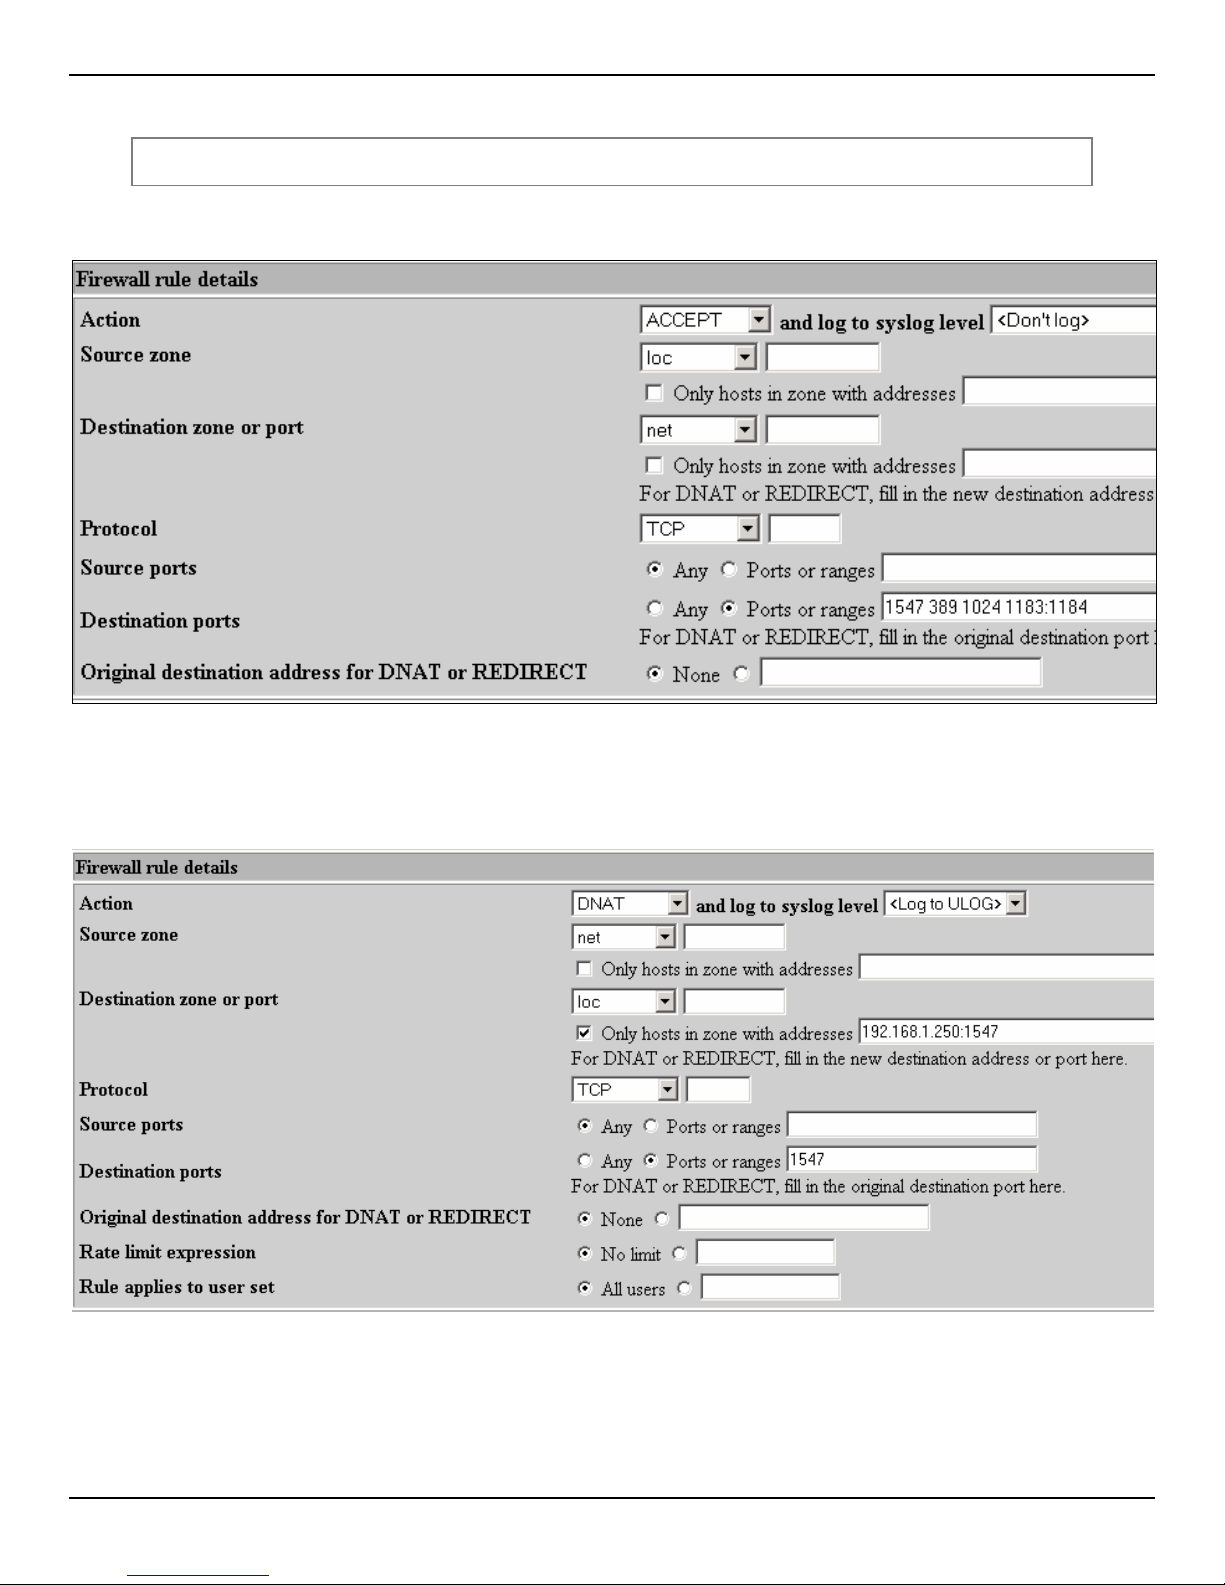
Laplink™
Ports 1547 (TCP), 389 (TCP), 1024 (TCP), 1183 (TCP), 1184 (TCP)
To allow client access from the LAN to the Internet use the following rule:
CONFIGURING COMSIFTER
Figure 3-37: Client Access to Laplink
If you have an internal Laplink server and you wish to allow access from the Internet to the server add the
following rule:
Figure 3-38: Accessing an Internal Laplink Server
In this rule, packets from the Internet destined for port 1547 are forwarded to 192.168.1.250 port 1547.
User Guide | ComSifter CS-8D Pro 3–33
Page 66
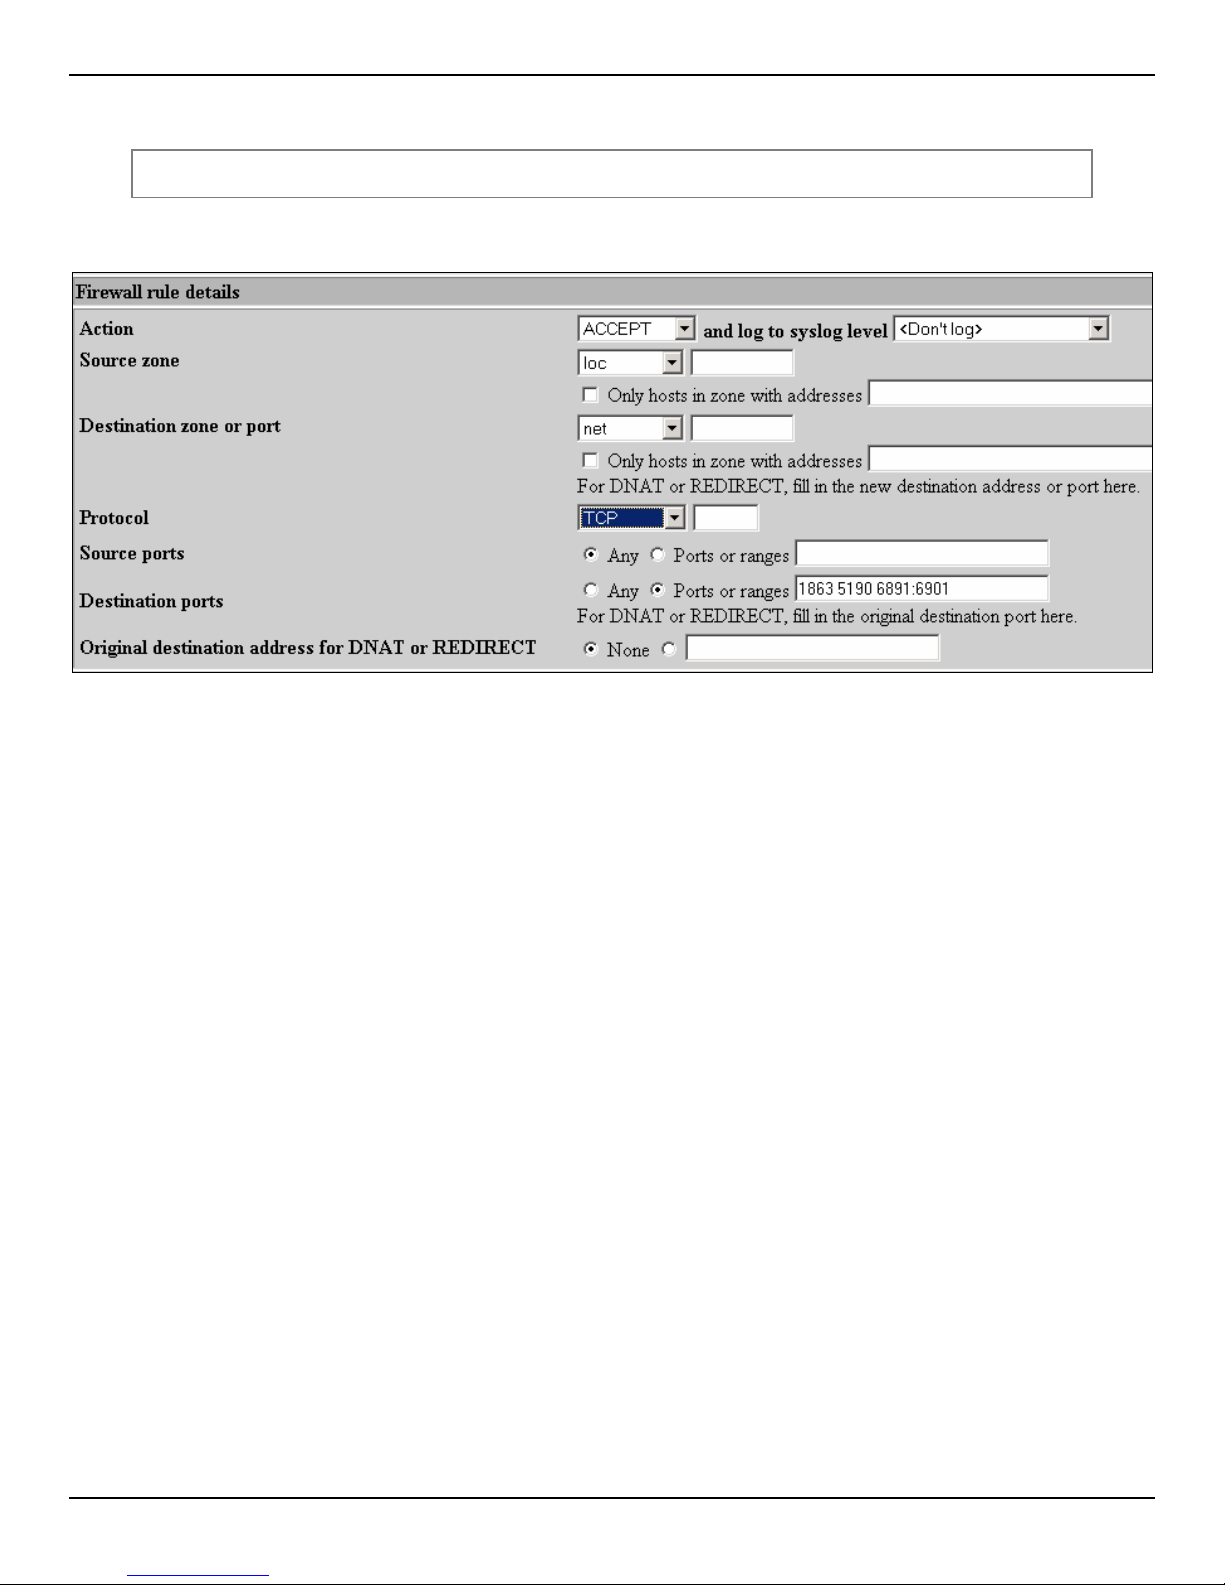
MSN™ Messenger
Ports 1863 (TCP), 5190 (TCP), 6891-6901 (TCP)
To allow client access from the LAN to the Internet use the following rule:
CONFIGURING COMSIFTER
Figure 3-39: Client Access to MSN Messenger
User Guide | ComSifter CS-8D Pro 3–34
Page 67
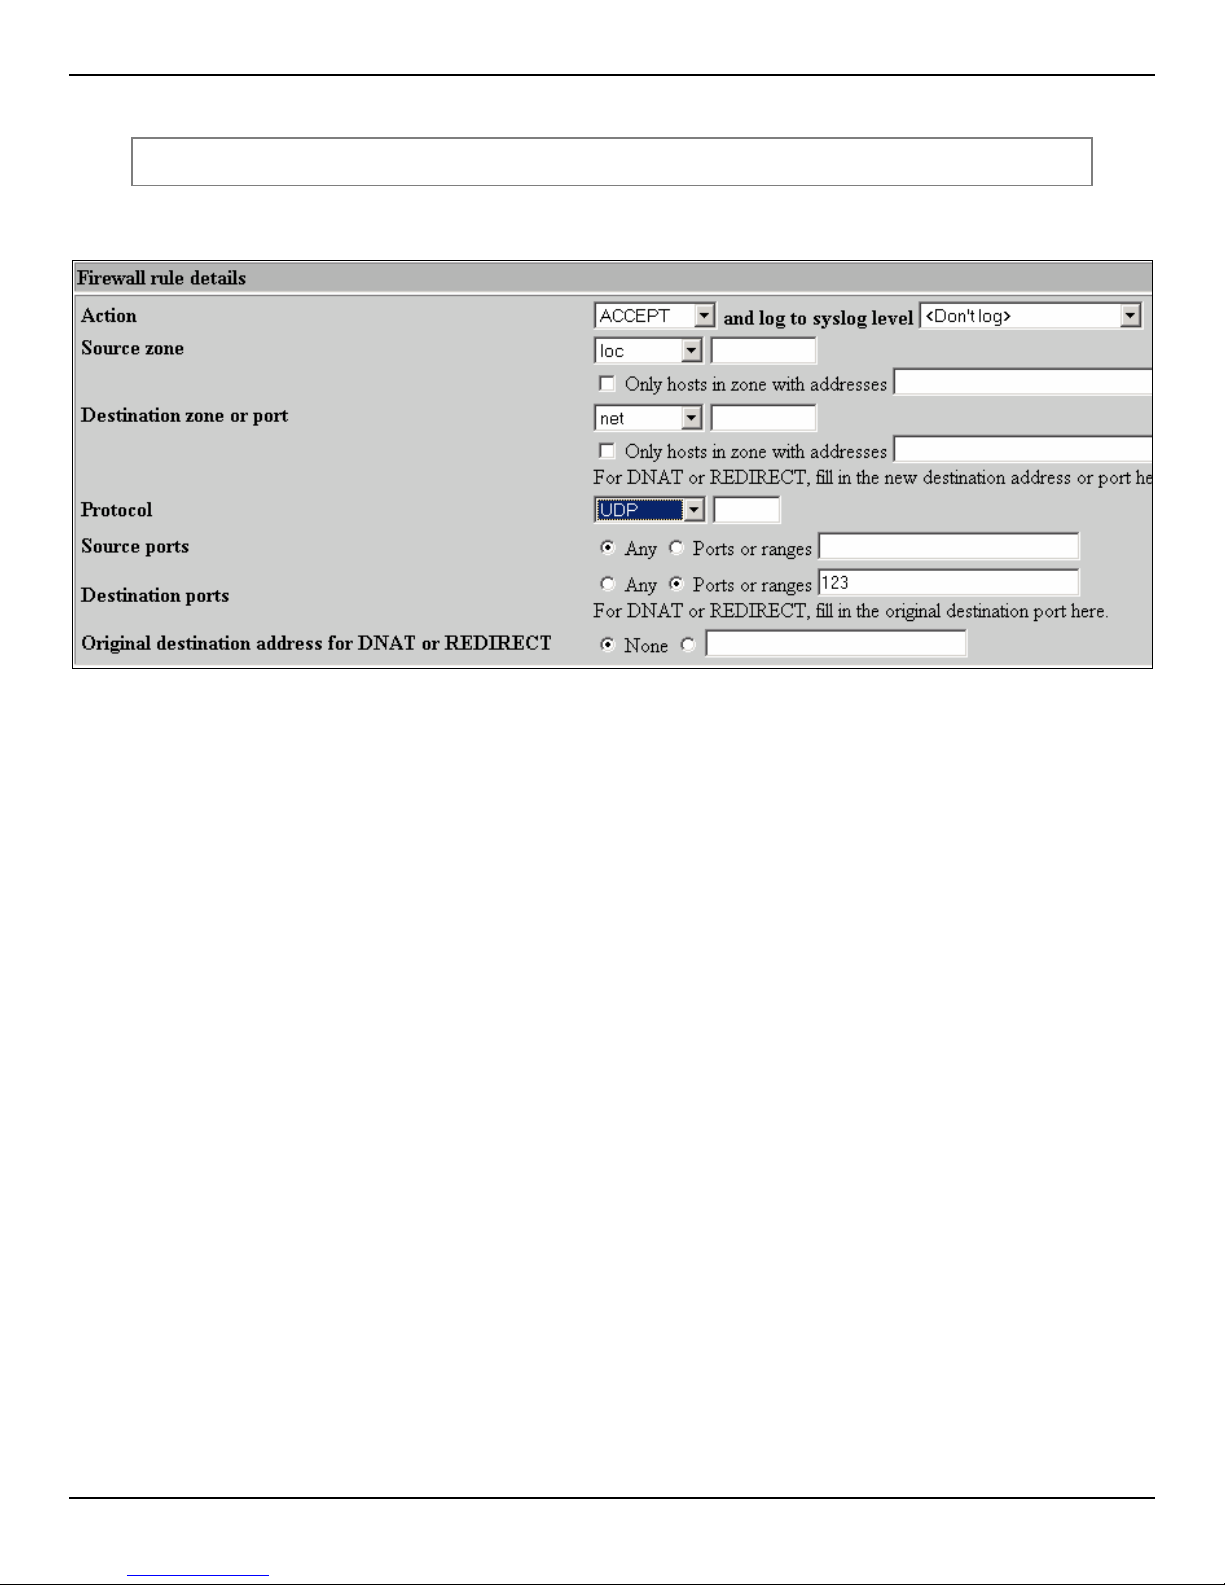
NTP (Network Time Protocol)
Port 123 (UDP)
To allow client access from the LAN to the Internet use the following rule:
CONFIGURING COMSIFTER
Figure 3-40: Client Access to NTP
User Guide | ComSifter CS-8D Pro 3–35
Page 68
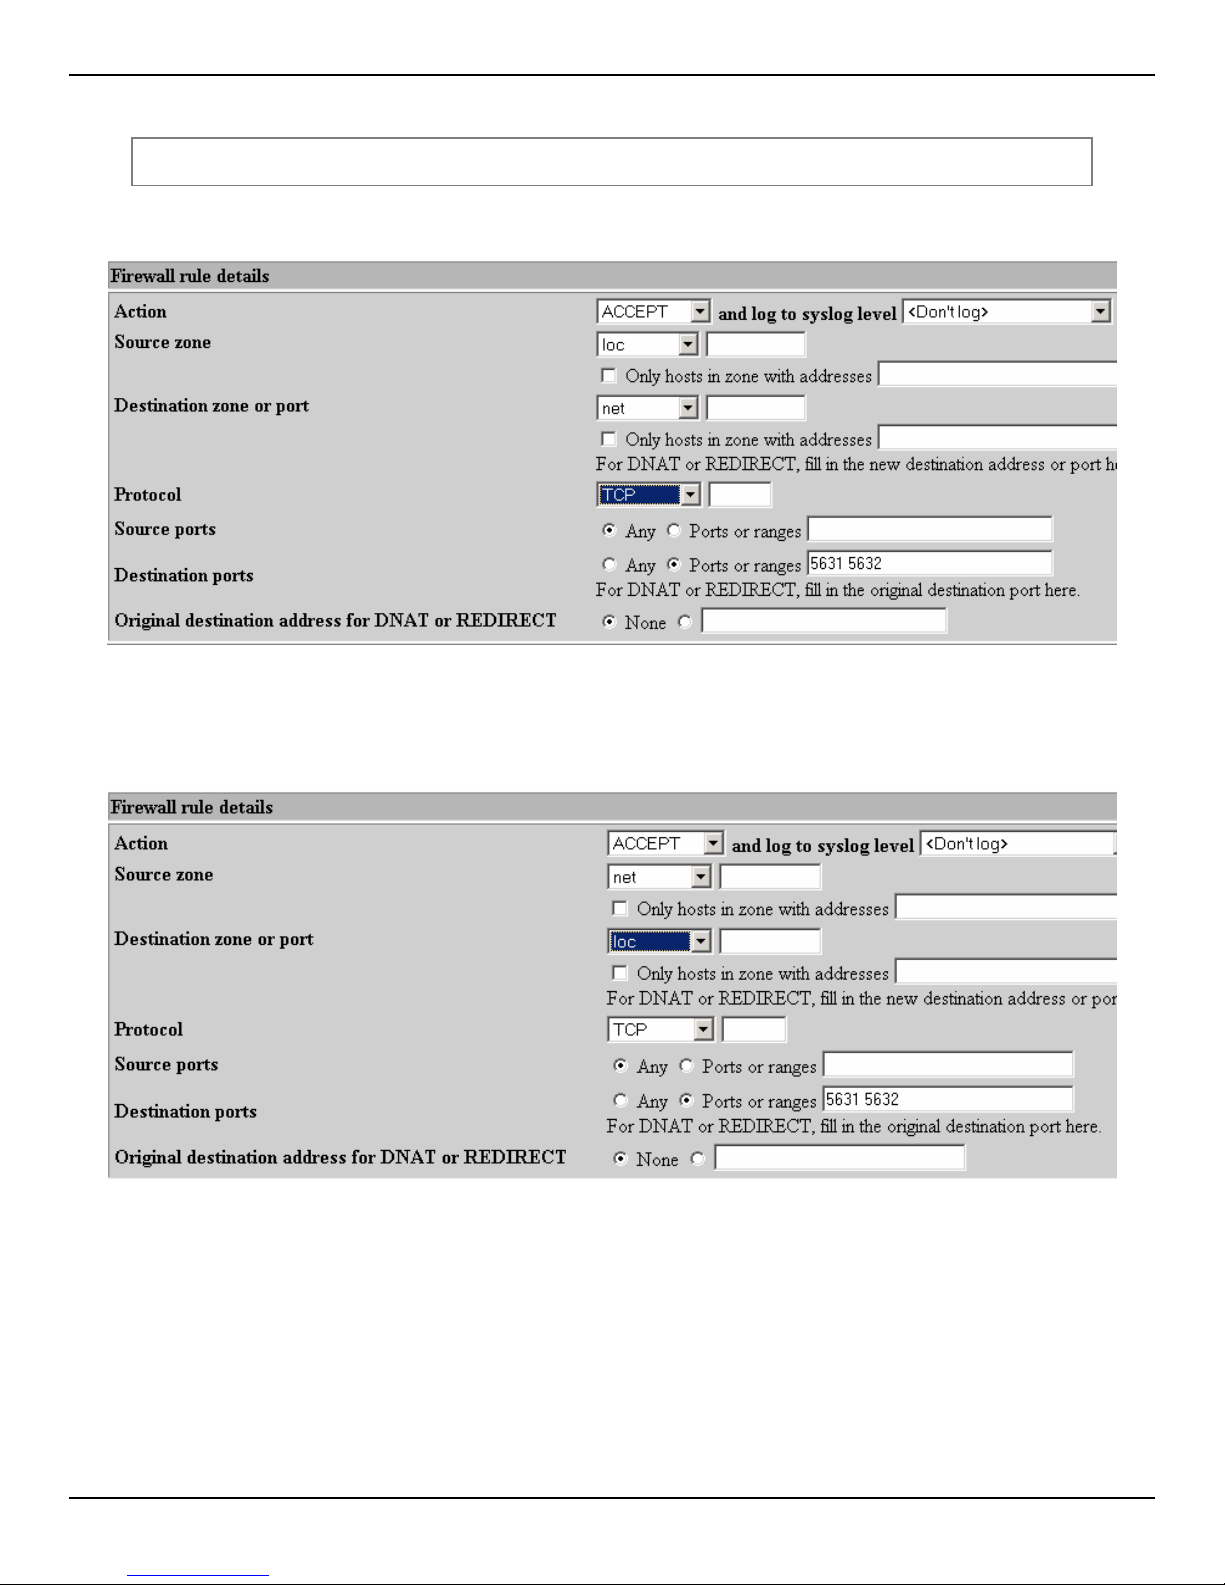
PCAnywhere™
Ports 5631 (TCP), 5632 (TCP)
To allow client access from the LAN to the Internet use the following rule:
Figure 3-41: Client Access to PCAnywhere
CONFIGURING COMSIFTER
If you have an internal PCAnywhere server and you wish to allow access from the Internet to the server add
the following rule:
Figure 3-42: Accessing an Internal PCAnywhere Server
User Guide | ComSifter CS-8D Pro 3–36
Page 69
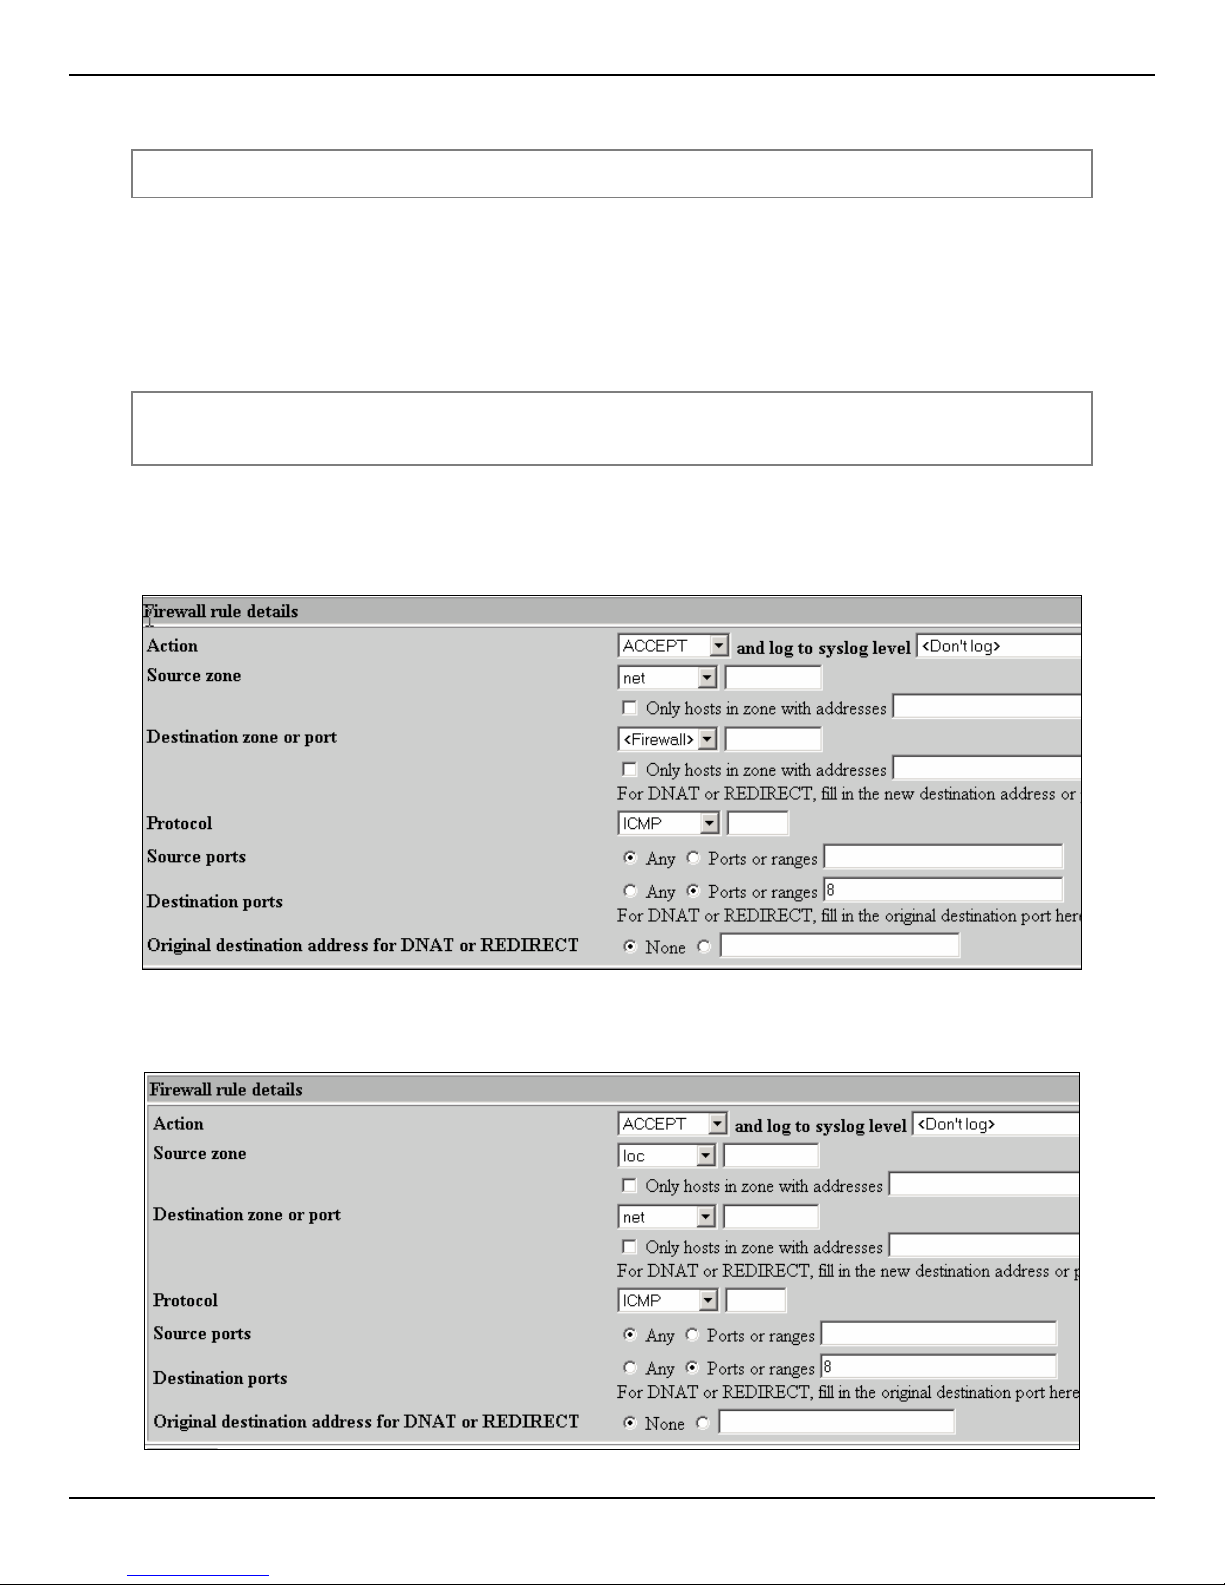
CONFIGURING COMSIFTER
Ping and Traceroute
Ports 8 (ICMP)
By default:
ComSifter is configured to allow all ICMP requests from the LAN to the firewall. This allo ws ComSifter to
always reply to pings and traceroute commands from inside the LAN. This may not be changed.
ComSifter will not reply to a ping request from the Internet. This allows ComSifter’s firewall t o operate in a
stealth mode (i.e. it does not exist). Use the rule shown below to reply to a pi ng from the Internet .
Warning: Allowing a ping from the Internet will confirm the existence of your location to
potential hackers. Best practices suggest that this only be for testing purposes.
ComSifter will not allow ping requests from the LAN to the Internet. Using the rule shown below ComSifter
can be configured to allow ping from the LAN to the Internet.
To allow a ComSifter to reply to a Ping request from the Internet apply the following rule.
Figure 3-43: Allow Ping from the Internet
To allow a client on the LAN to ping addresses on the Internet apply the following rule.
Figure 3-44: Client Access to Ping
User Guide | ComSifter CS-8D Pro 3–37
Page 70
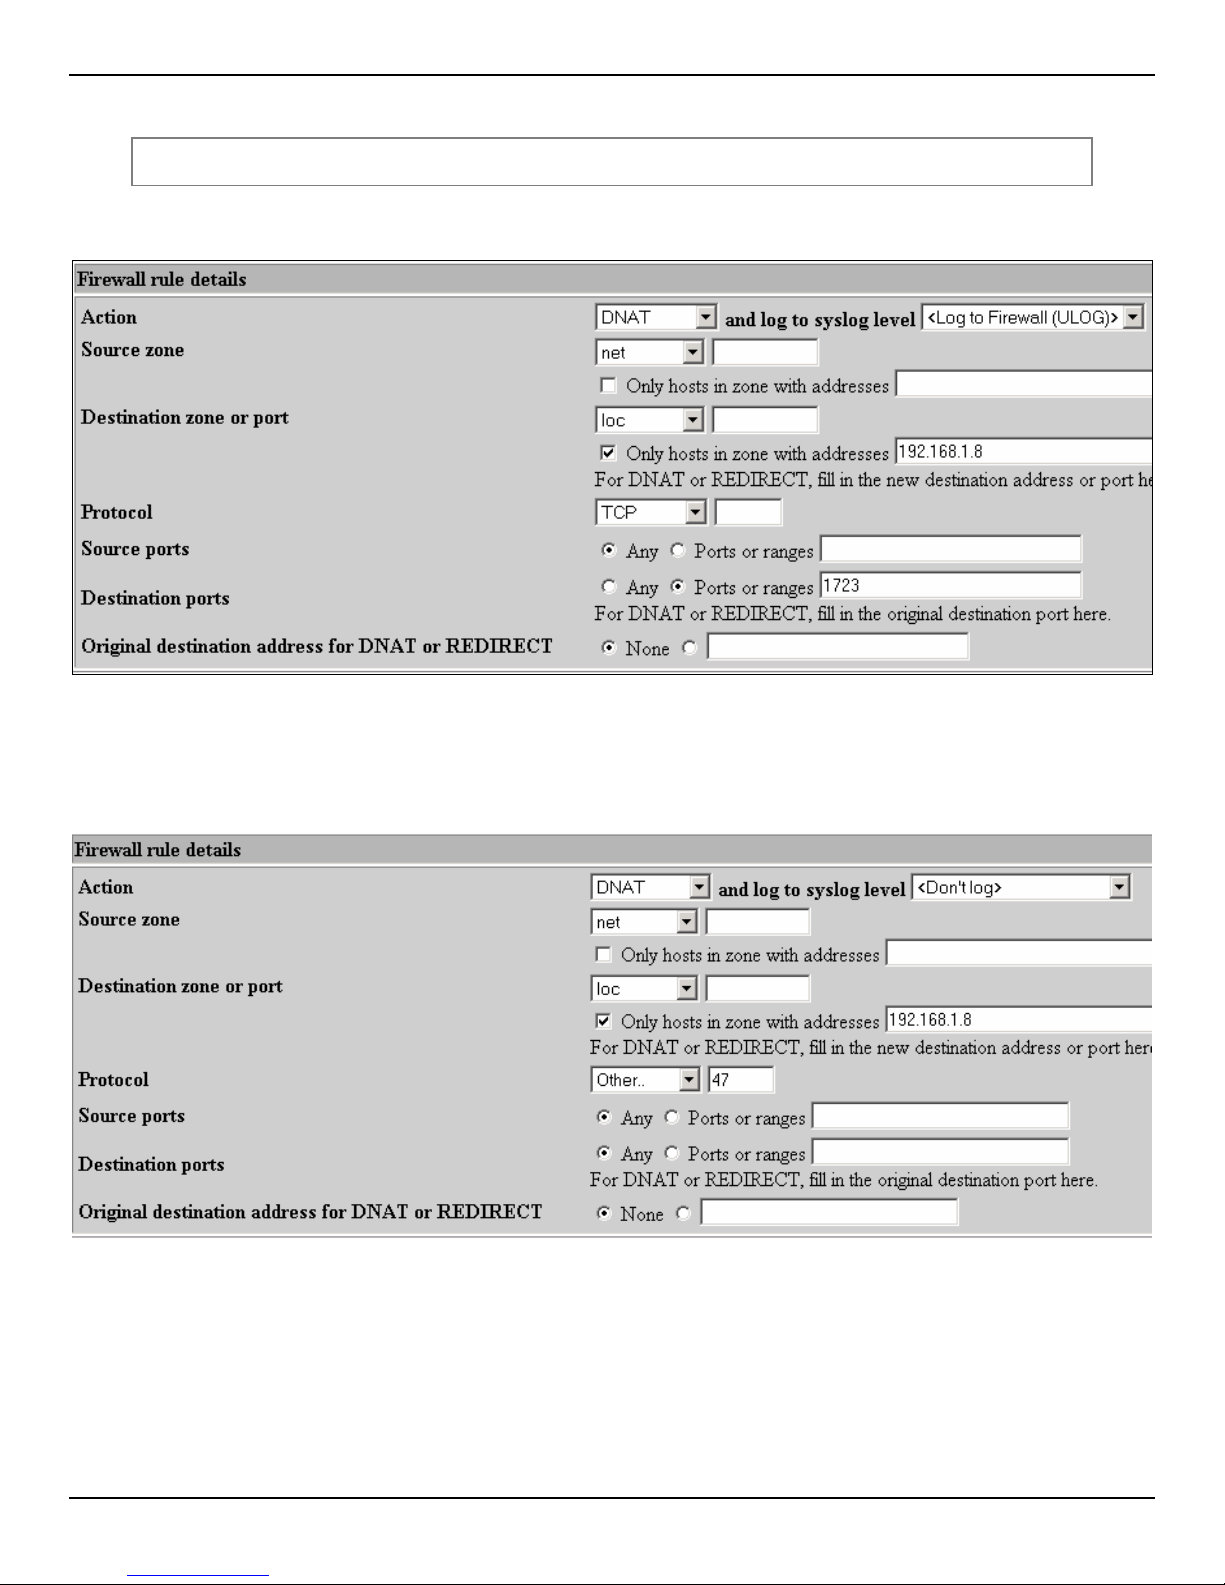
PPTP
Port 1723 (TCP) (GRE)
To allow client access from the LAN to the Internet use the following rule:
CONFIGURING COMSIFTER
Figure 3-45: Client Access to PPTP
To allow client access from the Internet to the LAN use the following rule:
First enable Protocol 47 (GRE).
Figure 3-46: Client Access to PPTP (protocol)
Setup continued on next page.
User Guide | ComSifter CS-8D Pro 3–38
Page 71
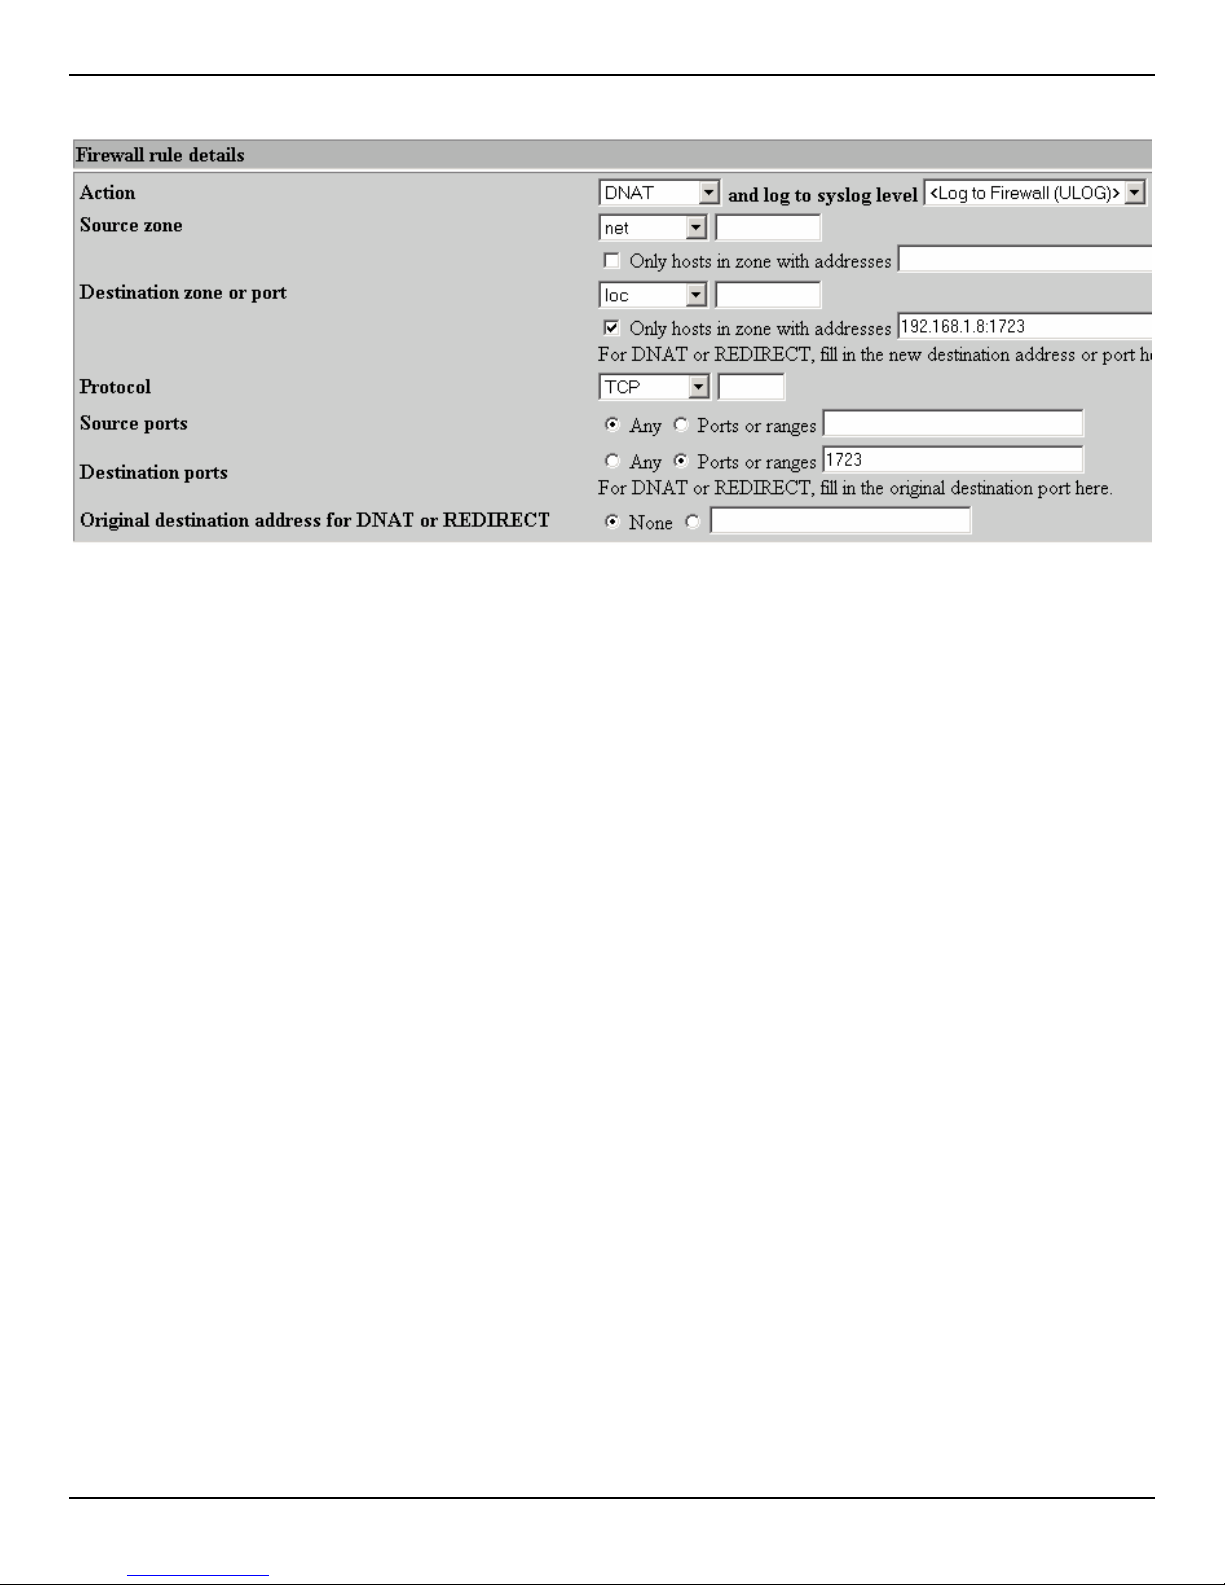
Then add a rule that connects TCP to the PPTP server.
Figure 3-47: Client Access to PPTP
CONFIGURING COMSIFTER
User Guide | ComSifter CS-8D Pro 3–39
Page 72
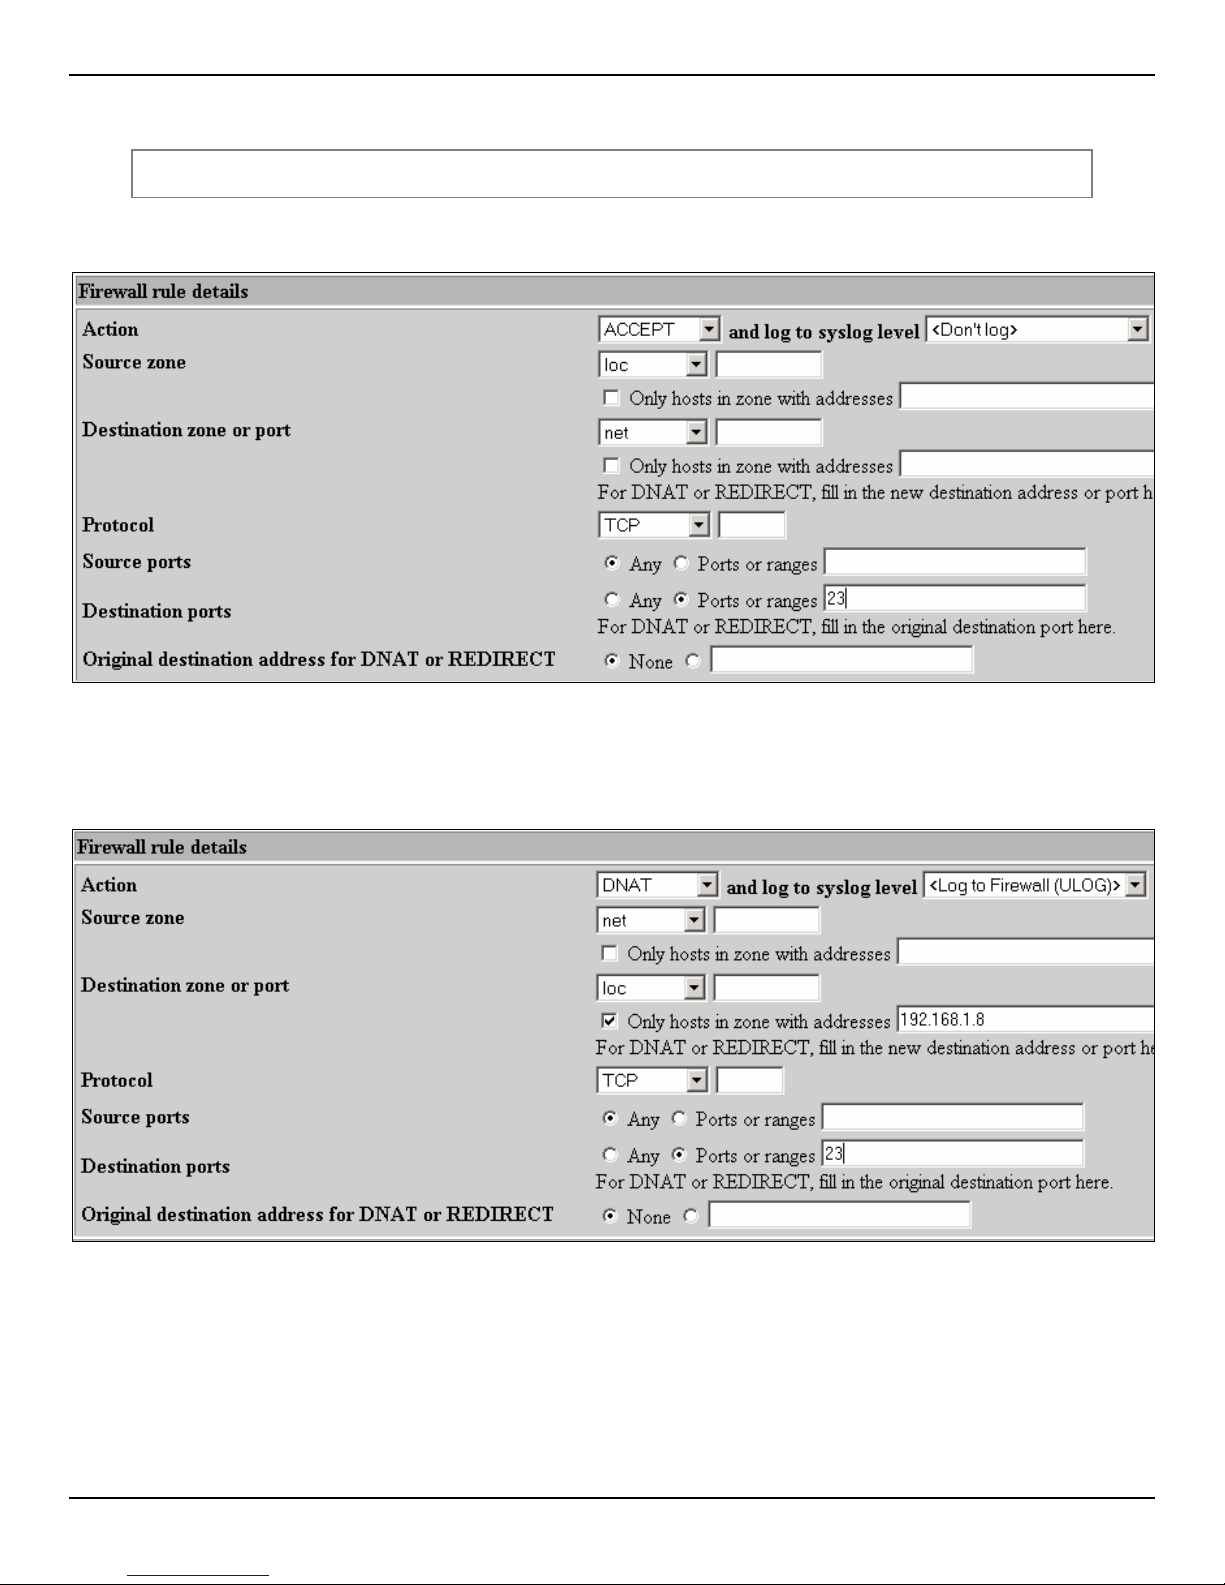
Telnet
Ports 21 (TCP)
To allow client access from the LAN to the Internet use the following rule:
CONFIGURING COMSIFTER
Figure 3-48: Client Access to Telnet
If you have an internal Telnet server and you wish to allow access from the Internet to the server add the
following rule:
Figure 3-49: Access to Telnet Server
In this rule, packets from the Internet destined for port 23 are forwarded to 192.168.1.8 port 23.
User Guide | ComSifter CS-8D Pro 3–40
Page 73
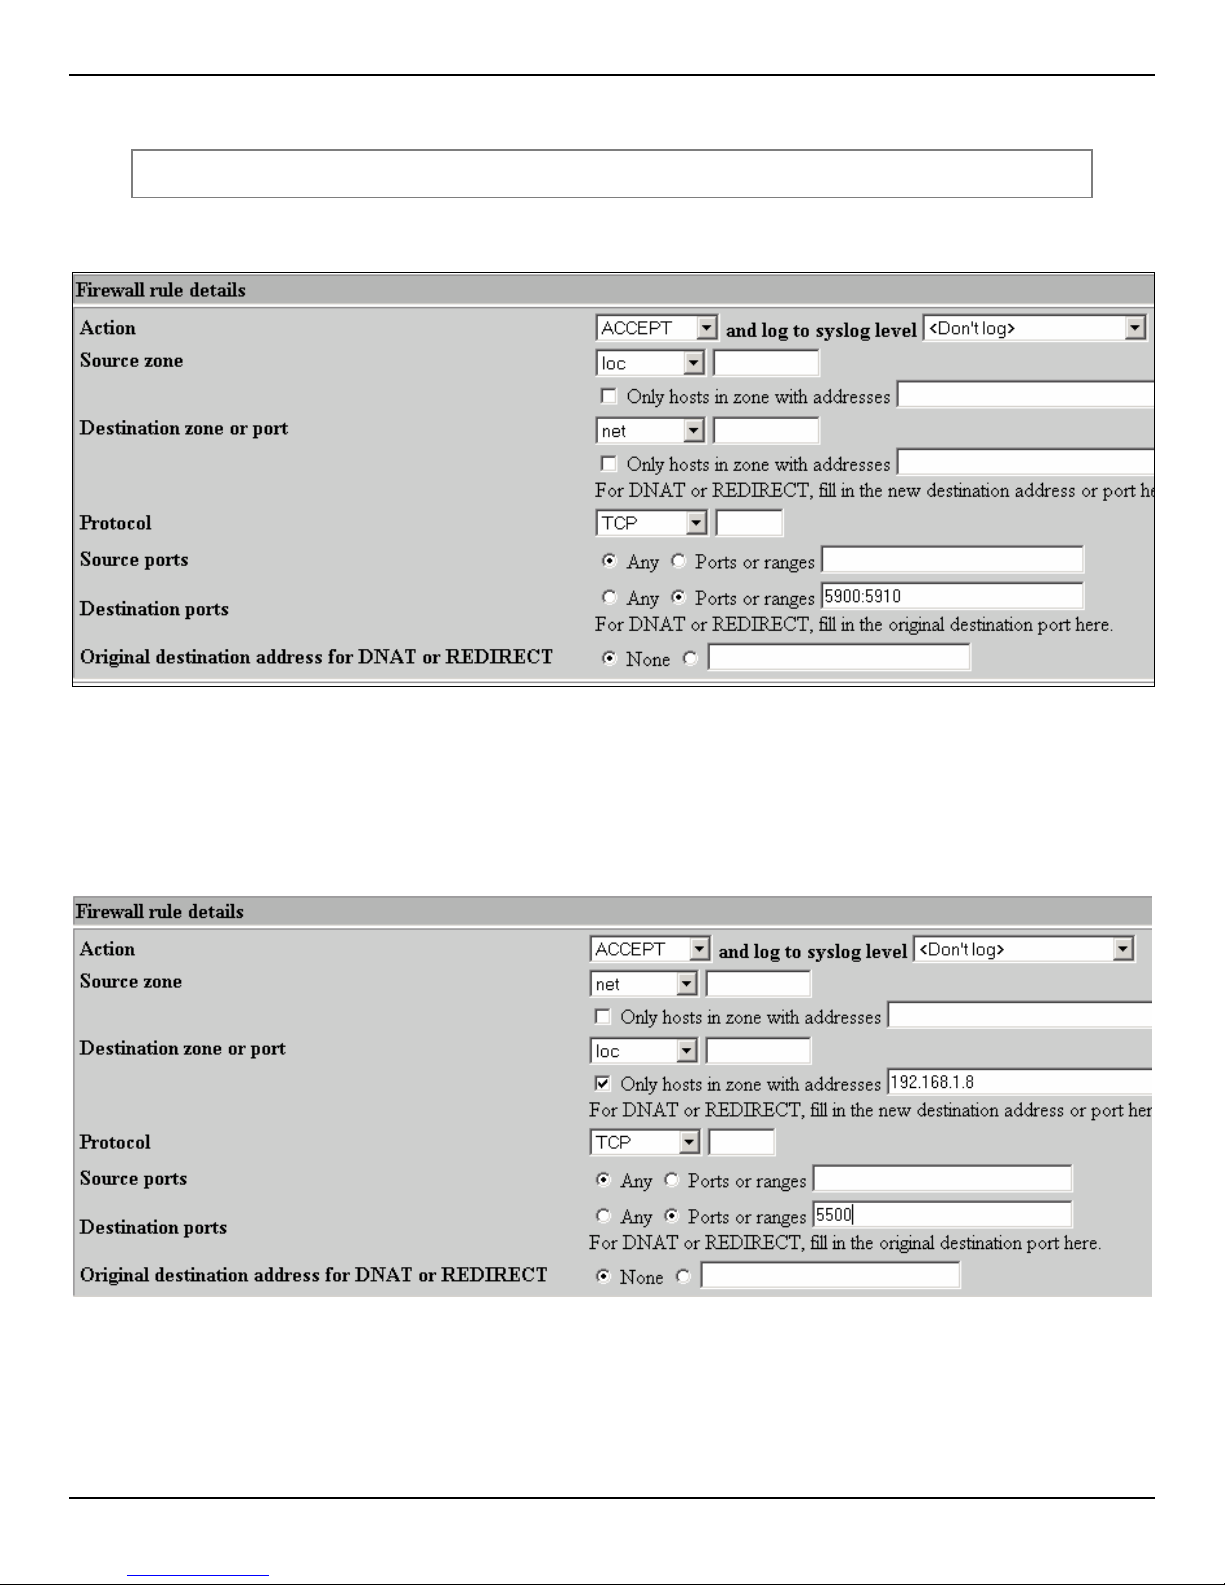
VNC
Ports 5500 (TCP), 5900+ (TCP)
To allow client access from the LAN to the Internet use the following rule:
CONFIGURING COMSIFTER
Figure 3-50: Client Access to VNC
Each client accessing VNC outbound will need a separate port. If you expect only one client at a time then only
open one port. The above example allows for up to 10 simultaneous clients.
If you have an internal VNC server and you wish to allow access from the Internet to the server add the
following rule:
User Guide | ComSifter CS-8D Pro 3–41
Figure 3-51: Accessing VNC Server
Page 74
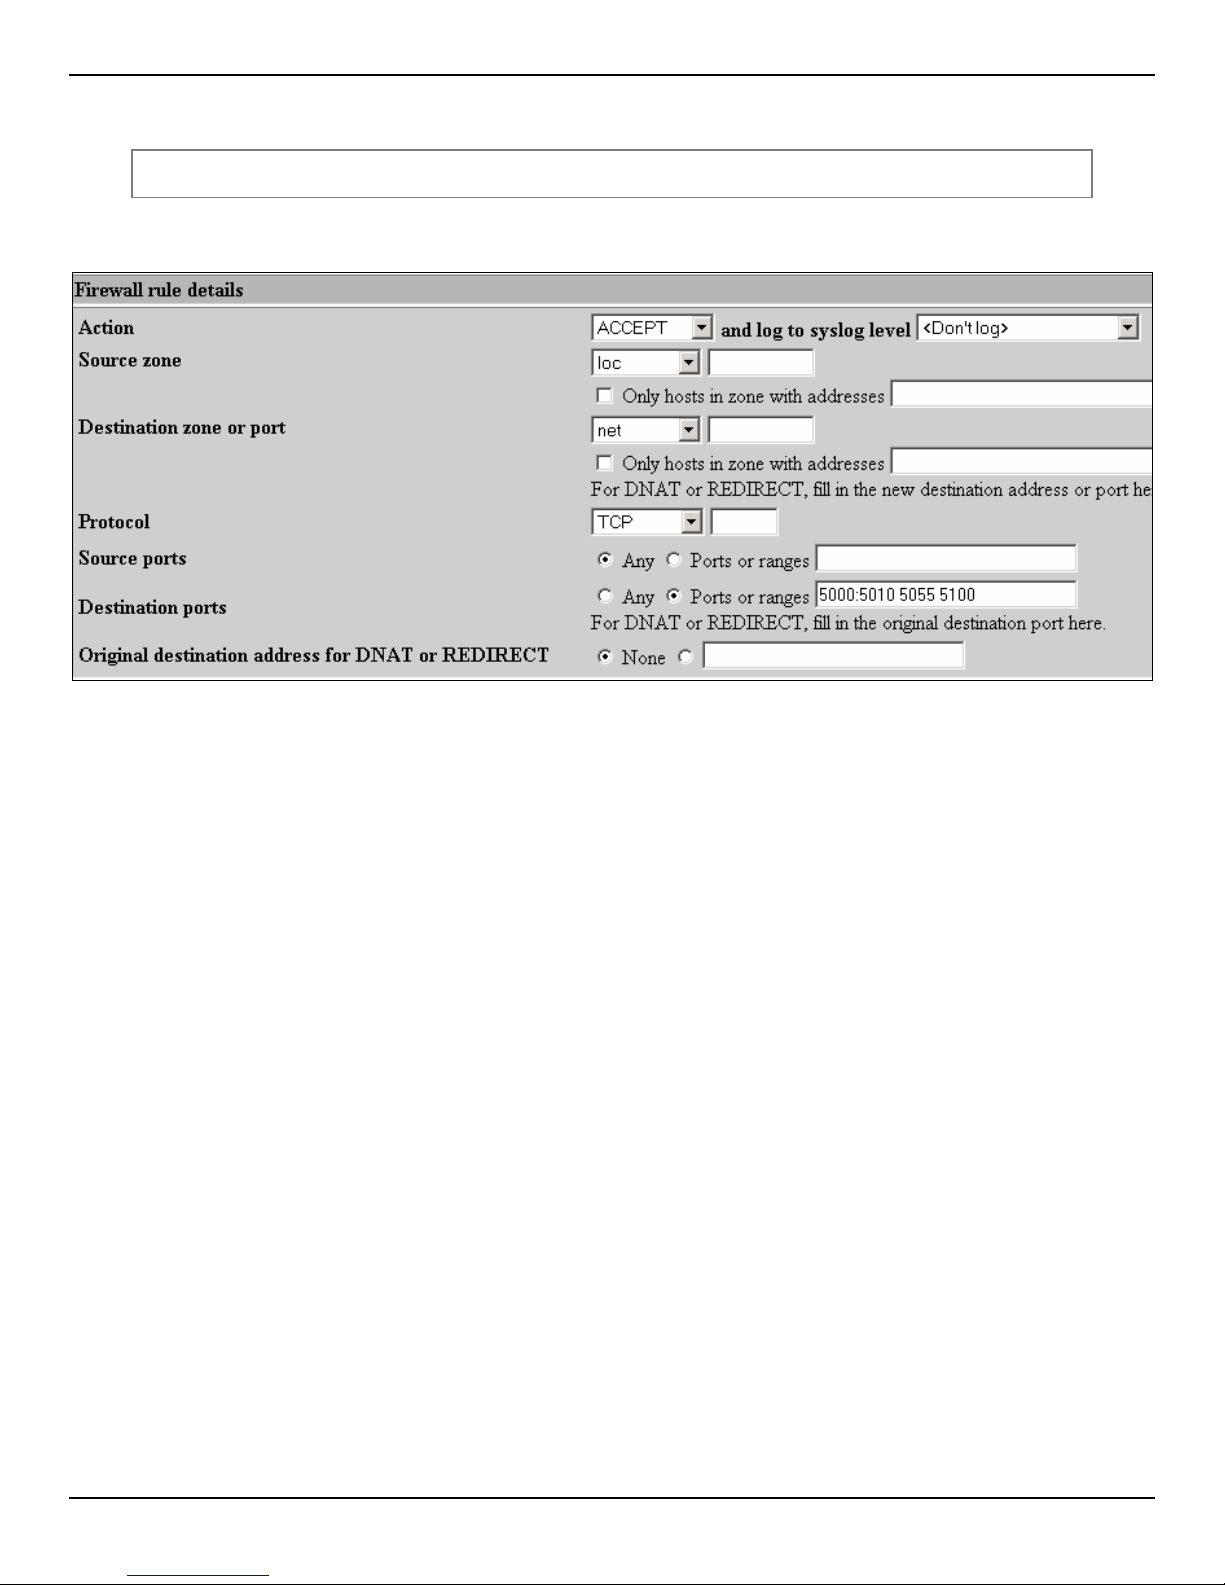
Yahoo™ Chat
Ports 5000-5010 (TCP), 5055 (TCP), 5100 (TCP)
To allow client access from the LAN to the Internet use the following rule:
CONFIGURING COMSIFTER
Figure 3-52: Client Access to Yahoo Chat
User Guide | ComSifter CS-8D Pro 3–42
Page 75
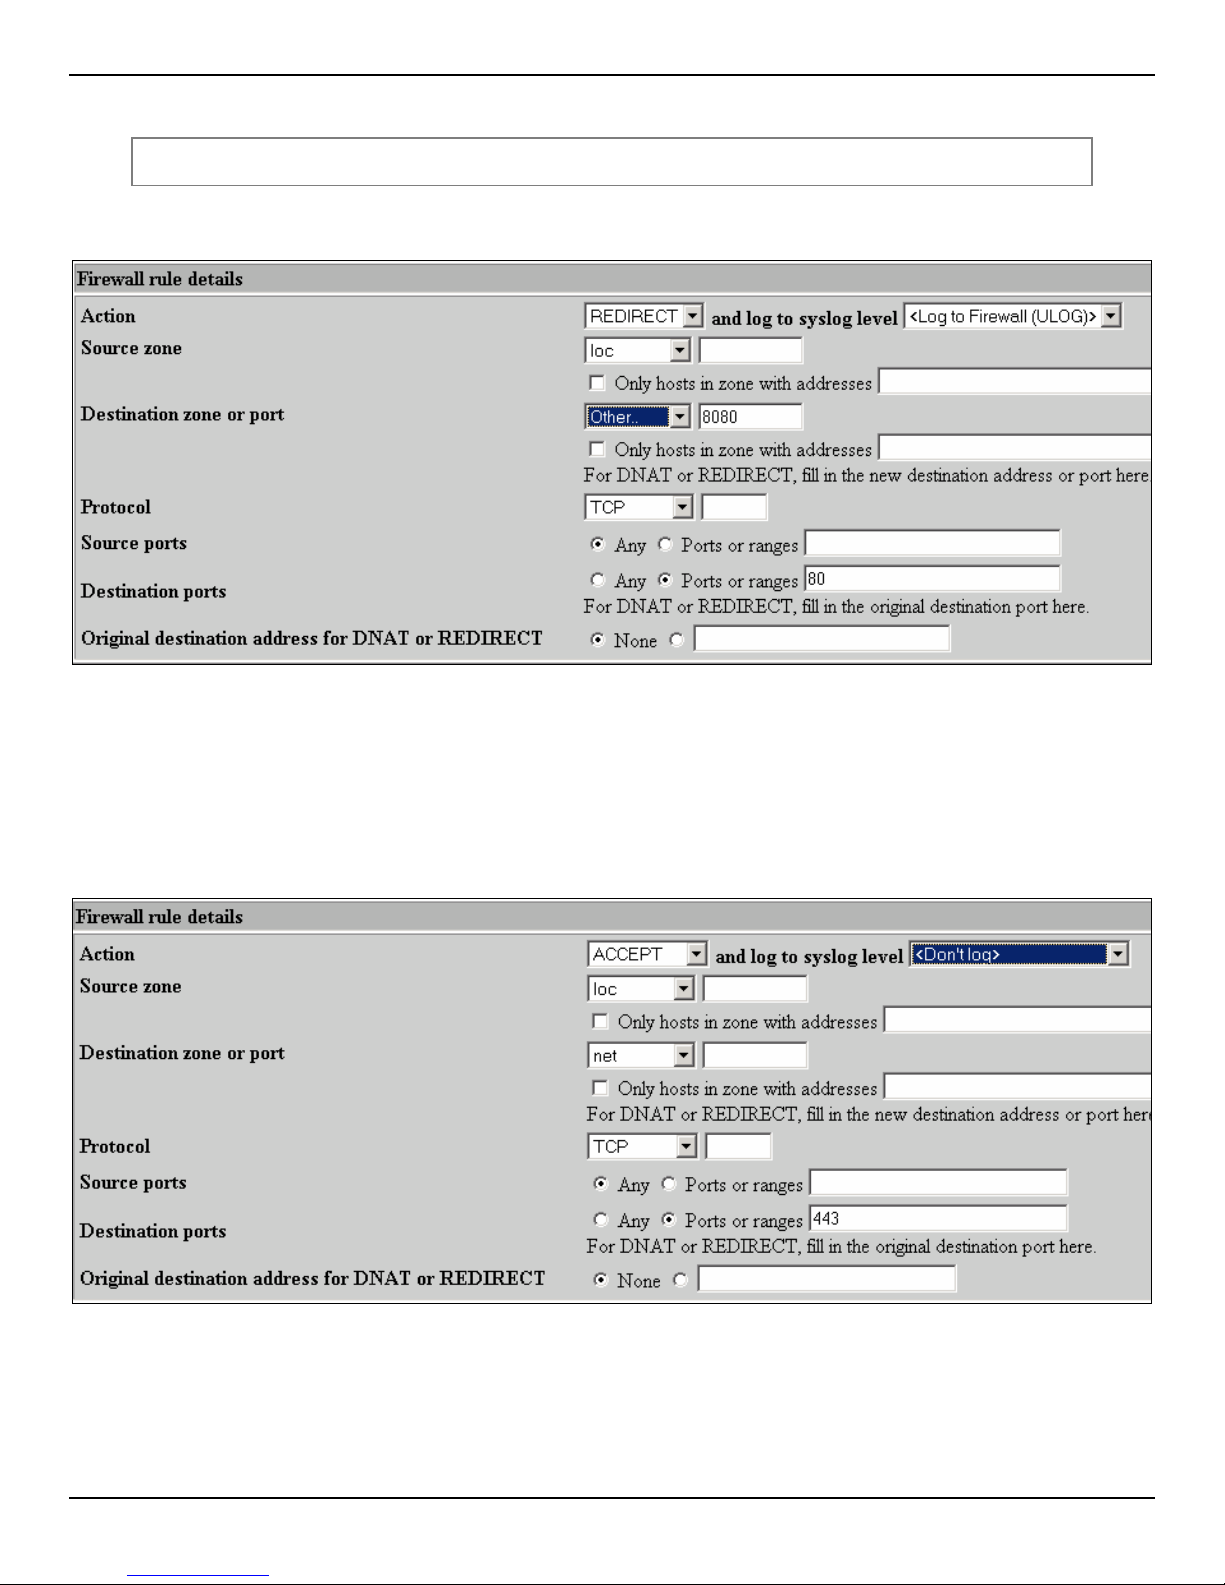
Web Access (browsing)
Ports 80 (TCP), 443 (TCP), 8080 (TCP)
To allow client access from the LAN to the Internet use the following rule:
CONFIGURING COMSIFTER
Figure 3-53: Client Access to the Web
The above rule will redirect all requests for access to the Internet (HTTP) to port 8080. ComSifter Filter Service
is listening on this port. It will intercept the request, retrieve, and filter the response and send either the
response or a denied page to the requesting computer.
In addition to allowing normal web browsing, you may allow secure authentication (HTTPS) by allowing port
443 outbound as shown below
Figure 3-54: Allowing Secure Access to the Internet
Setup continued on next page.
User Guide | ComSifter CS-8D Pro 3–43
Page 76
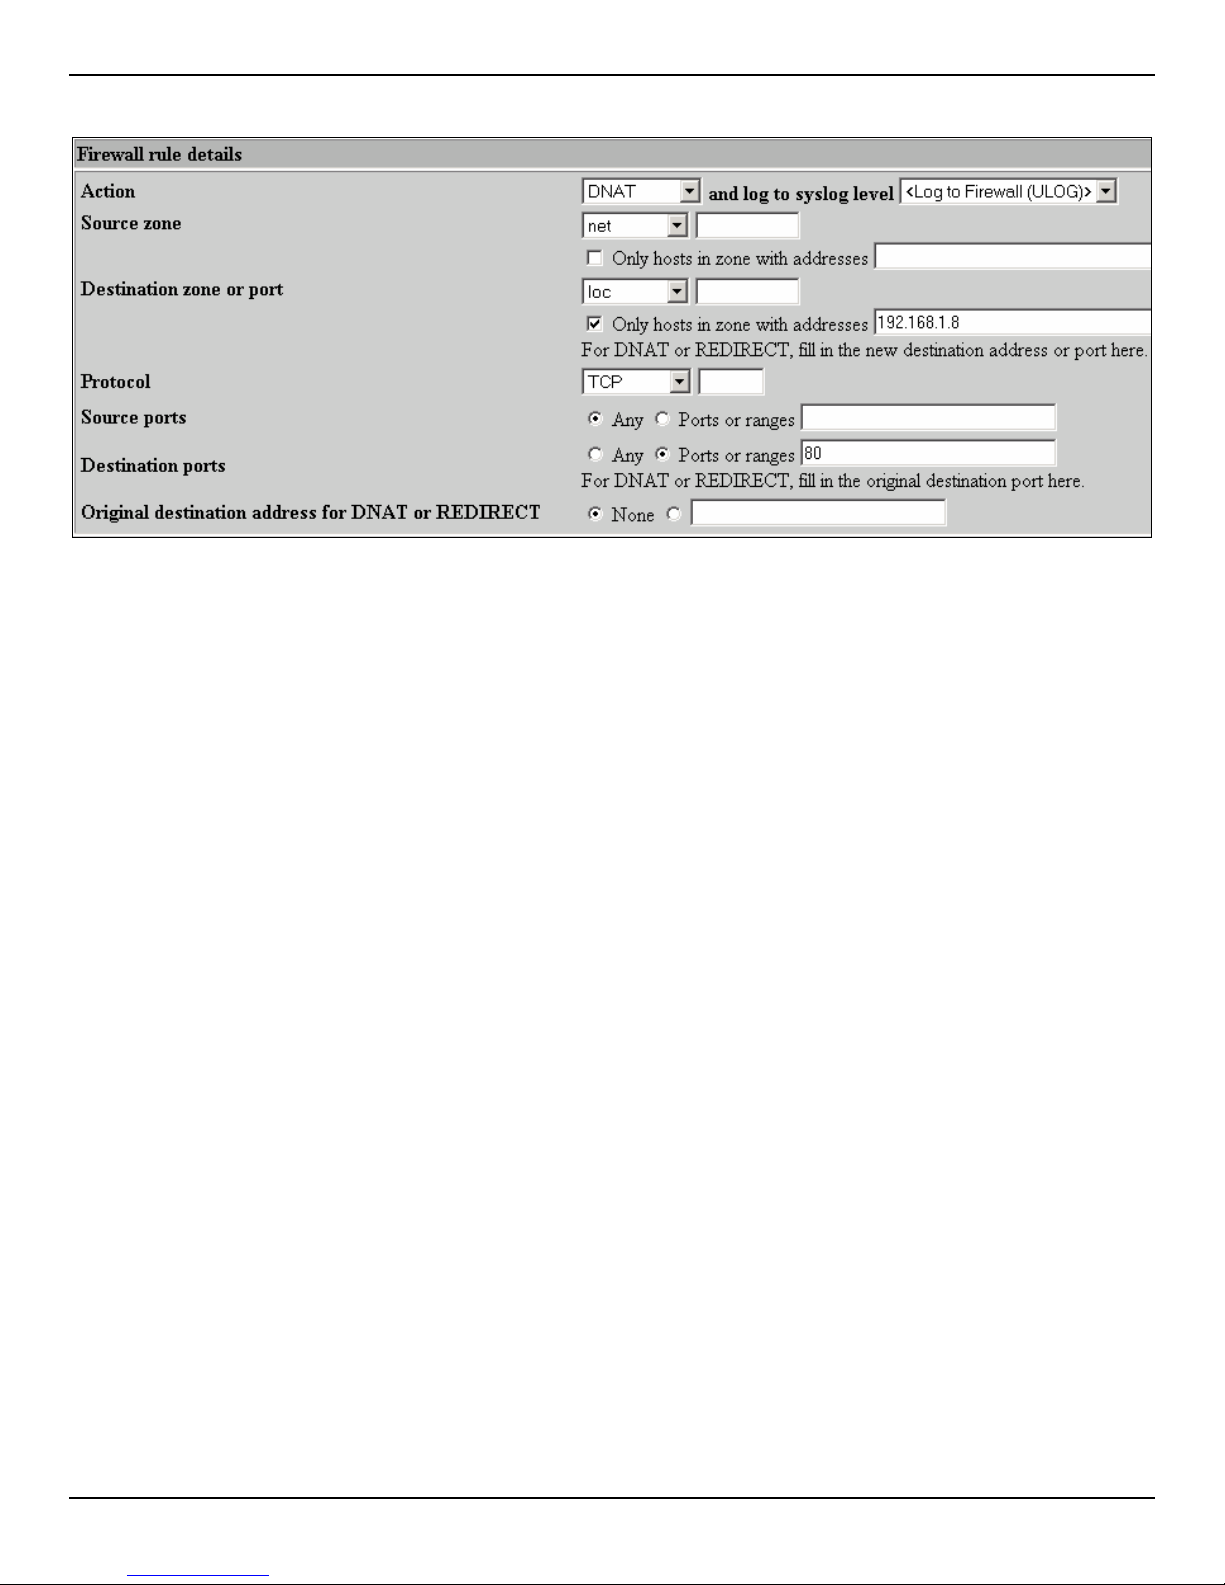
CONFIGURING COMSIFTER
To allow access from the Internet to a Web Server located on the LAN use the following rule:
Figure 3-55: Web Server Access
This rules routes any incoming port 80 requests from the Internet to the host defined in the Destination Zone.
User Guide | ComSifter CS-8D Pro 3–44
Page 77
Apply Configuration
Upon clicking Apply Configuration, ComSifter will:
8. Run a Check Firewall to validate the new firewall rules.
9. If Check Firewall is successful, the command will continue. If the Check Firewall fails you will be notified
that the command failed, the new rules will not be insta lled, and the f irewall will cont inue operating wi th its
current rules.
10. Stop all Filtering and Proxy Services.
11. Stop Network Services.
12. Stop the Firewall.
13. Restart the Firewall with the new rules.
14. Network, Proxy and Filtering Services will restart.
Note: If the Check Firewall fails you should manually run the Check Firewall
Command for information on why the command failed.
Warning: During an Apply Configuration, all Internet traffic is stopped. The Apply
Configuration may take up to one minute to complete.
CONFIGURING COMSIFTER
Stop Firewall
The Stop Firewall command will immediately shutdown the firewall and block all ports from incoming or
outgoing traffic—with the exception of port 10000—which is the port used by ComSifter for configuration.
Check Firewall
The Check Firewall command is used to verify that the new Firewall Rules are valid and that the firewall will
start. Check Firewall does not validate that the created rule will operate as you think it will, only that the firewall
will start. If you receive a failure notice, you will have to view the Check Firewall output and find the rule that
caused the failure.
Backup
Upon clicking the Backup button, ComSifter will create an internal backup of the existing Firewall Rules. A
backup should be created any time you are preparing to make changes to the Firewall Rules. In the rare event
that Check Firewall validates a new rule set but the firewall in unable to start, you will be able to return the
firewall to its previous state using the Restore feature.
Restore
The Restore button will restore the Firewall Rules captured in Backup described above. Upon clicking Restore
the ComSifter will:
15. Stop Network, Filtering, and Proxy Services
16. Load the Firewall Rules saved internally by the Backup command
17. Restart the Firewall with the backed up rules set.
18. Start Network, Filtering, and Proxy Services.
Warning: During Restore, all Internet traffic is stopped. The Restore may take up to one
minute to complete.
User Guide | ComSifter CS-8D Pro 3–45
Page 78
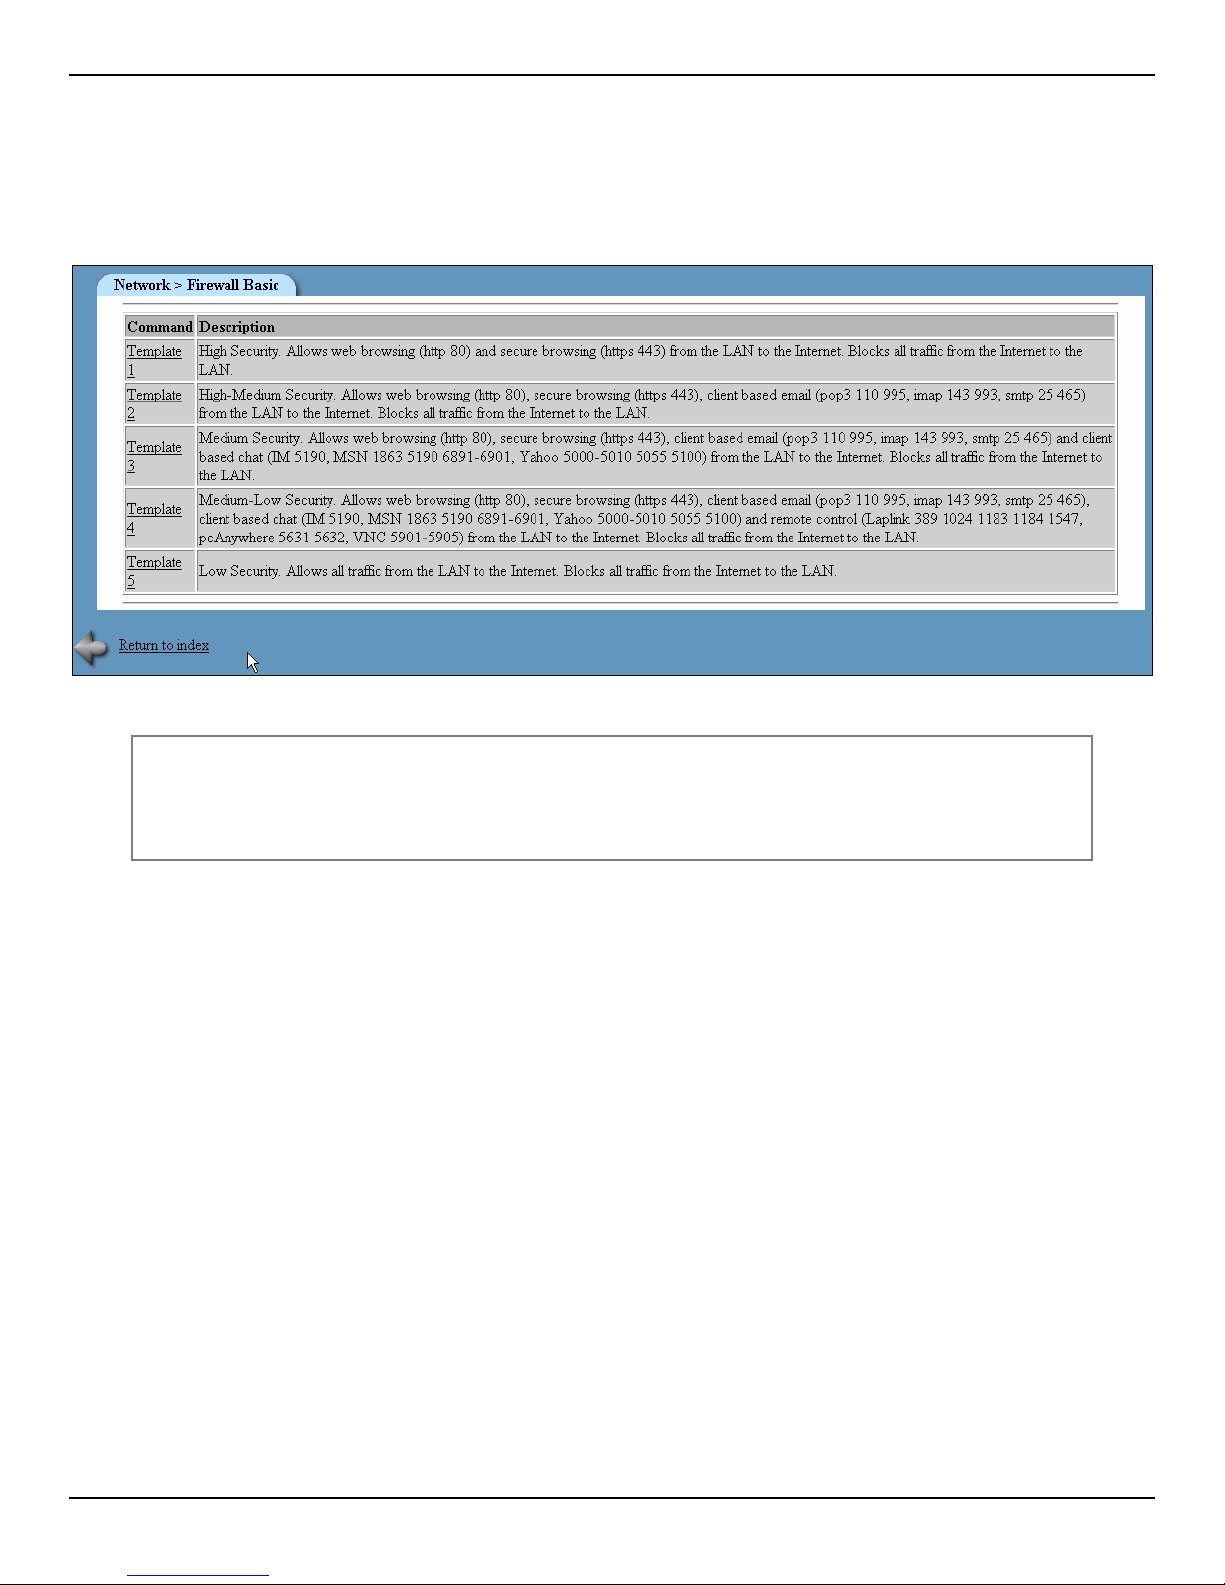
CONFIGURING COMSIFTER
Firewall Basic (Templates)
To streamline installation of ComSifter, five (5) firewall templates are included. These templates may be used
as they are, or may be used as a starting point for further modification by Firewall Advanced.
The Templates are arranged in order from highest security (all outgoing ports except 80 and 443 blocked) to
lowest security (all outgoing ports are open).
Figure 3-56: Firewall Basic
Note: Templates modify only the ports that are opened to outgoing traffic (from the
LAN to the Internet). In all Templates, all incoming ports (Internet to the LAN)
are blocked. To allow ports from the outside the appropriate rules must be
created in Firewall Advanced.
Upon selecting a Template, ComSifter will:
1. Stop Network, Filtering and Proxy Services
2. Load the Firewall Rules from the selected Template
3. Restart the Firewall with the Template rules set.
4. Start Network, Filtering and Proxy Services
Template 1, High Security
Template 1 allows no connection from the Internet to the LAN and only allows web browsing (80) and secure
web browsing (443). All other ports are blocked.
Template 2, High – Medium Security
Template 2 builds on Template 1 and adds support for email clients such as Outlook, Outlook Express, and
Eudora. POP3 (110, 995), IMAP (143, 993) and SMTP (25, 465) are opened from the LAN to the Internet.
Template 3, Medium Security
Template 3 builds on Template 2 and adds support for the popular chat programs from Instant Messenger,
Yahoo Chat, and MSN Messenger. IM (5190), MSN (1863 5190 6891-6901), and Yahoo (5000-5010 5055
5100) are opened from the LAN to the Internet.
User Guide | ComSifter CS-8D Pro 3–46
Page 79
CONFIGURING COMSIFTER
Template 4, Medium – Low Security
Template 4 builds on Template 3 and adds support for the popular remote control programs Laplink,
pcAnywhere and VNC. Laplink (389 1024 1183 1184 1547), pcAnywhere (5631 5632), VNC (5901-5905) are
opened from the LAN to the Internet.
Template 5, Low Security
Template 5 allows opens all ports from the LAN to the Internet. This setting is equivalent to the capabilities of
the firewall found in home and small business routers from companies such Linksys, Netgear, and SMC.
Warning: Although this setting may be the easiest to configure and maintain, it is the least
secure. Any program originating on a LAN computer will be able to access the
Internet without restriction.
User Guide | ComSifter CS-8D Pro 3–47
Page 80
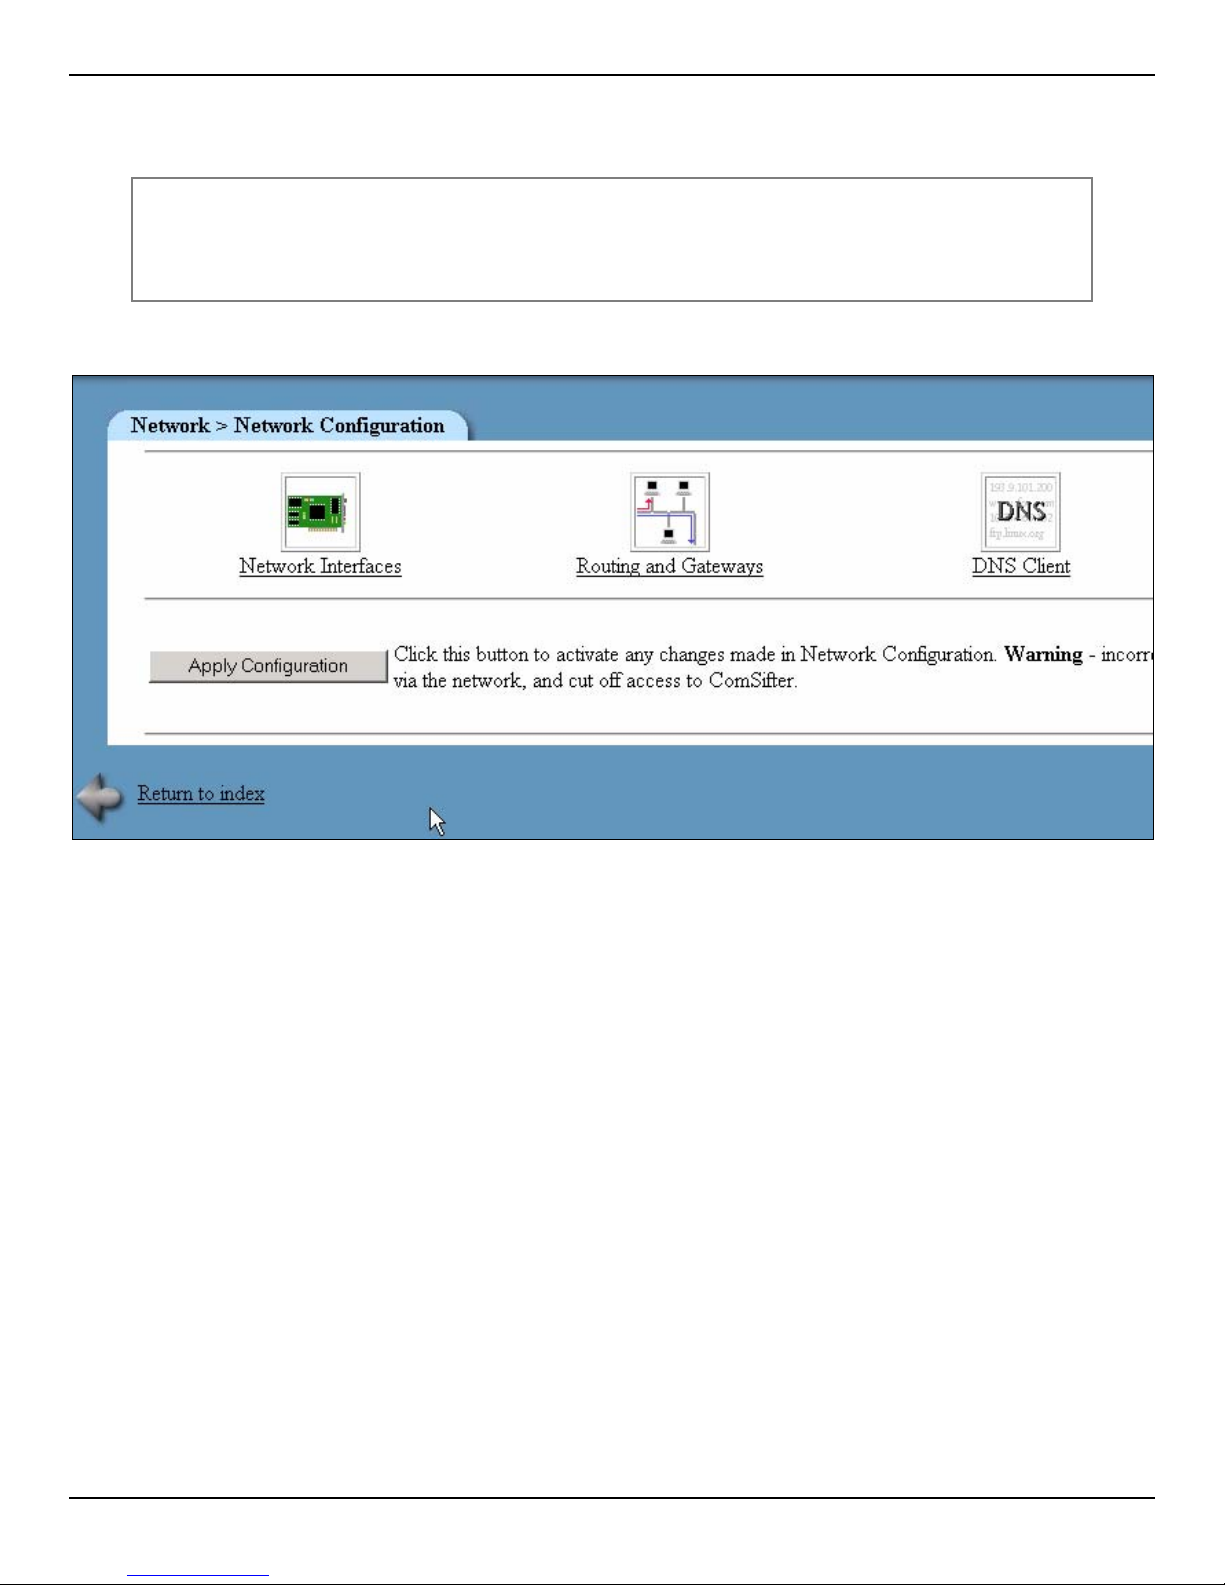
CONFIGURING COMSIFTER
Network Configuration
In this section, the Network, DNS, and Gateway settings of your network will be configured.
Warning: This section is for advanced users and should be used only under the
direction of Comsift Technical Support. ComSifter includes Network Wizards.
The wizards are designed to automatically configure most network settings
defined in this chapter and will prevent mis-configuration of the ComSifter.
To access these settings click on Network Configuration. You will be presented with the following choices:
Figure 3-57: Network Configuration Choices
Network Interfaces (IP Address Configuration)
ComSifter is configured with two Ethernet interfaces. Eth0 is connected to the WAN (cable, DSL, T1, or
upstream device); while eth1 is connected to the internal LAN. Additionally, a PPP interface is defined that will
automatically activate through eth0 when PPPoE is used.
User Guide | ComSifter CS-8D Pro 3–48
Page 81
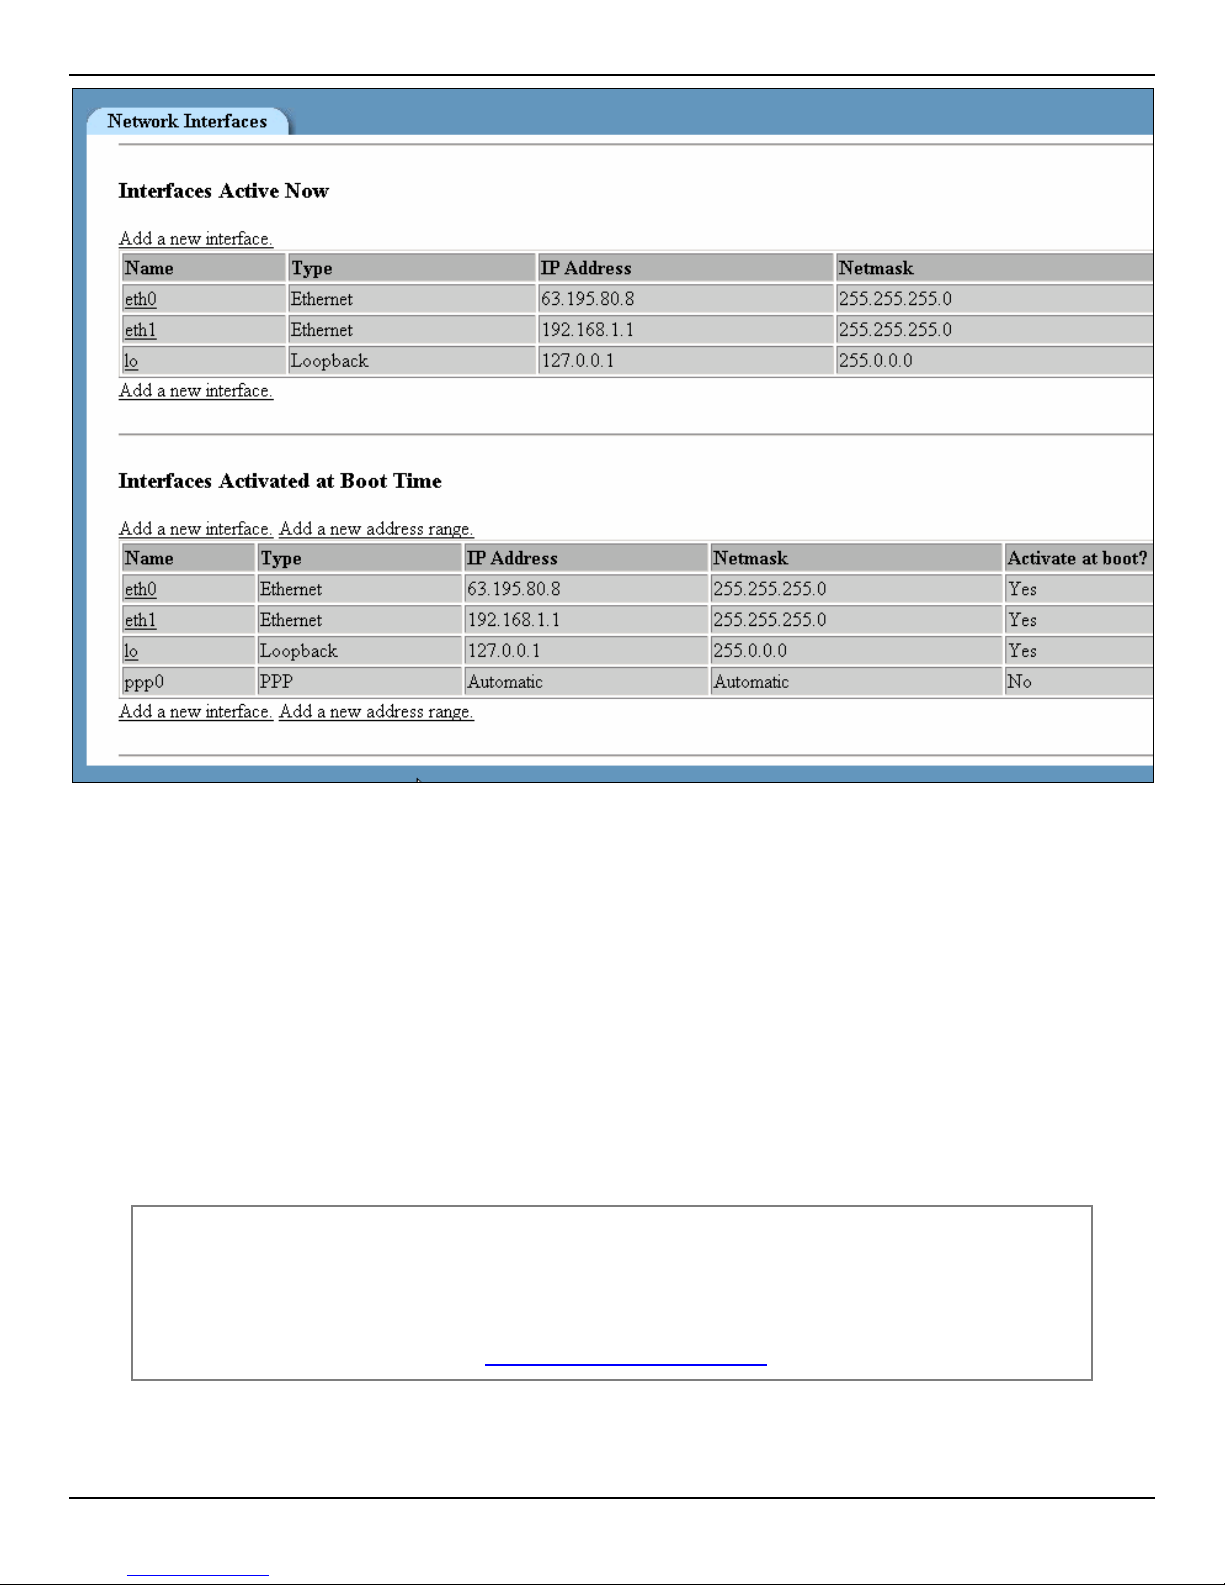
CONFIGURING COMSIFTER
Figure 3-58: Selecting Network Interface
There are two sections to Network Interfaces configuration.
Interfaces Active Now
The first of these is Interfaces Active Now. Interfaces Active Now reflects the current configuration. Any
changes made will only last until the next time the ComSifter is restarted. Then the setting in Interfaces Active
at Boot Time will become Interfaces Active Now. Interfaces Active Now is only used for temporarily trying out a
new setting and is not used in the normal configuration of ComSifter.
Interfaces Active at Boot Time
Normal configuration of ComSifter networking is done in this area. Any changes made here will be permanent
ComSifter is factory configured to an IP of 192.168.100.1 with a subnet mask of 255.255.255.0. If your
network does not use these settings, then change the IP and subnet mask of ComSifter as described below.
Warning: Entering the wrong IP address and subnet mask will cause you to lose
communication with ComSifter. If you do not remember the information entered
you will not be able to reconnect with ComSifter. Also, insure that IP Access
Control (see Security Configuration) is not configured to an address that will
prevent re-logging into ComSifter. If you forget or miss-configure the IP address
refer to the section Recovering a lost IP address.
WAN Interface Settings (eth0)
Under Interfaces activated at Boot Time click on eth0.
User Guide | ComSifter CS-8D Pro 3–49
Page 82
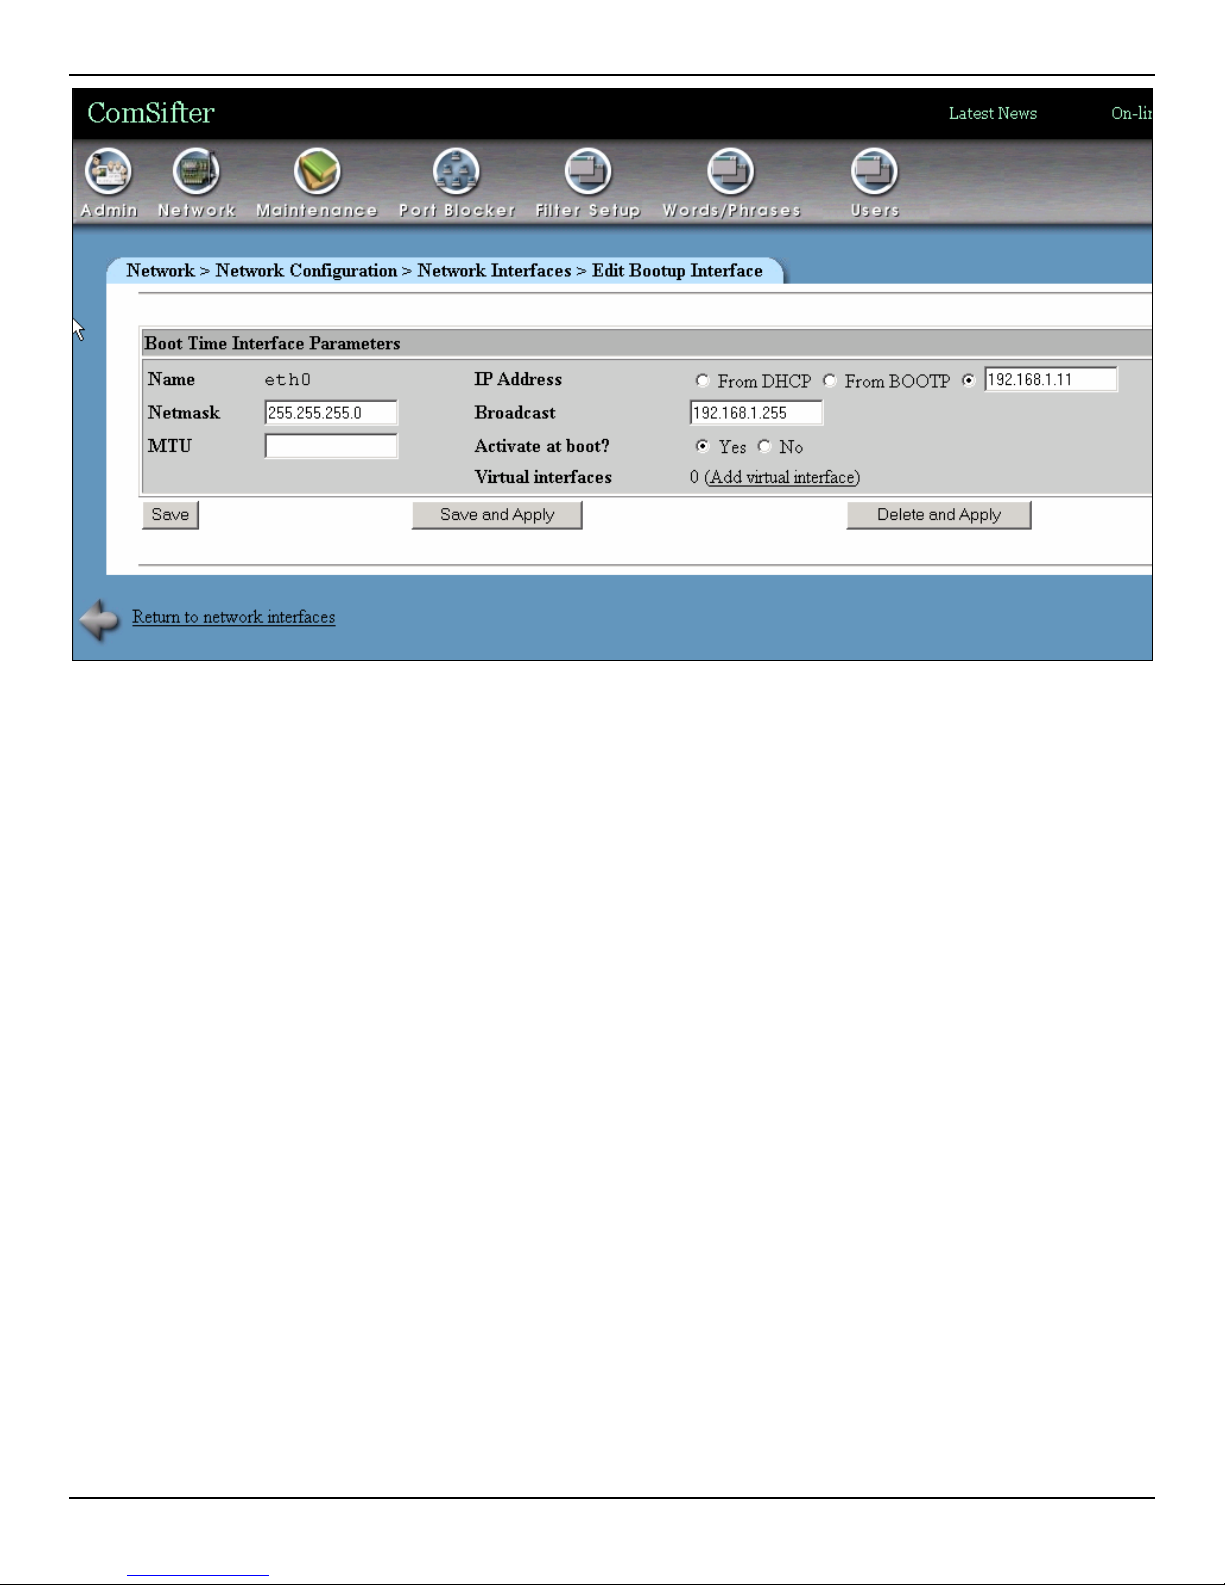
CONFIGURING COMSIFTER
Figure 3-59: Entering IP and Subnet Mask
1. Netmask – Change the subnet mask to reflect your network requirements.
2. MTU – Leave the MTU blank (default) unless your network has specia l requirements.
3. IP Address – If you obtain the external IP from the attached cable, DSL, T1 modem, or upstream device
from DHCP then click on DHCP. If you have been assigned a static IP then click the butto n next to then
blank field then enter the IP in the blank field.
4. Broadcast – Enter the broadcast address for ComSifter, if d ifferent from default. Norma lly the broadcast
address ends in 255.
5. Activate on Boot – Insure that Yes is selected.
LAN Interface Settings (eth1)
1. Netmask – Change the subnet mask to reflect your network requirements.
2. MTU – Leave the MTU blank (default) unless your network has specia l requirements.
3. IP Address – Enter the Internal LAN address for ComSifter. Th is will also be t he gateway for client
computers accessing the Internet.
4. Broadcast – Enter the broadcast address for ComSifter, if d ifferent from default. Norma lly the broadcast
address ends in 255.
5. Activate on Boot – Insure that Yes is selected.
If your network is using only one network range (Class C — i.e. 192.168.1.xxx) then click on Save and
continue to Routing and Gateways.
User Guide | ComSifter CS-8D Pro 3–50
Page 83
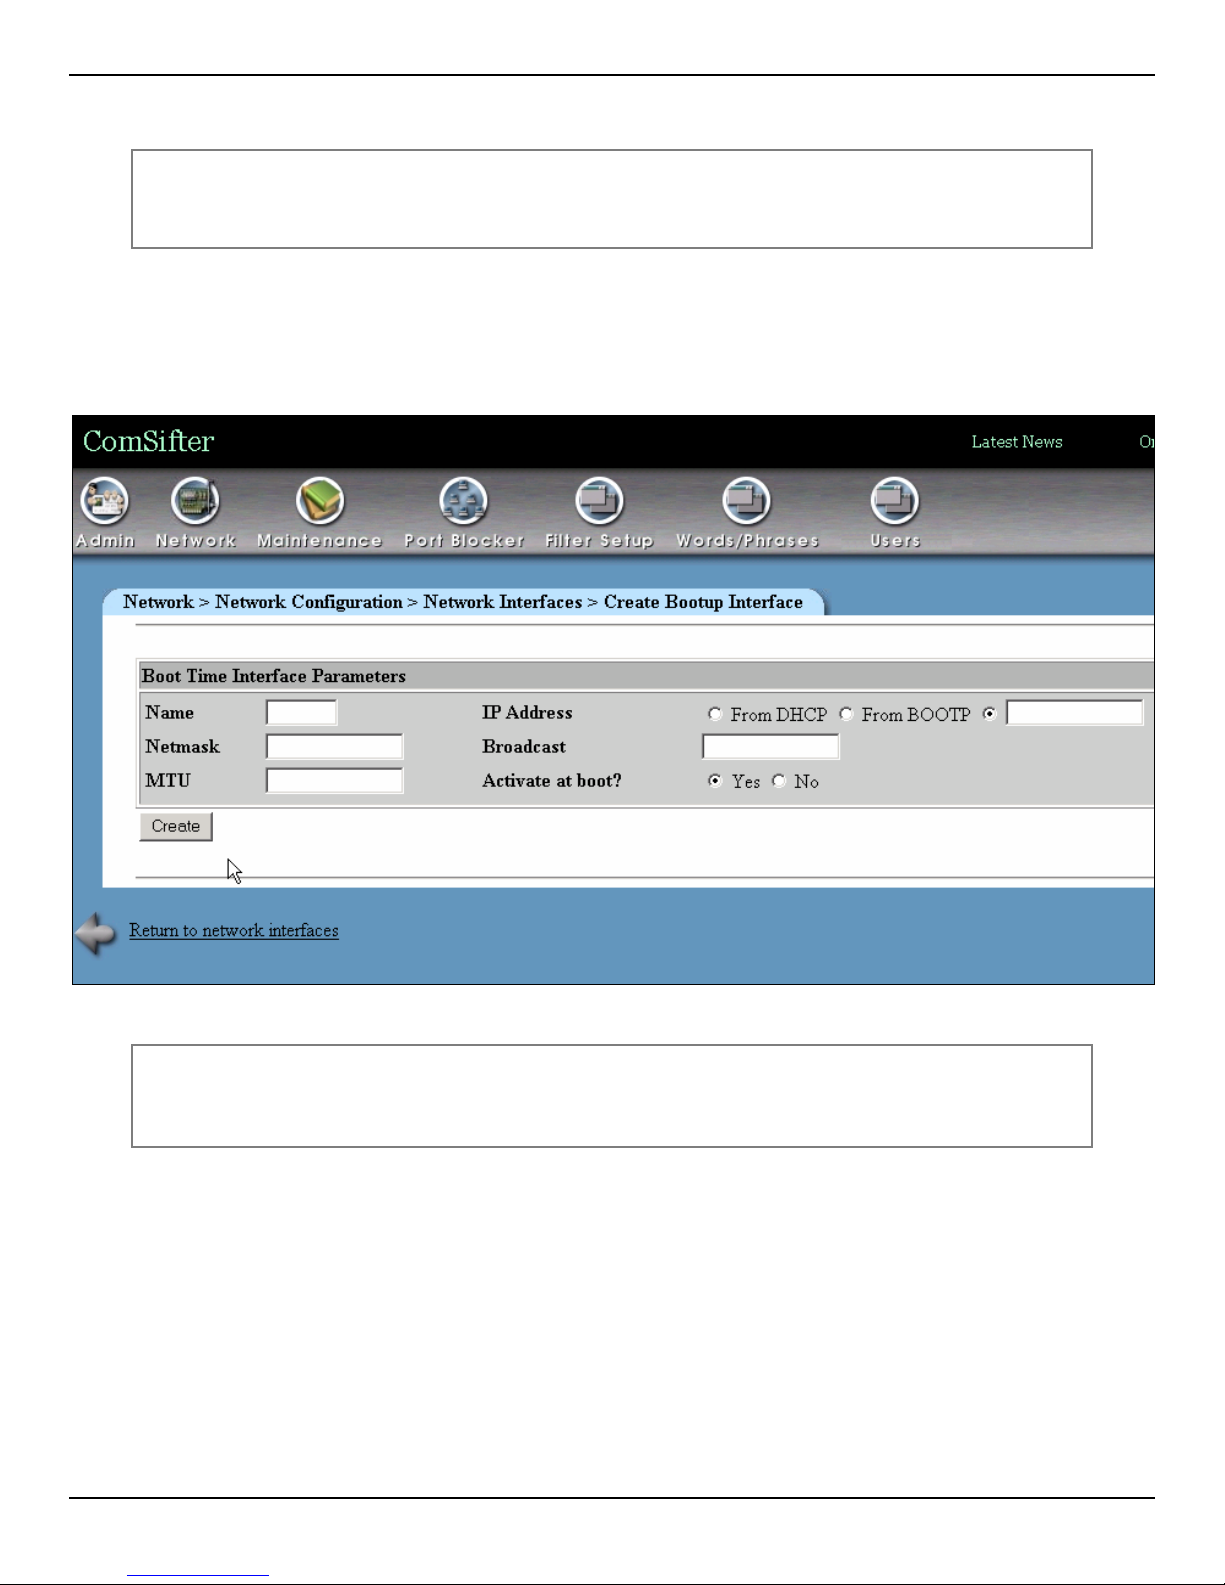
CONFIGURING COMSIFTER
Virtual Interfaces
Note: The Virtual Interfaces section is for advanced technicians only. The majority of
networks will not need Virtual Interfaces. If you have any questions please
contact Comsift Technical Support.
ComSifter has the ability to route multiple networks to one Internet gateway. For instance, it is possible for two
Class A networks—a 10.xxx.xxx.xxx network and a 192.xxx.xxx.xxx network—to both use a
192.xxx.xxx.xxx gateway. This is accomplished by clicking on Add Virtual Interface as shown in Figure 3-
7. When a virtual interface is added, ComSifter will need an IP on the new network. Enter the information for
the virtual interface and click on Create.
Figure 3-60: Adding a Virtual Interface
Note: If your network consists of two or more Class B networks (i.e.
192.168.xxx.xxx) it is more straightforward to open the netmask on the main
Interface to 255.255.0.0 than to add virtual interfaces.
User Guide | ComSifter CS-8D Pro 3–51
Page 84
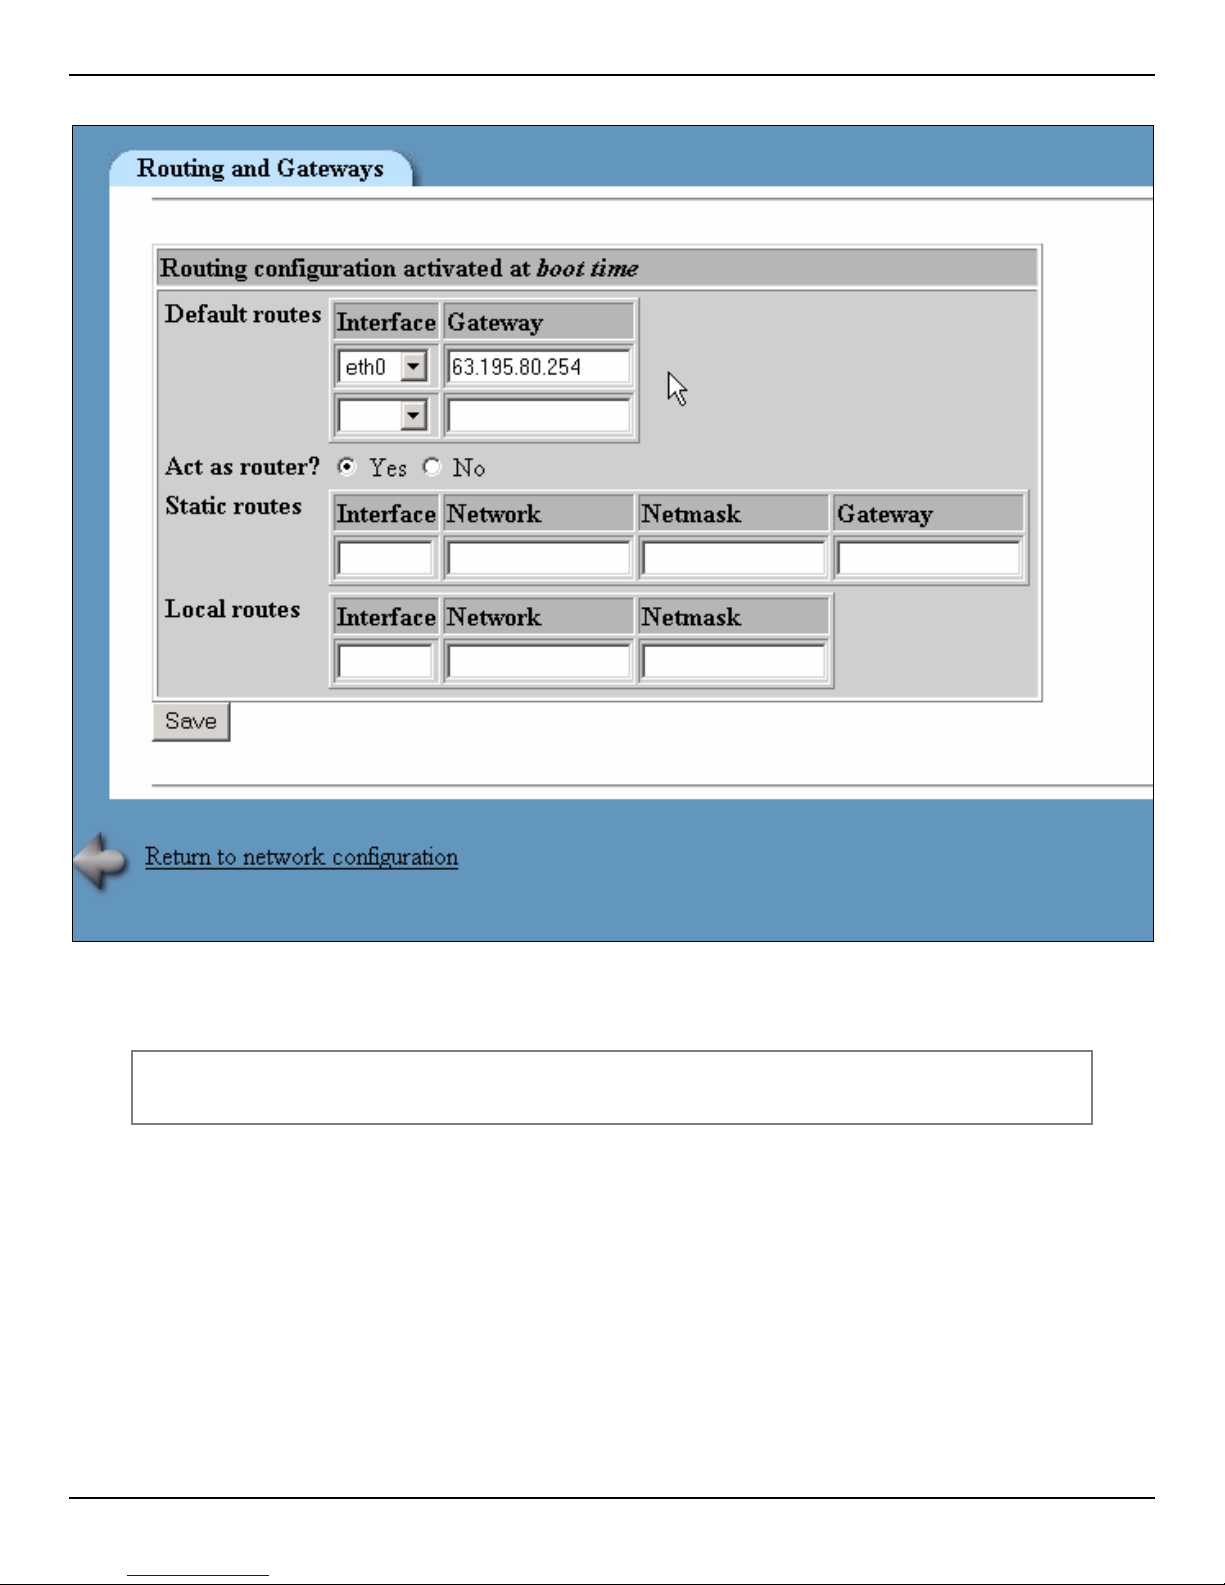
Routing and Gateways
CONFIGURING COMSIFTER
Figure 3-61: Entering Gateway IP
Enter the IP address of the External Gateway that ComSifter will use to access the Internet.
Note: The remaining options are not used in normal operation and may be left blank
(default).
When completed click on Save.
User Guide | ComSifter CS-8D Pro 3–52
Page 85
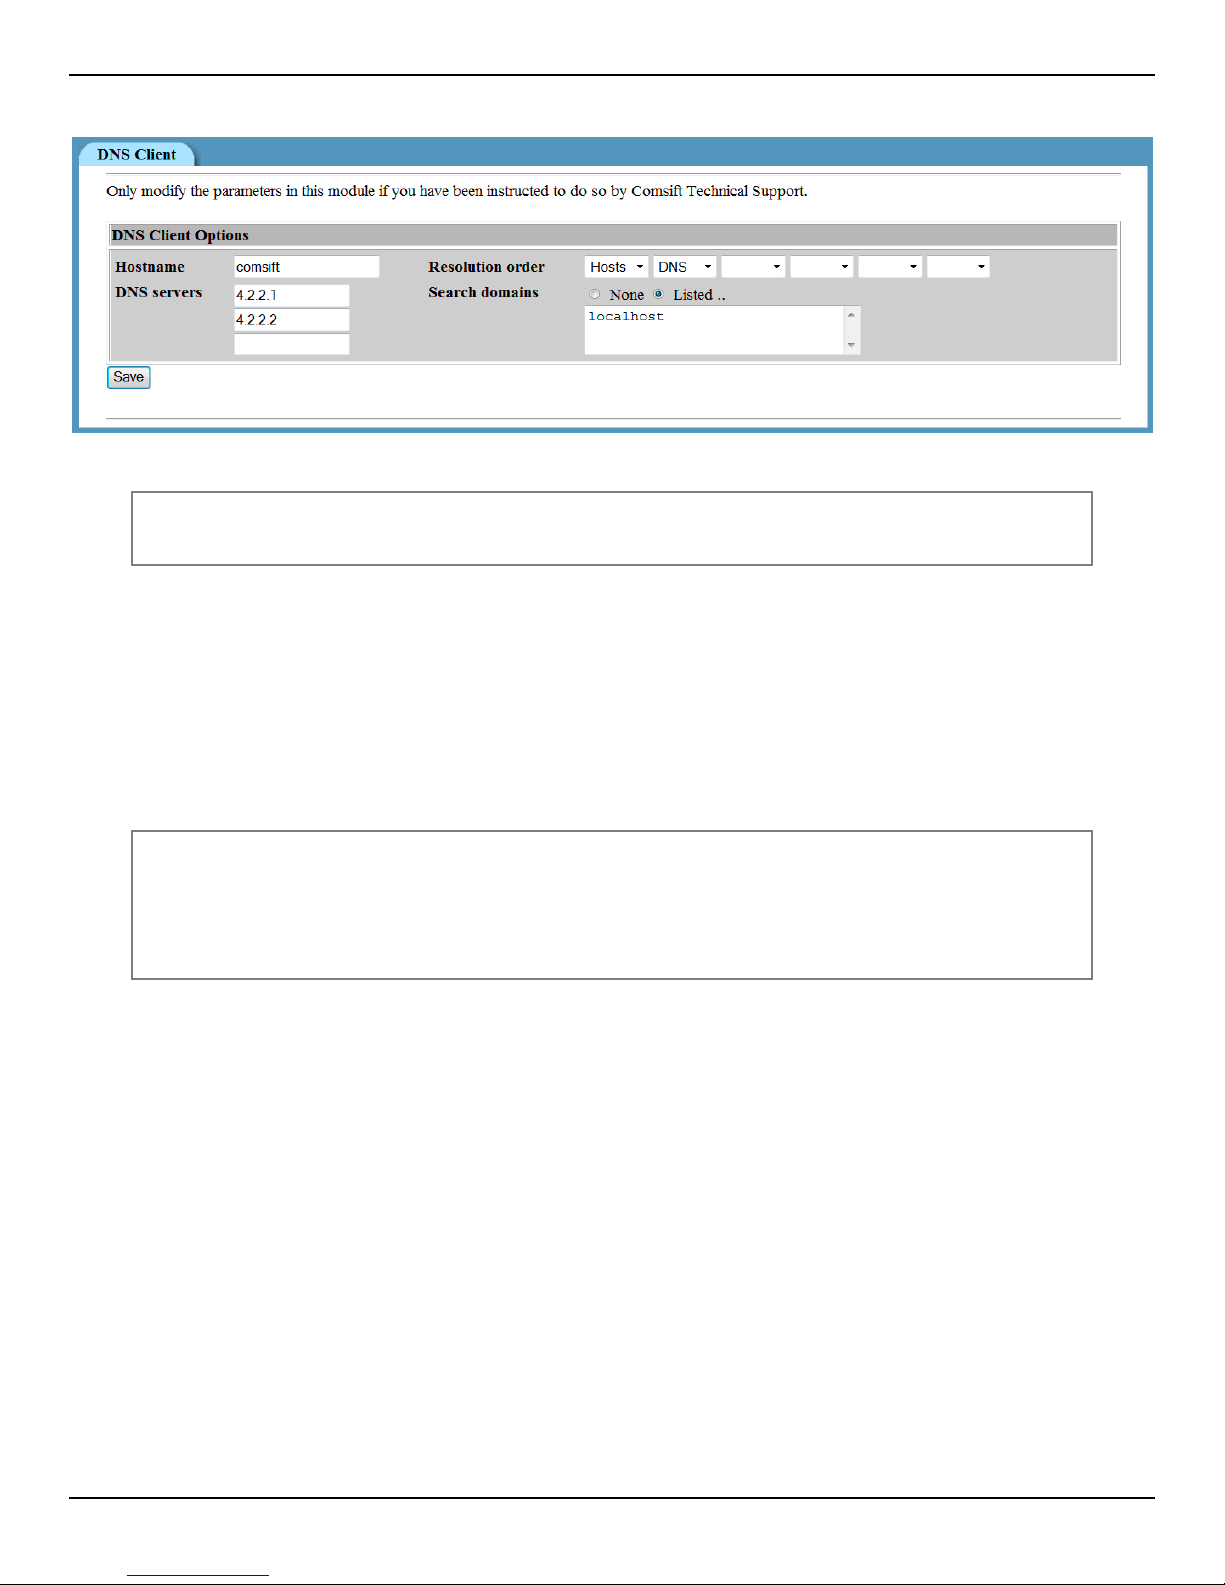
DNS
Figure 3-62: Entering DNS Settings
Warning: Do not change the Hostname, Resolution order, or Search domains unless
instructed to do so by Comsift Technical Support.
Enter the DNS server settings that ComSifter will use to resolve Domain Names.
Required settings are:
CONFIGURING COMSIFTER
1. Hostname – must be ‘comsift’.
2. DNS servers – Enter the DNS server names that ComSifter will use to resolve Domain Names.
3. Resolution order – must be Hosts, DNS (remaining four entries are left blank).
4. Search domains – must be Listed, ‘localhost’.
Note: ComSifter includes a Smart DNS feature. Every 15 minutes ComSifter queries
the defined DNS servers and calculates their lookup times. If the Secondary
DNS server is faster than the Primary DNS server by more than 200ms over 3
queries in a 45 minute period, ComSifter will make the faster Secondary DNS
server the Primary DNS server.
When completed click on Save.
User Guide | ComSifter CS-8D Pro 3–53
Page 86
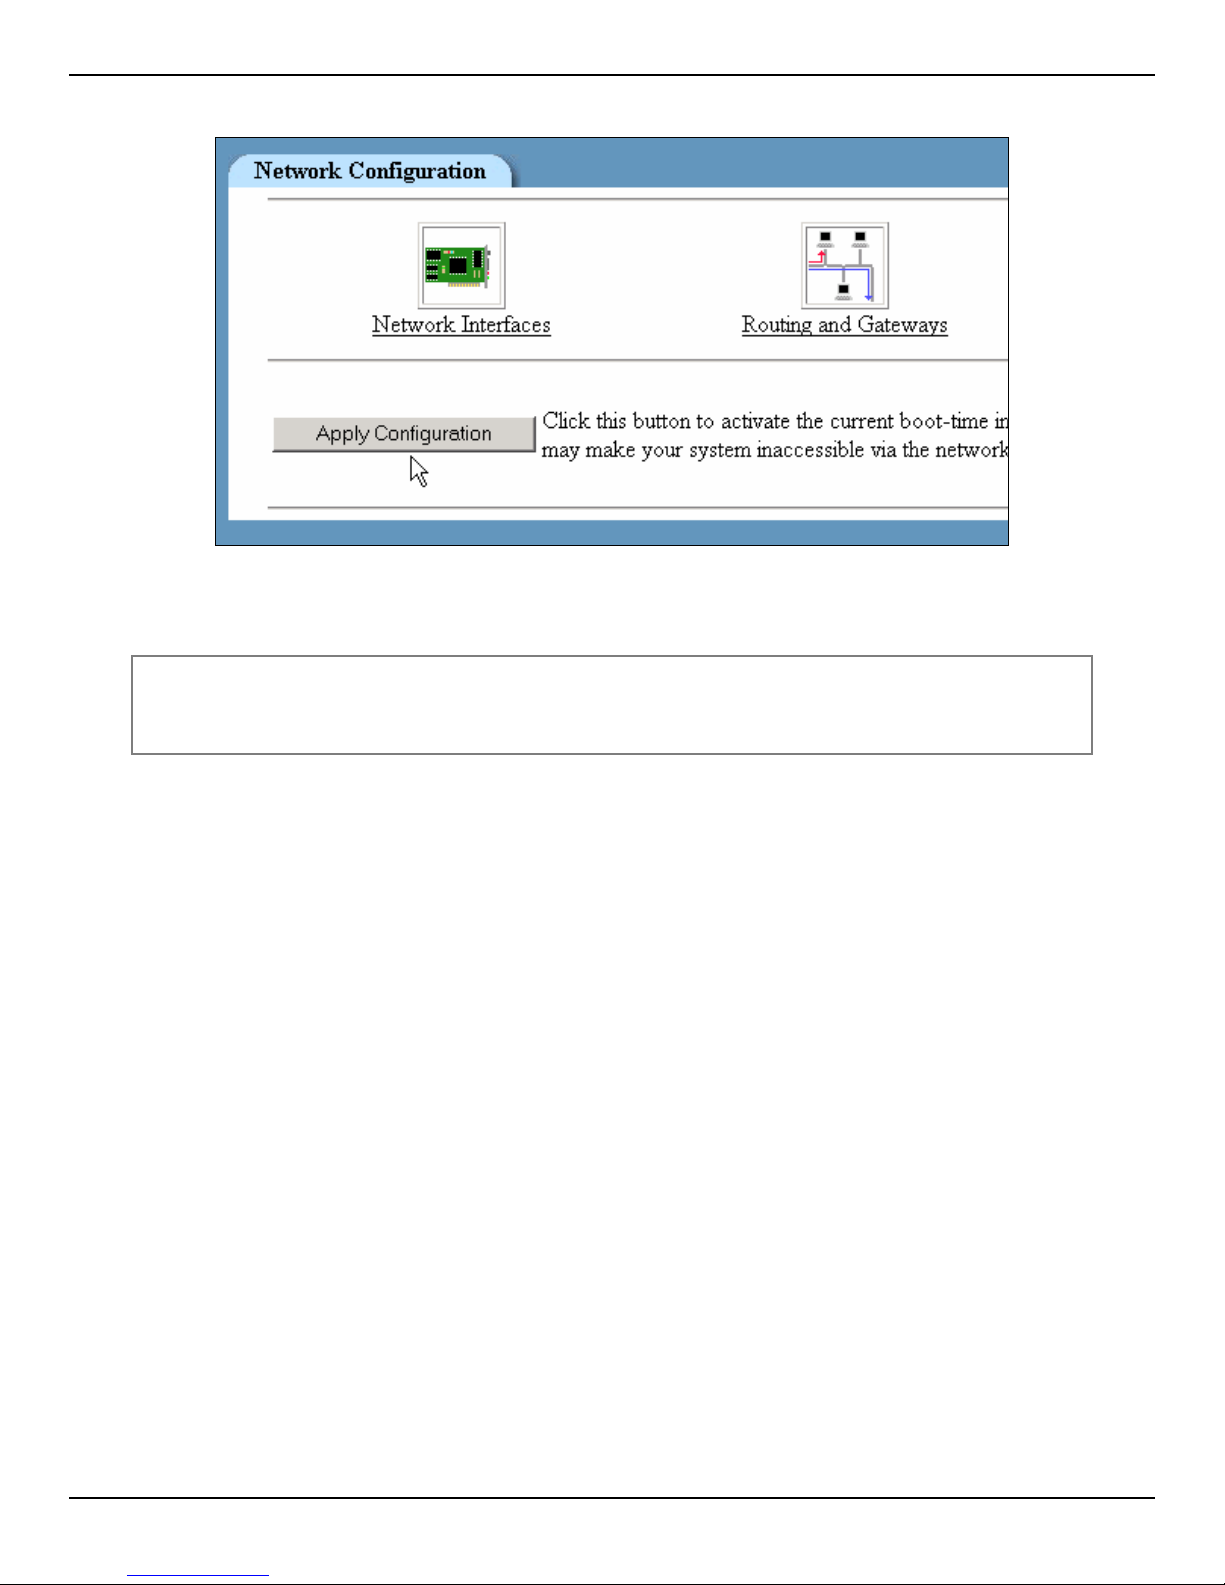
CONFIGURING COMSIFTER
Completing the DNS/Gateway Configuration
Figure 3-63: Apply Configuration
The final step in completing the DNS/Gateway configuration is to click the Apply Configuration button.
Warning: This step will change the IP address of ComSifter. If you have changed the IP of
ComSifter, you must reconfigure the computer you are using to configure
ComSifter, to reflect the new IP and netmask.
Recovering a lost IP address
ComSifter includes a failsafe method to determine network settings in the event that the settings are forgotten
or miss-configured.
1. Attach a standard VGA compatible monitor and keyboard to the ComSifter.
2. Restart the ComSifter.
3. At the end of the start up process, you will see a screen that says type YES to enter the Emergency
Console. You have 30 seconds to enter YES.
4. Upon accessing the Emergency Console, you will be prompted to enter a number to View Network
Settings. The Network Settings will include the internal IP address of the ComSifter.
User Guide | ComSifter CS-8D Pro 3–54
Page 87
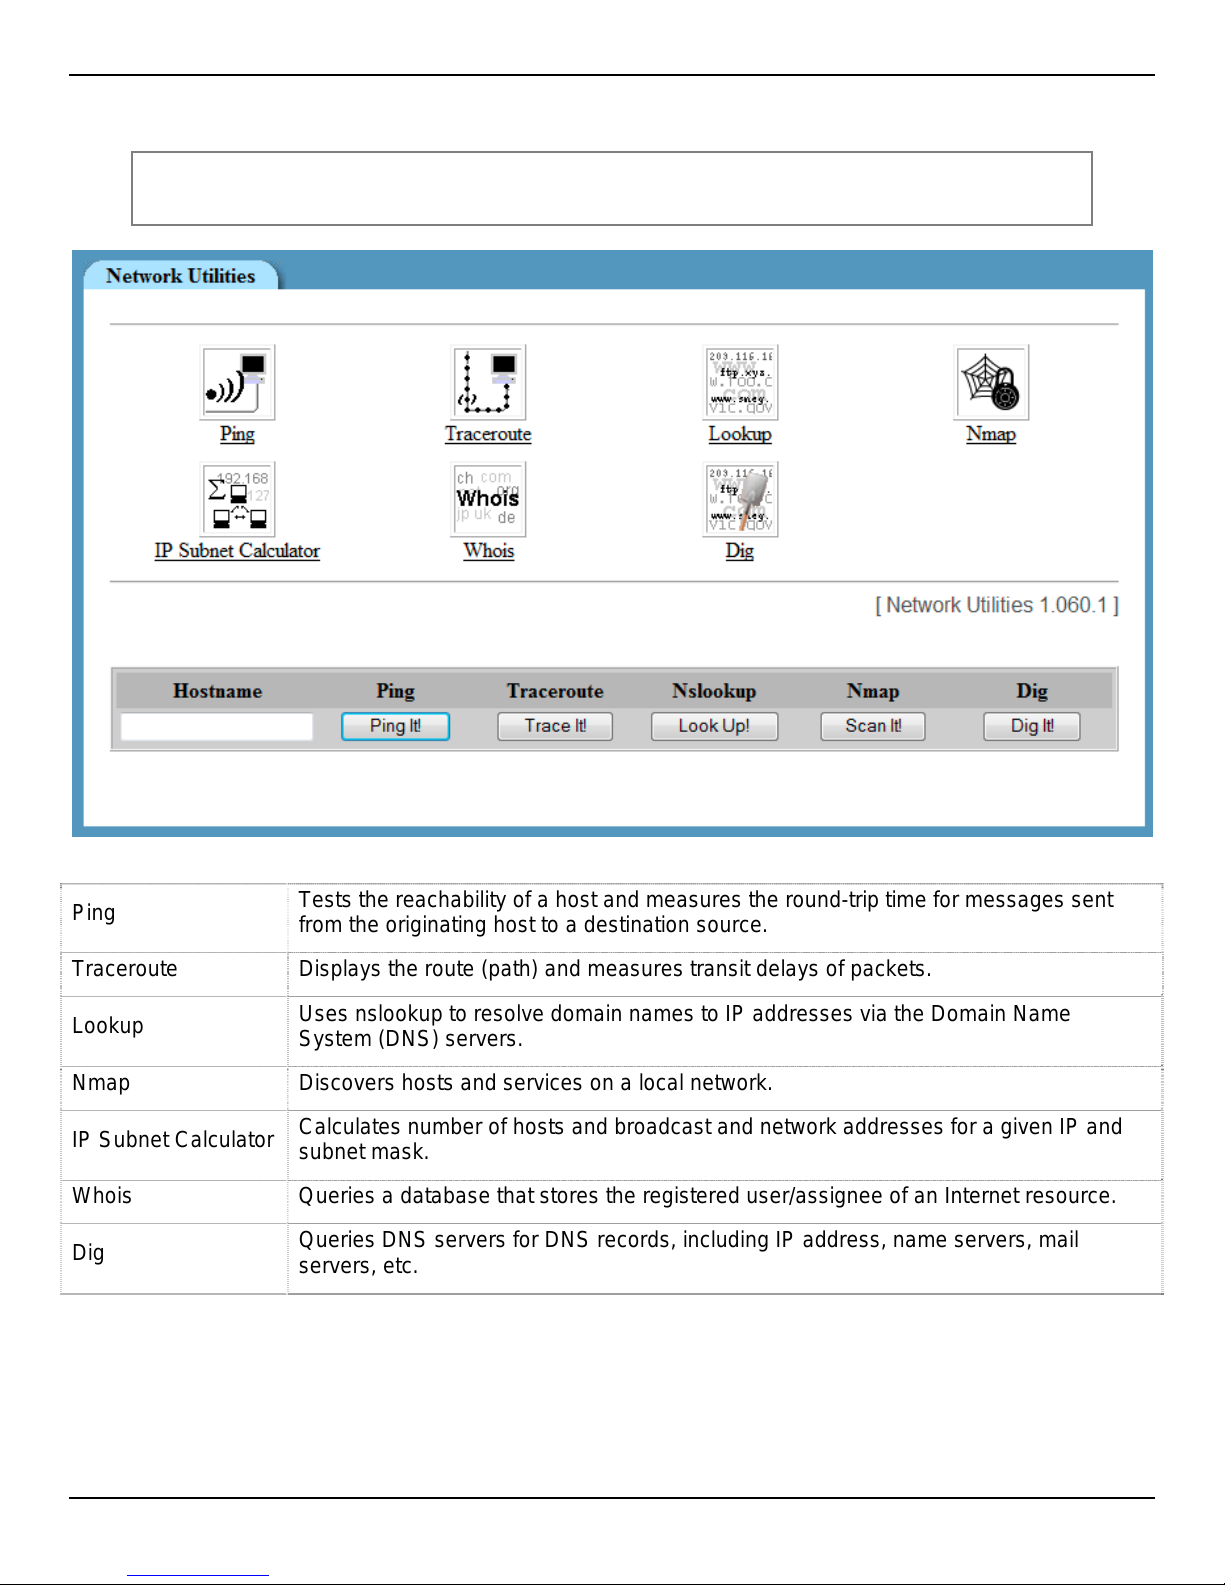
Network Utilities
Note: Network Utilities use is outside the scope of typical ComSifter use, and will not
CONFIGURING COMSIFTER
be covered in detail in this user guide.
Figure 3-64: Network Utilities
Ping
Tests the reachability of a host and measures the round-trip time for messages sent
from the originating host to a destination source.
Traceroute Displays the route (path) and measures transit delays of packets.
Lookup
Uses nslookup to resolve domain names to IP addresses via the Domain Name
System (DNS) servers.
Nmap Discovers hosts and services on a local network.
IP Subnet Calculator
Calculates number of hosts and broadcast and network addresses for a given IP and
subnet mask.
Whois Queries a database that stores the registered user/assignee of an Internet resource.
Dig
Queries DNS servers for DNS records, including IP address, name servers, mail
servers, etc.
User Guide | ComSifter CS-8D Pro 3–55
Page 88
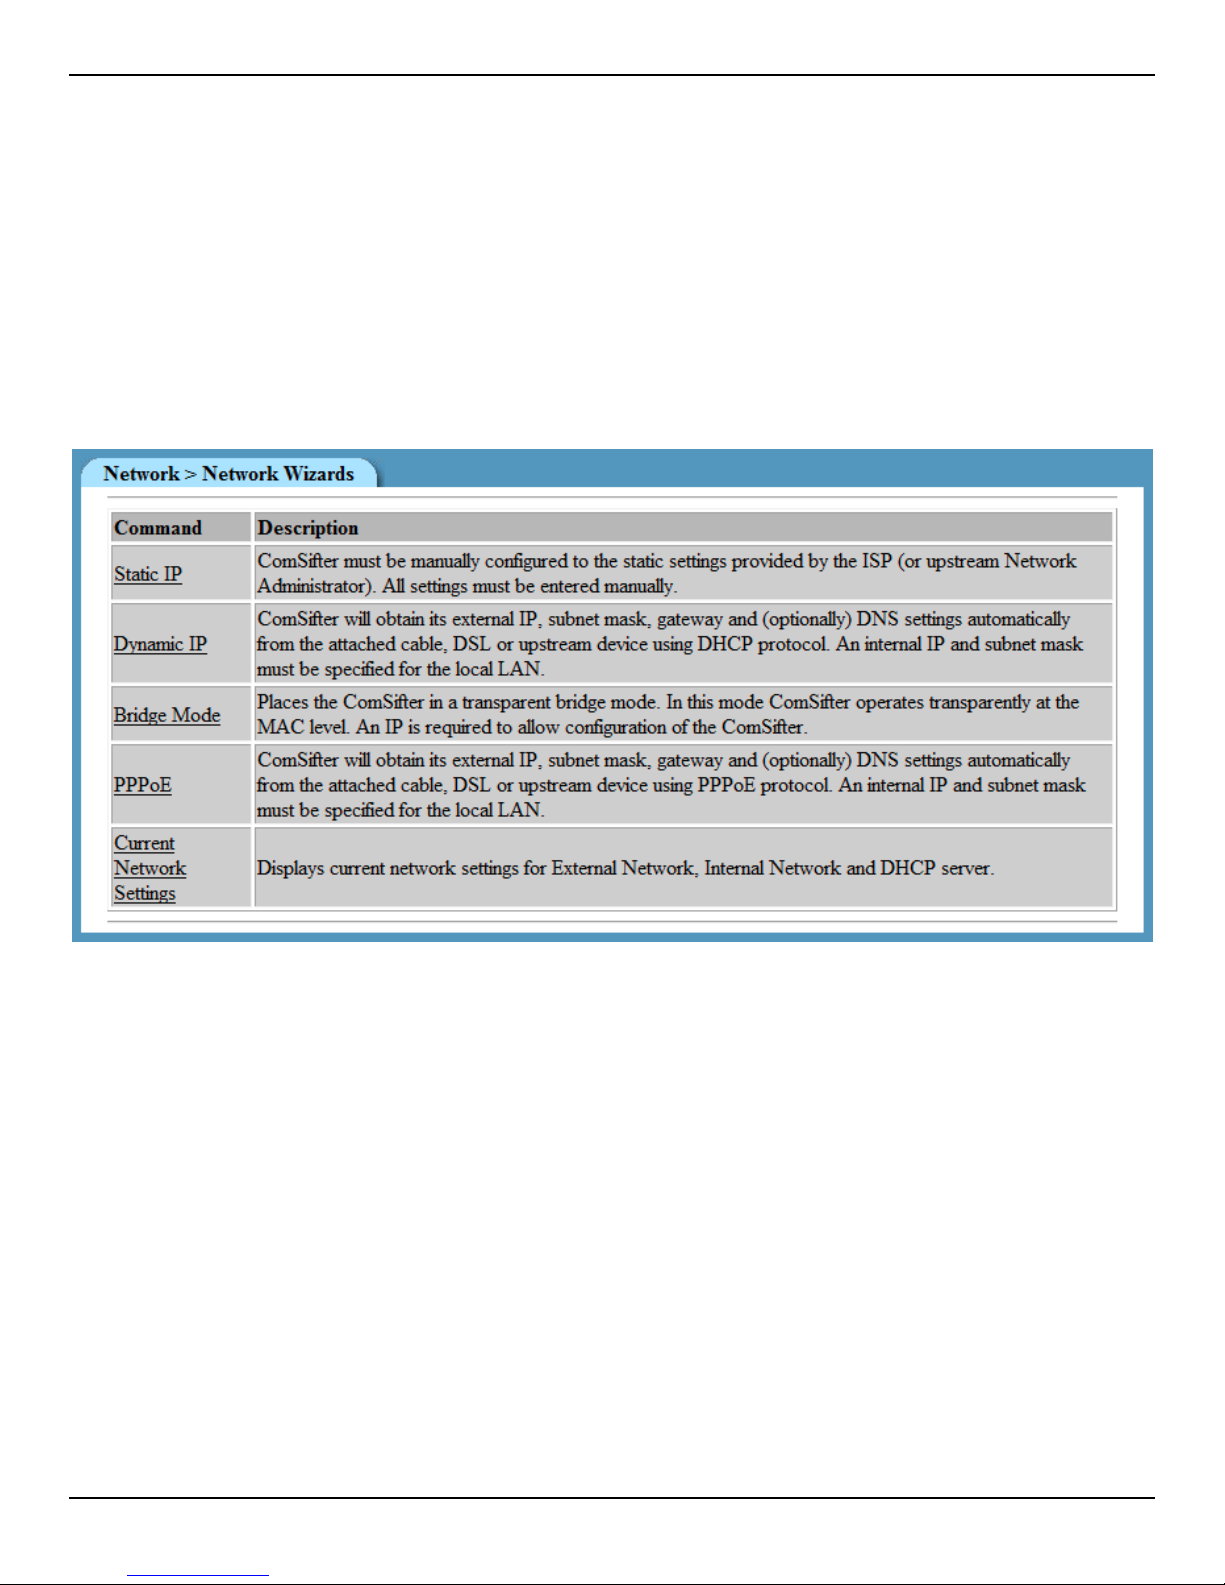
CONFIGURING COMSIFTER
Network Wizards
Network Wizards may be used to quickly configure your ComSifter. Depending on the Wizard selected the
following parameters will be set:
A Static, DHCP, Bridge, or PPPoE connection method.
External IP, Netmask, and Gateway settings.
A Firewall Basic Template.
Internal IP and Netmask.
Non-Stop peer address.
DNS Settings (optional).
DHCP Server settings (optional).
Figure 3-65: Network Wiza rds
After selecting a Network Wizard, further refinements to network and firewall settings may be performed from
ADSL Client, Network Configuration, and Firewall Advanced.
User Guide | ComSifter CS-8D Pro 3–56
Page 89
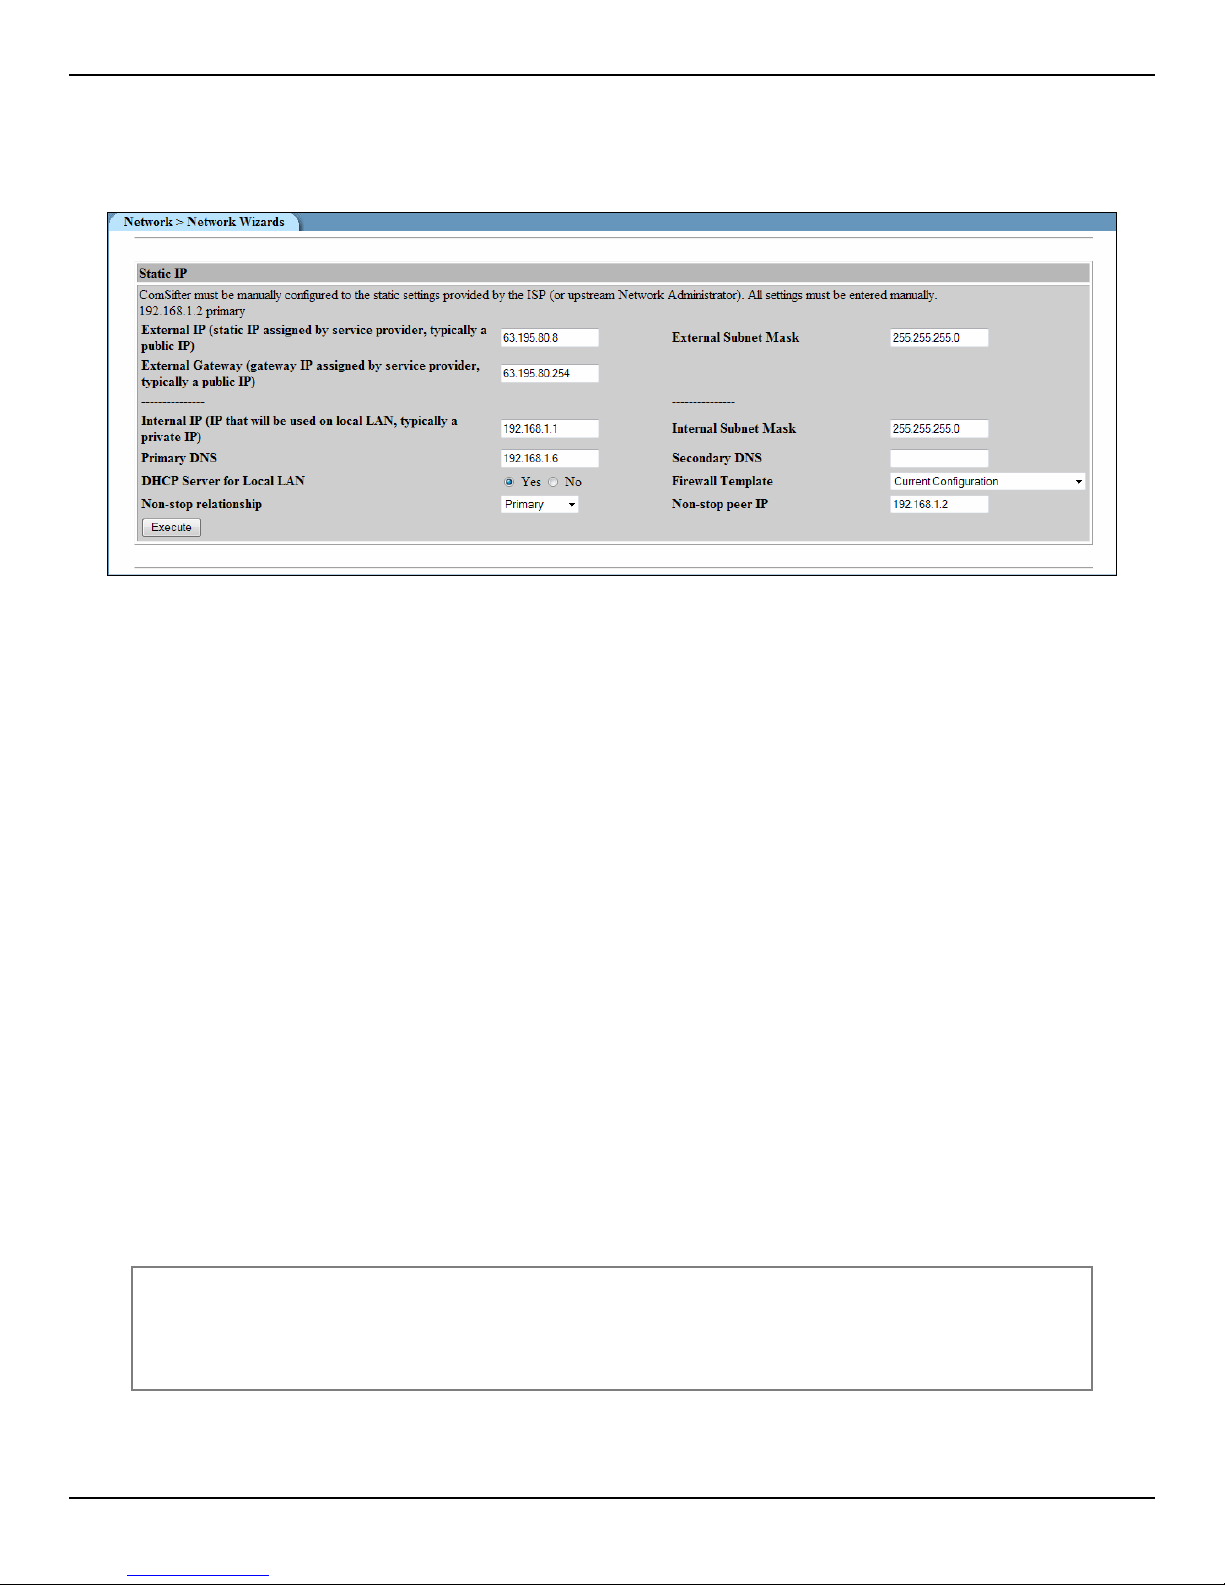
CONFIGURING COMSIFTER
Static IP
Use this wizard if your connection to the Internet uses a static IP that does not change. Typically, the service
provider assigns this IP address.
Figure 3-66: Network Wizard – Static IP
External IP
Enter the external IP for your installation. Typically, this will be assigned by your service provider and will be a
public IP accessible from the Internet. The format for this entry is xxx.xxx.xxx.xxx such as 63.195.80.100.
External Subnet Mask
Enter the External Subnet Mask for your installation. Typically, your service provider will assign the subnet
mask. The format for this entry is xxx.xxx.xxx.xxx such as 255.255.255.0.
External Gateway
Enter the External Gateway for your installation. Typically, your service provider will assign the gateway
address. The format for this entry is xxx.xxx.xxx.xxx such as 63.195.80.1.
Internal IP
Enter the Internal IP for your installation. This may be any Class A, B, or C Internet address, but typically will
be a non-routable address in the following IP ranges:
10.0.0.0
90.0.0.0
172.0.0.0
192.168.0.0
The format for this entry is xxx.xxx.xxx.xxx such as 192.168.0.1.
Note: Using a non-routable IP address adds an extra layer of security to your
installation as these addresses may not be used directly on the Internet.
Instead, they must be translated to the public IP before going out on the
Internet.
User Guide | ComSifter CS-8D Pro 3–57
Page 90
CONFIGURING COMSIFTER
Internal Subnet Mask
Enter the Internal Netmask for your installation. Typically, this will be 255.255.255.0. This setting will allow
all 254 IP addresses of the internal IP defined above.
Primary DNS
Enter the Primary DNS settings for your network. This setting determines where ComSifter will go to resolve
domain names to IP numbers.
Note: If ComSifter is installed in a network that uses a Domain Controller (Windows
2000/2003/2008 Server) then best practices suggest for ComSifter to use the
same Domain Controller for DNS. Enter the IP address of the Domain
Controller.
Note: ComSifter includes DNS forwarding. ComSifter will listen to the LAN network for
DNS requests. If a request is received, ComSifter will forward the request to the
defined DNS server. This feature may simplify LAN installation as ComSifter
may be used as the Primary DNS.
Secondary DNS
Enter the Secondary DNS settings for your network. This field is optional.
Note: ComSifter includes a Smart DNS feature. Every 15 minutes ComSifter queries
the DNS servers and calculates their lookup times. If the Secondary DNS server
is faster than the Primary DNS server by more than 200ms over 3 queries in a
45 minute period, ComSifter will make the faster Secondary DNS server the
Primary DNS server.
User Guide | ComSifter CS-8D Pro 3–58
Page 91
CONFIGURING COMSIFTER
DHCP Server for Local LAN
If enabled, ComSifter will provide DHCP Server services for the network. Default settings for DHCP Server are:
Scope – xxx.xxx.xxx.30–xxx.xxx.xxx.230.
Client Lease time – Eight (8) Days.
Client DNS Settings – Settings described in Primary and Secondary DNS.
Client Gateway – ComSifter’s Internal IP.
Note: If the network that ComSifter is installed into uses a Domain Controller
(Windows 2000/2003/2008 Server) then best practices suggest that the Domain
Controller provide DHCP Services. If so, do not enable ComSifters DHCP
Server.
Firewall Template
Select a Firewall Template from the drop down box. Firewall Templates are described in this manual under
Firewall Basic (Templates).
Non-Stop R
elationship
This field defines if this ComSifter is a single, primary, or a secondary device.
Single – Non-Stop operation is disabled. The ComSifter will act as a single d evice.
Primary – The ComSifter will act the primary device. All configurations, with the exception of usernames,
passwords, and admin roles, should be done from this device.
Secondary – The ComSifter will act as the secondary device. Every five minutes it will query the primary for
any configuration changes. If there are any configurat ion changes, it will apply the changes approp riately.
Non-Stop Peer IP
This field is used to enter the IP of the second ComSifter that makes up a Non-Stop pair.
User Guide | ComSifter CS-8D Pro 3–59
Page 92
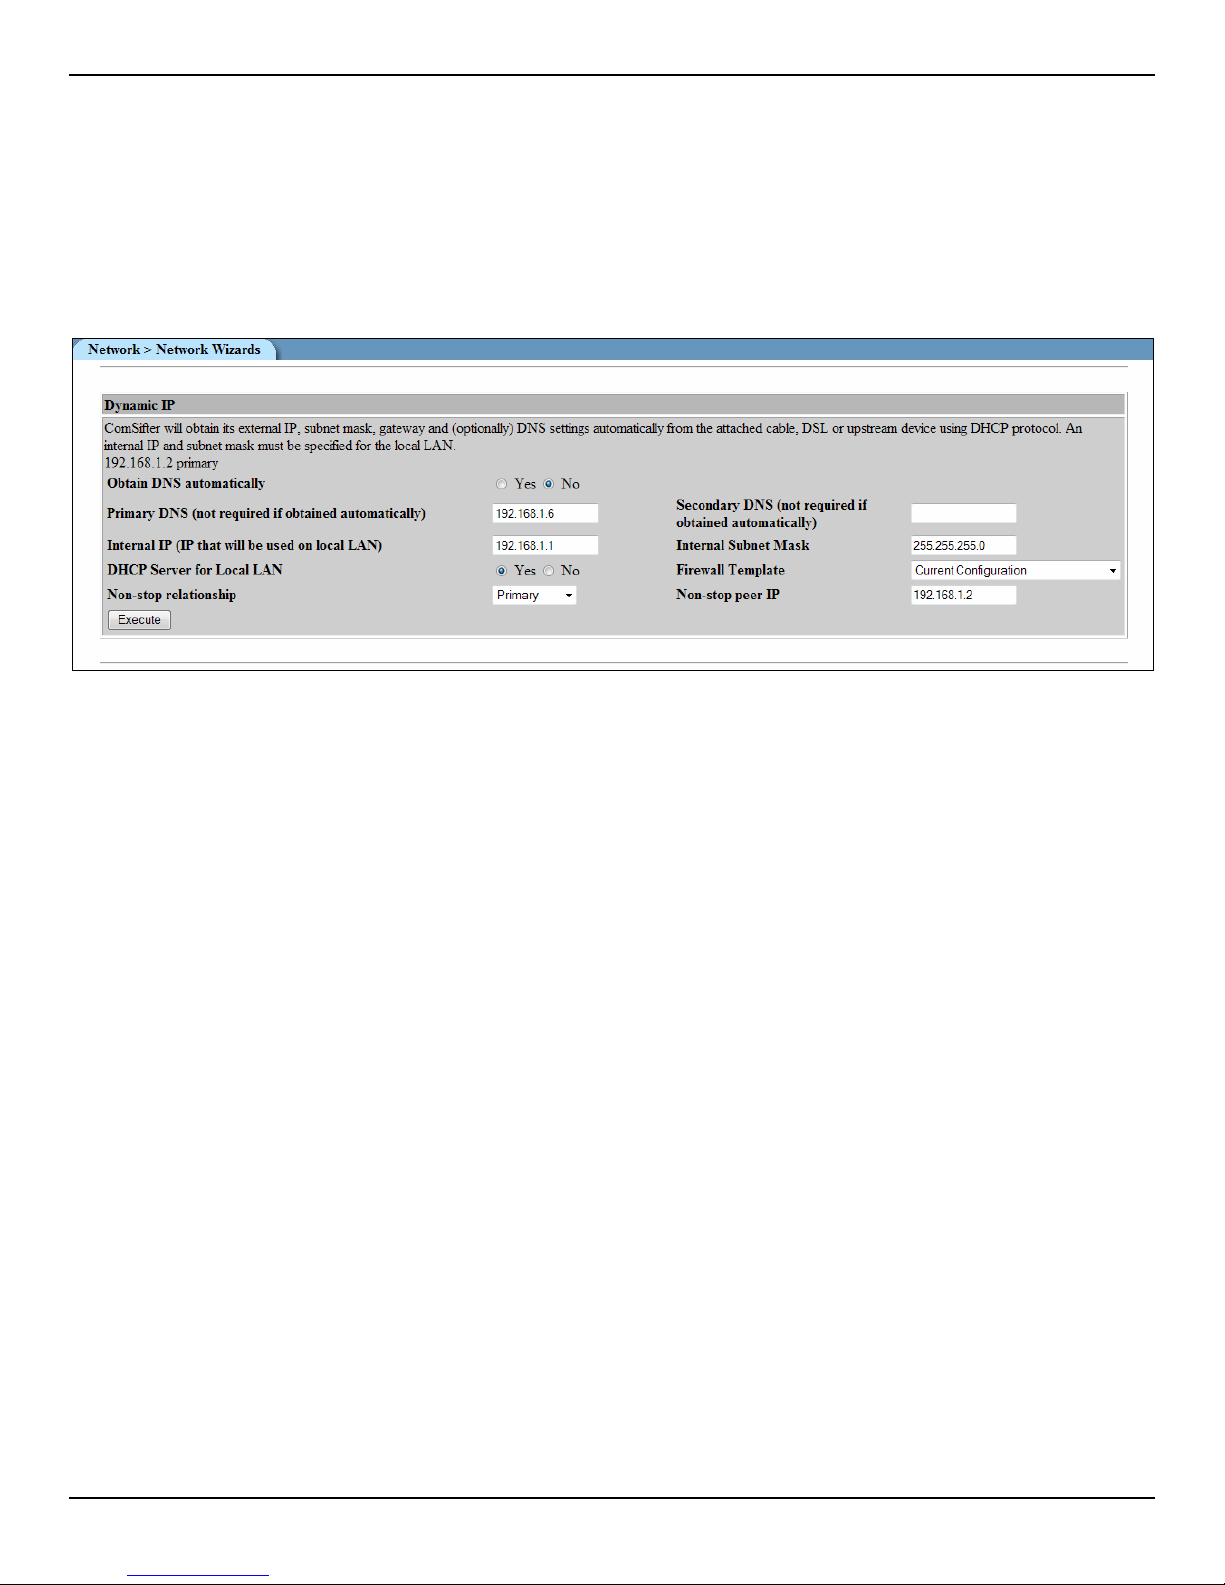
CONFIGURING COMSIFTER
Dynamic IP
Use this wizard if your service provider does not supply a permanent or static IP. Dynamic IP uses the DHCP
protocol to obtain an External IP, Netmask, and Gateway from the attached cable, DSL, T1, or upstream
device. Also included is a lease time—or the amount of time that the information will be valid. The lease time is
determined by the provider of the information and may range from hours to days. When the lease expires,
ComSifter will ask for a new lease. The lease may contain the same information or may contain new
information. In this arrangement, the external IP cannot be guaranteed as the provider may change it
dependent on their network requirements.
Figure 3-67: Network Wizard – Dyn amic IP
Configuration of Dynamic IP is the same as described in Static IP.
User Guide | ComSifter CS-8D Pro 3–60
Page 93
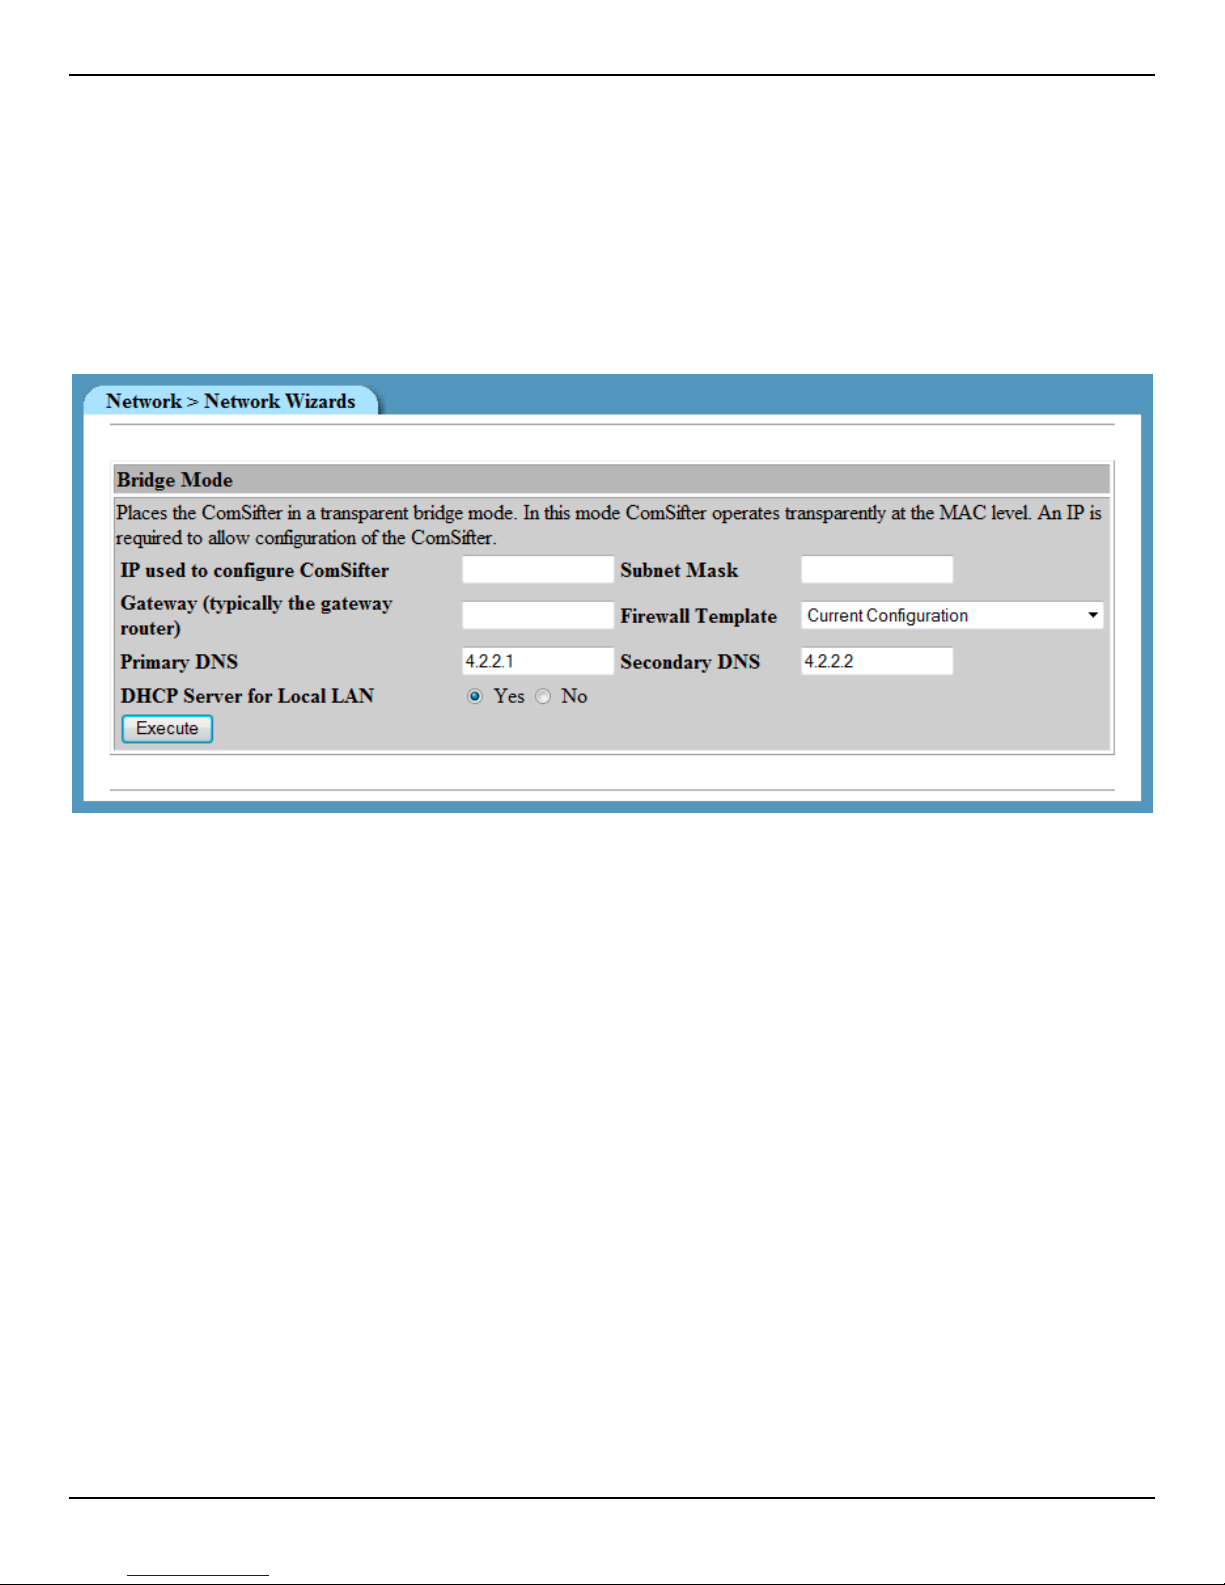
CONFIGURING COMSIFTER
Bridge
Bridge mode places the ComSifter in a transparent bridge mode. In this mode, ComSifter operates
transparently at the MAC level. An IP address is required to allow configuration of the ComSifter.
Bridge mode should be used if your network has the following requirements:
A quality router/firewall already exists and the ComSifter will be used only for Content Filt ering.
Your network has requirements for outside services to access client computer s without transla tion (e.g.
external source accessing local computers using VPN.
Figure 3-68: Network Wizard – Bri dge mode
Configuration of Bridge Mode is the same as described in Static IP.
User Guide | ComSifter CS-8D Pro 3–61
Page 94
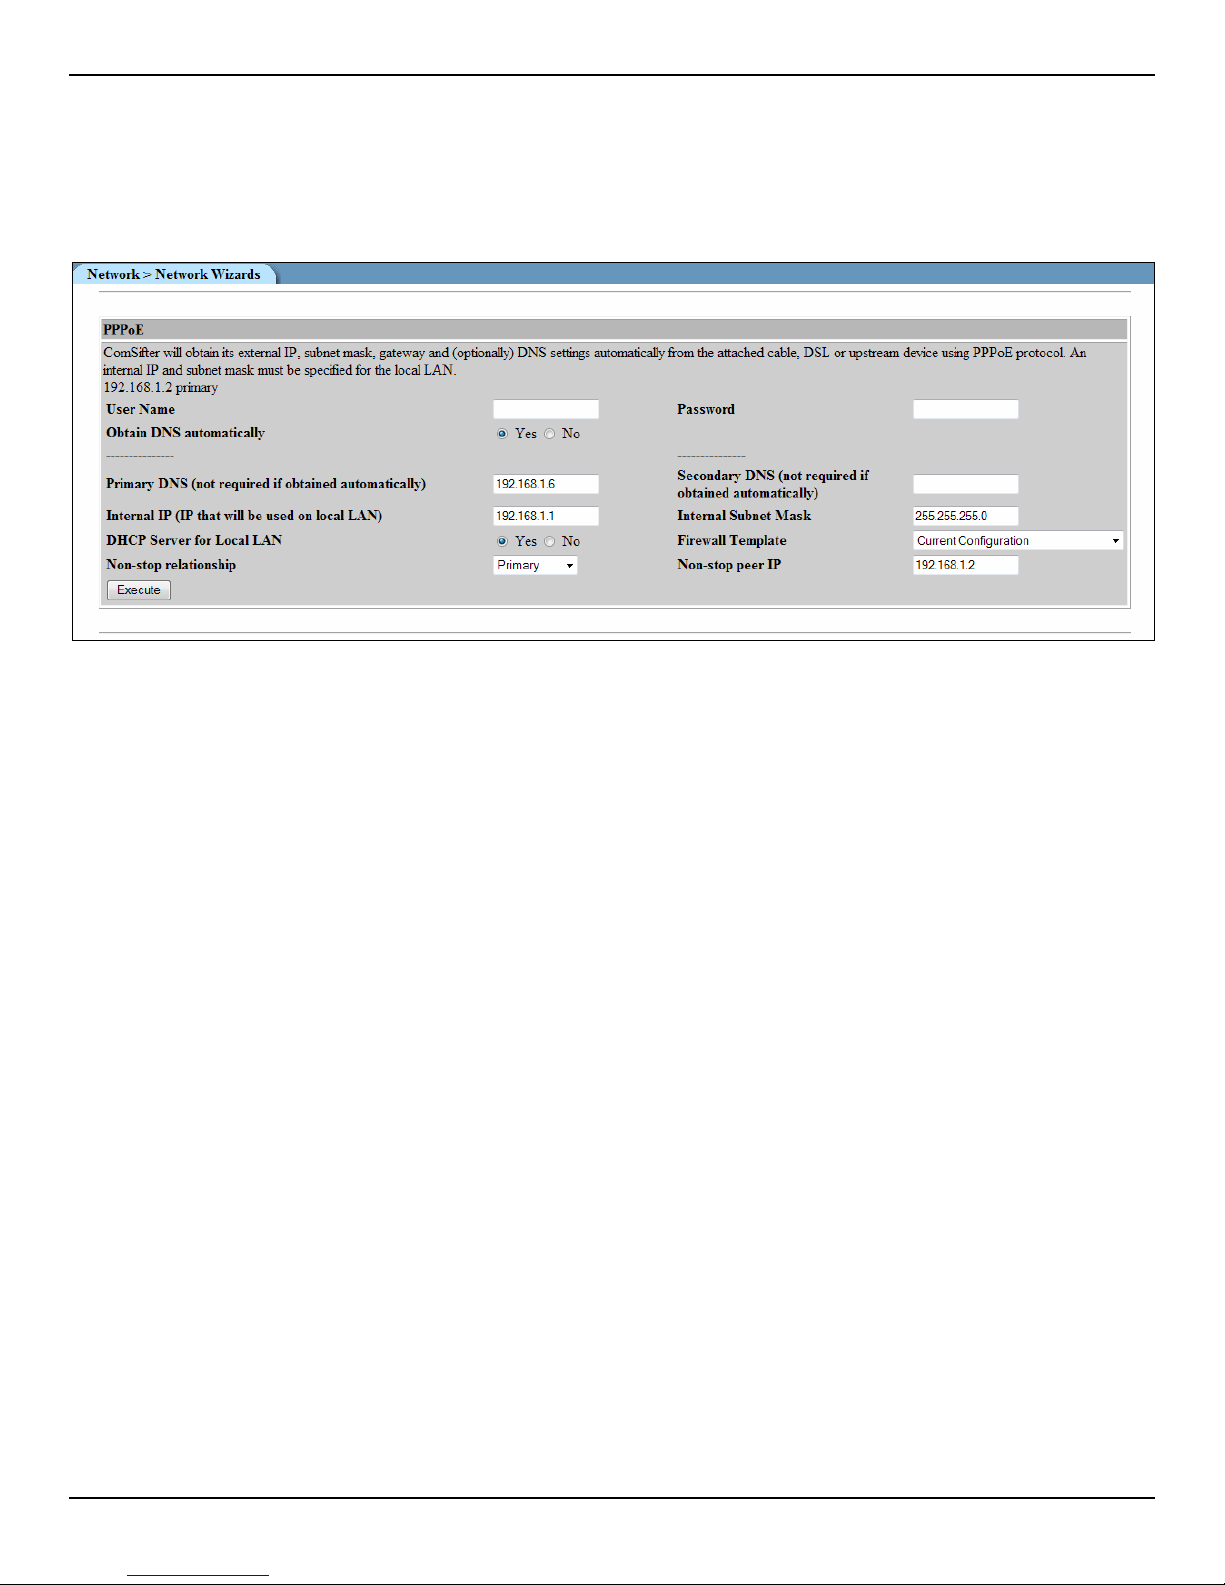
CONFIGURING COMSIFTER
PPPoE
PPPoE is connection method very similar to dial up services. When there is a request for Internet Access the
ComSifter connects with the service provider and logs on. After a predetermined period of inactivity, the
ComSifter logs out of the connection. In this arrangement, the External IP of the ComSifter may change many
times per day.
Figure 3-69: Network Wizard – PPPoE
User Name
Enter the User Name supplied by your provider.
Password
Enter the password supplied by your provider.
The remainder of the configuration options is the same as those described in Static IP.
User Guide | ComSifter CS-8D Pro 3–62
Page 95
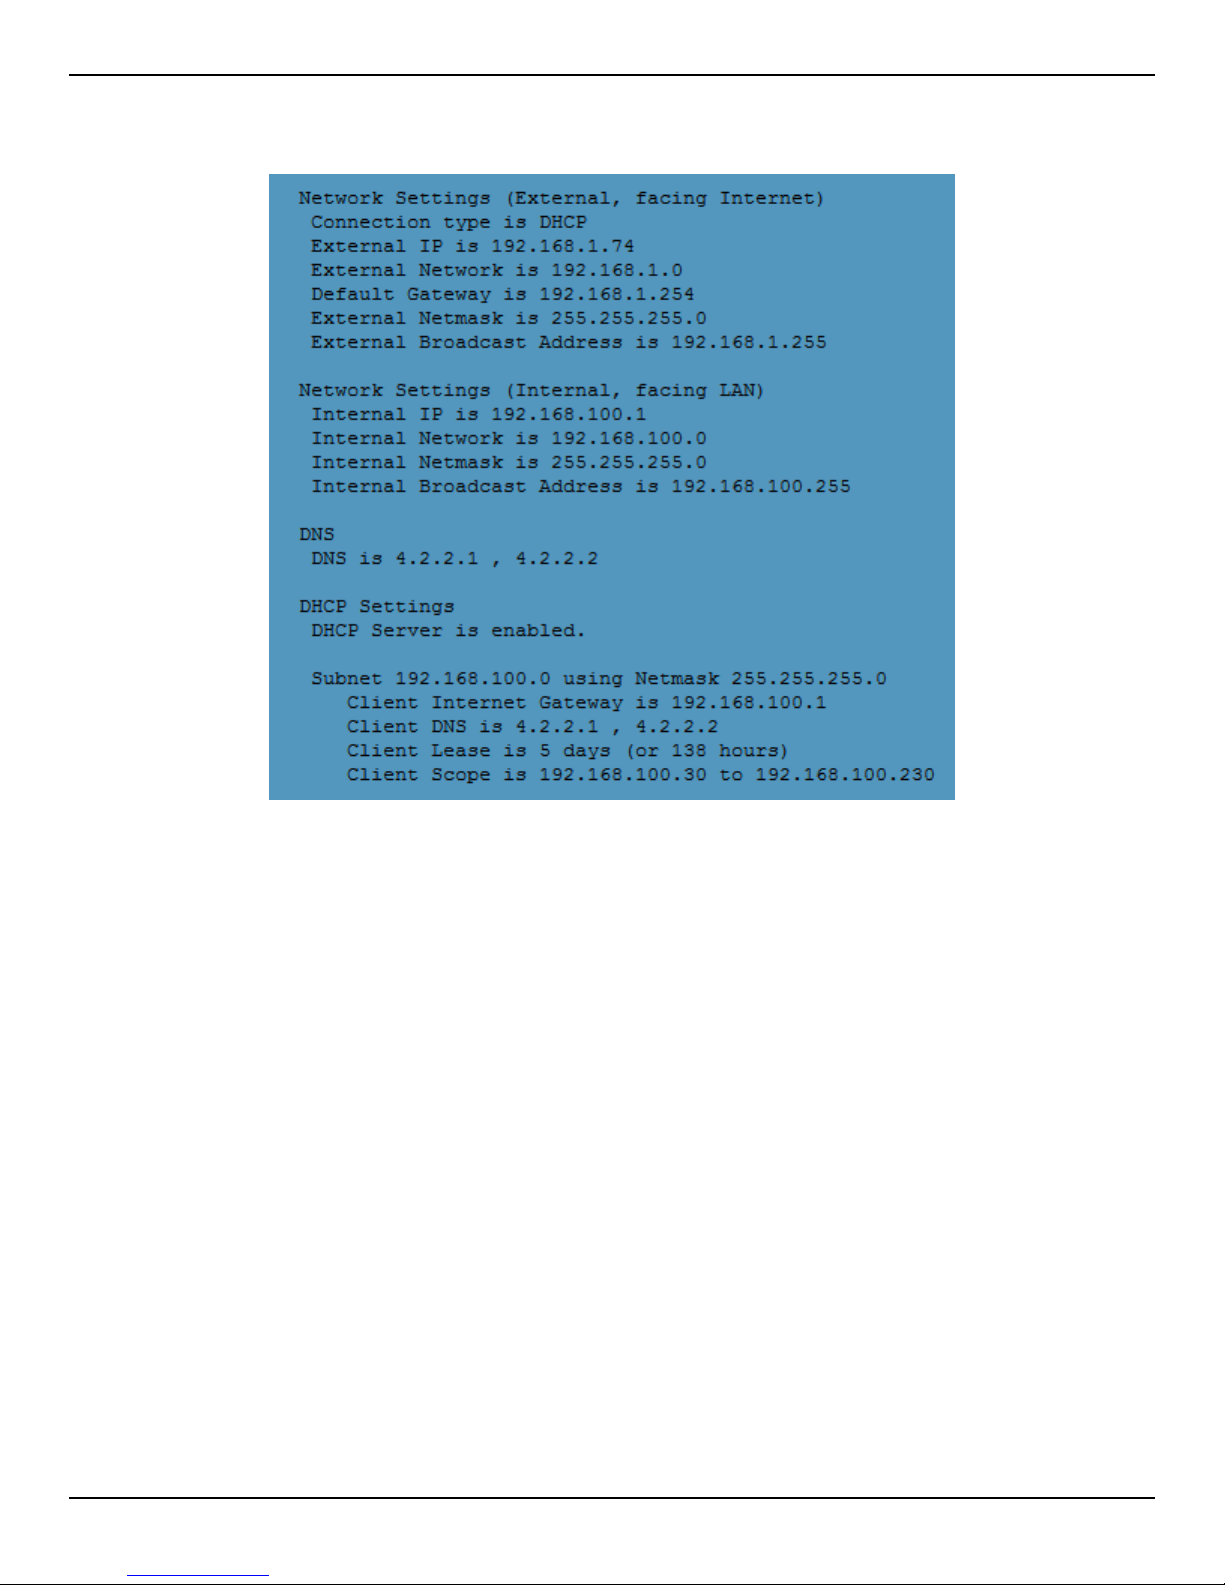
Current Network Settings
Current Network Settings will list all current settings.
CONFIGURING COMSIFTER
Figure 3-70: Current Network Settings
User Guide | ComSifter CS-8D Pro 3–63
Page 96
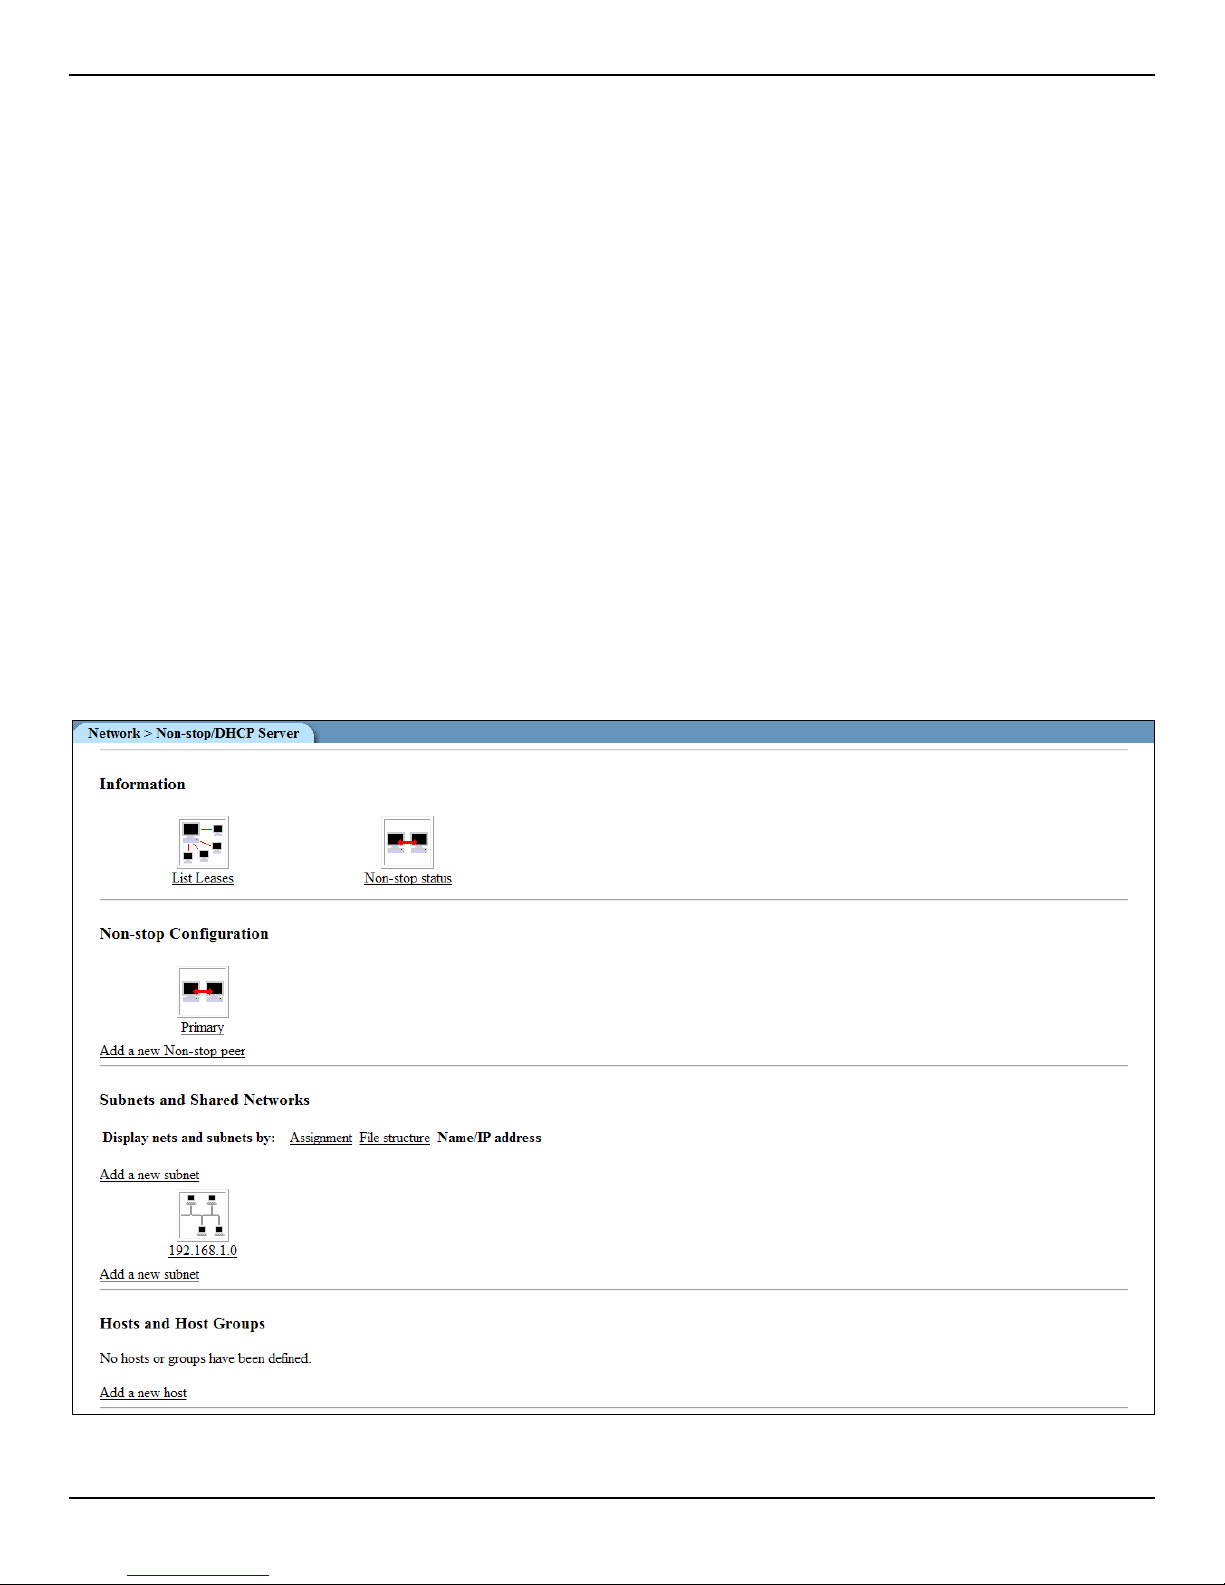
CONFIGURING COMSIFTER
Non-Stop/DHCP Configuration
ComSifter incorporates a sophisticated DHCP server with Non-Stop and IP load balancing capabilities. The
DHCP server is at the core of the ComSifter Non-Stop operation.
Automatic synchronization of the lease database.
Automatic IP load balancing.
Automatic failover if one ComSifter unit fails.
Automatic rebalancing upon ComSifter unit recovery.
Using the ComSifter DHCP Server
ComSifters DHCP server is factory configured, but not activated when shipped. Following are the factory
settings for the DHCP server:
Scope 192.168.1.10–192.168.1.240
Subnet Mask 255.255.255.0
Default Router 192.168.1.1
Default Gateway 192.168.1.1
Broadcast Address 192.168.1.255
Lease Time 7 days
It is suggested that Network Wizards be used to
Stop/DHCP files to meet your network needs.
initially set up the ComSifter. You may then modify the Non-
User Guide | ComSifter CS-8D Pro 3–64
Figure 3-71: Non-Stop/DHCP Server
Page 97
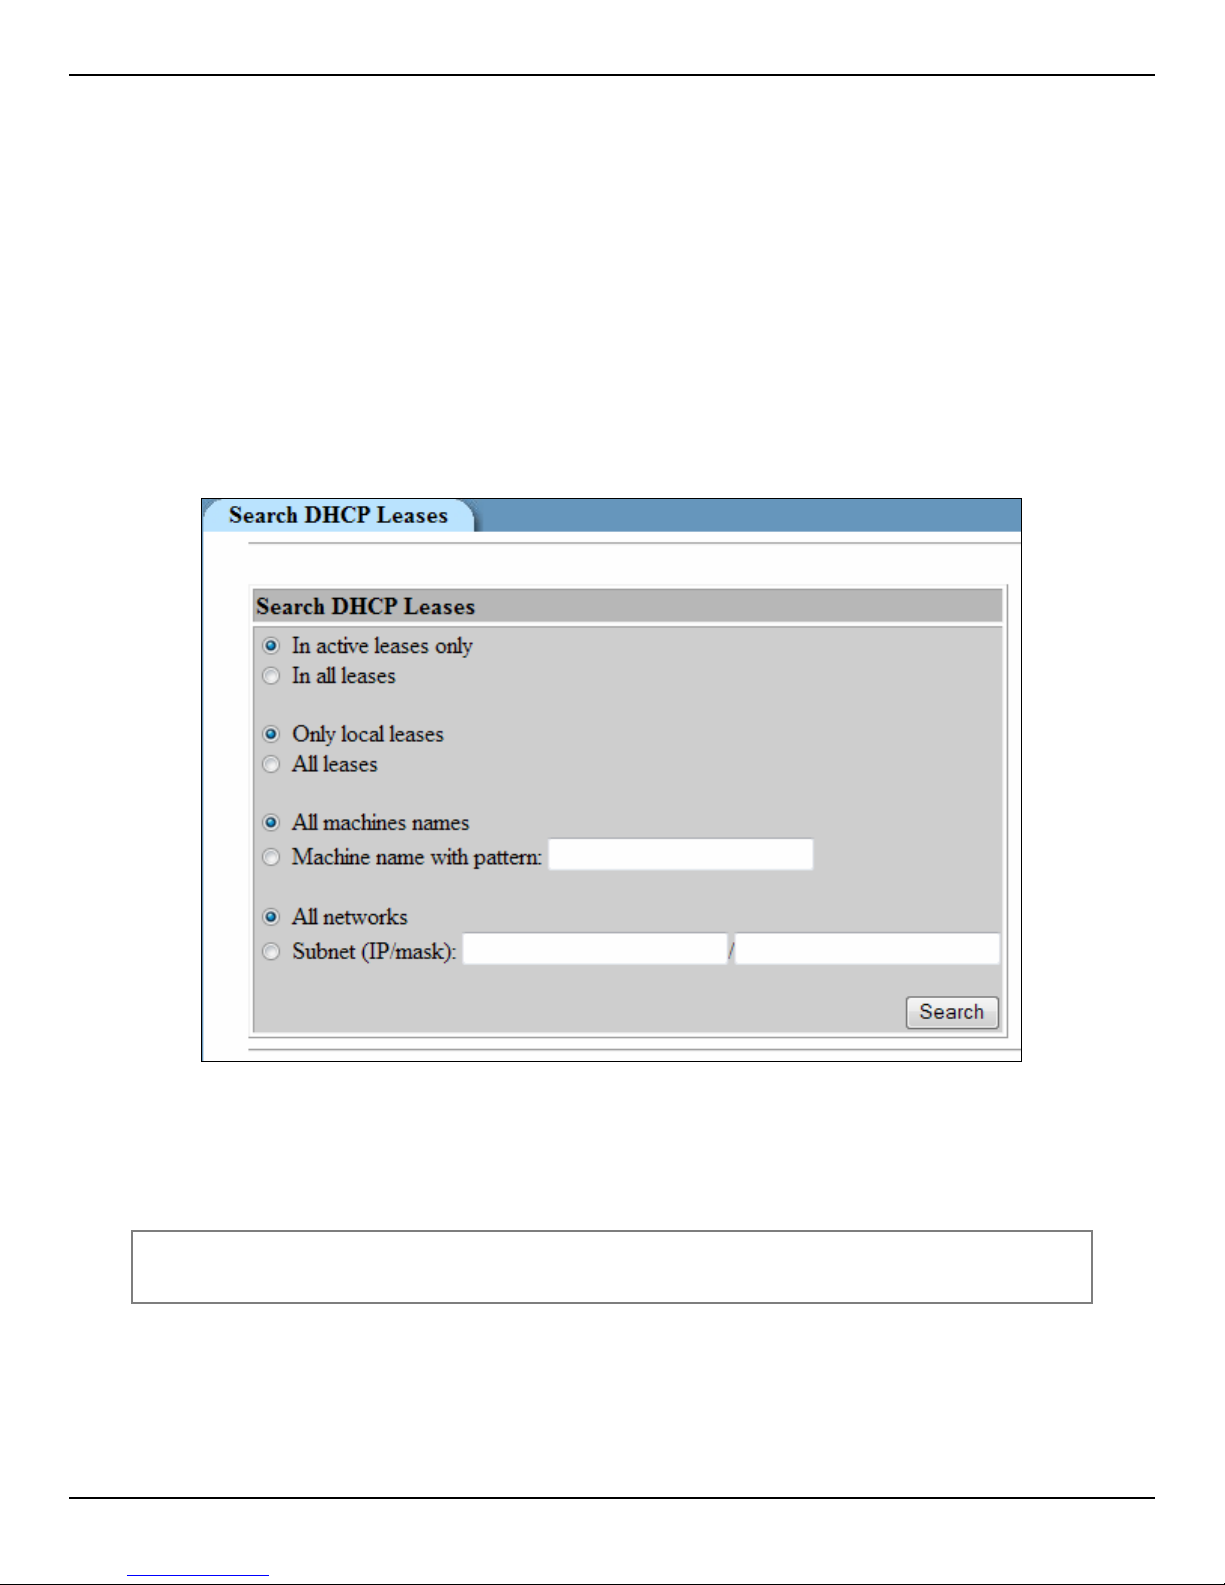
CONFIGURING COMSIFTER
In the initial DCHP server screen, the following options are available.
Information – Allows you to list leases and view the current status of the Non-Stop pa ir.
Non-Stop Configuration – Allows setting of IP, Non-Stop parameters, and No n-Stop relationsh ip.
Subnets and Shared Networks – This allows the setting of the subnet common address pool opt ions and
options that will be given to client work stations.
Hosts and Host Groups – Allows definition of host(s) that will be excluded from the IP scope.
Information
Allows you to list leases and view the current status of the Non-Stop pair.
List Leases
List leases allows you to see the lease database as defined below.
In active leases only/in all leases – Displays leases that are currently active ( within lease period ) or displays
all leases including leases that have expired.
Only local leases/all leases – Displays local leases only or displays local lea ses and remote leases.
Note: Non-Stop pairs synchronize their lease databases every few minutes. It is not
uncommon for both local leases and all leases to be the same.
All machines names/Machine name with pattern – All machine names will display a ll computers with leases.
Machine name with pattern may be used to find only one computer using its machine name (NetBIOS).
All networks/Subnet (IP/mask) – If you have more then one network this field may be used to display an yone
network using the IP/mask.
User Guide | ComSifter CS-8D Pro 3–65
Figure 3-72: DHCP Leases
Page 98
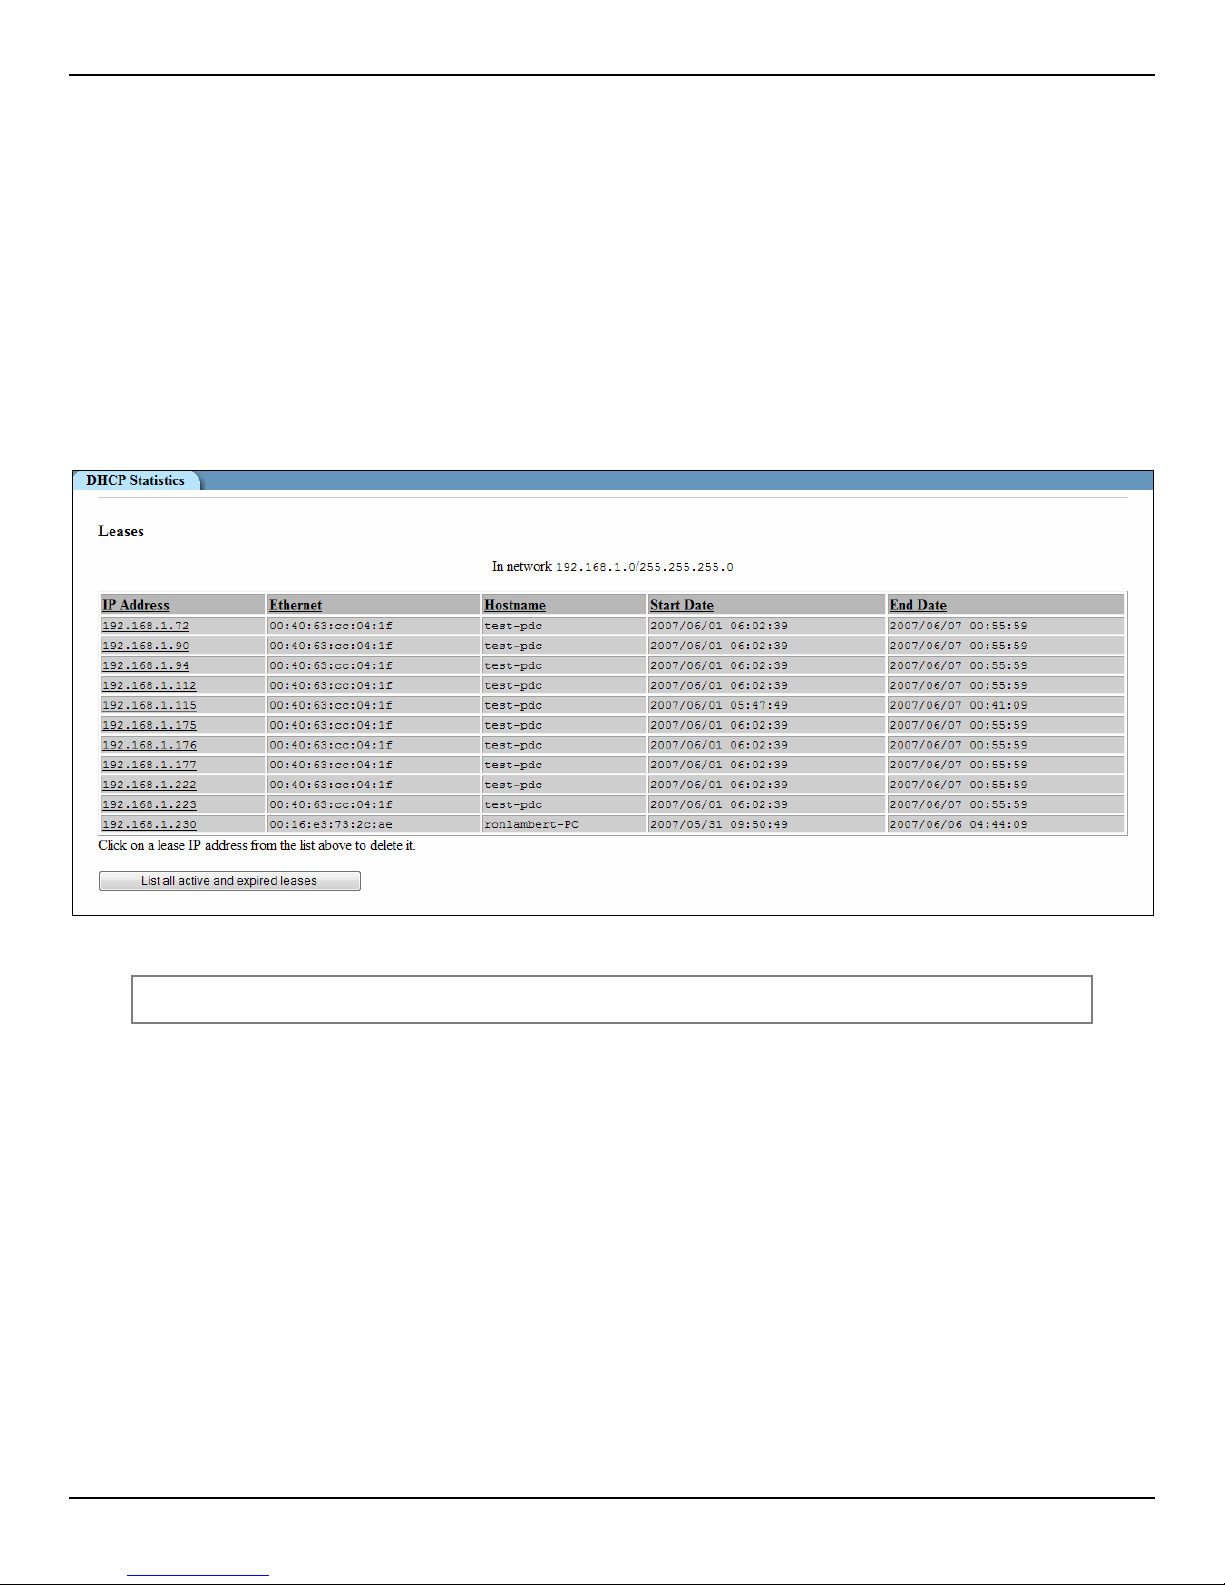
CONFIGURING COMSIFTER
Results of List Leases
After a query of Search DHCP Leases, a DHCP statistics display will be returned. The following information is
displayed:
Leases
IP Address – The IP Address of the workstation with the lease.
Ethernet – The MAC address of the workstation with the lease.
Hostname – The NetBIOS name of the workstation with the lease.
Start Date – The time and date the lease was issued.
End Date – The time and date the lease will expire.
Figure 3-73: DHCP Statistics
Note: You may sort each column by clicking the column heading.
Leases Utilization
At the bottom of the DHCP Statistics page, Lease Utilization is shown.
Network – The network being utilized.
Size – The number of leases defined.
Used – The number of leases that have been used.
%Full – The number of leases used as a percentage.
User Guide | ComSifter CS-8D Pro 3–66
Page 99
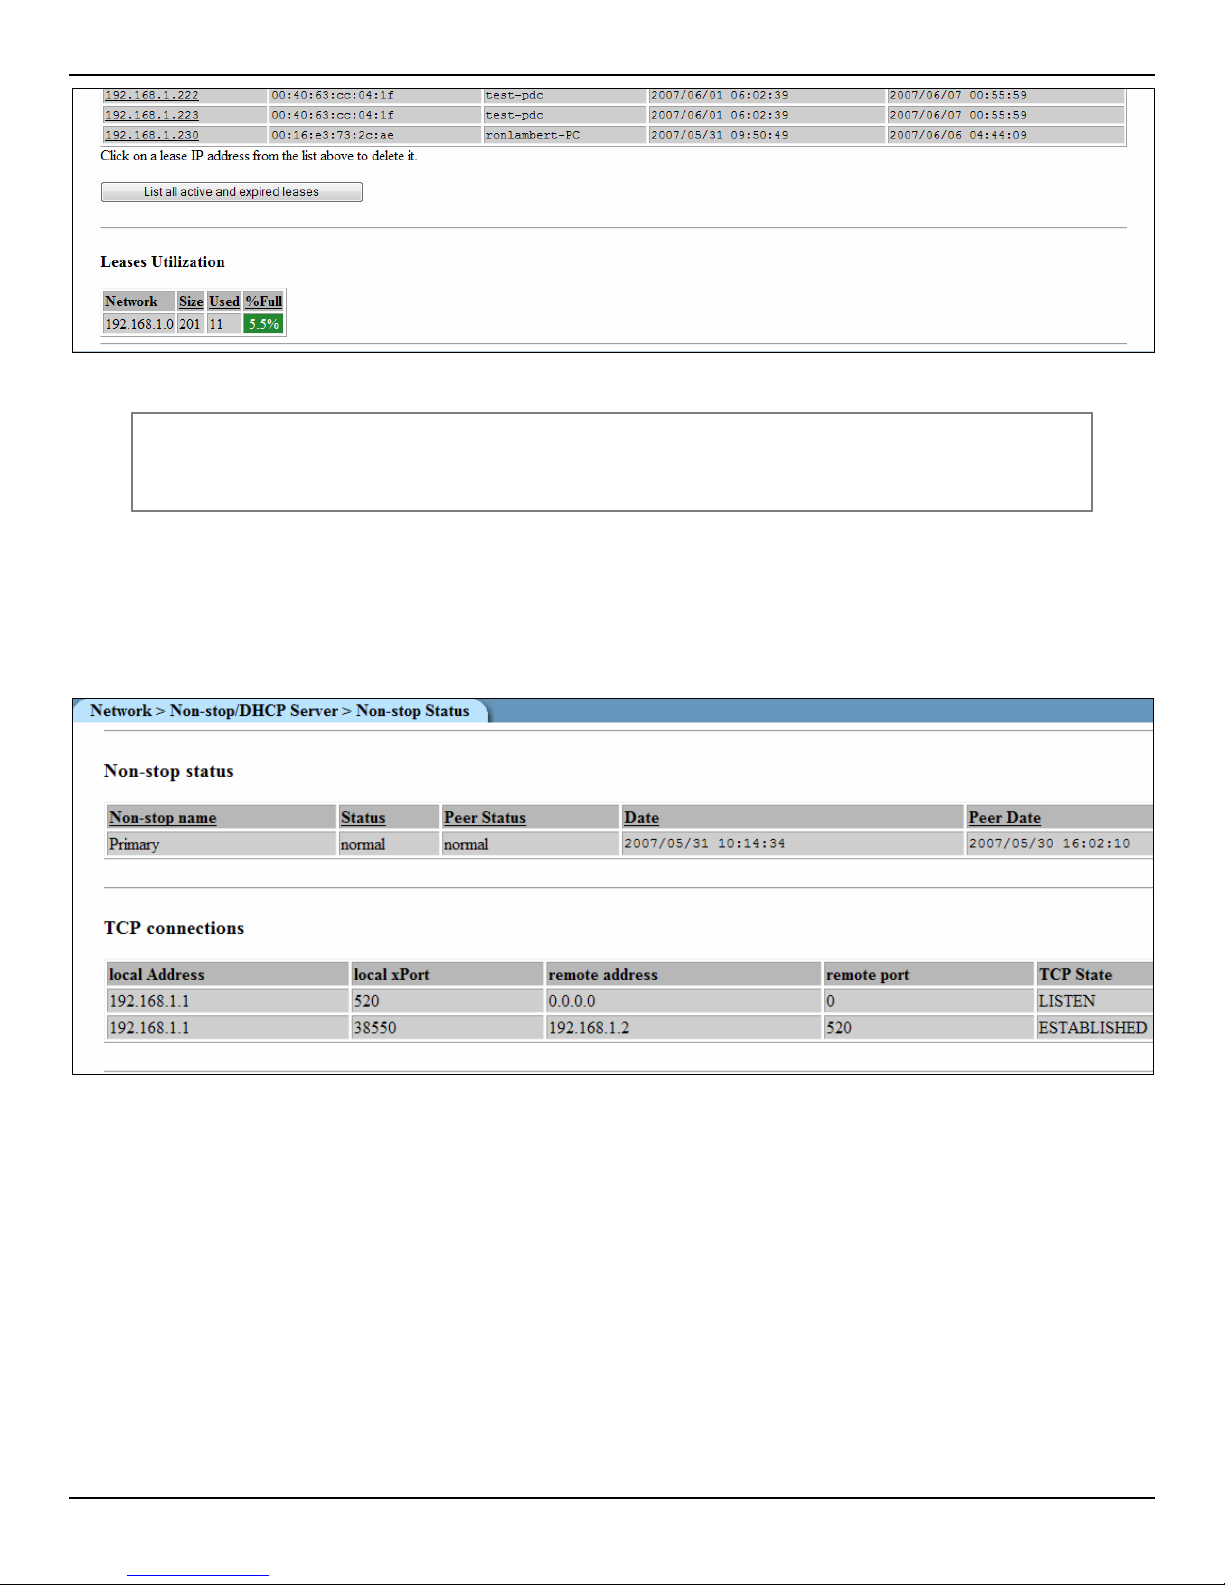
CONFIGURING COMSIFTER
Figure 3-74: Lease Utilization
Note: If utilization exceeds 90%, a warning email message will sent to the Non-Stop
DHCP log and any email recipients defined in Maintenance > Utilities > Email
Notification Parameters.
Non-Stop Status
Non-Stop Status displays the current status of the Non-Stop pairs. It also displays the actual TCP connection.
A normally operating Non-Stop pair will display normal in both the status and peer status columns. In the
example below, Non-Stop primary has a status of normal its peer is also normal and the time and date each
went normal is displayed appropriately.
TCP Connections displays the sequence of events that the Non-Stop pairs are transacting. In the above
example, address 192.168.1.1 began listening on local port 520 for any other Non-Stop pair. It was able to
establish a connection with remote address 192.168.1.2 using local port 38550 with a remote port 520.
In the following example, communication with the other Non-Stop pair has been lost. This may be due to a
break in the network cable, a loss of a network switch, or a hardware failure of the other Non-Stop. In this
example, we see that the status has changed to communication interrupted and that 192.168.1.1 is sending
reconnect packets to 192.168.1.2.
User Guide | ComSifter CS-8D Pro 3–67
Figure 3-75: Non-Stop Status (Good)
Page 100
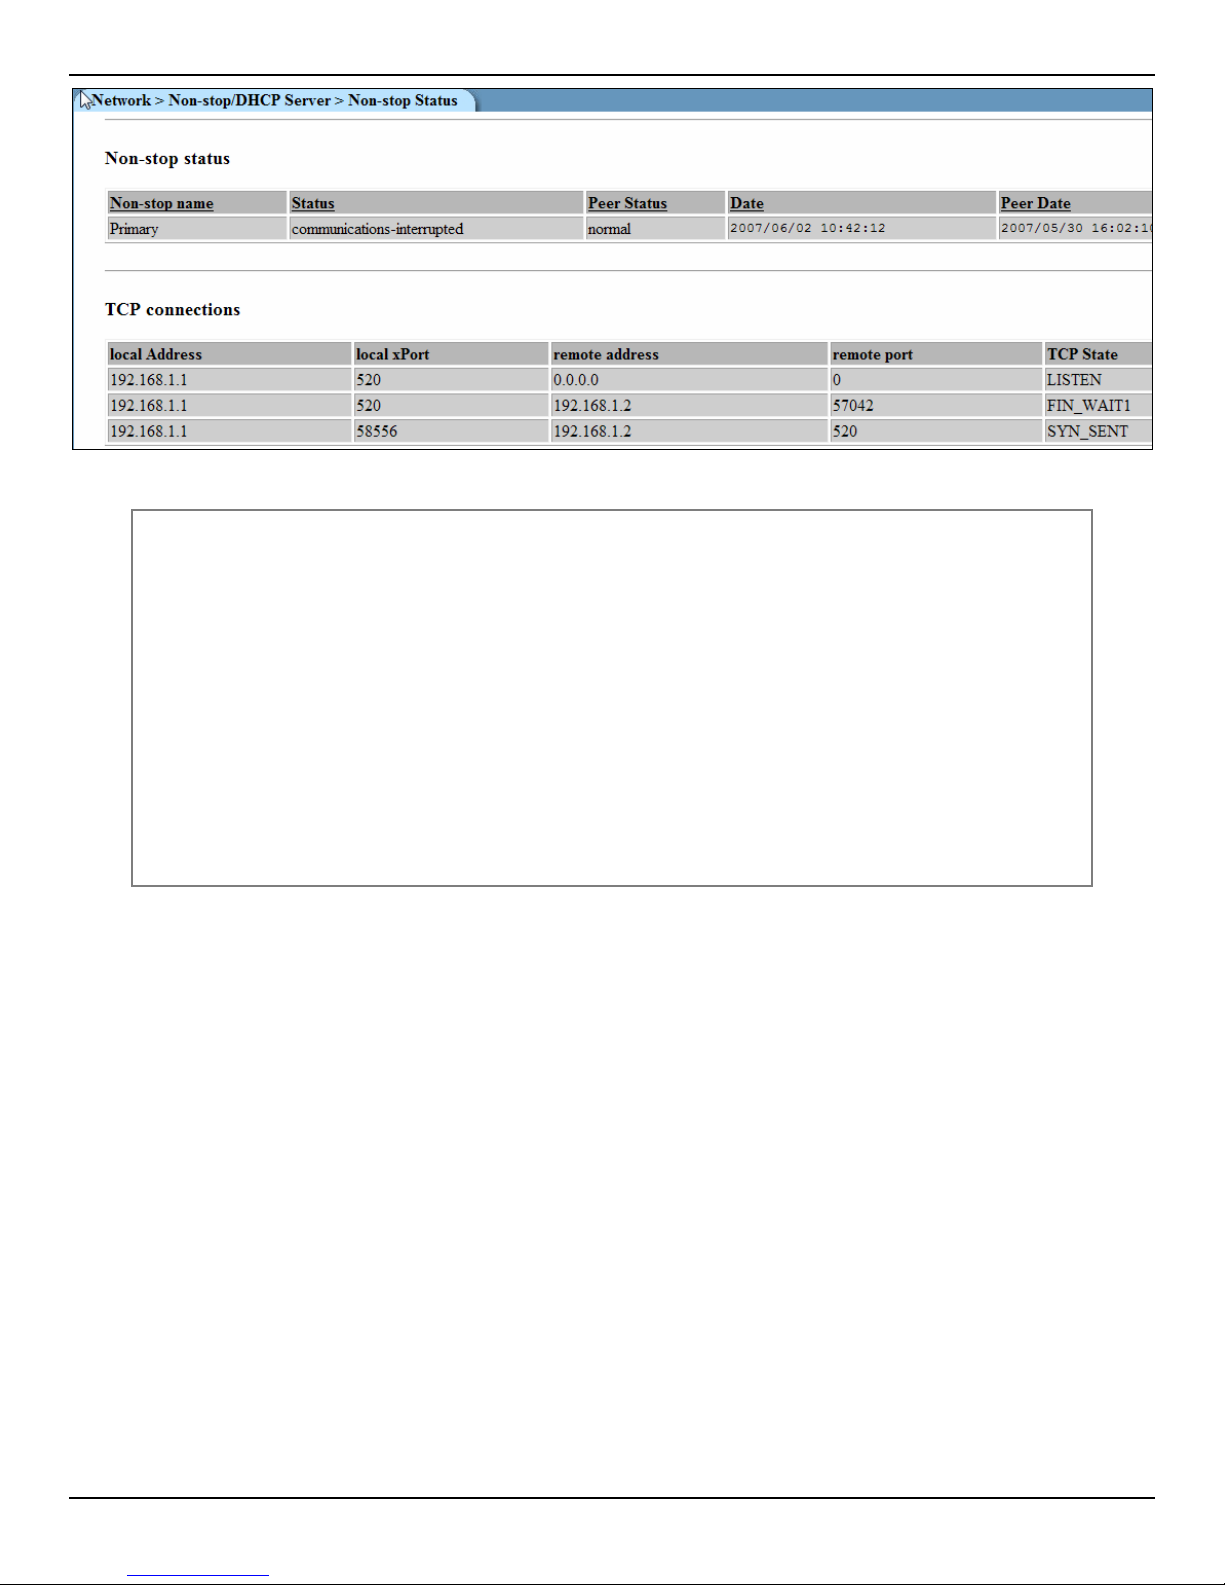
CONFIGURING COMSIFTER
Figure 3-76: Non-Stop Status (Bad)
Warning: When Non-Stop communication is interrupted, each Non-Stop unit will assume
the other Non-Stop is non-operational. It will continue to hand out leases it has
reserved, but will not hand out leases that the other Non-Stop has reserved. If
possible, the Comsifter units will send an email message stating that there is a
problem with non-stop operation and alerting the email recipient that a partnerdown determination should be considered. This determination should be quickly
made if the interrupted condition is caused by a failed ComSifter.
If the condition is caused by a failed ComSifter, then the operational Non-Stop
should be placed into a partnered-down state. By placing it in a partnered-down
state, the operational Non-Stop will recover and reuse all of the failed Non-Stop
leases. If this procedure is not followed, then the operational ComSifter may
eventually run out of leases. After 24 hours, if the condition is not resolved, the
remaining ComSifter will automatically place itself in a partner-down state.
User Guide | ComSifter CS-8D Pro 3–68
 Loading...