

Page 1
Total Recall Desktop & Rack – Installation and Administration Guide
Installation & Administration Guide
TOTAL RECALL
DESKTOP & RACK
Version 8.5.0
Date: December 2009
Copyright © 2009 ComsecTR Pty Ltd. All rights reserved. The information in this publication is subject to change without
notice. ComsecTR Pty Ltd assumes no responsibility for any errors that may appea r in this publication.
All trademarks are property of their owners.
For more information visit Total Recall on the Web at www.totalrecallvr.com.
Page 1
Page 2

Total Recall Desktop & Rack – Installation and Administration Guide
Table of Contents
ABOUT THIS MANUAL ............................ .. .. ..... .. ... .. ..... .. ... .... ... .. .. ..... .. ... .... ... .. .. ..... .. ... ..... .. .. ... .............................. ....7
1. INTRODUCTION ................................ ...................................................... ............................................................7
2. CONVENTIONS AND TERMINOLOGY..........................................................................................................7
2.1. CONVENTIONS ........................................................................................................................ ...........................7
2.1.1. References.......................................................................................................................... .......................7
2.1.2. Notes ................................................ .................................................................................. .......................7
2.1.3. Warnings............................................... .................................................................................. ..................7
2.1.4. Procedures...... .......................................................................................................... ................................7
2.1.5. Screen Navigation ....................................................................................................................................8
2.2. TERMINOLOGY ........................................................................ ...................................................... ....................8
TOTAL RECALL.......... ... .. .. ..... .. ... .... ... .. .. ..... .. ... ..... .. .. ... .... ... .. ..... .. .. ... .... ... .. ..... .. ... .. ..... .. .. ............................................9
3. OVERVIEW OF TOTAL RECALL............................ .. ..... .. .. ... .... ... .. ..... .. .. ... ..... .. .. ..... .. ... .. ..... .. .. ..... .. ................9
3.1. WHAT IS TOTAL RECALL?............................... ...................................................... ............................................9
3.2. STANDARD FEATURES................................................... ...................................................... ..............................9
3.3. OPTIONAL FEATURES .................................................................. ...................................................... ................9
4. COMPLIANCE STATEMENT................................................................................ ............................ ..............10
4.1. EUROPEAN MODEL...................................................................... ...................................................... ..............10
4.2. NEW ZEALAND MODEL.......................................................................................................... .........................10
4.3. USA MODEL .......................................... ...................................................... ...................................................11
5. SAFETY INFORMATION................................ .. ... .... ... .. ..... .. .. ... .... ... .. .. ..... .. ... .. ..... .. ... .... ... .. .. ..... .. .....................12
6. POWER .................. ...................................................... .........................................................................................13
7. PREVENTATIVE MAINTENANCE ..................................... ...................................................... .....................13
8. CHANNEL UPGRADES..................................... ...................................................... ..........................................13
8.1. ANALOG CHANNEL UPGRADES .................................................................... ...................................................13
9. UNPACKING....... ............................ .....................................................................................................................14
10. GETTING TO KNOW TOTAL RECALL ................................................................ ...................................14
10.1. UNIT LAYOUT – FRONT.................................................................. ...................................................... .......15
10.1.1. Headphone Jack ................................................... ... .. .. ..... .. ... .. ..... .. ... .. ..... .. .. ... .... ... .. .. ..... .. ... ..................15
10.1.2. Line Output Jack.......................... .. ..... .. .. ... .. ..... .. .. ... .... ... .. .. ... .... ... .. ... .... ... .. .. ..... .. ... .. .. ..... .......................15
10.1.3. Volume Control Thumb Wheel............................................................................................. ..................16
10.1.4. DVD/CD or Optional BD Writer...........................................................................................................16
10.1.5. Speaker Grill..................................................... ......................................................................................16
10.1.6. Cooling Fan Vent ........................................................... ................................................... .....................16
10.1.7. Front Panel On/Off Switch............................ .........................................................................................16
10.2. REAR PANEL........................................................................................ ........................................................16
10.2.1. Remote Connection Ports........................................ .. .. ... .... ... .. .. ... .... ... .. .. ... .. ..... .. ... .. .. ..... .. ... .. ................17
10.2.2. Line Interface Connectors... ..... .. ... .. ........................................................ ...............................................17
10.2.3. Power Cable Socket.............................. ..................................................................................................17
10.2.4. Power Supply (Standard: Desktop & Rack) .................... ...................................................... ................17
10.2.5. Power Supply (Optional Hot-Swap: Rack only)................................... .................................................17
11. TOTAL RECALL – ONBOARD CONTROLS................................................................... .........................18
11.1. CONTROL PANEL...................................................................................................... ........................... ........18
11.1.1. Playback and Navigation Keys ............................................... ...............................................................19
11.1.2. Power and Hard Drive Activity LEDs ................................................................ ...................................19
QUICK START GUIDE .......................................................... ...................................................... ..............................20
Page 2
Page 3

Total Recall Desktop & Rack – Installation and Administration Guide
12. INTRODUCTION ................................................... ...................................................... ...................................20
13. QUICK START GUIDE – TOTAL RECALL DESKTOP AND RACK..................................... ..............20
INSTALLATION............................................................. .............................................................................................22
14. BEFORE YOU INSTALL...............................................................................................................................22
14.1. EXTENSIONS ................................................................................................. ...............................................22
14.1.1. How Extensions are Identified from Call Signalling...................................................... .......................22
14.1.2. Capturing the Analog Signal.......................................... .. .. ..... .. ... .. .. ..... ... .. .. ..... .. ... .. ..... .. .. ... .. ................23
14.2. NETWORKING ............................................................... ...................................................... .........................23
14.2.1. Virtual LAN Support................................................................................... ............................................24
14.2.2. QoS Support............................................................................................................................................24
14.3. NETWORK SHARES (OPTIONAL – TR RACK ONLY)...................... ...............................................................24
14.3.1. NFS Network Share....................... .. ... .... ... .. .. ..... .. ... .. ..... .. .. ... .. ..... .. .. ... .... ... .. .. ... ..... .. .. ... .... ... .. ................24
14.3.2. Windows Network Share ........ ................................................................................................................25
15. CONNECTING TO ANALOG SIGNAL LINES............................................... ..........................................26
15.1. CONNECTION ................................. ...................................................... ........................................................26
15.1.1. Signal Sources........................................................................................................................................26
15.1.2. DSP Cards.............................. ................................................................................ ................................26
15.2. ANALOG TELEPHONE NETWORKING.......................................... .................................................................27
15.2.1. Connecting to the Telephone Network................................................................ ...................................27
15.2.2. Location of the Recorder........................................................................................................................27
15.2.3. Connecting to Analog Lines.................................................. .................................................................27
15.2.4. Connecting to Digital Phones................................... .. ... .... ... .. ... .... ... .. .. .. ..... .. ... .. ..... .. ... .. .. ..... .. ..............29
15.2.5. DTMF/CLI/Extension Capture.................................. ..... .. .. ... .... ... .. ..... .. ... .. ..... .. .. ..... .. ... .. ..... .. .. ..............30
16. SWITCHING ON AND GETTING STARTED .............. .. ... .... ... .. ..... .. .. ... .... ... .. ... .... ... .. .. ..... .. ... .... ... .. .. ..... ..31
16.1. STARTING UP........................................... ...................................................... ..............................................31
16.2. USING THE CONTROL PANEL.......................................................................................................................31
16.2.1. MENU Key..................................... .........................................................................................................31
16.2.2. SELECT Key.................... .. ..... .. .. ... .... ... .. .. ..... ... .. ..... .. .. ... .... ... .. .. ..... .. ... .. ..... .. ... .... ... .. .. ..... .......................32
16.2.3. Up and Down Arrow Keys .............. ... .... ... .. .. ..... .. ... .. .. ..... .. ... .. ..... .. ... .. .. ..... .. ... .. ..... .. .. ... .... ... .. .. ..............32
16.2.4. Numeric Keypad.....................................................................................................................................32
16.2.5. Playback Control Keys................................................ .......................... .................................................32
16.3. USING THE GRAPHICAL USER INTERFACE ..................................... .............................................................32
16.3.1. Using the GUI....................................... .. ..... .. ... .. ..... .. .. ... .... ... .. ..... .. ... .. ..... .. .. ... .... ... .. .. ..... .......................32
16.3.2. Cancelling....................................................................... ...................................................... ..................33
16.4. TOTAL RECALL GUI MENUS................................................................................ .......................................34
16.4.1. Options Menu ............. .. ... .. ..... .. .. ..... ... .. .. ..... .. ... .... ... .. .. ..... .. ... .... ... .. ... .... ... .. ..... .. .. ... .... ... .. .......................34
16.4.2. Search Menu................. ... .... ... .. ..... .. .. ... .... ... .. ... .... ... .. .. ..... .. ... .... ... .. .. ..... .. ... .. ..... .. ... .. ..... .........................34
16.4.3. Logging Menu.............................................................. .................................................... . ......................34
CONFIGURATION................................. .................................................................................. ...................................35
17. MENU SITE MAP & DEFAULT PARAMETERS ........................... ..........................................................35
18. CONFIGURING TOTAL RECALL............ .. ..... .. ... .... ... .. .. ..... .. ... .. ..... .. .. ... ..... .. .. ..... .. ... .. ..... .. .. ... .... ... .. .. .......38
18.1. LICENSED FEATURES (RACK MODEL ONLY).......................................................................................... ....38
18.2. ABOUT THE OPTIONS MENU ........................................ ...............................................................................38
18.3. GENERAL SETTINGS ....................................................................................................................................39
18.3.1. Language............................................................................................... .................................................39
18.3.2. Time & Date...................................................................................................................... .....................40
18.3.3. User Session ................................................................ ...........................................................................41
18.3.4. Recent Calls............................................................................................................................................42
18.3.5. User Password........................................................................................................................................42
18.3.6. Administrator Password.......................................... .... ... .. .. ..... .. ... ..... .. .. ... .... ... .. .. ..... .. ... .. ..... .... ..............43
18.4. ANALOG SETTINGS......................................................................... .............................................................44
18.4.1. Trigger Type...........................................................................................................................................44
18.4.2. Beep ..................................... ...................................................... .............................................................46
18.4.3. Detect DTMF..................................................................................... .....................................................46
Page 3
Page 4

Total Recall Desktop & Rack – Installation and Administration Guide
18.4.4. Extension.................................................................................................................................................47
18.5. CALL SETTINGS ................................................................ ...................................................... .....................47
18.5.1. Min. (Minimum) Call Length ................................................ .......................... .......................................48
18.5.2. Max. (Maximum) Call Length................................................................................................................48
18.5.3. Max. Call Lifetime..................................................................................................................................48
18.5.4. VOX Timeout............................................. .............................................................................................48
18.5.5. Recording Period...................... .......................................................................................................... ....49
18.6. NETWORK SETTINGS ................................... ...................................................... ..........................................49
18.6.1. Configuring Network Interfaces......................... ....................................................................................50
18.7. EXTENSION SETTINGS ....... ...................................................... ...................................................... ..............50
18.7.1. Default (System-Wide) Recording Policies....................................................... .....................................51
18.7.2. Conflicting Extension Policies............................. ... .. .. ... .... ... .. .. ..... ... .. .. ... .... ... .. .. ... .... ... .. .. ... .... ..............52
18.7.3. Extension-Specific Recording Policies........................................................................... .......................52
18.8. LICENSE SETTINGS (RACK MODEL ONLY)..................................................................................................54
18.8.1. Hardware Key...................... ... .. .. ..... ... .. .. ..... .. ... .. ..... .. .. ... .... ... .. .. ..... ... .. .. ..... .. ... .. ..... .. .. ... .........................54
18.8.2. VoIP & ISDN License Key................................... ..................................................................................54
18.8.3. Feature License Key............ ... .. ..... .. ... .. ..... .. .. ... .. ..... .. .. ... .... ... .. .. ..... ... .. .. ... .... ... .. .. ..... .. ... .. .. .....................54
18.9. ARCHIVE SETTINGS............................................................... ...................................................... ................55
18.10. DELETING CALLS ............................................... ...................................................... ...................................56
18.11. MAINTENANCE ....................................... ...................................................... ...............................................57
18.11.1. System Information............................................................................ .................................................57
18.11.2. Rebuild Call Database ................................................. .. ... .... ... .. .. ..... .. ... .. ..... .. ... .. ..... .. .. ... .... ..............58
18.11.3. Save Settings to DVD/CD........................................ ... .... ... .. .. ..... .. ... .. ..... .. ... .. ..... .. .. ... .... ... .. .. ..............58
18.11.4. Load Settings from DVD/CD .............................................................................................................59
18.11.5. Erase DVD..................................................................................................................... . ....................59
18.12. REMOTE MANAGER..................................................................................................... ................................59
18.12.1. Configuring Total Recall LAN Access...............................................................................................60
18.12.2. Configuring Total Recall Dialup Access...........................................................................................60
18.12.3. Configuring Remote Manager Options..............................................................................................60
18.13. SYSTEM SHUTDOWN ................ ...................................................... ...................................................... .......61
REMOTE MANAGER ......................... .. .. ... ..... .. .. ..... .. ... .... ... .. ..... .. .. ... .... ... .. ..... .. ... .... .. ... .. ..... .. ... ............................ ....62
19. INTRODUCTION ................................................... ...................................................... ...................................62
20. SYSTEM REQUIREMENTS............................................................................................ .......................... ....62
21. COMPATIBILITY BETWEEN REMOTE MANAGER AND TOTAL RECALL.................................63
22. INSTALLATION............................................................... ...................................................... .........................63
23. CONFIGURING TOTAL RECALL FOR REMOTE MANAGER ACCESS..........................................64
24. ADMINISTRATOR QUICK-START SETUP...................................... .. ..... ... .. .. ..... .. ... .... ... .. .. ..... .. ... .. ..... .. ..64
25. USER INTERFACE................................ .. ... .... ... .. .. ..... .. ... .... ... .. .. ..... .. ... ..... .. .. ... .... ... .. ..... .. .. ... .. . ......................65
26. MAIN MENU BAR ..................... ...................................................... ...............................................................65
26.1. FILE MENU ............................... ...................................................... .............................................................65
26.2. HELP MENU................ ...................................................... ...................................................... .....................66
27. BUTTON BAR....................................................... ...................................................... .....................................67
27.1. USER PREFERENCES .................................... ...................................................... ..........................................67
27.1.1. General Tab........... ... .... ... .. .. ..... .. ... .. ..... .. ... .... ... .. .. ..... .. ... .. ..... .. .. ... .... ... .. ..... .. ... .. ..... .. .. ... .........................68
27.1.2. TR Connectivity Tab...................... ..... .. .. ..... .. ... .. ..... .. .. ..... .. ... .. ..... .. ... .... ... .. .. ..... .. ... .... ... .. .. .... .................69
27.1.3. Add TR....................................................................................................................................................69
27.1.4. LAN............................................................................................................. ............................................70
27.1.5. Dialup .....................................................................................................................................................71
27.1.6. Cascaded.................................................................................................................................................72
27.1.7. Authorised Extensions................... .. ..... .. ... .. .. ..... .. ... .. .. ..... .. ... .. .. ... .... ... .. .. ... ..... .. .. ... .. ..... .. .. .....................73
27.1.8. Removing a Configured Total Recall.......................................................................................... ...........75
27.1.9. Editing the Connection Settings for an Added Total Recall............... ...................................................75
27.2. USER MANAGEMENT....... ...................................................... ...................................................... ................75
27.2.1. Adding Remote Manager User Accounts...............................................................................................76
Page 4
Page 5

Total Recall Desktop & Rack – Installation and Administration Guide
27.2.2. Modifying Existing Remote Manager User Accounts............................................................................77
27.3. REFRESH VIEWS..........................................................................................................................................77
27.4. CHOOSE LANGUAGE SETTINGS ...................................................................................................................77
28. TR CONFIGURATION TAB ...... ...................................................... .............................................................78
28.1. EXTENSIONS ................................................................................................. ...............................................78
28.1.1. Recording Policies..................................................................................................................................79
28.1.2. Event Policies......................................... ... .... ... .. .. ..... .. ... .. ..... .. .. ... ..... .. .. ... .... ... .. ..... .. .. ... .. .......................82
28.2. ARCHIVE........................................................ ....................................................... .......................................83
28.2.1. Auto Archive...................................... ..... .. ... .. ..... .. ... .. ..... .. .. ... .... ... .. .. ..... .. ... .. ..... .. ... .. ..... .........................83
28.2.2. Manual Archive ................................................ .. ..... .. .. ... .... ... .. ..... .. .. ... .... ... .. ..... .. ... .. ..... .. .......................85
28.2.3. Search Archive............................ ... ..... .. .. ... .... ... .. .. ..... .. ... .. ..... .. .. ... .... ... .. ... .... ... .. .. ..... .. ... .........................85
28.3. NETWORK............ ...................................................... ...................................................... .......................... ..86
28.3.1. Network Interfaces.................... .. ... .. ..... .. ... .. .. ..... .. ... .. ..... .. .. ... .. ..... .. .. ... ..... .. .. ... .... ... .. .. ... .........................86
28.3.2. Remote Manager Related Settings Pane........................................................................... .....................86
28.4. GENERAL................................................. ...................................................... ..............................................87
28.4.1. User and Administrator Passwords.......................................................................................................87
28.4.2. Recorder ID.............................. ..............................................................................................................87
28.4.3. Session Settings .......... .. ..... .. ... .. .. ..... .. ... .. ..... .. ... .. ..... .. .. ... .. ..... .. .. ... .... ... .. .. ... ..... .. .. ... .... ... .... .....................88
28.4.4. Recent Calls Settings....................... .......................................................................................................88
28.5. CALL............................................................................................................................................................88
28.5.1. Minimum Recording Length...................................................................................................................89
28.5.2. Max. Recording Length..........................................................................................................................89
28.5.3. Max. Call Lifetime..................................................................................................................................89
28.5.4. VOX Timeout............................................. .............................................................................................89
28.5.5. Recording Period...................... .......................................................................................................... ....90
28.6. TIME DATE......................................................... ...................................................... ...................................91
28.7. ROD AGENTS......................................................................................................... .....................................92
28.8. SIGNALLING MAPPING (TR RACK ONLY)...................................................................................................93
28.8.1. Creating Signalling Map Entries.............................. .................................................... .........................94
28.9. INTERNAL DIAL PLAN (TR RACK ONLY)............................ ........................................................................95
28.10. ANALOG ....... ...................................................... ................................................................................ .........96
28.10.1. Trigger Type............................................................ ...........................................................................96
28.10.2. Beep ........................................................... .........................................................................................98
28.10.3. Detect DTMF............ ... .. .. ..... .. ... .... ... .. .. ..... ... .. ..... .. .. ... .... ... .. ..... .. .. ... .... ... .. ..... .. ... .. ..... .. .. .....................98
28.10.4. Extension ...................................................................... ......................................................................99
28.11. PBX (OPTIONAL – TR RACK ONLY)..................................... ......................................................................99
28.11.1. CDR Collector........................ ... .. ... .... ... .. .. ..... .. ... .. ..... .. .. ... .... ... .. ... .... ... .. .. ... .... ... .. .. ..... .. ... .. ..............100
28.11.2. Collector Type...................................................................................................................... ............100
28.11.3. UDP/TCP........................................................ ..................................................................................100
28.11.4. Verifying the Connection......................................... ..... .. ... .. ..... .. ... .. ..... .. .. ... .... ... .. .. ..... .. ... .. ..............101
28.11.5. CDR Parser .................................................. .. .. ..... .. ... .... ... .. .. ..... .. ... .. ..... .. ... .. ..... .. .. ... .... ...................101
28.12. LICENSE (TR RACK ONLY).......................................... ...................................................... .......................103
28.13. SNMP (OPTIONAL, TR RACK ONLY) ................... ...................................................... ..............................104
28.13.1. Agent Configuration............................................................................ .............................................104
28.13.2. IP Address....................................................... ..................................................................................104
28.13.3. UDP Port....................................... ...................................................................................................104
28.13.4. Read-only Community........................ ... .. .. ..... .. ... .. .. ..... .. ... .. ..... .. .. ... ..... .. .. ... .. ..... .. .. ... .... ... .. .. ............104
28.13.5. Read-write Community................................... .. ..... .. ... .. ..... .. .. ... .. ..... .. .. ... ..... .. .. ... .. ..... .. .. ... .... ............104
28.14. TRAPHOSTS.................................... ...................................................... ......................................................105
28.14.1. Traphost.... .......................................................................................................... ..............................105
28.14.2. Community............................................... ................................................................................ .........105
28.14.3. Trap Type..........................................................................................................................................105
29. SYSTEM MAINTENANCE......................................................................... .................................................106
29.1. SYSTEM MAINTENANCE OPTIONS.............................................................................................................106
29.1.1. System Information........................................................................... ....................................................106
29.1.2. Archive.................................... ..............................................................................................................107
29.1.3. Rebuild TR Database.......................................................... ...................................................... ............108
29.1.4. Update TR Software ... ................................................................................ ..........................................108
Page 5
Page 6

Total Recall Desktop & Rack – Installation and Administration Guide
29.1.5. Load TR Settings............................ .. ... .. .. ..... .. ... .. ..... .. .. ... .. ..... .. .. ... ..... .. .. ... .... ... .. .. ... .... ... .. .....................109
29.1.6. Save TR Settings..................................... ... .... ... .. .. ... .... ... .. .. ..... .. ... .. ..... .. ... .. .. ..... .. ... .. ..... .. .....................109
29.1.7. Shutdown........................................................ .......................................................................................109
30. EVENT LOG TAB ............... .. ... .... ... .. .. ..... .. ... .... ... .. ... .... ... .. .. ..... .. ... .. ..... .. .. ..... .. ... .. ..... .. ... .. ..... .......................110
30.1. EVENT TYPES ............................................................... ...................................................... .......................110
30.2. USING THE EVENT LOG ...................................................................................................... .......................110
31. CONNECTING THROUGH FIREWALLS................................................ .. ... .. ..... .. ... .... ... .. .. ..... .. ... .... ... ..111
31.1. EXAMPLE 1: INTERNAL RECORDER, EXTERNAL PC............................................................... ...................111
31.2. EXAMPLE 2: EXTERNAL RECORDER, INTERNAL PC........................................................ ..........................112
31.3. EXAMPLE 3: MULTIPLE REMOTE MANAGER CLIENTS BEHIND A FIREWALL ...........................................113
31.4. LIMITATIONS OF FIREWALLED CONNECTIONS.................................... ......................................................114
31.4.1. Transfer of Files................................................................................................................ ...................114
RECORD ON DEMAND............................. .. .. ..... .. ... ..... .. .. ... .... ... .. ..... .. .. ..... .. ... .. ..... .. ... .... ... .. ..... ..............................115
32. INTRODUCTION ................................................... ...................................................... .................................115
33. SYSTEM REQUIREMENTS............................................................................................ ............................115
34. INSTALLATION............................................................... ...................................................... .......................115
35. CONFIGURATION .............................................................. .........................................................................116
35.1. RUNNING ROD FOR THE FIRST TIME....................................................................... .................................116
35.1.1. Configuration Dialog....................................... .. .. ..... .. ... .. ..... .. .. ... .... ... .. ... .... ... .. .. ..... .. ... .. .....................116
35.1.2. IP Address............................................................. ...................................................... ..........................116
35.1.3. Total Recall Extension.................................................... ......................................................................116
35.1.4. Total Recall Password..................... .....................................................................................................117
35.1.5. Total Recall Port Base ............... ... .. ..... .. .. ... ..... .. .. ... .... ... .. .. ..... .. ... .. ..... .. .. ... ..... .. .. ... .... ... .. .. ..... ..............117
35.1.6. Version............ ...................................................... ................................................................................117
35.2. ROD AGENTS......................................................................................................... ...................................117
35.3. RECORDING CONTROL .................................................................................................... ..........................117
SNMP TRAPS................................... ...................................................... ............................ ........................................118
36. EVENT TYPES............................................... .. ... .. ..... .. .. ... .... ... .. ..... .. .. ... .... ... .. .. ..... ... .. .. ..... . ...........................118
37. TRAP TABLE........................................................................ .........................................................................119
GLOSSARY.................................................................................................................................................................121
SPECIFICATIONS ............................................................................................ ........................................................124
LIMITED PRODUCTS WARRANTY.................................................. ... .. ..... .. .. ..... .. ... ..... .. .. ..... .. ... .. ..... .. ..............125
38. COMSECTR LIMITED PRODUCTS WARRANTY .................................. ..... ... .. .. ..... .. ... .... ... .. ..... .. .. .....125
38.1. OUR STANDARD LIMITED WARRANTY PERIOD........................................................................................125
38.2. EXCEPTION FOR SALES ARISING FROM STOCK-CARRYING DISTRIBUTORS/DEALERS.......... ...................125
38.3. LIMITATIONS OF THIS WARRANTY ..................................... ...................................................... ................125
38.4. HANDLING OF FAULTY PARTS ......................................................................................................... .........125
38.5. COMSECTR RECORD KEEPING ............................................................................... ...................................126
39. WARRANTY CLAIMS AND PROCEDURE............................................ .. ... .... ... .. ..... .. .. ... .... ... .. ..... .. .. ... ..126
39.1. WHO TO CONTACT ....................................................................................................................................126
39.2. WHAT PROCEDURE WILL BE FOLLOWED? ...................... ...................................................... ...................126
39.3. WHAT SERVICES WILL BE PERFORMED?...................................................................................... ............126
39.4. IMPORTANT NOTICE: SOLE & EXCLUSIVE REMEDY .................................................................................127
39.5. DISCLAIMER OF WARRANTIES ................................................................................. .................................127
39.5.1. Important Notice: Disclaimer of Warranties........................................................... ............................127
LEGAL...................................................................................................................................................... ...................128
40. COMSECTR SOFTWARE LICENCE ..................... ................................................................................ ..128
41. GNU PUBLIC LICENSE...............................................................................................................................130
Page 6
Page 7
Total Recall Desktop & Rack – Installation and Administration Guide
About this Manual
1. Introduction
This manual is intended for technical and/or network administrators who will be
installing and configuring
Total Recall and the associated PC client software.
Refer to the
recording features and function ality.
Total Recall User Guide for information about using Total Recall’s
2. Conventions and Terminology
2.1. Conventions
2.1.1. References
References to other manuals or other parts of this manual are indented, formatted in blue
text, and marked with a hand symbol:
Reference example
)
2.1.2. Notes
Notes are indented, formatted in blue text with light grey borders, and marked with a note
symbol:
Note example
2.1.3. Warnings
Warnings are indented, formatted in blue text with light grey borders, and marked with a
warning symbol:
Warning example
2.1.4. Procedures
Descriptions of procedures for performing certain tasks are marked with a ‘co gs’ icon,
and the purpose of the procedure is formatted in bold italic text:
Procedure Description Example
1. Procedural step example
Page 7
Page 8

Total Recall Desktop & Rack – Installation and Administration Guide
2.1.5. Screen Navigation
Screen navigation (indicating the navigation required to reach the relevant screen or
dialog) is formatted in blue text and marked with a menu icon:
Options Menu > General Settings
2.2. Terminology
The following table lists some writing style conventions used in this manual and their
associated meanings.
Example Meaning
‘Select OK to save your
settings’
Highlight (position the cursor over) the OK screen
button, and press the [SELECT] key on the control
panel
‘Select a date from the
list…’
‘Check the Recording
Period check box’
‘Enter the IP address…’ Highlight the relevant data field, and enter the IP
See the Total Recall User Guide for information on using the menu
)
system.
Highlight the relevant data fie ld, and press the
[SELECT] key repeatedly to cycle through the available
options, until you reach the required value
Highlight the relevant check box, and press the
[SELECT] key to populate it with a check mark
address using the numeric keypad on the control panel
Page 8
Page 9

Total Recall Desktop & Rack – Installation and Administration Guide
Total Recall
3. Overview of Total Recall
3.1. What is Total Recall?
Total Recall is a range of compact, cost-effective and self-contained digital voice loggers
and recorders that provide secure audio capture and storage for your most recent 350,000
records or 60,000 recording hours of calls and/or other audio signals.
Total Recall is easily operated via a simple control panel and intuitive menu system, or
remotely via a network using the
unlimited licenses as part of your solution.
Record on Demand software (also supplied with unlimited licenses) may be installed
onto users’ PCs to allow configurable control over the calls that are recorded on their
channel.
Remote Manager Client software that is included with
Depending on network type and configuration,
numbers of incoming and outgoing calls, the ti me an d date of the call, the durati on of the
call, and reference to a specific channel number or extension. All of this information can
be used to search and retrieve calls from the internal hard drive database or from archive
media.
3.2. Standard Features
• Comp act, self-contained, easy to install and operate.
• Record analogue telephone conversations.
• Record other analogue audio signals, such as two-way or broadcast radio.
• Onboard storage for the most recent 350,000 records or 60,000 hours of calls.
• Archive recordings to DVD+RW, CD-R, CD-RW or (optional) BD-RE.
• Secure and tamper proof recording format.
• Export to MP3, WAV or secure TRC format.
• Policy based recording control.
• One-click real-time monitoring of calls.
• Email and copy calls directly from
2000/XP/Vista32/Vista64 PC. Supplied free-of-charge and license free.
• Powerful search capability.
• Feature-rich call player.
• All remote access, monitoring and management software included.
Total Recall can also record the telephone
Remote Manager on your Windows
3.3. Optional Features
• Blu-Ray (BD-RE) Archive Device (optional on both Desktop and Rack models).
• Dual Hot-Swap Power Supplies (optional on
Total Recall Rack model only).
Page 9
Page 10
Total Recall Desktop & Rack – Installation and Administration Guide
• Channel Upgrades: Total Recall Desktop can accommodate two Digital Signal
Processor (DSP) cards, and
Systems may be upg r a d ed with 4, 8 or 12 channel cards.
• Software Upgrades (optional on
• TCP/IP Network Call Archiving.
• Simple Network Messaging Protocol (SNMP) Alarm Interface Support.
• Station Messaging Detail Record (SMDR) Support.
Contact your supplier for more information on obtaining upgrades for your Total
Recall system, or see www.totalrecallvr.com
Total Recall Rack can accommodate six DSP cards.
Total Recall Rack model only):
4. Compliance Statement
4.1. European Model
The equipment has been approved in accordance with Council Decision 98/482/EC for
pan-European single terminal connection to the public switched telephone network
(PSTN). However, due to differen ce s bet wee n t he in dividual PSTNs provided i n different
countries, the approval does not, of itself, give an unconditional assurance of successful
operation on every PSTN network termination point.
In the event of problems, you should contact your equipment supplier in the first instance.
This device is designed to work on any network. This device is not dependent on physical
and software switch settings. If this device is to be used outside of your area or different
network, contact your vendor.
This device complies with Class A of EN55022: 1995 incl. Amendments 1 & 2.
Warning
This is a Class A product. In a domestic environment this product may cause radio
interference, in which case the user may be required to take adequate measures.
4.2. New Zealand Model
This device complies with Class A of AS/NZS3548:1995, incl. Amendments 1 & 2.
Warning
This is a Class A product. In a domestic environment this product may cause radio
interference, in which case the user may be required to take adequate measures.
8.1.8 Call logging (automatic set-up).
(b) “The call log incorporated in this equipment does not record all answered calls. The
call log, therefore, may not agree with the Telecom account which may include calls not
shown on the log.”
8.5 Recording functions.
(c) “All persons using this device for recording telephone conversations shall comply
with New Zealand law. This requires that at least one party to the conversation is to be
aware that it is being recorded. In addition, the Principles enumerated in the Privacy Act
Page 10
Page 11

Total Recall Desktop & Rack – Installation and Administration Guide
1993 shall be complied with in respect to the nature of the personal information collected,
the purpose for its collection, how it is used and what is disclosed to any other party.”
4.3. USA Model
FCC Rules, Part 15
Total Recall has been tested and complies with the limits for a Class A digital device,
pursuant to Part 15 of the FCC Rules. These limits are designed to provide reasonable
protection against harmful interference when the equipment is operated in a commercial
environment. This equipment generates, uses, and can radiate radio frequency energy
and, if not installed and used in accordance with the instruction manual, can cause
harmful interference to radio communications. Operation of this equipment in a
residential area is likely to cause harmful interference, in which case the user will be
required to correct the interference at the user’s expense.
CHANGES OR MODIFICATIONS NOT EXPRESSLY APPROVED BY Comsec TR Pty Ltd
COULD VOID THE USER’S AUTHORITY TO OPERATE THE EQUIPMENT.
1. FCC Part 68 Registration
Total Recall complies with FCC Rules, Part 68, and the requirements adopted by ACTA.
On this equipment is a label that contains, among other information, the FCC Part 68
registration number. If requested, this number must be provided to the telephone
company.
2. REN
The ringer equiv alence n umber (REN ) is used t o determi ne the quali ty of devi ces, whi ch
may be connected to the telephone line. Excessive RENs on the telephone line may result
in the devices not ringing in response to an incoming call. In most, but not all, areas the
sum of RENs should not exceed five (5.0). To be certain of the number of devices that
may be connected to a line, as determined by the total RENs, contact the local telephone
company.
NOTE: RENs are associated with loop-start and ground-start ports. It is not us ed for
E&M and digital ports. The REN assigned to Total Recall is 1.5B. If requested, this
information must be given to the telephone company.
3. Service
In the event of equipment malfunction, all repairs should be performed by Comsec TR
Pty Ltd or an authorized agent. It is the responsibility of users requiring service to report
the need for service to Comsec TR Pty Ltd or to one of our authorised agent s. Service
can be facilitated through our Factory office at:
Comsec TR Pty Ltd
Unit 5, 7 Millennium Court
Silverwater, NSW 2128, Australia
Email: [email protected]
The telephone company can ask you to disconnect the equipment from the network until
the problem is corrected or until you are sure that the equipment is not malfunctioning.
4. Facility Interface Information
Page 11
Page 12
Total Recall Desktop & Rack – Installation and Administration Guide
r
In order to connect registered terminal equipment to the telephone company lines, the
terminal equipment must utilize an FCC registered jack. Standardised jacks are used for
this equipment. The following table contains Facility Interface Code (FIC), Ringer
Equivalence Number (REN), Service Order Code (SOC) and netw ork jack information
for the equipment.
Port Identifie
Line 1 to 72 N/A 1.5B RJ11C
Link 1 to 4 N/A N/A RJ48C
The Total Recall interface connects to the Public Switched Telephone Network through
a FCC registered NCTE that specifies the type of network jack to be used.
5. Disruption to the Network
If the Total Recall disrupts the telephone network, the telephone company can
discontinue your service temporarily. If possible, the telephone company will notify you
in advance. If advance notice is not practical, they will notify you as soon as possible.
You are also informed of your right to file a complaint with the FCC.
6. Telephone Company Facility Changes
The telephone company can make changes in its facilities, equipment, operations, or
procedures that can affect the operation of your equipment. If they do, you should be
notified in advance so you have an opportunity to maintain uninterrupted telephone
service.
7. Electrical Safety Advisory
While Total Recall is fully compliant with FCC rules and regulations, it is recommended
that an alternating current (AC) surge arrestor of the form and capability suitable for the
model purchased be installed in the AC outlet to which the Comsec TR Pty Ltd products
are connected. Consult with your distributor as to the surge protector requirements for
your equipment.
FIC REN Network Jack
Notes:
a) If a ruling is required on the legality of recording in your country, please seek legal
advice.
b) This product must not be used for illegal or unauthorised recording purposes.
5. Safety Information
WARNING: Potential electrical shock hazard.
Always follow basic safety precautions when using this product to reduce the risk of
injury from fire or electrical shock. The
service personnel. Observe the following:
1. Read and understand all instructions in the user manuals.
2. Observe all warnings and instructions marked on the product.
Total Recall must be installed by qualified
Page 12
Page 13

Total Recall Desktop & Rack – Installation and Administration Guide
3. Use only a grounded electrical outlet when connecting Total Recall to a power
source. If you are unsure the ou tlet is grounded, have a qualified electrician check
this.
6. Power
4. First connect the
appropriate interface lines.
5. Do not touch the contacts on the ends of any of the cables used with
any cable becomes damaged, have it repaired immediately.
6. Shut down and unplug
cleaning.
7. Do not open
Refer all servicing to qualified personnel.
Total Recall Desktop:
• Single Mini-ATX auto sensing 100-240 VAC, 50-60 Hz 180W PSU.
Total Recall Rack:
• Standard Single Mini-ATX auto sensing 100-240 VAC, 50-60 Hz 180W PSU.
• Optional Hot-Swap 300+300W PSU.
The maximum power draw for
Total Recall to grounded electrical outlet, and only then connect the
Total Recall. If
Total Recall from power outlets and telephone jacks prior to
Total Recall. There are no user serviceable parts inside Total Recall.
Total Recall Desktop and Rack is 80W.
7. Preventative Maintenance
The Total Recall recorder needs regular maintenance to ensure maximu m per formance at
all times.
As with most computing devices,
processor to keep it cool, and a filter to ensure that the air is clean.
Every 3 months a message will appear on the
maintenance is required.
The filter should be washed in warm soapy water, and then rinsed thoroughly and
allowed to dry completely prior to being replaced.
New filters are available from your supplier. After maintenance is complete, select OK to
remove the message.
Total Recal l has a fan th at provide s airflow acros s the
8. Channel Upgrades
8.1. Analog Channel Upgrades
Total Recall analog channel upgrades require additional interface cards, which are
available in 4, 8 or 12 channel capacities per card.
analog interface cards (for a maximum of 24 channels), while
6 analog interface cards (for a maximum of 72 channels).
Total Recall screen to indicate that filter
TR Desktop can accommodate 2
TR Rack can accommodate
Page 13
Page 14

Total Recall Desktop & Rack – Installation and Administration Guide
Contact your dealer for more informatio n on obt aining c hannel upgrad es, or vis it
us as www.totalrecallvr.com.
9. Unpacking
Total Recall is supplied with the following items:
•
Total Recall unit.
• On / Off Key.
•
Remote Manager CD (PC client software).
•
Record On Demand CD (PC client software).
• Power cable.
• A blank CD-R.
• This
•
• A crossover network cable for connecting directly to a PC.
• 4 x 19” rack mounting screws & nuts (
Total Recall Installation and Administration Guide.
Total Recall User Guide.
Rack unit only).
Telephone line cables are not supplied with
require differing lengths of cable.
If connection is required to the MDF or distribution frame, it is advisable to have a
certified telecom technician install the telephone cabling required for the recorder.
To prevent loss of power and interruptions to recordings, it is very important to
connect Total Recall to a UPS power system. Due to the nature of Total
Recall
’s database, power disruption during recording may cause damage to
open files, and the recordings may be lost entirely.
Total Recall, as individual installations may
10. Getting to Know Total Recall
Total Recall is simple to operate, is fully self-contained and can be operated using the
built-in controls and display panel.
It is not necessary to attach a PC and monitor as a management console for the rec order.
However you may configure and operate your
included
Remote Manager software if you wish.
See Total Recall Remote Manager on page 62 for more information on
)
using & configuring your
connection.
Total Recall via a network or dialup
Total Recall via a networked PC and the
Page 14
Page 15
Total Recall Desktop & Rack – Installation and Administration Guide
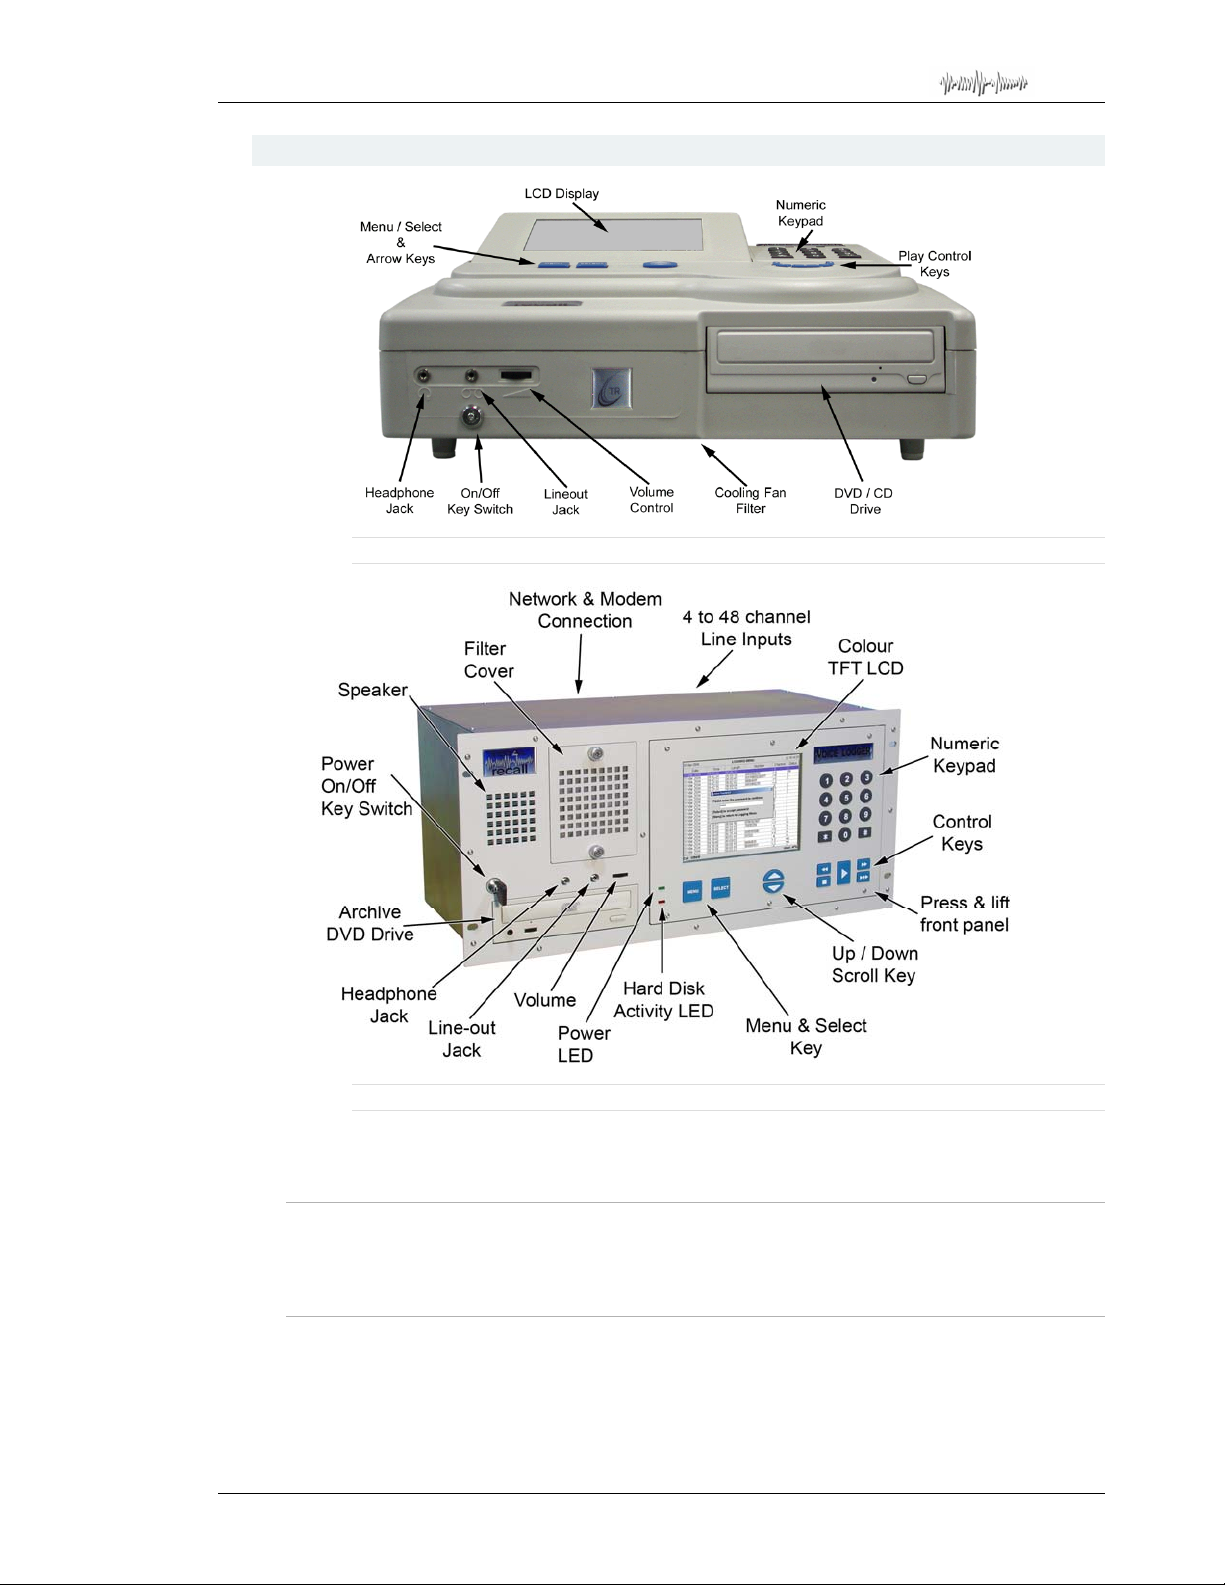
10.1. Unit Layout – Front
Total Recall – Desktop Model
Total Recall – Rack Model
10.1.1. Headphone Jack
This is a standard 3.5mm three conductor stereo audio jack for connection of headphones
or external speaker, volume controlled via the thumb wheel.
10.1.2. Line Output Jack
This is a standard 3.5mm three conductor stereo audio jack for connection to a tape
recorder or the line input of a PC. This output is not volume controlled.
Page 15
Page 16
Total Recall Desktop & Rack – Installation and Administration Guide
10.1.3. Volume Control Thumb Wheel
A thumb wheel to adjust internal speaker volume.
10.1.4. DVD/CD or Optional BD Writer
A standard DVD/CD or optional Blu-Ray read/write unit with standard DVD
player/recorder controls.
10.1.5. Speaker Grill
This is a grill that is located on the left side of the unit. It protects the in-built speaker.
10.1.6. Cooling Fan Vent
This is an opening that is located at the base of the unit (Desktop u nit), or the top lefthand corner of the front panel (Rack unit). It is protected by a grill, and acts as an air
intake for the unit. The grill is removable to allow access to the filter media for cleaning
or replacement.
10.1.7. Front Panel On/Off Switch
The Key Switch is located on the left side of the front panel for both Desktop and Rack
units. This is used to power off/on the unit after a Software Upgrade for example.
It is recommended that the On/Off Switch Key is not left in the switch to
prevent accidental powering off the unit.
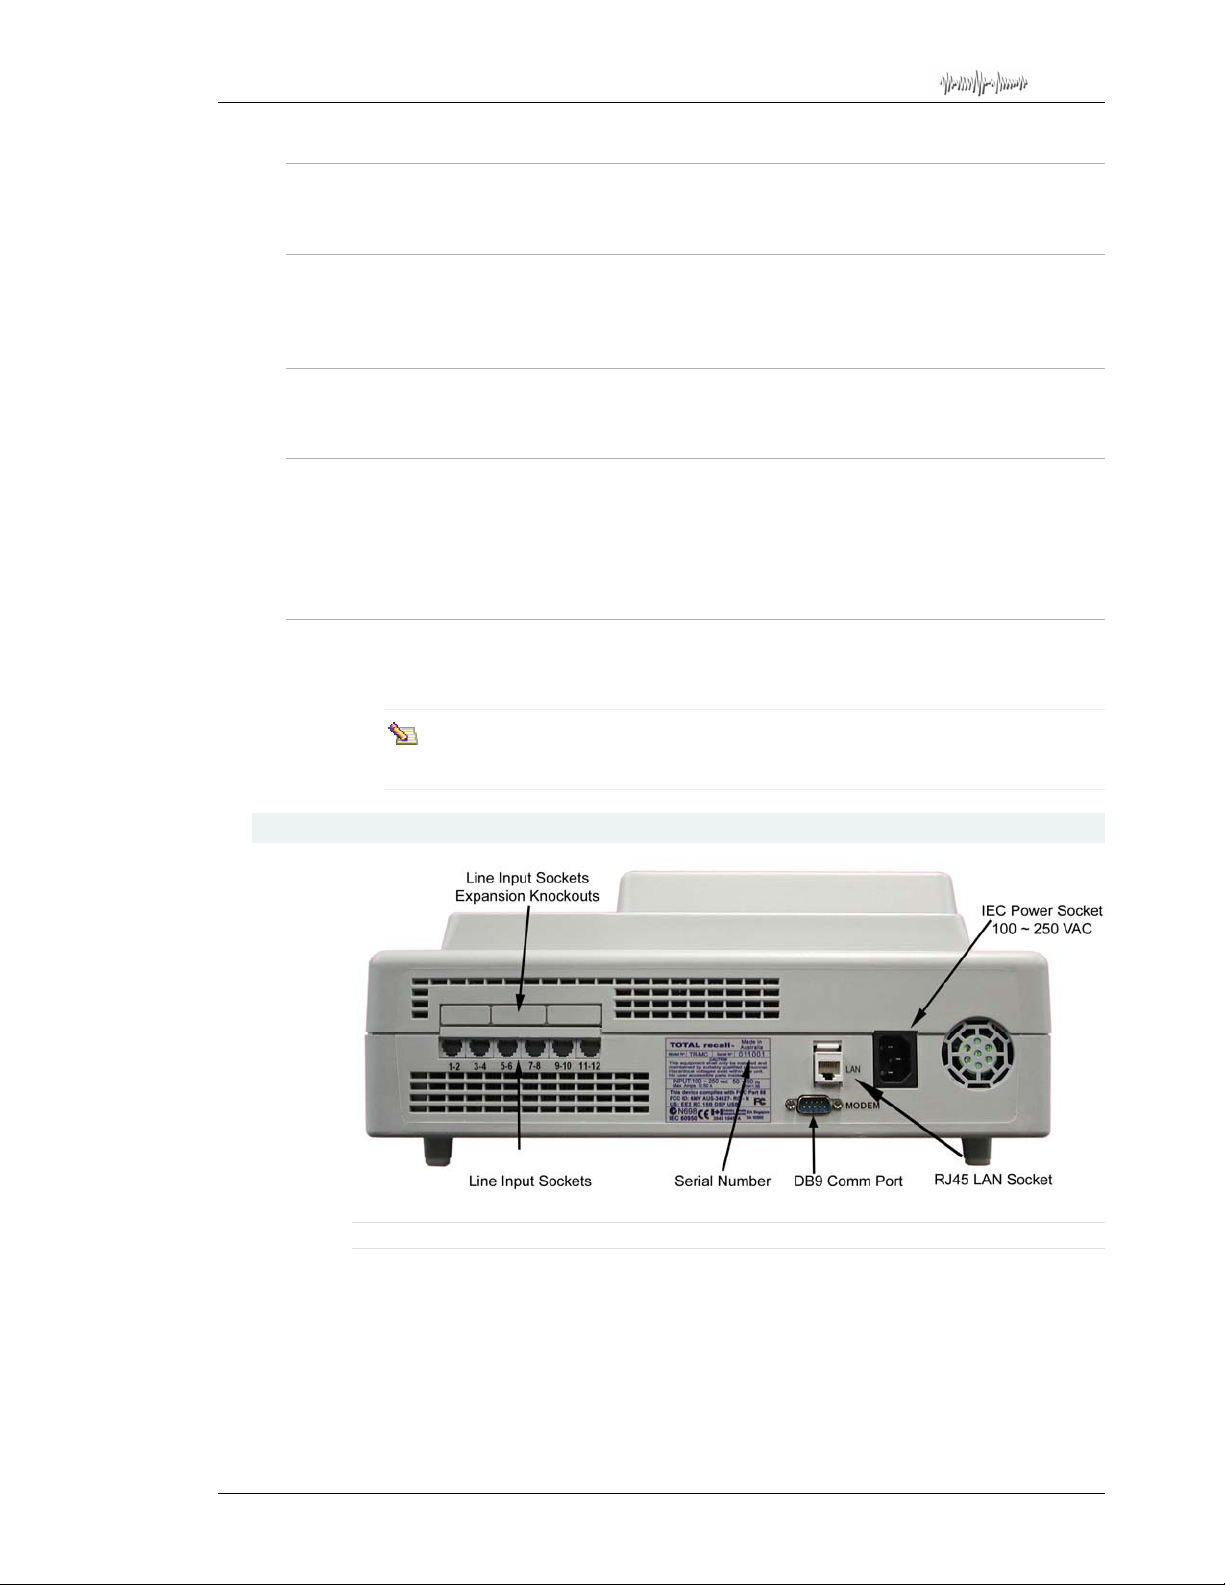
10.2. Rear Panel
Total Recall – Desktop Model
Page 16
Page 17
Total Recall Desktop & Rack – Installation and Administration Guide
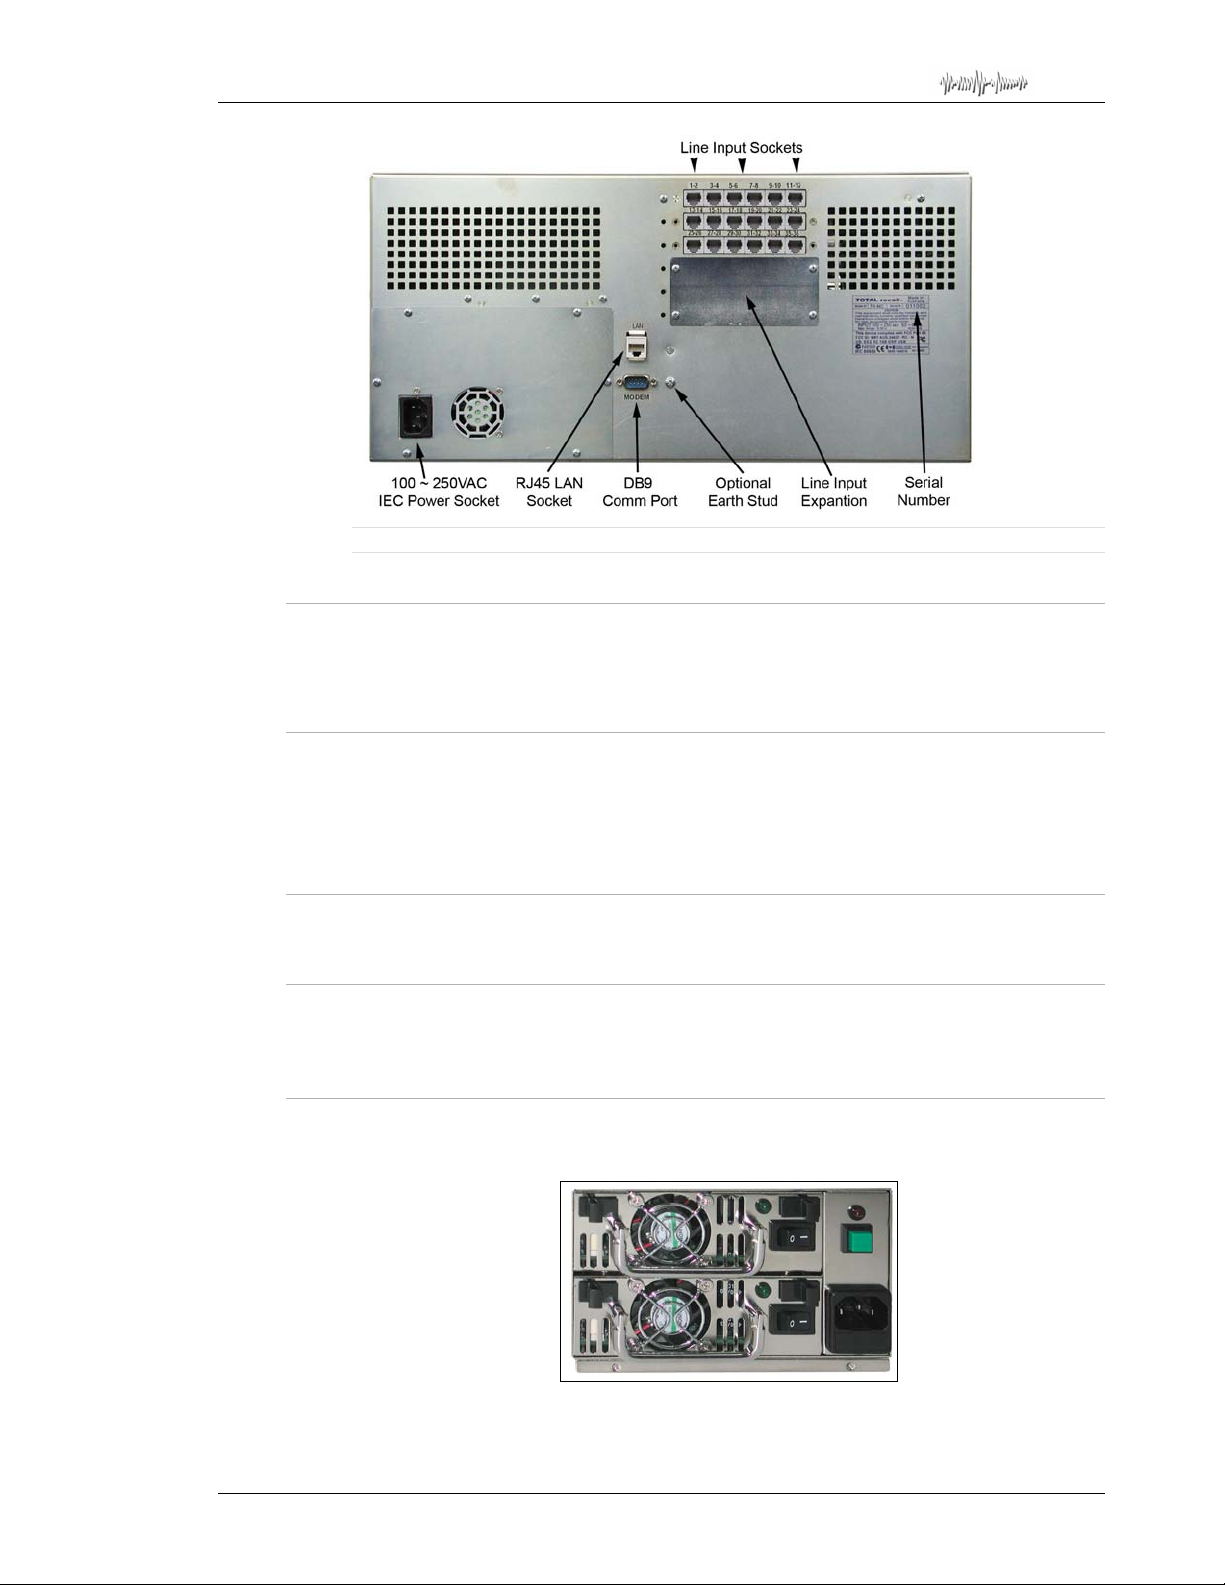
Total Recall – Rack Model
10.2.1. Remote Connection Ports
One standard RJ45 port (8P8C) is available for TCP/IP network connection.
The Modem (RS232) port is a standard male DB9 socket.
10.2.2. Line Interface Connectors
Total Recall has 4, 8, 12, 16, 20, or 24 channel inputs for the Desktop Unit, and 4, 8, 12,
16, 20, 24, 28, 32, 36, 40, 44, 48, 52, 56, 60, 64, 68 or 72 channel inputs for the
Unit. The connectors for the telephone line interface are standard RJ11C/RJ12/RJ14
(6P4C plug).
10.2.3. Power Cable Socket
IEC 90V - 260VAC power cable socket.
10.2.4. Power Supply (Standard: Desktop & Rack)
Total Recall Rack and Desktop are suppli ed as standard with a Mini-ATX auto sensin g
100-240 VAC, 50-60 Hz 180W maximum.
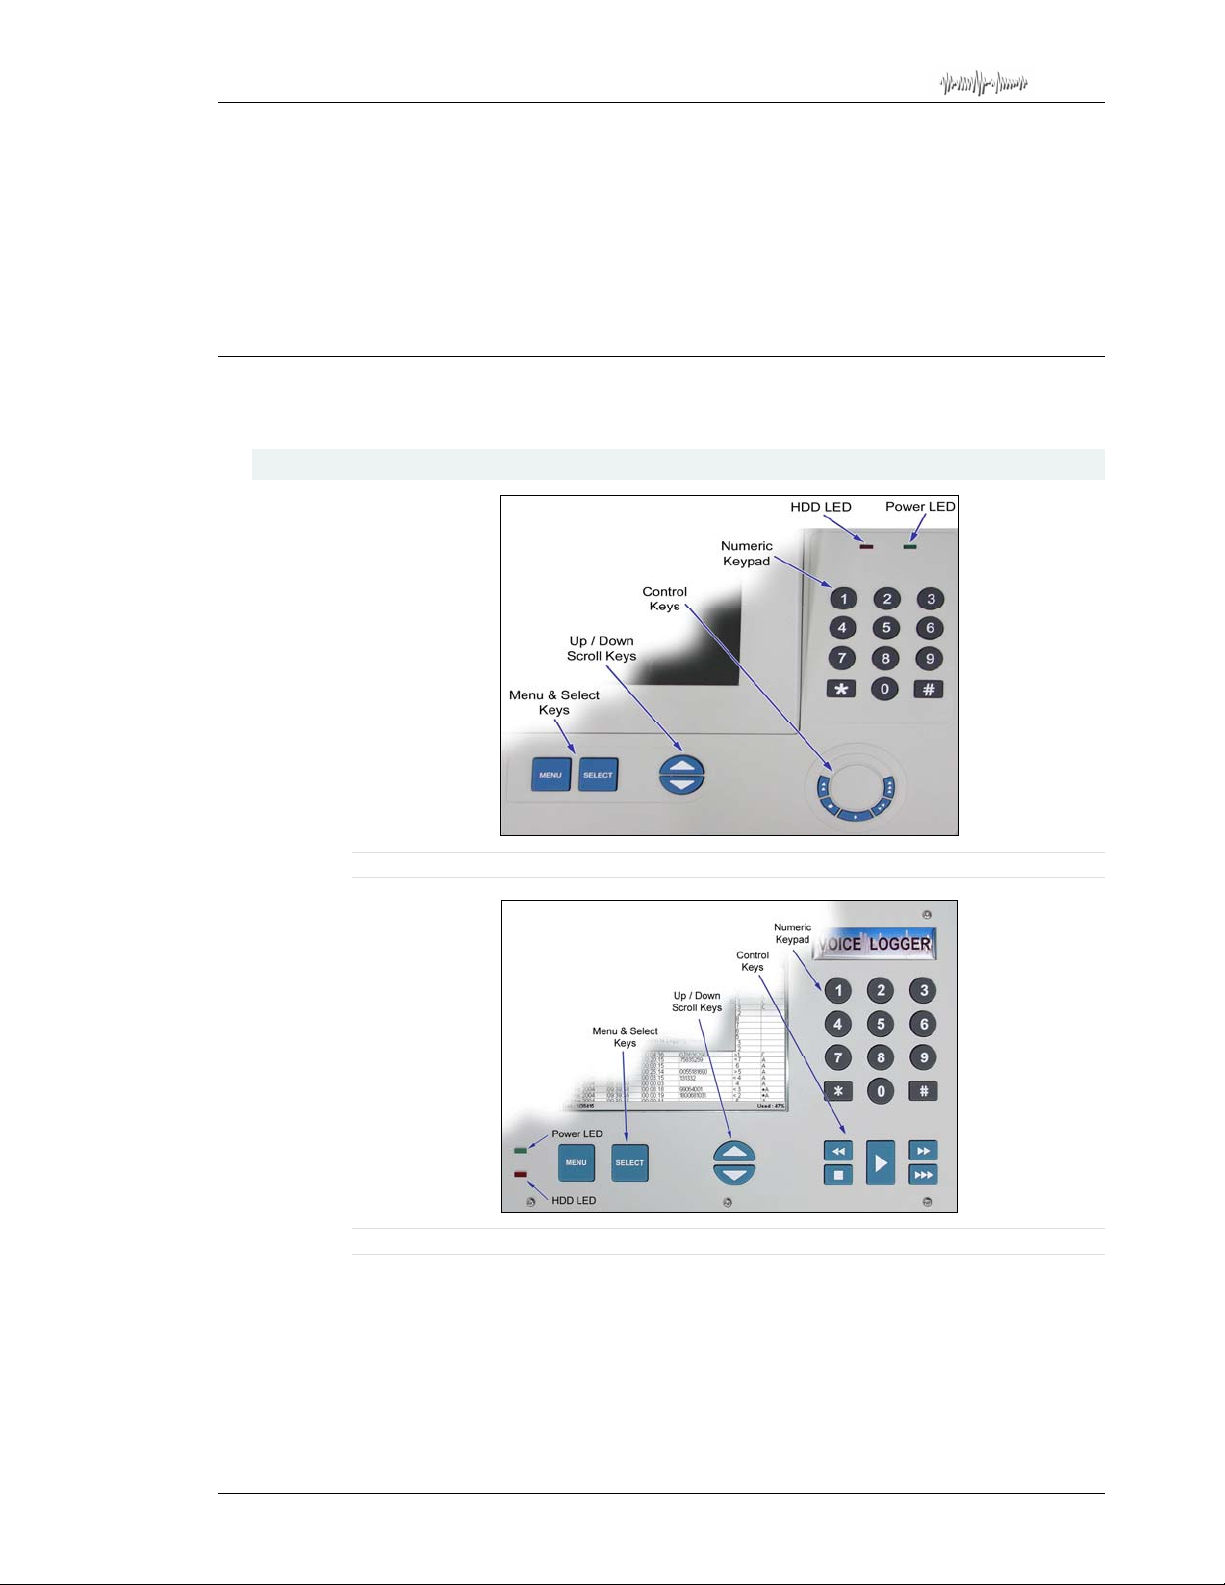
10.2.5. Power Supply (Optional Hot-Swap: Rack only)
Total Recall Rack is available with an optional Dual Hot Swap power supply, auto-
sensing 100-240 VAC, 50-60Hz 300 watts total.
Rack
To remove a hot-swap power supply module, simultaneously push the two black tabs
inwards and pull the flip-up handle. A power supply module can be removed while the
Page 17
Page 18
Total Recall Desktop & Rack – Installation and Administration Guide
unit is powered up and running, assuming the other module is operational. Re moving a
power supply module will cause an alarm to sound until it is replaced.
To replace a hot-swap power supply module, remove the faulty module according to the
above instructions, and slide a new module into the vacant opening, pushing firmly until
the module locks into place.
11. Total Recall – Onboard Controls
Total Recall is simple to operate, and features a built-in control and LCD display panel
for convenient configuration and operation.
11.1. Control Panel
Total Recall – Desktop Control Panel
Total Recall – Rack Control Panel
The colour TFT LCD displays the various screens, menus and dialogs. After five minutes
of keypad inactivity, the LCD backlight automatically switches off, to extend the life of
the backlight (the recorder continues to function normally).
Pressing any key illuminates the LCD backlight.
Page 18
Page 19

Total Recall Desktop & Rack – Installation and Administration Guide
11.1.1. Playback and Navigation Keys
The playback and navigation key s are used to contr ol the play back of recorded calls, and
to navigate the screen menus.
[Menu] Key
The [Menu] key is used to navigate between the three main menus; Logging, Search, and
Options. When [Menu] is pressed with the cursor at the top of one of the three main
menus, the cursor moves to the top of the next main menu. The system will “beep” each
time the [Menu] key is pressed.
When [Menu] is pressed and the cursor is in the body of a main menu, the cursor will go
straight to either the OK or Cancel button, saving keystrokes.
[Select] Key
Use the [Select] key to start an operation associ ated with a highlighted button or item,
and to confirm a request.
[Up] and [Down] Scroll Keys
The [Up] and [Down] arrow key s are used to navigate withi n a menu. With each [Up] o r
[Down] key press, the cursor highlights a different button or item within the menu. As
you press the [Up] or [Down] arrow keys, the system will “beep”.
Use the [Down] key to highlight items across the screen from left to right as well as
down. Use the [Up] arrow key to move i n the rev erse direction.
Call Playback Keys
During the playing of a call, the “Control Keys” can be used to navigate through the call.
The “Control Keys” operate in the same way as the key s on a CD or tape player. They
can be used to Stop, Play, Fast Forward and Fast Rewind through a call. Pressing the
“Play” key during playback will cause the playback to Pause. Pressing the “Play” key
again will continue the call.
Pressing the “Stop” key whilst not playing a call locks the User Interface (the padlock
icon on the LCD ‘closes’) when in the Options, Logging and Search Menus. This negates
the normal 120-second timeout required for the User Interface to lock.
11.1.2. Power and Hard Drive Activity LEDs
z Green is the ‘Power On’ indicator.
z Red indicates hard drive activity.
If the LCD backlight has switched off due to inactivity, the green LED flashes
continuously every two seconds. Pressing any key illuminates the LCD backlight and the
green LED stops flashing.
Your Total Recall system will continue to record normally while the LCD is
turned off.
Page 19
Page 20

Total Recall Desktop & Rack – Installation and Administration Guide
Quick Start Guide
12. Introduction
This section includes a basic example process for configuring your Total Recall Desktop
or Rack with an analo g ne twork.
The processes do not cover all system settings (just those that are usually essential for
proper operation) and do not take into account individual network characteristics.
13. Quick Start Guide – Total Recall Desktop and Rack
This is an example process for configuring Total Recall for r ecording fro m analog sign al
sources, with
This process assumes that the recorder has already been physically connected to the
analog lines, and to your LAN if desired.
Remote Manager access via the LAN if desired.
1. Remove your
make sure everything is there.
2. Connect
3. Power up your
turning it to the right. Your system may take up to three minutes to fully boot.
4. Enter the Administ rator Password (default password is 0000).
5. Go to the Options Menu by pressing the [Menu] key twice.
6. Select General Settings
Navigate the menus by using the [Up] and [Down] arro w keys, and [Select] to
enter the Menu of choice. Press the <OK> or <Cancel> key to return to the
General Settings Menu.
7. Set Language if required.
8. Does your network support Network Time Protocol (NTP)?
a. Yes: Add NTP server IP address/es
b. No: Manually set the time, date and time zone
Total Recall from its packaging, and check the contents of the box to
Total Recall to the analog input lines, and to the power cord.
Total Recall system by inserting the key in the front of the unit and
by pressing the [Select] key.
The call database must be empty when you set the Time Zone
9. Assign an Administrator Password.
10. Navigate to the Analog Settings
menu.
Page 20
Page 21

Total Recall Desktop & Rack – Installation and Administration Guide
11. Configure analog channels as appropriate, including assigning each channel an
“Extension” value. This extension va lue simply assigns the channel a name, and is
important in the later setup of your unit.
If you are not connecting your Total Recall unit to a TCP/IP network, there is no
need to proceed beyond this point. LAN access is not essential for normal
configuration, searching, monitoring, replay or CD/DVD/BD archive
functionality, but is convenient for many users.
12. Navigate to the Network Settings menu.
13. Assign an IP address
14. Navigate to the Remote Manager Settings
15. Select the IP address
16. Install
17. Run
18. Follow the on-screen prompts to create an Administrator account.
19. Add a Total Recall
20. Go to the ‘TR Configuration’ tab on your Remote Manager software.
21. Do you want to use
Remote Manager on a networked PC.
Remote Manager on the PC.
13).
a. Yes: Configure ROD Agents
b. No: You’re done!
for LAN 1. Specify the netmask and gateway if appropriate.
menu.
of LAN 1 for remote access.
to your Remote Manager software (using IP address from step
ROD from a remote PC?
.
Page 21
Page 22

Total Recall Desktop & Rack – Installation and Administration Guide
Installation
14. Before You Install
14.1. Extensions
To maximise the functionality of your recording system, Total Recall needs to establish
calling (CLI) and called (DTMF) number s for recorded calls where possible, so that the
direction of the call (incoming/outgoing) can be established. It is also preferable if the
system is configured to determine which of these CLI/DTMF numbers are to be
categorised as internal numbers, or ‘extensions’.
Refer to pages 20 an d 21 of the Quick Start Guide in this manual, or
)
the Extension chapter on page 47 for information about configuring
extensions via the
Total Recall GUI.
Extensions are a
extensions if they match the Internal Dial Plan, which is user-configured via the unit
control panel or
It doesn’t matter if your Total Recall system is actually installed on the trunk side of your
telephone system, or if the system is recording radios or another non-telephony signal
source. Assigning an ‘extension’ value to each recording channel is just like giving th e
channel a unique name, which you can use later for convenient call searching and system
configuration.
The Internal Dial Plan can be configured to identify any number as an extension,
regardless of whether the signal source is actually located on your premises.
Extension information is used in various ways:
• On the recorder, calls can be searched by extension (which requires an extension
name or number to be assigned to each recording channel).
• In
•
Remote Manager (remote monitoring and administration software), monitoring is
usually best done by extension, and again, calls can be searched by extension.
Record on Demand (remote recording control software) is configured on an
extension basi s .
It is recommended that
to an extension wherever possible.
Total Recall concept. Calling or called numbers are classed as internal
Remote Manager.
Total Recall is installed and configured so that calls can be linked
14.1.1. How Extensions are Identified from Call Signalling
When a call comes in to Total Recall, the following process is followed:
1. The calling (CLI) and called (DTMF) numbers are identified from the call signalling
(wherever possible).
2. The numbers are matched against a set of user-configurable ‘Signalling Mapping’
rules, which convert the CLI/DTMF nu mbers to more convenient values if required.
For example, a telephone number could be mapped to a user name, or a ‘direct line’
Page 22
Page 23

Total Recall Desktop & Rack – Installation and Administration Guide
number for an internal extension could be mapped to a 3-digit internal extension
number, for ease of reference and to simplify searching.
See Signalling Mapping on page 93 for further information.
)
If no matches are made, the number is left in its raw state.
3. The mapped values, and any unmapped numbers, are then matched against the user -
configurable Internal Dial Plan.
See Internal Dial Plan on page 95 for further information.
)
If any raw number or mapped val ue matches the Internal Dial Plan, the number is
classified as an internal extension by the recorder .
Remote Manager must be used to configure the Signalling Mapping and the
Internal Dial Plan.
14.1.2. Capturing the Analog Signal
Extension-Side Analog Recording
For extension-side (enterprise-side) analog recording, audio from each analog phone line
or extension is physically connected to a channel – so if extension information is not
present in the signalling, each analog channel can be manually assigned an extension
value instead.
This can be done directly on the recorder.
Any analog signal source (for example, a radio station) can be configured as an
extension, to allow extension-based searching and monitoring.
Trunk-Side Analog Recording
For trunk-side (network-side) analog record ing where all calls are routed internally by a
PBX, but come in to and go out from one central office number, extension information is
not present in the signalling. If extension information is required, it must be obtained
from the PBX itself.
In this situation,
PBX, and link calls to extensions using that data.
For more information about purchasing SMDR integration for your Total Recall
Rack, contact your dealer or visit www.totalrecallvr.com
Total Recall Rack may (optionally) analyse SMDRs obtained from the
14.2. Networking
Total Recall can be configured for IP communication by assigning a static IP address and
a default network gateway to the network port.
Page 23
Page 24
Total Recall Desktop & Rack – Installation and Administration Guide
The Total Recall is not a routing device for IP traffic. It can connect to
multiple networks, however, it will not route traffic between the networks.
The LAN 1 port should always be configured for IP communication and should be used
for remote access (using
Remote Manager) and system monitoring.
14.2.1. Virtual LAN Support
The LAN 1 port can be connected to a network that is using VLANs (IEEE 802.1Q).
However, the switch should remove (un-tag) and add (tag) the VLAN tag from/to the
MAC headers.
14.2.2. QoS Support
The LAN 1 port can be connected to a network that uses IEEE 802.1p tags for QoS.
However, it is not possible to configure the 802.1p priority for packets from the
Recall.
14.3. Network Shares (Optional – TR Rack only)
Total Recall Rack can optionally archive to Shared Network St orage. You can use your
Total Recall Rack and Remote Manager PC client software to search archives on
Network Shares. In addition, you may use
archives on Network Shares.
Remote Manager to update the information in
Total
A Network Share is either a file system that is part of a Network File System (NFS), or a
Windows shared folder. In both cases the Network S hare is storage space that p hysically
exists on a machine that is remote to the
Use the Total Recall to create archives and either the Total Recall or the
Remote Manager to modify the content of the archives. All manual (back-
door) changes to an archive will render the archive unusable.
Archiving to Network Shares requires a working network between the machine that
provides the storage space, the
Remote Manager client.
Use the LAN 1 port, and the network connected to the LAN 1 port, for IP communication
between the
Total Recall Rack and the machine that provides the network storage space.
14.3.1. NFS Network Share
The Tot al Recall Rack has an in-built NFS Client that uses the user-id and group-id of
the UNIX ‘root’ user (user-id of 0 and group-id of 0) to access NFS Network Shares.
Consult your NFS documentation on how to map the user-id and group-id to different
values, if required. For example,
/local/archives 192.168.1.0/24(rw,all_squash,a nonuid=150,anongid=100)
The Total Recall Rack requires read and write access to cr eate, an d add to, arch ives on a
NFS Network Share. However, read access is sufficient to search archives on a NFS
Network Share.
Total Recall Rack.
Total Recall Rack and the PC that is used to run your
Page 24
Page 25

Total Recall Desktop & Rack – Installation and Administration Guide
Unlike Total Recall, the Remote Manager requires the services of a 3rd party NFS Client
to access archives on NFS Shares. The NFS Client software needs to be installed
separately from the
The
Remote Manager CD does not contain NFS Client software. However, there are a
number of free as well as commercial NFS Clients. Microsoft’s “Windows Services for
Unix” product contains a suitable NFS Client and is free to download.
http://www.microsoft.com/downloads/details.aspx?FamilyID=896c9688-601b-44f181a4-02878ff11778&displaylang=en
The
Remote Manager requires read and write access to modify archives on a NFS
Network Share. However, read access is sufficient to search archives on a NFS Netw ork
Share.
Incorrect configuration (especially access rights) of the NFS Client and the
NFS Network Share is the most common problem when archiving to NFS
Network Shares.
Remote Manager.
14.3.2. Windows Network Share
The Total Recall Rack has an in-built SAMBA Client to access Windows Network
Shares.
The SAMBA Client uses the user and group that are specified during configuration to
access archives on Windows Network Shares.
The
Total Recall Rack requires read and write access to create, and add to, archives on a
Windows Network Share. However, read access is sufficient to search archives on a
Windows Network Share.
Unlike
Network Shares, which are Windows shared folders.
The Remote Manager requires read and write access to modify archives on a Windows
Network Share. However, read access is sufficient to search archives on a Windows
Network Share.
Total Recall, the Remote Manager depends on Windows to access Windows
Some versions of Windows, such as Windows XP Home, do not contain the
required software to access Windows shared folders.
Incorrect configuration (especially access rights) of the Windows Network
Share is the most common problem when archiving to Windows Network
Shares.
Page 25
Page 26
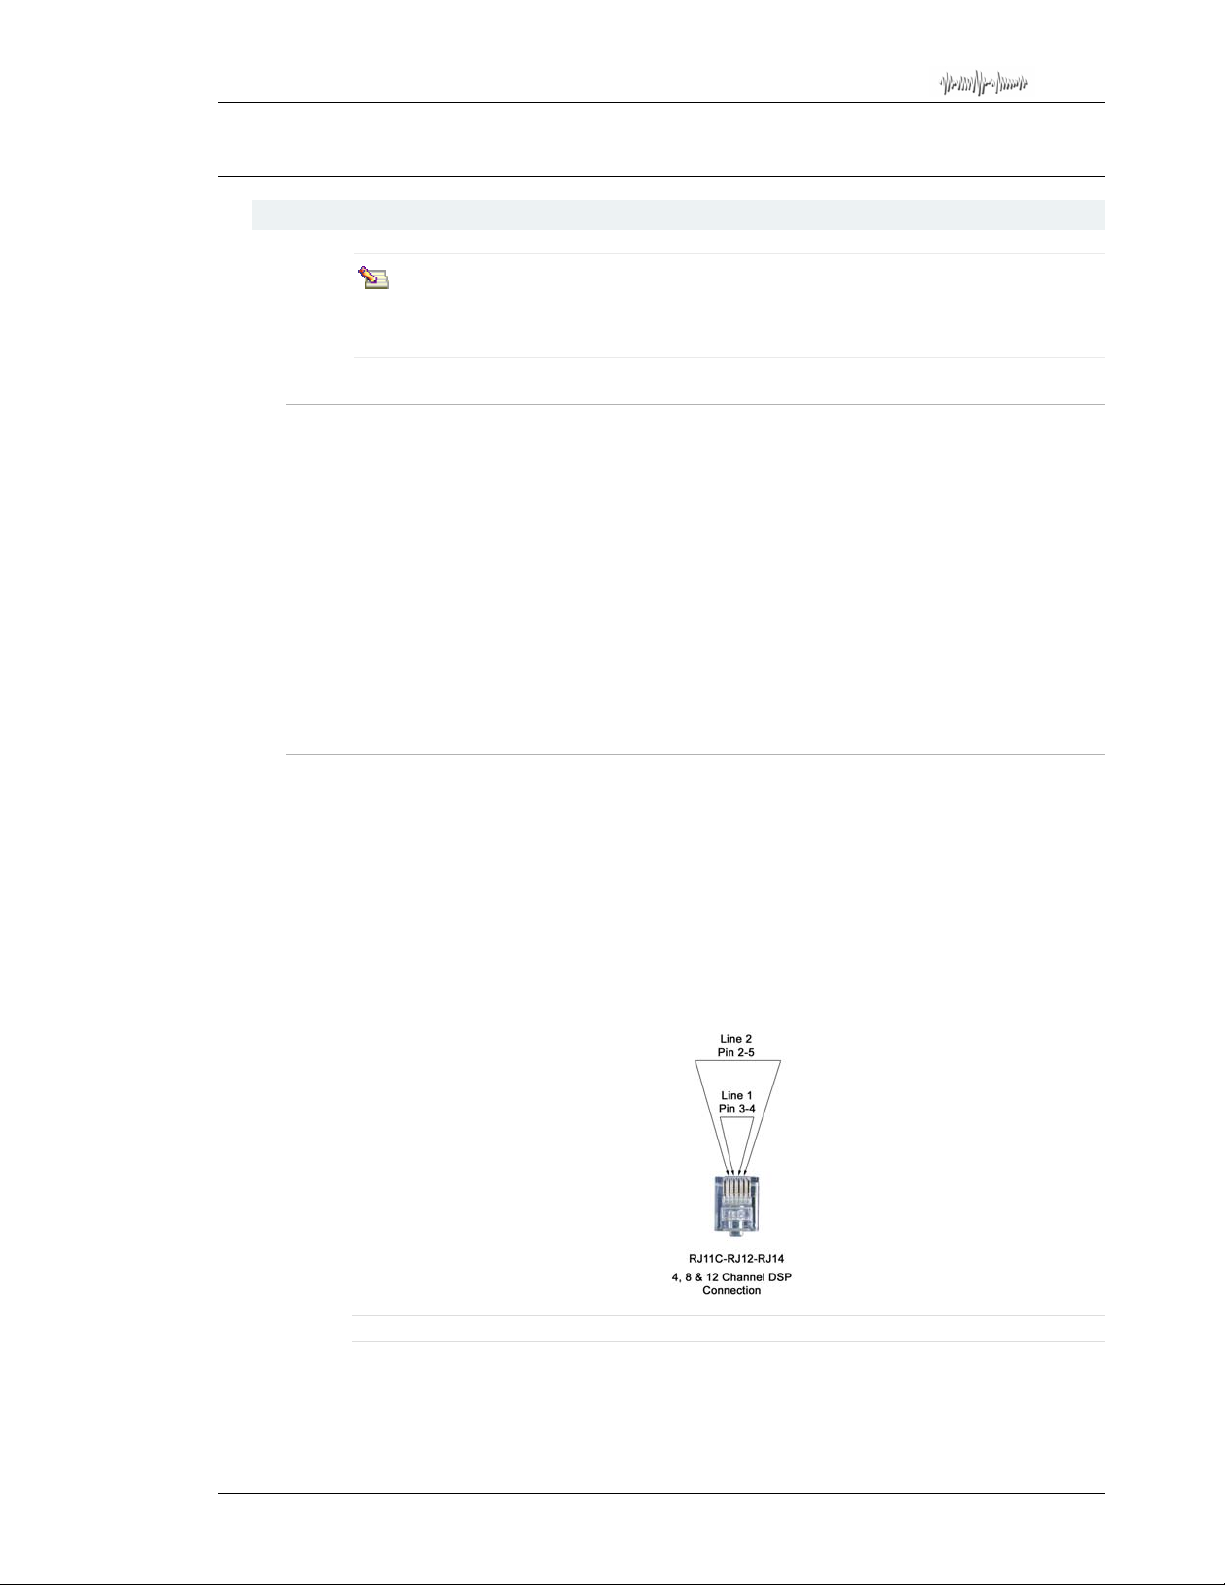
Total Recall Desktop & Rack – Installation and Administration Guide
15. Connecting to Analog Signal Lines
15.1. Connection
When installing Total Recall for analog recording, care must be taken to capture
call signalling wherever possible, to maximise the information that is recorded
with each call.
15.1.1. Signal Sources
Total Recall requires 2-wire inputs for analog recording. A digital line signal will first
need to be converted to analog before it can be recorded.
Total Recall can be installed to record from almost any line level audio signal source:
• An analog trunk (exchange) line.
• An analog extension line.
• A telephone handset, either analog or digital (via handset splitter / logger patch).
• A digital extension line, using D/A converters.
• A digital trunk line, using D/A converters.
• A radio or other audio signal presented as a two-wire analog interface.
15.1.2. DSP Cards
The Total Recall Desktop recorder can accommodat e up to 2 DSP car ds (maximum 24
channels), while the
(maximum 72 channels).
Each DSP card supports either 4, 8 or 12 input channels, via RJ11C/RJ12/RJ14 (6P6C)
line interface connectors. The connectors support 2 input lines each. As a result, 4channel boards have 2 connectors; 8-channel boards have 4 connectors; and 12-channel
boards have 6 connectors.
On each connector, line 1 must be wired to pins 3 and 4 of the connector, and line 2 must
be wired to pins 2 and 5 of the connector (as in Figure 1 below).
Total Recall Rack recorder can accommodate up to 6 DSP cards
Figure 1 - RJ connector wiring
Analog recorder channel numbering starts with the lines on the left-most connector,
where line 1 maps to analog recorder channel 1 and line 2 maps to analog recorder
Page 26
Page 27

Total Recall Desktop & Rack – Installation and Administration Guide
channel 2. The numbering than continues in lots of 2 channels to the right-most
connector.
15.2. Analog Telephone Networking
15.2.1. Connecting to the Telephone Network
The analog line interface on the Total Recall recorder is a bridging point and not a passthrough point. Therefore, it is not possible to connect the recorder in series with a
telephone line or telephone handset/headset.
The analog line interface connection from the recorder must be run back to a termination
point. Depending on the application, this termination point i s nor mally a parallel tap to an
extension line, a trunk line, or a digital handset/headset.
Most PBX installations have an MDF (Main Distribution Frame) fitted between the
incoming trunk lines and the premise equipment. The trunk lines are terminated to the
MDF, and then connected through to the PBX.
Similarly, there is normally a distribution frame on the extension (office) side of the
PBX. From this frame, the telephone cabling is routed through the office/work area to
individual telephones, or telephone connection points.
15.2.2. Location of the Recorder
The recorder can be located near the PBX and distributi on frame, or near the designated
users in the office area. Care should be taken when planning the installation to ensure that
telephone cable runs and ease of access to the rec order are considered.
The area should be dust free and the room temperature should be kept down to an
acceptable level.
15.2.3. Connecting to Analog Lines
Total Recall can be connected to the trunk side or the extension side of the PBX,
depending on user preferences and operational requirements.
The main difference is that an extension side connection will enable the recording of
internal (extension to extension) calls. In this case, the extension number dialled may be
recorded as a search field, provided the handset generates a DTMF dialling tone.
If the number of extensions exceeds the number of trunks, and the requirement is only to
record external calls, then the recorder can be connected to the MDF or distribution frame
on the trunk side.
Connecting on the trunk side will ensure calling number capture, if CLI is activated.
Page 27
Page 28
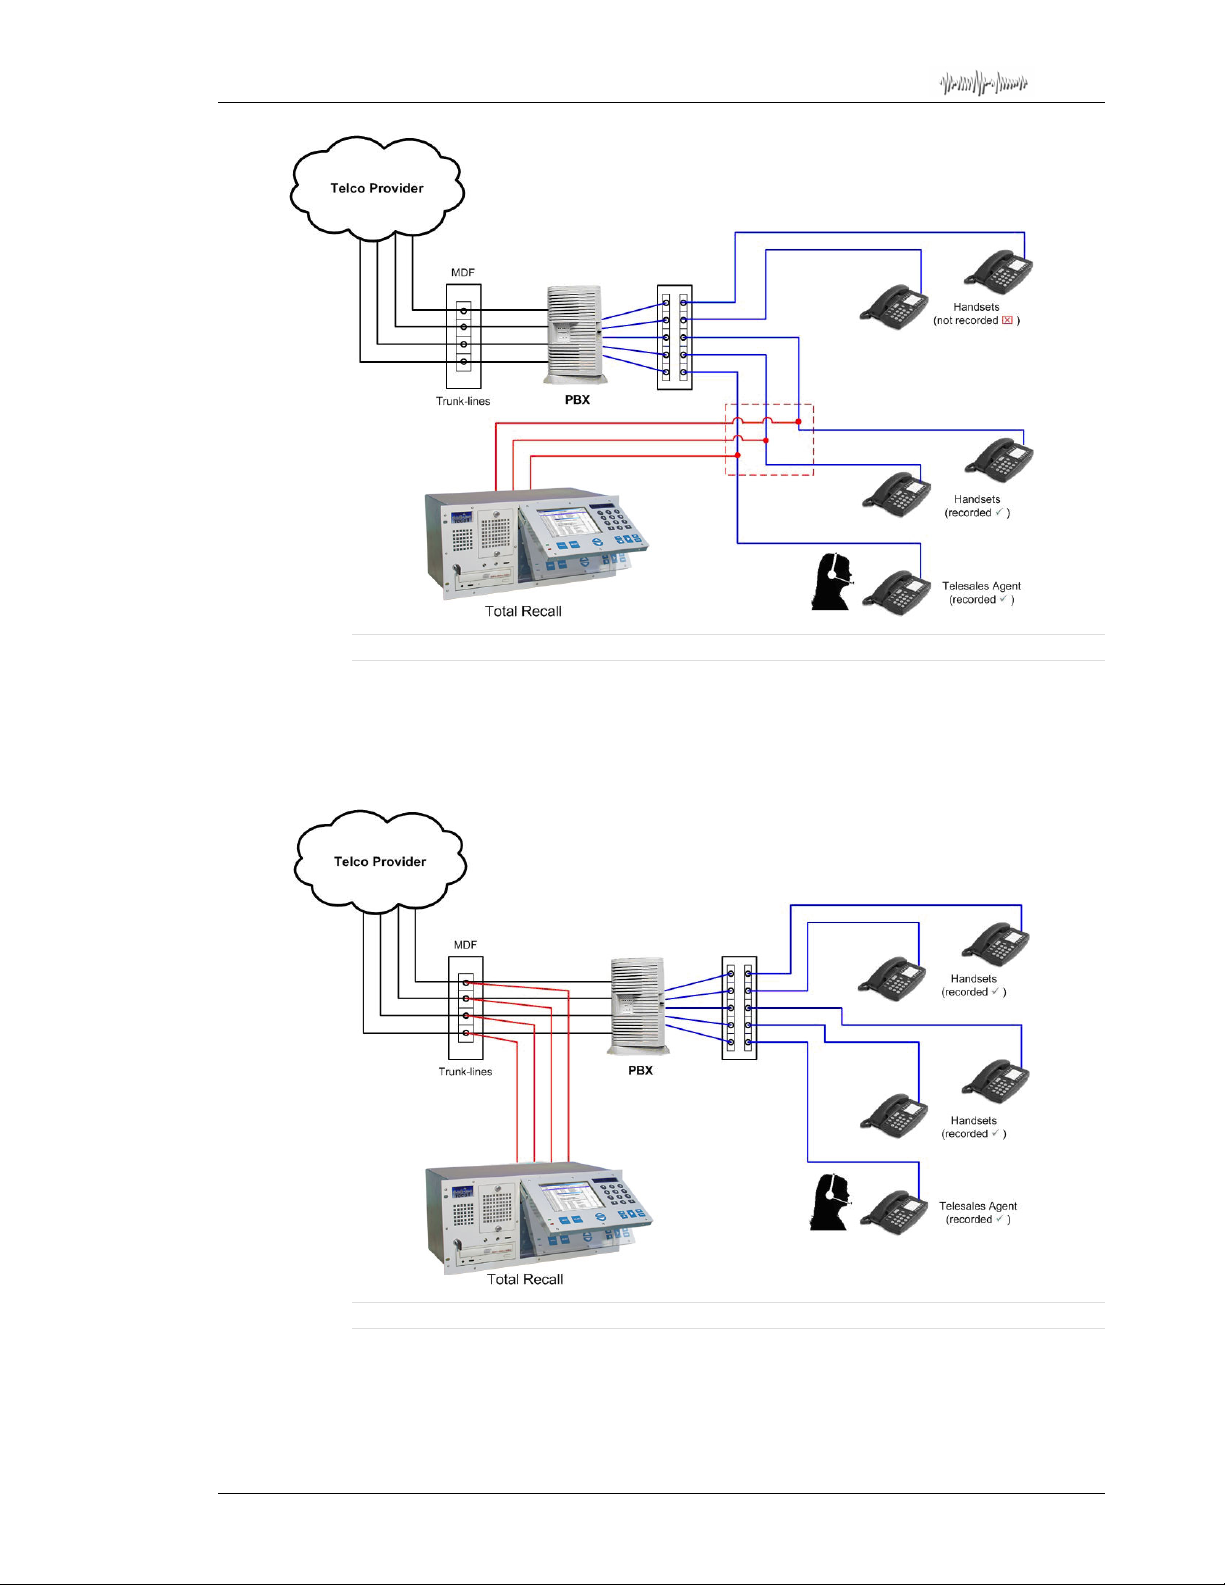
Total Recall Desktop & Rack – Installation and Administration Guide
Figure 2 – Example Total Recall Installation (2-wire analog extensions)
In Figure 2 above, the recorder is patched onto a distribution frame within the
communications or PBX room. This assumes that the lines between the PBX and the
Phones are 2-wire analog. Only three of the five available extensions will be recorded. If
required, the recorder could be located out in the office area and wired back to the
distribution frame.
Figure 3 - Example Total Recall Installation (2-wire analog direct to trunk lines)
In Figure 3 above, the recorder is patched directly to analog trunk lines. All incoming and
outgoing (but not internal) call activity will be recorded. The recorder can be located in
the Communication (or PBX) room, or in the front office.
Page 28
Page 29

Total Recall Desktop & Rack – Installation and Administration Guide
15.2.4. Connecting to Digital Phones
Many PBX installations use digital phones. It is common to have digital signalling on the
extension side, with analog trunk lines installed.
It is important to know the configuration of your PBX system before installing
Recall.
Total Recall will not record a digital line signal directly, so digital to analog (D/A)
conversion must occur before the signal reaches the line interface on the recorder.
Unlike standard two-wire analog, most digital PBXs generate their own signalling
protocol, and therefore recording from digital lines or handsets can be different for each
application.
Most digital phones have audio signalling in the handpiece, with the speaker (earpiece)
and microphone (mouthpiece) channels being connected to the recorder. A Logger Patch
can be used to parallel tap this audio signal from the handset, and wire directly back to
the recorder.
It is sometimes the case that there is a signal level difference between the speaker and
microphone, and therefore, in a recorded conversation, one party may be heard more
clearly than the other. (This is a limitation of recording via handset adapters, and not a
recorder limitation.)
Combinations of PBX and digital handsets can produce varying signal levels.
Total Recall does not provide D/A conversion. A third party product would be
required for this function.
Total
It is not possible to capture incoming call (CLI) data on the recorder when
using handset adapters, as the recorder connection is to the handset, rather than
to the incoming line. With some handsets, standard DTMF signalling tones are
not transmitted and thus will not be captured by the recorder.
Logger Patches are available from Total Recall. Your supplier should be able to advise
on a suitable Logger Patch which is compatible with the line signalling and wiring of the
handsets installed.
The diagram on the following page shows a representation of how Logger Patches may
be used to enable recording direct from digital handsets.
Page 29
Page 30
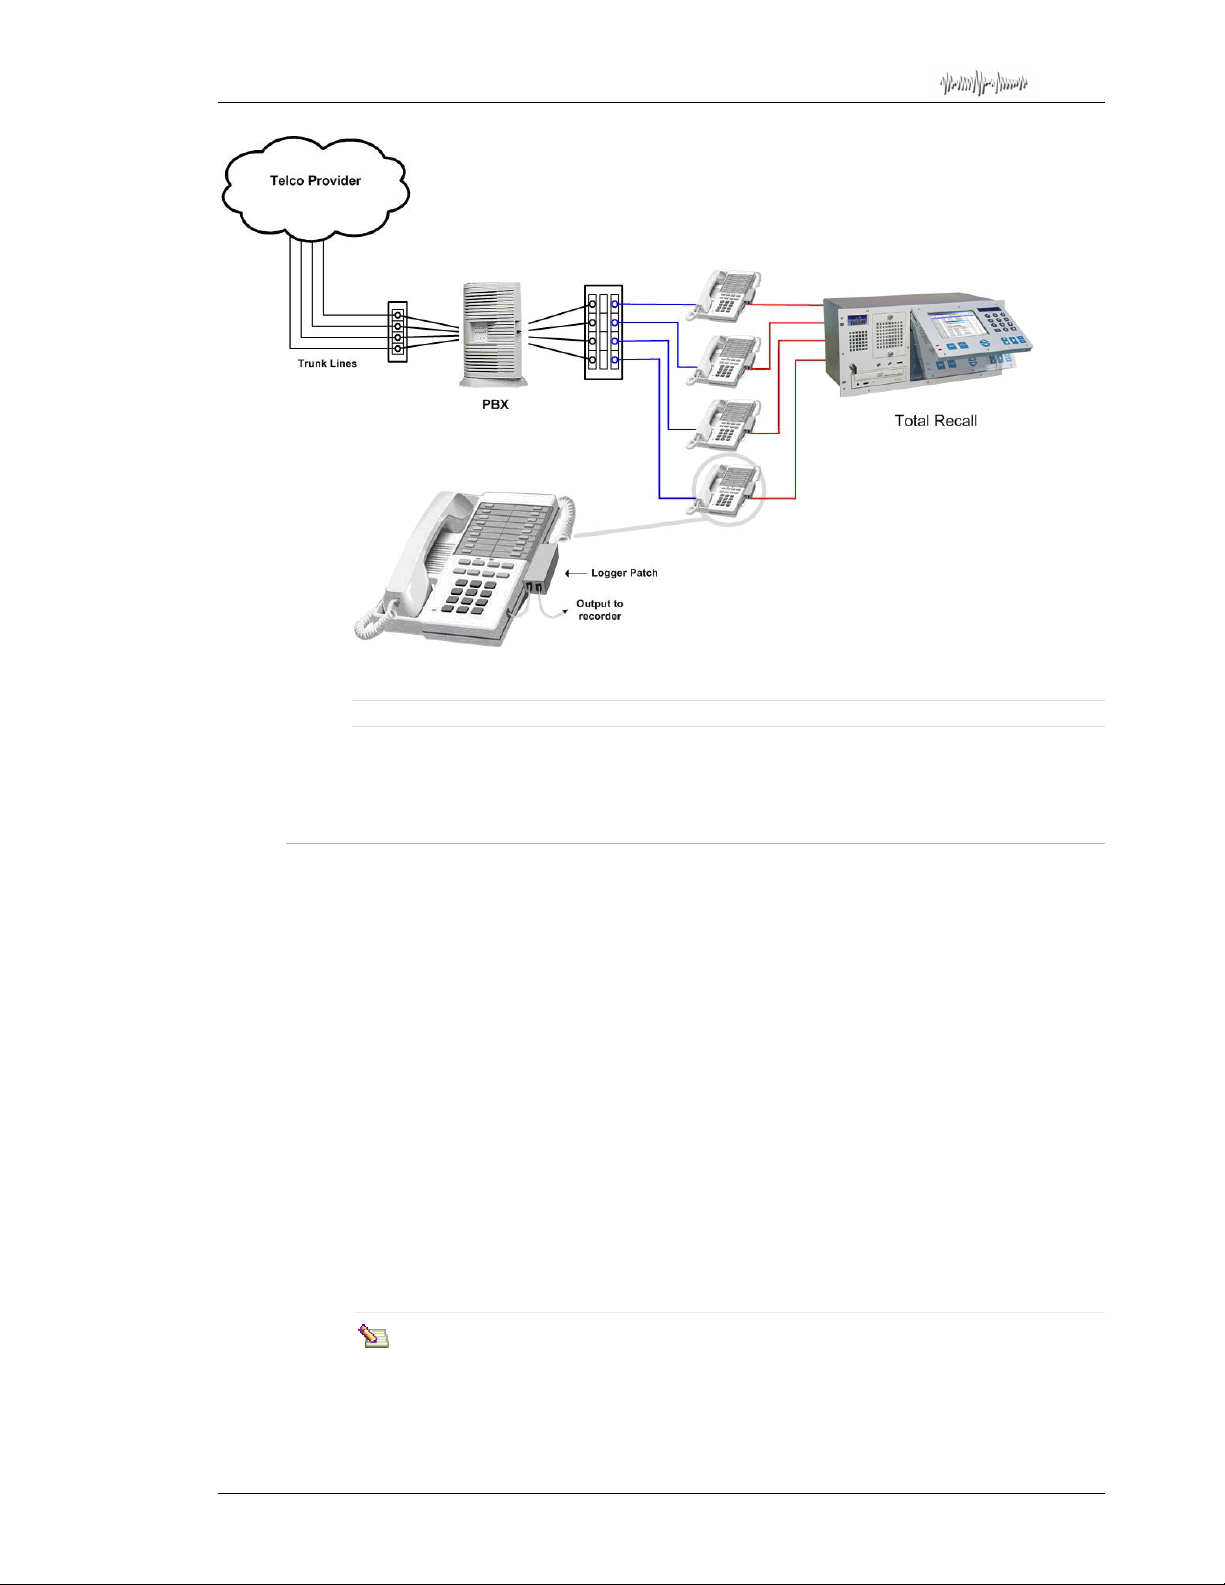
Total Recall Desktop & Rack – Installation and Administration Guide
Figure 4 – Example Total Recall Installation (recordi n g digita l pho nes from handset interface)
Your Total Recall supplier or the Digital phone manufacturer, should be able to advise
on a suitable Recorder Adapter, compatible with the
Total Recall analog interface.
15.2.5. DTMF/CLI/Extension Capture
For extension side recording, each line is dedicated to a specific channel, and will always
record the same channel unless the line is dis connected or physically changed to another
port. For trunk side recording, the next call in or out will generally pick up the next
available phone line and will be recorded on the channel dedicated to that line, so agent
calls are not channel specific.
If the recorder is connected trunk side on an analog line and set to VOX activation, and
an operator/receptionist answers the incoming call, the r ecorder w ill record the operator’ s
comments, and also the continuing conversation of the call if it is transferred. However,
in this scenario, the recorder will not capture the agent’s extension number.
In this situation with a
(optional) Station Messaging Detail Record (SMDR) processing capability to extract
extension information for each call.
CLI data will only be captured if it is embedded in the incoming call data. The recorder is
designed to detect DTMF tones on dialling and display the “Dialled Number” in the
Number Field of the call record. If DTMF is not present at the point of recording, then
the DTMF number will not be displayed.
Total Recall Rack, you could also take advantage of the
Due to differences in international standards for CLI and off hook, CLI captured
for an unanswered call will be held for five seconds after the last ring detect. If a
new call comes in without CLI within that five second period the previous CLI
Page 30
Page 31
Total Recall Desktop & Rack – Installation and Administration Guide
may be displayed. If CLI is critical then VOX trigger settings may be better
suited to your application.
If CLI signalling is not available, then you should specify an extension name ( or number )
as part of the analog channel configuration, to provide the
information about where the call originated.
See Analog Settings on page 44, and Extension on page 99 for further
)
information.
Total Recall with more
16. Switching On and Getting Started
16.1. Starting Up
Once the line interface and network cables have been connected, connect the power cable
and switch ON the recorder. The power ON/OFF key switch is located at the front of the
unit.
Total Recall must always be shut down properly using the System Shutdown
function, found in the administrator-only Options Menu. If Total Recall is
powered off without following the proper procedure, open database records can
be permanently damaged.
It is strongly recommended that Total Recall is connected to an Uninterruptable
AC Power Supply (UPS), to avoid improper system shutdown due to unexpected
power events.
Initially, you will see the green power LED illuminate, the red LED will flash to show
hard drive activity and you will hear a short beep. Text relating to the Linux boot process
will appear on the LCD screen, and then the Total Recall logo will be displayed. A screen
will then appear giving you essential recorder information, and a few seconds later the
Logging Menu will be displayed with the padlock icon “locked”. This Menu is the
“default” Menu that the system will revert to after 120 seconds of inactivity.
Before commencing to navigate the menu structure, enter the password [default 0000] at
the Logging Menu and then press [Select]. The padlock icon in the top right corner of the
LCD will display as “unlocked”, and you may begin to use the system.
16.2. Using the Control Panel
16.2.1. MENU Key
Use the [Menu] key to move betwee n the three main screens, the Logging Screen, the
Search Screen, and the Options Menu.
To move between main screens:
• Press the [Menu] key whilst at ‘root level’ of any of the main screens (that is, with no
dialogs open).
When [Menu] is pressed with a dialog open, the cursor either moves straight to either OK
or Cancel, or simply closes the dialog, depending on the contents of the dialog.
Page 31
Page 32

Total Recall Desktop & Rack – Installation and Administration Guide
The system beeps each time the [Menu] key is pressed.
16.2.2. SELECT Key
Use the [Select] key to start an op eration associated with a highlighted option or menu
item, and to confirm requests.
16.2.3. Up and Down Arrow Keys
Use the [Up] and [Down] arrow keys to navigate sequentially within a menu or
dialog. With each or key press, the cursor moves to the next option or menu item.
Press [Down] to highlight items across the screen from left to right, as well as down.
Press [Up] to move right to left, as well as up.
The system beeps each time arrow keys are pressed.
16.2.4. Numeric Keypad
Use the numeric keypad to enter n u me ra ls, an d the À key to tag calls.
See the Total Recall User Guide for further information on tagging
)
calls.
16.2.5. Playback Control Keys
Use the playback control keys to navigate through a call during playback.
The control keys operate in the same way as the buttons on a CD player. They can be
used to play, pause, stop, fast-forward and rewind a call.
See the Total Recall User Guide for further information about using
)
the playback control keys to play calls.
The (stop) key can also be used to lock the user interface.
To lock the user interface, press (stop) in either of the three 3 main screens (Opti ons,
Logging or Search), whilst not listening to a call.
This overrides the normal 2 minute timeout required for the user interface to lock
automatically.
The padlock icon, which appears in the top right hand corner on the LCD
screen, displays in the closed position ( ) when the user interface is locked,
and the open position (
) when it is unlocked.
16.3. Using the Graphical User Interface
16.3.1. Using the GUI
The Total Recall Graphical User Interfa ce (GUI) features a cursor that is moved around
the screen using the (Up) and (Down) keys.
Page 32
Page 33
Total Recall Desktop & Rack – Installation and Administration Guide
When the cursor is positioned on an interactive screen item (such as a screen button or a
check box), the object becomes highlighted. Pressing [Select] then executes the function
that is associated with that screen item.
Various methods are used to indicate that screen items are currently highlighted.
Buttons
Screen buttons (for example, menu buttons and OK and Cancel buttons) ‘pop up’ when
they are highlighted, and the button text is shown surrounded by a blue border.
Standard screen button:
Highlighted screen button:
Press the [Select] key to ‘press’ highlighted screen buttons.
Calls
Calls are shown highlighted when selected. Press [Select] or to play highlighted calls.
Data Fields
Data fields are shown in highlighted when selected and can be edited.
Use the numeric keypad to enter values for numeric data fields. If you enter the wrong
value, simply enter another value and it will overwrite the existing value.
Some data fields will clear the current value on the first key press.
Use the [Select] key to cycle through a vailable values for data fields with pre-populate d
options.
Check Boxes
Check box text is shown with a border when selected.
Press the [Select] key to place a c heck in the check box (referred to in this manu al as
‘checking’ the check box).
Data fields associated with check boxes cannot be populated or edited unless the check
box is checked.
16.3.2. Cancelling
Where it appears, y ou can select the Cancel button to return to the previous screen or
dialog without executing the current function.
Page 33
Page 34
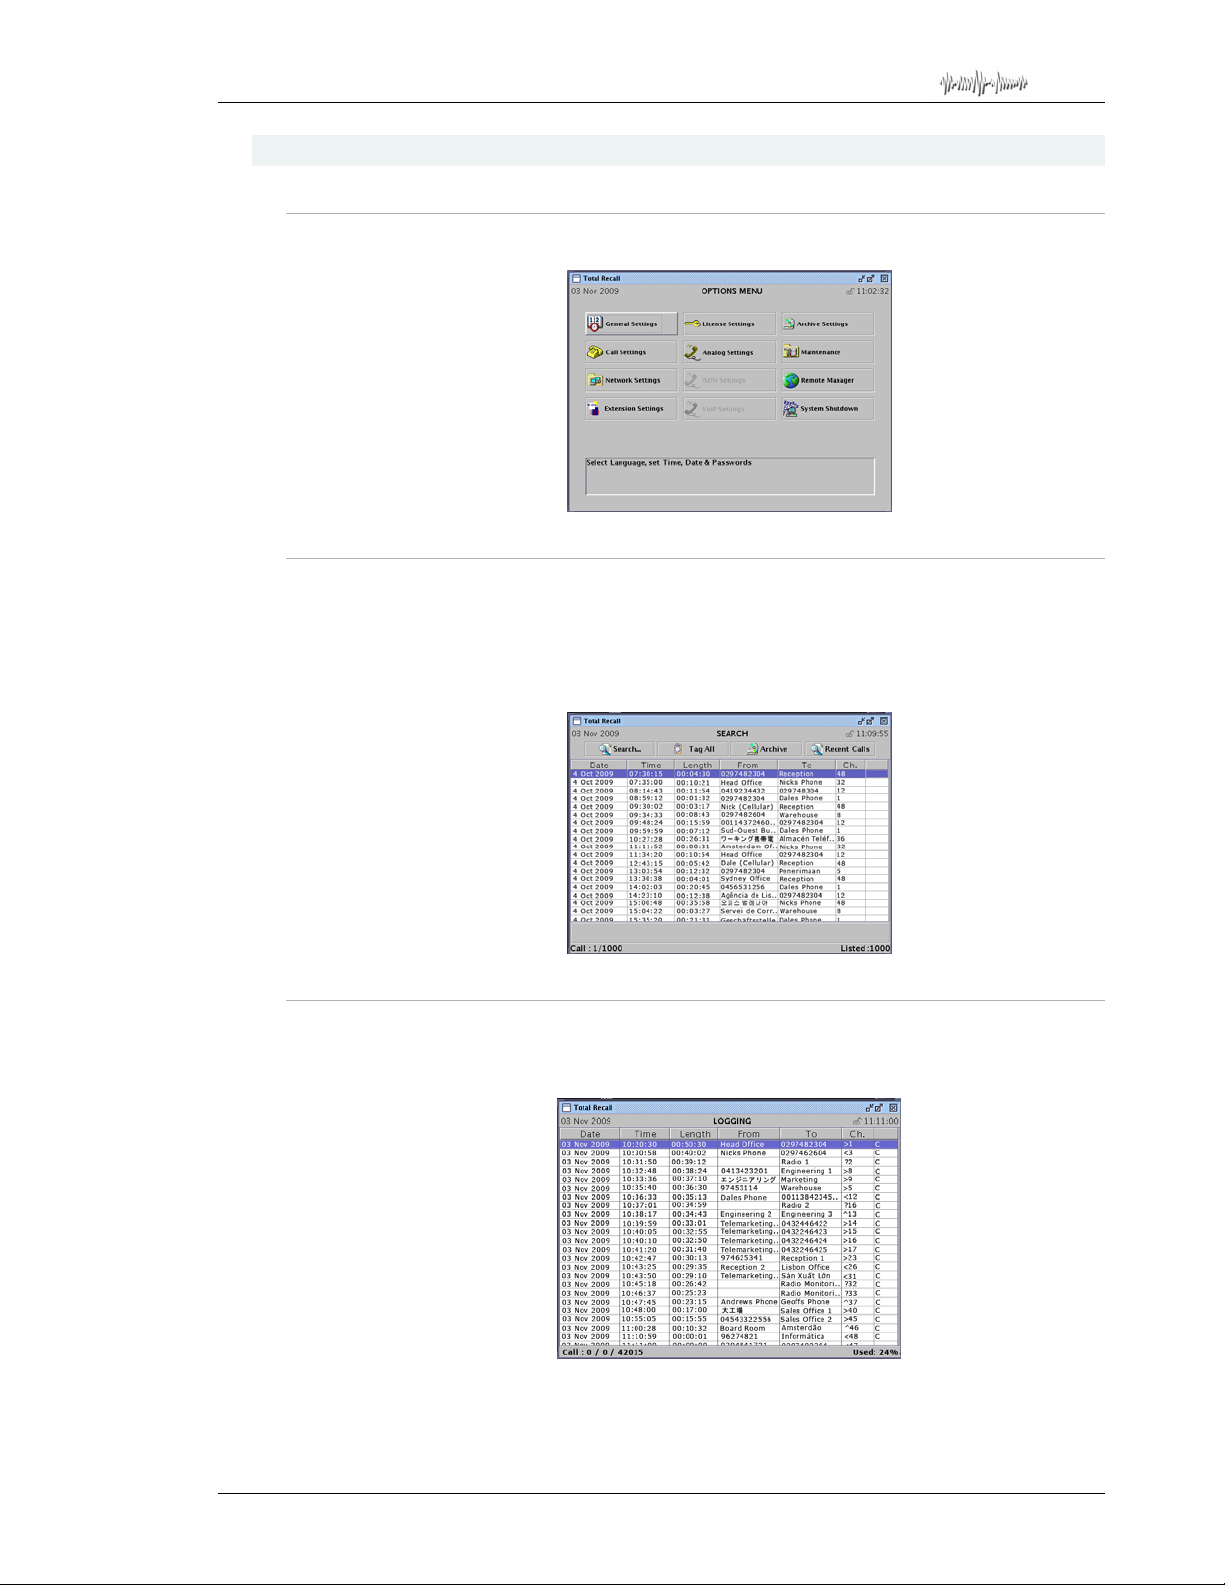
Total Recall Desktop & Rack – Installation and Administration Guide
16.4. Total Recall GUI Menus
16.4.1. Options Menu
Used for system configuration, system maintenance and system shutdown.
16.4.2. Search Menu
Used to set search parameters and to search the database or an archived DVD/CD for call
replay. Your
Total Recall units, or even archive DVD/CDs from old generation
Calls found through the search can be tagged for archiving. The Search Menu is also used
to manually archive calls to DVD or CD.
Total Recall can search and replay archive DVD/CDs created by other
Total Recall systems.
16.4.3. Logging Menu
The Logging Menu is the default Menu and is used to view current call data, call activity,
call status and playback selected calls. Calls can be tagged and Live Monitoring of calls
is enabled from the Logging Menu.
Page 34
Page 35

Total Recall Desktop & Rack – Installation and Administration Guide
Configuration
17. Menu Site Map & Default Parameters
Listed below are the user selectable/definable opti ons on the Total Recall system, and
their default values. Default values are listed in bold. Parameters such as language, date,
time and time zone may have already been pre-configured by your Total Recall dealer,
and as such will vary from the values listed here.
Logging Menu
Search Menu
Recent Calls (On/Off)
Search
Date
Time
Number
Extension
Tag
Tagged Only
Untagged Only
Direction
Incoming
Outgoing
Internal
Unknown
Channel
Search Archive
Search DVD/CD
Search Network Archive (Will only appear if optioned on TR Rack)
Tag All
Untag All
Archive
All Calls
Found Calls
Unarchived Calls
Tagged Calls
Archive Device
DVD/CD
Network Share (Will only appear if optioned on TR Rack)
Options Menu
General Settings
Language
English
Spanish
French
Portuguese
Afrikaans
Chinese
Korean
Japanese
Arabic (Islamic Calendar)
Arabic (Gregorian Calendar)
Time and Date
Page 35
Page 36

Total Recall Desktop & Rack – Installation and Administration Guide
Use NTP (Yes/No)
NTP Address 1
NTP Address 2
Date
(Current AEST)
Time
(Current AEST)
Time Zone Area
Australia
Time Zone City
Sydney
User Session
Enable Timeout (On/Off)
Idle Timeout (1-10 Mins, default = 2 mins)
Recent Calls
Update Period (5-60 secs, default = 20 secs)
Records to Show (1-999, default = 20 records)
User Password
0000
Administrator Password
0000
Call Settings
Min Call Length
Ignore
1-19 Seconds
Max Call Length
1-60 Minutes
Max Call Lifetime
Ignore
1-24 Months
VOX Timeout
2-15 Seconds
Recording Period (On/Off)
08:30 – 19:00
Network Settings
LAN 1 (Recommended for Remote Manager/PC connection)
IP Address
Netmask
Gateway
Extension Settings
Enable Monitoring (On/Off)
ROD Mode
Record by Default
Don’t Record by Default
Add Notes Only
Record Partial Calls
Allow ROD Phone Key (On/Off)
Add (Custom Extension Settings)
Extension
Enable Monitoring (On/Off)
ROD Mode
Record by Default
Don’t Record by Default
Add Notes Only
Record Partial Calls
Allow ROD Phone Key (On/Off)
License Settings (Total Recall Rack only)
Hardware Key (Read Only)
VoIP & ISDN License Key (Not Utilised on Total Recall Rack or Desktop)
Feature License Key
Page 36
Page 37

Total Recall Desktop & Rack – Installation and Administration Guide
Licensed Features (Read Only)
Analog Settings
Trigger
VOX 1, 2, 3, 4, 5, 6
Off Hook 1, 2, 3, 4, 5, 6
Manual
Off
Beep
Off
Low
Mid
High
Detect DTMF
On
Off
Extension (User Configurable)
Archive Settings
Reminder (On/Off)
50% Full
75% Full
90% Full
Auto Archive Every (On/Off)
Days/Weeks
Archive Device
DVD/CD
Network Share (Will only appear if optioned on TR Rack)
Maintenance
System Information
Recorder ID (001)
Rebuild Call Database
Load Settings From DVD/CD
Save Settings to DVD/CD
Erase DVD
Remote Manager
Use Dial-Up (Yes/No)
IP Address
Base Port
Maximum Sessions (05)
Session Duration (2 hours)
Page 37
Page 38
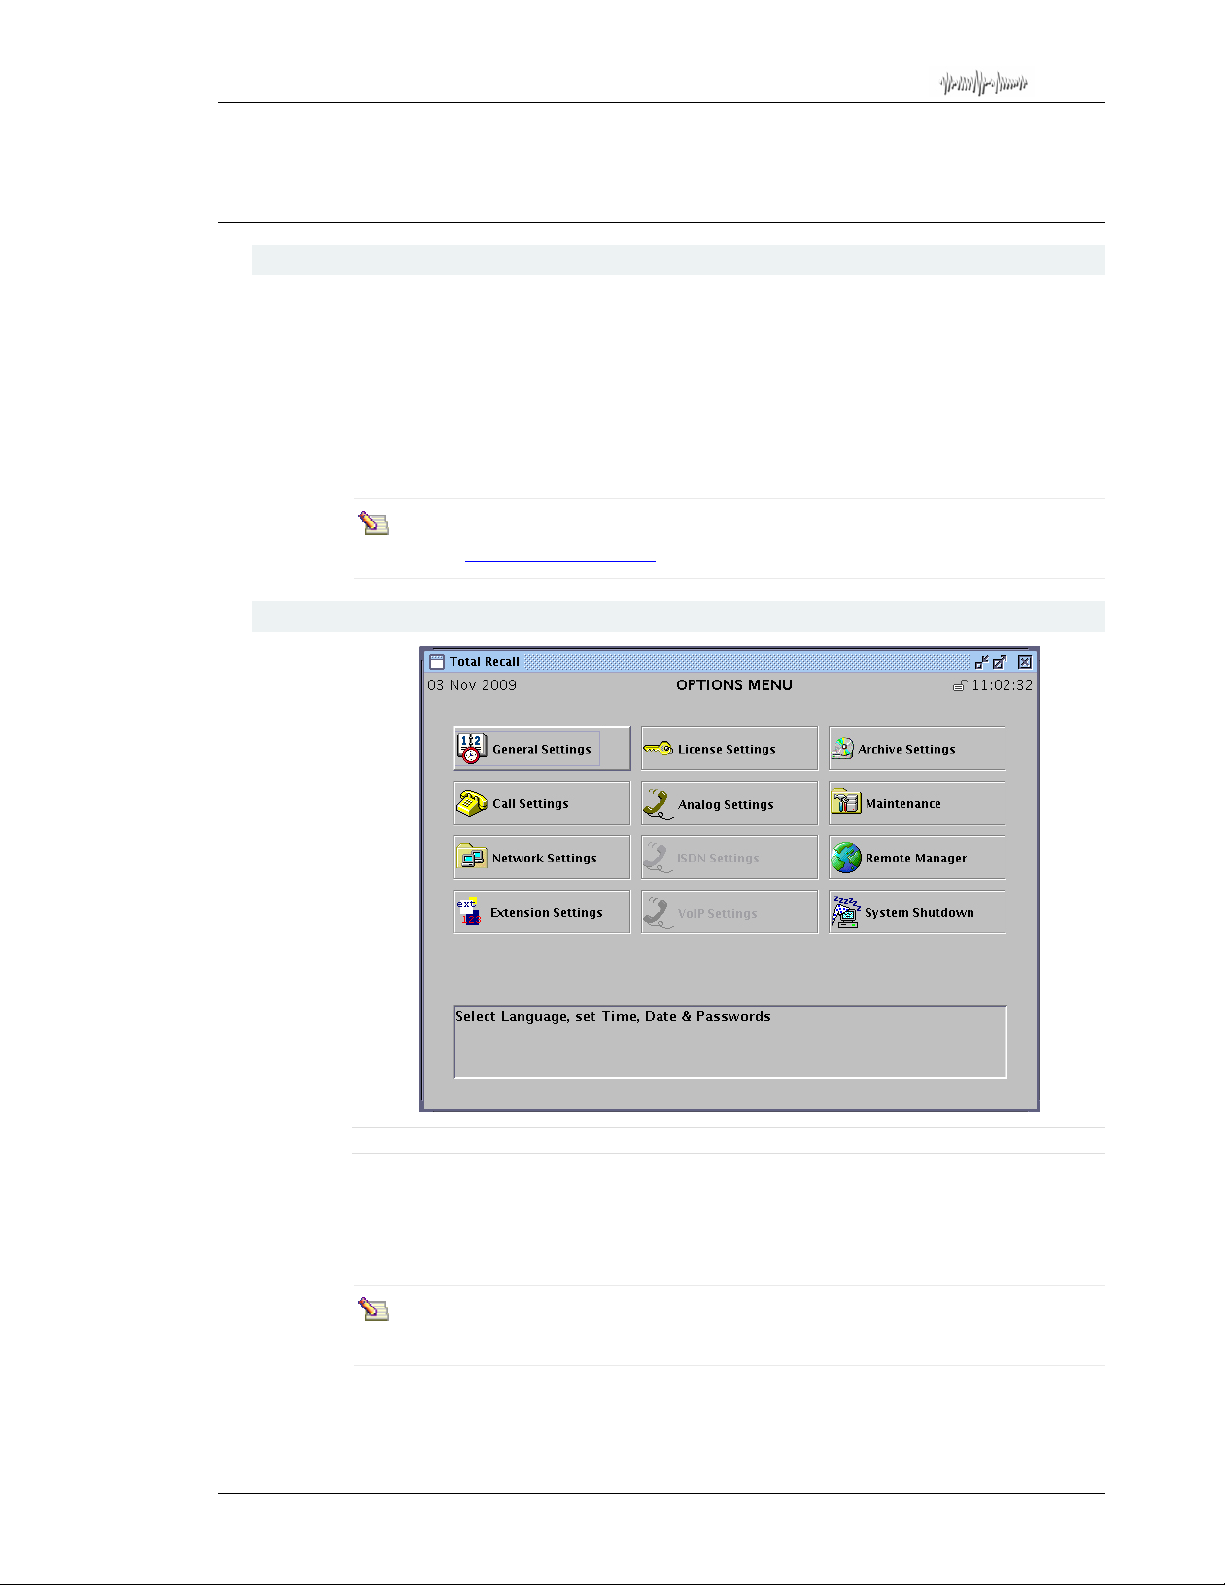
Total Recall Desktop & Rack – Installation and Administration Guide
18. Configuring Total Recall
18.1. Licensed Features (Rack Model Only)
The following application features require a Feature License Key to configure and use:
• SMDR Parsing.
• SNMP Alarm Interface.
• Network Archiving.
Your
Total Recall Rack system will not support and you will not be able to configure the
above features without a valid Feature License Key.
For more information on activating Licensed Features, contact your dealer or
visit www.totalrecallvr.com.
18.2. About the Options Menu
Figure 5 - Options Menu (Rack Model Shown)
The Options Menu provides access to the Total Recall system settings and administrative
functions. To view the Options Menu, press [Menu] twice from the Logging Screen.
Options that are not available on your recorder will be greyed out and cannot be selected.
The Options Menu can only be accessed by users who have logged i n with an
administrator password.
The various settings and functions are split out into the following groups, each of which
has an associated button in the Options Menu:
Page 38
Page 39
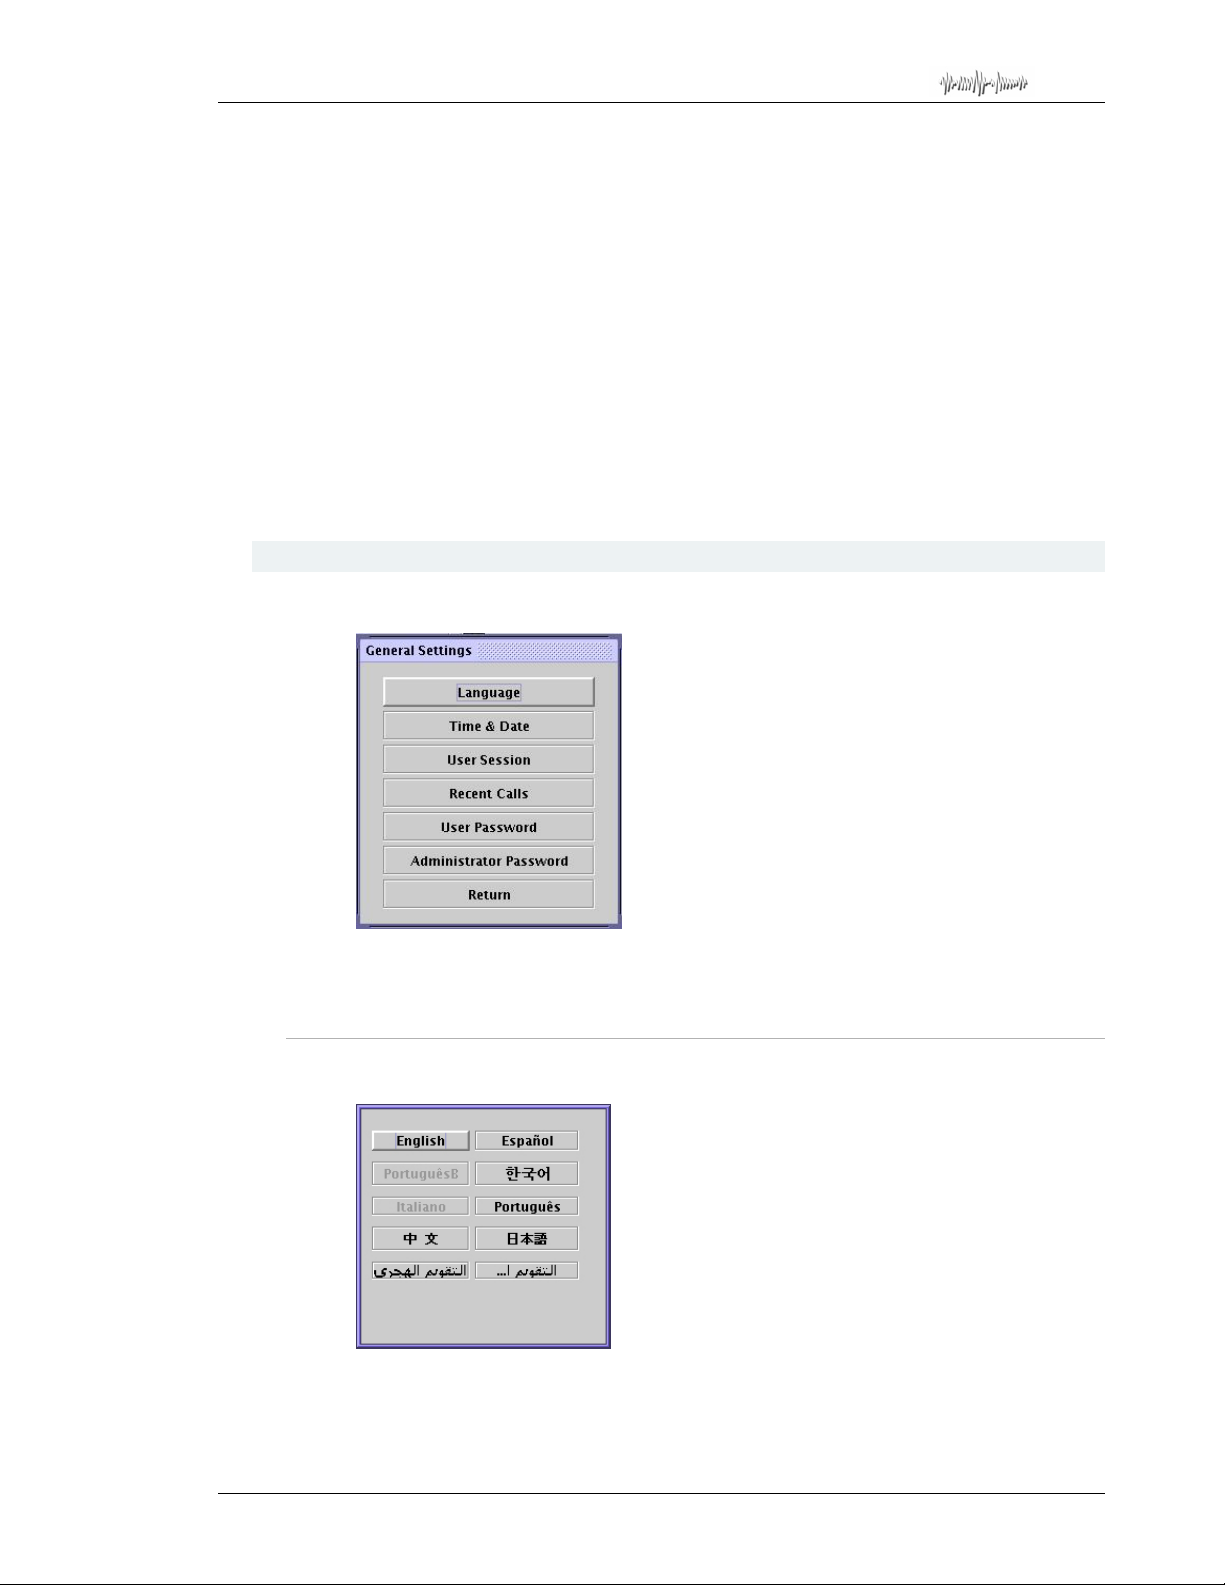
Total Recall Desktop & Rack – Installation and Administration Guide
• General Settings.
• Call Settings.
• Network Settings.
• Extension Settings.
• License Settings (
• Analog Settings.
• Archive Settings.
• Maintenance.
• Remote Manager.
• System Shutdown.
Total Recall Rack only).
For new installations, we recommend that you configure
the buttons appear in the Options Menu (from top to bottom, then left to right).
18.3. General Settings
Options Menu > General Settings
Use the General Settings screen to set the preferred display language, time and date,
passwords, system timeout and recent call replay settings.
18.3.1. Language
Total Recall in the order that
Options Menu > General Settings > Language
Select your preferred display language from the list using the down arrow key, and
confirm your selection by pressing the [Select] key.
Page 39
Page 40
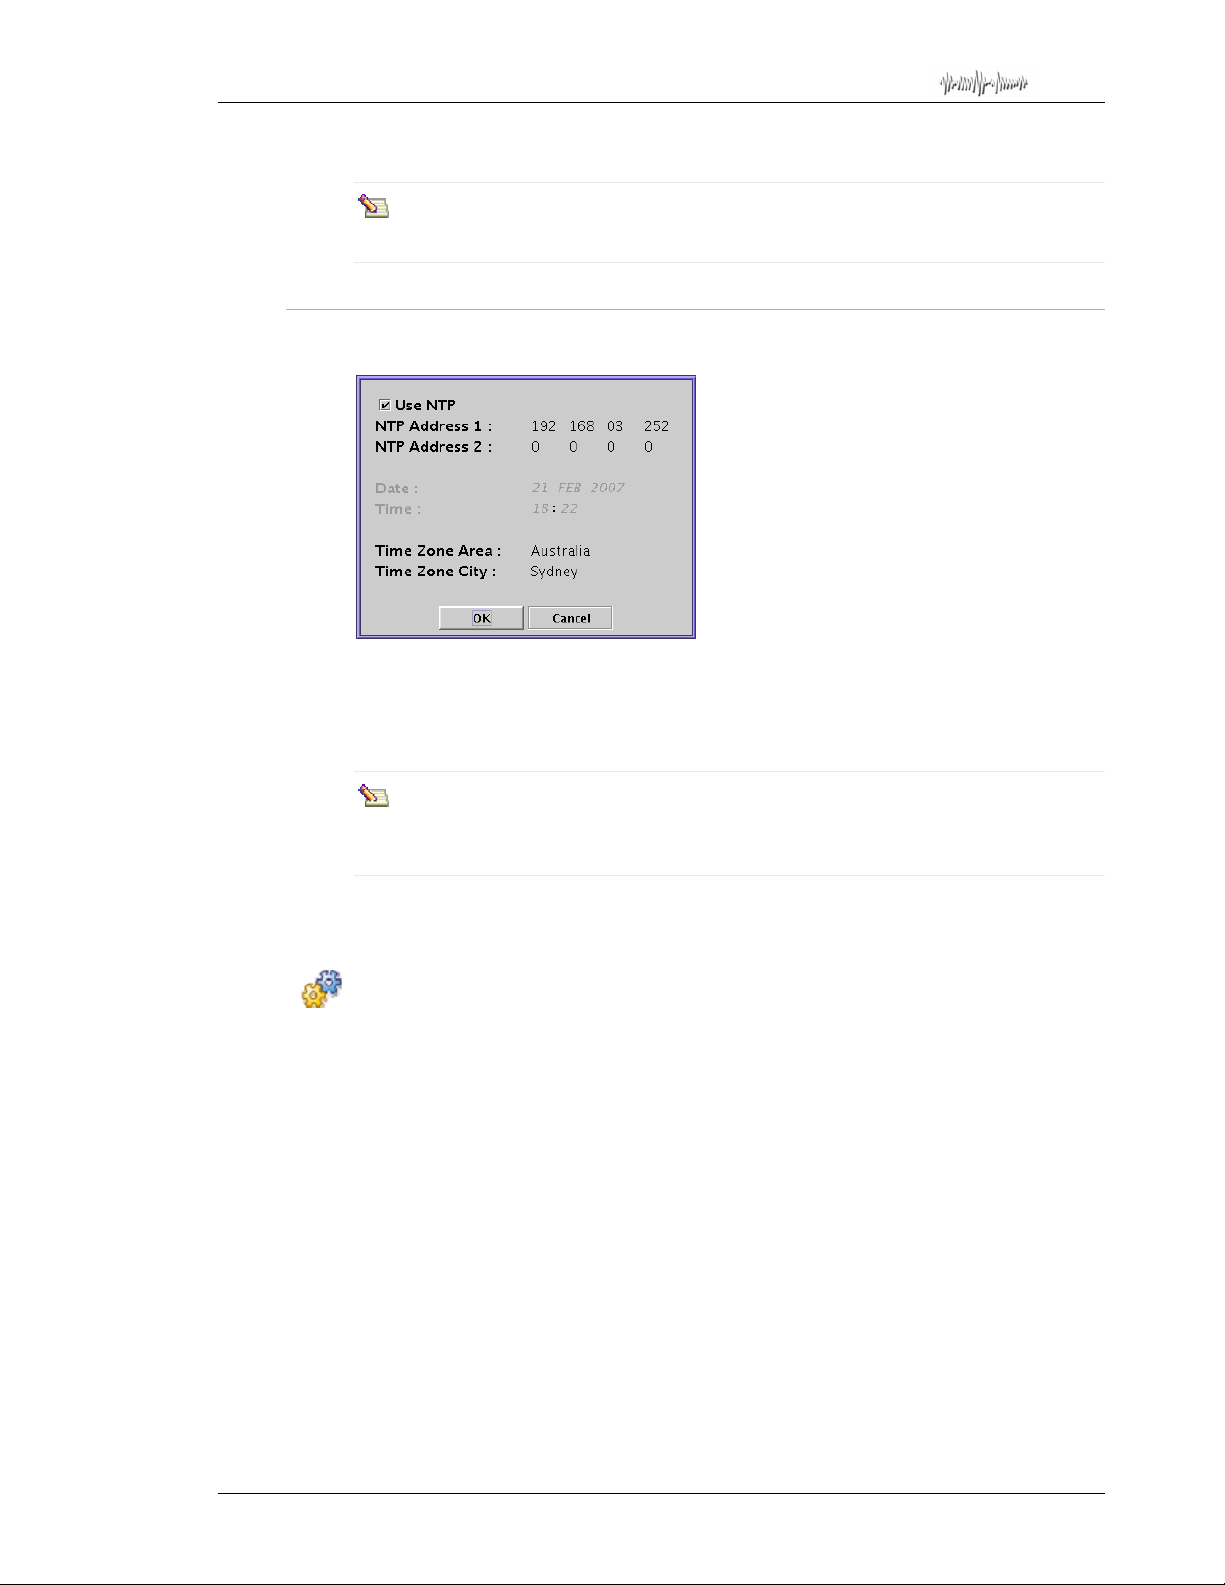
Total Recall Desktop & Rack – Installation and Administration Guide
The Language setting defaults to English.
It is recommended that you restart Total Recall after changing the display
language.
18.3.2. Time & Date
Options Menu > General Settings > Time & Date
Use the Time & Date menu to set your Total Recall to the local time and date, as well as
to configure your local Time Zone area and city. Time Zone settings are especially
important if users in different regions are connecting to your system via
Manager
.
Remote
Time Zone area and city must be c onfigured prior to recording cal ls. Time zone
data is saved with the call, and is used to calculate daylight savings changes or by
Remote Manager if a call is being replayed in a different time zone.
Set the local time and date via synchronisation with an NTP server (recommended), or
manually.
To use NTP to set Total Recall’s internal clock:
1. First, ensure that the system IP address and gateway are correctly configured. See
Section 18.6 for more information.
2. Check the Use NTP check box by highlighting the check box and pressing the
[Select] key.
3. Enter the IP address for at least one NTP server with the numeric keypad.
4. Select your Time Zone Area by highlighting the Area fi eld and pressing [S elect] to
scroll through the available options. When you have selected your area, press the
[Down] button to select your nearest Time Zone City.
5. Select your Time Zone City by scrolling through the available options with the
[Select] key. Press the [Down] button when complete.
6. Select OK.
Page 40
Page 41
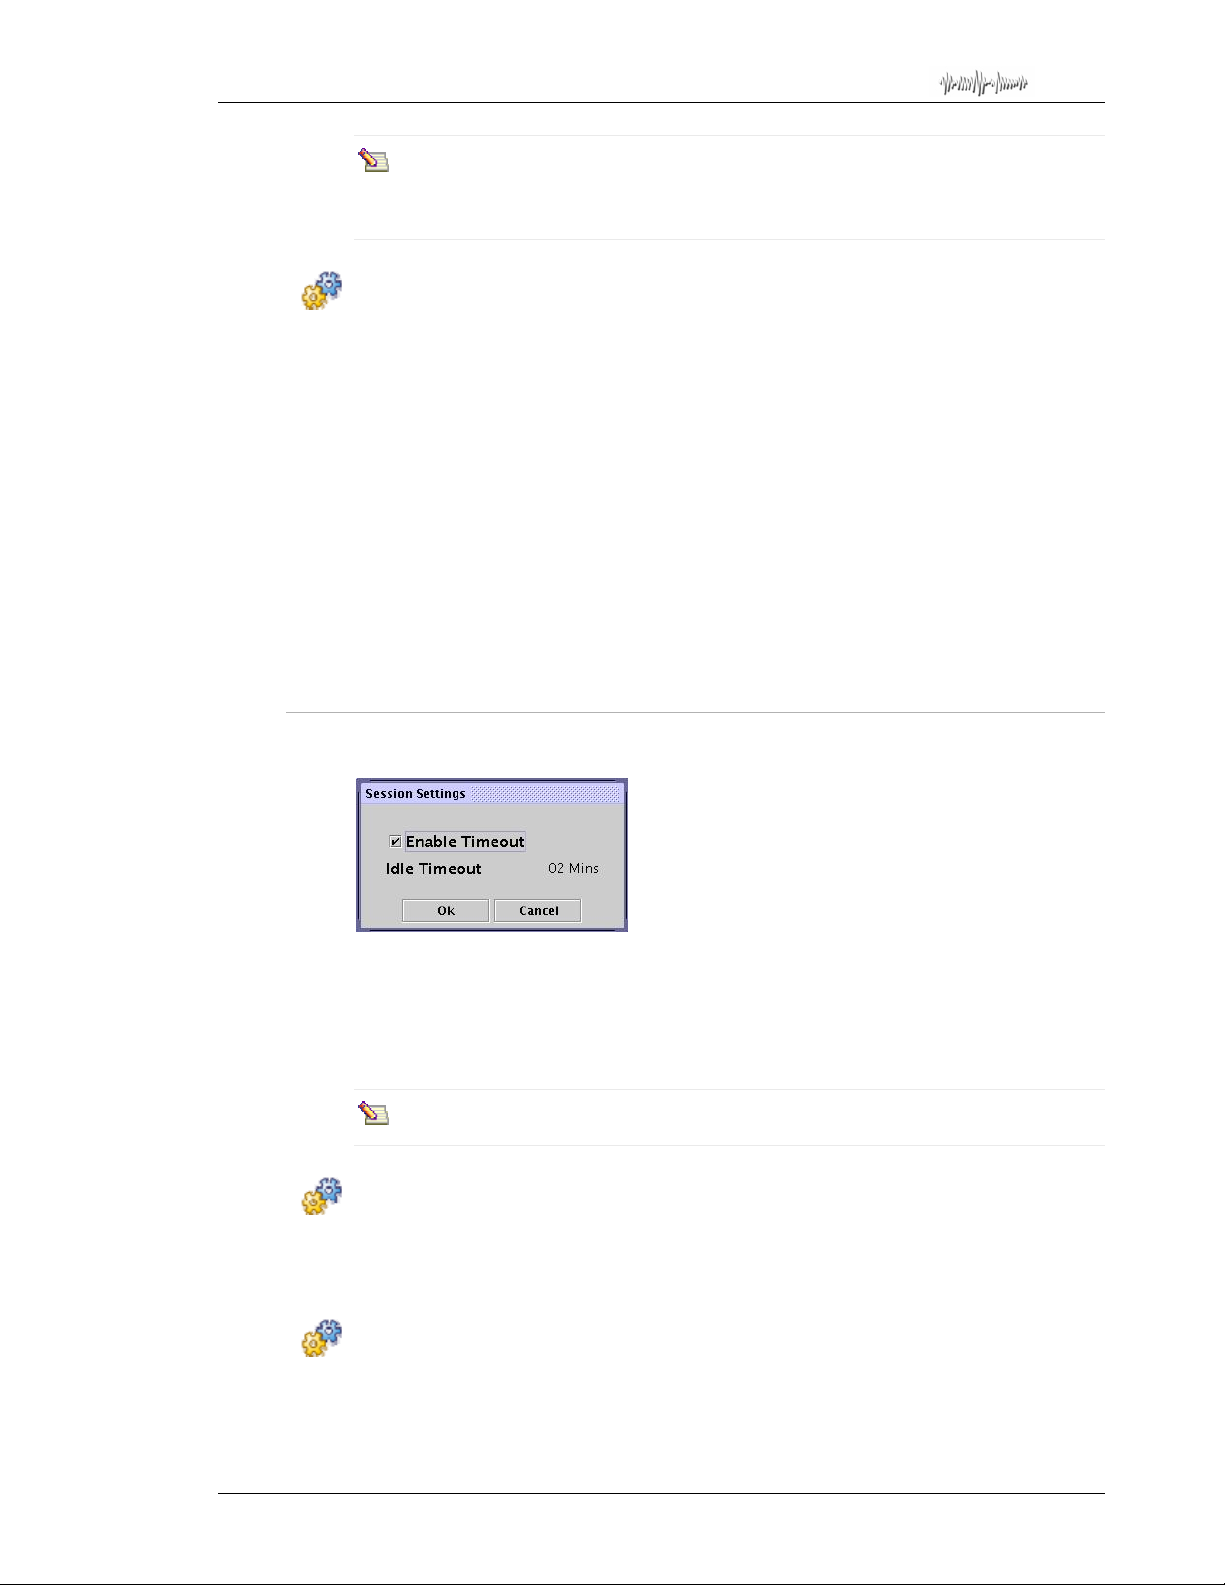
Total Recall Desktop & Rack – Installation and Administration Guide
If you enter IP addresses for 2 NT P servers, the top one in the list becomes the
‘preferred’ server, and Total Recall will synchronise with the second server if the
preferred server is unavailable.
To set the time and date manually:
1. Enter the current Date by highlighting each field and pressing the [Select] key to
scroll thought the available options. Numeric fields can be manually entered with the
numeric keypad if desired.
2. Enter the current Time (in 24-hour format) by highlighting the Time fields and
pressing [Select] to scroll through the available options, or by entering the values on
the numeric keypad.
3. Select your Time Zone Area by highlighting the Area field and pressing [Select] to
scroll through the available options. When you have selected your area, press the
[Down] button to select your nearest Time Zone City.
4. Select your Time Zone City by scrolling through the available options with the
[Select] key. Press the [Down] button when complete.
5. Select OK.
18.3.3. User Session
Options Menu > General Settings > User Session
The User Session menu allows an administrator to enable or disable automatic system
timeout, and to configure the amount of time that
interaction before timing out. ‘Timing out’ means that the
control panel menus, and will require the entry of an administrator or user password to
make system functions accessible to users again.
Total Recall continues to record normally while the control panel is ‘timed out’.
To enable or disable the System Timeout function:
1. Ensure Enable Timeout is highlighted.
2. Press the [Select] key to toggle between enabled (checked) and disabled (unchecked).
Total Recall will wait without user
Total Recall locks access to all
To modify the System Timeout period:
1. Ensure Enable Timeout is enabled (checked).
2. Highlight the Idle Timeout period by pressing the [Down] arrow key.
Page 41
Page 42
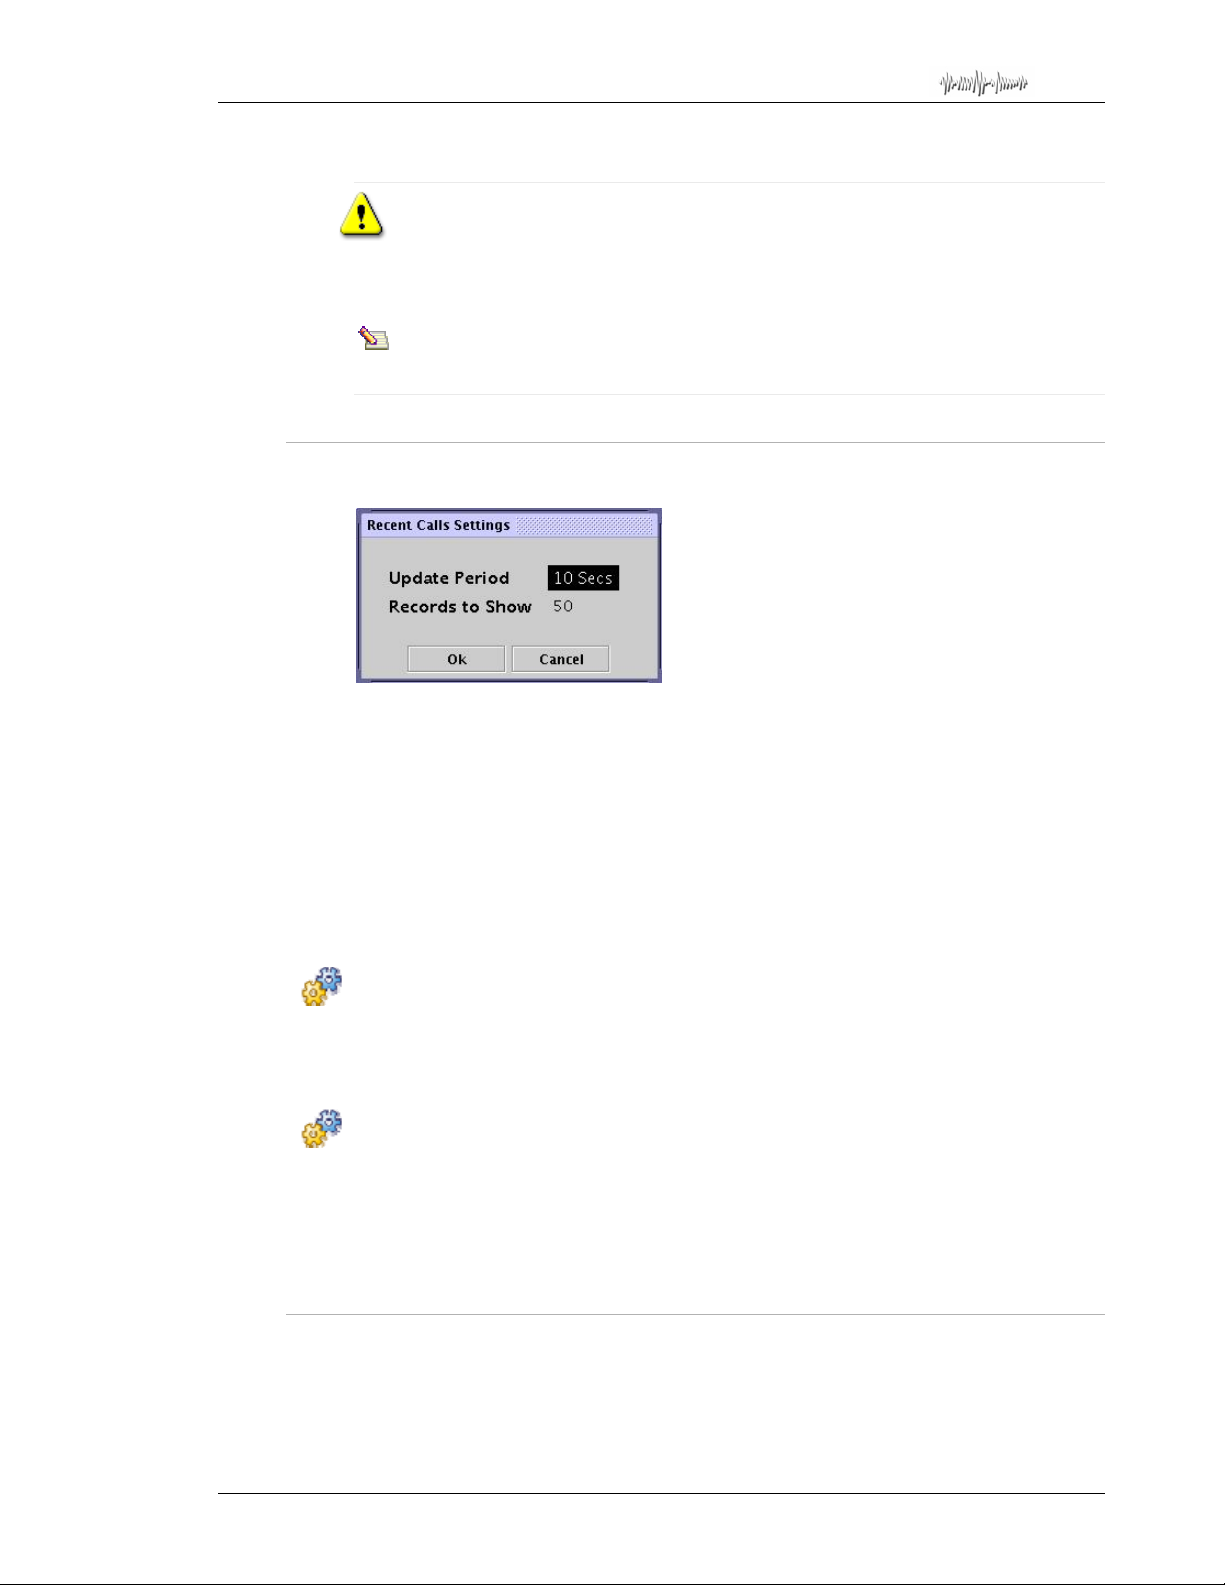
Total Recall Desktop & Rack – Installation and Administration Guide
3. Press the [Select] key to modify the system timeout period (1 to 10 minutes).
Disabling the System Timeout function will prevent Total Recall from locking
automatically. This means that all system functions will remain available
until the system is manually locked, according to the permissions of the last
password used to log in.
The system may be manually locked by pressing the [Stop] key on the unit when
no calls are being monitored or replayed.
18.3.4. Recent Calls
Options Menu > General Settings > Recent Calls
The Recent Calls menu provides configuration options for quick recall functionality in
the Search menu.
See the Total Recall User Guide for more information on using the
)
Search Menu
The Update Period refers to the frequency that
screen with the most recent calls when the Recent Calls toggle button is selected.
Records to Show refers to the number of call records that will be displayed in the search
menu when the Recent Calls button is selected.
To configure the Update Period:
1. Highlight the Update Period field.
2. Press [Select] to cycle through the available options (5 to 60 seconds).
To configure the number of records shown:
1. Highlight the Records to Show field by pressing the [Down] arrow key.
2. Use the numeric keypad o n y our
would like displayed in the Search menu when using the Recent Calls functionality
[0-999].
Total Recall to enter the number of records that you
Total Recall will update the search
18.3.5. User Password
Options Menu > General Settings > User Password
Page 42
Page 43
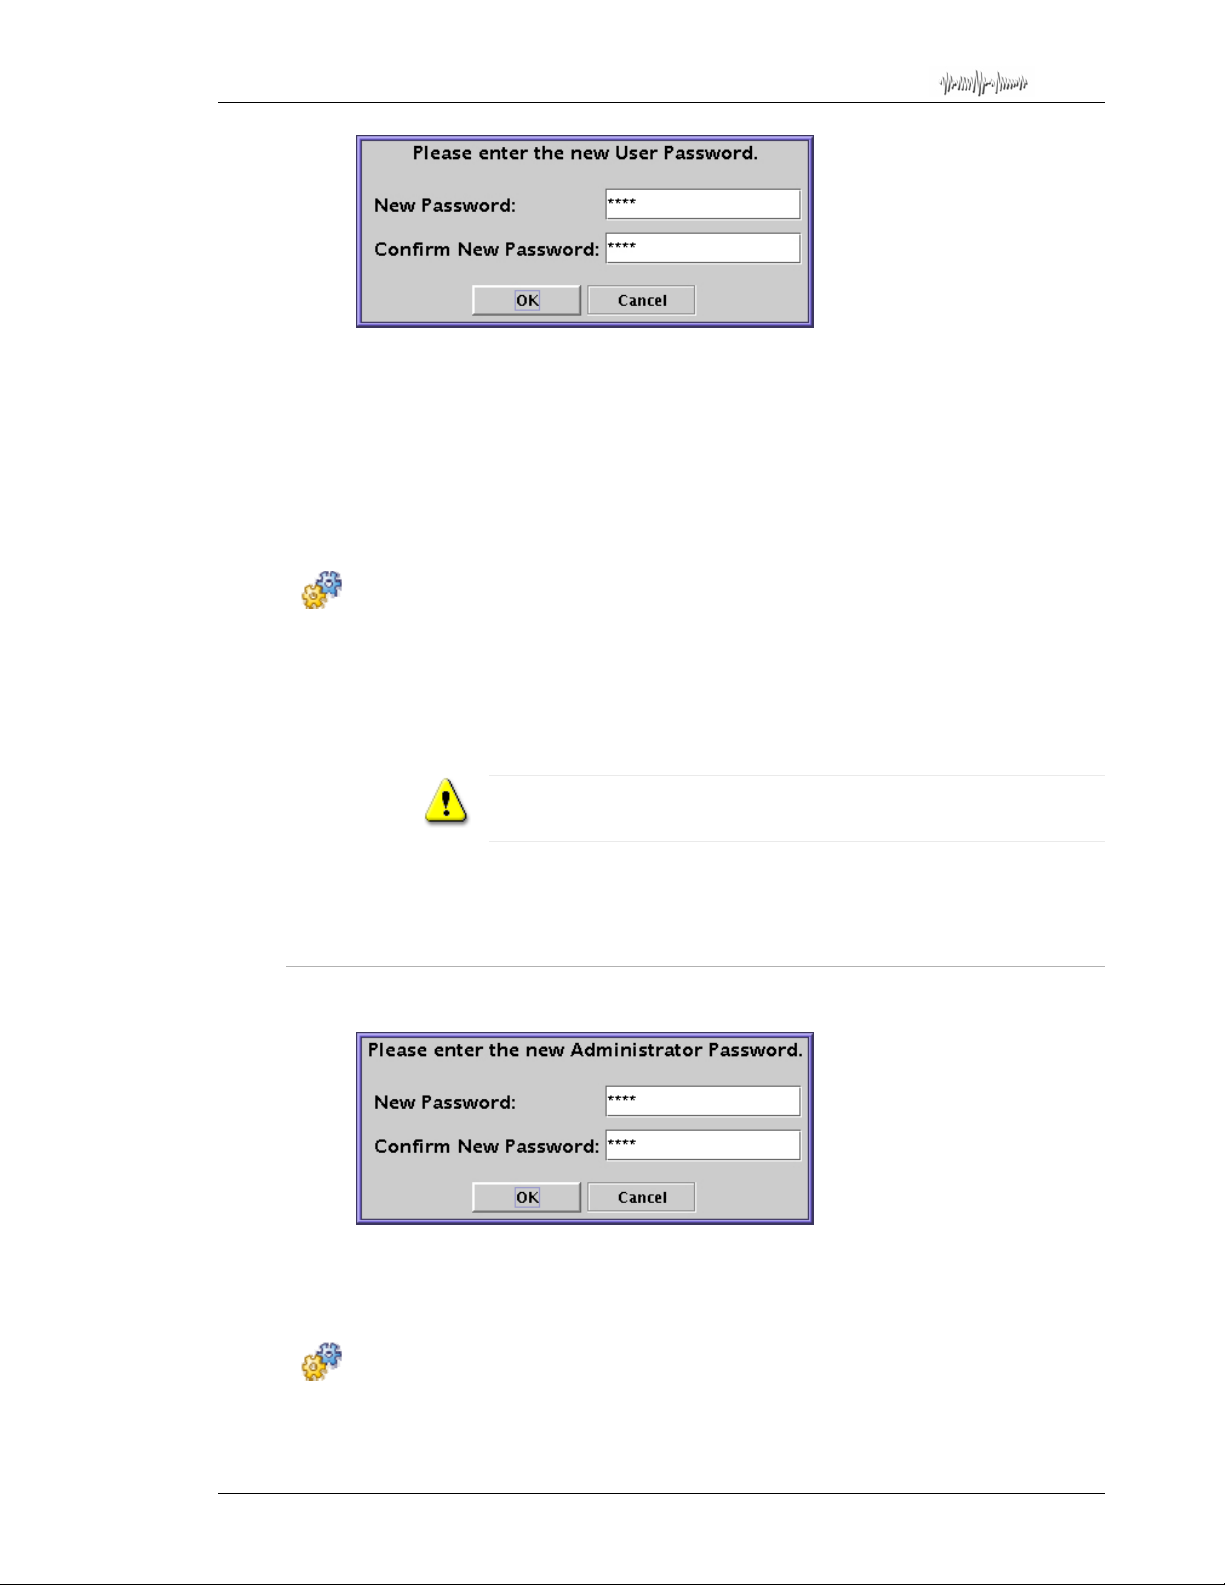
Total Recall Desktop & Rack – Installation and Administration Guide
Total Recall supports two password levels – the User Password and the Administrator
Password.
The
Total Recall user interface automatically locks after 120 seconds of inactivity
(default setting), and can only be unlocked by entering a password.
The User Password allows access to all functionality, unless an Administrato r Password
has been assigned – in which case, the User Password does not allow access to the
Options Menu, or the option to delete calls from the hard drive during a manual archive.
To assign a user password:
1. Enter the new password in the New Password field. The password must be numeric
characters only, and may be up to 8 characters long.
You may also enter a null password, allowing the unit to be unlocked without a
password. To enter a null password, simply press the [Select] key in the New
Password field.
Please ensure that your user and administrator password settings comply
with your internal data security policies.
2. Re-enter the password in the Confirm New Password field.
3. Select OK.
18.3.6. Administrator Password
Options Menu > General Settings > Administrator Password
If an Administrator Password is assigned, only the Administrator Password allows
access to the Options Menu and the option to delete calls during a manual archive. By
default, this password is 0000.
To assign an admi ni st r a t o r pas swo rd:
1. Enter the new password in the New Password field. The password must be numeric
characters only, 0 to 8 characters long.
Page 43
Page 44
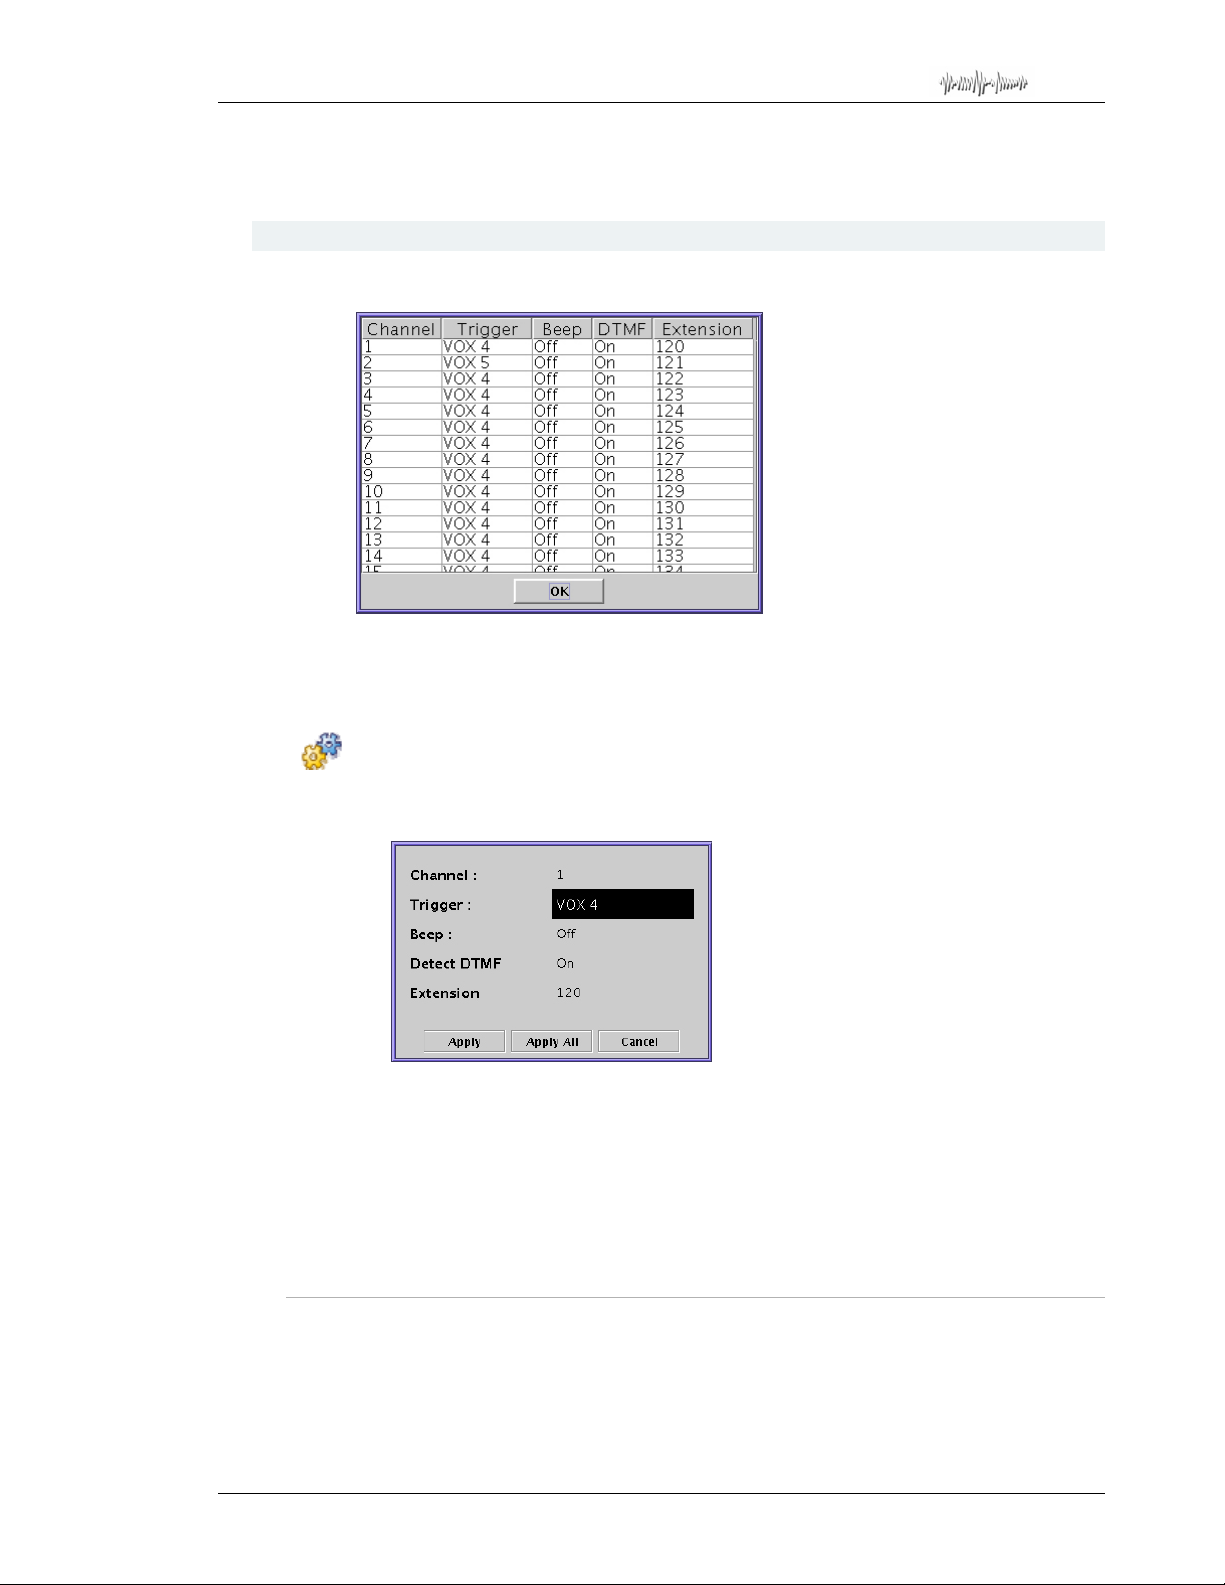
Total Recall Desktop & Rack – Installation and Administration Guide
2. Re-enter the password in the Confirm New Password field.
3. Select OK.
18.4. Analog Settings
Options Menu > Analog Settings
Use the Analog Settings screen to configure the interface betw e e n your
and the analog signal interface. Also, use this menu to assign Extension names or
numbers for each channel.
To set Analog Channel Settings:
1. Highlight the channel and press [Select].
The Add Channel Settings dialog appears:
2. Use the [Down] arrow key to highlight the field which you wish to configure.
3. Press [Select] to scroll through the available options. Use the nu meric keypad to input
a numeric extension value for the channel if desired.
4. When you have finished configuring the channel, press the [Down] arrow to highlight
Apply, and then press [Select]. Alternatively, if you would like to apply the current
settings to all channels, highlight Apply All and then press [Select].
Total Recall unit
18.4.1. Trigger Type
The Trigger Type determines what type of event will trigger recording on that channel.
The available options are VOX (1-6), Off-Hook (1-6), Manual and Off.
Page 44
Page 45

Total Recall Desktop & Rack – Installation and Administration Guide
VOX (1 - 6)
VOX is a voice or audio signal trigger. Recording will automatically start when noise is
detected on a channel, and will automatically stop when silence is detected (as configured
via the VOX Timeout).
The default setting, VOX 4, corresponds to a -28dBm signal (anything over this level
triggers recording).
The highest setting, VOX 6 (high signal / low sensitivity), corresponds to a -20dBm
signal. Channels set to VOX 6 will be triggered by loud conversations or signals, but
quieter conversations may fail to trigger recording.
The lowest setting, VOX 1 (low signal / high sensitivity), corresponds to a -40dBm
signal. Channels set to VOX 1 will be triggered by soft conversations or signals, but
noisy lines may also trigger recording.
In most cases the default setting (VOX 4) is adequate.
Off-Hook (1 - 6)
This is the recommended setting for normal recording on PSTN telephone lines. It will
cause a call recording to be automatically triggered when the phone handset is taken OffHook, and ended when the handset put back On-Hook. If you are recording telephone
calls from analog phone lines (POTS circuits), we recommend that you use this as default
trigger setting during the initial set-up.
The Off-Hook function is triggered by a voltage change on the line. A drop in voltage
(On-Hook voltage is typically 48V DC, Off-Hook voltage is typically 8V DC), will
normally provide sufficient voltage c hange to be detected by the recorder, and activate
recording. Replacing the receiver would normally stop the recording.
Different Off-Hook settings are available to provide triggering at different voltages.
The Off-Hook voltage ranges and their corresponding Off-Hook Settings are:
• Off-Hook #1: Recording Trigger with Off-Hook voltage below approxi mately 5
volts and On-Hook is above 7 volts.
• Off-Hook #2: Recording Trigger with Off-Hook voltage below approximately 10
volts and On-Hook is above 12 volts.
• Off-Hook #3: Recording Trigger with Off-Hook voltage below approximately 14
volts and On-Hook is above 16 volts.
• Off-Hook #4: Recording Trigger with Off-Hook voltage below approximately 17
volts and On-Hook is above 19 volts.
• Off-Hook #5: Recording Trigger with Off-Hook voltage below approximately 20
volts and On-Hook is above 22 volts.
• Off-Hook #6: Recording Trigger with Off-Hook voltage below approximately 25
volts and On-Hook is above 27 volts.
Example 1: If the On-Hook voltage is 48volts and the Off-Hook voltage is lower than
15 volts use setting Off-Hook #4.
Example 2: If the On-Hook voltage is 24volts and the Off-Hook voltage is lower than
3 volts use setting Off-Hook #1. If the On-Hook voltage is above the
range that is set the channel will start to record.
Page 45
Page 46

Total Recall Desktop & Rack – Installation and Administration Guide
The Off-Hook voltage ranges may vary slightly due to phone line conditions
and component tolerance. Off-Hook #4 would be the recommend setting for most
standard phone line recording applications. If the phone line does not have DC
voltages that can be sensed by the recorder for start/stop recording so that an offhook setting does not work satisfactorily, the VOX trigger should be used
instead. Each channel can be individually set as is best for its source of
conversations. If the Off-Hook setting does not work satisfactorily, the VOX
trigger should be used instead.
If a channel is set to Off-Hook and no line is connected to the channel, the
channel will commence recording, which can only be stopped by setting the
channel to OFF or VOX. Caller ID data (inbound number information - CID) will
only be available to the recorder on channels recording directly from phone lines
and with the CID data provided by your phone service provider in the Belcore
standard format. Caller ID data is not available for channels recording
from handset/headset audio.
Manual
This setting prepares the channel to receive manual recording instructions from an
external third party applications developed in conjunction with
installations do not use this setting.
Total Recall. Most
Off
A channel that is set to Off is effectively deactivated and no recording is possible on th at
channel. It is recommended that all unused analog channels be set to Off.
18.4.2. Beep
Beep (‘pip tone’) is a beep sound generated every 15 seconds to indicate to both parties
that the call is being recorded.
In some countries, it may be mandatory to play a beep tone when recording. For some
users, it is a matter of preference or company policy.
Total Recall does not transmit a recorded message to advise that recording is
taking place. This would be as part of a phone system auto-attendant message if
desired.
The Beep setting determines the volume of the beep. The available options are Hi, Mid,
Low or Off.
The default setting is Off.
18.4.3. Detect DTMF
Total Recall detects DTMF tones during calls on all channels. However, analog channels
may be used for recording analog signals other than telephone calls, such as radios or
intercoms. Such signals may not carry DTMF tones. How ever, such signals may contain
audio frequencies that resemble DTMF tones, which
interpret as DTMF.
Total Recall will incorrectly
Page 46
Page 47
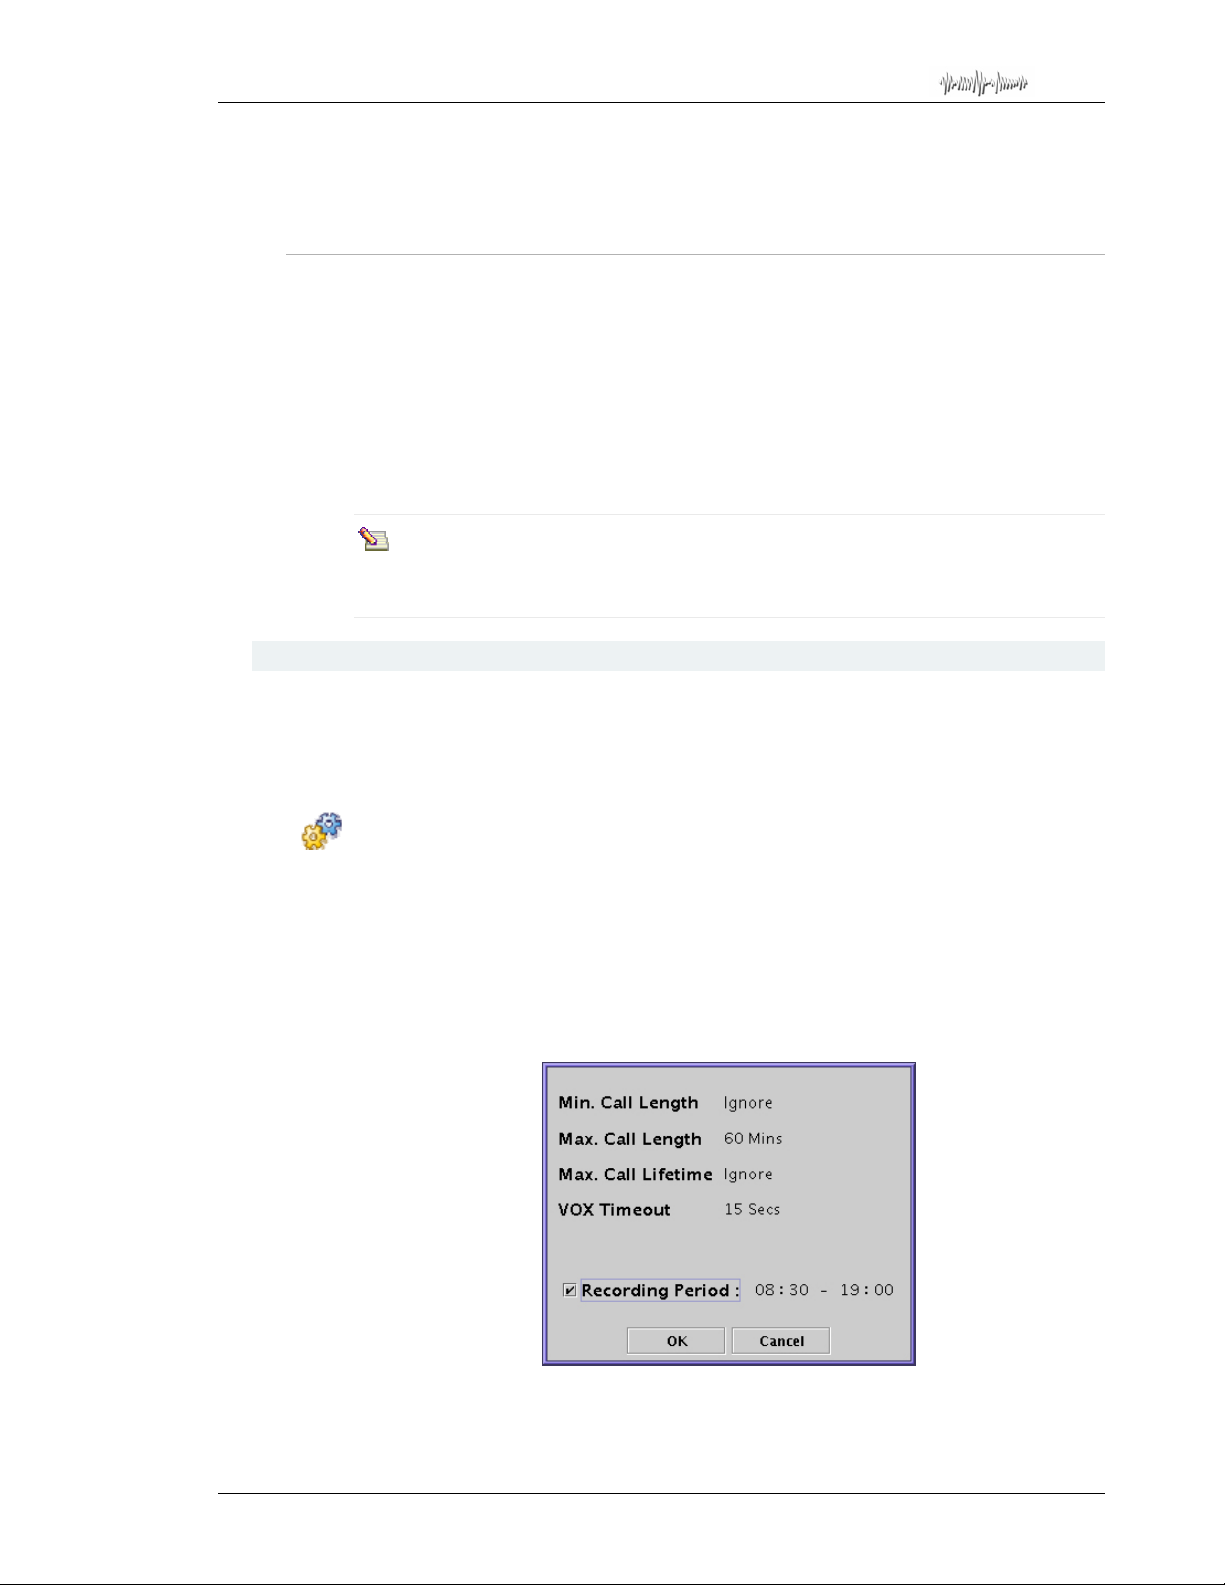
Total Recall Desktop & Rack – Installation and Administration Guide
Set Detect DTMF to On to enable DTMF detections on channels used to record
telephone calls, and to Off for channels that are used for signal sources that do not
contain DTMF.
18.4.4. Extension
It is advisable to set an extension value for each connected channel in order to take full
advantage of the features on your Total Recall system.
Setting an Extension value for a channel means that:
• Calls (or other recordings) on that channel can be searched for by extension value.
• Extension specific recording polices can be created.
• Extension specific event policies can be created.
• Features such as
Where an analog channel is used for recording telephone calls, any extension
information in the call signalling on the line will override the extension value set
for that channel.
Record on Demand can be used.
18.5. Call Settings
Options Menu > Call Settings
The Call Settings menu allows users to configure certain recording policies for their
Total Recall system. Call settings apply to every recording channel on your Total Recall.
To set Call Settings:
1. Highlight the parameter that you wish to change.
2. Press the [Select] key to cycle though the available options.
3. For numeric values, you can also ente r the re quire d value on the n ume ric key pad. Fo r
example, entering ‘05’ on the numeric keypad with VOX Timeout highlighted will
result in a VOX timeout of 5 seconds being displayed.
4. Select OK.
Page 47
Page 48

Total Recall Desktop & Rack – Installation and Administration Guide
18.5.1. Min. (Minimum) Call Length
Total Recall will automatically discard calls with duration that is less than the Min. Call
Length.
Min. Call Length can be set to Ignore, which instructs the
parameter, or to a value between 1 and 19 seconds, in increments of one second.
The default setting is Ignore.
Use caution with this setting – it is usual to record all calls, and only under very
specific circumstances (for example, noise spikes external to the recorder
causing frequent and unwanted false recordings) that this setting should be
changed from the default.
18.5.2. Max. (Maximum) Call Length
Total Recall can record calls of virtually any length, but longer calls are broken up into
separate records according to the Max Call Length setting.
This allows lengthy recordings (for example, AM/FM radio monitoring) to be presented
as a series of recordings in manageable lengths.
If a call reaches the Max Call Length setting, the record is rolled over to a new record.
Rolled-over records are marked with (CONT) after the number in the ‘To’ field on the
Logging screen.
The Max Call Length setting can be between 1 and 60 minutes in increments of one
minute, and applies equally to all channels.
The default setting is 60 minutes.
Total Recall to ignore this
18.5.3. Max. Call Lifetime
The Max Call Lifetime is the maximum time a call record is kept before it is
automatically deleted.
Max Call Lifetime can be set to Ignore, which instructs the
parameter, or to a value between 1 and 24 months, in increments of 1 month.
The default setting is Ignore.
With Max Call Lifetime set to Ignore, call records may still be automatically
deleted as part of the aut omatic cl eanu p proc ess. Se e Deleti ng Calls on page 56
for more information.
18.5.4. VOX Timeout
If VOX is set as the recording trigger for a channel, the VOX Timeout determines the
maximum length of ‘quiet time’ that is permitted before a recording on that channel i s
terminated.
This ensures that if a call has ended and the phone is not hung up properly, the recorder
will not continue to record silence indefinitely.
Total Recall to ignore this
Page 48
Page 49
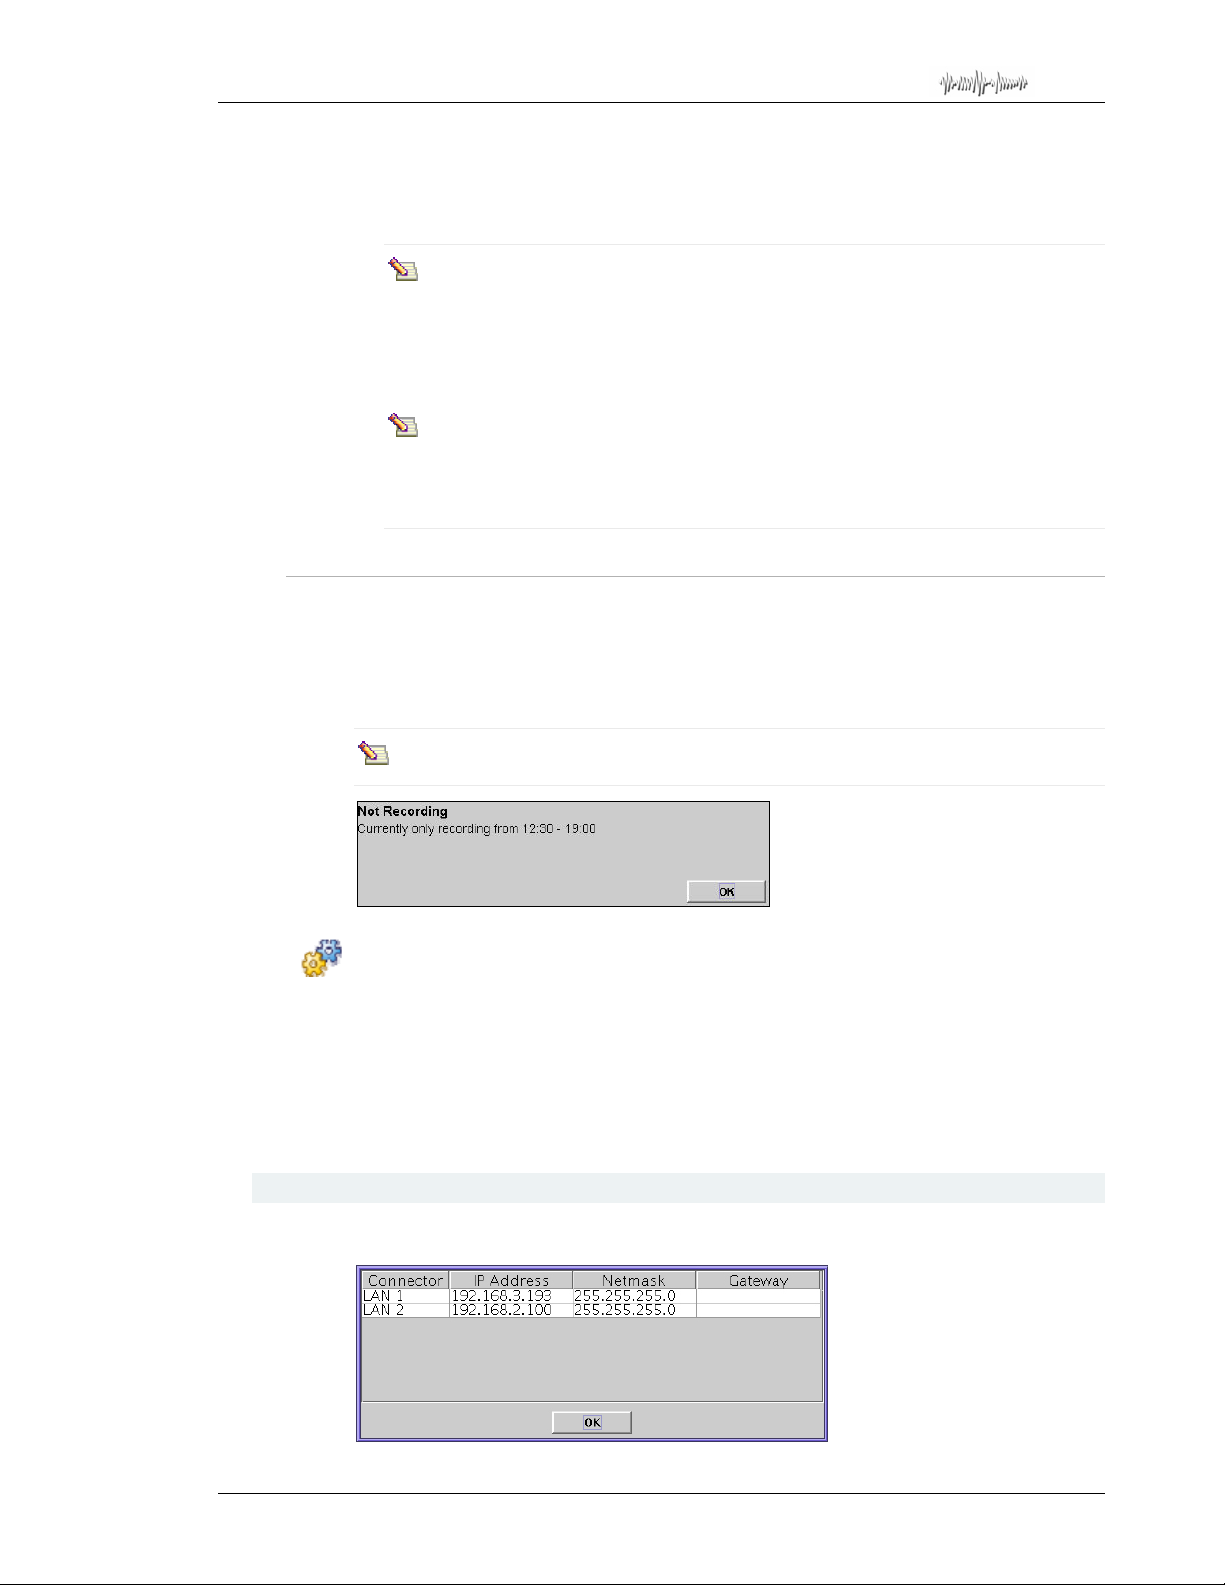
Total Recall Desktop & Rack – Installation and Administration Guide
VOX Timeout settings can be between 2-15 secs, and applies to all channels that have
VOX as their Trigger setting.
The default setting is 15 seconds.
In the event that an active call is put on hold, and there is no (or very quiet)
‘music on hold’ being played, the recording will terminate according to the
VOX Timeout setting. When the call recommences, the VOX trigger will
immediately open a new record, and the complete conversation will be
captured across two recordings.
For channels set to VOX trigger, the interval between calls must exceed the
VOX Timeout setting. If a fresh call starts within the VOX Timeout of the
previous call,
both calls will appear as one call record.
18.5.5. Recording Period
Set a Recording Period if you want the system to record only between specific times, for
example from 8:00 to 18:00 to record only during business hours.
Total Recall assumes it is a continuation of the first call, and
During non-recording times, the following message is displayed on the control panel
LCD screen to indicate that no recording is taking place.
The recording period cannot span midnight.
To set a Recording Period:
1. Check the Recording Period check box by pressing the [Select] key.
2. Press the [Down] arrow to highlight the Hour and Minute fields. Enter start and end
times (in 24 hour format).
3. Arrow down and highlight ‘OK’.
4. Press [Select] to confirm your configuration.
18.6. Network Settings
Options Menu > Network Settings
Page 49
Page 50
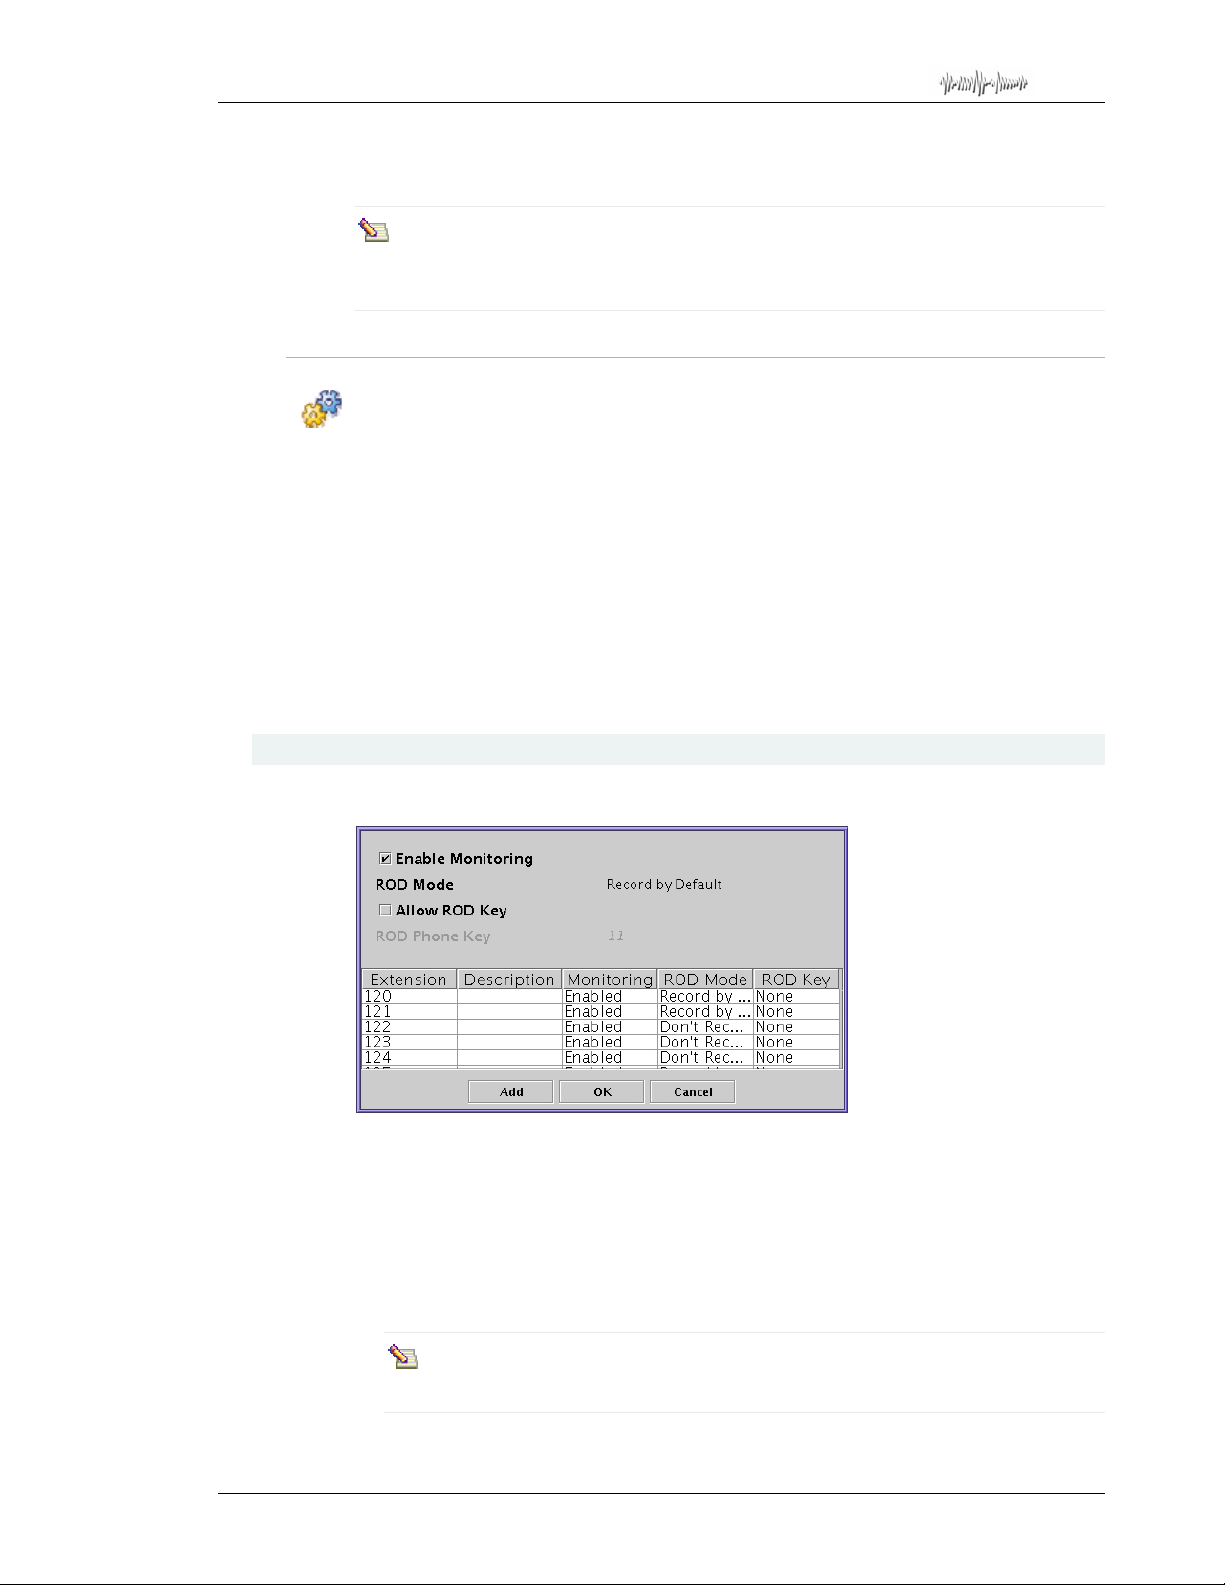
Total Recall Desktop & Rack – Installation and Administration Guide
Use the Network Settings screen to configure the available Ethernet port(s) for IP
communication between Total Recall and your network.
Total Recall Desktop and Rack only have one TCP/IP ethernet port. Therefore,
you will only configure LAN 1. The LAN 2 setting is irrelevant for your TRL or
TRR system.
18.6.1. Configuring Network Interfaces
To configure a Network interface:
1. Highlight LAN1 in the Network Settings screen by pressing the [Down] arrow
button.
2. Press [Select] to open the configuration screen for the LAN1 Ethernet port.
3. Press the [Down] arrow to highlight the IP Address field. Enter a valid static IP
address for your Total Recall unit.
4. Press the [Down] arrow to highlight the Netmask, and Default Gateway fields.
Enter the required values for your network (if appropriate).
5. Press the [Down] arrow to highlight OK. Press [Select] to confirm your
configuration.
18.7. Extension Settings
Options Menu > Extension Settings
Use the Extension Settings screen to configure default (system-wide) or extension
specific recording policies. Extension-specific recording policies apply only to calls to or
from a specified extension. The default recording policy applies to calls from or to any
extensions which do not have a specific recording policy.
To apply the settings in this menu, you should first assign an ‘Extension’ name or
numeric value to each of your recording channels. This is set up in the Analog Settings
screen, accessed from the Options Menu.
Extension specific recording policies have priority over the default recording
policy.
Page 50
Page 51

Total Recall Desktop & Rack – Installation and Administration Guide
Calls between numbers that are not extensions, and calls between unknown
numbers, are treated with default Extension Settings.
18.7.1. Default (System-Wide) Recording Policies
Enable Monitoring
With Enable Monitoring c hecked, calls may be monitored i n real-time while recording,
either directly from the unit, or remotely using
Remote Manager.
To enable or disable live monitoring on the whole system, highlighting the Enable
Monitoring check box, and press the [Select] key to toggle between checked (monitoring
enabled) and unchecked (monitoring disabled).
ROD (Record on Demand) Mode
ROD Mode determines whether the Total Recall system will retain or discard recorded
calls by default. Thus, this setting not only determines the behaviour of the optional
software client, but rather how the whole system handles call record storage.
The available options may be set by highlighting the ROD Mode field, and pres sing the
[Select] key to scroll through the available options. The options are:
•
Record by Default
Total Recall records all calls and stores the recording on disk by default.
However, if enabled, parties on the call can use a DTMF key sequence or
Demand
to toggle between “discarding” and “keeping” the recording of the whole
call.
Record on
ROD
• Don’t Record by Default
Total Recall records all calls, but automatically deletes the recording at the end of
each call.
However, if enabled, parties on the call can use a DTMF key sequence or
Demand
to toggle between “keeping” and “discarding” the recording of the whole
Record on
call.
• Add Notes Only
Total Recall records all calls and stores the recording on disk by default.
The parties on the call can not use a DTMF key sequence or
control recording. However, they can use
Record on Demand to add notes to the
Record on Demand to
call while the call is in progress.
• Record Partial Calls
Total Recall does not record calls by default.
However, parties on the call can use a DTMF key sequence or
Record on Demand
to toggle between “pausing” and “continuing” recording during the call as many
times as they wish.
Total Recall will store only the parts of the call when recording was active.
• Disallowed
Total Recall records all calls and stores the recording on disk by default.
The parties on the call can not use a DTMF key sequence or
control recording, nor can they use
Record on Demand to add notes to the call while
the call is in progress.
Record on Demand to
Page 51
Page 52

Total Recall Desktop & Rack – Installation and Administration Guide
Allow ROD Key / ROD Phone Key
The ROD Phone Key parameter allows you to specify a two-digit code that, when
entered, will allow users to keep or discard a current call (depending on their ROD Mode
settings).
To activate ROD Phone Key, highlight the Allow ROD Key check box and press
[Select] to activate. This will then open a field where you can customise your two-digit
DTMF phone key code.
Users can choose to keep or discard a current call, or stop and start a recording
(dependant on the ROD Mode settings) by pressing *, then their code on the phone
keypad while a call is in progress.
For ROD Key recording control, it is not necessary to install Record on
Demand on your PC or to create ROD Agent user accounts in Remote
Manager
ROD Key functionality relies on the presence of DTMF tones.
.
18.7.2. Conflicting Extension Policies
In the event of a call between 2 extensions with conflicting extension policies, the
settings for the extension with ROD Mode other than ‘Record Partial Calls’ will take
precedence over the settings for the extension set to ‘Record Partial Calls’.
For example, for a call between extensions A and B, where extension A is set to ‘Record
By Default’ with monitoring disabled, and extension B is set to ‘Record Partial Calls’
with monitoring enabled, the policy for extension A applies to the call – the entire call is
recorded by default, and monitoring is disabled.
If ROD Mode is identical for both extensions, the policy for the extension with
monitoring enabled take precedence over the policy for the extension with monitoring
disabled.
For example, if extension A is set to ‘Record By Default’ with monitoring disabled, and
extension B is also set to ‘Record By Default’ but with monitoring enabled, the policy for
extension B applies to the call – the call is recorded by default, and monitoring is
enabled.
If anyone in your or ganisation specifically does not want any of their calls to be
monitored, they must be made aware of the abov e rul e s.
18.7.3. Extension-Specific Recording Policies
Monitoring activity, ROD mode and R OD Phone Key can also be configured on a perextension basis.
To set extension specific policy:
1. Use the [Down] arrow button to highlight Add, and then press [Select].
The Extension Recording Policy dialog appears:
Page 52
Page 53
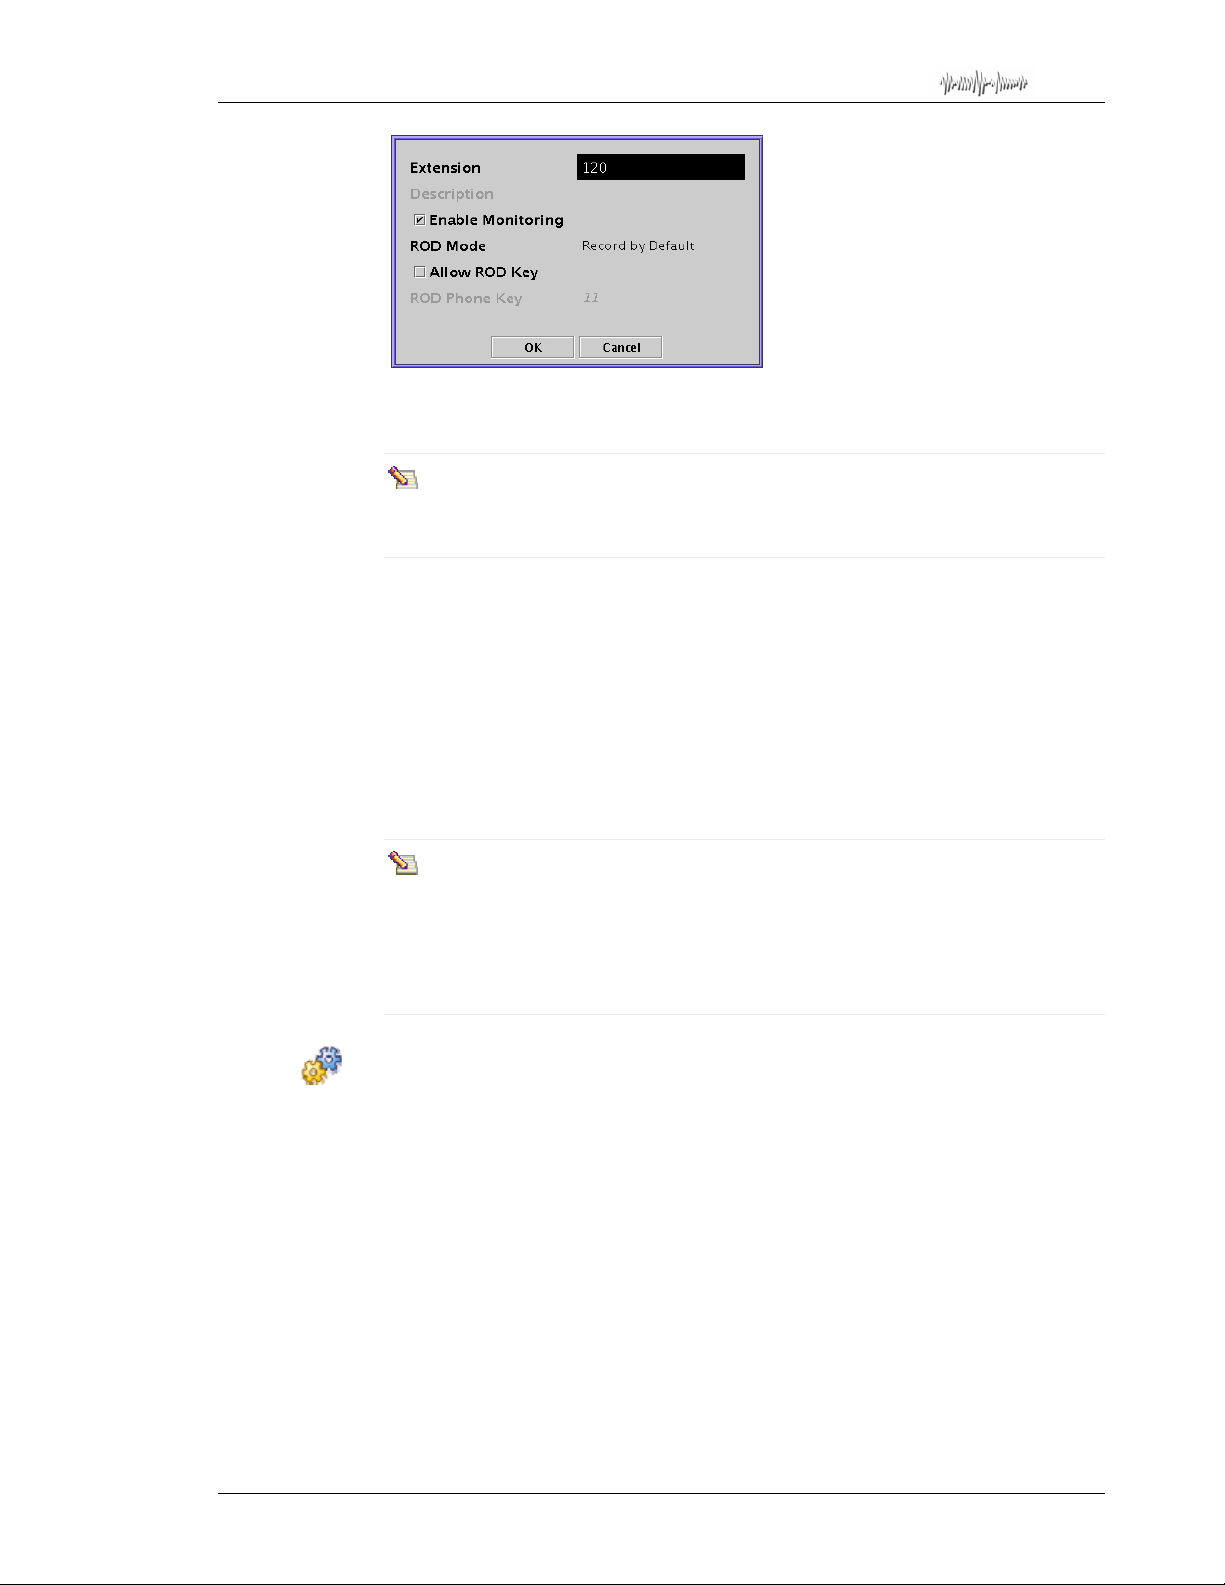
Total Recall Desktop & Rack – Installation and Administration Guide
2. Enter the Extension number you wish to create a specific policy for. This needs to be
pre-configured in Analog Settings screen, accessed via the Options Menu.
Alpha-Numeric Extensions can only be entered using Remote Manager.
Numeric-only Extensions may be entered with the numeric keypad on your
unit.
3. Check or uncheck Enable Monitoring to activate or deactivate monitoring on t hat
extension.
4. Set the ROD Mode for the specific extension.
5. Check or uncheck Allow ROD Key and enter a ROD Phone Key as appropriate.
When the required extension-specific policies have been defined, use the [ Down] arrow
key to highlight OK, and press the [Select] Key to apply your changes.
The extension policy will now appear in the Extension Settings box. Repeat the above
process for further extensions as necessary.
In some cases the extension information (which originates at the PBX) may
arrive slightly after the recorder ha s started to record a call. In this event, the
default recording policy will be applied to the call until the extension
information is available, at which point it will then be treated with the
appropriate extension recording policy, if any have been created for that
extension. The rules for conflicting extension settings also apply.
To remove an extension policy:
1. Highlight the specialised extension in the Extension Settings dialog and press
[Select].
2. Select Remove.
The extension policy is removed from the Extension Settings dialog.
Page 53
Page 54
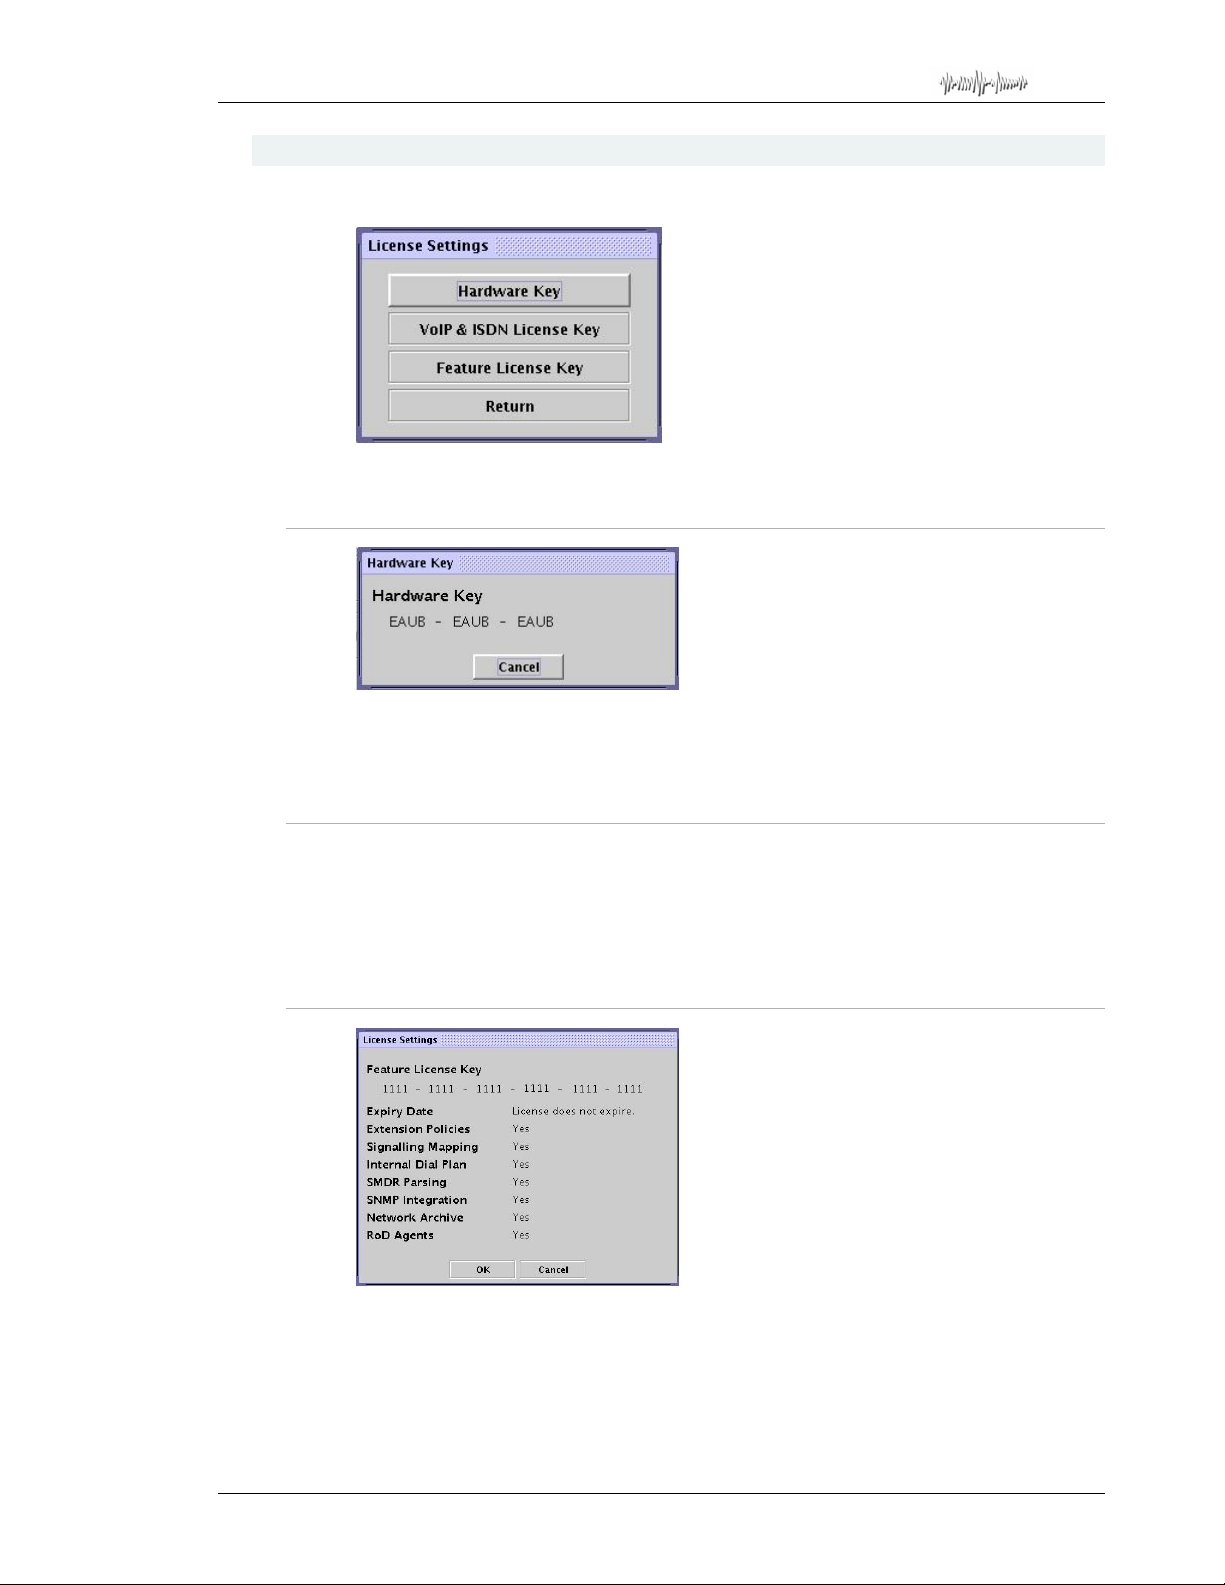
Total Recall Desktop & Rack – Installation and Administration Guide
18.8. License Settings (Rack Model Only)
Options Menu > License Settings
Use the License Settings screen to enter new and renewed license keys.
18.8.1. Hardware Key
The hardware key for the
reference. You will need to quote this key when ordering optional software upgrades for
your
Total Recall Rack.
Total Recall recorder is displayed as read-only field for
18.8.2. VoIP & ISDN License Key
The VoIP & ISDN License Key is not relevant to the operation of your Total Recall.
Please note that your
ISDN connectivity. If you are upgrading your telephony system to either of these
protocols please contact your
replacement system.
Total Recall Desktop or Rack cannot be upgraded to VoIP or
Total Recall dealer for information on a suitable
18.8.3. Feature License Key
A Feature License Key is required to enable optional functionality on your
system. The features that may be activated by license key are:
• SMDR Parsing.
• SNMP Alarm Integration.
• Network Archive.
Page 54
Total Recall
Page 55
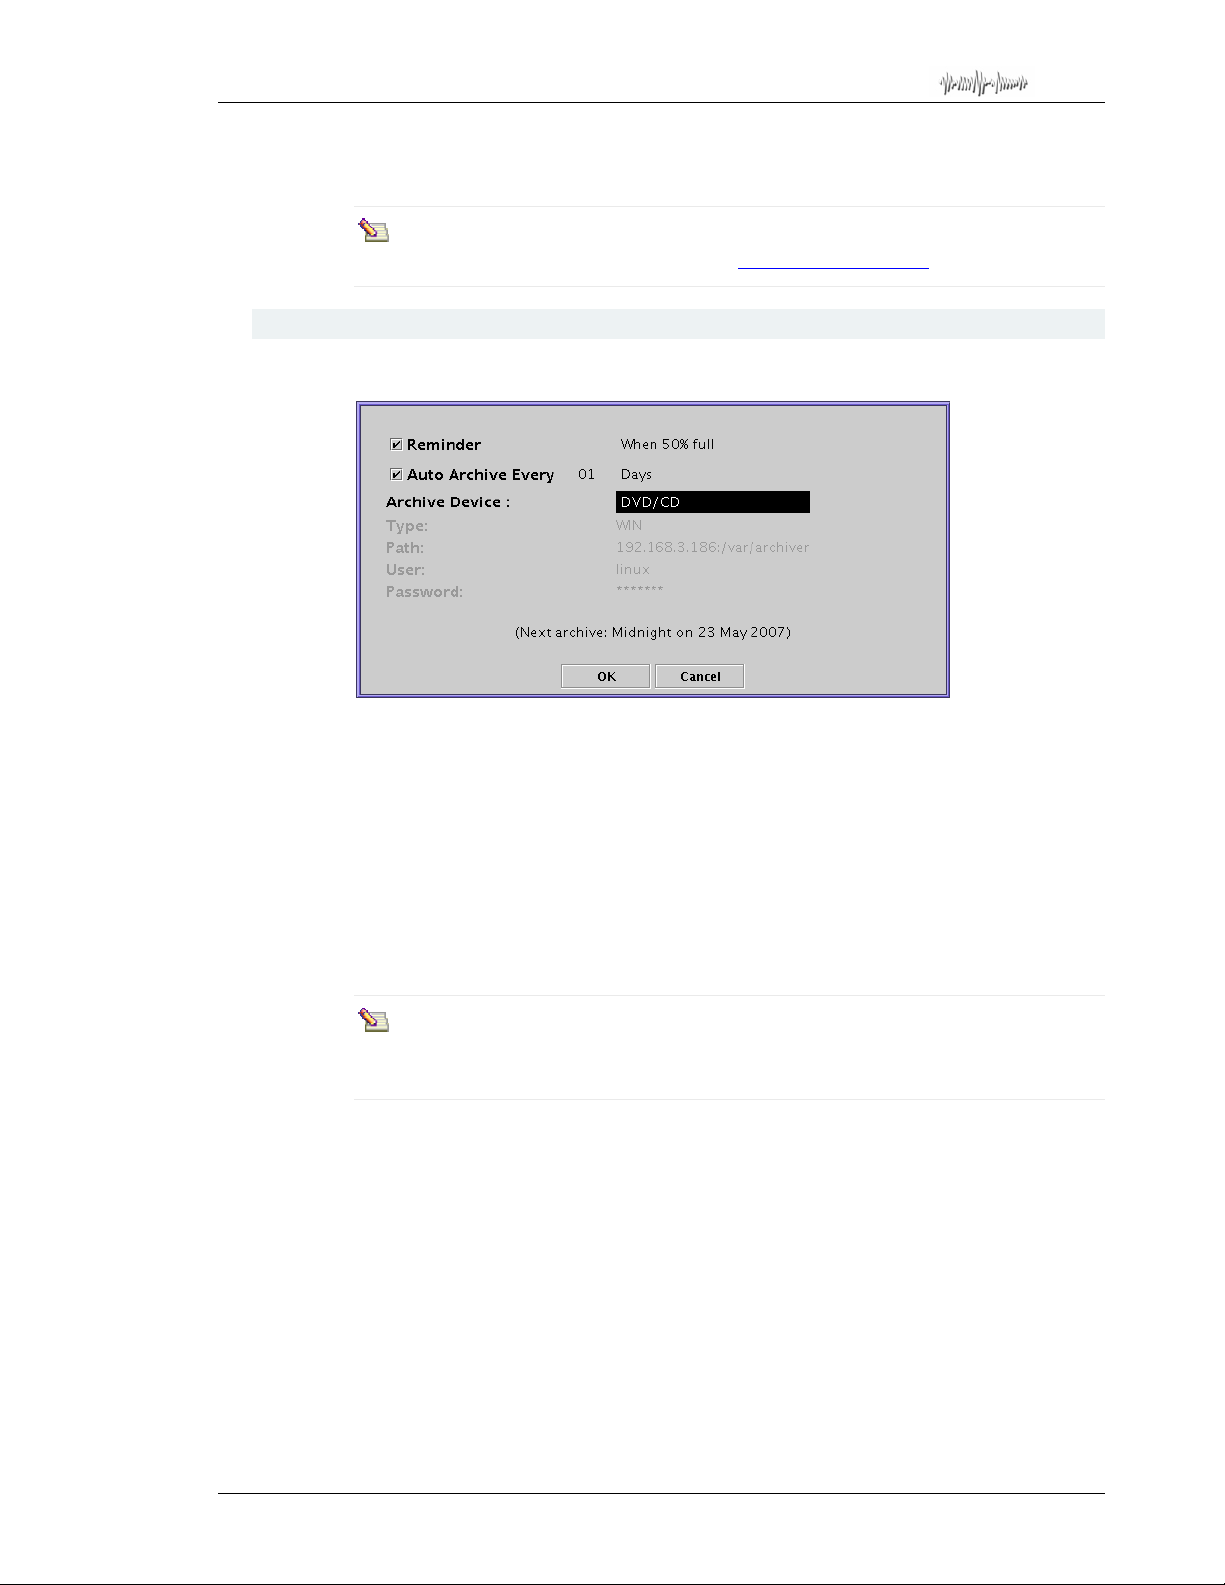
Total Recall Desktop & Rack – Installation and Administration Guide
The other listed features will have been activated by default on your Total Recall Rack
system.
Contact your local dealer for information on how to purchase a license key for
activating additional features, or visit www.totalrecallvr.com.
18.9. Archive Settings
Options Menu > Archive Settings
Use the Archive Settings screen to enable and configure automatic archiving.
Total Recall can be configured to archive automatically at specified intervals, and/or to
display a reminder when the hard drive reaches a specified percentage of capacity.
When using DVD/CD (or optional BD-RE) as the primary auto-archive device, you
should ensure th at you have a blank DVD/CD /BD, or one with sufficient space on it, in
the
Total Recall DVD/CD/BD drive.
If there is insufficient space on the DVD/CD/BD to complete the archive,
will archive as much as it can. However, the system will not prompt you to insert
additional disks.
The Auto Archive function archives all calls that have not been archived to a
DVD/CD (or a Network Share, if this feature has been optioned). Cal ls that yo u
have previously manually archived will not be included in the Auto Archive.
Archive Reminder
Archive Reminder is a visual and audible reminder of actual disk space used on your
system. This reminder will continue to appear even after an automatic archive, as no calls
have been removed.
To set the Archive Reminder featur e, highlight the Reminder check box with the [Up]
and [Down] arrows, and press the [Select] to check the box. Highlight the reminder
options field by pressing the [Down] arrow key, and press [Select] to configure the
Reminder to begin when the hard drive cap acity is at 50%, 75% or 90% used.
Total Recall
Page 55
Page 56
Total Recall Desktop & Rack – Installation and Administration Guide
Auto Archive
Auto Archive configures your Total Recall to archive to a specified device (by default
the DVD/CD drive) at a regular period, without manual intervention.
To set the
[Up] and [Down] arrow keys, and press [Select] key to check the box. The archive time
interval will now be available for configuration.
Press the [Down] arrow key to highlight the ‘Auto Archive Number’ box and use the
[Select] key to cycle through the available options. When complete, press the [Down]
arrow key again to highlight the weeks/days options box and press the [Select] key to
cycle through the options and make your selection. When complete, use the [Down]
arrow to highlight OK and press [Select] to confirm your configuration.
Within this screen,
occur based on the present time and the selected time interval. After setting up the
Automatic Archive parameters, the first archive will always occur at the following
midnight and then the Automatic Archive interval setting will regulate the frequency of
subsequent Automatic Archives.
If your Total Recall system is unlocked, AND a menu other than the main
Logging, Search or Options screens is open a t the scheduled a uto-archive ti me,
the Total Recall system will assume that you are currently using the unit. AutoArchive will be delayed until you navigate back to one of the main screens.
Archive Device
Total Recall Desktop may only archive to its built-in DVD/CD device, or optionally to a
Blu-Ray device if this has been optioned and installed on the system. As no other
archiving options are available on the
the Archive Device field.
Total Recall to automatically archive, navigate to the Auto Archive check box
Total Recall indicates when the next Automatic Archive session will
Desktop model, you will have no further options in
Total Recall Rack may archive to its built in DVD/CD drive, or optionally to a Blu-Ray
device (if installed), or optionally to Network Share storage (if optioned). To select the
default location for Auto Archiving, highlight the Archive Device field and press [Sel ect]
to scroll through the available options. When finished, press the [Down] arrow to
highlight OK and press [Select] to confirm your configuration.
Network Shares must be pre-configured with Remote Manager before they may
be set as an Auto Archive location. Configuration on the host that is managing
the Network Share as well
administrator will supply the Type, Path, User and Password parameters for the
network share.
18.10. Deleting Calls
Administrators may choose to delete calls from the hard disk during manual archiving.
Also, calls are automatically deleted when:
• A set period of time has passed since they were recorded (for example, 3 months).
This option (Max. Call Lifetime) can only be activated by a user with administrator
privileges.
Total Recall may be required. Your network
Page 56
Page 57
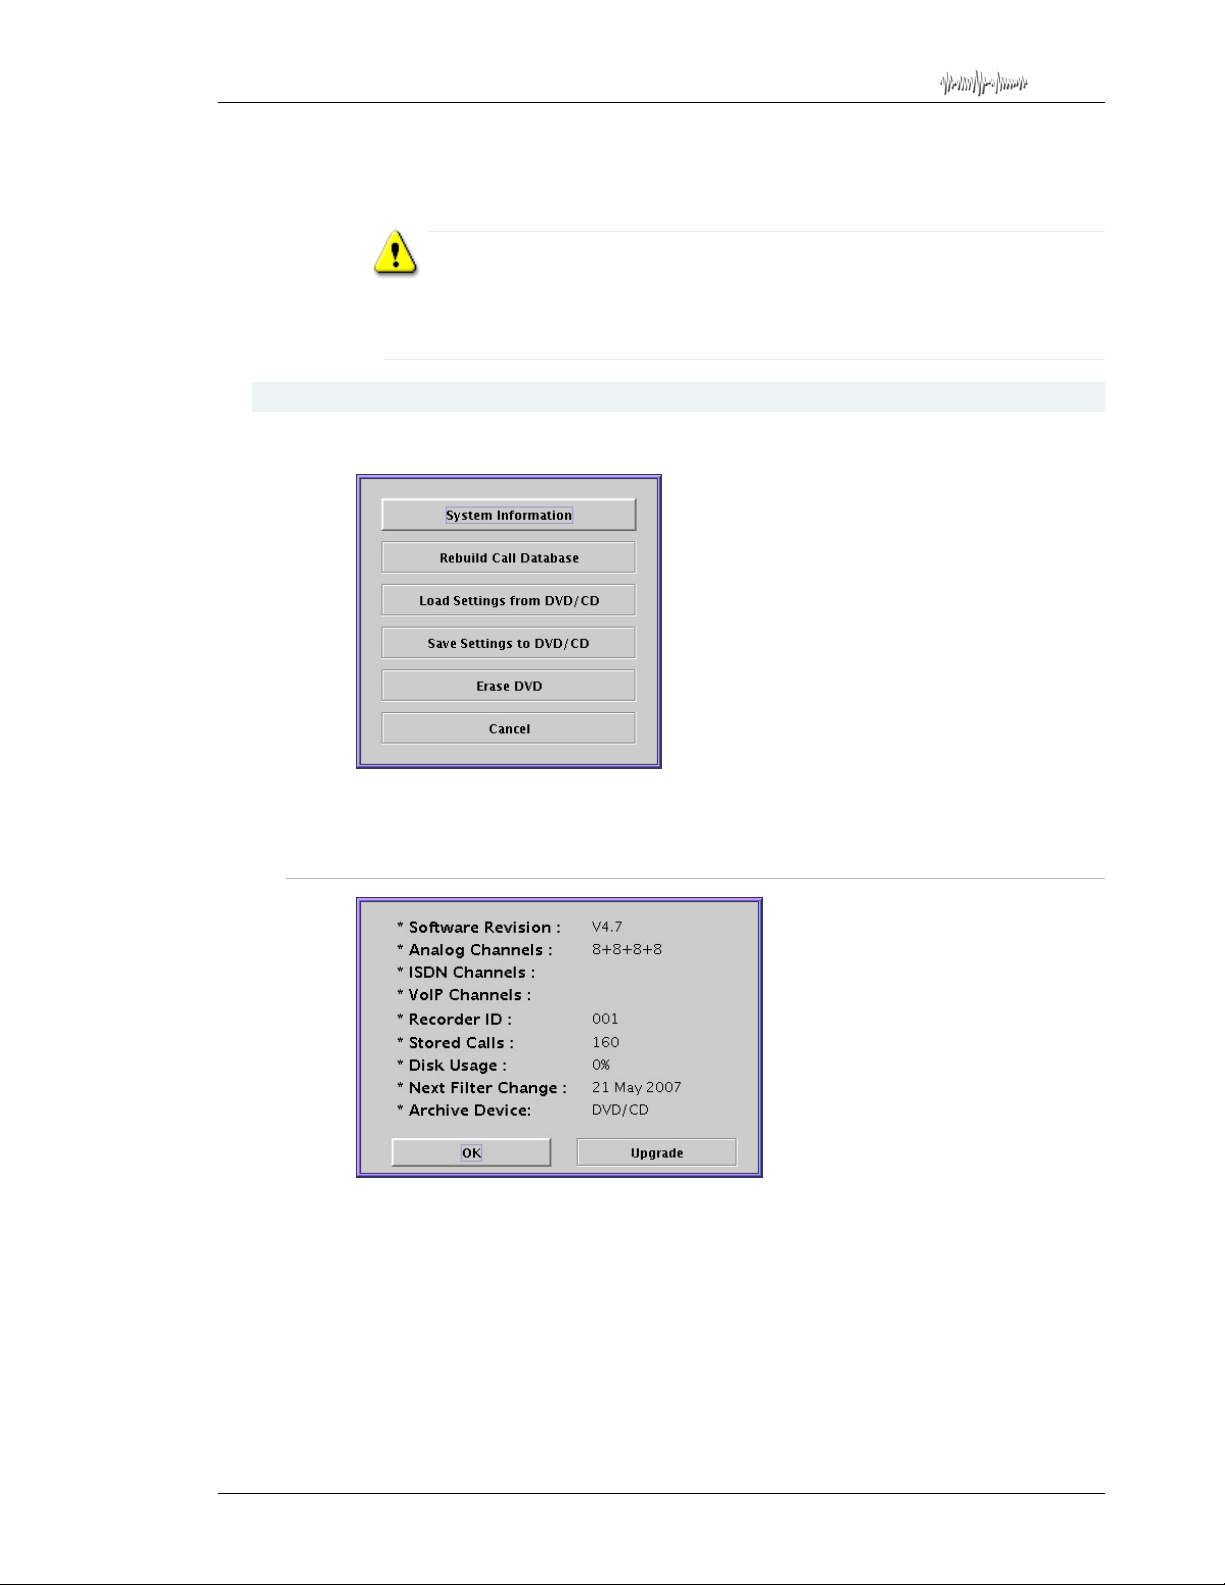
Total Recall Desktop & Rack – Installation and Administration Guide
• The number of calls on the hard disk reaches 350,000, or 60,000 recording hours.
When this happens, the oldest 50,000 calls are automatically deleted, until the
number of calls on the hard drive is reduced to 300,000.
Auto-deletion occurs according to the 3 conditions above in the priority that
they are listed. To avoid losing calls that have not been archived as a result of
automatic deletion, it is important to be aware of recorder capacity and to
ensure important calls are archived or saved regularly.
18.11. Maintenance
Options Menu > Maintenance
The Maintenance screen provides access to a range of system information and utilities,
including access to upgrade the system software.
18.11.1. System Information
The System Information screen displays useful system information and provides a
facility to upgrade the
The System Information screen includes one editable field, Recorder ID. The Upgrade
button initiates the software upgrade procedure.
Recorder ID
For installations that include multiple recorders, it may be useful to be able to identify
from which recorder a particular call originated. The Recorder ID value permits this
identification (000 to 999).
Total Recall software.
Page 57
Page 58
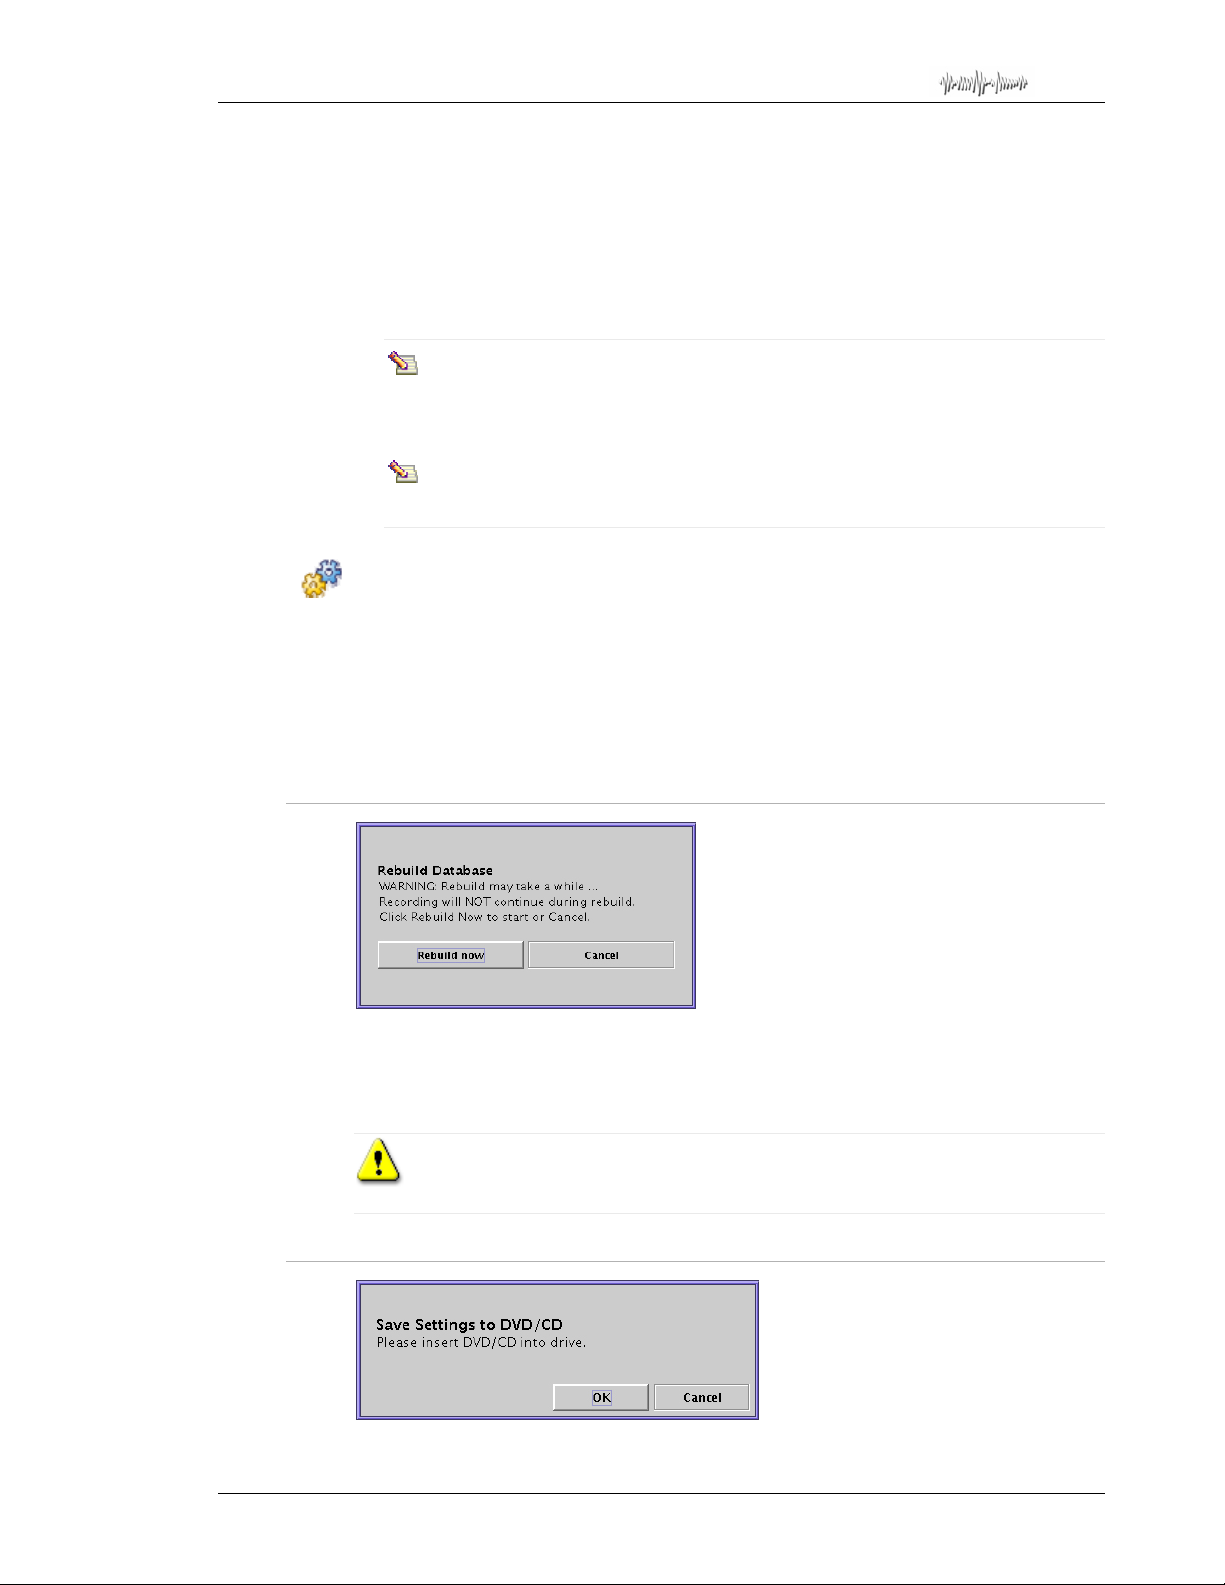
Total Recall Desktop & Rack – Installation and Administration Guide
The call list in the Remote Manager playback screen can be configured to display the
Recorder ID against each call.
Upgrade
Use the Upgrade button to upgrade the system software. Note that the system will
automatically re-boot itself during the upgrade process. Recording does not continue
during the upgrade process which may take up to 5 minutes to complete.
The Upgrade function only affects system files. However, it is recommended
that you back up all important calls from the call database before you perform
an upgrade.
Your passwords and system settings are not affected by updating the system
software.
To upgrade the software version:
1. Backup the call database as necessary (either save calls using Remote Manager, or
archive calls as appropriate).
2. Insert the upgrade CD into the
3. Use the [Down] arrow key to highlight Upgrade, then press [Select] . Follow the on-
screen prompts to complete your software upgrade.
18.11.2. Rebuild Call Database
If the call database has been corrupted in any way, it may be necessary to rebuild the
database.
Select Rebuild now to begin the database rebuild process.
No new recording takes place during the rebuild process, which may take from
1 to 5 hours for a database with 350,000 records.
18.11.3. Save Settings to DVD/CD
Total Recall DVD/CD drive.
Page 58
Page 59
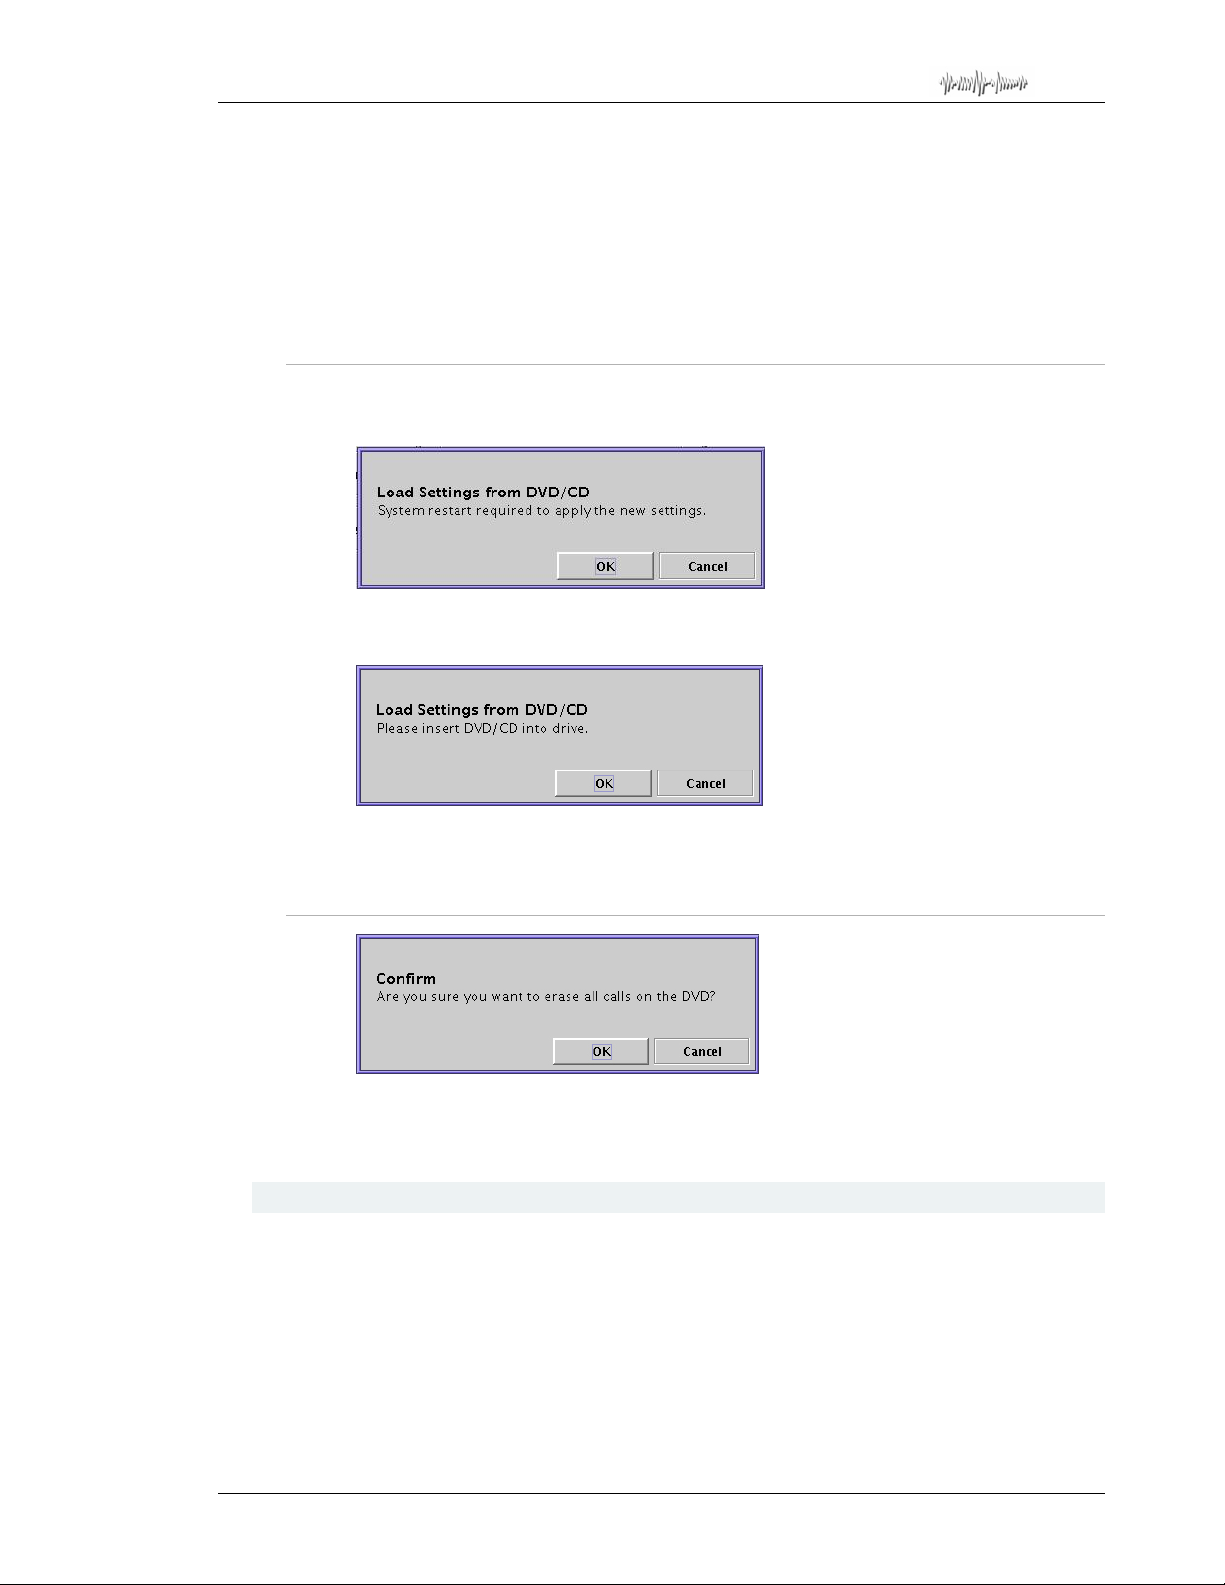
Total Recall Desktop & Rack – Installation and Administration Guide
Save Settings from DVD/CD saves the current Total Recall system settings to DVD or
CD.
It is advisable to save the system settings after the initial configuration, and also after any
major changes to the configuration, so you can roll-back to your initial settings if
necessary. To save settings, insert a blank DVD/CD into the DVD/CD drive of your
Total Recall system, select Save Settings in the maintenance menu, and then press
[Select].
18.11.4. Load Settings from DVD/CD
To load previously saved system settings, select Load Settings from DVD/CD in the
maintenance menu. The following screen will appear:
Highlight OK by pressin g the [Down] arrow, then pr ess [Select] to confirm th at you will
restart the system to apply the new settings.
Now insert a DVD/CD that contains the saved settings into the drive and select OK to
load the settings.
18.11.5. Erase DVD
To erase a currently inserted DVD+RW, select Erase DVD in the maintenance menu.
Press the [Down] arrow key to highlight OK, then press [Select] to confirm your
selection.
18.12. Remote Manager
Options Menu > Remote Manager
Page 59
Page 60
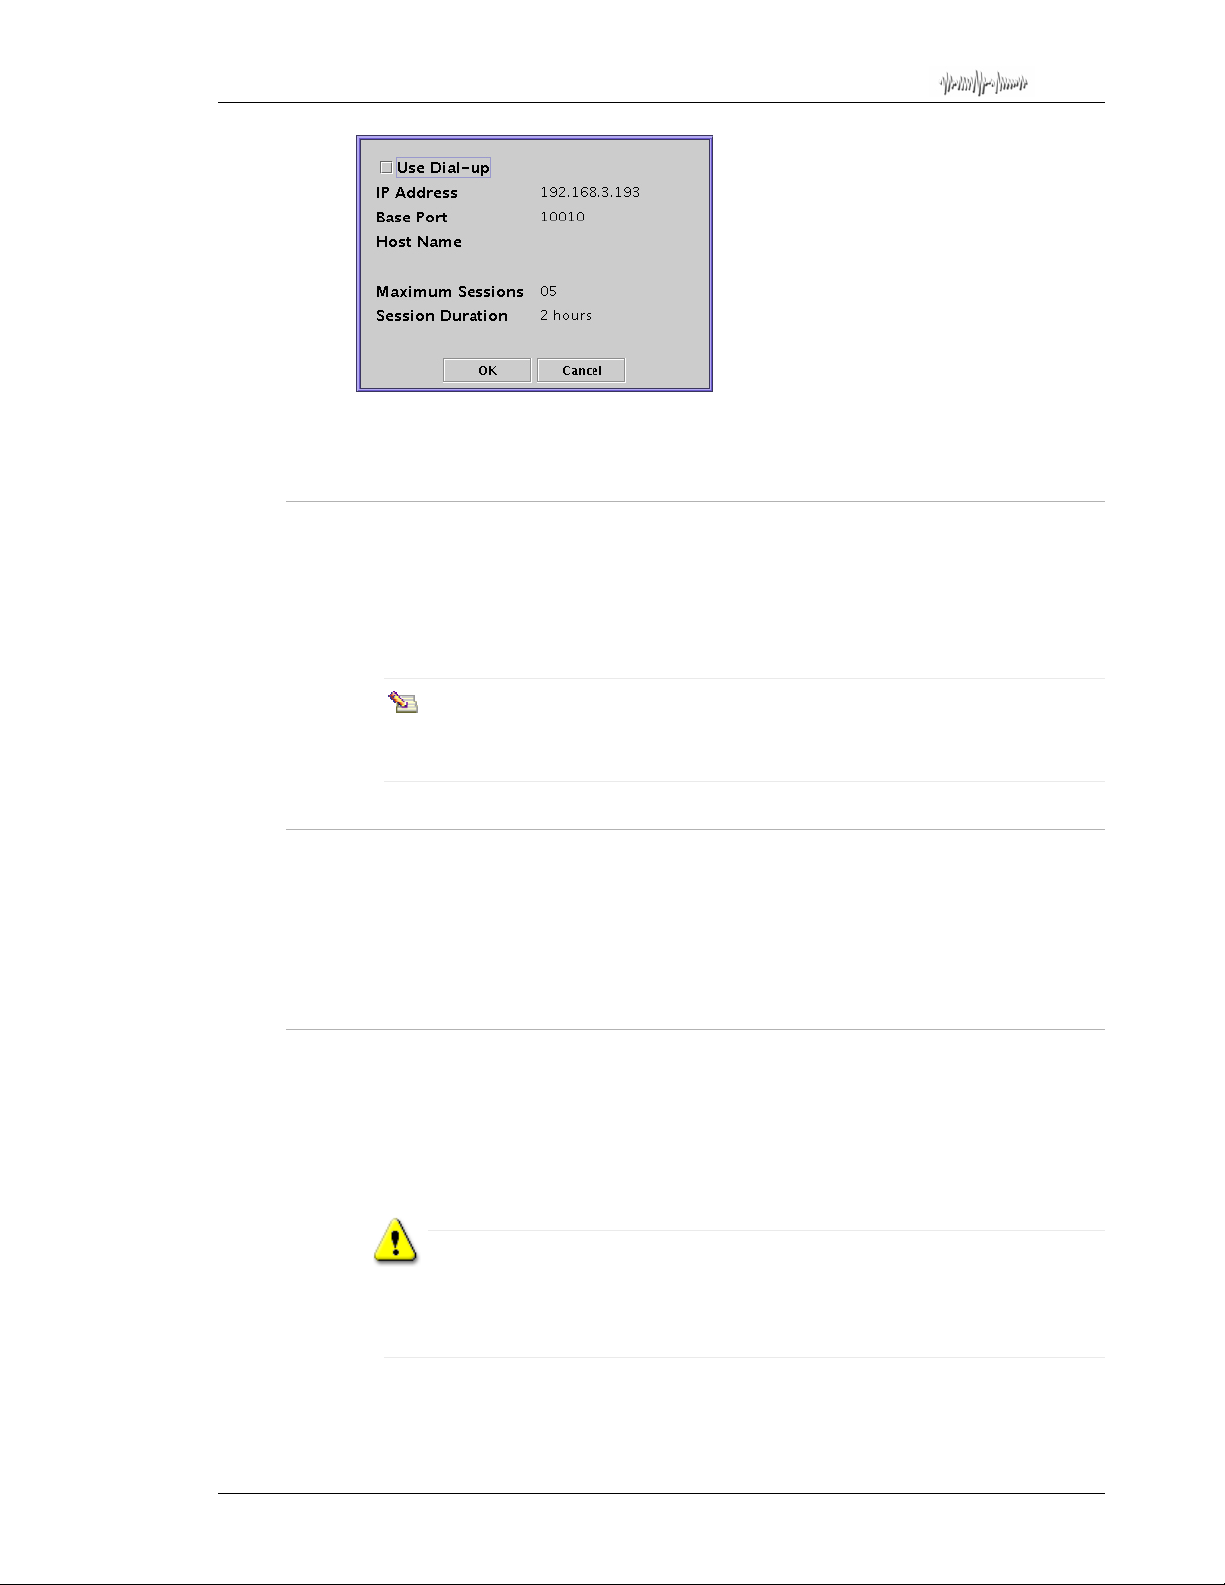
Total Recall Desktop & Rack – Installation and Administration Guide
Use the Remote Manager screen to configure access for the
software to your
Total Recall via your network or a dial up connection.
18.12.1. Configuring Total Recall LAN Access
To configure Total Recall for LAN access, highlight the IP Address field by pressing
the [Down] arrow. Press [Select] to to ggle between the available IP addresses that y our
unit may use to communicate with
assigned to the LAN 1 Ethernet port.
Press the [Down] button to enter a value for the Base Port if required.
The Base Port value can be left at the default value (10010) unless you have a
specific reason to change it (for example a port conflict on the administration
PC).
Remote Manager. This should be the IP address
18.12.2. Configuring Total Recall Dialup Access
To configure Total Recall for communication with Remote Manager via a 56k dialup
connection, press the down arrow to highlight the Use Dialup check box, and press
[Select] to activate this option.
All other fields will become read only. The IP address is set to 10.0.1.205, and cannot be
changed.
Remote Manager PC
18.12.3. Configuring Remote Manager Options
Press the [Down] button to highlight the Maximum Sessions option. Maximum
Sessions is the maximum number of simultaneous monitoring and playback connections
from
Remote Manager PCs that Total Recall will allow.
If this limit is reached, any further connections are blocked by the recorder, and the
Remote Manager displays a message to the user informing them that the limit has been
reached.
The default setting is 5. It is not recommended that you increase this setting
unless you are confident that the re corder is running well below capacity at all
times. Allowing too many simultaneous sessions may jeopardise the integrity
of your recordings.
Press the [Down] button to highlight the Session Duration field. The Session Duration
is the maximum length of time that a
will be allowed to run for.
Remote Manager monitoring or playback session
Page 60
Page 61
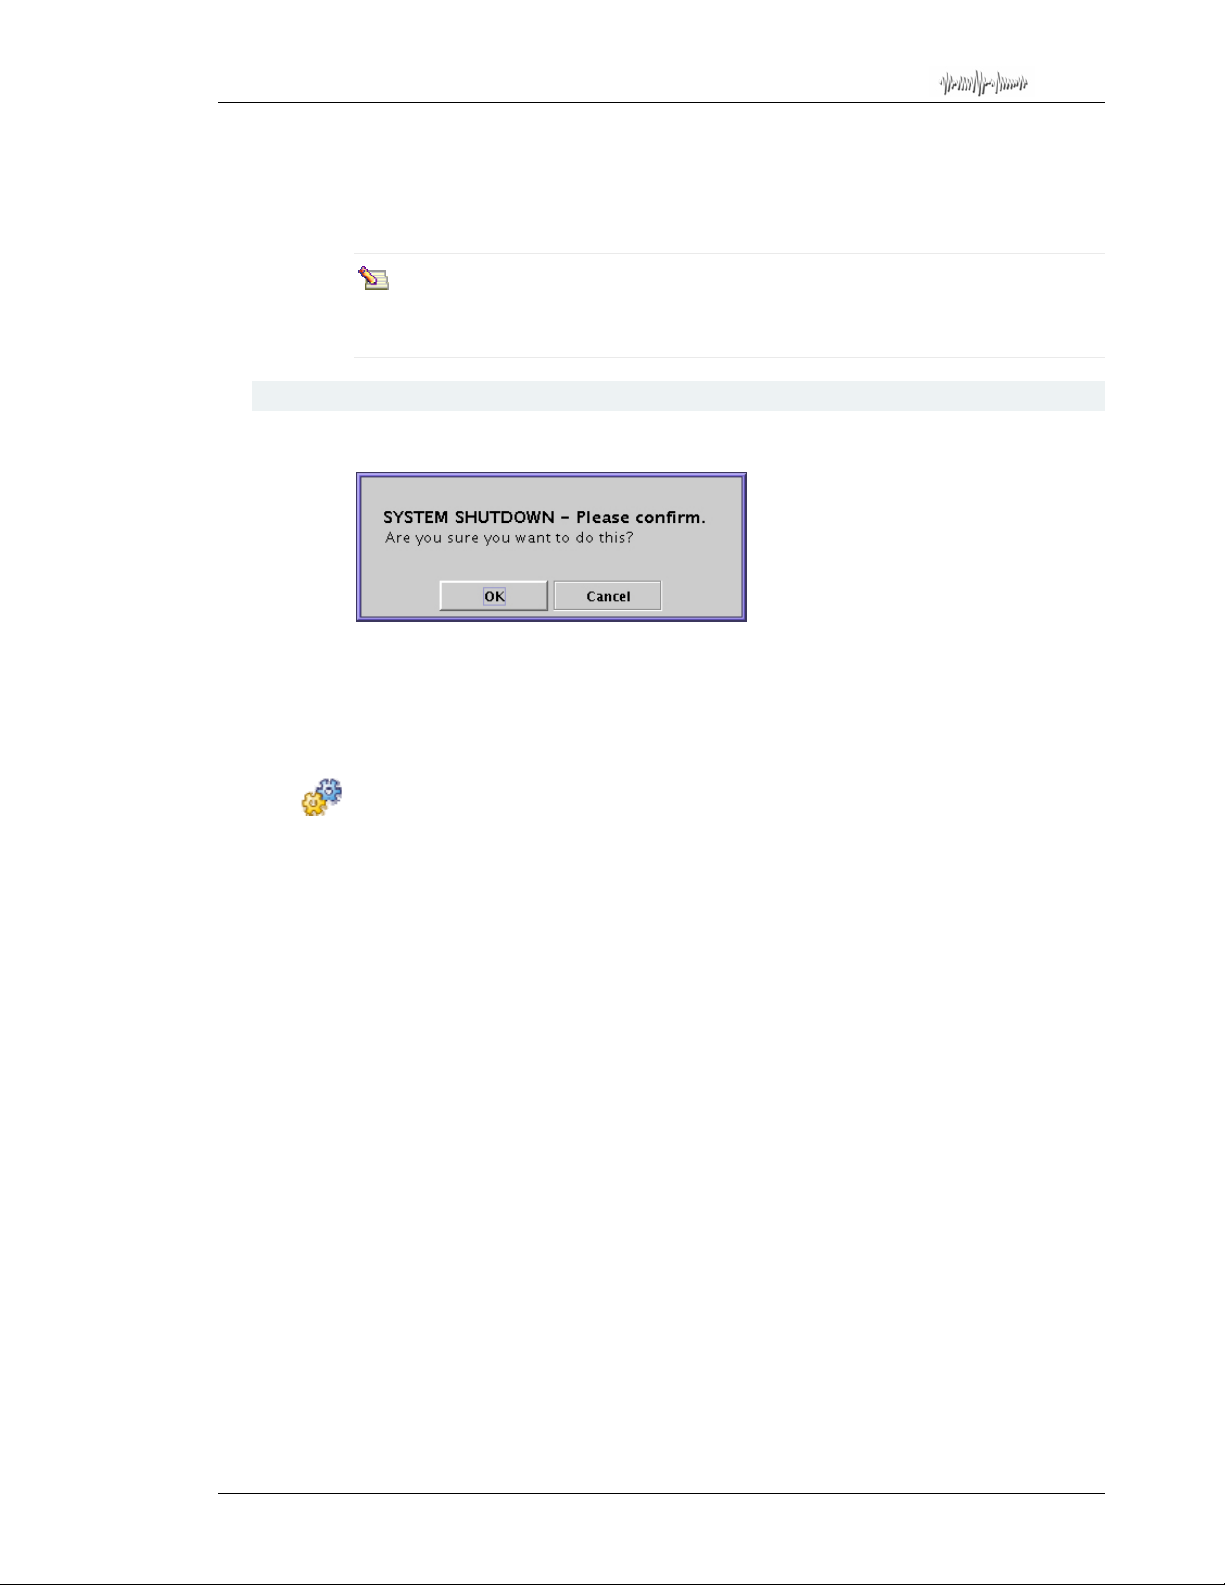
Total Recall Desktop & Rack – Installation and Administration Guide
This setting is a safeguard to prevent network congestion from ‘infinite’ session times if
(for whatever reason) a session is not closed properly. If this limit is reached, the session
closes – i.e. the audio stream stops. The
immediately upon initiating some other
The Host Name value can only be set using Remote Manager. If you plan to
connect from Remote Manager to the recorder via a firewall, you will first need
to assign a host name using
Remote Manager via a LAN or direct connection.
Remote Manager user is able to reconnect
Remote Manager activity.
18.13. System Shutdown
Options Menu > System Shutdown
If
Total Recall is powered off without following the proper procedure, open database
records can potentially be damaged.
For this reason,
Shutdown function.
To shut the recorder down:
1. Select System Shutdown in the maintenance menu.
2. Press the [Down] arrow to highlight OK.
3. Press [Select] to confirm the system shutdown.
4. Wait until the system displays the message “System Halted”. This means that the
system has completely shut down and it is safe to turn the power off.
5. Insert the key supplied with your system into the on/off switch at the front of the unit.
Turn it left to power off t he system. Alternatively, you may remove the power cor d
from the back of the system to disconnect power from the system.
Total Recall should always be shut down properly using the System
Page 61
Page 62

Total Recall Desktop & Rack – Installation and Administration Guide
Remote Manager
19. Introduction
Remote Manager is Microsoft Windows
from a PC to one or more
supplied on CD free-of-charge with al l Total Recall systems, for installation and use on
as many PCs as required.
Remote Manager can be used to:
• Configure the recorder (Administrator Users Only).
• Play recorded calls from t he system or archive media – includin g archive media
from older generation
• Monitor current calls in real-time.
• Search the call database.
• Archive recorded calls to CD/DVD or optional BD/Network storage.
• Tag and notate calls on the database.
• Download calls to the local hard drive.
• Email downloaded calls.
• Play and save calls from Total Recall archive discs.
• Generate reports.
• Export calls to .wav, .mp3 or secure .trc formats.
Total Recall units, via LAN or dialup. Remote Manager is
Total Recall systems.
®
compatible software that allows remote access
20. System Requirements
Minimum system requirements for Remote Manager are:
• Multimedia PC running Windows 2000/XP/Vista32/Vista64.
• 100Mb free HDD space.
• 256Mb RAM.
• Display resolution 800x600, 256 colours.
• Sound device and speakers.
• LAN device or modem.
Calls that are archived onto DVD, CD or (optional) BD are compressed and stored in a
secure proprietary data format (.trc) that cannot be played on a PC unless
Manager
Calls in .trc format can be converted using
compatibility with standard media players.
is installed.
A Remote Manager playback or monitoring session adds 1 Mbps to the
network payloa d. Regardl ess of your network cap acity, we reco mmend that no
Page 62
Remote
Remote Manager into .wav or .mp3 files for
Page 63
Total Recall Desktop & Rack – Installation and Administration Guide
more th an 20 Remote Manager sessions connect to a Total Recall at any one
time to ensure optimal system performance.
21. Compatibility Between Remote Manager and Total
Recall
It is very important to ensure that the software version number of your Total Recall unit
matches the software version number of
versions may cause
may exhibit intermittent problems.
Remote Manager to fail to connect to your Total Recall system, or
Remote Manager. Incompatible software
Please note that the current generation
generation
from archive discs made with old generation systems.
If your
Remote Manager program as well. At the time this manual was prepared, the current
Total Recall software version was 8.5.0, with the corresponding Remote Manager
version being 8.5.0.
Total Recall units and vice versa. However you can replay and copy calls
Total Recall system software is upgraded, you will be required to upgrade your
Contact your Total Recall dealer to ensure that you are running the latest
software version.
22. Installation
When running Remote Manager for the first time, you will be prompted to
set up the Administrator account for that PC. Therefore it is very important
that installation is carried out by the Administrator themselves or properly
authorised personnel.
Remote Manager Software is supplied on a CD together with the Total Recall recorder.
To install, insert the CD into the PC drive, and follow the onscreen instructions from the
Installation Wizard. If the install does not start automatically, manually run setup.exe
from the disc.
Remote Manager cannot connect to old
Please check with your system administrator before installing
Do not insert the CD into the Total Recall DVD/CD drive – Remote Manager
is PC software only.
During installation, you will be prompted to specify an install directory and a
data directory. The data directory must be accessible for all Remote Man ager
users on that PC: convenient locations may include C:\Documents and
Settings\All Users\ for Windows XP, or C:\Users\Public for Windows Vista.
Page 63
Remote Manager.
Page 64

Total Recall Desktop & Rack – Installation and Administration Guide
23. Configuring Total Recall for Remote Manager
Access
A Total Recall recorder must be configured to support LAN or dialup access before y ou
can connect to it using
To configure your Total Recall unit for Remote Manager access:
1. Configure the Recorder ID (if you do not wish to use the default value of 1) via the
Options > Maintenance > System Information menus. This can be important for
call search and replay functionality.
2. Navigate to the Options > Network Settings menu via the built-in LCD and keypad.
Configure the LAN 1 network port as required.
3. Navigate to the Options > Remote Manager menu. Select the IP address that you
would like to use for the Remote Manager connection (this will be IP address you set
for LAN 1). To connect via a 56k dial up modem, check the ‘Use Dialup’ box at th e
top of the menu.
Remote Manager.
24. Administrator Quick-Start Setup
1. Start the Remote Manager application (double-click the desktop shortcut, or select
TR Remote Manager from the Windows Start menu).
The Add User dialog displays. Upon first start-up, you will be directed to create an
Administrator account.
2. Enter an Administrator username and password.
The first user account defaults to an administrator account. Only administrators
can add standard user accounts, define the Total Recall recorder that these
accounts may connect to, and specify the software privileges of those users.
3. Select your preferred display language.
4. Click OK.
The
Remote Manager main application opens.
5. ‘Add’ one or more
See Add TR on page 69 for further information.
)
6. Create ‘standard’ user accounts as necessary, and configure their access privileges.
See User Management on page 75 for further information.
)
Total Recall units, if appropriate.
7. Add one or more
configure their channel/extension access as required.
Total Recall units for each standard user as appropriate, and
Page 64
Page 65
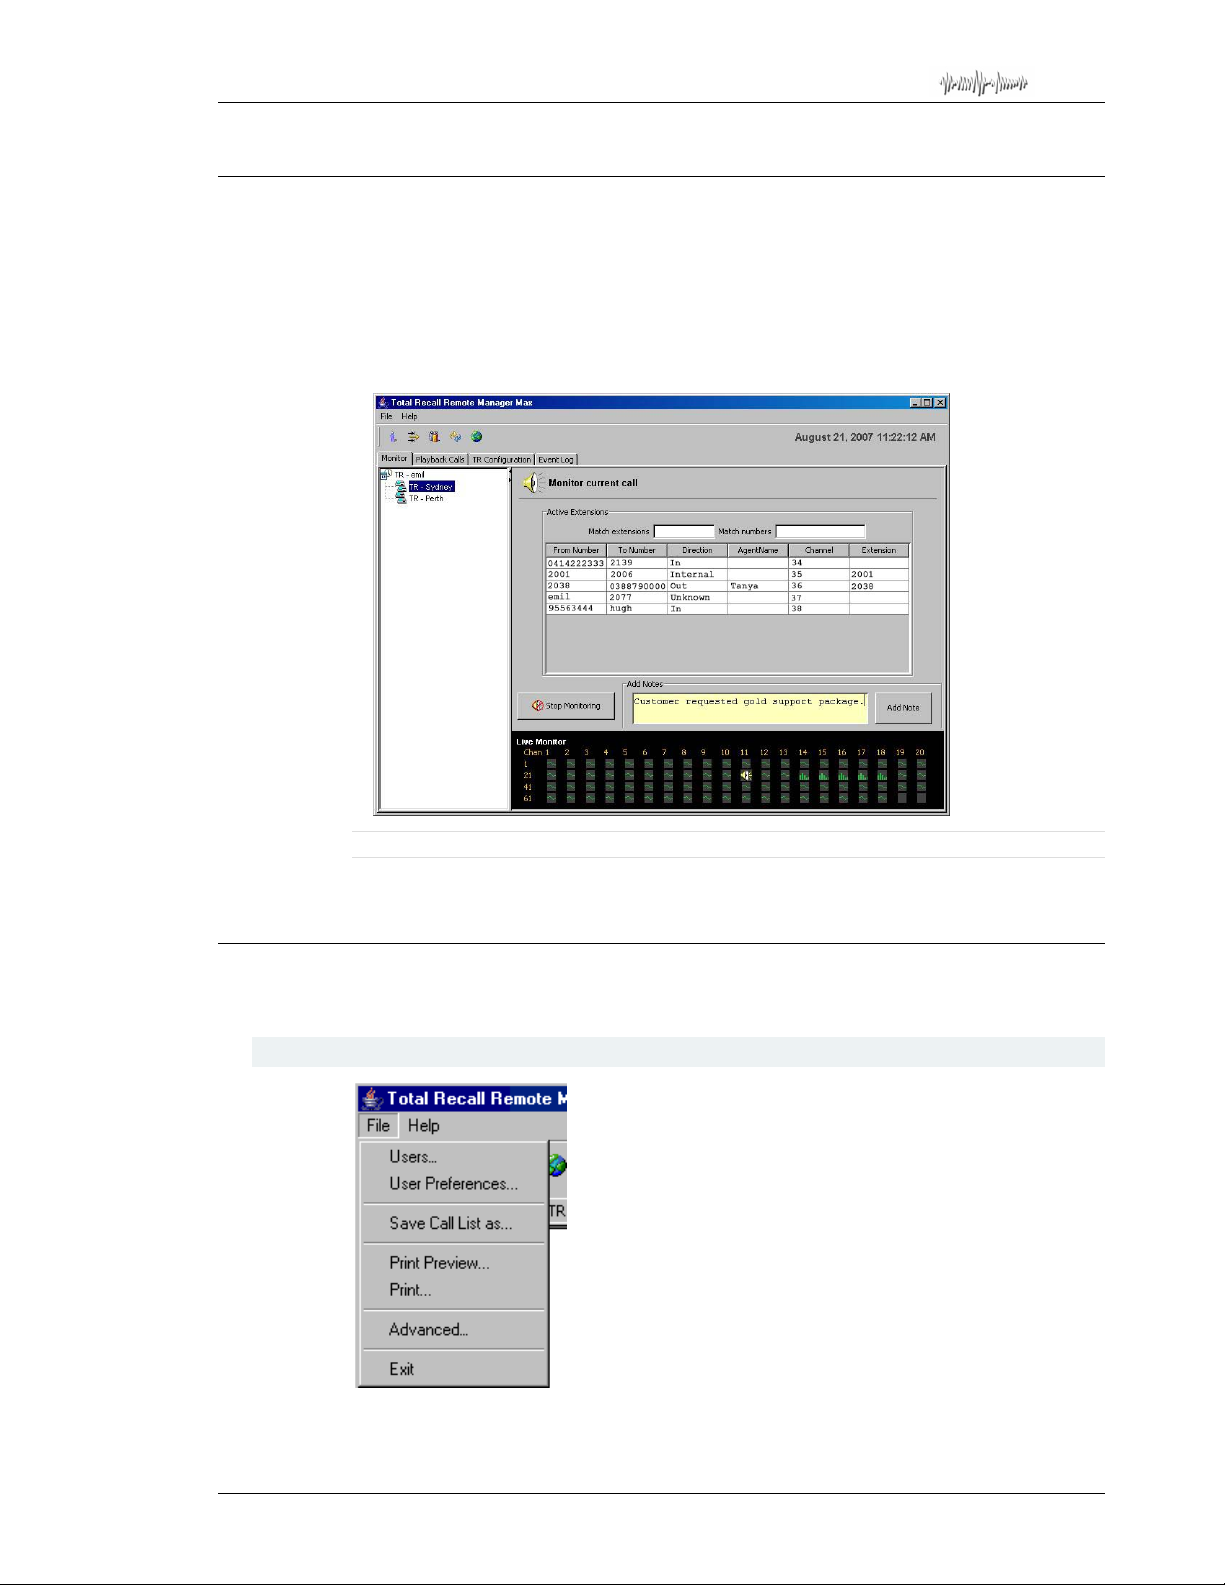
Total Recall Desktop & Rack – Installation and Administration Guide
25. User Interface
Remote Manager is a ‘tabbed’ application, including a Main Menu bar, a Button bar,
and 4 tabs:
• Monitor.
• Playback Calls.
• TR Configuration.
• Event Log.
26. Main Menu Bar
The Remote Manager main menu bar includes 2 menus – the File menu and the Help
menu.
26.1. File Menu
Figure 6 - the Remote Manager User Interface
The File menu includes the following options:
Page 65
Page 66
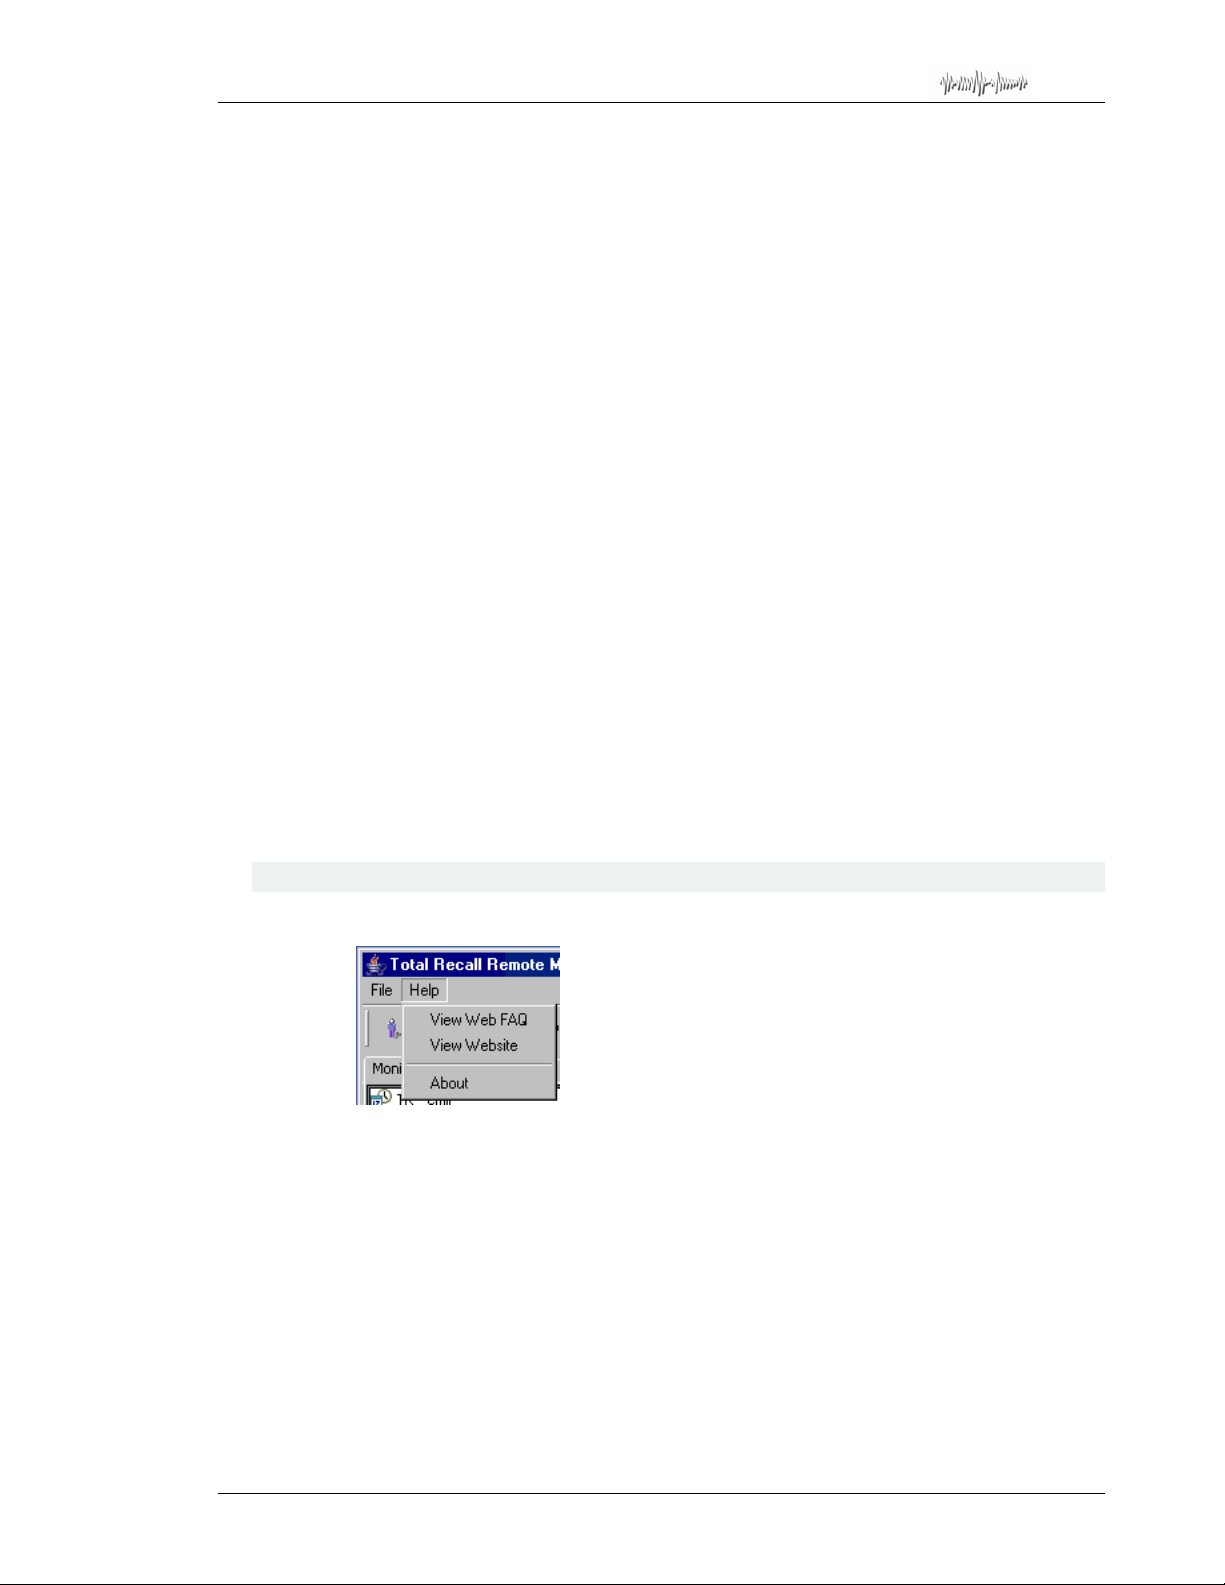
Total Recall Desktop & Rack – Installation and Administration Guide
• Users
Opens the Users dialog (administrators only).
See User Management on page 75 for more information.
)
• User Preferences
Opens the User Preferences dialog.
See User Preferences on page 67 for more information.
)
• Save Call List as
Saves the call list displayed in the Playback Calls tab as a .txt or .csv file. The data
included reflects the current call list column configuration.
• Print Preview
Opens a print preview of the Call Report.
The Call Report is a print-formatted version of the call list displayed in the Playback
Calls tab. The data included reflects the current call list column configuration.
• Print
Prints the Call Report via the standard Windows print dialog.
• Advanced
Opens the Advanced Settings dialog.
Use the Advanced Settings dialog to set the local IP address for the PC, and the
Manager Base Port.
• Exit
Closes
Remote Manager.
26.2. Help Menu
The Help Menu provides access to:
•
Total Recall FAQs on the web.
• The
• ‘About’ information (including the
Total Recall website.
Remote Manager version number).
Page 66
Page 67
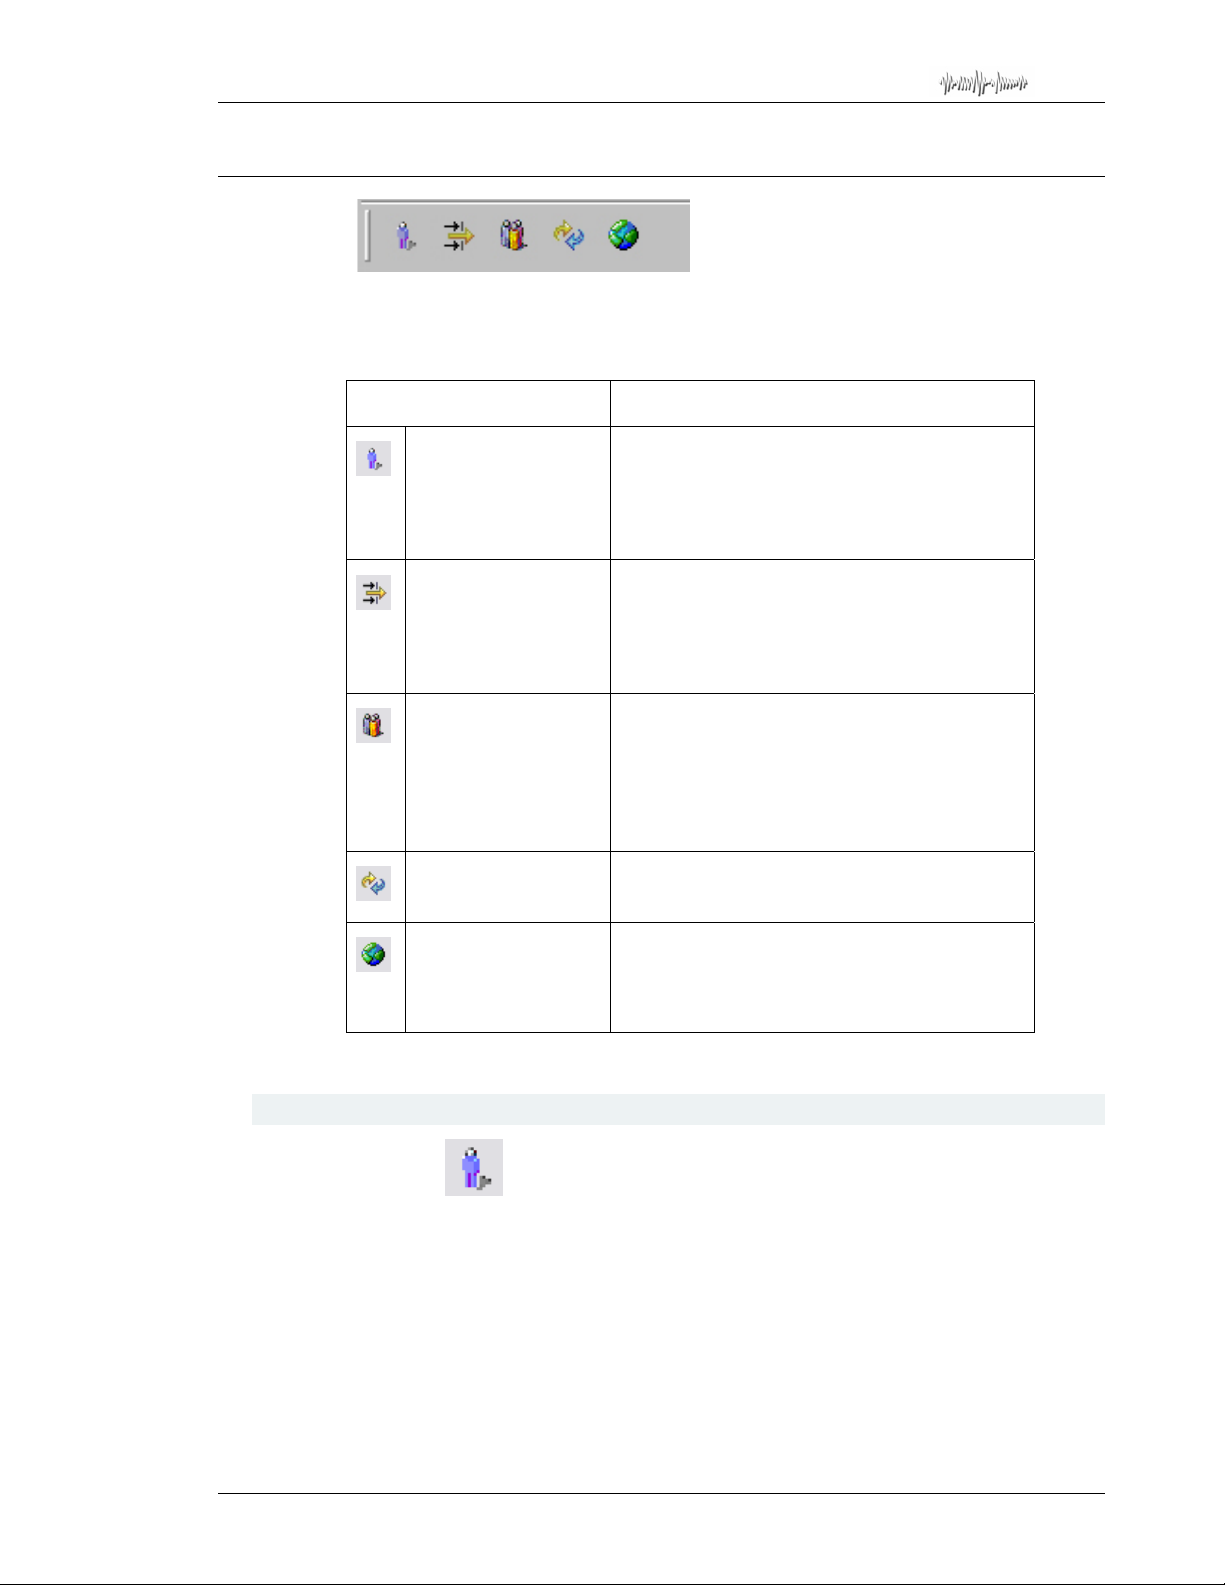
Total Recall Desktop & Rack – Installation and Administration Guide
27. Button Bar
The button bar provides acces s to most of the
and functions.
The following table lists the buttons and their uses:
Button Use
User Preferences
Add TR
(administrator users
only)
Update Users
(administrator users
only)
Opens the User Preferences dialog.
Use the User Preferences dialog to edit general
user preferences and
for the current user.
Opens the Add Total Recall dialog.
Use the Add Total Recall dialog to ‘add’
Recall recorders
settings for the current administrative user.
Opens the Update Users dialog.
Use the Update Users dialog to add and remove
user accounts, to modify user permissions and
preferences, and to add or remove
units associated with user accounts.
Remote Manager administrative dialogs
to the Remote Manager
Total Recall connections
Total
Total Recall
Refresh Views Refreshes the Device Tree and the Local
Change Language
Settings
See below for further information on each button’s function.
27.1. User Preferences
Click the button to open the User Preferences dialog. The User Preferences
dialog is also available from the File menu (File > User Preferences).
Use the User Preferences dialog to edit general user preferences for the user who is
currently logged in.
For Administrator users, the dialog includes 2 tabs, General and TR Connectivity. For
standard user accounts, only General will be available.
Folders pane to reflect the latest changes.
Opens the Choose Language Settings dialog.
Use the Choose Language Settings Dialog to
specify the
Remote Manager display language.
Page 67
Page 68
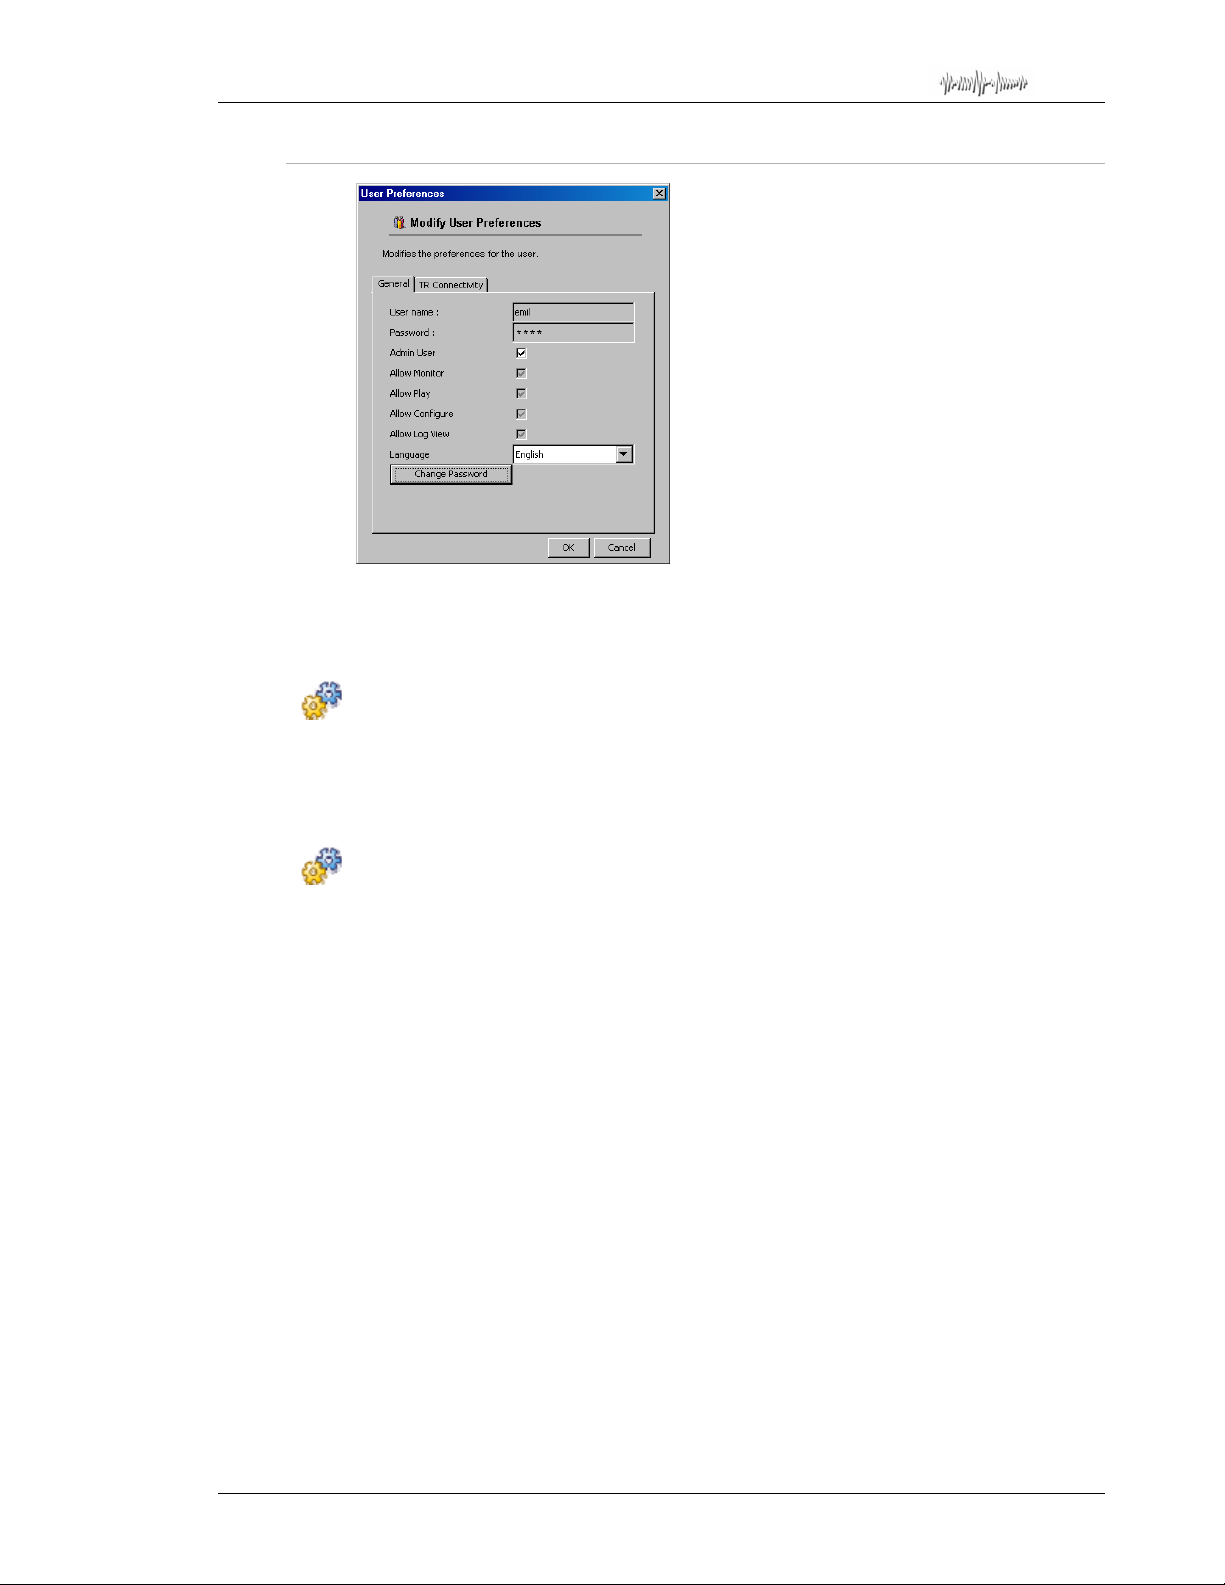
Total Recall Desktop & Rack – Installation and Administration Guide
27.1.1. General Tab
Use the General tab to change the displ ay language and passw ord for the current user .
The current software privileges for the logged in account will be displayed as read-only
fields.
To change your Remote Manager display language:
1. Click the drop-down arrow to the right of the Language field and select your
preferred language from the list.
2. Click OK.
To change your Remote Manager login password:
1. Click Change Password.
2. Enter the new password in the Password field.
3. Re-enter the password in the Confirm Password field.
4. Click OK.
Page 68
Page 69
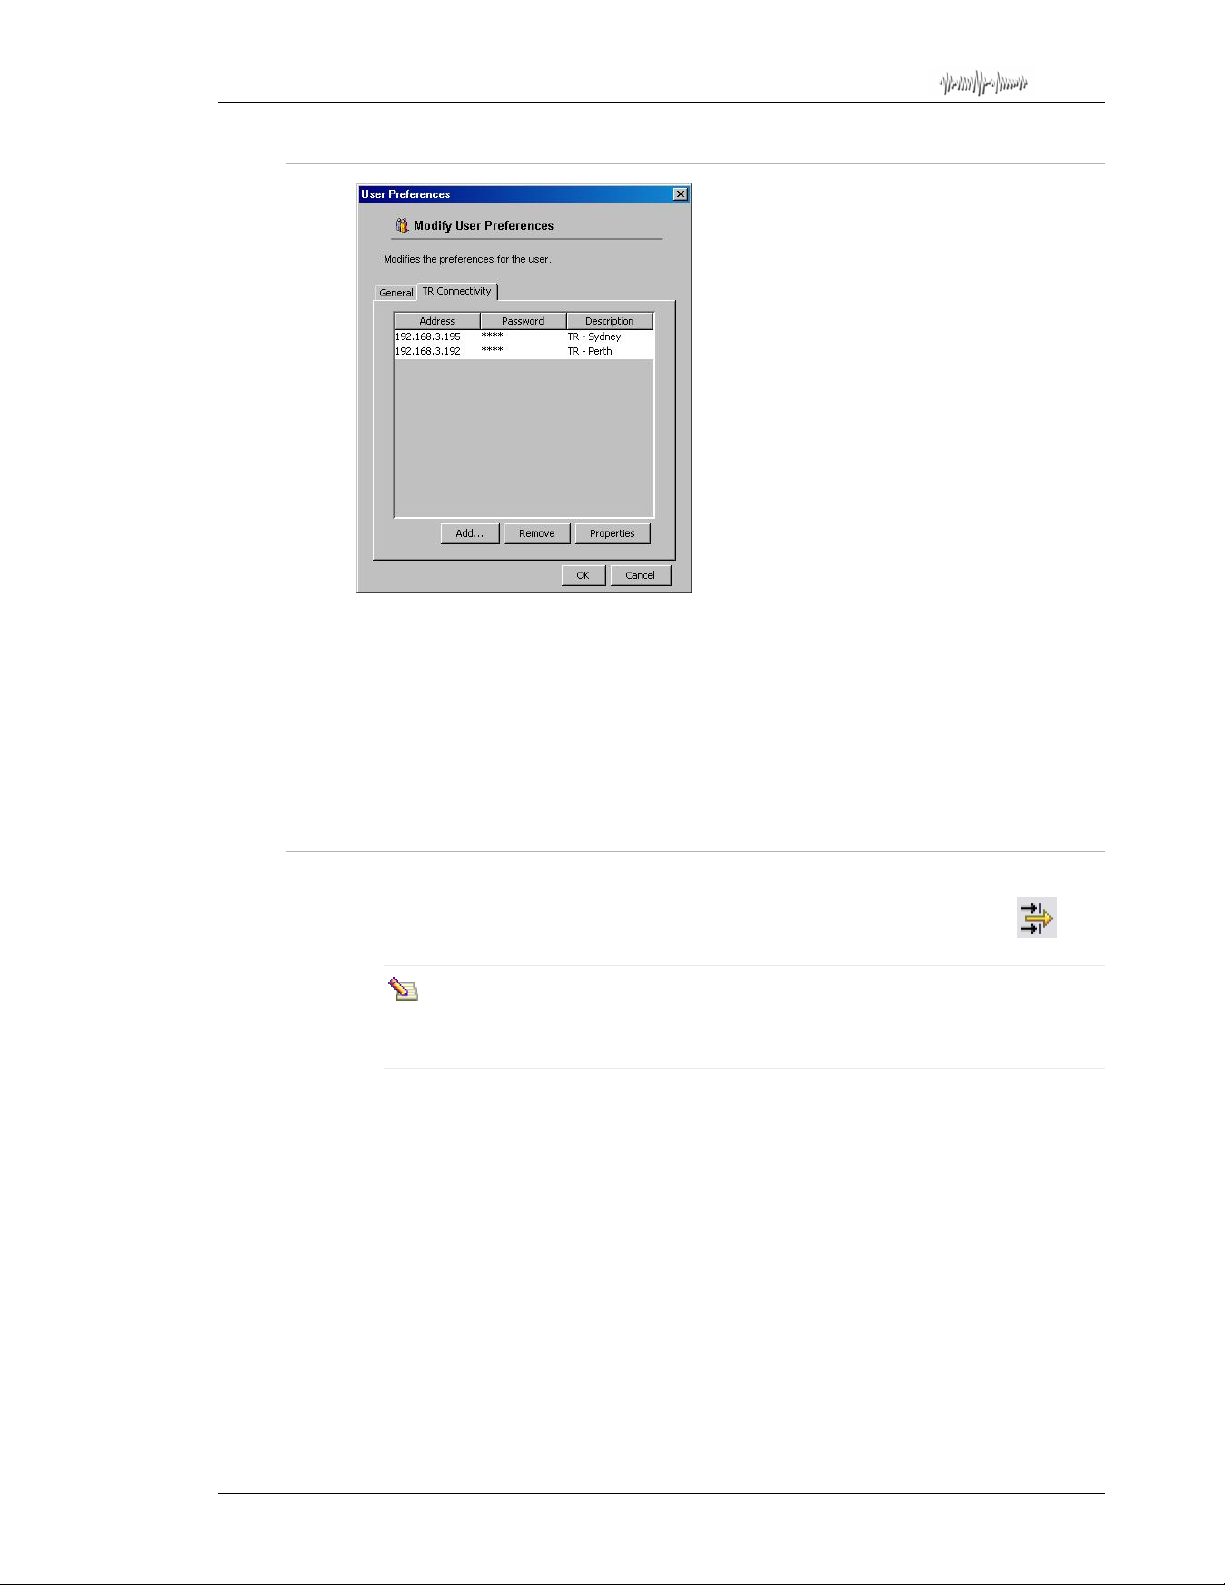
Total Recall Desktop & Rack – Installation and Administration Guide
27.1.2. TR Connectivity Tab
Use the TR Connectivity tab to add and remove
logged in user), or to modify the connection settings for Total Recall recorders that have
previously been added.
When you add a
Remote Manager program, and can be searched, monitored and configured.
The settings are preserved when
the process.
27.1.3. Add TR
Click the Add button to begin the process of adding a Total Recall unit to your Remote
Manager
button on the main
The Add TR screen includes 3 tabs; LAN, Dialup and Cascaded. There i s also a field to
configure Authorised Extensions.
program. You can also access this menu by clicking the “Add TR”
A similar dialog (titled Modify Total Recall Settings) is used to edit
connectivity settings for recorders that have already been added. When
modifying existing settings, the relevant fields are already populated.
Total Recall recorders (for the currently
Total Recall recorder to Remote Manager, it will appear in your
Remote Manager is closed, so there is no need to repeat
Remote Manager screen.
Page 69
Page 70
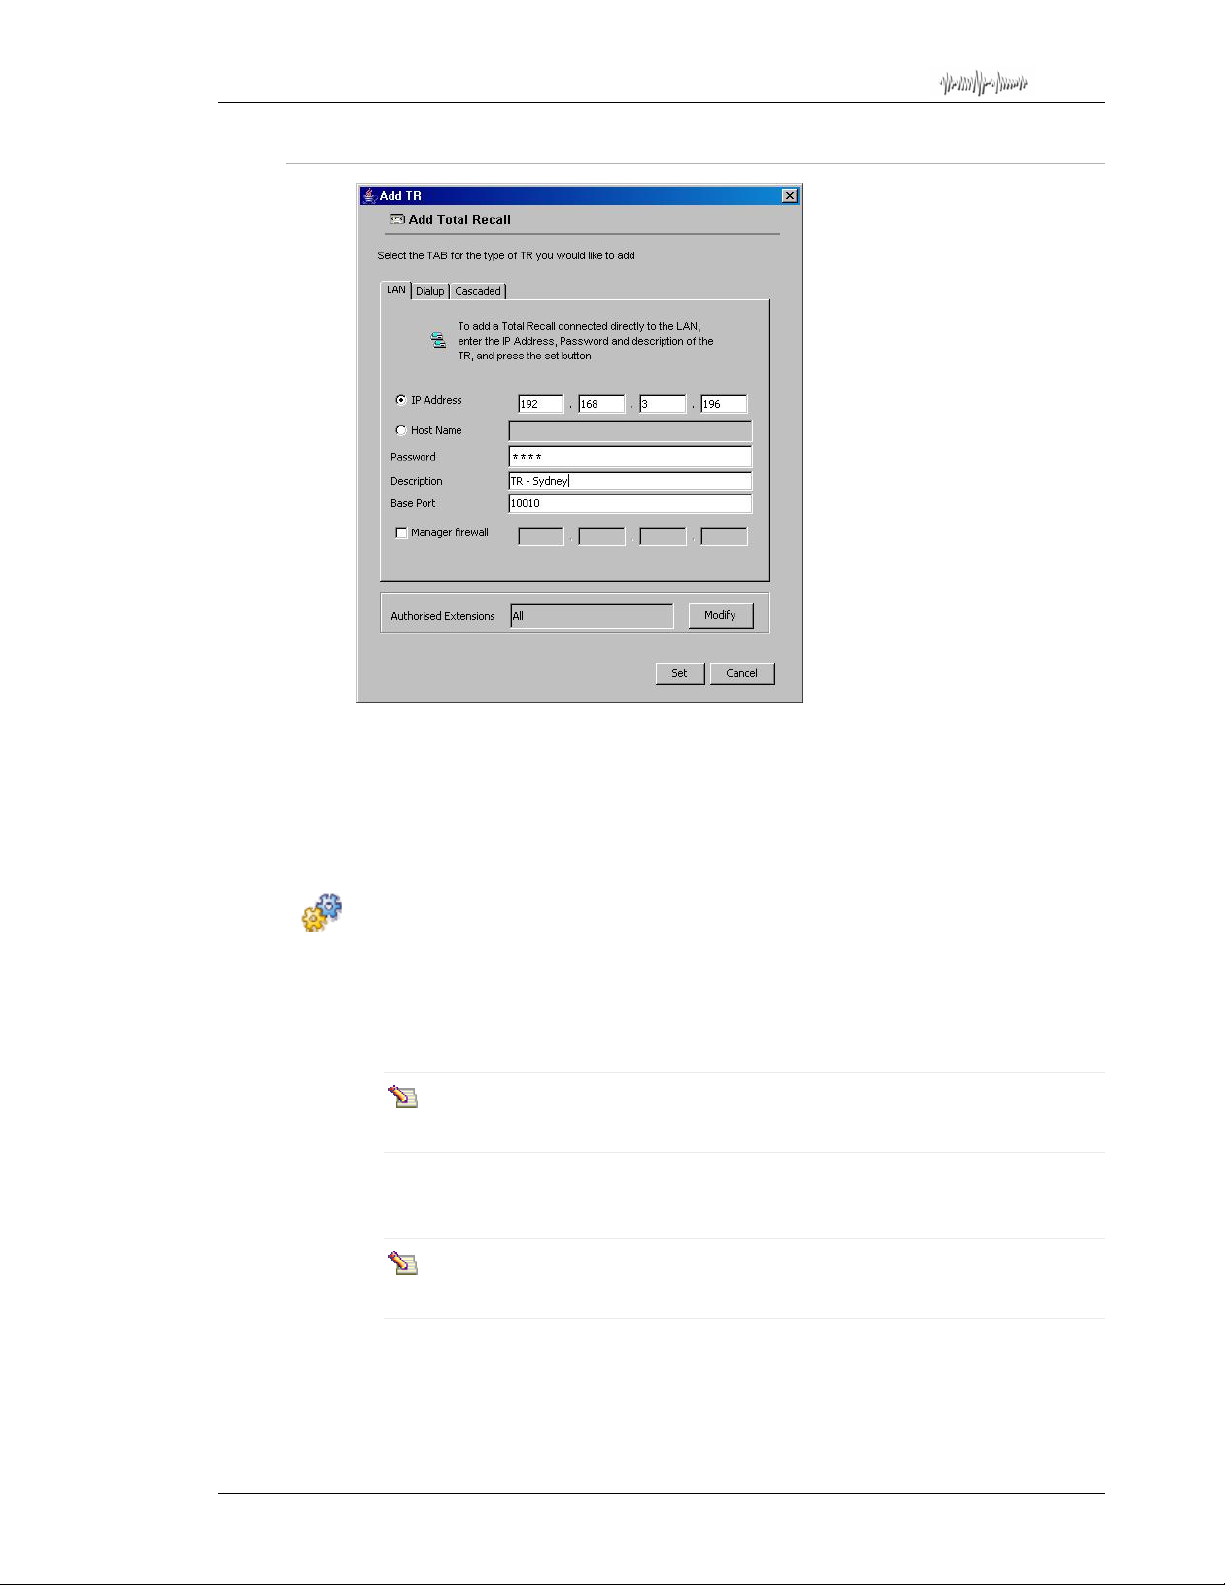
Total Recall Desktop & Rack – Installation and Administration Guide
27.1.4. LAN
Use the LAN tab to add a
area network.
To add a Total Recall to a LAN that is behind a firewall, or if the
)
Remote Manager client PC is behind a firewall, see Connecting
Through Firewalls on page 111.
To add a LAN Total Recall that is on the same LAN as the Remote Manager client
PC:
1. Click the LAN tab if necessary.
2. Click in the IP Address field, and enter the IP address that you configured on the
Total Recall recorder for remote administration.
If your network supports Domain Name System (DNS), you can select Host
Name and enter the host name instead.
3. Enter the Password for the Total Recall system that you w ish to add. This will be
the same password that you use to access the recorder via the built-in control panel.
If you wish to use Remote Manager to configure the recorder, the password
you enter here must carry administrator privileges.
Total Recall that is connected to an internal or exter nal local
4. Enter a description for the recorder.
Page 70
Page 71
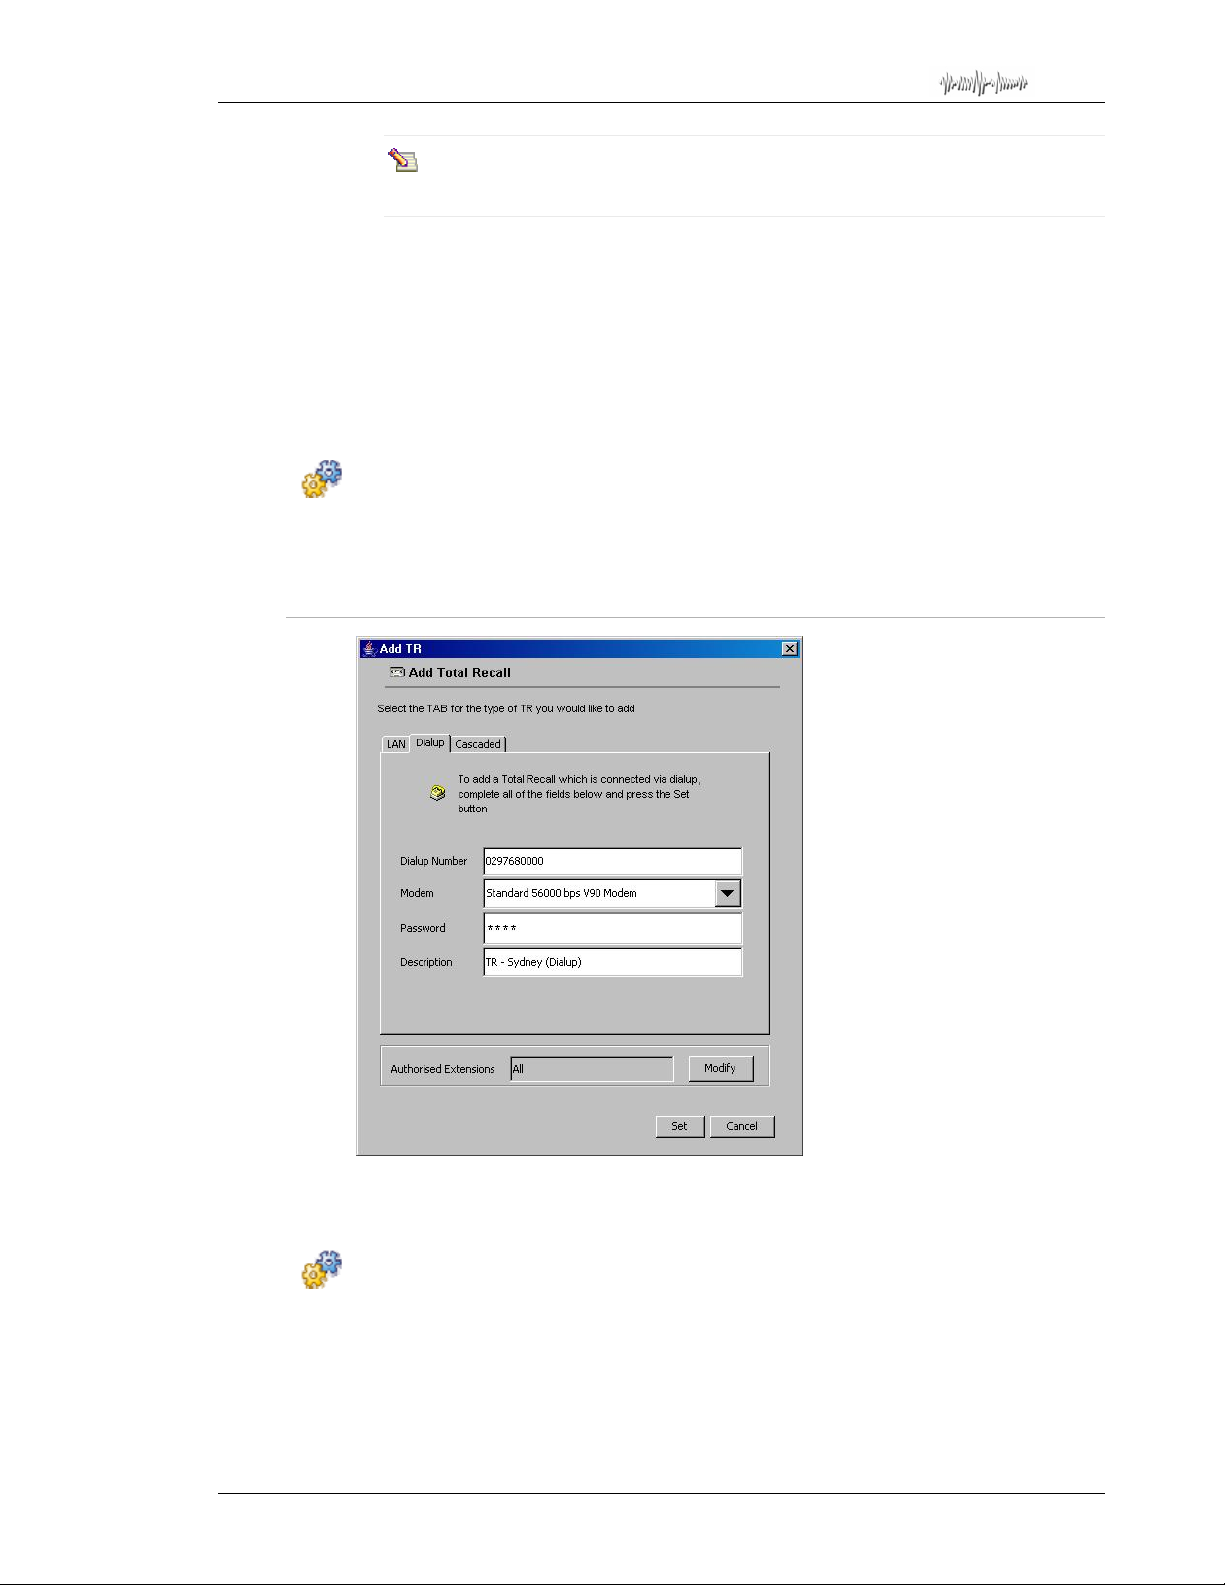
Total Recall Desktop & Rack – Installation and Administration Guide
This description is used to identify the recorder in the Remote Manager
program.
5. The Base Port value can be left at its default setting (10010) unless you have a
specific reason to change it.
6. If required, click the check box to set an external firewall IP address. This setting is
only necessary when
address, and the
firewall IP address.
7. Click Set to apply the settings.
To add further To t al Re c all systems via LAN:
1. Click the Add TR button.
2. Repeat the previously detailed process.
Remote Manager is behind a firewall, on an internal IP
Total Recall needs to access Remote Manager via that external
27.1.5. Dialup
Use the Dialup tab to add a
56k dialup modem connection.
To add a Total Recall that is connected via dialup modem:
1. Click the Dialup tab if necessary.
2. Enter the phone number to the modem in the Dialup Number field.
3. Select the Modem you want to use from the drop-down list (if only one is configure d
on your PC, only one option will be available).
Total Recall to your Remote Manager PC software via a
Page 71
Page 72
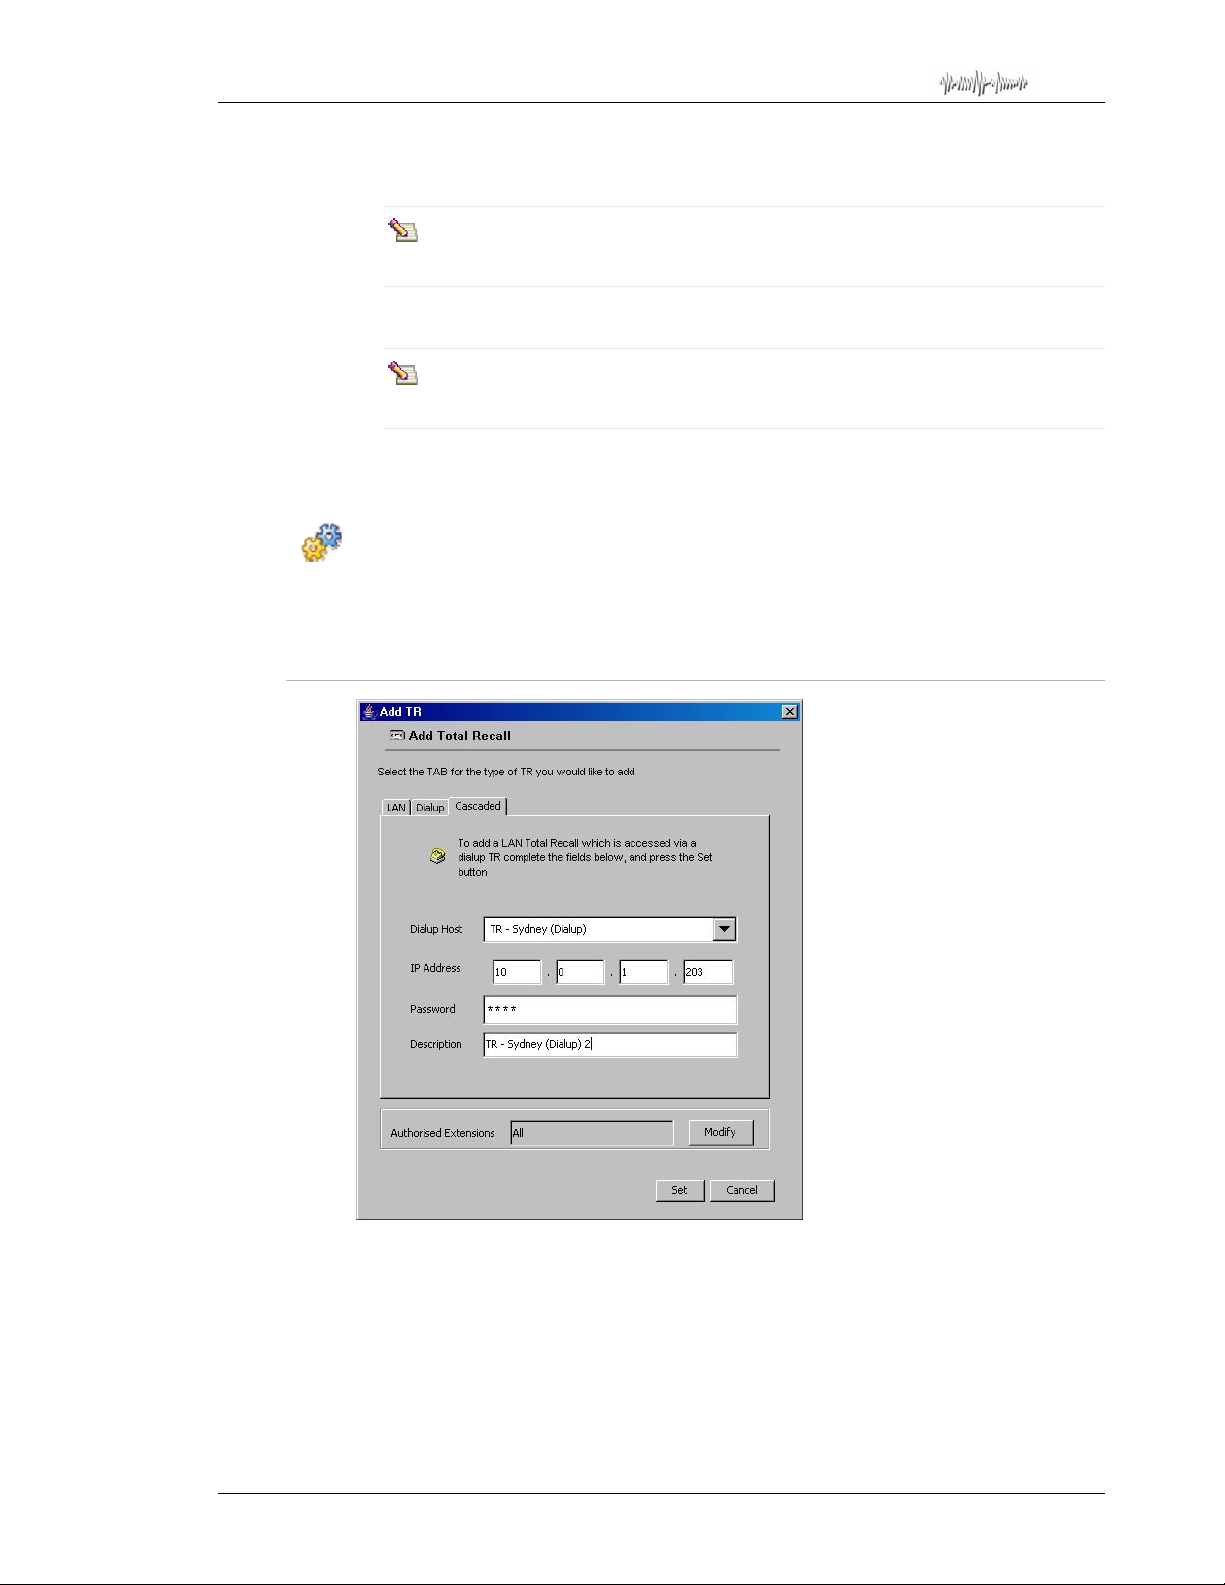
Total Recall Desktop & Rack – Installation and Administration Guide
4. Enter the Password (this is the PIN code for the Total Recall that you wish to
connect to).
If want to use Remote Manager to configure the r ecorder, the PIN you enter
here must carry administrator privileges.
5. Enter a suitable description for the recorder.
This description is used to identify the recorder in the Remote Manager
program.
6. Click Set to apply the settings. Remote Manager will dial the recorder before adding
it to the software, to verify that the dialup settings are correct.
To add further Total Recall units via dialup:
1. Click the Add TR button.
2. Repeat the previously detailed process.
27.1.6. Cascaded
Cascaded recorders are connected via LAN to a previously added dialup
recorder. The remote dialup
cascaded units.
To add a cascaded recorder:
1. Click the Cascaded tab if necessary.
2. Select the Dialup Host (the dialup recorder to which the cascaded recorder is
connected) using the drop-down menu.
Total Recall acts like a central gateway to all the other
Page 72
Total Recall
Page 73
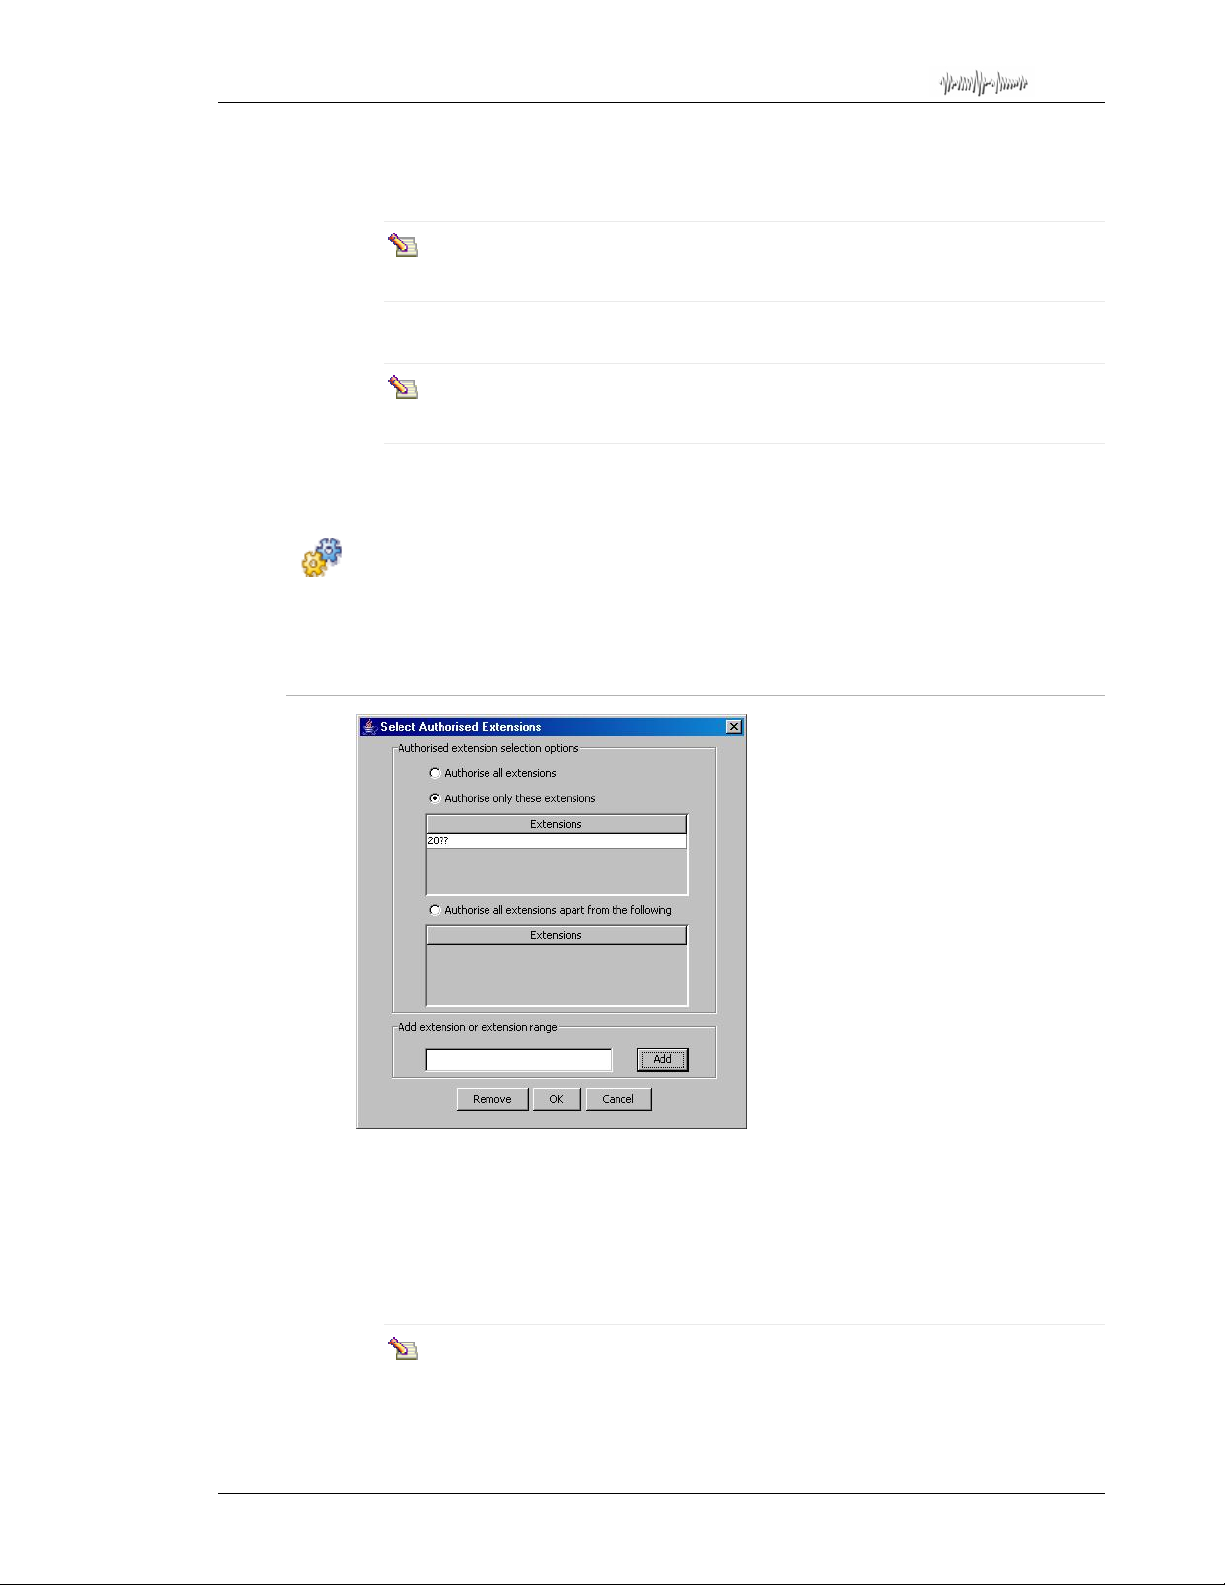
Total Recall Desktop & Rack – Installation and Administration Guide
3. Enter the IP Address of the cascaded recorder.
4. Enter the Password (the PIN for the
If want to use Remote Manager to configure the r ecorder, the PIN you enter
here must carry administrator privileges.
5. Enter a suitable description for the cascaded recorder.
This description is used to identify the recorder in the Remote Manager
program.
6. Click Set to apply the settings. Remote Manager will dial the Dialup Host in order
to verify the connection with the attached cascade unit.
To add further cascaded Total Recall units:
1. Click the Add TR button.
2. Repeat the previously detailed process.
27.1.7. Authorised Extensions
Total Recall).
The Authorised Extensions are those extensions on the
is able to monitor, search and play back calls from. To configure the authorised
extensions for the selected user, click modify in the Add TR screen.
Before configuring authorised extensions, you will need to create ‘extension’ values for
your channels. See especially Section 28.9 and Section 28.10 of this manual for more
information on setting up extensions.
Regular Expressions: Some Remote Manager functionality (including
Authorised Extensions) supports the use of regular expressions. Detailed
information about regular expression construction can be found here:
Page 73
Total Recall that the selected user
Page 74

Total Recall Desktop & Rack – Installation and Administration Guide
http://java.sun.com/j2se/1.4.2/docs/api/java/util/regex/Pattern.html
(The 1.4.2 entry in the above URL may require updating if a new Java 2
platform has been released since the printing of this manual.)
To modify authorised extensions:
1. In the Authorised Extensions section, click the Modify button.
2. Select the appropriate option:
• Authori se all exten sions
The user is able to monitor, search and play back calls from all extensions.
• Authorise only these extensions
The user is able to search and play back calls from only those extensions listed in the
associated Extensions list.
• A uthorise all extensions apart from the following
The user is able to monitor, search and play back calls from all extensions except
those listed in the associated Extensions list.
3. Populate the Extensions lists as appropriate (see below).
To add extensions or extension ranges to the Extensions lists:
1. Select the appropriate extension selection option.
2. In the Add extension or extension range text field, enter either:
• An individual extension valu e
• A list of comma-separated extension values
• An extension range
• A regular expression
See Regular Expressions on page 73 for further information.
)
3. Click Add.
The values are added to the Extensions list.
4. Click OK.
The following table demonstrates some examples of Extensions list entries, and the
extensions that would be covered by those entries.
Entry Type Entry Will Match Examples
Individual
extension
Multiple
extensions
100 Extension 100 only 100
100, 105, 106 Extensions 100, 105 and
106 only
Page 74
100, 105, 106
Page 75

Total Recall Desktop & Rack – Installation and Administration Guide
Extension range 100-150 All extensions from 100
Specific names John Smith
Helen Jones
Any names [^0-9] Any non-numeric
To remove extensions or extension ranges from the Extensions lists:
1. Select the value in the Extensions list.
2. Click Remove.
3. Click OK.
to 150
John Smith and Helen
Jones only
characters
100, 101, 102… 150
John Smith, Helen Jones
Dave, John Smith
27.1.8. Removing a Configured Total Recall
To remove a Total Recall recorder from your Remote Manager program:
1. Select the recorder that you want to remove.
2. Click Remove.
3. Click OK.
27.1.9. Editing the Connection Settings for an Added Total Recall
To edit connection settings for a recorder:
1. Select the recorder that you want to edit.
2. Click Properties.
3. Edit the connection settings as appropriate.
See Add TR on page 69 for further information.
)
4. Click Set.
5. Click OK.
27.2. User Management
On the main Remote Manager screen, click to opens the Users dialog. Use the
Users dialog to add and remove
Recall connections and permissions for these users. The Users dialog is also available
from the File menu (File > Users).
The user list is specific to the PC upon which Remote Manager is installed.
Remote Manager users, and to configure the Total
The user management dialog is only available to Remote Manager
Administrator accounts.
Page 75
Page 76
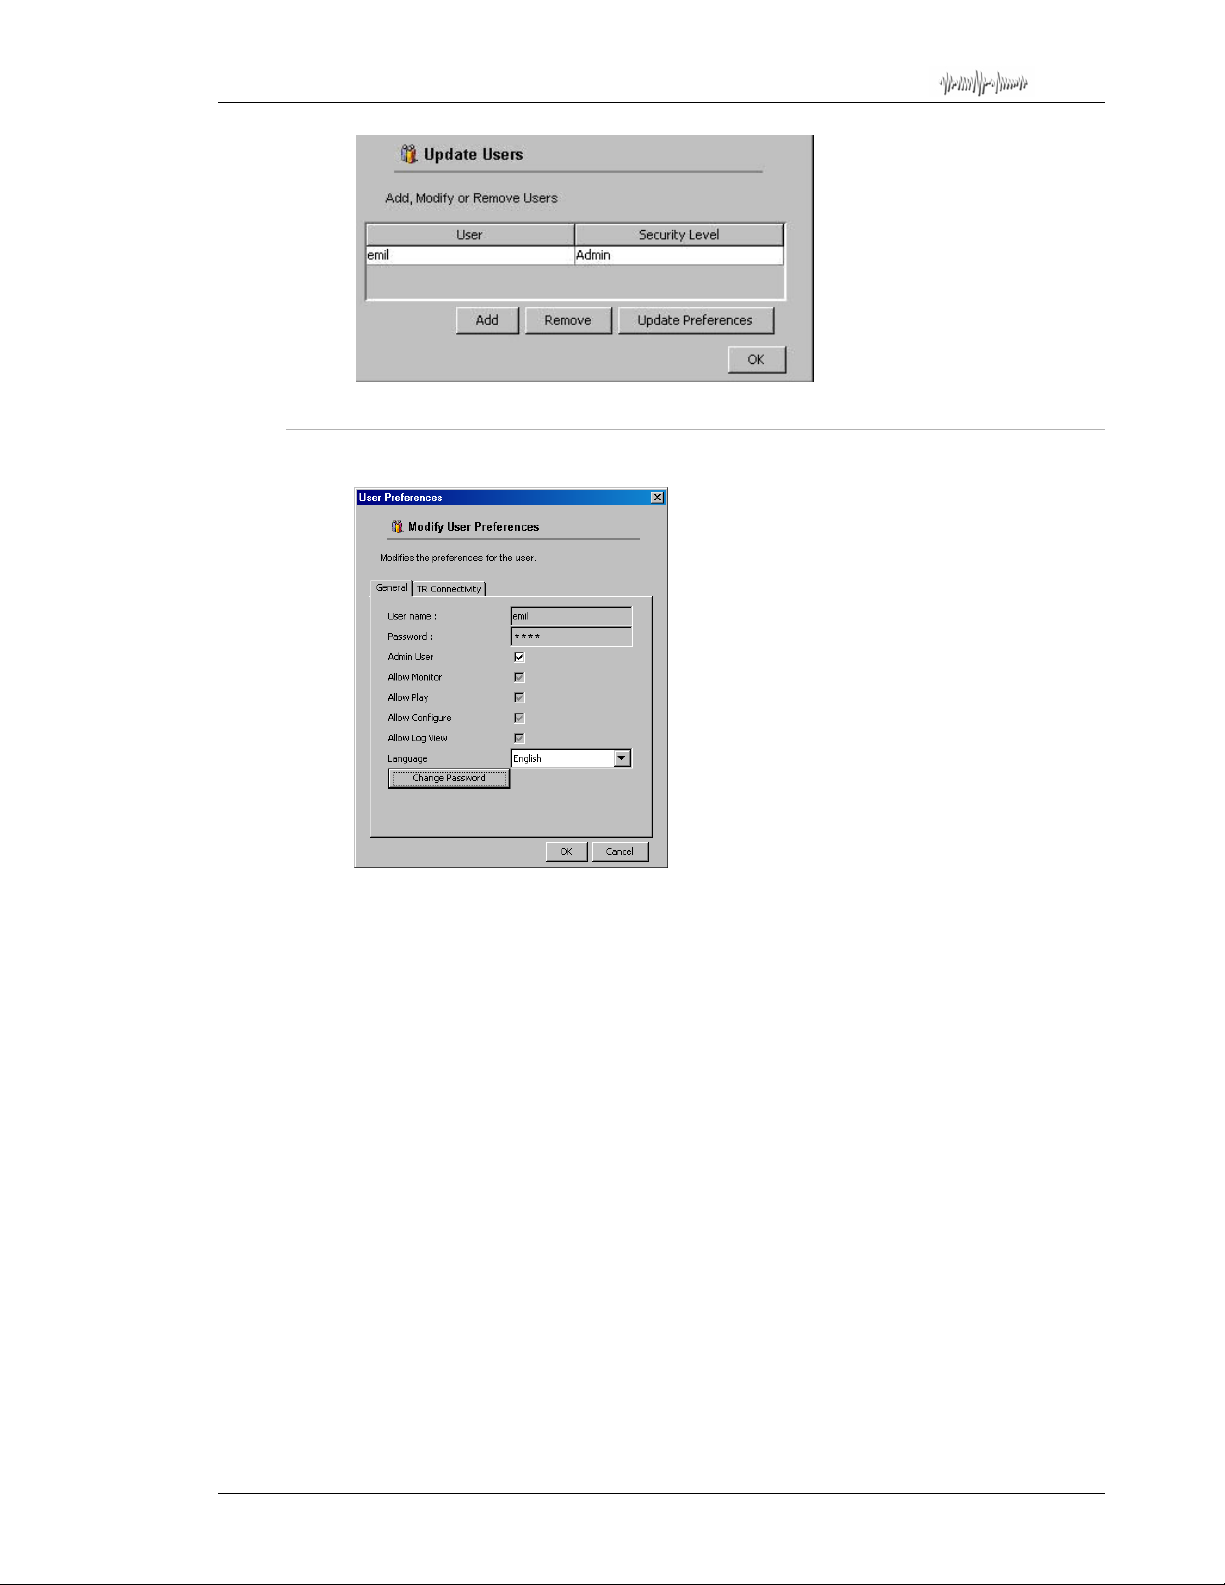
Total Recall Desktop & Rack – Installation and Administration Guide
27.2.1. Adding Remote Manager User Accounts
1. Click the Add button. The User Preferences dialog opens:
2. Enter a User name for the new user.
3. Set the software permissions for the new user.
Clicking the check box Set as Admin user will give the new user ac cess to all software
functions, and the ability to modify the configuration of all
Remote Manager users on
that PC.
Otherwise, un-check the Admin User check-box, and then:
Check the Allow Monitor check box to give the us er access to the Monitor tab of the
application.
Check the Allow Play check box to give the user access to the Play back Call tab of the
application.
Check the Allow Configure check box to give the user access to the TR Confi guration
tab of the application.
Check the Allow Log View check box to give the us er access to the Event Log tab of the
application.
4. Select the prefer re d display Language for the new user from the drop-down menu.
5. Click Change Password to set the password for the new user account.
6. Click OK.
Page 76
Page 77
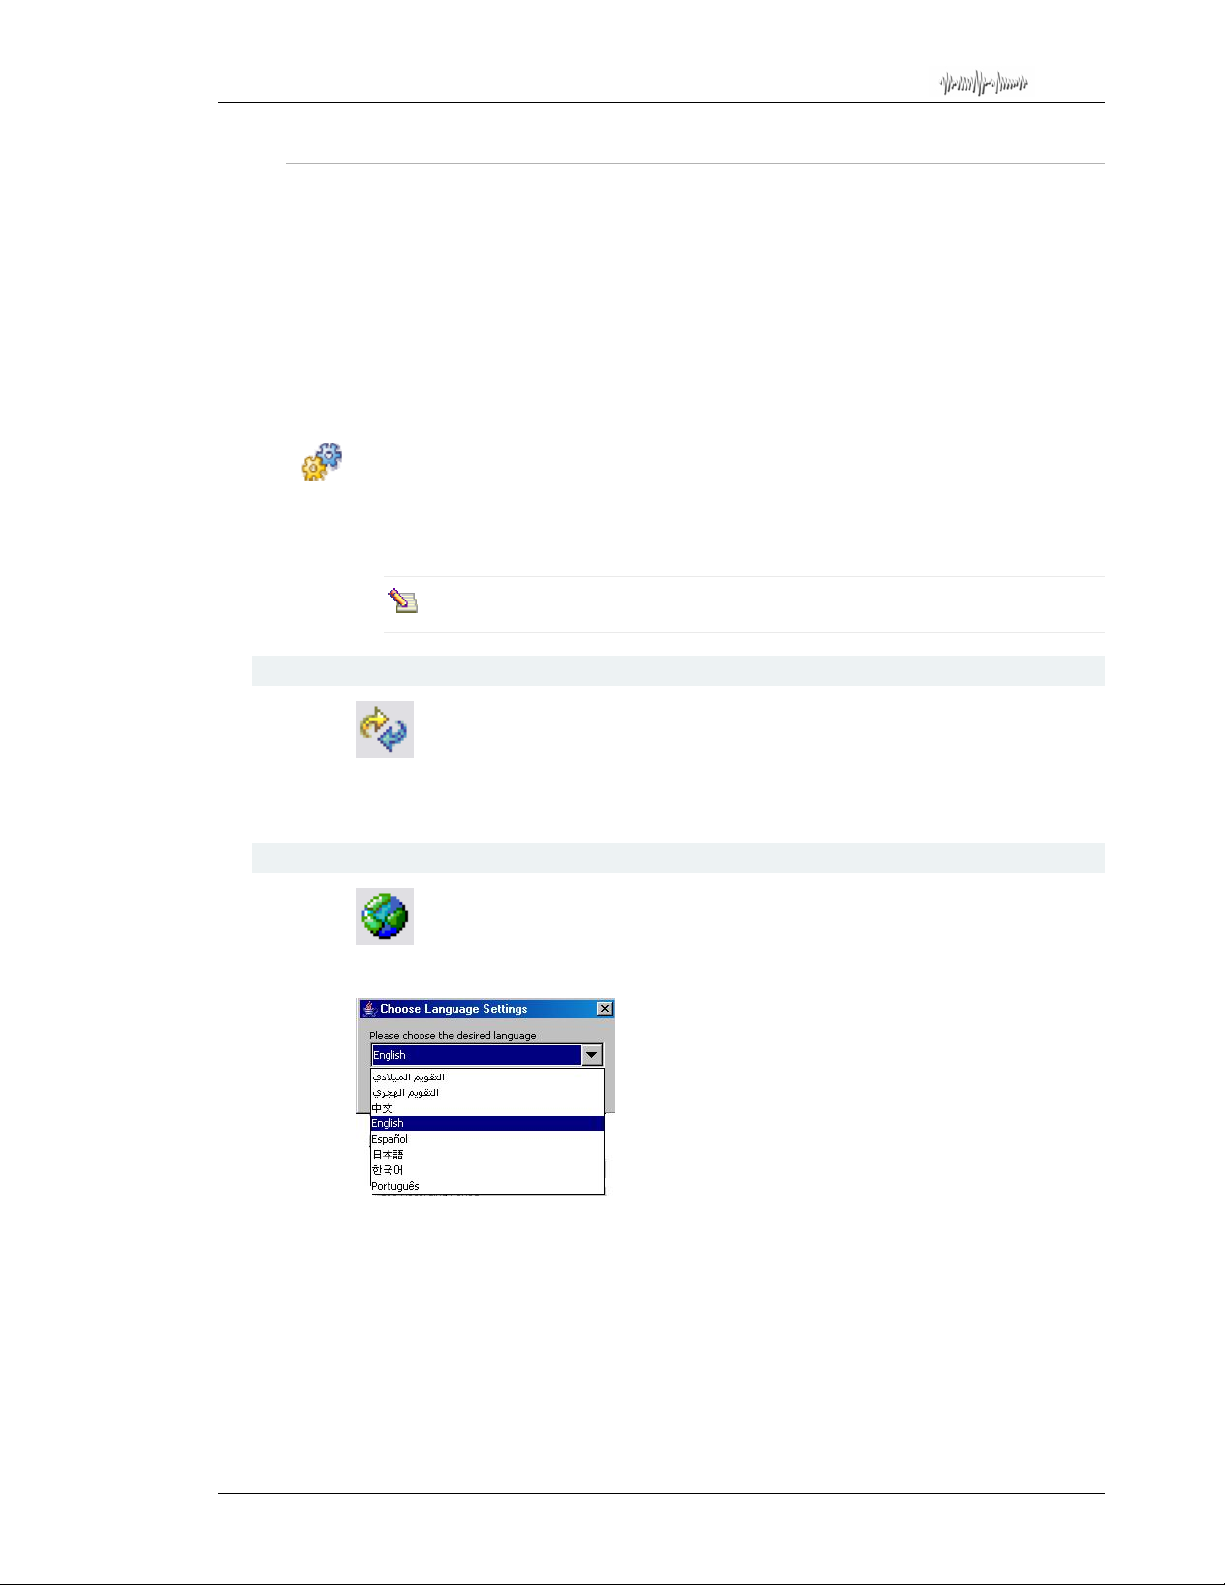
Total Recall Desktop & Rack – Installation and Administration Guide
27.2.2. Modifying Existing Remote Manager User Accounts
1. Select a user from the table in the Users menu.
2. Click the Update Preferences button.
The User Preferences dialog opens.
3. Edit the user properties as appropriate.
See User Preferences on page 67 for more information.
)
4. Click OK.
To remove an existing user:
1. Select the user from the table in the Users menu.
2. Click Remove.
The remove action is immediate. You will not be asked to confirm the action.
27.3. Refresh Views
Updates the Device Tree an d the M odify Local F olders pane to reflect any cha nges ma de
to recorder connections or local folders made outside of
27.4. Choose Language Settings
Opens the Choose Language Settings dialog.
Use the Choose Language Settings Dialog to specify the
display language.
Remote Manager.
Remote Manager program
To change the language setting:
1. Select the prefer re d display language from the drop-down list.
2. Click OK.
Page 77
Page 78
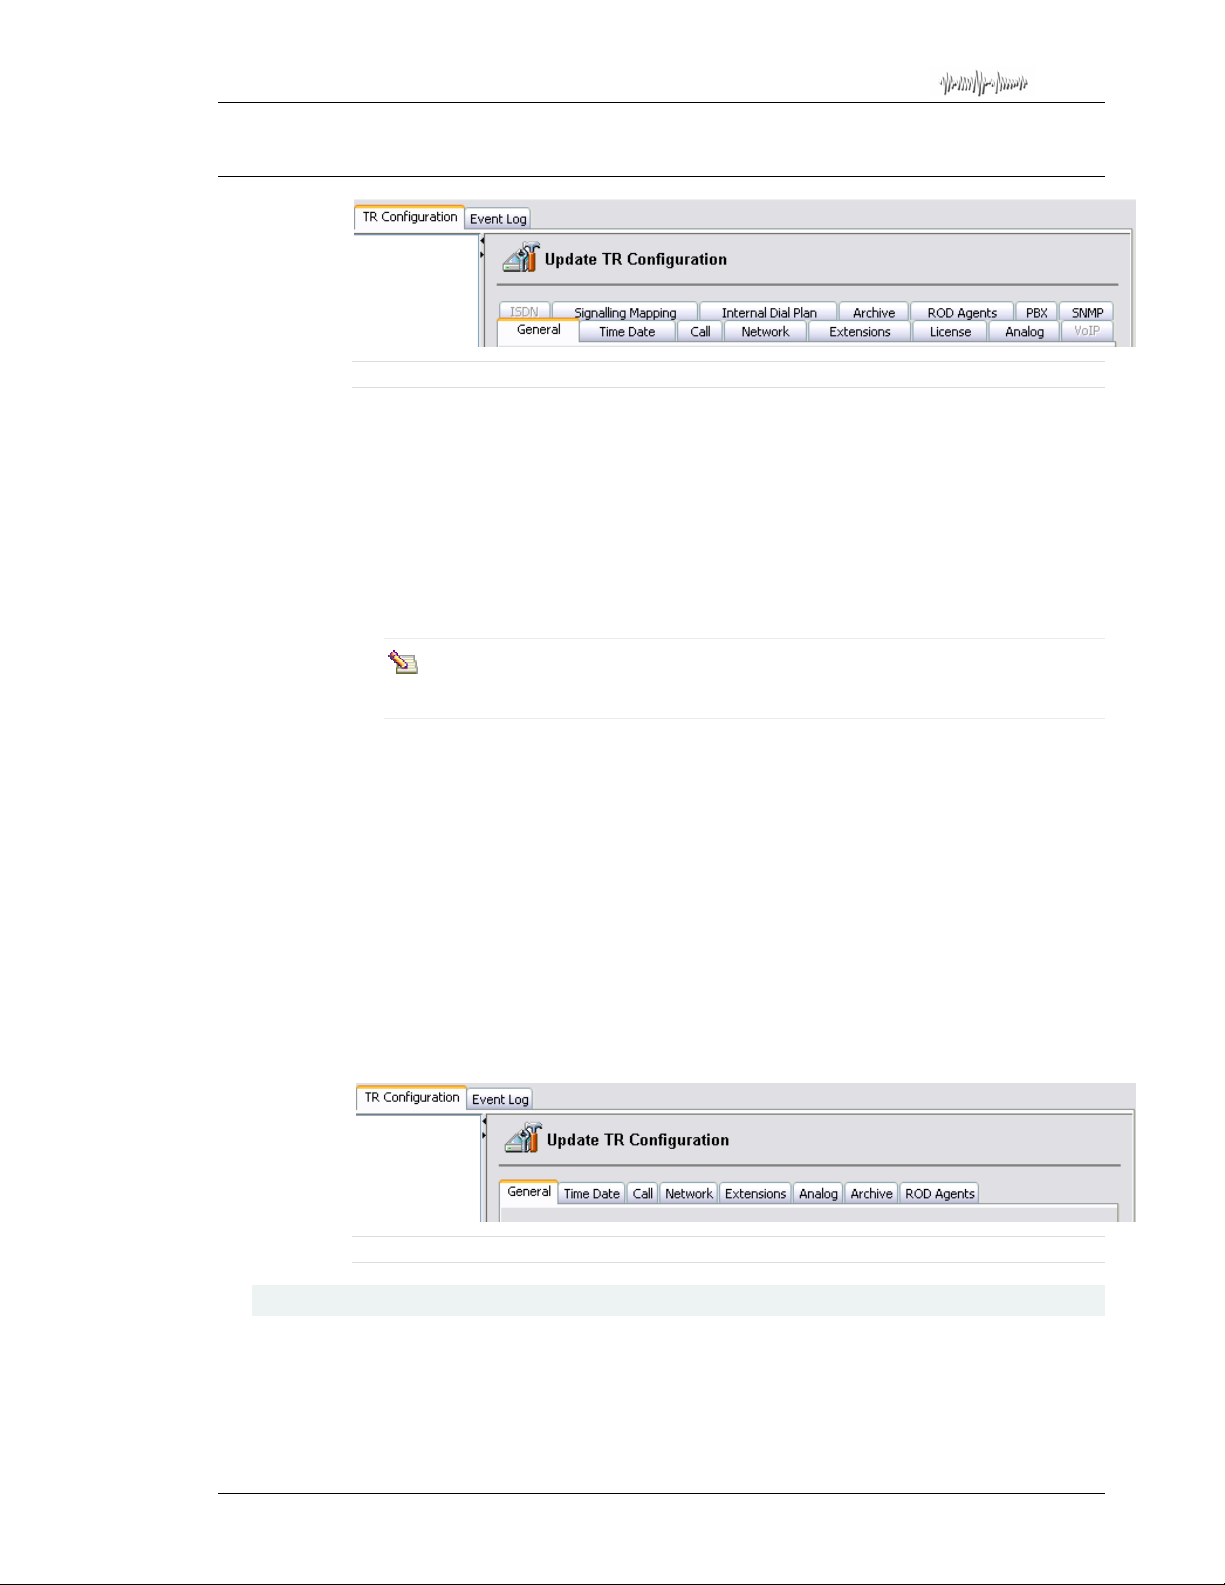
Total Recall Desktop & Rack – Installation and Administration Guide
28. TR Configuration Tab
Figure 7 – Total Recall Rack Configuration tab, all options activate d
Use the TR Configuration tab to remotely configure your Total Recall unit(s). Remote
Manager
your
been given permission to access the unit configuration by the
administrator.
will allow full configuration of each Total Recall unit that has been added to
Remote Manager system, assuming that you have administrator rights, or have
Remote Manager
All parameters that can be set using the
Total Recall unit. To begin configuring a Total Re call, click on the TR Configuration
Tab and the
For all configuration tabs, click Apply to save your changes or Restore Previous to
cancel your changes.
On
Total Recall Rack, the following application features r equire a Feature License Key
to configure and use:
Your
above features without a valid Feature License Key.
If you are using
will only be able to see and select tabs for the functions available on that system:
Total Recall you wish to configure.
Ensure the correct recorder is selected in the Device Tree before making
changes to the configuration.
• SMDR Parsing.
• SNMP Alarms.
• Network Archive.
Total Recall Rack system will not support and you will not be able to configure the
Remote Manager to connect to a Total Recall Desktop system, you
Remote Manager configuration are saved to the
28.1. Extensions
The Extensions tab lets you configure recording and event policies for extensions. The
Extensions tab contains the following configuration tabs:
• Recording Policies.
• Event Policies.
Figure 8 - Total Recall Desktop Configuration tab
Page 78
Page 79
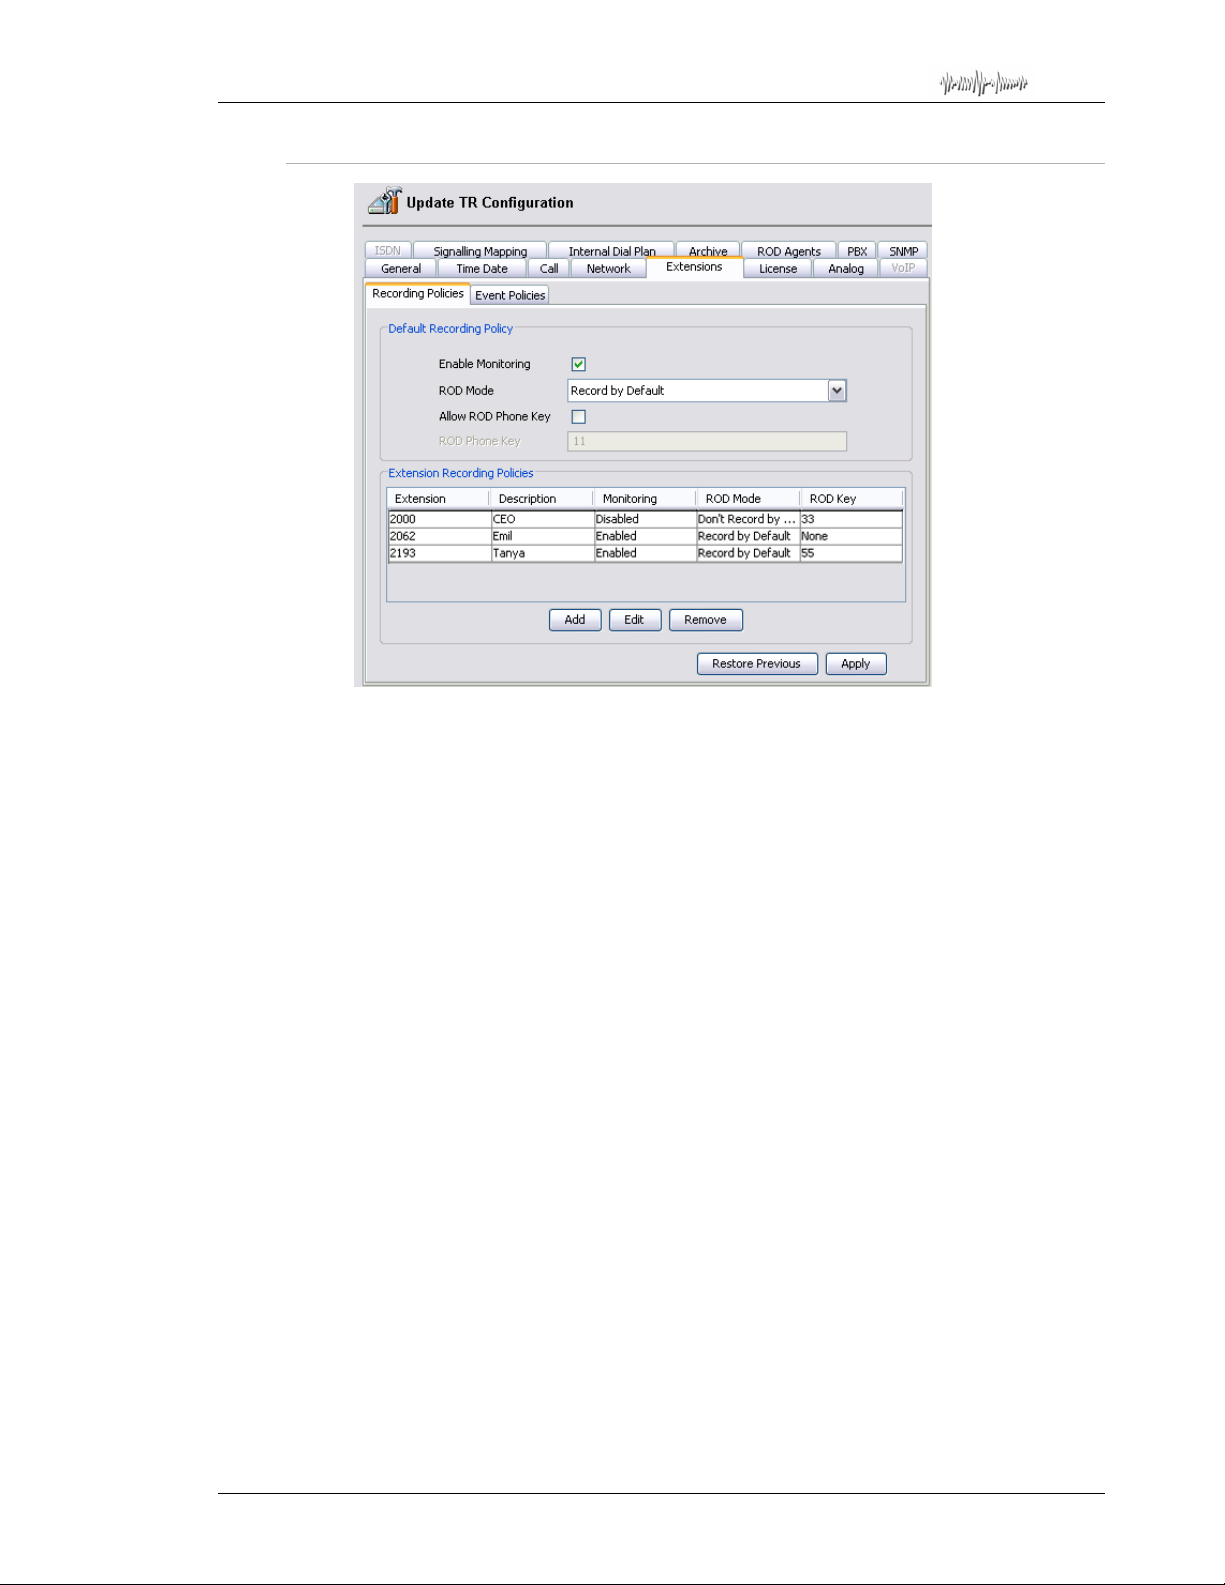
Total Recall Desktop & Rack – Installation and Administration Guide
28.1.1. Recording Policies
Use the Recording Policies tab to configure default (system-wide) and extension-specific
recording policies. Default recording policies apply to calls to/from extensions which do
not have a specific recording policy, while extension specific recording policies apply
only to calls to/from specific extensions.
Extension specific recording policies have priority over the default recording policy.
Each recording policy comprises of the following information:
• Whether real-time call monitoring is possible, or not, while recording.
• The method of recording (keep recordings by default, discard recordings by
• If parties on the call can use a DTMF key sequence to control (pause, re-
Enable Monitoring
With Enable Monitoring checked, real-time monitoring of calls is possible while
recording, either directly from the recorder, or remotely using
ROD Mode
The ROD Mode setting determines the method of recording.
default, only record on R O D so ftware or phone-key command…)
start, keep, discard …) recording, and if so, the sequence of DTMF digits
that users will use to control recording.
Remote Manager.
The available options from the drop-down menu are:
•
Record by Default
Total Recall records all calls and stores the recording on disk by default.
However, if enabled, parties on the call can use a DTMF key sequence or
Demand
to toggle between “discard” and “keep” the recording of the whole call.
Page 79
Record on
Page 80

Total Recall Desktop & Rack – Installation and Administration Guide
• Don’t Record by Default
Total Recall records all calls, but automatically deletes the recording at the end of
each call.
However, if enabled, parties on the call can use a DTMF key sequence or
Demand
to toggle between “discard” and “keep” the recording of the whole call.
Record on
• Add Notes Only
Total Recall records all calls and stores the recording on disk by default.
The parties on the call can not use a DTMF key sequence or
control recording. However, they can use
call while the call is in progress.
• Record Partial Calls
Total Recall does not record calls by default.
However, parties on the call can use a DTMF key sequence or
to toggle between “pause” and “continue” recording during the call as many times as
they wish.
Total Recall will store only the parts of the call when recording was active.
Record on Demand to add notes to the
Record on Demand to
Record on Demand
• Disallowed
Total Recall records all calls and stores the recording on disk by default.
The parties on the call can not use a DTMF key sequence or
control recording, nor can they use
the call is in progress.
Record on Demand to add notes to the call while
Record on Demand to
Allow ROD Key / ROD Phone Key
With Allow ROD Key checked, parties on the call can use a DTMF key sequence to
control (pause, re-start, keep, discard …) recording. The ROD Phone Key parameter
specifies the DTMF key sequence.
For ROD Key recording control, it is not necessary to install Record on
Demand or to assign ROD Agents in Remote Manager.
ROD Key functionality relies on the presence of DTMF tones.
Conflicting Extension Policies
In the event of a call between 2 extensions with conflicting extension policies, the
settings for the extension with ROD Mode other than ‘Record Partial Calls’ will take
precedence over the settings for the extension set to ‘Record Partial Calls’.
For example, for a call between extensions A and B, where extension A is set to ‘Record
By Default’ with monitoring disabled, and extension B is set to ‘Record Partial Calls’
with monitoring enabled, the policy for extension A applies to the call – the entire call is
recorded by default, and monitoring is disabled.
If ROD Mode is identical for both extensions, the policy for the extension with
monitoring enabled takes precedence over the policy for the extension with monitoring
disabled.
For example, if extension A is set to ‘Record By Default’ with monitoring disabled, and
extension B is also set to ‘Record By Default’ but with monitoring enabled, the policy for
Page 80
Page 81
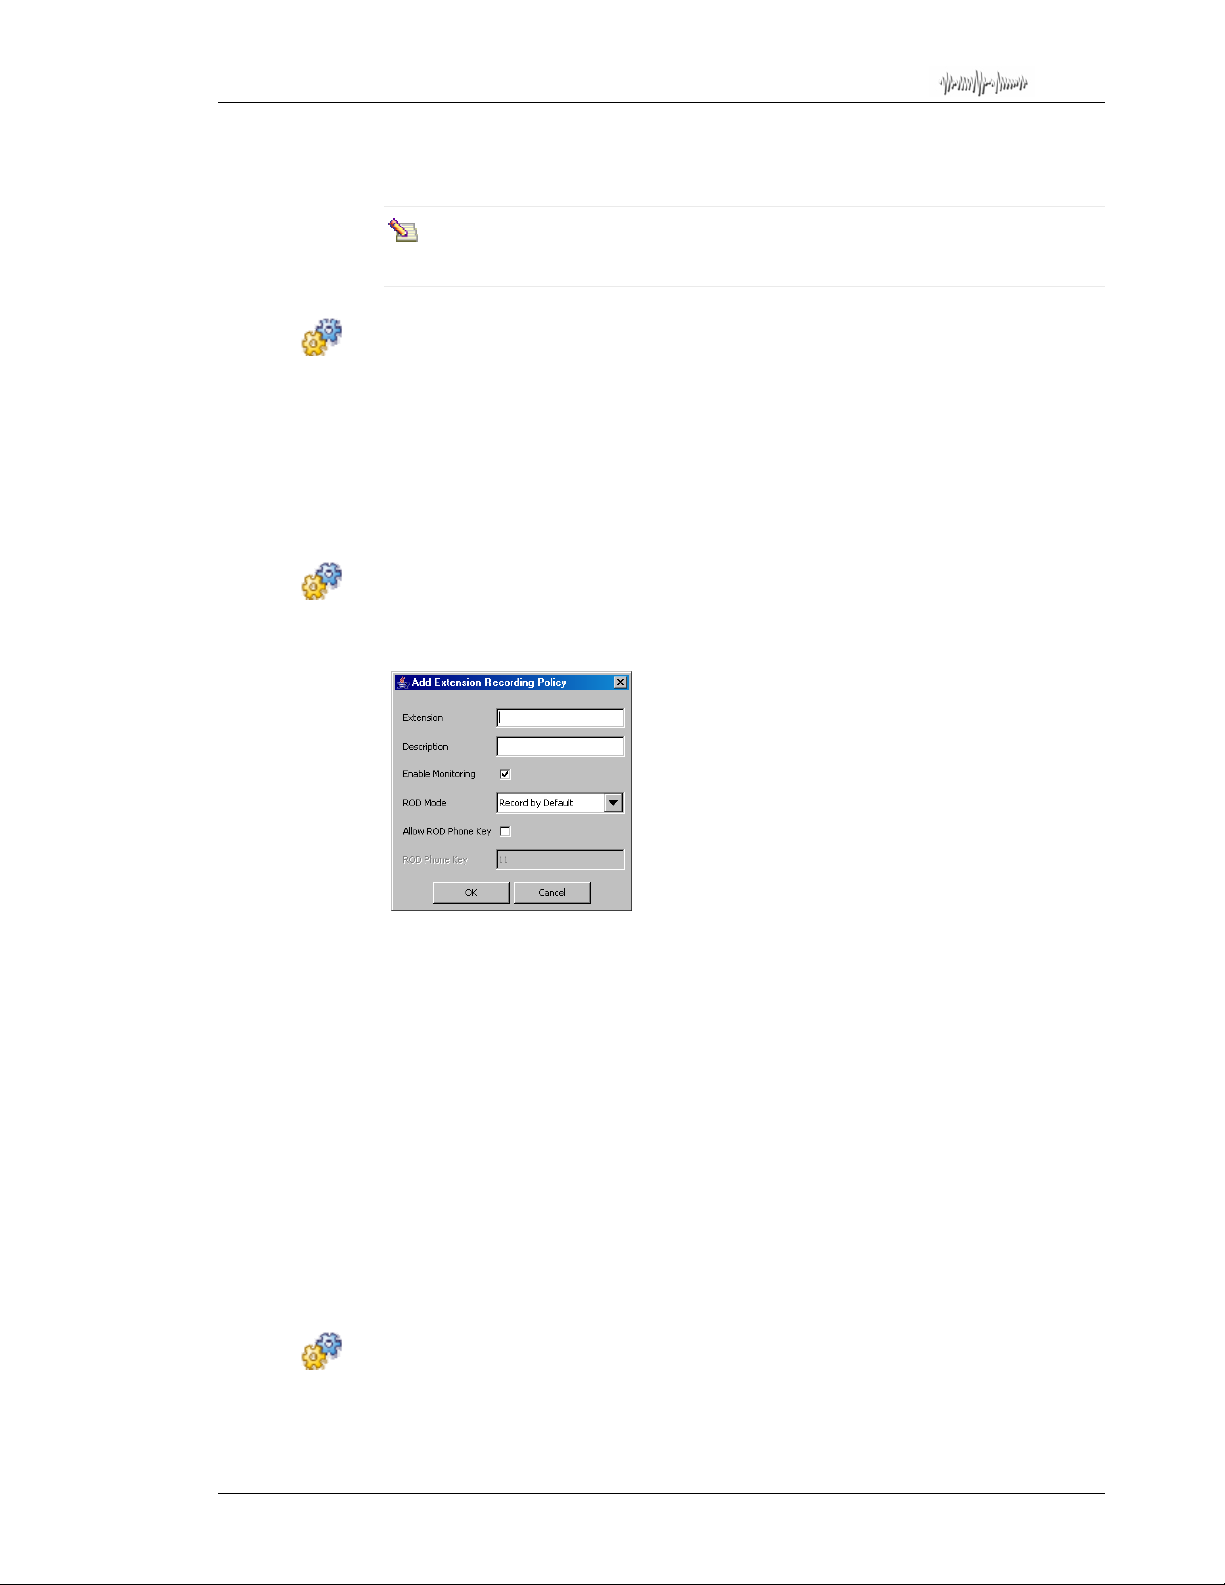
Total Recall Desktop & Rack – Installation and Administration Guide
extension B applies to the call – the call is recorded by default, and monitoring is
enabled.
If anyone in your organisation specifically does not want any of their calls to be
monitored, they must be made aware of the abov e rul e s.
To set default recording policy:
1. In the Default Recording Policy pane, check or uncheck Enable Monitoring as
appropriate.
2. Select the ROD Mode.
3. Check or uncheck Allow ROD Key and enter ROD Phone Key as appropriate.
4. Click Apply.
To set extension specific recording policy:
1. In the Extension Recording Policies pane, click Add.
The Add Extension Settings dialog appears.
2. Enter the extension name or number that you wish to create a specific recording
policy for.
3. Enter a Description for the extension if desired.
4. Uncheck Enable Monitoring to disable monitoring for the extension if required.
5. Select the required ROD Mode for that extension.
6. Check Allow ROD Key and enter a ROD Phone Key if required.
7. Click OK.
The extension recording policy appears in the Extension Recording Policies pane.
8. Repeat the above process for further extensions as necessary.
9. Click Apply when you have finished configuring extension recording policies to save
your settings.
To remove an extension specific recording policy:
1. Select the extension in the Specialised Extensions pane.
2. Click Remove.
Page 81
Page 82
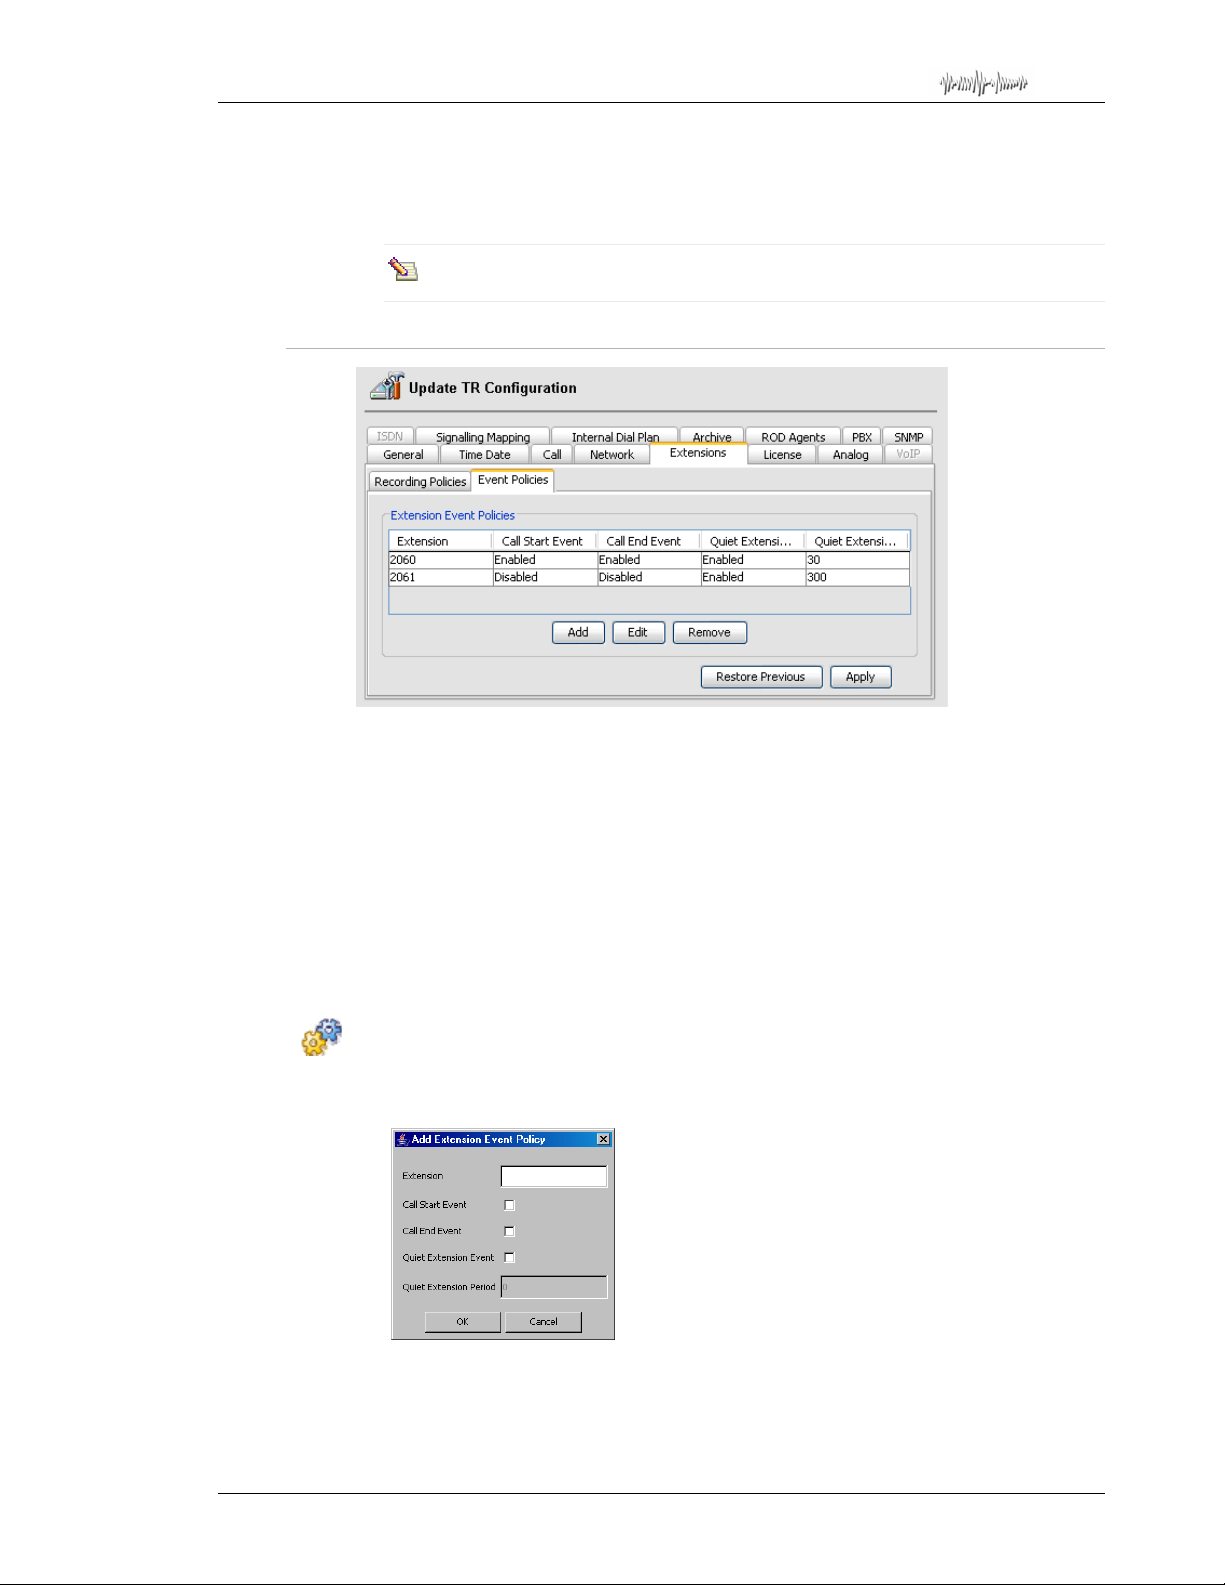
Total Recall Desktop & Rack – Installation and Administration Guide
The extension recording policy disappears from the Extension Recording Policies
pane.
3. Click Apply.
The remove action is immediate. You will not be asked to confirm the action.
28.1.2. Event Policies
‘Events’ are activities (or lack of) on a specific extension that
an Event Log entry and an SNMP trap for when detected. The activities that can be
configured t o generate an ‘event’ are:
• Call Start: i.e. an event is generated every time a call starts on a specified
extension.
• Call End: i.e. an event is generated every time a call ends on a specified
extension.
• Quiet Extension: i.e. an event is generated when there is a lack of activity
(new calls) on a specified extension for a specified period of time.
To set extension specific event policy:
1. In the Extension Event Policies pane, click Add.
The Add Extension Event Policy dialog appears.
Total Recall can generate
2. Enter the extension number.
3. Check Call Start Event to generate an event every time when a call starts on the
specified extension.
Page 82
Page 83
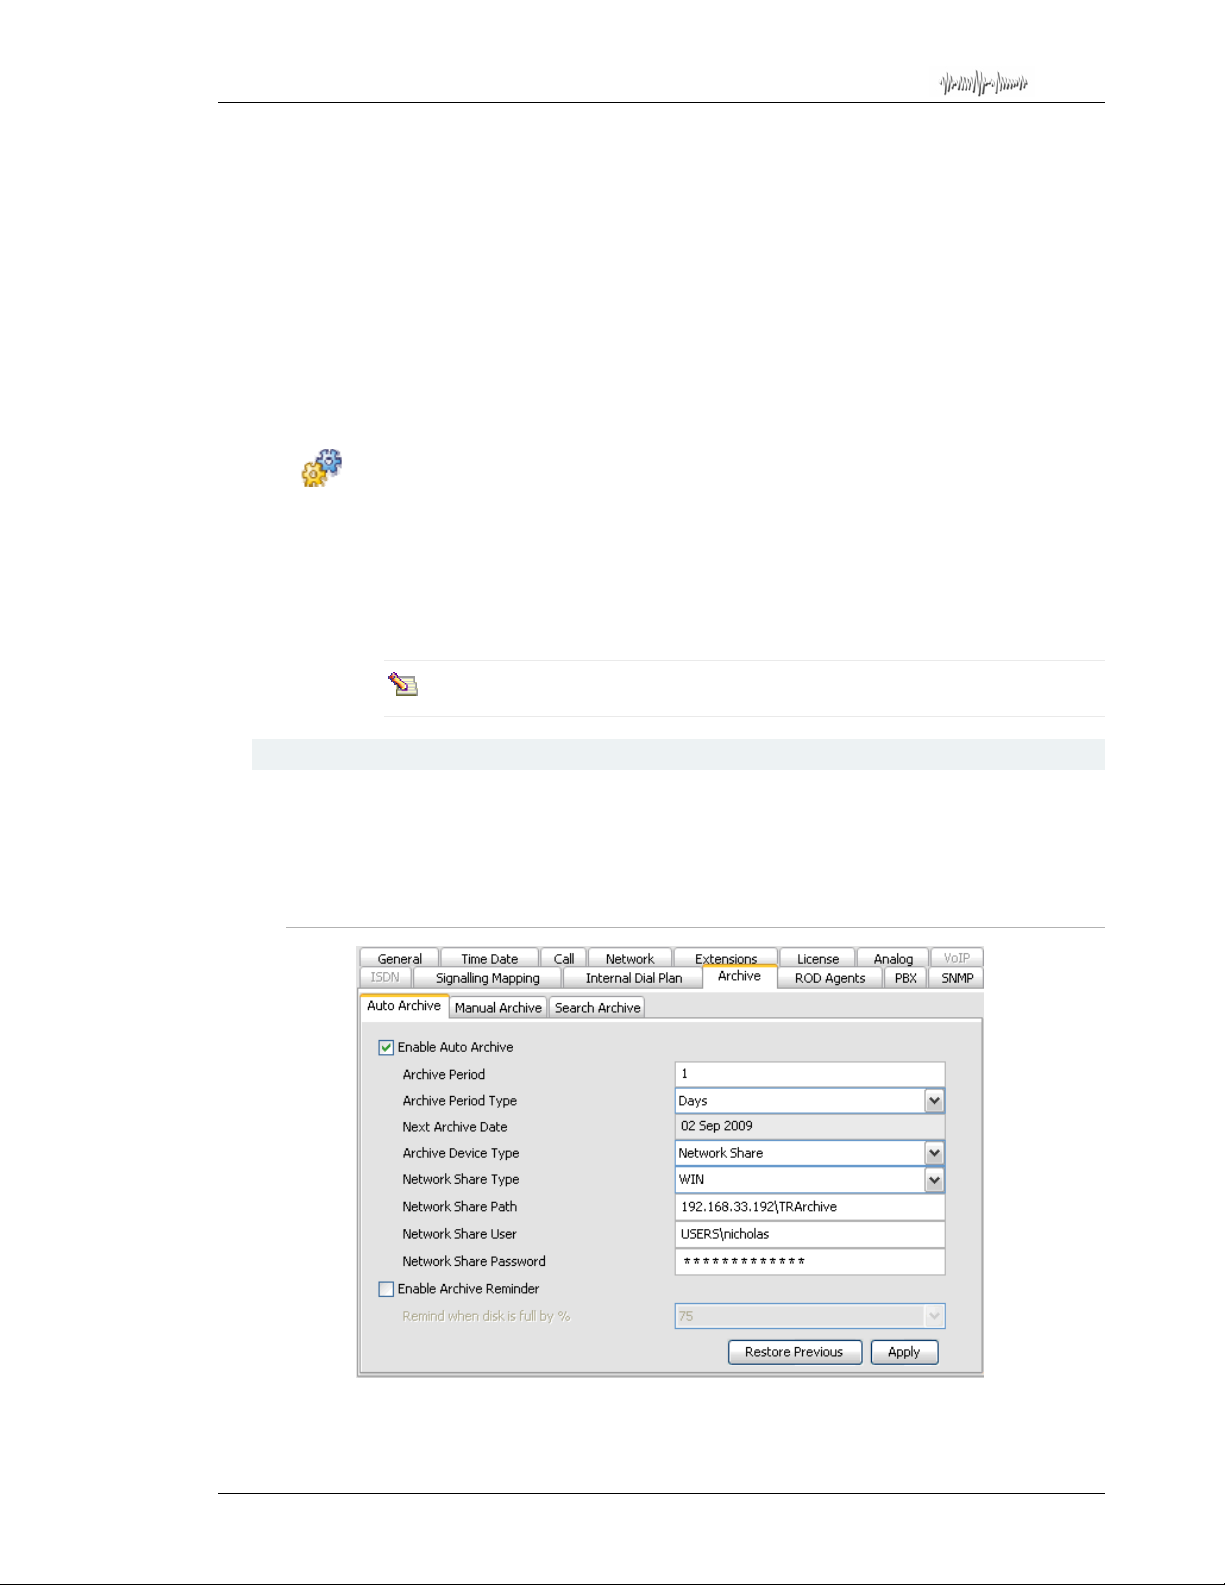
Total Recall Desktop & Rack – Installation and Administration Guide
4. Check Call End Event to generate an event every time when a call ends on the
specified extension.
5. Check Quiet Extension Event to generate an event if there is no activity (new calls)
on the specified extension f or a specified period of ti me, and then enter the period in
hours in the Quiet Extension Period field.
6. Click OK.
The extension event policy appears in the Extension Event Policies pane.
7. Repeat the above process for further extensions as necessary.
8. Click Apply.
To remove an extension specific event policy:
1. Select the extension in the Extension Event Policies pane.
2. Click Remove.
The extension event policy disappears from the Extension Event Policies pane.
3. Click Apply.
The remove action is immediate. You will not be asked to confirm the action.
28.2. Archive
The Archive tab lets you configure automatic archiving, and also allows to configure
network archiving (optional on
The Archive tab contains the configuration tabs for Auto Archive, Manual Archive and
Search Archive.
28.2.1. Auto Archive
TR Rack) parameters for manual archiving and searching.
Use the Auto Archive tab to enable and configure automatic archiving.
Page 83
Page 84

Total Recall Desktop & Rack – Installation and Administration Guide
Total Recall can be configured to archive automatically at specified intervals, and/or to
display a reminder when the hard drive reaches a specified percentage of capacity.
The Auto Archive function archives all calls that have not been archived to a
DVD/CD, or to optional BD media or a Network Share. Calls that have
previously been manually archived will not be included in the
Ensure that you have a blank DVD/CD/BD, or one with sufficient space on it, in
the drive. If there is insufficient space on the DVD/CD/BD to complete the
archive,
you to insert additional disks.
To Configure Automatic Archive:
1. Check the Enable Auto Archive check box.
2. Enter the Archive Period (this will refer to days or weeks, depending on your
selection in point 3).
3. Select the Archive Period Type (days / weeks).
Total Recall will archive as much as it can, however it will not prompt
Auto Archive.
4. Select the Archive Device Type.
To archive to a DVD/CD/BD select DVD/CD and click Apply. Howe ver, to archive to a
Network Share (optional on
5. Select the Network Share Type, which may be Windows (WIN) or Linux (NFS)
type. Your system administrator will supply these details.
6. Enter the Network Share Path, User and Password. Your system administrator
will supply these details.
In the Network Share User field, it can be advantageous to enter the credentials
in the format DOMAIN\USERNAME, WORKGROUP\USERNAME or PCNAME\USERNAME. Total Recall will attempt to authenticate your credenti als
with the network domain server by default, so specifying the domain, workgroup
or PC name will be required, depending on the credentials you want TR to use.
7. Select Apply.
To enable Archi v e Rem inder:
1. Check the Archive Reminder check box.
2. Select the capacity threshold at which the reminder will display (available options are
50% / 75% / 90%).
TR Rack), select Network Share and continue as follows:
3. Select Apply.
Page 84
Page 85
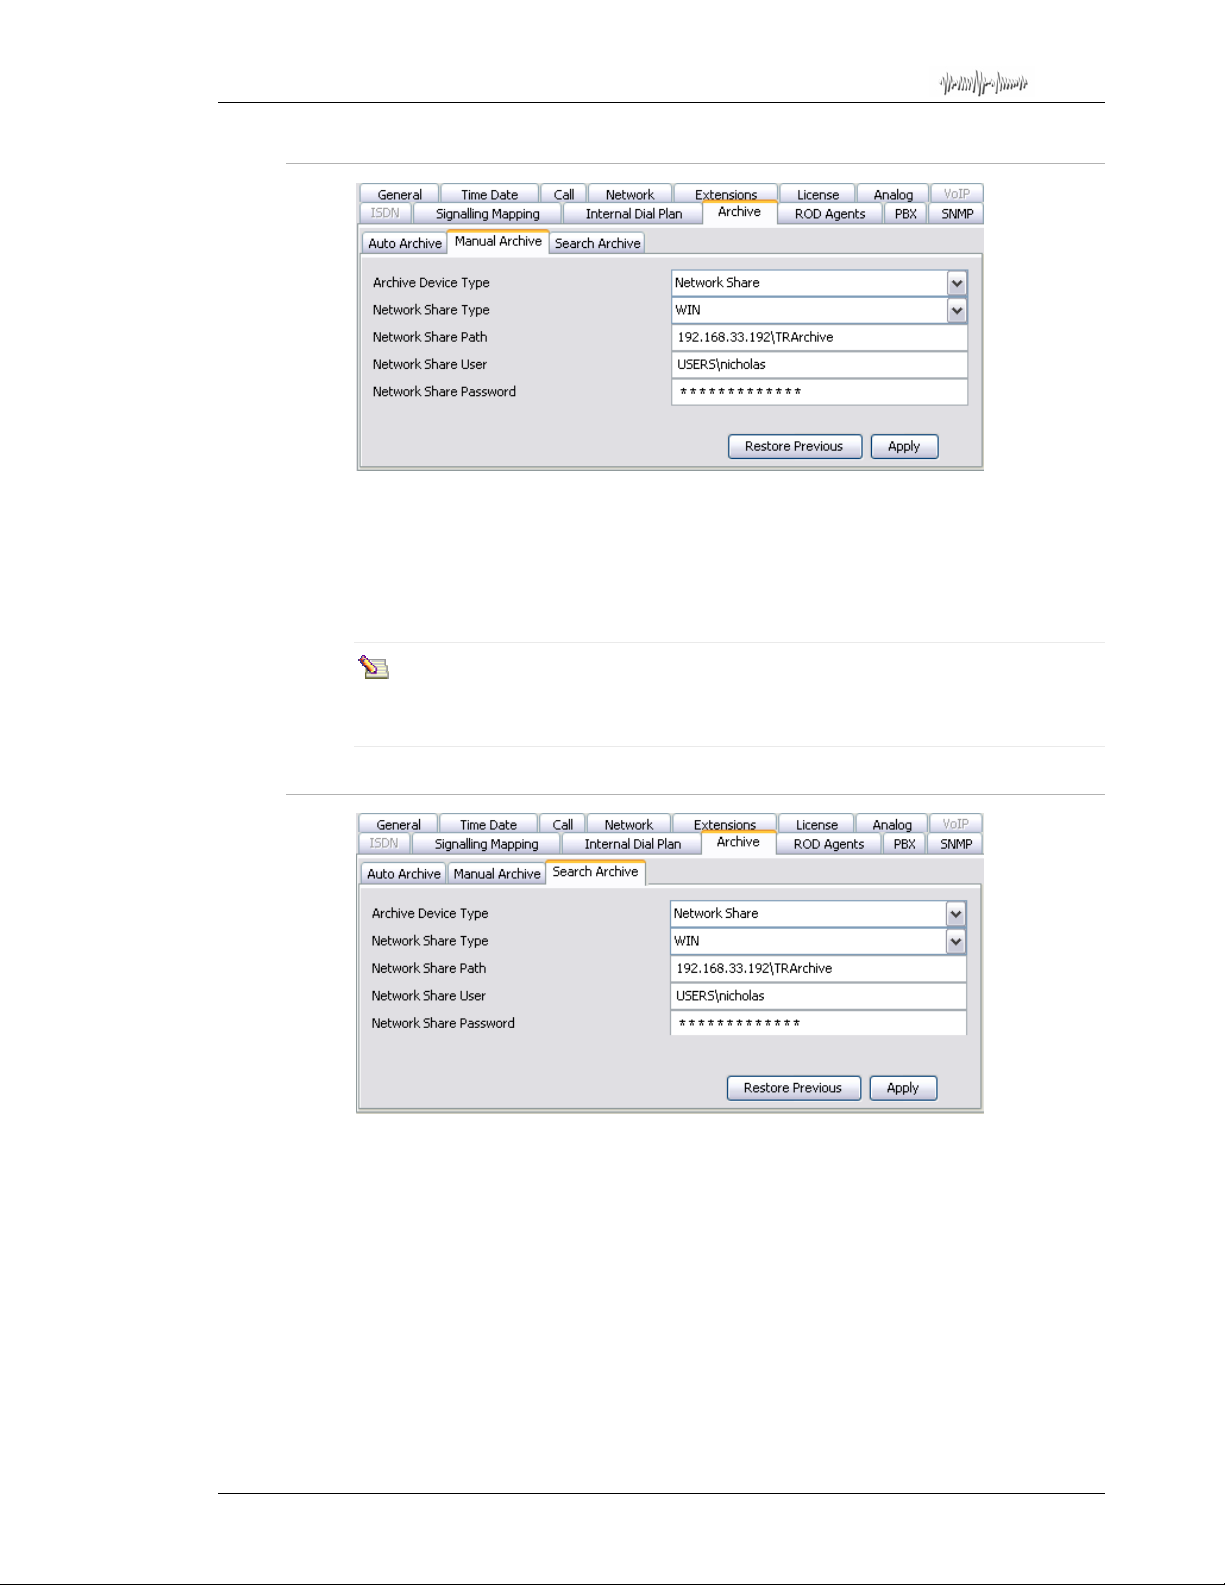
Total Recall Desktop & Rack – Installation and Administration Guide
28.2.2. Manual Archive
Use the Manual Archive tab to configure a Network Share (optional on
manual archiving. You must configure the Network Share parameters here if you wish to
manually archive to a Network Share from the
The configuration parameters are exactly the same as the Auto Archive menu in Section
28.2.1.
It is important to configure the access to the Network Share correctly. This
requires configuration on the host that is managing the Network Share as well
Total Recall.
28.2.3. Search Archive
TR Rack) for
Total Recall Search Menu.
Use the Search Archive tab to configure a network share for searching. You must enter
the correct network share parameters her e if you wish to search an archive on a networ k
share from the
Total Recall Search Menu.
Page 85
Page 86
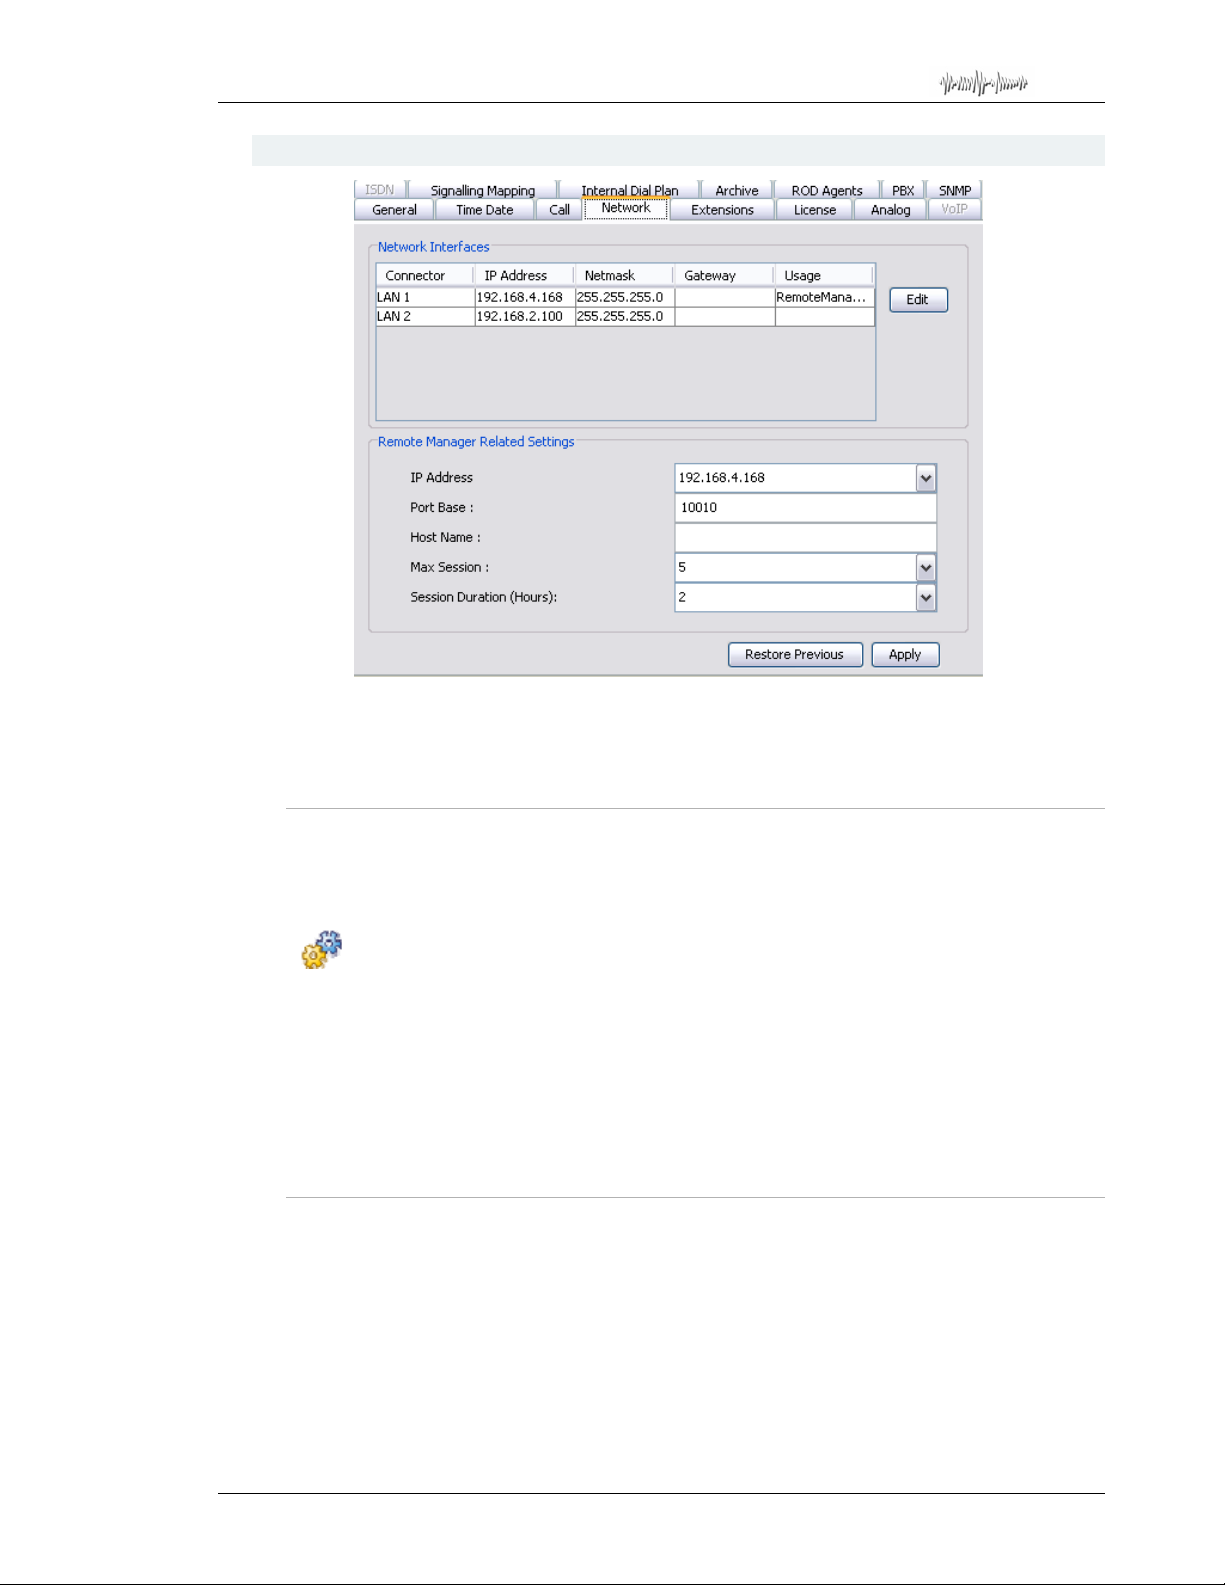
Total Recall Desktop & Rack – Installation and Administration Guide
28.3. Network
Use the Network Settings tab to configure the
communication and to specify connection details for
Total Recall.
Total Recall Ethernet port(s) for IP
Remote Manager access to the
28.3.1. Network Interfaces
The Netwo rk Interfaces pane displays a list of all Ethernet ports on the recorder, along
with their assigned IP address, netmask, default gateway and usage. Your
system has one TCP/IP ethernet port, so only LAN 1 is relevant for your configuration.
To edit a network interface configuration:
1. Select the interfac e in the Network Interfaces pane.
2. Click Edit.
The Edit Network Interface dialog displays.
3. Enter the IP Address, Netmask and default Gateway as required.
4. Click Apply.
28.3.2. Remote Manager Related Settings Pane
Use the Remote Manager Related Settings pane to specify connection details for Remote
Manager
to the Total Recall recorder.
Total Recall
Select the IP address that will be used for communication between
Total Recall (LAN 1) from the drop-down me nu, and configure the Max Sessions and
Session Duration as required. Maximum Sessions refers to the maximum number of
simultaneous
Duration refers to the total amount of time that a
connected to the unit before timing out.
Remote Manager connections to the Total Recall system, while Session
Remote Manager session may remain
Page 86
Remote Manager and
Page 87
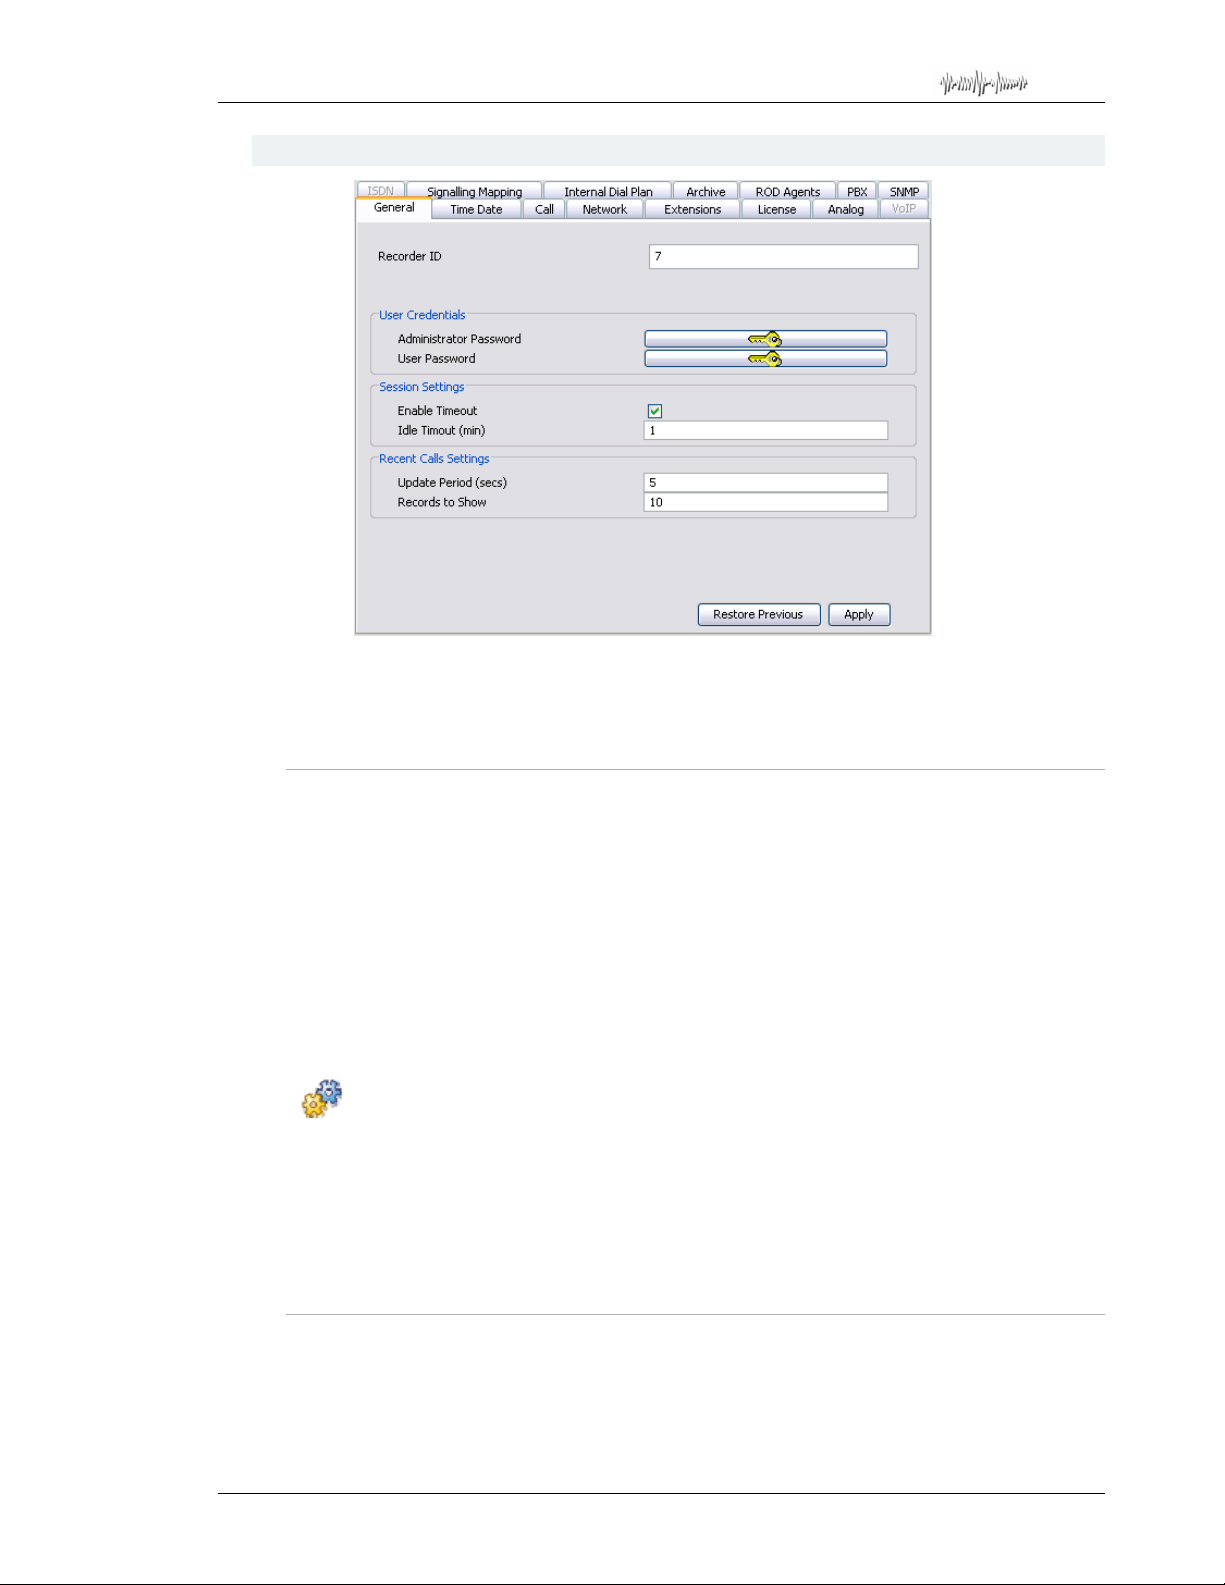
Total Recall Desktop & Rack – Installation and Administration Guide
28.4. General
Use the General tab to set the administrator and user passwords and the recorder ID, as
well as to configure the system timeout settings and the refresh rate for ‘Recent Calls’
functionality.
28.4.1. User and Administrator Passwords
Total Recall supports 2 passwords – the User Password and the Administrator
Password.
By default the
inactivity, and can only be unlocked by entering a password.
The User Password allows access to all functionality, unless an Administrator P assword
has been assigned – in which case, the User Password does not allow access to the
Options Menu, or the option to delete calls from the hard drive during a manual archive.
If an Administrator Password is assigned, only the Administrator Password allows
access to the Options Menu and the option to delete calls during a manual archive.
To set the administrator or user password:
1. Click the Administrator Password or User Password button.
2. Enter the password in the Password field.
3. Re-enter the password in the C onfirm Pass wo rd field.
4. Click Apply.
Total Recall user interface automatically locks after 120 seconds of
28.4.2. Recorder ID
For installations that include multiple recorders, it may be useful to be able to identify
which recorder a particular call originated from. Setting a unique recorder ID permits this
function. The call list in the
display the recorder ID against each call.
Remote Manager playback screen can be configured to
Page 87
Page 88
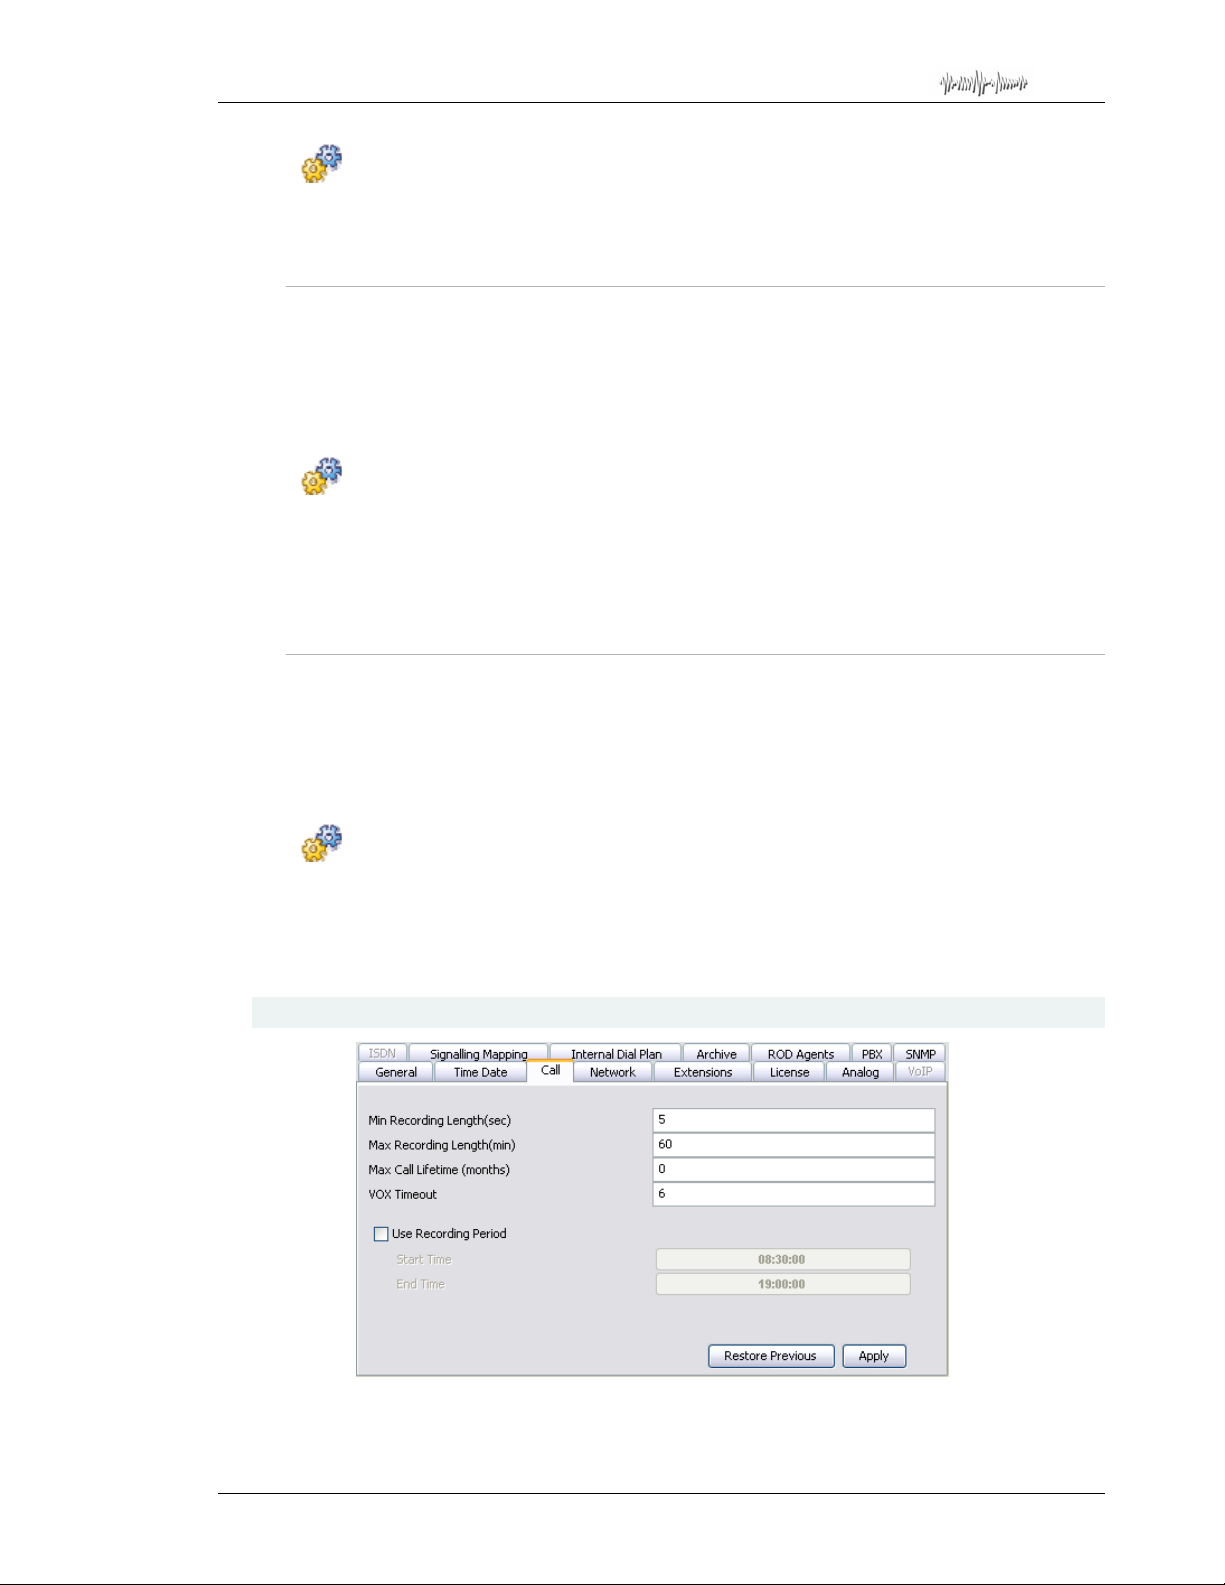
Total Recall Desktop & Rack – Installation and Administration Guide
To set the Recorder ID:
1. Enter the ID in the Recorder ID field.
2. Click Apply
28.4.3. Session Settings
Use the Session Settings menu to enable or disable the system timeout function.
Disabling system timeout will prevent
designated time period. Care must be taken with this setting; if system timeout is disabled
all unit functions will remain open according to the permissions of the last password
entered.
To configure your session settings:
1. Click the Enable Timeout check box to enable or disable automatic system timeout.
2. Enter your desired Timeout Period, in minutes. This is the amount of time that must
pass without user interaction until
3. Click Apply at the bottom of the menu to save your settings.
Total Recall from automatically locking after a
Total Recall will automatically lock itself.
28.4.4. Recent Calls Settings
Use the Recent Calls Settings menu to configure the operation of the automatic “recent
call recall” functionality in the search menu. The Update Period refers to how freque ntly
Total Recall will refresh the search screen with the most recent calls, while Records to
Show refers to how many call records will be displayed on the search screen when in
“recent call recall” mode.
To configure your Recent Calls settings:
1. Specify the required Update Period, in seconds.
2. Specify the Number of Record s to display in the search screen on your
system.
3. Click Apply at the bottom of the menu to save your settings.
28.5. Call
Total Recall
Use the Call menu to configure system-wide call handling settings.
Page 88
Page 89

Total Recall Desktop & Rack – Installation and Administration Guide
28.5.1. Minimum Recording Length
Total Recall will automatically discard the record of calls with duration that is less than
the Minimum Recording Length.
Minimum Recording Length can be set to 0, which instructs the
this parameter, or to a value between 1 and 19 seconds, in increments of one second.
The default setting is 0.
Care needs to be taken with this setting – it is usual to record all calls, and only
under very specific circumstances (for example, noise spikes external to the
recorder causing frequent and unwanted false recordings) that this setting
should be changed from the default.
28.5.2. Max. Recording Length
Total Recall can record calls of virtually any length, but longer calls are broken up into
separate records according to the Max Recording Length setting.
This allows lengthy recordings (for example, radio monitoring) to be presented as a series
of recordings in manageable chunks.
If a call reaches the Max Recording Length setting, the record is rolled over to a new
record. Rolled-over records are marked with (CONT) after the number in the ‘To’ field
on the Logging screen.
The M ax Recording Length setting can be between 1 a nd 60 minutes in increments of
one minute, and applies equally to all channels.
The default setting is 60 minutes.
Total Recall to ignore
28.5.3. Max. Call Lifetime
The Max Call Lifetime is the maximum time a call record is kept before it is
automatically deleted.
Max Call Lifetime can be set to 0, which instructs the
parameter, or to a value between 1 and 24 months, in increments of 1 month.
The default setting is 0.
With Max Call Lifetime set to 0, call records may still be automatically
deleted as part of the aut omatic cl eanu p proc ess. Se e Deleti ng Calls on page 56
for more information.
28.5.4. VOX Timeout
If VOX is set as the recording trigger for a channel, the VOX Timeout determines the
maximum length of ‘quiet time’ that is permitted before a recording on that channel i s
terminated.
This ensures that if a call has ended and the phone is not hung up properly, the recorder
will not continue to record silence indefinitely.
Total Recall to ignore this
Page 89
Page 90

Total Recall Desktop & Rack – Installation and Administration Guide
VOX Timeout settings can be between 2-15 secs, and applies to all channels that have
VOX as their Trigger setting.
The default setting is 15 seconds.
In the event that an active call is put on hold, and there is no ‘ music on hold’
being played, the recording will terminate according to the VOX Timeout
setting. When the call recommences, the VOX trigger will immediately open a
new record, and the complete conversation will be captured across two
recordings.
For channels set to VOX trigger, the interval between calls must exceed the
VOX Timeout setting. If a fresh call starts within the VOX Timeout of the
previous call,
both calls will appear as one call record.
Total Recall assumes it is a continuation of the first call, and
28.5.5. Recording Period
Set a recording period if you want to record only between certain times.
During non-r ecordin g times, a messa ge is dis play ed on the
that no recording is taking place.
To set call handling settings:
1. Enter the VOX Timeout, in seconds.
2. Enter the Min Recording Length, in seconds.
3. Enter the Max Recording Length, in minutes.
4. Click Apply.
To set a recording period:
1. Check the Use Recording Period check box.
2. Click the Start Time or End Time button.
The Set Time Range dialog displays.
3. Set the required recording period using the sliders.
4. Click Apply.
Total Recall LCD to indicate
Page 90
Page 91
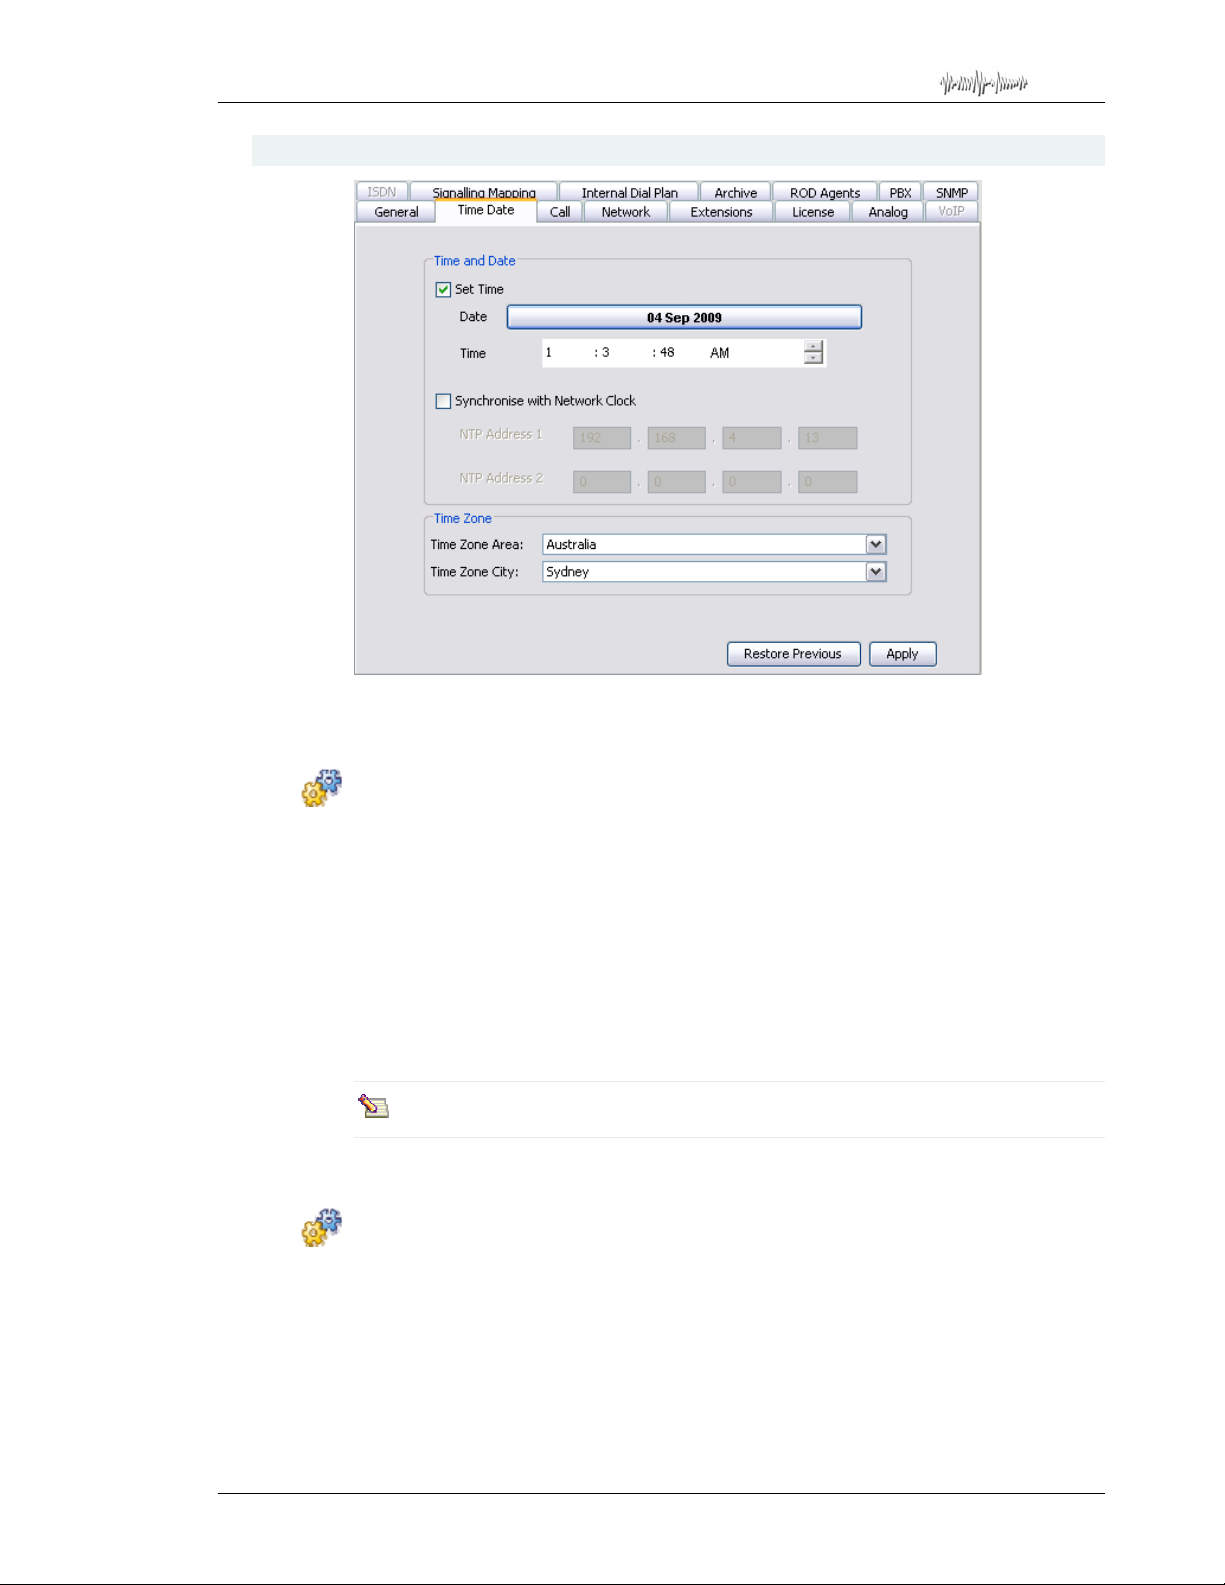
Total Recall Desktop & Rack – Installation and Administration Guide
28.6. Time Date
Use the Time Date tab to set the recorder time and date settings. The time and date on
the recorder can be set manually, or automatically via an NTP s erv e r (recommended).
To set the time manually:
1. Click the Set Time check box.
2. Click the Date button.
3. Set the date using the Calendar dialog.
4. Set the Time (select hours, minutes or seconds, and enter values using the keyboard,
or use the up and down arrows to change the values in increments of 1).
5. Select the Time Zone Area.
6. Select the Time Zone City.
The call database must be empty in order to set the Time Zone Area and City.
7. Click Apply to save your settings.
To use NTP (Network Time Protocol) to set the time and date automatically:
1. Ensure that the system IP address and Gateway are configured correctly – see
Section 18.6 for further details.
2. Select Synchronise with Network Clock.
3. Enter the IP address for at least one NTP server.
Page 91
Page 92
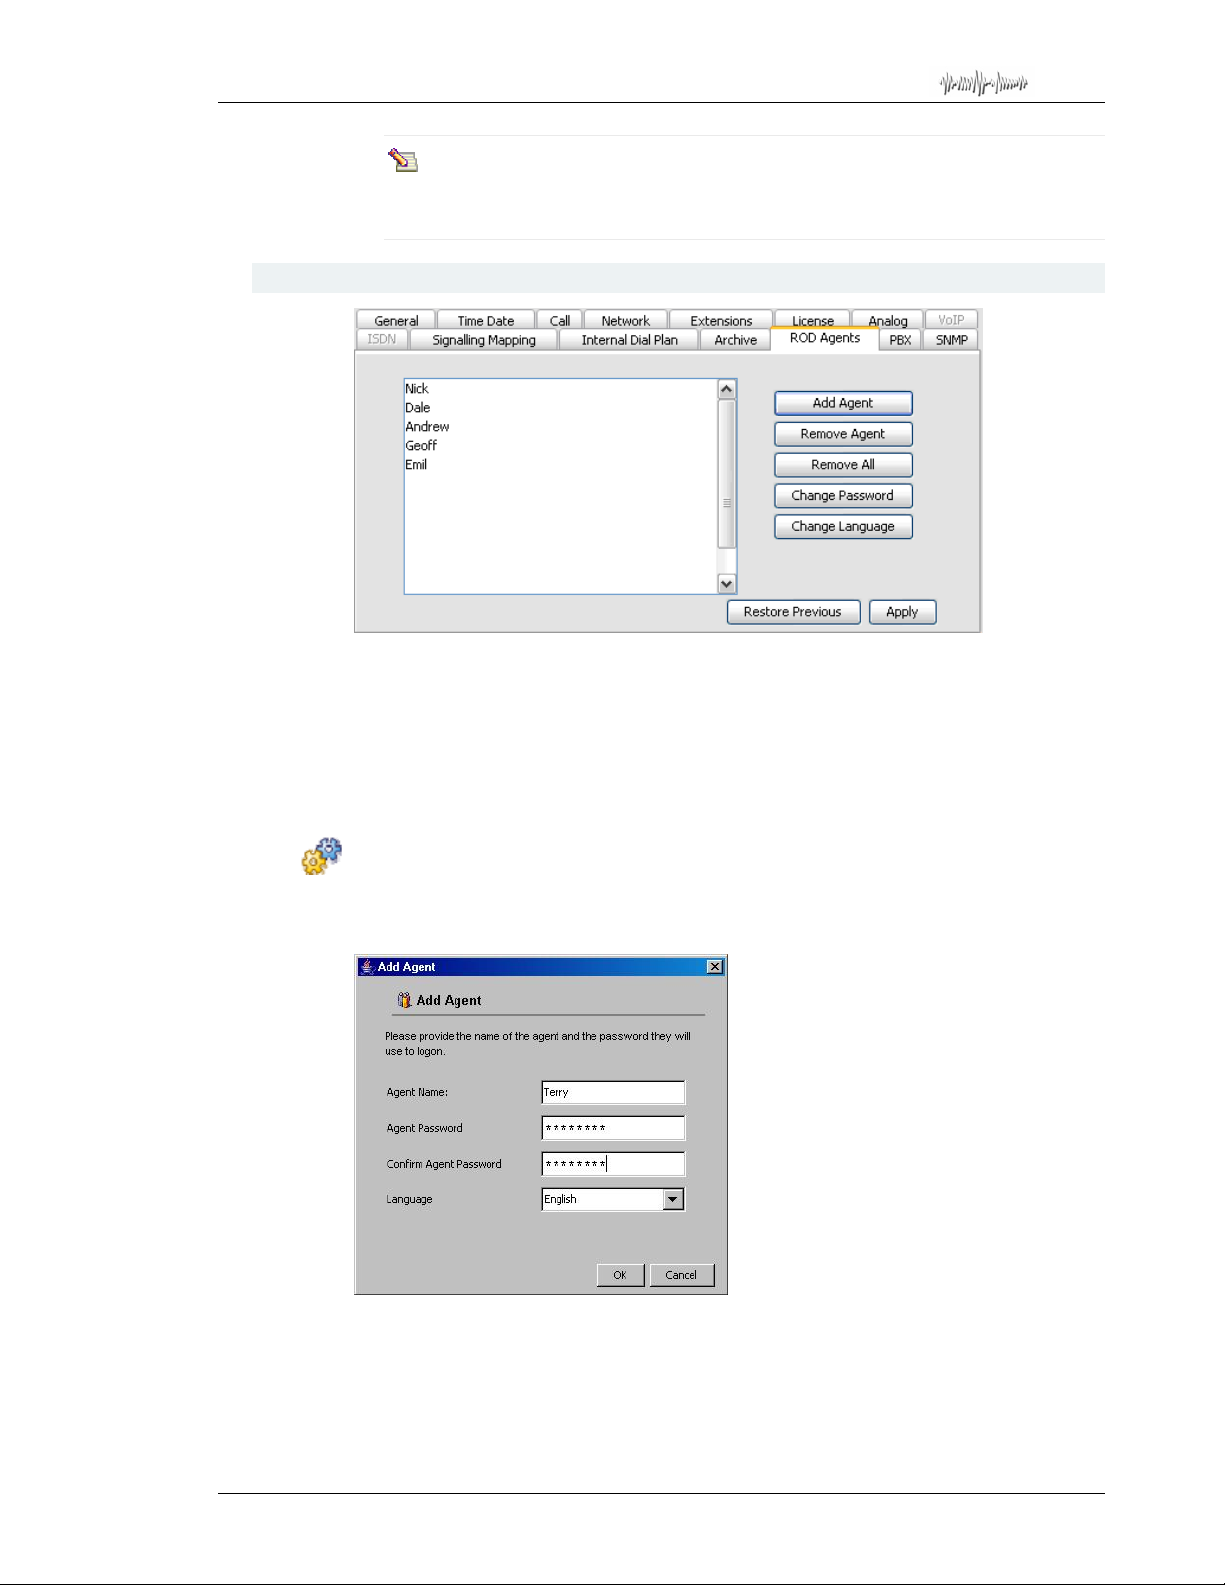
Total Recall Desktop & Rack – Installation and Administration Guide
If you enter IP addresses for 2 NTP servers, the top one in the list beco mes the
‘preferred’ server, and Total Recall will synchronise with the second server if
the preferred server is unavailable.
28.7. ROD Agents
Use the ROD Agents tab to add user accounts (agents) for the
(ROD) Client
configurable control over recording on their extension via an easy-to-use PC taskbar
application.
ROD users must be added as agents on this tab (and the changes applied) before they can
log into the
To add a ROD agent:
1. Click Add Agent.
The Add Agent dialog displays.
software, included with your Total Recall system. ROD gives users
ROD Client from their PC.
Record on Demand
2. Enter the Agent Name. The user must use this name to log into their
3. Enter the Agent Password (alpha/numeric, at least 1 character).
4. Re-enter the Agent Password.
Page 92
ROD Client.
Page 93
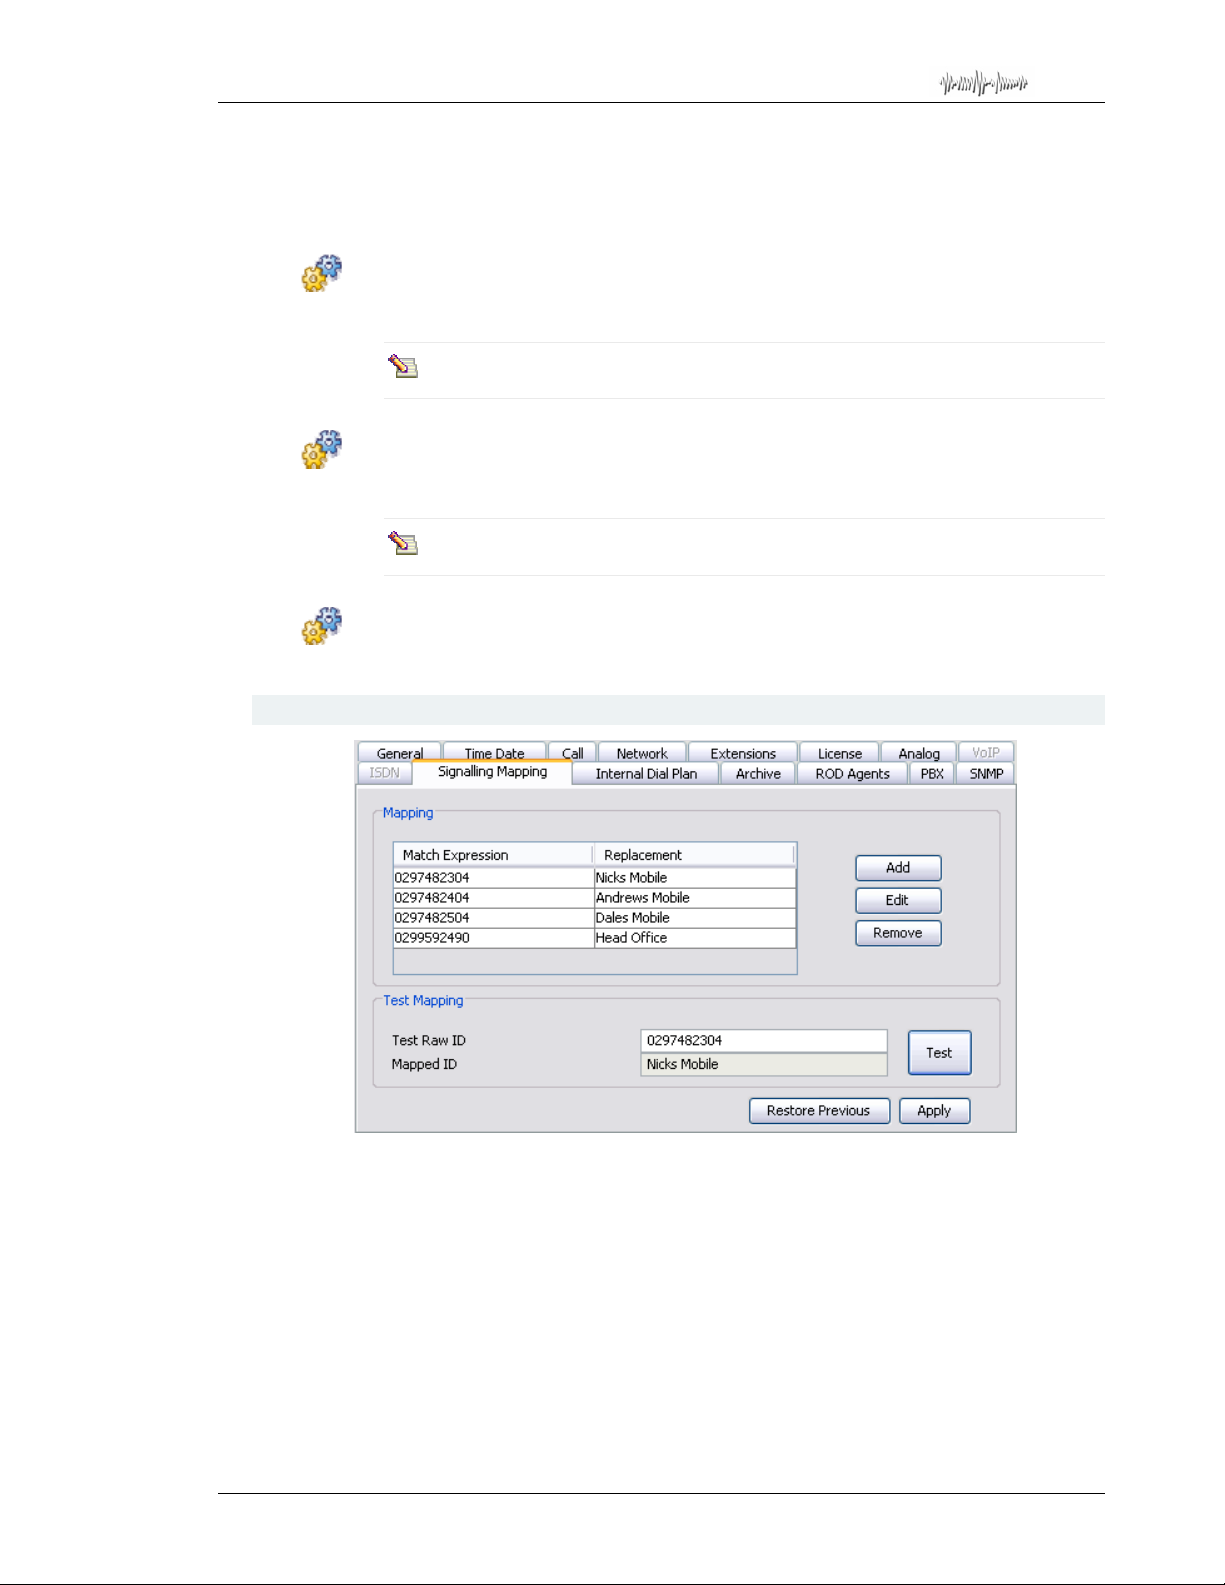
Total Recall Desktop & Rack – Installation and Administration Guide
5. Select the preferred display language. This is the language that will be used by the
ROD Client when the user logs in.
6. Click OK.
To remove a ROD agent:
• Click the agent in the list and click Remove Agent.
The remove action is immediate. You will not be asked to confirm the action.
To remove all agents:
• Click Remove All.
The remove action is immediate. You will not be asked to confirm the action.
To change an agent’s password or display language:
• Click the agent in the list and click Change Password or Change Language.
28.8. Signalling Mapping (TR Rack Only)
Use the Signalling Mapping tab to configure the conversion of calling and called
(‘From’ and ‘To’) numbers extracte d from call signalling to alterna tive values. This may
be configured to make call search and replay more convenient, or to expedite the
configuration of extensions.
Where a From or To number for a current or recorded call matches a signalling map
entry, the ‘mapped’ value will be displayed in its place, in all relevant locations (the
Total Recall Logging and Search Screens, and the Remote Manager Monitor and
Playback tabs). For example, if the phone number 123-456-789 was mapped to the value
“Head Office”, then “Head Office” woul d app ear in a ll the relevant locations.
Mapped values can also be used as search criteria on the recorder and in
Manager
.
Page 93
Remote
Page 94
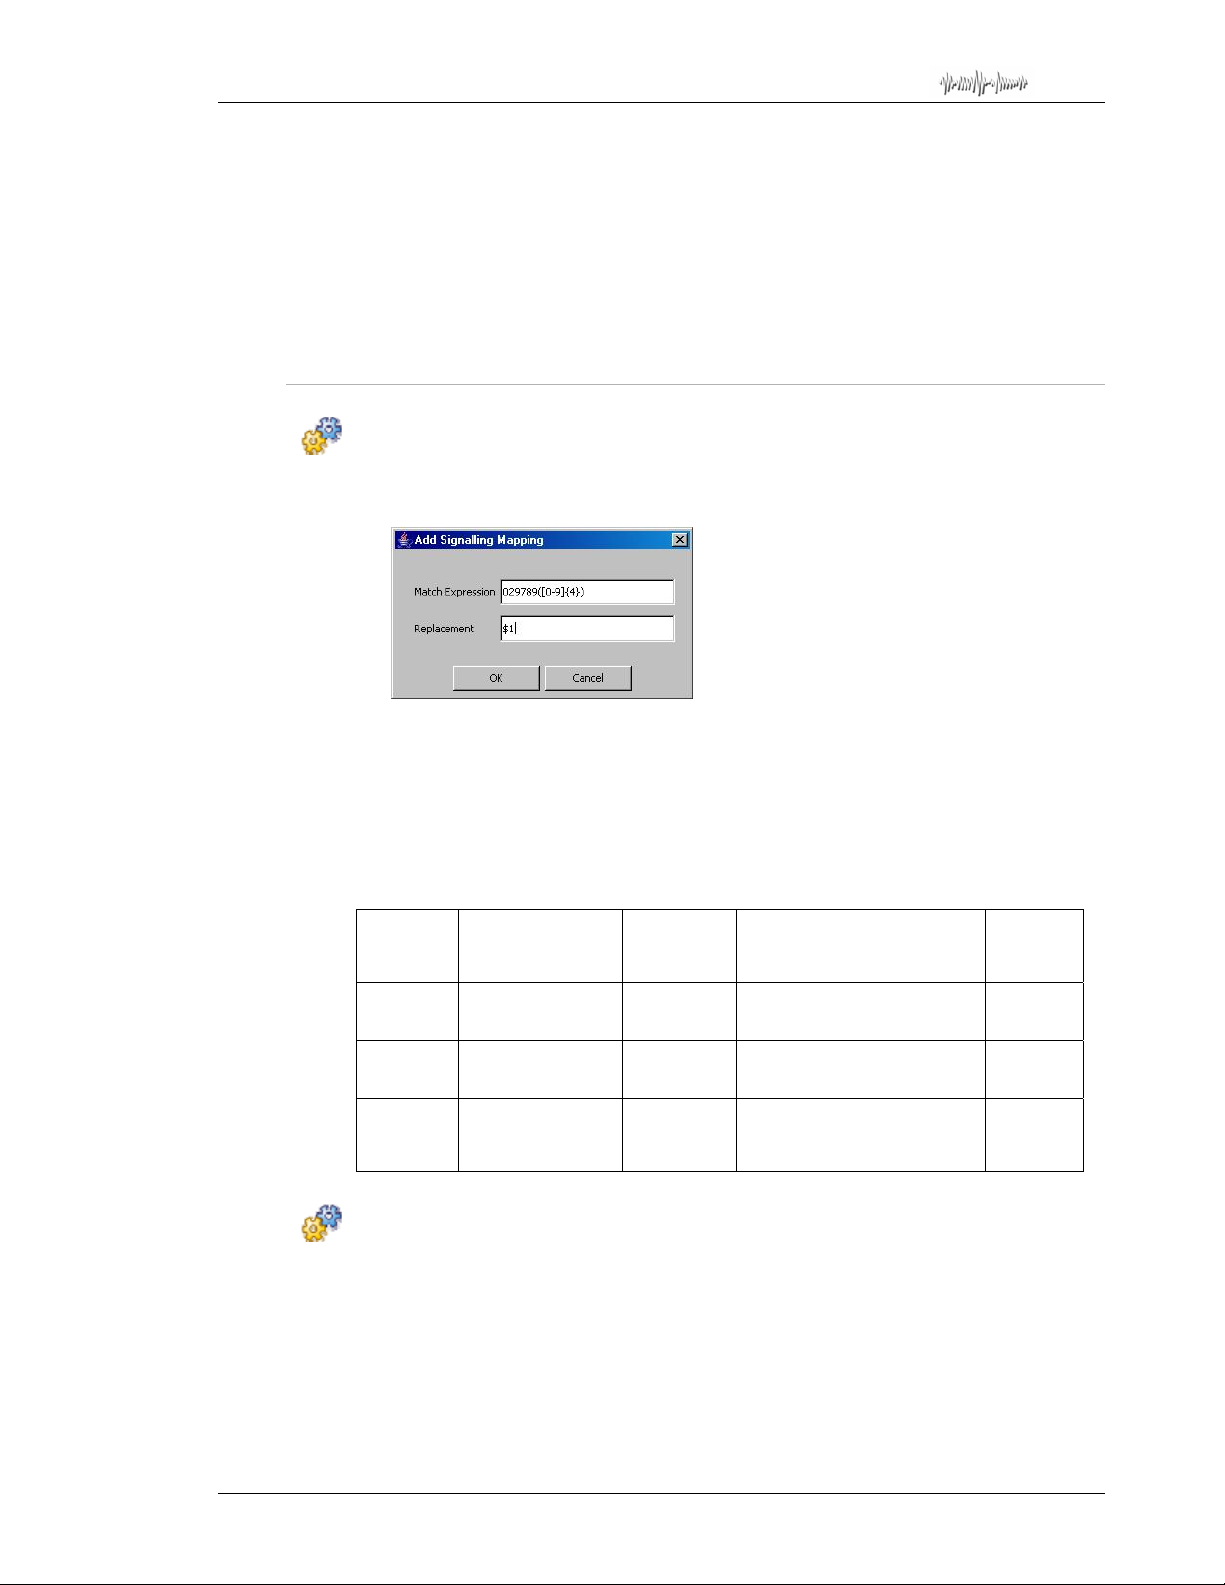
Total Recall Desktop & Rack – Installation and Administration Guide
Numbers that have Signalling Mapping entries can still be used in their raw form as
search criteria, but the search results will display the mapped value instead.
Numbers that do not match the Signalling map are displayed in their raw form.
Signalling Mapping entries may be entered as specific one-to-one replacements, or as
regular expressions.
See Regular Expressions on page 73 for further information.
)
28.8.1. Creating Signalling Map Entries
To create a signalling map entry:
1. In the Mapping pane, click Add.
The Add Signalling Mapping dialog displays.
2. In the Match Expression field, enter a raw value or an expression that defines the
matching criteria.
3. In the Replacement field, enter the appropriate replacement value or output variable.
4. Click OK.
The table below shows examples of signalling mapping of various types, plus example
input values and the respective mapped output values.
Expression
Type
Number to
extension
Number to
user
Extension
range
To test a signalling map entry:
Match Expression Replacement Example Input Mapped
Output
0125245678150 150 0125245678150 150
0125245678150 dave 0125245678150 dave
0125245678([0-9]{3}) $1 0125245678250
0125245678251
250
251
1. In the Test Mapping pane, enter an example ID in the Test Raw ID field.
2. Click Test.
The mapped value is displayed in the Mapped ID field.
Page 94
Page 95
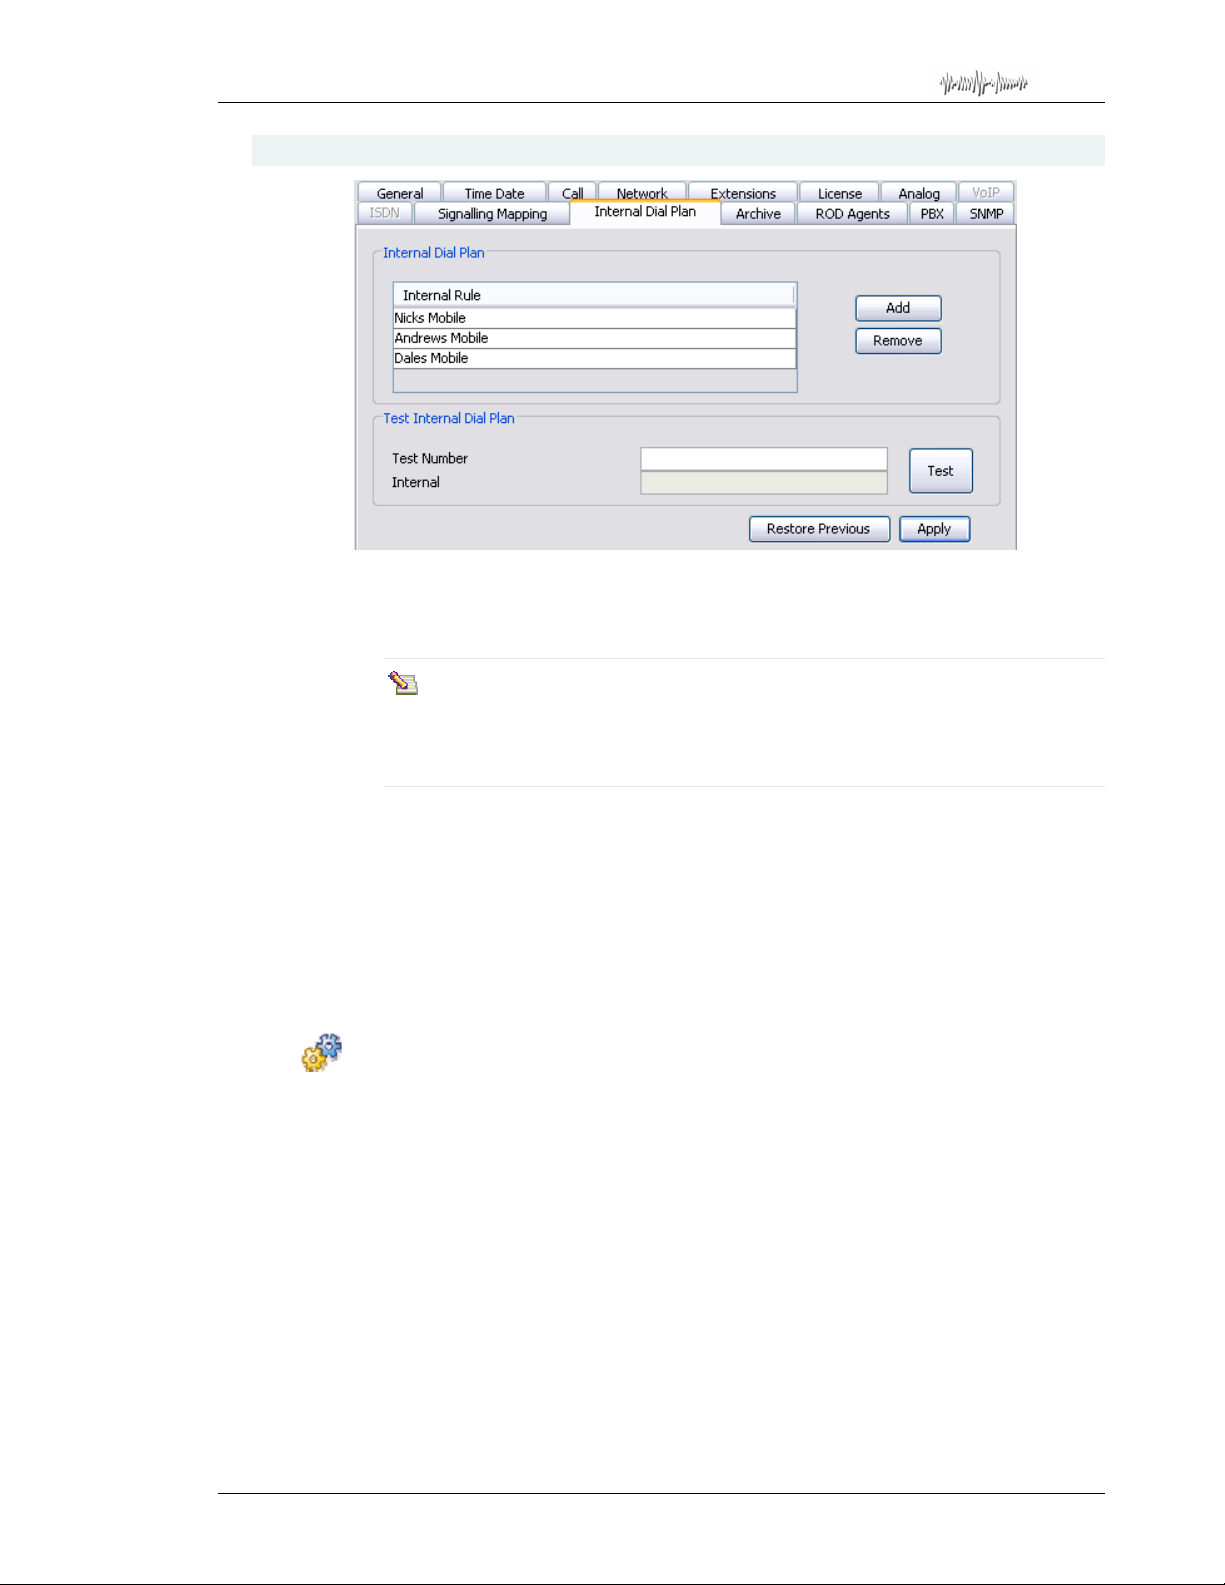
Total Recall Desktop & Rack – Installation and Administration Guide
28.9. Internal Dial Plan (TR Rack Only)
Use the Internal Dial Plan tab to define the rules that identify calling or called numbers
as ‘extensions’. An ‘extension’ in
any DTMF/CLI number that is included in the Internal Dial Plan.
Total Recall is any Total Recall recording channel, or
Some Total Recall and Remote Manager functionality relies on the
identification of extensions. ROD must be configured on an extension basis.
You must either configure the Internal Dial Plan, or assign extension values to
your analog recording channels in the Analog menu .
See Extensions on page 22 for further information.
)
Any mapped values or unmapped numbers that match one or more rules in the Internal
Dial Plan are considered to be extensions.
Rules can be entered as specific values, or as regular expressions.
See Regular Expressions on page 73 for further information.
)
To add a rule to the Internal Dial Plan:
1. In the Internal Dial Plan pane, click Add.
The Add Rule dialog displays.
2. Enter the extension name or CLI/DTMF number that is to be considered an
‘Extension’ for
3. Click Apply.
The rule is added to the Internal Rule list.
Total Recall (or a valid regular expression).
The following table shows examples of Internal Dial Plan rules of various types, with
example matches:
Page 95
Page 96
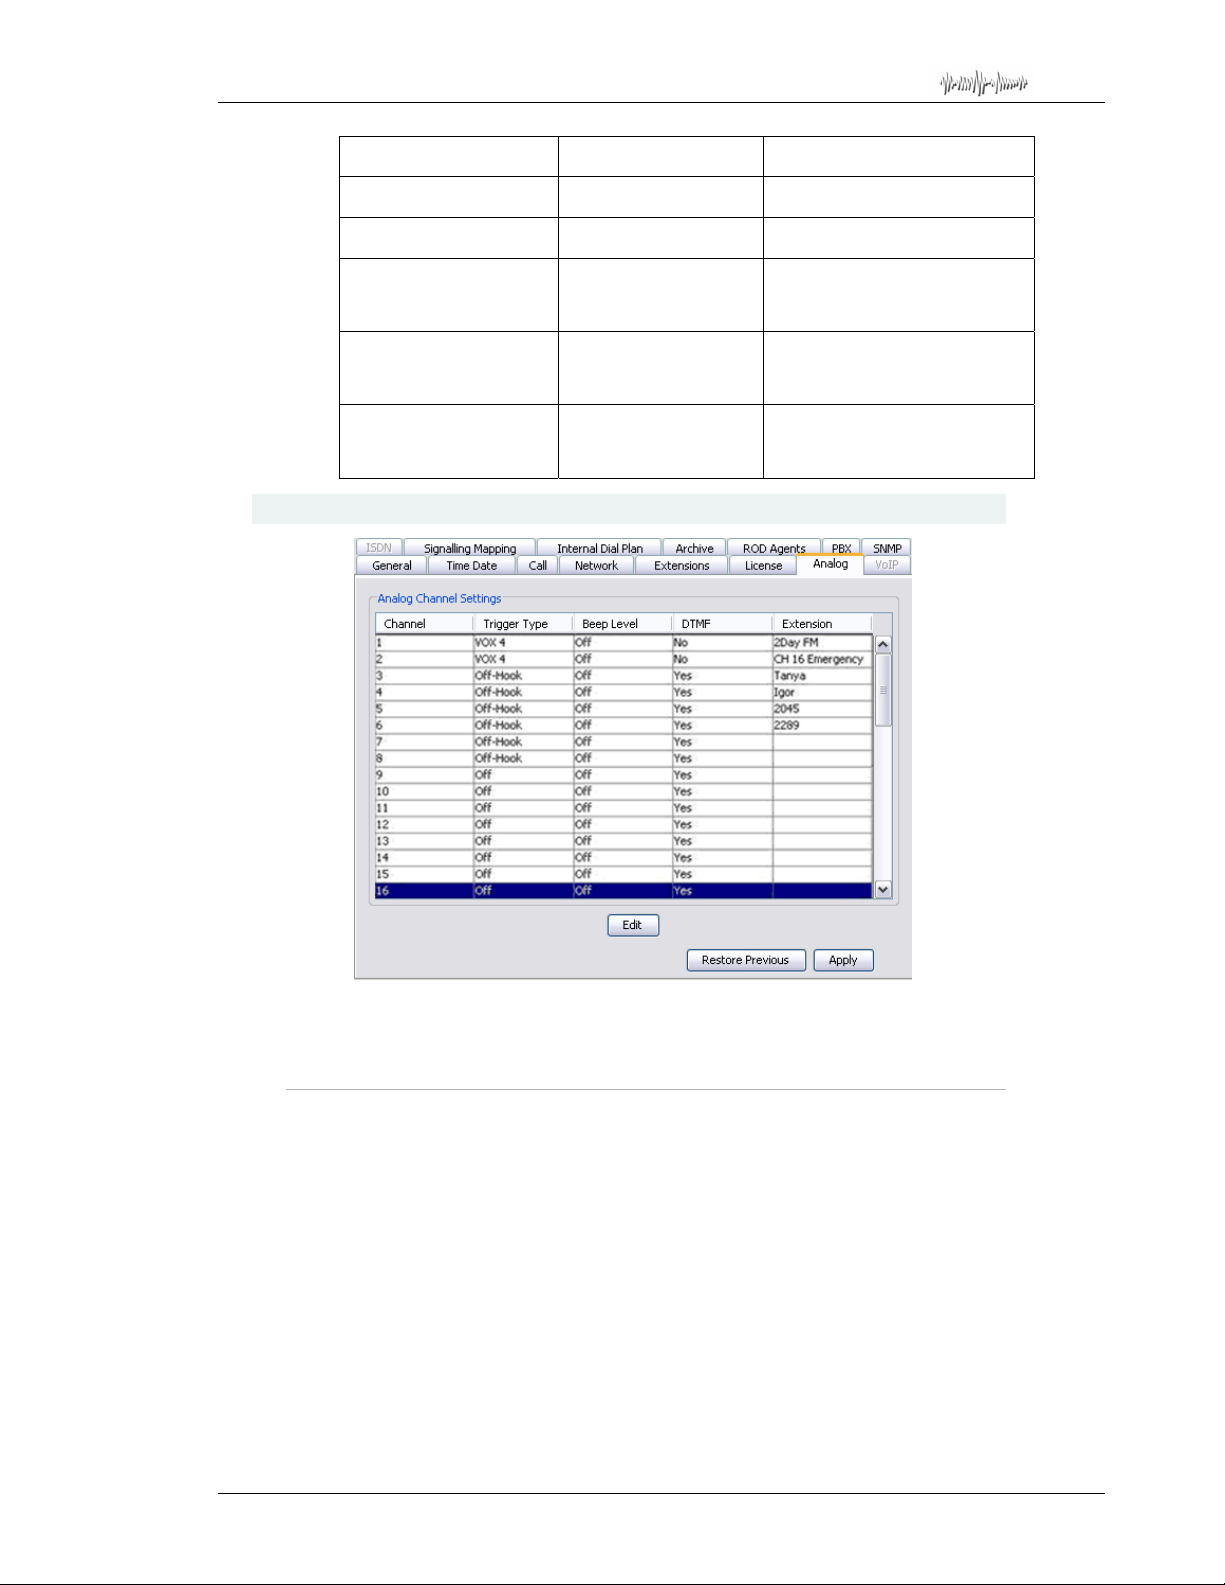
Total Recall Desktop & Rack – Installation and Administration Guide
Rule Will match Example Matches
0125245678150 0125245678150 only 0125245678150
Dave Dave only Dave
0125245678[0-9]{3} 0125245678 followed by
[0-9]{3} Any 3-digit number 150
[^0-9] Any characters except 0-9 Dave
28.10. Analog
any 3-digit number
0125245678150
0125245678255
251
Helen Smith
Use the Analog tab to set Trigger Type, Beep Level, as well as to set
extension values and control DTMF detection for analog channels.
28.10.1. Trigger Type
The Trigger Type determines what event type triggers recording on that
channel.
The available options are VOX (1-6), Off-Hook (1-6) and Off.
VOX (1 - 6)
VOX is a voice or audio signal trigger. Recording is automatically triggered
when the system detects noise on a channel, and terminated when silence is
detected on a channel (according to the VOX timeout setting).
The default setting, VOX 4, corresponds to a -28dBm signal (anything over
this level triggers recording).
Page 96
Page 97

Total Recall Desktop & Rack – Installation and Administration Guide
The highest setting, VOX 6 (high signal / low sensitivity), corresponds to a 20dBm signal. Channels set to VOX 6 will be triggered by loud
conversations or signals, but quieter conversations may fail to trigger
recording.
The lowest setting, VOX 1 (low signal / high se nsitivity), corresponds to a 40dBm signal. Channels set to VOX 1 will be triggered by soft conversations
or signals, but noisy lines may also trigger recording.
In most cases the default setting (VOX 4) is adequate.
Off-Hook (1 - 6)
This is the recommended setting for normal recording on PSTN telephone
lines. It will cause a call recording to be automatically triggered when the
phone handset is taken Off-Hook, and ended when the handset put back OnHook. If you are recording telephone calls from analog phone lin es (POTS
circuits), we recommend that you use this as default trigger setting during the
initial set-up.
The Off-Hook function is triggered by a voltage change on the line. A drop
in voltage (On-Hook voltage is typically 48V DC, Off-Hook voltage is
typically 8V DC), will normally provide sufficient voltage change to be
detected by the recorder, and activate recording. Replacing the receiver
would normally stop the recording.
Different Off-Hook settings are available to provide triggering at different
voltages.
The Off-Hook voltage ranges and their corresponding Off-Hook Settings are:
• Off-Hook #1: Recording Trigger with Off-Hook voltage below
approximately 5 volts and On-Hook is above 7 volts.
• Off-Hook #2: Recording Trigger with Off-Hook voltage below
approximately 10 volts and On-Hook is above 12 volts.
• Off-Hook #3: Recording Trigger with Off-Hook voltage below
approximately 14 volts and On-Hook is above 16 volts.
• Off-Hook #4: Recording Trigger with Off-Hook voltage below
approximately 17 volts and On-Hook is above 19 volts.
• Off-Hook #5: Recording Trigger with Off-Hook voltage below
approximately 20 volts and On-Hook is above 22 volts.
• Off-Hook #6: Recording Trigger with Off-Hook voltage below
approximately 25 volts and On-Hook is above 27 volts.
Example 1: If the On-Hook voltage is 48volts and the Off-Hook voltage
is lower than 15 volts use setting Off-Hook #4.
Example 2: If the On-Hook voltage is 24volts and the Off-Hook voltage
is lower than 3 volts use setting Off-Hook #1.If the On-Hook
voltage is above the range that is set the channel will start to
record.
The Off-Hook voltage ranges may vary slightly due to phone line
conditions and component tolerance. Off-Hook #4 would be the
recommend setting for most standard phone line recording
applications. If the phone line does not have DC voltages that can be
Page 97
Page 98

Total Recall Desktop & Rack – Installation and Administration Guide
sensed by the recorder for start/stop recording so that an off-hook
setting does not work satisfactorily, the VOX trigger should be used
instead. Each channel can be individually set as is best for its source
of conversations. If the Off-Hook setting does not work satisfactorily,
the VOX trigger should be used instead.
If a channel is set to Off-Hook and no line is connected to the
channel, the channel will commence recording, which can only be
stopped by setting the channel to OFF or VOX. Caller ID data
(inbound number information - CID) will only be available to the
recorder on channels recording directly from phone lines and with the
CID data provided by your phone service provider in the Belcore
standard format. Caller ID data is not available for channels
recording from han d set /headset audio.
Manual
This setting prepares the channel to receive manual recording instructions
from an external third party applications developed in conjunction with
. Most installations do not use this setting.
Recall
Total
Off
A channel that is set to Off is effectively deactivated and no recording is
possible on that channel. It is recommended that all unused analog channels
be set to Off.
28.10.2. Beep
Beep (‘pip tone’) is a beep sound generated every 15 seconds to indicate to
both parties that the call is being recorded.
In some countries, it may be mandatory to play a beep tone when recording.
For others, it is a matter of preference or company policy .
Total Recall does not transmit a recorded message to advise that
recording is taking place.
The Beep setting determines the volume of the be ep. The available options
are Hi, Mid, Low or Off.
The default setting is Off.
28.10.3. Detect DTMF
Total Recall detects DTMF tones during calls on all channels. However,
analog channels may be used for recoding analog signals other than telephone
calls, such as radio. Such signals do not carry DTMF digits, however they
may contain audio frequencies that resemble DTMF tones, which
Recall will incorrectly interpret as DTMF.
Total
Set Detect DTMF to On to enable DTMF detections on channels used to
record telephone calls, and to Off for channels that are used for signal sourc es
that do not contain DTMF.
Page 98
Page 99
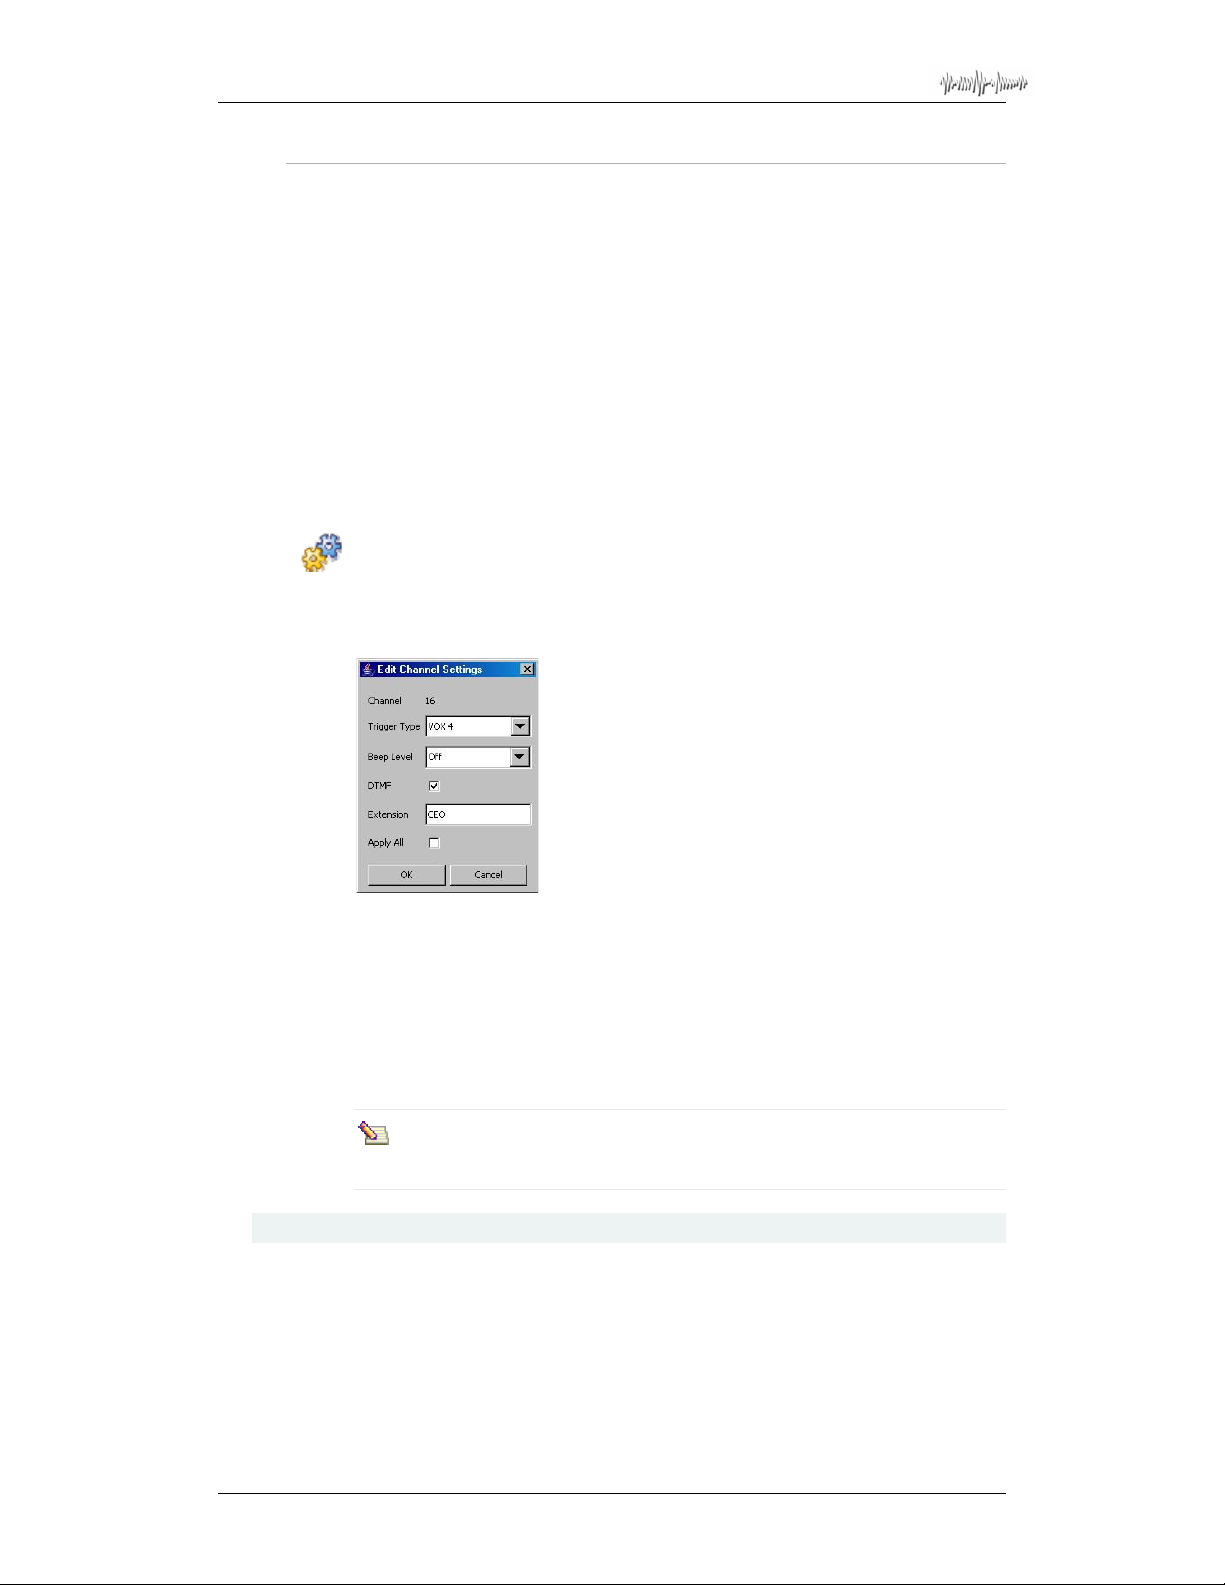
Total Recall Desktop & Rack – Installation and Administration Guide
28.10.4. Extension
For all analog recording where there is no calling or called nu mber signalling
on the line, it is advisable to set an extension value for each connected
channel.
Setting an Extension value for a channel means that:
• Calls (or other recordings) on that channel can be searched for by
extension value.
• Extension specific recording polices can be created.
• Extension specific venting policies can be created.
Where an analog channel is used for recording telephone calls, any extension
information in the call signalling on the line will override the extension value
set for that channel.
To set Analog Channel Settings:
1. Highlight the channel and click Edit.
The Edit Channel Settings dialog displays.
2. Select the Trigger Type for the channel.
3. Select Beep Level for the channel.
4. Set the DTMF control for the channel.
5. Set an Extension value for the channel.
6. Select OK.
Check the Apply All box to apply the Trigger Ty pe, Beep and DTMF
settings to all channels.
28.11. PBX (Optional – TR Rack Only)
Use the PBX tab to configure Total Recall to analyse SMDRs from the PBX,
which is used to capture extension-side information. The PBX tab contains
the following configuration tabs:
• CDR Collector.
• CDR Parser.
Page 99
Page 100
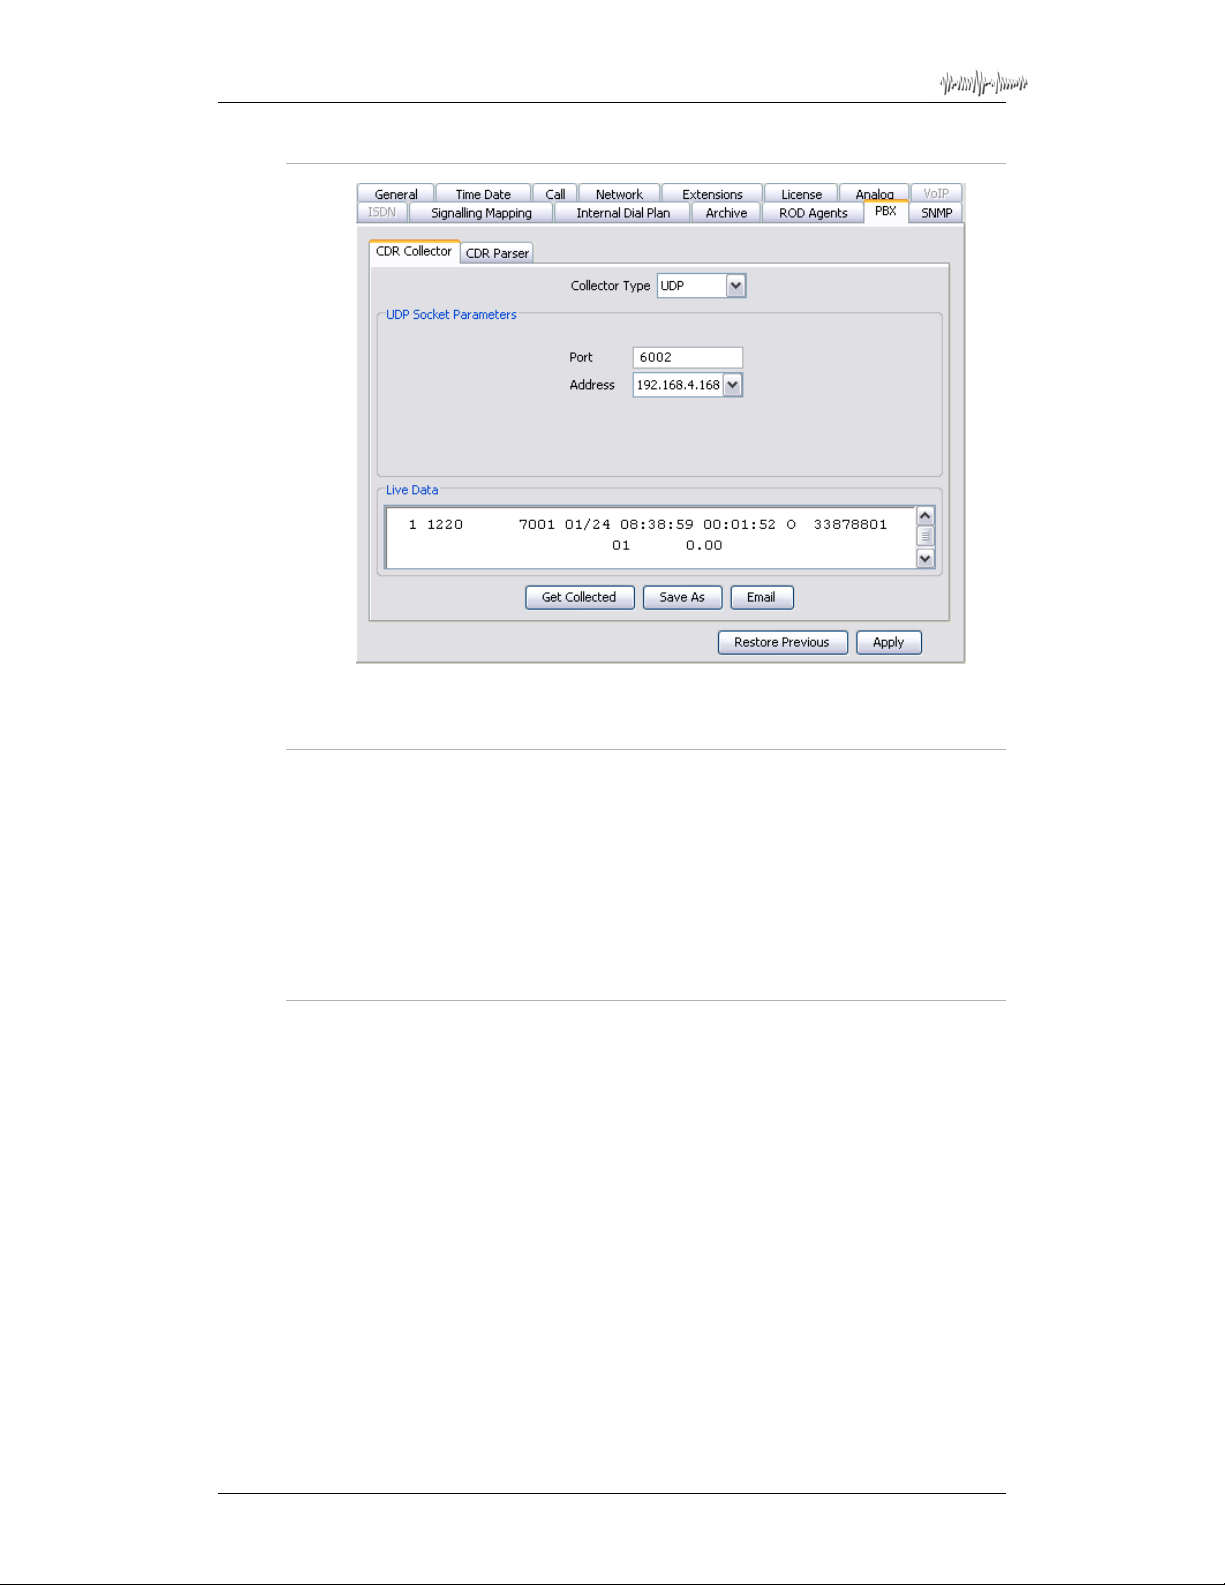
Total Recall Desktop & Rack – Installation and Administration Guide
28.11.1. CDR Collector
Use the CDR Collector tab to configure the connection to the PBX.
28.11.2. Collector Type
The Collector Type is the method by which Total Recall is connected to the
PBX.
Options are:
• UDP.
• TCP Server (PBX initiates connection).
• TCP Client (
Total Recall initiates connection).
28.11.3. UDP/TCP
With UDP or TCP (client or server) selected, the f ollowing parameters must
be supplied:
• Port
This is the UDP or TCP port that will be used for IP communication
between the PBX and the
• IP Address
This is the IP address that will be used for IP communication between the
PBX and the
Total Recall.
Total Recall.
Page 100
 Loading...