


TABLE OF CONTENTS
Introduction. . . . . . . . . . . . . . . . . . . . . . . . . . . . . . . . . . . . . . . . . . . . . . . . . . . . . . . . . . . . . . . . 3
Installing Batteries . . . . . . . . . . . . . . . . . . . . . . . . . . . . . . . . . . . . . . . . . . . . . . . . . . . . . . . . . 4
Setting The Clock. . . . . . . . . . . . . . . . . . . . . . . . . . . . . . . . . . . . . . . . . . . . . . . . . . . . . . . . . . . 5
Features And Functions . . . . . . . . . . . . . . . . . . . . . . . . . . . . . . . . . . . . . . . . . . . . . . . . . . . . . 6
Key Charts . . . . . . . . . . . . . . . . . . . . . . . . . . . . . . . . . . . . . . . . . . . . . . . . . . . . . . . . . . . . 7
Programming Device Control
. . . . . . . . . . . . . . . . . . . . . . . . . . . . . . . . . . . . . . . . . . . . . . . . 10
Programming TV/VCR Combo Control
. . . . . . . . . . . . . . . . . . . . . . . . . . . . . . . . . . . . . . . . 14
Manufacturer’s Codes. . . . . . . . . . . . . . . . . . . . . . . . . . . . . . . . . . . . . . . . . . . . . . . . . . . . . . 14
Setup Codes for Audio Amplifiers . . . . . . . . . . . . . . . . . . . . . . . . . . . . . . . . . . . . . . . . . . 14
Setup Codes for Audio Cassette Decks . . . . . . . . . . . . . . . . . . . . . . . . . . . . . . . . . . . . . . 14
Setup Codes for Audio Receivers . . . . . . . . . . . . . . . . . . . . . . . . . . . . . . . . . . . . . . . . . . . 14
Setup Codes for Audio Turntables . . . . . . . . . . . . . . . . . . . . . . . . . . . . . . . . . . . . . . . . . . 15
Setup Codes for Cable Converters . . . . . . . . . . . . . . . . . . . . . . . . . . . . . . . . . . . . . . . . . . 15
Setup Codes for CD Players . . . . . . . . . . . . . . . . . . . . . . . . . . . . . . . . . . . . . . . . . . . . . . . 16
Setup Codes for DAT Recorders . . . . . . . . . . . . . . . . . . . . . . . . . . . . . . . . . . . . . . . . . . . . 17
Setup Codes for DVD Players . . . . . . . . . . . . . . . . . . . . . . . . . . . . . . . . . . . . . . . . . . . . . . 17
Setup Codes for Home Automation . . . . . . . . . . . . . . . . . . . . . . . . . . . . . . . . . . . . . . . . . 18
Setup Codes for LD Players . . . . . . . . . . . . . . . . . . . . . . . . . . . . . . . . . . . . . . . . . . . . . . . 18
Setup Codes for Misc. Audio Services . . . . . . . . . . . . . . . . . . . . . . . . . . . . . . . . . . . . . . . 18
Setup Codes for Satellite Receivers . . . . . . . . . . . . . . . . . . . . . . . . . . . . . . . . . . . . . . . . . 18
Setup Codes for TVs . . . . . . . . . . . . . . . . . . . . . . . . . . . . . . . . . . . . . . . . . . . . . . . . . . . . 19
Setup Codes for TV/VCR Combos. . . . . . . . . . . . . . . . . . . . . . . . . . . . . . . . . . . . . . . . . . . 22
Setup Codes for VCRs . . . . . . . . . . . . . . . . . . . . . . . . . . . . . . . . . . . . . . . . . . . . . . . . . . . 23
Setup Codes for Video Accessories . . . . . . . . . . . . . . . . . . . . . . . . . . . . . . . . . . . . . . . . . 26
Searching For Your Code. . . . . . . . . . . . . . . . . . . . . . . . . . . . . . . . . . . . . . . . . . . . . . . . . . . . 27
Using Learning . . . . . . . . . . . . . . . . . . . . . . . . . . . . . . . . . . . . . . . . . . . . . . . . . . . . . . . . . . . 29
Programming A Learning Key . . . . . . . . . . . . . . . . . . . . . . . . . . . . . . . . . . . . . . . . . . . . . 29
Deleting A Function From A Learning Key. . . . . . . . . . . . . . . . . . . . . . . . . . . . . . . . . . . . . 31
Using Volume Lock. . . . . . . . . . . . . . . . . . . . . . . . . . . . . . . . . . . . . . . . . . . . . . . . . . . . . . . . . 32
Programming Volume Lock . . . . . . . . . . . . . . . . . . . . . . . . . . . . . . . . . . . . . . . . . . . . . . . 32
Programming Volume Unlock. . . . . . . . . . . . . . . . . . . . . . . . . . . . . . . . . . . . . . . . . . . . . . 33
Using Macros
. . . . . . . . . . . . . . . . . . . . . . . . . . . . . . . . . . . . . . . . . . . . . . . . . . . . . . . . . . . . . 34
Programming A Favorite Channel . . . . . . . . . . . . . . . . . . . . . . . . . . . . . . . . . . . . . . . . . . 34
Programming A Master Power Key With Instant Channel Selection. . . . . . . . . . . . . . . . . . 35
Clearing A Macro. . . . . . . . . . . . . . . . . . . . . . . . . . . . . . . . . . . . . . . . . . . . . . . . . . . . . . . 36
Re-Assigning Device Keys . . . . . . . . . . . . . . . . . . . . . . . . . . . . . . . . . . . . . . . . . . . . . . . . . . 37
Using Keymover
. . . . . . . . . . . . . . . . . . . . . . . . . . . . . . . . . . . . . . . . . . . . . . . . . . . . . . . . . . . 38
Programming Keymover. . . . . . . . . . . . . . . . . . . . . . . . . . . . . . . . . . . . . . . . . . . . . . . . . . 38
Restoring Keymover. . . . . . . . . . . . . . . . . . . . . . . . . . . . . . . . . . . . . . . . . . . . . . . . . . . . . 39
Using Channel Scan . . . . . . . . . . . . . . . . . . . . . . . . . . . . . . . . . . . . . . . . . . . . . . . . . . . . . . . 41
Programming Favorite Channel Scan
. . . . . . . . . . . . . . . . . . . . . . . . . . . . . . . . . . . . . . . . 41
Using The Home Theater Mode . . . . . . . . . . . . . . . . . . . . . . . . . . . . . . . . . . . . . . . . . . . . . . 43
Control Organization . . . . . . . . . . . . . . . . . . . . . . . . . . . . . . . . . . . . . . . . . . . . . . . . . . . . 43
Programming The Home Theater Mode . . . . . . . . . . . . . . . . . . . . . . . . . . . . . . . . . . . . . . 44
Operating The Home Theater Mode . . . . . . . . . . . . . . . . . . . . . . . . . . . . . . . . . . . . . . . . . 47
Using Commercial Skip . . . . . . . . . . . . . . . . . . . . . . . . . . . . . . . . . . . . . . . . . . . . . . . . . . . . 48
Programming Commercial Skip . . . . . . . . . . . . . . . . . . . . . . . . . . . . . . . . . . . . . . . . . . . . 48
Operating Commercial Skip. . . . . . . . . . . . . . . . . . . . . . . . . . . . . . . . . . . . . . . . . . . . . . . 49
Restoring Factory Default Settings. . . . . . . . . . . . . . . . . . . . . . . . . . . . . . . . . . . . . . . . . . . 50
About Upgrading . . . . . . . . . . . . . . . . . . . . . . . . . . . . . . . . . . . . . . . . . . . . . . . . . . . . . . . . . . 51
Using The IR/RF Command Center. . . . . . . . . . . . . . . . . . . . . . . . . . . . . . . . . . . . . . . . . . . 52
Setting Up The IR/RF Command Center . . . . . . . . . . . . . . . . . . . . . . . . . . . . . . . . . . . . . . 52
Adding The IR Signal Extension Cord . . . . . . . . . . . . . . . . . . . . . . . . . . . . . . . . . . . . . . . 53
Optimizing IR/RF Command Center Reception . . . . . . . . . . . . . . . . . . . . . . . . . . . . . . . . 54
Specifications. . . . . . . . . . . . . . . . . . . . . . . . . . . . . . . . . . . . . . . . . . . . . . . . . . . . . . . . . . . . . 54
Troubleshooting . . . . . . . . . . . . . . . . . . . . . . . . . . . . . . . . . . . . . . . . . . . . . . . . . . . . . . . . . . . 55
Error Messages. . . . . . . . . . . . . . . . . . . . . . . . . . . . . . . . . . . . . . . . . . . . . . . . . . . . . . . . . . . . 56
Customer Support . . . . . . . . . . . . . . . . . . . . . . . . . . . . . . . . . . . . . . . . . . . . . . . . . . . . . . . . . 57
Compliance With FCC Rules And Regulations
. . . . . . . . . . . . . . . . . . . . . . . . . . . . . . . . . 57
Key Index . . . . . . . . . . . . . . . . . . . . . . . . . . . . . . . . . . . . . . . . . . . . . . . . . . . . . . . . . . . . . . . . . 58
Limited Warranty . . . . . . . . . . . . . . . . . . . . . . . . . . . . . . . . . . . . . . . . . . . . . . . . . . . . . . . . . . 77
Additional Information . . . . . . . . . . . . . . . . . . . . . . . . . . . . . . . . . . . . . . . . . . . . . . . . . . . . . 78
2
Producer 2002 RF Mnl 4/4/02 10:15 AM Page 2

INTRODUCTION
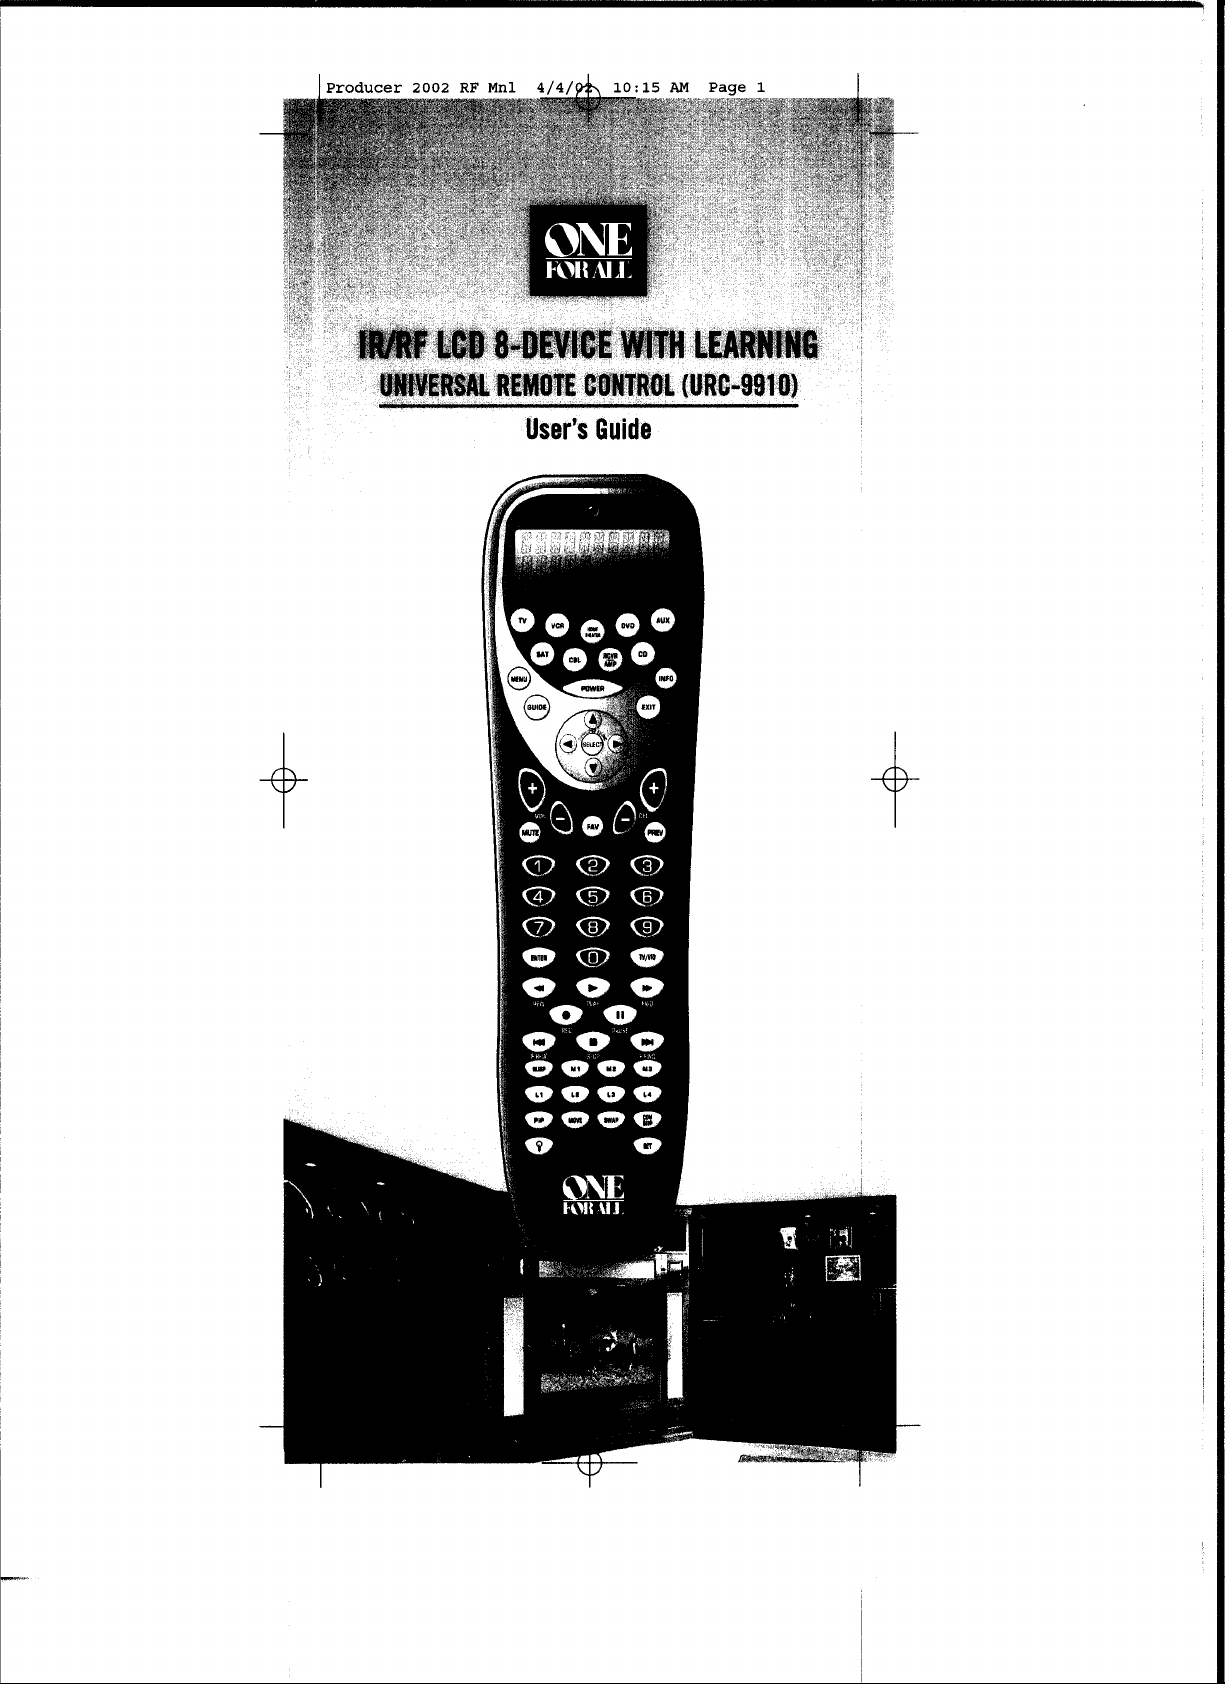
The One For All IR/RF LCD 8-Device With Learning Universal
Remote Control (URC-9910) is our latest high-performance
universal remote control. It is designed to operate up to eight home
entertainment devices,including TV, video, and audio components.
Moreover, this remote control contains sophisticated technology that
will allow you to conveniently consolidate the clutter of all of the
original remote controls used in your home entertainment system.
It’s packed with easy-to-use features such as:
• Advanced Liquid Crystal Display (LCD) with 15 alphanumeric
characters,real-time clock, and icons for constant visual feedback
of operations and programming sequences
• A unique Home Theater mode that combines different device
controls under one mode for operating convenience
• Three macro keys for instant activation of favorite key sequences
• Four learning keys to capture unique functions from your
devices’ original remote controls
• Key Mover for copying keys from one device to another,or to a
different position in the same mode
• Code Search to help you program device codes without using the
code list (starting on page 14) or for brands or models not listed
• Favorite Channel Scan for easy channel surfing
• Mode reassignment to control duplicate types of devices
• Volu me Lo ck to assign volume controls to individual devices or to
one global device
• Commercial Skip feature allows you to channel surf during
commercial interruptions of your favorite programs
• Includes IR/RF Command Center to extend the remote control’s
signal range
• Pre-programmed database with the world’s largest and most
efficient group of infrared codes insures device compatibility
• Internal modem for upgrading device codes over the telephone
• A low battery icon to notify you when batteries are getting low
• Backlighting feature to aid operation in low ambient light
The One For All IR/RF LCD 8-Device With Learning Universal
Remote Control (URC-9910) requires four (4) new AAA alkaline
batteries (not included) and easy programming to control your
devices. For best results, please read and perform all instructions
listed here.Also, keep these instructions for future reference.
3
Producer 2002 RF Mnl 4/4/02 10:15 AM Page 3
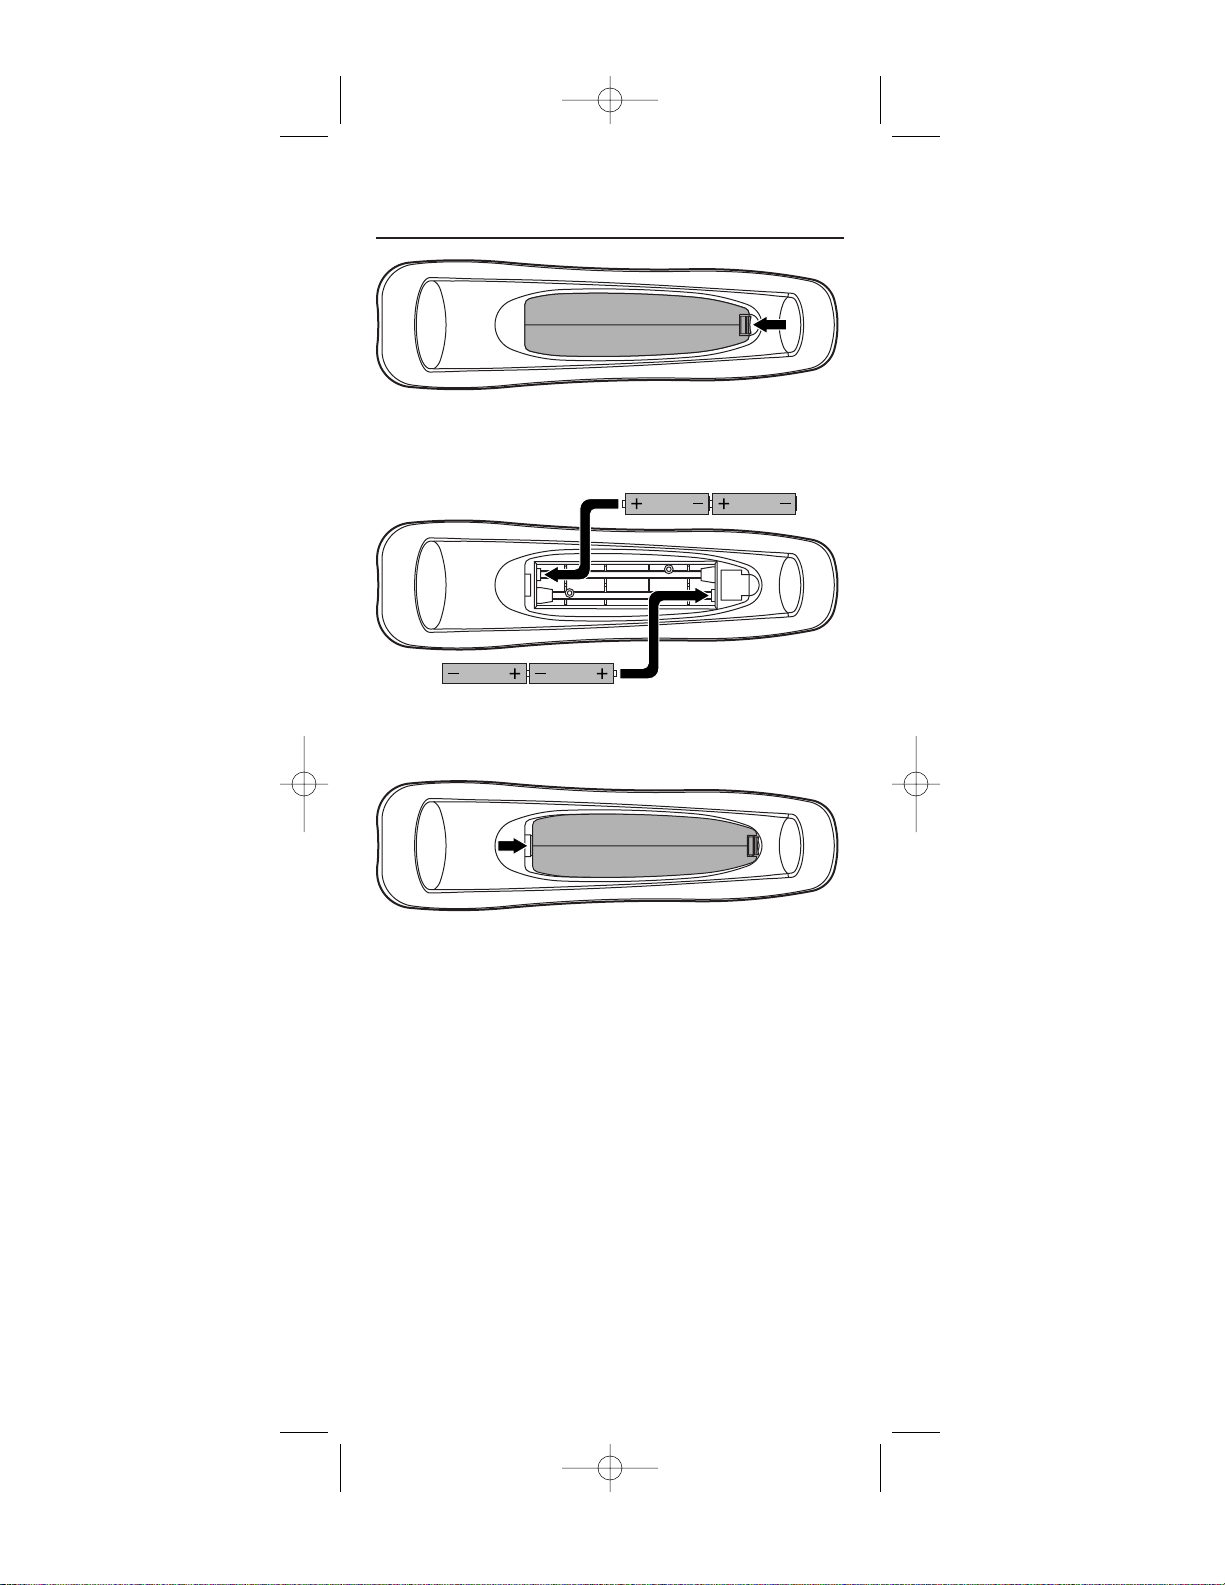
INSTALLING BATTERIES
1. On the back of the URC-9910 remote control, push
the tab and lift off the battery cover.
2. Obtain four (4) new AAA alkaline batteries. Match
the + and – marks on the batteries to the + and –
marks in the case, and then insert the new batteries.
3. Align the cover key with the case opening and
replace the cover until it locks.
4. If batteries are inserted correctly,the entire LCD
will turn on. After 5 seconds of inactivity,the remote
control will turn itself off to conserve battery life.
5. Perform the steps in Setting The Clock (on the next
page) to set the correct time.
NOTE:When a battery icon appears in the display (see page 7,Key Charts,
LCD), the batteries are low. Simply replace them and the URC-9910 remote
control will be restored to full functionality, complete with your favorite settings.
4
❶
❸
❷
Producer 2002 RF Mnl 4/4/02 10:15 AM Page 4
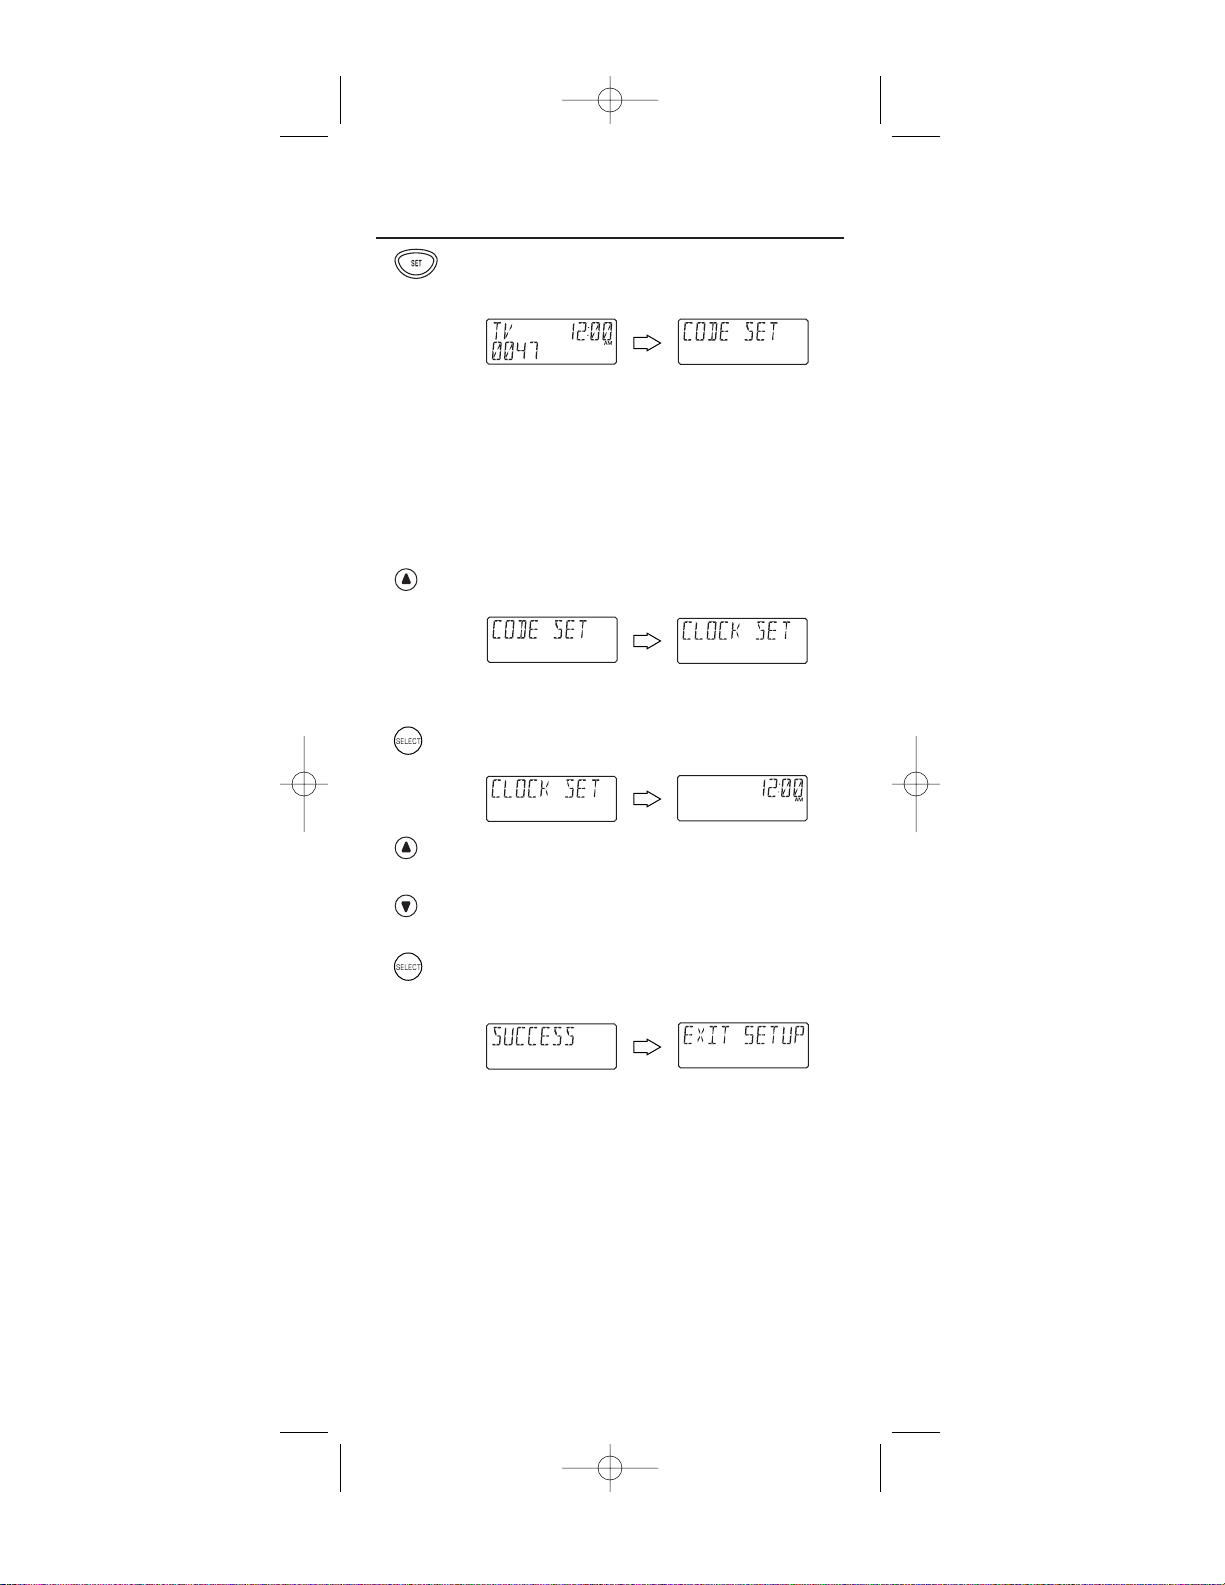
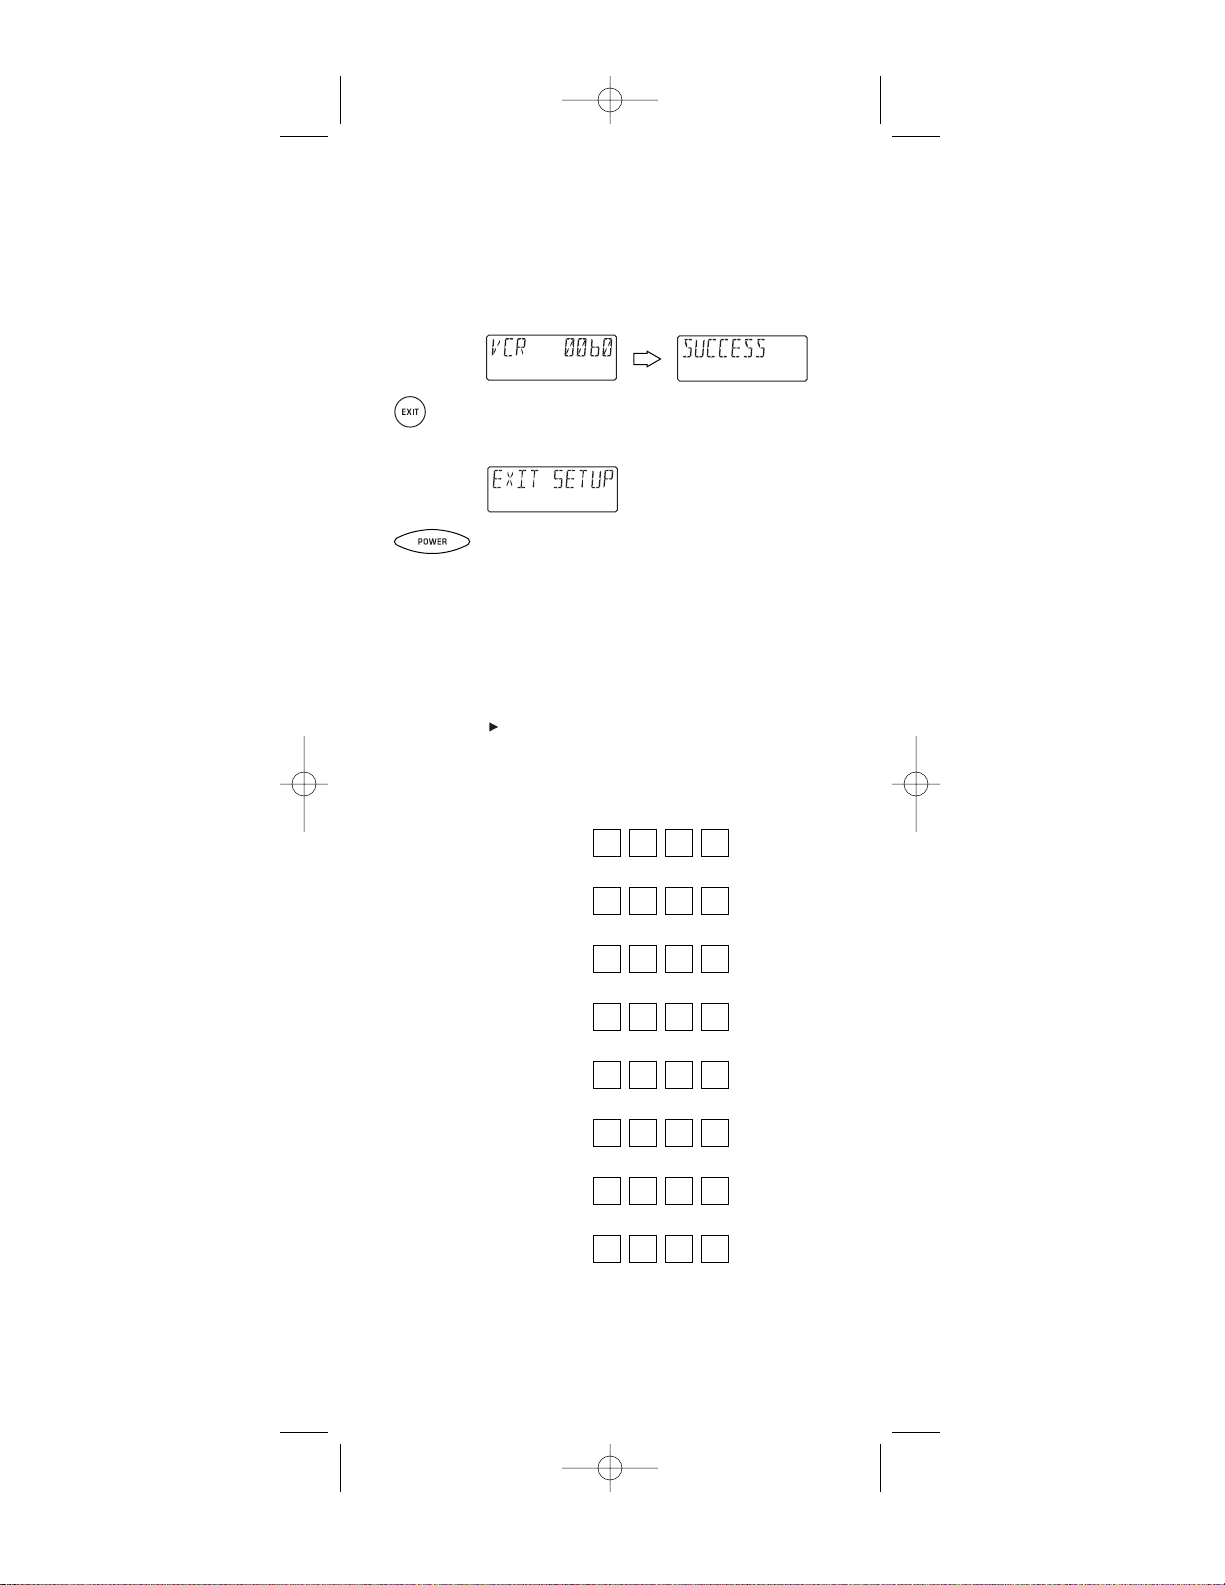
SETTING THE CLOCK
1. On the URC-9910 remote control, press and hold
SETuntil you see the display change from the default
device and time to [CODE SET].
NOTE: Default values for device, its code,and time are
shown above.Your remote control settings may be different.
NOTE: If you wish to exit the programming mode at any
time, press EXIT once. You will see an [EXIT] message as the
remote control returns to normal operation.
NOTE: If you see an [INVALID] message, you have inadvertently pressed an incorrect key. Simply note your error and
continue programming.
2. (x 5) Press the ▲ key five times until you see the display
change to [CLOCK SET].
NOTE: If you go past [CLOCK SET],press the ▼key one or
more times to return to it.
3. Press SELECTonce to begin programming. You will
see the display change to the current time.
4. Press the ▲ key one or more times until you see the
desired hour (a.m.or p.m.).
5. Press the ▼ key one or more times until you see the
desired minute.
6. Once the time is correctly set,press SELECTonce to
accept the values. The display will confirm your
entry with [SUCCESS] and then [EXIT SETUP].
The URC-9910 remote control will return to
normal operation.
5
Producer 2002 RF Mnl 4/4/02 10:15 AM Page 5
FEATURES AND FUNCTIONS
Use the illustration below to locate features on the URC-9910 remote
control and then study the Key Charts (on the next three pages) to
learn how they function.
6
Producer 2002 RF Mnl 4/4/02 10:15 AM Page 6
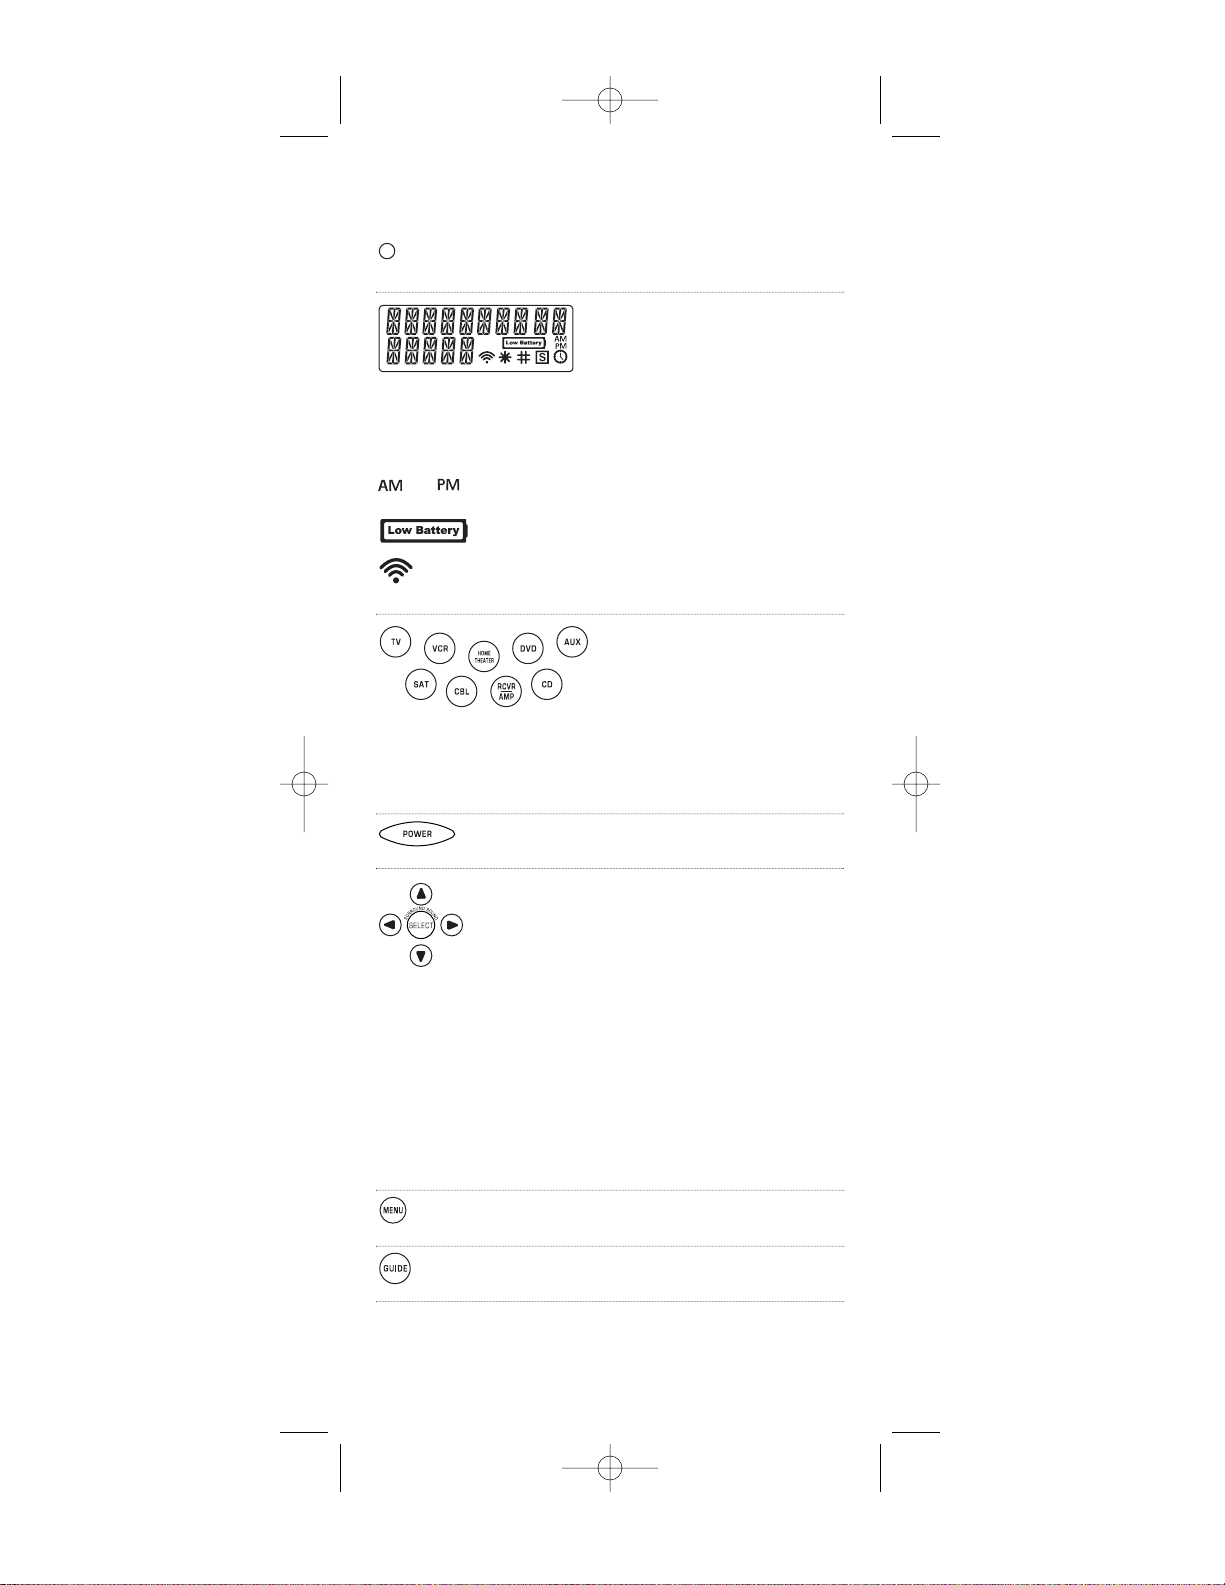
Key Charts
The LED (red light) blinks to show that the
remote control is working and sending signals.
The LCD (Liquid Crystal Display)
provides 15 alphanumeric characters that display status messages
during remote control operation
and programming.Also,one or
more icons appear in the LCDto
indicate the following conditions:
or Morning or Afternoon Time
Low Battery
IR Signal Transmission
Press TV,VCR,DVD, AUX,SAT,CBL,
RCVR/AMP,or CD once to select a
desired home entertainment
device to control.
After programming, press HOME
THEATERonce to select the home
theater mode.See Using The Home
Theater Mode on page 43.
Press POWERonce to turn on or off the
selected device.
Use the cursor keys (▲,▼,,or) to move
the cursor in the program guide and menu
screens.Use SELECTto choose options from
your selected device’s menu or guide.
In the CD mode, use SELECT to select a
compact disc.Use ▲ (or ▼) to select the next
(or previous) CD.Use (or ) to select the
next (or previous) track.
In the RCVR/AMP mode, use SELECT to
set the surround sound.Use ▲ (or ▼) to
adjust the volume higher (or lower). Use
(or ) to adjust the balance left (or right).
Press MENUonce to display your selected
device’s main menu.
Use GUIDEto display your selected device’s
program guide or setup menu.
continued on next page...
▲
▲
▲
▲
▲
▲
7
Producer 2002 RF Mnl 4/4/02 10:15 AM Page 7
FEATURES AND FUNCTIONS
Key Charts (continued)
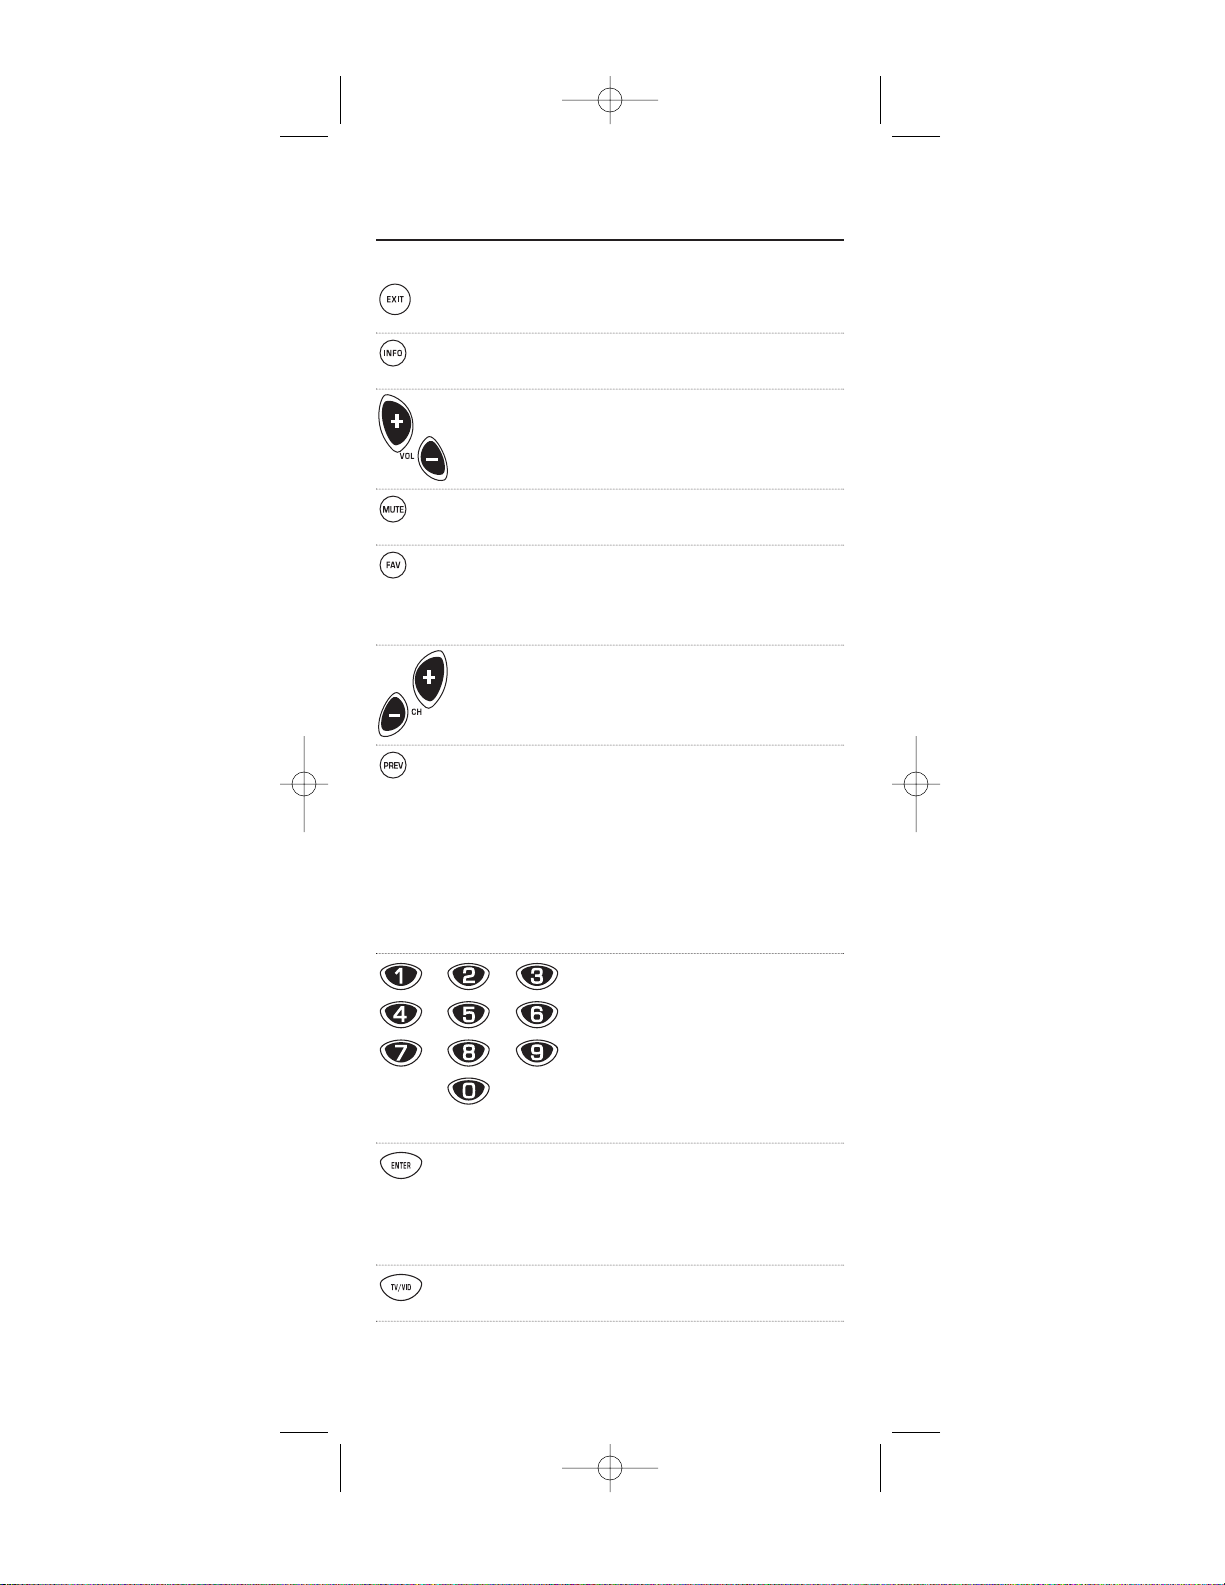
Use EXITto exit from your selected device’s
guide or menu.
Use INFOto display the current channel and
program information.
Use VOL+(or VOL-) to raise (or lower) the
audio volume.
Press MUTEonce to turn the audio off
or on.
In the TV, VCR,DVD, SAT,and CBLmodes,
use FAV to scan favorite channels and/or all
channels. See Using Channel Scan and Program-
ming Favorite Channel Scan on page 41.
Use CH+(or CH-) to select the next higher (or
lower) channel.
Press PREVonce to recall the last-viewed
channel and to page back one screen on the
main menu.
In the CD mode, use PREV to turn random
play on or off.
In the RCVR/AMP mode, use PREV to select
the receiver band.
Use the keypad (1~ 9and 0) to
directly select channels (e.g., 009 or
031).
In the RCVR/AMP mode, use the
keypad (1~ 9and 0) to select audio
sources 1through 10.
Press ENTERonce after entering the channel
numbers on some TVs.
In the CD mode, use ENTER to add 10 to the
digit entry (e.g., ENTERand 7is 17).
Use TV/VIDto switch the TV’s input to view
TV or video programs.
8
Producer 2002 RF Mnl 4/4/02 10:15 AM Page 8
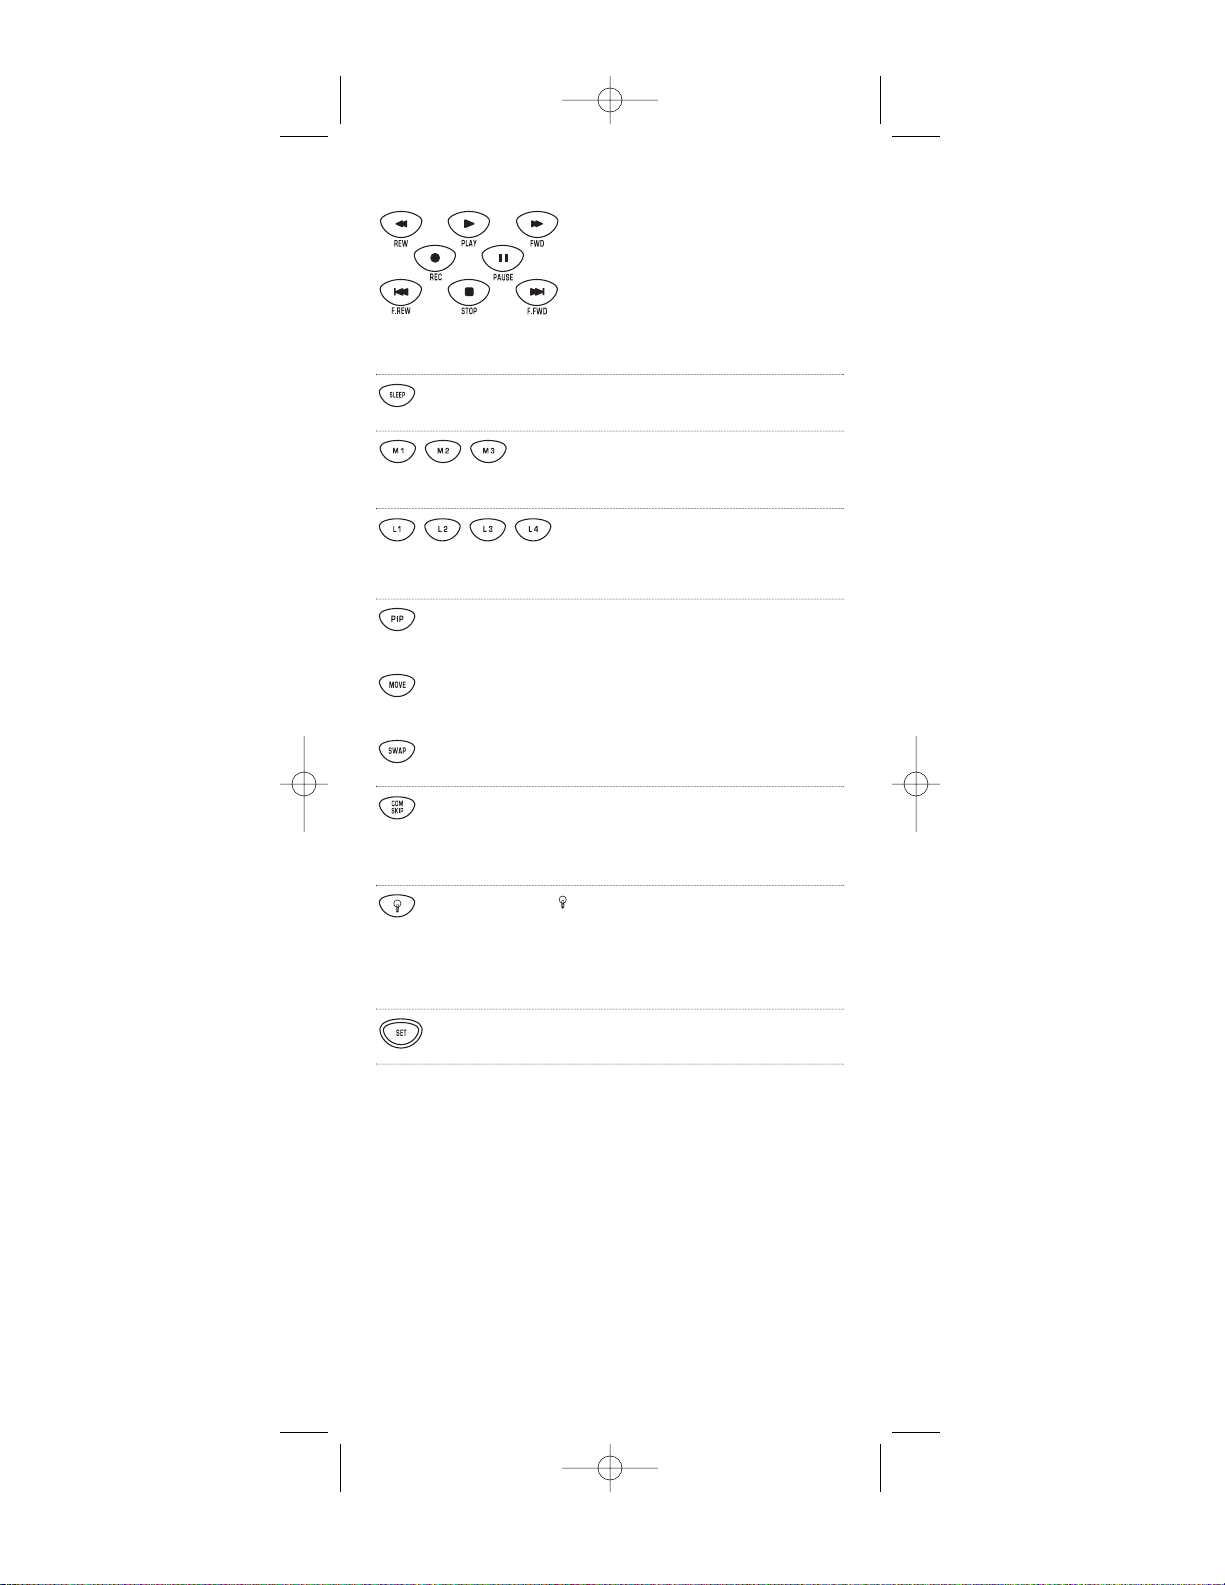
Use the transport keys to control your
VCR,DVD or CD player, or VOD (Video
On Demand) if available on your cable
or satellite service.
To record a VCR program, press REC
twice.
Use SLEEPto activate your device’s sleep
timer (not available for all devices).
After programming, press M1~ M3once to
run a desired macro (see Using Macros on
page 34).
After programming,press L1~ L4
once to activate a learned function.
See Using Learning on page 30.
Use PIPto switch the Picture-In-Picture
feature on or off (if available on your TV).
Use MOVEto move the window picture
to different positions in the main picture.
Use SW APto switch images and sound
between the main and window pictures.
After programming,use COM SKIP to skip
commercials on selected devices (i.e.,TV,VCR,
DVD, CBL,and SAT). See Using Commercial
Skip on page 48.
Use to turn on or off the key backlight.
When this feature is activated,keys will
remain backlit for 5 seconds after the last key
press.In the setup mode,backlighting
will remain on for 30 seconds.
Use SETfor all programming sequences.
9
Producer 2002 RF Mnl 4/4/02 10:15 AM Page 9
PROGRAMMING DEVICE CONTROL
The URC-9910 remote control is preprogrammed at the factory to
operate an RCA TV and VCR,a Motorola (GI) cable converter, an RCA
satellite receiver, a Pioneer CD player,a Toshiba DVD player,a Pioneer
audio receiver/ amplifier,and a One For All home automation device.
To control devices other than the default brands,perform the following steps and repeat them as needed for each device to be programmed; otherwise skip this section:
NOTE: For TV/VCR Combo control, see “Programming TV/VCR Combo
Control”on page 12.
1. Turn on a device (e.g.,VCR or DVD player) and,if
applicable, insert media (e.g., cassette or disc).
NOTE: Please read steps 2 through 8 completely before
proceeding. Highlight or write down the codes and device
you wish to program before starting step 2.
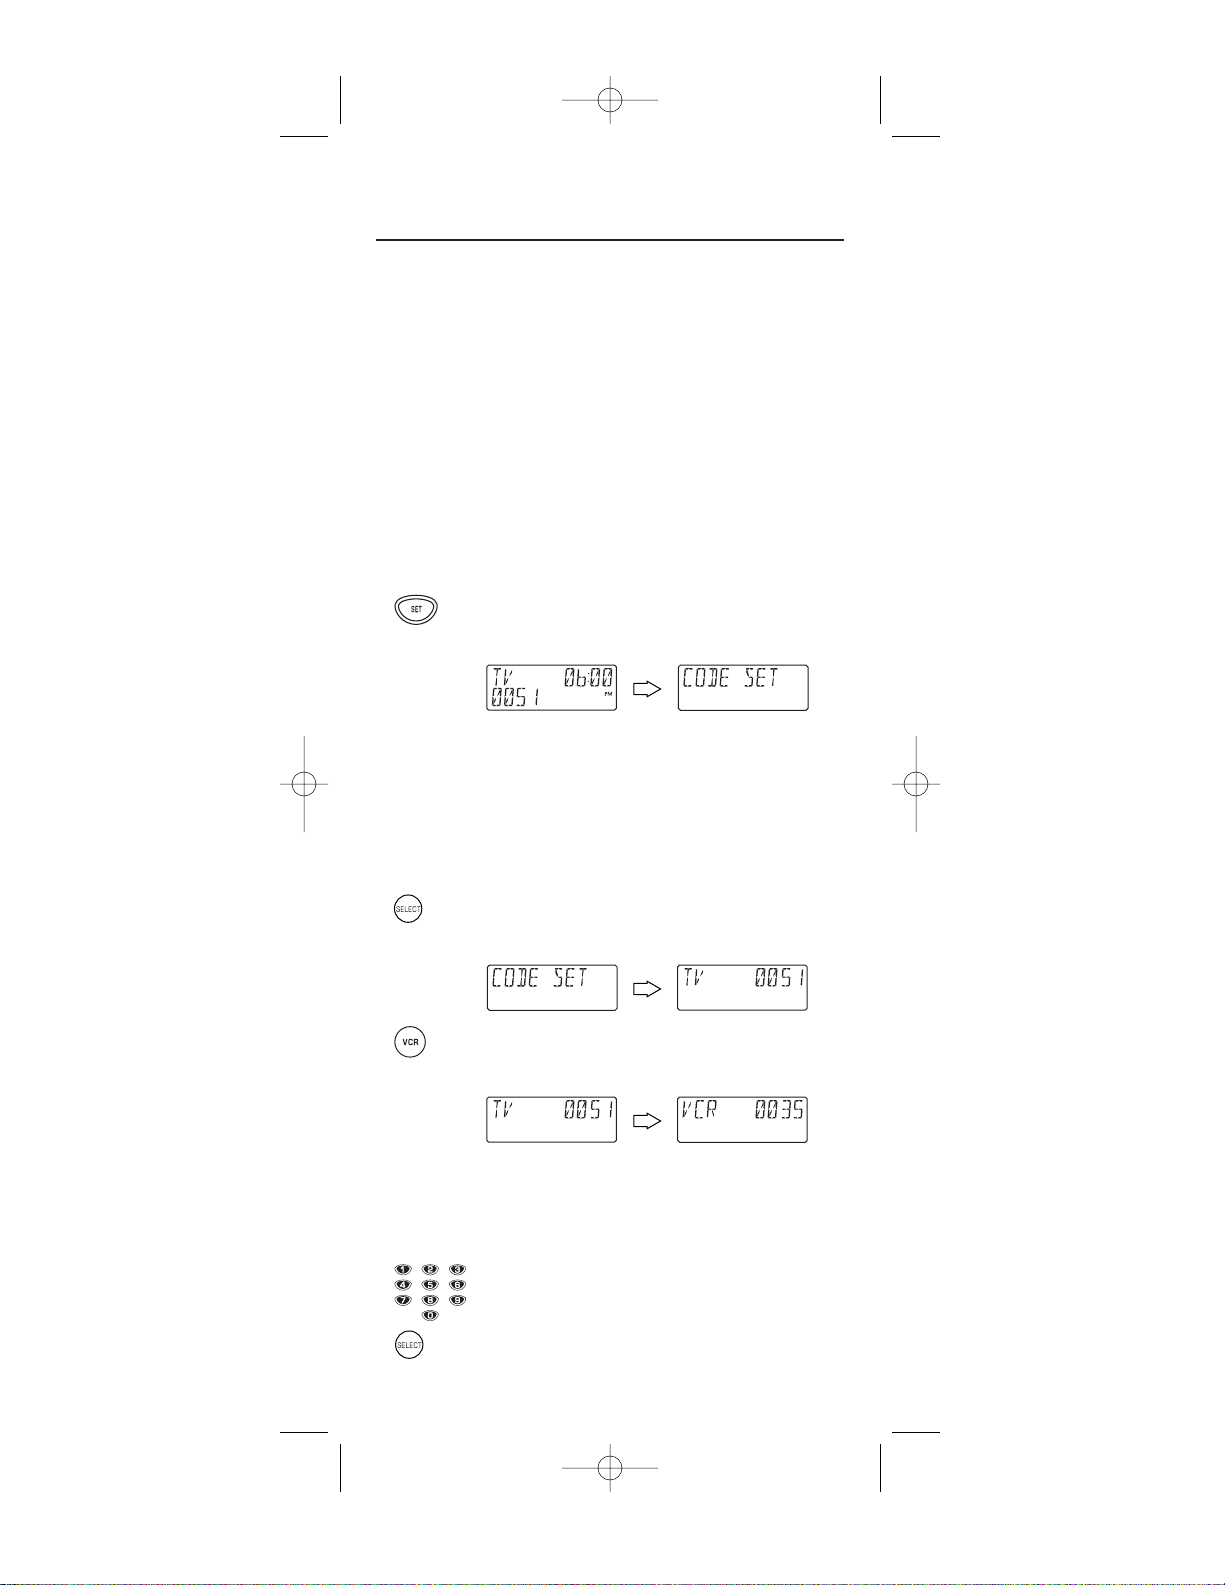
2. On the URC-9910 remote control, press and hold
SETuntil you see the display change from the current device and time to [CODE SET].
NOTE: The device,its code, and time are examples.Your
remote control settings may be different.
NOTE: To exit programming at any time, press EXIT once or
allow 30 seconds of inactivity to lapse.You will see [EXIT
SETUP] as the remote control returns to normal operation.
NOTE: [INVALID] means you have inadvertently pressed an
incorrect key.Note your error and continue programming.
3. Press SELECTonce to begin programming. You will
see the display change to the last-selected device
and its current code (e.g.,TVand 0051).
4. Press a desired device key once (e.g., VCR).You will
see the display change to the desired device and its
current code (e.g.,VCRand 0035).
NOTE: Use the AUX key to program control of home
automation devices, video accessories,audio services, and
other audio or video devices.Alternately, use the AUX key to
program control of a second device type (e.g., a second VCR;
see “Re-assigning Device Keys” on page 37).
5. Use the Manufacturer’s Codes (starting on page 14)
to locate the type of device and brand name. Then
use the keypad to enter the first four-digit code for
your device and press SELECTonce.
10
Producer 2002 RF Mnl 4/4/02 10:15 AM Page 10
For example, to enter the first GE VCR code (on
page 24), press 0twice, 6 once, 0once, and then
SELECTonce.
If the code is entered correctly, you will see the
[SUCCESS]message.
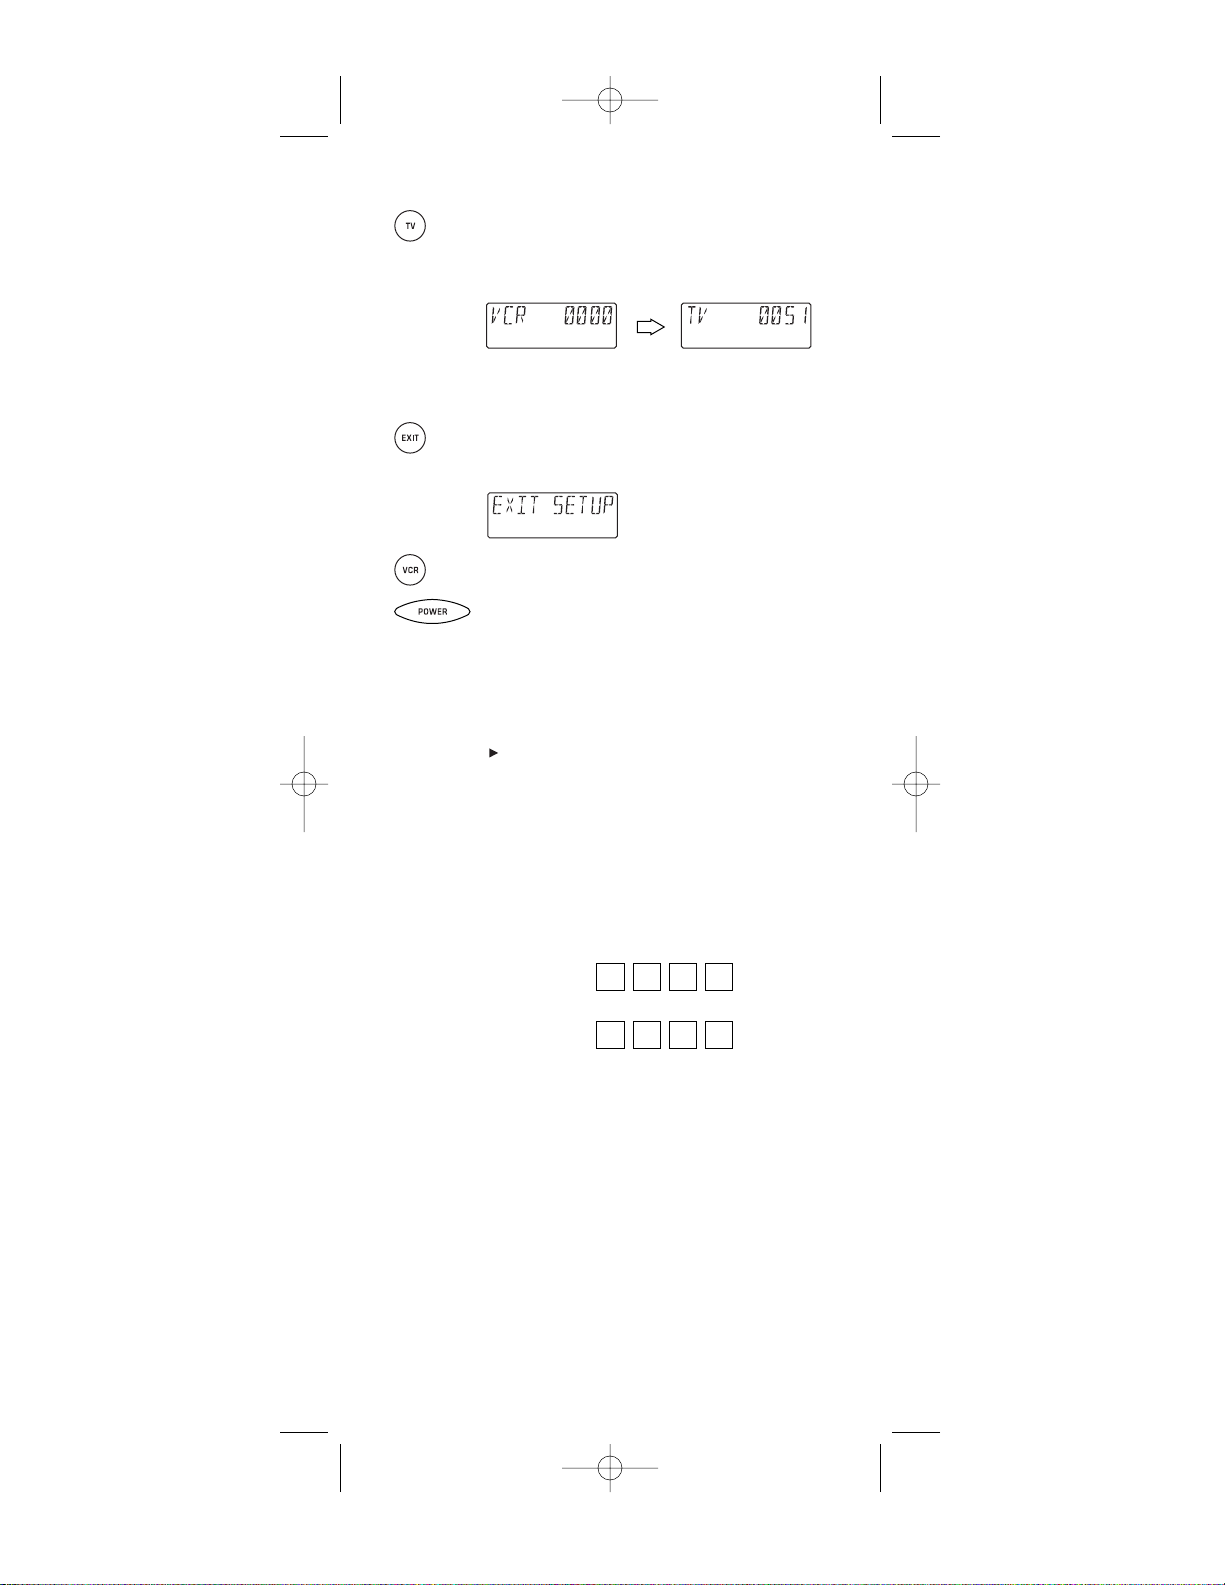
6. Press EXITto exit the programming mode.You will
see an [EXIT SETUP]message as the URC-9910
remote control returns to normal operation.
7. To verify the code works, aim the URC-9910 remote
control at the desired device, press its device key
once and then press POWER once. The device should
turn off. If it does not respond,repeat steps 2
through 6,trying each code for your brand until you
find one that works. If it still does not work, try
Searching For Your Code on page 27.
NOTE: If the device does not have a POWER key, press the
(Play) key.
8. Repeat steps 1 through 7 for each device you want
to control. For future reference,write down each
working device code in the boxes below:
TVCode:
VCRCode:
DVDCode:
SATCode:
CBLCode:
RCVR/AMP
Code:
CDCode:
AUXCode:
Aux.Device
Type:________________________________
11
Producer 2002 RF Mnl 4/4/02 10:15 AM Page 11
PROGRAMMING TV/VCR COMBO CONTROL
Perform the following instructions to control a TV/VCR Combo:
1. Turn on the TV/VCR Combo and insert a video
cassette.
NOTE: Please read steps 2 through 9 completely before proceeding.Highlight or write down the codes and device you
wish to program before starting step 2.
2. On the URC-9910 remote control, press and hold
SETuntil you see the display change from the current device and time to [CODE SET].
NOTE: The device, its code,and time are examples.Your
remote control settings may be different.
NOTE: To exit programming at any time, press EXIT once or
allow 30 seconds of inactivity to lapse.You will see [EXIT
SETUP] as the remote control returns to normal operation.
NOTE: [INVALID] means you have inadvertently pressed an
incorrect key.Note your error and continue programming.
3. Press SELECTonce to begin programming. You will
see the display change to the last-selected device
and its current code (e.g.,TVand 0051)
4. Press VCRonce.You will see the display change to
[VCR]and its current code.
5. Use the Setup Codes For TV/VCR Combos (on
page 22) to locate the type of device and brand
name. Then use the keypad to enter the first four-
digit code for your device and press SELECTonce.
For example, to enter the first Sony TV/VCR Combo
code on page 23,press 0four times and then
SELECTonce.
If the code is entered correctly, you will see the
[SUCCESS]message.
NOTE: If your TV/VCR Combo has a separate TV code, you
will also need to perform step 6.
12
Producer 2002 RF Mnl 4/4/02 10:16 AM Page 12
6. (Optional) Skip this step if your TV/VCR Combo
does not have a separate TV code.Otherwise, press
TVonce.You will see the display change to [TV]and
its current code.
Use the keypad to enter the separate TV code for
your device.
7. Press EXITto exit the programming mode.You will
see [EXIT SETUP] as the URC-9910 remote control
returns to normal operation.
8. To verify the code works, aim the URC-9910 remote
control at the desired device, press VCRonce and
then press POWERonce. The TV/VCR Combo
should turn off. If it does not respond, repeat steps 2
through 8,trying each code for your brand until you
find one that works. If it still does not work, try
Searching For Your Code on page 27.
NOTE: If the device does not have a POWER key, press the
(Play) key.
NOTE: For VCR/TV Combos programmed with separate TV
codes, TV volume is controlled by pressing
VCRfirst and
then
TV. After that, use VOL+ (or VOL-) to raise (or lower)
the TV volume.For other alternatives on controlling volume
keys, see “Changing Volume Lock” on page 32 or “Using
Keymover”on page 38.
9. For future reference, write down the working
TV/VCR combo code in the below boxes:
TV/VCRCode:
TVCode
(if used):
13
Producer 2002 RF Mnl 4/4/02 10:16 AM Page 13

MANUFACTURER’S CODES
Setup Codes for Audio Amplifiers:
GE 0078
Harman/Kardon 0892
JVC 0331
Luxman 0165
Marantz 0321, 0892
Nakamichi 0321
Optimus 0395
Philips 0892
Polk Audio 0892
Realistic 0395
Sansui 0321
Sony 0689
Soundesign 0078
Victor 0331
Wards 0078
Yamaha 0354
Setup Codes For Audio Cassette Decks:
Sony 0243
Setup Codes for Audio Receivers:
ADC 0531
Aiwa 0121,1089, 1405
Bose 1229
Capetronic 0531
Carver 1089, 1189
Compaq 1136
Denon 1104, 1160
Harman/Kardon 0110
Hewlett Packard 1181
JBL 0110
JVC 0074
Kenwood 0186, 1027,1313, 1569, 1570
MCS 0039
Magnavox 0531, 1089, 1189
Marantz 0039, 1089,1189
Onkyo 0135
Optimus 0531, 0670,0186, 1023
Panasonic 0039, 1518
Philips 1089, 1189, 1269
Pioneer 0531, 0014, 0150,0630, 1023
Proscan 1254
Quasar 0039
RCA 0531, 1023, 1254
14
Producer 2002 RF Mnl 4/4/02 10:16 AM Page 14
Sansui 1089
Sharp 0186
Sony 1058, 1158, 1258
Soundesign 0670
Sunfire 1313
Technics 0039, 1308, 1309,1518
Thorens 1189
Victor 0074
Wards 0014
Yamaha 0176, 0186, 1176
Setup Codes For Audio Turntables:
Aiwa 0188
Carver 0188
Magnavox 0188
Marantz 0188
Philips 0188
Setup Codes for Cable Converters:
ABC 0003, 0017
Americast 0899
Bell South 0899
General Instrument 0476, 0810
GoldStar 0144
Hamlin 0009, 0273
Jerrold 0003, 0476, 0276,0810
Memorex 0000
Motorola 0476, 1106
Pace 0237
Panasonic 0000, 0107
Paragon 0000
Philips 0305, 0317
Pioneer 0144, 0533, 0877
Pulsar 0000
Quasar 0000
Regal 0273, 0279
Runco 0000
Samsung 0144
Scientific Atlanta 0477, 0017, 0877
Sony 1006
Starcom 0003
Supercable 0276
Toshiba 0000
Zenith 0000, 0525, 0899
15
Producer 2002 RF Mnl 4/4/02 10:16 AM Page 15

MANUFACTURER’S CODES (continued)
Setup Codes For CD Players:
Aiwa 0157,0124
Burmester 0420
California Audio Labs 0029, 0303
Carver 0157, 0179, 0437
DKK 0000
Denon 0003, 0873
Emerson 0305
Fisher 0179, 0174
Garrard 0420, 0393
Genexxa 0032, 0305
Harman/Kardon 0157, 0173
Hitachi 0032
JVC 0072
Kenwood 0028, 0037,0190, 0626, 0681,0826
Krell 0157
LXI 0305
Linn 0157
MCS 0029
MTC 0420
Magnavox 0157, 0305
Marantz 0029, 0157,0180, 0626
Mission 0157
NSM 0157
Nikko 0174
Onkyo 0101, 0868
Optimus 0000, 0032,0179, 0305, 0037,0420, 0145, 0468, 0437,1063
Panasonic 0029, 0303
Parasound 0420
Philips 0157, 0626
Pioneer 0032, 0305, 0468,1062, 1063
Polk Audio 0157
Proton 0157
QED 0157
Quasar 0029
RCA 0032, 0179, 0305, 0053,0468, 0764, 1062
Realistic 0179, 0420,0180
Rotel 0157, 0420
SAE 0157
Sansui 0157, 0305
Sanyo 0179
Scott 0305
Sears 0305
Sharp 0037, 0180, 0861
Sherwood 0180, 1067
Sonic Frontiers 0157
Sony 0000, 0185, 0490
16
Producer 2002 RF Mnl 4/4/02 10:16 AM Page 16

Soundesign 0145
Tascam 0420
Teac 0420, 0393, 0174,0180
Technics 0029, 0303
Victor 0072
Wards 0157, 0053
Yamaha 0036, 0187, 0888
Yorx 0461
Setup Codes For DAT (Digital Audio Tape) Recorders:
Carver 0158
Harman/Kardon 0158
Magnavox 0158
Marantz 0158
Philips 0158
Setup Codes For DVD Players:
Aiwa 0641
Apex 0672
Denon 0490, 0634
Emerson 0591
Fisher 0670
GE 0522, 0717
GPX 0769
Go Video 0715
Gradiente 0651
Harman/Kardon 0582
Hitachi 0573, 0664
Hiteker 0672
JVC 0558, 0623
Kenwood 0534, 0682
Konka 0711, 0719, 0720,0721
Magnavox 0503, 0675
Marantz 0539
Mitsubishi 0521
Onkyo 0503, 0627
Optimus 0571
Oritron 0651
Panasonic 0490, 0632
Philips 0503, 0539
Pioneer 0525, 0571, 0632
Princeton 0674
Proscan 0522
RCA 0522, 0571, 0704, 0717
Samsung 0573
Sanyo 0670
continued on next page...
17
Producer 2002 RF Mnl 4/4/02 10:16 AM Page 17

MANUFACTURER’S CODES (continued)
Setup Codes For DVD Players:
Sharp 0630
Sherwood 0633
Sony 0533
Technics 0490
Techwood 0692
Theta Digital 0571
Toshiba 0503
Yamaha 0490, 0545
Zenith 0503, 0591
Setup Codes For Home Automation:
GE 0240
One For All 0167
RadioShack 0240
Security System 0167
Universal X10 0167
X10 0167
Setup Codes For LD (Laser Disc) Players:
Denon 0059
Mitsubishi 0059
NAD 0059
Optimus 0059
Pioneer 0059
Setup Codes For Misc. Audio Services:
Jerrold 0459, 0520
Scientific Atlanta 0460
Starcom 0459
Setup Codes For Satellite Receivers:
AlphaStar 0772
Chaparral 0216
Echostar 0775, 1005
Expressvu 0775
GE 0566
General Instrument 0869
HTS 0775
Hitachi 0819
Hughes Network Sys. 0749, 1142,1749
JVC 0775
Magnavox 0724, 0722
18
Producer 2002 RF Mnl 4/4/02 10:16 AM Page 18
Memorex 0724
Mitsubishi 0749
Next Level 0869
Panasonic 0701, 0247
Philips 0749, 0724, 0722,1076, 1142
Proscan 0392
RCA 0566, 0143, 0392, 0855
RadioShack 0869
Samsung 1109
Sony 0639
Star Choice 0869
Toshiba 0749, 0790
Uniden 0724,0722
Zenith 0856
Setup Codes For TVs:
AOC 0030, 0019
Admiral 0093, 0463
Aiko 0092
Aiwa 0701
Akai 0030
Alaron 0179
Ambassador 0177
America Action 0180
Ampro 0751
Anam 0180
Audiovox 0451, 0180, 0092, 0623
Baysonic 0180
Belcor 0019
Bell & Howell 0154, 0016
Bradford 0180
Brockwood 0019
Broksonic 0236,0463
CXC 0180
Candle 0030, 0056
Carnivale 0030
Carver 0054
Celebrity 0000
Cineral 0451, 0092
Citizen 0060, 0030, 0056,0092
Concerto 0056
Contec 0180
Craig 0180
Crosley 0054
Crown 0180
Curtis Mathes 0047,0054,0154, 0051,0451, 0093,0060, 0030,0145, 0056,
0016, 0166, 0466,0747, 1147, 1347
Daewoo 0451, 0019,0092, 0623,0624
continued on next page...
19
Producer 2002 RF Mnl 4/4/02 10:16 AM Page 19

MANUFACTURER’S CODES
Setup Codes For TVs (continued):
Daytron 0019
Denon 0145
Dumont 0017, 0019
Dwin 0720, 0774
Electroband 0000
Emerson 0154, 0236, 0463,0180, 0178, 0019, 0179,0177,0623, 0624
Envision 0030
Fisher 0154
Fujitsu 0179, 0683
Funai 0180, 0179, 0171
Futuretech 0180
GE 0047, 0051, 0451,0093, 0178, 0021, 0747,1147, 1347
Gibralter 0017, 0030, 0019
GoldStar 0030, 0178,0019, 0056
Gradiente 0053, 0056
Grunpy 0180, 0179
Hallmark 0178
Harley Davidson 0179
Harman/Kardon 0054
Harvard 0180
Hitachi 0145, 0056,0016, 0151
Infinity 0054
Inteq 0017
JBL 0054
JCB 0000
JVC 0053
KEC 0180
KTV 0180, 0030
Kenwood 0030, 0019
Konka 0628, 0632, 0638,0703, 0707
LG 0056
LXI 0047, 0054, 0154, 0156,0178, 0747
Logik 0016
Luxman 0056
MGA 0150, 0030, 0178, 0019
MTC 0060, 0030, 0019, 0056
Magnavox 0054, 0030, 0179, 1254
Majestic 0016
Marantz 0054, 0030
Matsushita 0250
Megatron 0178,0145
Memorex 0154, 0250, 0463, 0150,0178, 0179,0056, 0016
Midland 0047, 0017,0051, 0747
Minutz 0021
Mitsubishi 0093, 0150, 0178, 0019
Motorola 0093
20
Producer 2002 RF Mnl 4/4/02 10:16 AM Page 20

Multitech 0180
NAD 0156, 0178,0166
NEC 0030, 0019, 0056
NTC 0092
Nikko 0030, 0178, 0092
Onwa 0180
Optimus 0154, 0250,0166
Optonica 0093
Orion 0236, 0463, 0179
Panasonic 0051, 0250
Penney 0047, 0156, 0051, 0060,0030, 0178, 0021, 0019,0056, 0747,
1347
Philco 0054, 0463, 0030,0145, 0019
Philips 0054
Pilot 0030, 0019
Pioneer 0166, 0679
Portland 0019, 0092
Princeton 0717
Prism 0051
Proscan 0047, 0747
Proton 0178, 0466
Pulsar 0017, 0019
Quasar 0051, 0250
RCA 0047, 0051, 0093, 0019,0090, 0679, 0747, 1047,1147, 1247,
1347, 1447
RadioShack 0047,0154, 0180,0030, 0178,0019, 0056,0747
Realistic 0154, 0180,0030, 0178,0019, 0056
Runco 0017, 0030, 0603
SSS 0180, 0019
Sampo 0030
Samsung 0060, 0030, 0178, 0019,0056
Sansei 0451
Sansui 0463
Sanyo 0154
Scimitsu 0019
Scotch 0178
Scott 0236, 0180,0178, 0019,0179
Sears 0047, 0054,0154, 0156,0178, 0179,0056, 0171,0747
Semivox 0180
Semp 0156
Sharp 0093, 0688
Shogun 0019
Signature 0016
Sony 0000
Soundesign 0180, 0178,0179
Squareview 0171
Starlite 0180
Supreme 0000
Sylvania 0054, 0030
continued on next page...
21
Producer 2002 RF Mnl 4/4/02 10:16 AM Page 21

MANUFACTURER’S CODES
Setup Codes For TVs (continued):
Symphonic 0180, 0171
TMK 0178, 0056, 0177
TNCi 0017
Tandy 0093
Technics 0051, 0250
Technol Ace 0179
Techwood 0051, 0056
Teknika 0054, 0180, 0150,0060, 0019, 0179,0056, 0016, 0092
Telefunken 0056
Toshiba 0154, 0156, 0060, 1256
Vector Research 0030
Victor 0053
Vidikron 0054
Vidtech 0178, 0019
Wards 0054, 0030, 0178, 0021, 0019,0179, 0056, 0016
White Westinghouse 0463, 0623, 0624
Yamaha 0030, 0019
Zenith 0017, 0463, 0016, 0092,0624
Setup Codes For TV/VCR Combos:
Broksonic 0002,0479 (for TV use 0463)
Citizen 0278
Colt 0072
Curtis Mathes 0035 (for TV use 0051)
Daewoo 0278 (for TV use 0624)
Emerson 0002, 0278 (for TV use 0624), 0294 (for TV use 0236),
0479 (for TV use 0463)
Funai 0000
GE 0035 (for TV use 0051), 0048 (for TV use 0093),
0060 (for TV use 0047), 0240
GoldStar 0037 (for TV use 0056)
Harley Davidson 0000
Hitachi 0000
Lloyd’s 0000
Magnasonic 0278, 0563
Magnavox 0000, 0081 (for TV use 0054)
Magnin 0240
Memorex 0037, 0162 (for TV use 0250),1037, 1162,1262
MGA 0240
Mitsubishi 0048 (for TV use 0093)
Optimus 0162 (for TV use 0250), 1162,1262
Orion 0000, 0479 (for TV use 0463)
Panasonic 0035 (for TV use 0051), 0162 (for TV use 0250),1162,
1262
Penney 0035 (for TV use 0051), 0037 (for TV use 0056),0240
Quasar 0035 (for TV use 0051), 0162 (for TV use 0250)
22
Producer 2002 RF Mnl 4/4/02 10:16 AM Page 22

RadioShack 1037
RCA 0035 (for TV use 0051), 0048 (for TV use 0093),
0060 (for TV use 0047), 0240
Sansui 0000, 0479 (for TV use 0463)
Sanyo 0240
Sears 0000,0037 (for TV use 0056)
Sharp 0048 (for TV use 0093)
Sony 0000, 0032 (for TV use 0000)
Sylvania 0081 (for TV use 0054)
Symphonic 0000, 0563
Thomas 0000
White Westinghouse 0278 (for TV use 0624)
Zenith 0000, 0637 (for TV use 0624)
Setup Codes For VCRs:
Admiral 0048, 0209
Adventura 0000
Aiko 0278
Aiwa 0037, 0000
Akai 0041
America Action 0278
American High 0035
Asha 0240
Audiovox 0037
Beaumark 0240
Bell & Howell 0104
Broksonic 0184,0121, 0209,0002, 0479
CCE 0072, 0278
Calix 0037
Canon 0035
Carver 0081
Cineral 0278
Citizen 0037, 0278
Colt 0072
Craig 0037, 0047,0240, 0072
Curtis Mathes 0060,0035,0041, 0162,0760
Cybernex 0240
Daewoo 0045, 0278
Denon 0042
Dynatech 0000
Electrohome 0037
Electrophonic 0037
Emerex 0032
Emerson 0037, 0184, 0000,0121, 0043, 0209, 0002,0278, 0479
Fisher 0047, 0104
Fuji 0035, 0033
Funai 0000
GE 0060, 0035, 0048,0240, 0760
continued on next page...
23
Producer 2002 RF Mnl 4/4/02 10:16 AM Page 23

MANUFACTURER’S CODES
Setup Codes For VCRs (continued):
Garrard 0000
Go Video 0432
GoldStar 0037, 0038
Gradiente 0000
HI-Q 0047
Harley Davidson 0000
Harman/Kardon 0081, 0038
Harwood 0072
Hitachi 0000, 0042, 0041
Hughes Network Sys. 0042
JVC 0067, 0041
Jensen 0041
KEC 0037, 0278
KLH 0072
Kenwood 0067, 0041,0038
Kodak 0035, 0037
LXI 0037
Lloyd’s 0000
Logik 0072
MEI 0035
MGA 0240, 0043
MGN Technology 0240
MTC 0240, 0000
Magnasonic 0278
Magnavox 0035, 0039, 0081, 0000,0149, 0563
Magnin 0240
Marantz 0035, 0081
Marta 0037
Matsushita 0035, 0162
Memorex 0035, 0037, 0048, 0039,0047, 0240,0000, 0104,0209, 0162,
0479, 1037, 1162,1262
Minolta 0042
Mitsubishi 0048, 0067, 0043
Motorola 0035, 0048
Multitech 0000, 0072
NEC 0104, 0067, 0041, 0038
Nikko 0037
Noblex 0240
Olympus 0035
Optimus 0037, 0048,0104, 0162, 0432,1048, 1062, 1162, 1262
Orion 0184, 0209, 0002,0479
Panasonic 0035, 0162, 0225,0616, 1062,1162, 1262, 1362
Penney 0035, 0037, 0240, 0042,0038
Pentax 0042
Philco 0035, 0209, 0479
Philips 0035, 0081, 0618,1081, 1181
Pilot 0037
24
Producer 2002 RF Mnl 4/4/02 10:16 AM Page 24

Pioneer 0067
Polk Audio 0081
Profitronic 0240
Proscan 0060, 0760
Protec 0072
Pulsar 0039
Quasar 0035, 0162, 1162
RCA 0060, 0035, 0048, 0240,0042, 0149, 0760
RadioShack 0000,1037
Radix 0037
Randex 0037
Realistic 0035, 0037,0048, 0047,0000, 0104
ReplayTV 0614, 0616
Runco 0039
STS 0042
Samsung 0240, 0045
Sanky 0048, 0039
Sansui 0000, 0067,0209, 0041, 0479
Sanyo 0047, 0240, 0104
Scott 0184, 0045,0121, 0043
Sears 0035, 0037,0047, 0000,0042, 0104
Semp 0045
Sharp 0048
Shintom 0072
Shogun 0240
Singer 0072
Sony 0035, 0032, 0000,0033, 0636, 1032
Sylvania 0035, 0081, 0000,0043
Symphonic 0000
TMK 0240
Tatung 0041
Teac 0000, 0041
Technics 0035, 0162
Teknika 0035, 0037, 0000
Thomas 0000
Tivo 0618, 0636
Toshiba 0045, 0043
Totevision 0037, 0240
Unitech 0240
Vector 0045
Vector Research 0038
Video Concepts 0045
Videosonic 0240
Wards 0060, 0035, 0048, 0047, 0081,0240, 0000, 0042, 0072,0149,
0760
White Westinghouse 0209, 0072, 0278
XR-1000 0035, 0000,0072
Yamaha 0038
Zenith 0039, 0000, 0209, 0033,0479
25
Producer 2002 RF Mnl 4/4/02 10:16 AM Page 25

MANUFACTURER’S CODES (continued)
Setup Codes For Video Accessories:
Archer 0160
GC Electronics 0160
Jebsee 0160
Magnavox 0818
Panasonic 1120
Philips 0818
Pioneer 1010
RadioShack 0160
Sensory Science 1126
Sharp 1010
Sony 0850
26
Producer 2002 RF Mnl 4/4/02 10:16 AM Page 26

SEARCHING FOR YOUR CODE
If your device does not respond to the URC-9910 remote control
after trying all codes listed for your brand,or if your brand is not
listed at all,try manually searching for your code.
For example, to manually search for a code for your TV:
1. Turn on the TV.
2. On the URC-9910 remote control, press and hold
SETuntil you see the display change from the
current device and time to [CODE SET].
NOTE: The device,its code, and time are examples.Your
remote control settings may be different.
NOTE: To exit programming at any time, press EXIT once or
allow 30 seconds of inactivity to lapse.You will see [EXIT
SETUP] as the remote control returns to normal operation.
NOTE: [INVALID] means you have inadvertently pressed an
incorrect key.Note your error and continue programming.
3. Press the ▼ key once until you see the display
change to [MAN SEARCH].
NOTE: If you go past [MAN SEARCH],press the ▲key one or
more times to return to it.
4. Press SELECTonce to begin programming. You will
see the display change to the last-selected device
and its code (e.g.,VCR and 0035).
5. Press a desired device key once (e.g., TV).You will
see the display change to the desired device and the
first code in the manual search list (e.g.,TV and
0047).
6. Aim the URC-9910 remote control at the device
(e.g., TV)and press SELECT once.You will see the
LED(red light) blink and the (IR) icon flash
indicating IR codes are being transmitted.
continued on next page...
27
Producer 2002 RF Mnl 4/4/02 10:16 AM Page 27

SEARCHING FOR YOUR CODE (continued)
NOTE: In the manual search mode, the URC-9910 remote
control will send IR codes from its library to the selected
device, starting with the most popular code first.
7. If the device (e.g., TV) turned off, skip to the next
step.If it did not turn off,aim the URC-9910 remote
control at the device (e.g.,TV) and press the ▲ key
once to advance the manual search to the next code
(e.g., TVand 0054).Again you will see the LED(red
light) blink and the (IR) icon flash.
Repeat this step as often as needed until you find a
code that turns off the device.
8. To save the working code,press SELECTonce. The
display will confirm your entry with [SUCCESS] and
then [EXIT SETUP].
The URC-9910 remote control will return to
normal operation.
NOTE: For future reference,write down the working device
code in the appropriate boxes on page 11.
9. To perform a manual code search for another
device, repeat steps 1 through 8, but this time (in
step 5) substitute the appropriate device key for the
device you are searching for.
NOTE: If you have not found a working device code after trying the above
procedure, please contact our customer service center to upgrade your
One For All IR/RF LCD 8-Device With Learning Universal Remote Control
(URC-9910).See “About Upgrading”on page 51.
28
Producer 2002 RF Mnl 4/4/02 10:16 AM Page 28

USING LEARNING
Program the learning keys (L1~L4) to add functions that are
unique to your home entertainment devices (e.g.,VCR Tracking Up
or Down).However,there are some considerations:
• Your original remote control must be in working order for the
learning feature to work properly.
• Learned keys are mode specific, so each one can store a unique
function for each mode.
• Learned keys can be used in macros (see Using Macros on page 34).
• Although dedicated keys (L1~ L4) are provided for storing
learned functions, you can also use any key (except keys for
devices and programming) for learning. However, using them as
learned keys will overwrite their original functions.
• For optimum learning, avoid high levels of ambient light such as
natural sunlight or energy-efficient fluorescent lights.
NOTE: Please have your original remote controls handy before programming
learning. Be sure to press each key within 5 seconds of the previous entry.
If not, the URC-9910 remote control will exit the programming mode.
Programming A Learning Key
1. On the URC-9910 remote control, press and hold
SETuntil you see the display change from the current device and time to [CODE SET].
NOTE: The device,its code, and time are examples.Your
remote control settings may be different.
NOTE: To exit programming at any time, press EXIT once or
allow 30 seconds of inactivity to lapse.You will see [EXIT
SETUP] as the remote control returns to normal operation.
NOTE: [INVALID] means you have inadvertently pressed an
incorrect key.Note your error and continue programming.
2. (x 2) Press the ▼ key twice until you see the display
changes to [IR LEARN].
NOTE: If you go past [IR LEARN],press the ▲key one or
more times to return to it.
3. Press SELECTonce to begin programming. You will
see the display change to the last-selected device
(e.g., TV).
continued on next page...
29
Producer 2002 RF Mnl 4/4/02 10:16 AM Page 29

USING LEARNING
Programming A Learning Key (continued)
4. Press a device key once (e.g.,TV) to assign a desired
mode for learning.
5. Select an open learning key (e.g.,L1) and press it
once.You will see the display change to [LEARNING]
and the LED(red light) will turn on for 5 seconds.
6. Place your original remote control (e.g., TV remote
control) head-to-head (about 2" apart) from the
URC-9910 remote control.
7. On your original remote control, press and hold the
key (i.e.,feature) to be learned until until you see
[SUCCESS]appear on the URC-9910 remote control.
The display will return to device mode you selected
for learning (e.g.,TV).
If the key was not learned,you will see an [ERROR]
message instead.
Repeat steps 5 through 7 as needed to achieve
[SUCCESS].
8. To learn functions onto other learning keys (e.g.,L2
~ L4), repeat steps 4 through 7 for each key.
9. Press EXITto exit the programming mode.You will
see an [EXIT SETUP]message as the remote control
returns to normal operation.
10. To test a learned feature, aim the URC-9910 remote
control at the desired device and press its device key
once (e.g.,TV, where the learning mode was
assigned). Then press the learning key (e.g.,L1)
2"
30
Producer 2002 RF Mnl 4/4/02 10:16 AM Page 30

where the learned feature is stored.The feature
should activate. If not, try the programming the
learning key again,starting with step 1 (on page 29).
Deleting A Function From A Learning Key
1. On the URC-9910 remote control, press and hold
SETuntil you see the display change from the current device and time to [CODE SET].
NOTE: The device,its code, and time are examples.Your
remote control settings may be different.
NOTE: To exit programming at any time, press EXIT once or
allow 30 seconds of inactivity to lapse.You will see [EXIT
SETUP] as the remote control returns to normal operation.
NOTE: [INVALID] means you have inadvertently pressed an
incorrect key.Note your error and continue programming.
2. (x 3) Press the ▼ key three times until you see the display
change to [IR DELETE].
NOTE: If you go past [IR DELETE],press the ▲key one or
more times to return to it.
3. Press SELECTonce to begin programming. You will
see the display change to the last-selected device
(e.g., TV).
4. Press a device key once (e.g.,TV) for the mode that
contains the learned function.
5. Press learning key once (e.g.,L1) where the feature
(to be deleted) is stored.You will see the display
change to [DELETED] and then return to last-selected
mode (e.g., TV).
6. If desired,repeat steps 4 and 5 to delete other
learned functions.
7. Press EXITto exit the programming mode.You will
see an [EXIT SETUP]message as the URC-9910
remote control returns to normal operation.
31
Producer 2002 RF Mnl 4/4/02 10:16 AM Page 31

USING VOLUME LOCK
In its default (unlocked) state, the URC-9910 remote control allows
each device to control its own volume only in its own mode (e.g.,TV
volume in the TV mode, VCRvolume in VCRmode, etc.).However,
using our Volu me Lo ck feature, you can lock the volume controls for
each device to all modes (e.g., RCVR/AMPvolume in all modes).
Moreover, using the Volume Unlock feature (see the next page),
you can further customize the settings so that a device’s volume
controls are unlocked in one mode, but remain locked in all other
modes (e.g., TVvolume in the TV mode and RCVR/AMP volume in
other modes).
Programming Volume Lock
1. On the URC-9910 remote control, press and hold
SETuntil you see the display change from the current device and time to [CODE SET].
NOTE: The device,its code, and time are examples.Your
remote control settings may be different.
NOTE: To exit programming at any time, press EXIT once or
allow 30 seconds of inactivity to lapse.You will see [EXIT
SETUP] as the remote control returns to normal operation.
NOTE: [INVALID] means you have inadvertently pressed an
incorrect key.Note your error and continue programming.
2. (x 4) Press the ▼ key four times until you see the display
change to [VOL LOCK].
NOTE: If you go past [VOL LOCK],press the ▲key one or
more times to return to it.
3. Press SELECTonce to begin programming. You will
see the display change to [TO MODE].
4. Press a mode key (e.g.,RCVR/AMP) to lock a device’s
volume controls to all modes.You will see the display
change to [SUCCESS] and then [EXIT SETUP] as the
remote control automatically exits the programming
mode and returns to normal operation.
5. If desired,repeat steps 1 through 4 as needed to lock
volume controls for other devices to all modes.
32
Producer 2002 RF Mnl 4/4/02 10:16 AM Page 32

Programming Volume Unlock
1. On the URC-9910 remote control, press and hold
SETuntil you see the display change from the
current device and time to [CODE SET].
2. (x 5) Press the
▼ key five times until you see the display
change to [VOL UNLOCK].
NOTE: If you go past [VOL UNLOCK],press the ▲key one or
more times to return to it.
3. Press SELECTonce to begin programming. You will
see the display change to [ALL MODE].
To unlock one mode,skip to step 4.Otherwise press
SELECTonce to unlock all modes.You will see the
display change to [UNLOCKED] and then [EXIT SETUP]
as the remote control automatically exits the programming mode and returns to normal operation.
4. or (Optional) Press ▲ (or ▼) once.You will see the
display change to [ONE MODE].
a. Press SELECTonce.You will see the display change
to [SEL MODE].
b. Press a mode key once (e.g.,TV) to unlock it.
You will see the display change to [UNLOCKED]
and return to [SEL MODE].
c. If desired, repeat step 4b as needed to unlock
volume controls for other devices.Otherwise,
press EXIT to exit the programming mode.You
will see an [EXIT SETUP]message as the remote
control returns to normal operation.
33
Producer 2002 RF Mnl 4/4/02 10:16 AM Page 33

USING MACROS
With programming, the M1through M3 keys on your URC-9910
remote control can be setup to perform repetitive,time-consuming
operations for easy, convenient access through the press of a single
key.Macro keys are ideal for home theater operations, setting a
favorite channel, guide steps, or other multiple functions you would
like to control with one key press.Moreover, each macro key can
hold up to15 key presses total.
NOTE: Programming a new macro over an existing one will erase the
original macro.
Programming A Favorite Channel
With so many channels available through your cable or satellite
system provider, you can program a macro that directly selects a
favorite channel with one key press. For example,let’s assume your
favorite cable programs are on channel 71.Perform the following
steps to program a macro key for direct access of this channel:
NOTE: This example assumes the TV tuner is connected directly to the cable
line and not through a cable converter.
1. On the URC-9910 remote control, press and hold
SETuntil you see the display change from the current device and time to [CODE SET].
NOTE: The device,its code, and time are examples.Your
remote control settings may be different.
NOTE: To exit programming at any time, press EXIT once or
allow 30 seconds of inactivity to lapse.You will see [EXIT
SETUP] as the remote control returns to normal operation.
NOTE: [INVALID] means you have inadvertently pressed an
incorrect key.Note your error and continue programming.
2. (x 6) Press the ▼ key six times until you see the display
change to [KEY MACRO].
NOTE: If you go past [KEY MACRO],press the ▲key one or
more times to return to it.
3. Press SELECTonce to begin programming. You will
see the display change to [SEL MACKEY].
4. Select an open macro key (e.g.,M1) and press it
once.You will see the display change to [ENTER SEQ].
34
Producer 2002 RF Mnl 4/4/02 10:16 AM Page 34

5. Enter a macro sequence of up to 15 keys.For our
example, press the following keys once in this order:
TV- 7- 1
NOTE: If you have access to over 100 channels,add a 0
before the channel numbers (e.g.,0-7 -1). If the original
remote control required pressing an
Enter key to change the
channel, also press the Enter key after the channel number
(e.g., 0-7-1-ENTER).
NOTE: An [ERROR] message,followed by [MAX = 15] alerts
you that the macro sequence must be 15 keys or less.
After pressing the first key (in the macro sequence),
you will see the display change to [SEL TO END].This
message acts as a reminder to use SELECTto end the
sequence (see next step).
6. To end the macro sequence, press and hold SELECT
until you see [SUCCESS]appear in the display,
followed by [EXIT SETUP]. The URC-9910 remote
control will automatically exit the programming
mode and return to normal operation.
Now when you press M1,you will instantly see cable channel 71 on
your TV set.
Programming A Master Power Key With Instant
Channel Selection
A macro key can be programmed to turn on and off your devices as
well.For example,let’s set up a sequence that will turn on the TV
and tune it to channel3, and then turn on the cable converter and
tune it to a premium channel (e.g., 11).
NOTE: This example assumes all equipment is turned off and that the TV is
connected through the cable converter with TV tuning set to channel 3.
1. Perform steps 1 through 4 of the previous section,
Programming A Favorite Channel on page 34.
However, this time in step 4, substitute another open
macro key (e.g.,M2).
2. Enter a macro sequence of up to 15 keys.For our
example, press the following keys once in this order:
CBL- POWER - TV - POWER- 0- 3 - CBL- 1-1
NOTE: If you have access to over 100 channels,add an 0
before each set of channel numbers (e.g.,0- 0-3 and 0 -1- 1).
If the original remote control required pressing an
Enter key
to change the channel, also press the Enter key after each
channel number (e.g., 0-0-3-ENTER and 0 -1- 1-ENTER).
continued on next page...
35
Producer 2002 RF Mnl 4/4/02 10:16 AM Page 35

USING MACROS
Programming A Master Power Key With Instant
Channel Selection (continued)
NOTE: An [ERROR] message,followed by [MAX = 15] alerts
you that the macro sequence must be 15 keys or less.
3. After pressing the first key (in the macro sequence),
you will see the display change to [SEL TO END].
This message acts as a reminder to use SELECTto
end the sequence (see next step).
4. To end the macro sequence, press and hold SELECT
until you see [SUCCESS]appear in the display,
followed by [EXIT SETUP].The remote control will
automatically exit the programming mode and return
to normal operation.
Now when you press M2once, the cable converter and TV will turn
on, the TV will tune to channel 03, and then the cable converter will
tune to channel 11.
Clearing A Macro
1. Perform steps 1 through 4 of the earlier section,
Programming A Favorite Channel on page 34.
However, this time in step 4, select a macro key you
want to be cleared (e.g., M1 ~ M3).
2. Press and hold SELECT to clear the macro key.
You will see the display change to [SEL TO END].This
message acts as a reminder to use SELECTto end the
sequence (see next step).
3. Continue pressing SELECT until you see [SUCCESS]
appear in the display,followed by [EXIT SETUP].The
URC-9910 remote control will automatically exit the
programming mode and return to normal operation.
36
Producer 2002 RF Mnl 4/4/02 10:16 AM Page 36

RE-ASSIGNING DEVICE KEYS
The URC-9910 remote control can control a second TV,VCR,DVD
player, or other device by using the Mode Map feature. For example,
to control a TV, a cable converter, and two VCRs,you will need to re-
assign the unused AUXkey to operate the second VCR as follows:
1. On the URC-9910 remote control, press and hold
SETuntil you see the display change from the current device and time to [CODE SET].
NOTE: The device,its code, and time are examples.Your
remote control settings may be different.
NOTE: To exit programming at any time, press EXIT once or
allow 30 seconds of inactivity to lapse.You will see [EXIT
SETUP] as the remote control returns to normal operation.
NOTE: [INVALID] means you have inadvertently pressed an
incorrect key.Note your error and continue programming.
2. (x 7) Press the ▼ key seven times until you see the display
change to [MODE MAP].
NOTE: If you go past [MODE MAP],press the ▲key one or
more times to return to it.
3. Press SELECTonce to begin programming. You will
see the display change to [FROM MODE].
4. Select a mode to be copied (e.g.,VCR) and press it
once.You will see the display change to [TO MODE].
5. Select a mode to be re-assigned (e.g., AUX) and
press it once.You will see the display change to
[SUCCESS],followed by [EXIT SETUP]. The URC-9910
remote control will automatically exit the programming mode and return to normal operation.
6. The AUX key is now ready to be programmed as
your second VCR.See Programming Device Control
on page 10.
continued on next page...
37
Producer 2002 RF Mnl 4/4/02 10:16 AM Page 37

RE-ASSIGNING DEVICE KEYS (continued)
To re-assign other device keys to the AUXkey,repeat steps 1 through
6 on the previous page but substitute the key sequence from the
below chart:
To Re-Assign Device Key Perform Sequence
AUX as 2nd TV key: SET*- ▼ (x 7) - SELECT- TV - AUX
AUX as 2nd DVD key: SET*-
▼ (x 7) - SELECT
- DVD- AUX
AUX as 2nd SAT key: SET*- ▼ (x 7) - SELECT
- SAT- AUX
AUX as 2nd CD key: SET*- ▼ (x 7) - SELECT
- CD- AUX
AUX as 2nd CBL key: SET*- ▼ (x 7)- SELECT
- CBL- AUX
AUX as 2nd RCVR/AMP key: SET*- ▼ (x 7) - SELECT- RCVR/AMP - AUX
*NOTE: Press and hold SET (see step 1 on previous page).
You can also re-assign another unused device key by substituting an
open key for the AUX key in the above chart and performing the
sequence.For example,to re-assign an unused SATkey as a second
CDkey, perform SET*- ▼ (x 7) - SELECT - CD- SAT.
USING KEYMOVER
The URC-9910 remote control includes a Keym over feature that
allows you to map (or copy) keys from one mode (i.e., source mode)
to another mode (i.e., destination mode).
NOTE: The following keys cannot be used as a source or destination: TV, VCR,
DVD, AUX,SAT,CBL, RCVR/AMP,CD, HOME THEATER,and SET.
Programming Keymover
For example, if your VCR does not have volume control,try mapping
the volume and mute keys from TVmode to VCRmode as follows:
1. On the URC-9910 remote control, press and hold
SETuntil you see the display change from the current device and time to [CODE SET].
NOTE: The device,its code, and time are examples.Your
remote control settings may be different.
NOTE: To exit programming at any time, press EXIT once or
allow 30 seconds of inactivity to lapse.You will see [EXIT
SETUP] as the remote control returns to normal operation.
NOTE: [INVALID] means you have inadvertently pressed an
incorrect key.Note your error and continue programming.
2. (x 8) Press the ▼ key eight times until you see the display
change to [KEYMOVER].
38
Producer 2002 RF Mnl 4/4/02 10:16 AM Page 38

NOTE: If you go past [KEYMOVER],press the ▲key one or
more times to return to it.
3. Press SELECTonce to begin programming. You will
see the display change to [FROM MODE].
4. Select a source mode (e.g.,TV) and press it once.You
will see the display change to [FROM KEY].
5. Select a source key (e.g.,VOL+) and press it once.
You will see the display change to [TO MODE].
6. Select a destination mode (e.g., VCR) and press it
once.You will see the display change to [TO KEY].
7. Select a destination key (e.g.,VOL+) and press it
once.You will see the display change to [SUCCESS],
followed by [EXIT SETUP]. The URC-9910 remote
control will automatically exit the programming
mode and return to normal operation.
8. Repeat steps 1 through 7 twice more,substituting
VOL–and MUTEas source and destination keys in
steps 5 and 7.
Upon completion of the above procedure, you can now use your
URC-9910 remote control to control the TV’s volume and mute in
the VCR mode,as well as in the TV mode.
Restoring Keymoved Keys to Default Settings
Restoring A Single Keymoved Key
1. Perform steps 1 through 7 of the previous section,
Programming Keymover on the previous page.
However,this time in step 6, make the destination
mode the same as the source mode (e.g.,TV).You
will see the display change to [CLR KMVR].
continued on next page...
39
Producer 2002 RF Mnl 4/4/02 10:16 AM Page 39

USING KEYMOVER
Restoring Keymoved Keys to Default Settings
Restoring A Single Keymoved Key (continued)
2. Press SELECTonce to clear the keymoved key.You
will see [DELETED]appear in the display,followed by
[EXIT SETUP]. The URC-9910 remote control will
automatically exit the programming mode and return
to normal operation.
Restoring All Keymoved Keys In A Single Mode
1. Perform steps 1 through 4 of the earlier section,
Programming Keymover on page 38.However, this
time in steps 3 and 4, make the source mode and
source key the same mode (e.g., TV).You will see the
display change to [CLR KMVR].
2. Press SELECTonce to clear all keymoved keys from
this mode.You will see [DELETED] appear in the
display, followed by [EXIT SETUP].The remote control
will automatically exit the programming mode and
return to normal operation.
40
Producer 2002 RF Mnl 4/4/02 10:16 AM Page 40

USING CHANNEL SCAN
In the TV, VCR,DVD, SAT,and CBLmodes,use the FAV key to start a
3-second scan of all favorite channels (if programmed – see
Programming Favorite Channel Scan below) and/or all channels for
the selected mode.
1. If Favorite Channel Scan has been set up,skip to
step 2.Otherwise, on the URC-9910 remote control
press TV, VCR,DVD,SAT,or CBLonce.
2. Press FAV once.
•IfFavorite Channel Scan has been set up,scanning
of favorite channels will start and, upon completion, continue to scan all channels upward for the
same device.
•IfFavorite Channel Scan has not been set up,
scanning will start with the current channel,then
proceed to the next channel up,and continue
until all channels of the selected device is
scanned.You will see the LED (red light) and IR
transmission icon () blink each time a channel
is scanned.
3. To stop scanning channels at any time, press any key
once (except the backlight key ).
PROGRAMMING FAVORITE CHANNEL SCAN
In the TV, VCR,DVD, SAT,or CBLmode, you can store a list of up to
10 favorite channels, in any order,that will be immediately scanned
when FAV is pressed (see Using Channel Scan above).
NOTE: Only channels of one mode can be stored for Favorite Channel Scan.
1. On the URC-9910 remote control, press and hold
SETuntil you see the display change from the current device and time to [CODE SET].
NOTE: The device,its code, and time are examples.Your
remote control settings may be different.
NOTE: To exit programming at any time, press EXIT once or
allow 30 seconds of inactivity to lapse.You will see [EXIT
SETUP] as the remote control returns to normal operation.
NOTE: [INVALID] means you have inadvertently pressed an
incorrect key.Note your error and continue programming.
continued on next page...
41
Producer 2002 RF Mnl 4/4/02 10:16 AM Page 41
PROGRAMMING FAVORITE CHANNEL SCAN
(continued)
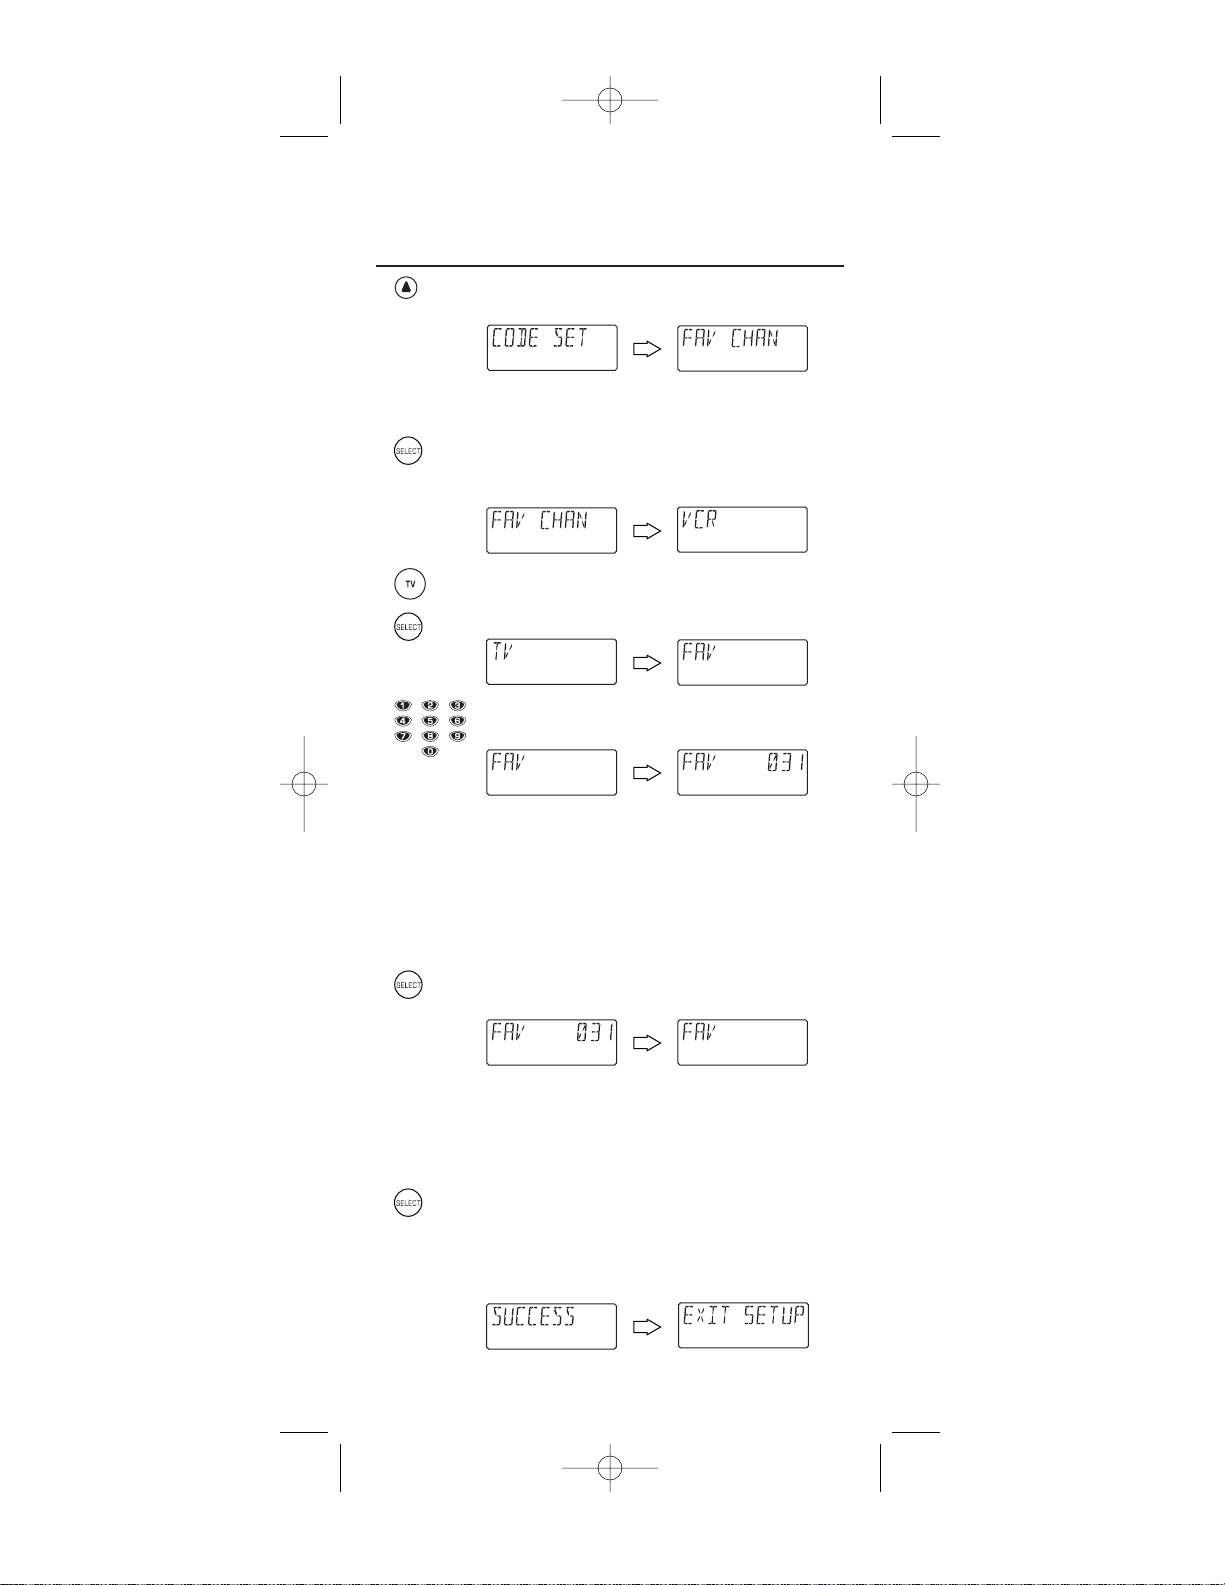
2. (x 4) Press the ▲ key four times until you see the display
change to [FAV CHAN].
NOTE: If you go past [FAV CHAN],press the ▼key one or
more times to return to it.
3. Press SELECTonce to begin programming. You will
see the display change to the last-selected device
(e.g., [VCR]).
4. Select a mode (e.g., TV) for favorite channel
scanning and press it once.Then press Press SELECT
once.You will see the display change to [FAV].
5. Use the keypad to enter a favorite channel number
(e.g., 031).The display will show your entry.
NOTE: If the original remote control required pressing an
Enter key to change the channel,also press the ENTER key
after the channel number (e.g., 0-3-1-ENTER). However, the
display will not show the ENTER key.
NOTE: If you made a mistake during entry,press any
number key one or more times until you see the display
clear out.Then try entering the correct numbers again.
Press SELECTonce.You will see the display clear out,
ready for your next entry.
6. If desired,repeat step 5 for each favorite channel to
be stored,up to a total of 10 channels.
NOTE: Once the tenth channel is entered, the remote control
will automatically exit programming.
7. (Optional) To exit programming, press and hold
SELECT until you see [SUCCESS]appear in the
display, followed by [EXIT SETUP].The URC-9910
remote control will automatically exit the programming mode and return to normal operation.
42
Producer 2002 RF Mnl 4/4/02 10:16 AM Page 42

USING THE HOME THEATER MODE
The URC-9910 remote control includes a custom Home Theater
mode.After the HOME THEATER key is programmed,it will allow you
to access five groups of remote control keys without having to
change device modes.However, there are some considerations.
• Key moved and Learned functions,as well Macros programmed
onto keys other than the dedicated macro keys (M1~ M3),are
affected by the Home Theater mode. If keys are moved (using
Key move r) or learned onto (using Learning) and they are placed
on keys not within the Control Groups,the keys will be ignored
when pressed.
•A Macro on the POWER key (if applicable) will carry over to the
Home Theater mode.
Control Organization
About Control Groups
For Home Theater programming, the URC-9910 remote control’s
keys are grouped by type of control into the following five
control groups:
(1) Playback Controls: PLAY,STOP,FWD, REW,F.FWD, F.REW, PAUSE,
and REC
(2) Audio Controls: VOL+, VOL-,and MUTE
(3) Channel Controls: CH+, CH-, (Keypad) 0~ 9, ENTER,LAST,
SLEEP, INFO,and TV/VID
(4) Menu Controls: MENU, GUIDE,Cursor Controls (▲, ▼,,),
SELECT,and EXIT
(5) PIP Controls: PIP, MOVE,and SWAP
About Device Groups
Moreover, the URC-9910 remote control’s devices are grouped into
the following five device groups:
(1) Playback Group: VCR, DVD,CD, CBL, SAT,and RCVR/AMP
(2) Audio Group: TV, VCR,CBL, SAT,DVD, CD,RCVR/AMP , and
AUX
(3) Channel Group: TV, VCR,CBL, SAT,DVD, CD,RCVR/AMP, and
AUX
(4) Menu Group: TV, VCR,CBL, SAT,and DVD
(5) PIP Group: TV, VCR, CBL,and SAT
continued on next page...
▲
▲
43
Producer 2002 RF Mnl 4/4/02 10:16 AM Page 43
USING THE HOME THEATER MODE
Control Organization
About Device Groups (continued)
The default Device Group settings from the factory is:
(1) Playback Group: VCR
(2) Audio Group: TV
(3) Channel Group: CBL
(4) Menu Group: CBL
(5) PIP Group: TV
Programming The Home Theater Mode
For example, let’s assume you have a TV, a cable converter,and a VCR
in your home theater system.You can set up the Home Theater mode
so that selected controls are assigned to these devices as follows:
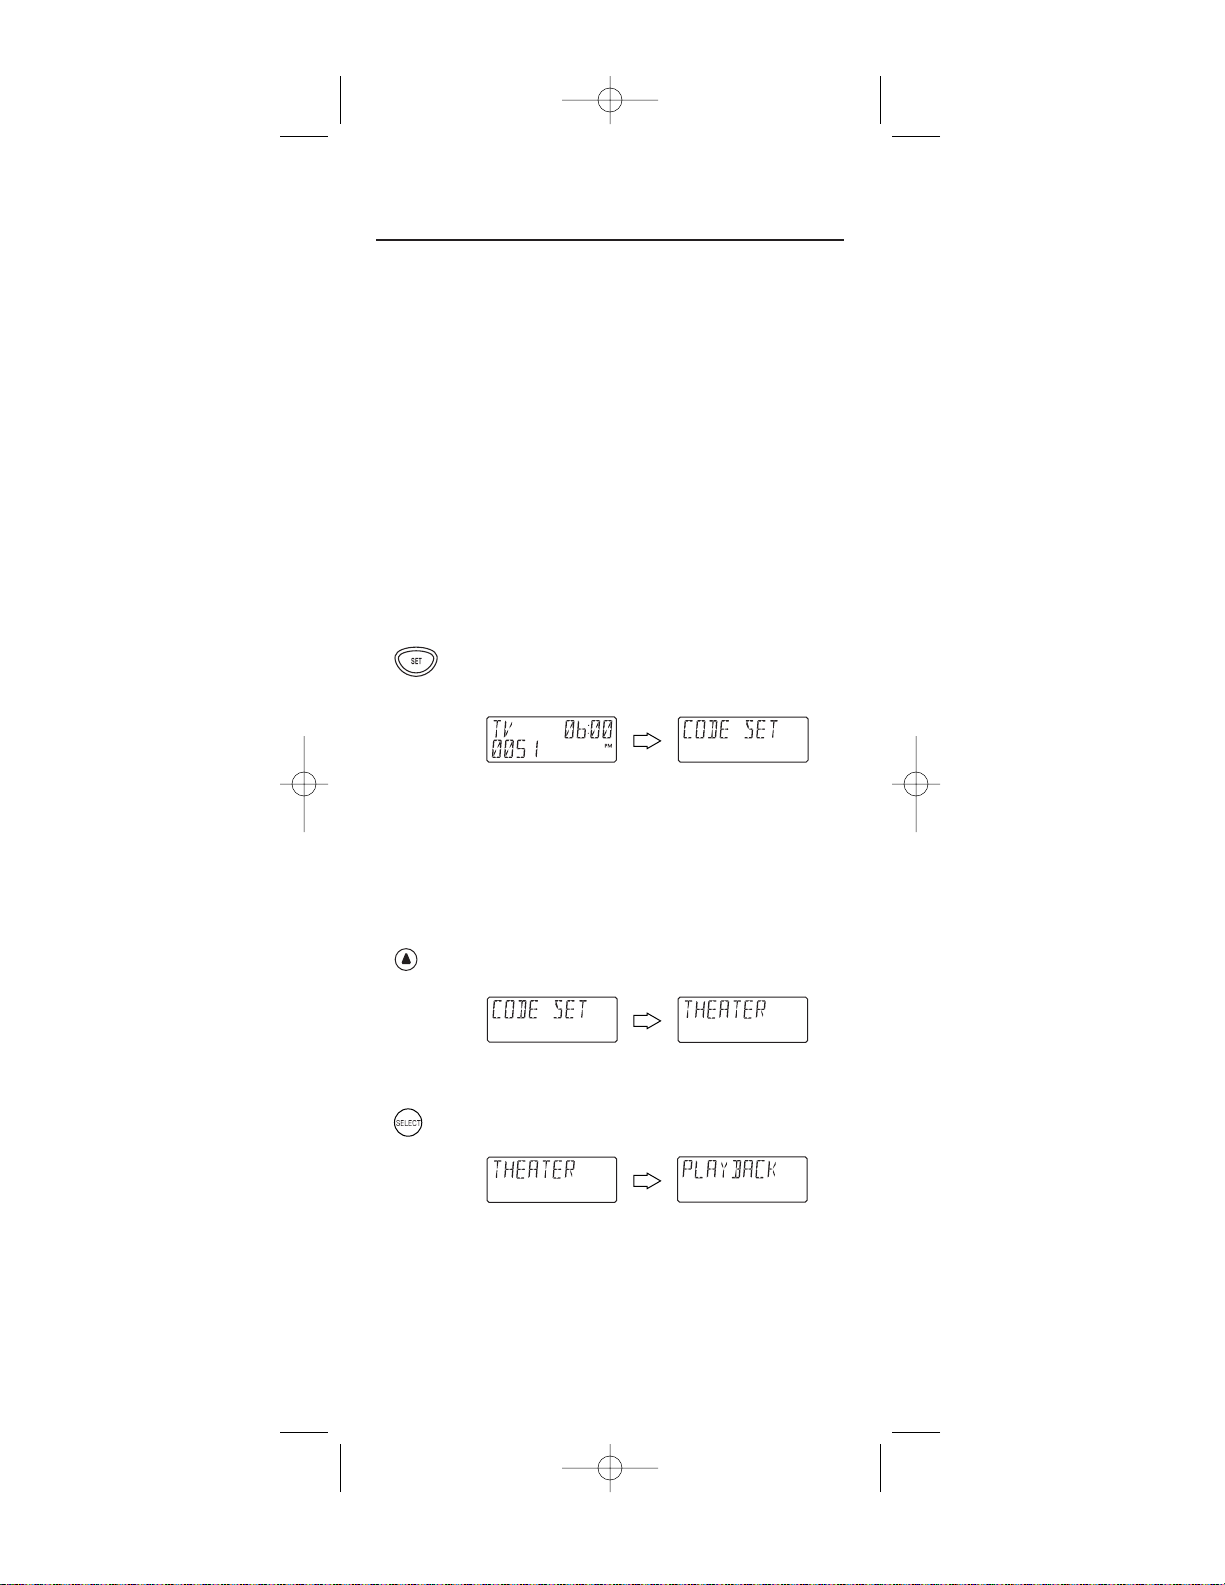
1. On the URC-9910 remote control, press and hold
SETuntil you see the display change from the current device and time to [CODE SET].
NOTE: The device,its code, and time are examples.Your
remote control settings may be different.
NOTE: To exit programming at any time, press EXIT once or
allow 30 seconds of inactivity to lapse.You will see [EXIT
SETUP] as the remote control returns to normal operation.
NOTE: [INVALID] means you have inadvertently pressed an
incorrect key.Note your error and continue programming.
2. (x 3) Press the ▲ key three times until you see the display
change to [THEA TER].
NOTE: If you go past [THEATER],press the▼key one or
more times to return to it.
3. Press SELECTonce to begin programming. You will
see the display change to [PLA YBACK].
NOTE: The program will automatically step through each
Control Group (from Playback to PIP) as you perform steps
3 through 7.However, you can use the
▲
or ▼keys to navi-
gate to a specific group to make further changes.
44
Producer 2002 RF Mnl 4/4/02 10:16 AM Page 44

a. Press SELECTonce to enter Playback Control
Group assignment.You will see the display change
to the last-selected device (e.g.,[TV]).
b. Select a device for Playback Control Group assign-
ment.For this example,press VCRonce.This will
assign the entire group of Playback Controls (i.e.,
PLAY,STOP,FF, REW,F.FWD,F.REW,PAUSE,and
REC) to the VCR. You will see the display change
to your device choice (e.g.,[VCR]).
c. Press SELECT once to accept the assignment in
step 3b.You will see the display change to the next
Control Group assignment, [AUDIO]).
4. Press SELECTonce to enter Audio Cont rol Group
assignment.You will see the display change to the
last-selected device (e.g., [VCR]).
a. Select a device for Audio Control Group assign-
ment.For this example,press TVonce.This will
assign the entire group of Audio Controls (i.e.,
VOL+, VOL-,and MUTE) to the TV.You will see the
display change to your device choice (e.g., [TV]).
b. Pre ss SELECT once to accept the assignment in
step 4a.You will see the display change to the next
Control Group assignment, [CHANNEL]).
5. Press SELECTonce to enter Channel Control Group
assignment.You will see the display change to the
last-selected device (e.g., [TV]).
continued on next page...
45
Producer 2002 RF Mnl 4/4/02 10:16 AM Page 45

USING THE HOME THEATER MODE
Programming The Home Theater Mode
5. (continued)
a. Select a device for Channel Control Group assign-
ment.For this example,press CBLonce.This will
assign the entire group of Channel Controls (i.e.,
CH+, CH-, (Keypad) 0~ 9,ENTER, LAST,
SLEEP, INFO,and TV/VID) to the cable converter.
You will see the display change to your device
choice (e.g.,[CBL]).
b. Pre ss SELECT once to accept the assignment in
step 5b.You will see the display change to the next
Control Group assignment, [MENU]).
6. Press SELECTonce to enter Menu Control Group
assignment.You will see the display change to the
last-selected device (e.g., [CBL]).
a. Select a device for Menu Control Group assignment.
For this example,press CBL once.This will assign
the entire group of Menu Controls (i.e., MENU,
GUIDE, Cursor Controls (▲,▼,,),SELECT,and
EXIT) to the cable converter.You will see the display
change to your device choice (e.g.,[CBL]).
b. Pre ss SELECT once to accept the assignment in
step 6a.You will see the display change to the next
Control Group assignment, [PIP]).
7. Press SELECTonce to enter PIP Control Group
assignment.You will see the display change to the
last-selected device (e.g., [CBL]).
a. Select a device for PIP Control Group assignment.
For this example,press TVonce. This will assign
the entire group of PIP Controls (i.e.,PIP,MOVE,
and SWAP) to the TV.You will see the display
change to your device choice (e.g.,[TV]).
▲
▲
46
Producer 2002 RF Mnl 4/4/02 10:17 AM Page 46

b. Pre ss SELECT once to accept the assignment in
step 7a.You will see the display change to the first
Control Group assignment, [PLAYBACK]).
8. or At this point, all Control Groups have been assigned.
To change an assignment,use the ▲ or ▼ keys to
navigate to a specific group and make changes by
repeating the appropriate step (3,4, 5,6, or 7).
Otherwise, to exit programming, press and hold
SELECT until you see [SUCCESS]appear in the display, followed by [EXIT SETUP]. The URC-9910
remote control will automatically exit the programming mode and return to normal operation.
Operating The Home Theater Mode
After programming the Home Theater mode (see the previous
section), you simply activate it by pressing HOMETHEATERonce.
Instantly, groups of URC-9910 remote control keys will be assigned
to their programmed devices.
For the above example (in the previous section), pressing HOME
THEATERonce would assign the following keys to the VCR, TV, and
cable converter:
VCR:
PLAY,STOP,FF, REW,F.FWD,F.REW,PAUSE,and REC
TV
: VOL+,VOL-, MUTE,PIP, MOVE,and SWAP
Cable Converter:
CH+, CH-, (Keypad) 0~ 9,ENTER, LAST,SLEEP,
INFO, TV/VID, MENU,GUIDE, Cursor Controls (▲,▼,
,),SELECT,and EXIT
▲
▲
47
Producer 2002 RF Mnl 4/4/02 10:17 AM Page 47

USING COMMERCIAL SKIP
The URC-9910 remote control includes a unique Commercial Skip
feature,once programmed, that will allow you to skip viewing com-
mercials by pressing the COM SKIPkey. Then, as you change chan-
nels (to view another program without commercials),an internal
timer will count down a preset time interval before returning the
device to the original channel.
Programming Commercial Skip
For example, let’s assume you are watching a national sports event
on channel 2 that consistently breaks for one-minute commercials.
Meanwhile,cable channel 26 is showing a favorite action movie
without commercials. By performing the following steps,you can set
Commercial Skip to automatically return the cable converter to the
sports event after one minute of viewing the movie:
NOTE: Commercial Skip only works in the following modes: TV, VCR,DVD,
CBL,and SAT.
1. Select the device where channels will be changed
(e.g., CBL).
2. On the URC-9910 remote control, press and hold
COM SKIPuntil you see the display change from the
current device and time to [CHANNEL].
NOTE: The device,its code, and time are examples.Your
remote control settings may be different.
NOTE: To exit programming at any time, press EXIT once or
allow 30 seconds of inactivity to lapse.You will see [EXIT
SETUP] as the remote control returns to normal operation.
NOTE: [INVALID] means you have inadvertently pressed an
incorrect key.Note your error and continue programming.
3. Use the keypad to enter a favorite channel number
(e.g., 002).The display will show your entry.
NOTE: If the original remote control required pressing an
Enter key to change the channel,also press the ENTER key
after the channel number (e.g., 0-0-2-ENTER). However, the
display will not show the ENTER key.
NOTE: If you made a mistake during entry, press EXIT once.
You will see [EXIT SETUP] as the remote control returns to
normal operation. Then try programming Commercial Skip
again starting with step 1.
4. Press SELECTonce to accept your channel entry.You
will see the display change to [30 SEC].
48
Producer 2002 RF Mnl 4/4/02 10:17 AM Page 48

5. or If desired, press ▲ (or ▼) one or times to select a
different time interval.Your choices are 30 (default),
60, 90,120, 150,or 180 seconds.For this example,
select 60 seconds.
6. Press SELECTonce to accept the 60-second setting.
You will see [SUCCESS] appear in the display,
followed by [EXIT SETUP]. The URC-9910 remote
control will automatically exit the programming
mode and return to normal operation.
Operating Commercial Skip
In our example,let’s assume you are watching a national sports
event on cable channel 2 and it looks like a commercial is about to
appear.Immediately, press COM SKIPonce and then enter channel
26 (e.g. 026).
The cable converter will switch to channel 26 and,after 1 minute,
automatically return to channel 2.The next time a commercial
appears, try pressing COM SKIPonce, followed by PREV once to
activate the same sequence.
For a more powerful Commercial Skip technique, try programming
these steps into an open macro key (see Using Macros on page 34).
This way you will be able to press one key to switch channels and
return after a preset time.
49
Producer 2002 RF Mnl 4/4/02 10:17 AM Page 49

RESTORING FACTORY DEFAULT SETTINGS
The URC-9910 remote control includes an Operation Reset program
that you can use to restore the unit to factory default settings.
IMPORTANT: Executing this program will erase all custom settings,
including Home Theater assignments, Macros,Learned Keys, Keymoved
Keys, and all device assignments.
1. On the URC-9910 remote control, press and hold
SETuntil you see the display change from the current device and time to [CODE SET].
NOTE: The device,its code, and time are examples.Your
remote control settings may be different.
NOTE: To exit programming at any time, press EXIT once or
allow 30 seconds of inactivity to lapse.You will see [EXIT
SETUP] as the remote control returns to normal operation.
NOTE: [INVALID] means you have inadvertently pressed an
incorrect key.Note your error and continue programming.
2. (x 2) Press the ▲ key twice until you see the display
change to [OPS RESET].
NOTE: If you go past [OPS RESET],press the▼key one or
more times to return to it.
3. Press SELECTonce to begin programming. You will
see the display change to [CLR SETUP].
4. Press SELECTonce to start the process.You will see
the display change to [RESET RAM]as the active
memory is cleared, followed by [RESET E2]as the
preprogrammed memory is restored.
Then you will see [EXIT SETUP] as the URC-9910
remote control automatically exits the programming
mode and returns to normal operation.
50
Producer 2002 RF Mnl 4/4/02 10:17 AM Page 50

ABOUT UPGRADING
The URC-9910 remote control has the largest infrared code library
available. However, if you purchase a brand new home entertainment or home automation device,it may not respond to the codes
stored in the remote control’s memory.
If this happens,please contact our Customer Support department
(see Customer Support on page 57) to upgrade the URC-9910 remote
control. The Customer Support representative will search our entire
database for a code that matches your device and instruct you how
to enter it into your URC-9910 remote control.
If the code for your home entertainment or home automation device
is not in our database,we will need to “capture” the code for that
device from its original remote control.A new code would then be
created and entered into your URC-9910 remote control.If necessary,
the Customer Support representative can instruct you how to begin
the capture procedure.
NOTE: One For All reserves the right to replace a returned remote control with
a new one of equal or superior functionality.
Upgrade Exclusions
• Home entertainment or home automation devices controlled by
radio frequency (RF/UHF),wired, or ultrasonic remote controls.
Only devices controlled by infrared remote controls are covered.
• Home entertainment or home automation devices not controlled
by remote controls.
• Broken or defective product.
• Products that operate over 100 kHz.
• Infrared keyboards and infrared pointing devices (such as
mouse substitutes).
• All products for sale and/or use outside the continental United
States,Hawaii,Alaska,or Canada.
51
Producer 2002 RF Mnl 4/4/02 10:17 AM Page 51

USING THE IR/RF COMMAND CENTER
The One For All IR/RF LCD 8-Device With Learning Universal
Remote Control (URC-9910) comes with an IR/RF Command Center
which receives radio-frequency (RF) signals from the URC-9910
remote control,anywhere in your home,up to 100 feet away.Once it
is set up,the IR/RF Command Center will convert the RF signals into
Infrared (IR) signals to control your home theater devices.
NOTE: The URC-9910 remote control transmits both an IR and an RF signal
simultaneously. It is your option whether you want to install the IR/RF
Command Center for extended remote control range. If you choose to do so,
during testing do not aim the URC-9910 remote control at your home entertainment devices to verify that RF transmission is working.
NOTE: The RF signal transmitted by the URC-9910 remote control,only
works with the IR/RF Command Center.
Setting Up The IR/RF Command Center
1. Find a location approximately 8 feet in front of your
home theater devices.It should provide (line-ofsight) access to your equipment and a power outlet
to plug in the IR/RF Command Center.
2. Plug in the IR/RF Command Center’s power cord and
raise the telescoping antenna.
Te l e s c o pi ng
Antenn a
IR Lens
3. Position the IR/RF Command Center so the black
IR Lens is aimed at your home theater devices.
4. To test the IR/RF Command Center,take the
URC-9910 remote control into another room in your
home,up to100 feet away. Select a device key (e.g.,
TV) and press it once. Then press POWERonce. The
device (e.g., TV) should turn on.
If it does not turn on, review the steps 1 through 3
and make any adjustments. Try step 4 again.If you
continue to have a problem, perhaps there is an IR
line-of sight problem.Try adding the enclosed IR
Signal Extension Cord (see next page).Also review
the tips in Optimizing IR/RF Command Center
Recept ion on page 54.
52
Producer 2002 RF Mnl 4/4/02 10:17 AM Page 52

Adding The IR Signal Extension Cord
Included with the URC-9910 remote control package is an IR Signal
Extension Cord for use with a home theater device that is not in
direct line-of-sight of the IR/RF Command Center.
If you are having problems remotely controlling a home theater
device from another room, try performing the following installation:
1. Plug the 4-foot IR Signal Extension Cord into the
back of the IR/RF Command Center.
2. Run the IR Signal Extension Cord to the device that is
not in line-of-sight of the IR/RF Command Center.
3. Using the supplied double-sided tape,attach the
IR Signal Extension Cord so that its LED is over or
next to the IR sensor of your home theater device.
LED
4. Test the installation by again taking the URC-9910
remote control into another room in your home,up
to 100 feet away.Select a device key (e.g., TV) and
press it once. Then press POWERonce.
The IR/RF Command Center will convert the RF sig-
nal from the URC-9910 remote control into an IR
signal and transmit that signal through the IR Signal
Extension Cord to turn on your device (e.g.,TV).
If it does not turn on,try repositioning the LED until
the device can be controlled, then re-attach the LED.
53
Producer 2002 RF Mnl 4/4/02 10:17 AM Page 53

USING THE RF/IR COMMAND CENTER
(continued)
Optimizing IR/RF Command Center Reception
Here are some adjustment tips for optimizing the operation of your
IR/RF Command Center:
• Aim the URC-9910 remote control toward the room where the
IR/RF Command Center is located.
• Do not position the IR/RF Command Center near metal objects,
such as heat ducts. Metal can absorb RF signals.
• Make sure the batteries in the URC-9910 remote control are fully
charged.Try replacing them if you are not sure (see Instal ling
Batteries on page 4).Weak batteries will affect the single range.
• Make sure that the URC-9910 remote control is not being affected
by other RF transmissions (e.g., garage door openers,cordless
telephones,etc.).
NOTE: The tests for range limits of the URC-9910 remote control and the
IR/RF Command Center were conducted in open-air distance tests.Actual
signal distance will be based on the construction of the building the unit is
being used in,as well as other factors,such as outside interference.
SPECIFICATIONS
Remote Control Power . . . . . . . . . . . . . . . . . . . . . . . . . . . . . . . . . . . . . . 4 AAA Batteries
IR/RF Console Power . . . . . . . . . . . . . . . . . . . . . . . . . . . . . . . . . . . . . . . . . . . . . . 120 Vac
Remote Control to IR/RF Console Range . . . . . . . . . . . . . . . . . . . 100 Feet (30.48 m)
IR/RF Command Console to Device Range. . . . . . . . . . . . . . . 25 Feet (7.62 m) ± 30˚
Remote Control Dimensions
(H x W x D). . . . . . . . . . . . . . . . . . . . . . . . . . . . . . . . . 9 -2⁄16 x 2-10⁄16 x 2-3⁄16 in.
(H x W x D) . . . . . . . . . . . . . . . . . . . . . . . . . . . . . . . . . . . . . . . . . . . 232 x 65 x 31 mm
IR/RF Command Console Dimensions
(H x W x D) . . . . . . . . . . . . . . . . . . . . . . . . . . . . . . . . . . . . . . . 1-9⁄16 x 5-1⁄16 x 4 in
(H x W x D) . . . . . . . . . . . . . . . . . . . . . . . . . . . . . . . . . . . . . 39.7 x 128.6 x 101.6 mm
Remote Control Weight (without Batteries) . . . . . . . . . . . . . . . . . . . . . . . . 8 oz (220 g)
IR/RF Command Console Weight . . . . . . . . . . . . . . . . . . . . . . . . . . . . . 10.4 oz (300 g)
NOTE: Specifications are typical. Individual units might vary.Specifications
are subject to change and improvement without notice.
54
Producer 2002 RF Mnl 4/4/02 10:17 AM Page 54

TROUBLESHOOTING
PROBLEM: LCD (Liquid Crystal Display) begins to fade,does not
appear, or the LOW BATTERY()icon appears.
SOLUTION: Replace the batteries with four (4) new AAA alkaline
batteries (see page 4).
PROBLEM: LED (red light) and IR( ) icon blinks when you press a
key, but home entertainment device does not respond.
SOLUTION: Be sure to select the correct device key for the device you
want to control.Also, aim the URC-9910 remote control
at the device not farther than 15 feet away (if not using the
IR/RF Command Center). Or try installing the IR/RF
Command Center for greater range (see page 52).
PROBLEM: The URC-9910 remote control does not control home
entertainment devices or commands do not work properly.
SOLUTION: Try all listed codes for the device brands being set up.
Make sure they originally can be operated with an
infrared remote control.
PROBLEM: TV/VCR combo does not respond properly.
SOLUTION: Use the VCR codes for your brand.Some combo units may
require both a TV code and a VCR code for full operation.
PROBLEM: The URC-9910 remote control does not turn on Sony or
Sharp TV/VCR Combo.
SOLUTION: For Power On, these products require programming TV
codes. For Sony, use TV code 0000 and VCR code 0032.
For Sharp,use TV code 0093 and VCR code 0048.
PROBLEM: Changing channels does not work properly.
SOLUTION: If original remote control required pressing ENTER to
change channels, press ENTERon the URC-9910 remote
control after entering the channel number.
PROBLEM: During learning, the display shows an [ERROR]message
after pressing and holding a key to be learned.
SOLUTION: A bad capture has occurred.Avoid high-ambient light
sources,such as direct daylight and fluorescent bulbs.
Also, tr y readjusting positions of remote controls before
performing the procedure again.Make sure the key(s)
on the original remote control is (are) operating correctly.
PROBLEM: CH+ and CH- do not work for your RCA TV.
SOLUTION: Due to RCA design (1983-1987),only the original remote
control will operate these functions.
PROBLEM: No remote control of volume.
SOLUTION: See Using Volume Lock on page 32 to lock/unlock the
volume controls.
PROBLEM: Tried Search For Your Code method and still could not find
a working code.
SOLUTION: Your device may be newer than the URC-9910 remote
control. See About Upgrading on page 51.
continued on next page...
55
Producer 2002 RF Mnl 4/4/02 10:17 AM Page 55

TROUBLESHOOTING (continued)
PROBLEM: The URC-9910 remote control turns on audio devices and
controls volume, but does not change preset channels.
SOLUTION: Some products may need both a Tuner/Receiver code
and an Audio Amplifier code for remote control of all
features on your audio device.
PROBLEM: Your satellite (DSS) receiver does not respond to the codes
listed on page 18.
SOLUTION: Make sure the satellite (DSS) receiver can be operated
with an Infrared (IR) remote control and is not set up to
receive only Radio Frequency (RF) signals.
ERROR MESSAGES
A wrong key sequence or incorrect data has
been entered.Try entry again.
Requested manufacturer’s code has not been
found in the remote control’s database.Try
another code.
Macro sequence being entered has reached the
maximum limit of 15 keystrokes.Try entry
again with fewer keystrokes.
A complete cycle of code search in the
URC-9910 remote control’s database has been
reached. Try another code search or contact
Customer Suppor t (see next page)
An error has occurred during a learning or
programming sequence.Try entry again.
Indicates a check result of E2 status is either
bad or is not present. Contact Cust omer
Support (see next page).
Indicates data captured during learning has
filled the URC-9910 remote control’s memory.
Try deleting older learned keys to free up
memory space (see page 31).
Indicates data captured during learning has
caused a error in the URC-9910 remote control’s memory. Try learning again.
56
Producer 2002 RF Mnl 4/4/02 10:17 AM Page 56

CUSTOMER SUPPORT
For assistance, please contact us in any of the following ways:
• E-mail: ofasupport@ueic.com
• Internet: http://www.oneforall.com
• Consumer Help Line: (330) 405-8616
COMPLIANCE WITH FCC RULES AND REGULATIONS
This equipment has been tested and found to comply with the limits
for a class B digital device,pursuant to part 15 of the FCC Rules.
These limits are designed to provide reasonable protection against
harmful interference in a residential installation.This equipment
generates,uses and radiates radio frequency energy and if not
installed and used in accordance with the instructions,may cause
harmful interference to radio communications. However,there is no
guarantee that interference will not occur in a particular installation. If this equipment does cause harmful interference to radio or
television reception,which can be determined by turning the equipment off and on,the user is encouraged to try and correct the interference by one or more of the following measures:
• Reorient or relocate the receiver antenna.
• Increase the separation between the equipment and the receiver.
• Connect the equipment into an outlet that is different from that to
which the receiver is connected.
• Consult the dealer or an experienced radio/television technician
for help.
The user is cautioned that changes and modifications made to the
equipment without the approval of the manufacturer could void the
user’s authority to operate his equipment.
FCC Authorization Label
This device complies with part 15 of the FCC Rules.Operation is
subject to the following two conditions:
1. This device may not cause harmful interference and
2. This device must accept any interference received, including
interference that may cause undesired operation.
FCC ID #: DI29910
IR/RF LCD 8-Device With Learning: URC-9910
Command Center:
57
Producer 2002 RF Mnl 4/4/02 10:17 AM Page 57
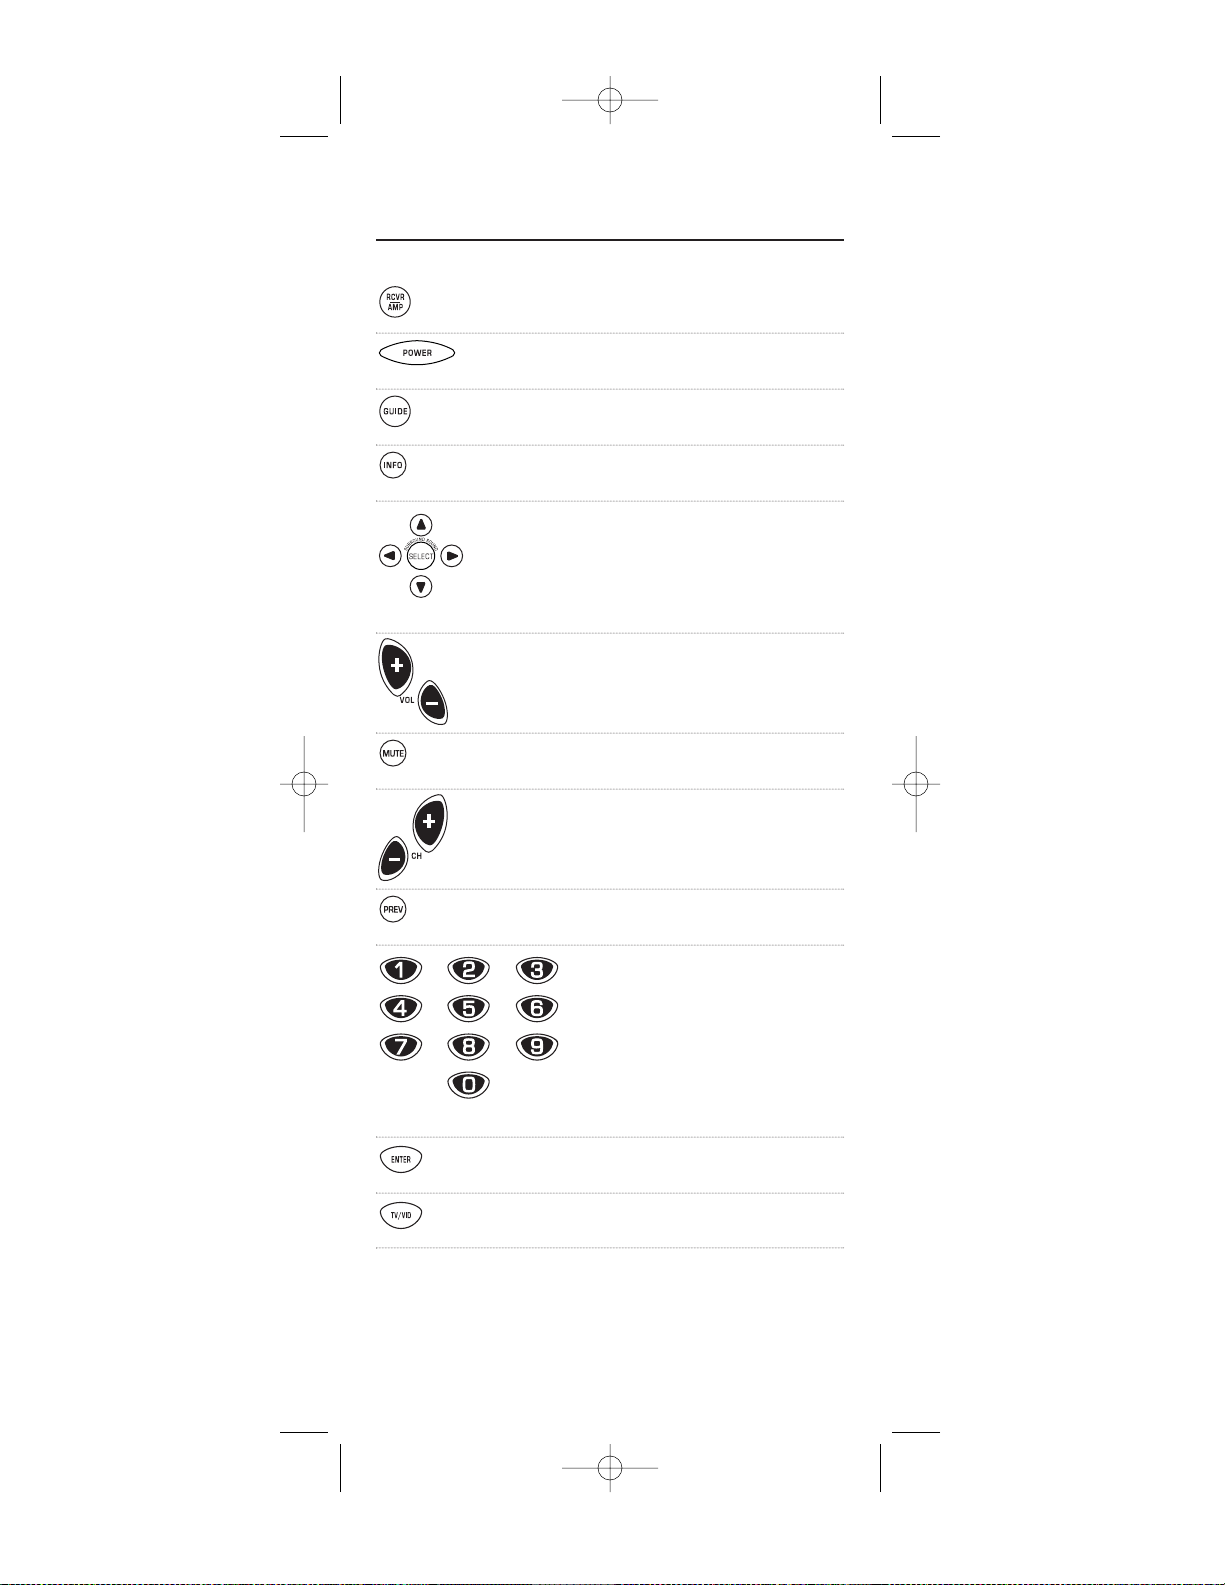
KEY INDEX
Audio Amplifier Functions
Press RCVR/AMPonce to control your audio
amplifier.
Press POWERonce to turn on or off the
selected device (e.g, RCVR/AMP).
Use GUIDEto display your audio amplifier’s
program guide or setup menu.
Use INFOto display the audio amplifier’s
program information.
Use SELECTto set the surround sound.Use ▲
(or ▼) to adjust the volume higher (or lower).
Use (or ) to adjust the balance left (or
right).
Use VOL+(or VOL-) to raise (or lower) the
audio amplifier’s audio volume.
Press MUTEonce to turn the audio amplifier’s
audio off or on.
Use CH+(or CH-) to select the audio amplifier’s
next higher (or lower) station (if applicable).
Use PREVto change the radio band
(if applicable).
Use the keypad (1~ 9and 0) to
select audio sources (e.g.,1~ 10). If
the original remote control required
pressing an Enter key to change the
audio source, also press the ENTER
key after the source number (e.g.,
9-ENTER).
Press ENTERonce after entering the source
numbers on some audio amplifiers.
Use TV/VIDto switch the audio amplifier
between input and output.
▲
▲
58
Producer 2002 RF Mnl 4/4/02 10:17 AM Page 58

Use the transport keys to control
your CD player (if applicable).
Use SLEEPto activate your audio amplifer’s
sleep timer (not available for all devices).
After programming, press M1~ M3once to
run a desired macro (see Using Macros on
page 34).
After programming,press L1~ L4
once to activate a learned function.
See Using Learning on page 29.
Use to turn on or off the key backlight.
When this feature is activated,keys will
remain backlit for 5 seconds after the last key
press.In the setup mode,backlighting
will remain on for 30 seconds.
Use SETfor all programming sequences.
Audio Cassette Deck Functions
Press AUXonce to control your audio cassette
deck. See Re-assigning Device Keys on page 37.
Press POWERonce to turn on or off the
selected device (e.g, AUX).
Use GUIDEto display your audio cassette
deck’s program guide (if applicable).
Use INFOto display the audio cassette deck’s
program information.
Use the cursor keys (▲,▼,,or) to move
the cursor in the audio cassette deck’s pro-
gram guide and menu screens.Use SELECTto
choose options from the menu or guide.
Use VOL+(or VOL-) to raise (or lower) the
audio cassette deck’s audio volume
(if applicable).
continued on next page...
▲
▲
59
Producer 2002 RF Mnl 4/4/02 10:17 AM Page 59

KEY INDEX
Audio Cassette Deck Functions (continued)
Press MUTEonce to turn the audio cassette
deck’s audio off or on (if applicable).
Use the keypad (1~ 9and 0) to
directly select tracks.If the original
remote control required pressing an
Enter key to select a track, also press
the ENTER key after the track number
(e.g., 1-2- ENTER).
Use TV/VIDto switch the audio cassette deck
between input and output.
Use the transport keys to control
your audio cassette deck.
After programming, press M1~ M3once to
run a desired macro (see Using Macros on
page 34).
After programming,press L1~ L4
once to activate a learned function.
See Using Learning on page 29.
Use to turn on or off the key backlight.
When this feature is activated,keys will
remain backlit for 5 seconds after the last key
press.In the setup mode,backlighting
will remain on for 30 seconds.
Use SETfor all programming sequences.
60
Producer 2002 RF Mnl 4/4/02 10:17 AM Page 60

Audio Receiver Functions
Press RCVR/AMPonce to control your audio
receiver.
Press POWERonce to turn on or off the
selected device (e.g, RCVR/AMP).
Use GUIDEto display your audio receiver’s
program guide or setup menu.
Use INFOto display the audio receiver’s
program information.
Use SELECTto set the surround sound.Use ▲
(or ▼) to adjust the volume higher (or lower).
Use (or ) to adjust the balance left (or
right).
Use VOL+(or VOL-) to raise (or lower) the
audio receiver’s audio volume.
Press MUTEonce to turn the audio receiver’s
audio off or on.
Use CH+(or CH-) to select the audio receiver’s
next higher (or lower) station (if applicable).
Use PREVto change the radio band
(if applicable).
Use the keypad (1~ 9and 0) to
select audio sources (e.g.,1~ 10). If
the original remote control required
pressing an Enter key to change the
audio source, also press the ENTER
key after the source number (e.g.,
9-ENTER).
Press ENTERonce after entering the source
numbers on some audio receivers.
Use TV/VIDto switch the audio receiver
between input and output.
continued on next page...
▲
▲
61
Producer 2002 RF Mnl 4/4/02 10:17 AM Page 61

KEY INDEX
Audio Receiver Functions (continued)
Use the transport keys to control
your CD player (if applicable).
Use SLEEPto activate your audio receiver’s
sleep timer (not available for all devices).
After programming, press M1~ M3once to
run a desired macro (see Using Macros on
page 34).
After programming,press L1~ L4
once to activate a learned function.
See Using Learning on page 29.
Use to turn on or off the key backlight.
When this feature is activated,keys will
remain backlit for 5 seconds after the last key
press.In the setup mode,backlighting
will remain on for 30 seconds.
Use SETfor all programming sequences.
Audio Turntable Functions
Press AUXonce to control your audio turn-
table. See Re-assigning Device Keys on page 32.
Press POWERonce to turn on or off the
selected device (e.g, AUX).
Use GUIDEto display your audio turntable’s
program guide (if applicable).
Use INFOto display the audio turntable’s
program information.
Use SELECTto select a disc.Use ▲ (or ▼) to
select the next (or previous) LP. Use (or )
to select the next (or previous) track.
▲
▲
62
Producer 2002 RF Mnl 4/4/02 10:17 AM Page 62

63
Use VOL+(or VOL-) to raise (or lower) the
audio turntable’s audio volume (if applicable).
Press MUTEonce to turn the audio turntable’s
audio off or on (if applicable).
Use the keypad (1~ 9and 0) to
directly select tracks.If the original
remote control required pressing an
Enter key to select a track, also press
the ENTER key after the track number
(e.g., 1-2- ENTER).
Use the transport keys to control
your audio turntable (if applicable).
After programming, press M1~ M3once to
run a desired macro (see Using Macros on
page 34).
After programming,press L1~ L4
once to activate a learned function.
See Using Learning on page 29.
Use to turn on or off the key backlight.
When this feature is activated,keys will
remain backlit for 5 seconds after the last key
press.In the setup mode,backlighting
will remain on for 30 seconds.
Use SETfor all programming sequences.
Producer 2002 RF Mnl 4/4/02 10:17 AM Page 63

KEY INDEX (Continued)
Cable Converter Functions
Press CBLonce to control your cable
converter.
Press POWERonce to turn on or off the
selected device (e.g, SA T).
Press MENUonce to display your cable
converter’s main menu.
Use GUIDEto display your cable converter’s
program guide or setup menu.
Use EXITto exit from your cable converter’s
guide or menu.
Use INFOto display the cable converter’s
current channel and program information.
Use the cursor keys (▲,▼,,or) to move
the cursor in the cable converter’s program
guide and menu screens.Use SELECTto
choose options from the menu or guide.
Use VOL+(or VOL-) to raise (or lower) the
cable converter’s audio volume (if applicable).
Press MUTEonce to turn the cable converter’s
audio off or on (if applicable).
Use FAVto scan favorite channels and/or all
channels. See Using Channel Scan and Program-
ming Favorite Channel Scan on page 41.
Use CH+(or CH-) to select the cable convert-
er’s next higher (or lower) channel.
Press PREVonce to recall the last-viewed
channel and to page back one screen on the
cable converter’s main menu.
Use the keypad (1~ 9and 0) to
directly select channels (e.g., 009 or
031). If the original remote control
required pressing an Enter key to
change the channel,also press the
ENTERkey after the channel number
(e.g., 0-3-1-ENTER).
▲
▲
64
Producer 2002 RF Mnl 4/4/02 10:17 AM Page 64

Press ENTERonce after entering the channel
numbers on some TVs.
Use TV/VIDto switch the TV’s input to view
TV or cable programs.
Use the transport keys to control
your cable converter’s VOD service
(if applicable).
Use SLEEPto activate your cable converter’s
sleep timer (not available for all devices).
After programming, press M1~ M3once to
run a desired macro (see Using Macros on
page 34).
After programming,press L1~ L4
once to activate a learned function.
See Using Learning on page 29.
Use PIPto switch the Picture-In-Picture
feature on or off (if available on your TV).
Use MOVEto move the window picture
to different positions in the main picture.
Use SW APto switch images and sound
between the main and window pictures.
After programming,use COM SKIP to skip
commercials on your cable converter.See
Using Commercial Skip on page 48.
Use to turn on or off the key backlight.
When this feature is activated,keys will
remain backlit for 5 seconds after the last key
press.In the setup mode,backlighting
will remain on for 30 seconds.
Use SETfor all programming sequences.
65
Producer 2002 RF Mnl 4/4/02 10:17 AM Page 65

KEY INDEX (continued)
CD Player Functions
Press CDonce to control your CD player.
Press POWERonce to turn on or off the
selected device (e.g, CD).
Use GUIDEto display your CD player’s
program guide.
Use INFOto display the CD player’s current
channel and program information.
Use SELECTto select a compact disc.Use ▲
(or ▼) to select the next (or previous) CD.
Use (or ) to select the next (or previous)
track.
Use VOL+(or VOL-) to raise (or lower) the
CD player’s audio volume (if applicable).
Press MUTEonce to turn the CD player’s
audio off or on (if applicable).
Use the keypad (1~ 9and 0) to
directly select tracks.If the original
remote control required pressing an
Enter key to select a track, also press
the ENTER key after the track number
(e.g., 1-2- ENTER).
Use the transport keys to control
your CD player.
After programming, press M1~ M3once to
run a desired macro (see Using Macros on
page 34).
After programming,press L1~ L4
once to activate a learned function.
See Using Learning on page 29.
▲
▲
66
Producer 2002 RF Mnl 4/4/02 10:17 AM Page 66

Use to turn on or off the key backlight.
When this feature is activated,keys will
remain backlit for 5 seconds after the last key
press.In the setup mode,backlighting
will remain on for 30 seconds.
Use SETfor all programming sequences.
DVD Player Functions
Press DVDonce to control your DVD player.
Press POWERonce to turn on or off the
selected device (e.g, DVD).
Press MENUonce to display your DVD player’s
main menu.
Use GUIDEto display your DVD player’s
program guide.
Use EXITto exit from your DVD player’s guide
or menu.
Use INFOto display the DVD player’s current
channel and program information.
Use the cursor keys (▲,▼,,or) to move
the cursor in the DVD player’s program guide
and menu screens.Use SELECTto choose
options from the menu or guide.
Use VOL+(or VOL-) to raise (or lower) the
DVD player’s audio volume (if applicable).
Press MUTEonce to turn the DVD player’s
audio off or on (if applicable).
Use FAVto scan favorite channels and/or all
channels. See Using Channel Scan and Program-
ming Favorite Channel Scan on page 41.
Use the keypad (1~ 9and 0) to
directly select chapters (e.g.,09or
31). If the original remote control
required pressing an Enter key to
select a chapter, also press the ENTER
key after the chapter number
(e.g., 3-1- ENTER).
continued on next page...
▲
▲
67
Producer 2002 RF Mnl 4/4/02 10:17 AM Page 67

KEY INDEX
DVD Player Functions (continued)
Use TV/VIDto switch the TV’s input to view
TV or DVD programs.
Use the transport keys to control
your DVD player.
After programming, press M1~ M3once to
run a desired macro (see Using Macros on
page 34).
After programming,press L1~ L4
once to activate a learned function.
See Using Learning on page 29.
Use to turn on or off the key backlight.
When this feature is activated,keys will
remain backlit for 5 seconds after the last key
press.In the setup mode,backlighting
will remain on for 30 seconds.
Use SETfor all programming sequences.
68
Producer 2002 RF Mnl 4/4/02 10:17 AM Page 68

Home Automation Functions
Press AUXonce to control home automation.
See Re-assigning Device Keys on page 37.
Press POWERonce to turn on home
automation.
Use VOL+(or VOL-) to brighten (or dim) the
lights controlled by home automation.
Press MUTEonce to turn off home
automation.
Use CH+(or CH-) to turn home automation
on (or off ).
After programming, press M1~ M3once to
run a desired macro (see Using Macros on
page 34).
After programming,press L1~ L4
once to activate a learned function.
See Using Learning on page 29.
Use to turn on or off the key backlight.
When this feature is activated,keys will
remain backlit for 5 seconds after the last key
press.In the setup mode,backlighting
will remain on for 30 seconds.
Use SETfor all programming sequences.
69
Producer 2002 RF Mnl 4/4/02 10:17 AM Page 69

KEY INDEX
LD (Laser Disc) Player Functions
Press AUXonce to control home automation.
See Re-assigning Device Keys on page 37.
Press POWERonce to turn on or off the
selected device (e.g, AUX).
Press MENUonce to display your LD player’s
main menu.
Use GUIDEto display your LD player’s
program guide.
Use EXITto exit from your LD player’s guide
or menu.
Use INFOto display the LD player’s current
channel and program information.
Use the cursor keys (▲,▼,,or) to move
the cursor in the LD player’s program guide
and menu screens.Use SELECTto choose
options from the menu or guide.
Use VOL+(or VOL-) to raise (or lower) the
LD player’s audio volume (if applicable).
Press MUTEonce to turn the LD player’s
audio off or on (if applicable).
Use the keypad (1~ 9and 0) to
directly select chapters (e.g.,09or
31). If the original remote control
required pressing an Enter key to
select a chapter, also press the ENTER
key after the chapter number
(e.g., 3-1- ENTER).
Use TV/VIDto switch the TV’s input to view
TV or LD programs.
Use the transport keys to control
your LD player.
▲
▲
70
Producer 2002 RF Mnl 4/4/02 10:17 AM Page 70

After programming, press M1~ M3once to
run a desired macro (see Using Macros on
page 34).
After programming,press L1~ L4
once to activate a learned function.
See Using Learning on page 29.
Use to turn on or off the key backlight.
When this feature is activated,keys will
remain backlit for 5 seconds after the last key
press.In the setup mode,backlighting
will remain on for 30 seconds.
Use SETfor all programming sequences.
Satellite Receiver Functions
Press SATonce to control your satellite
receiver.
Press POWERonce to turn on or off the
selected device (e.g, SA T).
Press MENUonce to display your satellite
receiver’s main menu.
Use GUIDEto display your satellite receiver’s
program guide or setup menu.
Use EXITto exit from your satellite receiver’s
guide or menu.
Use INFOto display the satellite receiver’s
current channel and program information.
Use the cursor keys (▲,▼,,or) to move
the cursor in the satellite receiver’s program
guide and menu screens.Use SELECTto
choose options from the menu or guide.
Use VOL+(or VOL-) to raise (or lower) the
satellite receiver’s audio volume (if applicable).
Press MUTEonce to turn the satellite receiver’s
audio off or on (if applicable).
Use FAVto scan favorite channels and/or all
channels. See Using Channel Scan and Program-
ming Favorite Channel Scan on page 41.
continued on next page...
▲
▲
71
Producer 2002 RF Mnl 4/4/02 10:17 AM Page 71

KEY INDEX
Satellite Receiver Functions (continued)
Use CH+(or CH-) to select the satellite
receiver’s next higher (or lower) channel.
Press PREVonce to recall the last-viewed
channel and to page back one screen on the
satellite receiver’s main menu.
Use the keypad (1~ 9and 0) to
directly select channels (e.g., 009 or
031). If the original remote control
required pressing an Enter key to
change the channel,also press the
ENTERkey after the channel number
(e.g., 0-3-1-ENTER).
Press ENTERonce after entering the channel
numbers on some TVs.
Use TV/VIDto switch the TV’s input to view
TV or satellite programs.
Use the transport keys to control
your satellite receiver’s PVR or VOD
service (if applicable).
Use SLEEPto activate your satellite receiver’s
sleep timer (not available for all devices).
After programming, press M1~ M3once to
run a desired macro (see Using Macros on
page 34).
After programming,press L1~ L4
once to activate a learned function.
See Using Learning on page 29.
Use PIPto switch the Picture-In-Picture
feature on or off (if available on your TV).
Use MOVEto move the window picture
to different positions in the main picture.
Use SW APto switch images and sound
between the main and window pictures.
72
Producer 2002 RF Mnl 4/4/02 10:17 AM Page 72

After programming,use COM SKIP to skip
commercials on your satellite receiver. See
Using Commercial Skip on page 48.
Use to turn on or off the key backlight.
When this feature is activated,keys will
remain backlit for 5 seconds after the last key
press.In the setup mode,backlighting
will remain on for 30 seconds.
Use SETfor all programming sequences.
TV Functions
Press TVonce to control your television.
Press POWERonce to turn on or off the
selected device (e.g, TV).
Press MENUonce to display your TV’s
main menu.
Use GUIDEto display your TV’s program
guide or setup menu.
Use EXITto exit from your TV’s guide
or menu.
Use INFOto display the TV’s current channel
and program information.
Use the cursor keys (▲,▼,,or) to move
the cursor in the TV’s program guide and
menu screens.Use SELECTto choose options
from the menu or guide.
Use VOL+(or VOL-) to raise (or lower) the
TV’s audio volume.
Press MUTEonce to turn the TV audio off
or on.
Use FAVto scan favorite channels and/or all
channels. See Using Channel Scan and Program-
ming Favorite Channel Scan on page 41.
continued on next page...
▲
▲
73
Producer 2002 RF Mnl 4/4/02 10:17 AM Page 73

KEY INDEX
TV Functions (continued)
Use CH+(or CH-) to select the TV’s next
higher (or lower) channel.
Press PREVonce to recall the last-viewed
channel and to page back one screen on the
TV’s main menu.
Use the keypad (1~ 9and 0) to
directly select channels (e.g., 009 or
031). If the original remote control
required pressing an Enter key to
change the channel,also press the
ENTERkey after the channel number
(e.g., 0-3-1-ENTER).
Press ENTERonce after entering the channel
numbers on some TVs.
Use TV/VIDto switch the TV’s input to view
TV or video programs.
Use the transport keys to control
your VCR.
To record a VCR program, press REC
twice.
Use SLEEPto activate your TV’s sleep
timer (not available for all devices).
After programming, press M1~ M3once to
run a desired macro (see Using Macros on
page 34).
After programming,press L1~ L4
once to activate a learned function.
See Using Learning on page 29.
Use PIPto switch the Picture-In-Picture
feature on or off (if available on your TV).
Use MOVEto move the window picture
to different positions in the main picture.
Use SW APto switch images and sound
between the main and window pictures.
74
Producer 2002 RF Mnl 4/4/02 10:17 AM Page 74

After programming,use COM SKIP to skip
commercials on your TV. See Usin g
Commercial Skip on page 48.
Use to turn on or off the key backlight.
When this feature is activated,keys will
remain backlit for 5 seconds after the last key
press.In the setup mode,backlighting
will remain on for 30 seconds.
Use SETfor all programming sequences.
VCR Functions
Press VCRonce to control your VCR.
Press POWERonce to turn on or off the
selected device (e.g, VCR).
Press MENUonce to display your VCR’s
main menu.
Use GUIDEto display your VCR/PVR’s
program guide or setup menu (if applicable).
Use EXITto exit from your VCR’s guide
or menu.
Use the cursor keys (▲,▼,,or) to move
the cursor in the VCR’s program guide and
menu screens.Use SELECTto choose options
from the menu or guide.
Use VOL+(or VOL-) to raise (or lower) the
VCR’s audio volume (if applicable).
Press MUTEonce to turn the VCR audio off
or on (if applicable).
Use FAVto scan favorite channels and/or all
channels. See Using Channel Scan and Program-
ming Favorite Channel Scan on page 41.
Use CH+(or CH-) to select the TV’s next
higher (or lower) channel.
continued on next page...
▲
▲
75
Producer 2002 RF Mnl 4/4/02 10:17 AM Page 75

KEY INDEX
VCR Functions (continued)
Press PREVonce to recall the last-viewed
channel and to page back one screen on the
VCR’s main menu.
Use the keypad (1~ 9and 0) to
directly select channels (e.g., 009 or
031). If the original remote control
required pressing an Enter key to
change the channel,also press the
ENTERkey after the channel number
(e.g., 0-3-1-ENTER).
Press ENTERonce after entering the channel
numbers on some VCRs.
Use TV/VIDto switch the TV’s input to view
TV or VCR programs.
Use the transport keys to control
your VCR.
To record a VCR program, press REC
twice.
Use SLEEPto activate your VCR’s sleep
timer (not available for all devices).
After programming, press M1~ M3once to
run a desired macro (see Using Macros on
page 34).
After programming,press L1~ L4
once to activate a learned function.
See Using Learning on page 29.
Use PIPto switch the Picture-In-Picture
feature on or off (if available on your TV).
Use MOVEto move the window picture
to different positions in the main picture.
Use SW APto switch images and sound
between the main and window pictures.
76
Producer 2002 RF Mnl 4/4/02 10:17 AM Page 76

Use to turn on or off the key backlight.
When this feature is activated,keys will
remain backlit for 5 seconds after the last key
press.In the setup mode,backlighting
will remain on for 30 seconds.
Use SETfor all programming sequences.
LIMITED WARRANTY
One For All (“OFA”) warrants,to the original purchaser only, that
this product will be free from defects in materials and workmanship,under normal use, for ninety (90) days from the date of original purchase.This warranty does not cover damage or failures
caused by products or services not supplied by OFA, or which result
from accident, misuse,abuse,neglect, mishandling,misapplication,
faulty installation,set-up adjustment,improper maintenance,alteration, maladjustment of consumer controls, modifications, commercial use, or that is attributable to acts of God.
There are no express warranties except as listed above. OFA SHALL
NOT BE LIABLE FOR INCIDENTAL OR CONSEQUENTIAL DAMAGES RESULTING FROM THE USE OF THIS PRODUCT OR ARISING OUT OF ANY BREACH OF WARRANTY. ALL EXPRESS AND
IMPLIED WARRANTIES, INCLUDING THE WARRANTIES OF
MERCHANT-ABILITY AND FITNESS FOR A PARTICULAR PURPOSE,ARE LIMITED TO THE WARRANTY PERIOD SET FORTH
ABOVE.
Some states do not allow the exclusion or limitation of incidental or
consequential damages, or limitations on how long an implied warranty lasts, so the above exclusions or limitations may not apply to
you.This warranty gives you specific legal rights and you may also
have other rights which vary from state to state.
To obtain warranty service for a defective product during the warranty period, please return the product, preferably in the original
carton, along with your purchase receipt,to the store of original purchase.A note detailing the complaint would be helpful.The store,at
its option,will replace or repair this product if found to be defective.
One For All: 330-405-8655 (for Warranty only)
77
Producer 2002 RF Mnl 4/4/02 10:17 AM Page 77

ADDITIONAL INFORMATION
As you update your home entertainment system, One For All® has
a universal remote control that will fit your needs.Look for these
exciting products at a retailer near you.
One For All Access 3 . . . . . . . . . . . . . . . . . . . . . . . . . . . . . . . . URC-3605
One For All Video Expert 4 Device . . . . . . . . . . . . . . . . . . . . URC-4081
One For All Video Expert Plus 4L
Upgradeable Remote Control with Learning. . . . . . . . . . . . URC-4880
One For All Access 4 . . . . . . . . . . . . . . . . . . . . . . . . . . . . . . . . URC-4605
One For All Access 5 . . . . . . . . . . . . . . . . . . . . . . . . . . . . . . . . URC-5705
One For All 6 Home Theater . . . . . . . . . . . . . . . . . . . . . . . . . URC-6011
One For All 8 Home Theater . . . . . . . . . . . . . . . . . . . . . . . . . URC-8011
One For All 8L Home Theater with Learning . . . . . . . . . . . URC-8811
One For All A/V Producer 8 Device Learner . . . . . . . . . . . . URC-8911
One For All IR/RF Home Producer 8 Device Learner. . . . . URC-9911
ONE FOR ALL® is the registered trademark of Universal Electronics
Inc. Computime International Ltd. is the Licensee of the ONE FOR
ALL® brand for USA and Canada.
Copyright 2002 by Universal Electronics Inc. No part of this publication may be reproduced,transmitted,transcribed, stored in any
retrieval system,or translated to any language,in any form or by any
means, electronic, mechanical, magnetic,optical, manual, or otherwise,
without the prior written permission of Universal Electronics Inc.
The One For All IR/RF LCD 8-Device With Learning Universal
Remote Control (URC-9910) is compatible for use in North
America, excluding Mexico.
URC-9910B00 . . . . . . . . . . . . . . . . . . . . . . . . . . . . . . . . . . . . . . . . . 04/02
78
Producer 2002 RF Mnl 4/4/02 10:17 AM Page 78

Producer 2002 RF Mnl 4/4/02 10:17 AM Page 79

Producer 2002 RF Mnl 4/4/02 10:17 AM Page 80
 Loading...