

Page 1
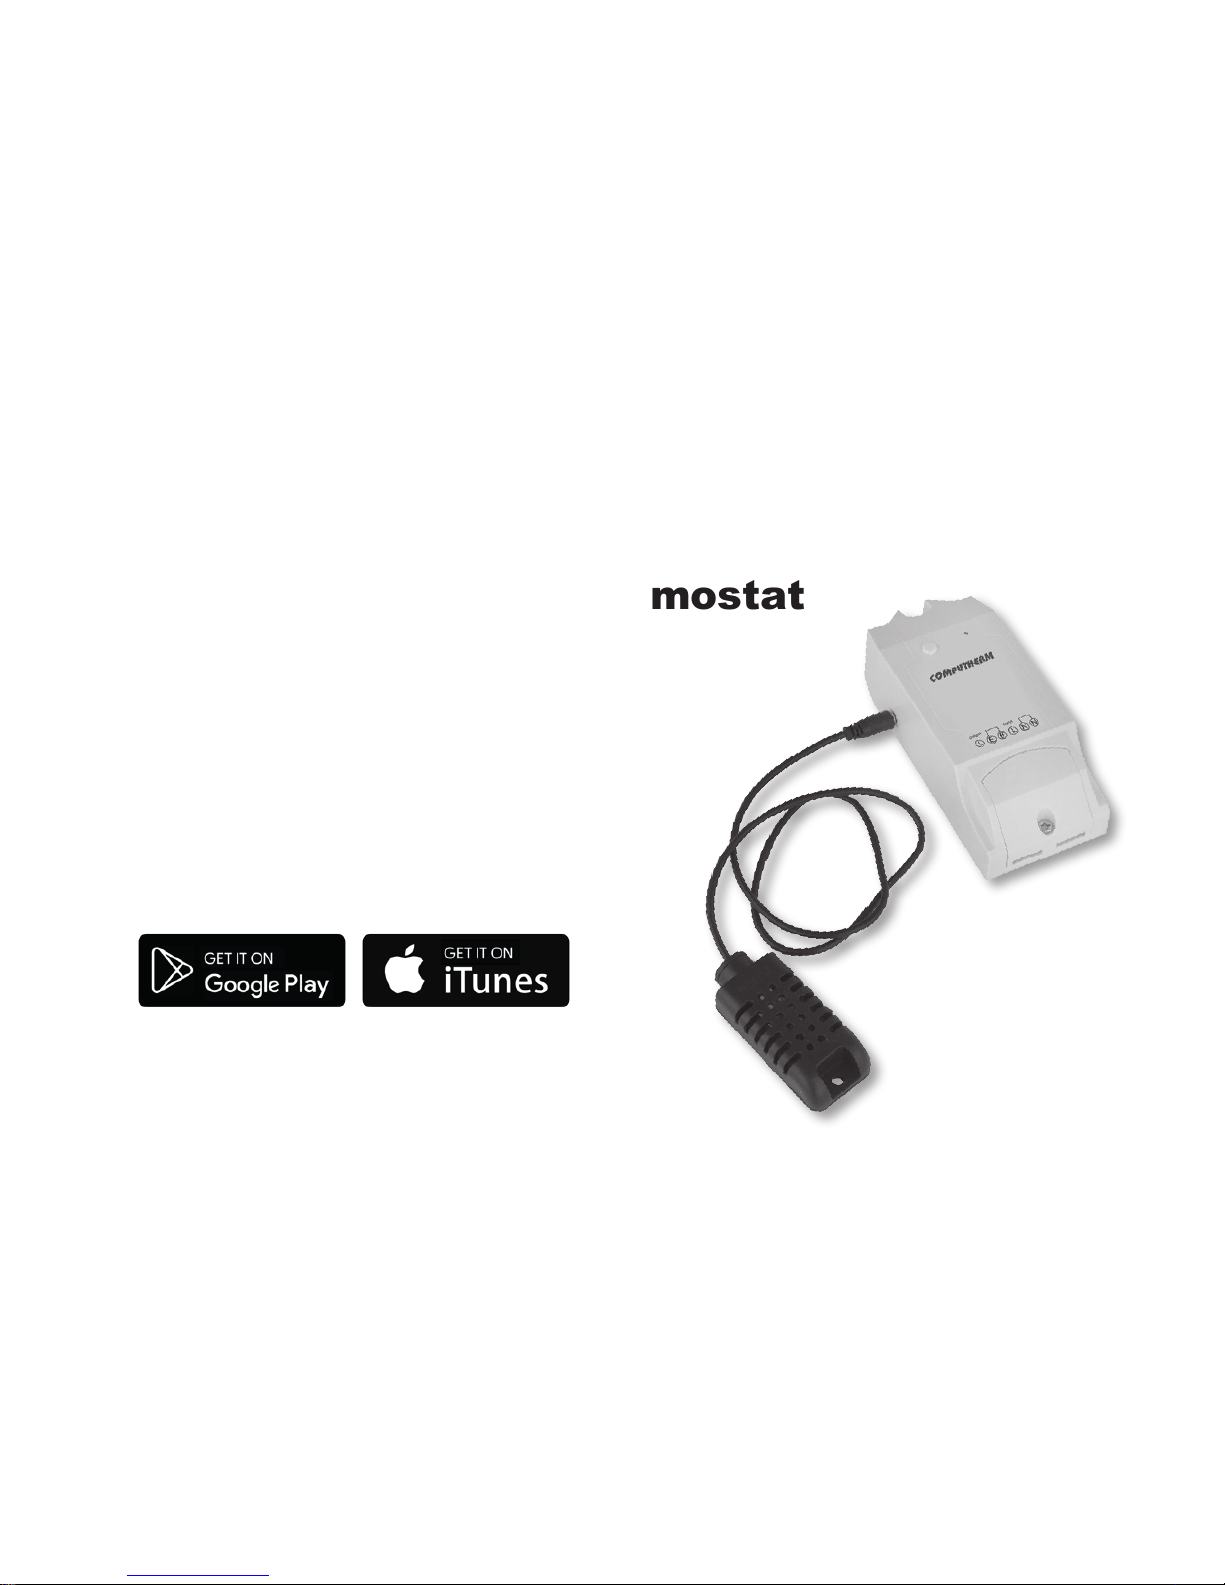
Operating instruction
COMPUTHERM
S300
Wi-Fi Thermostat
COMPUTHERM
S Series
Page 2

- 2 -
TABLE OF CONTENTS
1. A general description of the thermostat 3
2. Important warnings and safety recommendations 5
3. Meanings of the LED signals of the thermostat 8
4. Putting the apparatus into operation 9
4.1. Downloading and installing mobile application 9
4.2. Connecting the thermostat to the user account and establishing contact
between the thermostat and the Wi-Fi network 11
5. Use of the thermostat and application, a description of
functions and services 17
6. Recommendations for the use of the thermostat 24
6.1. Remote control for central heating, heaters and infrared heating panels 24
6.2. Programmed operation and remote control of other electric devices (e.g.
watering pumps, refrigerators) 28
7. Practical advices 30
8. Technical data 33
Page 3

- 3 -
1. A GENERAL DESCRIPTION OF THE THERMOSTAT
COMPUTHERM
S300 Wi-Fi thermostat is an apparatus that can be
controlled by a smart phone via the Internet, and we recommend it
primarily as a supplement for an existing central heating systems and
other electric devices to enable remote control. When it is ON, the net-
work voltage appears on the thermostat terminal, and below the maximum
loadability limit of its output relay the thermostat is suitable to control any
connected electric device (e.g. gas boilers, infrared heating panels, etc.).
The apparatus can be easily controlled manually on the spot or by a smart
phone via the Internet and its operating condition (ON/OFF) can be checked
continuously. In addition, the apparatus enables automatic control based on
the temperature and humidity. Several thermostats installed at dierent
places can be registered into the same user account and can be controlled
(even from the same smart phone). For easy handling, devices belonging
to the same place of use can be arranged into separate groups (e.g. at or
Page 4

- 4 -
holiday home). Devices that have been put into service can be controlled
by more than one smart phone with the help of „Share” function.
A heating system controlled by an existing thermostat and complemented
with a
COMPUTHERM
S300 Wi-Fi thermostat can be made remotely con-
trollable by means of a smartphone via the Internet.
We oer the installation of a supplementary
COMPUTHERM
S100 Wi-Fi
sensor centre to those who wish to control their
COMPUTHERM
S300 ther-
mostat based on the temperature/humidity measured in another room via
wireless means. For example, with the installation of the
COMPUTHERM
S100 Wi-Fi sensor centre a boiler connected to a
COMPUTHERM
S300
thermostat in the basement of a house can be easily controlled by the temperature measured in the sitting room upstairs or freezing can be prevented
with out having to lay a cable.
Page 5

- 5 -
This product is especially useful when you do not use your at or house
according to a predetermined schedule, you leave your home for an uncertain period of time or you wish to control or check the heating of your
holiday home remotely during the heating season.
The functions and services of the apparatus and recommendations
for its use are described in detail in Chapters 5 and 6.
2. IMPORTANT WARNINGS AND SAFETY RECOM-
MENDATIONS
• Before starting to use the apparatus, please study carefully the instruc-
tions for use and follow strictly the instructions therein.
• The thermostat was designed for business or household (not industrial)
use and can be used to control any electric device whose performance
does not exceed 3.6 kW (loadability: 230 V AC; 50-60 Hz; 16 A).
Page 6

- 6 -
• When it is ON, network voltage appears on the thermostat terminal,
contrary to thermostats with conventional potential free relay output.
• Before starting to use the thermostat, make sure that the Wi-Fi network
is reliably accessible at the place where you intend to use the apparatus.
• This apparatus has been designed for indoor use. Do not use it in a
humid, dusty or chemically aggressive environment.
• This apparatus is a thermostat that can be controlled via a wireless
Wi-Fi network. To prevent jamming, keep it away from such electric
equipment which may interfere with wireless communications.
• The manufacturer will assume no responsibility for any direct or in-
direct damages or income losses caused by/during the use of the
product.
• The apparatus will not work without power supply but in automatic
mode it memorizes the settings and resumes operation without any
Page 7

- 7 -
intervention after the power supply is restored (the power outage is
eliminated). In manual mode please check - and modify if required –
the setting of the thermostat according to the needs and specify its
position to be set after the power outage is eliminated and power supply is restored (turned on/o, last previous condition; see Point “g” in
Chapter 5). If you intend to use the apparatus in an environment where
power outages occur frequently, for safety purposes we propose you
to control proper operation of the thermostat regularly.
• Before actually starting to control the device connected to the ther-
mostat, make sure that the device is perfectly functioning when it
is controlled by the thermostat and it can be operated reliably.
• The software of the thermostat and the mobile application is con-
stantly upgraded and updated. For proper operation please check
regularly whether there is any accessible software or mobile application update in menu item „…” / „Setting” and always use their latest
Page 8

- 8 -
version! Due to constant updates it is possible that some functions of
the apparatus and the applications operate and appear in a way other
than described in these instructions for use. (The service provider will
send a notication of the accessible updated software).
3. ME ANINGS OF THE LED SIGNALS OF THE
THERMOSTAT
The operating condition of the thermostat is indicated by one red and
one blue LED light as described below:
• Normal operation of the device is indicated by a solid blue LED light.
• The device indicates tuning with the Wi-Fi network as follows:
- the blue LED is ashing briskly or
- the blue LED blinks three times then illuminates steadily for a short
time and this process is repeated.
Page 9

- 9 -
• When the blue LED ashes once for a short time every few seconds
then the connection between the thermostat and the Wi-Fi network
has not been established.
• When the blue LED ashes twice for a short time every few seconds then
the connection between the thermostat and the Wi-Fi network has been
established but the connection to the central server was unsuccessful.
• When the blue LED ashes once for ~1 second every few seconds then
the thermostat has been connected to the Wi-Fi network and the central
server but the connection to the user account was unsuccessful.
• The ON position of the thermostat terminal is indicated by steady
illumination of the red LED beside the blue LED.
4. PUTTING THE APPARATUS INTO OPERATION
4.1. Downloading and installing mobile application
The thermostat can be controlled from devices using the Android or iOS op-
Page 10

- 10 -
erating system by means of an application called COMPUTHERM S Series.
a) Download the free COMPUTHERM S Series application from App
Store or Google Play store to the device (e.g. smart phone or tablet)
you intend to use to control the thermostat. The application is accessible through the below link and QR code:
http://quantrax.hu/computherm-wi--termosztatok/
b) After the application has been installed, register a user account by
means of your e-mail address. During the registration process give
the e-mail address you wish to use then tap the „NEXT” button.
On the appearing page tap the „SEND” button and the application
will send your e-mail address to the central server which will send
a 4-digit validation code to the e-mail address given within a few
Page 11

- 11 -
minutes. Enter this 4-digit validation code into the line „VERIFI-
CATION CODE”. Following this, give a password composed of at
least 8 characters. When you are ready, click twice on the „REGIS-
TER” button and enter into your user account.
Following this, the mobile application is ready for use.
4.2. Connecting the thermostat to the user account and es-
tablishing connection between the thermostat and the
Wi-Fi network
The apparatus should be connected to the user account dierently from
devices which are using the Android or iOS operating system.
4.2.1. In case of devices using the Android operating system you
can connect the thermostat to the user account and the Wi-Fi network chosen by means of the following steps:
a) Enable the Wi-Fi connection on your device using the Android oper-
ating system.
Page 12

- 12 -
b) Connect the thermostat to the mains power source through the „N”,
„L” and „E” connection points indicated on the apparatus in the direct
vicinity of the Android-operated device and the Wi-Fi router selected
then wait for ~10 seconds. The Wi-Fi network selected must have
Internet access.
c) Press and hold down the push button on the thermostat for around
5 seconds. The LED on the apparatus will blink three times then illu-
minates steadily for a short time and this process is repeated. Press
and hold down the button again for around 5 seconds and the blue
LED starts to blink briskly indicating that the apparatus is in tuning
mode (should you encounter any problem during the further steps
of tuning then we propose you to reset the router to the factory
default and attempt tuning again. Another way to attempt tuning:
press only once and hold down the button on the apparatus for a
longer time and the blue LED on the apparatus blinks 3 times then
illuminates steadily for a short time and this process is repeated.
Page 13

- 13 -
This blinking indicates the alternative tuning mode).
d) On the Android device open application „COMPUTHERM S Series”
and click on „+” at the bottom of the screen then on the „Next” button.
e) In the application give the name and password of the Wi-Fi network to which
the thermostat is to be connected then click on the „Next” button again.
f) Following this, the Android operated device will automatically nd the
thermostat in its environment and connects it to the user account
and establishes connection between the thermostat and the Wi-Fi
network selected.
g) As a last step enter a name for the thermostat (e.g. daytime thermostat)
so that it can be distinguished from any possible devices easily then click
on the „Submit” button. Now the thermostat can be seen with the name
given in the application. Then you can connect the device to be controlled to the thermostat (see Chapter 6 for detailed instructions), which
becomes remotely controllable this way. Please make sure that neither
Page 14

- 14 -
the device to be controlled nor the thermostat are connected to the
mains power while the device is connected to the thermostat.
4.2.2. In case of a device using the iOS operating system you can
connect the thermostat to the user account and the Wi-FI network
chosen by means of the following steps:
a) Connect the thermostat to the mains power source through the „N”, „L”
and „E” connection points indicated on the apparatus in the immediate
vicinity of the iOS-operated device and the Wi-Fi router selected then wait
for ~10 seconds. (The Wi-Fi network selected must have Internet access).
b) On your iOS device open the „COMPUTHERM S Series” application
then tap „+” at the bottom of the screen then the „Next” button.
c) Pressing the „Home” button of the iOS device send the application
to the background then enter into menu item „Settings/Wi-Fi net-
works”. Press and hold down the push button on the thermostat for
around 5 seconds. The blue LED on the apparatus blinks three times
Page 15

- 15 -
then illuminates steadily for a short time and this process is repeated.
Press and hold down the button again for around 5 seconds and the
blue LED starts to blink briskly indicating that the apparatus is in tuning
mode. At this point the „ITEADxxxxxx” Wi-Fi network should appear
on the list of Wi-Fi networks. (Should you encounter any problem during the further steps of tuning than we propose you to reset the router
to the factory default and attempt tuning again. Another way to attempt
tuning: press only once and hold down the button on the apparatus for
a longer time and the blue LED on the apparatus blinks 3 times then
illuminates steadily for a short time and this process is repeated. This
blinking indicates the alternative tuning mode).
d) Out of the list of Wi-Fi networks oered by the device select the net-
work named „ITEADxxxxxx” and give its password: 12345678. (If
the phone does not allow connection to the ITEADxxxxxx Wi-Fi network then delete Wi-Fi connections saved at the given place because
Page 16

- 16 -
the phone tries to make connections to them automatically).Once the
iOS device is connected to the Wi-Fi network of the thermostat, exit from
the „Settings” menu.
e) On your iOS device open again application „COMPUTHERM S Se-
ries” then tap the „Next” button at the bottom of the page.
f) On the next screen give the name and password of the Wi-Fi network
to which the socket is to be connected then tap the „Next” button
again. Following this, the iOS device will connect the thermostat to
the user account and establishes connection between the thermostat
and the Wi-Fi network selected.
g) As a last step enter a name for the thermostat (e.g. daytime ther-
mostat) so that it can be distinguished easily from the other devices
connected to the user account and acknowledge settings by tapping
the button “Added successfully!” then „OK” that appears after-
wards. Now the thermostat can be seen with the name given in the
application. Then you can connect the device to be controlled to the
thermostat (see Chapter 6 for detailed instructions), which becomes
Page 17

- 17 -
remotely controllable this way. Please make sure that neither the
device to be controlled nor the thermostat are connected to the
mains power while the device is connected to the thermostat.
5. USE OF THE THERMOSTAT AND APPLICATION,
DESCRIPTION OF FUNCTIONS AND SERVICES
Once you have successfully established a connection between the thermostat and the Wi-Fi network selected (which must have the Internet
access) and connected the thermostat to your user account, you can
control it remotely with the help of the application.
To enable remote control, in the application log in to your user account with
your user name (phone number/e-mail address) and your password. By
means of the menu items that can be opened at the top of the main screen
of the application you can arrange the devices into groups („Group”) then
you can select those you wish to see together on the main screen.
Page 18

- 18 -
The settings of the user account and the application can be modied and
the application can be updated in settings ( ) menu. You can return to the
main menu with the icon showing four squares ( ).
The Andoid application has a widget functionality, with which the basic functionalities of the devices connected to the user account can be accessed
directly from the home screen of the Android device.
The thermostat will continue its pre-set function even in the absence of the
Internet access. Besides, it will continue its pre-set function after the power
is restored following a mains supply failure (power outage), except if the
Internet is not accessible any longer when power supply is restored.
If, for any reasons, in the future you intend to control you apparatus through
another Wi-Fi network or from another user account then rst you have to
remove it from this account with “Delete” or using the icon
then put the
thermostat into service again by means of the steps described in Chapter 4.
Attention! In the setting menu of the device the software of the thermo-
Page 19

- 19 -
stat can also be updated. For proper operation please check regularly
whether a software update is available and always use the latest version!
The thermostat has the following functions and services:
a) Manual on/off control: press the push button on the thermostat
for a short time.
b) Manual on/o control by means of the application: tap „OFF”/„ON” button.
c) Timed on/o control at a preset point of time with the application: tap
the „Timing/Timer” button then specify settings of the function.
d) Timed on/o control with the help of the application after a certain
period of time has elapsed: tap „Countdown” button then specify
settings of the function.
e) Repeated timed on/o control with the help of the application after a
certain period of time has elapsed: tap „...” then „Loop timer” button
then specify settings of the function.
f) Automatic mode: tap „Auto/Manual” button then specify the param-
Page 20

- 20 -
eter concerned (temperature or humidity) and the associated conditions (e.g. „Higher than 22°C” or „Lower than 21°C” and ON/OFF).
Settings can be conrmed by tapping the „OK” button. You can return
to manual mode by tapping the „Auto/Manual” button again.
g) You can get access to settings of the device by pressing „...” then
the „Setting” button. Here you can alter the name of the device or, in
case of switching, activate the vibration of the smart phone or update
the software. In addition, you can specify the position of the device to
be set (turned on/o, last previous condition) once the power supply
is restored (e.g. after a power outage). For proper operation please
check regularly whether there is any accessible software update and
always use the latest version!
h) You can share the device with other user accounts (e.g. those of
family members/colleagues) by tapping the „Share” button. Sharing
requires that the other party also registers a user account, enters into
Page 21

- 21 -
this account and stays online while sharing steps are carried out.
i) Coordinated control of several devices with function „Scene”: Coor-
dinated control of the devices connected to your user account can be
done with function „Scene”. You can manually control several devices
simultaneously or, based on pre-set parameters, turn on/o one or more
COMPUTHERM
Wi-Fi devices that are not equipped with temperature
sensor (e.g.
COMPUTHERM
S200 Wi-Fi sockets) with the help of the
COMPUTHERM
S300 Wi-Fi thermostat as a master device.
The „Scene” function is accessible from the main screen of the appli-
cation by tapping icon „...” then menu item „Scene”. After entering into this
function you can create a new switch command by tapping the „+” button at
the bottom of the screen, and previous settings also appear on this screen.
The creation of the switch command is composed of four steps:
• A name should be given to the switch command (e.g. Turn on the
heating or Turn o the heating)
Page 22

- 22 -
• After tapping the „+” button located beside menu item „When it meets”
you have to select the type of the switch command: manual start-up
(„Tap to run”) or control from the master device („Master device”).
• When „Master device” control is chosen, the program oers the
device(s) connected to the user account (e.g. the
COMPUTHERM
S300 Wi-Fi thermostat), out of which one should be chosen to be a
master device. Then out of the parameters oered for control you have
to choose the one (e.g. temperature) based on which you intend to
control the other device (e.g. a
COMPUTHERM
S200 socket). Finally,
you have to give the condition belonging to the parameter (e.g. „≤ 21
°C” or „≥ 22 °C”) then tap the „OK” button to conrm the settings.
• After conrming the parameters having been set, by tapping the „+”
button located beside menu item (Execute) you can choose the type
of switch („ON” or „OFF”) to be performed when the pre-set value is
reached on the selected device(s) (e.g. a
COMPUTHERM
S200 socket).
Page 23

- 23 -
• When manual start-up is chosen (Tap to run), several devices can
easily be turned on/o simultaneously. This mode is especially
suitable to activate certain electric devices with the push of a single
button (e.g. turning on/o lights, opening/closing motorized roller
blinds) when you arrive at or leave your at or holiday cottage.
• When controlling from a master device the thermostat will automatically
execute the commands when the specied conditions are met
therefore in this mode the thermostat is perfectly suited to control the
central heating system (for more details please refer to Sub-chapter
6.1). Function „Scene” is only in operation when each of the two or
more devices connected to the function have the Internet access.
The active „Scene” function overwrites the manual switch commands therefore you have to delete or modify the settings of
the „Scene” function if you wish to control, either on the spot
or remotely, e.g. a
COMPUTHERM
S200 socket controlled by the
„Scene” function from a
COMPUTHERM
S300 thermostat.
Page 24

- 24 -
6. RECOMMENDATIONS FOR THE USE OF THE
THERMOSTAT
6.1. Remote control for central heating, heaters and infrared
heating panels
Remote control of an existing central heating system is easily feasible if
it is complemented with and controlled by a
COMPUTHERM
S300 Wi-Fi
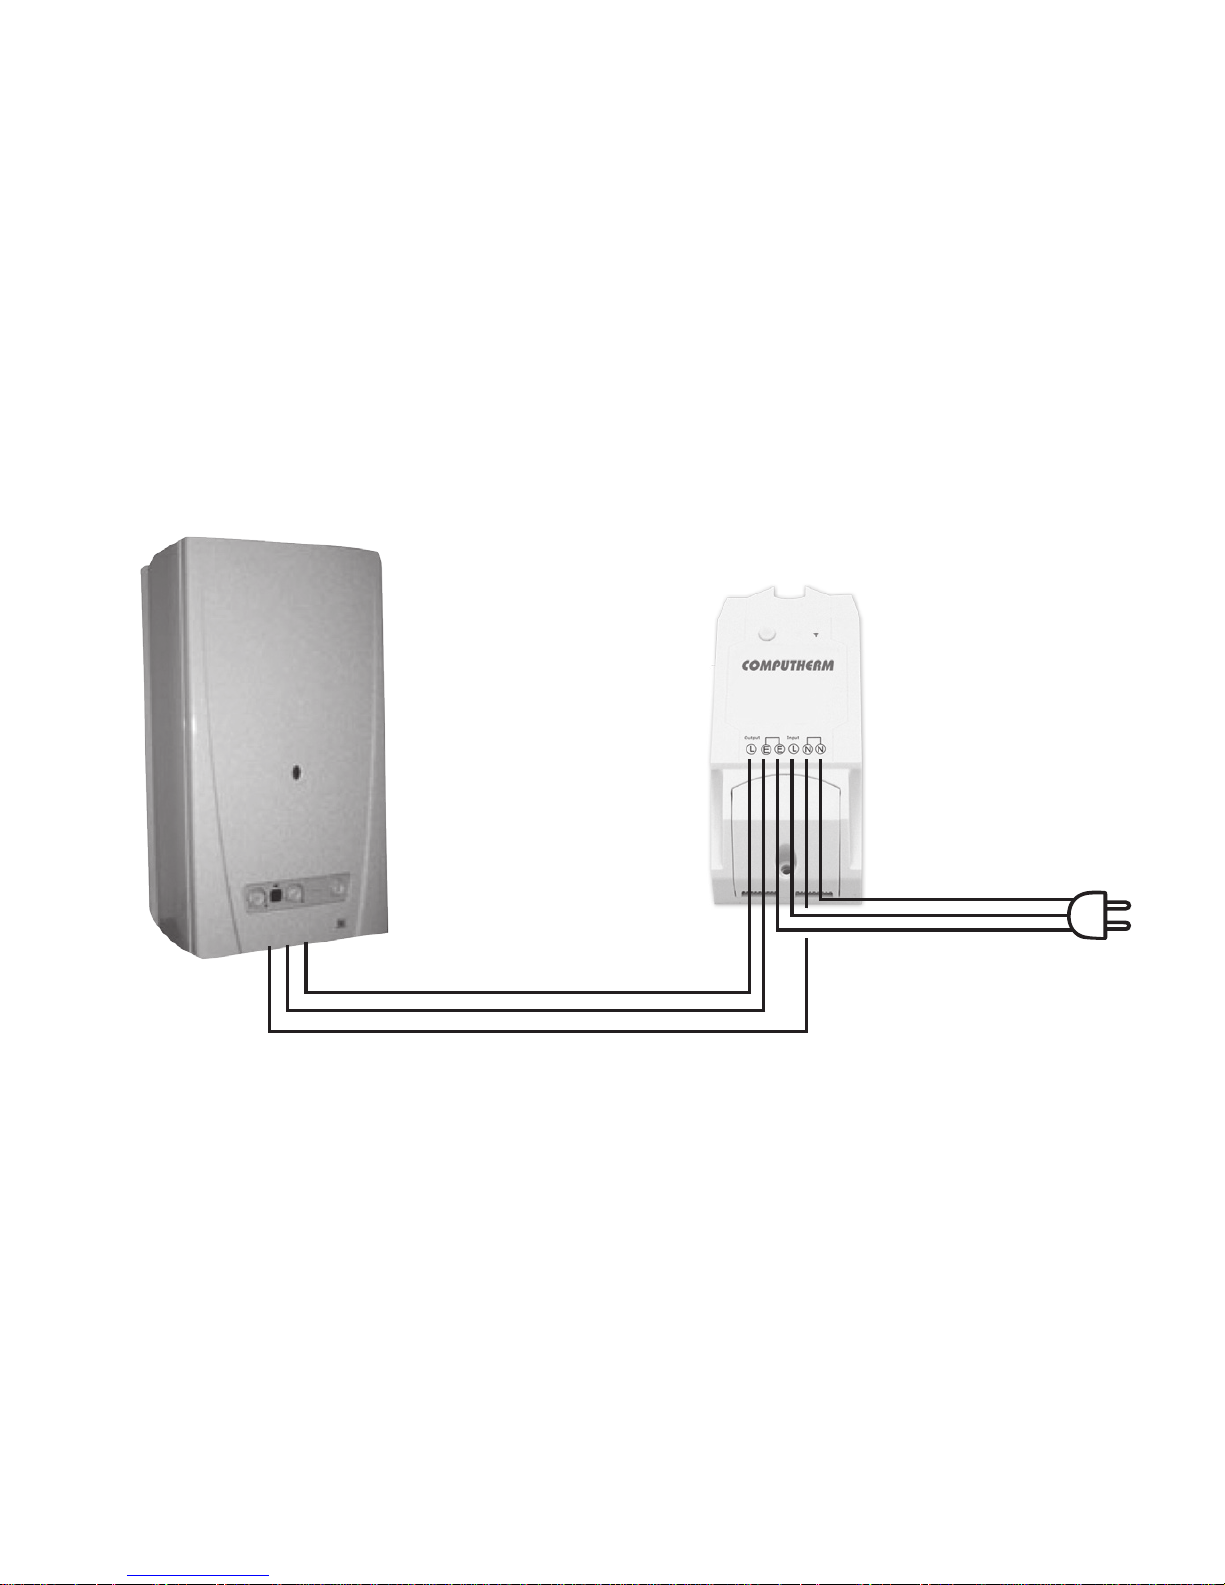
thermostat. To this end all you have to do is connect the power cable
of the boiler of the central heating system through the terminal of the
thermostat to the electrical network (Figure 1). However, please note
that in this case domestic hot water will not be available in the OFF
state of the Wi-Fi socket.
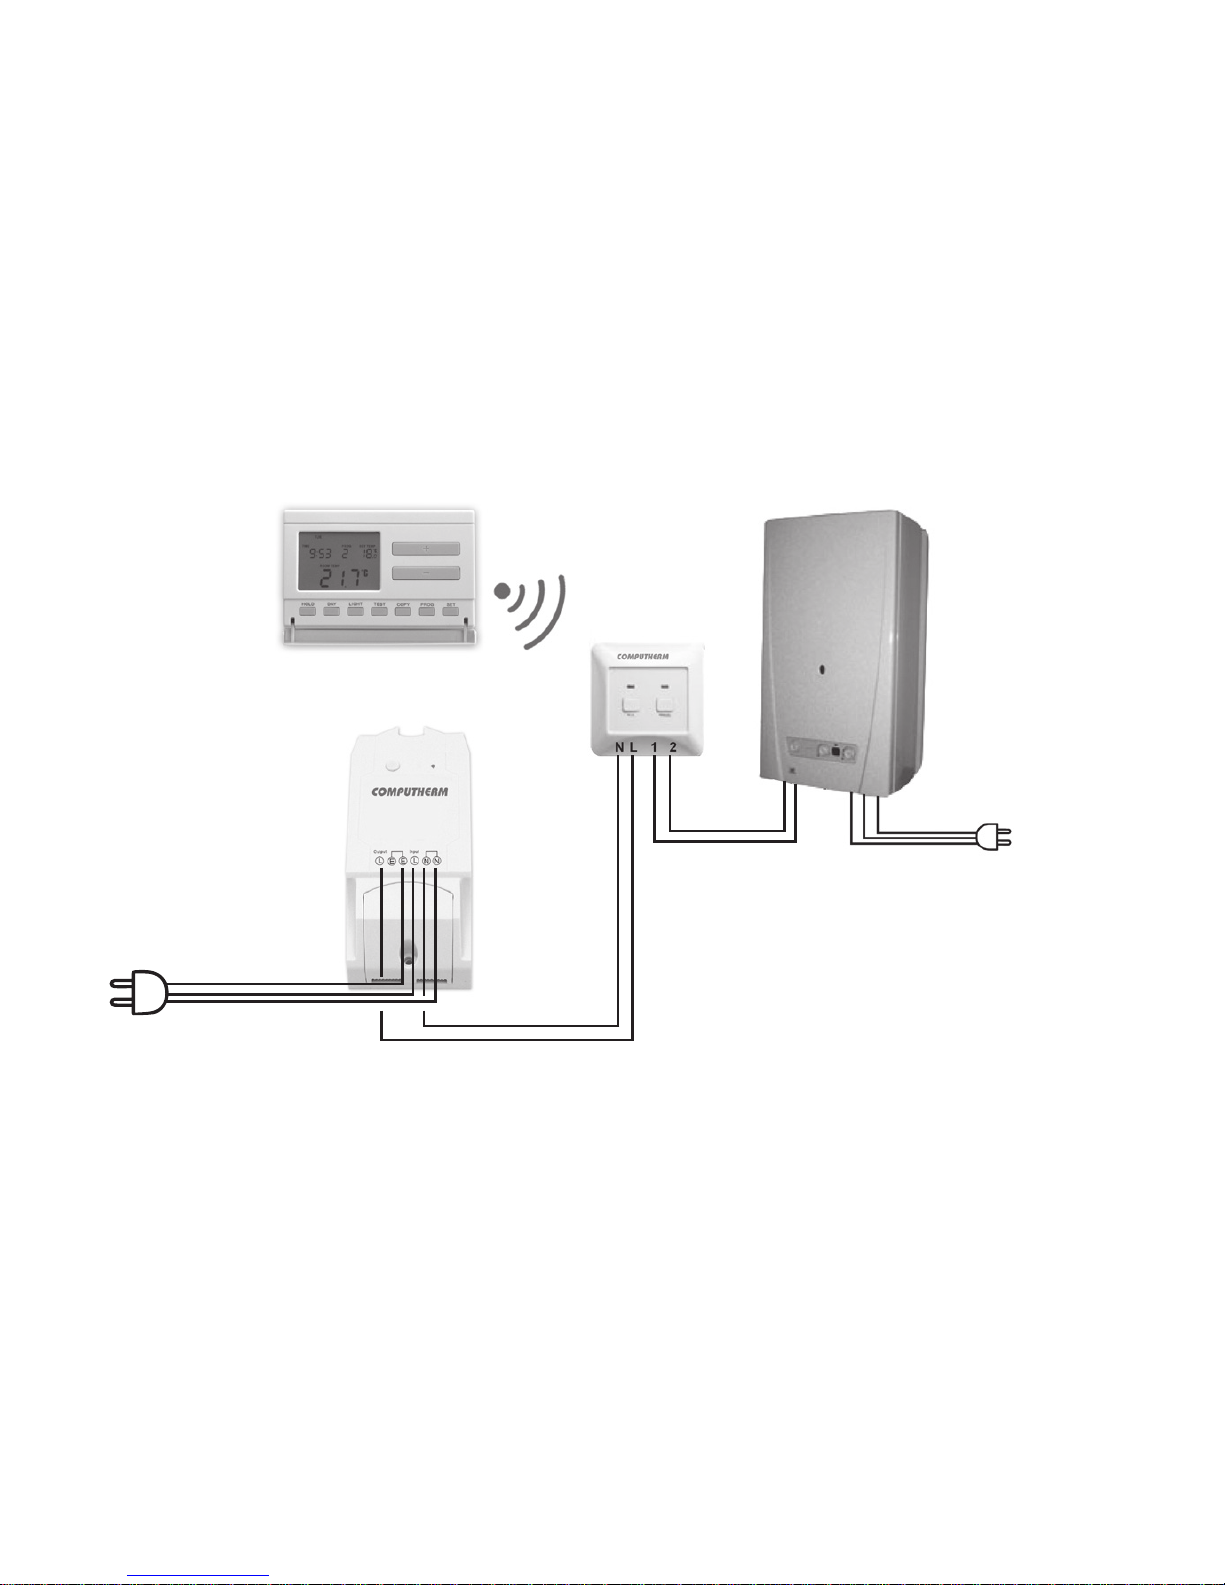
Therefore, if you control your boiler with a
COMPUTHERM
wireless (RF)
thermostat, we suggest you to connect the power supply of the receiver
unit of the RF thermostat to the
COMPUTHERM
S200 Wi-Fi socket
instead (Figure 2), asthiswayheatingwillbeturnedointheOFF
Page 25
- 25 -
heating equipment (boiler)
S300
230 V AC
50-60 Hz
Figure 1
Page 26
- 26 -
Figure 2
boiler
thermostat
receiver
230 V AC
50-60 Hz
thermostat
S300
230 V AC; 50-60 Hz
Page 27

- 27 -
state of the Wi-Fi socket, while domestic hot water is still available.
Then, with remote switch (ON/OFF) of the thermostat via the Internet,
the central heating system can be controlled and switching between
economy and comfort temperatures is feasible.
If the central heating system is operated in an environment where no
risk of frost exists (e.g. a south-facing condominium or holiday home in
commonhold) then it is sucient to turn OFF the thermostat when leaving
home and turn it ON remotely before arriving home. When it is ON, the
central heating system will heat the at to the temperature preset on the
room thermostat in the usual way.
If the central heating system is operated in an environment where risk of
frost exists we propose you to operate the
COMPUTHERM
S300 thermostat
in automatic mode and set an antifreeze temperature according to Subpoint „f” of Chapter 5 to prevent risk of frost.
If the temperature sensor of the thermostat installed in the vicinity of the
Page 28

- 28 -
boiler fails to guarantee that there is no risk of frost in the entire at then
either extend the cables thereof or use a
COMPUTHERM
S200 socket and
a
COMPUTHERM
S300 thermostat for the control of the boiler, and with the
help of the „Scene” function keep the temperature above freezing according
to Sub-point „i” of Chapter 5.
6.2. Programmed operation and remote control for other
electric devices (e.g. watering pump, refrigerator)
Below the loadability limit of the output relay, the thermostat, even without a temperature sensor that can be connected thereto, is able to control
any electric device (e.g. a watering pump) remotely.
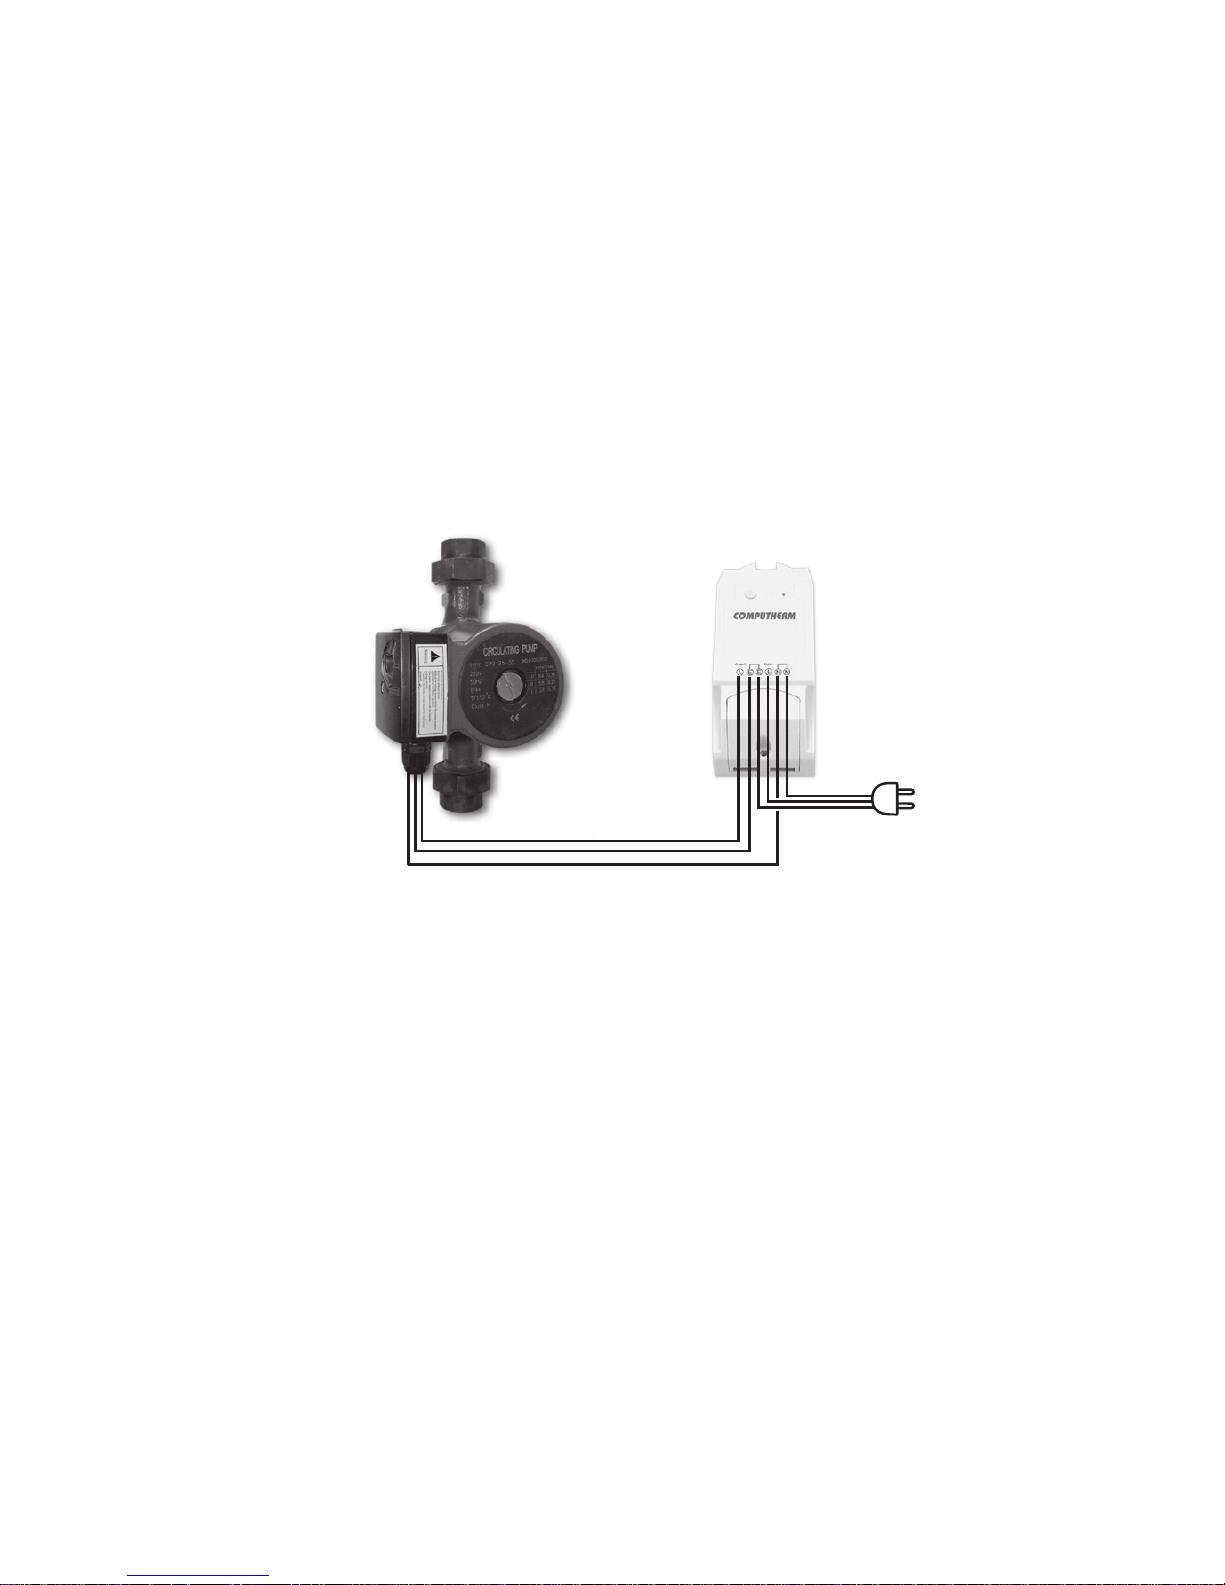
Connect your electric device to be controlled remotely to the 230 V network through the
COMPUTHERM
S300 thermostat and turn on the main
switch of the device to be remote controlled (Figure 3).
Page 29
- 29 -
You can switch between automatic and manual control modes by
tapping the „Auto/Manual” button. Choose manual control so that you
can control the operation of the device connected to the thermostat
remotely by turning on/o the thermostat manually.
230 V AC
50-60 Hz
pump
(heater / infrapanel etc.)
S300
230 V AC
50-60 Hz
Figure 3
Page 30

- 30 -
The timed („Timer”/„Timing”) and repeated timed („Loop timer”)
on/o controls make the device particularly suited to control e.g. a
watering pump. By means of the device you can operate the pump
of the irrigation system at pre-set intervals and period of time and,
additionally, you can modify settings remotely (e.g. in case of high
volume of rainfall or a severe draught), and you can check the
operation of the system, and manual remote control of the watering
pump is also feasible.
7. PRACTICAL ADVICES
Problems with the Wi-Fi connection
If you are not able to control the device through the Internet because
it cannot be reached through the application, then the connection
between the device and the server has been broken. This can have
Page 31

- 31 -
multiple reasons.
In most of the cases it is caused by the Wi-Fi router. It is practical to
restart the routers from time to time by disconnecting them from the mains
voltage for 2 minutes. In most cases the problems can be xed by this.
If the devices still cannot be controlled after a couple of seconds,
then you should try to reconnect the device to the Wi-Fi network,
as described in Section 4.2. If you nished the connecting steps
successfully but the device still cannot be controlled, then you should
reset the router to the factory default settings, because it is possible
that some settings of the router do not allow the device to connect to
the internet.
You can still switch on/o the device manually even when it is not
available through the internet using the button on the device.
Page 32

- 32 -
The use of the application
The phone/tablet application is under constant development. It is
advised to update it to the latest version, as the user experience is
continuously enhanced and there can be new functionalities available
in the new versions.
Page 33

- 33 -
8. PRODUCT INFORMATION AND TECHNICAL DATA
Trademark:
COMPUTHERM
Model identier: S300
Temperature control class: Class I
Contribution to the eciency of seasonal space heating: 1 %
Temperature measuring range: -20 °C – +70 °C
Temperature measurement accuracy: +/- 0.5 °C
Type of the temperature sensor: resistive (ohmic) temperature sensor
Adjustable measuring range: -20 °C – +70 °C
Switch sensitivity: +/- 1 °C (temperature); 1 % RH (humidity)
Humidity measuring range: 0 - 100 %
RH Humidity measurement accuracy: +/- 2 % RH
Adjustable humidity range: 0 - 100 % RH
Supply voltage for the thermostat: 90-230 V AC; 50/60 Hz
Output voltage of the thermostat: 90-230 V AC (identical with the input voltage)
Page 34

- 34 -
Protection against environmental impacts: IP51
Output loadability of the thermostat: 16 A (3 A inductive)
Standby power consumption: 0.1 W
Operating frequency: Wi-Fi (b/g/n) 2.4 GHz
Storage temperature: -40 °C … +80 °C
Operating temperature: -20 °C – +70 °C
Permissible relative humidity: max. 80 % without condensation
Dimensions: 115 x 52 x 32 mm
Mass: 85 g
Page 35

Page 36
The
COMPUTHERM
S300 type Wi-Fi thermostat complies
with standards RED 2014/53/EU
and RoHS 2011/65/EU.
Manufacturer: QUANTRAX Kft.
H-6726 Szeged, Fülemüle u. 34.
Telephone: +36 62 424 133 • Fax: +36 62 424 672
E-mail: [email protected]
Web: www.quantrax.hu • www.computherm-hungary.hu
Country of origin: China
Copyright© 2018 Quantrax Kft. All rights reserved.
 Loading...