

Page 1
Page 2

Page 3

The product:
Control your home through your
smartphone!
џ PS Gate is a Wi-Fi programmable
thermostat controller. The device is
an Internet connected relayed
module, that includes a weekly
schedule. The latter could be
programmed and controlled via an
Internet connected PC desktop
computer or a smartphone.
џ PS Gate allows the fast
automatization of every electrical
device, regardless of its
manufacturer or model.
џ The technology set in PS Gate allows
it to connect with any wireless
џ PS Gate is a complex system with
which you not only open and close
your doors, roller shutters and
windows remotely but manage and
adjust a number of devices in your
home, office, house or villa.
џ PS Gate allows the users to receive
real time information for all
connected devices — their work and
current status.
Internet, without the need of any
additional settings.
3
Page 4

Why choose PS Gate
џ Provides comfort and mobility
џ Optimizes the work of garage doors, barriers, roller shutters and windows
џ Complete integrated control system
џ Easy to use and user friendly software interface
џ Mobile application running on all mobile OS
PS Gate could be used for
џ Control of garage doors
џ Control of entrance doors
џ Control of barriers
џ Control of interior and exterior roller shutters
џ Control of roof windows
4
Page 5
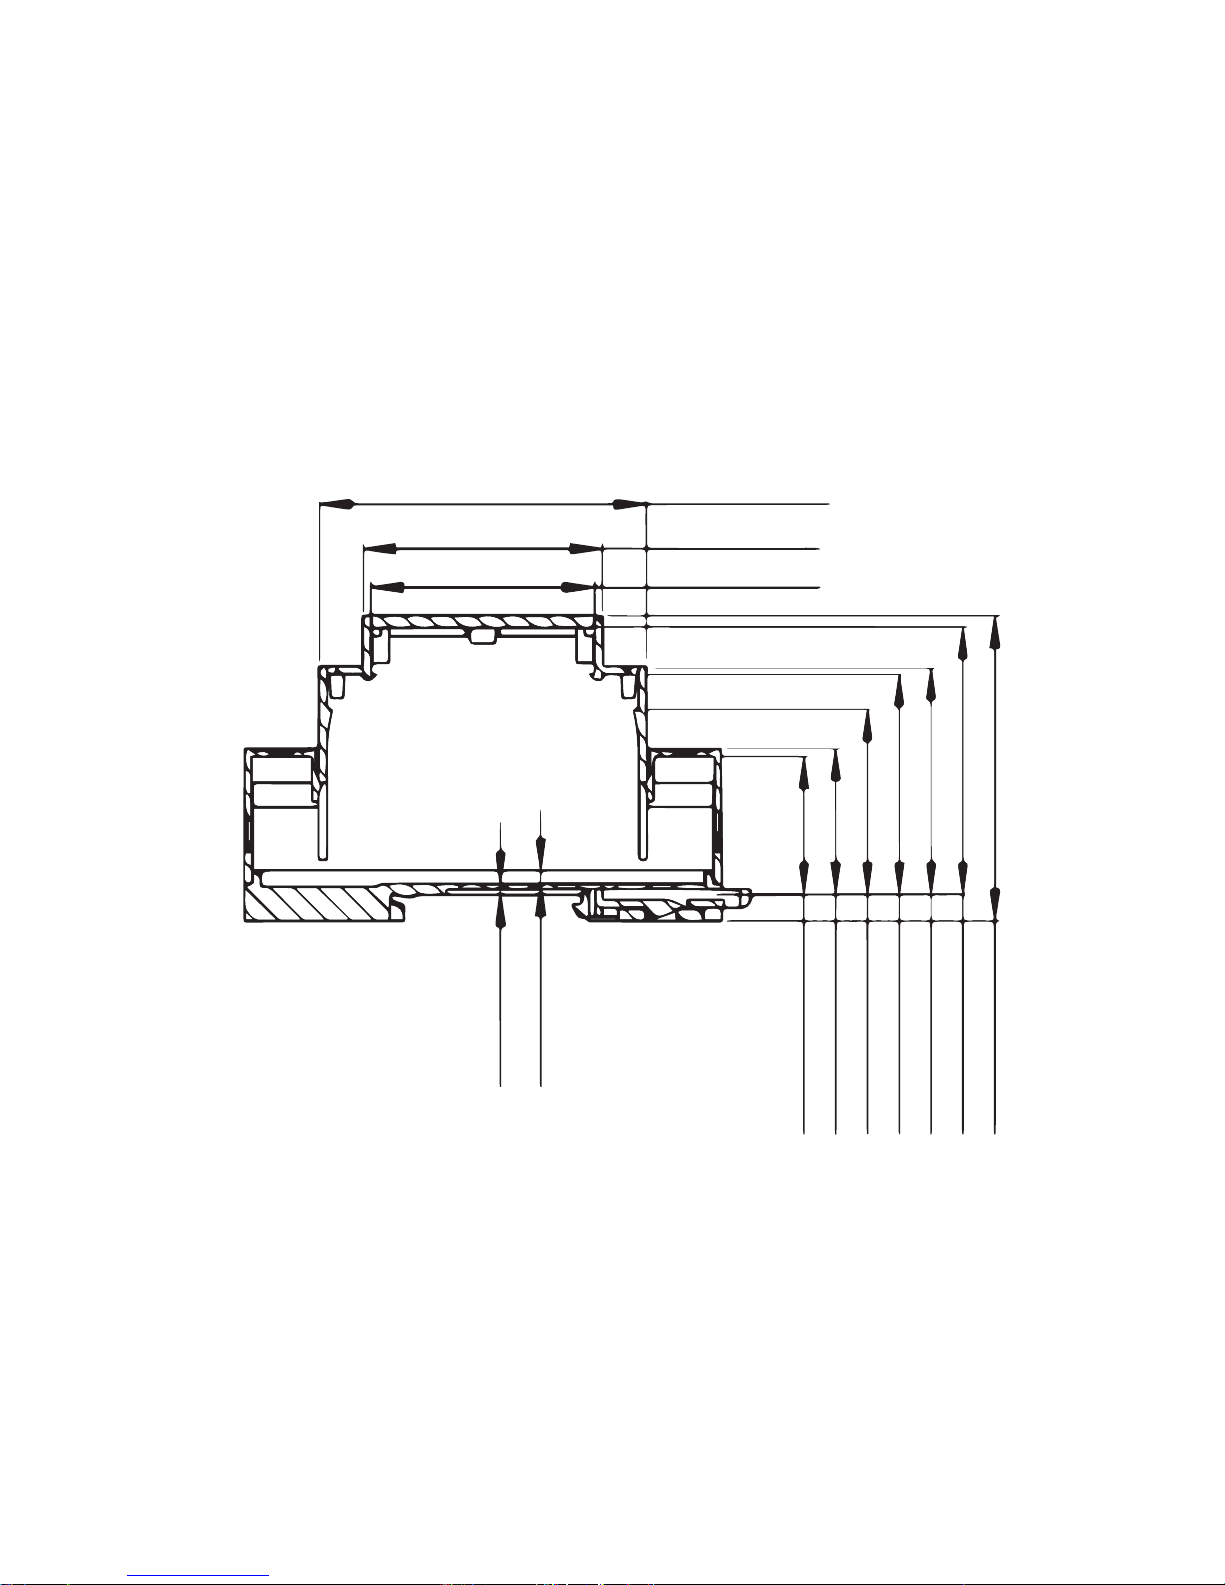
Схема 1
Technical specifications
2mm
2.50mm
61.6mm
45.1mm
42.20mm
2mm
57.50mm
50.45mm
42.70mm
41.50mm
34.90mm
27.50mm
26mm
5
Page 6

Air humidity during transportation
from 5% till 90% without condense
Wireless communication
Network topology
Protection degree, provided by the shell
IP20 – in installation position
Switching socket
3А
8-36V AC/DC
Working frequency
Charging block
Wi-Fi (b/g/n) 2,4GHz
Size
90,2 x 53,3 x 56,5 mm (LxWxH)
Working temperature
0°— + 45°C
Storage temperature
-20°— + 60°C
Working humidity
5% — 90% without condense
Ambient temperature during transportation
from –20°С till +60°С
6
Page 7

Safety instructions
Please, read before using the device for the first time
The outlined safety procedures below are to be followed while using the current
product. Please, do follow all warnings in the device’s user manual.
General safety instructions
You are the only one responsible for the device’s usage, as well as for any caused
damages in consequence of that. The device’s usage is a subject of the set safety
measures for the customers and their environment. Please do not press the
device too hard. Always use it and its accessories gently and keep them in a clean
place, away from any dust. Do not expose them to open fire or in any proximity to
lighted tobacco products. Do not let the device and its accessories to fall down, do
not throw or fold them. Do not use any aggressive chemicals, detergents or
aerosols for their cleaning. Do not paint them and do not attempt to disassemble
the device or its accessories. That could be accomplished only by a qualified
professional. The device’s working temperature is from 0°С till +45°С and storing
temperature of –20°С till +60°С. For removing electric products’ waste, the
7
Page 8

national and regional legislations are followed. The device is to be installed in
electric switchboards or in the device/s it will manage and is created to control
household devices and equipment.
Any unauthorized reconstruction and/or product modification is strictly
forbidden following the European safety and approval directives (CE). Services,
settings and repairs could be accomplished only by an authorised service provider.
For its repair use only the original spare parts. The usage of other spare parts could
cause significant damages or injuries. If you notice any damage, please stop using
the device. Before cleaning the device, disconnect it from the power supply. Do
not use any liquids or aerosols.
The device’s installation is accomplished according to the manufacturers’
instructions, the НD 60364-4-41 regulations and the national legislations.
8
Page 9
Attention! Damaged power supply cables are a life treat as could lead to an
electric shock.
Do not use the device if there is a damaged cable, power supply cord or network
plug. In the case of power supply cable’s damage, please leave its repair to a
qualified professional!
Do not leave children with the device without supervision!
Do not let children play with the device. They cannot properly assess the danger of
using electric devices. The device is not intended for use by individuals (including
children) with limited physical, sensory or mental capabilities or without any
experience and/or knowledge unless they are controlled by an individual
responsible for their safety or have received instructions on how to use it. Use, set
and keep the product only in places away from children. Do not leave the packing
materials spread aimlessly. They could be a dangerous toy for your children. Your
new device contains many small components with sharp edges that could cause
injuries and upon disassemble - a swallowing or suffocation risk.
9
Page 10

Electric safety
This device could be used only when powered by the specific supply unit. Every
other way could be dangerous and terminates the validity of any issued device’s
certificate. Use the correct external power supply. The device should be powered
only by the specific power supply as indicated on the nominal electric power
supply’s nameplate. If unsure of the power supply’s type, please turn to the
authorized service provider or to the local electric services company. Please, be
extremely careful. Store and use the device in a place far from water or other
liquids as those could cause a short circuit.
Dangerous environment limitation usages
Do not use this device in gas stations, gas storages, chemical plants or in places
where flow blasting is taking place, locations with potentially explosive
environment, for instance in places such as fueling areas, gas storages, ship holds,
chemical plants, in installations for fuel or chemical transportation or storage and
in zones where the air contains chemicals or particles such as grain, dust or metal
particles. The sparks in such places could cause a blast or fire and in consequence a severe health damage, even death.
10
Page 11

In case you are in a flammable materials’ environment, the device must be turned
off and the user is to follow all instructions and warning labels. The sparks in such
places could cause fires or explosions, leading to injuries and even death.
We highly recommend to not use the device in fueling areas, workshops or gas
stations. The customers should follow the limitations set for high frequency
devices’ usage in fuel storages, chemical plants or in places of flow blasting work
process.
Damages requiring repair
In case of any of the outlined cases below, unplug the device from the power
supply and look for an authorized service provider or turn to the supplier for
specialized repair: the product had been exposed to rain or moisture, slipped, hit,
damaged or has visible overheating traces.
Even though you are following the user manual, the device is not working
correctly. Do not expose it to heating or in a close proximity to a heating source,
such as radiators, thermal accumulators, furnaces or other equipment (including
amplifiers) that emit heat. Keep your device from any humidity. Never use the
product in rain, in a close proximity to sinks, in other moist environment or in such
11
Page 12

with high air humidity. If the device ever gets wet, do not attempt to dry it off in a
furnace or a dryer for the risk of damage is high!
Do not use the device after a sudden temperature change. If you are transferring
the device between environments with big temperature and humidity level
differences, it is possible for the steam to condense on the surface and inside of
the device. In order to avoid the device’s damage, please do wait for the moisture
to evaporate before using the device. Do not insert any elements in the device that
are not part of its original accessories!
EU-regulations and disposal
The device fulfills all needed standards for the free movement of goods within the
EU. This product is an electric device and as such must be collected and dispose of
according to the European directive on waste electrical and electronic equipment
(WEEE)
This product is in accordance of the regulations in Directive 2002/95/EC of the
European Parliament and of the Council of 27 January 2003 on the restriction of
12
Page 13

the use of certain hazardous substances in electrical and electronic equipment
(RoHS) and its recasts.
Burns and fire prevention
Do not use the device if the premises’ temperature goes above 40°C. Keep the
highly flammable materials away from the device. Make sure free air access
around the device is available.
13
Page 14

PS Gate is a Wi-Fi programmable thermostat, suitable for domestic and
industrial buildings without the need of additional wiring.
With you can easily control the movements of garage and portal doors, PS Gate
external doors, interior and exterior roller shutters, as well as other electric
devices such as electric light bulbs, irrigation systems and more, all through your
smartphone, smartwatch or tablet.
PS Gate guarantees the high security level and data and login storage via a
secure server.
PS Gate has a user friendly interface and a smartphone application running on
all mobile OS. There is also an option for control via a smartwatch.
PS Gate connects very easily to a chosen Wi-Fi router. This is accomplished via
the application for your smartphone, smartwatch, PC or tablet. COMPUTHERM
You can add a new device in three quick and easy steps. Upon installation of the
product the customer is to install according to the user manual to the PS Gate
desired device it would be controlling.
The products complies to the requirements of EN 50491-3.
14
Page 15
PS Gate is created to work on the following environmental conditions:
- For premises’ work;
- For altitude up to 2000m;
- For ambient temperature from 0°С till +45°С;
- For average maximum air humidity for temperature of up to 31°С 80%, linear decreasing to 30% average humidity for 45°С temperature;
Attention! The protection against inflation and fire spreading is provided by
the terminal equipment in which you would be embedding your device.
Please keep all devices for remote control away from children.
Please watch the installation and product usage video at: http://quantrax.hu/
15
Page 16
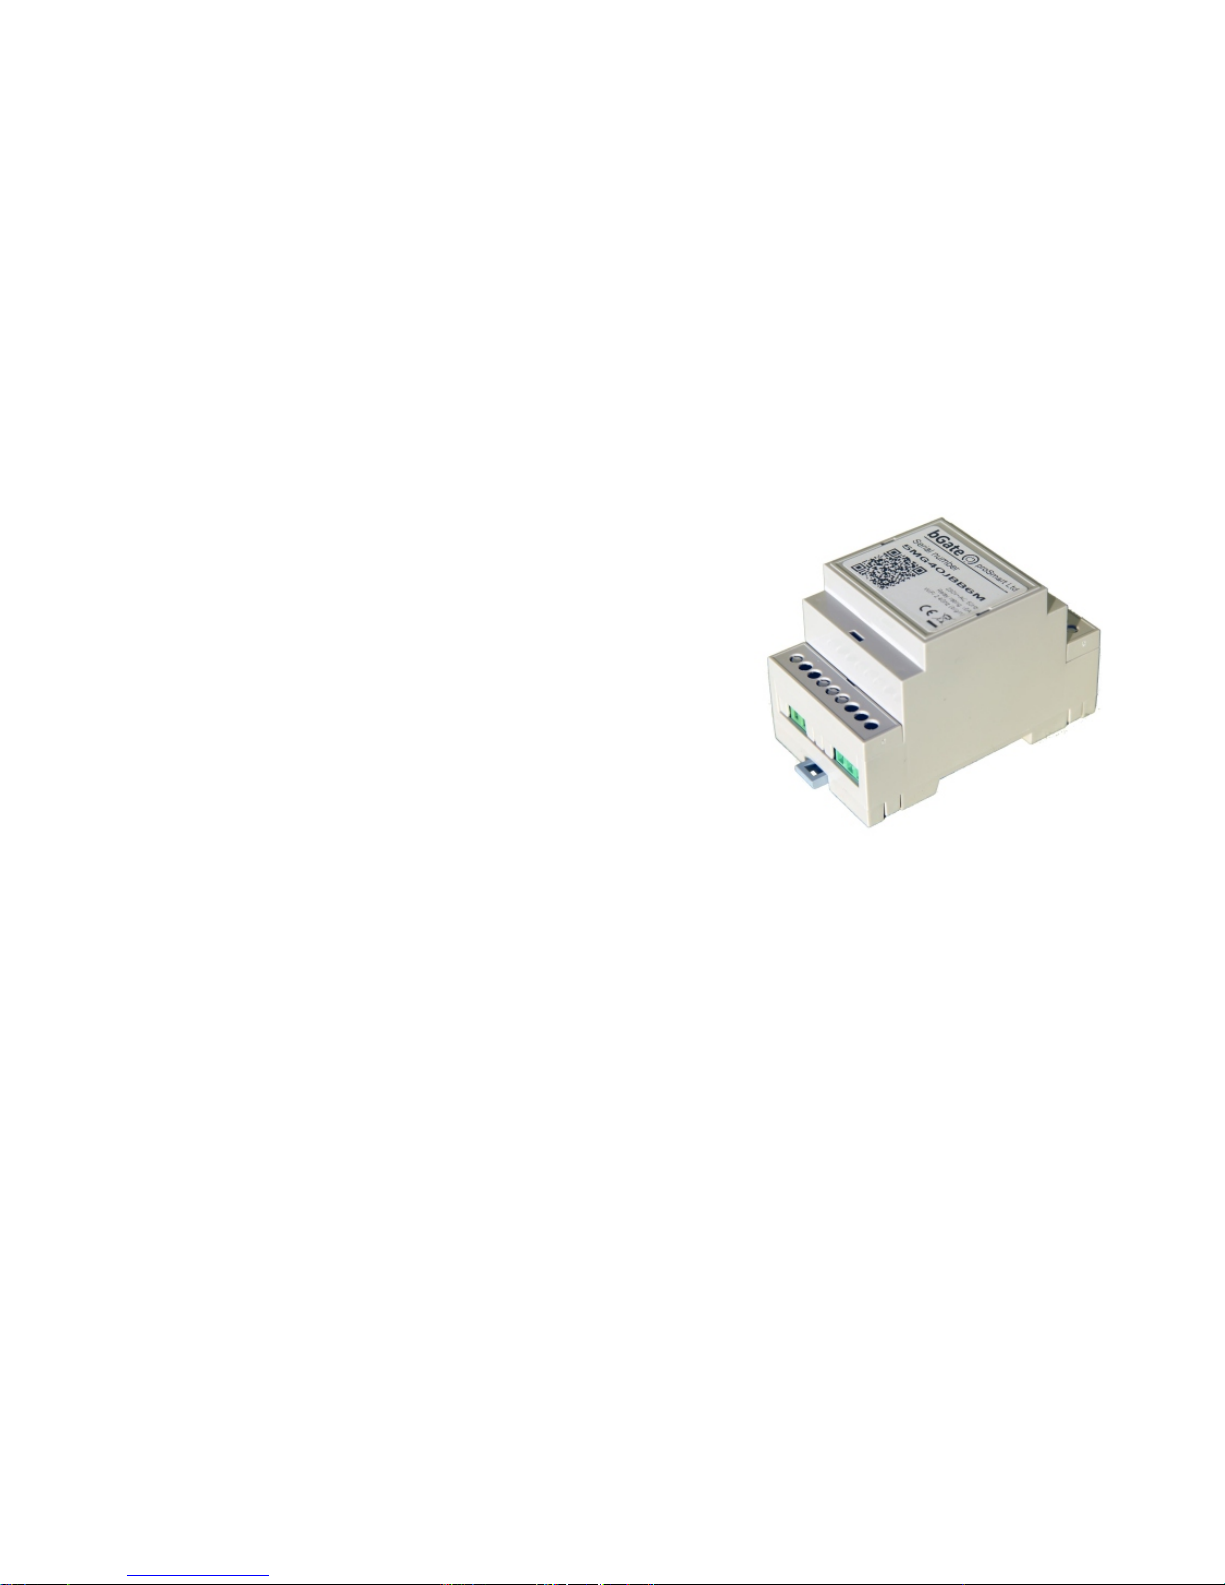
Scheme 1
Step 1:
1.1 Every PS Gate set includes:
1 pcs central control block;
1 pcs user manual for installation
Unpack the device and take the two main
elements out of the box (Scheme 1).
Connect PS Gate to a chosen electric device or appliance.
Installation guide
Attention! Switch off the power supply before installing .PS Gate
We highly recommend the installation to be performed by a qualified
technician. If you do not possess the needed knowledge and qualification,
please do turn to an authorized retailer!
Attention! Do not modify or influence the built in protection of the electric
device in any way!
16
Page 17
Scheme 2
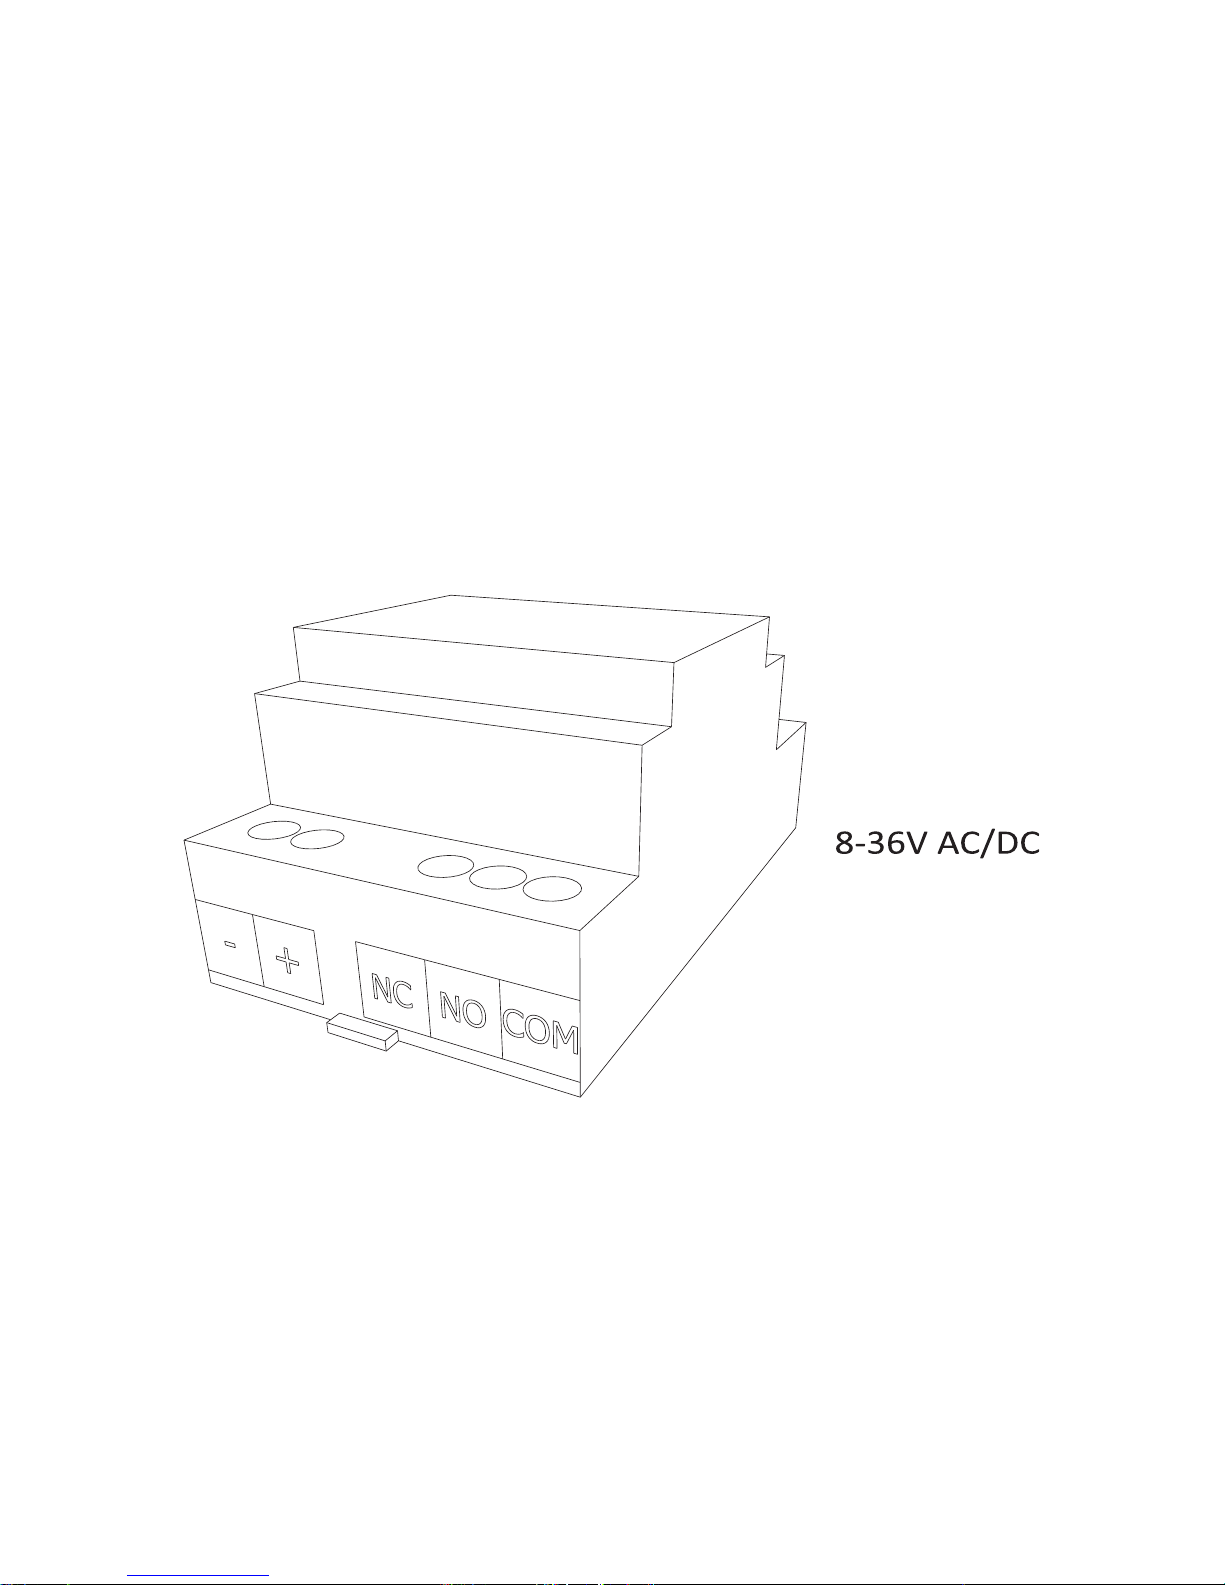
Connect the two connection points of the device you wish to control to the
outputs NO and COM, that is to the relays’ normally open outputs. The device’s
installation is outlined in Scheme 2. The device must be installed and connected
by a qualified professional.
17
Page 18
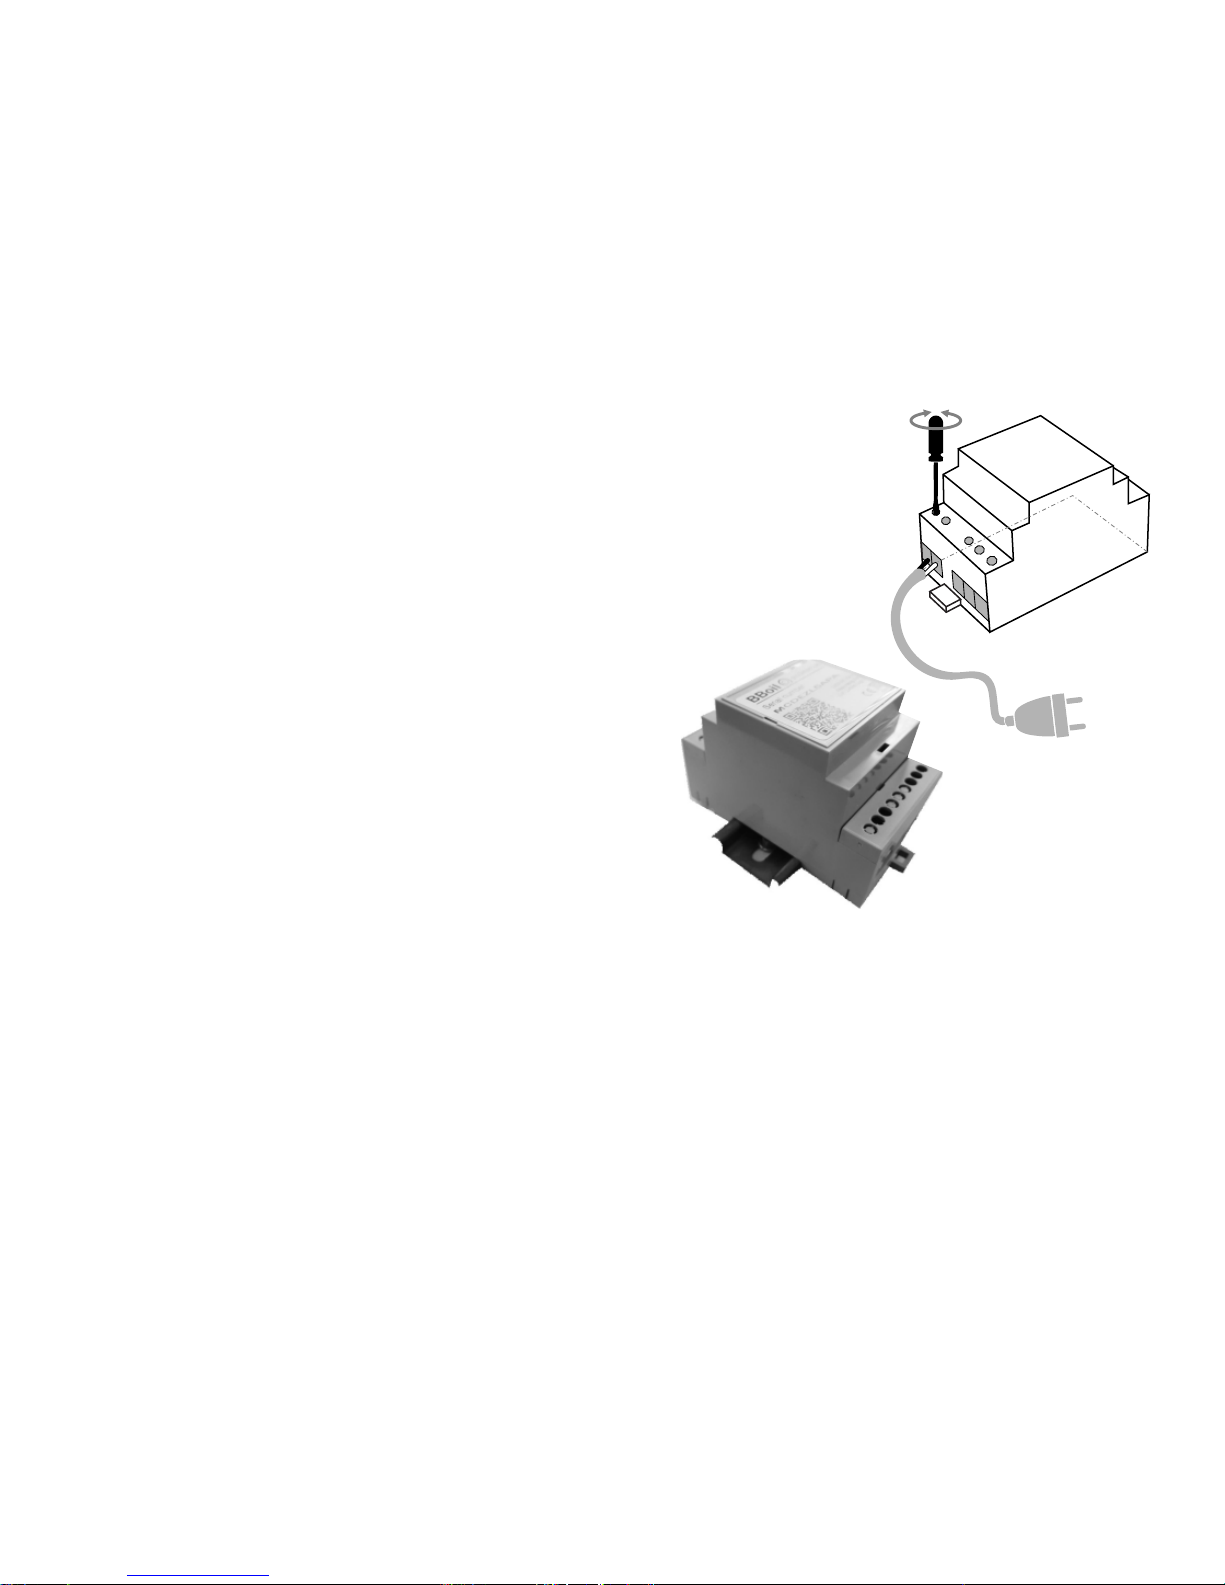
1.2 Central control block’s installation
Connect the power supply cable to the
PS Gate’s main control block. After that,
connect it to the power supply
(Scheme 3).
1.3 Installation possibilities
PS Gate is a product, constructed for
installation in limited access zones and must
be installed to the switchboard using a
Eurorim (Scheme 4).
Scheme 3
Scheme 4
1.4 A few requirements must always be considered and followed during
installation:
- The device’s installation and connection must be accomplished
according to the national legislation for electrical installations.
- All activities on the device’s installation, uninstallation, service
and repair are to be made only after it had been securely removed from
18
Page 19

the power supply (the controller itself, as well as the chain it controls
through the relayed exit).
- The device is to be installed only in places with limited access
with the assistance of an instrument or key and are accessible only to
the service personnel or a user who has passed the initial training.
- The wiring must be completed using double insulated wires.
- Disengagement tool must be provided for the electric installation
during the device’s installation and the needed safety is to be ensured
for the service provided.
- All connections to the relay’s outputs in the device must be
conducted with conductors with an insulation resistance not lower than that
of the insulated conductors of РVС Т 105°С.
- The device’s installation is conducted by the manufacturer’s
instructions and following the НD 60364-4-41 requirements, as well as the
national legislation.
- Installation of the controller in a way that the terminals are
positioned less than 5mm from the metal parts and the device’s surface, is
strictly forbidden.
19
Page 20

- The device is installed only in a shell allowing the needed level of
protection of the end product. Its installation on accessible surfaces and
covers, allowing the easy access without the use of any instrument, is strictly
forbidden.
- The device’s installation must be accomplished in such a way as to
deem it impossible to accidentally activate the reset button.
20
Page 21
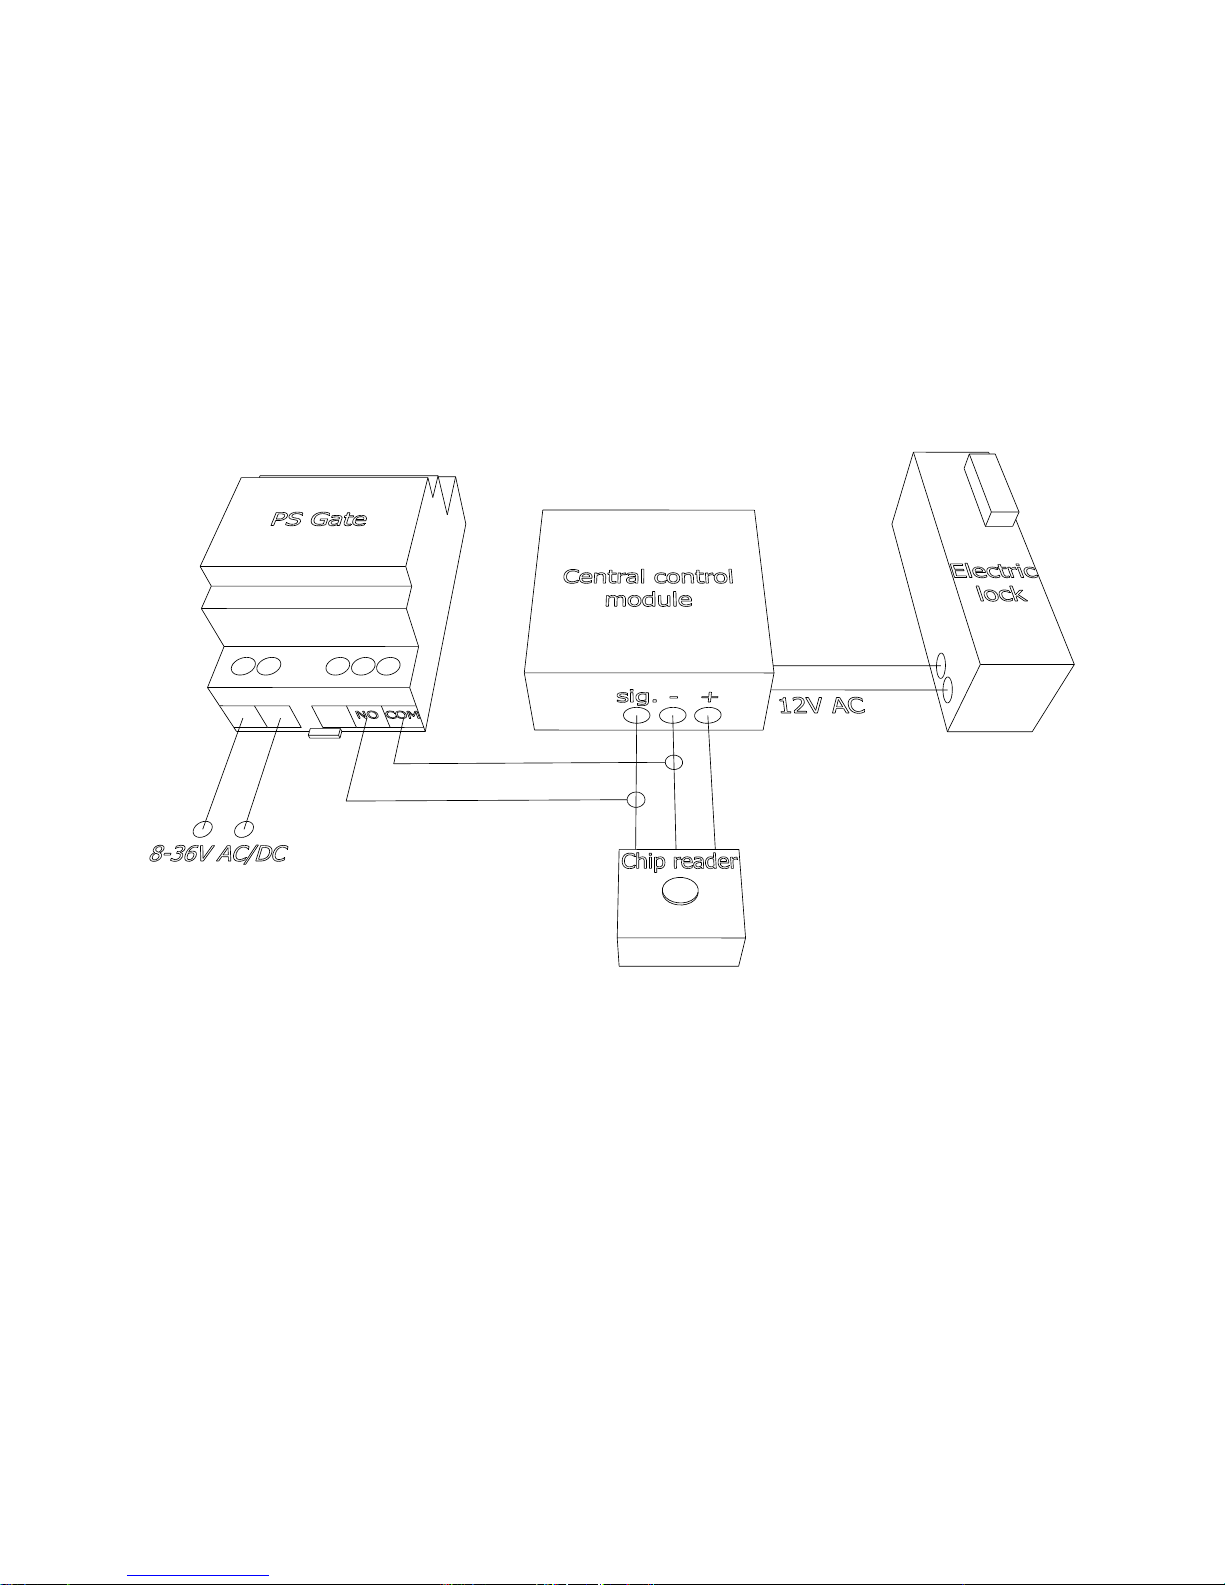
Scheme 5
2.1 is parallelly connected to the chip reader (Scheme 5). A signal is PS Gate
sent to the central control module’s ‘sig’ entrance through the relay’s PS Gate
NO contact. Depending on central control module’s model and work mode, a
‘+’ or ‘–‘ are connected to the COM entrance of the BGate’s relay.
Note: On the example scheme connected is the ‘-’.
Step 2: Example connection scheme of to a front doorPS Gate
21
Page 22
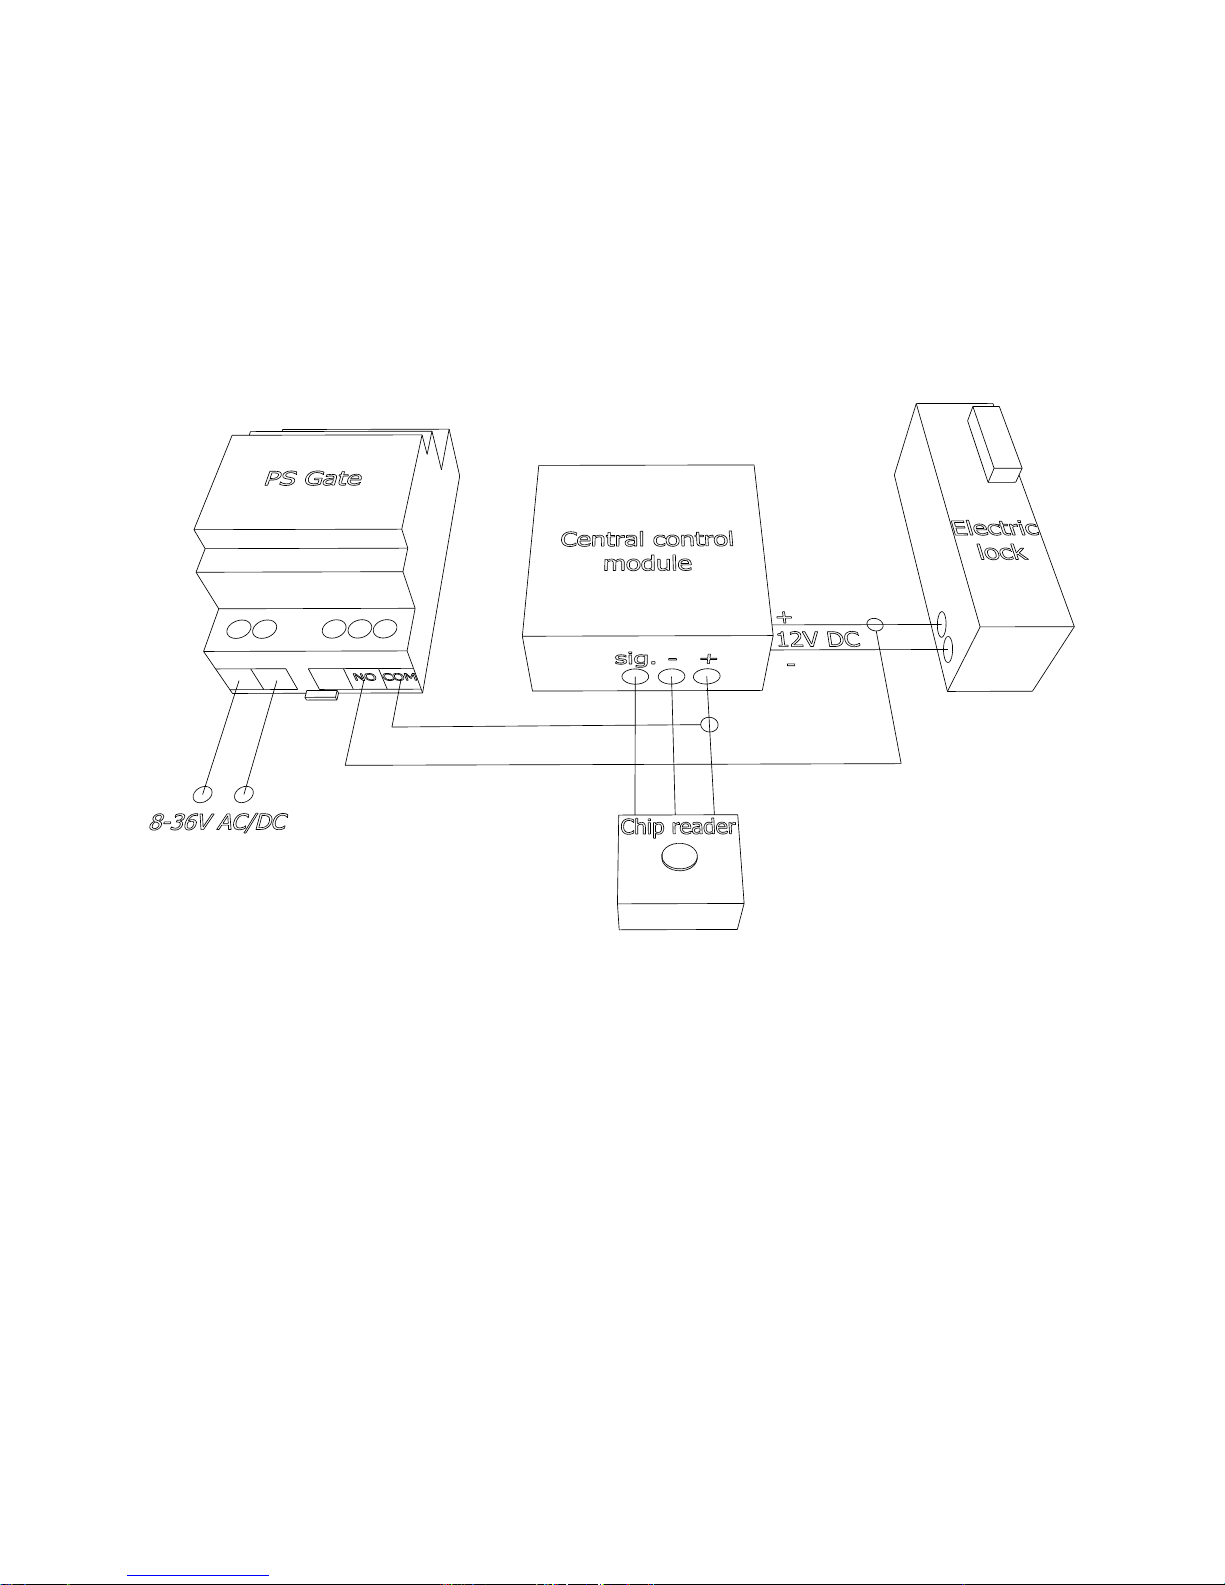
Scheme 6
2.2 is parallelly connected to the central control module (Scheme 6) PS Gate
and sends direct charge through the NO contact to the lock + 12V DC. This type
of connection is allowed if the electric lock uses a direct current and its supply
voltage is the same as the central control module one. Supply voltage could be
sent to the central control module’s exit. could be used for control of PS Gate
central control modules with relayed exit.
22
Page 23
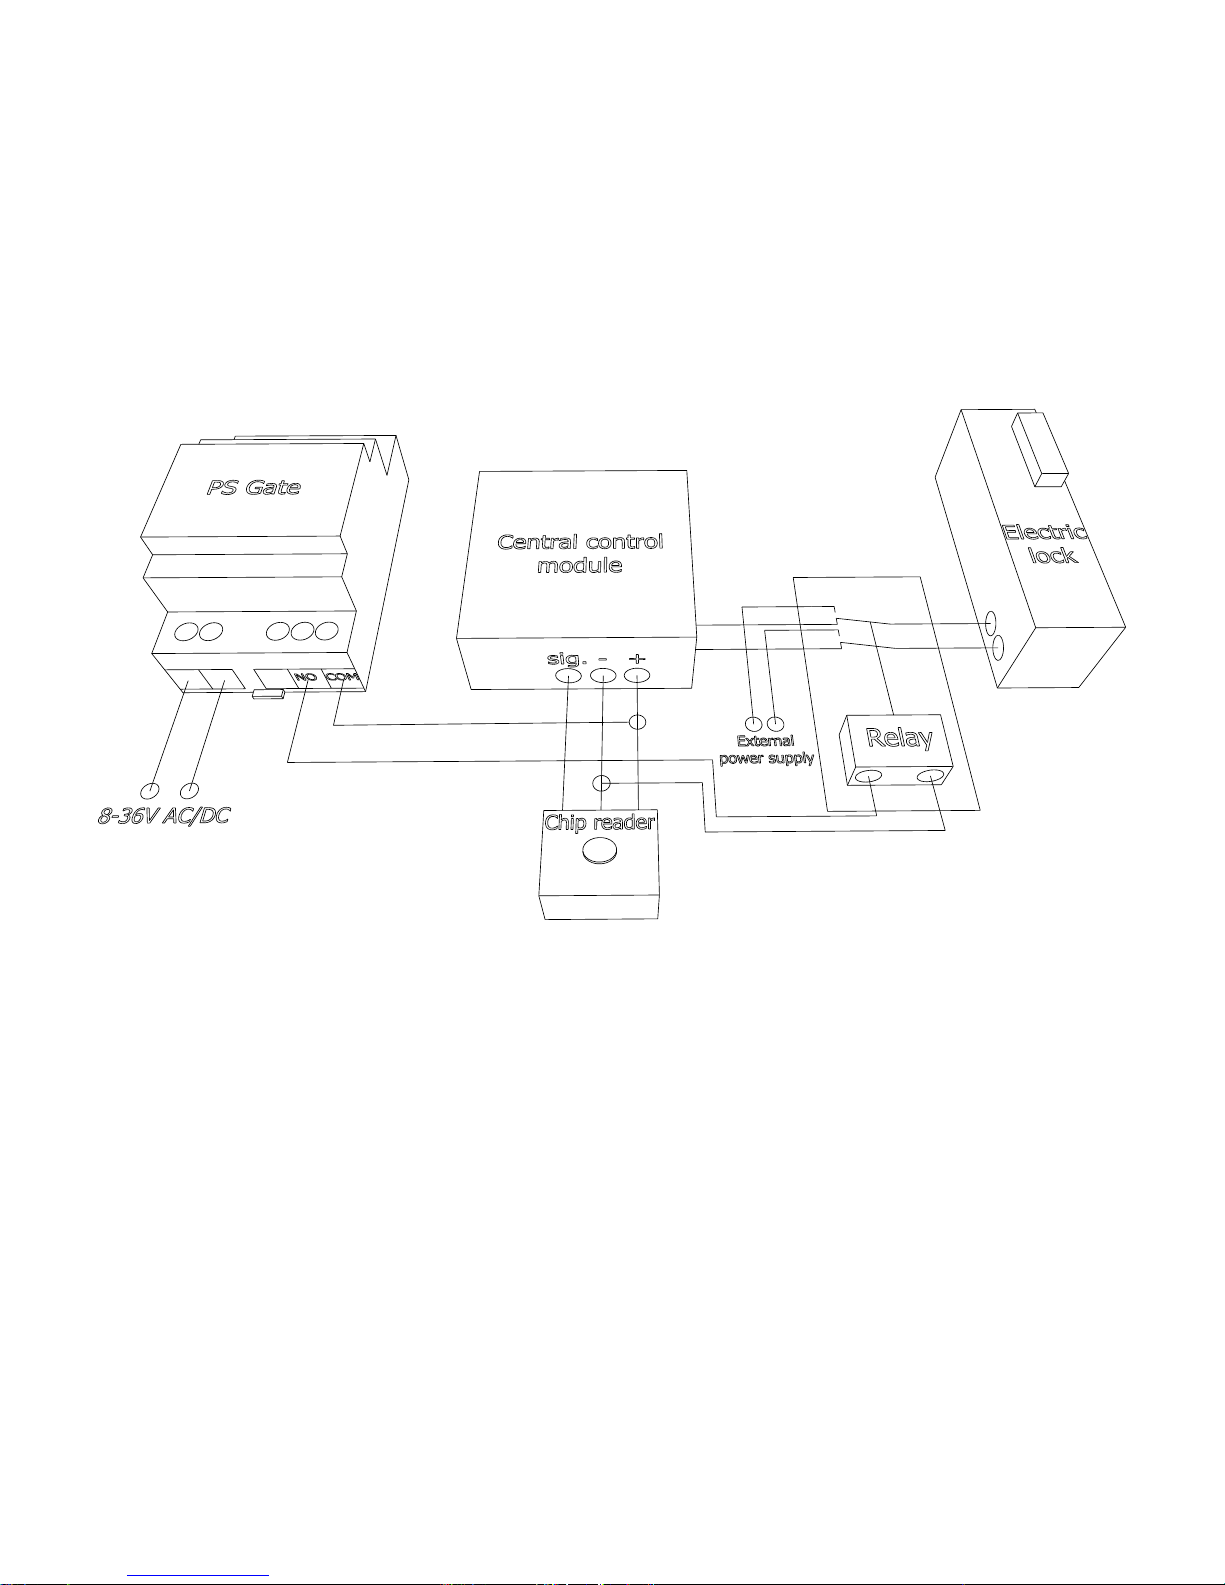
Scheme 7
2.3 controls external relay through an NO contact (Scheme 7) which is PS Gate
powered by the central control module’s power supply.
With this external relay, the electric lock could be triggered by an external
power source and to not influence the work (exits) of the central control
module.
23
Page 24
Step 3: Initial setting up and connection to a chosen Wi-Fi network
In order for the device to work properly, it must be connected to an
Internet network. After the installation is finished, provide a supply voltage
to the device and . Wait 10 seconds, press and hold the button forPS Gate
three seconds and follow the device’s light indication.
Attention! In Access Point and SmartConfig upon pressing the button for three
seconds, the device would be nullified with default settings!
3.1 SmartConfig mode
The central block’s blue light emitting diode starts blinking very rapidly for a quick
period of time. That indicates the device is in SmartConfig mode. Please connect
your mobile device to the Wi-Fi network where will be operating in. Open PS Gate
the B Series mobile app on your smartphone or tablet. If you still COMPUTHERM
do not have the mobile app installed, you can download it from Google Play store,
Apple store or Windows Phone Store.
24
Page 25
Log in to your profile with your email and password. If this is your first PS Gate
device purchased and you have not registered yet, you can do that in
COMPUTHERM B Series’s webpage: https://computhermbseries.com/
Press the ‘Add’ button for adding a new device, located in the upper hand side
of the screen.
Press the button ‘SMART CONFIG’ (Scheme 8), type in the password of your
selected Wi-Fi network and click on ‘SEARCH’ (Scheme 9).
25
Page 26
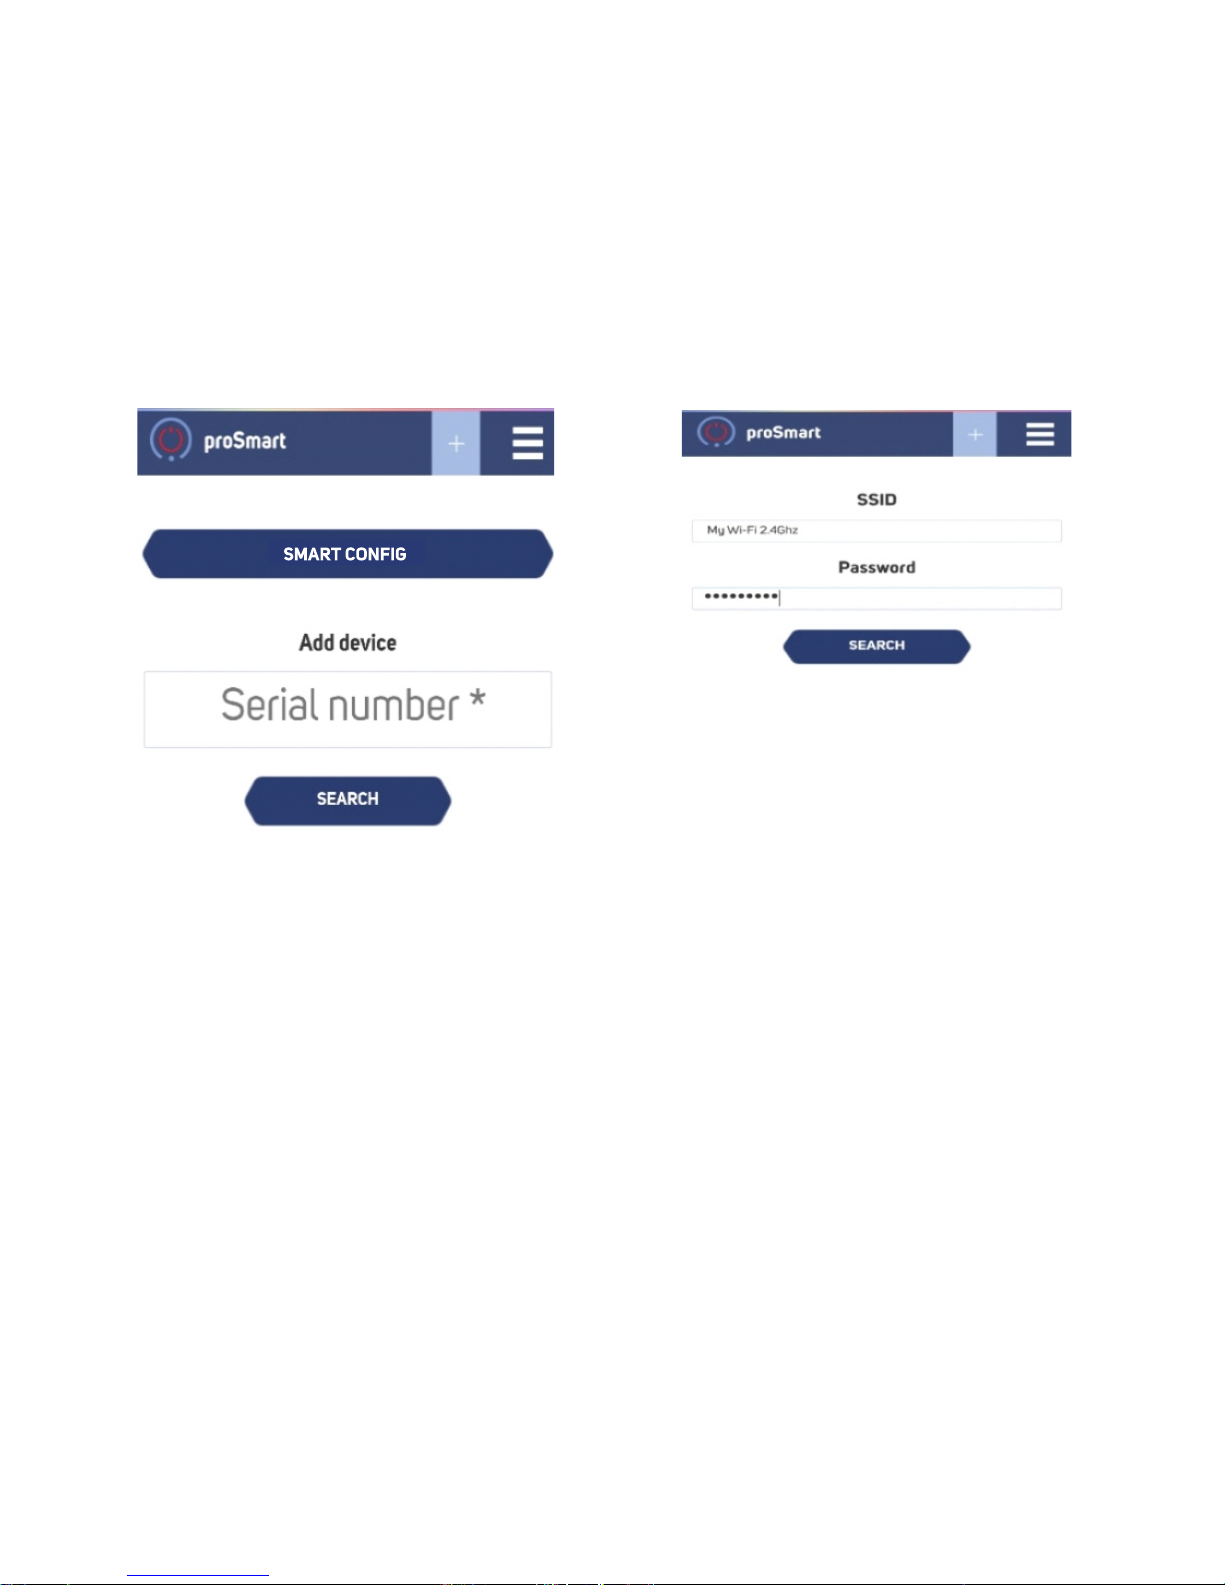
Scheme 9
Scheme 8
Take a look at the blue light emitting diode and when its light goes off, and then
stays on permanently, is all set up for work.PS Gate
Look at the mobile device’s screen. The app is now ready to control PS Gate.
If you have used Smart Config mode, please proceed to Step 4.
26
Page 27

3.2 AP (Access Point) mode
If you do not wish to use this mode, press twice the button quickly and the device
will be transferred to standard connection mode AP.
The blue light emitting diode’s blinking in a second’s interval, signifying that the
device’s Wi-Fi module is in AP mode and you can connect to it through your PC or
mobile device.
3.2.1 Initiate a wireless network search from your smartphone or laptop and
connect to the PS Gate’s AP (the wireless network). Every device creates a
network with its own name, starting with PSGate_xxx and a combination of
letters and numbers. For example PSGate_254 and it does not require a
password for access.
27
Page 28
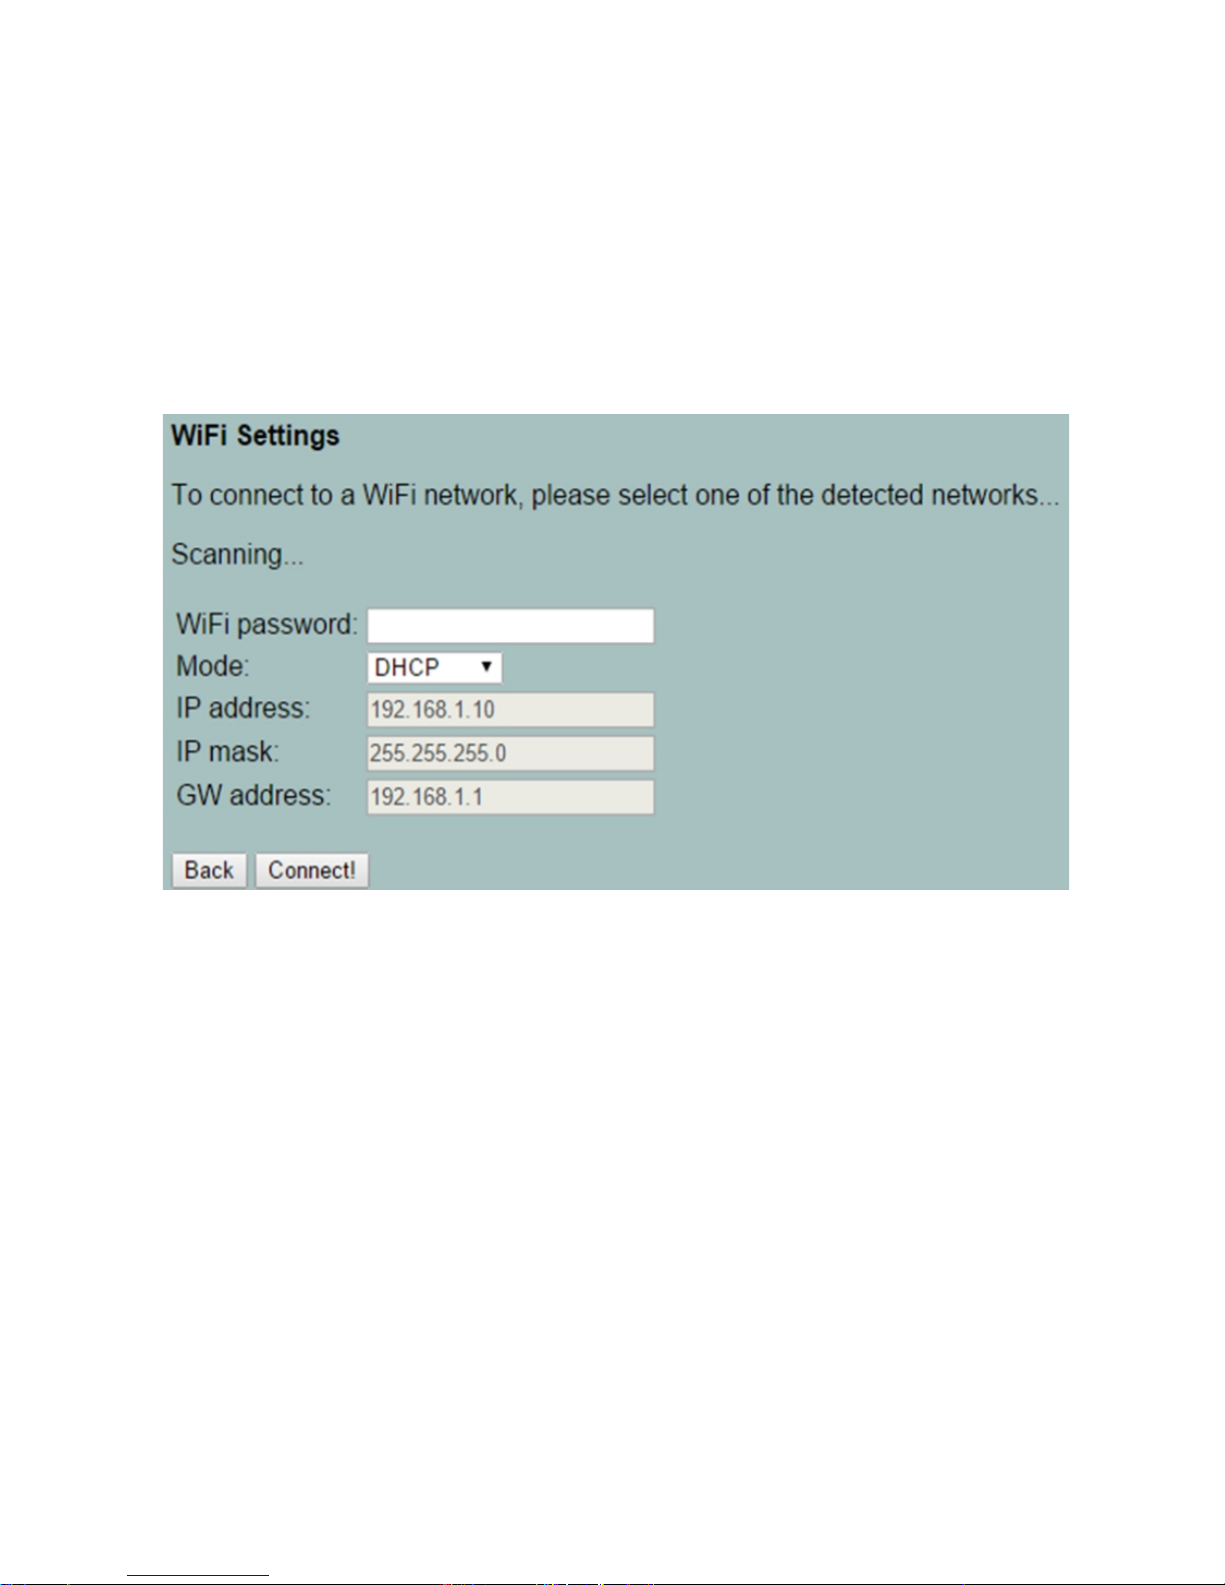
3.2.2 After connecting, your browser will automatically open a new page giving
you the chance to choose the wireless network, to which you want to connect
the device (Scheme 10).
If your browser does not open automatically, please open it manually for the
automatic opening of the browser is a manual setting and thus it could be
turned off.
Scheme 10
28
Page 29
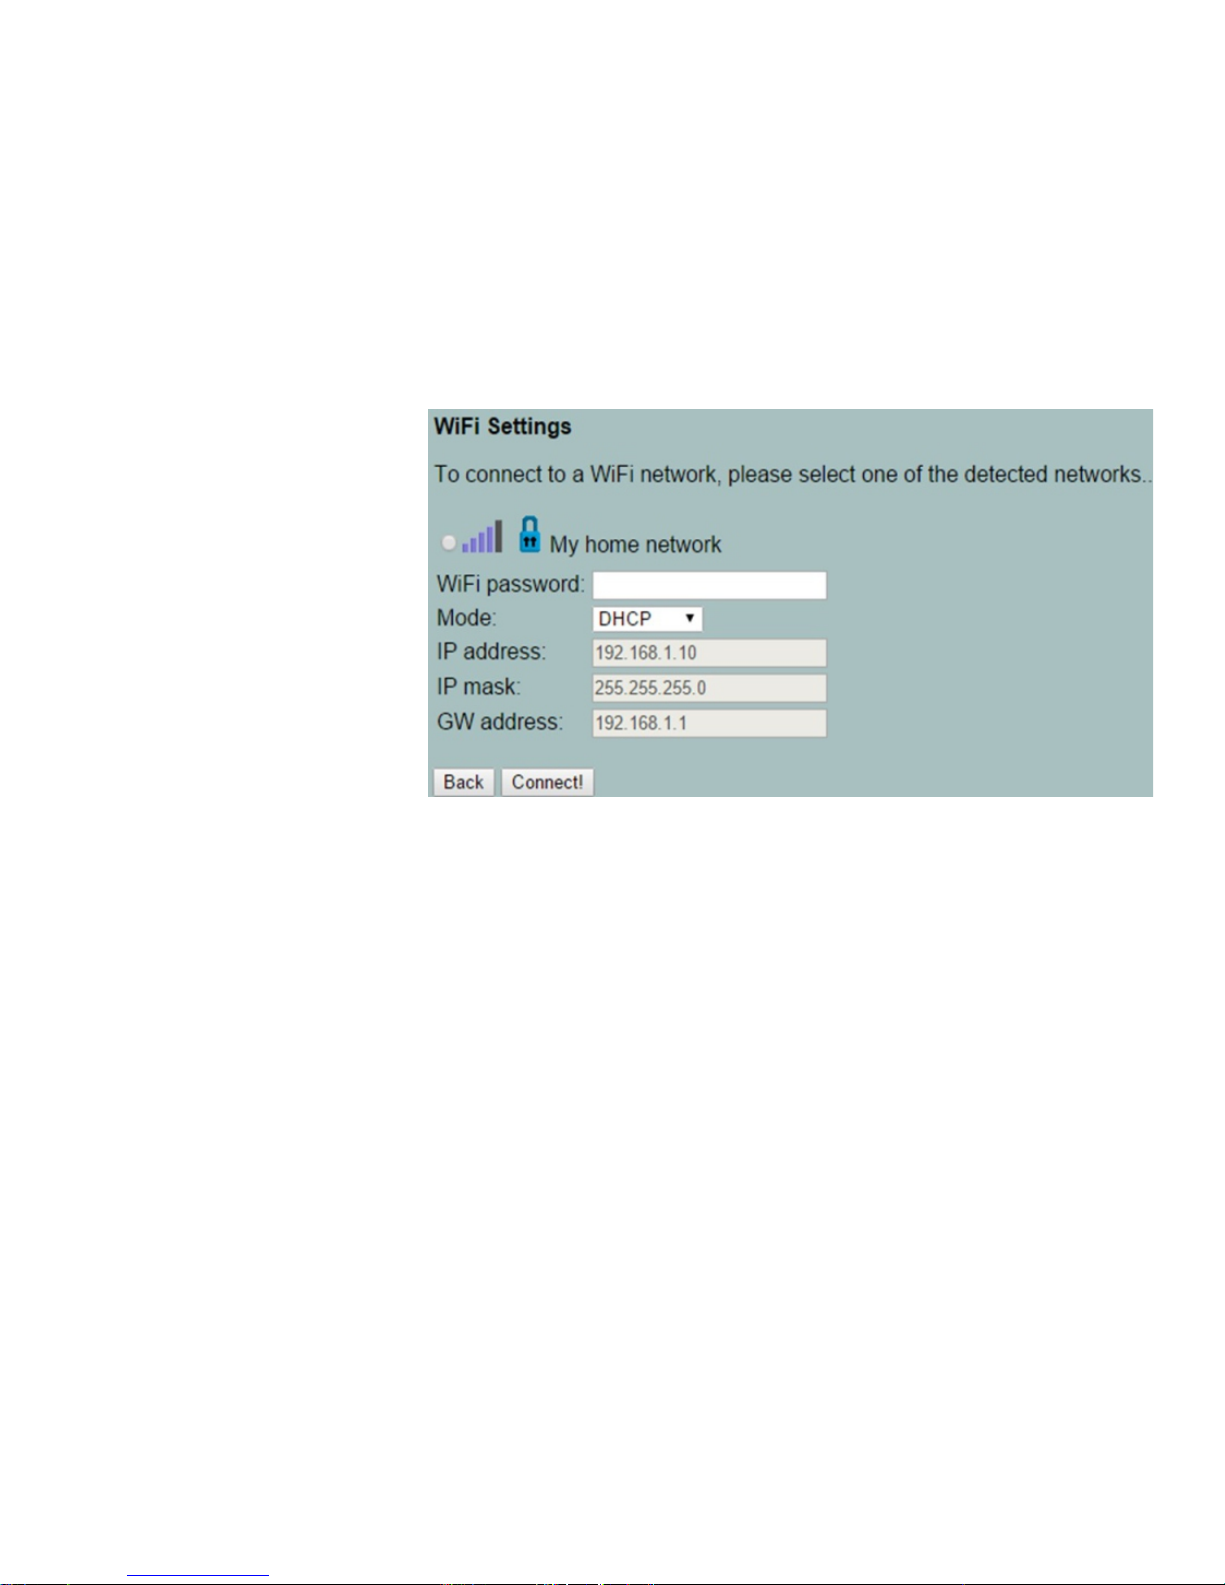
Scheme 11
3.2.3 If your
smartphone, tablet or
laptop did not
automatically load the
settings page, as shown
in Scheme 11, it could be
accomplished manually.
Open your browser and
write the following
address: 192.168.10.1
3.2.4 Choose the desired Wi-Fi network, type in your password and click
on the ‘Connect’ button - Scheme 11
3.2.5. In up to 20 seconds will switch to a working mode and thePS Gate
light indicator will be on all the time, blinking shortly per every second.
Congratulations! You connected your device successfully and can now add
your profile in https://computhermbseries.com/ so you can control and
monitor its
29
Page 30
3.3 Working mode – When the blue light emitting diode is always on and goes
off between two seconds, it indicates that ’s central block is in workingPS Gate
mode. Upon holding the button for three seconds, will transfer toPS Gate
Settings mode in SmartConfig mode.
Step 4: User profile creation:
4.1 Once connected to the Internet, becomes invisible to the otherPS Gate
devices in the network. The only way to connect with is via the userPS Gate
profile, associated with the particular device. If you do not have one, you can
load the COMPUTHERM’s page: https://computhermbseries.com/ or download
and install the COMPUTHERM B Series app in your smartphone or tablet:
30
Page 31
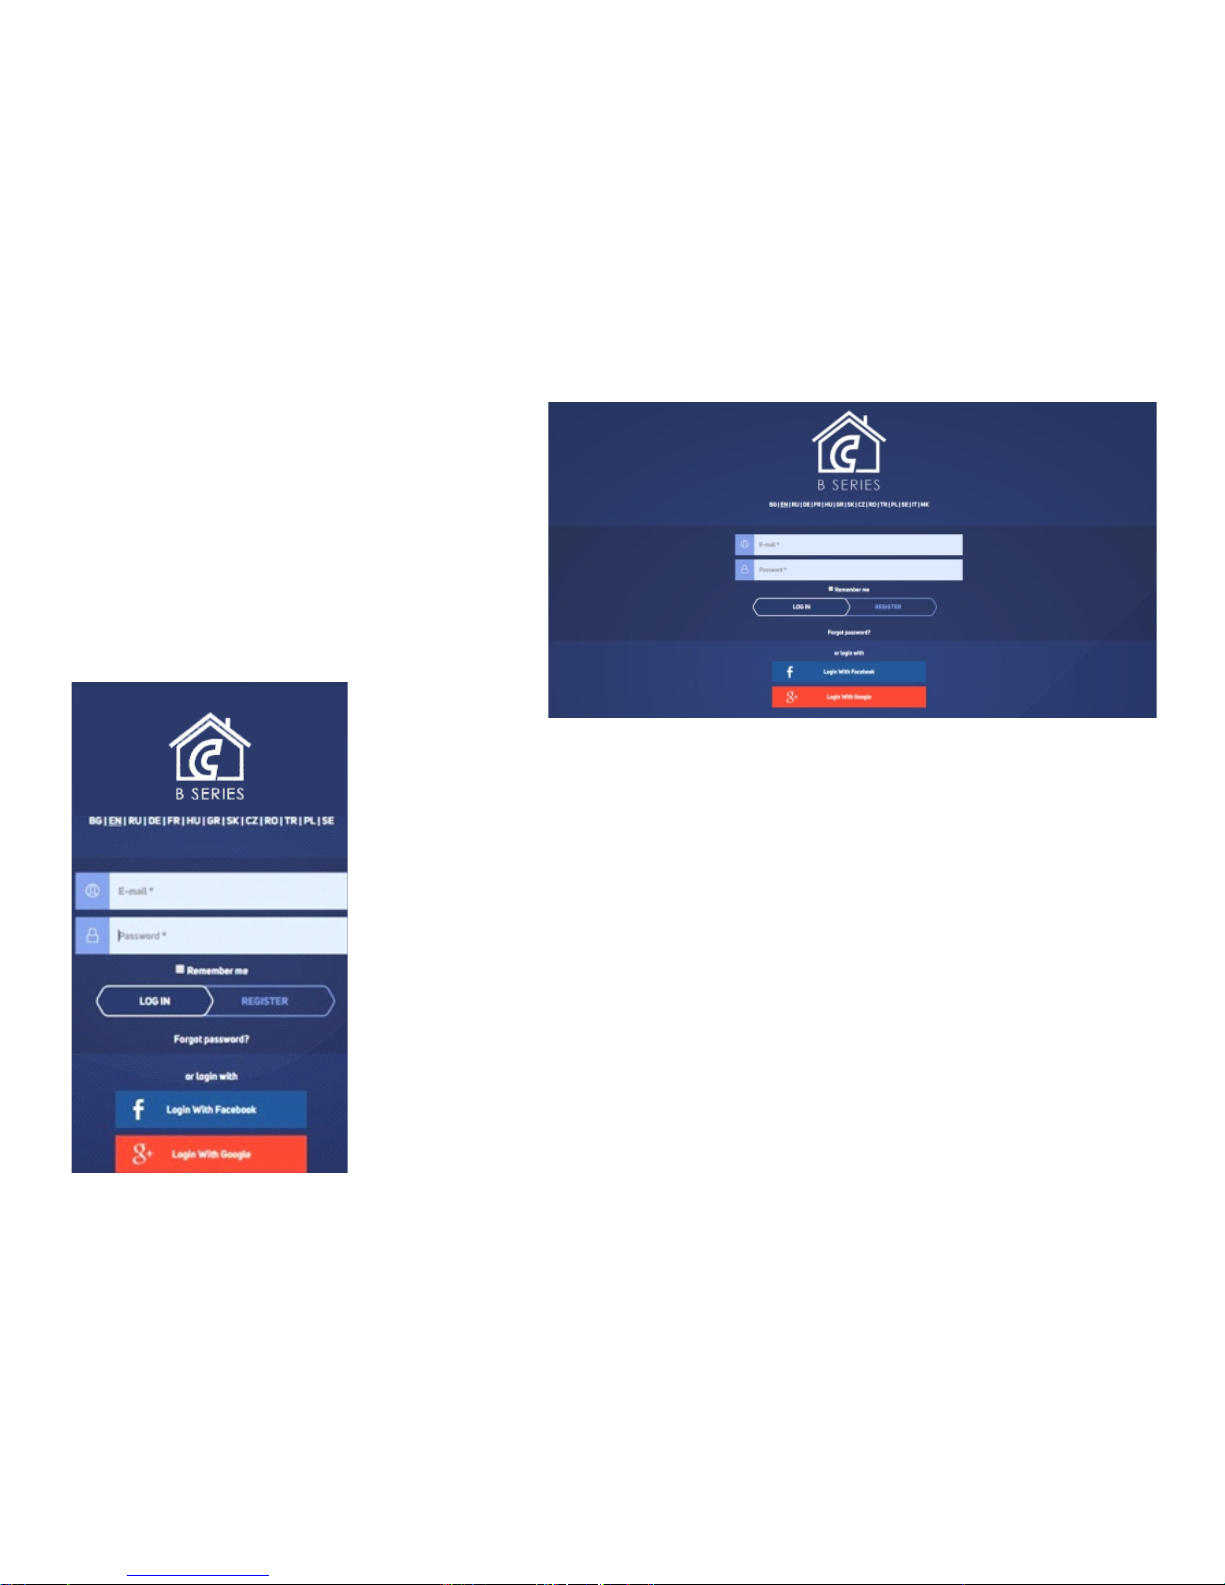
Scheme 13
Scheme 12
4.2 If you choose to use a
browser, open
https://computhermbseries.com
in your PC desktop or mobile
device and press the ‘Log in’
button in the upper right corner
(Scheme 12).
4.3 If you access the website or the app for the first
time, you need to register or log in with your Facebook
or Google + accounts just by clicking the particular
button. (Scheme 13).
31
Page 32
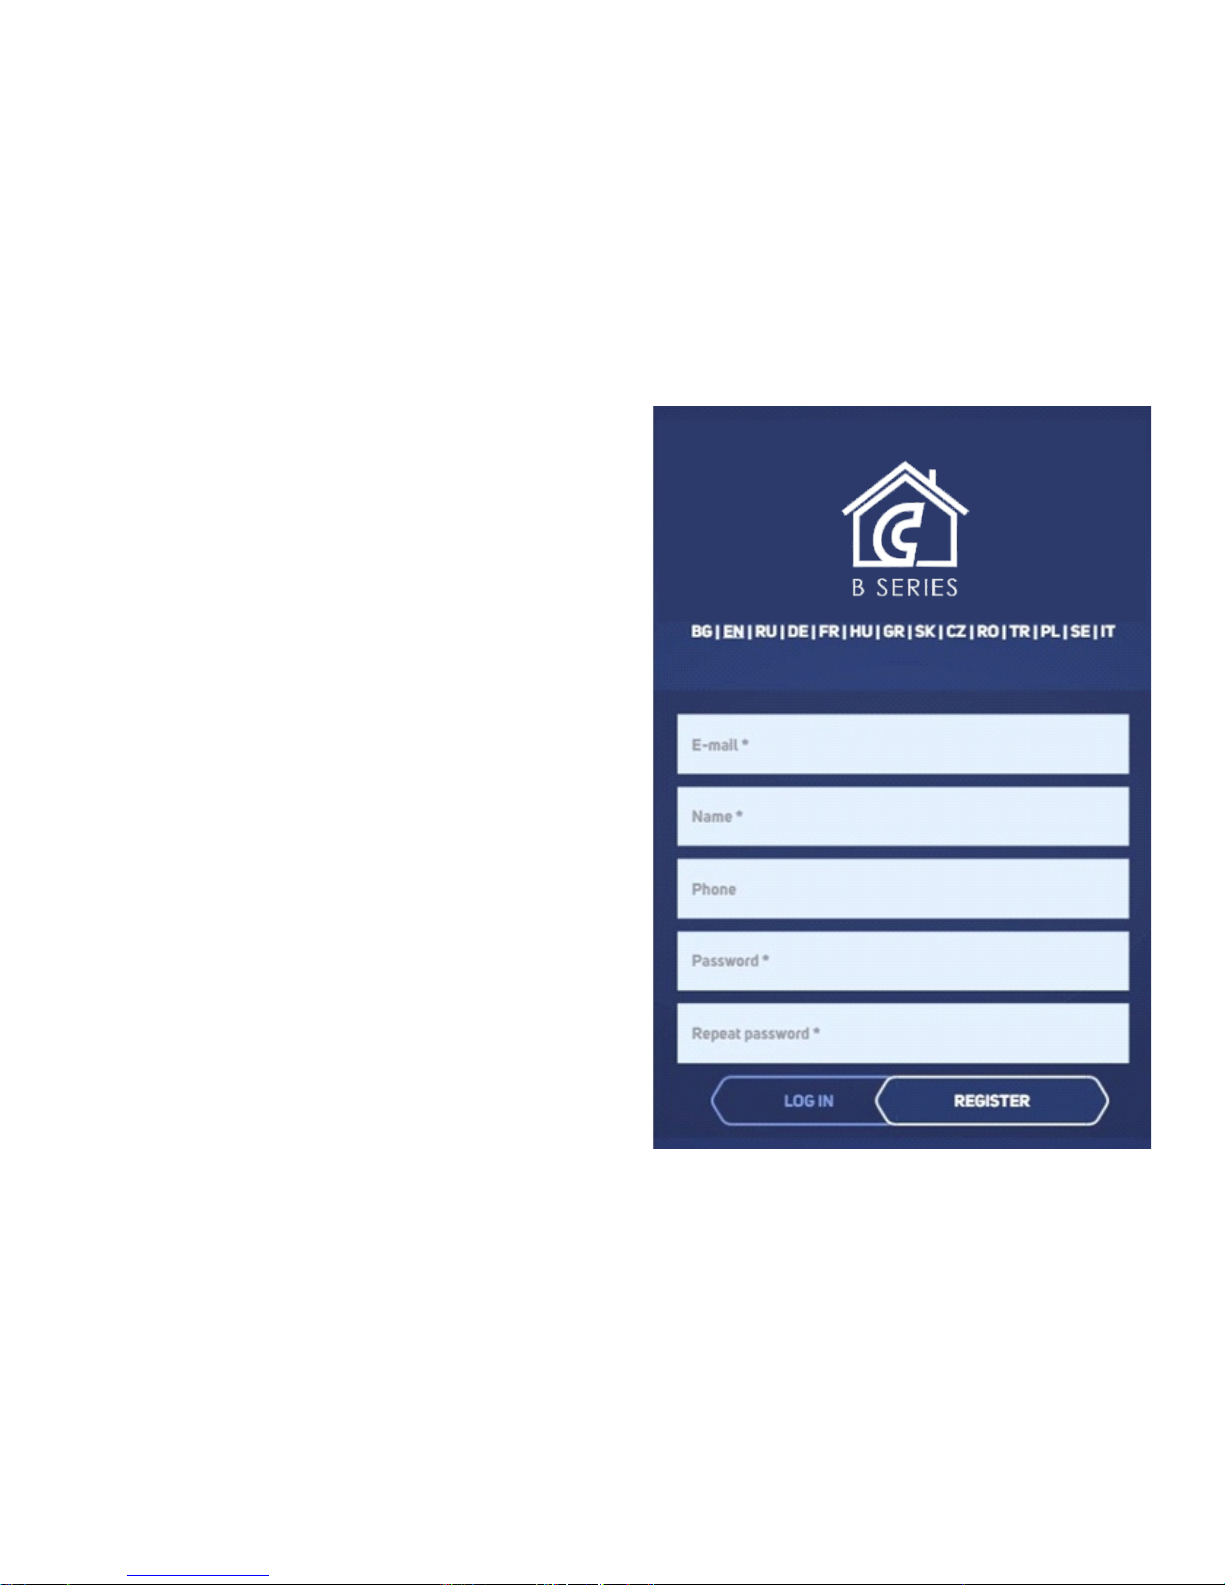
Scheme 14
4.4 New user registration.
Fill in the registration form’s fields and
click the ‘Register ’ button. You are now
registered and may enter the app.
(Scheme 14).
32
Page 33
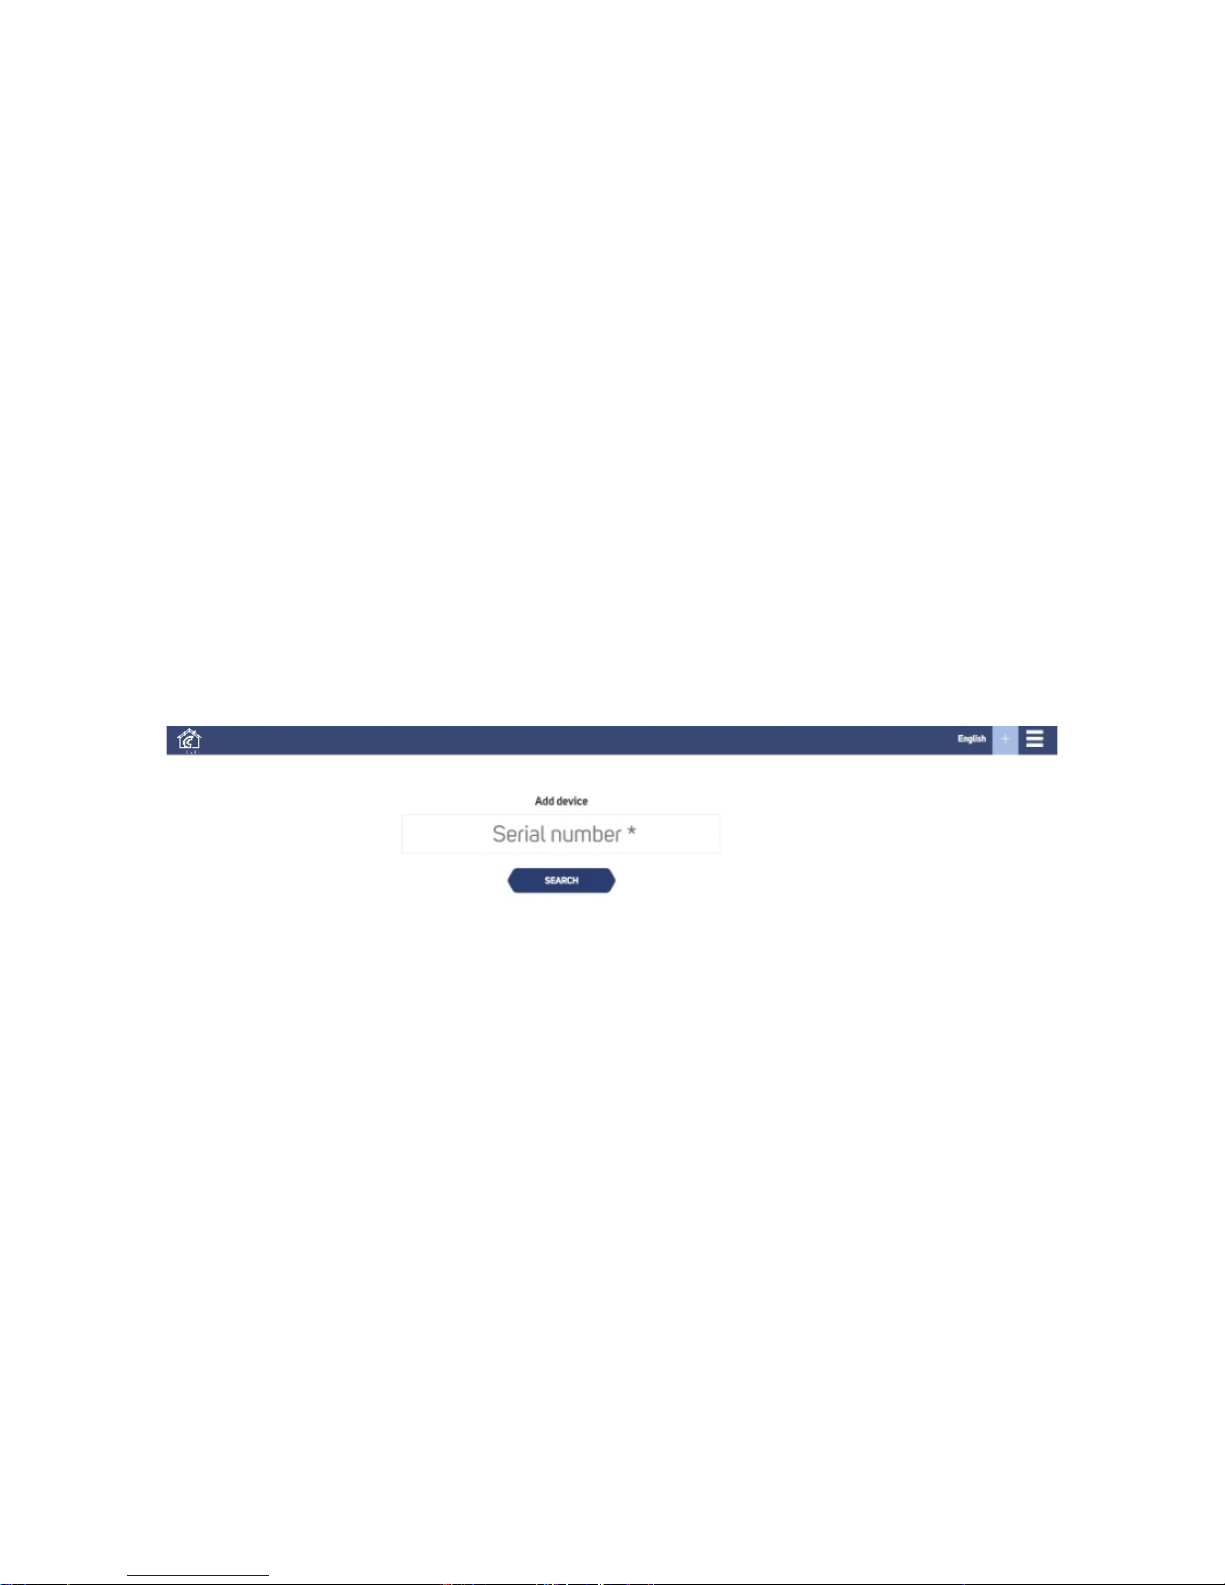
Scheme 15
Step 5: Adding a device
If you have used SmartConfig mode from step 3, please proceed to step 5.3.
5.1 Home Screen —After the successful login with username and password, you
should already be seeing the home screen in your profile and can add the device
you have received. Enter the serial number of your PS Gate device that you
previously connected to the wireless network (Scheme 15).
5.2 Click on the ‘Search’ button and after successfully finding your device, the
application will redirect you to the main controlling screen (Scheme 16).
33
Page 34
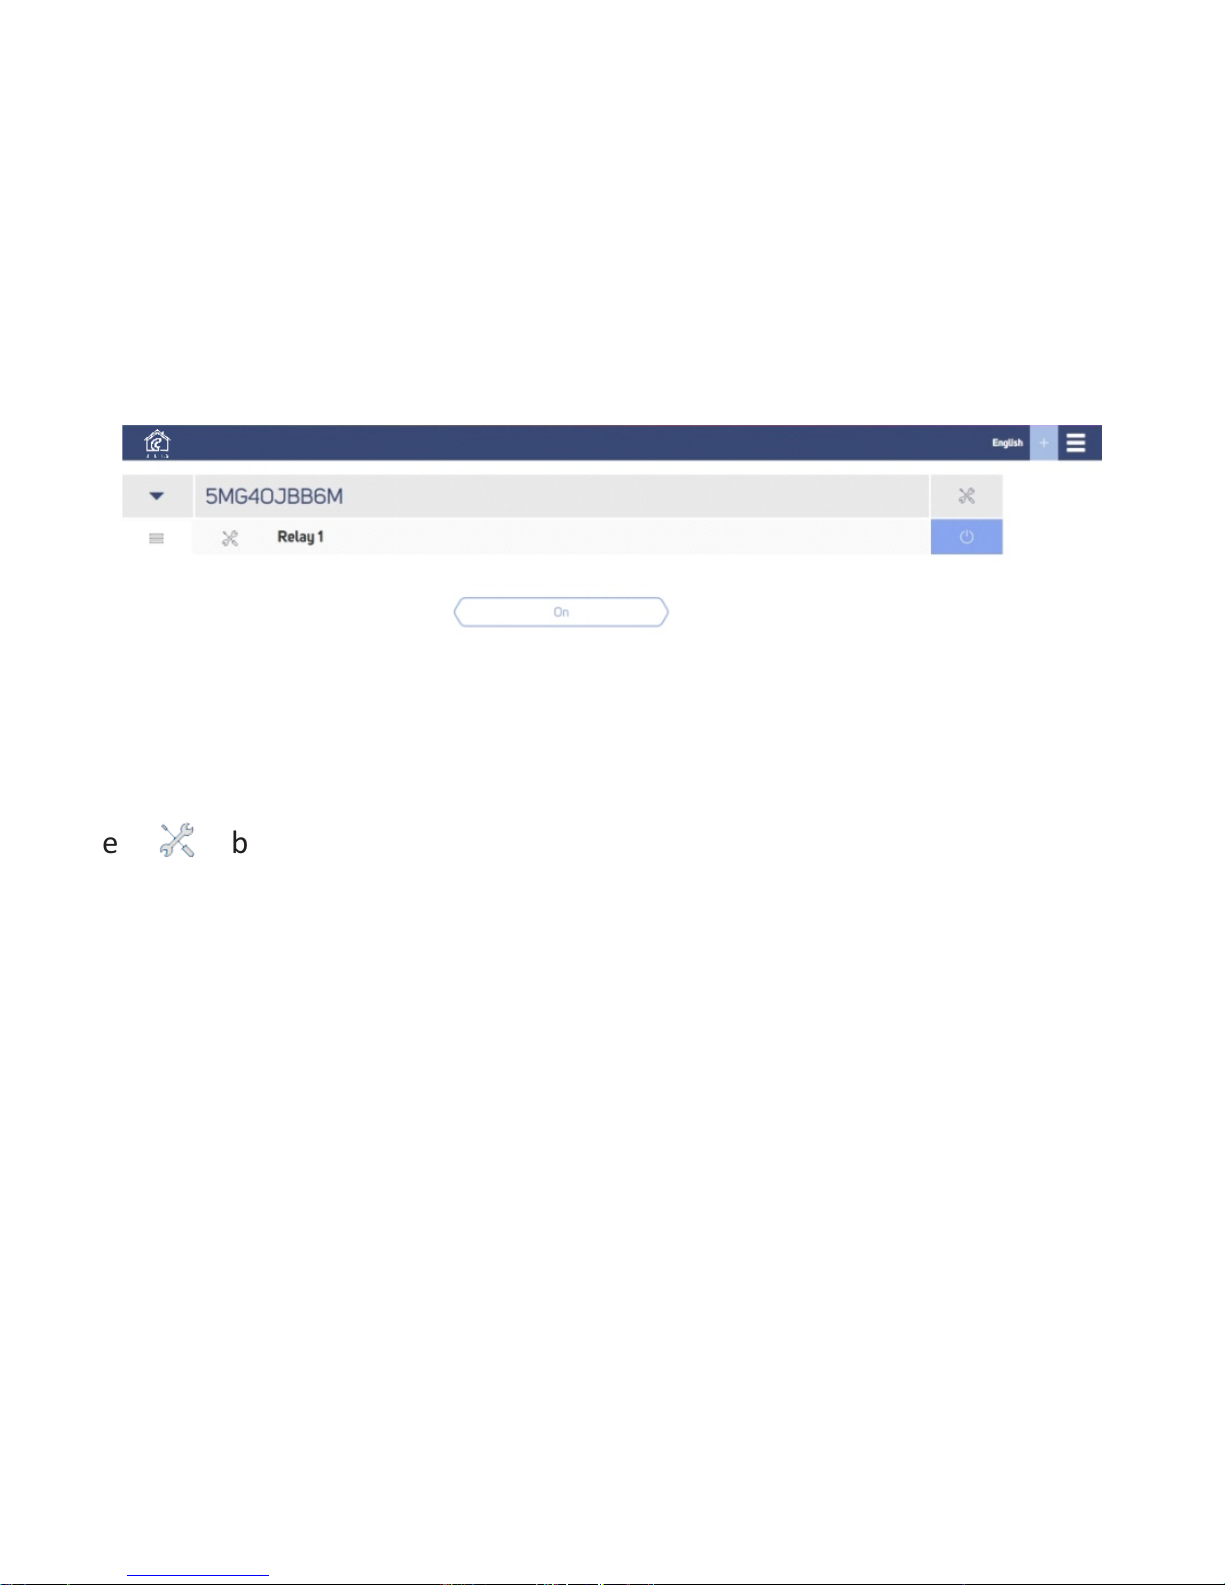
In order to set a name for your device, as well as a time zone and location, press
the button in the upper right corner and fill in the fields (Scheme
17). From that window you can also delete the device from your profile via
clicking the deletion button in the bottom right corner.
Scheme 16
34
Page 35
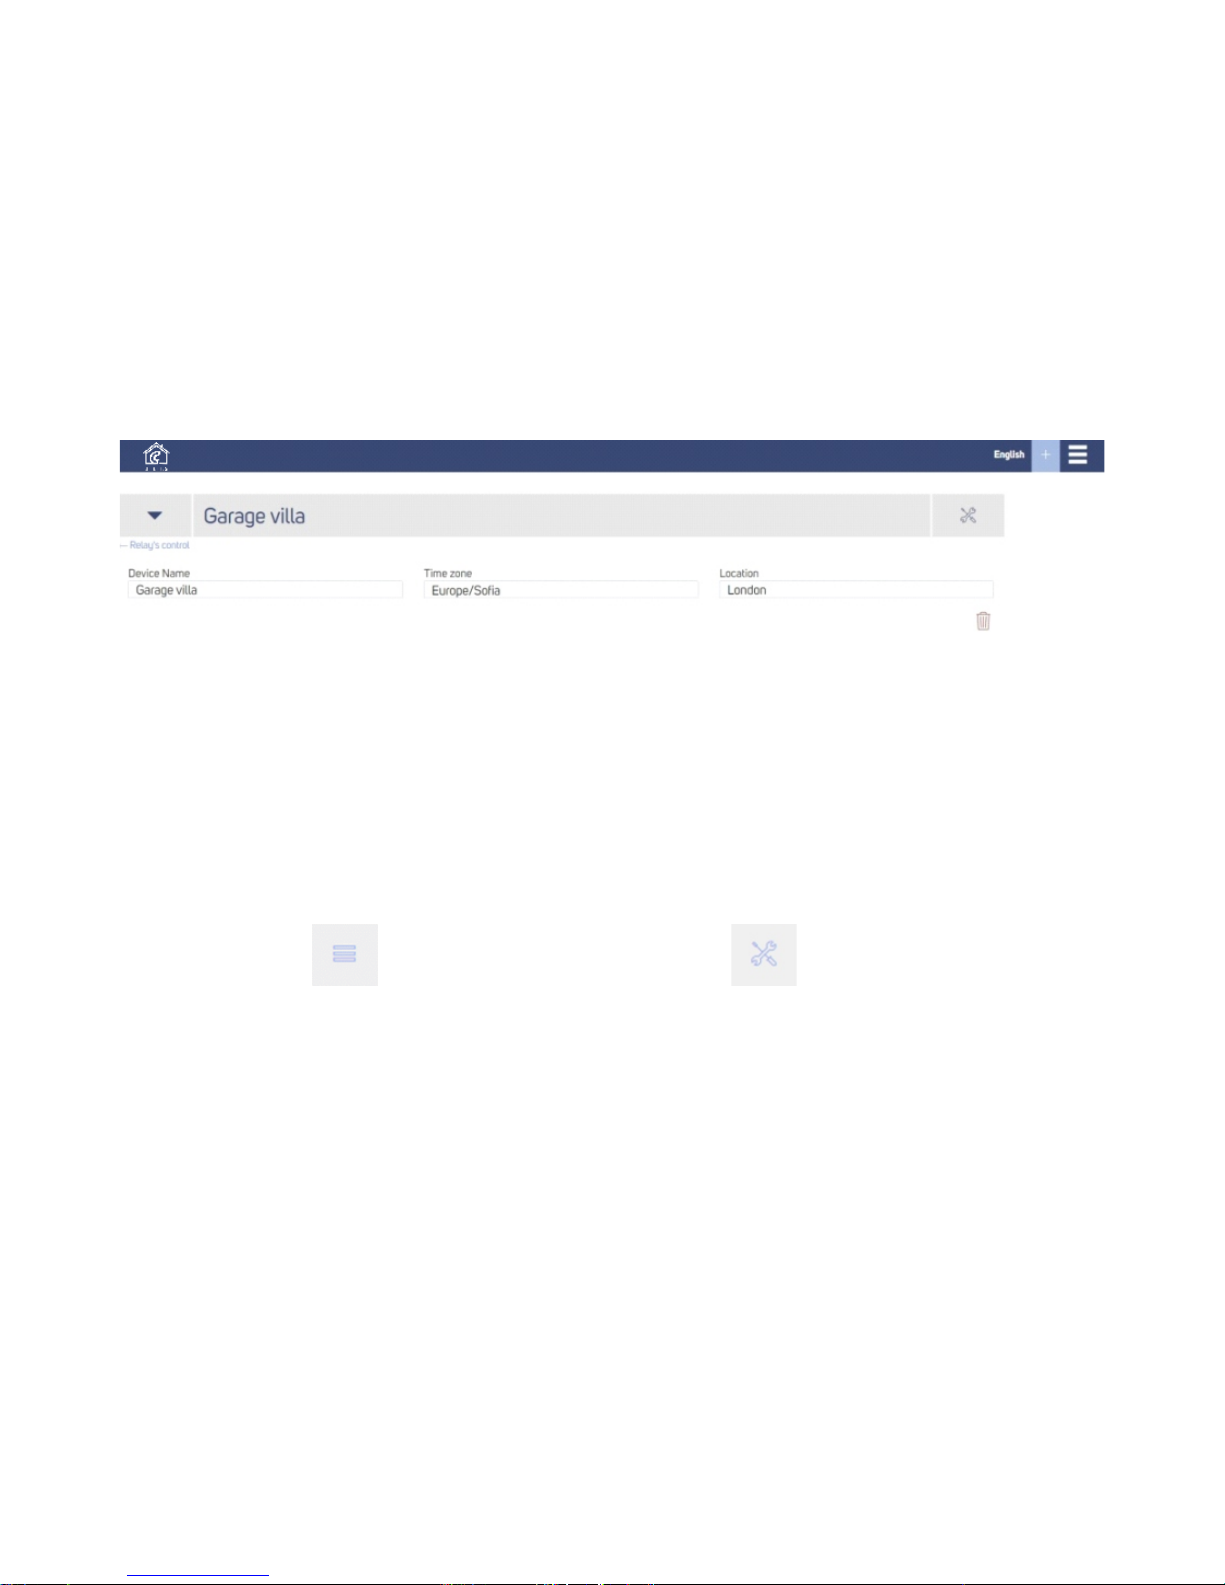
Scheme 17
Settings
Scheme 18
5.3 You can now set and control your device.
In the upper left corner you can find two buttons: Main screen and Settings
(Scheme 18).
Main screen
35
Page 36
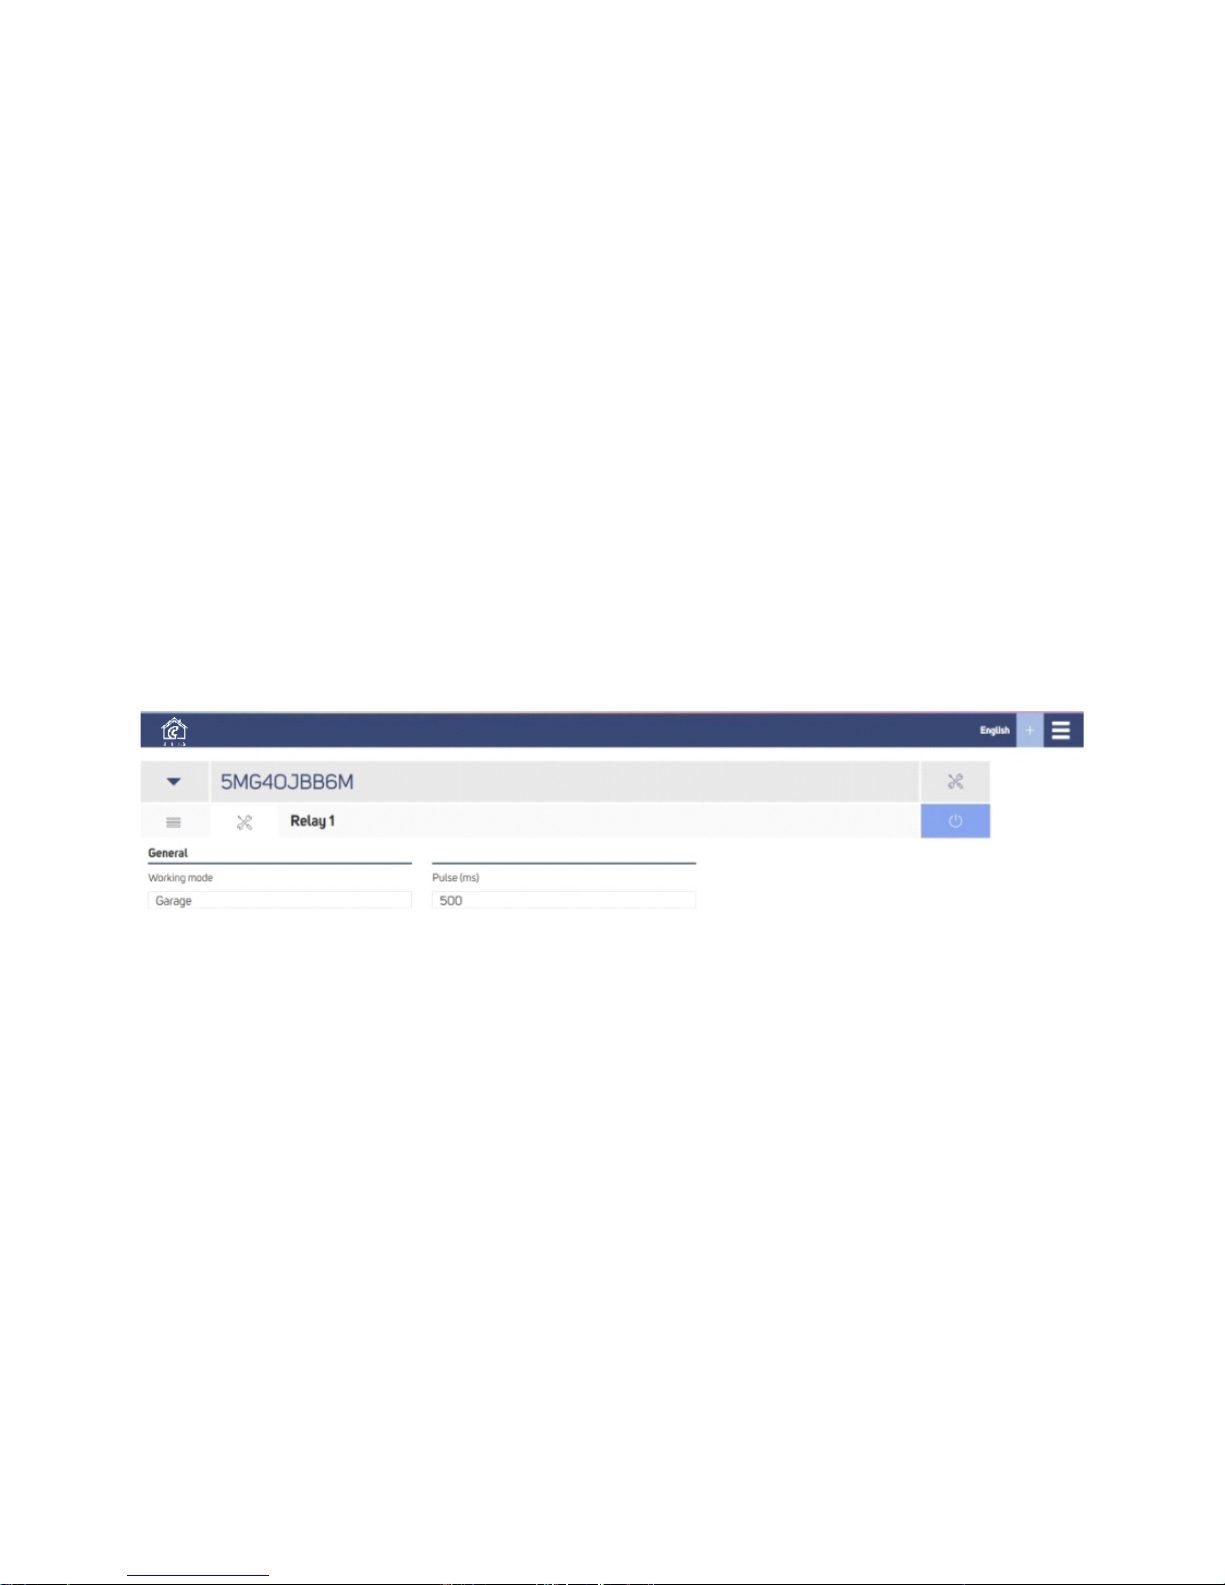
Step 6: Main screen
6.1 In the main page you can find a button for opening and closing or turning on
and off of the connected system. By pressing the button, an impulse is sent with
predefined length (Scheme 16).
6.2 Settings screen
Scheme 19
36
Page 37

In the Settings you can also find a menu for choosing the impulse length in
milliseconds (Scheme 19).
6.3 Sharing devices
From the Shared devices menu via a button , placed in the upper right
corner of the B Series application‘s screen, every device’s owner COMPUTHERM
can share them with other registered users via an email.
Step 7: PS Gate servicing
7.1 PS Gate is cleaned with a dry or slightly dampened with water towel.
The use of aggressive or abrasive cleaning liquids is strictly forbidden.
7.2 The condition of the terminals, terminal connections, as well as the
connection reliability of external wires needs to be checked every six months,
and strengthened if needed.
37
Page 38
The warranty of the device is 24 months from the date of purchase. The serial
number of the PS Gate device is unique and you need to present it in the event
of a problem during the warranty period.
The warranty will not be recognized if any of the following events occur:
• Lost or counterfeited warranty card;
• Damages, caused from wrong installation and exploitation;
• Attempted repair from an unauthorized service provider;
• Chemical, electrical or other influence on the product, which is not part
of its natural usage.
• Distorted physical integrity of the device
All claims under the warranty are to be directed at the shop the device had
been bought from or directly at the manufacturer Quantrax Ltd.
Warranty
38
Page 39

39
Page 40

Manufacturer:
Quantrax Ltd
34 Fülemüle Str.
6726 Szeged, Hungary
www.quantrax.hu
40
 Loading...