

Page 1
Page 2

Lark
User Guide
Gaddesden Place, Hemel Hempstead, Herts HP2 6EX
Tel 0442 63933 — Fax 0442 231632
Entail — [email protected]
Page 3

©Computer Concepts 1994
Manual issue 1.4
June 1994
All rights reserved. No part of this publication, hardware or software may be reproduced or
transmitted
in
any form or by any means without prior permission of Computer Concepts
Ltd. Such written permission must be obtained before any part of this publication is stored in
any
form in a retrieval system of any nature.
Computer Concepts Ltd. have no direct control over the use to which this product is put and
therefore offer no warranty, implied
or otherwise, relating to its use for any purpose other than
that for which it is intended.
The product described in this manual is the subject of continual development and, while all
efforts are taken to ensure that the information given is correct, Computer Concepts Ltd.
cannot accept any liability for any loss or damage resulting from the use or misuse of this
product.
Trademarks:
Lark is a trademark of Wild Vision Ltd.
Acorn is a trademark of Acorn Computers Ltd.
All other trademarks are acknowledged.
Acknow|edgements
We would like to acknowledge the assistance of Acorn Computers Ltd. in the
implementation of the Acorn M1D1 module, and in granting a licence to
distribute the MID1 module.
Thanks also due to Clares Micro Supplies for permission to supply the sample
MID1 files on disc 3.
Page 4

Contents
About this manual
Typographic conventions
Mouse buttons
1. Introduction 1
What the Lark can do 1
System requirements 1
Possible extras 2
The internal speaker 2
What's on the discs... 3
Specification 3
2. Installation 5
What you should have received... 6
Fitting the Lark card
Archimedes & A5000 7
Risc PC 13
A3000 15
Initial testing (all computer types) 16
Copying the software 16
Updating !System 16
Before using Lark for the first time 17
Testing your Lark 18
3. Getting started 19
Connecting a microphone 19
Connecting an audio input 20
Connecting the audio output (active speakers) 20
Connecting headphones or passive speakers 21
Playback using the computer's internal speaker 21
Playback using external speakers 21
Connection to MIDI 22
Page 5

4. The software suite 23
Audio Works
23
AudioCtri 24
MIDI
27
Piano
29
5. If problems occur...
31
6. Technical information
39
Lark link positions
39
Stereo line-level socket: pin~out.
40
Page 6

About this manua|
This manual describes the key aspects of the Lark package: the
expansion card itself, hardware connections and peripherals, and
the associated software. It describes in depth the use of software
applications that are provided exclusively with this product.
However, only the briefest details are given for 'stand alone'
programs for which separate manuals exist. Information about
using these applications can be found in the relevant user guides as
listed in the section What you should have received.
It is assumed that you have a basic knowledge of the RISC OS
conventions and are familiar with standard applications. If this is
not the case, we suggest that you first read the Welcome Guide
supplied with the computer.
Typographic conventions
This manual uses these conventions:
Menu options are shown like this: Preferences.
Dialogue box switches are shown like this: Mute.
Where you use the keyboard for control, the name of the key is
shown in italics. (For example, Return.)
Mouse buttons
We use the Acorn convention for the three mouse buttons:
the left-hand button is called Select,
the middle button is called Menu,
the right-hand button is called Adjust.
Where we say click on something but do not specify a mouse
button, use Select.
Page i
Page 7

Introduction
What the Lark can do:
It can record sound samples from an external source and manipulate them in a wide variety of ways. You can save the samples to
disc in any of several different formats, some suitable for use on
other types of computer.
The Lark provides a high-quality stereo sound output. Using this,
you can output sound samples to, for example, a hi-fi system.
The Lark also includes a MIDI interface. This lets you interface
third-party software on the computer to MIDI-compatible peripherals such
as
keyboards. The Lark's MID] interpreter also
enables you to use the card as a MIDI device in the same way
as a
synthesizer (though you don't get a keyboard).
As with all new software, the best way to gain an appreciation of
the capabilities of these programs is to experiment. If you have
any problems, refer first to the troubleshooting sections of your
manuals. Remember that there are also separate
Audio Works
and
MIDI
manuals.
Please return your product registration card to ensure swift
technical support and eligibility for any future software upgrades.
System requirements
The Lark can be used with Acorn computers with standard, halfwidth expansion slots. (These include the A300/A400 series
Archimedes, A540, A5000 and Risc PC computers. The A3000 is also
suitable with certain limitations.) The Lark is
not suitable
for
A3010, A3020, A4000 or A4 portable computers.
Page 1
Page 8

1 . Introduction
If your computer meets these system requirements:
• RISC OS 3.1 or greater,
• at least 2 Megabytes of RAM (memory),
then you can use Lark for:
• audio sample capture and playback through the stereo
connector on the Lark,
• MID] connection.
Outputting sound samples through the Lark requires an ARM3 or
faster processor. (Suitable processors are standard on the A540,
A5000 and Risc PC; the ARM3 is available as an upgrade to other
computers.) Use of the Lark with ARM2 is untested and thus not
recommended.
Possible extras:
Depending on which features of the Lark package you wish to use,
you will also need some or all of the following:
• audio equipment with line-level input/output, such as hi-fi
equipment, CD player, or amplifier,
• microphone,
• MIDI equipment,
• 'Active' or `MultiMedia' speakers,
• ordinary speakers (connected via headphone socket),
• headphones.
The interna| speaker
On all except A3000 and early A300/A400 series Archimedes, you
can connect the computer's internal speaker direct to the Lark. The
speaker can then play samples at higher quality than the internal
sound system provides.
If you do not connect the internal speaker to Lark, you can only
play samples through the speaker using the internal sound system.
Audio playback using the Lark is always possible through external
speakers via the stereo connector on the back panel of the card or
the headphone socket.
Page 2
Page 9

1. Introduction
What's on the discs...
Disc 1:
lAudioCtrl– this has two uses:
• to play audio samples, and
• to set-up audio parameters.
!AudioWrks– use this to record and play back audio samples.
For information on these applications, refer to the AudioWorks
manual. For information on using !AudioCtrl to set up the Lark
audio parameters refer to 4. The software suite.
!SysMerge– this updates the !System directory on your computer.
This is detailed later.
Disc 2:
This disc contains a selection of audio samples.
Disc 3:
Sample MIDI files, plus Piano Voice, an example of how to use
your Lark as a synthesizer.
Specification
Input connectors:
5-pin D1N connector (stereo line-level in).
3.5mm jack socket (for external microphone) – see note below.
Output connectors:
5-pin D1N connector as above. 3.
5mm jack socket for headphones.
Extra connections:
15-pin HD D-type connector with pig-tail
attachment for MIDI connection.
Ribbon cable attachment for internal
connection to VIDC sound system (not on .
A3000).
Suitable input spec:
1V r.m.s. or 2V r.m.s. (link selectable)
stereo or mono line-level up to 48 kHz
sample rate.
Max input without damage:
6V p-p.
Output formats:
Stereo line-level output, 1V r.m.s., 2.8V p-p
Page 3
Page 10

1. Introduction
On-board storage: 2
x 1KB F1FO
A-D conversion:
16-bit
File formats supported:
8-bit, 12-bit, 16-bit, linear signed, linear
unsigned, VIDC logarithmic, p-law logarithmic, mono and stereo samples, import/
export of Microsoft WAV, Armadeus, DataVox, SoundTracker, and RawData formats.
Power requirement:
+5V from computer,
-5V from computer or generated on card.
Note regarding jack sockets:
There are two standard types of 3.5mm jack: European and
Japanese. The jack sockets on the Lark are European specification (
which is of higher quality). Computer Concepts can supply an
adaptor if your equipment uses Japanese specification jacks. The
adaptor is free; return the voucher enclosed with the package.
Page 4
Page 11

Installation
Caution!
Static electricity can damage the Lark expansion card. Store the
card in its protective bag until you install it, and do not allow
the card to come into contact with static-productive materials
such
as man-made
fibres, wool, polystyrene or plastic bags not
designated anti-static. If possible, handle the card by the back
panel only and first discharge any static build up from your
hands by touching one of the metal screws on the computer
case.
No special skills are required to fit the Lark. However, the
suppliers cannot accept responsibility for any damage that
may result from incorrect installation. If in any doubt,
consult your local supplier.
The Lark is suitable for installation in any Archimedes, A5000 or
Risc PC with a backplane fitted. It may also be used with the
A3000 using the external expansion slot. In all cases your
attention is drawn to System requirements.
The card is
not suitable
for installation in the A3010, A3020, A4
portable or A4000, which cannot accept standard expansion cards.
Tools
The only tool required is a No. 2 (medium) cross-head screwdriver.
Page 5
Page 12

2. Installation
What you shou|d have received
Check that you have received the following:
• Lark expansion card in anti-static packaging,
• this manual,
• AudioWorks manual,
• MID1 manual,
• three floppy discs,
• ribbon cable,
• MID1 cable,
• half-width blanking panel + T-piece,
• registration card.
The fitting instructions are divided into three sections
dependent on which type of computer you have. The
sections are for:
• Archimedes (A300 series, A400 series & A540) and
A5000,
• Risc PC,
• A3000.
After following the appropriate set of fitting instructions,
continue reading from Initial testing (all computer types)
on page 16.
Page 6
Page 13
2. Installation
Fitting the Lark card — Archimedes & A5000
Disconnect power
Before installing the Lark, switch off the power to the computer.
However, leave the power lead connected. Disconnect all other leads
to the computer. Remove anything (such as a monitor) that may be
on top of the case.
Remove the computer's cover — Archimedes only
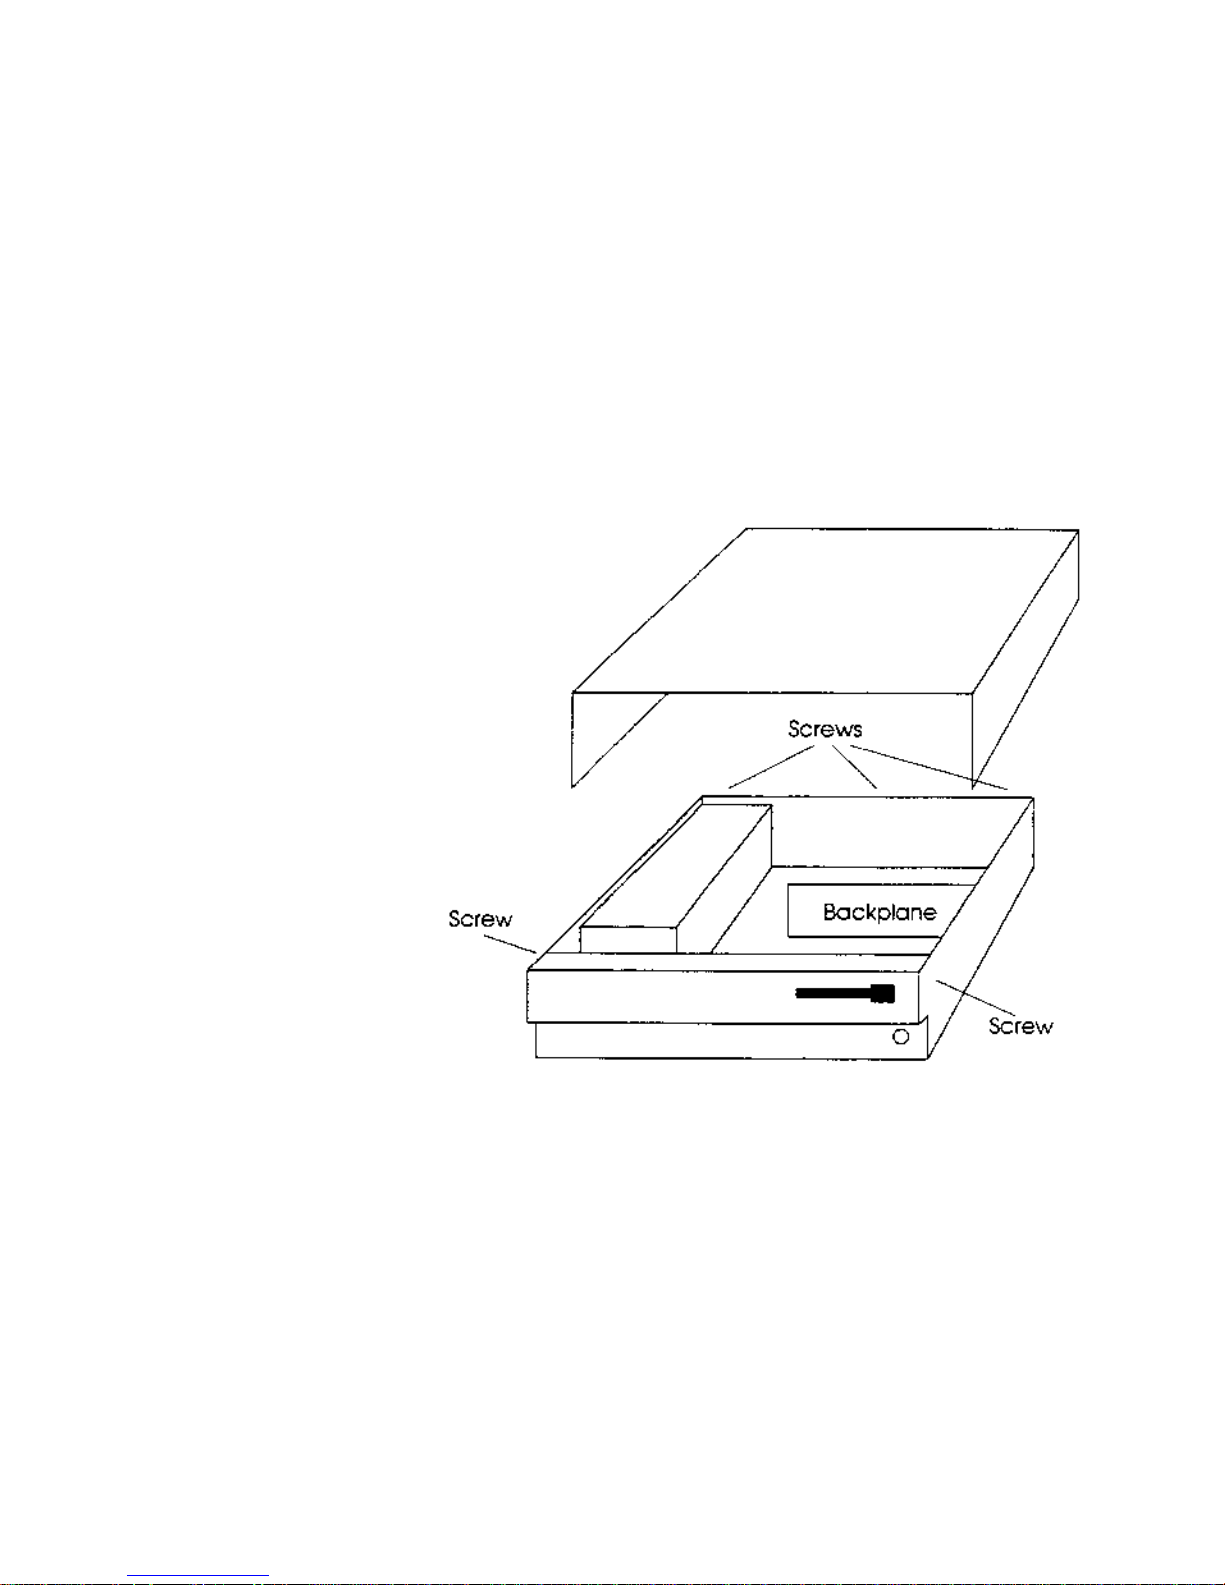
1 Remove the five screws that secure the cover:
2 Slide the cover back off the computer.
3 If you have an A305 or A310 computer – Ensure a backplane
is fitted. This is a vertically mounted circuit card, positioned
approximately half-way across the main circuit board. It
provides two or four sockets into which expansion cards
can be fitted.
Other types of computer – the backplane is already fitted.
Page 7
Page 14
2. Installation
Remove the computer's cover — A5000 only
The cover is secured by six screws (three each side) located
underneath the case. Take care tilting or lifting the A5000 as the
screw-heads can scratch a wooden or polished surface.
Remove all six screws. The cover should then slide back off the
computer. •
The card position
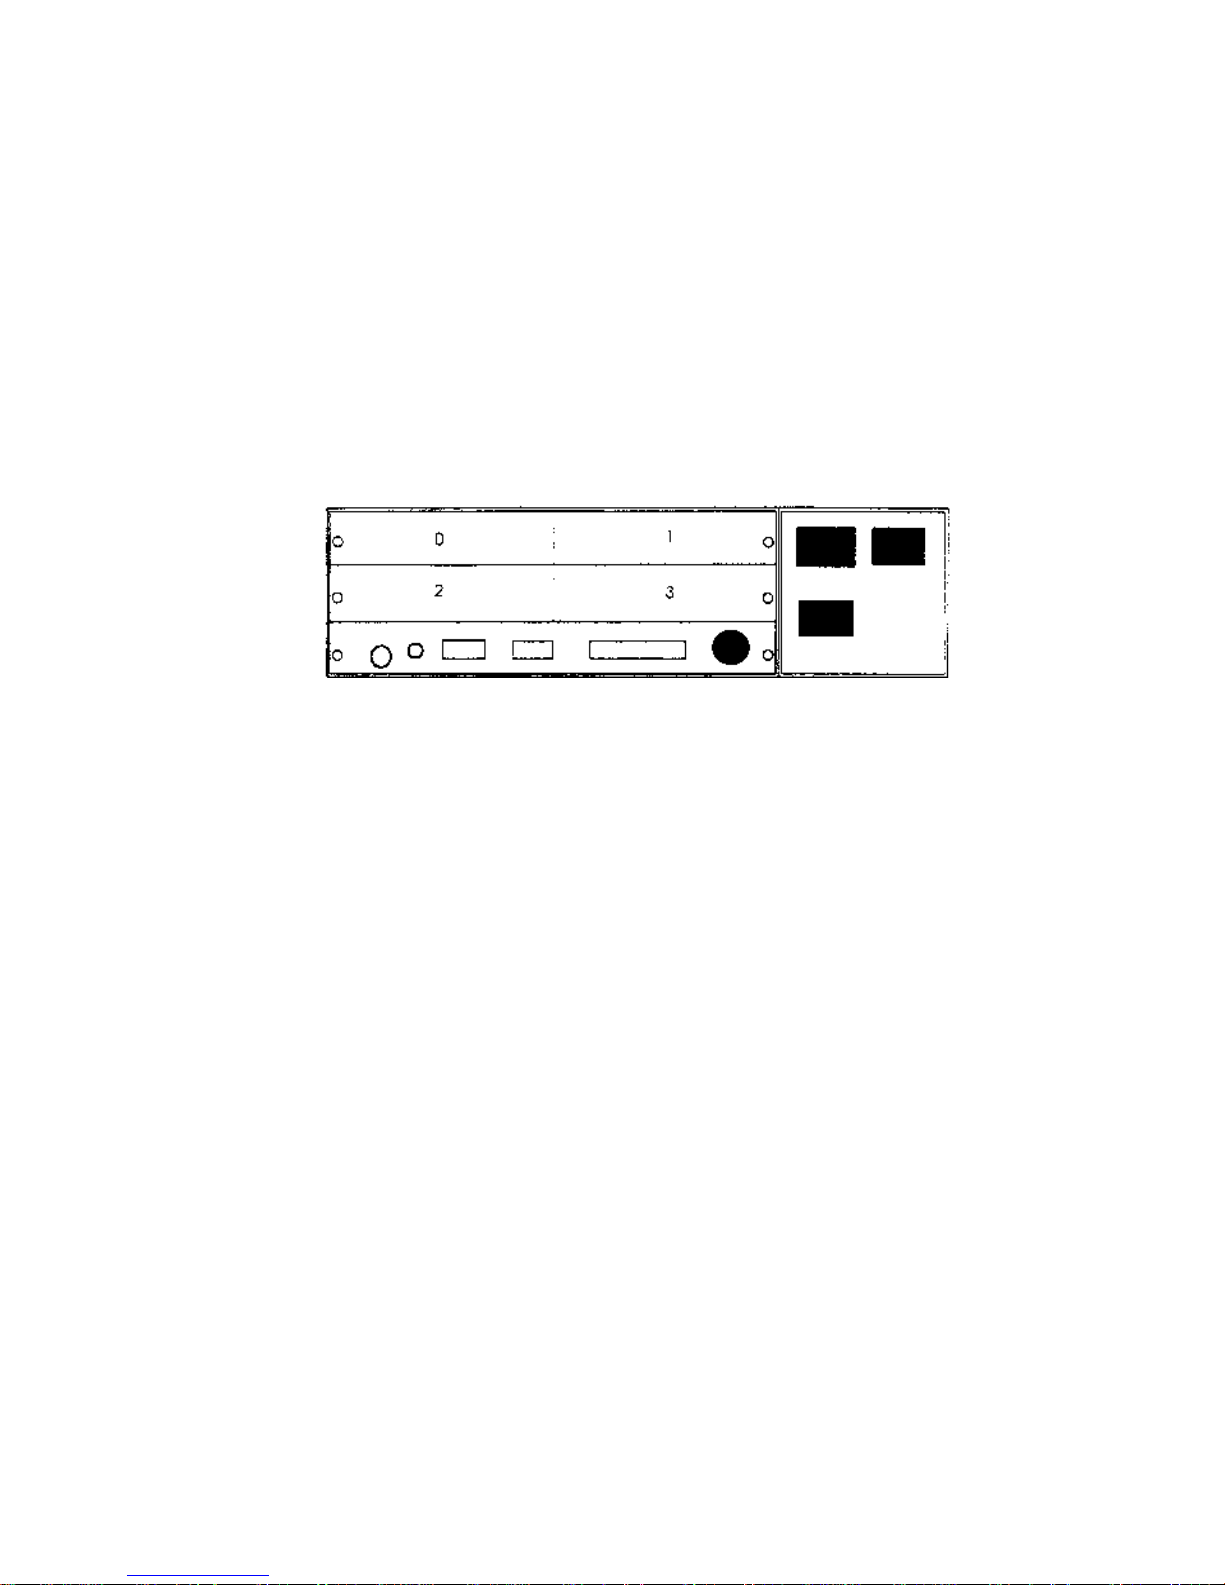
With no expansion cards fitted, the rear panel of the main unit
consists of three metal blanking plates, each secured to the case by
screws at both ends.
The lowest plate (containing various sockets) is secured to the main
circuit board.
Do not
remove this plate during expansion card
installation. The upper two plates are temporary fitments that are
removed when expansion cards, such as the Lark card, are installed.
One standard width expansion card occupies half the width of the
back panel. The numbers 0...3 on the diagram above indicate the
positions in which expansion cards may be fitted. With a two-socket
backplane only positions 0 and 2 are available.
Connecting the ribbon cable...
The ribbon cable supplied is for connecting the Lark to the
computer's internal sound system.
Note that separate instructions are given for the connection of the
internal speaker direct to the Lark. However, it is advisable to
connect both sets of cables at the same time, if you are opting to do
so.
Page 8
Page 15
2. Installation
Caution!
Incorrectly connecting the ribbon cable can damage your computer.
Carefully follow the instructions in this manual and pay particular
attention to the orientation of the cable. The suppliers of Lark cannot be
held liable for any damage that results from incorrect installation. If in
any doubt contact your local supplier.
Because of hardware differences you need to know exactly which
type of computer you have. The front panel of the computer shows
the model number. The options are:
• Archimedes 300 & 400 series,
• Archimedes 400/1 series,
• Archimedes 540,
• A5000.
The ribbon cable may seem longer than necessary but this lets it
reach any expansion card slot. Carefully fold any surplus cable
under the expansion card to make sure it doesn't snag with the
computer's cover.
If an existing expansion card is already fitted in the lower slot, the
connector on the computer may be slightly obscured.
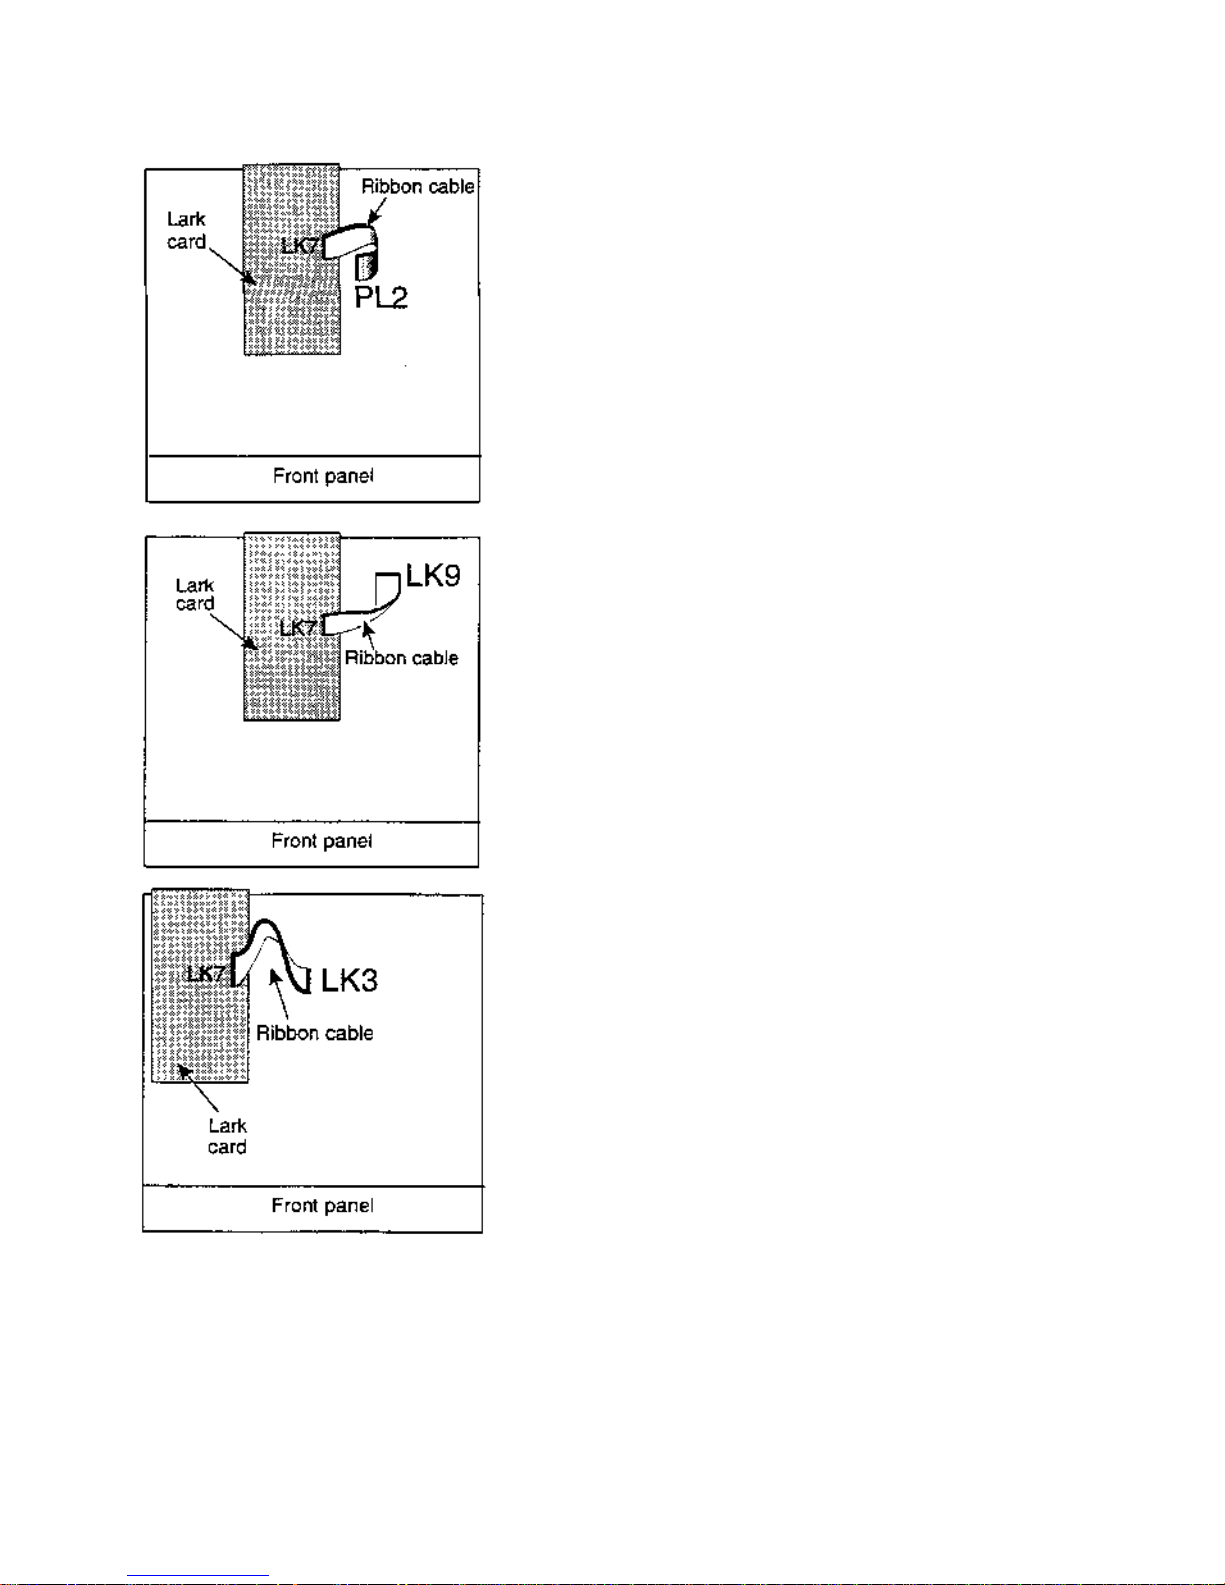
The dark band in the following diagrams denotes the red stripe on
one edge of the cable.
...on an Archimedes 300 & 400
series
The cable plugs into connector PL2 on the far
right of the Archimedes circuit board, partly
under the right-hand expansion card (looking
from the front of the machine). Note that the
rearmost pin on the Lark card connects to the
rearmost pin on the Archimedes circuit
board.
There may be two plastic-covered links on PL2.
Remove them but keep them in a safe place.
You may need them in the future if you change
your monitor. The Archimedes User Guide
gives more details. (Look under Connecting the
monitor.)
Page 9
Page 16
2. Installation
...on
an Archimedes 400/1 series
This is similar to the 300 series except that PL2
is towards the centre of the circuit board, partly
under the left-hand expansion card.
...on
an Archimedes 540
The cable plugs into connector LK9, which is
towards the rear of the Archimedes circuit
board (looking from the front of the machine).
Note the orientation of the cable as shown in
the diagram.
...on
an A5000
The cable plugs into connector LK3, which is
towards the centre of the A5000 circuit
board. Note that the cable is twisted through
180°; the rearmost pin on the Lark connects
to the frontmost pin on the A5000 circuit
board.
A component close to LK3 may prevent you
plugging the ribbon cable fully home. In most
cases you can still plug in the cable
sufficiently to make good contact.
Page 10
Page 17
2. Installation
Connecting the internal speaker
It is possible, but not essential, to use the internal speaker as an
output device for the Lark. The speaker then plays back both the
normal sound system from the computer and sounds from the Lark.
To do this requires:
• disconnecting the cable leading from the speaker to the
motherboard of the computer and
• plugging the cable onto link LK5 on the Lark card. You can
plug the cable in either way round.
The speaker cable may not be long enough to reach the Lark card. (
This depends on the type of computer and which slot you plug Lark
into.) In this case, return the voucher enclosed with Lark for a free
extension cable.
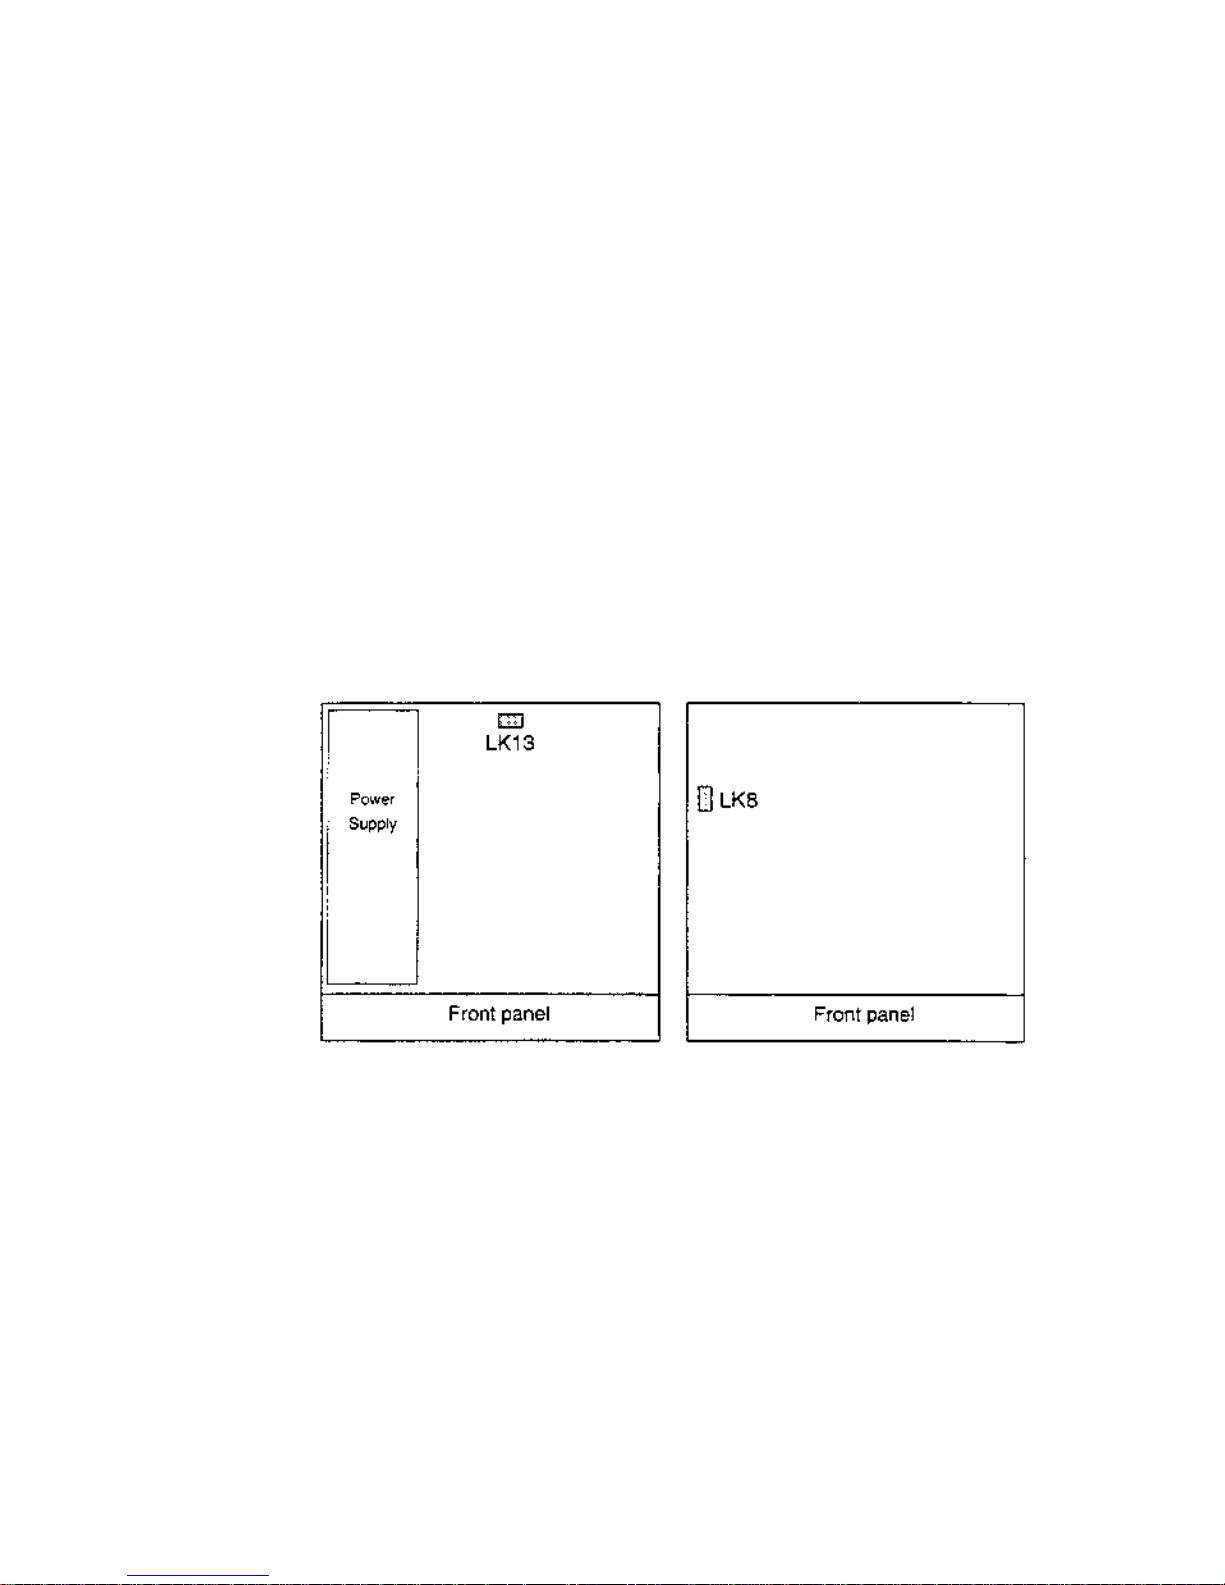
The diagrams below indicate the location of the links on the
motherboard of the A5000 and A540.
Left: A540 Right: A5000
If you have an A300/A400 series or A540 Archimedes, you cannot
connect the speaker cable.
Fitting the expansion card
Unscrew and remove the chosen blanking plate from the rear of
the case. The Lark card can be fitted into any position.
The Lark expansion card may now be inserted (usually from the
rear) and, whilst held horizontally, pushed into a corresponding
backplane socket. The backplane is supported by a strong metal
bar; however it is advisable to support it with one hand whilst
Page 11
Page 18

2. Installation
pushing the expansion card into place with the other hand.
If the Lark expansion card is fitted adjacent to another card, bolt
their rear panels together after installation using the T-piece
provided. However, if no adjacent card is present, screw the halfwidth blanking plate supplied to the Lark rear panel.
Replace any screws that you removed from the blanking plate.
Ensure that the Lark expansion card is screwed to an adjacent
expansion card or to the half-width blanking plate.
The Lark card is now fitted ready for initial testing. Replace the
cover by sliding it back onto the computer from the rear. Replace
the securing screws.
Page 12
Page 19

2. Installation
Fitting the Lark card — Risc PC
Disconnect power
Before installing the Lark, switch off the power to the computer.
However, leave the power lead connected. Disconnect all other leads
to the computer. Remove anything (such as a monitor) that may be
on top of the case.
Remove the computer's cover
The cover is secured by two clips at the back of the case. Turn
these. Lift the lid from the back and remove. (The Risc PC
documentation details this operation.)
Expansion card positioning
At the back of the Risc PC are two or more blanking plates. The
best position for Lark is the bottom slot. (If necessary, move any
expansion card to another slot.)
Connecting the ribbon cable.
The ribbon cable supplied is for connecting the Lark to the
computer's internal sound system.
Caution!
Incorrectly connecting the ribbon cable can damage your computer.
Carefully follow the instructions in this manual and pay particular
attention to the orientation of the cable. The suppliers of Lark cannot be
held liable for any damage that results from incorrect installation. If in
any doubt contact your local supplier.
Connecting the internal speaker
It is possible, but not essential, to use the internal speaker as an
output device for the Lark. The speaker then plays back both the
normal sound system from the computer and sounds from the Lark.
This operation is described below.
Page 13
Page 20
2. Installation
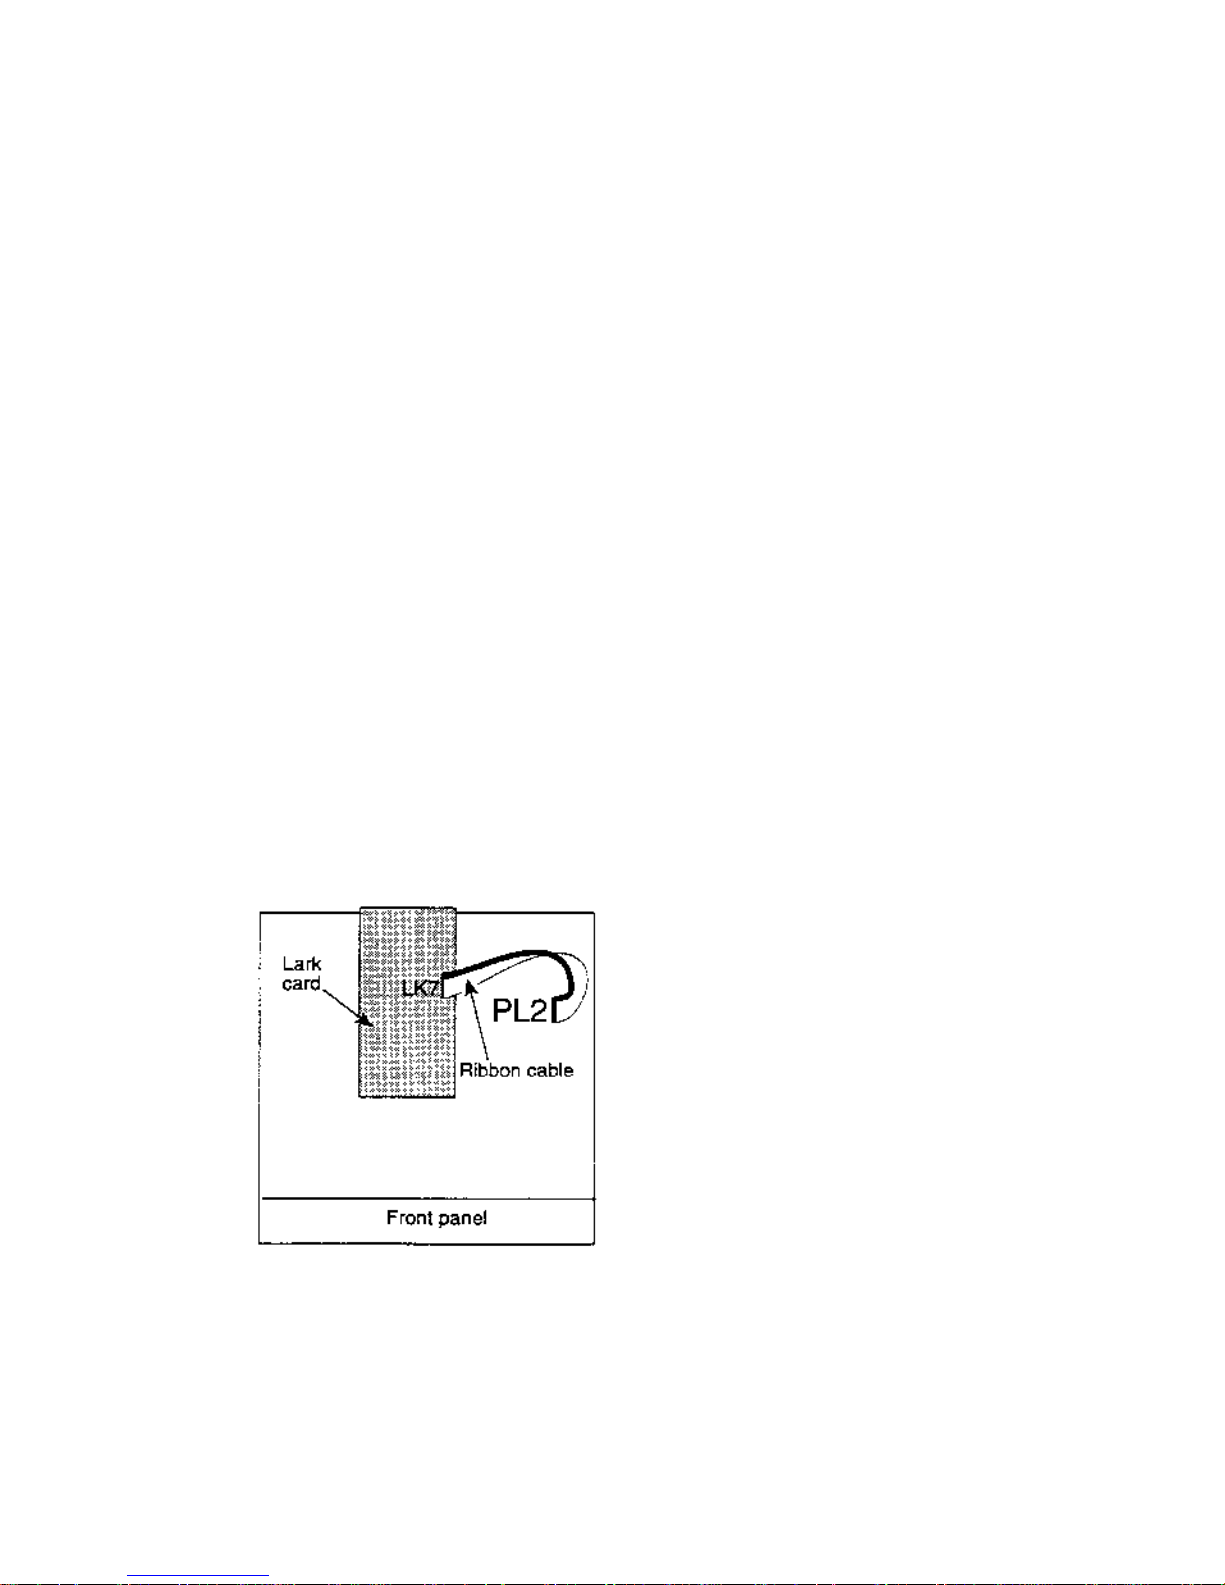
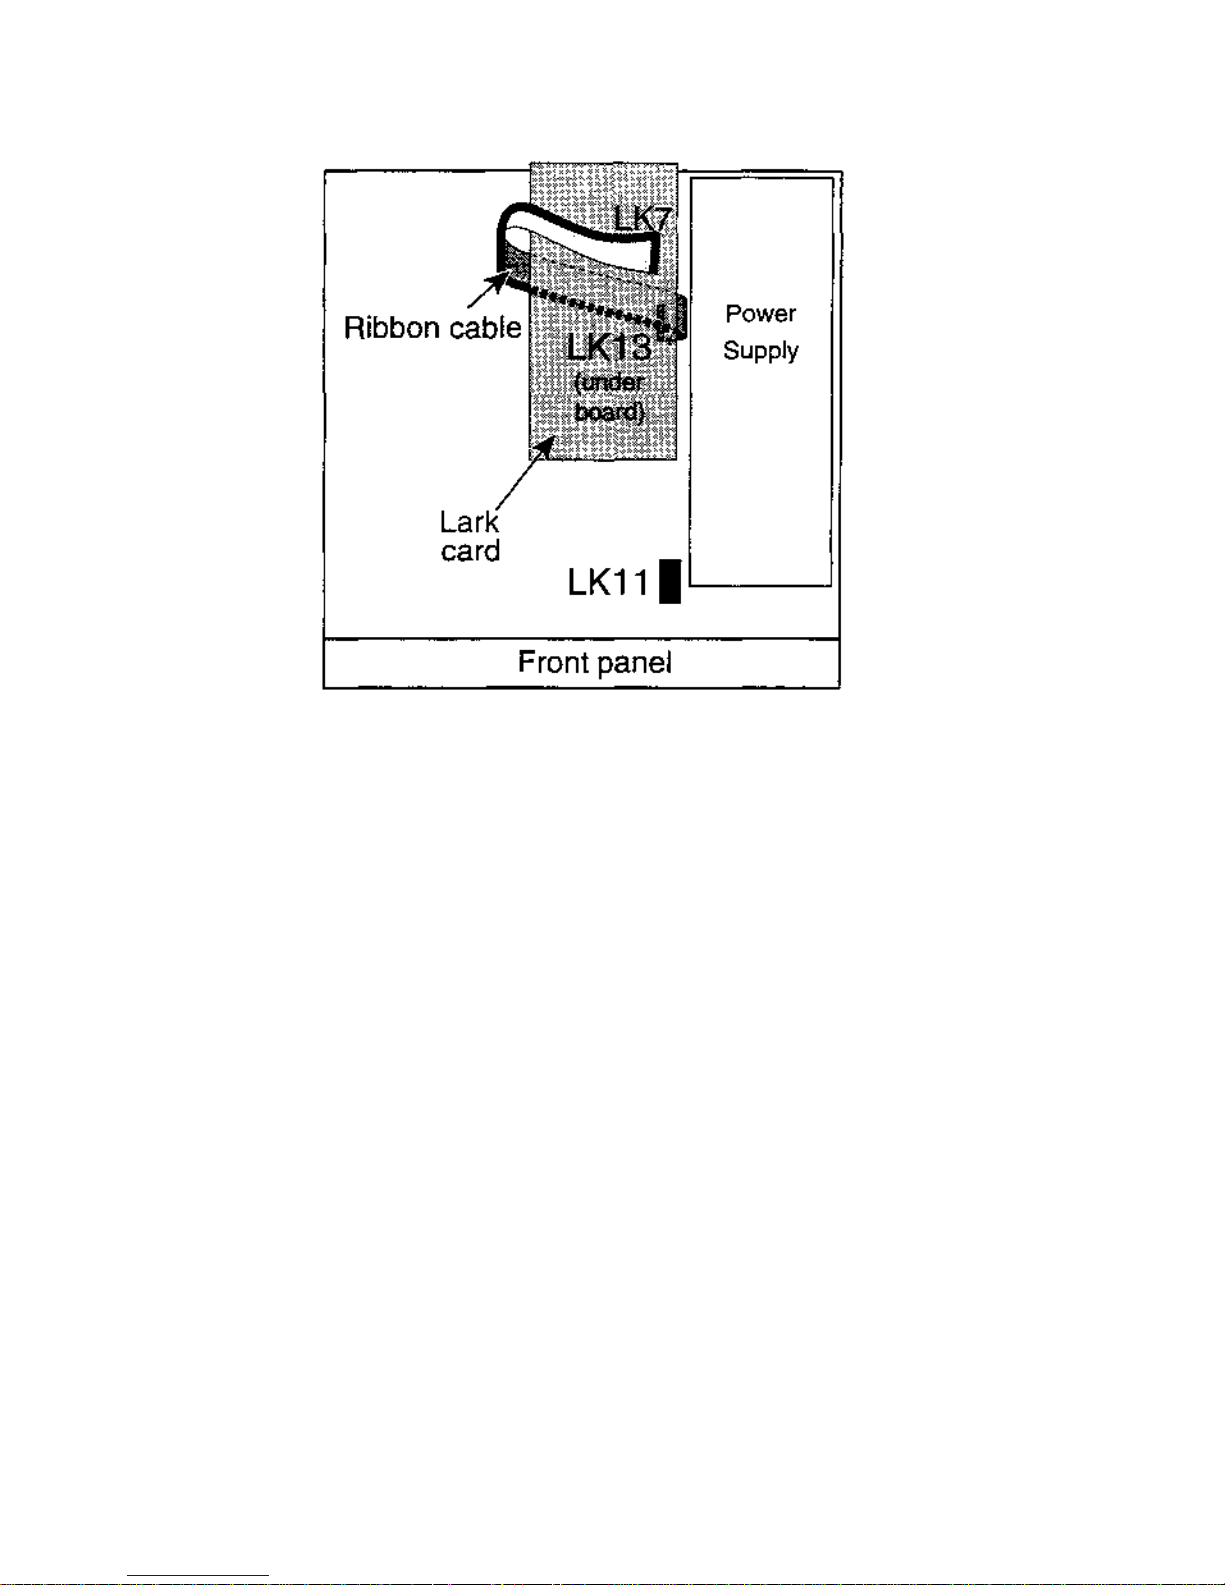
1 Unplug the ribbon cable from the Lark card.
2 LK13 is located close to power supply. Plug the ribbon cable
into LK13 with the cable to the right (when viewed from the
front of the Risc PC).
3 Thread the cable through the case work to the left so that it
is clear of the expansion card slot.
4 If you wish to connect the internal speaker to Lark:
Unplug the speaker cable from LK11 on the motherboard.
5 Plug in the Lark card.
6 Plug the ribbon cable into LK7 on Lark. Note that the cable
is twisted.
7 If you wish to connect the internal speaker to Lark:
Plug the speaker cable into LK5 on Lark.
8 Plug in any other expansion cards.
Page 14
Page 21

2. Installation
Fitting the Lark card — A3000
Before plugging Lark into an A3000 you must change two
links on the Lark card. These are:
LK6 and LK10
Change both links from pins 1-2 to 2-3. (Pin 1
is
marked
with a dot.) The position of these links is shown in 6.
Technical information.
Fitting the card
1 Disconnect the mains lead and all peripherals. You do not
need to remove the top cover of the computer.
2 Plug the expansion card into the external socket at the back of
the A3000.
Any expansion card plugged into an A3000 has little protection
against accidental damage. We therefore recommend that you
protect the card with a metal casing. Alternatively, Computer
Concepts can supply an A3000 Expansion Box which provides
three expansion sockets. Your A3000 then has a total of four
expansion sockets, the same as the Archimedes and A5000.
Contact Computer Concepts for further details.
There are no further connections to make, as you cannot connect
the Lark to the A3000's internal sound system.
Page 15
Page 22
2. Installation
Initial testing (al| computer types)
Reconnect any previously connected peripherals, and switch
power on to your computer.
When the computer has finished its initialisation, go to the
command line (press F12) and type
Podul es and press Return.
This lists the expansion cards fitted in the computer. In the list the
following should appear:
Wild Vision/CC Lark Al6 Vx.xx
where x . xx is the version number.
Press Return to return to the normal desktop display.
Copying the software
We recommend copying the Lark applications onto a hard disc for
normal use. After copying, store the original discs in a safe place.
Updating
!System
Do not delete your existing version of !System.
Do not copy !System from the lark disc.
Instead you must merge the two !System files. To do this:
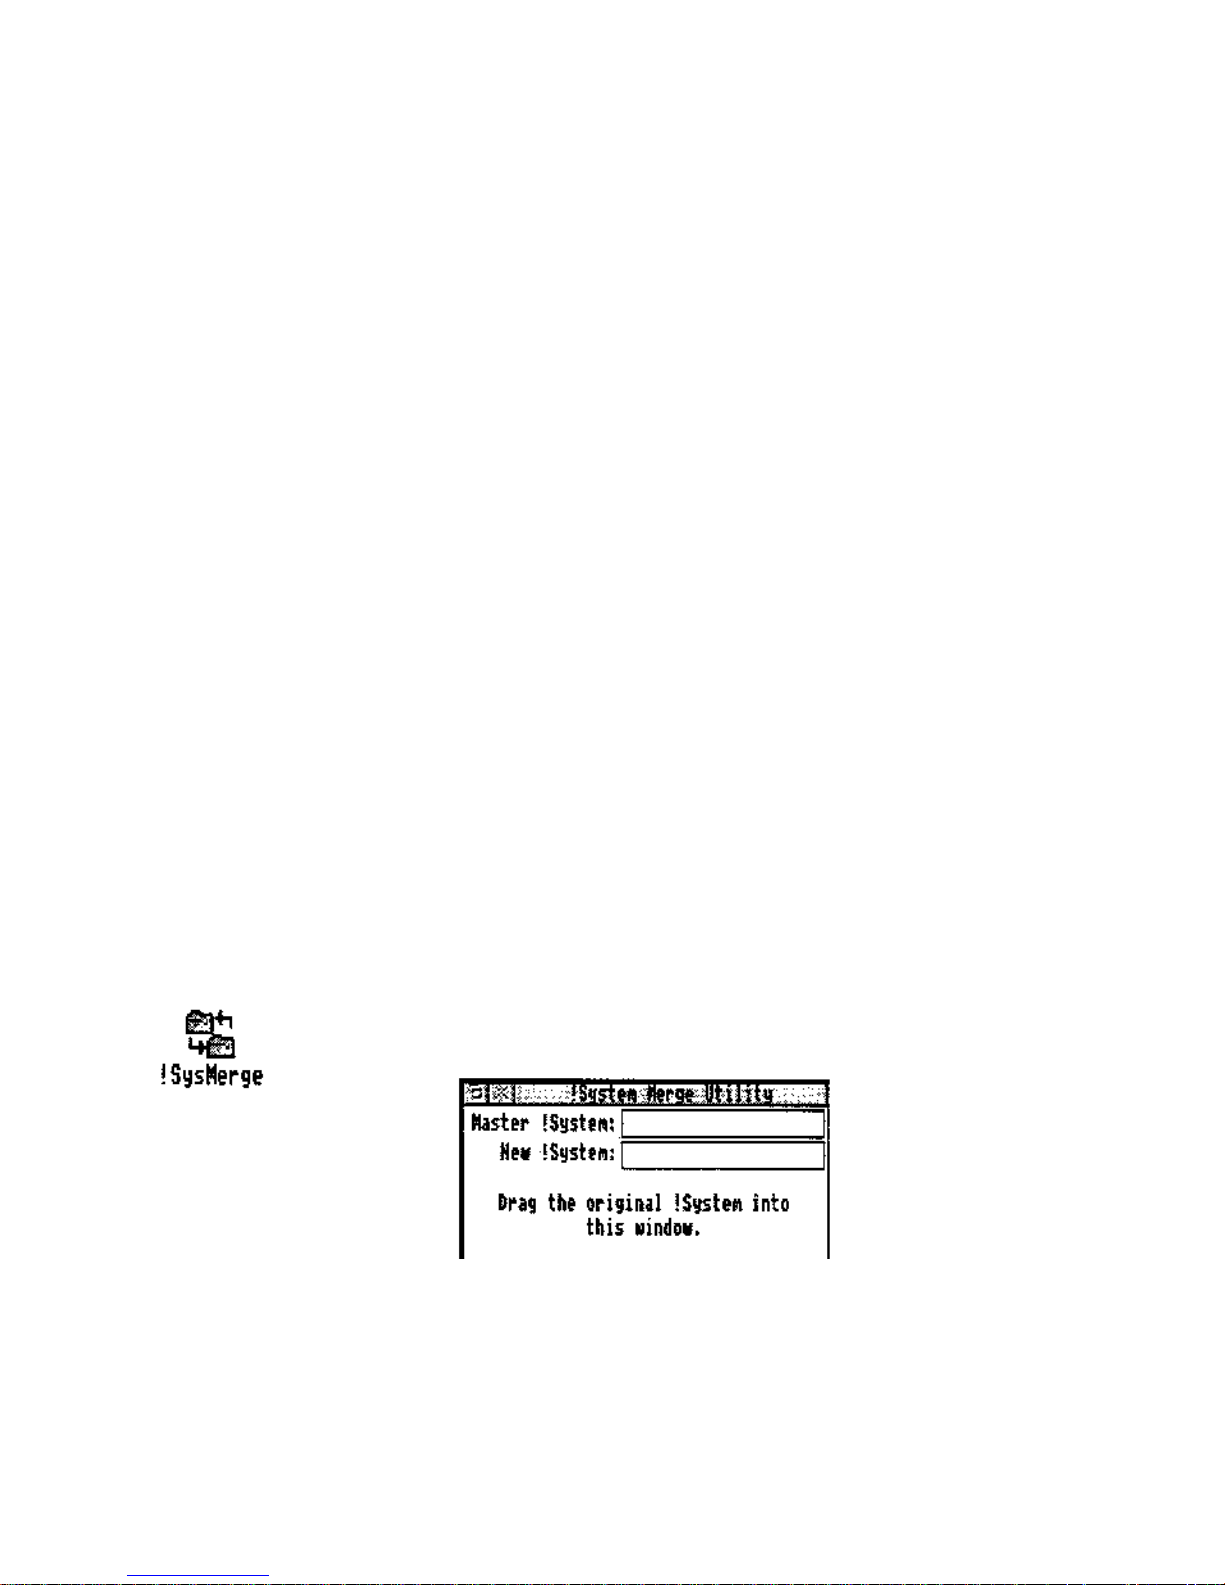
1 On the AudioWorks disc is a program called !SysMerge.
Load this in the usual way by double-clicking on its icon.
This opens a small window:
2 Drop your existing !System icon onto the window. (!System
is on your hard disc, if you have one, or your boot disc.)
Page 16
Page 23
2. Installation
3 Drop the !System icon from the Lark disc onto the window.
This creates a new, combined version of !System and
automatically updates the existing version.
4 When the window shows
!System updated,
click on its
Close icon to exit from !SysMerge.
Before using Lark for the first time:
Before you can use Lark, you must set-up the default configuration. To do this:
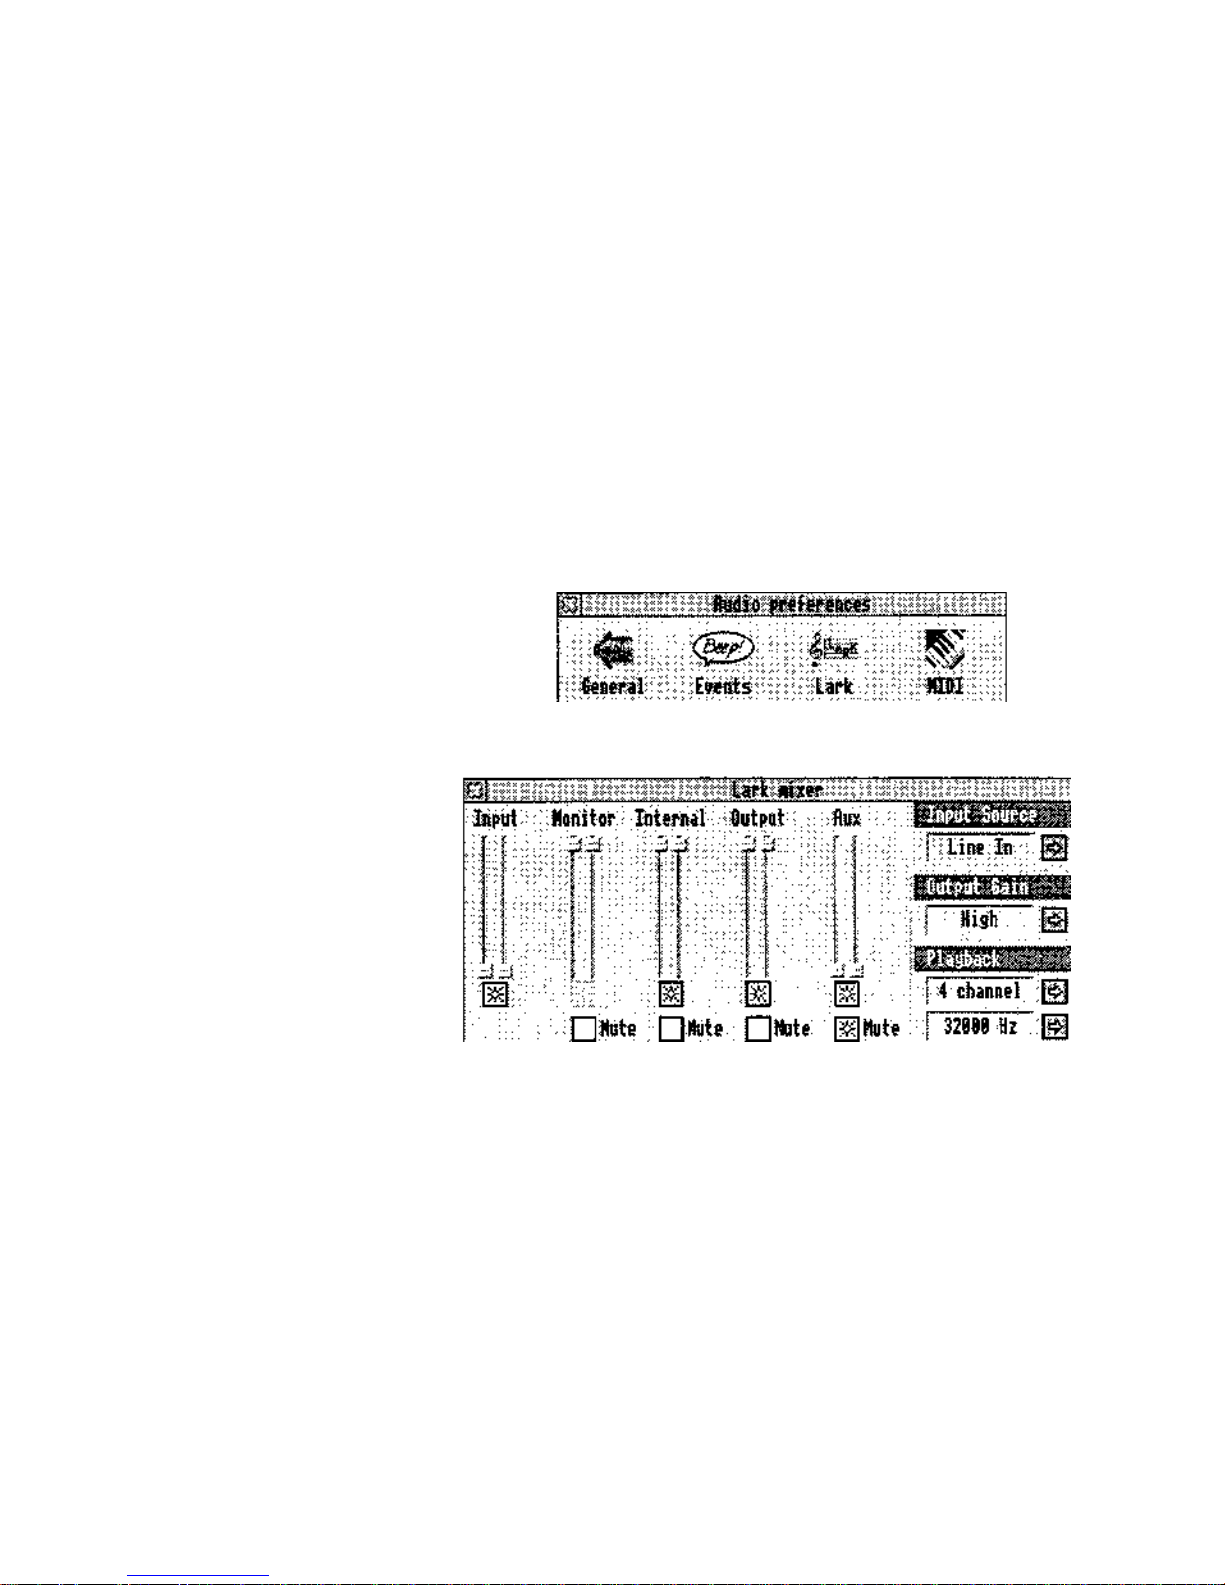
1 Load AudioCtrl.
2 From the Icon Bar Menu choose Show preferences. This
displays the preferences window.
3 Click on Lark. This opens the Lark mixer preferences window.
Set the controls in the window as shown below:
4 Close the mixer preferences window.
5 Display the preferences window again.
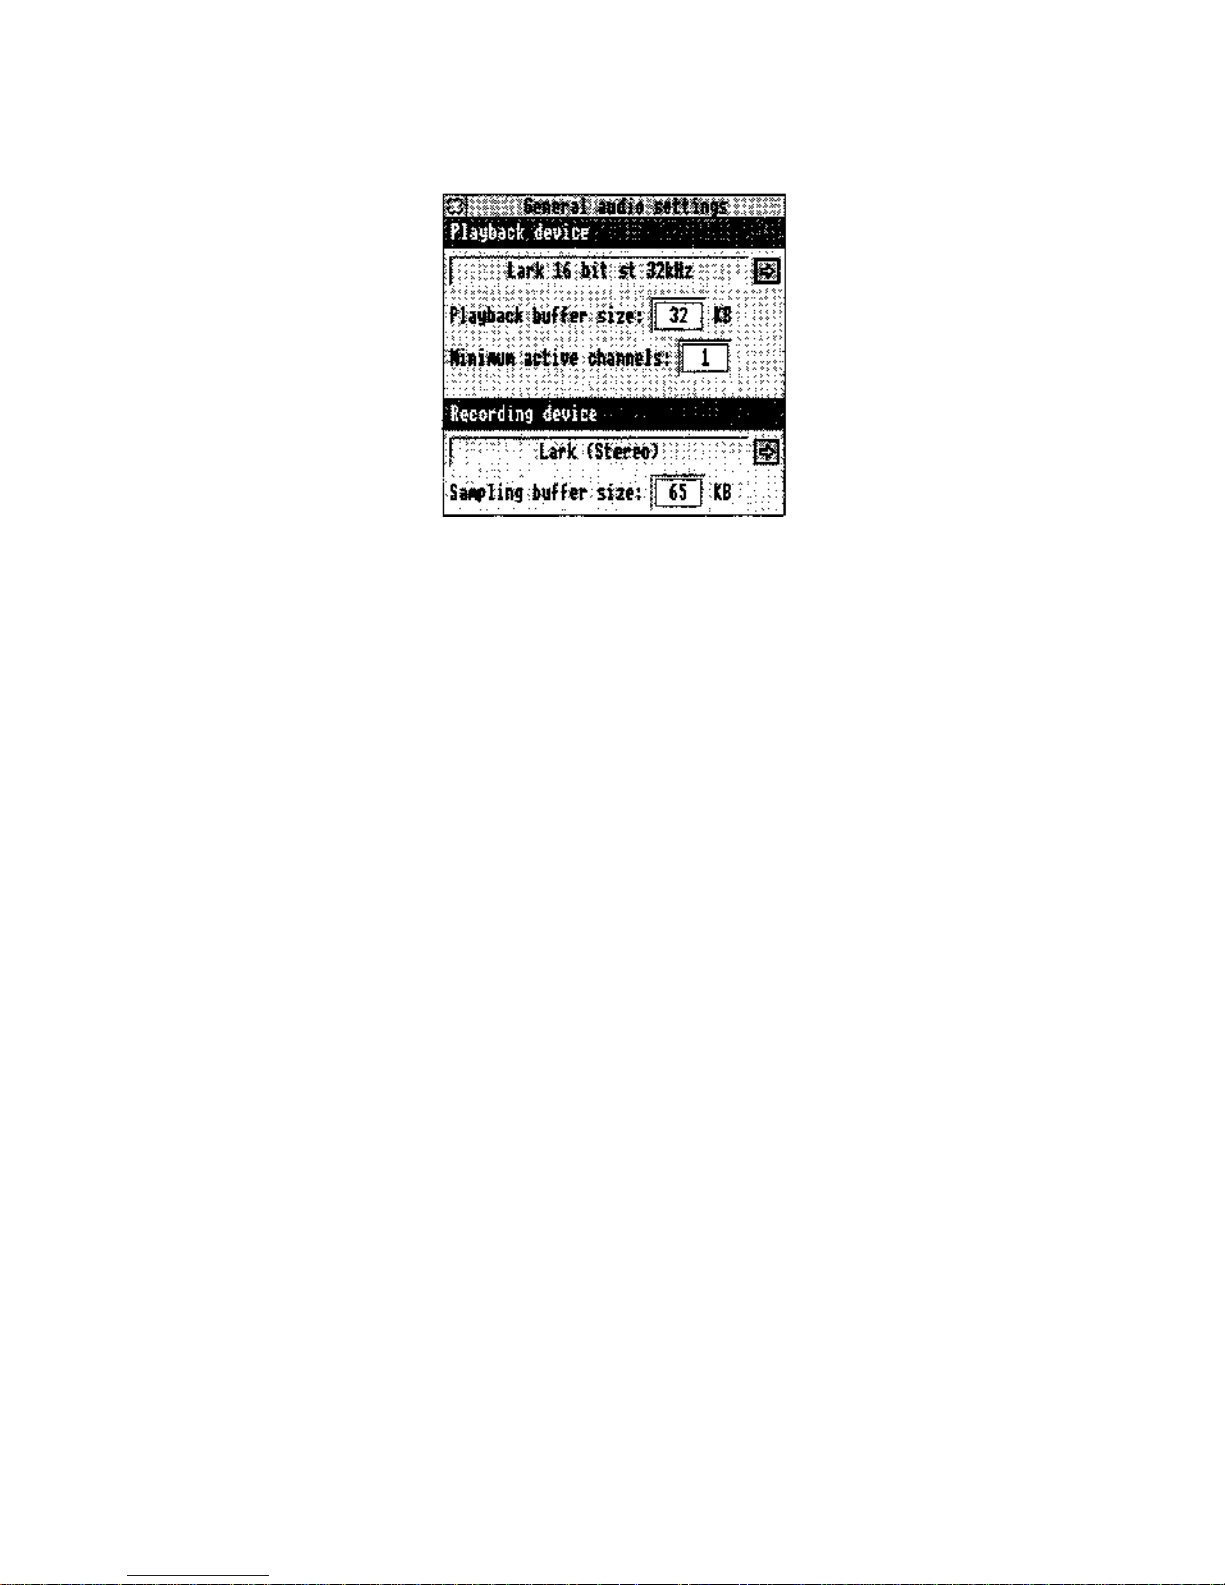
6 Click on General. This opens the audio settings dialogue box.
Page 17
Page 24
2. Installation
7 Make Lark the default device:
8 Close the window.
9 On the Icon Bar Menu choose Save preferences.
Testing your Lark:
If you have problems with these initial tests refer to 5. If problems
occur... There is more information on connecting to Lark in the
next section (Getting started).
1 Drop BellString onto the AudioCtrl icon on the icon bar.
You should hear a bell sound.
2 Load Piano. Drop a MID] file icon onto the Piano icon on
the icon bar. This plays the melody in the MIDI file.
Piano uses a lot of memory and so you should quit it when
satisfied with this test.
Page 18
Page 25
Getting started
Connecting a microphone
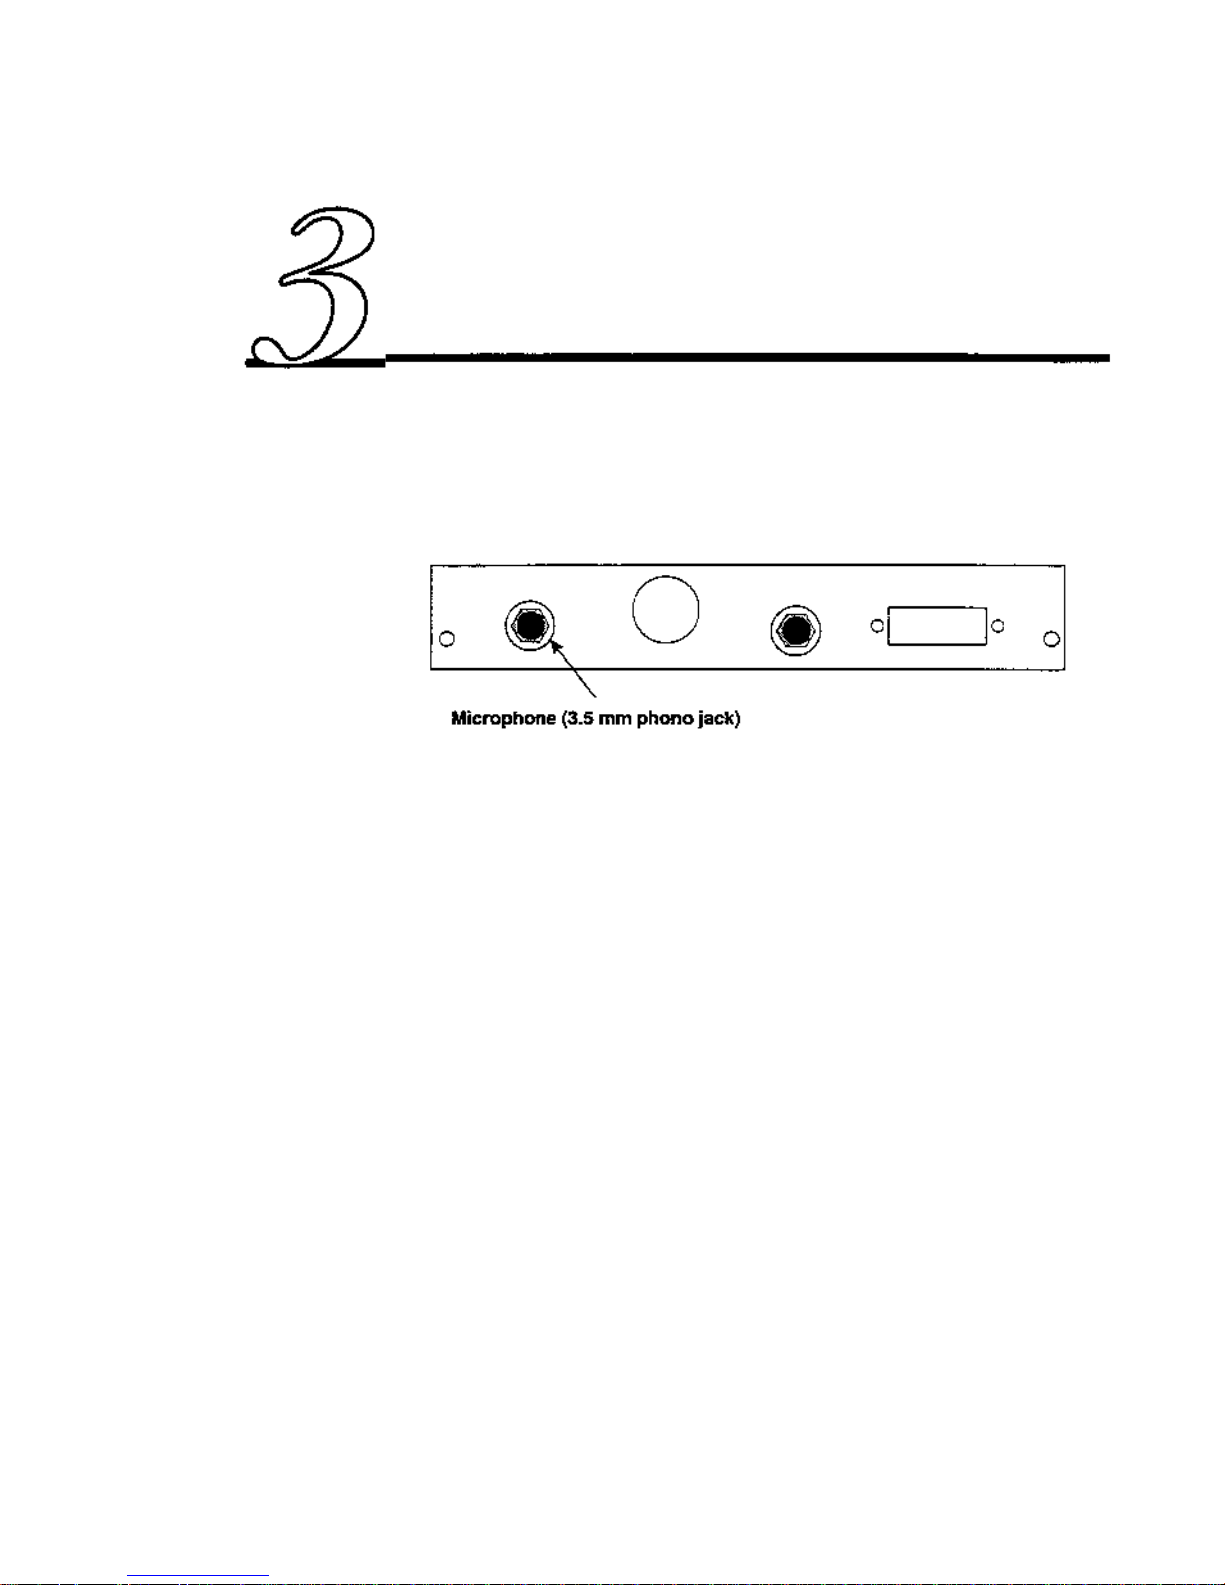
You can plug any standard microphone into the 3.5 mm phono jack
on the left. Note that there are two kinds of jack plugs -Japanese
and European specifications. If your microphone uses the Japanese
type of plug, you can obtain an adaptor by returning the voucher
included with Lark.
Some types of microphone require a preamp boost to give a
satisfactory level. Lark has an optional +20dB gain. The option tc
select this is found in the !AudioCtrl... Input Source menu (
described in 4. The software suite). You also need to set links LK1
to LK4; refer to 6. Technical information for details.
Alternatively, you may connect a microphone through an external
amplifier to the line-level input.
Page 19
Page 26
3. Getting started
Connecting an audio input
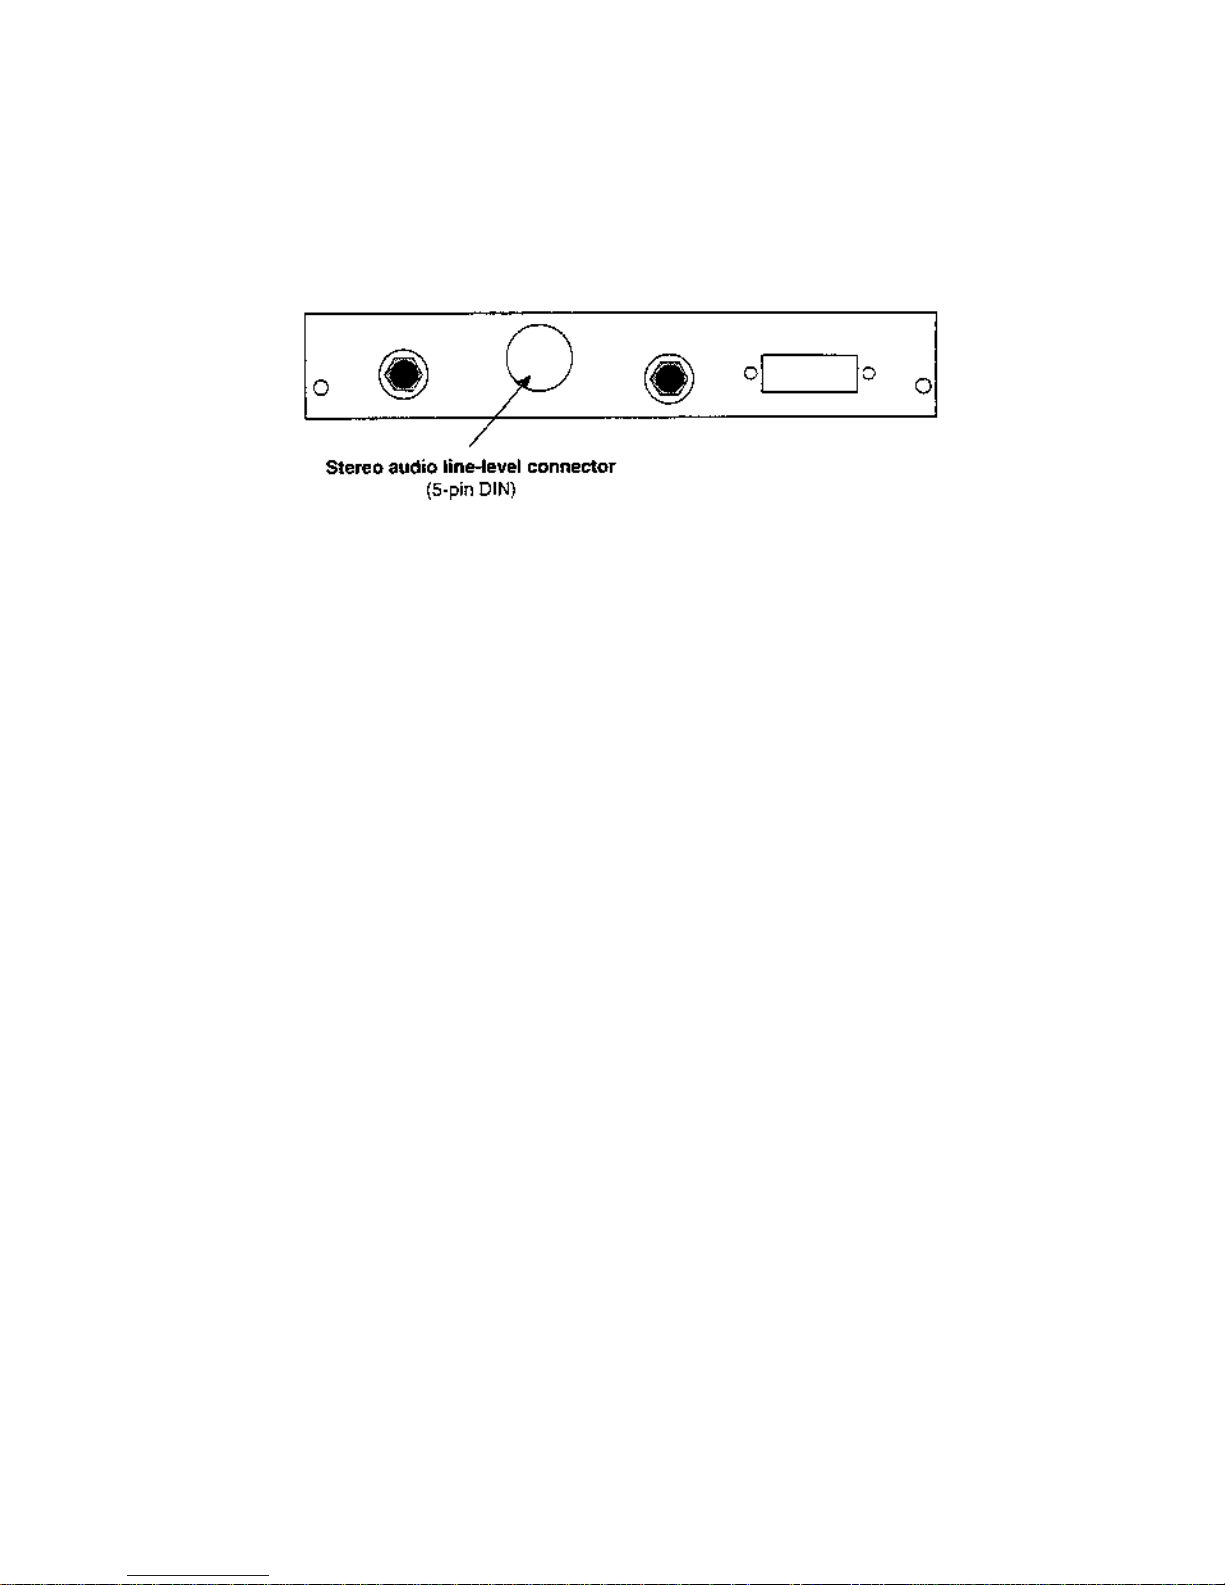
The Lark has a 5-pin DIN socket for audio input and output.
The pin-out of the socket is given in 6. Technical Information.
Suitable audio sources include: CD players, amplifiers, or hi-fi
equipment. Microphones may be used as inputs to this socket if
connected through an external amplifier or other equipment offering
line-level output (such as a hi-fi). Some microphones are supplied
with their own amplifier.
The input line-level is selectable as 1V or 2V r.m.s. (Links LK11 &
LK12; refer to 6. Technical information for details.) You should
check that the line-level for any equipment used does not exceed the
selected line-level for the card.
Connecting the audio output (active speakers)
You can use the 5-way DIN socket to connect Lark's stereo output.
The 5-pin DIN has both stereo input and output connections.
Suitable devices include: an amplifier and thence to stereo
speakers; direct to "active" or "multimedia" speakers; a tape deck for
recording; and so on.
The output line-level is 1V r.m.s. (or 2.8V p-p). Note that this is a
high impedance line-level output. It is not suitable for devices
intended for connection to a headphone socket. You should check
the specification of your equipment for compatibility.
Use !AudioCtrl to set the variables affecting the level and quality of
the sound being played back - refer to 4. The software suite.
Page 20
Page 27
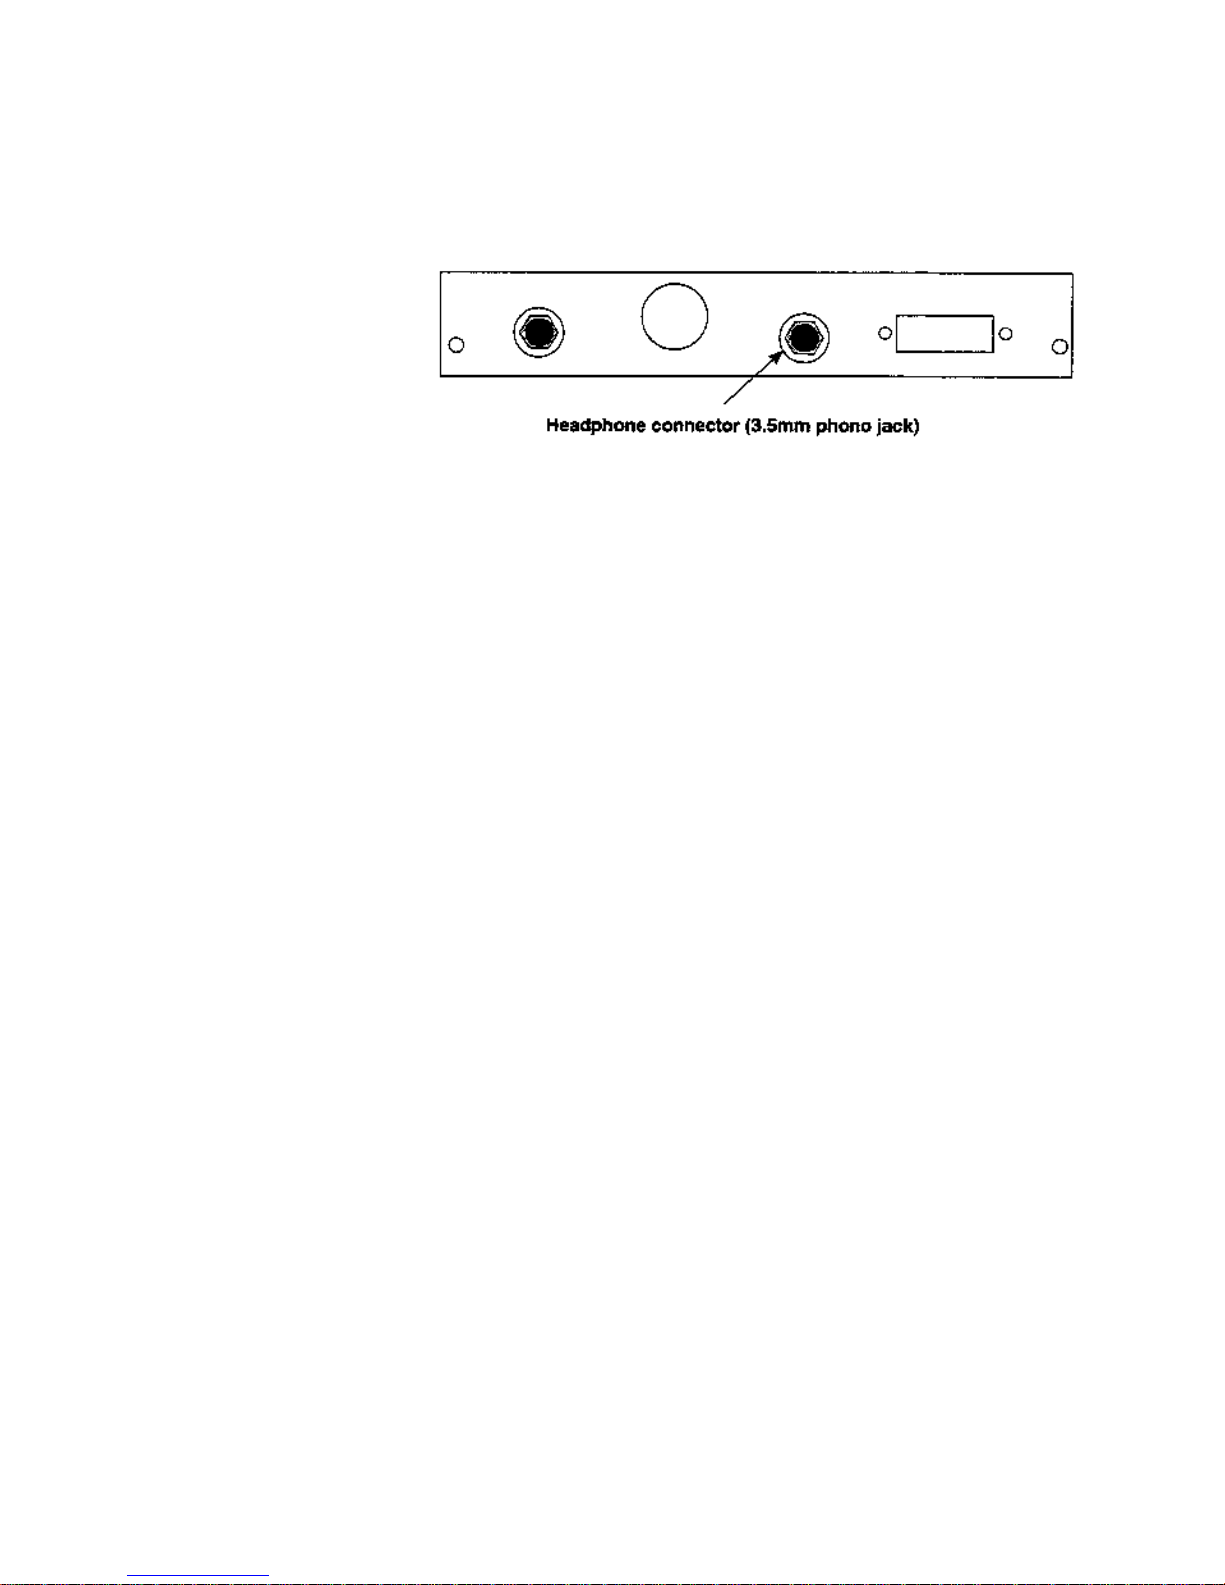
3. Getting started
Connecting headphones or passive speakers
To connect headphones, simply plug into the jack socket indicated
above. Note the comments on jack plug specifications in Connecting
a microphone, above.
If the internal speaker is connected to Lark, plugging in headphones mutes it. All system sounds are heard through the
headphones. (If the internal speaker is not connected to Lark,
plugging in headphones has no effect on the speaker.)
You may also use this socket to connect non-"active" ("passive")
speakers.
P|ayback using the computer's interna| speaker
Play back through the computer's internal sound system using Lark's
superior sound reproduction facilities requires the audio cable
plugged into LK5 on the Lark. This is not possible on the A3000 (refer
to 2. Installation). Sound played back through the speaker in the
computer is in mono only. This is a limitation of the computer.
When the speaker is connected in this way, the Internal slider
controls the volume of the original (VIDC) sound system through
the speaker.
P|ayback using externa| speakers
If the audio ribbon cable is fitted, the computer's internal sound
system can 'play' through the Lark. (The volume is controlled by
Internal on the Lark mixer.)
Page 21
Page 28
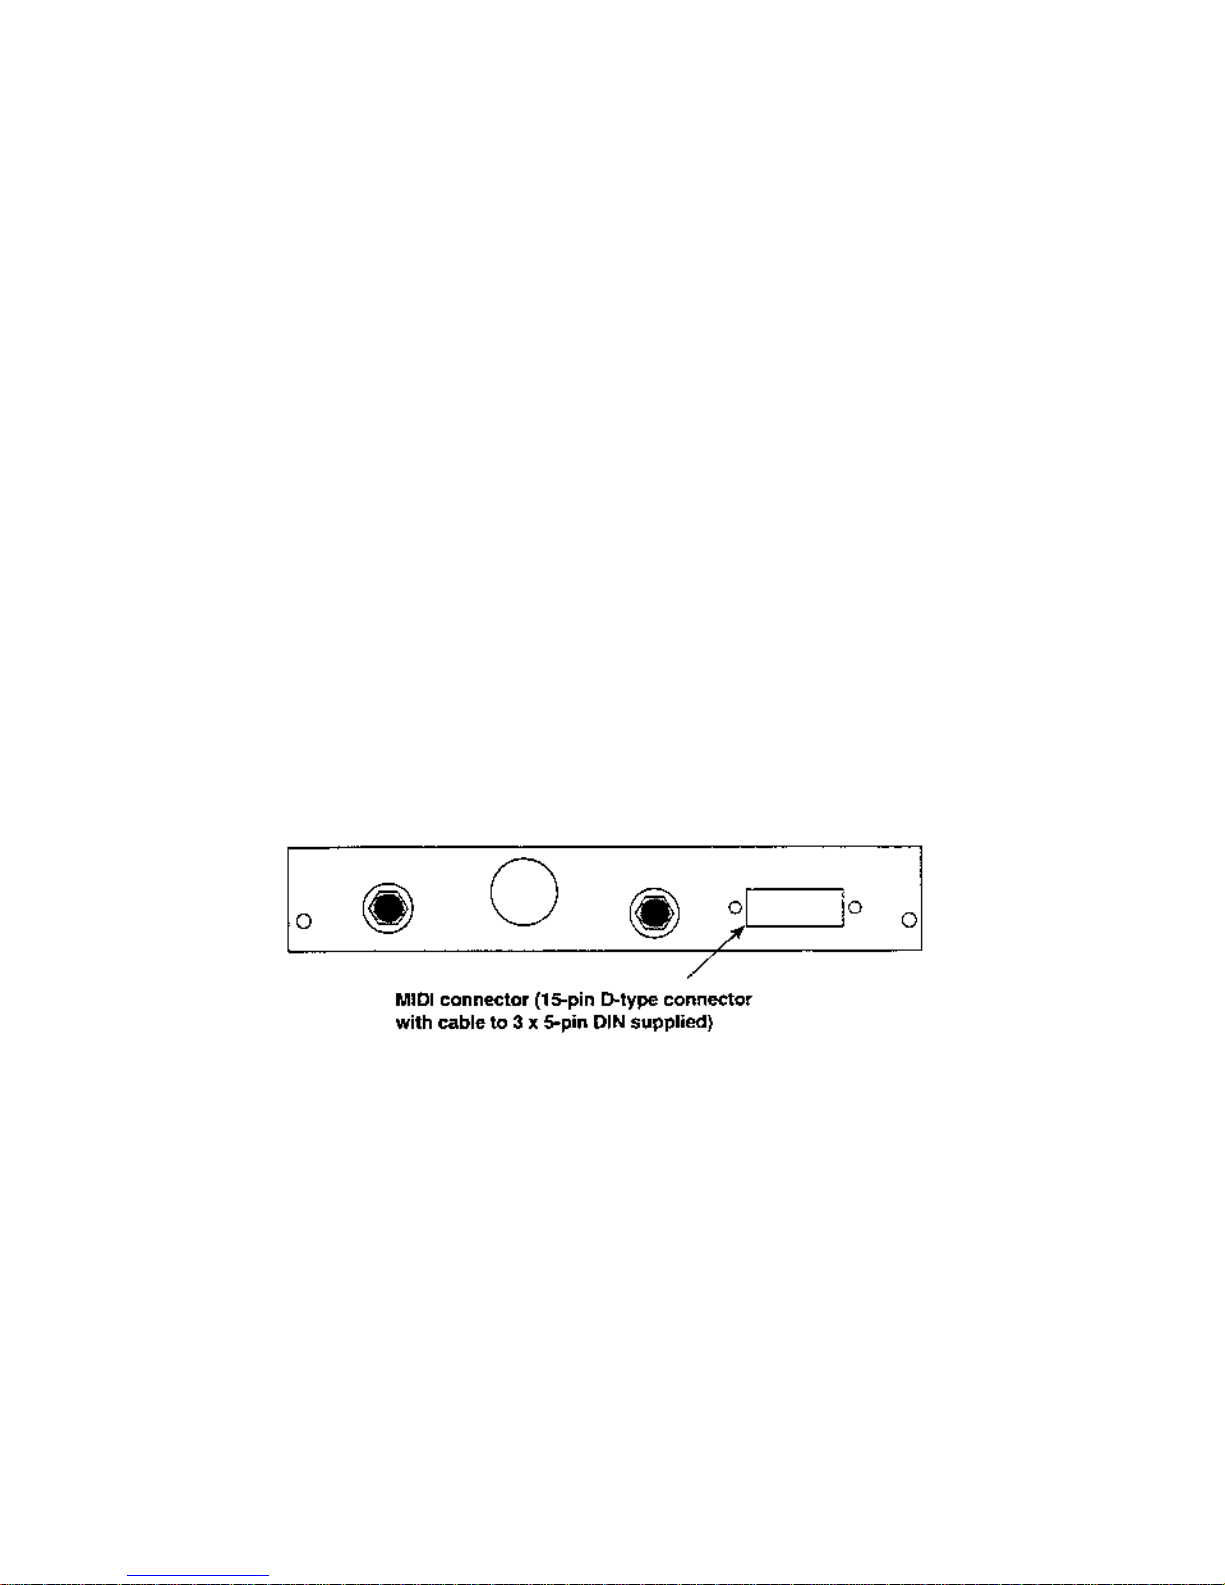
3. Getting started
When using external speakers, you should turn off the computer's
internal speaker:
1 Click on Apps on the icon bar. This opens a directory
window.
2 Double-click on !Configure in the directory window. A
computer-shaped icon appears on the icon bar.
3 Click on this icon.
4 Click once on the bell icon labelled 'Sound'.
5 Deselect the Loudspeaker enabled option.
This configures the computer to play only through Lark.
Connection to MIDI
Caution! Use only the MIDI cable supplied.
A cable has been supplied especially for use with the Lark's MID1
circuitry. This terminates in three 5-pin DIN sockets, for:
• MIDI in
(blue band),
• MIDI out
(red band) and
• MIDI Thru
(yellow band).
The cable plugs into the 15-pin D-type socket on the Lark card.
This cable should be connected into your MIDI system as required.
Please refer to the separate manual for details of the Acorn MID1
support software. (This manual also includes more information on
connecting M1DI devices.)
This connector is identical to the monitor connector on some Acorn
computers. Do not plug a monitor into the M1D1 connector — this
can damage the monitor or M1DI interface.
•
Page 22
Page 29
The software suite
AudioWorks
AudioWorks gives extensive audio manipulation options. It lets Lark
users create and play back audio samples in stereo or mono and up
to 16 bit in resolution. For detailed instructions refer to the
AudioWorks manual. However, AudioWorks includes extra features
when used in conjunction with Lark.
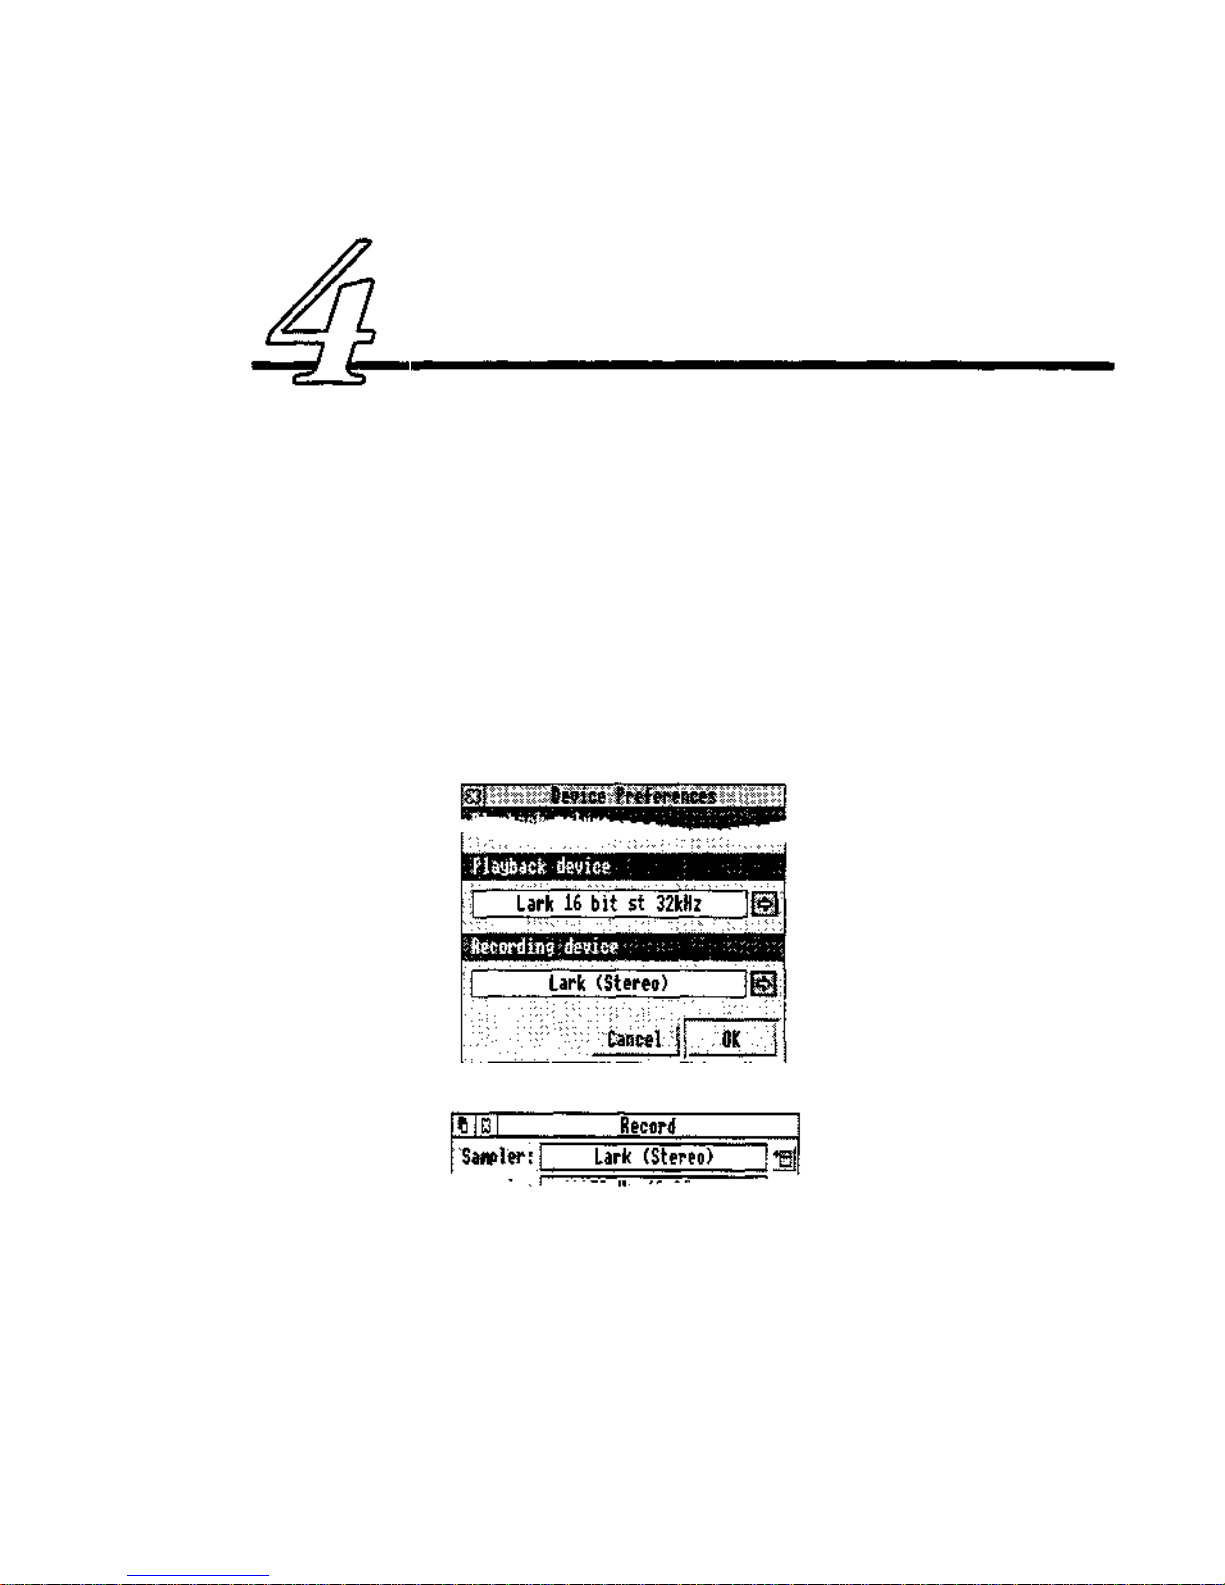
AudioWorks recognises Lark as an available input/output device in
its
Preferences -> Devices
dialogue box:
and in the recording dialogue box:
In these dialogue boxes you will find that two sampling devices are
available for use:
Lark (Stereo)
and
Lark (Mono).
Choosing the former
uses the Lark as a stereo sampling source, while the latter uses only
the left channel.
Page 23
Page 30
4. The software suite
AudioCtrl
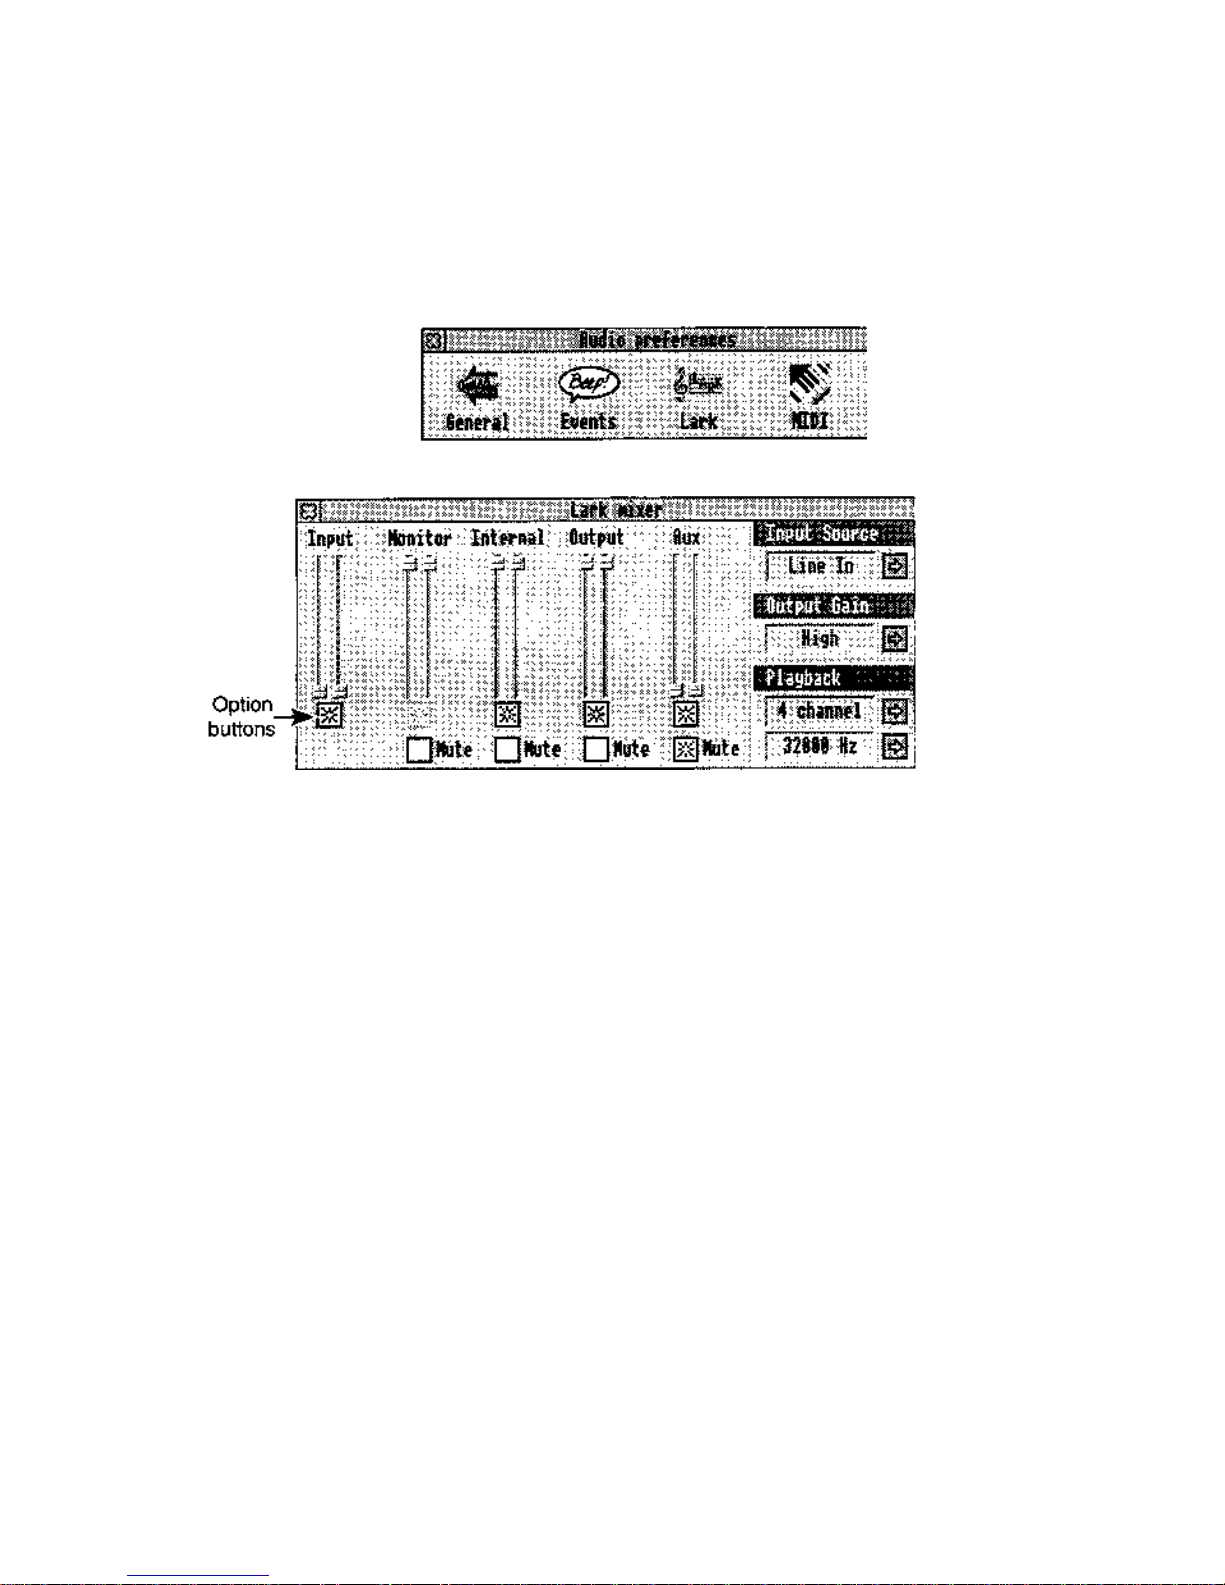
When the Lark is installed in your computer, a Lark option appears
in the !AudioCtrl preferences window.
Clicking upon Lark opens the mixer preferences window:
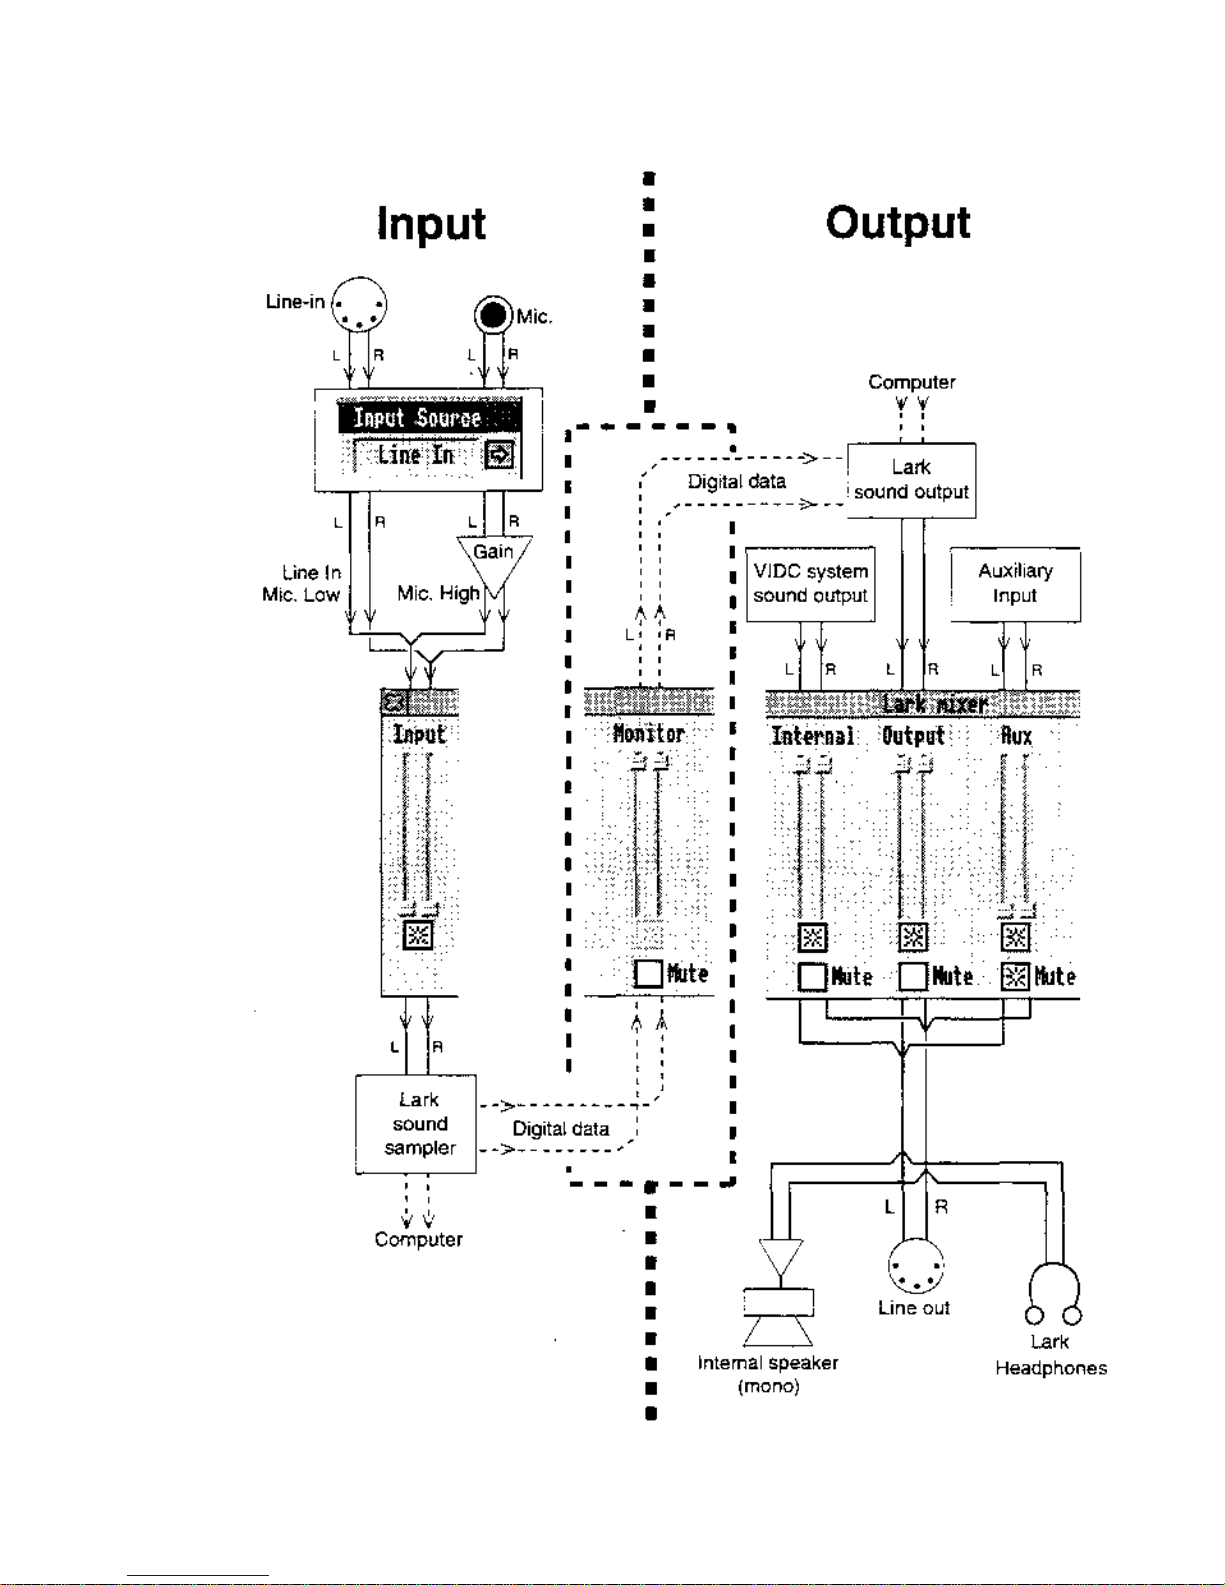
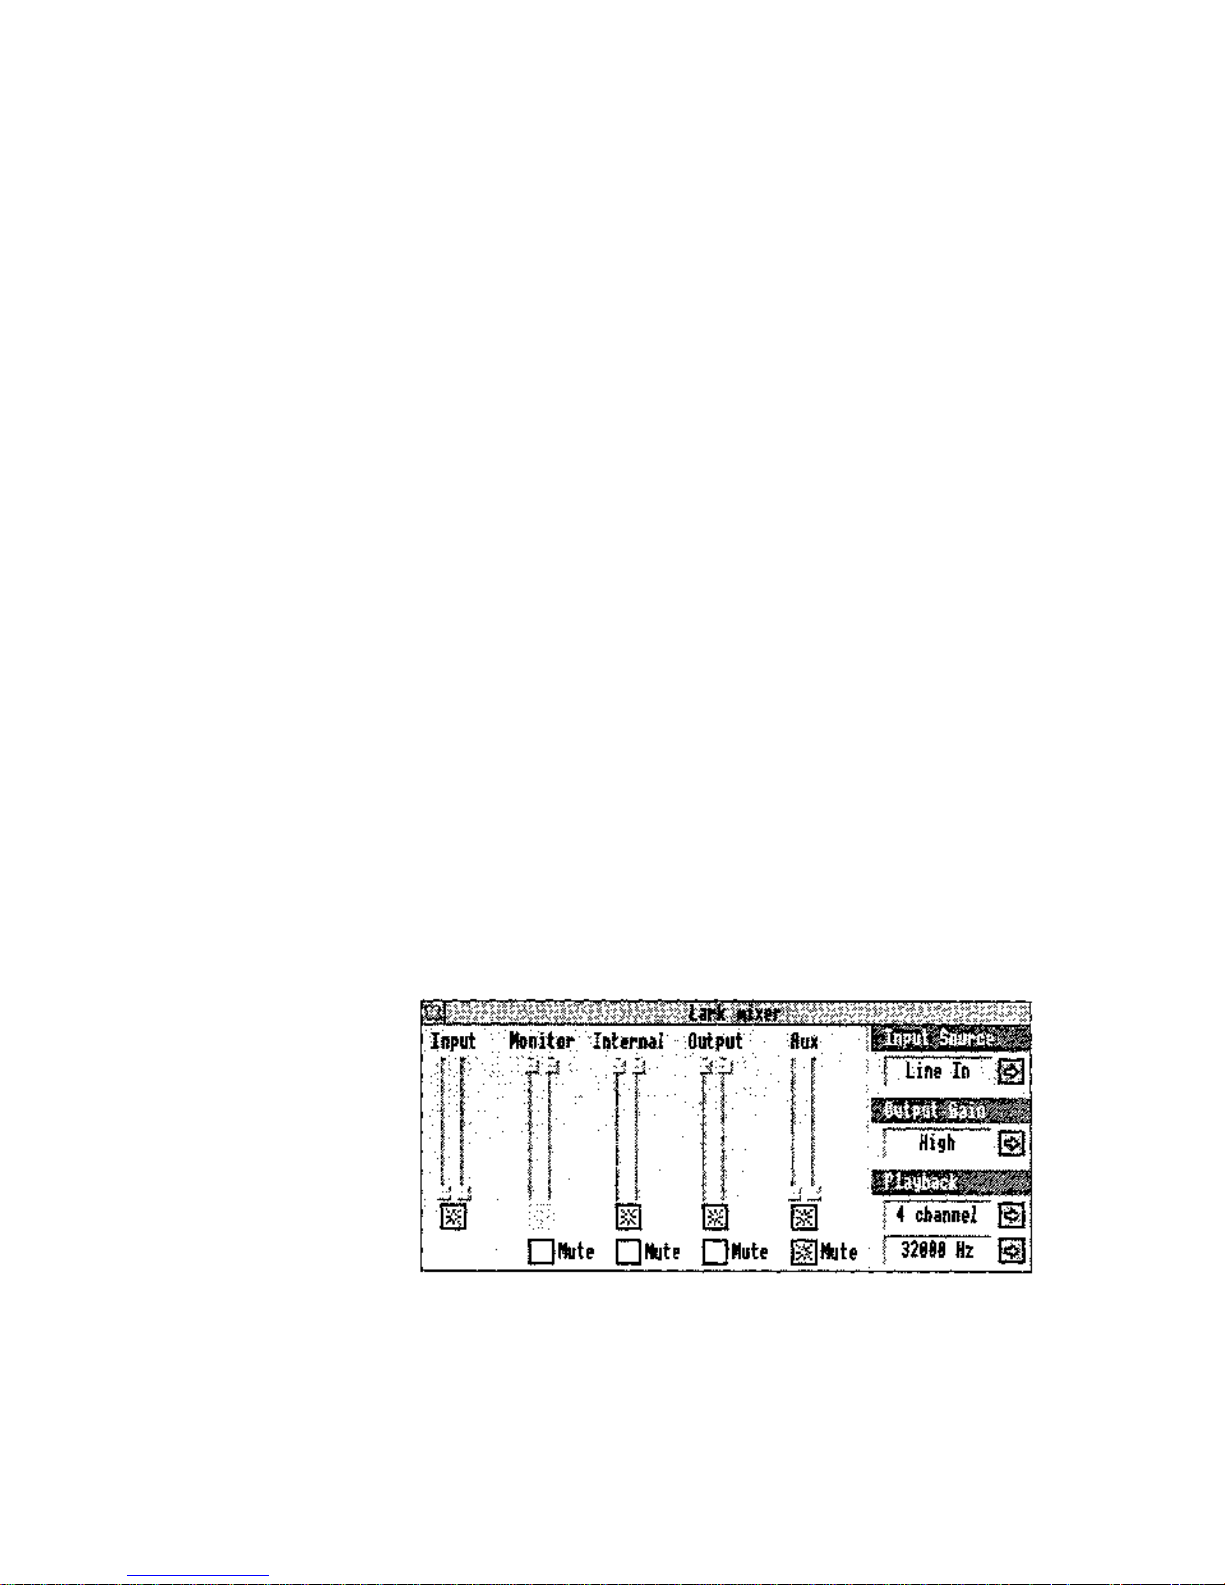
This window lets you adjust signal levels for the sound input and
output channels. Each mixer option has a stereo slider associated
with it — by dragging the left or right slider buttons up or down, you
can increase or decrease the overall level of that input/output.
To alter the levels on the left and right channels independently, click
on the option button at the base of the slider, and then drag the left
or right slider as appropriate. Clicking again on this button links the
channels together if you want them equal.
The five slider pairs control:
Input
Sets the level of the extra gain (up to 23dB) on the input
signal. Setting these sliders to the bottom (the normal
position) applies no extra gain.
Monitor
Sets the volume of the input sound mixed onto the output.
Does not affect recording.
Internal
Sets the volume of the internal sound system mixed onto the
Lark output.
Page 24
Page 31
4. The software suite
Page 25
Page 32

4.
The software suite
Output
Controls output volume of the Lark's synthesised sounds
mixed with Lark's output.
Aux
Controls the volume of the signal emanating from auxiliary
expansion cards (if fitted). See 6. Technical information for
connection details.
The Input, Output and Aux sliders control mixing of the three
playback signal sources:
• the computer's internal (VIDC) sound system,
• the Lark card (when playing sound from the computer
through the Lark), and
• sound from an auxiliary source.
Mute (Below each slider)
This mutes the Lark card so that the variable concerned
inputs or outputs no sound.
There are further options available at the side of the window:
Input source
Selects the current input source:
Line in —
selects input from the 5~pin DIN socket.
Mic low
Mic high —
these two options select input from the 3.5mm
jack socket.
Mic high
adds a +20dB gain. The best
option depends on the sensitivity of the microphone.
We suggest initially using Mic low; if the level is too quiet,
try
Mic high.
(You
also need to change the links on the Lark
card. Refer to 6. Technical information for details.)
Output gain
For synthesized sound, the output signal can be boosted
with three different gain levels (Low, Medium, and High).
Clicking on the icon to the side displays a menu allowing
you to set a new gain level. If set too high, output is
distorted.
Playback
Note:
the input is sampled and digitally recreated. Thus,
with monitor at maximum and 16-bit recording what you
sample is really what you play back.
Channels defines the number of notes or samples that can be
played simultaneously. (Each stereo sample uses two
channels.) Usually 4 channels is sufficient.
Page 26
Page 33
4. The software suite
Frequency is the sampling frequency at which sound is
played back. Higher frequencies give better results but
require more processor time. This can slow down other
applications.
Choose Save preferences from the main AudioCtrl menu to save
the current settings as your permanent preferences.
To use your preference settings in the future, you can either:
• Save preferences from the main AudioCtrl menu, and run
AudioCtrl each time before using the Lark card, or
• Save a desktop boot file including commands to set up the
Lark card mixer according to the settings currently showing
in the Lark mixer window. See Desktop boot files in your RISC
OS 3 User Guide for more details on these files.
MIDI
AudioCtrl can optionally interpret and play data on the
MID1 in or out line.
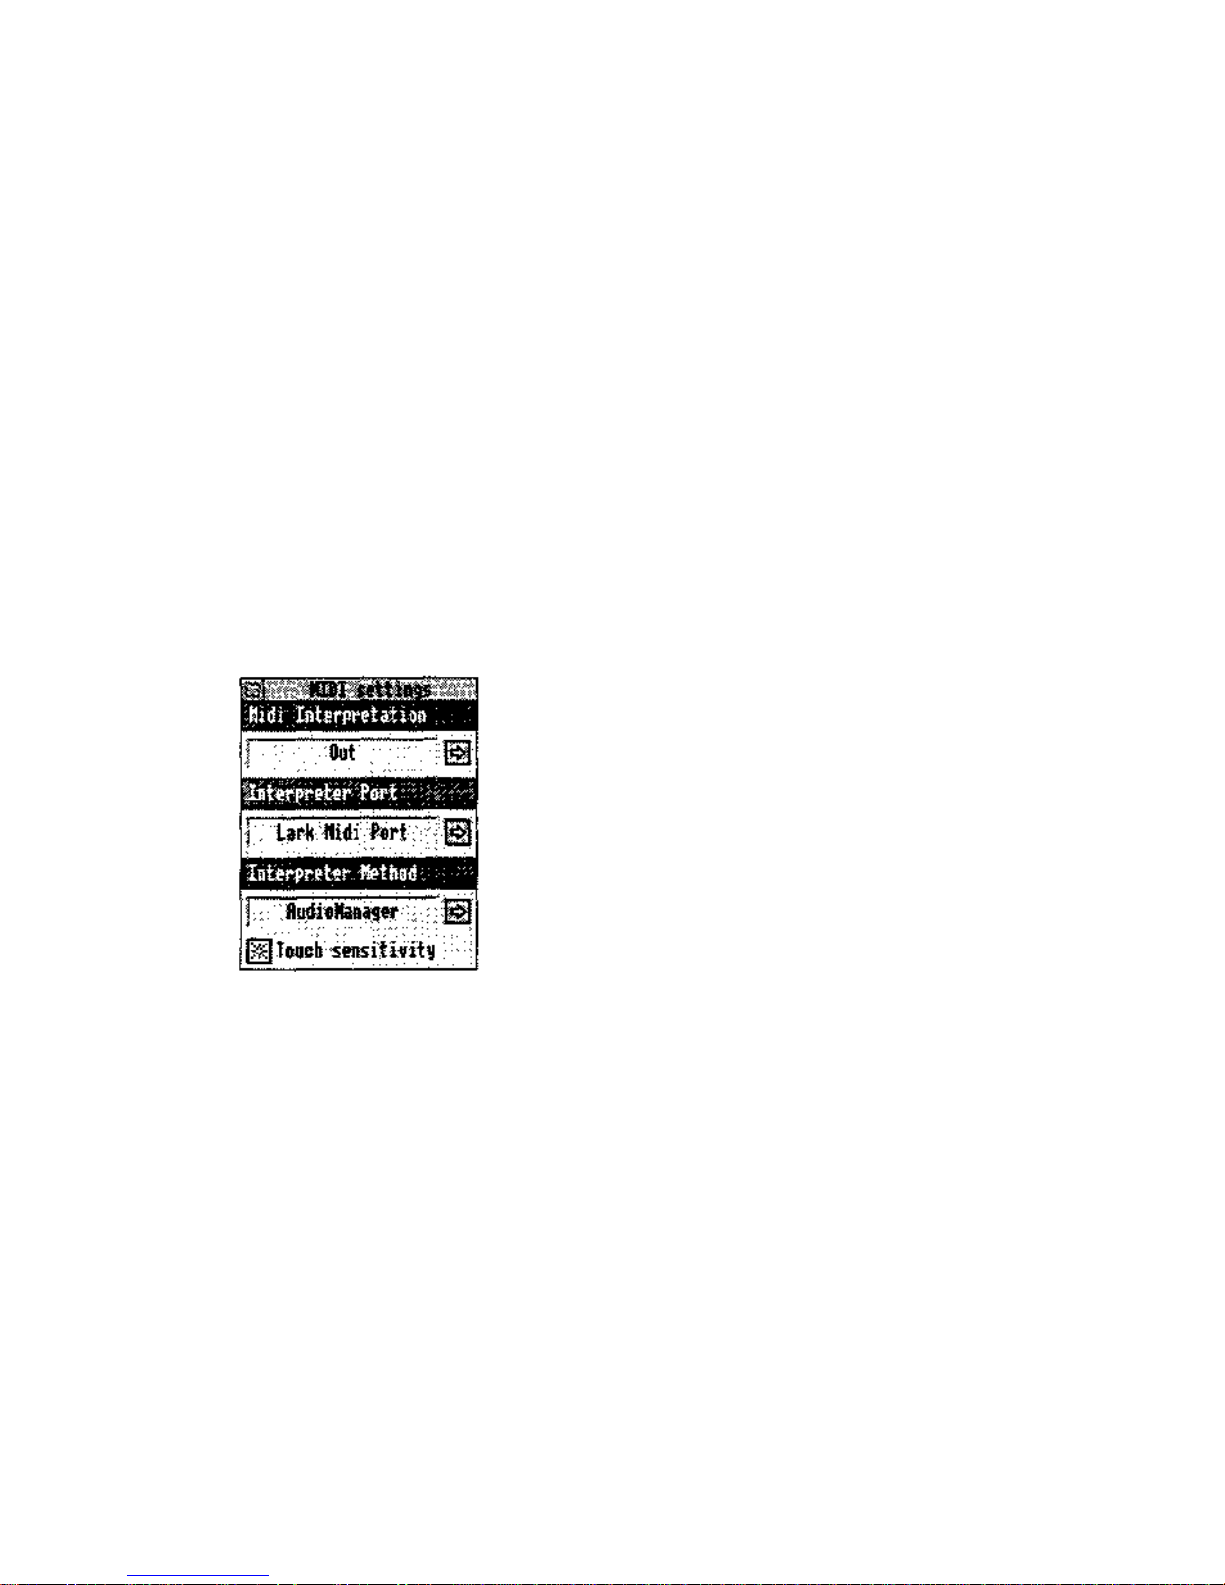
Clicking on the MID1 option in the AudioWorks preferences window displays a dialogue box that lets you set
preferences for MIDI playback.
MIDI interpretation
This has three options:
• Off –
data on the MIDI interface is not interpreted,
• In –
data on the
MIDI in
line (on the MID1 compatible card) is
interpreted,
• Out –
data on the
MIDI out
line (from the M1DI compatible
card) is interpreted.
Selecting either
In
or
Out
prevents Lark playing other sounds such
as sound samples.
Interpreter
port
If your computer is fitted with more than one MIDI compatible
card, this option selects which card to interpret data from.
Page 27
Page 34

4. The software suite
Interpreter method
The menu lets you select output through Audio Manager or the
Acorn sound system. The Acorn option exists only in case any
applications do not work with Audio Manager (we do not know of
any such applications).
Touch sensitivity
The M1DI protocol contains information on how hard keys on the
keyboard are pressed. This switch lets you ignore this pressure
information.
Advanced MID| interpretation use
When using M1D1 interpretation, MIDI program changes are
interpreted as requests for a different voice to be used. You can
check which voices are installed by pressing F12 and typing:
*voice info (if the interpreter method is switched to
AudioManager)
*voices (if the interpreter method is switched to
Acorn)
The following applies only if the interpreter method selected is
AudioManager (recommended).
AudioManager voices are like normal RISC OS voices (see your User
Guide) but are different in format, offering far more flexibility (
including higher quality sound, and output device
independence).
You can change sound samples into AudioManager voices by
doing Save as Voice module in AudioWorks. This saves your
sample as a voice module so a middle C M1D1 note plays at the
same frequency as AudioWorks would play the sample if you
loaded it. The keyboard may be helpful to you in altering the
playspeed of your sample to tune it before saving it.
If you have a repeat loop set in your sample when you save it, this
loop is repeated whilst the M1DI note is held down.
You can load a voice module by double-clicking on it. Voices are
loaded with sequential numbers. There are always two voices
present:
1 WaveSynth A simple sine-wave generator
2 AudioManager A special voice - see below
Page 28
Page 35

4. The software suite
Loading a new voice adds it to the list. To check which voice has
which number type *voi ceinf o as above.
Thus if you have MIDI Interpretation set to
in,
playing notes on your
keyboard uses the Lark as a synthesizer. Initially notes are played
using WaveSynth, but if you were to load another voice module, you
could execute a program change on your synthesizer and use this
new voice instead.
As a special case, if a MIDI program change is performed to the
AudioManager voice (normally number 2) then the system performs
slightly differently. When M1DI notes are received through MIDI,
instead of playing them as notes on a single voice, the notes generate
sound events (see page 50 of the manual for how to assign sound
events). You may assign a different sound sample to each note of the
octave (using sound events 'Midi Note C' etc.). These should be
sound samples in AudioWorks format (like for any other sound
event) and not voice modules. Each sample can be played from disk
or from memory. Multiple samples may be played concurrently, but
only one instance of any given sample may be played at once.
All of the above applies equally when using Midi interpretation on '
out' rather than 'in'. In this instance the notes and program changes
come from your sequencer rather than your keyboard.
MIDI files can be dropped onto !AudioCtrl for playback. However,
you get better results using Piano. Lark can also be used with any
third-party M1DI software (such as Clares' Rhapsody and Serenade)
that operates under RISC OS 3. You can also use Maestro
(supplied with the computer on applications disc 2 – refer to the
computer's User Guide for more information).
Note: Piano can require large amounts of memory to play M1D1
files and may not run on 2MB computers.
Page 29
Page 36

4. The software suite
Page 30
Page 37

If problems occur...
"System Resources cannot be found"
This message appears upon loading RISC OS applications if the !
System folder has not first been seen by the computer. One way to
avoid this happening on computer with hard discs is to install !
System in the root directory of the hard disc, with applications
stored in secondary folders so that !System is always "seen" before
the application. Another is to build an instruction to run !System
into an auto-boot file so that it is automatically "seen" and run
whenever the machine is switched on or after a reset.
Expansion card not recognised
If, upon typing
Podules
against the star on the command-line, Lark
does not appear as a listed expansion card, you should switch off
your computer, and check that the card is properly installed. In
particular, check that the card is firmly pressed into the expansion
card backplane.
Next, check whether the Lark ROM module has been unplugged
for some reason. Press F12 and type
Rom.
against the *. A list of installed modules is run, and the Lark
module is at the bottom against one of the expansion slot listings.
On the right hand side the word "active" should appear, but if for
any reason the module is "unplugged", type
RMReinit Lark
against the • and press Return twice to get back to the desktop.
A3000 users:
have you changed the link settings on the Lark card (
LK6 and LK10) to pins 2-3 ?
Page 31
Page 38
5. If problems occur...
Failing these suggestions, carefully remove the card from your
computer and contact Computer Concepts.
Lark icon does not appear in
!AudioCtrl
preferences box
As above (that is, the expansion card is not being recognised for
some reason).
Cannot record sound
The following procedures work only if the audio ribbon cable is
connected. You therefore cannot use this test on an A3000.
First try using AudioWorks:
1 load AudioCtrl and display the Lark mixer panel,
2 check the Input Mute button is not pressed.
If you have the internal speaker connected as described in
Installation, follow procedure 1 Otherwise follow procedure 2
.
Procedure 1
1 If fitted, remove headphones from the rear socket on Lark.
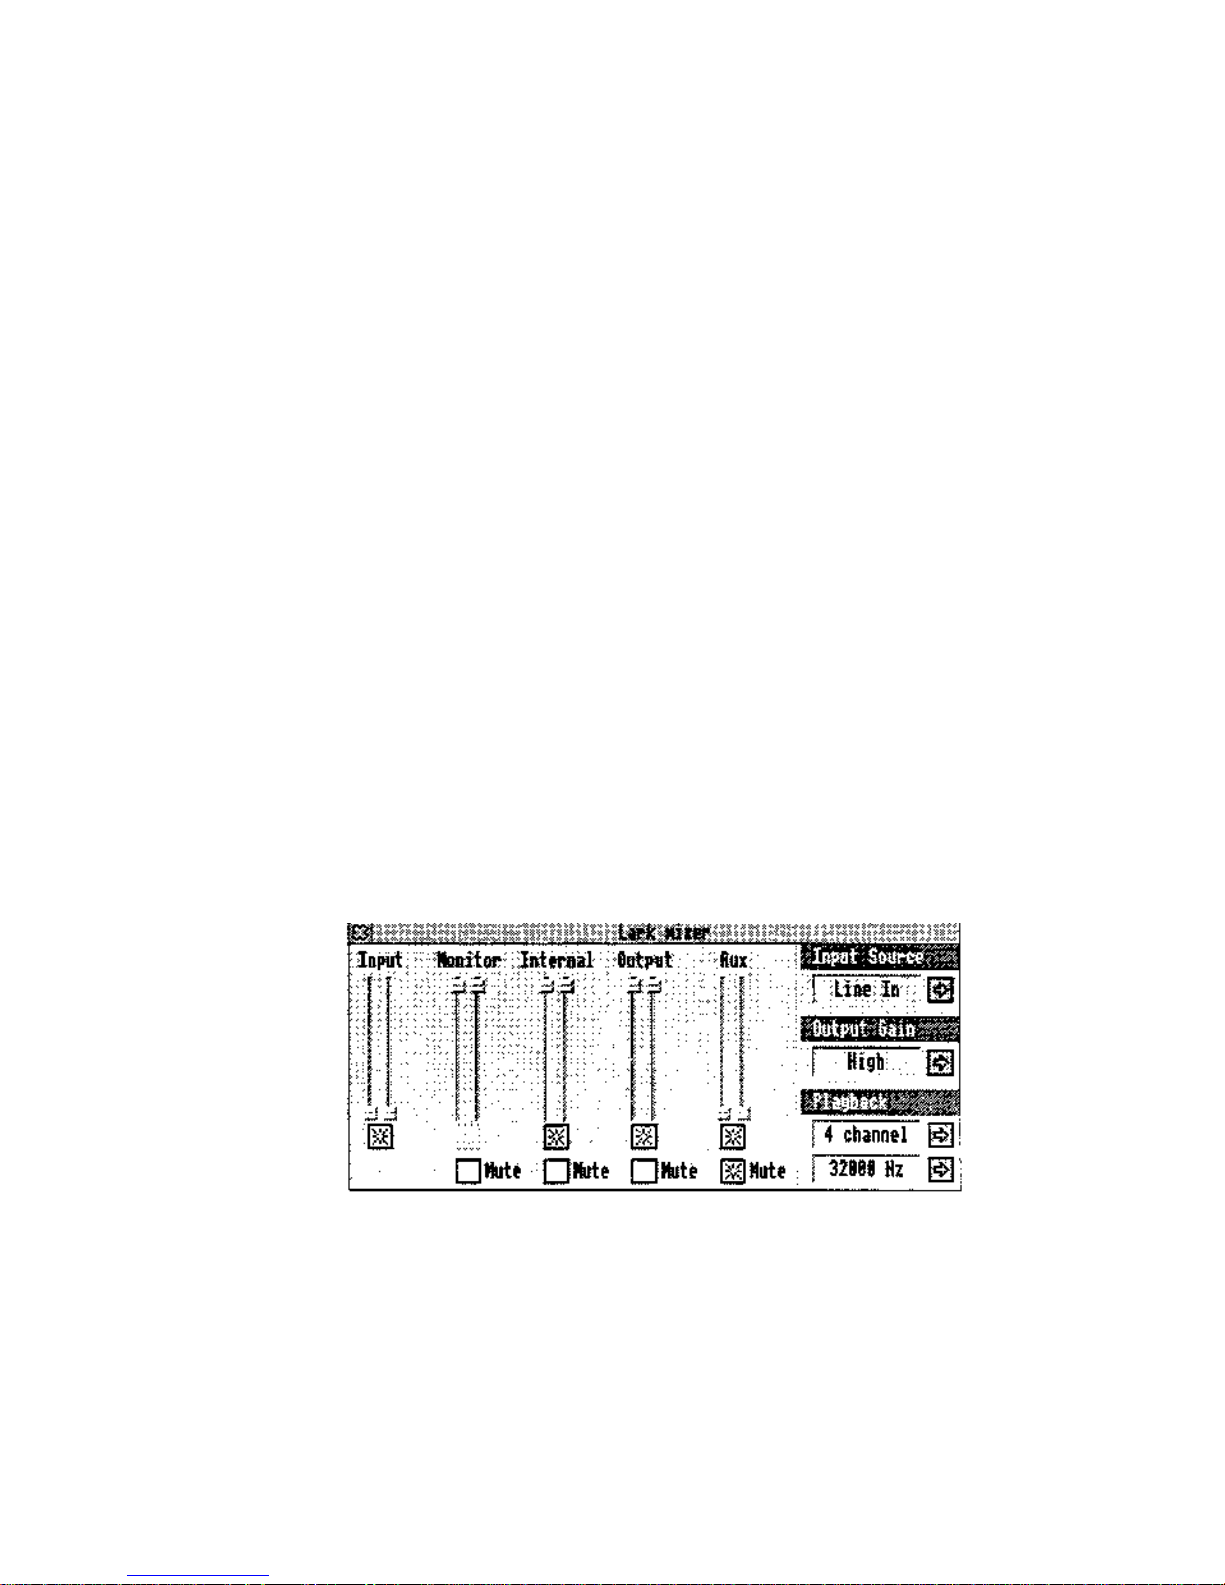
2 Check that the mixer preferences window is set up like this:
3 Check that the computer's sound system and speaker are
switched on. To do this:
i Click on Apps on the icon bar. This opens a directory
window.
ii Double-click on !Configure in the directory window. A
computer-shaped icon appears on the icon bar.
iii Click on this icon.
Page 32
Page 39

5. If problems occur...
iv Click once on the bell icon labelled 'Sound'.
v Check loudspeaker enabled is selected.
vi Check the volume is high enough so you can hear the
computer beep. The computer beeps every time you
adjust anything in this dialogue box.
If you cannot hear the computer beep, either the audio
cable or the speaker cable is wrongly connected to Lark.
Check the cables against the diagrams in 2. Installation.
2 You should now hear the sound source.
If not, increase the Input slider until you can.
If you still cannot hear the sound source then refer to
Defective sound source (below).
3 Select Create new sample in AudioWorks (a stereo sample is
best for this test), and choose Record.
4 Ensure the stereo Lark sampler is selected in the record
dialogue box.
5 Select Continuous recording and check that High quality is not
selected.
6 Activate your sound source and click on OK.
You should continue to hear your sound source through the
internal speaker. The incoming waveform should be displayed.
You can now adjust the volume of the incoming signal using Input on
the mixer panel. Adjust this so that the waveform is as large as
possible without 'clipping' (touching either the top or the bottom of
the display).
• If you can no longer hear your sound source, then you have
set up the mixer panel incorrectly.
• If you can hear the sound source but nothing appears in the
AudioWorks sample display, then you have probably not set
up AudioWorks properly.
When you are satisfied, click on Stop. Press Play and you should
hear your sound sample played back.
Defective sound source
If you cannot hear the sound through your internal speaker, then
the source is either:
• Silent.
Check that any controls on the sound source are
correctly set.
• Incorrectly connected.
Refer to the diagram of the stereo
line-level socket in 6. Technical information.
Page 33
Page 40
5. If problems occur...
•
Unsuitable.
Note the requirements for sound input sources in
System requirements. Note especially that a line level source
is required. A normal microphone is
not
suitable, unless
connected to the 3.5mm jack microphone socket, although you
should note the comments regarding microphones in
Connecting a microphone in 3. Getting started.
If the sound is too loud and distorted through the internal speaker,
adjust Input on the mixer panel.
Procedure ©
For this procedure, you should have an external amplifier connected
to LineOut as a monitor and a sound source is connected to Lark.
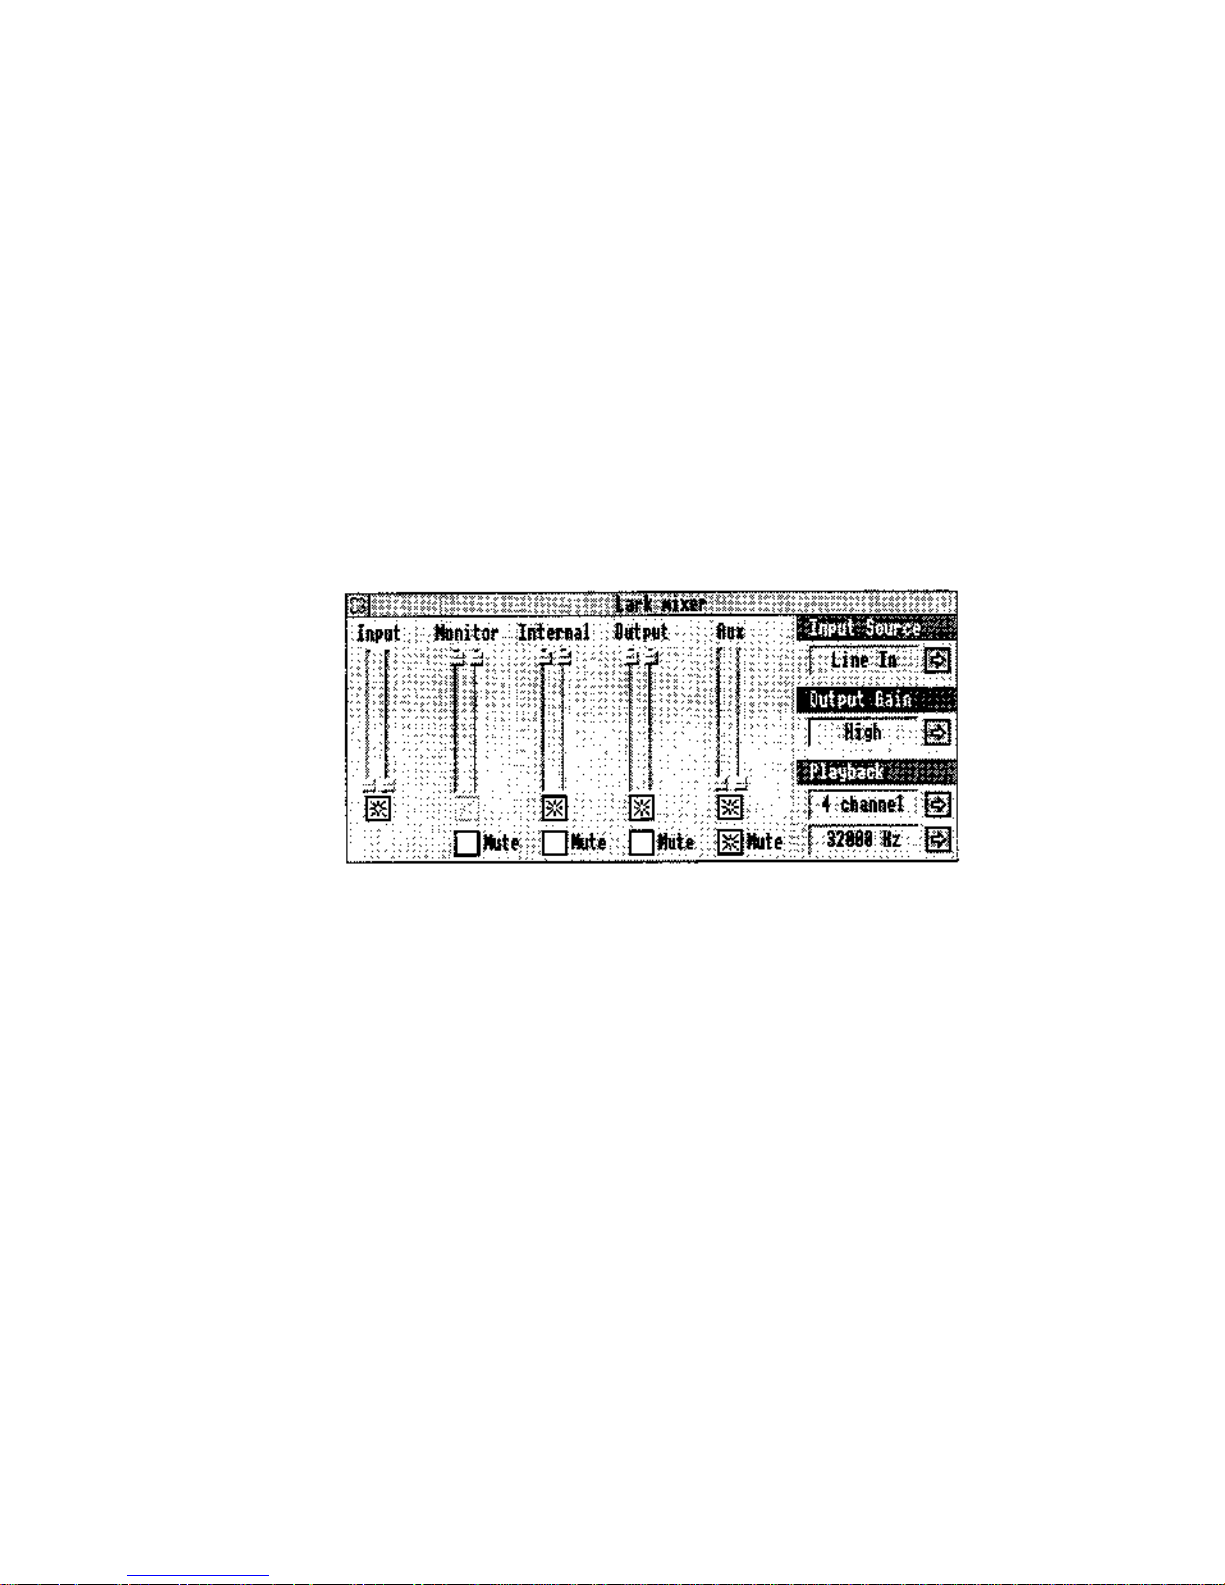
1 Check that the mixer preferences window is set up like this:
2 You should now hear the sound source.
If not, increase the Input slider until you can.
If you still cannot hear the sound source then refer to
Defective sound source (above).
3 Select Create new sample in AudioWorks (a stereo sample is
best for this test).
4 Choose Record.
5 Ensure the stereo Lark sampler is selected in the record
dialogue box.
6 Select Continuous recording and check that High quality is not
selected.
7 Activate your sound source and click on OK.
You should continue to hear your sound source through the external
speaker. The incoming waveform should be displayed. You can now
adjust the volume of the incoming signal using Input on the mixer
panel. Adjust this so that the waveform is as large as possible
without 'clipping' (touching either the top or the bottom
Page 34
Page 41
5. If problems occur...
of the display).
• If you can no longer hear your sound source, then you have
set up the mixer panel incorrectly.
• If you can hear the sound source but nothing appears in the
AudioWorks sample display, then you have probably not set
up AudioWorks properly.
When you are satisfied, click on Stop. Press Play and you should
hear your sound source played back.
If you still cannot hear the sound source then refer to Defective
sound source (above).
Sound output does not work
Check that the MIDI interpreter (refer to 4. The software suite) is
off.
If set to
MIDI in
or
MIDI out,
the normal sound output is
disabled.
The following test works only if the computer's internal
speaker
is
connected to Lark. You can only do this on an
A5000, A540 or Risc PC. For other models of computer try
procedure OO in
Cannot record sound as
this checks
components of the sound output system.
1 Check the computer's internal sound system is switched on.
See Cannot record sound for details.
2 Now load AudioCtrl and display the mixer controls.
3 Check that the mixer preferences window is set up like this:
4 Set the Output gain setting to high.
5 Now load Audio Works, and double-click on a sound sample
such as BellString. This loads the sample into AudioWorks.
6 Click
Menu
on the AudioWorks icon and choose Prefer~
ences. A window should appear.
Page 35
Page 42

5. Ifproblems occur...
7 Click on the Devices icon to open the Device preferences
window.
8 Click
Menu
over the playback device, and select Lark
44.1kHz st. Click OK.
9 Now select Repeat play in the AudioWorks sample window
and press Play. The play cursor should move indicating the
sample is playing.
You should hear the sound playing through the internal speaker or
headphones if you have these connected. If not, you have probably
connected the audio connectors incorrectly or have setup the
mixer panel incorrectly.
If you wish to test the connection of the Lark to an external amplifier
from the 5-pin DIN socket, note that via this conneetion the Lark's
output is at line level, and is
not
suitable for driving equipment
designed for direct connection to a headphone socket. The pin-out
of the connector is shown in 6. Technical
information.
Whilst the sound is still playing through the internal speaker, increase
the setting of the Output slider on the mixer (if you have an external
amplifier connected). You should now hear the sound playing
through your external amplifier. (It may now be helpful to disable
the internal speaker using the !Configure application.) You may
need to adjust the volume and/or input source on your amplifier. If
you do not hear any sound, it is likely that your amplifier is
incorrectly connected.
Sound playback and/or recording are punctuated
by bursts of noise
This is due to other expansion cards or other programs in the
machine interfering with the correct operation of the Lark. The
problem (in technical terms) is that the other product introduces
too much `IRQ latency' into the system.
To check that this is the problem, remove all other expansion cards
from the machine. Switch-on the machine in such a way that it does
not load any programs. (Depending on your setup, you might do
this by holding down Shift.) Try the Lark software again.
If it works, then an expansion card or another program is interfering with the correct operation of the Lark. By a process of
Page 36
Page 43

5. Ifproblems occur..
elimination (gradually re-introducing elements back into the
system), you should be able to tell which expansion card or
software is at fault. If you wish to use the Lark card successfully
you should remove the offending card or not run that program.
Contact the supplier of the product that causes the problem.
This problem may occur as a result of not having ARM 3 installed in
your computer. It can also occasionally occur in high bandwidth
screen modes on some machines . The computer has to spend so
much time handling the screen that there is insufficient time to
handle the Lark card correctly. The solution to this problem is to
switch into a lower bandwidth screen mode (try Mode 12).
Alternatively, you might consider purchasing a ColourCard from
Computer Concepts. This reduces the processor bandwidth needed
to display equivalent screen modes (as well as offering you greatly
enhanced graphics performance).
Sound recording / playback is of poor quality and/
or volume
Sound recording quality improves if the sampling rate is raised, or
if the number of bits per sample is increased.
If changing the sound format and rate does not cure the problem,
check your sound source is of sufficient quality. Try listening to it
directly through the internal speaker.
The sound quality of the internal speaker is limited — an external
amplifier connected to the sound D1N connector on the Lark
provides far better quality.
To adjust the volume, use the mixer controls. As well as the
sliders, remember you can also alter the gain settings.
Page 37
Page 44

5. Ifproblems occur...
The sound output is "stumbly" with sections missing
There is too much data for the computer to process. Therefore
some of the data is lost.
• Reduce the rate or
• increase the number of channels.
Input is distorted
• Check that the input source selected in the mixer preferences
window is suitable for the source. Select Line instead of one
of the Mic options.
• Alter the setting of the Input slider.
Output is distorted
• Alter the setting of the Output slider.
• You may have the wrong playback gain setting.
The computer runs very slowly
Lark is using most of the computer power to play a sample. Other
tasks therefore run slowly.
• Reduce the rate or
• reduce the number of channels.
AudiOWorks reports
All channels in use
This happens when the MIDI interpreter is selected. The interpreter seizes all available channels ready to play a MID1 sample.
• turn off MIDI interpretation. Select Off in the MIDI dialogue
box. (Described in 5. The software suite.)
Page 38
Page 45
Technical information
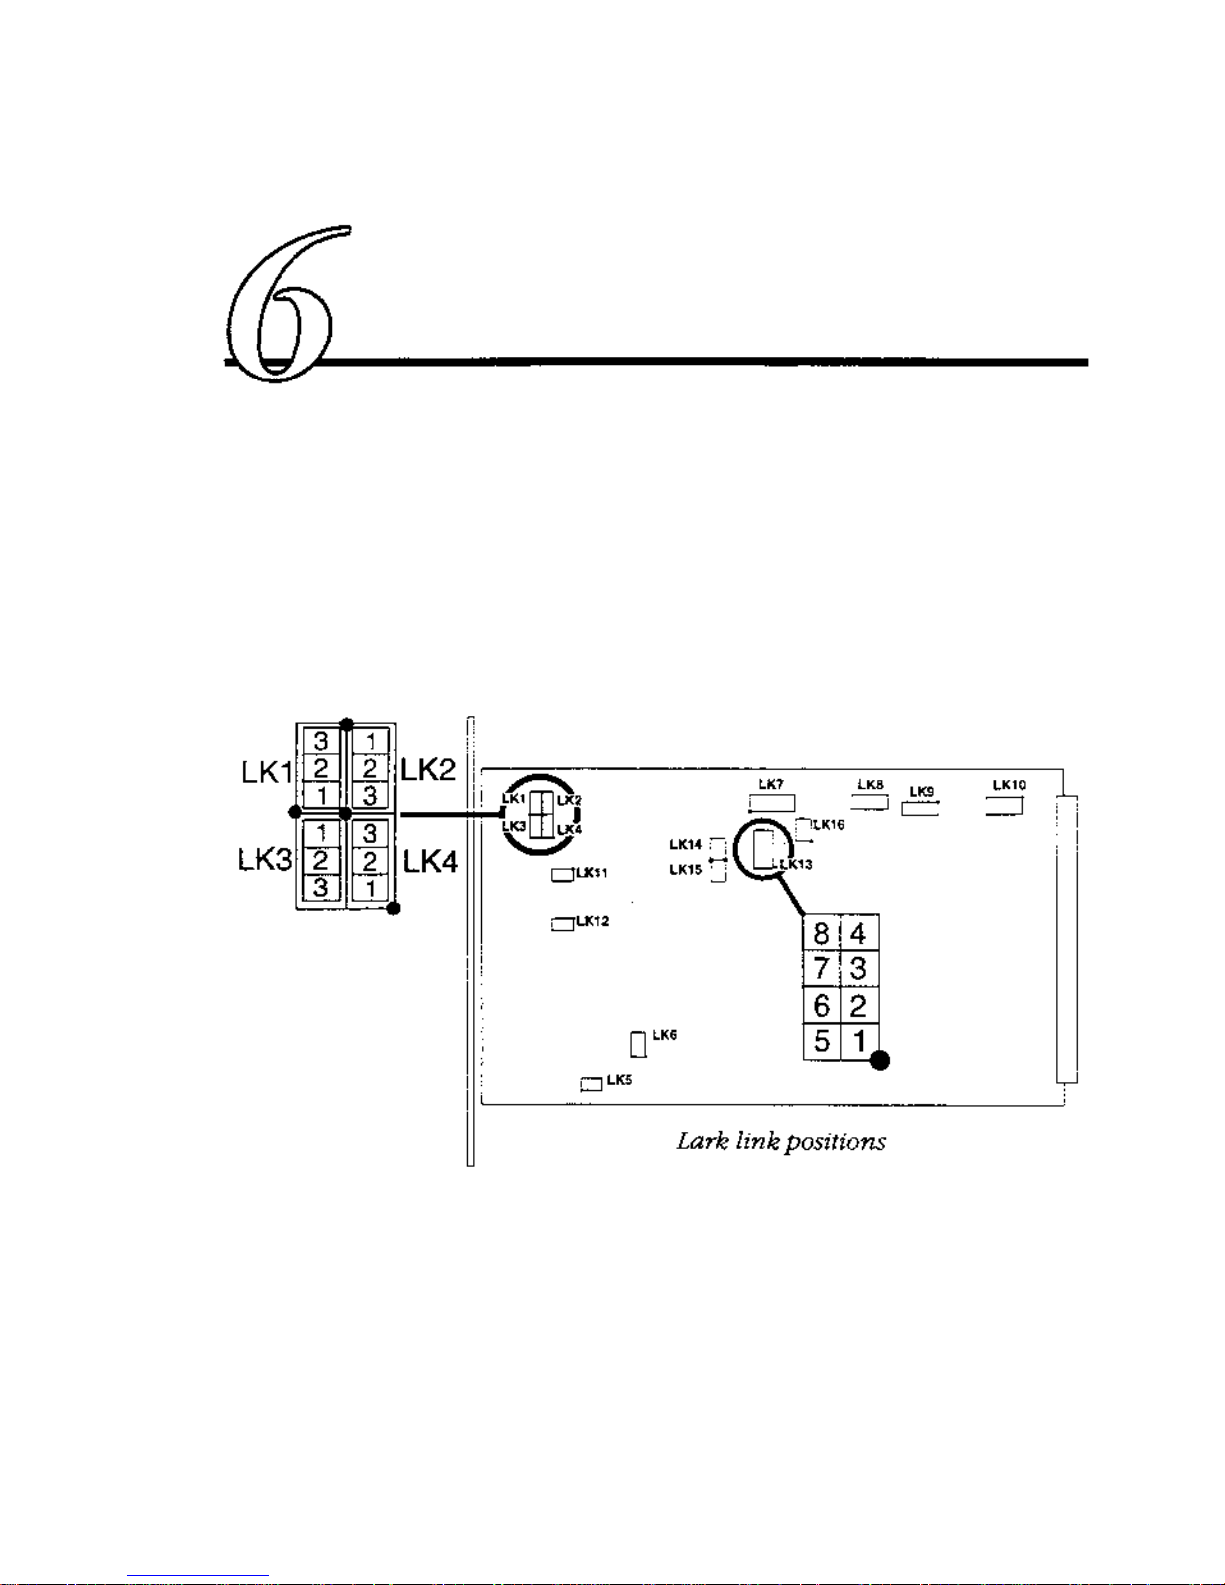
1. Lark link positions
The following diagram illustrates the position of various links on the
Lark which may or may not be shorted by default.
Do not alter any
of these link settings unless you are sure what you are doing. If
in any doubt, you should in all cases first contact Computer
Concepts.
Default link positions shown in bold.
LK1 Microphone Right Input Gain Select
1-2 : +23dB gain on audio input
2-3 : no additional gain
LK2 Microphone Right Input Source Select — set link as LK1
LK3 Microphone Left Input Gain Select — set link as LK1
LK4 Microphone Left Input Source Select — set link as LK1
Page 39
Page 46

6. Technical information
LK5 Internal speaker connection
LK6
1-2 :
+5V generated from 12V
2-3 : +5V from computer (must be set for A3000)
LK7 V1DC Header (Ribbon cable)
LK8 for future use
LK9 factory set - do not change
1-2 : 512KB/1MB EPROM
2-3 : 256KB EPROM
LK10
1-2 :
-5V from computer
2-3 : -5V generated on card (must be set for A3000)
LK11 left input level
fitted :
2V r.m.s.
not fitted : 1V r.m.s.
LK12 right input level – as LK11
LK13 Auxiliary input
Pins 4 & 8 GND,
Pin 5 Auxiliary Left,
Pin 6 Auxiliary Right.
This header can be used as another (internal) input to the
Lark.This can be controlled using the 'Auk slider in !
AudioCtrl, but the input cannot be sampled.
LK14
fitted;
used for auxiliary input
LK15
fitted;
used for auxiliary input
LK16 for future use
2. Stereo line-leve| socket: pin-out.
The following is the pin-out for the stereo audio line-level connector
on the rear panel of the Lark, provided for those users needing to
make up their own connecting cables.
(Viewed from back panel with expansion card PCB held away
Page 40
Page 47

Index
!AudioCtrl 3, 20, 24, 27 microphone 19
!AudioWrks 3 passive speakers 21
!SysMerge 3 ribbon cable 8, 13
!System 16, 31 to MIDI 22
*voiceinfo 28 Copying the software 16
*voices 28
D
A Discs, contents of 3
A300 /A400 series 1, 2, 9-11
A3000 1-2, 5, 15, 21, 31, 40 E
A3010 /A3020 1, 5
A305/A310 7 Expansion card not recognised 31
A4 portable 1, 5
A4000 1, 5 G
A5000 1~2, 5, 7-8, 11, 10
A540 1-2, 10~11 Getting started 19
Active" 20
Adjust mouse button i H
All channels in use report 38
Headphones
21
ARM2 processor 2
ARM3 processor 2
AudioCtrl 3, 20, 24, 27
AudioWorks 3, 23 Initial testing 16
Auxiliary input 40 Input is distorted 38
Input source
26
B Installation 5-18
Internal speaker
2, 11, 13
Before using Lark for the first time 17
Introduction
1-4
BellString 18 IRQ latency 36
Bursts of noise on playback 36
C J
Jack sockets
4
Cannot record sound 32
Computer runs slowly 38
Connecting L
active speaker 20 Lark icon does not appear 32
audio input 20 Link positions 39-40
audio output 20 LK1 to LK4 19
headphones 21 LK10 15
internal speaker 11, 13
41
Page 48

LK11 & LK12 20
LK6 15
Technical information 39
Testing your Lark 18
The software suite 23
Maestro 29 Touch sensitivity 28
Menu mouse button
Microphone 19
MIDI 27
MIDI in 22 Updating !System 16
MIDI interpretation 27
MIDI out 22
MIDI Thru 22
Mixer 24 You should have received 6
Mouse buttons 5
Multimedia speakers 20
Mute button 26
0
Output gain 26
Output is distorted 38
P
Piano 29
PianoVoice 3
Playback 21, 26
Podules 16, 31
Poor quality recording/playback 37
Possible extras 2
Possible problems 31~38
R
.Rhapsody 29
Ribbon cable 8, 13
Risc PC 1-2,13
S
Select
mouse button
Serenade 29
Sound output does not work 35
Sound output is "stumbly" 38
Specification 3
Stereo line-level socket 40
SysMerge 16
System requirements 1
System Resources cannot be found 31
42
 Loading...