

Page 1
CBC (EUROPE) Ltd
7/8 Garrick Industrial Centre
Irving Way
London NW9 6AQ
Tel: +44 (0) 181 732 3333
Fax: +44 (0) 181 202 3387
CBC (EUROPE) Ltd
Paris Branch
1 avenue des Marguerites
Z.A. des Petits Carreaux
94389 BONNEUIL SUR MARNE
Cedex France
Tel: +33 (1) 43 99 04 24
Fax: +33 (1) 43 99 59 06
CBC (EUROPE) Ltd
Ufficio di Milano
Via Carolina Romani, 1/11
20091 Bresso (MI) Italy
Tel: +39 2 665 03210
Fax: +39 2 665 03204
CBC (Deutchland) GmbH
Hansaallee 191,
40549 Düsseldorf,
Germany
Tel: +49-211-530670
Fax: +49-211-53067180
CBC (POLAND) Sp.z o.o.
ul. G. Morcinka 5, paw 6
01-496 Warszawa
Poland
TEL: +48 (0)22 638 4440
FAX: +48 (0)22 638 4541
computar
instruction manual
CS4.1 & CS8.1 Video Switcher
manuel d’installation
Sélecteurs vidéo CS4.1 & CS8.1
Benutzerhandbuch
Video-Umschalter CS4.1 und CS8.1
manuale di installazione
Commutatori ciclici CS4.1 & CS8.1
Instrukcja Obs∏ugi
Prze∏àcznik Sekwencyjny CS4.1 i CS 8.1
D
GB
PL
I
F
Page 2

p3 Installation Instructions for CS4.1 & CS8.1 Video Switcher
p5 Operating Instructions for the CS4.1 & CS8.1 Video Switcher
p7 Instructions d’installation pour le sélecteur vidéo CS4.1 et CS8.1
p9 Instructions de fonctionnement pour les sélecteurs vidéo
CS4.1 & CS8.1
p11 Installationsanweisung für die Video-Umschalter CS4.1 und CS8.1
p13 Bedienungsanleitung für die Video-Umschalter CS4.1 und CS8.1
p15 Istruzioni per l’installazione dei commutatori ciclici CS4.1 & CS8.1
p17 Instruzioni operative per commutatori ciclici CS4.1 & CS8.1
p19 Instrukcja instalacji dla Prze∏àcznika Sekwencyjnego CS4.1 i CS 8.1
p21 Instrukcja obs∏ugi dla Prze∏àcznika Sekwencyjnego CS4.1i CS 8.1
2
I
PL
GB
F
D
Page 3

Installation Instructions for CS4.1 & CS8.1 Video Switcher
1) IMPORTANT SAFETY INSTRUCTIONS
Before commencing with the installation of this equipment read these instructions carefully
and act on the information herein.
Never attempt to gain access to the equipment without first disconnecting the mains supply
to the unit.
Consideration should be given as to the correct installation of the unit. The equipment has
been designed for indoor use only and must not be installed in any situation where air flow
around the unit is restricted, where there are strong heat sources (such as intense direct
sunlight, radiators etc.) or in areas of extreme cold.
Before siting the unit, ensure that the user can operate the equipment comfortably without
causing repetitive strain. Each unit has been designed to minimise the amount of user
fatigue that may be caused during normal operation.
Never operate the equipment with damp or wet hands.
Do not push any objects into openings.
Do not use the equipment whilst drinking or allow the equipment to be used near to areas
which may get wet. Spillages invariably cause damage to the unit and may result in personal
injury.
Only use the power supply unit that was supplied with your switcher. Do not use this power
supply for any other purpose. Failure to comply may result in damage or serious injury.
2) Unpacking
Carefully unpack your Video Switcher. Your package should contain the following items:-
Video Switcher (CS4.1 or CS8.1)
12vDC Power Supply Unit
These Instructions
Retain the packing material. If any item is missing or damaged DO NOT ATTEMPT TO USE
THIS EQUIPMENT. Contact your supplier immediately.
3
Zwolnij przycisk 'Skip' aby powróciç do normalnej pracy.
Prosz´ pami´taç ˝e sekwencja musi sk∏adaç si´ z minimum dwóch kamer aby dzia∏a∏a
prawid∏owo. Je˝eli spróbujesz w∏àczyç sekwencj´ sk∏adajàcà si´ z mniej ni˝ dwóch kamer
wówczas automatycznie zostanà w∏àczone do sekwencji kamery 1 do 4.
22
1
2
3
4
5
6
7
8
SKIP
AUTO
W celu zmiany czasu kamery w sekwencji
nale˝y odpowiednio ustawiç tarcz´
umieszczonà z ty∏u jednostki.
Aby wybraç kamer´
naciÊnij przycisk wyboru
kamery
Aby rozpoczàç
sekwencj´ naciÊnij
przycisk 'AUTO'
Aby zmieniç ustawienie
sekwencji naciÊnij i
przytrzymaj przycisk 'SKIP'
a nast´pnie naciÊnij
przyciski wyboru kamer
➚➚
➚➚
CS8.1
computar
➚➚
➚➚
Page 4
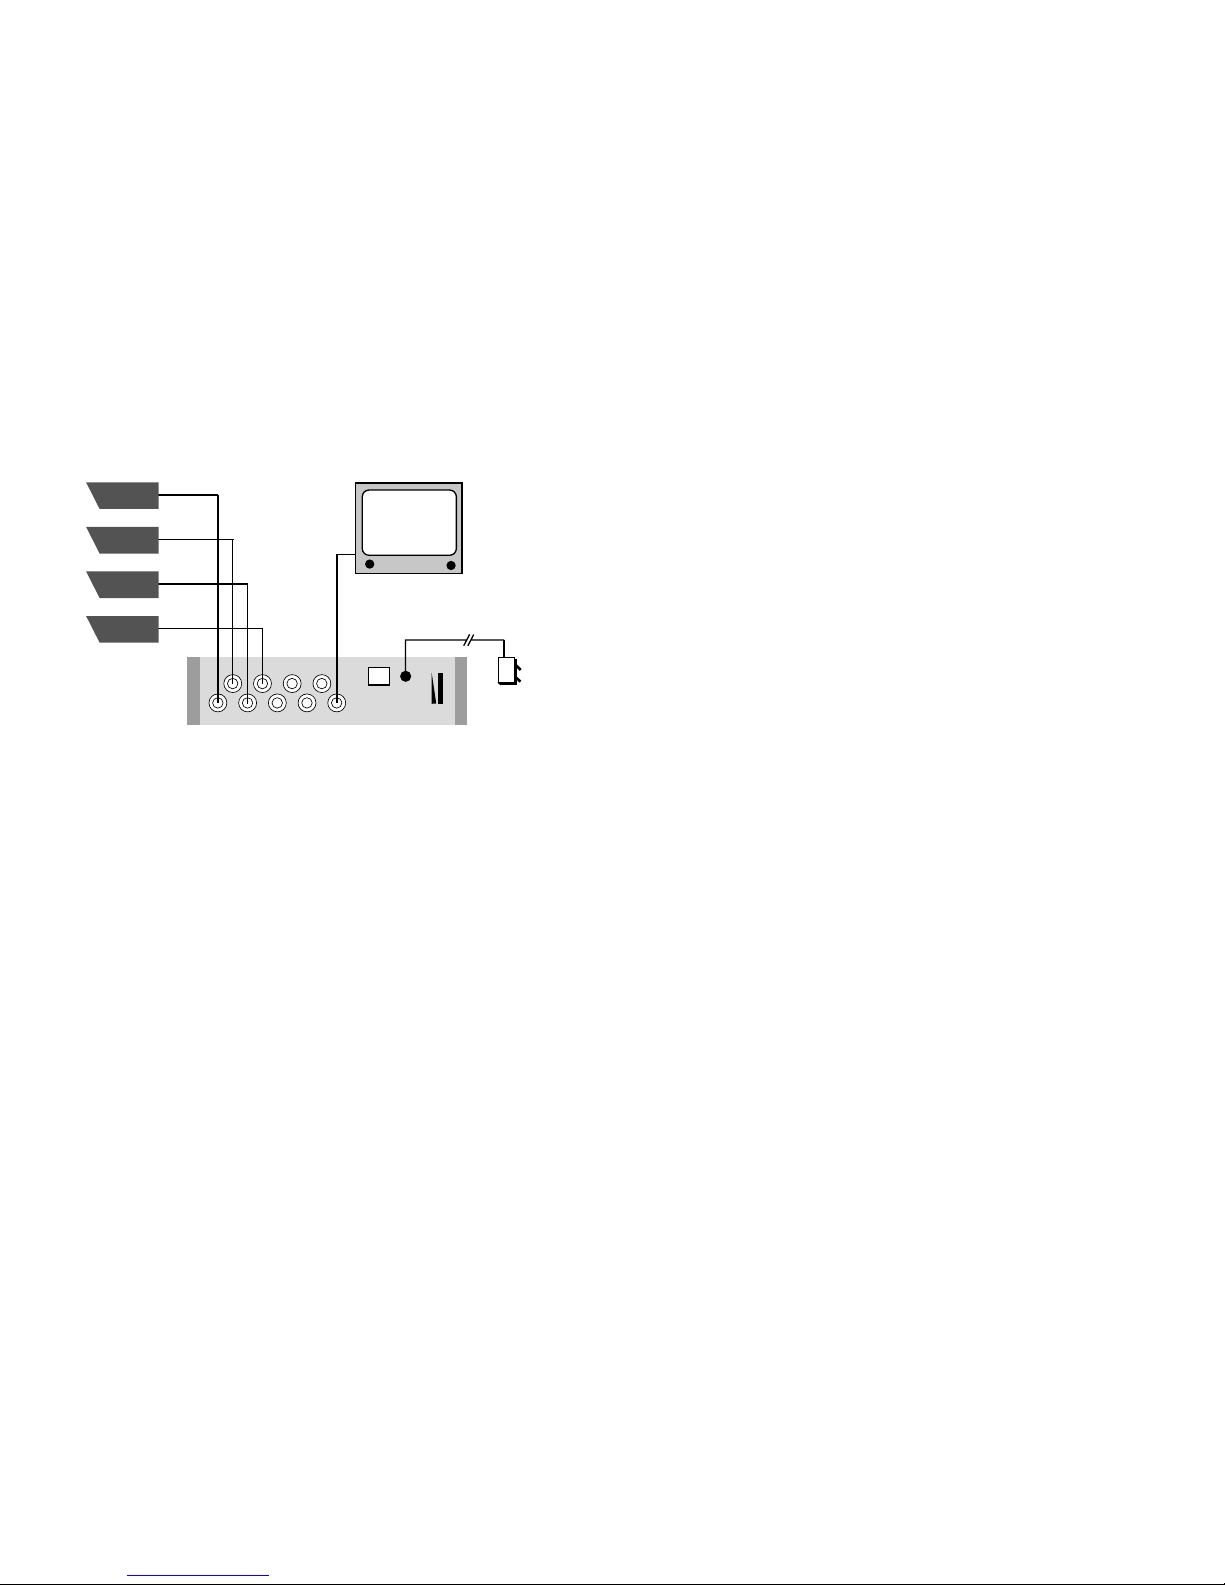
3) Installation of CS4.1 and 8.1 Video Switchers
Connect cameras, monitor and 12v power to the switcher as shown.
Ensure that the power supply lead is positioned behind the cable retaining clip to prevent
accidental disconnection.
4) Specification
Video Inputs and Outputs
1v peak to peak, 625 line CCIR/PAL standard composite video signal, impedance 75R on
BNC connectors.
CS4.1 - 4 Video Inputs, 1 Output
CS8.1 - 8 Video Inputs, 1 Output
Sequence
Adjustable from approximately 1 to 60 seconds using rear panel potentiometer.
Programmable skip of cameras in sequence
Power Consumption
Less than 0.25A @ 12vDC (both models)
Weights
CS4.1 0.95Kg CS8.1 1.15Kg
Dimensions
Height 47mm (including feet)
Depth 204mm (excluding mating connectors)
Width 180mm (CS4.1) 256mm (CS8.1)
4
1357Mon
Alarms
Power
DWELL
12v DC
Power
Supply
Camera 4
Camera 3
Camera 2
Camera 1
2468
Connection of cameras, monitor and power supply
21
Instrukcja obs∏ugi dla Prze∏àcznika Sekwencyjnego
CS4.1 i CS 8.1
Uwaga: Skróconà instrukcj´ u˝ytkowania prze∏àcznika sekwencyjnego mo˝na tak˝e
znaleêç na spodzie urzàdzenia.
Aby wybraç kamer´ dla monitora:
PrzyciÊnij przycisk znajdujàcy si´ nad numerem potrzebnej kamery. Zapali si´ kontrolka
powy˝ej przycisku wskazujàca, z której kamery jest aktualnie wyÊwietlany obraz na
monitorze.
Aby wyÊwietliç na monitorze sekwencj´ kamer:
NaciÊnij przycisk 'AUTO'. Zapali si´ kontrolka powy˝ej przycisku 'AUTO' co oznacza ˝e
uruchomiona zosta∏a sekwencja kamer i monitor b´dzie pokazywa∏ kolejno obrazy z
kamer.
Czas w którym b´dzie pokazywany obraz z ka˝dej kamery “dwell time” mo˝e byç
regulowany od oko∏o 1 sekundy do 60 sekund. Pos∏u˝ si´ instrukcjami zawartymi poni˝ej
aby zmieniç bie˝àce ustawienie czasu “dwell time”.
Mo˝na tak˝e zmieniaç kamery, z których b´dzie pokazywany obraz podczas sekwencji. W
poni˝szej sekcji podano sposób w∏àczania lub wy∏àczania kamer z sekwencji.
Aby zatrzymaç sekwencj´:
PrzyciÊnij któryÊ z przycisków wyboru kamery. Niezale˝nie od tego, która kamera zostanie
wybrana, na monitorze zostanie pokazany jej obraz i zgaÊnie kontrolka nad przyciskiem
'AUTO'.
Aby zmieniç bie˝àce ustawienie czasu zatrzymania “Dwell-Time”:
Dokonaj regulacji przy pomocy potencjometru znajdujàcego si´ na tylnym panelu
urzàdzenia. Przy najwy˝szym ustawieniu potencjometru, “dwell time” b´dzie wynosi∏ oko∏o
60 sekund a przy najni˝szym - oko∏o 1 sekunda.
Aby w∏àczyç lub wy∏àczyç kamer´ w sekwencji:
PrzyciÊnij i przytrzymaj przycisk 'SKIP'. Zapalà si´ kontrolki nad przyciskami wyboru
kamery dla tych kamer które sà aktualnie w∏àczone do sekwencji.
Trzymajàc przycisk 'SKIP', nale˝y nacisnàç przycisk wyboru kamery - spowoduje to
w∏àczenie lub wy∏àcznie kamery z sekwencji.
Page 5

Operating Instructions for the
CS4.1 & CS8.1 Video Switcher
Note that brief instructions for using the switcher can also be found on the
underside of the unit
To select a Camera to the Monitor
Press the button above the number of the required camera. The light above the button will
light to indicate which camera is currently selected for display on the monitor.
To Display a Sequence of Cameras on the Monitor
Press the ‘AUTO’button. The light above the ‘AUTO’ button will come on to indicate that the
sequence is running and the monitor will show a sequence of cameras.
The time for which cameras are shown in a sequence (the dwell time) can be adjusted from
approximately 1 second to 60 seconds. Follow the instructions below to change the current
dwell time setting.
Which cameras are displayed when the sequence is running can be altered. To include or
exclude cameras in a sequence refer to the section below.
To Stop a Sequence
Press any Camera Select button. Whichever camera is selected will appear on the monitor
and the light above the ‘AUTO’ button will go out.
To change the current Dwell-Time Setting
Adjust the potentiometer on the rear panel of the unit. With the pot. at the highest setting,
the dwell time will be approximately 60 seconds and at the lowest, approximately 1 second.
To include or Exclude Cameras in a sequence
Press and hold down the ‘SKIP’ button. The lights above the camera select buttons of the
cameras currently included in the sequence will illuminate.
Whilst still holding the 'SKIP'’ button, pressing a camera select button will include or exclude
that camera in the sequence.
520
3) Instalacja prze∏àcznika sekwencyjnego ‘CS4.2PII’ i ‘CS8.2PII’
Pod∏àcz do prze∏àcznika sekwencyjnego kamery, monitor i zasilacz 12v tak jak to
pokazano na schemacie.
Upewnij si´ ˝e pod∏àczenie zasilania zosta∏o zabezpieczone przy pomocy opaski
zabezpieczajàcej przed przypadkowym od∏àczeniem.
4) Dane techniczne
WejÊcia i wyjÊcia video
1V pik - do - piku, 625 linii CCIR/PAL , Impedancja 75R, na konektorach BNC.
CS4.1 - 4 wejÊcia Video, 1 wyjÊcie
CS8.1 - 8 wejÊç Video, 1 wyjÊcie
Sekwencja
Regulowana od oko∏o 1 do 60 sekund przy u˝yciu potencjometru na tylnym panelu.
Programowalne omijanie kamer w sekwencji.
Pobór mocy
Poni˝ej 0.25A @ 12v pr. st. (obydwa modele)
Ci´˝ar
CS4.1 0.95Kg. CS8.1 1.15Kg.
Wymiary
WysokoÊç 47mm (razem z podstawkà)
G∏´bokoÊç 204mm (bez ∏àczników)
SzerokoÊç 180mm (CS4.1) 256mm (CS8.1)
1357Mon
Alarmy
Moc
ZATRZYMANIE
12v DC
Zasilanie
Kamera 4
Kamera 3
Kamera 2
Kamera 1
2468
Page 6

If the light above the button comes ON then that camera is included in the sequence. If the
light above the button goes OFF then that camera is excluded from the sequence.
Release the ‘SKIP’ button to return to normal operation.
Note that a sequence must have a minimum of two cameras selected to run correctly. If an
attempt is made to have less than two cameras selected then cameras 1 and 4 will
automatically be included in the sequence.
6
19
Instrukcja instalacji dla Prze∏àcznika Sekwencyjnego
CS4.1i CS 8.1
1) WA˚NE INSTRUKCJE BEZPIECZE¡STWA
Przed rozpocz´ciem instalowania urzàdzenia, prosz´ uwa˝nie przeczytaç poni˝sze
instrukcje oraz stosowaç si´ do nich w czasie instalowania.
Nigdy nie wolno manipulowaç przy urzàdzeniu bez uprzedniego od∏àczenia jego zasilania
elektrycznego.
Nale˝y zwróciç uwag´ na w∏aÊciwe zainstalowanie urzàdzenia. Wyposa˝enie to zosta∏o
zaprojektowane wy∏àcznie do u˝ytku wewnàtrz pomieszczeƒ i nie mo˝e byç instalowane w
miejscach gdzie ograniczony jest przep∏yw powietrza, w pobli˝u êróde∏ ciep∏a (np.
intensywne promienie s∏oneczne, grzejniki) lub w miejscach bardzo zimnych.
Przed umieszczeniem urzàdzenia na swoim miejscu nale˝y upewniç si´, czy u˝ytkownik
b´dzie móg∏ z tego miejsca wygodnie go obs∏ugiwaç bez ciàg∏ego wysilania mi´Êni. Ka˝de
z tych urzàdzeƒ zosta∏o tak skonstruowane, aby zminimalizowaç zm´czenie u˝ytkownika
w czasie normalnej obs∏ugi.
Nie wolno nigdy obs∏ugiwaç urzàdzenia mokrymi lub wilgotnymi r´kami.
Nie wolno wk∏adaç ˝adnych przedmiotów w otwory urzàdzenia.
Nie wolno u˝ywaç urzàdzenia w czasie picia, ani te˝ nie dopuszczaç do tego, aby by∏o ono
stosowane w pobli˝u miejsc, które mogà zostaç zamoczone. Ka˝de rozlanie p∏ynu na
urzàdzenie spowoduje jego uszkodzenie, a równie˝ mo˝e spowodowaç wypadek osób.
Nale˝y u˝ywaç tylko dostarczony z urzàdzeniem zasilacz. Nie wolno u˝ywaç go do innych
celów. Awaria zasilacza mo˝e spowodowaç uszkodzenie urzàdzenia lub wypadek osób.
2) Rozpakowywanie
Prze∏àcznik sekwencyjny nale˝y rozpakowywaç b. ostro˝nie. W opakowaniu powinny
znajdowaç si´ poni˝sze pozycje dostawy:-
Prze∏àcznik Sekwencyjny (CS4.1i CS 8.1)
Zasilacz 12v PR. ST.
Niniejsza instrukcja
Nale˝y zachowaç opakowanie. Gdyby brakowa∏o którejÊ z tych pozycji lub sprz´t by∏
uszkodzony to NIE WOLNO ROZPOCZYNAå U˚YWANIA URZÑDZENIA. Nale˝y
natychmiast skontaktowaç si´ ze swoim dostawcà.
1
2
3
4
5
6
7
8
SKIP
AUTO
To alter time each camera is
shown in sequence, adjust
thumbwheel pot. on back of unit.
To select a camera
press a camera
select button
To start sequence
press ‘AUTO’ button
To alter sequence
pattern press and hold
‘SKIP’ and then press
camera select button
➚➚
➚➚
CS8.1
computar
➚➚
➚➚
Page 7

Instructions d’installation pour le sélecteur vidéo
CS4.1 et CS8.1
1) INSTRUCTIONS DE SECURITE IMPORTANTES
Avant de commencer l’installation de cet équipement, lisez soigneusement les instructions
suivantes et suivez les informations ci-après.
N’essayez jamais d’accéder à l’équipement sans d’abord déconnecter l’alimentation de
l’appareil.
Prenez garde à installer l’appareil correctement. L’équipement a été conçu pour être utilisé
uniquement à l’intérieur et ne doit en aucun cas être installé là où la circulation de l’air
autour de l’appareil est restreinte, à proximité de fortes sources de chaleur (comme par
exemple la lumière directe du soleil, un radiateur, etc...) ou dans des endroits exposés à un
froid extrême.
Avant d’installer l’appareil, assurez-vous que l’utilisateur peut commander confortablement
l’équipement sans subir de tensions répétitives. Chaque appareil a été conçu pour
minimiser la somme de fatigue de l’utilisateur pouvant survenir dans des conditions de
fonctionnement normales.
Ne faites jamais fonctionner l’équipement quand vous avez les mains humides ou
mouillées.
N’introduisez aucun objet dans les ouvertures.
N’utilisez pas l’équipement dans des zones humides. Tout liquide renversé endommagera
l’appareil et pourrait provoquer un accident.
Utilisez uniquement le bloc d’alimentation fourni avec votre sélecteur. Le non-respect de
ces instructions peut entraîner des dommages ou de sérieux accidents.
2) Fourniture
Déballez votre sélecteur vidéo avec précautions. Votre emballage doit contenir les articles
suivants :
1 Sélecteur vidéo (CS4.1 ou CS8.1)
1 Bloc d’alimentation 12v DC
Les présentes instructions
Conservez l’emballage.
En cas d’article manquant ou endommagé, N’ESSAYEZ PAS D’UTILISER CET
EQUIPEMENT. Contactez votre distributeur immédiatement.
718
1
2
3
4
5
6
7
8
SKIP
AUTO
Per modificare l’intervallo di
scansione, regolate il
potenziometro posto sul retro
dell’unità
Per selezionare una
telecamera premete
il pulsante
corrispondente
Per iniziare la
sequenza premete il
pulsante ‘AUTO’
Per modificare la
sequenza tenete
premuto il tasto ‘SKIP’
e selezionate la
telecamera opportuna
➚➚
➚➚
CS8.1
computar
➚➚
➚➚
Page 8

3) Installation des sélecteurs vidéo CS4.1 & 8.1
Connectez les caméras, le moniteur et l’alimentation 12v au sélecteur comme indiqué sur
le schéma.
Assurez-vous que le câble d’alimentation est correctement positionné afin d’empêcher
toute déconnexion accidentelle.
4) Spécifications
Entrées et sortie vidéo
1v P.P., 625 lignes, standard CCIR/PAL, signal composite vidéo, impédance 75Ω,
connecteurs BNC.
CS4.1 - 4 entrées vidéo, 1 sortie vidéo CS8.1 - 8 entrées vidéo, 1 sortie vidéo
Séquence
Ajustable à partir d’environ 1 à 60 secondes en utilisant le potentiomètre situé sur le
panneau arrière. Possibilité de programmer le passage d’une caméra à l’autre pour les
caméras en séquence.
Consommation
Moins de 250ma @ 12v DC (pour les deux modèles)
Poids
CS4.1 0,95Kg CS8.1 1,15Kg
Dimensions
Hauteur 47mm (pieds compris) Largeur 204mm (connecteurs d’accouplement non
compris)Longueur 180mm (CS4.1) 256mm (CS8.1)
8
1357Mon
Alarmes
Aliment
-ation
TEMPS
DE
CYCLE
Alimentation
12V DC
Caméra 4
Moniteur
Caméra 3
Caméra 2
Caméra 1
2468
Connexion des caméras, du moniteur et de l’alimentation Instruzioni operative per commutatori ciclici CS4.1 & CS8.1
NB: una breve guida all’uso è riportata sulla parte inferiore della’unità
Per visualizzare una telecamera sul monitor
Premete il pulsante relativo alla telecamera di visualizzare. La spia corrispondente si
accenderà ad indicare che la telecamera è effettivamente selezionata.
Per visualizzare una sequenza di telecamere sul monitor
Premete il pulsante ‘AUTO’. Si accenderà la spia corrispondente e la sequenza sarà
visualizzata sul monitor. l’intervallo di scansione può essere regolato da 1 a 60 secondi. per
la regolazione seguite le istruzioni relative riportate di seguito.
Le sequenza ciclica può essere modificata. Per includere o escludere telecamere fate
riferimento alla procedura riportata nel seguito.
Per fermare la sequenza
Premete il pulsante relativo ad una qualsiasi telecamera. La telecamera corrispondente
verrà visualizzata sul monitor e la spia relativa al pulsante ‘AUTO’ si spegnerà.
Per cambiare l’intervallo di scansione
Regolate il potenziometro posto sul retro dell’unità. Agli estremi della regolazione si
ottengono, rispettivamente, tempi di 1 secondo e 60 secondi.
Per includere o escludere telecamere dalla sequenza
Premete e tenete premuto il pulsante ‘SKIP’. Si accenderanno le spie relative alle
telecamere attualmente incluse nella sequenza. per includere o escludere una telecamera,
tenete premuto il tasto ‘SKIP’ e premete il pulsante relativo a quella telecamera. Rilasciate
il pulsante ‘SKIP’ per tornare al normale modo operativo.
Notate che una sequenza deve comprendere almeno due telecamere per funzionare
correttamente. Se si cerca di impostare una sequenza con meno di due telecamere,
saranno incluse automaticamente le telecamere 1,2,3,4.
17
Page 9

Instructions de fonctionnement pour les
sélecteurs vidéo CS4.1 & CS8.1
Remarque: Vous pouvez trouver de brèves instructions pour utiliser le sélecteur sur la paroi
intérieure de l’appareil.
Pour sélectionner une caméra pour le moniteur
Appuyez sur la touche située au-dessus de la caméra requise. Le voyant au-dessus de la
touche s’allume pour indiquer la caméra alors sélectionnée pour l’affichage sur le moniteur.
Pour afficher une séquence de caméras sur le moniteur
Appuyez sur la touche “Auto”. Le voyant au-dessus de la touche “Auto” s’allume pour
indiquer que la séquence est active et le moniteur affiche une séquence de caméras.
Il est possible de régler le temps pendant lequel les caméras sont affichées dans une
séquence (le temps de cycle) de 1 à 60 secondes environ. Suivez les instructions ci-après
pour changer le réglage du temps de cycle en cours.
Il est possible de changer les caméras affichées alors que la séquence est active. Reportezvous au paragraphe ci-dessous pour inclure ou exclure des caméras dans une séquence.
Pour arrêter une séquence
Appuyez sur n’importe quelle touche de sélection caméra. La caméra sélectionnée, quelle
qu’elle soit, s’affiche sur le moniteur et le voyant au-dessus de la touche “Auto” s’éteind.
Pour changer le réglage du temps de cycle en cours
Régler le potentiomètre situé sur le panneau arrière de l’appareil. Lorsque le potentiomètre
est réglé sur la plus grande valeur, le temps de cycle est environ de 60 secondes et
d’environ 1 seconde lorsqu’il est réglé sur la plus petite.
Pour inclure ou exclure des caméras dans une séquence
Appuyez sur la touche “Skip” et maintenez la enfoncée. Les voyants situés au-dessus des
caméras alors incluses dans la séquence s’allument.
T out en maintenant la touche “Skip” enfoncée, appuyez sur une touche de sélection caméra
pour inclure ou exclure la caméra dans la séquence.
Si le voyant au-dessus de la touche s’allume (ON), la caméra est alors incluse dans la
séquence. Si le voyant au-dessus de la touche s’éteind (OFF), la caméra est alors exclue
de la séquence.
9
4) Specifiche tecniche
Ingressi e uscite video
1V picco/picco, impedenza 75 Ohm, segnale video composito standard CCIR/PAL, 625
linee di risoluzione.
Sequenza
Regolabile con tempi da 1 a 60 secondi tramite potenziometro sul retro dell’unità. Possibilità
di esclusione di telecamere dalla sequenza.
Consumi
Meno di 0.25A/12V CC (entrambi i modelli).
Peso
CS4.1: 0.95Kg CS8.1: 1.15Kg
Dimensioni
Altezza: 47mm
Profondità: 204mm (connettori esclusi)
Larghezza: 180mm (CS4.1) 256mm (CS8.1)
16
1357Mon
Alarms
Power
DWELL
12V CC
Alimentatore
Telecamera 4
Telecamera 3
Telecamera 2
Telecamera 1
2468
Collegamenti con telecamere, monitor e alimentatore
Page 10

Relâchez la touche “Skip” pour retourner en fonctionnement normal.
Il faut noter qu’une séquence doit avoir au minimum deux caméras sélectionnées pour
fonctionner correctement.
10
1
2
3
4
5
6
7
8
SKIP
AUT
Pour modifier le temps d’affichage de
chaque caméra en séquence, régler le
potentiomètre à l’arrière de l’appareil
Pour sélectionner
une caméra,
appuyez sur la
touche de sélection
caméra
Pour lancer la
séquence, appuyez sur
la touche “AUTO”
Pour modifier la formule d’une
séquence, appuyez en même
temps sur la touche “SKIP” et
sur la touche de sélection
caméra
➚➚
➚➚
CS8.1
computar
➚➚
➚➚
Istruzioni per l’installazione dei commutatori ciclici
CS4.1 & CS8.1
1) INFORMAZIONI DI SICUREZZA
Prima di cominciare l’installazione di questo equipaggiamento leggete attentamente le
istruzioni allegate.
Prima di intraprendere qualsiasi attività sull’apparecchiatura, accertatevi di avere
sconnesso l’alimentazione.
Questo materiale è stato realizzato esclusivamente per un uso indoor. Le apparecchiature
non devono essere installate in postazioni dove manchi un corretto ricambio d’aria, vicino a
forti sorgenti di calore (esposizione diretta alla luce solare, termosifoni, ecc.) o in aree
estremamente fredde.
Non utilizzate mai l’apparecchiatura con le mani bagnate e non inserite oggetti nelle
aperture.
Fate attenzione a non rovesciare sostanze liquide sull’apparecchiatura. L’ingresso di liquido
all’interno dell’apparecchio ne causerà il non funzionamento e potrà causare danni alle
persone circostanti.
Usate esclusivamente l’alimentatore fornito in dotazione. L’uso di un alimentatore diverso
può casuare danni all’apparecchiatura e agli utilizzatori.
2) Apertura della confezione
Aprite con attenzione l’imballo. Dovete trovare i seguenti oggetti:
Commutatore video (CS4.1 o CS8.1)
Alimentatore 12V
Istruzioni per l’uso (questo manuale)
E’ consigliabile conservare il materiale di imballo per uso futuro. Se una o più parti sono
assenti o danneggiate NON UTILIZZATE LE APPARECCHIATURE e contattate
immediatamente il fornitore.
3) Installazione del commutatore ciclico CS4.1 & CS8.1
Collegate telecamere, monitor e alimentatore come in figura. Assicuratevi che il cavo di
alimentatore sia bloccato dall’apposito fermo, per prevenire disconnessioni accidentali.
15
Page 11

Installationsanweisung für die
Video-Umschalter CS4.1 und CS8.1
1) WICHTIGE SICHERHEITSHINWEISE
Bevor Sie mit der Installation der Geräte beginnen, lesen Sie sorgfältig diese Hinweise und
gehen Sie nach den im folgenden beschriebenen Schritten vor.
Ziehen Sie stets den Netzstecker, bevor Sie die Geräte einrichten wollen.
Achten Sie darauf, daß die Geräte unter den vorgeschriebenen Bedingungen installiert
werden. Die Geräte sind ausschließlich für den Gebrauch in geschlossenen Räumen
konzipiert und dürfen nicht an Standorten installiert werden, an denen die Luft nicht
zirkulieren kann. Sie dürfen nicht dem Einfluß von starken Wärmequellen ausgesetzt sein,
wie z.B. Heizkörpern oder direkter Sonnenbestrahlung. Halten Sie die Geräte ebenfalls fern
von extremer Kälte.
Achten Sie bei der Auswahl des Standortes auch darauf, daß der Bediener das Gerät
bequem bedienen kann. Er darf bei der Bedienung keiner permanenten körperlichen
Belastung ausgesetzt sein. Jedes Gerät wurde so konstruiert, daß die Belastungen für den
Bediener unter normalen Arbeitsbedingungen minimal sind.
Bedienen Sie die Geräte niemals mit feuchten oder gar nassen Händen! Führen Sie keine
spitzen Gegenstände in Gehäuseöffnungen oder Anschlußbuchsen ein.
Benutzen Sie die Geräte nicht, während Sie Getränke zu sich nehmen oder in der Nähe von
Bereichen, die naß werden können. Verschüttete Flüssigkeiten zerstören die Geräte
irreparabel und können sogar Verletzungen verursachen.
Benutzen Sie ausschließlich das mitgelieferte Netzteil! Verwenden Sie dieses Netzteil nicht
für andere Zwecke! Wenn Sie diese Vorsichtsmaßnahme nicht beachten, kann es zur
Zerstörung von Geräten oder zu schweren Verletzungen kommen.
2) Auspacken
Packen Sie den Video-Umschalter vorsichtig aus. Im Karton finden Sie die folgenden
Einzelteile:
- 1 Video-Umschalter (CS4.1 oder CS8.1)
- 1 Netzteil 12 V DC
- Diese Anleitung
Wenn etwas fehlt oder beschädigt ist, versuchen Sie nicht, das Gerät in Betrieb zu nehmen!
Wenden Sie sich sofort an Ihren Lieferanten!
11
Wenn Sie die Taste Skip loslassen, kehren Sie zum normalen Betrieb zurück.
Beachten Sie, daß eine Sequenz mindestens zwei Kameras enthalten muß, damit sie
ordnungsgemäß funktioniert. Wenn Sie versuchen, eine Sequenz mit weniger als zwei
Kameras einzustellen, werden automatisch die Kameras 1 bis 4 hinzugeschaltet.
14
1
2
3
4
5
6
7
8
SKIP
AUT
Drehpotentiometer auf der Geräterückseite
justieren, um die Verweilzeit aller Kameras
in der Sequenz zu verändern
Kamerawahltaste
drücken, um eine
Kamera auszuwählen
T aste AUTO drücken,
um die Sequenz zu
starten
Taste SKIP gedrückt halten
und Kamerawahltaste
drücken, um eine Kamera
hinzuzufügen oder zu über
➚➚
➚➚
CS8.1
computar
➚➚
➚➚
Page 12

3) Installation der Video-Umschalter CS4.1 und CS8.1
Verbinden Sie Kameras, den Monitor und das 12 V-Netzteil mit dem Umschalter, wie es in
der Abbildung dargestellt ist.
Stellen Sie sicher, daß das Netzteilkabel durch die Halteklammer gegen plötzliches
Herausziehen gesichert ist.
4) Technische Daten
Video-Ein und -Ausgang
1 Vpp, 625 Zeilen CCIR/PALStandard-Videosignal, Impedanz 75 Ω, BNC-Anschlüsse
CS4.1 - 4 Videoeingänge, 1 Videoausgang
CS8.1 - 8 Videoeingänge, 1 Videoausgang
Sequenz
Einstellbar von ca. 1 ... 60 Sekunden über ein Drehpotentiometer an der Rückfront.
Programmierbares Überspringen von einzelnen Kameras in der Sequenz.
Stromverbrauch
Weniger als 0,25 Aan 12 V DC (beide Modelle)
Gewicht
CS4.1 0,95 kg
CS8.1 1,15 kg
Abmessungen
CS4.1 (HxBxT) 47 mm x 180 mm x 204 mm (inklusive Gehäusefüße
und ohne Anschlüsse)
CS8.1 (HxBxT) 47 mm x 256 mm x 204 mm (inklusive Gehäusefüße
und ohne Anschlüsse)
12
1357Mon
Alarms
Power
DWELL
12v DC
Netzteil
Kamera 4
Kamera 3
Kamera 2
Kamera 1
2468
Verbindung von Kameras, Monitor und Netzteil Bedienungsanleitung für die Video-Umschalter
CS4.1 und CS8.1
Beachten Sie, daß auf der Unterseite des Gerätes eine Kurzanleitung zur Bedienung des
Umschalters angebracht ist.
Eine Kamera für die Monitordarstellung auswählen
Drücken Sie die Kamerawahltaste oberhalb der gewünschten Kameranummer. Die Leuchte
oberhalb der Taste leuchtet und zeigt damit an, welches Kamerabild momentan auf dem
Monitor zu sehen ist.
Eine Kamerasequenz auf dem Monitor darstellen
Drücken Sie auf die Taste Auto. Die Leuchte oberhalb der Taste leuchtet und zeigt damit
an, daß die Sequenz aktiviert ist und die Kamerasequenz auf dem Monitor erscheint.
Sie können die Verweilzeit eines Kamerabildes innerhalb einer Sequenz zwischen 1 ... 60
Sekunden einstellen. Befolgen Sie die Anweisungen weiter unten, wenn Sie die eingestellte
Verweilzeit verändern wollen.
Sie können bei laufender Sequenz bestimmen, welche Kamerabilder hinzugefügt und
welche übersprungen werden sollen. Lesen Sie weiter unten im Text, wie Sie die
Kamerabilder einer Sequenz austauschen können.
Eine Sequenz anhalten
Drücken Sie eine beliebige Kamerawahltaste. Das entsprechende Kamerabild erscheint auf
dem Monitor und die Leuchte über der Taste Auto erlischt.
Die aktuelle Verweilzeit verändern
Drehen Sie den Knopf des Drehpotentiometers auf der Geräterückseite. In der maximalen
Einstellung beträgt die Verweilzeit annähernd 60 Sekunden, in der minimalen Einstellung
annähernd 1 Sekunde.
Kameras in einer Sequenz hinzufügen und überspringen
Drücken Sie die Taste Skip. Die Leuchten oberhalb der Kamerawahltasten zeigen die
Kameras an, die momentan in der Sequenz sind.
Halten Sie die Taste Skip gedrückt und drücken Sie die Kamerawahltaste der Kamera, die
Sie hinzufügen oder überspringen wollen.
Die Leuchte oberhalb der Kamerawahltaste zeigt an, ob die betreffende Kamera in der
Sequenz ist (Leuchte AN) bzw. nicht in der Sequenz ist (Leuchte AUS).
13
 Loading...