

Page 1

LCD MONITOR USER’S MANUAL
GETTING STARTED
NTRODUCTION
I
EATURES
F
NPACKING AND CHECKING OF THE PACKAGE CONTENTS
U
NSTALLING THE MONITOR
I
................................................................................1
......................................................................................1
OPERATING THE MONITOR
OW TO USE THE
H
HE ADJUSTMENT OF MONITOR’S SCREEN DISPLAY
T
DJUSTING THE VIEWING ANGLE
A
ENU TABLE
M
OSD (ON S
..................................................................................6
FOR YOUR SAFETY
..................................................................1
................................................................1
...................................................3
CREEN DISPLAY
)
.................................4
......................................................5
..................................................................7
SPECIAL NOTES ON LCD MONITORS
LEANING
C
UPPORTED TIMING
S
ROUBLESHOOTING PROCEDURES
T
OWER MANAGEMENT
P
.......................................................................................8
.........................................................................8
...................................................9
.....................................................................9
..................1
..........................4
...............................8
CONFORMITY AND COMPLIANCE
....................................10
Page 2

GETTING STARTED
(
WARNING:Do not operate the LCD monitor with unspecified power supply. Usag e of
incorrect voltage will cause malfunction and may cause fire or electric shock.
Introduction
Bright and sharp images of text and graphics are what you will find with your LCD color
monitor. The LCD monitor provides a maximum resolution of 1024 x 768 pixels with a
flicker-free display at up to 75Hz refresh rates that offers bright, sharp and vibrant color
display without the radiation emission and hazards of CRT monitors.
Features
Supports XGA resolution of 1024 x 768 pixels
VESA DPMS-compliant power saving
Digital Character Smoothing
Automatic Set-Up
Ergonomic Design: TCO Approved
Windows 95/98/2000 Plug & Play Compliant
Versatile, functional & User friendly OSD
Plug & Play: Conform to the VESA standards and support DDC1/2B spec.
Unpacking and Checking of the Package Contents
Before unpacking your LCD Monitor, prepare a suitable workspace for your LCD Monitor
and computer. You need a stable, level, and clean surface near a wall outlet.
Set the LCD Monitor box in an upright position and open from the top of the box
1.
before removing the right/left cushions.
Note:
Please notice that the AC/DC a daptor i s plac ed on th e side of th e cush ion,
make sure the adaptor will be held and removed out from the carton
while removing the cushion.
Remove the back cover fr om yo ur monit or (pull fr om the bottom o f cov er to open)
2.
to install your PC system.
Accessories
1 pc 1 pc 1 pc 1 pc 1 pc
VGA Cable
Already Built-in)
AC/DC Adaptor Power Cord Audio Cable
(optional)
Installing the Monitor
DO NOT
!
humid, dusty, or smoky areas as it may cause fire, electric shock or damage.
DO NOT
!
exposed to rain, water, moisture, or sunlight.
MAINTAIN
!
PLACE
!
SAFE
!
install the monitor where sudden temperature changes may occur, or in
place your LCD Monitor near a window as it may be severely damaged if
good ventilation; covering of ventilation slots or holes may cause fire.
the monitor at least 4” (or 10 cm) way from the walls.
storage temperature of the LCD Monitor is in a range of -20 to +65.
User’s Manual
Page 3
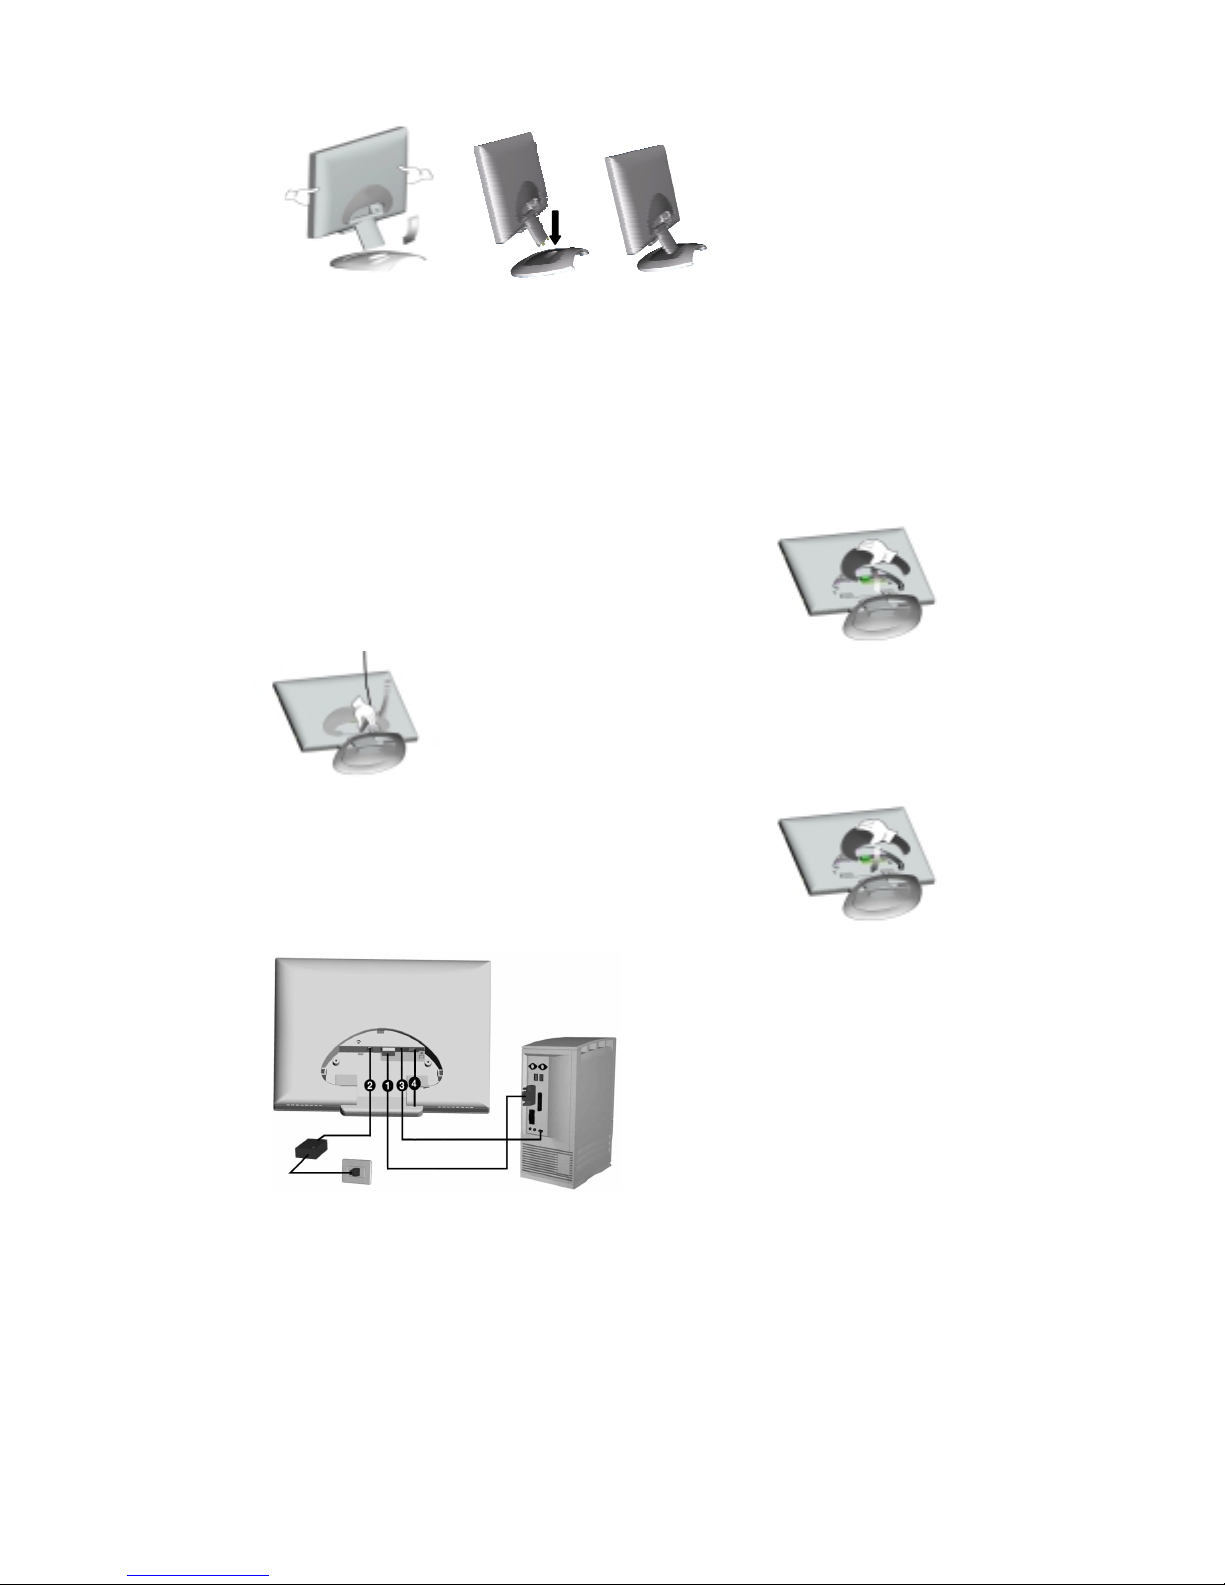
Connecting the Monitor
1. Turn off your PC before connecting your LCD monitor to the PC.
2. Take the monitor out from the box and assemble it with the
detachable base.
Note: Make sure to hock the
brace Into the right
position of the base.
3. Take off the plastic cover on the rear bezel of the LCD monitor.
Note: Make sure the surface of the table is clean and covered with a
soft cloth to prevent damaging or scratching the panel when
assembling the LCD monitor.
4. Connect signal cable(s), Audio cable and DC adapter
connector to your Monitor. Make sure the cable heads are
securely connected.
5. Assemble the plastic cable cover back to the rear cover of the
LCD monitor.
6. Connect the other end of VGA cable to the VGA port of the PC
system. Make sure the cable head is securely connected.
7. Connect the other end of Audio cable to sound card’s “Audio
out” jack.
8. Plug the female end of the power cord
into the AC adaptor.
9. Connect the male end of the power cord
into a wall socket.
10. Turn on your computer, and then turn on
your LCD Monitor.
Page 4
NOTE
For added protection, it is recommended to use a Surge Protection device plugged between
the AC Adapter and the electrical wall outlet to prevent the effects of sudden current
variations from reaching the LCD Monitor. Sudden peaks of electricity may cause damage to
the Monitor.
OPERATING THE MONITOR
The LCD monitor has been preset at the factory with the Timing shown in Appendix to create optimal
picture. Users are also able to adjust the picture to the desired brightness and sharpness by following
the instructions.
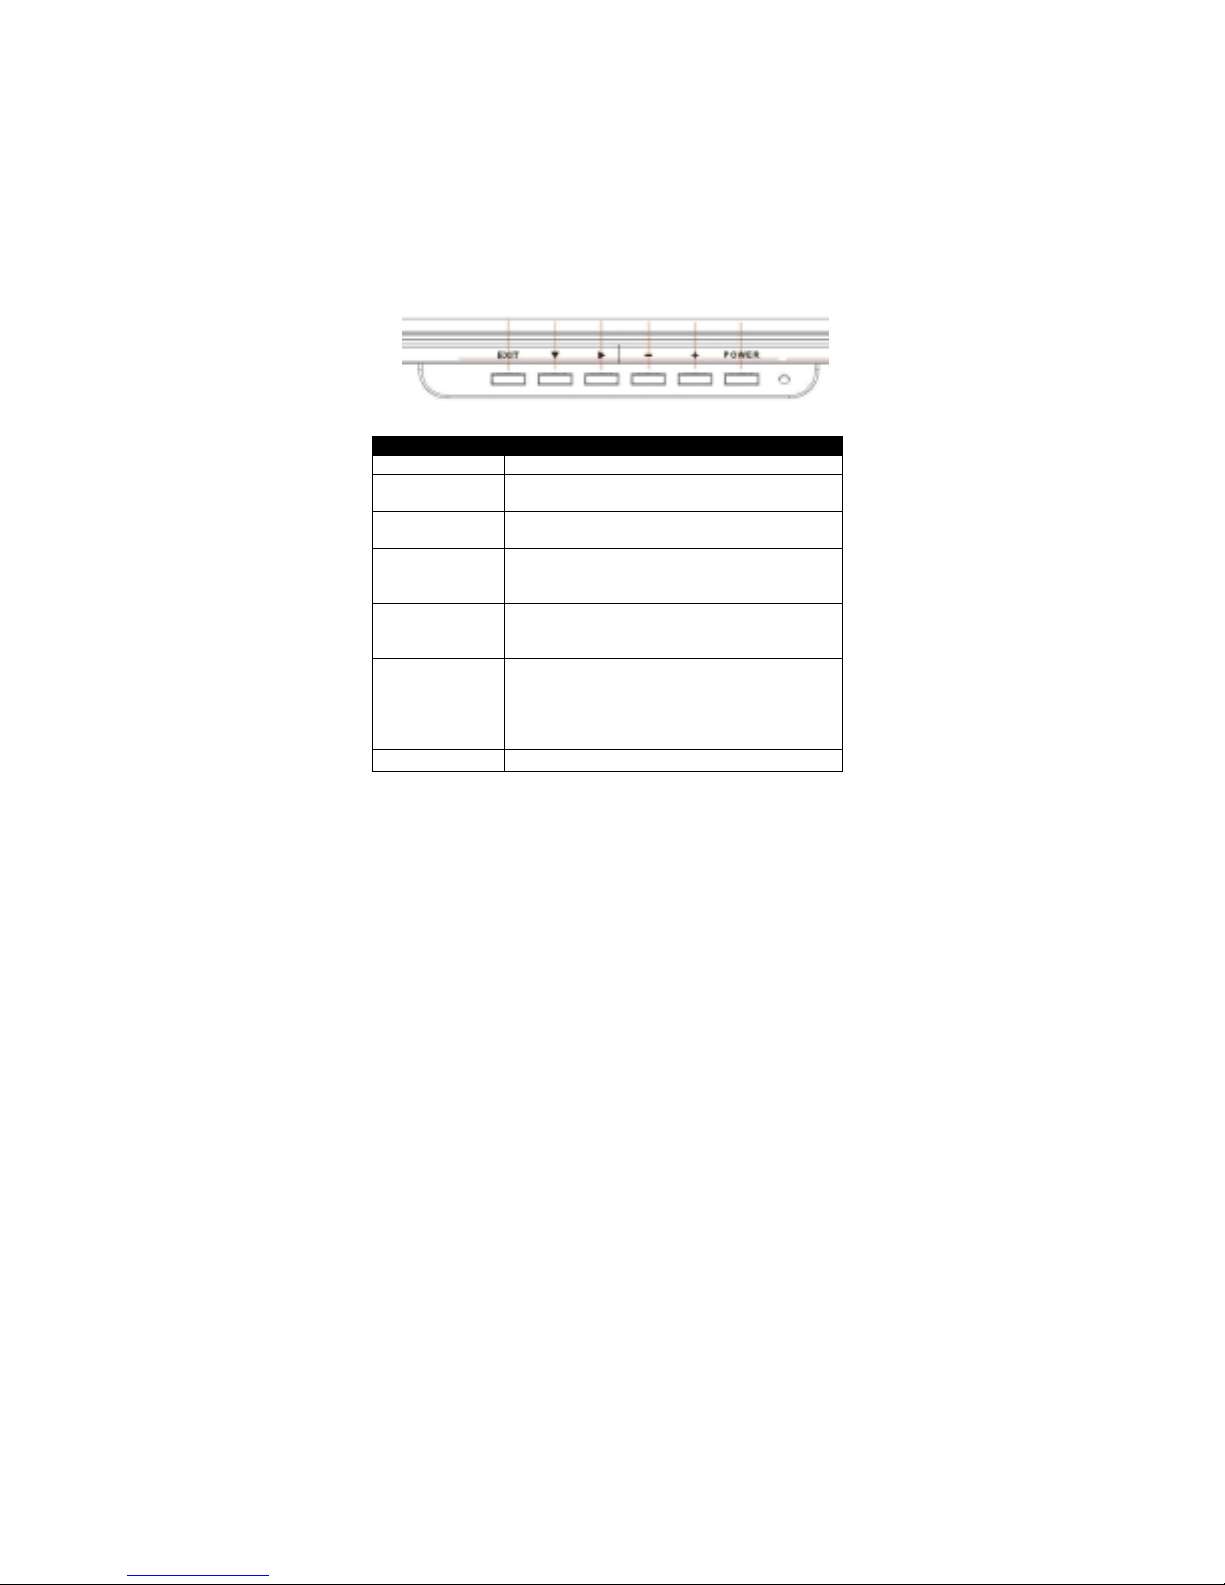
Buttons Functions
EXIT Button
Arrow key
υυυυ
Arrow key
“-” Minus key
“+” Plus key
LED power
status display
Power Switch
Exit the OSD (On Screen Display)
Press to bring up the On Screen Display and
select main menu items
Press to bring up the On Screen Display and
select sub menu items
Adjust sub-setting bars i.e. CONTRAST,
BRIGHTNESS, etc. to decrease setting values
of the OSD
Adjust setting bars i.e. CONTRAST,
BRIGHTNESS, etc. to increase setting values
of the OSD
Green – Normal operation
Amber – Power Management (i.e. DPMS
mode: reduces power consumption < 5W when
receiving no horizontal and/or vertical sync
signal)
For turning ON/OFF the monitor
Page 5
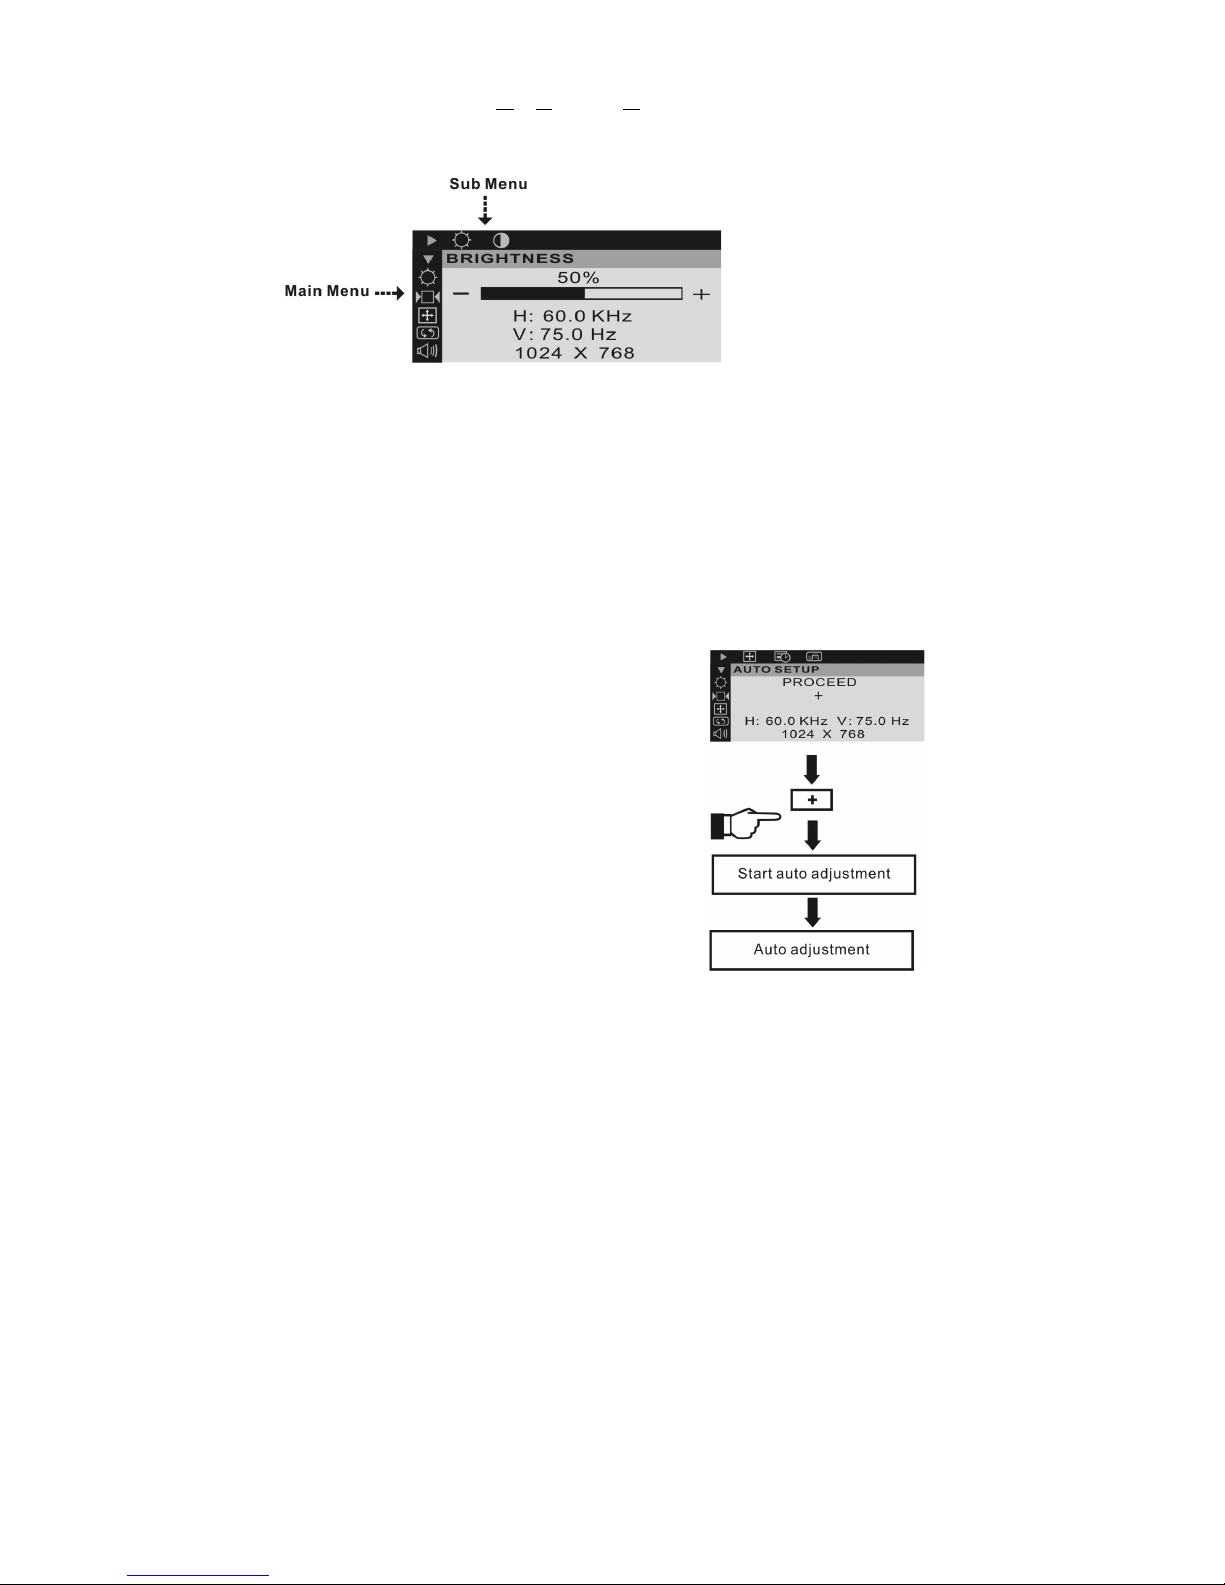
How to Use the OSD (On Screen Display)
OSD function allows the user to easily adjust the display to the desired quality.
Structure of OSD
Operating Procedure
1. Power on the LCD monitor.
2. Press “ ” or “ “ to pop up OSD menu.
3. Press “ ” to select main menu item.
4. Press “ “ to select sub menu item.
5. Press “+” and “-“ buttons to adjust.
Press the EXIT button when finish adjusting
The Adjustment of Monitor’s Screen Display
There are two ways to adjust the monitor’s screen, i.e. auto adjustment and manual adjustment.
Auto adjustment
1. Power ON the LCD monitor and computer.
2. Select “AUTO SETUP” of OSD screens by
pressing the“ ” button to “AUTO SETUP”.
3. Press “+” button while displaying “AUTO
SETUP” screen.
The auto adjustment is started. “AUTO
SETUP” will be displayed during auto
adjustment. It takes about 10 seconds to
finish adjustment.
Manual adjustment
Power ON the LCD monitor and computer.
a)
Adjust according to the aforementioned “Operating Procedure” and “Menu Table” to adjust the
b)
screen to your favorable screen display.
OSD Adjustment Lock
This function is used to prevent changing the adjusted status by mistake. All the adjusting items
except “BRIGHTNESS” will be locked.
Page 6
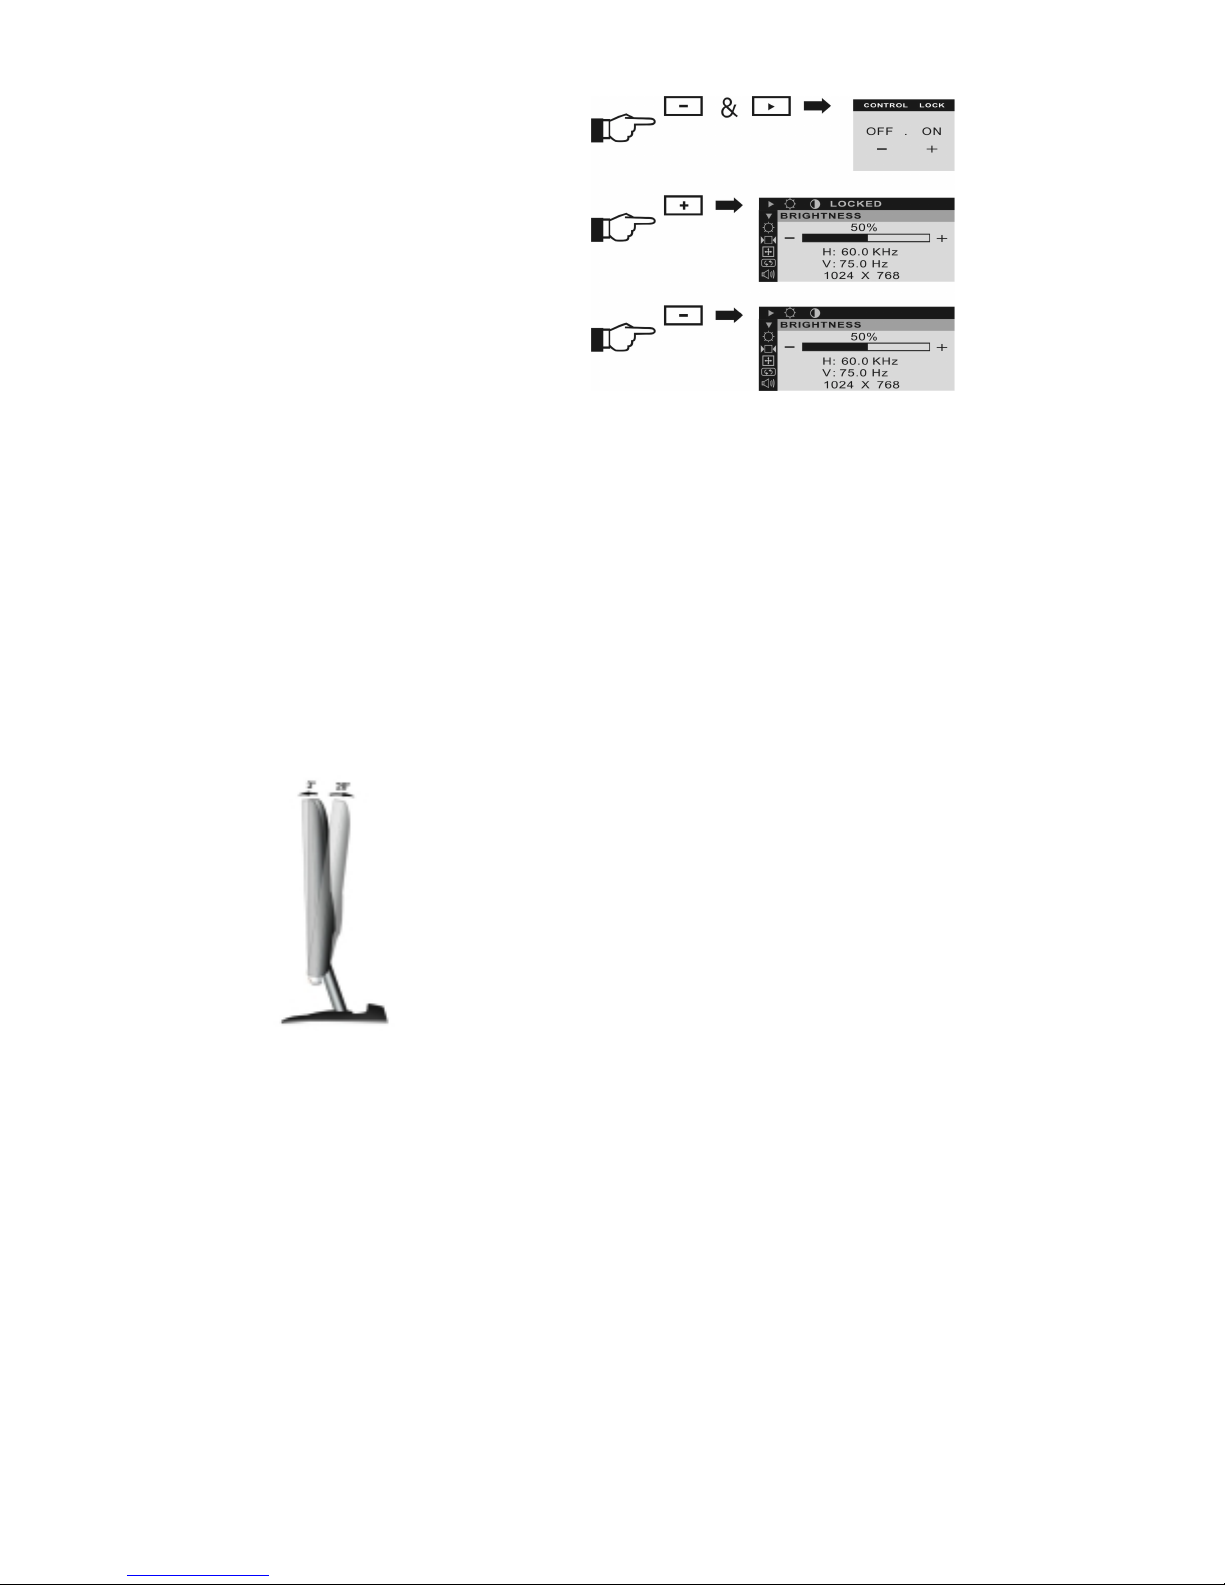
a) Press the “ ” and “-” buttons simultaneously and the “CONTROL LOCK” screen is displayed.
Press “+” button, and it will become
b)
“CONTROL LOCK” status. The
“LOCKED” will be displayed in the upright corner of screen indicating that
OSD is in
locked
position.
c) To release
the
“CONTROL
LOCK”, press
“ ” and “-”
buttons simultaneously and “CONTROL
LOCK” screen will appear. Press “-”
button to release the “CONTROL LOCK”.
The “CONTROL LOCK” screen will
disappear automatically.
d) Volume control: directly push “+” and “-” button to turn up/down audio volume.
NOTE
Do not touch the screen while changing the viewing
angle. It may damage the screen. Make sure not to
catch your fingers while changing the viewing angle.
Adjusting the Viewing Angle
Your LCD Monitor is designed to allow you to adjust it to an optimal viewing angle.
Page 7
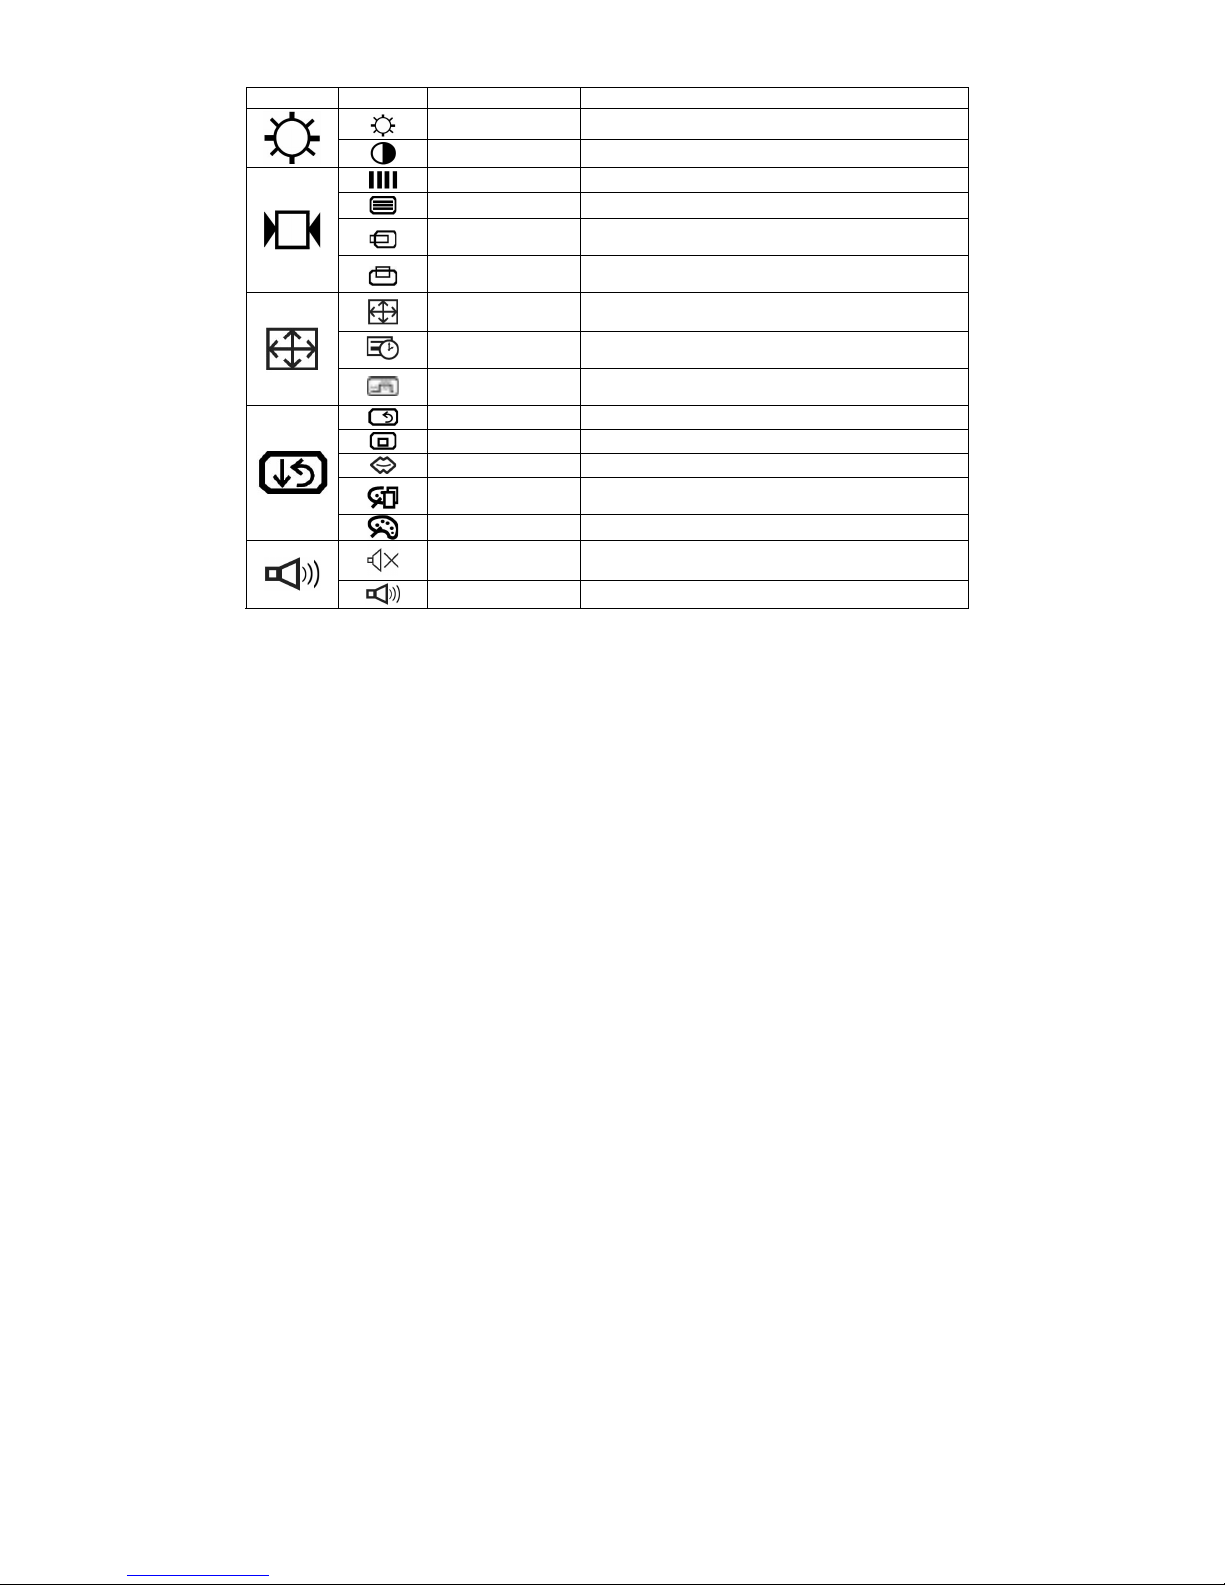
Menu Table
Main Menu Sub Menu Function Name Function
BRIGHTNESS Adjusts the level of brightness and darkness
CONTRAST Adjusts the RGB color pattern set of the contrast
CLOCK Adjusts the number of pixels from source video
CLOCK PHASE Adjusts the phase relative to video H-sync signal
HORIZONTAL
POSITION
VERTICAL
POSITION
Moves the screen horizontally (left/right)
Moves the screen vertically (up/down)
AUTO SETUP To auto adjust press the “+” button
AUTO ADJUST
AUTO BALANCE
Automatically adjusts the clock, phase, H/V position
values for the most optimal settings
Automatically adjust the R,G,B to a suitable color in
display.
ALL RESET Return to factory preset value
OSD POSITION Changes the OSD position
LANGUAGE
DISPLAY MODE
(optional)
Press “+” and “-” to choose OSD language
“-” Represents the TEXT mode
“+” Represents the GRAPHIC mode
COLOR STANDARD: Factory preset color
MUTE
Disable or enable sound
VOLUME Adjust the volume of built-in speaker
Page 8

FOR YOUR SAFETY
W
ARNING
ALWLAYS OPERATE UNDER SPECIFIED POWER SUPPLY
Usage of incorrect voltage will cause malfunction and may cause fire or electric shock.
PROTECT and CORRECTLY USE THE CABLE
Do not pull or bend the power cable and signal cable or place the monitor or any heavy objects on the
cables. If the cables are damaged, they may cause fire or electric shock.
IMMEDIATELY STOP OPERATING THE MONITOR WHEN YOU DETECT ANY
ABNORMAL OCCURENCE
If you notice any abnormal phenomenon such as strange noise, smoke or smells, unplug the monitor
and contact your dealer or the nearest service center immediately.
DO NOT REMOVE THE CABINET
Removing the cabinet may expose you to the danger of fire or electric shock.
DO NOT PUT ANY FOREIGN OBJECT INSIDE THE MONITOR
It may cause fire, electric shock or damage when operating the monitor with foreign objects inside.
DO NOT USE THE MONITOR NEAR WATER
Operating the monitor in close proximity to water where the water may be spilt or splashed onto the
monitor may cause fi re or electric shock.
BAD WEATHER CONDITIONS
It is advisable not to operate the monitor during heavy thunderst orms as interm ittent breaks in power
may cause malfunction. Do not touch the plug under these circumstances as it may cause electric
shock.
C
AUTION
DISCONNECT CABLES WHEN MOVING THE MONITOR
When moving the monitor, always turn off the switch, unplug the monitor, and disconnect the signal
cable. If the cables are not properly disconnected when moving the monitor, it may cause fire or
electric shock.
DO NOT TOUCH THE PLUG WITH WET HANDS
Pulling or inserting the plug with wet hands may cause electric shock.
HOLD THE PLUG WHEN DISCONNECTING
To disconnect the power cable or signal cable, always pul l the cable by the plug. Never pull on the
cable as this may cause fire or electric shock.
O
THERS
ERGONOMICS RECOMMENDATIONS
Do not operate the monitor in a dark room or against a bright background. For optimal viewing comfort,
the monitor should be just below eye level and 30-60 cm (16-24 inches) away from your eyes. When
using the monitor over a prolonged period of time, a ten-minute-break per hour is recommended.
Page 9
SPECIAL NOTES ON LCD MONITORS
The following are normal with LCD monitors and do not indicate a problem.
!
W hen first turning on the LCD monitor, if the picture does not fit in the display area, it is
because of the type of computer that is used. In such case, adjust the picture position to its
correct position. (See
!
The screen may flicker during initial use. Turn off the power switch and then turn it on again the
flickering should disappear.
!
Users may notice a little uneven brightness on the screen depending on the desktop pattern
they use. It is normal for LCD monitors to show such uneven brightness.
!
Due to the nature of the LCD screen, switching of images after a prolonged period of time of
displaying the same image, the image from t he previous screen may remain. In such case,
the screen is recovered slowly by changing the image or turning off the power switch for hours.
!
If the screen becomes dark, flickers, or does not light-up, contact your dealer or t he nearest
service center for a backlight replacement. Do not attempt to replace it yourself.
!
If you need to return your unit for service and the original packaging was discarded, please
contact your dealer or the nearest service center for advice or replacement of packaging.
Cleaning
W
ARNING
!
If you dropped any material or liquid such as water onto the monitor when cleaning, unpl ug the
C
AUTION
!
For safety reasons, turn-off the power switch and unplug the monitor before cleaning.
!
Do not scratch or rub the screen with a hard object.
!
Never use any of the following solvents on the LCD monitor. Such hars h chemic als may cause
!
Rubbing the cabinet with products made of rubber or plastic for a long period of time may cause
Cabinet
!
Remove dirt with a lightly moistened cloth and a mild solvent detergent. Then wipe the cabinet
LCD
!
Periodic cleaning with a soft dry cloth is recommended.
!
Do not use tissue to clean the screen. It may damage the LCD screen.
power cable immediately and contact your dealer or the nearest service center. Always make
sure your hands are dry when unplugging the power cable.
damage to the cabinet and the LCD screen.
Thinner Spray-type cleaner Benzene Wax Abrasive cleaner Acid or Alkaline solvent
degeneration or loss of paint on the cabinet.
with a soft dry cloth.
Operating the Monitor
.)
Supported Timing
Display Mode
VGA
VESA
Macintosh VGA
MS-DOS
SVGA
XGA
Horizontal Fre qu e nc y Vertical Frequency
640 x 480
720 x 400 31.5 KHz 70.1 Hz
800 x 600
1024 x 768
640 x 480 35.0 KHz 66.7 Hz
832 x 624 49.7 KHz 74.6 Hz
640 x 350 31.5 KHz 70.1 Hz
31.5 KHz 60.0 Hz
37.5 KHz 75.0 Hz
35.1 KHz 56.3 Hz
37.9 KHz 60.3 Hz
46.9 KHz 75.0 Hz
48.1 KHz 72.0 Hz
48.4 KHz 60.0 Hz
56.5 KHz 70.0 Hz
58.1 KHz 72.0 Hz
60.0 KHz 75.0 Hz
Analog
Page 10
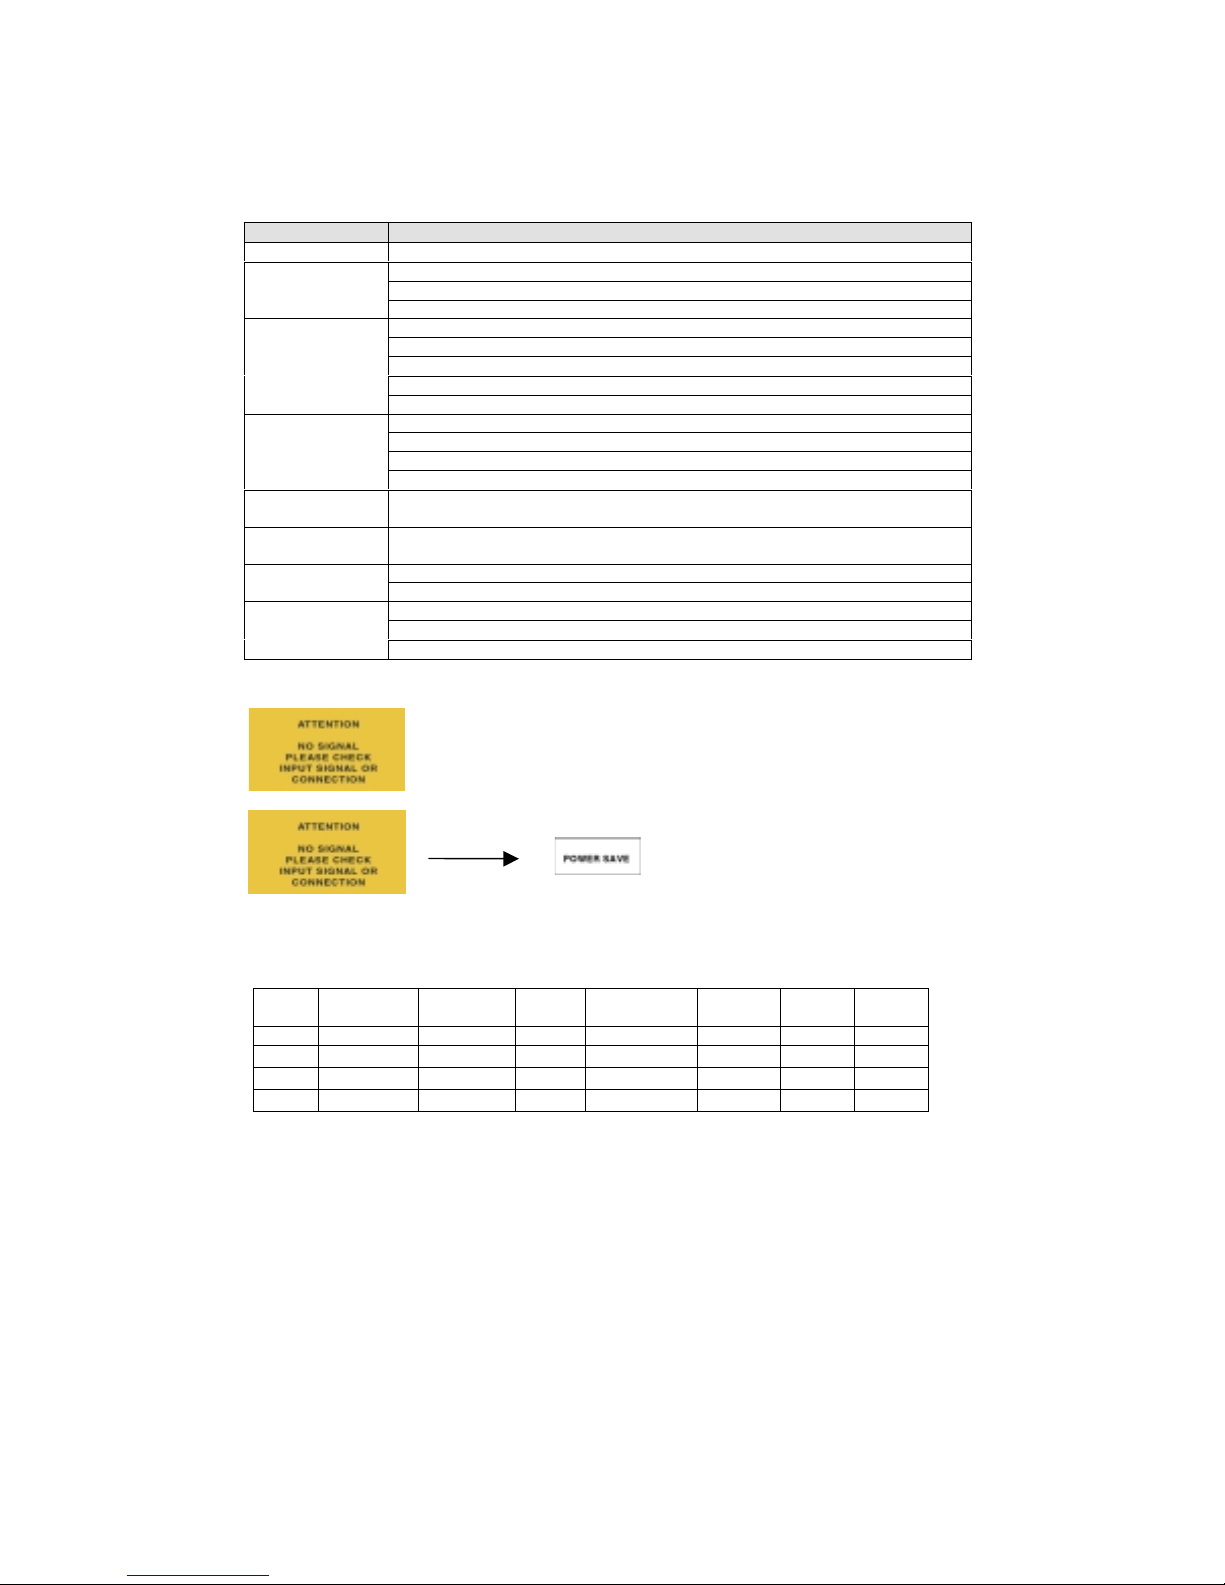
Troubleshooting Procedures
y
If the LCD monitor fails to function correctly, please follow the following steps for a possible solution.
1. Perform the adjustments according to
2. Refer to the following items if you cannot find a proper item listed in the
or if the problem remains.
3. If the problem you have experienced is not described below or you cannot correct the problem,
stop using the monitor and contact your dealer or the nearest service center for further
assistance.
Operating the Monitor
.
Operating the Monitor
PROBLEM CHECK TO SEE
No Display.
a) Power indicator
does not light up.
b) Power indicator
is green.
c) Power indicator
is amber.
Display is too
dark or too bright.
Display is not in
the center.
Display is
shaking.
Display is not
synchronized.
4. When “A
If the power cord is firmly plugged in the socket.
If the power switch is turned on.
If the AC socket is OK. Please check using another piece of equipment.
If the blank screen saver is active, touch the keyboard or mouse.
Increase the CONTRAST and/or BRIGHTNESS.
If the computer is ON.
If the signal cable is properly connected.
If the signal timing of the computer is within the spec of the monitor.
If the monitor is on power management mode, touch the keyboard or the mouse.
If the computer is ON.
If the signal cable is properly connected.
If the signal timing of the computer is within the spec.
If the video output level of the computer is within the spec.
If the signal timing of the computer is within the spec.
If the power voltage is within the spec.
If the signal timing of the computer is within the spec.
If the signal cable is properly connected.
If the signal timing of the computer is within the spec.
If the video output level of the computer is within the spec.
TTENTION”
is displayed:
OWER MANAGEMENT
a. “P
(1) Check if the signal cable is connected correctly to the computer.
(2) Check if the cable is broken.
After 5 seconds
of Displa
” is set to “OFF”
OWER MANAGEMENT
b. “P
(1) Check the signal cable is connected.
(2) Check the cable line is broken.
(3) Check the “P
function is operated correctly.
OWER MANAGEMENT
” is set to “ON”
”
Power Management
The LCD Monitor complies with the VESA DPMS (version 1. 0p) power management proposal. The
VESA DPMS proposal provides four phases of power saving modes by detecting the horizontal or
vertical sync signal.
Item DPMS Mode Display
1 On Normal Green Normal --- On On
2 Stand By No Display Amber
3 Suspend No Di splay Amber
4 Off No Display Amber
Power
LED
Power
Consumption
5W
5W
5W
Recovery
Time
3 sec < 10 KHz O n
3 sec On < 10 Hz
3 sec < 10 KHz < 10 Hz
H-sync V-sync
Page 11
CONFORMITY AND COMPLIANCE
FCC Compliance Statement
This equipment has been tested and found to comply with the limits for a Class B digital device,
pursuant to Part 15 of the FCC Rules. These limits are designed to provide reasonable protection
against harmful interference when the equipment is operated in a residential installation. This devic e
generates, uses, and can radiate radio frequency energy and, if not installed and used in accordance
with the instructions, may cause harmful interference to radio communicati ons. However, there is no
guarantee that interference will not occur in a particular installation. If this device does cause harmful
interference to radio or television reception (this can be determined by turning, the device off and on),
you are encouraged to try to correct the interference by one or more of the following measures:
* Reorient or relocate the receivi ng antenna.
* Increase the separation between the equipment and the receiver.
* Connect the equipment into an outlet on a circuit different from that to which the receiver is
connected.
* Consult the dealer or an experienced radio/TV technician for help.
Caution:
To comply with the limits for an FCC Class B computing device, you should use the shielded signal
cord and power cord supplied with this unit. The Federal Communication Commission warns that
changes or modifications of the unit not expressly approved by the party responsible for compliance
could void the user’s authority to operate the equipment.
Radio Frequency Interference Statement
Warning:
This is a Class B product. In a domestic environment this product may cause radio interference in
which case the user may be required to take adequate measures.
Canadian Doc Notice
For Class B Computing Devices
This digital apparatus does not exceed the Class B limits for radio noise emissions from digital
apparatus as set out in the Radio Interference Regulation of the Canadian Department of
Communications.
CE MARKING DECLARATION OF CONFROMITY
The LCD monitor complies with the requirements of related European standards,
which include:
!
Emission: EN 55022, EN 61000-3-2, EN-61000-3-3
!
Immunity: EN 50082-1
!
Safety: EN 60950 [Low-Voltage Directive (73/23/EEC)
ENERGY STAR
This product meets the Energy Star guidelines for energy efficiency.
TCO’99 (White Color Only)
TCO’95 (For All Colors)
Congratulations! You have just purchased a TCO’99/TCO’95 approved and labeled
products. Your choice has provided you with a product developed for professional
use. Your purchase has also contributed to reducing the burden on the environment
and also to the further development of environmentally adapted electronics
products.
 Loading...