

Compucessory 55252 Series, 55254 Series, 55253 Series, 55251 Series Installation Manual & User Manual

Amplifier
55251, 55252, 55253, 55254 Series
INSTALLATION GUIDE & USER MANUAL
Amplificateur
Séries 55251, 55252, 55253, 55254
GUIDE D'INSTALLATION & MANUEL DE L'UTILISATEUR
Amplificador
Serie 55251, 55252, 55252, 55254
GUÍA DE INSTALACIÓN Y MANUAL DE USUARIO
Amplificador
Séries 55251, 55252, 55253, 55254
GUIA DE INSTALAÇÃO E MANUAL DO UTILIZADOR
Amplificatore
Serie 55251, 55252, 55253, 55254
GUIDA ALL’INSTALLAZIONE E MANUALE PER L’UTENTE
Ver stärker
Serien 55251, 55252, 55253, 55254
INSTALLATIONSFÜHRER UND BEDIENUNGSANLEITUNG

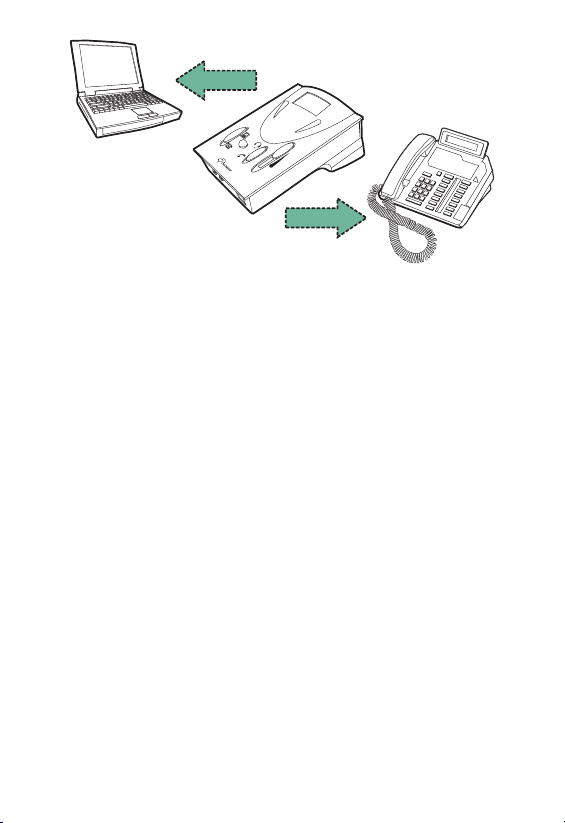
Telephone
Computer
Thank you for purchasing a Compucessory Telephone & Multi-media Amplifier
Kit. This unit is designed and developed with the aim to provide busy users,
whether at home or in the office, the comfort and convenience of using
telephone and computer with a single unit, freeing their hands for more
important tasks. Compucessory amplifiers work with most retail and system
telephones in the market, with the exception of telephones with the dial-pad
inside the handset.
This guide will walk you through your basic installation and normal operations
of a your Compucessory Amplifier:
PART I GETTING COMFORTABLE
I.1 Understanding the Controls.
I.2 Connection and Preparations.
I.2.1 connect to telephone
I.2.2 connect to computer
I.2.3 connect to headset
I.2.4 configure the control unit
I.3 Features and Functions
I.3.1 external DC supply (optional)
I.3.2 power on/off switch
I.3.3 rotary transmit volume control
I.3.4 telephone/computer application switch
I.3.5 headset/handset application switch
I.3.6 mute switch
PART II BEGIN TO OPERATE
PART III ACCESSORIES & SPECIFICATIONS
I.3.7 slide reception volume control
II.1 Telephone Communication
II.1.1 receiving calls/making calls using headset
II.1.2 using headset with computer
II.2 Troubleshooting
III.1 Accessories
ENGLISH
III.2 Specifications
1
PART I GETTING COMFORTABLE
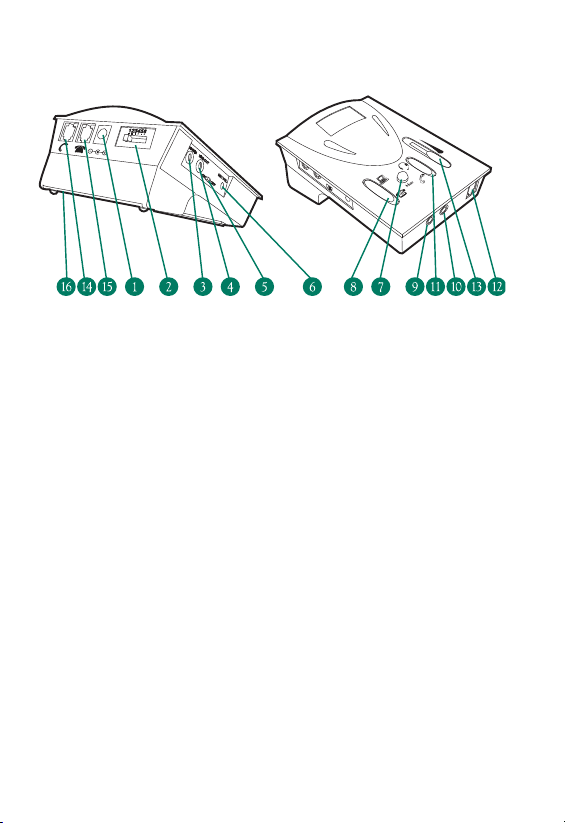
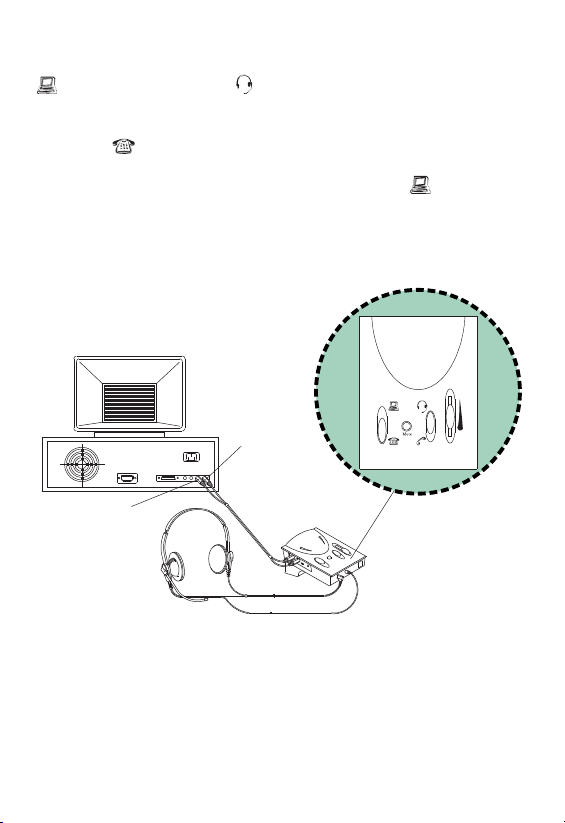
I.1 Understanding the Controls
MAIN SWITCHES AND INTERFACE
1. External DC Supply Jack (6V DC to 9V DC) – External Adapter
NOT Included
2. Telephone Configuration Switch
3. <Line In> Jack (3.5mm diameter stereo) from Computer Line Out
4. <Line Out> Jack (3.5mm diameter stereo) from Computer Line In
5. Power <On/Off> Switch
6. Rotary Transmission <Mic Volume> Control
7. <Mute> Switch
8. <Telephone/Computer> Application Switch
9. Computer Headset Jack (3.5mm diameter stereo) from
Speaker Plug
10. Computer Headset Jack (3.5mm diameter stereo) from
Microphone Plug
11. <Headset/Handset> Application Switch
12. Modular Jack for <Telephone> Headset
13. Slide Reception Volume Control
14. Modular Jack for <Telephone> Handset
15. Modular Jack for Input from Telephone Unit
16. Battery Compartment Door – Uses two AA size batteries
2
ENGLISH
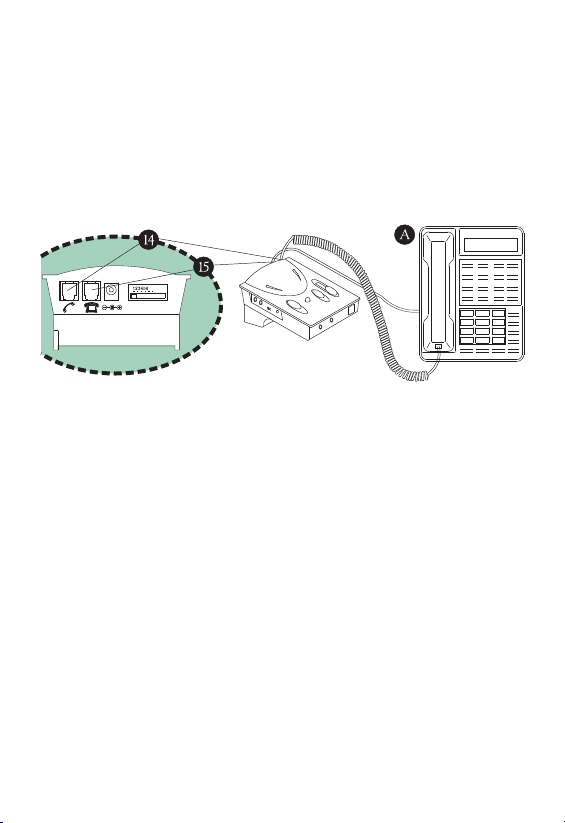
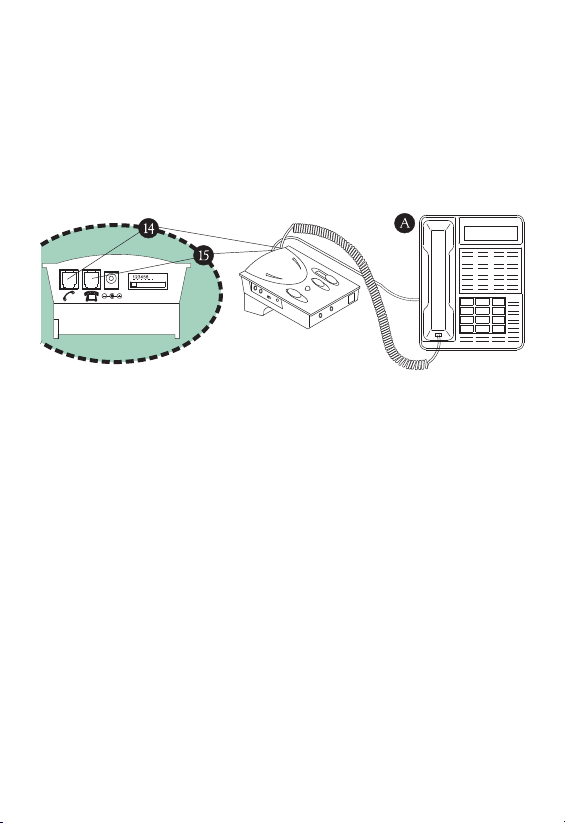
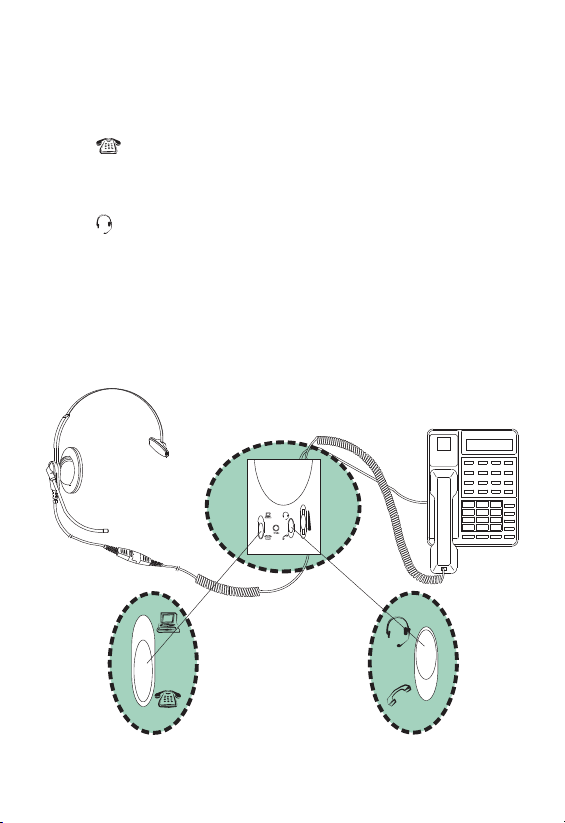
I.2.1 Connecting to Telephone
Unplug the handset from your telephone base unit and insert it to the
Handset Modular Jack (14). Use the phone cord provided with RJ-11
modular plug on both ends to connect the control unit to your
telephone. Plug one end of the cord to your base unit (A) and the
other end to the Phone Input Modular Jack (15) on the back of the
unit. (See illustration below)
I.2.2 Connecting to Computer (not necessary when using with
telephone only)
Connect this unit to your computer with the audio cable provided.
The color of the plugs is already-color coded in accordance with the
universal standard of line-in and line-out. In another words, the
speaker output line is green, and the microphone input line is blue for
the computer.
CONNECTING TO THE UNIT:
Green plug goes to "Line-In" Jack (also green)(3).
Blue plug goes to "Line-Out" Jack (also blue) (4).
CONNECTING TO THE COMPUTER SOUND CARD:
Green plug goes to "Line-Out" or "Speaker Out" Jack (also green).
Blue plug goes to "Line-In" Jack (also blue).
ENGLISH
3
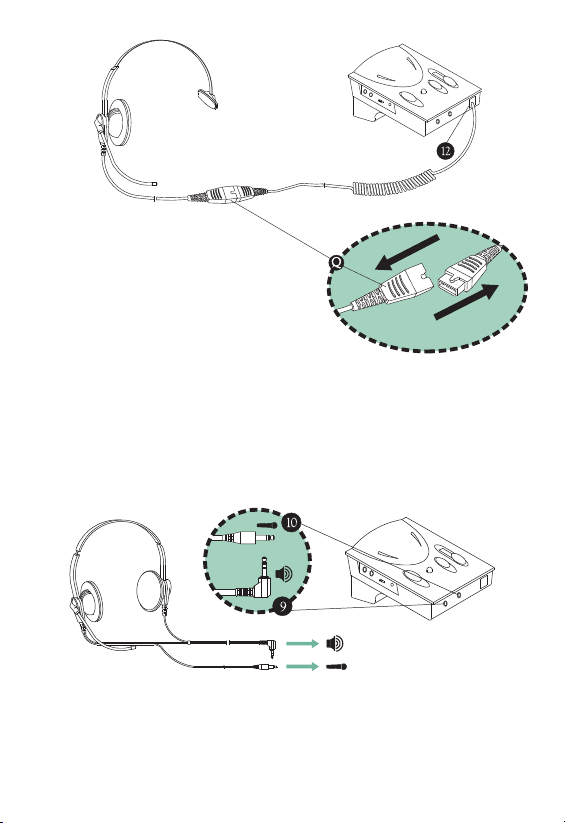
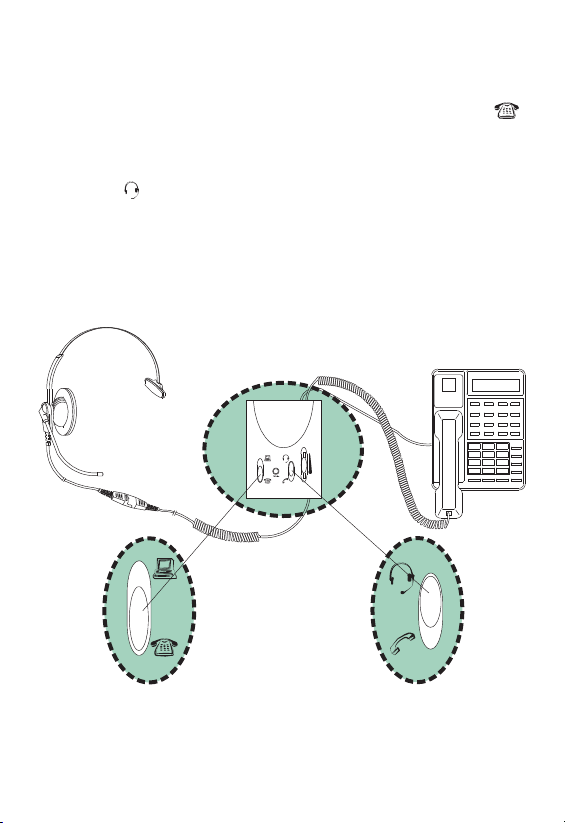
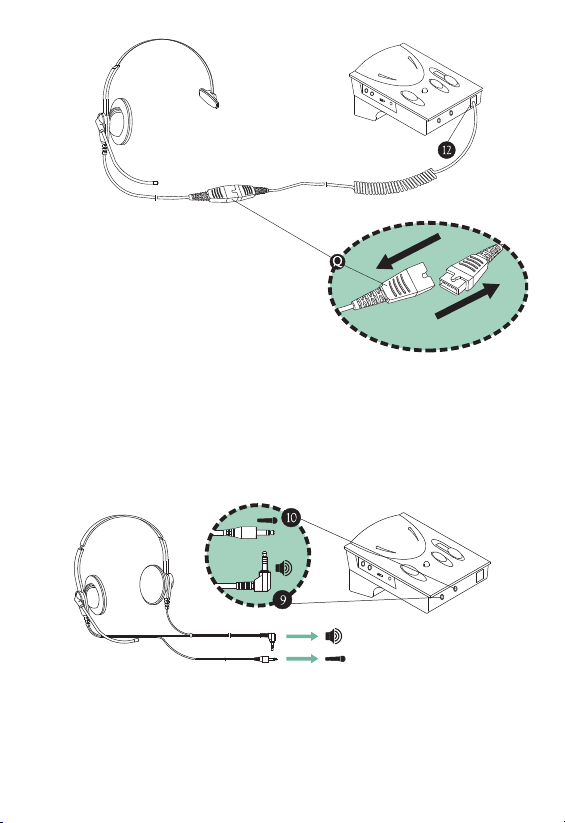
I.2.3 Connecting to Headset
The amplifier provides the choice
of using telephone headset (with RJ-11
Modular Plug) or stereo computer
headset (with 3.5mm Diameter Plugs)
according to your preference. For users
who require stereo sound in their multimedia
Quick Disconnect
application, you can choose from our wide
selection of our Compucessory computer headset series.
The headset included with the amplifier comes with a
special-designed Quick Disconnector (Q), giving you convenience
and compatibility.
CONNECTING TO THE TELEPHONE HEADSET:
Plug in the telephone headset to the RJ-11 Modular Jack (12) on the
front panel of the unit.
CONNECTING TO COMPUTER HEADSETS:
This applies only to computer headsets with separate microphone and
speaker plugs. Insert the Speaker Plug of the headset to the Jack on
the Front Panel with the "Speaker" sign (9) and the Microphone Plug
to the Jack with the "Microphone" sign (10).
4
ENGLISH

REPLACING BATTERIES:
Slightly depress the compartment
lid and slide it outwards. Install
batteries with polarities (+, –)
according to the battery diagram
inside the compartment. Close
the lid and turn the power
"ON". Two AA batteries are
required. Alkaline batteries are
recommended.
I.2.4 Configure the Control Unit
The 6-position Configuration Switch (2) at the back panel allows you to
select the proper setting so that the unit will work with your telephone
base unit. The control has 6 positions, which are (1 - 2 - 3 - 4 - 5 - 6).
Wear the headset over your head and switch the Handset/Headset
Switch (11) to the Headset position. Make sure to turn down the volume
adjustment to protect your ear. Check to see if the Telephone/Computer
Switch (8) is set to telephone position, if not, make sure it is. Now move
the switch through positions 1-6 slowly until you can hear a clear
dial tone.
If you receive a clear dial tone sound, then the receiving connection is
working. Note that there may be 2 matching setting, choose the clearer
setting or either one if both perform the same. There is at least one
setting which matches your telephone.
ENGLISH
5
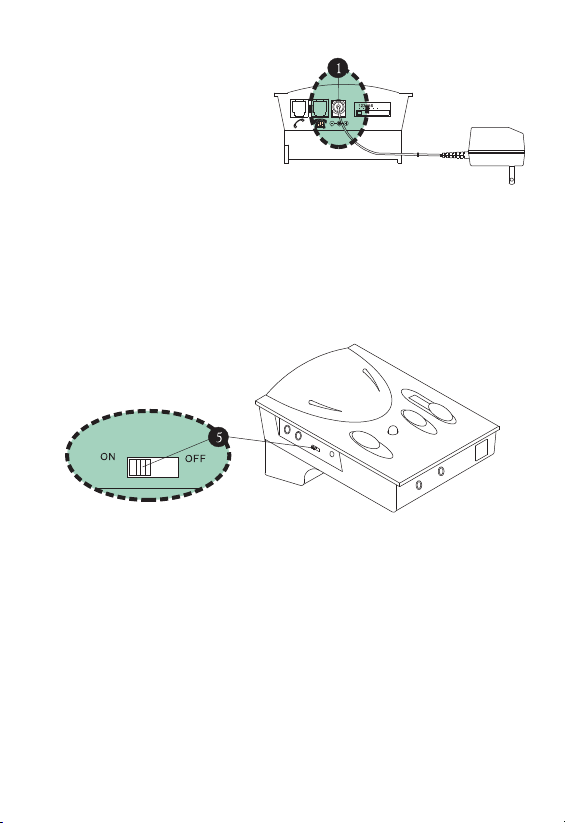
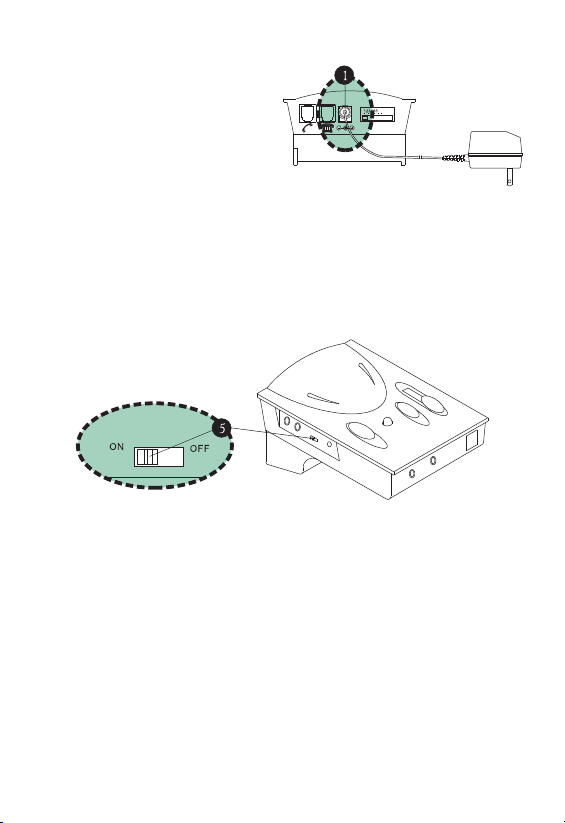
I.3.1 External DC Supply Jack (1)
The unit provides the choice of
using an optional external DC
supply instead of batteries.
When purchasing an AC adapter,
make sure the output polarity
(+/- voltage) matches the unit.
And the voltage should be between
6V DC to 9V DC.
I.3.2 Power ON/OFF Switch (5)
Although the unit will return to standby mode automatically after each
extended period of inactivity, you will still want to turn it off when not
in use for a prolonged period of time to extend battery life. Turning
off the unit does not affect normal telephone communication through
the handset, so you can answer or make phone calls through the
handset as usual.
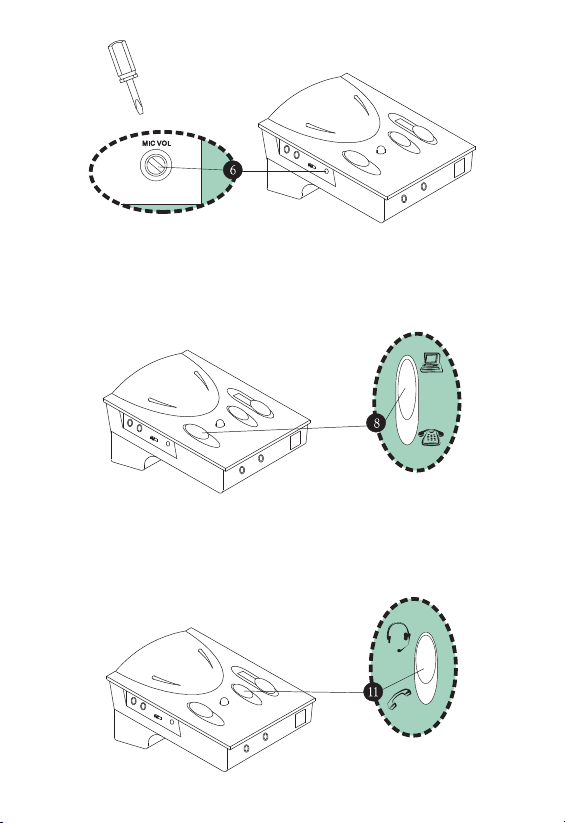
I.3.3 Rotary Transmit Volume Control
The amplifier allows you to adjust the volume of the outgoing sound
volume, and the high and low frequencies associated with it. To fine-tune
the transmission volume, place a call and talk as usual using the headset.
Slowly rotate the Rotary Transmit Volume Control (6) with the small
screwdriver pin provided until the desired level is reached. The person
talking to you should be able to tell you when the optimum sound and
tone level is reached. Once this is set, there should be no need to make
further adjustments in the future. (See illustration next page)
CAUTION: Be careful when you adjust the volume control, as rotating
the volume to the maximum setting may cause headset to "squeal".
Reduce the volume and the "squealing" will disappear, but continuous
over-turning of the control may cause damage to the unit.
6
ENGLISH
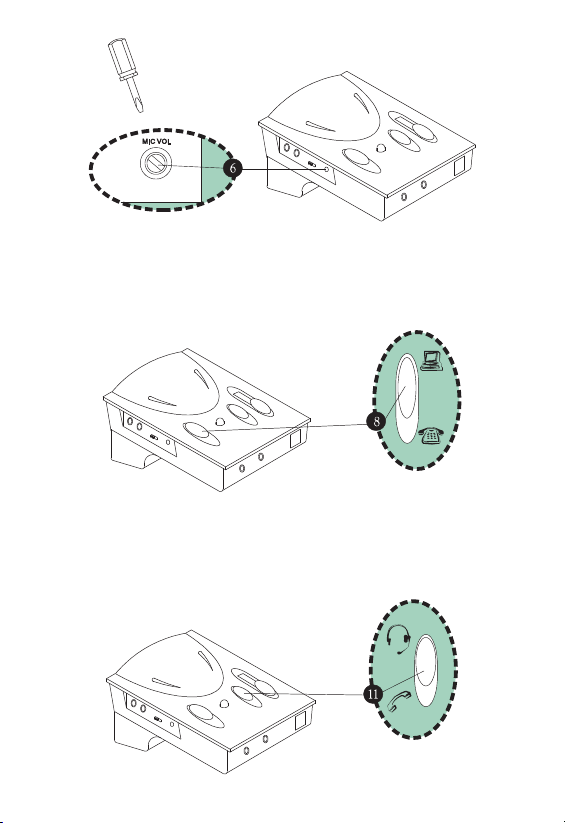
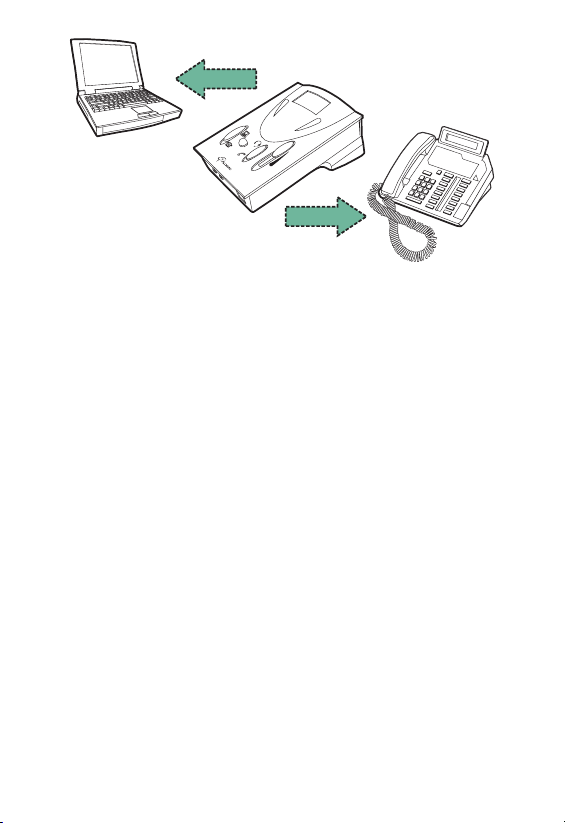
I.3.4 Telephone/Computer Application Switch
The Telephone/Computer Application Switch (8) is for you to select
either computer operation or telephone communication. Should this
switching result with no sound, be sure to first check the
Headset/Handset Application Switch to see if it's set properly.
I.3.5 Headset/Handset Application Switch
The Headset/Handset Application Switch (11) is for you to choose
between using the handset of your telephone base unit or the
telephone headset provided. Again, do not forget to switch the proper
setting of Telephone/Computer Application Switch, before use.
ENGLISH
7
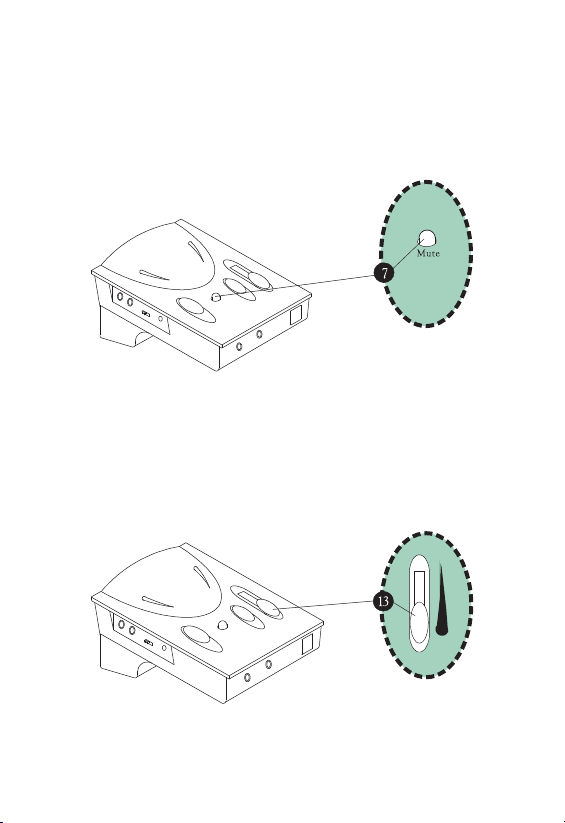
I.3.6 Mute Switch
The Mute Switch (7) enables you to place a caller on hold by
pressing it down. When the button is pressed down, the caller cannot
hear you, but you can still hear them. To resume communication,
press it again to release the button. You can see a color bar
surrounding the button, when the color bar is visible, there is no mute,
and when the color bar is not visible, then the call is muted.
I.3.7 Slide Reception Volume Control
The Slide Reception Volume Control (13) is for adjusting the volume
of the sound to the headset speaker or speaker box. By sliding the
button up and down, you can obtain the desired volume.
8
ENGLISH
PART II BEGIN TO OPERATE
II.1.1 Receiving Calls/Making Calls Using Headset
Switch the Telephone/Computer Application Switch to Telephone
position. Lift up the handset from its cradle and place it off-hook, or
with telephones that have a handsfree speakerphone function, choose
the Headset switch and press the Speakerphone button. Make sure
the Headset position is selected on the Headset/Handset
Application Switch. After finishing a call, return the handset to its
cradle as usual, or turn off the Speakerphone button. Remember to
press the Mute button to put a caller on hold, and simply press it
again to release the mute function.
ENGLISH
9
II.1.2 Using Headset with Computer
Switch the Telephone/Computer Application Switch to the Computer
position. Select Headset position from the Headset/Handset
Application Switch for using headset. When a phone call comes in or
you want to make a call while doing computer work, simply switch to
Telephone position and lift the handset from the cradle or press
the Speakerphone button. After the call is completed and you wish
to return to your computer work, select the Computer position
and place the handset back into its cradle or turn off the
Speakerphone button.
PC Line Out
PC Line In
10
ENGLISH

II.2 TROUBLESHOOTING
There is no response
from the unit.
• Check if the batteries are too low, replace
if required.
• Check if the Polarities of batteries are placed
correctly.
• Make sure the On/Off switched to ON.
• Check if the Configuration Switch is
properly selected.
• Volume Control and Mute button are
adjusted properly.
• Headset/Handset and Telephone/Computer
switches are properly selected.
• Check if the telephone patch cable is
properly connected.
I cannot hear any dial
tone or caller.
My Caller cannot hear
me at all or cannot
hear me very well.
I hear my voice too
loud and there is a
squealing sound.
When using with my
computer, the sound
is too loud even though
the volume is set at
minimum.
ENGLISH
• Check if the Telephone/Computer switch is
selected at telephone.
• Make sure the Configuration Switch is
properly selected. Try other positions until
your hear okay.
• Make sure the Mute button is not pressed
down.
•Use the screwdriver to check if Mic volume
is set too low.
•Try to select the proper settings with the
configuration switch.
• The rotary transmit Mic volume control is
set too high. Reduce this volume or refer to
section I.3.3.
• Take a look at the connection on your
computer where the cables connect with the
amplifier. There should be 3 jacks (line-in,
line-out and speaker).
• Make sure the line-out cable from the
amplifier is connected to the line-in jack of
the computer.
• Make sure that the line-in cable from the
amplifier is connected to the line-out jack of
the computer and NOT the speaker jack.
11
PART III ACCESSORIES & SPECIFICATIONS
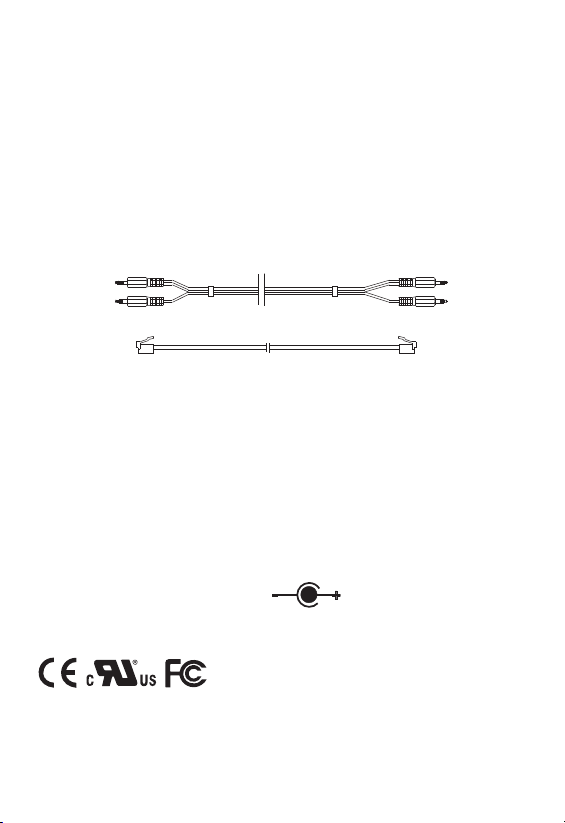
III.1 ACCESSORIES
Compucessory 55251, 55252, 55253, and 55254 Telephone &
Multimedia Amplifier Kits come with the following accessories to help
you connect to your telephone set or computer.
1. One Headset.
2. One pair of Computer Patch Cable (See below).
3. Telephone Patch Cable with RJ-11 Modular Plugs (See below).
4. Screwdriver Pin.
III.2 SPECIFICATIONS
Standard Operating Voltage 3V DC
Operating Current (Max) 9 mA
Standby Current 200 mA
Standby Mode Activation 2~3 min. without signal
Amplifier Gain – Speaker 13 dB (Max)
Battery UM-3 x 2 (size "AA")
Adapter DC Input 6V~9V DC
(Adapter not included)
– Microphone 30 dB (Max)
Standards Approval
12
ENGLISH
Téléphone
Ordinateur
Merci pour avoir fait l'acquisition d'un kit d'amplificateur téléphonique &
multimédia de Compucessory. Cette unité est conçue et développée dans le but
d'offrir aux utilisateurs occupés, que ce soit à domicile ou au bureau, le confort
et la commodité d'employer le téléphone et l'ordinateur avec une seule unité en
libérant leurs mains pour des tâches plus importantes. Les amplificateurs
Compucessory fonctionnent avec la plupart des téléphones du commerce et des
systèmes sur le marché, à l'exception des téléphones ayant le clavier de
numérotation à l'intérieur du combiné.
Ce guide vous fera parcourir l'installation de base et les opérations normales
de votre amplificateur Compucessory :
PARTIE I SE METTRE À L'AISE
I.1 Compréhension des commandes.
I.2 Connexion et préparations.
I.2.1 Branchement sur le téléphone.
I.2.2 Branchement sur l'ordinateur.
I.2.3 Branchement sur le casque d'écoute.
I.2.4 Configuration de l'unité de commande
I.3 Caractéristiques et fonctions
I.3.1 Alimentation externe en courant continu (option)
I.3.2 Interrupteur marche/arrêt
I.3.3 Commande rotative de volume transmis
I.3.4 Interrupteur d'application téléphone/ordinateur
I.3.5 Interrupteur d'application casque d'écoute/combiné
I.3.6 Interrupteur de sourdine
PARTIE II FONCTIONNEMENT INITIAL
I.3.7 Commande coulissante du volume de réception
II.1 Communication téléphonique
II.1.1 Réception d'appels/établissement de communications en
employant le casque d'écoute
II.1.2 Utilisation du casque d'écoute avec l'ordinateur
II.2 Recherche des pannes
PARTIE III ACCESSOIRES & SPÉCIFICATIONS
III.1 Accessoires
FRANÇAIS
III.2 Spécifications
13

PARTIE I SE METTRE À L'AISE
I.1 Compréhension des commandes
INTERRUPTEURS PRINCIPAUX ET INTERFACE PRINCIPAL
1. Prise externe d'alimentation en courant continu (6V continus à 9V
continus) – adaptateur externe NON fourni
2. Interrupteur de configuration téléphonique
3. Prise <Entrée de ligne> (stéréo, diamètre 3.5mm) de la sortie de
ligne de l'ordinateur
4. Prise <Sortie de ligne> (stéréo diamètre 3.5mm) de l'entrée de
ligne de l'ordinateur
5. Interrupteur <Marche/Arrêt>
6. Commande rotative du volume transmis du microphone
7. Interrupteur <Sourdine>
8. Interrupteur d'application <Téléphone/Ordinateur>
9. Prise de casque d'écoute d'ordinateur (stéréo, diamètre 3.5mm) de
la fiche haut-parleur
10. Prise de casque d'écoute d'ordinateur (stéréo, diamètre 3.5mm)
de la fiche microphone
11. Interrupteur d'application <Casque d'écoute/Combiné>
12. Prise modulaire pour casque d'écoute téléphonique
13. Commande coulissante du volume de réception
14. Prise modulaire pour combiné téléphonique
15. Prise modulaire pour l'entrée de l'unité téléphonique
16. Porte de compartiment des batteries (emploie deux batteries de
taille AA)
14
FRANÇAIS
I.2.1 Branchement sur le téléphone
Débranchez le combiné de votre unité de base de téléphone et
insérez-le dans la prise modulaire (14) pour combiné téléphonique.
Employez le cordon téléphonique fourni avec la prise modulaire RJ-11
des deux côtés pour brancher l'unité de commande sur votre téléphone.
Enfichez une extrémité du cordon dans votre unité de base (A), et
l'autre extrémité dans la prise modulaire (15) d'entrée de l'unité
téléphonique àl'arrière de votre unité. (voir l'illustration ci-dessous)
I.2.2 Branchement sur l'ordinateur (inutile lorsqu'on emploie l'unité
uniquement avec le téléphone)
Branchez cette unité sur votre ordinateur avec le câble audio fourni.
Les fiches portent un code couleur selon la norme universelle d'entrée
de ligne et de sortie de ligne. En d'autres termes, la sortie de ligne
haut-parleur est verte, et l'entrée de ligne du microphone est bleue
pour l'ordinateur.
BRANCHEMENT SUR L'UNITÉ :
La fiche verte se branche sur la prise "Entrée de ligne" (également
verte) (3).
La fiche bleue se branche sur la prise "Sortie de ligne" (également
bleue) (4).
BRANCHEMENT SUR LA CARTE SON DE L'ORDINATEUR :
La fiche verte se branche sur la prise "Sortie de ligne" ou "Sortie
haut-parleur" (également verte).
La fiche bleue se branche sur la prise "Entrée de ligne" (également
bleue).
FRANÇAIS
15
I.2.3 Branchement du
casque d'écoute
L'amplificateur offre le choix d'employer
le casque d'écoute téléphonique (avec
une fiche modulaire RJ-11) ou un casque
d'écoute stéréo d'ordinateur (avec des
fiches de diamètre 3,5 mm) selon votre
préférence. Pour les utilisateurs qui exigent un
câble à débranchement
rapide
son stéréo dans leur application multimédia, vous
pouvez choisir parmi le grand assortiment de notre série Compucessory
de casques d'écoute pour ordinateurs.
Le casque d'écoute fourni avec l'amplificateur est accompagné par un câble
à débranchement rapide (Q), vous apportant commodité et compatibilité.
BRANCHEMENT SUR LE CASQUE D'ÉCOUTE TÉLÉPHONIQUE :
Branchez le casque d'écoute téléphonique sur la prise modulaire RJ-11
(12) sur le panneau avant de l'unité
BRANCHEMENT SUR LE CASQUE D'ÉCOUTE D'ORDINATEUR :
Ceci s'applique uniquement au casque d'écoute d'ordinateur ayant des fiches
séparées de microphone et de haut-parleur. Insérez la fiche haut-parleur du
casque d'écoute dans la prise sur le panneau avant portant la signalétique
"Speaker" (9) et la fiche microphone dans la prise portant la signalétique
"Microphone" (10).
16
FRANÇAIS

REMPLACEMENT DES BATTERIES :
Appuyez légèrement sur le couvercle
du compartiment (4) et faites le
glisser vers l'extérieur. Installez les
batteries en respectant les
polarités (+, –) selon le schéma
des batteries à l'intérieur du
compartiment. Refermez le
couvercle et mettez l'unité "SOUS
TENSION". Deux batteries AA sont
nécessaires. On recommande les
piles alcalines.
I.2.4 Configuration de l'unité de commande
L'interrupteur de configuration téléphonique à 6 positions (2) au niveau du
panneau latéral, vous permet de sélectionner le bon réglage pour que votre
unité fonctionne avec votre unité de base téléphonique. L'interrupteur a 6
positions, qui sont respectivement (1 - 2 - 3 - 4 - 5 - 6). Mettez le casque
d'écoute sur votre tête et faites commuter l'interrupteur d'application casque
d'écoute/combiné (11) sur la position "Headset" (casque d'écoute). Veillez
à baisser le réglage du volume afin de protéger votre audition. Vérifiez que
l'interrupteur d'application téléphone/ordinateur (13) est mis sur la position
Téléphone, si cela n'est pas le cas, veuillez vous en assurer. A présent,
faites coulisser l'interrupteur de configuration à travers les positions 1-6
jusqu'à ce que vous entendiez une tonalité distincte.
Si vous recevez une tonalité nette, alors la connexion de réception fonctionne.
Remarquez qu'il peut y avoir 2 réglages correspondants; sélectionnez le
réglage donnant la tonalité la plus nette, ou bien l'un ou l'autre si les deux
fonctionnent de la même façon. Il existe au moins un réglage qui correspond
à votre téléphone.
FRANÇAIS
17
I.3.1 Prise externe d'alimentation en courant continu (1)
L'unité offre le choix d'employer
une alimentation externe en courant
continu en option, à la place de
batteries. Lorsque vous faites
l'acquisition d'un adaptateur secteur,
assurez-vous que la polarité de
sortie (tension +/-) correspond bien.
Et la tension doit être comprise entre
6 V continus et 9 V continus.
I.3.2 Interrupteur ON/OFF (MARCHE/ARRET) (5)
Bien que l'unité reviendra automatiquement au mode veille après toute
durée prolongée d'inactivité, vous devez encore la couper lorsqu'on ne
l'utilise pas pendant une durée prolongée, afin de prolonger la durée de
vie des batteries. Le fait de couper l'unité n'affecte pas la communication
téléphonique normale via le combiné, de sorte que vous pouvez répondre
et passer des appels téléphoniques via le combiné, comme d'habitude.
I.3.3 Commande rotative du volume transmis
L'amplificateur vous permet d'ajuster le volume du volume sonore sortant,
et les fréquences élevées et basses associées à celui-ci. Pour régler
finement ce volume transmis, passez un coup de fil et parlez comme le
feriez d'habitude en employant le casque d'écoute. Faites tourner
lentement la commande rotative du volume transmis (6) avec la petite
broche tournevis fournie jusqu'à obtenir le niveau souhaité. La personne
de l'autre côté qui dialogue avec vous doit être en mesure de vous dire si
vous avez obtenu le son optimal et le niveau optimal de tonalité. Dès que
ceci est réglé, on ne devrait pas avoir besoin de faire de nouveaux
ajustements à l'avenir. (Voir l'illustration en page suivante)
ATTENTION : Faites attention lorsque vous ajustez la commande du volume,
car en tournant le bouton vers la valeur maximum, vous pouvez provoquer un
sifflement. Diminuez le volume et le sifflement disparaîtra, mais en augmentant
le volume en permanence, vous pourriez endommager l'unité.
18
FRANÇAIS
I.3.4 Interrupteur d'application Téléphone/Ordinateur
L'interrupteur d'application Téléphone/Applicateur (8) vous permet de
choisir entre un fonctionnement avec un ordinateur ou une communication
téléphonique. Si le résultat de cette commutation n'aboutit à aucun son,
veuillez d'abord vérifier que l'interrupteur d'application Casque
d'écoute/Combiné est réglé correctement.
I.3.5 Interrupteur d'application Casque d'écoute/Combiné
L'interrupteur d'application Casque d'écoute/Combiné (11) vous permet
de choisir entre l'utilisation du combiné de votre unité de base de
téléphone ou du casque d'écoute téléphonique fourni. De nouveau,
n'oubliez pas de mettre l'interrupteur d'application Téléphone/Ordinateur
sur la bonne position, avant utilisation.
FRANÇAIS
19

I.3.6 Interrupteur de sourdine
L'interrupteur de sourdine (7) vous permet de placer un appelant en
attente en enfonçant le bouton en pressant. Dès que le bouton est
enfoncé, l'appelant ne peut vous entendre, mais vous pouvez encore
l'entendre. Pour reprendre la communication, pressez à nouveau sur
le bouton afin de le relâcher.
I.3.7 Commande coulissante du volume de réception
L'interrupteur coulissant de commande de volume de réception (13)
permet d'ajuster le volume sonore du haut-parleur du casque d'écoute
ou du boîtier du haut-parleur. En faisant glisser le bouton vers le haut
ou vers le bas, vous pouvez obtenir le volume souhaité.
20
FRANÇAIS
PARTIE II FONCTIONNEMENT INITIAL
II.1.1 Réception d'appels/établissement de communications en
employant le casque d'écoute
Mettez l'interrupteur d'application Téléphone/Ordinateur sur la
position Téléphone. Soulevez le combiné de son support et
placez-le décroché, si le téléphone possède une fonction mains libres,
sélectionnez l'interrupteur casque d'écoute et pressez sur le bouton
"Téléphone à haut-parleur" (Speakerphone). Assurez-vous que la
position casque d'écoute (Headset) a bien été sélectionnée sur
l'interrupteur d'application Casque d'écoute/Combiné (17). Après
avoir terminé un appel, replacez le combiné sur son support de la
façon habituelle ou bien coupez le bouton Speakerphone. N'oubliez
pas de presser sur le bouton Mute (Sourdine) (8) pour mettre un
appelant en attente et pressez simplement à nouveau sur celui-ci pour
interrompre la fonction sourdine.
FRANÇAIS
21
 Loading...