

Compucessory 25654 User Manual
IMPORTANT SAFETY INSTRUCTIONS (SAVE THESE INSTRUCTIONS)
This manual contains important safety instructions.
Please read and follow all instructions carefully during
installation and operation of unit. Read this manual
thoroughly before attempting to unpack, install, or operate.
CAUTION! To prevent the risk of re or electric shock,
install in a temperature and humidity controlled indoor
area, free of conductive contaminants. (Please see
specications for acceptable temperature and humidity
range).
CAUTION! To reduce the risk of electric shock, do not
remove the cover except to service the battery. No user
serviceable parts inside except for battery.
CAUTION! Hazardous live parts inside can be energized
by the battery even when the AC input power is
disconnected.
CAUTION! UPS must be connected to an AC power
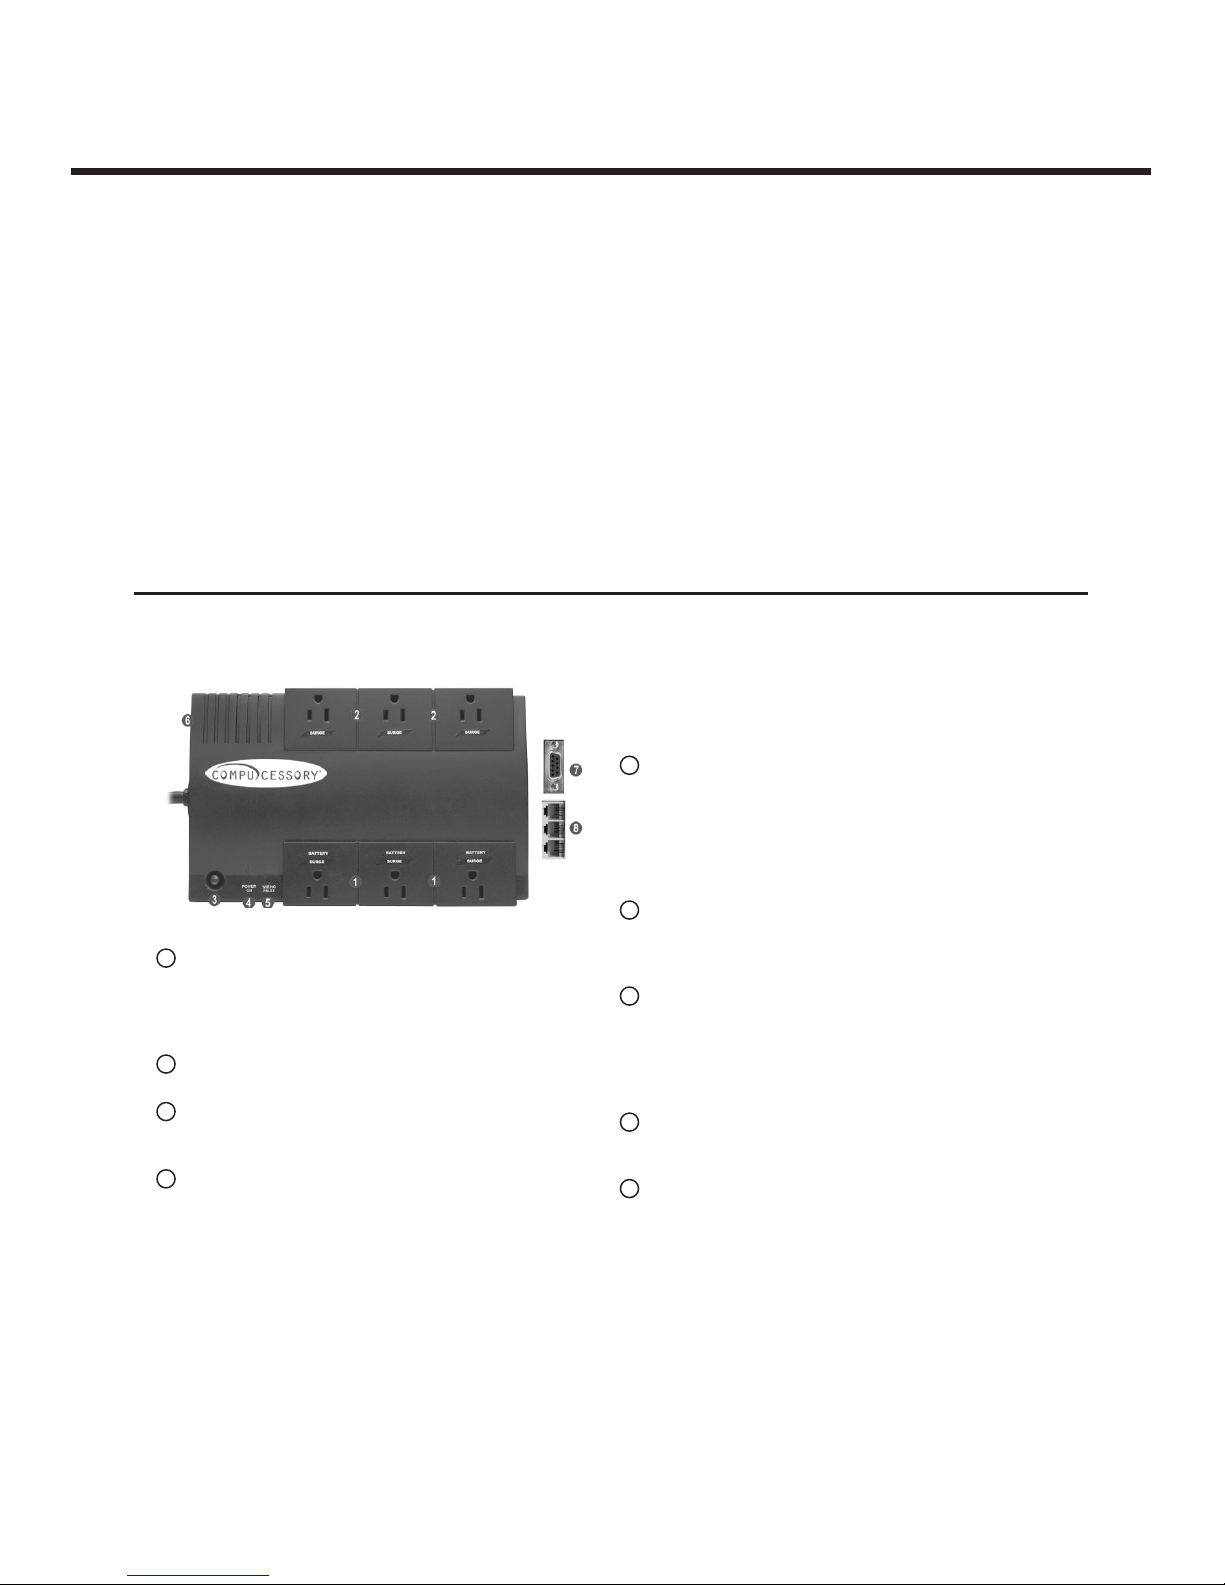
DESCRIPTION
Battery/Surge Outlets
Provides three battery powered/surge outlets
for connected equipment and insures temporary
uninterrupted operation of your equipment during a
power failure.
Full-Time Surge Protection Outlets
Provides three always on surge suppression outlets.
Power Switch
Can be used as a mater on/off switch for equipment
connected to the battery power supplied outlets.
Power On Indicator
This LED is illuminated when the utility condition is
normal and the UPS outlets are providing power, free of
surges and spikes.
Electrical Wiring Fault Indicator
This LED indicator will illuminate to warn the user that a
wiring problem exists, such as bad ground, miss ground
or reversed wiring. If this is illuminated, user is advised
to disconnect all electrical equipment from the outlet and
have an electrician check to ensure the outlet is properly
wired.
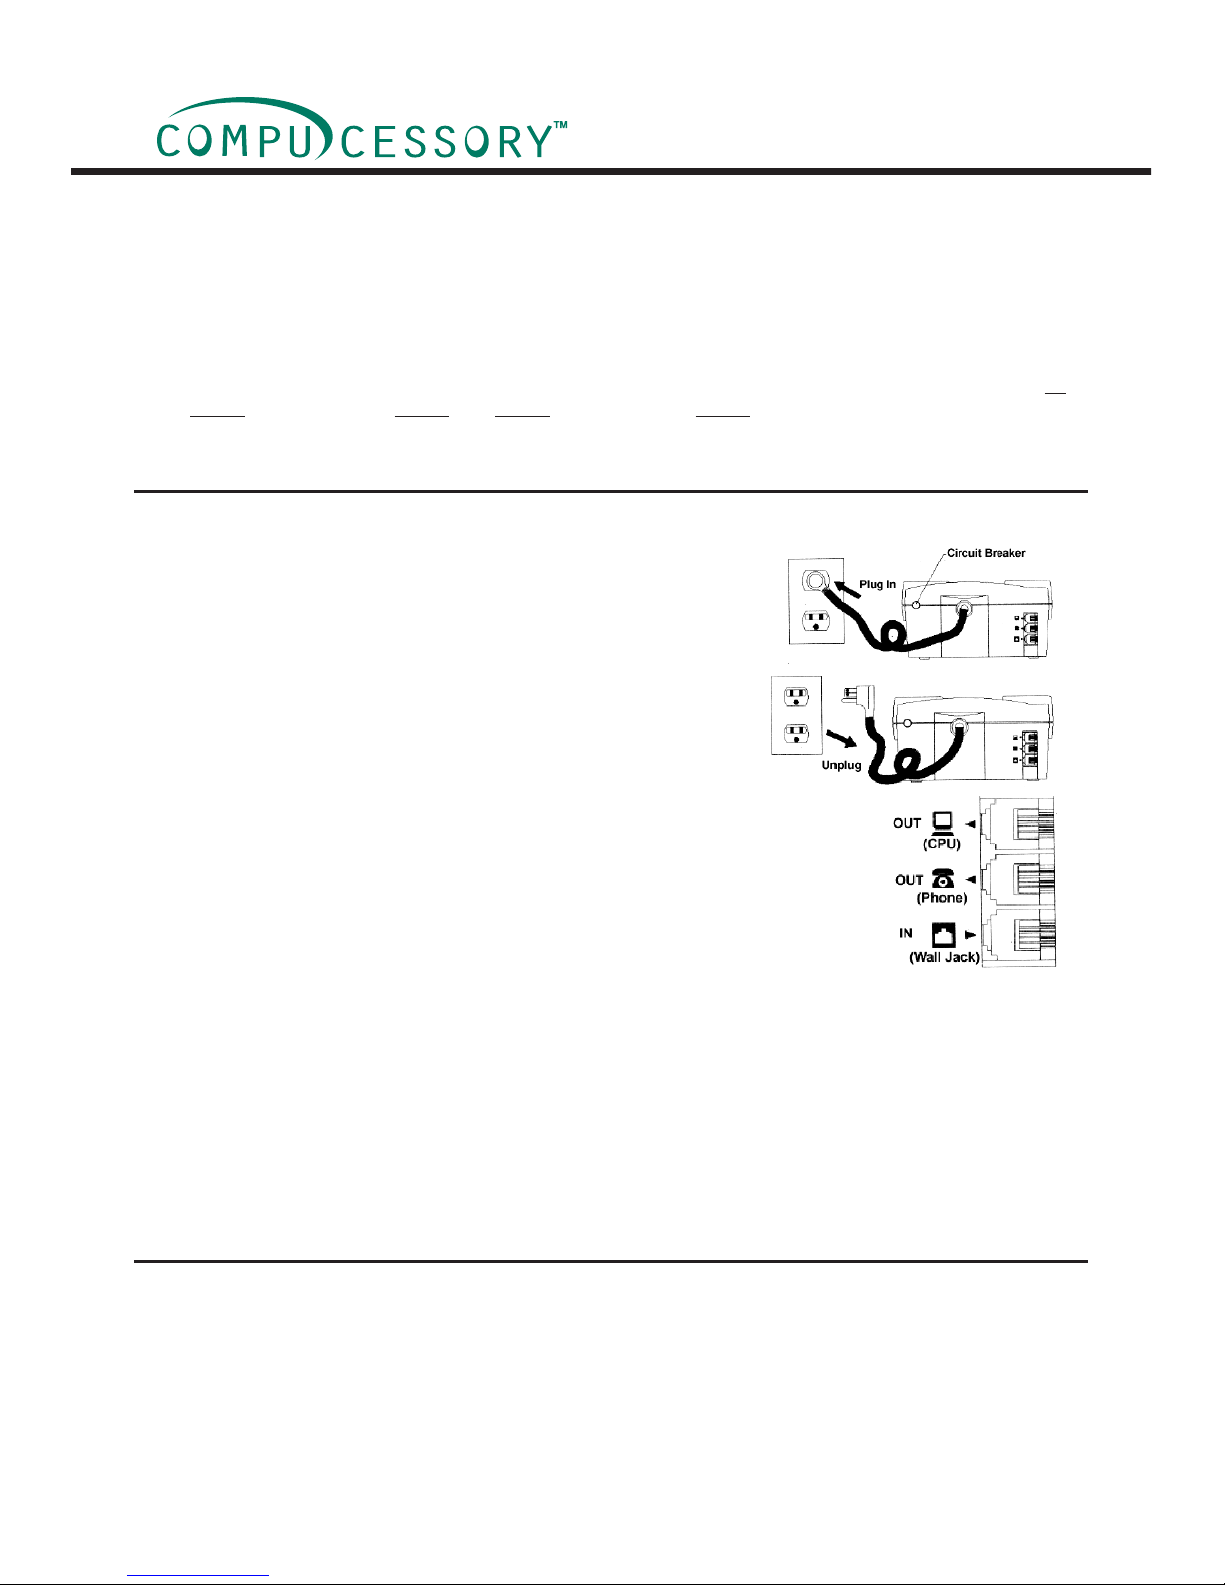
Circuit Breaker
Located on the side of the UPS, the circuit breaker serves
to provide overload and fault protection. Under normal
operating conditions, the circuit breaker is depressed.
Serial Port to PC
This port allows connection and communication from
the DB-9 serial port on the computer to the UPS unit.
The UPS communicates its status to the PowerPanel™
software. This interface is also compatible with the UPS
service provided by Windows NT and Windows 2000.
Communication Protection Ports
Communication protection ports will protect any standard
modem, fax or telephone line.
Outlets Designed for AC Adapters
Allows six AC power adapter blocks to be plugged into
the UPS without blocking adjacent outlets.
INSPECTION
The box should contain the following:
(1) PowerPanel™ software (oppy disk); (1) serial interface cable (DB-9);
(1) telephone communication cable; (1) user manual;
(1) USB adapter ; (1) UPS unit.
outlet with fuse or circuit breaker protection. Do not plug
into an outlet that is not grounded. If you need to deenergize this equipment, turn off and unplug the unit.
CAUTION! To avoid electrical shock, turn off the unit and
unplug it from the AC power source before servicing the
battery or installing a computer component.
DO NOT USE FOR MEDICAL OR LIFE SUPPORT
EQUIPMENT! Does not sell products for life support or
medical applications. DO NOT use in any circumstance
that would affect operation or safety of any life support
equipment or with any medical applications or patient
care.
DO NOT USE WITH OR NEAR AQUARIUMS! To
reduce the risk of re or electric shock, do not use with or
near an aquarium. Condensation from the aquarium can
cause the unit to short out.
Model: 25654
425VA/230W UPS Backup System
1
5
6
7
8
9
1
2
3
4
1. Make sure that the total Volt-Amp (VA) requirements of your computer, monitor and peripheral equipment does
not exceed 425VA.
2. Insure that the equipment plugged into the three battery power-supplied outlets does not exceed the UPS unit’s
rated capacity(425VA/230W for model # 25654). If rated unit capacities are exceeded, an overload condition may
occur and cause the UPS unit to shut down and the circuit breaker to trip.
3. If the power requirements of your equipment are listed in units other than Volt-Amps (VA), convert Watts (W)
or Amps (A) into VA by doing the calculations below. Note: The below equation only calculates the maximum
amount of VA that the equipment can use, not what is typically used by the equipment at any one time. Users
should expect usage requirements to be approximately 60% of below value to estimate power requirements:
Watts (W) x 1.82 = VA or Amps (A) x 120 = VA
Add the totals up for all pieces of equipment and multiply this total by .6 to calculate actual requirements.
There are many factors that can effect the amount of power that your computer system will require. The total load
that you will be placing on the battery-powered outlets should not exceed 80% of the unit’s capacity.
HOW TO DETERMINE THE POWER REQUIREMENTS OF YOUR EQUIPMENT
1. Your new UPS may be used immediately upon receipt. However,
recharging the battery for at least four hours is recommended to
insure that the battery’s maximum charge capacity is achieved. Charge
loss may occur during shipping and storage. To recharge the battery,
simply leave the unit plugged into an AC outlet. The unit will charge in
both the on as well as the off position.
2. If you wish to use the software, connect the enclosed serial
interface cable to the serial port on the UPS and an open serial port on
the computer. If you are not going to use the software, you do not need
to connect the cable.
3. With the UPS unit off and unplugged, connect your computer, monitor,
and any externally powered data storage device (Zip drive, Jazz drive,
Tape drive, etc…) into the battery power supplied outlets. Plug your
peripheral equipment (printer, scanner, speakers) into the full-time
surge protection outlets. DO NOT plug a laser printer, copier, space heater, vacuum
or other large electrical device into the UPS. The power demands of these devices
will overload and possibly damage the unit.
4. To protect a fax, phone or modem, connect a telephone cable from the wall jack outlet to
the in jack of the UPS. Connect a telephone cable from the out jack with the CPU icon
to the modem port on your computer. The out jack with the telephone icon can be used
to protect a telephone or fax machine.
5. Plug the UPS into a 2 pole, 3 wire grounding receptacle (wall outlet). Make sure the wall
branch outlet is protected by a fuse or circuit breaker and does not service equipment
with large electrical demands (e.g. refrigerator, copier, etc…). Avoid using extension cords. If used, the extension
cord must be rated for 15 amps.
6. Depress the power switch to turn the unit on. The power on indicator light will illuminate and the unit will “beep”
once.
7. If an overload is detected, an audible alarm will sound and the unit will emit one long beep. To correct this, turn
the UPS off and unplug at least one piece of equipment from the battery power supplied outlets. Wait 10 seconds.
Make sure the circuit breaker is depressed and then turn the UPS on.
8. Your UPS is equipped with an auto-charge feature. When the UPS is plugged into an AC outlet, the battery will
automatically recharge.
9. To maintain optimal battery charge, leave the UPS plugged into an AC outlet at all times.
10. To store your UPS for an extended period, cover it and store with the battery fully charged. Recharge the battery
every three months to insure battery life.
Hardware Installation Guide
POWERPANEL™ SOFTWARE
OVERVIEW
PowerPanel™ version 2.1.4 or greater is designed for use with Windows 95, Windows 98, Windows Me, Windows
NT, Windows 2000, and Windows XP. The latest version can be downloaded from www.cyberpower-eu.com/download.html. It works in conjunction with the UPS to provide full protection of valuable computer systems, applications
and data. In the event of a power failure, PowerPanel™ automatically saves and closes open les under auto-assigned le names or existing les names after a software controlled delay. The computer and UPS are auto-matically
shutdown to conserve battery power. Files with auto-assigned names will be saved under C:\PCTemp, where C is
the name of your main hard drive.
2
Files that have previously been saved will be saved in their original location.
PowerPanel™ is equipped with a Scheduled Shutdown feature which can automatically save and close open les
and then shutdown the computer and UPS at a user specied date and time. Use of this feature is optional and is
not required for the power failure shutdown to occur.
The use of the PowerPanel™ software is optional. The UPS unit will provide full surge suppression and battery
backup without the software. You must use the software if you wish to have the automatic shutdown feature.
INSTALLATION GUIDE
(UPS can provide surge suppression and battery backup without the software. However, if you need to schedule for
UPS Auto-shutdown, then it is necessary to install the software.)
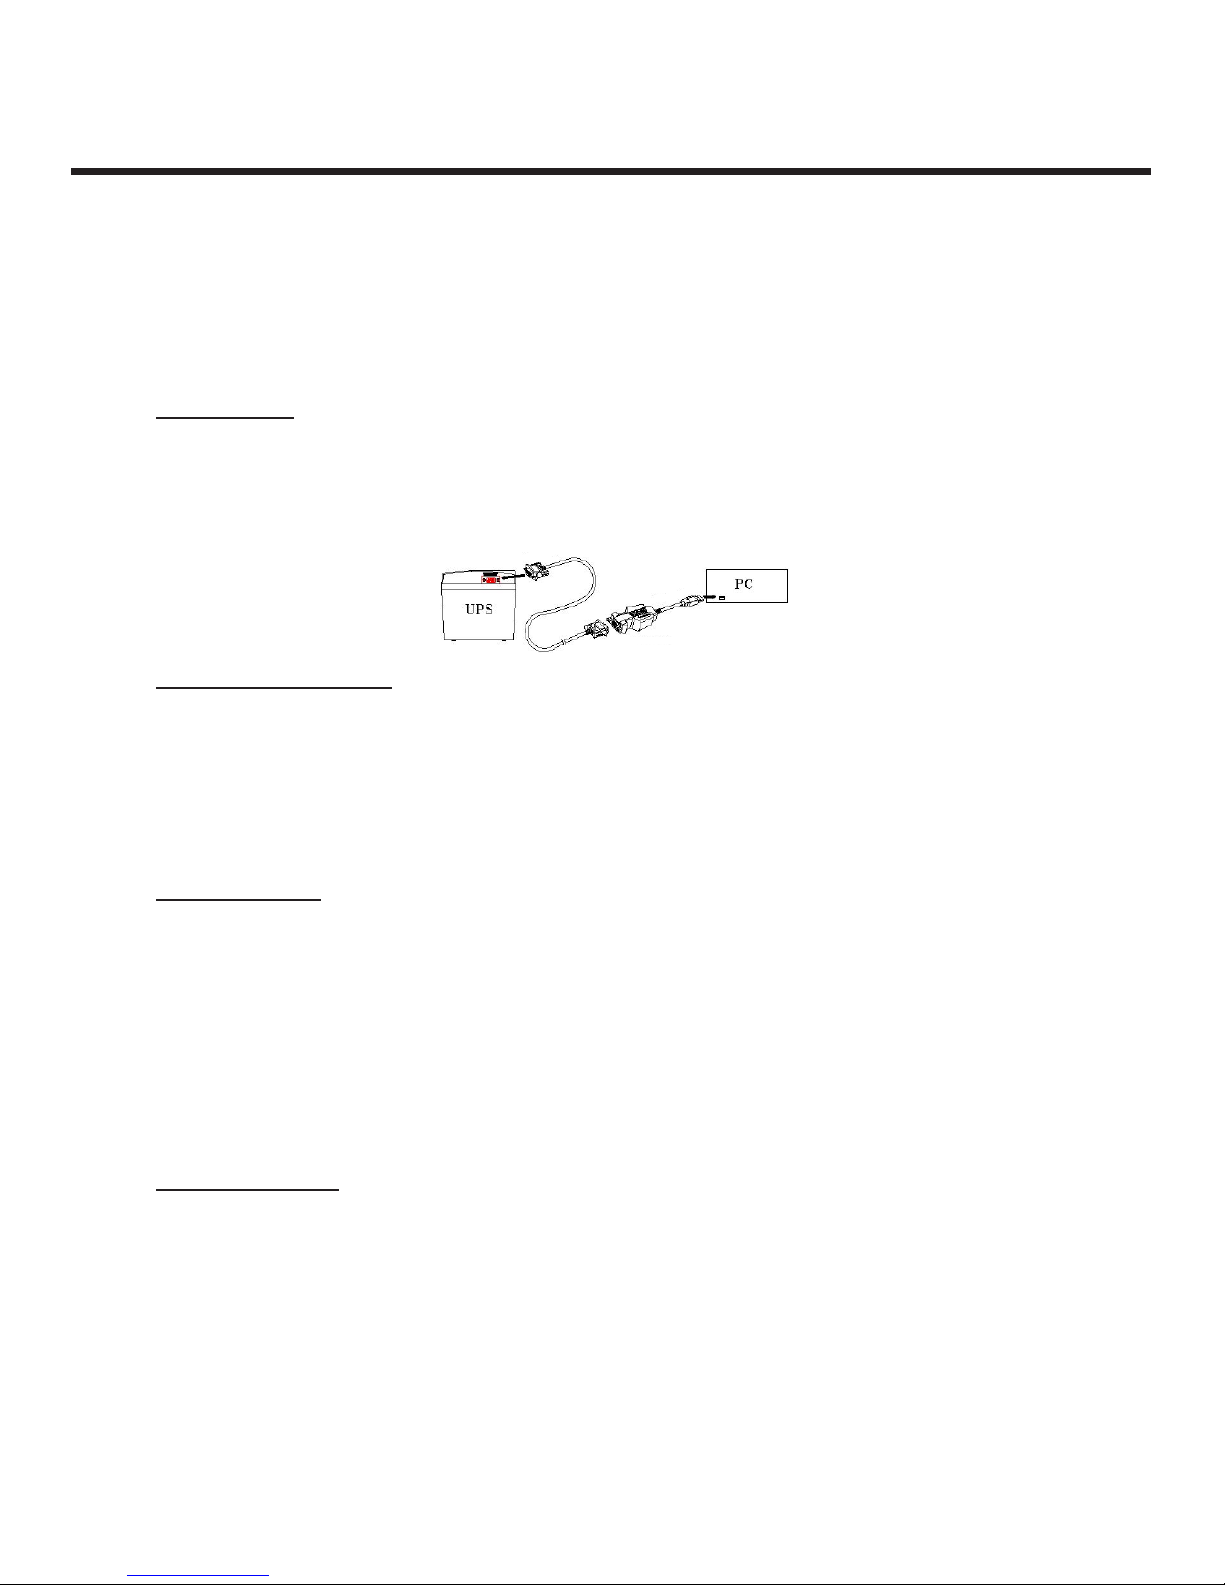
USB Function (Optional)
1. Turn off your UPS
2. Connect the serial interface cable to your UPS and the open serial port on the rear panel of the computer. If you
would like to use USB interface, please connect the USB adapter with the Serial Cable then connect the USB
to your computer. (See the gure)
3. Plug the UPS into an AC outlet, turn the UPS on and start your computer.
4. Follow the instructions on the User’s Manual to complete the installation.
For Windows 95 /98 /ME
1. Turn the UPS off and unplug it.
2. Connect the serial interface cable to serial port on the UPS and an open serial port on the back of the computer.
(Note: You must use the serial cable that was supplied with the unit).
3. Plug the UPS into an AC outlet, turn the UPS on and start your computer.
4. Once the computer was nished booting, insert the PowerPanel™ disk into the oppy drive.
5. Click on Start, point to Settings, and then click Control Panel.
6. Double-click on Add / Remove Programs.
7. Click the Install Button, and follow the on-screen instructions.
8. When the installation is completed, remove the oppy disk.
For Windows NT
1. Click on Start, point to Settings, then click Control Panel.
2. Double-click the UPS Icon.
3. Remove the checkmark from the box labeled UPS is installed on, and Click OK.
4. Acknowledge the message that the UPS is in an unknown state and exit to the desktop.
5. Shutdown your computer.
6. Turn off the UPS and unplug it.
7. Connect the serial interface cable to serial port on the UPS and an open serial port on the back of the computer.
(Note: You must use the serial cable that was supplied with the unit).
8. Plug the UPS into an AC outlet, turn the UPS on and then start your computer.
9. Click on Start, point to Settings, then click Control Panel.
10. Double-click on
Add / Remove Programs.
11. Click the
Install Button and follow the on-screen instructions.
12. When the installation is complete, remove the oppy disk.
For Windows 2000
1. Click on Start, point to Settings, then click Control Panel.
2. Double-click on Power Options.
3. On the UPS Tab, click Select.
4. In the UPS selection dialog box, under Manufacturers, select None.
5. Exit to the desktop.
6. Shutdown the computer, then turn the UPS off and unplug it.
7. Connect the serial interface cable to serial port on the UPS and an open serial port on the computer. (Note: You
must use the serial cable that was supplied with the unit).
8. Plug the UPS into an AC outlet, turn the UPS on, and then start your computer.
9. Insert the PowerPanel™ software disk into the oppy drive.
10. Click on
Start, point to Settings, and then click Control Panel.
11. Double-click on
Add / Remove Programs.
12. Click the
Install Button, and follow the on-screen instructions.
13. When the installation is completed, remove the oppy disk.
Model: 25654
425VA/230W UPS Backup System
3
 Loading...