

Page 1
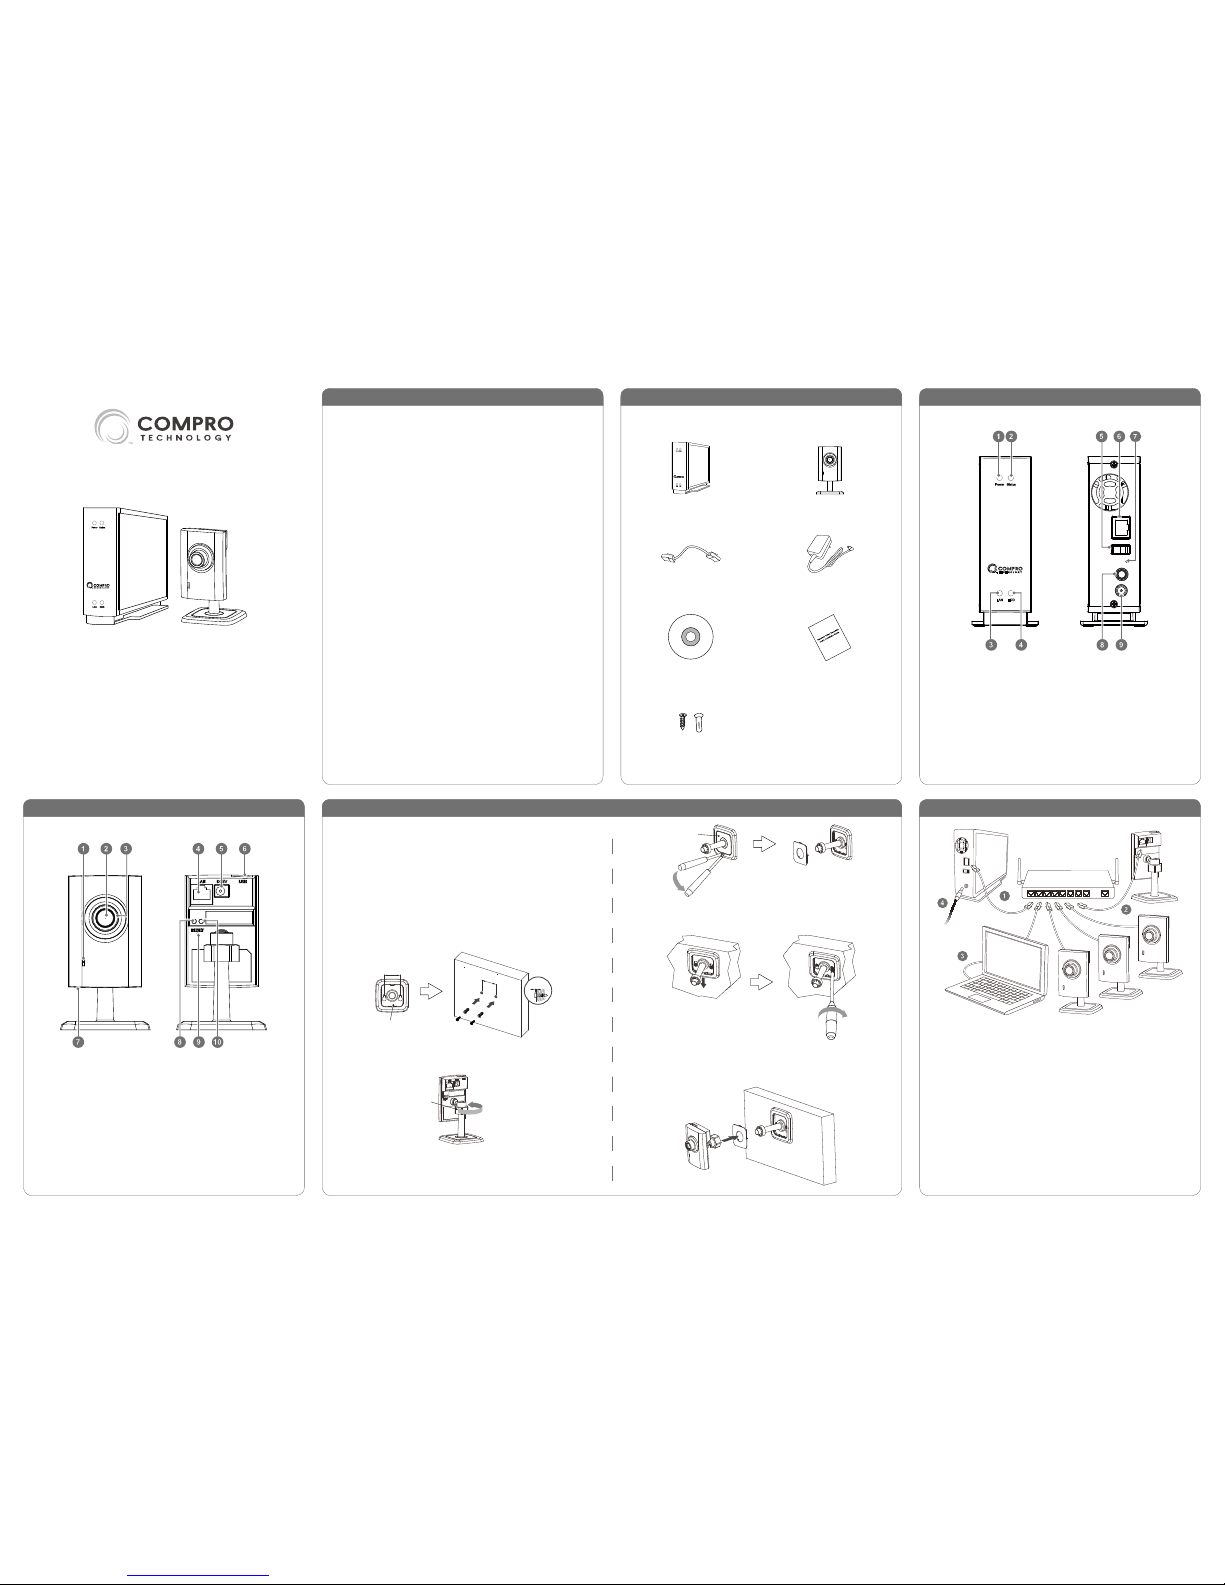
Please check the package contents on your hand. If anything is
missing, do not hesitate to contact your local distributor.
RS-2104 network video recorder
x 1
CS60 network camera x 4
RJ-45 LAN cable x 5 DC12V power adapter x 1
DC5V power adapter x 4
Installation CD Quick installation guide
(CS60) screw for ceiling mount
x 8, screw anchor x 8
Before starting using the Compro video surveillance products in the
bundle package, please carefully read the following information.
• Please only use the power adapter that is supplied with the
product.
• Please avoid walking on the power cord or placing heavy objects
on it.
• Please do not block or cover the ventilation openings on the
network video recorder while the unit is in operation
• Place the product on an even surface at all times to avoid damage
caused by falling o.
• Do not place this unit around products that produce heat, such as
television or microwave oven; keep the product away from direct
sunshine.
• Unplug the power cord before cleaning the product.
• Do not shake, move or disturb the network video recorder when it
is in operation, as such actions may result in the malfunction of the
device.
• Power o the unit as soon as it is found smoking or smelt unusual.
• Please do not disassemble or remodel the product; it may cause
damage or re.
1. Connect an Ethernet cable between the NVR and your network
router/switch.
2. Connect the LAN ports of the cameras to your network router/
switch with Ethernet cables.
3. Connect an Ethernet cable between your PC and your network
router/switch that also connects to the cameras and the NVR.
4. Connect the power adapters for the cameras and the NVR, and
then power them on.
Quick Installation Guide
Package ContentsImportant Notice
Connect the Cables
NVR Bundle Package
Front View Rear View
1. Power LED
2. Status LED
3. LAN LED
4. HDD LED
5. USB port
6. LAN port
7. Reset button
8. Power button
9. Power connector
Hardware Overview - RS-2104
Front View Rear View
1. LED status indicator
2. Lens
3. Focus adjustment ring
4. Ethernet port
5. Power connector
6. USB wireless adapter port
7. Microphone pinhole (on the
bottom)
8. Connection status indicator
9. Reset button
10. Network speed indicator
Hardware Overview - CS60
You can opt for mounting the camera on a wall or ceiling if needed.
The following section explains how to mount your camera.
1. Drill 2 mounting holes on the mounting surface. While you are at
it, bear in mind that there will have to be a minimum space of 2.5
mm (0.098 inch) between the screw head and the mounting surface. Also, the 2 mounting holes on the wall or ceiling should be
spaced exactly 31 mm (1.22 inch) apart to correspond to the position of screw holes on the camera's bracket base. Then, if you're
mounting on a concrete wall, insert a screw anchor into each of
the mounting holes.
STEP 1
31mm
31mm
2.5mm
Bracket
Base
2. Loosen the fastening hex nut to detach the bracket from the camera.
STEP 1
STEP 2
31mm
31mm
2.5mm
Fastening Nut
Bracket
Base
3. Remove the base cover by inserting a at blade screwdriver into
the small hole on the bracket base and then pressing the screwdriver downward.
STEP 3
Base
Cover
4. Put a screw into each of the mounting holes. Then secure the
bracket to the mounting surface.
STEP 3
STEP 4
Base
Cover
5. Finally, click the base cover back into position. After that, attach
the camera body back to the bracket and then adjust the camera
to the desired viewing angle.
STEP 5
Mount the Camera
Page 2
Listed below is the behavior of the LED indicators located at the
NVR's front panel.
LED Color State and Indication
Power Green/
Red
• Unlit – No power.
• Constant Green – System is powered on.
• Flashing Green – System is booting up.
Status Green/
Red
• Constant Green – System is ready for use.
• Flashing Green – Copying data via USB
port; when a USB device is successfully
mounted, the status LED flashes in
green in a period of 3 seconds.
• Flashing Red – Firmware upgrade is in
progress.
LAN Green/
Red
• Unlit – System is not connected to the LAN.
• Constant Green – System is connected
to the LAN.
• Constant Red – LAN connection error;
unable to obtain IP address.
• Flashing Green – Setup is in progress.
HDD Green/
Red
• Unlit – No HDD.
• Constant Green – HDD has been
mounted.
• Constant Red – Failed to mount HDD.
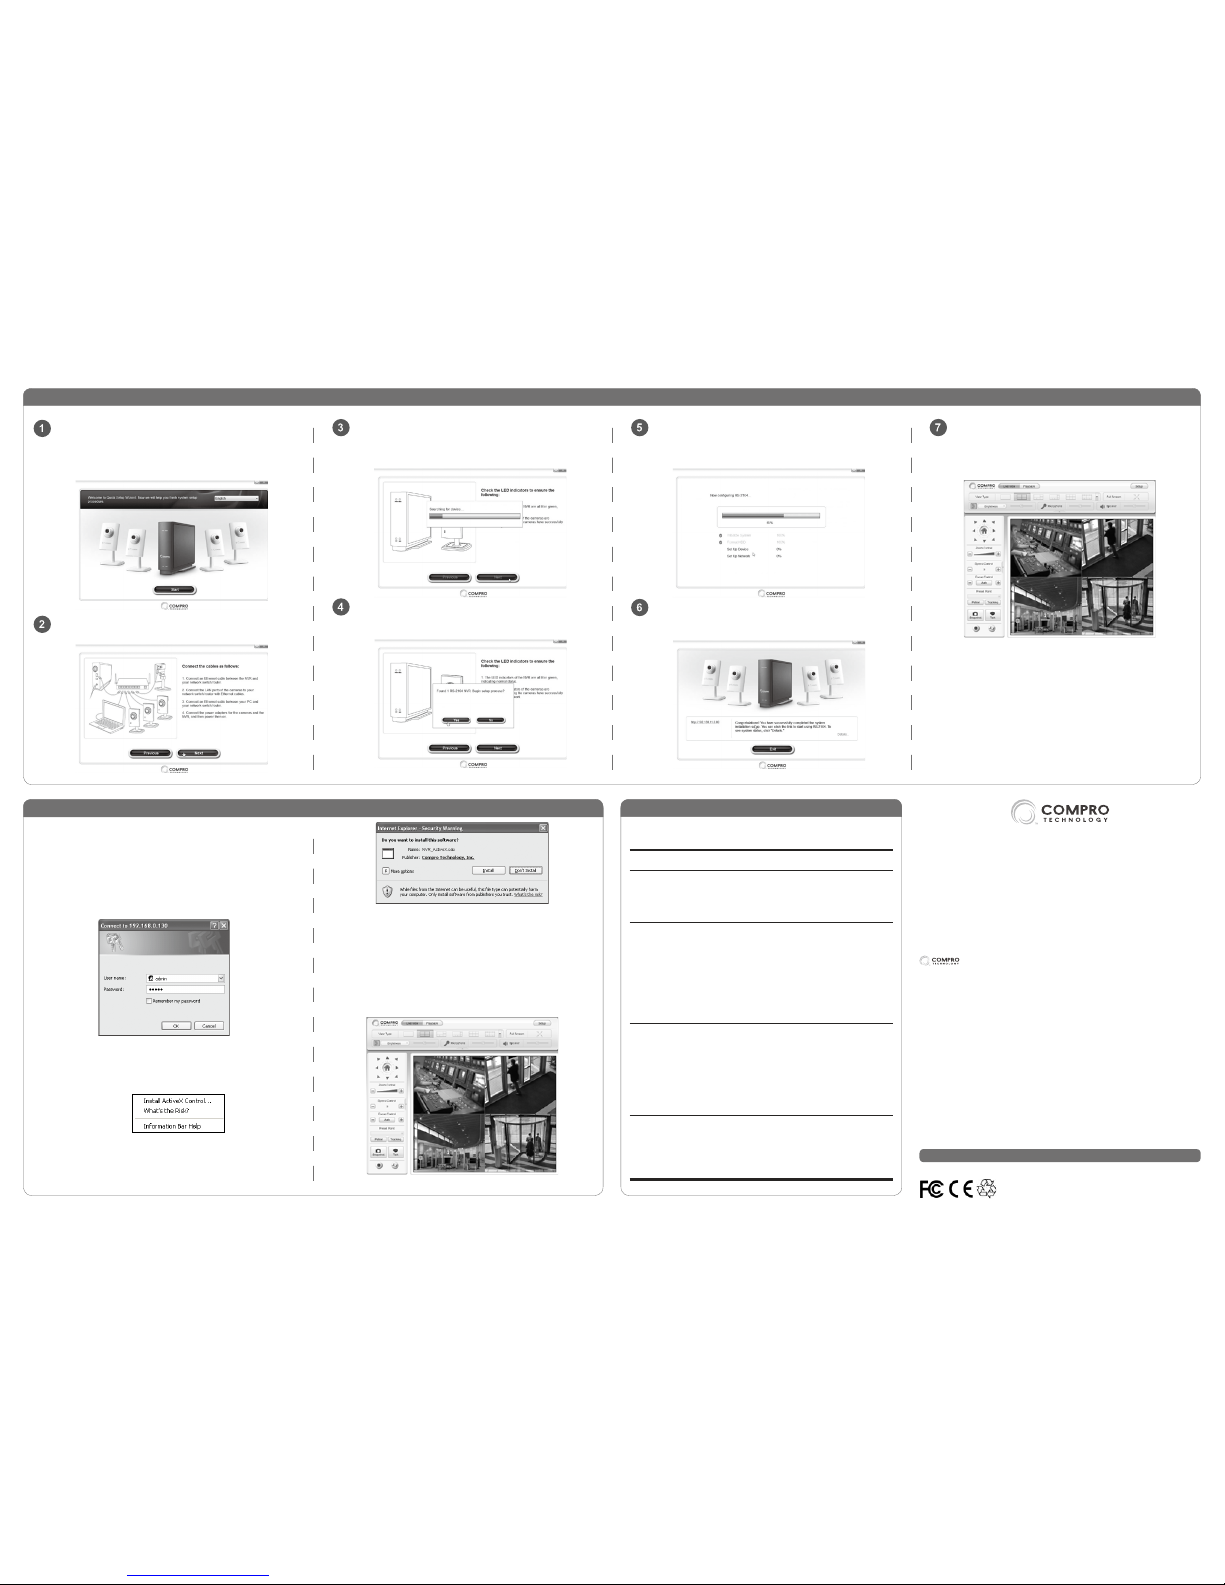
To log in to your NVR system using Internet Explorer:
1. Open the Internet Explorer on your Windows system.
2. Enter the NVR system's IP address in the address bar. (E.g.
192.168.0.100)
3. An "Enter Network Password" window that requests the user name
and password will appear; enter your user name and password
(both are "admin" by default) and hit [OK].
4. After valid user name and password are entered, Internet Explorer
will prompt the installation of NVR software from "Compro Technology, Inc."
5. Click on the warning message and choose "Install ActiveX Control."
6. And then the reconrmation dialog box will come up. Please press
[Install] twice to install NVR software.
7. Meanwhile, the Windows Security Alert dialog box may pop up.
When you see it, please click [Unblock] to unblock it from rewall.
8. Afterwards, Internet Explorer may pop up a Security Warning dialog box asking "Do you want to run this ActiveX control." Please hit
[Run] twice to run both the "Compro NVR LiveView ActiveX" and
"Compro NVR Playback ActiveX."
9. Now you have successfully logged in and can start monitoring
and managing your NVR system on Internet Explorer.
Log Into NVR on Internet Explorer
RS-2104 LED Indicators
Compro Technical Support Information
Before you request technical support, please check the troubleshooting
section in the user manual. You may ll out the online form (www.comprousa.
com/feedback/) or directly email to [email protected].
Compro Technology, Inc.
www.comprosecurity.com |Tel. +886 2 2918 0169 | Fax +886 2 2915 2389
3F, No.12, Alley 6, Lane 45, Pao Shin Road, Hsintien District, New Taipei City 231, Taiwan
© 2012 Compro Technology, Inc. All rights reserved.
Trademark
Compro Technology is the registered logo of Compro Technology,
Inc. All other company and product names mentioned in this document are
registered trademarks of the respective companies.
Restriction & Disclaimer
No part of this document may be copied or reproduced in any form or by any means
without the prior written consent of Compro Technology, Inc. Compro Technology
makes no warranties with respect to this documentation and disclaims any implied
warranties of merchantability, quality, or fitness for any particular purpose. The
information in this document is subject to change without prior notice.
Regulatory Notice
FCC Information: This device complies with Part 15 of the FCC Rules.
Operation is subject to the following two conditions: (1) This device may not
cause harmful interference, and (2) This device must accept any interference
received, including interference that may cause undesired operation.
P/N: 3GA0310837
Pub. 07AUG12
Initial Software Setup
Click the [X] button in the upper-right corner of the quick
setup wizard to exit the setup wizard. Then log in to the
system on Internet Explorer (steps are detailed in the next
section). The system is defaulted to continuous recording on
all channels after setup is complete.
The quick setup wizard will load the settings into your devices.
Please wait patiently and DO NOT interrupt the process. (If
more than one Compro NVR bundle product is found on your
network, the wizard will set up all the devices in sequence.)
Please make a note of the system's IP address in order to log in
to the system later manually. (Or click the link on the screen to
monitor the system right away on Internet Explorer.)
Refer to the user's manual on the installation CD for detailed information
Ensure that the LED indicators are lit as detailed on the
screen. Then click [Next] to search for Compro NVR bundle
products. (If you see a Windows Security Alert dialog box
during the search, please choose [Unblock].)
When Compro NVR bundle products are found, click [Yes]
to begin setup process for all the Compro NVR bundle
products.
Insert the installation CD into the CD-ROM drive of your
PC, and then a Quick Setup iWizard will start automatically.
(If "Autorun" has been disabled on your PC, please browse
the contents of the installation CD and double-click the
"QuickSetupWizard" executable to run the setup wizard.)
Ensure all cables and cords are connected properly and
securely. Then click [Next].
 Loading...