

Page 1

VideoMate X800
PCI TV Tuner Card
Start Up Guide
Compro Technology, Inc.
www.comprousa.com
Page 2

ii
Copyright © 2001-2005. Compro Technology, Inc. No part of this
document may be copied or reproduced in any form or by any means
without the prior written consent of Compro Technology, Inc.
Compro, VideoMate, Poladyne, Play with Power, and the Compro
logo are trademarks of Compro Technology, Inc. Other names and
marks are trademarks of their respective owners.
COMPRO makes no warranties with respect to this documentation
and disclaims any implied warranties of merchantability, quality, or
fitness for any particular purpose. The information in this document is
subject to change without notice. COMPRO reserves the right to
make revisions to this publication without obligation to notify any
person or entity of any such changes.
Compro Technology, Inc.
Tel. +886 2 2918 0169, Fax +886 2 2915 2389
3/F, No.12, Alley 6, Lane 45, Pao Shin Road
Hsintein City, Taipei, Taiwan.
www.comprousa.com
Page 3

Table of Contents
About This Guide ...................................................... 2
About VideoMate PCI TV Tuner Card....................... 2
VideoMate PCI TV Tuner Card Contents.................. 3
Remote Control Key Definition and Use ................... 4
VideoMate PCI TV Tuner Card Connectors.............. 6
Hardware Installation ................................................ 7
Software Installation................................................ 11
Remote Wake Up.................................................... 12
ComproDVD 2......................................................... 14
ComproPVR 2......................................................... 19
ComproFM 2 ........................................................... 26
Troubleshooting ...................................................... 27
Compro 3D Y/C Separation User’s Guide ………….15
Page 4

2
About This Guide
This manual tells you how to install and use your VideoMate PCI TV Tuner
Card. For more information on using applications, please see the User’s
Guides in the programs, on the CDs, or at our website for the latest manuals
http://www.comprousa.com/download.
About VideoMate PCI TV Tuner Card
VideoMate TV lets you watch and record TV on your PC. It features an analog
TV tuner, 3D Y/C Separation, FM Tuner, Remote Wake Up, and Power Up
Scheduling. You can do Digital Video Recording (DVR) functions, scheduled
recording at anytime, watching crystal video quality, intelligent TV viewing, and
Multi-function Remote Control. Additionally, VideoMate TV also provides a
Video capture function so that you can transfer videos from video devices,
such as video cameras, to your PC.
MINIMUM SYSTEM REQUIREMENTS
Your PC must meet or exceed the following system requirements to watch TV
on your PC.
• 400 MHz Pentium II or equivalent CPU
• 128 MB RAM
• Sound card
• Open PCI slot
• CD-ROM drive for software installation
• Windows XP, 2000 or above
• 50 MB free disk space for basic software installation.
• 600 MB (VCD-quality) to 3 GB (DVD-quality) per hour of recorded video.
RECOMMENDED SYSTEM REQUIREMENTS
To use all the features of VideoMate TV, including recording at DVD quality,
your PC should meet the following requirements.
• 1.7 GHz CPU
• 256 MB RAM
• Sound card
• Open PCI version 2.2 slot
• CD-ROM for software installation
Page 5

3
• Windows XP SP2 or above
• 50 MB free space for software installation
• 600 MB (VCD-quality) to 3 GB (DVD-quality) per hour of recorded video
• ATX power supply
• A computer case with a separate power switch cable from power on
button.
VideoMate PCI TV Tuner Card Contents
VideoMate PCI TV
Tuner card
FM Antenna
External Audio
patch cable
IR Receiver
Software CDs
Manuals
IR Remote Control
(batteries included)
Internal Audio
patch cable
Power Up Cable
(Power switch
patch cable)
1 to 4 converter
cable
Page 6

4
Remote Control Key Definition and Use
Please refer to the buttons and their corresponding function listed on the
opposite page.
Page 7

5
Key ComproPVR 2 ComproFM 2 ComproDVD 2
0-9 Number keys Pre-set stations Number keys
10 Mute sound Mute Mute sound
11 Zoom In/Out Minimize/Maximize Zoom In/Out
12 Start/Close ComproDVD 2
13 Start/Close ComproFM 2
14 Start/Close ComproPVR 2
15 Replay Rewind Rewind
16
Pause or enable
timeshifting
Play/Pause during
playback
Play/Pause during
playback
17 Advance Forward Forward
18 Previous channel Jump to last station Last chapter
19 Stop Stop Stop
20 Tab function Not used Next chapter
21 EPG (US only) Open on-line help Main manual
22 Open setup dialog Open setup dialog Open setup dialog
23
Up arrow or select
Mono/Stereo/SAP
Up arrow Up arrow
24
Replay or switch
TV format
Scan down Left arrow
25
Down arrow
or snapshot
Down arrow Down arrow
26 Advance Scan up Right arrow
27 Volume control Volume control Volume control
28 Open play list Open play list OK
29 Channel up Station up Choose DVD angle
30 Channel down Station down DVD subtitle select
31 Record Record Snapshot
32
TV/ S-Video/
Composite
Not used Add to bookmark
33 Channel surfing Not used Go to bookmark
34 Not used Enter frequency Select language
35 Sleep function Sleep function AB repeat
Page 8

6
VideoMate PCI TV Tuner Card Connectors
Item Function Description
1 TV Tuner-In Connect to a TV antenna or TV cable feed.
2 FM Tuner-In Connect to an FM antenna feed.
3 IR Connect the IR receiver here.
Audio-In (Blue) Use an audio patch cable to connect to an audio
source, such as a VCR, DVD or VCD.
External
Audio-Out
(Green)
Use the supplied audio patch cable to connect to
the Line-In port of your sound card.
S-Video-In
(Black)
Use an S-Video patch cable to connect to a
video source, such as a VCR, DVD or VCD.
4
(1 to 4
converter
cable)
Composite-In
(Yellow)
Use a Composite video patch cable to connect to
a video source, such as a VCR, DVD or VCD.
5 To Sound Card
AUX-IN
Use an internal audio patch cable to connect to
the AUX-IN port of your sound card.
6 To Case Power
Switch
Connect the ATX Power Switch cable of your
computer case here.
7 To Mainboard
Power Switch
Connector
Use the supplied power switch patch cable to
connect to the ATX Power Switch pins on the
mainboard.
1
3
5 6
2
4
7
Page 9

7
Hardware Installation
Warning
Unplug your PC’s main power cord before installing VideoMate TV.
Failure to do so may cause damage to your VideoMate TV tuner card and
void your warranty.
1. Shut down your computer and unplug main power cord.
2. Remove the computer case cover.
Power Up Connections
3. Locate the ATX power switch pins on
your computer case and trace the wires
to the power switch connector on your
mainboard. The ATX power switch cable
is normally a twisted pair cable with a
two-pin connector as shown above.
Note
On the mainboard, the ATX power switch pins are usually labeled “POWER
SW” or similar. It is vital to remember the position of these pins for a later step
in the installation process.
4. Unplug the ATX power switch cable from
the mainboard and connect it to the
connector JS1 on the VideoMate PCI TV
Tuner Card, as shown on the right.
Page 10

8
5. Connect the black socket of Power Up
power patch cable to the power switch
connector on the mainboard.
6. Connect the white socket of Power Up
patch cable to the connector JS2 on the
VideoMate PCI TV Tuner card.
Note
Double check your work. If you plug the cables into the incorrect pins, your PC
may not start or otherwise function improperly.
Connect the white end of the Power Up patch cable to the TV tuner card and
the black end to the mainboard.
Power Up Scheduling is not a required for using VideoMate TV. If you don’t
want to use Power Up Scheduling from the Windows Shut down state, you
can skip the power switch circuit connections, in other words, you can skip
Power Up Connections in steps 3 through 6. You can still use scheduled
recording from Standby mode or powered on state.
Sound card connection
TV sound output is from the green Audio-Out port on VideoMate PCI TV Tuner
card. You have to install the provided audio patch cable in order to hear the
sound. VideoMate TV also provide internal connections to your sound card
(AUX-In). You should not use the internal and external connections
simultaneously.
Page 11

9
External Audio Connection
7. The external audio patch cable is color-coded. Connect the green plug to
the green Audio-Out port on the 1 to 4 converter cable of VideoMate PCI
TV Tuner card and the blue plug to the “Line-In” port of your sound card.
Internal Audio Connection
8. Plug one end of the internal audio patch cable to the green internal
Audio-Out port on the VideoMate PCI TV Tuner card.
9. Plug the other end of the internal audio patch cable to the AUX-In socket on
your sound card or on the mainboard. The on-board sound usually has
AUX-In and CD-In connector. Make sure you connect to the right one. If to
CD-In, then you have to choose the audio source to be CD-In in the System
Device in Settings of ComproPVR.
Installation
10. Verify that the power cord to your PC case is unplugged.
11. Insert VideoMate TV in an open PCI slot. Compro recommends installing
the card in the third or fourth PCI slot from AGP away from the AGP slot.
12. Before closing your PC case, plug in main power cord of the PC case. You
should see a green LED light on the PCI TV tuner card. If you don't see the
green light, please read the notes on the following page.
13. Replace the computer cover.
TV signal and FM cable
14. Connect the supplied FM antenna to the upper and your TV signal to the
lower connector. Adjust FM antenna for optimal reception.
This completes hardware installation. Please read the following notes and
proceed to install the software.
Page 12
10
Note
If the computer cannot be turned on, verify the position of the power patch
cable on the mainboard. Consult the mainboard documentation to determine
the position of the ATX power switch connector. Also, double check that the
AC power cable is properly connected to your PC.
Power Up will start your computer 5 minutes in advance of the scheduled
recording time, for example, if you have set ComproPVR to record a program
at 4 o’clock, it will start your computer at 3:55. Therefore, you need to shut
down the computer before 3:54 in order to let Power Up start the computer.
Power Up from Windows Shutdown mode, i.e., ACPI S5
state, requires:
• An ATX power supply in your PC.
• Motherboard support for PCI version 2.2 in order to
have 3.3V standby power.
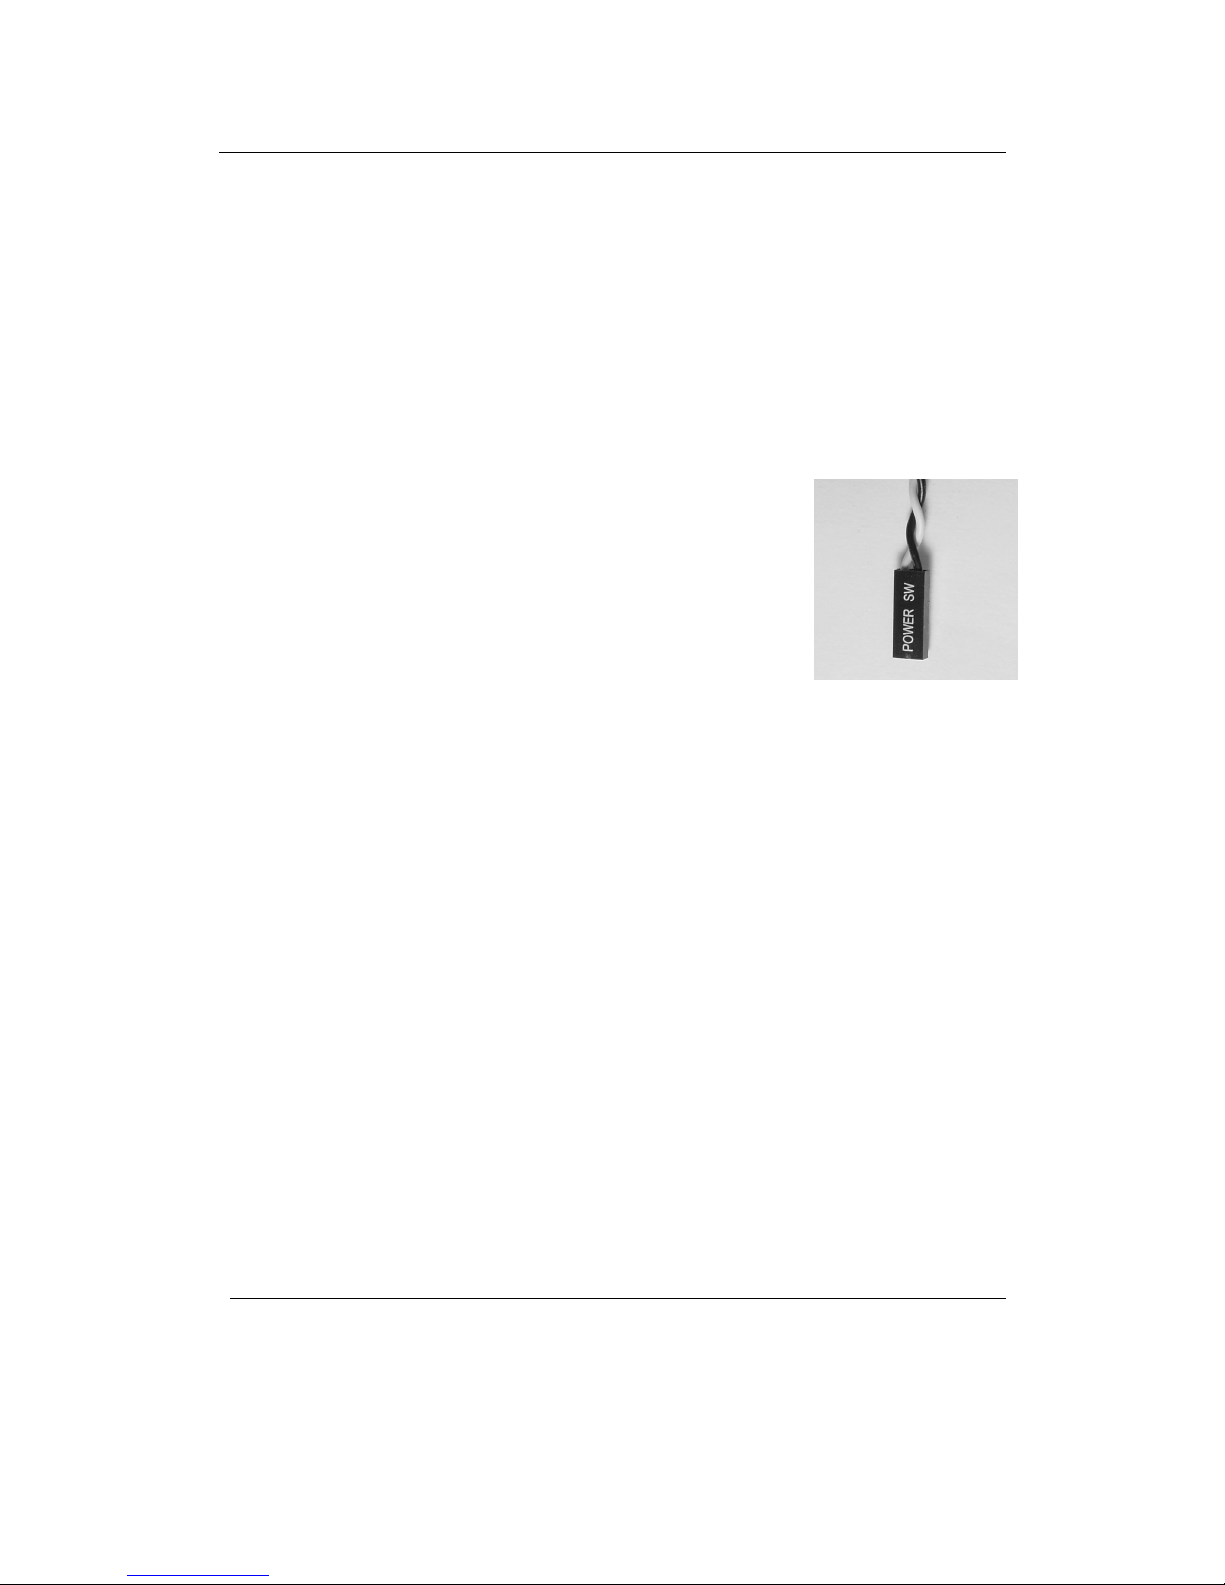
• An ATX power switch cable, which is a pair of
twisted wires with a two-wire connector, as shown to
the right.
If you don't have the above items, you can still use Power-Up Scheduling with
Windows Stand by mode, i.e., ACPI S1/S3 state, if your system supports it.
If your ATX power switch cable in your PC case cannot reach the TV Tuner
card Power Up socket, you cannot use the Power Up function with system
shutdown mode. You can try moving the card to another PCI socket.
You can use VideoMate TV without using Power Up Scheduling. If you don’t
want to use Power Up Scheduling from the Windows Shut down state, you
can skip the power switch circuit connections, in other words, you can skip
Power Up Connections in steps 3 through 6. You can still use scheduled
recording from Standby mode or leave your PC powered on.
The ATX power switch cable is not polarized. You can plug it in either
direction.
If computer can’t boot up while plugging in VideoMate TV tuner card, switch
the blue jumper from JP4 to JP3 to solve this problem. After doing so, you
have to switch the red jumper JP2 to 2-3 (right) and this disables the remote
wake up function.
Page 13
11
Software Installation
After installing the PCI card and cables in your computer, you should restart it
and follow these steps to install the software.
Step 1. After restarting, Windows will detect your VideoMate TV card and start
the Add/Remove Hardware Wizard, prompting you to install the
VideoMate TV drivers. Please press Cancel and go to the next step.
Step 2. Insert the installation CD into your CD drive. If you have Autorun
enabled, the installer will start automatically. (If Autorun is disabled,
double-click on “setup.exe” on the installation CD.) You can choose
Complete to install all necessary software (VideoMate TV drivers,
ComproPVR 2, ComproDVD 2, ComproFM 2, Ulead PhotoExplorer
8.5 SE) or choose Custom to select item by item. Compro
recommends you choose Complete. ComproFM 2 is not available for
all models.
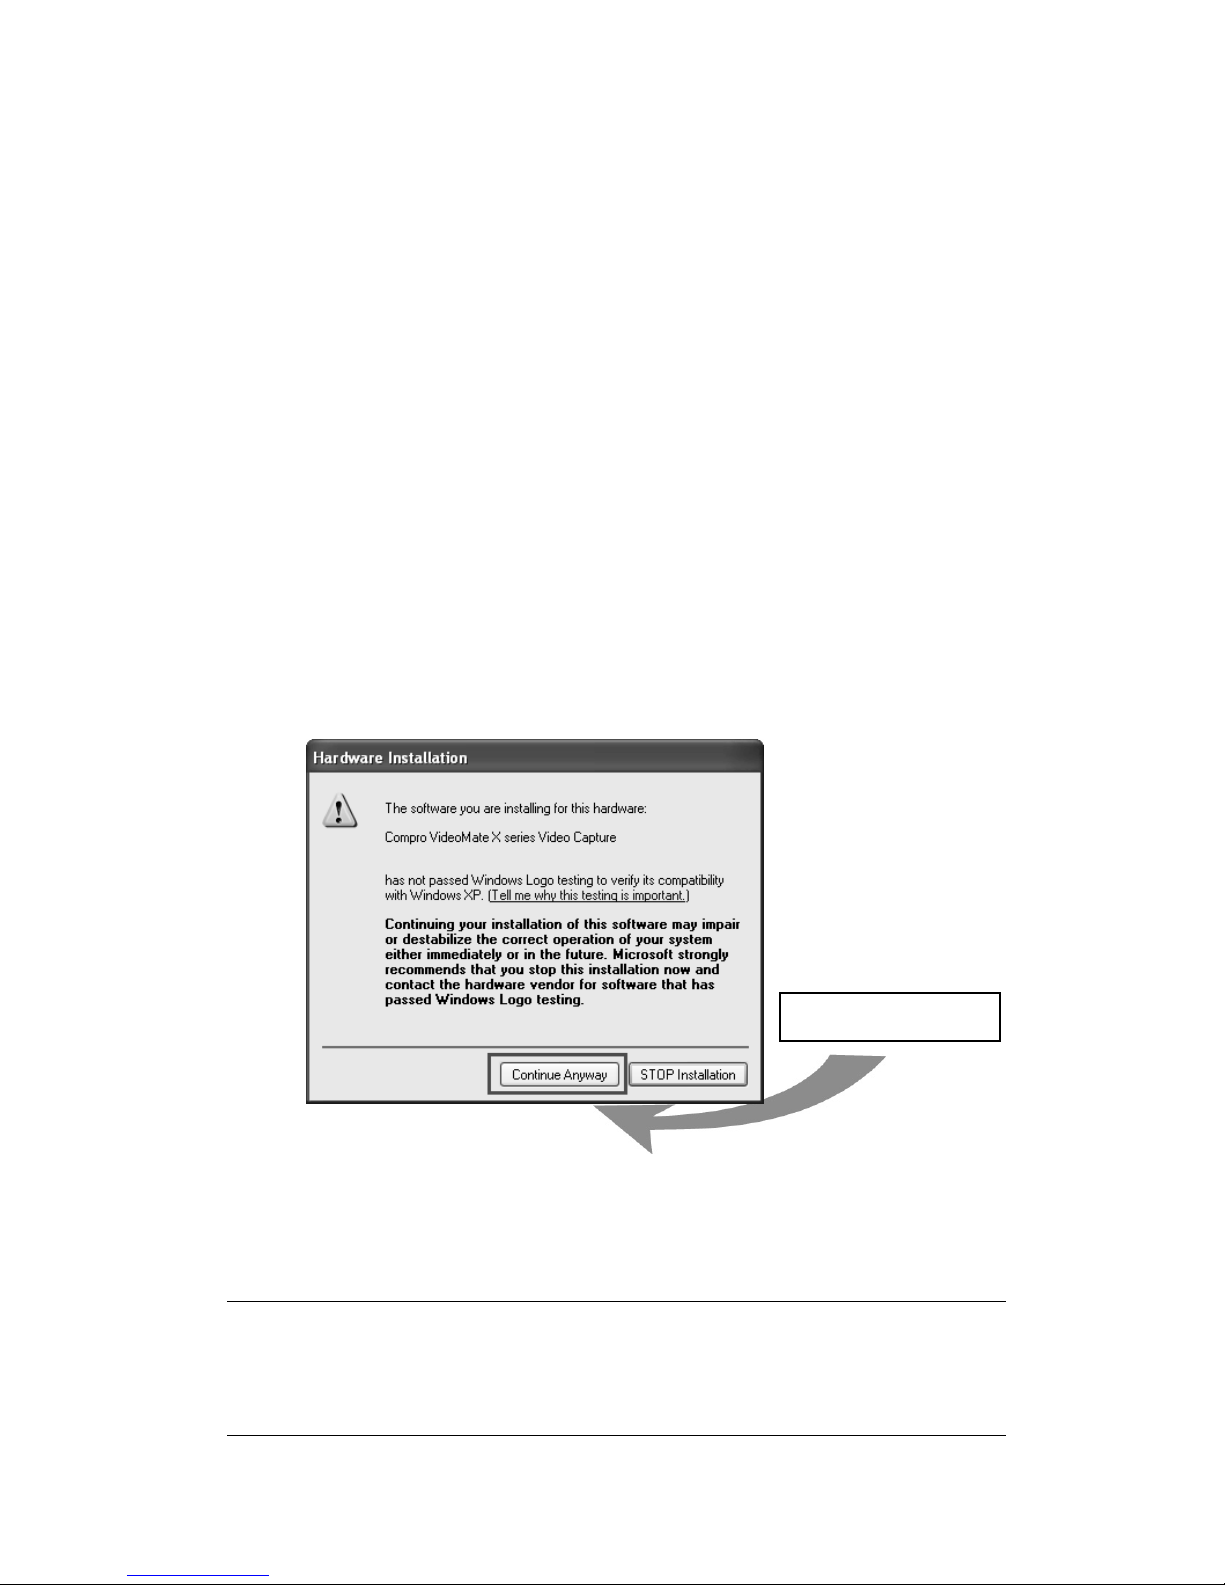
Step 3. If you see the Windows Logo testing message, below, please press
“Continue Anyway” to proceed.
Step 4. Press Next to install ComproPVR 2, ComproDVD 2, ComproFM 2,
Ulead PhotoExplorer 8.5 SE.
Step 5. When installation completes, press Finish to restart computer.
Note
ComproPVR 2 needs to use components of Ulead PhotoExplorer 8.5. If your
computer doesn’t have PhotoExplorer, ComproPVR 2 will fail to record.
Please reinstall Ulead PhotoExplorer 8.5 from installation CD.
Continue
Page 14

12
Remote Wake Up
Introduction
VideoMate X800 feature the Remote Wake Up function for greater
convenience.
Compro has always focused on developing products with great convenience.
Integration of hardware and software support, you can start your computer
from the shut down state by pressing a button on the remote keypad. You don’t
need to reach over to your computer anymore. You can also shut down the
computer by remote control as well. No more mouse clicks on the screen. This
feature converts your PC into a convenient home entertainment video
appliance.
Using Remote Wake Up
After install the TV card driver, put batteries in the remote control. Pressing one
of the PVR/TV, FM, DVD/VCD buttons will start your computer.
Note
You must correctly install the driver and Power Up connectors in order to use
Remote Wake Up function.
There will be a two second delay before the PC powers on.
This feature cannot logon your system. You may need to enter your user name
and password.
Page 15
13
Remote Shut Down
There are two situations for the operation.
When not watching TV, i.e. no ComproPVR running:
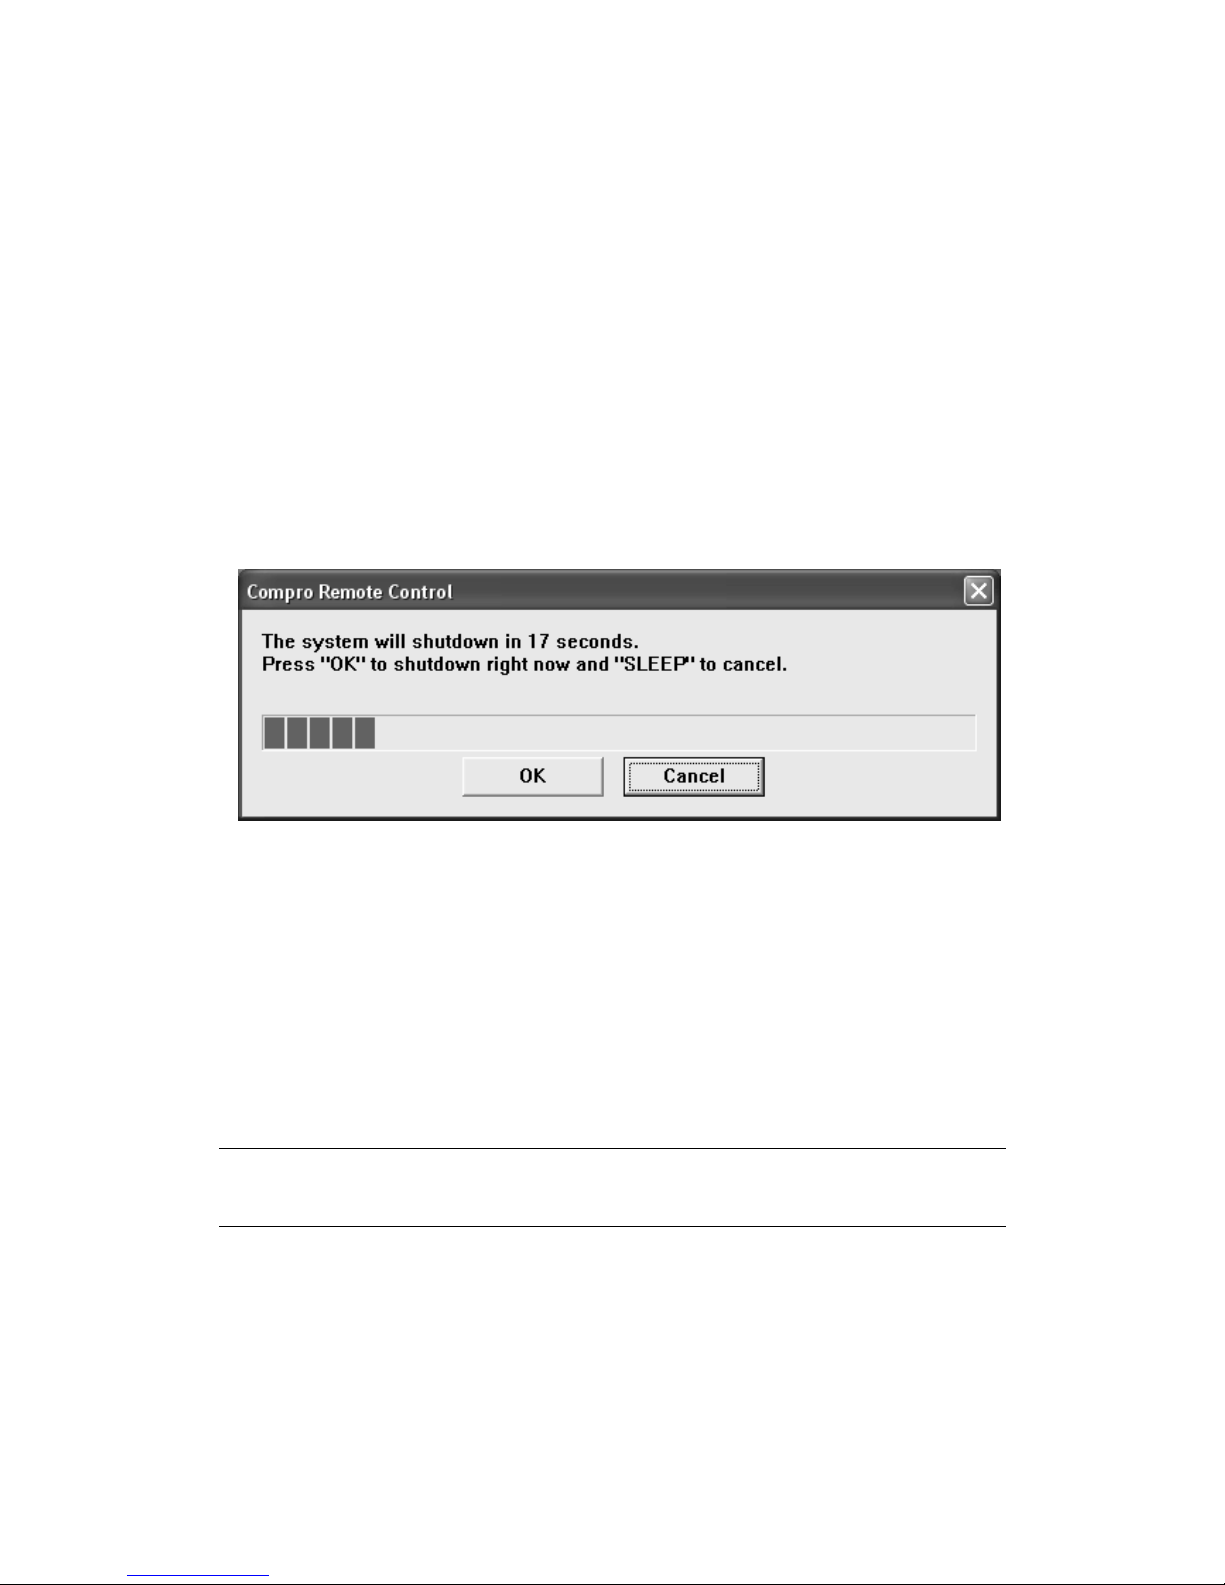
Just press the SLEEP button on the lower-right corner on the remote keypad,
you will see a dialog as shown below. Program will countdown 20 seconds to
shutdown the computer. If you don’t want to shut down the computer, please
press the SLEEP button again, in other words, pressing the SLEEP key a
second time is the same as pressing the “Cancel” button. You may also use
your mouse to press the cancel button. Press OK to immediately shutdown the
computer.
When watching TV, i.e. ComproPVR is running:
Just press the SLEEP button on the lower-right corner on the remote keypad
repeatedly, you will see the text on the screen turns to SLEEP OFF, SLEEP ON
- 30 MINUTES, SLEEP ON - 1 HOUR, SLEEP ON - 2 HOURS, and
SHUTDOWN. When the text shows SHUTDOWN, the program will countdown
20 seconds to shutdown the computer. If you don’t want to shutdown the
computer, please press the SLEEP button again.
Note
Make sure you save all open files before using remote shutdown function.
Disable the Remote Wake Up
If you want to disable the Remote Wake Up function, move the red jumper on
your TV card from position 1-2 (left, default) to position 2-3 (right).
Page 16
14
ComproDVD 2
Introduction
Stability, simplicity, and superiority. ComproDVD epitomizes these traits to
the maximum and gives users all they wish for in a DVD player.
Note
This section provides basic information for ComproDVD. For more details,
please check the help file of ComproDVD or the manual in the installation CD.
Control Panel
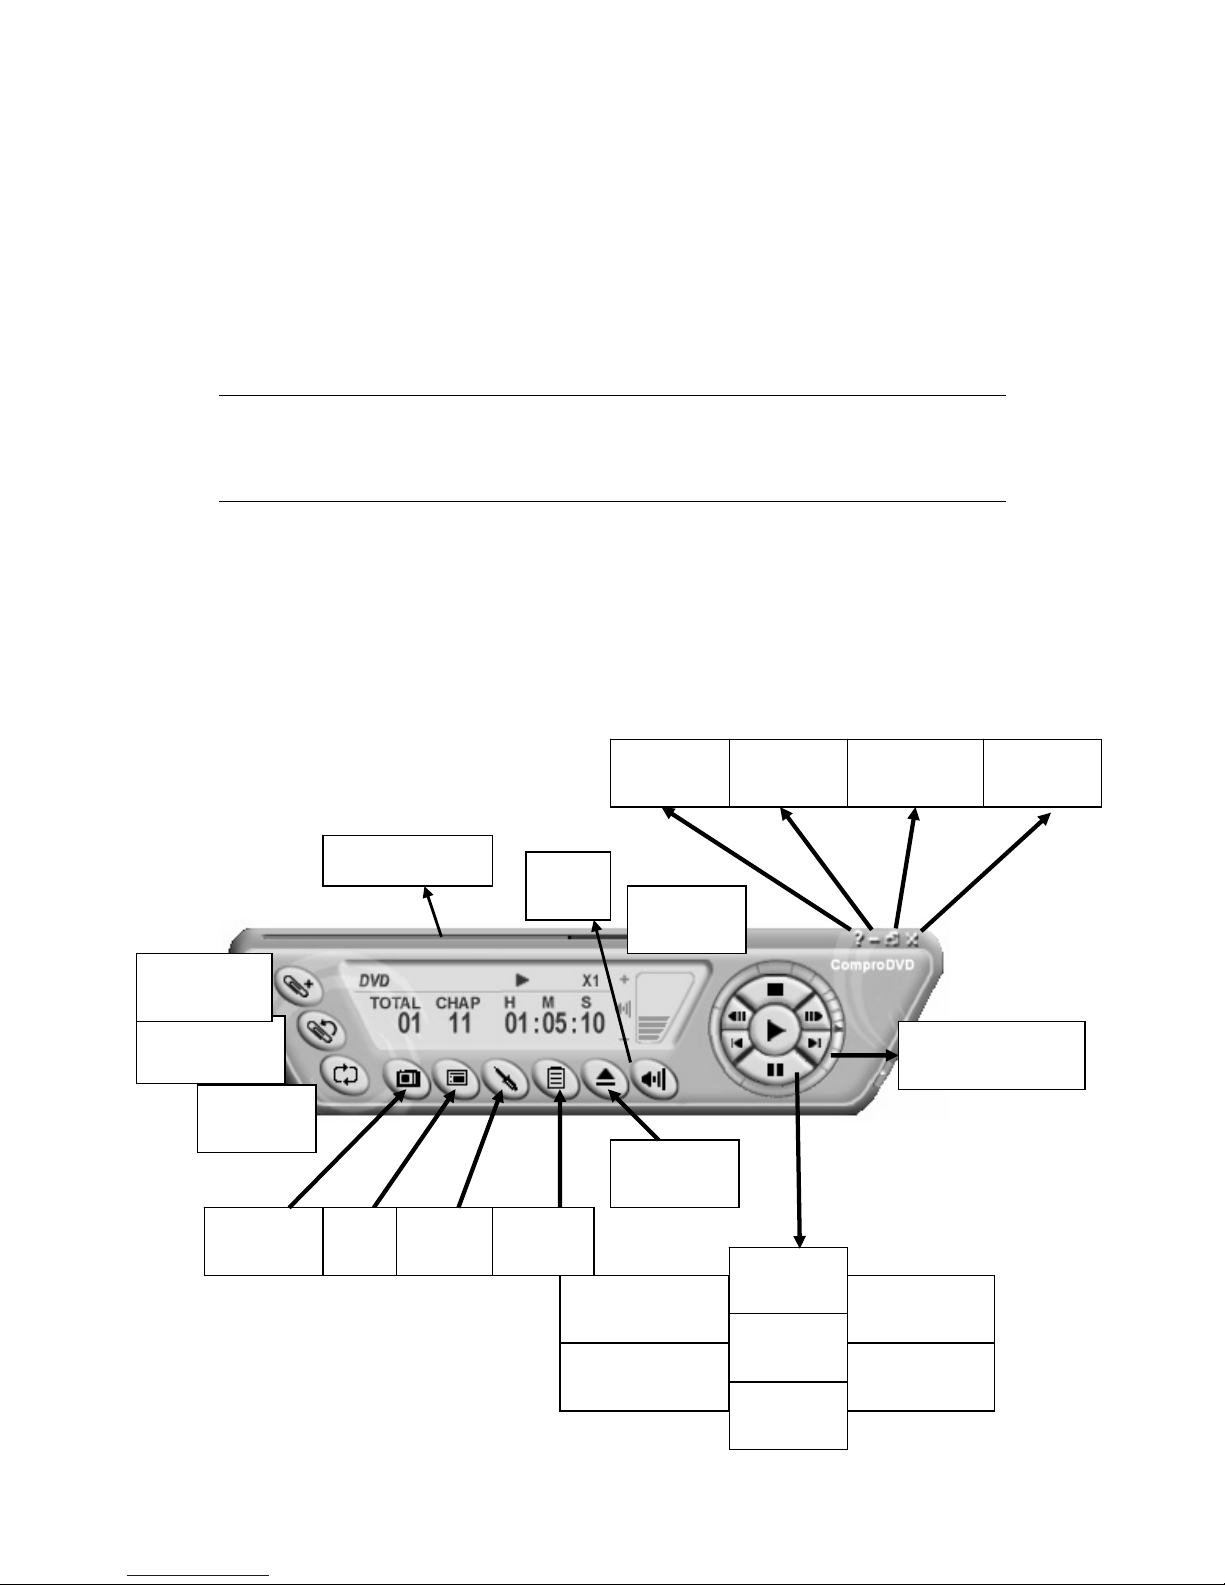
The following describe the ComproDVD control panel functions, and tips for
using ComproDVD. The following figure gives you the function of the button
with (Hot Key.)
Go to Bookmark
(F5)
Close
(CTRL+X)
Options
(E)
Add Bookmark
(F6)
Repeat
(R)
Shuttle search
Controls
Stop
(S)
Volume
(+, -)
Full Screen
(W)
Mute
(M)
Help
(H)
Minimize
(CTRL+N)
Progress bar
Play
(Enter)
Pause
(Space)
Step backward
( / )
Step forward
( . )
Menu
(M)
Media
Source
Eject
(CTRL+E)
Snapshot
(G)
Next chapter
( N )
Last chapter
( P )
Page 17

15
Compro 3D Y/C Separation User’s Guide
Introduction of 3D Y/C Separation
Television signals actually contain two signals, Luminance and Chrominance. By
convention, Y represents Luminance and C represents Chrominance. The Y
signal describes the brightness of the picture and C represents the color
information. Black and white TV signals contain only the Y signal. When color TV
was introduced many years ago, the Y and C signals were combined into a
composite video signal. This has the advantages of being compatible with black
and white TV set and using less bandwidth. All TV sets must separate the Y and
C signals before presenting a picture.
The disadvantage of this scheme is that it is impossible to perfectly separate the
Y and C signals. If part of the Y signal is treated as C signal, the picture will show
rainbow-like color pattern as known as the Cross-Color Artifact phenomenon. If
part of the C signal is treated as Y signal, the picture will show the vertical or
horizontal dot lines color as known as the Cross-Luminance phenomenon. In
other words, better separation of the Y and C signals results in a clearer, sharper
picture with brighter and more accurate color. Incomplete separation of the Y and
C signals results in Cross-Color Artifact and Cross-Luminance phenomena.
Scientists developed many algorithms trying to solve these problems. Among
them, 2D and 3D Y/C separation algorithms have been widely adopted. These
algorithms are superior to the simple comb filters found on most TV sets today.
VideoMate X800 incorporate the Y/C separation chip to process Y/C separation
and noise reduction. The chip provides 2D Y/C separation, Digital Noise
Reduction (DNR), and 3D Y/C separation calculations in hardware, greatly
reducing Cross-Color Artifacts and Cross-Luminance problems. Combined with
the deinterlacing technology in ComproPVR, you can enjoy crystal clear video
and less eyestrain, giving you greater enjoyment of TV programs.Different
algorithms are optimal for different types of TV programs, for example, action,
news, or drama shows. 2D Y/C separation, for example, has the side effect of
turning oblique lines into hanging dots while 3D algorithms can cause blurring in
action videos. However, 3D Y/C separation algorithm is not available in SECAM
system. Here is the table for the availability.
Input Signal TV
System
TV and Composite Video Input S-Video Input
PAL &
NTSC
3D Y/C Separation
2D Y/C Separation + Digital Noise Reduction (DNR)
Digital Noise
Reduction (DNR)
SECAM 2D Y/C Separation + Digital Noise Reduction (DNR) Digital Noise
Reduction (DNR)
Page 18
16
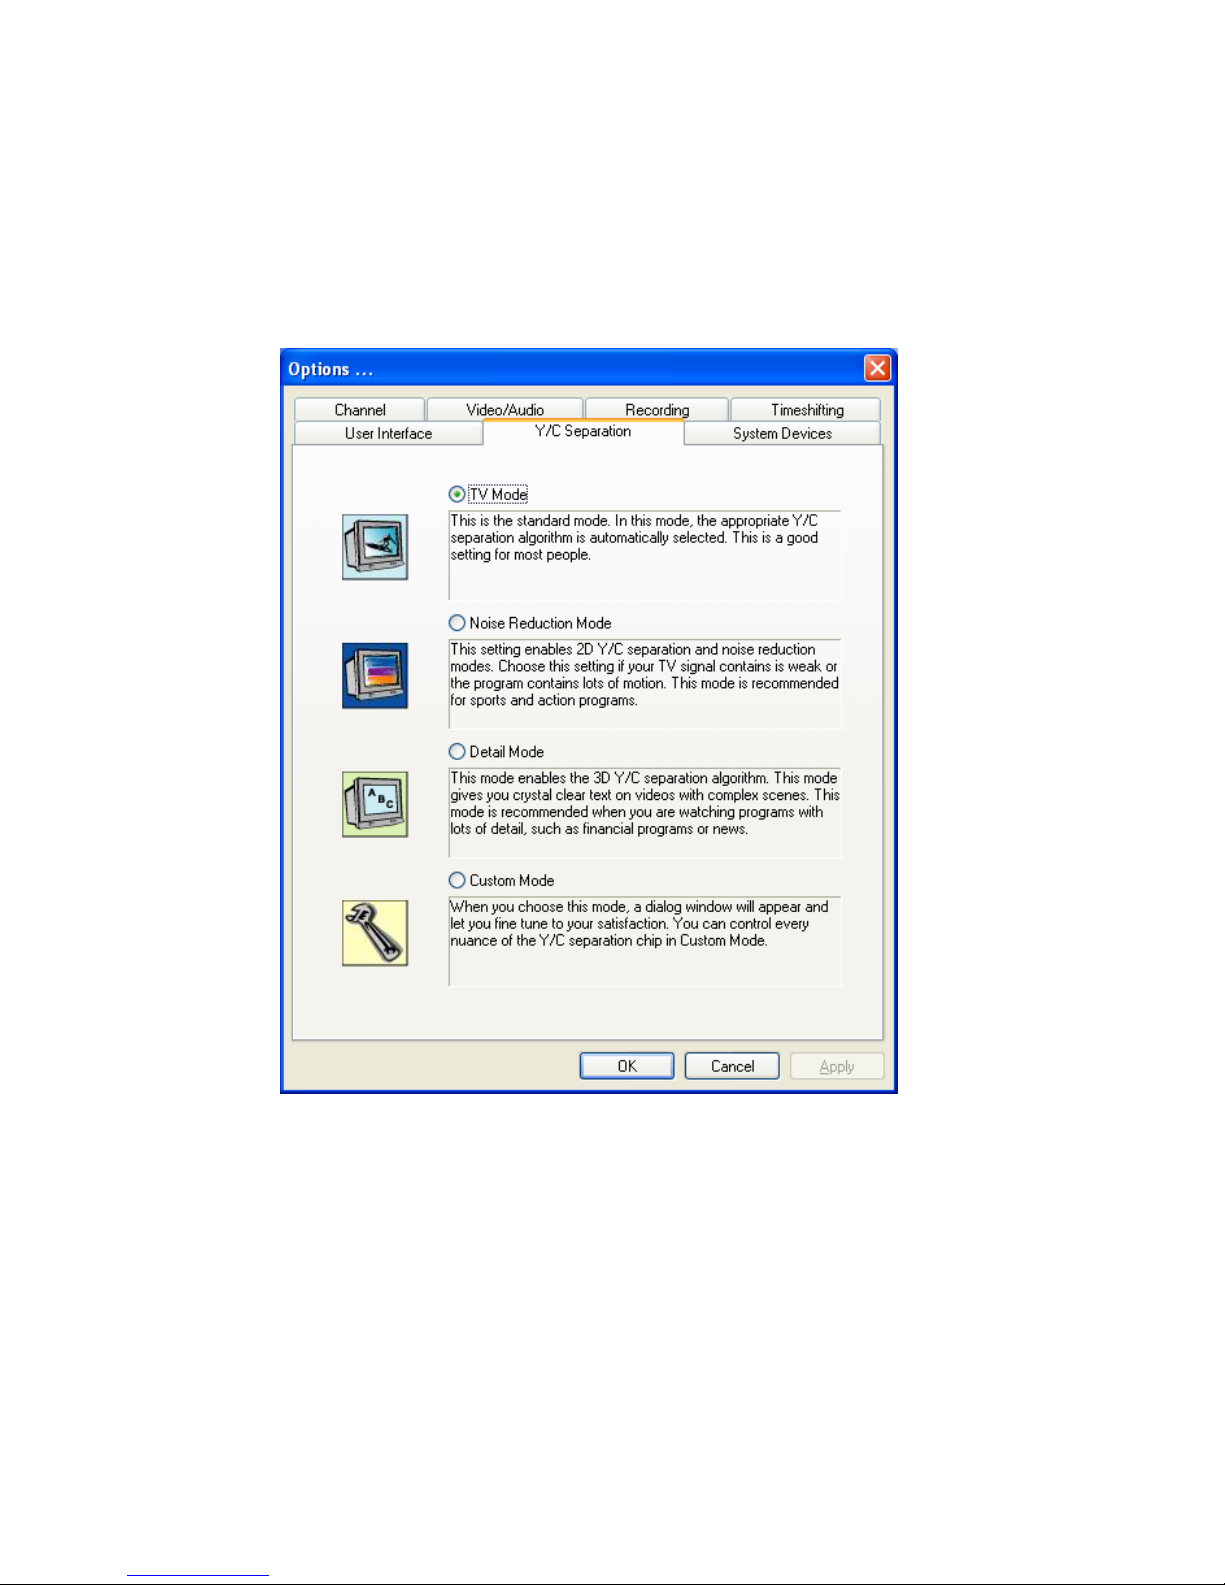
Using the Y/C Separation program
Compro Y/C Separation program provides three preset profiles that let you
quickly adjust the picture to your preferences without knowing the details of Y/C
separation. Additionally, TV enthusiasts can configure the Y/C separation
settings, in minute detail, to achieve ultimate picture quality.
TV Mode
This is the standard mode. In this mode, the appropriate Y/C separation
algorithm is automatically selected. This is a good setting for most people.
Noise Reduction Mode (2D Y/C Separation)
This setting enables 2D Y/C separation and noise reduction modes. Choose this
setting if your TV signal contains is weak or the program contains lots of motion.
This mode is recommended for sports and action programs.
Page 19
17
Detail Mode (3D Y/C Separation)
This mode enables the 3D Y/C separation algorithm. This mode gives you
crystal clear text and beautiful color on videos with little motion and complex
scenes. This mode is recommended when you have a strong video signal and
are watching programs with lots of detail, such as financial programs or news.
However, 3D Y/C separation algorithm is not available in SECAM system.
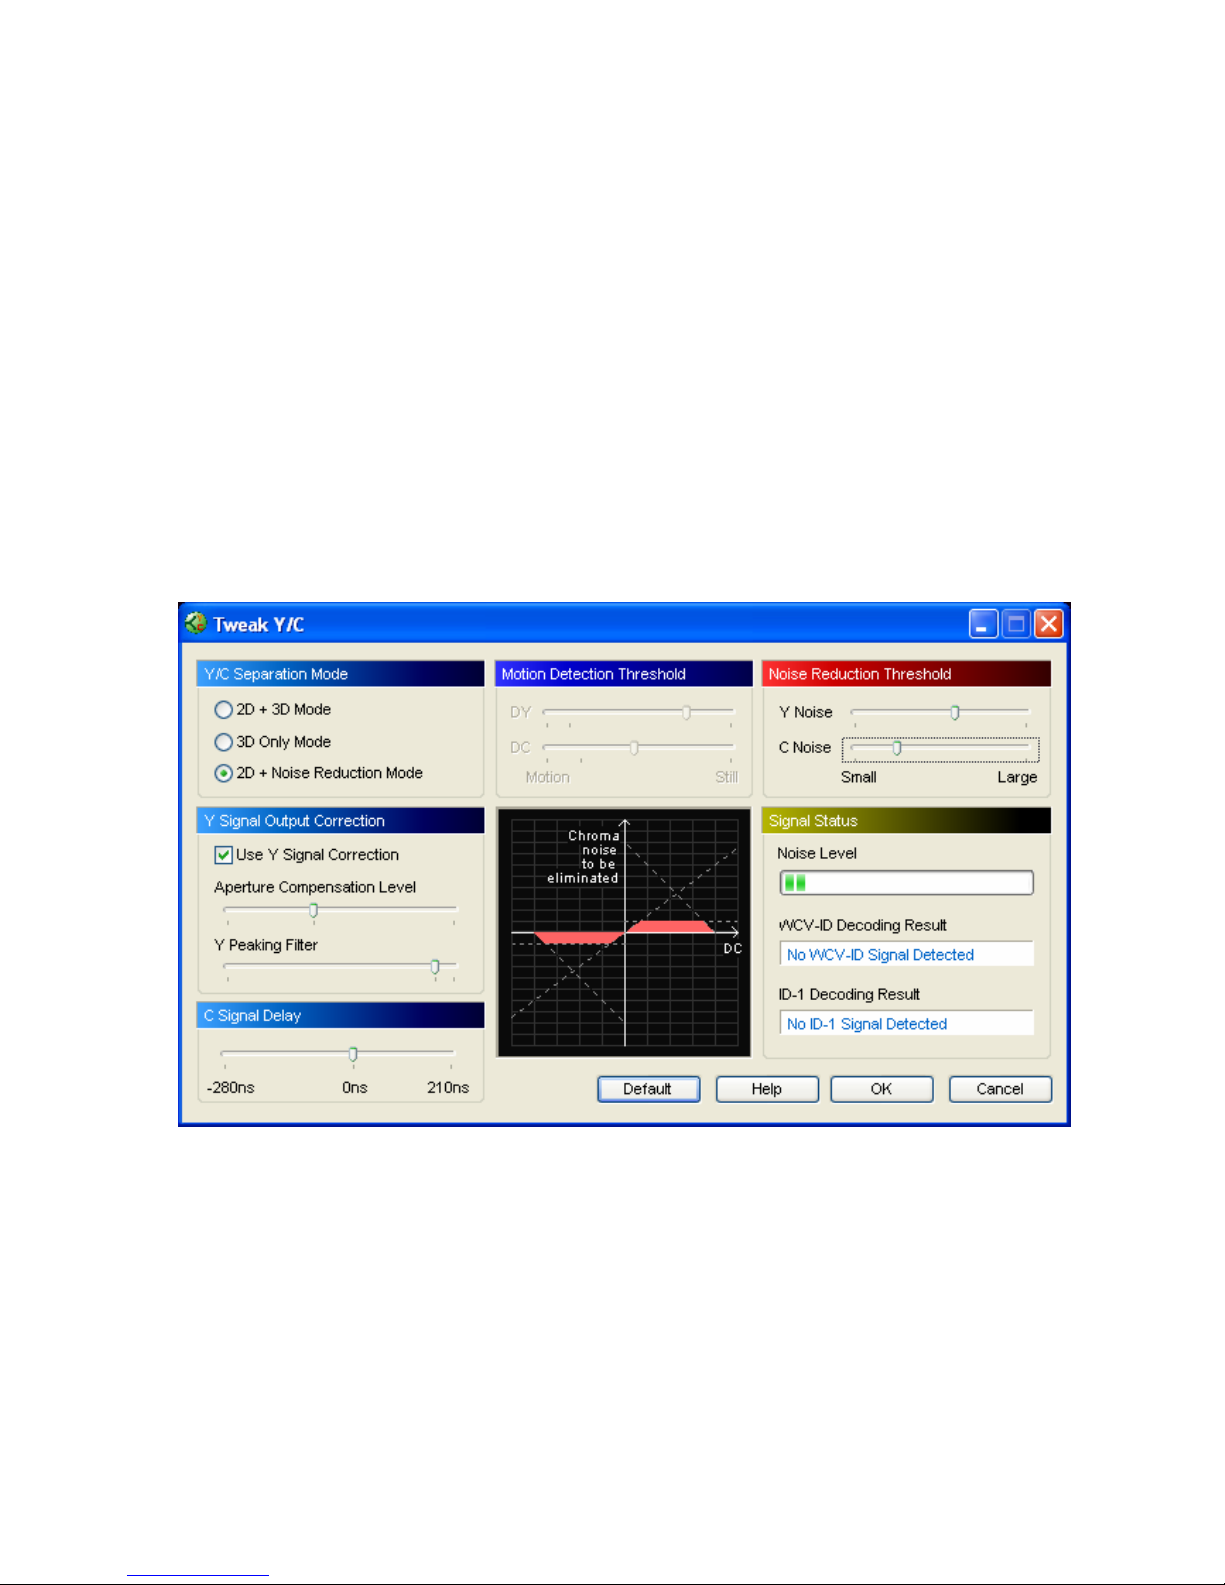
Custom Mode
The video enthusiast can control every nuance of the Y/C separation chip in
Custom Mode. When you choose this mode, a dialog window will appear and let
you fine tune to your satisfaction. The graph in middle is updated as you move
the slider bars so you can better understand the effects of your adjustments.
Pressing the Default button restores the settings in this dialog, so feel free to
explore and experiment.
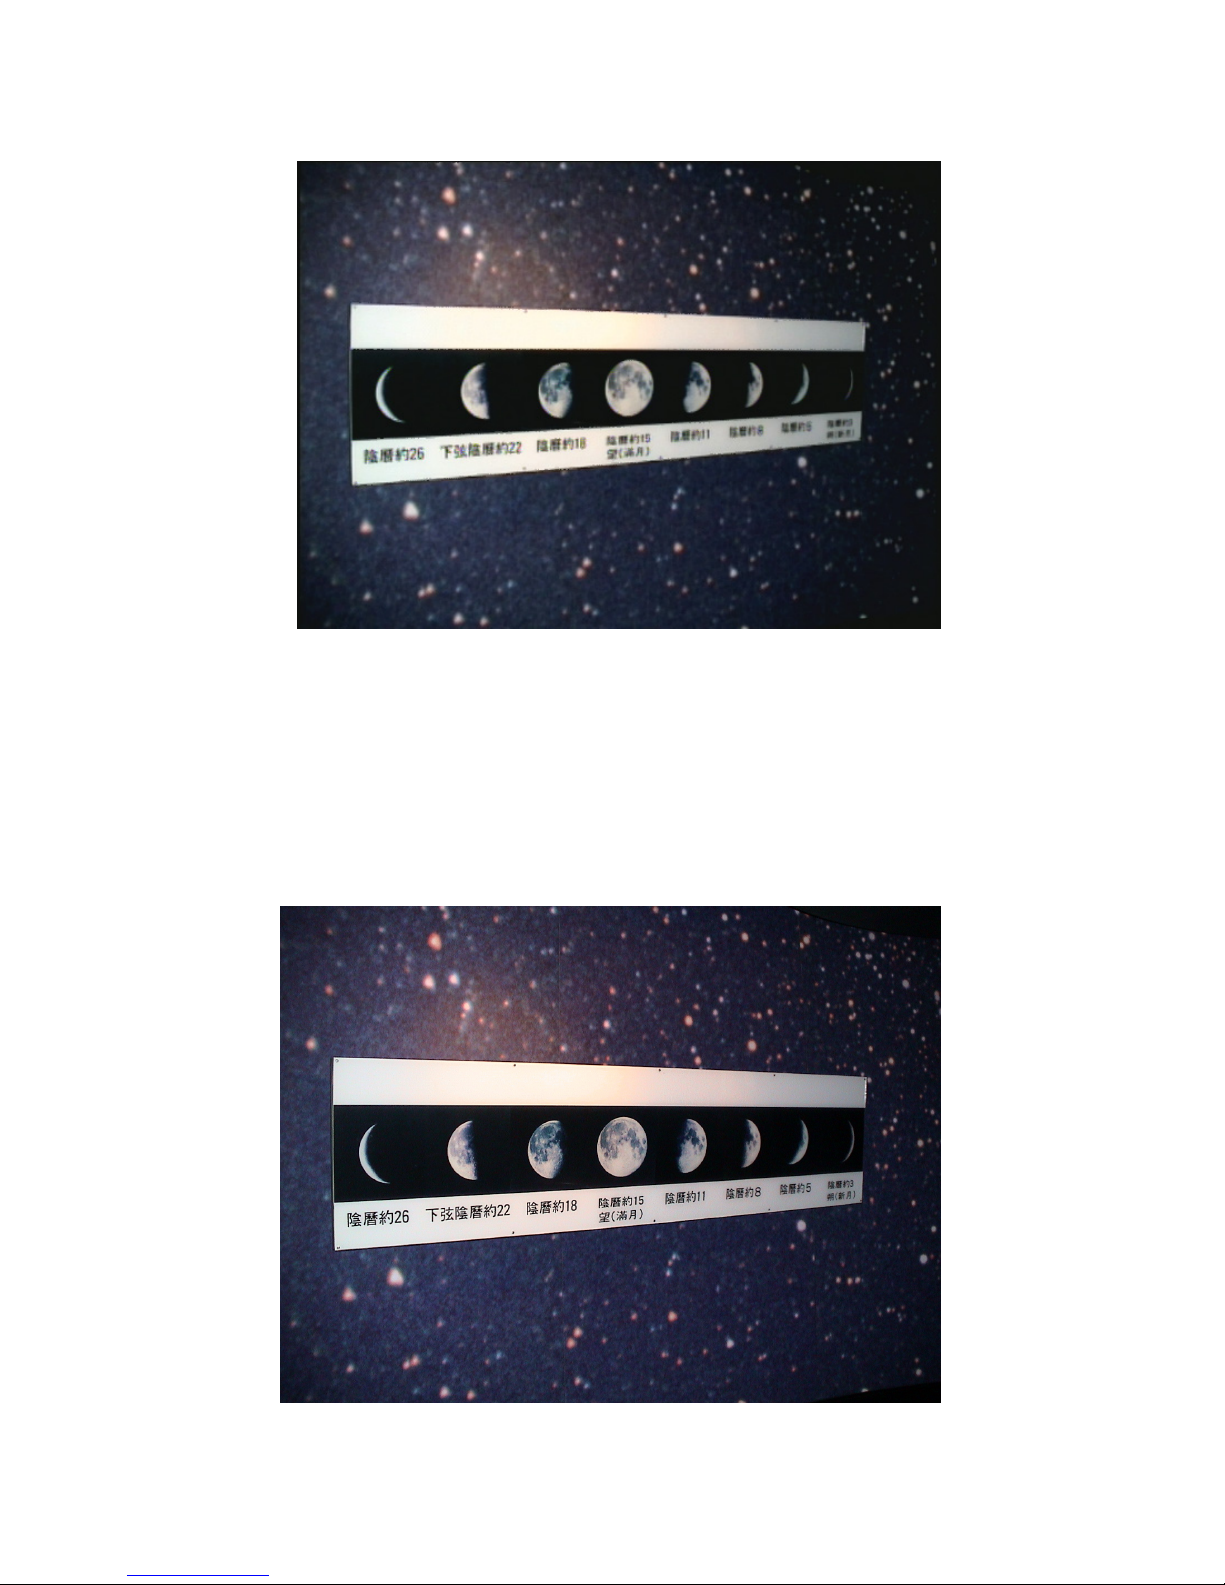
Benefits of Y/C Separation
The following page graphically explain the benefits of Y/C Separation. Please
look closely.These pictures were shot at the Taichung Scientific Museum in
Taiwan. The Y/C Separation process brings superior quality of video into your life.
It eliminates Cross-Color Artifacts and Cross-Luminance problems. When
combined with ComproPVR deinterlacing technology, you get sharper pictures
with more vivid and accurate colors. Give you eyes a treat and experiment a bit
the Y/C separation settings.
Page 20
18
Without Y/C separation
In these pictures, the texts should be very clear and sharp. Without Y/C
separation, however, the text displays the Cross-Color Artifact phenomenon.
Also, the line between the black and white bars shows the vertical or horizontal
dot lines color as known as the Cross-Luminance phenomenon. This error is
also avoided by the Y/C Separation process. Y/C Separation returns sharpness
to edges and clarifies text. You no longer need to suffer from blurry pictures.
After Y/C separation
Page 21
19
ComproPVR 2
Introduction
ComproPVR is a complete digital entertainment solution for your PC. Watch
and record TV programs on your PC, in full-screen mode or in a window.
Timeshifting lets you watch TV, pause live TV, or review your favorite scenes
without missing a minute of the program. Integrated deinterlacing technology
assures the highest picture quality. All this, with the universal remote control.
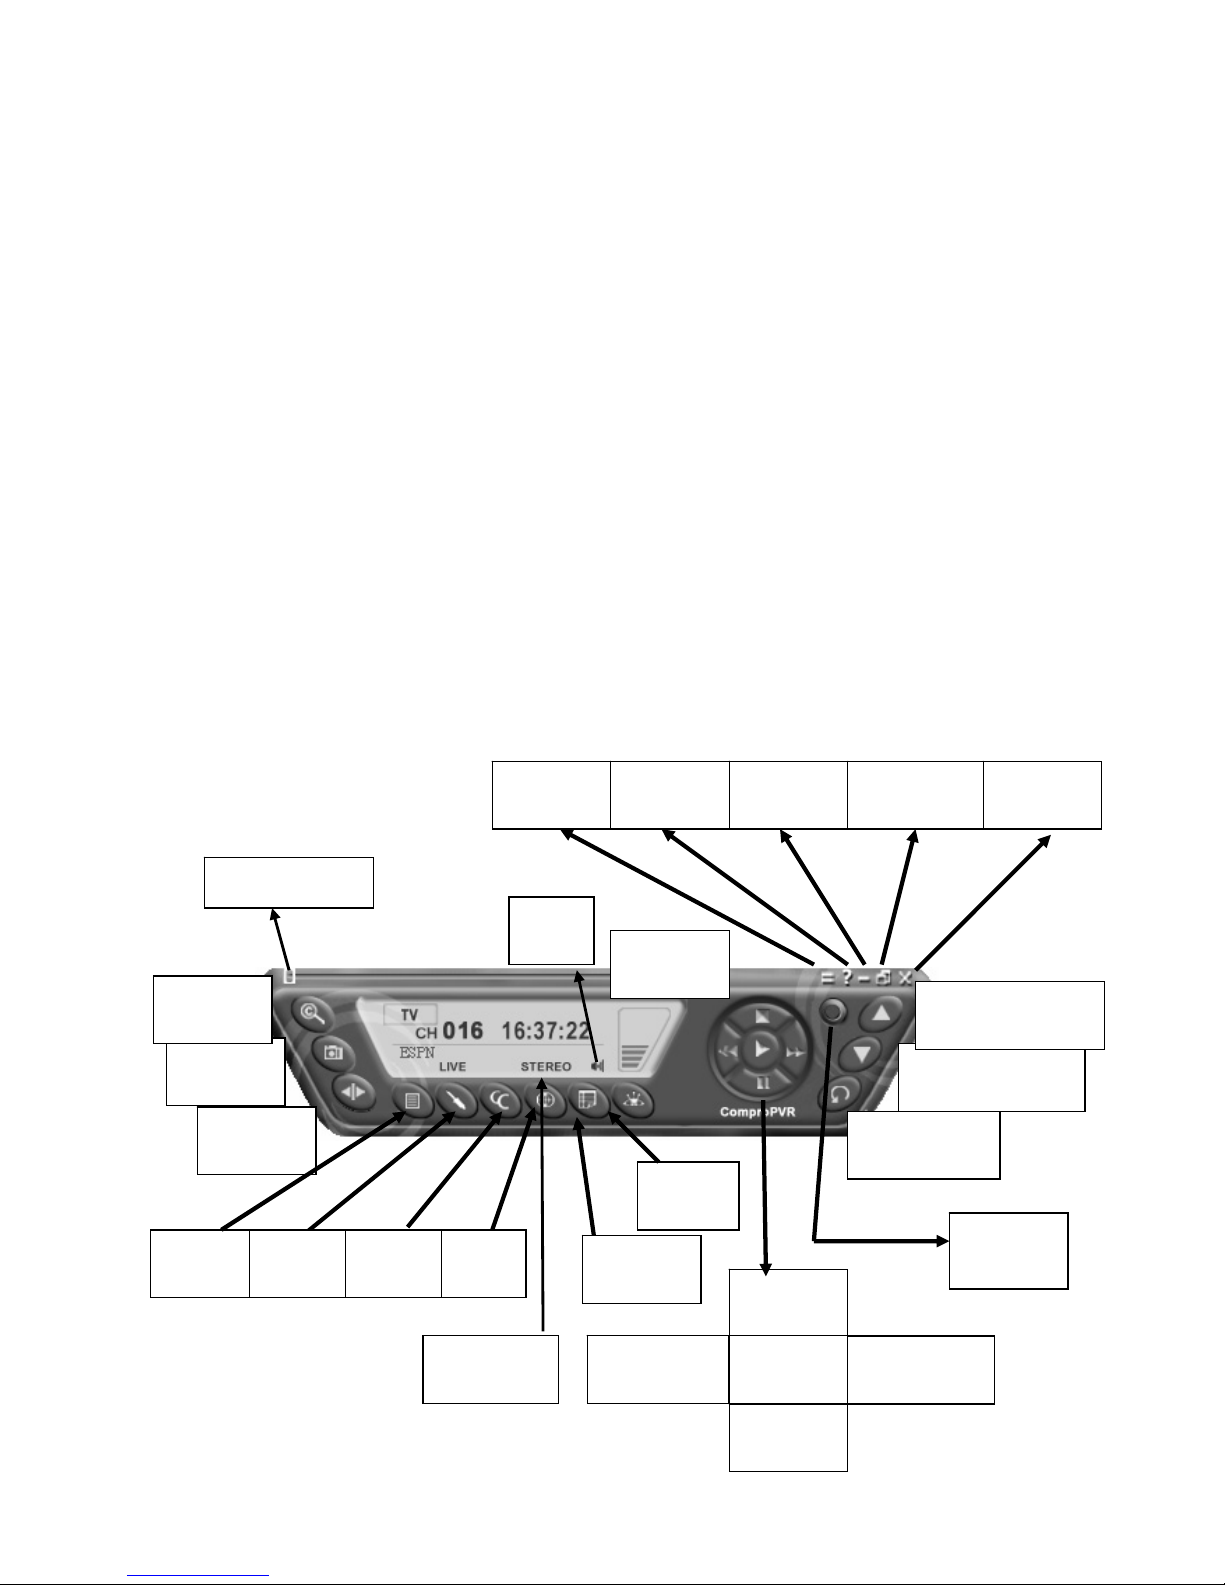
Control Panel
The ComproPVR control panel resembles the controls on a VCR. Keep in mind
that not all options are available at all times, and may be grayed out or
inaccessible depending on your hardware setup and TV services available.
The following describe the ComproPVR control panel functions, and tips for
using ComproPVR. The following figure gives you the function of the button
with (Hot Key.)
Snapshot
(Space)
Close
(CTRL+X)
Last Channel
(N)
Not
used
Schedule
(B)
Channel
Surf(F)
Language
Select (Q)
Timeshift
(T)
Channel Down
(Page down)
Stop
(S)
Docking
(D)
Volume
(+, -)
Full Screen
(Z)
Mute
(M)
Record
(R)
Channel Up (Page
Up) with lists( I )
Help
(H)
Minimize
(G)
Timeshift bar
Play
(P)
Pause
(U)
Replay
(Left Arrow)
Advance
(Right Arrow)
Options
(O)
EPG
(E)
Source
(V)
Lists
( I )
Page 22
20
Icon HotKey Description
A
Enable/Disable Always-on-Top function for
TV window.(Oregon circle on the upper-right
corner of the TV window)
n/a
L Sleep function
Note: Language select is only available while the program supports it.
Watching
After installation, just press the PVR/TV button on the remote or double click
the ComproPVR icon on the desktop you will be able to watch TV.
The first time you start ComproPVR, Autoscan will automatically scan for
available TV channels. When Autoscan is finished, detected channels are
automatically enabled and marked with the green check mark
. Channels,
where a valid signal could not be detected, are disabled and marked with a
blank.
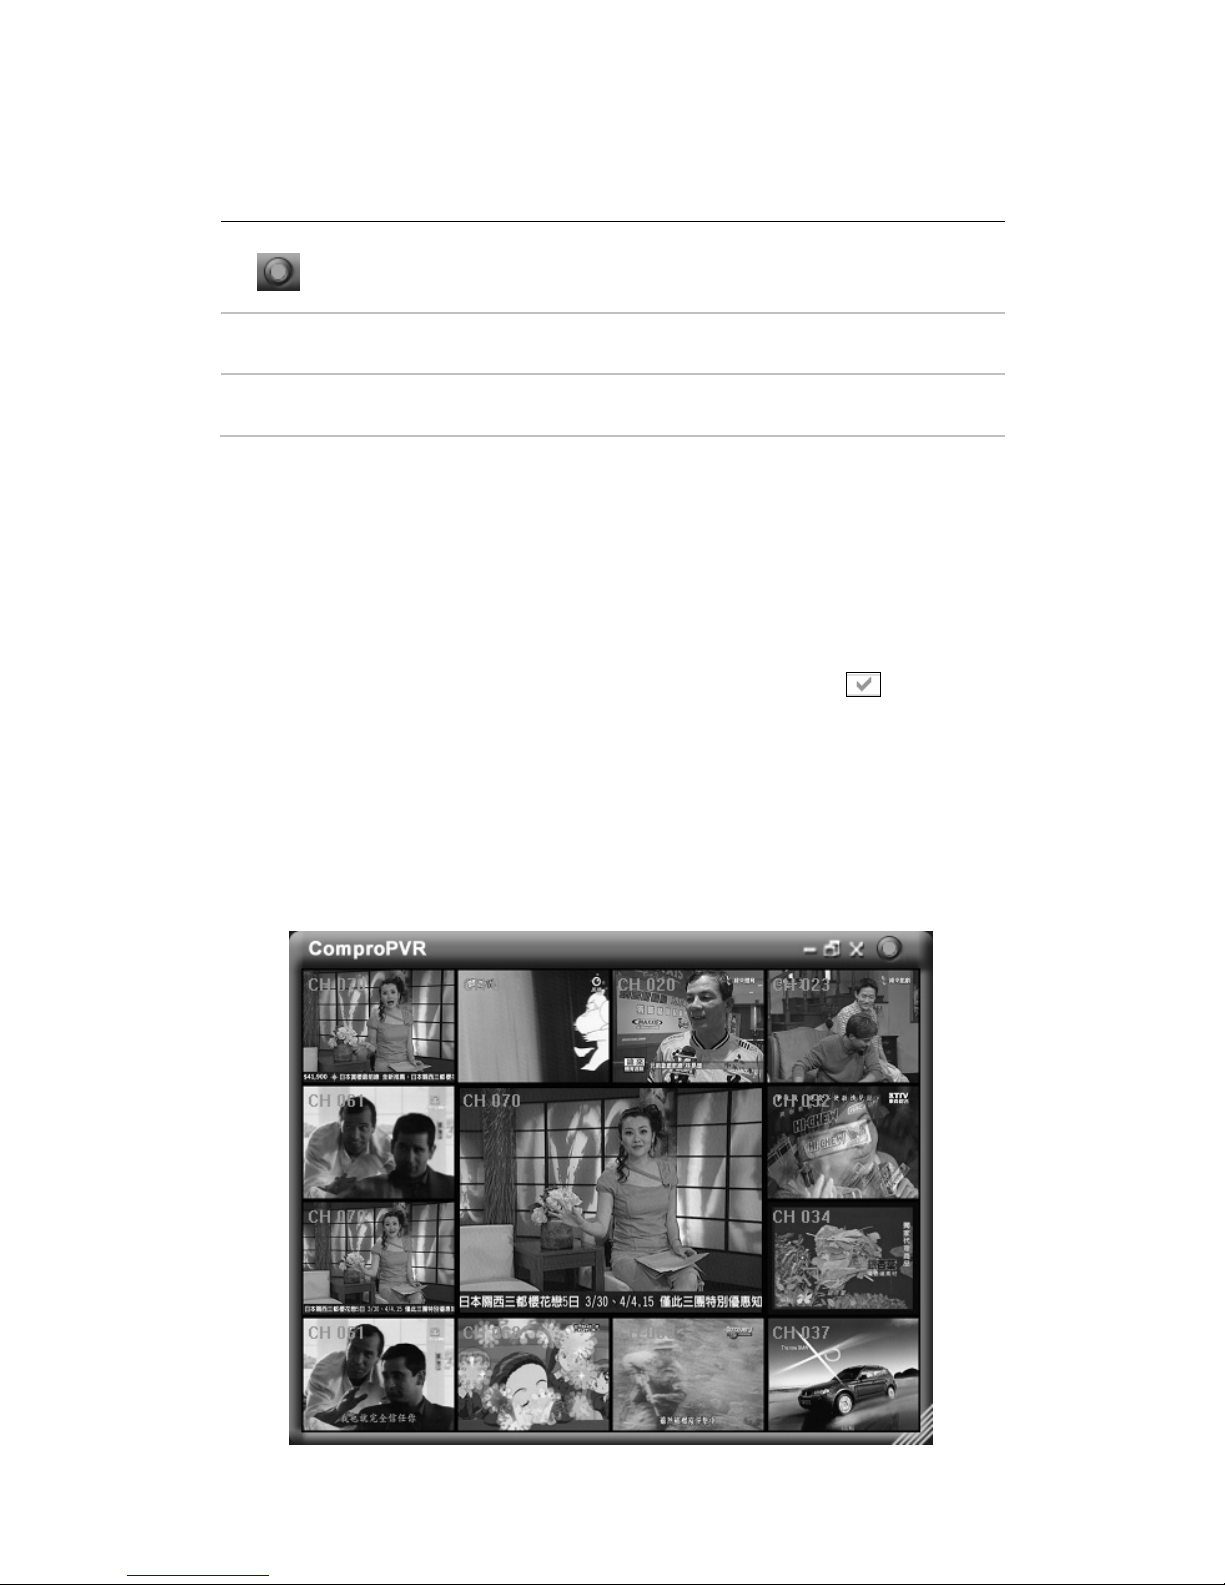
Channel Surfing
While watching TV, the channel surfing feature displays a 4x4 grid of channel
images to give you an overview of available programming.
Page 23
21
Right-Click Mouse Menu
If using mouse to right-click on the TV screen, you can see a menu pop up.
There are many useful options for your convenience.
Zooming image
If you would like to see more details on a certain part of a video image, you can
press the mouse right button to drag a zone of the screen. You will see the
zoomed image.
Also you can press the mouse right button and move on the screen to shift the
zoomed area of the image. Just click the mouse left button to resume normal
mode.
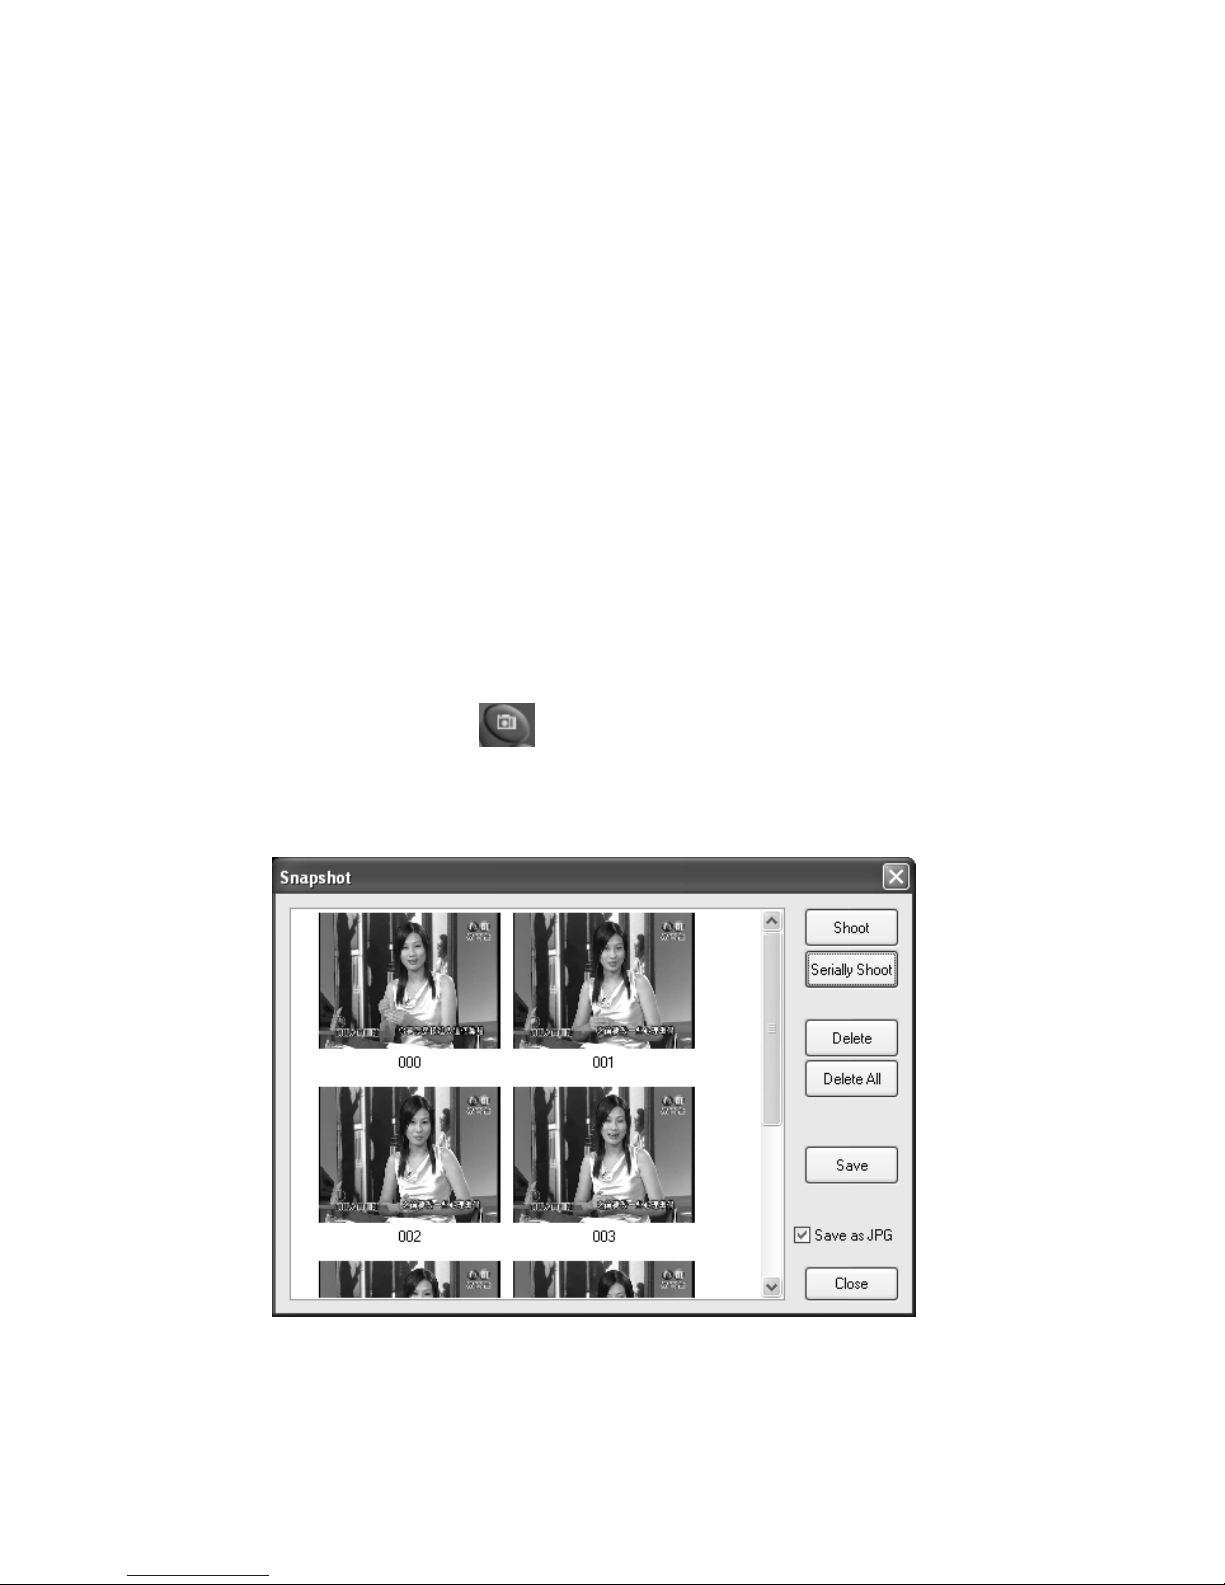
Still Frame Capture
Click on the capture icon on the control panel or hit the "Space Bar" of
the keyboard shortcut to capture an image of the display window. You can see
the screen capture dialog as below.
Page 24
22
Recording
ComproPVR is a digital video recorder. ComproPVR can record full-motion
video and audio from your video source and save it to your hard disk.
ComproPVR supports MPEG-1, MPEG-2, MPEG-4 encoding, which saves
disk space while providing high video quality.
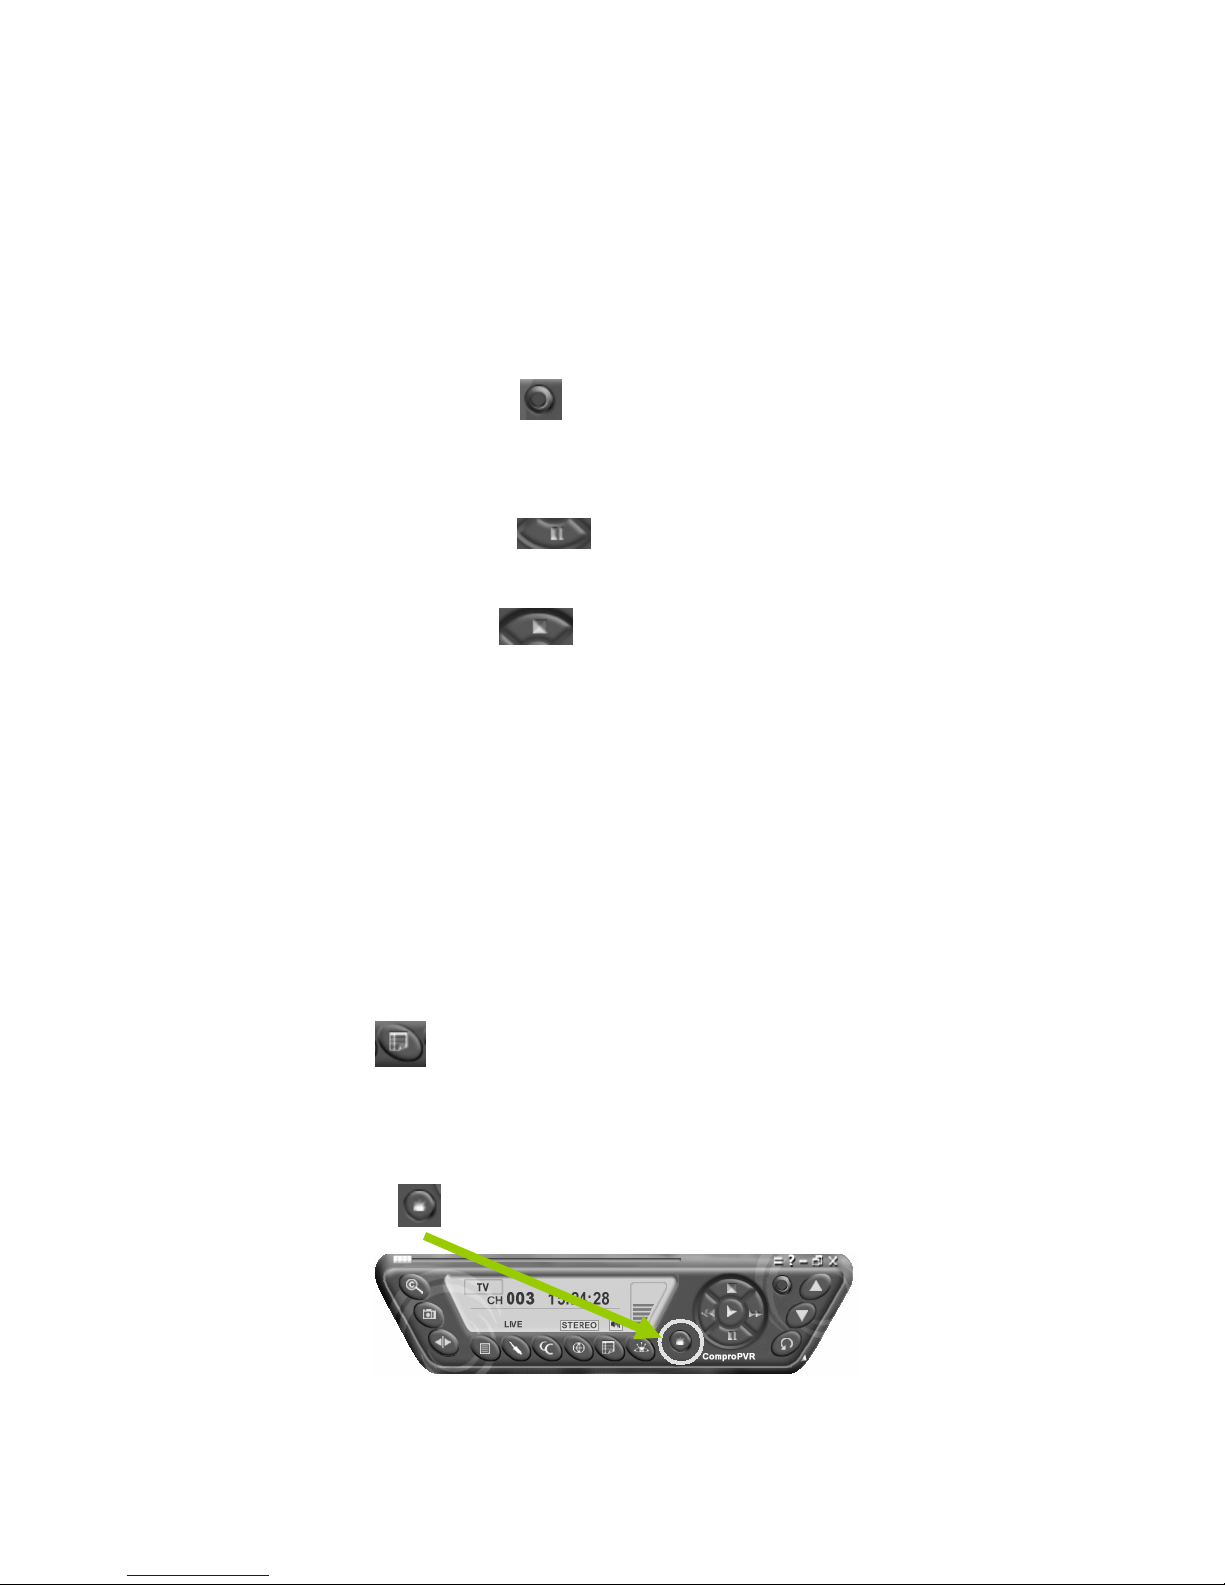
To instantly start recording:
1. Press the Record button . ComproPVR starts recording the video
source currently showing in the display window. It will save it to a file on
your disk.
2. Press the Pause button to pause the recording if you like. This is
useful to skip recording the commercials.
3. Press the Stop button to stop recording.
4. When you stop recording, ComproPVR prompts you to name the file
containing the recorded video. Enter the name and press OK.
To playback the recorded file, press the Play button and select the file you wish
to view.
Scheduled Recording
ComproPVR can be scheduled to record a TV program later or remind you of
an upcoming program. The schedule can be set for a one-time or a recurring
session. You can repeatedly record any regularly scheduled programming.
Relax. Never miss your favorite shows.
Press the icon to open the Scheduled Recording dialog box.
Straight-to-Disc
Click on the icon on the control panel.
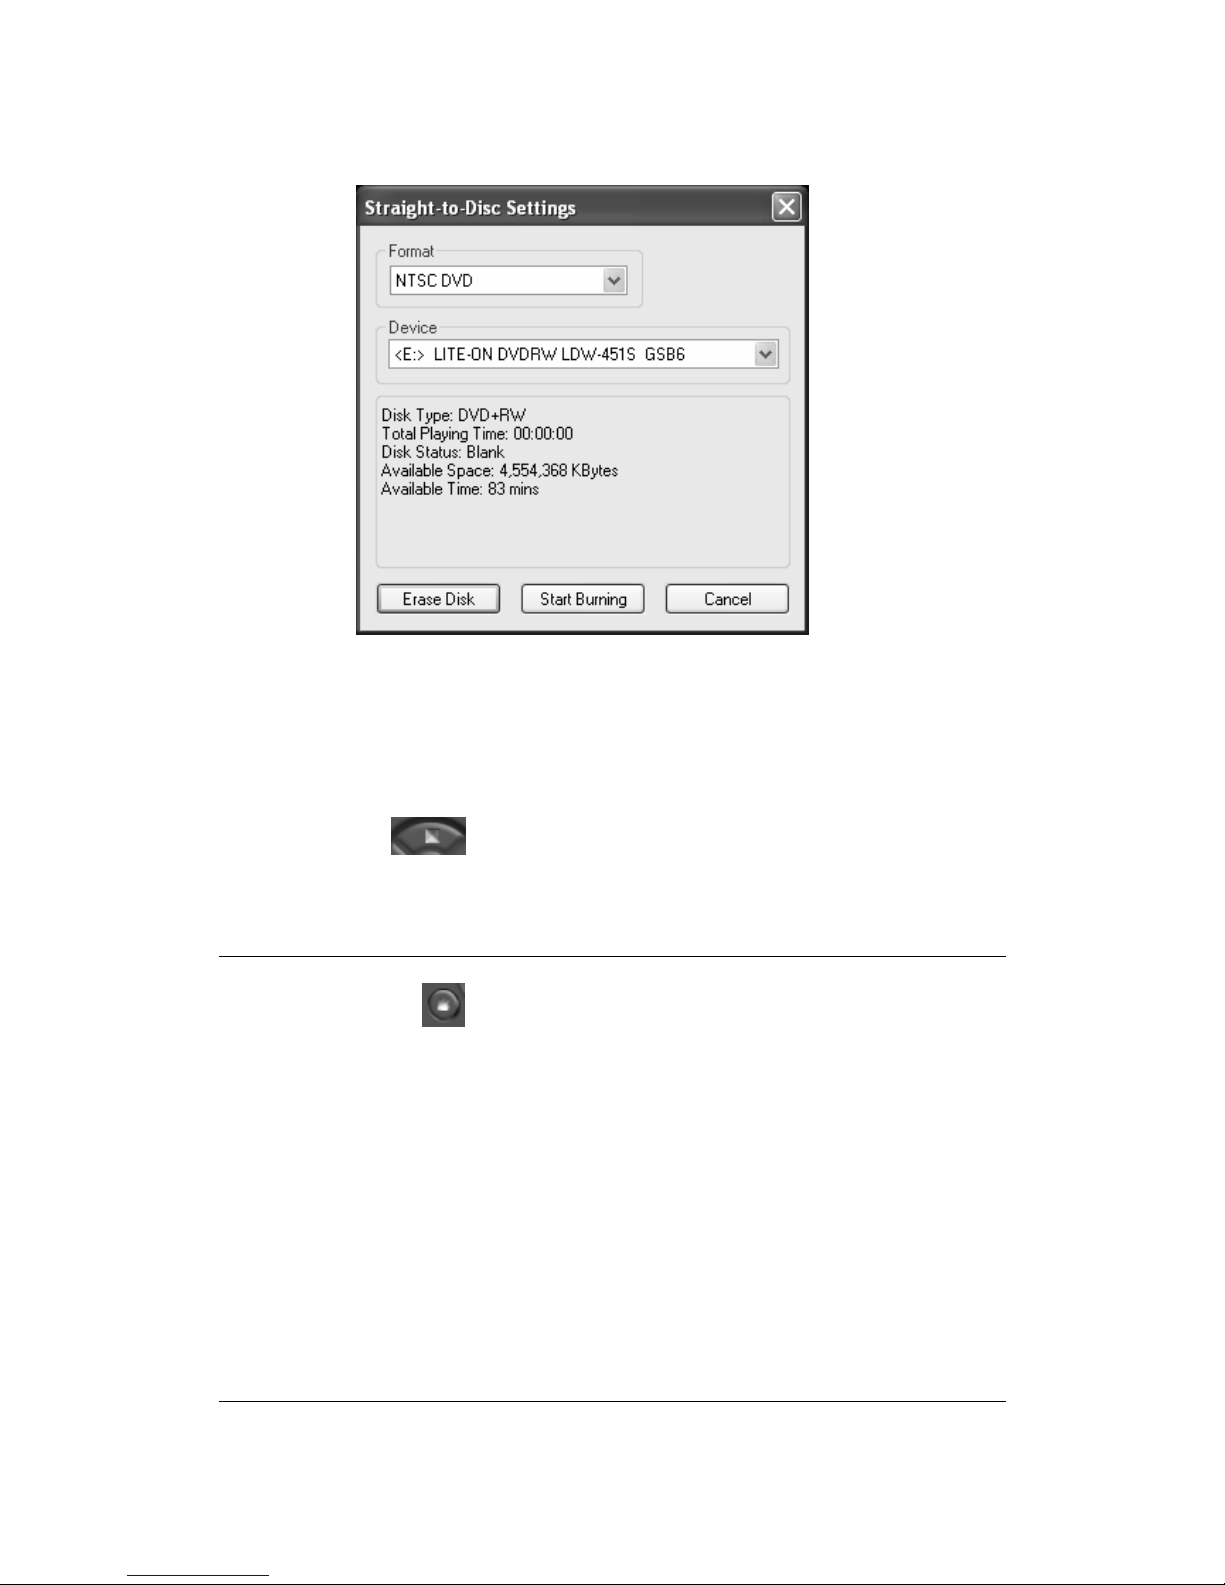
You can see the straight-to-disc dialog as below.
Page 25
23
Format: Choose the recording format you like.
Device: Choose the CD-R or DVD-R device here.
Erase Disk: If the disc is re-writable and not empty, you need to erase it first.
Start Burning: Press this button to start burning disc.
Stop: Press the button on the control panel to stop burning.
Cancel: Press this button to exit the dialog.
Note
If you can’t see the icon, please check the following:
This feature is only available on Windows XP and 2000.
You need to install the bundled Ulead DVD MovieFactory software in order to
have this feature. If you don’t have Ulead DVD MovieFactory in the package,
then this model doesn’t support it.
CD-R or DVD-R is necessary to use this feature and the recorded file will not
be saved in the disk.
ComproPVR will estimate your CD or DVD capacity automatically. It will stop
recording when it comes full..
The quality is related to the recording performance. Choosing better
performance in the recording option will result in a better video quality.
Page 26

24
Timeshifting
Timeshifting lets you pause, replay, or skip commercials during live TV, without
interrupting an ongoing recording session. Timeshifting gives you absolute
control over how you watch television, like never before. For example, you
watch your favorite sporting event, pause the live action and help yourself to
an ice-cold beverage from the fridge.
Press the Timeshifting button and the Time Monitoring bar will appear.
(See below.)
The Time Monitoring bar informs you of how much of the timeshifting buffer is
in use You can also use your mouse to drag the Time Control Shuttle to jump
to a specific time in the program.
You may also press the Advance (for commercial skip) and Replay (for instant
replay) buttons on the control panel or remote control to navigate through the
program.
Timeshifting temporarily saves the video to your hard disk for a specified
period of time.
When you return to your seat, you can resume viewing the program from the
point when you left.
Options
You can press the Options button to open the Options dialog box. You
can change detail settings of ComproPVR here.
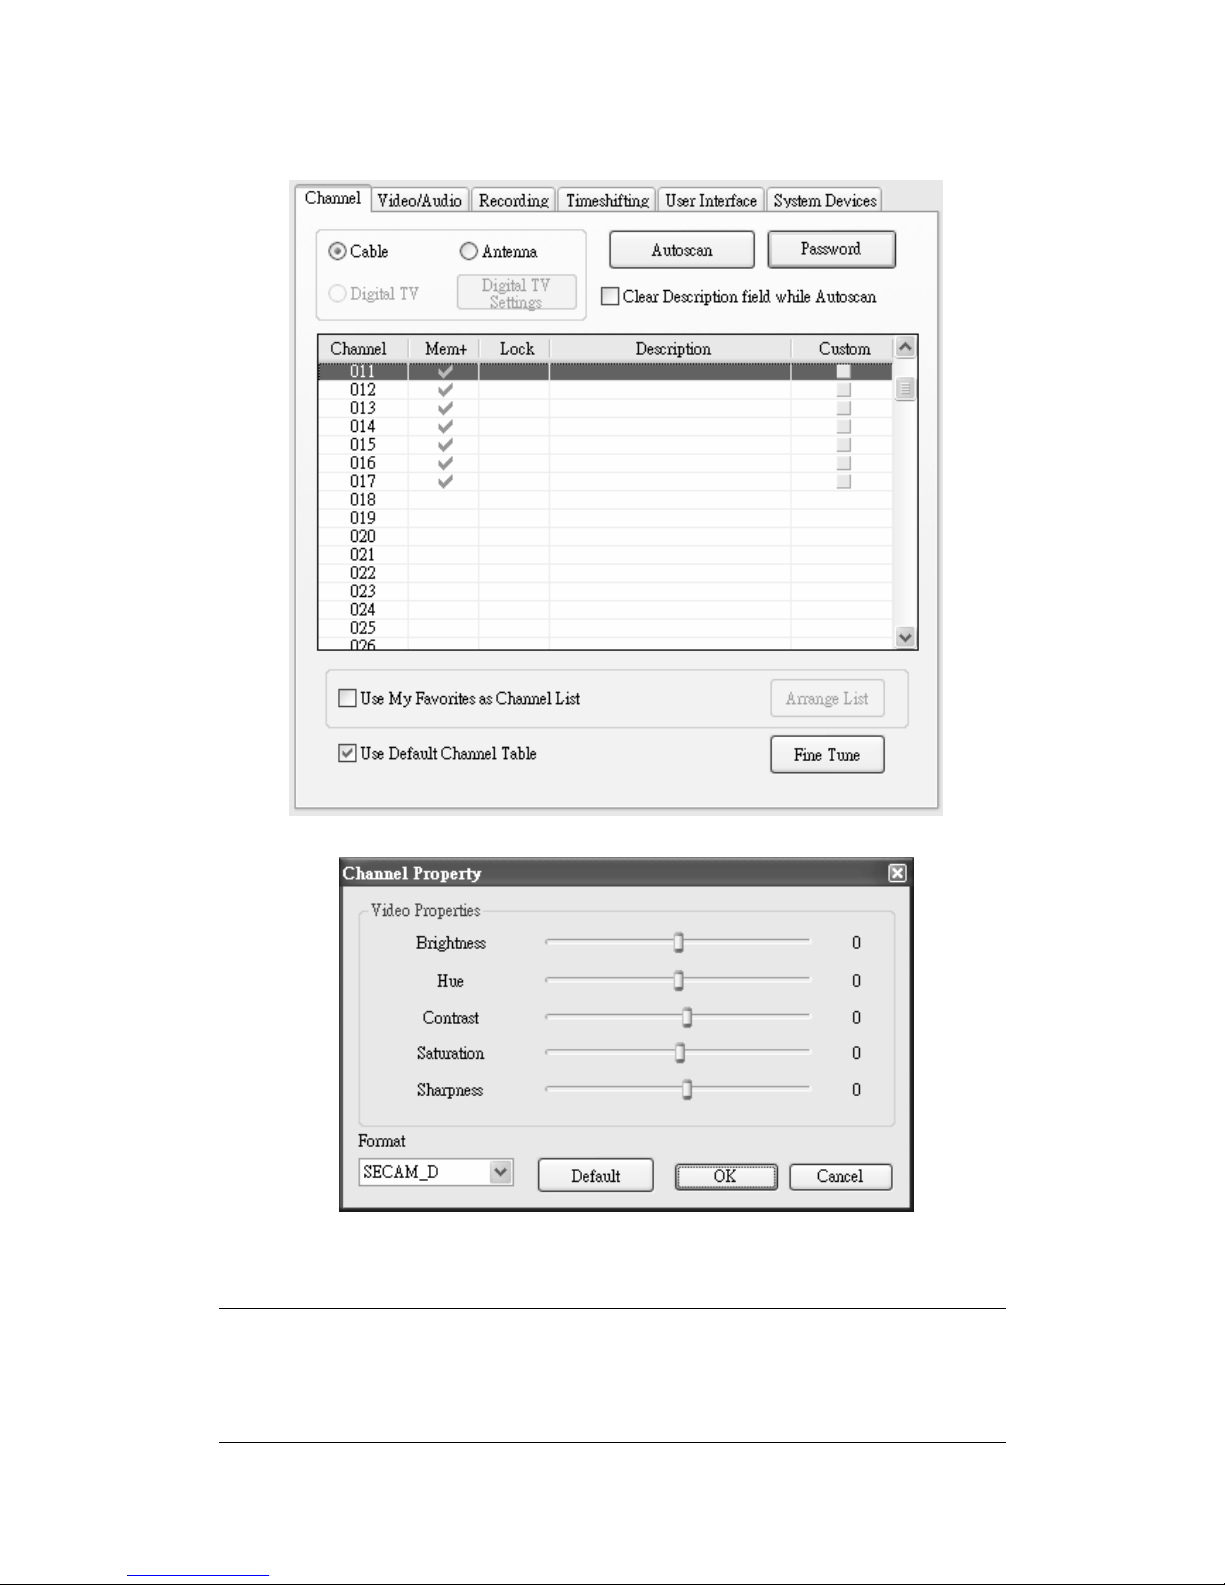
ComproPVR can let you set video properties (brightness, contrast, etc) for
each channel. Just press the button on the custom column in Channel tab in
Settings of ComproPVR. The dialog box will pop up as follow.
Page 27
25
Note
This manual only provides basic information for the ComproPVR 2. For more
information on using applications, please see the User’s Guides in the
programs, on the CDs, or at our website for the latest manuals.
Page 28
26
ComproFM 2
Introduction
ComproFM lets you enjoy FM radio programs on your PC. Listen to music or
other programs while you work or browse the Internet.
Note
The hardware needs to have FM tuner in order to use ComproFM.
This section provides basic information for ComproFM. For more details,
please check the help file of ComproFM or the manual in the installation CD.
Control Panel
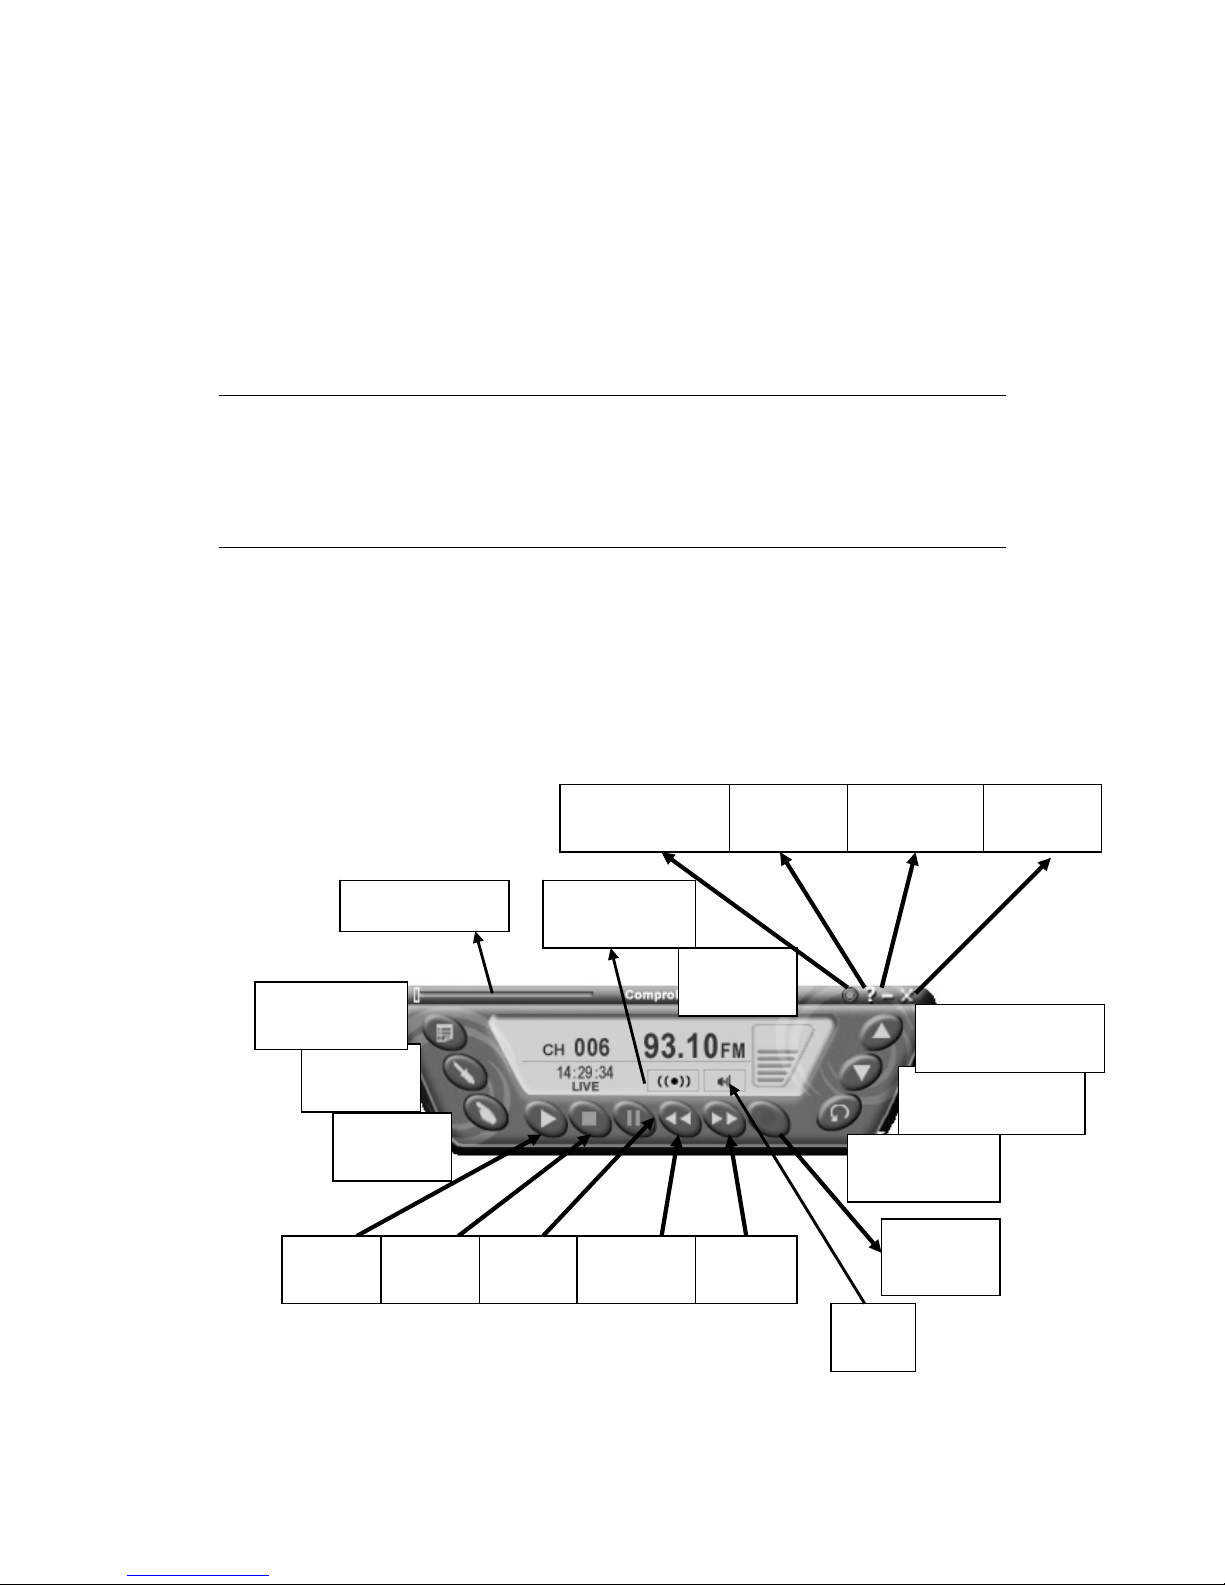
The following describe the ComproFM control panel functions, and tips for
using ComproFM. The following figure gives you the function of the button with
(Hot Key.)
Options
(S)
Close
(CTRL+W)
Last Channel
(N)
Backward
(Å)
Schedule
Record (B)
Frequency
(K)
Channel Down
(Page down)
Volume
(+, -)
Minimize
(Z)
Mute
(M)
Record
(R)
Channel Up
(Page Up)
Always on top
(CTRL+A)
Help
(H)
Progress bar
Pause
(Space)
Forward
(Æ)
Stop
(O)
Stereo/Mono
(CTRL+S)
Play
(Space)
Page 29
27
Troubleshooting
OS requirement
VideoMate TV has to work on Windows XP / Windows 2000 or above OS. You
are welcome to www.WindowsUpdate.com website for the Service Pack
update of Microsoft.
Driver Installation
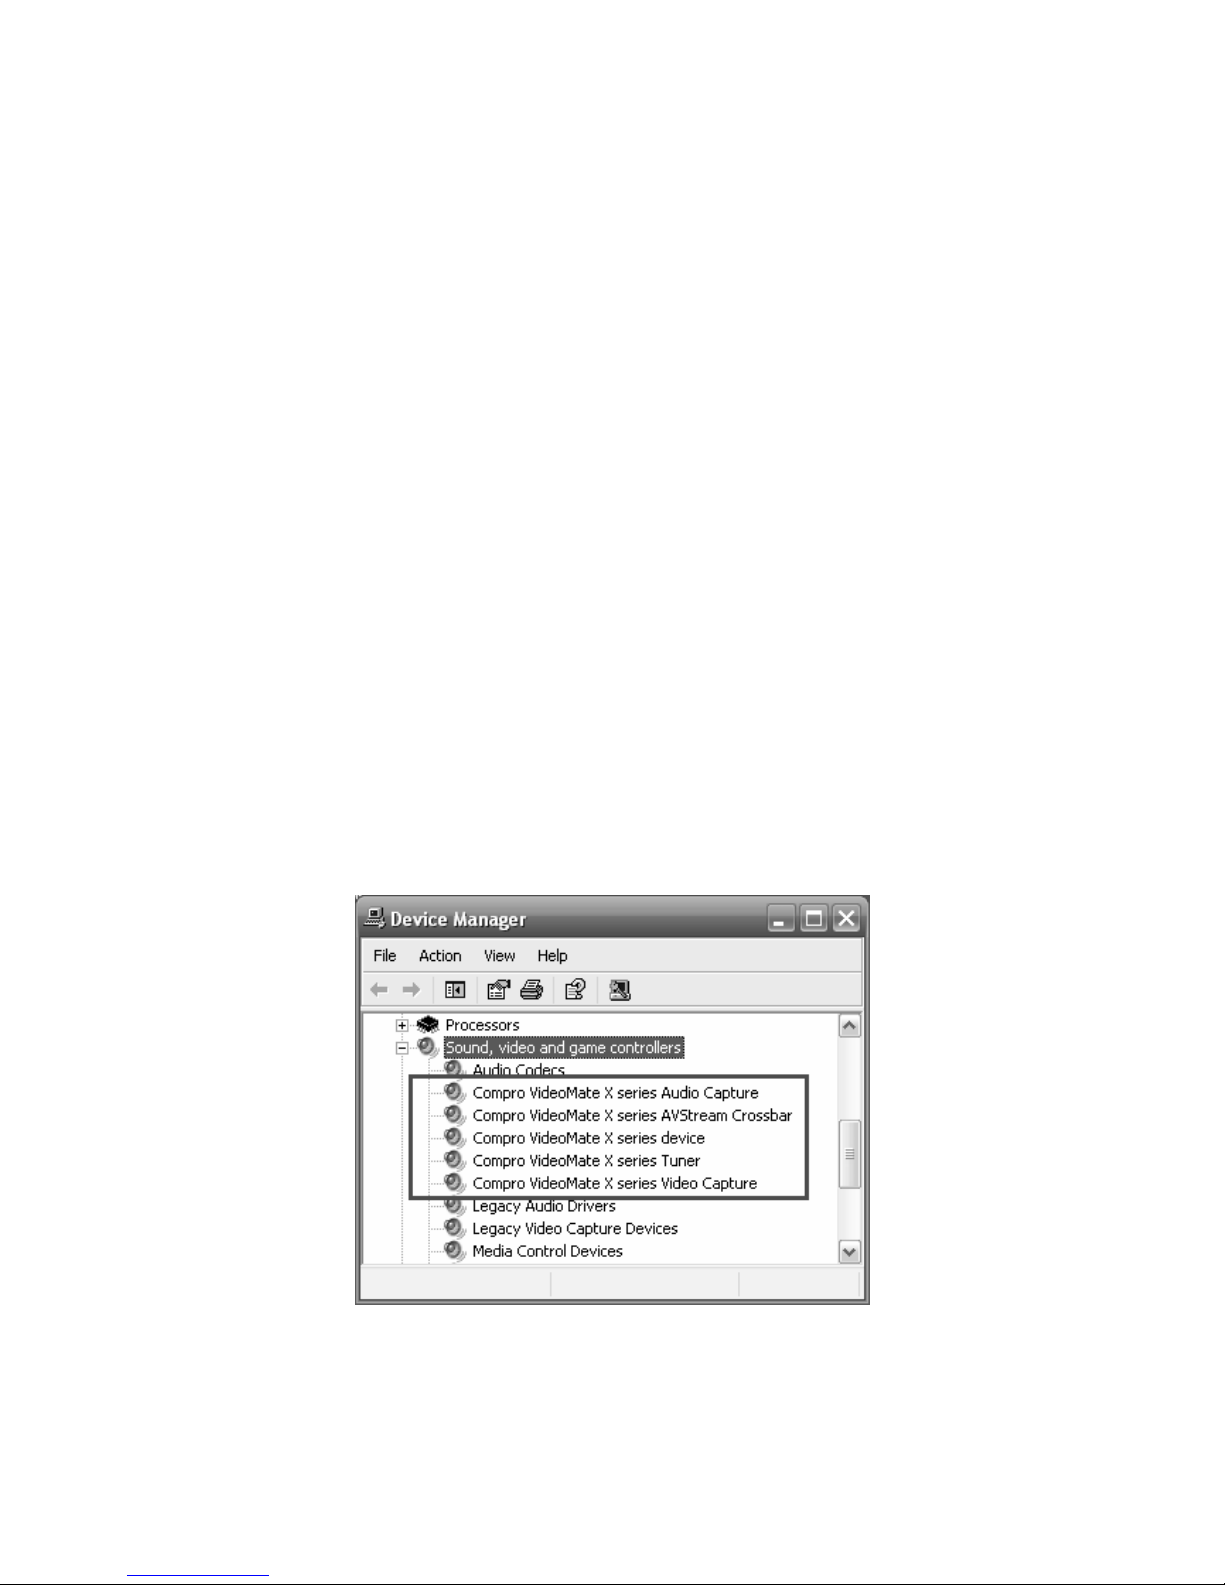
The most common cause of problems with the TV Tuner Card is incorrect
installation of the TV capture and TV tuner drivers. If you have problems
watching, recording, or timeshifting live TV, please check the status of the
drivers with Device Manager.
You should see the following five drivers in the "Sound, video and game
controllers" section of Windows Device Manager.:
"Compro VideoMate X series Audio Capture"
"Compro VideoMate X series AVStream Crossbar"
”Compro VideoMate X series device”
"Compro VideoMate X series Tuner"
"Compro VideoMate X series Video Capture "
If these drivers are not there, uninstalling and reinstalling the VideoMate TV
drivers can help. Use the Add/Remove Programs Control Panel applet to
uninstall the drivers. Reinstalling the drivers should fix this problem.
Page 30
28
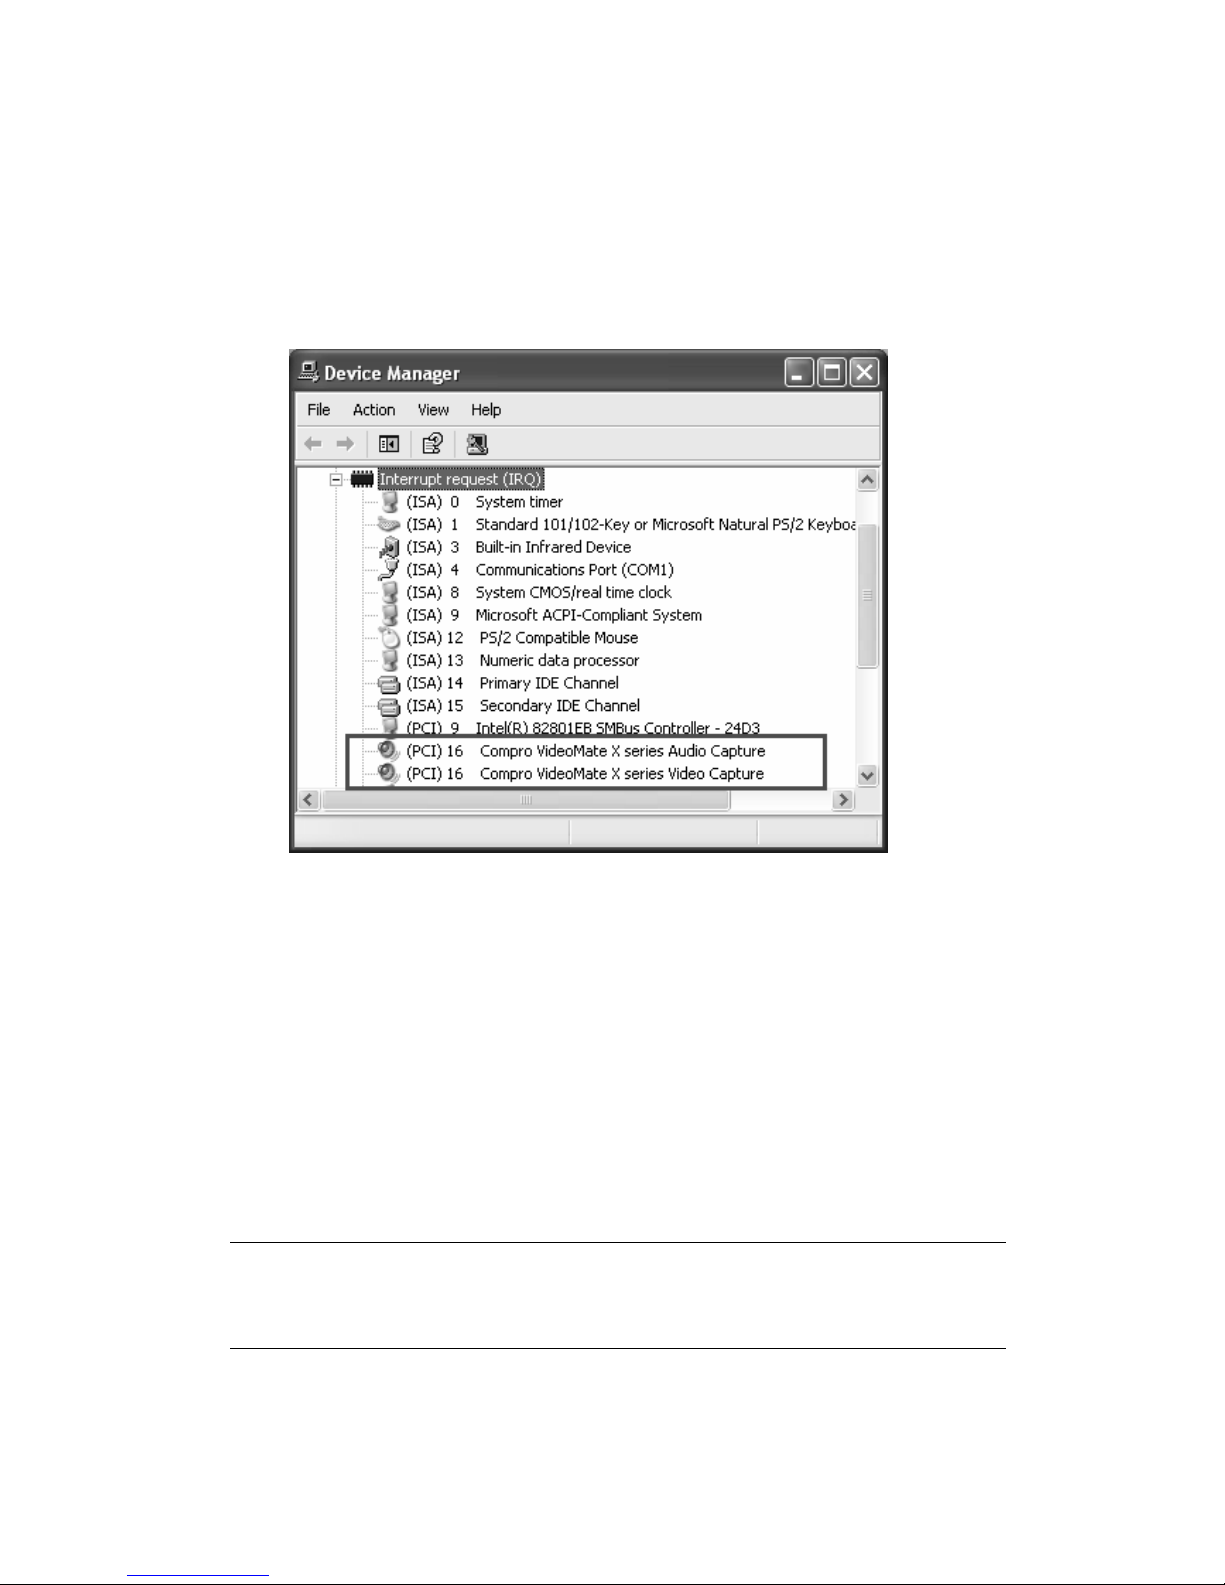
If the problem persists, your problem could also be the result of an IRQ conflict.
IRQ conflicts happen when other devices, e.g., network card or sound card, in
your computer share the same IRQ with your TV tuner card.
Use Device Manager to detect IRQ conflicts. In Device Manager, choose
"View->Resource by type" and click on the "+" besides Interrupt request (IRQ).
You should see the following.
For best performance, no device should share an IRQ with the VideoMate TV
card.
If another device shares an IRQ with the TV tuner card, remove other PCI
cards from your PC and insert TV card on the third or fourth slot from AGP only
(if available). Then uninstall and reinstall the TV card driver. This usually
solves the problem. If the problem persists, you should move the PCI TV Tuner
card to another PCI slot.
After you are able to successfully use ComproPVR, install the other PCI
devices one at a time. Restart your system and test ComproPVR after
installing each card.
Note
Pay attention to the IRQ numbers of networking, sound, and SCSI cards.
They should not share IRQs with the TV tuner card.
Page 31

29
Why won’t my PC start?
Don’t panic. The most common reason for this is because you connected the
ATX power switch cable to the wrong pins on the mainboard. Verify the
position of the power patch cable on the mainboard. Check the mainboard
documentation to verify the position of the connector for ATX power switch
cable.
If that doesn’t help, remove the TV card and restart your PC. If you still cannot
turn the computer on, the problem is not caused by VideoMateTV. Recheck
the ATX power switch cable connection.
If computer can’t boot up while plugging in VideoMate TV tuner card, switch
the blue jumper from JP4 to JP3 to solve this problem. After doing so, you
have to switch the red jumper JP2 to 2-3 (right) and this disables the remote
wake up function.
My system cannot Power Up, What should I do?
Make sure you connect the Power Up circuit correctly. Please refer the
hardware installation section for more information.
Second, make sure you see a green LED light on the VideoMate TV tuner card.
If you don’t see the green light, your motherboard does not support the
standby power. You can only use Power Up with motherboards that provide
standby power.
Third, Power Up will start your computer 5 minutes in advance of the schedule
time. If you set the schedule on 4 o’clock, Power up will wake up your
computer at 3:55. Therefore, you need to shut down the computer before 3:54
in order to let Power Up start the computer.
Fourth, make sure you have the correct schedule time, Also, verify your
system time or clock.
Fifth, some motherboards BIOS have an option “Wake up by PME# or PCI.”
This option must be ENABLED to use Power Up function.
Finally, it is possible that your power supply doesn’t provide the standard 3.3V
standby power. Therefore, changing your power supply might help.
Why can I not shut down my PC?
In rare circumstances, the VideoMate TV card must be reset. Unplugging the
AC power cord from PC case for 5 seconds will reset the card.
Page 32

30
When you set up for scheduled recording, VideoMate TV will issue the Power
Up signal to the computer until ComproPVR starts. If your computer cannot
start ComproPVR for some reason, the TV tuner card will try to wake up PC
even you shut it down. Unplug the main power cord to reset VideoMate TV
card. You can shut down the computer normally after that.
Other possible causes of this problem include:
1. If you have a multi-Boot system and ComproPVR is not installed and
running on the default OS. Solutions: Set the default OS properly or install
ComproPVR on the default OS.
2. There may be other, independent problems preventing Windows from
starting normally. Solution: Remove the VideoMate TV card and troubleshoot
PC start up. Remember to correctly reconnect the power switch cables.
3. The ComproPVR Scheduler shortcut is missing from the Programs “Startup”
folder. Reinstalling ComproPVR can help.
Audio OK / No Video
The main reason for this problem usually is the result of an IRQ conflict. Please
see Driver Installation, above, to solve it.
Video OK / No Audio
If you can view the TV picture but get no audio, you should check the following:
First directly connect the speaker to the audio-out (green circle) port on the 1 to
4 converter cable of TV card to see if the sound comes out. If so, then the
hardware is not defective.
Second, the external audio patch cable is color-coded. Connect the green plug
to the green Audio-Out port on VideoMate PCI TV Tuner card and the blue
plug to the “Line-In” port of your sound card and that you have selected the
audio source to be “Line-In” in the System Device in Settings of ComproPVR.
Third, check that the sound is not muted or volume too low in the Windows
Volume Control dialog. (Double-click on the speaker icon in the system tray.)
Sometimes updating the sound card driver from vendor or TV card’s driver and
application from our website may help as well.
Audio disappear after few minutes
If you have AntiVirus software running, please uncheck the Instant Messenger
(like ICQ, MSN, Yahoo Messenger) protection in the Internet in options.
Page 33
31
Why can’t I record?
ComproPVR 2 needs to use components of Ulead PhotoExplorer 8.5. If your
computer doesn’t have PhotoExplorer, ComproPVR 2 will fail to record. Please
reinstall Ulead PhotoExplorer 8.5 from installation CD.
No audio in the recorded file. What's wrong?
This may be a result of choosing the wrong record audio source in the System
Device in ComproPVR Settings. If you are using an external audio patch cable,
verify that it is connected between the Audio-Out of TV tuner card and Line-In
of your sound card and that you selected the audio source to be “Line-In.”
If using the internal audio patch cable, check that it is connected between the
internal Audio-Out of the TV tuner card and AUX-In of your sound card and
that you selected the audio source to “AUX.” You may plug in to CD-In. If so,
please select the audio source to “CD-In.”
Check the recording volume levels in the ComproPVR Recording tab in the
Settings dialog.
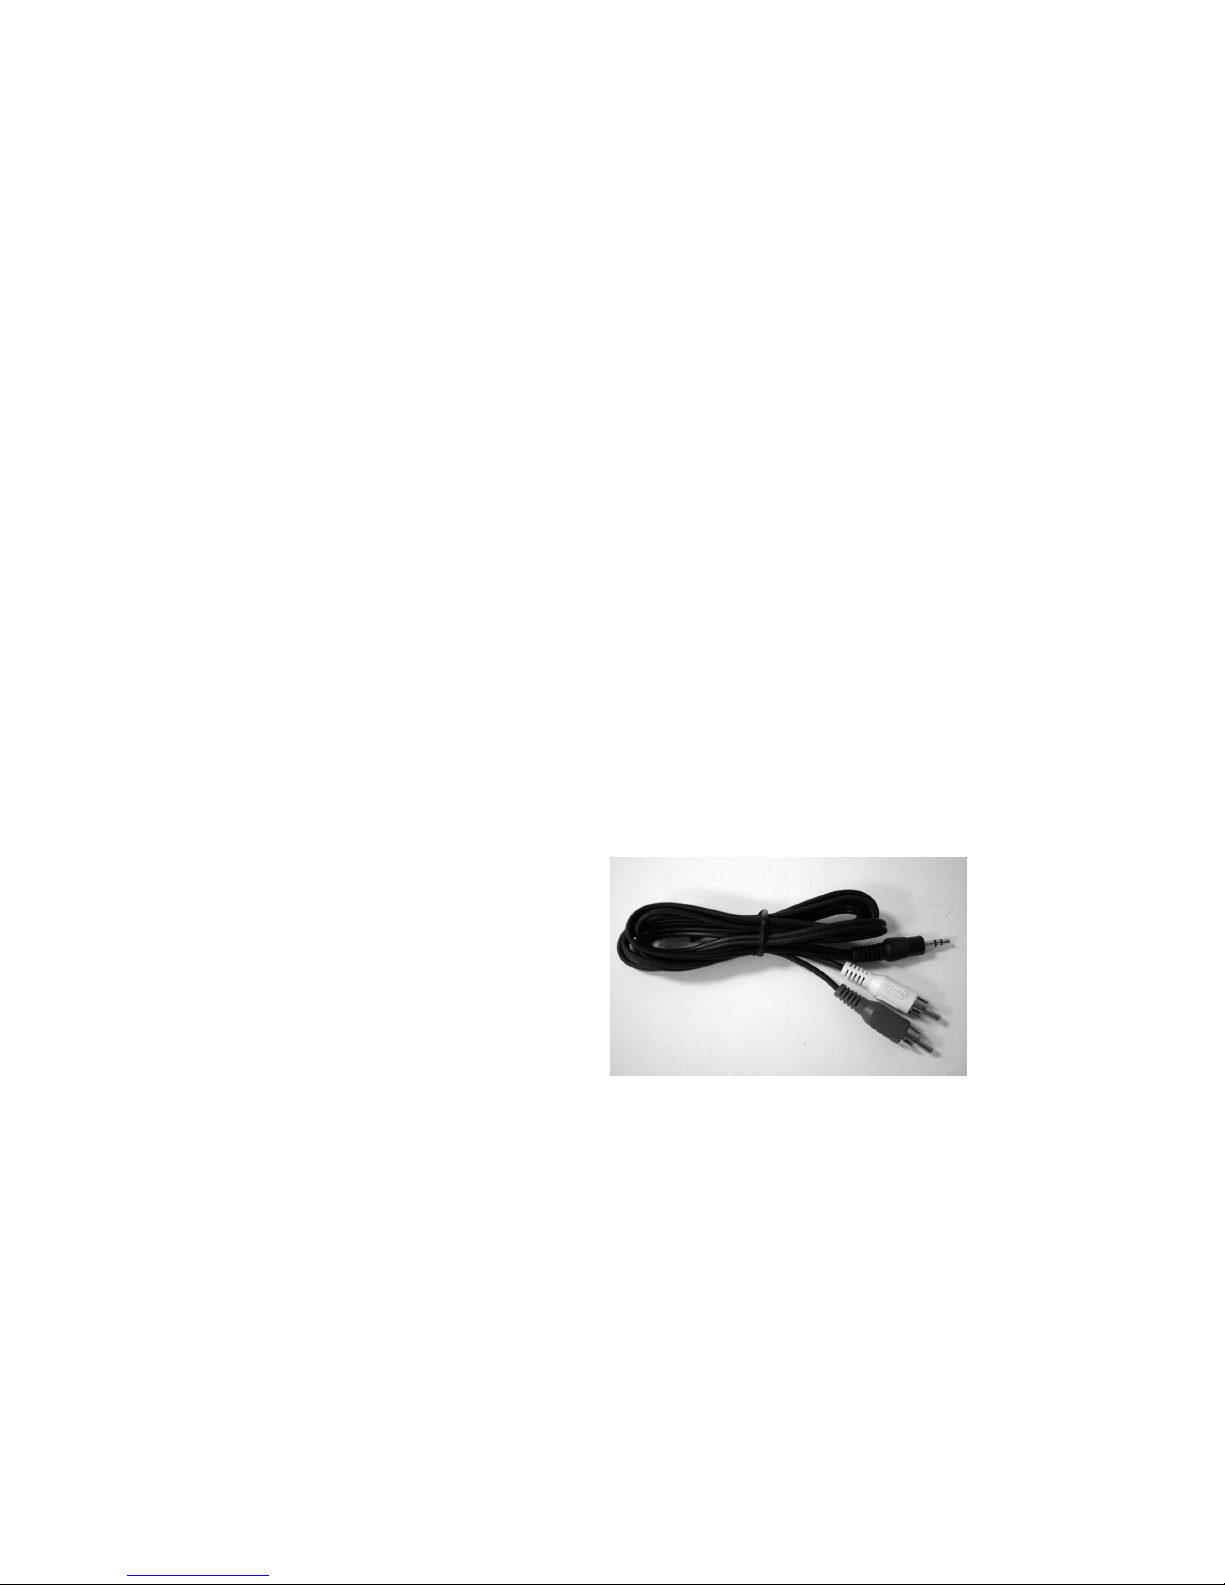
How to recorded file from VCR?
Please plug VCR Composite video
cable (yellow) into TV card yellow
connector which is on the 1 to 4
converter cable. Composite Audio
needs to connect to the Audio-In port
of TV card. You have to buy a
converter (see the right) to transfer
Composite Audio cable (red one and
white one) into stereo jack.
Why playback the recorded video has lags?
VideoMate PCI TV Tuner card needs CPU to do the encoding. Therefore, the
lags is due to CPU fails to encode in real time. Usually, VCD quality needs
about 900MHz CPU for recording while DVD quality needs about 1.7G CPU for
recording. Press Ctrl + Alt + Del to check your CPU usage. If it reaches 100%,
then the lag is inevitable.
The usual reason for this problem is conflict with some CODEC software, such
as Nimo or K-Lite. This kind of software forces applications to use their
Page 34

32
CODEC for play back. Therefore, the recorded file cannot be played since an
incompatible CODEC is being used for playback. Uninstalling the CODEC
software will help. Also reinstalling DirectX usually solves the problem. (See
our website for how to reinstall DirectX)
How can I choose MPEG-4 format for recording?
If you would like to record video in MPEG-4 format, you must supply your own
MPEG-4 CODEC. Furthermore, the CODEC must be installed before using
ComproPVR 2. In general, you can download MPEG-4 CODEC from the
following web sites.
http://www.divx.com/
After you install the CODEC software, you will see the MPEG-4 format appear
in the field of recording quality. However, Compro does not guarantee
compatibility or performance with third-party CODECs.
Why does the remote control fail?
The remote control sensor, which is plugged into the TV card, may be loose.
Please unplug it and plug it again. You should also check the batteries of the
remote control. Do not use rechargeable batteries.
Verify that the IR icon (ComproRemote) is in the system tray on the
lower-right corner of the screen. If you don't have ComproRemote on the
system tray, start the following program:
C:\Program Files\Common Files\VideoMate\ComproRemote.exe
Then you should see the icon on the system tray. The IR icon should turn
bright when you press buttons on the remote. If you see no response, your IR
drivers may not be not properly installed. Please remove ComproPVR using
"Add/Remove programs" in the Control Panel and reinstall it.
If you have switched the blue jumper to another pins set, you have to switch
the red jumper to 2-3 (right) in order to use remote function.
Why does ComproPVR start by itself?
Some device emits the IR signal around. Please check if there is any
microwave or light could do that. And make sure as few cable as possible
crossing the IR receiver. Also do not use rechargeable batteries for remote
keypad. And make sure there is no button getting stocked.
Page 35

33
No response to the Settings button?
The main reason for this problem usually is the result of installing other
CODEC software like Nimo or K-Lite. This kind of software forces applications
to use their CODEC for play back. Therefore, it causes corruption. Uninstall the
CODEC software will help. Also reinstalling DirectX usually solves the problem.
(See our website for how to reinstall DirectX)
It' also possible that Windows OS's system files has been damaged by a virus
or malicious software. If this is the case, repair or fresh install the Windows OS
is the only way to solve this problem. Note that repairing the OS will leave all
the software and settings.
My PC is not stable after plugging in TV card?
Here are few things to check.
Verify that the TV Tuner card is securely seated in the PCI slot. Removing and
reseating the card can help. Sometimes gently clean the contact (golden
fingers) by a rubber eraser can help as well.
Please update the video and sound card drivers from vendors’ web sites. Make
sure the driver for motherboard chipset is also up to date. The default drivers
supplied with the Windows operating system are usually too old to operate
correctly. If you still have problems, please install the latest ComproPVR and
driver from our website.
Some software, such as MSN Messenger, ICQ, Yahoo Messenger, and Norton
LiveUpdate, can interfere with the Tuner card. Try shutting down those
programs.
Make sure the PCI TV card is using an independent IRQ. Try moving the card
to another PCI slot.
Check your motherboard BIOS settings, as follows:
Assign IRQ to VGA — ENABLE
PCI Master 0 Write — DISABLE
IRQ activate by — Level
PCI Peer Concurrency — DISABLE
CPU to PCI write buffer — DISABLE
PCI Latency Timer — a higher value (64) can help image quality
Page 36

34
TV is not clear?
TV signal could be reduced by the branching. Please make sure the cable
signal is good. Try to move the computer to a TV set and connect the cable
which is being used for the TV set. Also directly connecting the cable before
the splitter may help.
This problem could also come from with static. Once you connect the cable to
our TV card, the static interfere the system. It's possible to correct this problem
by connecting a wire from the grounding of the cable to ground. Also make
sure computer grounding is good.
Does the VideoMate PCI TV Tuner Card support
other TV application software?
VideoMate TV follows the standard WDM driver specification and thus works
with many third-party programs. Please go to Compro FAQ website for more
information. However, Compro does not guarantee third-party programs’
results.
Contacting Compro Technical Support
Before you submit an email for support, please check support FAQs on our
web site. http://www.comprousa.com/support
You can download the latest update from our website. Many issues should be
solved on the newer version. When contacting Compro for technical support,
please use the Compro support request form and provide as much of the
requested information as possible. Please write the details in order to
determine the problem. And also provide the product serial number (19 digits
numbers) on the PCI card. Please use the form from
http://comprousa.com/support/form.htm
or directly email to [email protected].
Note
Make sure you include the information of hitting the button of "E-mail Info" in
the System Device in Settings of ComproPVR in order to determine the
problem.
In order to solve the problem quickly, it is very important to provide as much
detail regarding the problem as possible.
 Loading...