

Page 1

VideoMate S700/S900
USB 2.0 Satellite TV Tuner Box
Start Up Guide
Compro Technology, Inc.
www.comprousa.com
Page 2

Copyright © 2001-2011. Compro Technology, Inc. No part of this document
may be copied or reproduced in any form or by any means without the prior
written consent of Compro Technology, Inc.
Compro, VideoMate and the Compro logo are trademarks of Compro
Technology, Inc. Other names and marks are trademarks of their respective
owners.
Compro makes no warranties with respect to this documentation and
disclaims any implied warranties of merchantability, quality, or fitness for any
particular purpose. The information in this document is subject to change
without notice. COMPRO reserves the right to make revisions to this
publication without obligation to notify any person or entity of any such
changes.
Compro Technology, Inc.
Tel. +886 2 2918 0169, Fax +886 2 2915 2389
3/F, No.12, Alley 6, Lane 45, Pao Shin Road
Hsintein City, Taipei, Taiwan.
www.comprousa.com
1
Page 3

Table of Contents
Product Introduction ................................................................... 3
Key Features ............................................................................ 3
System requirements ............................................................... 4
Package Contents ....................................................................... 5
Hardware Installation .................................................................. 6
Software Installation ................................................................... 7
MyTheatre and driver installation ............................................. 7
DVBIPData installation ............................................................. 11
Software Setting .......................................................................... 14
MyTheatre ................................................................................. 14
DVBIPData ............................................................................... 24
Remote control ......................................................................... 28
Troubleshooting .......................................................................... 31
2
Page 4

Product Introduction
The VideoMate S700 and S900 satellite TV tuner box are designed to watch satellite
TV or listen to radio programs on your PC or laptop. Please read the instructions
carefully before installation.
Key Features
VideoMate S700 USB 2.0 DVB-S TV Tuner Box
Palm size USB 2.0 DVB-S TV tuner box with digital satellite TV tuner
Watch DVB-S digital satellite TV shows on your desktop or laptop PC
Bundled MyTheatre digital TV software
Supports IP over DVB-S (where available)
Supports DiSEqC 1.2 and USALS
Supports SDTV and 1080i HDTV (where available)
Digital TV supports MPEG-2 and Transport Stream recording
Timeshifting, channel surfing, and still frame capture
Supports audio and language selection in available channels
Supports EPG, Closed Caption, Subtitle and Teletext
Fully functional IR remote control with WMC controls support
Supports popular ProgDVB and DreamDVB 3
VideoMate S900 USB 2.0 DVB-S/S2 TV Tuner Box
Palm size USB 2.0 DVB-S/S2 TV tuner box with digital satellite TV tuner
Watch DVB-S, DVB-S2 digital satellite TV shows on your desktop or laptop PC
Bundled MyTheatre digital TV software
Supports IP over DVB-S (where available)
Supports DiSEqC 1.2 and USALS
Supports SDTV and HDTV (MPEG-4 AVC/H.264 up to 1080i)
Digital TV supports MPEG-2 and Transport Stream recording
Timeshifting, channel surfing, and still frame capture
rd
party digital TV applications
Supports audio and language selection in available channels
Supports EPG, Closed Caption, Subtitle and Teletext
Fully functional IR remote control with WMC controls support
3
Page 5

Supports popular ProgDVB and DreamDVB 3
rd
party digital TV applications
System Requirements (Recommended Platform)
CPU
- PIII 1.7 GHz for SDTV viewing
- P4 3.0 GHz for HDTV viewing and recording
Memory: 512 MB (1.0GB recommend)
Available USB 2.0 port
CD drive for software installation
Sound card or on-board sound chip
Graphics card or on-board graphics supports DirectX 9.0
OS: Windows XP SP3 / Vista SP2 / Win 7 x86/x64
Digital Satellite Dish and LNB
4
Page 6
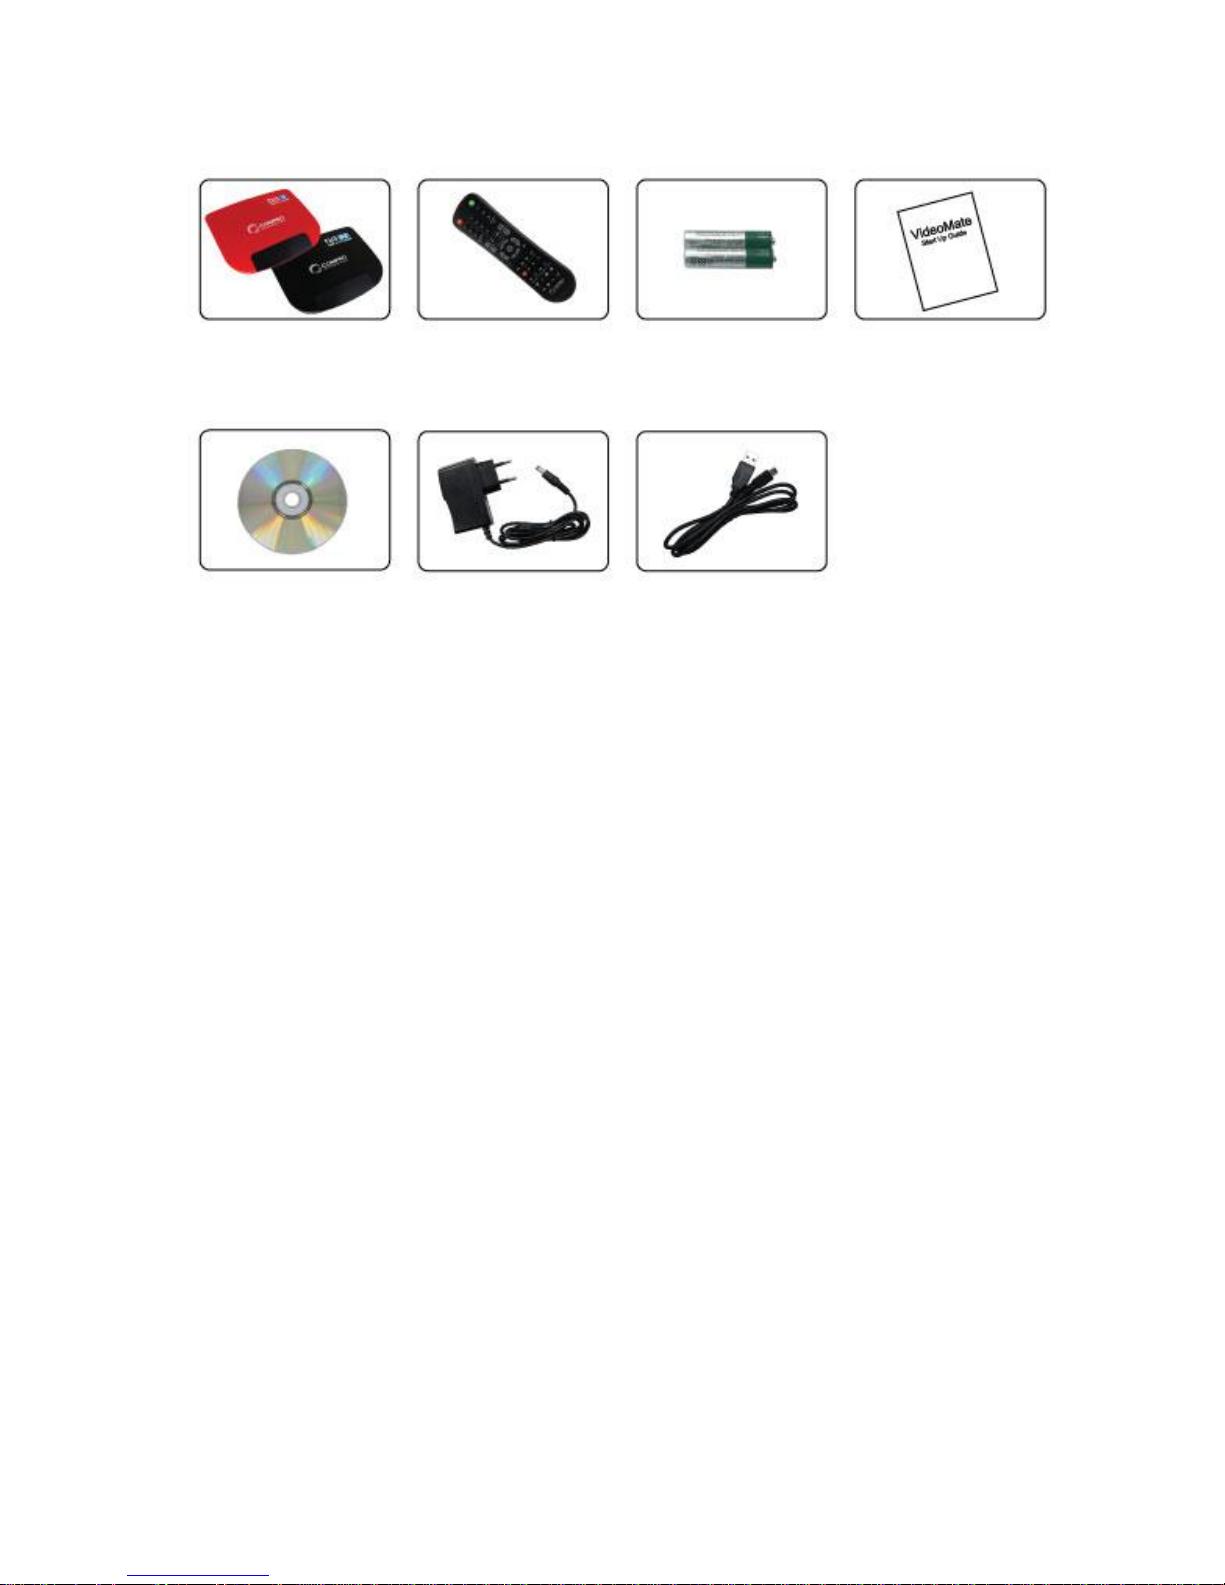
Package Contents
VideoMate
S700 or S900
TV tuner box
Remote Control
AAA Batteries
Quick Installation
Guide
Software CD
Power adapter
(I/P 100-240V,
O/P DC 12V/1A)
USB 2.0 cable
5
Page 7
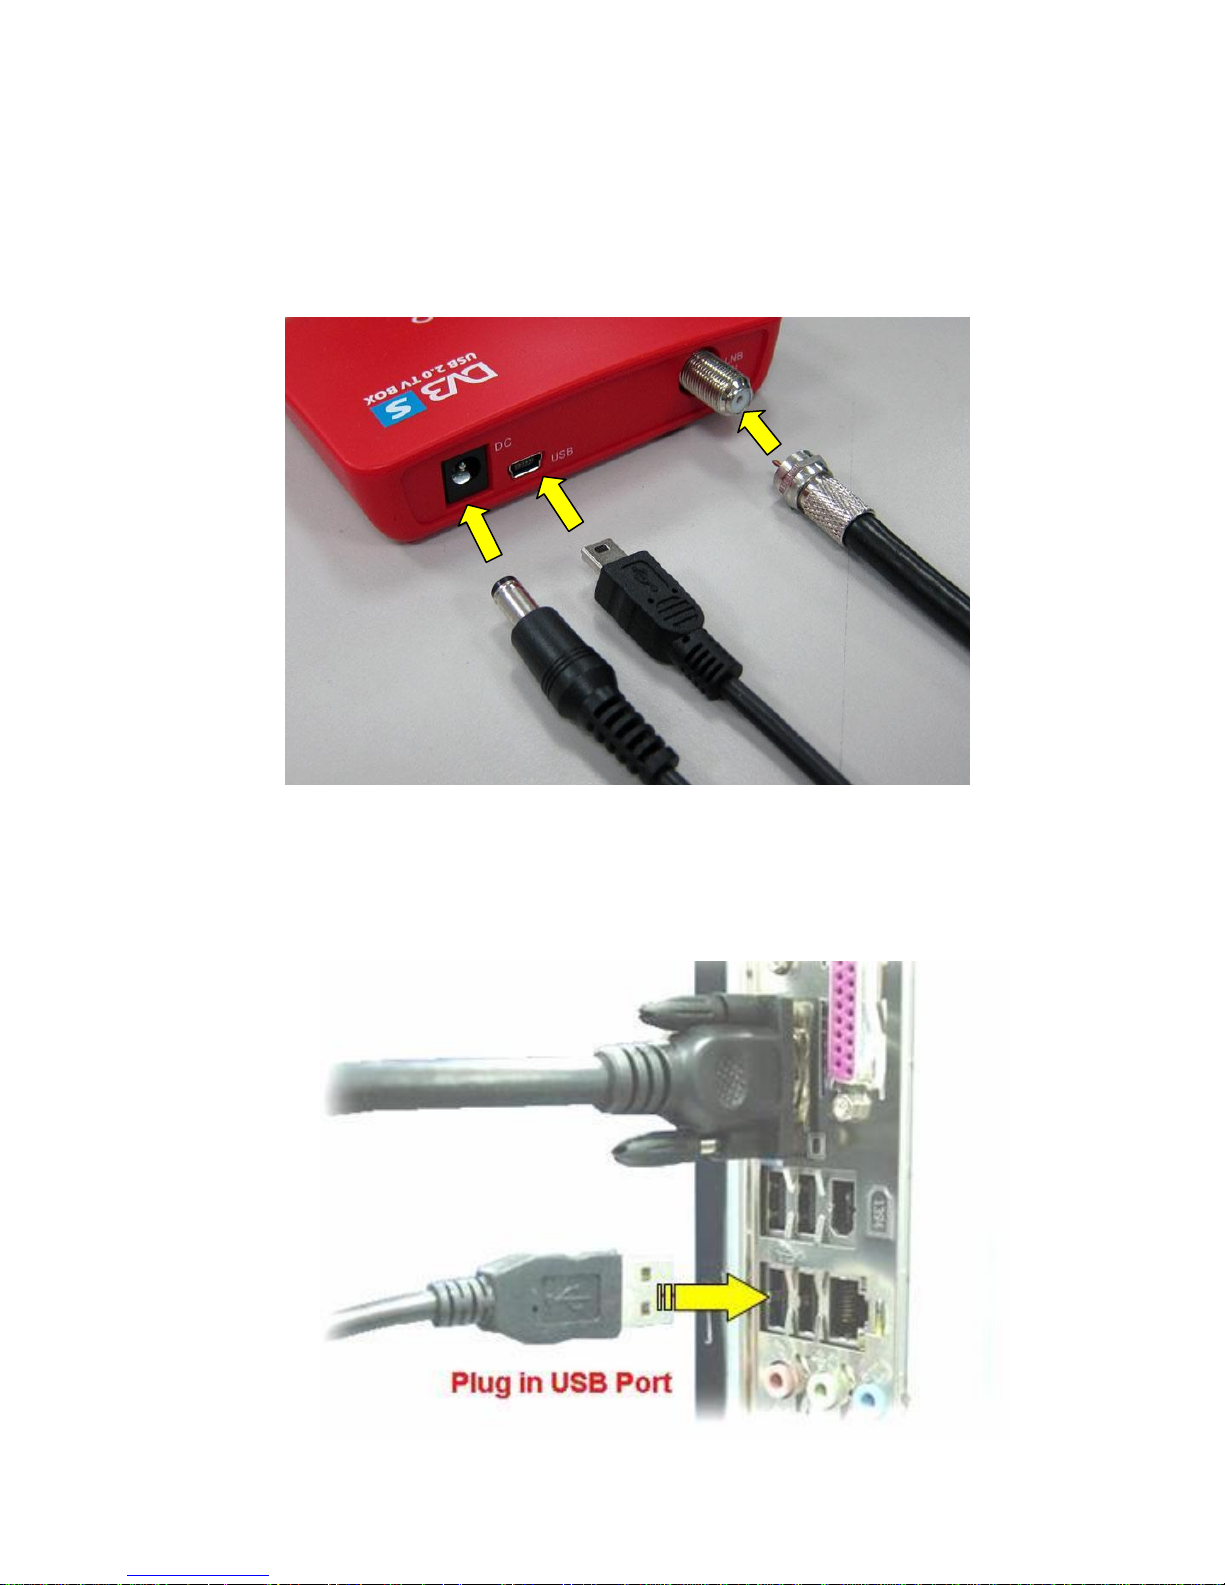
Hardware Installation
Signal Input
(LNB IN)
USB
DC Power
Step 1:
Connect the signal cable (from LNB), DC power and USB cable to your S700 or S900
TV box
Step 2:
Connect USB Cable to the USB port on your PC or laptop
6
Page 8
Software installation
MyTheater and driver installation
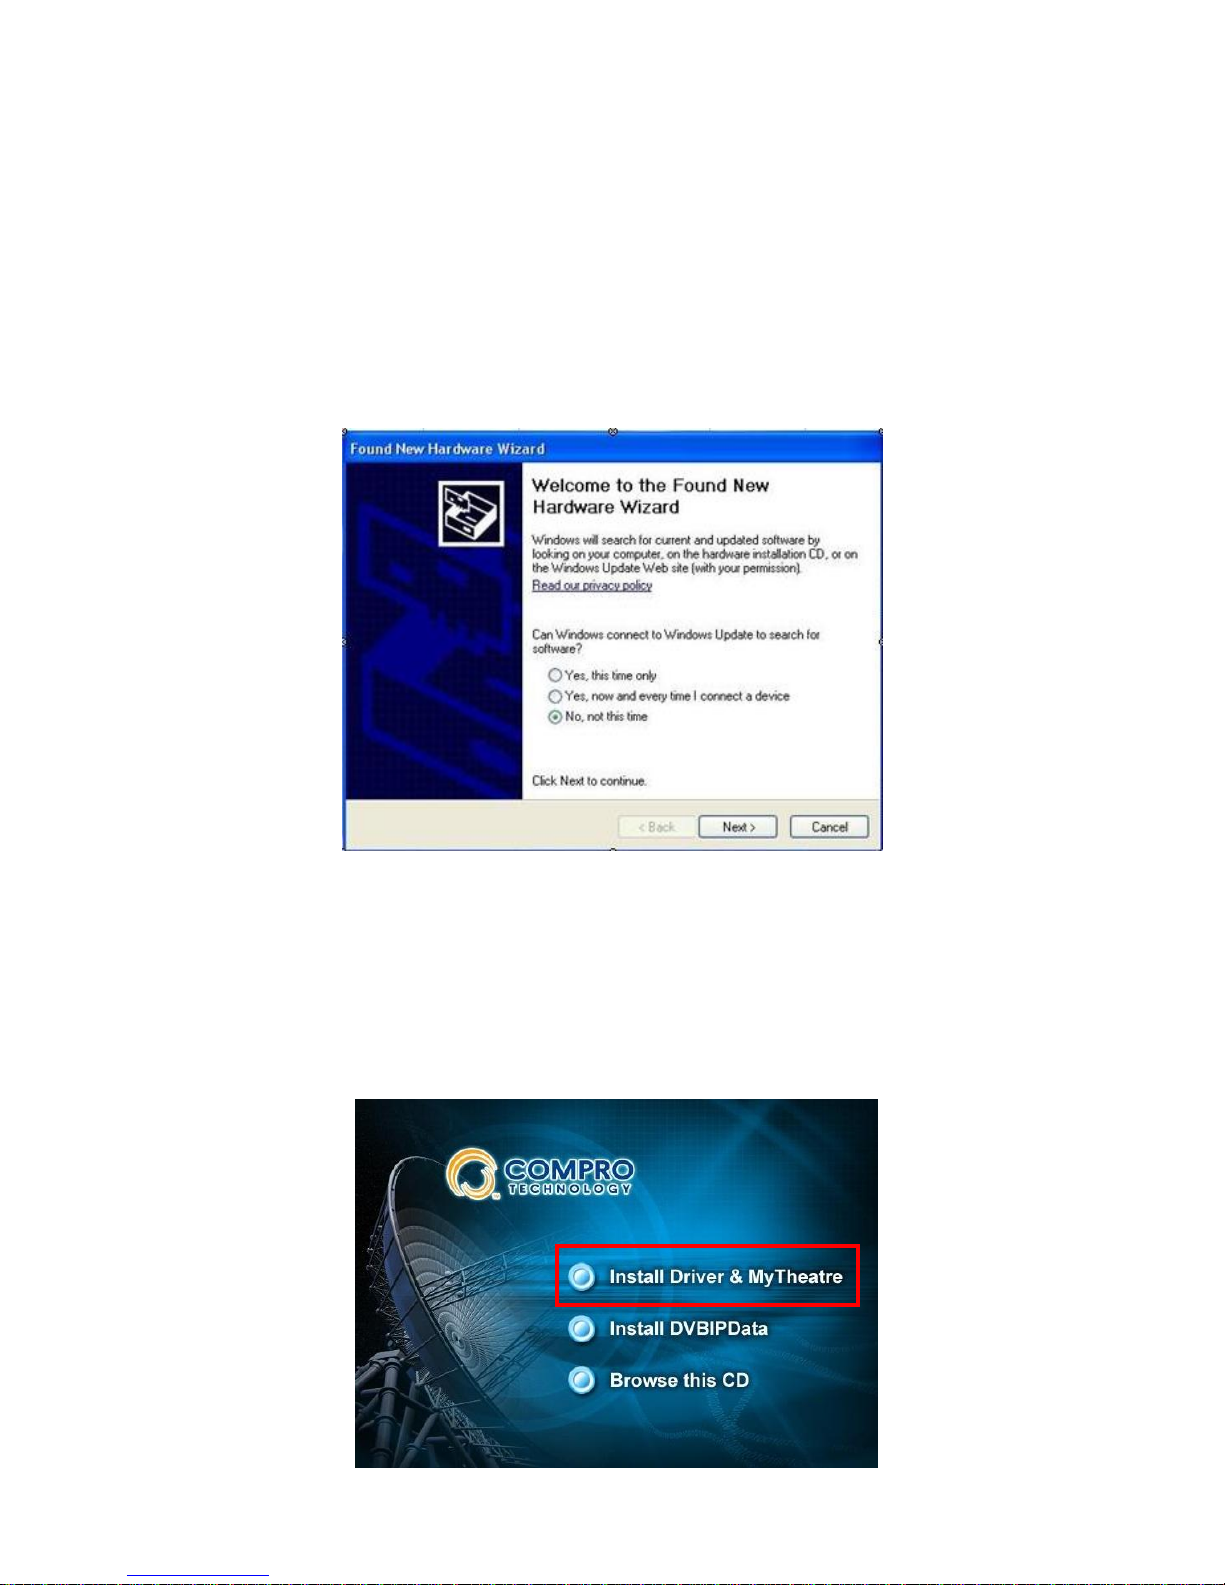
Step 1:
When you connect the S700 or S900 USB digital TV box to your PC.
“Found New Hardware Wizard” dialog will pop out; choose ”No, not this time” and
click ”Cancel”
Step 2:
Insert the software CD into your CD-ROM, Installshield will automatically start & follow
window will appear. If the window doesn’t appear, start Installshield from Drive CD
manually. Click on “Install Driver & MyTheatre”.
7
Page 9
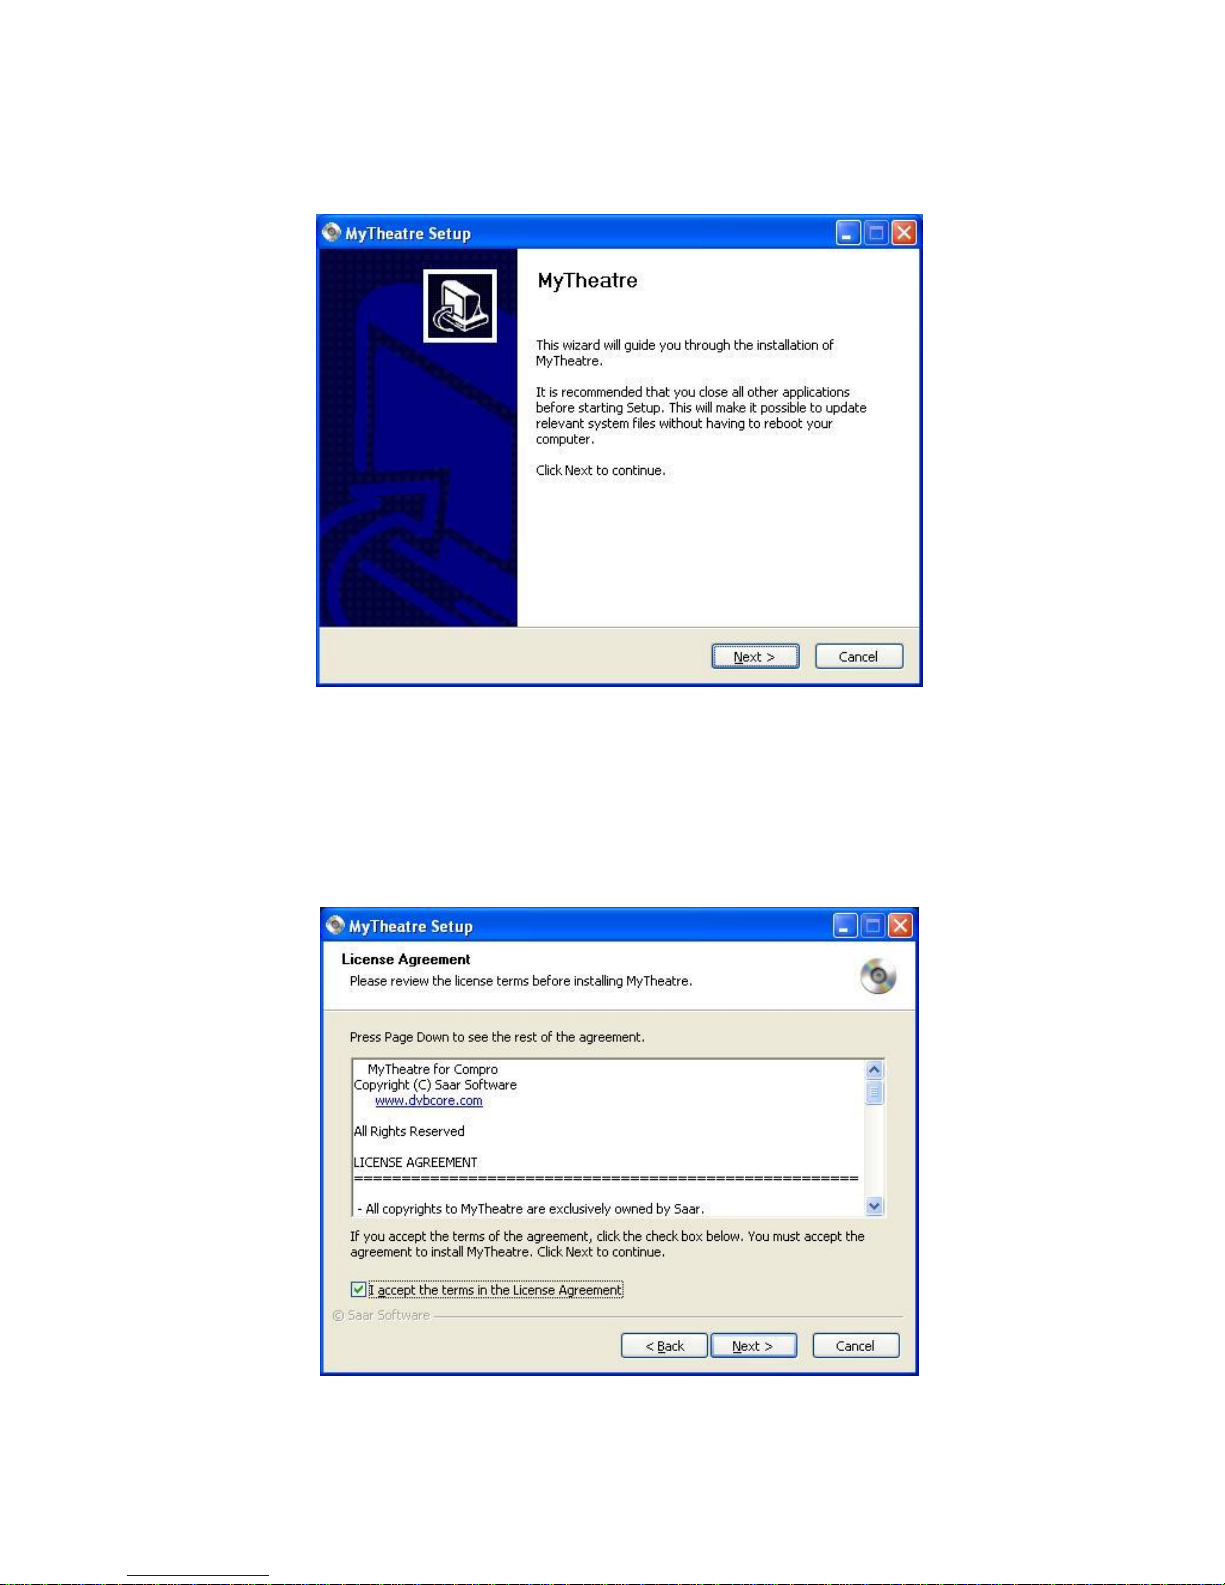
Step 3:
To start software installation; press “Next” button on each installation step.
Step 4:
Mark ”I accept the terms in the License Agreement” and click “Next”
8
Page 10
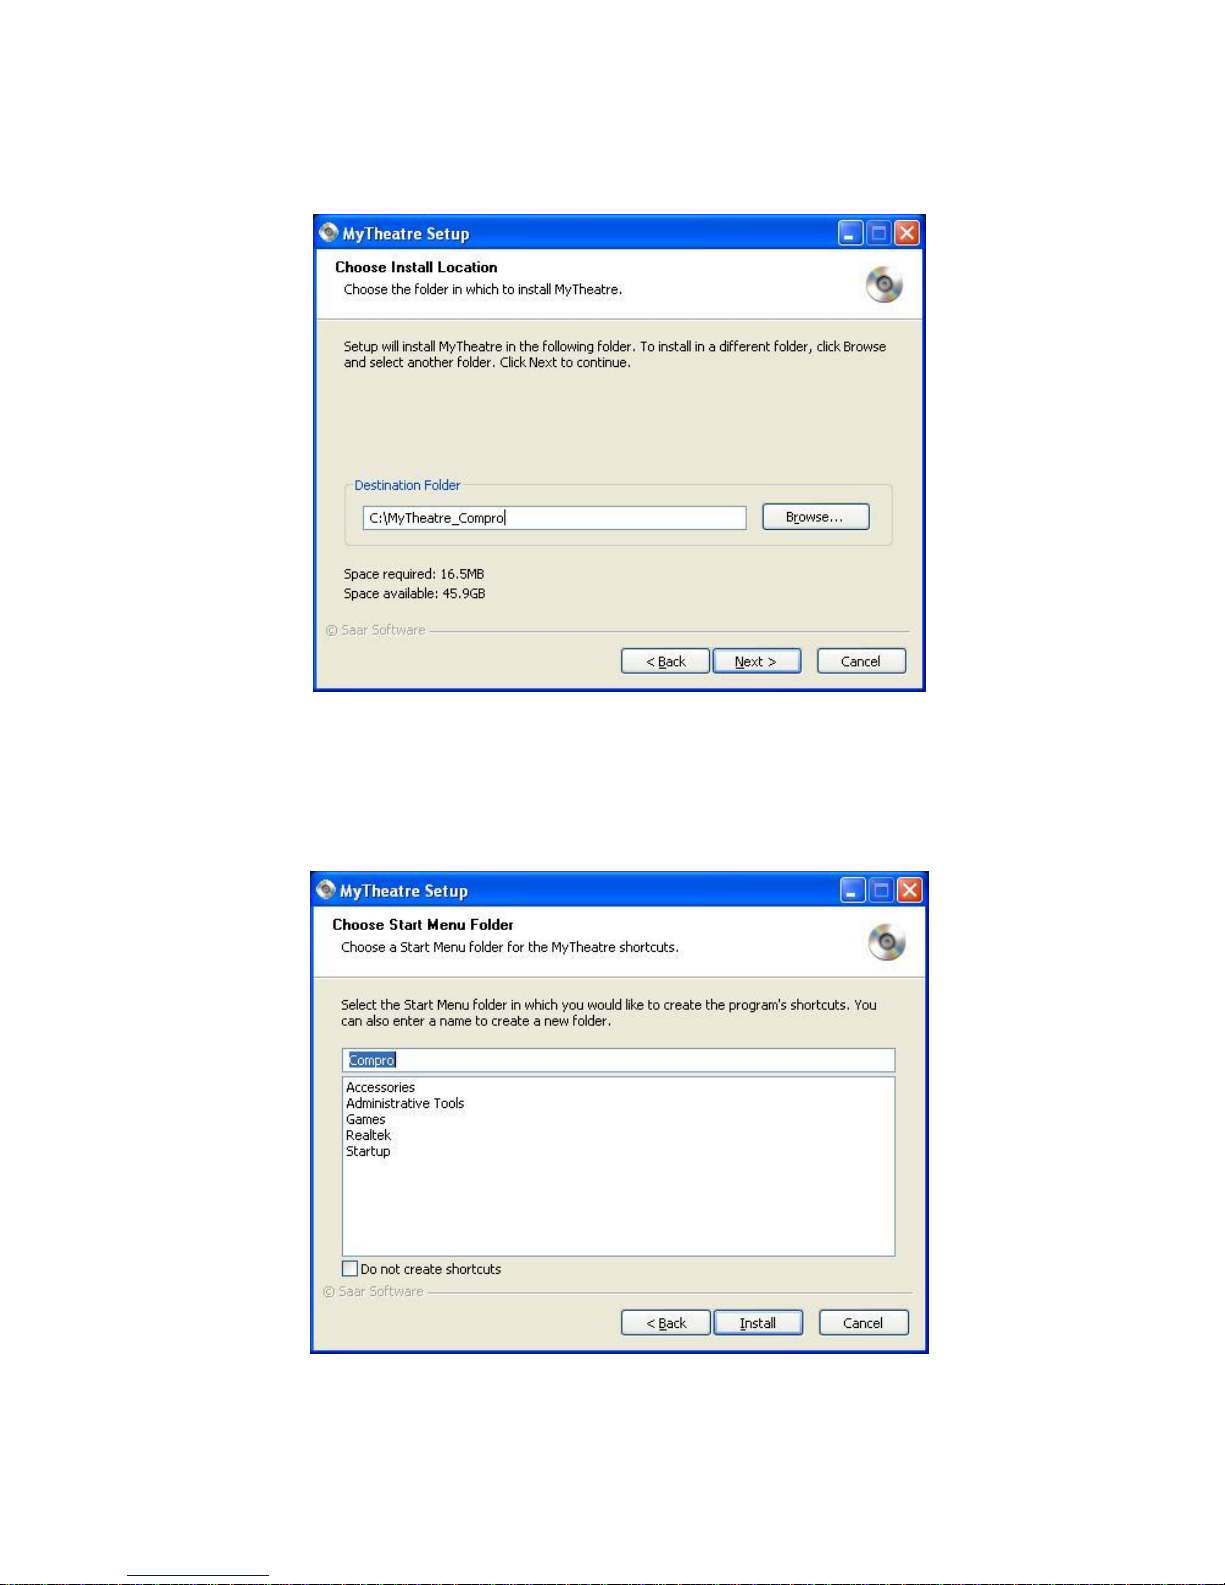
Step 5:
Choose install location and click “next”
Step 6:
Choose start menu folder and click ”Install”
9
Page 11
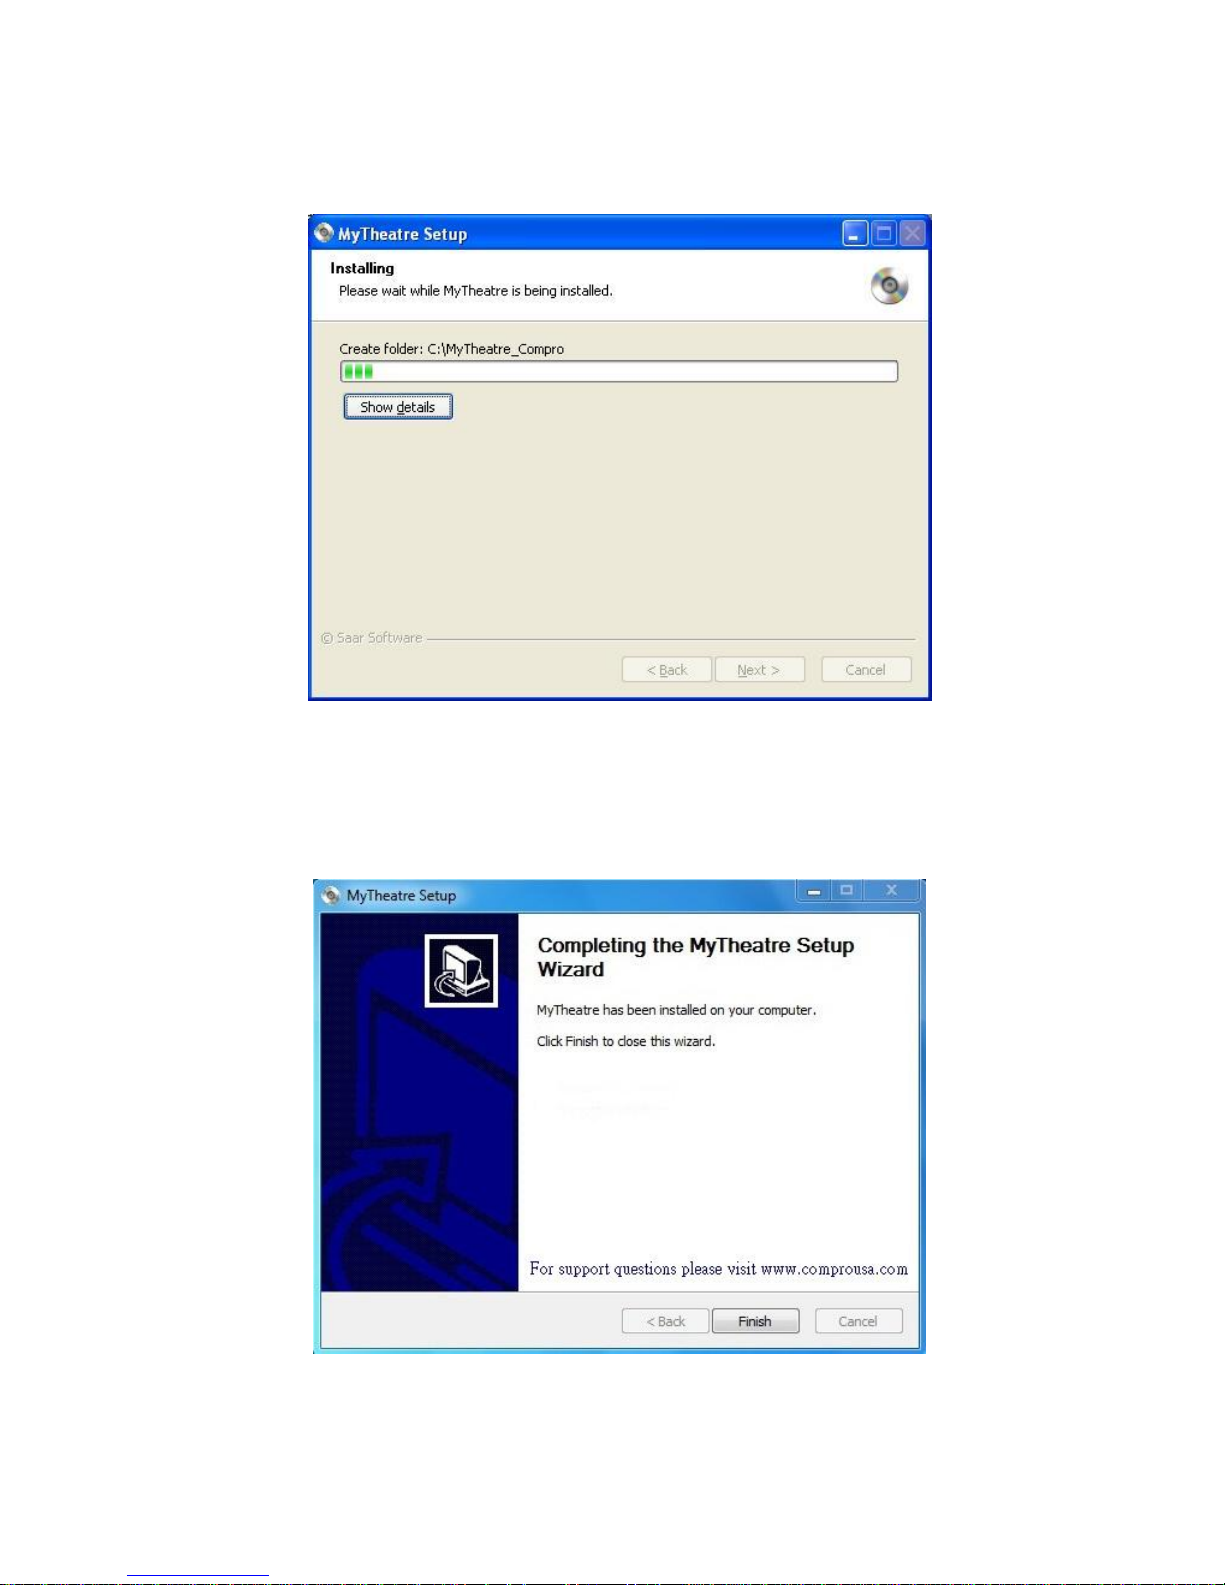
Step 7:
After installation complete, please click “Next”
Step 8:
Completing MyTheatre and driver setup, Please click “Finish”
10
Page 12
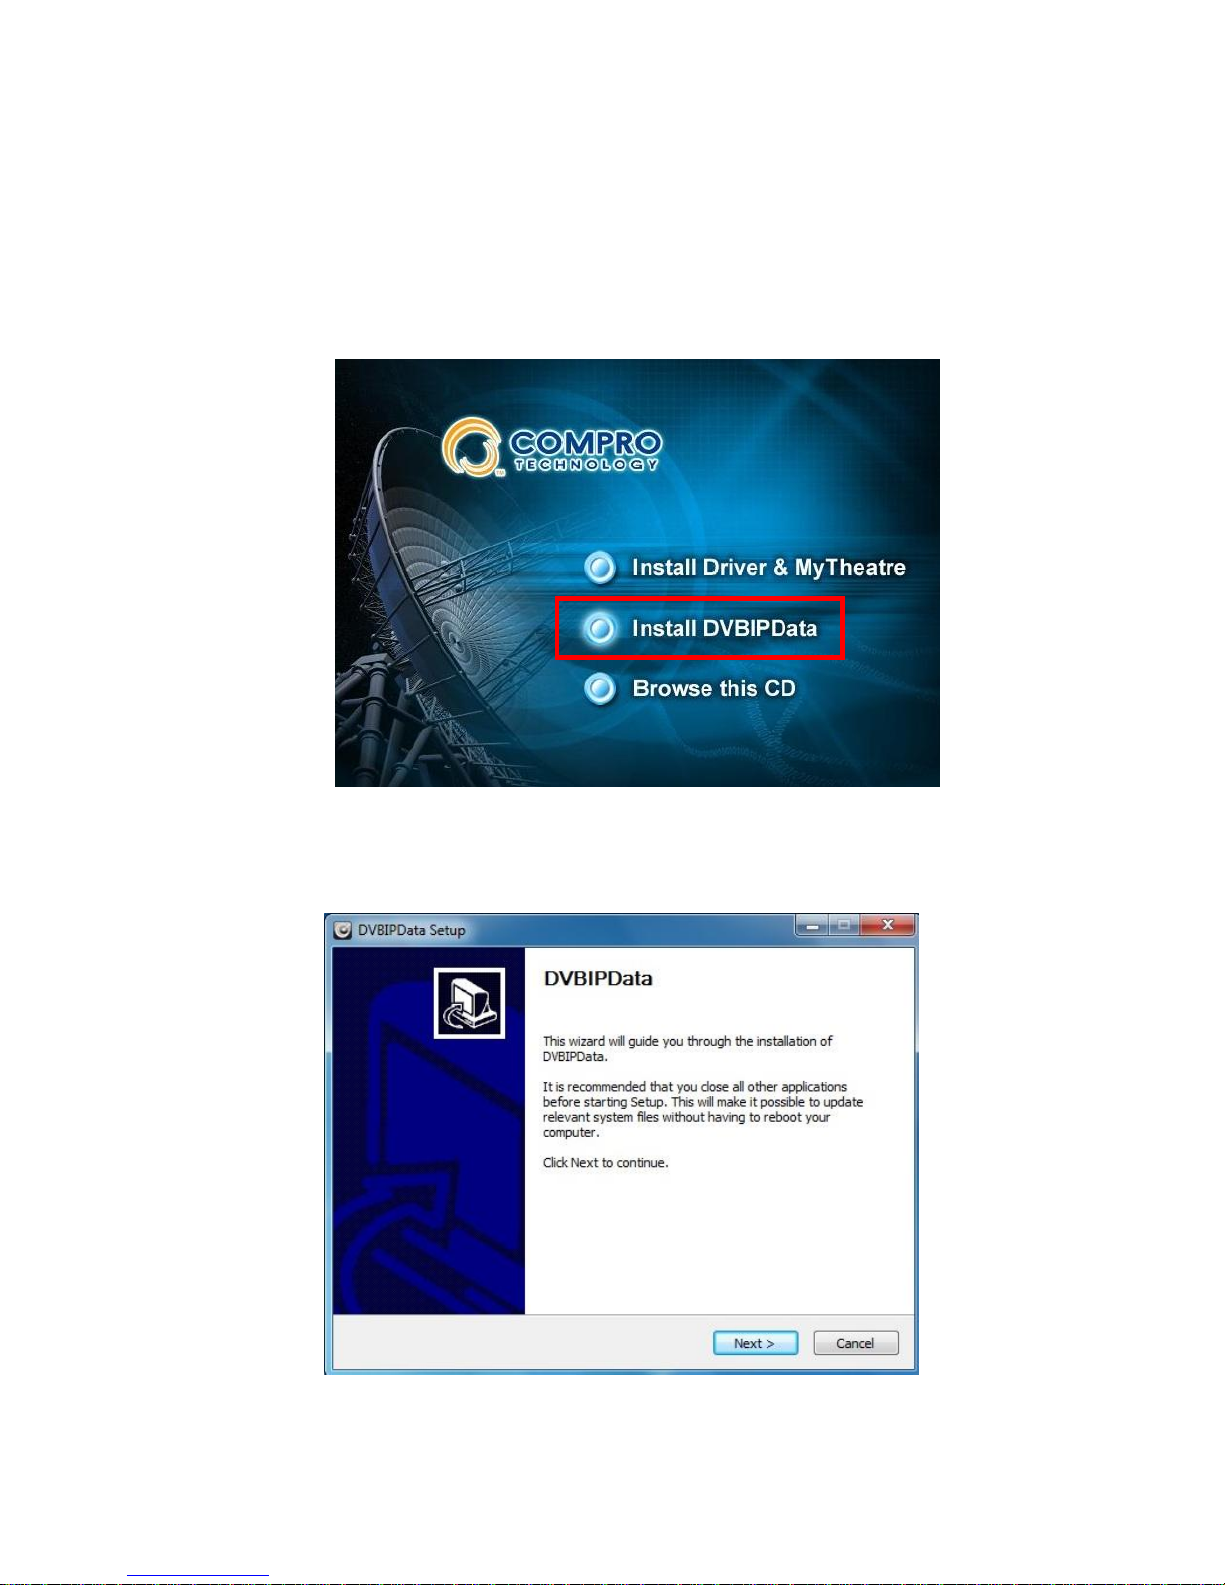
DVBIPData installation
Step 1:
Insert the Drive CD into your CD-ROM, .The Installshield will automatically start &
follow window will appear. If the window doesn’t appear, start Installshield from Drive
CD manually. Click on “Install DVBIPData”.
Step 2:
DVBIPData Setup, Please click “Next”
11
Page 13
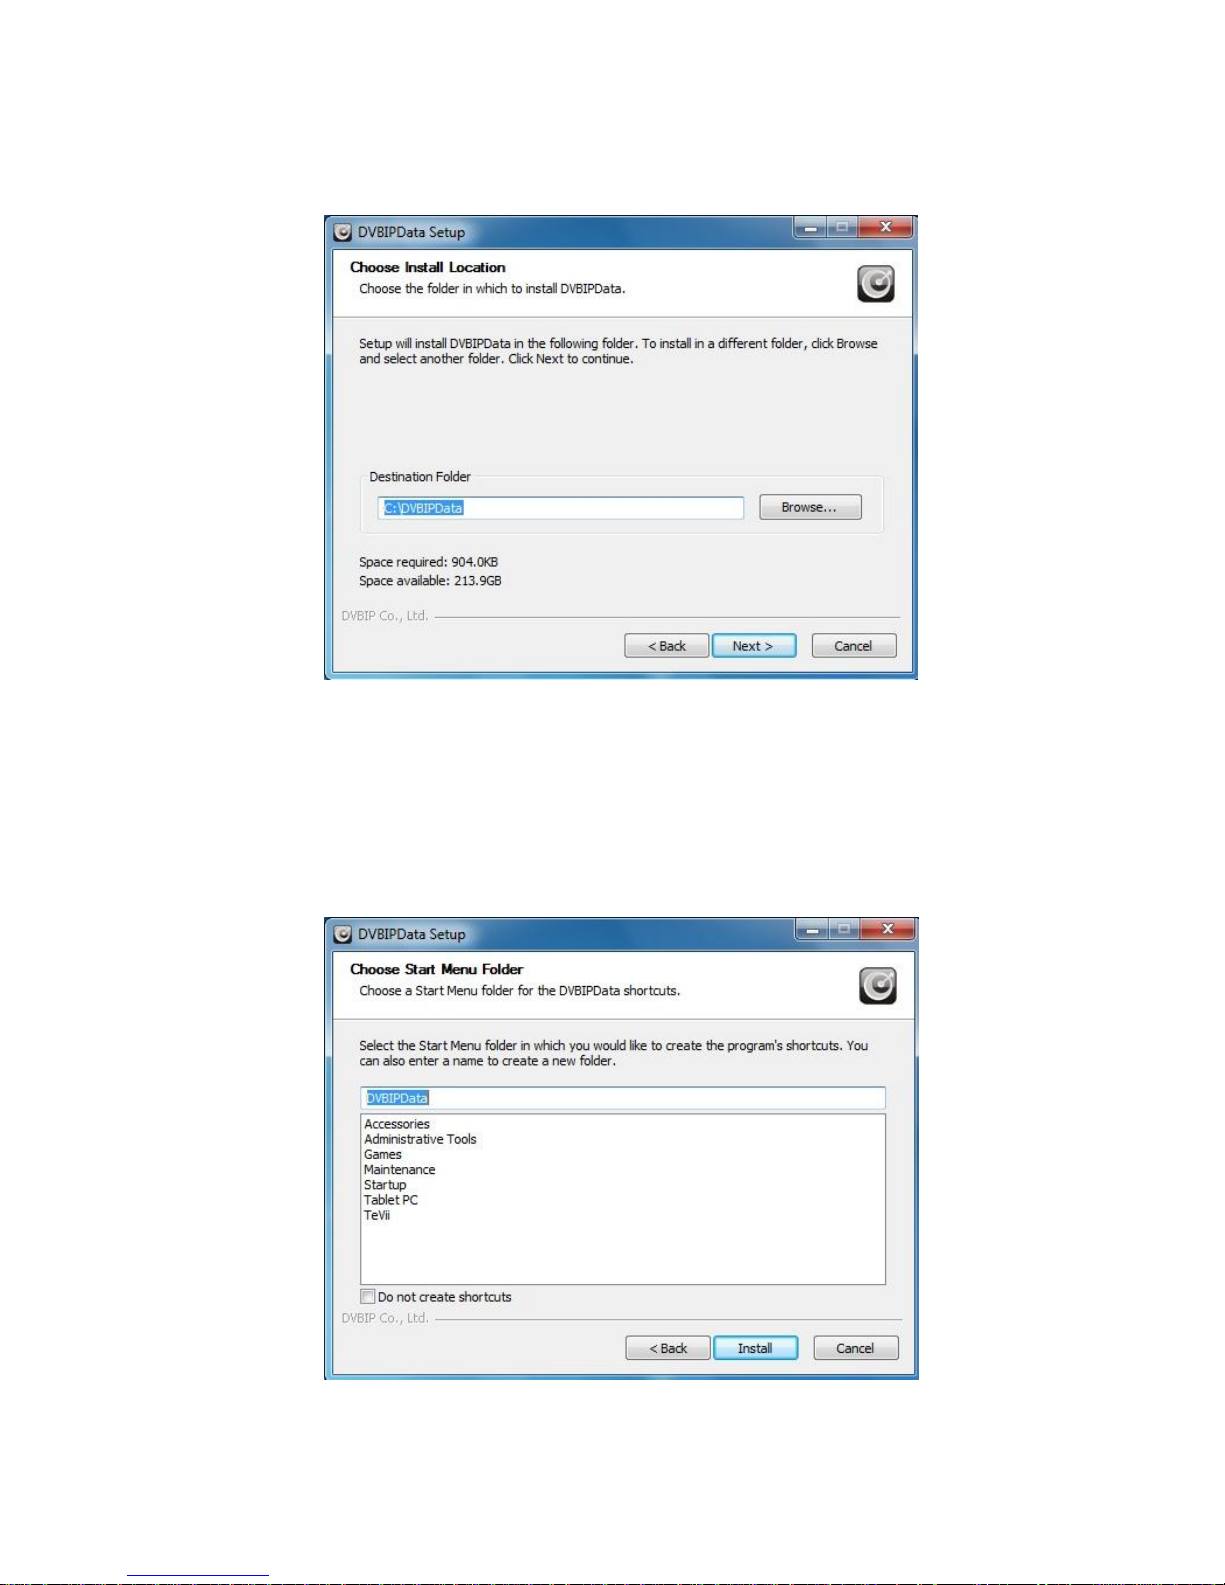
Step 3:
Please choose path to install and click “Next”
Step 4:
Choose start menu folder and click “Install”
12
Page 14
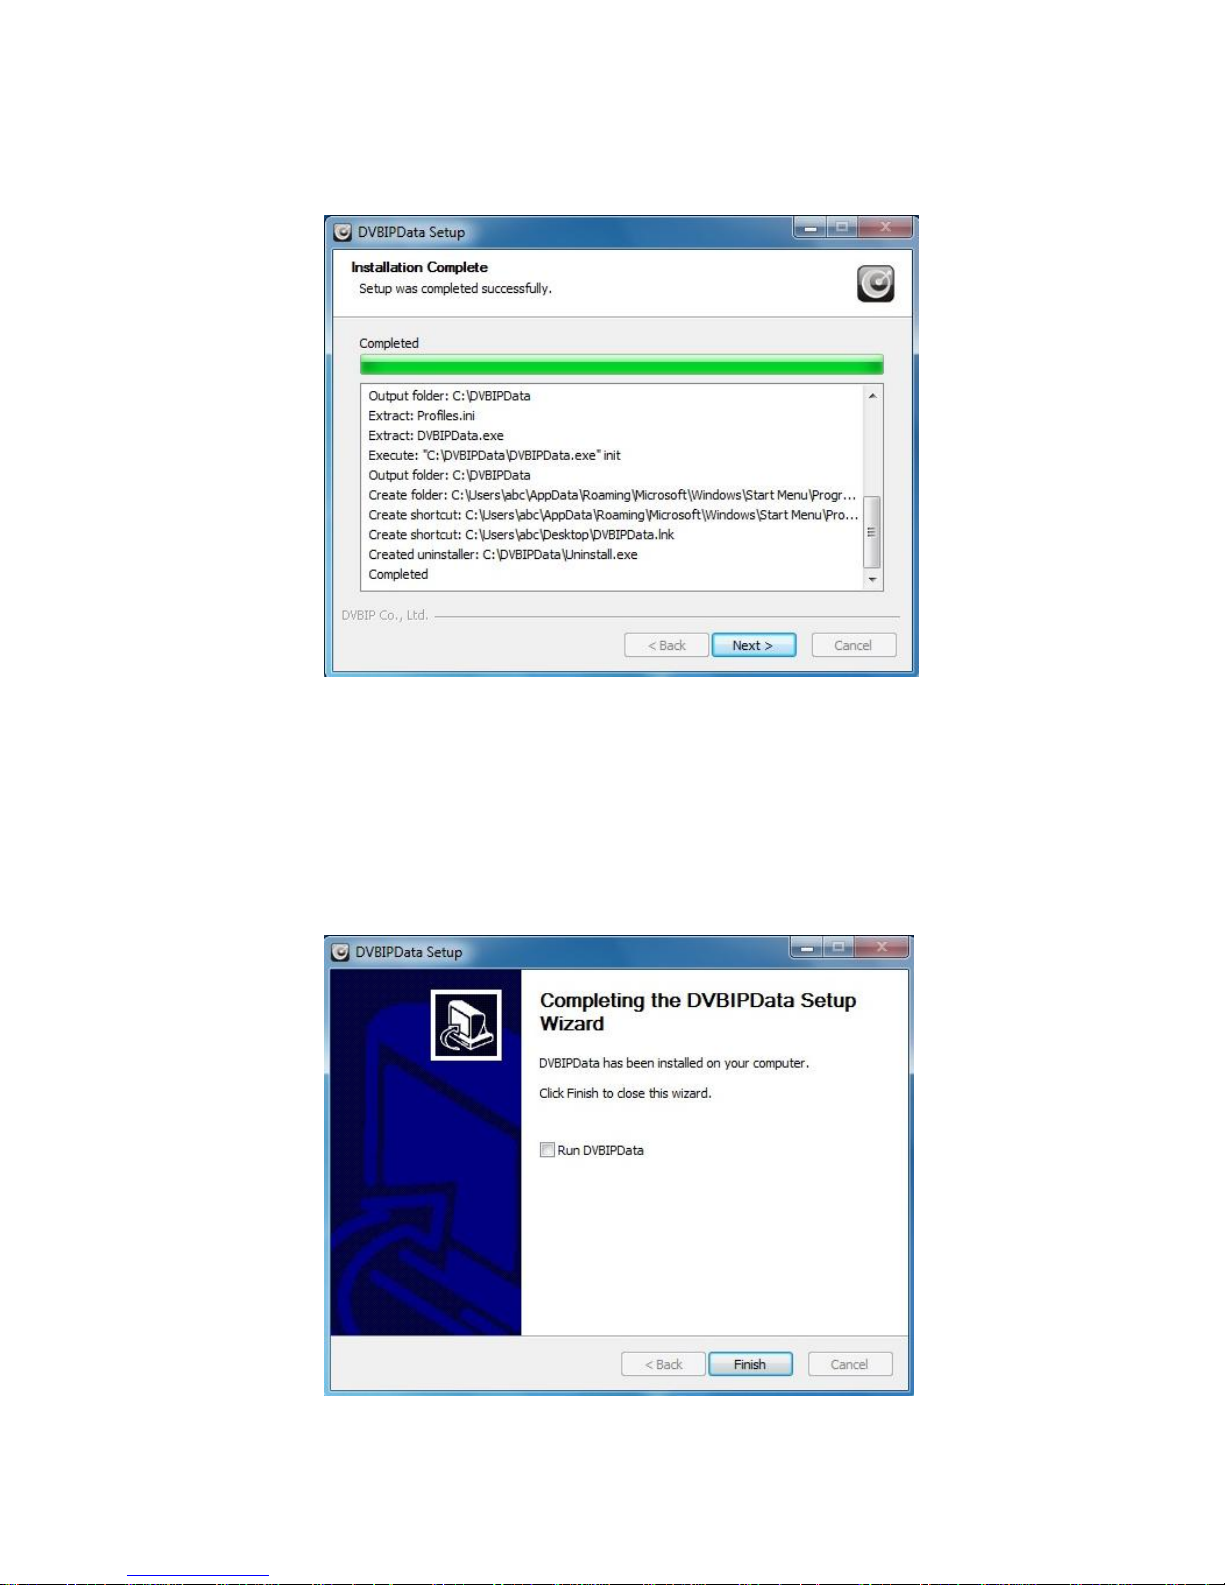
Step 5:
Installation completed, Please click “Next”
Step 6:
Installation completed, Please click “Finish”
13
Page 15
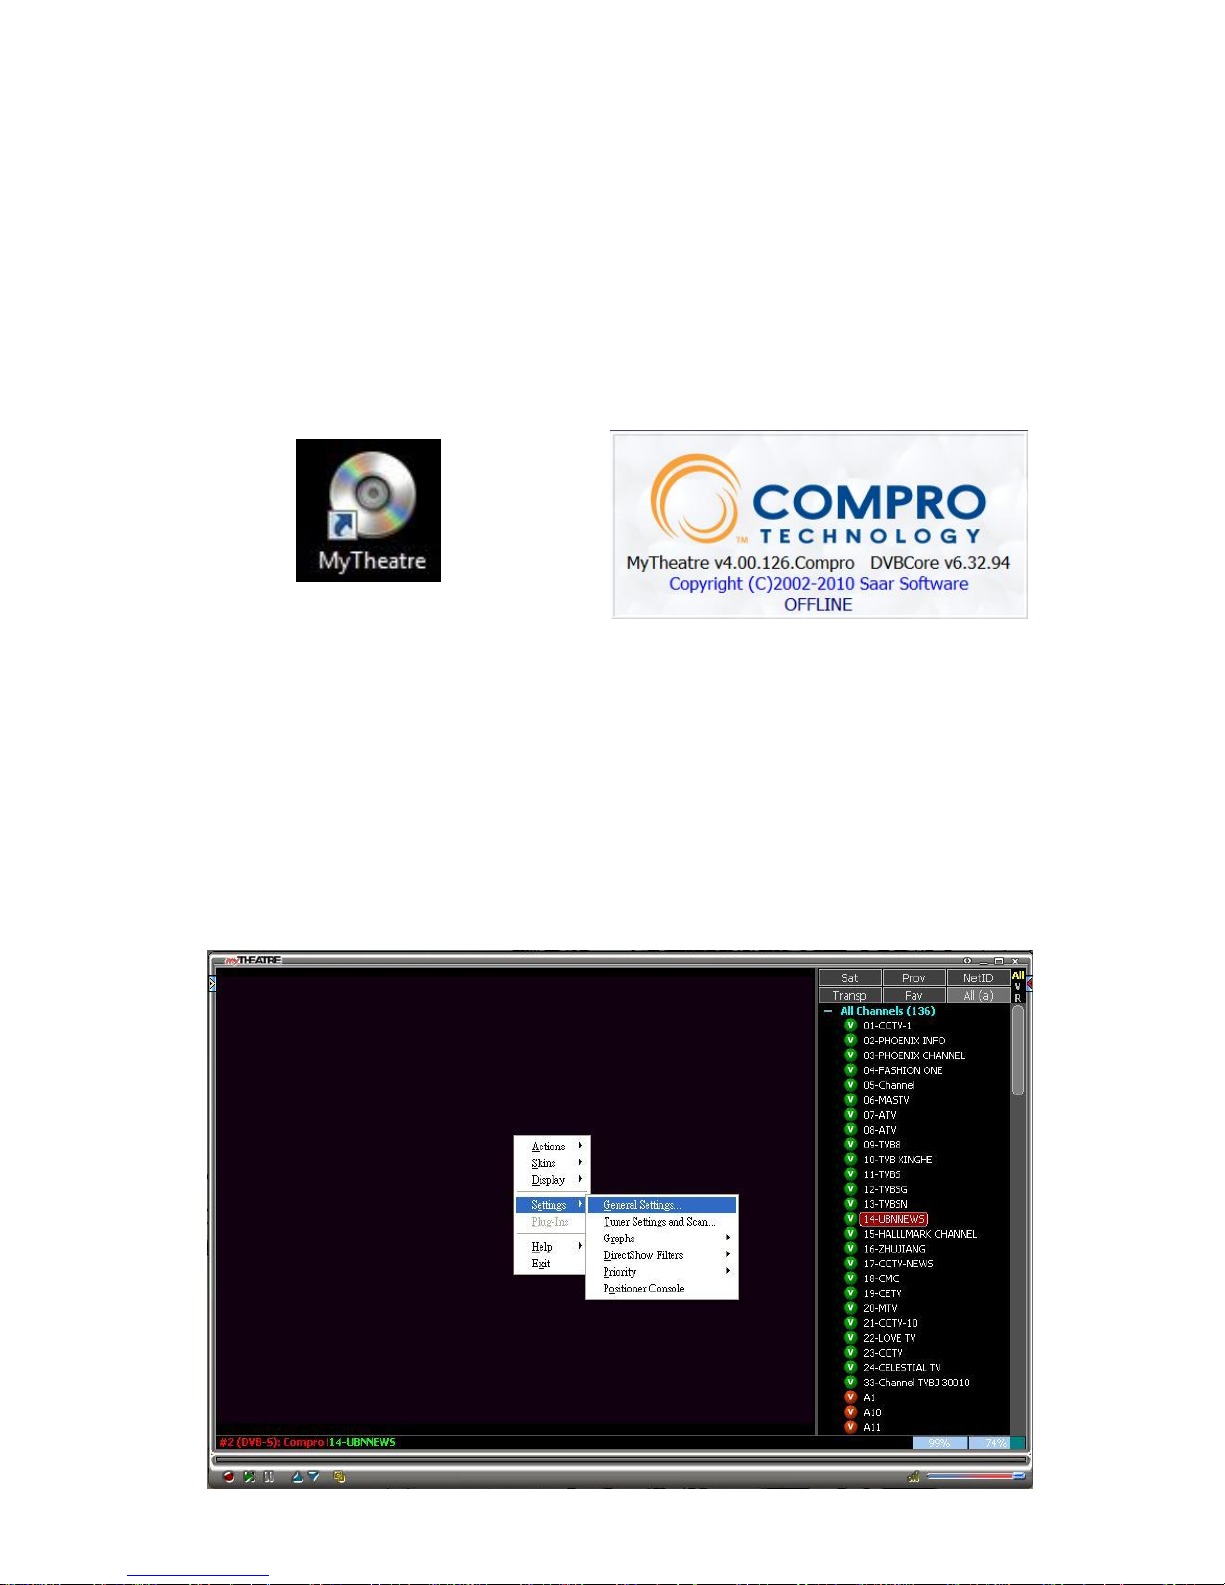
Software setting
MyTheatre icon on your desktop
MyTheatre
Step 1:
After installation finished, you will see the icon on your Desktop. Run it by double
clicking the icon. And you will see the splash-screen of MyTheatre starting.
Step 2:
After splash-screen, you will see main window of application. Click on video area
(at the first run it will look like large black area) by right mouse button. Pop-up menu
appears. Follow menu: Settings General Settings and choose the “Hardware” tab.
Please select the “Compro DVB-S Receiver” for signal reception.
14
Page 16
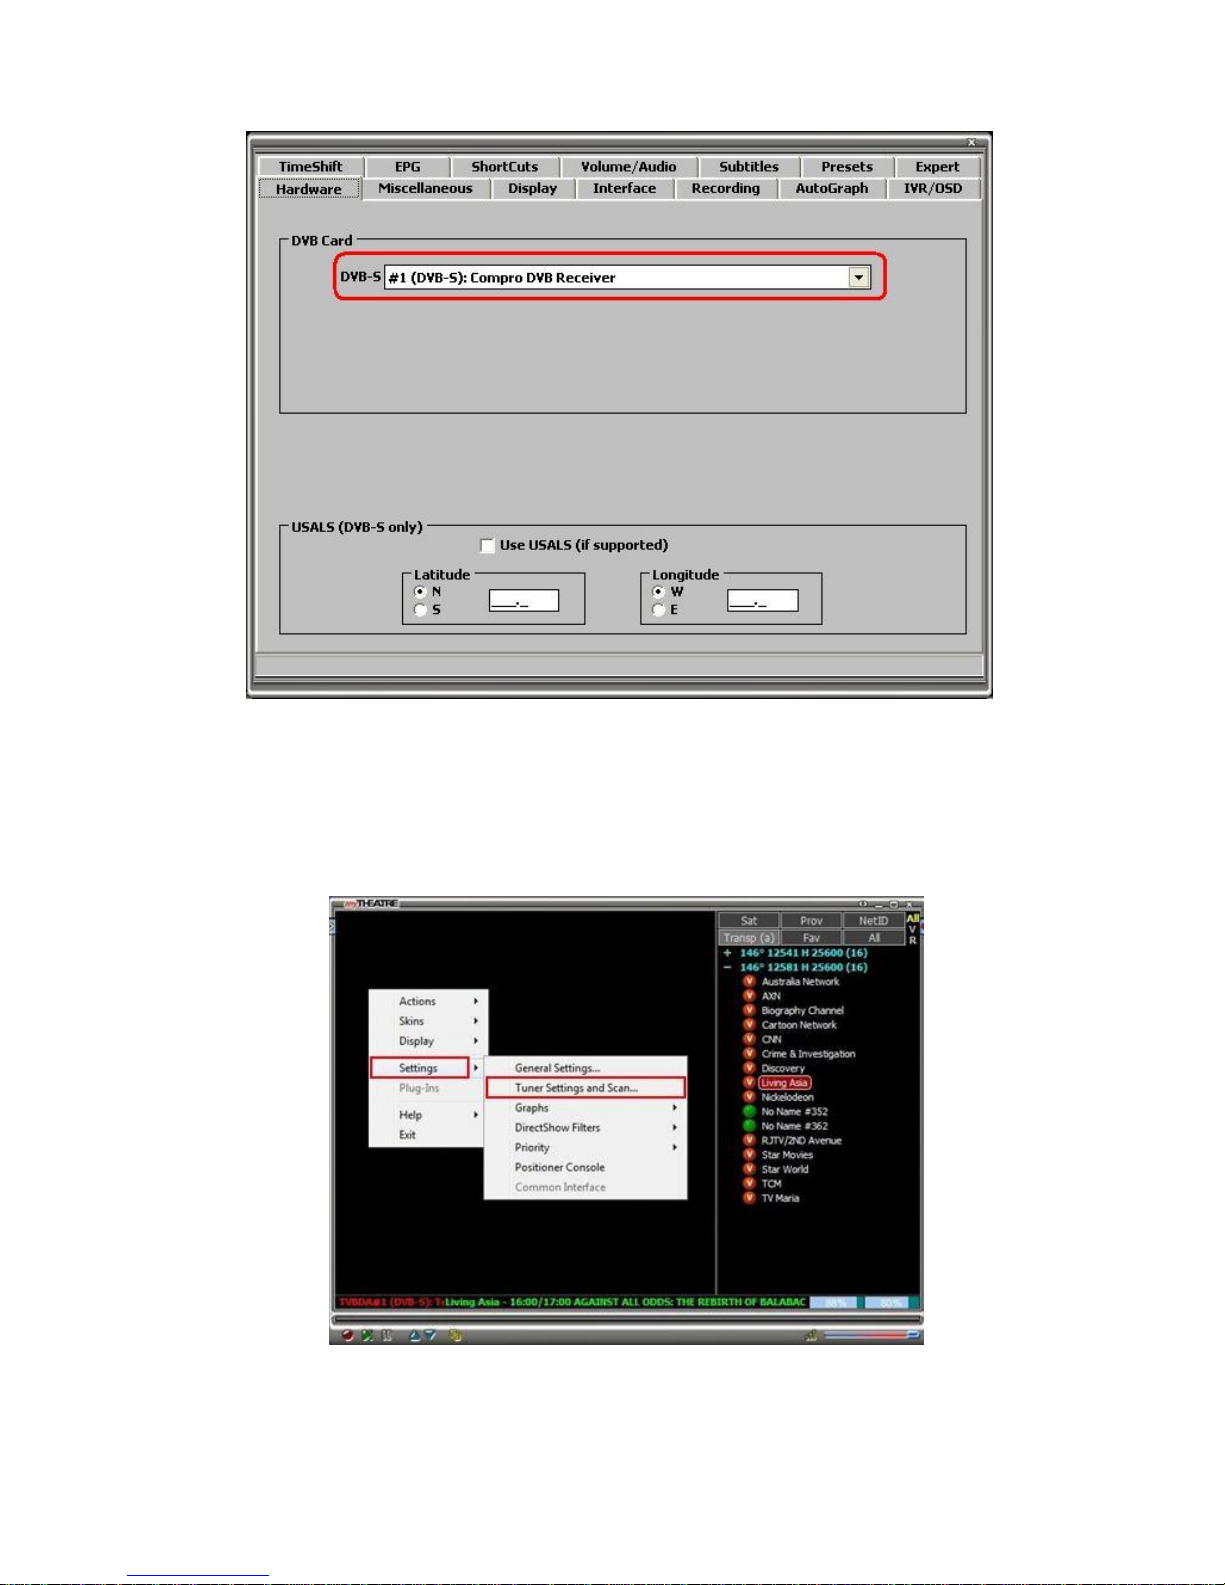
Step 3:
After select the device, please click on video area by right mouse button. Pop-up menu
appears. Follow menu: Settings Tuner settings & Scan…
15
Page 17
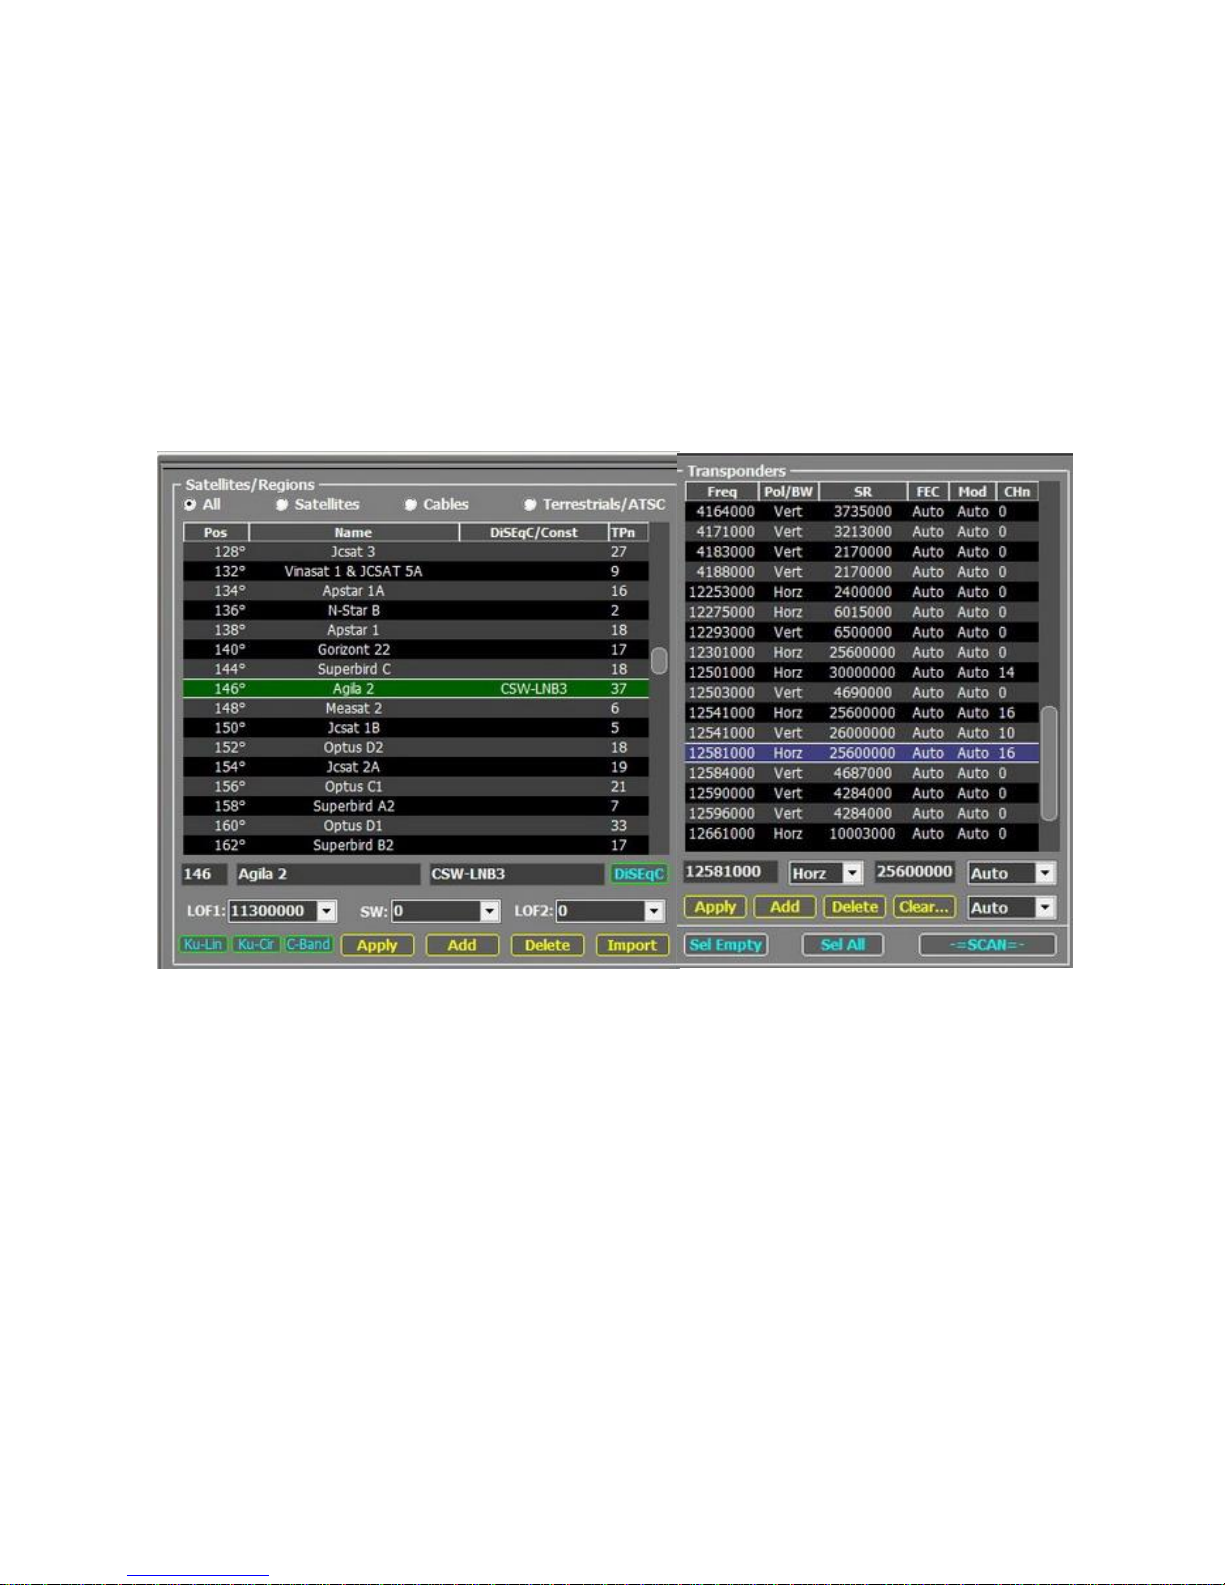
Step 4:
For LNB/Transponders settings, you will see settings for satellites and transponders.
(1). Find and click on required satellite on list. Fill appropriate LOF1, LOF2, SW values.
Please read instruction of LNB convertor you use. Don’t forget to click on “Apply”
button when you finish setup satellite LNB parameters.
(2.) Click on button “Sel All” (right side of window) to select all transponders or while
holding “Ctrl” key click sequentially on every transponder you want to scan. Click on
button “-=SCAN=-“ to start scanning process.
Note:
If you see universal (dual-band) Ku LNBF then usual parameters are:
LOF1=10600000, LOF2=9750000, SW=11700000. If you use DiSEqC switch
or motor then click on DiSEqC button and choose appropriate LNB input port.
16
Page 18
Step 5:
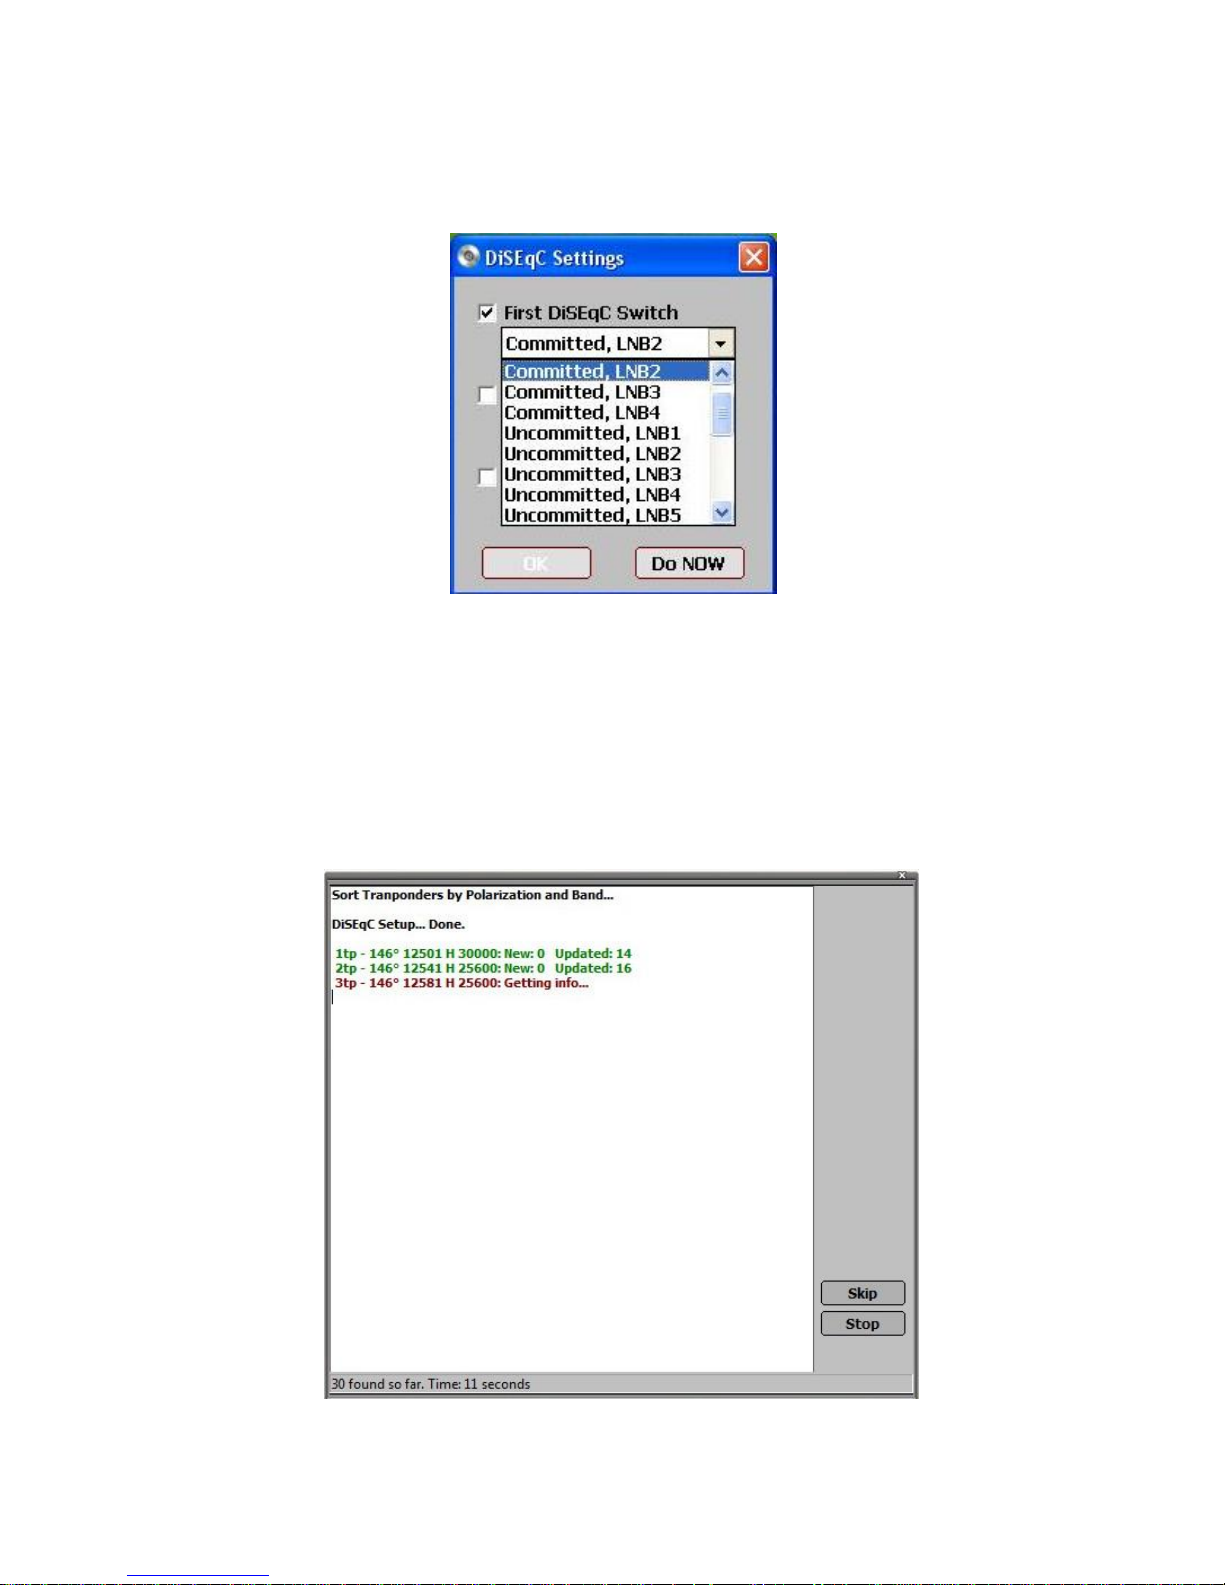
DiSEqC Switch Settings. Mark “First DiSEqC Switch” and choose Committed,
LNB1..LNB4 (depend on required port of switch)
Step 6:
Scan Dialog: You can watch scanning process in this window. You may interrupt
scanning by clicking “stop” button. After scanning completed, close scanning window
and then LNB dialog.
17
Page 19
Step 7:
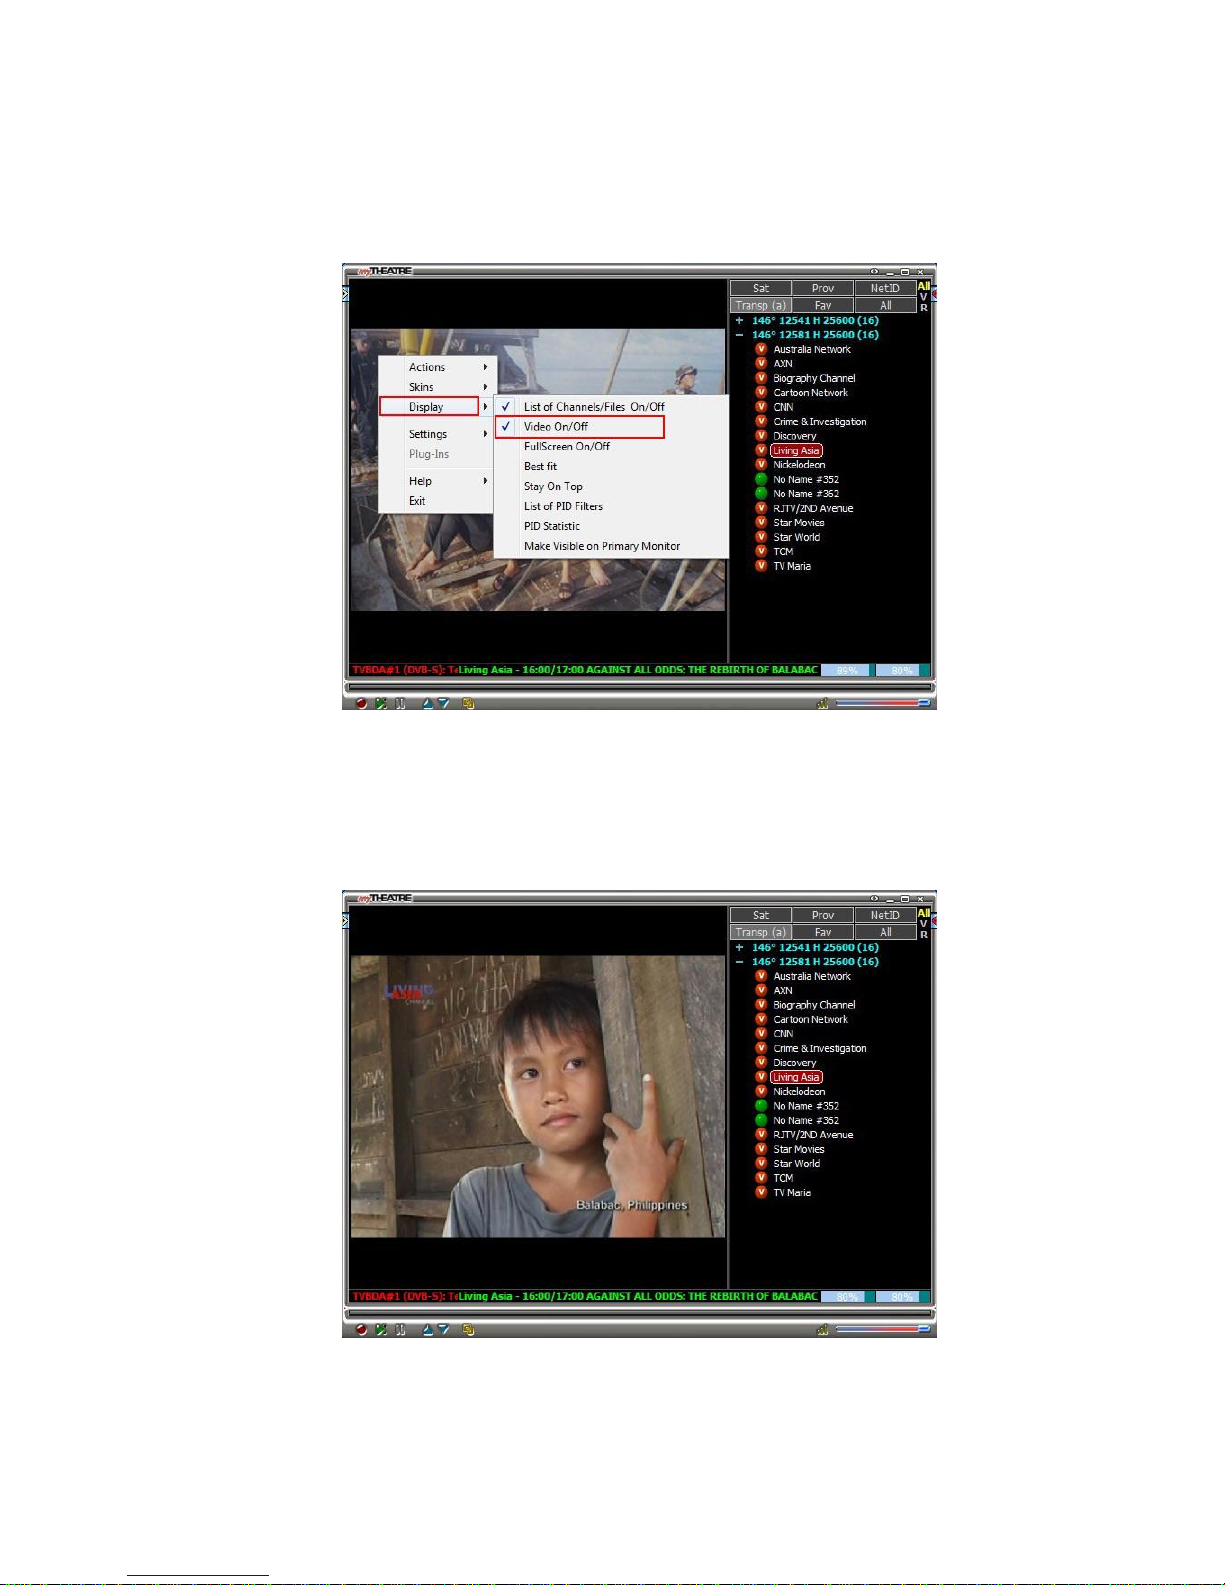
Open pop-up menu by clicking right mouse button on main window, then follow steps
below: Display Video On/Off. Make sure there is a mark sign on this option. If there
is no such mark then click on it.
Step 8:
Click on any channel name with green “V” sign. You may organize channel view by
clicking on any of following buttons “Sat”, “Prov”, NetID”, “Transp”, “Fav”, “All”
Three small buttons “All”, “V”, “R” can filter channels to show TV only, Radio only or all
channels.
18
Page 20
Other Setting:
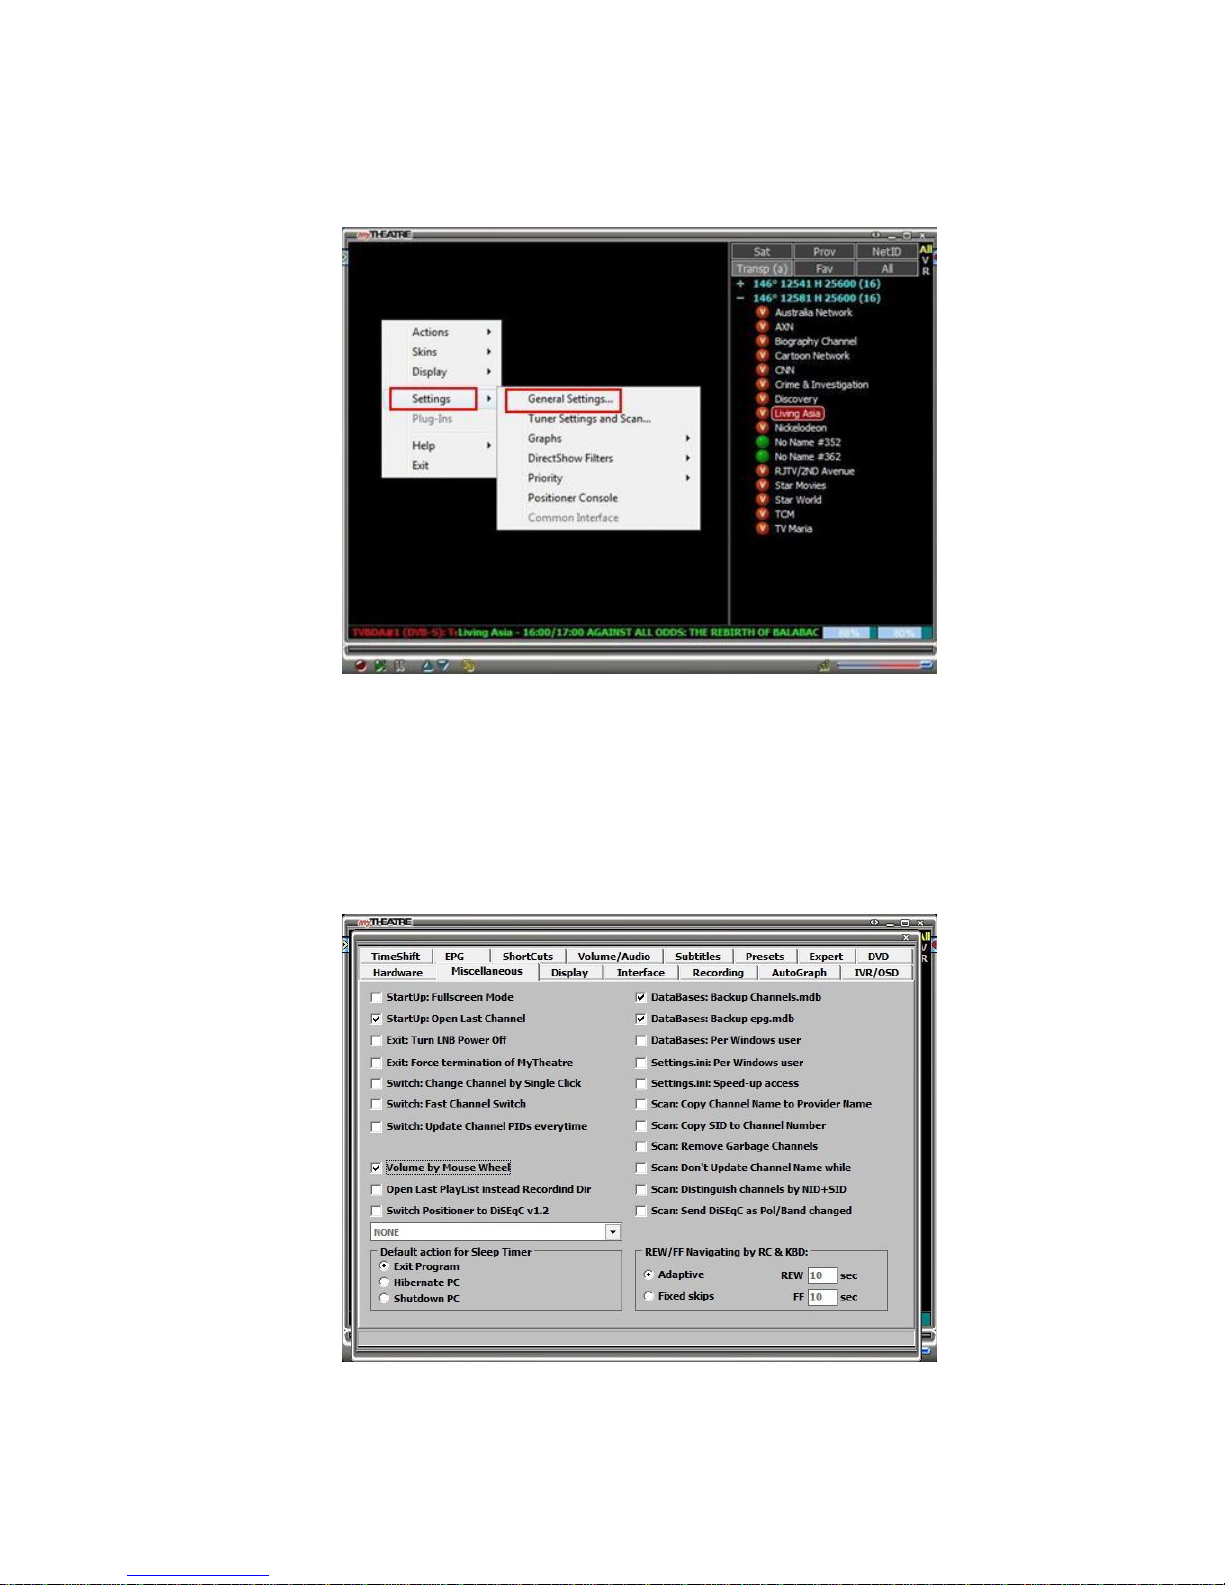
Click on video area by right mouse button. Pop-up menu appears. Follow menu:
Settings ->General settings…
Miscellaneous:
You can setting more detail functions, such as Full screen, LNB power turn off,
Database backup, sleep timer…etc
19
Page 21
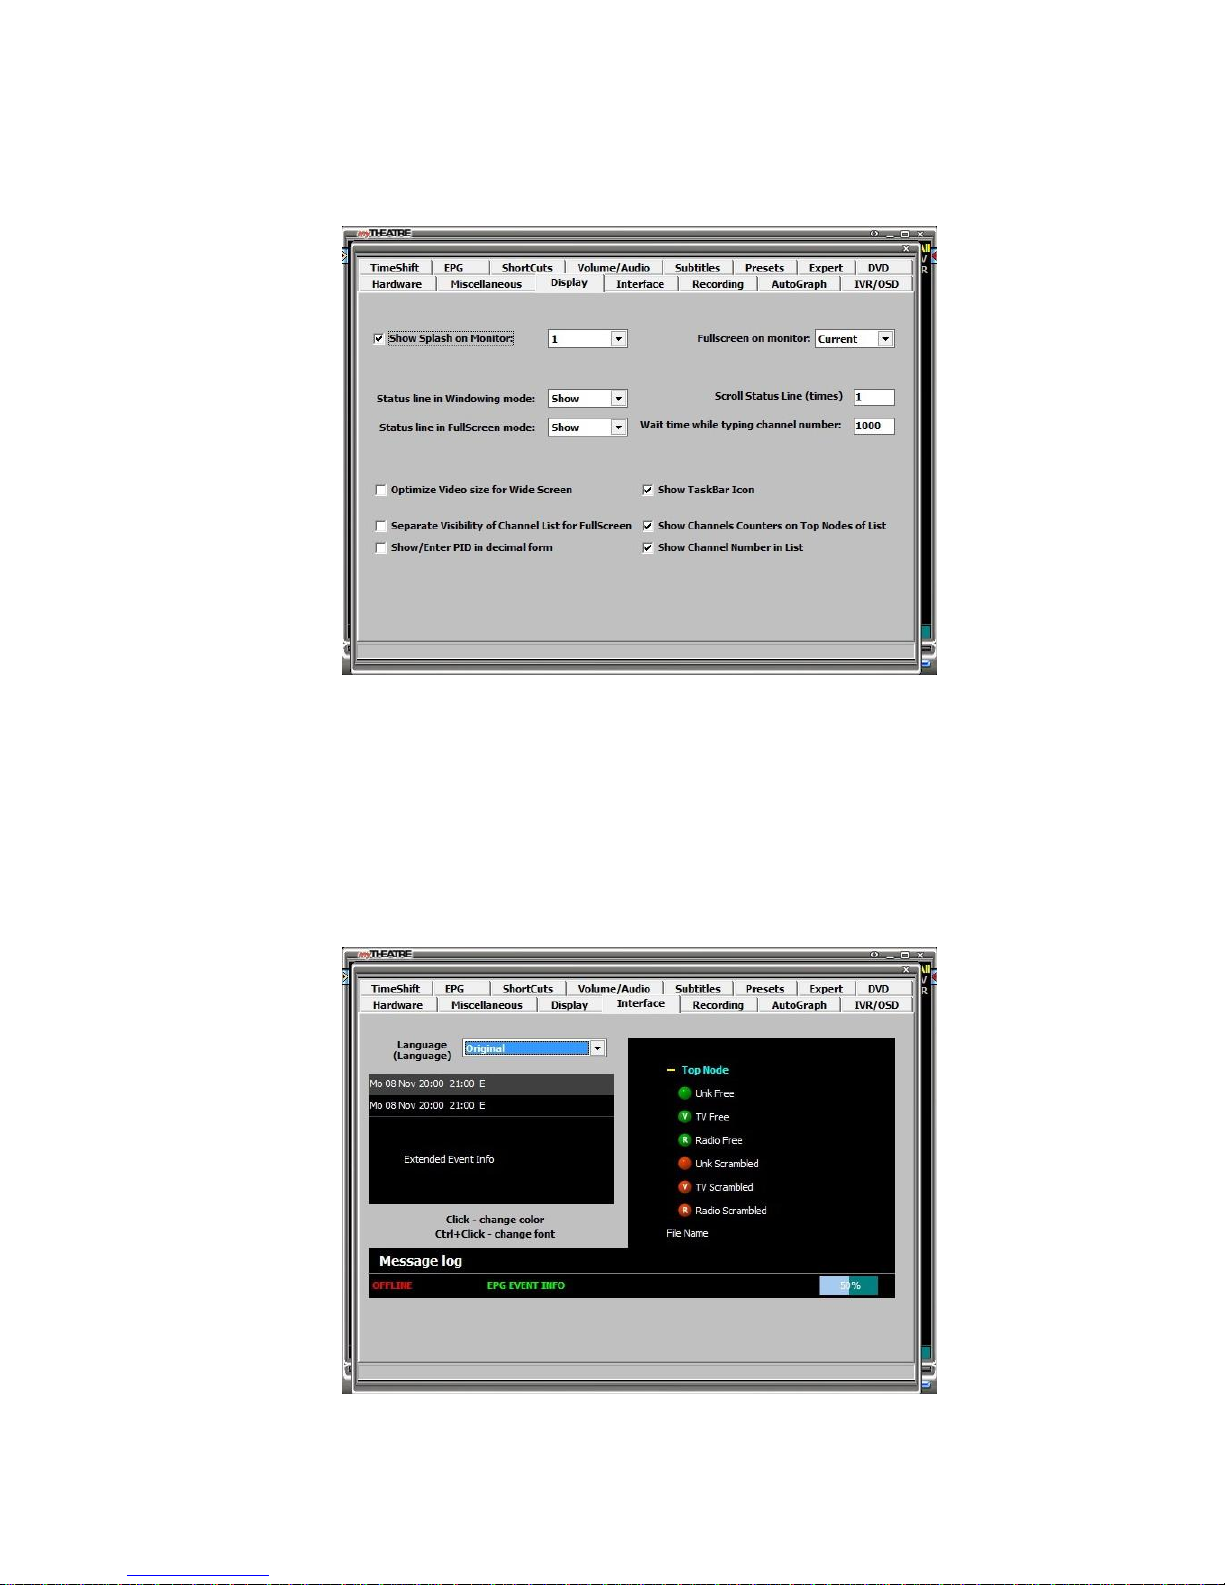
Display:
You can set up display option.
Interface:
You can choose the language by this page.
20
Page 22
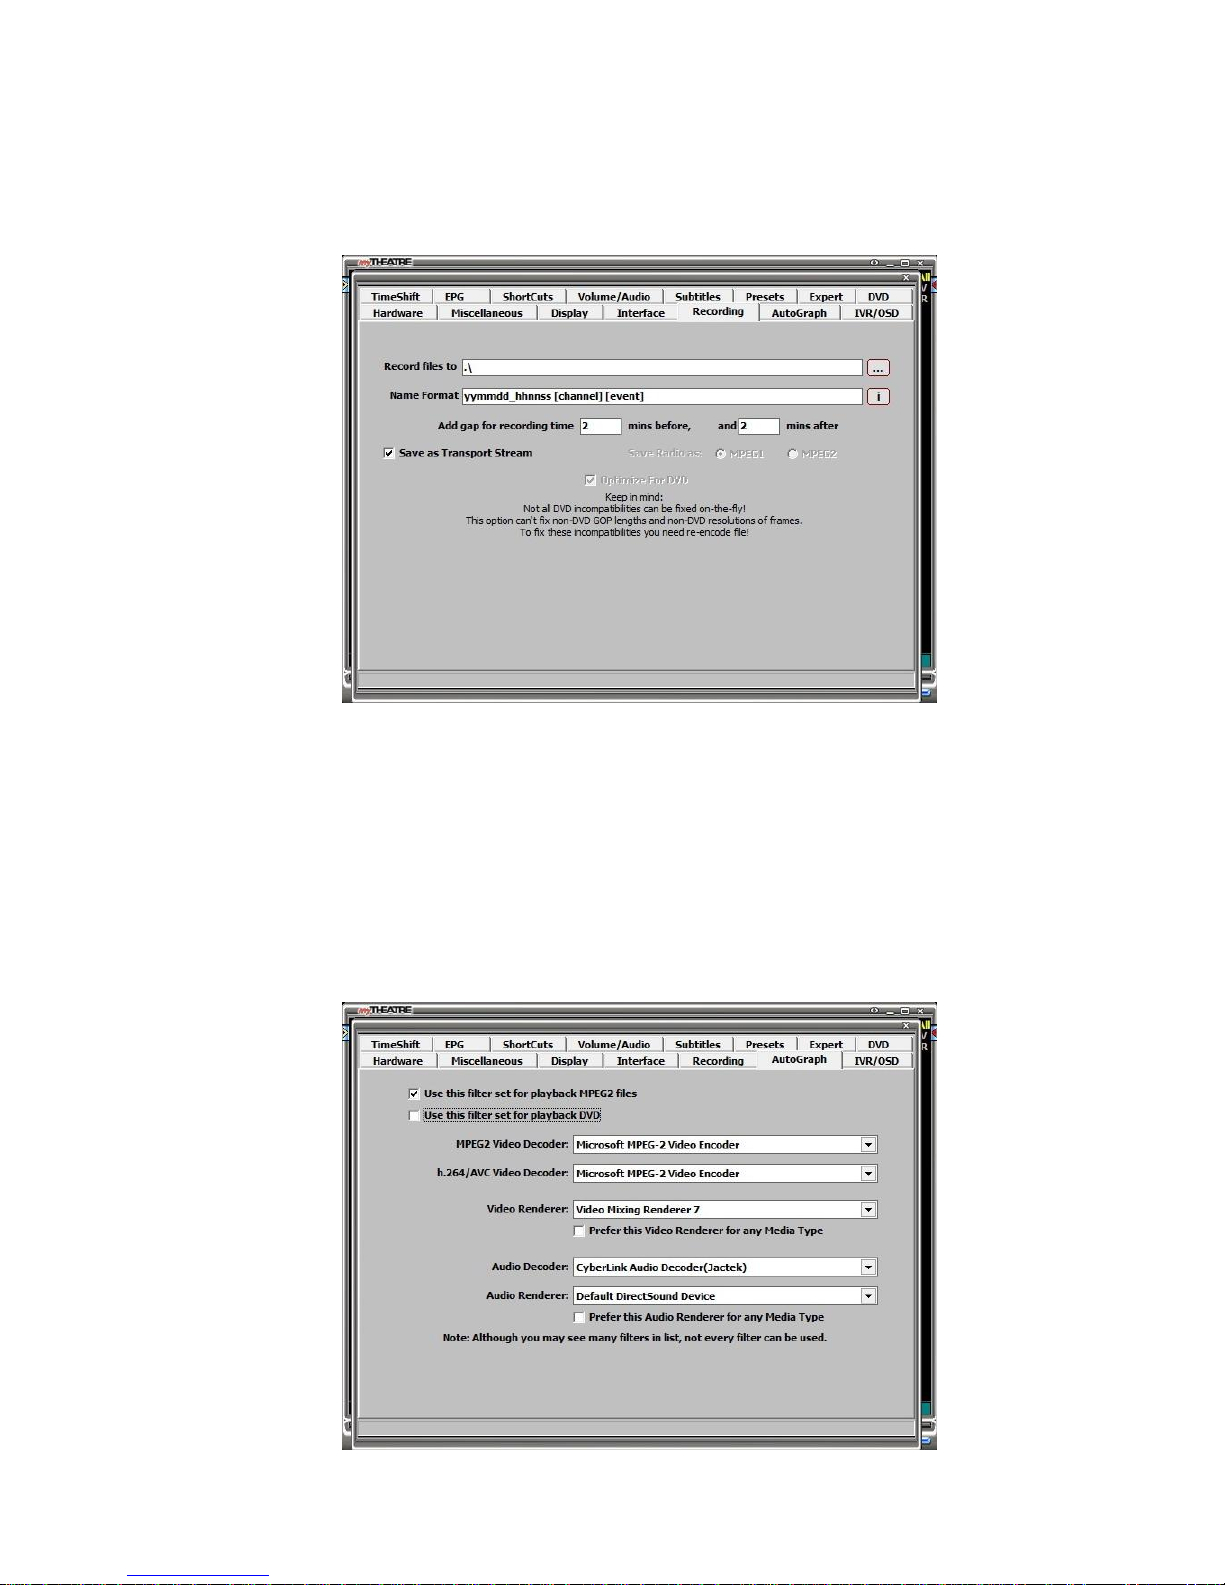
Recording:
Setting your recording option. such as recording destination, file name format &
recording format.
AutoGraph:
Setting MPEG-2/H.264 AVC Decoder you preferred; if you are using Windows MCE,
Microsoft Decoder is recommended.
21
Page 23
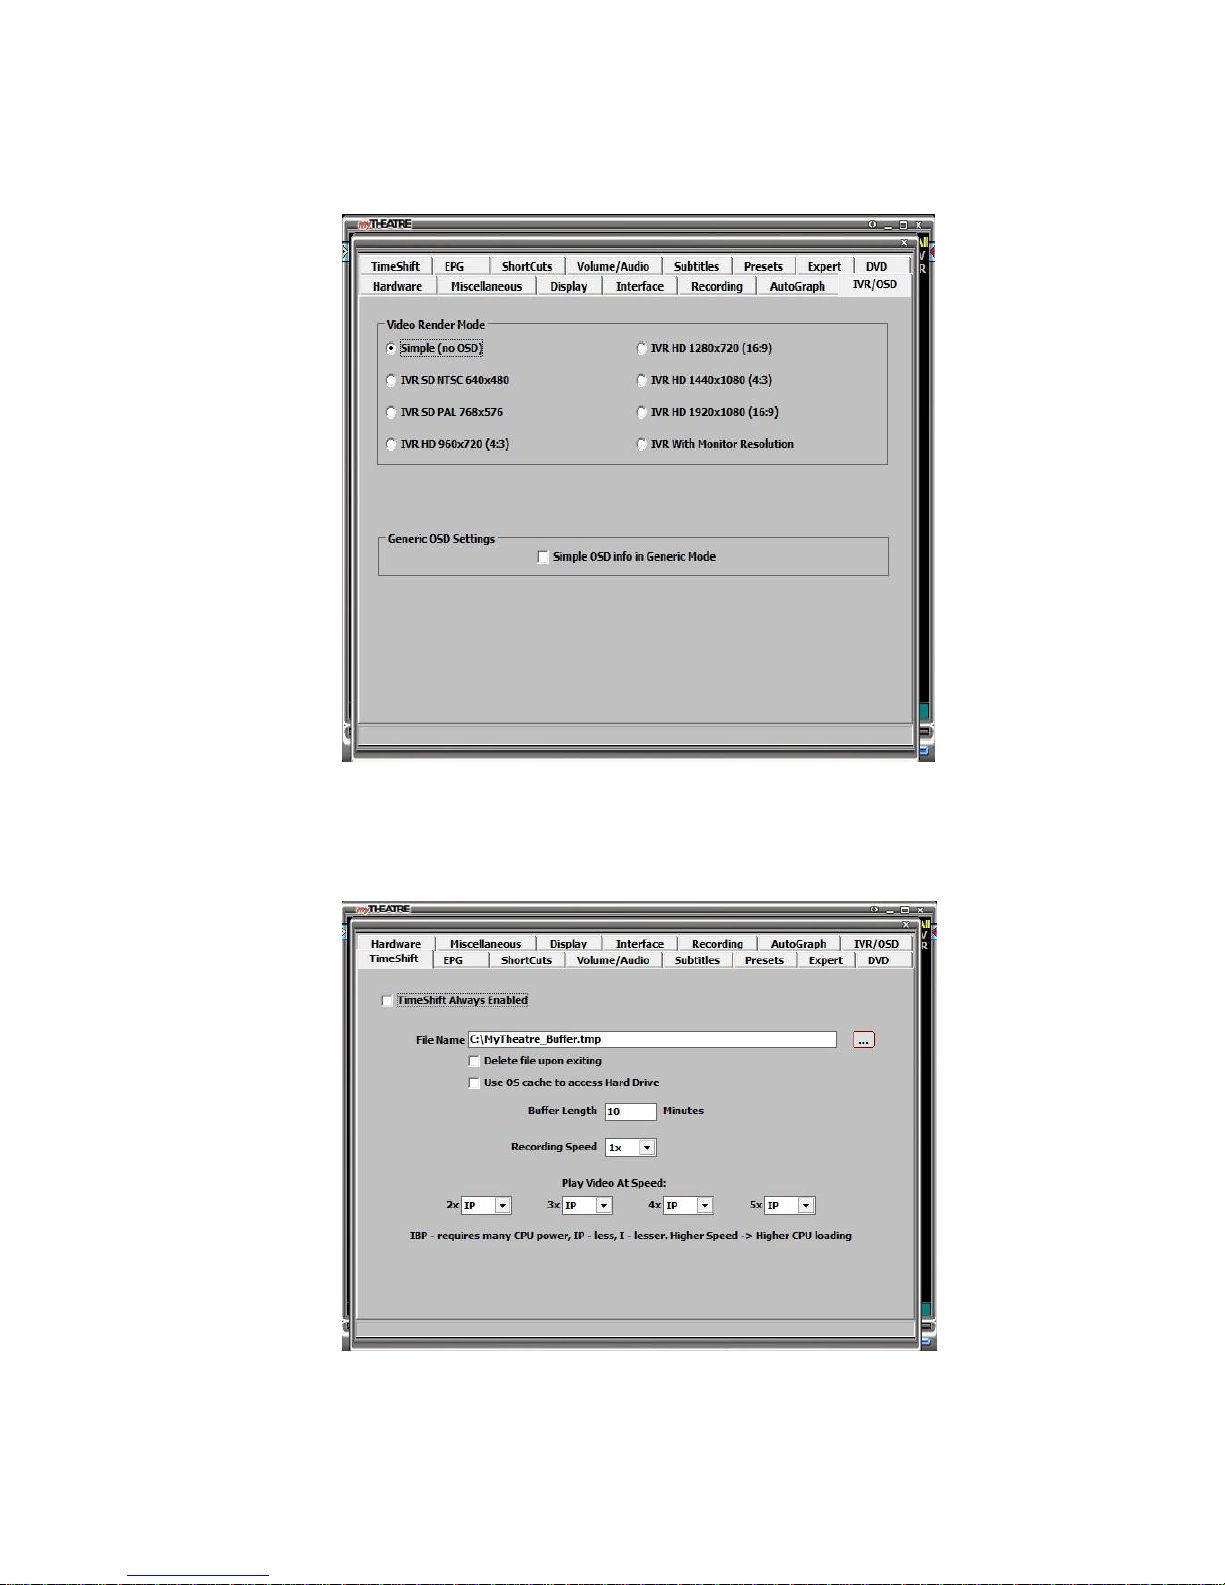
IVR/OSD:
Setting Resolution, Aspect Ratio & On-Screen-Display (OSD).
TimeShift:
Setting variants for TimeShift feature such as: buffer length, recording speed & play
speed…etc.
22
Page 24
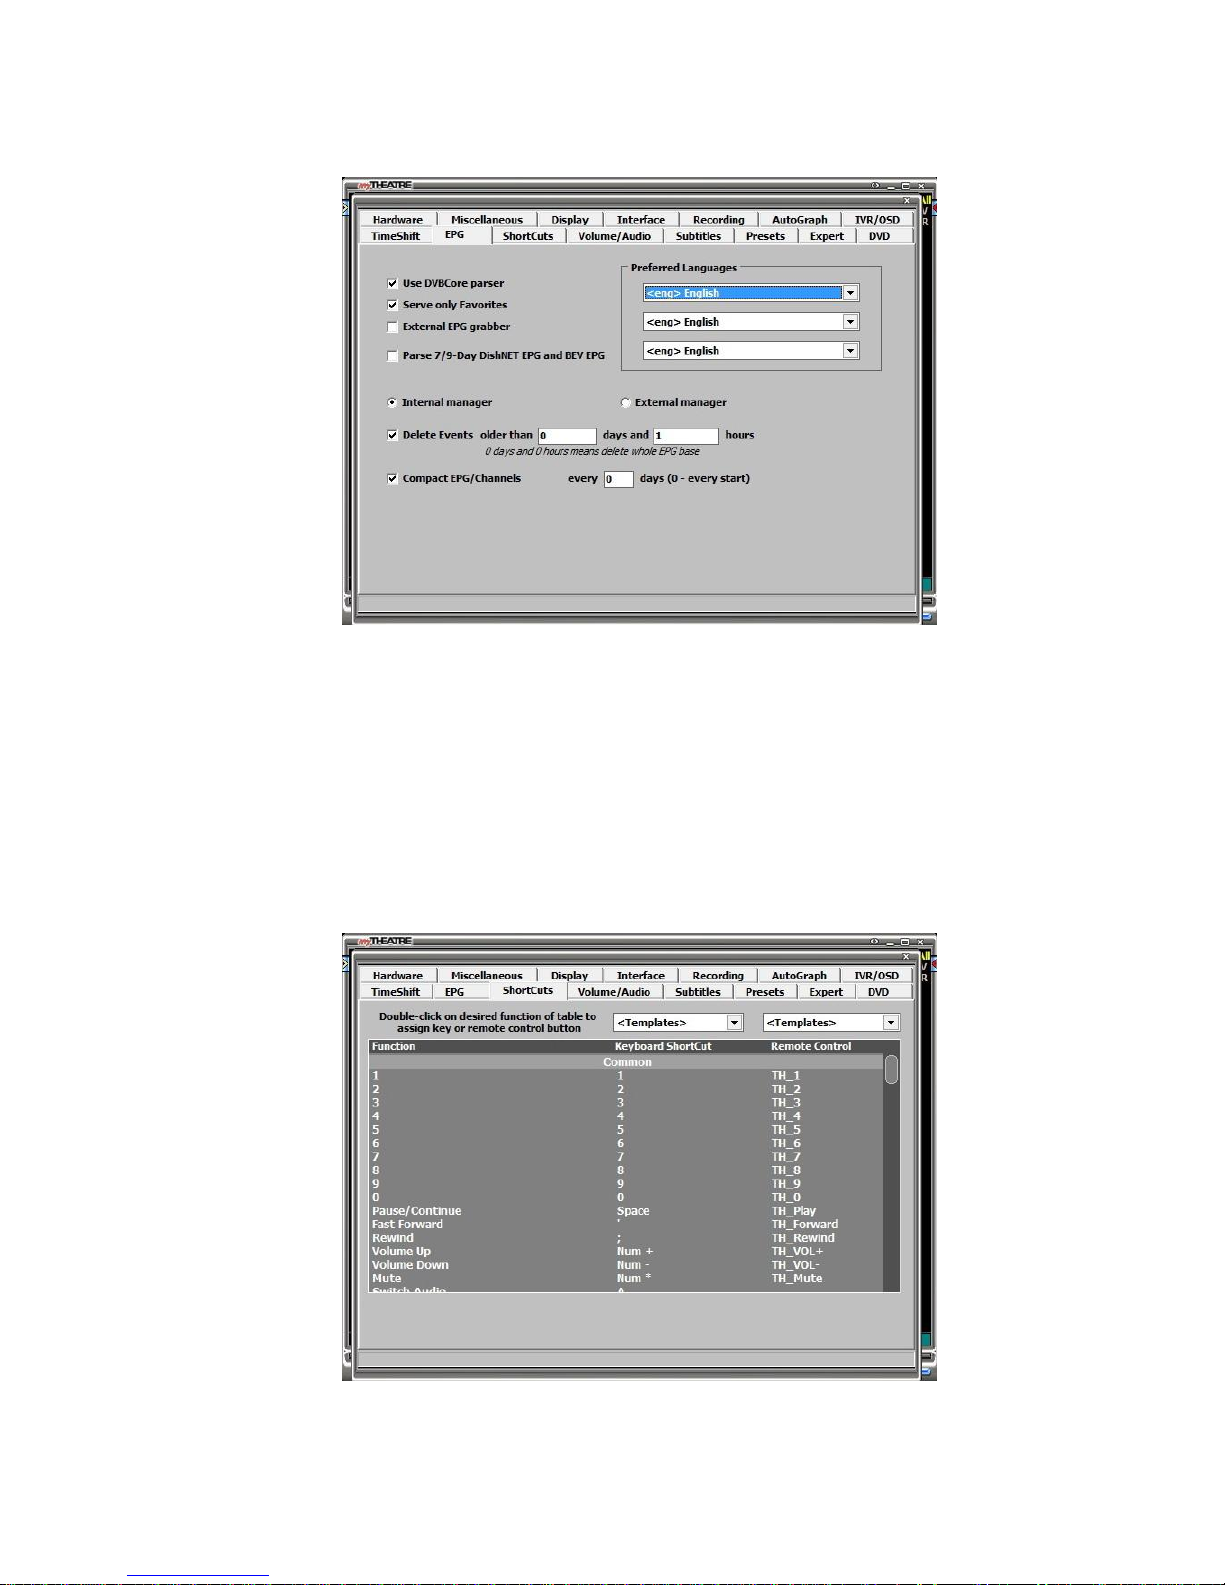
EPG:
Setting EPG (Electronic Program Guide)
Shortcuts:
Setting Hotkey & Shortcuts by double clicking the function you want to change.
23
Page 25
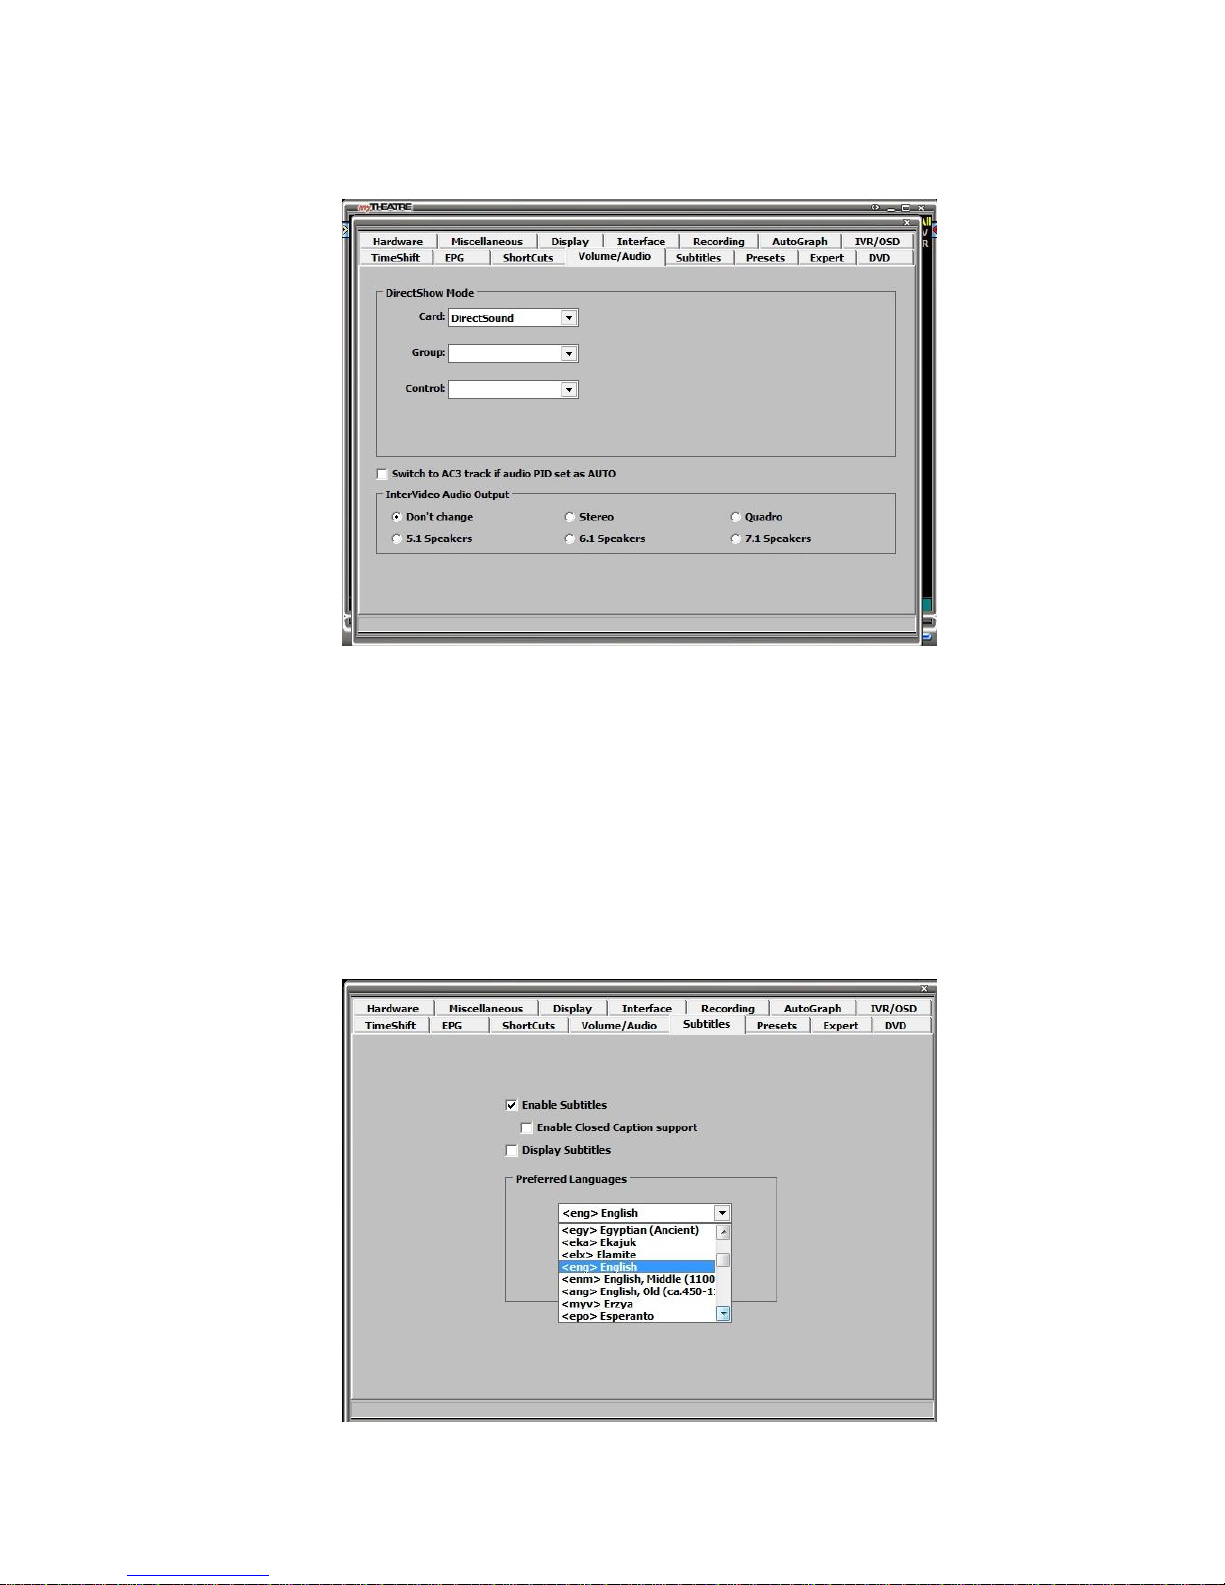
Volume/Audio:
Setting Audio options
Subtitles:
Setting Subtitle language you prefer
24
Page 26
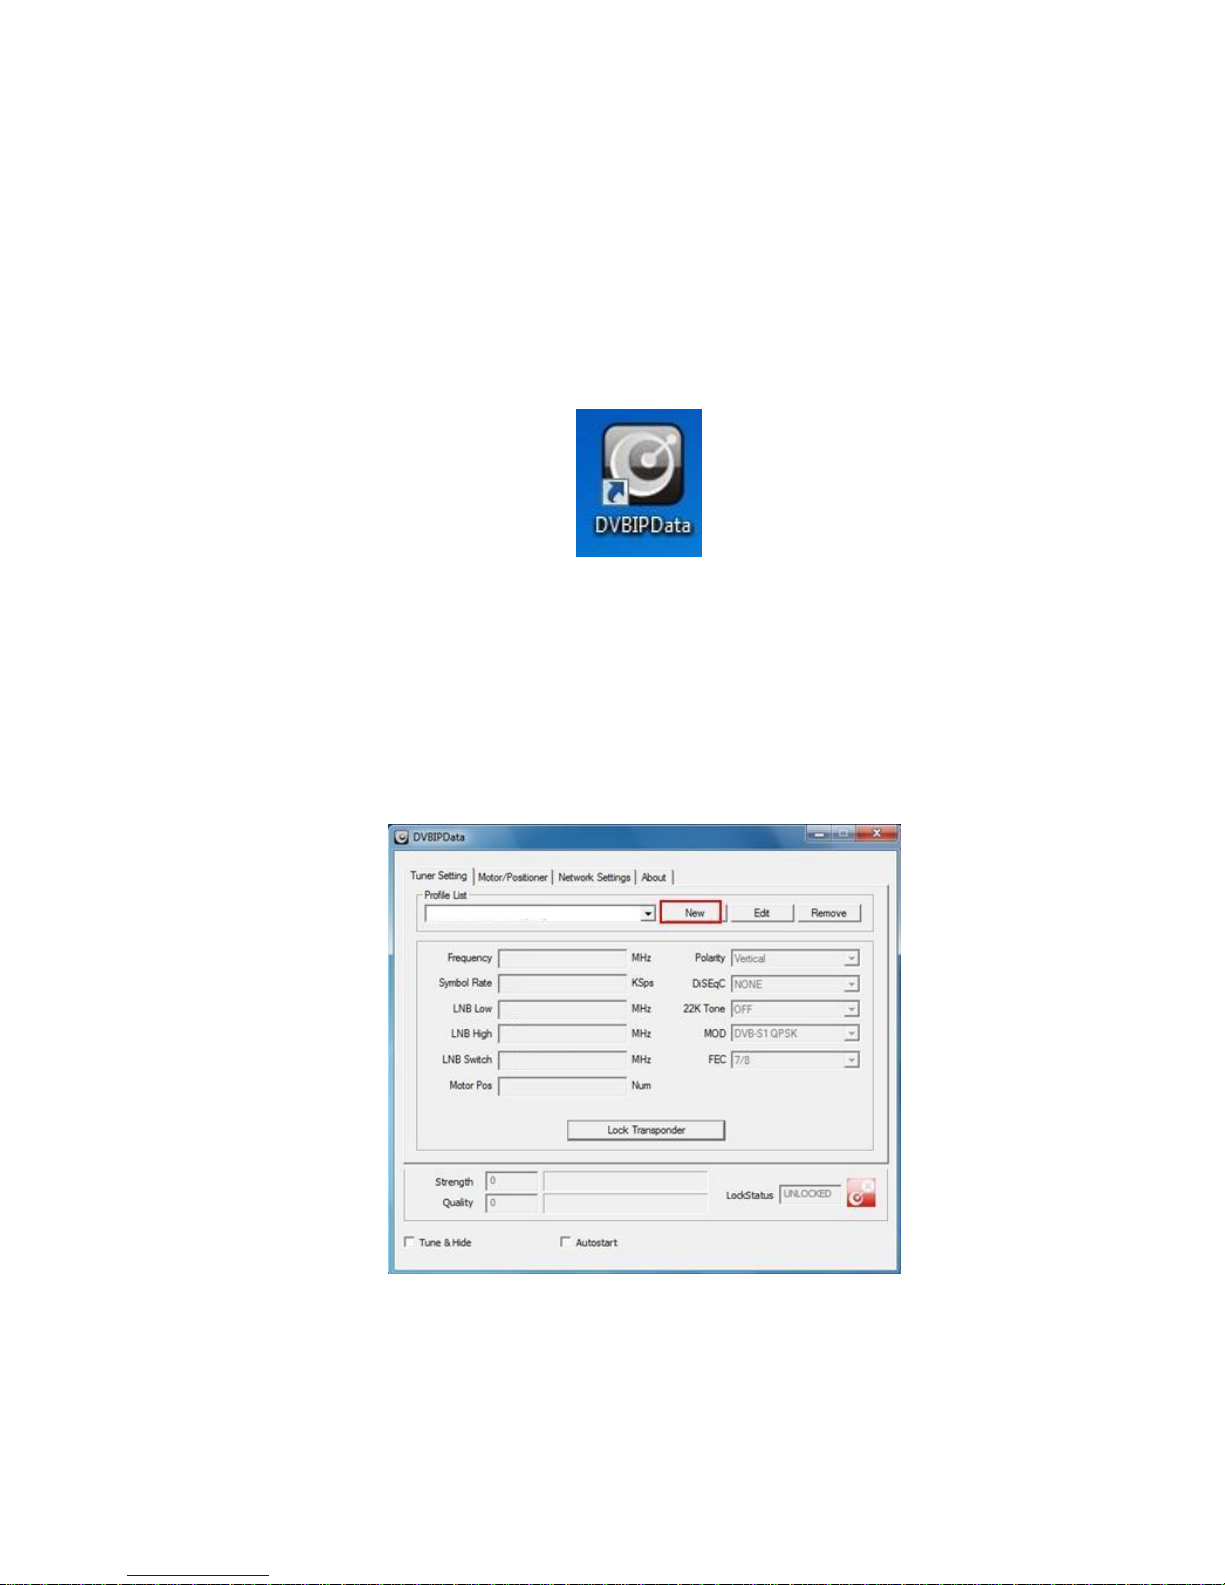
DVBIPData
DVBIPData icon on your desktop
Step 1:
After installation finished, you will see DVBIPData icon on your Desktop. Run it by
double clicking the icon.
Step 2:
After splash-screen, you will see main window of application. Please click “New”
25
Page 27
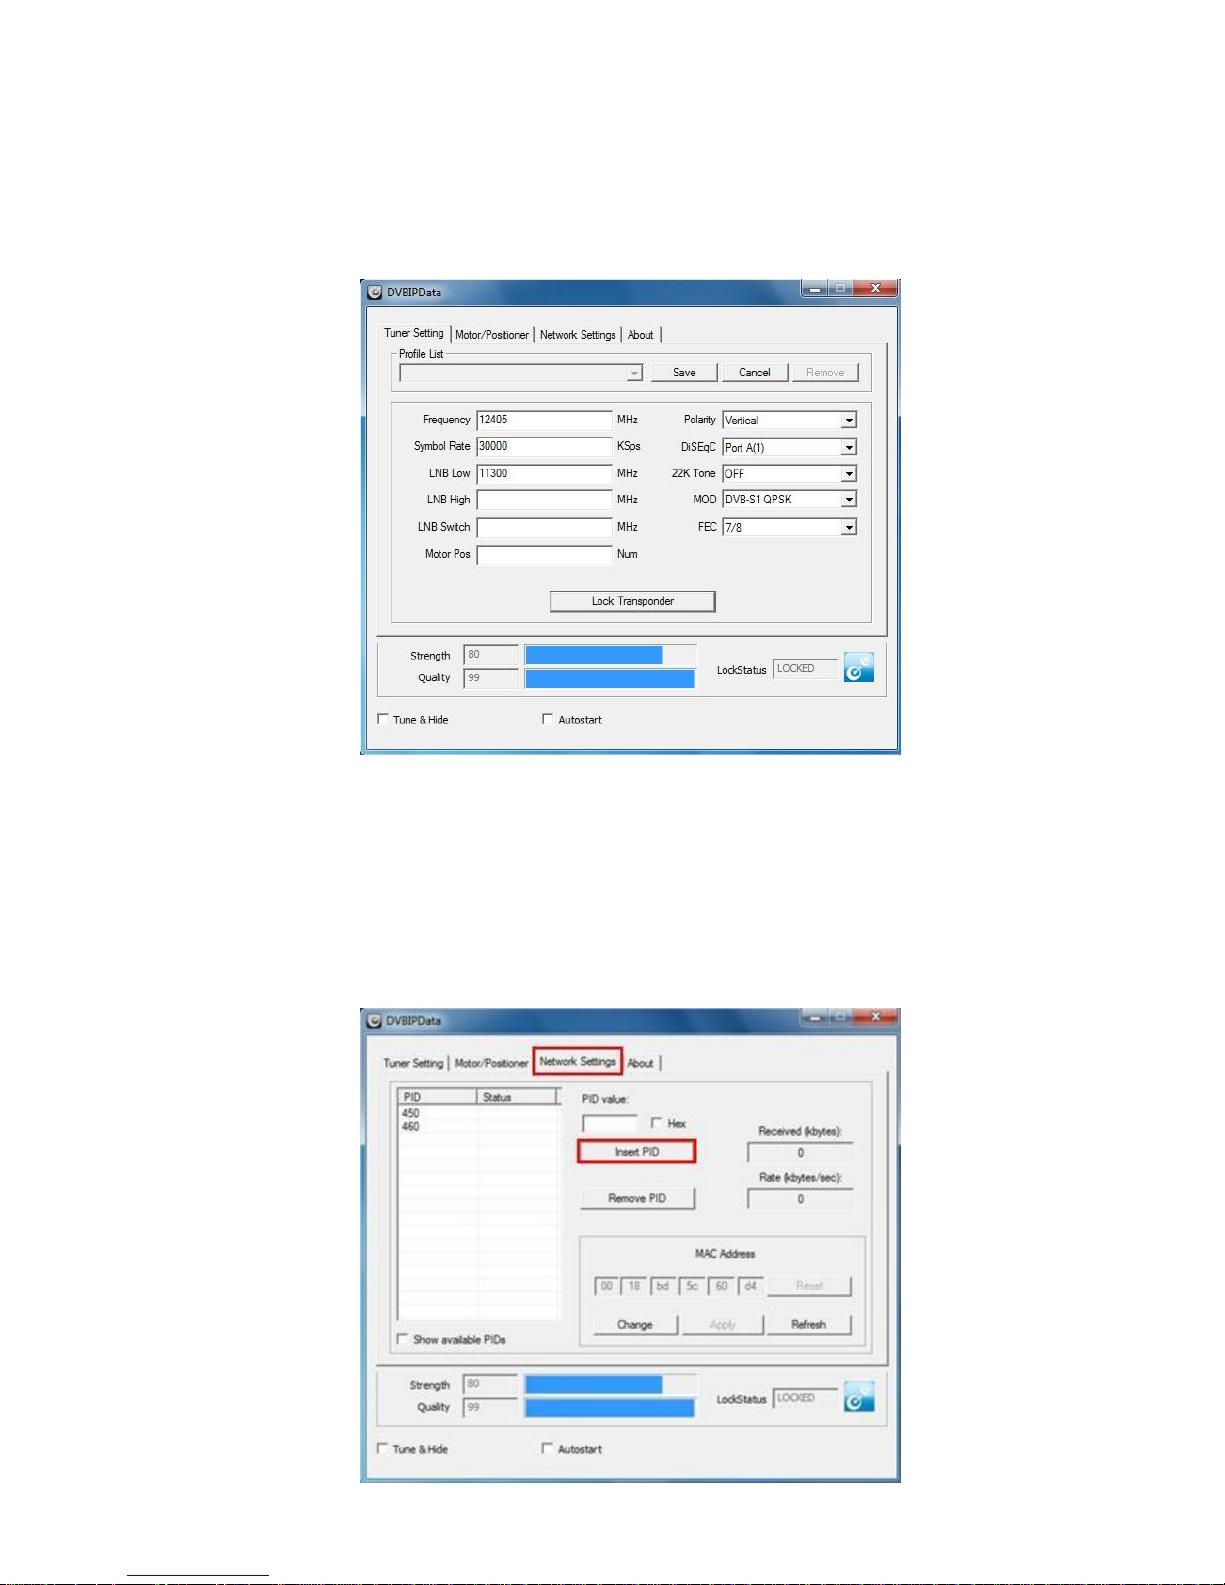
Step 3:
You need to fill in the parameters for your satellite,
For example: Frequency, Symbol Rate, LNB, Polarity, DiSEqC, 22K, and click
“Lock Transponder”
Note:
Once the transponder is locked, you will see Strength & Quality indicators in
Blue bar and the LockStatus icon turns Blue.
Step 4:
Please click “Network Settings” into this page & Insert PID
26
Page 28
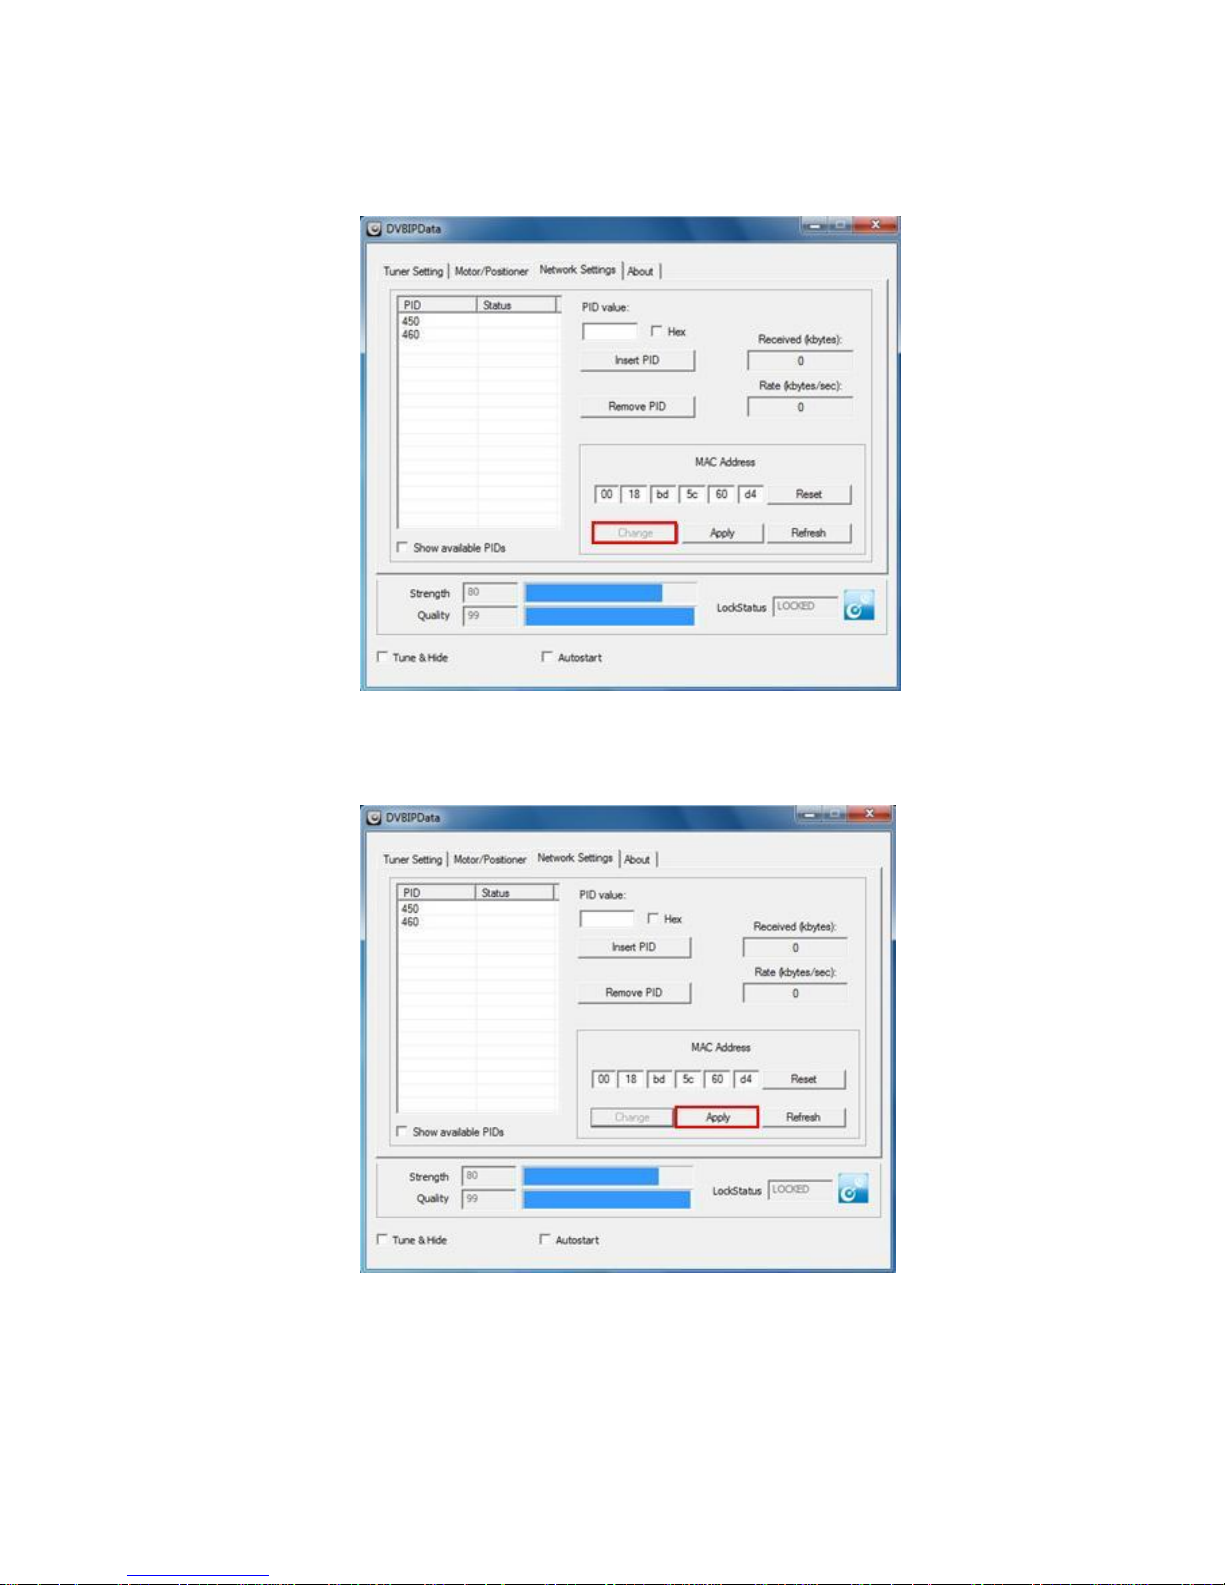
Step 5:
DVBIPData allows you to change MAC Address by yourself, Click “Change”, Enter the
"MAC Address" you need in the column as below
Step 6:
When you finish all setup, don’t forget to click “Apply”
Note:
DVBIPData is a stable and easy satellite internet software, with which you could
surf high speed broadband via satellite, but you need to apply for a valid account
from your local Satellite Internet ISP before using DVBIPData.
27
Page 29
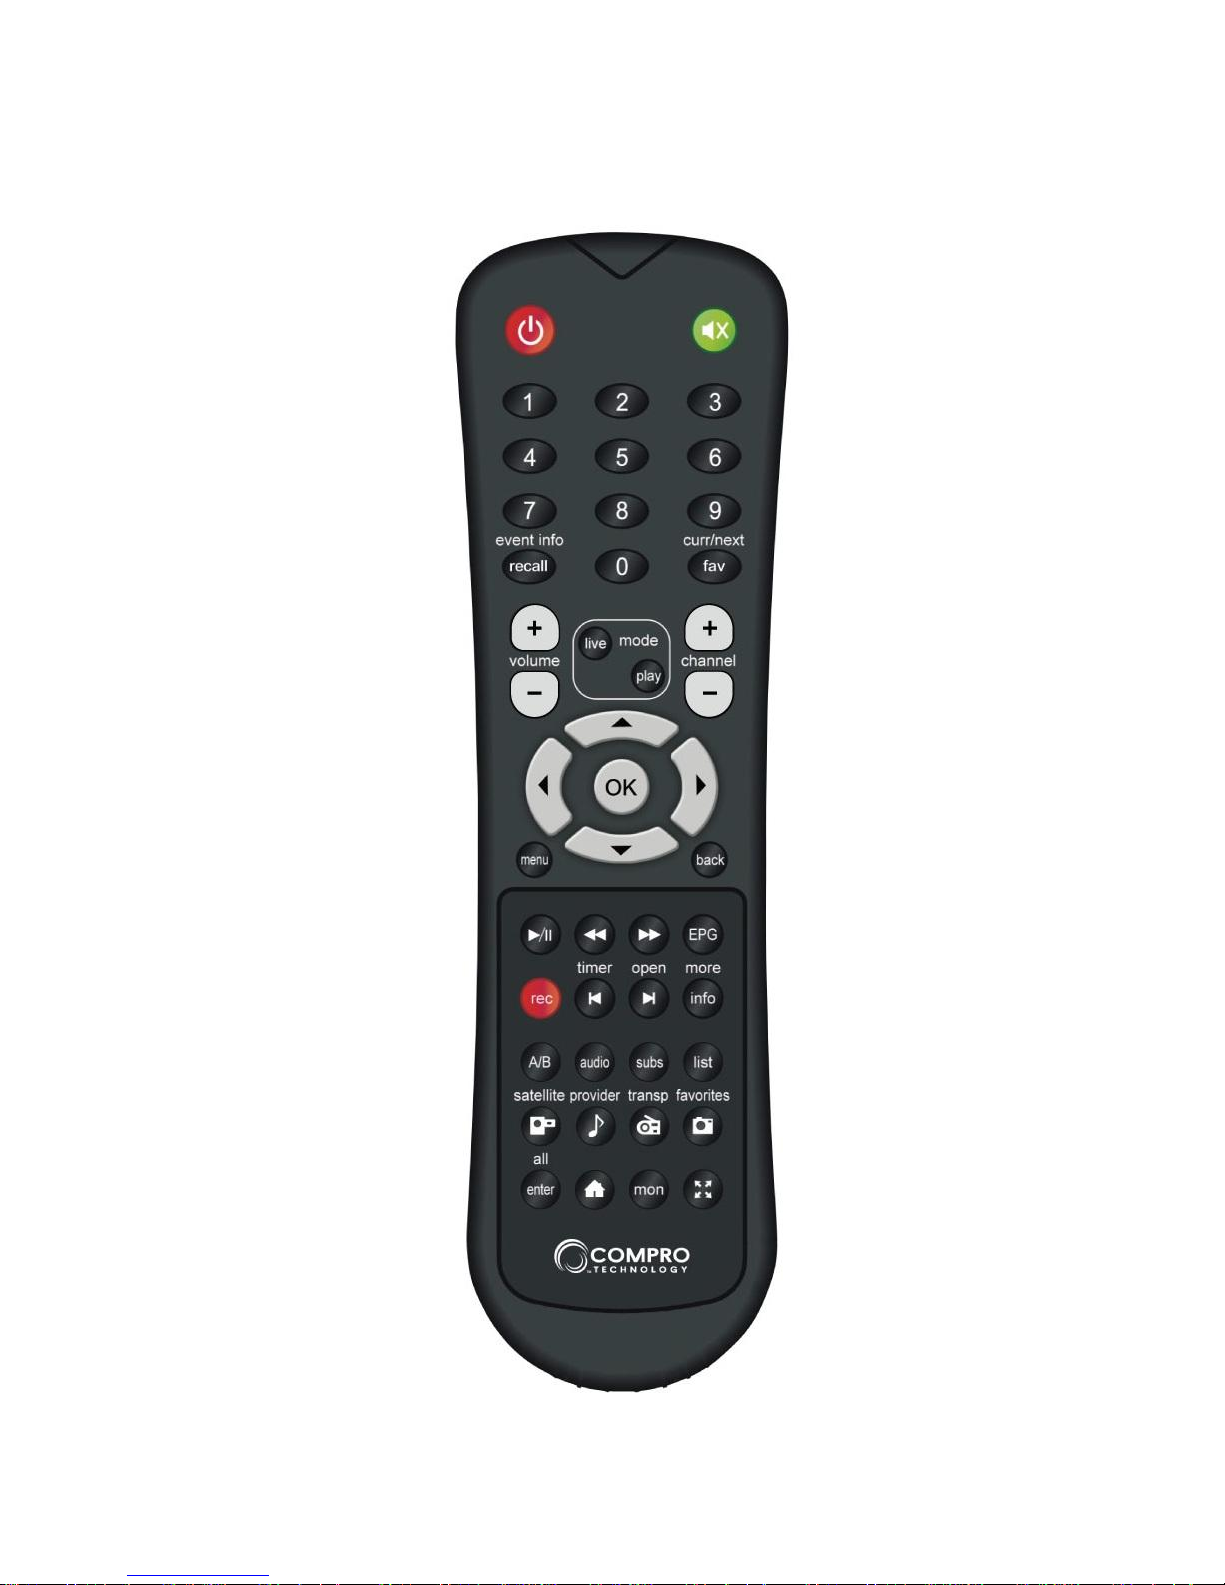
Remote Control
The outlook of remote control and button definitions has shown as below:
28
Page 30

Remote control keys definition
Key Name
Default Action
Live Mode
Play Mode
OSD
WMC Mode
Mute
Mute
Mute
Mute
Power
Exit
Shut Down
Shut Down
1 1
1 2 2
2 3 3
3 4 4
4 5 5
5 6 6
6 7 7
7 8 8
8 9 9
9
0 0
0
Recall
Previous Channel
Event Into
Fav
OSD Favorites
OSD File List
Vol+
Vol+
Vol+
Vol+
Vol-
Vol-
Vol-
Vol-
Channel+
Next File
Channel+
Channel-
Previuos File
Channel-
Live
Live Mode
Play
Play Mode
Up
Channel+
Up
Up
Down
Channel-
Down
Down
Left
Play Speed+
Left
Left
Right
Play Speed-
Right
Right
OK
Select
OK
Menu
OSD Menu
Back
Cancel
Back
Play/Pause
Play/Pause
Add To scheduler(Watch)
Play/Pause
>>
Fast Forward
Fast Forward
<<
Rewind
Rewind
EPG
EPG
EPG
Rec
Record
Add To scheduler(Record)
Record
Timer
Sleep Timer
Open
Open file
Info
OSD Info
Program Info
A/B
Audio A/B/AB
Audio
Switch Audio
Switch Audio
Subs
Subtitles on/off
List
Channel List
File List
Mon
Next Monitor
Full Screen
Full Screen
Full Screen
Preset 1
Satellite View
Video Library
Preset 2
Provider View
Music Library
Preset 3
Transponder View
Radio
Preset 4
Favorites View
Picture Library
WMC Home
Enter
Preset 5
All Channels
29
Page 31

Troubleshooting
My device can’t work correctly.
1. Please unplug device from PC/Laptop and re-connect to another USB port
again.
2. Please check device management and see if there is any exclamation mark or
not.
3. Please re-install latest driver again.
Video can be played but Audio failed.
Please check the sound card setting or the volume setting.
Why my EPG, Teletext and Subtitle cannot be shown?
At some areas, the broadcasters do not provide these services. Please contact
your broadcaster for further information.
Why I cannot lock any channel?
Please check whether the dish points at the satellite you wish to watch.
Please check the cable between device and the dish are well connected.
Please note that the cable should be connected to "LNB In" F-connector of
the box.
Check the settings of satellite; for example, LNB frequency is for C band or
Ku band.
Please re-connect the device to another USB port again.
30
Page 32
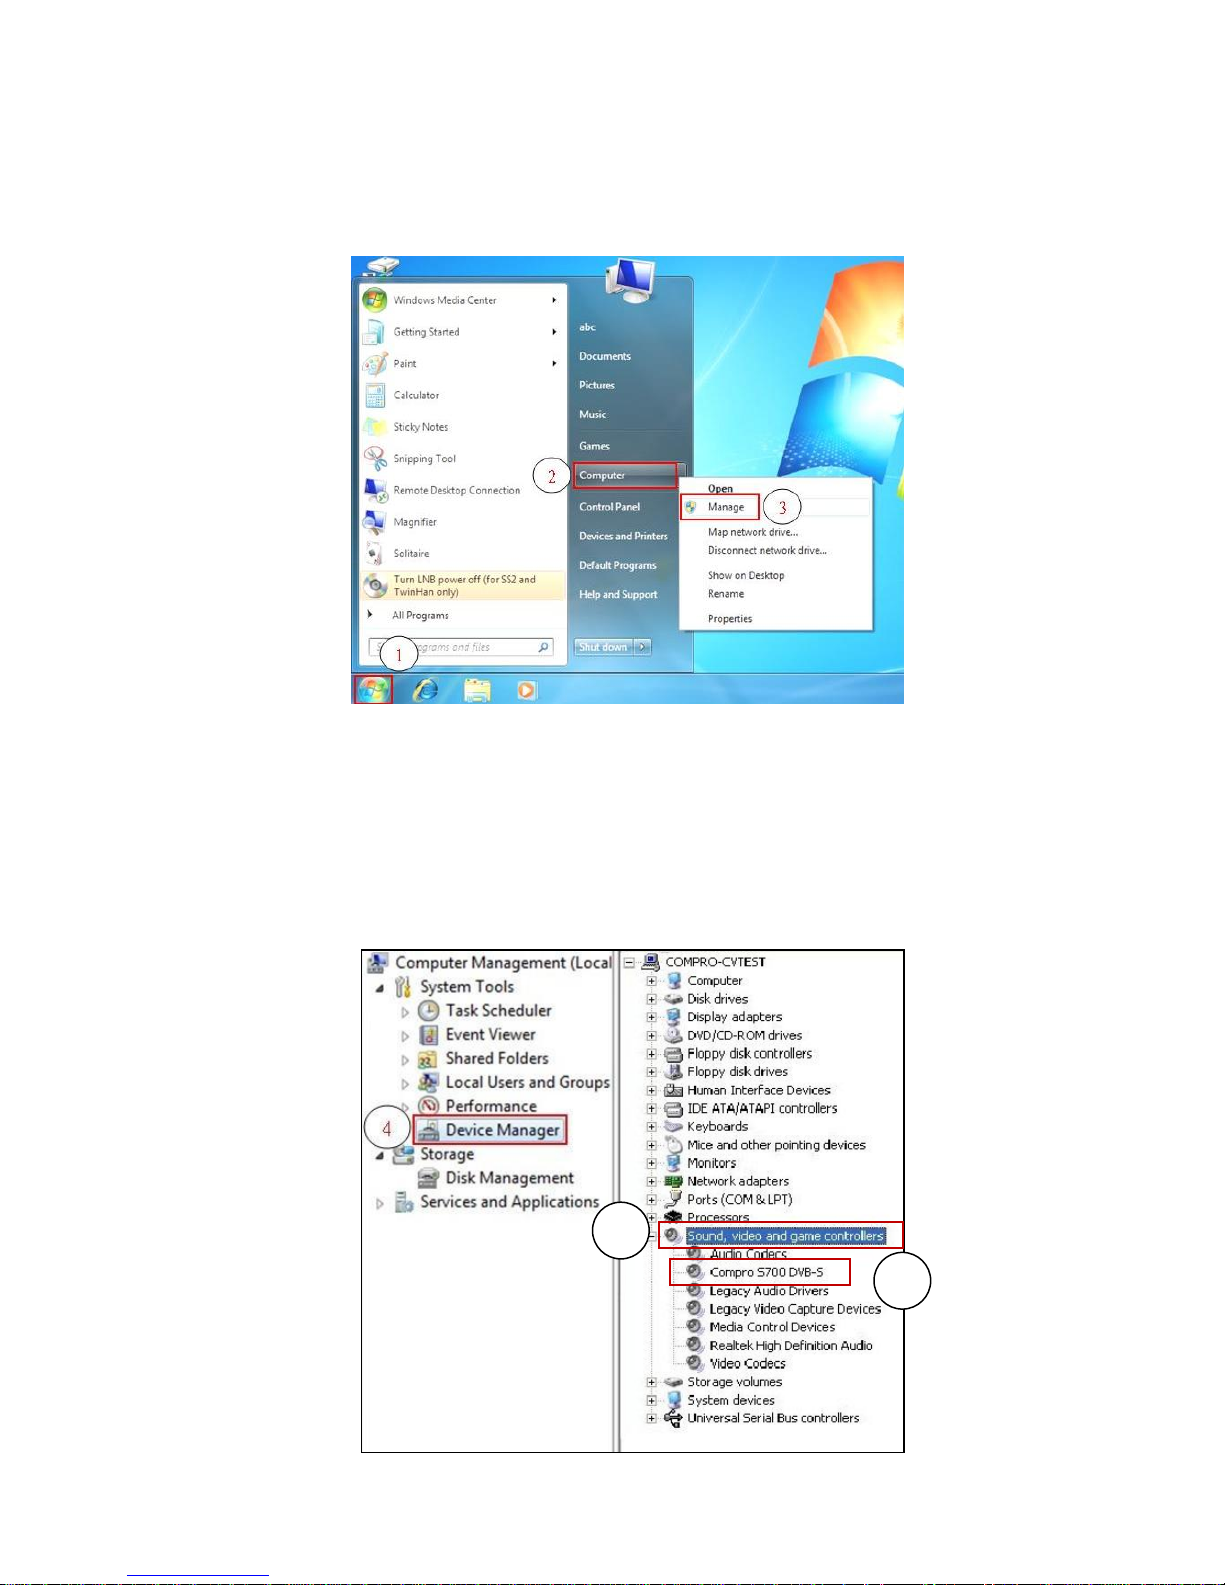
How to check Device Manager?
5
6
Step 1: Click “Start” on the bottom-left corner. (Windows logo on Vista / Windows 7)
Step 2: Click right-button on ”Computer” (”My Computer” on Windows XP)
Step 3: Click on ”Manage” (”Device Manager” on Windows XP)
Step 4: Double click ”Device Manager”
Step 5: Double click ”Sound, video and game controllers”
Step 6: Check whether the driver of TV tuner has been properly installed. If yellow
Question Mark or Exclamation mark appears, the driver is not well installed.
Please re-install.
31
 Loading...