

Page 1

VideoMate S500
DVB-S USB 2.0 TV Tuner Box
Start Up Guide
Compro Technology, Inc.
www.comprousa.com
Page 2

Copyright © 2001-2008. Compro Technology, Inc. No part of this
document may be copied or reproduced in any form or by any means
without the prior written consent of Compro Technology, Inc.
Compro, VideoMate, Poladyne, Play with Power, and the Compro
logo are trademarks of Compro Technology, Inc. Other names and
marks are trademarks of their respective owners.
Compro makes no warranties with respect to this documentation and
disclaims any implied warranties of merchantability, quality, or fitness
for any particular purpose. The information in this document is subject
to change without notice. COMPRO reserves the right to make
revisions to this publication without obligation to notify any person or
entity of any such changes.
Compro Technology, Inc.
Tel. +886 2 2918 0169, Fax +886 2 2915 2389
3/F, No.12, Alley 6, Lane 45, Pao Shin Road
Hsintein City, Taipei, Taiwan.
www.comprousa.com
ii
Page 3

Table of Contents
Table of Contents........................................................ 1
About This Guide ........................................................ 2
About VideoMate S500 DVB-S Tuner Box ................ 2
VideoMate S500 USB 2.0 Box Contents.................... 4
VideoMate S500 TV Box Connectors ........................ 5
Software Installation ................................................... 6
Remote Shut Down ..................................................... 7
Remote Control Key Definition and Use ................... 8
ComproDTV ................................................................. 9
ComproDVD 2............................................................ 19
Troubleshooting........................................................ 20
1
Page 4

About This Guide
This manual tells you how to install and use your VideoMate S500 DVB-S USB
2.0 Tuner Box. More information is available on the User’s Guides in the
programs or on the CD.
About VideoMate S500 DVB-S Tuner Box
VideoMate S500 lets you watch and record free-to-air satellite TV broadcast
on your PC. It features a TV tuner for satellite TV broadcast, remote power off,
Digital Video Recording (DVR) functions, scheduled recording at anytime,
crystal video quality, intelligent TV viewing, and a multi-function remote
Control.
Additionally, VideoMate S500 also provides a Video capture function so that
you can transfer videos from video devices, such as video cameras, to your
PC.
MINIMUM SYSTEM REQUIREMENTS
Your PC must meet or exceed the following system requirements to watch TV
on your PC.
z PIII 1.7 GHz CPU for SDTV viewing
z 512 MB RAM
z Sound Box or on-board sound chip
z Graphics Box or on-board graphics chip supports DirectX 9.0
z Available USB 2.0 port
z CD-ROM driver for software installation.
z Windows XP SP2, Vista 32 bit
(Not support 64 bit version of XP and Vista system)
z 50 MB free disk space for basic software installation.
z Digital Satellite TV Dish and LNB
2
Page 5

RECOMMENDED SYSTEM REQUIREMENTS
To use all the features of VideoMate S500 USB 2.0 Box, your PC should meet
the following requirements.
z P4 3.0 GHz CPU for HDTV viewing, recording, and PIP/POP feature
z 1.0 GB RAM
z Sound Box or on-board sound chip
z Graphics Box or on-board graphics chip supports DirectX 9.0
z Available USB 2.0 port
z CD-ROM for software installation
z Windows XP SP2, Vista 32 bit
(Not support 64 bit version of XP and Vista system)
z Update the latest drivers of VGA, motherboard, and sound box from
vendors.
z 50 MB free space for software installation
z Digital Satellite TV Dish and LNB
Note
The VideoMate S500 DVB-S USB TV Box not support 64 bit version of
Windows XP and Vista system.
3
Page 6
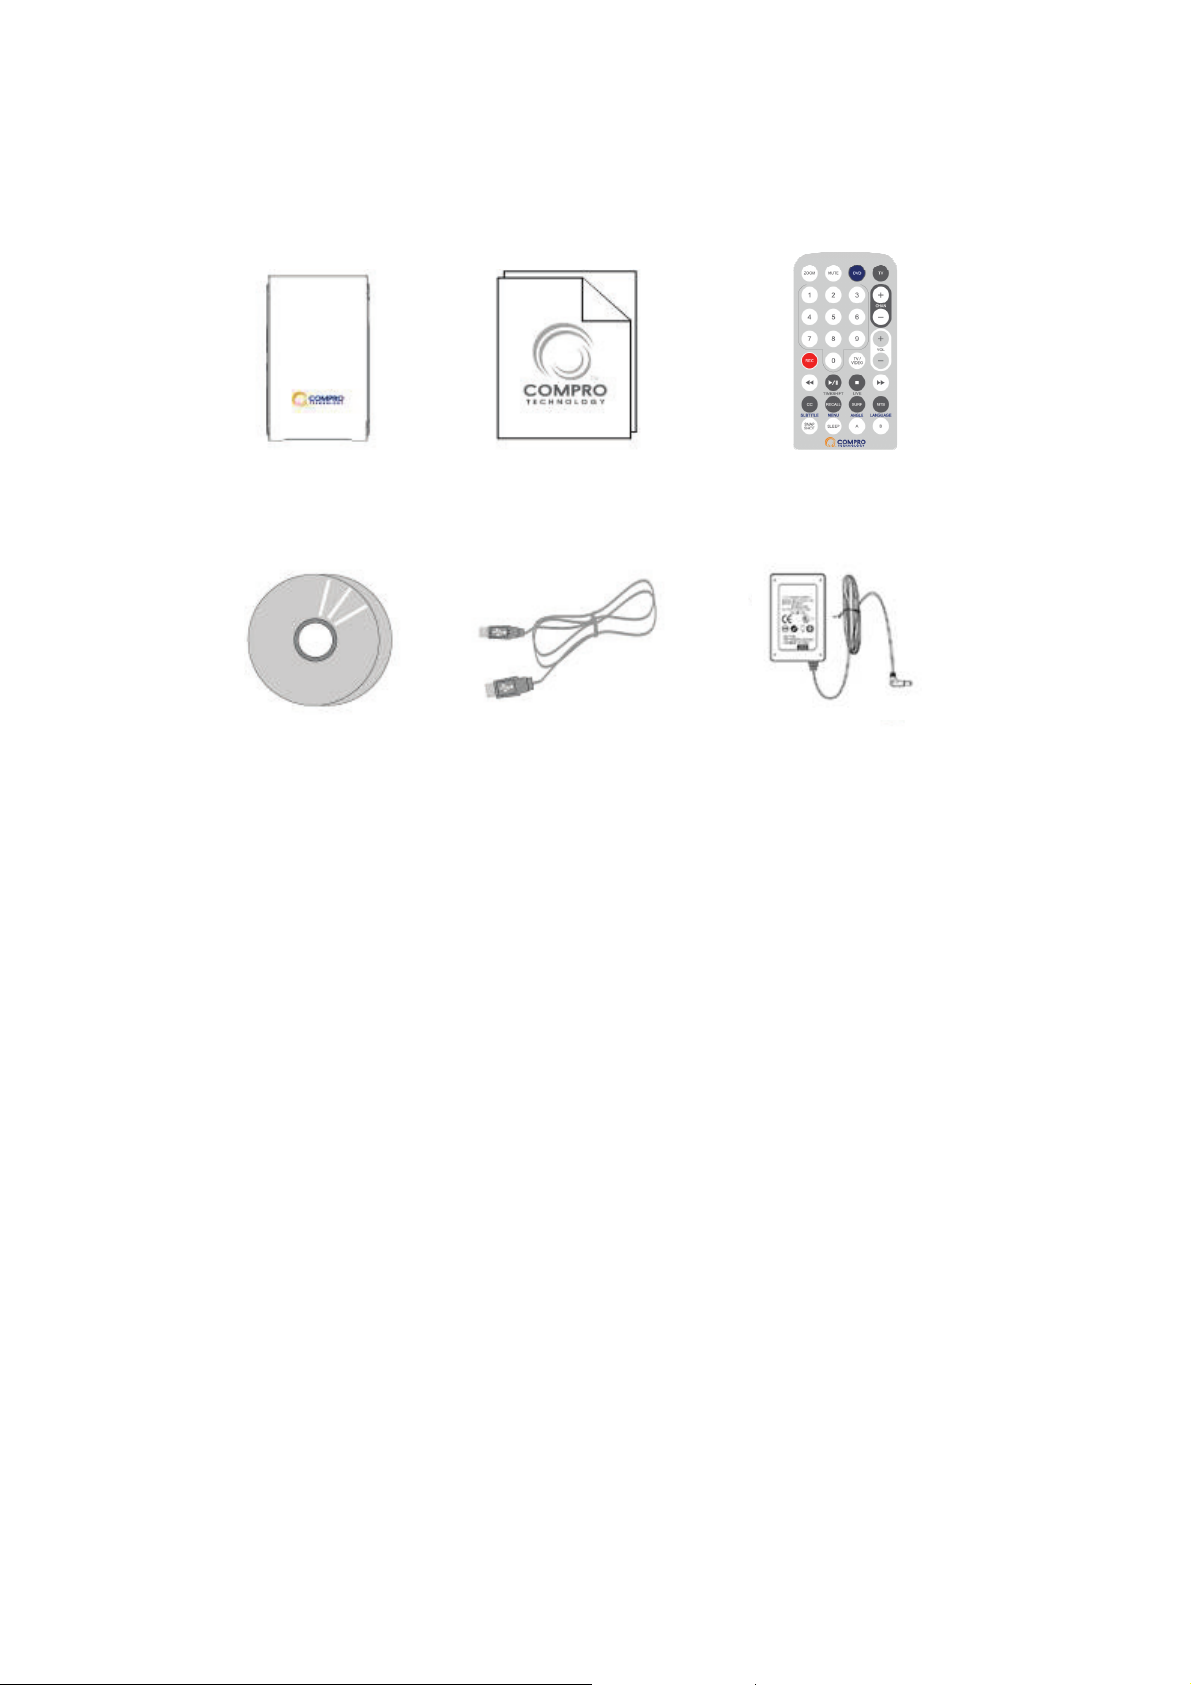
VideoMate S500 USB 2.0 Box Contents
VideoMate S500
USB 2.0 Box
Start Up
Guide
USB 2.0 cable
IR Remote Control
(batteries included)
Power Adapter Software CD
4
Page 7
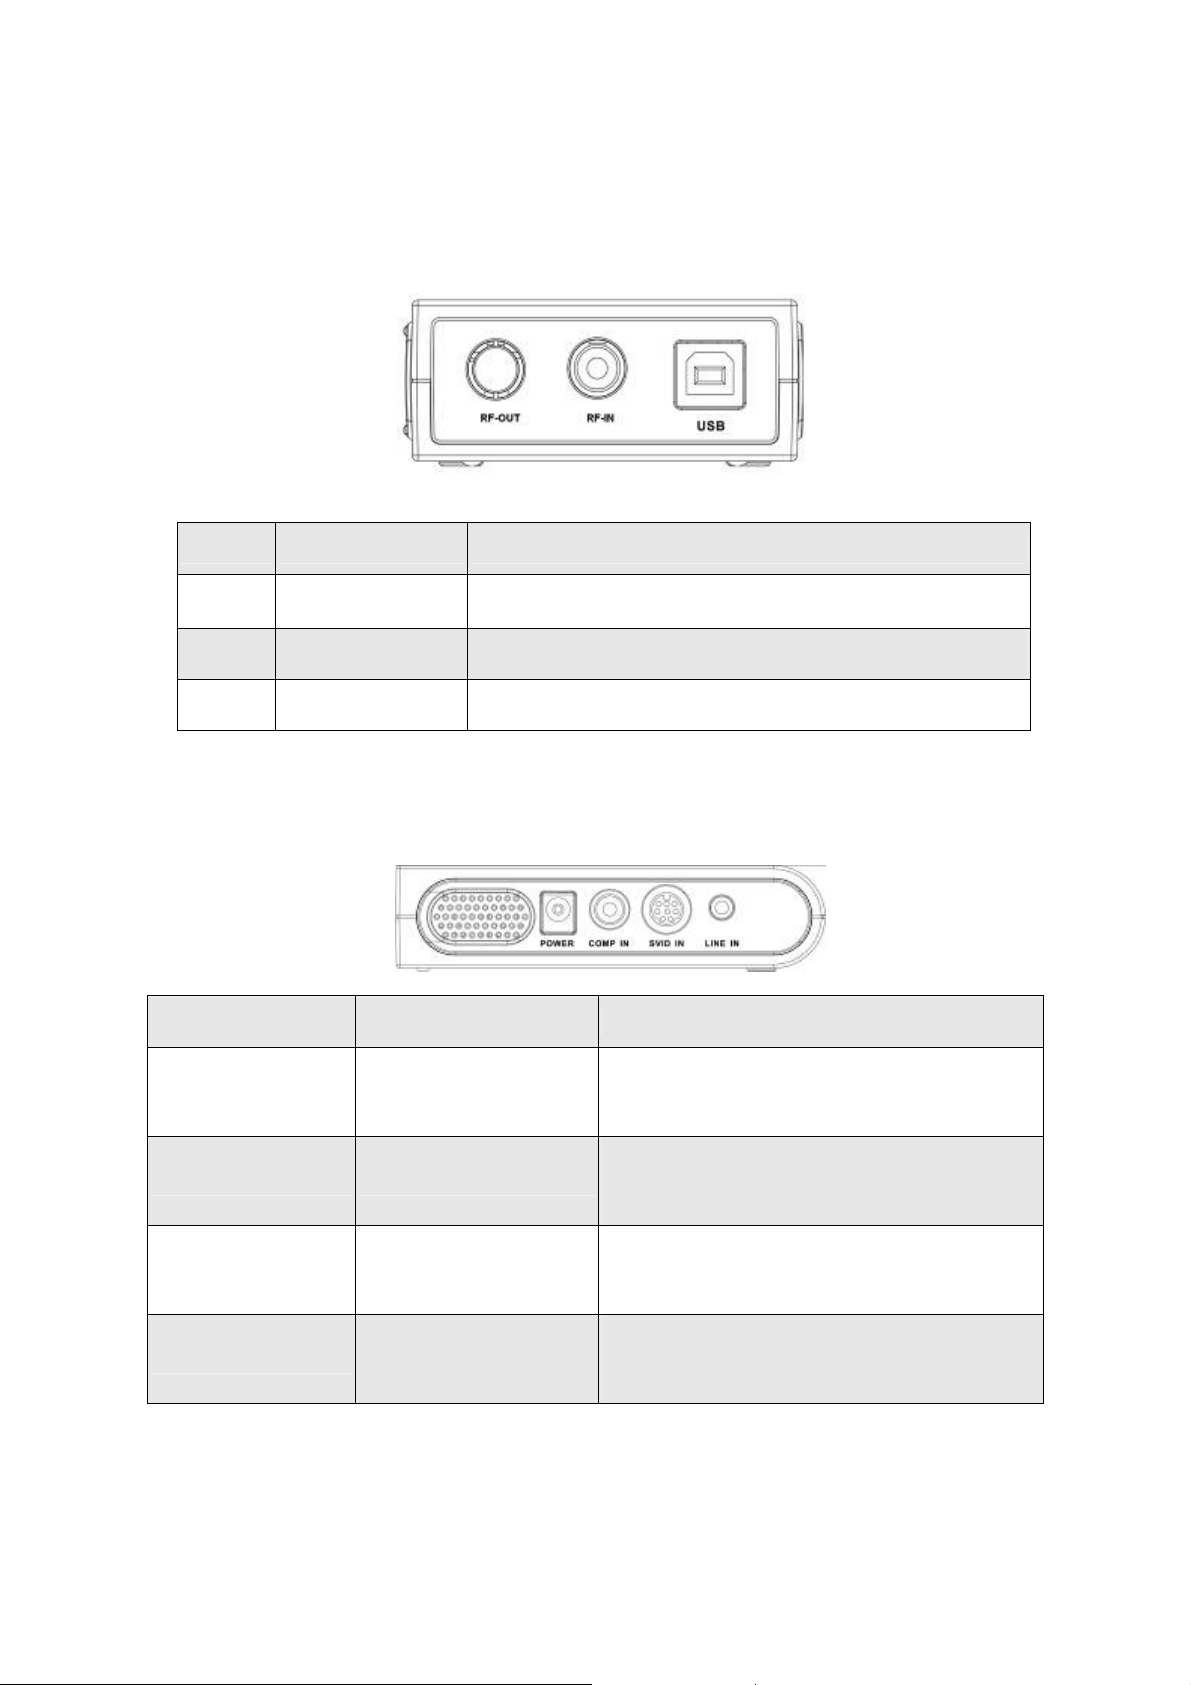
VideoMate S500 TV Box Connectors
BOX Back View
Name Function Description
RF-OUT RF Connector RF Signal out
RF-IN RF Connector RF Signal in
USB USB Connector To connect TV BOX and the PC with USB 2.0 cable
BOX Side View
Name Function Description
POWER Power Connector To use DC 12V 1A adapter to provide
enough power
COMP IN Composite video in Composite video in connector, can
connect to DVD, V8, Video Recorder
SVID IN S-Video input
connector
LINE IN Stereo sound input
connector
Video input connector can connect to
video recorder, DVD, V8
Sound input connector can connect to
video recorder, DVD, V8
5
Page 8

Software Installation
Please power up your desktop or laptop PC and follow the steps to install the
driver and software.
Step 1. Please put the software CD into your optical drive. The software will
auto running the setup program. (If you didn’t see the software auto
start, please running the “Setup.exe” in the disk.)
Step 2. You can choose to install the “full installation” to install all the software
(VideoMate S500 driver, ComproDTV, Compro IP Sink, ComproDVD 2)
or choose by your own. We suggest you to use “full Installation”.
Step 3. Please follow the instruction to install the software
Step 4. Please press “next ” to install software such as ComproDTV
Step 5. After installation, please press “Finish” to restart the PC.
Step 6. After restart the PC, please connect the S500 and PC with USB 2.0
Cable. Windows will detect VideoMate S500 immediately and start to
install the software in the driver CD.
Step 7. Plug in the satellite cable.
Step 8. Please launch the ComproDTV to enjoy it.
Note
Please plug the power adaptor to the VideoMate S500 USB TV box. It’s
necessary to use external power for VideoMate S500.
6
Page 9
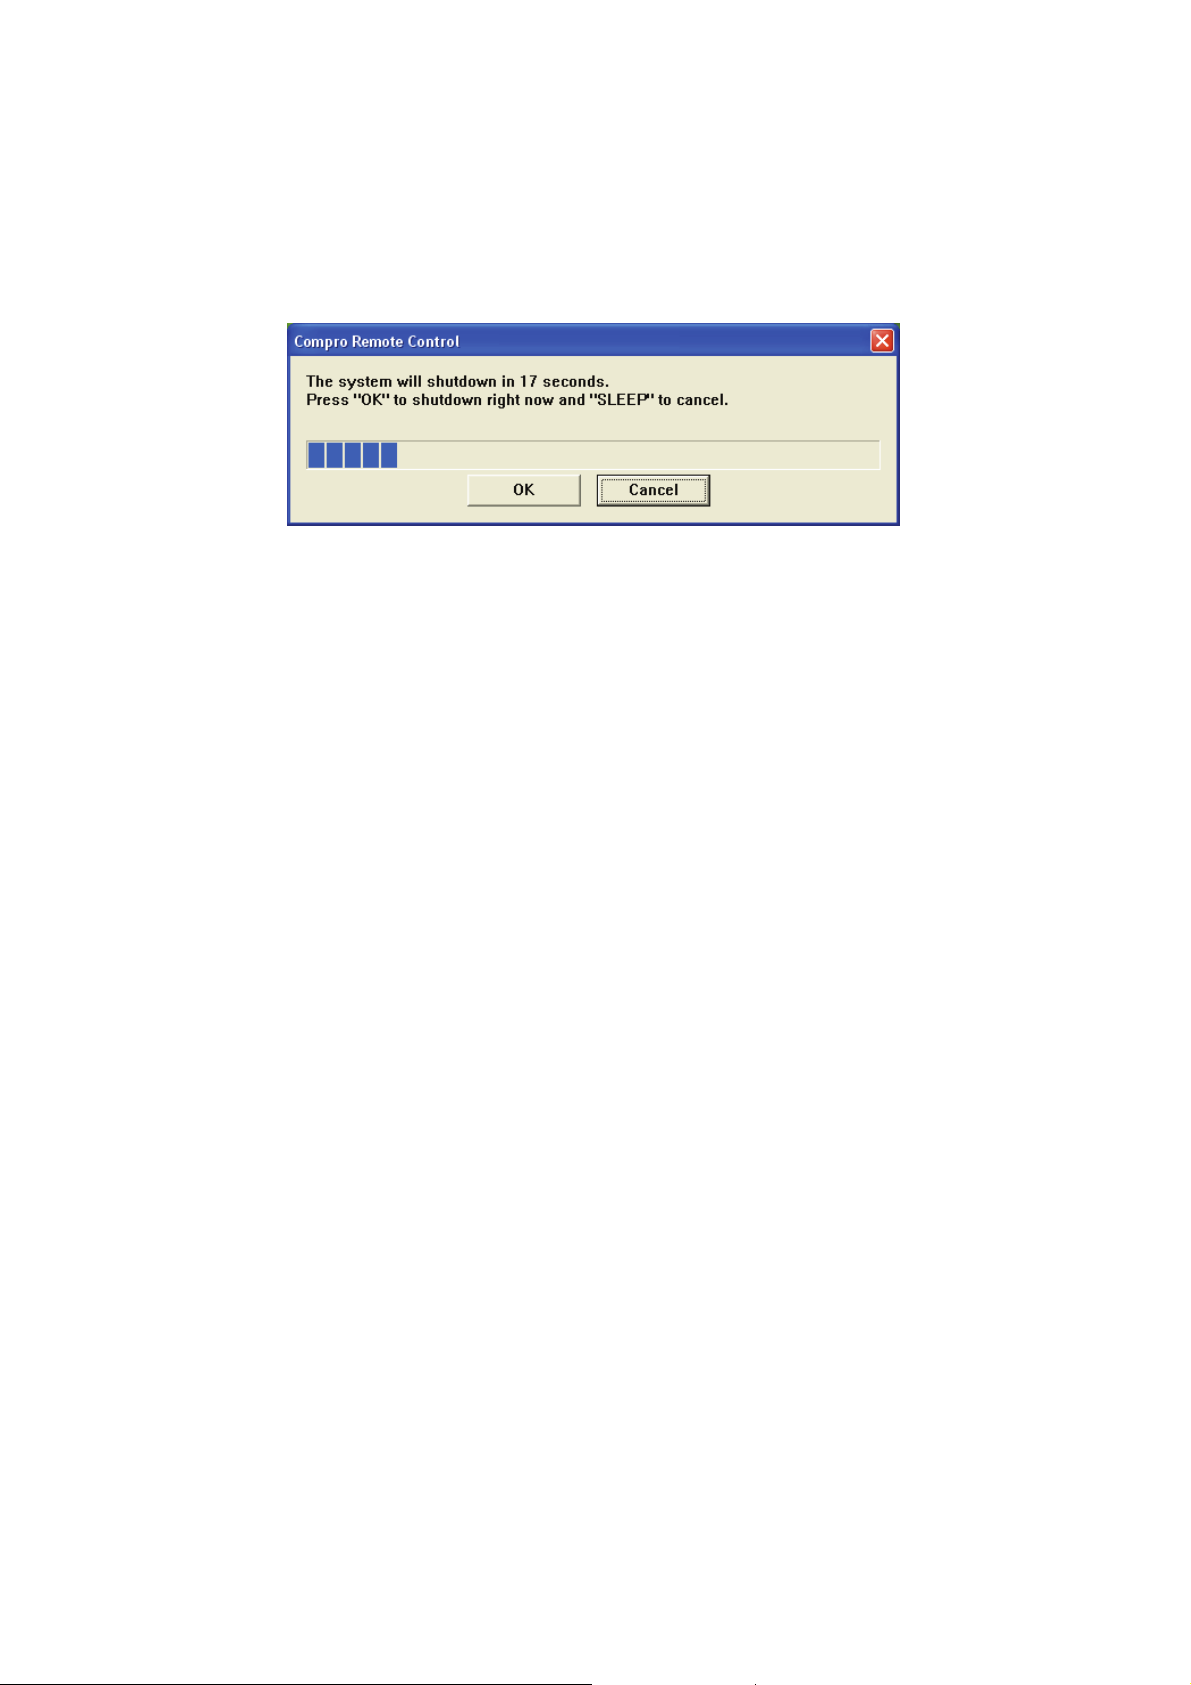
Remote Shut Down
There are two situations for the operation.
When not watching TV, i.e. no ComproDTV running:
Just press the SLEEP button on the remote keypad, you will see a dialog as
shown below. Program will countdown 20 seconds to shutdown the computer.
If you don’t want to shut down the computer, please press the SLEEP button
again, in other words, pressing the SLEEP key a second time is the same as
pressing the “Cancel” button. You may also use your mouse to press the
cancel button. Press OK to immediately shutdown the computer.
When watching TV, i.e. ComproDTV is running:
Just press the SLEEP button on the remote keypad repeatedly, you will see the
text on the screen turns to SLEEP OFF, SLEEP ON - 30 MINUTES, SLEEP
ON - 1 HOUR, SLEEP ON - 2 HOURS, and SHUTDOWN. When the text
shows SHUTDOWN, the program will countdown 20 seconds to shutdown the
computer. If you don’t want to shutdown the computer, please press the
SLEEP button again.
7
Page 10
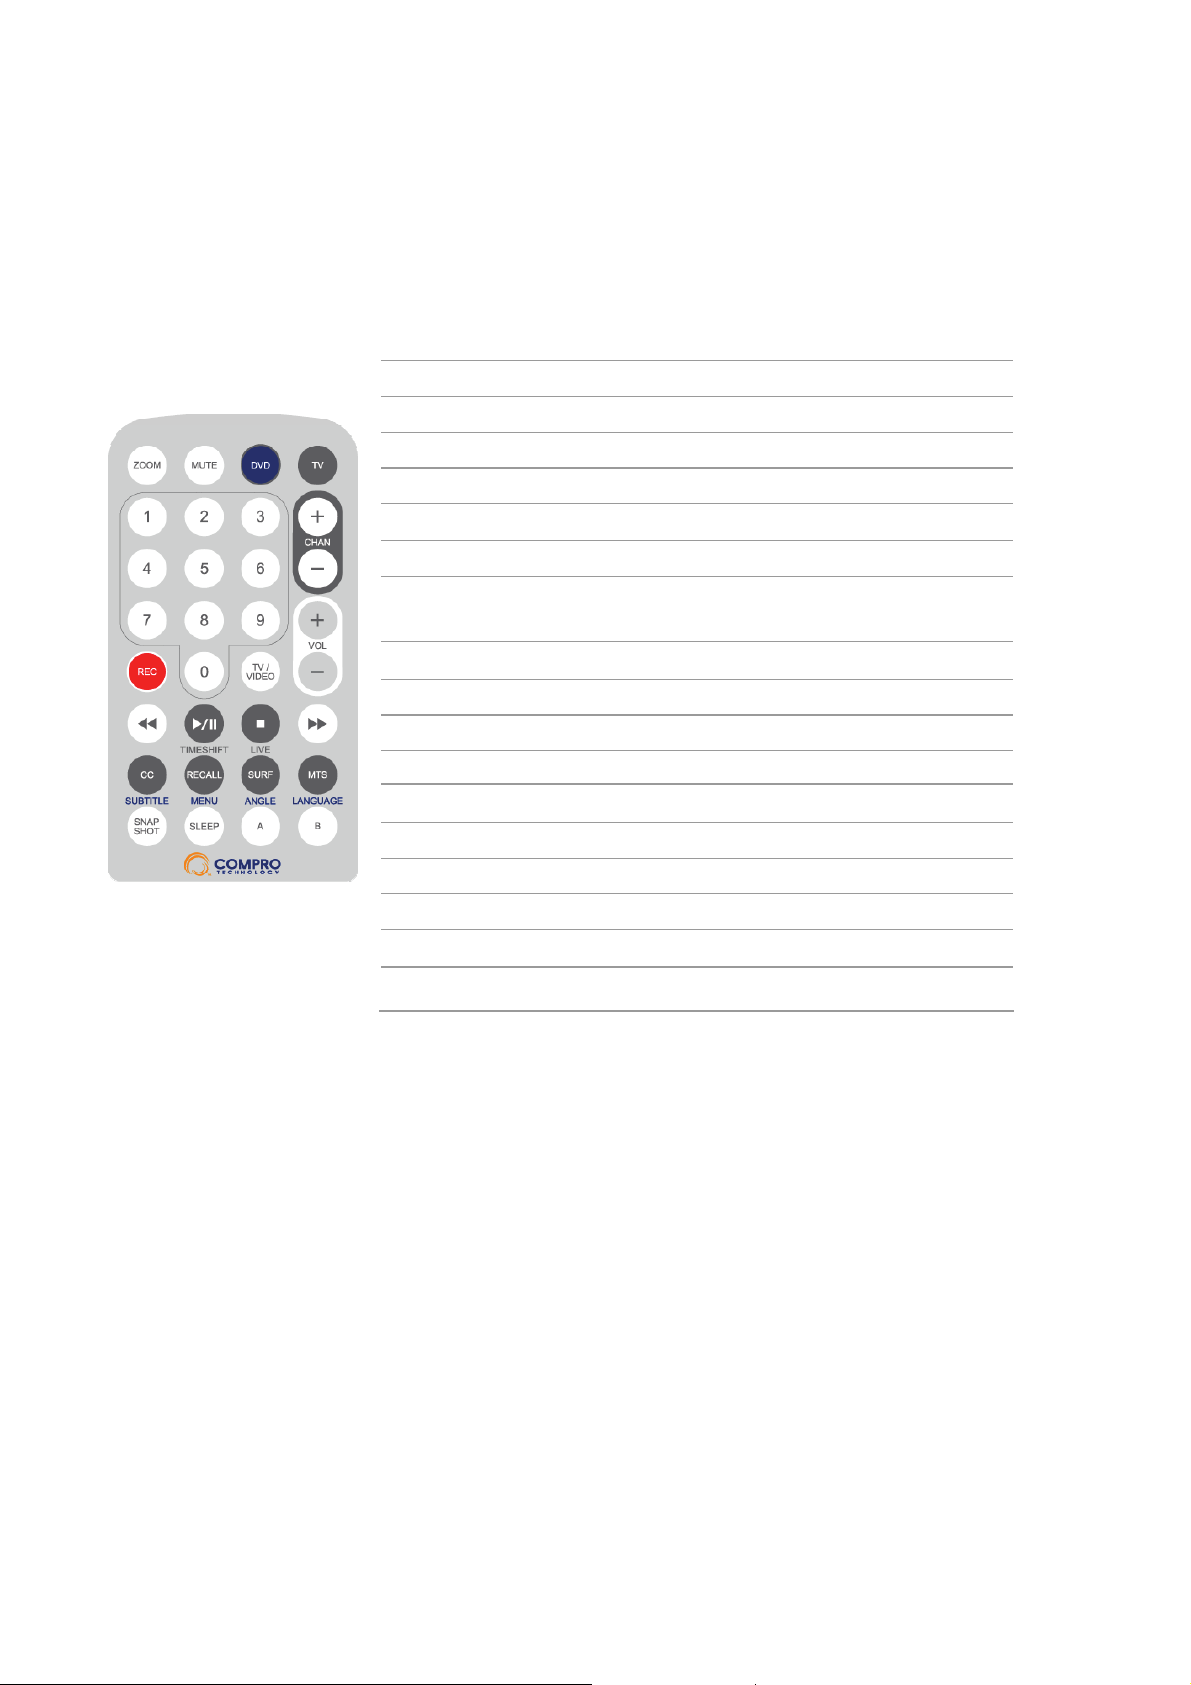
Remote Control Key Definition and Use
Icon ComproDTV 2 ComproDVD 2
ZOOM Zoom In/Out
DVD Start/Stop ComproDVD 2
TV Start/Stop ComproDTV 2
CHAN Switch channels Not used
VOL Volume Volume
REC Record Snapshot
TV/VIDEO TV/ S-Video
Backward Replay Rewind
Play/Pause Timeshifting Playback
Stop Stop Stop
Forward Advance Forward
CC Closed caption Select language
RECALL Previous channel Not used
SURF Channel surf DVD angle
MTS Mono/Stereo/SAP Select language
Snapshot Snapshot Not used
SLEEP Sleep function AB repeat
Add to
bookmark
8
Page 11
ComproDTV
(S)
(P)
(
)
(Rig
Introduction
ComproDTV is a complete digital entertainment solution for your PC. Watch
and record TV programs on your PC, in full-screen mode or in a window. Time
shifting lets you watch TV, pause live TV, or review your favorite scenes
without missing a minute of the program. Integrated de-interlacing technology
assures the highest picture quality. And most of the features can be controlled
with bundled remote control.
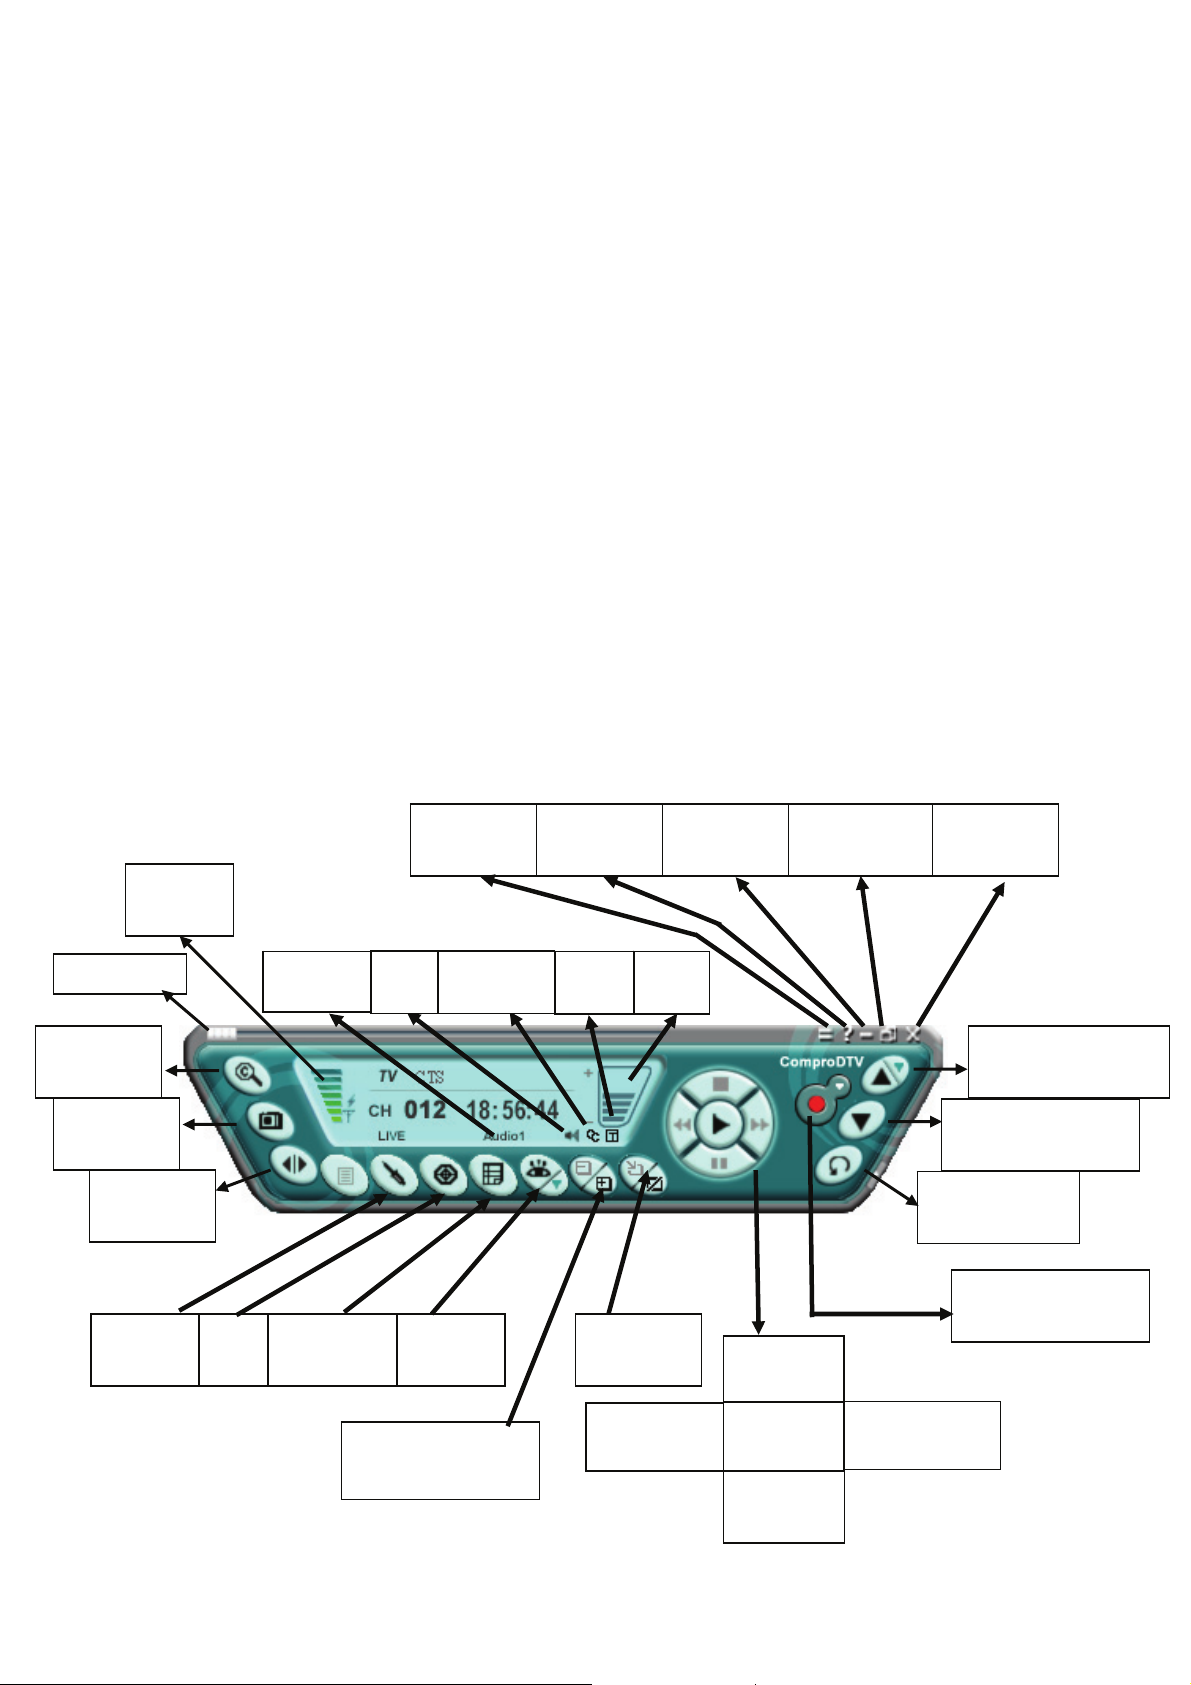
Control Panel
The ComproDTV control panel resembles the controls on a VCR. Keep in mind
that not all options are available at all times, and may be grayed out or
inaccessible depending on your hardware setup and TV services available.
The following pages describe the ComproDTV control panel functions, and tips
for using ComproDTV. The following figure gives you the function of the button
with hot key
Signal
Strength
Timeshift bar
Channel
Surf(F)
Snapshot
(Space)
Timeshift
(T)
Options
(O)
EPG
(E)
Language
Select (Q)
Schedule
(B)
Mute
(M)
Docking
(D)
Closed
Caption (C)
Source
(V)
Help
(H)
Te le t ext
Volume
(T)
Alignment (F5) /
All Windows (F6)
(+, -)
Windows
Minimize
(G)
Stop
Full Screen
(Z)
Close
(CTRL+X)
Channel Up (Page
Up) with lists( I )
Channel Down
(Page down)
Last Channel
(N)
Record (R) with
record methods
Reduce Window (F2) /
Add Window (F3)
Replay
Left Arrow
Play
Pause
(U)
Advance
ht Arrow)
9
Page 12
Icon Hot Key Description
Enable/Disable Always-on-Top function for
A
TV window.(Orange circle on the upper-right
corner of the TV window)
n/a
Note: Language select is only available while the program supports it.
L Sleep function
Options
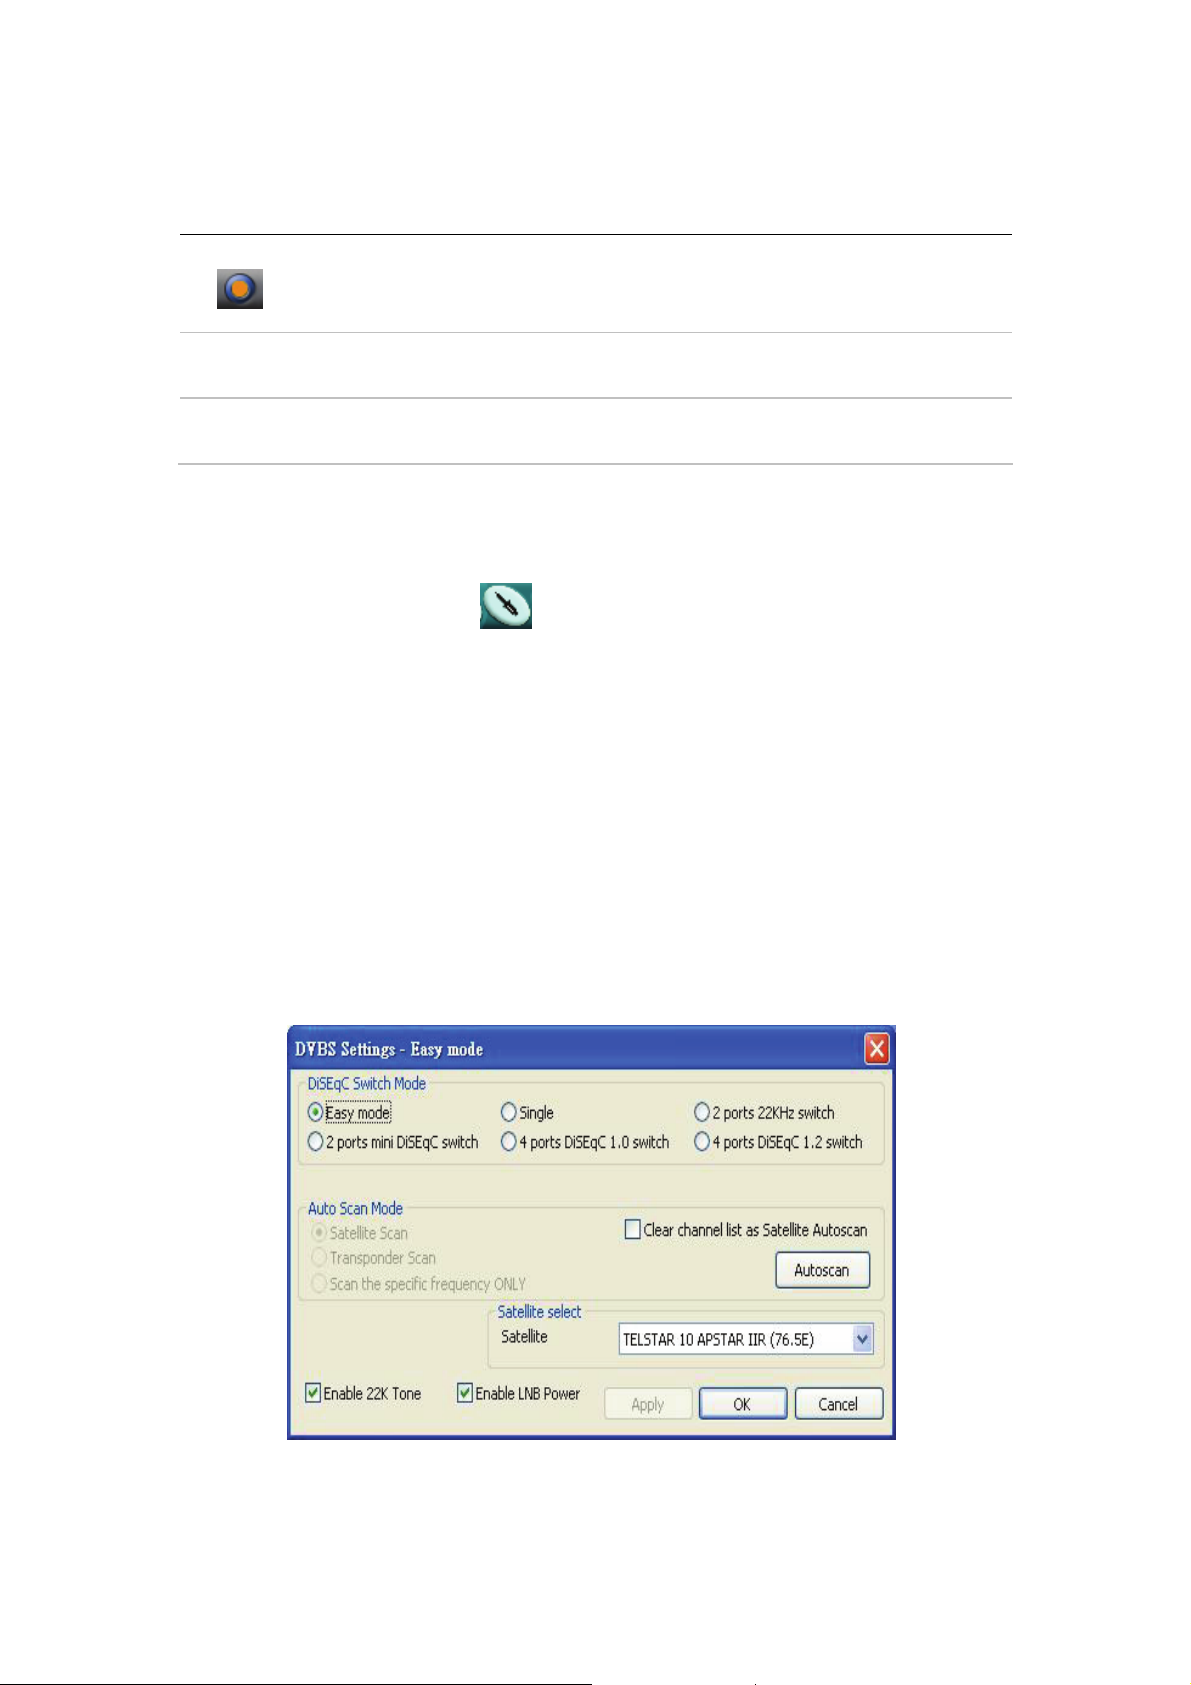
You can press the Options button to open the Options dialog box. You
can change detail settings of ComproDTV here.
Channel Scan
DiSEqC Switch Mode
1. Easy Mode
Easy Mode is for user who has connected the satellite signal directly to
Satellite TV Box without passing through DiSEqC switch. Please select the
satellite that your satellite dish have been aimed to and press “Autoscan” to
scan channels.
10
Page 13
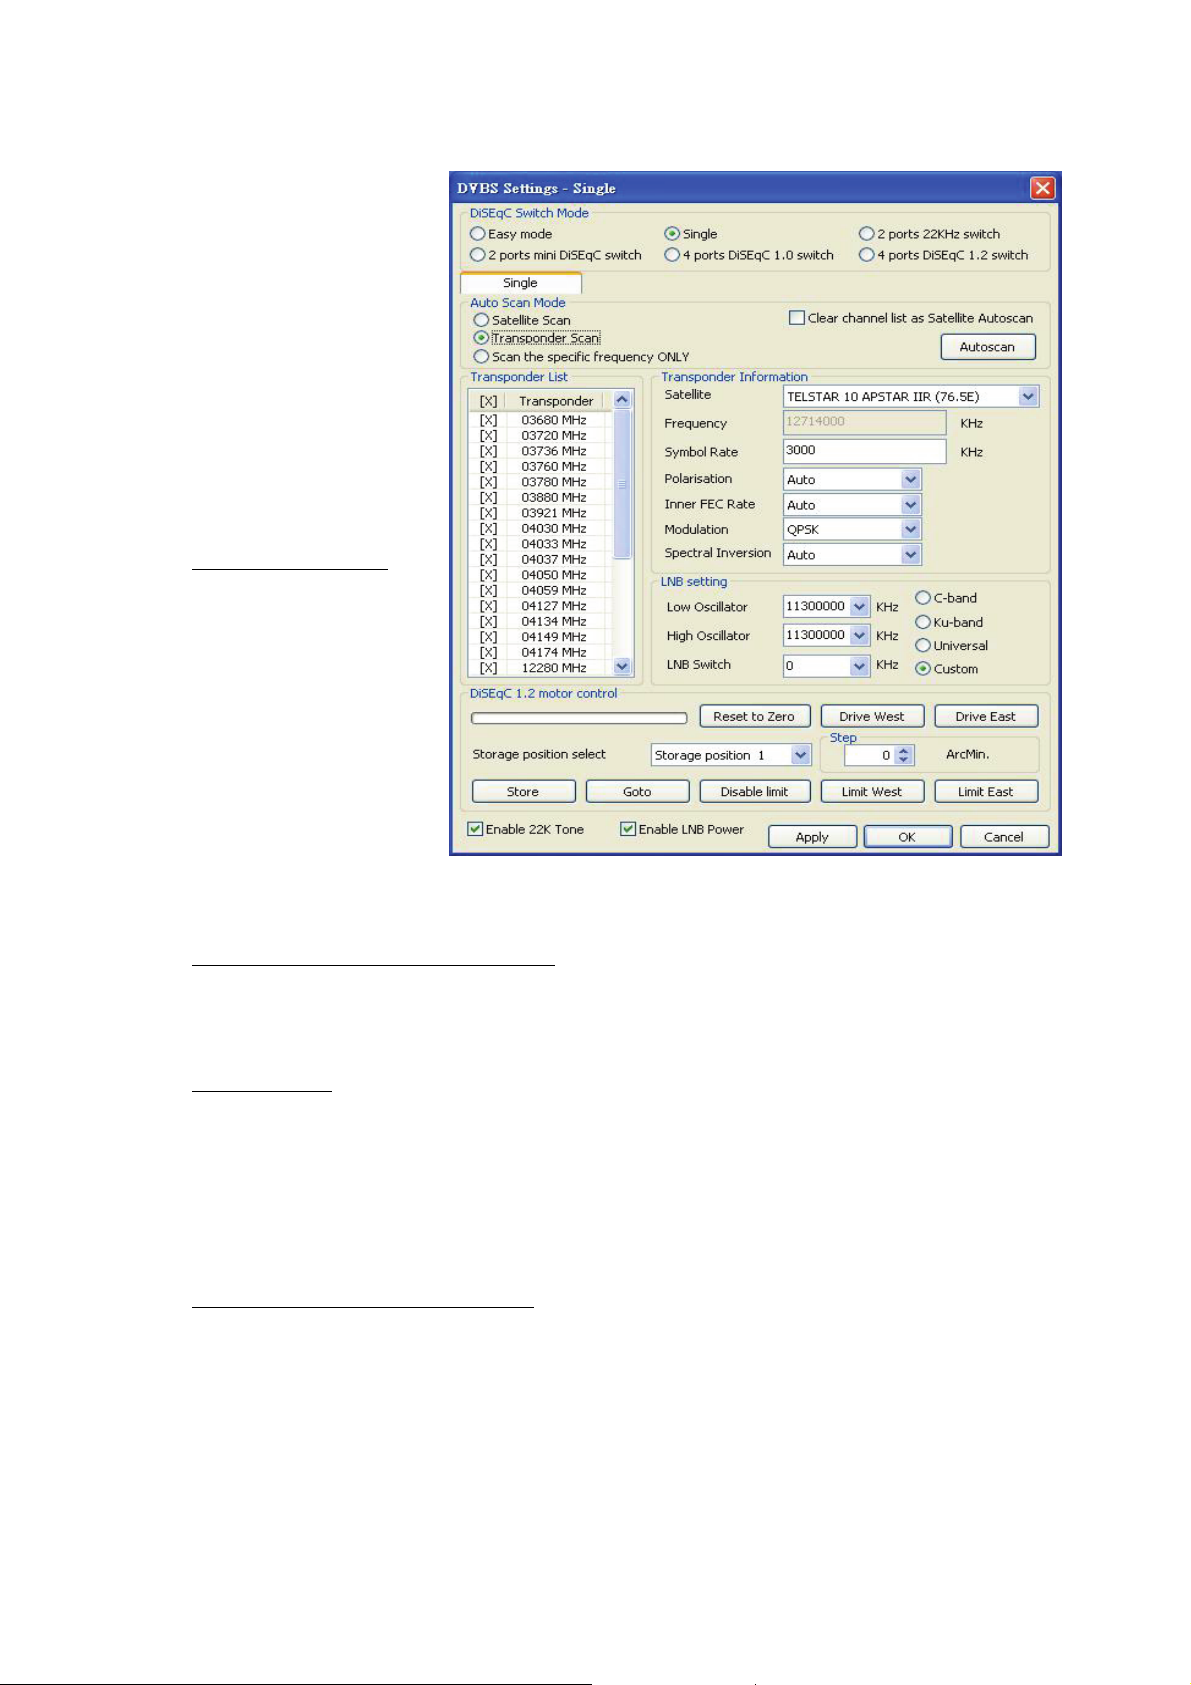
2. Single
Single mode and rest
of the mode are for
user who wants to
have advance settings
like LNB, DiSEqC1.2
motor control and etc.
It also has two other
scanning modes like
“Transponder Scan”
and “Scan the specific
frequency ONLY”.
Transponder Scan
This scanning mode is
for you to specifically
scan a transponder
that you know instead
of scanning the whole
satellite. When
scanning in this mode,
it will add the
channels you have
scanned to your channel list. You will need to know some information on the
transponder that you wish to scan first.
Scan the specific frequency ONLY
This scanning mode will specifically scan a frequency; usually used when the
signal is weak and has been lost during other type of scanning mode.
LNB Settings
This settings need to follow the instruction from the Satellite’s LNB spec. If
you already have other working device that can receive the signal from the
satellite (i.e. Set-Top Box) you may refer the settings for that device. If you still
have problem with LNB settings, please contact your satellite dish provider for
correct information.
DiSEqC1.2 motor control setting
Compro S500 supports DiSEqC 1.2 version. If you have installed motor that
compatible to DiSEqC, it may aim to different satellite to receive different
satellite’s channels.
11
Page 14
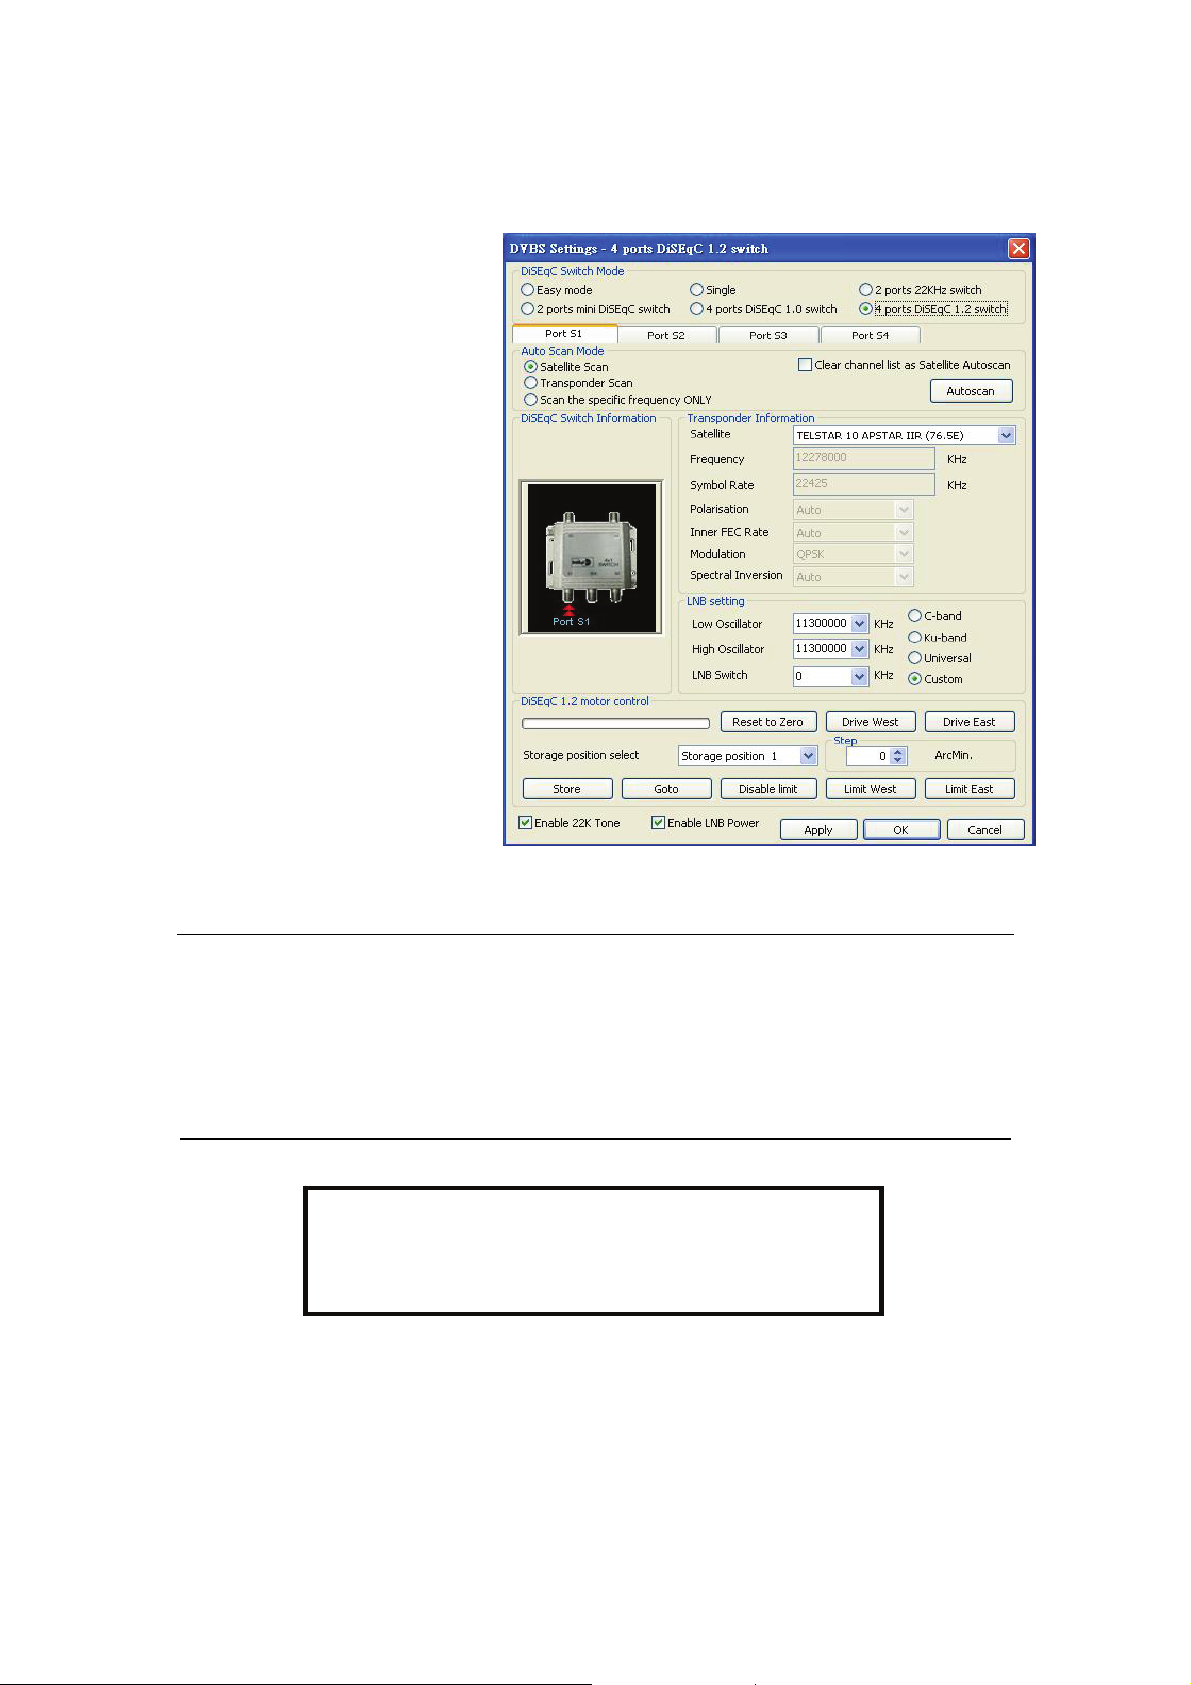
3. 2 ports 22KHz switch / 2 ports mini DiSEqC switch /
4 ports DiSEqC1.0 switch / 4 ports DiSEqC1.2 switch
These four settings are
similar to Single mentioned
above. The difference is
these four settings have
connected the LNB to the
TV Box through a switch.
Please refer to the picture
in each setting to confirm
which switch you are using,
and then continue with the
advance settings.
Each of these mode will
have 2~4 tabs to switch
between different satellites
(i.e. under “4 ports
DiSEqC1.2 switch” will
have Port S1, Port S2, Port
S3, and Port S4 tab)
Note
Compro S500 supports up to 4 ports DiSEqC switch. Before using auto scan,
you may need to confirm the LNB connection and settings are correctly setup.
After channel scanning, ComproDTV will receive the correspondent channels
of the satellite. For information on above settings, please refer to your satellite
installer.
Please always press “Apply” before using
“Autoscan” and “DiSEqC motor control”.
12
Page 15
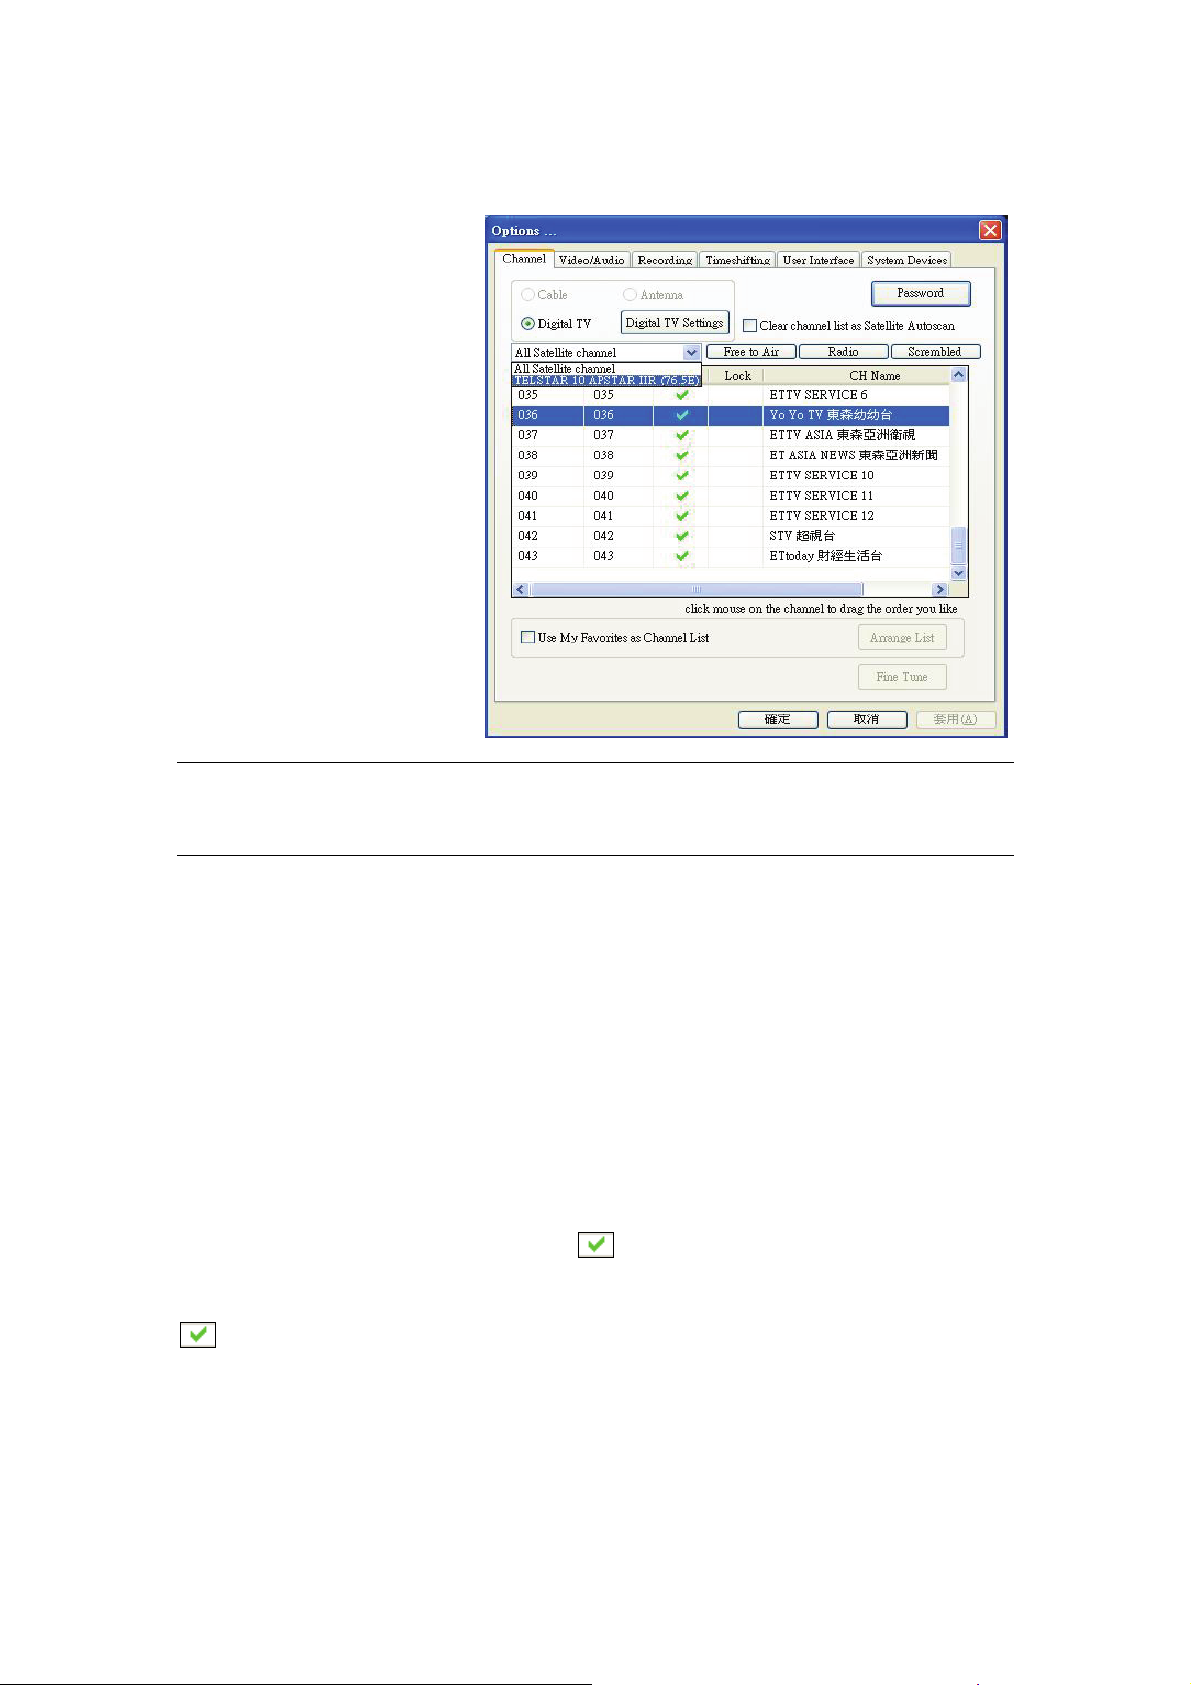
Channel Display
Pull-down list
Select all satellite TV
channels or specific
satellite TV only
Free to Air
Only Free-to-Air channels
Radio
Only radio channels
Scrambled
Only scrambled channels
Note
After one of above selection made, only the selected list will be used by the
channel up/down buttons on the control panel.
Channel Naming
You can customize the channel names by double-click on the Description
field of the channel you wish to rename.
For digital TV channels, you can do more changes on the channel’s property
by right-click the mouse on the Description field of the channel for edit.
Set Mem+
During the Autoscan process, ComproDTV automatically detects and enables
channels with a valid signal. By default, every available channel will be
enabled and marked with the green
list of enabled channels to reduce channel-browsing time. Customize your list
by enabling or disabling channels from the channel list by clicking on the green
icon.
icon. However, you can shorten the
Disabled channels will not be shown when you use the channel Up and Down
or channel surfing functions.
13
Page 16
Set Lock (Parental Control)
By default, ComproDTV lets you access all available channels. A Parental
Control feature allows you to restrict the viewing of certain channels altogether
or during limited times.
You can lock a channel by clicking in the column labeled Lock next to the
channel number you wish to restrict. You will then see a red check mark
in the box next to the channel. You can unlock it by clicking the check
mark. To use this feature, you should first set a password.
Password
There is no default password. If you like to change it, click on the Password
button. Enter the old password in the field labeled Old Password. Then enter
the new password in the field labeled Password and Confirm.
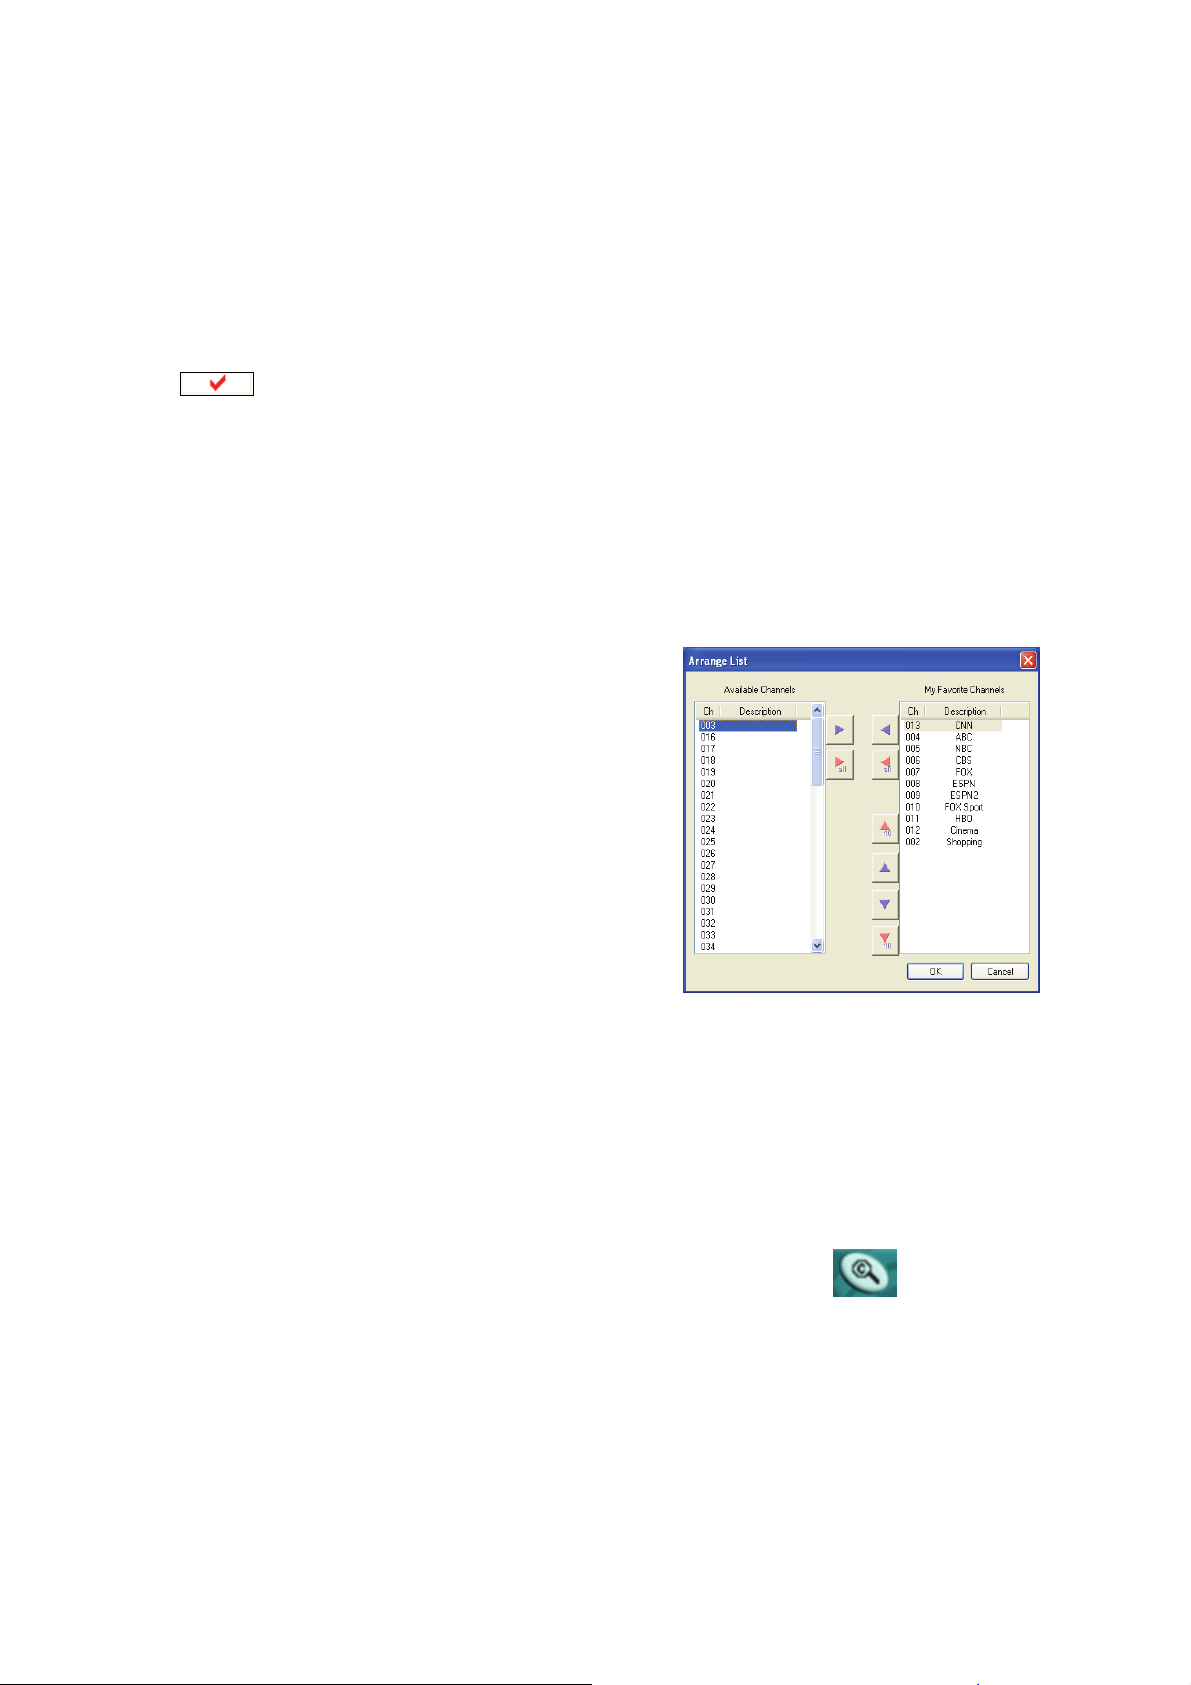
My Favorite Channels List
ComproDTV includes a channels sorting and
re-ordering feature. Check the “Use My
Favorites as My Channel Lists” checkbox.
You can see the window below.
Select the channel you wish to add to “my
favorite” and press the proper arrow button.
You may double-click on the channel to move
it as well. In addition, adjusts the channel
order by using the proper arrow button.
Watching
After installation, just press the ComproDTV button on the remote or double
click the ComproDTV icon on the desktop you will be able to watch TV. Same
as operating a normal TV set. Watch TV programs on your notebook, in
full-screen mode or in a window. Channel up and down. Close ComproDTV
and even shutdown the computer with the full function remote control keypad.
Channel Surfing
While watching TV, you can press the channel surfing button to
multiple channel watching, the channel surfing feature displays a 4x4 grid of
channel images to give you an overview of available programming.
Right-Click Mouse Menu
If using mouse to right-click on the TV screen, you can see a menu pop up.
There are many useful options for your convenience.
14
Page 17
Zooming image
If you would like to see more details on a certain part of a video image, you can
press the mouse right button to drag a zone of the screen. You will see the
zoomed image.
Also you can press the mouse right button and move on the screen to shift the
zoomed area of the image. Just click the mouse left button to resume normal
mode.
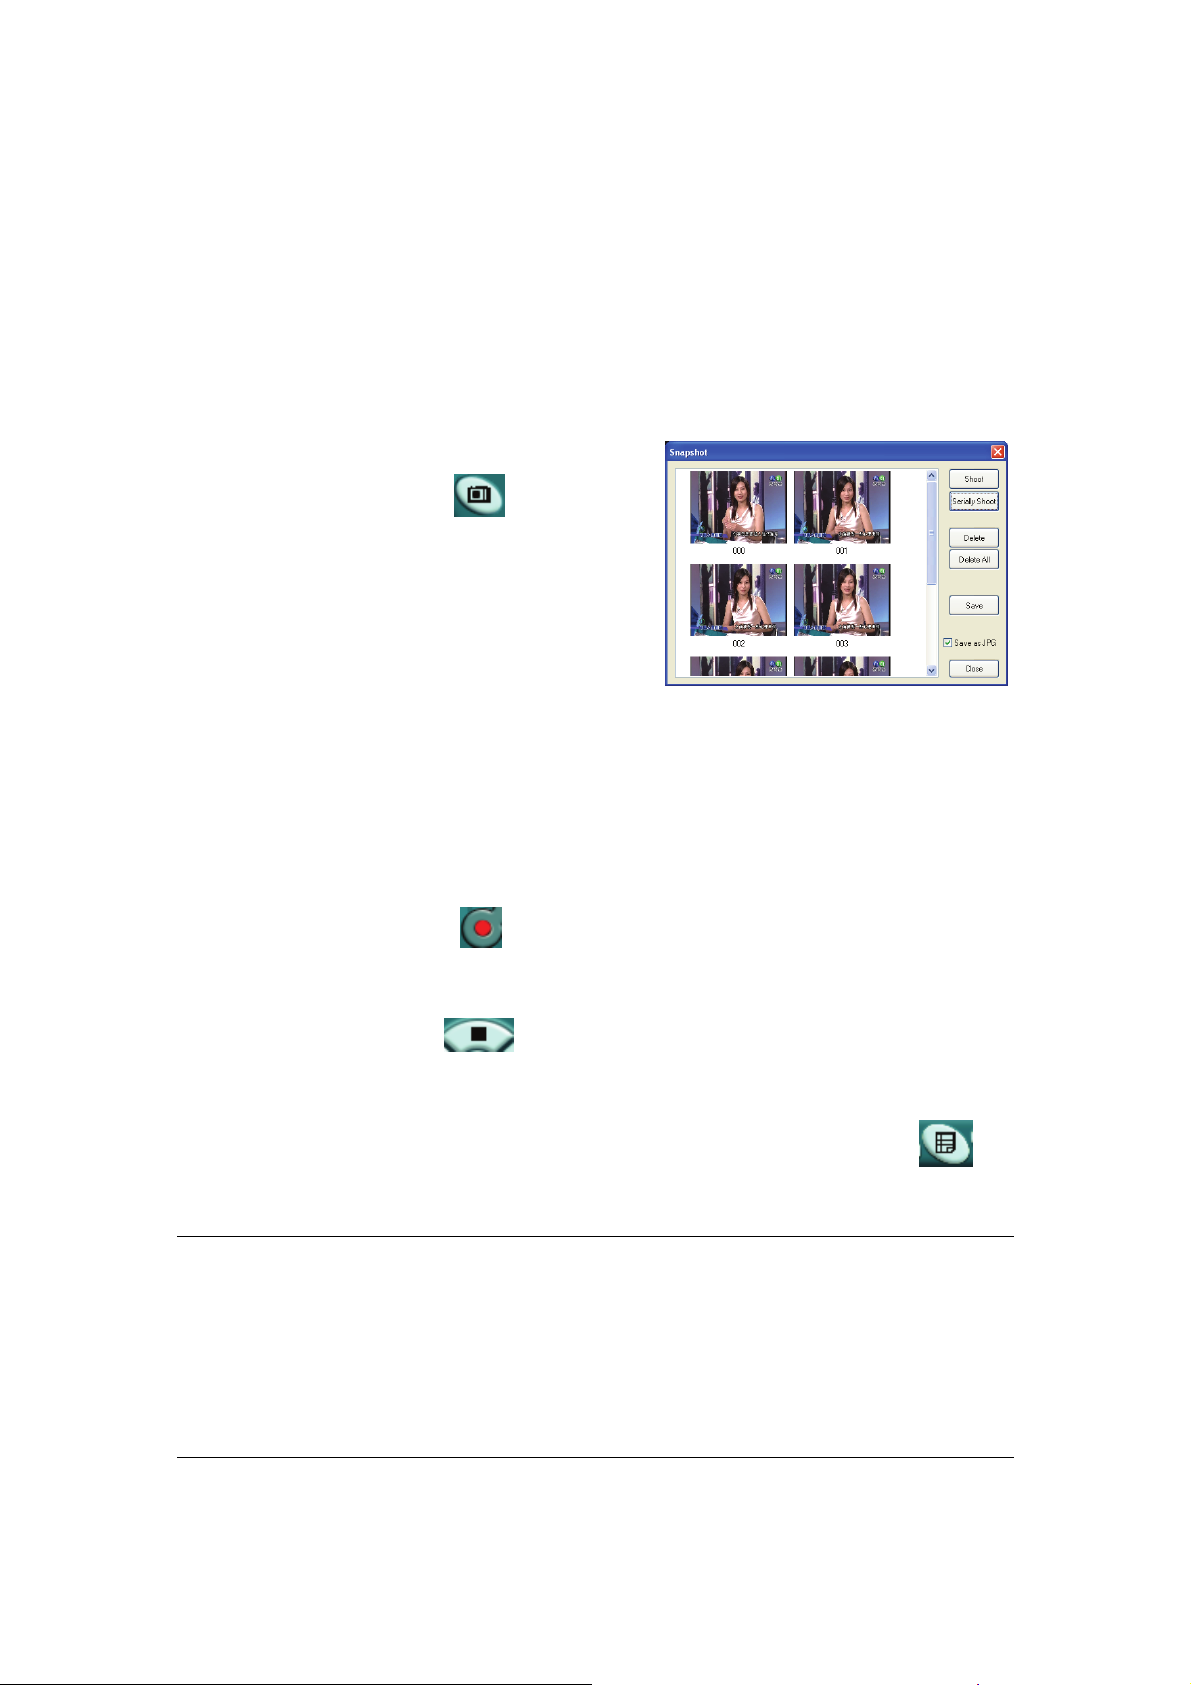
Still Image Capture
Click on the capture icon on the
control panel or hit the "Space Bar" of the
keyboard shortcut to capture an image of
the display window. You can see the screen
capture dialog as below.
Recording
ComproDTV is a digital video recorder and save the digital TV program to
MPEG-2 and TS (Transport Stream) format to your hard disk.
To instantly start recording:
Press the Record button . ComproDTV starts recording the video source
currently showing in the display window. It will save it to a file on your disk.
Press the Stop button to stop recording. ComproDTV will save it
automatically and show the file name on the screen.
You can also use the schedule recording by press Schedule button
control panel of ComproDTV.
on
Note
The default folder of recorded file is on “My Document”, you can change to
another folder by entering the Options of ComproDTV.
Digital TV program is a fixed MPEG-II file format from TV station. ComproDTV
will directly save them into your hard disk and can’t transfer them to another
format.
15
Page 18

Playback
Press the Play button to open the Play dialog box.
Timeshifting
Timeshifting temporarily saves the video to your hard disk for a specified
period of time so that you can pause, replay, or skip commercials during live TV,
without interrupting an ongoing recording session.
Press the Timeshifting button and the Time Monitoring bar will appear.
You may also press the Advance (for commercial skip) and Replay (for instant
replay) buttons on the control panel or remote control to navigate through the
program. When you return to your seat, you can resume viewing the program
from the point when you left.
PIP/POP (Picture In/Out Picture) mode
Usually, digital TV station broadcasts multiple programs on one frequency.
Therefore, ComproDTV supports up to four windows watching additional TV
program of same frequency on another window if available. You can press the
Add Window
illustration.
Main window has all features while sub window has limited functions only.
Double-click on the sub window can switch the TV program to the main window.
button to open a sub window for that. Please see the following
Double-click on the sub window can switch the
TV program to the main window.
16
Page 19
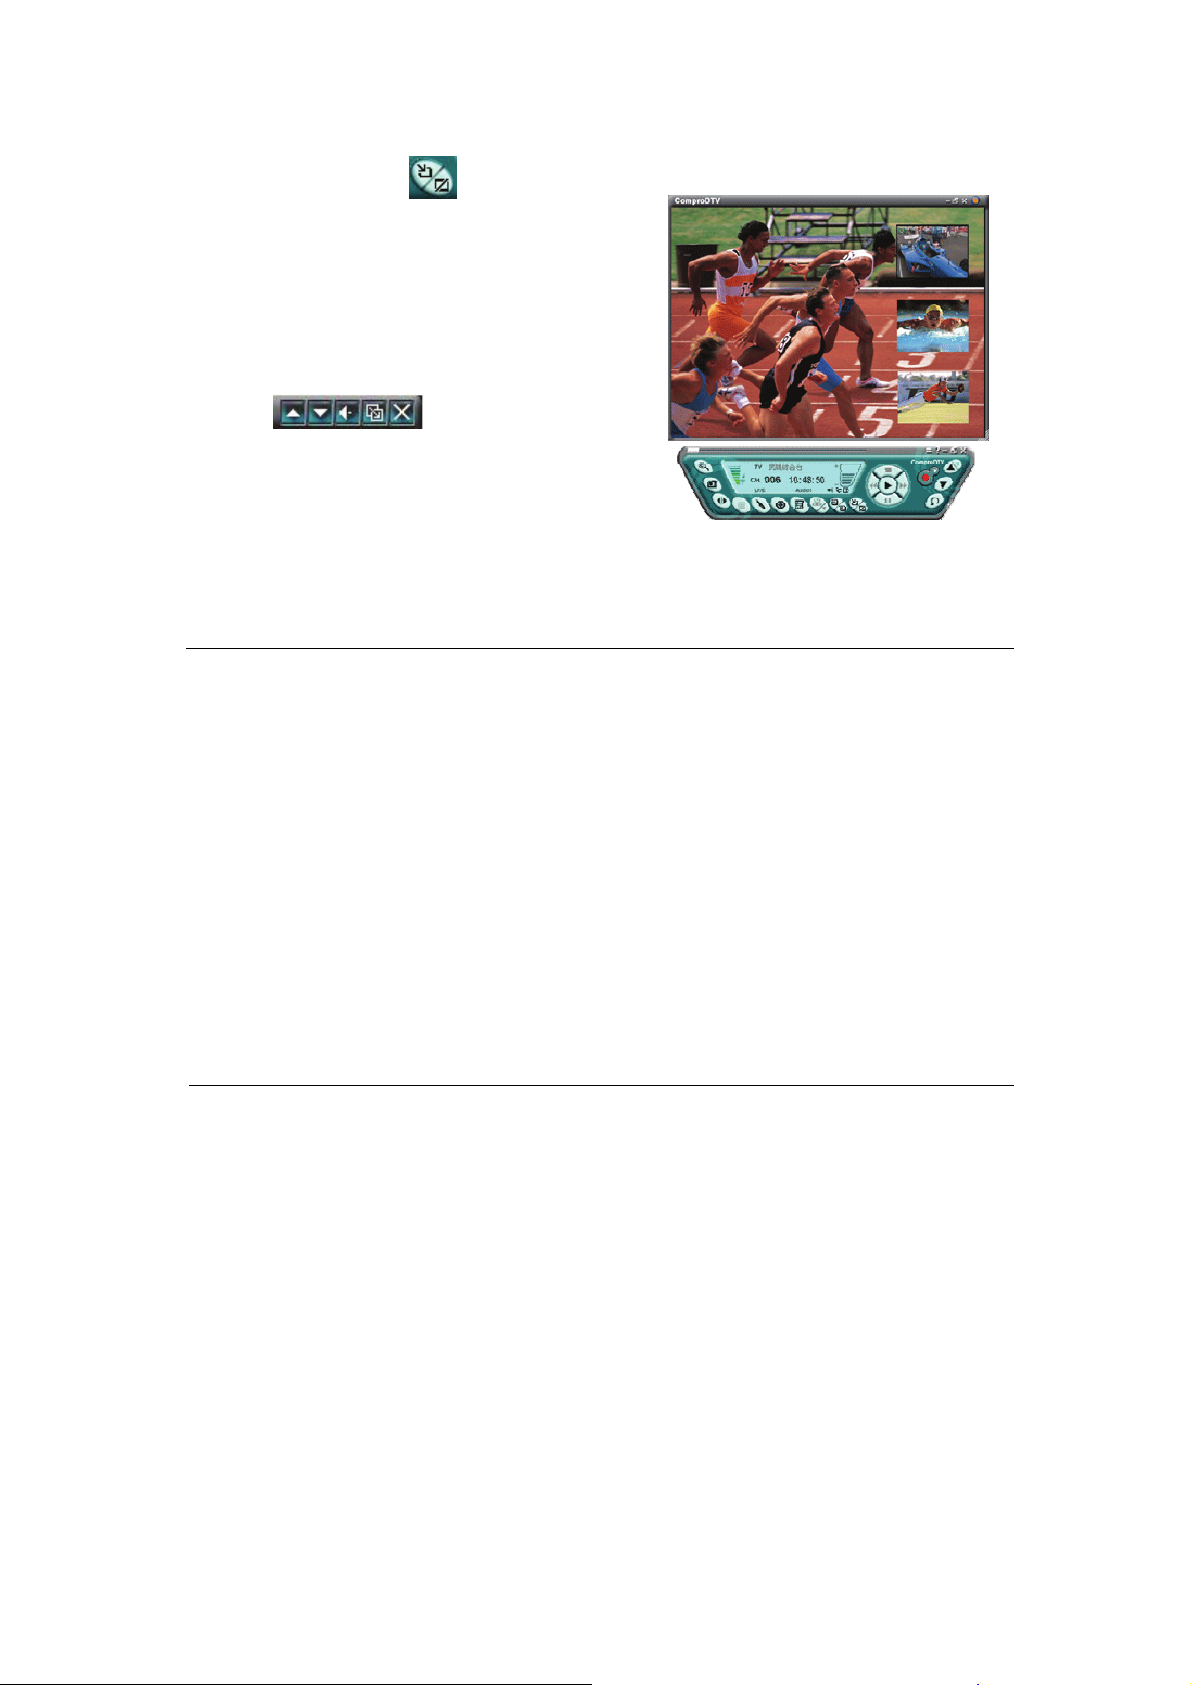
Alignment Window button will put
sub window(s) into main window which is
convenient for you to watch multiple
programs on full screen mode.
The buttons on the upper-left corner sub
window
Channel Down, Mute, Windows Alignment,
and Close respectively. Sub window can be
resized by mouse dragging lower-left corner
to any ratio.
are Channel Up,
Note
Running additional windows consumes more CPU usage. If CPU usage
reaches 100%, then video lag will occur. Please reduce the number of
windows.
When main window changes the channel to another frequency, sub window(s)
will move to available programs of another frequency. The sub window will
show black if there is no additional program on this frequency.
Sub window has no full screen mode. Please double-click on sub window to
switch program with main window in order to do so.
It is available to hear audio on multiple programs at the same time. You can
mute or un-mute the sound of sub window(s) at any time. However, main
window audio can’t be muted separately from sub window(s).
Video Desktop
ComproDTV provides the new feature of Video Desktop, you can click right
mouse button on the TV screen to open the dialog box and choose the Video
Desktop mode. And you can set your TV watching screen as the live wallpaper;
it’s more convenient to watch TV and using other application on your Windows’
desktop. It also supports PIP feature to watch TV and playback recorded video
file at the same time.
17
Page 20
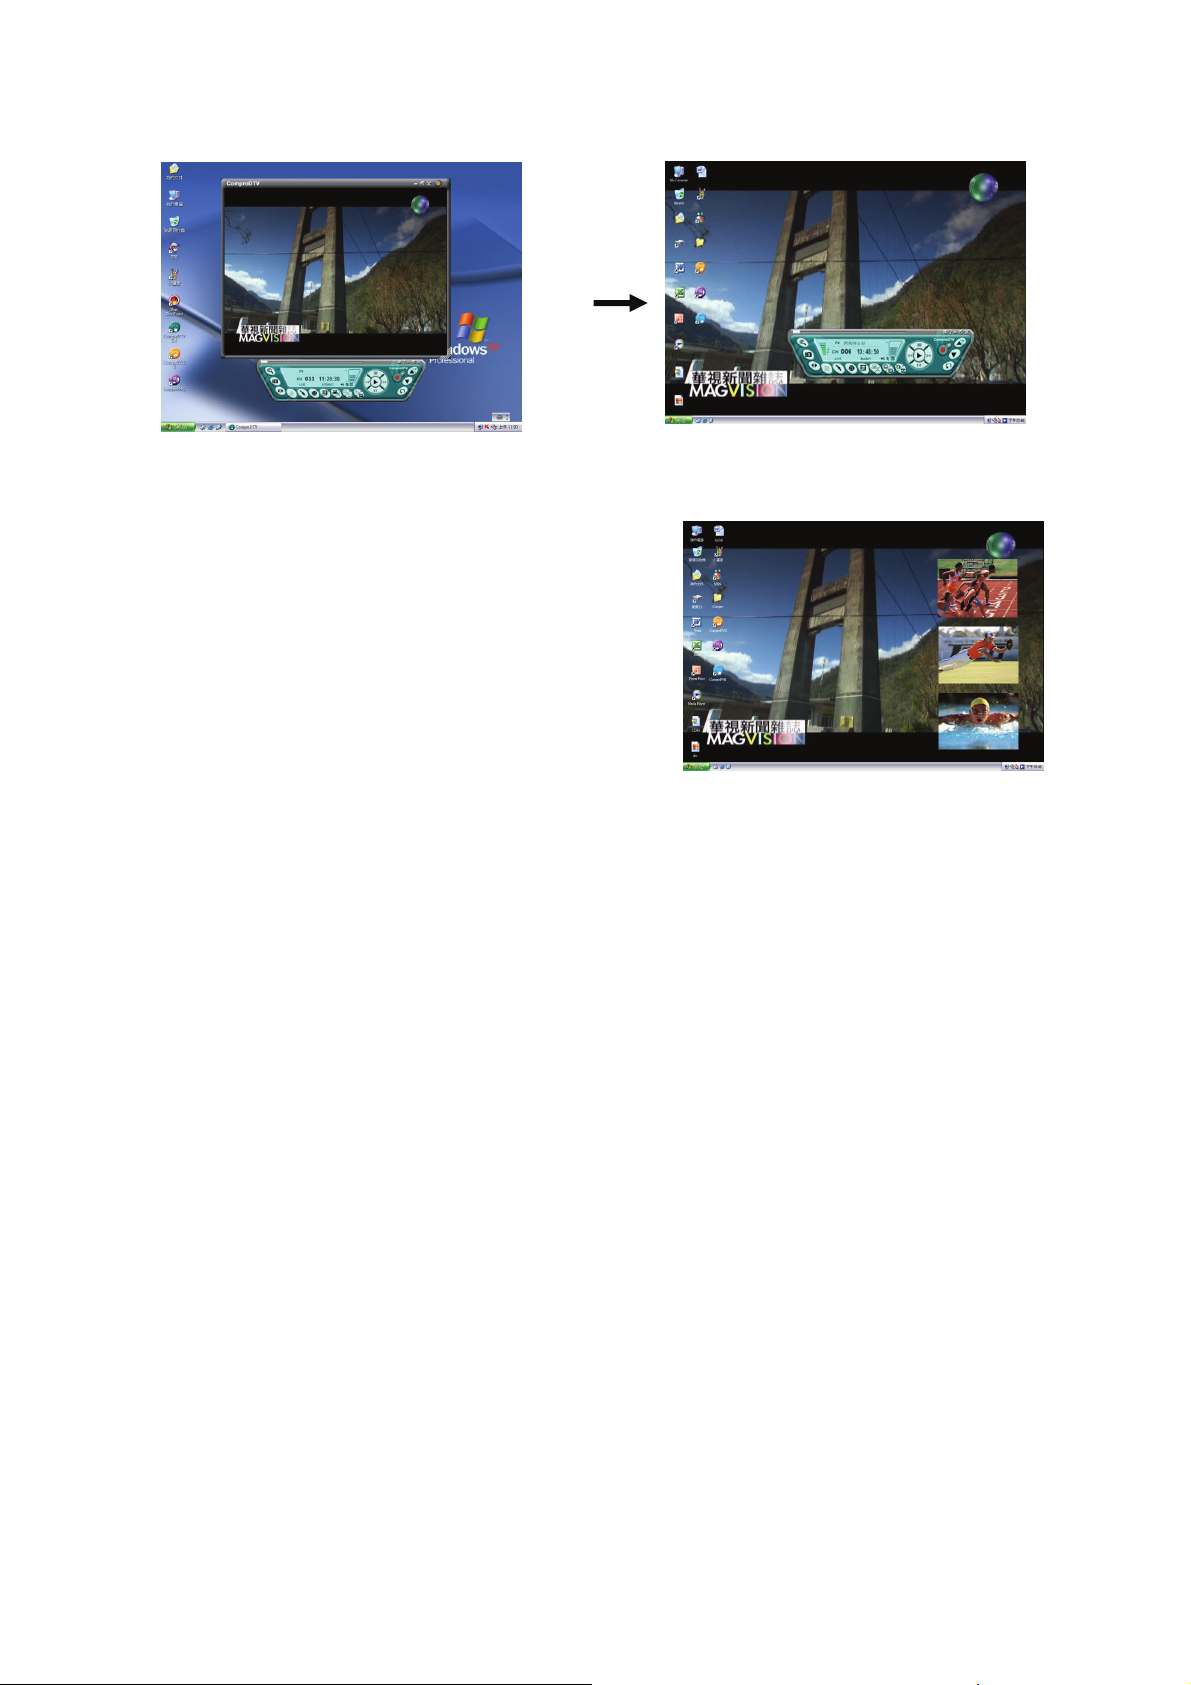
Click the right button of mouse on TV display window to
The Video Desktop feature also support
Picture in Picture feature, and you still can do
“Stop”, “Pause”, “Forward”, “Backward”,
“Mute”, “Snapshot”, “Windows Alignment”
and “Channel Up/Down” on the sub window.
open dialog box, then choose “Video Desktop”
18
Page 21
ComproDVD 2
Introduction
Stability, simplicity, and superiority. ComproDVD epitomizes these traits to
the maximum and gives users all they wish for in a DVD player.
Note
This section provides basic information for ComproDVD. For more details,
please check the help file of ComproDVD or the manual in the installation CD.
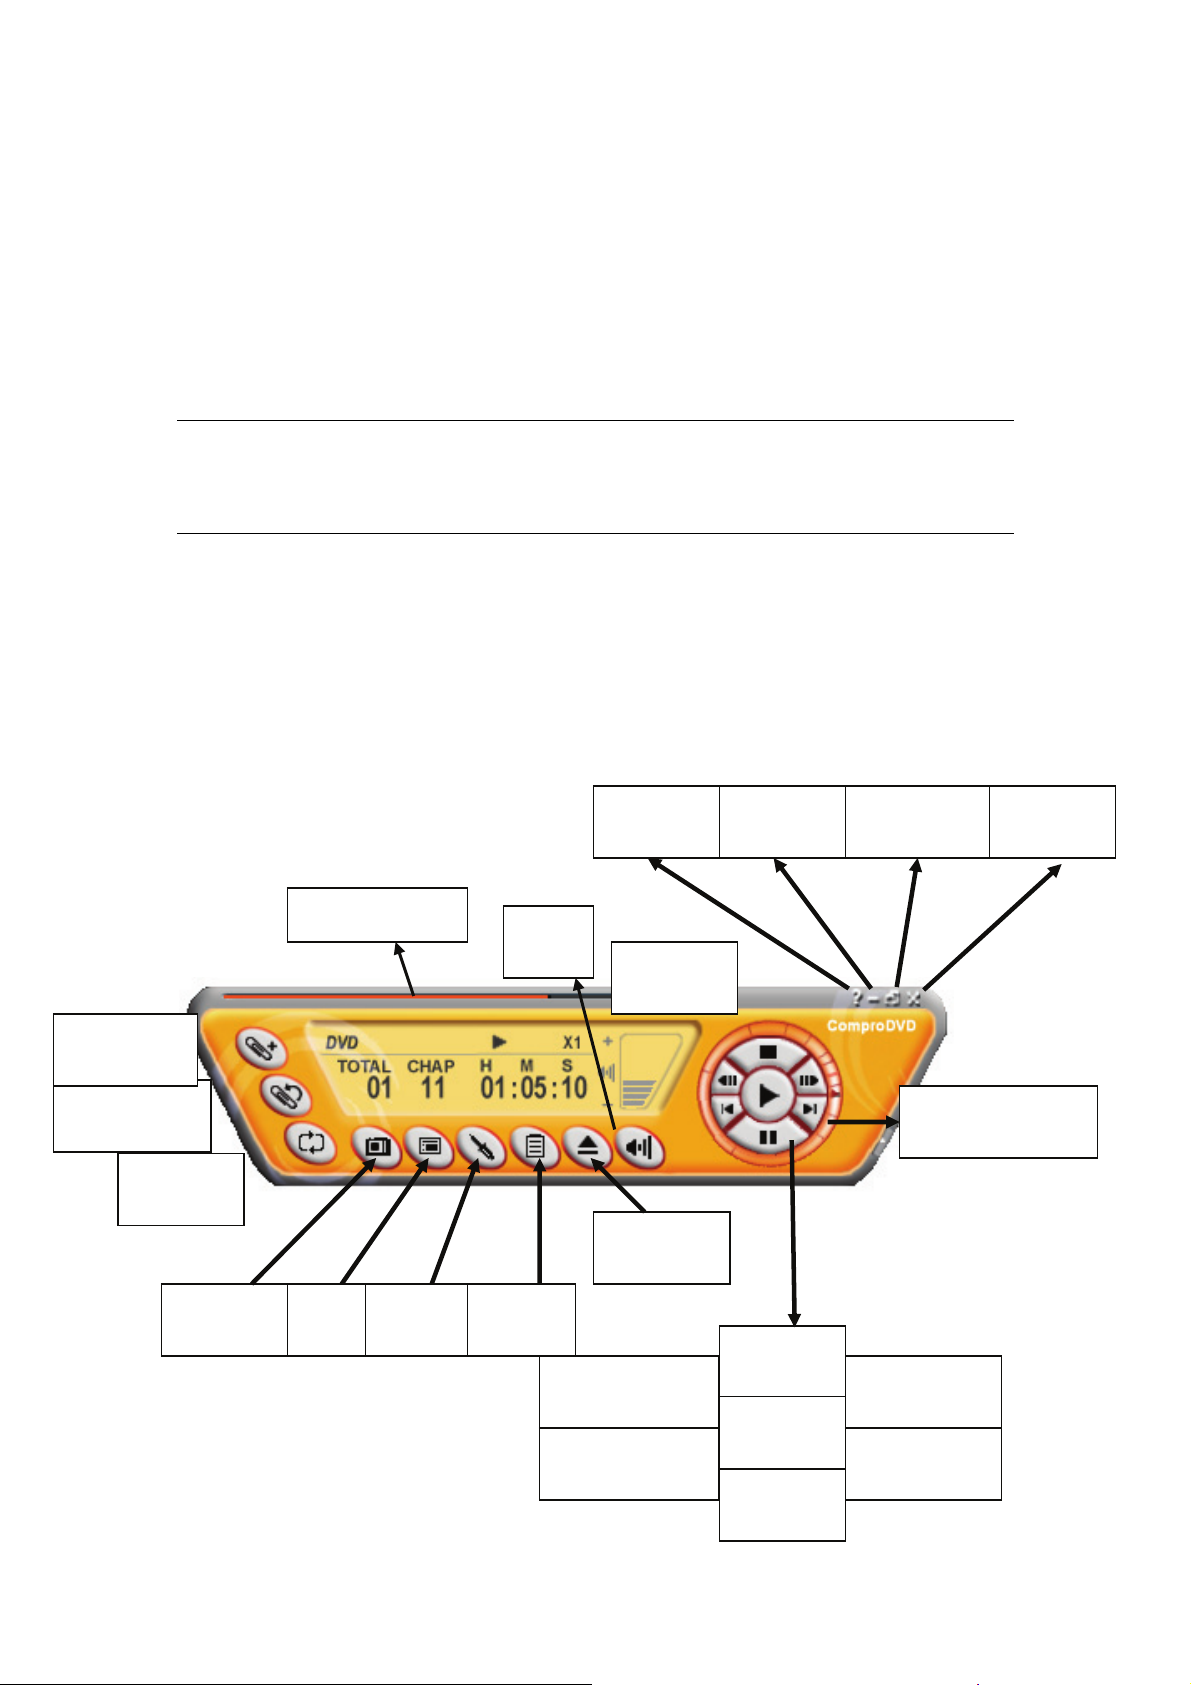
Control Panel
The following describe the ComproDVD control panel functions, and tips for
using ComproDVD. The following figure gives you the function of the button
with (Hot Key.)
Add Bookmark
(F6)
Go to Bookmark
(F5)
Repeat
(R)
Snapshot
(G)
Progress bar
Menu
(M)
Options
(E)
Mute
(M)
Media
Source
Help
(H)
Volume
(+, -)
Eject
(CTRL+E)
Step backward
( / )
Last chapter
( P )
Minimize
(CTRL+N)
Stop
(S)
Play
(Enter)
Pause
(Space)
Full Screen
(W)
Shuttle search
Controls
Step forward
( . )
Next chapter
( N )
Close
(CTRL+X)
19
Page 22
Troubleshooting
OS requirement
VideoMate S500 has to work on Windows XP SP 2 and Vista 32 bit (not
support 64 bit version of XP and Vista system). You are welcome to
www.WindowsUpdate.com website for the Service Pack update of Microsoft.
Driver Installation
The most common cause of problems with the TV Tuner Box is incorrect
installation of the TV capture and TV tuner drivers. If you have problems
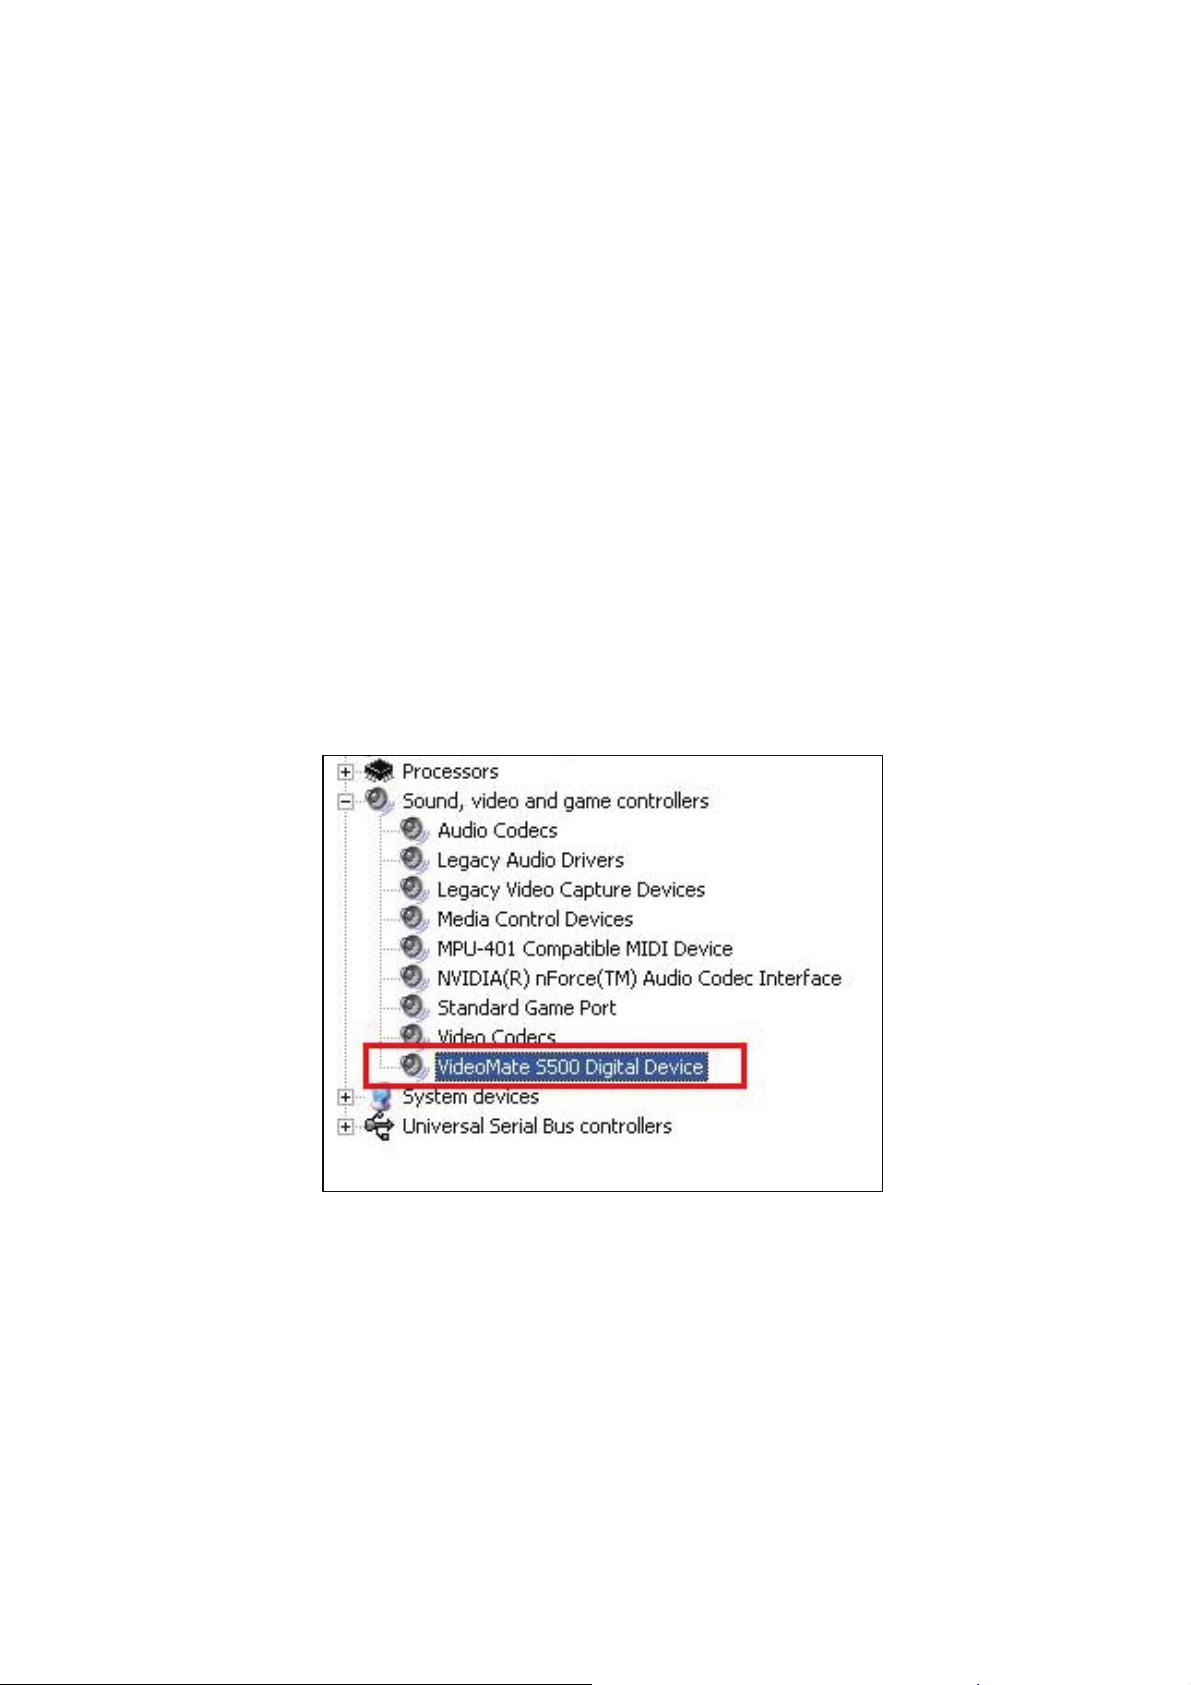
watching, recording, or timeshifting live TV, please check the status of the
drivers with Device Manager.
You should see "VideoMate S500 Digital Device", in the "Sound, video and
game controllers" section of Windows Device Manager.
If these drivers are not there, uninstalling and reinstalling the VideoMate S500
USB 2.0 Box drivers can help. Use the Add/Remove Programs Control Panel
applet to uninstall the drivers. Reinstalling the drivers should fix this problem.
20
Page 23

The recorded file from VCR has no sound?
Please plug VCR Composite video cable (yellow) into TV Box yellow connector.
Composite Audio needs to connect to the
Line-In port of your sound Box. You have to
buy a converter (see the right) to transfer
Composite Audio cable (red one and white
one) into stereo. Choose Line-In to be your
Recording Mixer in the Device System in
Settings of ComrpoDTV.
How can I record as a different video format?
Digital program is a fixed MPEG-II format file already. ComproDTV can’t
change it and will save it into hard disk directly. Only analog video from
composite or s-video input connect can be software encode to your choice of
video format. You can do that in the record tab in settings of ComproDTV 2.
Why does the remote control fail?
The remote control sensor, which is plugged into the TV Box, may be loose.
Please unplug it and plug it in again. You should also check the batteries of the
remote control. Do not use rechargeable batteries.
Verify that the IR icon (ComproRemote) is in the system tray on the
lower-right corner of the screen. If you don't have ComproRemote on the
system tray, start the following program:
C:\Program Files\ Common Files\VideoMate\ComproRemoteDTV.exe
Then you should see the icon on the system tray. The IR icon should turn
bright when you press buttons on the remote.
If you see no response, please move your mouse cursor on the IR icon. If you
see it shows “No Device,” your drivers may not be not properly installed.
Please remove ComproDTV using "Add/Remove programs" in the Control
Panel and reinstall it.
Some devices may emit the IR signals. Please check if there are any
microwaves or lights that may be doing this. And make sure as few cables as
possible are crossing the IR receiver.
21
Page 24

Contacting Compro Technical Support
Before you submit an email for support, please check support FAQs on our
web site. http://www.comprousa.com/support
You can download the latest update from our website. Many issues should be
solved on the newer version. When contacting Compro for technical support,
please use the Compro support request form and provide as much of the
requested information as possible. Please write the details in order to
determine the problem. And also provide the product serial number (15 digits
numbers) on the USB 2.0 Box. Please use the form from below or email to
[email protected].
http://www.comprousa.com/support/form.htm
Note
Make sure you include the information of hitting the button of "E-mail Info" in
the Device Settings in Settings of ComproDTV in order to determine the
problem. In order to solve the problem quickly, it is very important to provide
as much detail as possible.
22
P/N: 3GA0310318
 Loading...