

Page 1

VideoMate IP50/50W
Network Camera
Installation Guide
Compro Technology, Inc.
www.comprousa.com
Page 2

2
Table of Contents
IP50 / 50W Network Camera Hardware Layout ............................................ 3
Assembly and Disassembly ........................................................................ 4
Mounting: ....................................................................................................... 5
Cable Connections: ...................................................................................... 5
Wireless Connection .................................................................................... 6
IP50(W) Digital I/O Connector Block .......................................................... 6
Software Installation ........................................................................................ 8
Using the IP Camera ...................................................................................... 16
Web Browser Access (Internet Explorer) ................................................ 17
The Internet Setting .................................................................................... 20
Access the IP Camera via 3GPP Mobile Phone: ..................................... 21
Start ComproView: ...................................................................................... 22
Manual Installation ...................................................................................... 25
Client for Windows Mobile 5/6 Mobile Phone: ........................................ 28
Resetting to the Factory Default Setting .................................................... 31
Copyright © 2001-2009. Compro Technology, Inc. No part of this document may be copied or
reproduced in any form or by any means without the prior written consent of Compro Technology,
Inc.
Compro, VideoMate, Poladyne, Play with Power, and the Compro logo are
trademarks of Compro Technology, Inc. Other names and marks are trademarks
of their respective owners.
COMPRO makes no warranties with respect to this documentation and disclaims
any implied warranties of merchantability, quality, or fitness for any particular
purpose. The information in this document is subject to change without notice.
COMPRO reserves the right to make revisions to this publication without
obligation to notify any person or entity of any such changes.
Compro Technology, Inc. www.comprousa.com
Tel. +886 2 2918 0169, Fax +886 2 2915 2389
4/F, No.12, Alley 6, Lane 45, Pao Shin Road Hsintein City, Taipei, Taiwan.
Page 3
3
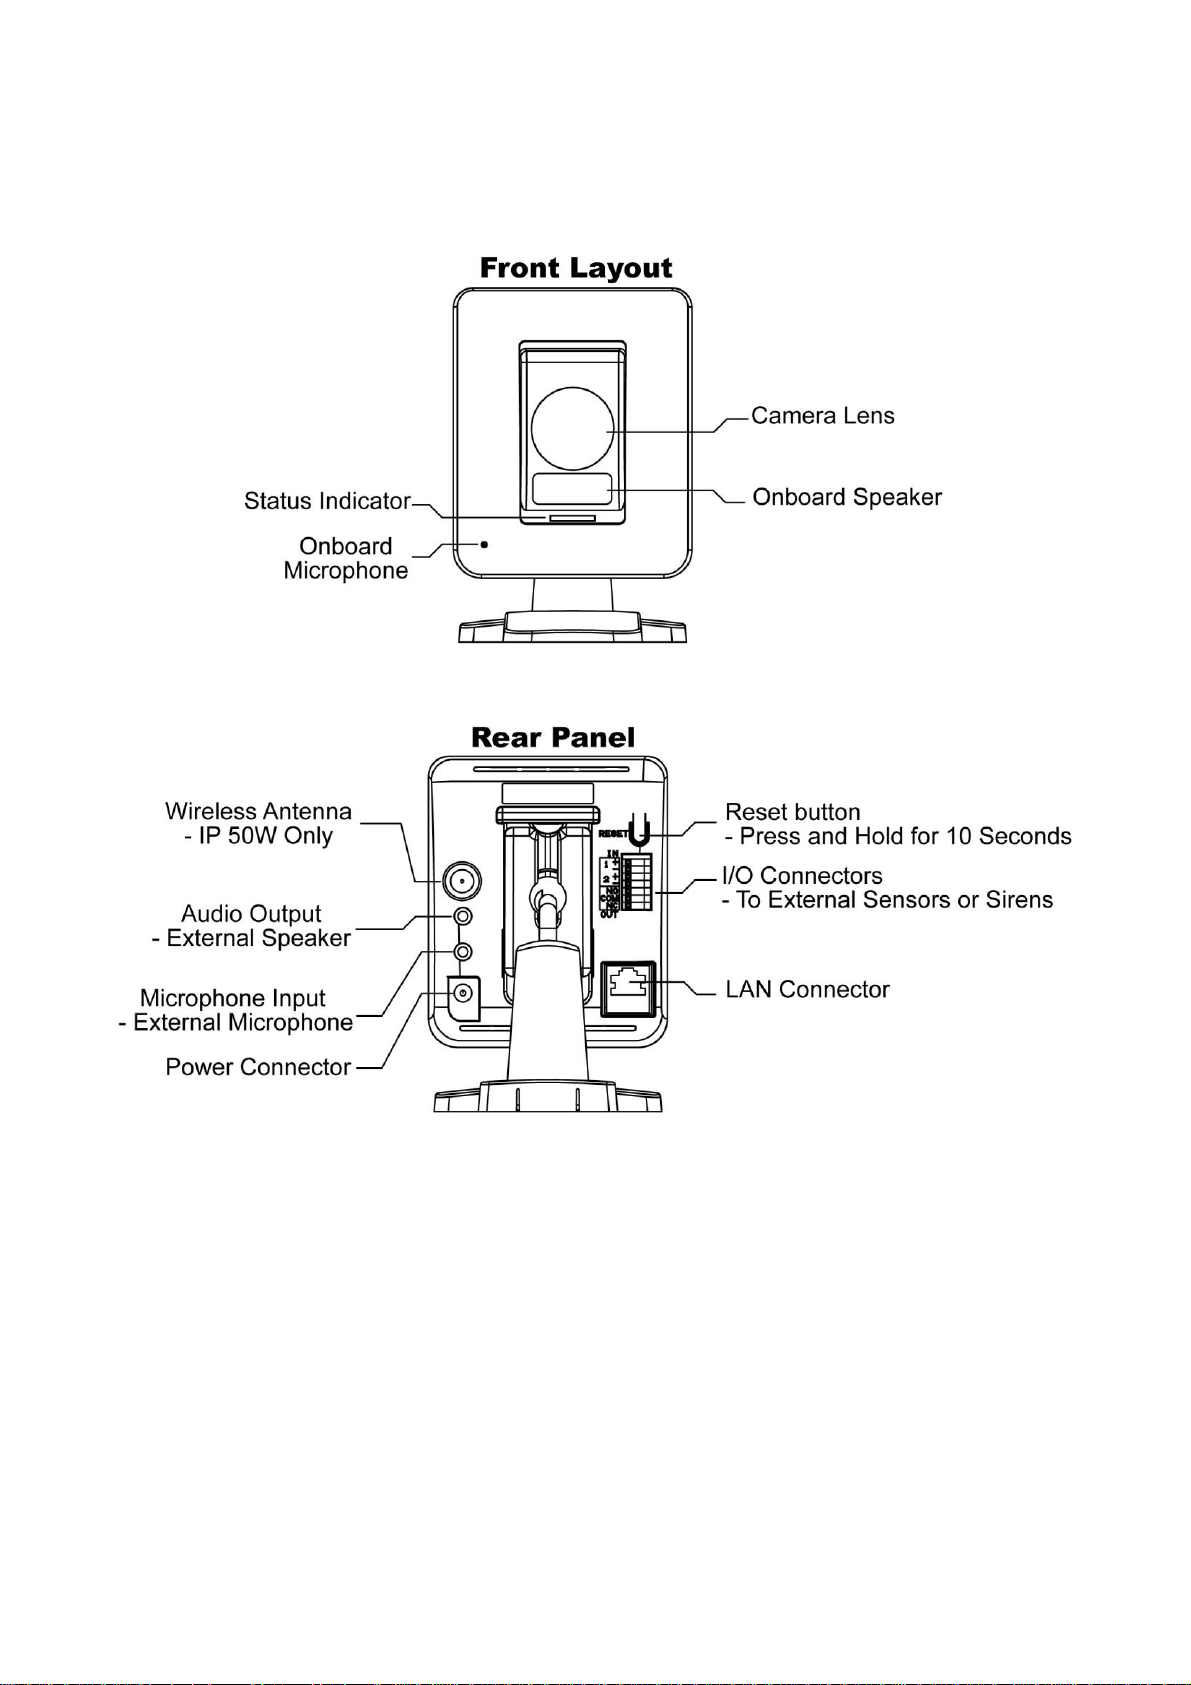
IP50 / 50W Network Camera Hardware Layout
Package Contents:
* Quick setup guide with software CD (ComproView Manual)
* Bracket
* DC adapter AC100V-240V in / DC12V
* Screws for ceiling mount
* LAN cable
* Wireless antenna (IP50W only)
Page 4
4
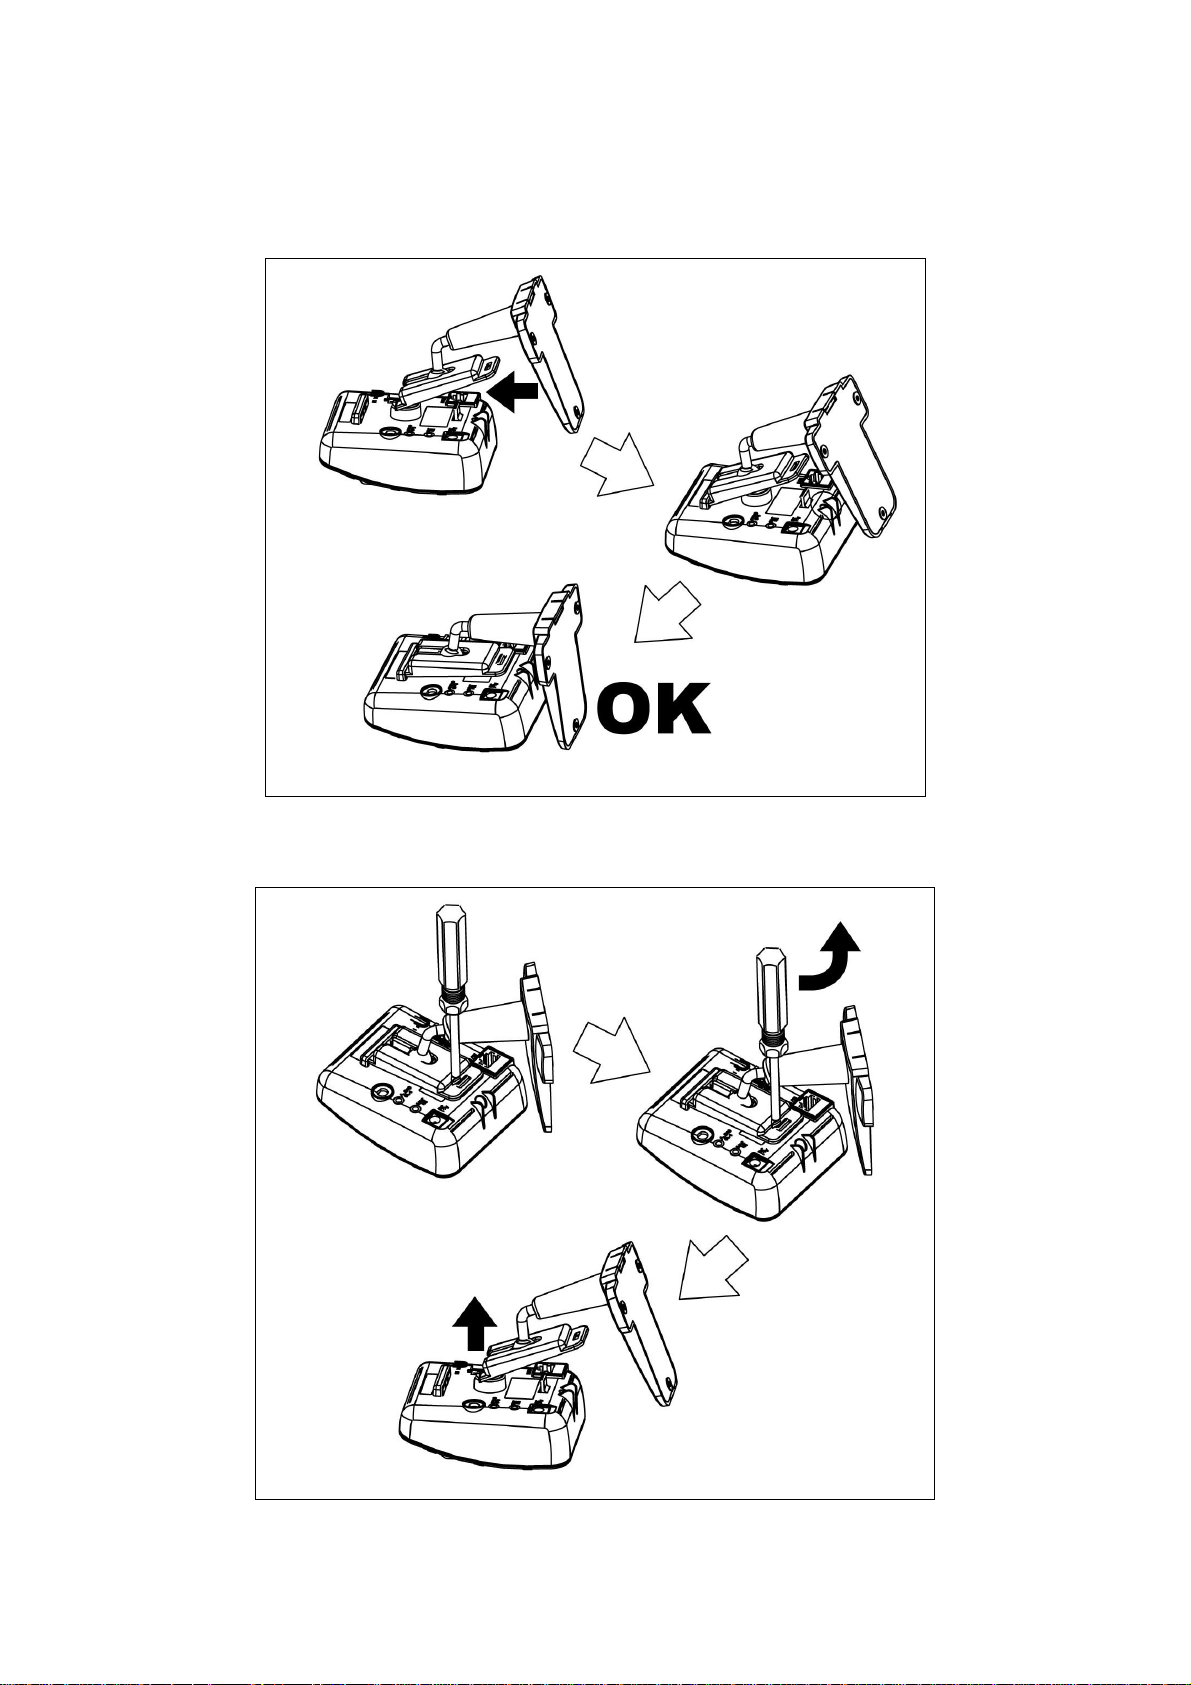
Assembly and Disassembly
Assembly
Disassembly
Page 5
5
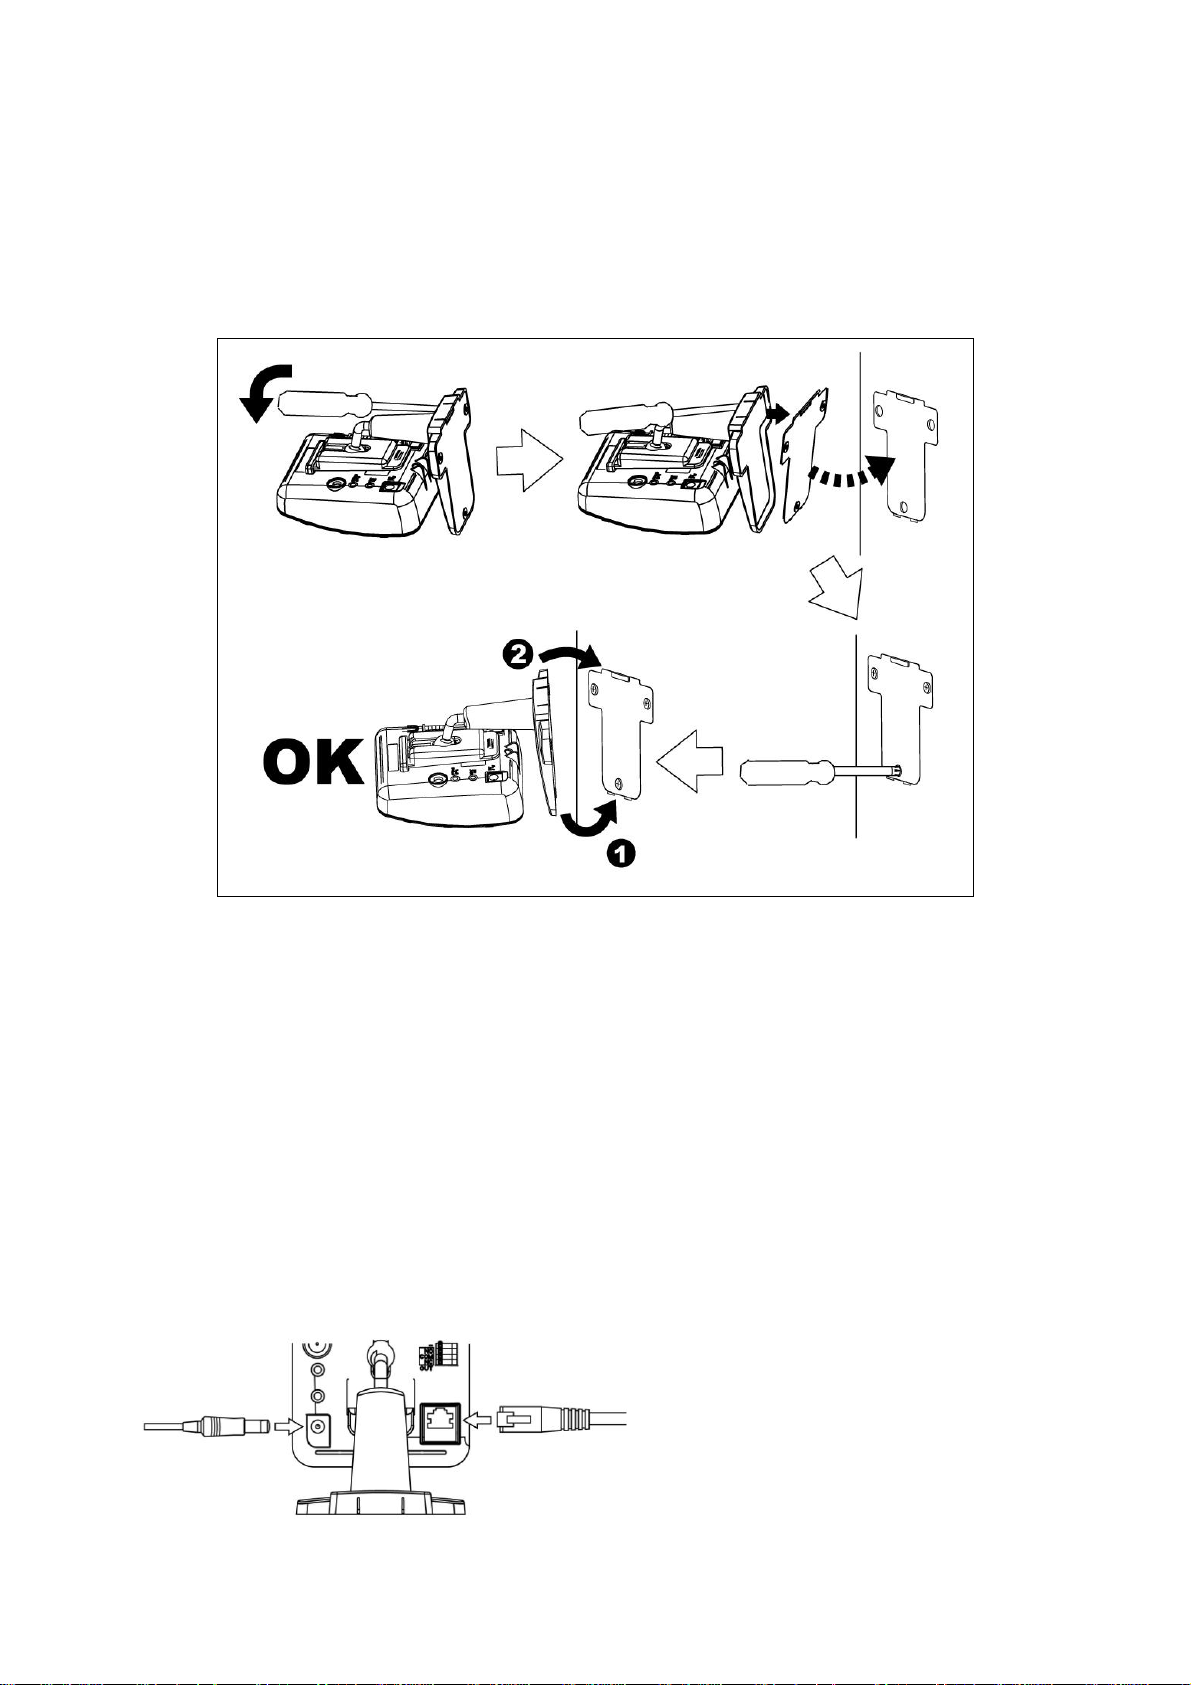
Mounting:
If user wants to set IP50 on the wall, please use the screws to fix the
bracket on the flat surface. After the bracket is fixed on the wall,
please try to adjust the angle to the desire position.
Cable Connections:
If user connects the IP camera on the intranet, then the same group
of user can share that IP camera to use.
1. Plug in the power adapter to camera.
2. Use the standard RJ-45 network cable to connect with the Compro
IP 50(W).
Important!
If the power cable (IP50W) and the network cable (IP50) are not
securely fastened, it could lead to unstable connection.
Page 6

6
Wireless Connection (IP50W only):
On the IP50W model, you also have the option of using the wireless
connection method. Please keep in mind that you can only have one
active connection only, via LAN or wireless.
If user connects the IP camera on the intranet, then the same group
of user can share that IP camera to use. Please ensure that the
wireless antenna had been securely fastened, otherwise it could lead
to unstable connection.
Important!
1. The operation of the IP50W wireless network may be interfered
should there be other 2.4GHz devices working in the vicinity, e.g.
microwave oven, digital cordless camera, etc. You may experience
slow frame rate or drops in connection; up on such situation, we
suggest that you try to move the IP camera around the area or try
to shut off other appliances.
2. Since wireless cameras cause interferences during transmission,
you may encounter erratic behaviors when there are more than
10x operating in close proximity.
3. The default wireless connection method is via 802.11g standard
and you should experience a stable connection of up to 20 meters
between the access point and the camera unit. Your wireless
performance may vary depending on the operating environment,
building material, etc.
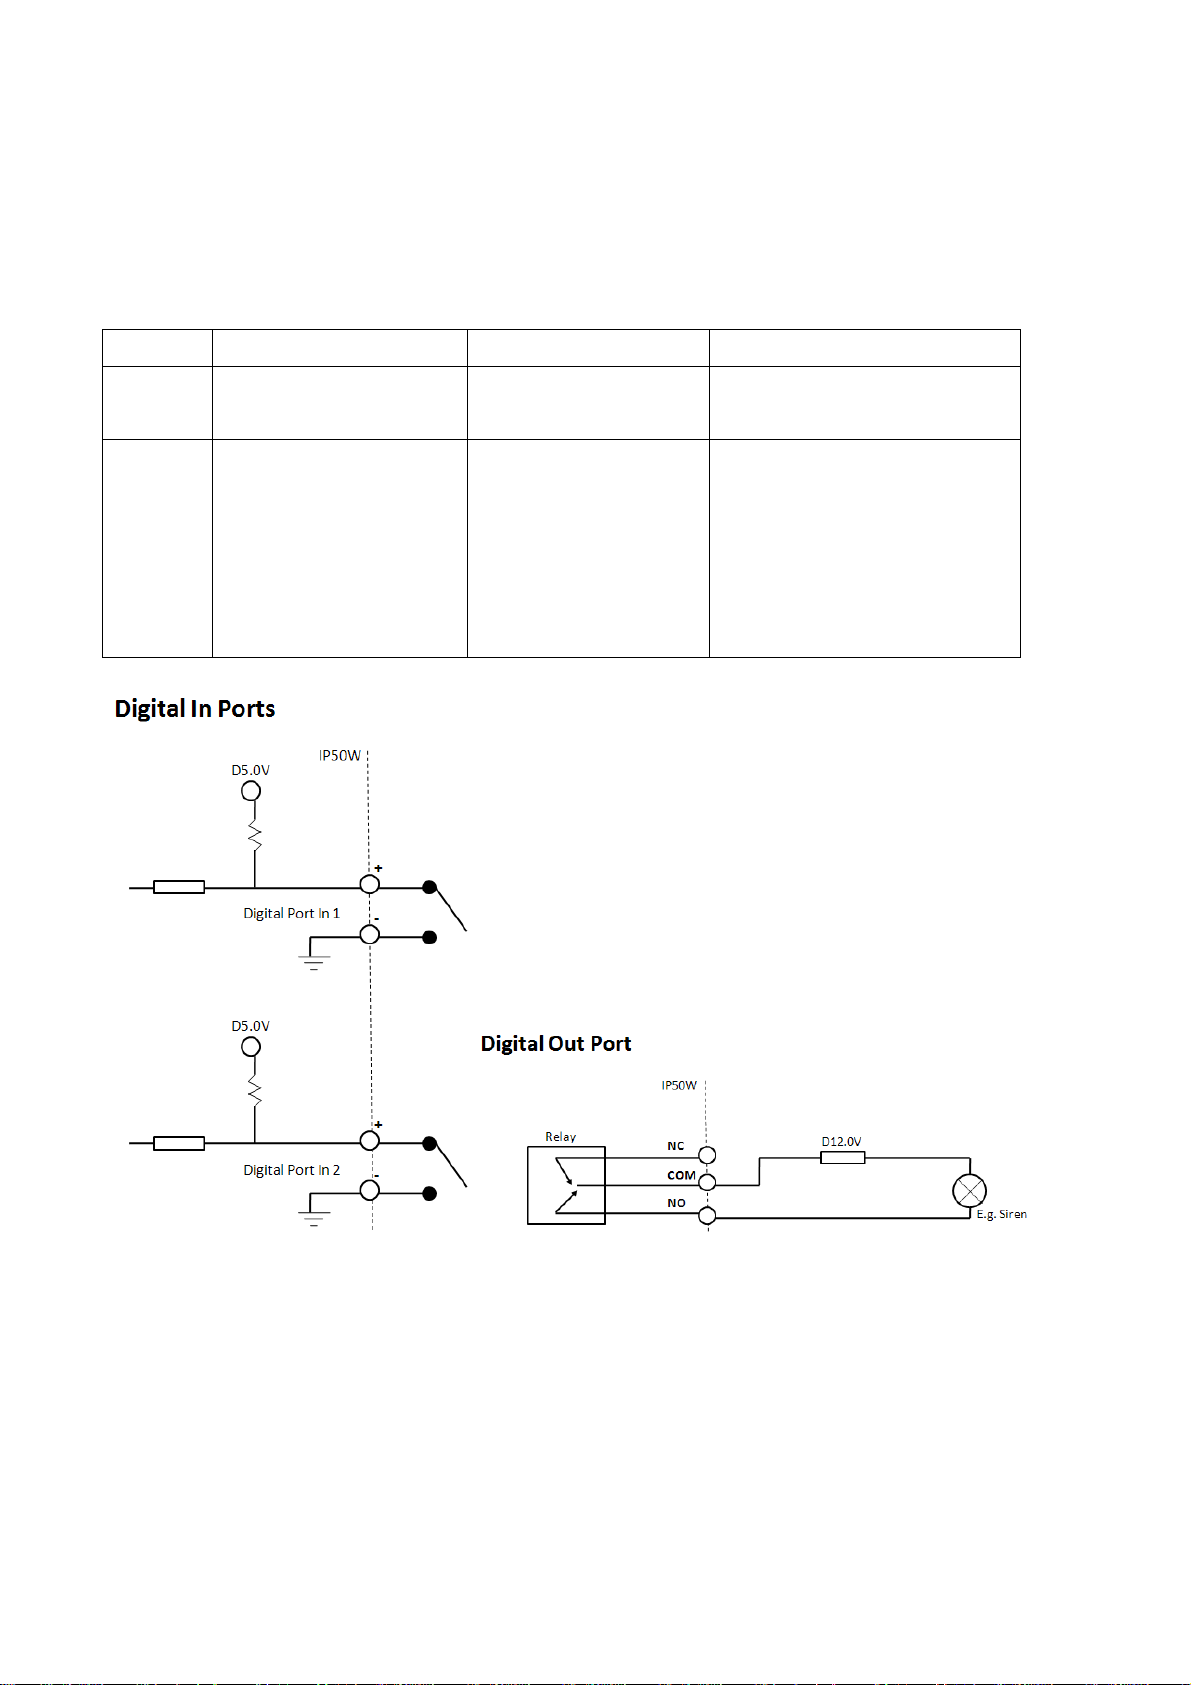
IP50(W) Digital I/O Connector Block
The I/O connector on the back of the IP50W provides a central
interface between your home security system and various output
devices.
The two digital inputs are normally used with security sensors, e.g.
passive infrared sensor (PIR), smoke detector, door/window open
sensor, etc. This input works by detecting a change in the state, open
Page 7
7
and closed circuit. You can check the status of the circuit by going to
Pin
Name
Specification
Note
1 – 4
Digital Input
Ports 1 & 2
Max 5VDC,
60mA
Floating, TTL
5 - 7
Digital Output
Port
Max 24VDC, 1A
or
Max 125VAC,
1A
You can only use
either the normally
open (NO) or
normally closed
(NC) at any given
time.
the Setup > Event Set > I/O Status.
The output port is normally used to trigger external audio or visual
indicators, e.g. sirens or strobe lights, etc.
Note: The above output scenario is where the siren will only sound
when it the input had been triggered. Should you wish to use the
other way where the output device is always on when it had not been
triggered, please use NC.
Page 8
8
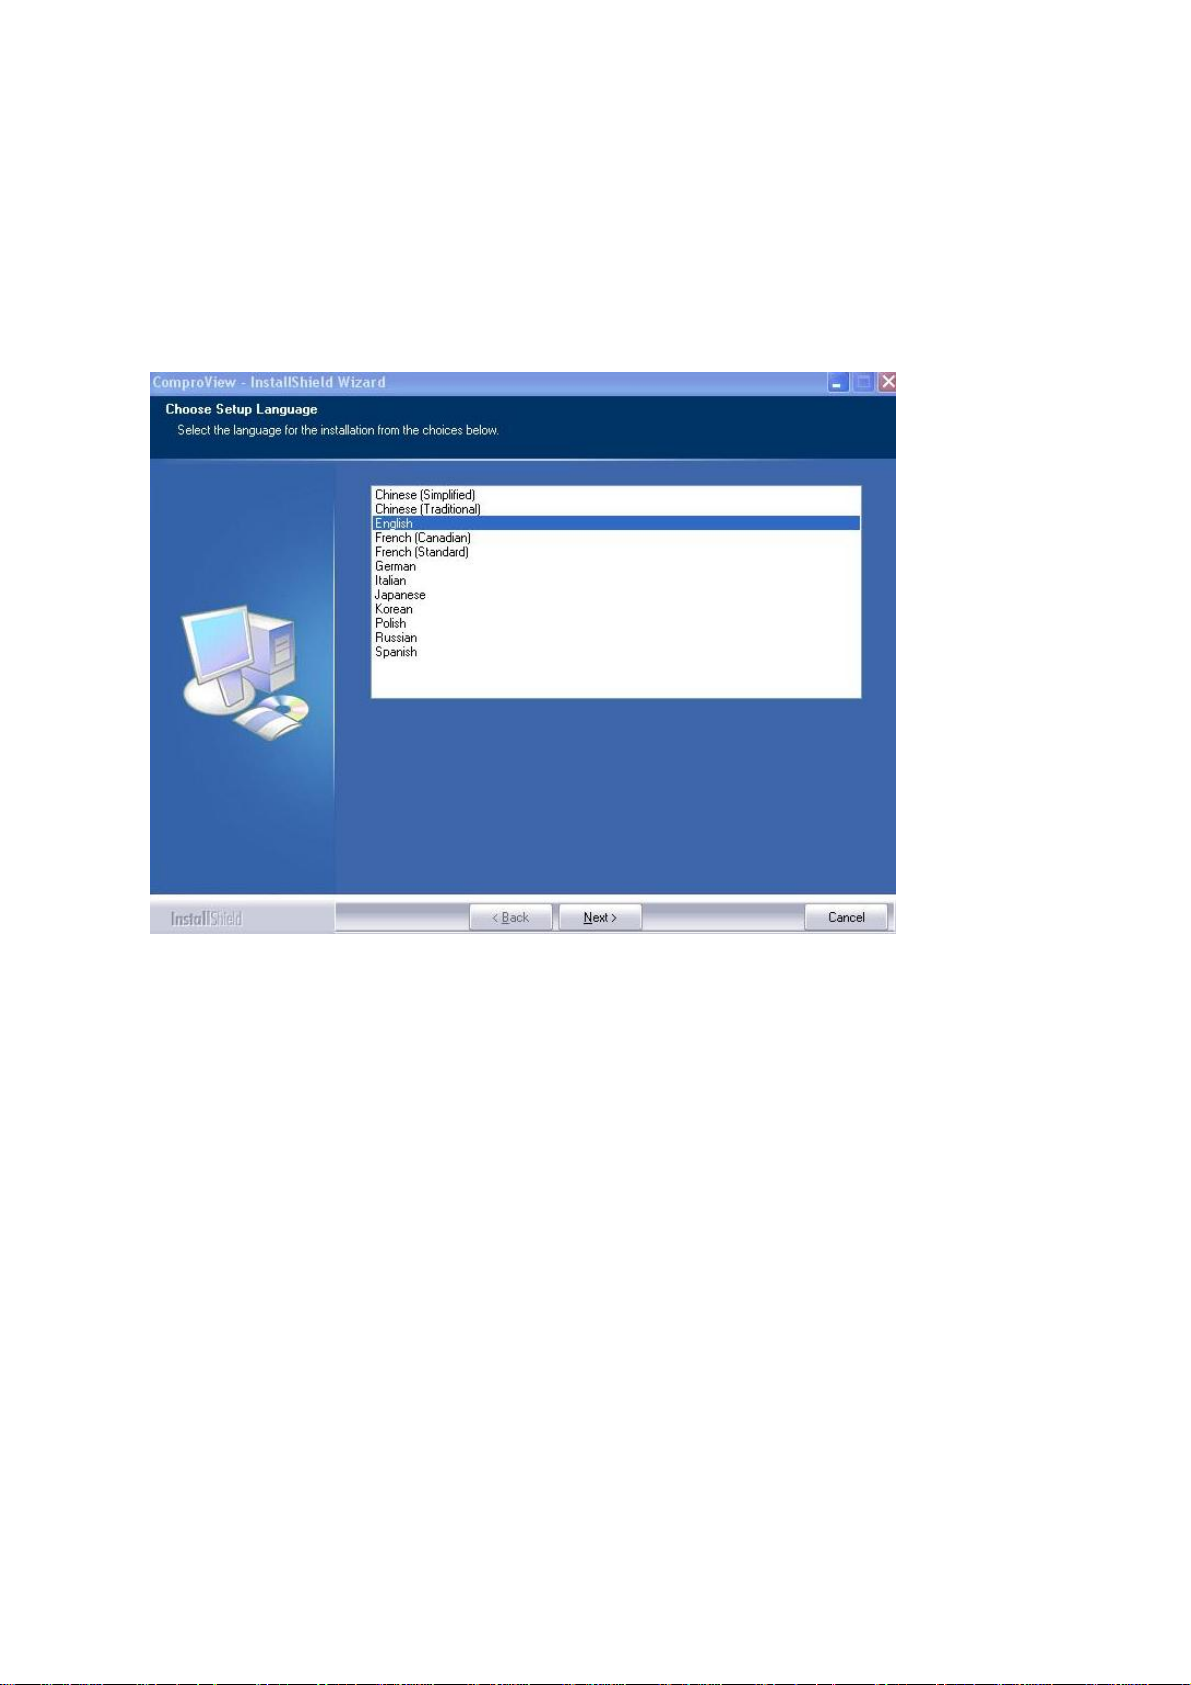
Software Installation:
Before ComproView installation, user has to make sure the IP Camera
is connected to the network.
1. Insert the ComproView installation CD.
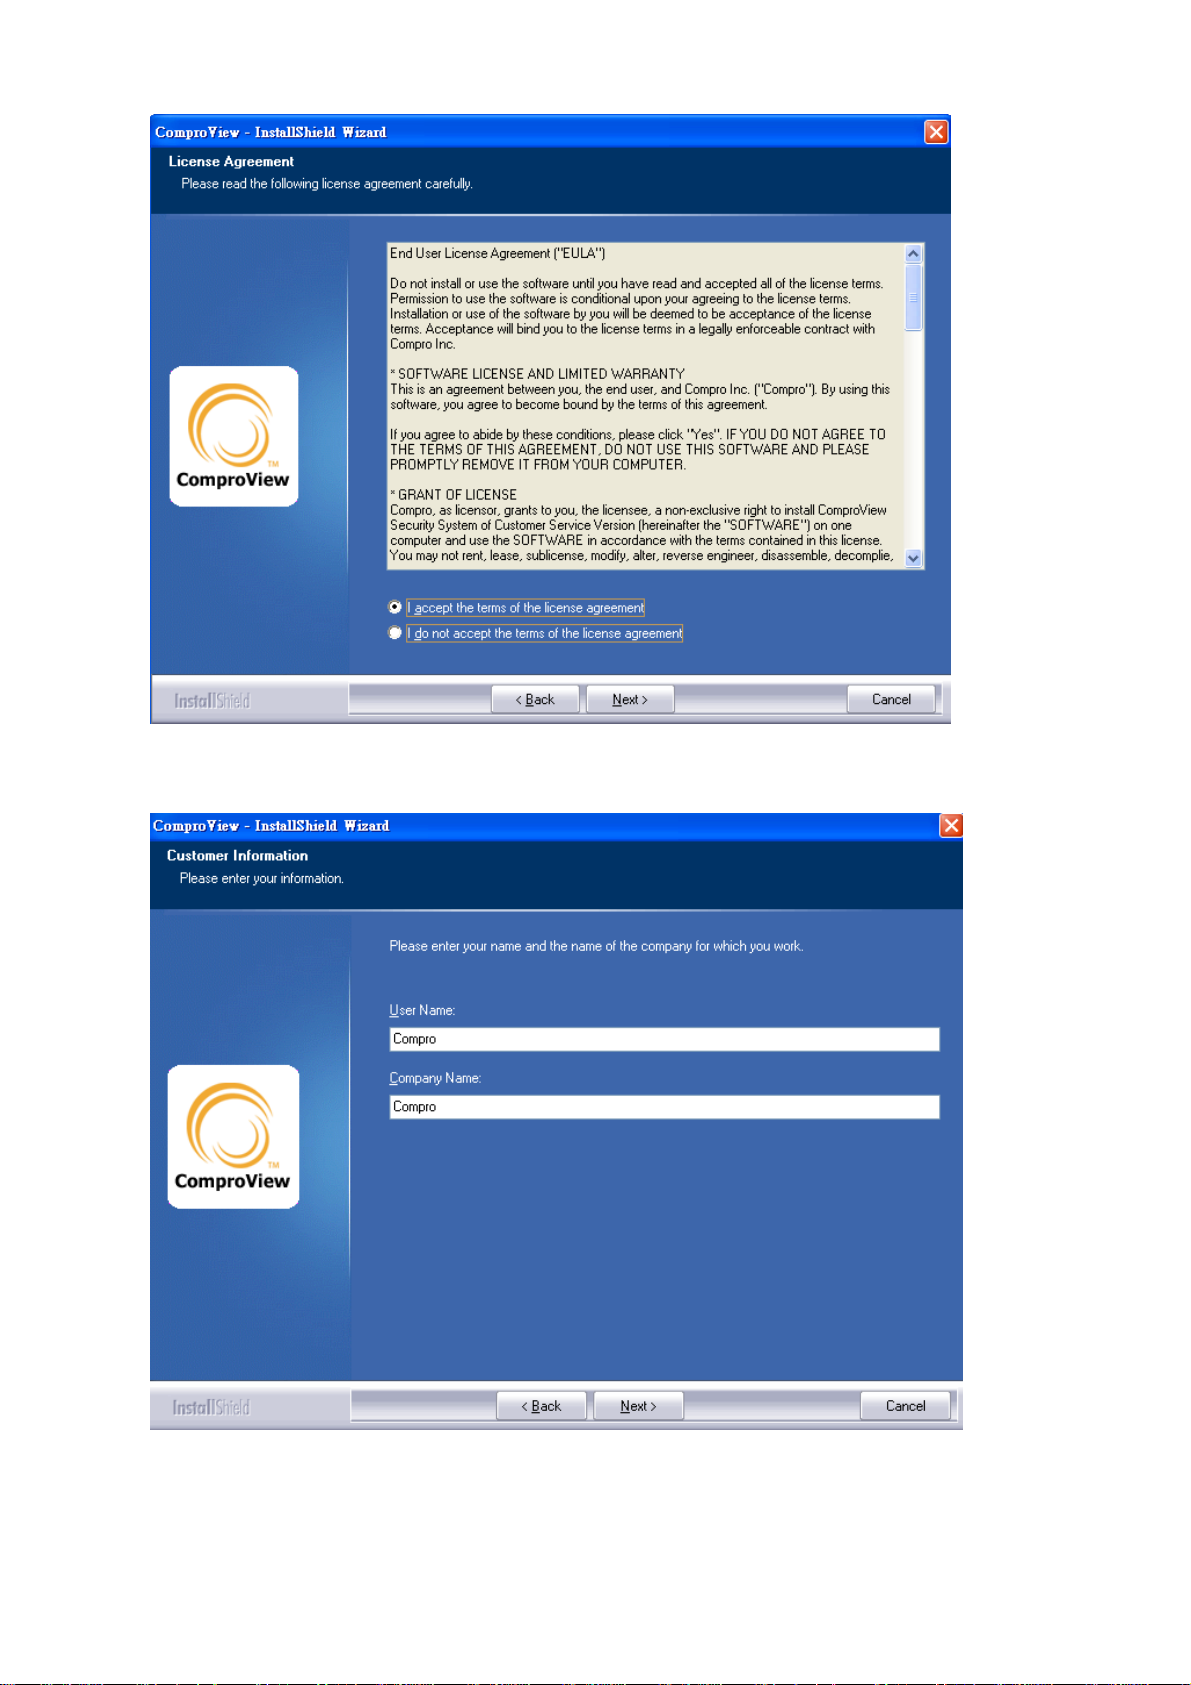
2. Please read the license agreement, then select “I accept the terms
of the license agreement”, and then press the “Next” button to
continue the install process.
Page 9
9
3. Please enter the user name and the company name.
Page 10
10
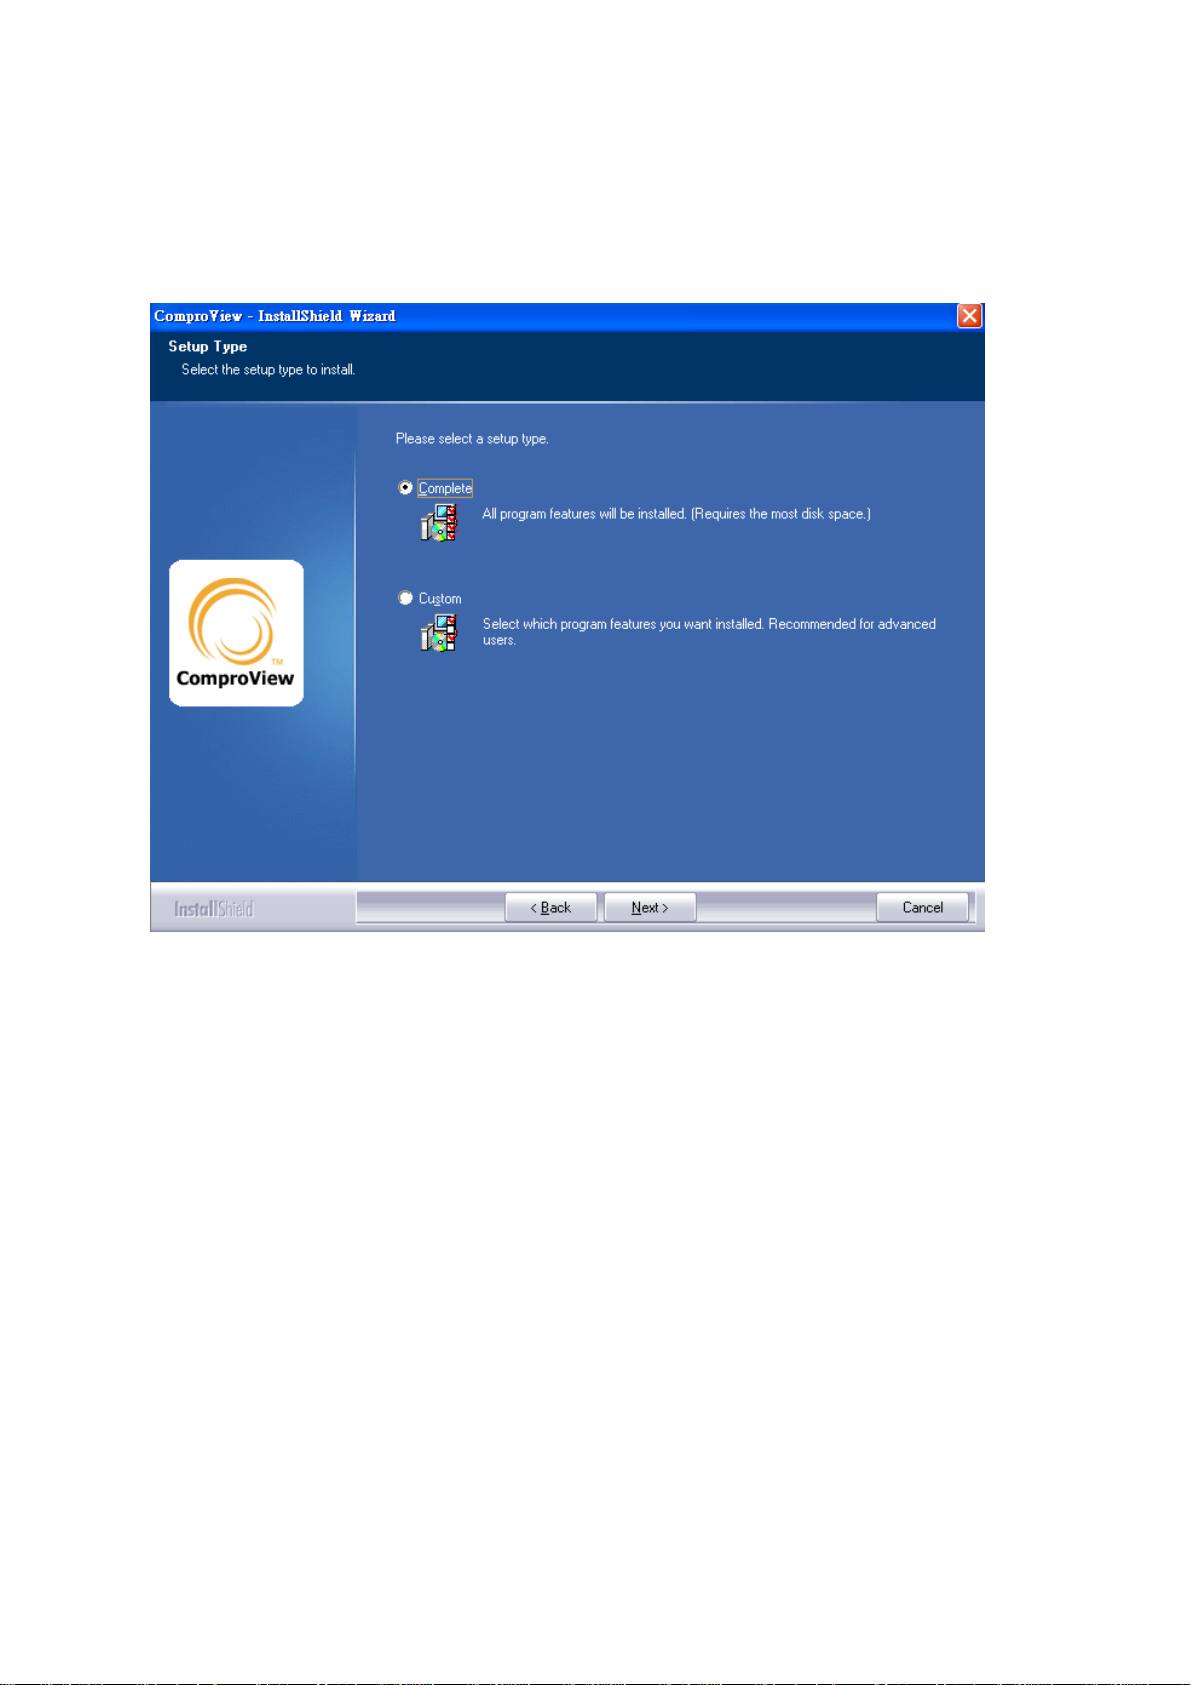
4. Depends on user’s demand to choose the “Complete” or “Custom”
selection, and then press the “Next” button to continue the install
process.
5. If user chooses the “Complete” selection, please press the “Install”
button to start the installation.
Page 11
11
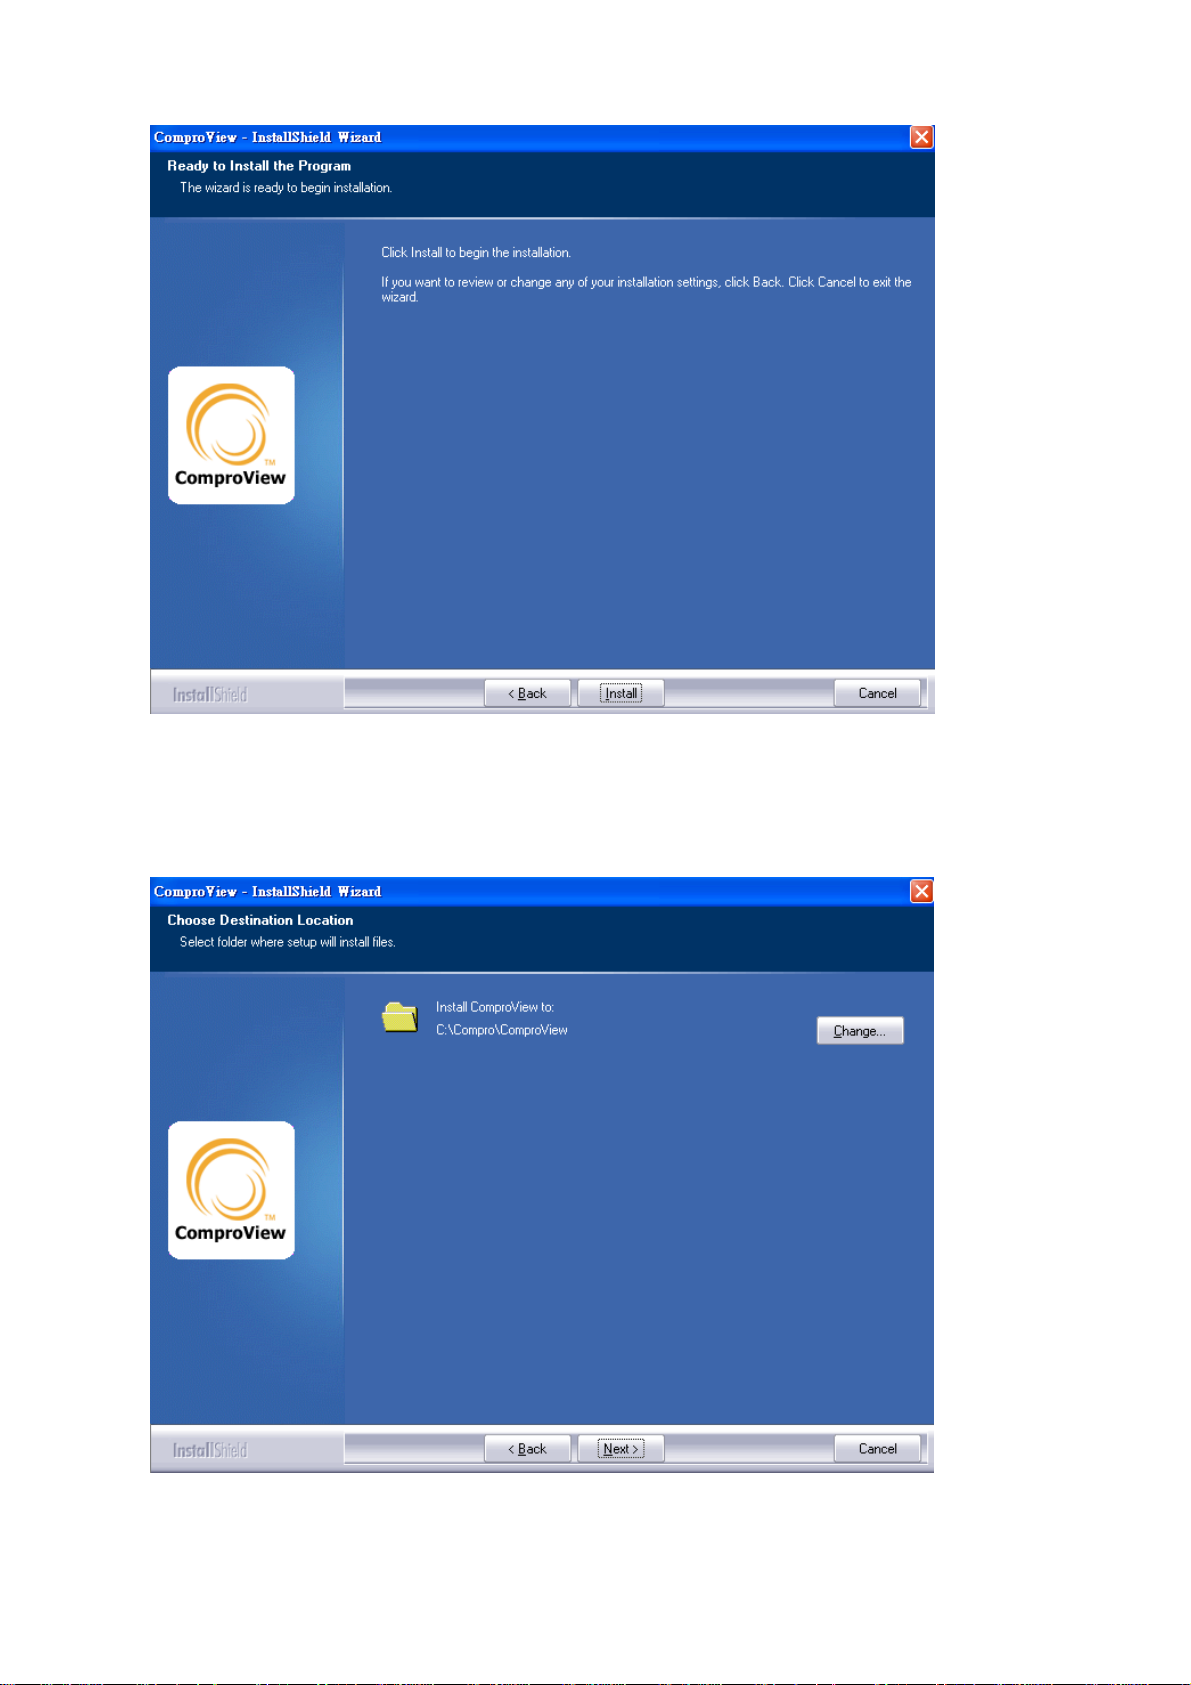
6. If user chooses the “Custom” selection, user could choose the
specific file folder to install the program.
Page 12
12
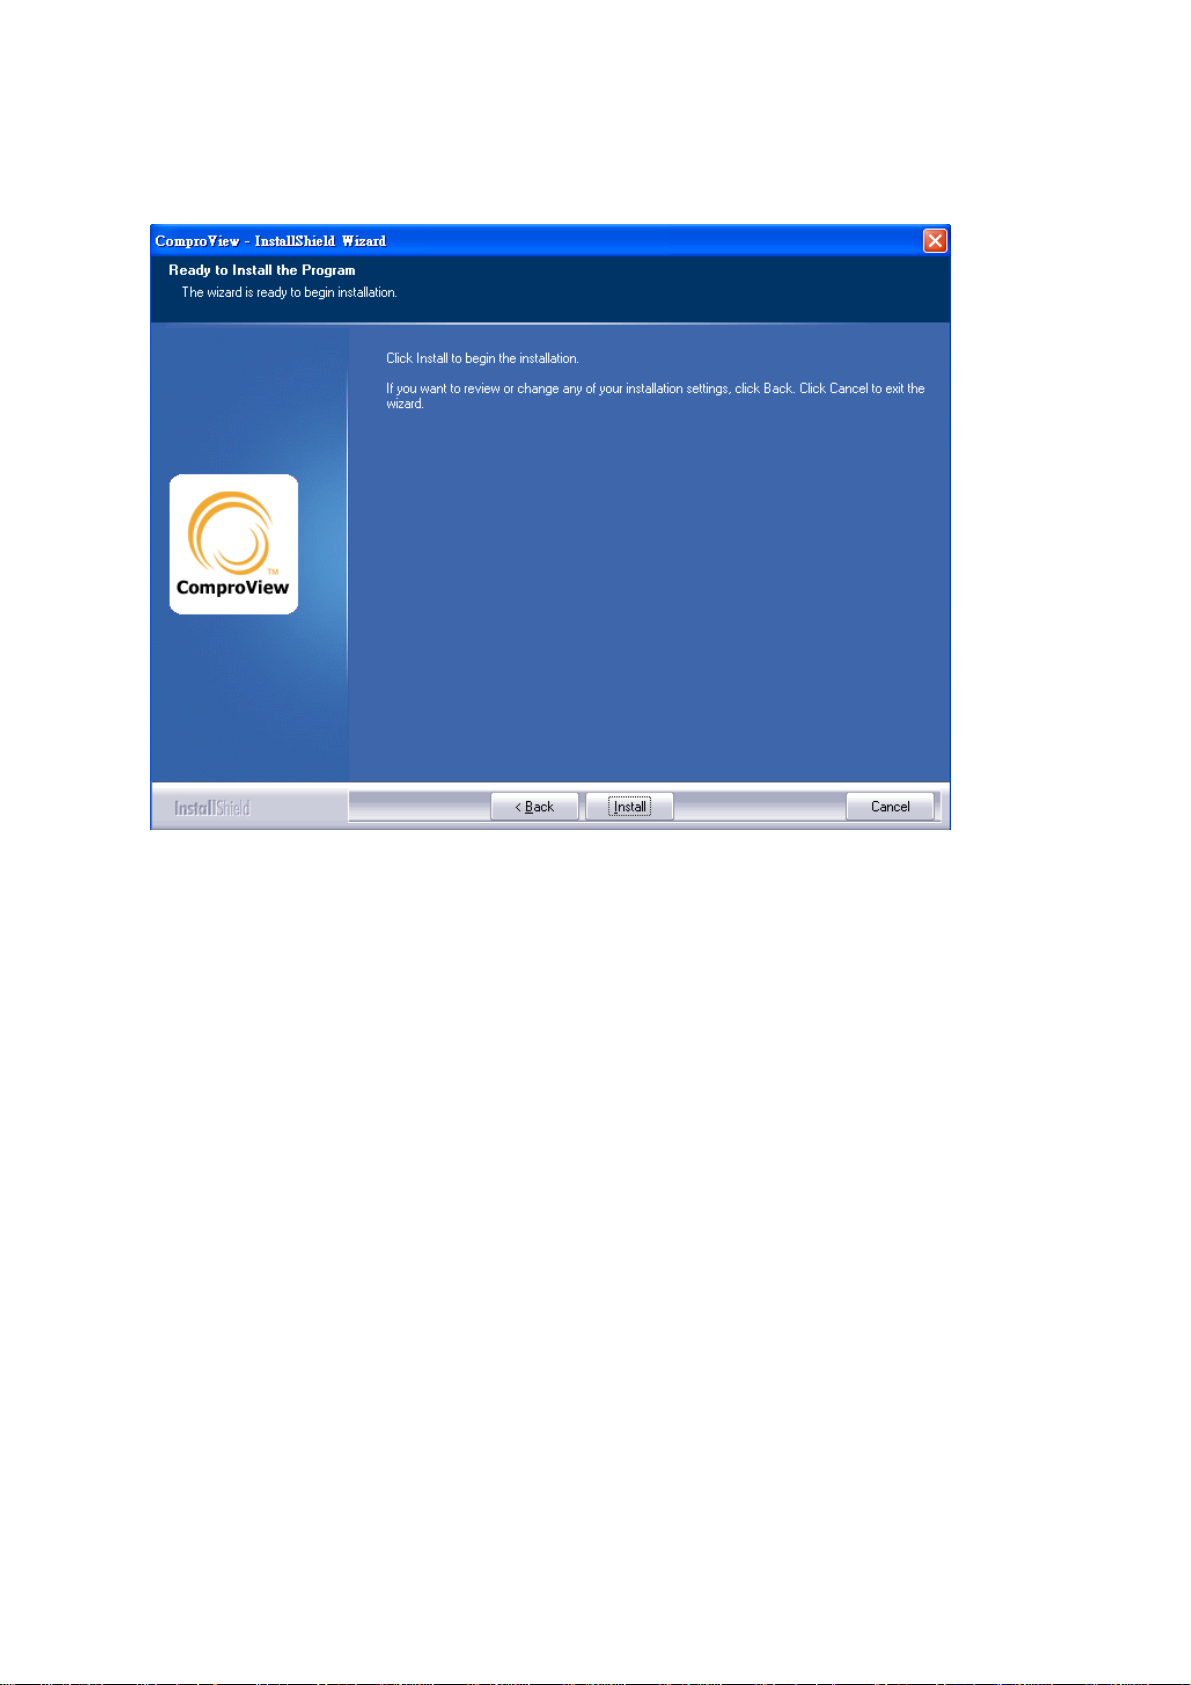
7. After all the setting is ready, please press the “Install” button to
start the installation.
8. After the install process completed, the ComproView system is
finished the installation.
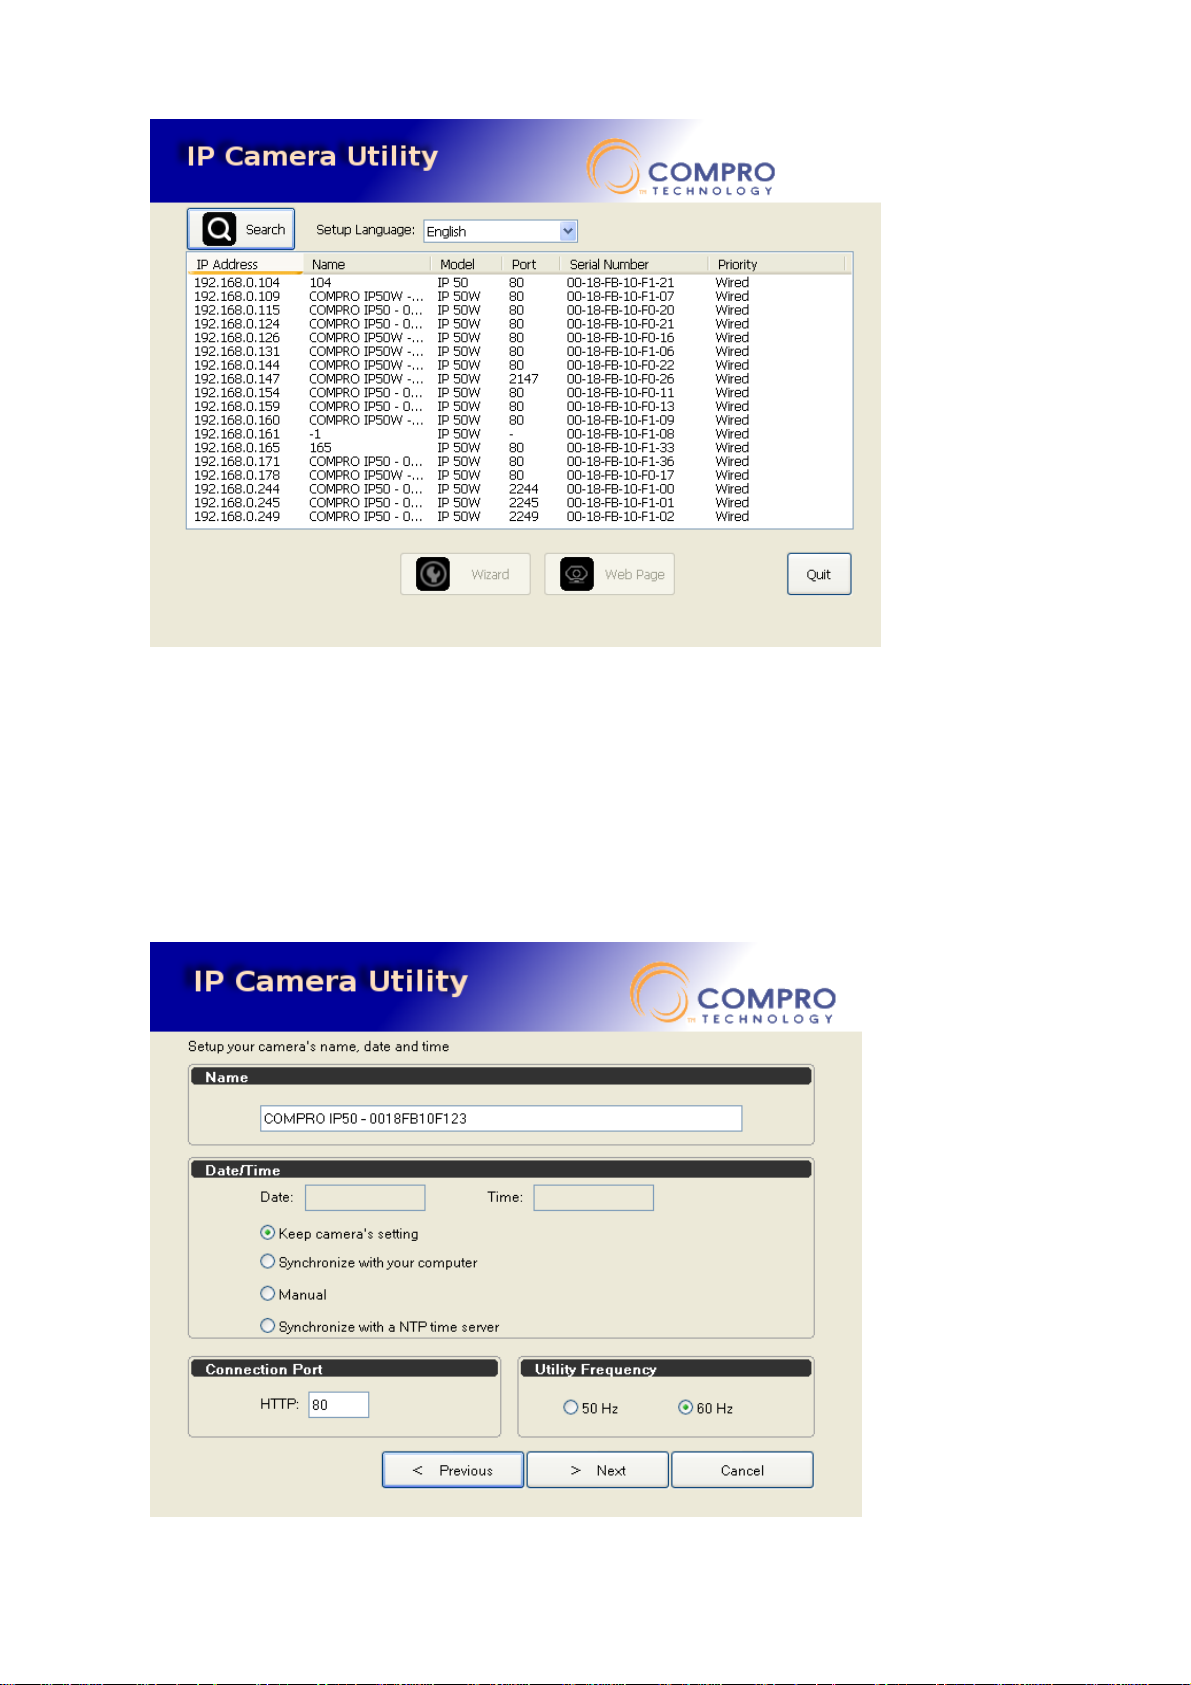
9. Before using the IP camera, please run the included IP Camera
Utility to customize the camera to your local condition. Up on the
start of the application, you will be presented with a list of installed
IP camera on your network. Please highlight the desired IP camera
and click the “Wizard” button.
Page 13
13
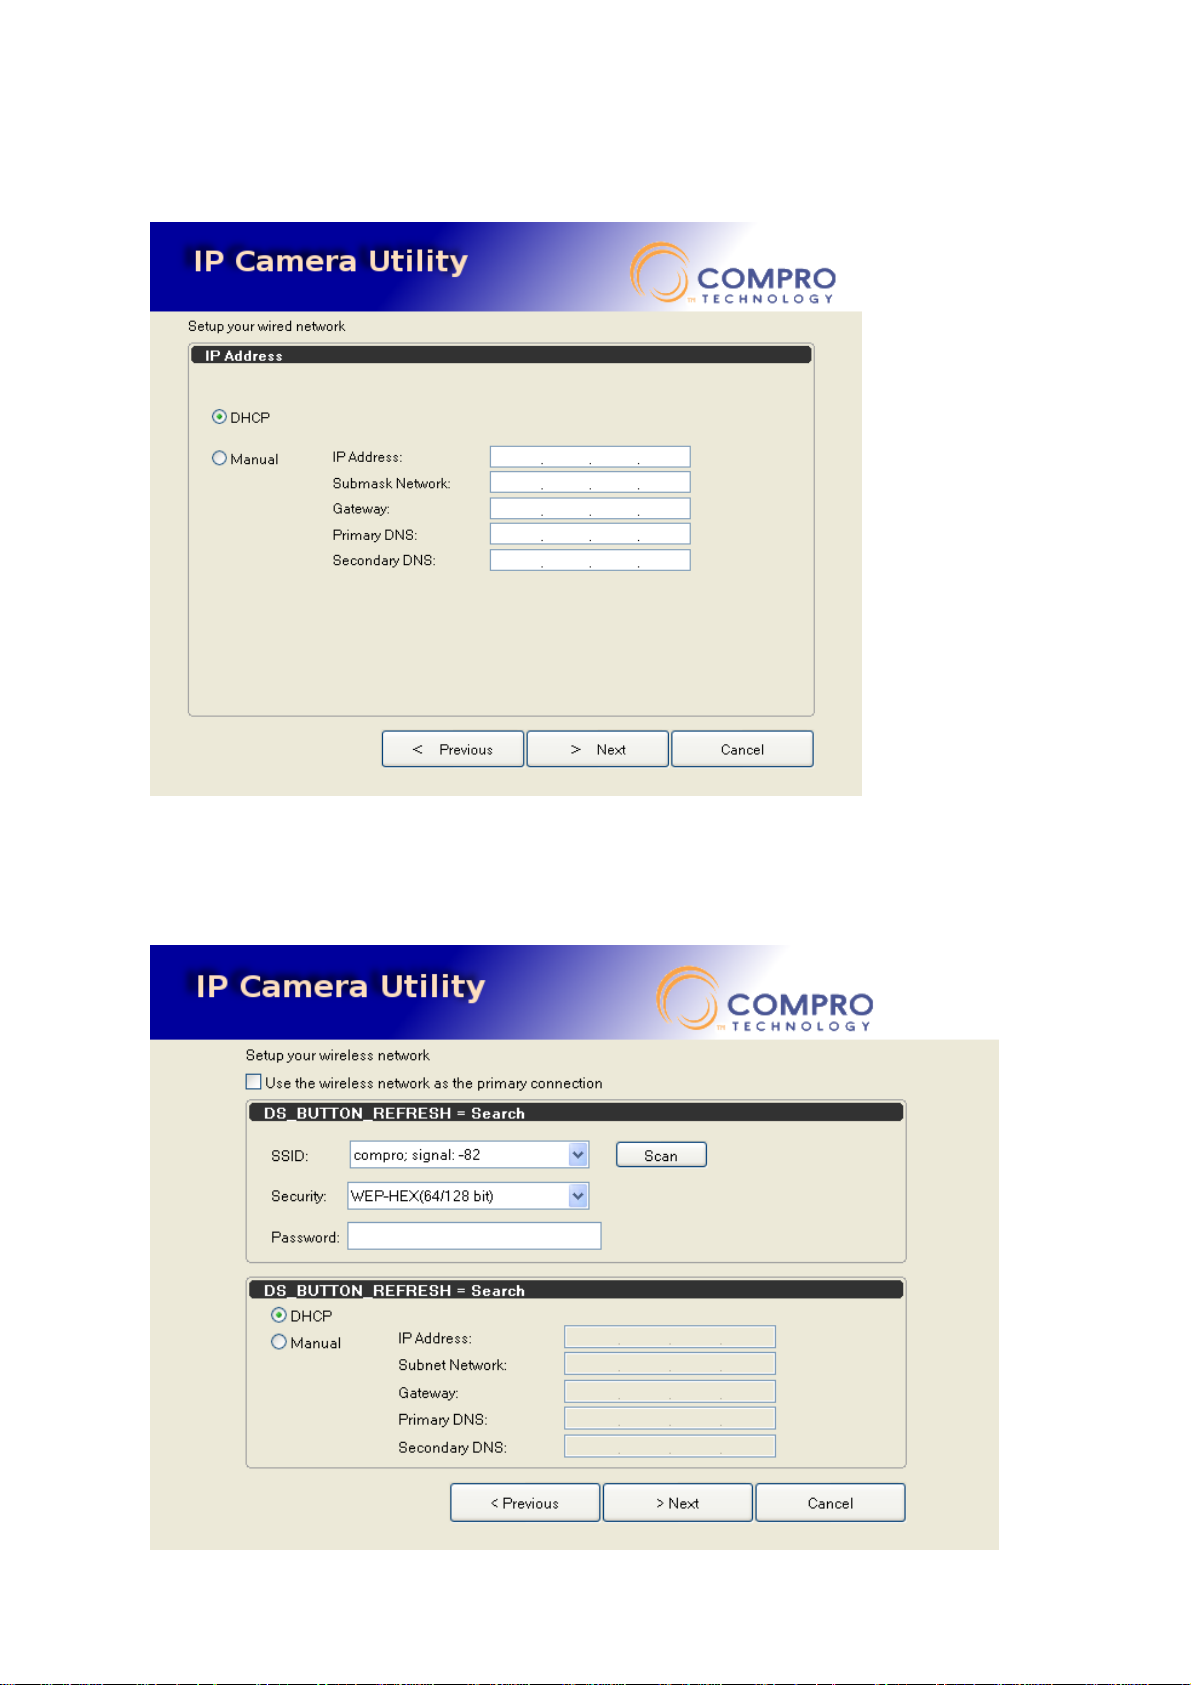
10. On page 1 of the Wizard, you can set the basic setting of the
camera, including name, time, port and frequency. Please note,
the default value should be used for the best performance. The
“Utility Frequency” represents the frequency of your local mains
power.
Page 14
14
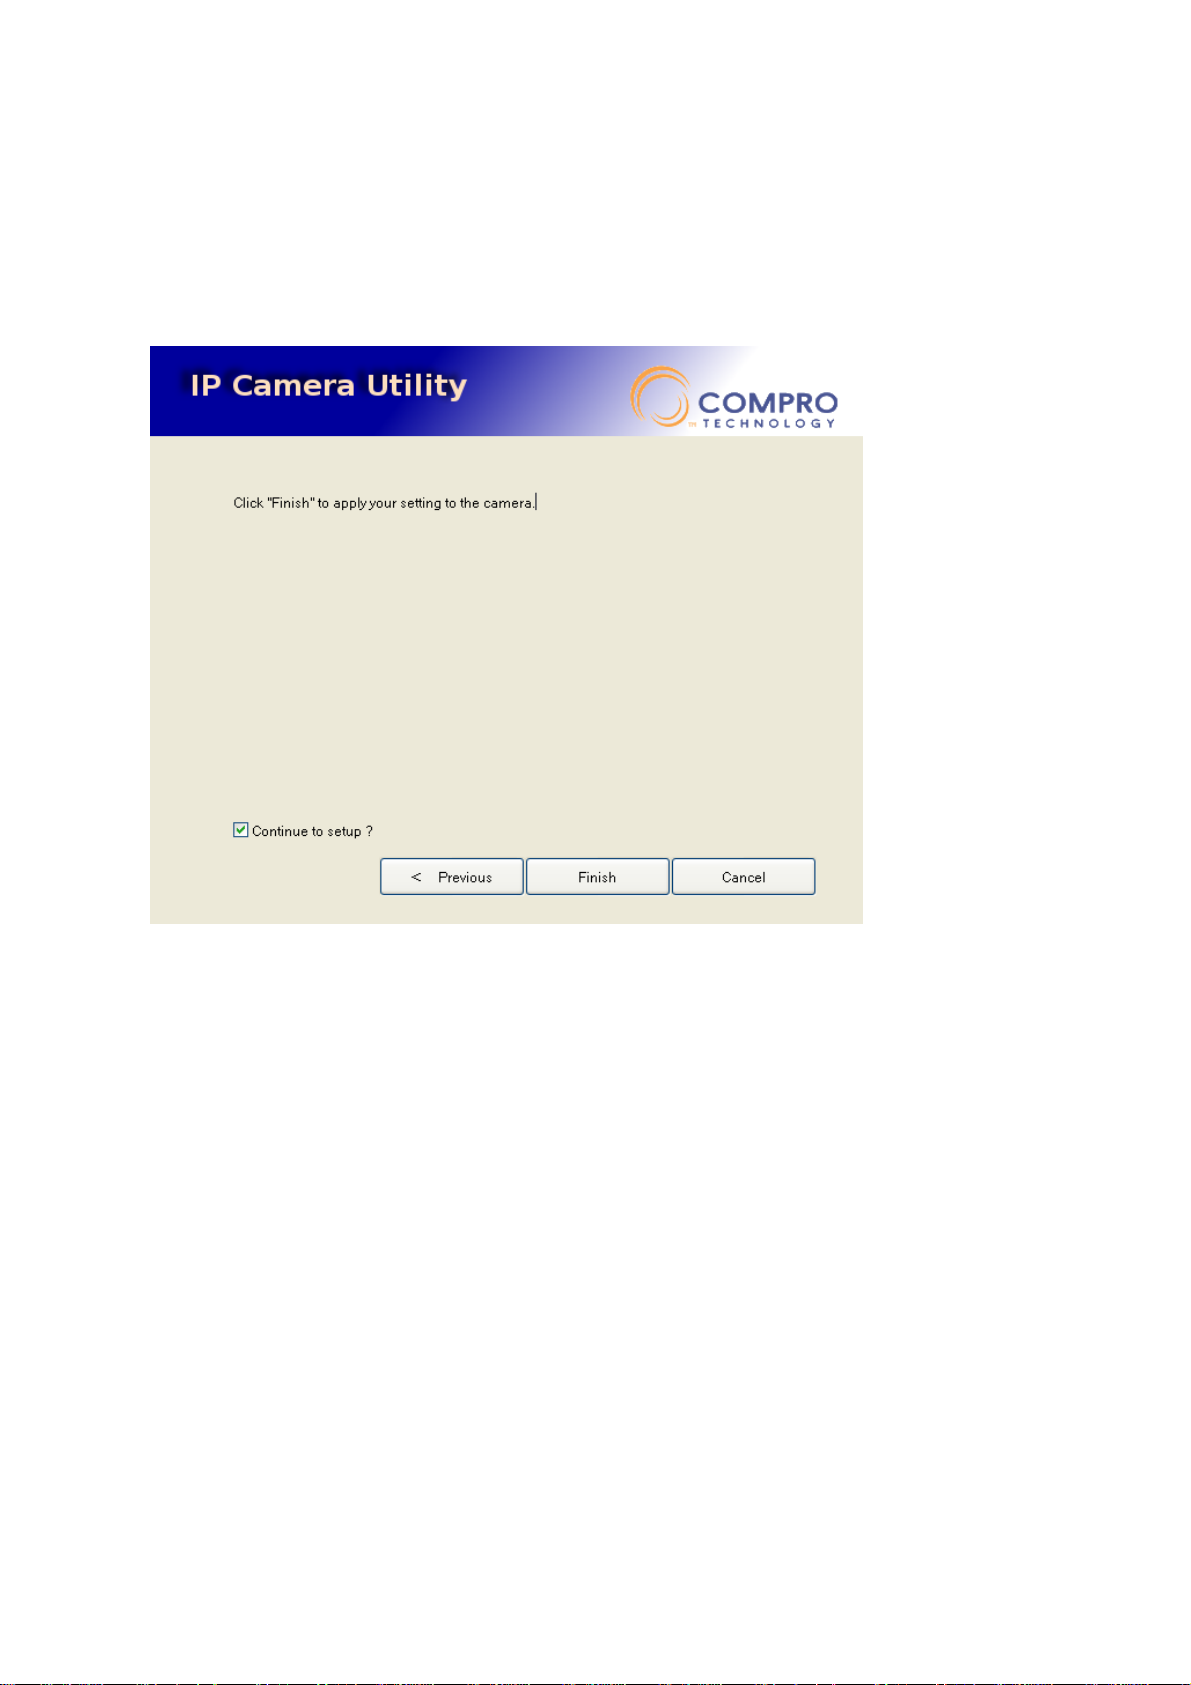
11. The default setting is for the IP camera to obtain IP address
automatically via LAN connection.
12. To use the wireless network as the primary connection, please tick
the “Use the wireless network as the primary connection” option.
Page 15
15
13. Once all of the previous settings had been done, please press the
“Finish” button to finalize the setup of this particular camera. You
will need to follow all of the above processes should you wish to set
another one. Note: It takes around 1 minute for the camera to
apply the setting and operational.
Page 16
16
Using the IP Camera:
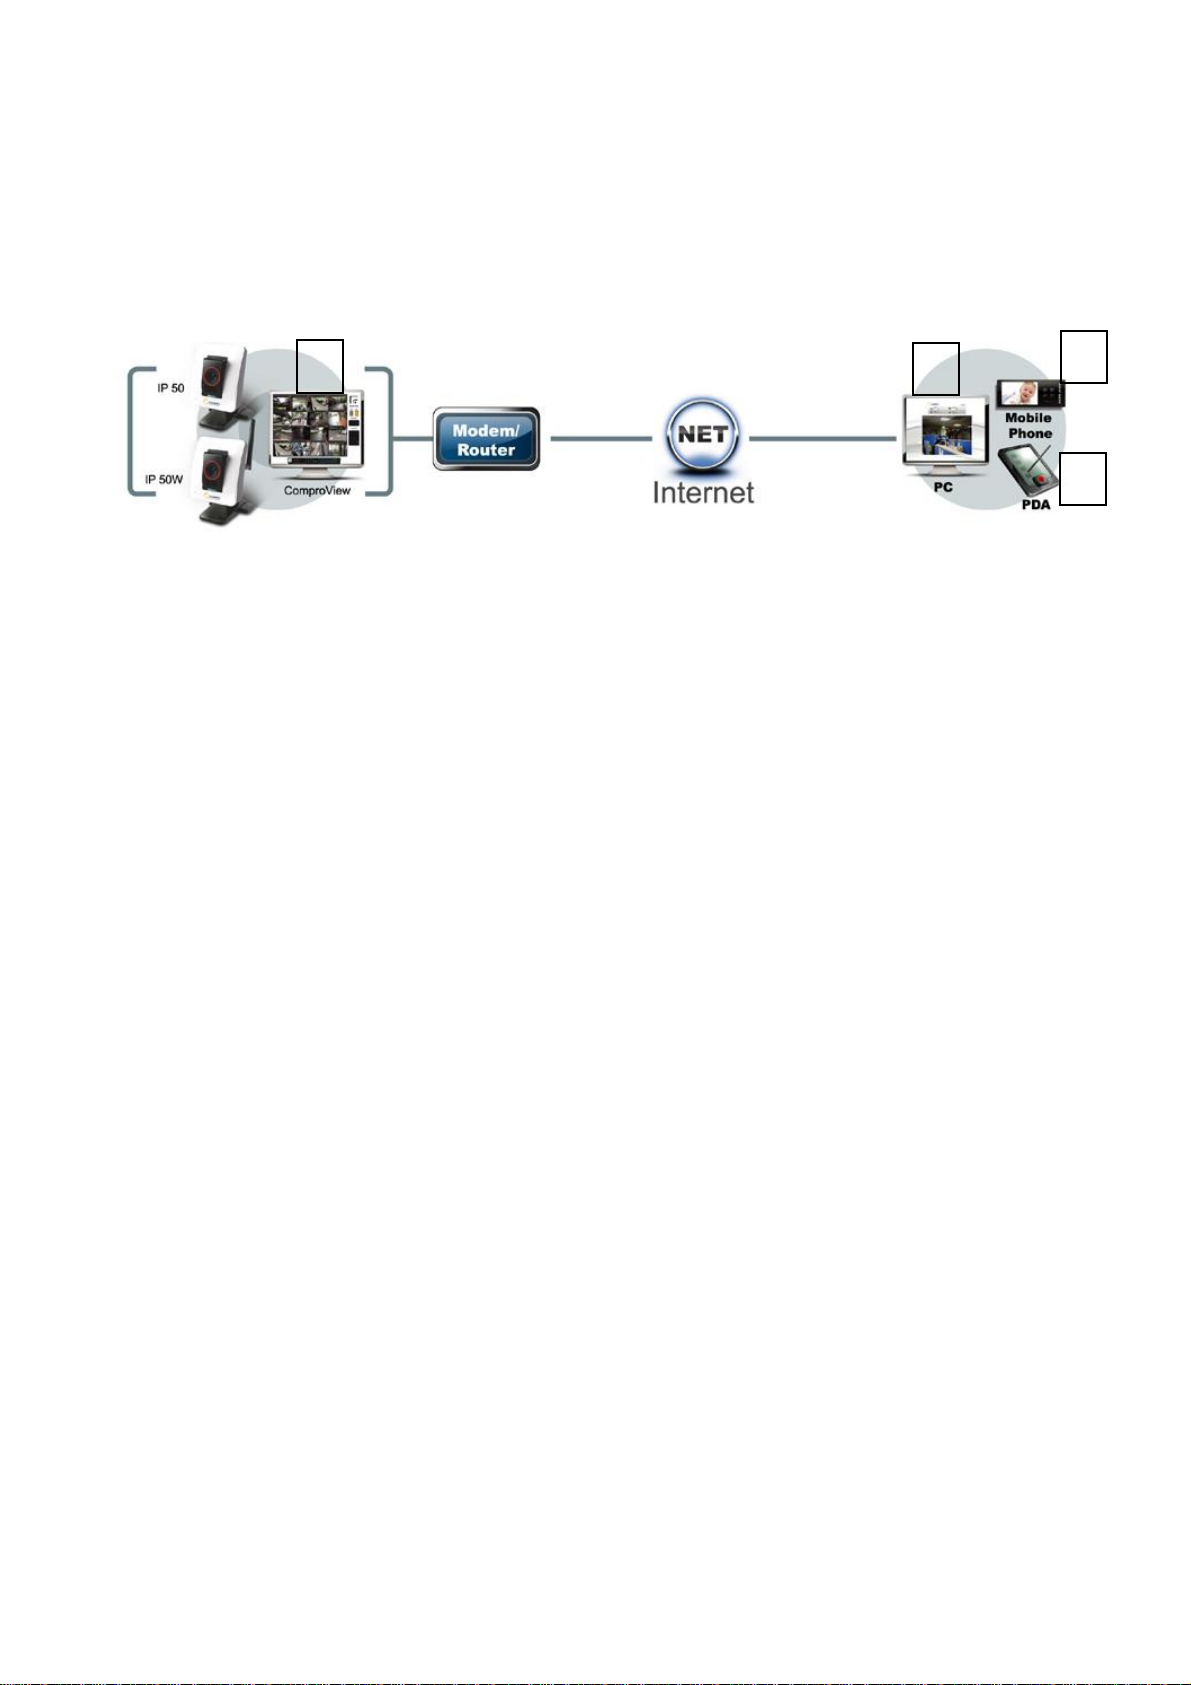
1 2 3
4
Compro Technology provides a range of access method to access and
using the IP camera that you’ve just installed.
1. Accessing a single camera via the Internet Explorer which is found
on all Windows system. This is the easiest way of using the IP
camera and requires little learning of the software.
2. Accessing a single camera or multiple cameras via the ComproView
Mobile client available on Windows Mobile 5 and 6 smart phones.
The current supported resolutions are 320 x 240 and 640 x 480.
3. Accessing a single camera via 3GPP capable phone over the
internet. This is the preferred way of monitoring your camera when
you are out of the house and have no access to a computer.
However, due to the limitation of the technology, only video stream
is provided in this mode.
Do keep in mind that your mobile phone network service provider
will be charging a pre-determined rate for using this service.
4. Access a single camera or multiple cameras via the bundled
ComproView software. ComproView is a comprehensive software
encompassing the monitoring, recording and detection of the set
area. For the full function of the ComproView, please refer to the
electronic manual included on the CD.
Page 17
17
Web Browser Access (Internet Explorer):
User can monitor the current condition of the monitor area via
Internet Explorer which is found on all Windows based machine.
Please refer the following steps:
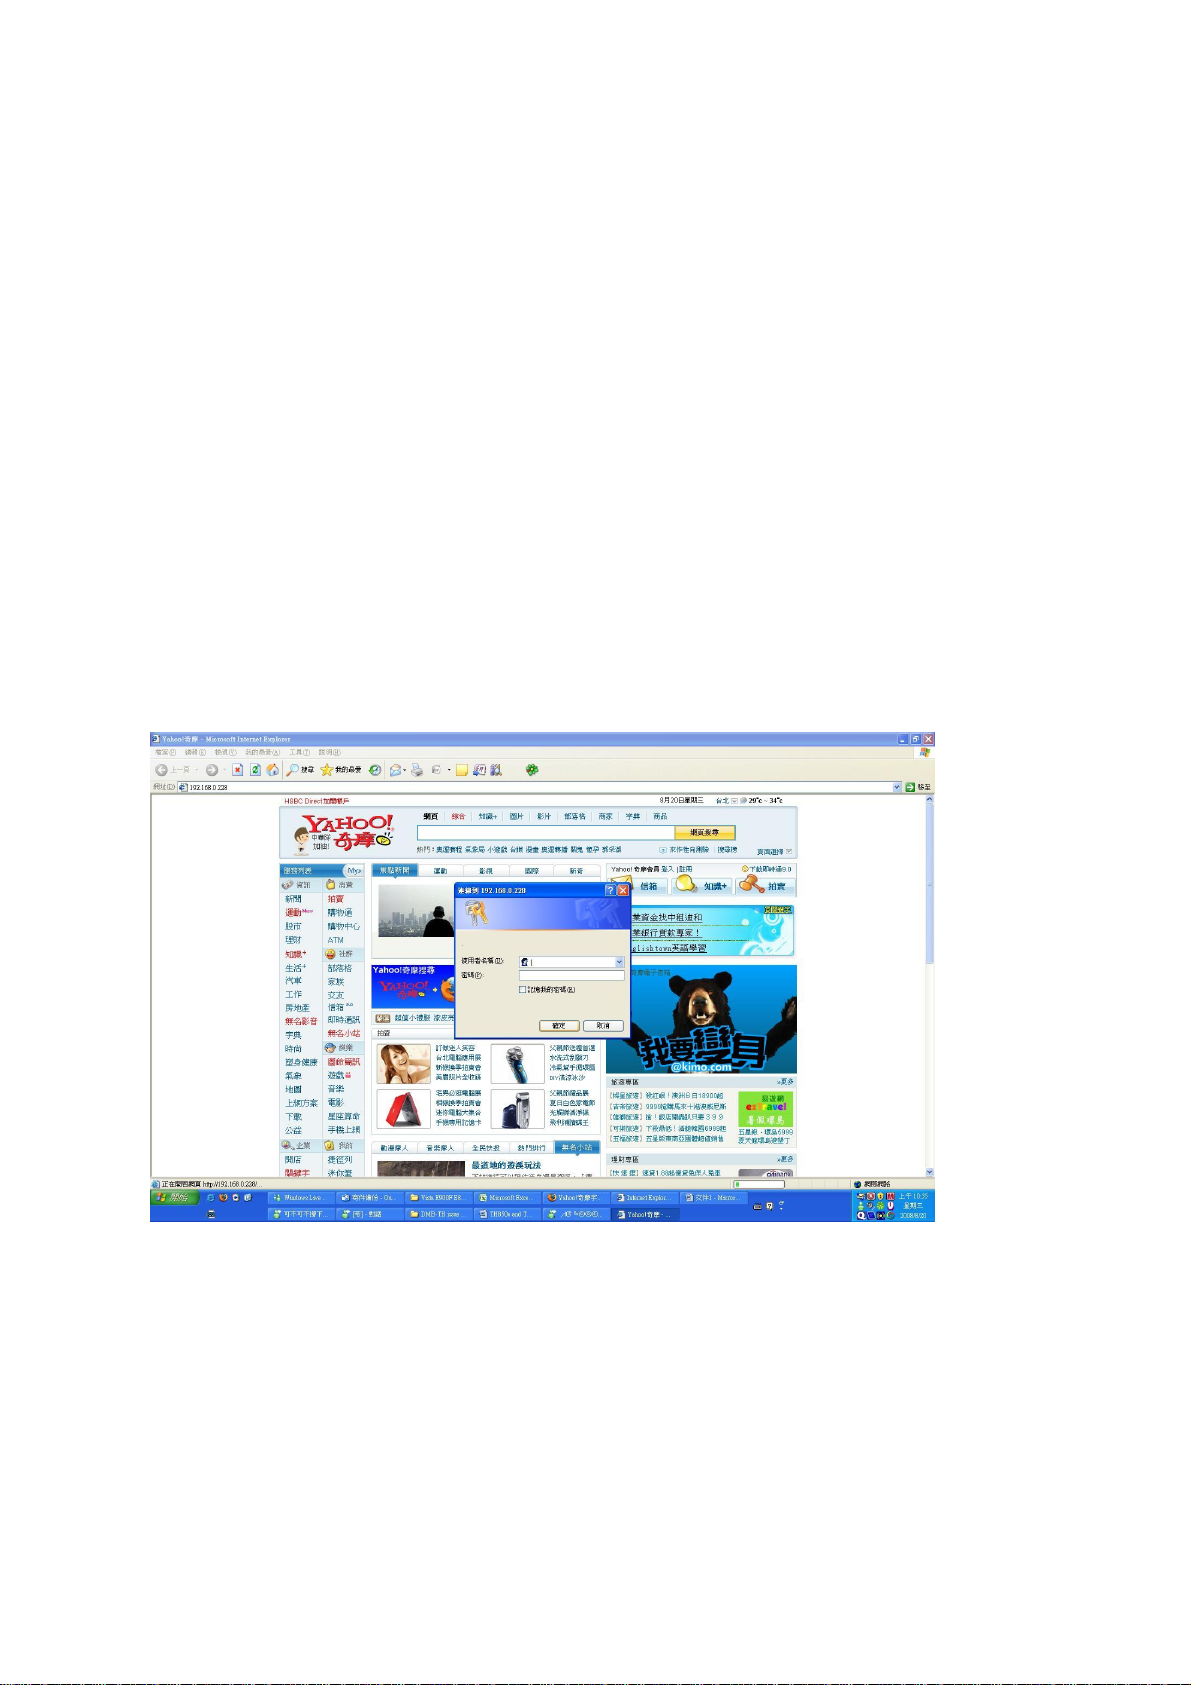
1. Open the Internet Explorer.
2. Enter the IP 50 / 50W’s IP address.
3. User will see the dialog to request the user name and password;
please enter the valid username and password of IP camera, and
then press OK.
The default user name and password is “admin”.
Page 18
18
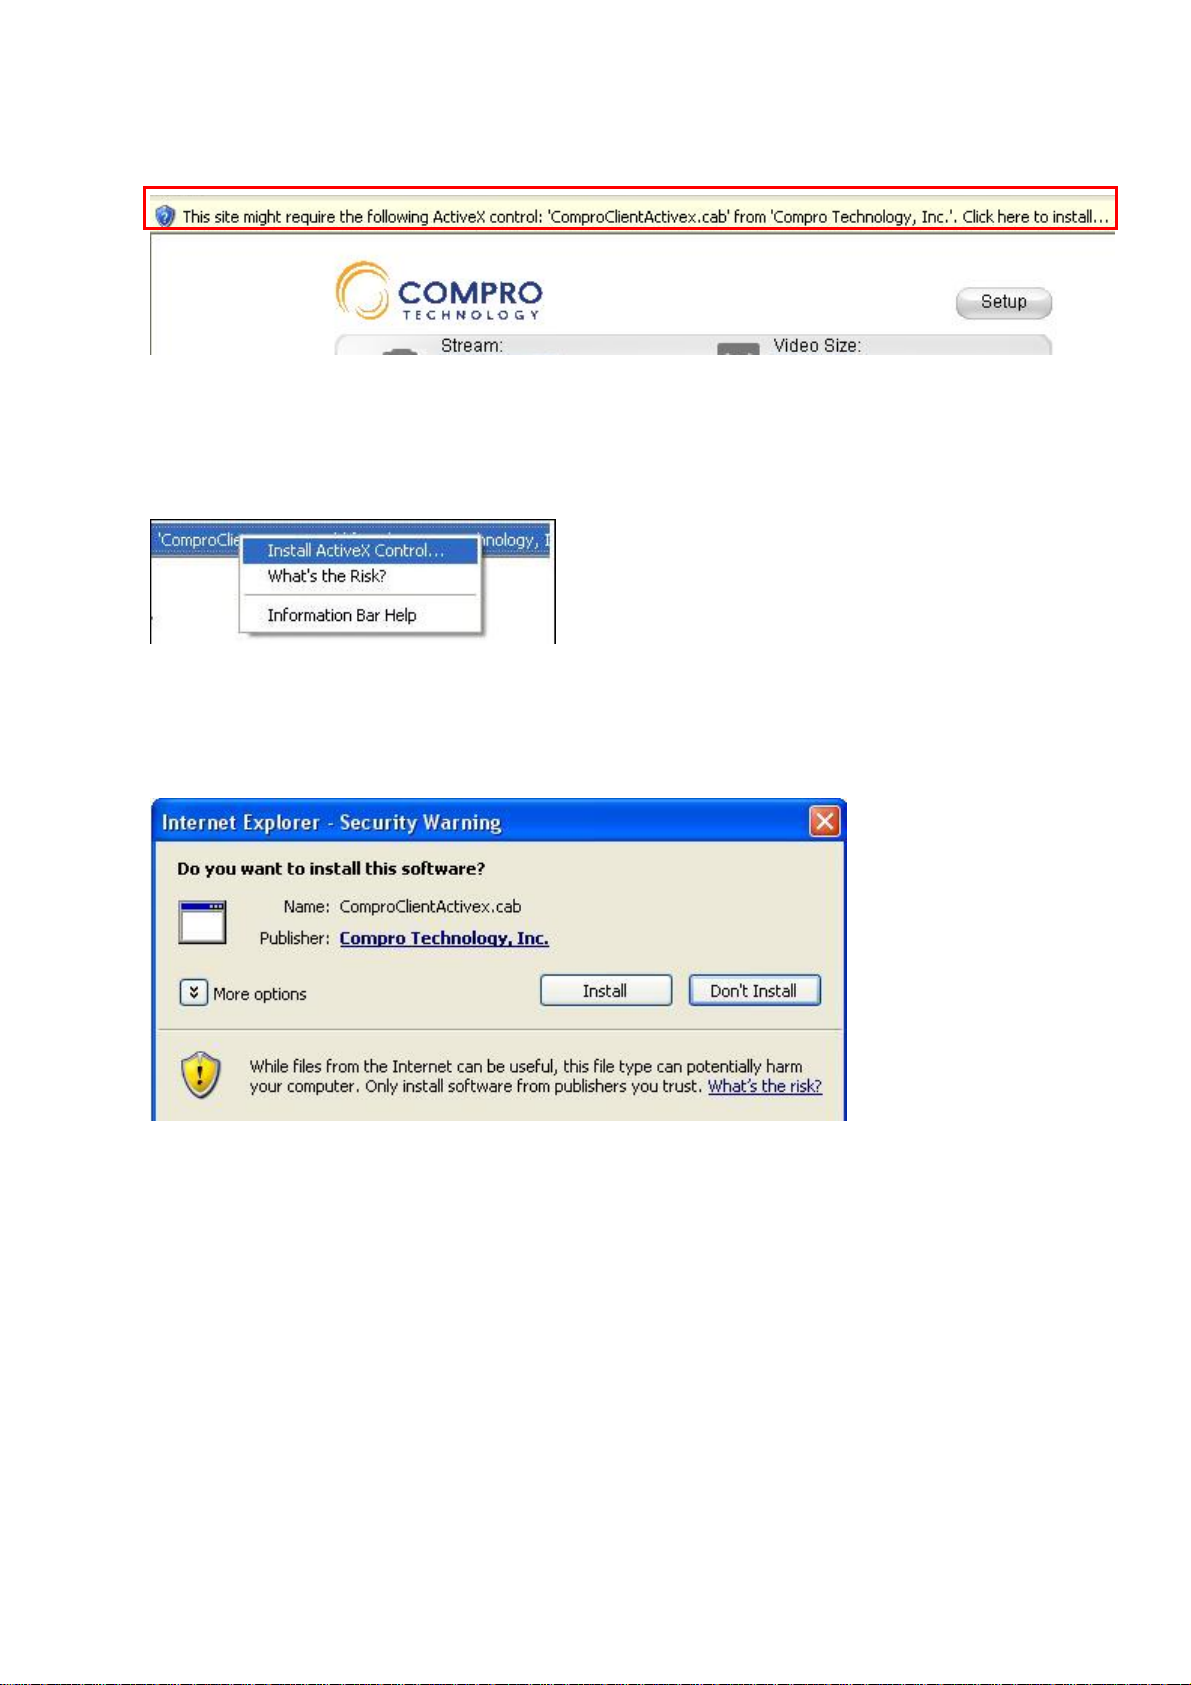
4. After enter the valid username and password, Internet will show up
the message to warning user to install the ActiveX selection.
5. Please press the selection and choose to install the ActiveX
6. And then the reconfirmation dialog will appear on the screen,
please press “Install” button to setup ActiveX up.
Page 19
19
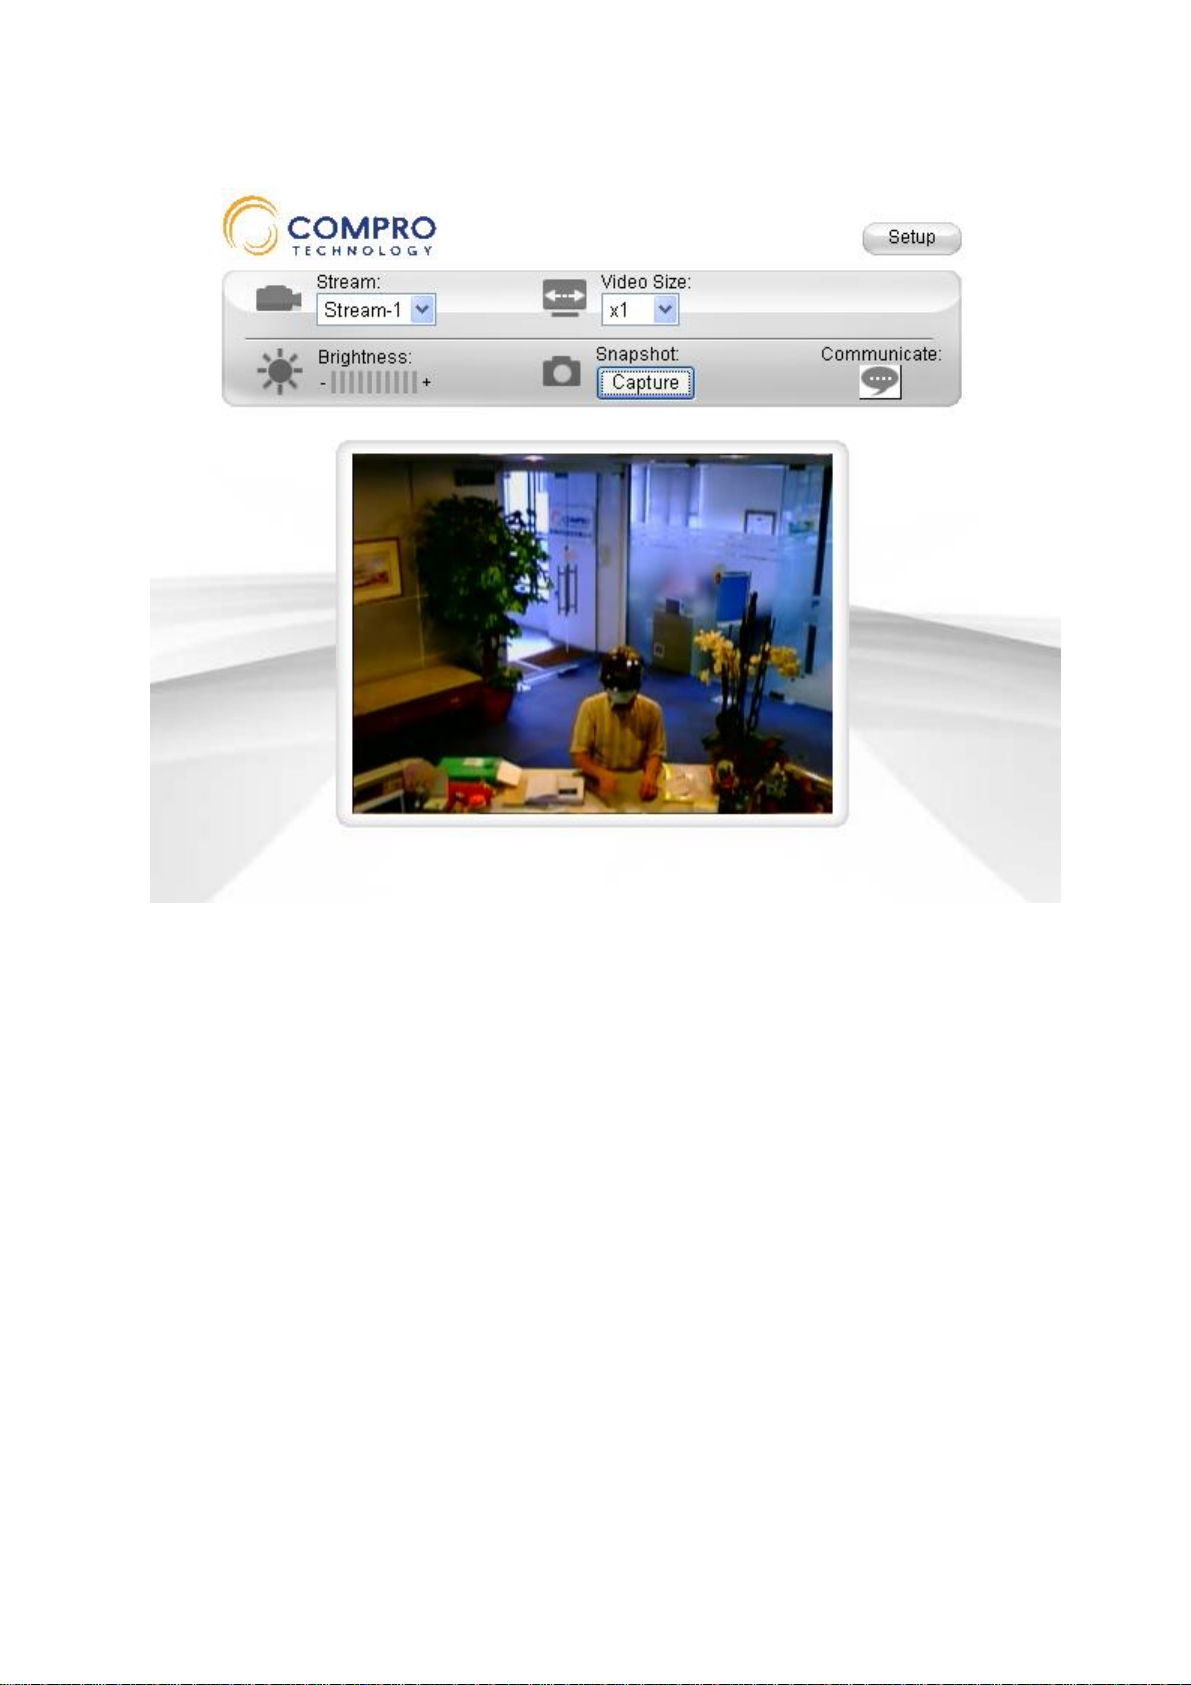
7. After ActiveX install completed, user could start to use web
browser to use IP camera function.
Note: If your IP camera falls behind firewalls, you will need to set
port forwarding for ports 80 and 554 (default value) to the internal
IP address of the camera. Should you have more than one IP
camera then please increment the values of the above ports by 1,
e.g. the second camera will have ports 81 and 555, etc. Please
refer to the manual of your router or firewall.
Page 20
20
The Internet Setting:
The IP camera connection could follow the method below:
1. If user’s PC is support Universal Plug and Play (UPnP™) service and
network setting is in DHCP, the Compro IP50 / 50W will auto
detected and add it into the My Network place. (If user could see
the Compro IP 50 / 50W already, please switch to next page)
Note: If user wants to install the UPnP™ service, please execute
the “Add/Remove” program in “Control Panel”. After the dialog
opened, please select “Add/Remove Windows Components” and
select the “Networking Services” selection. User will see the
“Detail” button, please press it and try to find the “UPnP” selection.
Please select it and add it into user’s operation system.
2. If user uses the router, user should easy to see the IP address had
been assigned for the Compro IP 50 / 50W in the router’s
administration pages. If user gets any problem, please refer the
router’s documentation.
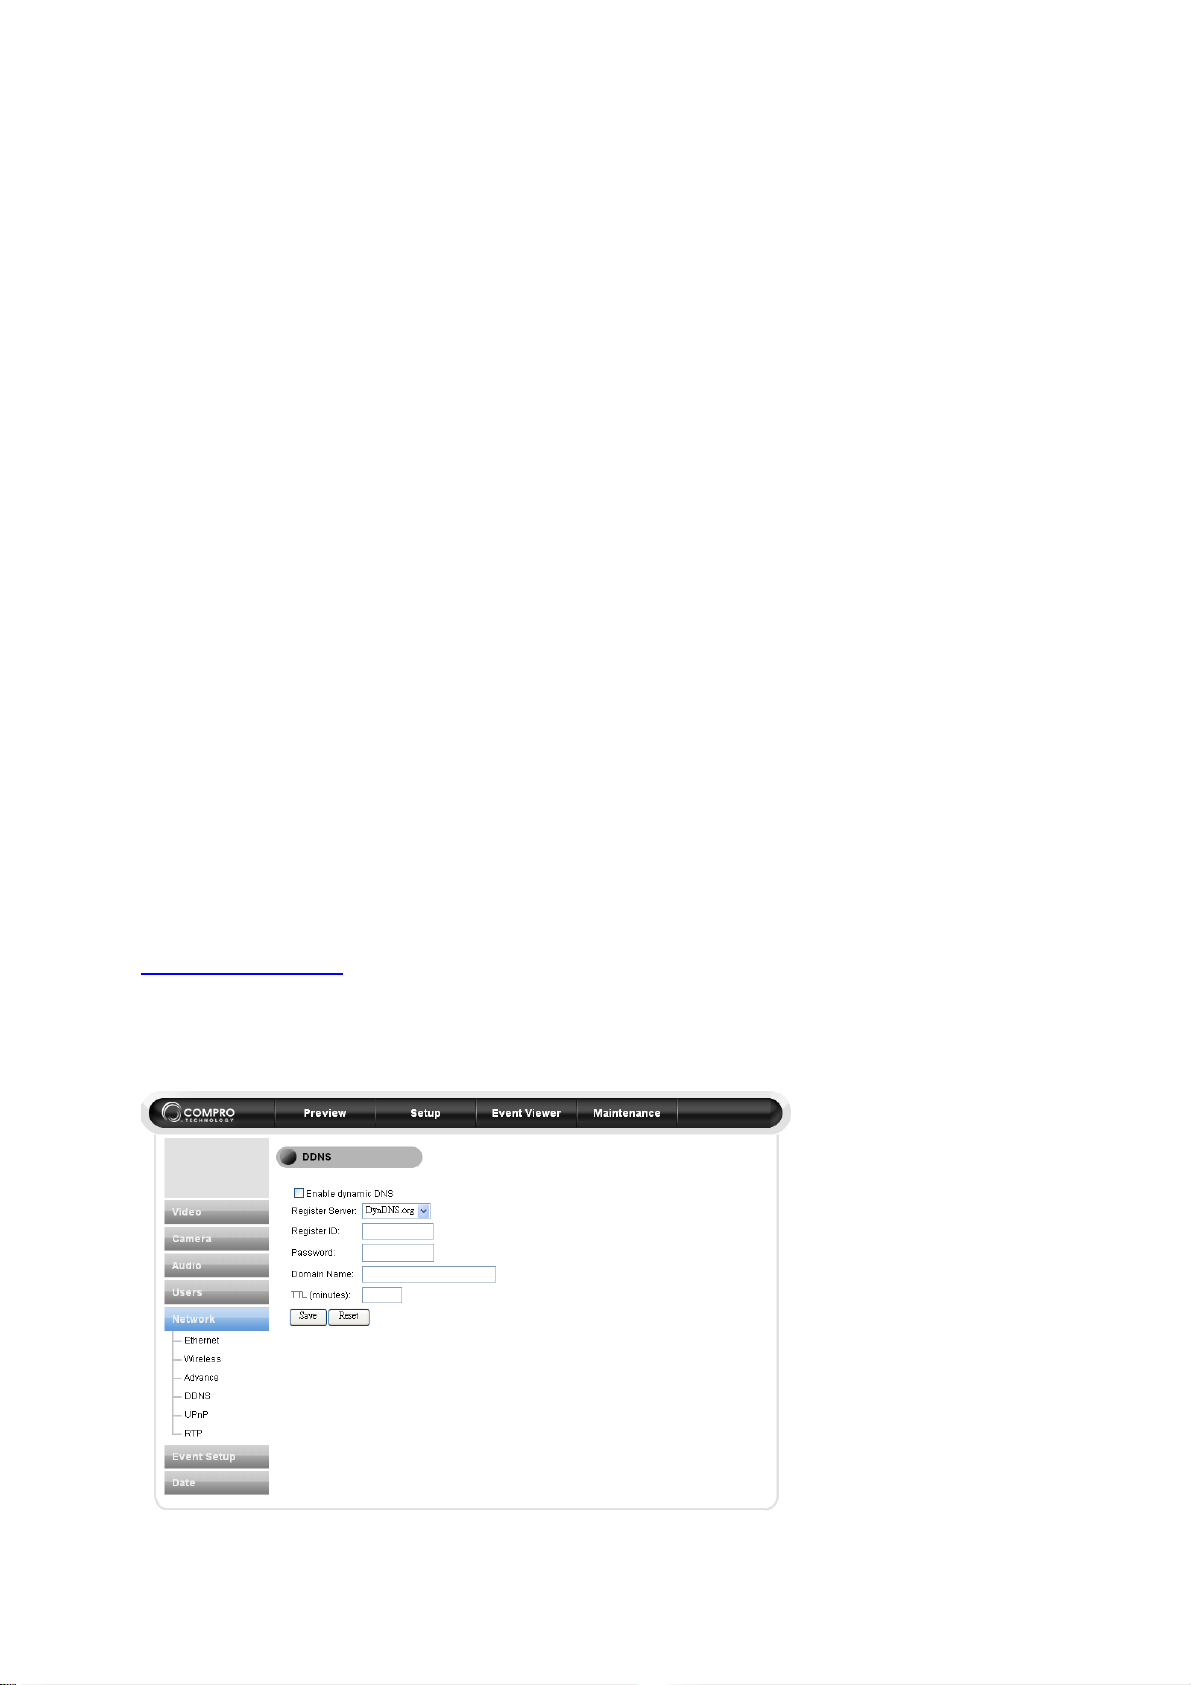
3. If user uses DHCP to connect to internet, then user needs to apply
for a DDNS (Dynamic DNS), user could refer the website
www.dyndns.org and apply for a new one. After user gets the DDNS,
please enter the IP address to login the IP Camera. After login the
IP Camera, please go for -> Setup ->Network ->DDNS and enter
the entire DDNS column.
Page 21

21
Access the IP Camera via 3GPP Mobile Phone:
You can access the desired IP camera via compatible 3GPP mobile
phone when both the IP camera has a working internet connection
and the mobile phone has a good connection on the GPRS or 3G
network.
There are several criteria which need to be fulfilled before the 3GPP
function can be successfully utilized.
1. In order to use the 3GPP function, you should turn on the 2
nd
stream of the IP camera and set the resolution as QQVGA, FPS as
5, and quality as medium. In addition, by enabling the 2nd stream,
you will notice a drop in the frame rate in the primary stream. This
is a normal behavior since the hardware has to process two
streams instead of just one.
2. Please apply for a Dynamic DNS (DDNS) address as specified on
the previous page.
3. Please ensure that you’ve got an active internet connection on both
the IP50(W) and the intended mobile phone.
4. To view the live image, please enter the following address into the
phone’s web browser or streaming software,
“rtsp://ip50-ip/medias2”. The ip50-ip is the DDNS address that
you’ve obtained in step 2.
Compatible Phones:
HTC: Touch Diamond
Nokia: N78
Samsung: U708
Sony Ericssion: K610i / W850i
Incompatible Phones:
Nokia: 6500C
Sony Ericssion: T700 / W910 / Z750i
Dopod: CHT9110
Page 22
22
Start ComproView:
Once the hardware and software installations are done, user can start
configuring the ComproView by adding cameras and setting the
detection range.
After the software is installed, user could start to add the camera and
device to begin the monitoring.
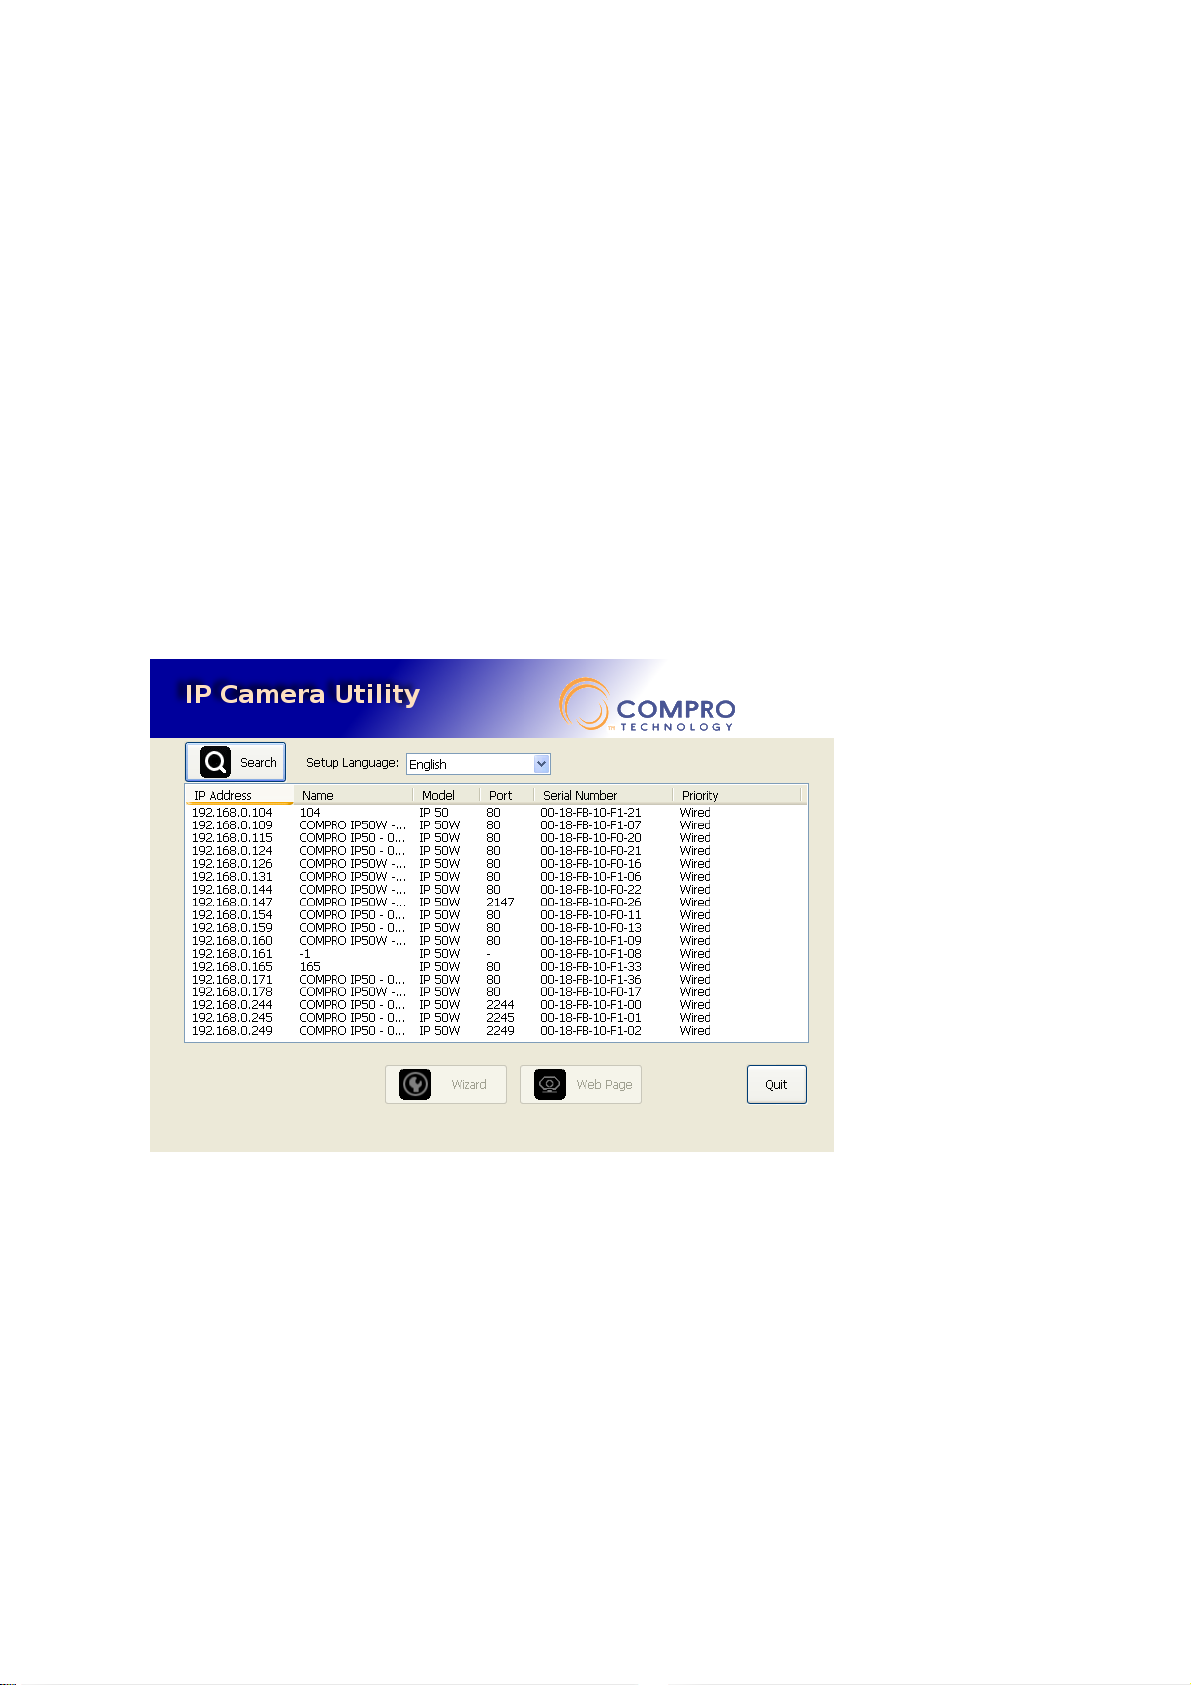
1. Go for start -> All Programs -> ComproView -> IP Camera Utility
2. After IP Camera Utility had been Launched, please select the
desired camera from the list and press the “Wizard” button to
guide you through the configuration process.
After you’ve configured the available cameras, you can start the
ComproView program, start -> All Programs -> ComproView ->
ComproView
3. At the log-in window, please enter the user name and password to
gain access to the system. The default user name and password is
“admin”.
Page 23
23
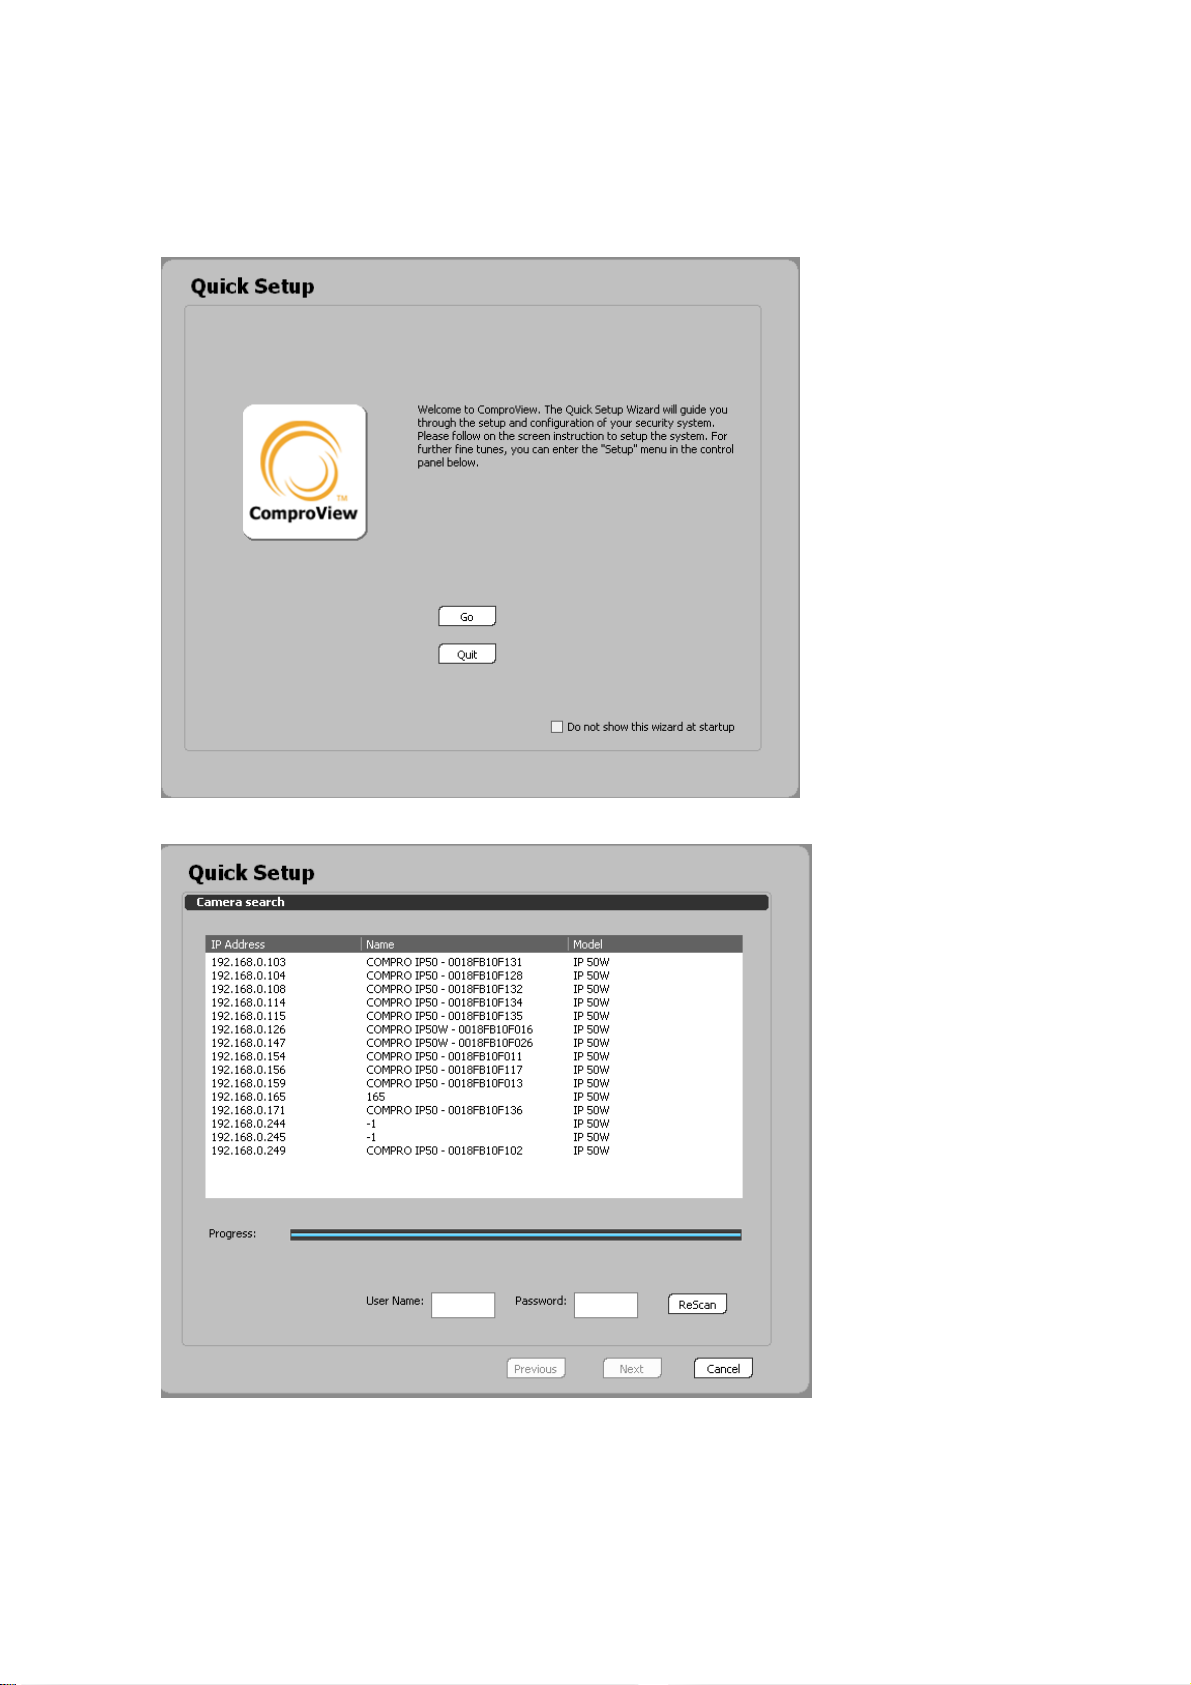
4. After login the system, you will be greeted by the Quick Setup
Wizard. The Wizard shall guide you through the setup process.
You do not have to enter any user name or password when setting
the camera unless the default had been changed.
Page 24
24
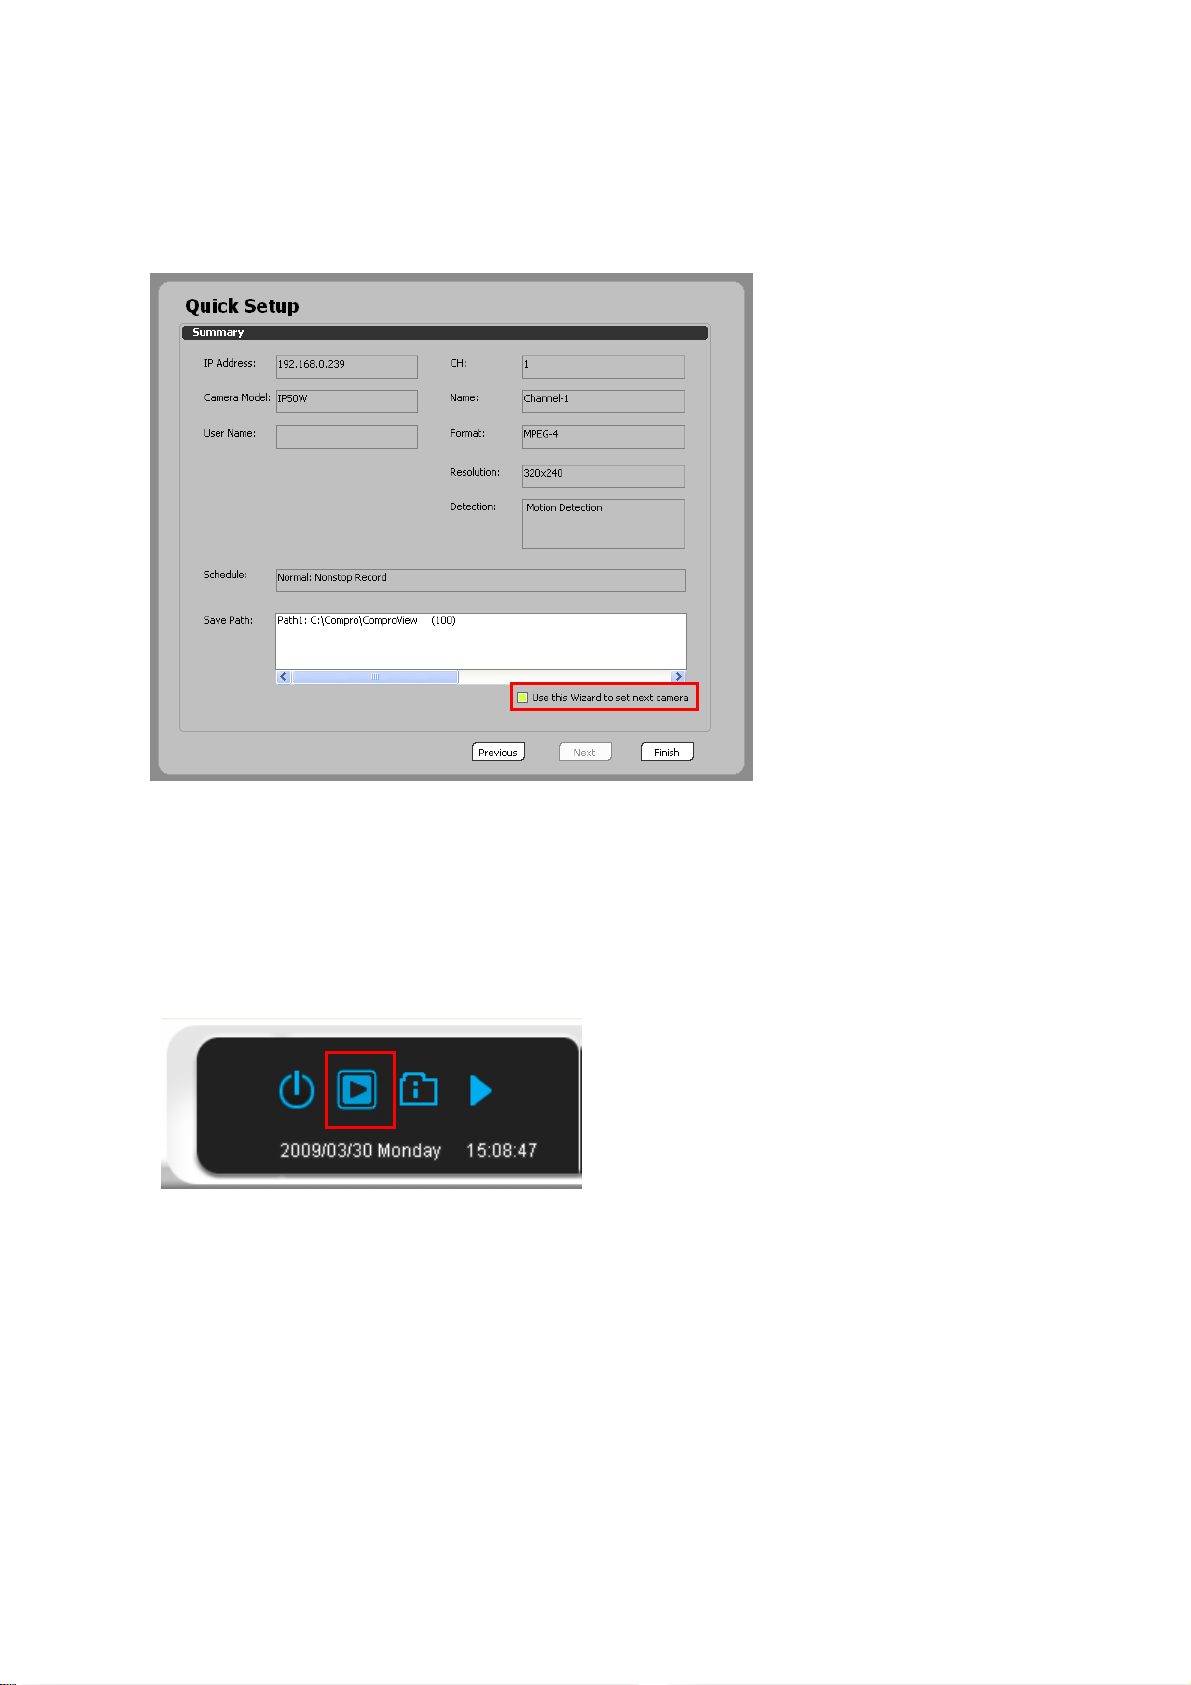
5. When you’ve reached the end of the quick setup and wish to setup
more than 1 camera in the system, please check the “Use this
Wizard to set the next camera” setting and press the finish button
to repeat Step4 until all available cameras had been set.
Once the above are done, your security system had been set.
Lastly, all of the schedule, detection and recording will only be
started when you enable the “Start all” option as shown blow.
Otherwise the system will only be in passive viewing mode and no
alarms will be triggered.
Note: You will not be able to change any of the system’s setting
when its “armed”, you must “dis-arm” the system by selecting the
“Stop all” function.
Page 25
25
Manual Installation
1
2.
3.
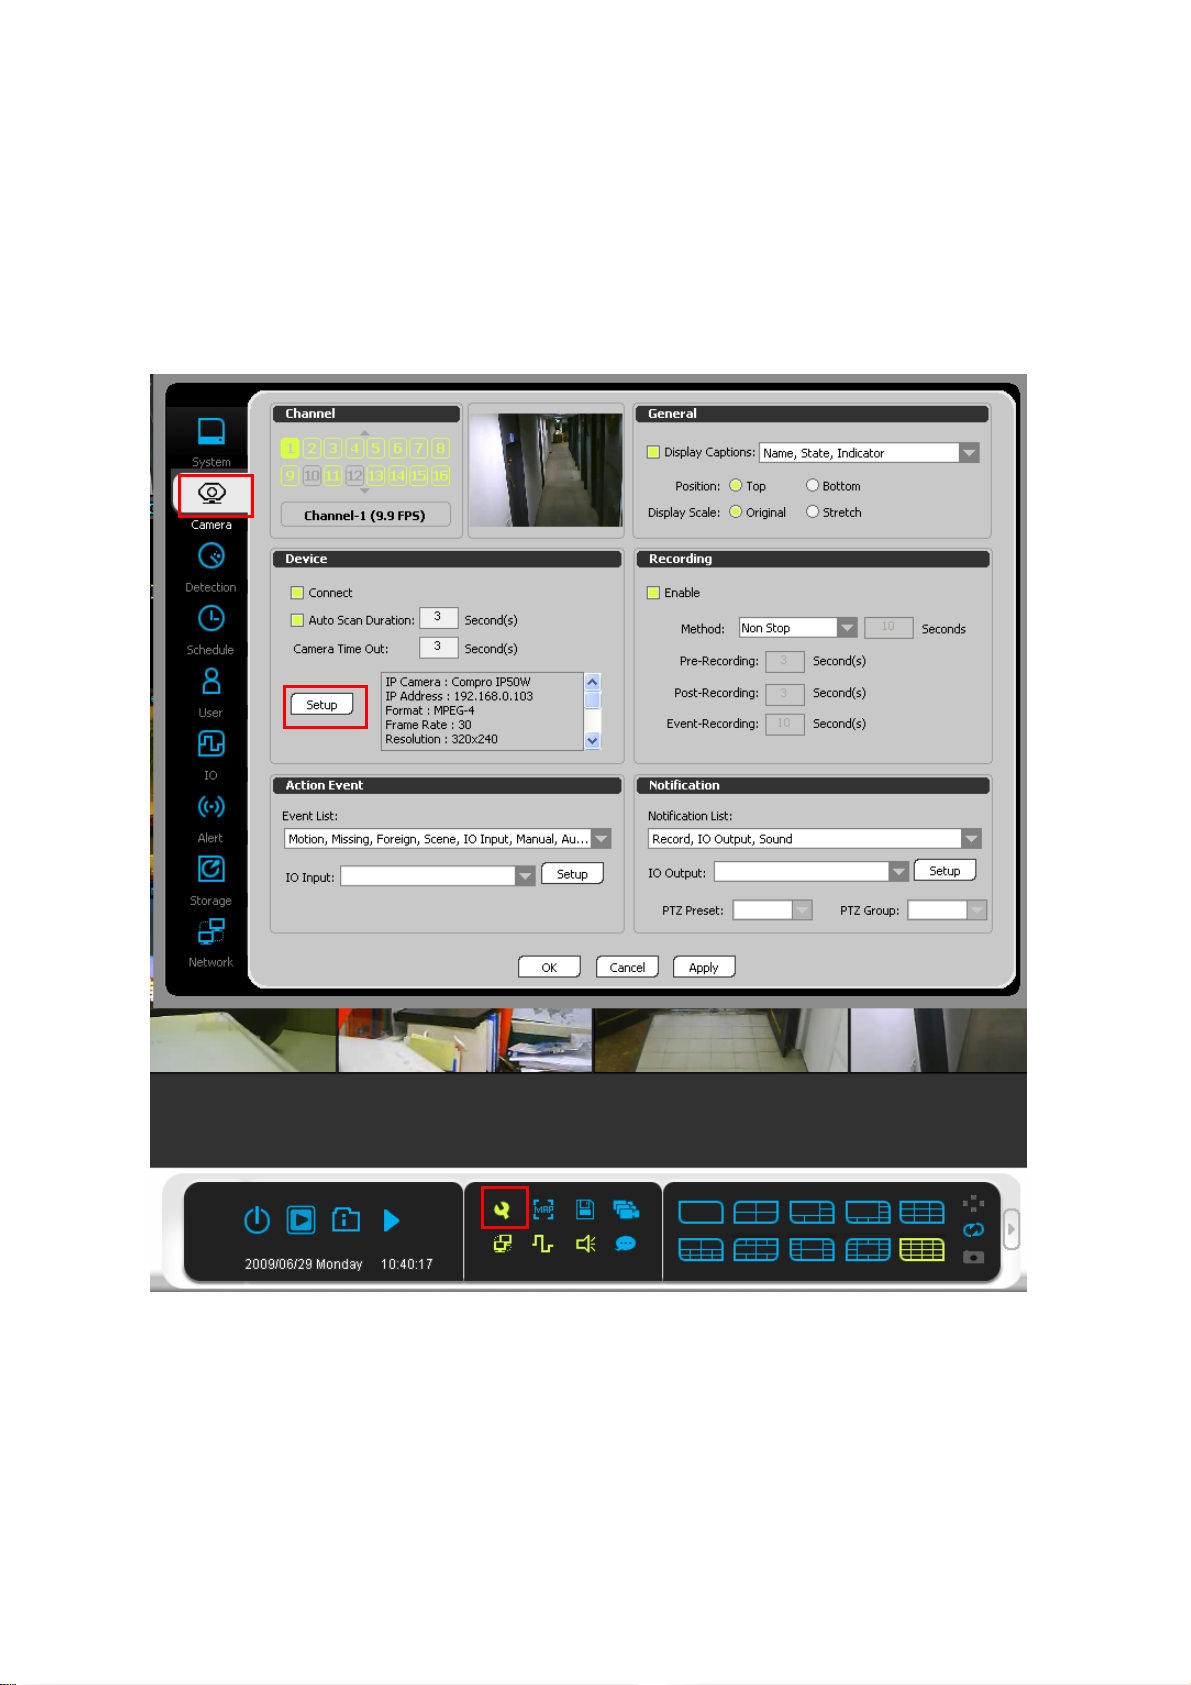
Should you wish to manually setup the camera, you can do so via
the “Setup” button located on the navigation bar. Once the Setup
button had been pressed, user should see the main console panel
below the live view window, please go for Setup -> Camera menu
-> One click for Device column -> Setup
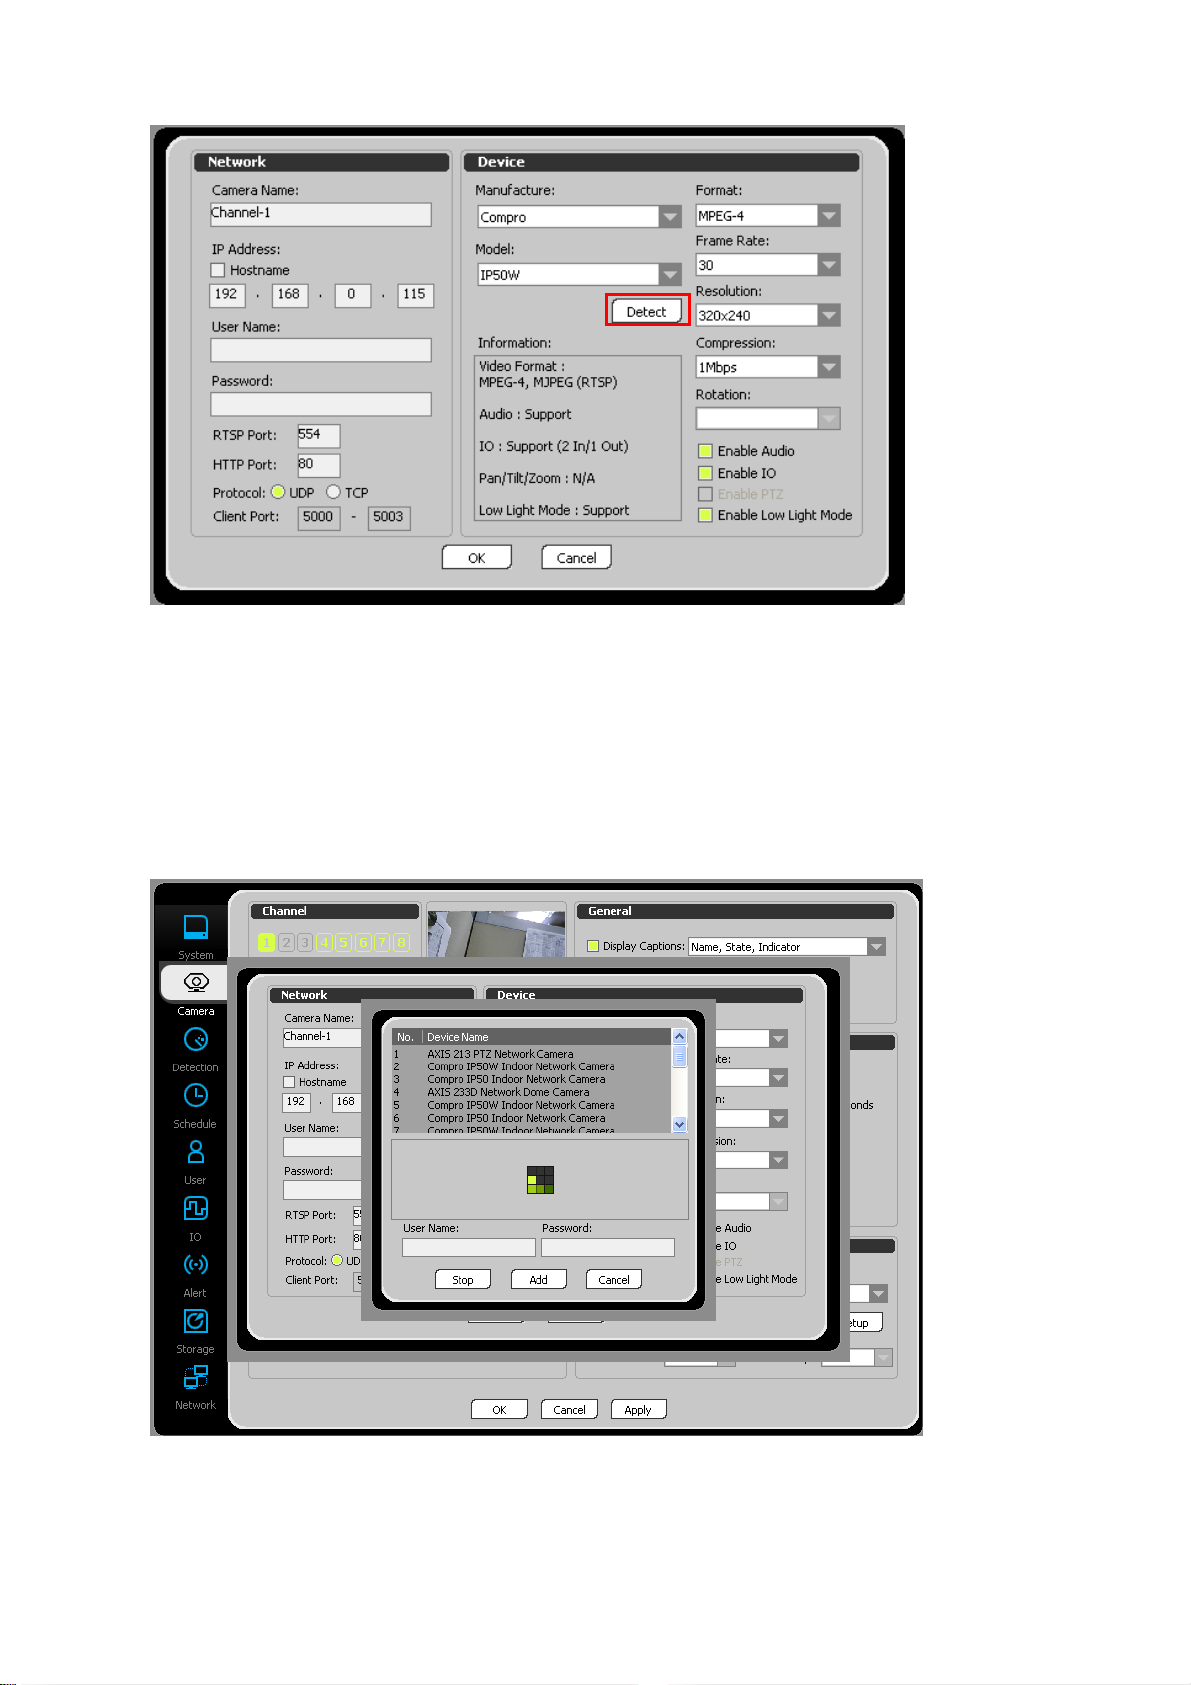
6. After IP Camera setup dialog is opened, if user does not know how
to lay on the setting, please press the “Detect” button for search
the device.
Page 26
26
7. If the desire model shows up on above column, please select it and
press “Add” button to add in the system. There is no need to enter
the user name and password manually, unless the user had set a
non-default combination to the camera.
Page 27
27
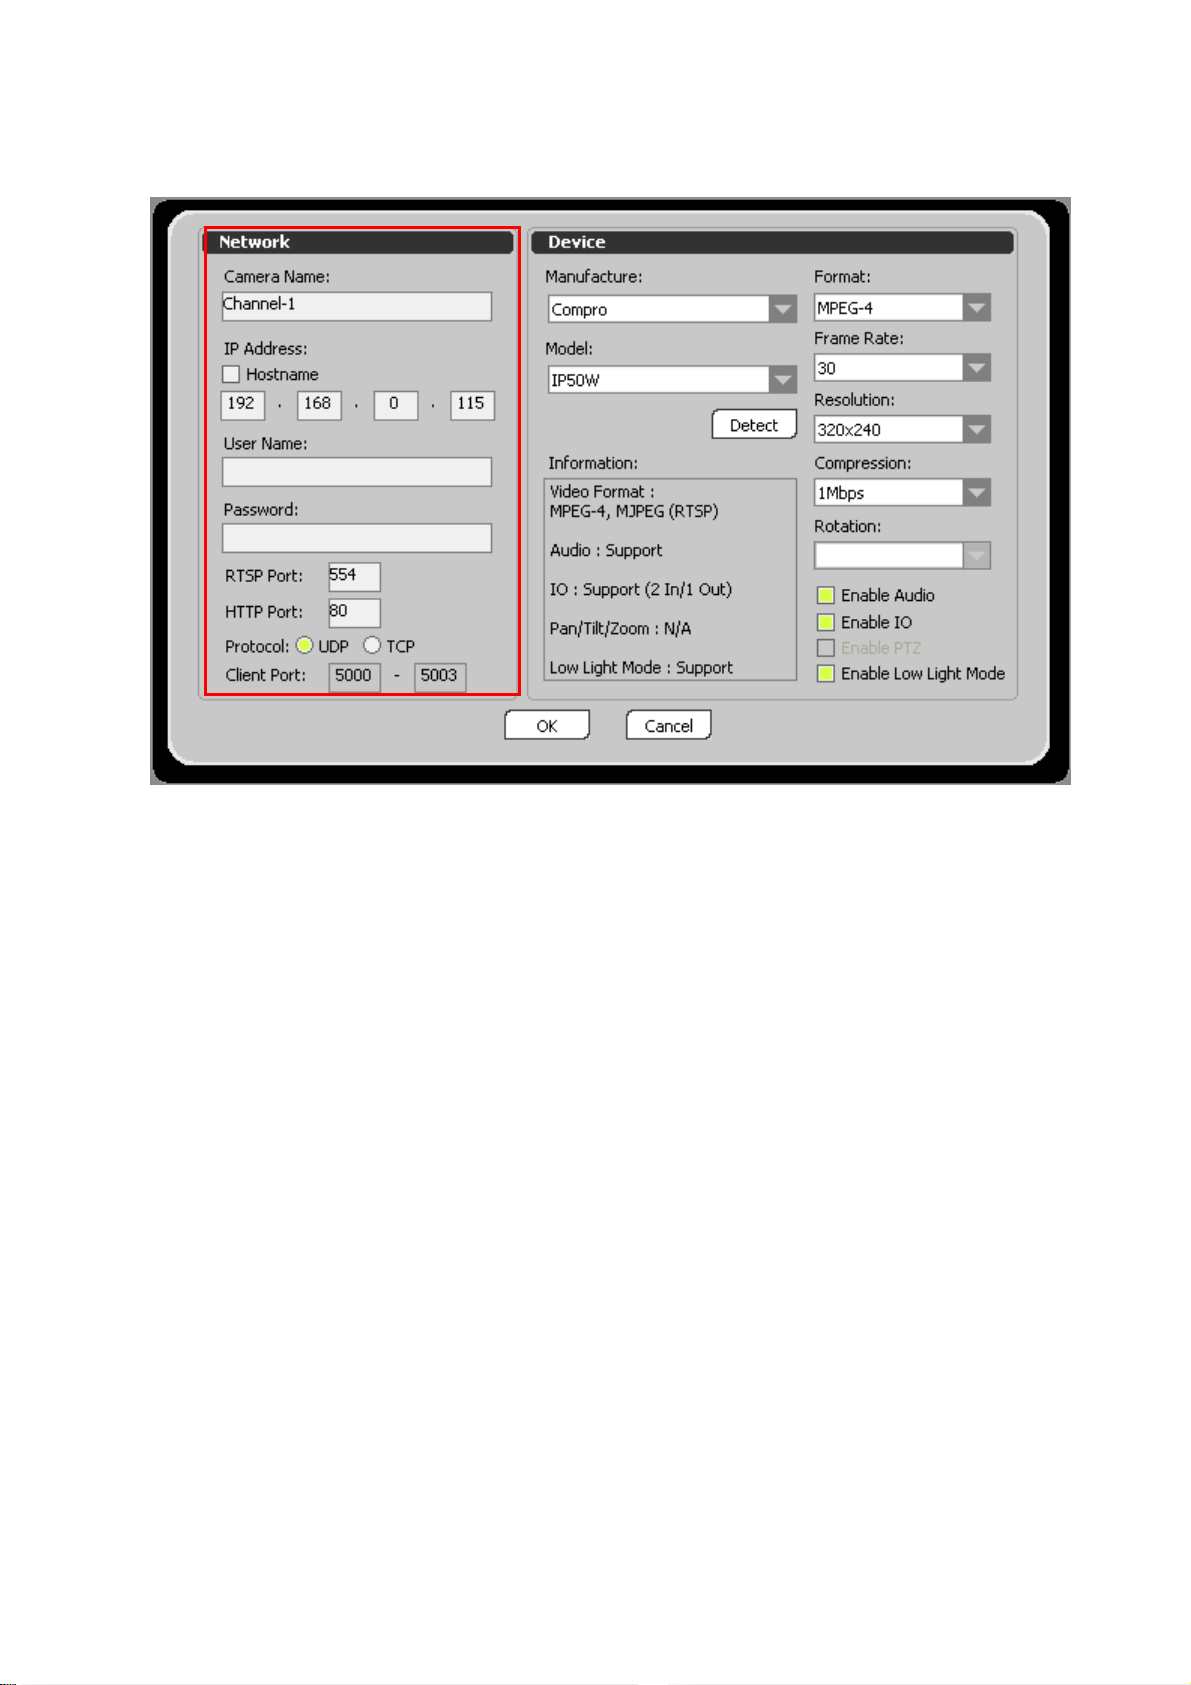
8. If user wants to add the new IP camera manually, please enter
“Camera Name”, “IP Address”, “User Name”, and “Password”.
The default user name and password is “admin”.
9. After IP Camera device is decided, the following option could let
user to change “Manufacture”, “Model”, “Format”, “Frame Rate”,
“Resolution”, “Compression”, “Rotation”, “Enable Audio”, “Enable
IO”, and “Enable PTZ”. After all the selections are ready, presses
the OK button to close the IP Camera setting.
10. Upon IP Camera Setup is completed, please press “Apply” button
to Memorized the setting and then press “OK” button to close the
setup dialog.
11. After the IP camera setting is completed, please wait a while for
connection. After user see the image on the screen, and then user
could start to execute the monitoring function.
Page 28

28
Client for Windows Mobile 5/6 Mobile Phone:
The ComproView Mobile client is the perfect companion to remotely
access the live video and past video history stored on the
ComproView. Its function far surpasses the capabilities offered by the
standard 3GPP camera since the 3GPP mode only supports the
viewing of live image and without audio.
There are several ways of utilizing the ComproView Mobile client for
Windows Mobile 5/6 mobile phones:
1. Mobile client connects directly to a single IP camera.
2. Mobile client connects to a computer with ComproView running.
3. Mobile client connects to a computer with ComproView running
and playing back pre-recorded videos.
To install the ComproView Mobile onto your mobile phone, you can do
one of the following:
1. Install via Microsoft ActiveSync: You must have Microsoft
ActiveSync installed on your computer and run the setup.exe found
under CVMobile folder in the root directory of the CD.
2. Installed via Cab file: You can copy the CVMobile.CAB onto the
storage medium and double click the file to execute the setup
process.
Page 29
29
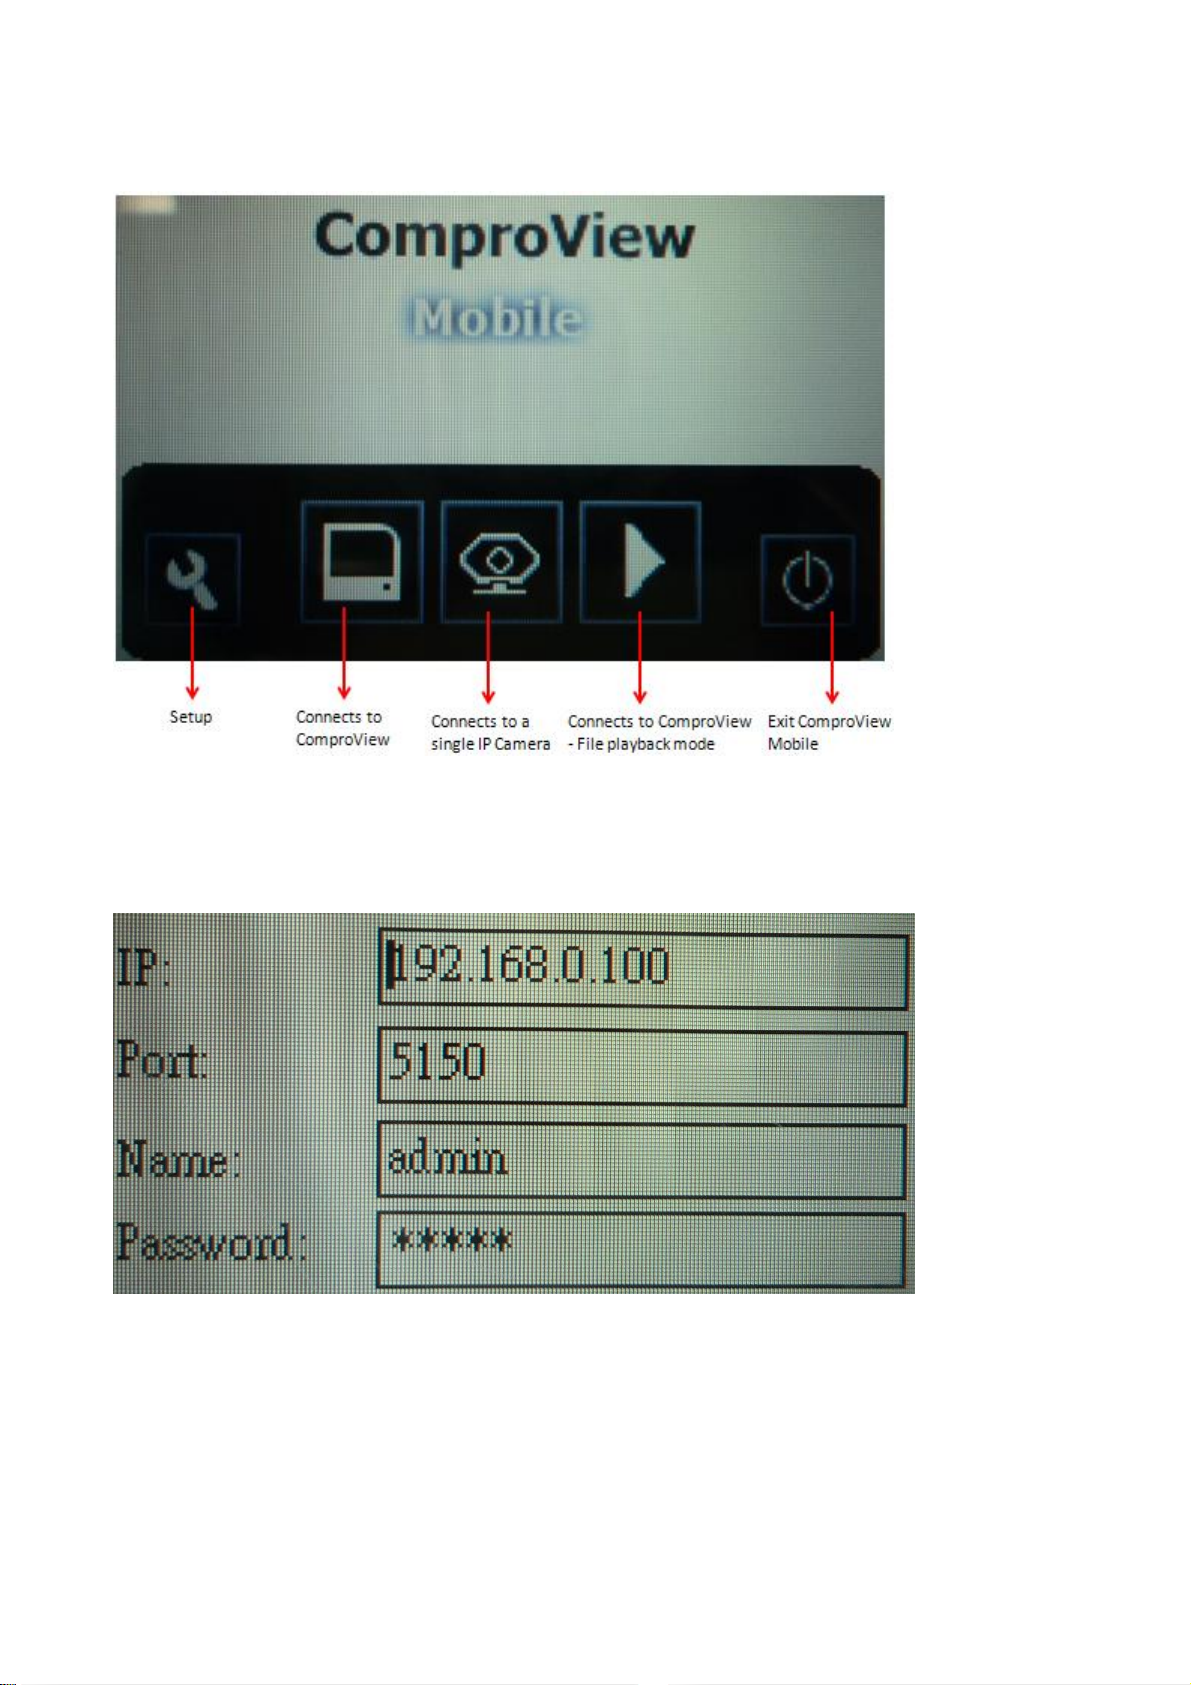
Up on starting the ComproView Mobile, you will be greeted by the
welcome screen with a list of options.
Setup: User selectable option for snapshot directory and phone
compatibility mode.
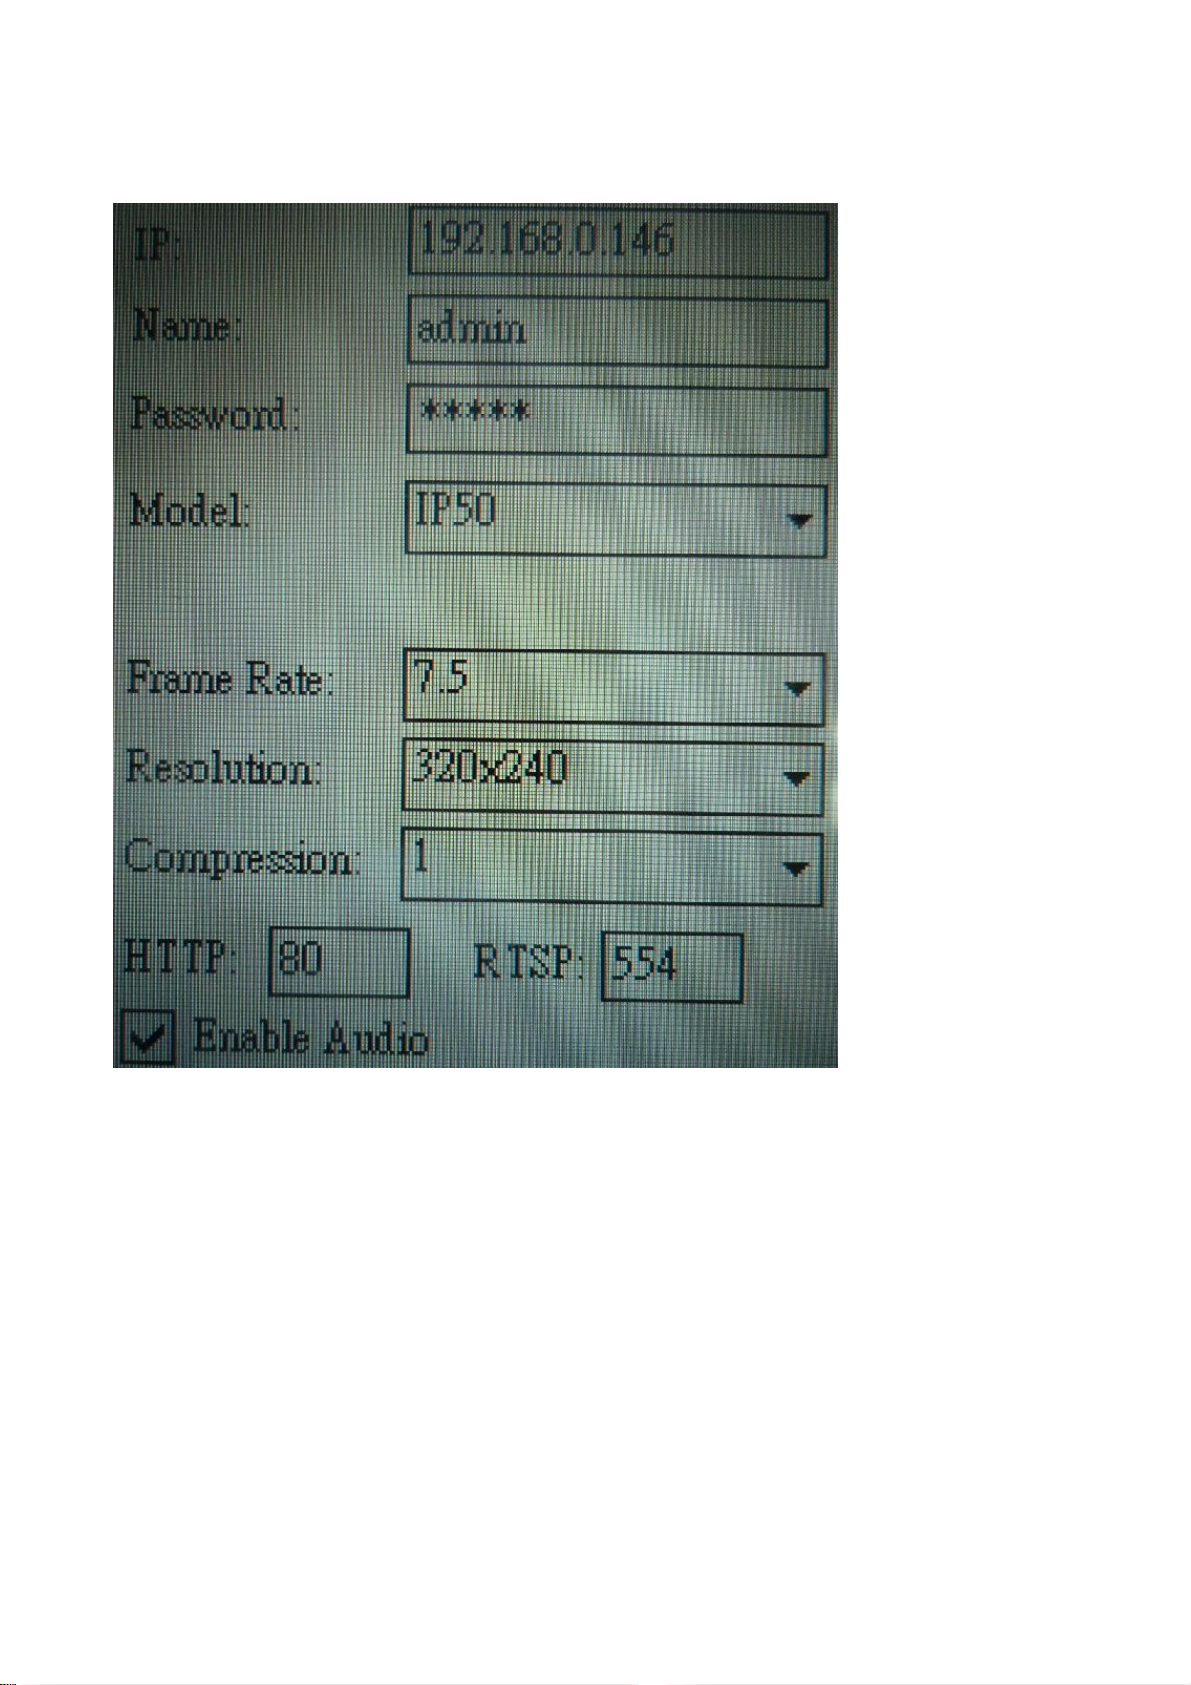
Connects to ComproView & Playback mode (LAN only):
Please enter the IP address of the machine of which the ComproView
is installed and currently operational. The user name and password is
the combination that the user used to log-on to ComproView. Under
this mode, the user can monitor every camera that is connected to
ComproView.
Page 30
30
Connect to a single IP camera (LAN/Internet):
You can connect to any active IP50W that is currently operational and
available on your network. For LAN based connection, you can use the
maximum resolution and frame rate supported by your mobile phone.
However, for Internet based connections, we recommend nothing
higher than 160 x 120 and 5 FPS due to speed limitation imposed by
many Internet service providers.
Note: Currently, you can only have one active connection to the
ComproView, under either monitor or playback mode.
Page 31

31
Resetting to the Factory Default Setting:
This function will cause the IP camera back to the factory default
settings, please refer the steps below:
1. Keep pressed the reset button (rear panel) about 10 seconds; user
will see the Status Indicator go out.
2. After about 5 seconds, the Status Indicator brightens up again. It
means that the IP camera is back to the factory default.
3. Please re-install the Compro IP 50 / 50W using the one of above
method.
Page 32

32
Compro Technology, Inc.
www.comprousa.com
P/N 3GA0310475
Rev.1.1
 Loading...