

Page 1

VideoMate V600
Analog Standalone TV Box
Start Up Guide
Compro Technology, Inc.
www.comprousa.com
Page 2

Copyright © 2001-2008. Compro Technology, Inc. No part of this
document may be copied or reproduced in any form or by any means
without the prior written consent of Compro Technology, Inc.
Compro, VideoMate, Poladyne, Play with Power, and the Compro
logo are trademarks of Compro Technology, Inc. Other names and
marks are trademarks of their respective owners.
COMPRO makes no warranties with respect to this documentation
and disclaims any implied warranties of merchantability, quality, or
fitness for any particular purpose. The information in this document is
subject to change without notice. COMPRO reserves the right to
make revisions to this publication without obligation to notify any
person or entity of any such changes.
Compro Technology, Inc.
Tel. +886 2 2918 0169, Fax +886 2 2915 2389
4/F, No.12, Alley 6, Lane 45, Pao Shin Road
Hsintein City, Taipei, Taiwan.
www.comprousa.com
Page 3

1
Table of Contents
About This Guide .............................................................. 2
VideoMate V600 TV Box Contents ................................... 3
VideoMate V600 TV Box Hardware Guide........................ 4
Remote Control Key Definition and Use ........................... 5
VideoMate V600 TV Box Using Guide .............................. 6
Troubleshooting............................................................... 12
Page 4

2
About This Guide
This guide provides you the information on how to install and use your
VideoMate V600 Analog Standalone TV Box.
VideoMate V600 Analog Standalone TV Box lets you watch TV with your
computer monitor. V600 TV Box also provides the input base stand to allow
you to connect other video devices (i.e. DVD Player, XBOX, PS2, PS 3, Wii or
other game console). The maximum resolution are 1600x1200 and 1680x1050
to gives you the crystal clear pictures. It also supports 4:3, 5:4, 16:9, and 16:10
screen ratio for all kinds of monitors. With the Remote Controller that included
with V600 TV Box will greatly increase the value of the computer monitor which
also saves you from buying another TV set.
SYSTEM REQUIREMENTS
z Monitor (CRT or LCD) contains D-sub Connector and supports 640*480
resolution or above.
z Speakers with stereo jack.
Warning
It is normal for VideoMate V600 TV Box become warm when it is being used.
Please place the TV Box at a place where the air flows.
VideoMate V600 TV Box will only need a computer monitor to work; It does not
require to connect to computer nor turn on the computer to work properly.
Please do not use other adaptor except the one included in the package to
prevent damaging V600. Damaged V600 by using wrong adaptor will not be
cover from the warranty.
Page 5

3
VideoMate V600 TV Box Contents
VideoMate V600
TV Box
Power Adaptor
Start Up Guide
Remote Control
(with 2 AAA batteries)
Base Holder
D-sub Cable Audio Cable
Page 6
4
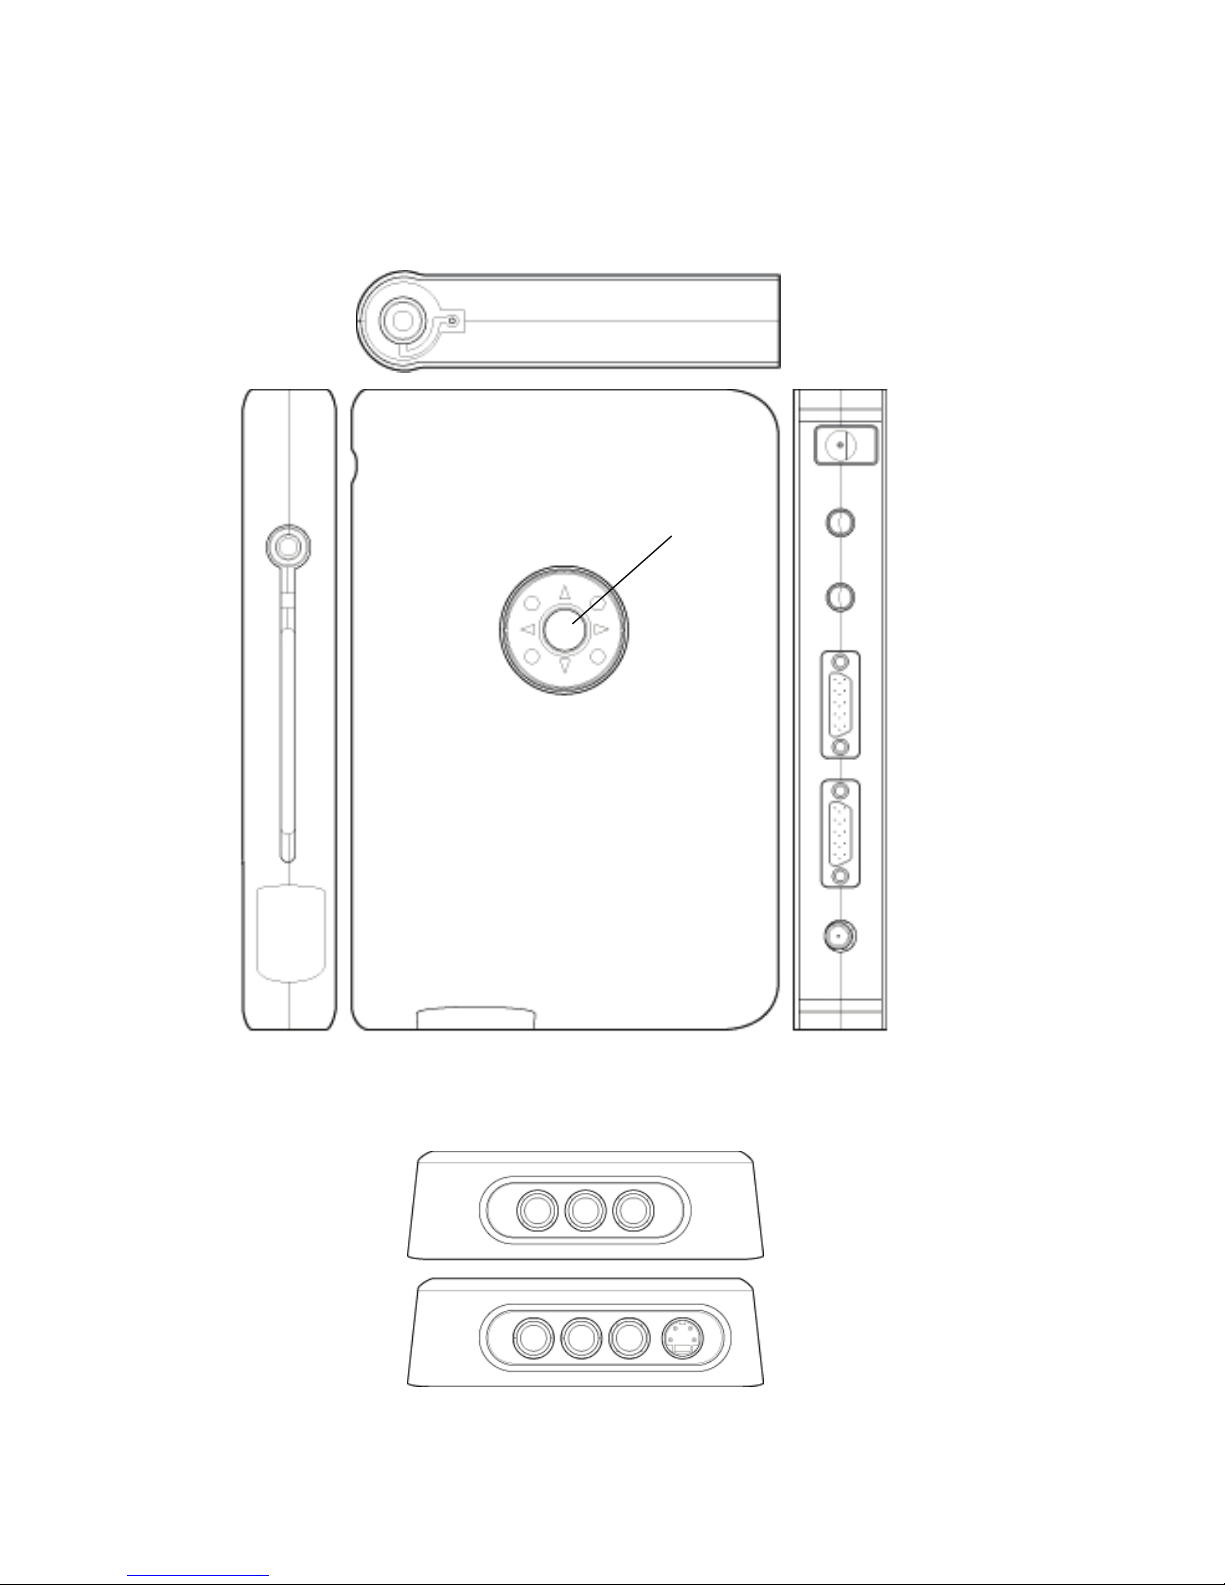
VideoMate V600 TV Box Hardware Guide
TV Cable/Antenna
Input
Line Out to Speaker
Connect to Monitor
(15 pin D-sub output)
12V Power Jack
Connect to Computer
(15 pin D-sub input)
Line In from PC
Power SW
(Hold 2 sec.)
Component Input (Y/Cb/Cr)
Ear Phone
Jack
15 pin D-sub
Channel +
Channel –
Menu
Volume +
Volume –
Composite (L&R Audio, Video)
S-Video
Page 7
5
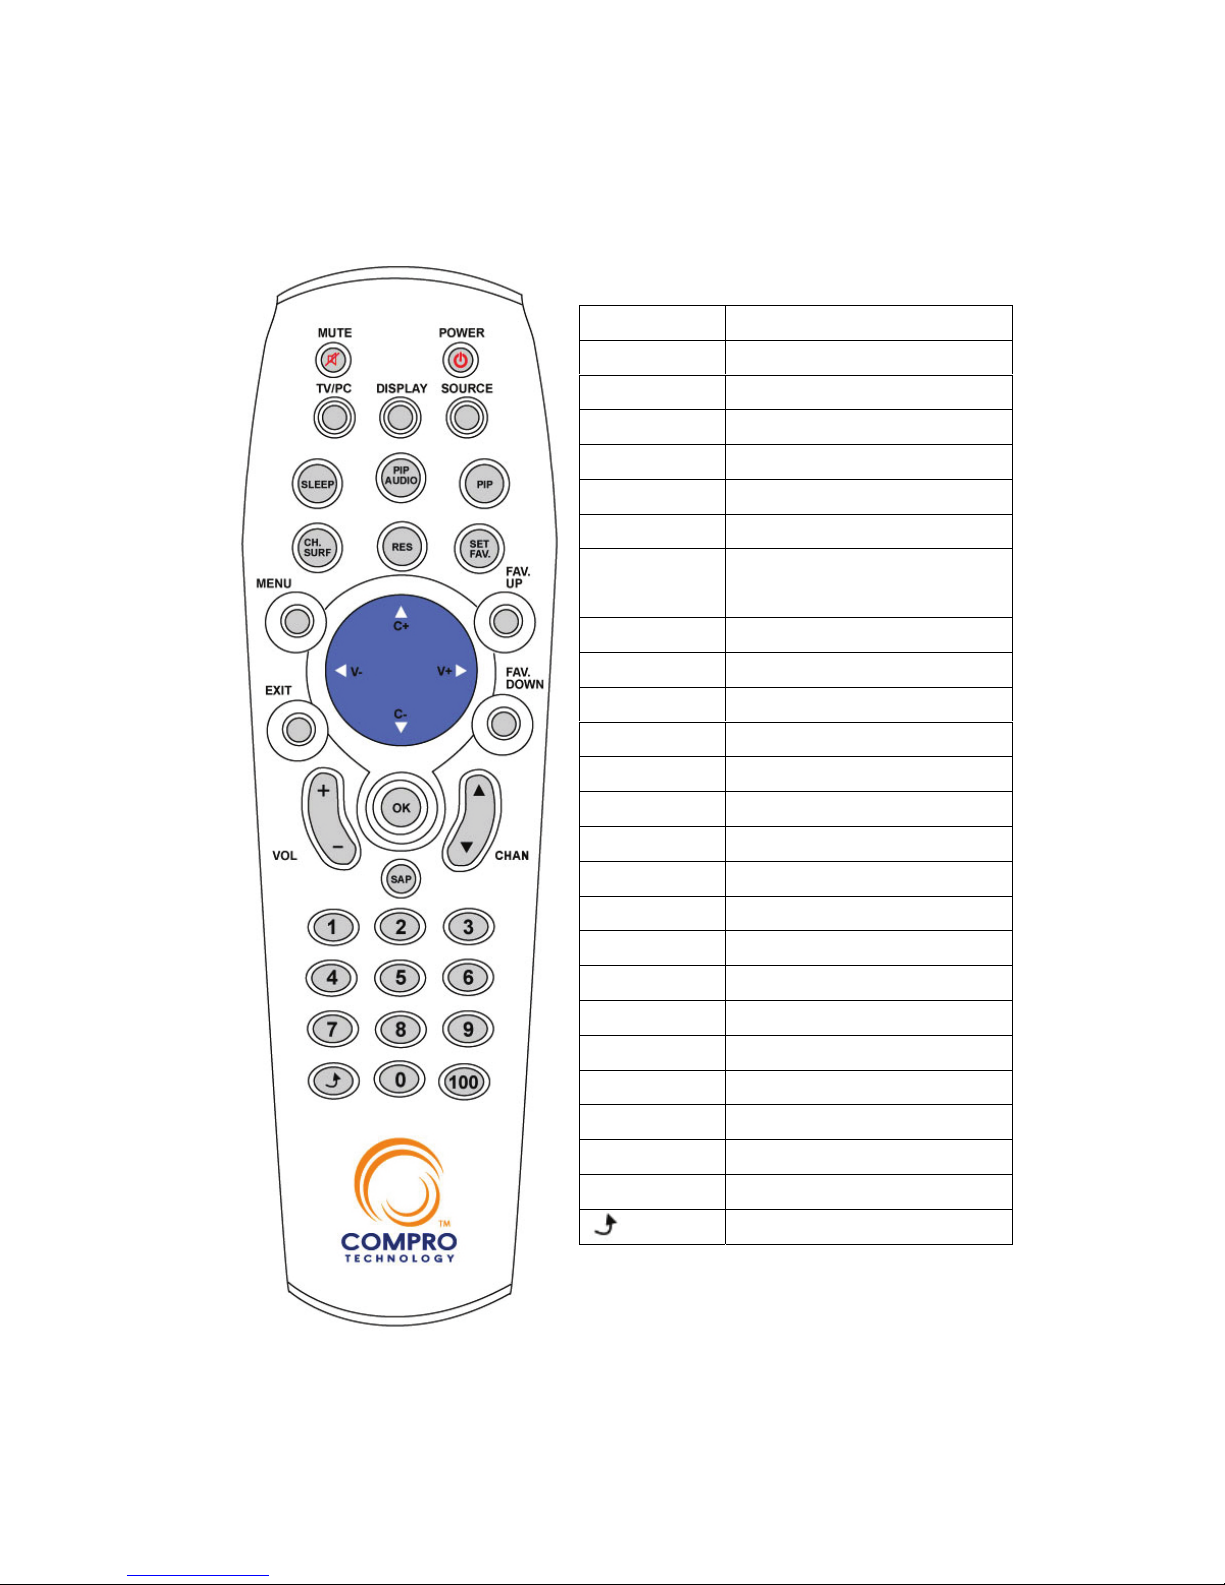
Remote Control Key Definition and Use
POWER Power On/Off
MUTE Mute
DISPLAY Display OSD Info.
TV/PC Switch TV/PC Mode
SOURCE Video Source Switch
SLEEP Sleep Mode
PIP Picture In Picture
PIP AUDIO Switch audio between TV
and PC
RES Switch Resolution
CH.SURF Channel Surfing
SET FAV. Set Favorite CH List
FAV UP Favorite CH List Up
FAV DOWN Favorite CH List Down
MENU Display Menu
EXIT Exit Menu
UP Direction Up (CH +)
DOWN Direction Down (CH -)
LEFT Direction Left (Volume -)
RIGHT Direction Right (Volume +)
OK Confirm
VOL Volume Control
CHAN Channel Switch
SAP Stereo/SAP/Mono
0-9 Number Keys
100 Number Key
Return to last channel
Page 8

6
VideoMate V600 TV Box Using Guide
Using at the first time
Please refer to the above for correct setup to use V600 TV Box. After you have
connected the power adaptor, you will see orange light shining out from the
side. Press the power button at the top will turn on the TV Box and you will see
orange light become blue light. Please use Auto Scan to remove channels
without signal. Now you may enjoy the TV Show.
If you have connect V600 TV box to your computer’s video card, press the
power button on the TV box or the power button on the remote control will
switch between TV and PC signal. You may also press “TV/PC” button on the
remote control to achieve the same result.
Order of the Sources: TV Æ Composite Æ S-Video Æ Component Æ TV
VideoMate V600 TV Box supports 9 resolutions from below. Each resolution
Supports 60Hz and 75Hz. The default setting is 1024*768 @ 60Hz.
Resolution 1 -> 640*480 (4:3) Resolution 6 -> 1400*1050 (4:3)
Resolution 2 -> 800*600 (4:3) Resolution 7 -> 1440*900 (16:10)
Resolution 3 -> 1024*768 (4:3) Resolution 8 -> 1600*1200 (4:3)
Resolution 4 -> 1280*720 (16:9) Resolution 9 -> 1680*1050 (16:10)
Resolution 5 -> 1280*1024 (5:4)
To change resolution, please open up menu and select the resolution you want.
Refer to later instruction for more detail. “RES” button from the remote
controller can also switch the resolution.
If using PIP feature, the refresh rates in Windows support resolutions below:
Support Refresh Rate
Resolution
60 Hz 70 Hz 72 Hz 75 Hz
640 x 480 Yes - Yes Yes
800 x 600 Yes - Yes Yes
1024 x 768 Yes Yes Yes Yes
1152 x 864 Yes Yes - Yes
1280 x 1024 Yes Yes Yes Yes
1280 x 720 Yes Yes Yes Yes
1440 x 900 Yes Yes Yes Yes
1400 x 1050 Yes Yes Yes Yes
1600 x 1200 Yes - Yes Yes
1680 x 1050 Yes Yes Yes Yes
Page 9
7
OSD Menu Guide
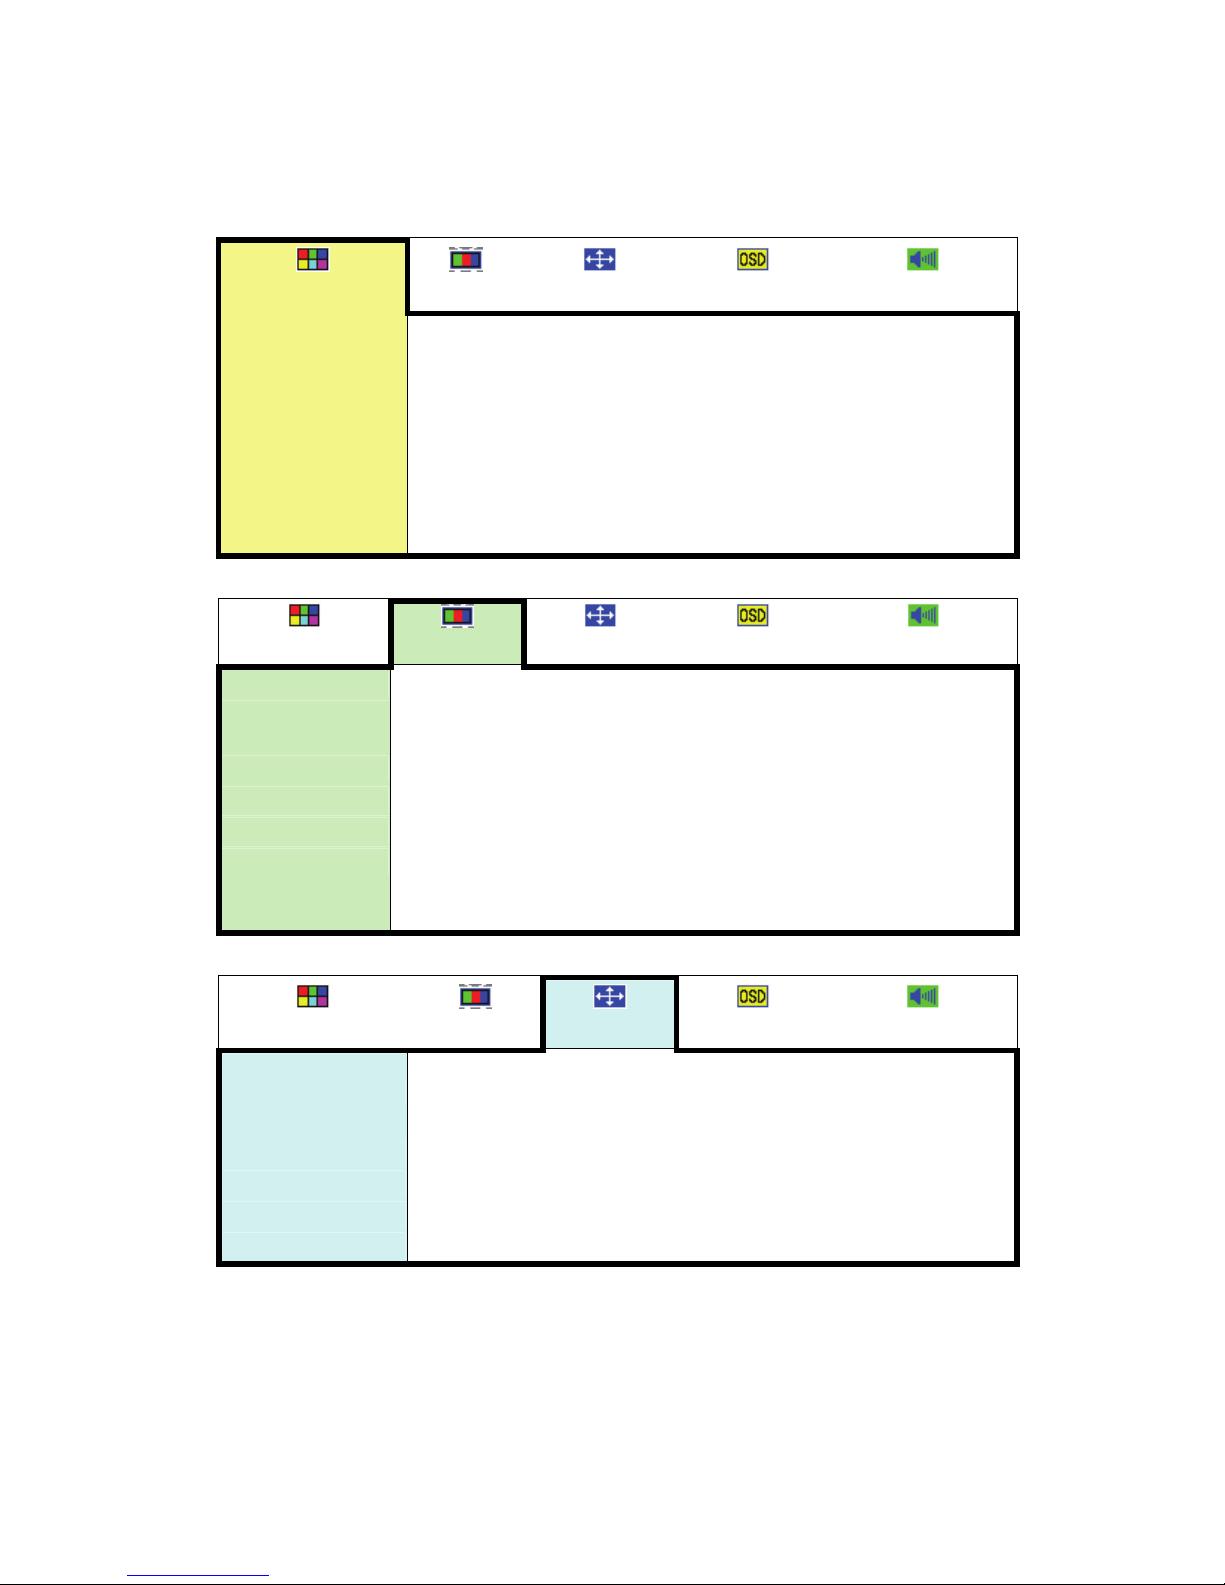
Menu button will open up OSD Menu, please use the direction key to navigate.
(Picture)
(TV)
(Monitor)
(OSD)
(Sound)
Brightness Adjust the brightness (0~100) Default : 50
Contrast Adjust the Contrast (0~100) Default : 50
Saturation Adjust the Saturation (0~100) Default : 50
Sharpness Adjust the Sharpness (0~15) Default : 0
Hue Adjust the Hue ( 0~100) Default : 50
Y/C Sep. Mode Choose between 2D/3D mode Default : 3D Mode
Presets 3 modes of picture settings (Standard/Game/Cinema)
(Picture)
(TV)
(Monitor)
(OSD)
(Sound)
Input Signal Select Air or Cable for TV input signal type. Default is Air
Channel
Rename
Set a name for specific channel. (5 letter/numbers)
Fine tune Fine tune frequency if TV is unclear. (0~100) default is 50
Auto Scan Recommend to use Auto Scan for the first time. (NO/YES)
Channel Swap Swap the channel numbers to your preference. (NO/YES)
CH Add/Erase Add or Erase channel.
Channel Video
System
Change video standard for current channel.
Default by different countries
(Picture)
(TV)
(Monitor)
(OSD)
(Sound)
640*480 800*600 1024*768 (default) 1280*720
1280*1024 1400*1050 1440*900 1600*1200
Resolution
1680*1050
Refresh Rate 60Hz (default) 75Hz
Noise Reduction Adjust level of noise reduction. (0~8) Default is 4
Display Type LCD (default) CRT PDP
Input Source TV Composite SV (S-Video) YCbCr (Component) PC
Page 10
8
Channel Swap
To swap the channel numbers, please select Channel Swap from the menu
then select yes, and it will show as a sub menu. Once you have entered this
menu, you will see a list of channels. You may browse with the direction keys;
Up and Down are going through the list while Left and Right are changing
pages of the list. Select the channel number that you wish to swap and press
OK, and then enter the number of the channel that you wish to switch.
To reset to the original channel numbers, please rescan the channel table
again by selecting Auto Scan in the menu.
My Favorite Channel List
My Favorite Channel List can store up to 10 channels that you watch the most
and browse with “FAV UP” and “FAV DOWN” keys on the remote controller.
To add channels to the favorite list, please turn to the channel you wish to add
and press “SET FAV” on the remote controller. Press “OK” on the selected
position.
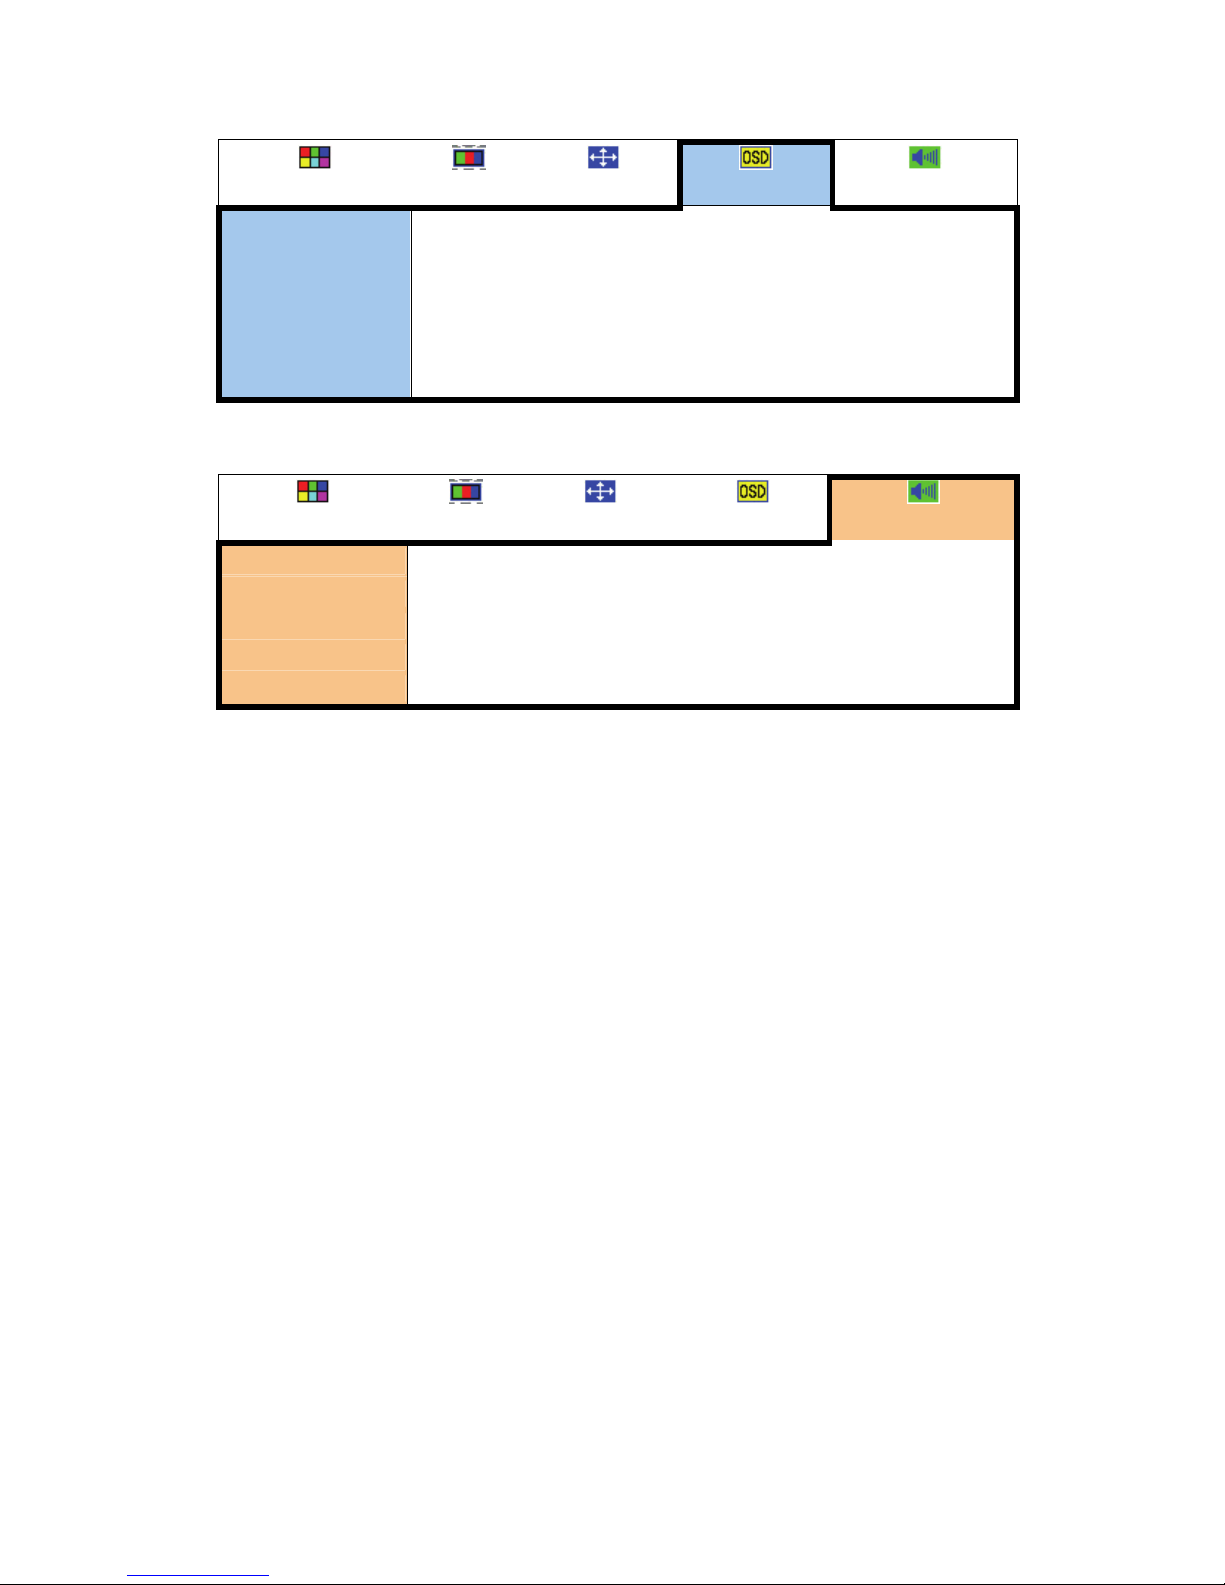
(Picture)
(TV)
(Monitor)
(OSD)
(Sound)
OSD Position Press OK key, use direction keys to move OSD position
OSDTransparency 1 2 3 4
Language Select your language
Reset All Settings NO/YES (1 Cancel / 2 Reset All Settings)
Information VideoMate V600 Version information
Country/Region Select your country or region
(Picture)
(TV)
(Monitor)
(OSD)
(Sound)
Volume Adjust volume (0-50)
Treble Adjust Treble volume (0-15)
Bass Adjust Bass volume (0-15)
Loudness ON (enlarge the amplifier) / OFF (original signal)
Reset Reset sound settings (NO/YES)
Page 11
9
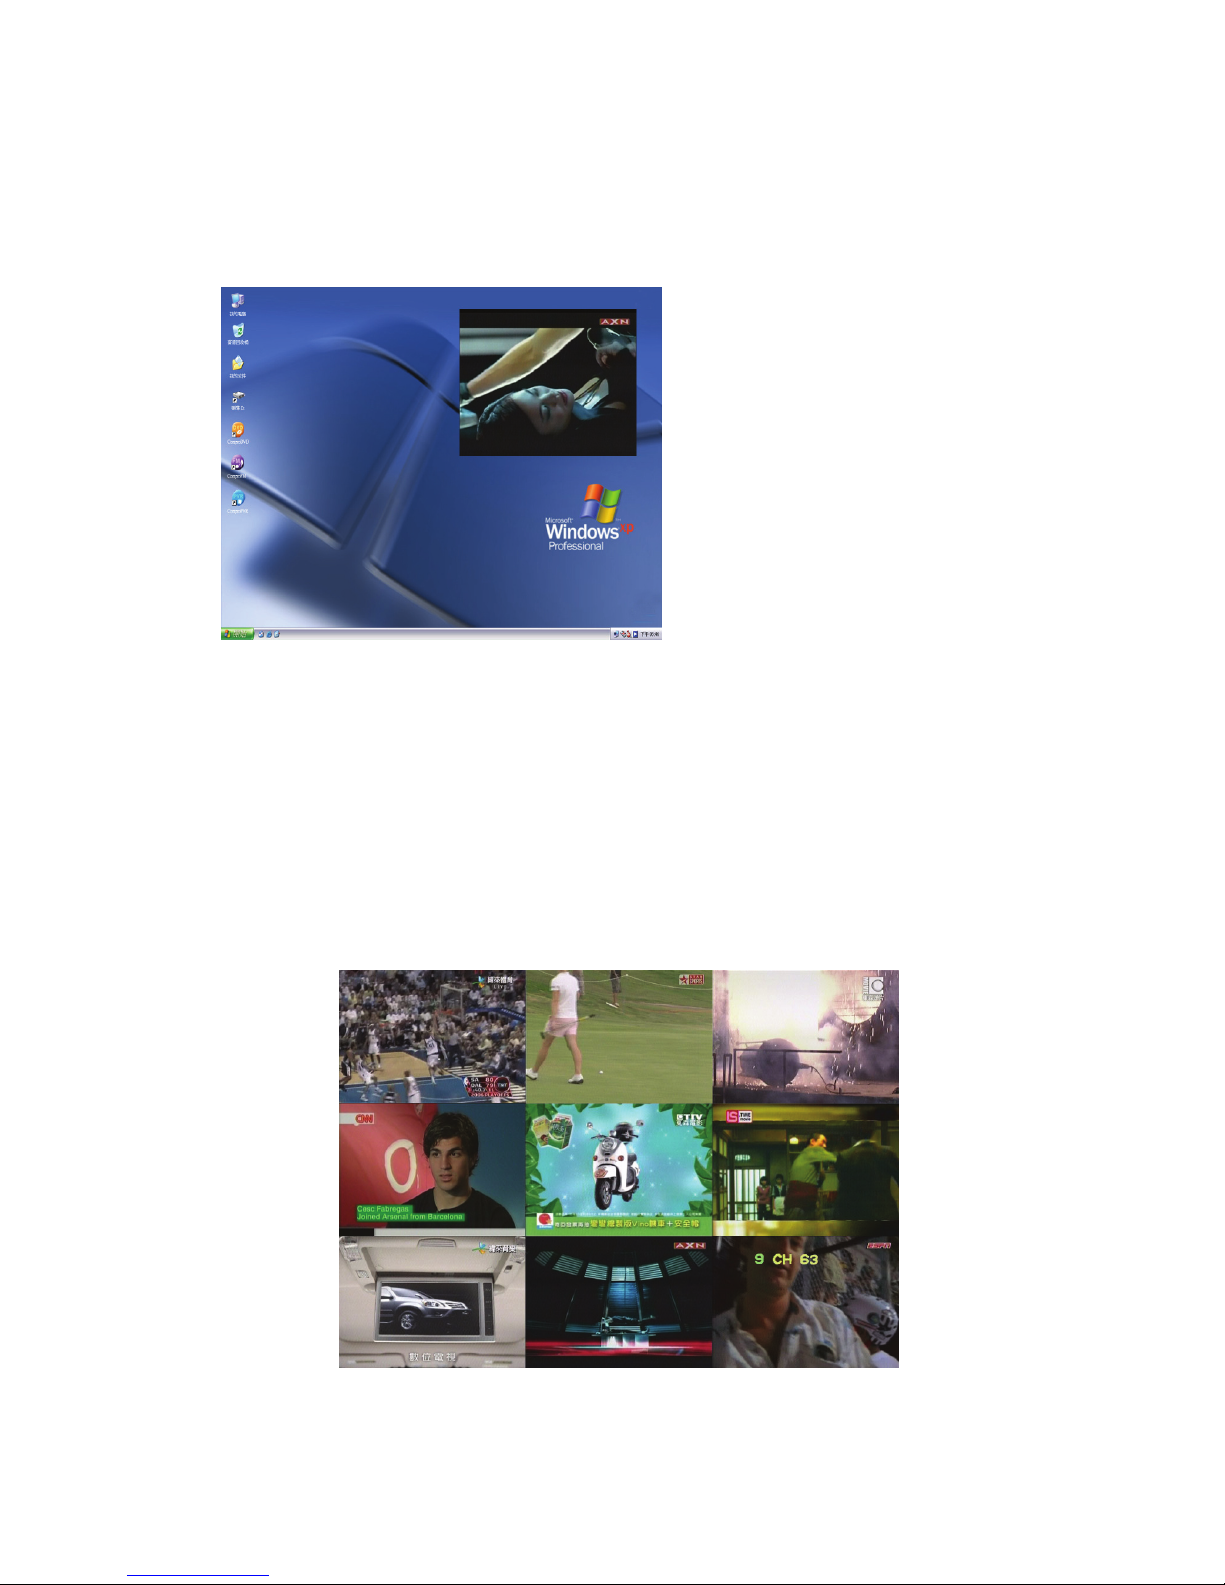
PIP (Picture In Picture)
You can start PIP function by clicking “PIP” button on the remote control. It
allows you to watch TV on the Windows desktop.
When PIP is working, press
“PIP” button again will change
the size of the TV screen; you
may zoom twice and the third
time you press “PIP”, it will close
the PIP function. And you can
move the TV screen position
with the blue arrow button on the
remote.
Channel Surfing
Channel Surfing allows you to preview and find the channel you want by
presenting in 9 squares.
To access this function, please press “CH.SURF” button on the remote
controller. The pictures will refresh from left to right. When you have found the
channel you prefer, please press the correspondent number keys (1~9) to
switch to that channel.
Page 12
10
OptiRatio
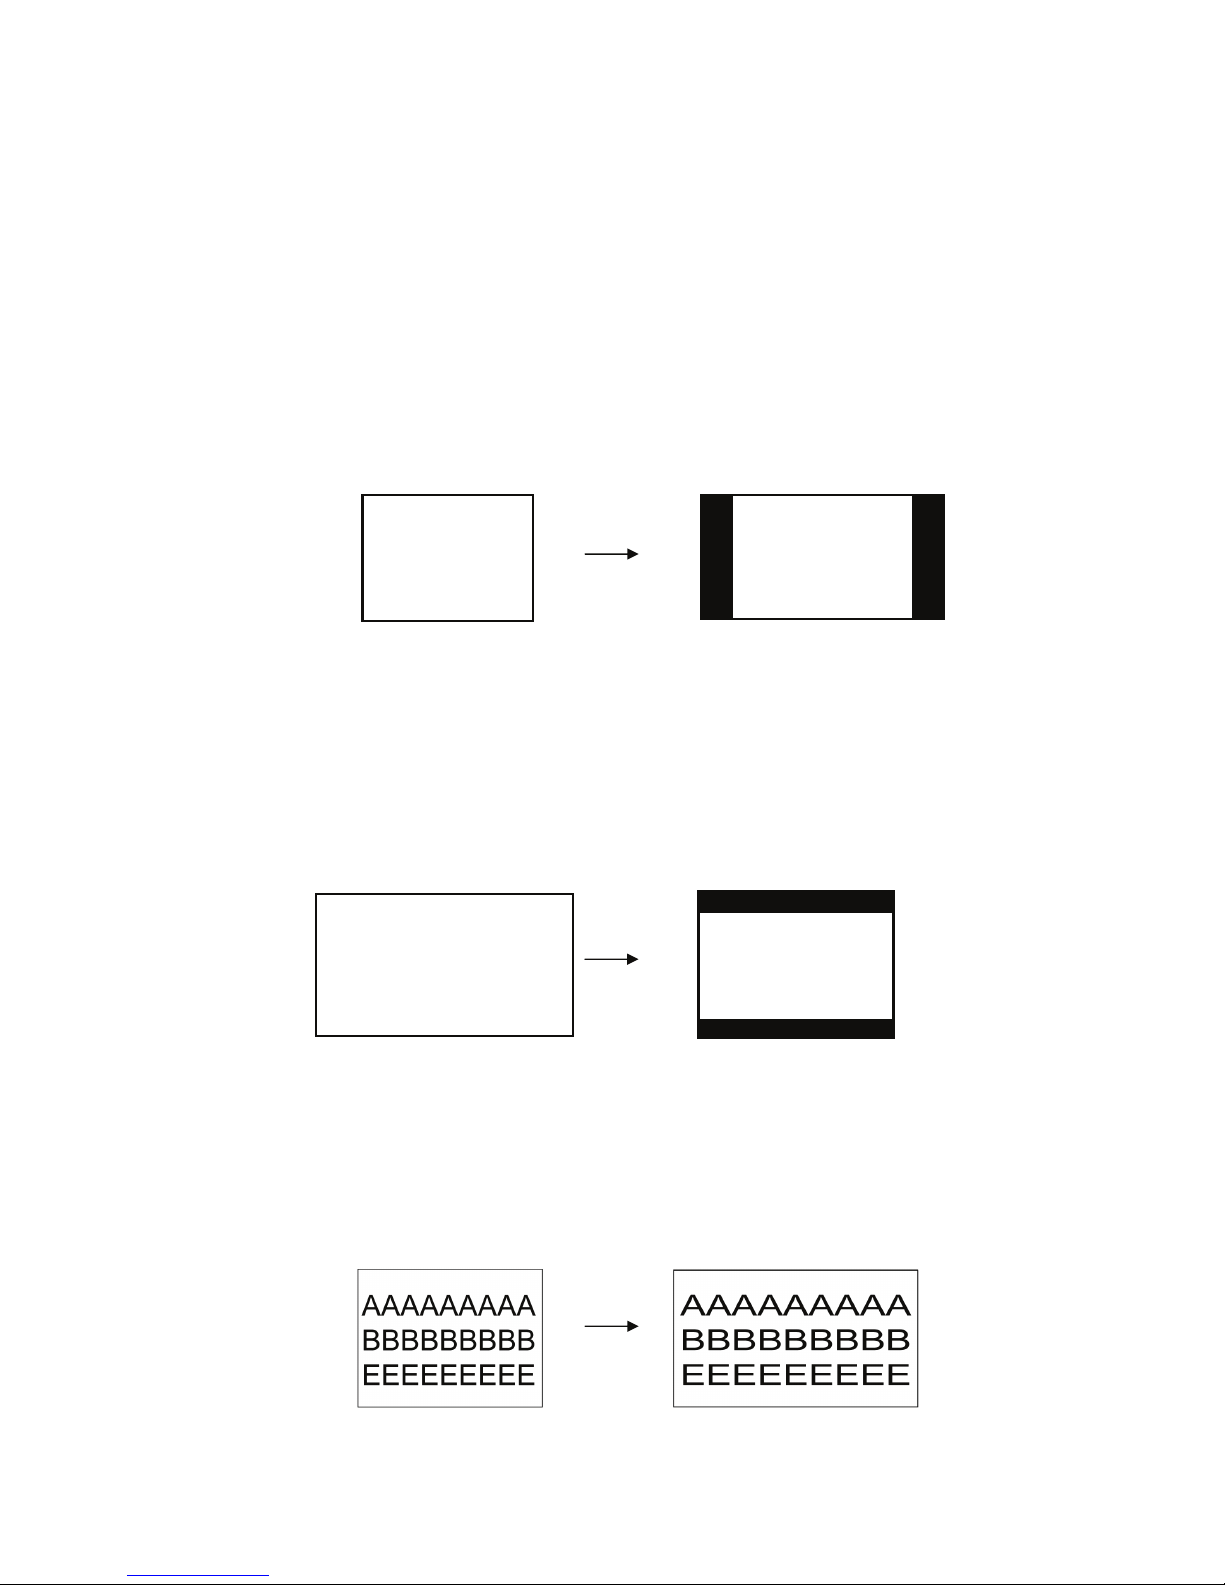
OptiRatio Aspect Selection provides 4:3, 16:9, Panorama, Full Screen, and
SmartZoom aspect ratio selections to provide the best TV and video watching
on different type monitors.
4:3 Mode: When the 4:3 formats TV/video display on 16:9/16:10 wide-screen
monitors, it can keep the 4:3 aspect ratio video and add letter box on both left
and right sides.
16:9 Mode:
When the 16:9 formats TV/video display on 4:3/5:4 standard monitors, it can
keep the 16:9 aspect ratio video and add letter box on both the top and bottom.
Full Screen Aspect Ratio Mode:
Stretch all the input TV and video to full screen display. But if the original video
format is 4:3, it will look a little squash.
Original video format 4:3
Add letter box on both
left and right sides of
wide-screen monitors
Original video format 16:9
Add letter box on both
top and bottom sides
of standard monitors.
Stretch video to fit monitors
Original video format 4:3
Page 13
11
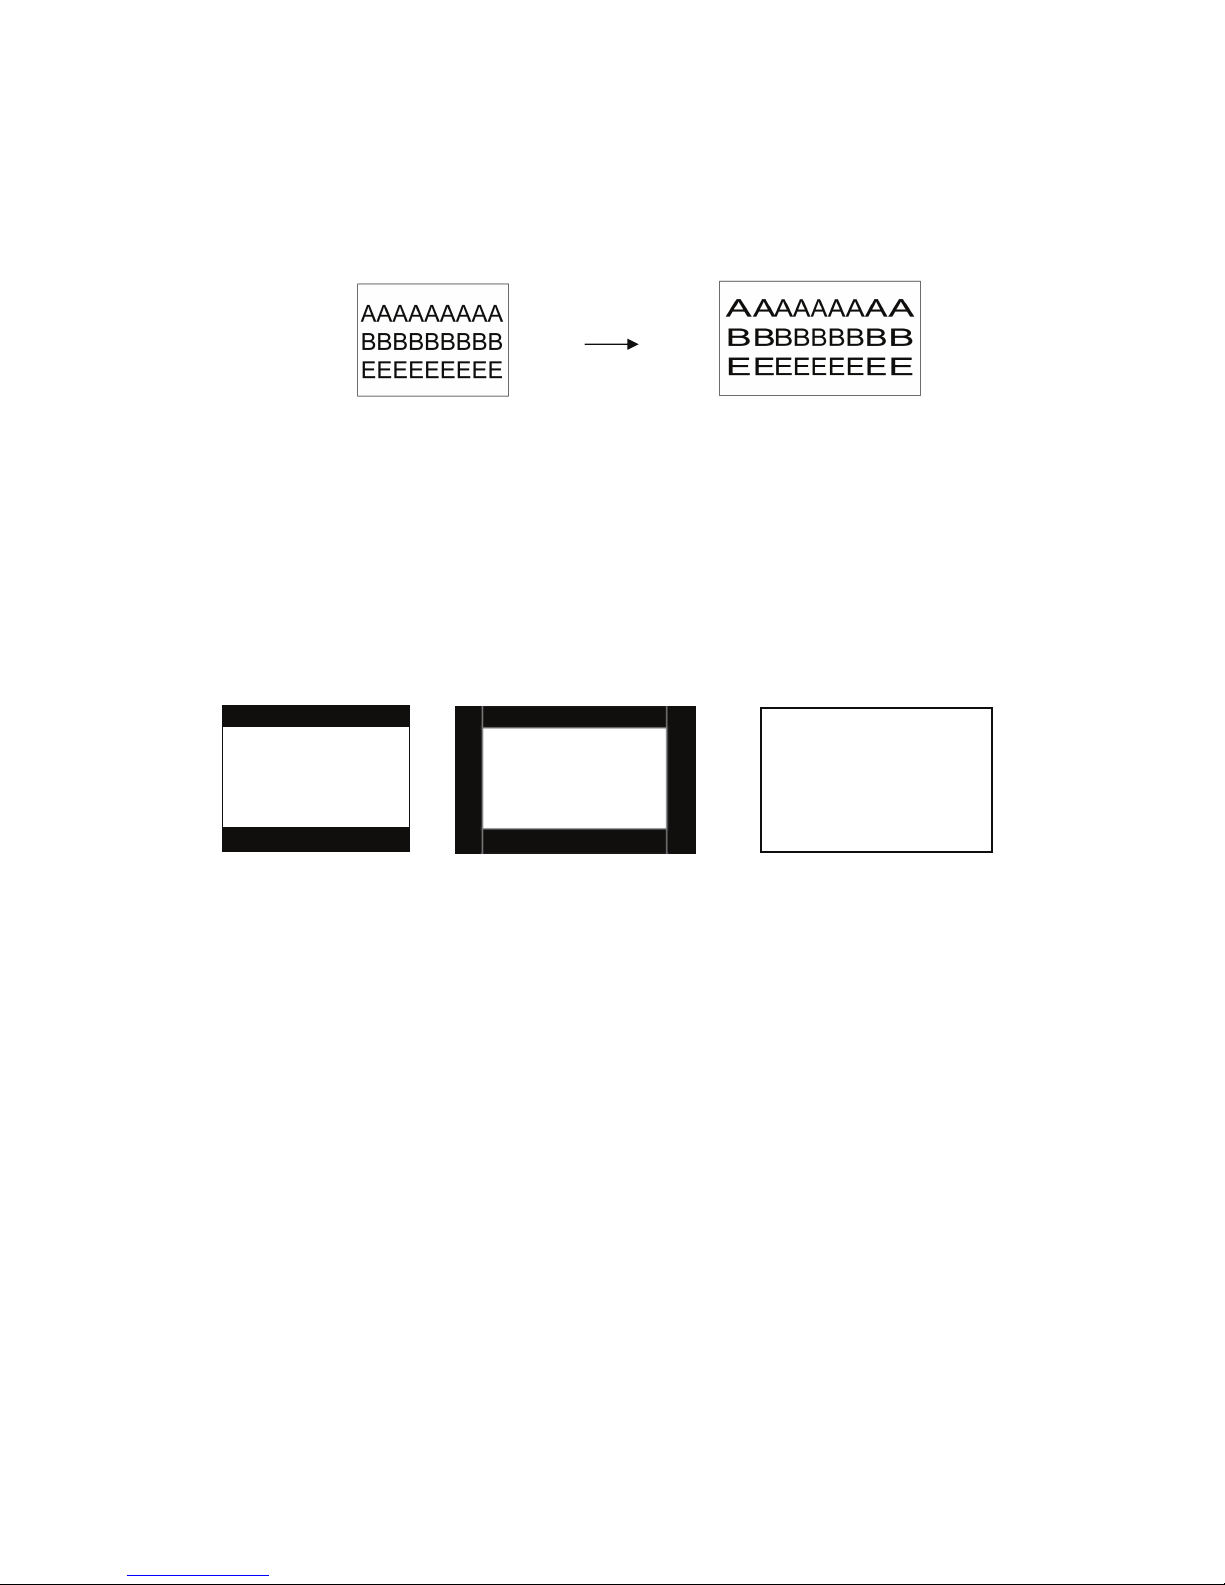
Panorama Mode:
Extend all the input TV and video to full screen display. But the distortion on
the center of screen will be less than full screen mode and looks better.
SmartZoom Mode:
When the 16:9 movie broadcast from TV channel, it will add the letter box for
4:3 video format transmit and it looks small on the 16:9/16:10 wide-screen
monitors. The SmartZoom mode can remove the letter box on top and bottom
to make the movie displays bigger and clearer.
Less distortion from center Original video format 4:3
Original video format
on 4:3 monitor
Letter box on each
sides of video with
16:9 monitor
Removed letter
box to display 16:9
Page 14

12
Troubleshooting
Installation
The most common cause of the problem is the incorrect connection of the
cables. Please refer to “VideoMate V600 TV Box Hardware Guide” on proper
connection. And also please check the power adaptor already plugged.
Warning
It is normal for VideoMate V600 TV Box become warm when it is being used.
Please place the TV Box at a place where the air flows.
VideoMate V600 TV Box will only need a computer monitor to work; It does not
require to connect to computer nor turn on the computer to work properly.
Please do not use other adaptor except the one included in the package to
prevent damaging V600. Damaged V600 by using wrong adaptor will not be
cover from the warranty.
No Graphic
Please make sure you have properly connected the TV cable to TV Box in
order to watch live TV. It might also because the input source of V600 TV Box
is not set to TV mode, please switch the video input source to TV.
No Sound
If the TV display without sound, please make sure you have connect your
speaker to V600 TV Box’s Line Out and make sure the speaker has turn on
and volume is not at the minimum.
If you switch to PC and PC does not have sound while TV has it, please make
sure you have connected Line In from V600 TV Box to Line Out from your
computer.
TV picture is not clear?
TV signal could be reduced by the branching. Please make sure the cable
signal is good. Try to move the computer to a TV set and connect the cable
which is being used for the TV set. Also directly connecting the cable before
the splitter may help.
This problem could also come from with static. Once you connect the cable to
our TV card, the static interfere the system. It's possible to correct this problem
by connecting a wire from the grounding of the cable to ground. Also make
sure computer grounding is good.
Page 15

13
Why does the remote control fail?
Please make sure you have put the batteries to the remote control. And we
suggest not using rechargeable batteries.
Please aim at the TV box and you should see the blue light flashes when you
press the remote controller.
How to reset to manufactory defaults?
Please press and hold the Menu button of the V600 for 8 second until it display
Reset All Settings
Please wait…
Contacting Compro Technical Support
Before you submit an email for support, please check support FAQs on our
web site. http://www.comprousa.com/support
You may fill out the form (http://comprousa.com/support/form.htm) or directly
email to [email protected]
P/N: 3GA0310288
 Loading...