

Page 1

VideoMate U500
Digital Terrestrial USB 2.0 TV Stick
Start Up Guide
Compro Technology, Inc.
www.comprousa.com
Page 2

Table of Contents
About This Guide ................................................................................. 1
VideoMate U500 Contents ................................................................... 2
Installation ............................................................................................ 3
Remote Control Key Definition and Use ............................................ 4
ComproDTV 2.5 .................................................................................... 5
Troubleshooting ................................................................................. 13
Copyright © 2001-2006. Compro Technology, Inc. No part of this
document may be copied or reproduced in any form or by any means
without the prior written consent of Compro Technology, Inc.
Compro, VideoMate, Poladyne, Play with Power, and the Compro
logo are trademarks of Compro Technology, Inc. Other names and
marks are trademarks of their respective owners.
Compro makes no warranties with respect to this documentation and
disclaims any implied warranties of merchantability, quality, or fitness
for any particular purpose. The information in this document is subject
to change without notice. COMPRO reserves the right to make
revisions to this publication without obligation to notify any person or
entity of any such changes.
Compro Technology, Inc.
Tel. +886 2 2918 0169, Fax +886 2 2915 2389
3/F, No.12, Alley 6, Lane 45, Pao Shin Road
Hsintein City, Taipei, Taiwan
www.comprousa.com
Page 3

1
About This Guide
This manual tells you how to install and use your VideoMate U500 Digital
Terrestrial USB 2.0 TV Tuner Box. For more information on using applications,
please see the User’s Guides in the programs, on the CDs, or at our website
for the latest manuals http://www.comprousa.com.
VideoMate U500 lets you watch and record digital terrestrial TV broadcast on
your computer or laptop. It can efficiently capture digital terrestrial TV
broadcast programs from your area. VideoMate U500 features a TV tuner for
digital TV broadcast, Digital Video Recording (DVR) functions, scheduled
recording at anytime, crystal video quality, and intelligent TV viewing.
MINIMUM SYSTEM REQUIREMENTS
z 1.0 GHz Pentium III or equivalent CPU (for watching digital TV)
z 128 MB RAM
z Sound card or on-board sound chip
z Available USB 2.0 port
z CD-ROM drive for software installation
z Windows XP SP2 or above
z 50 MB free disk space for basic software installation.
RECOMMENDED SYSTEM REQUIREMENTS
z 2.4 GHz CPU for HDTV watching, recording and PIP/POP function.
z 512 MB RAM
z Sound card or on-board sound chip
z Available USB 2.0 port
z CD-ROM drive for software installation
z Windows XP SP2 or above
z 3 GB (DVD-quality) per hour for recorded video.
Note
In order to receive digital terrestrial TV broadcast, the antenna is crucial.
Digital terrestrial TV broadcast uses about the same wave as analog TV. It’s
recommended to have a fishbone-like antenna on the roof for receiving. More
detail is on the troubleshooting chapter in this manual.
VideoMate U500 has to operate on USB 2.0 interface. Please check your
computer system to see if meets USB 2.0 requirement.
Page 4

2
VideoMate U500 Contents
VideoMate U500
USB stick
Remote control
(Battery included)
USB extension cable
Digital terrestrial
TV antenna
Software CD Start Up Guide
Page 5

3
Installation
Start the computer. Make sure VideoMate U500 is connected to your computer
and insert the installation CD into your CD drive.
Step 1. Windows will detect a new device and start the Add/Remove
Hardware Wizard. Please press Cancel and go to the next step.
Step 2. Insert the installation CD into your CD drive. If you have Autorun
enabled, the installer will start automatically. (If Autorun is disabled,
double-click on “setup.exe” on the installation CD.) You can choose
Complete to install all necessary software (VideoMate U500 drivers,
ComproDTV, ComproDVD, Ulead PhotoExplorer 8.5 SE) or choose
Custom to select item by item. Compro recommends you choose
Complete.
Step 3. If you see the Windows Logo testing message, below, please press
“Continue Anyway” to proceed.
Step 4. Press Next to install ComproDTV, ComproDVD, Ulead PhotoExplorer
8.5 SE.
Step 5. After each program is successfully installed, press Finish to proceed.
Step 6. When installation completes, press Finish to restart computer.
Step 7. Connect TV signal.
Step 8. Open ComproDTV to enjoy the show.
Continue
Page 6
4
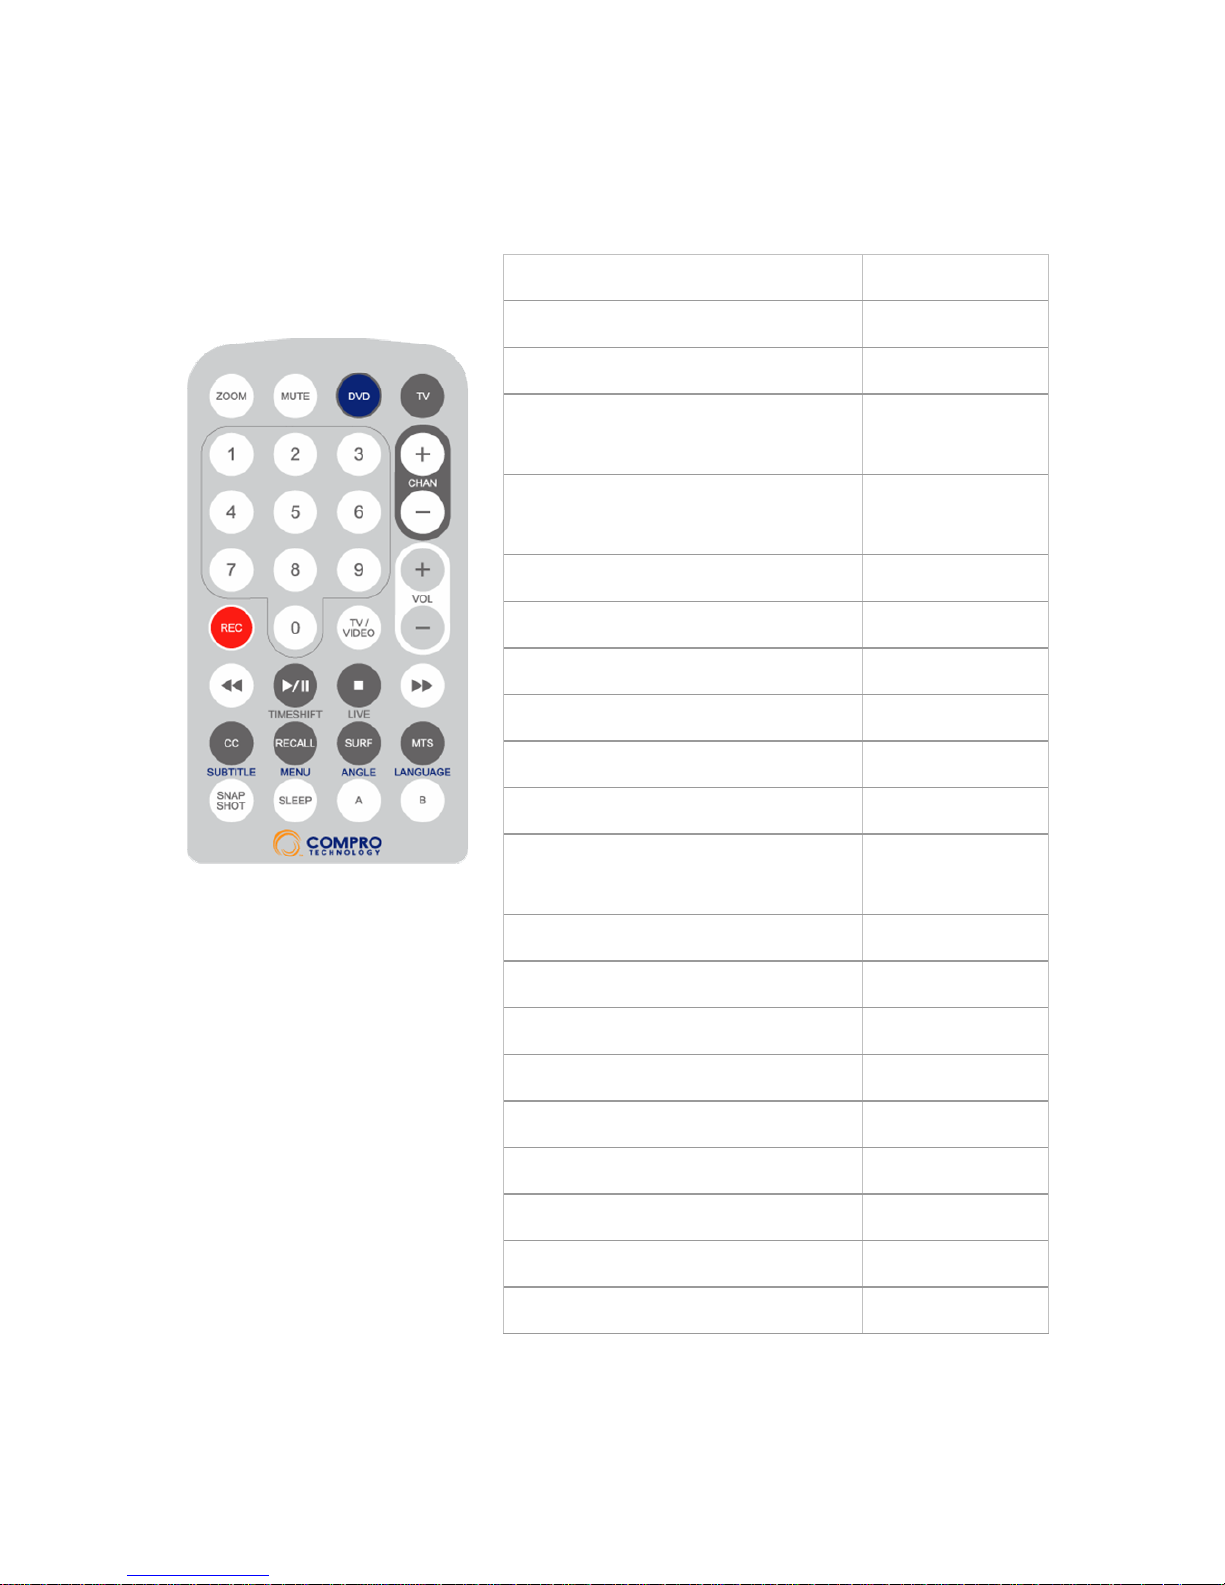
Remote Control Key Definition and Use
Icon ComproDTV 2
ComproDVD 2
ZOOM Zoom In/Out
Zoom In/Out
MUTE On/Off Mute
On/Off Mute
DVD
On/Off
ComproDVD 2
On/Off
ComproDVD 2
TV
On/Off
ComproDTV
On/Off
ComproDTV
0-9 Number keys Number keys
CHAN Switch channels
Not used
VOL Volume
Volume
REC Record
Not used
TV/VIDEO Not used
Not used
Backward Replay
Replay
Play/Pause
Pause or
timeshifting
Play/Pause
Stop Stop
Stop
Forward Advance
Advance
CC Not used
Subtitle
RECALL Previous channel
Menu
SURF Channel surf
Angle
MTS Audio select
Language
Snapshot Snapshot
Snapshot
SLEEP Sleep function
Not used
A, B Not used
Not used
Page 7
5
ComproDTV 2.5
Introduction
ComproDTV is a complete digital entertainment solution for your PC. Watch
and record TV programs on your PC, in full-screen mode or in a window.
Timeshifting lets you watch TV, pause live TV, or review your favorite scenes
without missing a minute of the program. Integrated de-interlacing technology
assures the highest picture quality.
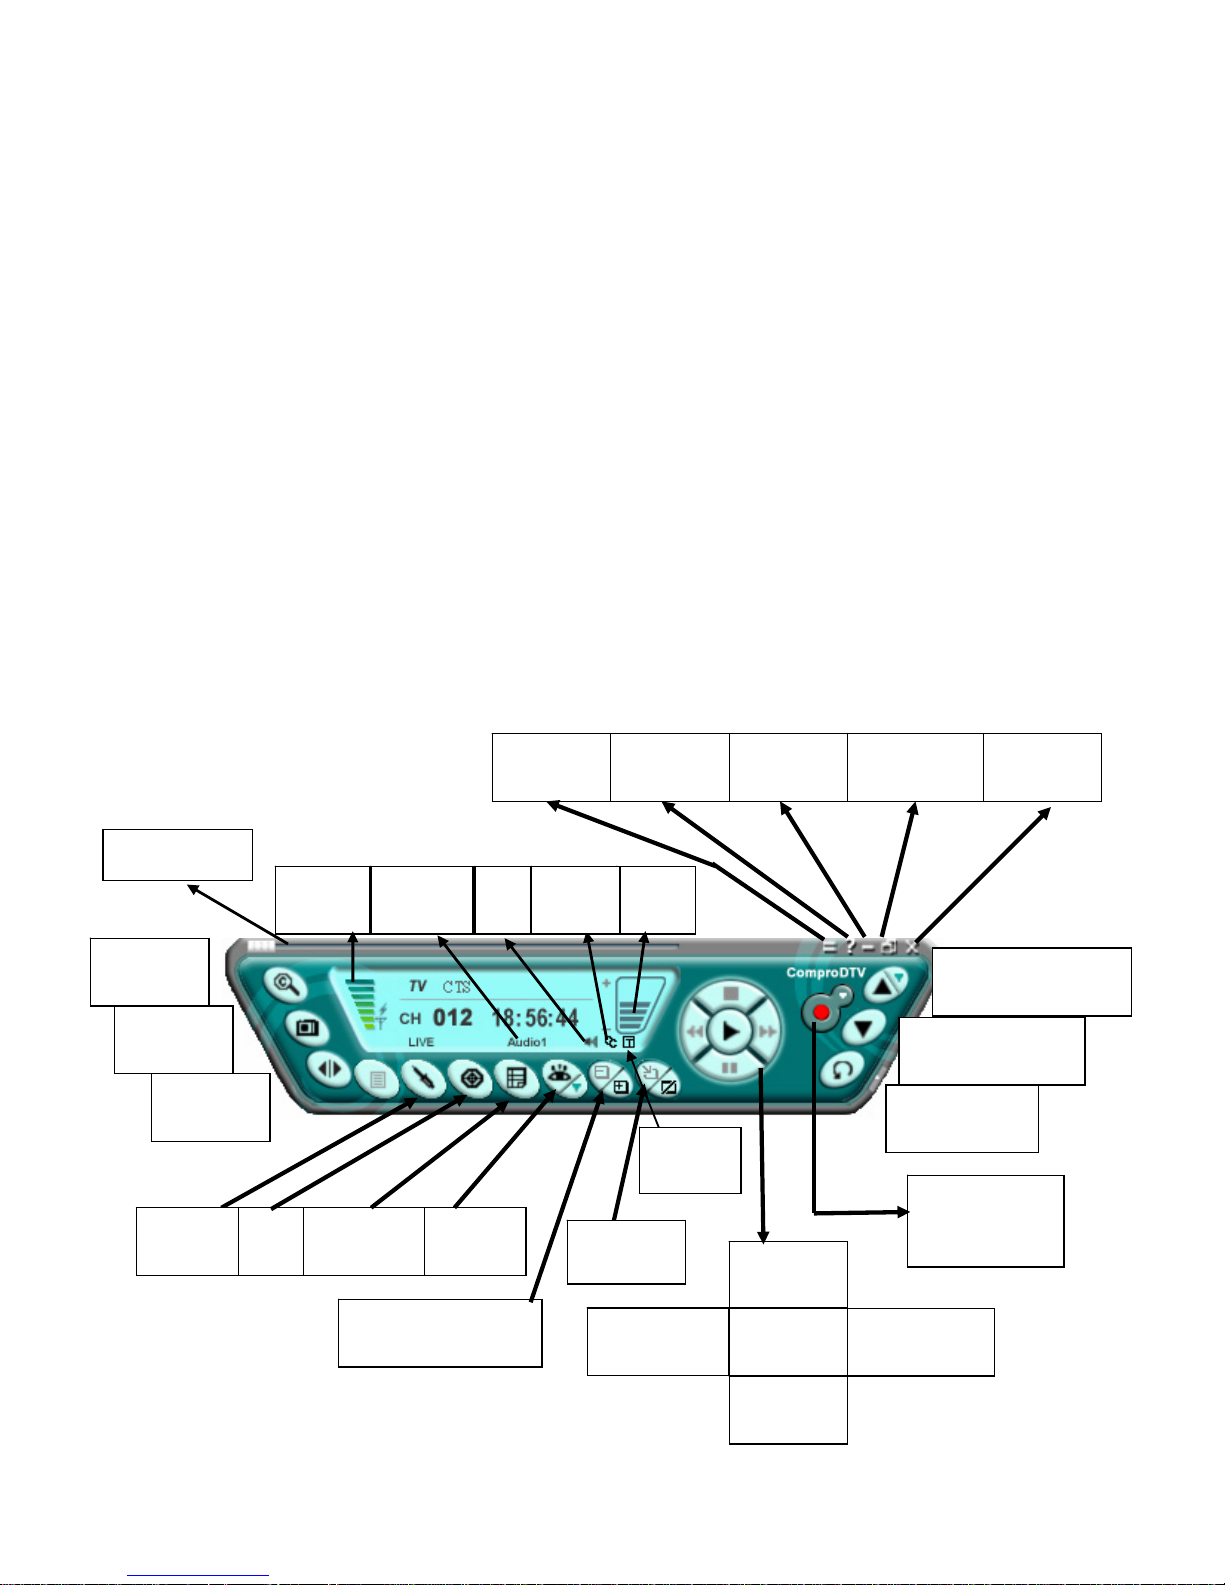
Control Panel
The ComproDTV control panel resembles the controls on a VCR. Keep in mind
that not all options are available at all times, and may be grayed out or
inaccessible depending on your hardware setup and TV services available.
The following pages describe the ComproDTV control panel functions, and tips
for using ComproDTV. The following figure gives you the function of the button
with (Hot Key.)
Close
(CTRL+X)
Last Channel
(N)
EPG
(E)
Source
(V)
Channel
Surf(F)
Reduce Window (F2) /
Add Window (F3)
Timeshift
(T)
Channel Down
(Page down)
Snapshot
(Space)
Stop
(S)
Docking
(D)
Volume
(+, -)
Full Screen
(Z)
Language
Select (Q)
Record (R)
with record
methods
Channel Up
(Page Up) with lists( I )
Help
(H)
Minimize
(G)
Timeshift bar
Play
(P)
Pause
(U)
Replay
(Left Arrow)
Advance
(Right Arrow)
Options
(O)
Schedule
(B)
Signal
Strengt
Mute
(M)
Windows
Alignment (F5) /
All Windows (F6)
Te le t ex t
(T)
Closed
Caption (C)
Page 8
6
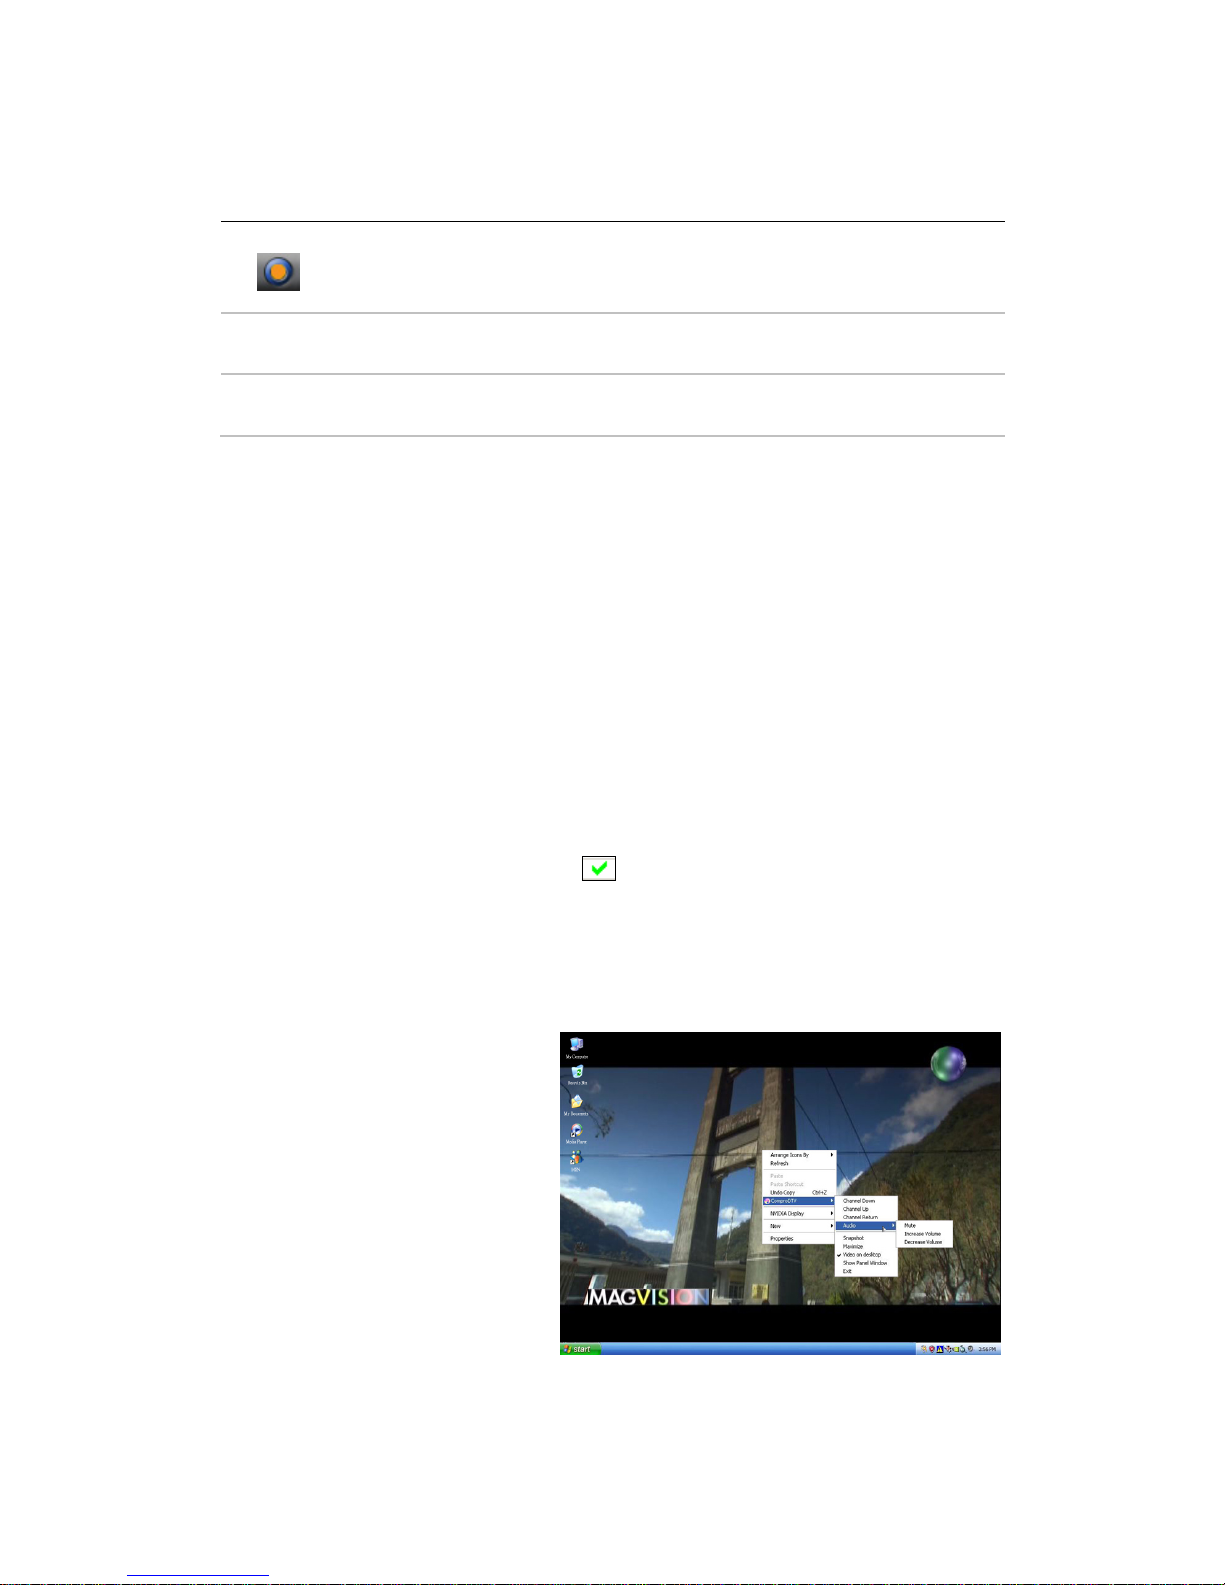
Icon HotKey Description
A
Enable/Disable Always-on-Top function for
TV window.(Orange Spot on the upper-right
corner of the TV window)
n/a
L Sleep function
Note: Language select is only available while the program supports it.
Watching
After installation, just double click the ComproDTV icon on the desktop you will
be able to watch TV. Same as operating a normal TV set. Watch TV programs
on your PC, in full-screen mode or in a window. Channel up and down.
Autoscan
The first time you start ComproDTV, Autoscan will automatically scan for
available TV channels for both Cable signal and Antenna signals. You can
rescan the channels at any time by pressing the Autoscan button.
When Autoscan is finished, detected channels are automatically enabled and
marked with the green check mark
. Channels, where a valid signal could
not be detected, are disabled and marked with a blank. However, you can
interrupt the scanning process by pressing the Stop button.
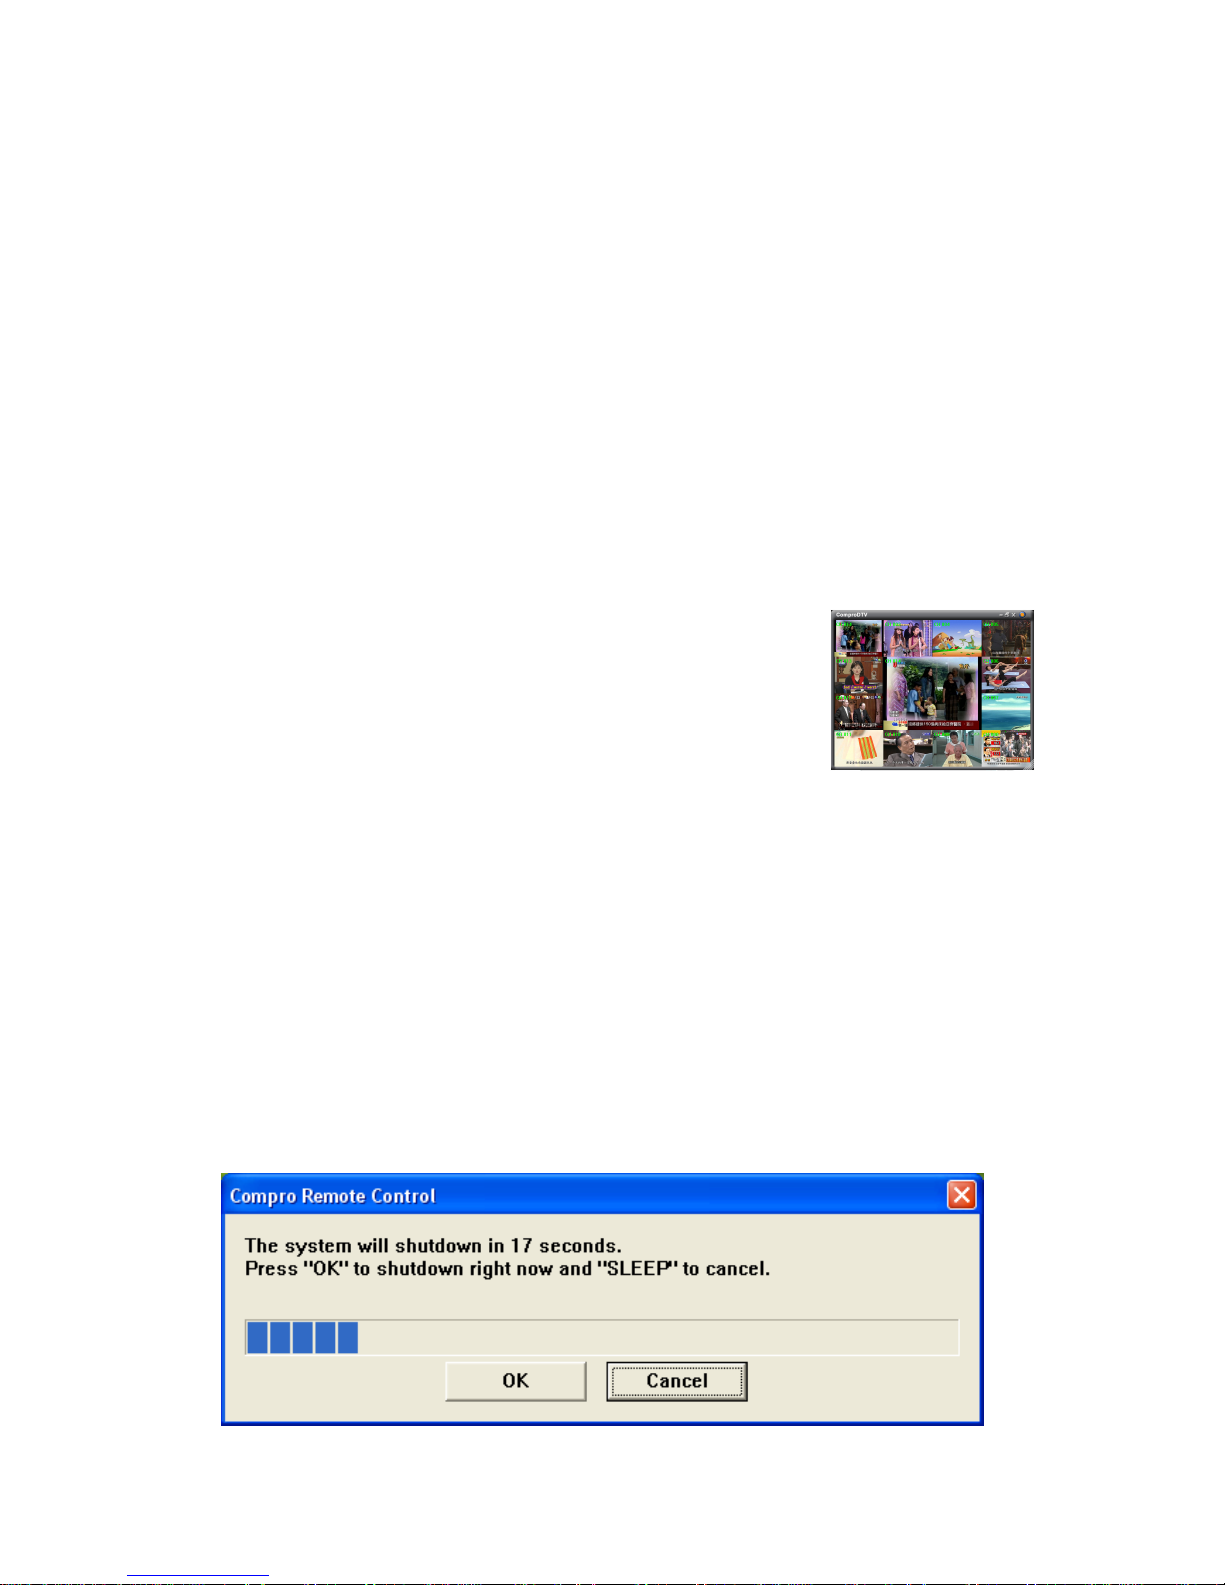
Video on Desktop
While watching TV, you may
right-click on the TV screen and
select video on desktop or
press the hotkey (F7) to activate
Video on Desktop mode. This
mode makes the video source
as your desktop screen. It is
similar with full screen but the
desktop icons and taskbar will
remain on top. The following
picture shows the TV on the
desktop.
Page 9
7
Right-Click Mouse Menu
If using mouse to right-click on the TV screen, you can see a menu pop up.
There are many useful options for your convenience.
Zooming image
If you would like to see more details on a certain part of a video image, you can
press the mouse right button to drag a zone of the screen. You will see the
zoomed image.
Also you can press the mouse right button and move on the screen to shift the
zoomed area of the image. Just click the mouse left button to resume normal
mode.
Channel Surfing
While watching TV, the channel surfing feature displays a
4x4 grid of channel images to give you an overview of
available programming.
Remote Power Off
There are two situations for this operation.
When not watching TV, i.e. no ComproDTV running:
Just press the SLEEP button on the lower-right corner on the remote keypad,
you will see a dialog as shown below. Program will countdown 20 seconds to
shutdown the computer. If you don’t want to shut down the computer, please
press the SLEEP button again, in other words, pressing the SLEEP key a
second time is the same as pressing the “Cancel” button. You may also use
your mouse to press the cancel button. Press OK to immediately shutdown the
computer.
Page 10

8
When watching TV, i.e. ComproDTV is running:
Just press the SLEEP button on the lower-right corner on the remote keypad
repeatedly, you will see the text on the screen turns to SLEEP OFF, SLEEP ON
- 30 MINUTES, SLEEP ON - 1 HOUR, SLEEP ON - 2 HOURS, and
SHUTDOWN. When the text shows SHUTDOWN, the program will countdown
20 seconds to shutdown the computer. If you don’t want to shutdown the
computer, please press the SLEEP button again.
PIP/POP (Picture In/Out Picture) mode
Usually, digital TV station broadcasts multiple programs on one frequency.
Therefore, ComproDTV supports up to four windows watching additional TV
program of same frequency on another window if available. You can press the
Add Window
button to open a slave window for that. Please see the
following illustration.
Main window has all features while slave window has limited functions only.
Double-click on the slave window can switch the TV program to the main
window. Alignment Window button will put slave window(s) into main
window which is convenient for you to watch multiple programs on full screen
mode.
The buttons on the upper-left corner slave window are
Channel Up, Channel Down, Mute, Windows Alignment, and Close
respectively. Slave window can be resized by mouse dragging lower-left corner
to any ratio.
Page 11
9
Note
Running additional windows consumes more CPU usage. If CPU usage
reaches 100%, then video lag will occur. Please reduce the number of
windows.
When main window changes the channel to another frequency, slave
window(s) will move to available programs of another frequency. The slave
window will show black if there is no additional program on this frequency.
Slave window has no full screen mode. Please double-click on slave window
to switch program with main window in order to do so.
It is available to hear audio on multiple programs at the same time. You can
mute or un-mute the sound of slave window(s) at any time. However, main
window audio can’t be muted separately from slave window(s).
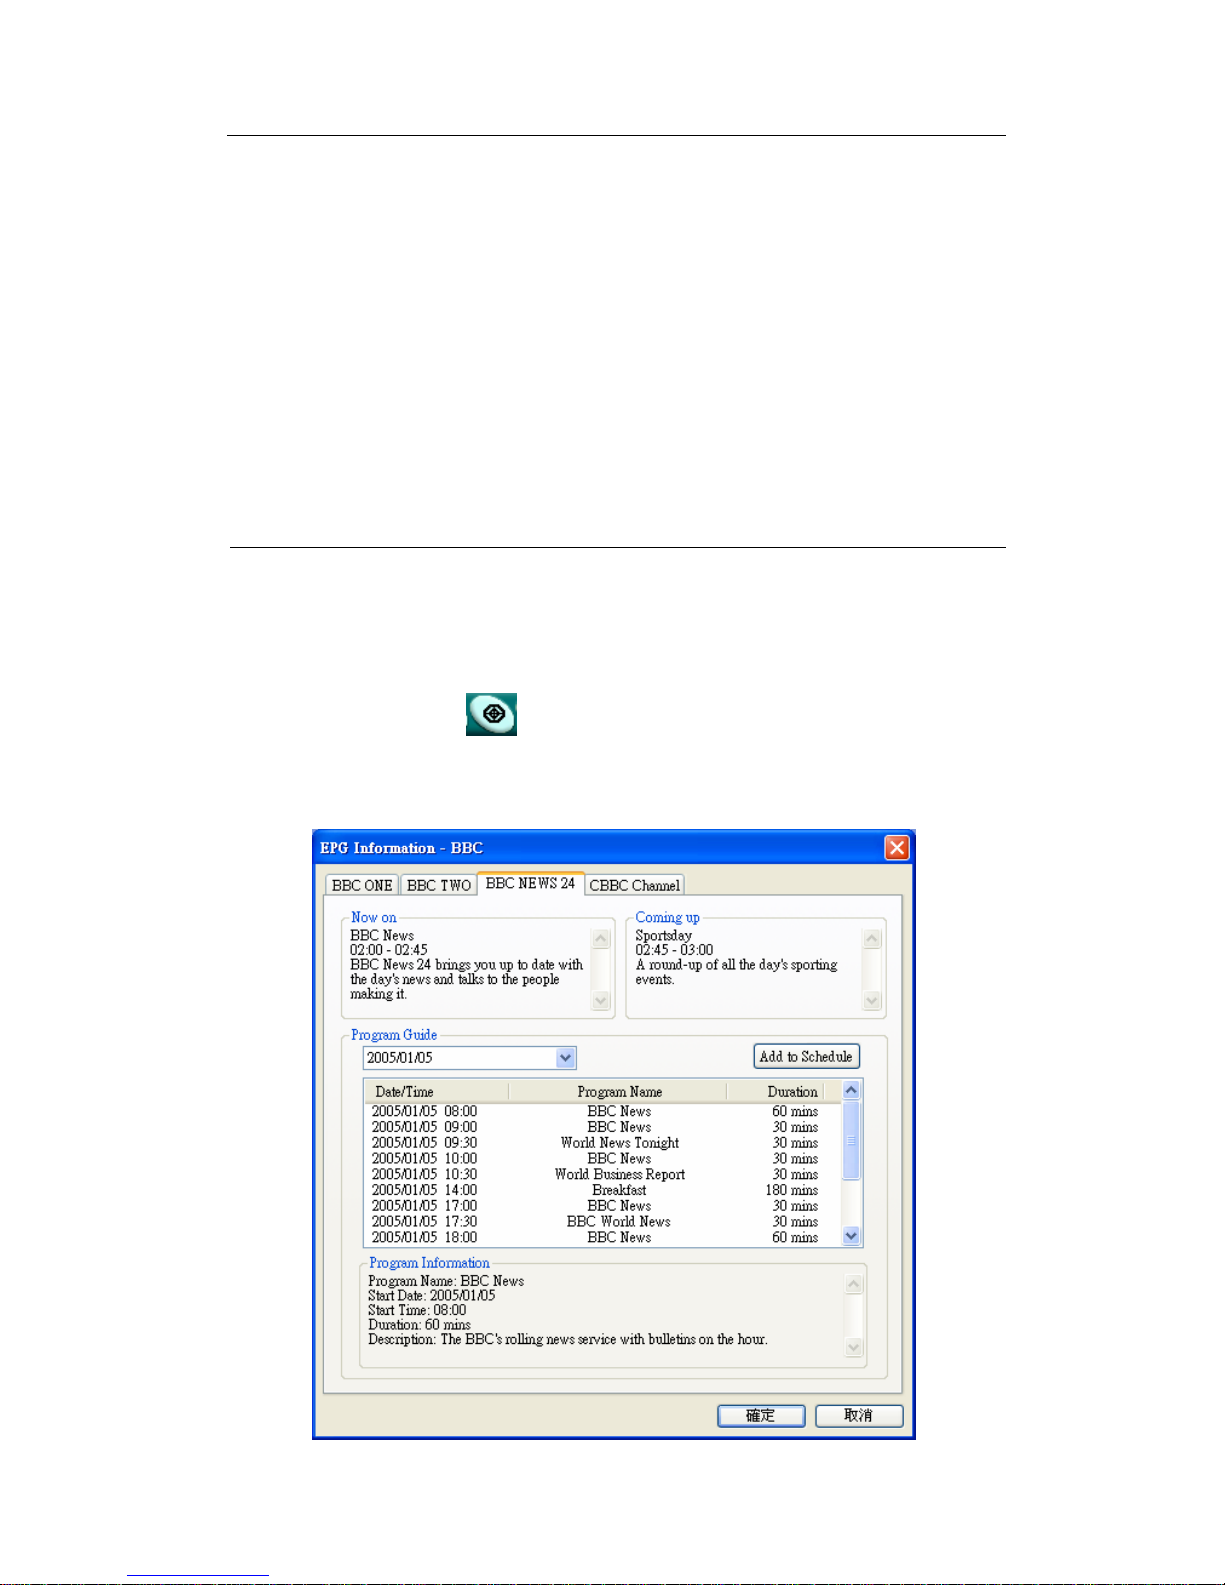
EPG (Electronic Program Guide)
You can press the EPG button to open the EPG dialog box. EPG can
provide lots of information about the TV program when available. You can
easily add a program into a recording schedule with it.
Page 12
10
Recording
ComproDTV is a digital video recorder and save the digital TV programs in
MPEG-II and Transport Stream formats to your hard disk.
To instantly start recording:
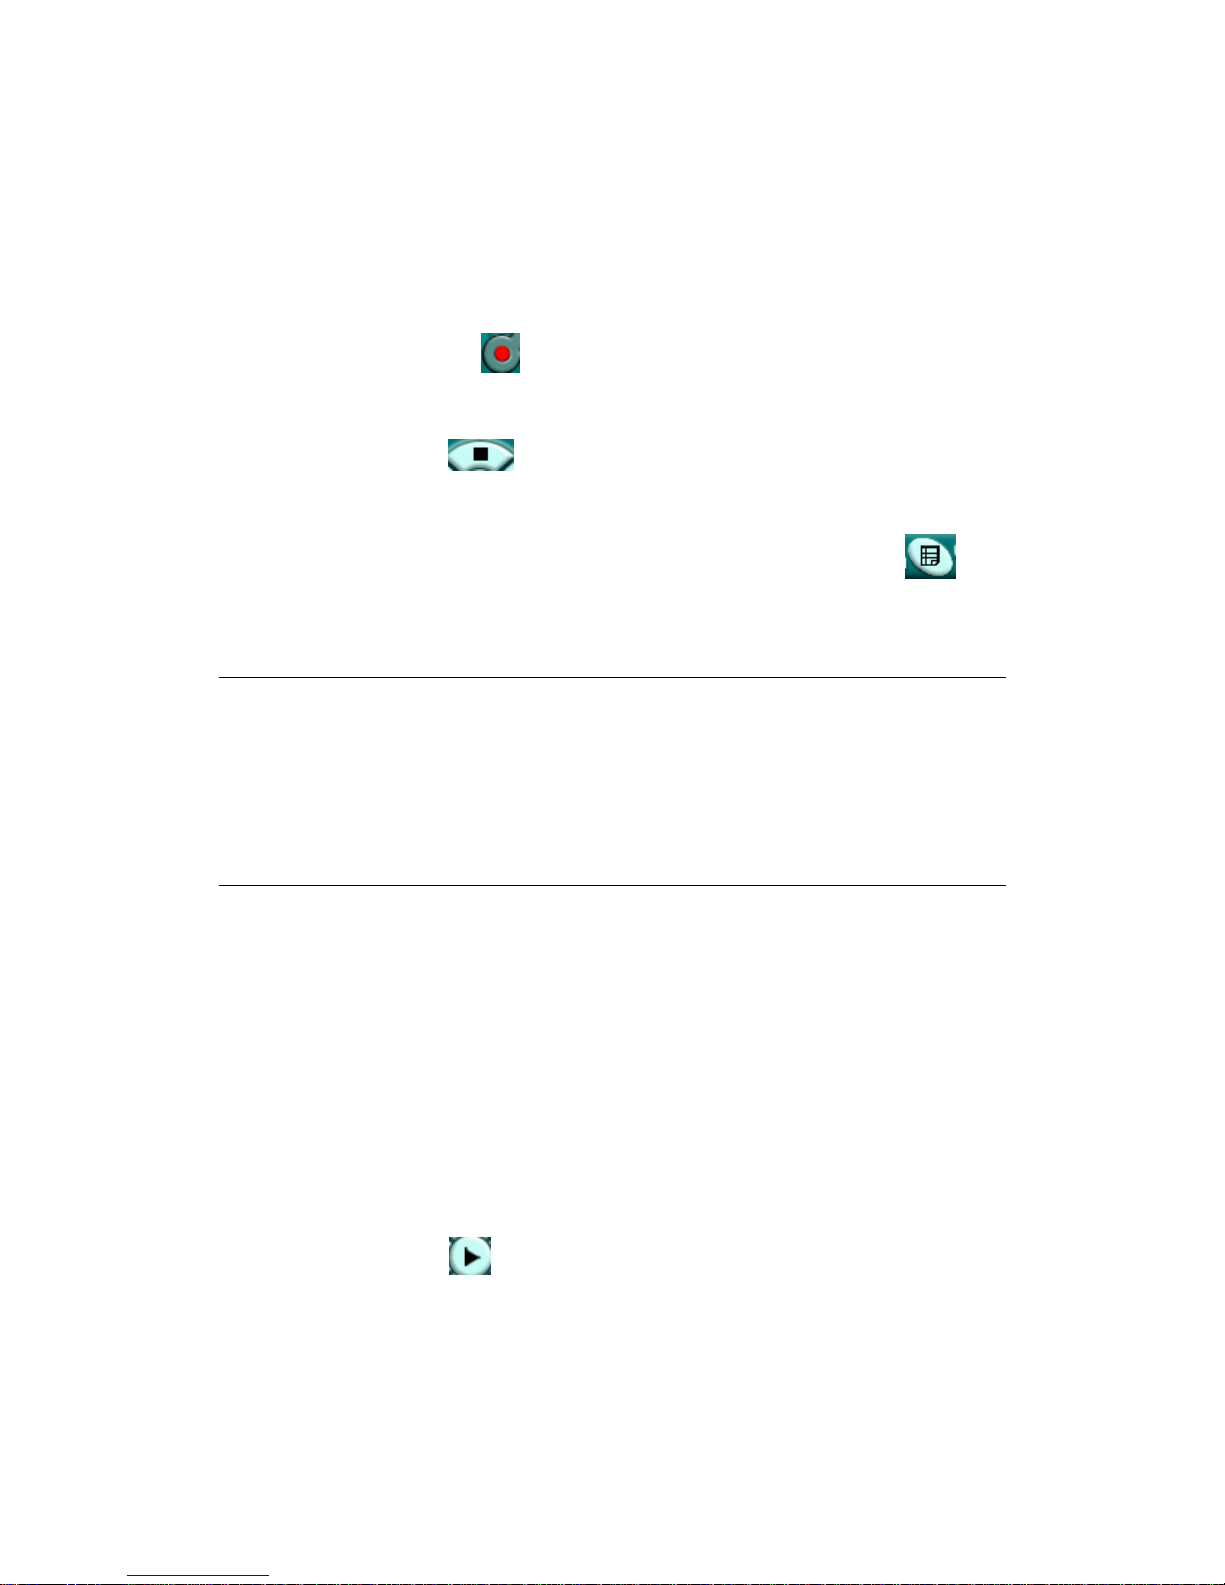
Press the Record button . ComproDTV starts recording the video source
currently showing in the display window. It will save it to a file on your disk.
Press the Stop button to stop recording. ComproDTV will save it
automatically and show the file name on the screen.
You can also use the schedule recording by press Schedule button on
control panel of ComproDTV.
Note
The default folder of recorded file is on My Document, you can change to
another folder by entering the Options of ComproDTV.
Digital TV program is a fixed MPEG-II file format from TV station. ComproDTV
will directly save them into your hard disk and can’t transfer them to another
format.
Straight-to-Disc Recording
ComproDTV provides the Straight-to-Disc recording feature, you can direct
recording the TV shows to VCD and DVD format discs, it can save your hard
disk space and easy to share it with your friends.
Playback
Press the Play button to open the Play dialog box.
Timeshifting
Timeshifting temporarily saves the video to your hard disk for a specified
Page 13
11
period of time so that you can pause, replay, or skip commercials during live TV,
without interrupting an ongoing recording session.
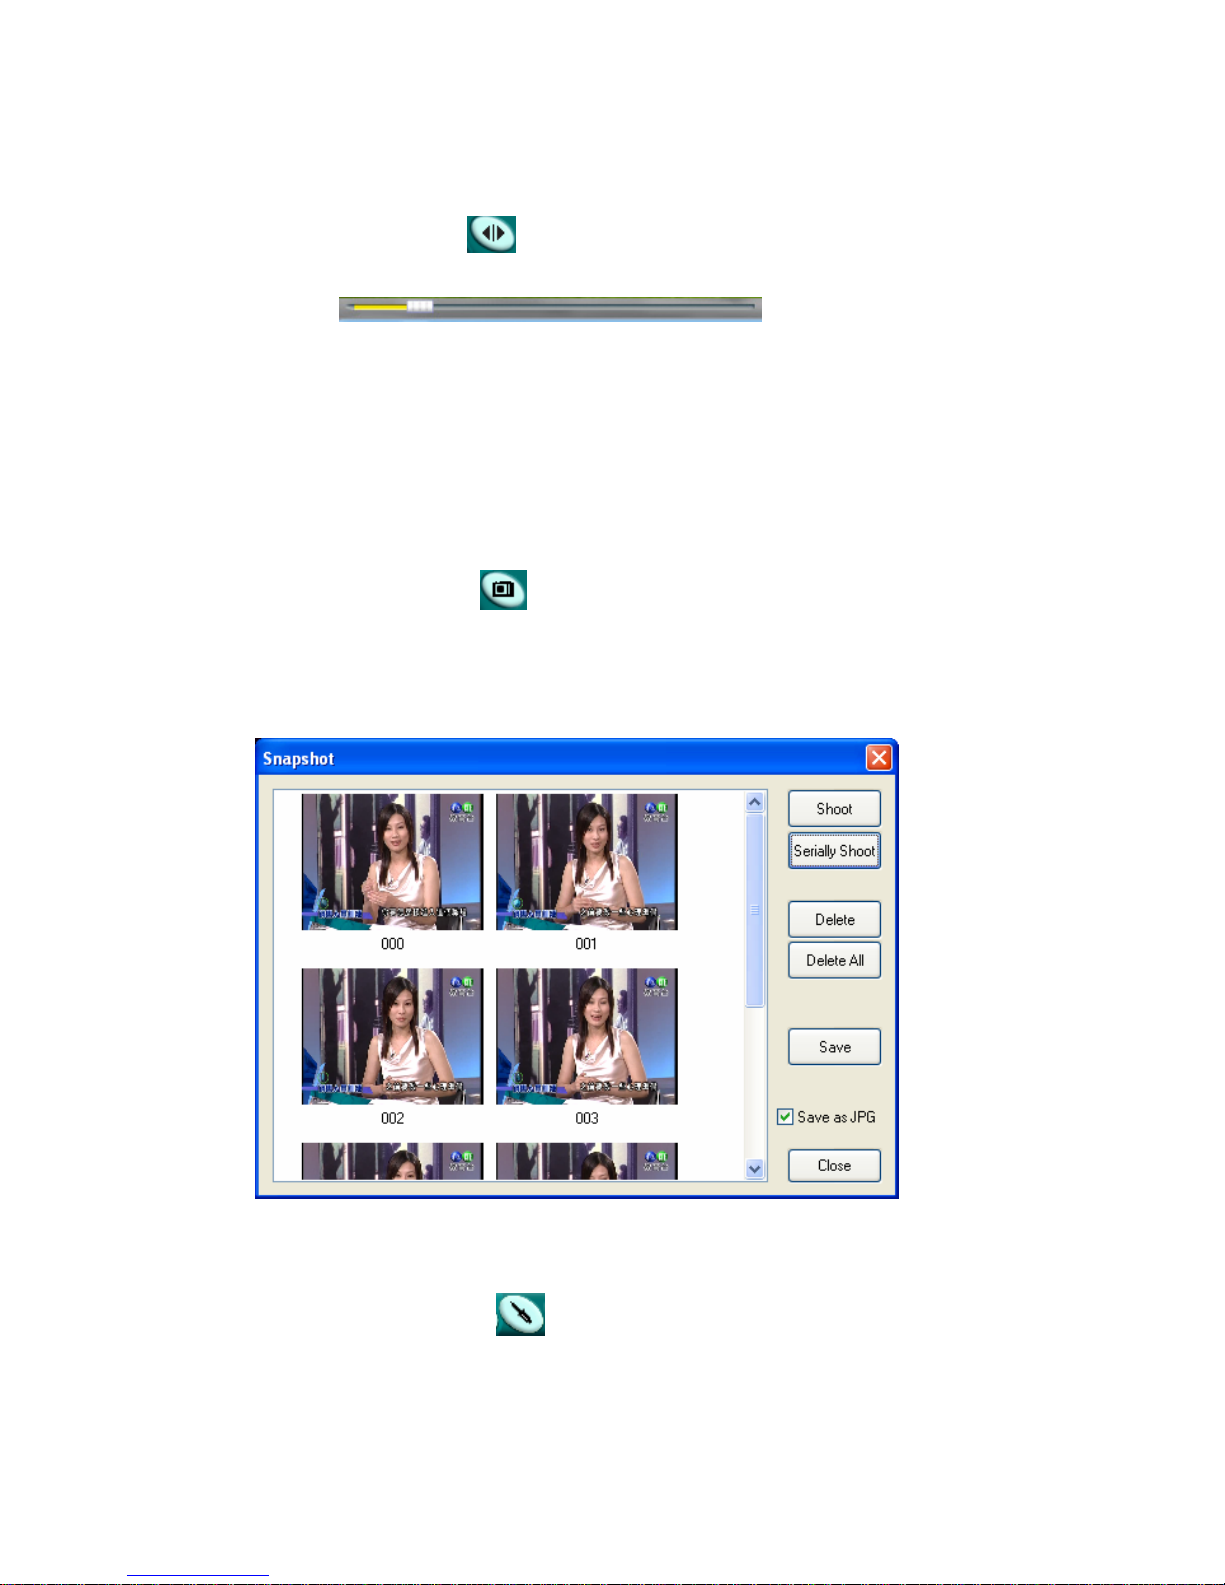
Press the Timeshifting button and the Time Monitoring bar will appear.
You may also press the Advance (for commercial skip) and Replay (for instant
replay) buttons on the control panel or remote control to navigate through the
program. When you return to your seat, you can resume viewing the program
from the point when you left.
Still Image Capture
Click on the capture icon on the control panel or hit the "Space Bar" of
the keyboard shortcut to capture an image of the display window. You can see
the screen capture dialog as below.
Options
You can press the Options button to open the Options dialog box. You
can change detail settings of ComproDTV here.
Page 14
12
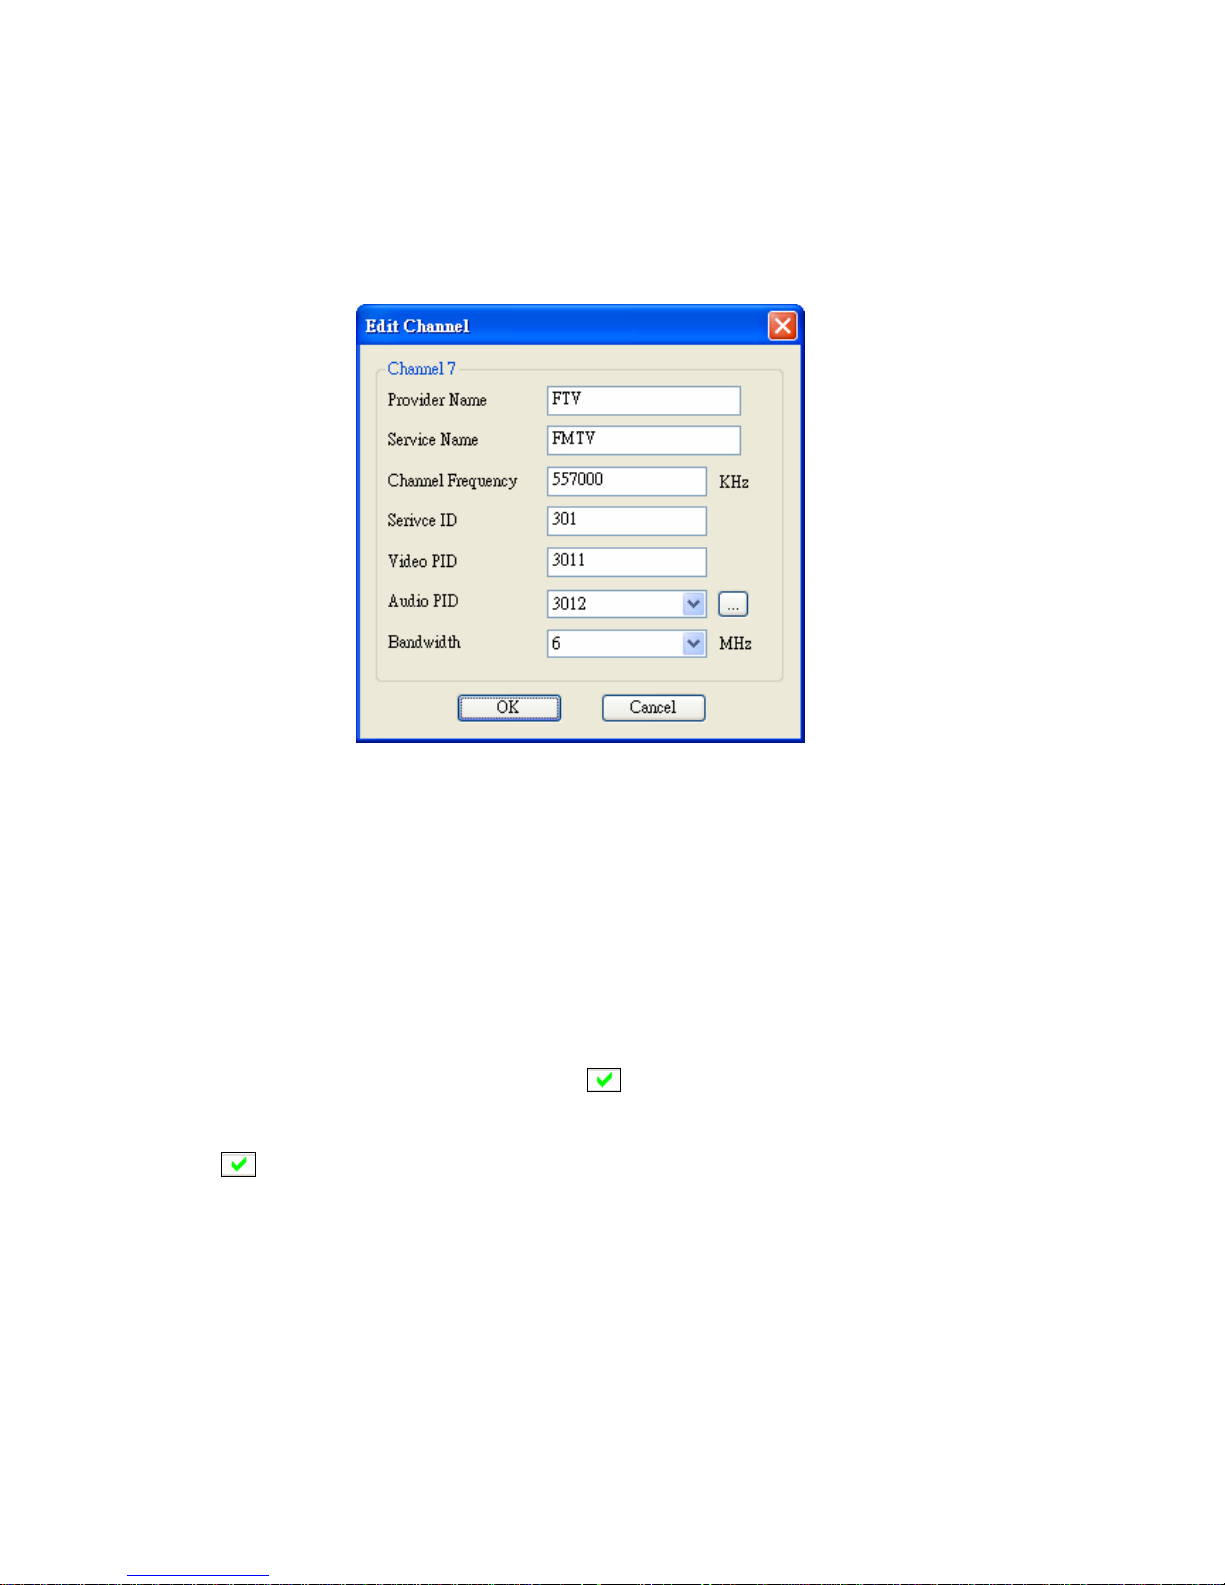
After you are finished scanning for available channels, you may select OK to
return to the display window, or customize the channel list according to your
preferences, as described below.
Channel Properties
You can customize the channel names by double-click on the Description
field of the channel you wish to rename.
Yu can do more changes on the channel’s property by right-click the mouse on
the Description field of the channel you wish to edit.
Set Mem+
During the Autoscan process, ComproDTV automatically detects and enables
channels with a valid signal. By default, every available channel will be
enabled and marked with the green
icon. However, you can shorten the
list of enabled channels to reduce channel-browsing time. Customize your list
by enabling or disabling channels from the channel list by clicking on the green
icon.
Disabled channels will not be shown when you use the channel Up and Down
or channel surfing functions.
More information is available on the User’s Guides in the programs or on the
CD
Page 15
13
Troubleshooting
Troubleshooting steps
If you have problem installing or running VideoMate U500, please check the
following by step:
1. OS issue: VideoMate U500 has to work on USB 2.0 interface. Note only
Windows XP SP1 or above OS support USB 2.0. You are welcome to
www.WindowsUpdate.com website for the Service Pack update of
Microsoft.
2. USB 2.0 issue: you need to check your computer has USB 2.0 or not.
Usually you will see “USB 2.0 Root Hub” device in the "Sound, video and
game controllers" section of Windows Device Manager.
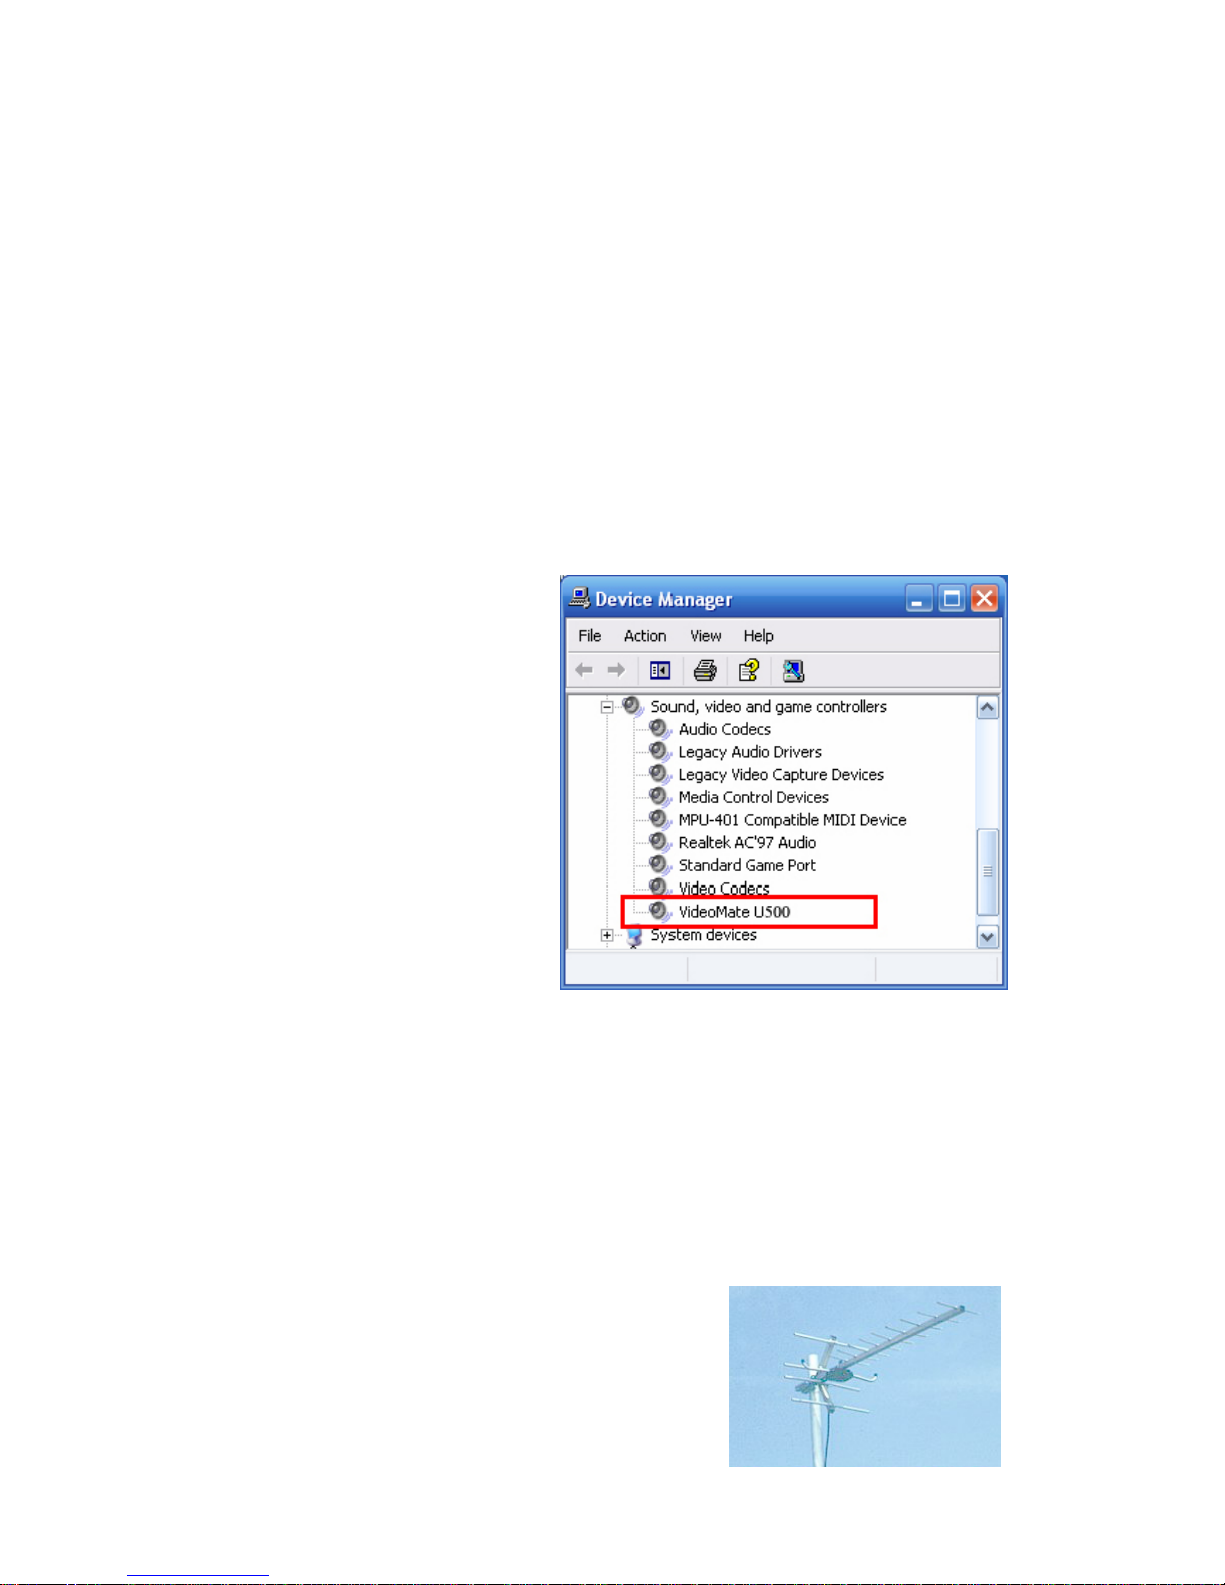
3. Driver issue: You should
see "VideoMate U500"
drivers, in the "Sound, video
and game controllers"
section of Windows Device
Manager. If these drivers are
not there, uninstalling and
reinstalling the VideoMate
U500 drivers can help.
4. Installation Issue: Make
sure using USB extension
cable to connect VideoMate
U500. Don’t connect device
without USB extension cable
in case of breaking USB connector. Also, make sure to plug in TV connect
cable gently.
5. Power Issue: VideoMate U500 takes power from the USB 2.0 port. Note:
PCMCIA and USB hub won’t provide enough power so that you have to use
PCMCIA and USB hub with adapter plug-in in order to take power from it.
Sometimes plugging in another USB 2.0 port may help. Some
motherboards and notebook’s USB 2.0 ports do not meet the USB standard
providing the standard 5V 500mA power. In these cases, VideoMate U500
will not have enough power to work. Please contact computer vendor for
the issue.
6. No Signal: In order to receive digital
terrestrial TV broadcasts, an antenna is
crucial. Digital terrestrial TV broadcast uses
about the same wave frequencies as analog
Page 16

14
TV (VHF and UHF). It’s recommended to have a fishbone-like antenna (see
figure) on the roof for reception.
Make sure you position the antenna in the direction of the TV broadcast
base. Adjust the position for the best reception.
Digital terrestrial TV determined by government policy. The broadcast
bases will be increased in order to cover the entire country. Please check
the related government website for more information about the strength of
digital terrestrial TV broadcast in your area.
7. No Video: In order to decode DVB-T MPEG-2 file format, you have to
install the Ulead PhotoExplorer 8.5 SE on the installation CD for decoding.
8. No Audio: Check the Mute and Volume settings in the Windows Volume
Control dialog. (Double-click on the speaker icon in the system tray.) Check
the Mute and Volume settings in the ComproDTV Volume Control dialog.
9. Can’t record: Make sure that your hard drive has plenty space for
recording. ComproDTV needs to use components of Ulead PhotoExplorer
8.5 SE on the installation CD. If your computer doesn’t have PhotoExplorer,
ComproDTV will fail to record. Please install Ulead PhotoExplorer 8.5 SE.
10. Video lags: It’s possible that signal is not strong enough. Please verify it as
above step. While receiving HDTV programs, VideoMate U500 needs full
speed USB 2.0 bandwidth to transfer data and a lot of CPU usage to
decode. Please also check the CPU usage if reaches 100% while watch
HDTV programs. 2.4 GHz is recommended for HDTV watching and
recording. Please also check if other devices occupy the USB bandwidth,
especially the hard disk usage.
11. Other issue: Please go to our website for the latest software update. Many
problems may be fixed on the newer software version. You are welcome to
visit our website at http://www.comprousa.com/support
Contacting Compro Technical Support
If above doesn’t help, please check support FAQs (Frequently Asked
Questions) on our web site http://www.comprousa.com/support
You are welcome to download the latest software from our website as well.
Most problems may be solved on the updates. When contacting Compro for
technical support, please use the Compro support request form and provide as
much of the requested information as possible. Please write the details in order
to determine the problem. And also provide the product serial number (15
digits numbers) on the VideoMate U500. Please use the form from
http://www.comprousa.com/support/form.htm.
We will get back to you as soon as possible.
P/N: 3GA0310143
 Loading...