

Page 1

Dear Customer:
Thank you for purchasing your equipment from Component Playgrounds. We are proud of our products and
we are confident that you will enjoy your equipment for many years.
NOTE! In order for bolt length guide included on the parts identification page to be correct, you may have to
remove the scaling when printing. To do this, click "print", then under "page scaling" select "none". Then
proceed to print.
Your product is being shipped to you on a common carrier truck line and will be brought directly to your
home. All shipments are delivered to curbside only. The receiver is responsible to unload the merchandise
from the truck and should make arrangements to have someone help unload upon delivery. Included below
are some guidelines that should be followed when receiving your shipment.
1. Confirm that the number of pieces being delivered matches with the number of pieces originally
shipped.
2. Your equipment may arrive on a pallet. If so, please verify with the packing list that all pieces
have arrived. If there are any pieces missing, note this directly on to the delivery receipt before
you sign. Some pieces, such as club house supports, may be shipped separate from the pallet.
3. Pay careful attention to the condition of the product when it arrives. If there are parts that
have been damaged, note these problems on the delivery receipt before you sign and accept
delivery of the product.
4. Open packaging of slides, glider seats, etc. to inspect for concealed damage.
5. If your shipment appears to have damage and/or missing pieces, a claim must be filed with
the freight company within two business days. Component Playgrounds will assist you with
this process. Contact the Shipping Manager Toll Free @ 877-530-0222 for claims assistance.
6. Ask your driver to sign or initial the freight slip acknowledging any damage or
discrepancies.
7. Get a copy of the delivery receipt from your delivery driver before he leaves.
All shortages and damaged items are the sole responsibility of the carrier. You are responsible to notify
Component Playgrounds of any shortages or damage relating to your shipment within 2 business days of
receipt of your equipment. After this time, any claim for shortage or loss cannot be honored.
Component Playgrounds cannot be responsible for replacement of any parts missing or damaged that
have not been properly noted on the delivery receipt. Component playgrounds cannot be responsible
for damaged or missing pieces due to the fault of, or loss by the freight company.
We appreciate your business, and look forward to serving you in the future.
Sincerely,
The entire team at Component Playgrounds
Page 2
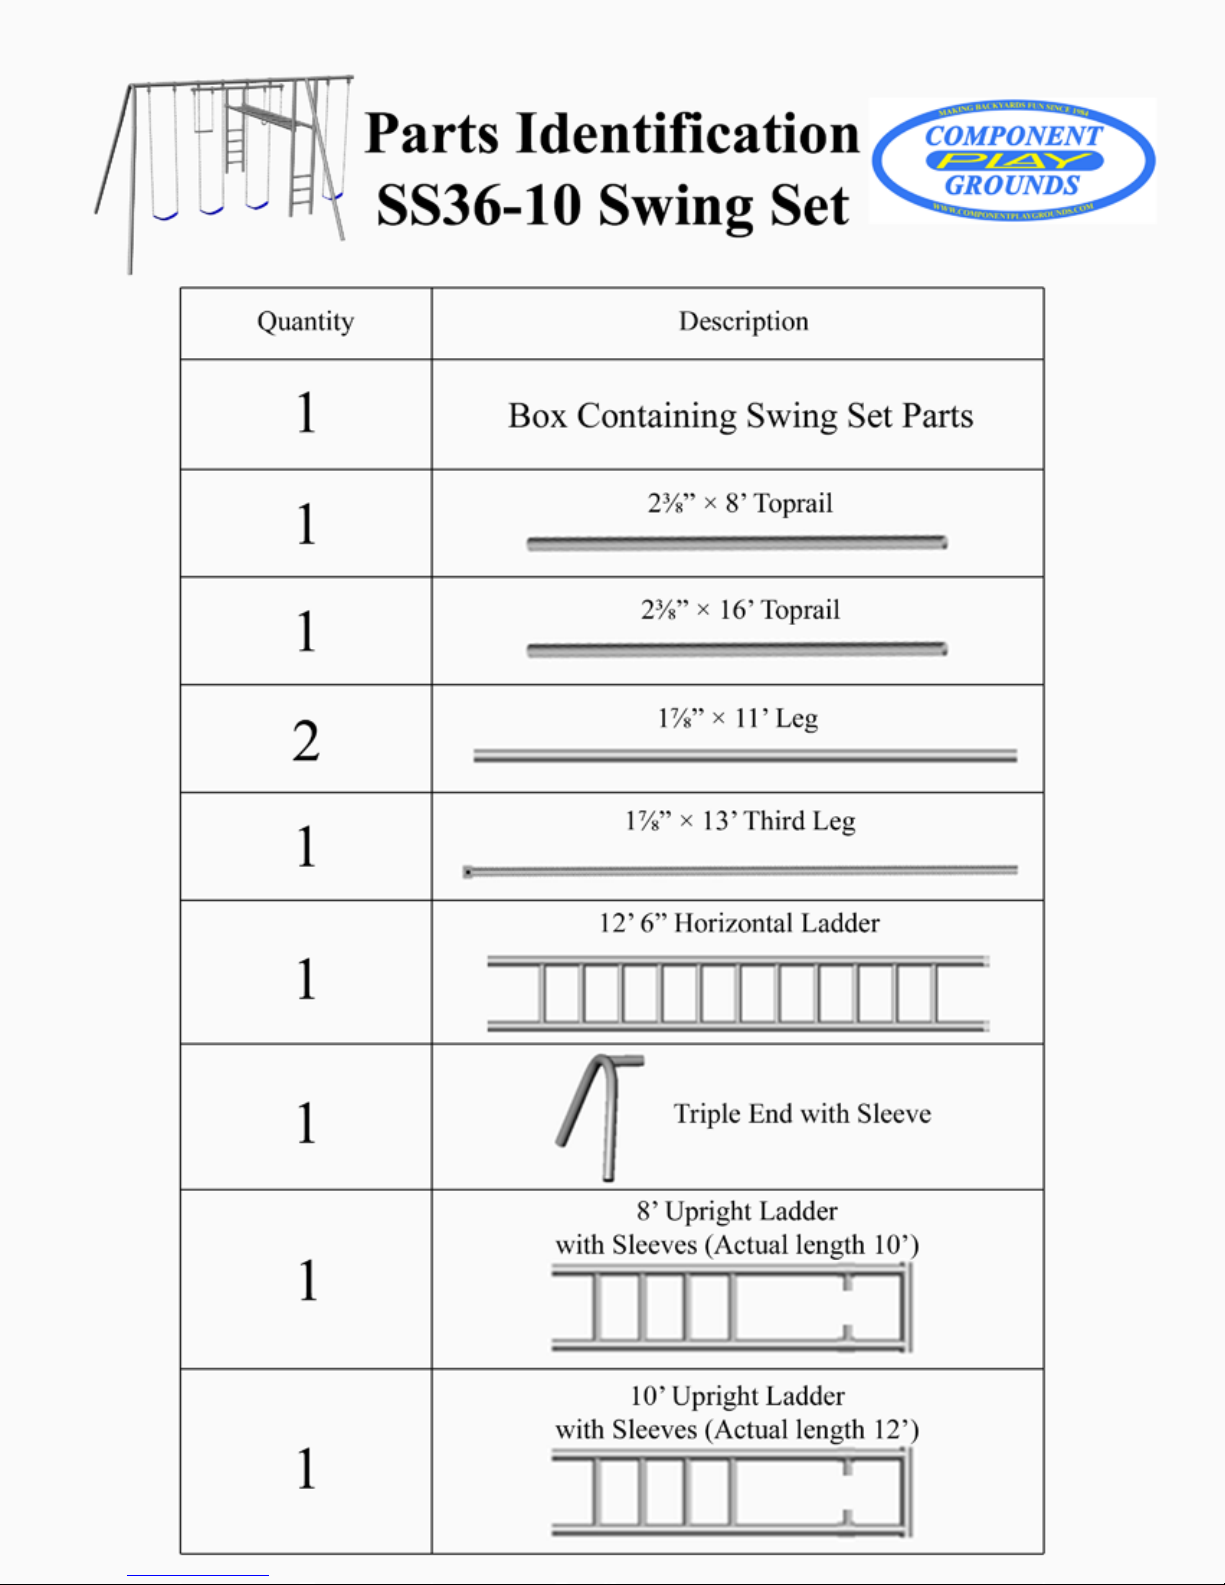
Page 3
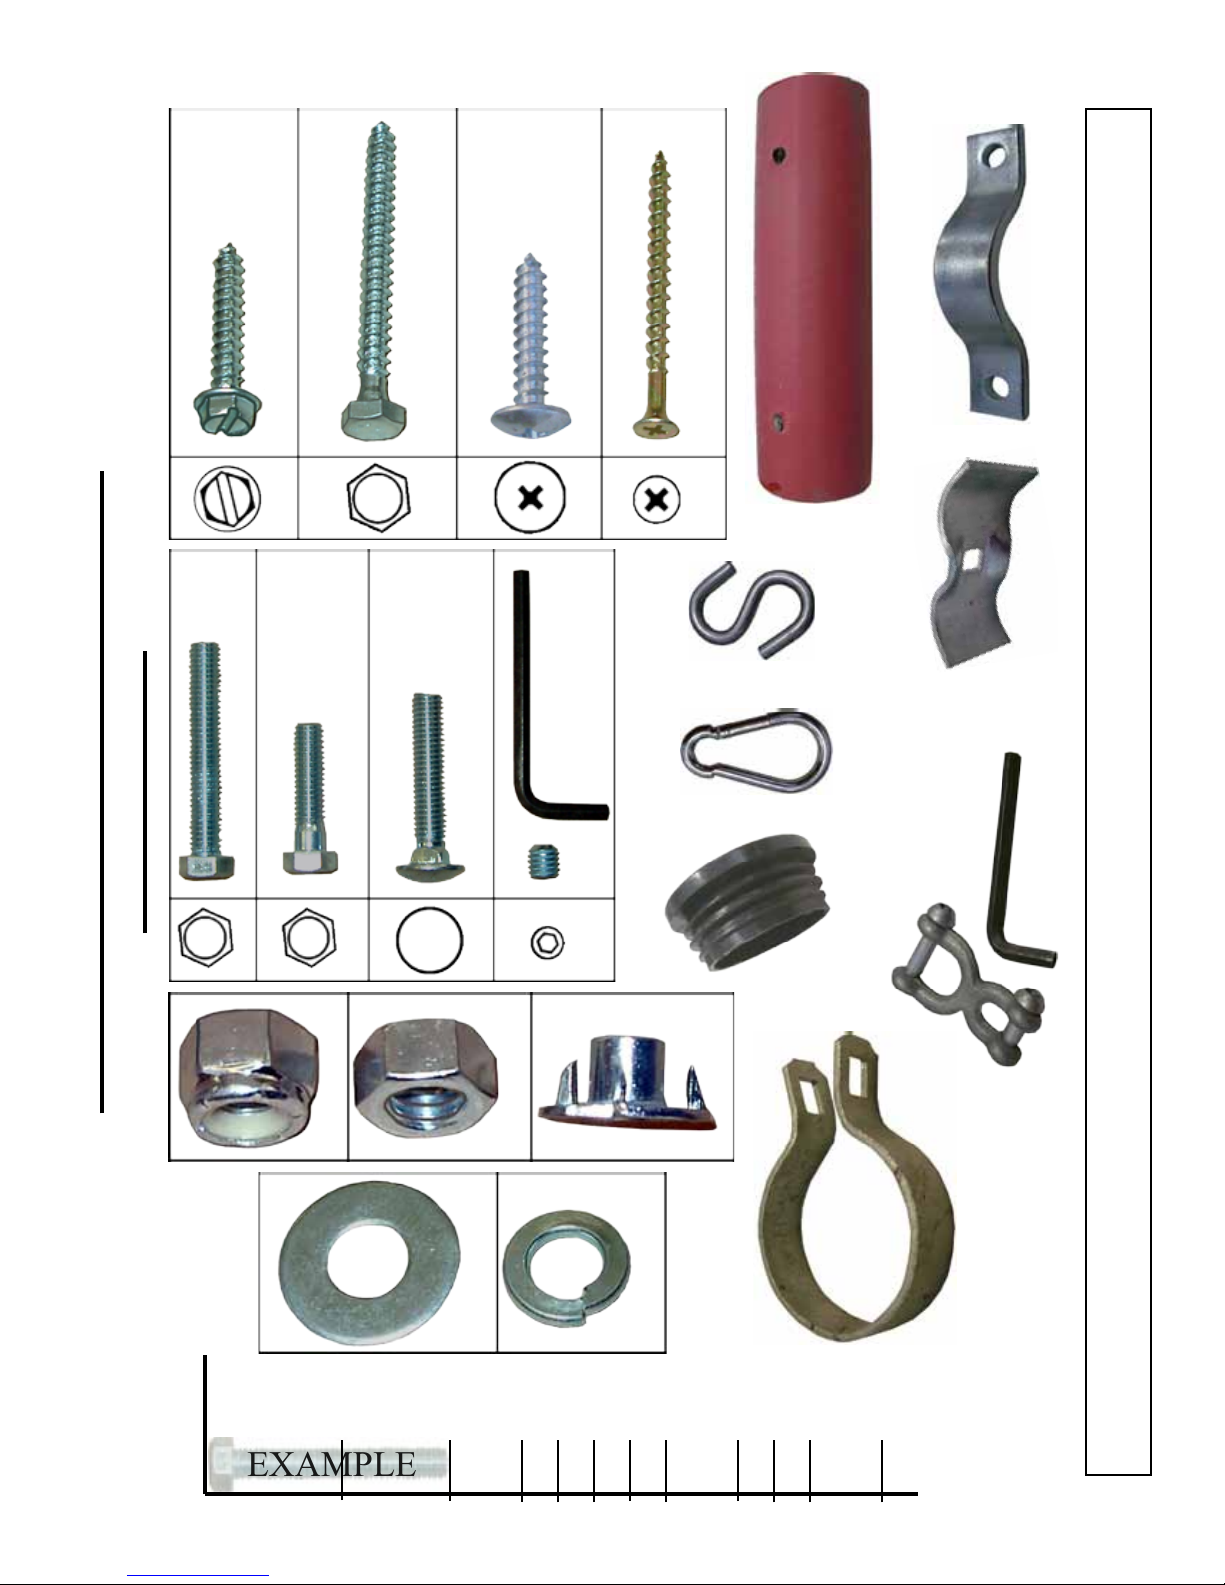
LagScrew
EXAMPLE
#14SheetMetalScrew
GrabberScrew
#14TrussScrew
PipeClamp
GliderBumper
TapBolt
TheSmallParts
SwingSetPartsIdentificationPage
HexBolt
NylocNut
CarriageBolt
HexNut
AllenWrench
SetScrewwith
T-Nut
“S”Hook
SpringClip
Carabineer/
Plug
PanelClamp
CleviswithKey
:?
2008 Swings & Things Inc.
©
BoltLength
FlatWasher
12?
2?
23?
LocWasher
22?
2:?
3?
32?
3:?
BraceBand
4?
42?
togiveyouageneralideaoftheshapeandnamesofthepartsofyourswingset.
Noteverymodelwillhaveeverycomponentorswingpart.Picturesarenottoscale.Thepurposeofthissheetis
Page 4

InstallationInstructions
SS36-10
RequiredTools
Wheelbarrow
Shovel
Digging Bar or Pick
Allen Wrench (provided)
Marker Pen
Ladder
PLEASEREADANDUNDERSTANDALLINSTRUCTIONSBEFOREBEGINNING
*Beforedigging,Pleaseobeylocallawsbynotifyingyourlocalutilitiesmarkingorganization*
1. Select an area in your yard that is reasonably level and meets the space requirements for your equipment. Ground
Space: 17’ x 19’, Play Space: 21’ x 31’.
2. Please refer to the Top Rail/Out Rigger assembly sheet and assemble your top rails as instructed.
3. Using the measurements from the top view diagram, measure and mark the position of the swing hangers and ladders on each of the top rails. Set aside.
4. Place over head ladder onto the ground in the desired location. Measure and adjust as necessary to allow for the
proper play space.
5. With the Horizontal ladder in its proper position in the yard, mark the location for the holes where the two vertical
ladders will stand. Move the horizontal ladder and dig the holes. (See #1 hole sizes for cementing.)
6. Lay each vertical ladder on the ground near the hole where it will eventually stand. Make a mark 15” from the top
of the ladder onto each ladder rail. Move the adjustable sleeves to these marks and position them to receive the
overhead ladder by turning them to point at a 90 degree angle (towards what will become the inside of the structure)
away from the upright ladder. Repeat this process with the 10’ ladder making your marks at 39”. Secure the set
screws.
7. Insert the 8’ top rail into the top sleeve of the ladder. Secure the set screws.
8. Place the ladder into its hole. Hint: Be sure that the adjustable sleeves are prepared to receive the horizontal ladder.
9. Lay the 10’ ladder on the ground with the bottom of the ladder just over the hole where it will eventually stand.
10. Place the 16’ outrigger about 12’ away from the hole. Assemble and attach the swing hangers to the 16’ outrigger.
11. Position the outrigger upside down on the ground. Assemble the “A” frame legs. (See #2 A frame leg assembly.)
Slide the outrigger into the top sleeve of the vertical ladder.
12. Using two strong adults, stand the structure up and allow the ladder to fall into the hole previously dug. Check and
make sure that the outrigger is still properly positioned inside of the ladder top sleeve. The out rigger can be adjusted as follows: While securely holding the ladder, take hold of the A-frame portion and push or pull as necessary.
When you are satised that the outrigger is properly positioned inside the ladder top sleeve, secure the set screws.
Note: The unit will not be level at this point.
13. Adjust the A frame legs in the play space as desired.
14. Mark the holes for the A frame legs. Move the legs out of the way and dig the holes. Hint: Keep most of the hole to
the inside of the leg.
15. Place the legs into the holes.
16. Using two strong adults, lift and slide the horizontal ladder onto the adjustable sleeves at the swings side of the structure and secure the set screws. (See #4 overhead ladder to upright ladder assembly.) Hint: Do not push the overhead ladder tight against the vertical ladders. Leave a ½” - 1” gap between the vertical ladder rails and the overhead
ladder. This will allow for easier adjustment of the overhead ladder in the future.
17. Bring the other vertical ladder up to the horizontal ladder and secure set screws as before.
18. Attach the swing hangers and chains onto the 8’ top rail.
19. Measure away from the 10’ ladder about 5-1/2’ and dig the hole for the third leg.
20. Drop the third leg into the hole and attach to the bolt welded at the top of the ladder. Securely tighten using a 3/8”
nyloc nut. Hint: The third leg can be useful when leveling the structure.
21. Measure the height of the top rail to insure proper swing height.
22. Level the structure.
23. Mix concrete according to the package directions. Pour the concrete. You will use approximately seven 80# bags in
each ladder hole and 1-1/2 bags in each of the other holes. (See #1 Hole sizes for cementing in the set.)
24. Allow the concrete to cure 3 - 5 days before using.
25. Attach the chains and swing seats and enjoy your Component Playground.
Tape Measure
Level
Open end or box wrench’s:
5/8”, 9/16”, 3/4”, 1/2”
Ratchet Handle & Sockets:
5/8”, 9/16”, 3/4”, 1/2”
Page 5
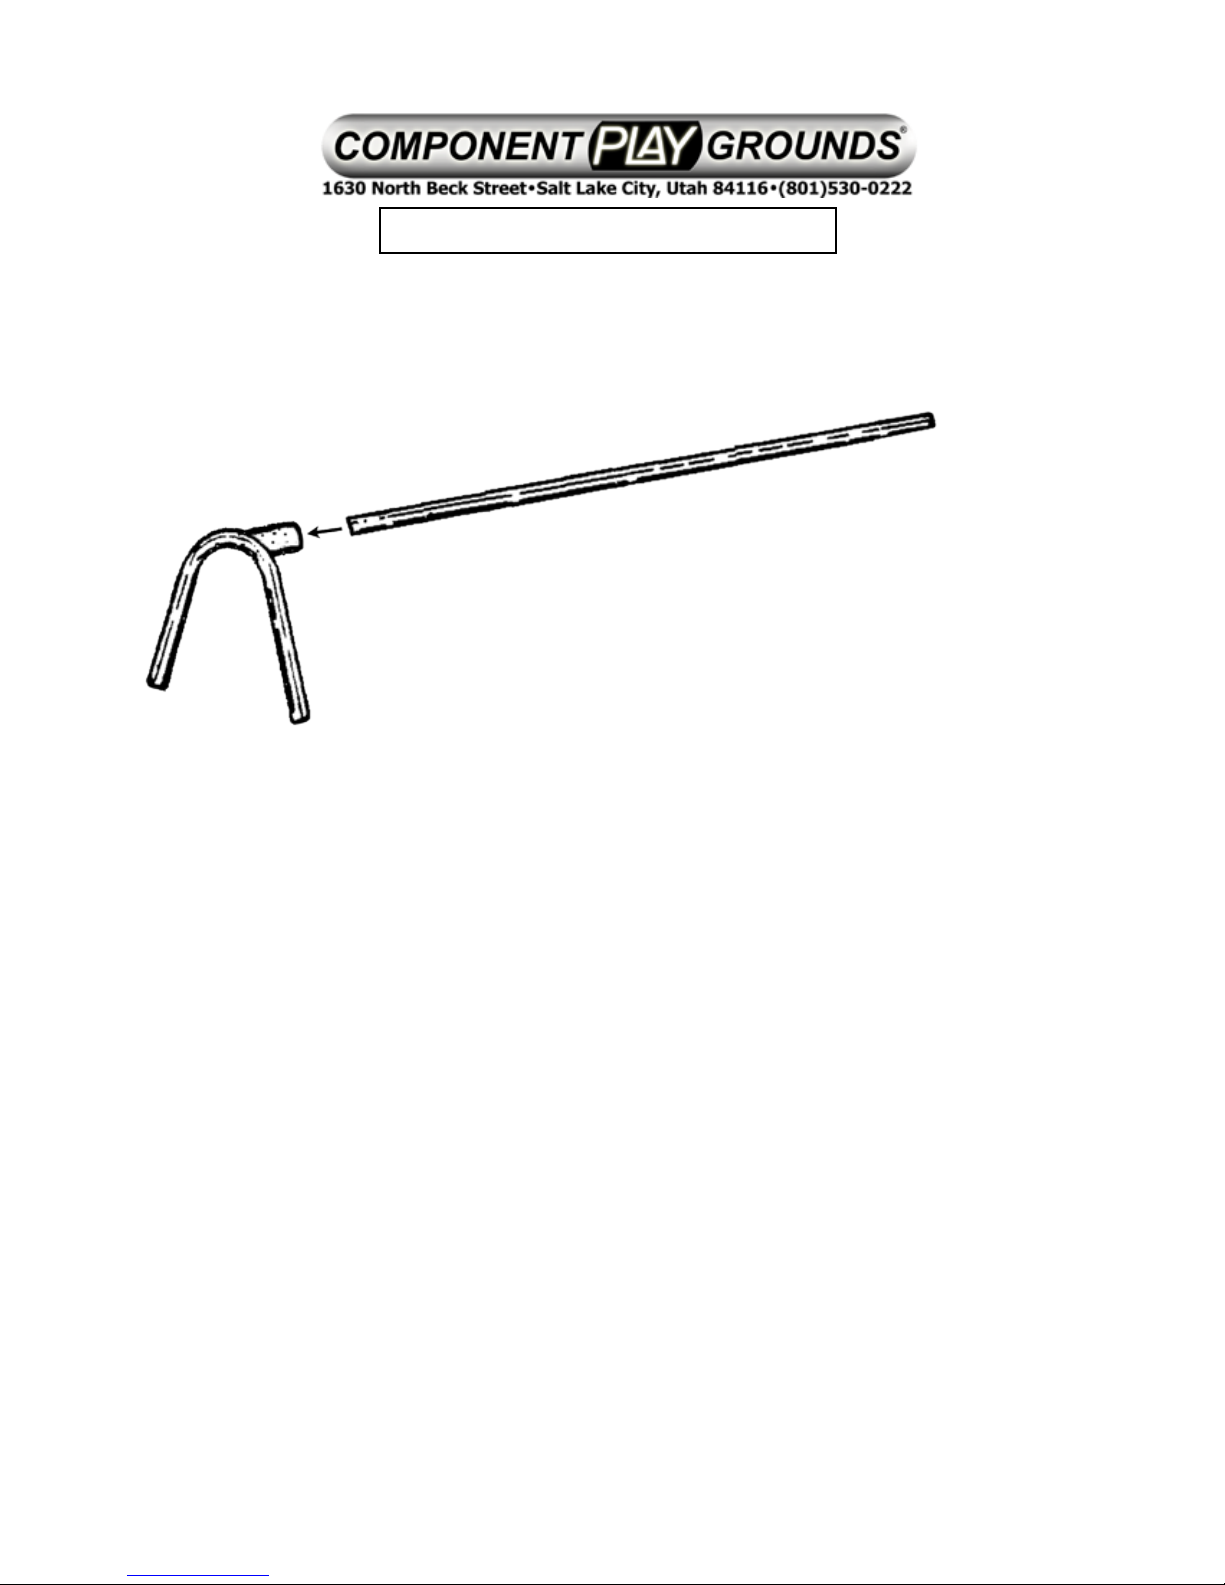
OUTRIGGERASSEMBLY
Step 1: Slide the end of the drilled Top Rail into the Sleeve of the
Triple End.
Step 2: Align the hole in the Top Rail with hole in the Sleeve of the
Triple End and join together using a 7/16” x 3 1/2” Hex Bolt and
7/16” Nyloc Nut.
Step 3: Insert and tighten (4) 3/8” x 3/8” set screws into the Triple
End Sleeve using Allen Wrench provided.
Page 6
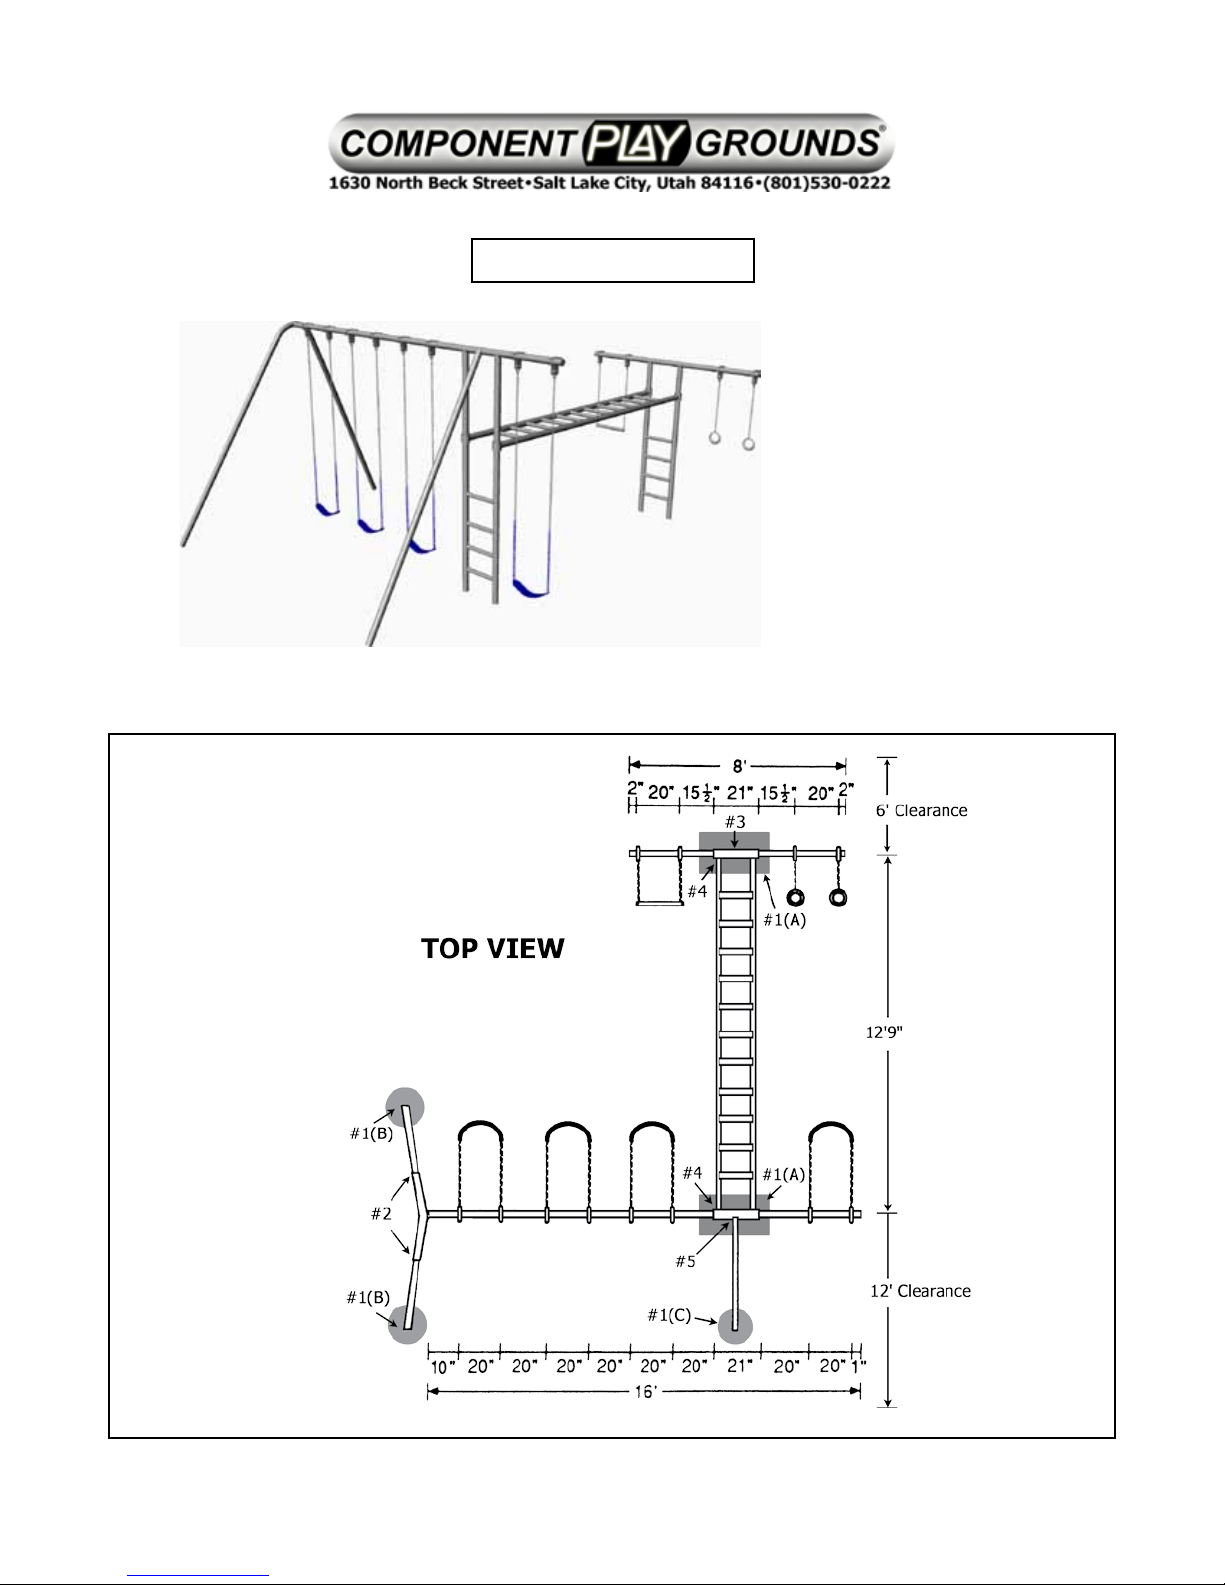
INSTALLATIONINSTRUCTIONS
ModelSS36-10
GROUNDSPACE17’X19’
RESIDENTIAL
PLAYSPACE21’X31’
(ContinuedonBack)
©2009 Swings & Things Inc.
Page 7
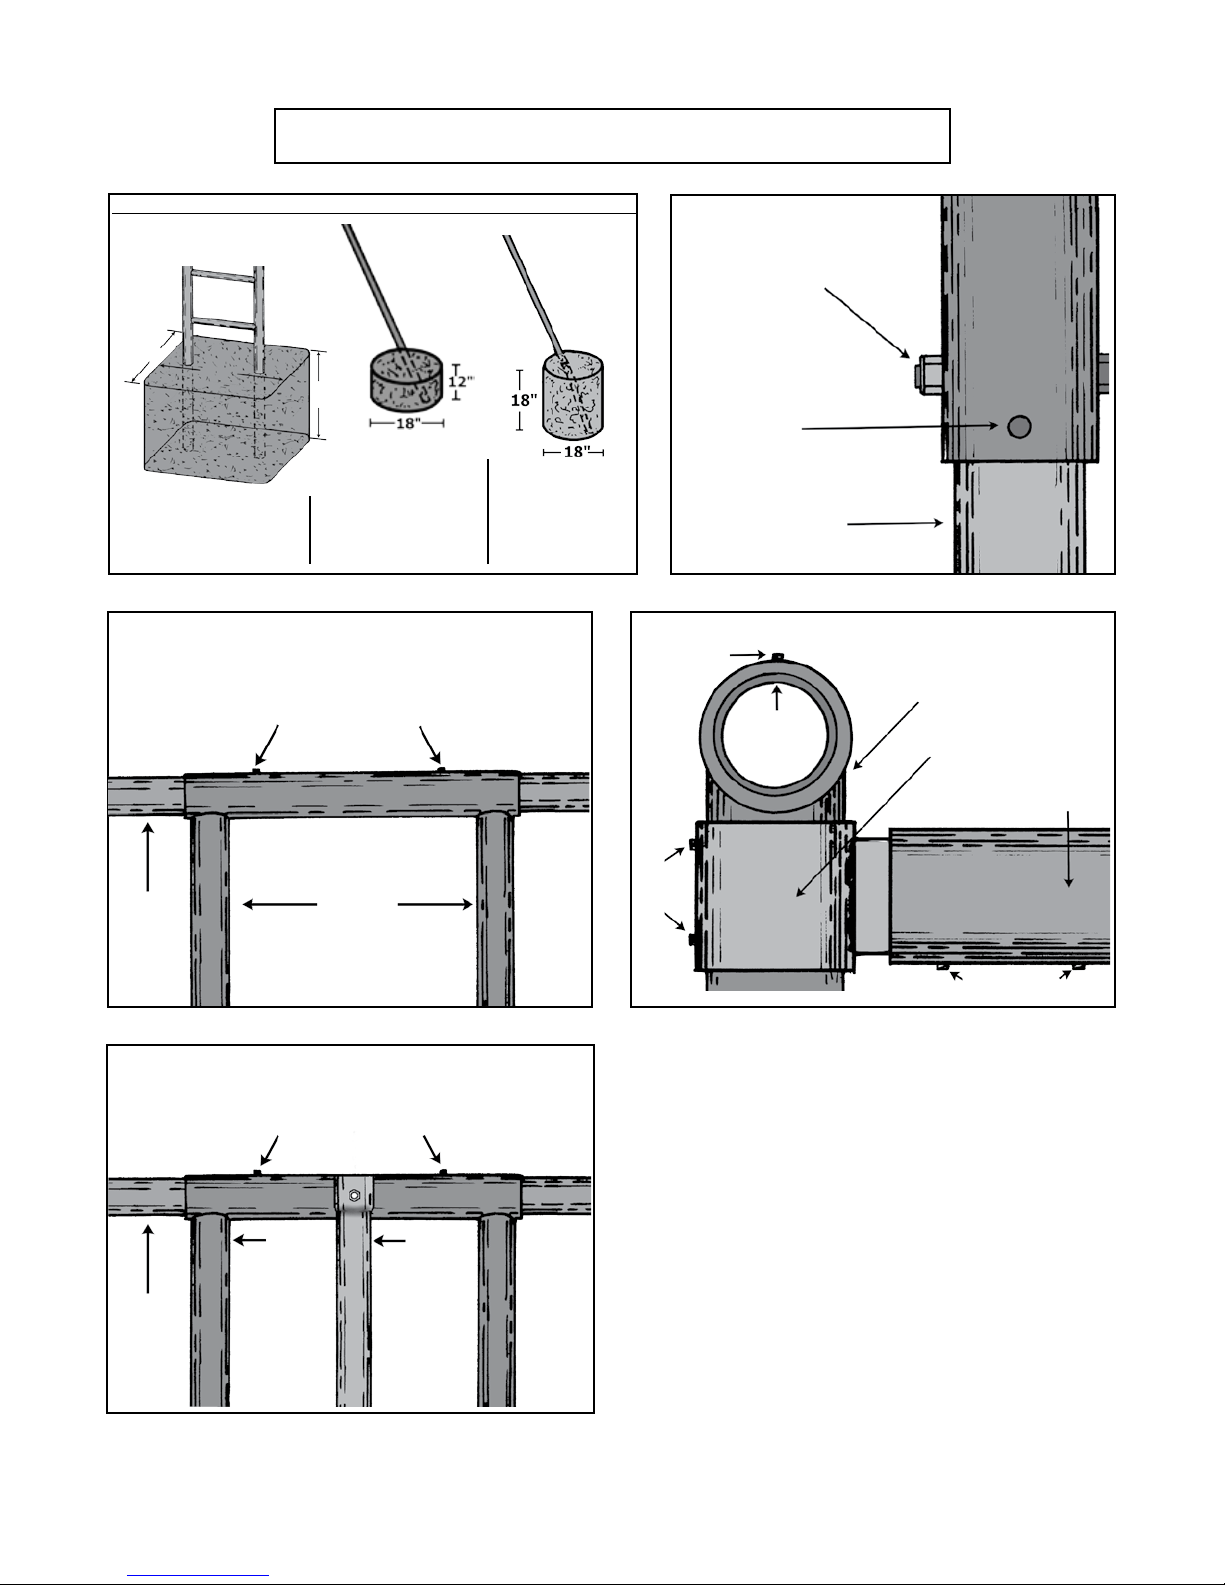
ModelSS36-10Continued
DONOTUSEPOSTMIXUSEGOODQUALITYCONCRETEMIX!
(A) Upright
Ladder
(B) A-Frame
Legs
(C) 3rd Leg
3/8” x 2¾” Hex Bolt
with 3/8” Nyloc Nut
(1 each per leg)
Triple End
20”
28”
Hole 28”x20”x24”
(approximately 7 80 lb.
bags of concrete mix
per hole)
#1HoleSizesforCementingintheSet
place on Top Rail
and secure with
two 3/8” x 3/8” set
Top Rail
24”
Holes 18” x 12”
(approximately
1½ 80 lb. bags
concrete mix
per hole)
Slide Ladder in
screws.
8’
Ladder
Hole 18” x 18”
(approximately
2 80 lb. bags of
concrete mix)
3/8” x 3/8”
Set Screw
(1 each per leg)
Slide in leg, bolt in
place and secure
with set screw
Set Screw
Set
Screws
A-Frame
Leg
#2A-FrameLegAssembly
Upright Ladder
Top Rail
Adjustable Sleeve
Horizontal Ladder
#3LaddertoTopRailAssembly
Slide Ladder in
place on Top Rail
and secure with
two 3/8” x 3/8”
set screws.
10’
Ladder
Top Rail
Place
3rd Leg
over
Bolt &
secure w/
3/8”
Nyloc Nut
#5LaddertoTopRailAssemblyand
AttachingtheThirdLeg
Set Screws
#4HorizontalLaddertoUprightLadderAssembly
PleaseNote:Onlythe10’SiderequiresaThirdLeg
©2007 Swings & Things Inc.
Page 8
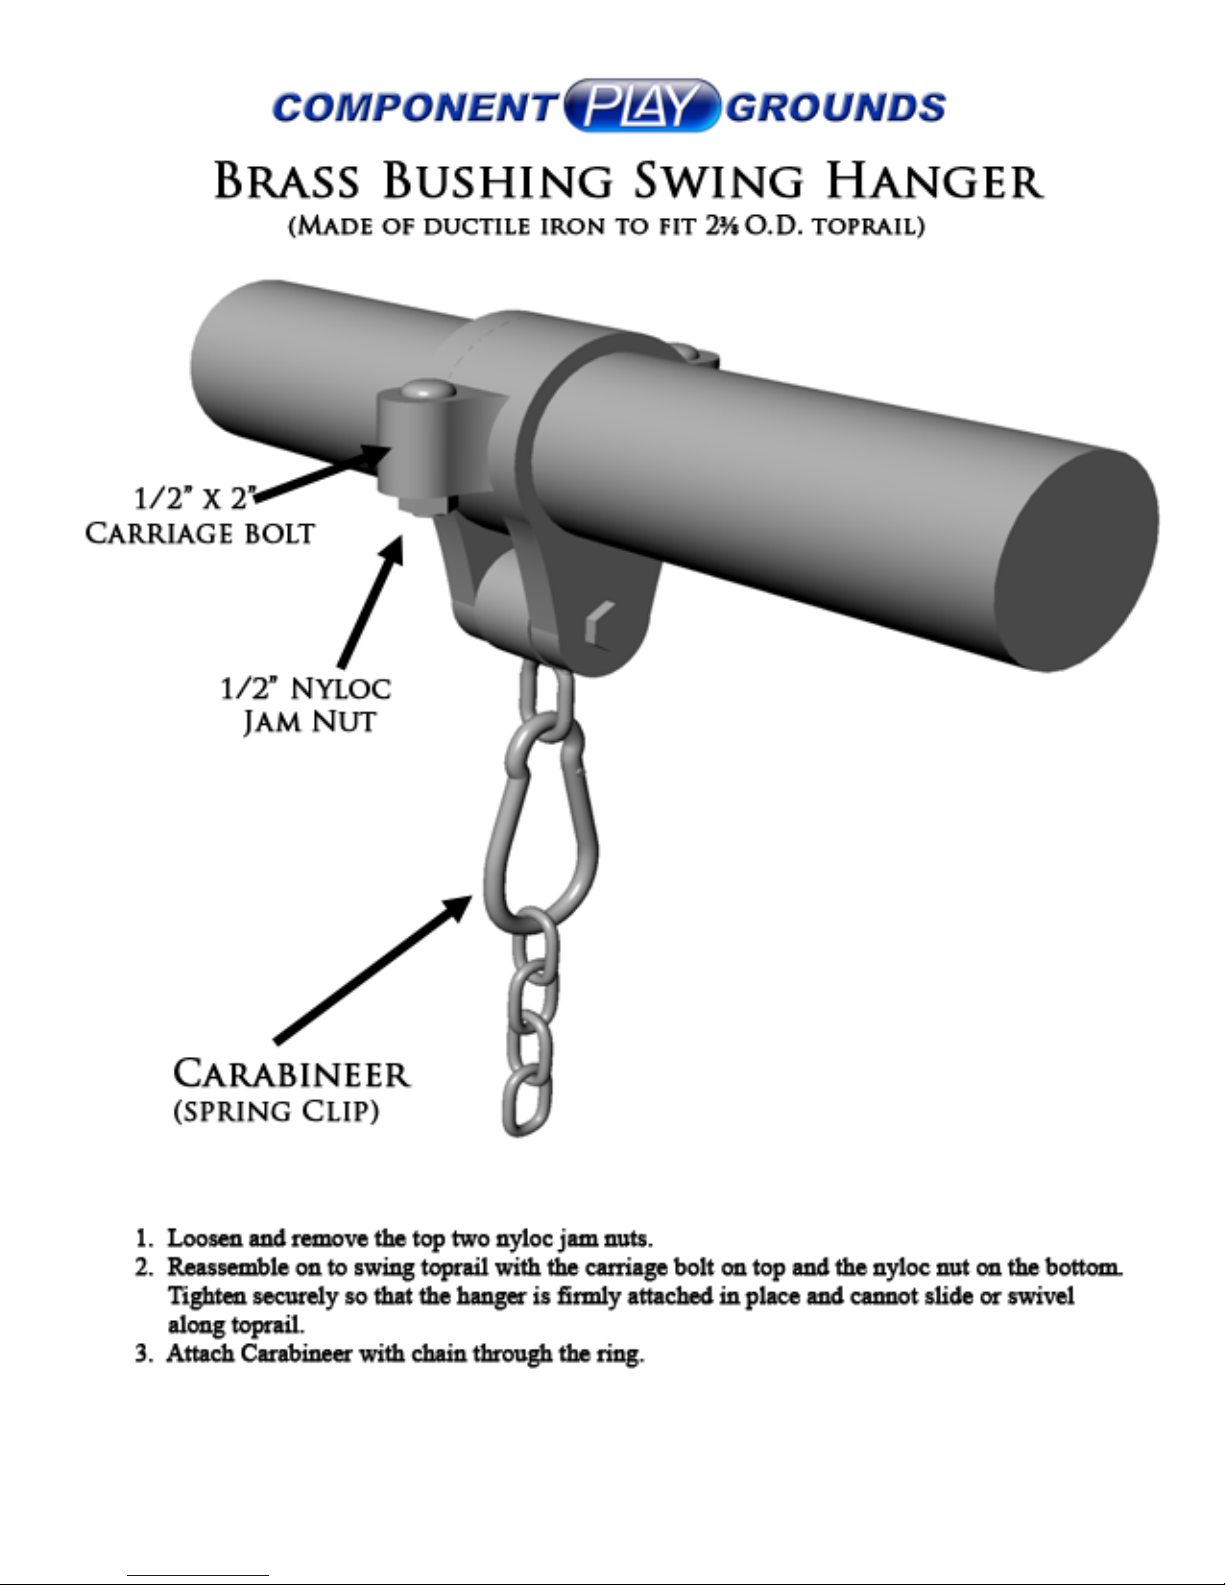
Page 9
Read Before Use
Congratulations! You have just pu rchased one of the finest pieces of playground equipment available. Your family
will enjoy many ho urs of fun with this fine eq uipm ent. Playgrou nd equipment can be most en joyable, but there are
some dangers if not used properly. Yo u should be aware of the following:
Equipm en t should be installed in a level area, free from obstructions, w ith enough space to allow for adequate
clearance in all directions when equipm ent is in maximum use.
Keep objects away from equipm ent that could interfere with persons using it or that could be hazardous.
Misuse or abuse of th is playgro und equipment is dangerous an d can cause serious injury.
This equipment sh ould b e inspected before each use and any worn, defective or missing parts shou ld be replaced.
Children should play on equ ipment o nly with adult supervision and should be duly warned o f the potential hazards
in this type o f equipm en t when used improperly, and they should be instructed as to prop er cautions to take in its
use.
Equipm ent should not be used when it is we
Equipm ent should only be used in a well-lighted area.
Do no t use equipmen t when tired, under stress or emotionally upset.
Do not overcro wd.
Do no t use equipment when under the influence of alcohol or drugs.
Do not attem pt somersaults or gymn astic stu nts without p ro per instructions and coaching. Kno w your own
lim itations and exercise caution at all tim es.
Do no t jump off of eq uipment when dismou nting. It is a dangerous practice to jum p on or off equipment.
Do not attempt to use equipment for so mething othe r than the use for which it was design ed and intended, or in a
manner other than that for which it was designed and intended .
While every attempt is mad e by Component P la yground s to ensure th e highest degree o f safety in all of our
equip ment, we cannot guarantee f reed om fro m injury . The user assumes all risk of injury du e to use. All
merchandise is sold on this condition, w hich no repre sentative of the com pany can w aive or change.
t or icy.
Page 10
Maintenance Of Your Playground
We hope you and your family are enjoying many hours of fun with your Component Playgrounds
products, and we thank you for your business. Our goal is to make durable functional products out of
the best materials available. Your product should be mostly maintenance free, however, over the years
you should consider the following suggestions with regard to upkeep of your Component Playgrounds
products:
1. Chain & Connectors- These products are coated with the highest quality zinc coating
available. Over time they may become discolored or eventually rust, this depends on
environmental conditions. These items should be inspected regularly for wear and
replaced as needed.
2. Swing Hangers- These parts are coated with bright zinc plating. Over time swing
hangers may become discolored or eventually rust. Should this happen, a touch-up with
cold galvanizing compound paint in a spray can followed with a top coat of silver
aluminum paint also in a spray can, will make them look new again. (These paints are
available at Component Playgrounds and many lumber and hardware stores.) Bearings
in the swing hangers are pre-greased and sealed and normally do not need additional
lubrication. All swing hanger parts should be regularly inspected for wear and replaced
as needed. Note: twisting the chain while swinging will put extra wear on the swing
hanger parts.
3. Gliders- Glider bushings should be lubricated as needed with grease. Glider safety
bumpers should be inspected regularly and replace as needed.
4.Tire Swing Swivels- Lubricate tire swing regularly to prevent excessive wear.
5. Welds- All welds are coated with cold galvanizing compound paint with a top coat of
silver aluminum paint , both in spray cans. Upon inspection of the welds, if any rust or
discoloration appears, simply apply another coat to the area to keep it looking new.
(Cold galvanizing and silver aluminum paint are available at most lumber and hardware
stores or at Component Playgrounds.)
6. Wood Decks- Stain the deck as needed to prolong the life of the redwood. As a
suggestion indoor/outdoor carpet works well on the deck to cut down on maintenance.
7. Vinyl Canopies/ Rubber Swing Seats- Inspect periodically and replace as needed.
8. Slides- Inspect periodically to ensure slide surface is in good condition.
9. Set Screws- Make sure all set screws are in place and tighten if needed.
10. Basketball Equipment- Check to be sure all nuts are tight and in place & grease any
required areas as needed. Replacement nets are available at Component Playgrounds.
Thank You again for your business and have many fun years using your equipment from
Component Playgrounds.
Page 11
X3. CONSUMER INFORMATION SHEET FOR PLAYGROUND SURFACING MATERIALS**
X3.1 The U.S. Consumer Product Safety Commission
(CPSC) estimates that about 100,000 playground equipment
related injuries resulting from falls to the ground surface are
treated annually in U.S. hospital emergency rooms. Injuries
involving this hazard pattern tend to be among the most
serious of all playground injuries, and have the potential to be
fatal, particularly when the injury is to the head. The surface
under and around playground equipment can be a major
factor in determining the injury causing potential of a fall. It is
self evident that a fall onto a shock absorbing surface is less
likely to cause a serious injury than a fall onto a hard surface.
Playground equipment should never be placed on hard
surfaces such as concrete or asphalt and while grass may
appear to be acceptable, it may quickly turn to hard packed
earth in areas of high traffic. Shredded bark mulch, wood
chips, fine sand or fine gravel are considered to be acceptable
shock absorbing surfaces when installed and maintained at a
sufficient depth under and around playground equipment.
X3.2 Table X3.1 lists the maximum height from which a
child would not be expected to sustain a life threatening head
injury in a fall onto four different loose-fill surfacing materials
if they are installed and maintained at depths of 6, 9, and 12
inches. However, it should be recognized that all injuries due
to falls cannot be prevented no matter what surfacing material
is used.
** This information has been extracted from the CPSC
Publications “Playground Surfacing–Technical Information
Guide” and “Handbook for Public Playground Safety.”
Copies of these reports can be obtained by sending a
postcard to the: Office of Public Affairs, U.S. Consumer
Product Safety Commission, W ashington, D.C., 20207 or
call the toll-free hotline: 1-800-638-2772.
TABLE X3.1 Fall Height in Feet From W hich Life
Threatening
Head Injury Would Not Be Expected
Type of Material 6 inch
depth
9 inch
depth
12
inch
depth
Double Shredded Bark 6 10 11
Wood Chips 6 7 12
Fine Sand 5 5 9
Fine Gravel 6 7 10
X3.3 It is recommended that a shock absorbing material
should extend a minimum of 6 feet in all directions from the
perimeter of stationary equipment such as climbers and slides.
However, because children may deliberately jump from a
moving swing, the shock absorbing material should extend in
front and rear of a swing a minimum distance of 2 times the
height of the pivot point measured from a point directly
beneath the pivot on the supporting structure.
X3.4 This information is intended to assist in comparing
the relative shock-absorbing properties of various materials.
No particular material is recommended over another.
However, each material is only effective when properly
maintained. Materials should be checked periodically and
replenished to maintain correct depth as determined
necessary for your equipment. The choice of a material
depends on the type and height of the playground equipment,
the availability of the material in your area, and its cost.
The American Society for Testing and Materials takes no position respecting the validity of any patent rights asserted in connection with any
item mentioned in this standard. Users of this standard are expressly advised that determination of the validity of any such patent rights, and
the risk of infringement of such rights, are entirely their own responsibility.
This standard is subject to revision at any time by the responsible technical committee and must be reviewed every five years and if not revised, either
approved or withdrawn. Your comments are invited either for revision of this standard or for additional standards and should be addressed to ASTM
headquarters. Your comments will receive careful consideration at a meeting of the responsible technical committee, which you may attend. If you feel
that your comments have not received
Conshohcken, PA 19428.
a fair hearing you should make your views known to the ASTM Committee on Standards, 100 Barr Harbor Drive, West
To Help Prevent Injuries from Falls & Other Hazards
1. Ne ver Attach – or allow ch ildren to attach – ropes, jum p rop es, cloth eslines, or pe t leash es to p la y equipm e nt; children
ca n be stran gled on these .
2. Check for hard w a re, like open “S ” hook s o r protruding bolt end s which can be h azard ous.
3. Check for s pace s th at could trap children, suc h as op enings in g uardra ils or be tw e en ladder rungs; th ese space s sho uld
measu re less than 3 .5 inch es or more than 9 inc hes.
4. Ma ke sure p la tform s and ram ps have g uard rails to prevent falls.
5. Check for sharp poin ts or e dges in equipm e nt.
6. Re m ove trip p ing haz ard s, lik e e xpo sed con cre te footings, tree stum ps, a nd ro cks.
7. Re gularly check p lay equipment an d s urfacing to m ake su re both ar
8. Ca refully su p erv ise children on play e quipment to make sure th ey a re safe.
e in goo d c ondition.
Page 12

Limited Warranty
Component Playgrounds warrants to the original purchaser/property owner that its products
are free from defect in materials and workmanship. This warranty is non-transferrable and will
be honored only after proper registration.
Component Playgrounds further warrants the following:
• Limited Lifetime warranty on all structural support parts of any new swing set, play
structure, climber, basketball pole, or fitness equipment are sound, safe, and durable to
be used as intended by appropriate aged children.
• 10 year warranty on galvanized steel or stainless steel slides
• 1 year warranty all moving parts, swing seats, fiberglass slides, backboards, rims, and
other items not listed above.
This warranty is not extended to cosmetic items such as scratches, dents, fading, discoloring,
paint wear, rust, weathering, or decorations. The warranty as stated is valid
only if equipment
is properly installed as detailed in the installation instructions provided, and when a regularly
scheduled maintenance program is observed (monthly recommended). All parts are subject to
normal use & wear for the purpose of which these items were designed.
When attached to the structure, plastic slides should not be lifted up from the bottom for any
reason. Cracks at the top of the slide that result from lifting the bottom of the slide will not be
warrantied.
This warranty is void should the equipment be subject to vandalism, misuse, neglect, abuse,
improper installation, tampering, or accident. This equipment is not to be altered, or modified,
by anyone other than Component Playgrounds or its authorized agent. This warranty also
does not cover damage resulting from flood, fire, catastrophe or other acts of nature.
To the extent permitted by law, Component Playgrounds shall not be liable for any direct,
indirect, special, incidental, or consequential damages which are not a part of this transaction.
Should this product be found to be defective due to material or workmanship within the
warranty period, contact Component Playgrounds for warranty return authorization.
Unauthorized returns will be refused and returned to sender. Return parts, freight prepaid, to
the Component
Playgrounds’ plant with proof of purchase for repair or replacement.
Component Playgrounds will decide if parts in question should be repaired or replaced. This
warranty does not cover costs related to removal, transportation and/or labor.
Component Playgrounds sales representatives or agents are not authorized to modify or
substitute claims which are not part of this exclusive written warranty. This warranty is void if
the product is in any way modified from its original state or is used for other than the purpose
for which it was intended.
June 27, 2008
Page 13
CUSTOMER INFORMATION
(If different from manufacturer)
INSTALLATION INFORMATION
(If different from customer or sales representative)
WARRANTY REGISTRATION SHEET
Project Name: _______________________________________
Contact Person: _____________________________________
Address: ___________________________________________
City: _____________________ State: ______ Zip: _________
Phone: _____________________ Fax: ___________________
Purchase Date: ___________ Completion Date: ____________
SALES REPRESENTATIVE/DEALER INFORMATION
Organization: _______________________________________
City: _____________________ State: ______ Zip: _________
Sales Rep Name: ____________________________________
Phone: _____________________ Fax: ___________________
Installed By: ________________________________________
Contact Person: _____________________________________
Address: ___________________________________________
City: _____________________ State: ______ Zip: _________
Phone: _____________________ Fax: ___________________
Note: To ensure your warranty is activated, complete and
return this form within 10 days of installation.
Return this form via fax to (801)530-0221, via e-mail to
Component Playgrounds
1630 North Beck Street
Salt Lake City, UT 84116
[email protected], or via U.S. mail to:
Today’s Date: _______________________________________
Sales Receipt/Invoice Number: _________________________
Model(s): __________________________________________
___________________________________________________
___________________________________________________
___________________________________________________
___________________________________________________
___________________________________________________
___________________________________________________
 Loading...