


Compix NewsScroll 4.1 User Manual

User Manual

COPYRIGHT
Copyright ©2011 Compix Media Incorporated. All rights reserved.
Compix Media, Inc., 26 Edelman, Irvine, CA 92618, U.S.A.
No part of this document may be reproduced or transmitted in any form or by any means, electronic or mechanical, for any purpose, without the express permission of Compix Media Incorporated.
Compix Media is a registered trademark of Compix Media Incorporated. NewsScroll, GenCG, and the NewsScroll logo are trademarks of Compix Media Incorporated. All other company and product names are
trademarks of their respective owners.
Compix Media Incorporated
Software License Agreement
IMPORTANT: PLEASE READ THE TERMS AND CONDITIONS OF THIS LICENSE AGREEMENT CAREFULLY BEFORE USING THE SOFTWARE. COMPIX MEDIA INCORPORATED
IS WILLING TO LICENSE THE SOFTWARE TO YOU AS THE INDIVIDUAL, THE COMPANY, OR THE LEGAL ENTITY THAT WILL BE UTILIZING THE SOFTWARE ONLY ON THE
CONDITION THAT YOU ACCEPT ALL OF THE TERMS OF THIS LICENSE AGREEMENT. THIS IS A LEGAL AND ENFORCEABLE CONTRACT BETWEEN YOU AND COMPIX MEDIA
INCORPORATED. BY OPENING THIS PACKAGE, BREAKING THE SEAL, OR OTHERWISE INDICATING ACCEPTANCE ELECTRONICALLY, OR LOADING THE SOFTWARE, YOU
AGREE TO THE TERMS AND CONDITIONS OF THIS AGREEMENT. IF YOU DO NOT AGREE TO THESE TERMS AND CONDITIONS, COMPIX MEDIA INCORPORATED IS UNWILL-
ING TO LICENSE THE SOFTWARE TO YOU, AND YOU SHOULD NOT UNSEAL THE DISK PACKAGE OR MAKE NO FURTHER USE OF THE SOFTWARE.
1. Denitions.
(A) “Software” means the software program covered by this agreement, and all related updates supplied by Compix Media Incorporated.
(B) “Compix Product” means the Compix Software and any related documentation, models, and multimedia content (such as animation, sound, and graphics), and all related updates supplied by Compix Media
Incorporated.
(C) “End-User Product” means the output le generated by you, if any, using the Compix Software. Examples of end-user products include animations, presentations, interactive multimedia material, interactive
entertainment products, and the like.
2. License.
The Software and documentation that accompanies this license is the property of Compix Media Incorporated, or its licensors, and is protected by copyright law. While Compix Media Incorporated continues to
own the Software, you will have certain rights to use the Software after your acceptance of this license.
The foregoing license gives you limited rights to use the Compix Product. You do not become the owner of, and Compix Media Incorporated retains title to, the Compix Product, and all copies thereof. All rights
not specically granted in this agreement, including federal and international copyrights, are reserved by Compix Media Incorporated.
Some states do not allow the exclusion of implied warranties, so the above exclusion may not apply to you. You may also have other legal rights which vary from state to state.
These limitations or exclusions of warranties and liability do not affect or prejudice the statutory rights of a consumer; i.e., a person acquiring goods otherwise than in the course of a business.
This agreement allows you to:
(A) Use the Software on the hard disk drive of any single compatible computer that you own. This License does not allow the Software to exist on more than one computer at a time, and you may not make the
Software available over a network where it could be used by multiple computers at the same time. If you wish to use the Software on more than one computer, you must either erase the Software from the rst hard
drive before you install it onto a second hard drive, or else License an additional copy of the Software for each additional computer on which you want to use it.
(B) Make one backup copy of the Software, provided your backup copy is not installed or used on any computer and further provided that all such copies shall bear the original and unmodied copyright, patent,
and other intellectual property markings that appear on or in the Software. You may not transfer the rights to a backup copy unless you transfer all rights in the Software as provided under Section A.
(C) Make copies of the End-User Product and distribute those copies for use by others.
3. Restrictions.
You may not, without written permission from Compix Media Incorporated: rent, lease, lend, redistribute, or sublicense the Software or any copy; use, copy, modify, merge, or transfer copies of the Software or
documentation except as provided in this Agreement; use any backup copy of the Software for any purpose other than to replace the original copy in the event it is destroyed or becomes defective; or decompile,
reverse engineer, disassemble, modify, or create derivative works of the Software or any part thereof.
Your rights under this License will terminate automatically without notice from Compix Media Incorporated if you fail to comply with term(s) of this License. Licensee also may terminate this License voluntarily
by giving notice of termination to Compix Media Incorporated and destroying or returning to Compix Media Incorporated all copies of all or any part of the Software and related user documentation in Licenses’
possession or under Licensee’s control.
4. Limited Warranty.
Compix Media Incorporated warrants the media on which the Software is recorded and the hardware delivered by Compix Media Incorporated to be free from defects in materials and workmanship under normal
use for a period of one (1) year from the date of original retail purchase. Your exclusive remedy under this Section shall be, at Compix Media Incorporated’s option, a refund of the purchase price of the Software
or replacement of the Software which is returned to Compix Media Incorporated with a copy of the receipt. In compliance with this Agreement, Compix Media Incorporated will replace a damaged or defective
interlock security device (dongle) no matter what the cause of the damage for a period of one (1) year from the date of purchase. In order to receive a replacement device, you must return the damaged device to
Compix Media Incorporated, 26 Edelman, Irvine, CA 92618, U.S.A.
5. Lifetime Warranty on Software.
Compix Media Incorporated warrants only to the original purchaser of the Software that the Software will be free from defects in material and workmanship under normal use and service. All Software updates are
free of charge for the lifetime of the Software. The Software and documentation are provided on an “As Is” basis and Compix Media Incorporated does not warrant that the Software will satisfy all your require-
ments or that operation of the Software will be uninterrupted or that the Software will be free from defects.
6. Limitation of Liability.
Compix Media Incorporated shall not be liable for any indirect, special, incidental, or consequential damages or loss (including damages for loss of business, loss of prots, or the like), whether based on break of
contract, tort (including negligence), product liability, or otherwise, even if Compix Media Incorporated or its representatives have been advised of the possibility of such damages. Some states do not allow the
limitation or exclusion of liability for incidental or consequential damages, so this limitation or exclusion may not apply to you.
The exclusive remedies and limited liability set forth above are fundamental elements of the basis of the bargain between Compix Media Incorporated and you. You agree that Compix Media Incorporated would
not be able to provide the Software on an economic basis without such limitations.
7. General.
This agreement shall be governed by the internal laws of the state of California. This agreement contains the complete agreement between the parties with respect to the subject matter hereof, and supersedes all
prior or contemporaneous agreements or understandings, whether oral or written.
All questions concerning this agreement shall be directed to:
Compix Media, Inc., 26 Edelman, Irvine, CA 92618, U.S.A.

Contents
Chapter 1. Getting Started
Chapter 2. Basic Operations
Chapter 3. Functions
Chapter 4. Scheduler
Appendix
Chapter 1. Getting Started
Compatibility with Windows 7 .......................................................10
Compatibility with Windows 7 .................................................................................10
Creating Story Data ........................................................................ 12
The Basics ..............................................................................................................12
Advanced ................................................................................................................13
Creating Template Files in GenCG ................................................14
Crawl Templates .....................................................................................................14
Optional Second Page for Crawls...........................................................................15
Data Box Templates ...............................................................................................16
Clock Templates .....................................................................................................17
Title Templates .......................................................................................................17
4
Compix Media NewsScroll
Document No: 2.3.002 Revision: 2.1 Updated: 4/11/2012

Chapter 2. Basic Operations
NewsScroll User Interface ............................................................. 20
Board Conguration ................................................................................................20
Primary Screen .......................................................................................................20
Playback Control.....................................................................................................21
Edit Window ............................................................................................................22
Menu Options ..................................................................................24
Options Menu .........................................................................................................24
Help Menu ..............................................................................................................28
Compix Media NewsScroll5Document No: 2.3.002 Revision: 2.1 Updated: 4/11/2012

Chapter 3. Functions
Crawls ..............................................................................................30
Crawls User Interface .............................................................................................30
Crawls at a Glance .................................................................................................33
Crawl Settings.........................................................................................................34
Logos ...............................................................................................38
Logos at a Glance...................................................................................................38
Logo Settings ..........................................................................................................39
Data Box ..........................................................................................40
Data Box Settings ...................................................................................................40
Clock ................................................................................................43
Clock Settings .........................................................................................................43
Title ..................................................................................................44
Title Settings ...........................................................................................................44
Ratings ............................................................................................45
Rating Settings .......................................................................................................45
6
Compix Media NewsScroll
Document No: 2.3.002 Revision: 2.1 Updated: 4/11/2012
Chapter 4. Scheduler
Schedule Data .................................................................................48
Schedule User Interface .........................................................................................48
Daily Schedule ........................................................................................................49
One Time Schedule ................................................................................................50
Time Control ...........................................................................................................51
Schedule View ........................................................................................................51
Editing a Schedule .........................................................................52
Editing a Schedule ..................................................................................................52
Deleting a Schedule .......................................................................53
Deleting a Schedule................................................................................................53
Disabling a Schedule .....................................................................53
Disabling a Schedule ..............................................................................................53
Compix Media NewsScroll7Document No: 2.3.002 Revision: 2.1 Updated: 4/11/2012

Appendix
Shortcut List ...................................................................................56
8
Compix Media NewsScroll
Document No: 2.3.002 Revision: 2.1 Updated: 4/11/2012
Chapter
Getting Started
Compatibility with Windows 7
Creating Story Data
Creating Template Files in GenCG
1
Chapter 1 Getting Started
Compatibility with Windows 7
Compatibility with
Windows 7
NewsScroll is now compatible with
Windows 7. The default folders
for opening and saving les have
been updated to t the Windows 7
requirements. Now, NewsScroll will
read all templates, animations, im-
ages, and data from within:
C:\Users\UserName\Documents\
Compix\NewsScroll\
Security Settings
Two security settings need to be
in place for NewsScroll 4.1 to work
smoothly in Windows 7.
Tip
Please Note:
Only new Compix systems have Windows 7 installed. Any existing Windows XP systems purchased from Com-
pix will not support user upgrades to Windows 7. If a customer upgrades from Windows XP to Windows 7, the
Compix warranty will be voided and Compix Media will not support the user upgrade.
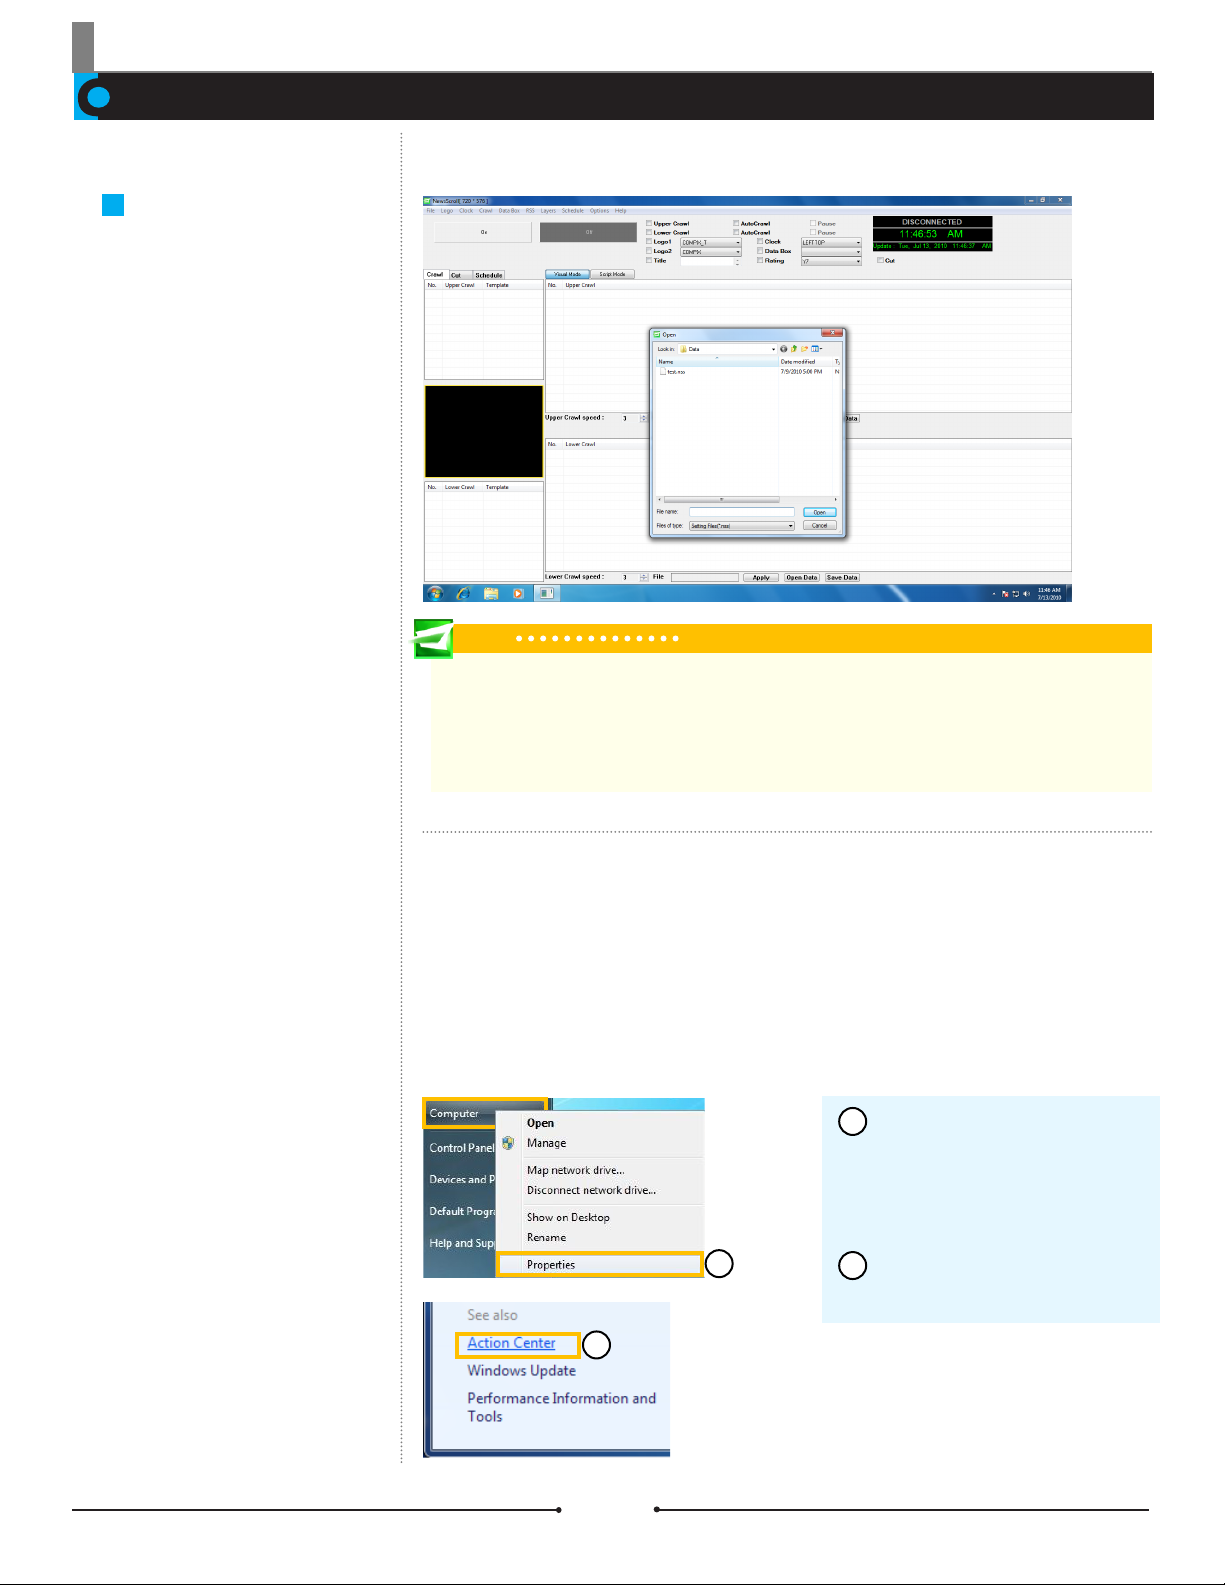
1. Windows 7 must be running in Administrator Mode
The Administrator Mode is the default mode in which Windows 7 runs until new
user accounts are created. Running NewsScroll 4.1 in Administrator Mode helps
with security parameters that Windows 7 has created.
2. The User Access Controls (UAC) must be set to the lowest level
Setting the UAC to the lowest level also combats the security parameters of
Windows 7.
1
To do this, click on the windows icon at the bottom left corner
of the screen and right-click on
[Computer], then click on [Properties].
1
2
Click on [Action Center] in the
lower left.
2
10
Compix Media NewsScroll Document No: 2.3.002 Revision: 2.1 Updated: 4/11/2012

Chapter 1 Getting Started
3
Click on [Change User Access Control
Settings] in the upper left.
4
This opens another window with a verticle
sliding bar. Move this bar to the lowest setting, [Never Notify], to stop security notica-
3
tion pop-ups. Click [OK] when done.
4
Compix Media NewsScroll Document No: 2.3.002 Revision: 2.1 Updated: 4/11/2012
11
Chapter 1 Getting Started
Creating Story Data
Before operating NewsScroll 4.1, there are a few les that should be prepared ahead of time. First is the story data containing the
information to be displayed on screen, which is discussed in this section. Next are template les containing the desired color, font,
and other attributes, discussed in the next section.
The Basics
Follow these easy steps to create
story data to be imported into News-
Scroll 4.1.
1
2
3
4
5
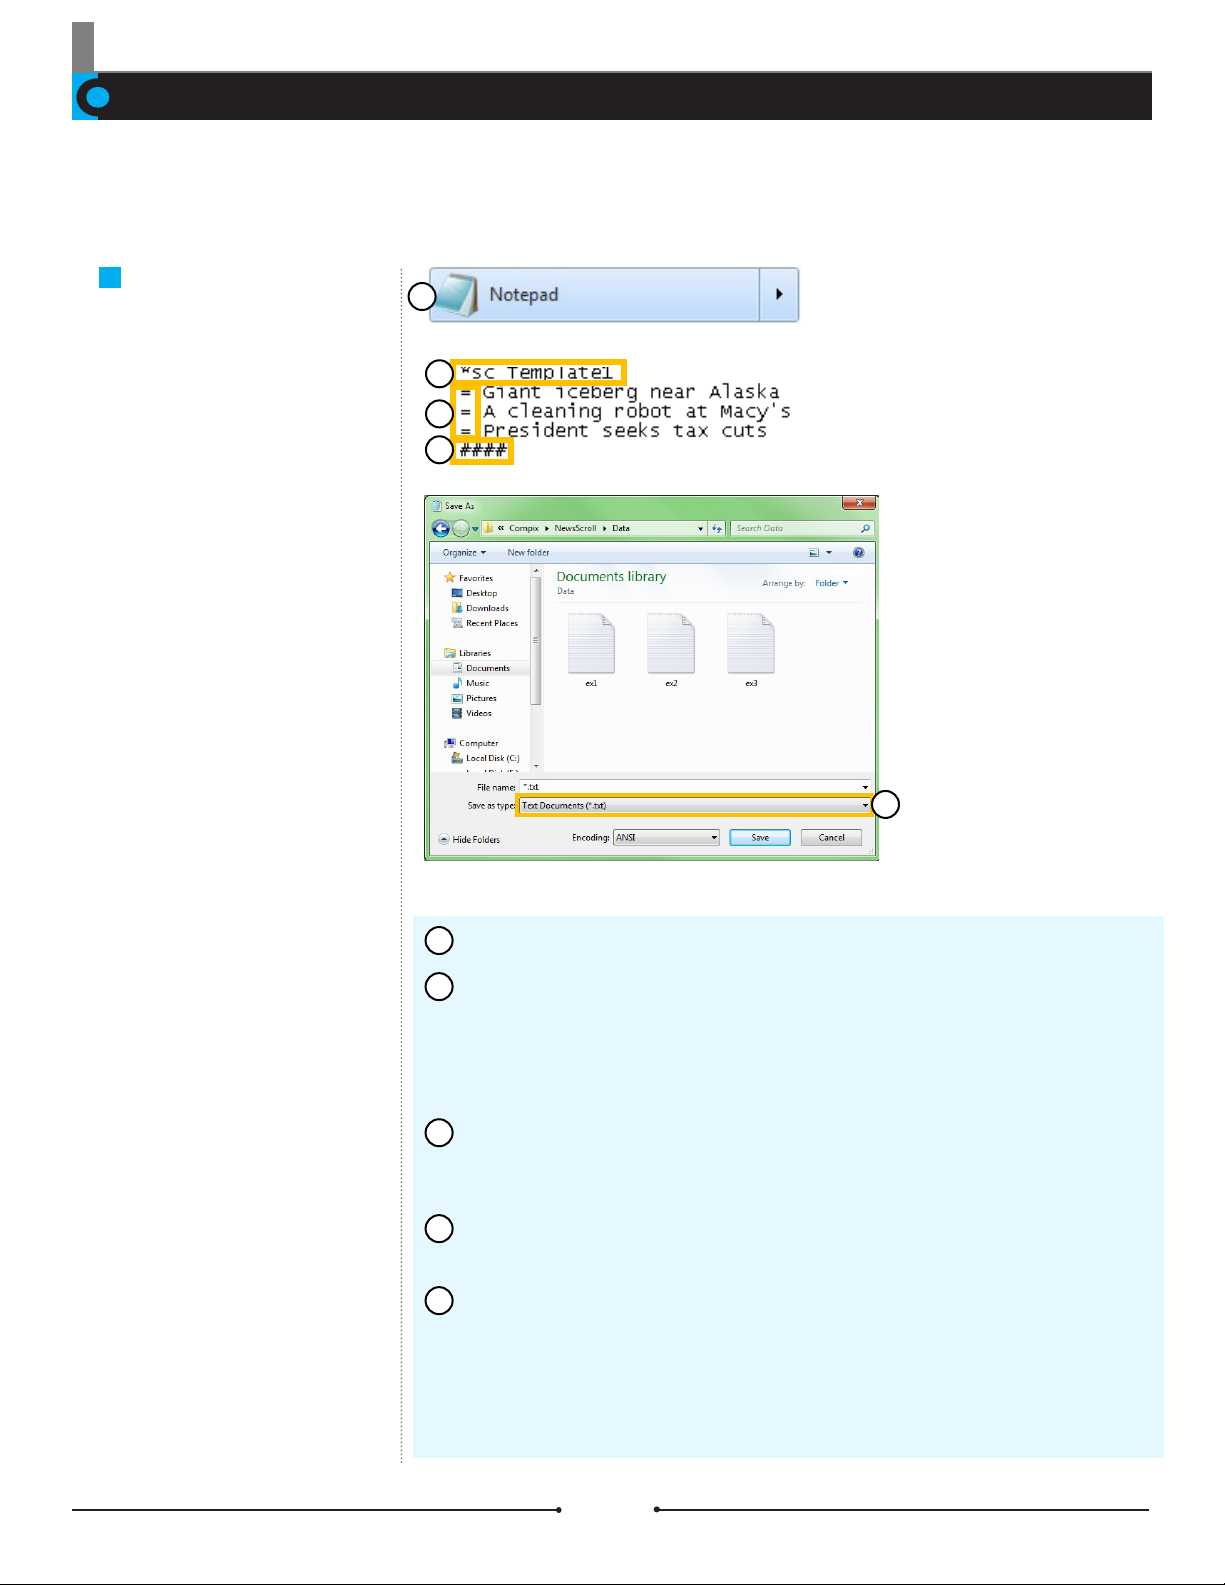
1
Open a new le in a text editing program, such as Notepad.
2
In the rst line, type “*sc”, followed by a space and the name of the desired
template to be used. If the template name is unknown, the name can be left blank
and lled in later. Any data items within this section will follow the format of the
named template until another template is listed. If the listed template does not exist, the default template will be used instead.
3
The next lines can be lled with the data to be displayed on air. Begin each
new line with the equal sign (=) followed by a space and the data. The equal sign
here signies a space in between each data element.
4
When all the data has been entered, create a new line and type four (4) hash
signs (#). This tells NewsScroll that the data le has ended.
5
Save the text le as *.txt and give the document a name. Depending on which
operating system the Compix system is running on, save the le into one of the
folders below:
Windows XP: C:\Program Files\Compix\NewsScroll\Data
Windows 7: C:\Users\UserName\Documents\Compix\NewsScroll\Data
12
Compix Media NewsScroll Document No: 2.3.002 Revision: 2.1 Updated: 4/11/2012
Advanced
Additional attributes and data can
be added to the data le which
are not mandatory. These include
multiple story data using different
templates and distinguishing words
or phrases by using various colors,
fonts, or sizes.
Chapter 1 Getting Started
1
2
4
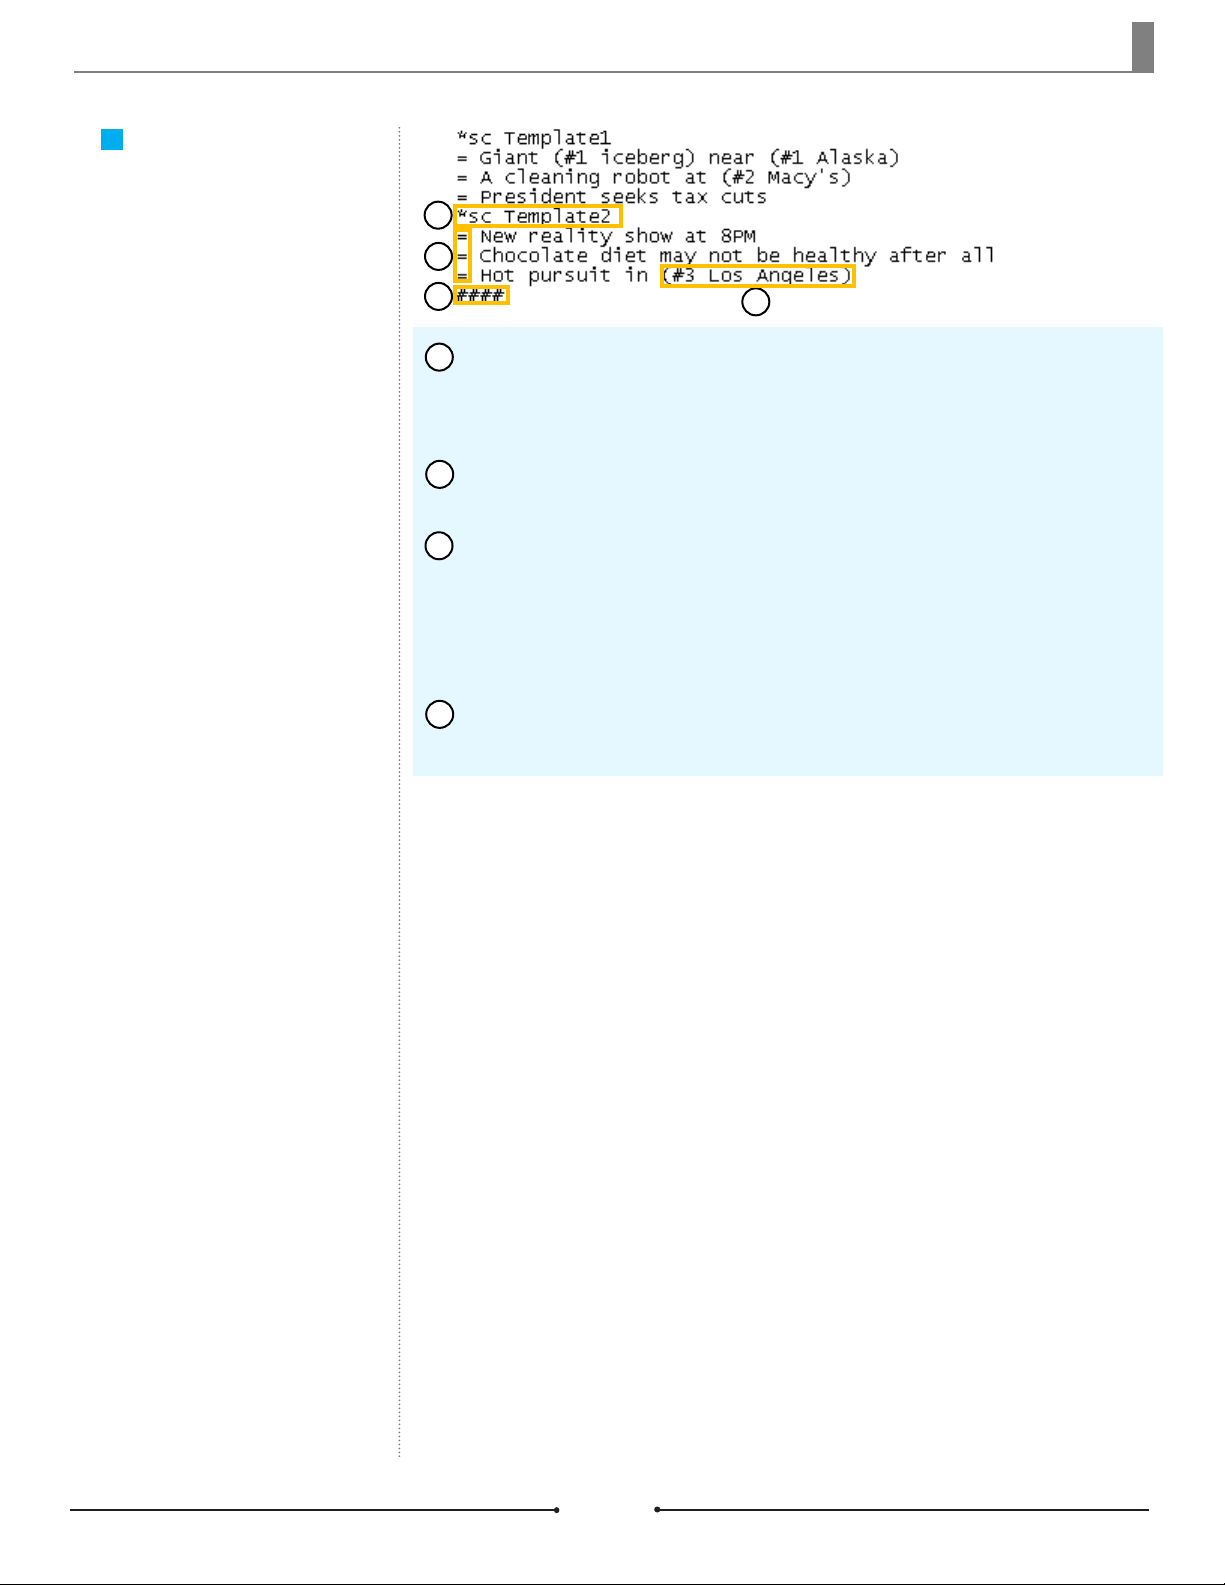
Using the example from The Basics section on the previous page, create a
1
new line and type in “*sc” followed by a space and the name of a different template. This creates a second story data section that will be displayed following the
format of the new template.
2
Enter new data in the next few lines, making sure to begin each line with the
equal sign (=) followed by a space.
3
To emphasize certain words or phrases, place parentheses around the
desired text. Within the parentheses but before the text, type the hash sign (#)
followed by a number. The number will correspond to a different text format within
the template. If the same number is used on multiple words or phrases, then the
same format will be applied to each. This is discussed more in depth within the
Creating Template Files in GenCG section.
3
4
When nished entering data and customizing the text format, be sure there
are four (4) hash signs (#) in the last line of text and save the document.
Compix Media NewsScroll Document No: 2.3.002 Revision: 2.1 Updated: 4/11/2012
13

Chapter 1 Getting Started
Creating Template Files in GenCG
Before operating NewsScroll 4.1, there are a few les that should be prepared ahead of time. Next are template les containing the
desired color, font, and other attributes, discussed in this section.
Crawl Templates
The crawl template le allows the
user to choose the style, color, and
size of the text corresponding to the
story data. It also offers the custom-
ization of the background design
and the display of bullets or logos
in between each data element.
Template les for NewsScroll 4.1 are
created in GenCG.
Tip
The background shape must be pres-
ent, even if it is not wanted under the
text. In this case, change the trans-
parency to 100%, making the shape
invisible.
1
3 4 5
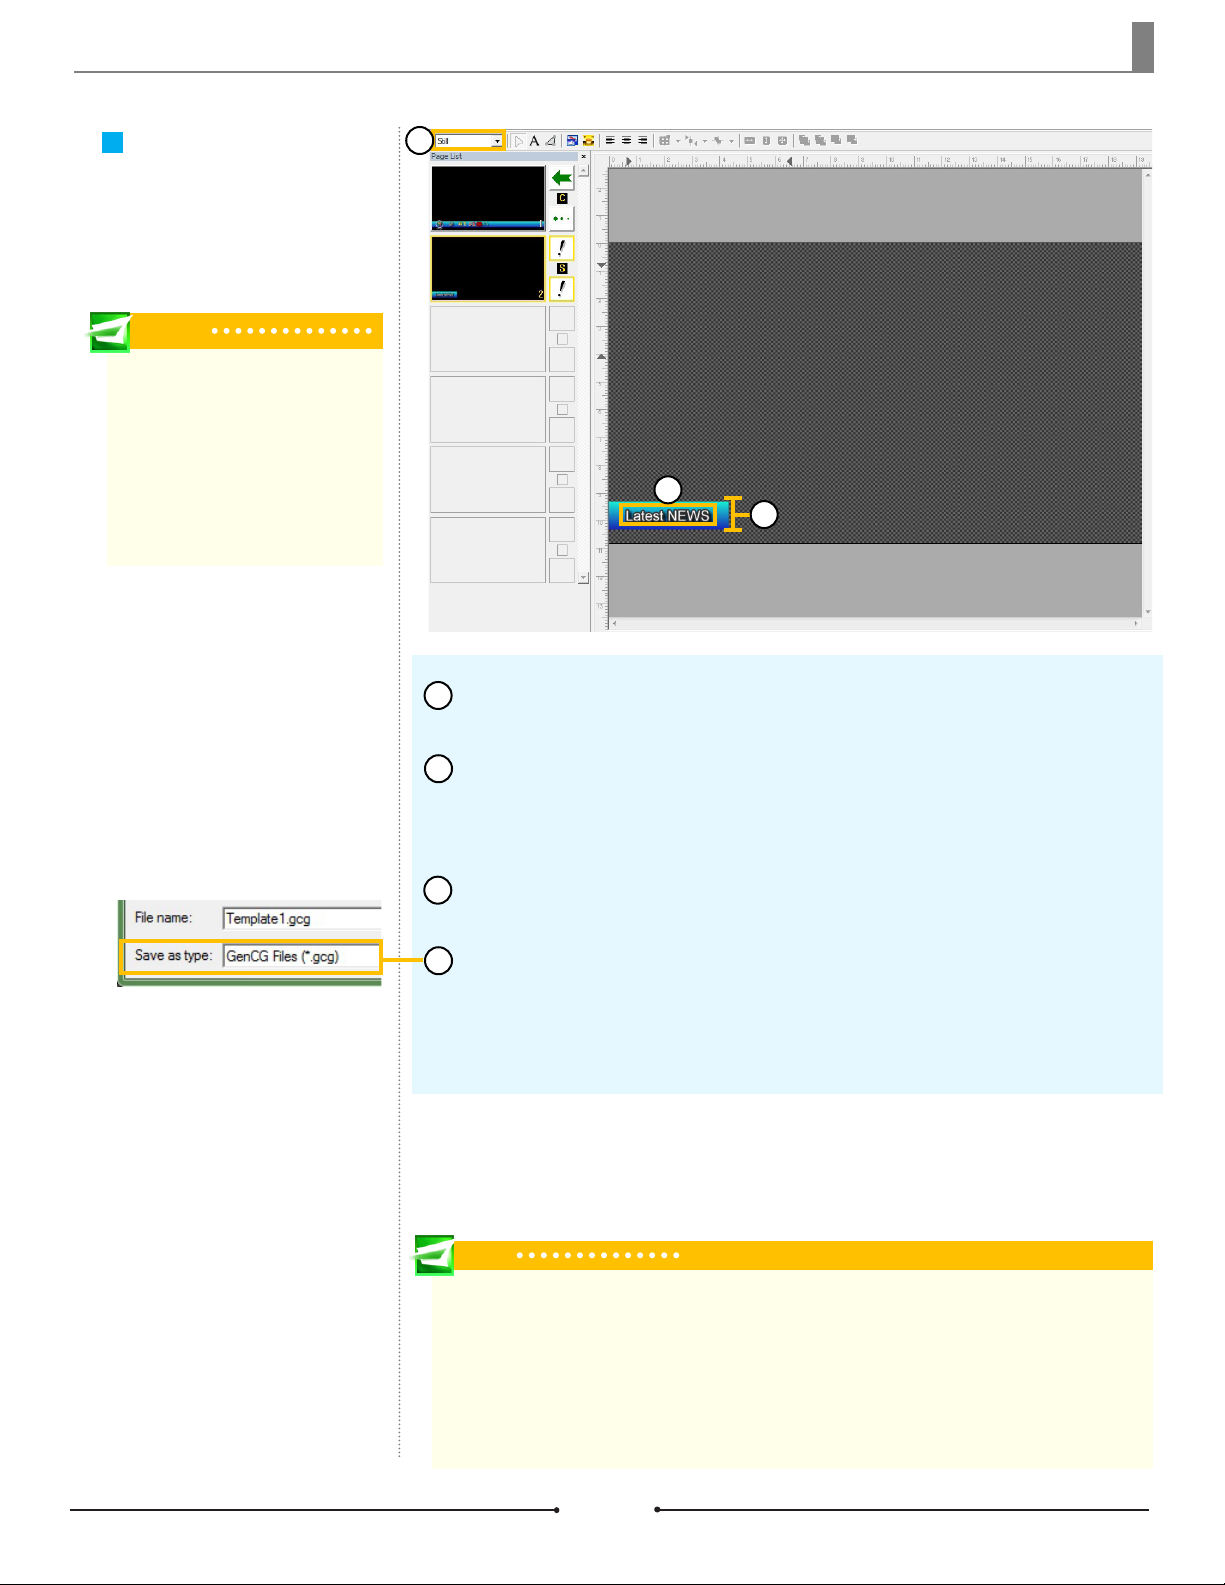
1
Open a new project in GenCG and set the rst page to [Crawl] in the Page
Mode drop down menu.
2
Using the Shape tool, create a long rectangle at the bottom of the canvas. The
length of this shape should exceed one page and ideally the length of the longest
data element. This rectangle will be used as the background for the text, so customize it by changing the color and transparency.
6
2
3
Insert an image to be used as a bullet or logo in between each data element.
Adjust the size as appropriate and place it to the left side of the rectangle.
4
To the right of the bullet or logo image, use the Text tool to type “@1”. This
becomes the default font, color, and size for all data elements, so customize as
needed.
5
In the advanced story data text le, some words or phrases were selected to
be emphasized by surrounding them in parentheses followed by a hash sign (#)
and a number. Now, in the template le, these customizations to font, color, and
size can be set. Using the Text tool again, create a new text object and type “#1”
to the right of the “@1”. Choose the appropriate attributes for this text. Continue to
type numbers within the same text object and change attributes until all numbers
are covered from the text le.
Optionally, add “@LOGO” to be able to place an End Logo after each cycle.
6
7
Once nished, save this template le as a *.gcg le into one of the folders
below.
Windows XP: C:\Program Files\Compix\NewsScroll\Template
Windows 7: C:\Users\UserName\Documents\Compix\NewsScroll\Template
14
Compix Media NewsScroll Document No: 2.3.002 Revision: 2.1 Updated: 4/11/2012
Chapter 1 Getting Started
Optional Second Page
for Crawls
This optional page allows for the
customization of a header for the
story data.
Tip
This optional page is very helpful when
each story data in the text le is a dif-
ferent topic. Use a different template
for each story data. When the template
is triggered, the headline in the second
page of the template will crawl across
the screen, preceeding the correspond-
ing data elements.
1
3
2
1
Create a second page in the Page List of the template le and set it to [Still] in
the Page Mode drop down menu.
2
Using the Shape tool, create another rectangle shape at the bottom of the canvas. It is recommended that this background shape and that of the rst page have
the same height and are the same color without shadows or edges for a smoother
scroll effect.
Use the Text tool to type the heading within the background shape. If neces-
3
sary, change the length of the rectangle to t the length of the text.
4
Once nished, save this template le as a *.gcg le into one of the folders
below.
Windows XP: C:\Program Files\Compix\NewsScroll\Template
Windows 7: C:\Users\UserName\Documents\Compix\NewsScroll\Template
Tip
Default Templates
Windows XP Location: C:\Program Files\Compix\NewsScroll\Template
Windows 7 Location: C:\Users\UserName\Documents\Compix\NewsScroll\Template
NewsScroll has many default GenCG templates that are needed to operate properly. The templates inside this
folder can be updated and additional templates can be created, but the structure within and the actual les
should not be deleted or renamed.
Compix Media NewsScroll Document No: 2.3.002 Revision: 2.1 Updated: 4/11/2012
15
Chapter 1 Getting Started
Data Box Templates
A data box template le allows the
user to choose the style, color, and
size of the text corresponding to
the bits of data. It also offers the
customization of the background de-
sign. Template les for NewsScroll
4.1 are created in GenCG.
Tip
Instead of creating a template le from
scratch, feel free to edit weather_box.
gcg, the default data box template from
within the Template folder.
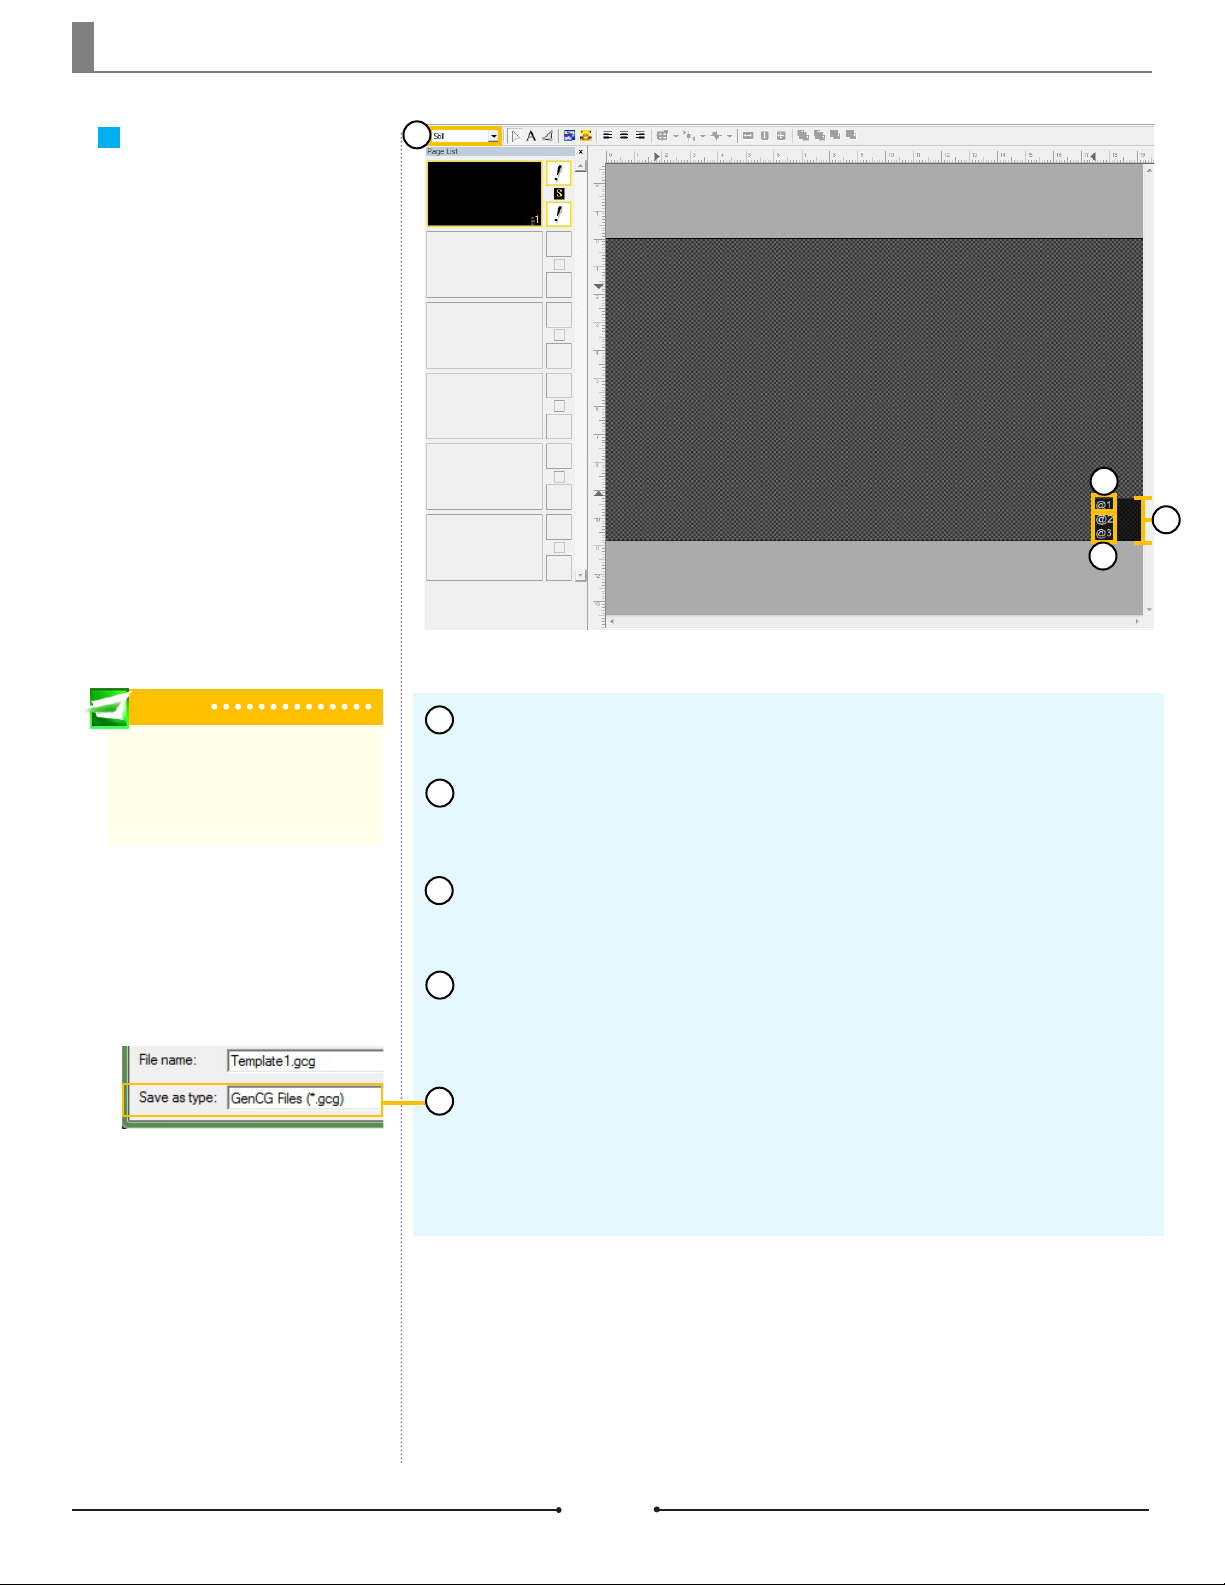
1
1
Open a new project in GenCG and be sure the rst page is set to [Still] in the
Page Mode drop down menu.
2
Using the Shape tool, create the desired shape for the look and feel of the
data box. This shape will be used as the background for the text, so customize it
by changing the color and transparency.
3
2
4
Now use the Text tool to type “@1” in the desired location for the data. This
3
becomes the default font, color, and size for the rst corresponding data elements,
so customize as needed.
4
Continue to create text objects incrementing the number for all data elements
needed. As an example, if there are three data elements to be displayed, there
should be three text objects with the following text, respectively: “@1”, “@2”, and
“@3”. Change the font attributes of each text object as desired.
5
Once nished, save this template le as a *.gcg le into one of the folders
below.
Windows XP: C:\Program Files\Compix\NewsScroll\Template
Windows 7: C:\Users\UserName\Documents\Compix\NewsScroll\Template
16
Compix Media NewsScroll Document No: 2.3.002 Revision: 2.1 Updated: 4/11/2012
Chapter 1 Getting Started
Clock Templates
The clock template le allows the
user to choose the style, color,
and size of the text. Template les
for NewsScroll 4.1 are created in
GenCG.
Tip
Instead of creating a template le from
scratch, feel free to edit clock_format.gcg,
the default clock template from within the
Template folder.
1
2
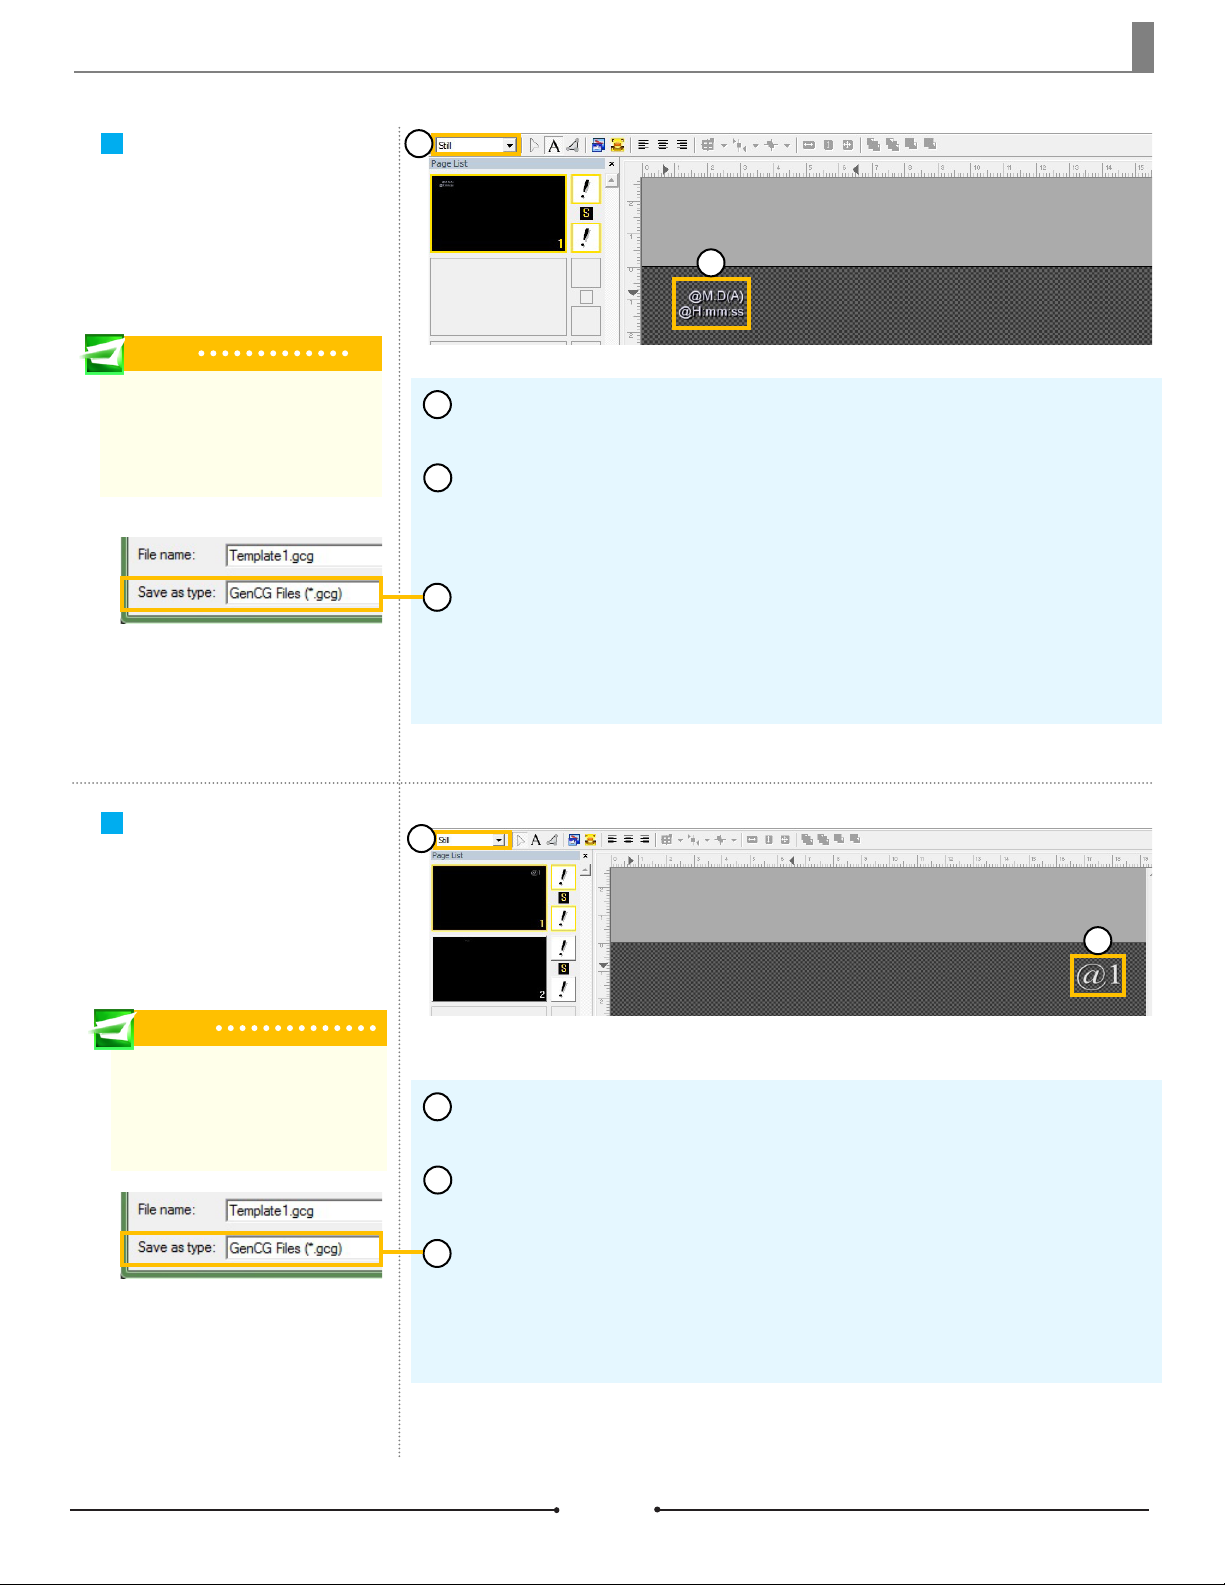
1
Open a new project in GenCG and be sure the rst page is set to [Still] in the
Page Mode drop down menu.
2
Select the [Clock/Timer] tab at the bottom of GenCG, giving access to the
Time Format Notation section. Chose the desired format to be displayed and type
it in using the Text tool. Be sure to place “@” at the beginning of each line of text.
Set the desired font, color, and size for the clock text.
3
Once nished, save this template le as a *.gcg le into one of the folders
below.
Windows XP: C:\Program Files\Compix\NewsScroll\Template
Windows 7: C:\Users\UserName\Documents\Compix\NewsScroll\Template
Title Templates
A title template allows the user to
choose the style, color, and size of
the text. Template les for NewsS-
croll 4.1 are created in GenCG.
Tip
Instead of creating a template le from
scratch, feel free to edit TitleLogo.gcg,
the default title template from within the
Template folder.
1
2
1
Open a new project in GenCG and be sure the rst page is set to [Still] in the
Page Mode drop down menu.
2
Using the Text tool, type “@1” in the desired location. This becomes the default font, color, and size for the title text, so customize as needed.
Once nished, save this template le as a *.gcg le into one of the folders
3
below.
Windows XP: C:\Program Files\Compix\NewsScroll\Template
Windows 7: C:\Users\UserName\Documents\Compix\NewsScroll\Template
Compix Media NewsScroll Document No: 2.3.002 Revision: 2.1 Updated: 4/11/2012
17