

Page 1

Compiere 3.2 Release Notes
October 21, 2008
Copyright©2008Compiere,inc.Allrightsreserved
www.compiere.com
Page 2

Table of Contents
Compiere 3.2 Release Notes
Compiere 3.2 Release Summary__________________________________________________________________________ 3
Audience ________________________________________________________________________________________________3
Prerequisites _____________________________________________________________________________________________3
Software Management __________________________________________________________________________________ 3
Previous Installations ______________________________________________________________________________________3
Recommended Infrastructure ________________________________________________________________________________3
Process to Log Support Requests for Compiere 3.2 ______________________________________________________________3
Update/Migration Procedure _________________________________________________________________________________3
Install Procedure __________________________________________________________________________________________3
Application Extensions _____________________________________________________________________________________3
Delete Client and Delete Client Transactions ____________________________________________________________________3
New In Compiere 3.2___________________________________________________________________________________________4
Warehouse Management Compiere Warehouse Management ____________________________________________________4
Business View Layer Compiere Professional Edition ___________________________________________________________4
New Data Dictionary Feature: Value Assignment_________________________________________________________________ 4
Account Balance Summary__________________________________________________________________________________4
Reports Enhancements_____________________________________________________________________________________4
Login Message Broadcast system Enhancement_________________________________________________________________4
Provision New Tenants Enhancements ________________________________________________________________________4
Request Enhancements ____________________________________________________________________________________4
Translation Enhancements __________________________________________________________________________________5
Additional Enhancements Compiere Professional Edition________________________________________________________ 5
The Web User Interface in Compiere 3.2 __________________________________________________________________________5
Web User Interface Compiere 3.2 Compiere Professional Edition _________________________________________________5
Fixed Issues for Compiere 3.2___________________________________________________________________________________6
Product Enhancements for Compiere 3.2 _________________________________________________________________________6
Known Issues in the Migration Process___________________________________________________________________________7
Known Issues in the Install Process _____________________________________________________________________________7
Known Issues in Compiere 3.2 __________________________________________________________________________________9
Appendix A___________________________________________________________________________________________ 10
Compiere 3.2 Migration Instructions ____________________________________________________________________________11
Prerequisites ____________________________________________________________________________________________11
Migration _______________________________________________________________________________________________11
Preserving Customizations _________________________________________________________________________________11
Migration Steps __________________________________________________________________________________________11
Preparation _____________________________________________________________________________________________12
Test Mode (optional) ______________________________________________________________________________________12
Migrate to a New Release__________________________________________________________________________________12
Post Migration Steps for RMA/RTV___________________________________________________________________________22
Appendix B___________________________________________________________________________________________ 23
Compiere 3.2 Installation Instructions ___________________________________________________________________________24
Prerequisites ____________________________________________________________________________________________24
Database Installation______________________________________________________________________________________24
Java Installation__________________________________________________________________________________________24
Download Compiere ______________________________________________________________________________________24
Run Application Server ____________________________________________________________________________________31
Start Compiere __________________________________________________________________________________________32
Appendix C___________________________________________________________________________________________ 33
Compiere 3.2 Application Extensions ___________________________________________________________________________34
Registration of Application Extensions – Application Provider (Partner) ______________________________________________34
Creation of Application .car file – Application Provider (Partner) ____________________________________________________36
Installation – Application Consumer (Customer)_________________________________________________________________38
Appendix D___________________________________________________________________________________________ 39
Delete Client and Delete Client Transactions _____________________________________________________________________40
Copyright © 2008 Compiere Inc. – All rights reserved 2
Page 3
Compiere 3.2 Release Summary
Compiere 3.2 is a major release that adds more than 30 new, functional, technical, and business analysis enhancements. This
new release continues Compiere’s commitment to building open source applications that drive down costs and complexities of
ERP. Visit http://www.compiere.com/products/new-compiere-erp-3-2.php
Certain features in Compiere 3.2 require a Compiere Professional Edition subscription. Contact a Compiere Authorized Partner or
Compiere Sales (http://www.compiere.com/company/contact-us.php
Compiere 3.2 may include certain prototype features and beta functionality as indicated in their respective user interfaces with a
beta checkbox. We advise our customers not to implement these on their production systems. These are intended only for
evaluation as beta and are not covered under Compiere support.
Audience
This guide is designed for Compiere Business Partners and Customers. It provides essential information for current Compiere
administrators planning to install or migrate (upgrade) to Compiere 3.2.
Prerequisites
to learn more about the Compiere 3.2 benefits.
) to acquire Compiere Professional Edition.
• Working knowledge of Compiere ERP and CRM
• Compiere Web Store Access
• Sun Java 1.6.0 Update 5 or Later
• Database Oracle XE, Oracle 10gR2, Oracle 11g, or
EnterpriseDB Postgres Plus Advanced Server 8.3
Software Management
Previous Installations
You can download the Compiere 3.2 from http://www.compiere.com/wstore. The migration tool will bring you up directly to
Compiere 3.2 plus all the cumulative fixes included in the service packs without having to migrate to an intermediate release.
Recommended Infrastructure
• Sun Java JDK 6 Update 5 or Later (SDK) – also known
as Sun Java JDK (not just JRE)
• Database Oracle XE, Oracle 10gR2, Oracle 11g, or
EnterpriseDB Postgres Plus Advanced Server 8.3.
Tip: It is Mandatory to use a Unicode character set.
• Database approved Linux Operating System, Windows
2003 or Windows XP
Process to Log Support Requests for Compiere 3.2
To ensure timely service for all future issues, we strongly recommend that you begin submitting all new cases into Compiere's
Case Management system. Start logging support requests by following the steps described in Support Requests
• TCP/IP connection and Internet access
• Disk Space: > 5 GB (includes database)
• Swap Space: > 1GB
• Memory: > 512 MB - Recommended: > 1 GB
• Firefox Browser 3.0 is recommended for Web User
Interface.
on our web page.
Update/Migration Procedure
See Appendix A
Install Procedure
See Appendix B
Application Extensions
See Appendix C
Delete Client and Delete Client Transactions
See Appendix D
Copyright © 2008 Compiere Inc. – All rights reserved 3
Page 4

New In Compiere 3.2
The following is a detailed description of the enhancements made available in Compiere 3.2.
Warehouse Management Compiere Warehouse Management
Compiere introduces Warehouse Management in 3.2. A warehouse management system, or (WMS), is a key part of the
supply chain, and is used to control the movement and storage of material within a warehouse, and process the
associated transactions, including shipping, receiving, putaway, and picking.
The following lists the main features added to the Warehouse Management Functionality:
• Zones and Zone Relationships
• Warehouse Management Rules Engine
• Wave Planning
• Warehouse Replenishment
Business View Layer Compiere Professional Edition
In 3.2 the Business View Layer enables report designers and users to access business data from an optimized reporting
schema that incorporates user-friendly field names, Compiere’s role-based security, and database security. Compiere
3.2 includes pre-defined business views spanning customer, vendor, product, invoice, shipment, and material receipt
objects. Customers can create additional Business Views in a single step from within the Compiere system.
In 3.2, we have added a default BVL database user called ‘CompiereBVL” with the same password as the Compiere user,
which will contain all the business views published by the user.
• Warehouse Task Management
• Streamlined Receiving
• Directed Picking and Putaway
• Reports
Important: In the 3.1 release, this step was done as a setup using ‘Initial BVL Setup’ window. The ‘Initial BVL setup’ is
no longer included in 3.2. For 3.1 users who have already setup their BVL using ‘Initial BVL setup,’ this will not be
overwritten. Compiere will not create the “CompiereBVL” user in 3.2 and the initial set up will be maintained.
In 3.2, we have also added 2 sample Jasper reports called ‘Customer Contact’ and ‘Customers and Partners’ that can be
used as an example to integrate Jasper reports with BVL. These reports are based on business views under the
“CompiereBVL” user mentioned earlier. For users who have already setup BVL in 3.1 release, the query within the
sample reports should be modified to refer to the BVL user created in ‘Initial BVL Setup’. This can be done using a tool of
your choice to create Jasper reports (like iReport, JasperAssi stant, etc)
New Data Dictionary Feature: Value Assignment
Compiere 3.2 provides the ability to dynamically create default field values when a new record is created (SQL, constant,
preferences). In addition to this, Value Assignments allow the ability to set values after the user presses save, just before
a record is saved. This could be used to create a default value without user intervention or if the user fails to define a
value. Another use is to assign a certain value based on other fields. Value Assignments are basically a declarative way
to define before-insert/update/delete trigger.
Account Balance Summary
Compiere 3.2 provides the ability to store and manage account balances by user-specified granularity of summarization.
Reports Enhancements
Compiere 3.2 provides the ability to zoom to a record from web generated pdf reports.
Login Message Broadcast system Enhancement
• Display Messages to user(s) after Login
• Display custom license information to all or
selective users
• Configurable rules based, targeted message and
information broadcast system
Provision New Tenants Enhancements
Compiere 3.2 provides a consistent way of creating new tenants from self service web store, swing or professional edition
User Interfaces.
Request Enhancements
Compiere 3.2 provides the ability to create and inquire requests from the toolbar of any document in the Web UI.
Copyright © 2008 Compiere Inc. – All rights reserved 4
Page 5

Translation Enhancements
Compiere 3.2 provides the ability to selectively translate portions of the product.
Additional Enhancements Compiere Professional Edition
Compiere supports the use of the Google Chrome Browser for web user interface.
The Web User Interface in Compiere 3.2
The following is a detailed description of what the Web user interface has to offer in Compiere 3.2.
Web User Interface Compiere 3.2 Compiere Professional Edition
In order to get properly acquainted with the Web User Interface, please read the section on “Using the Web Application”
in the user documentation.
At present, there are still some known features available in the “Java Swing” User Interface that are not yet available in
Web User Interface of Compiere 3.2. Most of these features are scheduled for a future release.
The following features are currently Not Available in the Web User Interface. However, they are fully functional in the
“Java Swing” User Interface:
The known features in the Java Swing User Interface that are not yet available in the Web User Interface include:
• Accounting: Account element, Accounting dimensions – Windows used to set up Acco unt structure.
• Work Flow Editor – A form available from the Main Menu used to create or modify a Workflow.
• Resource & Schedule Info Windows – Info Window available from the ‘View’ menu to view Scheduled Resources.
• Resource Assignment – A Form used to schedule a resource accessed from the Assigned Resou rce field in a
Sales Order, Project, or Expense Report.
• Personal lock – A security feature accessible from the toolbar used to lock a specific record to keep the record
private. It is also used as a method to set security access rules for specific records.
• Archive Viewer – A window used to view the Archived Records. Records or Documents can be archived v i a the
toolbar from the document viewer or automatically via a setting available in the tenant window.
• Ability to print mass shipments – A process available from the Main Menu used to print multiple shipments.
• Print from info windows – A button accessible from any Info window used to print a screen shot of the information.
• Drill down on reports – Interactivity on Reports which enables you to view a different report from a drill menu
where a selected record is used.
• Ability to email documents/reports as attachment – A button available from the toolbar of any report or document
that opens an e-mail dialog box with the report attached as a .pdf file allowing users to send the report via e-mail.
• Sizing / Moving of columns in grid view / Info windows – A mouse function that allows users to expand and
contract columns as well as modify the column positions in the Grid view of a window or any Info Window.
• Product attribute grid – A form available from the Main Menu which allows users to select an Attribute and view a
grid of which products are available with the selected attributes.
Important: The Firefox Browser 3.0 is recommended when using Compiere Release 3.2 with the web user interface.
When using Internet Explorer 7.0, verify the options: “Always switch to new tabs when they are created” and “A new tab in
the current window” are enabled: Under Tools> Internet Options> General Tab, open the Tab settings.
Copyright © 2008 Compiere Inc. – All rights reserved 5
Page 6
Fixed Issues for Compiere 3.2
The following is a list of the issues that have been fixed in Compiere 3.2.
Compiere
Case Number
10016501 The Last PO and last Invoice Price on the product Window.
10017444 Swing UI - Menu Workflow Activity Tab.
10018217 In the Replenishment Report, the process isn't including the Order Pack Qty correctly. It is ordering 1
pack too many.
10018220 Replenishment report includes:
a) Products that are discontinued
b) Product > Purchasing records that are discontinued
The replenishment report should ignore these.
10018232 The Scheduler runs at unexpected times and slows down DB dramatically.
10018819 On a "Bank Statement", when you "Create lines from" payments, the accounting date is not retrieved
from the payment.
10018998 RV_Payment UnAllocated
The "UnAllocated Payments" reports displays all payments for which no allocation lines exists.
10019119 The Invoiced Quantity is incorrect when creating an Invoice from a Material Receipt of a closed
Purchase Order.
10019141 Transaction support fails to work at all with EDB 8.2 on 3.0.2. When a rollback is issued the db
retains the saved record. Please see the attached java class.
10019216 When creating a location for a business partner; the default country is china, which displays without
the "State" field. If this is changed it to Australia, the "State" field still doesn’t appear. This results in
not being able to input the address.
10019250 Scheduler doesn't consider skip days.
10019271 In the BankAccount Tab of the Bank Windows, no organization is proposed on Web UI.
10019280 Lookup.run: C_Location.C_Location_ID: Loader - Too many records [45]
MAX_ROWS is set at 10000 in MLookup.java
Our C_Location table has more tha 12000 records.
10019460 Double allocation lines are created when the Payment and Invoice ID are set to null. The double
allocation lines have also caused the wrong Open balance of the Business Partner. Running the
Validate Business Partners process didn't help.
10019535 The allocation uses the transaction date of the payment for both its transaction and accounting date
and so it is in the closed period and can not be completed.
10018663 Sales Rep info window, Invoices for the given Sales rep are not displayed.
10019593 Table and Column window Reference key needs to be mandatory when the reference type is Table.
Description
Product Enhancements for Compiere 3.2
The following is a list of the enhancement Requests that have been completed in Compiere 3.2.
Product
Enhancement
10016095
10017748
10016879
10019300
10019327
Copyright © 2008 Compiere Inc. – All rights reserved 6
The product attribute pop-up window in the web UI is formatted in a not-so-ideal way. It starts with a
checkbox called, "Edit Record" and a button called "Select Existing". Following are the user defined
attributes. After which are a few more Compiere fields like "Guarantee Date", "Cancel", "OK". The
problem is that these just wrap 3 to a row no matter what. So the first user-defined attribute is on the
same line as the "Select Existing" button - They should start on a new line. Similarly an end line
should follow the user-defined attributes, before the Compiere fields.
Import Invoice and Import Order do not have the ability to import a line with a charge, only products.
Would like this as an enhancement.
Option to disallow negative Inventory at the warehouse level. If selected, the system will prevent the
on-hand balances from being driven negative.
In the web UI, the callouts do not cascade as it does in the swing UI.
Credit Check code while preparing a shipment creates a heavy CPU load on the oracle server.
Description
Page 7
Known Issues in the Migration Process
Warnings and Error Messages you may see during the Migration steps.
Migration Issues – Warning/Error Messages Database Solution
ORA-00001: unique constraint... violated All
ORA-01408: such column list already indexed All
ORA-01440: column to be modified must be empty to decrease precision or scale All
ORA-02296: cannot enable All
ORA-02275: such a referential constraint already exists All
ALTER TABLE S_ResourceType MODIFY ChargeableQty NUMBER(10) DEFAULT NULL
Failed sql statements
ERROR: cannot alter type of a column used by a view or rule
Detail: rule _RETURN on view rv_asset_delivery depends on column "lot" - ALTE R TABLE
A_Asset_Delivery ALTER Lot TYPE VARCHAR(255) , ALTER Lot SET DEFAULT NULL
Component migration not needed
Unable to get migration steps
WorkerData - java.lang.NullPointerException
Unable to execute postgres/oracle function scripts
Failded to run function scripts sql
No component migration needed
Unable to get target result set: SELECT...FROM AD_Role WHERE Name = 'GardenWorld
Admin' - java.sql.SQLException: ORA-00904: "OVERRIDERETURNPOLICY": invalid
identifier
Unable to get target result set: SELECT...FROM AD_Column WHERE AD_Table_ID = 783
AND ColumnName = 'R_Request_ID' - java.sql.SQLException: ORA-00904:
"ISRECURSIVEFK": invalid identifier
No Key & No Parent - Table AD_RecentItem All This is an acceptable
While executing RUN_Setup, refreshing an existing instance
===========> DB_PostgreSQL.getDataSource: DB_EnterpriseDB[null] [12]
java.lang.IllegalArgumentException: DataSource with name 'CompiereDS' alread y exists!
While executing RUN_Setup
-----------> ModelValidationEngine.addClasses: GardenWorld: compiere.model.MyValidator
- java.lang.ClassNotFoundException: compiere.model.MyValidator [12]
-----------> ModelValidationEngine.addClasses: Extended Units of Measure:
org.compiere.xuom.XUOMModelValidator - java.lang.ClassNo
tFoundException: org.compiere.xuom.XUOMModelValidat or [12]
Error “Don’t have core” when trying to install an application extension All Select Reinstall/Migrate
EnterpriseDB This is an acceptable
All
All Always select Compiere
EnterpriseDB This is an acceptable
All This is an acceptable
This is an acceptable
warning message.
This is an acceptable
warning message.
This is an acceptable
warning message.
This is an acceptable
warning message.
This is an acceptable
warning message.
warning message.
Always select Compiere
Core when installing or
migrating any additional
applications.
Core when installing or
migrating any additional
applications.
warning message
warning message
warning message
for the Core component
when installing new
application extensions
Known Issues in the Install Process
Warnings and Error Messages you may see during the Import steps.
Install Issues – Warning/Error Messages Database Solution
-----------> g.a: DROP SEQUENCE T_Spool_Seq
-----------> g.a: ORA-02289: sequence does not exist
-----------> DB_PostgreSQL.convertStatement: Convert error! Converted statement
Number=2 (CREATE OR REPLACE VIEW …
-----------> DB.saveError: DBExecuteError - ORA-00001: unique constraint
(COMPIERE.C_REGION_NAME) violated
[15]
-----------> MRegion.saveNewInsertSQL: Not inserted - C_Region [15]
-----------> ProgressPanel.publish: Unable to import Region, requires UNICODE database
[15]
===========> DB.executeUpdate: INSERT INTO C_Region
(AD_Client_ID,AD_Org_ID,C_Country_ID,C_Region_ID,Created,CreatedBy,Description,Is
Active,IsDefault,Name,Updated,UpdatedBy) VALUES (0,0,216,438,TO_DATE('2006-02-23
15:43:34','YYYY-MM-DD HH24:MI:SS'),0,'???(Miyasaki)','Y','N','???',TO_DATE('2006-02-
Copyright © 2008 Compiere Inc. – All rights reserved 7
All
EnterpriseDB
All
This is an acceptable
warning message.
This is an acceptable
warning message.
These are acceptable
if your database is not
set for Unicode.
Page 8
Install Issues – Warning/Error Messages Database Solution
23 15:43:34','YYYY-MM-DD HH24:MI:SS'),0) [null] [15]
java.sql.SQLException: ORA-00001: unique constraint
(COMPIERE263.C_REGION_NAME) violated; State=23000; ErrorCode=1
at oracle.jdbc.driver.DatabaseError.throwSqlException(DatabaseError.java:125)
at oracle.jdbc.driver.T4CTTIoer.processError(T4CTTIoer.java:305)
at oracle.jdbc.driver.T4CTTIoer.processError(T4CTTIoer.java:272)
At the very end of the install process or when manually executing utils/RUN_Support
13:07:55.094 Compiere.startup: Client lap-fr/10.104.139.177: C:\Compiere2 - Java
HotSpot(TM) Client VM 1.5.0_11-b03 - Windows XP 5
All No effect on the
functionality. You may
ignore this error.
.1 Service Pack 2 [15]
Exception in thread "AWT-EventQueue-0" java.lang.NullPointerE xception
at
javax.swing.plaf.basic.BasicScrollBarUI.layoutHScrollbar(BasicScrollBarUI.java:676)
at javax.swing.plaf.basic.BasicScrollBarUI.layoutContainer(BasicScrollBarUI.java:775)
at java.awt.Container.layout(Container.java:1401)
at java.awt.Container.doLayout(Container.java:1390)
at java.awt.Container.validateTree(Container.java:1473)
at java.awt.Container.validateTree(Container.java:1480)
at java.awt.Container.validate(Container.java:1448)
at
javax.swing.RepaintManager.validateInvalidComponents(RepaintManager.java:379)
at
javax.swing.SystemEventQueueUtilities$ComponentWorkRequest.run(SystemEventQueue
Utilities.java:113)
at java.awt.event.InvocationEvent.dispatch(InvocationEvent.java:209)
at java.awt.EventQueue.dispatchEvent(EventQueue.java:461)
at
java.awt.EventDispatchThread.pumpOneEventForHierarchy(EventDispatchThread.java:24
2)
at
java.awt.EventDispatchThread.pumpEventsForHierarchy(EventDispatchThread.java:163)
at java.awt.EventDispatchThread.pumpEvents(EventDispatchThread.java:157)
at java.awt.EventDispatchThread.pumpEvents(EventDispatchThread.java:149)
at java.awt.EventDispatchThread.run(EventDispatchThread.java:110)
Error after clicking Save on the RUN_Setup window
===========> CConnection.createConnection: jdbc:oracle:thin:@//lap-fr:1521/xe, (1)
AutoCommit=true,TrxIso=READ_COMMITTED - ORA-010
All No effect on the
functionality. You may
ignore this error
17: invalid username/password; logon denied
[12]
-----------> CPreparedStatement.<init>: ALTER TABLE AD_System MODIFY Summary
NVARCHAR2(2000) [12]
java.lang.UnsupportedOperationException: No DBConnection
at org.compiere.util.DB.getConnectionRW(DB.java:228)
Error installing the sample application extension XUOM
Failed sql statements:
All This is an acceptable
warning message
ORA-00955: name is already used by an existing object
- CREATE INDEX M_Product_ProductCategory ON M_Product (M_Product_Category_ID)
- java.sql.SQLException: ORA-00955: name is already used by an existing object
Error installing the sample application extension XUOM
Create Views ******************************* ***********
All This is an acceptable
warning message
Starting to create views for entity: XUOM
Created view #1 for entity: XUOM
Failed sql statements
<<ERROR: ERROR: relation "m_product_expensetype" already exists - CREATE
UNIQUE INDEX M_Product_ExpenseType ON M_Product (S_ExpenseTyp e_ID) -
java.sql.SQLException: ERROR: relation "m_product_expensetype" already
exists>>
… same error for other indexes…
<<ERROR: ERROR: constraint "fk208_10919" for relation "m_product" already
exists - ALTER TABLE M_Product ADD CONSTRAINT FK208_10919 FOREIGN KEY
(C_SubscriptionType_ID) REFERENCES C_SubscriptionType
(C_SubscriptionType_ID) - java.sql.SQLException: ERROR: constraint
"fk208_10919" for relation "m_product" already exists>>
…same error for other constraints…
Copyright © 2008 Compiere Inc. – All rights reserved 8
Page 9
Known Issues in Compiere 3.2
Issues you may encounter using Compiere 3.2
Issue Database Solution
Shortcuts: Firefox 3.0 on Windows, shortcut key 'Alt-Equals' does not expand in the
Compiere Web UI.
The Ctrl+M shortcut is not working in the Business Partner window and the Product
window including all Product tabs except for BOM tab.
Report Accounting Fact Details has been renamed to Accounting Fact Details Report. All Open
Keyboard Shortcut: F10 (Focus on the main auto completion menu) Issue: Mouse prompt
is not visible in ‘Main Menu’ field, so alternate key is suggested. Alternate Key: Ctrl+Alt+M.
Keyboard Shortcut: F1 (Help) Issue: Brings up 2 help menus, Compiere’s help popup and
IE’s help popup Menu and close button is only half visible. Alternate Key: Ctrl+Alt+H.
Keyboard Shortcut: Alt = (Expand) Issue: Not currently working. No Alternate Key All Open
Keyboard shortcut in Web UI Alt =, which is used to “Expand All” is not working in windows
Firefox 3.
When the workflow or workflow node responsible is set to Organization it does not get
routed to the supervisor defined for that organization. The workflow stays in a suspended
status but is not designated as a task for any user to complete.
Views information gets over-written when saving more than 4 views. (Web) All Open
The footer of reports generated from the web UI shows some of the JDBC connection info. All Open
When items are removed (moved to the left pane) in Sort order of Business View they
should not appear in Format Item tab. Currently you have to remove them two times (once
in each tab.)
In Work Order and Warehouse, Org * is not a valid value. Users must pick a specific org.
However, if you login and select * as the org in the Role login window, you are able to save
work orders and warehouse with org *.
Log into an instance. Use Zoom to open another instance Go back to original (do not close
second instance) Go back to second instance when the log in has time out. Log back in
with the same user name, password and role. Go back to first browser and you get a
message that you have logged in with a different role (this is not accurate) and to log off.
When you log off you cannot log back in as you do not get a db connection (langua ge field
is blank.) You have to reload the browser
The implementation of trees in the Web UI is not completed as of the 3.2 release. All Open
Chrome pop-ups: When you run a report using chrome, the report is opened in a new
window and the new window is located at the bottom of the screen.
Clear Browser cache before opening Compiere in the Web UI. All Web UI users need to
clear their browser cache and reload the URL before re-starting Compiere 3.2 after
migration.
View customizations not migrated to Release 3.2. Added one user-maintained column as a
view component and modified from clause of the view and marked as a customization, but
these changes from 3.1 were not migrated to 3.2. They had been migrated to 3.1 from
3.0.3. Occurred in Production Compiere instance with view C_PaySelection_Check_v.
In some instances when generating a Financial Report in the WebUI a print format called
Create Report will be generated. Once generated it is then used in every Financial Report.
If you delete the print format called Create Report for the tenant and then the correct print
format will either be used for your Financial Reports.
The Zone window: cannot add Locator (child tab) in grid view mode. All Open
BVL does not work on EnterpriseDB EDB Open
For a current list of open issues please query the list of public requests from our request system
http://www.compiere.com/support/support-requests.php
.
All Open
All Open
All Open
All Open
All Open
All Open
All Open
All Open
All Open
All Open
All Open
All Open
All Open
Copyright © 2008 Compiere Inc. – All rights reserved 9
Page 10

Appendix A
Compiere 3.2 – Migration Instructions
Copyright © 2008 Compiere Inc. – All rights reserved 10
Page 11
Compiere 3.2 Migration Instructions
Prerequisites
- A valid Support contract
- Sun Java JDK 6 (SDK) – Update 5 or later (not just JRE)
- Database Oracle XE, Oracle 10gR2, Oracle 11g or
EnterpriseDB Postgres Plus Advanced Server 8.3.
Migration
The Compiere Migration Management solution allows the following:
• Migrate from any release directly to Compiere 3.2.
Information: This is an optional convenience service. A skilled DBA
monitoring SVN changes and/or with the help of a change management
system can do this as all scripts used are available in SVN. Another
alternative are EAI tools.
The added service is the packaging and a database health check.
Preserving Customizations
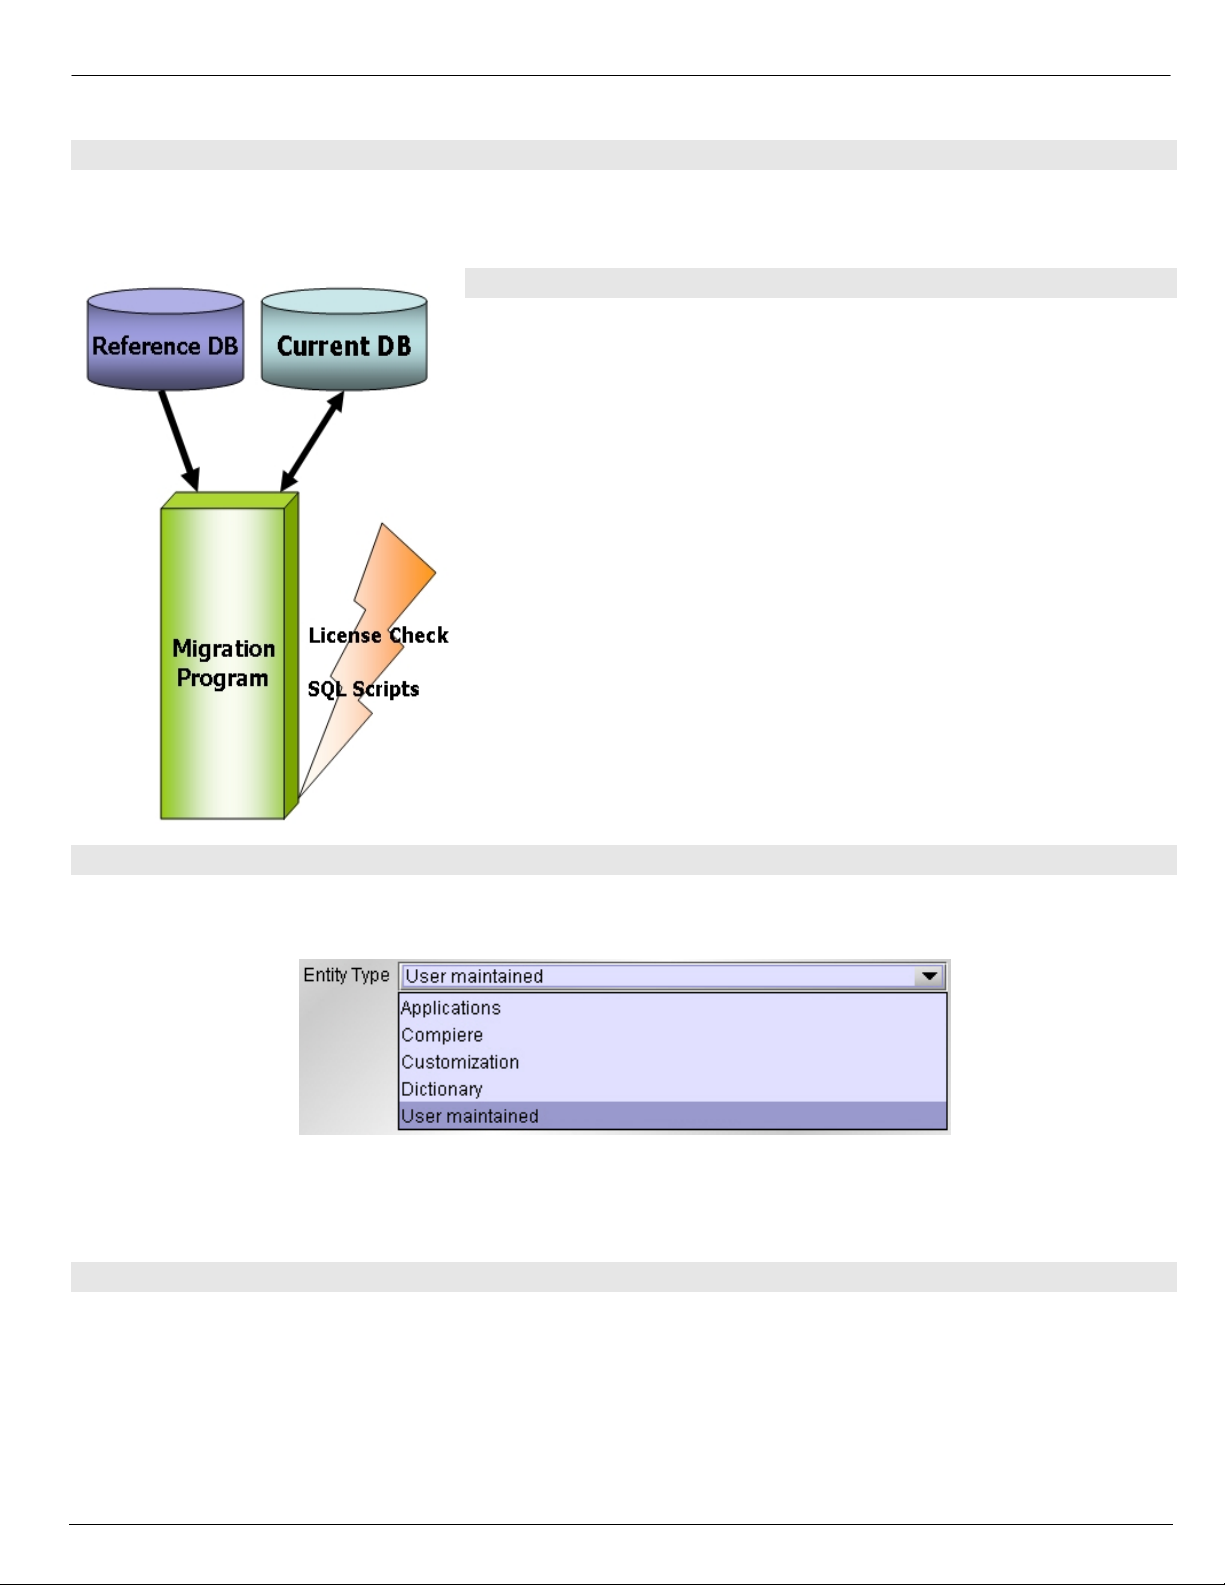
Compiere will not modify any customizations - as long as the customizations are marked appropriately! By default, all
added records in the dictionary will have the entity type "User Maintained":
- In the Change Audit window, mark the changes as Customizations before running the migration.
Tip: Alternatively, changes may be applied manually.
- Before performing the migration, run it in the test mode to ensure all customizations will be preserved.
Migration Steps
Migration Consists of the Following steps:
• Preparation
• Test Mode
• Migrate to a New Release
• Post Migration Steps
Copyright © 2008 Compiere Inc. – All rights reserved 11
Page 12

Preparation
Use the following steps to prepare for the Migration:
• Server needs to have access to the Internet.
• Stop the application server by executing
utils/RUN_Server2Stop
• Backup the database
• Rename COMPIERE_HOME/jboss directory
• Delete
COMPIERE_HOME/data/compiere_'CPRO'.car file
• Delete
COMPIERE_HOME/data/compiere_'XUOM'.car file
• If you are running EnterpriseDB 8.2 or older you
must upgrade to EnterpriseDB Postgres Plus
Advanced Server 8.3
Test Mode (optional)
First, run the Migration Program in Test mode. This allows the ability to evaluate the actions taken when running it agains t
the database. Please note that the first step (resolve ID conflicts) will not show the correct future IDs in test mode.
If the program marks certain wanted tables for deletion, then create the table in the data dictionary (Windo w
Table/Column) with the Entity Type User or Application.
If the program marks certain wanted columns for deletion, make sure that the column has the Entity Type User or
Application. If the wanted column has the Entity Type Data Dictionary or Compiere and it is marked for deletion, then copy
it under another name and mark the new column as Custom or Application.
The same applies to windows, tabs, fields, etc.
Mandatory User or Application Columns must have a default value defined in the database, e.g. ALTER TABLE
someTable MODIFY (myColumn DEFAULT 'myDefault'), otherwise adding new records will result in an error.
Check List:
• Server has HTTP (port 80) access to the Internet
• Compiere web store Asset - Support Contract
System Operation Steps:
• Resolve ID Conflicts from Customizations/Extensions
• Synchronize Data Structure (Table/Column/Index/Constraints/..)
• Synchronize Data Content
Migrate to a New Release
Use the following steps on the Application Server box for migrating to the new release:
1) Be sure to delete or rename the existing jboss subdirectory (due to different JBoss version and configuration
files.) Download and unzip/untar the distribution file, (e.g. Compiere_3XX.X.zip.)
Tip: It is also possible to extract the distribution file into a new directory and copy your configuration files.
Then change the COMPIERE_HOME environment variable to the new directory.
2) Execute RUN_setup. Verify all your environment settings and click Save to continue. If you get any errors in
the parameters validation, you’ll see a red icon right next to the parameter with the problem; make the
required changes, click Test to run the validation again and then click Save to con t inue.
Copyright © 2008 Compiere Inc. – All rights reserved 12
Page 13
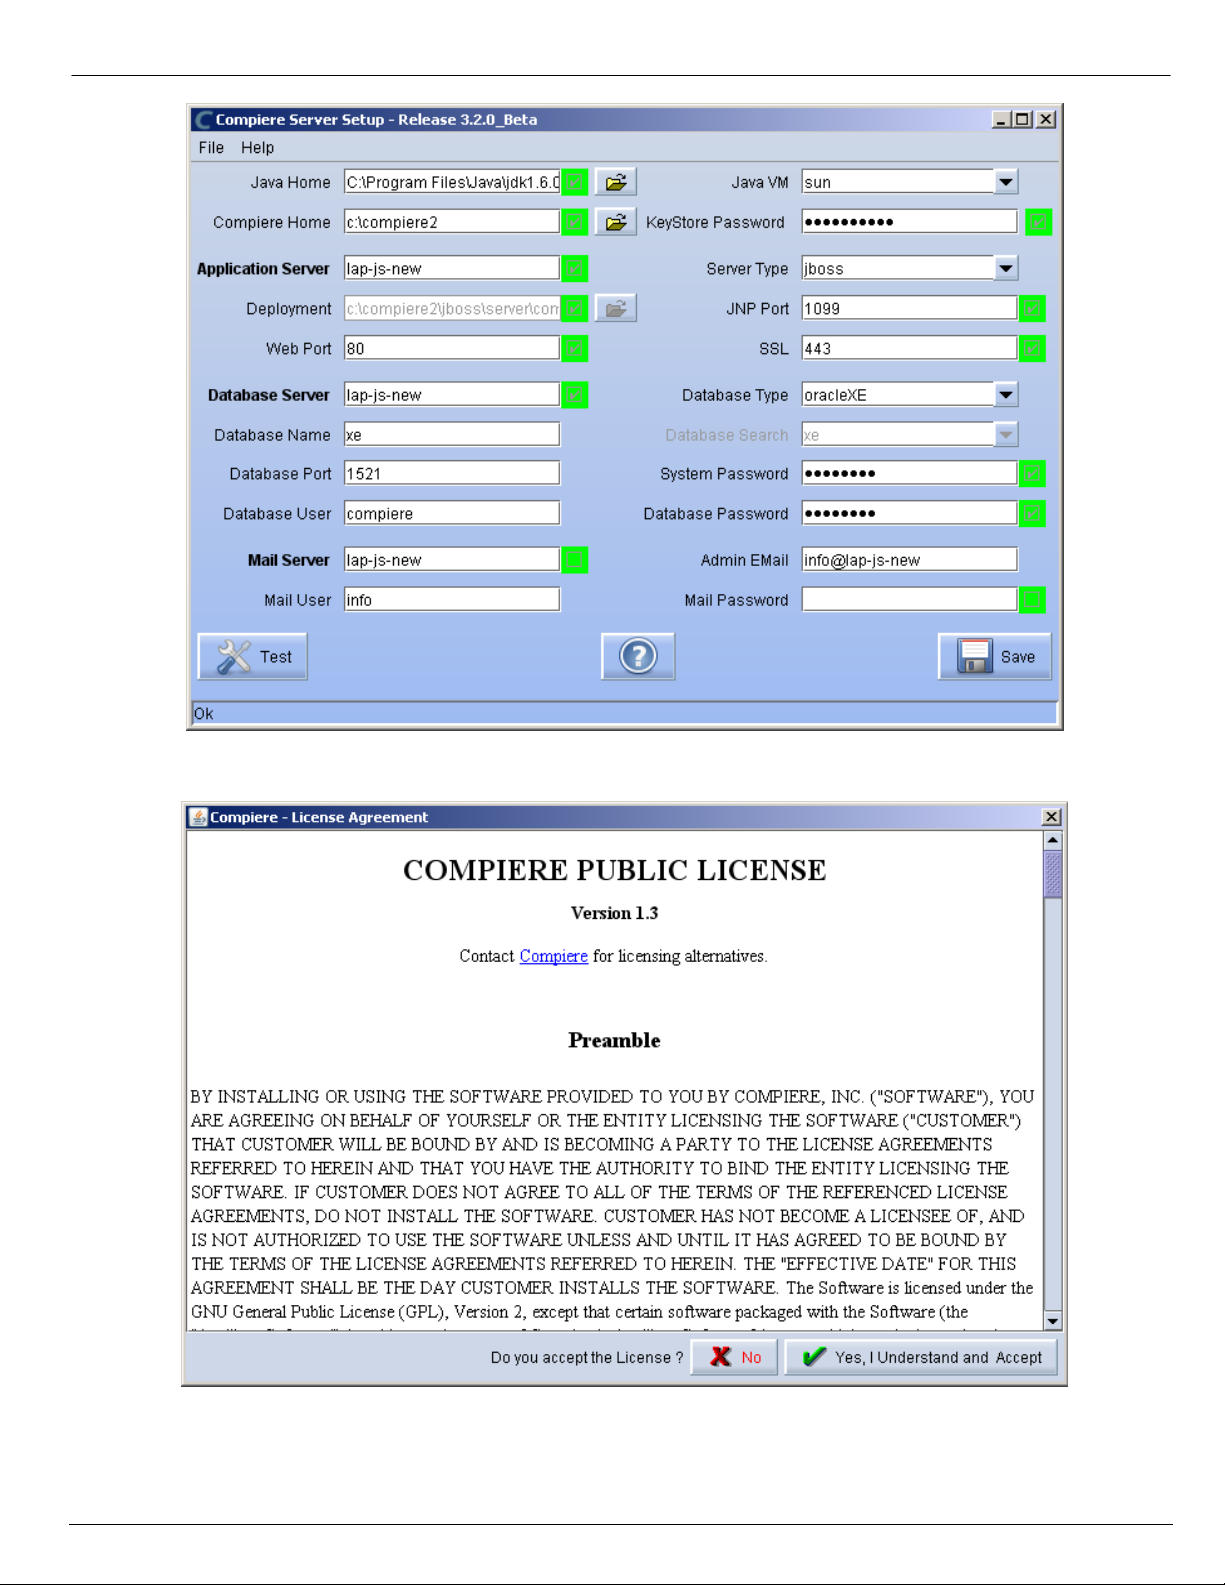
3) The Compiere Public License Opens. Click “Yes, I Understand and Accept” to continue.
Copyright © 2008 Compiere Inc. – All rights reserved 13
Page 14

4) The following prompt will display describing your new Security Key. Click ‘Ok’ to continue.
5) The Next step is to provide the Subscriber Information. Current customers should provide the subscriber
information (System Name, Email and Password) exactly as it was registered in the Compiere Web Store to
get a complete list of applications.
Click Check Available Applications to get a list of applications that are available to be installed
.
Note: To install additional applications once you have installed or migrated to the latest Compiere Core version,
you must select Compiere Core plus any additional applications to install, and then run Migration.
6) Select the applications that you want to migrate and select the action Reinstall/Migrate. Compiere Core 3.0 is
the main application that must always be installed or migrated to the latest release, but you also may choose
additional applications provided by Compiere or any of our authorized partners.
Tip: If you do not wish to install or migrate any of the applications listed, be sure to change the action to –
None- To install new applications change the action to New Install
Copyright © 2008 Compiere Inc. – All rights reserved 14
Page 15

7) Next, read and accept the Compiere Public License agreement.
Hint: You might get more than one license agreement, depending on the applications that yo u are installing.
Notice that XUOM is a sample application extension
Copyright © 2008 Compiere Inc. – All rights reserved 15
Page 16

8) If you are installing Compiere Professional, you will receive a Commercial license agreement. Please read
and accept the license agreement, in order to continue.
Hint: You might get more than one license agreement, depending on the applications that yo u are installing.
9) If you are installing Compiere Professional, you will also receive a Commercial and Evaluation license
agreement. Please read and accept the license agreement, in order to continue.
Hint: You might get more than one license agreement, depending on the applications that yo u are installing.
Copyright © 2008 Compiere Inc. – All rights reserved 16
Page 17

10) Click on Start File Installation
11) When the File Installation has completed click on Start Migrate Database.
Copyright © 2008 Compiere Inc. – All rights reserved 17
Page 18

12) Provide the following information exactly as it was registered in the Compiere Web store and click Check
License to validate your asset information (Note: This information may already be populated if it was entered
in the system window)
- System Name
- Registered Email
- Password
Tip: If you get the “Core Invalid” error after selecting the ‘Check License’ button, that is an indication that you
did not select the appropriate action for the Core component in step #5. In this case, Exit the setup and
support windows and execute RUN_setup again selecting the Core plus any other components to install.
13) Click on “Start Migration”.
Copyright © 2008 Compiere Inc. – All rights reserved 18
Page 19

14) At the Compiere Version Migration Prompt, click “Yes” to proceed with the Migration.
15) Unselect the “Test Only” option, and click Start.
Copyright © 2008 Compiere Inc. – All rights reserved 19
Page 20

16) Confirm that you have a current back up of your database
17) Confirm that the Source and Target database versions from the Compiere Version Migration window are
correct.
18) Verify that the migration finish with no errors and the message “After Migration - DONE” is display ed. In case
you get any errors, please be sure to review the list of known issues listed in this document before logging a
service request.
Copyright © 2008 Compiere Inc. – All rights reserved 20
Page 21

19) If you have a Compiere Professional Edition license, execute utils/RUN_Support and click “Check License”
to activate your license.
Tip: There is no need to click the start migration button.
20) After you have pressed the Check License button you should be able to see if your Professional License has
been activated.
21) After Compiere Professional license has been updated you may click the “X” to close the window.
Hint: It is NOT necessary to click the Start Migration at this point.
22) To start Compiere in the Web UI after migration, it is required that all Web UI users clear their browser cache
first.
Note: After migration, (re-) apply the language packs when needed.
Copyright © 2008 Compiere Inc. – All rights reserved 21
Page 22

Post Migration Steps for RMA/RTV
This step is only relevant if you plan to use the new returns functionality and you are migrating from 2.6.3 or older.
Compiere now has explicit return transactions. We discontinued the previously seeded "Return Material" functionality.
In the "Document Type" window you need to do the following for every Tenant/Client:
1) Delete or de-activate the document types
• Return Material
• MM Customer Return
Hint: This is discontinued functionality
If you choose to deactivate the obsolete document types (as opposed to deleting them), please rename the document
type 'MM Customer Return' to an alternate name (For eg., ' ** MM Customer Return ** Do Not Use **') so you can
successfully create the new document types detailed below.
2) Create Return Document Types
• MM Vendor Return
- Copy "MM Receipt" and set Name
- Select Return Transaction
- De-Select Counter Document flags
- Optionally select Confirmations
• Vendor RMA
- Copy "Purchase Order" and set Name
- Select Return Transaction
- De-Select Counter Document flags
• MM Customer Return
- Copy "MM Shipment" and set Name
- Select Return Transaction
- De-Select Counter Document flags
- Optionally create a special Document Sequence and or Confirmations
• Customer RMA (Copy Standard Order
- Copy "Standard Order" and set Name
- Select Return Transaction
- De-Select Counter Document flags
- Select AR Credit Memo for Invoice Document Type
- Select the created MM Customer Return for Shipment Document Type
- Optionally create a special Document Sequence
Unfortunately, we cannot do the above steps automatically as this is configuration specific user data.
Tip: For an example of a set-up, please check GardenWorld in a fresh install or in a newly created Tenant
Copyright © 2008 Compiere Inc. – All rights reserved 22
.
Page 23

Appendix B
Compiere 3.2 – Installation Instructions
Copyright © 2008 Compiere Inc. – All rights reserved 23
Page 24

Compiere 3.2 Installation Instructions
This is for a new installation of Compiere. If you already have installed a previous version of Compiere, please refer to the
Migration instructions.
Prerequisites
- Database Oracle XE, Oracle 10gR2, Oracle 11g or
EnterpriseDB Postgres Plus Advanced Server 8.3.
Important: It is mandatory to use a Unicode character set
- Database approved Linux Operating System,
Windows 2003 or Windows XP
- Disk Space: > 5 GB (includes database)
Update: Compiere 3.2 now includes version 4.2.3 of JBoss Application Server.
For more details please see the JBoss release notes
Hint: Notice that the screenshots in this document refer to the installation on Windows, but the process is the same for
Linux, except for the paths (e.g. C:\Compiere2 vs. /Compiere2) and the extension of the scripts (.bat vs. .sh)
.
Database Installation
Install Database – For the instructions on how to install Oracle XE and EnterpriseDB on Windows and Linu x please use
the install guide on the Compiere website http://www.compiere.org/support/installation.php
- Swap Space: > 1GB
- Memory: > 512 MB - Recommended: > 1 GB
- TCP/IP connection
- Network setup with DNS server and a domain.
Tip: Do not use IP addresses.
- Internet access
.
The JDBC driver for EnterpriseDB has been updated to the version that ships with Postgres Plus Advanced Server 8.3.
Java Installation
1. Download and install Sun Java JDK 6 (SDK), update 5 or higher.
Important: The Compiere Server requires the JDK (not just JRE).
Download Compiere
2. Install /Setup Compiere Server (this includes the Client as well)
1) Download the current version of Compiere: Web Store
2) Extract the .zip file. The steps shown assume that you extract to the root directory, resulting in a
COMPIERE_HOME of C:\Compiere2 in Windows or /Compiere2 in Linux.
3) Verify that the bin directory for your database executables is included in the PATH. Also, if using Oracle XE
on Linux, run $ORACLE_HOME/bin/oracle_env.sh.
To update the PATH in Windows, right click on My Computer and choose Properties. Then move to the
advanced tab and click on Environment Variables. Find the PATH variable and click Edit.
4) Verify that the path to the JAVA_HOME is set up in the Environment Variables.
To update the JAVA_HOME in Windows, right click on My Computer and choose Properties. Then move to
the advanced tab and click on Environment Variables. Find the JAVA_HOME variable and click Edit.
(for current customers) or free Community Edition.
5) Execute the script $COMPIERE_HOME/RUN_Setup.
Tip: if the following window does not display, please ensure that the following are updated.
• Add the bin folder where you have installed JDK 1.6 at the beginning of the PATH system environment
variable.
• Set the JAVA_HOME system variable to the location of your java installation (e.g., ‘C:\Program
Files\Java\jdk1.6.0_05’)
• Set the COMPIERE_HOME system variable to the path of your Compiere installation (e.g.,
‘C:\Compiere2’)
Copyright © 2008 Compiere Inc. – All rights reserved 24
Page 25

6) Select Database Type
Oracle XE, Oracle (for
Standard or Enterprise
Editions) or PostgreSQL
(for EnterpriseDB).
7) For System Password,
enter the System database
User password.
8) For Database Password,
enter the Compiere
database user password,
(e.g. ‘compiere’)
9) For Server Names, i.e.,
Application, Database and
Mail, use the DNS name of
the server.
use localhost (127.0.0.1) or
IP addresses.
Hint: Do not
10) Enter or update any other
parameters as necessary.
11) Select the Help button, for
information on any field.
12) Select the Test button to
check the parameters.
Tip: The parameters will
only save after they have
been verified.
13) If an entry is unverifiable, it
will display with a red X.
Correct the entry and reselect Test.
14) Once all fields are verified,
click the Save button to
proceed.
Copyright © 2008 Compiere Inc. – All rights reserved 25
Page 26

15) The Compiere Public License Opens. Click “Yes, I understand and Accept” to continue.
16) The following prompt will display describing your new Security Key. Click ‘Ok’ to continue.
17) The Next step is to provide the Subscriber Information. Current customers should provide the subscriber
information (
System Name, Email and Password) exactly as it was registered in the Compiere Web Store to
get a complete list of applications.
Click Check Available Applications to get a list of applications that are available to be installed.
Tip: Community Edition users may leave the fields blank and click “Check available components” to install
the Community Edition.
Copyright © 2008 Compiere Inc. – All rights reserved 26
Page 27

18) Select the applications that you would like to install. You can include additional applications by using the
button Add Application.
By default all available applications will be installed. If you do not wish to install one of them you should
change the action field from “New Install” to “-None-“. Notice that Compiere Core is a Mandatory Prerequisite
and must be selected.
Select the OK button to continue
19) Next, read and accept the Compiere Public License agreement.
Hint: You might get more than one license agreement, depending on the applications that yo u are installing.
Copyright © 2008 Compiere Inc. – All rights reserved 27
Page 28

20) Then read and accept the Compiere Commercial License agreement.
Hint: You might get more than one license agreement, depending on the applications that you are installing.
21) After accepting the license agreement the following window will display:
22) Select Start File Installation.
Important: At this point, you must be connected to the internet to continue or the installation will not succeed.
Copyright © 2008 Compiere Inc. – All rights reserved 28
Page 29

23) Once the file installation is complete, select Start Create New Database.
Note: If you already have a Compiere database in your system, you will be presented with a split panel after ‘Start
Server Install”. Click the left panel (Start DROP OLD and create NEW Database) if you want to replace the
existing database with the new database.
24) At the prompt select ‘Yes’ to Drop the existing Database and create a new database.
Warning: If you choose to replace the existing database, all data in the existing database will be removed.
25) Verify that you see a ’10: ** Finished’ message at the end of this step. Then a new window should pop-up to
do the license validation.
Copyright © 2008 Compiere Inc. – All rights reserved 29
Page 30

26) The Compiere Support window opens. Complete the necessary fields in order to validate your assets.
Hint: If you only intend to use the Community Edition of Compiere 3.0, you may skip the following steps and go to
the Application Server section.
Important: For customers with a valid support contract with Compi ere, this is a required step to ensure that the
features associated with the support level are enabled. If you are a customer and do not have a web store login,
please contact your system administrator or Compiere Support first. If you are not a customer and would like to
obtain a trial license for the Professional Edition, please
Contact Us and request the files for the Professional
Edition.
27) Provide the following information exactly as it was registered in the Compiere Web store and click Check
License to validate your asset information.
-
System Name (name provided in the web store registration)
- Registered Email (email address provided in the web store registration)
- Password (web store password)
28) To verify your license, click the “Check License” button.
Tip: Do not click Start Migration.
Notice that internet access is required to validate the license information.
Copyright © 2008 Compiere Inc. – All rights reserved 30
Page 31

29) Next, review that your license information has been validated.
30) After Compiere Professional license has been verified, click the “X” to close the window.
Note: If you get the error “You do not have an appropriate license to use this feature” when starting the web UI, then
login to the server and execute utils/RUN_Support to validate again your license and restart the application server.
31) Close any additional Setup and /or Support windows.
Run Application Server
3. Start the Compiere Application Server
Execute utils/RUN_Server2.
1)
2) There should be no errors. Check the logs in $COMPIERE_HOME/jboss/server/compiere/log to verify this.
3) Common problems include ports already in use:
- 17:41:09,085 ERROR [NamingService] Could not start on port 1099
java.net.BindException: Address already in use:
JVM_Bind at java.net.PlainSocketImpl.socketBind(Native Method)
- There is another program using port 1099; Stop it and restart Run_Server2
or setup Compiere to use another port in RUN_setup.
Likely port conflicts:
• 80 - You have some other web server running (or you need privileges under Linu x/Unix)
• 8080 - The Oracle Database uses that
• 1099 - Often used by IDEs for debugging
Copyright © 2008 Compiere Inc. – All rights reserved 31
Page 32

Start Compiere
4. Start the Compiere Client.
Start the Swing client by double clicking on the Compiere shortcut in your desktop or by executing
1)
RUN_Compiere2 from
Default users and passwords for the sample Garden World application:
the $COMPIERE_HOME directory.
- GardenUser/GardenUser
- GardenAdmin/GardenAdmin
- System/System
- SuperUser/System
2) Alternatively, if you have access to the Professional Edition, you can launch the application from the browser by
using the URL: http://server:port/apps
For optimal performance, the Firefox browser is recommended for using the Compiere Web User Interface.
Tip:
, (e.g. http://mycompany.com:80/apps.)
Information: For additional information see the Compiere home page http://www.compiere.com
Copyright © 2008 Compiere Inc. – All rights reserved 32
.
Page 33

Appendix C
Compiere 3.2 – Application Extensions
Copyright © 2008 Compiere Inc. – All rights reserved 33
Page 34

Compiere 3.2 Application Extensions
This section is for Application Extensions in Compiere available as beta functionality in 3.2 for Partners. This framework will
allow Partners to create application extensions that include both reference data and code, and can be distri buted to their
customers through Compiere. The rollout of the application marketplace is scheduled for the second half of 2008.
Registration of Application Extensions – Application Provider (Partner)
Use the steps below to register for Application Extensions:
1) To register an Application Extension, log a Support Request with Compiere.
2) Login with the System Administrator role.
3) Open the Entity Type window (Application Dictionary => Entity Type) and create a new record.
Hint: Be careful not to modify the entities C, D, CPRO or XUOM.
Important: Complete all the mandatory fields. For entity type, notice that names beginning with “C” and “X” are
reserved for Compiere and you must use four characters.
Copyright © 2008 Compiere Inc. – All rights reserved 34
Page 35

Comments about optional fields:
- Version: The version of your extension. Usually 1.0 for the first version.
- Prerequisite version: The Compiere Core version that is required for this extension, e.g. 3.2. You need to
use the exact text as defined for the entity type D.
- Prerequisite applications: The entity type of the applications that need to be installed in order to install this
extension. For example, set it to CPRO if the extension must be applied on top of the professional edition.
- Classpath: List of additional jar files required for this extension.
- Model package: Specific model package from the jar files listed in the classpath field.
4) You do not need to enter any information on the Version, Modification, or Migration Step tabs.
5) Ensure that your System window contains your up to date information for your system and web store
email/password information.
6) Click “Register Application” to send your request to Compiere.
Tip: If an entity type with the same name has already been registered you’ll get an error “Error: Already
registered: XXXX”. You will have to create a new record with the new entity type. Verify with Compiere that the
new entity type that you plan to use is available.
7) Click ‘Ok’ to start process.
8) Leave the defaults in place and click ‘Ok’ to continue.
9) At this point the status will be pending approval from Compiere. A Compiere representative should contact
you soon to confirm the registration or to ask any additional questions.
Copyright © 2008 Compiere Inc. – All rights reserved 35
Page 36

Creation of Application .car file – Application Provider (Partner)
Follow the steps below to create the Application.car file:
1) Make all the application dictionary changes using the entity type that you registered in the previous step.
2) Generate jar files for the custom code required by your extension.
3) After having your new Entity Type approved by Compiere; login to Compiere with the System Administrator
role and query the entity type that you registered in the previous step and click “Create Application File.”
4) Click ‘Ok’ to start process.
Copyright © 2008 Compiere Inc. – All rights reserved 36
Page 37

5) Provide the directory for the jar file directory.
6) The car file will be generated in the COMPIERE_HOME/data directory. The newly generated .car file will have
a name of compiere_XXXX.car.
Important: The naming convention for .car files has changed, (e.g. compiere_’CPRO’.car prior to 3.2 is now
compiere_CPRO.car in 3.2). If a customer unzipps the Compiere installation files into the same directory, it is
possible to end up with both compiere_’CPRO’.car as well as compiere_CPRO.car. This in turn will cause
Compiere Professional to show up twice in the installation window. To avoid this situation, customers will need to
manually delete compiere_’CPRO’.car and compiere_’XUOM’.car from COMPIERE_HOME/data directory. These
are the only two .car files that Compiere has distributed prior to 3.2. If a customer has created any additional .car
files prior to 3.2, it is necessary to follow the same procedure for those .car files as well.
Copyright © 2008 Compiere Inc. – All rights reserved 37
Page 38

Installation – Application Consumer (Customer)
Follow the steps below to install the Application:
1) After obtaining the car file for the application extension, copy it to the directory COMPIERE_HOME/data.
2) Execute RUN_Setup (see Appendix A for details on the setup information.)
Important: Be sure to have internet connection available to be able to get the license terms for the application
extensions that you plan to install.
3) When you get to the window to select the applications, besides the application extension that you need to
install, also select the option Reinstall/Migrate for Compiere Core 3.2.
4) Then continue with the MIGRATION steps as usual. (See Appendix A for more details.)
Copyright © 2008 Compiere Inc. – All rights reserved 38
Page 39

Appendix D
Compiere 3.2 – Delete Client and Delete Client Transactions
Copyright © 2008 Compiere Inc. – All rights reserved 39
Page 40

Delete Client and Delete Client Transactions
This allows you to remove unwanted tenants and transaction data that you might have added while testing the application.
This is an existing functionality from previous releases, but the instructions are now different. To access this functionality
you need follow the steps listed below.
Complete the following steps to Delete a Client and Client Transactions:
1) Execute utils/RUN_Support.
2) Provide your system name, email address and password exactly as it was registered in the Compiere Web
Store, and select Check License.
3) Update the source URL section. Then verify that the database is correct, and provide the Compiere user name
and password.
4) Select Start Migration.
5) Click ‘Yes’ to continue.
6) Select the operation Delete Client (all) or Delete Client Transactions.
7) Uncheck test only and select Start.
Copyright © 2008 Compiere Inc. – All rights reserved 40
Page 41

8) Verify that the migration finish with no errors and the message “After Migration - DONE” is displayed. In case
you get any errors, please be sure to review the list of known issues listed in this document before logging a
service request.
Copyright © 2008 Compiere Inc. – All rights reserved 41
 Loading...