

Page 1
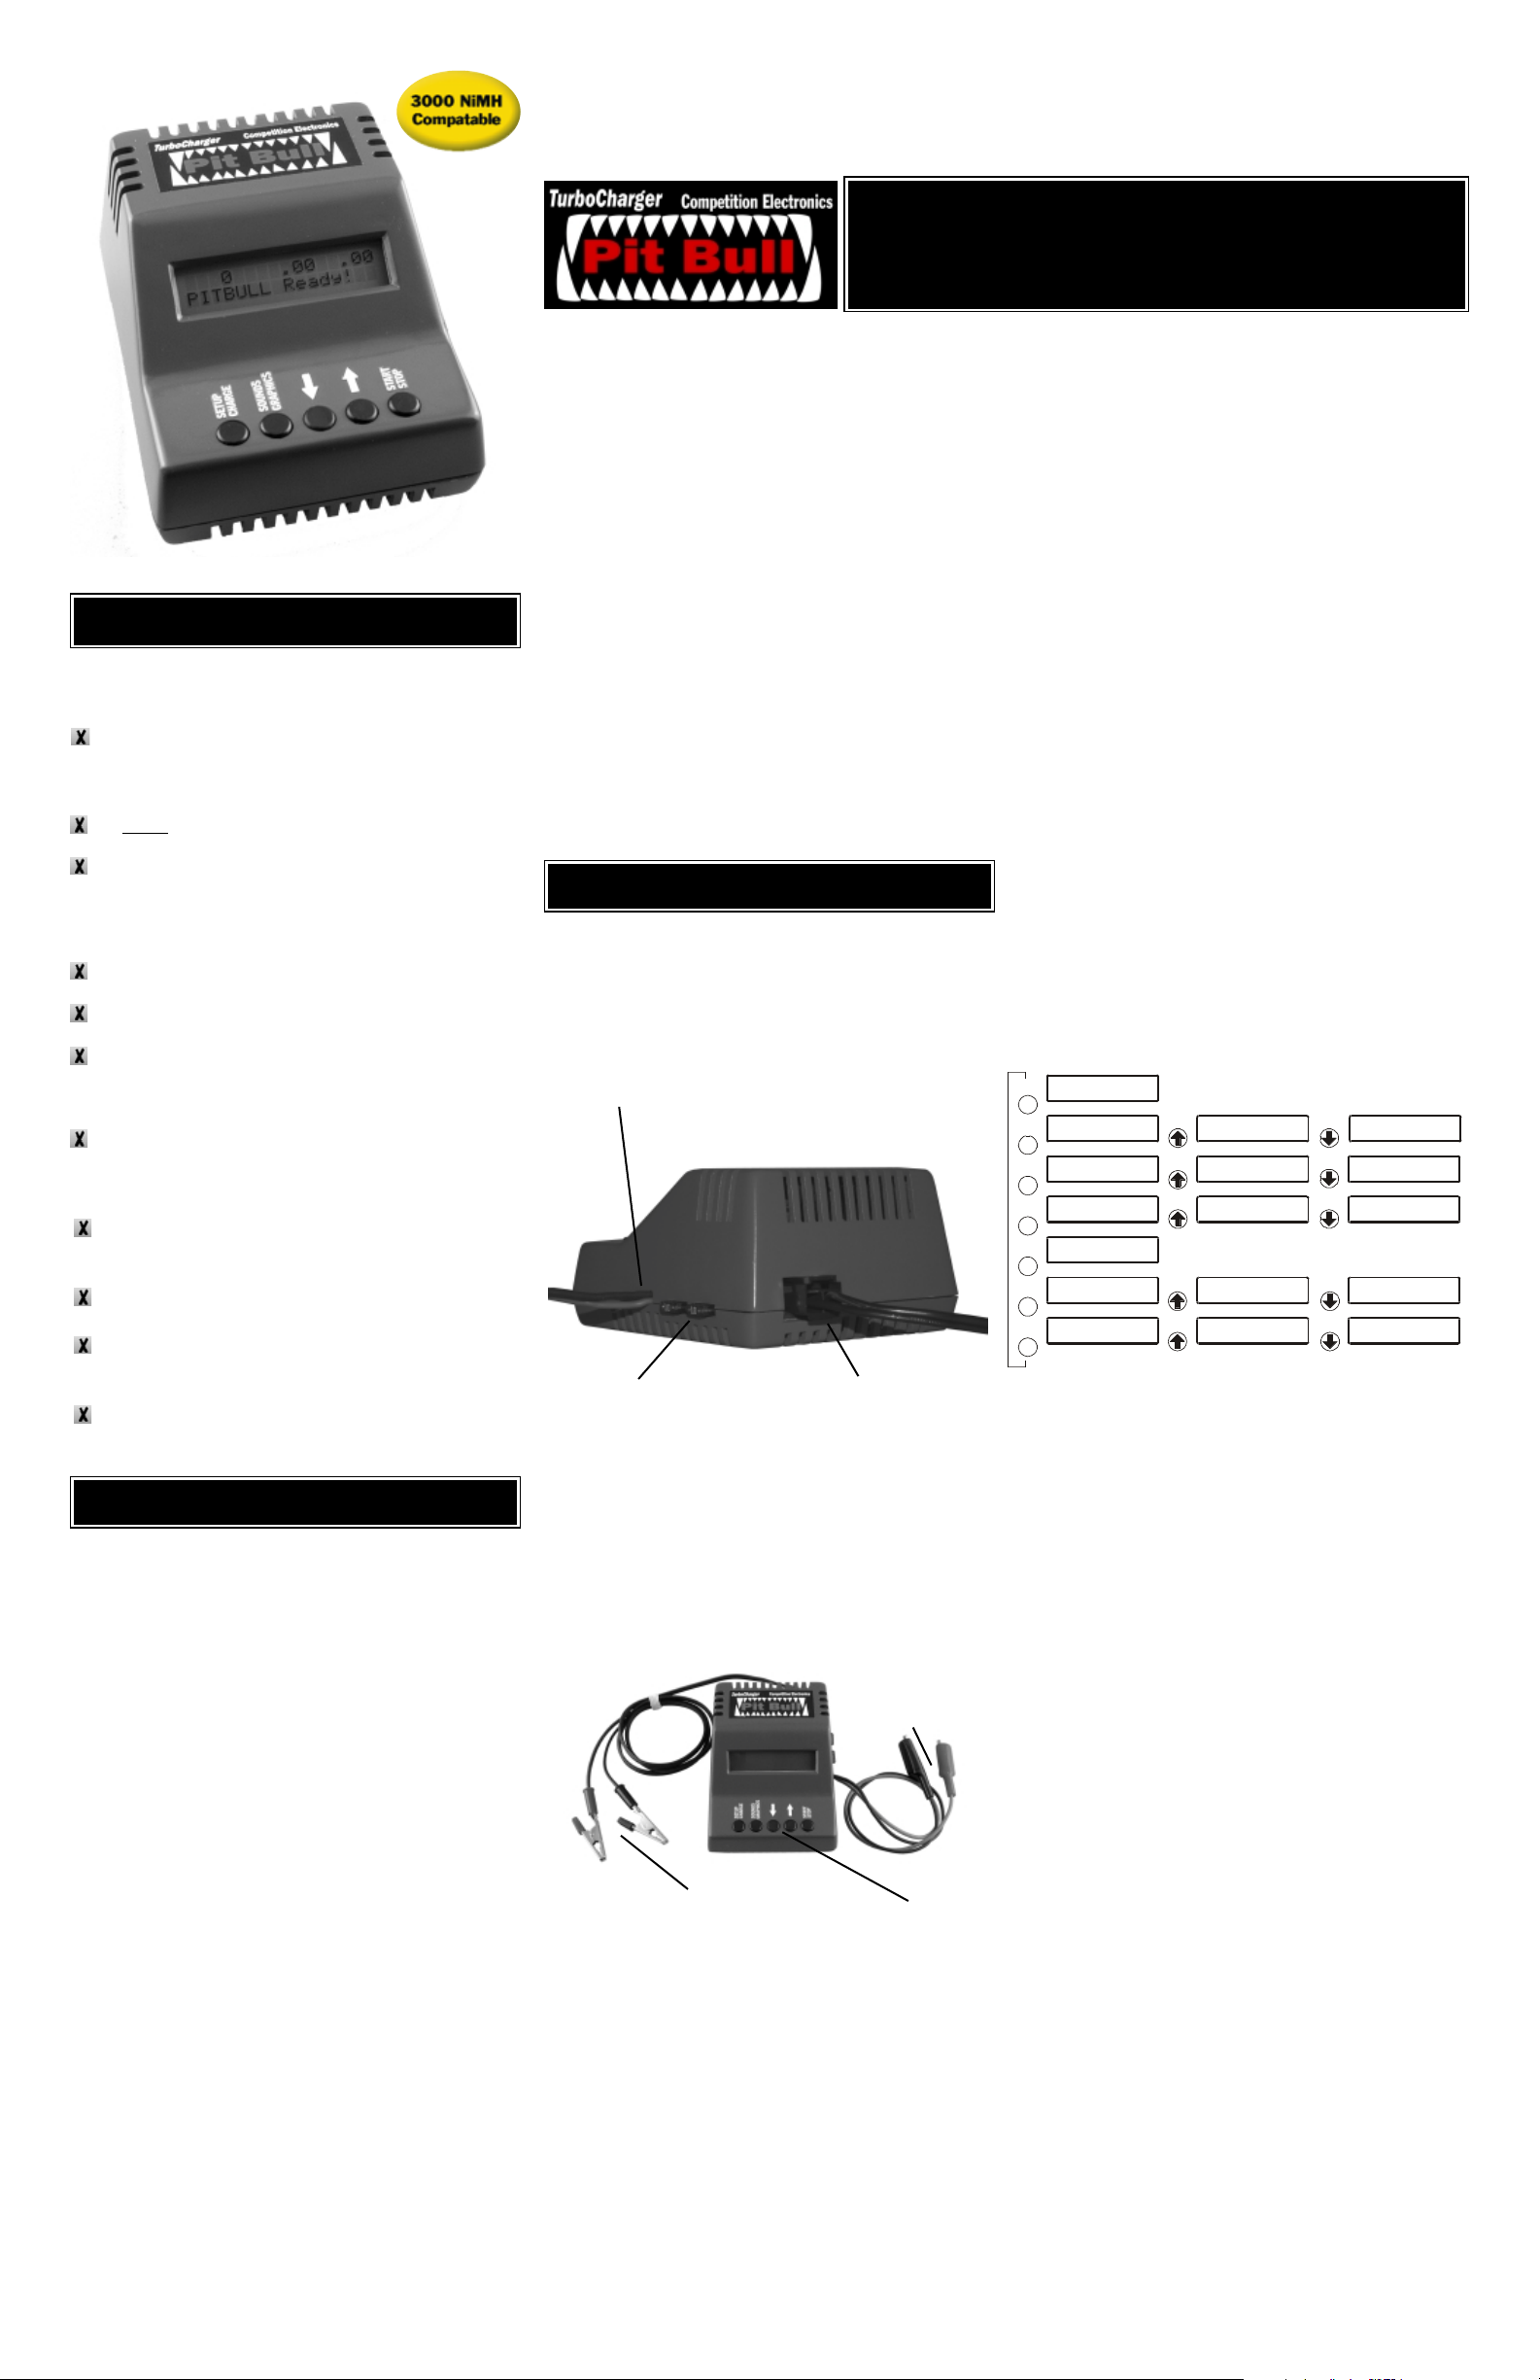
Here s a quick rundown of the great new features built
into your Pit Bull:
SMPS Technology means cool temperatures, light
weight, enhanced reliability, and efficient operation, and
it s quiet! (No fan)
It s small.
It easily fits in your pit kit.
Programmable sound and display graphics.
Personalize your Pit Bull and keep track of cycle status
from across the room or pit area! Or, turn off all the
sounds for silent operation.
.012 to .192 volts programmable peak detect.
.15 to 7 amps programmable charge rate.
Two selectable, programmable charge cycles for NiCd
and NimH packs means you can have two different
setups stored for your packs!
Automatically stores and displays detailed charge
cycle data for the last charge cycle. Stores data independently for both NimH and NiCd cycles!
16x2 character backlit alphanumeric LCD display is
easy to read.
Selectable Trickle Charge.
Long Lockout eliminates early shutdown due to false
peaking. Especially important for charging NimH packs.
The same Competition Electronics performance and
quality as our high-end chargers in a new, lower cost
unit!
Before you operate your new Pit Bull, please take a
moment to read over these precautions. This will ensure
that you get the results you desire.
Lead-Acid Batteries Produce Explosive Hydrogen Gas.
It is dangerous to work in the vicinity of a lead-acid battery since they
generate explosive gasses during normal battery operation. To prevent an
explosion while using a lead-acid battery, such as an automobile battery,
you MUST disconnect the Pit Bull power cable from the Pit Bull before
connecting or disconnecting the power cable to the lead-acid battery terminals. Operate the Pit Bull as far away from the lead-acid battery as possible. This will keep any sparks or arcing away from the lead-acid battery.
Charge ONLY NiCd or NimH cells with the Pit Bull charger.
To reduce the risk of injury, use only high-rate rechargeable NiCd or NimH
batteries with the Pit Bull. Any other type of battery may burst and cause
personal injury.
If charging smaller NiCd or NimH batteries such as those commonly used
in transmitter packs, for example, be sure to reduce the charge current
rate appropriately. These batteries are not designed for the high charge
rates used on typical R/C power packs.
Always make sure all cells are in the same state of discharge before
charging.
If you do not do this, the cells that are partially charged will get extremely
hot, and bursting or venting of battery acid may occur. Your cells may be
damaged.
Do not obstruct vents on the Pit Bull or allow liquids or other foreign
materials to enter the Pit Bull charger s case.
The Pit Bull needs unobstructed airflow to work properly. Obstruction of
the Pit Bull case vents may cause overheating.
Introduction of liquids or foreign materials through the Pit Bull case vents
may cause damage or faulty operation.
Do not allow the power supply output voltage to exceed 15 volts.
The Pit Bull circuitry is designed for a maximum of 15 volts on its power
supply inputs. Exceeding this WILL damage the charger.
Do not charge packs whose voltage exceeds the power supply volt-
age.
The Pit Bull cannot do this, and it will result in a blown fuse.
Do not leave the Pit Bull charger unattended while charging.
The remote possibility of an electronic failure could cause extreme overcharge. This could cause the battery to burst, or cause a fire hazard.
Always wear safety glasses when operating the Pit Bull charger.
This is just good safety practice.
Charging at elevated currents and large peak detect voltages will cause
very high temperatures in battery packs.
Also, be careful not to handle hot cells until they cool down.
In order to operate the Pit Bull, you must first connect it to power and to
the battery pack. Here s how.
Connecting Power
The power connector is located at the back of the Pit Bull. Viewing the
connector from the back, the (+) terminal is on your right (closest to the
center of the charger) and the (-) terminal is on your left.
Assembling the Power Cable and Alligator Clips
Alligator clips are supplied separately; if you decide to use them, you
must solder them to the supplied power cables. Use the Red clip for the
positive, and the black clip for the negative side of the cables. You may
desire to use some other type of connector.
After assembling the cable, plug it in to the back of the Pit Bull, and connect it to your DC power supply, being careful to observe the proper
polarities. As soon as you apply power, the display will illuminate and display the sign-on message. After this, it will display the message, PITBULL Ready!
Connecting Battery Packs
Again, the red alligator clip goes to the positive side of the pack and the
black alligator clip goes to the negative side of the pack. Most cells will be
clearly marked as the polarity of their terminals, but in general the end
with the smaller terminal is the positive side. Make certain you have good,
solid connections. Bad connections here can cause false peaking; see the
troubleshooting section for details.
Display and Control Pushbuttons
The Pit Bull has a menu-based display scheme that is easy to use and
intuitive once you get the hang of it.
Selecting the Charge Setup or Sounds & Graphics Menus
The Pit Bull menu display system is divided into two sections: the
CHARGE SETUP menu and the SOUNDS & GRAPHICS menu.
Whenever the Pit Bull is not charging a pack, these two menus may be
accessed at any time by pressing either the CHARGE SETUP pushbutton
or the SOUNDS GRAPHICS pushbutton.
Repeatedly pressing the CHARGE SETUP or SOUNDS & GRAPHICS
pushbuttons will advance the display to the next screen in the menu.
Pressing these pushbuttons at the last screen in the menu will reposition
the display to the first screen in the current menu.
Navigating the Selected Menu: Up/Down Pushbutton
In any screen that has a user-settable parameter, the DOWN and UP
pushbuttons are used to set that parameter. For Yes/No setting, a single
push will toggle the setting from Y to N . For numeric settings such as
Peak Detect or Charge Current, a single press will increment the setting
one time. Holding either down will cause an accelerating, continuous
increment to occur. The numeric settings will stop incrementing at their
programmed limits.
The Charge Setup Menu
The various screens contained in the CHARGE SETUP menu are
described below.
The Ready screen
This is the screen displayed while the Pit Bull is charging.
In the upper left portion of the screen, it shows elapsed time for the
charge cycle.
In the upper center portion of the screen, it shows the instantaneous pack
voltage.
In the upper right portion of the screen, it shows the charge current being
delivered to the pack.
In the lower line of the screen the Pit Bull will tell you what it is currently
doing. It will also indicate any errors or problems here.
The Cell Type screen
The Pit Bull stores a complete set of charging parameters for two separate charging cycles in its nonvolatile memory. One is intended for NiCd
and the other for NimH packs, as designated by the words NiCd and
NimH. However, either cycle can store any Pit Bull setup.
The Pit Bull arrives factory-programmed with typical values for NiCd and
NimH packs preprogrammed for immediate use.
The Chg Current screen
Here, the user can select the charge rate for the pack during a charge
cycle. It can be set from a lower limit of .15 amps all the way up to 7
amps.
The Peak Detect screen
This is the change in voltage, or delta-V of the pack which the charger
will use to determine when the pack is fully charged.
The Charge Data screen
Here the Pit Bull will display data it collected from the last charge cycle for
the selected Cell Type (above.) It displays the following data:
mWHr: This stands for milliwatt-hours and is a measurement of the power
delivered to the pack over time during the charge cycle.
mAHr: This stands for milliamp-hours and is a measure of the current
delivered to the pack over time during the charge cycle.
PkChV: This is the highest voltage reached by the pack during the charge
cycle.
Together, these parameters, along with the charge time on the Ready
screen will allow you to assess the condition of your packs.
The Long Lockout screen
Here, the user may select or deselect the long-lockout function. With this
feature not selected, the charger will ignore peaks on the pack for the first
60 seconds of the charge cycle. When long-lockout is selected (Y), peaks
will be ignored for a full 10 minutes. This is useful for packs that tend to
false-peak. That is, their voltage peaks as though they are completely
charged, even though they have not been charging for sufficient time to
be fully charged. This setting is NOT stored, but resets itself each time a
Thanks for purchasing the Pit Bull charger. This charger is designed
and built in the USA, with the same engineering know-how and quality
construction that goes into all of our R/C racing products. It is rich
with features, and built with performance in mind. Not only this, but
the programmable sounds and graphics enhance its usefulness, and
make it truly fun to operate! Once you start to use it, we believe it will
quickly become an indispensable part of your racing gear.
Competition Electronics
R/C battery charger
Pit Bull Features
Important Precautions
Connecting your Pit Bull
0 .00 .00
PITBULL Ready!
Cell Type?
NimH
Chg Current?
4.00
Peak Detect?
Volts .032
mWHr mAHr PkChV
0 0 .00
Long Lockout?
N
Trickle Charge?
N
CHARGE
SETUP
CHARGE
SETUP
CHARGE
SETUP
CHARGE
SETUP
CHARGE
SETUP
CHARGE
SETUP
CHARGE
SETUP
Cell Type?
NiCd
Chg Current?
7.00
Peak Detect?
Volts .192
Long Lockout?
Y
Trickle Charge?
Y
Cell Type?
NimH
Chg Current?
.15
Peak Detect?
Volts .012
Long Lockout?
N
Trickle Charge?
N
NO USER SETTINGS IN THIS SCREEN
NO USER SETTINGS IN THIS SCREEN
PRESS
PRESS
PRESS
PRESS
PRESS
PRESS
PRESS
PRESS
PRESS
PRESS
CHARGE SETUP MENU
Fuses
Power Leads. Note that the
ribbed conductor is (-) and
the smooth conductor is (+)
Battery Leads.
Solder the red alligator clip to the
red lead, black
alligator clip to the
black lead.
Power Leads. Solder the black
alligator clip to the ribbed conductor and the red alligator clip
to the smooth conductor.
Pushbutton
Controls
Battery Leads.
Page 2
cycle terminates, whether it terminates normally, or because of an error,
or because the user cancels it. You must enable it each time you run a
cycle.
The Trickle Charge screen
After the charge cycle, this causes the charger to deliver a constant .15
amps into the pack, trickle-charging the pack to keep it fully charged.
The Sounds and Graphics Menu
It is in the Setup menu that you can set the sounds and graphic displays
associated with each charge status. Here are the screens contained in
the Setup menu.
The Sounds and Graphics menu allows the user to select from an assortment of sounds and graphics effects which will be active when associated
functions are active during the Pit Bull charge cycles.
Sound screens
Select one of three sounds, or silence, by selecting 0-3 for the indicated
portion of the cycle.
Message screens
Select one of two scrolling display effects, or no effect, for the indicated
portion of the cycle.
All right, then how do I charge a pack? Here s how.
Start Pushbutton
After making sure to select the correct cycle (NiCd or NimH) for your
pack, just press the start button. The Pit Bull will immediately begin charging. To stop the charge cycle at any time, press the Start button again.
Information Displayed while Charging
When the start button is first pressed, the Pit Bull will ramp up to the
selected charge current. Then, the cycle will begin.
During a normal charge cycle, the Pit Bull goes through a three-stage
process.
* Lockout. The Pit Bull has a built in 60-second lockout during which it
ignores peaks. This feature lets the Pit Bull ignore false peaks. For old
packs, or packs which are in an extreme state of discharge, you may
need to set the Long Lockout on. In this case, the Lockout portion of the
cycle lasts 10 minutes.
* After the Lockout phase of the cycle, the Pit Bull then goes into the normal charge mode. The Pit Bull continues in this mode for as long as it
takes for the pack to begin peaking.
* Then, the Pit Bull enters the peak detect phase of the charge cycle. It
monitors the pack voltage and continues charging until the pack drops
from it s maximum voltage during the cycle down to a level which equals
that peak voltage minus the peak detect voltage setting.
* At this point, the Pit Bull signals that the charge cycle is complete. Press
any button other than the start button to return to the Ready screen.
* The user may optionally enable trickle charge. If Trickle charge is
enabled, the Pit Bull will automatically go into a trickle charge mode at the
end of the charge cycle, delivering .15 amps to the pack to keep it fully
charged. This will continue until the user presses the START button.
At all times during charging, the instantaneous pack voltage and current
are displayed, along with the accumulated charge time, and a periodic
status message to show you what phase of the charge cycle the Pit Bull
is currently in. Every ten seconds during the cycle, the Pit Bull will give an
audio prompt to signal what part of the cycle it is currently in.
The Pit Bull can detect error conditions such as low battery voltage, or
bad connections, and give an error message to tell you what the problem
is. The messages are self-explanatory. Once the problem is corrected,
press START again to charge the pack.
The Pit Bull has an on board nonvolatile memory which stores all your
programmed settings for the two charge cycles. It will also store the
recorded data for both cycles. This includes the following:
* Charge time
* mWHr
* mAHr
* PkChV
* Peak Detect Voltage setting
* Charge Current setting
* Currently Selected Cycle
* All Selected status sounds and graphic effects
When you change a nonvolatile setting, the Pit Bull will wait for an opportune moment and then inform you as it saves the data.
In the event you experience a problem with your Pit Bull, check these
remedies first:
Power Supply/Maximum and Minimum Voltage/Current Limits
The Pit Bull requires a DC power supply capable of 7 amps (in order to
achieve maximum current out) and a nominal 12-15 volts. As a battery
pack is charged, it s voltage rises steadily, peaking at some value higher than it s actual output voltage. The Pit Bull will charge properly only if
there is sufficient voltage available for it to maintain the current setting as
this voltage rises. If the power supply voltage is too low, the current will
drop off as the battery peaks and in some cases fuses may blow.
In practice, this means that the Pit Bull’s practical limit for the number of
cells in a pack is 8.
Power Supply/Supply Regulation
The Pit Bull has been tested and works well with as much as 2 volts
peak-to-peak ripple voltage on its power supply, depending on the number of cells and the output voltage of the supply. However, there are all
kinds of power supplies out there and it is quite possible to get one that
will limit the performance of your Pit Bull. Check with other racers at the
track and see what they are using. You ll soon find out what works well.
Power Supply/Guidelines for Using Lead-Acid Batteries
The Pit Bull works fine with a Lead-Acid battery, such as one found in
cars. Remember that a lead acid battery can only supply about 12 volts.
This limits the max number of cells you can charge. You may want to consider this as a source of portable power to use when there s no AC power
available for your power supply. Be sure to read about lead-acid batteries
under the Important Precautions section, above.
Fuses
Always check the fuses first when you have a problem with your Pit Bull.
Fuses protect the Pit Bull and your packs by self-destructing, so it s a
good idea to get some extras now; you should be able to get them at any
automotive store. Sooner or later, you ll need them.
False Peaking
Be aware that deeply discharged packs, and older packs can exhibit a
phenomenon known as false peaking. They peak way too early in the
cycle and fool your Pit Bull into thinking that the pack is fully charged. If
you see this, just turn on the Pit Bull’s Long Lockout. This will cause the
Pit Bull to ignore all peaks for 10 minutes at the beginning of the charge
cycle. After this, most all packs will have enough charge in them to prohibit false peaks.
Bad Battery Connections
During testing of the Pit Bull, it was discovered that an intermittent or
faulty connection between the Pit Bull and the pack could cause problems
with false peaking. Because NimH packs have smaller peak voltages, the
Pit Bull is necessarily more sensitive to changes in resistance in the circuit formed by the pack, the charge leads, and the alligator clips.
We have found that clipping the leads to bare copper bus bar, such as
that commonly used on an R/C battery pack, provides only marginal contact between the alligator clips and the buss bar. At higher charge currents, resistance between the alligator clips and the buss bar may suddenly change, causing a change in the voltage across the Pit Bull’s voltage sensing circuit. This may cause the Pit Bull to think the pack is peaking when it is not, and it may also cause premature shutdown of the
charge cycle, leaving a partially discharged pack.
Competition Electronics recommends that you put a thick coating of solder on the buss bars and attach the alligator clips to the soldered area.
An alternative is to use copper braid. Both of these methods maximize the
area of contact on the alligator clip s jaws and greatly reduce the possibility of introducing random, unwanted resistance into the connection. Be
sure to consider this if you are having odd peaking problems with your Pit
Bull.
Getting Help
Competition Electronics provides phone support for the Pit Bull. Ask to
speak to a technician and be sure to have a good description of the problem you are experiencing. If the problem cannot be resolved over the
phone, we can repair the unit.
Repair Policy
All repairs are normally completed within 5 working days from the time we
receive your unit. Total charges will include parts cost, labor and return
shipping.
Before you send it back, please call us. The method of payment will be
established at this time, and you will enable us to serve you more efficiently by avoiding irritating delays.
The preferred method of payment is MasterCard or Visa. Include your
card type (MasterCard or Visa only,) card number, your name as it
appears on the card, and the card s expiration date.
If you do not contact us and arrange payment, your repair will be returned
cash UPS COD. Please be sure to enclose a daytime phone number so
that we can contact you to arrange for return and payment.
When you return your Pit Bull, include your return UPS address, a daytime phone number, and an explanation of the problem. For warranty
repairs, include a dated receipt of purchase. The warranty appears at the
end of this manual.
Competition Electronics, Inc.
3469 Precision Dr.
Rockford, IL 61109
Phone 815-874-8001 (support 7:00AM to 4:30PM Mon-Fri)
FAX 815-874-8181
www.CompetitionElectronics.com
Power Supply: 12-15 VDC @ 7 amps
Maximum Power Supply Voltage: 15 VDC
Cell Types Supported: NiCd, NimH
Pack Size: 4 to 8 cell packs
Fuses: qty. (2), 10 amp miniature
flat-blade automotive type
Littelfuse¤ type MINI¤
Display: 2x16 character LCD, backlit
Controls: pushbuttons control charge
setup menu, sounds &
graphics menu,
navigate up, navigate
down, and start/stop
Case: blue translucent plastic.
Additional Features:
Nonvolatile memory stores
charge settings and data
Two separate charge
cycles
Programmable sounds
and graphics effects
.012 to .192 volts
programmable peak detect.
.15 to 7 amps
programmable charge rate.
SMPS charging technology
COMPETITION ELECTRONICS, INC., warrants the product manufactured by it to be free from defects in material and workmanship for a period
of 90 days from date of purchase by the original purchaser for use. COMPETITION ELECTRONICS, at its option, will repair or replace without
charge, or refund the purchase price of, any product which fails during the
warranty period by reason of a defect in material or workmanship found
upon examination by COMPETITION ELECTRONICS, INC., to have been
the cause of the failure. This warranty does not cover any failures attributable to abuse, mishandling, failure to follow operating instructions, alteration or accident.
To make claim under this warranty, the purchaser must return the product to COMPETITION ELECTRONICS, INC., at the address shown below,
properly packed and with shipping charges prepaid. All claims must be
made in thirty (30) days after the product failure and, in any event, within
thirty (30) days after the expiration of the 90 day warranty. All claims must
be accompanied by a sales slip or other written proof of date of purchase.
TO THE EXTENT PERMITTED BY LAW, ANY AND ALL IMPLIED WARRANTIES, INCLUDING MERCHANTABILITY AND FITNESS FOR PARTICULAR PURPOSE, ARE EXCLUDED; ANY IMPLIED WARRANTIES
NOT EXCLUDED ARE LIMITED IN DURATION TO 90 DAYS FROM DATE
OF PURCHASE. INCIDENTAL AND CONSEQUENTIAL DAMAGES ARE
EXPRESSLY EXCLUDED FROM THE REMEDIES AVAILABLE TO PURCHASER, AND THE REMEDIES PROVIDED IN THIS WARRANTY SHALL
BE EXCLUSIVE TO THE EXTENT PERMITTED BY LAW.
(Note: Some states do not allow limitations on how long an implied warranty lasts or the exclusion or limitation of incidental or consequential damages, so the foregoing limitations and exclusions may not apply to you.
This warranty gives you specific legal rights, and you may also have other
rights which vary from state to state.)
If any product returned by the purchaser is found by COMPETITION
ELECTRONICS, INC., to require service not covered by warranty, COMPETITION ELECTRONICS, INC., will so advise the purchaser and request
further instructions. COMPETITION ELECTRONICS, INC., will recondition
to working order any product returned to it regardless of condition upon the
purchaser s remittance of payment of 1/2 current retail price, if it is still manufactured by COMPETITION ELECTRONICS, INC.
Be sure to check out these other fine Competition Electronics R/C racing
products.
TurboMatcher 4
This is the gold standard for matching your cells. Used by most professional matching companies, the TurboMatcher 4 will let you characterize 4
individual cells at a time. Using this unit, you can test all of your cells and
match them into packs to get improved performance. A must for all serious R/C racers!
Turbo35
The ultimate pack maintenance machine! Charge, discharge and cycle
packs, and gather data. Match individual cells. Condition packs using our
oval and off-road conditioning cycles. Measure both relative and actual
internal resistance. We think this is the best charger available on the market today.
TurboLabel
TurboLabel is a Windows-based data collection and label printing program for use with the TurboMatcher 4 and the Turbo35. You can set up
large matching systems using TurboLabel with multiple TurboMatcher 4 s,
TurboLabel also works for the Turbo35 user, letting you create custom
labels with color and graphics.
See our website, www.CompetitionElectronics.com, for more info on these
and other fine Competition Electronics products.
Copyright 2000 Competition Electronics, Inc.
Charging a Pack
Error Conditions/Messages
Non-volatile Memory
Troubleshooting
Limited Warranty
Lock sound? 1
SOUNDS &
GRAPHICS
Lock sound? 2 Lock sound 0
PRESS
PRESS
Lock msg? 2
Peak lockout ON
SOUNDS &
GRAPHICS
Lock msg? 3
Peak lockout ON
Lock msg? 1
Peak lockout ON
PRESS PRESS
Chg done sound?2
SOUNDS &
GRAPHICS
Chg done sound?3 Chg done sound?1
PRESS PRESS
Chg done msg? 2
PITBULL DONE
SOUNDS &
GRAPHICS
Chg done msg? 3
PITBULL DONE
Chg done msg? 1
PITBULL DONE
PRESS PRESS
Charge sound? 1
SOUNDS &
GRAPHICS
Charge sound? 2
Charge sound? 0
PRESS PRESS
Charge msg? 2
PITBULL CHARGING
SOUNDS &
GRAPHICS
Charge msg? 3
PITBULL CHARGING
Charge msg? 1
PITBULL CHARGING
PRESS PRESS
Peak det sound?1
SOUNDS &
GRAPHICS
Peak det sound?2
Peak det sound?3
PRESS PRESS
Peak det msg? 2
PITBULL PEAKING
SOUNDS &
GRAPHICS
Peak det msg? 3
PITBULL PEAKING
Peak det msg? 1
PITBULL PEAKING
PRESS PRESS
Error sound? 1
SOUNDS &
GRAPHICS
Error sound? 2 Error sound? 0
PRESS PRESS
Error msg? 2
AARGH! LO VOLTS!
SOUNDS &
GRAPHICS
Error msg? 3
AARGH! LO VOLTS!
Error msg? 1
AARGH! LO VOLTS!
PRESS PRESS
Trickle sound? 1
SOUNDS &
GRAPHICS
Trickle sound? 2
Trickle sound? 0
PRESS PRESS
Trickle msg? 2
Trickle charging
SOUNDS &
GRAPHICS
Trickle msg? 3
Trickle charging
Trickle msg? 1
Trickle charging
PRESS PRESS
PB sound? 1
SOUNDS &
GRAPHICS
PB sound? 2 PB sound? 0
PRESS PRESS
SOUNDS AND GRAPHICS MENU
Specifications
Other Great Products
 Loading...