

Page 1

Welcome
The world’s first Auto-Finder makes locating your parked vehicle simple and
easy. When your vehicle is lost, simply press and hold the search button and let
the Auto-Finder do its magic. A series of audio tones and LED arrows will point
you directly to your vehicle from up to ½ mile away without having to activate any
obnoxious horns or lights from your vehicle’s alarm system.
How it works
The Auto-Finder is an advanced radio directional finder consisting of two transceivers.
Each Auto-Finder comes with a Pointer Remote (hand-held unit) that contains one of the
world’s smallest directional antennas, and an in-car Beacon that contains a proprietary
dual antenna system. At rest, the Beacon is in an intermittent sleep mode, waiting for an
activation signal from the Pointer Remote. When locating your vehicle, pressing and
holding the locate button on the Pointer Remote wakes up the Beacon. Within 3 to 5
seconds the Beacon the Pointer Remote enters the search mode. You can then locate
the direction of your vehicle by using the audio tones and LED lights on the Pointer
Remote.
Before using the Auto-Finder, carefully read the user manual and view the instructional
videos on our website at www.findertechnologies.com
Auto-Finder from shorter distances before attempting to locate your vehicle from a long
distance. At maximum distance (
difficult to locate. If the Pointer Remote does not enter the search mode after the button
is pressed, your vehicle is probably out of range.
½ mile away) the signal is at its weakest and is most
. Be sure to practice using the
The Auto-Finder should be used for finding temporarily lost stationary vehicles in
parking lots. It is not intended to locate people, pets, or other objects.
Page 2
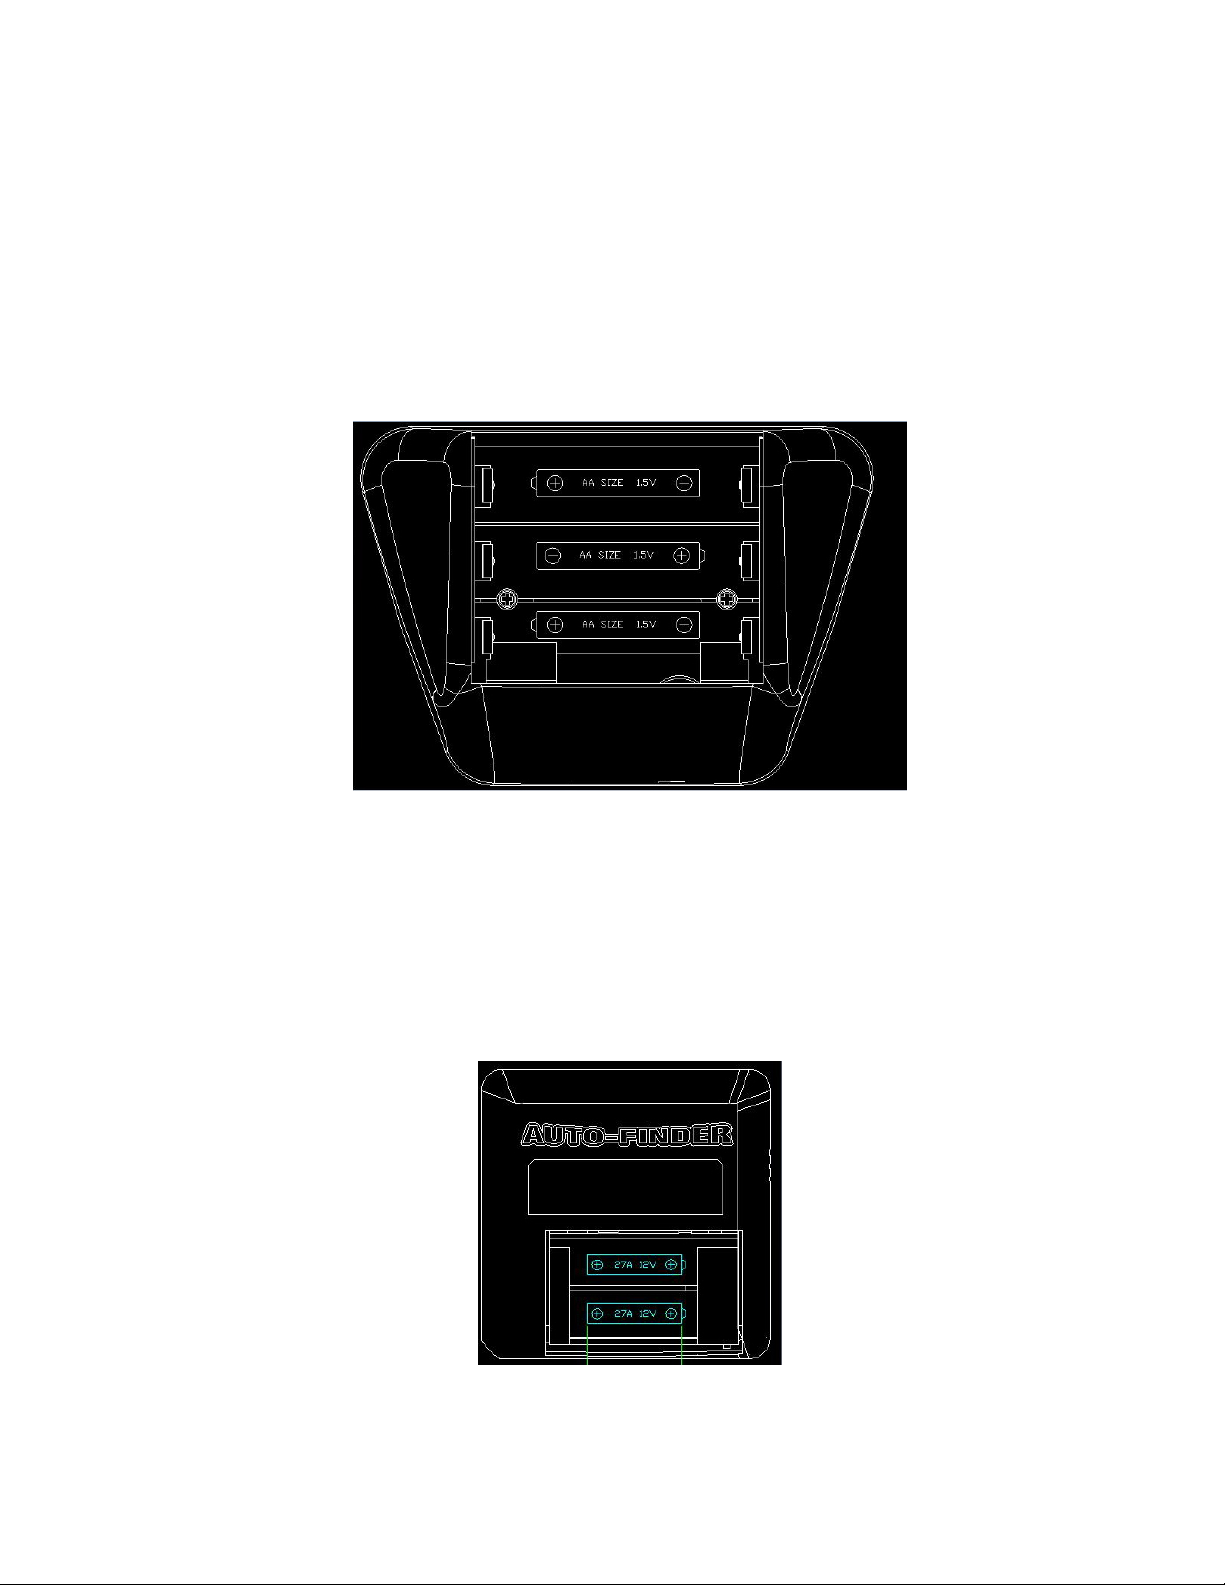
1. Battery installation
1.1. Remove the in-car Beacon and the Pointer Remote from the package
along with the set of three size AA batteries and the set of two size 27A
batteries.
1.2. Remove the Beacon battery door and install three size AA batteries in the
orientation shown inside the Beacon case and in Figure 1 below. As the
third battery is installed you should hear three short beeps indicating
correct battery orientation. If no beeps are heard, check for correct
battery orientation. Replace the Beacon battery door.
Figure 1: Beacon Battery Orientation
1.3. Remove the Pointer Remote battery door and insert the two size 27A
batteries in the orientation shown inside the Pointer Remote case and in
Figure 2 below. Replace the battery door and push the button on the
front of the Pointer Remote. You should hear three short beeps indicating
correct battery orientation. If no beeps are heard, check for correct
battery orientation.
Figure 2: Pointer Remote Battery Orientation
Page 3
2. Pairing the Beacon and Pointer Remote units
Before the first use of the Auto-Finder, or to add an additional Pointer Remote to
your existing Auto Finder, you will have to pair the Beacon and Pointer Remote
units. Pairing ensures that only your vehicle is being located, and keeps others
from locating your car.
Up to 5 Pointer Remote units can be paired to a single Beacon. This allows
multiple drivers of a single vehicle to have their own Pointer Remote.
To pair a Beacon and a Pointer Remote:
2.1. Install batteries into both the Beacon and the Pointer Remote as
described in section 1,
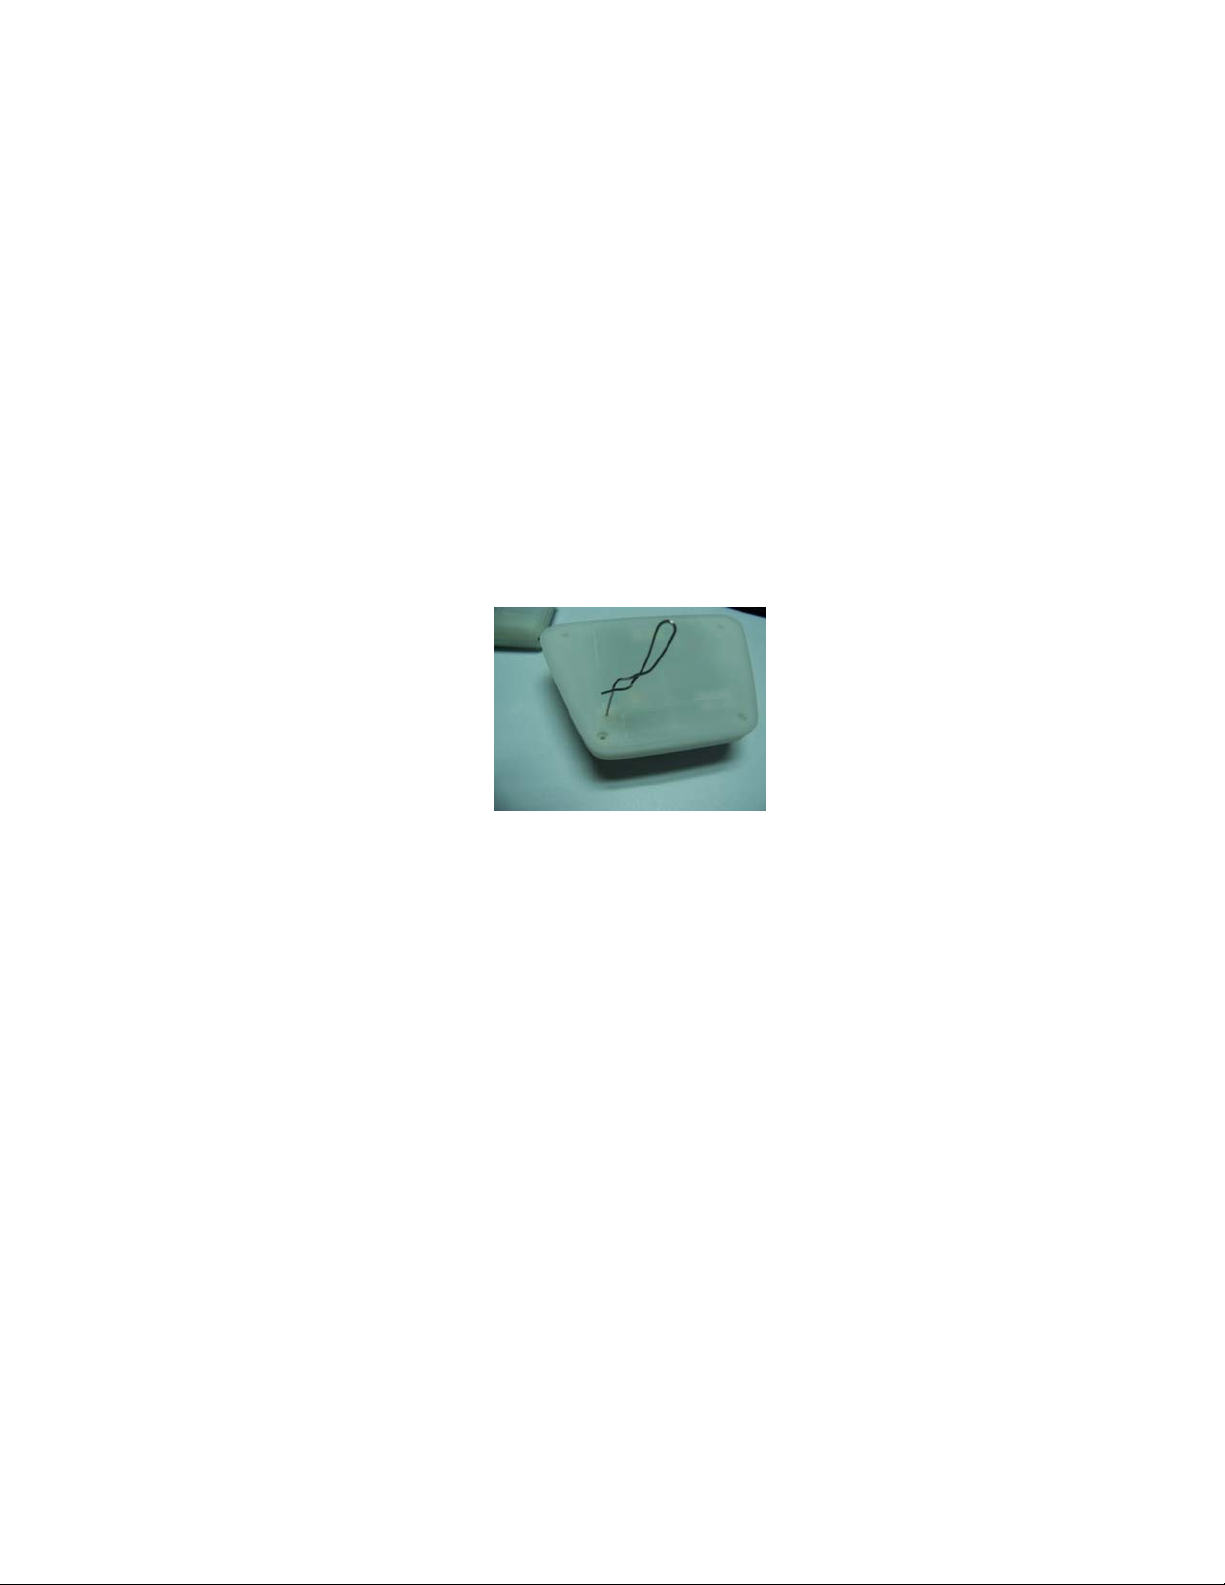
2.2. Locate the pairing hole on the bottom of the beacon as shown in Figure 3.
You will need a paper clip to press the pairing switch.
Figure 3: Beacon Pairing Hole
2.3. Press and hold the button on the Pointer Remote. Wait for the three
beeps to complete. Do not release button.
2.4. Press the pairing button on the Beacon using a paper clip inserted
through the pairing hole. While the pairing button is pressed and the
Beacon is waiting for pairing it will sound a beep once every second.
2.5. When units have paired to one another, the Beacon will sound 2 quick
beeps. Release the pairing button by removing the paper clip.
2.6. Release the button on the Pointer Remote
2.7. After the pairing process is complete, remove and reinstall the Beacon
batteries to cause it to reset.
2.8. To clear all paired Pointer Remotes from the Beacon memory, hold the
pairing button down while the batteries are installed in the Beacon. As
the last battery is installed you will hear two beeps acknowledging the
cleared memory. After clearing, you will need to pair any desired Pointer
Remotes again.
Page 4

3. Beacon installation in vehicle
The Beacon should be installed on the window glass inside the vehicle at the top
center of the rear window. Alternatively the Beacon can be placed on the inside
of the front windshield behind the rear view mirror. The location must be fully on
glass with no object blocking the radio signals from the Beacon. In either case,
care must be taken to ensure the Beacon placement does not interfere with the
driver’s field of vision. The Beacon may be installed with the word “Auto-Finder”
right-side-up or upside-down.
3.1. Install the Velcrotm strip to the bottom of the Beacon in the 2”x2” (5cm x
5cm) square area. Remove the backing tape from one side of the
Velcrotm strip and press firmly into place on the rear of the Beacon case.
tm
Ensure the Velcro
strip is securely attached to the Beacon.
3.2. Use a clean wipe or wet cloth to clean the area on the front windshield or
rear window where the Beacon is to be installed.
3.3. When area is fully dry, remove the backing tape from the other side of the
Velcro
tm
strip on the Beacon and press the unit firmly against the glass.
Ensure that the Velcrotm tape is securely attached to the glass.
3.4. Place the Pointer Remote on your key chain, or wear it on your belt in the
belt case provided.
3.5. Begin using and enjoying the Auto-Finder.
Page 5

4. Using the Auto-Finder
4.1. After the Auto-Finder is properly installed, it is recommended that you
take some time to learn how the device works. Interpreting the
directional information is a skill that you will develop after several uses.
4.2. Begin by walking 20 - 40 paces from your vehicle in an open area away
from other vehicles.
4.3. Hold the Pointer Remote horizontally in front of your body with your
elbow bent at 90 degrees.
4.4. While standing still, press and hold the button. Three short audio tones
will sound to let you know the batteries are good. The unit will begin
searching. If one long audio tone sounds, the batteries are low and
need to be replaced soon. Even with low batteries, the Pointer Remote
will continue to locate your vehicle for you but you may experience
reduced performance.
4.5. While continuing to hold the button down, scan the parking area by
slowly turning your body one full rotation of 360 degrees.
4.6. When the Pointer Remote is pointing towards your vehicle you will hear
more rapid and higher pitched tones.
4.7. The LED arrows will also aid in finding your direction. When pointing
away from your vehicle, none or only one LED will illuminate. As you
point towards your vehicle, more LED lights will illuminate. With a very
strong signal, all 3 LED lights will be lit.
4.8. Please note that any Radio Frequency Direction Finding device will
experience reflections as the radio signal bounces off of buildings and
other large metallic objects such as trucks and signs. These reflections
will cause the Auto-Finder to locate a strong signal source direction that
can be confused with the actual direction of your vehicle. For this
reason, it is important when searching to slowly turn your body in a full
360 degree circle. This will help to determine the direction where the
highest pitch and the fastest tones are indicated. With a practice and
experimentation, you will be able to distinguish between reflected
signals and the direct signal. Please see our website at
findertechnologies.com
methods for dealing with reflections and other challenging
environments.
4.9. Once you feel you have learned to find the proper direction (strongest
signal), you can use the Auto-Finder to guide you to your vehicle from
up to ½ mile away in an unobstructed environment.
for instructional videos showing various
Page 6

4.10. Above and below-ground parking structures present particular
challenges for most locating systems. The Auto-Finder is the most
effective device available for locating your vehicle in parking structures.
Because most parking structures block radio waves, GPS satellitebased systems cannot receive the GPS signals from the overhead
satellite. The Auto-Finder will point you directly to your car if you are
within two levels of your car. Please see Section 6, Helpful Tips, for
more information. Also visit our website at www.findertechnologies.com
for an instructional video with tips on how to locate your vehicle in
parking structures.
5. Battery Replacement
5.1. Standard alkaline batteries in the Beacon should last over six months
under typical use. When batteries become worn out, the Beacon will
sound a single beep once every minute. Replace the batteries with
name-brand alkaline size AA 1.5V batteries.
5.2. For extreme temperature operation where the Beacon is subjected to
temperatures below freezing or above 100oF/38oC, use of Lithium AA
batteries is recommended. Lithium batteries provide superior
performance in extreme hot and cold temperatures, and will last longer
than standard alkaline batteries. Lithium batteries for the Auto-Finder
Beacon are available on our website at www.findertechnologies.com.
5.3. Batteries for the Pointer Remote are size 27A, 12V. With typical use they
will last 4 to 6 months. When the batteries are depleted, the Pointer
Remote will sound one short beep upon initial press of the Search button,
but will continue to function until the batteries are dead. With low batteries
the Pointer Remote will continue to locate your vehicle for you but you
may notice degraded performance. Size 27A batteries for the AutoFinder Pointer Remote are available on our website at
www.findertechnologies.com
.
6. General Care
• Keep you’re the Beacon and the Pointer Remote in a dry environment. It
contains sensitive electronic components that can be damaged with water
contact.
• To clean your Auto-Finder, use a dry or slightly damp cloth. Do not use any
abrasive or chemical cleansers that may damage the surface.
• When not in use, store your Auto-Finder in a dry environment.
• Periodically check the condition of the Velcro
tm
strip used to attach the Beacon
to the window of your vehicle.
Page 7

7. Helpful Tips
The best way to hold the Pointer Remote for maximum performance may vary
according to certain conditions. You may need to hold the Pointer Remote
parallel or perpendicular to the ground for best performance depending on the
situation. Try both positions during your search.
In some parking lots and parking Structures, you may find large vehicles such as
moving vans, tow trucks, etc. blocking the signal. In this situation, you may need
to hold the Pointer Remote high above your head to find the temporarily blocked
signal.
In parking structures, you may not know which level you parked on. In most
situations you determine the level by exiting the elevator or staircase on a given
level and pressing the button to find your vehicle. If search mode never activates,
then your vehicle is not on this level. Proceed to the next level and repeat this
process. Once you are on the proper level, the Pointer Remote will guide you
directly to your vehicle.
The Auto-Finder works best in large open parking lots when you are standing still
and located away from other vehicles. You should begin by turning around in a
slow circle scanning the entire parking area. You will hear the slowest and lowest
tones when pointing away from your vehicle, and the fastest and highest tones
when pointing at your vehicle. Always follow the fastest tones. Once you have
walked in the direction of your vehicle, it may be necessary to stop and do a few
more scans along the way to stay on track. Stop in an open area and slowly scan
the parking lot, then release the search button and begin walking. It is not
necessary to hold the search button down while walking. This will cause
unneeded confusion and battery consumption. Always stop, find the direction,
and then walk.
Radio waves can reflect off of buildings, large metal surfaces and other objects.
The Pointer Remote may pick up some false readings due to these reflections. If
you are having trouble in a reflective environment, simply walk 10 to 20 paces to
a different location and try another scan. If the same readings are given from a
different area you must look at the environment to decide what could be creating
this reflection. You may have to do several tests in this type of an environment to
find your vehicle. Following a reflection will ultimately lead you to your vehicle.
Page 8

8. FCC Information
Radio Frequency Interference Requirements
This equipment has been tested and found to comply with the limits for a Class B
digital device, pursuant to part 15 of the FCC Rules. These limits are designed to
provide reasonable protection against harmful interference in a residential
installation. This equipment generates, uses, and can radiate radio frequency
energy and, if not installed and used in accordance with the instructions, may
cause harmful interference to radio communications. However, there is no
guarantee that interference will not occur in a particular installation. If this
equipment does cause harmful interference to radio or television reception, which
can be determined by turning the equipment off and on, the user is encouraged
to try to correct the interference by one or more of the following measures:
Reorient or relocate the receiving antenna.
Increase the separation between the equipment and receiver.
Connect the equipment into an outlet on a circuit different from that to
which the receiver is connected.
Consult the dealer or an experienced radio/TV technician for help.
Radio Transmitters (Part 15)
This device complies with part 15 of the FCC Rules. Operation is subject to the
following two conditions: (1) This device may not cause harmful interference, and
(2) this device must accept any interference received, including interference that
may cause undesired operation.
CAUTION
Changes or modifications not expressly approved by Finder Technologies will
void the user’s authority to operate the Auto-Finder.
9. Limited Six Month Warranty
This limited warranty covers the original purchase of a new product used for
normal non-commercial, personal or household use. Finder Technologies
warrants its products will be free from defects in materials and workmanship
(normal wear and tear excepted), for six (6) months from the date of purchase,
except as provided below. Finder Technologies, at its option, will repair and/or
replace a defective unit with a comparable product, free of charge. This warranty
does not apply to damage caused by fire, water damage, accident, negligence,
misuse, improper cleaning or other circumstances not directly attributable to
manufacturing defects.
Page 9

FINDER TECHNOLOGIES PROVIDES THIS LIMITED WARRANTY IN LIEU OF
ALL OTHER WARRANTIES EITHER EXPRESSED OR IMPLIED. EXPRESSLY
EXCLUDED ARE ALL WARRANTIES OF FITNESS FOR A PARTICULAR
PURPOSE OF MERCHANTABILITY. FINDER TECHNOLOGIE’S SOLE
OBLIGATION AND THE USER’S EXCLUSIVE REMEDY UNDER THIS
WARRANTY SHALL BE LIMITED TO THE REPAIR OR REPLACEMENT AT
FINDER TECHNOLOGIE’S SOLE DISCRETION AND COST, OF PRODUCT OR
COMPONENTS. IN NO EVENT SHALL FINDER TECHNOLOGIES, ITS
AFFILIATES, SUBSIDIARIES OR PARENT COMPANIES BE RESPONSIBLE
FOR CONSEQUENTIAL, SPECIAL OR INCIDENTAL DAMAGES ARISING OUT
OF A CLAIM OF DEFECTIVE PRODUCT EVEN IF FINDER TECHNOLOGIES
HAS BEEN ADVISED OF THE POSSIBILITY OF SUCH DAMAGES. SOME
STATES OR PROVINCES DO NOT ALLOW THE EXCLUSION OF IMPLIED
WARRANTIES OR LIMITATIONS ON HOW LONG AN IMPLIED WARRANTY
LASTS OR THE EXCLUSION OR LIMITATION OF INCIDENTAL OR
CONSEQUENTIAL DAMAGES SO THE ABOVE LIMITATIONS MAY NOT
APPLY TO YOU. THIS WARRANTY GIVES YOU SPECIFIC LEGAL RIGHTS
AND YOU MAY ALSO HAVE OTHER RIGHTS WHICH MAY VARY BY STATE
OR PROVINCE. THIS WARRANTY APPLIES ONLY TO THE U.S. AND
CANADA.
Return Instructions
Please call 1 888-679- FIND (3463) for your Return Material Authorization (RMA)
number. Carefully package the defective units and include: the defective item
(both Pointer Remote and Beacon), proof of purchase, your name, RMA number,
shipping address (No P.O. Boxes), e-mail address, and telephone number.
Ship to: Finder Technologies Warranty & Repair Service, 14260 Garden Road,
Suite A16, Poway, Ca 92064
DO NOT take the defective unit back to the store where it was purchased.
Any other questions? Please call our customer service center at 1-888-679-FIND
or visit our website at: www.auto-finder.com
10. Copyright and Trademarks
Finder Technologies logo and stylized Auto-Finder logo are registered with the
U.S. Patent and Trademark office. All other product or service names are the
property of their prospective owners.
Finder Technologies © 2009, All rights reserved.
 Loading...