

Page 1

Professional Workstation AP500
Reference Guide
Second Edition (February 1999)
Part Number 338521-002
Compaq Computer Corporation
Page 2

Notice
The information in this publication is subject to change without notice.
COMPAQ COMPUTER CORPORATION SHALL NOT BE LIABLE FOR TECHNICAL OR
EDITORIAL ERRORS OR OMISSIONS CONTAINED HEREIN, NOR FOR INCIDENTAL OR
CONSEQUENTIAL DAMAGES RESULTING FROM THE FURNISHING, PERFORMANCE, OR
USE OF THIS MATERIAL. THIS INFORMATION IS PROVIDED “AS IS” AND COMPAQ
COMPUTER CORPORATION DISCLAIMS ANY WARRANTIES, EXPRESS, IMPLIED OR
STATUTORY AND EXPRESSLY DISCLAIMS THE IMPLIED WARRANTIES OF
MERCHANTABILITY, FITNESS FOR PARTICULAR PURPOSE, GOOD TITLE AND AGAINST
INFRINGEMENT.
This publication contains information protected by copyright. No part of this publication may be
photocopied or reproduced in any form without prior written consent from Compaq Computer
Corporation.
1999 Compaq Computer Corporation.
All rights reserved. Printed in the U.S.A.
The software described in this guide is furnished under a license agreement or nondisclosure agreement.
The software may be used or copied only in accordance with the terms of the agreement.
Compaq, Fastart, ROMPaq, QVision, SmartStart, NetFlex, QuickFind, PaqFax, registered United States
Patent and Trademark Office.
Netelligent, SoftPaq, QuickLock, PowerStorm are trademarks and/or service marks of Compaq Computer
Corporation.
Microsoft, MS-DOS, Windows, and Windows NT are registered trademarks of Microsoft Corporation.
Other product names mentioned herein may be trademarks and/or registered trademarks of their
respective companies.
Compaq Professional Workstation AP500 Reference Guide
Second Edition (February 1999)
Part Number 338521-002
Page 3

Contents
About This Guide
Text Conventions ........................................................................................................................ ix
Symbols in Text............................................................................................................................ x
Symbols on Equipment ............................................................................................................... xi
Getting Help...............................................................................................................................xii
Compaq Website................................................................................................................. xii
Telephone Numbers............................................................................................................ xii
Chapter 1
Product Features
Standard Features......................................................................................................................1-2
SmartStart for Workstations......................................................................................................1-5
Front Panel Components...........................................................................................................1-6
Rear Panel Components ............................................................................................................1-8
Side View Components........................................................................................................... 1-10
Keyboard and Mouse ..............................................................................................................1-11
Special Mouse Functions................................................................................................. 1-11
Special Keyboard Functions ............................................................................................ 1-11
Windows Logo Key ......................................................................................................... 1-14
Keyboard Lights............................................................................................................... 1-15
iii
Chapter 2
Compaq Setup and Diagnostic Software
Accessing the Compaq Utilities Menu...................................................................................... 2-1
Computer Setup..................................................................................................................2-2
Computer Checkup (TEST) ............................................................................................... 2-6
View System Information (INSPECT)..............................................................................2-7
Create a Diagnostics Diskette............................................................................................2-8
Manage a Diagnostics Partition ......................................................................................... 2-9
Exit from This Utility......................................................................................................... 2-9
ROM BIOS................................................................................................................................ 2-9
Power-On Self-Test..........................................................................................................2-10
Runtime Services .............................................................................................................2-10
Upgrading the ROM BIOS ..............................................................................................2-11
Boot Block ROM ............................................................................................................. 2-11
Compaq Professional Workstation AP500 Reference Guide
Writer: Jeff Parmenter Project: Compaq Professional Workstation AP500 Reference Guide Comments: 338521-002
File Name: A-FRNT.DOC Last Saved On: 2/11/99 8:41 PM
COMPAQ CONFIDENTIAL - NEED TO KNOW REQUIRED
Page 4

iv
Chapter 3
Intelligent Manageability
Asset Management....................................................................................................................3-2
Compaq Diagnostics for Windows NT..............................................................................3-3
Fault Management..................................................................................................................... 3-5
SMART III Hard Drive Fault Prediction...........................................................................3-5
ECC Fault Prediction and Prefailure Warranty .................................................................3-5
Proactive Backup ............................................................................................................... 3-6
Surge-Tolerant Power Supply............................................................................................3-6
Thermal Sensor .................................................................................................................. 3-6
Security Management................................................................................................................ 3-7
Disabling Diskette Boot or Diskette Write........................................................................3-8
Disabling a Serial Port or Parallel Port.............................................................................. 3-9
Password Security............................................................................................................ 3-10
QuickLock/QuickBlank................................................................................................... 3-16
Cable Lock Provision.......................................................................................................3-18
Configuration Management.....................................................................................................3-20
Upgrading the ROM.........................................................................................................3-21
FailSafe Boot Block ROM...............................................................................................3-23
Remote Security Management......................................................................................... 3-25
Remote Wakeup and Remote Shutdown .........................................................................3-26
Power Management..........................................................................................................3-27
Advanced Configuration and Power Interfaces (ACPI)-Ready Hardware......................3-28
Compaq Support Software CD Kit and Support from the Compaq Website .................. 3-29
Integration Management ......................................................................................................... 3-30
Desktop Management Interface.......................................................................................3-30
Compaq Management Agents for Workstations.............................................................. 3-30
Compaq Management Solutions Partners Program......................................................... 3-31
Chapter 4
Network Communications
Connecting to an Ethernet Network.......................................................................................... 4-2
Installing the Network Driver ...................................................................................................4-2
Writer: Jeff Parmenter Project: Compaq Professional Workstation AP500 Reference Guide Comments: 338521-002
File Name: A-FRNT.DOC Last Saved On: 2/11/99 8:41 PM
COMPAQ CONFIDENTIAL - NEED TO KNOW REQUIRED
Page 5

Chapter 5
CD-ROM Drive and PremierSound Audio System
Using the Tray-Load CD-ROM Drive...................................................................................... 5-1
Using CD-ROM Software.................................................................................................. 5-2
Using Audio CDs...............................................................................................................5-3
CD-ROM Drive Precautions..............................................................................................5-3
PremierSound Audio System.................................................................................................... 5-4
Chapter 6
Hardware Upgrade Preparations
Installation Sequence.................................................................................................................6-2
Reconfiguring the Workstation................................................................................................. 6-3
Removing the Side Access Panel.............................................................................................. 6-4
Removing the Front Bezel.........................................................................................................6-5
Identifying Internal Components ..............................................................................................6-6
Removing the Expansion Board Assembly...............................................................................6-8
Reinstalling the Expansion Board Assembly............................................................................6-9
Removing the Removable Hard Drive Cage........................................................................... 6-10
Reinstalling the Removable Hard Drive Cage........................................................................ 6-11
Identifying the System Board Components ............................................................................ 6-12
v
Chapter 7
Memory Upgrades
Installing Additional Memory................................................................................................... 7-1
Important Guidelines for DIMM Installation ....................................................................7-3
Installing DIMM Modules................................................................................................. 7-3
Chapter 8
Drives
Installing Additional Drives...................................................................................................... 8-1
Removing a Blank Drive Bezel .........................................................................................8-3
Removing a Cooling Shield...............................................................................................8-4
Locating the Hardware Screws.......................................................................................... 8-5
Installing a 7200 rpm Hard Drive in Bays 5 or 6...............................................................8-6
Installing a 10,000 rpm Hard Drive in Bays 5 or 6............................................................8-9
Installing a Hard Drive in the Removable Hard Drive Cage (Bays 1 - 3).......................8-13
Compaq Professional Workstation AP500 Reference Guide
Writer: Jeff Parmenter Project: Compaq Professional Workstation AP500 Reference Guide Comments: 338521-002
File Name: A-FRNT.DOC Last Saved On: 2/11/99 8:41 PM
COMPAQ CONFIDENTIAL - NEED TO KNOW REQUIRED
Page 6

vi
continued
Drives
SCSI Cable and Guidelines..................................................................................................... 8-15
SCSI Cables ..................................................................................................................... 8-15
SCSI Guidelines for Installing SCSI Devices..................................................................8-16
SCSI Guidelines for Optimizing Performance ................................................................8-17
Chapter 9
Expansion Boards
Identifying the PCI and ISA Expansion Slots........................................................................... 9-2
Installing a PCI or an ISA Expansion Board ............................................................................9-4
Identifying the Accelerated Graphics Port (AGP) Graphics Controller Expansion Slot.......... 9-6
Installing and Removing an AGP Graphics Controller ............................................................9-7
Installing a Wide-Ultra2 PCI Controller................................................................................... 9-8
Chapter 10
Processors
Installing an Additional Pentium II Processor........................................................................10-1
Installing an Additional Pentium III Processor.......................................................................10-4
Upgrading the Processor ......................................................................................................... 10-6
Chapter 11
Troubleshooting
Checklist for Minor Problems................................................................................................. 11-1
Troubleshooting Common Problems ......................................................................................11-3
Minor Problems................................................................................................................11-3
Diskette Drive Problems..................................................................................................11-5
Display Problems.............................................................................................................11-7
Audio Problems................................................................................................................11-9
Printer Problems............................................................................................................. 11-10
Hardware Installation Problems..................................................................................... 11-11
Network Problems..........................................................................................................11-12
Memory Problems..........................................................................................................11-16
CD-ROM Drive Problems .............................................................................................11-17
Writer: Jeff Parmenter Project: Compaq Professional Workstation AP500 Reference Guide Comments: 338521-002
File Name: A-FRNT.DOC Last Saved On: 2/11/99 8:41 PM
COMPAQ CONFIDENTIAL - NEED TO KNOW REQUIRED
Page 7

Appendix A
Regulatory Compliance Notices
Federal Communications Commission Notice.........................................................................A-1
Class A Equipment................................................................................................................... A-1
Class B Equipment................................................................................................................... A-2
Modifications .................................................................................................................... A-2
Cables................................................................................................................................A-2
Declaration of Conformity for Products Marked with FCC Logo, United States Only... A-3
Mouse Compliance Statement .......................................................................................... A-4
Canadian Notice (Avis Canadien)............................................................................................ A-4
Class A Equipment............................................................................................................ A-4
Class B Equipment............................................................................................................ A-4
European Union Notice............................................................................................................ A-4
Japanese Notice........................................................................................................................ A-5
Taiwan Notice .......................................................................................................................... A-5
Laser Devices........................................................................................................................... A-6
Laser Safety Warnings...................................................................................................... A-6
Compliance with CDRH Regulations............................................................................... A-6
Compliance with International Regulations......................................................................A-6
Laser Product Label .......................................................................................................... A-7
Laser Information.............................................................................................................. A-7
Battery Replacement Notice..................................................................................................... A-8
vii
Appendix B
Electrostatic Discharge
Grounding Methods.................................................................................................................. B-2
Appendix C
Power Cord Set Requirements
General Requirements.............................................................................................................. C-1
Country-Specific Requirements............................................................................................... C-2
Appendix D
POST Error Messages
Error Messages......................................................................................................................... D-1
Compaq Professional Workstation AP500 Reference Guide
Writer: Jeff Parmenter Project: Compaq Professional Workstation AP500 Reference Guide Comments: 338521-002
File Name: A-FRNT.DOC Last Saved On: 2/11/99 8:41 PM
COMPAQ CONFIDENTIAL - NEED TO KNOW REQUIRED
Page 8

viii
Appendix E
Installing a New Battery
Running Computer Setup..........................................................................................................E-1
Installation Procedures..............................................................................................................E-2
Appendix F
Workstation Specifications
Index
Writer: Jeff Parmenter Project: Compaq Professional Workstation AP500 Reference Guide Comments: 338521-002
File Name: A-FRNT.DOC Last Saved On: 2/11/99 8:41 PM
COMPAQ CONFIDENTIAL - NEED TO KNOW REQUIRED
Page 9

About This Guide
This guide is designed to be used as step-by-step instructions for installation,
and as a reference for operation, troubleshooting, and future upgrades.
Text Conventions
This document uses the following conventions to distinguish elements of text:
Keys
ix
Keys appear in boldface. A plus sign (+) between two
keys indicates that they should be pressed
simultaneously.
USER INPUT
FILENAMES
Menu Options,
Command Names,
Dialog Box Names
COMMANDS,
DIRECTORY NAMES,
and DRIVE NAMES
Type When you are instructed
Enter When you are instructed
User input appears in a different typeface and in
uppercase.
File names appear in uppercase italics.
These appear in initial capital letters and italics.
These always appear in uppercase.
information
information and then press the
without
pressing the
information, type the
to type
Enter
to enter
information, type the
key.
Enter
key.
Compaq Professional Workstation AP500 Reference Guide
Writer: Jeff Parmenter Project: Compaq Professional Workstation AP500 Reference Guide Comments: 338521-002
File Name: A-FRNT.DOC Last Saved On: 2/11/99 8:41 PM
COMPAQ CONFIDENTIAL - NEED TO KNOW REQUIRED
Page 10

x About This Guide
Symbols in Text
These symbols may be found in the text of this guide. They have the following
meanings.
WARNING: Indicates that failure to follow directions in the
warning could result in bodily harm or loss of life.
CAUTION: Indicates that failure to follow directions could result
in damage to equipment or loss of information.
IMPORTANT: Presents clarifying information or specific instructions.
NOTE: Presents commentary, sidelights, or interesting points of information.
Writer: Jeff Parmenter Project: Compaq Professional Workstation AP500 Reference Guide Comments: 338521-002
File Name: A-FRNT.DOC Last Saved On: 2/11/99 8:41 PM
COMPAQ CONFIDENTIAL - NEED TO KNOW REQUIRED
Page 11

Symbols on Equipment
These icons may be located on equipment in areas where hazardous conditions
may exist.
Any surface or area of the equipment marked with these
symbols indicates the presence of electrical shock hazards.
Enclosed area contains no operator serviceable parts.
WARNING: To reduce risk of injury from electrical shock
hazards, do not open this enclosure.
Any RJ-45 receptacle marked with these symbols indicates a
Network Interface Connection.
WARNING: To reduce risk of electrical shock, fire, or damage
to the equipment, do not plug telephone or telecommunications
connectors into this receptacle.
Any surface or area of the equipment marked with these
symbols indicates the presence of a hot surface or hot
component. If this surface is contacted, the potential for injury
exists.
WARNING: To reduce the risk of injury from a hot component,
allow the surface to cool before touching.
xi
WARNING: To reduce the risk of electric shock or damage to the
equipment:
■ Do not disable the power cord grounding plug. The grounding plug is an
important safety feature.
■ Plug the power cord into a grounded (earthed) electrical outlet that is
easily accessible at all times.
■ Disconnect power from the workstation by unplugging the power cord
from either the electrical outlet or the workstation.
Compaq Professional Workstation AP500 Reference Guide
Writer: Jeff Parmenter Project: Compaq Professional Workstation AP500 Reference Guide Comments: 338521-002
File Name: A-FRNT.DOC Last Saved On: 2/11/99 8:41 PM
COMPAQ CONFIDENTIAL - NEED TO KNOW REQUIRED
Page 12

xii About This Guide
Getting Help
If you have a problem and have exhausted the information in this guide, you
can get further information and other help in the following locations.
Compaq Website
The Compaq website has information on this product as well as the latest
drivers and Flash ROM images. You can access the Compaq website by
logging on to the Internet at
Telephone Numbers
For the name of your nearest Compaq Authorized Reseller:
In the United States, call 1-800-345-1518
In Canada, call 1-800-567-1616
For Compaq technical support:
In the United States and Canada, call 1-800-652-6672
For Compaq technical support phone numbers outside the United States and
Canada, visit the Compaq website at:
www.compaq.com
.
www.compaq.com
Writer: Jeff Parmenter Project: Compaq Professional Workstation AP500 Reference Guide Comments: 338521-002
File Name: A-FRNT.DOC Last Saved On: 2/11/99 8:41 PM
COMPAQ CONFIDENTIAL - NEED TO KNOW REQUIRED
Page 13
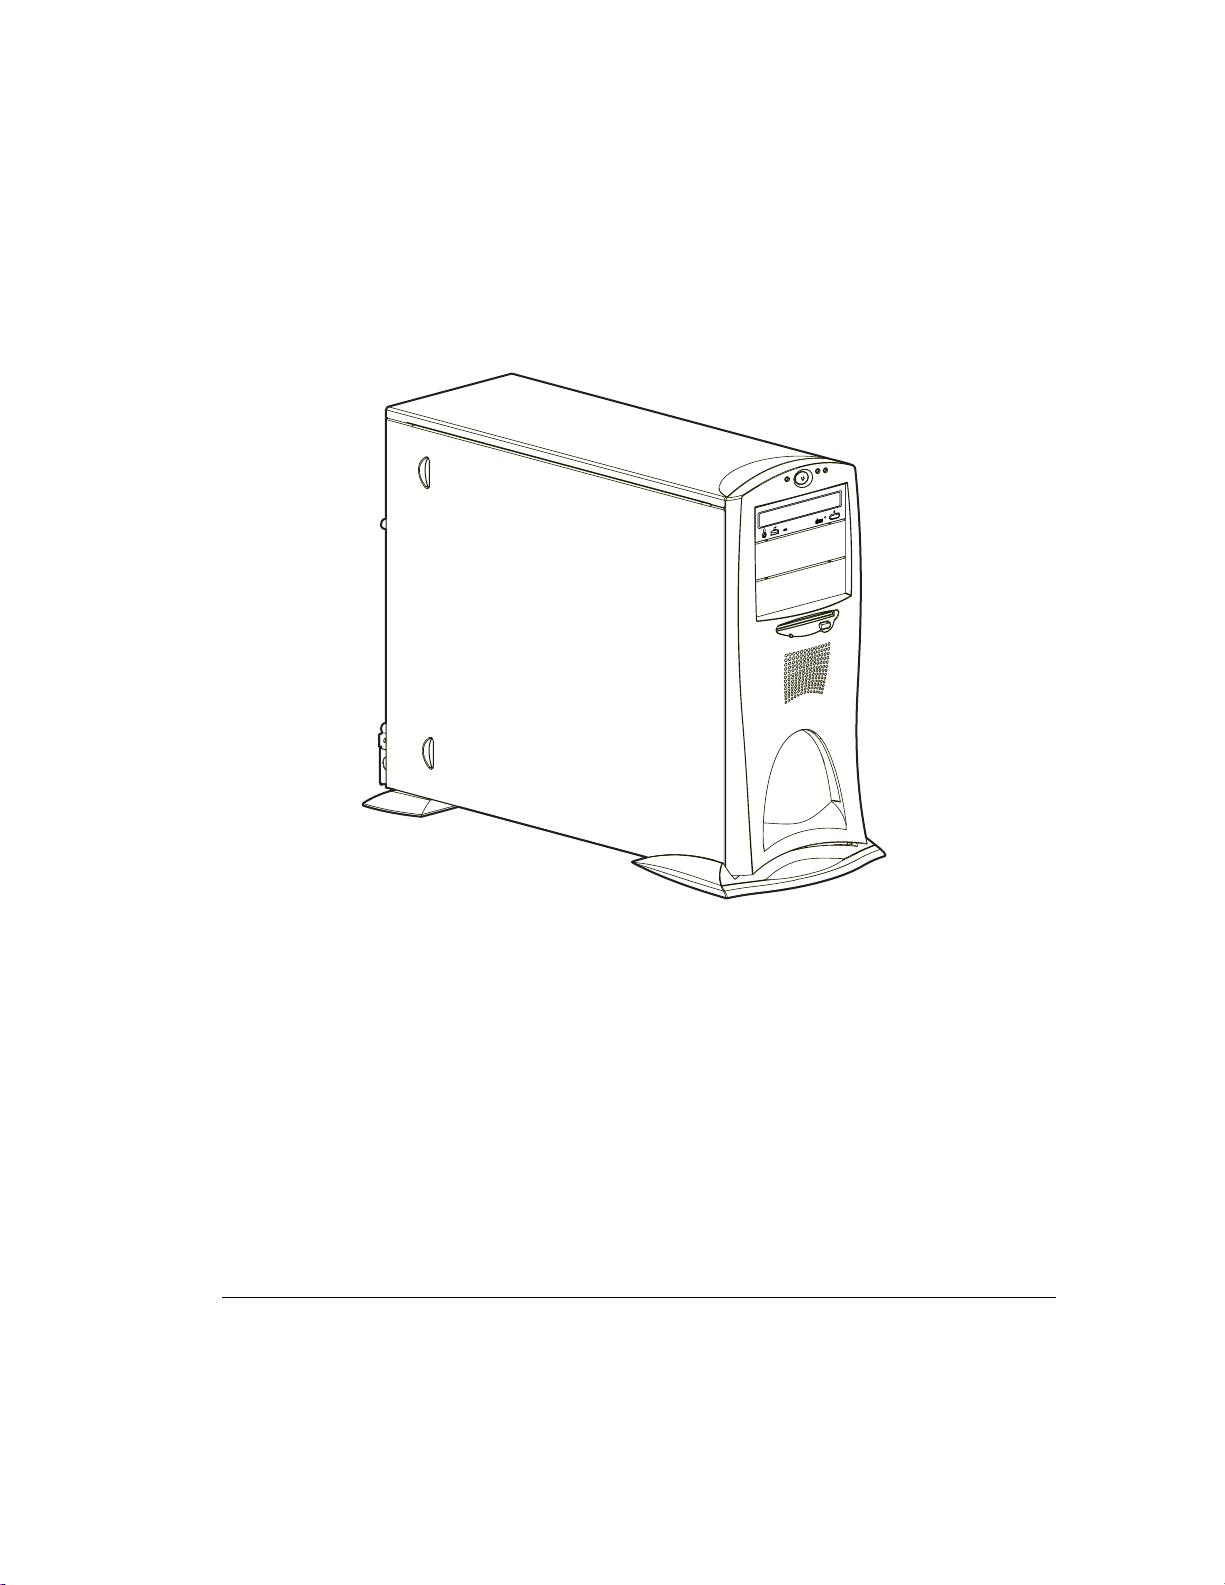
Chapter 1
Product Features
1-1
COMPACT
Figure 1-1. Compaq Professional Workstation AP500
Compaq Professional Workstation AP500 Reference Guide
Writer: Jeff Parmenter Project: Compaq Professional Workstation AP500 Reference Guide Comments: 338521-002
File Name: B-CH01.DOC Last Saved On: 2/11/99 8:09 PM
COMPAQ CONFIDENTIAL - NEED TO KNOW REQUIRED
Page 14

1-2
Product Features
Standard Features
The Compaq Professional Workstation AP500 offers the following standard
features. Features may vary depending on your model. For a complete listing of
the hardware and software installed in your workstation run the INSPECT
utility as described in Chapter 2.
Processors 400-MHz or 450-MHz Intel Pentium II or 500-MHz
Number of Processors One processor, upgradable to two
L2 Cache Size 512 KB
Memory 100-MHz ECC registered SDRAM DIMM, 4 DIMM sockets,
Table 1-1
Compaq Professional Workstation AP500 Standard Features
Feature Description
Pentium III embedded termination
upgradable to 1GB
Optional Memory
Upgrades
Memory Controller 800MB/s single channel memory controller
Error Checking and
Correcting (ECC) Memory
Graphics Controller 2D, 2D/3D, or 3D graphics controllers
Expansion Slots 6 slots total: 3 dedicated PCI, 1 PCI/ISA shared, 1 dedicated
Drive Controller IDE Controller, Wide-Ultra SCSI, Wide-Ultra2 SCSI
Supports 100-MHz ECC 32-MB, 64-MB, 128-MB, or
256-MB Registered SDRAM DIMMs
Uses an encoding scheme for memory error detection and
correction. (Specifically, this feature detects and corrects all
single-bit memory errors, and detects and reports doublebit errors.)
ISA, 1 AGP (all connectors populate full length cards)
Continued
Writer: Jeff Parmenter Project: Compaq Professional Workstation AP500 Reference Guide Comments: 338521-002
File Name: B-CH01.DOC Last Saved On: 2/11/99 8:09 PM
COMPAQ CONFIDENTIAL - NEED TO KNOW REQUIRED
Page 15

1-3
Compaq Professional Workstation AP500 Standard Features
Continued
Feature Description
Network Controller Compaq NC3161 Fast Ethernet Network Interface Controller
(10/100 Mb/s autosensing Ethernet controller) PCI
card with
Wake-on-LAN
Hard Drive Types Wide-Ultra2 SCSI Hard Disk Drive, Wide-Ultra SCSI (1”) Hard
Disk Drive, UATA Hard Disk Drive
Secondary Storage
3.5-inch diskette drive
CD-ROM drive
Drive Bays Seven drive bays
Standard External
Connectors/Jacks
Serial (two available)
Parallel
USB-hardware ready (two available)
External Wide-Ultra SCSI
Ethernet (RJ-45)
Headphone and microphone jacks
Line in/line out
Keyboard
Mouse
VGA (AGP on select models)
Audio
PremierSound with fixed equalization
ESS 1869 audio driver
external speaker output
ROM Software upgradable ROM via ROMPaq Utility
Power Supply 325-Watt power supply with Power Factor Correction (PFC)
Software Microsoft Windows NT Workstation 4.0 (Windows 2000-
ready) and Compaq support software (preinstalled)
Continued
Compaq Professional Workstation AP500 Reference Guide
Writer: Jeff Parmenter Project: Compaq Professional Workstation AP500 Reference Guide Comments: 338521-002
File Name: B-CH01.DOC Last Saved On: 2/11/99 8:09 PM
COMPAQ CONFIDENTIAL - NEED TO KNOW REQUIRED
Page 16

1-4
Product Features
Compaq Professional Workstation AP500 Standard Features
Feature Description
Intelligent Management
Asset Management
Security Features
Diagnostic Tools
Warranty 3-year limited (3/1/1): Three years Free Parts/ 1 year Free
Remote ROM update
Remote Security Management
Remote Wakeup and Remote Shutdown
Establishment of Power Management Settings
Advanced Configuration and Power Interface (ACPI) capable
Enhanced Support Software CD and support from Compaq
website
DMI 2.0
For more information, see Chapter 3.
Compaq Diagnostics for Windows NT
For more information, see Chapter 3.
Keyboard password
Administrator password
QuickLock /QuickBlank
Diskette Write Control
Diskette Boot Control
Serial Interface Control
Security Lock Provision
Power-On Self-Test (POST)
Diagnostics (DIAGS)
Computer Setup and Inspect
ROMPaq utilities to upgrade ROM
Labor On-site/ 1 year Free Labor Carry-in
Continued
Writer: Jeff Parmenter Project: Compaq Professional Workstation AP500 Reference Guide Comments: 338521-002
File Name: B-CH01.DOC Last Saved On: 2/11/99 8:09 PM
COMPAQ CONFIDENTIAL - NEED TO KNOW REQUIRED
Page 17

SmartStart for Workstations
If the preinstalled software on your workstation has been deleted, you can
reinstall Microsoft Windows NT Workstation and the Compaq support
software, using SmartStart for Workstations. For more information about
SmartStart for Workstations, refer to the Software Installation Guide shipped
with the workstation. There are also online help files located on the SmartStart
for Workstations CD.
For information about the graphics controller installed on your workstation,
refer to the appropriate guide on the SmartStart for Workstations CD under
X:\DOCS\GRAPHICS, where X is your CD-ROM drive designation. To view
one of the .pdf files, use Adobe Acrobat Reader. To install Adobe Acrobat
Reader, refer to the Software Installation Guide.
1-5
Compaq Professional Workstation AP500 Reference Guide
Writer: Jeff Parmenter Project: Compaq Professional Workstation AP500 Reference Guide Comments: 338521-002
File Name: B-CH01.DOC Last Saved On: 2/11/99 8:09 PM
COMPAQ CONFIDENTIAL - NEED TO KNOW REQUIRED
Page 18

1-6
Product Features
Front Panel Components
The following figure identifies the front panel components. See Table 1-2 for a
description of each component.
321 4
5
COMPACT
6
7
8
9
Figure 1-2. Identifying front panel components
Writer: Jeff Parmenter Project: Compaq Professional Workstation AP500 Reference Guide Comments: 338521-002
File Name: B-CH01.DOC Last Saved On: 2/11/99 8:09 PM
COMPAQ CONFIDENTIAL - NEED TO KNOW REQUIRED
Page 19

Table 1-2
Front Panel Components
Ref. Component Description
1
Power on/off LED After plugging the power cord into a grounded AC
outlet and the workstation, if the LED is:
—Workstation is ready to be powered up.
Off
Steady Amber
is not seated properly.
After pressing the power button, if the LED is:
Steady Green
expansion board assembly is seated properly.
Blinking green
—The expansion board assembly
—Workstation is turned on, and the
—Workstation is in standby mode
1-7
2
3
4
5
6
7
8
9
* An optional Zip drive can be installed in these bays.
Power button Turns the workstation on or off
Hard drive activity LED When lit, indicates the workstation is reading or
writing data to the hard drive(s)
Network activity LED When lit, indicates the workstation is receiving
or sending data on the network
Bay 4 5.25-inch, half-height drive bay for CD-ROM drive
Bay 5* 5.25-inch, half-height drive bay
Bay 6* 5.25-inch, half-height drive bay
Bay 7 3.5-inch, third-height drive bay for diskette
drive
Speaker PremierSound with fixed equalization
Compaq Professional Workstation AP500 Reference Guide
Writer: Jeff Parmenter Project: Compaq Professional Workstation AP500 Reference Guide Comments: 338521-002
File Name: B-CH01.DOC Last Saved On: 2/11/99 8:09 PM
COMPAQ CONFIDENTIAL - NEED TO KNOW REQUIRED
Page 20
1-8
Product Features
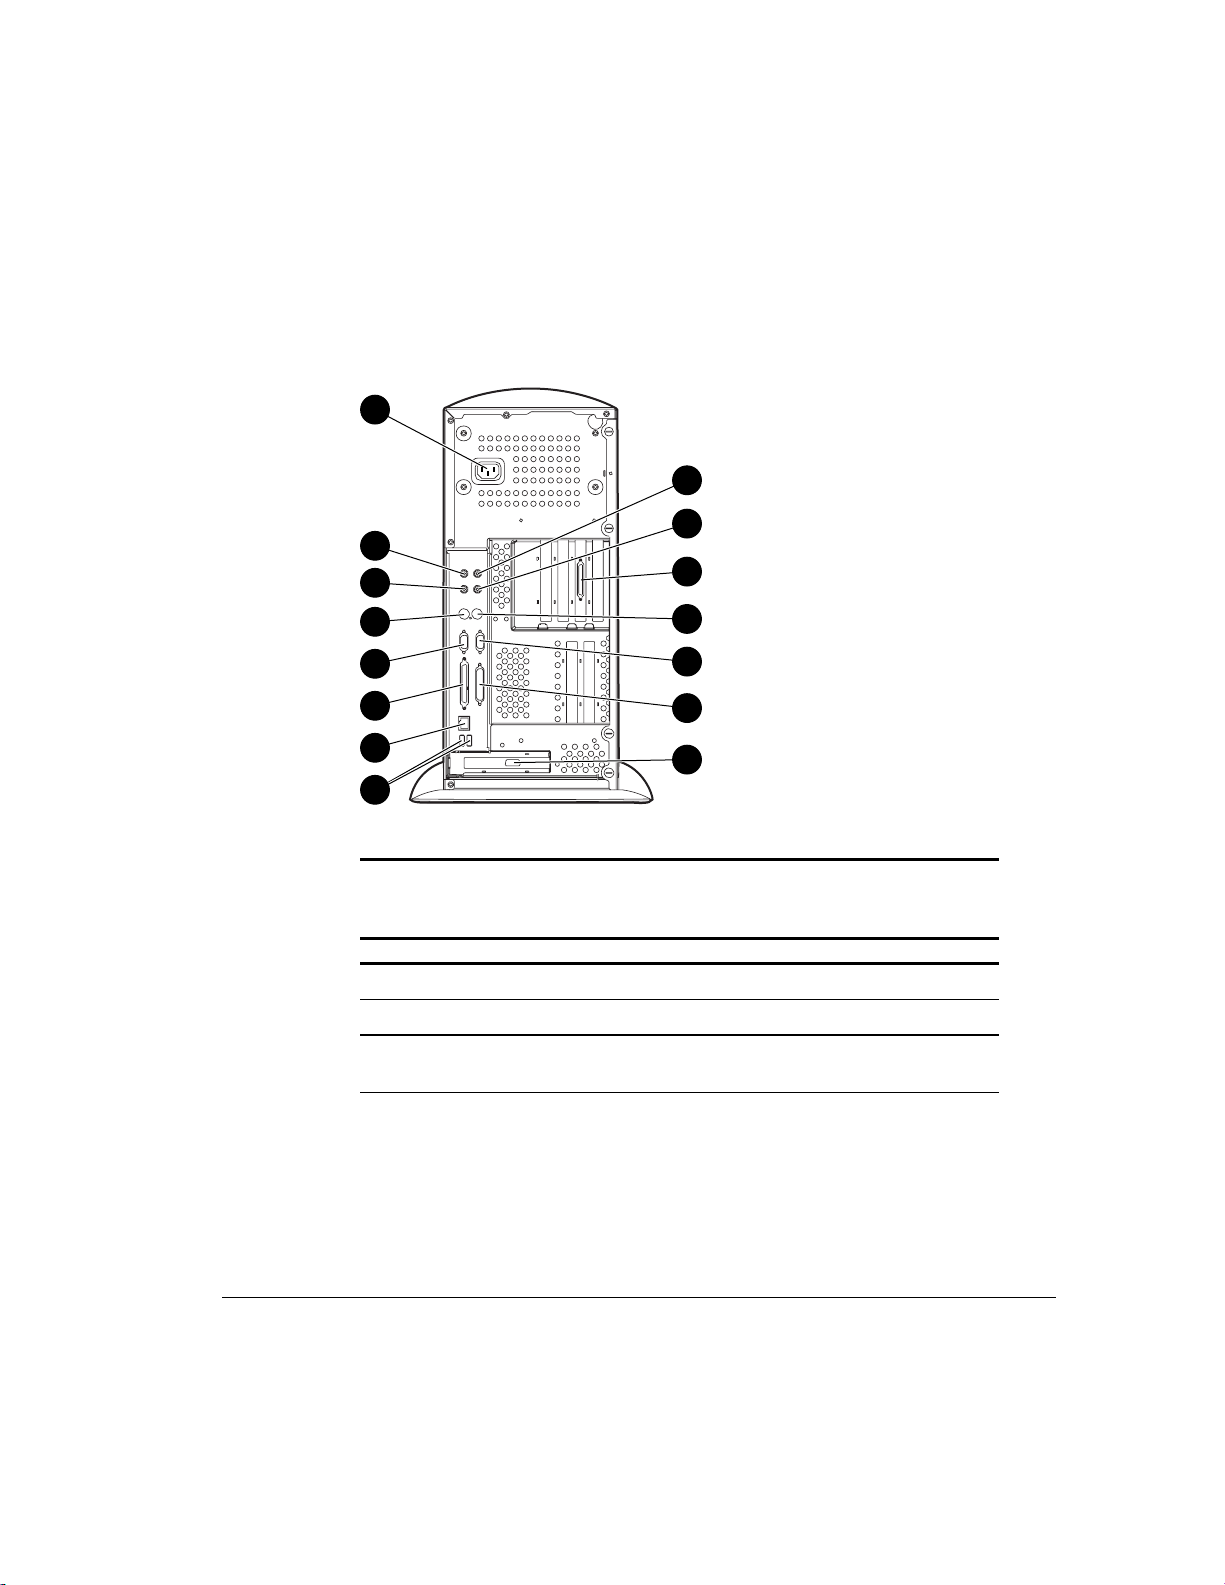
Rear Panel Components
The following figure illustrates the location of the external connectors and
jacks. See Table 1-3 for a description of each component.
1
2
3
4
5
15
6
8
10
12
14
Figure 1-3. Identifying rear panel components
7
9
11
13
Table 1-3
Rear Panel Components
Ref. Component Function
1
Power cord connector Connects the power cord
2
Headphone jack Connects to headphones
3
Audio line-out connector Connects to an external amplifier that powers
additional speakers or a tape deck for recording
Continued
Writer: Jeff Parmenter Project: Compaq Professional Workstation AP500 Reference Guide Comments: 338521-002
File Name: B-CH01.DOC Last Saved On: 2/11/99 8:09 PM
COMPAQ CONFIDENTIAL - NEED TO KNOW REQUIRED
Page 21

1-9
Rear Panel Components
Continued
Ref. Component Function
4
Microphone jack Connects to a microphone
5
Audio line-in connector Connects a device that supplies sound such as a
tape deck or CD player
6
Keyboard connector Connects to a keyboard (orange icon)
7
Mouse connector Connects to a mouse (green icon)
8
Serial connector Connects to a serial device
9
Serial connector Connects to a serial device
:
Wide-Ultra SCSI
Connects to a SCSI device
connector
;
Parallel connector Connects a parallel device such as a printer
<
RJ-45 connector Connects to the Ethernet network
=
VGA (AGP) connector Connects to a monitor
>
USB connectors (2) Connect to USB devices
?
Wide-Ultra2 SCSI Connects to external SCSI devices
Compaq Professional Workstation AP500 Reference Guide
Writer: Jeff Parmenter Project: Compaq Professional Workstation AP500 Reference Guide Comments: 338521-002
File Name: B-CH01.DOC Last Saved On: 2/11/99 8:09 PM
COMPAQ CONFIDENTIAL - NEED TO KNOW REQUIRED
Page 22
1-10
Product Features
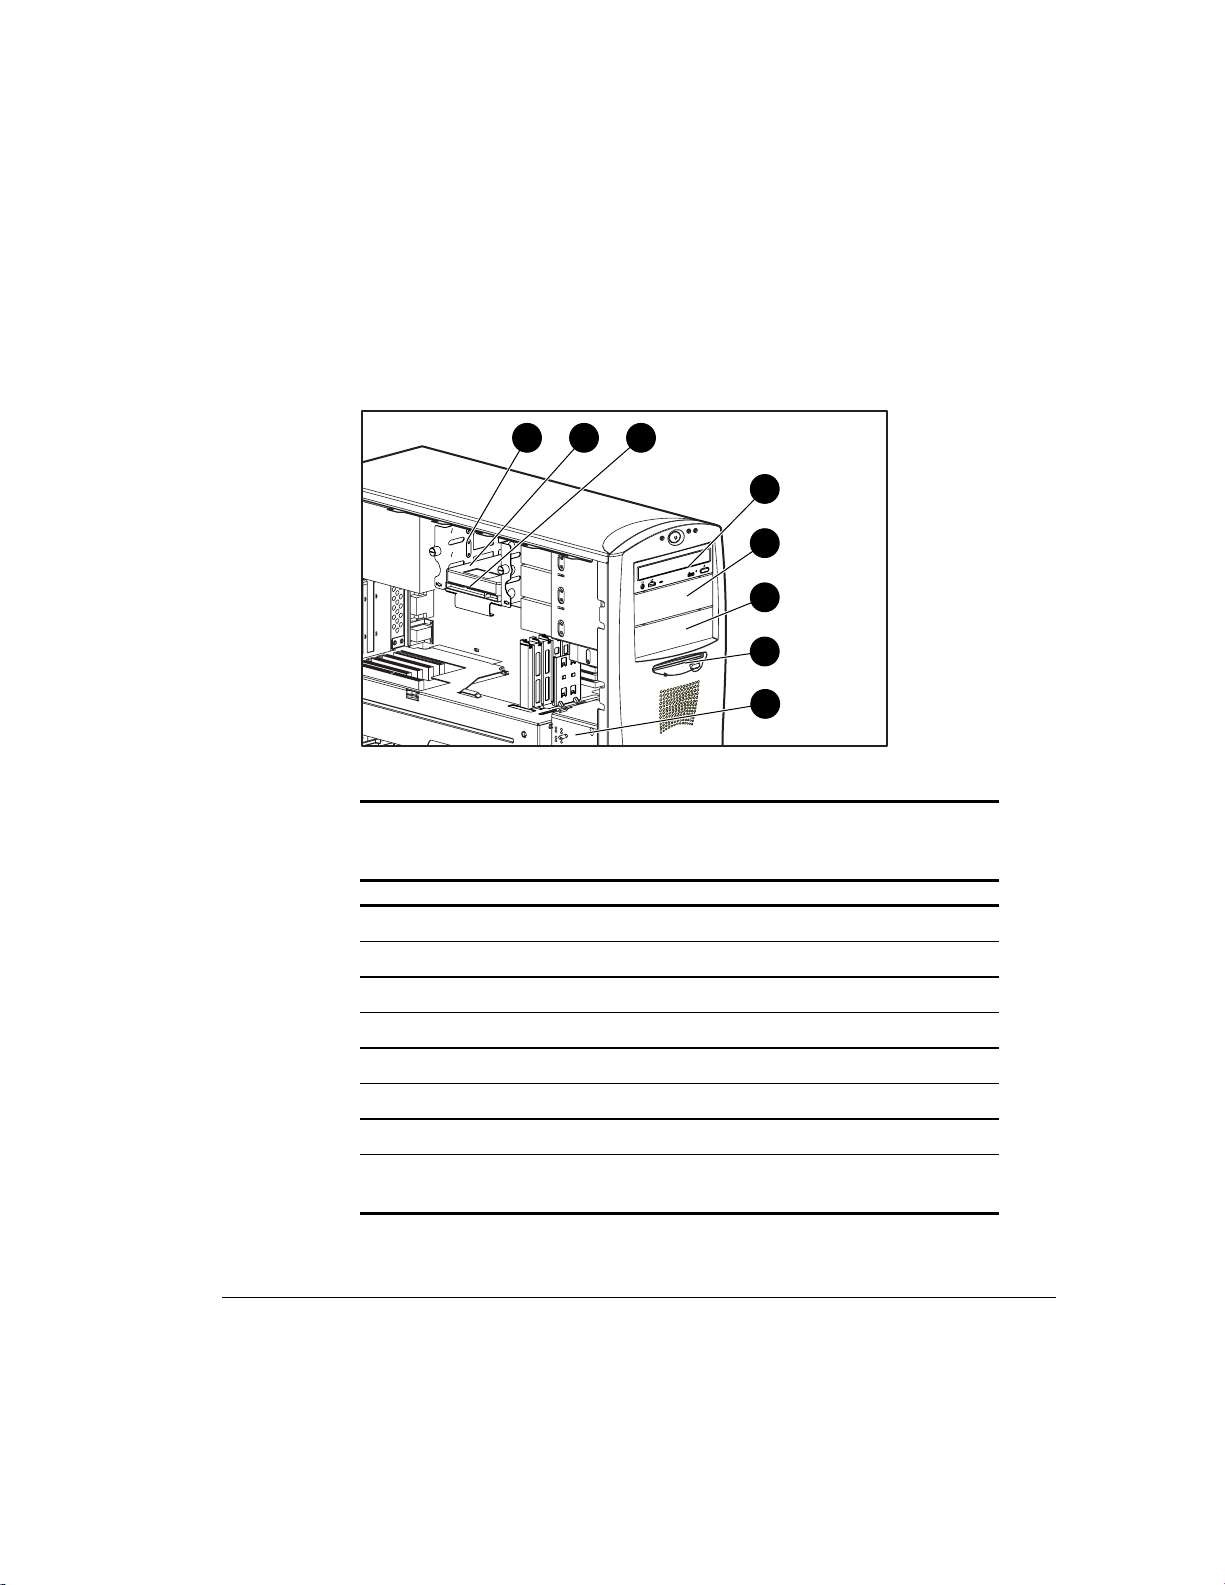
Side View Components
Figure 1-4 identifies the components from the side view of the workstation and
with the side access panel removed. See Table 1-4 for a description of each
component.
Figure 1-4. Identifying components from side view
3 2 1
4
5
COMPACT
6
7
8
Table 1-4
Side View Components
Ref. Component Description
1
2
3
4
5
6
7
8
Bay 1 3.5-inch drive; part of removable hard drive cage.
Bay 2 3.5-inch drive; part of removable hard drive cage.
Bay 3 3.5-inch drive; part of removable hard drive cage.
Bay 4 5.25-inch, half-height drive bay CD-ROM drive
Bay 5 5.25-inch, half-height drive bay
Bay 6 5.25-inch, half-height drive bay
Bay 7 3.5-inch, third-height drive bay, diskette drive
Air plenum (cooling
chamber)
Fan provides cooling for internal components
Writer: Jeff Parmenter Project: Compaq Professional Workstation AP500 Reference Guide Comments: 338521-002
File Name: B-CH01.DOC Last Saved On: 2/11/99 8:09 PM
COMPAQ CONFIDENTIAL - NEED TO KNOW REQUIRED
Page 23
Keyboard and Mouse
The Compaq Professional Workstation AP500 ships with a keyboard and a
three-button mouse.
Special Mouse Functions
Most software applications support the use of a mouse. The functions assigned
to each mouse button depend on the software application you are using.
The Logitech OEM MouseWare software provides special drivers and an applet
that allows you to define the functionality of the mouse buttons. For more
information on installing this software, refer to the Workstation Software
Reference located on the SmartStart for Workstations CD at
X:/DOCS/REFERENC/INDEX.HTM, where X is your CD-ROM drive
designation.
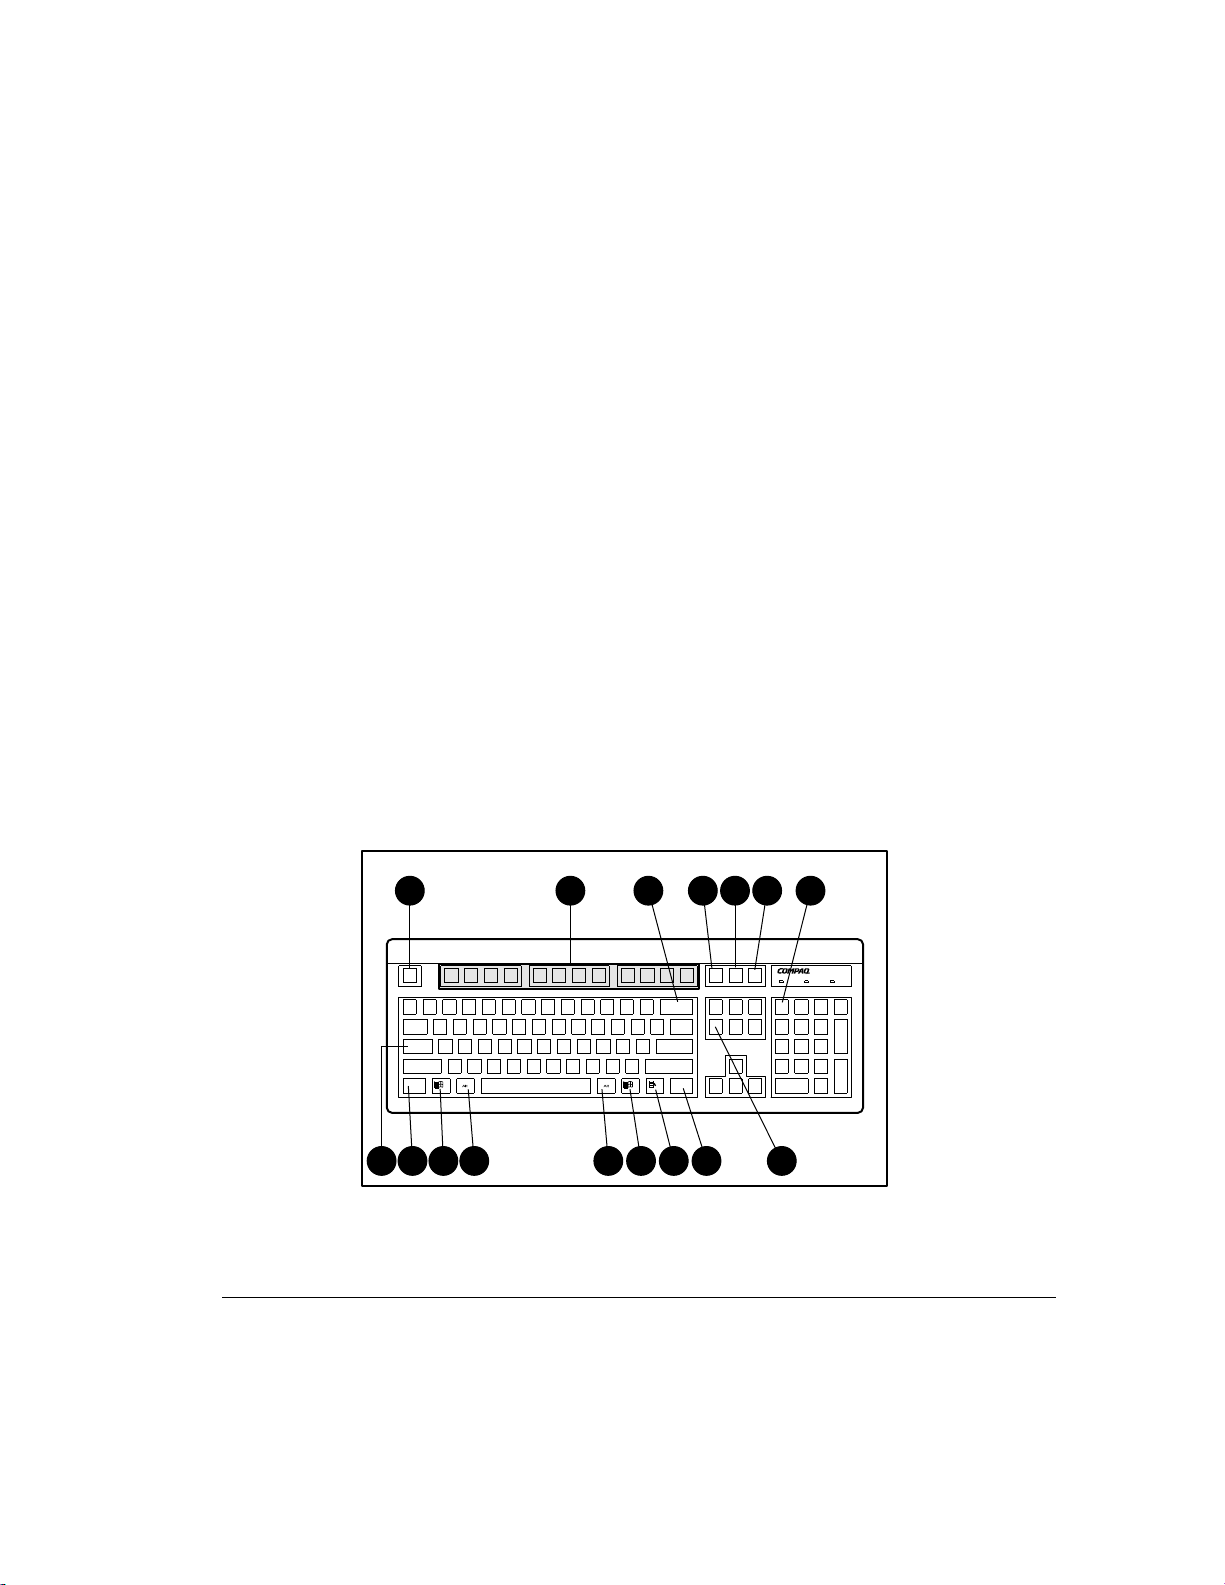
Special Keyboard Functions
Some keys on the keyboard provide special functions, depending on the
software application you are using. The following figure identifies all special
function keys. See Table 1-5 for a description of each key.
1-11
1 2
Figure 1-5. Identifying special function keys
Writer: Jeff Parmenter Project: Compaq Professional Workstation AP500 Reference Guide Comments: 338521-002
File Name: B-CH01.DOC Last Saved On: 2/11/99 8:09 PM
COMPAQ CONFIDENTIAL - NEED TO KNOW REQUIRED
3 4 5 6 7
912101189 1110
Compaq Professional Workstation AP500 Reference Guide
13
Page 24

1-12
Product Features
Table 1-5
Special Function Keys
Ref. Key Function
1
Esc
Often assigned a specific task by the application.
Frequently used as an exit key (for quitting an application),
for moving back one screen, or for canceling a command.
2
3
4
5
6
7
8
9
F1 - F12
Backspace
Print Scrn
Scroll Lock
Pause
Num Lock
Caps Lock
Ctrl
Used for specific effects in applications and operating
systems. Refer to the application software documentation.
Moves the cursor left and deletes characters as it moves to
the left.
Depending on the software you are using, prints the
displayed screen to a printer. Using this key may not print
the entire file.
When the Scroll Lock light is on, the screen is prevented
from scrolling.
Temporarily suspends screen scrolling or some operations.
When the Num Lock light is on, the numeric keypad is
activated and the arrow keys are deactivated. (The arrow
keys to the left of the keypad perform the same functions
as the arrow keys on the keypad.)
When the Caps Lock light is on, all letters typed are
capitalized.
Used in combination with another key, its effect depends
on the application software you are using.
Continued
Writer: Jeff Parmenter Project: Compaq Professional Workstation AP500 Reference Guide Comments: 338521-002
File Name: B-CH01.DOC Last Saved On: 2/11/99 8:09 PM
COMPAQ CONFIDENTIAL - NEED TO KNOW REQUIRED
Page 25

1-13
Special Function Keys
Continued
Ref. Key Function
:
Windows
Logo*
Used to open the Start menu in Windows NT Workstation.
Used in combination with other keys to perform other
functions. (See next table.)
;
Alt
Used in combination with another key, its effect depends
on the application software you are using.
<
Application* Used (like the right mouse button) to open pop-up menus
in a Microsoft Office application. May perform other
functions in other software applications.
=
Delete
Used to delete characters.
*Keys available in select geographic regions.
Compaq Professional Workstation AP500 Reference Guide
Writer: Jeff Parmenter Project: Compaq Professional Workstation AP500 Reference Guide Comments: 338521-002
File Name: B-CH01.DOC Last Saved On: 2/11/99 8:09 PM
COMPAQ CONFIDENTIAL - NEED TO KNOW REQUIRED
Page 26

1-14
Product Features
Windows Logo Key
The following table shows you how to use the Windows Logo key in
combination with other keys to perform certain functions in Windows NT.
Table 1-6
Key Combinations
Windows Logo Key Combination Function in Windows NT
Windows logo key +
F1
Displays a pop-up menu for the selected object.
Windows logo key +
Windows logo key +
Windows logo key +
Windows logo key +
Windows logo key +
Shift+Windows logo key +
Windows logo key +
Tab
E
F
Ctrl+F
M
R
Activates the next Taskbar button.
Launches Explore My Computer.
Launches Find Document.
Launches Find Computer.
Minimizes all open applications.
M
Undoes Minimize All.
Displays Run dialog box.
Writer: Jeff Parmenter Project: Compaq Professional Workstation AP500 Reference Guide Comments: 338521-002
File Name: B-CH01.DOC Last Saved On: 2/11/99 8:09 PM
COMPAQ CONFIDENTIAL - NEED TO KNOW REQUIRED
Page 27

Keyboard Lights
The following figure identifies the location of the three keyboard lights. For a
description of each light, refer to the corresponding table.
Figure 1-6. Keyboard lights
1-15
3
2
1
Table 1-7
Keyboard Lights
Ref. Description Function
1
2
3
Num Lock When Num Lock is enabled (light is on), the
numeric keypad is activated.
Caps Lock When the Caps Lock is enabled (light is on), all
text appears in uppercase when typed.
Scroll Lock When Scroll Lock is enabled (light is on), the
screen is prevented from scrolling.
Compaq Professional Workstation AP500 Reference Guide
Writer: Jeff Parmenter Project: Compaq Professional Workstation AP500 Reference Guide Comments: 338521-002
File Name: B-CH01.DOC Last Saved On: 2/11/99 8:09 PM
COMPAQ CONFIDENTIAL - NEED TO KNOW REQUIRED
Page 28

Chapter 2
Compaq Setup and Diagnostic
Software
Your workstation provides setup and diagnostic utilities that you can use to
configure your workstation’s hardware, resolve resource conflicts, run
diagnostic tests on your workstation, and view information about your
workstation. This software includes Compaq Utilities that are preinstalled on a
hard drive partition and ROM BIOS (Read Only Memory Basic Input/Output
System). This chapter explains how to access the Compaq Utilities menu,
describes the options available in Compaq Utilities, and discusses the ROM
BIOS.
NOTE: If you have reformatted your hard drive and removed the hard drive
partition that contains the Compaq Utilities, you can reinstall the partition by
using the Compaq SmartStart for Workstations CD, or you can download Setup
and User Diagnostics from the Compaq website at www.compaq.com.
NOTE: For information on another Compaq diagnostic tool, Compaq
Diagnostics for Windows NT, see Chapter 3.
2-1
Accessing the Compaq Utilities Menu
To access the Compaq Utilities menu, follow these steps:
1. Turn on or restart the workstation. If Windows NT Workstation is
running, click Start, Shut Down, Restart the computer.
2. When you see the words “F10=Setup” in the bottom-right corner of the
screen, press the F10 key.
NOTE: If you do not press the F10 key while the message is displayed, you
must turn the workstation off, then on again, to access the utility.
3. Press the Enter key to bypass the title and welcome screen. The
Compaq Utilities menu appears.
Compaq Professional Workstation AP500 Reference Guide
Writer: Jeff Parmenter Project: Compaq Professional Workstation AP500 Reference Guide Comments: 338521-002
File Name: C-CH02.DOC Last Saved On: 12/14/98 9:24 AM
COMPAQ CONFIDENTIAL - NEED TO KNOW REQUIRED
Page 29

2-2
Compaq Setup and Diagnostic Software
The Compaq Utilities menu consists of the following choices:
■ Computer Setup
■ Computer Checkup (TEST)
■ View System Information (INSPECT)
■ Create a Diagnostics Diskette
■ Manage Diagnostics Partition
■ Exit from this Utility
These options are described in the following subsections.
Computer Setup
Computer Setup allows you to configure your workstation’s hardware and
resolve resource conflicts. Computer Setup provides information you will need
about your workstation if you need assistance from Compaq Customer Support.
Setup can also be used:
■ To change factory default settings, and to set or change the system
configuration, which may be necessary when you add or remove
hardware.
■ To determine if all of the devices installed on the workstation are
recognized by the system and functioning properly.
■ To determine information about the operating environment of the
workstation.
■ To solve system configuration errors detected but not automatically
fixed during the Power-On Self-Test (POST).
■ To establish and manage passwords and other security features.
■ To establish and manage energy-saving time-outs.
IMPORTANT: Be sure to configure new options and drivers in your
operating system after they have been configured by Computer Setup.
Writer: Jeff Parmenter Project: Compaq Professional Workstation AP500 Reference Guide Comments: 338521-002
File Name: C-CH02.DOC Last Saved On: 12/14/98 9:24 AM
COMPAQ CONFIDENTIAL - NEED TO KNOW REQUIRED
Page 30

Using Computer Setup
To use Computer Setup, select Computer Setup from the Compaq Utilities
menu. The following table describes the features available in Computer Setup.
Table 2-1
Computer Setup Features
Task Computer Setup Selection
View the product name, processor
type/speed/stepping, CPU serial number,
system ROM date, system board revision,
installed memory size, and asset tracking
number.
Click
Built-in Devices,
Information.
then click
System
2-3
Set the system time and date.
Click
Information.
Set the Asset Tag. For more information, see
section “Security Management” in Chapter 3.
Set the POST mode (QuickBoot or FullBoot)
and enable/disable POST messages.
Click
Information.
enter the new
Click
Information.
options under
Messages Descriptive/Clean Mode.
Set I/O delay and bus priority (ISA/PCI). Click
Information.
select the appropriate
View the currently installed drive A:
(preinstalled diskette drive) and drive B:
devices and set resources for diskette drives.
Enable/disable diskette booting and diskette
writing.
After changing the settings for
NOTE:
Removable Media, manually turn the
workstation off, then back on again for the
changes to take effect.
Click
The information is displayed under
Diskette.
Click
Select the appropriate option under
Removable Media.
Built-in Devices,
Click
Date/Time.
Built-in Devices,
Under
System Parameters,
Asset Tag.
Built-in Devices,
Select the appropriate
Quick Boot
Built-in Devices,
Under
System Parameters,
Built-in Devices,
Built-in Devices,
then click
then click
then click
and
POST
then click
I/O Delay.
then click
then click
System
System
System
System
Storage.
Storage.
Continued
Compaq Professional Workstation AP500 Reference Guide
Writer: Jeff Parmenter Project: Compaq Professional Workstation AP500 Reference Guide Comments: 338521-002
File Name: C-CH02.DOC Last Saved On: 12/14/98 9:24 AM
COMPAQ CONFIDENTIAL - NEED TO KNOW REQUIRED
Page 31

2-4
Compaq Setup and Diagnostic Software
Computer Setup Features
Task Computer Setup Selection
View information regarding IDE devices
connected to the system.
ATAPI devices (CD-ROM) are listed
NOTE:
as ATAPI devices.
Enable/disable IDE drive translation. Click
Specify the boot order of installed peripheral
devices (such as diskette drive, hard drive, or
CD-ROM drives).
Enable/disable serial and parallel port and/or
set resources for onboard system devices
(serial port, parallel port, and other system
devices).
Set the printer mode (flexible/standard). Click
Set the Num Lock state at power-on. Click
Continued
Click
Built-in Devices,
The information is displayed under
then click
Storage.
Devices.
Built-in Devices,
Under
IDE Devices,
then click
select
Storage.
IDE Drive
Translation.
Click
Built-in Devices,
Click
Boot Order.
Click
Built-in Devices,
Communications.
options under
then click
then click
Select the appropriate
Storage.
Serial Ports or Parallel
Port.
Built-in Devices,
Communications.
select the appropriate
Built-in Devices,
Under
Devices.
then click
Under
Parallel Port,
Bi-directional Port.
then click
Keyboard,
Input
turn on
Lock State At Power-on.
IDE
Num
Disable energy save mode. Click
Management.
Disabled.
Select time-out values.
These selections appear only when
NOTE:
energy save mode is set (default).
Enable/disable power LED blink in suspend
mode.
This selection does not appear if the
NOTE:
energy saver mode is disabled.
Click
Management.
Monitor,
Click
Management.
Energy Save.
Built-in Devices,
Select
Built-in Devices,
Under
select the
Time-out
Built-in Devices,
Select
then click
Power
Energy Save
then click
Hard Drive
then click
and/or
value
Power
.
Power
Blink LED during
Continued
Writer: Jeff Parmenter Project: Compaq Professional Workstation AP500 Reference Guide Comments: 338521-002
File Name: C-CH02.DOC Last Saved On: 12/14/98 9:24 AM
COMPAQ CONFIDENTIAL - NEED TO KNOW REQUIRED
Page 32

2-5
Computer Setup Features
Task Computer Setup Selection
Enable the Power-on Password. For more
information, see the section “Security
Management” in Chapter 3.
Enable/disable network server mode,
keyboard QuickLock, and QuickLock in
energy saver mode. For more information,
see the section “Security Management” in
Chapter 3.
These selections appear only if a
NOTE:
Power-on Password is set.
Enable the Setup (administrator) Password.
For more information, see the section
“Security Management” in Chapter 3.
View the current settings of Plug and Play
(PnP) devices and set resources for installed
boards.
View the currently installed PCI devices and
view and/or reconfigure settings (IRQ, I/O,
DMA, Memory).
Enable/disable the SCSI controller boot order
for Compaq SCSI options.
Continued
Click
Built-in Devices,
Management.
click
Set.
Click
Built-in Devices,
Management.
select the appropriate options.
Click
Built-in Devices,
Management.
select
Enable Setup Password.
Click
Integrated and Add-in Devices,
click
ISA Boards.
Click
Integrated and Add-in Devices,
click
PCI Boards.
Click
Integrated and Add-in Devices,
click
PCI Boards.
Boot Order,
select
then click
Under
Power-on Password,
then click
Under
Power-on Password,
then click
Under
Setup Password,
Under
SCSI Controller
Enable Boot Order.
Security
Security
Security
then
then
then
Enable/disable PCI bus mastering, PCI VGA
palette snooping, and interrupt sharing.
Restore factory default settings and exit
Computer Setup.
Exit Computer Setup without applying or
saving any changes.
Save changes to the system configuration
and exit Computer Setup.
Writer: Jeff Parmenter Project: Compaq Professional Workstation AP500 Reference Guide Comments: 338521-002
File Name: C-CH02.DOC Last Saved On: 12/14/98 9:24 AM
COMPAQ CONFIDENTIAL - NEED TO KNOW REQUIRED
Click
Integrated and Add-in Devices,
click
PCI Boards.
select the appropriate options.
Select
File,
Under
then select
System Options,
Set Defaults and
then
Exit.
Select
then select
File,
Exit Without
Saving Changes.
Select
then select
File,
Save Changes
and Exit.
Compaq Professional Workstation AP500 Reference Guide
Page 33

2-6
Compaq Setup and Diagnostic Software
Computer Checkup (TEST)
NOTE: Computer Checkup (TEST) will detect Compaq hardware. Devices
from other manufacturers may not be detected.
Use Computer Checkup (TEST) in the following instances:
■ To determine if all the devices installed on the workstation are
recognized by the system and functioning properly. Running TEST is
optional but recommended after installing or connecting a new device.
■ To save, print, or display the information generated by TEST. You
should run TEST and have the printed report available before placing a
call to the Compaq Customer Support Center.
■ To assist your Compaq authorized dealer, reseller, or service provider in
analyzing the system by allowing the service provider to reproduce the
same environment on another workstation for testing.
To run Computer Checkup (TEST):
1. Turn on only the external devices that you want to test. You may want to
leave the printer connected to log error messages.
2. Access the Compaq Utilities menu.
3. From the Compaq Utilities menu, select Computer Checkup (TEST).
4. When the test option menu appears, select the option to view the device
list.
5. Verify that TEST correctly detected the devices installed.
❏ If the list is correct, select OK and go to step 6.
❏ If the list is incorrect, be sure that any new devices are installed
properly. If you do not find an installation problem, call your
Compaq authorized dealer, reseller, or service provider.
Writer: Jeff Parmenter Project: Compaq Professional Workstation AP500 Reference Guide Comments: 338521-002
File Name: C-CH02.DOC Last Saved On: 12/14/98 9:24 AM
COMPAQ CONFIDENTIAL - NEED TO KNOW REQUIRED
Page 34

6. Select one of the following from the test option menu:
❏ Quick Check Diagnostics—This option runs a quick, general test on
each device with a minimal number of prompts. If errors occur, they
are displayed when the testing is complete.
❏ Automatic Diagnostics—This option runs unattended, maximum
testing of each device with minimal prompts. You can choose how
many times to run the tests, to stop on errors, or to print or file a log
of errors.
❏ Prompted Diagnostics—This option allows maximum control over
the device testing process. You can choose attended or unattended
testing, decide to stop on errors, or choose to print or file a log of
errors.
7. Follow the instructions on the screen as the diagnostic tests are run on
the devices. Record any error message numbers and have them available
when you contact your Compaq authorized dealer, reseller, or service
provider for assistance.
8. Exit to the Compaq Utilities menu.
View System Information (INSPECT)
2-7
NOTE: View System Information (INSPECT) will detect Compaq hardware.
Devices from other manufacturers may not be detected.
Use View System Information (INSPECT):
■ To view information about the system once it has been configured.
■ To save, print, or display the information generated by INSPECT. You
should run INSPECT and have the printed report available before
placing a call to the Compaq Customer Support Center.
■ To assist your Compaq authorized dealer, reseller, or service provider in
analyzing the system by allowing the service provider to reproduce the
same environment on another workstation for testing.
Compaq Professional Workstation AP500 Reference Guide
Writer: Jeff Parmenter Project: Compaq Professional Workstation AP500 Reference Guide Comments: 338521-002
File Name: C-CH02.DOC Last Saved On: 12/14/98 9:24 AM
COMPAQ CONFIDENTIAL - NEED TO KNOW REQUIRED
Page 35

2-8
Compaq Setup and Diagnostic Software
The information provided by INSPECT includes:
■ Contents of the operating system startup files
■ Current memory configuration
■ ROM versions
■ Type of processor and coprocessor
■ Diskette, CD-ROM, or hard drives installed
■ Active printer and communications interfaces
■ Modem type installed
■ Graphics settings
NOTE: Categories or items of information displayed by View System
Information (INSPECT) are similar to but may vary slightly from those available
in Compaq Diagnostics for Windows NT.
Create a Diagnostics Diskette
This option allows you to create both Setup or Diagnostics diskettes from the
diagnostics partition. To create these diskettes, follow these steps:
1. Access the Compaq Utilities menu.
2. From the Compaq Utilities menu, select Create a Diagnostics Diskette.
One Diagnostic and two Setup diskettes will be created.
NOTE: The Diagnostics and Setup diskettes can also be created by
downloading the latest version from the Compaq website at
www.compaq.com.
Writer: Jeff Parmenter Project: Compaq Professional Workstation AP500 Reference Guide Comments: 338521-002
File Name: C-CH02.DOC Last Saved On: 12/14/98 9:24 AM
COMPAQ CONFIDENTIAL - NEED TO KNOW REQUIRED
Page 36

Manage a Diagnostics Partition
This option allows you to create, delete, or upgrade the diagnostics software on
the hard drive partition. This must be performed from a diagnostics diskette.
CAUTION: Creating a diagnostics partition involves performing a
low-level format on the hard drive. Normally this is only done to
add diagnostics to a new replacement hard drive. If the
diagnostics software is deleted, you will no longer be able to
access the Compaq Utilities Menu.
CAUTION: If you install an operating system without first
installing the diagnostics partition, you will not be able to install a
diagnostics partition without losing all data on your hard disk.
Exit from This Utility
Use this option to exit the Compaq Utilities menu.
ROM BIOS
2-9
Your workstation contains software called Basic Input/Output System (BIOS),
which is stored in Read Only Memory (ROM) on the system board. The BIOS
contains a set of routines for running Power-On Self-Test (POST) and for
accessing hardware specific information. The ROM is upgradable via the
ROMPaq software utility.
Compaq Professional Workstation AP500 Reference Guide
Writer: Jeff Parmenter Project: Compaq Professional Workstation AP500 Reference Guide Comments: 338521-002
File Name: C-CH02.DOC Last Saved On: 12/14/98 9:24 AM
COMPAQ CONFIDENTIAL - NEED TO KNOW REQUIRED
Page 37

2-10
Compaq Setup and Diagnostic Software
Power-On Self-Test
When you turn on your workstation, the BIOS runs a number of tests, called
Power-On Self-Tests (POST). These tests check and initialize many hardware
components. The basic sequence for POST is:
1. Check and initialize low level hardware.
2. Count memory.
3. Initialize processor (s)
4. Detect and spin up all drives.
5. Boot from, in sequence, either a CD, a diskette, or the hard drive.
See Appendix D, “POST Error Messages,” for a listing of POST error codes
and steps you can take to resolve an error condition.
Runtime Services
After your workstation boots to the operating system, the BIOS still provides
some runtime services to the operating system. For instance, the BIOS provides
information to the operating system on how many processors are installed, how
the system interrupts are configured, and information on the disk drives. BIOS
also provides information about your workstation’s configuration and
maintenance.
Writer: Jeff Parmenter Project: Compaq Professional Workstation AP500 Reference Guide Comments: 338521-002
File Name: C-CH02.DOC Last Saved On: 12/14/98 9:24 AM
COMPAQ CONFIDENTIAL - NEED TO KNOW REQUIRED
Page 38

Upgrading the ROM BIOS
Since the BIOS is stored in ROM on the system board, the upgrade procedure is
different than the upgrade procedure for other software.
New versions of BIOS may be downloaded from the Compaq website at
www.compaq.com. BIOS upgrades are called ROMPaq.
To upgrade your ROM BIOS, execute the ROMPaq software and follow the
directions.
Boot Block ROM
The Boot Block ROM cannot be upgraded.
For more information about Boot Block ROM, see the section “FailSafe Boot
Block ROM” in Chapter 3.
2-11
Compaq Professional Workstation AP500 Reference Guide
Writer: Jeff Parmenter Project: Compaq Professional Workstation AP500 Reference Guide Comments: 338521-002
File Name: C-CH02.DOC Last Saved On: 12/14/98 9:24 AM
COMPAQ CONFIDENTIAL - NEED TO KNOW REQUIRED
Page 39

Chapter 3
Intelligent Manageability
Intelligent Manageability combines innovative hardware technology with
systems management tools from Compaq and other leading vendors to make
Compaq workstations easier to inventory, troubleshoot, protect, and maintain.
Intelligent Manageability features focus on:
■ Asset Management
■ Fault Management
■ Security Management
■ Configuration Management
■ Integration Management
3-1
Compaq Professional Workstation AP500 Reference Guide
Writer: Jeff Parmenter Project: Compaq Professional Workstation AP500 Reference Guide Comments: 338521-002
File Name: D-CH03.DOC Last Saved On: 2/11/99 8:20 PM
COMPAQ CONFIDENTIAL - NEED TO KNOW REQUIRED
Page 40

3-2
Intelligent Manageability
Asset Management
The Compaq Asset Management solution begins with AssetControl, hardware
designed and built into new Compaq workstations, key components, and
monitors. AssetControl features make it easy and inexpensive to maintain an
accurate, up-to-date inventory of these devices. These features:
■ Provide detailed inventory information about various components,
including:
❏ Manufacturer, model, and serial number of Compaq workstations,
❏ Asset Tag
❏ System board and ROM revision level
■ Allow you to view, print, or electronically save inventory information
and other system configuration details, using:
❏ Compaq Diagnostics for Windows NT
❏ Compaq Management Agents for Workstations
❏ System management products from the Compaq Management
monitors, hard drives, and dual inline memory modules (DIMMs)
Solutions Partners
❏ Management software products supporting the Desktop
Management Interface revision 2.0 (DMI 2.0)
■ Simplify and help ensure the accuracy of inventory and accounting
procedures
■ Streamline service calls by giving the administrator fast access to the
Compaq workstation configuration and history
■ Simplify remote software distribution procedures by allowing the
system administrator to identify software and revision levels remotely
Writer: Jeff Parmenter Project: Compaq Professional Workstation AP500 Reference Guide Comments: 338521-002
File Name: D-CH03.DOC Last Saved On: 2/11/99 8:20 PM
COMPAQ CONFIDENTIAL - NEED TO KNOW REQUIRED
Page 41

Compaq Diagnostics for Windows NT
Compaq Diagnostics for Windows NT is a component of Intelligent
Manageability that allows you to view, print, or electronically save the
following:
■ System overview
■ AssetControl information
■ Input devices
■ Communications ports
■ Storage devices
■ Graphics information
■ Memory configuration
■ Security management settings
■ System health
■ Operating system
■ Windows version
3-3
To install Compaq Diagnostics for Windows NT, refer to the Software
Installation Guide.
Compaq Professional Workstation AP500 Reference Guide
Writer: Jeff Parmenter Project: Compaq Professional Workstation AP500 Reference Guide Comments: 338521-002
File Name: D-CH03.DOC Last Saved On: 2/11/99 8:20 PM
COMPAQ CONFIDENTIAL - NEED TO KNOW REQUIRED
Page 42

3-4
Intelligent Manageability
Using Compaq Diagnostics for Windows NT
1. Select the Compaq Diagnostics for Windows NT icon or the Compaq
Diagnostics icon, located in the Control Panel.
The screen displays an overview of the workstation hardware and
software.
2. For specific hardware and software information, select a category from
the Categories menu or from the toolbar.
NOTE: As you move your cursor over the toolbar icons, the corresponding
category names appear near the cursor.
3. To display more detailed information in a selected category, click More
in the Information Level box.
NOTE: Categories or items of information displayed by Compaq Diagnostics
for Windows NT are similar to but may vary slightly from the information
presented in View System Information (INSPECT).
4. Review and print this information and, if necessary, discuss it with your
authorized Compaq reseller or service provider.
NOTE: To print the information, click
, then select
File
. Select one of the
Print
following options: Detailed Report (All Categories), Summary Report (All
Categories), or Current Category. Click
to print the report you selected.
OK
5. To exit Compaq Diagnostics for Windows NT, click File, then click
Exit.
Writer: Jeff Parmenter Project: Compaq Professional Workstation AP500 Reference Guide Comments: 338521-002
File Name: D-CH03.DOC Last Saved On: 2/11/99 8:20 PM
COMPAQ CONFIDENTIAL - NEED TO KNOW REQUIRED
Page 43

Fault Management
Fault Management features combine innovative hardware and software
technology to prevent the loss of critical data and minimize unplanned
downtime.
When a fault occurs, the workstation displays a Local Alert message containing
a description of the fault and any recommended actions. You can then view
current system health by using Compaq Diagnostics for Windows NT. If the
workstation is connected to a network managed by Simple Network
Management Protocol (SNMP)-based management products (e.g., HP
OpenView or IBM Tivoli TME10 NetView), the workstation also sends a fault
notice to the network management application.
SMART III Hard Drive Fault Prediction
SMART III is an extension of SMART II capability. A SMART III hard drive
is able not only to monitor and report on its own health, but to fix problems
before they become failures that result in data losses. The SMART III drive
periodically executes read scans of the entire disk. These read scans take place
during periods of inactivity. During the scan, the disk drive will determine the
“health” of each data sector and move data from any questionable areas of the
disk to known good areas of the disk. To determine the health of the data during
the scan, the drive uses sophisticated methods of Cyclic Redundancy Codes
(CRC) and Error Checking and Correcting (ECC) codes to flag potentially bad
areas of the disk. With today’s multi-gigabyte hard drives, there are areas of the
disk that are not read or written by applications for long periods of time. The
SMART III technology will patrol the entire disk so that when unused or
infrequently used parts of the disk are called upon, the data will be available.
3-5
ECC Fault Prediction and Prefailure Warranty
When the workstation encounters an excessive number of error checking and
correcting (ECC) memory errors, the screen displays a Local Alert message.
This message contains detailed information about the errant memory module,
allowing you to take action before you experience non-correctable memory
errors. The Prefailure Warranty for ECC memory modules allows you to
replace these modules, free of charge, before the modules actually fail.
Compaq Professional Workstation AP500 Reference Guide
Writer: Jeff Parmenter Project: Compaq Professional Workstation AP500 Reference Guide Comments: 338521-002
File Name: D-CH03.DOC Last Saved On: 2/11/99 8:20 PM
COMPAQ CONFIDENTIAL - NEED TO KNOW REQUIRED
Page 44

3-6
Intelligent Manageability
Proactive Backup
Proactive Backup software initiates a tape backup upon receiving notice of an
impending SMART III hard drive failure. Third-party products that provide this
feature include Seagate Backup Exec SMART Client and Cheyenne SMART
Drive Agent.
Surge-Tolerant Power Supply
An integrated surge-tolerant power supply provides greater reliability when the
workstation is hit with an unpredictable power surge. This power supply is
rated to withstand a power surge of up to 2000 volts without incurring any
system downtime or data loss.
Thermal Sensor
The thermal sensor is a hardware and software feature that tracks the internal
temperature of the workstation. This feature displays a warning message when
the normal range is exceeded, which gives you time to take action before
internal components are damaged or data is lost.
Writer: Jeff Parmenter Project: Compaq Professional Workstation AP500 Reference Guide Comments: 338521-002
File Name: D-CH03.DOC Last Saved On: 2/11/99 8:20 PM
COMPAQ CONFIDENTIAL - NEED TO KNOW REQUIRED
Page 45

Security Management
Your workstation includes security features to protect the workstation and data
from unauthorized access. You can view Security Management features and
current settings by using Compaq Diagnostics for Windows NT (locally),
Compaq Management Agents for Workstations, or system management
applications from the Compaq Management Solution Partners.
Feature Purpose
Diskette Drive Boot Control Prevents booting from the diskette drive.
Diskette Drive Write Control Prevents writing to the diskette drive.
3-7
Table 3-1
Security Features
Serial or Parallel Interface
Control
Power-on Password Prevents use of the workstation until the password is
Setup Password Prevents reconfiguration of the workstation (the use of
QuickLock/QuickBlank Disables keyboard and mouse interface. The Power-on
Cable Lock Provision Inhibits access to the interior of the workstation, which
IDE Controller Prevents transfer of data through the IDE interface.
Prevents transfer of data through the integrated serial or
parallel interface.
entered.
the Computer Setup utility) until the password is
entered.
Password must be set to enable QuickLock/QuickBlank
prevents unwanted configuration changes or
component removal.
The following subsections describe how to access these features.
Compaq Professional Workstation AP500 Reference Guide
Writer: Jeff Parmenter Project: Compaq Professional Workstation AP500 Reference Guide Comments: 338521-002
File Name: D-CH03.DOC Last Saved On: 2/11/99 8:20 PM
COMPAQ CONFIDENTIAL - NEED TO KNOW REQUIRED
Page 46

3-8
Intelligent Manageability
Disabling Diskette Boot or Diskette Write
IMPORTANT: If you disable the diskette drive, the FailSafe Boot Block ROM
ignores the disabled component to accommodate a system ROM recovery in
the event a system ROM failure occurs.
To disable the factory settings (that is, to prevent booting from a diskette or
prevent saving to a diskette), follow these steps:
1. Turn on the workstation.
2. When you see the words “F10=Setup” in the bottom-right corner of the
screen, press the F10 key.
NOTE: If you do not press the F10 key while the message is displayed, you
must turn the workstation off, then on again, to access the utility.
3. Press the Enter key to bypass the welcome screens and display the
Compaq Utilities menu.
4. From the Compaq Utilities menu, select Computer Setup, then press the
Enter key.
5. In the Computer Setup window, click Built-in Devices.
6. In the Built-in Devices window, click Storage.
7. Under Removable Media, select the function that you want to disable.
8. Save the configuration and exit the utility.
9. Restart the workstation.
Writer: Jeff Parmenter Project: Compaq Professional Workstation AP500 Reference Guide Comments: 338521-002
File Name: D-CH03.DOC Last Saved On: 2/11/99 8:20 PM
COMPAQ CONFIDENTIAL - NEED TO KNOW REQUIRED
Page 47

Disabling a Serial Port or Parallel Port
To disable either of the serial ports or the parallel port, follow these steps:
1. Turn on the workstation.
2. When you see the words “F10=Setup” in the bottom-right corner of the
screen, press the F10 key.
NOTE: If you do not press the F10 key while the message is displayed, you
must turn the workstation off, then on again, to access the utility.
3. Press the Enter key to bypass the welcome screens and display the
Compaq Utilities menu.
4. From the Compaq Utilities menu, select Computer Setup, then press the
Enter key.
5. In the Computer Setup window, click Built-in Devices.
6. In the Built-in Devices window, click Communications.
7. To disable a Serial Port:
a. Under Available Serial Ports, select the port that you want to
disable.
b. Under Settings, select Disabled.
3-9
8. To disable the Parallel Port, under Settings, select Disabled.
9. Save the configuration and exit the utility.
10. Restart the workstation.
Compaq Professional Workstation AP500 Reference Guide
Writer: Jeff Parmenter Project: Compaq Professional Workstation AP500 Reference Guide Comments: 338521-002
File Name: D-CH03.DOC Last Saved On: 2/11/99 8:20 PM
COMPAQ CONFIDENTIAL - NEED TO KNOW REQUIRED
Page 48

3-10
Intelligent Manageability
Password Security
The workstation supports security password features, which can be established
through the Compaq Computer Setup menu.
Establishing a Setup Password Using
Computer Setup
Establishing a Setup Password through Computer Setup prevents
reconfiguration of the workstation (use of the Computer Setup utility) until the
password is entered.
1. Turn on or restart the workstation.
2. When you see the words “F10=Setup” in the bottom-right corner of the
3. Press the Enter key to bypass the welcome screens and display the
4. From the Compaq Utilities menu, select Computer Setup, then press the
screen, press the F10 key.
NOTE: If you do not press the F10 key while the message is displayed, you
must turn the workstation off, then on again, to access the utility.
Compaq Utilities menu.
Enter key.
5. In the Computer Setup window, click Built-in Devices.
6. In the Built-in Devices window, click Security Management.
7. Under Setup Password, select Enable Setup Password and follow the
instructions on the screen.
8. Save the configuration and exit the utility.
9. Turn off the workstation, then turn it on to establish the password.
Writer: Jeff Parmenter Project: Compaq Professional Workstation AP500 Reference Guide Comments: 338521-002
File Name: D-CH03.DOC Last Saved On: 2/11/99 8:20 PM
COMPAQ CONFIDENTIAL - NEED TO KNOW REQUIRED
Page 49

Establishing a Power-on Password Using
Computer Setup
Establishing a Power-on Password through Computer Setup prevents access to
the workstation when power is turned on, unless the password is entered. The
password must be entered each time the workstation is turned on, when the key
icon (
1. Turn on or restart the workstation.
2. When you see the words “F10=Setup” in the bottom-right corner of the
3. Press the Enter key to bypass the welcome screens and display the
4. From the Compaq Utilities menu, select Computer Setup, then press the
5. In the Computer Setup window, click Built-in Devices.
6. In the Built-in Devices window, click Security Management.
) appears on the monitor.
screen, press the F10 key.
NOTE: If you do not press the F10 key while the message is displayed, you
must turn the workstation off, then on again, to access the utility.
Compaq Utilities menu.
Enter key.
3-11
7. Under Power-on Password, click Set and follow the instructions on the
screen.
8. Save the configuration and exit the utility.
9. Turn off the workstation, then turn it on to establish the password.
Entering a Power-on Password
To enter a Power-on Password, complete the following steps:
1. Turn on or restart the workstation.
2. When the key icon (
password.
NOTE: Type carefully; for security reasons, the characters you type do not
appear on the screen.
) appears on the monitor, enter your current
Compaq Professional Workstation AP500 Reference Guide
Writer: Jeff Parmenter Project: Compaq Professional Workstation AP500 Reference Guide Comments: 338521-002
File Name: D-CH03.DOC Last Saved On: 2/11/99 8:20 PM
COMPAQ CONFIDENTIAL - NEED TO KNOW REQUIRED
Page 50

3-12
Intelligent Manageability
If you enter the password incorrectly, a broken key icon ( ) appears. Try
again. After three unsuccessful tries, you must turn off the workstation, then
turn it on again before you can continue.
Changing a Power-on or Setup Password
1. Turn on or restart the workstation. To change the Setup Password, run
Computer Setup.
2. When the key icon (
) appears, type your current password, a slash (/)
or alternate delimiter character, your new password, another slash (/) or
alternate delimiter character, and your new password again as shown:
current password/new password/new password
NOTE: Type carefully; for security reasons, the characters you type do not
appear on the screen. See the section “National Keyboard Delimiter
Characters” in this chapter for information about the alternate delimiter
characters.
The new password takes effect the next time you turn on the workstation.
Deleting a Power-on or Setup Password
1. Turn on or restart the workstation. To delete the Setup Password, run
Computer Setup.
2. When the key icon (
by a slash (/) or alternate delimiter character as shown:
current password/
NOTE: See the “National Keyboard Delimiter Characters” section in this
chapter for information about alternate delimiter characters.
) appears, type your current password followed
Writer: Jeff Parmenter Project: Compaq Professional Workstation AP500 Reference Guide Comments: 338521-002
File Name: D-CH03.DOC Last Saved On: 2/11/99 8:20 PM
COMPAQ CONFIDENTIAL - NEED TO KNOW REQUIRED
Page 51

Clearing a Power-on and Setup
Password
To disable the Power-on and Setup Password features, or to clear the Power-on
and Setup Passwords if you forget them and cannot access the workstation
system or Computer Setup, follow these steps:
1. Turn off the workstation. Disconnect the power cord from the grounded
AC outlet and from the power connector on the rear of the workstation.
2. Remove the following components:
❏ side access panel
❏ expansion board assembly
3. On SW1, move switch 1 to the ON position.
SW1
3-13
on
1 2 3 4 5 6
Figure 3-1. Locating the default SW1 switch
IMPORTANT: Switch 1 has a default setting of OFF. When the switch is
OFF, your system is password-protected. To re-enable password protection,
you MUST return the switch to its
position later in this procedure.
default
Compaq Professional Workstation AP500 Reference Guide
Writer: Jeff Parmenter Project: Compaq Professional Workstation AP500 Reference Guide Comments: 338521-002
File Name: D-CH03.DOC Last Saved On: 2/11/99 8:20 PM
COMPAQ CONFIDENTIAL - NEED TO KNOW REQUIRED
Page 52

3-14
Intelligent Manageability
4. Reassemble the workstation and reconnect the power cord to the electrical
wall outlet and to the power connector on the rear of the workstation.
5. Turn on the workstation.
IMPORTANT: Clearing the Power-on Password will also clear the Setup
Password. Be sure to reestablish your Setup Password after clearing the
Power-on Password.
6. Turn off the workstation once more. Disconnect the power cord from the
grounded AC outlet and from the power connector on the rear of the
workstation.
7. Remove the side access panel and the expansion board assembly to
access SW1 on the system board.
8. Return switch 1 to its original default (OFF) position.
9. Establish a new Power-on Password, if desired.
10. Reassemble and restart the workstation.
Writer: Jeff Parmenter Project: Compaq Professional Workstation AP500 Reference Guide Comments: 338521-002
File Name: D-CH03.DOC Last Saved On: 2/11/99 8:20 PM
COMPAQ CONFIDENTIAL - NEED TO KNOW REQUIRED
Page 53

National Keyboard Delimiter Characters
Each keyboard is designed to meet country-specific requirements. The syntax
and keys that you use for changing or deleting your password depend on the
keyboard that came with your workstation.
Table 3-2
National Keyboard Delimiter Characters
3-15
Arabic
Belgian
BHCSY*
Brazilian
Chinese
Czech
Danish
French
French Canadian
German
* For Bosnia-Herzegovina, Croatia, Slovenia, and Yugoslavia
/
=
-
/
/
-
-
!
é
-
Greek
Hebrew
Hungarian
Italian
Japanese
Korean
Latin American
Norwegian
Polish
Portuguese
-
.
-
-
/
/
-
-
-
-
Russian
Slovakian
Spanish
Swedish/Finnish
Swiss
Taiwanese
Thai
Turkish
U.K. English
U.S. English
/
-
-
/
-
/
/
.
/
/
Compaq Professional Workstation AP500 Reference Guide
Writer: Jeff Parmenter Project: Compaq Professional Workstation AP500 Reference Guide Comments: 338521-002
File Name: D-CH03.DOC Last Saved On: 2/11/99 8:20 PM
COMPAQ CONFIDENTIAL - NEED TO KNOW REQUIRED
Page 54

3-16
Intelligent Manageability
QuickLock/QuickBlank
QuickLock/QuickBlank disables the keyboard and mouse interface, and can
blank the screen, without exiting open applications.
Enabling QuickLock and QuickBlank
1. Turn on or restart the workstation.
2. When you see the words “F10=Setup” in the bottom-right corner of the
screen, press the F10 key.
NOTE: If you do not press the F10 key while the message is displayed, you
must turn the workstation off, then on again, to access the utility.
3. Press the Enter key to bypass the welcome screens and display the
Compaq Utilities menu.
4. From the Compaq Utilities menu, select Computer Setup, then press the
Enter key.
IMPORTANT: You must set a Power-on Password before you can enable
QuickLock or QuickBlank. For more information, see the section
“Establishing a Power-on Password Using Computer Setup” in this chapter.
5. In the Computer Setup window, click Built-in Devices.
6. In the Built-in Devices window, click Security Management.
7. Under Power-on Password, select Enable QuickLock of the Keyboard,
then select QuickBlank the screen when locked and/or Initiate
QuickLock when entering Energy Saver mode.
NOTE: In order to use
Initiate QuickLock when entering Energy Saver mode,
the Power Management option must be enabled.
8. Save the configuration and exit the utility.
9. Restart the workstation.
For more information about the various screen and configuration options, see
Chapter 2.
Writer: Jeff Parmenter Project: Compaq Professional Workstation AP500 Reference Guide Comments: 338521-002
File Name: D-CH03.DOC Last Saved On: 2/11/99 8:20 PM
COMPAQ CONFIDENTIAL - NEED TO KNOW REQUIRED
Page 55

Disabling the Keyboard and Mouse Interface
Enter the QuickLock key combination (Ctrl+Alt+L) to disable the keyboard
and mouse (or other input device connected to the mouse connector). The
applications you are running cannot be accessed, but remain in view unless the
QuickBlank feature is also enabled through the Computer Setup utility
Enabling the Keyboard and Mouse Interface
To enable the keyboard and input device connected to the mouse connector,
enter the Power-on Password.
NOTE: For security reasons, the characters you type do not appear on the
screen. The application will not be affected by the characters typed.
3-17
Compaq Professional Workstation AP500 Reference Guide
Writer: Jeff Parmenter Project: Compaq Professional Workstation AP500 Reference Guide Comments: 338521-002
File Name: D-CH03.DOC Last Saved On: 2/11/99 8:20 PM
COMPAQ CONFIDENTIAL - NEED TO KNOW REQUIRED
Page 56

3-18
Intelligent Manageability
Cable Lock Provision
The cable lock provision consists of a two-piece security bracket. The bottom
part of the bracket is attached to the workstation with a screw; the top part of
the bracket covers the screw and prevents its removal.
To install the security bracket:
1. Separate bracket A and bracket B by bending the metal back and forth
NOTE: The security bracket can be used with a padlock to inhibit access to
the interior of the workstation, which prevents unwanted configuration
changes or component removal. For increased security, a cable lock can be
installed to secure the workstation to a fixed object.
where the two pieces join.
B
A
Figure 3-2. Separating the security brackets
2. Insert the tab on bracket A into the notch on the rear of the workstation
until the bracket is positioned flat against the side access panel.
3. Align the hole on the flat portion of bracket A with the screw hole on the
side access panel.
Writer: Jeff Parmenter Project: Compaq Professional Workstation AP500 Reference Guide Comments: 338521-002
File Name: D-CH03.DOC Last Saved On: 2/11/99 8:20 PM
COMPAQ CONFIDENTIAL - NEED TO KNOW REQUIRED
Page 57

4. Install the retaining screw provided in the cable lock kit.
A
Figure 3-3. Installing bracket A
5. Place bracket B over bracket A to cover the retaining screw.
6. Install a padlock (not provided) through bracket A to inhibit access to
the interior of the workstation. Or, to inhibit access to the interior of the
workstation and secure the workstation to a fixed object, install a cable
lock (not shown).
3-19
A
B
Figure 3-4. Securing the workstation with a padlock
Compaq Professional Workstation AP500 Reference Guide
Writer: Jeff Parmenter Project: Compaq Professional Workstation AP500 Reference Guide Comments: 338521-002
File Name: D-CH03.DOC Last Saved On: 2/11/99 8:20 PM
COMPAQ CONFIDENTIAL - NEED TO KNOW REQUIRED
Page 58

3-20
Intelligent Manageability
Configuration Management
Configuration Management features include:
■ Upgrading the ROM:
❏ Local ROM flash
❏ Remote ROM Flash
■ FailSafe Boot Block ROM
■ Remote Security Management
■ Remote Wakeup and Remote Shutdown
■ Remote System Installation
■ Power Management
■ Advanced Configuration and Power Interface (ACPI)-ready hardware
■ Compaq Support Software CD Kit and support from the Compaq
website
NOTE: Your workstation must be connected to a network to take advantage
of all Configuration Management features. Use of some features also requires
an established Setup Password.
Writer: Jeff Parmenter Project: Compaq Professional Workstation AP500 Reference Guide Comments: 338521-002
File Name: D-CH03.DOC Last Saved On: 2/11/99 8:20 PM
COMPAQ CONFIDENTIAL - NEED TO KNOW REQUIRED
Page 59

Upgrading the ROM
Your workstation comes with reprogrammable flash ROM (read only memory).
By establishing a Setup Password in Security Management, you can protect the
ROM from being unintentionally updated or overwritten. This is important to
ensure workstation operating integrity. Should you need or want to upgrade
your ROM, you may:
■ Order an upgraded user ROMPaq diskette from Compaq.
■ Order the Compaq Support Software CD Kit.
■ Download the latest ROMPaq images from the Compaq website
www.compaq.com.
Local ROM Upgrade
To upgrade the ROM after you receive or download a user ROMPaq diskette,
follow these steps:
3-21
CAUTION: For maximum ROM protection, be sure to establish a
Setup Password. The Setup Password prevents unauthorized
ROM upgrades.
1. Insert the user ROMPaq diskette in the diskette drive and boot the
workstation.
2. Enter the Setup Password, if prompted.
NOTE: If the Setup Password is entered correctly, the ROMPaq utility will
take over and run the ROM upgrade. If the Setup Password is incorrectly
entered, the procedure will terminate and no changes will be made to the
ROM.
3. When the utility finishes upgrading the ROM, remove the diskette from
the diskette drive and restart your workstation.
IMPORTANT: Do not turn off the power to your workstation until the ROMPaq
utility has completed the upgrade process.
Compaq Professional Workstation AP500 Reference Guide
Writer: Jeff Parmenter Project: Compaq Professional Workstation AP500 Reference Guide Comments: 338521-002
File Name: D-CH03.DOC Last Saved On: 2/11/99 8:20 PM
COMPAQ CONFIDENTIAL - NEED TO KNOW REQUIRED
Page 60

3-22
Intelligent Manageability
Remote ROM Flash
Remote ROM Flash allows the system administrator to safely upgrade the
ROM on remote Compaq workstations, directly from the centralized network
management console. Enabling the system administrator to perform this task
remotely, on multiple workstations, results in a consistent deployment of and
greater control over workstation ROM images over the network. It also results
in greater productivity and lower total cost of ownership.
Compaq created the Remote ROM Flash capability to be secure and fail-safe.
All workstation ROMPaq ROM images from Compaq are digitally signed to
ensure authenticity and minimize potential corruption. The ROM firmware
includes a Boot Block that is protected during the flash process and allows the
workstation to be restarted, in the unlikely event of an unsuccessful ROM flash.
Remote ROM Flash is performed in two stages:
1. The system administrator uses the Remote Management Setup software
on a centralized management console to prepare a workstation ROMPaq
file.
2. The system administrator uses a PC LAN management product, such as
Microsoft SMS, Intel LANDesk Manager, or Symantec Norton
Administrator for Networks, to distribute and execute the file over the
network to remote workstations.
NOTE: Your workstation must be powered on, or turned on through Remote
Wakeup, to take advantage of Remote ROM Flash. Use of Remote ROM Flash
also requires an established Setup Password.
For more information on enabling Remote ROM Flash, refer to the online
Remote Management Administrators Guide. The Remote Management
Administrators Guide is included with the Remote Management Administration
Tools, and is available in the Support Software CD Kit or at the Compaq
website at www.compaq.com.
Writer: Jeff Parmenter Project: Compaq Professional Workstation AP500 Reference Guide Comments: 338521-002
File Name: D-CH03.DOC Last Saved On: 2/11/99 8:20 PM
COMPAQ CONFIDENTIAL - NEED TO KNOW REQUIRED
Page 61

FailSafe Boot Block ROM
The FailSafe Boot Block ROM allows for system recovery in the unlikely event
of a ROM flash failure, for example, if a power failure occurs during a ROM
upgrade. The Boot Block is a flash-protected section of the ROM that checks to
validate the system ROM each time power to the system is turned on.
■ If the system ROM is valid, the system starts normally.
■ If the system ROM fails the validation check, the FailSafe Boot Block
ROM provides enough support to start the system from a user ROMPaq
diskette, which will program the system ROM with a valid image.
IMPORTANT: The workstation ships with the diskette drive enabled. If the
diskette drive is disabled, the FailSafe Boot Block ROM will override the
disabled component to accommodate a system ROM recovery in the event a
system ROM failure occurs.
Because there is no video or hard drive support from the Boot Block ROM, the
keyboard lights communicate information. When the Boot Block detects an
invalid system ROM, the system sounds a series of beeps (one long and three
short) and flashes the three keyboard lights.
3-23
To recover the system after hearing the FailSafe Boot Block beeps, complete
the following steps:
1. Remove any diskettes from the diskette drive and turn off the power.
2. Insert a user ROMPaq diskette into the diskette drive.
3. Turn on power to the system.
If a Setup Password has been established, the Caps Lock light will
turn on.
4. Enter the Setup Password.
If the system successfully starts from the diskette and successfully reprograms
the ROM, then the three keyboard lights will turn on. A “rising tone” series of
beeps also signals successful completion.
Compaq Professional Workstation AP500 Reference Guide
Writer: Jeff Parmenter Project: Compaq Professional Workstation AP500 Reference Guide Comments: 338521-002
File Name: D-CH03.DOC Last Saved On: 2/11/99 8:20 PM
COMPAQ CONFIDENTIAL - NEED TO KNOW REQUIRED
Page 62

3-24
Intelligent Manageability
The following table lists the keyboard light combinations, as well as the
meaning and action associated with each combination.
Table 3-3
Keyboard Light Combinations
Num Lock
➊
OFF ON OFF System requires Setup Password.
ON OFF OFF System could not start from diskette because the
OFF OFF ON ROM upgrade failed.
ON ON ON ROM upgrade successfully completed.
Caps
Lock
Scroll
➋
Lock
➌
Enter the Setup Password. The light remains
turned on until you enter a valid Setup Password.
user ROMPaq diskette is not present, is bad, or
the drive is not ready.
Insert a valid user ROMPaq diskette, turn the
power off, then turn the power on.
Try another user ROMPaq diskette. If the light
remains on, contact Compaq customer support.
Turn power off and back on to resume normal
system operation.
Meaning and Required Action
Writer: Jeff Parmenter Project: Compaq Professional Workstation AP500 Reference Guide Comments: 338521-002
File Name: D-CH03.DOC Last Saved On: 2/11/99 8:20 PM
COMPAQ CONFIDENTIAL - NEED TO KNOW REQUIRED
Page 63

Figure 3-5. Keyboard lights
Remote Security Management
Remote Security Management allows the system administrator to safely set or
modify security features on remote Compaq workstations, directly from the
centralized network management console. Enabling the system administrator to
perform these tasks remotely, on multiple workstations, results in consistent
deployment of and greater control over workstation security parameters over
the network. It also results in greater productivity and lower total cost of
ownership.
NOTE: Your workstation must be powered on, or turned on through Remote
Wakeup, to take advantage of Remote Security Management. Use of Remote
Security Management also requires an established Setup Password.
3-25
3
2
1
Remote Security Management is performed in two stages:
1. The system administrator uses the Remote Management Setup software
on a centralized management console to define the security parameters.
2. The system administrator uses a PC LAN management product to
distribute the settings over the network to remote Compaq workstations.
For more information about the Remote Management Setup software and
enabling Remote Security Management, refer to the online Remote
Management Administrators Guide. The Remote Management Administrators
Guide is included with the Remote Management Administration Tools, and is
available in the Support Software CD Kit or at the Compaq website
www.compaq.com.
Compaq Professional Workstation AP500 Reference Guide
Writer: Jeff Parmenter Project: Compaq Professional Workstation AP500 Reference Guide Comments: 338521-002
File Name: D-CH03.DOC Last Saved On: 2/11/99 8:20 PM
COMPAQ CONFIDENTIAL - NEED TO KNOW REQUIRED
Page 64

3-26
Intelligent Manageability
Remote Wakeup and Remote Shutdown
Your workstation has a network controller installed that supports the Compaq
Remote Wakeup and Remote Shutdown functions. These functions allow a
system administrator to power on and power off a client workstation from a
remote location, supported by PC LAN management tools.
NOTE: Third-party software tools are required to remotely distribute
software.
Remote Wakeup allows the network interface controller to continue
functioning, even when power to the workstation has been turned off.
NOTE: The workstation continues to consume a small amount of electricity
even after you turn it off. Only when you disconnect the power cord from the
electrical outlet does the workstation stop consuming electricity.
For more information on using Remote Wakeup and Remote Shutdown, refer to
the online Remote Management Administrators Guide. The Remote
Management Administrators Guide is included with the Remote Management
Administration Tools, and is available in the Support Software CD Kit or at the
Compaq website www.compaq.com.
Writer: Jeff Parmenter Project: Compaq Professional Workstation AP500 Reference Guide Comments: 338521-002
File Name: D-CH03.DOC Last Saved On: 2/11/99 8:20 PM
COMPAQ CONFIDENTIAL - NEED TO KNOW REQUIRED
Page 65

Power Management
The power management feature shuts down certain components of the
workstation when they are not in use, saving energy without having to shut
down the workstation. To enable, customize, or disable standby time-outs,
follow these steps:
1. Turn on the workstation.
2. When you see the words “F10=Setup” in the bottom-right corner of the
screen, press the F10 key.
NOTE: If you do not press the F10 key while the message is displayed, you
must turn the workstation off, then on again, to access the utility.
3. Press the Enter key to bypass the welcome screens and display the
Compaq Utilities menu.
4. From the Compaq Utilities menu, select Computer Setup, then press the
Enter key.
5. In the Computer Setup window, click Built-in Devices.
6. In the Built-in Devices window, click Power Management.
3-27
7. Under Hard Drive and/or Monitor, select the Time-out value.
8. Save the configuration and exit the utility.
NOTE: When using a power-managed system, disable monitor time-outs in
Computer Setup first, then establish the settings in the operating system, to
avoid potential conflicts. Use Display Properties to establish, modify, or disable
Power Management settings for the monitor. To access Display Properties,
right-click on the Windows Desktop, then select
Compaq Professional Workstation AP500 Reference Guide
Properties
.
Writer: Jeff Parmenter Project: Compaq Professional Workstation AP500 Reference Guide Comments: 338521-002
File Name: D-CH03.DOC Last Saved On: 2/11/99 8:20 PM
COMPAQ CONFIDENTIAL - NEED TO KNOW REQUIRED
Page 66

3-28
Intelligent Manageability
Advanced Configuration and Power Interfaces (ACPI)-Ready Hardware
ACPI defines a hardware interface that allows a standard way to integrate
power management features throughout the workstation system, including
hardware, operating system, and application software. This enables the
workstation to automatically turn on and off peripherals such as CD-ROMs,
network cards, hard drives, and printers. With the ACPI technology, peripherals
will also be able to activate the workstation. For example, the simple act of
inserting a CD-ROM will turn on the workstation and activate a monitor.
Since the workstation ships standard with the ACPI hardware, you will be able
to utilize ACPI features once future ACPI-enabled Microsoft operating systems
become available. When the new Microsoft operating systems are released, you
will need to upgrade the ROM BIOS, driver, and operating system in order to
take advantage of the ACPI features.
Writer: Jeff Parmenter Project: Compaq Professional Workstation AP500 Reference Guide Comments: 338521-002
File Name: D-CH03.DOC Last Saved On: 2/11/99 8:20 PM
COMPAQ CONFIDENTIAL - NEED TO KNOW REQUIRED
Page 67

Compaq Support Software CD Kit and
Support from the Compaq Website
Compaq has made the task of locating, accessing, evaluating, and installing the
latest support software easier. There are two methods you can use to access
support software:
■ You can order the Compaq Support Software CD Kit. This set of
compact discs contains the latest device drivers, utilities, and ROM
images needed to run your Compaq workstation.
■ You can download the drivers and utilities from the Compaq website
www.compaq.com.
3-29
NOTE: Both the
The Locator
with
Compaq Support Software CD Kit
Decision Support,
a comprehensive listing of the device
and the website include
drivers, utilities, flashable ROM images, and more, categorized by operating
system, computer family, and model for easy retrieval.
Decision Support
provides detailed information for each piece of support software, including
descriptions, features, enhancements, dependencies, and critical updates.
If you choose to purchase the Compaq Support Software CD Kit, you have two
options:
■ You can purchase a single CD that gives you one-time access to the
latest support software.
■ You can purchase a yearly subscription that delivers up to
12 monthly CDs.
The annual subscription ensures your continuous access to the latest
developments.
NOTE: If you call Compaq to place an order, be sure to have the serial
number of your workstation available. The serial number is located on the topleft side of the workstation above the side access panel. This number is
necessary for all purchases.
Compaq Professional Workstation AP500 Reference Guide
Writer: Jeff Parmenter Project: Compaq Professional Workstation AP500 Reference Guide Comments: 338521-002
File Name: D-CH03.DOC Last Saved On: 2/11/99 8:20 PM
COMPAQ CONFIDENTIAL - NEED TO KNOW REQUIRED
Page 68

3-30
Intelligent Manageability
Integration Management
Integration Management features include:
■ Desktop Management Interface
■ Compaq Management Agents for Workstations
■ Compaq Management Solutions Partners Program
Desktop Management Interface
The Desktop Management Task Force (DMTF) is an industry body created in
1992 with the goal of standardizing systems manageability. DMTF established
the Desktop Management Interface (DMI) framework to standardize access to
PC configuration data. Compaq, as a Steering Committee and Technical
Committee member of the DMTF, delivers hardware and software
instrumentation that supports the DMI standard.
Compaq Management Agents for Workstations
Using the industry-standard Simple Network Management Protocol (SNMP)
found in Microsoft Windows NT, Compaq Management Agents for
Workstations allows the system administrator to remotely view AssetControl
data, configuration data, memory change alerts, NIC performance data, and
contact information.
NOTE: For more information about the Integration Management features, refer to
the
Workstation Software Reference
Workstations CD at
designation.
X:\DOCS\REFERENC\INDEX.HTM
. The reference is located on the SmartStart for
, where X is your CD-ROM drive
Writer: Jeff Parmenter Project: Compaq Professional Workstation AP500 Reference Guide Comments: 338521-002
File Name: D-CH03.DOC Last Saved On: 2/11/99 8:20 PM
COMPAQ CONFIDENTIAL - NEED TO KNOW REQUIRED
Page 69

Compaq Management Solutions Partners Program
Compaq delivers management solutions today under Microsoft Windows NT
Workstation through the Compaq Management Solutions Partners Program.
This Compaq initiative ensures compatibility and integration of Intelligent
Manageability features with leading systems management products. The
partnership ensures that the benefits of Intelligent Manageability are accessible
through a broad range of vendors. This allows customers to use their tools of
choice to remotely manage their Compaq workstations more confidently and
cost-effectively.
Compaq Management Solutions Partners include:
■ Intel (LANDesk Management Suite)
■ McAfee Associates (Saber LAN Workstation)
■ Microsoft Corporation (Systems Management Server)
■ Novell (ManageWise)
■ Seagate (LAN Directory)
■ Symantec (Norton Administrator for Networks)
3-31
■ Tally Systems (NetCensus)
■ Computer Associates (UniCenter TNG)
■ Hewlett Packard (OpenView)
■ Tivoli (TME10)
Compaq Professional Workstation AP500 Reference Guide
Writer: Jeff Parmenter Project: Compaq Professional Workstation AP500 Reference Guide Comments: 338521-002
File Name: D-CH03.DOC Last Saved On: 2/11/99 8:20 PM
COMPAQ CONFIDENTIAL - NEED TO KNOW REQUIRED
Page 70

Chapter 4
Network Communications
This chapter provides information about networks and the hardware connectors
and software device drivers that allow you to access a network. Once your
network connection is active, you can share resources such as printer exchange
information from device to device and run common software programs.
NOTE: For more information about installing your network driver, refer to the
Software Installation Guide.
Your workstation comes Ethernet network ready, which means that it has a
preinstalled network controller and preinstalled network drivers. The Compaq
NC3161 Fast Ethernet Embedded 10/100 with Wake-on-LAN supports a PCI
bus mastering, dual speed 10BaseT, and 100BaseTX controller that will
automatically detect network connection speed and adjust accordingly. The
controller supports full duplex Ethernet, allowing two-way transmission
between nodes for up to 20 or 200 Mbytes/sec aggregate bandwidth.
NOTE: Your workstation is also Token Ring Network capable. To connect to a
Token Ring Network, you must install a Token Ring board.
4-1
Compaq Professional Workstation AP500 Reference Guide
Writer: Jeff Parmenter Project: Compaq Professional Workstation AP500 Reference Guide Comments: 338521-002
File Name: E-CH04.DOC Last Saved On: 2/11/99 8:44 PM
COMPAQ CONFIDENTIAL - NEED TO KNOW REQUIRED
Page 71
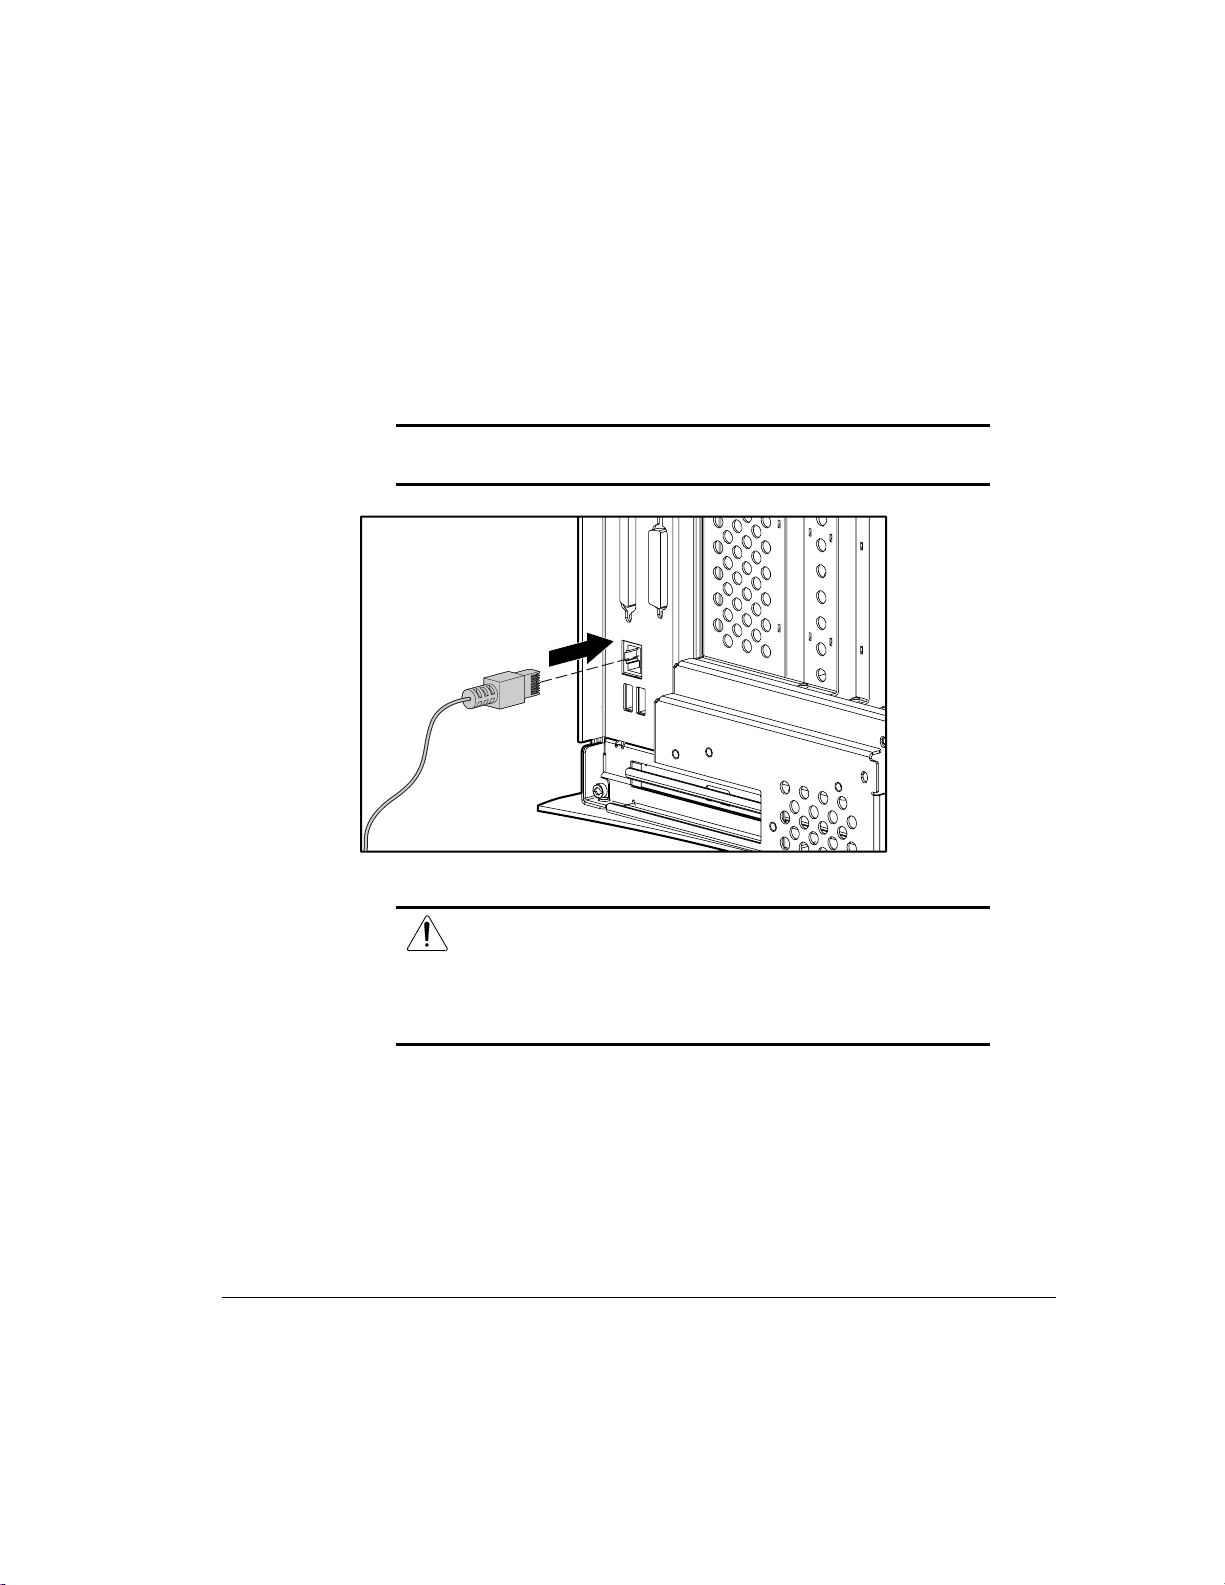
4-2
Network Communications
Connecting to an Ethernet Network
An RJ-45 Ethernet network connector is included on your workstation.
Refer to the following illustration to connect a network cable to the RJ-45
connector.
IMPORTANT: If you are connecting to a 100BaseTX network, you must use
a Category 5 UTP cable.
Figure 4-1. Attaching the network cable to the RJ-45 connector
Any RJ-45 receptacle marked with these symbols indicates
a Network Interface Connection.
WARNING: To reduce risk of electrical shock, fire, or
damage to the equipment, do not plug telephone or
telecommunications connectors into this receptacle.
Installing the Network Driver
The network device driver enables the workstation to communicate with the
network. The network driver is preinstalled on your workstation. For
information about installing the driver, operating system, and other support
software, refer to the Software Installation Guide.
Writer: Jeff Parmenter Project: Compaq Professional Workstation AP500 Reference Guide Comments: 338521-002
File Name: E-CH04.DOC Last Saved On: 2/11/99 8:44 PM
COMPAQ CONFIDENTIAL - NEED TO KNOW REQUIRED
Page 72

Chapter 5
CD-ROM Drive and
PremierSound Audio System
Your workstation includes a CD-ROM drive (IDE) and a PremierSound Audio
System. The CD-ROM drive is a random access, read-only storage device
capable of retrieving data from a removable compact disc. The PremierSound
Audio System provides sound capabilities for increased productivity in the
Windows NT Workstation operating environment.
Using the Tray-Load CD-ROM Drive
To insert a CD, refer to the illustration below.
5-1
Figure 5-1. Opening the CD tray and inserting a CD
Compaq Professional Workstation AP500 Reference Guide
Writer: Jeff Parmenter Project: Compaq Professional Workstation AP500 Reference Guide Comments: 338521-002
File Name: F-CH05.DOC Last Saved On: 12/16/98 11:23 AM
COMPAQ CONFIDENTIAL - NEED TO KNOW REQUIRED
Page 73

5-2
CD-ROM Drive and PremierSound Audio System
The drive performs a diagnostic check and automatically begins reading the
table of contents (TOC). The indicator turns amber while the drive reads the
TOC.
When the indicator turns green , the drive is ready to receive commands and
data may be retrieved from the disc.
To remove the CD, press the Eject button.
IMPORTANT:
disable the Eject button to prevent accidental damage to the disc. If the Eject
button is disabled by the application software, it will not operate.
Using CD-ROM Software
The first time you use a software program that comes on a compact disc, it may
load a certain amount of program data onto the hard drive of your workstation.
This enables the program to run more efficiently and quickly in the future.
NOTE
: Some software compact discs take control of the hardware volume
controls. If this occurs, adjust the sound before starting the software.
Read the software manufacturer’s instructions that accompany the compact disc
before you attempt to use it. Information to look for includes:
■ How much hard disk space will this program require? Do you have
enough disk space?
■ Will you activate the disc from Windows NT or from the system prompt?
CAUTION:
Do not apply labels to CDs. The presence of a label
will cause the CD to become unbalanced and may cause either
inconsistent operation or drive failure.
Certain applications or operating system software may
■ Have you connected any special devices this program requires, such as a
joystick?
■ Do you have the required information (such as serial number) available
to answer any questions during the setup program?
Writer: Jeff Parmenter Project: Compaq Professional Workstation AP500 Reference Guide Comments: 338521-002
File Name: F-CH05.DOC Last Saved On: 12/16/98 11:23 AM
COMPAQ CONFIDENTIAL - NEED TO KNOW REQUIRED
Page 74

Using Audio CDs
To play an audio CD:
1. Select Programs from the Start button.
2. Then select Multimedia from the Accessories menu.
3. Click CD Player, found in the Multimedia group box, to control audio
compact disc play.
Information on using CD Player can be found in the online help for that utility.
CD-ROM Drive Precautions
To ensure that the CD-ROM drive operates properly, observe the following
precautions:
■ Do not move the drive during operation. This may cause it to
malfunction during reading.
■ Avoid exposing the drive to sudden changes in temperature, as
condensation may form inside the unit. If the temperature suddenly
changes while the drive is on, wait at least one hour before you turn off
the power. If you operate the unit immediately, it may malfunction while
reading.
5-3
■ Avoid placing the drive in a location that is subject to high humidity,
extreme temperatures, mechanical vibration, or direct sunlight.
■ Clean the panel and controls with a soft, dry cloth or a soft cloth lightly
moistened with a mild detergent solution. Never spray cleaning fluids
directly on the unit.
■ Avoid using any type of solvent, such as alcohol or benzene, which may
damage the finish.
■ If any object or liquid falls into the slot, immediately unplug the
workstation and have it checked by an authorized Compaq service
provider.
Compaq Professional Workstation AP500 Reference Guide
Writer: Jeff Parmenter Project: Compaq Professional Workstation AP500 Reference Guide Comments: 338521-002
File Name: F-CH05.DOC Last Saved On: 12/16/98 11:23 AM
COMPAQ CONFIDENTIAL - NEED TO KNOW REQUIRED
Page 75

5-4
CD-ROM Drive and PremierSound Audio System
PremierSound Audio System
The PremierSound audio system included on your workstation allows you to
integrate voice messages and music directly into your files. Using a
microphone, you can record sounds as data on the hard drive. This sound data
may be used in many ways, for example; you can enhance presentation data
with voice and music.
If you choose to upgrade your audio system, you must disable the integrated
audio controller:
IMPORTANT:
in the Control Panel. Follow the instructions below.
1. From the Control Panel in Windows NT Workstation, select Devices.
2. From the Devices window, select the AudioDrive device.
3. Select the Stop button to stop the AudioDrive device.
4. Select the Startup button.
5. Select Disabled as the Startup Type for the AudioDrive.
6. Select OK.
7. Close the Devices window.
8. Restart the workstation for the changes to take effect.
9. Proceed with the installation process for your upgrade audio controller
board.
Do not remove the ESS 1869 driver from the Drivers window
Writer: Jeff Parmenter Project: Compaq Professional Workstation AP500 Reference Guide Comments: 338521-002
File Name: F-CH05.DOC Last Saved On: 12/16/98 11:23 AM
COMPAQ CONFIDENTIAL - NEED TO KNOW REQUIRED
Page 76

Chapter 6
Hardware Upgrade Preparations
This chapter explains how to prepare the workstation for the installation of
optional hardware upgrades. Information about reconfiguring the workstation is
also discussed to ensure that newly installed components are recognized by
your system. This chapter also identifies all internal components.
IMPORTANT: Compaq recommends that you finish the setup procedures for
the preinstalled software
third-party devices that were not included with the workstation. For more
information about the setup procedures, refer to the
Guide.
To install the following upgrades or optional equipment, see the related chapter:
■ Memory (Chapter 7)
■ Drives (Chapter 8)
■ Expansion Boards (Chapter 9)
■ Processors (Chapter 10)
you install any optional hardware or
before
6-1
Software Installation
Compaq Professional Workstation AP500 Reference Guide
Writer: Jeff Parmenter Project: Compaq Professional Workstation AP500 Reference Guide Comments: 338521-002
File Name: G-CH06.DOC Last Saved On: 2/11/99 8:24 PM
COMPAQ CONFIDENTIAL - NEED TO KNOW REQUIRED
Page 77

6-2
Hardware Upgrade Preparations
Installation Sequence
This chapter begins with an overview of the installation and configuration
sequence. Follow this sequence of steps to ensure the proper installation of any
optional equipment. Before you begin, observe the following precautions:
1. Turn off the workstation and disconnect the power cord from the
grounded AC outlet and the back of the workstation.
WARNING: To reduce the risk of personal injury from hot
surfaces, allow the internal system components to cool before
touching.
WARNING: To reduce the risk of electrical shock, fire, or damage
to the equipment, do not plug telecommunications/telephone
connectors into the network interface controller (NIC) receptacles.
CAUTION: Static electricity can damage the electronic
components of the workstation or optional equipment. Before
beginning these procedures, ensure that you are discharged of
static electricity by briefly touching a grounded metal object. Refer
to Appendix B for more information.
2. If you are installing or removing drives in the front bays, see the section
“Removing the Front Bezel” in this chapter for instructions.
3. Open the workstation by removing its outside side access panel. See the
section “Removing the Side Access Panel” in this chapter for
instructions.
4. Install any optional equipment: ISA or PCI expansion board,
Accelerated Graphic Port (AGP) graphics controller, processor upgrade,
memory, or drive. See the applicable chapters in this manual or the
documentation provided with the optional equipment for instructions.
5. Replace the front bezel, if necessary, and the side access panel.
Writer: Jeff Parmenter Project: Compaq Professional Workstation AP500 Reference Guide Comments: 338521-002
File Name: G-CH06.DOC Last Saved On: 2/11/99 8:24 PM
COMPAQ CONFIDENTIAL - NEED TO KNOW REQUIRED
Page 78

6. Reconnect the power cord to the back of the workstation and plug in the
power cord to a grounded AC outlet.
7. Turn on the monitor, workstation, and any devices you installed.
8. Reconfigure the workstation, if necessary. See Chapter 2 for instructions.
9. Test the workstation (optional) using the TEST utility.
Reconfiguring the Workstation
System configuration is the process of specifying the devices and programs that
make up a system. When you add or remove optional equipment, you must
reconfigure the workstation by running Computer Setup in order for the
changes to be recognized.
Run the Computer Setup utility after you complete the installation. To
configure in Windows NT, use Control Panel and configure your specific
option.
If configuration settings are incorrect, one or more devices may not work
properly, and you may receive an error message. If this occurs, run the
Computer Setup utility again. See Chapter 2 for more information on Computer
Setup.
6-3
Compaq Professional Workstation AP500 Reference Guide
Writer: Jeff Parmenter Project: Compaq Professional Workstation AP500 Reference Guide Comments: 338521-002
File Name: G-CH06.DOC Last Saved On: 2/11/99 8:24 PM
COMPAQ CONFIDENTIAL - NEED TO KNOW REQUIRED
Page 79

6-4
Hardware Upgrade Preparations
Removing the Side Access Panel
To remove the side access panel:
1. Turn off the workstation and disconnect the power cord from the
grounded AC outlet and the back of the workstation.
2. Refer to the following illustration to remove the side access panel.
Figure 6-1. Loosening the four rear panel thumbscrews and removing the side access panel
IMPORTANT: When replacing the side access panel, be sure to tighten all
four thumbscrews.
NOTE: The hood labels attached to the inside of the side access panel
provide system configurations and instructions for the installation of additional
components.
Writer: Jeff Parmenter Project: Compaq Professional Workstation AP500 Reference Guide Comments: 338521-002
File Name: G-CH06.DOC Last Saved On: 2/11/99 8:24 PM
COMPAQ CONFIDENTIAL - NEED TO KNOW REQUIRED
Page 80

Removing the Front Bezel
You will need to remove the front bezel when you are installing or removing
drives in the front bay. To remove the front bezel:
1. Turn off the workstation and disconnect the power cord from the
grounded AC outlet and the back of the workstation.
2. Remove the side access panel.
3. Refer to the following illustration to remove the front bezel.
6-5
T
PAC
M
O
C
1
2
Figure 6-2. Pressing front bezel release latches and removing front bezel
Compaq Professional Workstation AP500 Reference Guide
Writer: Jeff Parmenter Project: Compaq Professional Workstation AP500 Reference Guide Comments: 338521-002
File Name: G-CH06.DOC Last Saved On: 2/11/99 8:24 PM
COMPAQ CONFIDENTIAL - NEED TO KNOW REQUIRED
Page 81

6-6
Hardware Upgrade Preparations
Identifying Internal Components
The following illustration and table identify the internal components of your
workstation.
6
7
1
MPACT
CO
2
3
4
8
9
10
Figure 6-3. Identifying internal components
5
Writer: Jeff Parmenter Project: Compaq Professional Workstation AP500 Reference Guide Comments: 338521-002
File Name: G-CH06.DOC Last Saved On: 2/11/99 8:24 PM
COMPAQ CONFIDENTIAL - NEED TO KNOW REQUIRED
Page 82

Table 6-1
Internal Components
Ref. Component
1
CD-ROM drive, drive bay 4
6-7
2
3
4
* Speaker with PremierSound and fixed equalization
5
* Power supply
6
7
8
9
:
* An optional Zip Drive can be installed in either bay.
5.25-inch drive bay, drive bay 5
5.25-inch drive bay, drive bay 6
3.5-inch diskette drive, drive bay 7
3.5-inch removable hard drive cage that supports either three
1.0-inch drives or two 1.6-inch drives; drive bay 1 on bottom, bay 2
in middle, and bay 3 on top.
Expansion board assembly (includes riser board, PCI expansion
slots, and ISA expansion slots)
System board (includes SW1 switch, AGP expansion slot, four
DIMM sockets, two processor slots, and other connectors)
Accelerated Graphics Port (AGP) graphics controller (preinstalled on
select models)
Compaq Professional Workstation AP500 Reference Guide
Writer: Jeff Parmenter Project: Compaq Professional Workstation AP500 Reference Guide Comments: 338521-002
File Name: G-CH06.DOC Last Saved On: 2/11/99 8:24 PM
COMPAQ CONFIDENTIAL - NEED TO KNOW REQUIRED
Page 83

6-8
Hardware Upgrade Preparations
Removing the Expansion Board Assembly
To remove the expansion board assembly:
1. Turn off the workstation and disconnect the power cord from the
grounded AC outlet and the back of the workstation.
2. Remove the side access panel.
3. Refer to the following illustration to remove the expansion board
assembly.
Figure 6-4. Removing the expansion board assembly
4. Reassemble the workstation, and connect the power cord to the
grounded AC outlet and to the workstation.
IMPORTANT: After connecting the power cord to the grounded AC outlet
and to the workstation, DO NOT turn the power button on if the Power LED is
a steady amber color. A steady amber color indicates that the expansion
board assembly is not seated properly. Disconnect the power cord and reseat
the expansion board assembly.
IMPORTANT: When replacing the side access panel, be sure to tighten all
four thumbscrews.
Writer: Jeff Parmenter Project: Compaq Professional Workstation AP500 Reference Guide Comments: 338521-002
File Name: G-CH06.DOC Last Saved On: 2/11/99 8:24 PM
COMPAQ CONFIDENTIAL - NEED TO KNOW REQUIRED
Page 84

Reinstalling the Expansion Board Assembly
To reinstall an expansion board assembly, follow these steps:
1. Slide the expansion board assembly into the chassis 1, aligning the
guide rails and tab(s) 2.
2. Align the holes 3 in the back of the chassis.
3. Press the expansion board assembly firmly over the connector.
3
1
6-9
3
Figure 6-5. Reinstalling the expansion board assembly
Compaq Professional Workstation AP500 Reference Guide
2
Writer: Jeff Parmenter Project: Compaq Professional Workstation AP500 Reference Guide Comments: 338521-002
File Name: G-CH06.DOC Last Saved On: 2/11/99 8:24 PM
COMPAQ CONFIDENTIAL - NEED TO KNOW REQUIRED
Page 85

6-10
Hardware Upgrade Preparations
Removing the Removable Hard
Drive Cage
To remove the removable hard drive cage:
1. Turn off the workstation and disconnect the power cord from the
grounded AC outlet and from the back of the workstation.
2. Remove the side access panel.
3. Refer to the following illustration to remove the removable hard drive
cage.
1
1
2
Figure 6-6. Loosening the two thumbscrews and removing the removable hard drive cage
Writer: Jeff Parmenter Project: Compaq Professional Workstation AP500 Reference Guide Comments: 338521-002
File Name: G-CH06.DOC Last Saved On: 2/11/99 8:24 PM
COMPAQ CONFIDENTIAL - NEED TO KNOW REQUIRED
Page 86

Reinstalling the Removable Hard Drive Cage
6-11
When reinserting the removable hard drive cage 1, be sure to align the tab
on the bottom corners of the cage with the workstation chassis. Tighten the
thumbscrews 3.
2
3
3
1
Figure 6-7. Reinserting the removable hard drive cage
2
Compaq Professional Workstation AP500 Reference Guide
Writer: Jeff Parmenter Project: Compaq Professional Workstation AP500 Reference Guide Comments: 338521-002
File Name: G-CH06.DOC Last Saved On: 2/11/99 8:24 PM
COMPAQ CONFIDENTIAL - NEED TO KNOW REQUIRED
Page 87

6-12
Hardware Upgrade Preparations
Identifying the System Board Components
The following illustration and table identify the internal system board
components of your workstation.
21 3 4 5 6 7 8 9
10
11
12
141516
Figure 6-8. Identifying system board components
Table 6-2
System Board Components
Ref. Component
1
2
3
4
5
6
7
Power switch and power LED connector
Power connector
External battery connector
Diskette drive connector
Secondary IDE connector
Primary IDE connector
Wide-Ultra SCSI connector
13
Continued
Writer: Jeff Parmenter Project: Compaq Professional Workstation AP500 Reference Guide Comments: 338521-002
File Name: G-CH06.DOC Last Saved On: 2/11/99 8:24 PM
COMPAQ CONFIDENTIAL - NEED TO KNOW REQUIRED
Page 88

6-13
System Board Components
Ref. Component
8
9
:
;
<
=
>
?
@
Processor power module connector for primary processor
Processor power module connector for secondary processor
Secondary processor slot
Primary processor slot
SW1 switch
DIMM sockets 1-4
AGP expansion slot
Wake On LAN connector
Riser board connector
Continued
Compaq Professional Workstation AP500 Reference Guide
Writer: Jeff Parmenter Project: Compaq Professional Workstation AP500 Reference Guide Comments: 338521-002
File Name: G-CH06.DOC Last Saved On: 2/11/99 8:24 PM
COMPAQ CONFIDENTIAL - NEED TO KNOW REQUIRED
Page 89

Chapter 7
Memory Upgrades
This chapter explains how to install additional memory.
For information on preparing the workstation for upgrades, see Chapter 6.
Installing Additional Memory
Your workstation supports Registered 100-MHz Error Checking and Correcting
(ECC) SDRAM dual inline memory modules (DIMMs). Additional DIMMs
(32-MB, 64-MB, 128-MB, or 256-MB) are available to upgrade the memory.
The workstation has four DIMM sockets on the system board to support up to a
maximum of 1 GB. The four DIMM sockets are numbered from DIMM1
through DIMM4.
7-1
Compaq Professional Workstation AP500 Reference Guide
Writer: Jeff Parmenter Project: Compaq Professional Workstation AP500 Reference Guide Comments: 338521-002
File Name: H-CH07.DOC Last Saved On: 12/14/98 12:06 PM
COMPAQ CONFIDENTIAL - NEED TO KNOW REQUIRED
Page 90
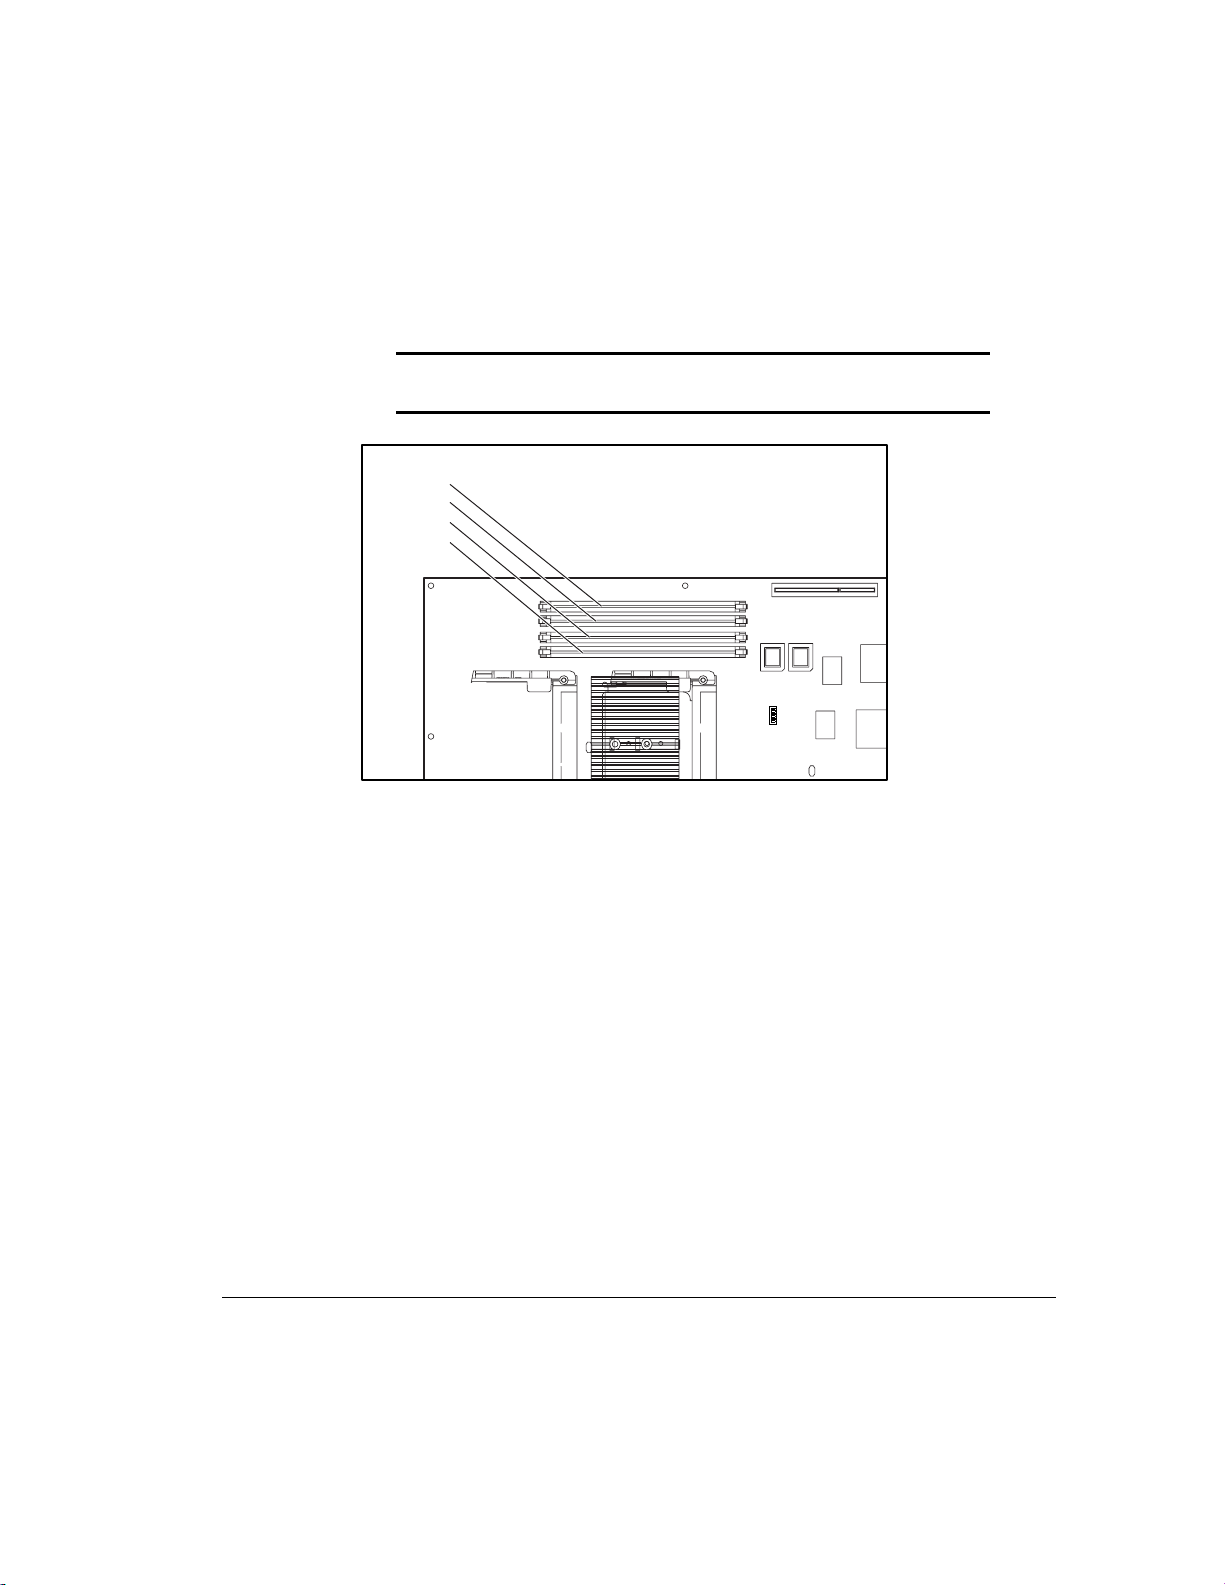
7-2
Memory Upgrades
The following figure illustrates the physical location of all DIMM sockets. Note
that DIMMs do not need to be installed in pairs, and can be installed in any of
the available DIMM sockets.
IMPORTANT: Before installing additional DIMMs, read “Important
Guidelines for DIMM Installation” in the following section.
DIMM 4
DIMM 3
DIMM 2
DIMM 1
Figure 7-1. Location of DIMM sockets 1-4
NOTE: The DIMM sockets are numbered in sequence from 1-4. DIMM1 is
located closest to the processor, and DIMM4 is located closest to the edge of
the board.
Writer: Jeff Parmenter Project: Compaq Professional Workstation AP500 Reference Guide Comments: 338521-002
File Name: H-CH07.DOC Last Saved On: 12/14/98 12:06 PM
COMPAQ CONFIDENTIAL - NEED TO KNOW REQUIRED
Page 91

Important Guidelines for DIMM Installation
When installing DIMMs, you MUST follow these guidelines:
■ Use only 32-, 64-, 128-, or 256-MB, Registered 100-MHz Error
Checking and Correcting (ECC) SDRAM DIMMs.
■ Registered DIMMs must be used.
■ DIMMs must have a 4 KHz refresh rate.
■ DO NOT INSTALL DIMMS THAT DO NOT SUPPORT ERROR
CHECKING AND CORRECTING (ECC).
■ A DIMM can be installed only one way. Be sure to match the two key
slots on the DIMM with the tab on the DIMM socket. Push the DIMM
down into the DIMM socket, ensuring that it is fully inserted and
properly seated.
■ When upgrading, do not exceed 1 GB total. Upgrades exceeding
1 GB will cause the system to halt.
Installing DIMM Modules
7-3
CAUTION: When handling a DIMM, be careful not to touch any
of the contacts. Doing so may damage the module.
CAUTION: Static electricity can damage the electronic
components of the workstation or optional boards. Before
beginning these procedures, ensure that you are discharged of
static electricity by briefly touching a grounded metal object. Refer
to Appendix B, “Electrostatic Discharge,” for more information.
IMPORTANT: Prior to installing additional DIMMs, read “Important
Guidelines for DIMM Installation” in the previous section.
Compaq Professional Workstation AP500 Reference Guide
Writer: Jeff Parmenter Project: Compaq Professional Workstation AP500 Reference Guide Comments: 338521-002
File Name: H-CH07.DOC Last Saved On: 12/14/98 12:06 PM
COMPAQ CONFIDENTIAL - NEED TO KNOW REQUIRED
Page 92
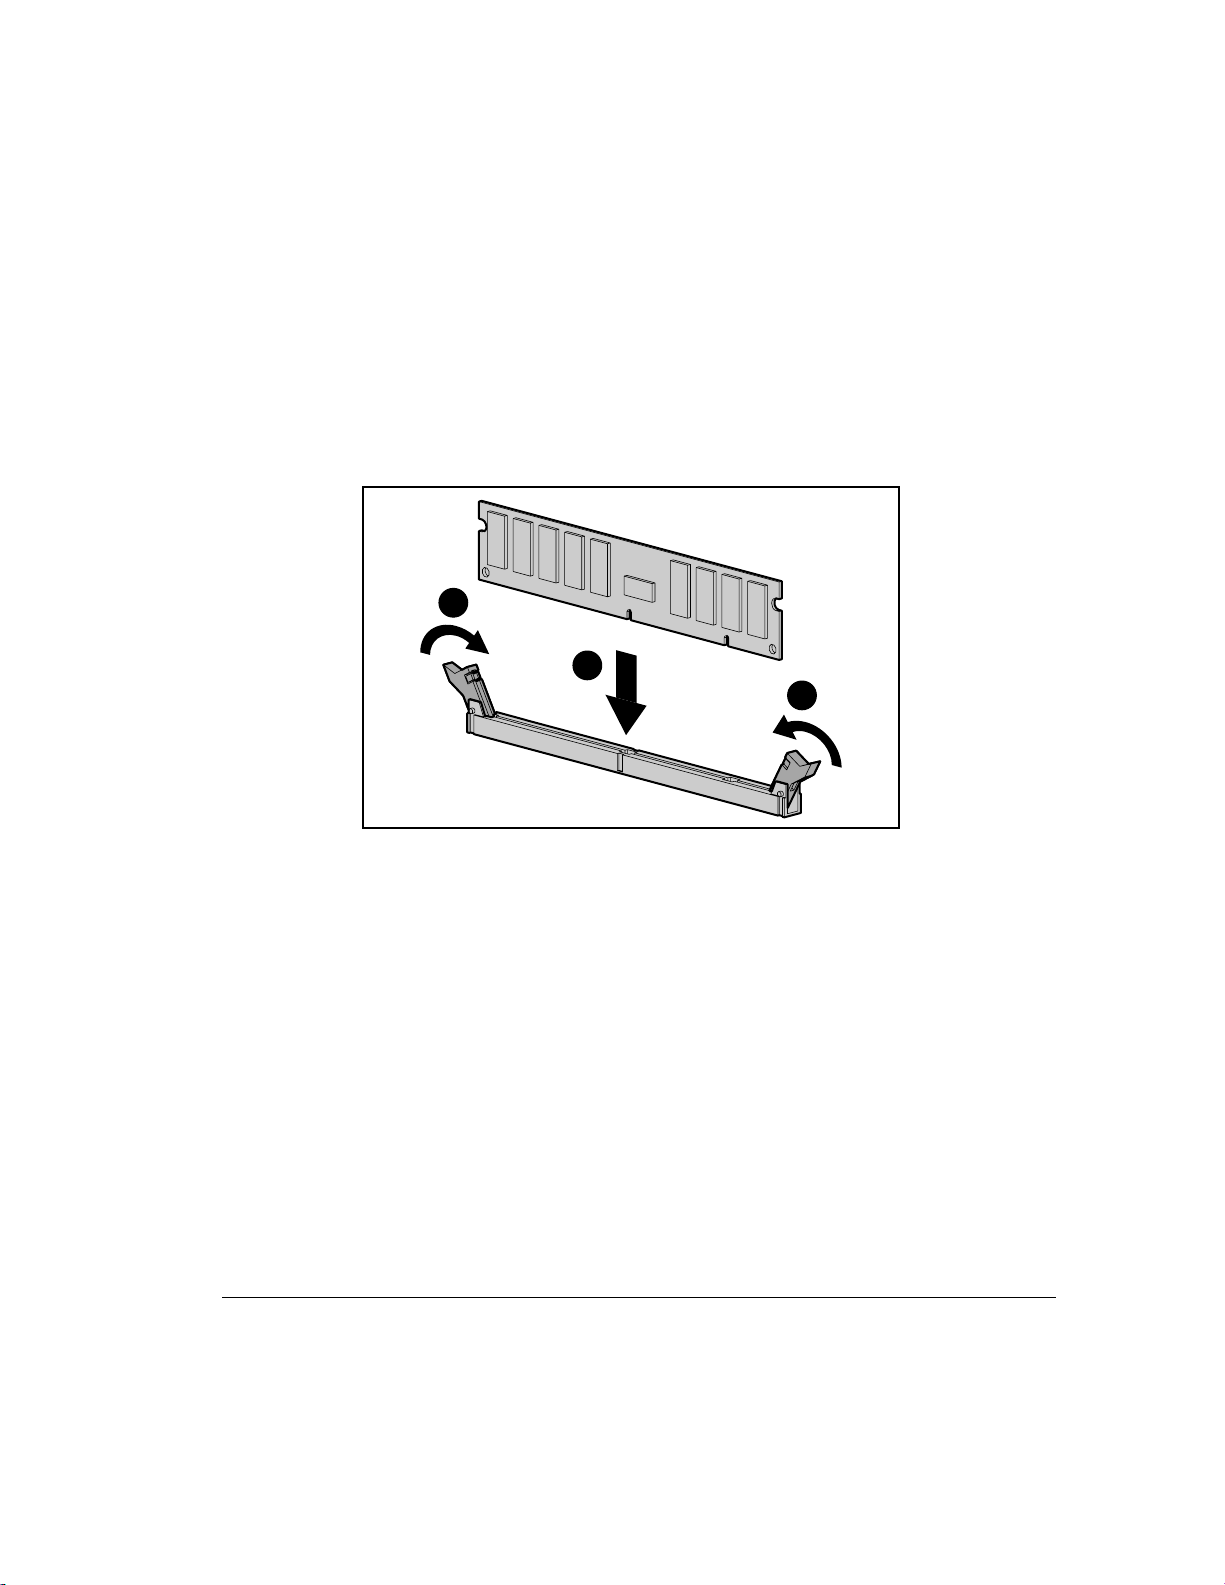
7-4
Memory Upgrades
To install a memory module:
1. Turn off the workstation and disconnect the power cord from the
grounded AC outlet and the back of the workstation.
2. Remove the side access panel.
3. Remove the AGP graphics controller, if necessary.
4. Refer to the following illustration to install a DIMM module.
2
1
2
Figure 7-2. Installing a DIMM module
To remove a memory module, reverse the above procedure.
Writer: Jeff Parmenter Project: Compaq Professional Workstation AP500 Reference Guide Comments: 338521-002
File Name: H-CH07.DOC Last Saved On: 12/14/98 12:06 PM
COMPAQ CONFIDENTIAL - NEED TO KNOW REQUIRED
Page 93
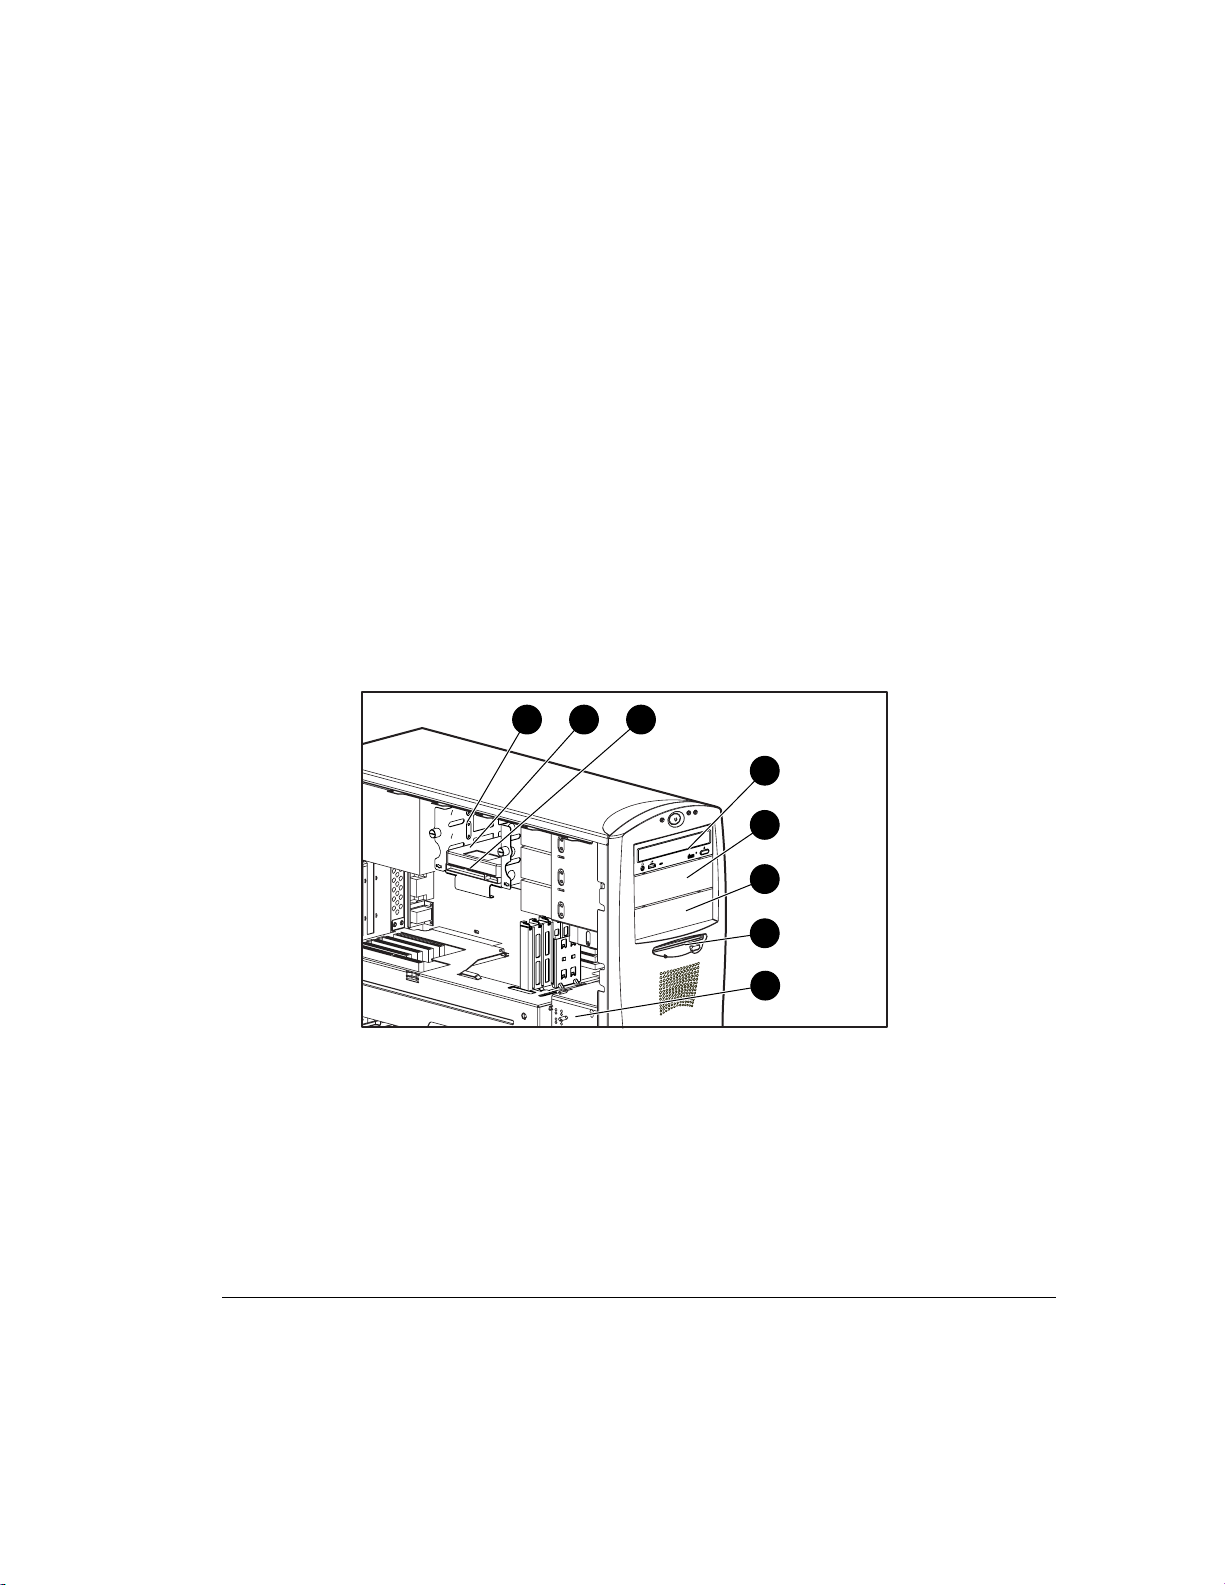
Chapter 8
Drives
This chapter explains how to install additional hard drives. This chapter also
provides guidelines for installing SCSI drives. For additional information about
installing optional SCSI and non-SCSI drives, refer to the documentation
included with the device or contact your Compaq authorized dealer, reseller, or
service provider.
For information on preparing the workstation for upgrades, see Chapter 6.
Installing Additional Drives
Your workstation supports up to seven individual drive bays. See Table 8-1 for
a description of the drive bay components.
3 2 1
8-1
4
Figure 8-1. Identifying drive bay components
5
COMPACT
6
7
8
Compaq Professional Workstation AP500 Reference Guide
Writer: Jeff Parmenter Project: Compaq Professional Workstation AP500 Reference Guide Comments: 338521-002
File Name: I-CH08.DOC Last Saved On: 2/11/99 8:29 PM
COMPAQ CONFIDENTIAL - NEED TO KNOW REQUIRED
Page 94

8-2
Drives
As shown in Figure 8-1, drive bays 1 through 3 are located in the removable
hard drive cage located behind the side access panel of the workstation. Drive
bays 4 through 7 are located on the front of the workstation. They support
various drive configurations.
Table 8-1
Drive Bay Components
Ref. Component Description
1
Bay 1 Part of the removable hard drive cage. A 3.5-inch, third-height
bay that supports a 1.0-inch hard drive or a 1.6-inch
hard drive.
2
3
4
5
6
7
8
* An optional Zip drive can be installed in these bays.
Bay 2 Part of the removable hard drive cage. A 3.5-inch, third-height
bay that supports a 1.0-inch hard drive. Bay 2 is not available
when a 1.6-inch drive is installed in bay 1 or bay 3.
Bay 3 Part of the removable hard drive cage. A 3.5-inch, third-height
bay that supports a 1.0-inch hard drive or 1.6-inch hard drive.
Bay 4 5.25-inch, half-height bay that supports 1.0-inch or 1.6-inch
storage devices. A CD-ROM drive is shipped in bay 4.
Bay 5* 5.25-inch, half-height bay that supports 1.0-inch or 1.6-
inch storage devices.
Bay 6* 5.25-inch, half-height bay that supports 1.0-inch or 1.6-inch
storage devices.
Bay 7 3.5-inch, third-height bay that supports a 1.0-inch device. A
standard 3.5-inch diskette drive is shipped in bay 7.
Air plenum
(cooling
chamber)
Side of air plenum provides temporary storage for the
hardware screws used to install optional mass storage devices
in the removable hard drive cage and in the front bays.
Writer: Jeff Parmenter Project: Compaq Professional Workstation AP500 Reference Guide Comments: 338521-002
File Name: I-CH08.DOC Last Saved On: 2/11/99 8:29 PM
COMPAQ CONFIDENTIAL - NEED TO KNOW REQUIRED
Page 95
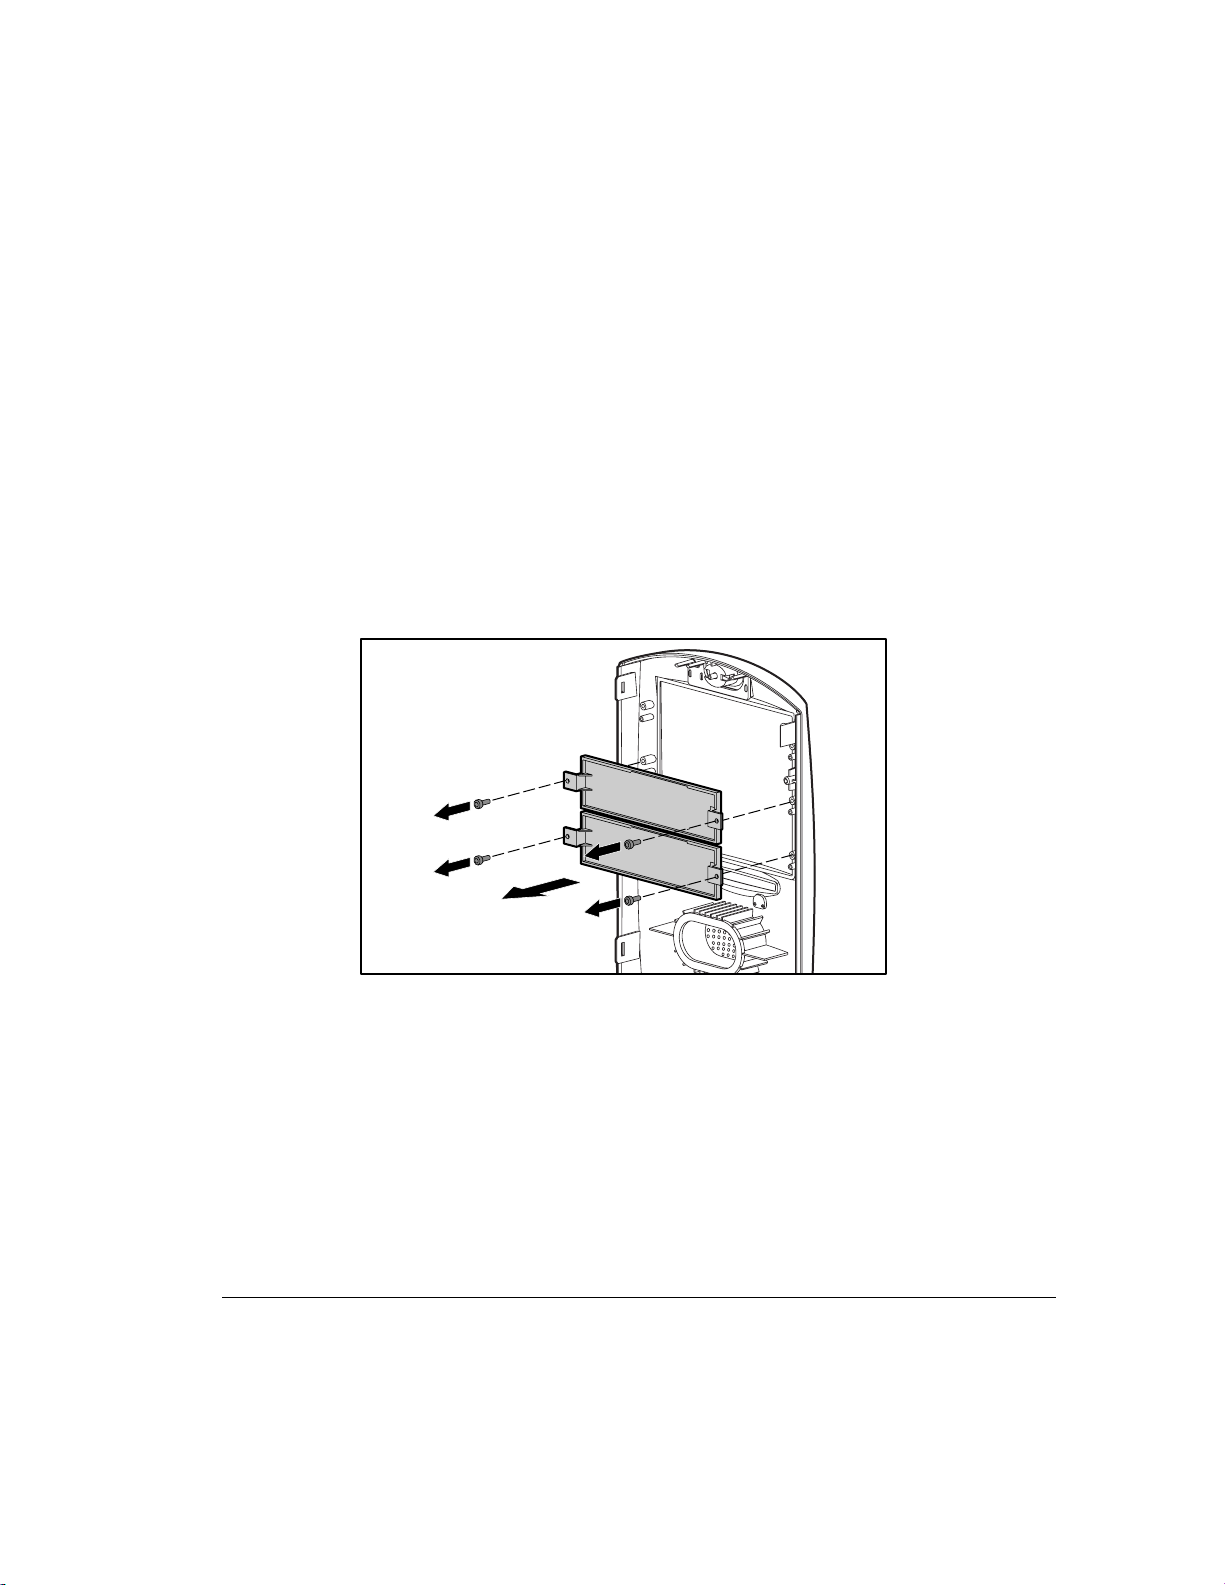
Removing a Blank Drive Bezel
A blank drive bezel covers bays 5 and 6 when they are not occupied with a
storage device. You will need to remove a drive bezel before installing any
removable media storage device (such as a CD-ROM, diskette, or other device)
in these bay locations. You will not need to replace the drive bezel after the
drive installation.
To remove a blank drive bezel:
1. Turn off the workstation and disconnect the power cord from the
grounded AC outlet and the back of the workstation.
2. Remove the side access panel and front bezel.
3. Refer to the following illustration to remove a blank drive bezel.
8-3
Figure 8-2. Removing a blank drive bezel
Compaq Professional Workstation AP500 Reference Guide
Writer: Jeff Parmenter Project: Compaq Professional Workstation AP500 Reference Guide Comments: 338521-002
File Name: I-CH08.DOC Last Saved On: 2/11/99 8:29 PM
COMPAQ CONFIDENTIAL - NEED TO KNOW REQUIRED
Page 96

8-4
Drives
Removing a Cooling Shield
A cooling shield covers bays 5 and 6 to provide proper cooling and EMI
protection.
To remove a cooling shield:
1. Turn off the workstation and disconnect the power cord from the
grounded AC outlet and the back of the workstation.
2. Remove the side access panel and front bezel.
3. Refer to the following illustration to remove a cooling shield.
COMPACT
Figure 8-3. Removing a cooling shield
IMPORTANT:
You will also need to replace the shield after the drive is
installed in the bay.
To replace the cooling shield, reinsert the two screws.
Writer: Jeff Parmenter Project: Compaq Professional Workstation AP500 Reference Guide Comments: 338521-002
File Name: I-CH08.DOC Last Saved On: 2/11/99 8:29 PM
COMPAQ CONFIDENTIAL - NEED TO KNOW REQUIRED
Page 97

Locating the Hardware Screws
A total of 17 extra hardware screws are provided on the side of the air plenum.
The top group of eight screws ➊ is for installing hard drives in the removable
hard drive cage. The bottom group of nine screws ➋ is for installing removable
media storage devices in the front drive bays.
Figure 8-4. Locating the hardware screws for drive bay installations
8-5
1
2
Compaq Professional Workstation AP500 Reference Guide
Writer: Jeff Parmenter Project: Compaq Professional Workstation AP500 Reference Guide Comments: 338521-002
File Name: I-CH08.DOC Last Saved On: 2/11/99 8:29 PM
COMPAQ CONFIDENTIAL - NEED TO KNOW REQUIRED
Page 98

8-6
Drives
Installing a 7200 rpm Hard Drive in Bays 5 or 6
Drive bays 5 and 6 can be configured with either 1.0-inch or 1.6-inch, 7200 rpm
hard drive. Other than using different screw holes, the installation for both
drives is basically the same.
NOTE
: Before installing a SCSI device, please read “SCSI Cables and
Guidelines” later in this chapter.
To install a 7200 rpm hard drive:
1. Turn off the workstation and disconnect the power cord from the
grounded AC outlet and the back of the workstation.
2. Remove the following components:
❏
side access panel
❏
front bezel
❏
cooling shield
3. Refer to the following illustrations to install a 7200 rpm hard drive in
bays 5 or 6.
Figure 8-5. Installing a 7200 rpm hard drive in the hard drive bracket
Writer: Jeff Parmenter Project: Compaq Professional Workstation AP500 Reference Guide Comments: 338521-002
File Name: I-CH08.DOC Last Saved On: 2/11/99 8:29 PM
COMPAQ CONFIDENTIAL - NEED TO KNOW REQUIRED
Page 99

Figure 8-6. Installing a hard drive
8-7
COMPACT
COMPACT
Figure 8-7. Replacing the cooling shield
Compaq Professional Workstation AP500 Reference Guide
Writer: Jeff Parmenter Project: Compaq Professional Workstation AP500 Reference Guide Comments: 338521-002
File Name: I-CH08.DOC Last Saved On: 2/11/99 8:29 PM
COMPAQ CONFIDENTIAL - NEED TO KNOW REQUIRED
Page 100

8-8
Drives
Figure 8-8. Connecting the SCSI signal cable and power cable
4. Reassemble the workstation.
Writer: Jeff Parmenter Project: Compaq Professional Workstation AP500 Reference Guide Comments: 338521-002
File Name: I-CH08.DOC Last Saved On: 2/11/99 8:29 PM
COMPAQ CONFIDENTIAL - NEED TO KNOW REQUIRED
 Loading...