

Page 1

®
®
Page 2

Notice
© 2000 Compaq Computer Corporation
Microsoft, Windows, and Windows 2000 Professional are trademarks of Microsoft Corporation.
Intel and Pentium are trademarks of Intel Corporation.
COMPAQ and the Compaq logo Registered in U.S. Patent and Trademark Office.
All other product names mentioned herein may be trademarks or registered trademarks of their respective
companies.
Compaq shall not be liable for technical or editorial errors or omissions contained herein. The information in this document is subject to change without notice.
The information in this publication is subject to change without notice and is provided "AS IS" WITHOUT WARRANTY OF ANY KIND. THE ENTIRE RISK ARISING OUT OF THE USE OF THIS
INFORMATION REMAINS WITH RECIPIENT. IN NO EVENT SHALL COMPAQ BE LIABLE FOR
ANY DIRECT, CONSEQUENTIAL, INCIDENTAL, SPECIAL, PUNITIVE OR OTHER DAMAGES
WHATSOEVER (INCLUDING WITHOUT LIMITATION, DAMAGES FOR LOSS OF BUSINESS
PROFITS, BUSINESS INTERRUPTION OR LOSS OF BUSINESS INFORMATION), EVEN IF
COMPAQ HAS BEEN ADVISED OF THE POSSIBILITY OF SUCH DAMAGES. THE FOREGOING
SHALL APPLY REGARDLESS OF THE NEGLIGENCE OR OTHER FAULT OF EITHER PARTY
AND REGARDLESS OF WHETHER SUCH LIABILITY SOUNDS IN CONTRACT, NEGLIGENCE,
TORT, OR ANY OTHER THEORY OF LEGAL LIABILITY, AND NOTWITHSTANDING ANY FAILURE OF ESSENTIAL PURPOSE OF ANY LIMITED REMEDY.
The limited warranties for Compaq products are exclusively set forth in the documentation accompanying
such products. Nothing herein should be construed as constituting a further or additional warranty.
The Hard Drive-based Recovery System is provided only for the purposes of restoring or
reinstalling software on the hard disk of designated Customer Systems.
Microsoft Windows 2000 Professional Operating System Manual
First Edition (April 2000)
Part Number 181247-001
Page 3

CONTENTS
Chapter 1 Notebook Operating System . . . . . . . . . . . . . . . . 1-1
Windows Desktop. . . . . . . . . . . . . . . . . . . . . . . . . . . . . . 1-2
Customizing the Windows Desktop . . . . . . . . . . . . . 1-2
Arranging Icons . . . . . . . . . . . . . . . . . . . . . . . . . . . . 1-3
Selecting a Background . . . . . . . . . . . . . . . . . . . . . . 1-3
Adding a Screen Saver . . . . . . . . . . . . . . . . . . . . . . 1-4
Windows Help. . . . . . . . . . . . . . . . . . . . . . . . . . . . . . . . . 1-5
Finding Help . . . . . . . . . . . . . . . . . . . . . . . . . . . . . . . 1-5
File Searches . . . . . . . . . . . . . . . . . . . . . . . . . . . . . . . . . 1-6
Searching for Files or Folders . . . . . . . . . . . . . . . . . 1-6
Folders . . . . . . . . . . . . . . . . . . . . . . . . . . . . . . . . . . . . . . 1-7
Creating New Folders . . . . . . . . . . . . . . . . . . . . . . . 1-7
Deleting Files and Folders . . . . . . . . . . . . . . . . . . . . 1-7
Shortcuts. . . . . . . . . . . . . . . . . . . . . . . . . . . . . . . . . . . . . 1-8
Creating Shortcuts . . . . . . . . . . . . . . . . . . . . . . . . . . 1-8
Internet Zone Buttons . . . . . . . . . . . . . . . . . . . . . . . . . . . 1-9
INDOWS
W
PERATIN G SYSTEM MANUAL
2000 O
Reprogramming the Internet Zone Buttons . . . . . . . 1-9
Windows Accessories . . . . . . . . . . . . . . . . . . . . . . . . . . 1-10
Using Windows Accessories . . . . . . . . . . . . . . . . . 1-10
ONTENTS-I
C
Page 4

Chapter 2 Notebook Configuration . . . . . . . . . . . . . . . . . . . 2-1
The Control Panel . . . . . . . . . . . . . . . . . . . . . . . . . . . . . 2-2
Adding or Removing Hardware . . . . . . . . . . . . . . . . 2-2
Adding/Removing Windows Components . . . . . . . . 2-2
Adding or Removing Programs . . . . . . . . . . . . . . . . 2-3
Modem Settings . . . . . . . . . . . . . . . . . . . . . . . . . . . . . . . 2-6
Country Selection for the Compaq
56K V.90 PCI Modem . . . . . . . . . . . . . . . . . . . . . . . 2-6
Audio Indication During Modem Dial-up . . . . . . . . . 2-7
Zoom Video Audio . . . . . . . . . . . . . . . . . . . . . . . . . . 2-8
Power Management . . . . . . . . . . . . . . . . . . . . . . . . . . . . 2-9
Changing Power Management Setting . . . . . . . . . . 2-9
Changing the Power Switch Settings . . . . . . . . . . 2-10
Changing the Low-Battery Settings . . . . . . . . . . . . 2-11
Changing the Critical-Battery Setting . . . . . . . . . . 2-13
Network Connection for Internal Ethernet Hardware . . 2-15
ONTENTS-II
C
Index
Understanding Network Connection Problems . . . 2-15
Creating a Hardware Profile in Windows 2000 . . . 2-16
Configuring the No Ethernet Profile . . . . . . . . . . . . 2-17
Testing the No Ethernet Profile . . . . . . . . . . . . . . . 2-19
System Recovery CD . . . . . . . . . . . . . . . . . . . . . . . . . . 2-20
Deleting a Hardware Profile in
Windows 2000 . . . . . . . . . . . . . . . . . . . . . . . . . . . . 2-20
Using the QuickRestore CD . . . . . . . . . . . . . . . . . 2-21
W
INDOWS
PERATING SYSTEM MANUAL
2000 O
Page 5

Notebook
Operating
System
Windows Desktop, 1-2
Windows Help, 1-5
File Searches, 1-6
Folders, 1-7
Shortcuts, 1-8
Internet Zone Buttons,
1-9
Windows Accessories,
1-10
The Microsoft Windows 2000 Professional operating system
(herein after referred to as Windows or Windows 2000) allows
you to perform tasks by clicking menu items and small pictures
(called icons). Windows also allows more than one program to
run at a time as well as share information between programs.
When you turn on your Notebook for the first time, the
Windows setup begins automatically.
INDOWS
W
PERATING SYSTEM MANUAL
2000 O
OTEBOOK OPERATING SYSTEM
N
1-1
Page 6
Windows
Customizing the Windows Desktop
Desktop
See also
Windows Help for detailed
information on customizing
your desktop.
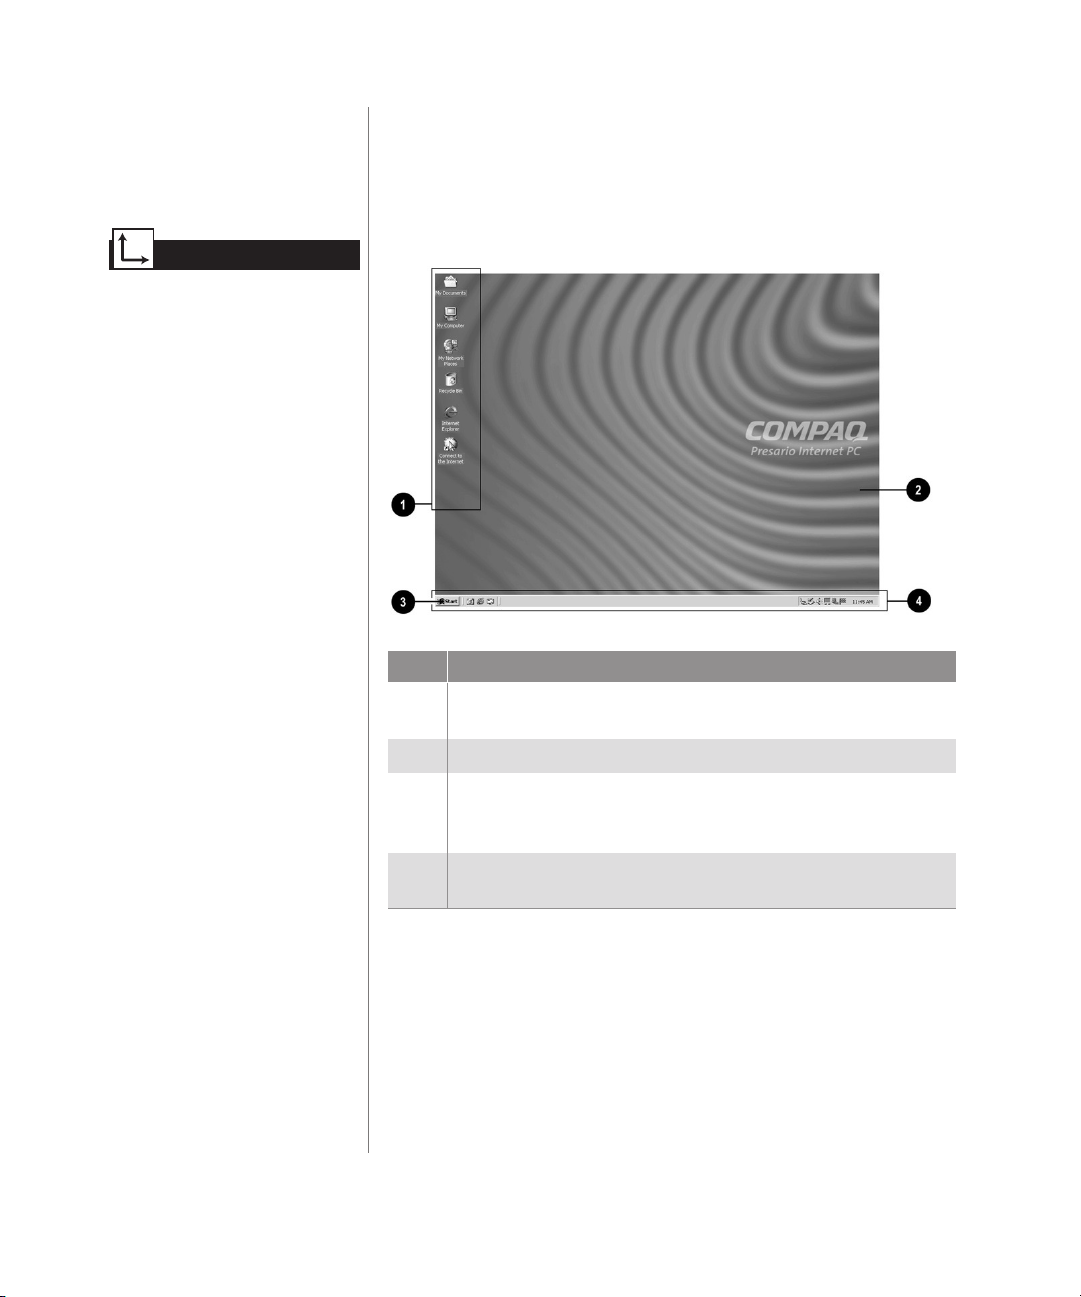
The Windows desktop is the screen you see when the Windows
startup is complete. You can arrange your desktop exactly the
way you want it.
No. Description
Icons represent files, folders, programs, and other objects that
1
you use.
Windows desktop is the basic Windows work area.
2
Start button displays a menu of commands for starting programs,
3
changing system settings, locating files, updating your system,
and getting help.
Windows taskbar provides a way to organize your programs and
4
files and navigate between files.
OTEBOOK OPERATING SYSTEM
1-2 N
W
INDOWS
PERATING SYSTEM MANUAL
2000 O
Page 7

Did you know...
You can also arrange your
icons in organized rows by
right-clicking the Windows
desktop and choosing Line Up
Icons from the Shortcut menu.
Arranging Icons
You can arrange the icons on your desktop for quick and easy
access to frequently used items.
To arrange icons, complete the following steps:
1. Right-click anywhere on the
2. From the
Shortcut
menu, select
Windows desktop
Arrange Icons
.
.
3. Choose the method you want to arrange the icons.
You can arrange icons in the following ways:
–
By Name (alphabetically)
–
By Type (file extension)
–
By Size (size of the file)
–
By Date (date the file was created or edited)
–
Auto Arrange (automatic icon arrangement)
Selecting a Background
INDOWS
W
PERATING SYSTEM MANUAL
2000 O
If you occasionally like a change of scenery, you can change
the background setting on your desktop for a different look
anytime you wish. You can install an assortment of wallpapers
or you can use the default wallpaper provided by
Windows 2000.
To change the background on your desktop, complete the
following steps:
1. Right-click the
Windows desktop
and select
Properties
from the Shortcut menu.
2. Select the
Background
tab and click
Pattern
.
3. From the Patterns list, choose the background you prefer.
4. Click
OK
to close the Pattern dialog box, then click OK to
apply the background.
OTEBOOK OPERATING SYSTEM
N
1-3
Page 8

Did you know...
You can download new
screen savers from the
Internet or buy them in your
local computer store.
Adding a Screen Saver
You can add or change your Notebook’s screen savers at any
time. Using screen savers allows you to change the scenes on
your display screen when your Notebook is inactive for a
specified period of time.
To add a screen saver, complete the following steps:
Did you know...
All screen savers and other
media downloaded from the
Internet consume space on
your hard disk.
Did you know...
You can set the length of time
you want the computer to be
inactive before the screen
saver begins.
1. Right-click the
Windows desktop
and select
Properties
from the Shortcut menu.
2. Select the
Screen Saver
tab.
3. From the Screen Saver drop-down list, select the design
you prefer.
4. Click the
Settings
button to choose options for the
screen saver.
5. Click
6. In the box next to
Preview
to view the screen saver.
Wait
, enter the number of minutes you
want your Notebook to wait before starting the screen saver.
7. Once you have selected the screen saver and settings you
want, clickOK to accept the changes and close the
dialog box.
OTEBOOK OPERATING SYSTEM
1-4 N
W
INDOWS
PERATING SYSTEM MANUAL
2000 O
Page 9
Windows Help
Finding Help
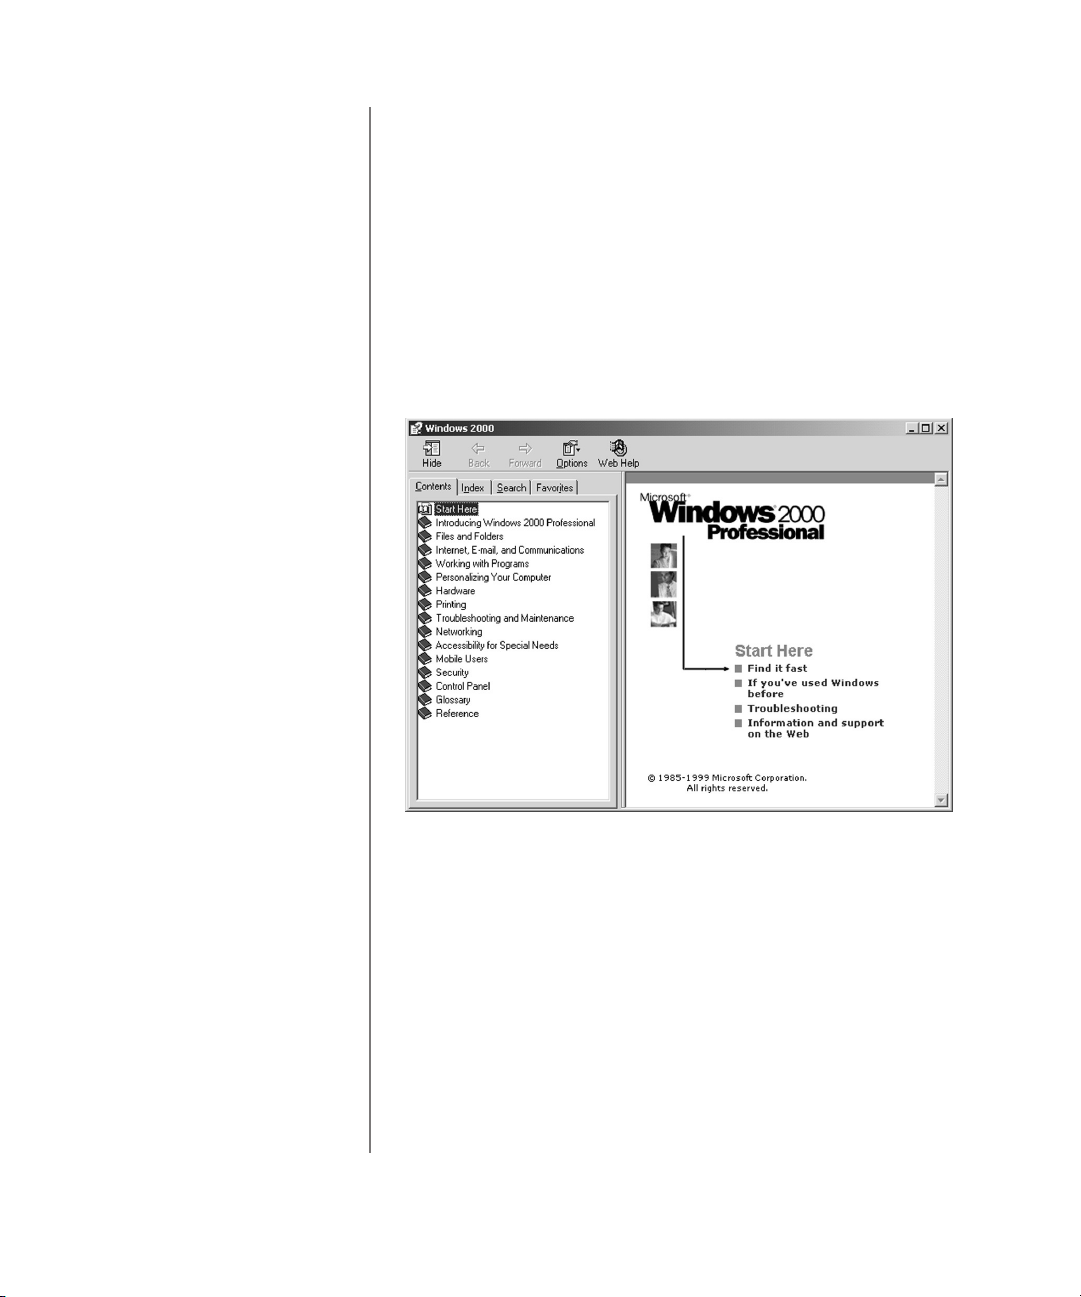
Windows Help is a valuable tool that can provide answers to
many of your questions about Windows.
To search for information in Windows Help, complete the
following steps:
1. Click the
2. Select the
for help.
Start
button, then click
Contents, Index, Search
Help
, or
.
Favorites
tab
INDOWS
W
PERATING SYSTEM MANUAL
2000 O
OTEBOOK OPERATING SYSTEM
N
1-5
Page 10
File Searches
Searching for Files or Folders
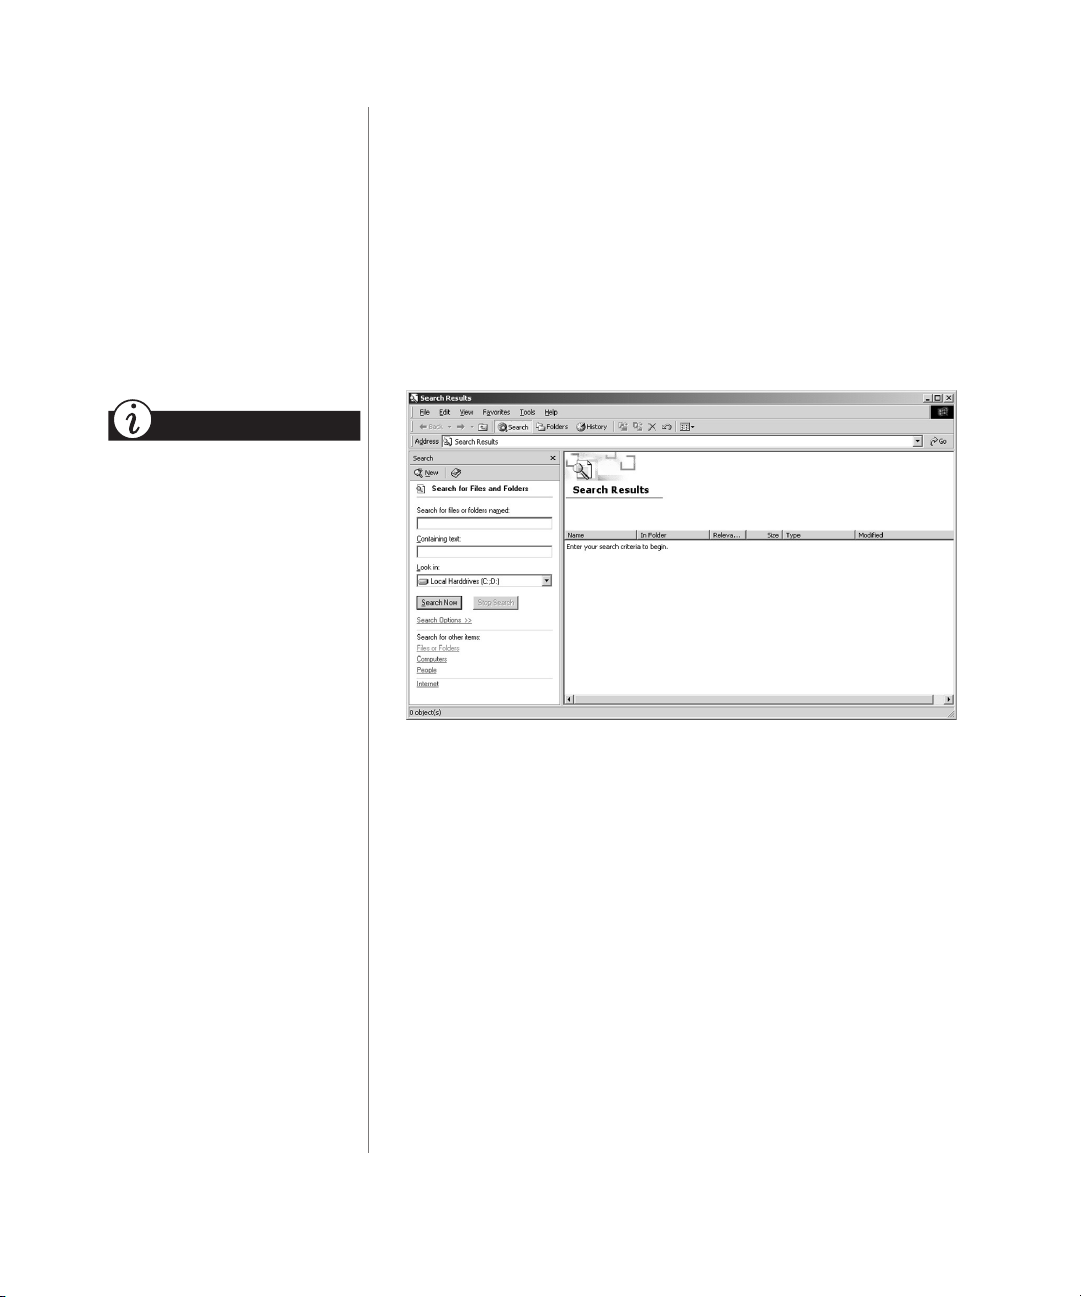
In Windows you can search for files or folders by entering a
complete or partial name, the date the file was created, or the file
type or size.
To search for a file or folder, complete the following steps:
Did you know...
From the Date tab in Find File
or Folders, you can provide a
time frame in which the file
was created or modified to help
search for and find a file
or folder.
From the Advanced tab, you
can specify the type or size of
document to search for.
1. From the Windows taskbar, click the
2. Point to
3. In the
Search for files or folders named
Search
and select
For File or Folders
Start
button.
.
box, type the name
of the file or folder, or as much of it as you can remember.
4. Specify the drive, then click the
5. Click the check box next to
Search Now
button.
Include subfolders
.
OTEBOOK OPERATING SYSTEM
1-6 N
6. Click
Find Now
. Your Notebook will search the drive and
subfolders you selected and display a list of files or folders
that match the search options you specified.
W
INDOWS
PERATING SYSTEM MANUAL
2000 O
Page 11

Folders
Creating New Folders
Windows allows you to create folders to organize your files. For
example, you can create a folder and name it Budget2000. In
this folder you could store all files related to expenses, profits,
taxes, and so forth.
To create a folder, complete the following steps:
1. Right-click the Start button and choose Explore from the
Shortcut menu to open Windows Explorer.
2. From Windows Explorer, click to select the drive in which
you want to place the new folder.
3. Right-click in Explorer and choose New from the
Shortcut menu.
4. Choose Folder.
5. Type a name for the new folder and press Enter.
Did you know...
Deleted files and folders are
temporarily stored on the hard
disk. To permanently remove
these files from your hard disk,
you must periodically empty
the Recycle Bin.
To empty the Recycle Bin,
right-click the Recycle Bin
icon, then select Empty
Recycle Bin.
INDOWS
W
PERATING SYSTEM MANUAL
2000 O
Deleting Files and Folders
To delete a file or folder, complete the following steps:
1. Right-click the file or folder you want to delete, then click
Delete from the pop-up menu. The Confirm File Delete
dialog box is displayed.
2. Click Ye s if you want to delete the file or folder. If you do not
want to delete the file or folder, click No or Cancel.
OTEBOOK OPERATING SYSTEM
N
1-7
Page 12

Shortcuts
Did you know...
To use the shortcut, doubleclick the new shortcut icon.
Creating Shortcuts
Shortcuts are used to open files and programs without having to
select them from the Start menu or from their permanent
location on the hard drive. If you frequently use a certain file or
folder, you can place a shortcut for it on your desktop as an icon
or on the Start menu for quick access.
To create a shortcut to a file or folder, complete the
following steps:
1. Right-click the Start button and choose Explore from the
Shortcut menu to open Windows Explorer.
2. From Windows Explorer, locate the file or folder you want to
use to create the shortcut.
3. Click the file or folder to select it.
4. Right-click the selected file or folder and choose Create
Shortcut from the Shortcut menu.
5. Right-click and drag the shortcut to the Windows desktop, or
a particular folder.
6. When Windows prompts you with a Shortcut menu, choose
Create Shortcut(s) Here.
OTEBOOK OPERATING SYSTEM
1-8 N
W
INDOWS
PERATING SYSTEM MANUAL
2000 O
Page 13

Internet Zone
Reprogramming the Internet Zone Buttons
Buttons
The Internet Zone buttons,
located above your
Notebook’s keyboard,
automatically connect you
to the Internet. These
buttons give you one-touch
access to your most
frequently used Internet
activities.
You can reprogram the Internet Zone buttons to reflect your
personal preferences.
To reprogram your Internet Zone buttons, complete the
following steps:
1. From the Windows taskbar, click Start, point to Settings and
then click Control Panel.
2. Double-click the Easy Access Buttons ÿ icon.
3. To reprogram the buttons, follow the instructions provided in
the dialog box.
INDOWS
W
PERATING SYSTEM MANUAL
2000 O
OTEBOOK OPERATING SYSTEM
N
1-9
Page 14

Windows
Using Windows Accessories
Accessories
Windows is equipped with a number of accessories. The
following are brief descriptions of the accessories available
to you:
• Accessibility allows you to configure Windows for your
vision, hearing, and mobility needs.
• Communications offers the following features:
– Network and Dial-up Connections enables you to
connect to another computer or to a network.
– HyperTerminal enables you to connect to a remote
computer, send and receive files, and connect to computer
bulletin boards or similar information services.
– Phone Dialer enables you to place calls using your
computer. It also stores a list of your calls for you to
review as needed.
• Entertainment offers the following features:
– Windows Media Player allows you to play multimedia
files (audio and video) saved in these and other
formats:
.wav, .mid, .rmi, .avi
, and
.mpg
.
Did you know...
You can attach a microphone to
your Notebook and record
sounds using the Windows
Sound Recorder.
OTEBOOK OPERATING SYSTEM
1-10 N
– CD Player allows you to play CD Audio on conventional
CD discs.
– Sound Recorder allows you to record sounds on
your Notebook.
– Volume Control provides the power to control
Windows sound. You can control the balance between the
left and right speakers, change the volume, and mute
certain devices.
W
INDOWS
PERATING SYSTEM MANUAL
2000 O
Page 15

• Games provides several activities for your entertainment.
• System Tools offers various utilities for your system,
including Clipboard Viewer, Disk Cleanup, Disk
Defragmenter, and ScanDisk.
• Calculator provides a means to perform simple and
complex calculations.
• Imaging allows you to view, zoom, rotate, and print a
previewed image.
• Notepad offers a place to work with unformatted text.
• Paint allows you to create and edit graphics.
• WordPad provides basic word-processing features.
To use any one of these accessories, complete the
following steps:
1. From the Windows taskbar, click the Start button, and then
point to Programs.
2. Click Accessories and select the feature you want to use.
INDOWS
W
PERATING SYSTEM MANUAL
2000 O
OTEBOOK OPERATING SYSTEM
N
1-11
Page 16

OTEBOOK OPERATING SYSTEM
1-12 N
W
INDOWS
PERATING SYSTEM MANUAL
2000 O
Page 17

Notebook
Configuration
The Control Panel, 2-2
Modem Settings, 2-6
Power Management, 2-9
Network Connection for
Internal Ethernet
Hardware, 2-15
System Recovery CD, 2-20
This chapter shows you how to configure your Presario
Notebook after you have set up Microsoft Windows 2000
Professional operating system (herein after referred to as
Windows or Windows 2000).
This guide is a supplemental reference to the Microsoft 2000
Professional guide that came with your Windows 2000
Professional software.
W
INDOWS
PERATING SYSTEM MANUAL
2000 O
OTEBOOK CONFIGURATION
N
2-1
Page 18

The Control
Adding or Removing Hardware
Panel
This section covers:
• Adding or Removing
Hardware
• Adding/Removing
Windows Components
• Adding or Removing
Programs
Tip
If you are ever prompted for
Windows 2000 CD, go to the
following directory on your
hard drive: C:\i386.
Most hardware devices are plug and play compliant. Windows
will locate the proper device driver or prompt you to insert the
media provided by your hardware manufacturer. Follow the
on-screen instructions and use any diskette or CD that has been
provided by your hardware manufacturer. If no diskette or CD
has been provided, you may find the drivers in the following
directory: C:\i386.
Adding/Removing Windows Components
To add or remove different components from Windows,
complete the following steps:
1. Click the Start button, point to Settings, then to
Control Panel.
2. Double-click the Add/Remove Programs
welcome dialog box is displayed.
3. Click the Add/Remove Windows Components button. The
Windows Components Wizard is displayed showing the
various components of your Notebook.
icon. A
¤
OTEBOOK CONFIGURATION
2-2 N
4. Select the component you want to configure, then click the
Details button. The Component Details dialog box
is displayed.
5. Select the component(s) you want to add or remove, and
click Next. The adding or removing process begins. You are
alerted when it is complete.
W
INDOWS
PERATING SYSTEM MANUAL
2000 O
Page 19

Adding or Removing Programs
To add or remove programs on your Notebook, complete the
following steps:
1. Click the Start button, point to Settings, then to
Control Panel.
2. Double-click the Add/Remove Programs
icon. A
¤
welcome dialog box is displayed.
3. Click Next. The Add/Remove Programs dialog box is
displayed with the following three buttons on its right side:
– Change or Remove Programs
– Add New Programs
– Add/Remove Windows Components
4. Click one of the buttons to display its dialog box and follow
the on-screen instructions.
W
INDOWS
PERATING SYSTEM MANUAL
2000 O
OTEBOOK CONFIGURATION
N
2-3
Page 20

Change or Remove Programs
When you click the Change or Remove Programs button, you
see all the programs that are installed on your Notebook.
Caution:
Ä
deleting program files and folders in Windows Explorer.
You can display these programs in the Add/Remove Programs
dialog box according to their name, size, frequency of use, or
date last used.
Caution:
Ä
already there. Removing programs incorrectly can damage software you
want to keep. Programs you have installed with the Add/Remove Programs
utility can later be safely deleted with that utility.
To change or remove a program, complete the following steps:
1. Click the Start button, point to Settings, then to
Control Panel.
2. Double-click the Add/Remove Programs
welcome dialog box is displayed.
3. Select the program you want to change or remove.
4. Click the Change/Remove button. The Confirm File
Deletion dialog box is displayed.
Caution:
Ä
Add/Remove button. Make sure you want to remove the program before
clicking the Add/Remove button.
Programs should never be removed from your Notebook by
Programs added to your Notebook interact with the software that is
¤
icon. A
You may not be prompted to confirm deletion after clicking the
OTEBOOK CONFIGURATION
2-4 N
5. Click Ye s if you want to remove the program or click No if
you don’t want to remove it.
Add New Programs
You can use the Add New Programs feature to do one of the
following:
• Add programs using a diskette or a CD
• Add new Windows features and device drivers using
Windows 2000 updates
W
INDOWS
PERATING SYSTEM MANUAL
2000 O
Page 21
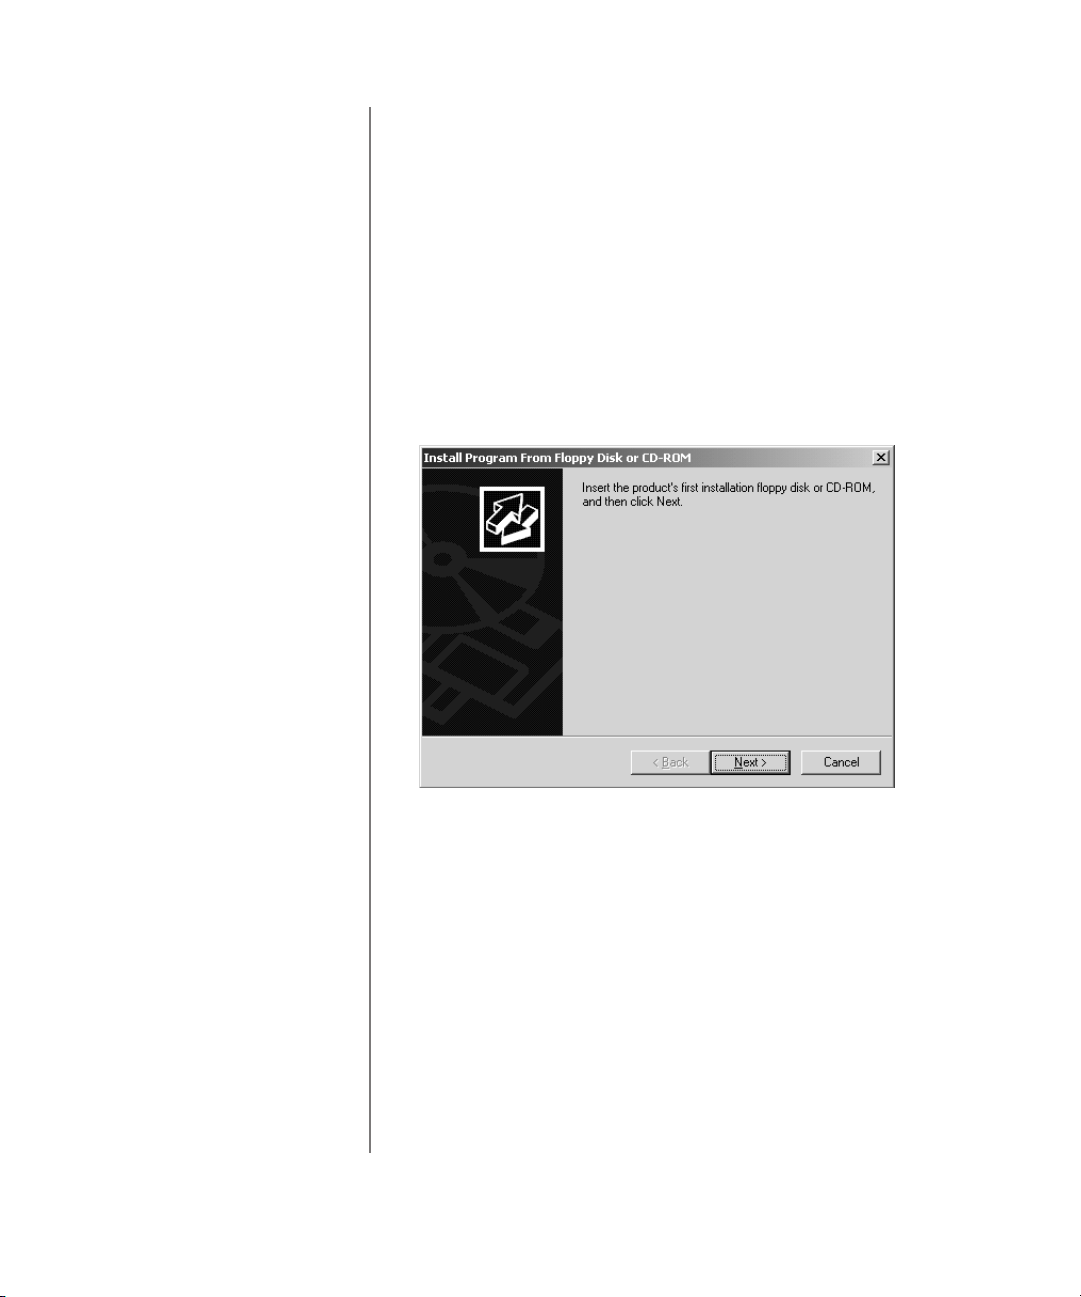
Add New Programs Using a Diskette or a CD
To add new programs, complete the following steps:
1. Click the Start button, point to Settings, then the
Control Panel.
2. Double-click the Add/Remove Programs
¤
icon. A
welcome dialog box is displayed.
3. Click the CD or Floppy button. The Install Program from the
Floppy Disk or CD-ROM Wizard is displayed. The Wizard
prompts you to insert a CD or a floppy disk.
4. Once you insert the CD or the diskette, the Add/Remove
Wizard selects the setup file from the CD or the diskette and
installs the program on your Notebook.
W
INDOWS
PERATING SYSTEM MANUAL
2000 O
Note:
If the Wizard does not select the setup file, click
correct setup file on your diskette or CD.
Caution:
Ä
the packaging states clearly that it is compatible with your Windows
operating system.
When selecting software for your Presario Notebook, make sure
Browse
OTEBOOK CONFIGURATION
N
and find the
2-5
Page 22

Modem
Settings
Country Selection for the Compaq 56K V.90
PCI Modem
(available on select models)
This section covers:
• Country Selection for
the Compaq 56K V.90
PCI Modem
• Audio Indication During
Modem Dial-up
• Zoom Video Audio
You must set the modem on your Notebook to the country in
which you are located. If the modem is set for another country, it
could be configured incorrectly and not work properly. In
addition, the incorrect setting could violate the
telecommunication regulations and laws of your country.
To change the assigned country for your modem, complete the
following steps:
1. Select the Start button, point to Settings, then click the
Control Panel.
2. Double-click the Phone and Modem Options icon. The
Phone and Modem Options dialog box is displayed.
3. In the Phone and Modem Options dialog box, click the New...
button. The New Location dialog box is displayed.
OTEBOOK CONFIGURATION
2-6 N
4. In the New Location dialog box, select the appropriate
location, then click OK to return to the Phone and Modem
Options dialog box.
5. Click OK to close the Phone and Modem Options.
W
INDOWS
PERATING SYSTEM MANUAL
2000 O
Page 23

Audio Indication During Modem Dial-up
If you want to hear dial tones during modem dial-up, change the
default setting by completing the following steps:
1. In the right corner of the taskbar, double-click the
÷
Vol um e
2. Click the Options menu, then Properties to open the
Properties dialog box.
3. Check the Phone option, then click OK. The Phone section is
displayed on the Volume Control panel.
icon to open the Volume Control panel.
W
INDOWS
PERATING SYSTEM MANUAL
2000 O
4. Under Phone, ensure that the box next to Mute
is not checked.
5. Click the x at the top of the dialog box to close the Volume
Control panel.
OTEBOOK CONFIGURATION
N
2-7
Page 24

Zoom Video Audio (available on select models)
When using a Zoom Video Card, the audio capabilities are set to
mute by default. To enable the audio sound, follow these steps:
1. In the right corner of the taskbar, double-click the
÷
Vol um e
2. Click Options, then Properties to open the Properties
dialog box.
3. Ensure that the box next to the IIS option is checked, and
click OK to confirm. The IIS section is displayed on the
Volume Control panel.
icon to open the Volume Control panel.
OTEBOOK CONFIGURATION
2-8 N
4. Under IIS, ensure that the box next to Mute is not checked.
5. Close the Volume Control panel.
W
INDOWS
PERATING SYSTEM MANUAL
2000 O
Page 25

Power
Changing Power Management Setting
Management
This section covers:
• Changing Power
Management Setting
• Changing the Power
Switch Settings
• Changing the Critical-
Battery Setting
To change the Power Management settings, do the following:
Caution:
Ä
behavior to change. Compaq recommends keeping these settings at the
original default settings as described in this document.
1. From the Windows taskbar, click the Start button, point to
Settings, then click Control Panel.
2. In the Control Panel window, double-click the Power
Options
displayed.
Changing any of these settings could cause your Notebook
:
icon. The Power Options Properties dialog box is
W
INDOWS
PERATING SYSTEM MANUAL
2000 O
3. Select the Power Schemes tab.
4. Use the various drop-down lists to change any settings as
necessary. Click Apply or the changes will not be made.
5. Click OK to accept the changes and close the dialog box.
OTEBOOK CONFIGURATION
N
2-9
Page 26

Changing the Power Switch Settings
To change the Power Switch settings to the Hibernate mode on
your Notebook, follow these steps:
Caution:
Ä
than Hibernate, data loss will occur in a low-battery state.
If you change the function of the
Power
button to anything other
1. Click the Start button, point to Settings, then click Control
Panel.
2. Double-click the Power Options
Options Properties dialog box
icon to open the Power
,
then select the Advanced tab.
3. Under Power Options, select the following option from the
drop-down list
computer: Hibernate
:
When I press the power button on my
,
then click OK to close the dialog box.
OTEBOOK CONFIGURATION
2-10 N
W
INDOWS
PERATING SYSTEM MANUAL
2000 O
Page 27

Changing the Low-Battery Settings
Your Notebook settings on the Alarms tab are preset for
optimum performance.
The following instructions are intended only for returning
alarms to their default settings.
To reset the low battery alarm, complete the following steps:
1. In the Power Management Properties dialog box, click the
Alarms tab.
W
INDOWS
PERATING SYSTEM MANUAL
2000 O
2. Check the box next to Activate low battery alarm when
power level reaches.
3. Under the Low Battery alarm, click and drag the percentage
slider to 10%. This setting tells your Notebook to sound an
alarm when the battery power drops below ten percent.
OTEBOOK CONFIGURATION
N
2-11
Page 28
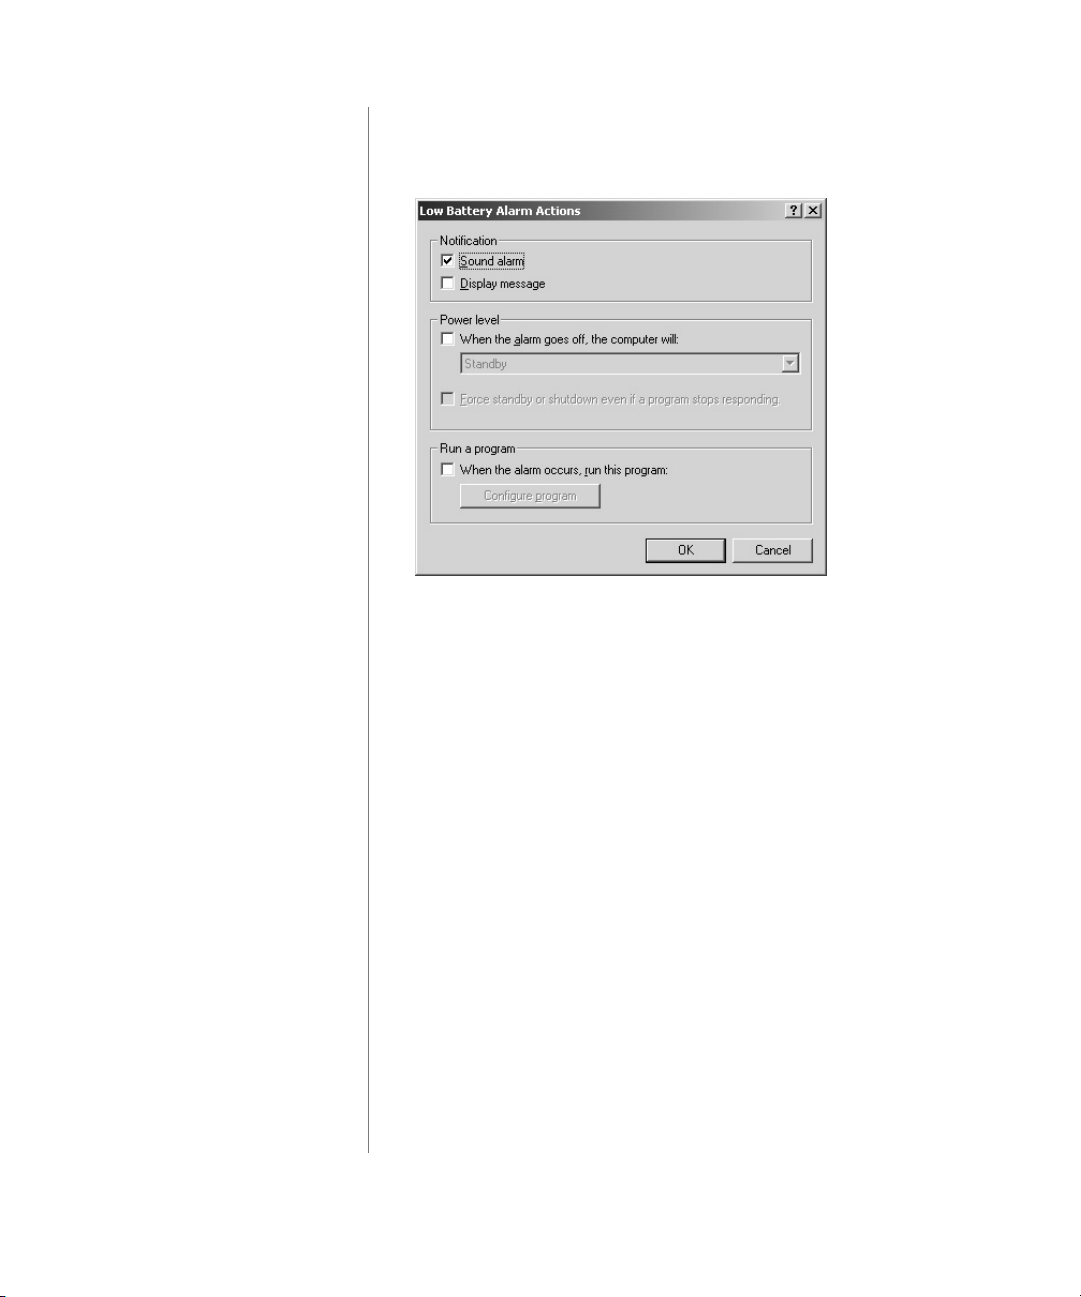
4. Click the Alarm Action button to open the Low Battery
Alarm Actions dialog box.
5. Under Notification, check the box next to Sound alarm.
This tells your Notebook to sound an alarm when the battery
power is low.
OTEBOOK CONFIGURATION
2-12 N
6. Ensure that all other boxes are not checked.
7. Click OK to close the Low Battery Alarm Actions
dialog box.
W
INDOWS
PERATING SYSTEM MANUAL
2000 O
Page 29

Changing the Critical-Battery Setting
To ensure that you do not lose data when your Notebook powers
off due to low-battery power, change the Critical-Battery setting
on your Notebook to the Hibernate mode by following
these steps:
Caution:
Ä
behavior to change. Compaq recommends keeping these at the original
default settings as described in this document.
Changing any of these settings could cause your Notebook
1. Click Start, point to Settings, then click Control Panel.
2. Double-click the Power Options
icon to open the Power
Options Properties dialog box.
W
INDOWS
PERATING SYSTEM MANUAL
2000 O
3. Select the Alarms tab, then set the Critical Battery Alarm
to 0 percent by sliding the bar flush to the left.
4. Under Critical Battery Alarm, click the Alarm Action…
button to open the Critical Battery Alarm Actions dialog box.
Caution:
Ä
battery gauge does not calibrate and may function improperly.
If the Critical Battery Alarm is set at anything other than 0%, the
OTEBOOK CONFIGURATION
N
2-13
Page 30

5. Select When the alarm goes off, the computer will
and select Hibernate.
6. Click OK to confirm your selection, then click OK to close
the Power Options Properties dialog box.
OTEBOOK CONFIGURATION
2-14 N
W
INDOWS
PERATING SYSTEM MANUAL
2000 O
Page 31

Network
Connection for
Understanding Network Connection
Problems
Internal
Ethernet
Hardware
This section covers:
• Understanding Network
Connection Problems
• Creating a Hardware
Profile in Windows 2000
• Configuring the No
Ethernet Profile
• Testing the No
Ethernet Profile
• Deleting a Hardware
Profile in Windows 2000
If your Notebook is configured with an internal Ethernet
controller (network card), and you have configured the Ethernet
hardware in Windows, you may encounter one or both of the
following situations:
• You experience delays while starting Windows or when
using certain network-related software programs such as
Microsoft Outlook or other e-mail programs when your
Notebook is not connected to the network (the network cable
is not physically plugged into your Notebook).
• You use the Notebook in both home and office situations in
which you are logged into the office network directly
through the Ethernet hardware and logged into a network at
home (either the office network or an ISP network) through
the modem. In this situation, when you are logged into the
network through the modem you will not be able to map to
network drives or access other network features that are
typically present when your Notebook is logged into a
network at the office.
These problems are associated with the functionality of
Windows. If Ethernet hardware is configured in a Notebook,
Windows tries to access the network through the Ethernet
hardware. If a connection does not exist, then startup delays or
loss of functionality can occur.
W
INDOWS
PERATING SYSTEM MANUAL
2000 O
One way to overcome these situations is to use the Hardware
Profile feature of Windows. This feature allows you to create
two different Hardware Profiles that are selectable upon startup:
one with the internal Ethernet hardware enabled and one with
the internal Ethernet hardware disabled.
OTEBOOK CONFIGURATION
N
2-15
Page 32
Creating a Hardware Profile in
Windows 2000
To create a hardware profile in Windows 2000, complete the
following steps:
1. Start Windows 2000 with all hardware fully enabled. If
prompted to log on to a network or into Windows, enter your
login name and password and click OK.
Note: You must log on with Administrator privilege to create hardware
profiles and change your hardware settings.
2. Right-click My Computer on the Windows desktop and
click Properties to open the System Properties dialog box.
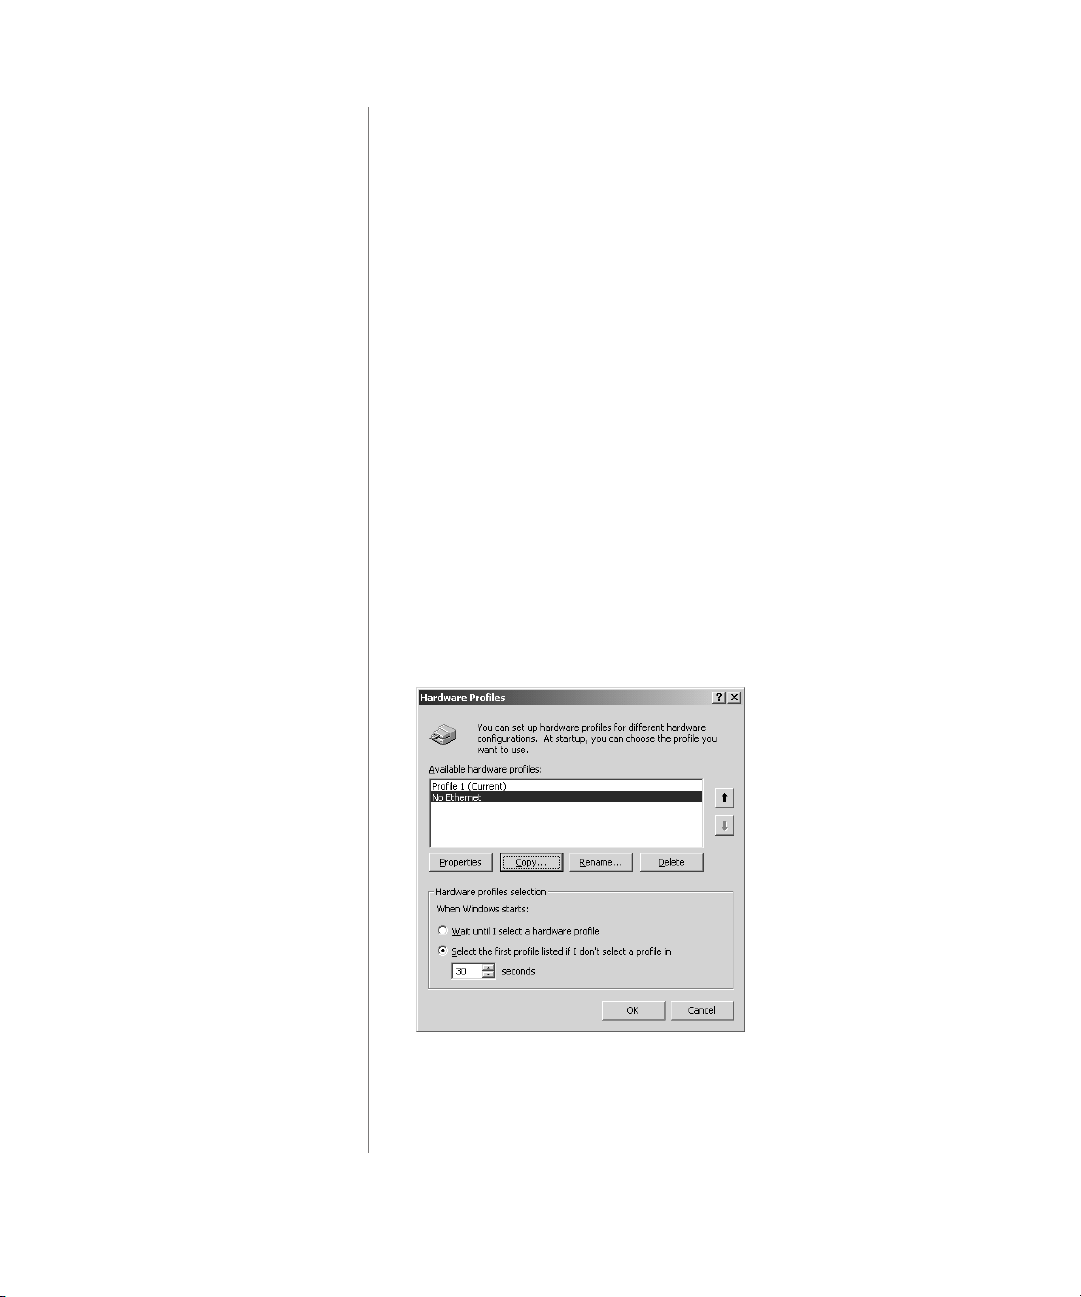
3. Select the Hardware tab, then click the Hardware Profiles
button to open the Hardware Profiles dialog box.
4. Select Profile 1 (Current) and click Copy.
5. Type No Ethernet as the name of the new profile and
click OK.
OTEBOOK CONFIGURATION
2-16 N
Note: No Ethernet” should show up along with “Profile 1 (Current)” in the
Hardware Profiles tab.
6. Click OK to close the System Properties dialog box.
W
INDOWS
PERATING SYSTEM MANUAL
2000 O
Page 33

Configuring the No Ethernet Profile
Two hardware profiles exist: the original configuration profile
and the No Ethernet profile. You must restart the No Ethernet
profile and configure it to turn off the Ethernet hardware.
To configure the No Ethernet profile, complete the following
steps:
1. Restart your Notebook by clicking Start, Shutdown, then
Restart from the drop-down selections.
2. You are then prompted to pick the Hardware Profile that
includes the original configuration and the No Ethernet
configuration. Select No Ethernet.
3. If prompted to log on to a network or log into Windows, type
in your login name and password, then click OK.
4. When Windows starts, right-click the My Computer
g
icon on the Windows desktop and select Properties to open
the System Properties dialog box.
5. Click the Hardware tab, then click the Device Manager
button to open the Device Manager dialog box.
6. Click the + sign next to Network Adapters to expand
this option.
W
INDOWS
PERATING SYSTEM MANUAL
2000 O
OTEBOOK CONFIGURATION
N
2-17
Page 34

7. Right-click your Ethernet adapter and click the Properties
button to open the Properties dialog box for the Ethernet
Controller.
Note: The name of your Ethernet adapter may vary from system
to system.
8. Click the General tab in the Device Usage drop-down field
of the Properties dialog box, then select Do not use this
device in the current hardware profile (disable).
Note: In the Device Manager window, an X is displayed over the icon of the
Ethernet Controller.
9. Click OK to close the Ethernet Controller Properties dialog
box, click the X button at the top right-hand corner to close
the Device Manager window, then click OK to close the
System Properties window.
Both hardware profiles are configured as follows:
• The original configuration contains all of the hardware
present in your Notebook and should be used when the
network is accessed directly through the built-in
Ethernet Controller.
OTEBOOK CONFIGURATION
2-18 N
• The No Ethernet configuration has the built-in Ethernet
Controller hardware turned off. This profile is used
whenever the Ethernet controller is not connected
to a network.
W
INDOWS
PERATING SYSTEM MANUAL
2000 O
Page 35

Testing the No Ethernet Profile
You must restart Windows to test the No Ethernet profile. To test
the No Ethernet profile, complete the following steps.
1. Restart your Notebook by selecting Start, Shutdown, and
then Restart from the drop-down menu.
2. When prompted for the Hardware Profile, select
No Ethernet.
3. When prompted, type in your login password.
Note: The Windows login dialog box is displayed rather than the Network
login dialog box. If your Notebook is set for multiple users, you will be
prompted to log on.
W
INDOWS
PERATING SYSTEM MANUAL
2000 O
OTEBOOK CONFIGURATION
N
2-19
Page 36

Deleting a Hardware Profile in
Windows 2000
If at any time you would like to delete the No Ethernet hardware
profile, complete the following steps:
1. Start your Notebook using the Profile 1 hardware profile. If
prompted to log on to a network or into Windows, enter your
login name and password, then click OK.
2. Right-click the My Computer
icon on the Windows
g
desktop and select Properties to open the System Properties
dialog box.
3. In the System Properties dialog box, click the Hardware tab.
4. Click the Hardware Profiles button to open the Hardware
Profiles dialog box.
5. Select No Ethernet, click Delete, then click Ye s to delete the
hardware profile.
6. Click OK to close the System Properties dialog box.
7. Restart your Notebook by clicking Start, Shutdown, and
then Restart from the drop-down selections.
Your Notebook should go directly into Windows without
prompting for the Hardware Profile when it is restarted.
OTEBOOK CONFIGURATION
2-20 N
W
INDOWS
PERATING SYSTEM MANUAL
2000 O
Page 37

System
Using the QuickRestore CD
Recovery CD
In the event of a system failure, call the Compaq Customer
Support to send you the QuickRestore CD. You can use the
QuickRestore Recovery CD to bring your Notebook back to an
operating state.
Caution:
Ä
personal files, software, and data to diskettes or other external storage
devices before proceeding.
To run the QuickRestore CD, complete the following steps:
Caution:
Ä
(QuikDock), you must turn the power to your Notebook off, disconnect it
from the QuikDock, and plug it into an external power socket. Disconnect
any printer cables or other peripherals from the Notebook before using Quick
Restore.
1. Insert the Quick Restore CD (bootable disk) in the CD drive,
and press Enter. A WARNING message is displayed
advising that you are attempting to totally reformat your hard
drive. Confirm by following the next step.
2. Press 1 and then Enter to continue. The Power Quest Quick
Restore Wizard starts copying and uncompressing data to the
local hard drive. This process takes approximately
7 to 10 minutes.
Full Restore deletes all information on your hard disk. Save all
if your Presario Notebook is attached to a Port Replicator
W
INDOWS
PERATING SYSTEM MANUAL
2000 O
3. When prompted, remove the CD from the CD drive and
restart your Notebook to apply the changes.
After the operating system completes the installation process,
you may install any application software.
OTEBOOK CONFIGURATION
N
2-21
Page 38

OTEBOOK CONFIGURATION
2-22 N
W
INDOWS
PERATING SYSTEM MANUAL
2000 O
Page 39

INDEX
A
Accessibility
Accessories
Accessibility feature
CD Player
Communication feature
Entertainment feature
Sound Recorder
1-10
1-10
B
Background selection
1-10
1-3
1-10
1-10
1-10
Desktop
arrangement
icons
1-2
icons arranging
icons auto arrange
icons lining up
Start button
taskbar
wallpaper
Windows
Dial-up audio indication
Dial-Up Networking
1-2
1-3
1-3
1-3
1-2
1-2
1-3
1-2
1-10
2-7
C
Calculator
Calls
list
Communications
Control Panel
adding programs
removing programs
D
Deleting
files
INDOWS
W
folders
1-11
1-10
1-10
1-7
1-7
PERATING SYSTEM MANUAL
2000 O
2-3
2-3
E
Entertainment
Ethernet
configuring
testing
Ethernet hardware
1-10
2-17
2-18
F
Files
deleting
search
1-7
1-6
2-15
I
NDEX
-1
Page 40

Folder
creating
deleting
search
Full Restore
1-7
1-7
1-6
2-21
N
Network and Dial-up Connections
Network connection problems
Notepad
1-11
2-15
1-10
G
Games
1-11
H
Hardware profile
creating
deleting
Ethernet
Hearing
accessibility
Help
1-5
HyperTerminal
2-16
2-20
2-17
1-10
1-10
I
Icons
1-1, 1-2
arrangement
auto arrange
lining up
Imaging
1-11
1-3
1-3
1-3
L
Low-battery setting
2-11
M
Media Player
Mobility
accessibility
Modem dial-up
Modem settings
audio indication during dial-up
country selection
1-10
1-10
2-7
2-6
2-7
P
Paint
1-11
Phone Dialer
Power Management
Power switch settings
Preview
screen savers
Programs
adding
adding using a CD
adding using a diskette
changing
removal
1-10
2-9
1-4
2-4
2-4
2-4
Q
QuickRestore CD
2-21
R
Recovery CD
Removing
programs
Windows components
2-21
2-3
S
Screen savers
adding
changing
options
preview
Searching
for files
for folders
1-4
1-4
1-4
1-4
1-6
1-6
2-10
2-5
2-5
2-2
NDEX
I
-2 W
INDOWS
PERATING SYSTEM MANUAL
2000 O
Page 41

Setup
Microsoft Windows
Shortcuts
creating
Sound Recorder
Start button
Startup
Windows
System Tools
1-8
1-2
1-2
1-11
T
Taskbar
1-2
V
Vision
accessibility
Volume Control
W
Wallpaper
desktop
1-3
1-10
1-10
1-10
1-1
Windows
accessories
Communications feature
desktop
desktop arrangement
desktop wallpaper
Entertainment
games
help
1-5
HyperTerminal
icons
Media Player
Network and Dial-Up Connections
Phone Dialer
screen savers
startup
taskbar
Windows components
adding
removing
WordPad
1-10
1-2
1-2
1-3
1-10
1-11
1-10
1-1
1-10
1-10
1-4
1-2
1-2
2-2
2-2
1-11
Z
1-10
1-10
INDOWS
W
PERATING SYSTEM MANUAL
2000 O
Zoom Video audio
2-8
I
NDEX
-3
Page 42

NDEX
I
-4 W
INDOWS
PERATING SYSTEM MANUAL
2000 O
 Loading...