

Page 1

Contents
&KDSWHU#4##,QWURGXFWLRQ# 1#1#1#1#1#1#1#1#1#1#1#1#1#1#1#1#1#1#1#1#1#1#1#1#1#1#1#1#1#1#1#1#1#1#1#1#1#1#1404
:KR#6KRXOG#5HDG#7KLV#*XLGH"1#1#1#1#1#1#1#1#1#1#1#1#1#1#1#1#1#1#1#1#1#1#1#1#1#1#1 405
8VLQJ#0\#3UHVDULR³*HWWLQJ#6WDUWHG#DQG#%H\RQG##1#1#1#1 405
6\PEROV#DQG#*UDSKLFV#8VHG1#1#1#1#1#1#1#1#1#1#1#1#1#1#1#1#1#1#1#1#1#1#1#1#1#1#1#1#1 406
&RPSXWHU#,OOXVWUDWLRQV#DQG#)HDWXUHV# 1#1#1#1#1#1#1#1#1#1#1#1#1#1#1#1406
:KHUH#&DQ#,#)LQG#,QIRUPDWLRQ"1#1#1#1#1#1#1#1#1#1#1#1#1#1#1#1#1#1#1#1#1#1#1#1#1#1407
6DIHW\ 1#1#1#1#1#1#1#1#1#1#1#1#1#1#1#1#1#1#1#1#1#1#1#1#1#1#1#1#1#1#1#1#1#1#1#1#1#1#1#1#1#1#1#1#1#1#1#1#1#1408
6DIHW\#DQG#&RPIRUW#1#1#1#1#1#1#1#1#1#1#1#1#1#1#1#1#1#1#1#1#1#1#1#1#1#1#1#1#1#1#1#1#1 408
&KDSWHU#5##6HWWLQJ#8S#<RXU#&RPSXWHU#1#1#1#1#1#1#1#1#1#1#1#1#1#1#1#1#1#1#1#1#1#1#1#1#1# 504
<RXU#3UHVDULR#8333#6HULHV#DW#D#*ODQFH#1#1#1#1#1#1#1#1#1#1#1#1#1#1#1#1#1#1# 505
:KDW·V#DW#WKH#)URQW"#+8333#6HULHV,# #1#1#1#1#1#1#1#1#1#1#1#1#1#1#1#1#1# 505
:KDW·V#DW#WKH#%DFN"#+8333#6HULHV,##1#1#1#1#1#1#1#1#1#1#1#1#1#1#1#1#1#1# 505
<RXU#3UHVDULR#:333#6HULHV#DW#D#*ODQFH#1#1#1#1#1#1#1#1#1#1#1#1#1#1#1#1#1#1# 506
:KDW·V#DW#WKH#)URQW"#+:333#6HULHV,# #1#1#1#1#1#1#1#1#1#1#1#1#1#1#1#1#1# 506
MY P
RESARIO—GETTING STARTED AND BEYOND
:KDW·V#DW#WKH#%DFN"#+:333#6HULHV,##1#1#1#1#1#1#1#1#1#1#1#1#1#1#1#1#1#1# 506
3OXJ#,Q#DQG#*R$ 1#1#1#1#1#1#1#1#1#1#1#1#1#1#1#1#1#1#1#1#1#1#1#1#1#1#1#1#1#1#1#1#1#1#1#1#1#1#1#1# 507
6HWWLQJ#8S#<RXU#&RPSXWHU#1#1#1#1#1#1#1#1#1#1#1#1#1#1#1#1#1#1#1#1#1#1#1#1#1# 507
C
ONTENTS
i
Page 2

5HJLVWUDWLRQ #1#1#1#1#1#1#1#1#1#1#1#1#1#1#1#1#1#1#1#1#1#1#1#1#1#1#1#1#1#1#1#1#1#1#1#1#1#1#1#1#1#1#1 508
5HJLVWHULQJ#ZLWK#0LFURVRIW# 1#1#1#1#1#1#1#1#1#1#1#1#1#1#1#1#1#1#1#1#1#1#1#1#1 508
3ULQWHU#6HWXS #1#1#1#1#1#1#1#1#1#1#1#1#1#1#1#1#1#1#1#1#1#1#1#1#1#1#1#1#1#1#1#1#1#1#1#1#1#1#1#1#1#1509
6HWWLQJ#8S#<RXU#3ULQWHU# #1#1#1#1#1#1#1#1#1#1#1#1#1#1#1#1#1#1#1#1#1#1#1#1#1#1#1#1 509
&KDSWHU#6##:LQGRZV#%DVLFV#1#1#1#1#1#1#1#1#1#1#1#1#1#1#1#1#1#1#1#1#1#1#1#1#1#1#1#1#1#1#1#1#1#1#1# 604
)HDWXUHV#RI#WKH#:LQGRZV#'HVNWRS#1#1#1#1#1#1#1#1#1#1#1#1#1#1#1#1#1#1#1#1#1#1 605
9LHZLQJ#WKH#:LQGRZV#'HVNWRS# 1#1#1#1#1#1#1#1#1#1#1#1#1#1#1#1#1#1#1#1#1 605
8VLQJ#WKH#6WDUW#0HQX##1#1#1#1#1#1#1#1#1#1#1#1#1#1#1#1#1#1#1#1#1#1#1#1#1#1#1#1#1#1#606
:LQGRZV#+HOS 1#1#1#1#1#1#1#1#1#1#1#1#1#1#1#1#1#1#1#1#1#1#1#1#1#1#1#1#1#1#1#1#1#1#1#1#1#1#1#1#1 607
$FFHVVLQJ#:LQGRZV#2QOLQH#+HOS#1#1#1#1#1#1#1#1#1#1#1#1#1#1#1#1#1#1#1#1 607
&KDSWHU#7##8VLQJ#<RXU#&RPSXWHU##1#1#1#1#1#1#1#1#1#1#1#1#1#1#1#1#1#1#1#1#1#1#1#1#1#1#1#1#1# 704
.H\ERDUG#%DVLFV1#1#1#1#1#1#1#1#1#1#1#1#1#1#1#1#1#1#1#1#1#1#1#1#1#1#1#1#1#1#1#1#1#1#1#1#1#1#1#1 705
*HWWLQJ#WR#.QRZ#WKH#6WDQGDUG#.H\ERDUG .H\V# 1#1#1#1#1#1#1 705
.H\ERDUG#%XWWRQV1#1#1#1#1#1#1#1#1#1#1#1#1#1#1#1#1#1#1#1#1#1#1#1#1#1#1#1#1#1#1#1#1#1#1#1#1#1 706
8VLQJ#&'2'9'#&RQWURO#%XWWRQV#1#1#1#1#1#1#1#1#1#1#1#1#1#1#1#1#1#1#1#1#1 706
8VLQJ#,QWHUQHW#=RQH#%XWWRQV##1#1#1#1#1#1#1#1#1#1#1#1#1#1#1#1#1#1#1#1#1#1#1707
C
ONTENTS
8VLQJ#4XLFN#/DXQFK#:HE#%XWWRQV# #1#1#1#1#1#1#1#1#1#1#1#1#1#1#1#1#1#1708
$VVLJQLQJ#WKH#0\#3URJUDP#%XWWRQ#1#1#1#1#1#1#1#1#1#1#1#1#1#1#1#1#1#1709
$GMXVWLQJ#WKH#9ROXPH#1#1#1#1#1#1#1#1#1#1#1#1#1#1#1#1#1#1#1#1#1#1#1#1#1#1#1#1#1#1709
5HDVVLJQLQJ#WKH#+HOS#%XWWRQ##1#1#1#1#1#1#1#1#1#1#1#1#1#1#1#1#1#1#1#1#1#1#1 70:
5HDVVLJQLQJ#WKH#0\#3URJUDP#%XWWRQ#1#1#1#1#1#1#1#1#1#1#1#1#1#1#1#170;
&XVWRPL]LQJ#WKH#,QWHUQHW#=RQH#%XWWRQV#1#1#1#1#1#1#1#1#1#1#1#1#170<
3XWWLQJ#<RXU#&RPSXWHU#WR#6OHHS#1#1#1#1#1#1#1#1#1#1#1#1#1#1#1#1#1#1#1 7043
:DNLQJ#<RXU#&RPSXWHU# 1#1#1#1#1#1#1#1#1#1#1#1#1#1#1#1#1#1#1#1#1#1#1#1#1#1#17043
8QGHUVWDQGLQJ#WKH#6\VWHP#6WDWXV#/LJKWV#1#1#1#1#1#1#1#1#1#1#1# 7044
ii MY P
RESARIO—GETTING STARTED AND BEYOND
Page 3

6FUROO#0RXVH#1#1#1#1#1#1#1#1#1#1#1#1#1#1#1#1#1#1#1#1#1#1#1#1#1#1#1#1#1#1#1#1#1#1#1#1#1#1#1#1#1#1 7045
0DNLQJ#6FUHHQ#6HOHFWLRQV#1#1#1#1#1#1#1#1#1#1#1#1#1#1#1#1#1#1#1#1#1#1#1#1#1#17045
$FFHVVLQJ#6RIWZDUH#DQG#)LOHV# #1#1#1#1#1#1#1#1#1#1#1#1#1#1#1#1#1#1#1#1#1#17045
6FUROOLQJ##1#1#1#1#1#1#1#1#1#1#1#1#1#1#1#1#1#1#1#1#1#1#1#1#1#1#1#1#1#1#1#1#1#1#1#1#1#1#1#1#1#17045
6SHDNHUV 1#1#1#1#1#1#1#1#1#1#1#1#1#1#1#1#1#1#1#1#1#1#1#1#1#1#1#1#1#1#1#1#1#1#1#1#1#1#1#1#1#1#1#1#1#1 7046
7XUQLQJ#RQ#WKH#6SHDNHUV# #1#1#1#1#1#1#1#1#1#1#1#1#1#1#1#1#1#1#1#1#1#1#1#1#1#1 7046
$GMXVWLQJ#WKH#9ROXPH³$XGLR#,Q#3RUW#1#1#1#1#1#1#1#1#1#1#1#1#1#1 7046
'LVNHWWH/#+DUG#'ULYH/#&'0520/#&'05:#DQG
'9'0520#GULYHV #1#1#1#1#1#1#1#1#1#1#1#1#1#1#1#1#1#1#1#1#1#1#1#1#1#1#1#1#1#1#1#1#1#1#1#1#1#17047
8VLQJ#WKH#'LVNHWWH#'ULYH#1#1#1#1#1#1#1#1#1#1#1#1#1#1#1#1#1#1#1#1#1#1#1#1#1#1#17047
8VLQJ#WKH#+DUG#'ULYH# 1#1#1#1#1#1#1#1#1#1#1#1#1#1#1#1#1#1#1#1#1#1#1#1#1#1#1#1#1#17047
,QVHUWLQJ#D#&'#LQWR#WKH#&'0520/#&'05:/#
RU#'9'0520#'ULYH# #1#1#1#1#1#1#1#1#1#1#1#1#1#1#1#1#1#1#1#1#1#1#1#1#1#1#1#1#1#1#1#17048
5HPRYLQJ#D#'LVF#IURP#D#'ULYH#1#1#1#1#1#1#1#1#1#1#1#1#1#1#1#1#1#1#1#1#1# 7049
3OD\LQJ#DQ#$XGLR &'#1#1#1#1#1#1#1#1#1#1#1#1#1#1#1#1#1#1#1#1#1#1#1#1#1#1#1#1#1#1# 7049
3OD\LQJ#D#'9'0520#0RYLH#1#1#1#1#1#1#1#1#1#1#1#1#1#1#1#1#1#1#1#1#1#1#1#1#1 704:
&KDSWHU#8##&RQQHFWLQJ#WR#WKH#,QWHUQHW#1#1#1#1#1#1#1#1#1#1#1#1#1#1#1#1#1#1#1#1#1#1#1#1#1#1804
MY P
RESARIO—GETTING STARTED AND BEYOND
&UHDWLQJ#<RXU#2ZQ#&'V# #1#1#1#1#1#1#1#1#1#1#1#1#1#1#1#1#1#1#1#1#1#1#1#1#1#1#1704;
,QWHUQHW#9LGHR#&DPHUD #1#1#1#1#1#1#1#1#1#1#1#1#1#1#1#1#1#1#1#1#1#1#1#1#1#1#1#1#1#1#1# 704<
8VLQJ#/RJLWHFK#4XLFN&DP#([SUHVV##1#1#1#1#1#1#1#1#1#1#1#1#1#1#1#1#1#1#1#1# 704<
*HW#&RQQHFWHG##1#1#1#1#1#1#1#1#1#1#1#1#1#1#1#1#1#1#1#1#1#1#1#1#1#1#1#1#1#1#1#1#1#1#1#1#1805
89.#0RGHP 1#1#1#1#1#1#1#1#1#1#1#1#1#1#1#1#1#1#1#1#1#1#1#1#1#1#1#1#1#1#1#1#1#1#1#1#1#1#1#1#1#1#1#1806
,GHQWLI\LQJ#<RXU#89.#0RGHP##1#1#1#1#1#1#1#1#1#1#1#1#1#1#1#1#1#1#1#1#1#1#1806
8VLQJ#WKH#,78#91<3#89.#6WDQGDUG#0RGHP# #1#1#1#1#1#1#1#1#1#1#1806
*HWWLQJ#RQ#WKH#:RUOG#:LGH#:HE#1#1#1#1#1#1#1#1#1#1#1#1#1#1#1#1#1#1#1#1#1#1#1# 807
6XUILQJ#7KH#:HE##1#1#1#1#1#1#1#1#1#1#1#1#1#1#1#1#1#1#1#1#1#1#1#1#1#1#1#1#1#1#1#1#1#1# 807
C
ONTENTS
iii
Page 4

6HQGLQJ#DQG#5HFHLYLQJ#(0PDLO#1#1#1#1#1#1#1#1#1#1#1#1#1#1#1#1#1#1#1#1#1#1#1#1#1#1 809
6HQGLQJ#(0PDLO# #1#1#1#1#1#1#1#1#1#1#1#1#1#1#1#1#1#1#1#1#1#1#1#1#1#1#1#1#1#1#1#1#1#1#1#1809
5HFHLYLQJ#(0PDLO# 1#1#1#1#1#1#1#1#1#1#1#1#1#1#1#1#1#1#1#1#1#1#1#1#1#1#1#1#1#1#1#1#1#1#1 809
3URWHFW#<RXUVHOI#ZKHQ#'RZQORDGLQJ#6RIWZDUH#
IURP#WKH#,QWHUQHW#1#1#1#1#1#1#1#1#1#1#1#1#1#1#1#1#1#1#1#1#1#1#1#1#1#1#1#1#1#1#1#1#1#1#1#1#1#1#80:
8VLQJ#6KDUHZDUH# #1#1#1#1#1#1#1#1#1#1#1#1#1#1#1#1#1#1#1#1#1#1#1#1#1#1#1#1#1#1#1#1#1#1#80:
8VLQJ#6RIWZDUH#´)L[HVµ#1#1#1#1#1#1#1#1#1#1#1#1#1#1#1#1#1#1#1#1#1#1#1#1#1#1#1#1#1#80:
,QVWDOOLQJ#6RIWZDUH#'RZQORDGHG#IURP#WKH#,QWHUQHW#1#180;
$GYDQFHG#(0PDLO#)XQFWLRQV1#1#1#1#1#1#1#1#1#1#1#1#1#1#1#1#1#1#1#1#1#1#1#1#1#1#1#1#180<
6HQGLQJ#DQ#(0PDLO#$WWDFKPHQW#LQ#
0LFURVRIW#2XWORRN#([SUHVV# #1#1#1#1#1#1#1#1#1#1#1#1#1#1#1#1#1#1#1#1#1#1#1#1#1 80<
2SHQLQJ#DQ#(0PDLO#$WWDFKPHQW# #1#1#1#1#1#1#1#1#1#1#1#1#1#1#1#1#1#1#1 8043
&KDSWHU#9##&RPPRQ#7DVNV##1#1#1#1#1#1#1#1#1#1#1#1#1#1#1#1#1#1#1#1#1#1#1#1#1#1#1#1#1#1#1#1#1#1#1#904
3ULQW#%DVLFV#1#1#1#1#1#1#1#1#1#1#1#1#1#1#1#1#1#1#1#1#1#1#1#1#1#1#1#1#1#1#1#1#1#1#1#1#1#1#1#1#1#1#1#1 905
8VLQJ#WKH#0HQX#WR#3ULQW#1#1#1#1#1#1#1#1#1#1#1#1#1#1#1#1#1#1#1#1#1#1#1#1#1#1#1#1905
'LJLWDO#$XGLR#)LOHV #1#1#1#1#1#1#1#1#1#1#1#1#1#1#1#1#1#1#1#1#1#1#1#1#1#1#1#1#1#1#1#1#1#1#1#1#1 906
C
ONTENTS
3OD\LQJ#'LJLWDO#$XGLR#)LOHV#1#1#1#1#1#1#1#1#1#1#1#1#1#1#1#1#1#1#1#1#1#1#1#1#1#1 906
*DPHV1#1#1#1#1#1#1#1#1#1#1#1#1#1#1#1#1#1#1#1#1#1#1#1#1#1#1#1#1#1#1#1#1#1#1#1#1#1#1#1#1#1#1#1#1#1#1#1#1907
3OD\LQJ#3UHLQVWDOOHG#*DPHV#RQ <RXU &RPSXWHU#1#1#1#1#1#1907
6RIWZDUH #1#1#1#1#1#1#1#1#1#1#1#1#1#1#1#1#1#1#1#1#1#1#1#1#1#1#1#1#1#1#1#1#1#1#1#1#1#1#1#1#1#1#1#1#1#1 908
,QVWDOOLQJ#6RIWZDUH#IURP#D#&'/#'9'/#RU#'LVNHWWH# 1#1#1#1#1 908
iv MY P
RESARIO—GETTING STARTED AND BEYOND
Page 5

&KDSWHU#:##&RPSXWHU#8SJUDGHV# #1#1#1#1#1#1#1#1#1#1#1#1#1#1#1#1#1#1#1#1#1#1#1#1#1#1#1#1#1#1#1:04
,QWHUQDO#&RPSRQHQWV1#1#1#1#1#1#1#1#1#1#1#1#1#1#1#1#1#1#1#1#1#1#1#1#1#1#1#1#1#1#1#1#1#1#1:05
$FFHVVLQJ#,QWHUQDO#&RPSXWHU#&RPSRQHQWV# 1#1#1#1#1#1#1#1#1#1:05
8SJUDGLQJ#&RPSRQHQWV 1#1#1#1#1#1#1#1#1#1#1#1#1#1#1#1#1#1#1#1#1#1#1#1#1#1#1#1#1#1#1#1:06
8SJUDGLQJ#WKH#&'0520/#&'05:/#DQG
'9'0520#'ULYHV##1#1#1#1#1#1#1#1#1#1#1#1#1#1#1#1#1#1#1#1#1#1#1#1#1#1#1#1#1#1#1#1#1#1#1:06
8SJUDGLQJ#&RPSXWHU#0HPRU\#1#1#1#1#1#1#1#1#1#1#1#1#1#1#1#1#1#1#1#1#1# :09
'HWHUPLQLQJ#<RXU#+DUG#'ULYH#6L]H##1#1#1#1#1#1#1#1#1#1#1#1#1#1#1#1#1#1:0:
$GGLQJ#&RPSRQHQWV #1#1#1#1#1#1#1#1#1#1#1#1#1#1#1#1#1#1#1#1#1#1#1#1#1#1#1#1#1#1#1#1#1#1# :0;
$GGLQJ#DQ#$GGLWLRQDO#+DUG#'ULYH# #1#1#1#1#1#1#1#1#1#1#1#1#1#1#1#1#1#1# :0;
$GGLQJ#DQ#([SDQVLRQ#RU#2SWLRQ#&DUG# #1#1#1#1#1#1#1#1#1#1#1#1#1#1# :0<
5HSODFLQJ#WKH#&RORU#$FFHQW#.LW#1#1#1#1#1#1#1#1#1#1#1#1#1#1#1#1#1#1#1#1#1#1#1#1#1:043
5HPRYLQJ#WKH#)URQW#&RORU#$FFHQW#3DQHOV# #1#1#1#1#1#1#1#1#1#1#1:043
5HSODFLQJ#WKH#)URQW#&RORU#$FFHQW#1#1#1#1#1#1#1#1#1#1#1#1#1#1#1#1#1#1#1#:044
5HSODFLQJ#WKH#.H\ERDUG#&RORU#$FFHQW# #1#1#1#1#1#1#1#1#1#1#1#1#1#1# :044
5HPRYLQJ#WKH#6SHDNHU#*ULOO# 1#1#1#1#1#1#1#1#1#1#1#1#1#1#1#1#1#1#1#1#1#1#1#1#:044
&KDSWHU#;##1HHG#6RPH#+HOS"# 1#1#1#1#1#1#1#1#1#1#1#1#1#1#1#1#1#1#1#1#1#1#1#1#1#1#1#1#1#1#1#1#1# ;04
MY P
RESARIO—GETTING STARTED AND BEYOND
,QVWDOOLQJ#$GGLWLRQDO#6RIWZDUH#1#1#1#1#1#1#1#1#1#1#1#1#1#1#1#1#1#1#1#1#1#1#1#1#1 :045
,QVWDOOLQJ#6RIWZDUH#IURP#D#&'#RU#'LVNHWWH##1#1#1#1#1#1#1#1#1#1 :045
5HLQVWDOOLQJ#'HOHWHG#'ULYHUV##1#1#1#1#1#1#1#1#1#1#1#1#1#1#1#1#1#1#1#1#1#1#1 :046
+HOSIXO#+LQWV1#1#1#1#1#1#1#1#1#1#1#1#1#1#1#1#1#1#1#1#1#1#1#1#1#1#1#1#1#1#1#1#1#1#1#1#1#1#1#1#1#1# ;05
(QWHULQJ#%,26#+&026,#6HWXS# 1#1#1#1#1#1#1#1#1#1#1#1#1#1#1#1#1#1#1#1#1#1#1# ;05
&RQWDFWLQJ#7HFKQLFDO#6XSSRUW# #1#1#1#1#1#1#1#1#1#1#1#1#1#1#1#1#1#1#1#1#1# ;05
7URXEOHVKRRWLQJ #1#1#1#1#1#1#1#1#1#1#1#1#1#1#1#1#1#1#1#1#1#1#1#1#1#1#1#1#1#1#1#1#1#1#1#1#1#1# ;06
$XGLR#1#1#1#1#1#1#1#1#1#1#1#1#1#1#1#1#1#1#1#1#1#1#1#1#1#1#1#1#1#1#1#1#1#1#1#1#1#1#1#1#1#1#1#1#1# ;06
&'0520/#&'05/#&'05:/#RU#'9'0520# 1#1#1#1#1#1#1#1#1#1#1#1#1#1#1# ;07
'LVNHWWH#'ULYH#1#1#1#1#1#1#1#1#1#1#1#1#1#1#1#1#1#1#1#1#1#1#1#1#1#1#1#1#1#1#1#1#1#1#1#1#1# ;08
C
ONTENTS
v
Page 6

'LVSOD\#+0RQLWRU,##1#1#1#1#1#1#1#1#1#1#1#1#1#1#1#1#1#1#1#1#1#1#1#1#1#1#1#1#1#1#1#1#1#1 ;0:
+DUG#'ULYH#1#1#1#1#1#1#1#1#1#1#1#1#1#1#1#1#1#1#1#1#1#1#1#1#1#1#1#1#1#1#1#1#1#1#1#1#1#1#1#1#1;0;
,QWHUQHW#$FFHVV# #1#1#1#1#1#1#1#1#1#1#1#1#1#1#1#1#1#1#1#1#1#1#1#1#1#1#1#1#1#1#1#1#1#1#1#1;0<
.H\ERDUG#DQG#6FUROO#0RXVH#1#1#1#1#1#1#1#1#1#1#1#1#1#1#1#1#1#1#1#1#1#1#1#1;043
0HPRU\# 1#1#1#1#1#1#1#1#1#1#1#1#1#1#1#1#1#1#1#1#1#1#1#1#1#1#1#1#1#1#1#1#1#1#1#1#1#1#1#1#1#1# ;044
3RZHU##1#1#1#1#1#1#1#1#1#1#1#1#1#1#1#1#1#1#1#1#1#1#1#1#1#1#1#1#1#1#1#1#1#1#1#1#1#1#1#1#1#1#1#1#;045
&KDSWHU#<##3UHYHQWDWLYH#0DLQWHQDQFH# #1#1#1#1#1#1#1#1#1#1#1#1#1#1#1#1#1#1#1#1#1#1#1#1# <04
:KDW#LV#3UHYHQWDWLYH#0DLQWHQDQFH" #1#1#1#1#1#1#1#1#1#1#1#1#1#1#1#1#1#1#1#1 <05
%DFNLQJ#8S#<RXU#)LOHV#1#1#1#1#1#1#1#1#1#1#1#1#1#1#1#1#1#1#1#1#1#1#1#1#1#1#1#1#1#1#1#1#1#1 <06
8VLQJ#0LFURVRIW#%DFNXS# 1#1#1#1#1#1#1#1#1#1#1#1#1#1#1#1#1#1#1#1#1#1#1#1#1#1#1#1<06
'HOHWLQJ#8QZDQWHG#)LOHV#1#1#1#1#1#1#1#1#1#1#1#1#1#1#1#1#1#1#1#1#1#1#1#1#1#1#1#1#1#1#1<07
7DNLQJ#,QYHQWRU\#RI#<RXU#+DUG#'LVN# 1#1#1#1#1#1#1#1#1#1#1#1#1#1#1#1#1<07
(PSW\LQJ#WKH#5HF\FOH#%LQ#1#1#1#1#1#1#1#1#1#1#1#1#1#1#1#1#1#1#1#1#1#1#1#1#1#1#1<08
'HOHWLQJ#8QZDQWHG#0DLO# 1#1#1#1#1#1#1#1#1#1#1#1#1#1#1#1#1#1#1#1#1#1#1#1#1#1#1<08
2SWLPL]LQJ#WKH#&RPSXWHU#+DUG#'LVN1#1#1#1#1#1#1#1#1#1#1#1#1#1#1#1#1#1#1# <09
8VLQJ#6FDQ'LVN##1#1#1#1#1#1#1#1#1#1#1#1#1#1#1#1#1#1#1#1#1#1#1#1#1#1#1#1#1#1#1#1#1#1#1# <09
C
ONTENTS
8VLQJ#'LVN#'HIUDJPHQWHU##1#1#1#1#1#1#1#1#1#1#1#1#1#1#1#1#1#1#1#1#1#1#1#1#1# <09
$QWL09LUXV#6RIWZDUH 1#1#1#1#1#1#1#1#1#1#1#1#1#1#1#1#1#1#1#1#1#1#1#1#1#1#1#1#1#1#1#1#1#1#1#1<0:
,QVWDOOLQJ#$QWL09LUXV#6RIWZDUH# 1#1#1#1#1#1#1#1#1#1#1#1#1#1#1#1#1#1#1#1#1#1<0:
8QLQVWDOOLQJ#\RXU#$QWL09LUXV#6RIWZDUH# 1#1#1#1#1#1#1#1#1#1#1#1#1#1<0:
6FDQQLQJ#IRU#9LUXVHV# 1#1#1#1#1#1#1#1#1#1#1#1#1#1#1#1#1#1#1#1#1#1#1#1#1#1#1#1#1#1#1<0:
8SGDWLQJ#0F$IHH#9LUXV6FDQ#1#1#1#1#1#1#1#1#1#1#1#1#1#1#1#1#1#1#1#1#1#1#1#1<0;
&UHDWLQJ#DQ#$QWL09LUXV#(PHUJHQF\#'LVNHWWH# 1#1#1#1#1#1#1#1# <0<
&RPSDT#6XSSRUW1#1#1#1#1#1#1#1#1#1#1#1#1#1#1#1#1#1#1#1#1#1#1#1#1#1#1#1#1#1#1#1#1#1#1#1#1#1<043
&RPSDT#6HUYLFH#&RQQHFWLRQ#1#1#1#1#1#1#1#1#1#1#1#1#1#1#1#1#1#1#1#1#1#1#1<043
'LDJQRVLQJ#6\PSWRPV# 1#1#1#1#1#1#1#1#1#1#1#1#1#1#1#1#1#1#1#1#1#1#1#1#1#1#1#1#<044
vi MY P
RESARIO—GETTING STARTED AND BEYOND
Page 7

&KDSWHU#43##&UHDWH#\RXU#RZQ#&'V# 1#1#1#1#1#1#1#1#1#1#1#1#1#1#1#1#1#1#1#1#1#1#1#1#1#1#1#1#14304
8VLQJ#(DV\#&'#&UHDWRU 1#1#1#1#1#1#1#1#1#1#1#1#1#1#1#1#1#1#1#1#1#1#1#1#1#1#1#1#1#1#1#1#14305
6WDUWLQJ#(DV\#&'#&UHDWRU# #1#1#1#1#1#1#1#1#1#1#1#1#1#1#1#1#1#1#1#1#1#1#1#1#1#14305
&UHDWLQJ#$XGLR#DQG#'DWD#&'V 1#1#1#1#1#1#1#1#1#1#1#1#1#1#1#1#1#1#1#1#1#1#1#1#1#14306
&UHDWLQJ#DQ#$XGLR#&'# #1#1#1#1#1#1#1#1#1#1#1#1#1#1#1#1#1#1#1#1#1#1#1#1#1#1#1#1#14306
&UHDWLQJ#D#'DWD#&'# 1#1#1#1#1#1#1#1#1#1#1#1#1#1#1#1#1#1#1#1#1#1#1#1#1#1#1#1#1#1#1# 4307
&RS\LQJ#&'V#ZLWK#(DV\#&'#&UHDWRU#1#1#1#1#1#1#1#1#1#1#1#1#1#1#1#1#1#1#1#1#14308
'XSOLFDWLQJ#D#&'# 1#1#1#1#1#1#1#1#1#1#1#1#1#1#1#1#1#1#1#1#1#1#1#1#1#1#1#1#1#1#1#1#1#14308
-HZHO#&DVH#&UHDWRU #1#1#1#1#1#1#1#1#1#1#1#1#1#1#1#1#1#1#1#1#1#1#1#1#1#1#1#1#1#1#1#1#1#1#1# 4309
8VLQJ#-HZHO#&DVH#&UHDWRU# 1#1#1#1#1#1#1#1#1#1#1#1#1#1#1#1#1#1#1#1#1#1#1#1#1# 4309
7URXEOHVKRRWLQJ #1#1#1#1#1#1#1#1#1#1#1#1#1#1#1#1#1#1#1#1#1#1#1#1#1#1#1#1#1#1#1#1#1#1#1#1#1# 430<
*HWWLQJ#+HOS# 1#1#1#1#1#1#1#1#1#1#1#1#1#1#1#1#1#1#1#1#1#1#1#1#1#1#1#1#1#1#1#1#1#1#1#1#1# 430<
&KDSWHU#44##*RYHUQPHQW#$SSURYDOV##1#1#1#1#1#1#1#1#1#1#1#1#1#1#1#1#1#1#1#1#1#1#1#1#1#1#1#4404
1RWLFHV#DQG#5HJXODWLRQV 1#1#1#1#1#1#1#1#1#1#1#1#1#1#1#1#1#1#1#1#1#1#1#1#1#1#1#1#1#1#1# 4405
)HGHUDO#&RPPXQLFDWLRQV#&RPPLVVLRQ#1RWLFH# 1#1#1#1#1#1#4405
(XURSHDQ#1RWLFH##1#1#1#1#1#1#1#1#1#1#1#1#1#1#1#1#1#1#1#1#1#1#1#1#1#1#1#1#1#1#1#1#1#1#4406
*ORVVDU\
MY P
RESARIO—GETTING STARTED AND BEYOND
5LQJHU#(TXLYDOHQFH#1XPEHU#+5(1,##1#1#1#1#1#1#1#1#1#1#1#1#1#1#1#1#1#4407
7HOHFRP#1HWZRUN#$SSURYDOV#1#1#1#1#1#1#1#1#1#1#1#1#1#1#1#1#1#1#1#1#1#1#1#1#1#1#1# 4408
6DIHW\# #1#1#1#1#1#1#1#1#1#1#1#1#1#1#1#1#1#1#1#1#1#1#1#1#1#1#1#1#1#1#1#1#1#1#1#1#1#1#1#1#1#1#1#1#4408
0RGHP#6WDWHPHQWV#1#1#1#1#1#1#1#1#1#1#1#1#1#1#1#1#1#1#1#1#1#1#1#1#1#1#1#1#1#1#1#1#1#1#1 4409
8VLQJ#WKH#&RPSXWHU#1#1#1#1#1#1#1#1#1#1#1#1#1#1#1#1#1#1#1#1#1#1#1#1#1#1#1#1#1#1#1 4409
C
ONTENTS
vii
Page 8

C
ONTENTS
viii MY P
RESARIO—GETTING STARTED AND BEYOND
Page 9
Introduction
Congratulations! As the owner of a new Compaq Internet PC,
,Q#7KLV#&KDSWHU
Who Should Read This
Guide?, 1-2
Symbols and Graphics
Used, 1-3
Where Can I Find
Information?, 1-4
Safety, 1-5
you have joined the world-wide community of Presario
computer users. Once your computer is set up and connected to
the Internet, you can explore vast regions of information,
entertainment, and online services.
4
MY P
RESARIO—GETTING STARTED AND BEYOND
This guide is designed to help you:
➜ Get acquainted with computer features you’ll want to try
during the first few days or weeks.
➜ Keep your computer running smoothly with the tools on your
computer.
➜ Solve problems if they occur.
I
NTRODUCTION
1-1
Page 10
Who Should
Read This
Who Should Read This Guide?
Using My Presario—Getting Started and
Beyond
Guide?
This guide is designed for
both beginners and
experienced computer
users. You can read from
cover to cover to learn
basic information about
your computer or scan the
guide for information on a
specific topic.
The Glossary, at the back
of this guide, has brief
definitions of computer
terms in everyday
language.
This chapter shows you
how to use this guide and
directs you to other
sources of information.
This easy-to-scan guide helps you find the information you want
as quickly as possible. The page layout lets you see, at a glance,
how the information is organized.
1-2 I
NTRODUCTION
The first column lists major topics. It explains what the topic is
and why it is important to you. This column also lists important
warnings and useful tips, and it directs you to additional
reference material as needed.
The second column explains how to perform a procedure. It
contains step-by-step instructions.
The third column uses graphics to help you visualize the task
and to validate what you are doing as you do it. Complex or
detailed graphics may span both columns.
MY P
RESARIO—GETTING STARTED AND BEYOND
Page 11
Symbols and
Graphics Used
Symbols and Graphics Used
The following words and symbols have special meaning in this
guide:
Warnings and cautions are
displayed to protect you
from injury, your
equipment from damage,
and your files from data
loss.
Failure to follow directions
may result in bodily harm or
loss of life.
Understanding the background
or concept may help you solve
a problem.
Helpful hints make using your
computer easier and faster.
Another document or another
page in this document has
related information.
▲▲▲▲Caution: Failure to follow directions may result in damage to
equipment or loss of data.
Computer Illustrations and Features
The computer illustrations shown and the features described in
this guide may differ slightly from your Compaq Presario
Internet PC.
MY P
RESARIO—GETTING STARTED AND BEYOND
I
NTRODUCTION
1-3
Page 12
Where Can I
Find
Information?
Information is available in
several forms: printed
documents, and the
Compaq Web site. Use this
guide as your first point of
reference, and then refer to
the following documents:
➜ Quick Set-Up poster
Where Can I Find Information?
Warranty Certificate
The warranty details Compaq’s commitment to repair or replace
parts during the warranty period, and it lists important Compaq
telephone numbers.
Keep the warranty in a safe place for future reference.
Replacing Parts
The Easy Access design of your Internet PC allows you to
access internal components: in most cases, without using any
tools.
➜ Warranty Certificate
➜ Getting Started:
Microsoft Windows
manual
The Compaq Web site is
available worldwide. As you
explore the Internet, go to
the following address for
information about products,
services, and other activities:
http://www.compaq.co.uk
Upgrading Your Computer
Expand your Presario performance with upgrades like memory
and additional peripherals, such as digital cameras and printers.
To learn more, visit the Online Store at:
http://www.compaq.co.uk
1-4 I
NTRODUCTION
MY P
RESARIO—GETTING STARTED AND BEYOND
Page 13
Safety
Safety
Safety and Comfort
Your computer is an
electrical device. Treat it
with care to avoid personal
injury and damage to the
equipment.
To reduce the risk of electric
shock and damage to the
equipment, read the Safety
and Comfort document
before performing any
procedures involving the
internal components of your
computer.
During an electrical storm,
disconnect your computer
(and all peripherals) from the
power source.
The Compaq Safety and Comfort Guide contains Safety and
Comfort information on how to:
➜ Set up your work area for maximum comfort.
➜ Practice good posture, hand position, work habits, and health
habits while using your computer.
➜ Use a grounding plug to prevent electrical shorts, shocks, or
fires.
➜ Become static-free before removing the side panel
MY P
RESARIO—GETTING STARTED AND BEYOND
I
NTRODUCTION
1-5
Page 14

1-6 I
NTRODUCTION
MY P
RESARIO—GETTING STARTED AND BEYOND
Page 15
Setting Up
Yo u r
Computer
Your Internet PC is designed for complete ease of use—from
,Q#7KLV#&KDSWHU
Your Presario 5000 Series
at a Glance, 2-2
Your Presario 7000 Series
at a Glance, 2-3
Plug In and Go!, 2-4
Registration, 2-5
setting up to upgrading new components. This chapter
introduces you to the internal and external features of your
computer. It also walks you through the process of registering
your computer and setting up an Internet Service Provider (ISP)
account. The remaining chapters of this guide show you how
easy it is to use your Compaq Presario.
Note: Illustrations and features shown may differ slightly from your
Computer.
5
Printer Setup, 2-6
MY P
RESARIO—GETTING STARTED AND BEYOND
S
ETTING UP YOUR COMPUTER
2-1
Page 16
Your Presario
5000 Series at
aGlance
Before you begin, you’ll
want to become familiar
with the components of
your Compaq Presario
5000 series.
Some components have
color-coded connectors that
match the ports on the back
of your computer.
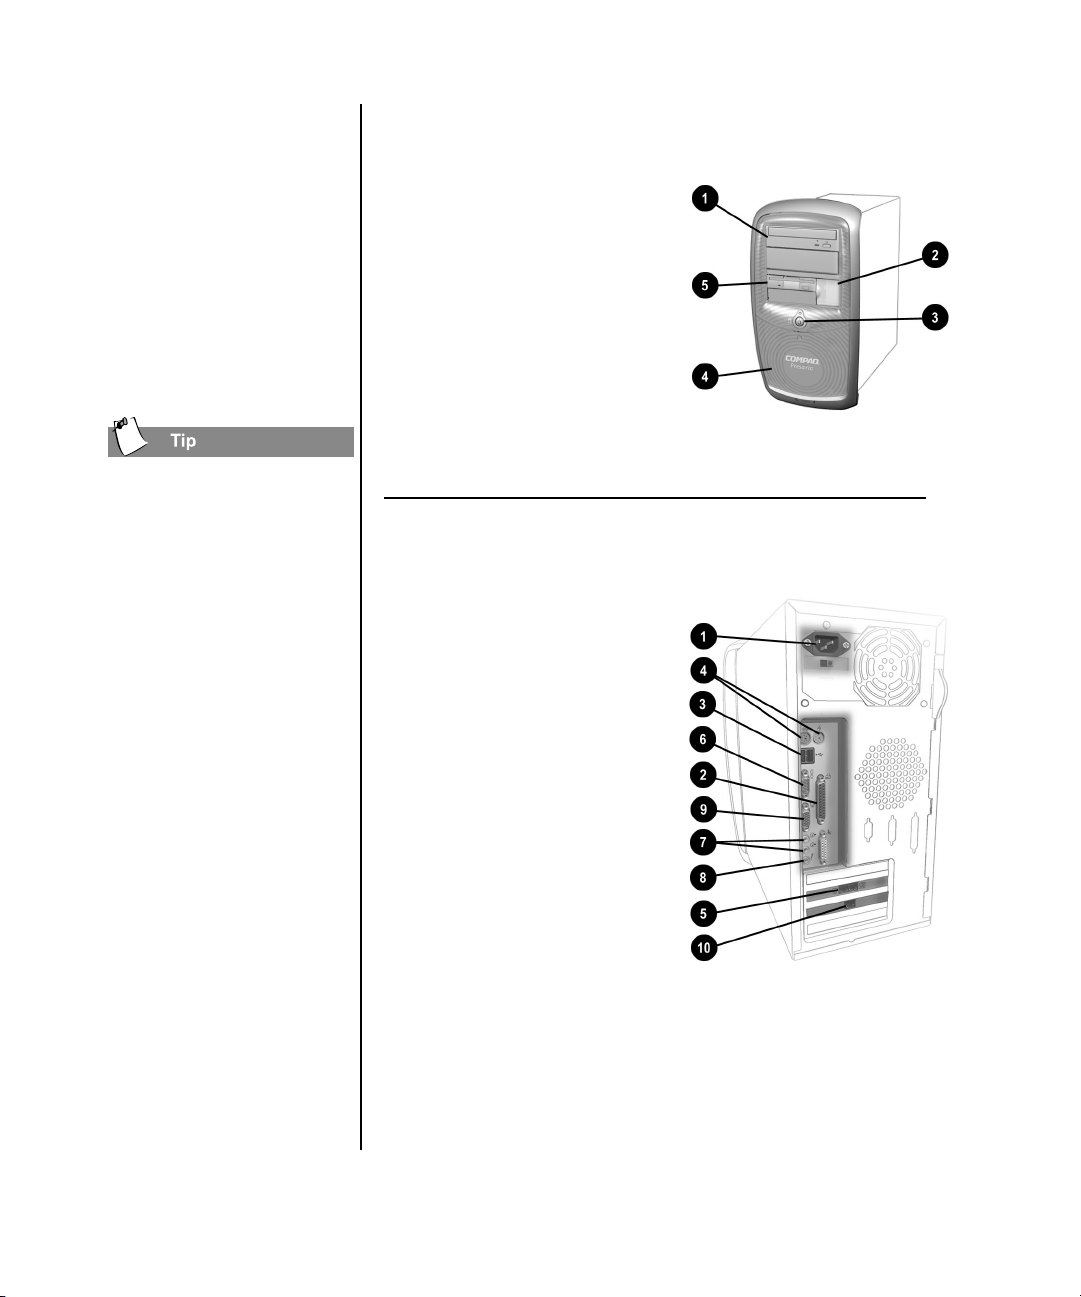
Your Presario 5000 Series at a Glance
What’s at the Front? (5000 Series)
1 CD-ROM, CD-RW, or
DVD-ROM drive
2 Dual USB and 1394 (varies
by model) port for
connecting peripheral
devices, such as gamepads,
joysticks, and video cameras
3 Power button
4 CD storage for storing a
maximum of five CDs
5 Diskette drive
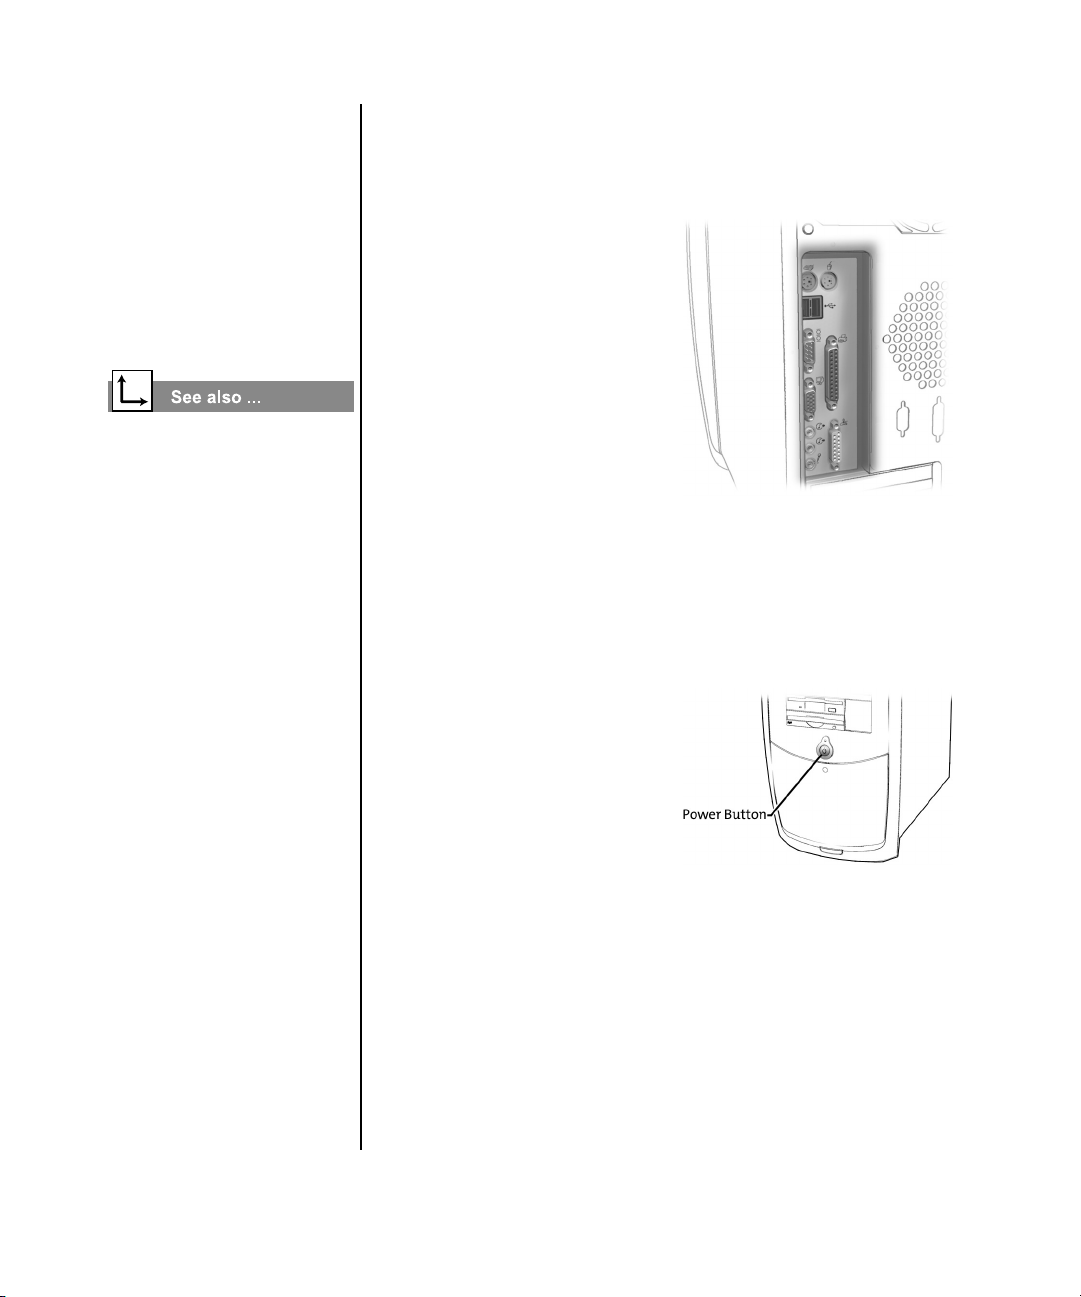
What’s at the Back? (5000 Series)
1 Power port
2 Parallel port for connecting
peripheral devices, such as
printers
3 USB port for connecting an
Internet keyboard or other
USB devices
4 PS2 port for connecting a
keyboard or mouse
5 Modem port for connecting
to a phone line
6 Serial port for connecting a
serial printer
7 Audio speakers port
8 Microphone port
9 Monitor port
2-2 S
ETTING UP YOUR COMPUTER
Ethernet port for connecting to an Ethernet network
_
-
(if equipped)
Note: Connectors may vary by model.
MY P
RESARIO—GETTING STARTED AND BEYOND
Page 17
Your Presario
7000 Series at
a Glance
Before you begin, you’ll
want to become familiar
with the components of
your Compaq Presario
7000 series.
Some components have
color-coded connectors that
match the ports on the back
of your computer.
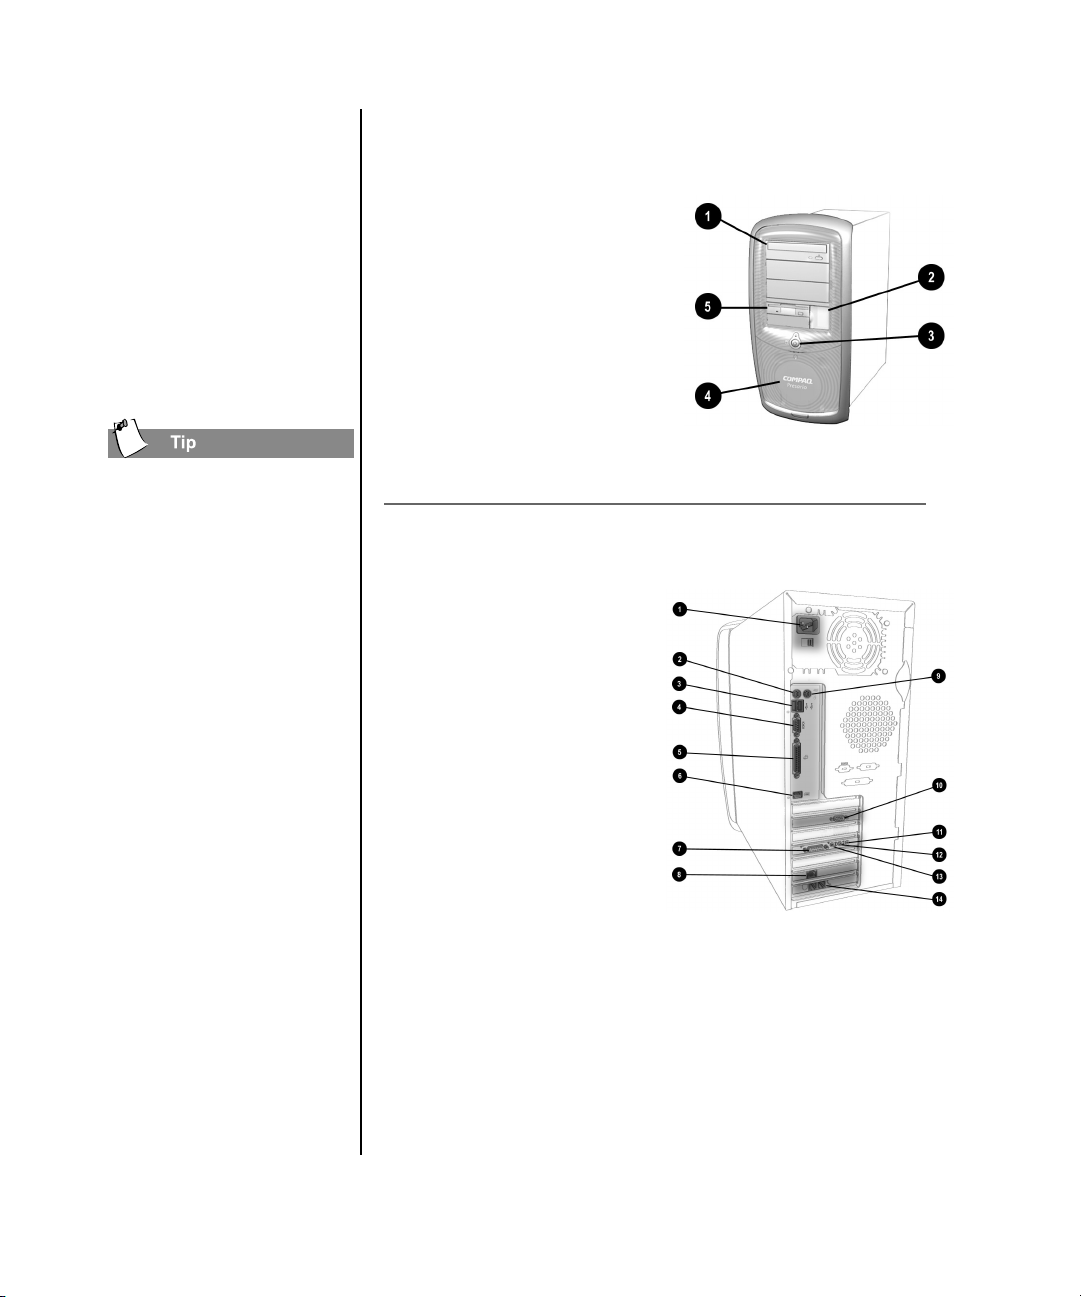
Your Presario 7000 Series at a Glance
What’s at the Front? (7000 Series)
1 CD-ROM, CD-RW, or
DVD-ROM drive
2 Dual USB and 1394 (varies
by model) port for
connecting peripheral
devices, such as gamepads,
joysticks, and video cameras
3 Power button
4 CD storage for storing a
maximum of five CDs
5 Diskette drive
What’s at the Back? (7000 Series)
1 Power port
2 PS2 port for connecting a
keyboard
3 USB port for connecting
an Internet keyboard or
other USB devices
4 Serial port
5 Parallel port
6 1394 high speed port
7 Game/MIDI port
8 Ethernet port (if equipped)
9 PS2 port for connecting a
mouse
: SVGA connector to connect a monitor
; Audio Out for connecting your speakers (light green)
< Audio In for connecting audio devices* (light blue)
= Microphone port (light pink)
> Modem port
MY P
RESARIO—GETTING STARTED AND BEYOND
Note: The Soundblaster LIVE soundcard is equipped with an additional port:
the SPDIF Digital Out. (yellow)
Note: Connectors may vary by model.
S
ETTING UP YOUR COMPUTER
2-3
Page 18
Plug In and Go!
Plug In and Go!
Setting Up Your Computer
If a cable is disconnected
or you move your
computer to another
location, this topic helps
you to quickly set up
again.
The Quick Set-Up poster that
came with your computer is a
visual guide to setting up
your computer.
Note: Do not set up the printer until your computer has been set up.
1. Connect the monitor
according to the color
coding, icons, and the
instructions from the monitor
manufacturer.
2. Connect the speaker cable
and microphone cable (if
applicable).
3. Connect the power cable.
4. Connect the keyboard to the
rear USB port and the mouse
to the PS2 port.
5. Connect the telephone cable
between the Modem Line In
~
port and and your telephone line
socket.
6. Plug the monitor and
computer power cables into
the wall outlet.
2-4 S
ETTING UP YOUR COMPUTER
7. Turn on the monitor and
press the Power 1 button to
turn on your computer.
Note: If you are setting up your
computer for the first time, follow the on-screen instructions to register
both your operating system and your computer. The next two topics
discuss the registration process.
MY P
RESARIO—GETTING STARTED AND BEYOND
Page 19
Registration
Registration
Registering with Microsoft
The first time you turn on
your computer, you will be
guided through the
registration process before
accessing the Windows
desktop. It is very
important that you register
Windows with Microsoft.
Registration activates the
warranties by entering your
serial numbers in the
manufacturers’ databases.
Anytime you install new
software or hardware, be
sure to register it with the
manufacturer to activate the
warranty.
To register the Windows operating system with Microsoft,
follow the on-screen instructions. After entering the appropriate
information on each screen, click the Next button to move to the
next screen.
Registering with Microsoft enables you to receive technical
support for the Windows operating system, software updates,
and notices about new Microsoft products.
MY P
RESARIO—GETTING STARTED AND BEYOND
S
ETTING UP YOUR COMPUTER
2-5
Page 20
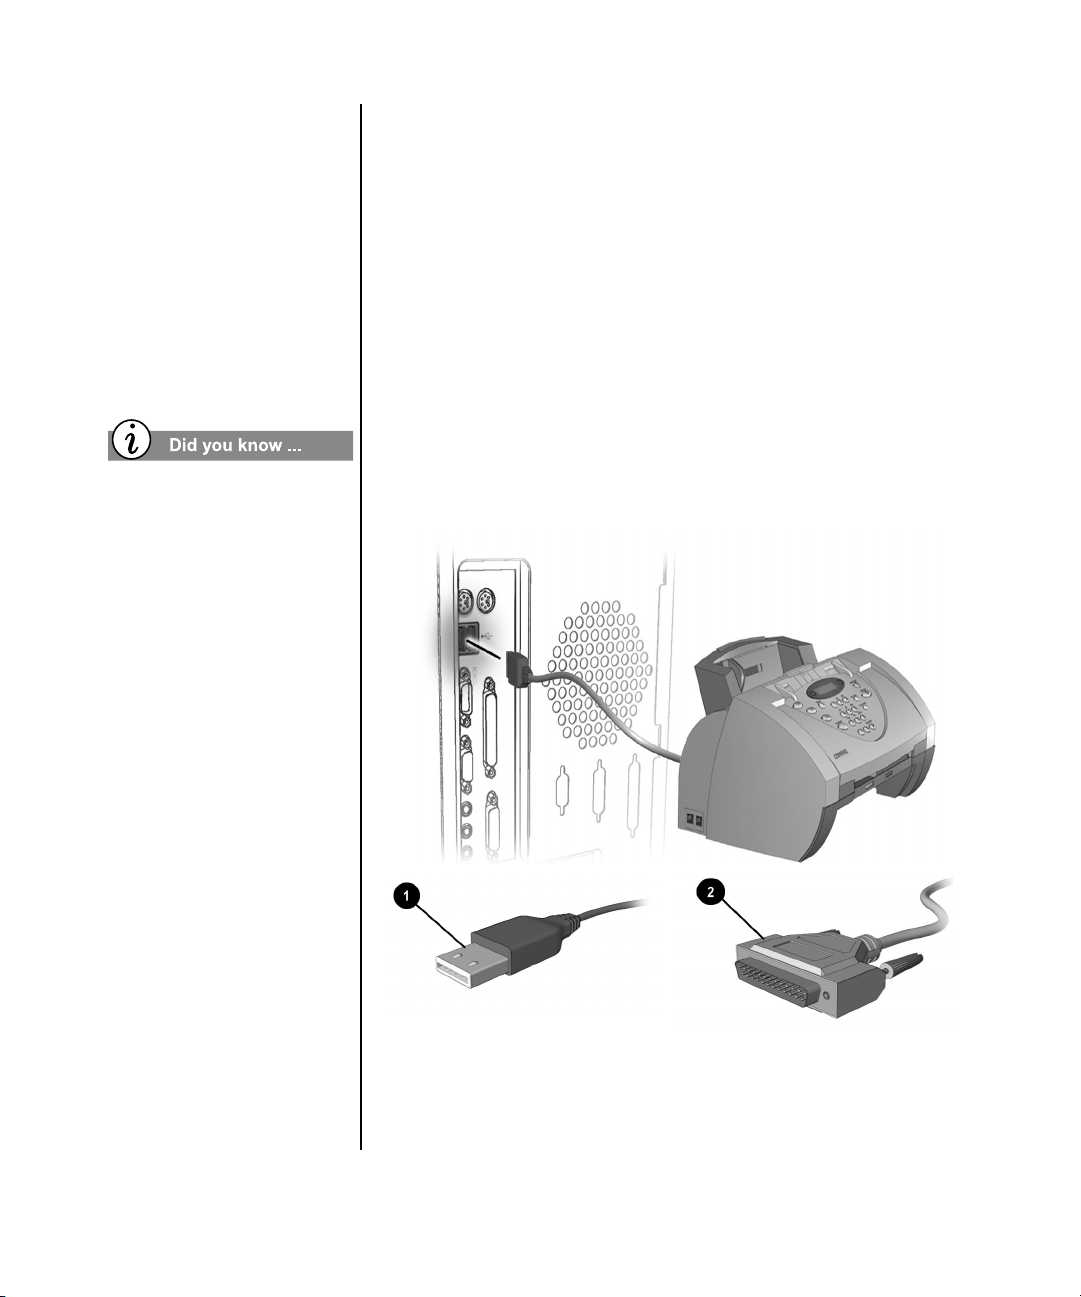
Printer Setup
Printer Setup
Setting Up Your Printer
After setting up and
registering your computer,
you are ready to set up
your printer.
A printer allows you to
print any document from
your e-mail, and Web
sites.
Most new computers have a
Universal Serial Bus (USB)
port for a new printer that
uses the latest technology.
Older printers, which plug
into a parallel port, cannot
be connected to a USB port.
Your printer may use a USB
plug
(rather than a
1
parallel plug
installation. USB is new
technology on all currently
manufactured computers.
2
) for
1. Complete “Plug In and Go!” and “Registration” first
(described on previous pages).
2. Set up the printer according to the printer manufacturer’s
instructions.
3. Connect the printer to the back of your computer according to
the icons.
4. Turn on your computer (if it’s not already on).
5. Turn on the printer.
6. Follow the on-screen instructions. If prompted, insert the
printer set-up diskette.
2-6 S
ETTING UP YOUR COMPUTER
Note: Location and style of connectors may vary by model.
MY P
RESARIO—GETTING STARTED AND BEYOND
Page 21
Windows
Basics
Microsoft Windows is the operating system that runs on your
,Q#7KLV#&KDSWHU
Features of the Windows
Desktop, 3-2
Windows Help, 3-4
For more information on the
Windows desktop, refer to the
Getting Started: Microsoft
Windows manual that came
with your computer.
computer. This means that Windows controls and manages your
computer by translating your mouse and keyboard instructions
into a language your computer can understand.
The Windows desktop is your personal workspace. On the
Windows desktop, you give your computer instructions to
perform tasks: Access files, copy files, connect to the Internet,
read e-mail, and more.
In this chapter, you learn how to use the standard features of the
Windows desktop.
6
MY P
RESARIO—GETTING STARTED AND BEYOND
W
INDOWS BASICS
3-1
Page 22
Features of
the Windows
Desktop
Although computers vary
based on specific hardware
and software, the Windows
desktop has many standard
features.
In this section, you are
introduced to the major
components of the desktop:
➜ Icons
➜ Taskbar
➜ Start menu
➜ Windows Help
Features of the Windows Desktop
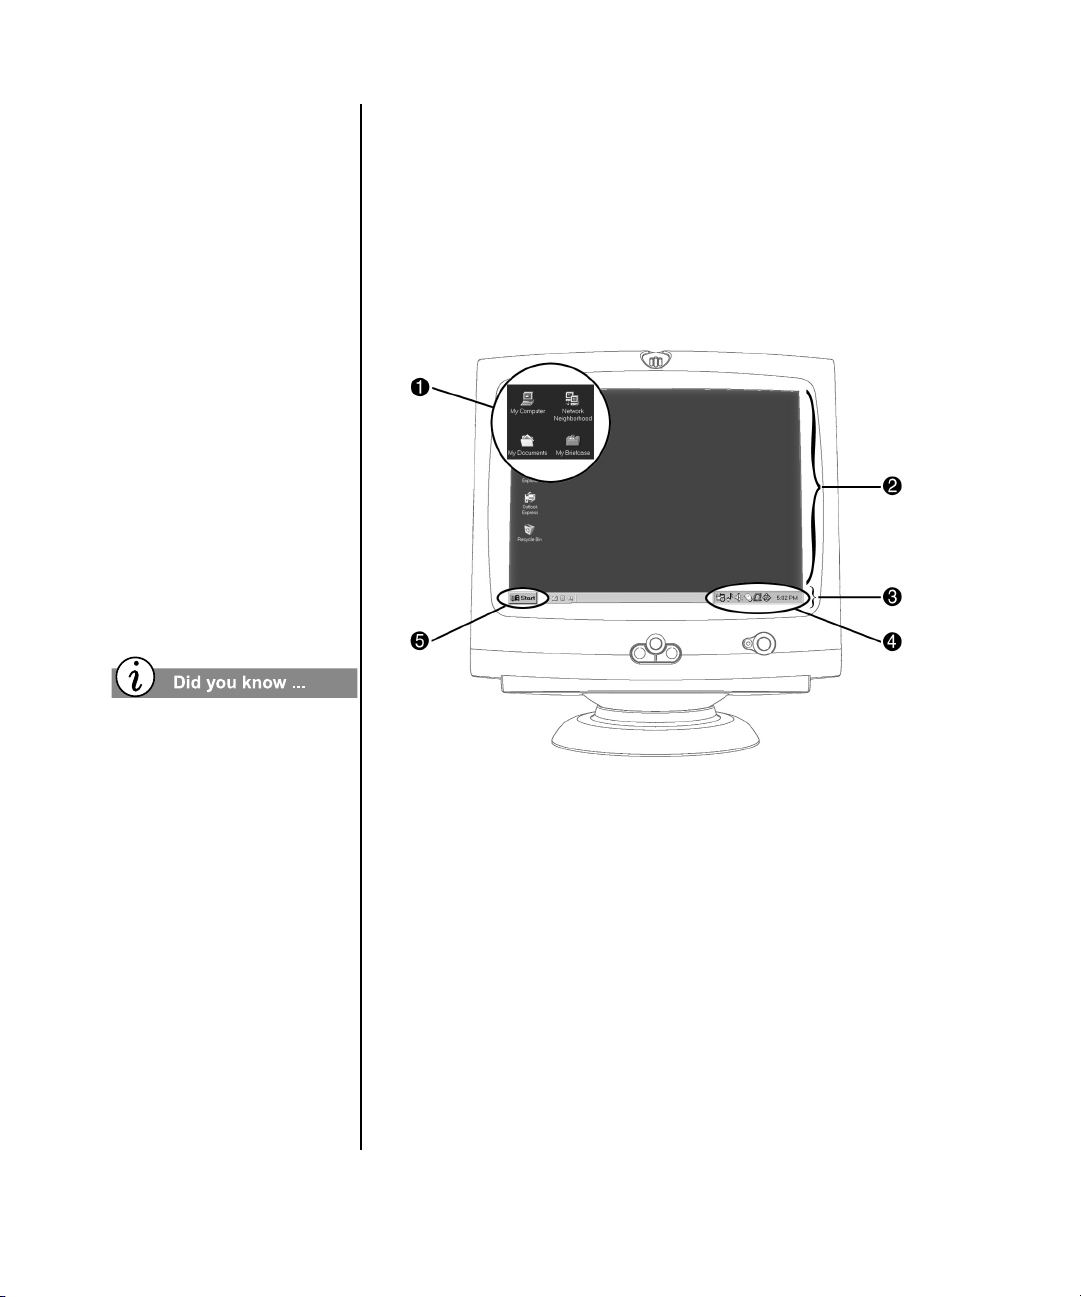
Viewing the Windows Desktop
When you turn on your computer, Microsoft Windows
automatically starts. The first screen you see after Windows
goes through the startup process is the Windows desktop, the
area in which you work.
Note: The programs and icons displayed vary by model.
Each time you access a
program, a button for that
program appears on the
Windows taskbar
each button to switch to that
program.
3-2 W
INDOWS BASICS
. Click
3
On the Windows desktop 2 there are several small graphics 1
(called icons). An icon represents a program, disk drive, file, or
folder, and provides easy access to the programs or documents
you use on a regular basis.
Across the bottom of the desktop is a grey bar (called the
Windows taskbar 3). The taskbar includes the Start button 5,
buttons for each program that is currently active, and the system
tray (systray) 4. The taskbar allows you to pick and choose
options or activities, and it is always displayed on your desktop.
The systray 4 contains icons for some of the system programs
that load automatically at startup. The system clock is also
displayed on the systray.
MY P
RESARIO—GETTING STARTED AND BEYOND
Page 23
Using the Start Menu
When you click the Start
button, a menu is displayed
that allows you to select
tasks, such as:
➜ Starting a program
➜ Finding or opening a
document
➜ Changing your
computer settings
➜ Shutting down the
computer
The Start menu also lists
programs, documents, and
other options available on
your computer.
You should always turn off
your computer by selecting
Shut Down from the Start
menu. Otherwise, an error
message is displayed the next
time you turn on your
computer.
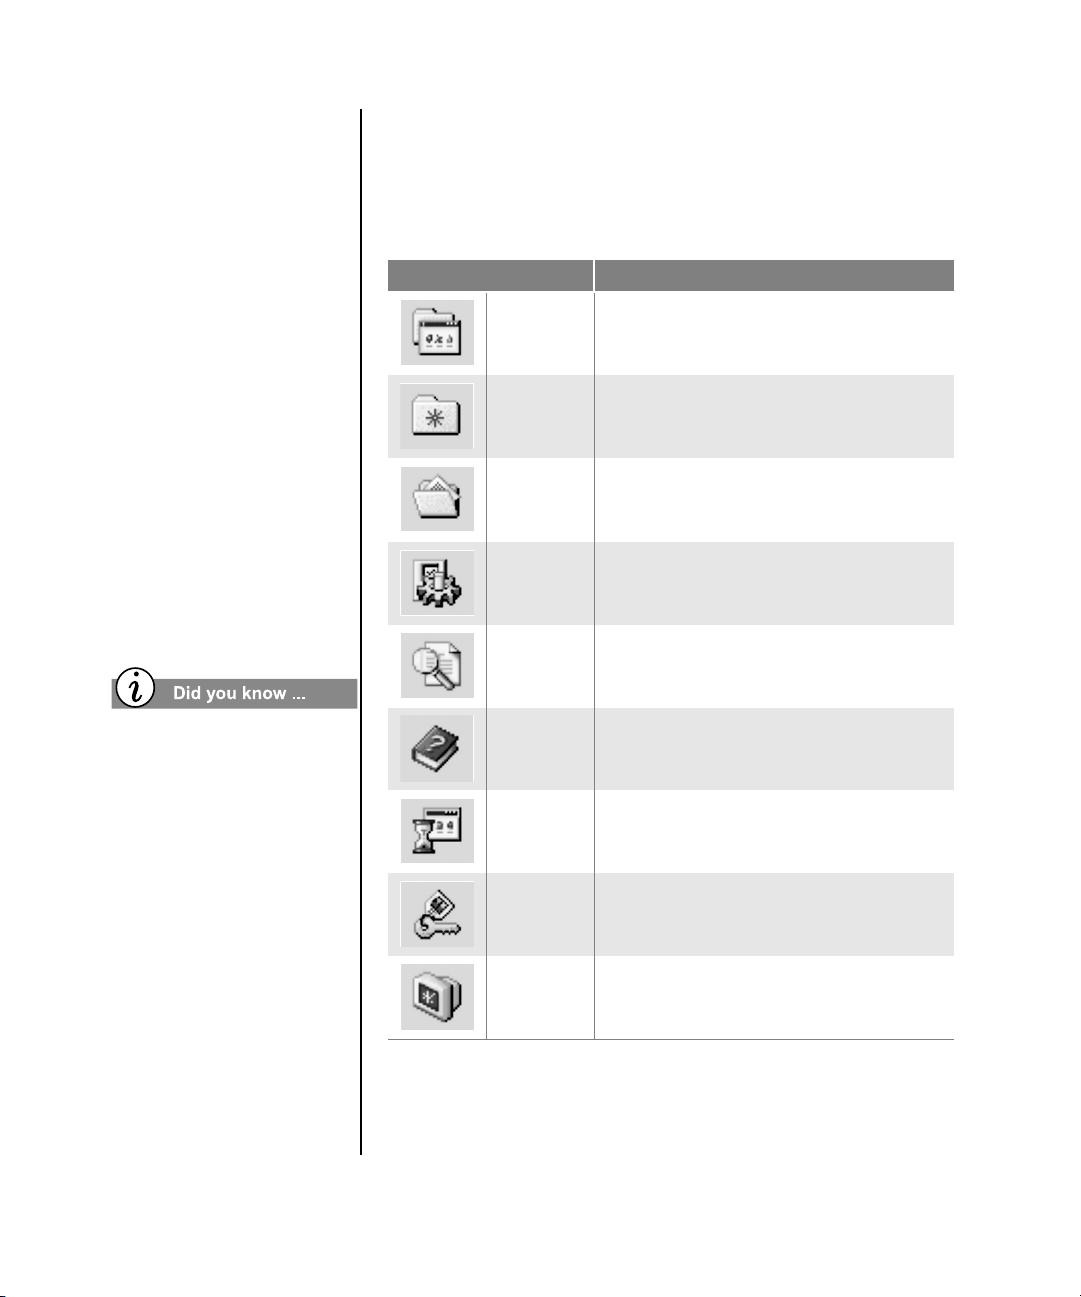
The following table lists some typical Start menu options and
the function of each option. The available Start menu options
vary by model.
Start Menu Options Functions
Programs Displays a list of programs available on your
computer.
Favorites Opens your favorite files and Web pages.
Documents Displays a recently accessed list of
documents, which you can select to open
again.
Settings Allows you to modify Windows desktop or
computer settings.
Find Enables you to search for files or folders
located on a drive that you specify.
Help Displays answers to your questions about
Microsoft Windows.
Run Opens programs and Web pages.
Log Off Logs off the current user so that a new user
can log on.
MY P
RESARIO—GETTING STARTED AND BEYOND
Shut Down Shuts down or restarts your computer.
W
INDOWS BASICS
3-3
Page 24
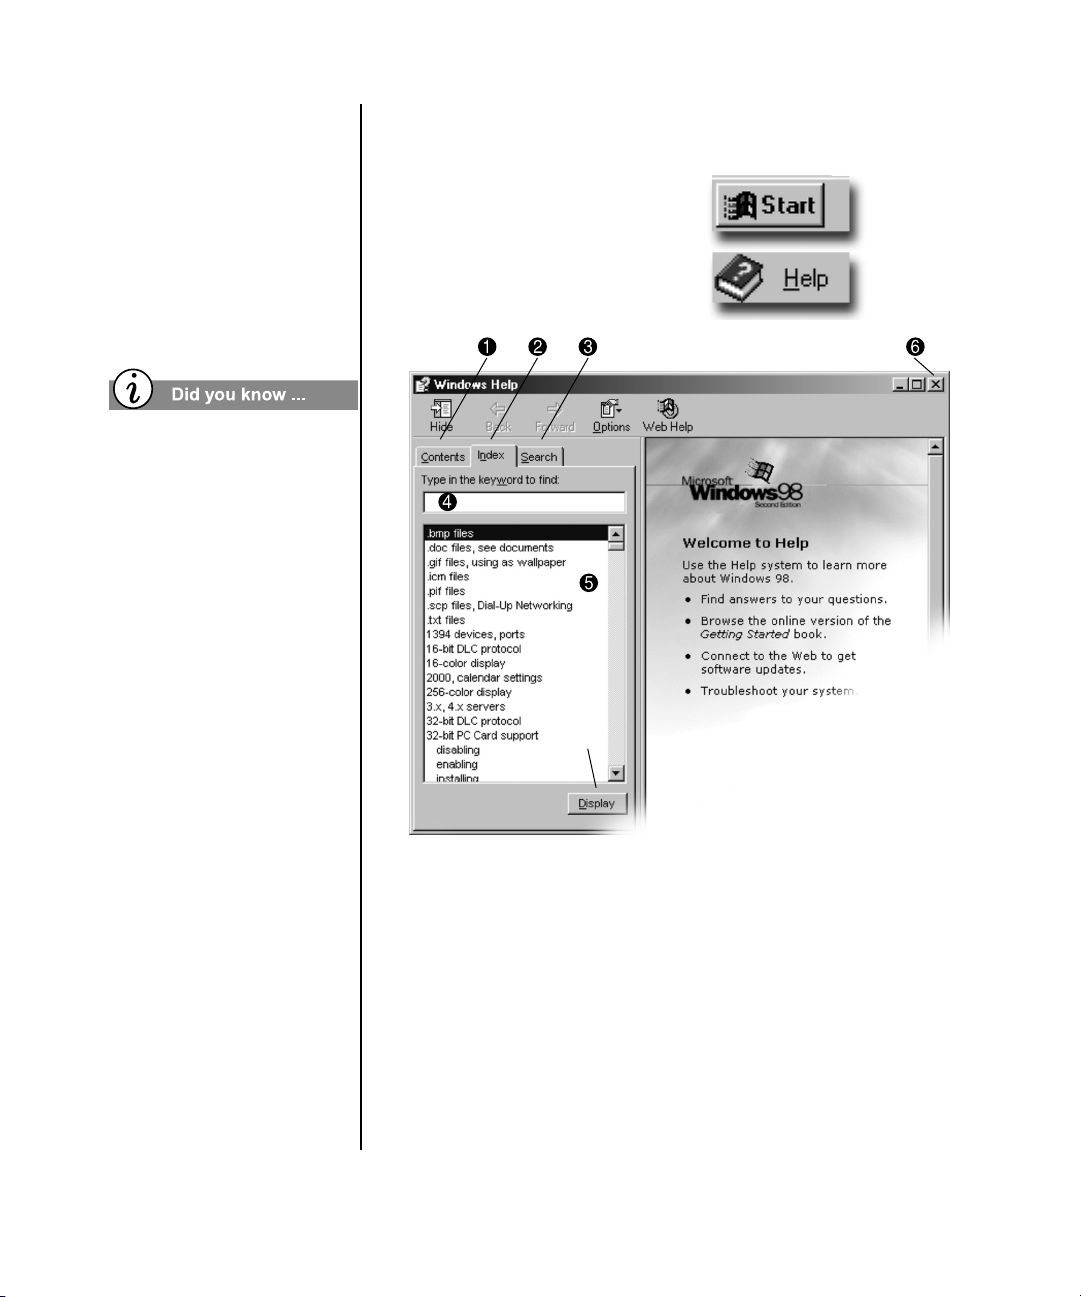
Windows Help
Windows Help
Accessing Windows Online Help
Microsoft Windows
includes online
documentation to help
answer your questions
about how the computer
operating system works.
If you are not familiar with
the features of Microsoft
Windows, several tutorials are
available through Microsoft’s
online Help file.
The Microsoft Web site, at
www.microsoft.com, offers
numerous tools and
information on the following
topics:
Windows
➜
Internet Explorer browser
➜
Microsoft Knowledge Base
➜
1. Click the Start button.
2. Select Help. The Windows
Help screen is displayed.
3. Select the Index tab 2.
7
3-4 W
INDOWS BASICS
Note: The Contents tab 1 lists help topics by subject, the Index tab 2
lists topics alphabetically, and the Search tab
topics based on keywords you type in the box.
3 lets you search for
4. Type the keyword you want to know about 4 or select an
index entry from the list 5. If you type a keyword, the
associated index entry is automatically displayed.
5. Click the Display button 7. The information appears on the
right side of the screen.
∫
6. To exit, click the
button 6 on the Help screen.
MY P
RESARIO—GETTING STARTED AND BEYOND
Page 25
8VLQJ#<RXU#
&RPSXWHU
In this chapter, you learn about the following exciting,
,Q#7KLV#&KDSWHU
easy-to-use features of your computer:
7
.H\ERDUG#%DVLFV/###705
.H\ERDUG#%XWWRQV/###706
6FUROO#0RXVH/###7045
6SHDNHUV/###7046
'LVNHWWH/#+DUG#'ULYH/#
&'0520/#&'05:#DQG#
'9'0520#GULYHV/###7047
,QWHUQHW#9LGHR#&DPHUD/###
704<
➜ Keyboard—Become
familiar with the keyboard
and all its capabilities,
including one-button access
to the Internet!
➜ Scroll Mouse—See how
easy it is to use the scroll
mouse and learn shortcuts to
save time.
➜ Speakers—Enjoy the
experience of high-quality sound with your computer.
➜ Hard Drive, CD-ROM, CD-RW and DVD-ROM
Drives—Use the various drives to listen to your favorite CDs
or to watch movies.
➜ Internet Video Camera—Understand the many capabilities
of an Internet video camera.
MY P
RESARIO—GETTING STARTED AND BEYOND
U
SING YOUR COMPUTER
4-1
Page 26

.H\ERDUG#
%DVLFV
.H\ERDUG#%DVLFV
*HWWLQJ#WR#.QRZ#WKH#6WDQGDUG#
.H\ERDUG .H\V
The standard keys perform
the following functions:
➜ Main keys are the
typewriter-style keys.
➜ Function keys are the
F1 to F12 keys. Two of
these keys are active
even without a
program running. F1
allows you to get help
on Windows-related
topics. F3 allows you
to search for files or
folders.
➜ Arrow keys can be
used for games and to
navigate in a document
or Web site. These keys
allow you to move left,
right, up, and down,
using the keyboard
instead of the mouse.
➜ Numeric keys work
like a calculator
keypad.
Some keys have special functions when used alone or combined
with other keys. These functions vary depending on the program
you are using.
Main keys
1
Function keys
2
Note: Style of keyboard may vary.
3
4
Arrow keys
Numeric keys
4-2 U
SING YOUR COMPUTER
MY P
RESARIO—GETTING STARTED AND BEYOND
Page 27
.H\ERDUG#
%XWWRQV
The keyboard buttons
make it easier and faster to
get on the Internet, use
your favorite software, or
listen to your favorite CD.
You might even want to
watch a movie or send an
e-mail.
The CD/DVD control
buttons provide a quick
and easy way to play a CD
or a DVD movie at the
touch of a button.
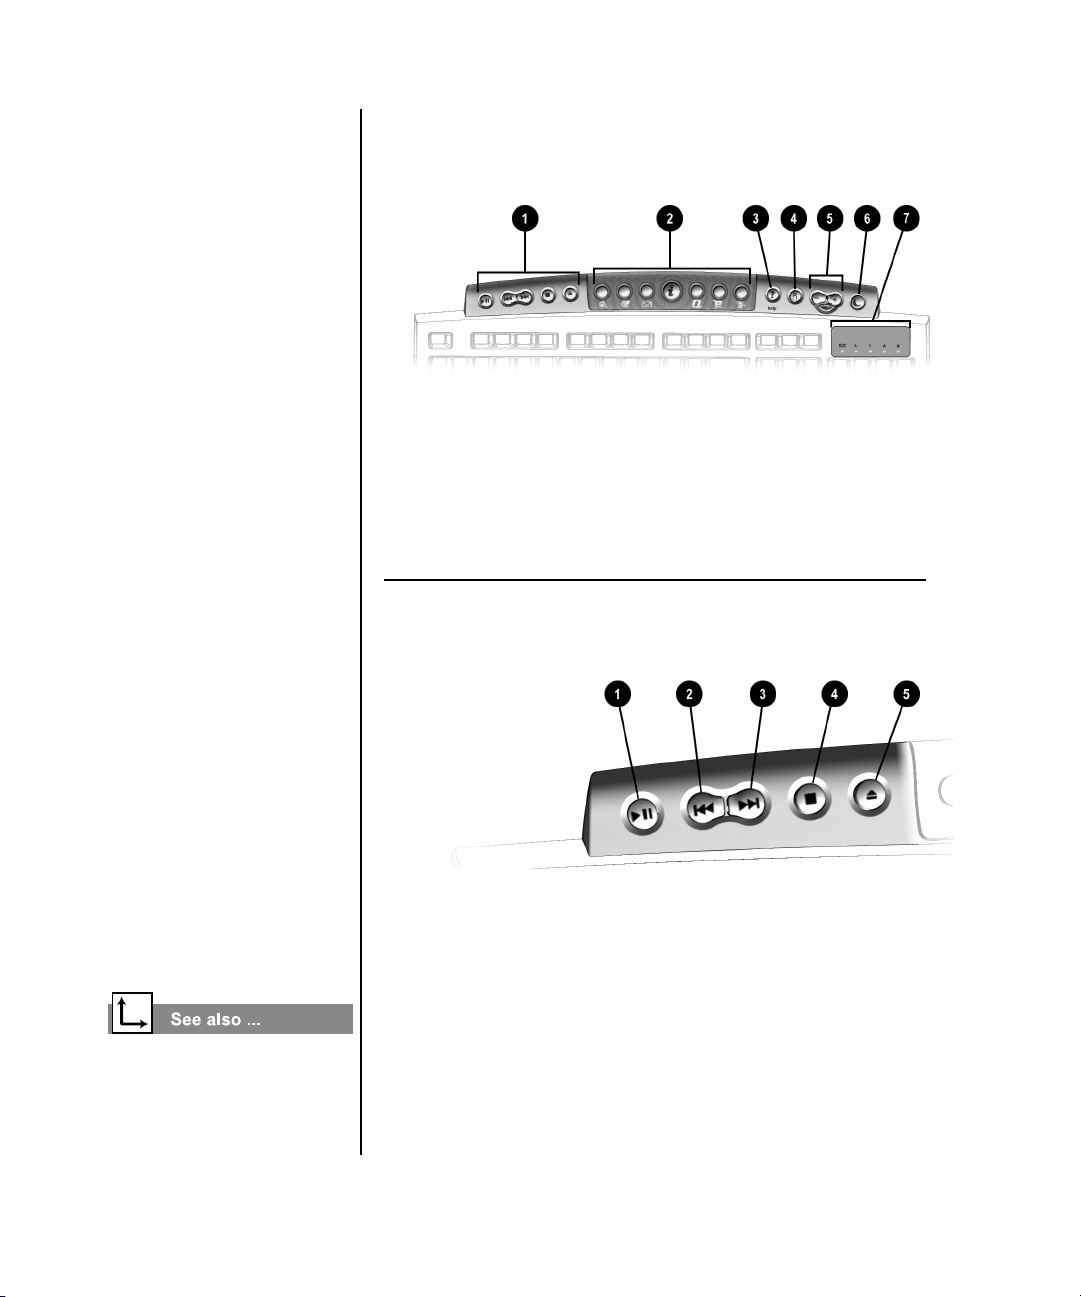
.H\ERDUG#%XWWRQV
The keyboard buttons are shown in the following illustration.
They are discussed in detail on the following pages.
CD/DVD Control Buttons
1
Internet Zone Buttons
2
Quick Launch Help Button
3
Quick Launch Web Button
4
Volume/Mute Button
5
Sleep Button
6
LED Status Lights
7
8VLQJ#&'2'9'#&RQWURO#%XWWRQV
Many CDs begin playing
automatically when
inserted into the drive.
Refer to “Playing an
Audio CD” in this chapter
to play a CD.
Refer to “Adjusting the
Volume” in this chapter to
adjust the volume when
playing a CD or a DVD.
MY P
RESARIO—GETTING STARTED AND BEYOND
Play/Pause starts or stops
1
a CD or DVD temporarily.
Rewind/Previous Track
2
skips to the previous track.
Fast Forward/Next Track
3
skips to the next track.
Note: Buttons may vary by model.
Stop ends the CD or DVD play,
4
rewind, and fast forward
functions.
Eject/Load ejects or loads the
5
CD or DVD.
U
SING YOUR COMPUTER
4-3
Page 28
With the press of a
keyboard button, you
can get on the Internet
fast, read your e-mail, or
check out the latest in
entertainment.
Depending on which
Internet Service Provider
(ISP) you have, the default
options provided by the
Internet Zone buttons may
vary.
Until you set up your Internet
Service Provider (ISP), each
Internet button takes you to a
window that guides you
through the ISP set-up
process.
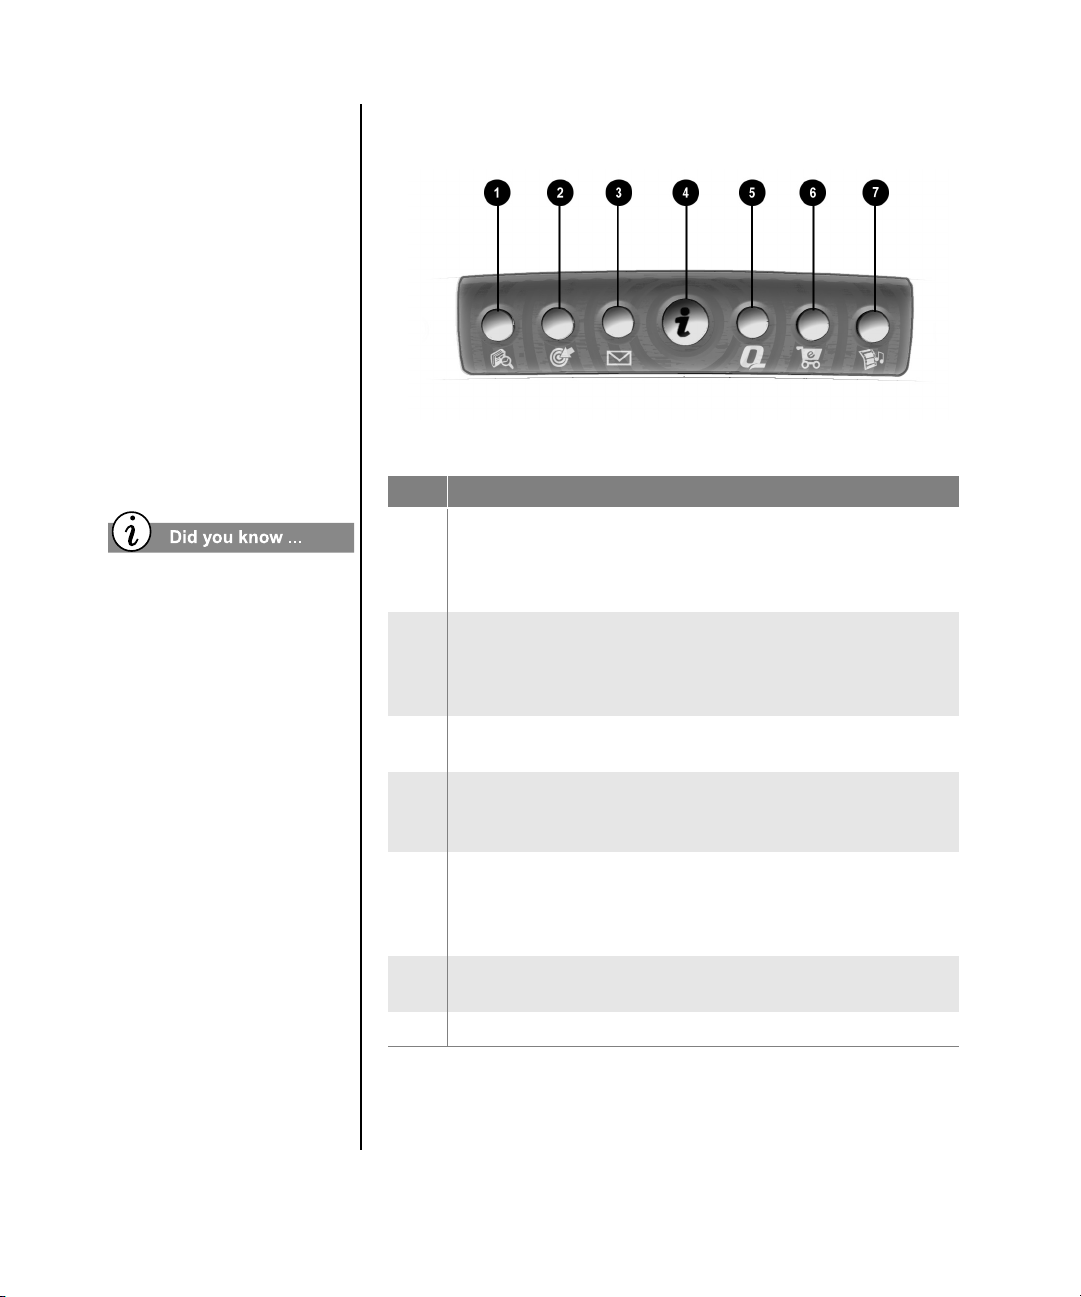
8VLQJ#,QWHUQHW#=RQH#%XWWRQV
Note: Button functions may vary by model and by region.
No. Description
Search accesses a Web site that helps you locate news and
1
information on the Internet. Search for topics including news and
information, shopping, images, music, and video. The default Web
browser is Alta Vista.
Activity launches the Internet Activity Centre. The default brings
2
you to an online community site with chat sessions, discussion
boards, clubs, home pages, photo albums, web voice products and
more.
E-mail provides one-touch access for sending and reading your
3
e-mail.
Instant Internet provides your daily start point to the Internet. It
4
connects you to a Web page filled with local weather, news, sports
and financial information.
My Presario is your instant connection to Compaq for getting the
5
most out of your computer and the Internet. Learn about the top
Internet Zones or adventure into your favorite Activity Centers to
get creative using the Web.
Retail/Affinity Central provides an instant connection to your
6
computer store and a variety of leading consumer companies.
Music Central launches the world of music and entertainment.
7
4-4 U
SING YOUR COMPUTER
MY P
RESARIO—GETTING STARTED AND BEYOND
Page 29
You can access your
favorite program,
Web site, or document by
pressing the Quick
Launch Web buttons.
These are the Help
My Program
G and
DDDD buttons.
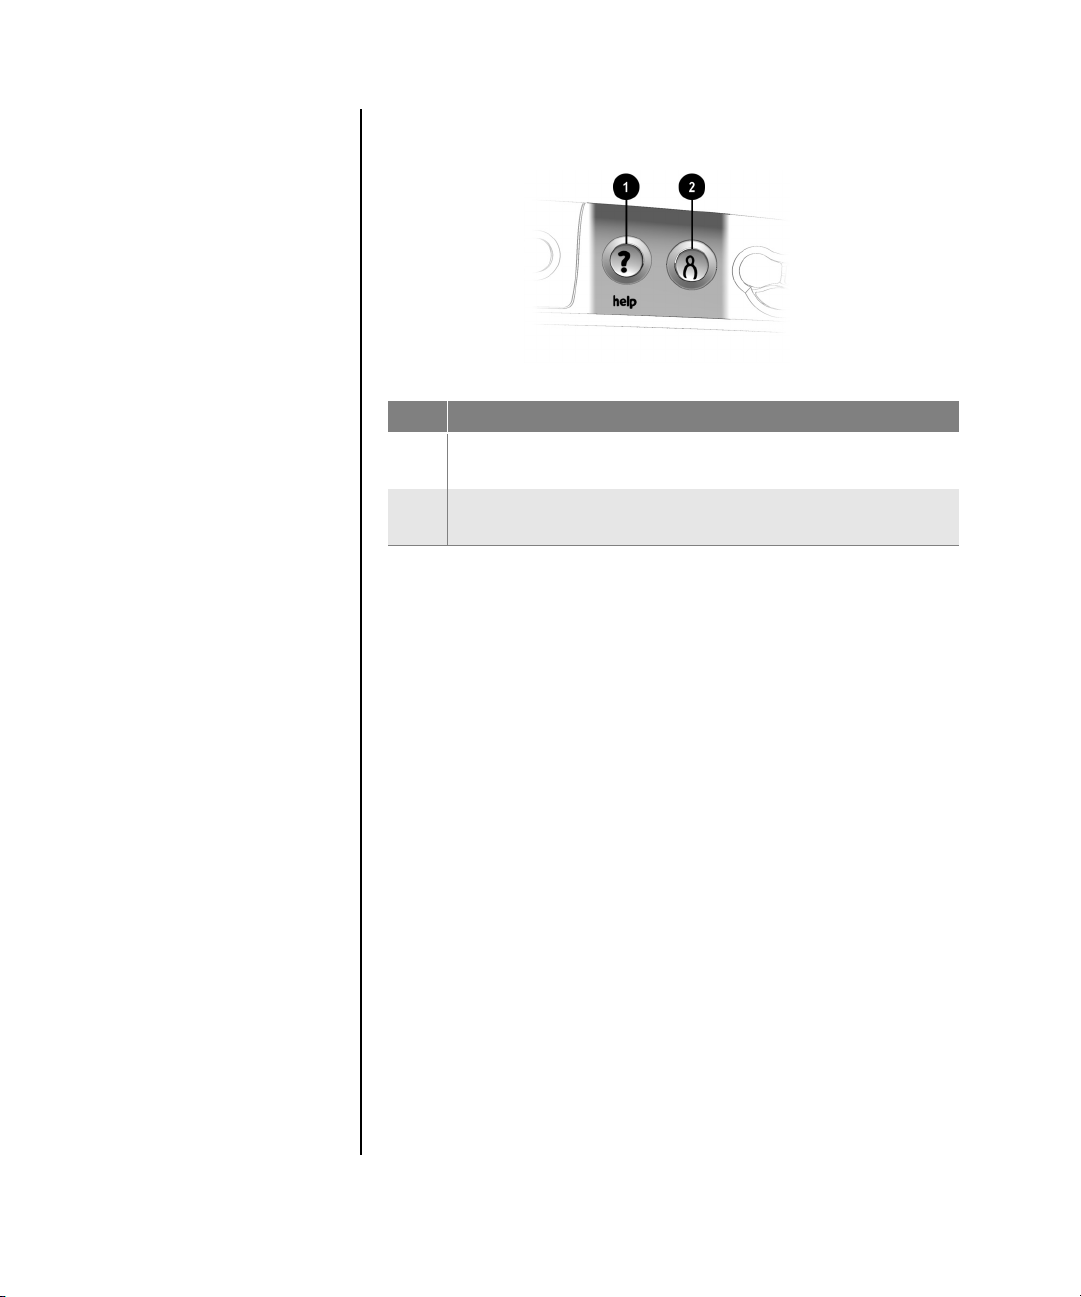
8VLQJ#4XLFN#/DXQFK#:HE#%XWWRQV
No. Description
Help takes you to the Service and Support folder on the Windows
1
desktop.
My Program accesses the utility where you can program the
2
button to launch your favorite software, Web site, or document.
Note: Buttons and their function may vary by model and region.
MY P
RESARIO—GETTING STARTED AND BEYOND
U
SING YOUR COMPUTER
4-5
Page 30
$VVLJQLQJ#WKH#0\#3URJUDP#%XWWRQ
After you assign the
My Program
DDDD button
settings, pressing the
button automatically opens
your selected software,
Web site, or document.
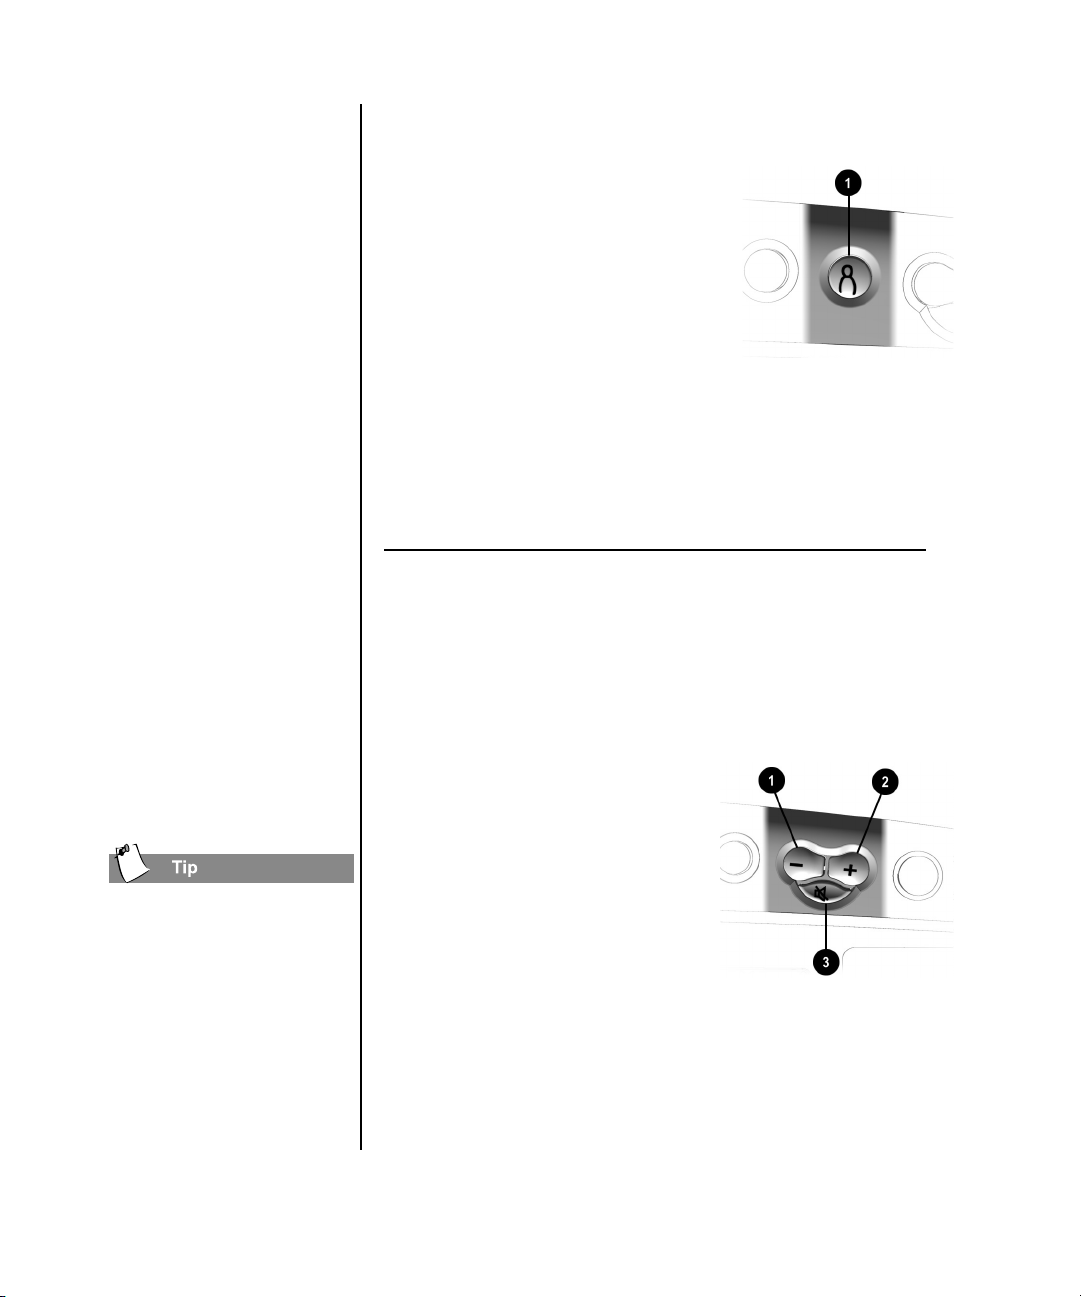
The Volume Control
buttons allow you to
control the volume of your
computer. Or, if you want
silence, press the Mute a
button. It’s that simple!
1. Press the My Program D
D
button 1.
DD
A window opens.
2. Select a program or Web site.
3. Click Next.
4. Select Program or Document.
5. Select the program or document
you want to assign to the
My Program
DDDD button.
6. Click OK to verify your selection.
7. Click OK.
$GMXVWLQJ#WKH#9ROXPH
When listening to or viewing a CD
or DVD, use the following buttons
on your keyboard to adjust the
volume as needed:
➜ Press the minus
to decrease the volume.
‘
button 1
You can also adjust the
volume by clicking the
Speaker
the system tray at the bottomright corner of the Windows
taskbar.
4-6 U
SING YOUR COMPUTER
icon located in
÷÷÷÷
➜ Press the plus
to increase the volume.
➜ Press the mute
to turn off the sound.
’
button 2
a
button 3
MY P
RESARIO—GETTING STARTED AND BEYOND
Page 31

Reassigning the Help Button
The Help G button takes you
to the Service and Support
folder for support for the
following programs:
➜ McAfee Active Shield
➜ Compaq Service
Connection
➜ Compaq Diagnostics
➜ Quick Restore
To restore the Help Web site,
select Restore to Default
Settings when reassigning the
Help
button.
G
After you assign the Help
button, it is set until you
reassign it.
G
1. From the Windows desktop,
click the Start button.
2. Point to Settings and then
Control Panel. The Control
Panel window is displayed.
3. Double-click the Easy
ÿ
Access Buttons
icon. The
Compaq Easy Access Button
Settings window is displayed.
G
4. Press the Help
button.
5. Select either Program or Web
site and click Next.
6. Select the program, document,
or Web site you want to program
to the Help
G button.
7. Click OK to verify your
selection.
8. Click OK to apply your
selection.
MY P
RESARIO—GETTING STARTED AND BEYOND
U
SING YOUR COMPUTER
4-7
Page 32

Reassigning the My Program Button
If you have already
assigned the My
DDDD
Program
button, this
procedure allows you to
reprogram it to a different
program, document, or
Web site, as often as you
would like.
After you reassign the My
Program
pressing the button
automatically opens your
selected program, document,
or Web site.
button setting,
DDDD
1. From the Windows desktop,
click the Start button.
2. Point to Settings and then
Control Panel. The Control
Panel is window is displayed.
3. Double-click the Configure
ÿ
Easy Access Button
icon.
The Compaq Easy Access
Button Settings window is
displayed.
4. Press the My Program button.
5. Select Launch a new program
or Launch a new Web site.
6. Click Next.
7. Select the program, document,
or Web site you want to program
to the My Program button.
8. Click OK to verify your
selection.
4-8 U
SING YOUR COMPUTER
9. Click OK to apply your
selection.
MY P
RESARIO—GETTING STARTED AND BEYOND
Page 33

Customizing the Internet Zone Buttons
Some Internet buttons
have a default function and
others can be assigned a
function, such as calling
up your favorite Internet
page or reading your email. After they have been
assigned a function, these
buttons can be reassigned
to a different function.
1. From the Windows desktop, click the Start button.
2. Point to Settings and then Control Panel. The Control Panel
is window is displayed.
ÿ
3. Double-click the Easy Access Buttons
icon. The
Compaq Easy Access Button Settings window is displayed
where your can select the button you would like to program.
4. Press the Internet button that you would like to program.
This will take you to a Web site that will provide instructions for
reassigning the Internet button.
MY P
RESARIO—GETTING STARTED AND BEYOND
Search
1
Activity
2
E-mail
3
Instant Internet
4
My Presario
5
Retail/Affinity Central
6
Music Central
7
U
SING YOUR COMPUTER
4-9
Page 34

3XWWLQJ#<RXU#&RPSXWHU#WR#6OHHS
If you’re going to be away
from your computer but
want to leave the power
on, you can let your
computer go to sleep. This
process allows you to let
programs run while
putting your computer into
a low-power state, which
saves energy. However,
some software (such as
DVD software) might
disable the sleep mode.
You can wake your computer
by moving the mouse, by
clicking a mouse button, or
by pressing any of the
keyboard buttons.
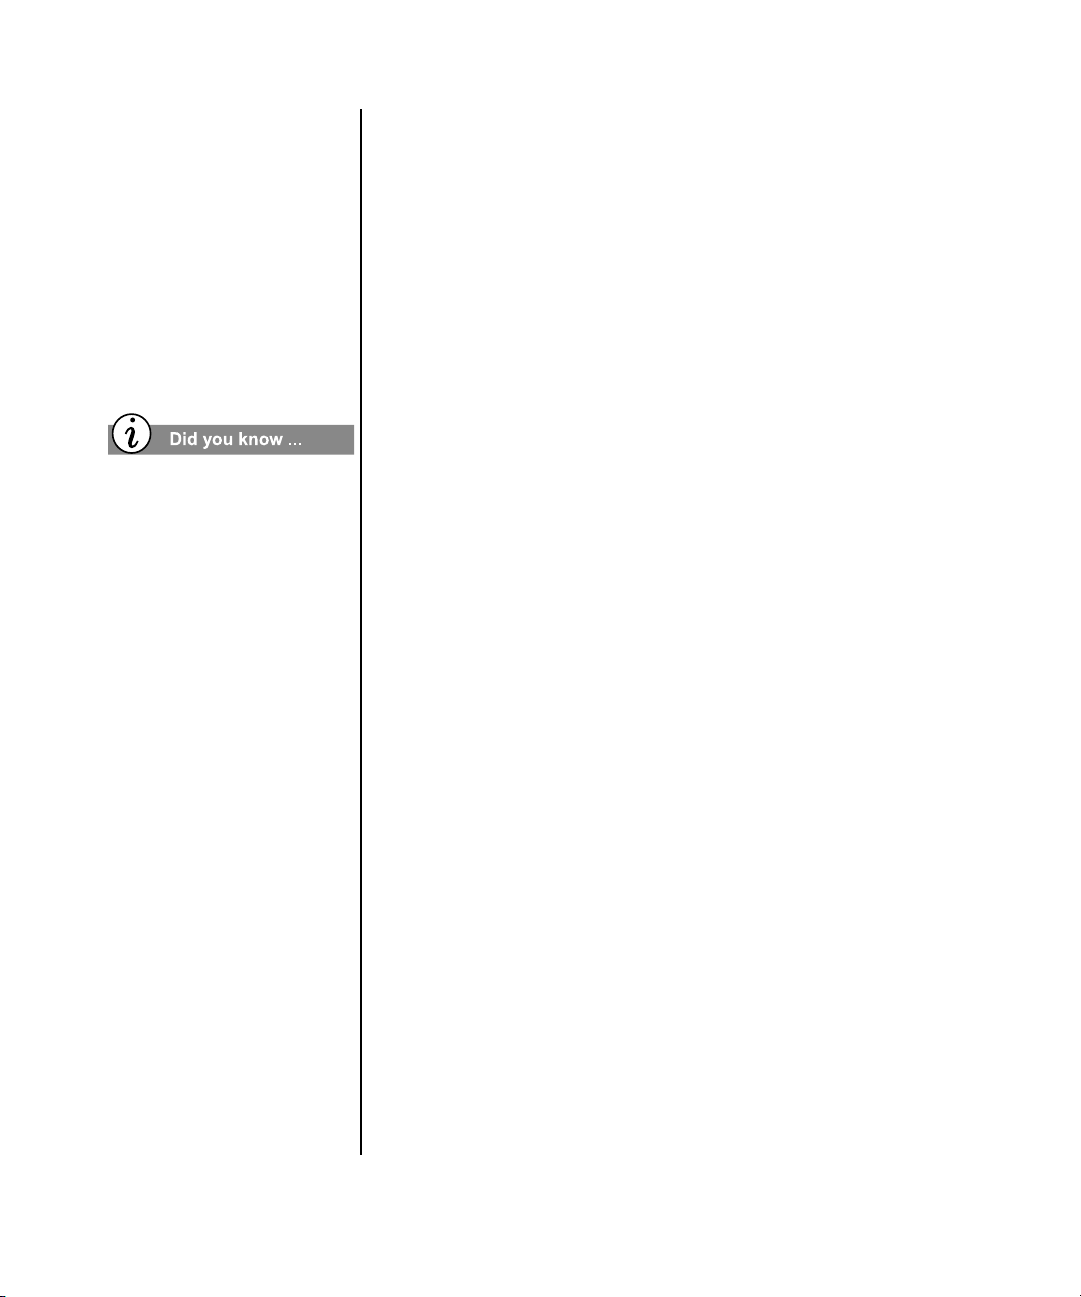
Press the Sleep E button 1 on the keyboard and your computer
goes to sleep. Or, your computer will go to sleep automatically if
no activity occurs within 20 minutes.
:DNLQJ#<RXU#&RPSXWHU
Press the Sleep E button 1
on the keyboard and your
computer wakes up.
4-10 U
SING YOUR COMPUTER
MY P
RESARIO—GETTING STARTED AND BEYOND
Page 35

8QGHUVWDQGLQJ#WKH#6\VWHP#6WDWXV#/LJKWV
The system lights on the
keyboard provide a quick
status of your computer
and keyboard settings.
Post Office Protocol (POP)
is a commonly used
messaging protocol. The
most widely used
implementation of this
protocol is POP3. POP3 is a
retrieval protocol, used to
retrieve mail messages from
a POP server. E-mail
messages received by the
POP server are delivered to a
server mailbox and messages
reside there until you retrieve
them.
The system status lights are shown in the following illustration,
and the function of each light is explained.
No. Description
E-mail indicates when you have e-mail waiting to be read.
1
Note: This light only works with POP3 Internet services. Some
ISPs do not support this functionality.
Sleep indicates the computer is in the sleep mode.
2
Num Lock indicates that you can use the numeric key pad to type
3
numbers.
Caps lock indicates all text typed will appear as capitalized letters.
4
Scroll lock indicates when the scroll-lock function is engaged,
5
allowing you to scroll through a document without moving the
cursor.
MY P
RESARIO—GETTING STARTED AND BEYOND
U
SING YOUR COMPUTER
4-11
Page 36

6FUROO#0RXVH
6FUROO#0RXVH
0DNLQJ#6FUHHQ#6HOHFWLRQV
Your computer comes with
a scroll mouse. The scroll
mouse directs a cursor on
the Windows desktop. You
use the mouse to move
quickly and easily through
a document or Web site.
Instead of using the scroll
bar to display pages, move
the scroll wheel on your
mouse forwards or
backwards through a
document or Web site to
save time.
Click by pressing and releasing the
left mouse button quickly one time.
You will hear a single clicking
sound.
$FFHVVLQJ#6RIWZDUH#DQG#)LOHV
Double-click by pressing and
releasing the left mouse button
twice, quickly.
Some mouse functions may
not work with all software.
4-12 U
SING YOUR COMPUTER
6FUROOLQJ
Click by pressing and holding
down the left mouse button
with the cursor positioned on a
scroll bar.
Click and hold down on the
scroll handle (the box in a scroll
bar area) to position text. Or
single-click the arrow buttons
to move up or down one line at
time.
MY P
RESARIO—GETTING STARTED AND BEYOND
Page 37

Speakers
(available on select models)
Speaker options depend on
which model you have.
However, the JBL
Platinum Series are the
standard speakers that
come with most Compaq
Presario desktop
computers. You can use
the speakers freestanding
or mount them to the side
of some monitors. For
more information, see the
documentation that came
with the speakers.
To set up the speakers,
follow the directions on
the monitor Quick Set-Up
poster. If you purchased
speakers separately, follow
the included instructions.
You can listen to many
digital MP3 portable
music players by plugging
them into the Audio In
port on the right side of the
speaker (on JBL Platinum
Series speakers). Other
portable music players
include:
Speakers
7XUQLQJ#RQ#WKH#6SHDNHUV
To turn the speakers on or off,
press the Power button on the
right side of the speaker
No. Description
Power Button—conveniently allows quick power down when not
1
in use, or to mute the sound. Simply push and release the Power
button—the light indicates when the power is on.
Headphone Jack—allows you to connect most stereo
2
headphones for your personal listening pleasure.
Audio-In Port—an advanced feature that lets you quickly connect
3
your favorite Digital MP3 player or any portable audio device and
play any audio directly through the speakers. Simply plug in your
player to the port and control the volume from your player.
.
$GMXVWLQJ#WKH#9ROXPH³$XGLR#,Q#3RUW
If the volume is too low, use the Volum e Control on the
connected digital player to adjust the volume.
➜ CD player
➜ Cassette player
➜ Stereo
MY P
RESARIO—GETTING STARTED AND BEYOND
U
SING YOUR COMPUTER
4-13
Page 38

These devices connect
with stereo cable (3.5 mm
plug) available at most
electronic stores and
computer retailers.
Diskette, Hard Drive, CD-ROM, CD-RW and DVD-ROM drives
Using the Diskette Drive
1. Hold a diskette with the
label facing up and the
arrow on the diskette
pointing toward the drive;
then gently push the diskette
into the drive.
2. To remove a diskette, press
the Eject button 1 on the
diskette drive.
▲▲▲▲Caution: Wait until the
diskette-drive activity is
complete (the activity light
2 stops glowing) before
removing a diskette. Removing
a diskette when the drive is
reading from or writing to the
diskette can damage the
diskette or the information
stored on it.
4-14 U
SING YOUR COMPUTER
8VLQJ#WKH#+DUG#'ULYH
The hard drive stores system files, software, and data files inside
your computer. When you install software, download files from
the Internet, receive e-mail and attachments, or create new files,
the computer saves them on your hard drive. The available
storage space is gradually used. To regain storage space, you can
either delete files or programs loaded on your computer.
MY P
RESARIO—GETTING STARTED AND BEYOND
Page 39

Diskette, Hard
Drive, CD-ROM,
,QVHUWLQJ#D#&'#LQWR#WKH#&'0520/#&'05:/#RU#
'9'0520#'ULYH#
+QXPEHU#DQG#VW\OH#RI#GULYHV#YDU\#E\#PRGHO,
CD-RW and
DVD-ROM
Drives
Your computer may have
one or more drives
depending on the model
you purchased:
➜ Diskette drive
➜ Hard drive
➜ CD-ROM drive
➜ CD-RW drive
➜ DVD-ROM drive
Each drive has different
size capacities for storing
information.
The diskette drive uses a
diskette to store files. Once
information is copied onto
a diskette, it remains there
until you delete or
overwrite it.
Note: Your computer must be turned on
before you can insert or remove a disc.
1. Press the Load/Eject ≤ 1
button to open the drive.
2. Carefully lift the disc from
the CD case by holding the
disc only by the edges to
avoid touching the surface.
3. Place the disc, label side
facing up, into the round
area of the tray. If the
tray contains support tabs,
carefully slide the disc
under the tabs to position it
correctly in the tray.
≤
4. Press the Load/Eject
button to close the drive.
1
The other drives are
discussed on the following
pages.
MY P
RESARIO—GETTING STARTED AND BEYOND
U
SING YOUR COMPUTER
4-15
Page 40

5HPRYLQJ#D#'LVF#IURP#D#'ULYH
The CD-ROM drive
allows you to read data
from a CD or listen to a
music CD.
The CD-RW drive allows
you to read and write data
to disc(s) for storage.
The DVD-ROM drive
allows you to view your
favorite movies, listen to
music, or read information
from CDs.
If a CD doesn’t play, make
sure the drive is closed.
You can set the volume
control from the keyboard.
Select models may have a
jack and volume control on
the physical drive that may
not work.
Press the
1.
Load/Eject
button to open the drive
≤
1
.
2. Carefully lift the CD or the
DVD from the drive.
3. Press the Load/Eject
≤
button on the front of the
drive to close the door.
4. Store the disc in its protective case or in the storage
compartment on the front of the computer.
3OD\LQJ#DQ#$XGLR &'
1. Insert a disc into the
CD-ROM or DVD-ROM
drive with the label face up.
2. If, after a few seconds, the
disc does not automatically
start playing, press the Play/
Pause ® button on
the keyboard.
3. Perform the following tasks using your Internet keyboard as
needed:
4-16 U
SING YOUR COMPUTER
➜ Click the Pause
➜ Click the Forward
Ã
button to pause play.
¨
and Back ´ buttons to skip
tracks.
➜ Click the Stop
➜ Press the Eject button on the drive to remove the disc.
±
button to stop playing the CD.
MY P
RESARIO—GETTING STARTED AND BEYOND
Page 41

3OD\LQJ#D#'9'0520#0RYLH
A CD-ROM drive reads
CDs, CD-R, and CD-RW
media. A DVD-ROM
drive reads all CD media,
plus DVD discs.
When you have finished
listening to the CD, store
the disc in the storage
compartment on the front
of your computer or in its
protective case.
To adjust the volume, refer to
“Adjusting the Volume” in
this chapter.
1. For best performance, close all running programs before
inserting a DVD movie, and insert the DVD into the
DVD-ROM drive. Playback begins automatically.
2. If playback does not begin automatically, click the Start
menu.
3. Point to Programs, and then Compaq DVD Express.
©
4. Click Compaq DVD Player and select the Play
button.
5. Adjust the play from the keyboard.
If the CD-ROM or DVDROM drive can’t play a disc,
check that the disc is inserted
with the label face-up and
properly seated in the drive.
The DVD-ROM drive takes
longer to begin playback
because it has to determine
the type of media being
played.
MY P
RESARIO—GETTING STARTED AND BEYOND
Play/Pause starts or stops
1
a CD or DVD temporarily.
Rewind/Previous Track
2
skips to the previous track.
Fast Forward/Next Track
3
skips to the next track.
Stop ends the CD or DVD
4
playback, rewind, and fast forward
functions.
Eject/Load ejects or loads the CD
5
or DVD.
U
SING YOUR COMPUTER
4-17
Page 42

&UHDWLQJ#<RXU#2ZQ#&'V
You can only play a DVD
movie from a DVD-ROM
drive. When you have
finished watching a movie,
store the DVD in its
protective case.
You can double-click the
DVD Player
Windows desktop to start
playing a movie.
icon on the
CDs are created using the Adaptec Easy CD Creator (available
on select models). Various uses of the CD-RW drive are shown
below:
Media Uses
Audio Create personal music CD with your favorite music tracks
and MP3 files.
Data Create a data CD to store data, such as files or folders
from the hard disk. This feature is useful for backing up
important files or sharing data with other people.
Direct CD Write files directly to a CD-R/CD-RW just like you copy files
to a disk drive. Drag-and-drop files from one drive to
another in Microsoft Explorer without accessing Easy CD
Creator.
CD Copier Create entire copy of a CD or a back up of data files.
Jewel Case
Creator
Make custom jewel case inserts and CD labels to indicate
the title and contents of a CD (labels are sold separately).
For more detailed information refer to chapter 10 of this guide.
4-18 U
SING YOUR COMPUTER
MY P
RESARIO—GETTING STARTED AND BEYOND
Page 43

,QWHUQHW#9LGHR#&DPHUD
8VLQJ#/RJLWHFK#4XLFN&DP#([SUHVV#
The CD-RW drive allows
you to create your own
CDs. You can buy two
types of media: CD-R and
CD-RW.
CD-R media can be played
on most of the newer CD
players, CD-ROM, and
DVD-ROM drives. CD-R
media can be written to
only once. However, you
can write to CD-RW
media using multiple
recording sessions until
you finalize the disc.
CD-RW media can be used
to make backups of your
personal CDs or hard disk.
These discs are reusable
and can be erased and
rewritten to numerous
times.
+DYDLODEOH RQ VHOHFW PRGHOV,
The Logitech camera installs
within minutes. Refer to the
Logitech documentation packed
with the camera for detailed
operating instructions.
Note: Load the camera software prior
to plugging the camera into the
computer.
The Logitech Spotlife Web site:
➜ Provides 15 Mb of free Web space
➜ Allows you to video broadcast live over the Internet
➜ Lets you chat directly with viewers using text or audio
The Adaptec Easy CD
Creator software is
intuitive. When you place
the cursor over any of the
functions, a description of
the function is displayed.
MY P
RESARIO—GETTING STARTED AND BEYOND
U
SING YOUR COMPUTER
4-19
Page 44

,QWHUQHW#9LGHR#
&DPHUD
The Logitech QuickCam
Express Internet video
camera provides many
useful features:
➜ Captures images at the
touch of a button
➜ Sends photo and video
e-mail as easily as text
➜ Allows video chatting
for a face-to-face
get-together with
faraway friends and
family
➜ Lets you save a video
image, print it, or send
the image over the
Internet with easy-touse software
➜ Quickly creates a
personal video
➜ Has one-click “Web
camming,” which lets
you put the special
events in your life
online
4-20 U
SING YOUR COMPUTER
MY P
RESARIO—GETTING STARTED AND BEYOND
Page 45

Connecting
to the
Internet
The Internet is one of the most fascinating developments in
,Q#7KLV#&KDSWHU
56K Modem, 5-3
Getting on the World
Wide Web, 5-4
Sending and Receiving
E-mail, 5-6
Protect Yourself when
Downloading Software
from the Internet, 5-7
recent years. When people talk about “the Internet” it is
basically the vast network of computers around the globe.
In the last few years the internet has become accessible (and
affordable) for almost anybody. With the Internet you can
e-mail your friends, find information on the World Wide Web,
do your banking and investments without leaving home, and
use several other internet services. Your Presario Internet PC
is fully equipped for Internet use.
8
Advanced E-mail
Functions, 5-9
MY P
RESARIO—GETTING STARTED AND BEYOND
C
ONNECTING TO THE INTERNET
5-1
Page 46

Get Connected
How does it work? You need to subscribe to an Internet Service
Provider (ISP) which is your ‘port’ to the net. After doing that
you can access the Net with your internet browser MS Internet
Explorer and the mail program MS Outlook Express.
Compaq has preselected an Internet provider for you to make it
as easy as possible. To make your first contact with the Net and
your provider, please make sure your PC is on and connected to
the phone line as described in chapter 2.
To get connected, you click the Internet ISP icon on the desktop.
This icon differs per country.
This will start a setup wizard which will guide you through the
setup process. This chapter shows you further the basics to
identify your modem and the use of the Internet.
5-2 C
ONNECTING TO THE INTERNET
MY P
RESARIO—GETTING STARTED AND BEYOND
Page 47

56K Modem
56K Modem
Identifying Your 56K Modem
Your Internet PC is
equipped with a 56K data/
fax modem.
1. From the Windows taskbar, click the Start button. The Start
menu is displayed.
2. Point to Settings and then click Control Panel. The Control
Panel window is displayed.
iiii
3. Double-click the Modems
icon. The Modems Properties
window displays the name of the installed modem.
Using the ITU V.90 56K Standard Modem
The ITU V.90 Standard defines modem data transmission at 56
Kbps speeds. The download rate is faster than the upload rate.
The theoretical maximum download speed is 56 Kbps, and the
maximum upload speed is up to 33.6 Kbps. Although your
modem is capable of download speeds of up to 56 Kbps,
maximum achievable download transmission rates may not
reach 56Kbps and the rate will vary depending on telephone line
conditions.
MY P
RESARIO—GETTING STARTED AND BEYOND
C
ONNECTING TO THE INTERNET
5-3
Page 48

Getting on the
World Wide
Web
As soon as you are
connected to your ISP you
can start surfing the Web.
Getting on the World Wide Web
Surfing The Web
To begin surfing the Web:
1. Click the Internet Explorer
icon on the Desktop and
follow the instructions on
the screen.
2. As soon as you are
connected you will see two
green monitor lights in the
lower right-hand corner of
the desktop. These lights indicate that you are connected and
that your phone line is open.
Internet Explorer will open with a Start Page. You can click on
the items on the page which will lead you to other pages. Use
the Back and Forward buttons in the button bar to go one page
back or one page forward.
Storing your Favorite Pages
The ‘History’ button in the
button bar shows you the
pages which you have visited
recently.
5-4 C
ONNECTING TO THE INTERNET
If you see an interesting page which you are likely to want to
visit later, you can store it as ‘favorite’. Click Favorites in the
menu bar and click Add to favorites. You can store the address
in any of the folders.
If you want to visit one of your favorite pages, click Favorites
on the button bar. In the panel on the left you will see a list of all
your previously stored pages.
MY P
RESARIO—GETTING STARTED AND BEYOND
Page 49

The Internet has no owner. It
is just a word for the entire
network of computers around
the world.
Typing a web address directly
A website in a newspaper or magazine is displayed in the
following format: www.compaq.com.
If you want to visit a page which you do not have stored under
your Favorites, you have to type in the address manually.
To type in that address directly, click on the address bar in
Internet explorer and type the exact address. Pressing <enter> or
clicking ‘go’ on the right hand side of the address bar will
trigger the browser to search the page.
MY P
RESARIO—GETTING STARTED AND BEYOND
C
ONNECTING TO THE INTERNET
5-5
Page 50

Sending and
Receiving
E-mail
Sending and Receiving E-mail
Sending E-mail
1. Click the MS Outlook Express icon on the desktop.
2. Click new mail in the button bar.
E-mail or ‘electronic mail’
is a fast way to get in
contact with friends and
family. You have to have
the e-mail address of the
person you want to mail
to. An e-mail address will
look like this:
someone@someone.com.
3. If you haven’t set up your mail account, a wizard will pop up
which will ask you information your account. You can get
this information from your Internet Service provider (ISP).
4. In the To: field, type the e-mail address of the person you
want to send the mail to.
5. Type your message and click send when done.
6. The mail program will connect to your ISP and send the
message.
Receiving E-mail
Until you retrieve your e-mail, the mails are stored on the server
of your ISP.
To check your mail:
1. Click the MS Outlook Express icon on the desktop.
2. Click Send/Receive.
3. MS Outlook Express connects to your ISP and retrieves the
mails.
5-6 C
ONNECTING TO THE INTERNET
4. You will find your new mail in the ‘inbox’ in the left hand
panel.
MY P
RESARIO—GETTING STARTED AND BEYOND
Page 51

Protect
Yourself when
Downloading
Software from
the Internet
When you download
software files from the
Internet, be sure that your
anti-virus utility is
running. Anti-virus
software ensures that your
computer does not become
infected with a virus.
Protect Yourself when Downloading Software from the Internet
Using Shareware
Shareware is software that is
made available on the Internet
as downloadable files.
Restrictions may apply to the
use of these files. Read all
copyright materials before
downloading software from the
Internet.
Using Software “Fixes”
Fixes are updates (or
“patches”) to the
software on your
computer. To access a
software fix, go to the
Web site of the software
manufacturer and find
the location of their
updates.
MY P
RESARIO—GETTING STARTED AND BEYOND
For updates on all
hardware-enabling
software that came with your Internet PC (the drivers that run
your hardware), go to the following Web site to receive free
SoftPaqs (“software fixes”):
www.compaq.com/support/files
▲▲▲▲Caution: Hardware-enabling software that does not come directly
from the Compaq Web site may render your hardware unusable.
All third-party software (that did not come with your computer)
“patches” must come directly from the manufacturer.
C
ONNECTING TO THE INTERNET
5-7
Page 52

If you download software
from a Web site, follow the
installation instructions
that are usually displayed
on the Web page. If
installation instructions are
not available, complete the
steps listed here.
Before downloading files of
any kind from the Internet,
make sure that call-waiting is
disabled and that your
anti-virus utility is running.
If the download process is
interrupted, you must restart
the download procedure from
the beginning.
Installing Software Downloaded from the
Internet
1. Before you start downloading, note the location on the hard
drive where the files will be stored. Also, make sure that you
have enough disk space available. See the “Computer
Upgrades” chapter in this guide for information on checking
your hard disk space.
2. After the download is complete, terminate your Internet
connection.
3. Close all other open programs.
4. From the Windows taskbar, click the Start button, point to
Settings, and then click Control Panel. The Control Panel
window is displayed.
5. Double-click the Add/
¤
Remove Programs
The Add/Remove Programs
Properties window is
displayed.
6. Click the Install button. The
Install Program wizard is
displayed.
icon.
For more information on
anti-virus software, see the
“Preventive Maintenance”
chapter in this guide.
Some software is downloaded
in a compressed state. Most
Web sites using this
technology provide links to
download the appropriate
utility, such as WinZip, to
decompress the files.
5-8 C
ONNECTING TO THE INTERNET
7. Click the Next button. The
Run Installation Program
window is displayed.
8. Click the Browse buttton.
The Browse dialog box is
displayed.
9. Locate and select the
Setup.exe or Install.exe file
for the downloaded software.
10. Click the Open button to
begin the installation process.
MY P
RESARIO—GETTING STARTED AND BEYOND
Page 53

Advanced
E-mail
Advanced E-mail Functions
Sending an E-mail Attachment in
Microsoft Outlook Express
Functions
E-mail is a great way to
send files across the
Internet, and the procedure
is simple. Just follow these
steps to attach a file to
your e-mail.
When you insert a file
attachment into an e-mail,
your computer creates a copy
of the file. Your original file
does not move from its
location.
You can also insert an
attachment by clicking the
Attach button
message rather than going to
the File menu.
on the e-mail
VVVV
1. After typing an e-mail
message in Outlook Express,
click the Insert menu and
select File Attachment. The
Insert Attachment dialog box
is displayed.
2. Locate the file that you want
to attach to the e-mail. You
may need to click the down
arrow next to the Look in box
to select the appropriate drive.
3. Click the file that you want to attach to the e-mail.
4. Click the Attach button. The Insert Attachment dialog box
closes and the file is inserted as an attachment into your
e-mail.
MY P
RESARIO—GETTING STARTED AND BEYOND
C
ONNECTING TO THE INTERNET
5-9
Page 54

Opening an E-mail Attachment
You may receive e-mails
with attached files. If an
e-mail contains an
attachment, a paperclip
icon is displayed next to
the e-mail.
While viewing an e-mail
attachment, the e-mail
message that contains the
attachment is minimized on
the Windows taskbar so that
you can easily return to the
message by clicking it.
VVVV
To open an e-mail attachment, open the e-mail message and
double-click the paperclip icon. Once the file is open, you can:
➜ View the file. If you do not want to save, modify, or print the
file, after viewing, click the Close button P. The file closes
and you are returned to the e-mail that contains the
attachment.
➜ Save the file. You can save a file attachment while it is open.
Or you can save the attachment without opening the file by
clicking the File menu and selecting Save Attachments, and
then specifying a drive or folder in the Save Attachments
dialog box. You can specify a new name for the file in the
File Name box if you don’t want to use the current file
name.
➜ Print the file. You can print the file attachment while it is
open. Or you can print the attachment without opening the
file by clicking the File menu and selecting Print. Then
select the Print attached files with item(s) check box in the
Print dialog box.
5-10 C
ONNECTING TO THE INTERNET
MY P
RESARIO—GETTING STARTED AND BEYOND
Page 55

Common
Tasks
In this chapter, you learn how to
,Q#7KLV#&KDSWHU
Print Basics, 6-2
Digital Audio Files, 6-3
Games, 6-4
Software, 6-5
perform some of the more
common activities with your
new Internet PC.
9
MY P
RESARIO—GETTING STARTED AND BEYOND
C
OMMON TASKS
6-1
Page 56

Print Basics
Print Basics
Using the Menu to Print
To print one or more pages
from a document file or
Web page, you have to
connect your printer and
install the necessary
software. These procedures
are detailed in the “Setting
Up Your Computer”
chapter in this guide.
To see what the document
will look like when printed,
select the Print Preview
option from the File menu.
This option is available in
most software packages.
These options vary depending
on the printer you installed.
1. Click File on the menu bar.
2. Click Print. The Print dialog box is displayed.
3. Select the printing options you want.
• Confirm the printer you are printing to 1.
• Choose the page range to print 2.
– All pages
– The current page you are viewing
– A range of pages (for example, type 1–4)
• Confirm the number of copies you want to print 3.
• Select All, Odd, or Even pages in range 4.
For additional information
about your printer, refer to the
manufacturer’s
documentation.
6-2 C
OMMON TASKS
4. Click OK.
MY P
RESARIO—GETTING STARTED AND BEYOND
Page 57

Digital Audio
Files
In addition to music CDs,
your computer can play
digital audio files, such as
music downloaded from
the Internet.
Digital Audio Files
Playing Digital Audio Files
1. From the Windows taskbar,
click the Start button.
2. Point to Programs and then
select RioPort Audio
Manager. The Audio
Manager is displayed.
You can download MP3
files and play them using
your RioPort Audio
Manager software. RioPort
Audio Manager is
available on selected
models.
3. Follow the on-screen
instructions for creating and
playing a playlist. For help on
specific functions, press the
F1 key or choose Help Topics
from the Help menu.
MY P
RESARIO—GETTING STARTED AND BEYOND
C
OMMON TASKS
6-3
Page 58

Games
Games
Playing Preinstalled Games
Your new Internet PC is
not only a powerful tool
for surfing the Internet and
running software, it can
also allow you to play
games. Your computer
came with several
Windows games
preinstalled, and many
more are available for
purchase or by
downloading from the
Internet. You can play
games online with other
players from all over the
world.
Before purchasing a game,
check the computer
requirements (listed on the
outside of the game box)
to make sure that your
computer is configured
correctly for the game you
want to buy.
on Your Computer
1. From the Windows taskbar,
click the Start button.
2. Point to Programs, then
Accessories, and then
Games.
3. Click the icon for the game
you want to play.
You should always use the
same disc drive (CD-ROM or
DVD-ROM) that you used to
install the game when you
play the game. If you
experience problems
installing or playing a game,
contact the game
manufacturer for assistance,
or visit their Web site for
updates.
6-4 C
OMMON TASKS
MY P
RESARIO—GETTING STARTED AND BEYOND
Page 59

Software
Software
Installing Software from a CD, DVD, or
You may want to purchase
and install additional
software. Software can be
installed from a CD, DVD,
or diskette, and it can be
downloaded from a Web
site.
The installation process
automatically begins when
you insert the CD into the
CD drive. If the
installation process
doesn’t automatically
begin, refer to the
documentation that came
with the software. If no
documentation exists,
follow the procedure listed
here to install software
from a CD or diskette.
In the event of difficulties
with the installation,
contact the software
manufacturer.
Diskette
1. Close all open programs.
2. From the Windows taskbar,
click the Start button, point
to Settings, and then click
Control Panel.
3. Double-click the Add/
¤
Remove Programs
The Add/Remove Programs
Properties window is
displayed.
4. Click Install.
5. Insert the CD or diskette into
the proper drive and click
Next. Microsoft Windows
will begin the installation
process.
icon.
When selecting software for
your computer, make sure the
packaging states that it is
compatible with your version
of Microsoft Windows, your
computer memory, processor,
and available disk space.
MY P
RESARIO—GETTING STARTED AND BEYOND
C
OMMON TASKS
6-5
Page 60

6-6 C
OMMON TASKS
MY P
RESARIO—GETTING STARTED AND BEYOND
Page 61

Computer
Upgrades
Your Compaq Internet PC is easily upgradable. It is designed
,Q#7KLV#&KDSWHU
Internal Components, 7-2
with an Easy Access panel to allow quick and easy access to the
internal components. This chapter provides installation
instructions for most hardware components.
:
Upgrading Components,
7-3
Adding Components, 7-8
Replacing the Color Accent
Kit, 7-10
Installing Additional
Software, 7-12
MY P
RESARIO—GETTING STARTED AND BEYOND
Note: If you would like to replace the system board or microprocessor, please
contact the Compaq Product Information Center at the telephone number
listed in your warranty.
Your safety is important. Before performing any procedures involving the
components, take a few minutes to read the Warning and Caution
statements in the “Introduction” chapter of this guide. Following the
guidelines in these statements will help reduce the risk of personal injury or
equipment damage.
C
OMPUTER UPGRADES
7-1
Page 62

Internal
Components
Your Computer is
constructed with an Easy
Access panel. This design
makes accessing the
internal parts easy.
y.
Failure to disconnect the
power from the computer
may result in personal injury.
Before working with the
components inside the
computer, you must ground
yourself and the equipment to
prevent static electricity from
damaging the parts. To
discharge any static buildup,
you should touch a metal part
of the computer chassis
before touching any internal
parts.
Internal Components
Accessing Internal Computer Components
1. Press the Power button to
turn off the computer.
2. Disconnect the power cable
from the wall and computer.
3. Remove the screw securing
the side access panel.
4. Locate the latch directly
below the screw, pull down,
and hold in the down
position.
5. Grab the handle and slide the
side panel from the chassis.
6. Turn the computer on its
side, with the open side
facing up.
7-2 C
OMPUTER UPGRADES
MY P
RESARIO—GETTING STARTED AND BEYOND
Page 63

Upgrading
Components
Upgrading Components
Upgrading the CD-ROM, CD-RW,
and DVD-ROM Drives
The CD-ROM, CD-RW,
and DVD-ROM drives are
often called optical drives
because they use light to
read and write information
to a compact disc (CD) or
DVD. These discs store
massive amounts of
information.
Your CD-ROM drive
allows you to read data
from a CD. A CD holds
600 Mb of data.
The CD-RW drive allows
you to read and write data
to disc(s) for permanent
storage. The CD-RW drive
allows you to record video
and audio.
The DVD-ROM drive
allows you to view your
favorite movies and listen
to music on DVDs. It can
also read CDs.
1. Complete the Accessing Internal
Computer Components
procedure.
2. Locate the drive door lock
inside the chassis.
3. Rotate the lock to the down
position to unlock the upper
front panel door.
4. Press the indention located
on the lower front panel to
open the lower door.
You do not have to place the
lock in the up position after
replacing the new drive(s).
MY P
RESARIO—GETTING STARTED AND BEYOND
C
OMPUTER UPGRADES
7-3
Page 64

The upper front panel door
was designed with finger
holes to make opening the
door easy.
The drive data cable has a
color pull tab to help you
identify the cable.
5. Grasp under the bottom of
the upper front panel door,
lift up, and remove from the
hooks.
6. Connect the data cable to the
drive.
T
7. Connect the audio and power
cables to the drive.
8. Press both sides of the drive
rails and pull the drive from
the front of the computer.
7-4 C
OMPUTER UPGRADES
MY P
RESARIO—GETTING STARTED AND BEYOND
Page 65

The drive rails snap on and
off the drive(s). Save the
drive rails that came with
your computer. They will be
used on your new drive(s).
9. Pull the drive from the front
of the computer.
10. Pull the drive rails from each
side of the drive and replace
the rails on the new drive.
11. Reverse the procedure to
replace the CD-ROM, CDRW, or DVD-ROM drive.
.
MY P
RESARIO—GETTING STARTED AND BEYOND
C
OMPUTER UPGRADES
7-5
Page 66

Upgrading Computer Memory
Memory is the workspace
for your computer. Data
and instructions are stored
temporarily in memory.
The most powerful
processor and the fastest
hard drive won’t let you do
much without the
workroom to keep the
program and data close at
hand.
There are several different
types of memory modules.
Your computer uses
Synchronous Dynamic
Access Memory
(SDRAM).
1. Complete the Accessing Internal
Computer Components
procedure.
2. Pull outward on the release
latches found on both ends
of the memory module.
3. Lift the memory module
from the system board slot.
4. Reverse the procedure to
replace the memory module.
5. Snap both latches securely
into place.
If a blank screen is displayed
after replacing the memory
module, the memory is
incorrectly installed. Repeat
the steps to reinstall the
memory module.
Upgrade memory modules of
identical type and speed to
match what was originally
installed in your computer.
7-6 C
OMPUTER UPGRADES
MY P
RESARIO—GETTING STARTED AND BEYOND
Page 67

Determining Your Hard Drive Size
This procedure shows you
how to determine the size
of your hard drive and how
much free space is
remaining.
You should check the size of
your hard drive before
downloading or installing
software programs. If you do
not have enough free space,
you will receive an error
message and the program
will not be loaded onto your
computer.
1. Double-click the My
g
Computer
icon on the
Windows desktop. The My
Computer window is
displayed
.
2. Right-click the Hard Drive
q
icon (drive C).
3. Select Properties from the
pop-up menu. The Properties
window is displayed. The
size of the hard drive and the
amount of free space
remaining are found under the
General tab.
Note: Your hard drive may be partitioned into two drives, the C drive and
the D drive. These two drives make up your total hard drive capacity. Your
D drive contains important operating system backup files and
diagnostics.
MY P
RESARIO—GETTING STARTED AND BEYOND
C
OMPUTER UPGRADES
7-7
Page 68

Adding
Components
The hard drive is used to
store information
permanently inside your
computer. Before adding
an additional hard drive,
back up the important data
files of your original hard
drive for safekeeping on
CD or diskette.
Save the screw securing the
hard drive for your
replacement hard drive.
Adding Components
Adding an Additional Hard Drive
1. Complete the Accessing Internal
Computer Components
procedure.
2. Insert the screw and secure
the extra hard drive bracket
to the extra hard drive.
▲▲▲▲Caution: Dropping the hard
drive might damage the read/
write head, which can cause
damage to the head or loss of
data.
3. Mount the extra hard drive
bracket tabs into the hooks
on the original hard drive
bracket.
The hard drive data cable
has a color pull tab to help
you identify the cable.
7-8 C
OMPUTER UPGRADES
4. Insert the screw and secure
the hard drive bracket to the
chassis wall.
5. Connect the hard drive data
and power cable.
6. Reverse the procedure to
replace the hard drive
and bracket.
MY P
RESARIO—GETTING STARTED AND BEYOND
Page 69

Adding an Expansion or Option Card
An expansion card is a
circuit board that fits into a
computer expansion slot to
add a certain function: a
modem, sound or audio
card, Network Interface
Card (NIC), or Small
Computer System
Interface (SCSI) adapter.
This topic shows you how
to upgrade or replace
expansion and option
cards in the computer.
Expansion and option
cards can include graphics,
audio, modem,
networking, and other
solutions for Accelerated
Graphics Port
(AGP) or
Peripheral Component
Interconnect (PCI) slots.
1. Complete the Accessing Internal
Computer Components
procedure.
2. Align the expansion card
with the slot on the system
board and rear connector slot
on the chassis and insert the
expansion card carefully and
firmly into the slot.
3. Place the slot screw into the
chassis slot to secure the
expansion card to the
chassis.
4. Reverse the procedure to
replace the expansion card.
The type and number of
expansion slots may vary by
model.
Be sure the expansion card is
properly positioned into the
rear connector slot on the
chassis.
MY P
RESARIO—GETTING STARTED AND BEYOND
C
OMPUTER UPGRADES
7-9
Page 70

Replacing the
Color Accent Kit
You can personalize your
Presario by replacing the
front bezel with your
favorite colour. Please
look at your local Compaq
website for details. (See
Chapter 2).
The color kit includes a
front bezel for your PC, an
Internet Keyboard plate,
and speaker grills.
Replacing the Color Accent Kit
Removing the Front Color Accent Panels
1. Complete the Accessing Internal Computer Components
procedure, but do not turn the computer on its side.
2. Locate the lock on the inside front of your computer and
move it to the unlocked position.
3. Push in on the indentation at
the top of the lower bezel
(CD storage door) to release
the latch and open the door.
You do not have to replace
the screw securing the side
access panel. This screw is
used for shipping purposes
only.
7-10 C
OMPUTER UPGRADES
4. While the lower bezel is
open, put your fingers in the
finger holes under the upper
bezel (marked with arrows
on the computer). Then pull
the upper bezel towards you
to remove it.
5. To remove the lower bezel,
make sure the bezel is in the
open position and push in on
the tabs (marked with arrows
on the computer) with your thumbs. Then push the base of
the bezel in and pull it straight up to release it from the hinge.
MY P
RESARIO—GETTING STARTED AND BEYOND
Page 71

Replacing the Front Color Accent
1. Slide the tabs on the top of the upper bezel into the slots at the
top of the computer and snap the bezel into place.
2. Slide the hinged base of the lower bezel (CD storage door)
into the slots on the computer and snap the lower panel down
into place.
3. Close the CD storage door.
Replacing the Keyboard Color Accent
1. Locate the finger holes on the back of the keyboard and
gently pull up on the plate to remove it.
2. To replace the plate, slide the tabbed portion of the plate into
the slot on top of the keyboard and snap the plate into place.
Removing the Speaker Grill
MY P
RESARIO—GETTING STARTED AND BEYOND
1. Place your fingers over the top of the speaker grill and pull
the speaker grill outward.
2. To replace the speaker grill, align the pins on the speaker grill
with the slots on the speaker and snap the speaker grill into
place.
C
OMPUTER UPGRADES
7-11
Page 72

Installing
Additional
Software
Installing Additional Software
When selecting software for your computer, verify on the
packaging that it is compatible with your version of the
Microsoft Windows operating system and the specifications of
your Internet PC.
After using your computer
and exploring the
preinstalled software, you
may want to purchase and
install additional software.
You may want to determine
the size of your hard drive
and how much free space is
remaining before you
download or install software.
Refer to the “Determining
Your Hard Drive Size” topic
in this chapter for details.
This procedure shows you
how to install software
from a diskette or from a
CD that does not
automatically install.
Note: If the software documentation contains installation instructions, use
those instructions. If not, you can complete the following steps for installing
software from a CD or diskette.
Software can be installed from a CD or a diskette or it can be
downloaded from a Web site. Many software CDs automatically
begin the installation process when placed in the CD drive. If
you have a software CD that does not automatically begin the
installation process, you can install the software by using the
Microsoft Windows Add/Remove Programs utility. Refer to the
next topic in this guide.
Installing Software from a CD or Diskette
1. Close all open programs.
2. From the Windows taskbar, click the Start button, point to
Settings, and then click Control Panel. The Control Panel
window is displayed.
¤
3. Double-click the Add/Remove Programs
Remove Programs Properties window is displayed.
icon. The Add/
7-12 C
OMPUTER UPGRADES
4. Click the Install button.
5. Insert the CD or diskette into the proper drive and click the
Next button. The computer will find the CD or diskette and
begin the installation process.
MY P
RESARIO—GETTING STARTED AND BEYOND
Page 73

Reinstalling Deleted Drivers
Drivers are programs that
enable the Windows
operating system to
recognize and operate
devices installed in or
attached to the computer.
If a driver is accidentally deleted or the Windows operating
system is reinstalled, the driver subdirectory C:\CPQDRV
allows you to restore individual drivers rather than restore all the
original software. The drivers you can restore are Audio, Video,
Display, Modem, and CD-ROM.
Drivers may be reinstalled by selecting the Selective Restore
option from QuickRestore on your hard drive.
MY P
RESARIO—GETTING STARTED AND BEYOND
C
OMPUTER UPGRADES
7-13
Page 74

7-14 C
OMPUTER UPGRADES
MY P
RESARIO—GETTING STARTED AND BEYOND
Page 75

Need Some
Help?
This chapter provides information on how to identify and fix
,Q#7KLV#&KDSWHU
Helpful Hints, 8-2
Troubleshooting, 8-3
common problems that may occur with your computer. Without
contacting a technician, you can easily diagnose and fix many
computer problems.
;
MY P
RESARIO—GETTING STARTED AND BEYOND
N
EED SOME HELP
? 8-1
Page 76

Helpful Hints
For additional
troubleshooting information
relating to your printer or
monitor, see the
documentation that came
with your equipment.
Helpful Hints
If you encounter problems with your computer, monitor, or
software, review the following check list before taking further
action:
➜ Check that the computer and monitor are plugged into a
working electrical outlet.
➜ Check to see that the computer is turned on and the power
∏
light
➜ Check to see that the monitor is turned on and the power
light
➜ Turn up the brightness and contrast controls of the monitor if
located on the front of the computer is on.
∏
on the front of the monitor is on.
the screen is dim.
➜ Check all cable connections for loose or incorrect
connections.
➜ Remove the diskette from the diskette drive before turning
on your computer.
8-2 N
EED SOME HELP
Entering BIOS (CMOS) Setup
If you need to enter the BIOS setup, as the computer powers on,
press the F10 key while the cursor is displayed in the upper right
corner with the word COMPAQ displayed in red on a black
background (before Windows starts).
.
Contacting Technical Support
If you are unable to fix your computer after reviewing this
chapter and checking the Compaq Web site, contact Technical
Support at the number listed in your Certificate of Warranty.
?M
Y PRESARIO—GETTING STARTED AND BEYOND
Page 77

Troubleshooting
If a solution does not fix
your problem, try all
solutions for the symptom
or try the solution a second
time.
Troubleshooting
Information in this section is divided into three areas: Symptom,
Problem, and Solution.
The Symptom line describes the symptom or warning for the
type of problem you are having. The Problem column identifies
one or more reasons why the symptom has occurred. And the
Solution column describes what you should do to try to fix the
problem.
Note: Some of the symptoms listed for certain troubleshooting problems will
not apply to your computer. For specific problems relating to your monitor or
printer, refer to the documentation that came with the equipment.
Audio
No sound.
Symptom
Problem Solution
Speaker cables are
not properly
connected.
Volume has been
muted.
Computer is in Sleep
mode. This mode is
identified when the
Power Status light
on the front of your
computer is not lit.
Shut down your computer using the normal
shutdown procedure. Reconnect the speakers.
Refer to the Quick Set-Up poster for instructions.
On the Windows taskbar, click the Volume
and clear the Mute check box.
See “Waking Your Computer” in the chapter “Using
Your Computer” in this guide.
÷÷÷÷
icon
MY P
RESARIO—GETTING STARTED AND BEYOND
N
EED SOME HELP
? 8-3
Page 78

CD-ROM, CD-R, CD-RW, or DVD-ROM
Symptom
CD-ROM, CD-R, CD-RW, or
DVD-ROM drive cannot read a
disc or takes too long to start.
Recording audio CDs is difficult
or impossible.
Problem Solution
CD has been inserted
Reinsert the CD with the label facing up.
upside down.
The DVD-ROM drive
will take longer to start
because it has to
determine the type of
Wait at least 30 seconds to let the DVD-ROM
drive determine the type of media being played.
If the disc still does not start, read the other
solutions listed in this topic.
media being played,
such as audio or video.
CD or DVD disc is dirty. Clean CD or DVD with a CD cleaning kit, which is
available in most computer stores.
Windows is not
detecting CD or DVD
driver.
1. On the Windows taskbar, click Start, then
point to Settings, and then click Control
Panel. The Control Panel window is
displayed.
2. Double-click the System
m
icon. The System
Properties dialog box is displayed.
3. Click the Device Manager tab.
4. Click the plus sign
’
next to the CD or DVD
drive, and select the installed driver.
5. Click the Remove button, and click OK twice.
6. Restart your computer, and let Windows
detect the CD or DVD driver.
Wrong or poor quality
media type.
Verify that you are using the correct media for
the drive.
Try a different brand of media. Quality varies
widely between manufacturers.
8-4 N
EED SOME HELP
?M
Y PRESARIO—GETTING STARTED AND BEYOND
Page 79

Diskette Drive
Symptom
Not reading drive: “Abort,
Retry, Fail?” message appears.
“Non-system disk or disk
error” message is displayed.
Problem Solution
A non-formatted
diskette has been
inserted.
To format the diskette:
1. Double-click the My Computer
the Windows desktop.
g
icon on
2. Select the diskette (A) drive.
3. Click File, and point to Format.
4. Select desired options, and click Start to
begin formatting the diskette.
Diskette is damaged. Replace the diskette with a new one.
A diskette that does
not contain system
files needed to start
When drive activity stops, remove the diskette
and press the spacebar. Computer should start
up.
your computer has
been inserted in drive.
Disk error has
occurred.
Restart your computer by pressing the Start/
Reset button. If the error returns, see the next
problem “System files have been damaged.”
System files have been
damaged.
1. Insert a start-up disk in the diskette drive.
2. Restart your computer.
3. At the A:> prompt, type SYS C: and press the
Enter key. The following message is
displayed: SYSTEM TRANSFERRED. This task
will restore the system files to the hard disk.
4. Restart your computer.
Hard drive has failed. Call Compaq Technical Support. Refer to your
Certificate of Warranty for details.
MY P
RESARIO—GETTING STARTED AND BEYOND
N
EED SOME HELP
? 8-5
Page 80

Symptom
Diskette drive light stays on.
Diskette drive cannot save
information to diskette.
Problem Solution
Diskette has been
improperly inserted.
Remove the diskette and reinsert it as follows:
Insert the edge with the sliding cover into the
drive, face up, and push all the way in until the
diskette stops.
Diskette is damaged. Remove the diskette and insert a new diskette. If
a problem persists, run the Windows
Maintenance Wizard to repair the drive:
1. From the Windows taskbar, click the Start
button.
2. Point to Programs, then Accessories, then
System Tools, and then click Maintenance
Wizard.
3. Select Perform maintenance now.
4. Click OK.
Diskette is not
formatted.
To format the diskette:
1. On the Windows desktop, double-click the
g
My Computer
icon.
2. Select the diskette (A) drive.
3. Click File, and point to Format.
4. Select the desired options, and click Start to
begin formatting the diskette.
Diskette is
write-protected.
Diskette is full or file is
too big.
File save command not
properly executed.
Slide the write-protection tab to the unlocked
position on the diskette.
Use another diskette or compress the file to
reduce the size.
When saving information to the diskette drive,
verify that you are using the correct drive letter.
Diskette is damaged. Replace the damaged diskette.
Diskette drive has
failed.
Call Compaq Technical Support. Refer to your
Certificate of Warranty for details.
8-6 N
EED SOME HELP
?M
Y PRESARIO—GETTING STARTED AND BEYOND
Page 81

Symptom
Diskette drive cannot read a
diskette.
Problem Solution
Diskette is not
formatted.
To format the diskette:
1. On the Windows desktop, double-click the
My Computer
2. Select the diskette (A) drive.
3. Click File, and point to Format.
4. Select the desired options, and click Start to
begin formatting the diskette.
Diskette drive has
failed.
Call Compaq Technical Support. Refer to your
Certificate of Warranty for details.
Display (Monitor)
g
icon.
Symptom
Screen is blank, and monitor
power light is not lit.
Screen is blank.
Problem Solution
Monitor power cable is
not connected to
Reconnect the power plug on back of monitor
and to wall outlet.
monitor or wall outlet.
Monitor is not turned
on.
Monitor connector
cable is not properly
connected to back of
Press the Power button on the front of the
monitor.
Inspect the monitor video connector for bent
pins. If bent pins do not exist, reconnect the
monitor connector cable on back of computer.
computer.
Screen saver is
enabled.
Computer is in Sleep
mode, as shown on
Press any key or move mouse to make screen
display.
See Waking Your Computer in the “Using Your
Computer” chapter in this guide.
the keyboard LED
panel.
MY P
RESARIO—GETTING STARTED AND BEYOND
N
EED SOME HELP
? 8-7
Page 82

Hard Drive
Symptom
Computer seems to be locked
up.
Hard drive error message is
displayed.
Hard drive fault protection error
message is displayed.
Problem Solution
Program in use has
stopped responding to
commands.
Attempt a normal Windows shutdown. If this
fails, press the Reset button for four or more
seconds to turn off the power. To restart your
computer, press the Reset button again.
Part of hard drive has
failed.
Run the Windows Maintenance Wizard to repair
the drive:
1. From the Windows taskbar, click the Start
button.
2. Point to Programs, then Accessories, then
System Tools, and then click Maintenance
Wizard.
3. Select Perform maintenance now.
4. Click OK.
Part of hard drive has
potential to fail or
Call Compaq Technical Support. Refer to your
Certificate of Warranty for details.
could already have
failed.
8-8 N
EED SOME HELP
?M
Y PRESARIO—GETTING STARTED AND BEYOND
Page 83

Internet Access
Symptom
Cannot connect to the Internet.
Cannot automatically launch
Internet programs.
Internet takes too long to
download Web sites.
Problem Solution
Internet Service
Provider (ISP) account
Verify Internet settings or contact your ISP for
assistance.
is not set up properly.
Modem is not set up
properly.
Reconnect the modem, verifying the following
connections: telephone line to telephone (for
external phone sets) and telephone line to wall
jack (from computer to wall).
Web browser is not set
up properly.
You must log in to your
ISP before some
Verify that the Web browser is installed and set
up to work with your ISP.
Log in to your ISP and launch the desired
program.
programs will start.
Modem is not set up
properly.
Verify that correct modem speed and COM port
are selected:
1. Click Start and point to Settings.
2. Click Control Panel. The Control Panel
window is displayed.
3. Double-click Modems. Windows detects the
modem(s) you have installed.
4. Click the Properties button. An identification
window is displayed.
5. Verify that the correct modem port is set and
the maximum speed of your modem is
selected. Reset these settings if necessary.
6. Click OK to close the identification window.
7. Click Close to close the Modems Properties
Window.
8. Click the Close
corner of the Control Panel window to return
to the Windows desktop.
button in the upper right
P
MY P
RESARIO—GETTING STARTED AND BEYOND
N
EED SOME HELP
? 8-9
Page 84

Keyboard and Scroll Mouse
Symptom
Keyboard commands and
typing are not recognized by
computer.
Mouse does not respond to
movement or is too slow.
Problem Solution
Keyboard connector is
not properly
connected.
1. On the Windows taskbar, click the Start
button.
2. On the Start menu, click Shut Down... The
Shut Down Windows dialog box is displayed.
3. Select the Shut down option.
4. Click OK.
5. After the shutdown is complete, reconnect
the keyboard to the back of your computer
and restart your computer.
Program in use has
stopped responding to
commands.
Shut down your computer using the mouse.
Refer to the problem below, “Mouse connector is
not properly connected.”
Keyboard needs repair. Refer to your Certificate of Warranty for details.
Mouse connector is
not properly
connected.
Shut down your computer using the keyboard:
1. Press the Ctrl and Esc keys at the same time
to display the Start menu.
2. Use the up or down arrow key to select Shut
Down..., and then press the Enter key.
3. Select the Shut down option. You may need
to use the up or down arrow key.
4. Press the Enter key to select OK.
5. After the shutdown is complete, reconnect
the mouse connector on the back of your
computer (or the keyboard) and restart your
computer.
Mouse will only move vertically
or horizontally.
8-10 N
EED SOME HELP
?M
Mouse roller ball is
dirty.
Remove roller ball cover from bottom of mouse
and clean with mouse cleaning kit available in
most computer stores.
Program in use has
stopped responding to
commands.
Shut down your computer using the keyboard.
Refer to the preceding problem “Mouse
connector is not properly connected” for details
on how to shut down using the keyboard.
Mouse needs repair. Replace mouse. See your Certificate of Warranty
for details.
Y PRESARIO—GETTING STARTED AND BEYOND
Page 85

Memory
Symptom
Insufficient memory message
is displayed.
Problem Solution
All memory in
computer is being
used by open
programs, and
memory is needed for
desired task.
To avoid Windows automatically running
unnecessary programs at startup:
1. From the Windows desktop, click the Start
button.
2. Select Run.
3. In the Open box, type MSCONFIG.
4. Click OK. The System Configuration Utility
dialog box is displayed.
5. Click the Startup tab, and clear the check
box(es) for any unnecessary programs.
Close one or more programs, and restart
Windows to recover memory. If the error
message is displayed again, repeat the
preceding steps and close one or more
programs.
MY P
RESARIO—GETTING STARTED AND BEYOND
N
EED SOME HELP
? 8-11
Page 86

Power
Symptom
Computer will not turn on.
“Illegal Operation has
Occurred” error message is
displayed.
Computer will not start.
Problem Solution
Line voltage selection
switch is not in the
proper position for
your region (115V/
230V).
Wall outlet is faulty. Test the outlet by connecting a different
Software being used is
not Microsoft-certified
for your version of
Windows.
Configuration files are
corrupt.
Set the line voltage selection switch to the
correct setting for your region, or call Compaq
Technical Support for assistance. Refer to your
Certificate of Warranty for details.
electrical device to outlet.
Verify that the software is certified by Microsoft
for your version of Windows (see program
packaging for this information).
If possible, save all data, close all programs, and
restart your computer. If the error message
returns, you may need to back up your data files
and use the QuickRestore utility.
▲▲▲▲ Caution: QuickRestore reformats your
hard drive; all data files will be lost.
System files may have
been damaged. You
will need to insert a
start-up disk or
Windows Start-Up disk
to restart your
computer.
Wrong memory
modules were used in
upgrade, or memory
modules were installed
in the wrong location.
Hard drive has been
damaged.
1. Insert a start-up disk in the diskette drive.
2. Restart your computer.
3. At the A:> prompt, type SYS C: and press the
Enter key. The following message will be
displayed: SYSTEM TRANSFERRED. This task
will restore the system files to your hard
drive.
4. Restart your computer.
If this task does not restart your computer, call
Compaq Technical Support. Refer to your
Certificate of Warranty for details.
Verify the installation of memory modules by
calling Compaq Technical Support. Refer to your
Certificate of Warranty for details.
Call Compaq Technical Support. Refer to your
Certificate of Warranty for details.
8-12 N
EED SOME HELP
?M
Y PRESARIO—GETTING STARTED AND BEYOND
Page 87

Preventative
Maintenance
You turn on your computer and it
,Q#7KLV#&KDSWHU
What is Preventative
Maintenance?, 9-2
Backing Up Your Files, 9-3
Deleting Unwanted Files,
9-4
won't start. You get an error
message that prevents you from
getting your work done
there's no one around who knows
what to do. Help!
Computer problems can happen,
but regular preventative
maintenance will go a long way to
help you avoid them.
—and
<
Optimizing the Computer
Hard Disk, 9-6
Anti-Virus Software, 9-7
Compaq Support, 9-10
MY P
RESARIO—GETTING STARTED AND BEYOND
In this chapter, you will learn how to keep your computer in peak
operating condition and become familiar with the important
Compaq service and support tools.
Note: Information in this chapter is specific to Microsoft Internet Explorer,
the standard Internet browser included with your computer.
P
REVENTATIVE MAINTENANCE
9-1
Page 88

What is
Preventative
hat is Preventative Maintenance?
W
Basic preventative maintenance procedures include the
following:
Maintenance?
Your car needs it, people
need it, and so do
computers. Regular
preventative maintenance
helps you avoid common
computer problems.
Preventative maintenance
for your computer is easier
than you might think. You
don’t need any special
tools or know-how. A few
basic procedures will help
keep your computer
operating at its best.
➜ Creating backups of your files
➜ Deleting unwanted files
➜ Maximizing your hard disk
➜ Running VirusScan
Perform these preventative maintenance tasks at the intervals
recommended below, or more often if you use your computer a
lot.
Procedure Frequency
Backup Files
Delete Unwanted Files As Needed
Maximize Your Hard Disk Monthly
Run Virus Scan As Needed
Note: For more critical files, you may want to back up more often.
(see note below)
Monthly
9-2 P
REVENTATIVE MAINTENANCE
MY P
RESARIO—GETTING STARTED AND BEYOND
Page 89

Backing Up
Your Files
cking Up Your Files
Ba
Using Microsoft Backup
1. Close all open programs.
You can use Microsoft
Backup to back up files to
the hard disk, diskettes, a
Zip disk, CD-RW, or
another computer on your
network.
If your original files are
damaged or lost, you can
restore them from the
backup.
It is a good idea to run
Microsoft Backup before
deleting files from the hard
disk. If you accidentally
delete an important file, it
can be retrieved from the
back-up file.
2. From the Windows taskbar,
click the Start button, then
point to Programs, then
Accessories, then System
Tools, and then click
Backup. The Microsoft
Backup window is
displayed.
3. Select the drive you want to
backup.
4. Click the Start button to begin
the backup.
MY P
RESARIO—GETTING STARTED AND BEYOND
P
REVENTATIVE MAINTENANCE
9-3
Page 90

Deleting
Unwanted Files
The more you use your
computer, the more files
you will create. In time,
the hard disk can become
cluttered and performance
may suffer.
It’s easy to take an
inventory of files stored on
your computer and then do
some regular “house
cleaning.”
Deleting Unwanted Files
Taking Inventory of Your Hard Disk
1. Double-click the My
g
Computer
Windows desktop. The My
Computer window is
displayed.
2. Right-click the disk you want
to free space on, and then click
Properties on the pop-up
menu.
icon on the
▲▲▲▲Caution: When deleting files,
make sure you don’t delete any files
that are necessary for system or
program operation including the
following file extensions: .exe, .dll, or
.ini.
When in doubt, don’t delete a
file.
9-4 P
REVENTATIVE MAINTENANCE
3. On the General tab, click Disk
Cleanup.
4. Click the files you want to
delete.
5. Click OK.
MY P
RESARIO—GETTING STARTED AND BEYOND
Page 91

Emptying the Recycle Bin
Deleted files are sent to the
Recycle Bin, but still take
up space on the computer
hard disk. Emptying the
recycle bin permanently
deletes the files and frees
up disk space.
1. Double-click the Recycle
J
Bin
desktop.
icon on the Windows
▲▲▲▲Caution: Files that are
emptied from the Recycle Bin
cannot be retrieved.
2. Click individual files and
press Delete. Or click the
File menu, and then click
Empty Recycle Bin to remove
all files.
3. Click Ye s to confirm the deletion.
Deleting Unwanted Mail
1. Right-click the Deleted
L
Items
toolbar.
icon on the Outlook
MY P
RESARIO—GETTING STARTED AND BEYOND
2. Select Empty “Deleted
Items” Folder.
3. Click Ye s.
P
REVENTATIVE MAINTENANCE
9-5
Page 92

Optimizing the
Computer Hard
Disk
You can use ScanDisk to
check your hard disk for
technical errors and repair
any damaged areas.
ScanDisk and Defragmentor
take less time to complete
when run on a regular basis.
When only a few
passengers are on a bus,
each person can sit
wherever he wants. But as
the bus gets crowded,
passengers must move
closer together so that all
the seats can be filled.
When you optimize the
computer hard disk, you’re
moving files closer
together so that hard disk
space is used more
efficiently. This helps
programs run faster and
speeds up access to your
hard disk.
Optimizing the Computer Hard Disk
Using ScanDisk
1. Close all open programs in
the system tray—Compaq
Service Connection, printer,
pointcast, Norton, etc. (The
system tray is located at the
far right of the Window
taskbar at the bottom of the
screen.)
2. From the Windows taskbar,
click the Start button, then point to Programs, then
Accessories, then System Tools, and then click Scan Disk.
3. Select the drive you want to
scan.
4. Click Start to begin scanning.
Using Disk Defragmenter
1. Close all open programs.
2. From the Windows taskbar,
click the Start button, then
point to Programs, then
Accessories, then System
Tools, and then click Disk Defragmenter.
3. Select the drive you want to defragment.
4. Click OK to begin defragmenting.
Note: If you haven’t defragmented the hard disk for a while, the operation
may take an hour or longer.
9-6 P
REVENTATIVE MAINTENANCE
MY P
RESARIO—GETTING STARTED AND BEYOND
Page 93

Anti-Virus
Software
A computer virus can
destroy information on
your hard disk. A virus can
enter your computer
through:
➜ a diskette
➜ a CD, DVD, CD-R or
CD-RW disc
➜ e-mail
➜ infected files
downloaded from the
Internet
Some viruses affect your
computer immediately;
others are set to activate on
a certain date.
Your computer is equipped
with anti-virus software.
Scanning your computer
for viruses is an important
part of keeping your files
safe from becoming
infected with computer
viruses.
However, hundreds of new
viruses are created each
month, so you should
update the anti-virus tool
often.
Anti-Virus Software
Installing Anti-Virus Software
Anti-virus software is not installed by default. You can install it
*
by double-clicking the icon
on the desktop.
Uninstalling your Anti-Virus Software
To uninstall your anti-virus software, click on Start, Settings,
Control Panel, Add/Remove Programs. Select McAfee from
the list and click Add/Remove.
Scanning for Viruses
1. Press the Help G button
on the keyboard.
2. Click the McAfee
*
VirusScan
VirusScan Launcher is
displayed.
3. Click Scan.The McAfee
VirusScan window is
displayed.
4. Select the Where & What tab.
The C drive, your local hard
disk, is the default. If you want
to scan a different drive, click
Browse and select another drive
letter.
5. Click Scan Now.
icon. The
MY P
RESARIO—GETTING STARTED AND BEYOND
P
REVENTATIVE MAINTENANCE
9-7
Page 94

Updating McAfee VirusScan
1. Press the Internet ∆ button
on the Internet keyboard.
2. In the Address box type
www.mcafee.com. The
McAfee home page is
displayed.
3. Click the Anti-Virus tab.
4. Click Update VirusScan.
9-8 P
REVENTATIVE MAINTENANCE
MY P
RESARIO—GETTING STARTED AND BEYOND
Page 95

An important part of
computer preventative
maintenance is making
sure you’re prepared for
any possible emergencies.
In this section you will
create an Anti-Virus
Emergency diskette.
If your computer is
infected with a virus, you
may not be able to access
the hard disk or start
Windows. An Emergency
Diskette contains the
operating system files
necessary to restart your
computer.
Creating an Anti-Virus Emergency Diskette
1. Press the Help
keyboard to access the Compaq
support tools.
2. Click the McAfee VirusScan
icon. The VirusScan Launcher is
displayed.
3. Click Tools. The Utility
Toolbox is displayed.
4. Click Emergency Disk. The
Emergency Disk Wizard is
displayed.
5. Insert a formatted diskette in the
diskette drive.
6. Click Don’t Format.
7. Click Next.
8. Click Finish.
G
button on the
*
If you ever need to start your
computer from the
Emergency Diskette, you
should immediately perform
a scan of your computer and
its contents.
MY P
RESARIO—GETTING STARTED AND BEYOND
9. Label the disk VirusScan Emergency Diskette, and store it
in a cool and dry place.
P
REVENTATIVE MAINTENANCE
9-9
Page 96

Compaq
Support
Compaq Support
Press the Help
Compaq support tools:
G
button on the keyboard to access the following
If you have a computer
problem or question, you
can check the following
resources for answers:
➜ Press the Help
button on the keyboard
to access the Compaq
Service and Support
folder for personalized
Web support and
computing tips.
➜ Review the “Need
Some Help?” chapter
in this guide for
suggestions on how to
fix the problem.
➜ Review the tools in this
topic to find answers.
G
*
Icon Compaq Support Tools
Compaq Service
Connection
D
McAfee Anti-Virus
*
Internet Support
«
This maintenance program keeps your computer in
superior operating condition, with secure, automated
software updates over the Internet. Look for the
spinning
Install.
latest technical information!
Need the right tool to protect data on your computer
from viruses? Check out the McAfee Anti-Virus
software found in your Service and Support folder.
The McAfee VirusScan detects and destroys
potentially destructive viruses and provides you with
free anti-virus updates for one year after registering.
Protect your investment with McAfee!
With Internet Support, you are one click away from a
wide variety of Web-based service tools, which will
make your entire computing experience easier.
D
that notifies you of updates, and click
Then sit back and relax while you receive the
Compaq Service Connection
9-10 P
REVENTATIVE MAINTENANCE
Compaq Service Connection is an innovative technology for
updating your PC via the Internet. After you have activated
Compaq Service Connection and you are on the Internet, your
PC connects to a secure Compaq Service Centre. Your PC will
be automatically updated with the latest drivers and patches.
This connection is secure and does not transmit any personal
information. To activate Compaq Service Connection, click
D
icon on the desktop. To de-activate Compaq Service
the
Connection, restart your PC.
MY P
RESARIO—GETTING STARTED AND BEYOND
Page 97

Compaq Diagnostics
provides an easy way to
perform system checks and
diagnose problems.
A progress bar is displayed
on the Windows desktop
while the application
analyzes your computer
for information about its
components.
After approximately one
minute, a Summary
window with the
component information is
displayed.
Diagnosing Symptoms
1. Press the Help
Support tools.
2. Click the Compaq Diagnostics
displayed at the top of the window.
3. Click an icon to view information about the component being
tested. Refer to the following table for descriptions of the
tabs.
Tab Description
Overview Contains information about your computer.
Tes t Selects the devices you want tested.
Status Shows progress of tests and faults detected.
Log Shows a record of all device tests and detailed
Error Reports details of errors detected.
G
button on the keyboard to access Compaq
%
icon. A series of icons is
results.
MY P
RESARIO—GETTING STARTED AND BEYOND
P
REVENTATIVE MAINTENANCE
9-11
Page 98

9-12 P
REVENTATIVE MAINTENANCE
MY P
RESARIO—GETTING STARTED AND BEYOND
Page 99

Create your
own CDs
Use Easy CD Creator™, the award winning CD recording
,Q#7KLV#&KDSWHU
Using Easy CD Creator,
10-2
software, to make your own CDs. In just a couple of mouse
clicks, you can create Audio CDs that can be played on your
home or car stereo CD player, or create Data CDs to store data
such as the files and folders on your hard disk.
43
Creating Audio and Data
CDs, 10-3
Copying CDs with Easy
CD Creator, 10-5
Jewel Case Creator, 10-6
Troubleshooting , 10 -9
MY P
RESARIO—GETTING STARTED AND BEYOND
This chapter provides instructions on performing the most
common tasks with Easy CD Creator. To get a more
comprehensive set of instructions, refer to Easy CD Creator’s
Online Help.
C
REATE YOUR OWN
CDS 10-1
Page 100

Using Easy CD
Creator
It is a good idea to close all
other applications before you
start Easy CD Creator.
Using Easy CD Creator
Starting Easy CD Creator
There are two ways to start Easy CD Creator so you can begin
creating your own CDs; from the Start menu or by using the
Create CD menu. See Using the Create CD Menu below.
To start Easy CD Creator from the Start menu:
➜ On the Windows taskbar, click the Start button, point to
Programs, point to Adaptec Easy CD Creator 4, point to
Features, and select Easy CD Creator.
Using the Create CD Menu
The Create CD menu appears when you first restart your
computer after installing Easy CD Creator, or whenever you
insert a blank CD into your CD-Recorder. You can also open the
Create CD menu from the Start menu. To open the Create CD
menu from the Start menu:
➜ On the Windows taskbar, click Start button, point to
Programs, point to Adaptec Easy CD Creator 4, and select
Create CD.
10-2 C
REATE YOUR OWN
CD
Using the CD Guide
The CD Guide is the animated character that helps you through
the steps of creating Audio CDs, Data CDs, and designing
custom jewel case inserts and CD labels.
To show or hide the CD Guide:
➜ Click the CD Guide button on the toolbar.
S
MY P
RESARIO—GETTING STARTED AND BEYOND
 Loading...