

Page 1

b
Getting Started
Compaq Presario 4000, 6000, and 8000
Series Computers
Document Part Number: 274894-001
March 2002
This book helps you get acquainted with the features of your
computer and provides solutions to problems should they occur.
Page 2

© 2002 Compaq Information Technologies Group, L.P.
Compaq, the Compaq logo, and Presario are trademarks of Compaq Information
Technologies Group, L.P. in the United States and other countries.
Microsoft, MS-DOS, Windows, and Windows NT are trademarks of Microsoft
Corporation in the United States and other countries.
Compaq shall not be liable for technical or editorial errors or omissions
contained herein. The information in this document is provided “as is” without
warranty of any kind and is subject to change without notice. The warranties for
Compaq products are set forth in the express limited warranty statements
accompanying such products. Nothing herein should be construed as
constituting an additional warranty.
WARNING: Text set off in this manner indicates that failure to follow
Å
directions could result in bodily harm or loss of life.
CAUTION: Text set off in this manner indicates that failure to follow
Ä
directions could result in damage to equipment or loss of information.
Getting Started
First Edition (March 2002)
Document Part Number: 274894-001
Page 3

Contents
1 Getting Information and Updates
Limited Warranty . . . . . . . . . . . . . . . . . . . . . . . . . . . . . . . . . . . . . . . . . . . . . . . . . . . . . 1–2
Replacing Parts . . . . . . . . . . . . . . . . . . . . . . . . . . . . . . . . . . . . . . . . . . . . . . . . . . . . . . . 1–2
Upgrading the Computer. . . . . . . . . . . . . . . . . . . . . . . . . . . . . . . . . . . . . . . . . . . . . . . . 1–2
Using the Documentation Library CD . . . . . . . . . . . . . . . . . . . . . . . . . . . . . . . . . . . . . 1–3
Locating SoftPaq Information. . . . . . . . . . . . . . . . . . . . . . . . . . . . . . . . . . . . . . . . . . . . 1–4
Using Compaq Advisor. . . . . . . . . . . . . . . . . . . . . . . . . . . . . . . . . . . . . . . . . . . . . . . . . 1–4
2 A Look at the Computer
Front Panel Components . . . . . . . . . . . . . . . . . . . . . . . . . . . . . . . . . . . . . . . . . . . . . . . . 2–1
4000 Series . . . . . . . . . . . . . . . . . . . . . . . . . . . . . . . . . . . . . . . . . . . . . . . . . . . . . . . 2–1
6000 Series . . . . . . . . . . . . . . . . . . . . . . . . . . . . . . . . . . . . . . . . . . . . . . . . . . . . . . . 2–3
8000 Series . . . . . . . . . . . . . . . . . . . . . . . . . . . . . . . . . . . . . . . . . . . . . . . . . . . . . . . 2–4
Rear Panel Components . . . . . . . . . . . . . . . . . . . . . . . . . . . . . . . . . . . . . . . . . . . . . . . . 2–6
4000 Series . . . . . . . . . . . . . . . . . . . . . . . . . . . . . . . . . . . . . . . . . . . . . . . . . . . . . . . 2–6
6000 Series . . . . . . . . . . . . . . . . . . . . . . . . . . . . . . . . . . . . . . . . . . . . . . . . . . . . . . . 2–8
8000 Series . . . . . . . . . . . . . . . . . . . . . . . . . . . . . . . . . . . . . . . . . . . . . . . . . . . . . . 2–10
Mouse Components. . . . . . . . . . . . . . . . . . . . . . . . . . . . . . . . . . . . . . . . . . . . . . . . . . . 2–12
Installing the Wireless Wheel Mouse . . . . . . . . . . . . . . . . . . . . . . . . . . . . . . . . . . . . . 2–13
Using the Scroll Mouse. . . . . . . . . . . . . . . . . . . . . . . . . . . . . . . . . . . . . . . . . . . . . . . . 2–14
Using the Wireless Wheel Mouse . . . . . . . . . . . . . . . . . . . . . . . . . . . . . . . . . . . . . . . . 2–14
Using the USB Optical Mouse . . . . . . . . . . . . . . . . . . . . . . . . . . . . . . . . . . . . . . . . . . 2–15
Keyboard Components . . . . . . . . . . . . . . . . . . . . . . . . . . . . . . . . . . . . . . . . . . . . . . . . 2–16
Easy Access Keyboard Components . . . . . . . . . . . . . . . . . . . . . . . . . . . . . . . . . . 2–16
Using the Easy Access Buttons . . . . . . . . . . . . . . . . . . . . . . . . . . . . . . . . . . . . . . 2–17
Customizing the Easy Access Buttons . . . . . . . . . . . . . . . . . . . . . . . . . . . . . . . . . 2–19
Smart Card Keyboard Components . . . . . . . . . . . . . . . . . . . . . . . . . . . . . . . . . . . 2–20
Using the Smart Card Feature. . . . . . . . . . . . . . . . . . . . . . . . . . . . . . . . . . . . . . . . 2–21
Getting Started iii
Page 4

Contents
3 Using the Computer
Inserting and Removing a Diskette . . . . . . . . . . . . . . . . . . . . . . . . . . . . . . . . . . . . . . . . 3–1
Inserting and Removing a CD or DVD Disc. . . . . . . . . . . . . . . . . . . . . . . . . . . . . . . . . 3–2
Installing Additional Software . . . . . . . . . . . . . . . . . . . . . . . . . . . . . . . . . . . . . . . . . . . 3–3
Installing Software from a CD, DVD, or Diskette . . . . . . . . . . . . . . . . . . . . . . . . . 3–3
Installing Software from the Internet . . . . . . . . . . . . . . . . . . . . . . . . . . . . . . . . . . . 3–4
Customizing Your Computer Interface . . . . . . . . . . . . . . . . . . . . . . . . . . . . . . . . . . . . . 3–5
4 Internal Computer Components
Accessing Internal Computer Components. . . . . . . . . . . . . . . . . . . . . . . . . . . . . . . . . . 4–1
4000 Series . . . . . . . . . . . . . . . . . . . . . . . . . . . . . . . . . . . . . . . . . . . . . . . . . . . . . . . 4–1
6000 Series . . . . . . . . . . . . . . . . . . . . . . . . . . . . . . . . . . . . . . . . . . . . . . . . . . . . . . . 4–3
8000 Series . . . . . . . . . . . . . . . . . . . . . . . . . . . . . . . . . . . . . . . . . . . . . . . . . . . . . . . 4–4
Upgrading or Replacing Computer Memory. . . . . . . . . . . . . . . . . . . . . . . . . . . . . . . . . 4–6
5 Help & Support
Preventative Care and Maintenance . . . . . . . . . . . . . . . . . . . . . . . . . . . . . . . . . . . . . . . 5–1
Online Service and Support. . . . . . . . . . . . . . . . . . . . . . . . . . . . . . . . . . . . . . . . . . . . . . 5–3
How to Access Help . . . . . . . . . . . . . . . . . . . . . . . . . . . . . . . . . . . . . . . . . . . . . . . . . . . 5–3
Solving Minor Problems . . . . . . . . . . . . . . . . . . . . . . . . . . . . . . . . . . . . . . . . . . . . . . . . 5–4
Audio . . . . . . . . . . . . . . . . . . . . . . . . . . . . . . . . . . . . . . . . . . . . . . . . . . . . . . . . . . . 5–5
CD-ROM, CD-RW, DVD-ROM, or DVD-R/RW Drive . . . . . . . . . . . . . . . . . . . . 5–6
Diskette Drive. . . . . . . . . . . . . . . . . . . . . . . . . . . . . . . . . . . . . . . . . . . . . . . . . . . . . 5–8
Hard Drive . . . . . . . . . . . . . . . . . . . . . . . . . . . . . . . . . . . . . . . . . . . . . . . . . . . . . . 5–11
Display (Monitor) . . . . . . . . . . . . . . . . . . . . . . . . . . . . . . . . . . . . . . . . . . . . . . . . . 5–11
Hardware Installation Problems . . . . . . . . . . . . . . . . . . . . . . . . . . . . . . . . . . . . . . 5–12
Internet Access . . . . . . . . . . . . . . . . . . . . . . . . . . . . . . . . . . . . . . . . . . . . . . . . . . . 5–13
Power . . . . . . . . . . . . . . . . . . . . . . . . . . . . . . . . . . . . . . . . . . . . . . . . . . . . . . . . . . 5–15
Keyboard and Scroll Mouse . . . . . . . . . . . . . . . . . . . . . . . . . . . . . . . . . . . . . . . . . 5–17
Wireless Wheel Mouse . . . . . . . . . . . . . . . . . . . . . . . . . . . . . . . . . . . . . . . . . . . . . 5–19
USB Optical Mouse . . . . . . . . . . . . . . . . . . . . . . . . . . . . . . . . . . . . . . . . . . . . . . . 5–20
Memory. . . . . . . . . . . . . . . . . . . . . . . . . . . . . . . . . . . . . . . . . . . . . . . . . . . . . . . . . 5–21
Miscellaneous . . . . . . . . . . . . . . . . . . . . . . . . . . . . . . . . . . . . . . . . . . . . . . . . . . . . 5–22
Index
iv Getting Started
Page 5

Getting Information and Updates
Information is available in several forms: printed documents,
electronic documents on the CD that came with your computer, and
the Compaq Web site. Use this guide as your first point of reference,
and then refer to the following documents:
■ Quick Setup poster
■ Limited Warranty
■ Documentation Library CD
■ Compaq Presario Times Newsletter (North America only)
The Compaq Web site is available worldwide. As you explore the
✎
Internet, go to the compaq.com/athome Web site for information
about products, services, and exciting activities.
For the fastest path to the right answers, go to
compaq.com/consumersupport.
1
At this site you will find online services to assist with your hardware
and software related questions, issues, and product needs.
When escalating a service event online, it is important to include the
following information in your inquiry. Please take a moment to write
down the following information for your future reference.
■ Product Name:
■ Model Name:
■ Serial Number:
■ Date of Purchase:
Getting Started 1–1
Page 6

Getting Information and Updates
Limited Warranty
The warranty details the Compaq commitment to repair or replace
parts during the computer’s warranty period and lists important
Compaq telephone numbers. In the event of a mechanical problem,
contact Compaq, not the retailer who sold you the computer.
Keep the warranty in a safe place for future reference.
Replacing Parts
For hardware upgrade and installation instructions, refer to the
documentation included with the hardware component or to the
Hardware Reference Guide on the Documentation Library CD that
came with your computer. Compaq recommends that you print the
instructions on the Documentation Library CD to make the
installation process easier.
If you experience a problem and are unable to resolve the issue after
referring to the Hardware Reference Guide, contact Technical
Support. If the technician determines a replacement part is necessary,
you will be sent the replacement part with illustrated instructions for
removing the factory-installed part and replacing it.
Upgrading the Computer
You can expand your computer performance with hardware upgrades,
such as memory and additional peripherals, such as a digital camera
and a printer. To view options available from Compaq, visit the online
store at (not available in all regions):
compaq.com/athome/accessories
For more information on upgrading memory, refer to “Upgrading or
Replacing Computer Memory” in this guide or refer to the Hardware
Reference Guide on the Documentation Library CD that came with
your computer. Compaq recommends that you print the instructions
on the Documentation Library CD to make the installation process
easier.
1–2 Getting Started
Page 7

Using the Documentation Library CD
The Documentation Library CD included with your computer
contains several guides:
■ Hardware Reference Guide – Contains information specific to
your computer model. It includes an illustrated quick reference to
all exterior components as well as information on upgrading or
replacing internal components.
■ Learning More About Your Computer – Contains basic
information on using your computer’s hardware and software
features.
■ Troubleshooting Guide – Contains troubleshooting topics for
advanced computer users.
■ Internet Communications Guide – Contains basic information on
using the features of the Internet.
■ Safety & Regulatory Information – Provides governmental and
safety guidelines.
■ Safety & Comfort Guide – Suggests ways to set up a safe and
comfortable work area and includes ergonomic and safety
information about using your computer.
Getting Information and Updates
Compaq recommends that you print the guides on the Documentation
✎
Library CD when referencing them.
To access the documents on the Documentation Library CD:
1. Insert the Documentation Library CD into the CD drive. The CD
will run automatically and the main page will be displayed with a
list of the documents on the CD.
If the CD does not run automatically, click the Start button, select
✎
Run, and type E:\CPQRefLib.exe (where E represents the letter of
your CD drive).
2. Click on the desired document to access that document.
Getting Started 1–3
Page 8

Getting Information and Updates
Locating SoftPaq Information
You can download original product drivers, the latest updates and
software fixes (also known as SoftPaqs™) by going to the Web site
compaq.com/consumersupport and choosing “Drivers &
Downloads.”
When prompted, be prepared to enter your computer’s product type,
model, series, and operating system to access the SoftPaqs for your
particular computer. Follow the instructions in the Readme.txt file or
at the download site to install your software update.
Compaq can also automatically deliver SoftPaqs to ensure your
computer works at its optimal level. Use Compaq Update to
automatically receive the latest SoftPaqs directly from Compaq.
Press the Easy Access Help G button for further information and
direct access to SoftPaqs for your computer.
Using Compaq Advisor
Compaq Advisor (not available in all regions) is an intelligent
software application on your computer that makes your computer
smarter by providing relevant and timely information to you about:
■ Your computer’s functionality
■ Proactive notification of potential service issues
■ Enhancements for your computer
■ Special offers
To begin receiving the benefits of Compaq Advisor, enable Advisor
by double-clicking the Launch Compaq Advisor icon on your
desktop, or click Start > Programs > Compaq Advisor > Run
Advisor.
After Advisor is enabled, you can change Compaq Advisor settings
by clicking Start > Programs > Compaq Advisor > Advisor
Settings.
1–4 Getting Started
Page 9
Front Panel Components
The components on the front of your computer will vary depending
on the model you purchased. Take a look at the following illustrations
to get acquainted with the front panel features of your computer
model.
4000 Series
2
A Look at the Computer
Getting Started 2–1
Page 10

A Look at the Computer
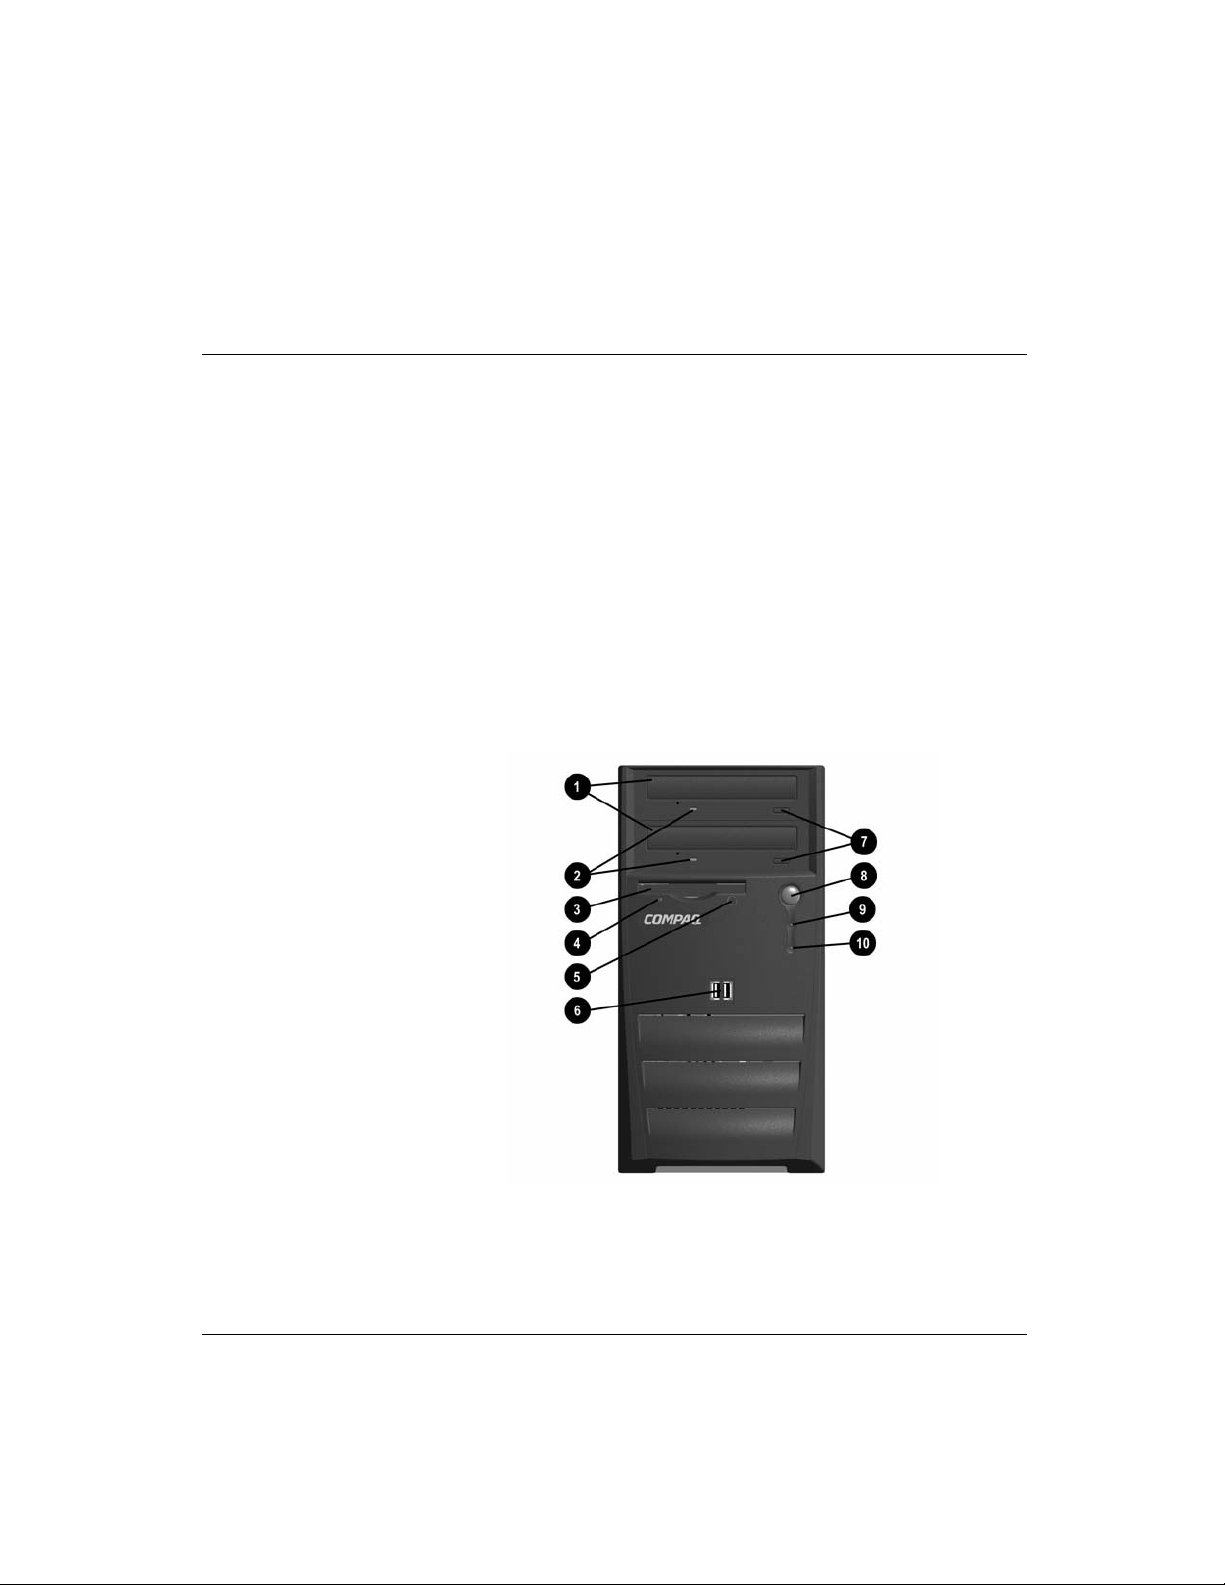
Front Panel Components - 4000 Series
1 Optical Drives Depending on your computer model, this may be a
CD-ROM, CD-RW, or DVD-ROM drive. If a second
optical drive is not installed, a removable blank bezel
is provided.
2 Optical Drive Activity
Lights
3 Diskette Drive Reads and writes information onto a 3.5-inch diskette.
4 Diskette Drive Activity
Light
5 Diskette Eject Button Ejects the diskette from the diskette drive.
6 USB (Universal Serial
Bus) Ports
7 Optical Drive Eject Button Releases the optical drive disc tray.
8 Power Button Turns on the computer. To turn off the computer, use
9 Power-On Light When lit, indicates the power is turned on.
: Hard Drive Activity Light When lit, indicates the hard drive is being accessed.
Arrangement and number of drives and connectors may vary by model.
✎
When lit, indicates the optical drive is being accessed.
When lit, indicates the diskette drive is being accessed.
(Do not remove the diskette while the light is on.)
Connects USB peripheral devices, such as gamepads,
joysticks, and video cameras.
the operating system “Turn Off Computer” command.
2–2 Getting Started
Page 11
6000 Series
A Look at the Computer
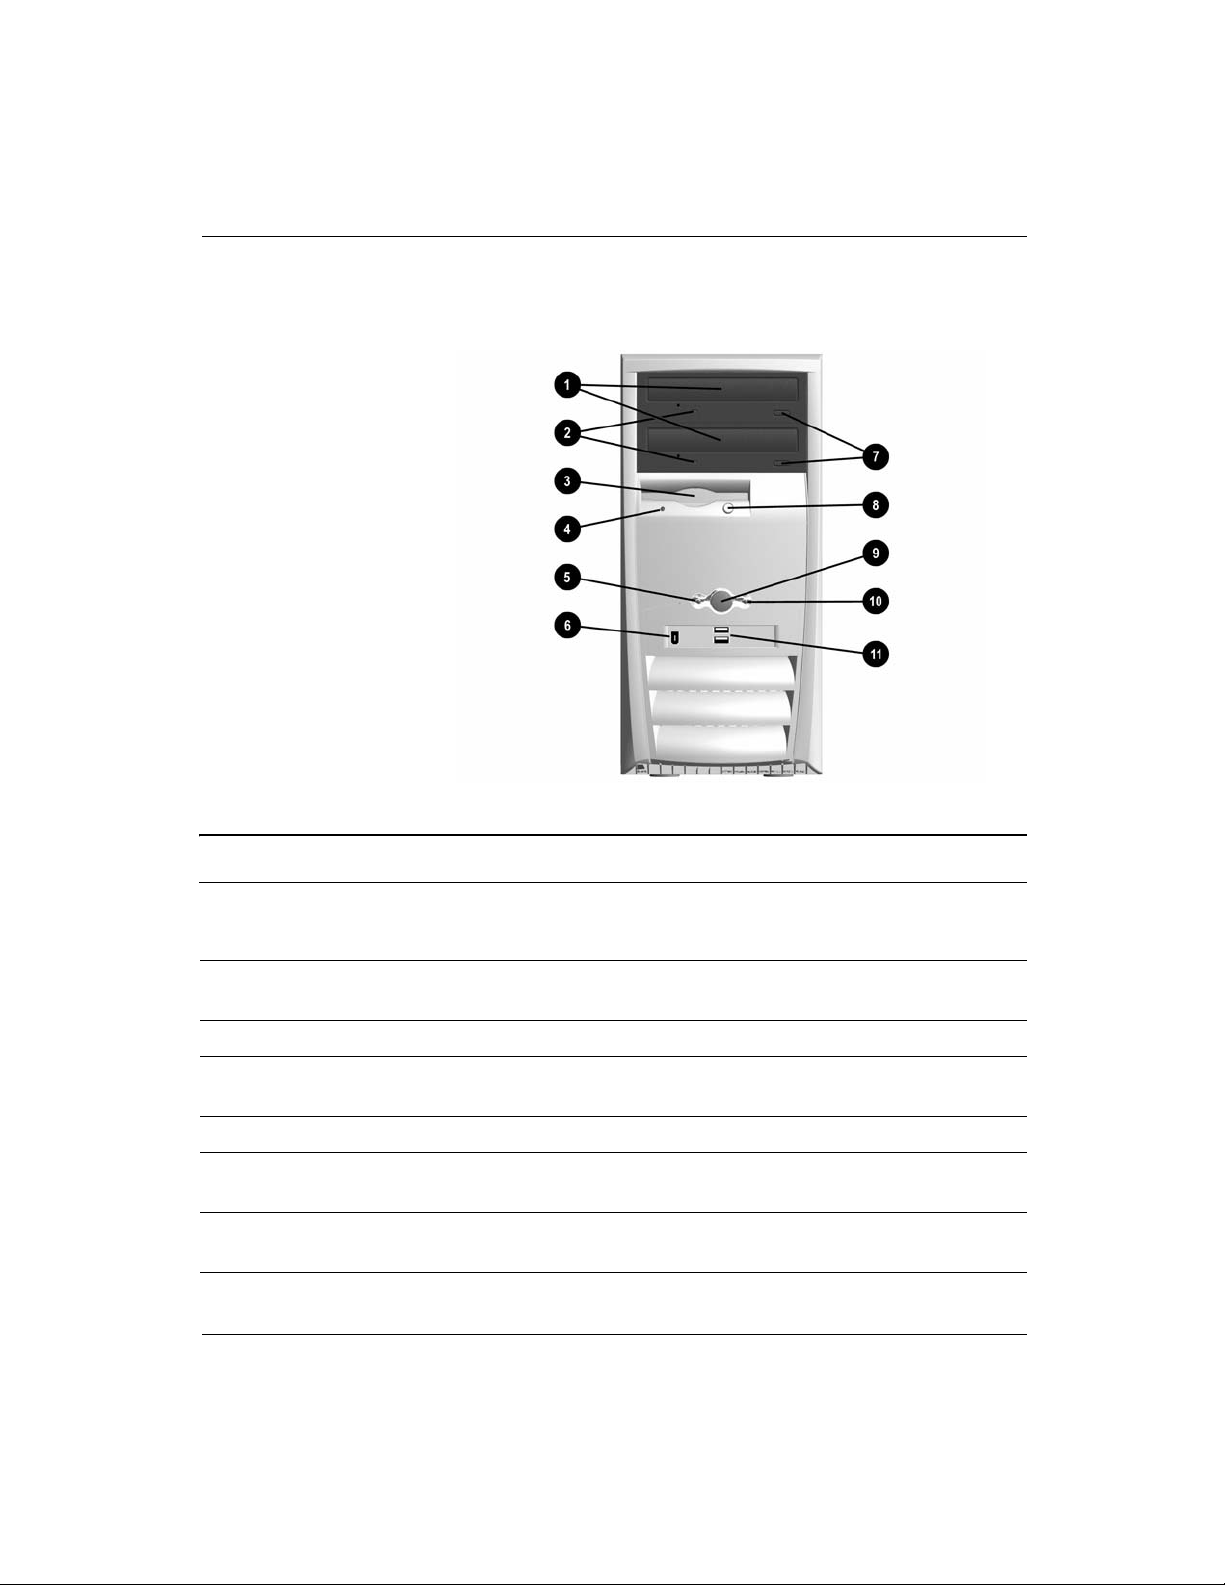
Front Panel Components - 6000 Series
1 Optical Drives Depending on your computer model, this may be a
CD-ROM, CD-RW, DVD-ROM, or DVD-R/RW drive.
2 Optical Drive Activity
Lights
3 Diskette Drive Reads and writes information onto a 3.5-inch diskette.
4 Diskette Drive Activity
Light
5 Power-On Light When lit, indicates the power is on.
6 1394 Port (available on
select models)
7 Optical Drive Eject
Buttons
Getting Started 2–3
When lit, indicates the optical drive is being accessed.
When lit, indicates the diskette drive is being accessed.
(Do not remove the diskette while the light is on.)
Connects digital video equipment and allows fast data
transfer to your computer.
Releases the optical drive disc tray.
Page 12

A Look at the Computer
Front Panel Components - 6000 Series (Continued)
8 Diskette Eject Button Ejects the diskette from the diskette drive.
9 Power Button Turns on the computer. To turn off the computer, use
the operating system “Turn Off Computer” command.
: Hard Drive Activity Light When lit, indicates the hard drive is being accessed.
; USB (Universal Serial
Bus) Ports
Arrangement and number of drives and connectors may vary by model.
✎
Connects USB peripheral devices, such as gamepads,
joysticks, and video cameras.
8000 Series
2–4 Getting Started
Page 13

A Look at the Computer
Front Panel Components - 8000 Series
1 Optical Drives Depending on your computer model, this may be a
CD-ROM, CD-RW, DVD-ROM, or DVD-R/RW drive.
2 Optical Drive Activity
Lights
3 Diskette Drive Activity
Light
4 Power Button Turns on the computer. To turn off the computer, use
5 Power-On Light When lit, indicates the power is on.
6 1394 Port (available on
select models)
7 USB (Universal Serial
Bus) Ports
8 Optical Drive Eject
Buttons
9 Diskette Drive Reads and writes information onto a 3.5-inch diskette.
: Diskette Eject Button Ejects the diskette from the diskette drive.
; Hard Drive Activity Light When lit, indicates the hard drive is being accessed.
Arrangement and number of drives and connectors may vary by model.
✎
When lit, indicates that the optical drive is being
accessed.
When lit, indicates the diskette drive is being accessed.
(Do not remove the diskette while the light is on.)
the operating system “Turn Off Computer” command.
Connects digital video equipment and allows fast data
transfer to your computer.
Connects USB peripheral devices, such as gamepads,
joysticks, and video cameras.
Release the optical drive disc trays.
Getting Started 2–5
Page 14

A Look at the Computer
Rear Panel Components
The components on the rear of your computer will vary depending on
the model you purchased. Take a look at the following illustrations to
get acquainted with the rear panel features of your computer model.
Some components have color-coded connectors that match the ports
✎
on the rear of your computer. Refer to the Quick Setup poster that
came with your computer for more information on connecting
computer components.
4000 Series
2–6 Getting Started
Page 15

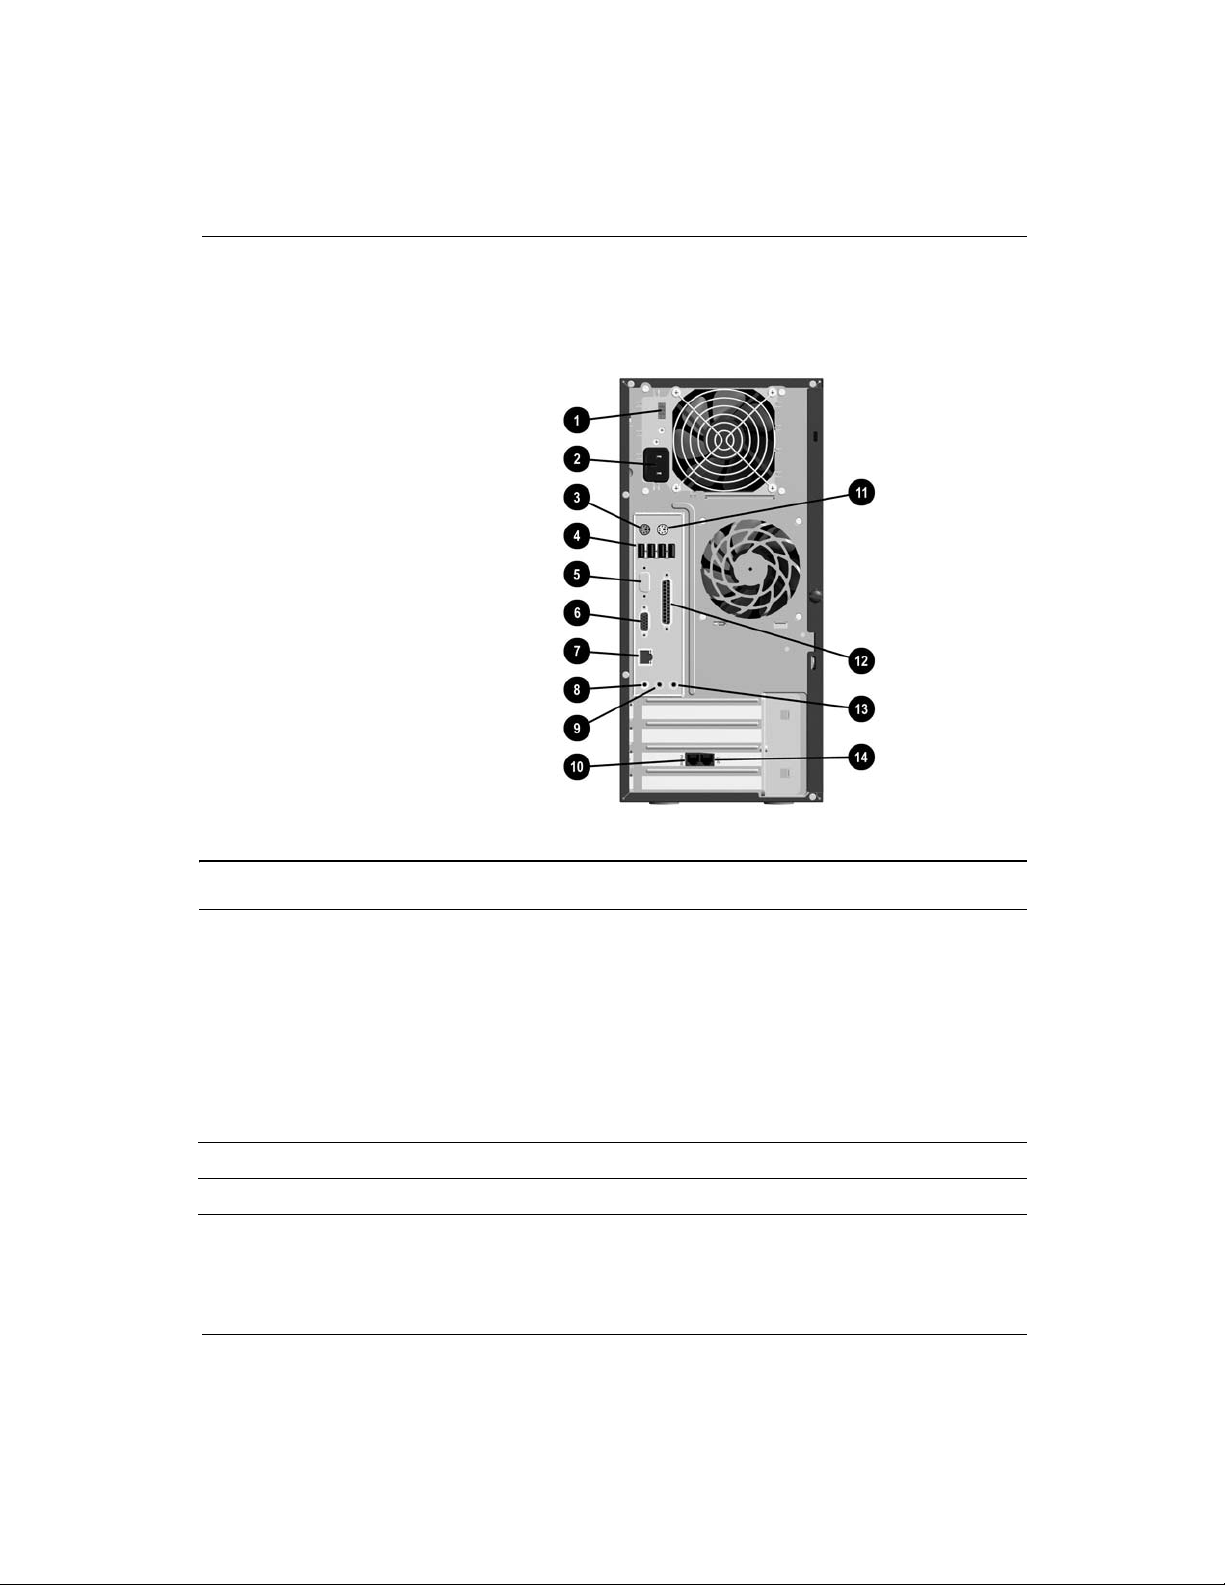
Rear Panel Components - 4000 Series
1 Power Cord Connector Connects the computer’s power cord.
A Look at the Computer
2 Voltage Select Switch
(available on select
models)
3 PS/2 Keyboard Connector Connects a PS/2-compatible keyboard.
4 USB (Universal Serial
Bus) Ports
5 Serial Port Connects a serial peripheral device, such as a scanner.
6 VGA Connector Connects the monitor to the computer.
7 Audio Line-Out Connector Connects stereo speakers.
8 Audio Line-In Connector Connects audio devices.
9 Microphone Connector Connects a microphone.
: Modem Port Connects the modem cable. A modem cable is included
; PS/2 Mouse Connector Connects a PS/2-compatible mouse or other pointing
Selects 230 volts (for some areas of Asia, Africa,
Australia, and Europe) or 115 volts (for North America,
South America, and Japan). This switch may be factory
set to 230 volts. Before plugging the power cord into an
electrical outlet be sure the switch is set to your
regional requirement.
Failure to set the switch to the correct regional voltage
Ä
requirement may damage your internal components.
Connects USB devices, such as a USB keyboard,
mouse, or pointing device.
with your computer.
device.
< Parallel Port Connects a parallel device, such as a printer.
= Second Serial Port Connects a serial peripheral device.
> Telephone Extension (not
available in all countries)
? Network Interface Card
(NIC) Connector (available
on select models)
Arrangement and number of connectors may vary by model.
✎
Getting Started 2–7
Connects a telephone cable to the computer.
Connects to an Ethernet network cable. A network
cable is not included with the computer.
Page 16
A Look at the Computer
6000 Series
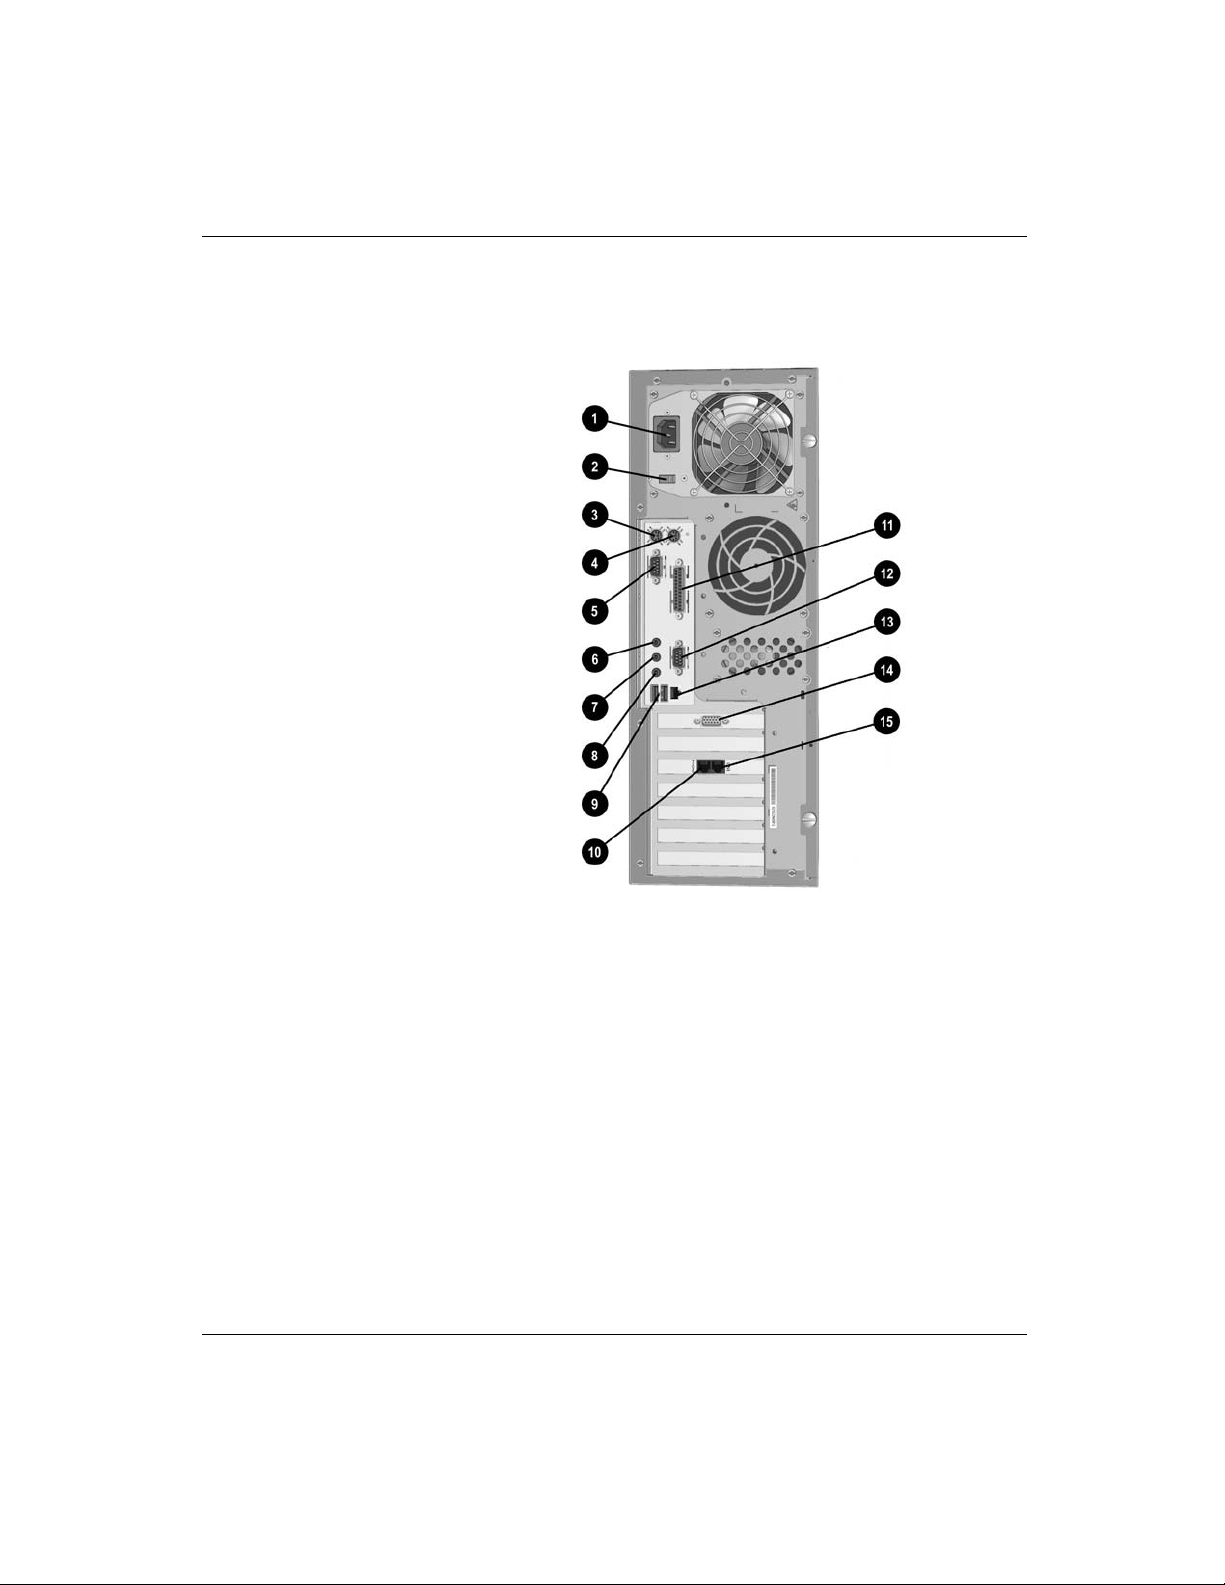
Rear Panel Components - 6000 Series
1 Voltage Select Switch
(available on select
models)
2 Power Cord Connector Connects the computer’s power cord.
3 PS/2 Keyboard Connector Connects a PS/2-compatible keyboard.
2–8 Getting Started
Selects 230 volts (for some areas of Asia, Africa,
Australia, and Europe) or 115 volts (for North America,
South America, and Japan). This switch may be factory
set to 230 volts. Before plugging the power cord into an
electrical outlet be sure the switch is set to your
regional requirement.
Failure to set the switch to the correct regional voltage
Ä
requirement may damage your internal components.
Page 17

Rear Panel Components - 6000 Series (Continued)
A Look at the Computer
4 USB (Universal Serial
Bus) Ports
5 Serial Port Connects a serial peripheral device, such as a scanner.
6 VGA Connector Connects the monitor to the computer.
7 Network Interface Card
(NIC) Connector
8 Audio Line-Out Connector Connects stereo speakers.
9 Audio Line-In Connector Connects audio devices.
: Modem Port Connects the modem cable. A modem cable is included
; PS/2 Mouse Connector Connects a PS/2-compatible mouse or other pointing
< Parallel Port Connects a parallel device, such as a printer.
= Microphone Connector Connects a microphone.
> Telephone Extension (not
available in all countries)
Connects USB devices, such as a USB keyboard,
mouse, or pointing device. The number of USB ports
on your computer will vary depending on your model.
Depending on your model, the VGA connector may
✎
be located on the VGA card in the expansion slot.
Connects to an Ethernet network cable. A network
cable is not included with the computer.
with your computer.
device.
Connects a telephone cable to the computer.
Arrangement and number of connectors may vary by model.
✎
Getting Started 2–9
Page 18
A Look at the Computer
8000 Series
2–10 Getting Started
Page 19

Rear Panel Components - 8000 Series
1 Power Cord Connector Connects the computer’s power cord.
A Look at the Computer
2 Voltage Select Switch
(available on select
models)
3 PS/2 Keyboard Connector Connects a PS/2-compatible keyboard.
4 PS/2 Mouse Connector Connects a PS/2-compatible mouse or other pointing
5 Serial Port Connects a serial peripheral device, such as a scanner.
6 Audio Line-Out Connector Connects stereo speakers.
7 Audio Line-In Connector Connects audio devices.
8 Microphone Connector Connects a microphone.
9 USB (Universal Serial
Bus) Ports
: Modem Port Connects a modem cable. A modem cable is included
; Parallel Port Connects a parallel device, such as a printer.
Selects 230 volts (for some areas of Asia, Africa,
Australia, and Europe) or 115 volts (for North America,
South America, and Japan). This switch may be factory
set to 230 volts. Before plugging the power cord into an
electrical outlet be sure the switch is set to your
regional requirement.
Failure to set the switch to the correct regional voltage
Ä
requirement may damage your internal components.
device.
Connects USB devices, such as a USB keyboard,
mouse, or pointing device.
with your computer.
< Second Serial Port Connects a serial peripheral device.
= Network Interface Card
(NIC) Connector
> VGA Connector Connects the monitor to the computer.
? Telephone Extension (not
available in all countries)
Arrangement and number of connectors may vary by model.
✎
Getting Started 2–11
Connects to an Ethernet network cable. A network
cable is not included with your computer.
Connects a telephone cable to the computer.
Page 20
A Look at the Computer
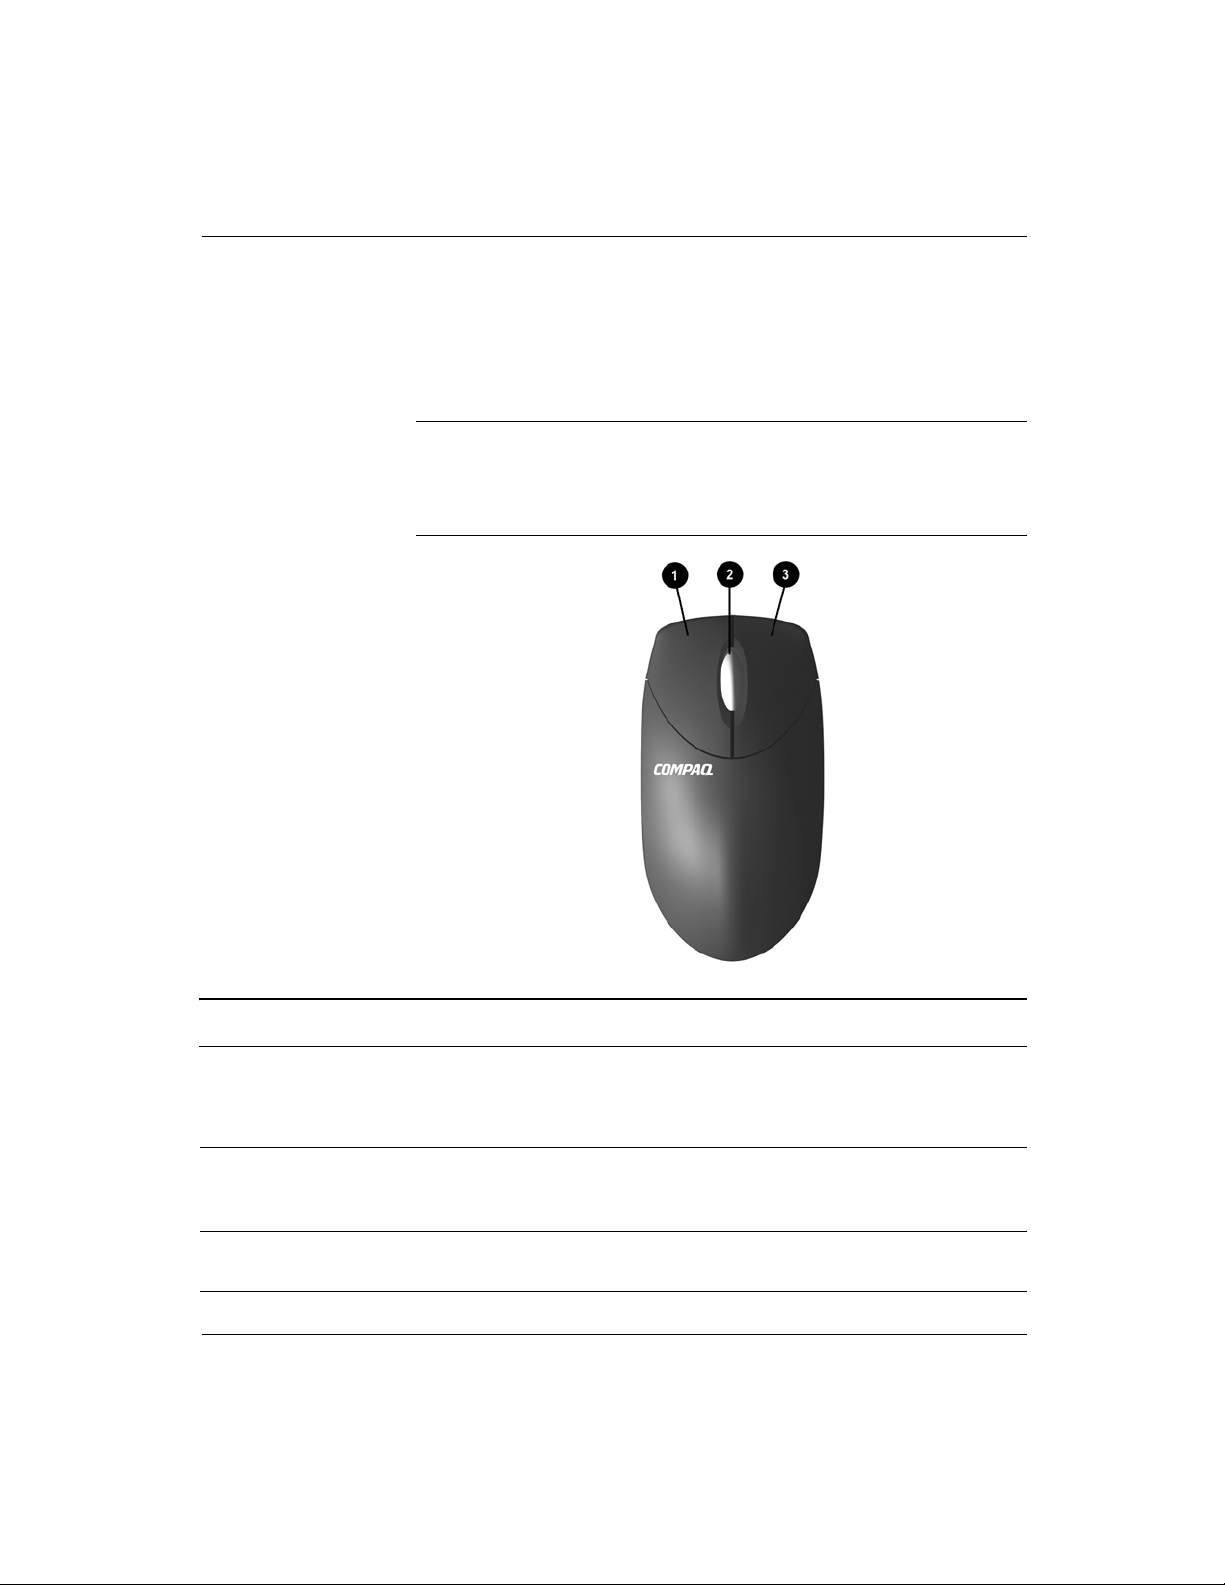
Mouse Components
Your computer includes a Scroll Mouse, a Wireless Wheel Mouse, or
a USB Optical Mouse. The Wireless Wheel Mouse and USB Optical
Mouse are available with select models.
Your mouse can be customized for a left-handed user from the Mouse
✎
Properties dialog box. Click on Start then click Control Panel. Click
Printers and Other Hardware then click on the Mouse icon to open
the Mouse Properties dialog box.
Mouse Components
1 Left Mouse Button Click and quickly release to make screen selections.
Double-click and quickly release to open applications
and files.
2 Scroll Wheel Moves the screen backward and forward through a
document without having to continuously move the
mouse or mouse wheel.
3 Right Mouse Button Click and quickly release to display application menu
selections.
2–12 Getting Started
Page 21
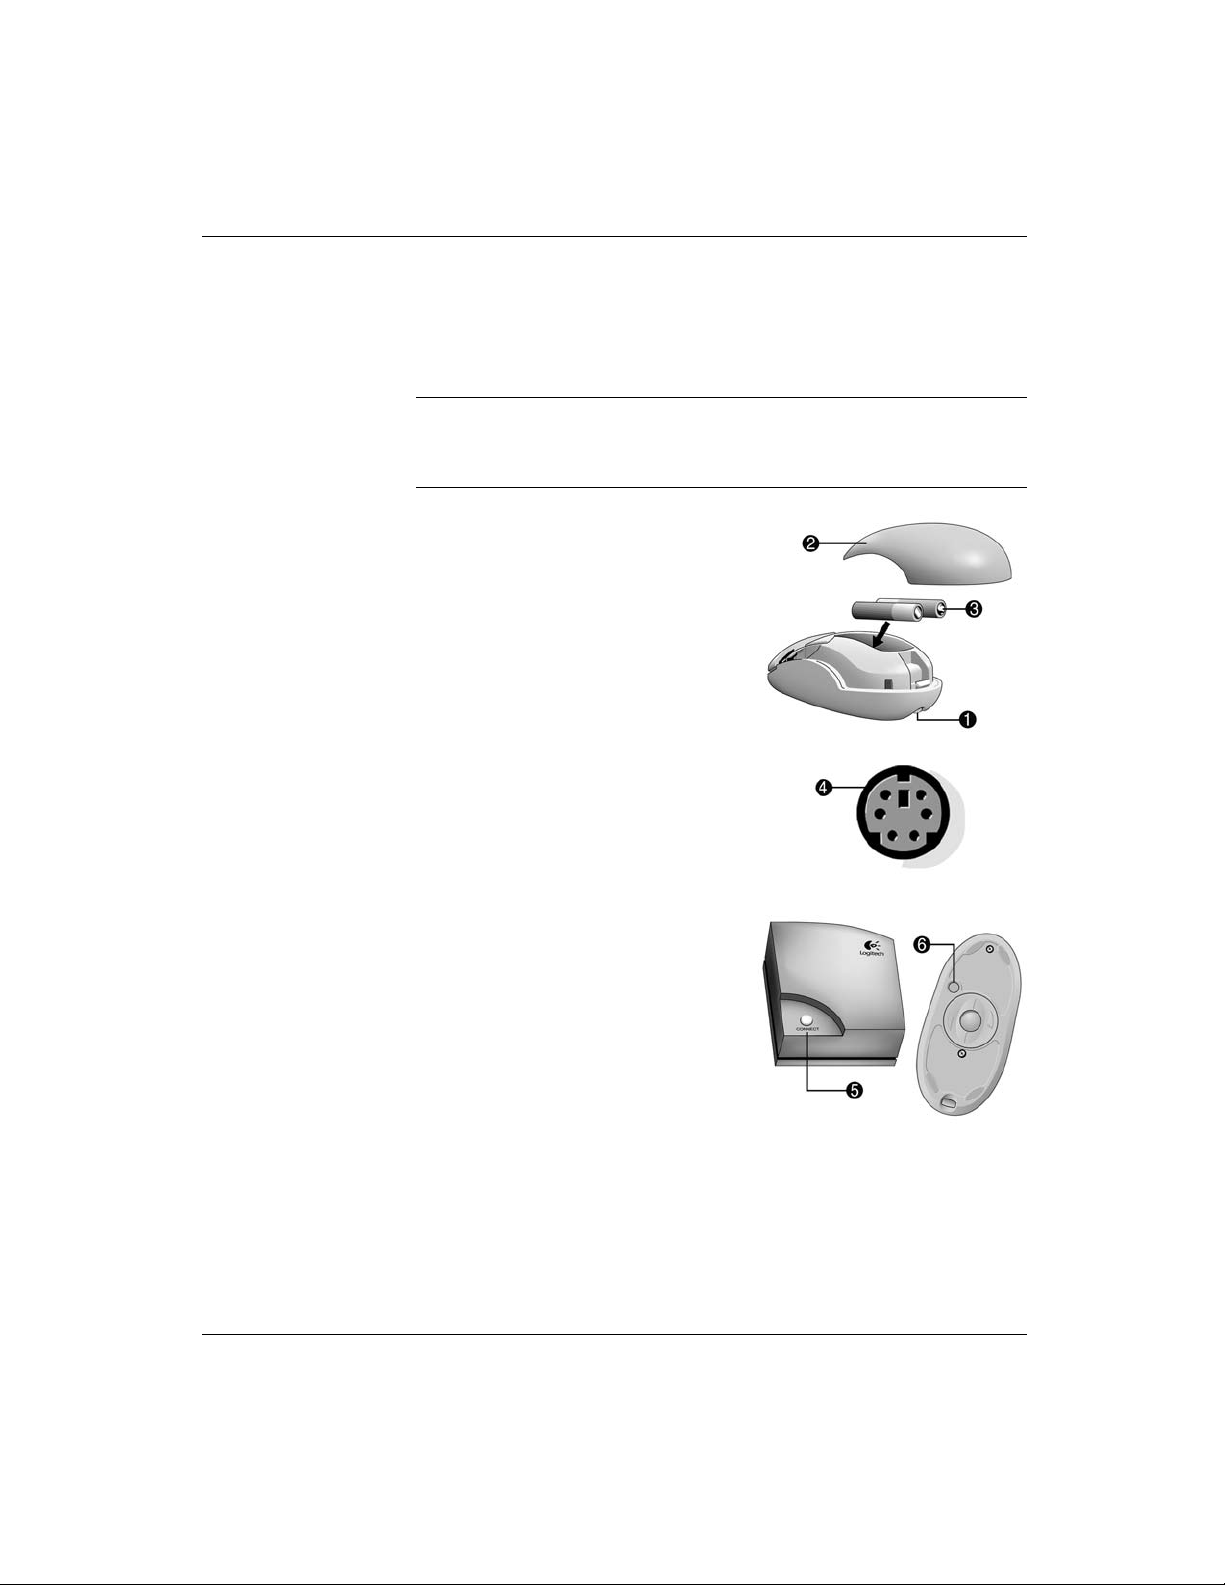
Installing the Wireless Wheel Mouse
Follow the instructions below to install your wireless wheel mouse
(available on select models only).
Before using your wireless wheel mouse, refer to the Comfort
✎
Guidelines on the Logitech Web site at:
logitech.com/cf/support/comfortguide.cfm
1. Remove the battery compartment
cover by pressing the tab on the
bottom of the mouse 1 and
sliding off the cover 2.
2. Insert the two AAA alkaline
batteries 3 according to the
diagram inside the battery
compartment.
3. Turn off your computer.
4. Connect the receiver cable to the
PS/2 port 4 on the back of your
computer.
A Look at the Computer
5. Turn on your computer.
6. Establish communication
between the mouse and the
receiver by pressing the Connect
button 5 on the receiver, then
pressing the Connect button 6
under the mouse.
Getting Started 2–13
Page 22

A Look at the Computer
Using the Scroll Mouse
The mouse directs the cursor on the Windows desktop. Use the mouse
to move quickly or easily through a document or Web site.
Moving the scroll wheel on your mouse through a document or Web
site is faster than using the scroll bar. You can use the scroll wheel to:
■ Scroll forward or backward through a document or Web site by
turning the scroll wheel forward or backward.
■ Autoscroll by pressing down on the scroll wheel until it clicks
(you will see an autoscroll icon on your desktop). Move the
mouse vertically, horizontally, or diagonally to scroll in the
desired direction. The farther you move the cursor from the
starting point icon, the faster the scrolling occurs. To stop
autoscrolling, press any mouse button.
Some mouse functions, such as autoscrolling, may not work with all
✎
software.
Using the Wireless Wheel Mouse
The wireless wheel mouse is available with select models. It has the
same scroll features and functions as the Scroll Mouse with the
addition of a receiver box.
When using the wireless wheel mouse:
■ Replace the batteries approximately every six months. The
wireless wheel mouse does not alert you when the batteries
are low.
■ For optimal performance, place the receiver at least eight inches
(twenty centimeters) away from other electrical devices, such as
the computer, the computer monitor, or external storage devices.
■ Refer to the “Solving Minor Problems” section in this guide if
your wireless wheel mouse does not function properly.
2–14 Getting Started
Page 23

Using the USB Optical Mouse
The USB optical mouse is available with select models. It provides
the same functions as the scroll mouse and wireless wheel mouse
except it uses an optical sensor instead of a mechanical ball to
determine the position of the cursor on the screen. The surface on
which you use the optical mouse plays an important role in tracking
the cursor. When using the optical mouse:
■ Use a mousepad or a white sheet of paper underneath your
mouse. Using it on a glass or see-through surface will inhibit the
ability of the sensor to track the cursor.
■ Avoid using the mouse on a reflective surface such as a mirror or
shiny metal disk. This may cause tracking problems.
■ Some wood grains and grooved surfaces may also cause tracking
problems.
■ Refer to the “Solving Minor Problems” section in this guide if
your optical mouse does not function properly.
A Look at the Computer
Getting Started 2–15
Page 24

A Look at the Computer
Keyboard Components
Your computer includes a Compaq PS/2 Easy Access Keyboard or a
Compaq USB Smart Card Keyboard. The Smart Card Keyboard is
available with select models and in some regions.
Easy Access Keyboard Components
Easy Access Keyboard Components
1 Function Keys Perform special functions, depending on the software
application being used.
2 Easy Access Buttons Provide quick access to your favorite Web sites,
services, and applications.
3 Editing Keys Includes the following: Insert, Home, Page Up, Delete,
End, and Page Down.
4 Status Lights Indicates a quick status of your computer and keyboard
settings (Num Lock, Caps Lock, and Scroll Lock).
5 Numeric Keys Works like a calculator keypad.
2–16 Getting Started
Page 25

A Look at the Computer
Easy Access Keyboard Components (Continued)
6 Arrow Keys Used for games or to navigate through a document or
Web site. These keys allow you to move left, right, up,
and down, using the keyboard instead of the mouse.
7 Application Key* Used (like the right mouse button) to open pop-up
menus in a Microsoft Office application. May perform
other functions in other software applications.
8 Windows Logo Keys* Used to open the Start menu in Microsoft Windows.
Used in combination with other keys to perform other
functions.
9 Main Keys Used like standard typewriter-style keys.
*Keys available in select geographic regions.
Using the Easy Access Buttons
The Easy Access Buttons make accessing your favorite Web sites,
services, and applications easier and faster.
Several Easy Access Buttons are programmed to default to an Internet
✎
Web site when pressed. However, until you set up your Internet
Service Provider (ISP), the buttons will take you to a window that
guides you through the ISP setup process.
Getting Started 2–17
Page 26

A Look at the Computer
Easy Access Buttons
1 Instant Internet Provides your daily starting point to the Internet. It
connects you to a customizable Web page filled with
local weather, news, sports, and financial information.
2 Help Takes you to the Compaq Help & Support Center,
which provides information about your computer.
You can find information about your computer and
computer-related peripherals as well as access links
to online technical support.
3 Search Accesses a Web site that helps you to locate news and
information on the Internet. Search for topics including
news and information, shopping, graphics, music, and
video.
4 E-mail Launches your e-mail application.
2–18 Getting Started
Page 27

Easy Access Buttons (Continued)
A Look at the Computer
5 Smart Card
or
Community
6 Entertainment Your online connection to the world of entertainment,
7 My Compaq PC Takes you to the My Presario Web site.
8 Retail/Affinity
Central
Easy Access Button functions may vary by model and by region.
✎
Depending on your region, this button launches the
Smart Card or the Compaq online Community.
• The Smart Card button is available on U.S. English
keyboards. When pressed, it provides information
on obtaining a Smart Card and/or shopping at
participating online merchants. Refer to “Smart Card
Keyboard Components” in this chapter for additional
information.
• Community provides online collaboration between
novice and technical experts, who share knowledge
and information and provide assistance. Participate
in existing product discussions, review commonly
asked questions, and answer or post new questions
to a community of users.
featuring music downloads, streaming video, Web
casts, entertainment news, and reviews.
Provides an instant connection to your computer store
and a variety of leading consumer companies.
Customizing the Easy Access Buttons
All Easy Access Buttons can be reprogrammed to open any software
application or data file on your hard drive, or any Internet address.
To reprogram the Easy Access Buttons, complete the following steps:
1. Double-click the keyboard icon in the notification area (lower
right corner) of the Windows taskbar. The Keyboard Properties
dialog box is displayed.
2. Click the Help button on the Keyboard Properties dialog box for
instructions.
Getting Started 2–19
Page 28

A Look at the Computer
Smart Card Keyboard Components
The Compaq USB Smart Card Keyboard (available with select
models in some regions) has the same features as the Easy Access
Keyboard with some additional Smart Card features.
The Smart Card features provide you with online shopping
convenience and security. If you have a Smart Card or when you
receive your Smart Card, you can insert your card into the terminal on
the keyboard, enter a PIN number and make purchases from
participating online merchants.
The Smart Card Keyboard is classified as a low power USB device
✎
that should be connected directly to one of the USB ports on the front
or back of your computer. If an optional external USB hub is used, it
must be a powered external USB hub.
Smart Card Keyboard Components
1 Smart Card Button Press this button to apply for a Smart Card and/or shop
online at many of the participating online merchants.
2 Smart Card Activity Light When lit, indicates that you have inserted your Smart
Card into the terminal.
3 Smart Card Terminal Insert your Smart Card into the terminal (face up) to
purchase merchandise online.
2–20 Getting Started
Page 29

Using the Smart Card Feature
The Smart Card feature makes it easy for you to purchase
merchandise online.
To apply for a Smart Card or use your Smart Card to shop at
participating online merchants:
1. Press the Smart Card button 1. This button launches a Web site
with instructions on obtaining your Smart Card.
A Look at the Computer
2. When you receive your Smart Card and want to purchase
merchandise online, insert your card into the Smart Card
terminal, when prompted, with the front of the card facing up 2.
3. Follow the on-screen instructions to complete the transaction.
The Smart Card Keyboard comes with a non-payment Smart Card,
the Presario Internet Smart Card powered by Netissimo®, which
enables a value added Internet utility. The Internet utility will:
■ Intelligently auto-sense and dial the default Internet connection
on the Presario desktop computer.
■ Securely log you into online accounts with automatic population
of Web aliases and passwords.
■ Automatically allow you to access and store Web site favorites.
■ Provide access to Web site destinations containing specialized
content and offers for Smart Card Keyboard users.
Getting Started 2–21
Page 30

A Look at the Computer
2–22 Getting Started
Page 31

Using the Computer
Inserting and Removing a Diskette
The diskette drive (also known as a floppy drive) uses a 3 1/2"
diskette (or floppy disk) to store files. A diskette can hold up to
1.44 MB of data. Once information is copied onto a diskette, it
remains there until you delete or overwrite it.
To insert or remove a diskette from the drive, follow the procedure
below.
1. Hold the diskette with the label facing up and the arrow on the
diskette pointing toward the drive; then gently push the diskette
into the drive.
3
Inserting and Removing a Diskette
2. To remove a diskette, press the Eject button 1 on the diskette
drive.
CAUTION: Wait until the diskette drive activity is complete (the activity
Ä
light 2 stops glowing) before removing a diskette. Removing a diskette
when the drive is reading from or writing to the diskette can damage the
diskette or the information stored on it.
Remove the diskette from the drive prior to shutting down Microsoft
✎
Windows. If you do not remove the diskette, your computer will not
start until you remove the diskette from the drive.
Getting Started 3–1
Page 32

Using the Computer
Inserting and Removing a CD or DVD Disc
Your computer may have a CD-ROM, CD-RW, DVD-ROM, and/or
DVD-R/RW drive, depending on the model you purchased.
■ The CD-ROM drive enables you to read data from a CD or listen
to a music CD.
■ The CD-RW drive enables you to read and write data to a CD,
and enables you to listen to music CDs or read data CDs.
■ The DVD-ROM drive enables you to view your favorite movies,
listen to music, or read information from CDs.
■ The DVD-R/RW drive enables you to view your favorite movies,
record your own movies, listen to music, or read information
from CD or DVD discs.
To insert or remove a CD or DVD disc from the drive, follow the
procedure below.
Your computer must be turned on before you can insert or remove a
✎
CD or DVD disc.
1. Press the Load/Eject button to open the drive.
Inserting a CD or DVD disc
2. Carefully lift the disc from the CD case. Hold the disc by the
edges and the center hole only to avoid touching the surface.
3. Place the disc, label side facing up, into the round area of the tray.
4. Press the Load/Eject button to close the drive.
5. To remove the disc, press the Load/Eject button to open the drive.
3–2 Getting Started
Page 33

Make sure to store CD and DVD discs that are not in use in their
✎
protective cases.
Installing Additional Software
You may want to purchase and install additional software. Software
can be installed from a CD, DVD, diskette, or downloaded from a
Web s i te.
Follow the installation instructions provided with the software. In the
event of difficulties with the installation, contact the software
manufacturer.
When selecting software for your computer, make sure the packaging
✎
states that it is compatible with your version of the Microsoft
Windows operating system, your computer memory, processor, and
available hard drive space.
Using the Computer
Installing Software from a CD, DVD, or Diskette
The installation process begins automatically when you insert the CD
or DVD into the disc drive. If the installation process does not begin
automatically, refer to the documentation that came with the software.
If no documentation exists, follow the procedure listed here to install
software from a CD, DVD, or diskette.
1. Close all open programs.
2. On the Windows desktop, click Start then click Control Panel.
3. Double-click the Add or Remove Programs icon. The Add or
Remove Programs window is displayed.
4. Click Add New Programs.
5. Click the CD or Floppy button.
6. Insert the CD or diskette into the proper drive and click Next.
Microsoft Windows begins the installation process.
Getting Started 3–3
Page 34

Using the Computer
Installing Software from the Internet
If you download software from a Web site, follow the installation
instructions that are usually displayed on the Web page. If installation
instructions are not available, complete the steps listed here.
CAUTION: Before downloading files of any kind from the Internet, make
Ä
sure that call-waiting is disabled and that your anti-virus utility is
running. If the download process is interrupted, you must restart the
entire download procedure from the beginning.
1. Before you start downloading, note the location on the hard drive
where the files will be stored. Also, be sure that you have enough
hard drive space available.
2. Close all other open programs.
3. On the Windows desktop, click Start then click Control Panel.
4. Double-click the Add or Remove Programs icon. The Add or
Remove Programs window is displayed.
5. Click Add New Programs.
6. Click the CD or Floppy button.
7. Click the Next button.
8. Click the Browse button.
9. Locate (as noted in Step 1) and select the executable file (.exe) for
the downloaded software.
10. Click Open to begin the installation process.
3–4 Getting Started
Page 35

Customizing Your Computer Interface
If you have trouble reading the screen, hearing sounds, using the
keyboard, or moving the mouse, you can adjust the settings to make
your computer more accessible.
You can use the Accessibility Wizard to automatically adjust your
text size, monitor display, sound, and mouse pointer. Just answer a
few questions in the Accessibility Wizard and your computer will be
reconfigured to fit your needs. To start the Accessibility Wizard:
1. On the Windows desktop, click Start.
2. Point the cursor to All Programs, then to Accessories, then
Accessibility.
3. Click Accessibility Wizard. The Accessibility Wizard begins.
4. Follow the on-screen instructions.
If you would like to customize your keyboard, display, sound, and
mouse functions yourself, follow the directions below.
1. On the Windows desktop, click Start then click Control Panel.
Using the Computer
2. Click Accessibility Options then click Accessiblity Options
again.
3. Adjust the keyboard, sound, display, and mouse settings to fit
your needs.
Getting Started 3–5
Page 36

Using the Computer
3–6 Getting Started
Page 37

Internal Computer Components
Accessing Internal Computer Components
Follow the procedures listed below to access the internal components
for your computer model.
For detailed instructions on upgrading and replacing internal
✎
computer components, see the Hardware Reference Guide on the
Documentation Library CD included with your computer. Compaq
recommends that you print these instructions to make the installation
process easier.
4000 Series
Follow the procedure below to access the internal components of your
4000 Series computer.
CAUTION: Static electricity can damage the electronic components
Ä
of your computer or optional equipment. Before beginning these
procedures, ensure that you are discharged of static electricity by briefly
touching a grounded metal object.
4
1. Remove all diskettes, CDs, and DVDs from the computer.
2. To shut down the computer, click the Start button, and then click
Turn Off Computer. The Turn Off Computer dialog box is
displayed. Select Turn O f f to turn the computer off.
3. Disconnect the power cord from the electrical outlet and then
from the computer.
Getting Started 4–1
Page 38

Internal Computer Components
WARNING: To reduce the risk of personal injury from electrical shock
Å
and/or hot surfaces, be sure to disconnect the power cord from the wall
outlet, and allow the internal system components to cool before
touching.
4. Disconnect all peripheral device cables from the computer.
5. Remove the access panels by loosening the screws that secure the
access panels to the computer chassis 1. Slide the access panels
back from the unit 2.
Removing the 4000 Series Access Panels
6. Turn the computer on its side with the open side facing up to
access the internal components.
4–2 Getting Started
Page 39

6000 Series
Internal Computer Components
Follow the procedure below to access the internal components of your
6000 Series computer.
CAUTION: Static electricity can damage the electronic components
Ä
of your computer or optional equipment. Before beginning these
procedures, ensure that you are discharged of static electricity by briefly
touching a grounded metal object.
1. Remove all diskettes, CDs, and DVDs from the computer.
2. To shut down the computer, click the Start button, and then click
Turn Off Computer. The Turn Off Computer dialog box is
displayed. Select Turn O f f to turn the computer off.
3. Disconnect the power cord from the electrical outlet and then
from the computer.
WARNING: To reduce the risk of personal injury from electrical shock
Å
and/or hot surfaces, be sure to disconnect the power cord from the wall
outlet, and allow the internal system components to cool before
touching.
4. Disconnect all peripheral device cables from the computer.
5. Lay the computer on its side with the access panel (the side with
the pull grip) facing up.
Getting Started 4–3
Page 40

Internal Computer Components
6. Remove the access panel by loosening the screw that secures the
access panel to the computer chassis 1. Slide the access panel
back about 1 inch (2.54 centimeters), then lift it up and off the
unit 2.
Removing the 6000 Series Access Panel
8000 Series
Follow the procedure below to access the internal components of your
8000 Series computer.
CAUTION: Static electricity can damage the electronic components
Ä
of your computer or optional equipment. Before beginning these
procedures, ensure that you are discharged of static electricity by briefly
touching a grounded metal object.
1. Remove all diskettes, CDs, and DVDs from the computer.
2. To shut down your computer, click the Start button, and then
click Turn Off Computer. The Turn Off Computer dialog box is
displayed. Select Turn O f f to turn the computer off.
3. Disconnect the power cord from the electrical outlet and then
from the computer.
4–4 Getting Started
Page 41

Internal Computer Components
WARNING: To reduce the risk of personal injury from electrical shock
Å
and/or hot surfaces, be sure to disconnect the power cord from the wall
outlet, and allow the internal system components to cool before
touching.
4. Disconnect all peripheral device cables from the computer.
5. With the computer lying on its side, loosen the two screws that
secure the access panel to the computer chassis 1. Slide the
access panel back about 1 inch (2.54 centimeters), then lift it up
and off the unit 2.
Removing the 8000 Series Access Panel
Getting Started 4–5
Page 42

Internal Computer Components
Upgrading or Replacing Computer Memory
Complete the following procedure to replace or add a memory
module.
CAUTION: When handling a memory module, be careful not to touch
Ä
any of the contacts. Doing so may damage the module.
Upgrade the memory in your computer with memory of the same type
✎
and speed as the memory originally installed in your computer. You
can find out exactly what type of memory is in your computer at the
following Web site (not available in all languages):
compaq.com/athome/memory
1. Complete the “Accessing Internal Computer Components”
process for your computer model.
2. Open both ends of the memory module socket 1.
Opening the Latches on the Memory Module Socket
If you are replacing a memory module, remove the old memory and
✎
put the new memory module in the same memory slot from which the
old memory was removed.
4–6 Getting Started
Page 43

Internal Computer Components
If you are adding a memory module, install the new module into the
✎
socket nearest the preinstalled module.
3. Align the memory module 1 with the memory slot. The memory
module can be installed in only one way. Match the notch on the
module with the tab on the memory socket 2. Push the module
carefully and firmly into the slot ensuring that the latches 3 on
both ends snap into place.
Installing a Memory Module
4. Reassemble the computer and turn on the power.
If a blank screen is diplayed after replacing or adding a memory
✎
module, the memory is installed incorrectly or it is the wrong type
of memory. Repeat the above procedure to return your computer to its
original state.
Getting Started 4–7
Page 44

Internal Computer Components
4–8 Getting Started
Page 45

5
Help & Support
This chapter provides information for identifying and solving
common problems that may occur with your computer. You can easily
diagnose and solve many computer problems on your own without
contacting a Compaq Support Specialist.
If you have a computer problem or question, check the following
resources for answers:
■ Review this “Help & Support” chapter for suggestions to solve
the problem.
■ Press the Easy Access Help G button on the keyboard to access
the built-in Compaq Help & Support Center, where you can find
information about your computer and computer-related
peripherals as well as links to online technical help.
■ Visit the Compaq Help & Support Web site at:
compaq.com/consumersupport
■ Contact a Compaq Support Specialist at the telephone number
listed in your Limited Warranty.
The Web sites listed in this chapter may be specific to certain regions
✎
and English only.
Preventative Care and Maintenance
Your computer is equipped with an integrated help and assistance tool
from Microsoft and Compaq, providing simple click access to built-in
product information, preventative care and maintenance assistance,
and Web links to online support and technical information. Press the
Easy Access Help G button on your keyboard to access the Compaq
Help & Support Center.
Getting Started 5–1
Page 46

Help & Support
■ Prevent unnecessary data loss: Protect your valuable data and
system files from possible damage by utilizing the virus
protection software available on your computer along with
backing up important data and programs.
■ Undo harmful or unintended changes to your system:
Your computer comes with restore features to help protect your
computer from unnecessary downtime. Return your computer to
its optimal state using one of the provided restore features.
■ Adjust your startup resources to improve performance:
Compaq has engineered an exclusive utility, called a Virtual
Technician, which helps you safely manage your computer's
system performance and resources.
■ Troubleshoot modem or Internet connection issues:
Test your modem line connection for slow or poor connection
speeds, as well as troubleshoot common modem problems.
■ Improve hard drive performance: Perform a series of easy
tasks to help remove unwanted files, repair simple hard drive
errors, increase the amount of free space on your hard drive, and
improve the overall speed and performance of your computer.
■ Reprogram your Easy Access buttons: Launch your favorite
programs and Web sites by easily reprogramming the Easy
Access buttons (select models only) on your Compaq keyboard.
■ Receive automatic delivery of drivers, software updates,
and fixes: Receive notifications and automatic updates to help
improve functionality and ensure your computer runs at peak
performance.
■ Learn more about how to replace end-user parts:
The End User Replaceable Parts Program (not available in all
regions) is part of the Limited Warranty. Leveraging the easy
access design, the End User Replaceable Parts Program enables
you to easily service your own computer.
5–2 Getting Started
Page 47

Online Service and Support
For rapid access to accurate solutions, go to
compaq.com/consumersupport. Whether you are a novice or
technical expert, knowledge, information, and assistance are available
when and where you need them.
■ Need access to drivers and product documentation? Find
original product drivers, the latest updates and software fixes,
warranty information, and product documentation.
web14.compaq.com/falco/sp_list.asp
■ Join the Compaq Customer Communities: Where novices to
technical experts collaborate to share knowledge, information,
and assistance. Participate in existing product discussions, review
commonly asked questions, and answer or post new questions to
a community of users.
compaq.com/communities
■ Open an online service event with a Compaq Support
Specialist: Do you have a product warranty issue or need to
contact a technical expert? Contact Compaq online for the fastest
time to a solution. To ensure proper handling of your service
event, please include your:
Help & Support
❏ Product model number
❏ Product serial number
❏ Date of purchase
❏ Detailed description of your issue or question
compaq.com/athome/support/consumeremail.html
How to Access Help
The first step when you need help is to press the Help G button on
your keyboard, giving you access to an integrated help and assistance
tool from Microsoft and Compaq. The Compaq Help & Support
Center provides a wealth of help and assistance, especially when you
need:
■ Answers to questions about your hardware or software
Getting Started 5–3
Page 48

Help & Support
■ Help installing new peripherals or software applications
■ A resolution to a hardware or software problem or error
■ To restore your computer and undo harmful changes
■ Access to the latest drivers, updates, and downloads
If you want interactive help or didn’t find exactly what you were
looking for, go to the Compaq Help & Support Web site at
compaq.com/consumersupport. The Compaq Help & Support Web
site is the fastest way to find accurate solutions by providing:
■ Original product drivers and the latest software updates
■ Warranty information and product documentation
■ Questions, answers, and insights through the Compaq Customer
Communities, compaq.com/communities
■ E-mail responses from a Compaq Support Specialist
If additional methods of getting assistance and resolving a problem
are needed, try the following:
■ Contact a Compaq Support Specialist at the telephone number
listed in your Limited Warranty with the following information
available:
❏ Product model number
❏ Product serial number
❏ Date of purchase
■ Restore the operating system and software to its original state as
when you purchased the computer by using your Compaq Restore
Kit. Refer to your Compaq Restore Kit for complete instructions
on using this feature.
Solving Minor Problems
Before contacting a Compaq Support Specialist, keep in mind that the
information needed to correct the problem may be at your fingertips.
Try pressing the Easy Access Help G button on the keyboard. This
button accesses important help and support information and tools.
Information in this section is divided into three areas: Symptom,
Problem, and Solution.
5–4 Getting Started
Page 49

Audio
Help & Support
The Symptom indicates the sign or warning message for the type of
problem you are having. The Problem identifies one or more reasons
why the symptom may have occurred. The Solution describes what
you should do to try to solve the problem.
Some of the symptoms listed for certain troubleshooting problems
✎
will not apply to your computer. For problems relating specifically to
the monitor or printer, refer to the documentation that came with the
equipment.
Symptom Problem Solution
No sound Speaker cables are not
properly connected.
Volume is muted. 1. On the Windows
Computer is in Stand By
mode.
Turn off your computer using
the normal “Turn Off
Computer” procedure.
Reconnect the speakers.
Refer to the Speaker
Options poster for
instructions.
desktop, click Start then
click Control Panel. The
Control Panel window is
displayed.
2. Click Sounds, Speech,
and Audio Devices then
click Sounds and Audio
Devices.
3. Click the Mute check box
to remove the check
mark from the box.
Press the Power button to
resume from Stand By
mode.
Getting Started 5–5
Page 50

Help & Support
CD-ROM, CD-RW, DVD-ROM, or DVD-R/RW Drive
Symptom Problem Solution
CD-ROM, CD-RW,
DVD- RO M, or DVD-R/RW
drive cannot read a disc or
takes too long to start.
CD has been inserted
upside down.
The DVD-ROM drive takes
longer to start because it
has to determine the type of
media being played, such as
audio or video.
Re-insert the CD with the
label facing up.
Wait at least 30 seconds to
let the DVD-ROM drive
determine the type of media
being played. If the disc still
does not start, read the
other solutions listed in this
topic.
CD or DVD disc is dirty. Clean CD or DVD with a CD
cleaning kit, available from
most computer stores.
5–6 Getting Started
Page 51

CD-ROM, CD-RW, DVD-ROM, or DVD-R/RW Drive (Continued)
Symptom Problem Solution
Help & Support
Recording audio CDs is
difficult or impossible.
Windows does not detect
CD-ROM or DVD-ROM
driver.
Wrong or poor quality media
type.
1. On the Windows
desktop, click Start then
click Control Panel. The
Control Panel window is
displayed.
2. Click Performance and
Maintenance then click
System.
3. Click the Hardware tab
then click the Device
Manager button.
4. Click the plus sign + next
to the CD/DVD-ROM
drives, and select the
drive you are having a
problem with.
5. Click the Action menu
item and select
Uninstall.
6. Restart your computer,
and let Windows detect
the CD or DVD driver.
Verify that you are using the
correct media for the drive.
Try a different brand of
media. Quality varies widely
between manufacturers.
Getting Started 5–7
Page 52

Help & Support
Diskette Drive
Symptom Problem Solution
Unable to read the diskette. A non-formatted diskette
has been inserted.
Diskette is damaged. Replace the diskette with a
“Invalid system disk”
message is displayed.
A diskette has been left in
the drive.
Diskette error has occurred. Restart your computer by
To format the diskette:
1. On the Windows
desktop, click Start then
click My Computer. The
My Computer window is
displayed.
2. Right-click on the
3 1/2 Floppy (A:) icon.
3. Select Format from the
pop-up menu.
4. Select the desired
options and click Start
to begin formatting the
diskette.
new one.
When drive activity stops,
remove the diskette and
press the Spacebar. The
computer should start up.
pressing the Power button.
Diskette drive light stays on. Diskette has been
improperly inserted.
Remove the diskette and
reinsert it as follows: Insert
the edge with the sliding
cover into the drive, face up,
and push the diskette all the
way in until it stops.
5–8 Getting Started
Page 53

Diskette Drive (Continued)
Symptom Problem Solution
Help & Support
Diskette drive is damaged. Press the Help G button on
the keyboard to access the
Compaq Help & Support
Center or refer to your
Limited Warranty for details.
Diskette drive cannot save
information to the diskette.
Diskette is not formatted. To format the diskette:
1. On the Windows
desktop, click Start then
click My Computer. The
My Computer window is
displayed.
2. Right-click on the
3 1/2 Floppy (A:) icon.
3. Select Format from the
pop-up menu.
4. Select the desired
options and click Start
to begin formatting the
diskette.
Diskette is write-protected. Slide the write-protection tab
to the unlocked position on
the diskette.
Diskette is full or the file is
too big.
Use another diskette or
compress the file to reduce
the size.
Diskette is damaged. Replace the damaged
diskette.
File Save command not
properly executed.
When saving information to
the diskette drive, verify that
you are using the correct
drive letter.
Getting Started 5–9
Page 54

Help & Support
Diskette Drive (Continued)
Symptom Problem Solution
Diskette drive cannot read a
diskette.
Diskette drive has failed. Press the Help G button on
the keyboard to access the
Compaq Help & Support
Center or refer to your
Limited Warranty for details.
Diskette is not formatted. To format the diskette:
1. On the Windows
desktop, click Start then
click My Computer. The
My Computer window is
displayed.
2. Right-click on the
3 1/2 Floppy (A:) icon.
3. Select Format from the
pop-up menu.
4. Select the desired
options and click Start
to begin formatting the
diskette.
Drive not found. Cable is loose. Press the Help G button on
the keyboard to access the
Compaq Help & Support
Center or refer to your
Limited Warranty for details.
5–10 Getting Started
Page 55

Hard Drive
Symptom Problem Solution
Help & Support
Computer seems to be
locked up.
Hard drive error message is
displayed.
Program in use has stopped
responding to commands.
Part of hard drive has failed
or is about to fail.
Attempt the normal
Windows “Turn Off
Computer” procedure. If this
fails, press the Power button
for four or more seconds to
turn off the power. To restart
your computer, press the
Power button again.
Press the Help G button on
the keyboard to access the
Compaq Help & Support
Center or refer to your
Limited Warranty for details.
Display (Monitor)
Symptom Problem Solution
If you encounter display problems, refer to the documentation that came with your monitor
✎
and to the common causes and solutions listed in this table.
Screen is blank, and monitor
power light is not lit.
Monitor power cable is not
connected to the monitor or
to the wall outlet.
Reconnect the power plug
on the back of the monitor
and on the wall outlet.
Monitor is not turned on. Press the Power button on
the front of the monitor.
Screen is blank. Monitor connector cable is
not properly connected to
the back of the computer.
Getting Started 5–11
Inspect the monitor video
connector for bent pins. If no
pins are bent, reconnect the
monitor connector cable on
the back of the computer.
Page 56

Help & Support
Display (Monitor) (Continued)
Symptom Problem Solution
Screen saver is enabled. Press any key or move the
mouse to make the screen
display visible again.
Computer is in Stand By
mode.
Hardware Installation Problems
Symptom Problem Solution
A new device is not
recognized as part of the
system.
Device is not seated or
connected properly.
Cable(s) of new external
device are loose or power
cables are unplugged.
Power swi tch of new
external device is not
turned on.
Press the Power button to
resume from Stand By
mode.
Ensure that the device is
properly and securely
connected and that pins in
the connector are not bent
down.
Ensure that all cables are
properly and securely
connected and that pins in
the cable or connector are
not bent down.
Turn off the computer, turn
on the external device, then
turn on the computer to
integrate the device with the
computer system.
5–12 Getting Started
Page 57

Hardware Installation Problems (Continued)
Symptom Problem Solution
Help & Support
Internet Access
Symptom Problem Solution
Cannot connect to the
Internet.
When the system advised
you of changes to the
configuration, you did not
accept them.
A plug and play board may
not automatically configure
when added if the default
configuration conflicts with
other devices.
Internet Service Provider
(ISP) account is not set up
properly.
Reboot the computer and
follow the instructions for
accepting the changes.
Deselect the automatic
settings in the Operating
System for the board and
choose a basic configuration
that doesn’t cause a
resource conflict. You can
also use Computer Setup to
reconfigure or disable
devices to resolve the
resource conflict.
Verify Internet settings or
contact your ISP for
assistance.
Modem is not set up
properly.
Web browser is not set up
properly.
Getting Started 5–13
Reconnect the modem,
verifying the following
connections: telephone line
to telephone (for external
phone sets) and telephone
line to wall jack (from
computer to wall).
Verify that the Web browser
is installed and set up to
work with your ISP.
Page 58

Help & Support
Internet Access (Continued)
Symptom Problem Solution
Cannot automatically launch
Internet programs.
Internet takes too long to
download Web sites.
You must log in to your ISP
before some programs will
start.
Modem is not set up
properly.
Log in to your ISP and
launch the desired program.
Verify that the correct
modem speed and COM
port are selected:
1. Click Start then click
Control Panel. The
Control Panel window is
displayed.
2. Click Printers and Other
Hardware.
3. Click Phone and
Modem Options.
4. Select the Modems tab
then click the Properties
button.
5. Under Device status,
verify the modem is
working properly.
6. Under Device usage,
verify the modem is
enabled.
7. If there are further
problems, click the
Troubleshoot button
and follow the on-screen
instructions.
5–14 Getting Started
Page 59

Power
Help & Support
Symptom Problem Solution
Computer will not turn on. Line voltage selection switch
is not in the proper position
for your region (115V/230V).
Computer is not connected
to an external power source.
Drive power, data, or power
supply cables may not be
properly connected.
Wall outlet is defective. Test the outlet by connecting
“Illegal Operation has
Occurred” error message is
displayed.
Software being used is not
Microsoft-certified for your
version of Windows.
Set the line voltage selection
switch to the correct setting
for your region, or call
Compaq Technical Support
for assistance. Refer to your
Limited Warranty for details.
Connect to an external
power source. Ensure that
cables connecting the
computer to the external
power source are plugged in
properly.
Reseat drive power, data,
and power supply cables.
a different electrical device
to the outlet.
Verify that the software is
certified by Microsoft for
your version of Windows
(see program packaging for
this information).
Configuration files are
corrupt.
If possible, save all data,
close all programs, and
restart your computer. If the
error message returns,
press the Help G button on
the keyboard to access the
Compaq Help & Support
Center and select Undo
harmful or unintended
changes to your system.
Getting Started 5–15
Page 60

Help & Support
Power (Continued)
Symptom Problem Solution
Computer will not start. System files may have been
damaged.
Wrong memory modules
were used in the upgrade, or
memory modules were
installed in the wrong
location.
Hard drive is damaged. Refer to your Limited
Computer appears locked
up and won’t turn off when
the power button is pressed.
Computer powered off
automatically.
Software control of the
power switch is not
functional.
The unit temperature was
exceeded. The fan may be
blocked.
The unit temperature was
exceeded because the
computer was functioning
with the cover or access
panel removed.
Refer to your Compaq
Restore Kit or your Limited
Warranty for details.
Reinstall the old memory to
return your computer to its
original state. Refer to
“Upgrading or Replacing
Computer Memory” in this
guide for instructions.
Warranty for details.
Press and hold the power
button for at least 4 seconds
until the computer turns off.
1. Unit is in an exceedingly
hot environment. Let it
cool down.
2. Ensure computer air
vents are not blocked
and internal fan is
running.
Replace cover or access
panel, and let the computer
cool down before attempting
to turn on power to the
computer.
Processor or system fan has
failed.
5–16 Getting Started
Contact a Compaq Support
Specialist.
Page 61

Keyboard and Scroll Mouse
Symptom Problem Solution
Help & Support
Keyboard commands and
typing are not recognized by
the computer.
Keyboard connector is not
properly connected.
1. On the Windows
desktop, click the Start
button.
2. Click Turn Of f
Computer. The Turn Off
Computer dialog box is
displayed.
3. Select Tu rn Of f.
4. After the shutdown is
complete, reconnect the
keyboard to the back of
your computer and
restart your computer.
Program in use has stopped
responding to commands.
Shut down your computer
using the mouse. If your
mouse cannot activate a
shutdown, refer to the
problem below: “Mouse
connector is not properly
plugged into the back of the
computer.”
Keyboard is damaged. Refer to your Limited
Warranty for details.
Cursor will not move using
the arrow keys on the
keypad.
The Num Lock key may
be on.
Press the Num Lock key.
The Num Lock light should
not be on if you want to use
the arrow keys.
Getting Started 5–17
Page 62

Help & Support
Keyboard and Scroll Mouse (Continued)
Symptom Problem Solution
Mouse does not respond to
movement or is too slow.
Mouse connector is not
properly plugged into the
back of the computer.
Program in use has stopped
responding to commands.
Shut down your computer
using the keyboard:
1. Press the Ctrl and Esc
keys at the same time (or
press the Windows logo
key) to display the Start
menu.
2. Use the up or down
arrow key to select Tu rn
Off Computer, and then
press the Enter key.
3. Use the up or down
arrow key to select the
Turn Of f option, and
then press the Enter key.
4. After the shutdown is
complete, plug the
mouse connector into the
back of your computer
(or the keyboard) and
restart your computer.
Shut down your computer
using the keyboard. Refer to
the preceding problem
“Mouse connector is not
properly plugged into the
back of the computer” for
details about shutting down
using the keyboard.
5–18 Getting Started
Page 63

Keyboard and Scroll Mouse (Continued)
Symptom Problem Solution
Help & Support
Mouse will only move
vertically or horizontally.
Wireless Wheel Mouse
Symptom Problem Solution
Mouse does not work after
installation or is not
detected.
Mouse roller ball is dirty. Remove roller ball cover
from bottom of mouse and
clean with mouse cleaning
kit available from most
computer stores.
Mouse needs repair. See your Limited Warranty
booklet for details.
Receiver is not connected
properly.
Batteries are not installed
properly.
Try unplugging then
reconnecting the receiver
cable to your computer. The
receiver cable goes into the
computer’s USB port or, with
an adapter, into the PS/2
mouse port.
Reinstall the batteries
according to the diagram
inside the battery
compartment.
Communication between
receiver and mouse not
established.
Getting Started 5–19
Press the Connect button
on the receiver, then press
the Connect button under
the mouse.
Page 64

Help & Support
Wireless Wheel Mouse (Continued)
Symptom Problem Solution
Poor reception. Receiver too close to other
electrical devices.
Mouse stops functioning. Batteries are low. Replace the batteries.
Place the receiver at least 8
inches or 20 centimeters
away from other electrical
devices, such as the
computer, the computer
monitor, or external storage
devices.
If you are working on a
metallic surface, try turning
the receiver on its side.
USB Optical Mouse
Symptom Problem Solution
Mouse does not work after
installation or is not
detected.
Mouse is not connected
properly.
Try unplugging then
reconnecting the mouse
cable to your computer. The
mouse cable goes into the
computer’s USB port.
USB port is not working. Plug the mouse cable into a
different USB port on your
computer.
Mouse does not track cursor
well.
5–20 Getting Started
The optical sensor uses the
pattern of the surface to
track the position of the
cursor. Reflective surfaces,
grooved surfaced, glass, or
other see-through surfaces
will inhibit the ability of the
sensor to track the cursor.
Place a mousepad or white
sheet of paper underneath
the mouse while in use.
Page 65

Memory
Help & Support
Symptom Problem Solution
Insufficient memory
message is displayed.
Miscellaneous
Symptom Problem Solution
Computer date and time
display is incorrect.
All memory in the computer
is being used by open
programs, and memory is
needed for a desired task.
RTC (real-time clock)
battery may need to be
replaced. Battery life is
approximately 3–5 years.
1. Press the Help G button.
2. Select Adjust your
startup resources to
improve performance
and/or Improve your
hard drive
performance.
3. Follow the on-screen
instructions.
First, reset the date and time
in your operating system. If
the problem persists,
replace the RTC battery.
Contact a Compaq Support
Specialist.
Printer problems. Printer will not print. If you encounter printer
problems, refer to the
documentation that came
with your printer.
Getting Started 5–21
Page 66

Help & Support
5–22 Getting Started
Page 67

Index
1394 port 2–3, 2–5
A
access panels
4000 Series 4–2
6000 Series 4–4
8000 Series 4–5
accessibility 3–5
accessories 1–2
application key 2–17
arrow keys 2–17
audio
line-in connector 2–7
line-out connector 2–7
troubleshooting 5–5
autoscrolling 2–14
, 2–9, 2–11
, 2–9, 2–11
C
CD
inserting a disc 3–2
removing a disc 3–2
CD-ROM drive 3–2
See also optical drives
CD-RW drive 3–2
See also optical drives
Community button 2–19
Compaq Advisor 1–4
Compaq Restore Kit 5–4
Compaq Support Specialist 5–3
Compaq Update 1–4
Compaq Web site 1–1
computer interface changes 3–5
computer upgrades 1–2
connecting components 2–6
, 5–4
D
diskette
inserting 3–1
removing 3–1
diskette drive
activity light 2–2
eject button 2–2
locating 2–2
troubleshooting 5–8
Documentation Library CD 1–3
drivers and downloads 1–4
DVD
inserting a disc 3–2
removing a disc 3–2
DVD-R/RW drive 3–2
See also optical drives
DVD-ROM drive 3–2
See also optical drives
, 2–3, 2–5
, 2–4, 2–5
, 2–3, 2–5
, 5–1, 5–3
E
Easy Access Buttons
customizing 2–19
locating 2–16
using 2–17
editing keys 2–16
E-mail button 2–18
End User Replaceable Parts Program 5–2
Entertainment button 2–19
Ethernet 2–7
, 2–9, 2–11
F
floppy disk
See diskette
floppy drive
See diskette drive
Getting Started Index–1
Page 68

Index
front panel components
4000 Series 2–1
6000 Series 2–3
8000 Series 2–4
function keys 2–16
H
hard drive
activity light 2–2
troubleshooting 5–11
hardware installation
instructions 1–2
problems 5–12
Hardware Reference Guide 1–3
Help
accessing 5–3
keyboard button 2–18
Web site 5–1
Help & Support Center 2–18
, 2–4, 2–5
, 5–1
, 5–1
I
Instant Internet button 2–18
internal components
4000 Series 4–1
6000 Series 4–3
8000 Series 4–4
Internet
access problems 5–13
Communications Guide 1–3
downloading software 3–4
keyboard buttons 2–17
online service and support 5–3
K
keyboard
components 2–16
connector 2–7
Easy Access Buttons 2–17
keys 2–16
, 2–8, 2–11
properties 2–19
Smart Card 2–19
status lights 2–16
taskbar icon 2–19
troubleshooting 5–17
, 2–20
L
Learning More About Your Computer 1–3
M
memory
replacing 4–6
troubleshooting 5–21
upgrading 4–6
Web site 4–6
microphone connector 2–7
modem
port location 2–7
troubleshooting 5–2
monitor
connector 2–7
troubleshooting 5–11
mouse
clicking 2–12
components 2–12
customizing 2–12
double-clicking 2–12
left button 2–12
left-handed users 2–12
optical 2–15
right button 2–12
scroll wheel 2–12
scrolling 2–14
troubleshooting 5–17
using 2–14
using wireless 2–14
wireless installation 2–13
My Compaq PC button 2–19
, 2–9, 2–11
, 2–9, 2–11
, 2–9, 2–11
, 5–19, 5–20
Index–2 Getting Started
Page 69

Index
N
Network Interface Card (NIC) connector
2–7
, 2–9, 2–11
numeric keys 2–16
O
online
community of users 5–3
service and support 5–3
shopping 2–19
optical drives
activity light 2–2
eject button 2–2
locating 2–2
troubleshooting 5–6
optical mouse
troubleshooting 5–20
using 2–15
, 2–20
, 2–3, 2–5
, 2–3, 2–5
, 2–3, 2–5
P
parallel port 2–7, 2–9, 2–11
power
button 2–2
connector 2–7
indicator light 2–2
troubleshooting 5–15
Presario
documentation 1–1
Web site 2–19
preventative care and maintenance 5–1
PS/2
keyboard connector 2–7
mouse connector 2–7
, 2–4, 2–5
, 2–8, 2–11
, 2–3, 2–5
, 1–3
, 2–8, 2–11
, 2–9, 2–11
R
rear panel components
4000 Series 2–6
6000 Series 2–8
8000 Series 2–10
replacing parts 1–2
Retail/Affinity Central button 2–19
S
Safety & Comfort Guide 1–3
Safety & Regulatory Information Guide 1–3
scrolling 2–14
Search button 2–18
serial port 2–7
shut down procedure 4–1
Smart Card
activity light location 2–20
applying for card 2–21
button location 2–19
keyboard 2–20
keyboard components 2–19
terminal location 2–20
using 2–21
SoftPaqs 1–4
software
installing from CD, DVD, or diskette 3–3
installing from the Internet 3–4
solving minor problems 5–4
speaker connector 2–7
special offer notification 1–4
static electricity 4–1
, 2–9, 2–11
, 2–20
, 2–9, 2–11
T
telephone extension 2–7, 2–9, 2–11
troubleshooting
audio 5–5
diskette drive 5–8
hard drive 5–11
hardware installation 5–12
Internet access 5–13
keyboard 5–17
memory 5–21
monitor 5–11
mouse 5–17
optical drives 5–6
power 5–15
, 5–19, 5–20
Getting Started Index–3
Page 70

Index
Troubleshooting Guide 1–3
U
Universal Serial Bus (USB)
external hub 2–20
locating ports 2–2
2–11
optical mouse 2–15
Smart Card Keyboard 2–20
, 2–4, 2–5, 2–7, 2–9,
V
VGA connector 2–7, 2–9, 2–11
voltage select switch 2–7
, 2–8, 2–11
W
warranty information 1–2, 5–3
Web sites
community 5–3
, 5–4
Compaq Support Specialist 5–3
drivers 5–3
Logitech 2–13
memory identification 4–6
My Presario 2–19
products and services 1–1
software fixes 5–3
technical support 1–1
upgrades and accessories 1–2
warranty information 5–3
Windows logo keys 2–17
wireless wheel mouse
installing 2–13
troubleshooting 5–19
using 2–14
, 1–4, 5–1, 5–4
Index–4 Getting Started
 Loading...