

Page 1

White Paper
March 2002
14UH-0701A-WWEN
Compaq Confidential - Need to Know Required
Compaq ProLiant DL380
Prepared by Industry Standard
Server Group
Compaq Computer Corporation
Contents
Executive Summary.....................1
Symbols in Text...........................3
Symbols on Equipment...............3
Server Warnings ..........................4
Rack Warnings.............................4
Where to Find Information..........5
Introduction..................................5
Power, Thermal, and Weight
Information.................................10
Power Distribution Units and
Power Cords ..............................11
Console Management
Systems......................................16
Planning Rack
Configurations ...........................19
Installation Procedures.............26
Appendix A −−−− Related
Documents .................................34
Appendix B −−−− Parts
Reference ...................................35
Appendix C – Power and
Thermal Budgeting....................38
Appendix D −−−− Connecting
Multiple Racks ...........................43
Generation 2 Server
High-Density Deployment in
Compaq Racks
Abstract: This white paper is intended for use as a planning guide
to expedite concentrated deployments of several
Compaq ProLiant
Use this white paper in conjunction with documents for the
ProLiant DL380 Generation 2 server and Compaq rack deployment
products. This paper is intended for Field Systems Engineers (FSEs)
and customers (IT managers, system managers, account managers,
and installers).
Executive Summary
Many business enterprises and service providers use network
infrastructure and web applications that work best on dedicated
servers. This creates the need to fit a large number of smaller servers
into existing server rooms and data centers. Compaq meets this need
with the density-optimized line of ProLiant servers such as the
ProLiant DL380 Generation 2 server. At a height of 2U each, up to
21 ProLiant DL380 Generation 2 servers can fit in a single Compaq
42U rack. While the ProLiant DL380 Generation 2 server has clear
space saving benefits, its compressed size presents new challenges
for rapid server deployment, as well as cable management and
environmental considerations.
DL380 Generation 2 servers in a Compaq rack.
Compaq engineers have developed innovations in rapid high-volume
deployment and improved cable management for large installations
of ProLiant DL380 Generation 2 servers. This white paper
introduces planning, power and thermal considerations, server and
rack requirements, and installation configurations. It also outlines the
products associated with high-volume deployment in Compaq rack
configurations.
IMPORTANT: This document discusses only the ProLiant DL380
Generation 2 server, the Compaq 7000- and 9000-series racks, and
related Compaq rack options. This document does not discuss other
Compaq servers or products or racks not manufactured by Compaq.
Page 2

Compaq ProLiant DL380 Generation 2 Server High-Density Deployment in Compaq Racks 2
Compaq Confidential - Need to Know Required
Notice
Document Number 14UH-0701A-WWEN © 2001 Compaq Computer Corporation
Compaq, the Compaq logo, and ProLiant Registered in U.S. Patent and Trademark Office. All other
product names mentioned herein may be trademarks of their respective companies.
Compaq shall not be liable for technical or editorial errors or omissions contained herein. The information
in this document is provided “as is” without warranty of any kind and is subject to change without notice.
The warranties for Compaq products are set forth in the express limited warranty statements accompanying
such products. Nothing herein should be construed as constituting an additional warranty.
14UH-0701A-WWEN
Page 3

Compaq ProLiant DL380 Generation 2 Server High-Density Deployment in Compaq Racks 3
Compaq Confidential - Need to Know Required
Symbols in Text
The following symbols may be found in the text of this guide.
WARNING: Text set off in this manner indicates that failure to follow directions in the
warning could result in bodily harm or loss of life.
CAUTION: Text set off in this manner indicates that failure to follow directions could
result in damage to equipment or loss of information.
IMPORTANT: Text set off in this manner presents clarifying information or specific
instructions.
Note: Text set off in this manner presents commentary, sidelights, or interesting points of
information.
Symbols on Equipment
The following symbols are located on equipment in areas where hazardous conditions may exist.
This symbol in conjunction with any of the following symbols indicates the
presence of a potential hazard. The potential for injury exists if warnings are not
observed. Consult the documentation included with the server for specific details.
This symbol indicates the presence of hazardous energy circuits or electrical
shock hazards. Refer all service to qualified personnel.
WARNING: To reduce the risk of injury from electrical shock hazards, do not
open this enclosure. Refer all maintenance, upgrades, and service to qualified
personnel.
This symbol indicates the presence of electrical shock hazards. The area contains
no user or field serviceable parts. Do not open for any reason.
WARNING: To reduce the risk of injury from electrical shock hazards, do not
open this enclosure.
This symbol on a RJ-45 receptacle indicates a Network Interface Connection.
WARNING: To reduce the risk of electrical shock, fire, or damage to the
equipment, do not plug telephone or telecommunications connectors into this
receptacle.
14UH-0701A-WWEN
Page 4
Compaq ProLiant DL380 Generation 2 Server High-Density Deployment in Compaq Racks 4
Compaq Confidential - Need to Know Required
This symbol indicates the presence of a hot surface or hot component. If this
surface is contacted, the potential for injury exists.
WARNING: To reduce the risk of injury from a hot component, allow the
surface to cool before touching.
Server Warnings
Adhere to the following guidelines when servicing or installing a Compaq server:
WARNING: To reduce the risk of electrical shock or damage to the equipment:
• Unplug the power cord from the system.
• Do not disable the power-cord grounding plug. The grounding plug is an important
safety feature.
• Plug the power cord into a grounded (earthed) electrical outlet that is easily accessible
at all times.
CAUTION: To properly ventilate the system, provide at least 7.6 cm (3 inches) of
clearance at the front and back of the computer.
CAUTION: The system is designed to be electrically grounded. To ensure proper
operation, plug the AC power cord only into a properly grounded (earthed) AC outlet.
Rack Warnings
WARNING: To reduce the risk of personal injury or damage to the equipment:
• Do not attempt to move or relocate an equipment rack populated with servers. A fully
populated rack can weigh as much as 771 kg (1,700 lb). The rack may become
unstable and cause serious personal injury or equipment damage.
• Before installing the servers, extend the leveling jacks to the floor and rest the full
weight of the rack on the leveling jacks. Either install the stabilizer kit or couple
multiple racks together for stability.
• Always load the heaviest item first, and load the rack from the bottom to the top.
Loading in this manner makes the rack “bottom-heavy” and helps prevent the rack
from becoming unstable.
• Extend only one ProLiant DL380 Generation 2 server at a time. A rack may become
unstable if more than one ProLiant DL380 Generation 2 server is fully extended for
any reason.
CAUTION: Do not overload the AC supply branch circuit that provides power to the
rack.
14UH-0701A-WWEN
Page 5
Compaq ProLiant DL380 Generation 2 Server High-Density Deployment in Compaq Racks 5
Compaq Confidential - Need to Know Required
Note: Slide rails, power distribution units (PDUs), power cords, and cables can be preinstalled
into the rack in a build room or on the data center floor before moving the rack to its final
location.
Where to Find Information
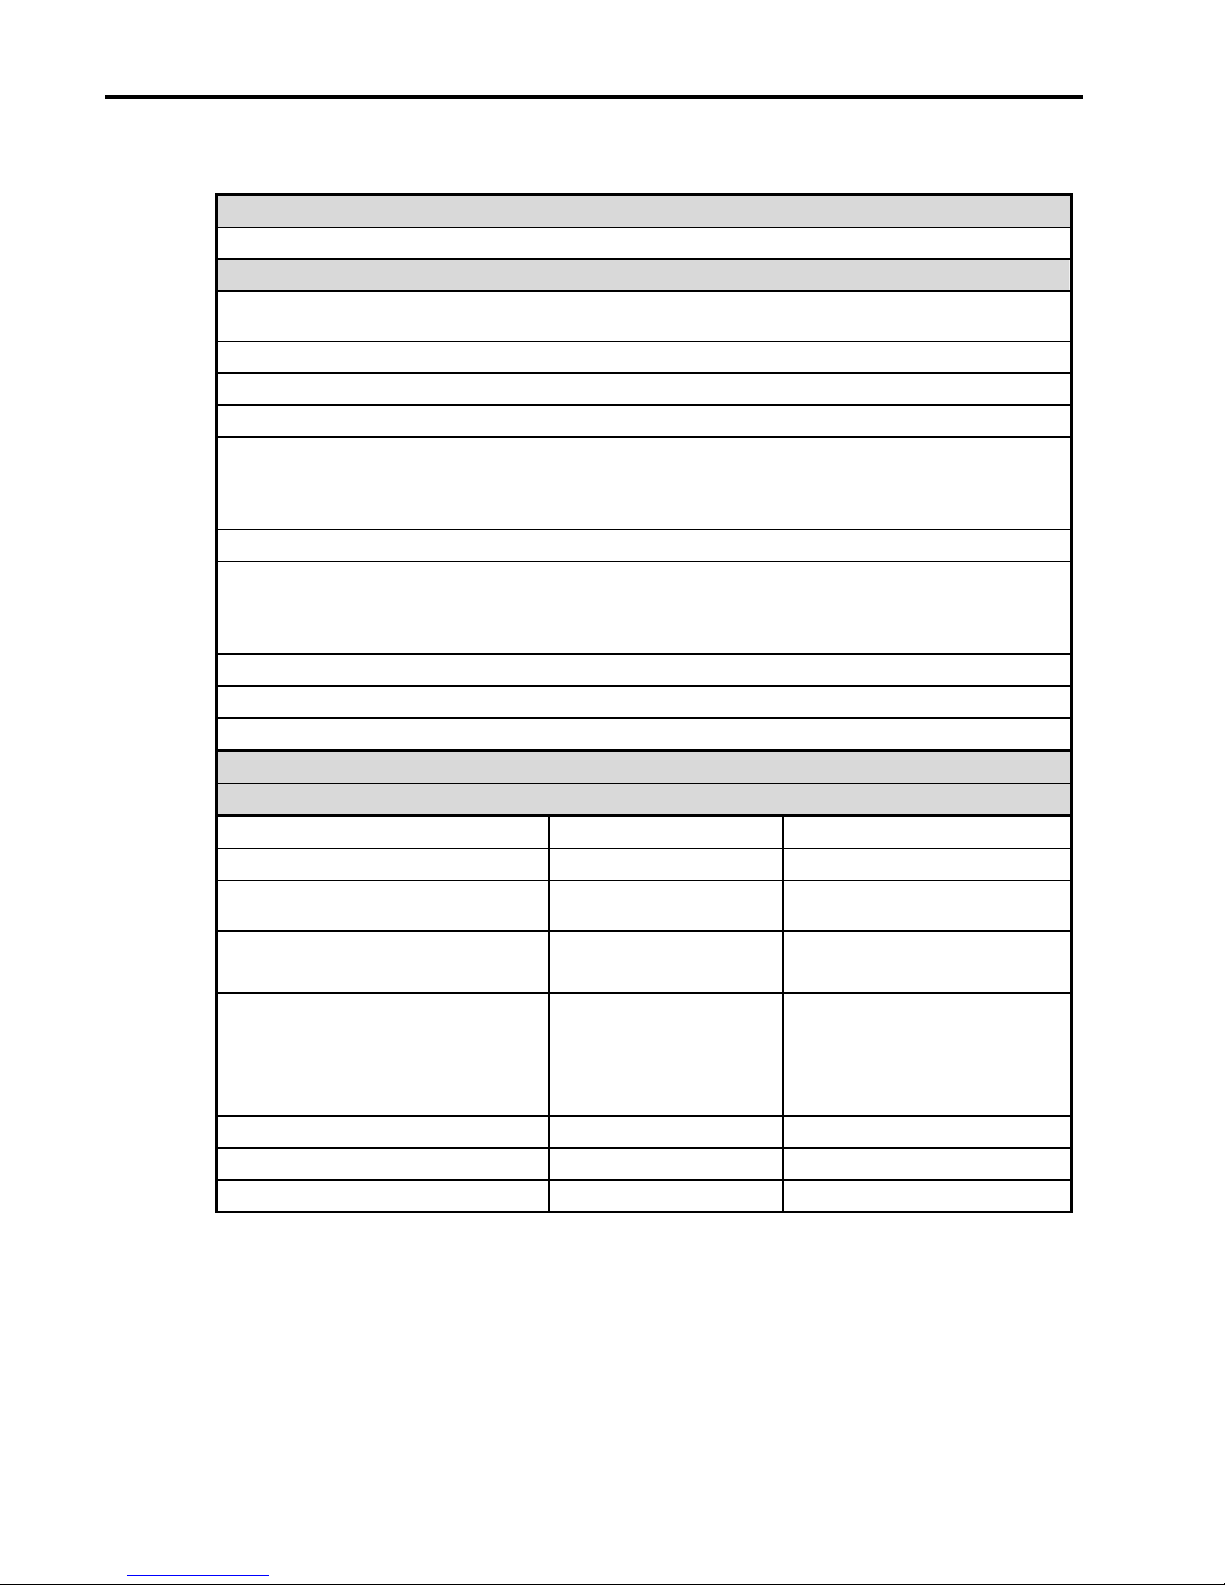
Table 1. Where to Find Information
Section Description Where to Find
Introduction Explains the purpose and scope of this white paper and
Power, Thermal, and Weight
Information
Power Distribution Units and
Power Cords
Console Management Systems Discusses server management options Page 16
Planning Rack Configurations Discusses rack configuration issues Page 19
Installation Procedures Describes installation procedures Page 26
Related Documents, Appendix A Lists documents and websites that provide additional
Parts Reference, Appendix B Lists part numbers for all the components referred to in
Power and Thermal Budgeting,
Appendix C
Connecting Multiple Racks,
Appendix D
provides a glossary of terms
Lists important information about the
ProLiant DL380 Generation 2 server, Compaq racks,
PDUs, and related options to help choose a rack
configuration
Discusses specific PDU and power cord choices Page 11
information about Compaq racks, rack options, and rack
deployment of ProLiant DL380 Generation 2 servers
this white paper
Explains calculating power deratings Page 38
Discusses connecting multiple racks and lists rack
deployment options for 7000- and 9000-series racks.
Page 5
Page 10
Page 34
Page 35
Page 43
Table 2. Steps for High-Volume Server Deployment
Step Description
Step 1 Choose PDUs from Table 6.
Step 2 Determine the PDUs and related options from Table 12.
Step 3 Determine rack configuration. See examples on pages 22-24.
Step 4 Determine rail, console, and cable configurations. See the "Rack Management
Step 5 Install the ProLiant DL380 Generation 2 server. See the "Installation Procedures"
Systems" section on page 25.
section on page 26.
Introduction
Compaq designed the dense ProLiant DL380 Generation 2 server to meet the challenges
associated with deploying a high concentration of servers in a single rack. Compaq suggests that
customers evaluate their environments, power distribution, console, cable, and thermal
management choices well in advance to ensure the efficient deployment of multiple
14UH-0701A-WWEN
Page 6

Compaq ProLiant DL380 Generation 2 Server High-Density Deployment in Compaq Racks 6
Compaq Confidential - Need to Know Required
ProLiant DL380 Generation 2 servers in a rack. Use this document, in conjunction with the
documents listed in Appendix A,
as a guideline for planning rack configurations for high-volume
deployments of ProLiant DL380 Generation 2 servers.
The “Power Distribution Units” section outlines Compaq PDU choices best suited for building
rack configurations. This section provides technical specifications for high- and low-voltage
PDUs. It also describes how to allocate the correct number and type of PDUs for specific rack
deployments.
The “Planning Rack Configurations” section provides weight information for individual rack
components to help address floor support requirements. It also describes cable systems.
The “Console Management Systems” section provides information on server management
options.
All discussions of power requirements for ProLiant DL380 Generation 2 servers are based on the
input power of the server. This document uses the maximum rated power supply input of 575 W
for calculation purposes. However, derating the input power may be effective to:
• Minimize the number of PDUs required for each rack.
• Match the rack current requirements with the existing circuit breaker capacity.
• Match the rack cooling requirements with the existing facility cooling capability.
For more information about input power derating, see Appendix C.
IMPORTANT: In this document, derating the input power budget means using less than the
maximum rated input power values for the power supply. To derate the input power, see
Appendix C. Compaq strongly recommends that the derated power budget satisfies all the
installation requirements, including future upgrade plans.
Refer to the Compaq ProLiant DL380 Generation 2 Server QuickSpecs for detailed specifications
and options for the ProLiant DL380 Generation 2 server.
14UH-0701A-WWEN
Page 7
Compaq ProLiant DL380 Generation 2 Server High-Density Deployment in Compaq Racks 7
Compaq Confidential - Need to Know Required
References
Sources referenced in this paper are listed in Table 3.
Table 3. Sources of Information
Topic Where to Find
Information focal point for the Compaq
ProLiant DL380 Generation 2 server
Specifications, options, and a list of other Compaq
products and options compatible with the
ProLiant DL380 Generation 2 server
Installation and service guidelines for the
ProLiant DL380 Generation 2 server
Installation of vertical-mount PDU brackets and
Y-cables
Installation guidelines for the
ProLiant DL360 Generation 2 server in third-party
racks. (Contains information that applies to the
ProLiant DL380 G2 server.)
Installation guidelines for the
ProLiant DL360 Generation 2 server in
telecommunications (Telco) racks. (Contains
information that applies to the ProLiant DL380 G2
server.)
www.compaq.com/proliant
Compaq ProLiant DL380 Generation 2 QuickSpecs
Compaq ProLiant DL380 Generation 2 Setup and Installation
Guide, P/N 203844-001
Compaq ProLiant DL380 Generation 2 Maintenance and
Service Guide, P/N 203840-002
Vertical-Mount PDU Brackets kit, P/N 191265-B21
Vertical-Mount PDU Brackets with High-Voltage Cables kit, P/N
166097-B21
Compaq Ultra-Dense Server Deployment in Third-Party Cabinet
Racks, Document Number 12CU-0400A-WWEN
Third-Party Rack Cabinet kit, P/N 228894-B21
Compaq Ultra-Dense Server Deployment in
Telecommunications (Telco) Racks, Document number 12CZ0400A-WWEN
Telco Rack kit, P/N 228892-B21
14UH-0701A-WWEN
Page 8

Compaq ProLiant DL380 Generation 2 Server High-Density Deployment in Compaq Racks 8
Compaq Confidential - Need to Know Required
Table 4. Notations for Optional Components
Notation Description
1x, 2x, 4x Number of components, for example, 1 x 128 MB means one 128-MB DIMM
1.13 GHz Intel Pentium III 1.13-GHz processor
1.266 GHz Intel Pentium III 1.266-GHz processor (when available)
128 MB 128-MB DIMM
256 MB 256-MB DIMM
512 MB 512-MB DIMM
HDD Hard disk drive
36-GB HDD
72-GB HDD (when available)
Hot-plug fan
Hot-plug power supply
Tape drive
SA5300 Smart Array 5300 Controller option (64-bit PCI card)
Remote Insight Lights-Out
Edition
Remote Insight Lights-Out Edition option (32-bit PCI card)
Glossary
1U – A rack unit (1U) is 4.45 cm or 1.75 inches in vertical dimension. The height of a device,
1U Integrated Keyboard/Mouse/TFT −−−− The TFT5600 RKM (rack-mount keyboard and
Flat Panel Display (FPD) – A Compaq TFT5010R (15-inch) flat panel monitor provides a large
High-voltage – AC line voltage of 200 V to 240 V. With higher voltage levels, a server can use a
In-Rack Keyboard – The 1U Rack Keyboard Drawer and the Internal Keyboard with Trackball
Keyboard/Video/Mouse (KVM) – KVM refers to a keyboard cable, a video cable, a mouse
(also known as form factor), can be expressed in rack units (Us). The ProLiant DL380
Generation 2 server is a 2U server.
monitor) is a 1U integrated keyboard and monitor. Its full 15-inch TFT active matrix display
provides flicker-free, quality display at viewing angles up to 120 degrees horizontally and
105 degrees vertically.
image size and exceptional screen performance in a space-saving 2U size that enables the
monitor to be neatly tucked away when not in use.
lower current and still meet its power requirements. Compaq recommends using a highvoltage source to support high-volume deployments of ProLiant DL380 Generation 2 servers
in a rack.
are designed to work together to save room in space-constrained, rack-mount environments.
The 1U Keyboard Drawer requires only half the Compaq rack depth and provides enough
space behind it to mount a Compaq Server Console Switch.
cable, or a switch. Some Compaq parts lists may refer to KVM switches as Server Console
Switches.
Local Console –A local console system interacts with a server using a set of KVM devices and
can be in-rack or off-rack. In this paper, in-rack local console refers to a flat panel display
14UH-0701A-WWEN
Page 9

Compaq ProLiant DL380 Generation 2 Server High-Density Deployment in Compaq Racks 9
Compaq Confidential - Need to Know Required
and a keyboard/trackball in the same rack as the servers. Off-rack local console refers to any
combination of a display, a keyboard, and a pointing device located outside of the rack. A
local console system does not use a network connection to interact with the server.
Low-Voltage – AC line voltage of 100 V to 120 V.
N.A. – North America, including U.S., Canada, and Mexico.
Network Interface Controllers (NICs) – Controllers that are embedded on the system board of
the ProLiant DL380 Generation 2 server.
Power Distribution Unit (PDU) – A PDU is a high-voltage or low-voltage device that is
equipped with circuit breakers that help prevent electrical surges and external equipment
malfunction by providing over current and surge protection for connected devices. See the
“Power Distribution Units” section of this paper.
Remote Console – A remote console is a server console system that uses a network connection to
interact with the server. This system enables any computer with appropriate software and
network access to control a server from anywhere across the globe. Compaq recommends
using the remote-console system for managing a large number of servers because it
eliminates the congestion of KVM cabling.
Remote Insight Lights-Out Edition – The Compaq Remote Insight Lights-Out Edition is
designed to provide remote access and control of Compaq ProLiant server products from
anywhere on the network with a standard web browser. Consequently, customers can deploy
a ProLiant DL380 Generation 2 server in a true “headless” fashion with a minimum of only
three cables per server: one power cord for the server, one network cable for the LAN
connection, and one network cable for the Remote Insight Lights-Out Edition management
LAN connection. Using the Remote Insight Lights-Out Edition, customers can deploy 21
ProLiant DL380 Generation 2 servers in a 42U Compaq rack with significantly fewer cables
than in a local console.
Server Console Switch – A device that enables multiple servers in a rack to be accessed and
managed by a single keyboard, mouse, and monitor. These switches are also known as KVM
switches.
Sliding Rail – A toolless rack management system designed for Compaq 7000- and 9000-series
racks that supports in-rack serviceability for ProLiant DL380 Generation 2 servers.
UID LED and Switch – The blue Unit Identification LED identifies the ProLiant DL380
Generation 2 server requiring service. A UID switch toggles both the front and rear UID
LEDs simultaneously.
Wake on LAN (WOL) – An option that enables a remote restart of the server.
For detailed information about the products in this glossary visit the Compaq website:
www.compaq.com
14UH-0701A-WWEN
Page 10

Compaq ProLiant DL380 Generation 2 Server High-Density Deployment in Compaq Racks 10
Compaq Confidential - Need to Know Required
Power, Thermal, and Weight Information
Power, thermal, and weight considerations are the most important parameters in high-volume
server deployment. Table 5 provides server parameters necessary to calculate the power needs,
thermal requirements, and total weight of a full rack of ProLiant DL380 Generation 2 servers.
Table 5. ProLiant DL380 Generation 2 Server Parameters
Dimensions H x W x D
8.64 x 65.45 x 44.45 cm (3.38 x 25.75 x 17.50 inches)
Server Weights
Minimum configuration: 1 x processor, 2 x 128-MB DIMM, 0 x CD-ROM drive, 1 x diskette
assembly, 0 x HDD, 5 x fans, 1 x power supply
Average configuration: 1 x processor, 4 x 256-MB DIMM, 4 x HDD, 1 x CD-ROM drive,
1 x diskette assembly, 5 x fans, 1 x power supply, 1 x Remote Insight Lights-Out Edition
Maximum configuration: 2 x processor, 6x DIMMs, 6 x HDDs, 2 x SA5300, 1 x CD-ROM drive,
1 x diskette assembly, 8 x fans, 2x power supplies, 1 x Remote Insight Lights-Out Edition
Component Weights
CD/diskette drive assembly 0.34 kg (0.75 lb)
DIMM 0.04 kg (00.1 lb)
HDD 0.86 kg (1.9 lb)
Remote Insight Lights-Out Edition 0.86 kg (1.2 lb)
SA5300 0.45 kg (1.0 lb)
Rack Rails and Hardware Weights
Cable arm 0.81 kg (1.8 lb)
Slide (2) 2.07 kg (4.6 lb)
Rail (2) 1.8 kg (4.0 lb)
Total Weight: 4.7 kg (10.4 lb)
Power Ratings
Maximum power supply rated input AC power
16.7 kg (37 lb)
21.2 kg (47 lb)
27 kg (60 lb)
115 V 575 W
240 V 545 W
Maximum system measured input AC power (per power calculator)
115 V 457 W
240 V 400 W
Maximum power supply rated input current
115 V 6.4 A
240 V 3.2 A
Maximum system measured input current (per power calculator)
115 V 3.8 A
240 V 1.7 A
continued
14UH-0701A-WWEN
Page 11
Compaq ProLiant DL380 Generation 2 Server High-Density Deployment in Compaq Racks 11
Compaq Confidential - Need to Know Required
Table 5. ProLiant DL380 Generation 2 Server Parameters (continued)
System Thermal Dissipation (per hour)
115 V 1,435 BTUs
240 V 1,363 BTUs
Relative Humidity (non-condensing)
Operating 10 to 90%
Non-operating 5 to 95%
The SA5300 option and the Remote Insight Lights-Out Edition option are PCI cards available
from Compaq. Any third-party PCI cards used in the ProLiant DL380 Generation 2 server must
comply with the industry-standard PCI specifications for dimension, weight, power, and thermal
requirements.
Power Distribution Units and Power Cords
Power Distribution Units
Compaq offers several PDUs designed for use in high-volume rack deployments. Compaq PDUs
are equipped with circuit breakers that help prevent electrical surges and external equipment
malfunction by providing over current and surge protection for connected devices. Compaq offers
a variety of PDUs that support both high-voltage and low-voltage applications. Table 6 lists PDU
options.
Table 6. Compaq PDUs
Part Number
207590-B21
207590-D71
207590-B31
207590-D72
207590-B23
continued
1
Availability
Worldwide High 16 A 5 IEC 320 C-20
North America
& Japan
International High 32 A 10 IEC 309-32A
North America
& Japan
North America High 40 A 12 Field wiring 12 x IEC 320-C13 2 x 10 A;
Input
Voltage
Current
Rating
Maximum
Servers per
PDU
Input
Connectors
and Cord
Low 24 A 3 NEMA L5-30P
High 24 A 7 NEMA L6-30P
12-ft cord
12-ft cord
2 × 12-ft cord
Output
Connectors
12 × IEC 320-C13 2 × 10 A 4.27 × 20.32 × 43.18 cm
12 × NEMA 5-15 4 × 15 A 4.27 × 20.32 × 43.18 cm
12 × IEC 320-C13 4 × 10 A 4.27 × 20.32 × 43.18 cm
12 × IEC 320-C13 4 × 10 A 4.27 × 20.32 × 43.18 cm
3 x 15 A
Output
Breakers
Dimensions
1.62 × 8.0 × 17.00 in
1.62 × 8.0 × 17.00 in
1.62 × 8.0 × 17.00 in
1.62 × 8.0 × 17.00 in
4.27 × 20.32 × 43.18 cm
1.62 × 8.0 × 17.00 in
Weight
3.15 kg
7 lb
4.5 kg
11 lb
4.5 kg
11 lb
4.5 kg
11 lb
6.4 kg
14 lb
14UH-0701A-WWEN
Page 12

Compaq ProLiant DL380 Generation 2 Server High-Density Deployment in Compaq Racks 12
Compaq Confidential - Need to Know Required
Table 6. Compaq PDUs (continued)
1
Part Number
191186-001
191186-B31
197616-B22
295363-001
295363-002
295363-003
295363-291
295363-B21
295363-B32
Note 1: These numbers are determined using a single power source (non-redundant).
Note 2: This PDU supports power from two different sources. If one power source fails, the PDU uses the alternate source.
Note 3: This PDU must be hard-wired to the power source by a certified electrician.
Note 4: This PDU requires Compaq Vertical Mount Bracket kit (PN# 191265-B21 or 166097-B21 with high-voltage Y-cables) to vertically mount
in rack side panel.
Note 5: This PDU is no longer being shipped by Compaq.
Availability
2
North America High 24 A 7 NEMA L6-30P
2
International High 30 A 9 IEC 309-32A
3
Worldwide High 40 A 12 Field wiring
4,5
North America Low 24 A 3 NEMA L5-30P
4,5
North America High 16 A 5 NEMA L6-20P
4,5
North America High 24 A 3 NEMA L6-30P
4,5
Japan Low 24 A 3 NEMA L6-30P
4,5
Worldwide High 16 A 5 IEC 320 C-20
4,5
International High 16 A 5 NEMA 309-16A
Input
Voltage
Current
Rating
Maximum
Servers per
PDU
Input
Connectors
2 × 12-ft cord
12-ft cord
12-ft cord
12-ft cord
12-ft cord
12-ft cord
and Cord
Output
Connectors
12 × IEC 320-C13 4 × 10 A 4.37 × 30.48 × 43.18 cm
12 × IEC 320-C13 4 × 10 A 4.37 × 30.48 × 43.18 cm
12 × IEC 320-C13
1 × DB9 Serial
1 × RJ-45
12 × NEMA 515R
12 × IEC 320-C13 2 × 10 A 5.03 × 25.15 × 48.97 cm
12 × IEC 320-C13 4 × 10 A 5.03 × 25.15 × 48.97 cm
12 × NEMA 515R
12 × IEC 320-C13 2 × 10 A 5.03 × 25.15 × 48.97 cm
12 × IEC 320-C13 2 × 10 A 5.03 × 25.15 × 48.97 cm
Output
Breakers
Dimensions
1.72 × 12.0 × 17.00 in
1.72 × 12.0 × 17.00 in
4 × 10 A 4.32 × 43.18 × 50.04 cm
2 × 15 A 5.03 × 25.15 × 48.97 cm
2 × 15 A 5.03 × 25.15 × 48.97 cm
1.70 × 17.00 × 19.70 in
1.98 × 9.9 × 19.28 in
1.98 × 9.9 × 19.28 in
1.98 × 9.9 × 19.28 in
1.98 × 9.9 × 19.28 in
1.98 × 9.9 × 19.28 in
1.98 × 9.9 × 19.28 in
Weight
9.1 kg
20 lb
9.1 kg
20 lb
6.4 kg
14 lb
5.4 kg
12 lb
3.6 kg
8 lb
5.4 kg
12 lb
5.4 kg
12 lb
5.4 kg
12 lb
5.4 kg
12 lb
In Compaq 7000- and 9000-series racks, the 295363-xxx PDU series must be installed vertically
in the rack side panels to prevent interference with the server rack rails. Compaq Vertical-Mount
PDU Bracket kits enable PDUs to be mounted vertically in the side compartments of 7000- and
9000-series racks. Compaq offers two Vertical-Mount PDU Bracket kits:
• Compaq Vertical-Mount PDU Bracket (P/N 191265-B21): This kit includes eight brackets
that support four PDUs. This kit works best with low-voltage applications that use the power
cord included with the server.
• Compaq Vertical-Mount PDU Bracket with High-Voltage Cables (P/N 166097-B21): This kit
includes 11 Y-cables and 4 brackets that support 2 PDUs. This kit works best with highvoltage, high-current PDUs. Using the Y-cables enables each power outlet on the PDU to
supply power for 2 servers.
14UH-0701A-WWEN
Page 13

Compaq ProLiant DL380 Generation 2 Server High-Density Deployment in Compaq Racks 13
Compaq Confidential - Need to Know Required
Figuring Type and Number of PDUs
The type and number of PDUs required to power a full rack of servers depends on each server’s
power requirement, the number of servers deployed in the rack, and the available power for the
servers.
Compaq PDUs support both high-voltage and low-voltage applications. The input current rating
for a ProLiant DL380 Generation 2 server is either 3.2 A at 200 to 240 volts or 6.4 A at 100 to
120 volts. To determine the number of servers supported by a PDU, divide the PDU’s current
rating by the server’s total input current rating.
IMPORTANT: The examples shown in the following sections use the maximum rating of the
power supply. They are for reference only.
Non-Redundant Power
The following examples illustrate how to calculate the number of servers per PDU when using
non-redundant power.
Example
One high-voltage PDU (P/N 207590-D72) has a current rating of 24 A. The server has a total
input current rating of 3.2 A at 200 volts.
24 A (PDU current rating) / 3.2 A (server total input current rating) = 7
This PDU can support a maximum of 7 servers at full server input current ratings.
Example
One low-voltage PDU (P/N 207590-D71) has a current rating of 24 A. The server has a total
input current rating of 6 A at 100 volts.
24 A (PDU current rating) / 6.4 A (server total input current rating) = 3
This PDU can support a maximum of 3 servers at full server input current ratings.
Redundant Power
The ProLiant DL380 Generation 2 server supports a redundant power supply. The power supply
for this server automatically senses input voltage level.
When using redundant power, it is necessary to use two PDUs per server. The following
examples illustrate how to calculate the number of servers per pair of PDUs when using
redundant power.
Example
Two high-voltage PDUs (P/N 207590-D72) have a combined current rating of 48 A. The
server has a total input current rating of 3 A at 200 volts (redundant power).
2 [24 A (PDU current rating) / 3.2 A (server total input current rating)] = 7
These PDUs can support a maximum of 7 servers at full server input current ratings.
Example
Two low-voltage PDUs (P/N 207590-D71) have a current rating of 48 A. The server has a
total input current rating of 6 A at 100 volts (redundant power).
14UH-0701A-WWEN
Page 14
Compaq ProLiant DL380 Generation 2 Server High-Density Deployment in Compaq Racks 14
Compaq Confidential - Need to Know Required
2 [24 A (PDU current rating) / 6.4 A (server total input current rating)] = 3
These PDUs can support a maximum of 3 servers at full server input current ratings.
For more information on high-voltage PDUs, refer to the “Power Distribution Unit High-Voltage
Models for North America and International Use, (NA CPQ # 295363-002; INT'L CPQ #
295363-B31)” website:
www.compaq.com/products/servers
For more information on low-voltage PDUs, refer to the “Power Distribution Unit Low-Voltage
Models for North America and International Use” website:
www.compaq.com/products/servers
Selecting Server Power Cords
The appropriate server power cord to use depends on the cable management system installed in
the rack. Generally, the sliding rail cable management system requires a power cord that is
1.8288 m (6 ft) in length. This length provides enough slack for the power cord to route through
the cable management arm.
High-Voltage Y-Cables
The Vertical-Mount PDU Bracket with High-Voltage Cables kit includes 11 Y-cables, each of
which is 3.0 m (10 ft) long. The single-cord PDU section is 1.8 m (6 ft) long, and the dual-cord
server section is 1.3 m (4 ft) long. See Table 7 for part numbers.
Y-cables have a single-cord section with an IEC connector that connects to the PDU, a dividing
joint in the center, and a dual-cord section with IEC connectors that connect to the servers. One
Y-cable supplies power from the PDU to two ProLiant DL380 Generation 2 servers in the
standard configuration or one ProLiant DL380 Generation 2 server in the maximum
configuration.
CAUTION: When installing server power cords into the PDUs, ensure that the load is
balanced among the output circuit breakers. Do not exceed the ratings of the circuit
breakers.
Table 7. Compaq High-Voltage Power Cables
Description Compaq Part # Description
Vertical-Mount PDU Bracket with Highvoltage Cables kit
10A IEC-to-IEC Cables kit 142257-001 (6 ft)
14UH-0701A-WWEN
166097-B21 This kit includes two sets of PDU brackets and 11 Y-
142257-002 (8 ft)
142257-003(10 ft)
cables. Each cable is 10-ft long with a 6-ft section on
the single-side and 4-ft sections on the dual-side.
The IEC-to-IEC cables can be used either as individual
power cords for the server or to extend the length of the
high-voltage Y-cables. The cables are available in six-,
eight-, and ten-foot lengths. The ProLiant DL380
Generation 2 Server ships with one 10-ft IEC to IEC
cable, part number 142257-003.
Page 15

Compaq ProLiant DL380 Generation 2 Server High-Density Deployment in Compaq Racks 15
Compaq Confidential - Need to Know Required
Power Cords
The power cord included with the North American model of the ProLiant DL380
Generation 2 server can be used for low-voltage applications. Use a 1.8-m (6-ft) to 2.4-m (8-ft)
long power cord with the standard rack rails and cable management arm.
For information on obtaining high-voltage power cords, visit the Compaq website:
www.compaq.com
Table 8 lists PDU configurations for 42U racks and Table 9 lists PDU configurations for 36U
racks. The configurations in these tables refer to racks that are fully populated with servers. Racks
fully populated with servers use either an off-rack console management system or a remote
console management system. For an example configuration of a rack using an in-rack console
management system, see Figure 3.
Table 8. PDU Configurations for 42U Racks
Vertical Mount Bracket Kits
Part Number
207590-B21 High/16 A 2 5 4 1,813 29,400
207590-D71 Low/24 A 3 4 1,813 29,400
207590-B31 High/32 A 2 10 3 1,800 29,400
207590-D72 High/30 A 2 7 3 1,800 29,400
191186-001 High/24 A 2 7 3 1,800 29,400
191186-B31 High/30 A 2 9 3 1,800 29,400
197616-B22 High/32 A 2 12 2 1,787 29,400
295363-001 Low/24 A 1 3 4 1,813 29,400
295363-002 High/16 A 2 5 4 1,813 29,400
295363-003 High/24 A 2 7 3 1,800 29,400
295363-291 Low 24 A 1 3 4 1,813 29,400
295363-B21 High/16 A 2 5 4 1,813 29,400
295363-B32 High/16 A 2 5 4 1,813 29,400
Input Voltage/
Current Rating
166097-B21
with Y-cables
191265-B21
Maximum
Servers
PDUs per
Rack
Populated Rack
Weight (lb)
BTUs
14UH-0701A-WWEN
Page 16

Compaq ProLiant DL380 Generation 2 Server High-Density Deployment in Compaq Racks 16
Compaq Confidential - Need to Know Required
Table 9. PDU Configurations for 36U Racks
Vertical Mount Bracket Kits
Input Voltage/
Part Number
207590-B21 High/16 A 2 5 4 1,510 24,534
207590-D71 Low/24 A 3 4 1,510 24,534
207590-B31 High/32 A 2 10 2 1,484 24,534
207590-D72 High/30 A 2 7 3 1,497 24,534
191186-001 High/24 A 2 7 3 1,497 24,534
191186-B31 High/30 A 2 9 2 1,484 24,534
197616-B22 High/32 A 2 12 2 1,484 24,534
295363-001 Low/24 A 1 3 4 1,510 24,534
295363-002 High/16 A 2 5 4 1,510 24,534
295363-003 High/24 A 2 7 3 1,497 24,534
295363-291 Low/24 A 1 3 4 1,510 24,534
295363-B21 High/16 A 2 5 4 1,510 24,534
295363-B32 High/16 A 2 5 4 1,510 24,534
Current Rating
166097-B21
with Y-cables
191265-B21
Maximum
Servers
PDUs per
Rack
Populated Rack
Weight (lb)
BTUs
Console Management Systems
A console management system enables a single keyboard and video console to control a full rack
of servers. Install an in-rack console management system in the same rack with the servers it
manages. Install an off-rack console management system in the local vicinity of the rack of
servers it manages. Use a remote console management system to manage a rack of servers from
any other system connected to the same network.
Table 10 lists options for configuring console management systems.
Table 10. Local Console Management Options
Description Compaq
TFT5600 Rack-Mount
Keyboard and Monitor
Server Console Switch 1 x 8port (100-230VAC)
TFT5010R Flat Panel Monitor 104741-001 N.A.
Keyboard with Trackball 185152-406 N.A.
1U Rack Keyboard Drawer 338056-B21 A Server Console Switch can be mounted behind the keyboard
CPU-to-Switchbox Cable 110936-B25 Use 6-ft cables for sliding rails.
Part No.
221546-001 A 1U integrated keyboard and monitor; N.A.
400337-001 N.A.
Description
drawer (0U installation).
14UH-0701A-WWEN
Page 17

Compaq ProLiant DL380 Generation 2 Server High-Density Deployment in Compaq Racks 17
Compaq Confidential - Need to Know Required
In-Rack Local Consoles
With an in-rack local console, all equipment, servers, switchboxes, keyboards, keyboard drawers,
and video displays are installed together in the same rack. One console switchbox can support up
to eight pieces of equipment.
Each server deployed in a fully populated rack with an in-rack local console management system
requires the following accessories for successful deployment and operation:
• Rack Rail kit (standard rack rails and cable management arm, Telco rack solution, or
third-party rack cabinet and cable management arm )
• KVM server to console cables [1.8 m (6 ft) cables for sliding rail solutions]
• One or two RJ-45 cables for NIC 1 and NIC 2
Table 11 outlines the number of devices that fully populate a 42U or 36U rack with an in-rack
local console.
Table 11. Device Configuration for an In-Rack Local Console
Device or Cable 42U Rack 36U Rack
ProLiant DL380 Generation 2 servers 19 16
KVM console switches 3 2
Flat panel display 1 1
Keyboard with trackball 1 1
Keyboard tray 1 1
RJ-45 cables 19/36 16/30
KVM server to console cables 21 17
Off-Rack Local Consoles
When an off-rack local console is used, certain components such as console switchboxes,
keyboards, and video displays do not populate space in the rack, but are located in close
proximity to the rack. Because of this, the rack can be fully populated with servers. Cable lengths
for connecting servers to an off-rack local console vary in length depending on the location of the
console.
Each server deployed in a fully populated rack with an off-rack console management system
requires the following accessories for successful deployment and operation:
• Rack Rail kit (standard rack rails and cable management arm, Telco rack solution, or thirdparty rack cabinet and cable management solution)
• KVM server to console cables
• One or two RJ-45 cables for NIC 1 and NIC 2
Remote Console Management
The Compaq Remote Insight Lights-Out Edition board is a PCI-based board that enables server
management by remote access regardless of the state of the host server operating system or the
host CPU. The Remote Insight board sends alerts and performs other functions even if the host
server operating system is not responding. For installation information and features, refer to the
14UH-0701A-WWEN
Page 18

Compaq ProLiant DL380 Generation 2 Server High-Density Deployment in Compaq Racks 18
Compaq Confidential - Need to Know Required
documentation that ships with the Remote Insight board and the Compaq
ProLiant DL380 Generation 2 Server Setup and Installation Guide.
Each server deployed in a fully populated rack with a remote console management system
requires the following accessories for successful deployment and operation:
• A Rack Rail kit (standard sliding rail and cable management arm, Telco rack solution, or
third-party pack cabinet and cable management arm)
• A Remote Insight board
• An RJ-45 cable for the Remote Insight board
• One or two RJ-45 cables for NIC 1 and NIC 2
14UH-0701A-WWEN
Page 19

Compaq ProLiant DL380 Generation 2 Server High-Density Deployment in Compaq Racks 19
Compaq Confidential - Need to Know Required
Planning Rack Configurations
Consider several important factors when planning a rack configuration:
• The number of servers deployed in the rack
• The number of other devices such as keyboards, keyboard drawers, video displays, and
console switchboxes that support the servers
• The number of PDUs and their orientation
• The type of rack
• The rack management system
• The console management system
All of these factors influence floor support requirements, future service and upgrade
requirements, and installation requirements.
Table 12 lists the weight and power specifications for Compaq racks and rack option products. To
calculate floor support requirements for a particular rack configuration, add the weight
measurements to calculate the total weight of a rack fully populated with
ProLiant DL380 Generation 2 servers. See the following example:
1 ×
21 ×
21 ×
3 ×
22 ×
21 ×
Total configured rack weight 810 kg (1,800 lb)
9142 rack 114 kg (253 lb)
ProLiant DL380 Generation 2 server
567 kg (1,260 lb)
with hard disk drives
Cable management system 76 kg (168 lb)
High-voltage PDUs with brackets 17 kg (38 lb)
High-voltage Y-cables 9 kg (21 lb)
Keyboard/Video/Mouse cables 27 kg (59 lb)
IMPORTANT: Compaq recommends populating a rack with ProLiant DL380 Generation 2
servers and other rack option products only after the rack is in or very near its final position.
Compaq does not recommend transporting a fully populated rack.
14UH-0701A-WWEN
Page 20

Compaq ProLiant DL380 Generation 2 Server High-Density Deployment in Compaq Racks 20
Compaq Confidential - Need to Know Required
Table 12. Compaq Rack and Related Options Weight (and power if applicable)
Option Note Weight Power
Compaq Rack 9142 (42U) Without the side panels 114.84 kg/253 lb
Compaq Rack 9136 (36U) Without the side panels 75 kg/165 lb
Compaq Rack 7142 (42U) Without the side panels 114.84 kg/253 lb
High-voltage Power Y-cable 10 ft 0.45 kg/1 lb
Keyboard/Video/Mouse
molded cable
High-voltage 16 A PDU 4.99 kg/11 lb
High-voltage 24 A PDU 4.99 kg/11 lb
Low-voltage 24 A PDU 4.99 kg 11 lb
Keyboard/trackball With sliding tray 7.26 kg/16 lb
TFT5010R Flat Panel
Monitor
TFT5600 Rack-mount
keyboard and monitor
Server Console Switch 1 x 8 port (100-230 VAC) 2.38 kg/5.25 lb 100 W
6 ft 0.64 kg/1.42 lb
With sliding tray 22 kg/48.5 lb 45 W
6.25 kg/13.75 lb
For detailed specifications or more options, refer to the Compaq website:
www.compaq.com.
Compaq Rack Builder Online
Compaq Rack Builder Online is a tool that assists in planning and configuring new racks. It
provides users with a powerful web-based tool for configuring one or many racks with Compaq
components. Using either a simple guided interface or a “build it yourself” mode for advanced
users, rack configurations are created using a complete and current database that includes all
Compaq rack-mountable products. To access Compaq Rack Builder Online, visit the Compaq
website:
www.compaq.com/rackbuilder
Special Considerations for 7000-Series Racks
Compaq recommends deploying servers in either a 7000- or 9000-series Compaq rack. 4000series racks (36U) are not recommended for 2U high-volume deployments with ProLiant
DL380 Generation 2 servers because they are not sturdy enough to support the weight of 18
servers. The 7000- and the 9000-series Compaq racks mentioned in this section are the 7142,
9142, and 9136, racks. This document does not discuss deploying servers in any rack not
manufactured by Compaq.
14UH-0701A-WWEN
Page 21

Compaq ProLiant DL380 Generation 2 Server High-Density Deployment in Compaq Racks 21
b
Compaq Confidential - Need to Know Required
WARNING: Follow these guidelines to reduce the risk of personal injury or damage to
the equipment:
• Do not install a ProLiant DL380 Generation 2 server into a rack until the rack has
been placed in its final location.
• Pre-install slide rails, PDUs, power cords, and cables into the rack in a build room or
other location before moving the rack to its final location.
• Extend the leveling jacks to the floor and rest the full weight of the rack on the jacks
efore installing any servers. The casters are not designed to support the full weight of
a populated rack.
• Do not move a rack populated with servers. A fully populated rack can weigh up to
1,800 pounds. Moving a populated rack can cause the rack to become unstable,
resulting in serious personal injury or equipment damage.
To effectively cool the ProLiant DL380 Generation 2 servers in a 7000-series rack, replace the
front door of the rack with the High Air Flow Rack-Door Insert before deploying the servers in
the rack. See Table 13 for rack-door insert part numbers.
Compaq strongly recommends using the Compaq Rack Extension kit (P/N 154392-B21) to
alleviate any space problems for cable bundles at the rear of 7000-series racks.
Cabling and Rack Configurations
The figures on the following pages show three possible cabling and rack configurations. The
configurations do not include every possible combination.
14UH-0701A-WWEN
Page 22

Compaq ProLiant DL380 Generation 2 Server High-Density Deployment in Compaq Racks 22
Compaq Confidential - Need to Know Required
2U Server
2U Server
2U Server
PDU-2
24 A
2U Server
2U Server
2U Server
2U Server
2U Server
2U Server
2U Server
2U Server
2U Server
2U Server
2U Server
PDU-3
24 A
PDU-1
24 A
200-240 V
30 A service each
Figure 1. Four high-voltage PDUs (24A)
2U Server
2U Server
2U Server
2U Server
2U Server
2U Server
2U Server
42 Power Cables
PDU-4
24 A
200-240 V
30 A service each
14UH-0701A-WWEN
Page 23

Compaq ProLiant DL380 Generation 2 Server High-Density Deployment in Compaq Racks 23
Compaq Confidential - Need to Know Required
2U Server
2U Server
2U Server
PDU-2
24 A
PDU-1
24 A
*
*
*
2U Server
2U Server
2U Server
2U Server
2U Server
2U Server
2U Server
2U Server
2U Server
2U Server
2U Server
2U Server
2U Server
2U Server
2U Server
2U Server
2U Server
3 208 V lines 21 Power Cables
30 A service each
Figure 2. Two high-voltage PDUs (24A)
2U Server
14UH-0701A-WWEN
Page 24

Compaq ProLiant DL380 Generation 2 Server High-Density Deployment in Compaq Racks 24
Compaq Confidential - Need to Know Required
PDU-2
24 A
PDU-1
24 A
*
*
*
*
2U Server
2U Server
2U Server
2U Server
2U Server
2U Server
2U Server
2U Server
2U Server
2U Server
2U Server
2U Server
2U Server
2U Server
2U Server
2U Server
2U Server
2U Server
2U Server
2U Server
2U Server
*
PDU-3
24 A
*
*
PDU-4
24 A
*
110 V lines
30 A service each
Figure 3. Four low-voltage PDUs (24A)
14UH-0701A-WWEN
21 Power Cables
110 V lines
30 A service each
Page 25

Compaq ProLiant DL380 Generation 2 Server High-Density Deployment in Compaq Racks 25
Compaq Confidential - Need to Know Required
Rack Management Systems
Compaq recommends using the standard rack rails and cable management arm. The rack
management solution installed in the rack determines the position of the PDUs installed in the
rack side panels. To determine the best rack management solution, consider the service and
upgrade demands of the servers deployed in the rack.
IMPORTANT: Read the Compaq Ultra-Dense Server Deployment in Third-party Cabinet
Racks or the Compaq Ultra-Dense Server Deployment in Telco Racks before deploying ProLiant
DL380 Generation 2 servers in a third-party rack or Telco rack.
Standard Rack Rails
The standard rack rails and cable management arm work best with a rack of servers that are
frequently serviced or upgraded. With this solution, a server can be powered down and serviced
without disconnecting the server cables or removing the server from the rack.
The standard rack rails and cable management arm are designed for 29-inch deep, square-hole
racks. The sliding rack rails compress and snap securely in place in the rack without screws or
nuts.
The cable management arm attaches directly onto the rear of the server and the rear of the rack. It
secures and routes the cables along the rear of the rack. This not only prevents the cables from
sagging and tangling, but it also enables proper air ventilation through the rack while enabling the
servers to be fully extended without disconnecting any of the server cables.
The standard rack rails and cable management arm are conducive to in-rack servicing and provide
convenient access to the server cables and connectors. Refer to the Compaq ProLiant DL380
Generation 2 Setup and Installation Guide for complete installation instructions.
Third-Party Rack Cabinet Solution
Because not all customers use Compaq racks, the ProLiant DL380 Generation 2 server design
supports deployment in third-party rack cabinets. Compaq offers a Third-Party Rack Cabinet kit
to use in installing ProLiant DL380 Generation 2 servers in third-party racks. This kit includes
variable length rack rails that are compatible with a variety of third-party racks. The Third-Party
Rack Cabinet kit can be installed in racks that are 610 mm (21 inches) to 740 mm (29.13 inches)
deep.
IMPORTANT: Always install the Compaq Third-Party Rack Cabinet kit when deploying a
ProLiant DL380 Generation 2 server in a third-party rack. The kit supports the same cable
management arm that the standard fixed rack rail solution uses.
14UH-0701A-WWEN
Page 26

Compaq ProLiant DL380 Generation 2 Server High-Density Deployment in Compaq Racks 26
Compaq Confidential - Need to Know Required
Telco Rack Solution
Many data centers use Telco racks. The ProLiant DL380 Generation 2 server design supports
deployment in Telco racks. Compaq offers a Telco Rack kit designed to install ProLiant DL380
Generation 2 servers in Telco racks. This kit includes rack rails and screws that are compatible
with a variety of Telco racks. The Telco rack kit includes replacement server rails designed to fit
on the ProLiant DL380 Generation 2 server. Before deploying ProLiant DL380 Generation 2
servers into a Telco rack, remove the standard server rails and replace them with the Telco server
rails included in the Telco Rack kit.
IMPORTANT: Always install the Compaq Telco Rack kit when deploying a ProLiant DL380
Generation 2 server in a Telco rack.
Installation Procedures
This section describes preparation and basic installation procedures common to various
configurations outlined in “Planning Rack Configurations.” Compaq recommends performing the
preparation and installation procedures in the order that they are presented in this section. This
section discusses the following procedures:
• Preparing the ProLiant DL380 Generation 2 server
• Installing Power Distribution Units (PDUs)
• Routing the Power Cords
• Installing the Rack Rails
• Installing a Server in a Rack
• Connecting Cables
• Completing the Installation
See the safety guidelines at the beginning of this paper before beginning any installation
procedures.
Preparing the ProLiant DL380 Generation 2 Server for
Rack Installation
This section briefly describes preparing the server for rack installation.
Standard Rack Rails and Cable Management Arm
1. If the server is still in the shipping container, remove the server and all included components
from the box. Ensure that all parts and components ordered with the server are present and
undamaged. Place the server on a stable, flat surface.
2. Install any optional hardware components ordered with the server. Unpack and install one
option kit at a time to reduce the risk of damage to any option kit or component.
3. The documentation included with each option kit contains detailed installation instructions
for that option. Refer to the setup and installation guide included with the server for
additional information on any hardware installation procedure.
14UH-0701A-WWEN
Page 27

Compaq ProLiant DL380 Generation 2 Server High-Density Deployment in Compaq Racks 27
Compaq Confidential - Need to Know Required
4. The ProLiant DL380 Generation 2 server ships with rack rails and a cable management arm.
Remove the server rails from the standard rack rails and attach them to the server. Attach the
cable management arm to the rear of the server before installing the server in a rack.
Refer to the Compaq ProLiant DL380 Generation 2 Server Setup and Installation Guide and the
rack option documentation for detailed installation instructions.
Third-Party Rack Cabinet Solution and Cable Management Arm
The standard rack rails and cable management arm that are included with the ProLiant
DL380 Generation 2 server are required for the third-party Rack Cabinet option kit. Before
deploying ProLiant DL380 Generation 2 servers into a third-party rack, install the slide rail
assembly on the third-party rack rail. For detailed instructions on deploying ProLiant DL380
Generation 2 servers into a third-party rack, refer to the documentation that ships with the thirdparty rack-mounting kit (P/N 228894-B21).
IMPORTANT: Read the Compaq Ultra-Dense Server Deployment in Third-Party Cabinet
Racks before deploying ProLiant DL380 Generation 2 servers in a third-party rack.
Telco Rack Solution
The Telco Rack kit includes replacement server rails designed to fit on the ProLiant
DL380 Generation 2 server. Before deploying ProLiant DL380 Generation 2 servers into a Telco
rack, remove the standard server rails and replace them with the Telco server rails included in the
Telco Rack kit. For detailed instructions on deploying ProLiant DL380 Generation 2 servers into
a Telco rack, refer to the documentation that ships with the Telco rack-mounting kit (P/N
228892-B21).
IMPORTANT: Read Compaq Ultra-Dense Server Deployment in Third-party Cabinet Racks or
Compaq Ultra-Dense Server Deployment in Telco Racks before deploying ProLiant DL380
Generation 2 servers in a third-party rack or Telco rack.
Installing Power Distribution Units
PDU installation varies depending on the rack configuration, the number of servers deployed in
the rack, the selected type of PDU, and the voltage and current rating for each PDU. The
295363-xxx series of PDUs must be mounted vertically in the side panels of the rack. See the
“Power Distribution Units” section for information about the Vertical-Mount PDU Bracket kits
available from Compaq. The installation card in the Vertical-Mount PDU Bracket kit contains
detailed instructions for installing the Vertical-Mount PDU Brackets on a PDU and in a rack.
Positioning PDUs in 36U and 42U Racks
The position of the PDUs in the rack side panels varies depending on the rack size, the number of
servers deployed in the rack, and the cable management solution. As a rule, install PDUs from the
bottom to the top on the same side of the rack as the cable management arm (viewing the rack
from the front).
Installing PDUs in a 36U or 42U Rack
Before installing PDUs in a 36U or 42U rack, you may need to remove the center support bracket
and center it between the PDUs. Install the PDUs on the same side of the rack as the cable
14UH-0701A-WWEN
Page 28

Compaq ProLiant DL380 Generation 2 Server High-Density Deployment in Compaq Racks 28
Compaq Confidential - Need to Know Required
management arm (viewing the rack from the front). Use Figure 4 and Table 13 to determine the
position of PDUs in a 36 or 42U rack.
A
B
Figure 4. PDU positions in a 36U or 42U rack
Table 13. PDU Configurations in a 36U or 42U Rack
2 PDUs 3 PDUs
Left Right Left Right
C A C
D D
C
front
of
rack
D
14UH-0701A-WWEN
Page 29

Compaq ProLiant DL380 Generation 2 Server High-Density Deployment in Compaq Racks 29
Compaq Confidential - Need to Know Required
Routing Power Cords
Use the following general procedures to route server power cords in 36U and 42U racks.
IMPORTANT: When installing server power cords into the PDUs, ensure that the load is
balanced among the output circuit breakers.
High-Voltage Power Cords
To route and connect low-voltage power cords:
IMPORTANT: Route and connect the high-voltage power cord to the PDU after the server is
installed.
1. Connect the power cord to the server and route it through the cable management system with
the other server cables.
2. Route the power cord inside the rear rack support to the PDU.
High-Voltage Y-Cables
To route high-voltage Y-cables:
1. Connect the single-cord section of the Y-cable to the PDU installed on the same side as the
cable management tray.
2. Align the Y-joint with the rear rack support and center it between the rack rails of the two
servers that the Y-cable supports.
3. Use two plastic tie wraps to secure the Y-joint to the rack support.
4. After installing the servers, connect the cables to the servers and route them through the cable
management system with the other server cables.
Low-Voltage Power Cords
To route and connect low-voltage power cords:
IMPORTANT: Route and connect the low-voltage power cord to the PDU after the server is
installed.
1. Connect the power cord to the server first and route it through the cable management system
with the other server cables.
2. Route the power cord inside the rear rack support to the PDU.
IMPORTANT: In 7000-series racks, route the power cables from the servers to the PDUs
through the gap in the rear of the rack rail.
14UH-0701A-WWEN
Page 30
Compaq ProLiant DL380 Generation 2 Server High-Density Deployment in Compaq Racks 30
Compaq Confidential - Need to Know Required
Installing the Rack Rails
The following procedure describes how to install the standard rack rails onto the rack. The rails
are designed to snap in place without screws or nuts.
1. Remove the server rails from the left and right standard rails.
2. Insert the rails into the rack holes.
3. Install the server rails on the chassis.
4. Insert the server into the rack.
5. Install the cable management arm.
6. Cable and power up the server.
Repeat the procedure for any subsequent rack rails. For detailed instructions on installing
standard rack rails, refer to the Compaq ProLiant DL380 Generation 2 Server Setup and
Installation Guide and to the Compaq ProLiant DL380 Generation 2 Hardware Configuration
and Installation Poster.
CAUTION: Always install servers from the bottom of the rack to the top. Installing
servers in this manner provides more stability for the rack and reduces the risk of the rack
tipping over.
IMPORTANT: Before installing the rack rails for the standard rack rails and cable
management arm, remove the server rails from the slide rail assembly. See the “Preparing the
ProLiant DL380 Generation 2 for Rack Installation” section in this paper for more information.
IMPORTANT: Install a ProLiant DL380 Generation 2 server in every U-space from the bottom
to the top for maximum density.
14UH-0701A-WWEN
Page 31
Compaq ProLiant DL380 Generation 2 Server High-Density Deployment in Compaq Racks 31
Compaq Confidential - Need to Know Required
Installing a Server in a Rack
Install ProLiant DL380 Generation 2 servers in the rack from the bottom to the top. Tighten the
thumbscrews on the front of each server to secure the server to the rack. Attach the cable
management arm to the rear of the server and to the rear of the rack.
WARNING: To reduce the risk of serious personal injury, fire, or damage to the
equipment:
• Extend the leveling jacks to the floor and rest the full weight of the rack on the
leveling jacks.
• Either install the stabilizer kit or couple multiple racks together for stability.
• Load the heaviest item first and load the rack from the bottom to the top. Loading the
rack in this manner makes the rack “bottom-heavy” and helps prevent the rack from
becoming unstable.
• Do not overload the AC supply branch circuit that provides power to the rack.
• Extend only one ProLiant DL380 Generation 2 server at a time. A rack may become
unstable if more than one ProLiant DL380 Generation 2 server is fully extended for
any reason.
14UH-0701A-WWEN
Page 32

Compaq ProLiant DL380 Generation 2 Server High-Density Deployment in Compaq Racks 32
Compaq Confidential - Need to Know Required
Connecting Cables
This section discusses connecting and routing cables with different cable management solutions
and different console management solutions.
In-Rack Local Console
To install cables with in-rack local consoles:
1. Connect the cables to each device installed in the rack, working from the bottom to the top.
2. Connect the cables to the bottom piece of equipment.
3. Bundle the cables and route them through the cable management arm.
4. Connect the cables to the console switchbox.
5. Connect the power cord to the PDU. Do not connect the PDU to any power source until all
equipment is fully deployed in the rack.
Refer to Compaq ProLiant DL380 Generation 2 Server Setup and Installation Guide for the
recommended order for connecting cables.
When the cables are properly connected and routed through the cable management arm, the rear
door of the rack closes easily over the cables. If the rear door does not close easily, additional
space may be required. Install the rack extension or the bustle kit to provide more space for the
cables at the rear of the rack.
WARNING: To reduce the risk of electrical shock or damage to the equipment:
• Unplug the power cord from the system.
• Do not disable the power-cord-grounding plug. The grounding plug is an important
safety feature.
• Plug the power cord into a grounded (earthed) electrical outlet that is easily accessible
at all times.
• Do not route the power cord where it can be walked on or pinched by items placed
against it. Pay particular attention to the plug, electrical outlet, and the point where the
cord extends from the server.
IMPORTANT: In 7000-series racks, route the power cables from the servers to the PDUs
through the gap in the rear of the rack rail.
Off-Rack Local Console
Use the in-rack local console procedure for the cable management arm installed in the rack to
connect and route cables with an off-rack local console. Longer cables may be required to reach
an off-rack console. See Table 11 for information on CPU-to-switchbox cables available from
Compaq.
14UH-0701A-WWEN
Page 33

Compaq ProLiant DL380 Generation 2 Server High-Density Deployment in Compaq Racks 33
Compaq Confidential - Need to Know Required
Remote Console Management
The remote console management system uses a CAT5 cable connected to the RJ-45 connector in
the Remote Insight Lights-Out Edition PCI board and the power cord. Route these cables through
the cable management arm according to the instructions in the Compaq ProLiant DL380
Generation 2 Server Setup and Installation Guide. Connect the power cord to the PDU and the
CAT5 cable to the network data line outlet.
Completing the Installation
To complete the installation:
1. Install side panels on the outsides of the end racks.
2. Install the front and rear doors.
3. Connect the PDUs to the power source.
4. Power up the servers.
14UH-0701A-WWEN
Page 34

Compaq ProLiant DL380 Generation 2 Server High-Density Deployment in Compaq Racks 34
Compaq Confidential - Need to Know Required
Appendix A −−−− Related Documents
Compaq 9000 Series Rack Brochure
Document number 0266-0799A-NAEN
ftp://ftp.compaq.com/pub/products/storageworks/options/9000_Series_Profile.pdf
Compaq 9000 Series Universal Racks
Document number ECG0145-0899-A
ftp://ftp.compaq.com/pub/supportinformation/papers/ecg01450899a.pdf
Compaq Rack 9000 Series Catalog
ftp://ftp.compaq.com/pub/products/storageworks/options/CompaqRack9000Series.pdf
Compaq Rack 7000 Series Catalog
ftp://ftp.compaq.com/pub/products/storageworks/options/CompaqRack7000Series.pdf
Installing Compaq Rack-Mountable Components into Third-Party Racks
www.compaq.com/support/techpubs/whitepapers/3rdpartyracks.html
Compaq Rack Options and Accessories Catalog
ftp://ftp.compaq.com/pub/products/storageworks/options/CompaqRackAccessories.pdf
Compaq Power Management Products Catalog
ftp://ftp.compaq.com/pub/products/storageworks/powerprotection/PowerManagementProducts.pdf
Compaq Power Distribution Unit Information Guide
Document number ECG045/0299
ftp://ftp.compaq.com/pub/supportinformation/papers/ecg0450299.pdf
Compaq Power Distribution Unit QuickSpecs
Document number DA-10253-00-002
ftp://ftp.compaq.com/pub/products/storageworks/powerdistribution/pduqs.pdf
Compaq Server Console Switch (KVM) Information Guide
Document number ECG0155/0699-A
ftp://ftp.compaq.com/pub/supportinformation/papers/ecg01550699a.pdf
Compaq Server Console Switch User Guide
Document number 141555-001
ftp://ftp.compaq.com/pub/supportinformation/techpubs/user_reference_guides/
141555-001.pdf
Compaq Server Console Switch Brochure
Document number 0304-0799A-NAEN
ftp://ftp.compaq.com/pub/products/storageworks/options/KVM_Profile.pdf
Compaq Flat Panel Monitor (TFT5000R) QuickSpecs
ftp://ftp.compaq.com/pub/products/storageworks/options/15inchfpmonitor.pdf
Compaq Internal Keyboard with Trackball and 1U Keyboard Drawer QuickSpecs
ftp://ftp.compaq.com/pub/products/storageworks/options/iukeyboard_qs.pdf
Compaq 1U Keyboard Drawer and Internal Keyboard Brochure
Document number NA020A/0499
ftp://ftp.compaq.com/pub/products/storageworks/options/iukeyboard_brochure.pdf
14UH-0701A-WWEN
Page 35

Compaq ProLiant DL380 Generation 2 Server High-Density Deployment in Compaq Racks 35
Compaq Confidential - Need to Know Required
Appendix B −−−− Parts Reference
The parts referenced in this white paper are listed in this appendix. Refer to
Compaq ProLiant DL380 Generation 2 Server QuickSpecs for more option parts.
Note: In this appendix, the notation Int’l (or) International is used for a part number for the
countries not explicitly listed for that part. The other notations are as follows:
APD Asia Pacific
EURO Europe
N.A. North America (including U.S., Canada, Mexico)
U.K. United Kingdom
Table 14. Power Management
Part Compaq P/N Notes
Vertical-Mount PDU Brackets kit 191265-B21 8 brackets
Vertical-Mount PDU Brackets Option with HighVoltage Cables kit
10A IEC to IEC cable kit
2.0 m / 6 ft
2.5 m / 8 ft
3.0 m / 12 ft
Table 15. Console management
166097-B21 4 brackets and 11 Y-power cords
Each Y-power cord is 10 ft in length (6-ft
single-section and 4-ft dual-sections).
These cables are not available
separately from this option kit.
142257-001
142257-002
142257-003
The IEC-to-IEC cables can be used
either as individual power cords for the
server or to extend the length of the
high-voltage Y-cables. The cables are
available in 6-, 8-, and 10- ft lengths.
The ProLiant DL380 Generation 2 server
ships with one 10-ft IEC-to-IEC cable,
part number 142257-003.
Part Availability Compaq P/N Notes
TFT 5010R Flat Panel
Monitor
TFT5000R Flat Panel
Monitor
TFT5000R Flat Panel
Monitor
Server Console Switch
1 x 8-port (100-230VAC).
continued
14UH-0701A-WWEN
N.A., International 104741-001
104741-B24
N.A, Japan 120207-001
120207-291
International 120207-B31
N.A., International,
Japan
400337-001
400337-B31
400337-291
The power cord shipped with this
switch is for low-voltage PDUs. Highvoltage PDUs may use the Y-cables
included in the Vertical-Mount
Bracket kit.
Page 36

Compaq ProLiant DL380 Generation 2 Server High-Density Deployment in Compaq Racks 36
Compaq Confidential - Need to Know Required
Table 15. Console management (continued)
Part Availability Compaq P/N Notes
CPU-to-Switchbox Cables 110936-B21
110936-B22
110936-B23
110936-B24
110936-B25
1U Rack Keyboard Drawer 338056-B21 A Server Console Switch may be
Keyboard with Trackball U.S. 185152-406
U.K., Germany,
France
Italy, Spain, Denmark 185152-066
Norway,
Sweden/Finland
Swiss, Portugal,
Belgium
Japan, International 185152-296
185152-036
185152-046
185152-056
185152-076
185152-086
185152-096
185152-106
185152-116
185152-136
185152-186
185152-B36
1 Cable, 12 ft
1 Cable, 20 ft
1 Cable, 40 ft
1 Cable, 3 ft
1 Cable, 6 ft
mounted behind the keyboard
drawer (0U installation).
14UH-0701A-WWEN
Page 37
Compaq ProLiant DL380 Generation 2 Server High-Density Deployment in Compaq Racks 37
Compaq Confidential - Need to Know Required
Table 16. Rack Deployment
Part Compaq P/N Notes
Grounding Option Kit 120682-B21
9000-Series Racks
Ballast option kit 120672-B21 Extends rear part of rack to gain
Baying kit 120669-B21
Bustle kit 120679-B21 Pallet, shock pallet, crated
Stabilizer option kit 120673-B21
Compaq Rack 9142 (42U) 120663-B21
120663-B22
120663-B23
9142 Side Panel Kit 120670-B21
Compaq Rack 9136 (36U) 120664-B21
120664-B22
120664-B23
9136 Side Panel kit 120671-B21
42U Short Rear Door 218217-B21
36U Short Rear Door 218218-B21
Part Compaq P/N Notes
7000-Series Racks
High Air-Flow Rack Door Insert for 7122 157847-B21
High Air-Flow Rack Door Insert for 7142 327281-B21
High Air-Flow Rack Door Insert for 7142 (6
pack)
Stabilizing Feet (42U only) 189907-001
Compaq Rack 7142 (42U) 165753-001
Rack Sidewall kit (42U only) 165652-001
Rack Extension Kit for 7142 154392-B21
Coupling kit (42U only) 165664-001
327281-B22
189907-291
165753-002
165753 –003
165753-293
cabling space
Pallet, shock pallet, crated
Pallet, shock pallet, crated
Others, Japan
N.A., Air Shipment,
International, Japan
14UH-0701A-WWEN
Page 38

Compaq ProLiant DL380 Generation 2 Server High-Density Deployment in Compaq Racks 38
Compaq Confidential - Need to Know Required
Appendix C – Power and Thermal
Budgeting
This appendix provides the information and worksheets necessary to calculate power and thermal
budgeting for your system. However, for the most accurate, updated power and thermal budgeting
calculations for your particular configuration, Compaq recommends using the online power
calculator. To use the calculator, visit the Compaq Active Answers website:
activeanswers.compaq.com/aaconfiguratorcode/configurationUi.asp?HTMLFilename=Country
Note: In this document, derating the input power budget means using less than the maximum
rated input power values for the power supply. Verify that the derated power budget satisfies
all the installation requirements including future upgrade plans.
Use either of the following methods to determine the lower input power requirement for
ProLiant DL380 Generation 2 servers:
• Use the derated input power. Calculate this value by using the supplied worksheet at the end
of this appendix.
• Use the allocated input power. Calculate this value by dividing the maximum power of a
PDU by the number of servers. This calculated power must be at least 421 W to support all
the optional components initially released with the ProLiant DL380 Generation 2 server.
Table 17 demonstrates how calculating the derated input power of the system can significantly
reduce input current and thermal dissipation.
Table 17. Derated Current and Thermal Dissipation for Reduced Input Power Assumptions
Input Power Derated Fully Rated
226 W 421 W 575 W
Input Current @115 VAC 2.0 A 3.8 A 6.4 A
Input Current @220 VAC 1.0 A 1.9 A 3.2 A
Thermal Dissipation 770 BTUs/hour 1435 BTUs/hour 1961 BTUs/hour
The derated input power values of 226 W and 421 W can be correlated with the measured input
power values for the minimum and maximum configurations of
ProLiant DL380 Generation 2 servers and optional components outlined in this paper. However,
the derated input power value must be high enough to account for any future upgrades.
Carefully derating the input power may satisfy deployment needs and reduce the number of PDUs
per rack.
14UH-0701A-WWEN
Page 39

Compaq ProLiant DL380 Generation 2 Server High-Density Deployment in Compaq Racks 39
××××
Compaq Confidential - Need to Know Required
Input Current and Thermal Dissipation Calculations
The input power is necessary for determining the input current and thermal dissipation. For a
given input power, the input current varies depending on the input voltage level.
The relationship among the current, the voltage, and the power for the power supply input is as
follows:
Input Current = Input Power / Input Voltage
For example,
Input Current = 100 W /110 V = 0.91 A
Input Current = 100 W /208 V = 0.48 A
The thermal dissipation can be calculated from the input power as follows:
Thermal Dissipation = Input Power
3.41
For example,
Thermal Dissipation = 100 × 3.41 = 341 BTUs/hour
Thermal Dissipation = 200 × 3.41 = 682 BTUs/hour
The easiest way to calculate the thermal dissipation for the entire rack is to add the input power
requirements for all the servers and other units populated in a rack and then multiply the total
input power by 3.41. The total thermal dissipation helps determine cooling and environmental
requirements for the populated rack.
The following section, “Measured Input Power,” further explains the effects on input power and
thermal calculations from adding or removing subsystem components.
Measured Input Power
Table 18 lists the measured input power of the ProLiant DL380 Generation 2 server with varying
subsystem components to illustrate the effects of adding or removing optional components. The
“typical” input power values were measured during idle/normal operations.
Table 18. Measured Input Power for Selected Server Configurations
Configuration
Number
1 1x1.13-GHz, 2 x 128 MB, 0x HDD (minimum/base configuration) 226 W
2 2 x 1.26-GHz, 6 x 1-GB, 6 x 36-GB, 3 x 10 W PCI Load Cards (maximum
14UH-0701A-WWEN
ProLiant DL380 Generation 2 Server Configuration Typical Power
tested configuration)
Input
421 W
Page 40

Compaq ProLiant DL380 Generation 2 Server High-Density Deployment in Compaq Racks 40
Compaq Confidential - Need to Know Required
Table 19 lists the input power of each subsystem component.
Table 19. Measured Input Power for Subsystem Components
Subsystem Components Typical Power
Intel Pentium III 1.13-GHz processor 27 W
Intel Pentium III 1.26 GHz processor (when available) 30 W
128-MB DIMM 2 W
256-MB DIMM 2.4 W
512-MB DIMM 2.4 W
1-GB DIMM 3 W
9.1-GB HDD 10 W
18.2-GB HDD 10 W
36-GB HDD 10 W
Remote Insight Lights-Out Edition 9 W
SA5300 17 W
Input
Note: DIMM and HDD input power may vary depending on the component and drive
manufacturer.
14UH-0701A-WWEN
Page 41

Compaq ProLiant DL380 Generation 2 Server High-Density Deployment in Compaq Racks 41
Compaq Confidential - Need to Know Required
Input Power Budget Derating
This section explains how to derate the input power budget. The maximum rated power supply
input power is 575 W.
To derate the input power, start with the minimum configuration 0 from Table 18. Add the typical
power of the components included in the desired system configuration to calculate the derated
power budget. Typical input powers for various components are listed in Table 19.
Example
Assume the desired server configuration is: 2 × 1.13 GHz, 4 × 128 MB, and 2 × 18.2 GB.
Use Table 20 to calculate the derated power budget using the typical power from Tables 18 and
19.
Table 20. Example Derating Worksheet
Maximum Rated Input Power (in watts) for the base configuration Typical Power 226 W
1. Add the typical power for the processor. 27 W
2. Add the typical power for the memory. 2 W
2 W
3. Add the typical power for the HDD. 10 W
10 W
4. Add the typical power for the PCI card.
Typical power for the desired configuration (in watts) 278 W
5. Calculate the thermal dissipation.
Thermal dissipation for the desired configuration (in BTUs) 947 BTUs/hour
× 3.41
Therefore, the new power budget for this configuration is 278 W (compared to the rated 575 W),
and the thermal dissipation is approximately 947 BTUs/hour (compared to the rated 1961
BTUs/hour).
This derated input power budget significantly reduces the power and thermal requirements for
highly populated racks, which reduces the number of PDUs for certain configurations. Fewer
PDUs increases deployment time and lowers costs. Costs for the facility electrical plumbing, data
center floor ventilation, and facility air conditioning installation can be reduced.
IMPORTANT: Compaq strongly recommends verifying that the derated power budget satisfies
all the installation requirements, including future upgrade plans.
14UH-0701A-WWEN
Page 42

Compaq ProLiant DL380 Generation 2 Server High-Density Deployment in Compaq Racks 42
Compaq Confidential - Need to Know Required
Input Power Budget Derating Worksheet
Add together the input powers of the components that are included in the desired configuration.
The typical and typical input powers are listed in Table 19 earlier in this appendix. Use Table 21
to calculate the derated input power.
Table 21. Derating Worksheet
Maximum Rated Input Power (in watts) for the base configuration Typical Power 226 W
1. Add the typical power for the processor.
2. Add the typical power for the memory.
3. Add the typical power for the HDD.
4. Add the typical power for the PCI card.
Typical power for the desired configuration (in watts)
5. Calculate the thermal dissipation.
Thermal dissipation for the desired configuration (in BTUs)
× 3.41
14UH-0701A-WWEN
Page 43

Compaq ProLiant DL380 Generation 2 Server High-Density Deployment in Compaq Racks 43
Compaq Confidential - Need to Know Required
Appendix D −−−− Connecting Multiple Racks
Compaq offers baying or coupling kits designed to connect two or more 7000- or 9000-series
racks side by side. When coupling two or more racks, only install the side panels on the outsides
of the end racks. The following tables list the rack-deployment option kits for 7000- and
9000-series racks. Refer to the Compaq ProLiant DL380 Generation 2 Quick Specs for the most
recent options available. Table 22 lists rack-deployment options for 7000-series racks. Table 23
lists rack-deployment options for 9000-series racks.
Table 22. Rack Deployment Options for 7000-Series Racks
7000-Series Rack Options Compaq Part #
7000 Extension Bustle kit
The extension kit for the 7142 rack includes a steel collar that attaches to the front and/or rear
of the rack, enabling additional space in the rack for large equipment or cable management.
Rack Side Wall kit (42U only)
This kit includes two rack side panels for the 7142 rack.
Coupling kit
Use this kit to join two or more racks to create a multi-bay configuration. The kit supports 24inch and 600-mm floor tile spacing. Sides of adjacent rack frames are connected, and side
panels are installed on the two ends of the multi-bay configuration.
Rack Stabilizing Feet kit (42U only)
High Air-Flow Rack Door Insert
This kit enables proper ventilation to effectively cool a high-volume deployment of ProLiant
DL320 servers.
154392-B21
165652-001
165664-001
189907-001
7122: 157847-B21
7142: 327281-B21
7142 6 pack:
327281-B22
Table 23. Rack Deployment Options for 9000-Series Racks
9000-Series Rack Options Compaq Part #
Baying/Coupling kit
Use this kit to join two or more racks to create a multi-bay configuration. The kit supports 24inch and 600-mm floor tile spacing. Sides of adjacent rack frames are connected, and side
panels are installed on the two ends of the multi-bay configuration.
Stabilizer kit
The anti-tip stabilizer kit provides stability and support when equipment is installed, removed,
or accessed within the rack. Compaq highly recommends using a stabilizer kit with a standalone rack.
Ballast kit
The ballast kit provides additional stability and support for the stabilizer kit. Use the ballast kit
if heavy equipment is routinely installed, removed, or accessed within the rack. A ballast kit
must be assembled with a ballast installed on each side of the rack.
Extension Bustle kit
The extension bustle kit attaches to the rear of the rack providing an additional 8.6 cm (3.9 in)
of space to the depth of the rack. This option enables more space for cable management or
extended equipment installed in the rack.
continued
120669-B21
120673-B21
120672-B21
120679-B21
14UH-0701A-WWEN
Page 44

Compaq ProLiant DL380 Generation 2 Server High-Density Deployment in Compaq Racks 44
Compaq Confidential - Need to Know Required
Table 23. Rack Deployment Options for 9000-Series Racks (continued)
9000-Series Rack Options Compaq Part #
9142 Side Panels
This kit includes two rack side panels for the 9142 (42U) rack.
9136 Side Panels
This kit includes two rack side panels for the 9136 (36U) rack.
42U Short Rear Door
The short rear doors do not fully extend to the bottom of the rack, leaving room for cables to
route under the door at the bottom.
36U Short Rear Door
120670-B21
120671-B21
218217-B21
218218-B21
14UH-0701A-WWEN
 Loading...