

Page 1

Notice
© 2000 Compaq Computer Corporation
COMPAQ and the Compaq logo Registered in U.S. Patent and Trademark Office.
Microsoft and Windows are trademarks of Microsoft Corporation.
All other product names mentioned herein may be trademarks or registered trademarks of
their respective companies.
Compaq shall not be liable for technical or editorial errors or omissions contained herein.
The
information in this document is subject to change without notice.
The information in this publication is subject to change without notice and is provided
"AS IS" WITHOUT WARRANTY OF ANY KIND. THE ENTIRE RISK ARISING OUT
OF THE USE OF THIS INFORMATION REMAINS WITH RECIPIENT. IN NO
EVENT SHALL COMPAQ BE LIABLE FOR ANY DIRECT, CONSEQUENTIAL,
INCIDENTAL, SPECIAL, PUNITIVE OR OTHER DAMAGES WHATSOEVER
(INCLUDING WITHOUT LIMITATION, DAMAGES FOR LOSS OF BUSINESS
PROFITS, BUSINESS INTERRUPTION OR LOSS OF BUSINESS
INFORMATION), EVEN IF COMPAQ HAS BEEN ADVISED OF THE POSSIBILITY
OF SUCH DAMAGES. THE FOREGOING SHALL APPLY REGARDLESS OF THE
NEGLIGENCE OR OTHER FAULT OF EITHER PARTY AND REGARDLESS OF
WHETHER SUCH LIABILITY SOUNDS IN CONTRACT, NEGLIGENCE, TORT, OR
ANY OTHER THEORY OF LEGAL
LIABILITY, AND NOTWITHSTANDING ANY FAILURE OF ESSENTIAL PURPOSE
OF ANY LIMITED REMEDY.
The limited warranties for Compaq products are exclusively set forth in the documentation
accompanying such products. Nothing herein should be construed as constituting a further
or
additional warranty.
Compaq C3-1000
First Edition (August 2000)
Page 2

Page 3

Contents
Getting Started 1
Follow the Quick Set Up poster 1
About the Software 1
Installing the Software 3
Component locations 5
Control Panel features 6
Cable and power connections 7
Where to go from here 7
Using the Settings Utility 9
Accessing the Settings Utility 9
Main Settings 10
Print Settings 11
Contents
Copy Settings 11
Scan Settings 13
Printing 17
Loading Paper 17
Printing a Document 18
Changing the Printer Properties 19
Accessing the Control Program 21
Loading specialty papers 22
Contents
•
•
•
iii
•
•
Page 4

Copying 25
Positioning the document 25
Basic Copying 27
Additional copy settings 28
Scanning 31
Positioning the document 31
Scanning with the Computer 33
Scanning with the scan button 35
Scanning to a folder 35
Scanning to Email 36
Scanning to applications 37
Adjusting scanner settings 37
Maintaining your C3-1000 39
Using the Control Program 39
Installing or replacing print cartridges 40
iv
•
•
•
Contents
•
•
Improving print quality 41
Troubleshooting 47
Printer prints slowly or doesn’t print 47
Paper misfeeds or jams 49
Document prints with mistakes or poor quality 51
Problems with transparencies, photos, or envelopes 53
Error messages 54
Appendix 59
Index
Page 5

1
Getting Started
Getting Started
This section will help get you started using your new
Compaq C
3
1000 quickly.
Follow the Quick Set Up poster
First, follow the Quick Set Up poster. This illustrates
how to safely unpack your C
and install the ink cartridges.
Once you have finished setting it up, you are ready to
install the software.
About the Software
Although your Compaq C3 1000 can be used as a stand
alone copier, you will get the greatest benefit from your
A1500 by connecting it to your computer and installing
the included software.
Installing the software will allow you to:
•
Print from your computer
•
Scan images to your computer
3
1000, connect the cables,
•
•
•
•
Scan documents to email or word processers
Adjust the Compaq C3 1000 settings
Upload image albums to the internet
And more!
Getting Started
•
•
•
1
•
•
Page 6

What’s on the CD
The software is located on the C3 1000 Drivers CD. The
CD includes the following software:
Printer driver
The printer driver tells the computer what kind of a printer
you are using and controls the various settings, such as
print quality and paper type. You define these settings
within the printer driver, which then communicates the
settings to both the computer and the printer.
Scanner driver
The scanner driver allows you to scan images from any
graphics or OCR (Optical Character Recognition)
applications program that supports the TWAIN standard;
for example,
Compaq C3 1000 utilities
The Compaq utility software allows you to control how
you want to use your Compaq C
scan.
Kodak Imaging, Microsoft Paint
3
1000 to print, copy, and
, etc.
2
•
•
•
Chapter 1
•
•
With the utility software, you can access your printer
properties, change your default settings, and set your
scanning applications.
Media Browser
Use Media Browser to manage your images. Create image
albums, enhance your images, and post your albums to the
internet.
ReadIRIS (OCR)
With ReadIRIS, you can scan documents and convert them
to text. Load the text files into your favorite word processor
for editing.
Page 7

System requirements
Make sure your computer has the minimum system
requirements:
•
486 processor (recommend Pentium 100 or better
for optimum performance).
•
Microsoft Windows 98 Second Edition, Windows
Millennium, or Windows 2000.
•
32 MB RAM (64 MB RAM or more for optimum
performance, and 128 MB or more for scanning
large images).
•
40 MB available hard drive space (100 MB for a full
installation).
•
Additional minimum of 100 MB free hard drive
space recommended for full-color scanning.
•
CD-ROM drive required for software installation.
Getting Started
Note:
The Compaq Limited Warranty excludes the use of the
C3 1000 outside of the country of purchase. See your
Limited Warranty Statement for more details.
Installing the Software
Before you start, make sure your computer meets or
exceeds the system requirements for the drivers and
application programs you want to install. See the
System Requirements
To install the Compaq C
1 Turn on your computer and let it complete its start
up into Windows.
2 Plug in the C3 1000 power cable, then connect the
USB cable to the PC.
listed above.
3
1000 software
Getting Started
•
•
•
3
•
•
Page 8

3 Windows then detects new hardware.
Important:
For proper software installation, you MUST cancel the Add New
Hardware wizard!
Windows detects that you have installed the Compaq C3
1000 and asks you for the Driver disk. Select the Cancel
button on the above dialog. If you are starting Windows for
the first time, Windows asks you to select a printer. Again,
select Cancel.
4 Put the C3 1000 Driver CD in the CD-ROM drive. The
installation will start after a short period of time.
If the CD does not run automatically, you will need to start
it yourself:
a Click Start > Run.
b Type x:\setup.exe
(where x is the drive letter for your CD-ROM drive)
c Click OK.
3
5 When the C
1000 setup screen appears, follow the on-
screen instructions to complete the software installation.
•
•
•
Chapter 1
4
•
•
Page 9

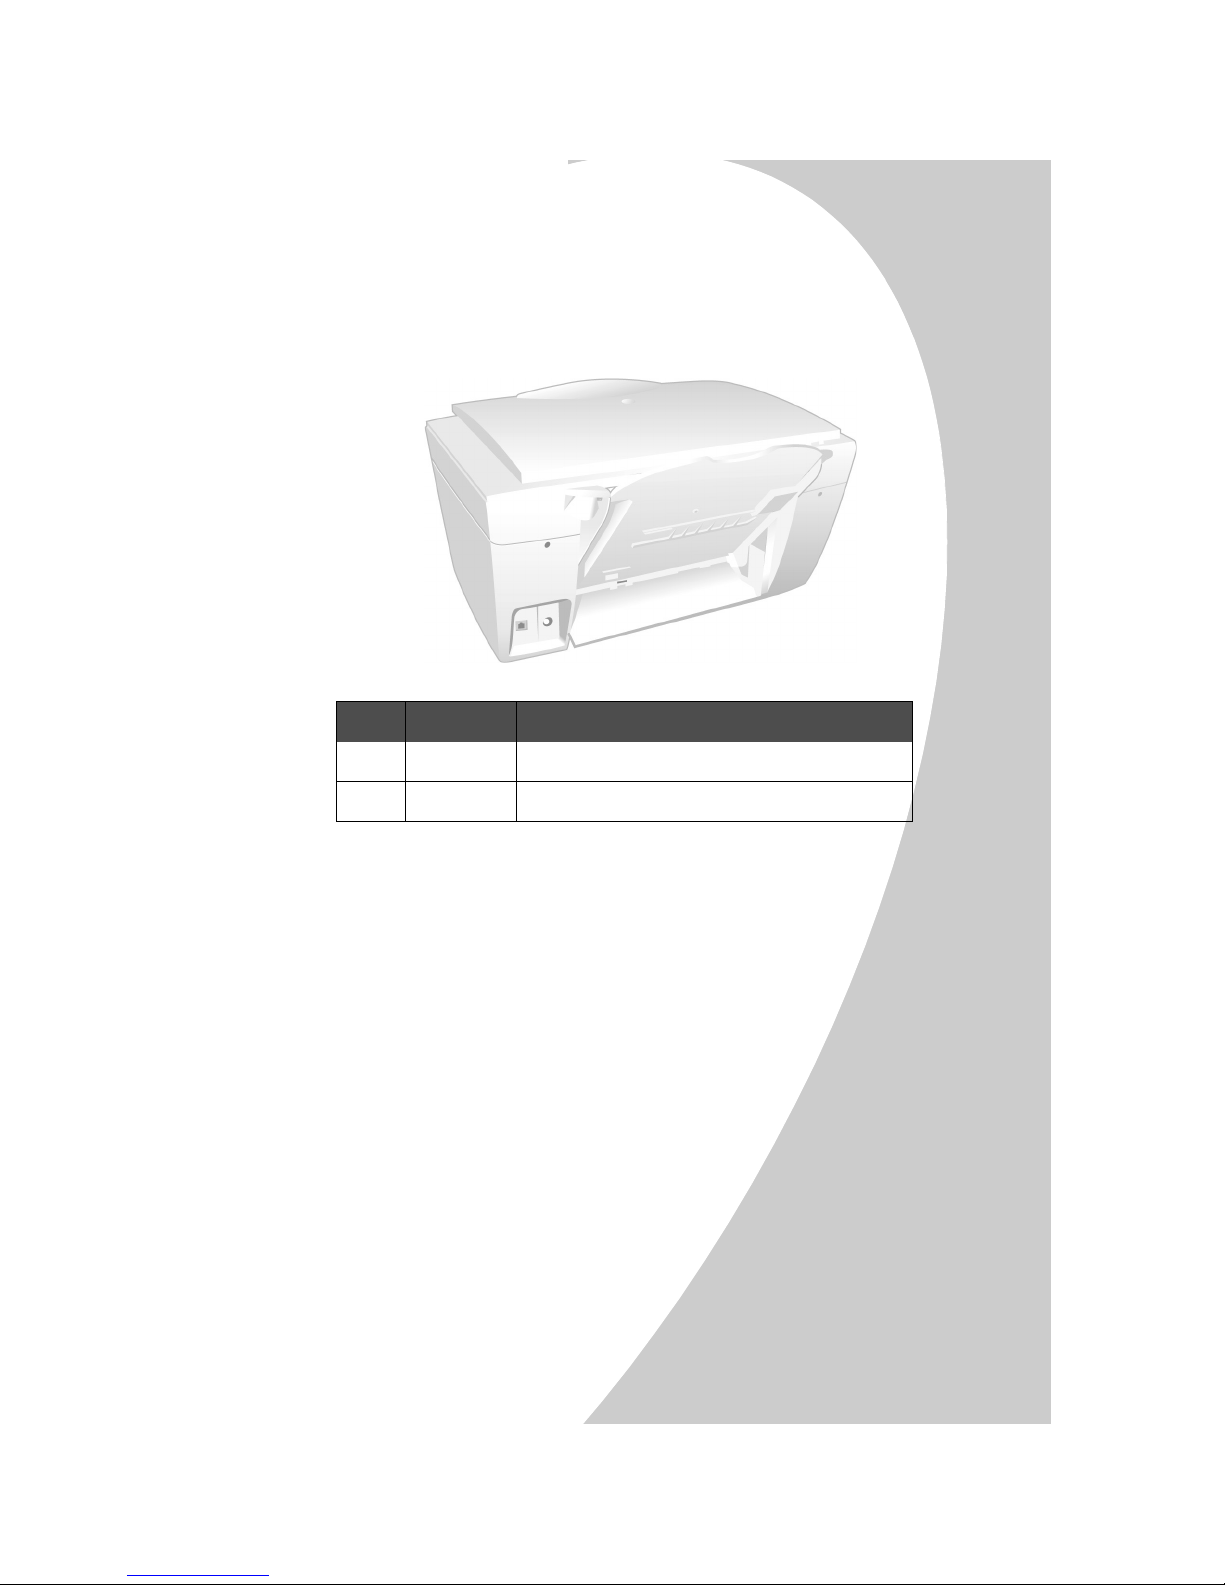
Component locations
Take a moment to become familiar with the main
components of your C
# Component Description
1 Control Panel Controls the functions of the C3 1000
2 Scanner cover Covers the scanner glass. Lift or remove to scan.
3 Input tray
latches
Press down on the two latches to open the input tray.
Used when adjusting the paper width, loading
envelopes, or clearing paper jams.
3
1000.
Getting Started
4 Input tray Place blank paper into the input tray for printing.
5 Front door Open the front door for access to the ink cartridges or
scanner lock.
6 Exit tray Extend the paper exit tray to support your printed
documents.
Getting Started
•
•
•
5
•
•
Page 10

Control Panel features
The control panel provides you access to many features of
3
the C
1000:
# Button Description
1 Power Turns the power on or off.
2 Form Feed Use to continue printing after reloading the paper tray
3 Menu Display a menu of the current settings. Press
4 Black Copy Performs a black copy, or switch to the black copy
5 Color Copy Performs a color copy, or switches to the color copy
when it runs out of paper during a print job. Also
removes paper if paper does not exit after printing.
repeatedly to cycle through all menus, and the
Up/Down buttons to change the settings.
mode from the color copy mode.
mode from the black copy mode.
6
•
•
•
Chapter 1
•
•
6 Scan Accesses the Scan menu. Use the arrow buttons to
select a scan destination, then press Start.
7 Setup Provides access to the system setup menus. Use the
menu button to cycle through all menus, and the
Up/Down buttons to change the settings.
8 Up/Down Use to change the number of copies, or to change the
setting while in a menu.
9 Cancel/No Cancels an operation at any time. Also provides a No
response when answering questions.
10 Start/Yes Starts a copy or scan job. Also provides a Yes
response when answering questions.
Page 11
Cable and power connections
The USB cable connection and power outlet are located
on the rear of the unit:
# Connection Description
1 USB Plug the USB cable into this connector.
2 Power Plug in the C3-1000 power supply cable.
Getting Started
Where to go from here
If you have not installed your ink cartridges, see
“Installing or replacing print cartridges” on page 40.
To learn about the C3 1000 Settings Utility software
for your computer, see the next chapter “Using the
Settings Utility” on page 9.
For information on printing, see “Printing” on page 17.
To learn how to make copies, see “Copying” on
page 25, or for scanning, see “Scanning” on page 31.
Getting Started
•
•
•
7
•
•
Page 12

•
•
•
Chapter 1
8
•
•
Page 13

2
Using the Settings Utility
Using the Settings Utility
The C3 1000 Settings Utility allows you to change the
default settings of your C
make a copy by pressing the Black Copy or Color
Copy button, the default copy settings will be used.You
can customize copy and scan settings to suit your
preferences.
You can always make a temporary change for a specific
job (for instance, changing the Contrast while
performing a copy). When you are finished with the
current job, the C
settings you have chosen with the Settings Utility.
3
1000 will default back to the
Accessing the Settings Utility
There are a number of ways to access the C3 1000
Settings Utility:
•
From the Windows
Start Programs > Compaq C3-1000 >
Compaq C3-1000 Settings Utility.
•
From the system tray, left click on the C3 1000
Monitor icon (shown here on the left):
3
1000. For instance, if you
Start
menu button, click:
•
Or right click on the C3 1000 Monitor icon, and
select C
3
1000
Settings
from the menu.
Using the Settings Utility
•
•
•
9
•
•
Page 14

Main Settings
The main settings window is the starting point for
accessing all of the C
3
1000 settings. Select one of the
buttons to change the default settings for the corresponding
feature (Black Copy for black copy settings, Scan for scan
settings, and so on).
3
You can make changes to your C
your C
3
1000 is not connected to your computer. Any
changes will be sent to the C
1000 settings even when
3
1000 the next time it is
connected.
10
•
•
•
•
•
IMPORTANT:
Chapter 2
Your settings changes are sent to the C3 1000 after you press the
Ok
button, the
Close
button, or the
[x]
close button.
Page 15
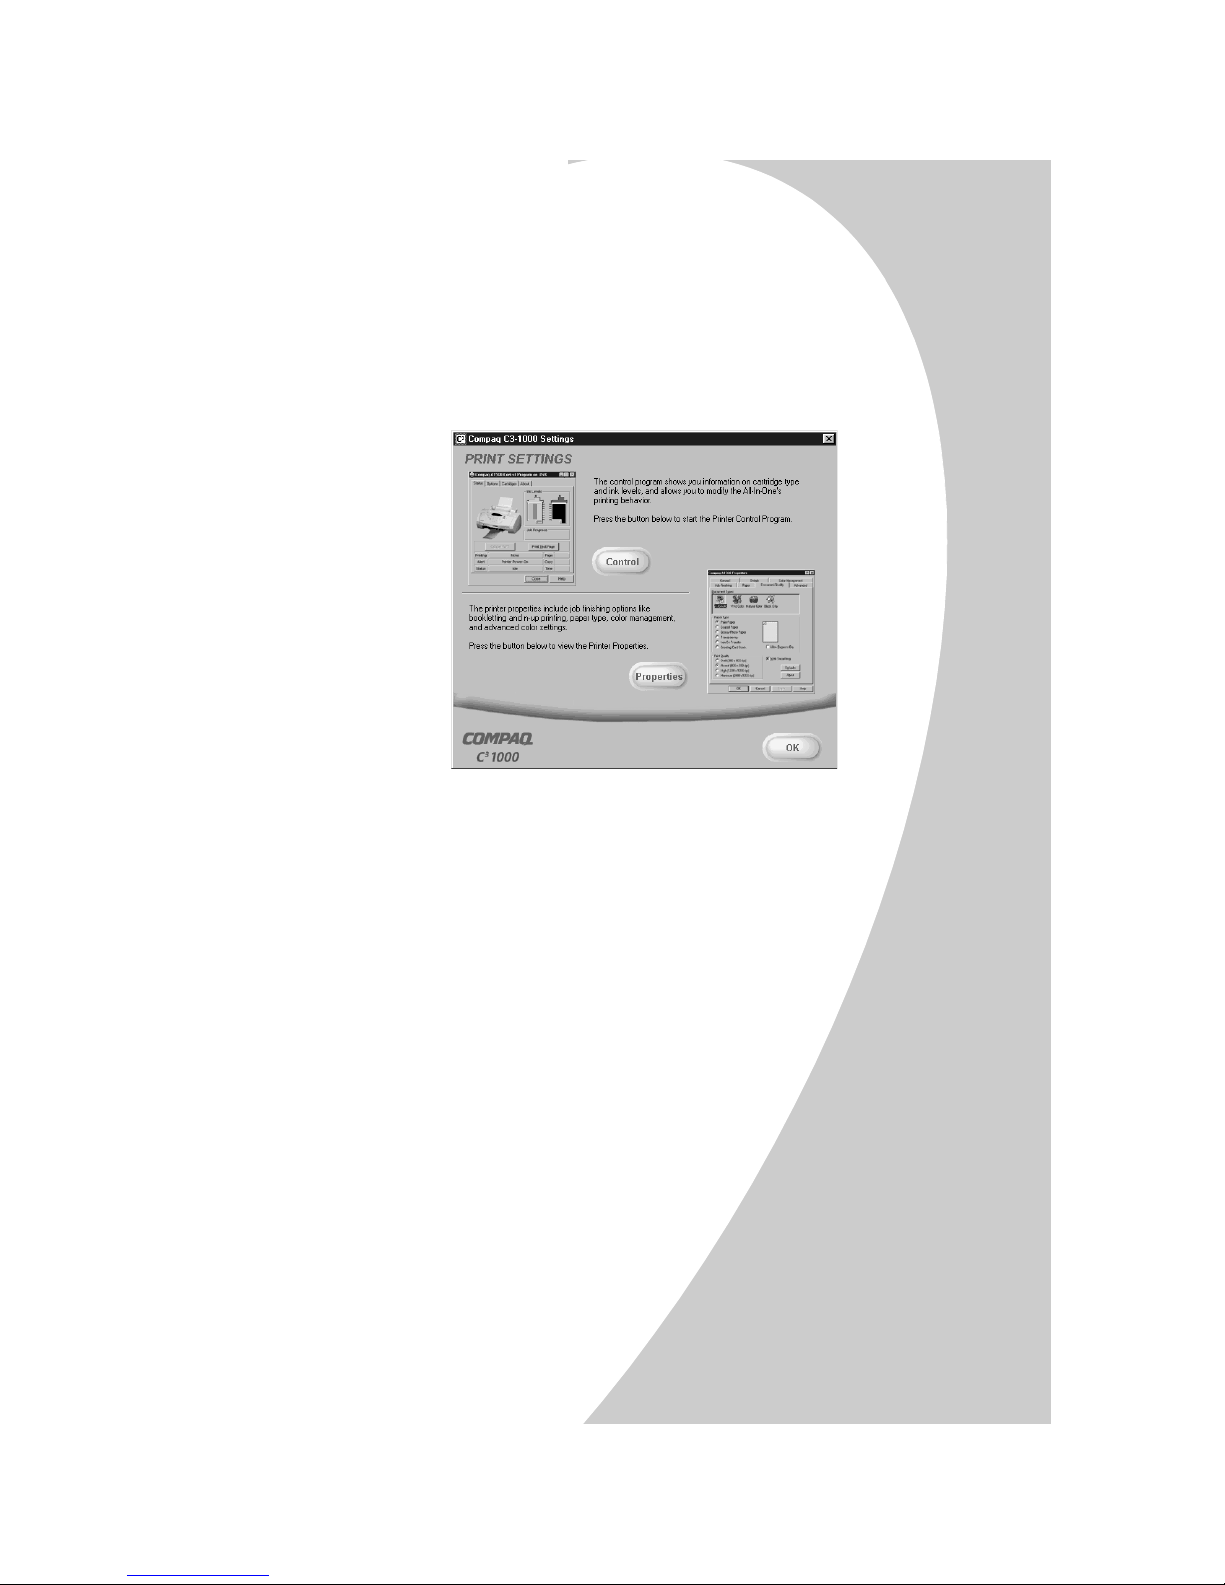
Print Settings
Select the
Print
button from the main settings window
to access the Print Settings. The Print Settings gives
you access to the
Properties
Control Program
.
and the
Printer
For more information on using the Control Program
and Printer Properties, see “Printing” on page 17.
Using the Settings Utility
Copy Settings
Copy Type
The Copy Settings window controls how the C3 1000
makes copies.
By default, the C3 1000 makes normal resolution black
and white copies. You can change the default copy type
to three different black settings and three different
color settings. Choose the type of copy you expect to
usually make.
Using the Settings Utility
•
•
•
11
•
•
Page 16
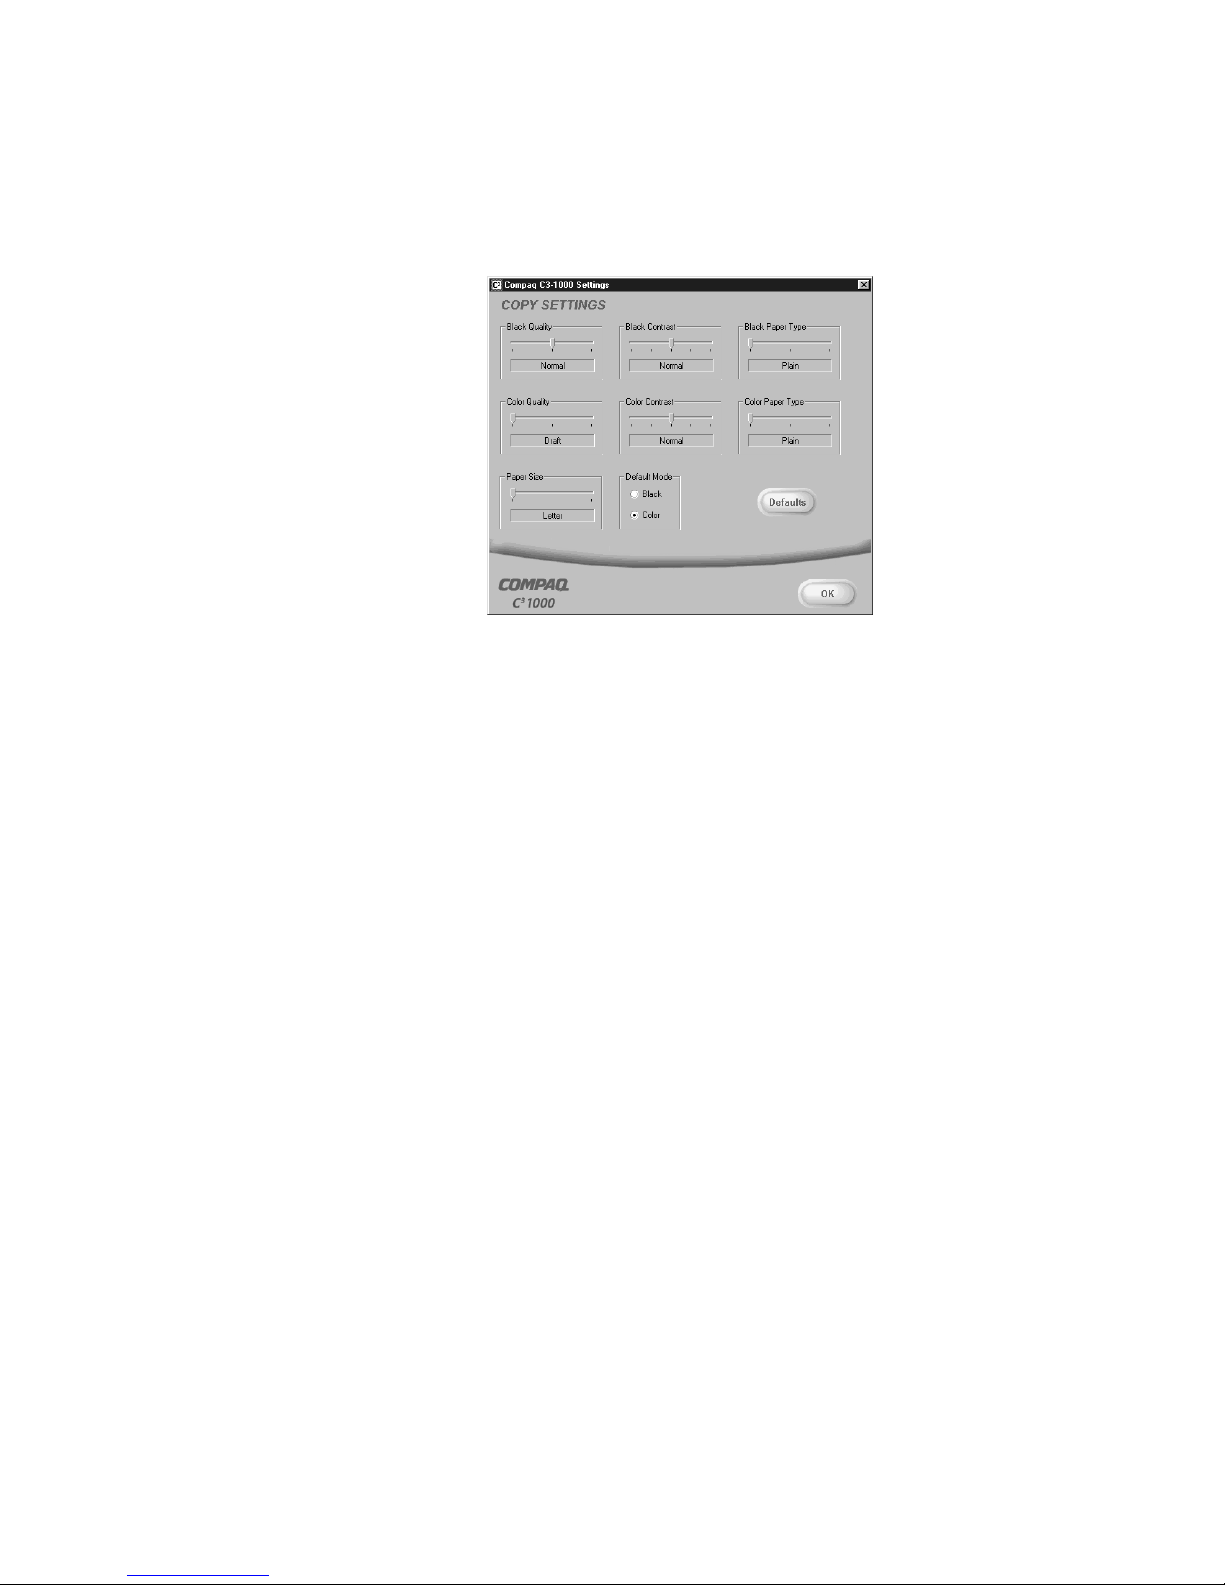
Copy Quality
Select a default quality for Black copies, and a default
quality for Color copies. Use a lower quality setting for fast
copies and less ink usage.
Copy Contrast
The Copy Contrast setting controls the lightness or
darkness of the copy. You can select a default contrast for
Black copies and one for Color copies.
Paper Type
The paper type makes a big difference, especially when
making color copies. Select the default paper type used
when you make black copies, and the paper type you
normally use for color copies.
Default Mode
When the C3 1000 is powered on, or has been inactive for a
period of time, it will return to the defaults you select
above. You can also select which copy mode you use the
most often.
•
•
•
Chapter 2
12
•
•
Page 17

Defaults
Scan Settings
To reset all of the copy settings to the C3 1000 defaults,
press this button.
Using the Settings Utility
The Scan Settings window controls the scan type and
contrast and the Scan To list.
Scan To Menu
When you press the Scan button on the C3 1000, a Scan
To menu appears on the LCD display panel. The first
two menu entries are
User Folder
and
Email
. You can
add up to six (6) additional menu options for your
favorite applications.
Scan To User Folder
The first menu entry is always the
User Folder is where your scanned pictures are stored
after you scan them. Once scanned, they will be given
the filename of
Month-Day-###.ext
file you scan on August 5th will be named
002.JPG
(if you scanned a JPEG file).
User Folder
. The second
Aug-05-
Using the Settings Utility
. The
•
•
•
13
•
•
Page 18

By default, the User Folder is set to
usually located in your
My Documents
My Pictures
folder. You can
, which is
change this to any folder you wish. Type in the new folder
name, or press the
[…]
button to browse for an existing
folder.
Images can be stored in one of three popular file types
(Windows bitmap BMP, TIFF, or JPEG), or one of two text
formats (ASCII Text TXT, or Rich Text Format RTF).
Select a file type that is compatible with your application.
Scan To Email
The second Scan To menu entry is always
to email, you must have an internet account and
connection, a valid email address, and an email program
that supports MAPI (such as
,
Express
Eudora
, etc).
Microsoft Outlook, Outlook
Email
. To scan
14
•
•
•
Chapter 2
•
•
Note:
By default, the text
TXT
file format is used for Emails.
Your documents will be scanned, converted by ReadIRIS,
and then placed into the body of your email message.
You can select a different default file type, such as JPG or
TIF. Your scanned files will be attached to the email
message.
Once scanned, your email program will be run. You can
then select recipients from your email address book, add a
subject, and type a message.
Be sure and read over any scanned text to verify its accuracy.
Scan To Applications
Once an image is scanned, the C3 1000 can launch your
favorite image processing applications. You can define up
to six (6) additional Scan To applications, numbered 3 to 8.
Page 19

Scan To Entry
To store an entry, first select the number you wish to
assign to that entry. The numbers do not have to be
sequential. Pick numbers that are meaningful to you.
Display Name
Once you've chosen a number, give the entry a name.
This name can be up to 16 characters, and will be
displayed on the C
3
1000 LCD panel.
Application
Type the path of the application program you want to
use to edit or view the scanned image. To browse for a
program, click on the
[…]
browse button.
File Type
Select a file type that is compatible with the program.
For graphics programs, choose one of the graphics file
formats (BMP, TIFF, or JPG). For text or word
processing programs, choose TXT or RTF.
Using the Settings Utility
Note:
ReadIRIS must be installed to convert your scanned files
into the text (TXT) or word processing (RTF) formats.
ReadIRIS is normally installed as part of the C
software installation.
3
1000
Clearing an Entry
To clear an entry of all information, first select the
entry number you wish to clear and then press the Clear
button.
Scan Type
By default, the C3 1000 performs normal resolution
color scans. You can change the default scan type to
three different black settings and three different color
settings. Choose the type of scan you expect to usually
make.
Using the Settings Utility
•
•
•
15
•
•
Page 20

Scan Contrast
The contrast setting controls the lightness or darkness of
the scan. Use the contrast to lighten or darken your scans if
needed.
Defaults
To reset all of the scan settings to the C3 1000 defaults,
press this button.
•
•
•
Chapter 2
16
•
•
Page 21

3
Printing
Loading Paper
Printing
This chapter provides some basic steps for printing a
document. The exact steps for printing may vary from
one software program to another. Refer to your
software application's user manual for detailed printing
steps.
First, you will need to load some paper for printing.
1 Place up to 100 sheets of paper
thickness)
with the print side facing you.
2 If this is the first time you have loaded paper into the
printer, or you have changed paper sizes, you will
need to adjust the paper guide. To adjust the guide:
a Press down on the two input tray latches, and
lower the input tray.
against the right side of the input tray,
(depending on
Printing
•
•
•
17
•
•
Page 22

b Squeeze the release tab and the paper guide together
and slide the paper guide to the edge of the paper.
c Raise the input tray and press it firmly against the
back of the C
Important:
Make sure both latches are securely fastened! Otherwise you
may experience misfeeds or paper jams.
Printing a Document
To print a document:
1 Start a program and create a document, or open an
existing document that you want to print.
2 Open the program's File menu.
3 Select Print… or Print Setup from the File menu.
Make sure the Compaq C3 1000 is selected as your
printer. If it isn't, select it now.
Note:
When installed, your C3 1000 is initially set as the default
printer.
4 Click Properties or the Setup button if you want to
change the settings that are appropriate for printing that
document.
5 Select OK to close the Properties dialog box.
6 Select OK to print after making any necessary changes
to your print settings.
3
1000.
•
•
•
Chapter 3
18
•
•
Page 23

Changing the Printer Properties
Most Windows software applications allow you to
make changes to the printer properties. The properties
are the settings used when you print. This includes
settings that determine how a print job looks, such as
page size, paper orientation, and margins. Settings
changed in the software application will override
settings made in the printer driver.
Printing
Note:
Changes you make to the printer properties from within an
application will only last while that application is running.
To change the default printer properties for all
applications, access the Printer Properties from the
Settings Utility. You can do this two ways:
1 Left click on the C3 1000 Monitor icon in the system
tray. Click on the Print button, and then click on the
Properties button to view the Printer Properties.
-or-
2 Right click on the C3 1000 Monitor icon, and select
Properties from the displayed menu.
Printing
•
•
•
19
•
•
Page 24

Job Finishing
The Job Finishing tab in the printer properties provides
options for you to adjust how the document will appear on
the printed page. Finishing options can include Booklet,
Poster, Handout and Two-sided Printing.
Note:
The Job Finishing options available will vary depending on your
printer driver and operating system.
Booklet
The Booklet option allows you to print a document out as a
booklet. If the Print Instruction Page is checked, a page will
print directing you how to insert the paper so that the
booklet prints correctly.
Poster
The Poster option enlarges the printed document. If you
check Show Crop Marks, the image will print with crop
marks. The white space around the image can be easily
trimmed.
Handout
Choose the Handout option to print multiple pages on a
single sheet of paper. If you want to print the document on
both sides of the paper, you can change the binding edge to
change how the image is printed.
•
•
•
Chapter 3
20
•
•
Two-Sided Printing
The Two-Sided Printing option prints the document on
both sides of the paper. If you check the Print Instruction
Page box, a sheet will print describing how to insert the
paper. Selecting the Binding Edge will print the image in
either Portrait or Landscape mode.
Page 25

Paper
Use the paper tab to select what size of paper you have
in your printer, the orientation, the number of copies to
print, etc.
You can also reverse the printing order of your
document pages. The first page of your document will
be on top of the stack in the paper exit tray. If you
choose to collate your document, multiple copies of a
multi-page document will be printed such that the
documents are grouped together, rather than the pages.
Document/Quality
The Document/Quality tab controls the paper type,
such as plan, coated, and glossy. It also controls the
quality (resolution) of the printing. Higher resolutions
print better, but take longer and consume more ink.
Advanced
The advanced tab allows you to change how the printer
handles color printing. You should rarely need to
change these settings, if at all.
Printing
Accessing the Control Program
To access the Compaq C3 1000 Control Program:
1 Click on the Windows Start menu button:
Start > Programs > Compaq C3-1000 >
Compaq C3-1000 Control Program.
-or-
2 Right click on the C3 1000 icon in the bottom right
corner of the taskbar (the system tray), then select
Control Program from the menu.
Note:
See “Using the Control Program” on page 39 for more
information on using the Control Program.
Printing
•
•
•
21
•
•
Page 26

Loading specialty papers
Load up to: Make sure:
10 envelopes • The print side is facing you and the
paper guide is against the side of
the envelopes.
• The stamp location is in the upper
left corner.
• The envelopes are loaded
against the right side of the sheet
feeder.
vertically
10 greeting cards,
index cards, postcards, or photo cards
• The print side is facing you and the paper guide is
against the side of the cards.
• The cards are loaded vertically against the right side
of the sheet feeder.
25 sheets of photo
paper or photocards
20 sheets of banner
paper
• The glossy or coated side is facing you.
• The paper guide is against the side of the paper.
• You place the banner paper
behind the printer. Then
bring the unattached edge of
Note:
Make sure you
select Banner or Ban-
ner A4 paper size in the
Printer Properties. For
help, see page 23.
the first page over the
printer and into the sheet
feeder.
• The paper guide is against
the side of the paper.
10 transparencies • The rough side of the transparency is facing you
(smooth side down).
• The paper guide is against the edge of the
transparencies.
100 sheets of customsized paper
• The print side is facing you and the paper guide is
against the side of the paper.
• Your paper size fits within these dimensions:
- Width: 3.0 in. to 8.5 in. (76 mm to 215.9 mm)
- Length: 5.0 in. to 17.0 in. (127 mm to 432 mm)
25 iron-on transfers • You load the iron-on transfers following the
•
•
•
Chapter 3
22
•
•
instructions on the package.
• The paper guide is against the side of the iron-on
transfers.
Page 27

Choosing settings for specialty papers
When your printer software was installed, the Printer
Properties settings were set to the default settings. Use
the default settings for printing most documents on
plain paper. To change your printer settings for printing
on specialty papers, use the following table:
When you are
printing on this
specialty paper:
Envelopes Paper From the Paper Size area, scroll to
Click this Printer
Properties tab:
To make these selections:
select the appropriate envelope
size.
Note:
Many applications are designed
to override the envelope settings in
Printer Properties.
Printing
Greeting cards,
index cards, or
postcards
Photo, glossy or
coated papers
Sheets of customsized paper
Document/Quality
Paper
From the Paper Type area, select
Greeting Card Stock
.
Select the appropriate Paper Size
setting.
Document/Quality From the Paper Type area, select
Glossy/Photo Paper
Notes:
• For the best possible photo quality,
print with a photo and color
cartridge combination in your
printer. For help installing a
cartridge, see page 40.
• When printing photos, remove
each photo as it exits from the
printer and allow it to dry before
stacking.
.
Paper From the list of Paper Sizes, scroll
to select
Custom
. Enter the dimensions for your custom paper size.
For help, see “Loading specialty
papers” on page 22.
Printing
•
•
•
23
•
•
Page 28

When you are
printing on this
specialty paper:
Click this Printer
Properties tab:
To make these selections:
Banner paper Paper From the list of Paper Sizes, select
Banner
or
Banner A4
.
Iron-On transfers Document/Quality From the Paper Type area, select
Iron-On Transfer
Note: We recommend printing on
plain paper before printing on the
actual iron-on transfer.
.
Transparencies Document/Quality From the Paper Type area, select
Transparency
Select
1200dpi
Note:
When printing transparencies,
remove each transparency as it exits
from the printer and allow it to dry
before stacking.
.
Normal 600dpi or High
Print Quality.
•
•
•
Chapter 3
24
•
•
Page 29

4
Copying
The Compaq C3 1000 offers two ways to copy a
document. You can copy:
•
Using black only
•
Using full color
You can copy a document even while your C
printing another document, but not while you are
scanning. Your copies will print after the first
document has completed printing.
Your copies are stored in memory while the first
document is printing. When the memory becomes full,
you will have to wait for some of the printing to
complete before making more copies.
Copying requires the use of both the printer and the
scanner components.
3
1000 is
Copying
Note:
The scanner is locked for shipping. Make sure you have
unlocked the scanner before you attempt any scanning
operations. For instructions on unlocking the scanner, See
“Unlocking and locking the scanner” on page 45.
Positioning the document
The Compaq C3 1000 can scan thin items (such as a
sheet of paper, a magazine, or a photograph), or larger
items (such as a book).
Positioning a thin document
To scan a thin document, such as a sheet of paper or
photograph:
Copying
•
•
•
25
•
•
Page 30

•
Lift the top cover of the C3 1000.
•
Place your document face down on the glass. Align it
along the left and top edges, so it occupies the corner.
•
Close the top cover.
Positioning a large item
To scan a large item, such as a book or other object:
•
•
•
Chapter 4
26
•
•
•
Lift the top cover of the C3 1000 until it is at a 90 degree
angle. The cover will be straight up and down.
•
Pull the cover gently upward. The cover will pull out of
the hinge slots in the back. Gently store the cover on a
nearby table or desk.
•
Place your document face down on the glass. Align it
along the left and top edges, so it occupies the corner
indicated by the arrow.
Page 31

•
When you have completed your scan, replace the
cover by sliding the cover hinges into their slots in
3
the back of the C
1000.
Caution:
Basic Copying
Note:
Making multiple copies
While the cover is removed, do not look at the scanner lamp.
The light can be bright for your eyes. Always use the
scanner cover when possible.
To make a copy with the default settings, simply press
Start
the
# Copies
You can customize the default settings of your C3 1000 to fit
your needs. See “Using the Settings Utility” on page 9.
button! It is that easy.
Copy Mode Copy Quality
Before you press the Start button, use the Up and Down
arrows to adjust the number of copies you wish to
make. The default is always one (1) copy, and the
maximum is 99.
Copying
Note:
Changing the copy mode
The LCD will display the current copy mode, either
BLACK
or
COLOR
. To change the mode, press either
the Black Copy or Color Copy button.
Once you are in the BLACK copy mode, pressing the Black
Copy button will make a black copy, just as if you had
pressed the Start button. Likewise, pressing the Color Copy
button while in the COLOR copy mode starts a color copy.
Copying
•
•
•
27
•
•
Page 32

Adjusting the quality
You can select from three different copy qualities for each
copy mode.
To adjust the quality of your copies:
1 Press the Menu button until Quality: appears on the
LCD display.
2 Use the Up and Down arrow buttons to make your
selection. Choose from Draft, Normal, or Best.
3 When finished, you can press the Start button to make
your copies, or press the Menu button again to change
additional settings (described below). Press the Cancel
button to cancel the copy operation altogether.
Use Draft quality for quick copies, Normal quality for a
good balance between speed and quality, and Best quality
for the best copies you can make.
Note:
The Best quality setting will consume more ink and will take
longer to print, but the printing quality is excellent.
Additional copy settings
To help you make the best copies possible, the C3 1000
allows you to adjust several other copy settings.
Adjusting the contrast
If you need to lighten or darken your copy, use the contrast
setting. To adjust the contrast:
1 Press the Menu button until Contrast: appears on the
LCD display.
2 Use the Up and Down arrow buttons to decrease or
increase the contrast. A contrast bar will display the
current contrast value...a smaller bar indicates a lighter
copy, and a larger bar indicates a darker copy.
•
•
•
Chapter 4
28
•
•
Page 33

3 When finished, you can press the Start button to
make your copies, or press the Menu button again to
change additional settings. Press the Cancel button
to cancel the copy operation altogether.
Changing the size
Normally, your copies will be the same size as the
original document (a value of 100%). You may want to
3
reduce or enlarge your copies. The C
1000 can create
copies that are 25% to 400% of the original size.
To adjust the copy size:
1 Press the Menu button until Size: appears on the
LCD display.
2 Use the Up and Down arrow buttons to decrease or
increase the size. Each press of the button will
decrease or increase the size in 1% increments. Hold
the button down to adjust the size in faster 10%
increments.
3 When finished, you can press the Start button to
make your copies, or press the Menu button again to
change additional settings. Press the Cancel button
to cancel the copy operation altogether.
Copying
Using different paper types
The quality of your copies will depend on the type of
paper you use. In most cases, you will use normal copy
paper. If you use glossy paper or transparencies, you
should change the C3 1000 paper type setting.
To change the paper type:
1 Press the Menu button until Paper: appears on the
LCD display.
Copying
•
•
•
29
•
•
Page 34

2 Use the Up and Down arrow buttons to select your
paper type, either Plain, Glossy, or Transp. (for
Transparency).
Note:
Note:
The Glossy paper type is only available when using the Color
Copy mode.
3 When finished, you can press the Start button to make
your copies, or press the Menu button again to change
additional settings. Press the Cancel button to cancel the
copy operation altogether.
For more information on paper types, See “Loading specialty
papers” on page 22.
Copy paper size
By default, the C3 1000 is set to use Letter sized copy
paper. You can choose between Letter and A4 sized paper.
To change the copy paper size setting:
1 Press the Setup button. The first setup menu will be
Copy Size.
2 Use the Up and Down arrow buttons to select your copy
paper size, either LT R for Letter size, or A4 for the A4
paper size.
3 When finished, you can press the Start/Yes button to
make your selection, or press the Menu button again to
view additional setup menus. Press the Cancel/No
button to retain your original paper size setting.
•
•
•
Chapter 4
30
•
•
Page 35

5
Scanning
The Compaq C3 1000 offers two ways to scan a
document. You can scan:
•
Using your computer
•
Using the Scan button
You can scan a document while your C
printing another document, but not while you are
making copies.
The driver supports scanning from the bundled
applications as well as all your favorite computer
programs.
3
1000 is
Scanning
Note:
The scanner is locked for shipping. Make sure you have
unlocked the scanner before you attempt any scanning
operations. For instructions on unlocking the scanner, See
“Unlocking and locking the scanner” on page 45.
Positioning the document
The Compaq C3 1000 can scan thin items (such as a
sheet of paper, a magazine, or a photograph), or larger
items (such as a book).
Positioning a thin document
To scan a thin document, such as a sheet of paper or
photograph:
•
Lift the top cover of the C3 1000.
Scanning
•
•
•
31
•
•
Page 36

•
Place your document face down on the glass. Align it
along the left and top edges, so it occupies the corner.
•
Close the top cover.
Positioning a large item
To scan a large item, such as a book or other object:
•
Lift the top cover of the C3 1000 until it is at a 90 degree
angle. The cover will be straight up and down.
•
Pull the cover gently upward. The cover will pull out of
the hinge slots in the back. Gently store the cover on a
nearby table or desk.
•
•
•
Chapter 5
32
•
•
•
Place your document face down on the glass. Align it
along the left and top edges, so it occupies the corner
indicated by the arrow.
Page 37

•
When you have completed your scan, replace the
cover by sliding the cover hinges into their slots in
3
the back of the C
1000.
Caution:
While the cover is removed, do not look at the scanner lamp.
The light can be bright for your eyes. Always use the
scanner cover when possible.
Scanning with the Computer
The Compaq C3 1000 provides a standard TWAIN
interface for scanning documents into the PC.
TWAIN is a common scanner interface supported by
many application programs.
Note:
The Kodak Imaging for Windows program comes standard
with Windows. Use it for your simple scanning needs.
To perform a scan using the
the following steps:
1 Place the document on the scanner glass, as
described in Positioning the Document above.
2 Start Kodak Imaging (select Start > Programs >
Accessories > Imaging)
3 Open the File menu and choose the Select Device...
menu option. Make sure that the selected scanner is
set to Compaq C3-1000 USB.
Imaging
Scanning
utility, complete
Scanning
•
•
•
33
•
•
Page 38

4 Open the File menu again and choose Scan New (or
Acquire Image if you are running Windows 2000).
Note:
5 The Compaq C
3
1000 USB TWAIN scanning dialog
will appear, as shown above. Select the Scan button on
the dialog to scan the entire page.
6 Optionally, you can select the Preview button instead.
This will perform a quick preview scan of your
document. Once the preview is complete, you can move
and size the dashed box to select the exact area of your
document you wish to scan. Once you have selected
your area, push the Scan button to perform the actual
scan.
Pay attention to the Image Size indicated on the dialog.Large
scan areas and resolutions above 300 DPI require a lot of
memory and disk space, and may take a long time to process.To
minimize this, scan only the area you need, and don’t use a
resolution above 300 DPI unless you know you require it.
•
•
•
Chapter 5
34
•
•
Page 39

Scanning with the scan button
To perform a scan using the
following steps.
1 Place the document on the scanner glass, as
described in Positioning the Document above.
2 Press the Scan button.
3 Select the Scan To destination. Use the up and down
arrow buttons to cycle through the available choices.
For a full description of the scan destinations, see
below.
4 Press Start.
The C3 1000 will then contact your computer and
perform the scan.
Note:
If you have not scanned any documents for 30 minutes, there
will be a delay of approximately one minute while the
scanner warms up.Otherwise, the scan will proceed
immediately.
Scanning to a folder
The first Scan To destination is your
is initially your My Pictures folder, located in your My
Documents directory. You can change your user folder
and default file type with the Settings Utility.
Scan
button, complete the
User Folder
Scanning
. This
Note:
Simply press the Scan button twice to scan your document to
your User Folder, using the settings you selected with the
Settings Utility.
Scanned file names
Once scanned, scanned files will be given the filename
of
number of the image scanned that day. For instance, the
second image scanned on August 5 would be named
Aug-05-002.JPG
Month-Day-###.ext
.
, where
###
indicates the
Scanning
•
•
•
35
•
•
Page 40

The file extension depends on the file type selected for
your scan.
Scanning to Email
The second Scan To menu destination is
Email
. This
option will scan documents directly into your email
program, and either convert the document to text for
editing, or attach the documents as graphic images.
To use this option, you must have an email program
installed on your computer, and it must support MAPI (a
special mail interface). Examples of MAPI email programs
include
Eudora
Microsoft Outlook Express, Microsoft Outlook
. Also, you must have an internet account and an
, and
email address.
By default, Scan To Email uses the TXT file type. This will
convert your scanned documents to ASCII text and place
the text in your email program for editing. If you select
another file type with the Settings Utility, your documents
will be scanned using the file type you choose and attached
to you email message.
Once your document is scanned, your email program will
launch. The document text will be added or the scanned
images will be attached. Simply enter a subject, select your
recipients from your email address book, and send!
Note:
•
•
•
Chapter 5
36
•
•
Be sure and read over the scanned text for formatting or editing
mistakes. The character recognition does a great job of
converting characters, but the quality of conversion will depend
on the document being scanned.
A copy of your document will be stored in your User
Folder. See the previous
Scan to a Folder
section for a
description of the file naming convention used.
Page 41

Scanning to applications
The remaining Scan To menu options are for defining
your own Scan To destinations. You can define up to
six (6) applications, numbered 3 through 8.
Scanning
For instance, you can add
and scan to BMP files for editing, add
and scan to the RTF format for word processing, or
scan to a program like
images to the internet!
Once your document is scanned, the application
program will automatically launch and will load the
scanned document.
See “Scan To Menu” on page 13 for information on
setting up your Scan To destination menu.
Adjusting scanner settings
When using your computer to scan, the application
program will control the scanner settings. If the
application uses the TWAIN dialog, you can control the
resolution, contrast, brightness, and more.
When scanning with the C
scan settings are controlled by the Settings Utility. See
“Scan Settings” on page 13 for more information.
Microsoft Paint
Media Browser
3
1000
Scan
to the menu
Microsoft Word
and upload your
button, your
Scanning
•
•
•
37
•
•
Page 42

•
•
•
Chapter 5
38
•
•
Page 43
6
Maintaining your C3-1000
Maintaining your C3-1000
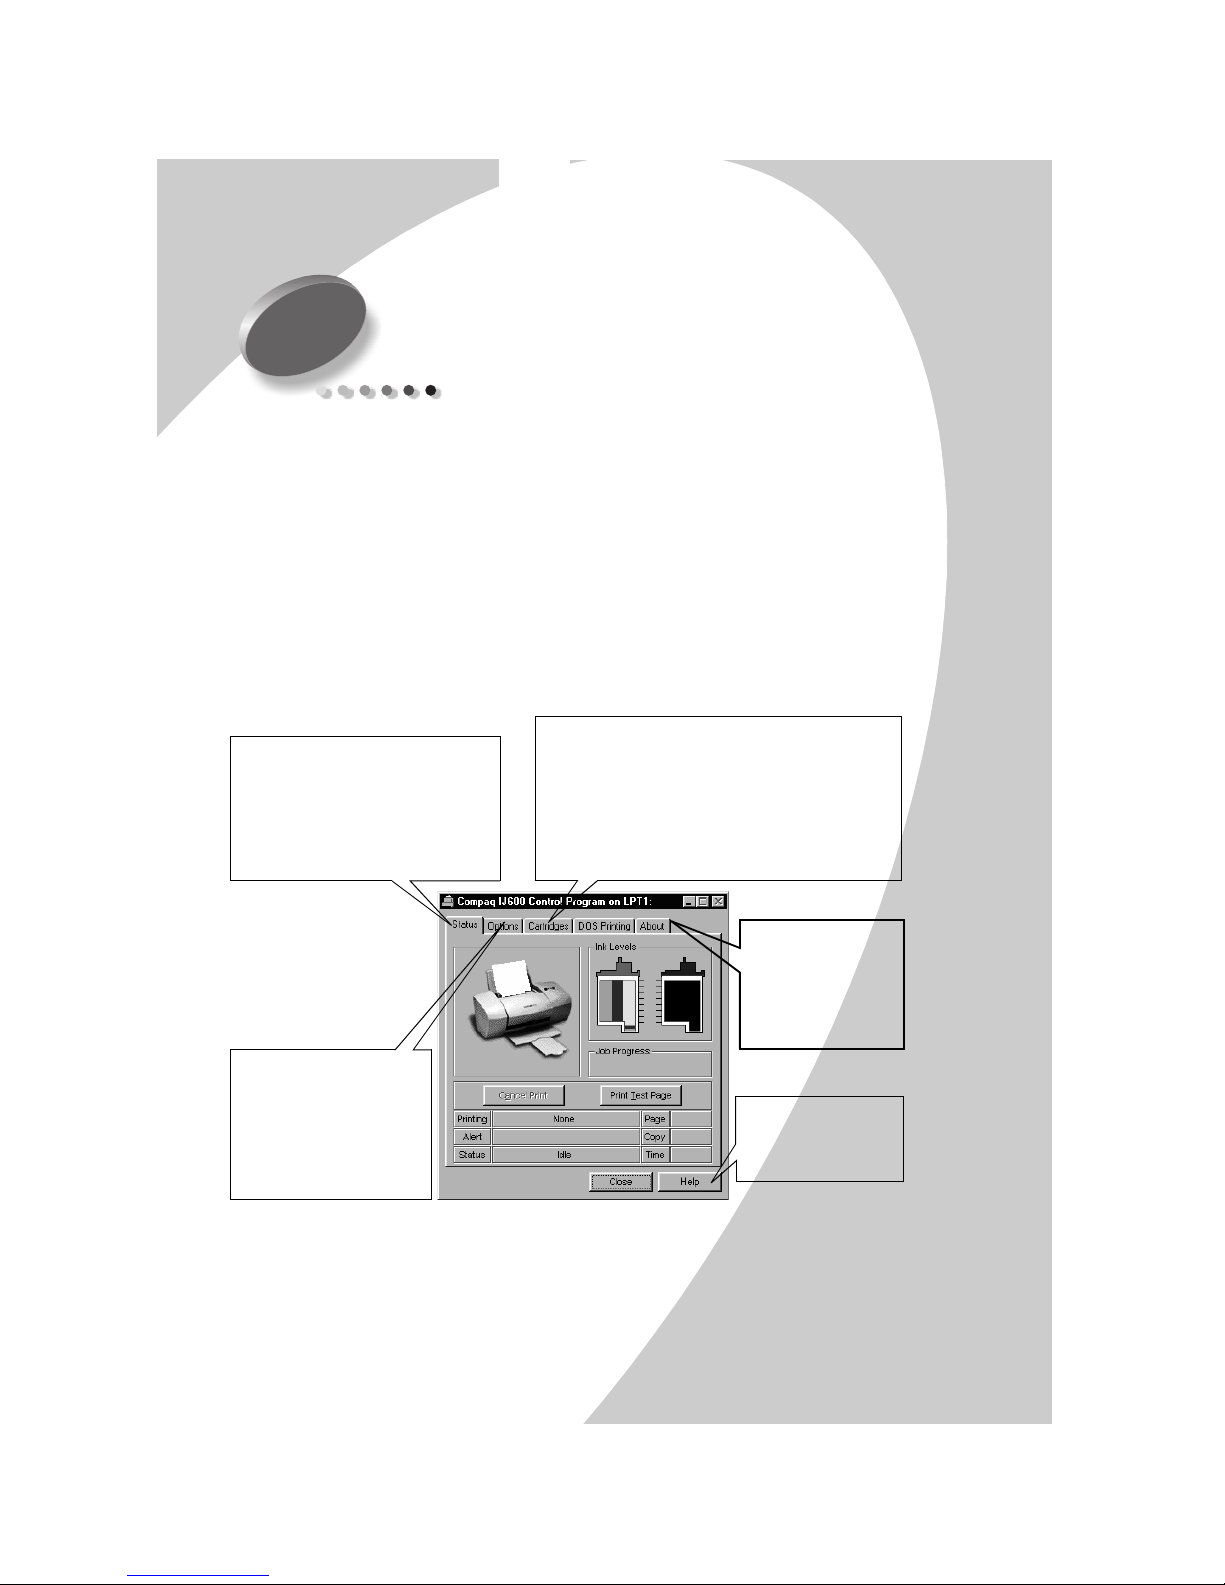
Using the Control Program
The Control Program lets you monitor your printer and
install or replace print cartridges. To open the Control
Program from the
1 Programs.
2 Compaq C3-1000.
3 Compaq C3-1000
Click the...
Cartridges tab to:
Status tab to:
• Monitor the status of your
print job.
• Cancel your print job.
• Print a test page.
• Install or replace print cartridges.
• Align print cartridges for best print quality.
• Clean the print nozzles.
• View cartridge part numbers and order
Start
menu, click:
Control Program.
supplies from
Compaq’s Web site.
About tab to
find the printer
software version
and copyright
information.
Options tab to
enable/disable various
printer software
functions, such as
sound effects and
buffer mode.
Note:
clicking on the Compaq C3-1000
Help button to
access the printer
driver help.
You can also access the Control Program by right
icon in your system tray.
Maintaining your C3-1000
•
•
•
39
•
•
Page 44
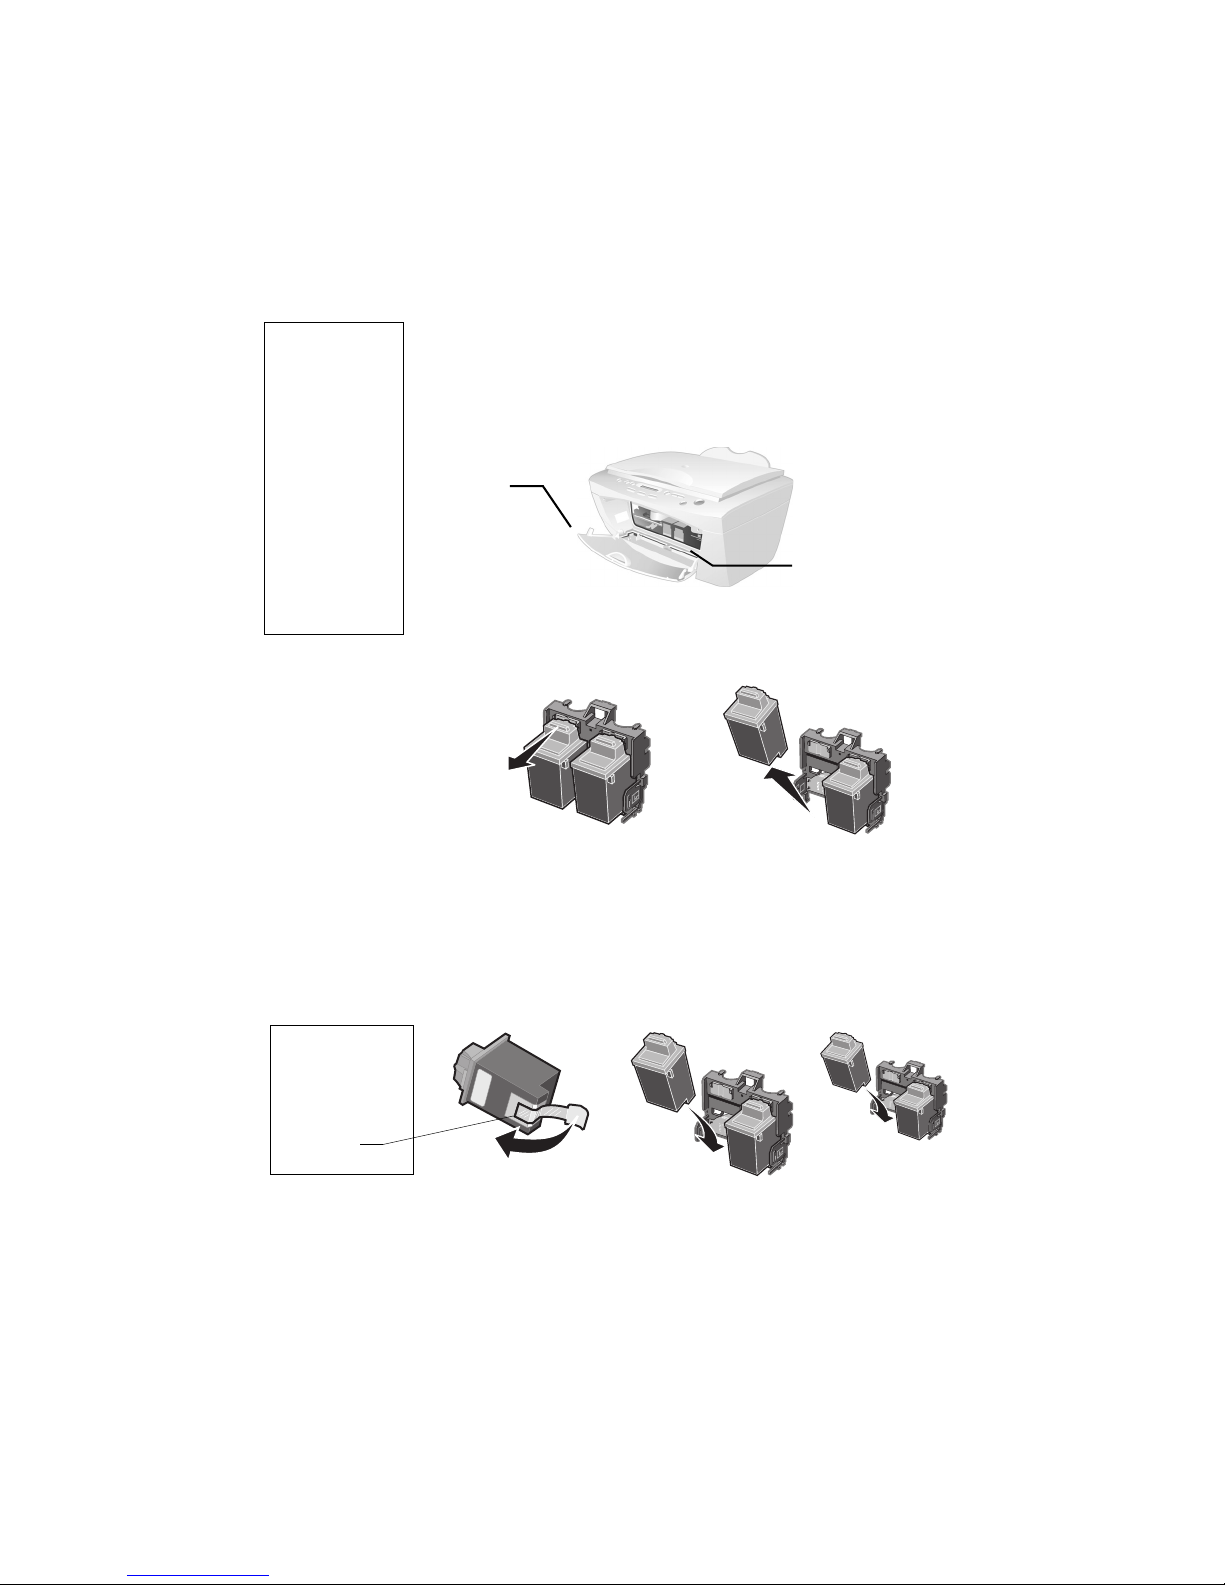
Installing or replacing print cartridges
1 Make sure the Power is On (the LCD display is not
Black Cartridge
• Standard Yield
P/N 12A1970
•High Yield
P/N 12A1975
Color Cartridge
• Standard Yield
P/N 12A1980
•High Yield
P/N 12A1985
Photo Cartridge
• P/N 12A1990
blank).
2 Lower the front cover. The ink cartridge carrier moves
to the center loading position unless the printer is busy.
Front
cover
3 Remove the old print cartridge. Store or dispose of the
old cartridge.
4 Install the replacement cartridge in the printer:
Ink cartridge
carrier in the
loading position
40
Warning:
DO NOT
the gold
contact area of
the print
•
•
•
Chapter 6
•
•
touch
If you are installing
a new cartridge,
remove
sticker and the tape
from the bottom of
the print cartridge.
Note:
only the
For the best possible photo quality, print with a photo
Insert the
replacement print
cartridge into the
print cartridge
carrier.
Push back firmly
on the cartridge
snaps
until it
securely into
place.
and color cartridge combination in your printer. For help
installing a cartridge, see page 40.
Page 45

5 Close the front cover.
6 From the Control Program’s Cartridges tab, select
Install/Change Cartridge. For help, see page 39.
7 Select the type of cartridge you installed and click
OK.
8 If you installed a new cartridge, the Alignment
dialog box displays. Follow the instructions on the
Alignment screen to complete the cartridge
installation. For help, see the next section.
Improving print quality
If your print quality is not satisfactory, you may need to
align your print cartridges or clean the print nozzles.
Aligning print cartridges
1 Load plain paper in the printer.
2 From the Control Program’s Cartridges tab, select
Align Cartridges. For help, see page 39.
Maintaining your C3-1000
Your printer prints an alignment test page and the Align
Cartridge dialog box displays.
3 Alternately, you can print an alignment page using
the front control panel:
a Press the Setup button.
b Press the Menu button until Cartridge Align?
appears.
c Press the Start/Yes button.
The test page that prints has several alignment
patterns, depending on the cartridge combination
Maintaining your C3-1000
•
•
•
41
•
•
Page 46

installed. Each pattern has a number under it. The test
page that prints is similar to the one shown:
In this example, in
alignment group
comes closest to
forming a straight line.
A, 16
4 From each alignment group on the test page, find the
number under the alignment pattern that comes closest
to forming a straight line.
For example, in sample group A, the arrow points to the
pattern that comes
closest to forming a straight line.
42
•
•
•
Chapter 6
•
•
5 In the Align Cartridges dialog box (or on the LCD
display if you pressed the Setup button to align your
cartridges), enter the pattern numbers from the printed
test page that come closest to forming a straight line.
6 After you have entered a number for all of the patterns,
click OK.
Page 47

Cyan, magenta,
yellow, and
black purge
lines (shown
here in black
and white) print
when ink is
forced through
the print
nozzles to
unclog them. If
any of these
colors do not
print, you may
need to replace
your print
cartridge.
Cleaning print nozzles
1 Load plain paper in the printer.
2 From the Control Program’s Cartridges tab, select
Clean Print Nozzles. For help, see page 39.
3 Alternatively, you can use the front panel to clean
the cartridges:
a Press the Setup button.
b Press the Menu button until Cartridge Clean?
appears.
c Press the Start/Yes button.
The printer feeds a sheet of paper and prints a nozzle
test pattern similar to the one shown:
Broken lines at
the top of the
page indicate
clogged nozzles.
Unbroken lines at
the bottom of the
page indicate the
nozzles were
cleaned.
Maintaining your C3-1000
4 Compare the diagonal line above the printed bars to
the diagonal line below the printed bars. Look for a
break in the diagonal lines above the printed bars. A
broken line indicates clogged nozzles. If the bottom
line still has breaks, run the test up to two more
times.
Maintaining your C3-1000
•
•
•
43
•
•
Page 48

• If the print quality is satisfactory after running the
test three times, the print nozzles are clean. You do
not need to complete the remaining steps.
• If the print quality of both lines is not satisfactory
after running the test three times, wipe the print
cartridge nozzles. For help, see the next section.
Wiping print nozzles and contacts
If print quality does not improve after cleaning the print
nozzles (see page 43), you may need to wipe dried ink from
the nozzles.
For help on wiping the print nozzles, see the
“Troubleshooting: Print Quality ” section of the printer
driver Help file.
Preserving print cartridges
To ensure the longest life from your print cartridges and
optimum performance from your printer:
44
•
•
•
Chapter 6
•
•
•
Keep a new print cartridge in its packaging until you are
ready to install it.
•
Do not remove a print cartridge from the printer except
to replace, clean, or store it in an air-tight container. The
print cartridge will not print correctly if removed from
the printer and left exposed for an extended period of
time.
•
If a print cartridge runs out of ink, leave the empty
cartridge in the printer until you are ready to replace it.
Printing with one of the print cartridge carriers empty
may cause printer problems.
Page 49

Compaq’s printer warranty does not cover repair of
failures or damage caused by a refilled cartridge.
Compaq does not recommend use of refilled cartridges.
Refilling cartridges can affect print quality and cause
damage to the printer. For best results, use Compaq
recommended supplies.
Unlocking and locking the scanner
When the C3 1000 is shipped, the scanner is locked to
prevent movement and possible damage. Before you
can use the scanner, it must be unlocked.
Maintaining your C3-1000
Note:
To unlock the scanner:
1 Open the front door.
2 In the upper-left hand corner there is a sliding lever.
Push the lever inward (away from the front door)
until it stops.
To lock the scanner again, pull the lever toward the
front opening until it stops.
The scanner should be locked during transportation or
shipping.
Maintaining your C3-1000
•
•
•
45
•
•
Page 50

Cleaning the scanner glass
Over time, the scanner glass may become dirty. To ensure
the best quality scans, wipe the scanner glass with a soft
clean cloth to remove dust or other debris.
Caution:
Never put water or spray glass cleaner directly on the scanner
glass! If you need to remove a stubborn smudge, slightly dampen
your cloth with water or glass cleaner first, then apply only the
cloth to the glass.
Preparing the C3 1000 for shipment
If you need to transport or ship the C3 1000, please make sure
you:
•
Remove both print cartridges. For instructions, See
“Installing or replacing print cartridges” on page 40.
•
Lock the scanner. For instructions, See “Unlocking and
locking the scanner” on page 45.
•
Place the unit in its original packaging. If that is not
possible, use a large box and plenty of packing material.
•
•
•
Chapter 6
46
•
•
Page 51

7
Troubleshooting
This section describes printer problems, and explains
what you can do to solve them. Select a category from
the list in the left margin that best describes your
printing problem.
When your printer has a problem, first make sure that:
•
The power supply is plugged into the printer and a
properly grounded electrical outlet.
•
The printer is turned On.
•
The USB cable is plugged into the printer and your
computer.
Printer prints slowly or doesn’t print
Your printer and your computer may not be able to
communicate properly. The following events also
indicate communications problems:
Troubleshooting
•
Print cartridge ink level indicators on the Status or
Cartridges tabs of the printer’s Control Program are
shaded.
•
Error messages (such as Paper Out) and job progress
information do not display on your computer screen.
•
The Settings Utility icon displays a red “X”.
Before proceeding, verify that:
•
The printer software is installed correctly. For help,
See “Installing the Software” on page 3.
•
The USB cable is securely attached to both the
printer and the personal computer.
Troubleshooting
•
•
•
47
•
•
Page 52

•
The printer is plugged in and turned On.
•
If you are using Windows 98 or Windows 2000, your
printer port is set to a USB port. To check your printer
port and change it if necessary:
1 From the File menu of your software application,
select Print.
2 Check your printer port in the Where area.
•
Try unplugging the USB cable from the printer, wait 10
seconds, then plug it back in.
If you are still experiencing problems:
1 Unplug the power cable from the C3 1000, wait 10
seconds, and plug it back in.
2 Restart Windows.
Printer ejects a blank page after appearing to
print
•
Make sure you have removed the transparent tape
covering the bottom of the print cartridges. For help, see
page 40.
•
Make sure your Compaq printer is set as the default
printer.
48
•
•
•
Chapter 7
•
•
Printer prints very slowly
If you are printing photos or your document contains
graphics, it may take longer to print than regular text.
•
Close any open applications not in use.
•
Decrease your print quality setting.
•
Consider purchasing more memory, or increasing the
virtual memory for your computer.
Page 53

Printer is plugged in but doesn’t print, or you
get a Printer Offline message
Make sure:
•
The printer is turned On and the paper is loaded
correctly.
•
The USB cable is securely connected
•
Your Compaq printer is set as the default printer.
•
The print job is not being held or paused in the print
.
queue. To check the printer status:
1 From the Printers folder, double-click the
Compaq C3-1000
icon.
2 Click the Printer menu and make sure no
check mark appears next to the Pause
Printing option.
•
Remove any extra devices, such as a scanner, and
connect the printer to the parallel port.
Print a test page. If the test page prints, the printer is
functioning properly. Check your application.
Test page does not print
Make sure:
Troubleshooting
•
Your print cartridges are properly installed, (see
page 40).
•
The printer is set as the default printer.
Paper misfeeds or jams
Paper misfeeds or multiple sheets feed
Make sure:
•
You are using a paper recommended for inkjet
printers.
Troubleshooting
•
•
•
49
•
•
Page 54

•
You do not force the paper down into the printer when
you load it. Align the top of the paper with the paper
alignment guides on the paper support.
•
You do not load too much paper in the sheet feeder.
Depending on the thickness of your paper, the sheet
feeder can hold up to 100 sheets of paper.
•
The back sheet feeder tray is securely latched on both
sides. If you are not sure, open the tray by pressing on
both latches, and then close it again.
•
The left paper guide does not cause the paper to bow in
the sheet feeder, and that it also prevents the paper from
moving side to side.
•
The printer is on a flat, level surface.
Printer has a paper jam
Try removing the paper from the sheet feeder. If the paper
is lodged too far into the printer and can’t be removed:
a Press the Power button to turn the printer Off.
b Pull firmly on the paper to remove it. If you cannot
reach the paper because it is too far into the printer,
lower the front cover and pull the paper out.
c If the paper has jammed in the input tray, open the
tray by pressing down on both latches. Lowering the
tray should give you enough access to reach the
paper. For help lowering the tray, See “Loading
Paper” on page 17.
d Close the front cover and/or the rear input tray.
e Press the Power button to turn the printer On.
f Resend your document to print.
•
•
•
Chapter 7
50
•
•
Page 55

Printer does not feed envelopes or specialty
papers
If regular paper feeds without problems, make sure:
•
You are loading the envelopes correctly. For help,
see “Loading specialty papers” on page 22.
•
You are using an envelope size supported by your
printer, and it is selected in Printer Properties.
•
Your application is designed to print envelopes.
Check the user’s documentation that came with your
application.
Document prints with mistakes or poor quality
Print quality is poor at the left, right, top, or
bottom edge of page
Your printer cannot print in the extreme margins of a
page. Use these minimum settings:
•
Left and right margins:
6.35 mm (0.25 in.) each for all paper sizes except A4
Troubleshooting
For A4 size paper - 3.37 mm (0.133 in.) each
•
Top and bottom margins:
Top - 1.7 mm (0.067 in.)
Bottom - 12.7 mm (0.5 in.)
Vertical straight lines are not smooth
To improve the print quality of vertical straight lines in
tables, borders, and graphs:
•
Select a higher print quality setting.
•
Test the cartridge alignment. For help, see page 41.
•
Clean the print nozzles. For help, see page 43.
Troubleshooting
•
•
•
51
•
•
Page 56

Print is too dark or smudged
Make sure:
•
The Paper Type setting in the Printer Properties matches
the paper type loaded in the printer.
•
The paper is straight and unwrinkled.
•
The ink is dry before you handle the paper.
•
The print quality setting is appropriate for the paper
type. If you are printing on regular paper, select Black
Normal or Color Normal.
•
The print nozzles are clean . For help, see page 43.
Printed pages have alternating bands of light
and dark print (intermittent printing)
•
Make sure Enable Buffer Mode is selected on the
Options tab of the Control Program.
•
Select the High 1200dpi Print Quality setting on the
Document/Quality tab of Printer Properties.
•
Your printer may have communications problems. For
help, see page 47.
52
•
•
•
Chapter 7
•
•
The printer settings I selected changed
•
When you change printer settings from your application,
the settings apply only to the specific document you
opened with that application. To make the settings apply
to all documents, change the settings from Windows.
For more information, see page 24.
•
The settings in your application may override the Printer
Properties settings. Check the documentation that came
with your application for more information.
Colors on the printout differ from the colors on
the screen
•
Check the ink level graphic on the Cartridges tab of your
printer’s Control Program. An ink cartridge may be out
of ink or low on ink.
Page 57

•
Use a different brand of paper. Every paper brand
accepts ink differently and prints with slight color
variations.
•
Clean the print nozzles. For help, see page 43.
Colors on the printout are faded
•
Check the ink level graphic on the Cartridges tab of
your printer’s Control Program. Your print cartridge
may be low on ink.
•
Clean the print nozzles. For help, see page 43.
•
Wipe the print nozzles and contacts if the colors still
seem faded. For help, see the “Troubleshooting:
Print Quality” section of your printer driver Help.
Characters are missing or unexpected
Make sure
•
Your Compaq printer is selected as the default
printer.
•
Your printer and computer have communication. For
help, see “Printer prints slowly or doesn’t print” on
page 47.
Troubleshooting
Problems with transparencies, photos, or envelopes...
Printer does not feed envelopes or specialty
papers
For help, see page 51.
Glossy photo papers or transparencies stick
together
•
Remove each page as it exits the printer and allow it
to dry before stacking.
•
Use a transparency or photo paper designed for an
inkjet printer.
Troubleshooting
•
•
•
53
•
•
Page 58

Transparencies or photos contain white lines
•
•
Error messages
Paper Jam
For help, see “Printer has a paper jam” on page 50.
Add Cartridges
No cartridges are installed. Open the front cover and install
new cartridges. For help, see "Installing or replacing print
cartridges"on page 40
Ink Low
Your print cartridge is running out of ink. Purchase a new
print cartridge.
From the Printer Properties, select the High Quality
1200dpi setting.
Your print nozzles may need cleaning. For help, see
page 43.
54
•
•
•
Chapter 7
•
•
System Busy
An alignment or cleaning page is being printed, or other
system maintanence is being performed. Wait for the task
to complete before starting a new job.
Memory Full
No more copy jobs will be started until the memory
becomes available. Your C3 1000 can queue many copies
ahead of the printer. Wait until some of the pages have
completed printing before copying more pages.
Page 59

Program Scan Tos
The Scan To menu is created by your computer. If the
C3 1000 has not been attached to a PC with the
Settings Utility installed, the Scan To menu will be
blank.
•
Make sure the USB cable is connected and the C3
1000 software has been installed.
•
Run the C3 1000 Settings Utility. If it is already
running, right-click on the icon in the system tray
and select
Shutdown
before running it again.
For help in programming your Scan To menu, See
“Scan To Menu” on page 13.
Waiting for PC
You have initiated a task that requires assistance from
the PC, such as pressing the Scan button. The C3 1000
is waiting for the PC to wake up or become available.
It will wait for approximately two minutes. To stop
waiting before the timeout occurs, press the Cancel
button.
Troubleshooting
PC Not Available
You have initiated a task that requires assistance from
the PC, but the PC was not available. Make sure:
Your PC is On and is not in suspend mode. If you are
unsure, move the mouse. If you can see your mouse
moving, your PC is available.
The USB cable is connected to both the C3 1000 and
your computer.
Troubleshooting
•
•
•
55
•
•
Page 60

Paper Out
You have run out of paper. For help, See “Place up to 100
sheets of paper (depending on thickness) against the right
side of the input tray, with the print side facing you.” on
page 17.
Power Down Error
You must remove the power plug from the back of the C3
1000 to clear this error. After unplugging the power cord,
follow these steps:
•
Open the front door.
•
Check for paper jams or other obstructions.
•
Make sure the ink cartridges are correctly installed and
snapped into place.
•
Verify the scanner lock (on the left) is in the unlocked
position.
•
Close the front access door.
•
Open the back paper input tray by pressing down on
both latches. Clear any paper jams and close the tray
again.
•
Plug the power cord back in.
56
•
•
•
Chapter 7
•
•
Warm up
This is not an error. The scanner lamp is warming up after a
period of inactivity and will take less than a minute to
complete. Once the scanner is warm, your job will be
performed...no action is required.
Unlock Scanner
When shipping or transporting the C3 1000, the scanner
must be locked. To use the scanner, however, it must be in
the unlocked position. Turn the power off, unlock the
scanner, and turn the power back on. See “Unlocking the
Scanner” in the “Getting Started” section.
Page 61

Scan Motor Error
Most likely the scanner is locked. Follow the procedure
above for the
Unlock Scanner
message.
Printer Error: ##
You should solve this error in the same manner as the
Power Down Error
If you are still experiencing difficulty after following
those steps, try removing one cartridge at a time to see
if the message goes away. If it does, try replacing the
cartridge with a new one.
previously described.
Troubleshooting
Troubleshooting
•
•
•
57
•
•
Page 62

•
•
•
Chapter 7
58
•
•
Page 63

Appendix
Appendix
This section contains
information about:
• Notices
• Safety information
Electronic
emission notices
Federal
Communications
Commission (FCC)
compliance
information
statement
This equipment has been
tested and found to comply
with the limits for a Class B
digital device, pursuant to
Part 15 of the FCC Rules.
Operation is subject to the
following two conditions: (1)
this device may not cause
harmful interference, and (2)
this device must accept any
interference received,
including interference that
may cause undesired
operation.
The FCC Class B limits are
designed to provide
reasonable protection against
harmful interference in a
residential installation. This
equipment generates, uses
and can radiate radio
frequency energy and, if not
installed and used in
accordance with the
instructions, may cause
harmful interference to radio
communications. However,
there is no guarantee that
interference will not occur in
a particular installation. If
this equipment does cause
harmful interference to radio
or television reception,
which can be determined by
turning the equipment off
and on, the user is
encouraged to try to correct
the interference by one or
more of the following
measures:
• Reorient or relocate the
receiving antenna.
• Increase the separation
between the equipment
and receiver.
• Connect the equipment
into an outlet on a circuit
different from that to
which the receiver is
connected.
• Consult your point of
purchase or service
representative for
additional suggestions.
The manufacturer is not
responsible for any radio or
television interference
caused by using other than
recommended cables or by
unauthorized changes or
modifications to this
equipment. Unauthorized
changes or modifications
could void the user's
authority to operate this
equipment.
To assure compliance with
FCC regulations on
electromagnetic interference
for a Class B computing
device, use a properly
shielded and grounded cable.
Use of a substitute cable not
properly shielded and
grounded may result in a
violation of FCC regulations.
Any questions regarding this
compliance information
statement should be directed
to:
Compaq Computer Corporation
P. O. Box 692000
Mail Stop 510101
Houston, Texas 77269-2000
Or, call (281) 514-3333
Industry Canada
compliance
statement
This Class B digital
apparatus meets all
requirements of the
Appendix
•
•
•
59
•
•
Page 64

Canadian Interference-Causing
Equipment Regulations.
Avis de conformité aux
normes d’Industrie
Canada
Cet appareil numérique de la
classe B respecte toutes les
exigences du Règlement sur le
matériel brouilleur du Canada.
European Community
(EC) directives
conformity
This product is in conformity
with the protection
requirements of EC Council
directives 89/336/EEC and
73/23/EEC on the
approximation and
harmonization of the laws of
the Member States relating to
electromagnetic compatibility
and safety of electrical
equipment designed for use
within certain voltage limits.
A declaration of conformity
with the requirements of the
Directive has been signed by
the the assigned parties within
Compaq Computer
Corporation.
This product satisfies the Class
B limits of EN 55022 and
safety requirements of EN
60950.
Japanese VCCI Notice
The United Kingdom
Telecommunications
Act 1984
This apparatus is approved
under the approval number
NS/G/1234/J/100003 for the
indirect connections to the
public telecommunications
systems in the United
Kingdom.
Energy Star
The EPA ENERGY STAR
Computers program is a
partnership effort with
computer manufacturers to
promote the introduction of
energy-efficient products and
to reduce air pollution caused
by power generation.
Companies participating in this
program introduce personal
computers, printers, monitors,
or fax machines that power
down when they are not being
used. This feature will cut the
energy used by up to 50
percent. Compaq is proud to be
a participant in this program.
As an Energy Star Partner,
Compaq Computer
Corporation has determined
that this product meets the
Energy Star guidelines for
energy efficiency.
Power supply
information
IIf your power supply fails,
replace it with the Compaq
replacement part or other UL
LISTED Direct Plug-In Power
Unit marked “Class 2" and rated
30 Vdc at 500 mA to 830 mA.
Safety information
• If your product is NOT
marked with this symbol ,
it MUST be connected to an
electrical outlet that is
properly grounded.
• The power cord must be
connected to an electrical
outlet that is near the product
and easily accessible.
• Refer service or repairs, other
than those described in the
operating instructions, to a
professional service person.
• This product is designed,
tested, and approved to meet
strict global safety standards
with the use of specific
authorized components. The
safety features of some parts
may not always be obvious.
The printer manufacturer is
not responsible for the use of
other replacement parts.
•
•
•
Appendix
60
•
•
Page 65

Index
Index
A
aligning print cartridges 41
B
banding 52
banner paper
22
loading
setting recommenda-
tions
24
bidirectional
communications
problems
indicators
buttons, Clean Print
Nozzles
47
43
C
cards
loading
22
setting recommenda-
23
tions
cartridges, print
aligning
41
installing 40
preserving 44
removing 40
replacing 40
characters, missing or
unexpected
contacts, print nozzle 44
Control Program
using
53
39
align print cartridges
41
custom size paper
loading
22
setting recommenda-
23
tions
D
default settings 23
E
electronic emission notices
59
Energy Star 60
envelopes
22
loading
setting recommenda-
tions
23
error messages
Ink Low
Paper Jam 50, 54
Printer Offline 49
European Community
directives conformity
54
60
F
Federal Communications
Commission Compliance
Information Statement
foils
22
loading
setting recommenda-
24
tions
59
G
greeting cards
22
loading
setting recommenda-
tions
23
I
improving print quality 41
index cards
22
loading
setting recommenda-
tions
23
Industry Canada
Compliance Statement
Ink Low message 54
installing
print cartridge
intermittent printing 52
iron-on transfers
22
loading
setting recommenda-
tions
24
59
40
J
Japanese VCCI notice 60
L
lights
40
Power
Index
•
•
•
1
•
•
Page 66

M
margins, minimum settings
51
messages, error
Ink Low
Paper Jam 54
Printer Offline 49
54
N
notices
electronic emission
Energy Star 60
European Community
Directives Conformity
59
60
FCC statement 59
Industry Canada compli-
ance statement
Japanese VCCI 60
safety information 60
nozzles, print
cleaning
wiping 44
59
43
O
ordering supplies 39
P
parallel cable
connection problems
photo paper
problems
setting recommendations
53
23
postcards
22
loading
setting recommendations
23
print cartridges
aligning
41
47
installing 40
preserving 44
removing 40
replacing 40
wiping nozzles 44
print nozzle contacts
44
wiping
print nozzles
cleaning
wiping 44
print quality
banding
different colors 52
faded colors 53
improving 41
missing colors 43, 52
smudged 52
too dark 52
troubleshooting 51
Printer Properties
setting recommendations
43
52
23
printing problems
color quality
faded colors 53
intermittent 52
missing colors 43, 52
paper feeding 51
paper jam 50
paper misfeeds 49
52
R
removing print cartridge 40
S
safety information 60
setting recommendations
banner paper
cards 23
custom size paper 23
envelopes 23
iron-on transfers 24
normal 23
24
photo papers 23
transparencies 24
sheet feeder
17
locating
software applications
Control Program
specialty papers
banner paper
custom sized paper 22
envelopes 22
iron-on transfers 22
photo paper 22
transparencies 22
T
test page
alignment
does not print 49
nozzle test pattern 43
transparencies
loading
problems 53
setting recommendations
troubleshooting
blank pages
color quality 52
doesn’t print 47
envelopes don’t print 51
error messages 54
faded colors 53
flashing lights 54
missing colors 52
paper feed problems 51
paper jam 50
paper sticks together 53
print quality 51
slow print 47
two-way communications
two-way communications
problems
42
22
24
48
47
indicators
39
22
47
•
•
•
Index
2
•
•
Page 67

U
United Kingdom
Telecommunications Act
1984
60
USB cable connection
problems
47
Index
Index
•
•
•
3
•
•
Page 68

•
•
•
Index
4
•
•
 Loading...