

Page 1

b
Reference Guide
Compaq Notebook Series
Document Part Number: 370698-002
April 2005
This guide explains how to set up, operate, maintain, and
troubleshoot your notebook. It also provides information on
battery pack and power management, external device
connections, and modem and network connections. The last
chapter provides additional reference material on modem
commands, safety, and regulatory information.
Page 2

© Copyright 2004, 2005 Hewlett-Packard Development Company, L.P.
Microsoft and Windows are U.S. registered trademarks of Microsoft
Corporation.
The information contained herein is subject to change without notice. The
only warranties for HP products and services are set forth in the express
warranty statements accompanying such products and services. Nothing
herein should be construed as constituting an additional warranty. HP shall
not be liable for technical or editorial errors or omissions contained herein.
Reference Guide
Compaq Notebook Series
Second Edition April 2005
First Edition June 2004
Document Part Number: 370698-002
Page 3

Contents
1 Getting Started with Your Notebook
Identifying Parts of the Notebook . . . . . . . . . . . . . . . . . . 1–1
Front Panel and Right Panel Components. . . . . . . . . 1–2
Left Panel and Back Panel Components . . . . . . . . . . 1–3
Bottom Panel Components . . . . . . . . . . . . . . . . . . . . 1–4
Status Lights . . . . . . . . . . . . . . . . . . . . . . . . . . . . . . . 1–5
Setting Up Your Notebook. . . . . . . . . . . . . . . . . . . . . . . . 1–7
Step 1: Insert the Battery Pack . . . . . . . . . . . . . . . . . 1–7
Step 2: Connect AC Power . . . . . . . . . . . . . . . . . . . . 1–8
Step 3: Connect a Phone Line . . . . . . . . . . . . . . . . . . 1–9
Step 4: Turn On the Notebook. . . . . . . . . . . . . . . . . 1–10
Step 5: Set Up Windows . . . . . . . . . . . . . . . . . . . . . 1–11
2 Basic Operation
Operating Your Notebook . . . . . . . . . . . . . . . . . . . . . . . . 2–1
Default Power Settings . . . . . . . . . . . . . . . . . . . . . . . 2–2
To Reset the Notebook . . . . . . . . . . . . . . . . . . . . . . . 2–3
To Change the Boot Device. . . . . . . . . . . . . . . . . . . . 2–3
To Use the TouchPad . . . . . . . . . . . . . . . . . . . . . . . . 2–4
To Use the Tap to Click Function of
the TouchPad . . . . . . . . . . . . . . . . . . . . . . . . . . . . . . . 2–5
To Use the Function Hot Keys . . . . . . . . . . . . . . . . . 2–6
To Use the One-Touch Buttons . . . . . . . . . . . . . . . . . 2–7
To Use the Windows and Applications Keys . . . . . . 2–8
To Type Alternate Graphics Using
the ALT GR Key . . . . . . . . . . . . . . . . . . . . . . . . . . . . 2–9
Reference Guide iii
Page 4

Contents
Using CDs or DVDs. . . . . . . . . . . . . . . . . . . . . . . . . . . . 2–10
To Insert or Remove a CD or DVD. . . . . . . . . . . . . 2–10
To Play DVD Movies . . . . . . . . . . . . . . . . . . . . . . . 2–11
To Create or Copy CDs . . . . . . . . . . . . . . . . . . . . . . 2–12
To Write to DVD Media (Select Models Only) . . . 2–12
Securing Your Notebook . . . . . . . . . . . . . . . . . . . . . . . . 2–13
To Set Up Password Protection . . . . . . . . . . . . . . . . 2–13
To Lock Your Notebook . . . . . . . . . . . . . . . . . . . . . 2–13
To Attach an Optional Security Cable. . . . . . . . . . . 2–14
To Protect Against Viruses . . . . . . . . . . . . . . . . . . . 2–15
To Lock the Hard Drive. . . . . . . . . . . . . . . . . . . . . . 2–15
Taking Care of Your Notebook . . . . . . . . . . . . . . . . . . . 2–16
To Protect Your Hard Drive . . . . . . . . . . . . . . . . . . 2–16
To Maintain Your Notebook . . . . . . . . . . . . . . . . . . 2–16
To Safeguard Your Data . . . . . . . . . . . . . . . . . . . . . 2–17
To Extend the Life of the Display . . . . . . . . . . . . . . 2–17
To Clean Your Notebook . . . . . . . . . . . . . . . . . . . . 2–17
3 Battery Packs and Power Management
Managing Power Consumption . . . . . . . . . . . . . . . . . . . . 3–1
How the Notebook Manages Power
Automatically . . . . . . . . . . . . . . . . . . . . . . . . . . . . . . 3–2
To Change Timeout Settings and Create
Power Schemes . . . . . . . . . . . . . . . . . . . . . . . . . . . . . 3–3
Using Battery Power . . . . . . . . . . . . . . . . . . . . . . . . . . . . 3–4
To Respond to a Low-Battery Warning . . . . . . . . . . 3–5
To Recharge the Battery Pack . . . . . . . . . . . . . . . . . . 3–5
To Get the Most from Your Battery Packs . . . . . . . . 3–6
Disposing of a Used Battery Pack . . . . . . . . . . . . . . . 3–8
iv Reference Guide
Page 5

4 Modem and Network Connections
Using the Modem. . . . . . . . . . . . . . . . . . . . . . . . . . . . . . . 4–1
To Connect the Modem . . . . . . . . . . . . . . . . . . . . . . . 4–2
Special Restrictions in Certain Countries . . . . . . . . . 4–3
To Change Your Modem Settings . . . . . . . . . . . . . . . 4–4
Connecting to a Local Area Network (LAN). . . . . . . . . . 4–5
Using a Wireless LAN Adapter
(Select Models Only) . . . . . . . . . . . . . . . . . . . . . . . . . . . . 4–6
Making Wireless Network Connections
(Select Models Only) . . . . . . . . . . . . . . . . . . . . . . . . . . . . 4–7
To Turn Wireless Communication On and Off . . . . . 4–8
5 Add-On Devices
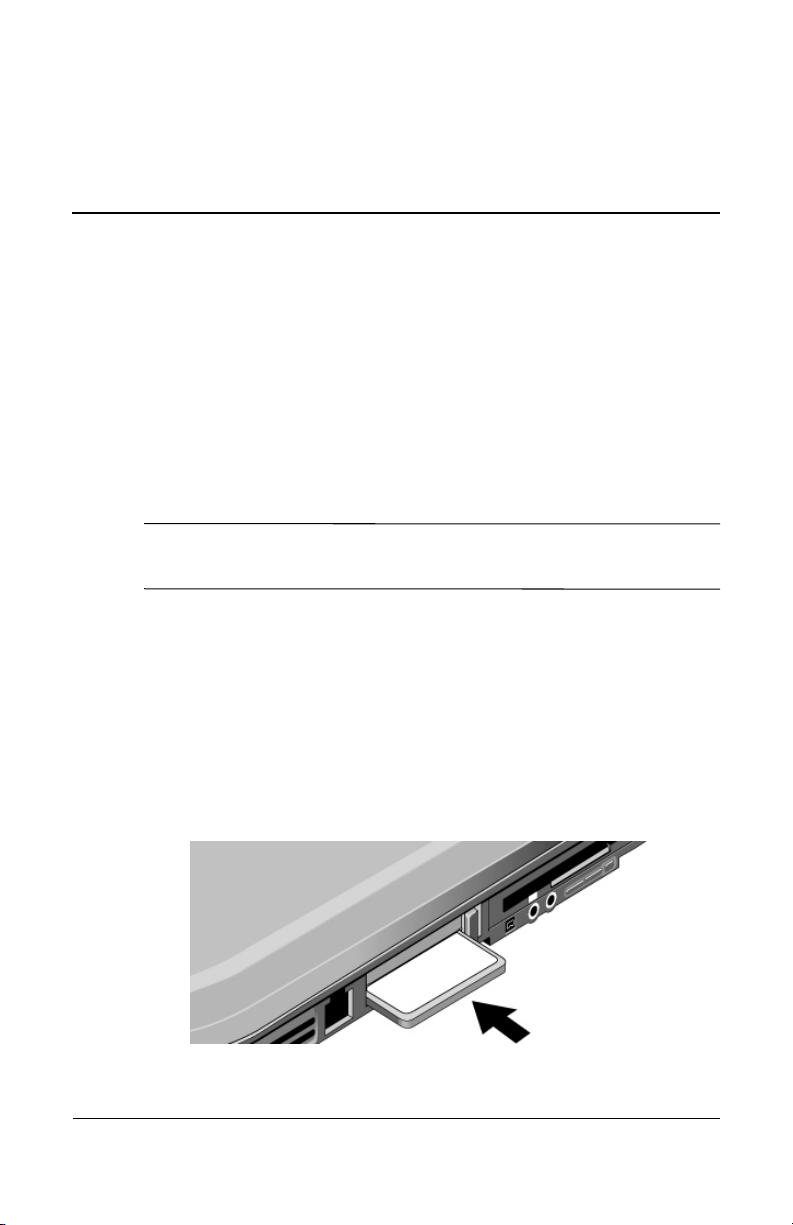
Connecting External Devices. . . . . . . . . . . . . . . . . . . . . . 5–1
To Insert or Remove a PC Card. . . . . . . . . . . . . . . . . 5–1
To Connect an Audio Device . . . . . . . . . . . . . . . . . . 5–3
To Connect a TV to Your Notebook
(Select Models Only). . . . . . . . . . . . . . . . . . . . . . . . . 5–4
To Connect a 1394 Device
(Select Models Only). . . . . . . . . . . . . . . . . . . . . . . . . 5–6
Installing Additional RAM (Memory) . . . . . . . . . . . . . . . 5–7
To Install a RAM Expansion Module . . . . . . . . . . . . 5–7
To Remove a RAM Expansion Module . . . . . . . . . . 5–9
Replacing the Hard Drive. . . . . . . . . . . . . . . . . . . . . . . . 5–11
To Replace the Hard Drive . . . . . . . . . . . . . . . . . . . 5–11
To Replace the Hard Drive Holder . . . . . . . . . . . . . 5–12
To Prepare a New Hard Drive . . . . . . . . . . . . . . . . . 5–13
Contents
6 Troubleshooting
Troubleshooting Your Notebook . . . . . . . . . . . . . . . . . . . 6–1
Audio Problems . . . . . . . . . . . . . . . . . . . . . . . . . . . . . 6–2
CD-ROM and DVD Problems. . . . . . . . . . . . . . . . . . 6–3
Display Problems. . . . . . . . . . . . . . . . . . . . . . . . . . . . 6–4
Hard Drive Problems . . . . . . . . . . . . . . . . . . . . . . . . . 6–5
Reference Guide v
Page 6

Contents
Heat Problems . . . . . . . . . . . . . . . . . . . . . . . . . . . . . . 6–6
Keyboard and Pointing Device Problems . . . . . . . . . 6–7
Local Area Network (LAN) Problems . . . . . . . . . . . 6–8
Memory Problems . . . . . . . . . . . . . . . . . . . . . . . . . . . 6–9
Modem Problems. . . . . . . . . . . . . . . . . . . . . . . . . . . 6–10
PC Card (PCMCIA) Problems . . . . . . . . . . . . . . . . 6–13
Performance Problems. . . . . . . . . . . . . . . . . . . . . . . 6–14
Power and Battery Pack Problems. . . . . . . . . . . . . . 6–15
Printing Problems . . . . . . . . . . . . . . . . . . . . . . . . . . 6–17
Serial, Parallel and USB Problems . . . . . . . . . . . . . 6–18
Startup Problems . . . . . . . . . . . . . . . . . . . . . . . . . . . 6–19
Wireless Problems . . . . . . . . . . . . . . . . . . . . . . . . . . 6–21
Configuring Your Notebook . . . . . . . . . . . . . . . . . . . . . 6–23
To Run the BIOS Setup Utility . . . . . . . . . . . . . . . . 6–23
Updating Software and Drivers from the Web . . . . . . . 6–28
Using System Recovery Features. . . . . . . . . . . . . . . . . . 6–28
Safeguarding Your Data . . . . . . . . . . . . . . . . . . . . . 6–29
Operating System (OS) CD Repair . . . . . . . . . . . . . 6–30
OS CD Reinstall . . . . . . . . . . . . . . . . . . . . . . . . . . . 6–31
Reinstalling Drivers. . . . . . . . . . . . . . . . . . . . . . . . . 6–32
Restoring Software Applications. . . . . . . . . . . . . . . 6–32
Index
vi Reference Guide
Page 7

1
Getting Started with
Your
Identifying Parts of the Notebook
Components included with the notebook may vary by
geographical region and the features you selected. The following
tables identify the standard external components included with
most notebook models.
Notebook
Reference Guide 1–1
Page 8
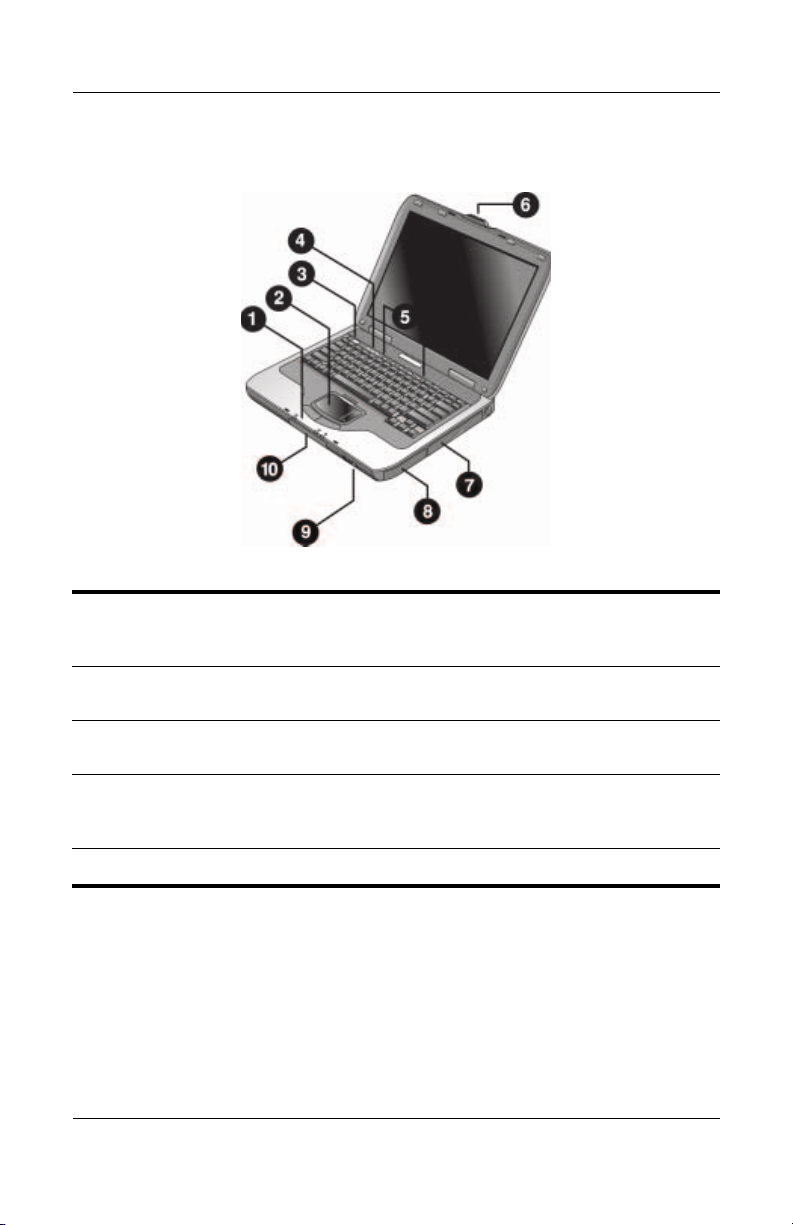
Getting Started with Your Notebook
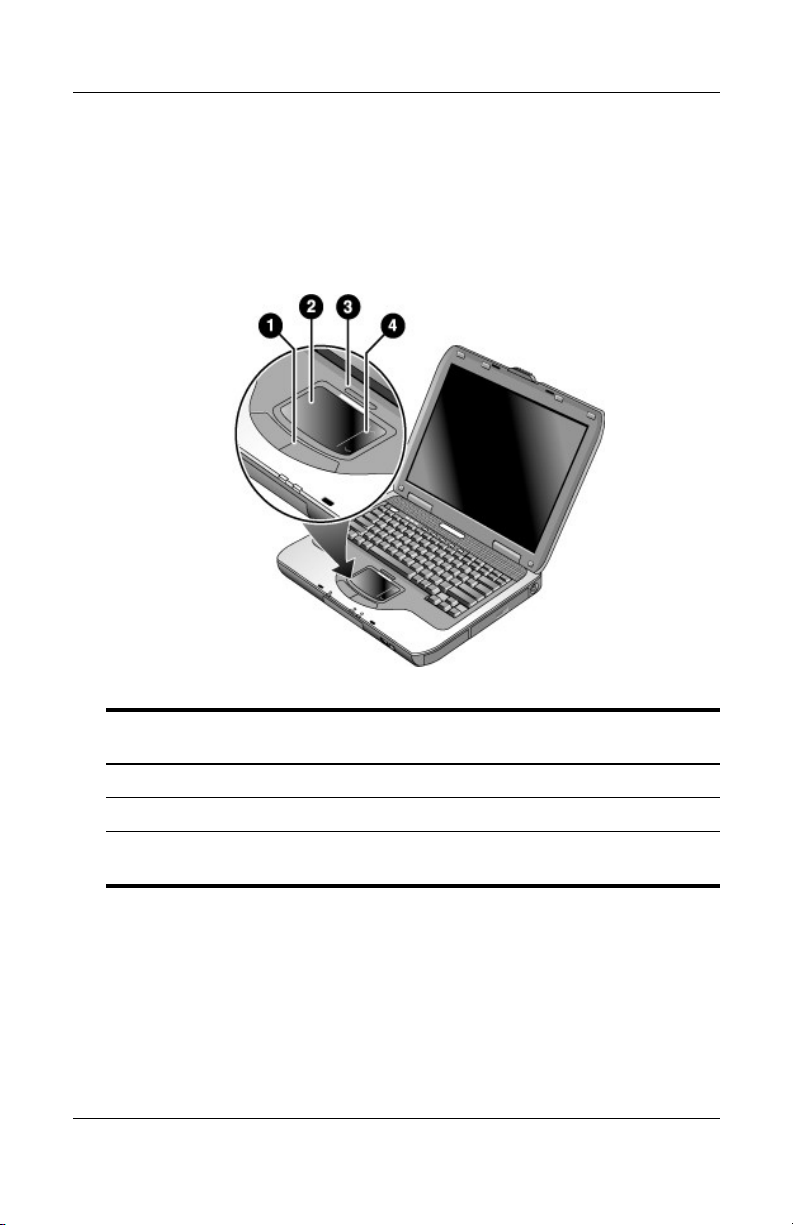
Front Panel and Right Panel Components
Main status lights (left to right):
1
power mode, hard drive activity,
and battery
TouchPad, scroll pad, Click
2
buttons, and an on-off button
Power button: turns the notebook
3
on and off
Keyboard status lights
4
One-Touch buttons
5
1–2 Reference Guide
Notebook open/close latch
6
CD-ROM, DVD, or other drive
7
Battery pack
8
Wireless on-off button and
9
indicator light (select
models
only)
Hard drive
-
Page 9
Getting Started with Your Notebook
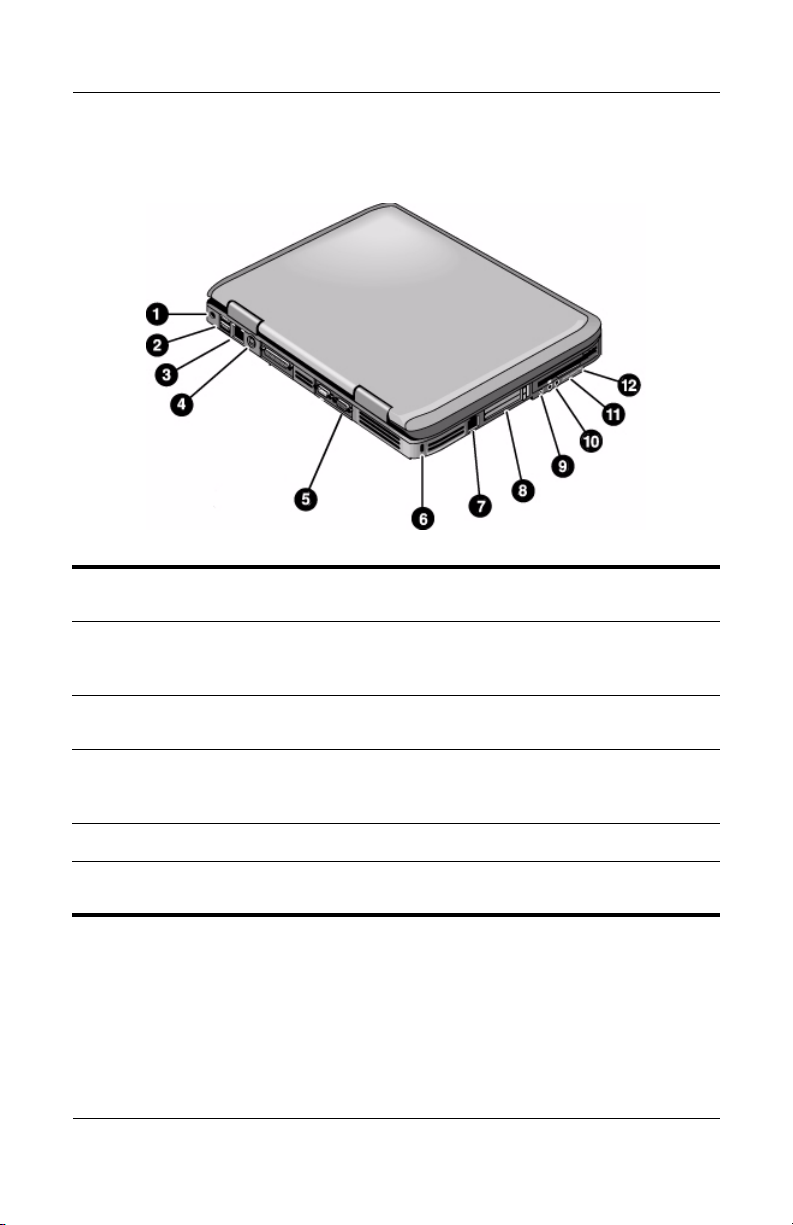
Left Panel and Back Panel Components
AC adapter jack
1
Universal serial bus (USB) ports
2
RJ-45 jack: connects a network
3
cable
S-Video out jack
4
(select models only)
External monitor port
5
Cable lock slot (security
6
connector)
Reference Guide 1–3
RJ-11 jack: connects the modem
7
cable
PC Card and CardBus slot and
8
button (select models only;
location varies by model)
IEEE 1394 port
9
(select models only)
Audio jacks (left to right): external
-
microphone, audio out
(headphones)
Volume control
q
Audio mute button and audio
w
mute light
Page 10
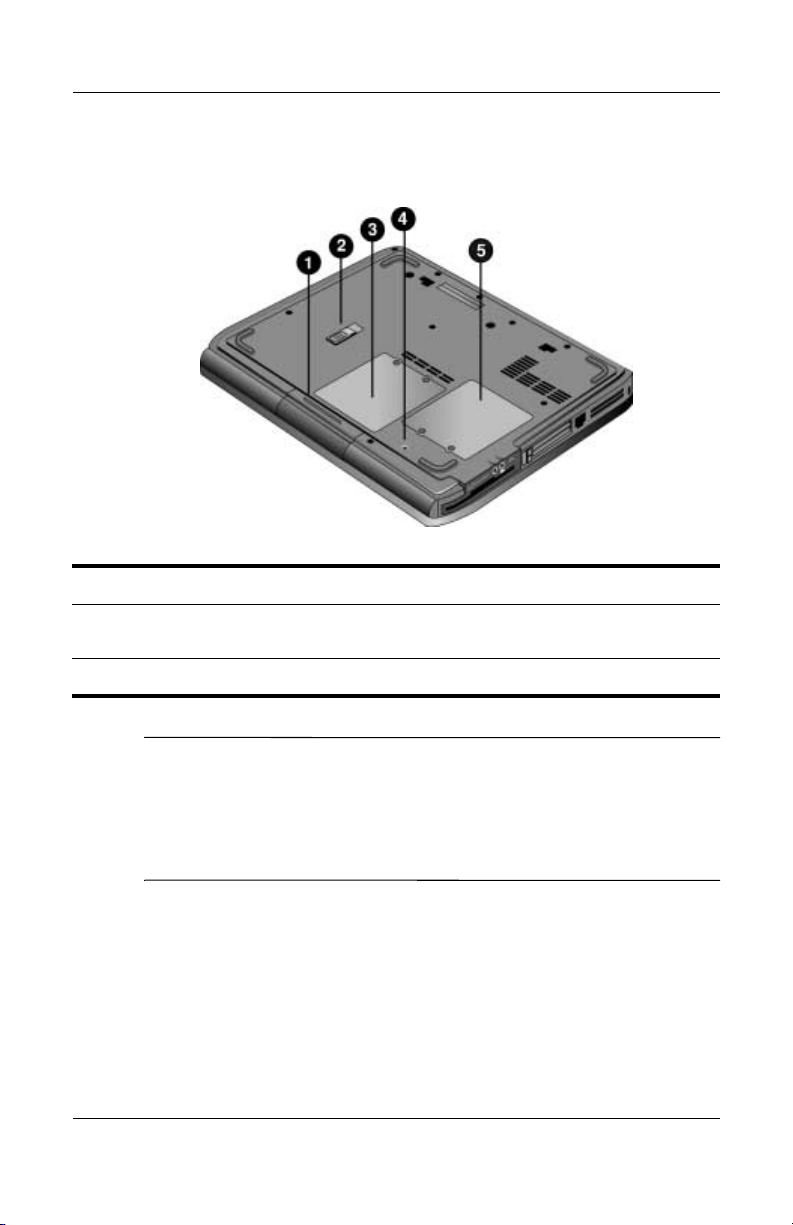
Getting Started with Your Notebook
Bottom Panel Components
Hard drive
1
Battery latch
2
RAM (memory) cover
3
CAUTION: To prevent an unresponsive system and the display of a
Ä
warning message, install only a Mini PCI device authorized for use in
notebook by the governmental agency that regulates wireless
your
devicesgin your country. If you install a device and then receive a warning
message, remove the device to restore notebook functionality. Then contact
Customer Care.
1–4 Reference Guide
Reset button
4
Mini PCI cover (no user parts
5
inside)
Page 11
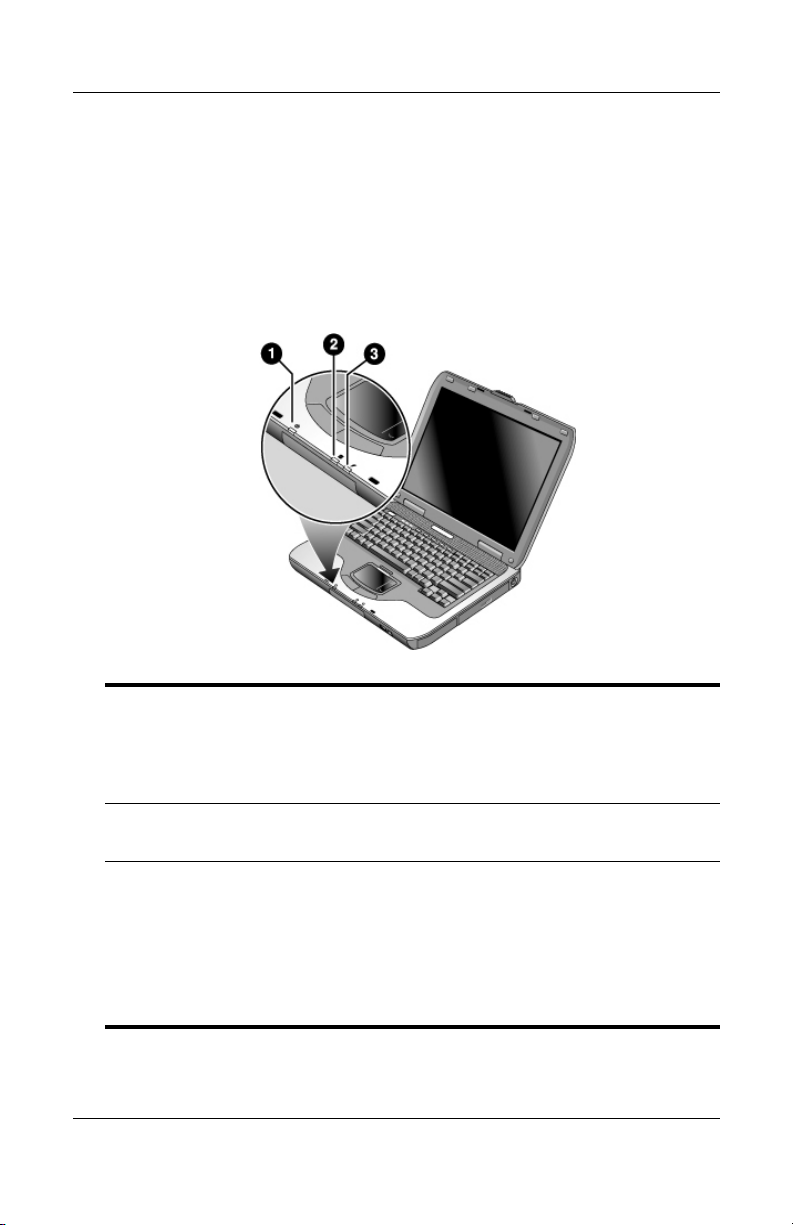
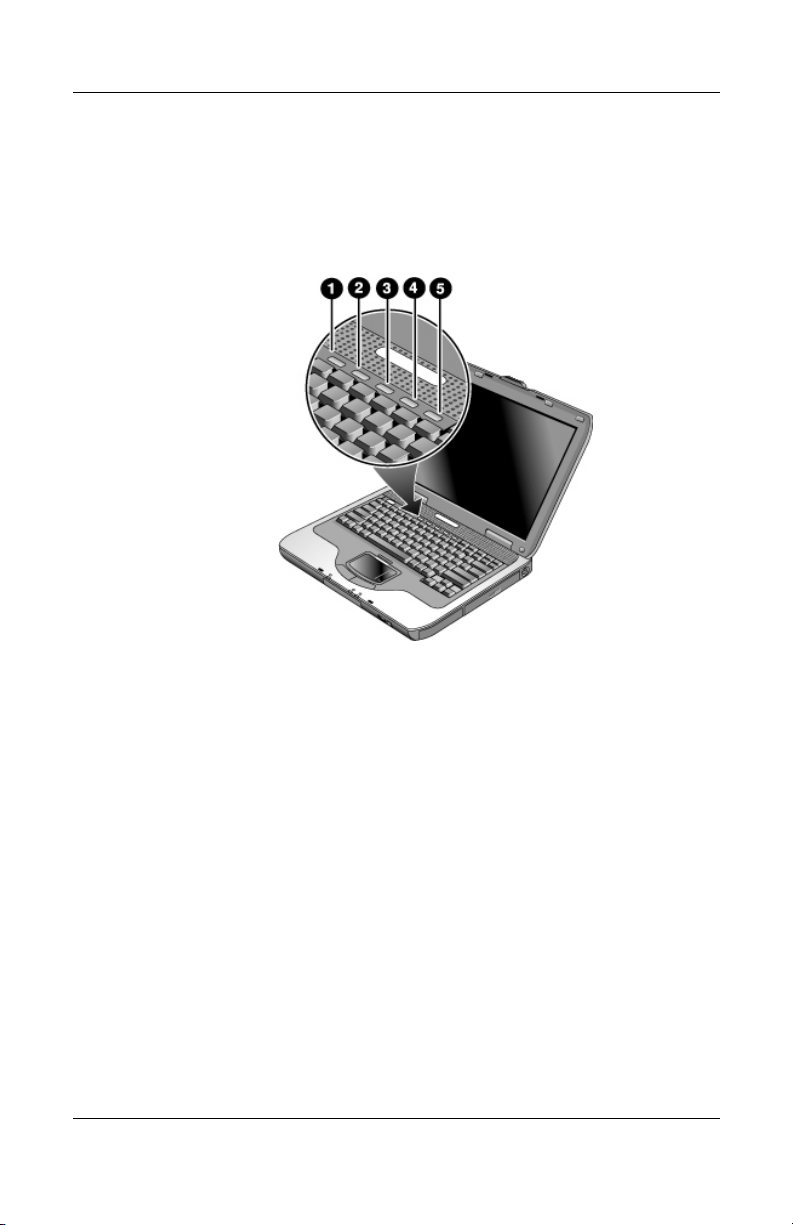
Status Lights
The notebook includes a number of status lights that report power
and battery status, drive activity, and keyboard functions such as
Caps Lock and Num Lock.
The following diagram shows the main status lights on the front
of the notebook.
Getting Started with Your Notebook
Power mode
1
■ On: Notebook is on (even if the display is off).
■ Blinking: Notebook is in Standby.
■ Off: Notebook is off or in Hibernation.
Hard drive activity
2
On: Notebook is accessing the hard drive.
Battery status
3
■ Green: Battery pack is fully charged.
■ Amber: Battery pack is charging.
■ Blinking: Battery pack has reached a low-battery condition.
■ Off: No AC power is applied, or AC power is applied with battery
pack either close to full-charge capacity or not installed.
Reference Guide 1–5
Page 12

Getting Started with Your Notebook
The keyboard status lights, located above the keyboard, indicate
the states of the keyboard locks.
Caps Lock On: Caps Lock is active.
1
Num Lock On: Num Lock is active. (The Keypad Lock must also be
2
on to use the embedded keypad.)
Keypad Lock On: The embedded keypad is active (Fn+F8). Num
3
Lock must also be on to activate the numeric keys. Otherwise, cursor
control is active (as marked on an external keyboard).
1–6 Reference Guide
Page 13
Getting Started with Your Notebook
Setting Up Your Notebook
WARNING: To reduce the risk of serious injury, read the Safety &
Å
Comfort Guide. It describes proper workstation setup, posture, and
health and work habits for computer users, and provides important
electrical and mechanical safety information. This guide is located on
the Web at http://www.compaq.com/ergo and on the hard drive or
on the Documentation CD that is included with the product.
When you set up your notebook for the first time, you will
connect the AC adapter, charge the battery pack, turn on the
notebook, and run the Microsoft® Windows® Setup program.
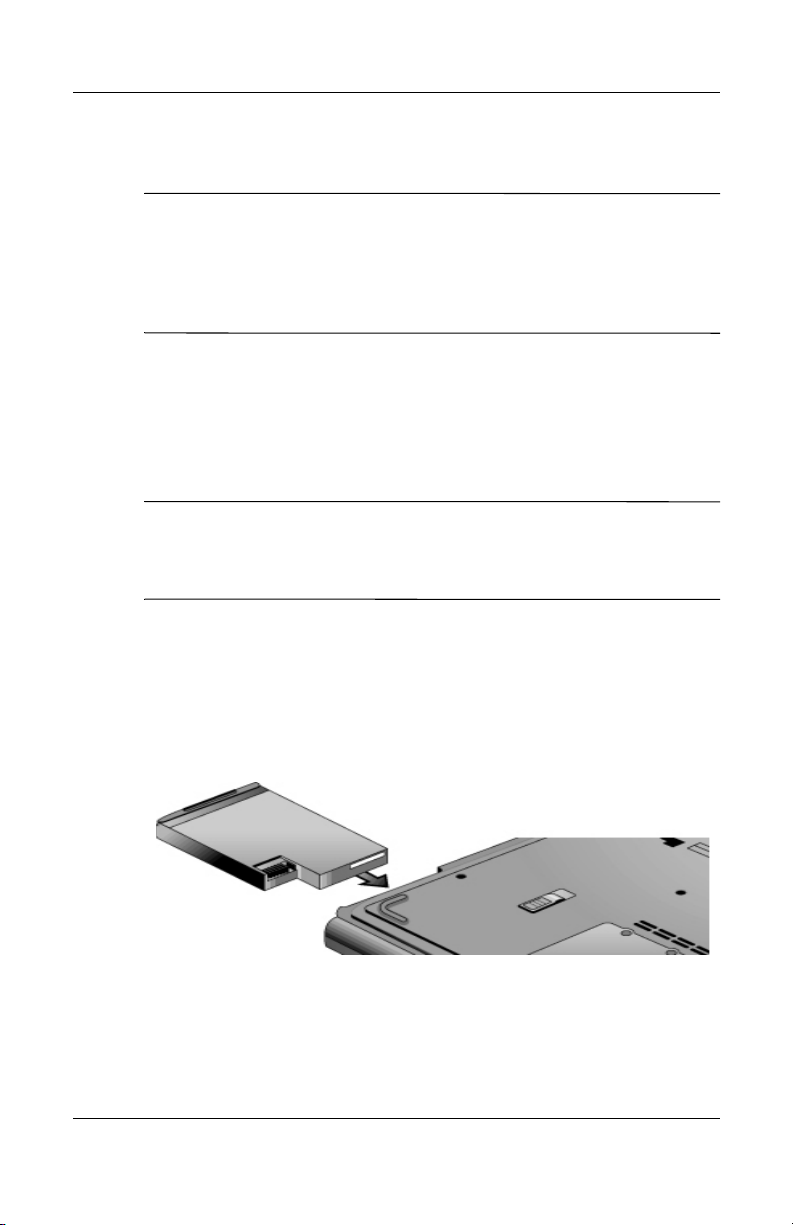
Step 1: Insert the Battery Pack
WARNING: Do not mutilate or puncture battery packs. Do not dispose
of battery packs in fire, or they can burst or explode, releasing
Å
hazardous chemicals. Rechargeable battery packs must be recycled or
disposed of properly.
To install the battery pack:
1. Turn the notebook upside down.
2. Insert the connector end of the battery pack into the battery
pack compartment, then slide the battery pack in until it
latches.
Reference Guide 1–7
Page 14
Getting Started with Your Notebook
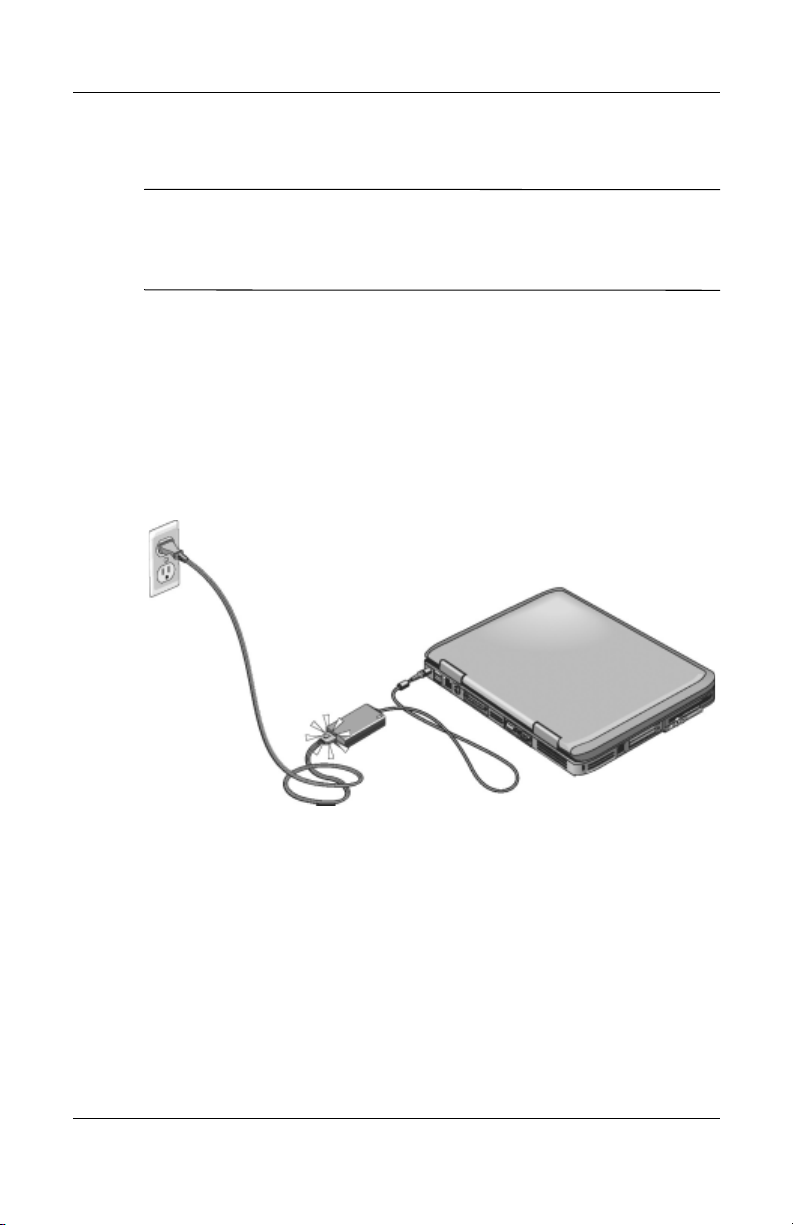
Step 2: Connect AC Power
CAUTION: Use only the AC adapter included with your notebook
Ä
other approved adapter that meets the power requirements of the
(or
notebook). Using the wrong AC adapter could damage the notebook
or adapter, cause data loss, and may void your warranty.
1. Plug the AC adapter into the notebook.
2. Connect the power cord to the AC adapter.
3. Plug the power cord into a wall outlet. The notebook battery
starts charging.
When unplugging the power cord, unplug it from the outlet
✎
before unplugging it from the AC adapter.
While the battery pack is charging, you can continue with the
section
1–8 Reference Guide
“Step 3: Connect a Phone Line.”
Page 15
Getting Started with Your Notebook
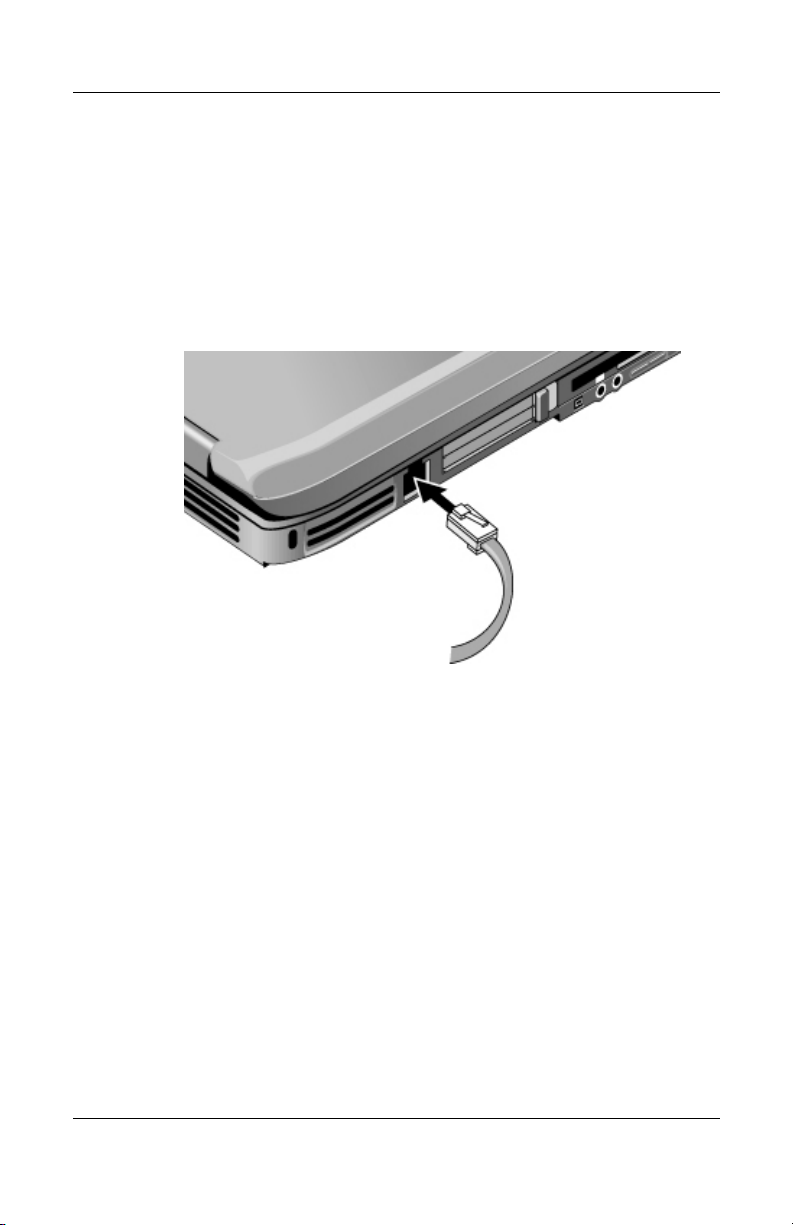
Step 3: Connect a Phone Line
1. Make sure the telephone line is an analog line, sometimes
called a data line. (Do not use a digital line.)
2. Connect the telephone cord (RJ-11) into a telephone jack.
3. Plug the other end of the telephone cord into the RJ-11
modem jack on the notebook.
For details about using the modem, see “Using the Modem.”
Reference Guide 1–9
Page 16
Getting Started with Your Notebook
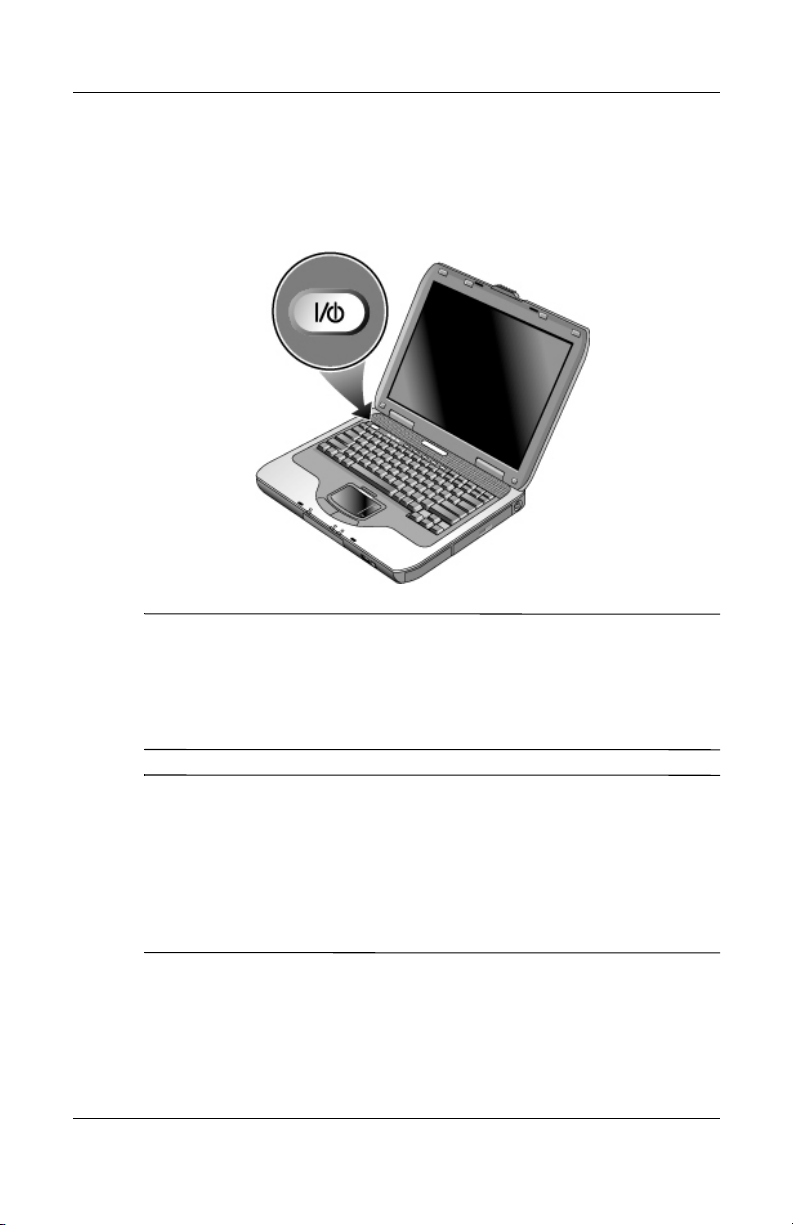
Step 4: Turn On the Notebook
Press the power button above the left side of the keyboard. The
notebook boots up, and Windows starts automatically.
If your notebook does not turn on when operating on
✎
battery
in
the
battery pack. Charge times will vary.
power, the battery pack may be out of power. Plug
the AC adapter, then press the power button again. Leave
AC adapter plugged in for several hours to fully charge the
WARNING: This notebook is designed to run demanding applications
Å
at full power. As a result of increased power consumption, it is normal
for the notebook to feel warm or hot when used continuously. To avoid
potential discomfort or burns, do not block the air vents or use the
notebook on your lap for extended periods. The notebook complies with
the user-accessible surface temperature limits defined by the
International Standard for Safety of Information Technology Equipment
(IEC 60950).
1–10 Reference Guide
Page 17

Step 5: Set Up Windows
Your notebook has the Microsoft Windows operating system
preinstalled on its hard drive. The first time you turn on your
notebook, the Windows Setup program runs automatically and
includes opportunities to customize your setup.
1. Follow the Setup program instructions on the screen. If the
program prompts you to enter the Product ID code, locate the
code on the bottom of the notebook.
2. Check the modem country or region settings. Select Start >
Control Panel > Printers and Other Hardware > Phone and
Modem Options, then select your country/region.
Getting Started with Your Notebook
Reference Guide 1–11
Page 18

Basic Operation
Operating Your Notebook
You can start and stop your notebook by using the power button.
However, alternative methods may be required, depending on
power considerations, types of active connections, and startup
time. This chapter describes several of these methods.
2
Reference Guide 2–1
Page 19

Basic Operation
Default Power Settings
Power mode To enter this mode Function
ON—Power status
light is on.
OFF—Power status
light is off.
Standby—Power
status light blinks.
Hibernation—Power
status light is off.
Briefly press the power
button.
Select Start > Turn Off
Computer > Turn Off. If the
system has stopped
responding and Windows
shutdown procedures cannot
be used, press and hold the
power button for 4 seconds to
turn off the notebook.
Select Start > Turn Off
Computer > Standby.
-orAllow the system to time out.
If the notebook is already on,
briefly press the power
button.
-orPress Fn+F12.
-orAllow the system to time out.
Powers on the notebook.
Powers off the notebook.
■ Saves significant
power.
■ Turns off the display
and other
components.
■ Maintains current
session in RAM.
■ Restarts quickly.
■ Restores network
connections.
■ Saves maximum
power.
■ Saves current
session to disk, then
shuts down.
■ Restores network
connections.
You can also customize the way these power modes work. See the
“Battery Packs and Power Management” chapter in this guide.
2–2 Reference Guide
Page 20

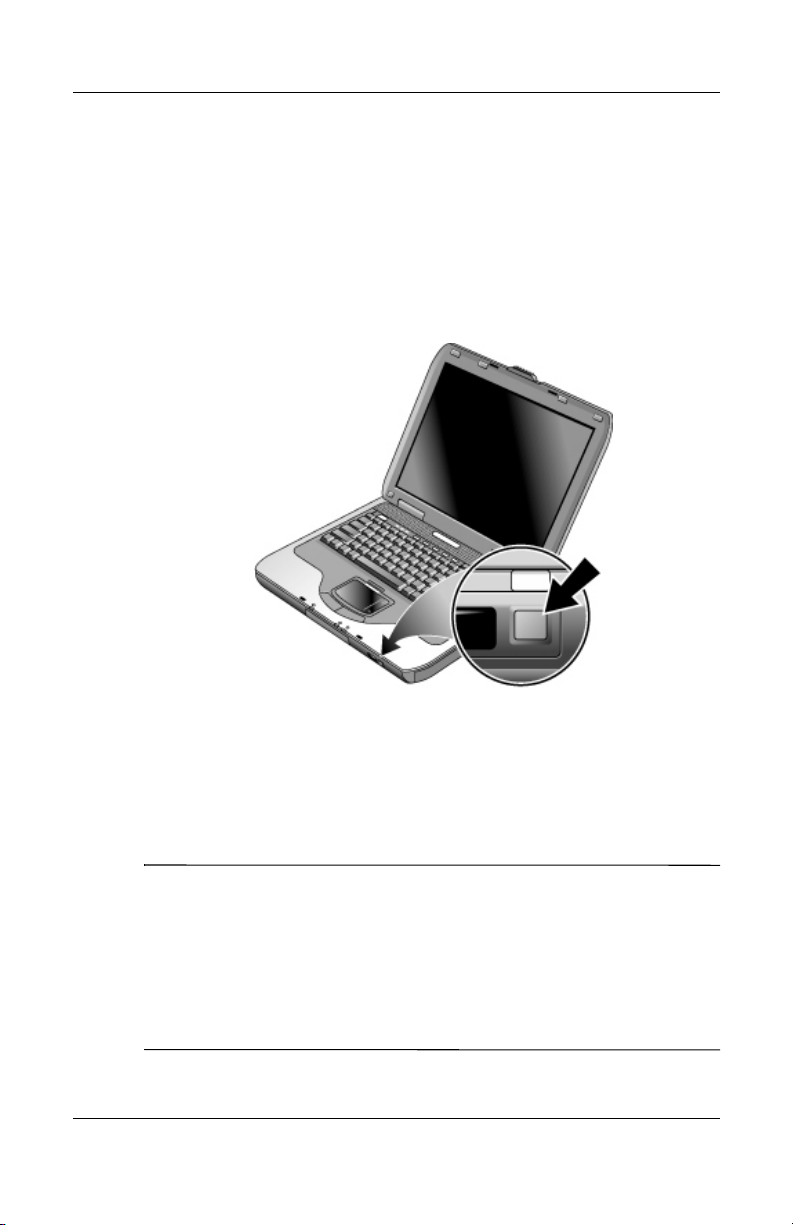
To Reset the Notebook
Occasionally, Windows or the notebook may stop responding and
you will not be able to turn off the notebook. If this happens, try
the following procedures in the order listed:
■ If possible, shut down Windows. Press ctrl+alt+del, then select
Shut Down > Restart.
-or-
■ Press the power button for at least 4 seconds until the display
shuts down. Unsaved data will be lost. Press the power button
again to restart.
-or-
■ Insert the tip of a paper clip into the reset button on the
bottom of the notebook, then press the power button to
restart.
To Change the Boot Device
The notebook normally boots from its internal hard drive. You
can also boot the notebook from a diskette drive, a CD-ROM
drive, or an internal network interface card.
1. Select Start > Turn Off Computer > Restart.
2. When the logo screen appears, press esc to display the
Boot
menu.
3. Use the arrow keys to select the boot device, then press enter.
If you want to boot from a specific device whenever it is present,
change the boot order using the BIOS Setup utility. See
“Configuring Your Notebook” in the “Troubleshooting” chapter
in this guide.
Basic Operation
Reference Guide 2–3
Page 21
Basic Operation
To Use the TouchPad
The TouchPad includes an on-off button so you can turn off the
TouchPad to avoid moving the pointer accidentally when you are
typing. The indicator light turns off when you turn off the
TouchPad.
1 Click buttons. The Click buttons work like the left and right buttons on
a standard mouse.
2 TouchPa d (touch-sensitive pointing device).
3 TouchPad on-off button and indicator light.
4 Scroll pad. The scroll pad causes the contents of the active window
to scroll vertically.
2–4 Reference Guide
Page 22

Basic Operation
To Use the Tap to Click Function of the TouchPad
The Tap to Click function of your TouchPad is enabled by default.
To disable it, follow the instructions included here:
1. Select Start > Control Panel > Printers and Other Hardware >
Mouse. The Mouse Properties dialog box opens.
2. Select the Tapping tab.
3. In the left panel, clear the Tapping check box.
4. Select Apply > OK.
The Tap to Click function is now disabled.
Reference Guide 2–5
Page 23

Basic Operation
To Use the Function Hot Keys
The combination of the Fn key plus another key creates a hot
key—a shortcut key sequence—for various system controls. To
use a hot key, press and hold
then release both keys.
This hot key Does this
Fn+F1 Decreases the display brightness.
Fn+F2 Increases the display brightness.
Fn+F5 Toggles the external monitor on and off.
Fn+F8 Toggles the built-in keypad on and off. Does
Fn+F12 Initiates Hibernation.
Fn, press the appropriate second key,
not affect an external keyboard. If Num Lock
is on, then the numeric functions are active;
otherwise, cursor control is active (as marked
on an external keyboard).
Fn+NumLock Toggles Scroll Lock on and off.
Fn+Page Up Increases the audio volume and cancels the
Fn+Page Down Decreases the audio volume.
Fn+Backspace Mutes/unmutes the audio output.
2–6 Reference Guide
mute setting.
Page 24
To Use the One-Touch Buttons
Your notebook includes 5 One-Touch buttons that can start
any
application or open a document or Web site by pressing a
single key.
Basic Operation
Press a One-Touch button to open the corresponding application,
document, or Web site.
To program a One-Touch button:
1. Select Start > All Programs > Utilities > One-Touch.
2. On the One-Touch tab, select the button you want to
reprogram.
3. Type a label for the button, then select the application,
document, folder, or Web site you want the button to open.
4. If you want a label to appear onscreen when you press a
One-Touch button, select that option on the Onscreen
Display
Reference Guide 2–7
tab.
Page 25

Basic Operation
To Use the Windows and Applications Keys
The Windows key brings up the Windows Start menu. This is the
same as selecting the Start button on the taskbar.
The Applications key brings up the shortcut menu for the selected
item. This is the same menu that appears when you right-click
while pointing at the selected item.
This key combination Does this
Windows key+E Runs Windows Explorer.
Windows key+F1 Runs Windows Help.
Windows key+F Runs Windows Find: Search.
Windows key+M Minimizes all displayed windows.
Shift+Windows key+M Returns all minimized windows to
Windows key+R Runs the Windows Run dialog box.
2–8 Reference Guide
original size.
Page 26

Basic Operation
To Type Alternate Graphics Using the
GR Key
ALT
Non-U.S. keyboards have an ALT GR key to the right of the
spacebar and keys on the keyboard that show International
characters. These special characters appear on the lower-right
corner of some keys on the keyboard. For example:
1 Shifted
2 Unshifted
3 ALT GR
» To type an International character, press and hold the ALT GR
key, then press the key containing the International character
you want to display.
If your keyboard does not have an ALT GR key, you can use the
✎
ALT key instead of the ALT GR key to get the same result.
Reference Guide 2–9
Page 27
Basic Operation
Using CDs or DVDs
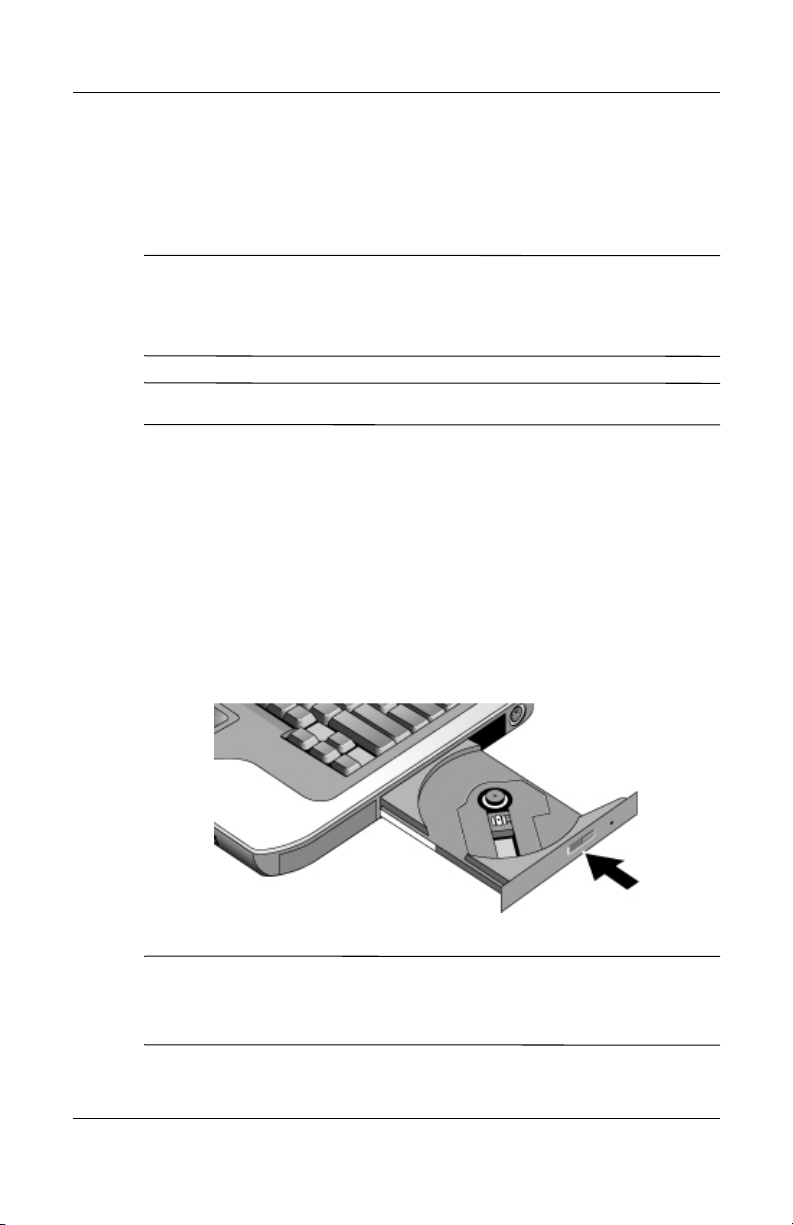
To Insert or Remove a CD or DVD
CAUTION: Do not remove a CD or DVD while the notebook is reading
Ä
it, or the notebook could stop responding and you could lose data. To
avoid damage to the disk or drive, be sure to press the CD or DVD firmly
onto the spindle.
The location of the CD or DVD drive varies by model.
✎
1. Press the button on the face of the CD or DVD drive. If you
are using this drive for the first time, be sure to remove the
cardboard packing insert, if present.
2. Press the CD or DVD gently but firmly onto the spindle (label
facing up).
-or-
Remove the CD or DVD.
3. Slide the tray back into the module to close it.
If your notebook loses power, you can manually open the drive to
✎
remove a CD. Insert a straightened paper clip into the recessed
hole on the front of the drive to open it.
2–10 Reference Guide
Page 28

To Play DVD Movies
If your notebook is equipped with a DVD or other DVD-readable
drive, it also includes DVD player software that lets you play
DVD movies.
» Select Start > All Programs > Multimedia > DVD Player >
InterVideo WinDVD.
For best performance while playing movies on battery power, set
✎
the Control Panel Power Scheme to Portable/Laptop.
DVDs can have regional codes embedded in the disc data. These
✎
codes prevent DVD movies from being played outside the region
of the world in which they are sold. If you get a region code error,
you are trying to play a DVD intended for a different region.
Most DVD drives let you change the region code only a limited
number of times (usually no more than 4). When you reach this
limit, your last change to the region code will be hard-coded on
the DVD drive and will be permanent. Your warranty does not
cover the expense of correcting this situation. Refer to the Help
for your DVD player software for details about setting region
codes.
Basic Operation
Reference Guide 2–11
Page 29

Basic Operation
To Create or Copy CDs
If your notebook is equipped with a DVD/CDRW Combo Drive,
it also includes CD software that lets you copy or create CDs.
Follow the instructions that are included with the software. Read
and write quality may vary by media.
To Write to DVD Media (Select Models Only)
If your notebook is equipped with a DVD+RW/R and CD-RW
Combo Drive, you must install your DVD burning software from
the CDs included with your notebook before you can write to
DVD media.
When writing to DVD+R or DVD+RW media, observe the
following guidelines:
■ Place the notebook on a flat, stable surface.
■ Ensure that the AC adapter is connected to the notebook and
an AC electrical outlet.
■ Close and exit all other software applications, except the CD
burning software (when writing a data disc) or DVD burning
software (when writing a video disc).
2–12 Reference Guide
Page 30

Securing Your Notebook
To Set Up Password Protection
To protect your notebook from access by another user, set up the
password protection as follows:
1. Select Start > Control Panel > User Accounts, then select
your account.
2. Select Create a Password, then set the password.
3. Select Start > Control Panel > Performance and
Maintenance
4. On the Advanced tab, select the option to prompt for a
password when the notebook leaves Standby.
To cancel password protection, repeat the preceding steps, but set
✎
an empty password.
For complete protection, set passwords in Windows and through
the BIOS Setup utility, see
“Troubleshooting” chapter.
> Power Options.
“Configuring Your Notebook” in the
Basic Operation
To Lock Your Notebook
To protect against unauthorized access while your notebook is
running, lock the notebook before leaving it unattended, or set up
a screen saver with a Windows password. You can lock the
notebook in either of the following ways:
■ If a One-Touch button is assigned to Quick Lock, press that
button.
-or-
■ Press ctrl+alt+del, then select Lock Computer.
To unlock the notebook, follow your normal logon steps.
Reference Guide 2–13
Page 31

Basic Operation
To Attach an Optional Security Cable
Your notebook includes a built-in connector to secure the
notebook with an optional cable and a lock (not included with the
notebook).
1. Wrap the cable around a secure object.
2. Insert the cable into the security cable slot on the notebook.
3. Lock it with the cable lock key, then store the key in a safe
place away from the notebook.
The purpose of security solutions is to act as a deterrent. These
✎
solutions do not prevent the product from being mishandled or
stolen.
2–14 Reference Guide
Page 32

To Protect Against Viruses
Virus-protection software can help protect the integrity of your
data. This is especially important if you use the Web.
Your notebook comes equipped with Norton AntiVirus software.
Because new viruses appear frequently, you will also want to
keep the program virus definitions up to date. Norton AntiVirus
updates are on the Web at
http://www.symantec.com. You can also
get detailed instructions from the program’s online Help.
To Lock the Hard Drive
The notebook enables you to lock its internal hard drive to help
keep your information secure.
CAUTION: When you enable the hard drive lock, the current BIOS user
Ä
password (or administrator password if that is the only password set) is
encoded on the hard drive. If you move the hard drive to
another notebook, you cannot access the drive until you
set the user (or administrator) password to match the drive
password. After you match the drive password, you can change the
notebook (and drive) password. If you forget the password, you cannot
recover your data.
Basic Operation
1. Select Start > Turn Off Computer > Restart.
2. When the logo screen appears, press F2 to enter the BIOS
Setup utility.
3. From the Security menu, enable Password Required to Boot.
4. From the Security menu, enable Internal hard drive lock.
5. Press F10 to save and exit BIOS Setup.
Reference Guide 2–15
Page 33

Basic Operation
Taking Care of Your Notebook
Follow these recommendations to maintain your notebook during
everyday use and prevent potential physical damage or data loss.
To Protect Your Hard Drive
Hard drives, as well as other internal components, are not
indestructible and can be damaged by inappropriate handling and
operation.
■ Avoid bumps or jolts.
■ Do not operate the notebook while traveling over bumpy
terrain.
■ Put the notebook in Standby or shut it down before
transporting it. This turns off the hard drive. A drop of a few
inches onto a rigid surface while the hard drive is operating
could destroy data or damage the drive.
■ Carry the notebook in a padded case to protect against bumps
and jolts.
■ Set down the notebook gently.
To Maintain Your Notebook
■ Provide adequate ventilation around the notebook. Always
set the notebook on a flat surface, so that air can flow freely
around and underneath it.
■ Always shut down the notebook or put it in Hibernation mode
before putting it into a carrying case or other enclosed space.
■ Do not pick up or carry the notebook by its display.
■ Do not use the notebook outside in the rain or snow
(inclement weather). If the notebook is cold, warm it
gradually to avoid condensation.
■ Maintain your battery pack for best performance. See the
“Battery Packs and Power Management” chapter.
2–16 Reference Guide
Page 34

To Safeguard Your Data
■ Do not use a pointing device or activate any other device that
interrupts operation while the system is starting or stopping.
■ Back up your work regularly. Copy files to diskettes, CDs,
DVDs, and other media, or to network drives.
■ Use a virus-scanning program (such as the Norton AntiVirus
program included with your notebook) to check your files
and operating system.
■ Check your disk using the Tools tab in the Disk Properties
window.
To Extend the Life of the Display
■ Set the display brightness to the lowest comfortable level
(
Fn+F1).
■ If you are not using an external monitor, set the Turn off
monitor timeouts (for both AC and battery pack operation)
to
the shortest comfortable interval.
■ Avoid using a screen saver or other software that prevents the
notebook from changing to Display-off or Standby mode
after a timeout period. If you use a screen saver, enable the
option to shut off the display after a time delay.
■ Do not disable Display-off or Standby timeouts.
■ If you are using AC power and have no external monitor
attached, put the notebook in Standby mode when not in use.
Basic Operation
To Clean Your Notebook
■ You can clean the notebook with a soft cloth dampened with
clean water or with water containing a mild detergent. Do not
use an excessively wet cloth, and take care to keep water out
of the case.
■ Do not use abrasive cleaners, especially on the display. Do
not apply any cleaner directly to the display. Instead, apply
the cleaner to a soft cloth, then gently wipe the display.
Reference Guide 2–17
Page 35

Battery Packs and Power
Management
Managing Power Consumption
When you are running your notebook on battery power, you
can
maximize operating time without compromising
performance. Your notebook is designed to help you reduce
power consumption and extend battery life.
During idle periods, the notebook automatically enters
power-saving modes after specified timeout periods. You can
adjust these timeouts to suit your working habits.
3
Reference Guide 3–1
Page 36

Battery Packs and Power Management
How the Notebook Manages Power Automatically
Your notebook enters Hibernation and Standby automatically,
and
turns off the hard drive and display based on values set in
Windows.
When this occurs The result is To resume
No keyboard, pointing
device, or other input
activity occurs for the
specified interval.
The hard drive is not
accessed for a specified
interval.
No pointing devices are
used, no disk drive is
accessed, and no port is
active for the specified
interval.
The notebook stays in
Standby for the specified
interval.
CAUTION: Make a habit of saving your work before allowing your
Ä
notebook to enter Standby. If power is interrupted while the notebook is
in Standby, any information that was not saved will be lost.
The notebook can also enter Hibernation if battery power reaches
a critically low level. If this happens, you will find on resuming
that all your data has been saved, but some functions may be
disabled. To resume normal operation, restore power by
connecting an AC adapter or installing a charged battery pack,
then turn the notebook off and restart it.
Display is turned off.
Conserves battery power
and extends the life of the
display.
Hard drive is turned off.
Is usually set to occur
shortly after the display is
turned off.
Standby is initiated.
Maintains your current
session in RAM, and turns
off the display and other
components to conserve
battery power.
Hibernation is initiated.
Saves your current
session to the hard drive,
and turns off the notebook.
Briefly press any key
or move a pointing
device to turn on the
display.
Begin using the
notebook, and
the
hard drive is
turned on.
Briefly press any key
or move a pointing
device to turn on the
display.
Press the power
button to return to
your previous
session.
3–2 Reference Guide
Page 37

Battery Packs and Power Management
To Change Timeout Settings and Create Power Schemes
You can adjust the length of timeouts after which your notebook
automatically shuts down components or enters a power-saving
mode. You can also save these settings as a power scheme.
1. Select Start > Control Panel > Performance and
Maintenance
2. Select the Power Schemes tab, then enter the settings you
want. If you do not want a particular timeout to occur, set the
value to Never. See Windows Help for details.
If you want to save the settings as a power scheme, select
Save As and enter a name for the scheme.
CAUTION: Do not disable Hibernate support in the Power Options
Ä
settings or you will lose all unsaved data if the battery pack becomes
completely depleted.
> Power Options.
Reference Guide 3–3
Page 38

Battery Packs and Power Management
Using Battery Power
To Check Battery Status
From the battery status light
» Check the battery status light on the notebook.
From the Windows taskbar
The Windows taskbar can display a power icon that provides
detailed battery status information (see Windows Help for
details). The icon resembles a battery when a battery pack is
the
notebook’s sole source of power.
■ Place the pointer over the power icon to display the
remaining battery charge. This value is shown as either a
percentage of charge remaining or as time remaining.
■ Select the power icon to open the Battery Meter window.
From the Windows Control Panel
» Select Start > Control Panel > Performance and
Maintenance
tab to see the battery status. The Alarms and Advanced tabs
provide additional power information options.
On the battery pack
1. Remove the battery pack from the notebook. See the “Getting
Started with Your Notebook” chapter in this guide.
2. Press the contact pad on the side of the battery pack.
> Power Options, then select the Power Meter
3–4 Reference Guide
Page 39

Battery Packs and Power Management
To Respond to a Low-Battery Warning
The notebook automatically alerts you when the battery power
drops to a critically low level. The notebook first emits a
high-pitched beep or displays a warning message. Then, if you
do
not restore power within a short time, the notebook goes into
Hibernation.
After the notebook enters Hibernation in this way, you will not be
able to turn it on again until you restore power by using one of the
following procedures:
■ Replace the battery pack with a charged one.
■ Plug in the AC adapter.
If you plug in the AC adapter, you can continue to work while
✎
your battery pack recharges.
To Recharge the Battery Pack
CAUTION: The AC adapter is normally warm when plugged into an
Ä
AC outlet. The notebook is normally warm while recharging. Do not
recharge the notebook in a briefcase or other confined space, or the
battery pack could overheat.
» Plug the AC adapter into the notebook.
Charging can take several hours. If you continue working while
the battery pack charges, the charging time may increase.
The operating time for a fully charged battery pack depends on
the notebook model, power management settings, and level
of
use.
Reference Guide 3–5
Page 40

Battery Packs and Power Management
To Get the Most from Your Battery Packs
Follow these suggestions to make your battery power last as long
as possible:
■ Plug in the AC adapter, especially when using a CD-ROM or
DVD drive, or any external connections such as a PC Card
a modem.
or
■ Set the display brightness to the lowest comfortable level
Fn+F1).
(
■ Put the notebook in Standby when you will not be using it for
a short while.
■ Put the notebook in Hibernation whenever you want to save
your current session but will not be using the notebook for
day or more.
a
■ Set the automatic timeout settings to emphasize saving
power. If your notebook has a multispeed processor, use the
lower speed on battery power (the default settings conserve
battery power).
■ If your notebook has a wireless on-off button, turn off
wireless function when you are not using it. Press the
the
wireless on-off button to turn off the light.
■ If you have a PC Card, such as a network card, remove it
when you are not using it. Some PC Cards use significant
power even while they are inactive.
■ If you work with an application that uses the serial port or a
PC Card, exit the application when you finish using it.
3–6 Reference Guide
Page 41

Battery Packs and Power Management
In addition, follow these suggestions to extend the life of your
battery packs:
■ Do not leave battery packs unused for long periods. If you
have more than one, rotate them.
■ Unplug the AC adapter when the notebook is not in use.
■ If the notebook will be unused and unplugged for more than
2
weeks, remove and store the battery pack.
CAUTION: To prevent damage to the battery pack, do not expose it to
Ä
high temperatures for extended periods of time.
■ High temperatures accelerate the self-discharge rate of a
stored battery pack. To prolong the charge of a stored battery
pack, place it in a cool, dry location.
■ To maintain the accuracy of battery charge displays, calibrate
a battery pack that has been stored for one month or more
before using it.
■ Avoid using or charging battery packs at high temperatures.
Reference Guide 3–7
Page 42

Battery Packs and Power Management
Disposing of a Used Battery Pack
WARNING: There is a risk of fire and chemical burn if a battery pack
is handled improperly. Do not disassemble, crush, or puncture a
Å
battery
pack or short the contacts on a battery pack. Do not expose a
battery pack to temperatures higher than 60°C (140°F) or dispose of
a battery pack in water or fire.
When a battery pack has reached the end of its useful life, do not
dispose of it in general household waste.
■ In Europe, dispose of or recycle battery packs by using the
public collection system or by returning them to your service
partner.
■ In other regions, refer to the Worldwide Telephone Numbers
booklet, included with the notebook, to contact your service
partner and request information about battery pack disposal.
For more information about battery pack precautions and disposal
and the complete text of governmental agency notices, refer to the
Regulatory and Safety Notices guide on the Documentation CD.
3–8 Reference Guide
Page 43

Modem and Network
Using the Modem
You can connect your modem to a telephone line and
communicate throughout the world. You can explore the Internet,
send and receive e-mail messages, and use your notebook to send
and receive faxes. Your notebook contains several software
programs that work with your modem:
■ Internet Explorer, for browsing the World Wide Web
■ Outlook Express, for sending and receiving e-mail messages
■ Windows Fax Console, for sending and receiving faxes
For best performance, you can connect to any Internet service
provider (ISP) or modem network that has V.90 or V.92
interoperable modems. Check with your ISP for a list of
telephone numbers that support V.90 or V.92. (V.92 enables
modem on-hold technology that allows an Internet session to be
interrupted to answer a phone call, then resumes the Internet
session after the call is complete.)
The maximum speed for faxing is 14.4 Kbps, even though the
modem is capable of downloading at higher speeds.
4
Connections
Reference Guide 4–1
Page 44

Modem and Network Connections
To Connect the Modem
CAUTION: Your built-in modem may not work with multiple phone
Ä
lines or a private branch exchange (PBX). It cannot be connected to a
coin-operated telephone and does not work with party lines. Some of
these connections may result in excess electrical voltage and could
cause a malfunction in the internal modem. Check your telephone line
type before connecting your phone line.
4–2 Reference Guide
Page 45

Modem and Network Connections
Special Restrictions in Certain Countries
■ Many countries impose a blackout period after a modem
repeatedly fails to connect to a service provider. The number
of failed attempts and the period you must wait before trying
again differ from country to country. Check with your
telephone company.
For example, if you are dialing from Italy and fail to connect
to your server or cancel the connection, you must wait
one
minute before dialing that number again. If you dial
before then, you will get the message “delay.” After the
fourth failed connection, you must wait one hour before
trying the number again. If you dial before the hour is up, you
will get the message “black list.”
■ When your modem is in use, an external surge protector can
prevent notebook damage by lightning or other electrical
surges. Connect any approved surge protector to the modem
cable whenever you are using the modem.
Reference Guide 4–3
Page 46

Modem and Network Connections
To Change Your Modem Settings
The modem is already set up to be compatible with telephone
systems and modems in most areas. However, in some situations,
you may have to change modem settings to match local
conditions. If you have questions about local requirements,
contact your telephone company.
■ Control Panel. Open Phone and Modem Options in Control
Panel to change many modem settings. On the Modems tab,
select Properties to set connection speeds, or on the Dialing
Rules tab, select Edit to set dialing options.
■ Communications software. Many communications
applications provide options for controlling modem settings.
See the Help for your software.
■ AT commands. You can control many aspects of modem
operation using modem AT commands. AT commands are
special strings of characters sent to the modem to set up
specific conditions. Those command strings normally start
with
“AT.” For a list of AT commands for the built-in modem,
see the Documentation CD.
From the Control Panel, select Phone and Modem Options.
On the Modems tab, select Properties. You can type AT
commands on the Advanced tab in the space for extra
settings.
4–4 Reference Guide
Page 47

Modem and Network Connections
Connecting to a Local Area
Network
You can connect to local area networks (LANs). LANs give you
access to network resources, such as printers and file servers on
your corporate network, and possibly to the Internet.
To connect to a LAN:
1. Check that the existing LAN supports Ethernet 10Base-T
(10
2. Plug the LAN cable (not supplied) into the built-in LAN port.
The cable must have an RJ-45 connector.
3. Windows automatically detects and sets up a LAN
connection. To edit settings, open Network and Dial-up
Connections in Control Panel.
See Windows Help for information about setting up and using
LAN connections. Select Start > Help and Support. Contact your
network administrator for network information.
(LAN)
Mbps) or 100Base-TX (100 Mbps) connections.
Two lights at the LAN port indicate the connection status:
■ The yellow light indicates network activity.
■ The green light indicates a 100-Mbps link.
Reference Guide 4–5
Page 48

Modem and Network Connections
Using a Wireless LAN Adapter (Select Models Only)
Your notebook model may include a wireless local area network
(WLAN) adapter. A WLAN adapter enables your notebook to
connect to a compatible wireless network access point or to
another, compatible, wireless-enabled notebook. A WLAN
adapter cannot be used to connect the notebook to a mobile
telephone service or a cordless telephone.
Setting up a wireless network requires:
■ A notebook equipped with a WLAN adapter—The WLAN
adapter can be integrated or a free-standing add-on, such as a
PC Card.
■ A wireless access point—Wireless access point functionality
can be provided by a standalone device or be included with
another networking device, such as a router.
4–6 Reference Guide
Page 49
Modem and Network Connections
Making Wireless Network Connections (Select Models Only)
If your notebook includes a wireless on-off button, you can
connect by radio to an 802.11 wireless local area network
(WLAN) and access computers and other resources on the
network.
A wireless network provides all the functions of a typical “wired”
network, but also provides for “roaming.” Since your notebook
connects to the network by radio rather than through cables, you
can move from place to place within the network—from your
office to a conference room, for example—and remain on the
network the entire time.
WARNING: Exposure to Radio Frequency Radiation.
Å
Reference Guide 4–7
radiated output power of this device is below the FCC radio
The
frequency exposure limits. Nevertheless, the device should be used in
such a manner that the potential for human contact during normal
operation is minimized. To avoid the possibility of exceeding the FCC
radio frequency exposure limits, human proximity to the antenna should
not be less than 20 cm (8 inches) during normal operation, including
when the notebook display is closed.
Page 50

Modem and Network Connections
To Turn Wireless Communication On and Off
For instructions to enable WLAN communications, refer to
the
Go Wireless booklet included with your notebook (select
models
Wireless networks and cellular modems are examples of devices
✎
that use wireless communication. Such devices may be restricted
in some situations or environments, such as when traveling in an
airplane. If in doubt, be sure to ask for authorization before
turning on your notebook wireless networking.
In Italy, Singapore, and possibly other countries, you may be
required to purchase a license before using the wireless function.
Turning On Communication and Making a Connection
If your notebook has wireless 802.11 capabilities, the wireless
indicator light on the front of the notebook turns on when 802.11
communication is turned on.
If you are within range of your wireless network, your notebook
automatically connects. To check the status of your wireless
connection, open Network Connections in Control Panel, then
select the connection.
only).
1. If the notebook is not on, turn it on.
2. If you normally press the wireless on-off button on the front
of the notebook to turn wireless 802.11 communication on
and off, press the button so the indicator light turns on. This
restores your previous wireless configuration.
-or-
Select Start > Control Panel > Network and Internet
Connections > Network Connections, then select the wireless
network connection icon.
4–8 Reference Guide
Page 51

Modem and Network Connections
Turning Off Communication and Ending a Connection
1. Close any files that reside on other network notebooks.
2. To turn off the wireless 802.11 communication without
turning off the notebook, press the wireless on-off button.
-or-
Right-click the wireless network connection icon in the
taskbar, then select Disable.
Putting the notebook in Standby or shutting it down also turns off
the wireless function.
Reference Guide 4–9
Page 52
Add-On Devices
Connecting External Devices
To Insert or Remove a PC Card
The notebook PC Card slot supports standard Type II and
Type
III PC Cards (PCMCIA and CardBus).
The location and number of the PC Card slots vary by model
✎
series.
Inserting a PC Card
1. Hold the PC Card label side up and its connectors facing the
card slot.
2. Aligning the PC Card along the bottom of the slot, slide the
PC Card until it is seated. Most cards are properly seated
when the outer edge is flush with the casing of the notebook,
but some cards are designed to protrude from the case.
5
Reference Guide 5–1
Page 53

Add-On Devices
Removing a PC Card
CAUTION: Before removing a PC Card, you must use the Eject Hardware
Ä
or Safely Remove Hardware icon in the taskbar, or shut down the
notebook. Otherwise, you could lose data.
1. Select the Eject Hardware or Safely Remove Hardware icon
in the taskbar, select the card you want to remove, then
remove the card. This protects your data and helps avoid
unexpected problems.
If needed, you can restart the card by reinserting it.
2. Press the eject button to extend the button, then press the
button again to eject the PC Card.
Before you connect any device, check its documentation to see if
✎
you need to make any settings or adjustments to the equipment
before using it. This might include setting switches to configure
the equipment so that it will operate properly with your notebook
and the software you plan to use.
5–2 Reference Guide
Page 54

To Connect an Audio Device
You can plug in an external microphone, external speakers, or
headphones.
CAUTION: The headphone and line-in jacks are three-terminal stereo
jacks. They are not compatible with two-terminal mono plugs. Connecting
a mono plug into either of these jacks may damage the notebook.
Add-On Devices
1
2 Audio out (headphones) connector (green)
When you plug a device into the headphone port, the built-in
✎
speakers automatically turn off.
Reference Guide 5–3
External microphone connector (pink)
Page 55

Add-On Devices
To Connect a TV to Your Notebook (Select Models Only)
1. Plug a standard 4-pin S-Video cable to the S-Video out jack
on your notebook (yellow connector on the back panel). Plug
the other end of the cable to the S-Video in jack on your
television.
Although your notebook has a 7-pin S-Video out jack, the
✎
notebook accepts either a 7-pin or 4-pin cable connection.
2. Select Start > Control Panel > Appearance and Themes >
Display. Then, select the Settings tab > Advanced button >
Display tab.
3. To enable the TV, select the red button next to TV.
If the S-Video cable is not plugged into your notebook and TV,
✎
the red button will not be displayed.
4. Select Apply to accept the changes.
5. If you are prompted to restart Windows, select Yes.
Adjusting Monitor Resolution and Other Settings
1. Select Start > Control Panel > Appearance and Themes >
Display.
2. On the Settings tab, adjust the Screen area. Other settings are
also available.
If you need to increase the refresh rate on the external monitor,
you can switch to only the external monitor. An alternative is to
make one display a “secondary” display so you can select
independent refresh rates:
1. Select Start > Control Panel > Appearance and Themes >
Display.
2. On the Settings tab, select the Advanced button, then the
Display or Monitor tab. Set the refresh rate on the
Monitor
5–4 Reference Guide
tab.
Page 56

Using Dual Display Mode
You can extend your desktop by connecting an external monitor
to your notebook.
1. Select Start > Control Panel > Appearance and Themes >
Display.
2. Select the Settings tab.
3. Select the second display, then select the option to extend the
desktop.
You can set different resolutions and numbers of colors for each
display. However, using the Extended Desktop requires video
memory for each display. For this reason, higher resolutions and
higher numbers of colors may cause unexpected behavior on the
displays. Try starting with 1024 × 768 resolution on the external
display and 64 K colors (16-bit) on both displays. You can then
try higher settings to see whether they work for your applications.
In addition, certain operations such as playing DVDs and running
3D graphics require extra video memory, so you may have to
adjust display settings.
If you play a DVD movie, the movie will show only on
the
primary display. To change the primary display, go to
the
Settings tab of Display Properties (see the steps above),
right-click the display you want, and select Primary.
Add-On Devices
Reference Guide 5–5
Page 57

Add-On Devices
To Connect a 1394 Device (Select Models Only)
If your notebook has a 1394 port (also known as FireWire), you
can use it to connect devices such as audio and video equipment,
disk drives, printers, and other notebooks.
Attach the device cable to the 1394 port. Windows automatically
recognizes the device.
The 1394 port is a 4-wire port. If you want to connect a device
that has a 6-wire plug, you can purchase a simple adapter if the
device is unpowered, or a hub if the device requires power.
If you have problems making this connection, go to the device
✎
manufacturer Web site for the latest version of the driver for the
device.
5–6 Reference Guide
Page 58

Add-On Devices
Installing Additional RAM (Memory)
The notebook has 2 slots that hold 2 RAM modules. At least
one
slot contains a RAM module installed at the factory. You can
use both slots to expand your RAM.
To Install a RAM Expansion Module
Use only PC2100 DDR-266-MHz or higher RAM.
You will need a small Phillips screwdriver for these steps.
CAUTION: The internal components of your notebook are extremely
Ä
sensitive to static electricity and can be permanently damaged by it.
Handle the RAM module only by its edges. Before installing the memory
module, discharge static electricity by touching the metal shielding around
the connectors on the back of the notebook.
1. Save your work and shut down the notebook. If you are not
sure whether the notebook is off or in Hibernation, briefly
press the power button. If your work returns to the screen,
save your work, exit all applications, and then shut down the
notebook.
2. Disconnect all external devices connected to the notebook.
3. Disconnect the power cord
4. Remove the battery pack.
5. Turn the unit bottom-side up, loosen the screws holding the
RAM cover, then remove the cover.
Reference Guide 5–7
Page 59

Add-On Devices
6. Match your notebook to the following illustration. Insert the
RAM board into the connector at about a 30-degree angle
until it is fully inserted. Then press down at both sides until
both latches snap closed.
7. Replace the cover.
8. Insert the battery pack.
5–8 Reference Guide
Page 60

Add-On Devices
To Remove a RAM Expansion Module
You may want to remove a RAM module so you can install a
larger one. You will need a small Phillips screwdriver for
these
steps.
CAUTION: Your notebook internal components are extremely sensitive to
Ä
static electricity and can be permanently damaged by it. Handle the RAM
module only by its edges. Before installing the memory module, discharge
static electricity by touching the metal shielding around the connectors on
the back of the notebook.
1. Save your work and shut down the notebook. If you are not
sure whether the notebook is off or in Hibernation, briefly
press the power button. If your work returns to the screen,
save your work, exit all applications, and then shut down the
notebook.
2. Disconnect all external devices connected to the notebook.
3. Disconnect the power cord
4. Remove the battery pack.
Reference Guide 5–9
Page 61

Add-On Devices
5. Turn the unit bottom-side up, loosen the screws holding the
RAM cover, then remove the cover.
6. Match your notebook to the following illustration. Release
the 2 latches at the sides of the RAM board, so the free edge
of the board pops up.
7. Pull the board out of the connector.
8. Replace the cover.
9. Insert the battery pack.
5–10 Reference Guide
Page 62

Replacing the Hard Drive
To Replace the Hard Drive
You will need a small Phillips screwdriver for this procedure.
1. Save your work and shut down the notebook. If you are not
sure whether the notebook is off or in Hibernation, briefly
press the power button. If your work returns to the screen,
save your work, exit all applications, and then shut down the
notebook.
2. Disconnect all external devices connected to the notebook.
3. Disconnect the power cord
4. Remove the battery pack.
5. Turn the unit bottom-side up.
6. Match your notebook to the following illustration. Use a
pointed tool to remove the plugs from the 2 or 3 screw holes,
then remove the screws. The number of screws varies by model.
Add-On Devices
7. Gently pull the hard drive out of the notebook.
8. Gently slide the new drive into the hard drive compartment.
Press firmly to make sure the connector seats properly.
9. Reinstall the hard drive screws and plugs.
If you are installing a new hard drive, you should create a Utility
✎
partition on the drive before loading any software.
Reference Guide 5–11
Page 63

Add-On Devices
To Replace the Hard Drive Holder
If you are installing a new hard drive that does not have a holder,
you can remove the holder parts from the hard drive you are
removing. You will need a small Phillips screwdriver for this
procedure.
1. Remove the 4 screws from the sides of the holder and drive
case, then slide the drive out of the holder.
2. Notice that the hard drive has a pin connector attachment at
one end. Carefully remove this connector from the end of the
drive. Work alternately at each end so that the connector
slides off evenly without bending the connector pins.
3. Carefully put the pin connector attachment back onto the pins
on the end of the new hard drive. Work alternately at each end
so that the connector slides on evenly without bending the
connector pins.
4. Insert the drive into the holder.
5. Reinstall the screws into the holder and drive case.
5–12 Reference Guide
Page 64

To Prepare a New Hard Drive
When you install a new hard drive, you also need to prepare it to
be able to work with your notebook.
If you want to restore the Windows software and operating
system that were originally installed on your notebook, follow
the
system recovery procedures described in the
“Troubleshooting” chapter of this guide.
Add-On Devices
Reference Guide 5–13
Page 65

Troubleshooting
Troubleshooting Your Notebook
This chapter contains solutions to many types of problems you
might have with your notebook. Try the solutions one at a time, in
the order in which they are presented.
Here are some other sources of information for troubleshooting:
■ Use the Windows troubleshooters. Select Start > Help and
Support.
■ Select the question mark One-Touch key located at the top of
the keyboard.
■ See the Microsoft Windows manual shipped with the
notebook.
■ Refer to the Worldwide Telephone Numbers booklet to
contact customer service for help and support.
6
Reference Guide 6–1
Page 66

Troubleshooting
Audio Problems
If No Sound Is Audible
■ If your model has a volume control, press the + (plus) button
to increase the volume.
■ Select the speaker icon on the taskbar (if present). Clear the
Mute all check box if selected. If your model has an audio
mute button, press it so the indicator light goes off.
■ When you are operating your notebook in MS-DOS mode
(for example, when running MS-DOS games), you may find
that the sound does not operate properly. Use Windows
applications for full use of sound capabilities.
If Sound Does Not Record
■ Plug in an external microphone. The notebook does not have
a built-in microphone.
■ Check the software controls for recording sound by selecting
Start > All Programs > Accessories > Multimedia (or
Entertainment) > Sound Recorder.
■ In Volume Control, select Option > Properties, and make sure
the microphone is enabled in the recording controls.
If You Hear Loud, High-Pitched Feedback from the Speakers
■ In the Volume Control, try reducing the Master volume by
selecting the speaker icon in the taskbar.
■ In Volume Control, select Options > Properties, then select
the microphone option for the playback settings. Also in
Volume Control, make sure the microphone is muted.
6–2 Reference Guide
Page 67

Troubleshooting
CD-ROM and DVD Problems
If You Cannot Boot from a CD or DVD
■ Make sure the CD or DVD is bootable.
■ Make sure the CD-ROM/DVD drive is selected as the boot
device. See the
change the boot sequence.
■ Restart the notebook by selecting Start > Turn Off
Computer
If a DVD Plays Erratically
■ Dirt or smudges can cause a disc to skip. Clean the disc with
a soft cloth. If the disc is badly scratched, it will probably
have to be replaced.
■ If you are playing the DVD on battery power, try changing
the power scheme.
If You Get a Region Code Error When Playing a DVD Movie
“Basic Operation” chapter in this guide to
> Restart.
DVDs can have regional codes embedded in the disc data. These
codes prevent DVD movies from being played outside the region
of the world in which they are sold. If you get a Region Code
error, you are trying to play a DVD intended for a different
region.
Reference Guide 6–3
Page 68

Troubleshooting
If the Notebook Cannot Read a CD or DVD
■ For a single-sided CD or DVD, make sure the disc is placed
in the drive with the label facing up.
■ Clean the disc.
■ Wait 5 to 10 seconds after closing the tray to give the
notebook time to recognize the disc.
■ Restart the system: remove the disc from the drive, and select
Start > Turn Off Computer > Restart.
■ If you created the CD on a DVD/CDRW combo-type drive,
try using a different media brand. Read and write quality may
vary for media.
If a DVD Movie Does Not Fill the Screen
Each side of a double-sided DVD has a different format (standard
or widescreen). In widescreen format, black bands appear at the
top and bottom of the screen. To view the standard format, flip
the
disc over and play the other side.
Display Problems
If the Notebook Is On, But the Screen Is Blank
■ Move the mouse or tap the TouchPad. This will wake the
display if it is in Display-off mode.
■ If the notebook is cold, allow it to warm up.
If the Screen Is Difficult to Read
■ Set the display resolution to its default setting of 1024 × 768
or higher, depending on your model, by selecting Start >
Control Panel > Appearance and Themes > Display.
■ Adjust the size of the desktop icons and labels.
■ Adjust the brightness of the screen.
6–4 Reference Guide
Page 69

If an External Display Does Not Work
■ Check the connections.
■ The external monitor may not be detected. In the BIOS Setup
utility, try setting Video Display Device to Both in the System
Devices menu.
■ If you are using a TV connected to the optional S-Video port,
you must activate the TV.
■ Install the driver or .inf file for your specific monitor
❏ Select the external monitor as the primary display device
in the display properties
❏ Continue to toggle Fn+F5 until the external display is
enabled.
Hard Drive Problems
If the Notebook Hard Drive Does Not Spin
■ Make sure the notebook has power. If necessary, connect the
AC adapter, and make sure it is fully plugged into a power
source and into the back of the notebook.
■ Remove and reinsert the hard drive.
Troubleshooting
If the Hard Drive Makes a Buzzing or Whining Noise
■ See whether the noise is coming from elsewhere, such as
from the fan or a PC Card drive.
■ Back up the drive immediately.
Reference Guide 6–5
Page 70

Troubleshooting
If Files Are Corrupted
■ Open My Computer, and the disk you want to scan. Select
File > Properties. Select the Check Now box under the
Error-checking section of the Tools tab.
■ Run the virus-scanning program.
■ If necessary, you can format the hard disk and reinstall the
original factory software using the system recovery features
described in this guide.
Heat Problems
Your notebook normally gets warm during routine operation.
If the Notebook Gets Abnormally Hot
■ Always set the notebook on a flat surface, so that air can flow
freely around and underneath it.
■ Make sure the air vents on the bottom and sides of the
notebook are clear.
■ Keep in mind that games and other programs that drive CPU
usage toward 100 percent can increase the notebook
temperature.
6–6 Reference Guide
Page 71

Troubleshooting
Keyboard and Pointing Device Problems
Use these suggestions for built-in or external devices.
✎
If the Pointer Is Difficult to Control
■ Adjust the pointer controls by selecting Start > Control
Panel
> Printers and Other Hardware > Mouse.
■ Ensure that your thumb or palm is not pressing or near the
TouchPad on-off button while typing.
■ Use an external mouse if using the TouchPad is difficult.
If the TouchPad Does Not Work
■ Press the TouchPad on-off button to turn on the light.
■ Do not touch the TouchPad while the notebook is rebooting
or resuming from Standby mode. If you do, try the following:
press a key on the keyboard to restore normal operation.
■ If an external mouse is connected, the built-in pointing
devices are normally disabled. You can change this setting
with the BIOS Setup utility. See
Notebook” in this chapter.
■ Restart the notebook by selecting Start > Turn Off
Computer
> Restart.
“Configuring Your
If the TouchPad Moves the Pointer or Cursor While You Type
Press the TouchPad on-off button to turn off the TouchPad while
you type.
Reference Guide 6–7
Page 72

Troubleshooting
Local Area Network (LAN) Problems
If the Built-In Network Adapter Does Not Connect to the LAN
■ Check all cables and connections. Try connecting at a
different network station, if available.
■ Make sure the LAN cable is Category 3, 4, or 5 for 10Base-T
operation, or Category 5 for 100Base-TX operation.
Maximum cable length is (100 meters) 330 feet.
■ Select Start > Help and Support > and use the Networking
troubleshooter.
■ Open the hardware Device Manager:
1. Select Start > Control Panel > Performance and
Maintenance > System.
2. If the network interface is disabled, try to enable it. If it
has a conflict, try disabling another device.
If You Cannot Browse the Network Neighborhood or My Network Places
Select Start > Search > Notebooks or People to look for a
notebook.
If You Cannot Log In to Netware Servers
If a Netware server is using IPX/SPX protocol, you may need to
force your frame type to match the server frame type. Check with
your network administrator.
If a Network Connection Responds Slowly
If your network connection uses a proxy server, try enabling the
option for bypassing the proxy server for local addresses. You can
do this in Control Panel under your network connection
properties.
6–8 Reference Guide
Page 73

Troubleshooting
Memory Problems
If a Message Reports That You Are Out of Memory
■ Make sure drive C is not running low on free space.
■ If you are having memory problems while running MS-DOS
programs, select Start > Help and Support. Use the MS-DOS
or Application and Software troubleshooter in Windows
Help.
■ The full amount of RAM in your notebook is not available
for
running applications. A certain amount of RAM is
used
for display memory. The amount of display memory
is
shown in the BIOS Setup utility.
If Memory Does Not Increase After Adding RAM
Make sure your notebook is using only PC2100 DDR 266-MHz
or higher memory (RAM) modules.
If the Notebook Beeps But Does Not Start After Adding RAM
You installed an incompatible type of RAM. Remove the module.
Reference Guide 6–9
Page 74

Troubleshooting
Modem Problems
If the Modem Seems Slow
■ Excess static or noise on a line reduces the overall
transmission speed of the modem connection. If necessary,
contact your telephone company about fixing this type of
problem.
■ If you are dialing internationally, line noise is often a problem
that is difficult or impossible to eliminate.
■ If you have call-waiting, disable it. Your telephone company
can provide instructions. Call-waiting can cause symptoms
similar to static.
■ Eliminate extra connections in the line. If possible, connect
directly to the wall jack.
■ Try another telephone line, preferably one normally used for
a fax machine or modem.
If the Modem Does Not Dial or No Dial Tone Is Detected
■ Check all cables and connections.
■ Connect a standard telephone to the phone line and make sure
the line is working.
■ Make sure someone else is not using the same phone line.
■ Try another telephone line, preferably one normally used for
a fax machine or modem.
■ If you are in a foreign country, the dial tone may not be
recognized by the modem. In Control Panel, open Phone
and
Modem Options. Try disabling the option that waits for
a
dial tone.
6–10 Reference Guide
Page 75

If the Modem Dials Incorrectly
■ Check the telephone number you entered, including any
digits required for outside access or long distance.
■ In Control Panel, open Phone and Modem Options. Check the
dialing options—look for duplicate digits for outside access
or long distance.
■ Make sure the number you are calling is not busy.
■ If you are in a foreign country, the dial tone may not be
recognized by the modem. In Control Panel, open Phone
and
Modem Options. Try disabling the option that waits for
a
dial tone.
■ If you have call-waiting, disable it. Your telephone company
can provide instructions.
If the Modem Dials, But Does Not Connect
■ Make sure you are using an analog telephone line (2, 3, or
4
wires). You must not use a digital line. In a hotel, ask for
a
data line.
■ Try another telephone line, preferably one normally used for
a fax machine or modem.
■ The modem at the other end may have a problem. Try dialing
to a different modem.
Troubleshooting
If the Modem Is Not Detected
■ Check the modem setup. In Control Panel, open Phone and
Modem Options. Check the COM port.
■ Open the hardware Device Manager:
1. Select Start > Control Panel > Performance and
Maintenance > System.
2. If the modem is disabled, try to enable it. If it has a
conflict, try disabling another device.
■ If you are running fax software using fax Class 2, try using
Class 1.
Reference Guide 6–11
Page 76

Troubleshooting
If the Modem Dials, But You Cannot Hear It
■ If your model has an audio mute light, make sure it is turned
off. If it is on, press the audio mute button.
■ Check the speaker volume setting.
■ In Control Panel, open Phone and Modem Options, then
select the modem and select Properties. Check the volume
setting on the General tab.
If the Modem Connects, But Transferred Data Is Bad
■ In Control Panel, open Phone and Modem Options. Make
sure the parity, speed, word length, and stop bits match on
the
sending and receiving modems.
■ Try a different phone line or dial a different server number.
If the Modem Causes an ERROR Message
A string of AT commands may contain an incorrect command. If
you entered commands as extra settings for the modem in Control
Panel or in your communications software, check the commands.
If the Modem Does Not Fax
■ If you are using fax Class 2 in the fax software, try using
Class
1.
■ Close any other communications programs.
■ If you are faxing by printing from an application, make sure
you have selected the fax printer.
■ Try turning off power management features temporarily.
If Excessive Line Current Is Detected
Make sure you are using an analog telephone line (2, 3, or
4
wires). You must not use a digital line. In a hotel, ask for a
data
line.
6–12 Reference Guide
Page 77

Troubleshooting
If the Modem Clicks Repeatedly, But Does Not Connect
■ Make sure you are using an analog telephone line (2, 3, or
4
wires). You must not use a digital line. In a hotel, ask for
a
data line.
■ Check all cables and connections.
PC Card (PCMCIA) Problems
If the Notebook Does Not Recognize a PC Card
■ Remove and reinsert the PC Card.
■ Restart the notebook by selecting Start > Turn Off
Computer
■ Try the card in another notebook to see whether the card
functions properly.
■ Zoomed Video is not supported.
■ If the card requires an IRQ, make sure one is available. Open
the hardware Device Manager. Select Start > Control Panel >
Performance and Maintenance > System.
> Restart.
If a Network PC Card Stops Communicating Properly
■ The card may have been reset if the notebook entered
Standby or was shut down. Exit any applications, then
remove and reinsert the card.
■ Check settings in the Control Panel.
Reference Guide 6–13
Page 78

Troubleshooting
If a PC Card Modem Is Not Working
Disable the internal modem:
1. Open the hardware Device Manager. Select Start > Control
Panel > Performance and Maintenance > System.
2. Select Modem to list the current modem devices.
3. Select the internal modem, then select the option to disable
the modem.
Performance Problems
If the Notebook Pauses or Runs Sluggishly
■ This may be normal Windows behavior. Background
processing can affect response time.
■ Certain background operations (such as a virus-scanning
program) can affect performance.
■ Press ctrl+alt+del and use Task Manager to see if an application
is not responding.
■ Restart the notebook by selecting Start > Turn Off
Computer
■ Some file browsers respond slowly while processing graphics
or waiting for broken network connections to time out.
■ If the notebook hard drive frequently runs (as indicated by
the
hard drive light on the front of the notebook) while the
notebook appears to be paused or running slowly, Windows is
likely spending excess time writing to its swap file on the
notebook hard disk. If this occurs frequently, consider
installing additional memory.
■ Check the amount of available free disk space. Delete
temporary and unneeded files.
> Restart.
6–14 Reference Guide
Page 79

Troubleshooting
If the Notebook Stops Responding
■ Press ctrl+alt+del and use Task Manager to end the application
that is not responding.
■ Press the power button for at least 4 seconds to turn off and
reset the notebook. Unsaved data will be lost. Then press the
power button again to turn the notebook back on.
■ If nothing happens, insert the tip of a paper clip into the
reset
button on the bottom of the notebook. Then press
the
power button to turn the notebook back on.
■ To avoid lockup problems, avoid turning the notebook off or
putting it into Standby while graphic-intensive applications
are running.
Power and Battery Pack Problems
If the Notebook Turns Off Immediately After It Turns On
Battery power is probably extremely low. Plug in the AC adapter
or insert a charged battery pack.
If the Notebook Keeps Beeping
The notebook beeps repeatedly or displays a warning when
battery power is low. Save your work, shut down Windows
immediately, and insert a charged battery pack or plug in the
AC
adapter.
If the Battery Pack Does Not Charge
■ Make sure the AC adapter is fully plugged into the
power
source and the notebook, and that the light on
the
adapter is on.
■ If you are using a power strip, remove the AC adapter from
the power strip and plug it directly into a wall outlet.
■ Make sure the battery pack is fully installed and locked in
place.
Reference Guide 6–15
Page 80

Troubleshooting
■ Make sure you are using only the AC adapter included with
your notebook (or other approved adapter that meets the
power requirements of the notebook). Do not use a 60-watt,
3.16-amp adapter.
■ Move the notebook away from any nearby heat source.
Unplug the AC adapter and allow the battery pack to cool
down. If
the battery pack gets too hot, it will not charge
properly.
■ If available, try another battery pack and AC adapter.
If the Notebook Has a Short Operating Time
■ Conserve power using any of the suggestions listed in the
“Battery Packs and Power Management” chapter in this
guide.
■ If you are running an application that has an automatic save
feature (such as Microsoft Word), disable this feature or
increase the specified save time to reduce hard disk access.
■ If the operating time has gradually become shorter and the
battery pack is more than a year or two old, you may need to
replace the battery pack.
■ Heavy modem use can impact battery-operating time.
■ PC Card use can impact battery-operating time.
■ Test and recondition the battery pack every 3 months.
If the Time Remaining for the Battery Pack Is Not Correct
The Time Remaining is an estimate, not a precise value, and is
based on the rate at which the notebook is using power at the
moment. This value therefore depends on your current task and
assumes that you will continue using power at the same rate until
the battery pack runs out. So, if you check the Time Remaining
while the notebook is performing a task requiring a good deal of
power (such as reading from a CD or DVD), the value will
probably show less time remaining than you really have, since
you will probably later switch to tasks that require less power.
6–16 Reference Guide
Page 81

Troubleshooting
If the Notebook Does Not Enter Standby Mode as Expected
■ If you have a connection to another computer, the notebook
will not enter Standby if the connection is active.
■ If the notebook is performing an operation, it normally waits
for the operation to finish before going into Standby.
If the Notebook Does Not Enter Hibernation as Expected
■ Make sure Hibernation support is enabled. From Control
Panel, open Power Options, then select the Hibernate tab.
■ Check the Power Schemes tab. Make sure the Hibernation
timeouts for both AC power and battery power are not set
to
Never.
Printing Problems
You will be able to solve most printing problems by using the
✎
Print troubleshooter in Windows Help. Select Start > Help and
Support.
If a Serial or Parallel Printer Does Not Print
■ Make sure the printer is on and has paper in it.
■ Make sure you are using the correct printer cable or cable
adapter, and that the cable is secure at both ends.
■ Check for printer errors.
If the Left Edge of Printed Output Is Missing
Certain applications may not work properly with 600-dpi printers.
If you are using such a printer, try selecting a compatible printer
driver for a 300-dpi printer.
Reference Guide 6–17
Page 82

Troubleshooting
Serial, Parallel and USB Problems
If a Serial Mouse Does Not Work
■ Make sure you followed the manufacturer’s installation
instructions completely and have installed the mouse
properly. If not, repeat the procedure.
■ Make sure the port connection is secure.
■ Restart the notebook by selecting Start > Turn Off
Computer
■ Check mouse settings in Control Panel by selecting Start >
Control Panel > Printers and Other Hardware > Mouse.
■ Use a mouse that connects to the USB port.
■ Check the port settings in Control Panel. Open the hardware
Device Manager, then select Ports (COM & LPT).
If a Serial Modem Does Not Work Properly
■ Make sure the port connection is secure.
■ Use the Modem troubleshooter in Windows Help. Select
Start
■ In Control Panel, open Phone and Modem Options, and check
the modem settings.
■ Disable the internal modem:
1. Open the hardware Device Manager. Select Start >
2. Select Modem to list the current modem devices.
3. Select the internal modem, then select the option to
■ Check the port settings in Control Panel. Open the hardware
Device Manager, then select Ports (COM & LPT).
> Restart.
> Help and Support.
Control Panel > Performance and Maintenance > System.
disable the modem.
6–18 Reference Guide
Page 83

Troubleshooting
If the Serial or Parallel Port Is Not Working
■ Make sure the port connection is secure.
■ Check the port settings in Control Panel. Open the hardware
Device Manager, then select Ports (COM & LPT).
If the USB Port Is Not Working
■ Contact the vendor of the peripheral device for the latest USB
drivers.
■ Check the port settings in Control Panel. Open the hardware
Device Manager, then select Universal Serial Bus Controller.
Startup Problems
If the Notebook Does Not Respond When You Turn It On
■ Connect the AC adapter.
■ Reset the notebook by inserting the tip of a paper clip into
the
reset button on the bottom of the notebook. Then press the
power button to turn it on.
■ If the notebook still does not respond, remove the battery
pack and AC adapter, remove any PC Cards, and undock the
notebook if docked. Then plug in the AC adapter again, and
reset the notebook using the reset button.
If the Notebook Will Not Boot from Battery Power
■ Make sure the battery pack is properly inserted and fully
charged. Check the battery charge by removing it and
pressing the pad on the side of the battery pack. The lights
show the charge level.
■ If available, try another battery pack.
Reference Guide 6–19
Page 84

Troubleshooting
If the Notebook Will Not Boot from the Diskette Drive
■ Make sure the diskette drive is selected as the boot device.
See the
■ If you are using a USB diskette drive, use the BIOS Setup
“Basic Operation” chapter in this guide for directions.
utility to make sure Legacy USB Support is enabled. If your
notebook also has a built-in diskette drive, use the BIOS
Setup utility Boot menu to make sure the USB diskette drive
is the first device under Removable Drive.
If the Notebook Stops Responding After Booting
Check whether you are connected to a TCP/IP network with
no
DHCP server. This can cause a long delay at startup because
DHCP is enabled. Contact your network administrator to
determine the proper TCP/IP configuration.
If the Notebook Takes a Long Time to Resume After Entering Standby
The notebook can routinely take a minute or more to resume if
it
has a network card installed. While the operating system is
loading drivers and checking hardware and network connections,
you will see a blinking cursor on your display. As soon as the
hardware has been reinitialized, the Windows desktop will
appear.
6–20 Reference Guide
Page 85

Troubleshooting
Wireless Problems
If You Have Problems with Wireless 802.11 Communication
■ Make sure the wireless indicator light is on.
■ Make sure you are using the correct SSID and channel
settings.
■ Make sure you are in range of an access point (for an
infrastructure connection) or other wireless notebook
(for
an ad hoc connection).
■ When you log on to an 802.11 network via an access point,
yet your notebook cannot connect to network resources,
your
notebook may not have been assigned an IP address.
If
the subnet mask for your wireless connection is
255.255.000.000, the network server did not assign an IP
address to your notebook, and you may have to release and
renew your network IP address. If releasing and renewing the
IP address does not fix the problem, the access point may
need to be rebooted.
■ If you want to change the SSID to a different value to connect
to a different access point, or if you want to change from
Infrastructure mode to Ad Hoc mode, you may first have to
release and renew the Internet IP address.
■ See “Local Area Network (LAN) Problems” in this chapter.
Reference Guide 6–21
Page 86

Troubleshooting
If You Have Trouble Connecting to Another Notebook in the Network Neighborhood or My Network Places
■ Wait a few minutes, then press F5 to refresh the list of
notebooks on the network.
■ Select Start > Search > Notebooks or People to locate the
notebook.
If You Cannot Connect to a Particular Notebook on the Network
■ Make sure the notebook is properly connected to the network.
■ Make sure your TCP/IP setup is correct for your network by
selecting Start > Control Panel > Network Connections.
If You Can Connect, But the Network Is Slow
■ Check whether you might be in an area served by more than
one wireless LAN. If so, the LANs could be interfering with
each other.
■ Move closer to the access point (for an infrastructure
connection) or other wireless notebook (for an ad hoc
connection). You could be too far away for high-speed
communication.
6–22 Reference Guide
Page 87

Configuring Your Notebook
The BIOS Setup utility helps you configure your notebook
operation.
To Run the BIOS Setup Utility
The BIOS (basic input and output system) Setup utility enables
you to make changes to the notebook system configuration and to
tailor the operation of your notebook to your individual work
needs.
The settings made in BIOS Setup generally control the notebook
hardware, and so greatly affect how the notebook operates.
1. Select Start > Turn Off Computer > Restart.
2. When the logo screen appears, press F2 to enter BIOS Setup.
3. The pointing devices are not active in BIOS Setup, so you
will need to use the keyboard to navigate:
❏ Press the left and right arrow keys to move among menus.
❏ Press the up and down arrow keys to move among
parameters in a menu.
❏ Press + or - to move through values for the current
parameter, or press
4. After you select the options you want, press F10 or use the
Exit menu to exit BIOS Setup.
5. If the settings cause a conflict between devices during reboot,
the system prompts you to run BIOS Setup, and marks the
conflicting settings.
enter to change a setting.
Troubleshooting
Reference Guide 6–23
Page 88

Troubleshooting
The following tables describe BIOS settings for the BIOS version
at publication. If your BIOS is a different version, some settings
may differ from those shown.
Main Menu
Setting Description Default
BIOS Revision Shows the current BIOS
System Time Sets the time using 24-hour
System Date Sets the date using dd/mm/yy
Language Sets the language for BIOS
Internal
Hard Disk
UMA Video
Memory
Memory Shows the extended
Serial Number Displays the serial number as
Service ID Displays an identifier used for
UUID Displays the value of the
MAC Address Displays the MAC network
version.
format. Values set take effect
immediately.
format (except English, which
uses mm/dd/yy format).
Setup.
Sets the hard drive type and
various parameters.
Sets the video memory size
allocated from total installed
memory (RAM).
memory
shown on the back of the unit.
repair service.
16-byte UUID (Universally
Unique ID) as 32 hex
characters.
address of the internal
(wired)
size.
LAN.
Detected
automatically
Detected
automatically
Detected
automatically
Auto
Detected
automatically
Detected
automatically
Detected
automatically
Detected
automatically
Detected
automatically
6–24 Reference Guide
Page 89

Troubleshooting
System Devices Menu
Setting Description Default
Video Display
Device
External
Pointing Device
Legacy USB
Support
Wake On LAN
from Power Off
Sets whether the built-in
display automatically switches
to an external display, if one is
detected.
Disables the internal pointing
devices when an external
pointing device is connected.
Enables BIOS support for USB
mouse, keyboard, and diskette
disk drive during startup.
Lets the notebook be turned
on via the LAN port. If this
option is enabled, the
notebook uses increased
power while it is shut
down.
Auto
Auto
Enabled
Disabled
Reference Guide 6–25
Page 90

Troubleshooting
Security Menu
Setting Description Default
User
Password
Administrator
Password is
Set User
Password
Set
Administrator
Password
Require
Password
on
Internal hard
drive lock
is
Boot
Shows if a user password
is
set.
Shows if an administrator
password is set.
Press enter to set, change, or
clear the user password. The
password can have no more
than 8 characters (0–9, A–Z),
and cannot include special or
accented characters.
Press enter to set, change,
or clear the administrator
password, which protects
BIOS
Setup settings. The
password can have no more
than 8 characters (0–9, A–Z),
and cannot include special or
accented characters.
Sets whether a user password
is required when the notebook
boots. Requires the
administrator password for
changes.
Only if the Boot password
option is enabled, encodes
the
current user password (or
administrator password if that
is the only password set) on
the hard drive.
Clear
Clear
Enter
Enter
Disabled
Disabled
6–26 Reference Guide
Page 91

Troubleshooting
Boot Menu
Setting Description Default
Hard Drive
+Removable
Devices
CD-ROM Drive
Built-in LAN
Shows the order of boot
devices. Move the entries
to
change the order. If the
notebook has more than
one
device in a + category, you
can select the one scanned.
Built-in LAN provides diskless
boot from a network server.
1. Hard Drive
2. Removable
3. CD-ROM
4. Built-in
Exit Menu
Setting Description Default
Save Changes
and Exit
Discard
Changes and
Exit
Get Default
Val ues
Saves Setup changes, then
exits and reboots.
Discards any Setup changes
made since last save, then
exits and reboots. Does not
affect password, date, or time
changes.
Restores default settings, and
remains in Setup. Does not
affect password, date, or time
changes.
devices
Drive
LAN
Reference Guide 6–27
Page 92

Troubleshooting
Updating Software and Drivers from the Web
Software and driver updates for your notebook are available for
download. For more information, visit the Web site at
http://www.compaq.com/consumersupport.
Using System Recovery Features
The notebook system recovery process provides several options
for recovering optimal system functionality. The Notebook
Recovery Solution consists of the following restore CDs:
■ Operating System CD
■ Driver Recovery CD
■ Application Recovery CDs
■ Third-party CDs for software included on select models
Please refer to Microsoft operating system (OS) documentation
and Web site for specific information regarding:
■ Repairing missing or damaged OS files
■ Adding or removing Windows components
■ Creating System Restore Points
The Operating System CD may be required for these actions.
However, procedures will vary.
For best results, attempt to recover optimal notebook
✎
functionality by using the following procedures in the order
described here.
6–28 Reference Guide
Page 93

Safeguarding Your Data
Software or devices added to the notebook can cause your system
to become unstable. To safeguard your documents, store personal
files in the
backup copy of My Documents. Setting System Restore points is
also recommended.
Your notebook sets System Restore points (benchmarks) daily as
you change your personal settings. The notebook may also set
restore points when you add new software or devices. You should
periodically set personal restore points when the notebook is
functioning at optimal performance and before installing new
software or devices. This enables you to return to a previous
configuration restore point if you encounter problems.
To set a system restore point:
1. Select Start > Help & Support. Select the task Use Tools to
2. Follow the on-screen directions for setting a restore point.
To restore the notebook to a previous date and time when it was
functioning optimally:
1. Select Start > Help & Support > Tools > System Restore.
2. Follow the on-screen directions for restoring the notebook.
My Documents folder and periodically create a
view your computer information and diagnose problems.
Select System Restore. A System Restore window opens.
Troubleshooting
Reference Guide 6–29
Page 94

Troubleshooting
Operating System (OS) CD Repair
To repair the operating system without deleting your personal
data, use the standard Microsoft OS CD that was shipped with the
notebook. This CD contains the following preinstalled operating
systems:
■ Microsoft Windows XP Home or Pro (depending on
configuration)
■ Appropriate service pack
To repair the operating system:
1. Connect the notebook to external power and turn on the
notebook.
2. Immediately insert the OS CD into the notebook.
3. Press and hold the power button for 5 seconds to turn off the
notebook.
4. Press the power button again to start the notebook.
5. When prompted, press any key to boot from CD. After a few
minutes, the Welcome to Setup screen is displayed.
6. Press enter to continue. A Licensing Agreement screen is
displayed.
7. Press F8 to accept the agreement and continue. The Setup
window opens.
8. Press R to repair the selected Windows installation. The repair
process begins. This process takes 1 to 2 hours to complete.
The notebook restarts in Windows after the
complete.
process is
6–30 Reference Guide
Page 95

OS CD Reinstall
If other recovery efforts do not successfully repair the notebook,
you can reinstall the operating system.
WARNING: Personal data and software you have installed on the
Å
notebook will be lost during the OS CD reinstall. To protect your data,
make a backup copy of My Documents before reinstalling your operating
system. Visit Help and Support to learn more about backing up your files.
To reinstall the operating system:
1. Connect the notebook to external power and turn on the
notebook.
2. Immediately insert the OS CD into the notebook.
3. Press and hold the power button for 5 seconds to turn off the
notebook.
4. Press the power button again to start the notebook.
5. When prompted, press any key to boot from the CD. After a
few minutes, the Welcome to Setup screen opens.
6. Press enter to continue. A Licensing Agreement screen is
displayed.
7. Press F8 to accept the agreement and continue. The Setup
window is displayed.
8. Press esc to continue installing a fresh copy of the operating
system without repairing.
9. Press enter to set up the operating system.
10. Press C to continue setup using this partition.
Troubleshooting
Reference Guide 6–31
Page 96

Troubleshooting
11. Select Format the partition using the NTFS file system
(Quick) and press
this drive will delete all current files.
12. Press F to format the drive. The reinstallation process begins.
This process takes 1 to 2 hours to complete. The notebook
restarts in Windows after the process is complete.
When prompted for the product key, refer to the Microsoft
✎
Certificate of Authenticity located on the bottom of the notebook.
Reinstalling Drivers
After the OS installation process is complete, you must reinstall
drivers. Use the Driver Recovery CD with the OS CD for
hardware driver and system utility refresh and for full system
software restoration.
To reinstall drivers:
1. While running Windows, insert the Driver Recovery CD into
the optical drive.
2. If you do not have Autorun enabled, select Start > Run. Then
type
D:\SWSETUP\APPINSTL\SETUP.EXE (where D indicates the
optical drive).
3. Select the desired driver(s) or system utility from the Driver
Recovery CD menu.
4. Select Next to complete the installation.
enter. A caution is displayed that formatting
Restoring Software Applications
After the drivers are reinstalled, you must reinstall any software
you added to the notebook. Use the Application Recovery and
third-party discs to reinstall or continue restoring software
applications. Follow the installation instructions provided with
the software discs included with the notebook.
6–32 Reference Guide
Page 97

Index
1394 port
connecting 5–6
location 1–3
A
AC adapter
connecting 1–8
jack location 1–3
adjusting
brightness 2–6
monitor resolution 5–4
volume 2–6
ALT GR key 2–9
alternate graphics (ALT GR)
antivirus software
AT commands
audio
adjusting volume 2–6
device connection 5–3
jack location 1–3
mute button 1–3
port locations 5–3
troubleshooting 6–2
volume control location 1–3
2–15
4–4
2–9
B
back panel components 1–3
battery packs
checking battery status 1–5,
3–4
creating power schemes 3–3
disposal and recycling 3–8
disposing of 3–8
extending life of 3–6
installing 1–7
location 1–2
low-battery warning 3–5
recharging 3–5
release latch 1–4
saving power automatically
3–2
saving power manually 3–3
status lights 1–5
troubleshooting 6–15
battery power
check status 3–4
low-battery warning 3–5
recharging 3–5
battery status lights 3–4
BIOS Setup Utility
6–23
Reference Guide Index–1
Page 98

Index
blackout periods, modem 4–3
bottom panel components
brightness, adjusting
buttons
Click 1–2
One-Touch 1–2, 2–7
on-off (on TouchPad) 1–2
power 1–2, 1–10
reset 1–4
wireless on-off 1–2
1–4
2–6
C
cable lock slot 1–3
CardBus slot location
CD-ROM drive
copying/creating CDs 2–12
inserting CD 2–10
removing CD 2–10
troubleshooting 6–3
changing the boot device 2–3
cleaning the notebook
Click buttons
components
back panel 1–3
bottom panel 1–4
keyboard status lights 1–2
left panel 1–3
status lights 1–1
configuring
modem 4–4
notebook 6–23
connecting
1394 device 5–6
AC power 1–8
audio device 5–3
external devices 5–1
1–2
1–3
2–17
local area network (LAN) 4–5
phone line 1–9
wireless network 4–7
connectors
audio 1–3
RJ-11 (modem) 1–3
RJ-45 (network) 1–3
security 1–3
S-Video out 1–3
D
decreasing display brightness 2–6
display
adjusting brightness 2–6
adjusting settings 5–4
cleaning 2–17
extending the life 2–17
troubleshooting 6–4
using dual display mode 5–5
drivers
reinstalling 6–32
updating 6–28
DVD drive
creating data disc 2–12
creating movie disc 2–12
inserting DVD 2–10
playing movies 2–11
removing DVD 2–10
setting region code 2–11
troubleshooting 6–3
E
external monitor
adjusting settings 5–4
port location 1–3
Index–2 Reference Guide
Page 99

Index
F
Fn keys 2–6
function hot keys
2–6
H
hard drive
activity status light 1–5
holder replacement 5–12
location 1–2, 1–4
locking 2–15
preparing a new drive 5–13
protecting 2–16
replacing 5–11
troubleshooting 6–5
heat
precaution 6–6
troubleshooting 6–6
Hibernation mode 2–2
holder, hard drive
hot keys
2–6
5–12
I
identifying components 1–1
increasing display brightness
inserting
battery pack 1–7
CD 2–10
DVD 2–10
PC Card 5–1
RAM (memory) 5–7
K
keyboard
status lights 1–2, 1–6
troubleshooting 6–7
2–6
keys
ALT GR 2–9
Applications 2–8
Fn (Function) 2–6
Windows 2–8
L
LAN (local area network)
connection 4–5
troubleshooting 6–8
using a wireless adapter 4–6
left panel components 1–3
locking
hard drive 2–15
notebook 2–13
low-battery warning 3–5
M
maintenance and care 2–16, 2–17
Mini PCI cover
modem
AT commands 4–4
blackout periods 4–3
connecting 4–2
settings 4–4
troubleshooting 6–10
monitor
resolution 5–4
1–4
N
network jack, location 1–3
networks
LAN 4–5
O
One-Touch buttons 1–2, 2–7
on-off button
1–2
Reference Guide Index–3
Page 100

Index
open/close latch 1–2
Operating System CD
reinstall 6–31
repair 6–30
P
parallel connection,
troubleshooting
parts of the notebook
back panel 1–3
bottom panel 1–4
left panel 1–3
status lights 1–5
password protection 2–13
PC Cards
installing 5–1
removing 5–2
slot location 1–3
troubleshooting 6–13
performance, troubleshooting
6–14
ports
1394 1–3
external monitor 1–3
USB 1–3
power
button 1–2, 1–10
manage consumption
automatically
manage consumption manually
3–3
mode status light 1–5
settings 2–2
troubleshooting 6–15
6–19
3–2
power-saving modes 3–3
printing, troubleshooting
protecting
data 2–17
hard drive 2–16
6–17
R
RAM
cover 1–4
installing 5–7
removing 5–9
troubleshooting 6–9
recharging the battery pack 3–5
reinstalling
operating system 6–31
software 6–32
removing
CD 2–10
DVD 2–10
PC Cards 5–2
RAM (memory) 5–9
repairing the operating system
6–30
reset button
location 1–4
using 2–3
restoring software 6–32
RJ-11 (modem) jack
connecting 1–9
location 1–3
RJ-45 (network) jack 1–3, 4–5
S
safeguarding data 2–17, 6–29
saving power
scroll pad, location
3–3
1–2
Index–4 Reference Guide
 Loading...