

Page 1

b
Startup Guide
Compaq Notebook Series
Document Part Number: 355391-001
November 2003
This guide explains how to set up your hardware and software,
find and install the latest versions of Compaq software, and find
additional information and support. This guide introduces you to
exterior features of the notebook.
Page 2

© 2003 Hewlett-Packard Development Company, L.P.
Microsoft
Corporation. Adobe® and Acrobat® Reader are trademarks of Adobe
Systems Incorporated. SD Logo is a trademark of its proprietor.
The information contained herein is subject to change without notice. The
only warranties for HP products and services are set forth in the express
warranty statements accompanying such products and services. Nothing
herein should be construed as constituting an additional warranty. HP shall
not be liable for technical or editorial errors or omissions contained herein.
® and Windows® are U.S. registered trademarks of Microsoft
Startup Guide
Compaq Notebook Series
Reference Number: R3000
First Edition November 2003
Document Part Number: 355391-001
Page 3

Contents
1 Hardware and Software Setup
Setting Up the Hardware . . . . . . . . . . . . . . . . . . . . . . . . . 1–1
Setting Up the Software . . . . . . . . . . . . . . . . . . . . . . . . . . 1–6
Installing Optional Software . . . . . . . . . . . . . . . . . . . 1–7
Selecting Regional Settings . . . . . . . . . . . . . . . . . . . . 1–7
Selecting Screen Settings. . . . . . . . . . . . . . . . . . . . . . 1–7
Protecting the Notebook from Power Surges . . . . . . 1–8
Protecting Your Notebook. . . . . . . . . . . . . . . . . . . . . 1–8
Using Security Software Measures . . . . . . . . . . . . . . 1–9
Turning Off the Notebook . . . . . . . . . . . . . . . . . . . . . . . 1–10
Using the Notebook Safely . . . . . . . . . . . . . . . . . . . . . . 1–10
2 Additional Information, Help and Updates
Using the Documentation Library CD . . . . . . . . . . . . . . . 2–1
Using the Help and Support Center . . . . . . . . . . . . . . . . . 2–2
Contacting Technical Support . . . . . . . . . . . . . . . . . . . . . 2–4
Obtaining Support Telephone Numbers . . . . . . . . . . 2–4
Preparing to Call Technical Support . . . . . . . . . . . . . 2–4
Installing a Retail Version of an Operating System. . . . . 2–5
Startup Guide iii
Page 4

Contents
3 Notebook Features
Features . . . . . . . . . . . . . . . . . . . . . . . . . . . . . . . . . . . . . . 3–1
Display . . . . . . . . . . . . . . . . . . . . . . . . . . . . . . . . . . . . . . . 3–1
TouchPad . . . . . . . . . . . . . . . . . . . . . . . . . . . . . . . . . . . . . 3–2
Top . . . . . . . . . . . . . . . . . . . . . . . . . . . . . . . . . . . . . . . . . . 3–3
Power Lights . . . . . . . . . . . . . . . . . . . . . . . . . . . . . . . 3–3
Keyboard and Drive Lights . . . . . . . . . . . . . . . . . . . . 3–4
Power and Volume Controls . . . . . . . . . . . . . . . . . . . 3–5
Wireless On/Off Button and Windows
Applications Key . . . . . . . . . . . . . . . . . . . . . . . . . . . . 3–6
Function and Keypad Keys . . . . . . . . . . . . . . . . . . . . 3–7
Front Components . . . . . . . . . . . . . . . . . . . . . . . . . . . . . . 3–8
Rear Components. . . . . . . . . . . . . . . . . . . . . . . . . . . . . . 3–10
Left-Side Components . . . . . . . . . . . . . . . . . . . . . . . . . . 3–11
Right-Side Components . . . . . . . . . . . . . . . . . . . . . . . . . 3–13
Bottom Components. . . . . . . . . . . . . . . . . . . . . . . . . . . . 3–15
Index
iv Startup Guide
Page 5

1
Hardware and Software Setup
Setting Up the Hardware
CAUTION: To ensure that the correct drivers load and to prevent file
Ä
corruption or damage to the components during initial setup:
■ Do not set up the notebook while it is docked in an optional
HP Notebook Expansion Base.
■ Run the notebook on external AC power, not on battery power,
throughout initial setup.
Startup Guide 1–1
Page 6

Hardware and Software Setup
To set up the notebook hardware:
1. Insert the battery pack:
a. Place the notebook upside down and align the battery
pack with the notebook battery bay.
b. Slide the battery pack into the battery bay until it is seated.
(For more information regarding battery packs, refer to
the “Battery Packs” chapter in the Hardware Guide on the
Documentation Library CD.)
Inserting the battery pack
1–2 Startup Guide
Page 7
Hardware and Software Setup
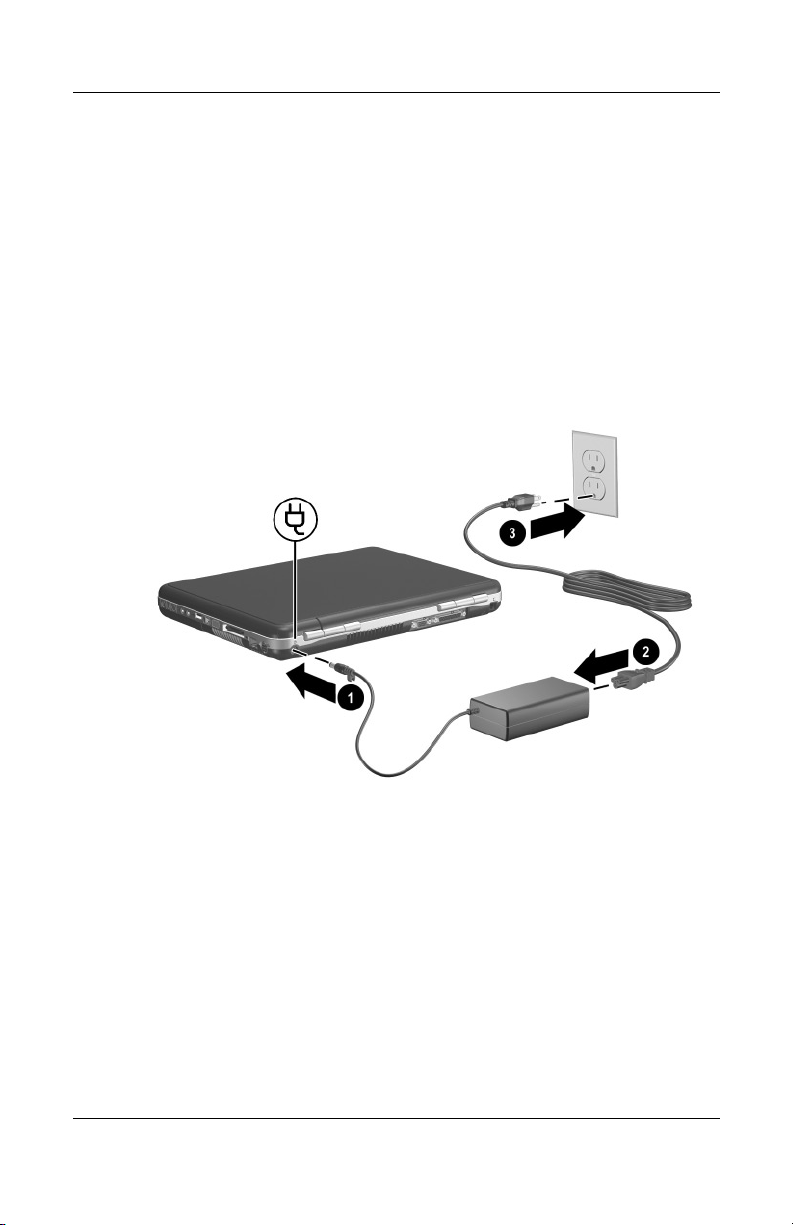
2. Connect the notebook to AC power:
a. Place the notebook on a flat surface near an electrical
outlet.
b. Connect the AC adapter cable to the power connector
on the notebook 1.
c. Connect the power cord to the AC adapter 2. (Power
cords and AC adapters vary by region and country.)
d. Plug the power cord into an electrical outlet 3. (Electrical
outlets vary by region and country.)
Connecting the notebook to AC power
Startup Guide 1–3
Page 8

Hardware and Software Setup
3. Open the notebook by pressing the display release latch 1
and lifting the display 2.
Opening the notebook
1–4 Startup Guide
Page 9
Hardware and Software Setup
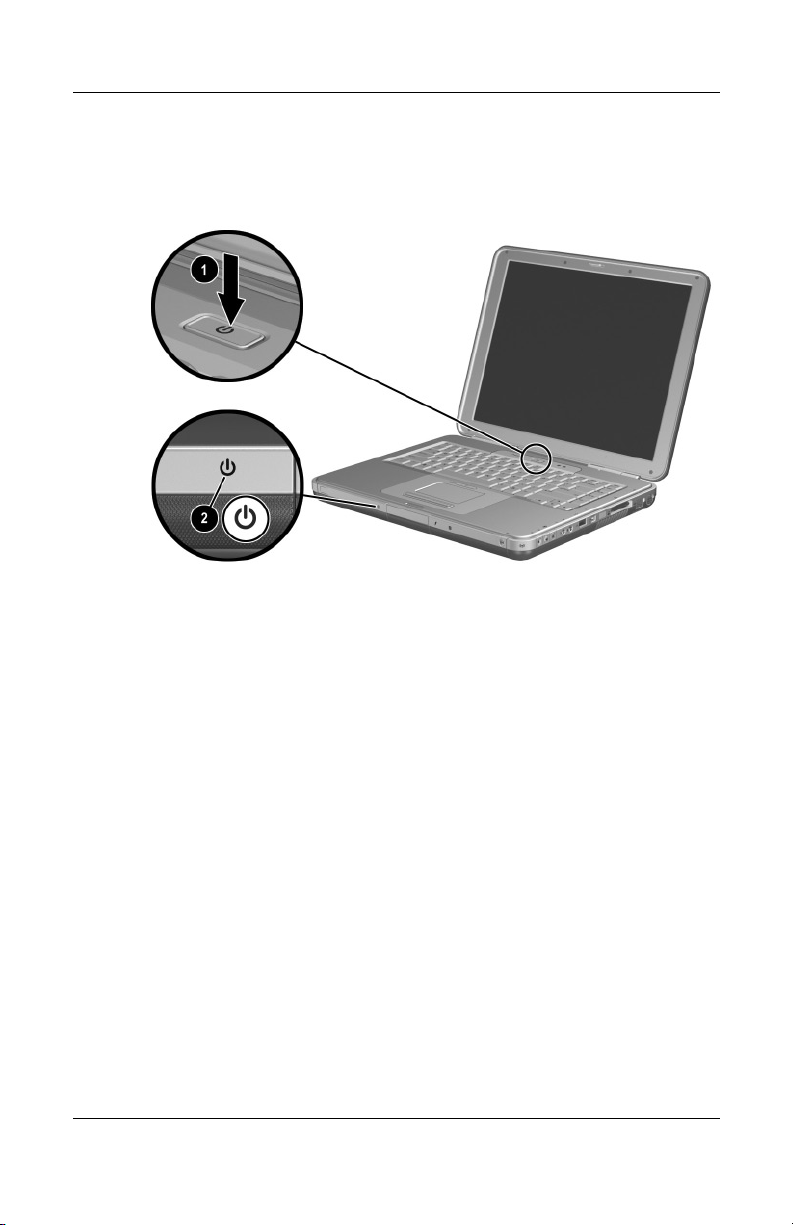
4. Turn on the notebook by pressing the power button 1. The
power/Standby light turns on 2.
Turning on the notebook
After the notebook power is on:
■ The software setup prompt appears on the screen.
■ The battery light remains on while the battery pack is
charging and turns off after the battery pack is fully charged.
Startup Guide 1–5
Page 10

Hardware and Software Setup
Setting Up the Software
A prompt to set up your software is displayed on the screen when
the notebook is turned on for the first time. Before responding
to the prompt and proceeding through the online instructions,
read the following caution and other installation information.
CAUTION: To prevent file corruption and to be sure that the correct device
Ä
drivers are installed during software setup:
■ Do not unplug the notebook from the electrical outlet.
■ Do not shut down the notebook.
■ Do not remove or insert a drive.
■ After you begin the software setup, you must complete the
entire process without interruption. Setup time varies.
■ If you are prompted to select a language, choose carefully.
The languages that you do not choose are deleted from the
system and cannot be restored during the installation.
■ When you are prompted to accept the End User License
Agreement, you must choose Accept to continue the
software setup.
1–6 Startup Guide
Page 11

Installing Optional Software
You can install third-party software or preloaded utilities at any
time after initial setup is complete.
■ To install a third-party application, refer to the documentation
included with the application.
■ To install a preloaded application, select Start >
All Programs > Software Setup. A setup wizard loads, and a
list of applications is displayed. Select the application you
want to install, and follow the instructions on the screen.
To view the descriptions and space requirements of preloaded
✎
utilities without installing them, select Start > All Programs >
Software Setup, and after viewing the utility information, select
Cancel.
Selecting Regional Settings
Keyboard language and other regional preferences, such as time,
date, and currency format, are set in the operating system. To
access regional settings, select Start > Control Panel > Date,
Time, Language, and Regional Options.
For information about selecting regional settings, open the
Regional and Language Options window, and then use
context-sensitive Help. To use context-sensitive Help, select the
question mark button in the upper-right corner of the window, and
then select an item. A definition, explanation, or procedure is
displayed.
Hardware and Software Setup
Selecting Screen Settings
If you would like to see more items on your screen or to change
the size of items displayed on the screen, you can change the
screen resolution setting in your operating system. To access
the screen resolution settings, select Start > Control Panel >
Appearance and Themes. Then select the Settings tab and change
the screen resolution.
Startup Guide 1–7
Page 12

Hardware and Software Setup
Protecting the Notebook from Power Surges
To protect the notebook from the power surges that might be
caused by an unreliable power supply or an electrical storm:
■ Plug the notebook power cord into an optional, high-quality
surge protector.
■ Provide surge protection for the cable that connects the
modem to the telephone jack.
■ During an electrical storm, run the notebook on battery power
or shut down the notebook and disconnect the power cord.
Surge protectors are available from most computer or electronics
retailers.
Protecting Your Notebook
When you use your notebook to access a network or the Internet,
you expose the notebook to security and privacy threats in the
form of viruses, worms, and hackers. These security and privacy
occurrences can potentially disable the notebook operating
system, software applications, and personal files. Using a
combination of software and hardware security measures can
significantly help in the prevention, the detection, and often the
repair of these occurrences.
1–8 Startup Guide
Page 13

Hardware and Software Setup
Using Security Software Measures
Compaq recommends that you follow these 3 protective security
software measures to improve your notebook security and to
reduce the severity of security access threats.
Step Use this Security Measure For More Information
1 Install antivirus software before
connecting to the Internet or a
network. (Some notebook
models are shipped with
antivirus software.)
Keep the virus definition files up
to date to maintain protection
against newly discovered
viruses.
2 Install Microsoft Windows®
updates by downloading the
updates as they become
available.
3 Install the Microsoft Internet
Connection Firewall or an
equivalent firewall.
Microsoft:
http://www.microsoft.com/security/antivirus
Symantec:
http://securityresponse.symantec.com
Refer to the online Help File within
the antivirus software.
http://windowsupdate.microsoft.com
Refer to the Help and Support
Center. Select Start > Help &
Support. Enter “Firewall” in the
Search field and press enter.
Using a firewall can block access to Internet games, or to printer
✎
and file sharing within a network. If this occurs, you can disable
the firewall or contact your firewall provider for configuration
information. Disabling the firewall will leave you unprotected.
Startup Guide 1–9
Page 14

Hardware and Software Setup
Turning Off the Notebook
Whenever possible, turn off the notebook by following the
appropriate Microsoft® Windows® shutdown procedure:
To turn off the notebook:
» Select Start > Shut Down > Shut down.
For information about conserving power, setting power
preferences, and using Standby and Hibernation, refer to the
“Power” chapter in the Software Guide on the Documentation
Library CD.
Using the Notebook Safely
WARNING: To reduce the risk of electric shock or damage to your
Å
equipment:
■ Plug the power cord into an electrical outlet that is easily accessible
at all times.
■ Disconnect power from the product by unplugging the power cord
from the electrical outlet.
■ If provided with a three-pin attachment plug on your power cord,
plug the cable into a grounded (earthed) three-pin outlet. Do not
disable the power cord grounding pin. The grounding pin is an
important safety feature.
1–10 Startup Guide
Page 15

Hardware and Software Setup
WARNING: To reduce the risk of serious injury, read the Safety &
Å
Comfort Guide. It describes proper workstation setup, posture, and
health and work habits for computer users, and provides important
electrical and mechanical safety information. This guide is located on
the Web at
Documentation Library CD that is included with the product.
WARNING: This notebook is designed to run demanding applications
Å
at full power. As a result of increased power consumption, it is normal
for the notebook to feel warm or hot when used continuously. To avoid
potential discomfort or burns, do not block the air vents or use the
notebook on your lap for extended periods. The notebook complies
with the user-accessible surface temperature limits defined by the
International Standard for Safety of Information Technology Equipment
(IEC 60950).
http://www.compaq.com/ergo, on the hard drive, or on the
This product is designed for accessiblity. It has been tested with
industry-leading assistive technology products to ensure equal
access to anyone, anytime, anywhere.
This equipment has also been tested and found to comply with
the limits for a Class B digital device, pursuant to Part 15 of the
FCC Rules. For more safety and regulatory information, as well
as instructions for protecting the notebook against electrostatic
discharge, refer to the Regulatory and Safety Notices on the
Documentation Library CD. This CD is included with your
notebook.
Startup Guide 1–11
Page 16

Additional Information, Help
and Updates
Using the Documentation Library CD
For supplementary information about the notebook, refer to the
Documentation Library CD. This CD, included with all models,
contains the guides described in the following list. Additional
guides—for example, instruction manuals for using an optional
wireless device—are included with select models.
■ Hardware Guide—Contains information specific to your
notebook. The guide includes an illustrated reference to all
exterior components, and steps for replacing battery packs,
using keyboard features and drives, connecting external
equipment, and upgrading the notebook.
■ Software Guide—Describes software, including details about
power and security features.
■ Modem and Networking guide—Provides details about
modem connections and equipment.
■ Maintenance, Shipping and Travel guide—Describes steps
for notebook maintenance and guidelines for using the
notebook internationally.
■ Troubleshooting guide—Includes solutions for common
problems encountered by users.
2
Startup Guide 2–1
Page 17

Additional Information, Help and Updates
■ Regulatory and Safety Notices—Includes governmental
agency information.
■ Safety & Comfort Guide—Describes the best ways to set up
a safe and comfortable work environment, including
ergonomic and safety information.
To view a guide:
1. Insert the Documentation Library CD into a CD drive.
2. Select the guide you want to read from the reference
library menu.
3. If prompted, accept the Adobe® Acrobat® Reader license
agreement and install Acrobat Reader by following the
instructions on the screen.
Using the Help and Support Center
Installed on your notebook desktop is the Help and Support
Center that provides a comprehensive online resource tool for
contacting a Compaq support specialist, for downloading the
latest software driver updates and product information, and for
learning more about using and maintaining your notebook.
For example, in Help and Support, you can:
■ Learn how to use the software tools for working with your
favorite music, video, games, and photos (select models).
■ Get information about Microsoft Windows XP for
customizing your notebook.
■ Set up your notebook for networking and for communicating
on the Web.
■ Use administration tools to manage areas such as passwords,
file backups, system restore, and user accounts.
■ Learn how to print, fax, run performance and maintenance
tools, and install and configure new hardware.
■ Troubleshoot and fix common notebook problems.
2–2 Startup Guide
Page 18

Additional Information, Help and Updates
■ Protect your notebook files by using Norton AntiVirus
software.
■ Undo changes to your notebook with System Restore.
■ Improve performance of your hard drive and battery.
■ Contact a Compaq support specialist or use Remote
Assistance to get additional help.
■ Download the latest drivers, utilities, software updates, and
product documentation for your notebook.
■ Use Tools to view notebook information and diagnose
problems.
■ Keep your notebook up to date with Windows Update.
■ Find compatible hardware and software.
To access the online Help and Support Center:
1. Press the
Fn+F1 hotkey or select Start > Help and Support.
2. Follow the on-screen directions to select the online Help and
Support Center feature that you need.
Startup Guide 2–3
Page 19

Additional Information, Help and Updates
Contacting Technical Support
Obtaining Support Telephone Numbers
If you cannot solve a notebook problem by using the online
Help and Support Center installed on your notebook or the
documentation included with the notebook, you might need to
contact Compaq. To obtain a list of worldwide customer support
telephone numbers or to locate the Compaqoffice near you, use
one of the following methods:
■ Select Start > Control Panel > Performance and
Maintenance > System. Then, near the lower edge of the
System Properties window, select the Support Information
button.
■ Refer to the Worldwide Telephone Numbers booklet
(English only) included with your notebook to contact
a Compaq Product Information Center.
■ Visit the Compaq Web site at:
http://www.compaq.com/consumersupport
Preparing to Call Technical Support
To provide the fastest possible resolution of your problem, have
the notebook and the following information available when
you call:
■
Product name, serial number, and product number, provided on
the Service Tag label affixed to the bottom of the notebook.
■ Purchase date on the invoice.
■ Conditions under which the problem occurred.
2–4 Startup Guide
Page 20

Additional Information, Help and Updates
■ Error messages that have been displayed.
■ Operating system version number and registration number.
To display the operating system version number and
registration number, select Start > Control Panel >
Performance and Maintenance > System > General.
■ Brand and model of an optional printer.
Installing a Retail Version of an Operating System
CAUTION: Replacing an operating system that is enhanced by
Ä
Compaq with a retail version will result in the loss of all Compaq
enhancements. In some cases, the loss of these enhancements might
result in an unresponsive system or the loss of complete USB support.
A Windows operating system provided on the notebook or on
a CD is optimized by Compaq to improve overall system
performance. Compaq recommends that you do not install a retail
version in place of this operating system.
Startup Guide 2–5
Page 21

Features
Features included with your notebook vary by geographical
region and by model. The following illustrations identify the
standard external features included on most notebook models.
Reference the illustrations that closely match your notebook.
Display
3
Notebook Features
Component Description
Display release latch Opens the notebook.
Startup Guide 3–1
Page 22

Notebook Features
TouchPad
Component Description
TouchPad Moves the pointer and selects or
1
activates items on the screen.
Left and right TouchPad
2
buttons
TouchPad on/off button Turns TouchPad on or off.
3
TouchPad light On: TouchPad is enabled.
4
3–2 Startup Guide
Function like the left and right buttons
on an external mouse.
Page 23

Top
Power Lights
Notebook Features
Component Description
Power button light On: Notebook is turned on.
1
Blinking: Notebook is in Standby.
Off: Notebook is off or in Hibernation.
Power/Standby light On: Notebook is turned on.
2
Blinking: Notebook is in Standby.
Off: Notebook is off or in Hibernation.
Battery light On: Battery pack is charging.
3
Blinking: Battery pack has reached a
low-battery condition.
Off: AC power is applied, with battery
pack either fully charged or not
installed, or no AC power is applied.
Startup Guide 3–3
Page 24

Notebook Features
Keyboard and Drive Lights
Component Description
Caps lock light On: Caps lock is on.
1
Num lock light On: Num lock or the internal
2
IDE (Integrated Drive
3
Electronics) light; also
referred to as hard
drive/optical drive activity
light
Optical disk drive light On: The optical drive bay is being
4
(select models) On: Memory Reader is accessing
5
3–4 Startup Guide
keypad is on.
On: The internal hard drive or the
optical drive bay is being accessed.
accessed.
optional digital media.
Page 25

Power and Volume Controls
Component Description
Power button* When the notebook is:
1
■ Off, press button to turn on the notebook.
■ On, briefly press button to initiate Hibernation.
■ In Standby, briefly press button to resume from
Standby.
■ In Hibernation, briefly press button to resume
from Hibernation.
Notebook Features
If the system has stopped responding
✎
and Windows shutdown procedures
cannot be used, press and hold the button
for at least 4 seconds to turn off the
notebook.
Mute button On: Audio is muted.
2
3
Volu me
buttons (2)
Decrease and increase the system volume:
■ To decrease volume, use left button.
■ To increase volume, use right button.
*This table describes default settings. For information about changing the
function of the power button, refer to the “Power” chapter in the
on the
Guide
Startup Guide 3–5
Documentation Library
CD.
Software
Page 26
Notebook Features
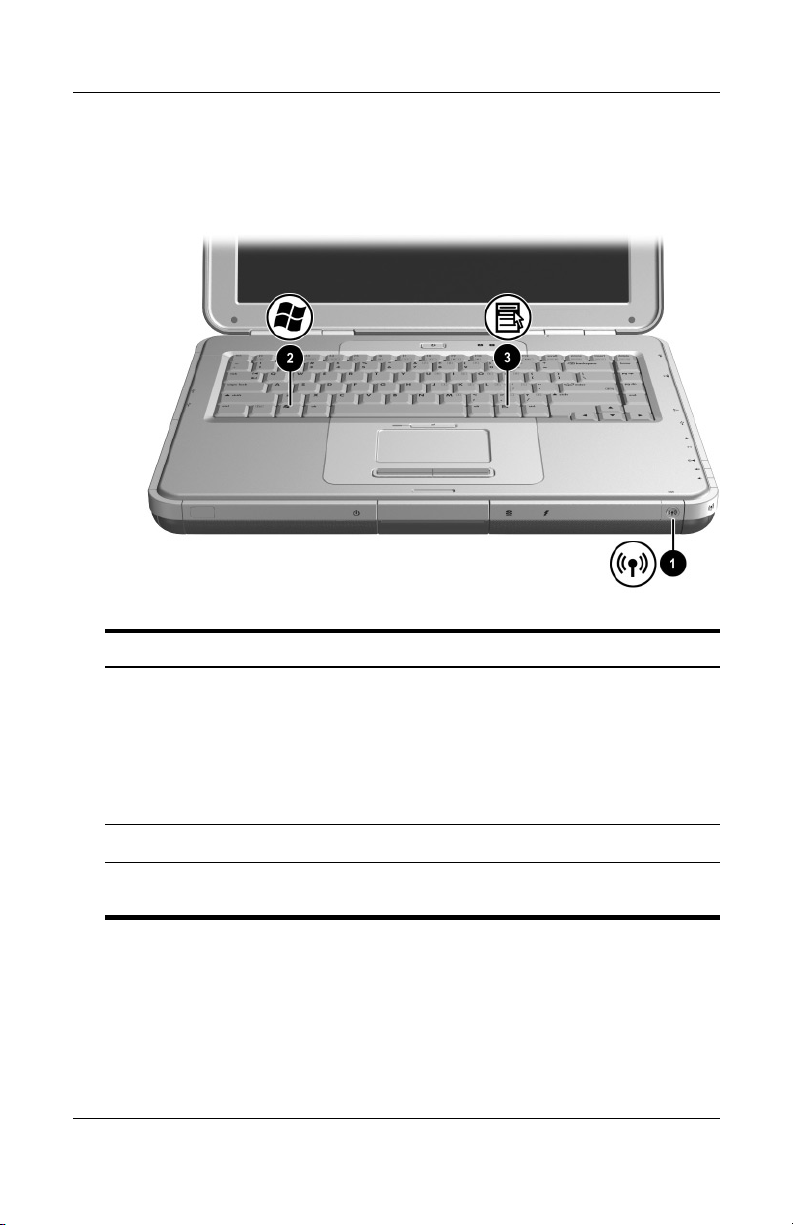
Wireless On/Off Button and Windows Applications Key
Component Description
Wireless On/Off button Enables wireless functionality, but
1
Windows logo key Displays Windows Start menu.
2
Windows applications key Displays shortcut menu for items
3
3–6 Startup Guide
does not create a wireless connection.
To set up and complete a
✎
wireless connection,
additional hardware and
software might be required.
beneath the pointer.
Page 27

Function and Keypad Keys
In this guide, the function keys are capitalized (Fn, F5). The
✎
function keys on your keyboard might be lowercase (fn, f5).
Notebook Features
Component Description
Fn key Combines with the function keys to
1
Function keys (11) Perform system and application tasks.
2
Keypad keys (15)* Can be used like the keys on an
3
*Refer to the “TouchPad and Keyboard” chapter in the
Documentation Library
the
Startup Guide 3–7
CD.
perform additional system and
application tasks. For example,
pressing Fn+F8 increases screen
brightness.
When combined with the Fn
function keys F1
additional tasks as hotkeys.
(The F2 function key is not used.*)
external numeric keypad.
through F12 perform
Hardware Guide
key,
on
Page 28

Notebook Features
Front Components
Component Description
Stereo speakers (2) Produce stereo sound.
1
Power/Standby light On: Notebook is turned on.
2
Blinking: Notebook is in Standby.
Off: Notebook is off or in Hibernation.
Display release latch Opens the notebook.
3
IDE (Integrated Drive
4
Electronics) light; also
referred to as hard
drive/optical drive activity
light
3–8 Startup Guide
On: The internal hard drive or optical
drive bay is being accessed.
(Continued)
Page 29

Notebook Features
Battery light On: Battery pack is charging.
5
Blinking: Battery pack has reached a
low-battery condition.
Off: AC power is applied, with battery
pack either fully charged or not
installed, or no AC power is applied.
Wireless On/Off button Enables wireless functionality, but
6
does not create a wireless connection.
To set up and complete a
✎
wireless connection, additional
hardware and software might be
required.
Startup Guide 3–9
Page 30

Notebook Features
Rear Components
Component Description
Power connector Connects an AC adapter.
1
Exhaust vent Allows airflow to cool internal
2
components. Additional vents are on
the bottom panel of the notebook.
Ä
External monitor connector Connects an optional external monitor
3
or overhead projector.
To prevent overheating, do
not obstruct the vent. Do not
allow a hard surface, such as
an adjoining printer, or a soft
surface, such as bedding or
clothing, to block airflow.
Parallel connector Connects an optional parallel device,
4
RJ-11 jack (select models) Connects the modem cable
5
3–10 Startup Guide
such as a printer.
(select models).
Page 31

Left-Side Components
Component Description
Security cable slot Attaches an optional security cable to
1
the notebook.
Notebook Features
The purpose of security
✎
solutions is to act as a
deterrent. These solutions do
not prevent the product from
being mishandled or stolen.
5-in-1 Memory Reader and
2
light (select models)
PC Card slot (1 or 2 slots,
3
select models)
Startup Guide 3–11
Supports 5 optional digital media
formats: Secure Digital (SD)
Memory Card, MultiMediaCard,
SmartMedia card, Memory Stick, and
Memory Stick Pro.
Light On: Slot is accessing digital
media.
Supports an optional Type I or Type II
32-bit (CardBus) or 16-bit PC Card.
(Continued)
Page 32

Notebook Features
PC Card eject button (1 or
4
2 buttons, select models)
USB connectors (2) Connect an optional USB device, such
5
Three drive configurations:
6
optional HP USB Digital Bay,
optional diskette drive, no
drive
One of 4 optical drive bay
7
configurations
Ejects an optional PC Card from the
PC Card slot.
as a printer.
Digital Bay: Supports optional
pocket-sized HP USB Digital Drive.
Diskette drive: Supports standard
1.4-MB diskette.
No drive: No drive is installed.
■ CD-ROM drive
■ DVD-ROM drive
■ DVD/CD-RW combo drive—Can
write to recordable CDs, but
cannot write to recordable DVDs.
(Type of drive varies by model.)
■ DVD+RW/R and CD-RW combo
drive—Can write to both
recordable CDs and DVDs.
3–12 Startup Guide
Page 33

Right-Side Components
Component Description
Wireless on/off light On: Wireless functionality is enabled, but
1
Volume buttons (3) and
2
audio mute light
wireless connection might not be
configured.
Off: No wireless device is active.
Decrease, mute, and increase the system
volume:
■ To decrease volume, use left button.
■ To increase volume, use middle button.
■ To mute or restore volume, use right
button.
■ Light on: Audio is muted.
Notebook Features
Audio-out
3
headphone jack
Audio-in
4
microphone jack
Startup Guide 3–13
Connects an optional headphone, headset,
or powered stereo speakers. Also connects
the audio function of an audio/video device,
such as a television or VCR.
Connects an optional external microphone.
(continued)
Page 34

Notebook Features
USB connector Connects an optional USB device, such as
5
a printer.
1394 connector
6
(select models)
Infrared port
7
(select models)
Expansion port Connects an optional HP Notebook
8
RJ-45 network jack Connects an optional network cable.
9
S-Video-out jack Connects an optional S-Video device, such
-
Connects an optional IEEE 1394 device,
such as a camcorder.
Provides wireless communication between
the notebook and an optional
IrDA-compliant device.
Expansion Base.
as a television, VCR, camcorder, overhead
projector, or video capture card.
3–14 Startup Guide
Page 35

Bottom Components
Component Description
Battery bay Holds the battery pack. (Battery type and
1
Exhaust vents Allows airflow to cool internal components.
2
shipment mode vary by model.)
Notebook Features
To prevent overheating, do not
Ä
obstruct the vent. Do not allow a
hard surface, such as an adjoining
printer, or a soft surface, such as
bedding or clothing, to block airflow.
Hard drive bay Holds the primary hard drive.
3
Memory compartment Contains 2 memory slots, one of which is
4
Battery release latch Releases the battery pack from the
5
Startup Guide 3–15
accessible for an optional 128-MB, 256-MB,
512-MB, or 1024-MB memory module
upgrade. As shipped, the memory slot might
be filled with a replaceable memory module,
or it might be vacant, depending on the
notebook model.
battery bay.
Page 36

Index
A
AC adapter 1–3
AC power
Adobe Acrobat Reader
antivirus software
1–3
1–10
B
battery bay 3–15
battery light
battery pack, inserting
battery release latch
bottom components
buttons
PC Card eject
power
volume
Wireless On/Off
1–5, 3–3, 3–9
3–15
3–15
3–12
1–5, 3–5
3–5, 3–13
3–6, 3–9
C
cables
AC adapter
network
security
caps lock light
connectors
1394
expansion
3–10
3–14
3–11
3–4
3–14
3–14
2–2
1–2
external monitor
parallel
power
USB
See also infrared port; jacks
contacting, technical support
customer support
3–10
1–3, 3–10
3–14
3–10
2–4
D
display
component location
opening
settings
display release latch
Documentation Library CD
drive light
drivers
drives
diskette
HP USB Digital Drive
1–4, 1–5
1–7
3–4
1–1
3–12
3–1
1–4, 1–5
3–12
E
electric shock warning 1–10
End User License Agreement
exhaust vents
expansion port
external monitor connector
3–10, 3–15
3–14
3–10
2–3
2–2
1–6
Startup Guide Index–1
Page 37

Index
F
FCC notice 1–11
features
function keys
3–1
3–7
H
hard drive bay 3–15
hardware
display components
front components
left-side components
rear components
right-side components
top components
Hardware Guide
headphone jack
Help and Support Center
Hibernation
exiting
initiating
3–13
3–5
3–5
3–1
3–8
3–11
3–10
3–13
3–4
2–1
2–2
I
IDE light 3–8
infrared port, location. See also
connectors; jacks
3–14
J
jacks
headphone
microphone
RJ-11 telephone
RJ-45 network
S-Video-out
3–13
3–13
3–10
3–14
3–14
K
keyboard light 3–4
keypad keys
3–7
keys
Fn 3–7
function
keypad
Quick Launch
Windows applications
Windows logo
3–7
3–7
3–6
3–6
3–6
L
languages 1–6
left-side components
license, software
lights
battery
caps lock
drive
IDE
keyboard
num lock
optical disk drive
power/Standby
wireless on/off
1–5, 3–3, 3–9
3–4
3–4
3–8
3–4
3–4
3–11
1–6
3–4
1–5, 3–3, 3–8
3–13
M
Maintenance, Shipping and Travel
2–1
guide
memory compartment location
3–15
Memory Reader
microphone jack
Modem and Networking guide
3–11
3–13
2–1
N
num lock light 3–4
O
opening the notebook 1–4, 1–5
optical drive bay configurations
3–12
Index–2 Startup Guide
Page 38

Index
P
parallel connector, identifying
3–10
PC Card
power button
power connector
power cord
power features
power, AC
power/Standby light
problems and solutions
protection against viruses
3–12
1–5
1–3
1–3
power button
power/Standby light
3–5
1–3, 1–5, 1–10
3–8
3–3
2–1
1–10
R
regional settings 1–7
regulatory information
notices
Regulatory and Safety Notices
release latch
right-side components
RJ-11 telephone jack
RJ-45 network jack
1–11
2–2
1–4, 1–5
3–13
3–10
3–14
S
Safety & Comfort Guide 2–2
safety considerations
screen settings
security cable slot
See also connectors; infrared port
3–14
Service ID tag
shutting down the notebook
1–8
1–7
3–11
2–4
1–9
software
Adobe Acrobat Reader
antivirus
installing
license
setup
Software Setup utility
space requirements
Software Guide
Software Setup utility
speakers, internal stereo
Standby
exiting
power/Standby light
S-Video-out jack
system drivers
1–10
1–7
1–6
1–6
2–1
3–5
3–14
1–1
T
technical support 2–4
telephone numbers, service and
support
Troubleshooting guide
turning the notebook on/off
1–10
2–4
U
USB connectors 3–14
V
vents 3–10, 3–15
W
Web site 2–4
Windows applications key
Windows logo key
Wireless On/Off button
wireless on/off light
3–6
2–2
1–7
1–7
1–7
3–8
3–3
2–1
1–5,
3–6
3–6, 3–9
3–13
Startup Guide Index–3
 Loading...