

Page 1

Integrated Remote Console
User Guide
Second Edition (December 1998)
Part Number 281862-002
Compaq Computer Corporation
Page 2

Notice
The information in this publication is subject to change without notice.
COMPAQ COMPUTER CORPORATION SHALL NOT BE LIABLE FOR TECHNICAL OR
EDITORIAL ERRORS OR OMISSIONS CONTAINED HEREIN, NOR FOR INCIDENTAL OR
CONSEQUENTIAL DAMAGES RESULTING FROM THE FURNISHING, PERFORMANCE, OR
USE OF THIS MATERIAL. THIS INFORMATION IS PROVIDED “AS IS” AND COMPAQ
COMPUTER CORPORATION DISCLAIMS ANY WARRANTIES, EXPRESS, IMPLIED OR
STATUTORY AND EXPRESSLY DISCLAIMS THE IMPLIED WARRANTIES OF
MERCHANTABILITY, FITNESS FOR PARTICULAR PURPOSE, GOOD TITLE AND AGAINST
INFRINGEMENT.
This publication contains information protected by copyright. No part of this publication may be
photocopied or reproduced in any form without prior written consent from Compaq Computer
Corporation.
1998 Compaq Computer Corporation.
All rights reserved. Printed in the U.S.A.
The software described in this guide is furnished under a license agreement or nondisclosure agreement.
The software may be used or copied only in accordance with the terms of the agreement.
Compaq, Deskpro, Fastart, Compaq Insight Manager, Systempro, Systempro/LT, ProLiant, ROMPaq,
QVision, SmartStart, NetFlex, QuickFind, PaqFax, ProSignia, registered United States Patent and
Trademark Office.
Netelligent, Systempro/XL, SoftPaq, QuickBlank, QuickLock are trademarks and/or service marks of
Compaq Computer Corporation.
Microsoft, MS-DOS, Windows, and Windows NT are registered trademarks of Microsoft Corporation.
Other product names mentioned herein may be trademarks and/or registered trademarks of their
respective companies.
Compaq Integrated Remote Console User Guide
Second Edition (December 1998)
Part Number 281862-002
Page 3

Contents
About This Guide
Text Conventions.......................................................................................................................vii
Symbols in Text....................................................................................................................... viii
Getting Help ............................................................................................................................ viii
Compaq Website .............................................................................................................. viii
Telephone Numbers ............................................................................................................ix
Chapter 1
Introduction
Integrated Remote Console Capabilities ................................................................................. 1-1
Benefits of Using Integrated Remote Console ........................................................................ 1-2
Requirements........................................................................................................................... 1-2
Installation Sequence Outline.................................................................................................. 1-3
Terminology............................................................................................................................ 1-4
Accessing Integrated Remote Console.................................................................................... 1-5
Expected Audience.................................................................................................................. 1-5
iii
Chapter 2
Setup and Configuration
Installing the Modem............................................................................................................... 2-1
Configuring the Modem .......................................................................................................... 2-2
Configuring a non “plug-n-play” ISA Modem................................................................. 2-2
Configuring an external modem or direct connection...................................................... 2-4
Configuring Integrated Remote Console................................................................................. 2-6
Modem Strings................................................................................................................. 2-9
Assigning Authorized Users...................................................................................................2-10
User Configuration..........................................................................................................2-11
Compaq Integrated Remote Console User Guide
Page 4

iv
Chapter 3
Establishing a Connection
Establishing a Connection Using Compaq Insight Manager................................................... 3-1
Configuring Insight Manager for Out-of-Band Remote Console Access......................... 3-2
Establishing an Out-of-Band Remote Console Connection ............................................. 3-4
Invoke Integrated Remote Console Login........................................................................ 3-5
Benefits of Using Insight Manager to Establish the Connection...................................... 3-5
Verifying Modem Settings............................................................................................... 3-6
Establishing a Connection Using Windows HyperTerminal................................................... 3-8
Setting up a Connection ..................................................................................................3-10
Invoke Integrated Remote Console Login.......................................................................3-14
Saving a Connection........................................................................................................3-14
Establishing a Connection Using an ANSI Compatible Terminal Emulator..........................3-15
Configuration Guidelines ................................................................................................3-15
Limitations ......................................................................................................................3-16
Establishing a Connection...............................................................................................3-17
Invoke IRC Login............................................................................................................3-17
Login ......................................................................................................................................3-18
Chapter 4
Using Integrated Remote Console
Main Menu Options................................................................................................................. 4-3
Remote Console Menu Option ................................................................................................ 4-4
Beginning a Remote Console Session.............................................................................. 4-5
Changing the Default Attention Key................................................................................ 4-9
Changing the Terminal Screen Size ................................................................................4-10
Return to Main Menu ......................................................................................................4-11
Reboot Server Menu Option...................................................................................................4-12
View Reboot Sequence...........................................................................................................4-17
View Event Log......................................................................................................................4-19
Change Password....................................................................................................................4-20
Manage Login Information.....................................................................................................4-21
Modify User Information ................................................................................................4-22
Manage Configuration............................................................................................................4-23
Communications Setup....................................................................................................4-24
Disconnecting.........................................................................................................................4-26
Page 5

Chapter 5
Using Attention Key Sequences
Attention Key Command Sequences....................................................................................... 5-2
Example: Returning to IRC Main Menu .......................................................................... 5-2
Attention Key Support Sequences........................................................................................... 5-3
Example: Pressing F10 Key ............................................................................................. 5-4
Attention Key Compose Sequences......................................................................................... 5-5
Example: Entering Alt + P ............................................................................................... 5-6
Example: Entering Ctrl + Alt + Del ................................................................................. 5-7
More Attention Key Examples................................................................................................ 5-8
Attention Key Template .......................................................................................................... 5-9
Changing the Attention Key.................................................................................................... 5-9
Chapter 6
Additional Modem Information
Modem Types.......................................................................................................................... 6-1
External Serial Modems................................................................................................... 6-2
Internal ISA Plug-n-Play Modems................................................................................... 6-3
“Windows” Modems........................................................................................................ 6-3
PCI-based Modems .......................................................................................................... 6-4
Modem Configuration Strings................................................................................................. 6-5
Computer to Modem Serial Port Speed............................................................................ 6-6
Data Carrier Detect (DCD) Operation.............................................................................. 6-6
Data Terminal Ready (DTR) Interpretation ..................................................................... 6-7
Flow Control .................................................................................................................... 6-7
Error Correction ............................................................................................................... 6-7
Data Compression ............................................................................................................ 6-8
Response Codes................................................................................................................ 6-8
v
Chapter 7
Direct Connections
Connecting Using a Terminal or Terminal Emulator.............................................................. 7-1
Cable Requirement........................................................................................................... 7-2
Communication Requirements......................................................................................... 7-2
Connecting Using a Terminal Server or Concentrator ............................................................ 7-4
Obtaining the Appropriate Cable...................................................................................... 7-5
Configuring Integrated Remote Console.......................................................................... 7-8
Configuring the Terminal Server...................................................................................... 7-9
Compaq Integrated Remote Console User Guide
Page 6

vi
Chapter 8
Modem Sharing
Asynchronous Management .................................................................................................... 8-2
Graphical Remote Control ....................................................................................................... 8-4
Additional Information............................................................................................................ 8-6
Determining Proper Initialization Strings in a Windows NT 4.0 RAS Environment....... 8-6
Appendix A
Suggested Modem Settings
Suggested Settings When Modem is Dedicated or Shared in non-Windows NT
Environments...........................................................................................................................A-1
Suggested Settings When Modem is Shared in Windows NT 4.0...........................................A-3
Appendix B
Null-Modem Cable Description
Appendix C
Troubleshooting
POST Errors ............................................................................................................................C-2
Server displays “172-2 IRC Configuration Invalid” message during POST....................C-2
Connection Problems...............................................................................................................C-3
Connection problems using a modem in dedicated mode ................................................C-3
Connection problems using a modem in shared mode.....................................................C-6
Connection problems using a direct-connection.............................................................C-10
Problems while using IRC.....................................................................................................C-11
Screen temporarily pauses during menus or remote console text...................................C-11
Terminal doesn’t scroll correctly in Remote Console Mode..........................................C-11
Terminal loses characters or doesn’t paint correctly in Remote Console Mode ............C-12
“View Reboot Sequence” is grayed out .........................................................................C-13
Index
Page 7

About This Guide
This guide is designed to be used as step-by-step instructions for installation,
and as a reference for operation, troubleshooting, and future upgrades.
Text Conventions
This document uses the following conventions to distinguish elements of text:
Keys
vii
Keys appear in boldface. A plus sign (+) between two
keys indicates that they should be pressed
simultaneously.
USER INPUT
FILENAMES
Menu Options
Command Names,
Dialog Box Names
COMMANDS,
DIRECTORY
NAMES, and DRIVE
NAMES
Type When you are instructed to
Enter When you are instructed to
User input appears in a different typeface and in
uppercase.
File names appear in uppercase italics.
These appear in italic initial capital letters
These appear in initial capital letters.
These always appear in uppercase.
information
information and then press the
without
pressing the
information, type the
type
key.
Enter
information, type the
enter
key.
Enter
Compaq Integrated Remote Console User Guide
Page 8

viii About This Guide
Symbols in Text
These symbols may be found in the text of this guide. They have the following
meanings.
Getting Help
If you have a problem and have exhausted the information in this guide, you
can get further information and other help in the following locations.
WARNING: Indicates that failure to follow directions in the
warning could result in bodily harm or loss of life.
CAUTION: Indicates that failure to follow directions could result
in damage to equipment or loss of information.
IMPORTANT: Presents clarifying information or specific instructions.
NOTE: Presents commentary, sidelights, or interesting points of information.
Compaq Website
The Compaq website has information on this product as well as the latest
drivers and Flash ROM images. You can access the Compaq website by
logging on to the Internet at
http://www.compaq.com
.
Page 9

Telephone Numbers
For the name of your nearest Compaq Authorized Reseller:
In the United States, call 1-800-345-1518
In Canada, call 1-800-263-5868
For Compaq technical support:
In the United States and Canada, call 1-800-OK COMPAQ (For continuous
quality improvement, calls may be monitored or recorded.)
For Compaq technical support phone numbers outside the United States and
Canada, visit the Compaq website at:
http://www.compaq.com.
ix
Compaq Integrated Remote Console User Guide
Page 10

Chapter 1
Introduction
Compaq Integrated Remote Console (IRC) is an integrated hardware function
that provides remote access and remote control to diagnose server failures
interactively. IRC gives authorized users direct access to the managed server,
independent of the operating system or other software, from locations a few
feet away or from another continent.
Ability to control the server is not dependent upon any special software running
on the server, nor is it restricted to when the managed server is in a particular
state (like running BIOS). An administrator now has the ability to access the
server, perform diagnostics, reset the system, watch the reset process remotely,
and view Automatic Server Recovery sequences, regardless of whether the
server operating system is online or offline.
IRC capability is built into your server. No add-on system management board is
required.
Integrated Remote Console Capabilities
1-1
The primary capabilities of IRC let you:
■ Access the server via modem from a distant location
■ Access the server via direct-line connection to a terminal or terminal
server
■ Remotely control the managed server with complete remote console
access, regardless of the state of the server operating system
■ Perform a controlled reset of the server, regardless of the state of the
server operating system
■ Cycle the power, unconditionally resetting all features and internal
peripherals, followed by automatic reconnection to Integrated Remote
Console
■ View a complete boot sequence including all ROM POST messages and
operating system load information following an Automatic Server
Recovery event
Compaq Integrated Remote Console User Guide
Page 11

Introduction
1-2
■ View a log of Integrated Remote Console events
■ Allow users without supervisory access to modify their login passwords
Allow supervisory users to control access by other users
■ Remotely change the configuration parameters of Integrated Remote
Console
Benefits of Using Integrated Remote Console
IRC advantages include:
■ Integrated, low-cost, hardware-based out-of-band management
■ Support for most standard, high-speed modems
■ Independent of the server operating system
■ Full-text mode support
■ Realistic remote console performance
■ ANSI compatible
Requirements
To use IRC, you must have:
■ A Compaq server equipped with IRC (listed in your server’s features)
■ Hayes-compatible, controller-based modem for the managed server (for
modem-based out-of-band access) or appropriate cable to couple server
to a terminal or terminal server
■ Management console equipped with the appropriate communications
hardware to establish a connection to IRC
■ Communications software that includes the ANSI terminal emulation
feature
Page 12

Installation Sequence Outline
In preparation for using IRC, the following tasks must be performed:
■ Prepare the management console with the necessary hardware and
software for out-of-band communication
■ Prepare the managed server for out-of-band communications by
installing a modem or connecting the managed server to a suitable
communications device
■ Configure the usage and communication parameters of IRC
■ Set up a list of authorized users and their permissions in the IRC user
database
figure2.EPS
CSR TSR CSR CSR
1-3
TSR CSR CSR
CSR
CSR TSR CSR CSR
TSR CSR CSR
CSR
Figure 1-1. Communication topology showing a modem-based out-of-band connection between a
managed server, left, and a management console, right
Compaq Integrated Remote Console User Guide
Page 13

Introduction
1-4
Terminology
Table 1-1 lists the standard terms used throughout this guide.
Table 1-1
IRC Terminology
Term Definition
Managed Server Server that contains IRC or server which can be
remotely managed through a variety of Compaq tools.
Management Console Computer that runs management applications or
collects management data.
Management Application Software running on the
collects management data and/or provides access to
managed server
the
Terminal Server Multiple port device that includes several serial port
connections and allows access to the managed
server via direct-line connection.
management console
.
that
Page 14

Accessing Integrated Remote Console
Integrated Remote Console can be accessed through either Compaq Insight
Manager or through any communications package that supports ANSI terminal
emulation. It can be accessed through Compaq Insight Manager by configuring
the modem remote console feature associated with the managed server. When
accessed through Insight Manager, Integrated Remote Console supports
dynamic text mode changes and extended keyboard functionality, including the
function and alternate keys.
Integrated Remote Console can also be accessed through any ANSI terminal
emulation program. This gives you multiple options in the choice of a server
management console application. In addition, Integrated Remote Console
supports complex keystroke combinations. You can synthesize complex
combinations, such as function and alternate keys, which would otherwise be
unavailable through the ANSI standard. As a result, virtually any keystroke
combination can be entered from any terminal emulation package. Integrated
Remote Console also supports different terminal line modes (for example, 80 x
25 or 80 x 50) in both monochrome and color.
1-5
Expected Audience
This document assumes that you are familiar with the setup and configuration
of Compaq server hardware and that you have a working knowledge of
Compaq Insight Manager. The Compaq Insight Manager User Guide is referred
to throughout this document.
Compaq Integrated Remote Console User Guide
Page 15

Chapter 2
Setup and Configuration
This chapter describes the steps required to implement Integrated Remote
Console (IRC) using an internal modem, external modem, or direct serial port
connection.
See Chapter 6 for information on supported modems and for additional
information pertaining to the appropriate configuration of modems with IRC.
To operate IRC by modem, the management console must be equipped with a
modem that is compatible with the modem in the managed server. Using
different classes of modems in the management console and managed server,
particularly if they are from different manufacturers, can cause various
connection problems, including the inability to obtain a login prompt. Using the
same type of modem from the same manufacturer in both the management
console and managed server is strongly recommended.
IMPORTANT: Most connectivity problems are caused by modems that
default to a “
Robotics modems and others). For Integrated Remote Console to function
properly, both the modem in the management console and the modem in the
managed server must have the computer-to-modem port speed set to
fixed.”
“
Integrated Remote Console and the management application. See Chapter 6
and your modem's documentation for more information.
floating”
This can be configured through initialization strings in both
computer-to-modem (or DCE-to-DTE) port speed. (U.S.
2-1
Installing the Modem
Consult the instructions for installing hardware options in the documentation
that accompanied your Compaq server. Consult the user documentation that
accompanied your modem for additional instructions specific to the modem,
including default settings.
For internal modems, the Compaq System Configuration Utility can be used to
determine the appropriate COM port and IRQ jumper settings.
Compaq Integrated Remote Console User Guide
Page 16

Setup and Configuration
2-2
Configuring the Modem
Configuring a non “plug-n-play” ISA Modem
The Compaq System Configuration Utility does not automatically detect non
plug-n-play ISA devices. Therefore, you must manually account for system
resources used by an installed ISA modem. To configure the modem:
1. Boot the server and run the Compaq System Configuration Utility. This
utility can be run from floppies or by booting the Compaq SmartStart
and Support Software CD included with your server. If you created a
system partition during the initial setup of the server, you can invoke
this utility by pressing the F10 key when prompted during the server’s
power-on-self-test sequence.
2. Select the System Configuration menu option from the utilities main
menu.
3. Select Configure Hardware from the configuration menu.
4. Select Step 2: Add or Remove Boards from the System Configuration
main menu.
5. Press Insert to manually add a board to the server configuration.
Page 17

6. Select !ISA0010.CFG Generic Modem (for use with IRC) from the list of
boards that appears.
Figure 2-1. Example: Selecting a configuration file
7. Select the slot where the modem is installed when the Configuration
Utility identifies appropriate slots for the modem, then press Enter.
8. Press F10 to return to the System Configuration Main Menu.
2-3
9. Select Step 3: View or Edit Details.
Compaq Integrated Remote Console User Guide
Page 18
Setup and Configuration
2-4
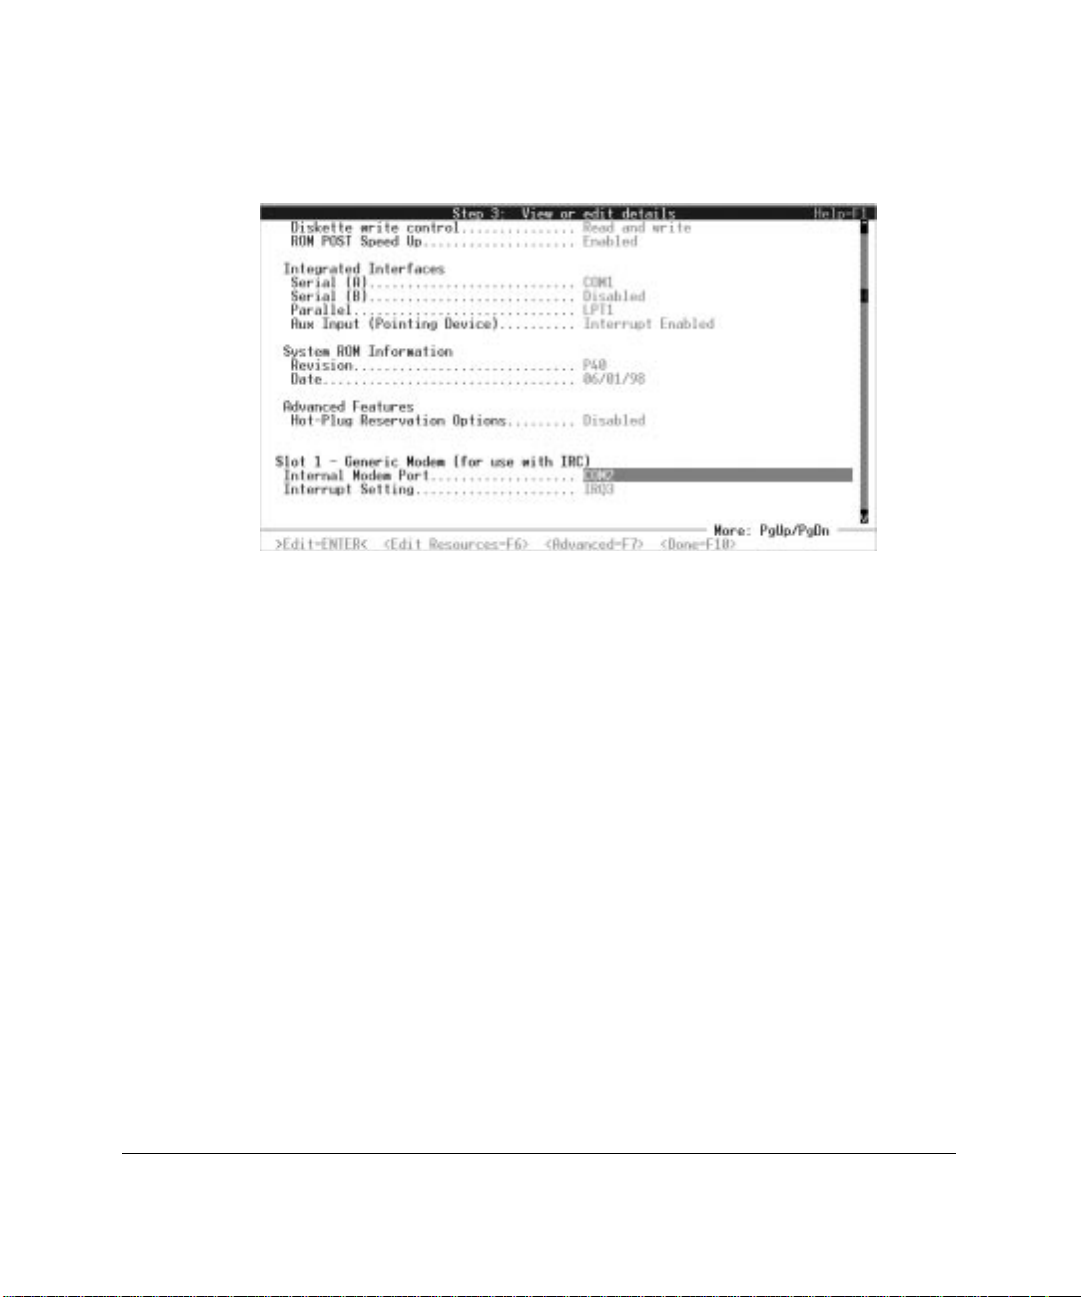
10. Set the COM and IRQ IRQ resources to match the jumper settings on
the modem. Note these settings as they are needed when configuring
Integrated Remote Console.
Figure 2-2. Example: Setting the COM and IRQ resources
Configuring an external modem or direct connection
If you are using an external modem or want to connect IRC directly to another
computer, terminal, or terminal server, you must first configure one of the
integrated serial ports on the managed server.
1. In the System Configuration Utility, move the selector to Integrated
Interfaces in Step 3: View or Edit details. Highlight the serial port that
will be connected to the external device. Either serial port can be used
with Integrated Remote Console.
2. Select the desired COM port resource setting. The recommended
settings are COM1 for Serial (A) or COM2 for Serial (B).
3. Check the interrupt setting for the desired integrated serial port by
selecting Edit Resources (F6) when the COM port selection is
highlighted. Make sure that the configured interrupt setting is “edge”
triggered.
Page 19

4. Note the COM and interrupt settings for the desired integrated serial
port; these are needed when configuring IRC.
Figure 2-3. Example: Configuring an integrated serial port
2-5
Figure 2-4. Example: Viewing the resources of an integrated serial port
Compaq Integrated Remote Console User Guide
Page 20

Setup and Configuration
2-6
Configuring Integrated Remote Console
Use the System Configuration Utility to configure IRC. Table 2-1 summarizes
the System Configuration Utility configuration options and their default values.
Integrated Remote Console Configuration Summary
Parameter Configuration Value
General Integrated Remote Console Information
Remote Console Functions Enabled/
Communication Device External Modem/Internal Modem/Direct Connect
Table 2-1
(default settings in bold)
Disabled
Keyboard
Communication Settings
COM Port COM1,
Interrupt (Internal Modem only)
Sharing Options
Maximum DTE Baud Rate
Data Bits 7,
Parity
Stop Bits
United States
French, French Canadian, German, Italian,
Japanese, Latin American, Norwegian, Portuguese,
Spanish, Swedish, Swiss French, Swiss German
, IRQ4, IRQ5
IRQ3
Shared
19200
8
None
,2
1
, Belgian, British, Danish, Finnish,
, COM3, COM4
COM2
, Dedicated
, 38400, 57600, 115200
, Even, Odd
Continued
Page 21
2-7
Integrated Remote Console Configuration Summary
Parameter Configuration Value
Modem Settings (not required for direct connection)
Initialization String (primary)
Initialization String (secondary)
Dial Prefix
Answer String
Security Access
Supervisor Yes/
Remote Console
Reboot Server
Replay Boot Sequence
Force Dial-back Yes/
ATZ
AT&C1&D2
ATDT
ATS0=1
no
/no
Yes
/no
Yes
/no
Yes
no
Continued
(default settings in bold)
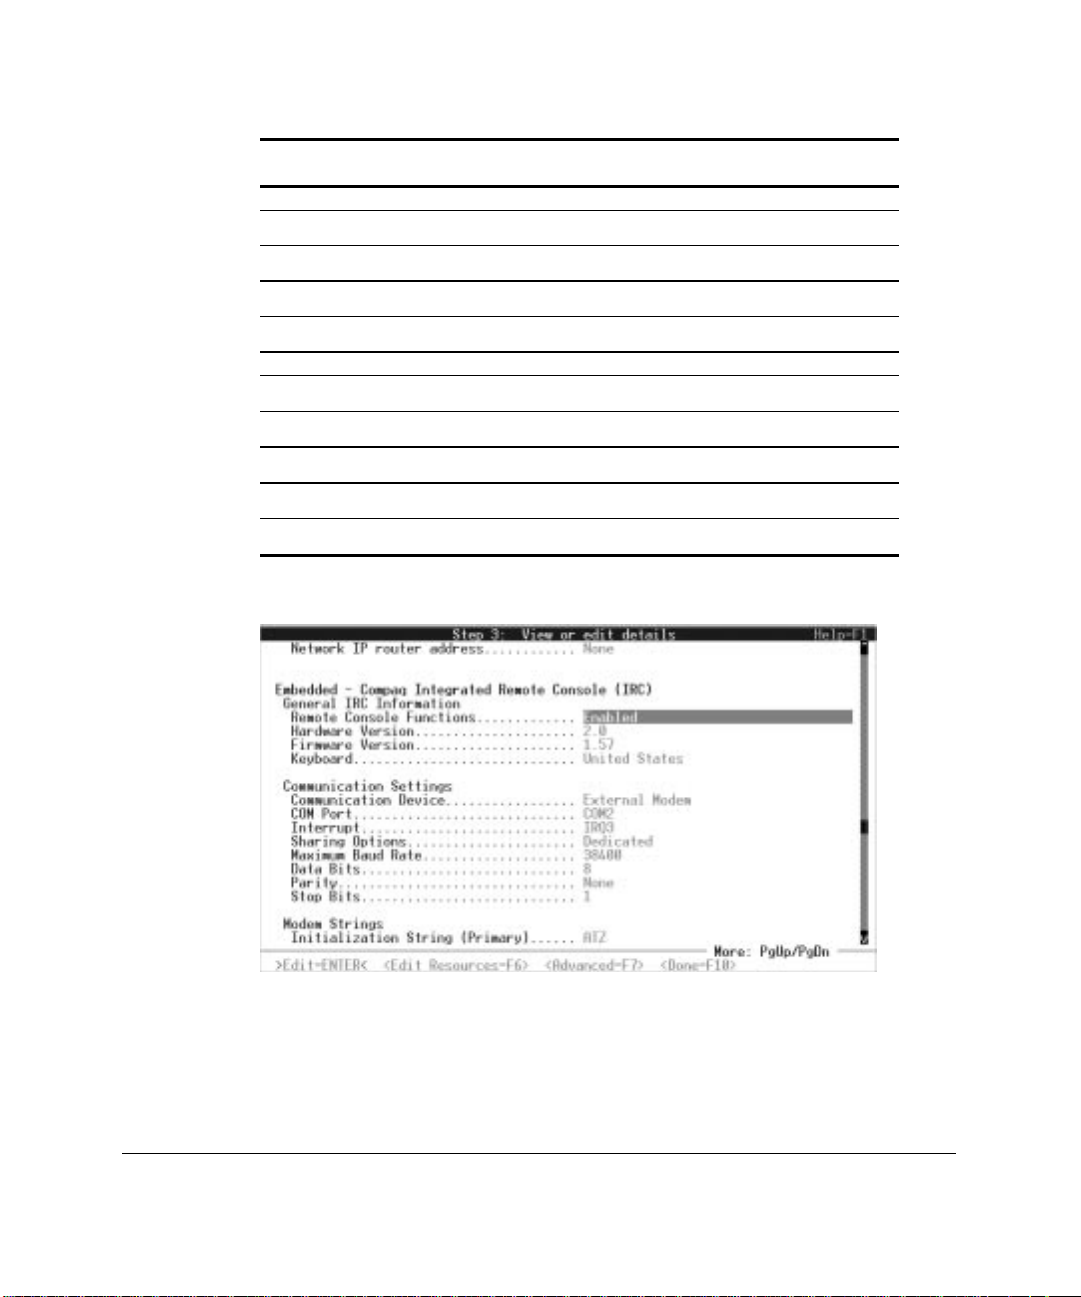
1. Select Remote Console Functions from View or edit details, and set to
Enabled.
Figure 2-5. Example: Enabling Remote Console Functions
Compaq Integrated Remote Console User Guide
Page 22

Setup and Configuration
2-8
2. Set the Keyboard type to match the layout of the keyboard on the
managed server. For proper remote keyboard operation, this setting must
match the keyboard country configuration of the server’s operating
system.
3. Set Communications Device according to your hardware configuration:
a. Internal Modem
b. External Modem or
c. Direct Connect if connecting with a null modem serial cable to
another computer, terminal, or terminal server.
4. Configure the IRC modem resources. Set the COM port and interrupt
setting to match the hardware jumper settings on the internal modem , or
integrated serial port settings if connecting to an external device.
5. To use this modem only for the IRC feature, select Dedicated under
Sharing Options.
To use a single modem for both IRC and Asynchronous System
Management, or to allow the operating system to access the modem,
accept the default setting of Shared.
NOTE: To use the “shared” modem setting, you must ensure that Integrated
Remote Console is configured identically to the modem configuration settings
of the operating system. See Chapter 8 and Appendix A for more information.
6. Configure the COM port settings. Set the baud rate to the highest
reliable DTE rate for your modem. Most high-speed modems will
tolerate DTE rates as high as 38,400, 57,600 or 115,200 bps. Consult the
instructions supplied with the modem for the appropriate computer to
modem serial port speed. This setting will be greater than or equal to the
desired connection rate. The Data, Parity, and Stop settings should be
set to 8-None-1 respectively unless a 7-bit parity mode is required.
Page 23

Modem Strings
Configure the Modem Command Strings (not required for direct connect):
1. Set the Primary and Secondary Initialization strings. These command
The Primary Initialization string must include the appropriate AT
The Secondary Initialization string must include additional AT
The configuration utility sets the Primary and Secondary Initialization
2-9
strings are used to initialize the modem used by IRC.
command to reset the modem to a known state. Since AT command
strings can contain multiple configuration and command sub-strings,
this string can also contain additional configuration commands. (For
example, AT&F and AT&C1&D2 can usually be combined into one
command: AT&F&C1&D2.) Not all command strings can be
concatenated. For example, most modems ignore commands following
the ATZ command.
configuration commands necessary to properly configure the modem for
use with IRC.
strings to “ATZ” and “AT&C1&D2,” respectively. These strings were
chosen since they generally apply to all modems. Your modem may
require different strings to operate properly. These initialization strings
must place the modem in the following state for proper operation with
Integrated Remote Console.
■ Computer to modem serial port speed:computer to modem, to fixed
(&B1 or \J0)
■ DCD serial port signal assertion to “normal” (&C1)
■ Modem responds correctly to DTR assertion (&D2)
■ Computer to modem serial port set for hardware flow control
■ Error correction enabled
Additional configuration options may be necessary if you have the modem
in the shared configuration. These settings are necessary to ensure that
Integrated Remote Console and the operating system have configured the
modem similarly. Additional configuration settings include:
■ Modem response format (numeric or verbose)
Compaq Integrated Remote Console User Guide
Page 24

Setup and Configuration
2-10
■ Modem result code options
Chapter 6 explains modem command strings in more detail. Chapter 8
provides additional information on using the modem in shared mode.
Appendix A contains suggested entries for proper initialization strings for
several common modems.
2. Set Dial Prefix to either ATDT (tone - default) or ATDP (pulse)
dialing.
3. The Answer String should contain the command string necessary to
place the modem in “auto-answer” mode. It will not accept calls if this
string is not set appropriately.
The default string, ATS0=1 places a Hayes-compatible modem in auto-
answer mode, answering on the first ring.
Assigning Authorized Users
Before any users can log into IRC, the system administrator must set up a valid
user database. This is also performed through the System Configuration Utility.
Figure 2-6. Example: Configuring users
Page 25
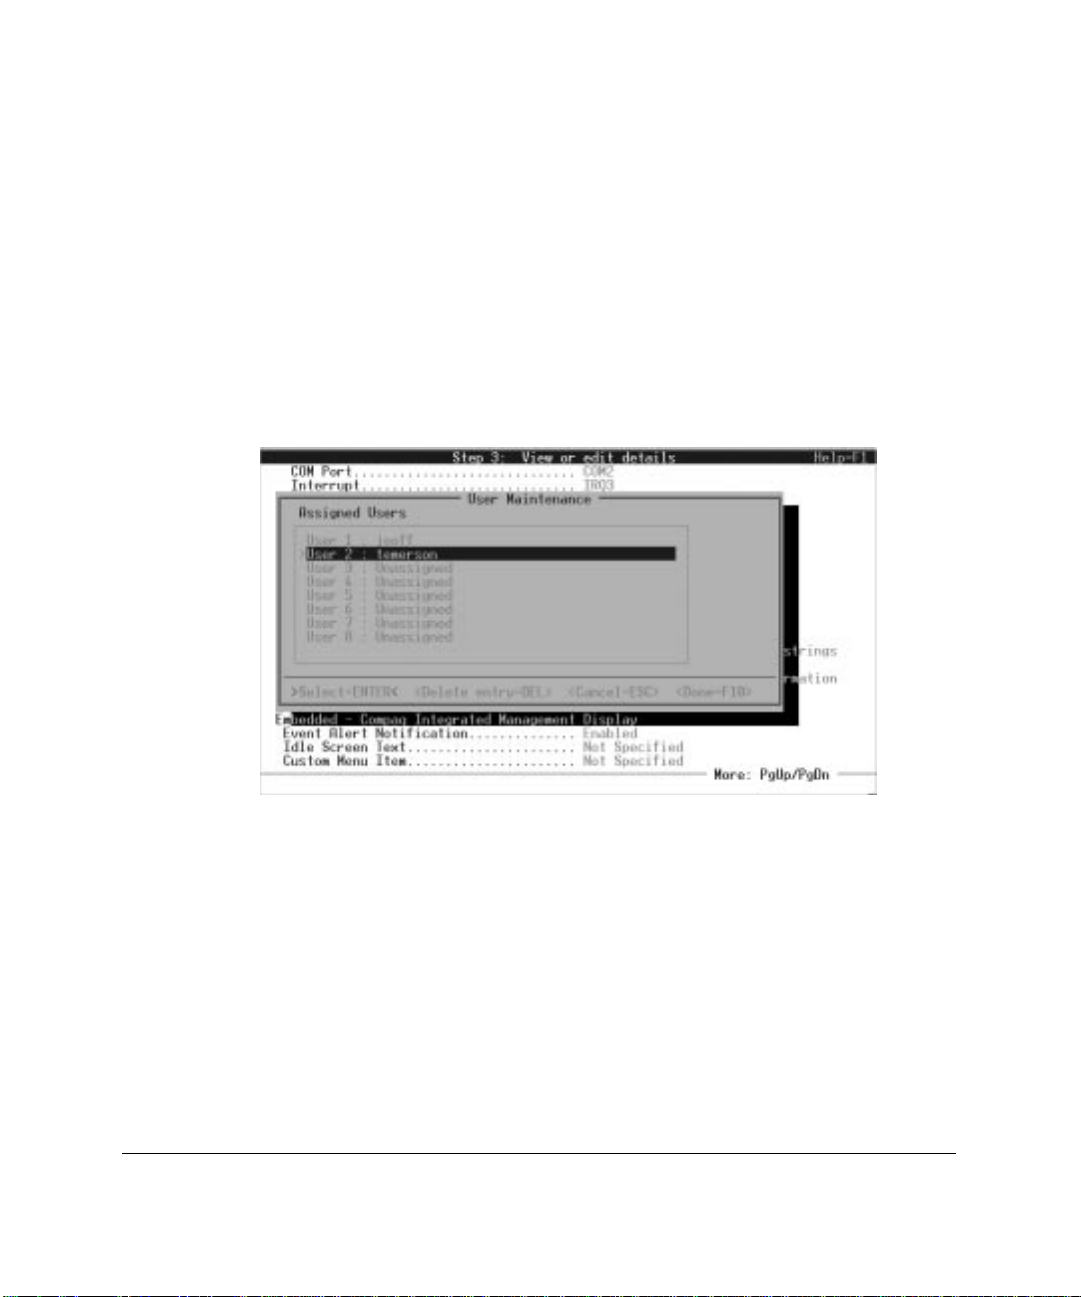
User Configuration
You must have at least one user configured in the database to access IRC. The
maximum number of users is eight. Use the System Configuration Utility to
add, delete, or modify user entries. Users can also be added, deleted, or
modified online from the IRC Main Menu if the connected user has supervisor
privileges.
To edit user information:
1. Select View or edit details from the System Configuration Utility.
2. Highlight Configure Users, then press Enter.
2-11
Figure 2-7. Example: Selecting a user to modify
3. Highlight the desired user line, then press Enter. To add a user, simply
choose one of the unassigned entries.
Compaq Integrated Remote Console User Guide
Page 26

Setup and Configuration
2-12
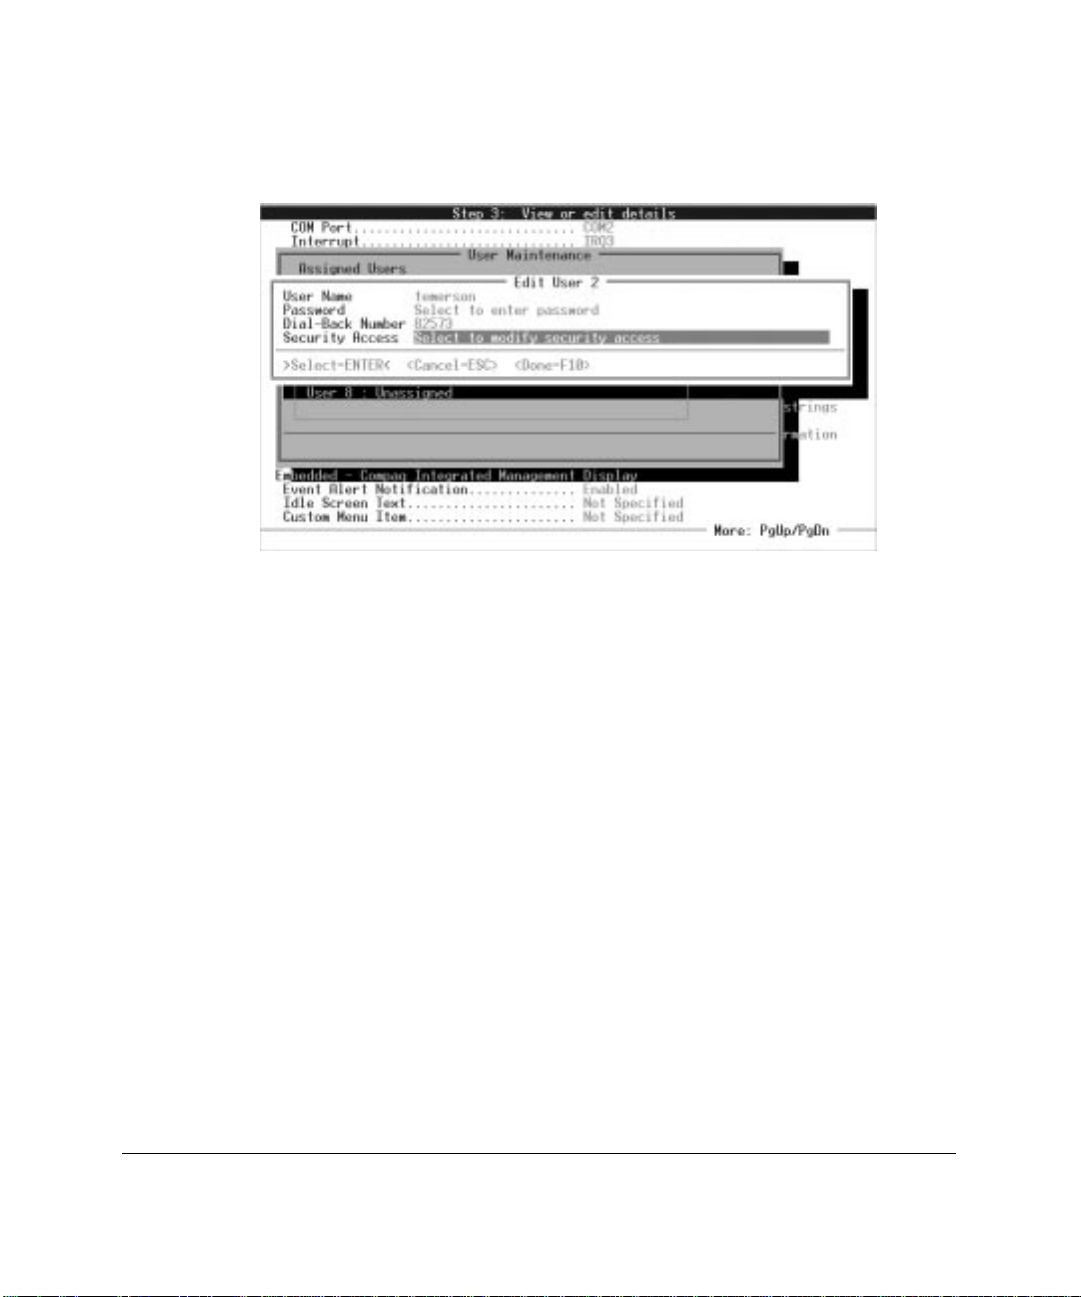
4. Edit the following user information:
a. User Name — Case-sensitive name that must be used when logging
into the Integrated Remote Console. User names can be up to 11
characters in length.
b. Password — Case-sensitive password that the user must use when
logging into IRC. It must contain at least four characters and no
more than 15. When setting passwords, the administrator is
prompted for verification.
c. Dial-Back Number — If dial-back security is desired for this user,
enter the user’s dial-back number and enable the Dial-Back option
in Security Access. When enabled, IRC logs the user out after
successful authentication and calls the user back at this number.
This prevents the user from logging in from an arbitrary location.
When entering telephone numbers, use only the following
characters: 0, 1, 2 ,3 ,4 ,5, 6, 7, 8, 9, ), (, space, comma, and hyphen.
Any other characters are ignored. The following are examples of
valid entries:
(713) 123-4567
(011612) 213231234
*70, 713-123-4567
1265312653612536
(73847) - 38 - 834378
Page 27
5. Verify/Change the user’s security settings. Position the highlight to
Security Access and press Enter. Ensure the correct setting of the
following security attributes:
Figure 2-8. Example: Edit User screen
a. Supervisor Rights — A user with supervisor rights can remotely
modify all Integrated Remote Console configuration parameters,
including the addition, deletion, and modification of other users.
The default setting is disabled.
b. Remote Console Rights — Authenticated user has remote access
to the managed server’s console. Users can be assigned login
access, but have no access to the server console. The default setting
is enabled.
c. Reboot Server Rights — Authenticated user can remotely reboot
or power-cycle the managed server. The default setting is enabled.
d. Boot Sequence Replay Rights — Authenticated user can replay
boot sequences stored in the Integrated Remote Console. The
default setting is enabled.
2-13
Compaq Integrated Remote Console User Guide
Page 28

Setup and Configuration
2-14
e. Force Dial-back — Integrated Remote Console logs out the user
after successful authentication and calls the user back at the number
specified in the Dial Back Number entry of the user’s data structure.
This prevents the user from logging in from an arbitrary location.
Figure 2-9. Example: Setting Security Access
6. Press F10 until you return to the User Maintenance screen.
Repeat steps 1-6 for additional users.
Page 29

Chapter 3
Establishing a Connection
You can establish a connection to Integrated Remote Console (IRC) from any
ANSI X3.64 compatible terminal or terminal emulator. This section contains
specific information on how to establish a connection using either Compaq
Insight Manager or Windows HyperTerminal. In addition, this section contains
general guidelines necessary if an administrator wants to use a different
terminal emulator application.
Establishing a Connection Using Compaq Insight Manager
Compaq Insight Manager is the recommended application for accessing IRC in
a managed server. Although IRC is designed to be accessible from any ANSI
compatible terminal, Insight Manager incorporates several keyboard and
terminal extensions to make certain tasks easier from within IRC. In addition,
Insight Manager combines access to the Compaq suite of remote management
tools into one convenient location.
3-1
Compaq Insight Manager provides the ability to manage multiple servers either
through a local area network (LAN) or a dial-up connection. In addition to
providing in-band manageability to these machines, Insight Manager provides
the ability to establish an out-of-band modem remote console session with any
of the managed servers. Out-of-band remote console access to a server’s
Integrated Remote Console feature can be enabled simply by supplying Insight
Manager with that server’s out-of-band management phone number. Once
completed, the Remote Console menu item is activated for this server and you
are able to use this menu item to establish a connection with Integrated Remote
Console.
To use the Insight Manager out-of-band remote console feature, both the
managed server and the management console must be equipped with
compatible (preferably identical) modems.
Compaq Integrated Remote Console User Guide
Page 30

Establishing a Connection
3-2
Configuring Insight Manager for Out-of-Band Remote Console Access
To contact the IRC function of a server, there must be an entry for that server in
the Insight Manager device list. If an entry already exists for this server,
proceed to step #2.
1. If the server containing Integrated Remote Console is available for inband management through a LAN connection, create an IPX or IP entry
for the server using methods described in the Compaq Insight Manager
User’s Guide.
Create a “PPP” entry if the server is accessible only via a point-to-point
connection.
This step is necessary for any server managed through Insight Manager
regardless of whether out-of-band remote console access is configured
or desired.
2. Right-click the server name created in step #1 from the Insight Manager
Device List window to display a list of functions you can perform on the
selected server.
3. Select Device Setup. The Device Setup dialog box is displayed.
Page 31

Figure 3-1. Device Setup window
4. Enter the phone number of the managed server in the Modem Remote
Console configuration group.
3-3
5. Verify the COM port settings to ensure they are correct and reflect the
configuration of the modem in the management console.
NOTE
: The COM port used for this configuration setting is based entirely
upon the hardware setup of the management console and is not related in any
way to the COM port setup of IRC.
6. Click OK to complete the configuration.
Compaq Integrated Remote Console User Guide
Page 32
Establishing a Connection
3-4
Establishing an Out-of-Band Remote Console Connection
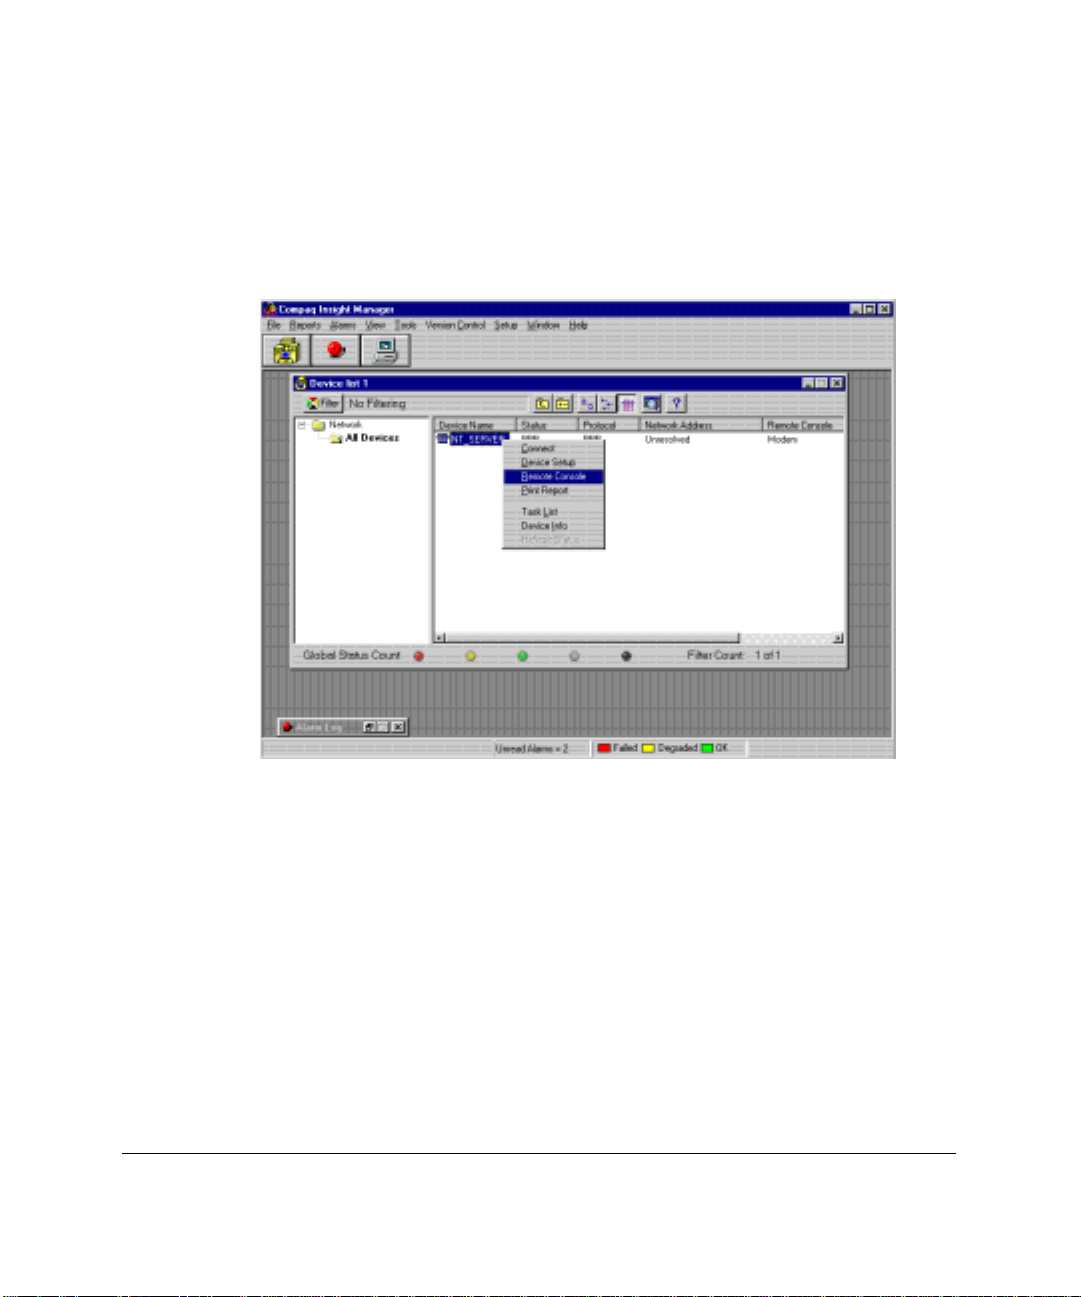
Right-click the managed server in the device list to display a list of menu items,
as shown in Figure 3-2.
Figure 3-2. Establishing a connection using Compaq Insight Manager
If the server is configured for out-of-band remote console access, the Remote
Console menu option is available. Select this menu item to initiate a remote
console, out-of-band session with the managed server. In certain circumstances,
Insight Manager may prompt you to select between a network or modem
remote console session. Select Modem Remote Console to access the IRC
feature on the managed server.
Page 33

Insight Manager launches a terminal window and dials the number configured
above. The call progress is displayed in the terminal window’s status bar. If
configured correctly, IRC on the managed server answers the call. If the server
does not answer (possibly indicating that the OS currently owns the modem),
wait 60 seconds and try again. For more troubleshooting information, see
Appendix C.
Invoke Integrated Remote Console Login
When Insight Manager indicates that the connection is established
(“Connected” is displayed in the terminal status window), press Enter three
times. This tells the managed server that the incoming call is intended for
Integrated Remote Console.
3-5
IMPORTANT:
to press the ENTER key three times to validate the call. Pressing any other
key combination or pressing the correct key combination after the 10-second
interval causes the call to be forwarded to the OS and does not invoke IRC. If
this occurs and modem sharing is enabled, IRC is unavailable for at least 60
seconds following the failed login attempt. Wait 60 seconds and try again.
After the login is successfully invoked, see the section “Login” later in this
chapter.
After connection has been established, you have 10 seconds
Benefits of Using Insight Manager to
Establish the Connection
One of the benefits of accessing IRC through Insight Manager is enhanced
keyboard support. Certain key sequences, like the function and Alt keys, are
not available through strict ANSI emulation. These key sequences are
necessary to perform certain remote server operations. (Pressing F10 to invoke
system partition utilities, for example). If IRC detects Insight Manager is the
control application, many of these key sequences are directly supported and do
not require attention sequences. See chapter 4 for the enhanced key sequences
available directly through Insight Manager.
Compaq Integrated Remote Console User Guide
Page 34

Establishing a Connection
3-6
In addition to enhanced keyboard support, Insight Manager also offers
enhanced display support. If the server console changes to a different display
mode, this change is automatically updated in the Insight Manager terminal
window. This is particularly useful when managing a Microsoft NT server,
which changes from 25-line to 50-line text modes during the OS load process.
An additional feature is the Switch Consoles button, which appears below the
status bar in the terminal window. This button conveniently switches between
the Remote Console mode and the Integrated Remote Console main menu.
Verifying Modem Settings
A majority of IRC connection problems are actually caused by improper
configuration of the modem on the management console. For consistent and
reliable out-of-band connections to IRC, the modem in the management
console must be configured as follows:
■ Computer to modem serial port speed to “fixed” (&B1 or \J0)
■ DCD serial port signal assertion to “normal” (&C1)
■ Modem responds correctly to DTR assertion (&D2)
■ Computer to modem serial port set for “hardware flow control”
■ Error correction “enabled”
Chapter 6 contains additional information on the settings listed above. If you
are having trouble connecting to the Integrated Remote Console feature on a
managed server, particularly if a connection is established but you are unable to
obtain a login prompt, check the modem initialization strings within Compaq
Insight Manager. To verify or modify the out-of-band modem initialization
strings:
1. Select Setup →COM Ports… from within Insight Manager.
2. Click Setup next to the COM port used for out-of-band access.
Page 35

Figure 3-3. COM port settings
3. The COM port settings dialog box is displayed. The modem
initialization string for out-of-band access on the management console is
listed in the Modem Control Strings control group. The default value is
“AT&F&C1&D2E0S0=0”. Additional configuration settings may need
to be appended to this string (for example, some modems may require
appending an &B1 (set computer-to-modem speed to fixed) resulting in
a string like “AT&F&C1&D2E0S0=0&B1”). To finish configuration,
click OK.
3-7
Compaq Integrated Remote Console User Guide
Page 36

Establishing a Connection
3-8
Establishing a Connection Using Windows HyperTerminal
HyperTerminal is a terminal emulation application generally available on any
Windows-based management console. Since it supports ANSI terminal
emulation and is a standard part of Microsoft Windows 95 and Windows NT, it
serves as a good example of how an administrator could manage an Integrated
Remote Console-based server from a standard ANSI terminal. Although the
following information is specific to HyperTerminal, many of the concepts
apply to other terminal emulation applications.
There are some limitations if you are not connecting to Integrated Remote
Console through Compaq Insight Manager. Limitations specific to the
HyperTerminal application include:
■ Server video is limited to 24 lines — The terminal size for ANSI
emulation within HyperTerminal is 24 lines and is not configurable. As
a result, Integrated Remote Console can only display the first 24 lines of
server video, regardless of the video mode currently displayed on the
server. Be sure to set the terminal size within Integrated Remote
Console to 24 lines for remote console video to be drawn correctly.
■ Must use attention sequence [Atn] Esc to return to the IRC main menu
from remote console mode.
■ Must use attention key sequences to generate the following key
sequences to the server:
❏ function keys (F1-F12)
❏ ALT- keys (ALT-F, and so on)
❏ Editing keys (Insert, Delete, Home, End, Page Up, Page Down)
NOTE
: See Chapter 5 for more information on attention key sequences.
Page 37

■ No auto-answer support — Must manually enter modem commands in
the terminal window to take advantage of call back.
3-9
IMPORTANT:
Make sure your IRC firmware revision revision is 1.41 or
greater if you wish to use HyperTerminal to connect to IRC. In certain
circumstances, HyperTerminal may not accurately transmit characters until
is has received characters from the remote system. Consequently, the
Enter, Enter
sequence may not be correctly sent by HyperTerminal, even
Enter
though it was typed correctly by the administrator. If IRC receives any
characters other than the three carriage return sequence, it rejects the call
and does not display the login prompt. IRC Firmware revisions 1.41 or
greater automatically detect this condition to work-around the HyperTerminal
anomaly. To update your IRC firmware, obtain the latest ROMPaq ROM
update for your server.
,
Compaq Integrated Remote Console User Guide
Page 38

Establishing a Connection
3-10
Setting up a Connection
To access IRC from within HyperTerminal, you must first create a “connection
file.” This file contains the phone number and session-specific settings, which
can be used for future connections.
To create a connection file:
1. Select New Connection from the File menu. The initial dialog box,
shown in Figure 3-4, prompts you for a name for the connection file.
Figure 3-4. Entering a connection file name
Page 39

2. Enter a name that describes the managed server, then click OK.
3. Enter the server phone number. Also verify that the modem identified
under “Connect using:” correctly describes the modem in the
management console, then click OK.
3-11
Figure 3-5. Entering connection details
HyperTerminal is now ready to dial into the managed server.
Compaq Integrated Remote Console User Guide
Page 40

Establishing a Connection
3-12
4. Verify that HyperTerminal has the correct phone number, complete with
any prefix codes that may be required to access outside lines or long
distance services. Use Modify… and Dialing Properties… to make any
corrections.
Figure 3-6. Connection window
Page 41
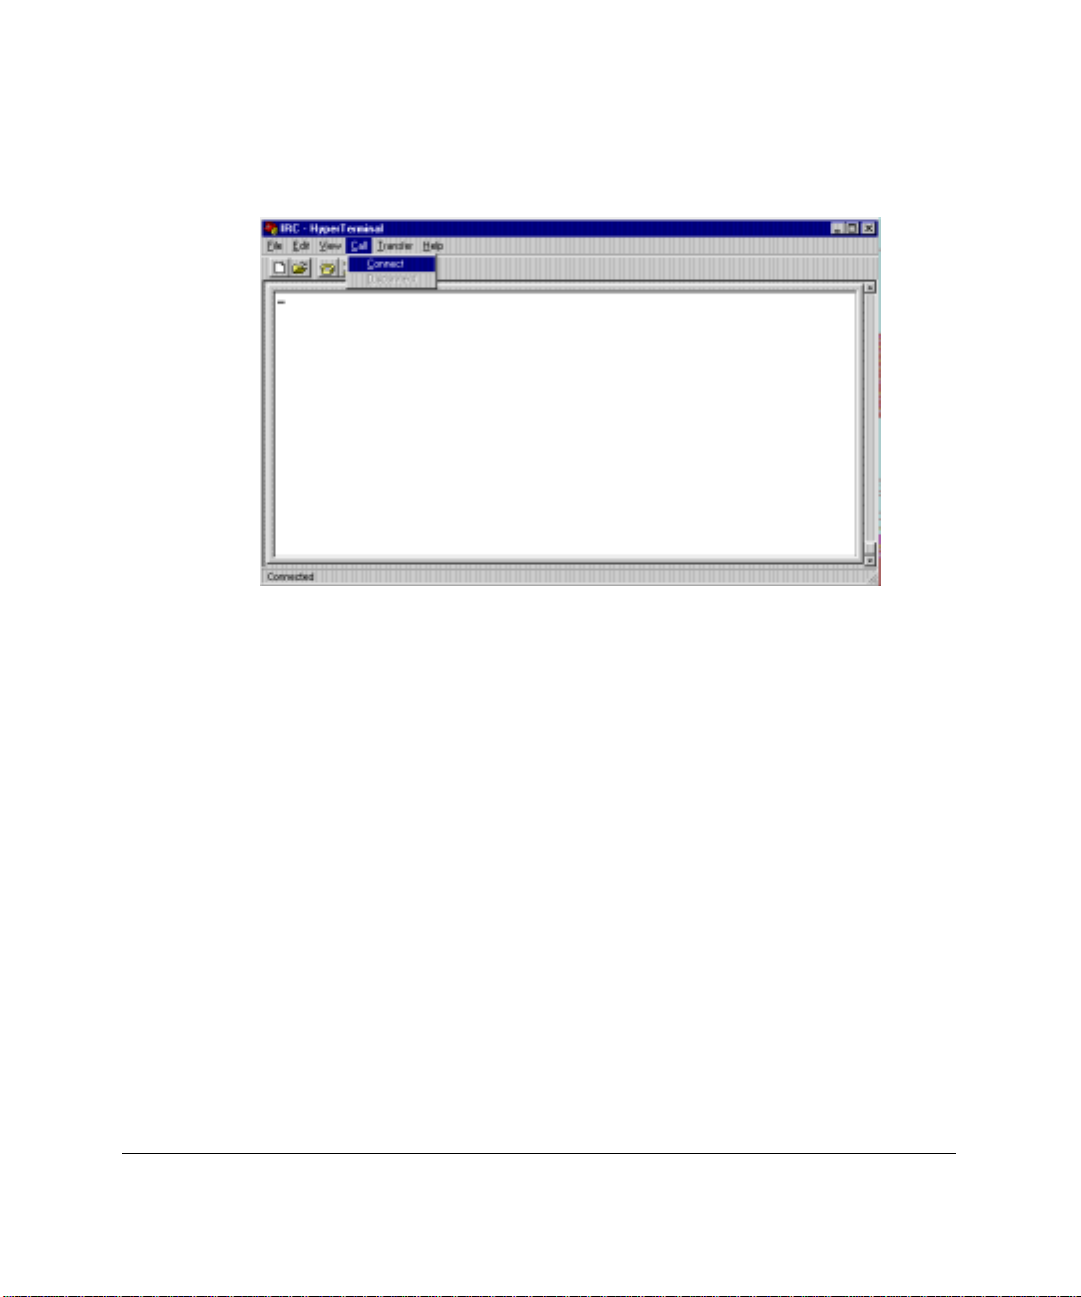
5. After verifying the phone number, click Dial. You should be prompted
with a status dialog box and hear the modem establishing connection
with the managed server.
Figure 3-7. Establish a connection using HyperTerminal
The HyperTerminal application should indicate that a call is in progress. If
configured correctly, IRC answers the call. If the server does not answer answer
(possibly indicating that the OS currently owns the modem), wait 60 seconds
and try again. For more troubleshooting information, see Appendix C.
3-13
Upon connection, the status dialog box closes and returns you to the terminal
window. Notice that the status bar of the terminal window indicates
“Connected.”
Compaq Integrated Remote Console User Guide
Page 42

Establishing a Connection
3-14
Invoke Integrated Remote Console Login
After HyperTerminal establishes a connection, press Enter three times. This
indicates that the incoming call is intended for Integrated Remote Console.
IMPORTANT:
to press
combination or pressing the correct key combination after the 10-second
interval will cause the call to be forwarded to the OS and will not invoke
Integrated Remote Console. If this occurs and modem sharing is enabled, IRC
is unavailable for at least 60 seconds following the failed login attempt. Wait
60 seconds and try again.
After the login is successfully invoked, see the section “Login” later in this
chapter.
Saving a Connection
After verifying the connection information, select File Save so that future
Remote Console sessions can be invoked by selecting File Open, or by
simply clicking the saved name.ht file from Windows Explorer.
After connection has been established, you have 10 seconds
Enter
three times to validate the call. Pressing any other key
Page 43

Establishing a Connection Using an ANSI Compatible Terminal Emulator
The ANSI terminal standard allows access to IRC from most standard terminal
emulation applications.
Configuration Guidelines
The following are general guidelines for using ANSI terminal emulation
programs to access Remote Console.
Display Settings
Display font — If the display font of your terminal application can be
configured, choose a font that supports the OEM (Original Equipment
Manufacturer) character set. The “terminal” font is usually a good choice. If
your terminal application is configured for a non-OEM-based font, some of the
graphic line-draw characters used in the Remote Console menu system may not
be drawn correctly.
3-15
Terminal settings
Terminal Size — If the terminal size of your terminal application is
configurable, set it to the maximum number of lines to be displayed on the
server console. For Netware and Unix applications, 25 lines is the appropriate
setting to ensure that all lines on the server console are visible on the remote
terminal. Windows NT, however, switches to a 50-line mode during OS load
and during “blue-screen” error conditions. To insure that this information is
also visible on the terminal, set the terminal size to 50 lines. The terminal size
setting within Integrated Remote Console must be set to match the setting of
your terminal application to function correctly.
■ Line Wrap — Make sure your terminal application is configured to wrap
lines that exceed terminal width. This is the default in most terminal
applications.
■ Backspace key mapping — Some terminal applications allow the
backspace key to either be mapped to Backspace (Ctrl+H) or Delete.
Make sure that Backspace is mapped to Ctrl+H and not Delete.
Compaq Integrated Remote Console User Guide
Page 44

Establishing a Connection
3-16
■ Screen Scroll — Make sure that screen scroll is enabled. Again, this is
the default in most terminal applications.
Modem settings
A majority of IRC connection problems are actually caused by improper
configuration of the modem on the management console. If your terminal
emulation application supports TAPI (like HyperTerminal), the application
should configure the modem correctly using information in the Windows
modem database. If your terminal emulation application directly accesses the
modem in the management console, make sure the modem initialization strings
in the management console place the modem in the following state:
■ Computer to modem serial port speed to “fixed” (&B1 or \J0)
■ DCD serial port signal assertion to “normal” (&C1)
■ Modem responds correctly to DTR assertion (&D2)
■ Computer to modem serial port set for “hardware flow control”
■ Error correction “enabled”
Chapter 6 contains additional information on the settings listed above.
Limitations
Many aspects of IRC accommodate any ANSI terminal emulation application.
There are, however, some limitations to be aware of when operating IRC from
these applications. These include:
■ Screen Size — The screen size of the terminal window must be
manually configured in both the terminal application and IRC.
■ Keyboard Support — Attention key sequences will usually need to be
used to simulate keystrokes for the function, Alt, arrow, and editing
keys (Page Up, Page Down, Home, End, Insert, Delete).
Page 45

■ Callback Support — You need to manually place the modem in auto-
answer mode if either of the following situations occur:
❏ callback authentication is required to complete your login
❏ you want IRC to automatically reestablish a connection following a
remote power cycle
Establishing a Connection
After verifying the proper configuration of the terminal emulator settings,
instruct the application to dial into the managed server. The terminal emulator
application should indicate that a call is in progress. If configured correctly,
IRC answers the call. If the server does not answer (possibly indicating that the
OS currently owns the modem), wait 60 seconds and try again. For more
troubleshooting information, see Appendix C.
Invoke IRC Login
When the terminal emulator verifies that the connection is established, press
Enter three times. This action indicates that the incoming call is intended for
IRC.
3-17
IMPORTANT:
to press
After connection has been established, you have 10 seconds
Enter
three times to validate the call. Pressing any other key
combination or pressing the correct key combination after the 10-second
interval causes the call to be forwarded to the OS and does not invoke IRC. If
this occurs and modem sharing is enabled, IRC is unavailable for at least 60
seconds following the failed login attempt. Wait 60 seconds and try again.
Compaq Integrated Remote Console User Guide
Page 46

Establishing a Connection
3-18
Login
After a connection has been established using one of the management
applications described above, and the call has been validated by pressing Enter
three times, IRC responds by displaying a login prompt, as shown in
Figure 3-8.
Figure 3-8. Remote Console displays login prompt after successful call identification
To log in to IRC:
1. Enter a valid username, then press Enter.
2. Enter a valid password, then press Enter.
If dial-back security is not turned on for your login and you have entered a
valid username and password, you are successfully logged into the Integrated
Remote Console application.
Page 47

If you established your connection using any standard terminal emulation
program that supports ANSI, the Integrated Remote Console application main
menu displays as shown in Figure 3-9 after you have successfully logged in.
Figure 3-9. Remote Console Main Menu
3-19
Compaq Integrated Remote Console User Guide
Page 48

Establishing a Connection
3-20
If you established your connection with Insight Manager through the Remote
Console menu option, Insight Manager automatically switches you into Remote
Console mode following login, as shown in Figure 3-10. To return to the main
menu, simply click Switch Consoles, located at the bottom of the Insight
Manager terminal window.
Figure 3-10. Remote Console mode
The Remote Console main menu, as shown in Figure 3-9, is the main control
center for the various functions available through IRC. See Chapter 4 for
information on using the functions of Remote Console.
Page 49

Chapter 4
Using Integrated Remote
Console
Use the instructions in Chapter 3 to establish a connection to the managed
server and to log in to Integrated Remote Console (IRC).
If you establish your connection using an application other than Compaq
Insight Manager, the Integrated Remote Console Main Menu displays, as
shown in Figure 4-1, after you have successfully logged in.
4-1
Figure 4-1. Remote Console Main Menu
The Main Menu is the main control center for the various functions available
through IRC.
Compaq Integrated Remote Console User Guide
Page 50

Using Integrated Remote Console
4-2
If you establish your connection through the “Remote Console” menu option
within Insight Manager, you are automatically switched into Remote Console
mode following login, as shown in Figure 4-2. To return to the Main Menu,
simply click Switch Consoles, located at the bottom of the Insight Manager
terminal window.
Figure 4-2. Remote Console mode
Page 51

Main Menu Options
The following options are available from the Main Menu.
■ Remote Console — Redirects the managed server’s console to the
management console to provide the user with remote control
capabilities, regardless of the software running on the managed server.
■ Reboot Server — Lets you reset the managed server. Use this only as a
last resort; it performs an unconditional reset of the server.
■ View Reboot Sequence -— Lets you view all recorded video activity
following an Automatic Server Recovery (ASR) event. This includes all
ROM POST messages and operating system load information.
■ View Event Log — Lets you examine the IRC event log.
■ Change Password — Lets users without supervisory access modify
their login password.
■ Manage Login Information — Lets a user with supervisory access add
or delete users or modify an existing user’s configuration.
■ Manage Configuration — Lets an administrator remotely change the
configuration parameters of Integrated Remote Console.
4-3
■ Disconnect — Lets the user terminate the connection with IRC.
This chapter discusses each of the menu options in the order listed above.
Compaq Integrated Remote Console User Guide
Page 52

Using Integrated Remote Console
4-4
Remote Console Menu Option
One of the primary control features offered by IRC is its ability to allow a user
remote access to the managed server’s console.
Enter remote console mode by selecting Remote Console… from the Main
Menu. This can be done by positioning the cursor, then pressing Enter. If your
terminal emulation program supports arrow keys (as does Insight Manager and
HyperTerminal), the UP and DOWN arrow keys can be used to move the
highlight bar to the various items available from this menu. If your application
does not support the arrow keys, the I and M keys can be used to perform this
function. See Table 4-1 for more information about navigating from within
Integrated Remote Console. After selecting Remote Console… from the main
menu, the Remote Console submenu is displayed as shown in Figure 4-3. This
menu allows you to:
■ Begin a Remote Console Session
■ Change the default attention key
■ Change the terminal screen size
■ Return to the Main Menu
Figure 4-3. Remote Console submenu
Page 53

Beginning a Remote Console Session
If the attention key and terminal size settings are correct, select Begin a Remote
Console Session to enter the Remote Console mode. The managed server
console is displayed if the following conditions are met:
■ The user has remote console access to the server.
■ The managed server is in text mode. If the managed server is in graphics
mode, an appropriate message is displayed.
In this mode, characters typed into the terminal emulation window are
redirected to the managed server. Figure 4-4 shows an example of remote
console mode. In this example, the server is running the Windows NT operating
system and is currently waiting for input at the initial OS Loader.
4-5
Figure 4-4. Using Remote Console mode
In this example, the arrow keys can be used to move the selector to the
appropriate operating system choice. Again, if your terminal emulator supports
arrow keys (true for Insight Manager and HyperTerminal), you can move the
selector bar using these keys, as you would at the server console.
Compaq Integrated Remote Console User Guide
Page 54

Using Integrated Remote Console
4-6
1-9 Moves and selects the corresponding menu item
↑ or I Scrolls the highlighted selection up. The “I” key can be used to
↓ or M Scrolls the highlighted selection down. The “M” key can be used to
Table 4-1
Key Functions for Navigating the IRC Menu System
Key Function
navigate the menus from ANSI terminal programs that do not support
the up and down arrow keys.
navigate the menus from ANSI terminal programs that do not support
the up and down arrow keys.
Tab
[Atn] Esc
Enter
Esc
Page Up or O Displays the previous page.
Page Down or ,
(comma)
Space
Home or U Returns to the top.
End or N Moves to the bottom.
Moves to the next selection.
Exits the Remote Console session. This is a two-key sequence
performed by first pressing the user-definable attention key and then
pressing the Esc key. See Chapter 5 for more information on entering
attention key sequences.
Displays the next level menu, detail information for a selected item, or
terminates editing and accepts changes.
Cancels the current event and returns to the previous screen. A
confirmation message is displayed to verify that you have saved any
changes.
Displays the next page.
Toggles between two options.
If your terminal emulator does not support the arrow keys, you can still
generate these keys by using attention key sequences (described in detail in
Chapter 5). The attention key sequence for generating the up and down arrow
keys in Remote Console mode is [Atn]I and [Atn]M respectively. For this
example, the attention key method is used to move the selector to the “MSDOS” entry.
Page 55

In this example, the attention key is defined to its default: Ctrl+A. To perform
a down-arrow attention key sequence:
1. Hold the Ctrl key down while pressing the A key on the terminal
keyboard.
2. Release both keys making sure to release the Ctrl key last. This informs
IRC that you want to generate an enhanced key sequence. There is no
change to the server console, since Remote Console is waiting for the
next key to complete the sequence.
3. Press the M key. The down-arrow key sequence is complete.
Since the M key was preceded by the attention key [Ctrl + A], IRC presses the
down-arrow key on the managed server’s keyboard. The M key used to
complete the attention sequence is not case sensitive.
NOTE
: Remote Console interprets the character sequence the same
regardless of the state of the CAPS LOCK key on the terminal emulator
keyboard.
Keep in mind that your are actually composing this character sequence by
entering two distinct characters: first the [Ctrl+A] and then the M. It is
incorrect, for example, to hold down all three keys (Ctrl+A+M) at the same
time. If you have entered this sequence correctly, Remote Console generates a
down-arrow to the managed server, which moves the highlight down one entry.
You can move the highlight down one more entry by repeating the above
sequence.
4-7
Compaq Integrated Remote Console User Guide
Page 56

Using Integrated Remote Console
4-8
The terminal emulator interactively displays any changes to the server console
as they are typed, as shown in Figure 4-5.
Figure 4-5. Selecting MS DOS as the operating system
Press Enter to select the operating system.
Returning to the Main Menu
To return to the Main Menu from remote console mode, you must enter an
attention key sequence to distinguish this command from keys that might be
valid or desired for server control. The attention key sequence to return to the
Main Menu is [Atn] Esc. This is done by entering the attention key as
described in the down-arrow example, followed by Esc. The same rules apply.
That is, the sequence consists of Ctrl+A followed by Esc. It is incorrect to
press all three keys at the same time. Successful entry of this character
sequence returns you to the Main Menu.
If you are using Compaq Insight Manager as the terminal emulation
application, the process of switching between the main menu and remote
console mode is greatly simplified by the Switch Consoles button, located at
the bottom of the terminal emulation window. Click this button to toggle
between the two modes and bypass the Remote Console submenu.
Page 57

In addition to the Switch Consoles feature, Insight Manager offers enhanced
keyboard and terminal support. As a result, the function keys (F1-F12) and Alt
sequences can be performed on the terminal console, without having to use
attention sequences. In addition, the Insight Manager terminal window
dynamically resizes itself to match the screen size of the server console.
Windows NT, for example, changes between 25-line and 50-line mode during
its boot process.
Note that your ability to control the server is not dependent upon any special
software running on the server, nor it is restricted to when the managed server
is in a particular state (like running BIOS). This allows you to inspect and
control the server between operating system transitions or when the server is
completely off line.
Changing the Default Attention Key
The attention key is important since it must be used to exit from remote console
mode and return to the Main Menu. Be sure to note the currently defined
attention key before entering Remote Console mode. Figure 4-3 illustrates the
default attention key setting of Ctrl + A.
The Change Attention Key menu option lets you modify the key that is used to
generate unavailable key sequences and special command sequences from
standard ANSI terminal emulation programs.
4-9
Compaq Integrated Remote Console User Guide
Page 58

Using Integrated Remote Console
4-10
When the Change Attention Key menu option is selected, IRC prompts you to
enter a new attention key. A screen similar to Figure 4-6 is displayed.
Figure 4-6. Change Attention Key screen
The default attention key for a new user is Ctrl + A. If a user modifies the
attention key, the modified value is saved in the user database. Different users
can use different attention keys.
An attention key may be any ASCII key, preferably a key that is infrequently
used. For this reason, numbers and upper and lower case numbers are not
allowed to be assigned as the attention key.
See Chapter 5 for a complete listing of attention key sequences.
Changing the Terminal Screen Size
This option allows you to accurately view the server console from the remote
terminal program. Users accessing IRC from Compaq Insight Manager do not
need to change this setting, since Insight Manager’s terminal window
automatically adjusts to the correct number of lines as the server changes video
modes.
For proper operation, this setting must match the number of lines currently
displayed by the remote user’s ANSI terminal. Most standard ANSI terminal
emulation packages, like HyperTerminal, default to a screen size of 80 columns
by 24 rows. This mode can be accommodated by IRC by changing the terminal
size setting to 24 rows. However, since the server display usually contains at
least 25 rows, all rows which extend beyond the terminal size setting are
shortened.
Page 59

Most of the more advanced ANSI terminal emulation packages allow
adjustment of the number of displayed rows. If this is the case, it is
recommended that both the remote terminal and the terminal size settings be
adjusted to accommodate the maximum number of lines which will usually be
displayed on the server console. For instance, if the managed server operating
system is Windows NT, the recommended terminal size is 50 lines, since
Windows NT uses this video mode during operation system load and during
“blue screen” trap conditions. If both the terminal emulation application and
IRC are configured for more lines than are currently being displayed on the
managed server, IRC adjusts the output so it is correctly displayed on the
Management Console. This allows you to use one terminal size setting for all
display modes.
If you are using a terminal emulation package that supports 25 lines, make sure
that the terminal application is correctly configured for 25 lines. If the terminal
emulation package does not support 25 lines (like HyperTerminal), IRC must
be configured to match this limitation. In either case, the terminal size setting in
IRC and the terminal emulation application must match for correct display. IRC
saves this setting in your user profile, so changes to the terminal size are
retained between sessions. If the terminal size requires adjustment, select the
“Change Terminal Size” option from the Remote Console submenu. Adjust the
terminal size to either 24, 25, 43, or 50 lines.
4-11
Return to Main Menu
You can return to the IRC Main Menu by pressing Esc or selecting this option.
Compaq Integrated Remote Console User Guide
Page 60
Using Integrated Remote Console
4-12
Reboot Server Menu Option
It may become necessary to reboot a server that has gone off line and is no
longer accessible through the OS. Compaq Automatic Server Recovery can be
configured to reboot the server automatically when this condition is
determined. In some instances, however, the administrator may want to control
this reset event so that it can be interactively invoked and monitored.
For this example, a catastrophic error was intentionally introduced in the
Windows NT operating system. This server is no longer available through OSbased tools since the operating system is off line. If this server is equipped with
IRC, it is still accessible and can be rebooted remotely.
To establish a connection with IRC in this server, use the steps described in
Chapter 3. Upon entering Remote Console mode, notice that the operating
system is currently off line and is displaying valuable information about the
failure, as shown in Figure 4-7.
Figure 4-7. Example of a failure situation
Page 61

This debug information can be easily captured for later analysis by using the
Copy to Clipboard function of the terminal emulator application. In Insight
Manager this can be done by clicking Copy, located at the bottom of the
terminal window.
From visual inspection of the server console, you can see that the operating
system is off line. To restore this server to an online state, it must rebooted.
This can be done by returning to the Main Menu and selecting the Reboot
Server… menu option.
To return to the Main Menu, press the [Atn] Esc sequence, described earlier in
this chapter. If you are using the terminal window from within Insight Manager,
click Switch Consoles.
After switching to the Main Menu, select Reboot Server…. This invokes the
Reboot Server submenu shown in Figure 4-8.
4-13
Figure 4-8. Server Reboot menu
From this menu, you can reboot the server in one of two ways:
■ Perform a low-level reset of the server and all connected peripherals.
This is the same type of reset that occurs following an Automatic Server
Recovery event. Although the server itself is reset, you remain
connected and can monitor the reboot process from within Remote
Console mode.
■ Cycle Power to the Server is available on servers that support this
feature. Since both Remote Console and the modem rely on server
power to function, you cannot remain connected to the server through
this type of reset. However, Remote Console can be configured to
automatically reestablish the connection when power returns.
Compaq Integrated Remote Console User Guide
Page 62

Using Integrated Remote Console
4-14
In this example, the server is reset by selecting Reboot Server…. Remote
Console prompts you for verification, since this unconditionally resets the
server.
Figure 4-9. Reboot Server warning
Press Y to begin the server reboot process. Following the server reset event,
Remote Console automatically places you in Remote Console mode so that you
can interactively monitor the reset process. After several seconds, the server
initializes its video controller, and you see the power-on-self-test (POST)
messages of the server’s reboot process. Note that in this mode, you can control
the reset flow by entering commands at the terminal keyboard. These are
interpreted in the same way as commands entered at the server console. This
allows you to run diagnostics or pause the reset process to inspect possible error
messages.
You may choose to perform the Complete Power Cycle option for the Reboot
Server submenu. Since both IRC and the modem will lose power, IRC asks you
if you want to be called back when the power returns. A screen similar to
Figure 4-10 is displayed.
Page 63

Figure 4-10. Power Cycle warning
Type Y to instruct Remote Console to attempt to automatically reestablish the
connection upon power-up. Integrated Remote Console prompts for the phone
number of the management console. After entering the phone number of the
management console, you are prompted for verification one last time. Type Y
to initiate the remote server power down sequence.
4-15
Figure 4-11. Power Cycle dial back
Compaq Integrated Remote Console User Guide
Page 64

Using Integrated Remote Console
4-16
If you are using Insight Manager as the terminal application, as shown in Figure
4-11, the reconnection is reestablished without user intervention. The Insight
Manager terminal window is placed into “Callback mode”, indicated by the
phrase “Waiting for Callback…” located in the status window. When power
returns to the server, Remote Console uses the supplied phone number to
attempt to reestablish a connection. Insight Manager answers the incoming call
and redisplays the Main Menu.
If you are using a standard ANSI terminal emulation application, like Windows
HyperTerminal, the method for putting the modem in auto-answer mode varies.
Some applications, like HyperTerminal, do not provide for answering incoming
calls. The modem can be manually placed in auto-answer mode by entering the
modem auto answer string (usually “ATS0=1”) followed by Enter. The modem
responds by displaying “OK” in the terminal window. The modem answers the
incoming call from Remote Console.
NOTE
: Insight Manager is the recommended management application if this
functionality is desired.
Figure 4-12. Power Cycle using ANSI terminal emulation emulation
Page 65

View Reboot Sequence
Selecting the View Reboot Sequence option from the IRC Main Menu lets you
view a stored boot sequence. The IRC boot sequence recorder starts
automatically following an Automatic Server Recovery (ASR) event. The boot
sequence contains all ROM POST messages and operating system load
messages that were displayed on the managed server console while it was being
rebooted. If the Compaq Health Driver for your particular operating system is
loaded, this sequence will also include a snapshot of the server console at the
time the ASR event occurred. Boot sequences are stored in system memory and
are not available once the server power has been deactivated.
When the boot sequence recorder is activated, all text-mode video data is
collected until the boot sequence recorder is full or the recorder duration timer
expires (approximately five minutes). The recorder duration timer insures that
even the minimal overhead necessary to sustain the boot sequence recorder will
not affect server performance.
If IRC contains a valid boot sequence, the View Reboot Sequence menu option
is available. If this menu option is gray or inactive, there is no boot sequence to
view. Select View Reboot Sequence from the Main Menu to display a screen
similar to Figure 4-13, showing the commands that control sequence playback.
4-17
Compaq Integrated Remote Console User Guide
Page 66

Using Integrated Remote Console
4-18
Figure 4-13. Reboot Replay Sequence screen
You can adjust the playback speed using keys 1-9. The space bar can be used to
stop/start the playback. After the sequence has been played, you are returned to
the main menu. Pressing Esc terminates the sequence replay and immediately
returns you to the main menu.
Page 67

View Event Log
Select View Event Log from the Main Menu to view the IRC Event Log, as
shown in Figure 4-14.
4-19
Figure 4-14. Event Log screen
If the event log contains multiple pages of information, you may navigate
through these pages using Page Up, Page Down, Home, or End (or character
equivalents). The following events are logged as they occur:
■ IRC user login
■ Failed login attempt
■ IRC user logout
■ Server logged critical error(s)
■ Event log cleared
■ Server reset
Compaq Integrated Remote Console User Guide
Page 68

Using Integrated Remote Console
4-20
Additional events may be present or available through future firmware
upgrades. To clear the contents of the event log, press Delete. To return to the
Main Menu, press Esc.
Change Password
The Change Password option is available to users without supervisory access.
These users are permitted to change their own passwords, but are prohibited
from viewing or changing any other user attributes in the user database. IRC
prompts the user for the old password, the new password, and for new password
confirmation. A screen similar to the one shown in Figure 4-15 displays.
Figure 4-15. Change Password screen
The password is changed if the following conditions are met:
■ The old password matches the current password for the user
■ The new password confirmation matches the new password
■ The new password is at least 4 characters in length
■ Password entry has not been terminated by pressing Esc
Valid passwords must contain at least four characters and not more than 15.
Page 69

Manage Login Information
Manage Login Information is available to users with supervisory rights. This
option enables an administrator to add or delete users or modify an existing
user’s configuration remotely. Select Manage Login Information to display a
screen similar to that shown in Figure 4-16.
4-21
Figure 4-16. Manage Login Information screen
Press A to add a user. You are then prompted to fill in the added user
information.
To delete or modify a user, position the highlight next to the desired user and
press Enter to edit the highlighted user, or D to delete the highlighted user. A
confirmation message is displayed before a user is deleted.
Compaq Integrated Remote Console User Guide
Page 70

Using Integrated Remote Console
4-22
Modify User Information
After selecting a user from the Manage Login Information screen, a screen
similar to the one in Figure 4-17 displays. For new users, all fields are set to
defaults.
Figure 4-17. Example: Modify User Information screen
See “User Configuration” in Chapter 2 for a description of the various fields in
the Modify User Information dialog box.
To edit, position the highlight next to the desired field and press Enter to
select. Security rights may be toggled by pressing the space bar. To accept
changes, select Save Modified Information. To cancel changes, press Esc.
Page 71

Manage Configuration
The Manage Configuration option, available to users with supervisory rights,
allows an administrator to view or change the configuration parameters of IRC
remotely. Since many configuration options are necessary for the proper
operation of IRC, care must be exercised when making changes. Selecting
Manage Configuration presents a screen similar to that shown in Figure 4-18.
Figure 4-18. Manage Configuration screen
4-23
From this screen, the administrator can perform the following functions:
■ Remote Console Functions — Toggles the status of Remote Console
Functions from Enabled to Disabled.
IMPORTANT:
If Remote Console Functions are remotely disabled, IRC no
longer accepts incoming calls. IRC can only be re-enabled by running the
Compaq System Configuration Utility.
■ Keyboard Type — Specifies which country-specific keyboard is
attached to the managed server. For proper remote keyboard operation,
this setting must match the keyboard country configuration of the
server’s OS. This option allows the administrator to ensure that the
keyboard type matches the keyboard configuration of the server.
Compaq Integrated Remote Console User Guide
Page 72

Using Integrated Remote Console
4-24
■ Communications Setup… — Allows the administrator to view or
change all communication parameters used by Integrated Remote
Console.
■ System Information… — Displays hardware and firmware revision
information pertaining to the managed server.
■ IRC Information — Displays hardware and firmware revision
information pertaining to Integrated Remote Console.
To edit or select a particular item, position the highlight to the desired field and
press Enter. To accept changes, select Save Modified Information. To reject
changes, press Esc.
Changes made in the Communications Setup configuration screen are
permanent if you accept these changes as they are applied. The Save Modified
Information pertains only to changes made to the Remote Console Functions
and Keyboard Type fields.
Communications Setup
Selecting Communications Setup from the Manage Configuration screen
displays the administrator screen, similar to the one shown in Figure 4-19.
Figure 4-19. Communications Setup screen
Page 73
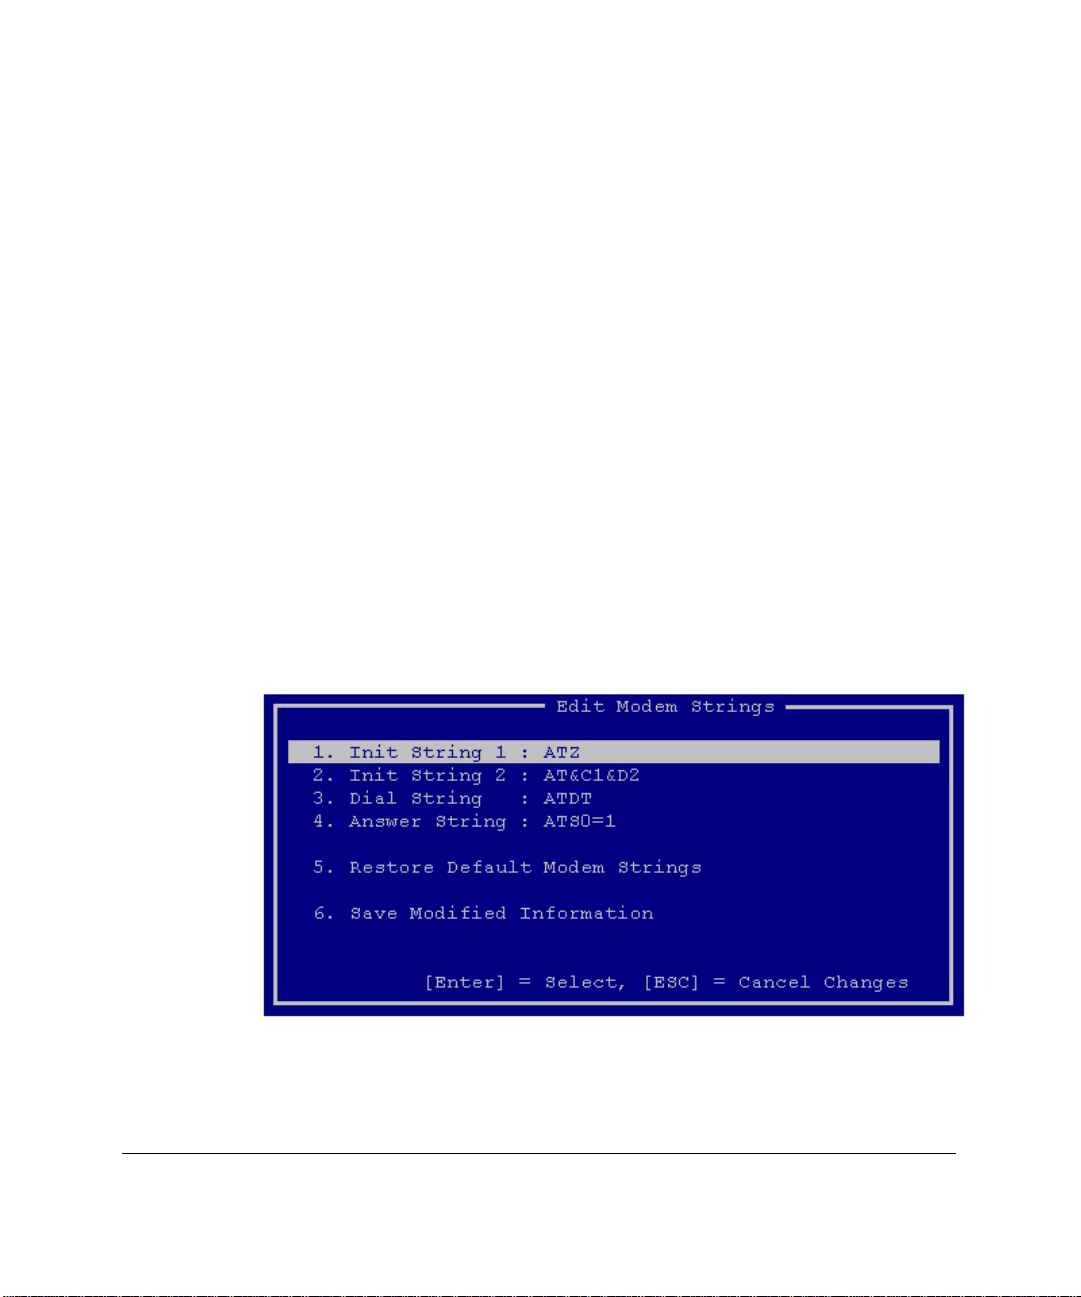
NOTE
: The Compaq System Configuration Utility helps in the initial setup of
communications setup parameters.
The following communications parameters can be changed from this screen:
■ Baud Rate
■ Data Bits
■ Stop Bits
■ Parity
See Chapter 2 for detailed information on these parameters. To edit or select a
particular item, position the highlight on the desired field and press Enter. To
accept changes, select Save Modified Information. To reject changes, press
Esc.
Modem Strings
Select Edit Modem Strings at the Communications Setup screen to display a
screen similar to that shown in Figure 4-20. Again, see Chapter 2 for detailed
information on how these strings should be set. See Appendix A for additional
information on modem configuration commands and parameters.
4-25
Figure 4-20. Edit Modem Strings screen
Compaq Integrated Remote Console User Guide
Page 74

Using Integrated Remote Console
4-26
From this screen, the administrator can change the strings used to initialize and
communicate with the modem. See Chapter 2 for detailed information on the
modem strings.
To change any of the modem strings, position the highlight next to the desired
field and press Enter. To accept changes made to these strings, select Save
Modified Information. To restore default modem strings, select Restore Default
Modem Strings. To cancel changes, press Esc.
Disconnecting
You can terminate an IRC session at any time either by selecting Disconnect
from the Main menu or the Close or Disconnect option from terminal emulation
applications. The logout event is appended to the IRC connection log.
Figure 4-21. Terminating the connection
Page 75

Chapter 5
Using Attention Key Sequences
You can use attention key sequences in Remote Console mode to maximize
ANSI terminal emulation functionality. Integrated Remote Console (IRC)
provides a mechanism to enter complicated key sequences otherwise
unavailable from a standard ANSI terminal emulation program. This
mechanism consists of key sequences where you press a configurable “attention
key” followed by a standard ANSI key.
The attention key is actually a combination of key strokes (usually two) that
alerts the server that a command is about to follow. IRC lets you define the
attention key, or you can use the default selection Ctrl + A.
Attention key sequences are used to perform three types of functions:
■ Attention Key Command Sequences
■ Attention Key Support Sequences
■ Attention Key Compose Sequences
Each of the items is described in detail in the following sections.
5-1
Compaq Integrated Remote Console User Guide
Page 76

Using Attention Key Sequences
5-2
Attention Key Command Sequences
These sequences, listed in Table 5-1, issue an instruction to IRC from within
remote console mode.
Attention Key Command Sequences
Key Command
[Atn] Esc
Exits the Remote Console mode and displays the IRC Main
Menu.
Table 5-1
[Atn] Space
Instructs the Integrated Remote Console application to refresh
the server console screen on the remote terminal. This
command is only necessary if the remote terminal program is
reset or instructed to clear its screen.
Example: Returning to IRC Main Menu
For example, to exit the Remote Console mode and display the Main Menu:
1. Enter the attention key. In this example the attention key is set to its
default: Ctrl+A. Press both the Ctrl and the A keys down
simultaneously. Release both keys, making sure to release the Ctrl key
last.
2. Enter the command to exit Remote Console mode and return to the main
menu. This command is key is Esc.
Step 1 signals IRC that a special key sequence is to follow. The Esc key
pressed in step 2 is therefore interpreted as the “exit to Remote Console mode”
command and not interpreted as a keystroke needing to be typed at the server
keyboard.
Page 77

Attention Key Support Sequences
These sequences emulate special PC keyboard keys that are not part of the
ANSI standard, such as function keys and Page Up and Page Down.
Table 5-2 lists the attention key sequences for entering special non-ANSI key
sequences from any ANSI terminal program. Included are keys such as Home,
End, Page Up, Page Down, and function and arrow keys.
NOTE
: Some of the sequences described in Table 5-2 are not required with
Compaq Insight Manager or other ANSI terminal programs that support
function keys,
[Atn] 1-9, 0
Page Up, Page Down, Home
Table 5-2
Attention Key Support Sequences
Key Key it is equal to on the server console
Corresponding F1-F10
, and
End
5-3
.
[Atn] - (minus)
[Atn] = F12
[Atn] I
[Atn] M
[Atn] Y Insert
[Atn] B Delete
[Atn] J
[Atn] K
[Atn] O Page Up
F11
↑ (up arrow)
↓ (down arrow)
← (left arrow)
→ (right arrow)
Continued
Compaq Integrated Remote Console User Guide
Page 78

Using Attention Key Sequences
5-4
Attention Key Support Sequences
Key Key it is equal to on the server console
[Atn] , (comma)
[Atn] U Home
[Atn] N End
[Atn] [Atn]
Example: Pressing F10 Key
For example, if you wanted to press the F10 key on the managed server:
1. Enter the attention key. In this example the attention key is set to its
default: Ctrl+A. Press both the Ctrl and the A keys down
simultaneously. Release both keys, making sure to release the Ctrl key
last.
2. Enter the command to type an F10 at the server’s keyboard. This
command key is 0 (zero).
Continued
Page Down
Generates a literal Atn sequence to the server console.
For instance, if the attention key was assigned to Ctrl +
A, but an actual Ctrl + A was required as input to the
server console, the user could insert a literal Ctrl + A by
pressing this sequence twice.
Step 1 signals IRC that a special key sequence is to follow. Pressing 0 (zero) in
step 2 generates an F10 on the managed server.
Page 79

Attention Key Compose Sequences
These sequences extend the ability to enter complex keyboard sequences
necessary in the PC environment, like Ctrl + Alt + Delete.
Table 5-3 identifies keystroke sequences used to enter complex keyboard
commands. These settings are automatically cleared after an ANSI key is
entered, or if the Sequence Clear or Sequence End attention code is entered.
Table 5-3
Attention Key Compose Sequences
Key Function
[Atn] A
Emulates holding down the left Shift key.*
5-5
[Atn] X
[Atn] Z
[Atn] ‘ (single quote) Emulates holding down the right Shift key.*
[Atn] . (period) Emulates holding down the right Alt key (This key
[Atn] /
[Atn] Backspace
[Atn] Enter
*Other attention key signals can be used simultaneously if the appropriate attention
sequence(s) are entered before terminating the sequence.
Emulates holding down the left Alt key.*
Emulates holding down the left Ctrl key.*
corresponds to the AltGr key on the International
keyboards).*
Emulates holding down the right Ctrl key.*
Sequence Clear - Clears all Shift, Alt, and Ctrl flags
without entering any key sequence into the server console.
It provides a means of canceling the composition of any
special-key sequence.
Sequence End – Signals the end of the special-key
composition sequence, instructing Remote Console to
generate a key sequence based upon the Shift, Alt, and
Ctrl flags set through other attention sequences. This is
used if the special key sequence does not end with a nonattention key, like Alt-Shift.
Compaq Integrated Remote Console User Guide
Page 80

Using Attention Key Sequences
5-6
Example: Entering Alt + P
For example, if you needed to enter a command such as Alt + P on the
managed server:
1. Enter the attention key. In this example the attention key is set to its
default: Ctrl+A. Press both the Ctrl and the A keys down
simultaneously. Release both keys, making sure to release the Ctrl key
last.
2. Enter the command to press and hold the Alt key on the managed
server’s keyboard. This command key is X.
3. Press P.
Steps 1 and 2 signal IRC that you wish to compose a key sequence on the
managed server’s keyboard with the Alt key pressed down. Pressing the P key
in step 3 completes your key sequence. IRC generates an Alt+P on the
managed server keyboard.
If you performed steps 1 and 2 above but then decided that you did not want to
continue with the intended command, you could abort the key sequence and
release the Alt key by entering the sequence clear command:
1. Enter the attention key. In this example the attention key is set to its
default: Ctrl+A. Press both the Ctrl and the A keys down
simultaneously. Release both keys, making sure to release the Ctrl key
last.
2. Press Backspace.
The [Atn] Backspace sequence cancels the Alt key flag that was set by
pressing [Atn] X.
Page 81

Example: Entering Ctrl + Alt + Del
The attention key compose sequences can be combined together and with other
attention key support sequences to compose virtually any key combination. For
example, if you needed to perform a Ctrl + Alt + Del key sequence on the
managed server:
1. Enter the attention key. In this example the attention key is set to its
default: Ctrl+A. Press both the Ctrl and the A keys down
simultaneously. Release both keys, making sure to release the Ctrl key
last.
2. Enter the command to press and hold the Ctrl key on the managed
server’s keyboard. This command key is Z.
3. Enter another attention key to begin the sequence to add the Alt key to
list of keys that should be pressed down on the managed server’s
keyboard. Press Ctrl + A as above in step 1.
4. Enter the command to add the Alt key to the list of keys pressed down
on the managed server’s keyboard. This command key is X.
5. Enter another attention key to begin the Del key support sequence. Press
Ctrl + A as above in step 1.
5-7
6. Enter the command to press the Del key on the managed server’s
keyboard. This command key is B.
Steps 1 and 2 signal IRC that you wish to compose a key sequence on the
managed server keyboard with the Ctrl key pressed down. Steps 3 and 4 signal
IRC that you additionally want to hold down the Alt key on the managed server
keyboard. Steps 5 and 6 generate a Del key on the managed server keyboard.
Since the Del key was preceded by the Ctrl and Alt compose sequences, all
three are pressed simultaneously on the server’s keyboard. The Del support
sequence, since it is not an attention compose sequence, automatically ends the
compose sequence, releasing both the Ctrl and Alt keys following the Ctrl +
Alt + Del sequence.
Compaq Integrated Remote Console User Guide
Page 82

Using Attention Key Sequences
5-8
More Attention Key Examples
Table 5-4 summarizes how to compose some common key sequences within
the Remote Console mode from any ANSI terminal program. The abbreviations
L-Shift, L-Ctrl, and L-Alt are used to represent Left-Shift, Left-Ctrl, and
Left-Alt respectively. Similarly, R-Shift, R-Ctrl, and R-Alt represent RightShift, Right-Ctrl, and Right-Alt, respectively.
Attention Key Composition Examples
Desired Key sequence Attention Key sequence
F10
Alt + F [Atn] X F (emulates pressing both L-Alt, and F
Ctrl + Alt + Del [Atn] Z [Atn] X [Atn] B (emulates pressing L-Ctrl, L-
Alt + L-Shift [Atn] X [Atn] A [Atn] Enter (emulates pressing L-Alt
Table 5-4
[Atn] 0 (emulates pressing the F10 key)
simultaneously)
Alt, and Delete simultaneously)
and L-Shift simultaneously.)
Page 83

Attention Key Template
Figure 5-1 illustrates the layout of the attention key sequences. Essentially the
attention key places the keyboard in an alternate mode, much like the “altfunction” keys on a laptop keyboard. Note the geographic placement of these
sequences as seen on an U.S. domestic keyboard layout.
Esc
Menu
5-9
Backspace
Seq Clear
Tab
Shift
Shift
Ctrl
Ctrl
Alt
EndDel
Refresh Screen
Figure 5-1. Example: United States Keyboard with Attention Keys indicated
Changing the Attention Key
See Chapter 4 for instructions on how to change the attention key. The attention
key may be changed to any ASCII key, preferably a key that is infrequently
used.
PgUpHomeIns
PgDn
Shift
AltAlt
Ctrl
Enter
Sequen End
Compaq Integrated Remote Console User Guide
Page 84

Chapter 6
Additional Modem Information
Integrated Remote Console (IRC) has been tested and is compatible with a wide
variety of internal and external modems. IRC requires a high-speed (14400
baud or greater) Hayes-compatible serial modem. Virtually all external RS-232
serial modems meet this requirement.
Modem Types
Internal modems must be ISA and must be controller-based. The following
sections describe many of the commercially available types of modems and
their compatibility with IRC.
Table 6-1
Modem Requirements
Internal Modem External Modem
■ High-Speed with error negotiation
protocol (V.FC, V.42, V.34, LAPM,
V.90)
■ Controller-based (16550 or
equivalent)
■ ISA adapter card
■ Jumper-able resource settings
(COM & IRQ)
6-1
■ High-Speed with error
negotiation protocol (V.FC, V.42,
V.34, LAPM, V.90)
■ Serial (RS-232) Interface
Compaq Integrated Remote Console User Guide
Page 85

Additional Modem Information
6-2
External Serial Modems
IRC supports most external high-speed serial modems. Some modems, like the
Compaq Microcom 510, offer both a serial and parallel (APT) interface. Such
modems must be connected through the serial interface to operate correctly
with IRC.
External modems are cabled to the managed server using a standard straightthrough DTE to DCE style cable. A standard DB-9F to DB-25M cable can be
used and there are no specific requirements specific to IRC.
Important Tip
Most external modems offer modem state indicator lights, which can be useful
troubleshooting tools, particularly if you are configuring IRC for the first time.
If IRC is configured for the proper COM port, the TR or DTR indicator should
be illuminated shortly after the Compaq ProLiant splash screen is displayed
during power-on-self-test (POST). The AA indicator indicates that the modem
has been placed in auto-answer mode. If the modem has not been preconfigured (through switches on the modem) for auto-answer mode, this signal
should also be illuminated shortly after the TR indicator. This indicates that
IRC can communicate with the modem and the modem has correctly received
the auto-answer string configured through the Compaq System Configuration
Utility. If the managed server is running Windows NT as its primary operating
system, this indicator can also reflect the ownership of the modem in the shared
configuration. Windows NT 4.0 generally does not program the modem for
auto-answer mode. As a result, if the AA indicator is illuminated after
Windows NT has booted, IRC currently owns the modem. Similarly, if the AA
indicator is not illuminated, the modem is currently in use by the operating
system.
Page 86

Internal ISA Plug-n-Play Modems
Internal ISA Plug-n-Play modems, designed for the PC consumer industry, are
designed to be easy to install and configure. Such modems rely on the operating
system for resource configuration, eliminating the need for the user to set predetermined jumpers. The modem’s COM port and interrupt settings are
automatically configured by the operating system and can be adjusted at runtime to resolve resource conflicts when new hardware is installed. Although
these modems greatly simplify the hardware configuration process, they require
the operating system for proper operation.
IRC must be able to access the communications device, regardless of the state
or health of the server operating system. If the managed server is unable to load
the operating system, IRC is unable to access the communications device. In
addition, the operating system may readjust the modem resources at run-time.
For IRC to function correctly the modem configuration must be fixed and it
must be available regardless of the state of the managed server.
Fortunately, however, most ISA internal Plug-n-Play modems contain jumpers
that allow the modem to be configured in “legacy” mode. These jumpers ensure
that the modem can be used whether or not the operating system loads. For
proper operating with Integrated Remote Console, internal plug-n-play modems
must be jumpered for “legacy” mode, with the resources manually configured
using methods described in Chapter 2.
6-3
“Windows” Modems
Since these modems require the operating system and a proprietary driver to
function correctly, they cannot be used with IRC. “Windows” modems, offered
by some modem manufacturers, attempt to reduce the hardware complexity and
cost of internal modems by replacing the industry standard controller interface
with a proprietary one. Functions that would normally be performed on the
modem in hardware are shifted to the main CPU. These modems require a
specific driver and considerable CPU resources to function correctly. These
modems are usually a poor choice in a server environment.
“Windows” modems were not designed to be accessible from anywhere except
through the operating system. As mentioned above, IRC must be able to access
the communications device regardless of the state or health of the server
operating system.
Compaq Integrated Remote Console User Guide
Page 87

Additional Modem Information
6-4
PCI-based Modems
PCI-based modems have recently been introduced to the industry to replace the
need for internal modems in computers without ISA slots. Most PCI-based
modems are based on proprietary “windows” modem interfaces and are not
supported by IRC (see above on “windows” modems). If an internal modem is
desired, use a controller-based ISA modem. If an ISA modem is unable to be
accommodated, use an external serial modem.
Page 88

Modem Configuration Strings
For IRC to function correctly, the modem must be configured correctly. The
modem is configured using the primary and secondary initialization strings,
which are specified during the configuration process. For many modems, the
proper initialization strings can be found in Appendix A. This section provides
the information necessary to determine the proper initialization strings for
modems not listed in this chapter.
To function in a wide array of computing environments, modems have many
configuration options. Table 6-2 provides a summary of those settings which
are important for compatibility with IRC.
Modem Configuration Setting Summary
6-5
Table 6-2
Parameter
Computer to Modem serial port speed
Data Carrier Detect Operation
Data Terminal Ready Interpretation
Flow Control
Error Control
Response Codes Only important if using modem sharing –
Configuration Value
(varies)
Fixed
(&C1)
Normal
(&D2)
Normal
Hardware
Enabled
Configure identically to operating system
(varies)
(varies)
(varies)
(AT Command)
Compaq Integrated Remote Console User Guide
Page 89

Additional Modem Information
6-6
Computer to Modem Serial Port Speed
Some modems have a configuration option that controls whether the DTE serial
port interface is fixed at a predetermined baud rate or changed dynamically
based upon the modem to modem connect rate. In “floating DTE” mode, the
Computer to Modem speed is automatically adjusted based upon the Modem to
Modem negotiated baud rate. For IRC to operate properly, the DTE (server to
modem) baud rate must be set to fixed. For many enhanced high-speed
modems, this is the default setting following a modem reset. This configuration
command must be appended to the IRC initialization string if your modem does
not default to the fixed setting (particularly a problem with U.S. Robotics
modems). Improper setting of the DTE speed configuration results in the
inability to obtain a login prompt from IRC after establishing a connection.
(See Appendix C, “Troubleshooting”). Refer to your modem documentation for
more details. Modem vendors differ on the specific nomenclature used to refer
to this setting. Look for terms such as “Fixed/Floating DTE,” port-rate adjust,
speed conversion, or buffered mode. Look for the &B or \J setting in your
modem’s AT command reference.
Data Carrier Detect (DCD) Operation
Most modems have a configuration option that controls the assertion of the
DCD serial port interface signal. Typically DCD can be configured so that it is
either always asserted (DCD Override) or only asserted when connected to
another modem (DCD Normal). For Integrated Remote Console to function
properly, the modem must be configured to assert DCD only when a carrier is
established with another modem. Improper setting of this configuration option
results in the inability to obtain a login prompt from Integrated Remote Console
after establishing a connection. The &C AT command controls this setting in
most modems. Since modem vendors differ with respect to the default setting
of this configuration option, appending an &C1 to the Integrated Remote
Console initialization string ensures proper DCD operation.
Page 90

Data Terminal Ready (DTR) Interpretation
Most modems have a configuration option that controls the interpretation of the
DTR serial port interface signal. For IRC to function properly, the modem must
be configured to terminate a connection whenever DTR is dropped. Improper
setting of this configuration option results in the improper termination of an
existing IRC session and may result in the inability to establish a future IRC
connection. The &D AT command controls this setting in most modems. Since
modem vendors differ with respect to the default setting of this configuration
option, appending an &D2 to Integrated Remote Console’s initialization string
insures proper DTR interpretation.
Flow Control
IRC is designed to use hardware flow control on the serial port interface. For
IRC to function properly, the modem must be set to hardware flow control for
both receive and transmit operations. Improper setting of this configuration
option could result in the loss of characters, causing the remote terminal to
display incomplete or garbled information. Modem manufacturers differ with
respect to how this configuration option is implemented and controlled. Typical
AT commands to configure flow control include &K, &H, &R, &J, &E, \G or
\Q. Refer to your modem’s AT command reference for more details.
6-7
Error Correction
Most high-speed modems, by default, automatically negotiate an error control
protocol such as v.42 (LAPM) or MNP upon establishing a connection to
another modem. For connection speeds in excess of 1200 baud, error control is
essential to insure proper communication between IRC and the management
console. If error control is not negotiated between modems, erroneous data may
result in either the inability to obtain a login prompt, garbled characters on the
terminal display, or incorrect or extra keystrokes being sent to the server. Error
control is normally negotiated, unless it is explicitly turned off on either modem
or the modems are incompatible. If you encounter any of the problems
mentioned above, try using identical modems for both the server and the
management console. Typical AT commands to configure error control include
\N, &Q, &M, &E, and S-Register settings. Refer to your modem’s AT
command reference for more details.
Compaq Integrated Remote Console User Guide
Page 91

Additional Modem Information
6-8
Data Compression
Most high-speed modems also try to negotiate a compression protocol such as
v.42 bis or MNP5 upon establishing a connection to another modem.
Compression settings do not effect the ability to connect to IRC. However,
negotiating such a protocol is advantageous, since it greatly accelerates
responses from the server, particularly in remote console mode. Typically,
compression is normally negotiated, unless it is explicitly turned off on either
modem or the modems are incompatible. Typical AT commands to configure
compression include &K, %C, &E, and S-Register settings. Refer to your
modem’s AT command reference for more details.
Response Codes
The way a modem responds to commands and events is also highly
configurable. Through AT command strings, the modem can be instructed to
communicate this information numerically or through verbal descriptions. For
instance, based on its configuration, the modem may return “RING” in
response to an incoming call, or the number 2. In addition, the modem can be
configured return varying levels of information in several different formats.
Since modems vary greatly in how and what they send in response to event,
IRC does not use modem response codes when communicating with the
modem. Consequently, it does not matter what response code format it chosen
or what is communicated in the response codes. IRC uses the modem control
signals to determine events such as connect and ring.
Response code format commands are important, however, if you are sharing the
modem with the operating system. In this case, IRC must have the modem
configured to respond in a way that the operating system will expect and
understand. See Appendix A for instructions in how to determine how the
operating system has configured the modem under Windows NT 4.0.
There are several different AT commands on each modem to configure
different attributes of the response codes. Typical AT commands used to
configure the response codes include, V, \V, W, X, Q, &A, and S-register
settings (particularly S95). Refer to your modem’s AT command reference for
more details.
Page 92

Chapter 7
Direct Connections
In a data-center environment, connecting a modem to each server may be
undesirable. For this reason, Integrated Remote Console (IRC) supports
configurations whereby access can be obtained through companion hardware,
such as a “buddy server” or terminal server. In a “buddy server” configuration,
two servers are directly connected to each other’s serial ports. If either server
fails, the other server can be used to gain out-of-band access to the failing one.
In a terminal server configuration, a cluster of servers can be connected to a
terminal server or terminal concentrator, allowing out-of-band access to any of
the servers through either a LAN (telnet) connection, or through a shared
modem or bank of modems.
For both configurations, identical concepts apply. The following section
entitled “Connecting Using a Terminal or Terminal Emulator” describes the
elements necessary to setup a direct-connection to IRC from a generic terminal
device. Additional information necessary for terminal server configurations is
found later in this chapter in the section entitled “Connecting to a Terminal
Server.”
7-1
Connecting Using a Terminal or Terminal Emulator
The following section contains information necessary to connect IRC directly
to a terminal or terminal emulator. For simplicity, the terminal or terminal
emulator is referred to as the “terminal.”
For proper operation in direct connect mode mode, IRC requires the following:
1. A null-modem cable, with the complete set of modem control signals.
2. A terminal or terminal emulator that supports the complete set of
modem control signals, including hardware flow control, proper DTR
assertion, and DCD interpretation.
Compaq Integrated Remote Console User Guide
Page 93

Direct Connections
7-2
Cable Requirement
For proper communication, IRC requires a null-modem cable with a complete
set of modem control signals. The exact wiring diagram for this cable is shown
in Appendix B. Cables are occasionally labeled as “null-modem” which do not
conform to this diagram. Check with your cable vendor to ensure that the cable
meets the requirements shown in Appendix B. Cables that differ from this
specification may not function correctly.
Communication Requirements
For proper operation, both IRC and the terminal must be configured and
operate compatibly. The following communication attributes are important for
proper out-of-band access:
■ Managed Server Serial Port Configuration — For a direct-connect
configuration, one of the server’s integrated serial ports is used as the
communication device. Verify that the desired port is enabled and
configured correctly. See “Configuring an external modem or direct
connection” in Chapter 2 for more details. One suggested configuration
is using integrated serial port B configured as COM2, IRQ3.
■ IRC Configuration — Make sure you have configured IRC’s
communication device as direct connect. Also ensure that the COM port
and interrupt settings match the serial port selected above. In directconnect configurations, it is recommended that the serial port sharing
options be set to dedicated, making the selected serial port into a
dedicated out-of-band management port. Configure and note the baud
rate and communication settings, as the terminal needs to mirror these
settings to gain access.
■ Terminal Communication Settings — Configure the terminal to match
to communication settings specified for IRC. This includes the
communication baud rate, number of data bits, whether a 7-bit parity
mode is selected, and the number of stop bits. If the terminal is not
configured correctly, you can not obtain a login prompt from IRC.
■ Flow Control — Configure the terminal for hardware flow control. An
improper flow control setting could result in the loss of characters,
causing the terminal to display incomplete or garbled information,
especially during peak video activity.
Page 94

■ DTR Control — For compatibility with IRC, the terminal must assert
DTR whenever a communication session is open. IRC uses the DCD
control signal (which is driven by the terminal’s DTR output) to
determine whether a remote session is open. IRC ignores any serial port
activity whenever DCD is inactive. Consequently, if the terminal does
not assert it’s DTR output, it is impossible to establish a connection with
IRC. Conversely, the terminal must lower DTR whenever a
communication is closed. This ensures that the current user is properly
logged out and IRC will return to a passive state.
■ DCD Interpretation — IRC asserts it’s DTR serial port control signal
whenever it is prepared to accept an incoming login request. Through
the null-modem cable, this signal is wired to the terminal’s DCD input,
which is usually reflected by the terminal’s status bar as “CARRIER” or
“ONLINE.” IRC drops DTR in response to a logout or close session
request.
7-3
Compaq Integrated Remote Console User Guide
Page 95

Direct Connections
7-4
Connecting Using a Terminal Server or Concentrator
A terminal server can be a perfect compliment to IRC, particularly in a datacenter environment where servers are grouped in clusters. Through one terminal
server, a remote administrator can gain access to a number of different servers
either through a shared modem or through a local area network connection.
This topology greatly decreases or eliminates the need for multiple modems
and phone lines. This topology also provides another level of security since
access can be restricted to a trusted private network or a centralized remote
access server.
Terminal
Server
LAN
Management
Console
Modem
Modem
Server 1 Server 2 Server 3 Server 4
Figure 7-1. Typical terminal server topology
Figure 7-1 shows a typical terminal server topology. In such a configuration,
the terminal server is directly connected to the integrated serial ports on a
cluster of servers. The Integrated Remote Console feature of each server is
configured for direct-connect access through the selected integrated serial port.
Out-of-band access to any connected server can be obtained by establishing a
TELNET connection through the terminal server to the appropriate port.
Page 96

Such an implementation has three requirements:
1. You must select or obtain an appropriate cable or adapter to connect the
terminal server asynchronous serial port to the managed server DB-9F
serial port.
2. You must properly configure the IRC feature of each server for this
environment.
3. You must configure each port of the terminal server with the necessary
serial port settings.
Each of these requirements is described in detail in the following sections.
Obtaining the Appropriate Cable
Unfortunately, this is usually the biggest obstacle preventing proper operation
of Integrated Remote Console in this environment. To obtain the necessary
connector density, terminal servers typically route the serial ports to nonstandard connectors. Typically, the serial port connections are provided in an
RJ-45 style connector located either on the terminal server or available through
a special high-density “break-out” cable. Although the use of the RJ-45
connector is somewhat standard, the way the signals are routed to this
connector differ from manufacturer to manufacturer. Consequently, the adapter
required to connect to the DB-9F connector on the managed server differs with
each brand of terminal server. Adapters offered by the terminal server vendors
are typically constructed to connect to simple RS-232 devices and may not
contain the complete set of serial port control signals which Integrated Remote
Console requires to operate correctly. The requirements of the necessary
adapter are listed in Table 7-1. Check with your terminal server vendor to make
sure all these conditions are satisfied.
7-5
Compaq Integrated Remote Console User Guide
Page 97

Direct Connections
7-6
IRC requires a complete null-modem cable connection to operate correctly. For
proper connectivity, the serial port signals must be wired in a fashion identical
to the diagram shown in Appendix B. As shown in the diagram, the managed
server serial port transmit (TX or TxD) must be wired to the serial port receive
(RX or RxD) of the terminal server. Similarly, the managed server serial port
receive (RX or RxD) must be wired to the serial port transmit (TX or TxD) of
the terminal server. For proper flow-control, the request-to-send (RTS) and
clear-to-send (CTS) signals must be similarly cross-wired. The data-terminalready (DTR) of the managed server must be connected to both the data-carrierdetect (DCD) and the data-set-ready (DSR) of the terminal server. Similarly,
DTR signal of the terminal server must be connected to both DCD and DSR of
the managed server. The DTR and DCD cross-connections are extremely
important. Improper connection of these signals inhibits the ability to open a
connection to IRC. Lastly, the ground (GND) connection of both devices must
be connected together.
Page 98

Connector Example
To demonstrate the proper adapter, a serial port found on the Cisco 2509/2511
terminal server is used as an example. On this terminal server, a breakout cable
provides the serial port connectivity through individual RJ-45 style connectors.
The RJ-45 connector is defined with the following pinouts:
Table 7-1
Example: Cisco 2509/2511 RJ-45 Connector Pinout
8-Pin RJ-45 Signal Direction with respect to
terminal server
1 CTS Input
2 DSR/DCD Input
3 RXD Input
4 RXD/GND -5 TXD/GND -6 TXD Output
7-7
7 DTR Output
8 RTS Output
Compaq Integrated Remote Console User Guide
Page 99

Direct Connections
7-8
Using the information provided above from the terminal server manufacturer
and the cable specified in Appendix B, the following adapter can be obtained.
Table 7-2
Example: Cisco 2509/2511 RJ-45 to DB-9F Adapter
Terminal Server Managed Server
8-Pin RJ-45 Signal 9-Pin DB-9F Signal
1 CTS 7 RTS
2 DSR/DCD 4 DTR
3 RXD 3 TXD
4 RXD/GND 5 GND
5 TXD/GND 5 GND
6 TXD 2 RXD
7 DTR 1 & 6 DCD & DTR
8 RTS 8 CTS
NOTE: The above table is only applicable to the Cisco 2509/2511 terminal server and is
only provided as an example of how such an adapter is to be constructed.
Configuring Integrated Remote Console
See “Configuring Integrated Remote Console” in Chapter 2 for details on how
to make the appropriate configuration settings to the managed server using the
Compaq System Configuration Utility. Ensure the following settings are
correct.
■ Configure the Managed Server Serial Port — Since the terminal
server is typically directly connected to one of the managed server’s
integrated serial ports, you must verify that the desired port is enabled
and configured correctly. See “Configuring an external modem or direct
connection” in Chapter 2 for more details. One suggested configuration
is using integrated serial port B configured as COM2, IRQ3.
Page 100

■ Integrated Remote Console Communication Device Settings — Set
the communication device to direct connect and ensure that the
communication device COM port and interrupt settings match the serial
port selected above.
■ Integrated Remote Console Sharing Options — In instances where a
terminal server is used, in-band management information is typically
available directly through a LAN connection. Consequently, the serial
port sharing option should be set to dedicated, making the selected serial
port a dedicated out-of-band management port.
■ Integrated Remote Console Communication Settings — Set the baud
rate and communication settings to match those configured on the
terminal server. A baud rate of 19200 is sufficient for most applications,
although a higher rate can be selected provided the cable and terminal
server can accommodate it. The recommended setting of data, parity,
and stop bits are 8, none, and 1 respectively. Keep in mind that these
settings must match the settings configured for the corresponding port
on the terminal server.
Configuring the Terminal Server
7-9
Typically, terminal servers are extremely adaptable and configurable. The exact
configuration mechanisms and commands differ between manufacturers. Use
the following guidelines along with your terminal server documentation to
correctly configure the terminal server to communicate with Integrated Remote
Console.
■ Communication Settings Settings — Configure each port on the
terminal server to match to communication settings specified for
Integrated Remote Console. This includes the communication baud rate,
number of data bits, whether a 7-bit parity mode is selected, and the
number of stop bits. If the receive and transmit baud rates are each
configurable, make sure they are both set to match maximum baud rate
settings specified in IRC. Note that the terminal server’s default
configuration almost always needs to be modified. If the communication
settings are not configured correctly, you will not be able to obtain a
login prompt from Integrated Remote Console.
Compaq Integrated Remote Console User Guide
 Loading...