

Page 1

b
Learning More About Your
Computer
Compaq Presario Computers
Document Part Number: 277958-001
March 2002
The guide provides basic information to assist you in using the
hardware and software features of your computer.
Page 2

© 2002 Compaq Information Technologies Group, L.P.
Compaq, the Compaq logo and Presario are trademarks of Compaq Information
Technologies Group, L.P. in the U.S. and other countries.
Microsoft, MS-DOS, Windows, Windows NT are trademarks of Microsoft
Corporation in the U.S. and other countries.
Intel, Pentium, Intel Inside, and Celeron are trademarks of Intel Corporation in
the U.S. and other countries.
All other product names mentioned herein may be trademarks of their respective
companies.
Compaq shall not be liable for technical or editorial errors or omissions
contained herein. The information in this document is provided “as is” without
warranty of any kind and is subject to change without notice. The warranties for
Compaq products are set forth in the express limited warranty statements
accompanying such products. Nothing herein should be construed as
constituting an additional warranty.
WARNING: Text set off in this manner indicates that failure to follow
Å
directions could result in bodily harm or loss of life.
CAUTION: Text set off in this manner indicates that failure to follow
Ä
directions could result in damage to equipment or loss of information.
Learning More About Your Computer
First Edition (March 2002)
Document Part Number: 277958-001
Page 3

Contents
1 Performing Common Tasks
Modifying the Display. . . . . . . . . . . . . . . . . . . . . . . . . . . . . . . . . . . . . . . . . . . . . . . . . . 1–1
Modifying the Keyboard Language Setting . . . . . . . . . . . . . . . . . . . . . . . . . . . . . . . . . 1–2
Modifying the Mouse Properties. . . . . . . . . . . . . . . . . . . . . . . . . . . . . . . . . . . . . . . . . . 1–3
Shutting Down the Computer . . . . . . . . . . . . . . . . . . . . . . . . . . . . . . . . . . . . . . . . . . . . 1–5
Printing . . . . . . . . . . . . . . . . . . . . . . . . . . . . . . . . . . . . . . . . . . . . . . . . . . . . . . . . . . . . . 1–5
Using the Print Menu . . . . . . . . . . . . . . . . . . . . . . . . . . . . . . . . . . . . . . . . . . . . . . . 1–5
Playing Games . . . . . . . . . . . . . . . . . . . . . . . . . . . . . . . . . . . . . . . . . . . . . . . . . . . . 1–6
Playing Digital Audio. . . . . . . . . . . . . . . . . . . . . . . . . . . . . . . . . . . . . . . . . . . . . . . 1–8
2 Using Your Computer Drives
Using the Diskette (Floppy) Drive . . . . . . . . . . . . . . . . . . . . . . . . . . . . . . . . . . . . . . . . 2–1
Inserting a diskette . . . . . . . . . . . . . . . . . . . . . . . . . . . . . . . . . . . . . . . . . . . . . . . . . 2–1
Removing a diskette . . . . . . . . . . . . . . . . . . . . . . . . . . . . . . . . . . . . . . . . . . . . . . . . 2–2
Using the Hard Drive . . . . . . . . . . . . . . . . . . . . . . . . . . . . . . . . . . . . . . . . . . . . . . . . . . 2–3
Using the CD or DVD Drive. . . . . . . . . . . . . . . . . . . . . . . . . . . . . . . . . . . . . . . . . . . . . 2–4
Multimedia Support . . . . . . . . . . . . . . . . . . . . . . . . . . . . . . . . . . . . . . . . . . . . . . . . 2–5
Inserting a CD or DVD. . . . . . . . . . . . . . . . . . . . . . . . . . . . . . . . . . . . . . . . . . . . . . 2–7
Removing a CD or DVD . . . . . . . . . . . . . . . . . . . . . . . . . . . . . . . . . . . . . . . . . . . . 2–9
Listening to Music . . . . . . . . . . . . . . . . . . . . . . . . . . . . . . . . . . . . . . . . . . . . . . . . . 2–9
Playing a Movie . . . . . . . . . . . . . . . . . . . . . . . . . . . . . . . . . . . . . . . . . . . . . . . . . . 2–11
Creating a CD . . . . . . . . . . . . . . . . . . . . . . . . . . . . . . . . . . . . . . . . . . . . . . . . . . . . 2–12
Maintaining the CD or DVD Drive . . . . . . . . . . . . . . . . . . . . . . . . . . . . . . . . . . . 2–14
3 Maintaining and Shipping
Routine Maintenance Guidelines . . . . . . . . . . . . . . . . . . . . . . . . . . . . . . . . . . . . . . . . . 3–1
Preventive Maintenance . . . . . . . . . . . . . . . . . . . . . . . . . . . . . . . . . . . . . . . . . . . . . . . . 3–2
Cleaning Up the Hard Drive. . . . . . . . . . . . . . . . . . . . . . . . . . . . . . . . . . . . . . . . . . 3–2
Emptying the Recycle Bin . . . . . . . . . . . . . . . . . . . . . . . . . . . . . . . . . . . . . . . . . . . 3–4
Scanning the Hard Drive. . . . . . . . . . . . . . . . . . . . . . . . . . . . . . . . . . . . . . . . . . . . . 3–4
Learning More About Your Computer iii
Page 4

Contents
Defragmenting the Drive . . . . . . . . . . . . . . . . . . . . . . . . . . . . . . . . . . . . . . . . . . . . 3–5
Protecting from a Virus. . . . . . . . . . . . . . . . . . . . . . . . . . . . . . . . . . . . . . . . . . . . . . . . . 3–6
Preparing for Shipping or Travel. . . . . . . . . . . . . . . . . . . . . . . . . . . . . . . . . . . . . . . . . . 3–7
4 Saving Energy
Using Power Management . . . . . . . . . . . . . . . . . . . . . . . . . . . . . . . . . . . . . . . . . . . . . . 4–1
Using the Power Options Properties. . . . . . . . . . . . . . . . . . . . . . . . . . . . . . . . . . . . 4–2
Sleep Mode . . . . . . . . . . . . . . . . . . . . . . . . . . . . . . . . . . . . . . . . . . . . . . . . . . . . . . . . . . 4–3
Adjusting the Sleep Mode. . . . . . . . . . . . . . . . . . . . . . . . . . . . . . . . . . . . . . . . . . . . 4–3
Manually Entering the Sleep Mode . . . . . . . . . . . . . . . . . . . . . . . . . . . . . . . . . . . . 4–4
Awaking From Sleep . . . . . . . . . . . . . . . . . . . . . . . . . . . . . . . . . . . . . . . . . . . . . . . 4–4
Hibernate Mode. . . . . . . . . . . . . . . . . . . . . . . . . . . . . . . . . . . . . . . . . . . . . . . . . . . . . . . 4–5
Adjusting the Hibernate Mode . . . . . . . . . . . . . . . . . . . . . . . . . . . . . . . . . . . . . . . . 4–5
Awaking from Hibernation. . . . . . . . . . . . . . . . . . . . . . . . . . . . . . . . . . . . . . . . . . . 4–5
5 Understanding Computer Terms
iv Learning More About Your Computer
Page 5

Performing Common Tasks
You may find yourself wanting to perform tasks such as:
■ Modifying your display
■ Modifying your keyboard language setting
■ Modifying your mouse settings
■ Shutting down your system
■ Printing
■ Playing games
■ Listening to digital audio files
Modifying the Display
You can modify how information displays on the monitor.
1
To Modify the Display
1. Click the Start button from the Windows taskbar.
2. Click Control Panel.
3. Click Appearance and Themes.
4. Click Change the Screen Resolution.
5. Click and drag the Screen Resolution slide control on the
Settings tab to display less or more on your screen.
If you move the slide towards Less, the text on your screen increases
✎
in size. If you move the slide towards More, the text on your screen
decreases in size.
Learning More About Your Computer 1–1
Page 6
Performing Common Tasks
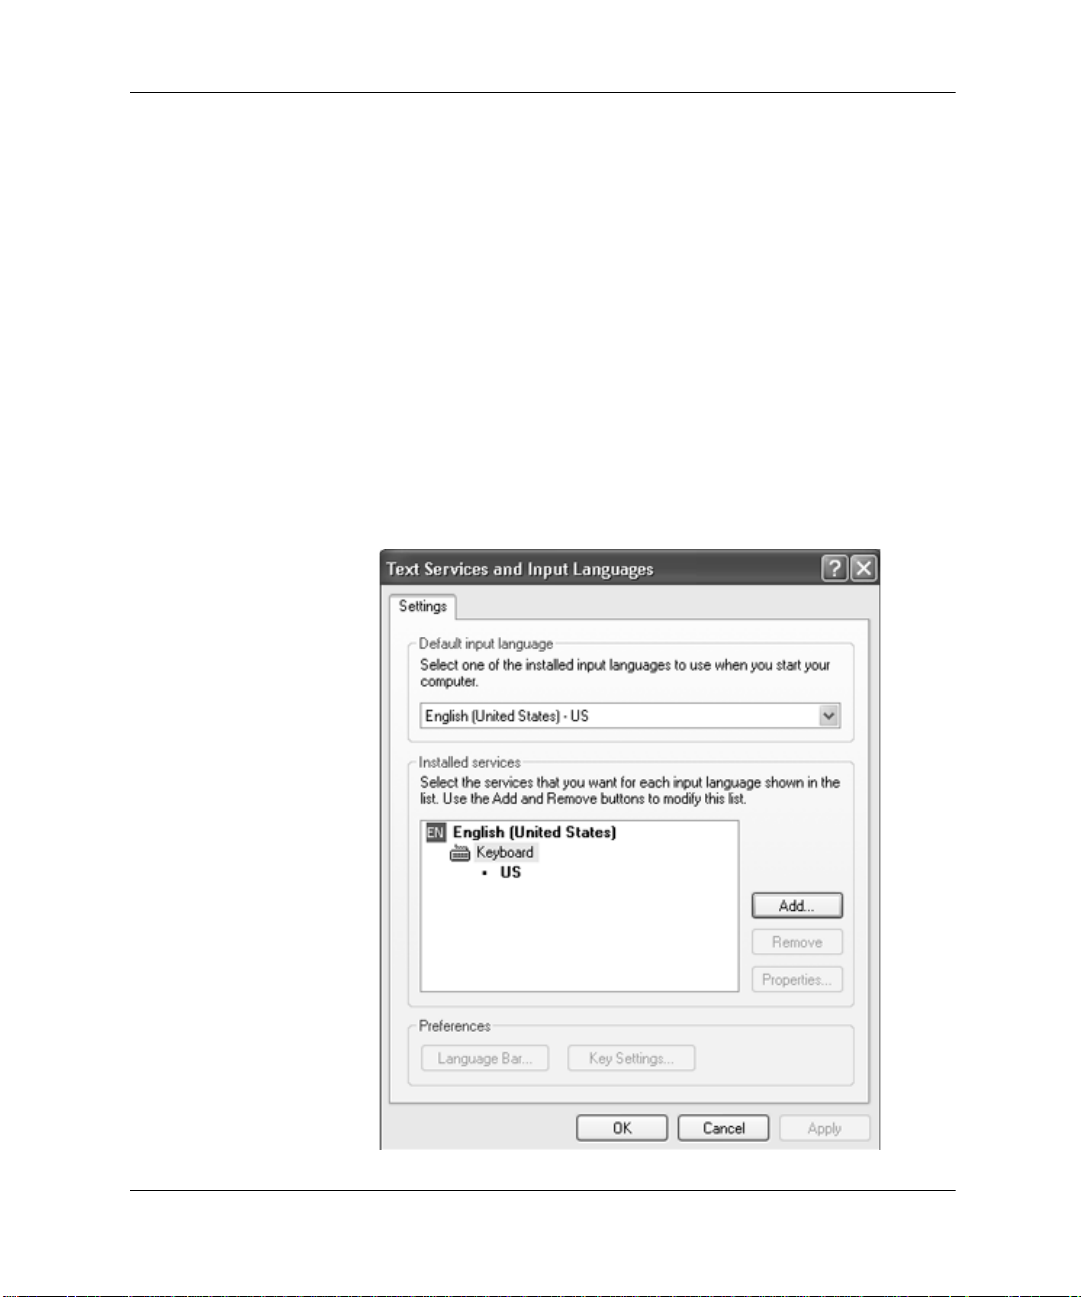
Modifying the Keyboard Language Setting
You can modify the language setting for your keyboard.
To Modify the Keyboard Language Setting
1. Click the Start button from the Windows taskbar.
2. Click Control Panel.
3. Click Date, Time, Language, and Regional Options.
4. Click Regional and Language Options.
5. Click the Language tab.
6. Click the Details button.
7. Click Keyboard, then the Add button.
1–2 Learning More About Your Computer
Page 7

8. Click the Keyboard layout/IME down arrow and select a
language from the list.
9. Click OK.
10. Click OK to apply the changes.
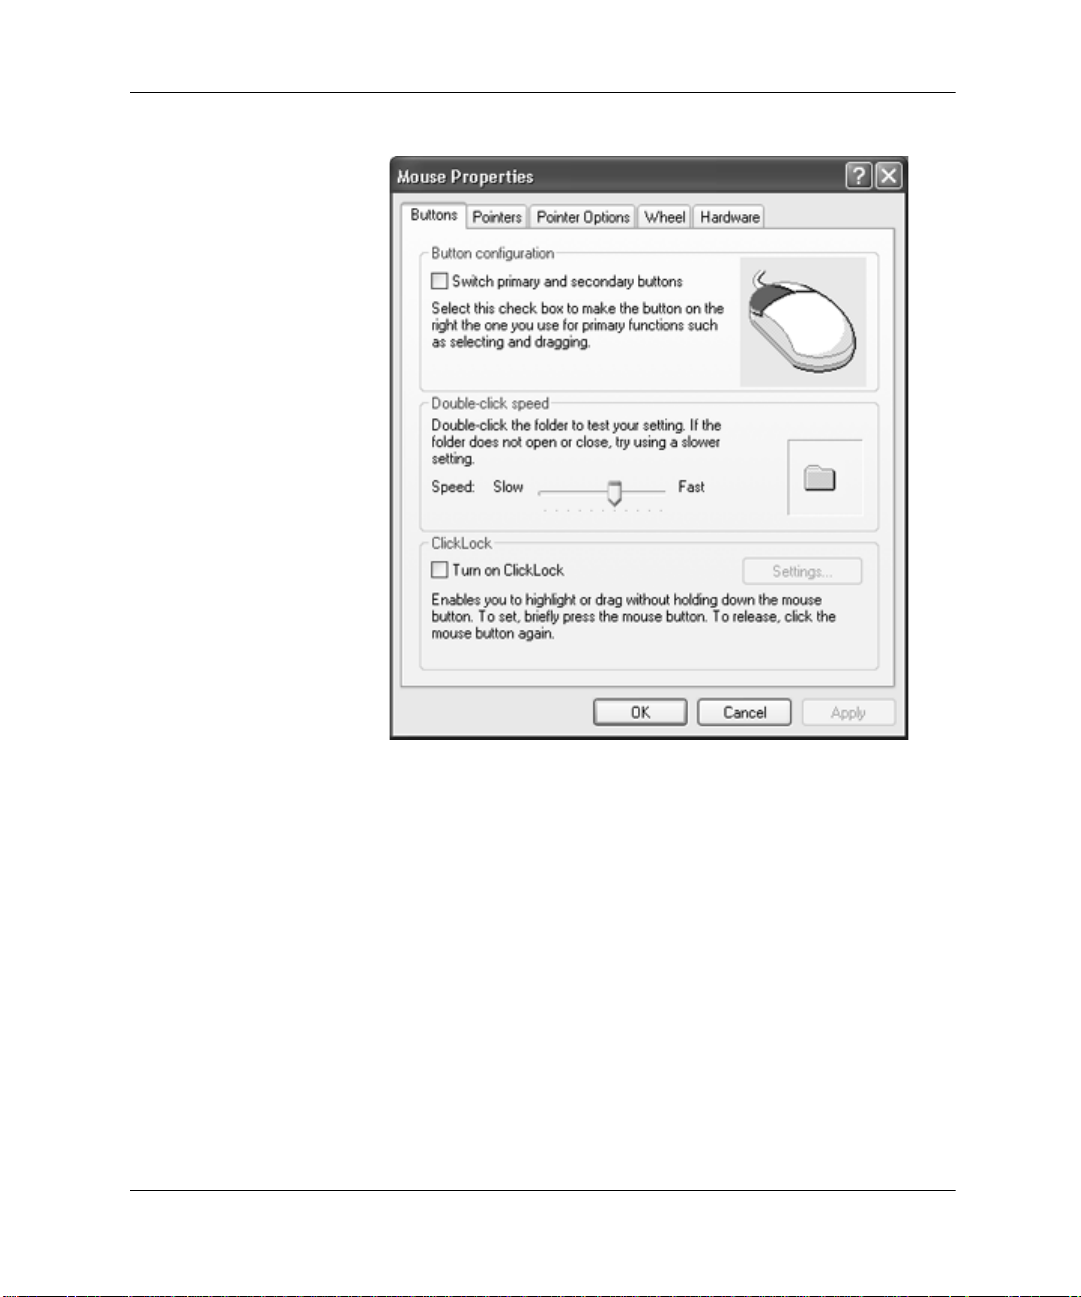
Modifying the Mouse Properties
You can view and modify different properties of the mouse from the
Mouse Properties dialog box. The dialog box may vary depending
on the type of mouse you purchased.
From the Mouse Properties dialog box, you can:
■ Change the type of pointer
■ Modify button assignments
■ Modify the speed of your mouse
■ Check the battery status if you have a cordless mouse
■ Review the manufacturer’s information
Perf orming Common Tasks
To Modify Mouse Properties
1. Click the Start button from the Windows taskbar.
2. Click Control Panel.
3. Click Printers and Other Hardware.
4. Click Mouse.
5. Click the appropriate tab to modify settings.
Learning More About Your Computer 1–3
Page 8
Performing Common Tasks
6. Click OK to apply the changes.
1–4 Learning More About Your Computer
Page 9

Shutting Down the Computer
When you are finished working or playing on the computer, it is a
good idea to shut it down.
To Shut Down the Computer
1. Click the Start button from the Windows taskbar.
2. Click Turn Off Computer.
Printing
You can print text and graphics from most applications and Internet
sites as long as you have your computer connected to a printer and the
necessary software installed for your printer.
For additional information on connecting the printer to the computer,
✎
see the printer’s setup documentation.
If you want to look at the document or graphic before you print it, you
can use the Print Preview option on the File menu. This option is
available in most applications.
Perf orming Common Tasks
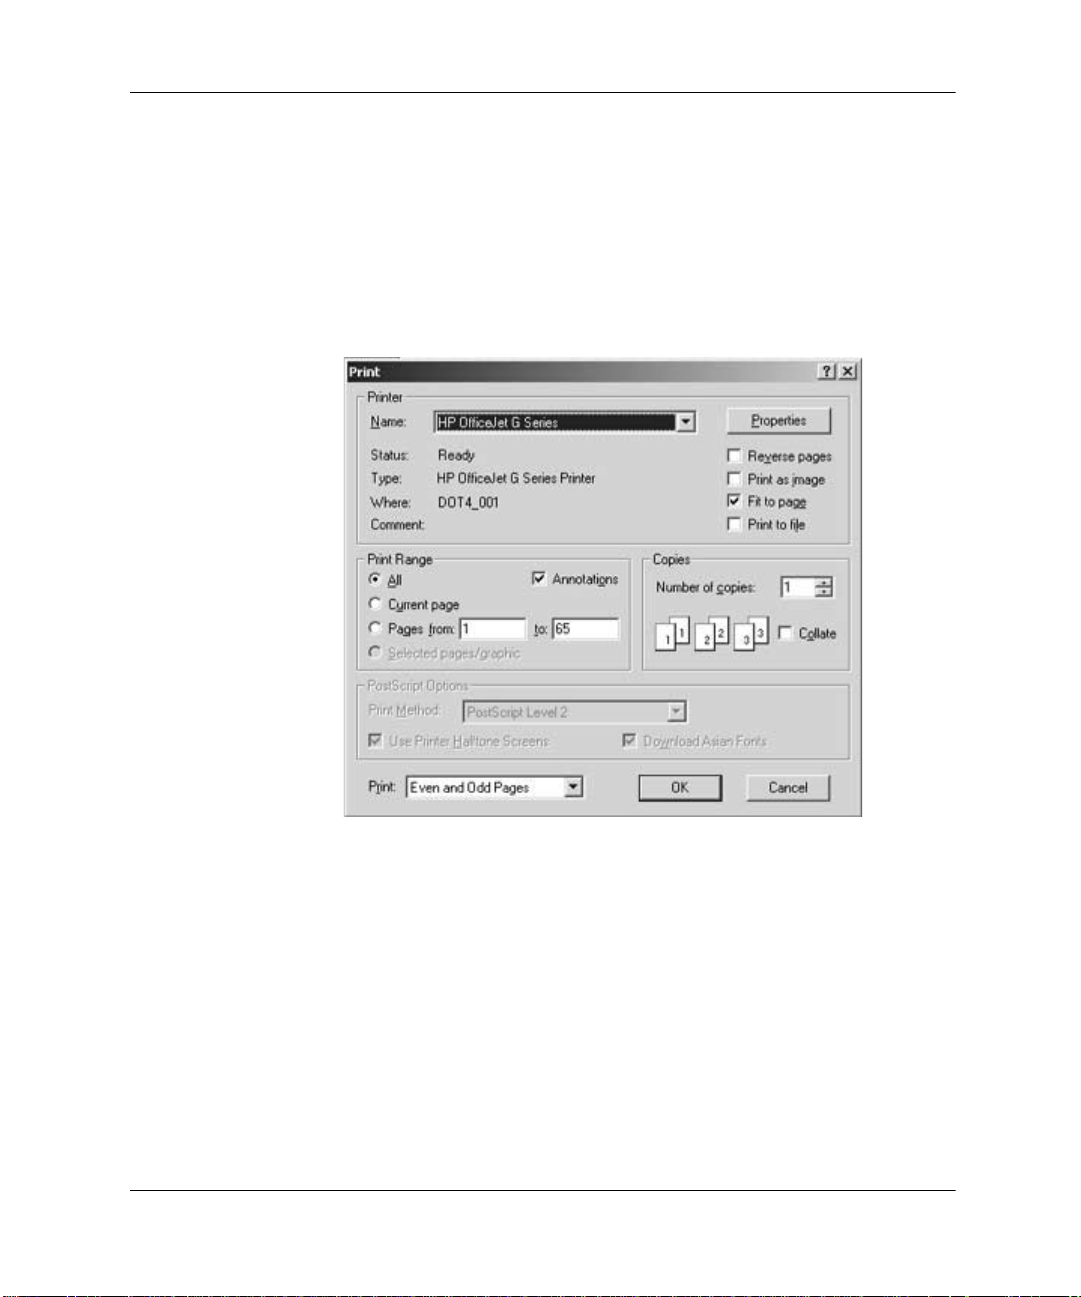
Using the Print Menu
The Print menu is widely used in Windows applications. Although,
each application may modify the Print menu, you can generally:
■ Select the printer
■ Choose the page range (for example, all pages, current page,
range of pages)
■ Determine the number of copies
■ Select all, odd, or even pages in a range
Learning More About Your Computer 1–5
Page 10
Performing Common Tasks
To Use the Print Menu
1. Click File on the menu bar.
2. Click Print...
3. Select your printing options. Remember, the look and feel of the
Print dialog box varies from application to application.
4. Click OK.
Playing Games
You can use the computer to play games that were:
■ Installed when you bought your computer
■ Downloaded from the Internet
■ Purchased
1–6 Learning More About Your Computer
Page 11
Perf orming Common Tasks
Before you download or purchase any games, check the computer
requirements for the game. These are usually listed on the Internet
site or outside of the game box.
You should pay particular attention to the amount of disk space
required for the game and make sure you have at least that amount
available.
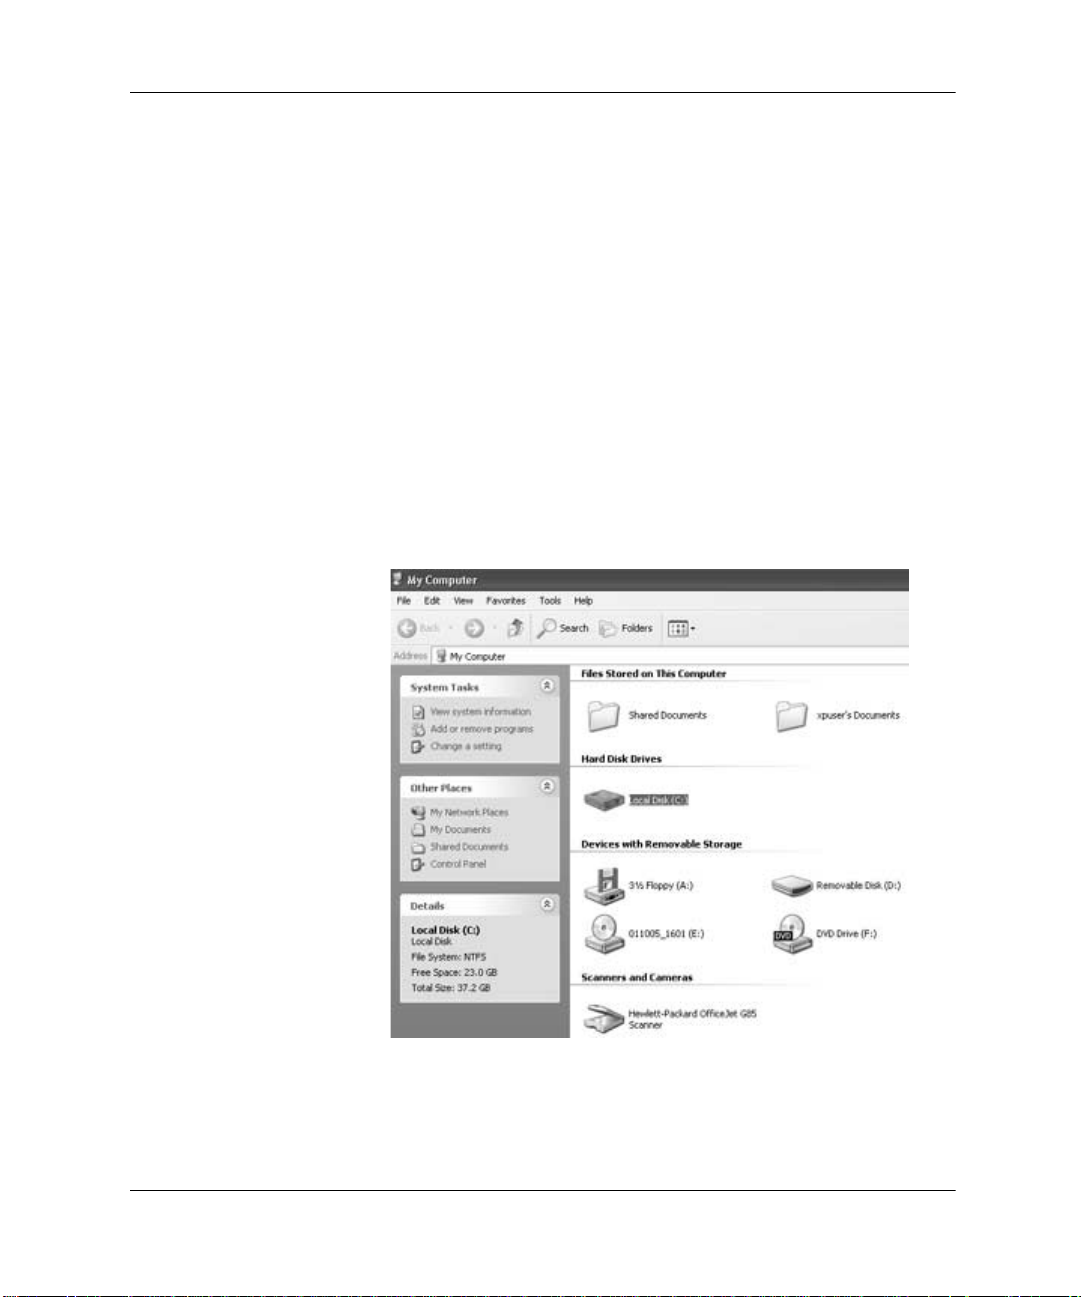
To Check Hard Disk Space
1. Click the Start button on the Windows taskbar.
2. Click My Computer.
3. Click the hard disk drive where you want to store the game files.
4. Notice the amount of free space listed in the Details area and
make sure it is enough for installing game.
Learning More About Your Computer 1–7
Page 12

Performing Common Tasks
It is recommended that you use the same disc drive (CD or DVD) to
✎
play a game that you used to install it. If you have problems installing
or playing a game, contact the game manufacturer.
Playing Digital Audio
You can play digital audio files that you download from the Internet.
To Play Digital Audio
1. Click the Start button from the Windows taskbar.
2. Click All Programs, then your media player application.
3. Follow the on-screen instructions for creating a play list.
Press the F1 key for help with specific functions.
✎
1–8 Learning More About Your Computer
Page 13

Using Your Computer Drives
Computers can have several types of drives that include:
■ Diskette (floppy)
■ Hard
■ CD-ROM (compact disk - read only memory)
■ CD-RW (compact disk - re-writable)
■ DVD-ROM (digital versatile disk- read only memory)
■ DVD-R/RW (digital versatile disk- recordable/re-writable)
The type of drive or drives your computer has depends on the model
you purchased.
Using the Diskette (Floppy) Drive
The diskette drive uses a diskette or flopp y disk to store f iles. You can
copy information to the diskette from places like your hard drive or
Internet. A diskette can only store a limited amount of information, so
if your file is very large it may not fit on the diskette.
2
Remember, once you copy information onto the diskette, it remains
there until you delete or overwrite it.
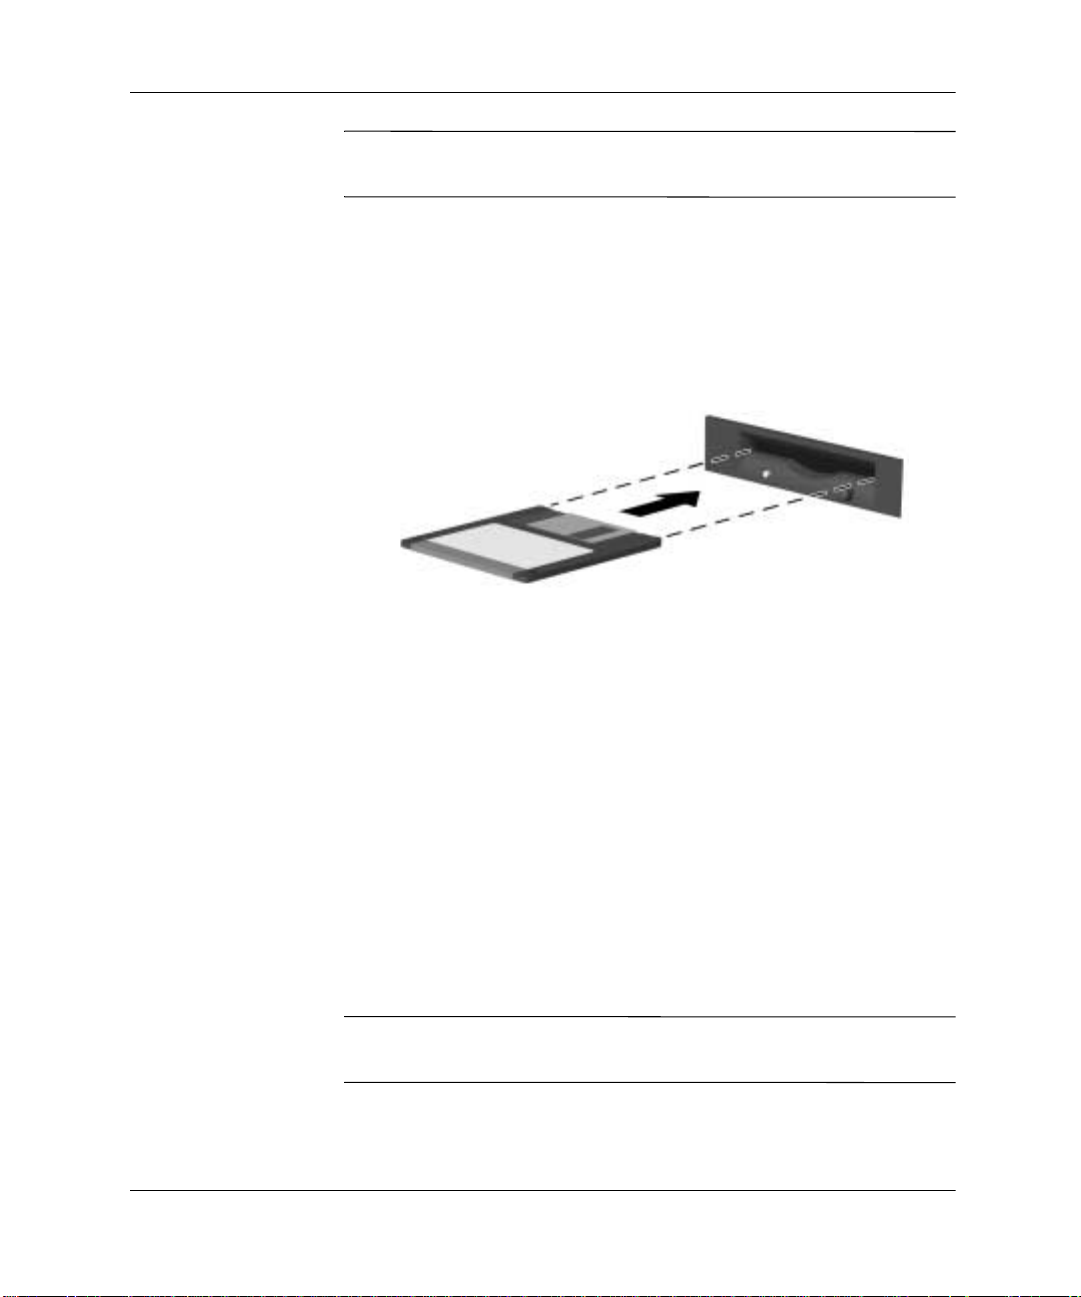
Inserting a diskette
You must insert the diskette into the diskette drive before attempting
to copy information to it.
To insert a diskette
1. Hold the diskette with the label facing up and arrow pointing
toward the drive
Learning More About Your Computer 2–1
Page 14
Using Your Computer Drives
✎
If you have a tower model, hold the diskette with the label facing left
and the arrow pointing toward the drive.
2. Gently push the diskette into the drive.
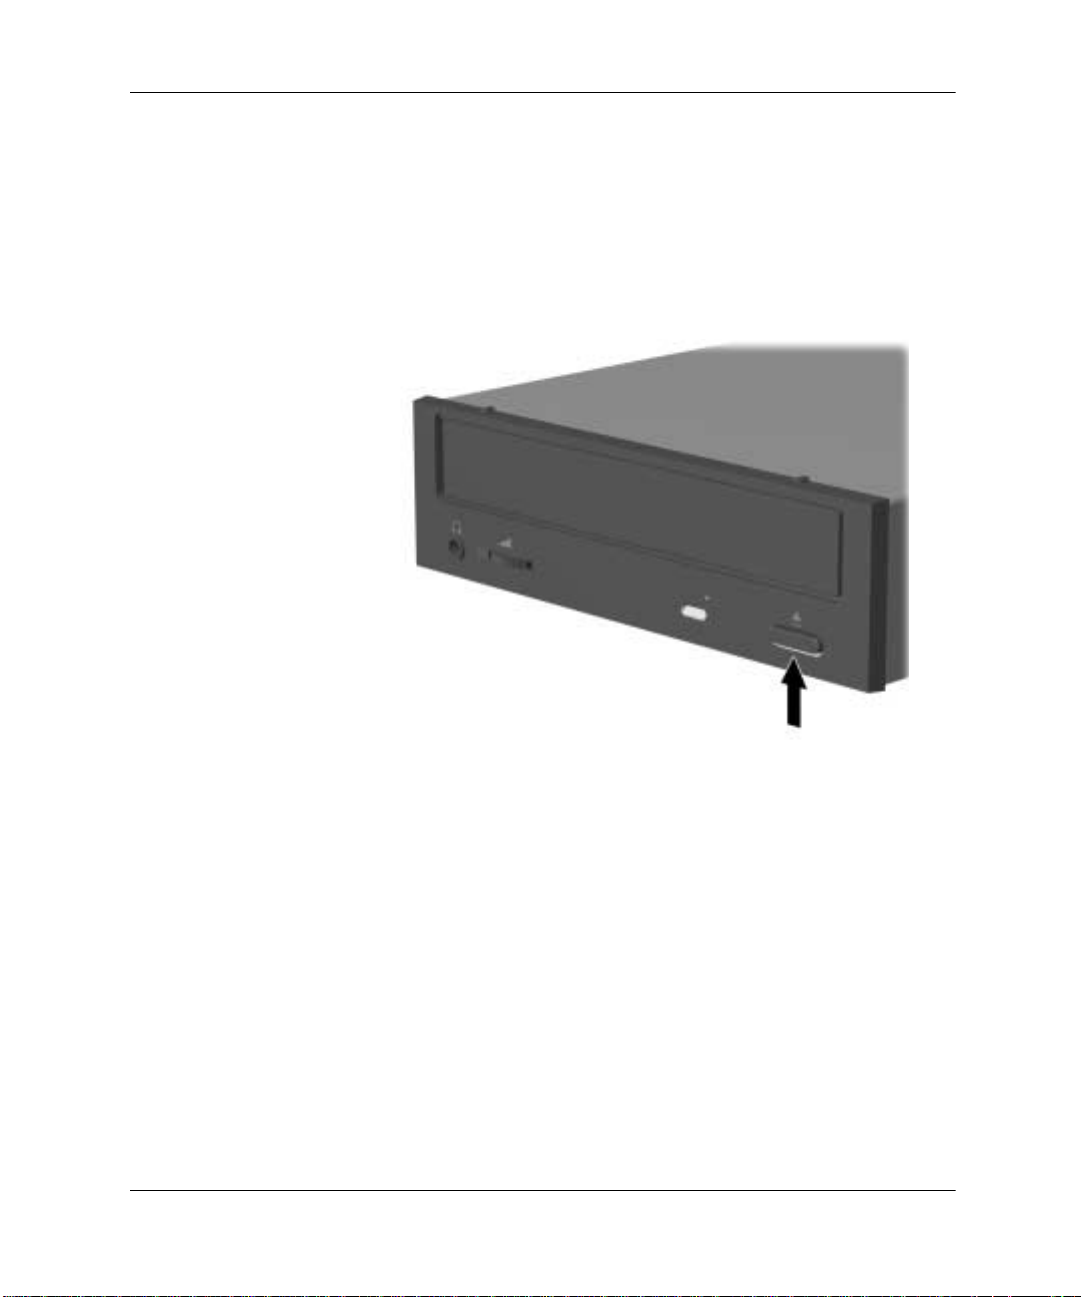
Removing a diskette
You should remove the diskette from the diskette drive when you are:
■ Finished copying information to your diskette, hard driv e, or
computer
■ Shutting down Microsoft Windows
To remove a diskette
1. Make sure the activity light 2 is not glowing
The activity light will glow until the disk ette dri ve completes reading
✎
from or writing to the diskette.
2. Press the eject button 1 on the diskette drive.
2–2 Learning More About Your Computer
Page 15

Using Your Computer Drives
CAUTION: If you remove a diskette while the activity light is glowing,
Ä
you can damage the diskette or the information stored on it.
Using the Hard Drive
You can store computer operating files, applications, data, Internet,
and personal files on your hard drive.
As you create and save files, download information from the Internet,
install applications, or receive e-mail messages and attachments, your
hard drive storage space diminishes. The amount of information you
can store on your computer’s hard drive depends on the size of the
drive.
It is recommended that you periodically check the amount of space
available on your hard drive. To check the amount of space on your
hard drive, follow the directions in the “To Check Hard Disk Space”
section of Chapter 1.
If you need to free space on the hard drive, you can:
■ Delete files and applications
■ Save files or applications to external storage media like diskettes
(floppy), CD-R, CD-RW, DVD-R, or DVD-RW discs.
Learning More About Your Computer 2–3
Page 16

Using Your Computer Drives
Using the CD or DVD Drive
The CD-ROM, CD-RW, DVD-ROM, and DVD-R/RW drives allow
you to perform several different actions (such as, store information,
listen to music, view and create movies).
The DVD-ROM and DVD-R/RW drives take longer to begin
playback than CD drives because they must determine the type of
media being played. If any of the drives fail to play a disc, check to
make sure that the disc is inserted with the label facing up (facing left
on tower models) and properly seated in the drive.
Table 2-1 provides a comparison of drives and actions. The number
and type of drives your computer has varies by model.
Table 2–1: Comparison of Drives and Actions
Allows you to... CD-ROM CD-RW DVD-ROM DVD-R/RW
Read CDs, CD-Rs, and CD-RWs
Read DVDs
Read data from CD
Listen to music
Write data to disc for storage
View movies
Record movies
••••
••
••••
••••
••
••
•
2–4 Learning More About Your Computer
Page 17

It is important to read all directions before attempting to record onto a
DVD-R or DVD-RW disc. You should make sure that all open
applications are closed and remain closed while you are burning the
DVD-R or DVD-RW disc.
Your 4.7 Gigabyte (GB) (where 1GB = 1000 cubed or 1 billion bytes
✎
as is used on the disc packaging) DVD-R or D VD-RW disc is capable
of storing data up to 4.38 GB (where 1GB = 1024 cubed or
1,073,741,824 bytes as is used by Windows).
Multimedia Support
You can use several different types of media with your CD or DVD
drives. Media simply refers to the type of disc you insert into the CD
or DVD drive.
What you can do with your drive is determined by the type of drive
you have and the media you use in the drive. For example, you can
listen to music, but not record it, if you use a CD-ROM disc in the CD
drive. On the other hand, you can record and playback a DVD movie,
if you use a DVD-R or DVD-RW disc in the DVD-R/RW drive.
Using Your Computer Drives
A DVD-R disc is more compatible than a DVD-RW disc with DVD
✎
set-top players. Consult with your DVD set-top manufacturer to
determine DVD-R/RW discs compatibility.
Table 2-2: Media Comparison
Ability to
Media File Type
CD-ROM Data No Yes Requires CD-ROM,
Music No Yes Requires CD-ROM,
Learning More About Your Computer 2–5
Record
Ability to
Playback
Ability to Playback
on other PCs DVD Set-top
Varies
DVD-ROM, CD -RW,
or DVD-R/RW hardware
DVD-ROM, CD -RW,
or DVD-R/RW hardware
per model
Varies
per model
Page 18

Using Your Computer Drives
Table 2-2: Media Comparison (Continued)
Ability to
Media File Type
CD-R Data Yes
MP3 Music Yes
CD-RW Data Yes Yes Requires CD-RW or
MP3 Music Yes Yes Requires CD-RW or
DVD-ROM Data No Yes Requires DVD playback
DVD Movie No Yes Requires DVD playback
DVD-R Data Yes
DVD Movie Yes
Record
(only once)
(only once)
(only once)
(only once)
Ability to
Playback
Yes Requires CD-RW or
Yes Requires CD-RW or
Yes Requires DVD-ROM or
Yes Requires DVD-ROM or
Ability to Playback
on other PCs DVD Set-top
DVD-R/RW hardware
DVD-R/RW hardware
DVD-R/RW hardware
DVD-R/RW hardware
software and D VD-R OM
or DVD-R/RW hardware
software and D VD-R OM
or DVD-R/RW hardware
DVD-R/RW hardware
and software
DVD-R/RW hardware
and software
Varies
per model
Varies
per model
Varies
per model
Varies
per model
No
Yes
No
Yes
(varies
per model)
DVD-RW Data Yes Yes Requires D VD-R/RW
hardware and software
DVD Movie Yes Yes Requires DVD-R/RW
hardware and software
No
Varies
per model
Regardless of the drive(s), you insert and remove a CD or DVD disc
using the same steps.
2–6 Learning More About Your Computer
Page 19
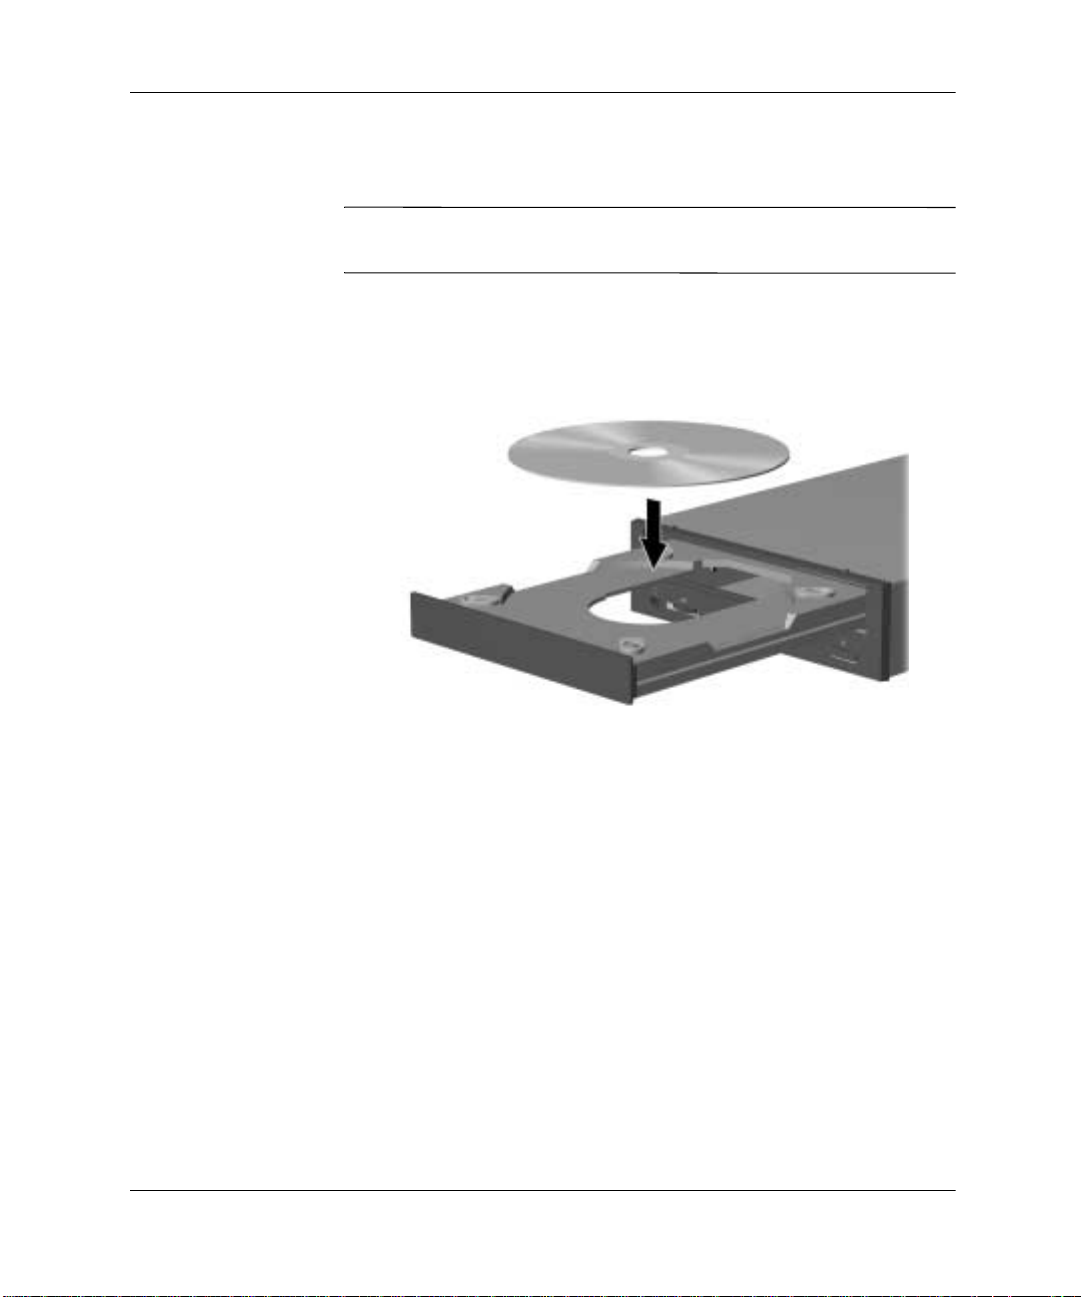
Inserting a CD or DVD
To Insert a CD or DVD
1. Power on the computer.
2. Press the load/eject button to open the drive.
Using Your Computer Drives
3. Carefully lift the CD or DVD from its case. You should avoid
touching the surface of the CD or DVD. If possible, hold the CD
or DVD by the edges.
Learning More About Your Computer 2–7
Page 20
Using Your Computer Drives
✎
4. Place the CD or DVD, label side up (label side left if tower
model), into the round tray
If the tray has support tabs, carefully slide the disc under the tabs to
position it correctly in the tray.
5. Press the load/eject button to close the drive tray.
2–8 Learning More About Your Computer
Page 21

Removing a CD or DVD
To Remove a CD or DVD
1. Power on the computer.
2. Press the load/eject button to open the drive.
3. Carefully lift the CD or DVD from the drive. You should avoid
touching the surface of the disc. If possible, hold the CD or DVD
by the edges.
Using Your Computer Drives
4. Press the load/eject button on the front of the drive to close the
drive tray.
5. Store the CD or DVD in its protective case.
Listening to Music
You can listen to music using any of the CD-ROM, CD-RW,
DVD-ROM, and DVD-R/RW drives.
Learning More About Your Computer 2–9
Page 22

Using Your Computer Drives
✎
The DVD drives may take longer to begin music playback because
they must determine the type of media being played.
To Listen to Music
1. Insert a CD or DVD as described previously in this chapter,
“Inserting a CD or DVD.”
2. Wait for disc to automatically start playing.
3. Press the load/eject button to eject the CD or DVD from the
drive.
To Adjust the Volume
1. Click the Start button on Windows taskbar.
2. Click Control Panel.
3. Click Sounds, Speech, and Audio Devices.
4. Click Adjust the System Volume.
5. Make adjustments to the device and speaker volume levels.
2–10 Learning More About Your Computer
Page 23

Using Your Computer Drives
6. Click Apply, then OK.
Playing a Movie
You can only play a DVD movie from the DVD-ROM and
DVD-R/RW drives.
To Play a Movie
1. Insert a DVD as described pre viously in this chapter, “Inserting a
CD or DVD.”
For best performance, it is recommended that you close all running
✎
programming before inserting a DVD movie.
Learning More About Your Computer 2–11
Page 24

Using Your Computer Drives
Creating a CD
2. Wait for the DVD to automatically start playing. If the DVD does
not start playing automatically, follow these steps.
a. Click the Start button on your Windows desktop.
b. Click All Programs, Compaq WinDVD, then Win DVD
Player.
c. Click the Play button to start the movie.
3. Press the load/eject button to eject the DVD from the drive.
There are several applications available for creating CDs. Compaq
provides CD burning software on select models to assist you with
creating CDs. Follow the instructions provided in the documentation
included with the CD burning software to create your CD.
You can create many types of CDs using the CD-RW drive:
■ Audio
■ Data backup
■ Copies of files or CDs
Table 2-3 lists the various uses of the CD-RW drive.
2–12 Learning More About Your Computer
Page 25

Using Your Computer Drives
Table 2-3: Uses of the CD-RW Drive
You can create a(an)... To....
Audio CD Create personal music CDs with your fa vorite music trac ks and
MP3/WMA files.
Data CD Store data from files or folders on your hard disk.
This feature is useful for backing up important files or for
sharing data with other people.
Direct copy Write files directly to a CD-R and CD-RW just like you copy
files to a disk drive. You can drag-and-drop files from one drive
to another in Microsoft Explorer.
Copy of a CD Create an entire copy of a CD or a backup of data files.
Jewel Case Creator Make custom jewel case inserts and CD labels to indicate the
title and contents of a CD (labels are sold separately).
You can use either CD-R or CD-RW discs to create your CDs. You
can only write to a CD-R disc once, but you can write to, erase,
rewrite to, and reuse a CD-RW disc.
It is recommended that use a CD-R disc if you are going to use it in a
CD player, CD-ROM, DVD-ROM, or DVD-R/RW drive.
The CD-RW discs are typically used for making data backups of your
personal CDs and computer hard drive. They are not recommended
for use in the Compaq 12X or slower CD-RW drives.
Table 2-4 provides a comparison of the CD-R and CD-RW discs.
Learning More About Your Computer 2–13
Page 26

Using Your Computer Drives
Table 2-4: CD-R and CD-RW Disc Comparison
Allows you to... CD-R CD-RW
Write to CD
••
Write to CD multiple times
Use multiple recording
sessions
Reuse CD
Erase information
Maintaining the CD or DVD Drive
You should keep the following guidelines in mind when maintaining
and cleaning your CD or DVD drive:
■ Do not move the drive while it is operating
■ Avoid exposing the drive to rapid changes in temperature
■ Wait one hour before turning off the computer if the drive is
exposed to sudden change in temperature
■ A void exposing the drive to high temperatures or humidity, direct
sunlight, or mechanical vibrations
•
•
•
•
■ Clean the panel and controls with a soft, dry cloth.
■ Never spray cleaning fluids into the drive
■ Unplug the computer if any liquids or objects fall into the drive
2–14 Learning More About Your Computer
Page 27

Maintaining and Shipping
Routine and preventive maintenance for the computer is easier
than you might think. A few basic procedures will help keep the
computer and monitor in good operating condition.
■ Disk cleanup
■ Scan disk
■ Defragment
Use virus scan software to protect your operating system,
applications, and personal files.
If you plan to ship or travel with the computer, make sure to review
the shipping guidelines.
Routine Maintenance Guidelines
Keep the following care guidelines in mind when you are setting up
or using your computer:
3
■ Operate the computer on a level surface
■ Make sure you have at least 3 inches (7.6 cm) of space between
the back of the unit and any cabinet or wall
■ Make sure you have at least 3 inches (7.6 cm) of space between
the top of the monitor and any cabinet
■ Never block vents or air intake areas for the computer or monitor
■ Never operate the computer with the cover or side panel removed
■ Do not place the keyboard, with the keyboard feet down, against
the front of the desktop
Learning More About Your Computer 3–1
Page 28

Maintaining and Shipping
■ Keep the computer away from e xcessi ve heat, cold, moisture, and
direct sunlight (for specific ranges of temperature and humidity,
see your computer specifications)
■ Keep liquids away from the computer and keyboard
■ Turn off the computer before you:
❏ Wipe the exterior with soft, damp cloth
❏ Clean the air vents
Preventive Maintenance
Preventive maintenance is essential for keeping your computer in
good working condition. A few basic tasks include:
■ Creating backup files
■ Deleting unwanted files
■ Optimizing your hard drive
■ Running virus scan software
It is recommended that you backup files and optimize your hard driv e
at least monthly . If you use your computer a great deal, you may want
to perform any and all of these tasks more frequently.
Cleaning Up the Hard Drive
As you use your computer and store files, the hard driv e begins to fill
up, get cluttered, and ultimately affects performance. To prevent this,
you can delete files that you are not using.
CAUTION: You should not delete any unfamiliar files. If in doubt, do not
Ä
delete.
To Clean Up the Hard Drive
1. Close all open programs.
2. Click the Start button from the Windows taskbar.
3. Click My Computer.
3–2 Learning More About Your Computer
Page 29

Maintaining and Shipping
4. Right click the hard disk drive you want to clean up.
5. Click Properties on the pop-up menu.
6. On the General tab, click Disk Cleanup.
7. Click the types of files you want to delete.
8. Click OK.
Learning More About Your Computer 3–3
Page 30

Maintaining and Shipping
Emptying the Recycle Bin
After you delete files from the hard drive, they are sent to the recycle
bin. You can retrieve files that are sent to the recycle bin as long as
you have not emptied it.
Once you empty the recycle bin, your files are permanently deleted.
To Empty the Recycle Bin
1. Double click the Recycle Bin icon on your Windows desktop.
2. On the File menu, click Empty Recycle Bin to delete all files.
3. Click Yes to confirm the deletion.
Scanning the Hard Drive
You can scan the hard drive to search for and repair errors.
Your computer may not have the ScanDisk application installed.
✎
To Scan the Hard Drive
1. Close all open programs.
2. Click the Start button on the Windows taskbar.
3. Click My Computer.
4. Right click the hard disk drive you want to check.
5. Click Properties.
6. On the Tools tab, click the Check Now button.
7. Select the disk check options you want to use.
3–4 Learning More About Your Computer
Page 31

8. Click Start to begin scanning.
Defragmenting the Drive
You can increasingly improve the efficiency of the computer by
defragmenting it on a regular basis. Defragmenting moves the files
closer together so that the hard drive space is used more effectively.
Maintaining and Shipping
Your computer may not have defragmenting software installed or use
✎
another type of defragmenter.
To Defragment the Hard Drive
1. Close all open programs.
2. Click the Start button on the Windows taskbar.
3. Click My Computer.
4. Right click the hard disk drive you want to check.
5. Click Properties.
6. On the Tools tab, click the Defragment Now button.
7. Select the disk you want to defragment.
Learning More About Your Computer 3–5
Page 32

Maintaining and Shipping
8. Click Defragment to begin.
Protecting from a Virus
A computer virus can destroy information on the hard drive. You can
get a virus through:
■ An infected diskette
■ A CD, CD-R, CD-RW, DVD, DVD-R or DVD-RW disc
■ E-mail messages and attachments
■ Infected files downloaded from the Internet
Some viruses will affect your computer immediately, while others
may activate only if you open a certain file or do not delete them
before a certain date.
Norton Anti-Virus is ready to install on your computer with preset
options that make your computer safe. Your computer will be scanned
for viruses as you install the Norton Anti-Virus application.
3–6 Learning More About Your Computer
Page 33

You should take the following precautions in order to protect your
new computer:
■ Do not open unsolicited e-mail from unknown sources
■ Only download files from sources you feel are safe
■ Always scan documents for viruses before opening
■ Make sure you have the latest version of Norton Anti-Virus
Norton offers a free upgrade for six months from the date you register
Norton Anti-Virus. To download the latest version of the anti-virus
application, go to Norton.com.
Preparing for Shipping or Travel
Follow these guidelines when preparing the computer for shipping:
■ Back up the hard drive
■ Make sure the back up media is not exposed to electrical or
magnetic impulses
■ Remove any diskette, CD, or DVD from the drive and store it
separately
Maintaining and Shipping
■ Insert a blank diskette (floppy) into the disk drive
■ Turn off the computer and external devices. The hard drive
automatically locks when the computer is turned off.
■ Disconnect the power cord(s) from the electrical outlet and then
the computer and external devices
■ Pack the computer and external devices in their original packing
boxes or sufficient packing material to protect them
Learning More About Your Computer 3–7
Page 34

You can conserve energy by using the Microsoft Windows Power
Management system. With this system, you can determine when the
computer is sleeping, hibernating, or awake. You can also determine
when your monitor and hard drive turns off.
Using Power Management
The Microsoft Power Management System provides preset power
schemes to assist you with conserving energy:
■ Home/Office Desk
■ Always On
These power schemes determine when your system goes into sleep or
hibernation mode and when your monitor and hard drive turn off.
Table 4–1: Preset Power Scheme Properties
4
Saving Energy
System goes
Power Scheme
Home/Office
Desk
Always On Never Never After 10
Learning More About Your Computer 4–1
to sleep...
After 20
minutes of no
activity
To alter these settings, you can change them in the Power Opti ons
Properties dialog box.
System
hibernates...
Never After 15
Monitor
turns off...
minutes of no
activity
minutes of no
activity
Hard drive
turns off...
After 30
minutes of no
activity
After 1 hour of
no activity
Page 35

Saving Energy
If your computer is connected to a network or has “always on” DSL
✎
connection, you should use the Always On power scheme.
Using the Power Options Properties
1. Click Start from the Windows taskbar.
2. Click Control Panel.
3. Click Performance and Maintenance.
4. Click Power Options to display the Power Options Properties
dialog box.
4–2 Learning More About Your Computer
Page 36

Sleep Mode
Sleep mode is a low-power standby state that reduces the amount of
electrical power consumed by the computer while you are not using it.
The Microsoft Windows Power Management system automatically
puts the computer into sleep mode after it has been idle for a while.
You can:
■ Determine when your computer should automatically go into
sleep mode
■ Manually put your computer to sleep
Adjusting the Sleep Mode
You can determine when the computer automatically goes into sleep
mode.
To Adjust the Sleep Mode
1. Click Start from the Windows taskbar.
2. Click Control Panel.
Saving Energy
3. Click Performance and Maintenance.
4. Click Power Options.
5. Make sure the Power Schemes tab is selected.
6. In the System Standby drop-down list, select how much inactive
time you want to pass before putting your computer to sleep.
7. Click the Apply button, and then OK.
Learning More About Your Computer 4–3
Page 37

Saving Energy
Manually Entering the Sleep Mode
You can manually put the computer into sleep or standby mode to
conserve energy.
To Manually Enter Sleep Mode
1. Close all programs and save any open files.
2. Click Start on the Windows taskbar
3. Click the Control Panel.
4. Click Performance and Maintenance.
5. Click Power Options.
6. On the Advanced tab, under When I press the power
button on my computer, click Standby.
7. Click OK or Apply , and then turn off the power.
Awaking From Sleep
You must wake the computer to use it again.You can wake the
computer by:
■ Pressing any key on the keyboard
■ Moving your mouse
4–4 Learning More About Your Computer
Page 38

Hibernate Mode
You can also set the computer to go into Hibernate mode after a
specified period of inactivity.
Before the computer can hibernate, it saves everything in memory to
the hard drive. Then, it shuts itself off. When you awake the
computer, the Windows Desktop appears exactly as you left it.
Adjusting the Hibernate Mode
You can determine when the computer automatically goes into
hibernation mode.
To Hibernate the Computer
1. Click Start from the Windows taskbar.
2. Click Control Panel.
3. Click Performance and Maintenance.
4. Click Power Options.
Saving Energy
5. Make sure the Power Schemes tab is selected.
6. In the System Hibernates drop-down list, select the number of
minutes of inactive time you want to pass before your computer
goes into hibernation mode.
7. Click the Apply button, and then OK.
Awaking from Hibernation
You must wake the computer to use it again. Press the Power button
on the front of the computer to awake it from hibernation.
Learning More About Your Computer 4–5
Page 39

5
Understanding Computer Terms
This chapter provides definitions for computer terms used in this
guide and other documents that ship with your computer.
A
1394 port
A new type of connector for plugging in peripherals with extremely
fast data-transfer rates, such as video cameras. The 1394 standard
synchronizes audio and video files by delivering data at the intended
rate-in real time. See peripheral. See also USB port.
Acrobat Reader
Software created by Adobe Systems that can be downloaded free of
charge from the Adobe Web site (www.Adobe.com) The Acrobat
Reader allows you to view an electronic document with the exact
layout (font, colors, and graphics) that the author intended.
Regardless of the program the author used to create the document,
every computer with the Acrobat Reader installed can display the
document with the same layout once the file is converted to PDF
format. (To view an ordinary e-mail attachment in its original format,
your computer must have the same program, the same or later version
of the program, and the same fonts as the author used.) To save
printing and postage costs, companies, professional organizations,
and clubs distribute newsletters to employees and members over the
Internet. With the Acrobat Reader, you can view and print the
newsletter in its original format. See PDF. See also font.
anti-virus utility
A program that detects, and in many case repairs, the damage caused
by a computer virus. See virus. See also utility.
Learning More About Your Computer 5–1
Page 40

Understanding Computer Terms
application
A technical term for a computer program. See program.
audio/video streaming
See streaming.
authoring
What you do to create a program that may eventually be stored on a
CD. For example, if you want to create a multimedia game or
presentation, you need authoring software that allows you to combine
sound, graphics, and text with user interactivity. When you finish
creating your program with the authoring software, use Easy CD
Creator to record it on CD.
B
back up
To copy files in case the original files are lost or damaged. Backup
copies can be stored on the hard drive or on a diskette, Zip disk, or
CD-R disc. Regular backups of all data files on removable storage
media are recommended in case of hard drive failure.
bit
The smallest possible piece of computer information-a single digit
(either a 1 or a 0). See digital.
bitmap
Defines a display space and the color of each pixel or bit in the
display space. A GIF and a JPEG are examples of graphic image file
types that contain bitmaps.
boot
To start or restart the computer. During the start-up process,
information necessary for the computer to operate is loaded into
memory. See main memory.
5–2 Learning More About Your Computer
Page 41

Understanding Computer Terms
browser
Software that searches for, displays, and downloads text, graphics,
sound, and video from the Internet. Microsoft Internet Explorer and
Netscape Navigator are two popular browsers.
buffer
A temporary storage area in memory. It acts as a holding area where
data with different transfer rates can be collected, then sent as a
steady stream to the device that processes data for permanent storage.
In CD recorders, the buffer helps to prevent buffer underruns.
buffer underrun
The inability of your computer to maintain the steady stream of data
required for CD recording. The CD recorder has an internal memory
buffer to protect against interruptions and slowdowns; howe ver, if the
interruption is so long that the buffer is completely emptied, a buffer
underrun occurs, writing stops, and the CD can be damaged beyond
repair.
bug
A mistake in the design of computer software. Because of their
complexity, designs may have minor bugs. As soon as the
manufacturer becomes aware of the problem, modifications are made
to correct it. These modifications, called fixes or patches, can be
downloaded from the manufacturer’s Web site. If a major bug is
discovered, the manufacturer releases a new version of the software.
V isit the Compaq Web site (www.compaq.com) from time to time for
the latest information about your computer, including software
updates that you can download. And visit the manufacturer’s W eb site
for any software or peripherals that you purchase for your computer.
See peripheral.
bulletin board
An electronic notice board on the Internet where people can post
notices for others with similar interests. Professional organizations
and clubs often have bulletin boards for members to share
information and opinions.
Learning More About Your Computer 5–3
Page 42

Understanding Computer Terms
byte
Eight bits of data strung together to make a message that the
computer can interpret. Most information is organized into bytes, the
standard unit of data. One byte of data is required to represent a single
character that you can see on the screen (a letter, number , punctuation
mark, or other symbol). For example, the byte 01001000 represents
the capital letter H. See bit.
C
cable modem
A modem that allows you to access the Internet through your cable
service provider. Continuously connected to the Internet, it allows
high-speed, high-capacity data transfer.
CD (Compact Disc)
Media used in a CD player (digital recordings of music) or CD-ROM
drive (computer data, such as programs). Both types of compact disc
are read-only; once data is recorded or written to them, they can only
be played or read.
CD-DA
Compact disc-digital audio. Jointly developed by Philips and Sony
and launched in October, 1982, CD-DA was the first incarnation of
the compact disc, used to digitally record and play back music. The
standard under which CD-DA discs are recorded is kno wn as the Red
Book.
CD Extra, CD Plus, or Enhanced CD
A multi session CD containing a number of audio tracks in the first
session, and one CD-ROM XA data track in the second session.
Additional characteristics are defined in the Blue Book standard. An
alternative to mixed-mode for combining standard CD-DA audio,
which can be played in a normal audio player, and a computer
application on a single CD.
5–4 Learning More About Your Computer
Page 43

Understanding Computer Terms
CD-I
A compact disc format developed by Philips, designed to allow
interactive multimedia applications to be run on a player attached to a
television. The standard document defining CD-I is called the Green
Book.
CD-R (CD-recordable)
Media used in a CD-R drive to record or write data that cannot be
erased. The base is a circular piece of clear plastic, molded with a
spiral track to ensure that the CD-R drive follo ws the same spiral path
as that stamped on a conventional CD. The plastic layer is covered
first with an organic dye that is photosensitive, then a reflective layer
of silver alloy or 24-carat gold, and finally lacquer to protect the metal
from air and dust. Depending on the dye and metal used in
manufacture, the disc may be gold/gold (gold on top and bottom),
green/ gold, silver/blue, or silver/silver. When referring to CD media,
“CD-R” is often used to refer to write-once CDs in contrast to
CD-RW.
CD-R drive
Drive that uses a low-power laser to burn pits into the dye layer of a
CD-R, on which digital data is written. The marks are permanent.
When the finalized disc is played or read, the metal layer reflects laser
light in much the same way as the aluminum layer in a music CD or
CD-ROM. For this reason, the write-once CD-R can be read by most
of the newer CD players, CD-ROM, and DVD-ROM drives.
CD-ROM (CD Read-Only Media)
Media used in a CD-ROM drive. The data is read-only; you cannot
erase or record over it. The disc has three layers. The base is a circular
piece of clear plastic, mechanically stamped with tiny indentations, or
pits, in which digital data is written. The plastic layer is covered with
a sheet of shiny aluminum to reflect laser light; and the aluminum is
coated with lacquer to protect it from air and dust. Specifications for
the CD-ROM were f irst defined in the Yellow Book.
Learning More About Your Computer 5–5
Page 44

Understanding Computer Terms
CD-ROM drive
A drive that reads a CD-ROM (or music CD) by shining a laser into
the clear plastic base and interpreting the way the laser light is
reflected by the shiny aluminum layer. The CD-ROM drive is
read-only; it cannot write to a disc. Most modern drives can also read
a CD-R (unless written in multi-sessions by a CD-RW drive). Only
the newest multi-session CD-ROM drives can read a CD-RW written
in multi-sessions.
CD-ROM XA
“XA” stands for Extended Architecture. CD-ROM XA is an
extension of the Yellow Book standard, generally consistent with the
ISO 9660 logical format, but designed to add better audio and video
capabilities taken from the CD-I standard so that a CD-ROM could
more easily be used for multimedia applications. CD-ROM XA was
abandoned as an independent multimedia format, but Photo CDs are
written in the CD-ROM XA physical format.
CD-RW (CD-Rewritable)
Media used in a CD-RW drive to record data that can be overwritten
thousands of times. The clear plastic base is molded with a spiral
track to ensure that the CD-RW drive follows the same spiral path as
the one stamped on a conventional CD. The middle (recording) layer
is a phase-change crystalline mixture. Sandwiched between two
layers that draw away excess heat during the writing process, the
phase-change layer gives the disc a metallic grey color. The media
can be used for single-session or multi-session writing (recording
different tracks on different occasions). Advanced multi-session
technology is not backward-compatible. Only multi-read capable
CD-ROM and newer DVD-ROM drives can read CD-RWs written in
multi-sessions. Because of the lower reflectivity of the phase-change
recording layer, older CD players and CD-ROM drives cannot read
CD-RWs, even when written in a single session. CD-RW technology
is improving, but the quality of recordings is not yet comparable to
CD-R recordings.
5–6 Learning More About Your Computer
Page 45

Understanding Computer Terms
CD-RW drive
A drive with three laser powers that can write to a CD-RW, erase the
data, or read the data. A high-power laser melts the crystalline
recording layer. It cools quickly, sets without forming crystals, and
absorbs the laser beam. Data is written in pits that form as the
non-crystalline material shrinks. A medium-power laser erases the
data. It melts the recording layer at a lower temperature for a longer
period of time. As the phase-change material cools, crystals form that
reflect the laser beam. The high-power laser can then overwrite the
crystalline material. A low-power laser, which does not alter the state
of the recording layer, reads the data. A CD-RW drive can read
CD-ROMs, CD-Rs, and CD-RWs. It can write to both CD-Rs and
CD-RWs.
CD Text
An audio CD format in which up to 5000 characters of CD
information (title, artist, and song titles) are written into the Table of
Contents of a CD. The information is displayed when the CD is
played back on CD Text-enabled players.
chat
An Internet feature that allows you to exchange typed messages with
another person (or group of people) in real time. A message you type
is instantly displayed on the other person’s computer.
click (left-click)
To press and quickly release the left mouse button to select an item.
close disc
To “close” a recordable disc so that no further data can be written to
it. This is done when the last session’s lead-in is written. The next
writable address on the CD is not recorded in the lead-in, so that the
CD-Recorder in subsequent attempts to write has no way of knowing
where to begin writing. Note: It is not necessary to close a CD to read
it in a normal CD-ROM drive.
Learning More About Your Computer 5–7
Page 46

Understanding Computer Terms
close session
When a session is closed, information about its contents is written
into the Table of Contents of the CDs, and a lead-in and lead-out are
written to prepare the CD for subsequent sessions.
coaster
Popular term for a ruined recordable CD, named after the round
object you rest your drinking glass on to avoid marking the table.
component
a device installed inside the computer. Examples are the CD-ROM,
CD-R, CD-RW, DVD-ROM, Zip, disk, and hard drives, memory
chips, modem, graphics cards, and sound cards. See peripheral.
cursor
The blinking vertical line on the screen that indicates where the next
character appears when you type.
D
data
Information that can be processed by a computer. See digital.
data file
Files that you create with a computer program. Most programs are
designed to process a specific type of data. For example, spreadsheet
programs allow you to create data files primarily with numbers; word
processing programs primarily with letters; page design programs,
with text and graphics; drawing programs, with lines; photo
manipulation programs, with photos and drawings; and music
programs, with sounds.
database
Collection of related data designed to retrieve useful information
easily.
5–8 Learning More About Your Computer
Page 47

Understanding Computer Terms
dedicated line
A telephone line that is always connected to the modem (inside the
computer) to provide constant access to the Internet. A separate
telephone line is used for phone calls. See modem.
default
The option that the program automatically chooses for you when you
do not indicate a choice yourself. For example, when you print a
document, the Print dialog box asks which pages to print (the default
is All) and how many copies to print (the default is 1). You can
change the settings, and you can designate the new settings as the
default.
desktop
See Windows desktop.
desktop computer
A personal computer designed to be placed on a desk. It is not
portable as is a laptop or notebook computer.
dialog box
A small window that requests information from the user before a
command can be carried out digitally.
digital
A system that uses electronic signals to transfer data in the form of
bits. A bit is represented by a single digit. Computers use only two
digits-either a 0 or a 1-in various combinations. See bit and byte.
digital audio extraction
The process of copying CD-DA audio tracks digitally, from your
CD-Recorder or CD-ROM dri ve to a hard dri ve or to a recordable CD.
Not all CD-ROM drives support this, but most CD-Recorders do.
disc-at-once
A method of writing CDs in which one or more tracks are written in a
single operation, and the CD is closed without ever turning off the
writing laser. Contrast with track-at-once. Not all CD-Recorders
support disc-at-once.
Learning More About Your Computer 5–9
Page 48

Understanding Computer Terms
disc image
A single large file which is an exact representation of the whole set of
data and programs as it will appear on a CD in terms of both content
and logical format. This may be an ISO 9660 image or some
proprietary format such as the .cif format used by Easy CD Creator.
discussion group
A group discussion held on the Internet on a topic of mutual interest.
Instead of meeting in a classroom, students may meet for group
discussions on the Internet.
directory
See folder.
disk
Low-capacity, removable storage media made of flexible plastic film
encased in a hard plastic shell. Since the plastic film is flexible, the
3.5-inch disk is sometimes referred to as a floppy disk.
disk drive
The drive that reads and writes to a disk.
double-click
T o push do wn and quickly release the left mouse button twice in rapid
succession to open an item.
download
To receive files from another computer on the Internet.
drive
A device that reads and sometimes writes to storage media. Examples
are CD-ROM, CD-R, CD-RW, DVD-ROM, Zip, diskette, and hard
drives.
driver
Software that enables the operating system (OS) to recognize and
operate devices installed in or attached to the computer, such as a
printer. All dri ves that use remo v able media and all peripheral devices
have drivers. You can download updated drivers from the
manufacturer’s Web site. See drive and peripheral. See also OS.
5–10 Learning More About Your Computer
Page 49

Understanding Computer Terms
drop-down menu
A list of options that drops down when you click a menu name on the
menu bar or click the down arrow on a dialog box.
DSL (digital subscriber line)
A telephone line that carries both voice and data signals, allowing you
to talk on the phone and surf the Internet at the same time. The data
part of the line, which is continuously connected to the Internet,
allows high-speed, high-capacity data transfer. Your local telephone
company provides the necessary equipment-a DSL modem, a network
interface card, (NIC) and a splitter. See NIC.
DSL modem
A modem that connects to the Internet using digital subscriber line
service through an existing copper telephone line.
DVD-ROM (DVD read-only media)
A CD-sized disc that stores full-length movies, music videos, and
multimedia computer games with three-dimensional graphics. Both
single-sided and double-sided discs are available.
DVD-ROM drive
A drive that reads DVDs. Backward-compatible with CD technology,
it also reads old music CDs, CD-ROMs, CD-Rs, and CD-RWs.
E
e-mail (electronic mail)
Messages sent over the Internet.
encrypt
To translate data into a secret code. You must have access to a secret
key or password to read an encrypted file. See secure Web site<.
Explorer
See Microsoft Internet Explorer and Windows Explorer.
F
fax modem
A modem that allows your computer to transmit and receive faxes. It
can transmit documents to fax machines and other computers with fax
modems. It can broadcast a fax to several sites at once.
Learning More About Your Computer 5–11
Page 50

Understanding Computer Terms
file extension
A dot and three letters after a file name that indicate the program in
which the file was created. For example, filename.doc. The file
extension .doc indicates that the file was created in Microsoft Word.
floppy disk
An older term for disk. See disk.
folder
Represented by an icon that looks like a yellow manila folder, a
computer folder contains other folders (subfolders) and files.
MS-DOS and early versions of Microsoft Windows used the term
directory (and subdirectories) for folder (and subfolders).
font
A complete set of letters, numbers, punctuation marks, and symbols
in a particular typeface. When you use a word processing program,
you can choose from a long list of fonts to give your document
personality. Typefaces can suggest masculinity, femininity, strength,
delicacy, formality, frivolity, friendliness, warmth, coldness, classical
tradition, or contemporary trends. Matching the personality of the
typeface with the content of the text is a challenge for desktop
publishers.
G
game port
A connector on the back of the computer for plugging in a gamepad,
joystick, or steering wheel. See joystick.
5–12 Learning More About Your Computer
Page 51

Understanding Computer Terms
gap
The gap (more correctly called a pause) is a space dividing tracks on a
CD. In some situations, a gap is required by standards such as the Red
Book. For example, if you hav e data and audio tracks within the same
session, they must be separated by a gap. Also, there must be a gap of
two to three seconds preceding the first track on a CD.
GIF
(pronounced “giff”). A file format for graphics displayed on the
Internet. These are easily identified by the file extension.gif. You can
save a GIF file from a Web site to your computer. Point to the image
with the cursor and right click. A shortcut menu is displayed. Select
Save Picture As... The Save As dialog box is displayed. Select a
folder, name the fi le, and click the Save b utton. See file e xtension. See
also JEG.
graphical interface
Communication between a person and a computer by means of
images. With a pointing de vice such as a mouse, you can click an icon
to tell the computer what you want. See icon. See also interface.
graphics
Pictures or illustrations, including drawings, pie charts, bar graphs,
street maps, architectural and engineering designs, fashion designs,
musical scores, cartoons, animated images, and photographs. A
graphics card enables the monitor to display these items on the
screen. See SVGA.
H
hard disk
Internal media for permanent storage of system files, programs,
utilities, and data files. The hard disk consists of flat, round platters.
Each side of each platter has a head that floats on a thin cushion of air
over the surface of the rapidly spinning disk and reads electronically
stored data or writes data onto the disk. If the computer is dropped, a
head may fall onto and dig into a platter and cause the hard drive to
become unreadable.
Learning More About Your Computer 5–13
Page 52

Understanding Computer Terms
hard drive
The drive that reads and writes to the hard disk. If you have a large
hard drive, it may be divided into several partitions. Each partition is
designated by a different icon and a consecutive drive letter,
beginning with the letter C. Partition C: contains the files the
computer uses to start up. The other partitions contain no pre installed
files.
hardware
The physical components of a computer-the parts you can physically
touch. See software.
HTML (Hypertext Markup Language)
The standard language for documents designed for viewing on the
Web with a browser. Tags embedded in the documents mark the
locations of other electronic files. Click the hyperlinks to jump from
one Web site to another. Documents formatted for a browser can be
identified by the file extension .htm or .html. See hyperlink. See also
file extension.
http:// (hypertext transfer protocol)
This protocol commands the Web server to locate the Web site you
requested and transmit the Web site to your computer. You
communicate a request to your computer by using the keyboard or
mouse. You type the Web site address (URL) in the address box of the
browser or click a hyperlink on a Web page. Your computer
communicates the request to the Web server by using hypertext
transfer protocol. The Web server communicates the request to other
servers and computers connected to the Web. Throughout the world,
servers and computers recognize the same protocol. Their common
language makes the World Wide Web possible. See URL, browser,
hyperlink, and server.
hyperlink
An embedded link to another document or Web site. When you
position the cursor over a hyperlink (colored text or image), a small
hand is displayed. When you click the hyperlink, the browser displays
the new document or Web site. See HTML.
5–14 Learning More About Your Computer
Page 53

Understanding Computer Terms
I
icon
A small picture that represents a menu command, file, program, tool,
or peripheral.
interactive
A computer program that responds to you as if you were having a
conversation. You give instructions; computer performs an action (or
requests additional information). Computer games and multimedia
tutorials are interactive programs.
interface
A means of communication between two entities. A person and a
computer interface through an operating system (OS). T wo computers
interface through protocol. Computers on the Web use hypertext
transfer protocol (http://). See OS and http://.
Internet
A worldwide collection of computer networks that are interconnected
so that users can share electronic information.
Internet Explorer
See Microsoft Internet Explorer.
Internet keyboard
A keyboard that resembles a typewriter ke yboard but is equipped with
special buttons programmed to connect to the Internet.
Internet phone
A video telephone that allows you to make long-distance calls over
the Internet.
ISO 9660 Format
The most common international standard for the logical format for
files and directories on a CD-ROM. Some other common logical
formats such as Joliet and Rock Ridge are extensions of ISO 9660.
Learning More About Your Computer 5–15
Page 54

Understanding Computer Terms
ISP (Internet Service Provider)
A company that provides access to the Internet. To use the service,
you need the ISP software, a user name, a password, and access
phone number(s).
J
jewel case
The hinged plastic case in which CDs are often stored.
jewel case sleeve
The pieces of paper that can be inserted into the jewel case to help
identify the contents of the CD stored in the case.
joystick
A lever that moves in all directions to control the movement of a
pointer or objects on the screen. It is used for computer games in
which you drive, fly, or shoot objects displayed on the monitor.
JPEG
(pronounced “jaypeg”). A file format for graphics, especially
photographs, displayed on the Internet. It is easily identified by the
file extension .jpg. JPEG files, which store more information per pix el
than GIF files, are used for complex, high-resolution images. See
GIF. See also pixel.
L
lead-in
An area at the beginning of each session on a recordable session that
is left blank for the session’s table of contents. The lead-in is written
when a session is closed, and takes up 4500 sectors, approximately
one minute, on a CD. The lead-in also contains the next writable
address on the CD so that future sessions can be added, unless the CD
is closed.
5–16 Learning More About Your Computer
Page 55

Understanding Computer Terms
lead-out
An area at the end of a session which indicates that the end of data has
been reached. The first lead-out on a CD is 6750 sectors long. Any
subsequent lead-outs are 2250 sectors, or about 30 seconds.
link
See hyperlink.
link block
A block, also known as a sector , of digital rubbish that is written each
time the recording laser is turned on (before) or off (after) writing a
track or a packet. See also Run-in/Run-out Blocks.
linked multi-session
A CD containing more than one session, in which all (or selected)
data from the various sessions can be seen as if they had been
recorded in a single session.
listserv
See mailing list.
logical block
The smallest addressable space on a CD. Each logical block is
identified by a unique Logical Block Number (LBN), each of which is
assigned in order starting from 0 at the beginning of the CD. Under
the ISO 9660 standard, all data on a CD is addressed in terms of
Logical Block Numbers.
logical format/logical structure/file system
A file system, such as ISO 9660, that translates the sector-by-sector
view of a CD into a virtual tree of directories and files. This system
makes it easier for both people and computers to use the information
on the CD. UDF is another example of a file system that can be used
to write CDs. See UDF.
log on
To gain access to a computer network or the Internet by entering a
user name and password. See network.
Learning More About Your Computer 5–17
Page 56

Understanding Computer Terms
M
mailing list
An electronic mail-forwarding service that allows subscribers to send
e-mail to a single address where the message is copied and sent to all
addresses on the list. Clubs and professional organizations use this
service, sometimes called a “listserv,” to contact members quickly,
cheaply, and effortlessly.
main memory
RAM memory chips inside the computer. Every program you launch
and every file you open must be copied from a storage disk, disc, or
diskette into main memory. The amount of main memory in your
computer determines how many programs you can run and ho w much
data you can process at one time. Memory is measured in megabytes
(1 million bytes or characters) of information. Most personal
computers come with a minimum of 32 megabytes of main
memory-the minimum recommendation for windows-based
programs. You can install extra memory (refer to “Upgrading Your
computer” in this guide). See RAM. See also byte.
mastering
Technically refers to the process of creating a glass master from
which CDs are reproduced in quantity. In desktop recordable CD
systems, mastering is done together with premastering by the desktop
CD-Recorder, and the term is generally used to mean recording.
maximize
To enlarge the screen (or maximize the window) in a Windows-based
program by clicking the Maximize button, the button with an open
square in the upper-right corner of a window that has not been
maximized. See Microsoft Windows. See also minimize.
microprocessor
A silicon chip inside your computer that processes the instructions
and data from input devices (such as the keyboard and mouse) and
communicates them to output devices (such as the monitor, speakers,
and printer).
5–18 Learning More About Your Computer
Page 57

Understanding Computer Terms
Microsoft Internet Explorer
A Web browser developed by the Microsoft Corporation. See
browser.
Microsoft Windows
The most popular computer operating system in the world. It is
characterized by the use of windows and icons. Each running program
and open file has its own window . Instead of memorizing commands,
you click icons to communicate with the computer. Clicking the
Minimize button shrinks a program to a button on the taskbar.
Clicking the button again displays the program as a window. Y ou can
have several windows open at the same time and toggle from one to
another by using Alt+Tab (press and hold down the Alt key, press the
Tab key, and then release both keys). A palette with an icon for each
program is displayed. Click the icon for the program you want.
MIDI (Musical Instrument Digital Interface)
(pronounced middy). A file format used to store electronic music
sounds. A sound card that supports MIDI files allows the computer to
generate the synthesized musical sounds found in games, CD-ROMs,
and multimedia presentation packages. The format is easily identified
by the file extension .mid. See f ile extension. See also music softw are.
MIDI connector
A connector on the back of the computer for plugging in a synthesizer
keyboard. A MIDI connector allows you to record sounds created by
a synthesizer and then manipulate the data to produce new sounds,
such as changing the key of a composition. See MIDI. See also music
software.
minimize
To shrink a running program window into an icon on the Windows
taskbar by clicking the Minimize button-the button with the minus
sign in the pper-right corner of a window. Click the button on the
taskbar to view the window again. See Microsoft Windows. See also
maximize.
Learning More About Your Computer 5–19
Page 58

Understanding Computer Terms
mixed-mode disc
A CD that includes both computer data and CD-DA tracks. The data
is all contained in track one, and the audio in one or more of the
following tracks. Contrast with CD Extra.
modem:
A device in the computer that converts data from digital format to
analog format so that it can be transferred through a standard
telephone line to another computer. The modem in the receiving
computer converts the data back to digital format. See digital.
mouse
A device that you move across the top of your desk (or a mousepad)
to move the pointer or cursor on the screen. Click to select an item,
double-click to launch a program, and right-click to display a shortcut
menu. See mouse pointer and cursor. See also click, double-click, and
right-click.
mouse pointer
The arrow on the screen that moves with the mouse.
MP3
The file extension for MPEG (pronounced “empeg”), audio layer 3,
sound files. The format is easily identified by the file extension .mp3.
This format compresses sound data from a stereo music CD to 1/12th
its original size without sacrificing sound quality. Because of their
small size, MP3 files can be transferred over the Internet easily. You
can download individual songs or entire CDs in MP3 format to your
computer. See file extension.
MPEG
Moving Picture Experts Group, a standards organization responsible
for the MPEG1 and MPEG2 standards for the compression of
full-motion video.
multimedia
Two or more media formats used together, such as text, graphics,
animation, audio, or video.
5–20 Learning More About Your Computer
Page 59

Understanding Computer Terms
multiread:
An OSTA (Optical Storage Technology Association) standard
for CD-ROM and ROM drives. Drives that follow the multiread
standard can read commercial CDs (audio and data), CD-R discs,
and CD-RW discs. They can also read CDs written in fixed- or
variable-length packets.
multi-session
A method of adding data incrementally to a CD in more than one
recording session. If data is linked between sessions, all data on a
multi-session CD, when read on a multi-session CD-ROM dri ve, may
be seen as part of a single logical structure. Multi-session is different
from packet writing. See packet writing.
mutli-volume
A CD containing multiple sessions that are not linked together. Each
volume on the CD must be read as if it were a separate CD. You can
read different sessions on a CD by using the Session Selector in Easy
CD Creator Deluxe.
music software
Programs for composing and editing music. When you play a tune on
a synthesizer keyboard connected to a computer, the music program
translates what you play into a written score. Music software creates
MIDI files. See MIDI and MIDI connector.
N
navigate
To move through a Web site or online document by clicking the
hyperlinks. See hyperlink.
Netscape Navigator
A Web browser developed by the Netscape Communications
Corporation. See browser.
network
Two or more computers linked together to share resources, such as
programs, files, and printers.
Learning More About Your Computer 5–21
Page 60

Understanding Computer Terms
newsgroup
A discussion group on the Internet where people can post or read
messages on thousands of topics, such as professional basketball,
environmental protection, Himalayan cats, Scottish bagpipes, Irish
clog dancing, soufflés, macramé, book reviews, mountain bikes,
political candidates, and cartoon strips. Imagine a topic, and you can
probably find a newsgroup that discusses it.
newsreader
A program that lets you read and post messages to newsgroups.
news server
A server that receives the Usenet news feed (all the individual
messages collected from 100,000 news servers around the world).
You access the news server through your Internet Service Provider.
See Usenet. See also newsgroup.
NIC (network interface card)
A computer circuit board or card installed in a computer so that the
computer can be connected to a network. Personal computers and
workstations on local area networks (LANs) typically contain a
network interface card specifically designed for the LAN
transmission technology, such as Ethernet or Token Ring.
O
online
To be communicating with another computer through a modem or
network. You are online when you log on and establish a connection.
You are offline when you lose or terminate a connection. See modem
and network.
online Help
A help manual that is displayed on the screen while you are actually
working in a program and need help. It can be accessed through the
Help menu at the top of the screen. Help for the Windows operating
system can be accessed from the Start button on the taskbar.
5–22 Learning More About Your Computer
Page 61

Understanding Computer Terms
online shopping
Ordering products on the Internet. You can purchase books, flowers,
music CDs, toys, groceries, stocks, airline tickets, cars, and much
more.
on the fly
To write on the fly means to write directly from source data to CD
data without first writing a disc image.
OS (Operating System)
The interface that permits a person and a computer to “talk” to one
another. Microsoft Windows, the most popular operating system,
displays icons, menus, and dialog boxes to find out what you want.
You use a mouse and keyboard to reply. See Microsoft Windows. See
also interface.
P
packet writing
A method of writing data on a CD in small increments. Packets can be
of fixed or variable length. Roxio’s DirectCD software supports
packet writing. Contrast with track-at-once and disc-at-once.
parallel port
A connector on the back of the computer for plugging in a parallel
cable attached to a parallel device, such as a printer. Data is
transferred, one byte at a time, through eight data wires (one for each
bit in the byte). All eight bits travel side b y side and arri ve at the same
time. A parallel port is faster than a serial port, which lets data
through one bit at a time. See byte. See also serial port.
path
A sequence of information that directs the operating system to a file.
For example, C:\Windows\Clouds.bmp is the path to a bitmap file
named Clouds. It is located in a folder named Windows, which is
located on the C drive.
Learning More About Your Computer 5–23
Page 62

Understanding Computer Terms
peripheral
An external device connected to a computer, such as a monitor,
keyboard, mouse, joystick, scanner, printer, and digital camera. See
component.
PDF (Portable Document Format)
A file format that has captured all the elements of a printed document
as an electronic image, which you can view, navigate, print, or
forward to someone else. PDF files are created using Adobe Acrobat,
Acrobat Capture, or similar products. To view and use the files, you
need the free Acrobat Reader, which you can easily download. Once
you have downloaded the Reader, it starts automatically whenever
you want to look at a PDF file.
photo CD
A CD format based on the CD-ROM XA and Orange Book Hybrid
Disc specifications; it is used to store photographic images for display
and printing.
physical format
The physical format of a CD determines how data is recorded in each
sector. The various physical formats are defined by the color book
standards, such as Red Book, Yellow Book, and Orange Book.
pixel (short for picture element)
One of the individual dots that compose a graphical image. See
graphics.
PMA (Program Memory Area)
An area on a recordable CD that temporarily contains the table of
contents information when tracks are written in a session that is not
yet closed. When the session is closed, this same information is
written in the session lead-in.
playlist
Tracks chosen to be played from a CD or DVD.
5–24 Learning More About Your Computer
Page 63

Understanding Computer Terms
plug-and-play
A feature introduced with Windows 95 to simplify the use of some
peripheral devices. Once the device is installed (in accordance with
the manufacturer’s instructions), you can plug it into the computer
while the computer is running. The operating system automatically
recognizes the new device. In order to connect a non-plug-and-play
device, you must first shut down the computer. See peripheral.
pop-up menu
A list of options that pops up when you right-click an icon on the
desktop or taskbar, the vacant part of the desktop, a selection in a
document, or a file in Windows Explorer. See right-click.
premastering
The process of preparing data to be recorded onto a CD. This includes
dividing the data into sectors and recording those sectors with the
appropriate header (address) and error correction information. In the
case of recordable CD systems, premastering and mastering are done
in one operation, resulting in a ready-to-read CD.
Processor (short for microprocessor)
The brains of the computer. See microprocessor
product key
A unique series of letters and numbers that is assigned to each
software package you buy. You are asked to enter the product key
when you install the software. When you register the software, you
transmit the product key to the manufacturer for entry in a customer
database. Registration activates your warranty. When you telephone
for technical support, you are asked for the product key. The
technician matches it against the database to determine whether you
qualify for support. You should keep a record of all product keys to
protect your investment. They are comparable to the serial numbers
on hardware. See software. See also hardware.
Learning More About Your Computer 5–25
Page 64

Understanding Computer Terms
program
A set of instructions, written in a programming language understood
by the computer, that tells the hardware what tasks to perform. Some
programs are installed at the factory as ROM chips that cannot be
altered; they are essential for operating the microprocessor. These
programs are called firmware. Most programs are installed as
software from removable storage media. The word “program,”
howev er, is commonly used for specific type of software applications
that create data files. See data files. See also hardware and software.
R
RAM (Random Access Memory)
The main memory of the computer. It holds a copy of the operating
system (OS), any programs that are running on the computer, and an y
data that is being processed. RAM is temporary memory; turning off
the computer clears RAM. The more RAM your computer has, the
faster the programs respond. See main memory, OS, program, and
data file. See also ROM.
random erase
The ability to erase a single file at a time from a CD-ReWritable CD,
freeing up CD space for immediate re-use, just as you would do on a
hard or floppy disk. (Available with CD-RW CDs and DirectCD).
recordable disc
The media used in recordable CD systems. The blank CD is made of a
bottom layer of poly carbonate with a preformed track spiral, which
the recording laser follows when inscribing information onto the CD.
A translucent layer of recordable material is laid on top of the
bicarbonate, then a reflective layer (gold or silver colored). On top
there is a thin layer of lacquer and sometimes a printed label. The
standard recordable CD is “write-once,” which means data written to
it cannot be erased, although it is possible to add data in a later
session. See multi-session. For erasable and rewritable CDs, see
CD-RW.
5–26 Learning More About Your Computer
Page 65

Understanding Computer Terms
right-click
T o press and quickly release the right mouse b utton to display a menu
of options. See pop-up menu.
ROM (Read-Only Memory)
Memory that contains the basic instructions for the microprocessor.
ROM is permanent memory; turning off the computer does not erase
it. Since you cannot change or write to ROM, it is referred to as
read-only. See microprocessor. See also RAM.
Run-In/Run-Out Blocks
Blocks of written data before and after a packet or a track. These
blocks allow the recorder to synchronize with the data on the CD and
to finish up interleaved data. Four run-in blocks and two run-out
blocks are written for each packet.
S
scanner
A device that creates digital images of printed documents and
photographs. Optical character recognition (OCR) and photo
manipulation programs allow you to save and edit the images on your
computer. See digital
screen saver
A moving picture or pattern that appears on the screen when you stop
using your computer for a specified period of time. Originally
designed to protect the monitor, screen savers are now used for
amusement.
scroll
T o gradually mo ve information across the screen when a document or
Web page is too long or too wide to view all at once. Scroll bars are
located along the right side and across the bottom of a window. When
scroll arrows are present at the ends of the bars, you know that some
information is off the screen. Click one of the arrows to scroll the
information into view. See click.
Learning More About Your Computer 5–27
Page 66

Understanding Computer Terms
scroll mouse
A mouse with a scroll wheel (between the two mouse buttons) for
automatic scrolling through long documents or Web pages. See scroll
and mouse.
search engine
A program, accessed on the Internet, that allows you to search large
databases for information by using keywords or phrases. See
database.
sector
The smallest recordable unit on a CD. A CD can contain [(75 sectors
per second) x (60 seconds per minute) x (number of minutes on a
CD)] sectors. The amount of data contained in the sector depends on
the physical format in which it is recorded; for “regular” CD-ROM
data, you can fit 2048 bytes (2 kilobytes) of data into a sector.
secure Web site
A Web site that encrypts data to protect it from unauthorized use.
When you purchase items over the Internet, you are asked to type
your name, mailing address, e-mail address, and credit card
information on an electronic form. Sending information to a secure
W eb site is comparable to gi ving it ov er the telephone when you order
from a catalog. (Never send your social security number over the
Internet. Criminals can steal your identity with your social security
number.) See encrypt.
sequential erase
Erasing the entire CD so that it can be re-used. (Available with
CD-RW CDs).
serial port
A small connector on the back of the computer (or keyboard) for
plugging in a thin cable attached to a serial device, such as a mouse.
Serial devices transfer data one bit at a time through a data wire. The
serial cable has two wires for bi-directional communication (sending
and receiving information simultaneously). See bit. See also parallel
port.
5–28 Learning More About Your Computer
Page 67

Understanding Computer Terms
server
A computer with a large hard drive that serves (provides information
to) other computers connected to it on a network. In a local area
network, several computers in the same room or all the computers in a
high-rise office building may be connected to a server. The server
stores everyone’s files. The Internet is the largest computer netw ork in
the world. It is a network of servers. When you send or receiv e e-mail,
it travels through a series of servers to which both the sender’s and
receiver’s computer are connected through a modem. When you enter
a Web site address in the address box of your browser, Internet
protocol commands the Web server to locate the site you requested,
transmit the files to your computer, and display them on your monitor.
session
As defined in the Orange Book, a recorded segment of a CD that may
contain one or more tracks of any type (data or audio). In data
recording, there is usually only one track per session. In audio
recording, all audio tracks are contained in a single session. A lead-in
and lead-out are recorded for every session on a CD.
session-at-once
Session-at-once is a subset of disc-at-once, used for CD Extra. In
session-at-once recording, a first session containing multiple audio
tracks is recorded in a single pass; the laser is then turned off, but the
CD is not closed. A second (data) session is then written and the CD
is closed.
shareware
Software you can try before you buy. After a trial period, usually 30
days, the program either uninstalls or refuses you access unless you
pay for it. You can download shareware from the Internet. See
software.
Learning More About Your Computer 5–29
Page 68

Understanding Computer Terms
shortcut
An icon on the Windows desktop that you double-click to launch a
program. Without the shortcut, you click the Start button on the
Windows taskbar, point to Programs to display a menu of programs
installed on your computer, and click the one you want to launch. You
can create shortcuts to your favorite programs. See icon and
double-click.
shortcut menu
A menu that pops up when you right-click an icon on the Windows
desktop or taskbar, the vacant part of the desktop, a selection in a
document, or a file in Windows Explorer. The options on the pop-up
menu are the most commonly used commands that relate to the item
you right-clicked. See right-click.
sleep mode
A low-power state that saves electricity when the computer is on but
not in use.
software
A program you can install on computer from a disk, CD, DVD, Zip
disk, or the Internet. Software can be upgraded or uninstalled. It may
contain system files for an operating system (OS), an application for
creating data files, a utility for making the computer run eff iciently, or
a game for entertainment. See OS, data file, and utility.
streaming
To deliver real-time multimedia content that you can play while it is
being downloaded from the Internet, not afterwards. Se veral tools use
advanced streaming technology: Microsoft Media Player,
RealNetworks RealPlayer, and Vivo VideoNow.
surf
To jump from place to place on the Internet, searching for topics of
interest, by clicking hyperlinks. Instead of searching for specific
information, surfing is an undirected type of Web browsing. You just
click whatever catches your interest. See hyperlink.
5–30 Learning More About Your Computer
Page 69

Understanding Computer Terms
surge protector
A device that protects a computer from fluctuations in power. A surge
protector regulates the flow of electricity to the computer and
prevents high-voltage surges from reaching and possibly damaging
the equipment.
SVGA (Super Video Graphics Array)
A video display standard that offers greater resolution and color depth
than VGA. The resolution (clarity and sharpness) of an image is
determined by the number of pixels that can be displayed per square
inch. Color depth is determined by the number of colors (from 256 to
16 million) that can be displayed simultaneously . The number of both
pixels and colors is limited by the amount of video memory on the
SVGA system. See pixel.
system file
A resource file that contains resources needed by the operating
system, such as fonts, icons, and default dialog boxes.
T
taskbar
See Windows taskbar.
table of contents
Shows the number of tracks, their starting locations, and the total
length of the data area for a whole CD or any session within a CD.
The table of contents does not show the length of each track, only its
starting point.
track
Every time you write to a CD, you create at least one track that is
preceded by a gap. Any session may contain one or more tracks, and
the tracks within a session may be of the same or of different types.
For example, a mixed-mode CD contains data and audio tracks.
Learning More About Your Computer 5–31
Page 70

Understanding Computer Terms
track-at-once
A method of writing data to a CD. Each time a track (data or audio) is
completed, the recording laser is stopped, even if another track will be
written immediately afterwards. Link and run blocks are written when
the laser is turned on and off.
U
UDF (Universal Disk Format)
A file system endorsed by OSTA (Optical Storage Technology
Association) for use with packet writing and other recordable optical
disc technologies. Also known as EAN.
upload
To send information to another computer on the Internet.
UPS (Uninterruptible Power Supply)
A device that provides a short-term backup power supply as well as
surge protection. See surge protector.
URL (Uniform Resource Locator)
The address of a Web site, for example, www.compaq.com.
USB port (Universal Serial Bus Port)
A connector for plugging in multiple, ultra-high-speed peripherals.
USB ports are gradually replacing serial and parallel ports and are
eliminating the need for so many connectors and cables. (Multiple
USB peripherals can be linked together in a daisy chain to share the
same port.) Windows 98 included a built-in driver for USB
peripherals. Windows Millennium supports a new USB standard that
is 40 times faster than the previous standard. See serial port and
parallel port. See also peripheral</i></a> and driver.
Usenet (Users’ Network)
A worldwide network of computers set up to transmit messages to
newsgroups. See newsgroups.
5–32 Learning More About Your Computer
Page 71

Understanding Computer Terms
utility
A small program that helps your computer to manage system
resources for optimum performance. For example, anti-virus,
diagnostic, file backup, file compression, and font management
utilities.
V
V.90 standard
A standard adopted in 1998 to resolve competition between two
technologies for 56KBps modems. (If your modem does not conform
to the V.90 standard, you can visit the manufacturer’s Web site and
download a software update.)
video CD
A standard for displaying full motion pictures with associated audio
on CD. The video and sound are compressed together using the
MPEG1 standard and recorded onto a CD Bridge CD. Video CDs
contain one data track recorded in CD-ROM XA Mode 2 Form 2.
This is always the first track on the CD (Track 1). The ISO 9660 file
structure and a CD-I application program are recorded on this track,
as well as
the Video CD information area that gives general information about
the Video CD. After the data track, video is written in one or more
subsequent tracks within the same session. These tracks are also
recorded in Mode Form 2. The session is closed after all tracks have
been written.
video phone
See Internet phone.
virus
A program written to cause harm to computers. A virus can cause
unusual messages to be displayed on the screen, destroy information
on the hard drive, or cause your hard drive to crash. Some viruses
affect your computer immediately; others are set to activate on a
certain date. See anti-virus utility. See also program, hard disk, and
hard drive.
Learning More About Your Computer 5–33
Page 72

Understanding Computer Terms
W
WAV
A file format used to store sounds. WAV sound files can be identified
by the file extension .wav. Microsoft and IBM developed the format
for Windows-based programs that support sound. See file extension.
Web
See World Wide Web.
Web browser
See browser.
window
A framed area that is displayed on the Windows desktop after you
select an item or open a program.
Windows
See Microsoft Windows.
Windows desktop
The main screen you see when your computer completes startup. The
desktop displays icons (small pictures) that represent items in the
operating system (such as My Computer and Recycle Bin), shortcuts
to programs installed on your computer, and shortcuts to folders or
files. See shortcut.
Windows Explorer
A file management program that lets you see the hierarchy of folders
on your computer and the files and subfolders stored in each folder.
Visualizing the hierarchy is useful for copying and moving files. You
can open the folder that contains the file you want to move or copy,
click and drag the file to a new folder, and then drop it in. To find
Windo ws Explorer, click the Start button, and point to Programs. You
can also create a shortcut to Windows Explorer.
5–34 Learning More About Your Computer
Page 73

Understanding Computer Terms
Windows taskbar
The gray bar across the bottom of the screen that you see when your
computer completes startup. The Start button is on the left end of the
taskbar, and the systray (a tray with icons and the computer clock) is
on the right. Programs that are running but have been minimized are
displayed as buttons in the middle of the taskbar.
wizard
Part of a program that guides you through a complex process, such as
signing up with an Internet service provider or posting a Web site to a
server. Most programs on CD-ROMs have wizards to guide you
through the installation process. World Wide Web: A system of
Internet servers supports documents formatted in HTML. See HTML.
See also server.
Z
Zip disk
High-capacity, removable storage media made by Iomega
Corporation.
Zip drive
The drive that reads and writes to a Zip disk. A Zip drive can be
internal (installed inside the computer) or external (a peripheral). An
external Zip drive is portable; it can be taken to a friend’s house or a
client’s office.
zipped file
A file that has been squeezed to a smaller size by compression
software, such as WinZip, developed by Niko Max Computing. An
archive (group of related files that are zipped together) can be
transmitted as an e-mail attachment much faster than individual files.
An archive takes up less storage space on your disk and can be
identified by the file extension .zip. An archive contains a
self-extracting program with the file extension .exe (for executable).
Double-click the executable file, and a wizard guides you through the
process of unzipping the files. See file extension and wizard.
Learning More About Your Computer 5–35
Page 74

Understanding Computer Terms
5–36 Learning More About Your Computer
 Loading...