

Page 1

CL50 User Manual
Page 2

Safety Instructions
Use the following safety guidelines to help protect yourself
and your computer.
When Using Your Computer
CAUTION: Do not operate your portable computer
for an extended period of time with the base
resting directly on your body. With extended
operation, heat can potentially build up in the
base.
Allowing sustained contact with the skin could
cause discomfort or, eventually, a burn.
z Do not attempt to service the computer yourself. Always
follow installation instructions closely.
z Do not carry a battery in your pocket, purse, or other
container where metal objects (such as car keys) could
short-circuit the battery terminals. The resulting
excessive current flow can cause extremely high
temperatures and may result in damage from burns.
z Be sure that nothing rests on your AC adapter’s power
cable and that the cable is not located where it can be
tripped over or stepped on.
z Place the AC adapter in a ventilated area, such as a
desktop or on the floor, when you use it to run the
Page 3

computer or to charge the battery. Do not cover the AC
adapter with papers or other items that will reduce
cooling; also, do not use the AC adapter while it is
inside a carrying case.
z Do not push objects into air vents or openings of your
computer. Doing so can cause fire or electric shock by
shorting out interior components.
z Use only the AC adapter and batteries that are
approved for use with this computer. Use of another
type of battery or AC adapter may risk fire or explosion.
z Danger of explosion if battery is incorrectly replaced.
z Replace only with the same or equivalent type battery
recommended by the manufacturer.
z Dispose of used batteries according to the
manufacturer’s instructions.
z Before you connect the computer to a power source,
ensure that the voltage rating of the AC adapter
matches that of the available power source.
- 115 V/60 Hz in most of North and South America and
some Far Eastern countries such as South Korea and
Taiwan.
- 100 V/50 Hz in eastern Japan and 100 V/60Hz in
western Japan.
- 230 V/50 Hz in most of Europe, the Middle East, and
the Far East.
z If you use an extension cable with your AC adapter,
Page 4

ensure that the total ampere rating of the products
plugged in to the extension cable does not exceed the
ampere rating of the extension cable.
z To remove power from the computer, turn it off, remove
the battery, and disconnect the AC adapter from the
electrical outlet.
z To help avoid the potential hazard of electric shock, do
not connect or disconnect any cables or perform
maintenance or reconfiguration of this product during an
electrical storm.
z Do not dispose of batteries in a fire. They may explode.
Check with local authorities for disposal instructions.
z When setting up the computer for work, place it on a
level surface.
z When traveling, do not check the computer as baggage.
You can put your computer through an X-ray security
machine, but never put your computer through a metal
detector. If you have the computer checked by hand, be
sure to have a charged battery available in case you are
asked to turn on the computer.
z When traveling with the hard drive removed from the
computer, wrap the drive in a non-conducting material,
such as cloth or paper. If you have the drive checked by
hand, be ready to install the drive in the computer. Your
can put the hard drive through an X-ray security
machine, but never put the drive through a metal
Page 5

detector.
z When traveling, do not place the computer in overhead
storage compartments where it could slide around. Do
not drop your computer or subject it to other mechanical
shocks.
z Protect your computer, battery, and hard drive from
environmental hazards such as dirt, dust, food, liquids,
temperature extremes, and overexposure to sunlight.
z When you move your computer between environments
with very different temperature and/or humidity ranges,
condensation may form on or within the computer. To
avoid damaging the computer, allow sufficient time for
the moisture to evaporate before using the computer.
Î NOTICE: When taking the computer from
low-temperature conditions into a warmer
environment or from high-temperature conditions
into a cooler environment, allow the computer to
acclimate to room temperature before turning on
power.
z When you disconnect a cable, pull on its connector or
on its strain relief loop, not on the cable itself. As you
pull out the connector, keep it evenly aligned to avoid
bending any connector pins. Also, before you connect a
cable make sure both connectors are correctly oriented
and aligned.
z Before you clean your computer, turn it off, unplug it
Page 6

from its power source, and remove the battery.
z Handle components with care. Hold a component such
as a memory module by its edges, not its pins.
CAUTION: When using your telephone equipment,
basic safety precautions should always be
followed to reduce the risk of fire, electric shock
and injury to persons, including the following:
z Do not use this product near water, for example, near a
bathtub, washing bowl, kitchen sink or laundry tub, in a
wet basement or near a swimming pool.
z Avoid using a telephone (other than a cordless type)
during an electrical storm. There may be a remote risk
of electric shock from lightning.
z Do not use the telephone to report a gas leak in the
vicinity of the leak.
z Use only the power cord indicated in this manual.
Page 7

Regulatory Notices
This equipment has been tested and found to comply with
the limits for a Class B digital device, pursuant to Part 15 of
the FCC rules. These limits are designed to provide
reasonable protection against harmful interference in a
residential installation.
Any changes or modifications made to this equipment may
void the user's authority to operate this equipment.
This equipment generates, uses, and can radiate radio
frequency energy and, if not installed and used in
accordance with the instructions, may cause harmful
interference to radio communications. However, there is no
guarantee that interference will not occur in a particular
installation. If this equipment does cause harmful
interference to radio or television reception, which can be
determined by turning the equipment off and on, the user is
encouraged to try to correct the interference by one or more
of the following measures:
• Reorient or relocate the receiving antenna.
• Increase the separation between the equipment and
receiver.
• Connect the equipment into an outlet on a circuit
different from that to which the receiver is connected.
• Consult the dealer or an experienced radio/TV
technician for help.
• All external cables connecting to this basic unit must
be shielded. For cables connecting to PCMCIA cards,
see the option manual or installation instructions.
Page 8

Federal Communications Commission (FCC)
PART 68 Warning
This equipment complies with Part 68 of the FCC Rules. On
the bottom of the computer is a label that contains, among
other information, the FCC Registration Number and
Ringer Equivalence Number (REN) for this equipment. You
must, upon request, provide this information to your
telephone company.
FCC Part 68 Registration Number: 6CTTAI - 25876 - FB –
E
REN: 0.8B
The REN is useful to determine the quantity of devices you
may connect to your telephone and still have those devices
ring when your number is called. In most, but not all areas,
the sum of the REN's of all devices should not exceed five
(5.0). To be certain of the number of devices you may
connect to your line, as determined by the REN, you should
call your local telephone company to determine the
maximum REN for your calling area.
If your MODEM causes harm to the telephone network, the
local Telephone Company may discontinue your service
temporarily. If possible, they will notify you in advance.
However, if advanced notice isn't practical, you will be
notified as soon as possible. You will be informed of your
right to file a complaint with the FCC.
Your telephone company may make changes in its facilities,
equipment, operations, or procedures that could affect the
proper functioning for your equipment. If they do, you will be
notified in advance to give you an opportunity to maintain
uninterrupted telephone service.
Page 9

Federal Communications Commission (FCC)
Statement
You are cautioned that changes or modifications not
expressly approved by the part responsible for compliance
could void the user’s authority to operate the equipment.
This equipment has been tested and found to comply with
the limits for a Class B digital device, pursuant to part 15 of
the FCC rules. These limits are designed to provide
reasonable protection against harmful interference in a
residential installation. This equipment generates, uses and
can radiate radio frequency energy and, if not installed and
used in accordance with the instructions, may cause
harmful interference to radio communications. However,
there is no guarantee that interference will not occur in a
particular installation. If this equipment does cause harmful
interference to radio or television reception, which can be
determined by turning the equipment off and on, the user is
encouraged to try to correct the interference by one or more
of the following measures:
-Reorient or relocate the receiving antenna.
-Increase the separation between the equipment and
receiver.
-Connect the equipment into an outlet on a circuit different
from that to which the receiver is connected.
-Consult the dealer or an experienced radio/TV technician
for help.
You are cautioned that changes or modifications not
expressly approved by the party responsible for compliance
could void your authority to operate the equipment.
Page 10

FCC RF Radiation Exposure Statement:
This Transmitter must not be co-located or operating in
conjunction with any other antenna or transmitter.
SAR Exposure
This device has been tested for compliance with FCC RF
Exposure (SAR) limits in typical flat configurations.
In order to comply with SAR limits established in the ANSI
C95.1 standards, it is recommended when using a CF card
that the integrated antenna is positioned more than 1.5cm
from your body or nearby persons during extended periods
of operation. If the antenna is positioned less than 1.5cm
from the user, it is recommended that the user limit the
exposure time.
Page 11

CE Notice (European Union)
Marking by the symbol
indicates compliance of this
Compal computer to the EMC Directive and the Low
Voltage Directive of the European Union. Such marking
indicates that this Compal system meets the following
technical standards:
• EN 55022 — "Limits and Methods of Measurement of
Radio Interference Characteristics of Information
Technology Equipment."
• EN 55024 — "Information technology equipment -
Immunity characteristics - Limits and methods of
measurement."
• EN 61000-3-2 — "Electromagnetic compatibility (EMC)
- Part 3: Limits - Section 2: Limits for harmonic current
emissions (Equipment input current up to and
including 16 A per phase)."
• EN 61000-3-3 — "Electromagnetic compatibility (EMC)
- Part 3: Limits - Section 3: Limitation of voltage
fluctuations and flicker in low-voltage supply systems
for equipment with rated current up to and including 16
A."
• EN 60950 — "Safety of Information Technology
Equipment."
NOTE: EN 55022 emissions requirements provide for
two classifications:
• Class A is for typical commercial areas.
Page 12

• Class B is for typical domestic areas.
Page 13

To determine which classification applies to your computer,
examine the FCC registration label located on the back
panel of the computer. If the label indicates a Class A rating,
the following warning applies to your computer:
RF INTERFERENCE WARNING: This is a Class A
product. In a domestic environment this product may
cause radio frequency (RF) interference, in which case
the user may be required to take adequate measures.
This Compal device is classified for use in a typical Class B
domestic environment.
A "Declaration of Conformity" in accordance with the
preceding directives and standards has been made and is
on file at Compal Computer Corporation.
CCC Notice (China Only)
On Class A systems, the following warning will appear near
the regulatory label:
Warning: This is a Class A product. In a domestic
environment this product may cause radio interference,
in which case the user may be required to take
adequate measures.
Page 14

BSMI Notice (Taiwan Only)
Most Compal computer products are classified by the
Bureau of Standards, Meteorology and Inspection (BSMI)
as Class B information technology equipment (ITE).
This Compal device is classified for use in a typical Class B
domestic environment.
CANADIAN DOC NOTICE
This digital apparatus does not exceed the Class B limits for
radio noise emissions from digital apparatus as set out in
the Radio Interference Regulation of the Canadian
Department of Communications.
"Le présent appareil numérique n'èmet pas de bruits
radioélectriques dépassant les limites applicables aux
appareils numériques de la class B prescrites dans le
Règlement sur le brouillage radioélectrique édicté par le
ministère des Communications du Canada"
Page 15

Specification
This part describes the functional specifications for the
Note Book personal computer CL50 series
CPU
• Intel Mobile Pentium M Processor 1.4GMHz, 1.5GMHz, 1.6MHz,
1.7GMHz
• µFCPGA CPU
Chip Set
• Intel 855PM for system controller.
• Intel ICH4-M for PCI to LPC Bridge, PCI IDE controller, Power
Management Logic.
• NS87591 for Keyboard Controller, Battery management Unit, and
RTC.
• ENE CB1410 for Card Bus PCMCIA controller.
• ATI M9-P for VGA controller.
• ACL202 for AC97 CODEC.
• SMCLPC47N227 for super I/O controller.
• VT6301S for 1394 controller
• RTL8100BL for LAN controller
• W83L518D for Secure Digital
Memory
• No on board memory.
• On board with two 200-pin +2.5V SO-DIMM connector, supporting,
• 1 MB L2 Cache on CPU.
BIOS
• 512KB Flash ROM for system BIOS.
DDR memories card. Maximum upgradeable to 1024MB by two
512MB SO-DIMM module.
• Suspend to RAM/Disk.
• Password protection (System).
• Windows 98 ready with PnP
• Various hot key for system control.
Page 16

• Refreshable
• Complete ACPI 1.0B Function
Power
• 8 cells of LI-ION 2150mAH 18650 size, battery Pack with 63.6WH
capacity
• 4.5 hours operation with Battery Mark 4.0.1
• 3 Hrs charging time to 100% capacity on 4300mAH LI-ION Battery
(System off or Suspend)
One 2.5", 9.5mm Hard Disk, Up to 60GB
• Bus Master IDE
• 9.5m/m, 2.5”HDD Support
• Support Ultra 100 synchronous DMA
Select Bay devices
• 5.25” 12.7mm height CD-ROM device
• 5.25” 12.7mm height DVD-ROM & CD-RW combo device
• 5.25” 12.7mm height DVD-ROM device
• 5.25” 12.7mm height DVD-R/RW device
Options
• 256/512MB SO-DIMM DDR modules
• Li-ION Battery Pack
• MINI PCI Wireless module (Intel 802.11B/G module. WM3B2200BG )
• MDC Modem module
Touch Pad with two buttons
• Left Button
• Right Button
I/O Ports
• One 25 pins Parallel port, EPP/ECP Capability
• One 15 pins CRT port, Support DDC 2B
• One 7 pins TV out port
• One MIC In port
• One headphone-out Port
• One 2pins AC Adapter Jack
• One type II PCMCIA Card Bus slots
Page 17

• Three 4 pins USB ports
• One RJ11/RJ45 Port
• FIR
• Secure Digital slot(Option)
PCMCIA Card Organization
• One type II card sockets
• 1.8" 10.5mm removable ATA Device
• Card bus card or PC Care with hot insertion and removal
• ACPI 1.1 Compliant.
• Support 5V/3.3V PC Cards and 3.3V Card bus cards.
• Supports PCMCIA-ATA Specification.
Excellent Power Management Function
• Standby mode, Suspend to RAM or Suspend to Disk mode, by time
out or by hot key
• HDD Local Stand-By mode by time out
• LCD Local Stand-By mode by time out
• Low battery alarm by beep
• Auto-backlight off when LCD cover closed
• Full ACPI 1.0B supported
• LCD Auto-DIM mode by time out
Switch
• Power switch
• Lid switch
• Kill switch
• User Define Button 1, 2
AC Adapter
• Universal AC adapter module 60W
• 1/P range:90-264Vac,47-63Hz
• 0/P:19V,3.16A
Security
• Boot-up password protection
• Single level password architecture. (Supervisor)
Page 18

About this user’s manual
This user’s manual is designed to let you easily find the
information you need to get the most from your notebook.
Chapter 1 introduces you to the features of your computer.
Chapter 2 gives you useful details on using your computer.
Chapter 3 tells you how to look after your notebook
computer, whether at home or traveling.
Chapter 4 talks about PC Card peripherals and how to use
them.
Chapter 5 goes into more detail about power management
and explains how to conserve power while on the move.
Chapter 6 gives you tips on solving typical problems you
may run up against.
Chapter 7 introduces you to BIOS, the nervous system of
your computer, and how to change its fundamental
settings.
There is no need to read the manual from the beginning to
end. Simply find your way to the section that interests you
using the index, or browse through the manual.
You will come across the following icons in the manual:
Helpful pointers and tricks to get more from your notebook
To help you note and avoid possible damage to your notebook's
hardware or software, or loss of your work
Points out possible damage to property, personal injury or death
Page 19

Information in this document is subject to change without
notice.
© Compal Electronics, Inc. 2003. All rights reserved.
Trademarks used in this document: Microsoft and Windows
are registered trademarks of Microsoft Corporation.
Other trademarks and trade names may be used in this
document to refer to either the entities claiming the marks
and names or their products.
Page 20
1 Introducing Your Notebook
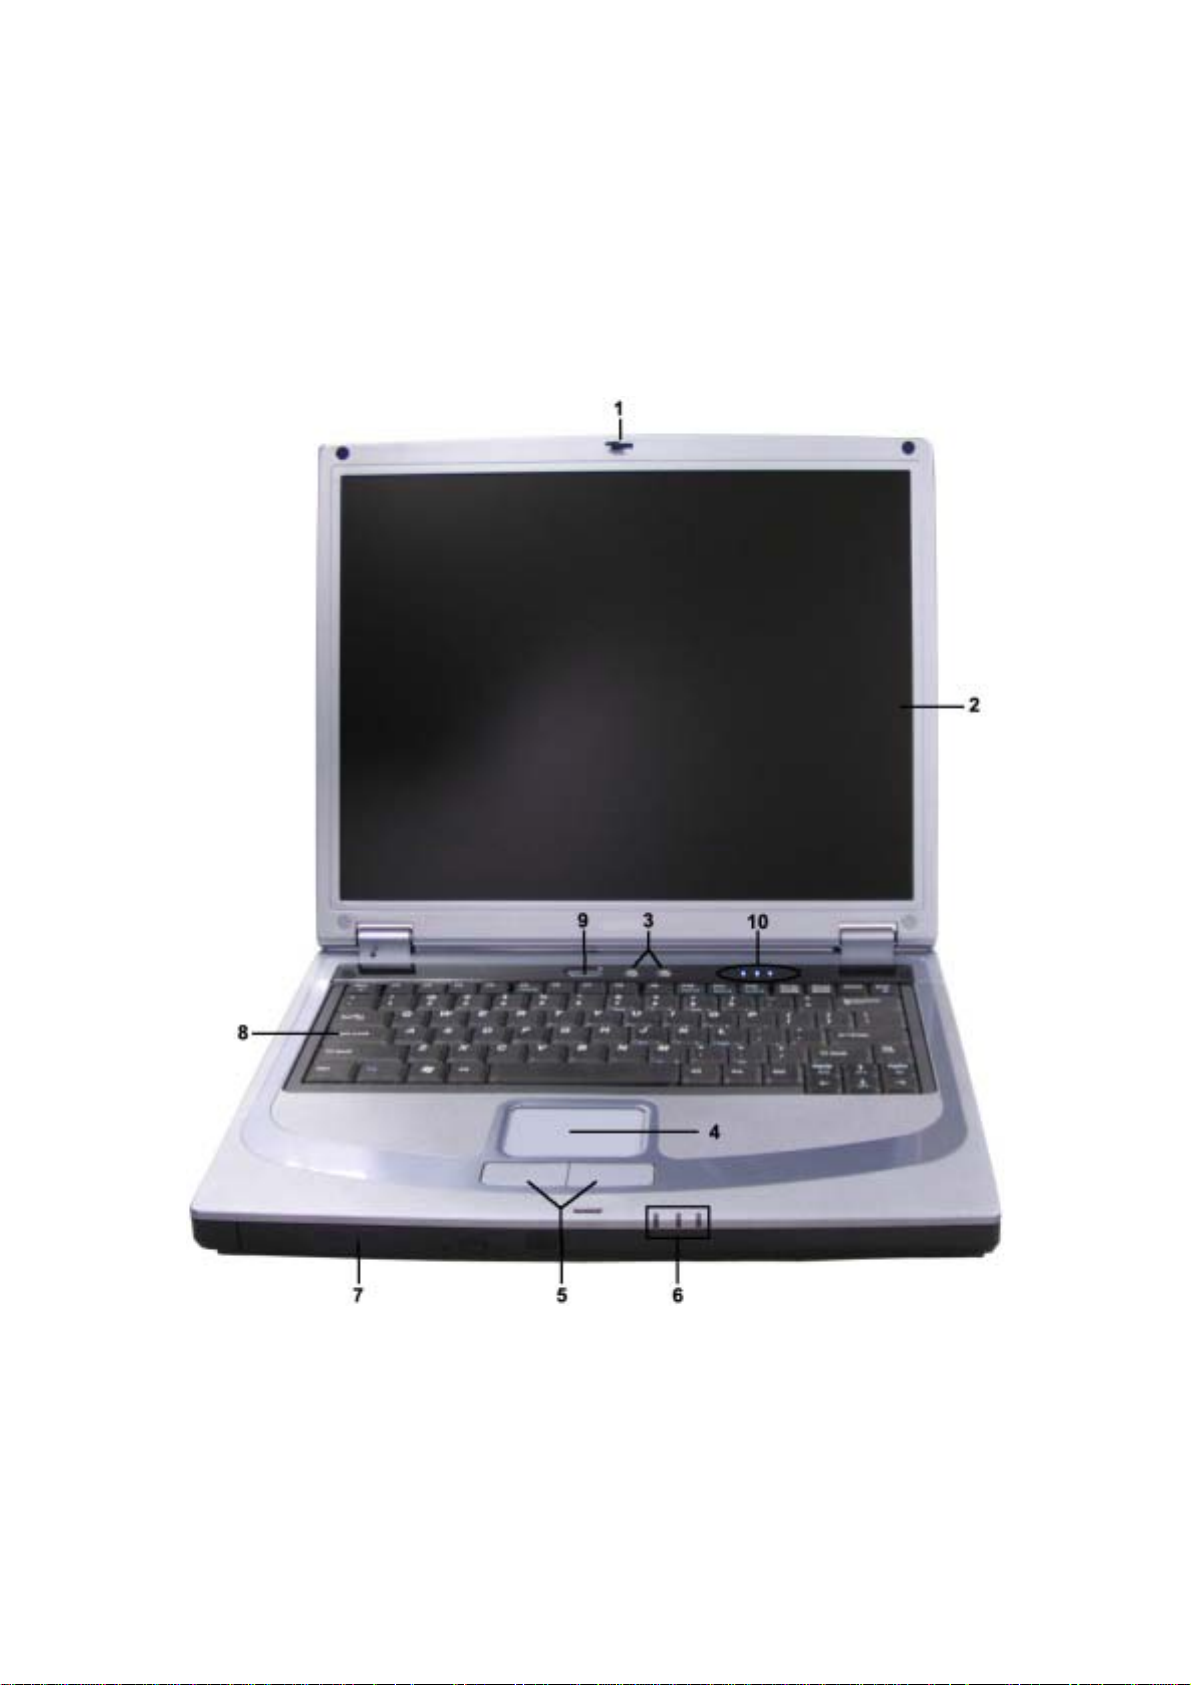
1.1 Front
Page 21

1 Case Latch 6 Device Status Lights
2 Display 7 Optical Media Drive
3 Easy Buttons 8
4 TouchPad 9 Power Button
5 TouchPad Buttons 10 Keyboard Status Lights
Keyboard
Page 22

1.1.1 Case Latch
Secures the display case to your notebook. To open the
display, slide the case latch to the right and lift the display.
When you close the display the case latch secures it
automatically.
Page 23

1.1.2 Display
Your display is either a 14.1" or 15.1” COLOR TFT/XGA or
COLOR TFT/SXGA+ LCD.
Page 24

1.1.3 Easy Buttons
These buttons launch your favorite programs.
Launches a pre-configured program.
Launches a pre-configured program.
Page 25
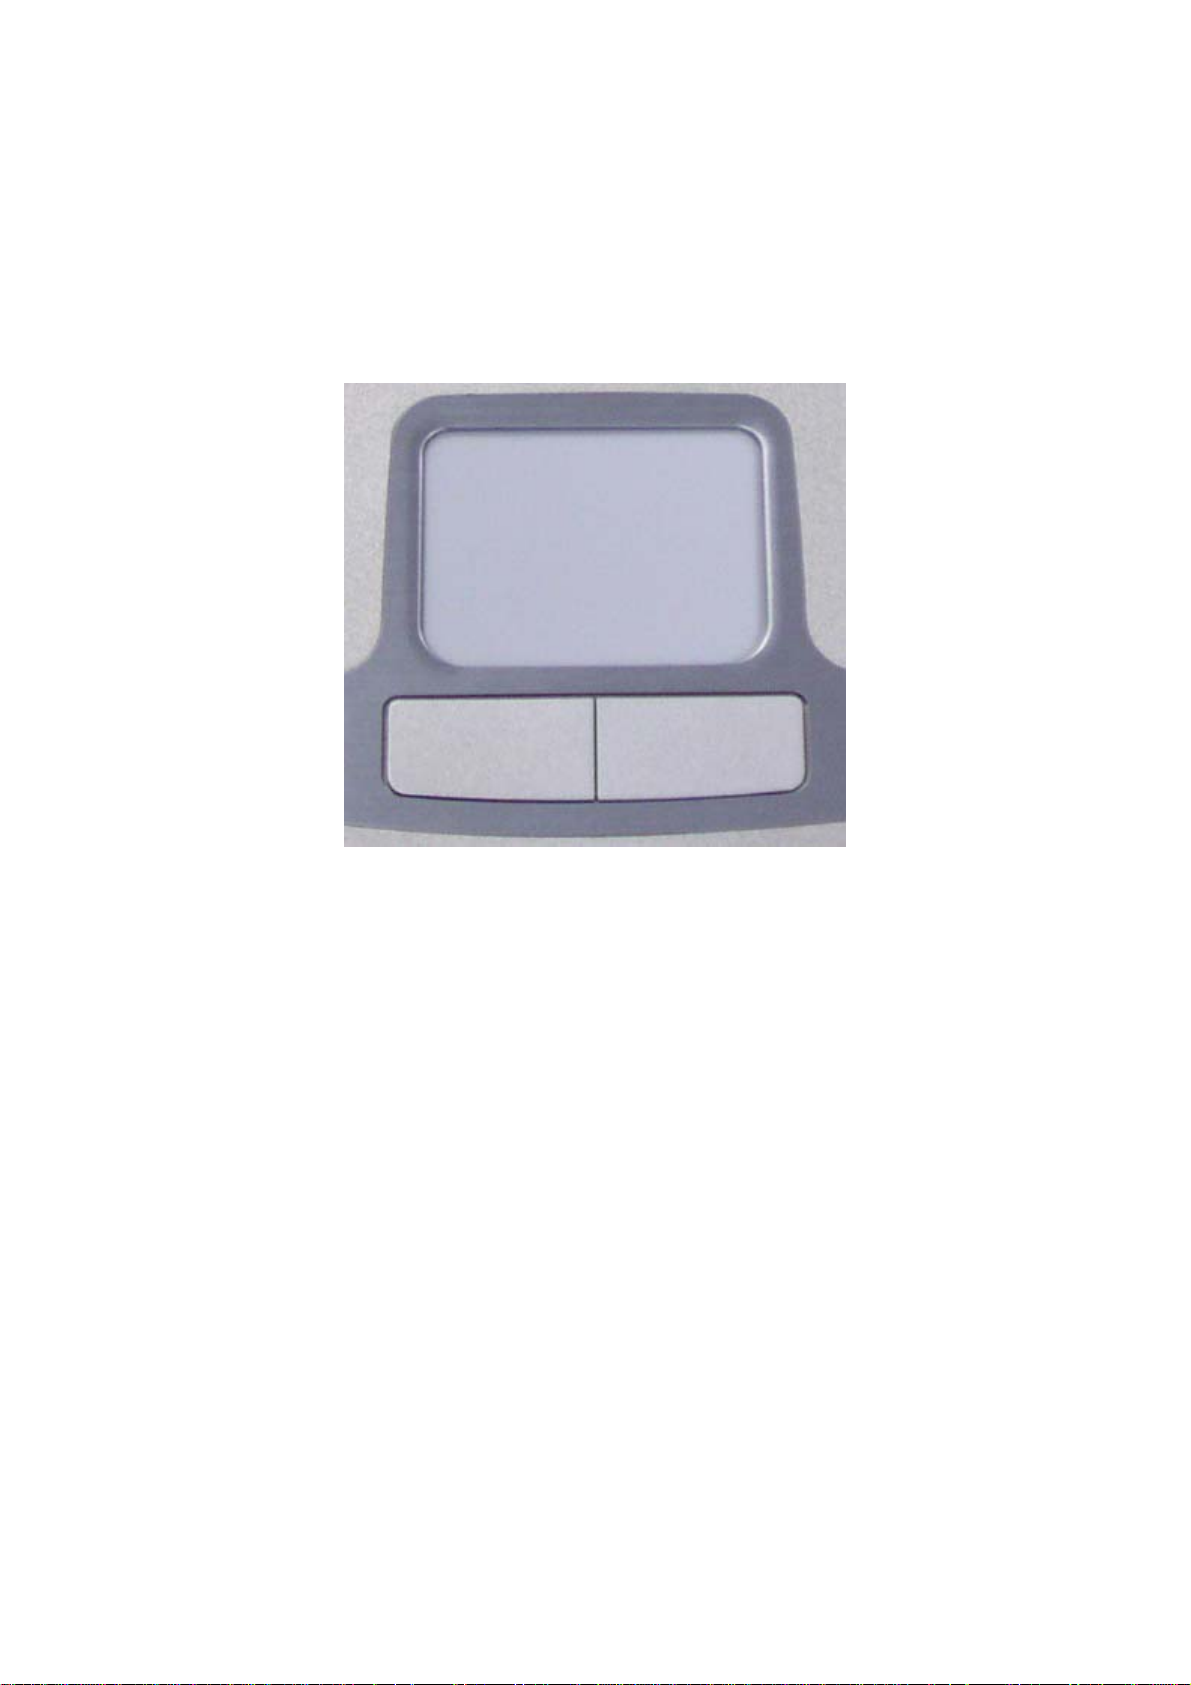
1.1.4 TouchPad
The TouchPad works like a desktop mouse. For more
information see Keyboard and TouchPad in Chapter 2.
Page 26

1.1.5 TouchPad Buttons
The left and right TouchPad buttons work like the left/right
buttons on a standard mouse.
Page 27
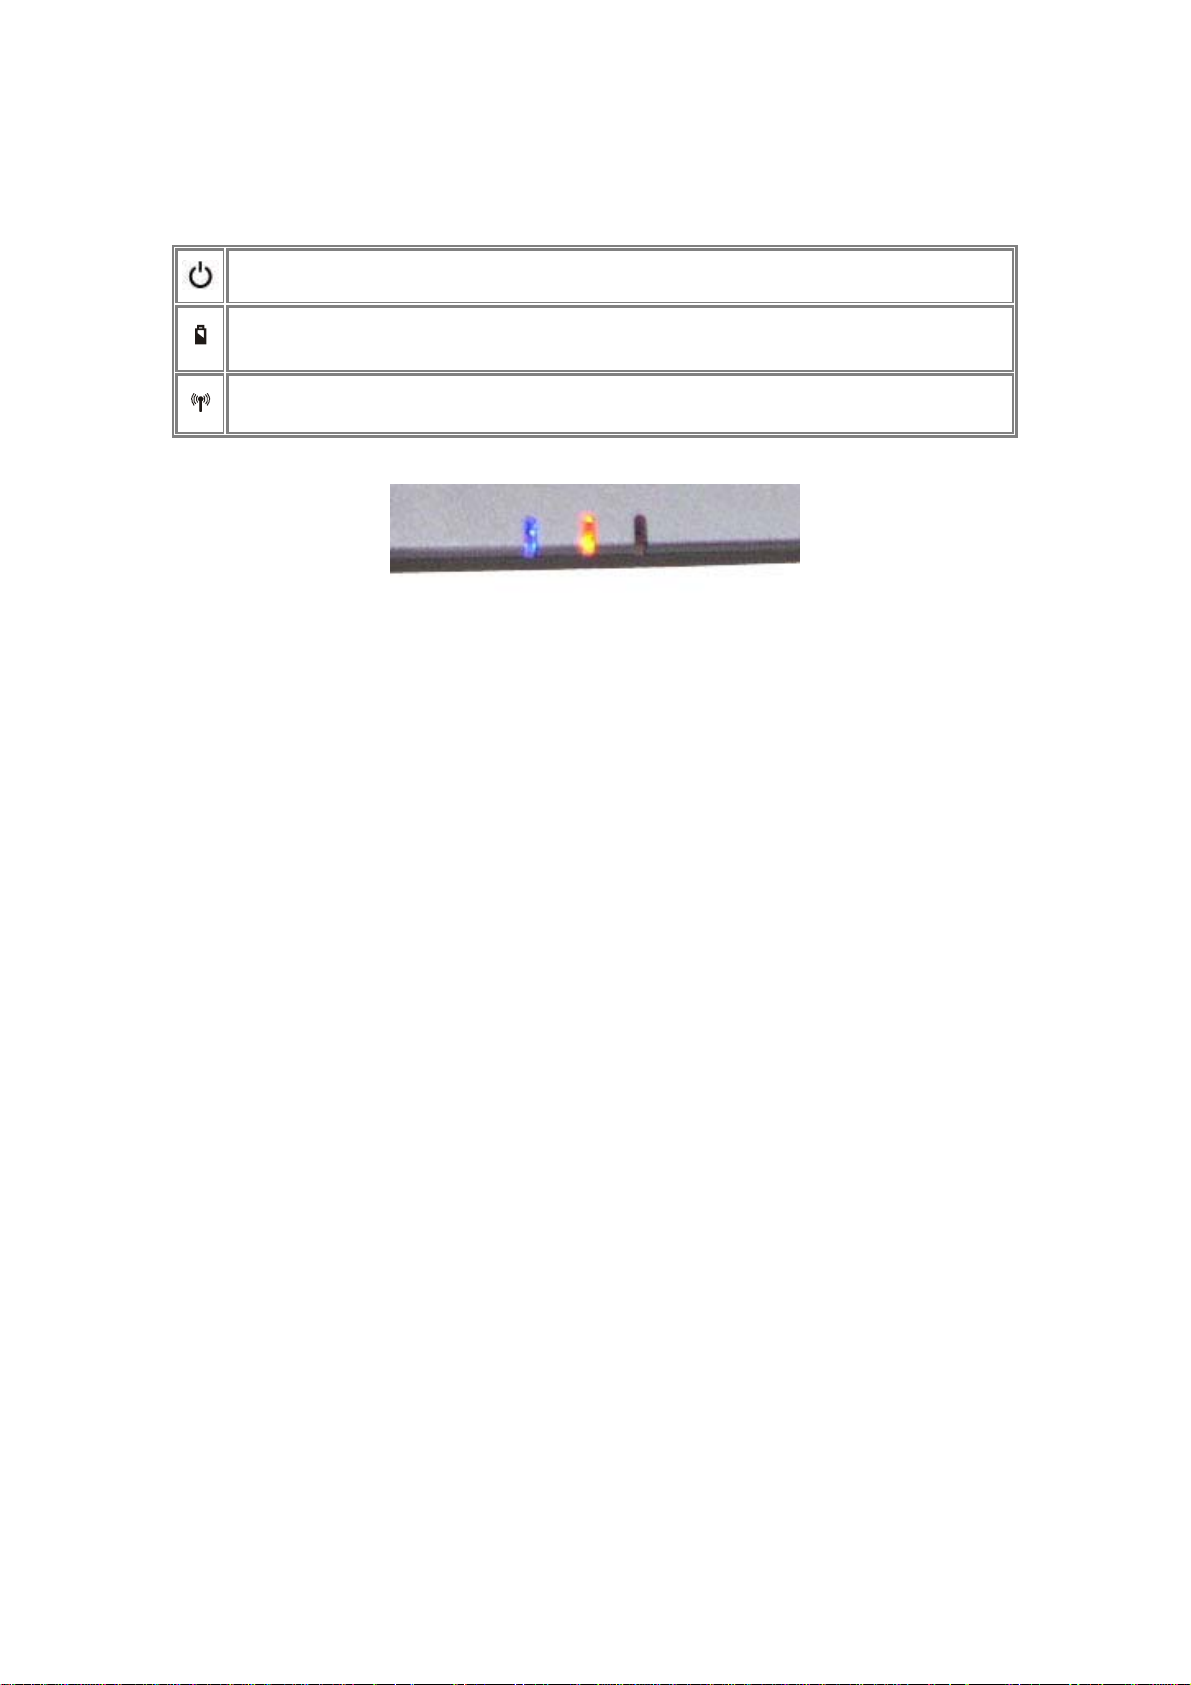
1.1.6 Device Status Lights
Indicates power on; flashing indicates standby mode.
Indicates battery status. For details, see Battery.
Indicates wireless communication status.
Page 28

1.1.7 Optical Media Drive
The optical media drive provides a means for you to
import/export data and small files into/from your computer.
Depending on the configuration of your computer, you may
either be able to record CDs or play DVDs.
Page 29

1.1.8 Keyboard
The keyboard includes a numeric keypad and the
®
Microsoft
See Keyboard and TouchPad in Chapter 2 for more on
using keyboard shortcuts.
Windows® logo key.
Page 30

1.1.9 Power Button
Press to turn your notebook on. For more on power settings
see Power Management.
Windows XP, which comes preinstalled, goes into the
shutdown sequence automatically if you press the power button
while on.
You can configure this in Control Panel: Power Options –
Advanced.
Page 31

1.1.10 Keyboard Status Lights
Indicates uppercase letter function enabled
Indicates numeric keypad enabled
Indicates scroll lock function enabled
Page 32

1.2 Right Side
1 Speaker
2 AC Adapter Connector
3 Air Fan
Page 33

1.2.1 Speaker
To adjust the system speaker volume, look under the
Sounds and Audio Devices Properties of the Control Panel.
See Chapter 2 for more details. Many software programs,
such as multimedia applications, also include their own
volume controls.
Page 34

1.2.2 AC Adapter Connector
Use this connector to attach the AC adapter to your
notebook. You can connect an AC adapter when your
notebook is switched on or off.
While the AC adapter works with electrical outlets worldwide,
power connectors and power strips vary from country to
country. Ensure you use compatible cable or correctly connect
the cable to the power strip or electrical outlet. Failure to do so
may cause fire or damage to equipment.
Page 35

1.2.3 Air Vent
An internal fan creates airflow through the vents, preventing
your notebook from overheating.
When it gets hot, your notebook will switch on the fans, which
may make some noise. This is normal, and does not mean there
is a problem.
Never block, push objects into, or allow dust to gather in the air
vents. Doing so may damage your notebook or cause a fire.
Page 36

1.3 Left Side
1 USB Connector
2 Infrared Port
3 PC Card Port
4 Audio Ports
5 Wireless Communication Switch
6 Speaker
Page 37

1.3.1 USB Connector
Use this port to connect a USB device, such as a mouse,
full-size external keyboard, or printer, to the computer.
USB is a peripheral expansion standard that supports a
data-transfer rate of up to 480 Mbps. USB peripherals have a
single standard for cables and connectors. You can install and
remove USB devices while the computer is on. This is known
as "hot swapping".
Page 38

1.3.2 Infrared Port
Use this port to send and receive infrared (IR) signals to
and from other IR-compatible devices. Supports a transfer
rate of up to 4 Mbps per second.
Page 39

1.3.3 PC Card Slot
Supports two type II PC Cards or one type III card. For
more information, see PC Cards in Chapter 4.
Page 40

1.3.4 Audio Ports
You can connect a headphone or an external speaker to
the
speakers are disabled when a device is connected to the
port.
port and a microphone to the port. The built-in
Page 41

1.3.5 Wireless Communication Switch
Turns the wireless communication function on or off. The
wireless communication LED
when the function is activated.
on the front panel lights
Page 42

1.3.6 Speaker
To adjust the system speaker volume, look under the
Sounds and Audio Devices Properties of the Control Panel.
See Chapter 2 for more details. Many software programs,
such as multimedia applications, also include their own
volume controls.
Page 43

1.4 Back
1 Security Cable Connector 5 Modem Jack
2 Parallel Port 6 Network Jack
3 External Monitor Port 7 TV-out Port
4 USB Ports x 2 8 IEEE 1394 Port
Page 44

1.4.1 Security Cable Connector
To protect your notebook from theft, you can purchase an
antitheft device. Instructions for use are included with such
devices.
Before purchasing any antitheft device, check that it will work
with your notebook's security cable connector.
Page 45

1.4.2 Parallel Port
Use this port to connect parallel devices, such as a printer.
To protect your notebook, wait 5 seconds after turning it off
before disconnecting any external device.
Page 46

1.4.3 External Monitor Port
Use this port to connect an external monitor to your computer.
See Display, Chapter 2-5.
Page 47

1.4.4 USB Connectors
Use these ports to connect up to three USB devices, such as
a mouse, full-size external keyboard, or printer.
USB is a peripheral expansion standard that supports a
data-transfer rate of up to 12 Mbps. USB peripherals have a
single standard for cables and connectors. You can install and
remove USB devices while the computer is on. This is known
as "hot swapping.”
Page 48

1.4.5 Modem Jack
The modem jack allows you to connect your notebook to a
telephone line with a standard RJ-11 connector.
Never connect the modem jack to a digital line. The high current
of a digital line could damage the modem.
Page 49

1.4.6 Network Jack
The RJ-45 network jack allows you to connect your
computer to a local area network (LAN).
Be careful not to plug the telephone line into the slightly larger
network connector.
Page 50

1.4.7 TV-out Port
Use this port to connect a television set. See Display,
Chapter 2-5, for details.
Page 51

1.4.8 IEEE 1394 Port
The IEEE 1394 port allows you to connect devices that
utilize IEEE 1394 technology to your computer. This
technology is widely used in consumer products such as
digital cameras.
Page 52

1.5 Bottom
1 Battery Release Latch
2 Battery Pack
3 HDD
4 Memory Module Cover
5 ODD Release Latch
Page 53

1.5.1 Battery Release Latch
The battery release latch secures the battery pack. To
release, simply slide the latch across. The battery pack will
pop up.
Page 54

1.5.2 Battery Pack
With a charged battery pack installed, you can use your
notebook without connecting it to an electrical outlet. For
more details, see Battery, Chapter 5.
Page 55

1.5.3 HDD
The HDD should only be removed if you need to repair or
replace the installed HDD unit.
Page 56

1.5.4 Memory Module Cover
The memory module(s) is (are) housed beneath the memory
module cover.
Page 57

1.5.5 ODD Release Latch
This releases the optical media drive (ODD). Slide it to the
left, then carefully pull the ODD from its bay.
Page 58

2 Operating Your Notebook
2.1 Turning Your Notebook On and Off
Turning Your Notebook On
Turning Your Notebook Off
Logging Off
Adding User Accounts
Standby Mode
Page 59

2.1.1 Turning Your Notebook On
You can configure the computer to start from a specific drive,
such as a CD-ROM, an external floppy disk, or even an
external. See Chapter 3, the BIOS Setup Program.
Press the power button
Do not turn off the computer until the operating system has
loaded completely. Turning the computer off during its initial
startup will result in an error the next time you start your
notebook.
to turn on your notebook.
Page 60

2.1.2 Turning Your Notebook Off
If your notebook is using Microsoft Windows XP Professional
operating system, there are security and networking features
not available in Windows XP Home Edition. You will see
different options in some windows, related to security and
networking.
Save and close any open files, exit any open programs.
Click Start > Turn Off Computer > Turn Off.
Your notebook will automatically turn off after the shutdown
process is finished.
You can configure Windows XP to shut down or go into sleep
mode by pressing the power button. Open the Control Panel:
Power Options – Advanced dialog box to do this.
Page 61

2.1.3 Logging Off
With Microsoft Windows XP, multiple users can access a
single computer with their own, personal settings. Using
their own password, each user logs on to the computer,
meaning other users cannot access their settings or files.
To log off:
1. Save and close any open files, exit any open programs, click
Start > Log Off > Log Off.
2. To switch users, click Start > Log Off > Switch User.
Using Fast User Switching, programs that previous users
were running remain running in the background. This
means a possible slower computer response. It may also
stop multimedia programs, including games and DVD
software, from running.
Fast User Switching does not work if your notebook is
running Windows XP Professional and is a member of a
computer domain or if the notebook has less than 128 MB of
memory.
You can set up Fast User Switching in the Control Panel
dialog box, under User Accounts: Change the way users
log on or off.
Page 62

2.1.4 Adding User Accounts
Different account options are available when a computer is
running the Windows XP Professional operating system and is
connected to a domain.
With Windows XP installed, the system administrator or a
user with administrator rights can create additional user
accounts:
1. Click Start > Control Panel > User Accounts.
2. Under Pick a task, click Create a new account.
3. Under Name the new account, enter the name of the
new user. Click Next.
4. Under Pick an account type, choose one of the
following options:
• Computer administrator: Can change all computer
settings.
• Standard (Windows XP Professional only): Can install
some programs and hardware.
• Limited: Can only change your own personal settings, such
as your password. You are not able to install programs or
use the Internet.
5. Click Create Account.
Page 63

2.1.5 Standby Mode
To find out how to conserve power using the Standby Mode,
see Power Management, Chapter 5.
Page 64

2.2 Tips For Using Windows
Microsoft Windows XP Help
Windows Desktop
Start Button
Taskbar
Notification Area (System Tray)
Recycle Bin
Control Panel
My Computer
Page 65

2.2.1 Microsoft Windows XP Help
For Microsoft Windows XP help, click the Start menu then
click the Help and Support icon. The Help and Support
Center dialog box opens.
Page 66

2.2.2 Windows Desktop
Depending on your notebook setup and software, your desktop
may have different or additional shortcuts. See Personalizing
Your Desktop, section 2-4, for more information.
Page 67

2.2.3 Desktop Cleanup Wizard
The Desktop Cleanup Wizard moves icons for programs
not frequently used to a folder 7 days after you first start
your notebook and every 60 days after that.
The Start menu's appearance changes as program icons
are moved. To turn off the Desktop Cleanup Wizard:
Right-click an empty spot on your desktop > Properties >
Desktop > Customize Desktop > click Run Desktop
Cleanup Wizard every 60 days to remove the check mark
> OK.
The Desktop Cleanup Wizard can be run any time by
simply clicking Clean Desktop Now under Desktop
Cleanup.
Page 68

2.2.4 Start Button
The Start button allows easy access to your notebook's
programs.
The Start menu is designed to adapt, to show the programs
you use most frequently. To always keep an item on the
Start menu, no matter how often it's used, right-click the
item and click Pin to Start menu.
Log Off allows the current user to log off so a new user can
log on to the notebook using their personal settings.
Turn Off Computer provides options for turning off,
restarting, and placing your notebook in power saving
modes. If your notebook is running Windows XP
Professional and is connected to a domain, different
options appear in the Shut Down window.
Page 69

2.2.5 Taskbar
The Start button is on the left and the notification area on
the right. Each time you open a program a button for it
appears on the taskbar. To move between programs,
simply click the relevant button. Windows XP groups
multiple instances of the same program on a single taskbar
button if more space is needed.
Toolbars can be added to or removed from the taskbar:
Right-click an empty spot on the taskbar, and select
Toolbars > choose the toolbar you want to add.
Page 70

2.2.6 Notification Area (System Tray)
The icons in this area allow quick access to programs and
computer functions, including the clock and printer status.
Windows XP hides icons that are not used frequently. Click
to see hidden icons.
To prevent Windows XP from hiding icons:
Right-click an empty spot on the Taskbar > Properties >
ensure that Hide inactive icons is not checked.
Page 71

2.2.7 Recycle Bin
When you delete a file, it is moved to the Recycle Bin. Files
can be restored from the Recycle Bin.
Emptying the Recycle Bin deletes files permanently.
Page 72

2.2.8 Control Panel
In the Control Panel you can change how Windows looks
and works.
Click the Start button and then Control Panel.
There are two interfaces - you can choose either Classic
View or Category View. You can switch interfaces in the
upper left hand window of the Control Panel dialog box.
Under Pick a Category, choose the category of the task
you wish to complete, and then choose the task in the next
window.
Page 73

2.2.9 My Computer
My Computer allows you to see the contents of your
notebook's drives. The My Computer icon appears on your
Desktop. To see the contents of a drive or folder, open My
Computer then double-click the icon for the drive or folder
you want to view (for example, drive C).
You can also use Windows Explorer to see the contents of
your notebook and find files. To open Windows Explorer,
right-click the Start button and click Explore. Find the drive or
folder that you want to view. To find out more about My
Computer and Windows Explorer, see the Help and Support
Center.
Page 74

2.3 Keyboard and TouchPad
Numeric Keypad
Keyboard Shortcuts
Easy Buttons
StickyKeys
TouchPad
Customizing the TouchPad
Page 75

2.3.1 Numeric Keypad
Keypad numbers and symbols are marked in blue on the
lower right edge of the keypad keys.
To enable the numeric keypad, press .
The
To disable the numeric keypad, press again.
To use the primary function of a dual-function key when the
numeric keypad is enabled, press
indicator will light when the numeric lock is on.
and the desired key.
Page 76

2.3.2 Keyboard Shortcuts
Switches Display Mode (LCD > CRT
> Simultaneous). Switches the video image to
the next display in the following sequence: the
integrated display, an external monitor, and both
displays simultaneously
When using an external PS/2 keyboard, the Fn key can be
simulated by using the left-Ctrl + left-Alt keys. USB keyboards
do not support this function.
Number Lock
Scroll Lock
Brightness Up
Brightness Down
Page 77

2.3.3 Windows Logo Key Functions
opens Windows Explorer
opens the Run dialog box
opens the Search Results dialog box
opens the Search Results - Computers dialog
box (when your notebook is connected to a
network)
opens the System Properties dialog box
To adjust keyboard operation, including character repeat
rate, in the Control Panel click Printers and Other
Hardware > Keyboard.
Page 78

2.3.4 Easy Buttons
The Easy Buttons are designed to give you fast access to
the programs you use most often.
By default, the easy button keys are not configured for any
particular program. The first time you press one of them,
the Configure Buttons dialog box opens.
Select the button you’d like to configure, and then assign a
program to it either from the Application Launch list of
pre-defined defaults or by using the Browse button to
locate a different program.
The Caption option lets you define the caption that appears
on your screen when you press the button.
Page 79

2.3.5 StickyKeys
The StickyKeys function lets you use the SHIFT, CTRL,
ALT, FN keys or the Windows logo key (referred to as
modifier keys) in conjunction with other keys by pressing
one key at a time instead of simultaneously.
To activate StickyKeys mode, press the Shift key five times
and then click OK.
Page 80

Alternatively, you can click on Start > Control Panel >
Accessibility Options and check Use StickyKeys before
clicking OK.
Page 81

To further customize StickyKeys, click Settings in either of
the above dialogue boxes. The following dialogue box will
appear.
Click Use shortcut to enable the listed shortcut to activate
StickyKeys mode.
By checking Press modifier key twice to lock, pressing
the SHIFT, CTRL, ALT, FN or the Windows logo key twice
will 'lock' the key until it is pressed again. This allows you to
perform multiple commands with these keys in succession
without having to press the modifier key again each time.
Check Turn StickyKeys off if two keys are pressed at
once to have StickyKeys automatically disable whenever
any two keys are pressed simultaneously.
If Make sounds when modifier key is pressed is
checked, a tone will be heard each time a modifier key is
pressed. Different tones are heard when activating and
deactivating modifier keys.
Page 82

Check Show StickyKeys status on screen to display the
StickyKeys icon in your toolbar whenever the StickyKeys
mode is activated. The icon will change to indicate which
modifier key, if any, is currently active.
Click on OK to confirm your changes, or Cancel to exit the
dialogue box without making any changes.
Page 83

2.3.6 TouchPad
The TouchPad responds to the movements and pressure of
your finger, allowing you to move the cursor around the
screen, in the same way you would with a mouse.
Place your fingers on the keyboard in the normal typing
position.
You can use the TouchPad by moving either your right or
left thumb off the space bar and on to the TouchPad.
Gently move your thumb across the TouchPad in the
direction you want the cursor to move.
The TouchPad buttons have the same function as mouse
buttons. Clicking these buttons makes selections, drags
objects, or performs a variety of other functions depending
on the software. To select an object, first move the pointer
over the object you want to select, and then press the left
button one time and release it. The functionality of these
buttons depends on your software.
Double-clicking is a common technique for selecting
objects or launching programs.
You may also select object or execute applications from
icons by double tapping. This is similar to double-clicking,
Page 84

but instead of pressing the TouchPad buttons, you tap the
TouchPad itself.
Page 85

2.3.7 Customizing the TouchPad
To adjust TouchPad settings, use the Mouse Properties
window, which you can open by clicking Control Panel >
Printers and Other Hardware > Mouse.
Select the desired settings and click Apply.
Click OK to save the settings and close the window.
Page 86

2.4 Personalizing Your Desktop
Choosing Wallpaper
Choosing a Screen Saver
Choosing a Desktop Theme
Creating a Shortcut on the Desktop
Page 87

2.4.1 Choosing Wallpaper
To make your notebook reflect your style, you can set
background colors and patterns, the wallpaper, on the
desktop.
Control Panel > Appearance and Themes > Pick a task
> Change the desktop background.
The Display Properties window offers a choice of
wallpapers. Choose the name of the wallpaper you want to
display, or click (None) if you prefer not to use a wallpaper
image.
You can also choose your own images by choosing Browse,
and specifying images in a directory.
The Position pull-down menu lets you either Tile your
selected image, Center (places one copy of the image in
the center of the screen) or Stretch (enlarges it to fit the
screen).
To accept the settings, click OK and close the Display
Properties window.
Page 88

2.4.2 Choosing a Screen Saver
Control Panel > Appearance and Themes > Pick a task
> Choose a screen saver.
Select a screen saver from the Screen Saver pull-down
menu, or click (None) if you prefer not to activate a screen
saver.
You can customize your screen saver by choosing
Settings. To check your selections, choose Preview.
To accept the settings, click OK and close the Display
Properties window.
Page 89

2.4.3 Choosing a Desktop Theme
Desktop themes change the appearance of your desktop
and add sound effects:
Control Panel > Appearance and Themes > Pick a task
> Change the computer's theme.
Select a theme from the Theme pull-down menu in the
Display Properties Window, and then click OK.
Page 90

2.4.4 Creating a Shortcut on the Desktop
A shortcut is an icon that is placed on the desktop let you
quickly access programs, files, folders, and drivers. To
create a shortcut:
Open My Computer or Windows Explorer, and highlight
the file or program you want to create a shortcut to.
Click and hold down the right TouchPad button, drag the
highlighted item to the Windows desktop, and then release
the right TouchPad button to display a pop-up menu.
Click Create Shortcut(s) Here.
An icon appears on your desktop - double-click to activate
the shortcut.
Page 91

2.5 Display
Adjusting Brightness
Using an External Monitor or Television
Setting Display Resolution
Page 92

2.5.1 Adjusting Brightness
To conserve power when running your notebook from the
battery, set the brightness to the lowest comfortable setting
using the keyboard shortcuts.
Page 93

2.5.2 Using an External Monitor or Television
When you start your notebook with an external display
device such as an external monitor or television attached
and turned on, the image may appear on either the display
or the external device. Alternatively, you can
Press
the display and the external device simultaneously, or the
external device only.
to switch the video image to the display only,
Page 94

2.5.3 Setting Display Resolution
To view a program at a specific resolution, both the video
controller and display must support the program and the
necessary video drivers must be installed.
Before changing any of the original display settings, note
the original settings for future reference.
Start > Control Panel > Pick a category > Appearance
and Themes.
Under Pick a task..., click the area you want to change, or
under or pick a Control Panel icon, click Display.
You can try different settings for Color quality and Screen
resolution.
If you choose a resolution or color palette that is higher than
the display supports, the settings will automatically adjust to
the closest possible setting.
Page 95

2.6 Networks
To access a network:
At the office, you can access a network via the built-in PCI
LAN.
For specific information about connecting to the LAN or
WAN, consult your systems administrator.
If you are working from home or while traveling, you need a
dial-up connection. Ask your system administrator for the
telephone number of the network.
To set up the connection, go to Start > Control Panel
> Network and Internet Connections (in Classic Interface,
Network Connections).
Enter the details for your connection and click OK.
Page 96

2.7 Wireless LAN Card
To access a wireless LAN Card:
At the office, you can access a network via the built-in Mini
PCI wireless LAN card.
For specific information about connecting to the WLAN,
consult your systems administrator.
To set up the connection, go to Start > Control Panel
> Network and Internet Connections (in Classic Interface,
WLAN Connections).
Enter the details for your connection and click OK.
Page 97

2.8 Managing Programs
Running Programs
Adding Software
Removing Software
Page 98

2.8.1 Running Programs
Programs are any software that process data - like a word
processing program or an email program. They require an
operating system - like Windows XP - to run on.
To run a program, click Start > Programs.
Click the program you want to run.
On the right side of the title bar in the window of any open
program, there are three icons:
minimizes the program. That is, it is removed from the
screen, but is still running. It will appear as a button on your
bottom taskbar. To restore the program, simply click the
button.
enlarges (maximizes) the window to fill your entire
screen. When the window is maximized, the button
switches to
when clicked.
closes the program or document.
, which will reduce the size of the window
Page 99

2.8.2 Adding Software
To check what software is already installed on your
computer, click Start > All Programs. If a program is listed
in the All Programs menu or the Start menu, the software
is already installed.
Before installing software, check the software's technical
requirements to ensure that it is compatible with your
notebook and that there is enough memory and hard drive
space for installation and operation.
Temporarily disable your notebook's antivirus software
before installing software. See the documentation that
came with the antivirus software for detailed procedure.
Be sure to enable your antivirus software once you have
installed any new software.
Insert the software installation CD into the CD drive and
follow the instructions that came with the software to help
you respond to the prompts on the screen.
If the software installation CD does not automatically run,
click Start > Run. In the dialogue box, type x:\setup.exe
(where x is the letter of your CD drive [usually D or E]).
Then click OK and follow the prompts on your screen.
Page 100

2.8.3 Removing Software
p
Once you've begun removing software, do not interrupt the
rocess. To do so may result in data loss and corruption of your
operating system.
Start > Control Panel > Add or Remove Programs >
Change or Remove Programs.
Select the program that you want to remove and click the
Change/Remove button. Instructions for removing
programs will appear on the screen.
Some programs may not be listed and cannot be
removed via this window. In this case, check the
documentation that came with the specific program.
 Loading...