

Page 1

OPERATING MANUAL
(VP-5X)
Revision : 0.3
VACOM WIRELE SS, INC
1
Page 2

IMPORTANT SAFETY INFORMATION
GETTING TO K NOW YOUR PHONE
DISPLAY INDICATOR
BATTERY INFORMATION
BASIC FUNCTIONS
Making a Call
Ending a Call
Answering a Call
Correcting dialing Mistakes
Storing Phone Numbers
Adjusting Earpiece Volume During a Call
Last Number Redial
Speed Dialing
Using Caller ID
MENUS
I. SEARCH a phone number
Last 10 Numbers You Dialed
Last 10 Numbers You Received
ABC Search Menu
Name Search Menu
Location Search Menu
Search by Phone Number
II. PHONE SETTING
Backlight
Auto Answer
Auto Redial
Anykey Answer
DTMF tone
Language
III. SOUND
Incoming Calls
2
Page 3

Ring Type
Volume
Alert
IV. SECURITY
Auto Lock
Changing Password
Memory Clear
Initialization
Voice Pivacy
Send Call Restrict
System Selection
LCD Contrast
V. MY DIALY
Alarm Set
Phone Number Store
Worl d Tim e View
Call Time
VI. MY PHONE NUMBER
My Phone Number
Software Version
MESSAGE SERVICES
I. TEXT MESSAGE SERVICES (SMS)
Read Text Messages
Send Text Messages
Delete Messages
II. VOICE MAIL SERVICE
Listen Voice Mails
Delete Messages
III. MESSAGE ALERTS
IV. MESSAGE SA VE
USING MENU During a Call
Sending My Phone Number
Storing a Phone Number
Mute
DTMF Mute
3
Page 4

My Phone Number View
Earpiece Volume Control
Voice Privacy
DTMF Tone
ENTERING LETTERS & NUMBERS
4
Page 5

IMPORTANT SAFETY INFORMATION
Some of the following information may not appl y to your particula r produ ct . Howe ver, as with
any electronic product, you should observe safety preca utions when you use this product .
◈ Save thi s manual : it contains important safety informat ion and ope rating instru ction s.
◈ Before using this product, plea se follow and adh ere to al l warn ings, safety and operat ing
instructions locate d on the product and in this User’s Manual.
◈ Do Not expose the product to water or moisture.
◈ Do Not expose th e prod uct to extre me hot or co ld te mpera tur es.
◈ Do Not expose the prod uct to open f lames.
◈ Do Not al low objec ts to fall on, or li quid s to spill on the produc t.
◈ Use only Original Accessories. Damage from use of non-approved accessories will void
your phone warranty.
◈ Connect the approved charger only to designed power sources as mar ked on the product.
◈ To reduce the risk of damage, remove the electrical co rd from an out let by pullin g the
charger rather than the cord.
◈ Make sure the electric cord is located so tha t it will not be subjected to damage.
◈ To reduce the risk of electric shock, unplug the produc t from the powe r source before
attempting any cleaning. Once unp lugged, use a soft clo th dampe ned with wate r.
◈ DANGER : Never alter the cord or plug. If the plug will not fit into the outlet, have a proper
outlet installed by a qualifie d elec trici an . Improper con necti on can result in elect ric shock .
◈ Do Not at tempt to disassemble the product – doing so will void the warra nty. This product
5
Page 6

does not contain consumer -servicea ble components. Service should be performed only by
Authorized Service Center s.
◈ Do Not remove the antenn a. A detache d ante nna may be a chokin g hazar d for childre n.
◈ Do Not allow battery to be pla ced in th e mouth . Ele ctr olytes coul d relea se and may be toxic
if swallowed.
6
Page 7

GETTING TO KNOW YOUR PHONE
LED Indicator
: Flashes to indicate a n incoming call or message. Also li ghts
up (flashes) when you turn on the phone.
Backlit LCD Screen
: The LCD screen contains th ree ar eas;
- The top line displays indications about your phone’s
operating mode.
- Two lines in the middle are the display area of numbers
and characters.
- The bottom line displays memus.
Menu Keys (
: This key performs several useful functions.
- During incoming calls, press it to answer the incoming
call.
- In Standb y mod e, press it bri efly to access Main Menu
and Select menus.
- When navigating a menu, press it to select the highlighted
selection.
SMS Key (
: When in Standby mode, press this key to access Message
Menu items.
- During incoming calls, press it to answer the incoming
call.
- From Standby mode, press it briefly to access Message
Services.
Microphone
: Your typical voice microphone for conversation and you can
also mute the microphone during conversation by pressing
“MENU” “3”.
Accessories Connec tor
: The location wher e you connect your charging device. It can
also be used to connect a wireless data de vice or hands-free
car kit.
CLR Key
: This key is used to erase numbers or characters you may have
entered incorrectly, or to return to a previous screen.
- To erase one character from the display screen, briefly
press it once.
- To erase all of them, hold it for one second.
- To back up one menu level, press it once.
- To return to Standby mode, hold it for one second.
- During a call, press it to control a earpiece volume.
/ )
)
7
Page 8

END/ Key
: Press this key to disconnect a call or to return to Standby
mode from any menu. Press and hold this key to turn the
phone On or Off.
SEND Key
: This key performs several useful functions.
- Dial a number and press it to connect.
- Press it once to redial the last outgoing number.
Numeric Keys
: These keys are to dial and to in put numbers an d char acte rs.
◀
◀ *
◀◀
: This key performs several useful functions.
- Change bells to vibration
- Use as navigation keys.
# ▶▶▶▶
: This key performs several useful functions.
- Use as instance lock.(Key lock)
- Use as navigation keys..
Antenna
8
Page 9
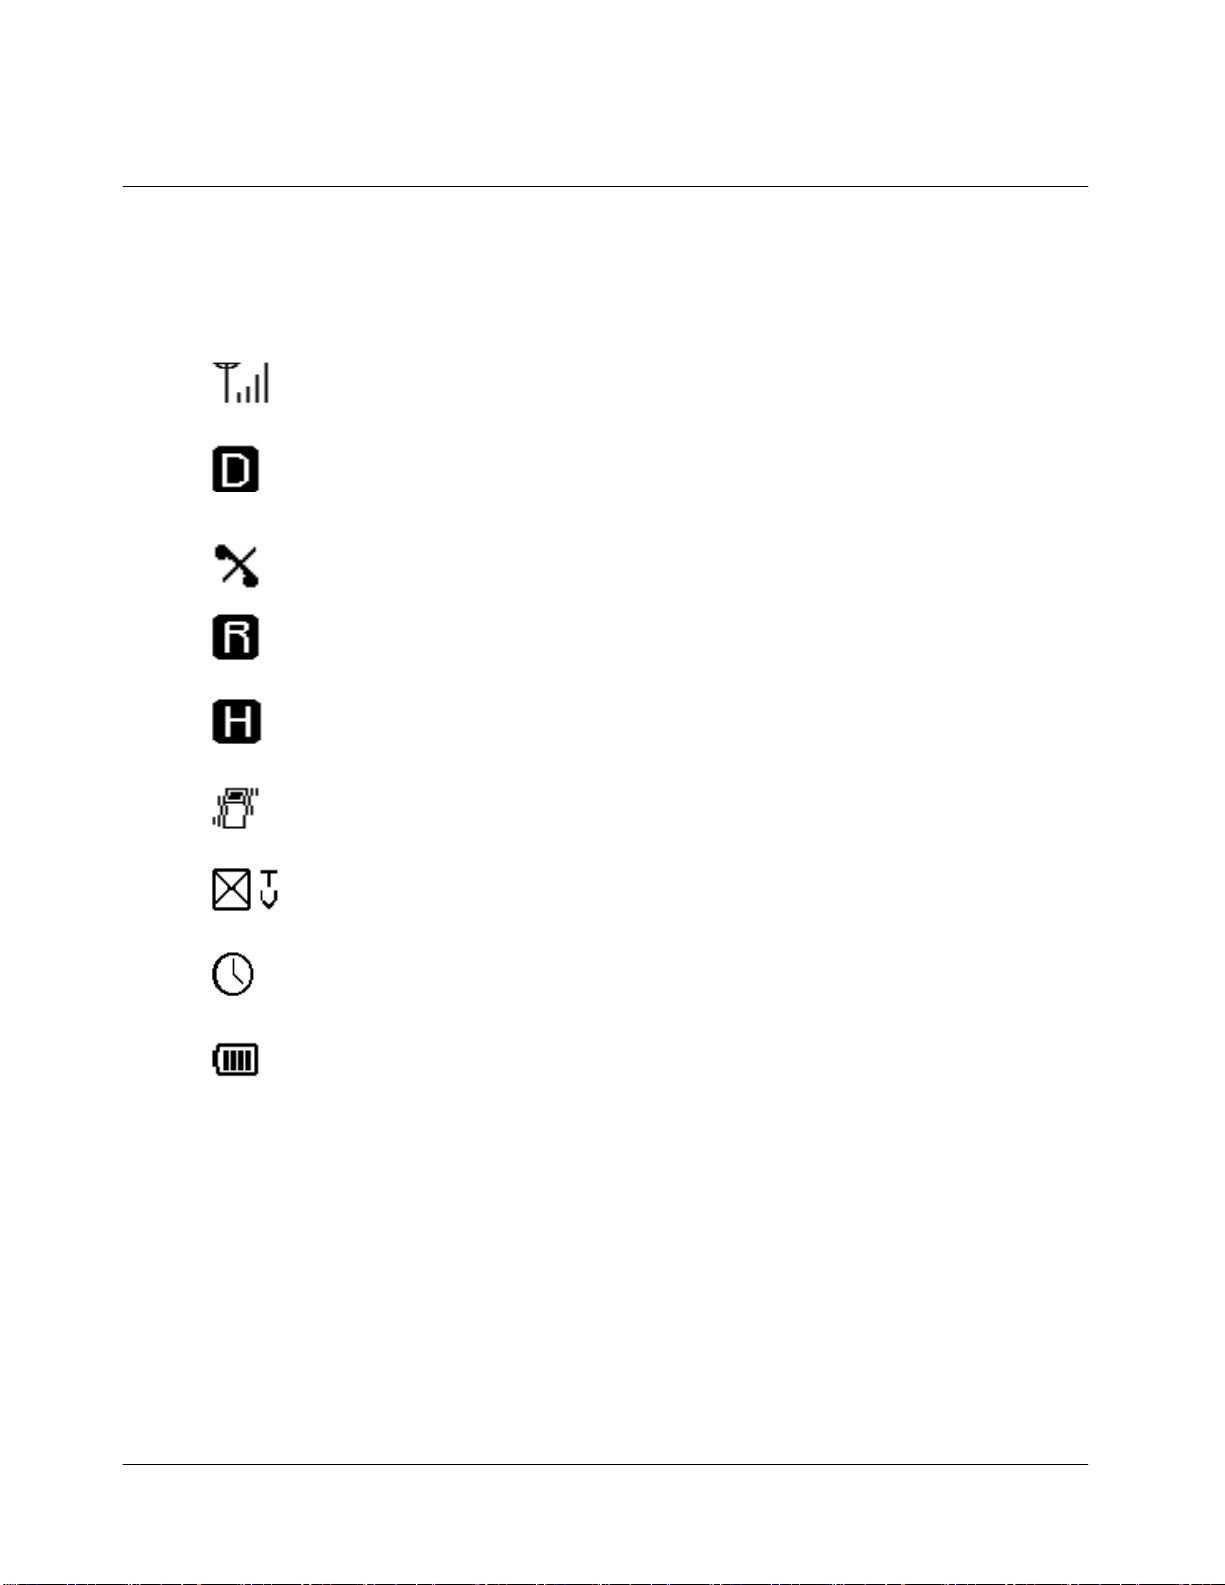
DISPLAY INDICATORS
Display indicators ap pear across the bottom of your phone’s LCD screen. These display
indicators (or icons) will vary based your phone’s operating mode.
Signal strength : This icon shows your current signal strength. More lines
indicate more signal strength. Four lines indicate maximum stre ngth, and one
line indicates l ea st stre ngth.
Digital mode : This icon indica tes your phone is operat ing in digital mode . If
you are in analog service area, “D” will be disappeared.
No service indicator : This icon indi cate s your phone cannot find a signal
because you’re outside a service area . When this is displayed, you cannot make
or receive calls. Wait a little while for a signal or move into an open are a.
Roaming : This icon indicates you are “roaming” on to other carrier’s service
area. But you must resi ste r the roaming service.
Home display
Etiquette mode on : This icon means that an incoming call wil l vibrat e the pho ne
rather than ring i t. This feature is good for quiet situations where you don’t want
your ringer to disturb anyone . Also it indicate s a vibrator on.
Message indicator : Thi s icon indicates you have message(s) waiting.
Press SMS Menu button to see the message menu, or press and hold to be
connected to voic ema il.
Alarm on : This icon means that you set the alarm On.
Battery strength : T his icon shows the level of your battery charge. The mor e
black bars you see the greater the charge. When the battery becomes very low,
an empty box appears and the phone flashes an alert.
9
Page 10

BATTERY INFORMATION
Your phone comes with a partially charged, rechargeable Li-ion Bat tery so that you can use the
phone immediately after it is activated.
Installing the Battery.
To put the battery into your phone :
1. Remove the battery compartment cover of the phone by sliding it down.
2. Put the battery pack into the batt ery c r adle.
3. Replace the battery compart ment cover by sliding it up towa rds the phone.
4. Before use, charge the battery pack for at least 3 hours.
Charging the Battery.
You ca n tell whe ther or not your batte ry needs to be recharged by checking the upper-ri ght
corner of your phone ’s display.
When the battery charge level gets low, the battery sensor will let you kno w by blinking the
battery icon and sound ing a warning tone. If the ba ttery level gets too low, the phone will turn
off automatically. Unfortunately, if this happens you’ll lose whatever you were just doing,
including dropping your call. Watch the battery strength icon and make sure your battery is
adequately charged.
Charging with the Traveler’s Charger.
Use only Compal Electronics app roved travele r’s chargers with your phone. Use of any
unauthorized accessories may be dangerous and will invali date the pho ne war ranty if said
accessories cause damage or a defect to the phon e.
To charge the battery using the Traveler’s Charger :
- Plug the power cord of the charger into a wall outlet.
- Insert the connector of the charger at the bottom of the phone.
- Note) Be sure that you put th e con necto r of the c harger into the phone co r rect ly.
Failure to do so may causes damages to the phone.
10
Page 11

If you charge the battery, a green LED on the charger denotes that the battery has completed its
charge cycle.
A completely discharged standard battery recharges fully in approximately tbd hours. The
extended battery recharges in approximately tbd hour s. Leaving your phone powered on durin g
charging, or charging batteries simultaneously, increases charging time. Leaving the battery in
the charger once it is fully charged does not harm the batter y.
Turning your phone on and off.
When you’re ready to turn your phone on, press and hold “END/
and the phone sounds. When the phone has found a signal, the “
” until the LED comes on
” icon appears. Once the
phone is on, it enters Standby mode, which is the phone ’s idle state. You can make and receive
calls now.
To turn your phone off, press and hold “END/
” until the LED comes on and the phone sounds,
then the display will goes blank. When the phone is turned off, nothi ng is displayed on the
screen.
Note : If “END/
” is pressed for less than one second, the phone will not turn off. Thi s helps
your phone from being turned off accidentally.
Standby mode.
Standby is the most basic state of your phone. The phone goes into standby mode soon after you
turn it on, or whenever you briefly press “END/
”. When your phone is in Standby mode, you
will typically see the banner (that’s the message displayed when you turn on your phone). If you
enter a phone number, you can press “SEND” to dial it, or press “
” to save it in the internal
phone book.
Power Save mode.
Your pho ne co mes with a Power Save featur e tha t will au toma tica lly be acti vated if your phone
is unable to find a signal after 15 minutes of searchi ng. While thi s feature is active, the pho ne’s
battery charge is conserved.
The phone will automatically rec heck for a signal peri odically. To manually force the phone to
11
Page 12

recheck for a signal, press any key. A message on the display will let you know when the phone
is operating in Power Save mode.
Conversation Mode.
You can place and answer calls only when your phone is powered on. During a call, the phone is
in Conversation mode.
12
Page 13

Making a Call.
To place a call :
BASIC FUNCTIONS
Press and hold “END/
means the phone is o n.
Enter the phone number (up to 32 di gits) by pressing the digit keys. The pho ne number displays
from left to right.
Press “SEND”. The ph one places the call to the entered phone number (if service is a vailable).
You ca n al so make call s ;
From your Diary (see “V. My Diary” on page )
From your Call Stack list (see “Using Caller ID” on page )
By using One- or Two-Touch Dialing (see “Speed Dialing” on page ).
Ending a Call.
To end a call, press “END/
or number of the called party (if availabl e). T he phone returns to Sta ndby mode automat ical ly.
Answering a Call.
To answer an incoming call, press any keys. If your phone is registered in Caller ID, a caller’s
phone number is displayed on the display. If a caller’s number is stored in Phone Book, t he
” to power on your phone. If you see indicators on the display that
”. The call time (len gth of the ca ll) displ ays, along with th e name
caller’s name is displayed. (메뉴 중 call 을 받기 위한 키 설정 부분이 따로 있음) –
menu2 + 4 (phone setting 중 AnyKeyAns)`
Correcting Dialing Mistakes.
To correct a misdialed digit, press “CLR” to erase one digit at a ti me. You can erase all the
digits at once by pressing “CLR” and holding it down for at least one second.
Storing Phone Numbers
13
Page 14

Phone numbers for freq uently used services are pre-programmed into your phone. To store a
number,
- After dialing a number, press “
” key . Then you can see “Location ??? / auto=001”
on the display.
- Press [NEXT] (
) to select location numbers or just press [OK] ( ).
- Then select “NAME ” or “NUMB ER E DIT” to stor e a na me.
- If you want to edit a number, press “▶ NUMBER EDIT” and edit .
- Press [SAVE] (
- Press [SAVE] “
) to go back to previous menu (“NAME” & “NUMBER EDIT”).
” to save the number and name.
- For more information, see “V. My Diary” on page .
Note ) While you are entering numbers for storing or dialing a phone number, you can enter
“Hard Pause”, “Time Pause” and “Hyphen”. To enter “Hard Pause”, “Time Pause” and
“Hyphen”,
- Press “MENU (
) when you want to enter them between numbe rs and select “1-
HardPause”, “2-TimePause” or “3-Hyphen”.
- And continue enterin g numbers.
Adjusting Earpiece volume during a call
To adjust Earpiece volume du ri ng a call,
- Press “CLR” to increase or decrease Earpiece volume.
- During a call, press “MENU (
)” key.
- Press “6. Call Vol”.
- Press “◀ *” to decrease or pr ess “ # ▶ ” to increase Earpiece volume.
Last Number Redial
You ca n redi al up to 10 la st numbers. If you want to redia l the la st call you made, simply press
“SEND” once. Or if you want to redi al the last 10 c alls you made,
- Press “
” and “1:Outgoing” on standby mode. Then you can see last 10 numbers
on logs.
- Press “VIEW (‥ )” and “TIME (
or “VIEW (
14
)” and “SAVE ( )” to save a number in Phone Book.
)” key to see the time you called and the number
Page 15

- Simply press “SEND” key to redial the number you select.
- Or you can also find 10 last numbers by pressing “
”, “1: Search” and “1:
Outgoing” on standby mode.
Speed Dialing
Once you stored phone numbers in your phone by using Phone Book, you can make a ca ll by
pressing One- or Two-Touch Dialing.
Press a location number you stored, then your phone automaticall y connect you to the ph one
number you want to call.
Using Caller ID.
This feature tells you who is calling you by displaying the caller’s number when the phone rings.
If a caller ’s name and number are stored in your Phone Book, the corre sponding name is also
displayed. If you call someone who has this feature, your phone number wil l be di splayed on
their phone.
To see the last call numbers you received,
- Press “
” and “2: Incoming” on standby mode. Then you can see last 10 numbers
you received.
- Press “VIEW (‥ )” and “TIME (
if possible. If you want to save it, press “VIEW (
)” key to see the time you received and a name
)” and “SAVE ( )” to save a
number in Phone Book.
- Simply press “SEND” key t o call back to t he number received.
- Or you can also find 10 last numbers by pressing “
”, “1: Search” and “2:
Incoming” on standby mode.
Note :) if you didn’t register Caller ID service at your service provider or there is no calls you
received, “No Numbers On T he Call Stac k” will be di splayed when you pr ess “2: Inc oming”.
15
Page 16

MENUS
I. SEARCH MENU
Last 10 numbers you dialed
- Press “MENU (‥ )”, “1: Search” and select “1: Outgoing”. T hen you can see the last
10 numbers you dialed. It is the same function as “Last 10 number redia l” on page .
- Select one of them to see the numbers and the time you dialed.
- If you want to store it in Phone Book, press [SAVE] (
“Phone Number Store” on page .
- Press “SEND” key to redial.
Last 10 numbers you received
- Press “MENU (‥ )”, “1: Search” and select “2: Incoming”. Then you can see the last
10 numbers you received. It is the same function as “Using Caller ID” on page .
- Select one of them to see the numbers and the time you dialed.
- If you want to store it in Phone Book, press [SAVE] (
“Phone Number Store” on page .
- Press “SEND” key to redial.
ABC Sequence Menu
You can find a number you st ored in Phone Book by ABC se quence.
). How to store a number, see
). How to store a number, see
- Press “MENU (‥ )”, “1: Search” and selec t “3: ABC sequence”. Then you can see the
numbers you stored alphabetically.
- Scroll “◀ ” or “▶ ” and place the cur so r on the number you want.
- Press “SEND” to dial.
- Or press “VIEW (‥ )” to delete or edit.
16
Page 17

Name Search Menu
You ca n fi nd a number you stored in Phone Book by names.
- Press “MENU (‥ )”, “1: Search” and select “4: Na me ”.
- Enter the name you want to call.
- If you don’t remember the full name, just enter th e first let ter of t he name, then your
phone will show you all similar names.
- Press “SEND” to dial.
- Or press “VIEW (‥ )” to delete or edit.
Location Search Menu
You can find a number you st ored in Phone Book by l oca tions.
- Press “MENU (‥ )”, “1: Search” and select “5: Location”.
- Enter the location numbe r you want to find.
- Press “SEND” to dial and/or choose “EDIT (‥ )” to edit th e phone boo m and/o r press
“DEL (
)” to delete the number.
- If a number is not stored in the locati on, “E mpty Location” is shown on the display.
Search by Phone number
You ca n find a number’s information you stored in Phone Book by entering a phone number.
- Press “MENU (‥ )”, “1: Search” and select “6: Number”.
- Enter the number you want to see. Then you will see the name and loc ation.
- “FIND (‥ )”키를 누르면 찾는 사람의 주소와 이름이 display 된다.
- Press “SEND” to dial.
- Or press “VIEW (‥ )” to delete or edit.
- If the number is not stored in the locatio n, a warning tone is sounded an d “No Number
Matches” is shown on the display.
17
Page 18

II. PHONE SETTING
Back Light
You ca n set back lighting of LCD display and the keypad to stay on or stay off continuously or
automatically turn off i n 7, 15 and 30 seconds. To set back light;
- Press “Menu (‥ )”, “2. Phone Setting” and “1. Backlight”.
- Select “always off”, “7 seconds”, “15 seconds”, “30 seconds” and “always on”.
- Press “OK (‥ )” to set.
Auto Answer
The “Auto Answer” function lets the phone answer the call automatically when a call is
incoming. It helps you to answer a call while you are dri ving. To set “Auto Answer”;
- Press “Menu (‥ )”, “2: Phone Setting” and “2: Auto Answer”.
- Select “Release”, “Always” or “Ear-Mic”.
- Press “OK (‥ )” to set.
Note ) Release : Auto Answer Off
Always : Auto Answer Always On
Ear-Mic : Auto Answer On when a headset is connected to t he phone
Auto Redial
The “Auto Redial” funct ion makes a call be re diale d after 5 seco nd automa tical ly if a ca ll is not
connected. To set “Auto Redial”;
- Press “Menu (‥ )”, “2: Phone Setting” and “3: Auto Redial”.
- Select “Setup” for On or “Release” for Off.
- Press “OK (‥ )” to set.
18
Page 19

Anykey Answer
“Anykey Answer” function makes the phone answer a call by pressing any buttons or makes the
phone answer a call by pressing only “SEND” button. To set “Anykey Answer”;
- Press “Menu (‥ )”, “2: Phone Setting” and “4: Anykey Answer”.
- Select “Setup” for On or “Release” for Off.
- Press “OK (‥ )” to set.
DTMF Tone
You ca n set DTMF tone length as normal or long.
- Press “Menu (‥ )”, “2: Phone Setting” and “5: DTMF Tone”.
- Select “Normal” or “Long” and press “OK (‥ )” to save.
Language
You ca n set Language 2 different types. (Spanish, En glish).
- Press “Menu (‥ )”, “2. Phone Setting” and “6. Language”.
- Select “Spanish ” or “English” and pr ess “OK (‥ )” to save.
- Press “OK (‥ )” to set. (중복)
III. SOUND MENU
Incoming Calls
You ca n set incoming call ’s alert in 5 different types (Bell+Lamp, Vibration+Lamp,
Bell!Vibration, Vibration!Bell, Lamp).
19
Page 20

- Press “Menu (‥ )”, “3: Sound” and “1: Ring/Vib”.
- Select “Bell+Lamp”, “Vibration+Lamp”, “Bell!Vibration”, “Vibration!Bell” or
“Lamp”.
- Press “OK (‥ )” to set.
Ring Type
This option enab le s you to set a ring type in 10 different bells an d 10 different melodies.
- Press “Menu (‥ )”, “3: Sound”, “2: Ring Type” and choose “1. R ing Type” or “2.
Melody Select”.
- Scroll “◀ ” and “ ▶ ” to select. While you scroll, you can hear bell s and melodie s.
- Press “OK (‥ )” to set.
Volume
Volume optio n allow s you to set the level of the ring volume, the key volume and the ca ll
volume.
- Press “Menu (‥ )”, “3: Sound” and “3: Volume”.
- Select “Ring Volume”, “Key Volume” or “Call Volume”.
- Scroll “◀ ” and “ ▶ ” to increase or decr ease the volume level.
- Press “YES (‥ )” to set.
Alert
1. Connection
“Connection” option allo ws you to hear a to rn when a cal l is connec ted.
- Press “Menu (‥ )”, “3: Sound”, “4: Alert Se tting” and “1: Connection”.
- Select “CALL CONNECT” on or off.
20
Page 21

- Press “OK (‥ )” to set.
2. Call Drop
“Call Drop” option allows you to hear a warning torn when a call is disconnected
occasionally or when the calle r han gs up the phone.
- Press “Menu (‥ )”, “3: Sound”, “4: Alert Setting” and “2: Call Drop”.
- Select “CALL DROP ” on or off.
- Press “OK (‥ )” to set.
3. 1 Min. Alert
“1 Min. Alert” option allo ws you to hear a to rn every 1 minute whi le you are cal li ng.
- Press “Menu (‥ )”, “3: Sound”, “4: Alert Se tting” and “3: 1 Min. Alert”.
- Select “MINUTE ALERT” on or off.
- Press “OK (‥ )” to set.
4. Roaming
“Roaming” option allows you to hear a warning torn when you move to other carrie rs’
service area, which you registered for roaming service.
- Press “Menu (‥ )”, “3: Sound”, “4: Alert Se tting” and “4: Roaming Alert”.
- Select “ROAM. ALERT” on or off.
- Press “OK (‥ )” to set.
5. RoamRinger
“RoamRinger” option allows you to hear a different ringer whe n you move to other
carriers’ service area, which you registered for roaming service.
- Press “Menu (‥ )”, “3: Sound”, “4: Alert Setting” and “5: RoamRinger”.
- Select “ROAM RINGER” on or off.
- Press “OK (‥ )” to set.
IV. SECURITY FUNCTION
21
Page 22

Your p hone provide s many security options, inclu din g a user-programmable lock code and cal l
restriction features. To access the Security menu in Standby mode, press “Menu (‥ )” and “4:
Security”. And enter the four-digit password.
Note : The password is “0000” if you don’t have your phone number yet or the last 4 digits of
your number if you al ready have you phone number. If you want to c hange the password, see
“Changing Password” on page .
Auto Lock
Locking the phone limits all outgoing calls except calls to the three ha rd-c ode d emergency
numbers (***).
You ca n lock the phone manua ll y during use, or set the phon e to lock au toma tica lly when it is
turned on. When the phone is in Lock mode, you can answer incoming call s, but you must
unlock the phone to place outgoing calls (e xcept to emergency).
- Press “Menu (‥ )” and “4: Security” and enter the password.
- Press “1: Auto Lock”.
- Select “SET AUTOLOCK” as “never”, “on power up” or “now”.
- Press “OK (‥ )” to set.
Notes 1) “now” – you must unlock the phone to place outgoing calls.
“on power up” – the phone is locked auto matica lly when i t is turned on.
“never” – the phone is unlocked.
Note 2) Or you can simply lock your phone by pressing and holding “#” on standby mode. It is
a KEY LOCKED.
Changing Password
If you want to cha nge the password,
- Press “Menu (‥ )” and “4: Security” and enter the password.
- Press “2: New Code” and enter the new 4-di git p assword.
22
Page 23

- Press “OK (‥ )”, then you can see “CONFIRM _ _ _ _”.
- Enter the new password again and press “OK (‥ )” to set.
Memory Clear
Memory Clear option allows you to clear ca ll lists, which you call ed, recei ved and stored or a ll
information in memory.
- Press “Menu (‥ )” and “4: Security” and enter the password.
- Press “3: Memory Clear” and choose “Outgoing”, “Incoming”, “Stored #” or “Clea r
All”.
- Press “OK (‥ )” to erase the memory.
Initialization
“Initialization ” let you initi aliz e your phone . If you want to init ia lize your phone,
- Press “Menu (‥ )” and “4: Security” and enter the password.
- Press “4: Initialize”.
- Chose “INITIALIZE Yes”.
- Press “OK (‥ )”, then your phone display “– Init ia lizing –”.
- And your phone will turn off and turn on automatic ally.
Voice Privacy
“Voice Privacy” You can set “Voice Privacy” on or off.
- Press “Menu (‥ )” and “4: Security” and enter the password.
- Press “5: VoicePriv.”.
- Choose “VoicePrivacy ▶ Enhanced” or “▶ Standard”.
23
Page 24

- Press “OK (‥ )” to set.
Sending Calls
“Sending Calls” You can set your phone to restrict outgoing calls.
- Press “Menu (‥ )” and “4: Security” and enter the password.
- Press “6: Send”.
- Choose “OUTGOING ▶ release” or “▶ setup”
- Press “OK (‥ )” to set.
Note ) Once you use this function, your phone would not work prope rly. Leave your phone as
initially set.
Network(삭제
삭제)
삭제삭제
You ca n cho ose the net work CDMA or Analo g.
- Press “Menu (‥ )” and “4: Security” and enter the password.
- Press “7: Network”.
- Scroll “◀ ” and “ ▶ ” to chose “Aut omatic”, “Onl y CDMA”, “Only Analog” or “Temp
Analog”.
- Press “OK (‥ )” to set.
Note ) Once you use this function, your phone would not work prope rly. Leave your phone as
initially set.
System Change
You c an choo se the systems.
24
Page 25

- Press “Menu (‥ )” and “4: Security” and enter the password.
- Press “8: System Select”.
- Scroll “◀ ” and “ ▶ ” to chose “S ta ndard”, “A only”, “B only”, “C only”, “D onl y”, “E
only”, “F only” or “home only”.
- Press “OK (‥ )” to set.
Note : Once you use this function, your phone wou ld not work pr operly. Leave your phone as
initially set.
LCD contrast
You ca n adj ust LCD contrast.
- Press “Menu (‥ )” and “4: Security” and enter the password.
- Press “9: Contrast”.
- Scroll “◀ ” and “ ▶ ” to chose 10 steps of LCD contrast.
- Press “OK (‥ )” to set.
V. MY DIALY
Your pho ne support you various additi onal fun ct ions, such as “Alarm”, “Numbe r Stori ng”,
“World Time View” and “Call Time”.
Alarm
You ca n set the 24 -hour alarm to sound a n alert a t the set ti me, when your phone is on. If the
phone is off at the alarm set time, the alarm will not sound. To set the alarm;
- Press “Menu (‥ )” and “5: Phone Book”.
- Select “1: Alarm Setting”.
25
Page 26

1. Daily Alarm : Once you set the alarm using “Daily Alarm” option, your phone will
sound an alert at the set time everyday.
- Once you select “1: Alarm Set”, press “1: Da ily”. Then “DAILY ALARM” will be
shown on the display.
- Select “SETUP” and press [OK] (
)”.
- Enter the time and AM/PM.
- Press [YES] (‥ ) to set.
Note ) If you don’t want your phone alert you on weekend, see “Weekend?” below. And if
you want to release the alarm setting, press “Menu(‥‥‥‥ )”, “5”, “1”, “1”. Choo se “release”
and press [OK] (‥‥‥‥ ).
2. Once Alarm : Once you set the alarm using “Once Alarm” option, your phone will
sound an alert at the set time once.
- Once you select “1: Alarm Set”, press “2: ONCE”. Then “ ONCE ALARM” will be
shown on the display.
- Select “SETUP” and press [OK] (
)”.
- Enter Date, Month, Year, Time and AM/PM.
- Press “YES (‥ )” to set.
Note ) If you want to release the alarm setting, press “Menu(‥‥‥‥ )”, “5”, “1”, “2”. Choo se
“release” and press [OK] (‥‥‥‥ ).
3. Week end ? : Onc e you set this option, your phone won’t sound an alert on weeken d.
- Once you select “1: Alarm Setting”, press “ 3: Weekend?”. Then “WEEKEND SEL.”
will be shown on the display.
- Select “ NO” and press [OK] (
)”.
Note ) If you want your phone alert you on weekend, selec t “WEE KE ND SEL.” “YES”.
26
Page 27

Storing a Number and Name
You can store phone numbers and associated names in your phone ’s memory up to 100 numbers
to use for Speed Dialing. Each number you store can be up to 32 digits in length, and names you
store can be up to 12 characters i n length.
A number and a name you want to store is stored in specific memory location together. And you
can use Speed Dial ing to press and hold t he location number.
To store phone numbers and a name ;
- Press “Menu (‥ )”, “5: My Diary” and “2: Number Store”. Then you can see
“Location ??? / auto= 001” on the displ ay.
- Press [NEXT] (
) to select location numbers or just press [OK] ( ).
- Then select “▶ NAME” or “▶ NUMBER E DIT” to stor e a na me or numbers. Pr ess
[YES] (
).
- Enter a name and edi t a pho ne number.
- Press [SAVE] “
” to save the number or pre ss [OK] “ ” to save the name.
- Then your phone will show you the result of storing and the tot al number of stor ed
locations and empty locations.
1. NAME :
- After you choose a location number, select “▶ NAME” on the display and press [YES]
(‥ ).
- Enter the name and press [OK] (‥ ) to store.
2. NUMBER EDIT
- After you choose a location number, select “▶ NUMBER E DIT” on the displ ay and
press [YES] (‥ ).
- Enter the phone number and press [SAVE] “
” to store.
Note ) While you are entering numbers for storing or dialing a phone number, you can enter
“Hard Pause”, “ Time Pause” and “Hyphen”. To enter “Hard Pa use ”, “Time Pause” and
“Hyphen”,
27
Page 28

- Press “MENU ( ) when you want to enter them between numbers and select “ 1HardPause”, “2-TimePause” or “3-Hyphen”.
- And continue entering numbers.
Worl d Tim e View
Your pho ne shows you world 77 citi es’ curr ent time . To access the world time view;
- Press “Menu (‥ )”, “5: Phone Book” and “3: World Time”.
- [VIEW] “‥ ”를 누르면 그 도시의 시각을 볼 수 있다.
- Use “◀ ▶ ” or [NEXT] “
” to scroll cities.
Call Time
The Call Time function shows the approximate dur ation of last call and to tal ti me in hours and
minutes that the phone has been in used and the tot al number of call s made under th e curren t
phone number in the display.
- Last Call : Press “Menu (‥ )”, “5: Phone Book”, “4: Call Time” and “1: Last Call”.
Then your phone indicates the approxi mate duration of last call you made in minu tes
and seconds.
- Home Cal ls : Press “Menu (‥ )”, “5: Phone Book”, “4: Cal l Time” and “2: . Home
Calls”. Then your phone indicates the approximate total time in hours and minutes that
the phone has been used in your provider’s service area.
- Roam Calls : Press “Menu (‥ )”, “5: Phone Book”, “4: Call Time” and “3: Roam
Calls”. Then your phone indicates the approximate total time in hours and minutes that
the phone has been used in roaming area.
- All Calls : Press “ Me nu ( ‥ )”, “5: Phone Book”, “4: C all Time” and “4: All Calls”.
Then your phone indicates the appr oximate total ti me in hou rs and minutes that the
phone has been used in home and roam area .
28
Page 29

VI. MY NUMBER
This option allows you to see your phone number and S/W version.
My Phone Number
To see your phone number, press “Memu (‥ )”, “6: My Phone Number” and “1: My Number ”.
Then your phone number will appear on the display.
S/W version
To see your phone number, press “Memu (‥ )”, “6: My Phone Numbe r ” and “2: S/W version”.
Then your phone number will appear on the display.
29
Page 30

MESSAGE SERVICES
Your pho ne can rec e ive two types of message service – text messages and voice mail – and you
can send a text me ssage ( SMS : Sho rt Messagi ng Ser vic e) i f th ese ser vic es ar e a vail ab l e fr om
your service provider. If you subscribe to eithe r or both services, callers can leave you text
messages or voice mail. Your service provider the n tra nsmits the text messages and voice mail
notifications to your phone .
I. Text Mes sage Services (SMS : Short Messaging Serv ice)
The actual tagging of the text message is dependent on the system used by your service provider.
Your service provide r transmit s messages to your phone. If your phone is on, it receives the
messages as described below. If your phone is not turned on, your service provider retain s the
messages and transmits th em again later.
When a new text message is received, your phon e sounds an ale rt or vibrat es and
on the display. Once you read a new message,
Note ) You r phone holds up to TBD messages or a maximum of TBD KB of message text.
Read Text Messages
If your phone is turne d ON when it receives a text message, your phone sounds an alert or
vibrates and
immediately by pressing “
- Press “
- Select “▶ 1 Page/Msg” and press [YES] (
sender, sender’s phone number and a new text message appear on the display.
- You can read the text message by scrolling “◀ ▶ ” keys.
- If you want to see a message which you already read, press “
and select “▶ 1 Old Msg”. Then you can see the message list on the display. Select a
is shown on the display. You have a choice of rea ding the message
” key or reading it later. To read a new message;
” key and “1: View MSG”.
is disappeared.
)” to see. Then the ti me you rece ived, a
” key, “1: View MSG”
is shown
message what you want to see again and press [YES] (‥ ).
- If you want to call to a sender back, pre ss “SE ND ” while you ar e re adin g a message.
Then “Call back #” appears on the display.
30
Page 31

- If you want to call, press “SE ND” again. Or i f you want to save sender’s number, press
“SAVE (‥ )”.
Send Text Message (SMS : Short Messaging Service)
You ca n send a text message through your phone. To edit and send a text message;
- Press “
” key and “2: Send MSG”. Then old message lists appe ar on the display
below “▶ New MSG”.
- Select “▶ New MSG” to create a new message or old messages you sent before. In
addition, th ere are 10 messages stored i n your phone as “Yes”, “No”, “Call me”, “Need
directions”, “Where are you?”, “Will call later”, “Busy”, “On my way”, “Will arrive 15
minutes” and “Thank you”.
- Write a new message or edit old and canned messages.
- Once you fini sh t o wri t e a messag e, pr ess [OK] (‥ ).
- Select “▶ New NUM” for a new number or the other phone numbers you have sent
before.
- If you choose “▶ New NUM”, enter the dial number and press [OK] (‥ ).
- Enter the receive number, which you wish a receiver to cal l to, and press [OK] (‥ ).
(There is your phone number displayed for the rece ive number)
- Choose “Priorit y” as “Normal”, “Inter ac tive”, “Urgent” or “Emergency”.
- Choose “Delivery Ack” as “Yes” or “No”. (Delivery Ack 부분을 없애버렸음)
- Then your phone displays that a message is being sent.
Delete Messages
You ca n del ete a mes sage one by one or delete all messages at once. To delete a message;
- Press [DEL] (…) key while you are reading a message or on the message list display.
- Or press “
31
” key and “5: Erase All”.
Page 32

- Choose “1. Inbox” to erase all messages you received or “2. Outbox” to erase all
messages you sent.
- Then “E ra se ? ” app ear s on t he di spla y. Press [OK] (‥ ) to erase the messa ges.
Note ) If you use “Erase All” option, it also erases voice mail s.
II. Voice Mail Service
Your pho ne can rec eive voice mai l notifi ca tion when it is turned ON. If your service provider
transmits the notific ation and your phone is turned OFF, you will rec eive notification t he next
time you turn your phone ON.
If your phone is turned on when it rece ives a voice mail notice, your phone sounds an alert or
vibrates and
disappeared.
Note ) Sometime
depends on service providers’ system conditions.
is shown o n the display. Once you listen a new voice message, is
wouldn’t be disappea red alt hou gh you check the message already. It
Listen Voice Mails
If your phone is turned ON when it receives a voice message, your phone sounds an ale rt or
vibrates and
immediately by pressing [SEL] “
- Press “
- Select “▶ 1 Voice” and press [YES] (‥ ). Then the time you received, a sender and
sender’s phone number appear on the display.
- If you want to listen a voice message, di al “ X X X ”. Then you can list en the voi ce
messages.
- If you want to see message s agai n, pre ss “
Voice”. Then you can see the voice mail list on the display. Select a message and press
[YES] (‥ ).
- If you want delete a message, press [DEL] (
- If you want to call to a sender back, simply press “SEND” while you are reading or
listening a voice mail.
is shown on the display. You have a choice of li stening the message
” key or listening it later. To listen a new voice message;
” key and “1: View MSG”.
” key, “1: View MSG” and select “▶ 1
) while you are reading a voice m ai l list.
32
Page 33

Delete Messages
You ca n del ete a message one by one or dele te all messages at once. To delete a message;
- Press [DEL] (
- Or press “
- Choose “1. Inbox” to erase all messages you received including text messages.
- Then “E ra se ? ” app ear s on t he di spla y. Press [OK] (‥ ) to erase al l message s.
) key while you are reading a message or on the message list display.
” key and “5: Erase All”.
III. Message Alerts
You ca n set message alerts in 5 different types (Bell, Lamp, Vibrator+Lamp, Bell+Vibrator,
Bell+Lamp, Vibrator).
- Press “
- Select “Bell”, “Lamp”, “Vib.+Lamp”, “Bell+Vib.”, “Bell+Lamp” or “Vib.”.
- Press “YES (‥ )” to set.
Note ) “Vib. = vibrator”
” key and “3: Message Aler t”.
IV. Message Save
You ca n save message in 3 different types (Auto Save, Prompt, Not Save).
- Press “
- Select “Auto Save”, “Prompt” or “Not Save”.
” key and “4: Message Save”.
- Press “YES (‥ )” to set.
33
Page 34

USING MEMU During a Call
Sending My Phone Number
You ca n send your phone number durin g a call. To send your phone number;
- Press “Menu (‥ )” and “1: Send My #”.
- Then your phone will dial your phone number automatically and you can h ear the dial
tone.
Storing a Phone Number
You ca n store a phone numbe r and a name duri ng a call . To store a phone number;
- Press “Menu (‥ )” and “2: Phone # Memo”. ! “2: # Memo”로 수정
Note ) How to store a phone number and a name, see “Numbe r Store ” in “Phone Book” on
page .
Mute
To mute the microphone, press “Menu (‥ )” and “3: Voice Mute”. And to release muting the
microphone, press “Menu (‥ )” and “3: Voice Mute” again.
DTMF Mute
To mute the DTMF, press “Menu (‥ )” and “4: DTMF Mute”. And to release muting the DTMF,
press “Menu (‥ )” and “4: DT MF Mute” again .
My Phone Number View
34
Page 35

To see my phone number, press “Menu (‥ )” and “5: My number”. And press “PREV ( )” to
go back to previous display.
Earpiece Volume Control
To increase or decrease Earpiece volume, press “Menu (‥ )” and “6: Call Vol.”. Then you can
increase and decrease by scrolling “◀ ▶ ”
Voice Privacy
To set “Voice Privacy”, pr ess “Menu (‥ )” and “7: Voice Privacy”. Choose “Voice Privacy” as
“Enhanced” or “Standa rd”.
DTMF Tone
To set DTMF tone length as normal or long, press “Menu (‥ )”, “8: DTMF Tone” Select
“Normal” or “Long”
35
Page 36

ENTERING LETTERS & NUMBERS
You ca n enter le tt ers, as wel l as numbers, whe n storing numbers and names into your phone or
sending a text message (SMS : Short Messaging Service) by using your phone’s keypad. To
enter letters, press the key associated with the let ter you wish to enter until it appears on the
screen (numbers also appear).
When you need to enter letters into your phone, it automati call y switches to ABC mode. Once
you enter letters, you enter a capital lett er.
1. To enter a small letter, press [X ! x] (
you can enter a small letter.
2. To enter a number, press [x ! X] (
can enter a number.
3. Inserting Punctuation Symbols & Special Characters : When in ABC mode, you can
press “0 (OPR)” key and the following special charact er s appear. Yo u can use the se
characters when storing names in your phone book or sending a text message.
! @ # % & * < > - _ + = : ” ’ ( ) / \ ? . , { }
$ [ ] ; ¡¡¡¡ ¿¿¿¿ << >>
4. While you are entering numbers for storing or dialing a phone number, you can enter
“Hard Pause”, “Time Pause” and “Hyphen”. To enter “Hard Pause”, “Time Pause” and
“Hyphen”,
- Press “MENU (
HardPause”, “2-TimePause” or “3-Hyphen”.
- And continue entering numbers.
) when you want to enter them between numbe rs and select “1-
). Then [X! x] cha n ge s to [ x ! X]. Now
). Then [x ! X] chan ges to [NUM]. Now yo u
36
Page 37

FCC RF EXPOSURE INFORMATION
Read this information before using your handset
In August 1996 the Federal Communication Commission (FCC) of the United States with its
action in Report and Order FCC 96-326 adopted an updated safety standard for human exposure
to radio frequency (RF) electromagnetic energy emitted by FCC regulated transmitters. Those
guidelines are consistent with the safety standard previously set by both U.S and international
standards bodies. The design of this phone complies with the FCC guidelines and these
international standards.
Use only the supplied or an approved antenna. Unauthorized antennas, modifications, or
attachments could impair call quality, damage the phone, or result in violation of FCC
regulations.
Do not use the phone with a damaged antenna. If a damaged antenna comes into contact with
the skin, a minor burn may result. Please conta ct your lo cal dea ler for repla cement antenn a.
Body-worn Operation
This device was tested for typical body-worn operations. To comply with FCC RF exposure
requirements, a minimum separation distance of 0.6 inches (1.5 cm) must be maintained
between the user’s body and the handset, including the antenna. Third-party belt-clips, holsters,
and similar accessories used by this device should not contain any metallic components. Bodyworn accessories that do not meet these requirements may not comply with FCC RF exposure
requirements and should be avoided.
For more information about RF exposure, please visit the F CC website at www.fcc.gov
37
 Loading...