

Page 1

ThinkPadYoga260UserGuide
Page 2

Note:Beforeusingthisinformationandtheproductitsupports,besuretoreadandunderstandthefollowing:
•Safety,Warranty,andSetupGuide
•RegulatoryNotice
•“Importantsafetyinformation”onpagevi
•AppendixF“Notices”onpage161
ThelatestSafety,Warranty,andSetupGuideandtheRegulatoryNoticeareavailableontheLenovoSupport
Websiteat:
http://www.lenovo.com/UserManuals
SecondEdition(January2016)
©CopyrightLenovo2016.
LIMITEDANDRESTRICTEDRIGHTSNOTICE:IfdataorsoftwareisdeliveredpursuanttoaGeneralServices
Administration“GSA”contract,use,reproduction,ordisclosureissubjecttorestrictionssetforthinContractNo.
GS-35F-05925.
Page 3

Contents
Readthisfirst..............v
Importantsafetyinformation..........vi
Conditionsthatrequireimmediateaction..vii
Safetyguidelines............vii
Chapter1.Productoverview......1
Locatingcomputercontrols,connectors,and
indicators..................1
Frontview................1
Right-sideview..............2
Left-sideview..............4
Bottomview...............5
Statusindicators.............6
Locatingimportantproductinformation......7
Machinetypeandmodelinformation.....7
FCCIDandICCertificationinformation....8
LabelsfortheWindowsoperatingsystems...9
Features.................10
Specifications...............11
Operatingenvironment...........12
Lenovoprograms.............12
AccessingLenovoprograms.......12
AnintroductiontoLenovoprograms....13
Chapter2.Usingyourcomputer...15
Registeringyourcomputer..........15
Frequentlyaskedquestions.........15
Usingthespecialbuttons..........17
GettinghelpabouttheWindowsoperating
system..................17
Usingthemulti-touchscreen.........17
ThinkPadPenPro.............20
Specialkeys...............21
Operatingmodes..............23
Enablingtheoperatingmodes.......24
Rotatingthecomputerdisplay.......24
Notebookmode............25
Standmode..............25
Tabletmode..............26
Tentmode..............27
Usingthekeyboard.............28
ThinkPadpointingdevice..........30
TrackPointpointingdevice........30
Trackpad...............31
Trackpadtouchgestures.........32
CustomizingtheThinkPadpointingdevice..33
Replacingthecaponthepointingstick...33
Powermanagement............34
Usingtheacpower...........34
Usingthebatterypower.........35
Power-savingmodes..........36
Managingthepowerplan........36
Connectingtothenetwork..........37
Ethernetconnections..........37
Wirelessconnections..........37
Usinganexternaldisplay..........41
Connectinganexternaldisplay......42
Choosingadisplaymode........42
Changingdisplaysettings........43
Usingaudiofeatures............43
Usingthecamera.............43
Usingasmartcard.............44
Chapter3.Enhancingyour
computer...............47
FindingThinkPadoptions..........47
ThinkPadOneLink+Dock..........47
ThinkPadWiGigDock............48
Locatingcontrols,connectors,and
indicators...............48
SettinguptheThinkPadWiGigDock....50
UsingtheThinkPadWiGigDock......52
Chapter4.Youandyourcomputer..55
Accessibilityandcomfort..........55
Ergonomicinformation..........55
Comfort...............56
Accessibilityinformation.........56
Travelingwithyourcomputer.........59
Traveltips...............59
Travelaccessories...........59
Chapter5.Security..........61
Usingpasswords..............61
Typingpasswords...........61
Power-onpassword...........61
Supervisorpassword..........62
Harddiskpasswords..........63
Harddisksecurity.............65
Settingthesecuritychip...........66
Usingthefingerprintreader..........67
Noticeondeletingdatafromyourstorage
devices.................70
Usingfirewalls...............70
©CopyrightLenovo2016
i
Page 4

Protectingdataagainstviruses........71
Chapter6.Advancedconfiguration..73
Installinganewoperatingsystem.......73
InstallingtheWindows7operatingsystem..73
InstallingtheWindows10operatingsystem.74
Installingdevicedrivers...........75
UsingtheThinkPadSetupprogram......75
Mainmenu..............76
Configmenu..............76
DateandTimemenu..........82
Securitymenu.............82
Startupmenu.............87
Restartmenu.............88
UpdatingtheUEFIBIOS.........89
Usingsystemmanagement..........89
Settingmanagementfeatures.......90
Chapter7.Preventingproblems...93
Generaltipsforpreventingproblems......93
Makingsuredevicedriversareup-to-date....94
Takingcareofyourcomputer.........95
Cleaningthecoverofyourcomputer....96
UsingtheRescueandRecovery
workspace..............117
Creatingandusingarescuemedium....118
Reinstallingpreinstalledprogramsanddevice
drivers................118
Solvingrecoveryproblems........119
RecoveryoverviewfortheWindows10operating
system..................120
Resettingyourcomputer.........120
Usingadvancedstartupoptions......120
RecoveringyouroperatingsystemifWindows
10failstostart.............120
CreatingandusingarecoveryUSBdrive..121
Chapter10.Replacingdevices...123
Staticelectricityprevention..........123
Disablingthebuilt-inbattery.........123
InstallingorreplacingthemicroSIMcard....124
InstallingorremovingthemicroSDcard....126
Replacingthebasecoverassembly......128
ReplacingtheM.2solid-statedrive......129
Replacingamemorymodule.........131
ReplacingthewirelessWANcard.......133
Replacingthecoin-cellbattery........135
Chapter8.Troubleshootingcomputer
problems...............99
Diagnosingproblems............99
Troubleshooting..............99
Computerstopsresponding.......99
Spillsonthekeyboard..........100
Errormessages............100
Errorswithoutmessages.........102
Beeperrors..............103
Memorymoduleproblems........103
Networkingproblems..........103
Problemswiththekeyboardandotherpointing
devices................105
Problemswiththedisplayandmultimedia
devices................106
Fingerprintreaderproblems........111
Batteryandpowerproblems.......111
Problemswithdrivesandotherstorage
devices................114
Asoftwareproblem...........114
Problemswithportsandconnectors....114
Chapter9.Recoveryoverview...115
RecoveryoverviewfortheWindows7operating
system..................115
Creatingandusingrecoverymedia.....115
Performingbackupandrecovery
operations..............116
Chapter11.Gettingsupport....137
BeforeyoucontactLenovo..........137
Gettinghelpandservice...........137
Usingdiagnosticprograms........138
LenovoSupportWebsite.........138
CallingLenovo.............138
Purchasingadditionalservices........139
AppendixA.Supplemental
informationabouttheUbuntu
operatingsystem..........141
AppendixB.Regulatory
Information.............145
LocatingtheUltraConnect™wirelessantennas..145
Wirelessrelatedinformation.........146
Wireless-radiocomplianceinformation...147
Locatingwirelessregulatorynotices....148
Certificationrelatedinformation........148
Exportclassificationnotice..........148
Electronicemissionnotices..........148
FederalCommunicationsCommission
DeclarationofConformity........148
IndustryCanadaClassBemissioncompliance
statement...............149
EuropeanUnion-Compliancetothe
ElectromagneticCompatibilityDirective...149
GermanClassBcompliancestatement...149
iiThinkPadY oga260UserGuide
Page 5

KoreaClassBcompliancestatement....150
JapanVCCIClassBcompliancestatement..150
Japannoticeforacpowercord......150
Japancompliancestatementforproducts
whichconnecttothepowermainswith
ratedcurrentlessthanorequalto20Aper
phase................150
Lenovoproductserviceinformationfor
Taiwan................150
Eurasiancompliancemark..........150
Brazilaudionotice.............151
AppendixC.WEEEandrecycling
statements.............153
ImportantWEEEinformation.........153
RecyclinginformationforChina........154
RecyclinginformationforJapan........154
RecyclinginformationforBrazil........155
BatteryrecyclinginformationforTaiwan.....155
BatteryrecyclinginformationfortheEuropean
Union..................155
BatteryrecyclinginformationfortheUnitedStates
andCanada................156
AppendixD.RestrictionofHazardous
SubstancesDirective(RoHS)....157
EuropeanUnionRoHS...........157
TurkishRoHS...............157
UkraineRoHS...............157
IndiaRoHS................157
ChinaRoHS................158
AppendixE.ENERGYST ARmodel
information.............159
AppendixF.Notices.........161
Trademarks................162
©CopyrightLenovo2016
iii
Page 6

ivThinkPadY oga260UserGuide
Page 7
Readthisfirst
Besuretofollowtheimportanttipsgivenheretogetthemostuseandenjoymentoutofyourcomputer.
Failuretodosomightleadtodiscomfortorinjury,orcauseyourcomputertofail.
Protectyourselffromtheheatthatyourcomputergenerates.
Whenyourcomputeristurnedonorthebatteryischarging,thebase,thepalm
rest,andsomeotherpartsmaybecomehot.Thetemperaturetheyreach
dependsontheamountofsystemactivityandthelevelofchargeinthebattery.
Extendedcontactwithyourbody,eventhroughclothing,couldcause
discomfortorevenaskinburn.
•Avoidkeepingyourhands,yourlap,oranyotherpartofyourbodyin
contactwithahotsectionofthecomputerforanyextendedtime.
•Periodicallytakehandsfromusingthekeyboardbyliftingyourhandsfrom
thepalmrest.
Protectyourselffromtheheatgeneratedbytheacpoweradapter.
Whentheacpoweradapterisconnectedtoanelectricaloutletandyour
computer,itgeneratesheat.
Extendedcontactwithyourbody,eventhroughclothing,maycauseaskin
burn.
•Donotplacetheacpoweradapterincontactwithanypartofyourbody
whileitisinuse.
•Neveruseittowarmyourbody.
Preventyourcomputerfromgettingwet.
Protectthecablesfrombeingdamaged.
Toavoidspillsandthedangerofelectricalshock,keepliquidsawayfromyour
computer.
Applyingstrongforcetocablesmaydamageorbreakthem.
Routecommunicationlines,orthecablesofanacpoweradapter,amouse,a
keyboard,aprinter,oranyotherelectronicdevice,sothattheycannotbewalked
on,trippedover,pinchedbyyourcomputerorotherobjects,orinanyway
subjectedtotreatmentthatcouldinterferewiththeoperationofyourcomputer.
©CopyrightLenovo2016
v
Page 8

Protectyourcomputeranddatawhenmovingit.
Beforemovingacomputerequippedwithaharddiskdrive,dooneofthe
following,andmakesurethatthepowerbuttonisofforisblinking:
•T urnitoff.
•Putitinsleepmode.
•Putitinhibernationmode.
Thiswillhelptopreventdamagetothecomputer,andpossiblelossofdata.
Handleyourcomputergently.
Donotdrop,bump,scratch,twist,hit,vibrate,push,orplaceheavyobjectson
yourcomputer,display,orexternaldevices.
Carryyourcomputercarefully.
•Useaqualitycarryingcasethatprovidesadequatecushioningandprotection.
•Donotpackyourcomputerinatightlypackedsuitcaseorbag.
•Beforeputtingyourcomputerinacarryingcase,makesurethatitisoff,insleep
mode,orinhibernationmode.Donotputacomputerinacarryingcasewhileit
isturnedon.
Importantsafetyinformation
Note:Readtheimportantsafetyinformationfirst.
Thisinformationcanhelpyousafelyuseyournotebookcomputer.Followandretainallinformationincluded
withyourcomputer.Theinformationinthisdocumentdoesnotalterthetermsofyourpurchaseagreement
ortheLenovo
andSetupGuidethatcomeswithyourcomputer.
Customersafetyisimportant.Ourproductsaredevelopedtobesafeandeffective.However,personal
computersareelectronicdevices.Powercords,poweradapters,andotherfeaturescancreatepotential
safetyrisksthatcanresultinphysicalinjuryorpropertydamage,especiallyifmisused.Toreducethese
risks,followtheinstructionsincludedwithyourproduct,observeallwarningsontheproductandinthe
operatinginstructions,andreviewtheinformationincludedinthisdocumentcarefully.Bycarefullyfollowing
theinformationcontainedinthisdocumentandprovidedwithyourproduct,youcanhelpprotectyourself
fromhazardsandcreateasafercomputerworkenvironment.
Note:Thisinformationincludesreferencestopoweradaptersandbatteries.Inadditiontonotebook
computers,someproducts(suchasspeakersandmonitors)shipwithexternalpoweradapters.Ifyouhave
suchaproduct,thisinformationappliestoyourproduct.Inaddition,computerproductscontainacoin-cell
batterythatprovidespowertothesystemclockevenwhenthecomputerisunplugged,sothebattery
safetyinformationappliestoallcomputerproducts.
®
LimitedWarranty.Formoreinformation,see“WarrantyInformation”intheSafety,Warranty,
viThinkPadY oga260UserGuide
Page 9

Conditionsthatrequireimmediateaction
Productscanbecomedamagedduetomisuseorneglect.Someproductdamageisseriousenough
thattheproductshouldnotbeusedagainuntilithasbeeninspectedand,ifnecessary,repairedby
anauthorizedservicer.
Aswithanyelectronicdevice,paycloseattentiontotheproductwhenitisturnedon.Onveryrare
occasions,youmightnoticeanodororseeapuffofsmokeorsparksventfromyourproduct.Oryou
mighthearsoundslikepopping,crackingorhissing.Theseconditionsmightmerelymeanthatan
internalelectroniccomponenthasfailedinasafeandcontrolledmanner .Or,theymightindicate
apotentialsafetyissue.However,donottakerisksorattempttodiagnosethesituationyourself.
ContacttheCustomerSupportCenterforfurtherguidance.ForalistofServiceandSupportphone
numbers,seethefollowingWebsite:
http://www.lenovo.com/support/phone
Frequentlyinspectyourcomputeranditscomponentsfordamageorwearorsignsofdanger.
Ifyouhaveanyquestionabouttheconditionofacomponent,donotusetheproduct.Contact
theCustomerSupportCenterortheproductmanufacturerforinstructionsonhowtoinspectthe
productandhaveitrepaired,ifnecessary.
Intheunlikelyeventthatyounoticeanyofthefollowingconditions,orifyouhaveanysafety
concernswithyourproduct,stopusingtheproductandunplugitfromthepowersourceand
telecommunicationlinesuntilyoucanspeaktotheCustomerSupportCenterforfurtherguidance.
•Powercords,plugs,poweradapters,extensioncords,surgeprotectors,orpowersuppliesthatare
cracked,broken,ordamaged.
•Signsofoverheating,smoke,sparks,orfire.
•Damagetoabattery(suchascracks,dents,orcreases),dischargefromabattery,orabuildupofforeign
substancesonthebattery.
•Acracking,hissingorpoppingsound,orstrongodorthatcomesfromtheproduct.
•Signsthatliquidhasbeenspilledoranobjecthasfallenontothecomputerproduct,thepowercordor
poweradapter.
•Thecomputerproduct,powercord,orpoweradapterhasbeenexposedtowater.
•Theproducthasbeendroppedordamagedinanyway.
•Theproductdoesnotoperatenormallywhenyoufollowtheoperatinginstructions.
Note:Ifyounoticetheseconditionswithaproduct(suchasanextensioncord)thatisnotmanufacturedfor
orbyLenovo,stopusingthatproductuntilyoucancontacttheproductmanufacturerforfurtherinstructions,
oruntilyougetasuitablereplacement.
Safetyguidelines
Alwaysobservethefollowingprecautionstoreducetheriskofinjuryandpropertydamage.
Serviceandupgrades
DonotattempttoserviceaproductyourselfunlessinstructedtodosobytheCustomerSupportCenteror
yourdocumentation.OnlyuseaServiceProviderwhoisapprovedtorepairyourparticularproduct.
Note:Somecomputerpartscanbeupgradedorreplacedbythecustomer.Upgradestypicallyare
referredtoasoptions.ReplacementpartsapprovedforcustomerinstallationarereferredtoasCustomer
ReplaceableUnits,orCRUs.Lenovoprovidesdocumentationwithinstructionswhenitisappropriatefor
customerstoinstalloptionsorreplaceCRUs.Y oumustcloselyfollowallinstructionswheninstallingor
replacingparts.TheOffstateofapowerindicatordoesnotnecessarilymeanthatvoltagelevelsinsidea
©CopyrightLenovo2016
vii
Page 10

productarezero.Beforeyouremovethecoversfromaproductequippedwithapowercord,alwaysmake
surethatthepoweristurnedoffandthattheproductisunpluggedfromanypowersource.Ifyouhave
anyquestionsorconcerns,contacttheCustomerSupportCenter.
Althoughtherearenomovingpartsinyourcomputerafterthepowercordhasbeendisconnected,the
followingwarningsarerequiredforyoursafety.
CAUTION:
Hazardousmovingparts.Keepfingersandotherbodypartsaway.
CAUTION:
BeforereplacinganyCRUs,turnoffthecomputerandwaitthreetofiveminutestoletthecomputer
coolbeforeopeningthecover.
Powercordsandpoweradapters
DANGER
Useonlythepowercordsandpoweradapterssuppliedbytheproductmanufacturer.
Thepowercordsshallbesafetyapproved.ForGermany,itshallbeH05VV-F,3G,0.75mm
better.Forothercountries,thesuitabletypesshallbeusedaccordingly.
Neverwrapapowercordaroundapoweradapterorotherobject.Doingsocanstressthecordin
waysthatcancausethecordtofray,crack,orcrimp.Thiscanpresentasafetyhazard.
Alwaysroutepowercordssothattheywillnotbewalkedon,trippedover,orpinchedbyobjects.
Protectpowercordsandpoweradaptersfromliquids.Forinstance,donotleaveyourpowercord
orpoweradapternearsinks,tubs,toilets,oronfloorsthatarecleanedwithliquidcleansers.
Liquidscancauseashortcircuit,particularlyifthepowercordorpoweradapterhasbeenstressed
bymisuse.Liquidsalsocancausegradualcorrosionofpowercordterminalsand/ortheconnector
terminalsonapoweradapter,whichcaneventuallyresultinoverheating.
Alwaysconnectpowercordsandsignalcablesinthecorrectorderandensurethatallpowercord
connectorsaresecurelyandcompletelypluggedintoreceptacles.
Donotuseanypoweradapterthatshowscorrosionattheacinputpinsorshowssignsof
overheating(suchasdeformedplastic)attheacinputpinsoranywhereonthepoweradapter .
2
,or
Donotuseanypowercordswheretheelectricalcontactsoneitherendshowsignsofcorrosionor
overheatingorwherethepowercordappearstohavebeendamagedinanyway.
viiiThinkPadY oga260UserGuide
Page 11

Topreventpossibleoverheating,donotcoverthepoweradapterwithclothingorotherobjects
whenthepoweradapterispluggedintoanelectricaloutlet.
Extensioncordsandrelateddevices
Ensurethatextensioncords,surgeprotectors,uninterruptiblepowersupplies,andpowerstripsthatyouuse
areratedtohandletheelectricalrequirementsoftheproduct.Neveroverloadthesedevices.Ifpowerstrips
areused,theloadshouldnotexceedthepowerstripinputrating.Consultanelectricianformoreinformation
ifyouhavequestionsaboutpowerloads,powerrequirements,andinputratings.
Plugsandoutlets
DANGER
Ifareceptacle(poweroutlet)thatyouintendtousewithyourcomputerequipmentappearstobe
damagedorcorroded,donotusetheoutletuntilitisreplacedbyaqualifiedelectrician.
Donotbendormodifytheplug.Iftheplugisdamaged,contactthemanufacturertoobtain
areplacement.
Donotshareanelectricaloutletwithotherhomeorcommercialappliancesthatdrawlargeamounts
ofelectricity;otherwise,unstablevoltagemightdamageyourcomputer,data,orattacheddevices.
Someproductsareequippedwithathree-prongedplug.Thisplugfitsonlyintoagrounded
electricaloutlet.Thisisasafetyfeature.Donotdefeatthissafetyfeaturebytryingtoinsertitinto
anon-groundedoutlet.Ifyoucannotinserttheplugintotheoutlet,contactanelectricianforan
approvedoutletadapterortoreplacetheoutletwithonethatenablesthissafetyfeature.Never
overloadanelectricaloutlet.Theoverallsystemloadshouldnotexceed80percentofthebranch
circuitrating.Consultanelectricianformoreinformationifyouhavequestionsaboutpowerloads
andbranchcircuitratings.
Besurethatthepoweroutletyouareusingisproperlywired,easilyaccessible,andlocatedclose
totheequipment.Donotfullyextendpowercordsinawaythatwillstressthecords.
Besurethatthepoweroutletprovidesthecorrectvoltageandcurrentfortheproductyouare
installing.
Carefullyconnectanddisconnecttheequipmentfromtheelectricaloutlet.
Powersupplystatement
DANGER
Neverremovethecoveronapowersupplyoranypartthathasthefollowinglabelattached.
©CopyrightLenovo2016
ix
Page 12

Hazardousvoltage,current,andenergylevelsarepresentinsideanycomponentthathasthislabel
attached.Therearenoserviceablepartsinsidethesecomponents.Ifyoususpectaproblemwith
oneoftheseparts,contactaservicetechnician.
Externaldevices
CAUTION:
DonotconnectordisconnectanyexternaldevicecablesotherthanUSBcableswhilethecomputer
powerison;otherwise,youmightdamageyourcomputer.T oavoidpossibledamagetoattached
devices,waitatleastfivesecondsafterthecomputerisshutdowntodisconnectexternaldevices.
Generalbatterynotice
DANGER
BatteriessuppliedbyLenovoforusewithyourproducthavebeentestedforcompatibilityand
shouldonlybereplacedwithapprovedparts.AbatteryotherthantheonespecifiedbyLenovo,ora
disassembledormodifiedbatteryisnotcoveredbythewarranty.
Batteryabuseormishandlingcancauseoverheat,liquidleakage,oranexplosion.Toavoidpossible
injury,dothefollowing:
•Donotopen,dissemble,orserviceanybattery.
•Donotcrushorpuncturethebattery.
•Donotshort-circuitthebattery,orexposeittowaterorotherliquids.
•Keepthebatteryawayfromchildren.
•Keepthebatteryawayfromfire.
Stopusingthebatteryifitisdamaged,orifyounoticeanydischargeorthebuildupofforeign
materialsonthebatteryleads.
Storetherechargeablebatteriesorproductscontainingtherechargeablebatteriesatroom
temperature,chargedtoapproximately30to50%ofcapacity.Werecommendthatthebatteriesbe
chargedaboutonceperyeartopreventoverdischarge.
Donotputthebatteryintrashthatisdisposedofinlandfills.Whendisposingofthebattery,comply
withlocalordinancesorregulations.
Noticeforbuilt-inrechargeablebattery
DANGER
Donotattempttoreplacethebuilt-inrechargeablebattery.Replacementofthebatterymustbe
donebyaLenovo-authorizedrepairfacilityortechnician.
Onlyrechargethebatterystrictlyaccordingtoinstructionsincludedintheproductdocumentation.
TheLenovo-authorizedrepairfacilitiesortechniciansrecycleLenovobatteriesaccordingtolocal
lawsandregulations.
xThinkPadY oga260UserGuide
Page 13

Noticefornon-rechargeablecoin-cellbattery
DANGER
Ifthecoin-cellbatteryisincorrectlyreplaced,thereisdangerofanexplosion.Thebatterycontains
asmallamountofharmfulsubstance.
Donotheattomorethan100°C(212°F).
ThefollowingstatementappliestousersinthestateofCalifornia,U.S.A.
CaliforniaPerchlorateInformation:
Productscontainingmanganesedioxidelithiumcoin-cellbatteriesmaycontainperchlorate.
PerchlorateMaterial-specialhandlingmayapply,See
www.dtsc.ca.gov/hazardouswaste/perchlorate
Heatandproductventilation
DANGER
Computers,acpoweradapters,andmanyaccessoriescangenerateheatwhenturnedonandwhen
batteriesarecharging.Notebookcomputerscangenerateasignificantamountofheatduetotheir
compactsize.Alwaysfollowthesebasicprecautions:
•Whenyourcomputeristurnedonorthebatteryischarging,thebase,thepalmrest,andsome
otherpartsmaybecomehot.Avoidkeepingyourhands,yourlap,oranyotherpartofyour
bodyincontactwithahotsectionofthecomputerforanyextendedlengthoftime.Whenyou
usethekeyboard,avoidkeepingyourpalmsonthepalmrestforaprolongedperiodoftime.
Yourcomputergeneratessomeheatduringnormaloperation.Theamountofheatdependson
theamountofsystemactivityandthebatterychargelevel.Extendedcontactwithyourbody,
eventhroughclothing,couldcausediscomfortorevenaskinburn.Periodicallytakebreaks
fromusingthekeyboardbyliftingyourhandsfromthepalmrest;andbecarefulnottouse
thekeyboardforanyextendedlengthoftime.
•Donotoperateyourcomputerorchargethebatterynearflammablematerialsorinexplosive
environments.
•Ventilationslots,fansand/orheatsinksareprovidedwiththeproductforsafety,comfort,and
reliableoperation.Thesefeaturesmightinadvertentlybecomeblockedbyplacingtheproducton
abed,sofa,carpet,orotherflexiblesurface.Neverblock,cover,ordisablethesefeatures.
•Whentheacpoweradapterisconnectedtoanelectricaloutletandyourcomputer ,itgenerates
heat.Donotplacetheadapterincontactwithanypartofyourbodywhileusingit.Neverusethe
acpoweradaptertowarmyourbody.Extendedcontactwithyourbody,eventhroughclothing,
maycauseaskinburn.
Foryoursafety,alwaysfollowthesebasicprecautionswithyourcomputer:
•Keepthecoverclosedwheneverthecomputerispluggedin.
•Regularlyinspecttheoutsideofthecomputerfordustaccumulation.
•Removedustfromventsandanyperforationsinthebezel.Morefrequentcleaningsmightbe
requiredforcomputersindustyorhigh-trafficareas.
•Donotrestrictorblockanyventilationopenings.
•Donotoperateyourcomputerinsidefurniture,asthismightincreasetheriskofoverheating.
©CopyrightLenovo2016
xi
Page 14

•Airflowtemperaturesintothecomputershouldnotexceed35°C(95°F).
Electricalcurrentsafetyinformation
DANGER
Electriccurrentfrompower,telephone,andcommunicationcablesishazardous.
Toavoidashockhazard:
•Donotuseyourcomputerduringalightningstorm.
•Donotconnectordisconnectanycablesorperforminstallation,maintenance,orreconfiguration
ofthisproductduringanelectricalstorm.
•Connectallpowercordstoaproperlywiredandgroundedelectricaloutlet.
•Connecttoproperlywiredoutletsanyequipmentthatwillbeattachedtothisproduct.
•Wheneverpossible,useonehandonlytoconnectordisconnectsignalcables.
•Neverturnonanyequipmentwhenthereisevidenceoffire,water,orstructuraldamage.
•Donotuseyourcomputeruntilallinternalpartsenclosuresarefastenedintoplace.Neveruse
thecomputerwheninternalpartsandcircuitsareexposed.
DANGER
Connectanddisconnectcablesasdescribedinthefollowingprocedureswheninstalling,moving,
oropeningcoversonthisproductorattacheddevices.
Toconnect:
1.TurneverythingOFF.
2.First,attachallcablestodevices.
3.Attachsignalcablestoconnectors.
4.Attachpowercordstooutlets.
5.TurndevicesON.
Thepowercordmustbedisconnectedfromthewalloutletorreceptaclebeforeinstallingallother
electricalcablesconnectedtothecomputer.
Thepowercordmaybereconnectedtothewalloutletorreceptacleonlyafterallotherelectrical
cableshavebeenconnectedtothecomputer.
DANGER
Duringelectricalstorms,donotperformanyreplacementanddonotconnectthetelephonecable
toordisconnectitfromthetelephoneoutletonthewall.
Todisconnect:
1.TurneverythingOFF.
2.First,removepowercordsfromoutlets.
3.Removesignalcablesfromconnectors.
4.Removeallcablesfromdevices.
Liquidcrystaldisplay(LCD)notice
CAUTION:
Theliquidcrystaldisplay(LCD)ismadeofglass,androughhandlingordroppingthecomputercan
causetheLCDtobreak.IftheLCDbreaksandtheinternalfluidgetsintoyoureyesoronyour
xiiThinkPadY oga260UserGuide
Page 15

hands,immediatelywashtheaffectedareaswithwaterforatleast15minutes;ifanysymptomsare
presentafterwashing,getmedicalcare.
Note:Forproductswithmercury-containingfluorescentlamps(forexample,non-LED),thefluorescentlamp
intheliquidcrystaldisplay(LCD)containsmercury;disposeofaccordingtolocal,state,orfederallaws.
Usingheadphonesorearphones
CAUTION:
Excessivesoundpressurefromearphonesandheadphonescancausehearingloss.Adjustmentof
theequalizertomaximumincreasestheearphoneandheadphoneoutputvoltageandthesound
pressurelevel.Therefore,toprotectyourhearing,adjusttheequalizertoanappropriatelevel.
Excessiveuseofheadphonesorearphonesforalongperiodoftimeathighvolumecanbedangerousifthe
outputoftheheadphoneorearphoneconnectorsdonotcomplywithspecificationsofEN50332-2.The
headphoneoutputconnectorofyourcomputercomplieswithEN50332-2Subclause7.Thisspecification
limitsthecomputer’smaximumwidebandtrueRMSoutputvoltageto150mV.Tohelpprotectagainst
hearingloss,ensurethattheheadphonesorearphonesyouusealsocomplywithEN50332-2(Clause7
limits)forawidebandcharacteristicvoltageof75mV.UsingheadphonesthatdonotcomplywithEN
50332-2canbedangerousduetoexcessivesoundpressurelevels.
IfyourLenovocomputercamewithheadphonesorearphonesinthepackage,asaset,thecombinationof
theheadphonesorearphonesandthecomputeralreadycomplieswiththespecificationsofEN50332-1.
Ifdifferentheadphonesorearphonesareused,ensurethattheycomplywithEN50332-1(Clause6.5
LimitationValues).UsingheadphonesthatdonotcomplywithEN50332-1canbedangerousdueto
excessivesoundpressurelevels.
Additionalsafetyinformation
Plasticbagnotice
DANGER
Plasticbagscanbedangerous.Keepplasticbagsawayfrombabiesandchildrentoavoiddanger
ofsuffocation.
Glasspartsnotice
CAUTION:
Somepartsofyourproductmaybemadeofglass.Thisglasscouldbreakiftheproductisdropped
onahardsurfaceorreceivesasubstantialimpact.Ifglassbreaks,donottouchorattempttoremove
it.Stopusingyourproductuntiltheglassisreplacedbytrainedservicepersonnel.
Savetheseinstructions.
©CopyrightLenovo2016
xiii
Page 16

xivThinkPadY oga260UserGuide
Page 17

Chapter1.Productoverview
Thischaptercontainsthefollowingtopics:
•“Locatingcomputercontrols,connectors,andindicators”onpage1
•“Locatingimportantproductinformation”onpage7
•“Features”onpage10
•“Specifications”onpage11
•“Operatingenvironment”onpage12
•“Lenovoprograms”onpage12
Locatingcomputercontrols,connectors,andindicators
Thissectionintroducesthecomputerhardwarefeaturestogiveyouthebasicinformationyouwillneed
tostartusingthecomputer.
Frontview
1Microphones(availableonsomemodels)2Camera(availableonsomemodels)
3Ambientlightsensor
5Trackpad
7TrackPoint
9Windows
1Microphones(availableonsomemodels)
®
buttons8TrackPointpointingstick
®
button10Multi-touchscreen
4Fingerprintreader(availableonsomemodels)
6NFClabel(availableonsomemodels)
Thebuilt-inmicrophonescapturesoundandvoicewhenusedwithaprogramcapableofhandlingaudio.
2Camera(availableonsomemodels)
Usethecameratotakepicturesorholdavideoconference.Formoreinformation,see“Usingthecamera”
onpage43.
©CopyrightLenovo2016
1
Page 18

3Ambientlightsensor
Theambientlightsensordetectsthesurroundinglightconditions.Thenthecomputeradjuststhescreen
brightnessandthekeyboardbacklightmodeaccordingly.
4Fingerprintreader(availableonsomemodels)
Fingerprintauthenticationtechnologyprovidessimpleandsecureuseraccessbyassociatingyourfingerprint
withapassword.Formoreinformation,see“Usingthefingerprintreader”onpage67.
ThinkPad
5Trackpad
7TrackPointbuttons
8TrackPointpointingstick
®
pointingdevice
ThekeyboardcontainstheLenovo-uniqueThinkPadpointingdevices.Pointing,selecting,anddraggingare
allpartofasingleprocessthatyoucanperformwithoutmovingyourfingersfromatypingposition.For
moreinformation,see“ThinkPadpointingdevice”onpage30
6NFClabel(availableonsomemodels)
.
Ifyoufindanearfieldcommunication(NFC)labelnearthetrackpad,itindicatesthatyourcomputercomes
withanNFCcard.FormoreinformationabouttheNFCfeature,see“UsingtheNFCdevices”onpage40.
9Windowsbutton
PresstheWindowsbuttontoopentheStartmenuortowakeupthecomputerfromsleepmode.
10Multi-touchscreen
Themulti-touchscreenisaglasspanelcoveredwithaplasticfilm.Formoreinformation,see“Usingthe
multi-touchscreen”onpage17.
Right-sideview
1Powerbutton2Volume-controlbuttons
3ThinkPadPenPro(availableonsomemodels)
5Micro-SD-cardslot6Micro-SIM-cardtray(availableonsomemodels)
7USB3.0connector
9Security-lockslot
1Powerbutton
4Audioconnector
8HDMI™connector
Pressthepowerbuttontoturnonthecomputerorputthecomputerintosleepmode.Forinformationabout
howtoturnoffthecomputer,see“Frequentlyaskedquestions”onpage15
.
Ifyourcomputerisunresponsive,youcanturnoffthecomputerbypressingandholdingthepowerbutton
forfourormoreseconds.Ifthecomputercannotbeturnedoff,see“Computerstopsresponding”on
page99
formoreinformation.
2ThinkPadY oga260UserGuide
Page 19

Youalsocandefinewhatthepowerbuttondoes.Forexample,bypressingthepowerbutton,youcanturn
offthecomputerorputthecomputerintosleeporhibernationmode.Tochangewhatthepowerbutton
does,dothefollowing:
1.GotoControlPanelandthenchangetheviewofControlPanelfromCategorytoLargeiconsorSmall
icons.
2.ClickPowerOptions➙Choosewhatthepowerbuttonsdo.
3.Followtheinstructionsonthescreen.
2Volume-controlbuttons
Thevolume-controlbuttonsenableyoutoadjustthevolumewhileyouareusingyourcomputerinthe
tabletmode.
3ThinkPadPenPro(availableonsomemodels)
Dependingonthemodel,yourcomputermighthaveaThinkPadPenPro(anelectronicpen)orafiller
installed.UsetheThinkPadPenProtointeractwithyourcomputer.Formoreinformation,see“ThinkPad
PenPro”onpage20.
4Audioconnector
Connectheadphonesoraheadsetthathasa3.5-mm(0.14-inch),4-poleplugtotheaudioconnectorto
listentothesoundfromthecomputer.
Notes:
•Ifyouareusingaheadsetwithafunctionswitch,suchasaheadsetforaniPhonemobiledigitaldevice,
donotpressthisswitchwhileusingtheheadset.
•Theaudioconnectordoesnotsupportaconventionalmicrophone.Formoreinformation,see“Using
audiofeatures”onpage43.
5Micro-SD-cardslot
Yourcomputerisequippedwithamicrosecuredigital(SD)cardreader.InsertamicroSDcardinto
themicro-SD-cardslotfordataaccessorstorage.Formoreinformation,see“Installingorremovingthe
microSDcard”onpage126
6Micro-SIM-cardtray(availableonsomemodels)
.
Ifyourcomputerhasawirelesswideareanetwork(wirelessWAN)feature,amicroSubscriberIdentification
Module(SIM)cardmightberequiredtoestablishwirelessWANconnections.Dependingonthecountry
orregionofdelivery,themicroSIMcardmightbealreadyinstalledintheMicroSIM-cardtray.Formore
information,see“InstallingorreplacingthemicroSIMcard”onpage124
7USB3.0connector
.
TheUniversalSerialBus(USB)3.0connectorisusedforconnectingUSB-compatibledevices,suchasa
USBkeyboard,aUSBmouse,aUSBstoragedevice,oraUSBprinter.
Attention:WhenyouattachaUSBcabletotheUSB3.0connector,ensurethattheUSBmarkisfacing
upward.Otherwisetheconnectormightgetdamaged.
8HDMIconnector
UsetheHigh-DefinitionMultimediaInterface(HDMI)connectortoconnectthecomputertoan
HDMI-compatibleaudiodeviceorvideomonitor,suchasahigh-definitiontelevision(HDTV).
Note:IfyouconnectthecomputertoasupportedThinkPadOneLink+Dock,usetheHMDIconnectoronthe
ThinkPadOneLink+Dock,nottheoneonthecomputer.
Chapter1.Productoverview3
Page 20

9Security-lockslot
Toprotectyourcomputerfromtheft,purchaseasecuritycablelockthatfitsthissecurity-lockslottolock
yourcomputertoastationaryobject.
Note:Youareresponsibleforevaluating,selecting,andimplementingthelockingdeviceandsecurity
feature.Lenovomakesnocomments,judgments,orwarrantiesaboutthefunction,quality,orperformance
ofthelockingdeviceandsecurityfeature.
Left-sideview
1Powerconnector
3MiniDisplayPortconnector
5Smartcardslot(availableonsomemodels)
1Powerconnector
2OneLink+connector
4AlwaysOnUSBconnector(USB3.0connector)
Connecttheacpoweradaptertothepowerconnectortoprovideacpowertothecomputerandcharge
thebattery.
2OneLink+connector
UsetheOneLink+connectortoconnecttotheThinkPadOneLink+DockortoconnecttotheThinkPad
OneLink+toRJ45Adapter.WiththeThinkPadOneLink+toRJ45Adapter,youcanconnectthecomputer
toalocalareanetwork(LAN).
DANGER
Toavoidtheriskofelectricalshock,donotconnectthetelephonecabletotheEthernetconnector
ontheThinkPadOneLink+toRJ45Adapter.YoucanonlyconnectanEthernetcabletothis
connector.
Dependingonthecountryorregionofdelivery,aThinkPadOneLink+toRJ45Adaptermightbeapartof
theshippingcontentsthatcomewithyourcomputer.IfyourcomputerdoesnotcomewiththeThinkPad
OneLink+toRJ45Adapter,youcanpurchaseonefromLenovoat:
http://www.lenovo.com/accessories
TheEthernetconnectorontheThinkPadOneLink+toRJ45Adapterhastwonetworkstatusindicators.
Whenthegreenindicatorison,thecomputerisconnectedtoaLAN.Whentheyellowindicatorblinks,
dataisbeingtransmitted.
ForinstructionsonhowtousetheThinkPadOneLink+Dock,see“ThinkPadOneLink+Dock”onpage47.
3MiniDisplayPortconnector
UsetheminiDisplayPort®connectortoconnectyourcomputertoacompatibleprojector,externalmonitor,
orhigh-definitiontelevision.Thiscompactconnectorenablesaplug-and-playsetupandsupportsadapters
thatcanplugintoDigitalVisualInterface(DVI),VideoGraphicsArray(VGA),orHDMIconnectors.Themini
DisplayPortconnectorofyourcomputersupportsaudioaswellasvideostreaming.Formoreinformation,
see“Usinganexternaldisplay”onpage41
.
4ThinkPadY oga260UserGuide
Page 21

4AlwaysOnUSBconnector(USB3.0connector)
Bydefault,theAlwaysOnUSBconnectorenablesyoutochargesomemobiledigitaldevicesand
smartphoneswhenyourcomputerisinthefollowingsituation:
•Whenyourcomputerisonorinsleepmode
•Whenyourcomputerisinhibernationmodeoristurnedoff,butconnectedtoacpower
Tochargethesedeviceswhenthecomputerisinhibernationmodeorturnedoff,andthecomputerisnot
connectedtoacpower,dothefollowing:
•ForWindows7:StartthePowerManagerprogram,clicktheGlobalPowerSettingstab,andthen
followtheinstructionsonthescreen.
•ForWindows10:StarttheLenovoSettingsprogram,clickPOWER,andthenfollowtheinstructionson
thescreen.
Forinstructionsonhowtostarttheprograms,see“AccessingLenovoprograms”onpage12
.
Attention:WhenyouattachaUSBcabletothisconnector,ensurethattheUSBmarkisfacingupward.
Otherwisetheconnectormightbedamaged.
5Smartcardslot(availableonsomemodels)
Yourcomputermighthaveasmartcardslot.Smartcardscanbeusedforauthentication,datastorage,and
applicationprocessing.Smartcardsalsomightprovidestrongsecurityauthenticationforsinglesign-on
(SSO)withinlargeorganizations.Formoreinformation,see“Usingasmartcard”onpage44
.
Bottomview
Note:Dependingonthemodel,yourcomputermightlookslightlydifferentfromthefollowingillustration.
1Emergency-resethole2Keyboarddrainageholes
1Emergency-resethole
Ifthecomputerstopsrespondingandyoucannotturnitoffbypressingthepowerbutton,removethe
acpoweradapterfirst.Theninsertastraightenedpaperclipintotheemergency-resetholetoresetthe
computer.
2Keyboarddrainageholes
Ifyouaccidentallyspillwaterordrinkoverthekeyboard,thekeyboarddrainageholescanhelpdrainout
liquidfromyourcomputer.
Chapter1.Productoverview5
Page 22

Statusindicators
Thistopichelpsyoulocateandidentifythevariousstatusindicatorsonyourcomputer.
1FnLockindicator
TheFnLockindicatorshowsthestatusofFnLockfunction.Formoreinformation,see“Specialkeys”
onpage21
6ThinkPadY oga260UserGuide
.
Page 23

2Speaker-muteindicator
Whenthespeaker-muteindicatorison,thespeakersaremuted.
3Microphone-muteindicator
Whenthemicrophone-muteindicatorison,themicrophonesaremuted.
4Camera-statusindicator
Whenthecamera-statusindicatorison,thecameraisinuse.
6CapsLockindicator
Whentheindicatorison,itindicatesthatCapsLockmodeisenabled.Y oucantypeallalphabeticcharacters
(A-Z)inuppercasedirectly.
57System-statusindicators
TheindicatorintheThinkPadlogoonthelidandtheindicatorinthecenterofthepowerbuttonshowthe
system-statusofthecomputer.
•Blinksforthreetimes:Thecomputerisinitiallyconnectedtopower.
•Solidon:Thecomputerison(innormalmode).
•Blinksfast:Thecomputerisenteringsleeporhibernationmode.
•Blinksslowly:Thecomputerisinsleepmode.
•Off:Thecomputerisofforinhibernationmode.
Note:Theindicatorinthecenterofthepowerbuttonstaysoffwhenthecomputerdisplayisclosed.Inthis
situation,usetheindicatorintheThinkPadlogoonthelidtoidentifythestatusofyourcomputer.
8acpower-satusindicator
Theacpower-statusindicatorshowstheacpowerchargingstatusofthecomputer.
•Green:Connectedtoacpower(charging80%–100%)
•Amber:Connectedtoacpower(charging1%–80%)
•Off:Notconnectedtoacpower(nocharging)
Locatingimportantproductinformation
Thissectionprovidesinformationtohelpyoulocatethemachinetypeandmodellabel,theFCCIDandIC
Certificationlabel,andtheGenuineMicrosoft
®
label.
Machinetypeandmodelinformation
Themachinetypeandmodellabelidentifiesyourcomputer.WhenyoucontactLenovoforhelp,themachine
typeandmodelinformationhelpssupporttechnicianstoidentifyyourcomputerandprovidefasterservice.
Thefollowingillustrationshowsthelocationofthemachinetypeandmodelofyourcomputer.
Chapter1.Productoverview7
Page 24

FCCIDandICCertificationinformation
TheFCCandICCertificationinformationisidentifiedbyalabellocatedonthecomputerbasecoveras
showninthefollowingillustration.
Thecontentofthislabeldiffersdependingonthewirelessmodulesthatcomewithyourcomputer:
•Forapreinstalledwirelessmodule,thislabelidentifiestheactualFCCIDandICcertificationnumberfor
thewirelessmoduleinstalledbyLenovo.
Note:Donotremoveorreplaceapreinstalledwirelessmodulebyyourself.Formodulereplacement,you
mustcontactLenovoservicefirst.Lenovoisnotresponsibleforanydamagecausedbyunauthorized
replacement.
•Forauser-replaceablewirelessWANmodule,thislabeldirectsyoutoconsultthisuserguidefortheactual
FCCIDandICcertificationnumber.
TheFCCIDandICCertificationnumberlabelfortheuser-replaceablewirelessWANmoduleisaffixedto
thewirelessmodule
1(availableonsomemodels)installedinyourcomputer.
8ThinkPadY oga260UserGuide
Page 25

Note:Fortheuser-replaceablewirelessmodule,ensurethatyouuseonlyLenovo-authorizedwireless
modulesforthecomputer.Otherwise,anerrormessagewillbedisplayedandthecomputerwillbeep
whenyouturnonthecomputer.
LabelsfortheWindowsoperatingsystems
Windows7CertificateofAuthenticity:ComputermodelspreinstalledwiththeWindows7operating
systemhaveaCertificateofAuthenticitylabelaffixedtothecomputercoverorinsidethebattery
compartment.TheCertificateofAuthenticityisyourindicationthatthecomputerislicensedforaWindows7
productandispreinstalledwithaWindows7genuineversion.Insomecases,anearlierWindowsversion
mightbepreinstalledunderthetermsoftheWindows7Professionallicensedowngraderights.Printedon
theCertificateofAuthenticityistheWindows7versionforwhichthecomputerislicensedandtheProduct
ID.TheProductIDisimportantincaseyouneedtoreinstalltheWindows7operatingsystemfromasource
otherthanaLenovoproductrecoverydiscset.
Windows10GenuineMicrosoftlabel:Dependingonyourgeographiclocation,thedatewhenyour
computerwasmanufactured,andtheversionofWindows10thatispreinstalled,yourcomputermighthavea
GenuineMicrosoftlabelaffixedtoitscover.Seehttp://www.microsoft.com/en-us/howtotell/Hardware.aspx
forillustrationsofthevarioustypesofGenuineMicrosoftlabels.
•InthePeople’sRepublicofChina,theGenuineMicrosoftlabelisrequiredonallcomputermodels
preinstalledwithanyversionofWindows10.
•Inothercountriesandregions,theGenuineMicrosoftlabelisrequiredonlyoncomputermodelslicensed
forWindows10Pro.
TheabsenceofaGenuineMicrosoftlabeldoesnotindicatethatthepreinstalledWindowsversionisnot
genuine.FordetailsonhowtotellwhetheryourpreinstalledWindowsproductisgenuine,refertothe
informationprovidedbyMicrosoftathttp://www.microsoft.com/en-us/howtotell/default.aspx.
UnlikeWindows7products,therearenoexternal,visualindicatorsoftheProductIDorWindowsversionfor
whichthecomputerislicensed.Instead,theProductIDisrecordedinthecomputerfirmware.Whenever
aWindows10productisinstalled,theinstallationprogramchecksthecomputerfirmwareforavalid,
matchingProductIDtocompletetheactivation.
Insomecases,anearlierWindowsversionmightbepreinstalledunderthetermsoftheWindows10Pro
licensedowngraderights.
Chapter1.Productoverview9
Page 26

Features
Thecomputerfeaturesintroducedinthissectioncovervariousmodels.Foryourspecificmodel,some
featuresmightvaryornotapply.
Notebookcomputercolor
Blackorsilver
Microprocessor
•Toviewthemicroprocessorinformationofyourcomputer,dothefollowing:
–ForWindows7:OpentheStartmenu,right-clickComputer,andthenclickProperties.
–ForWindows10:Doeitherofthefollowing:
–OpentheStartmenuandthenclickSettings.IfSettingsisnotdisplayed,clickAllappstodisplay
allprograms,andthenclickSettings➙System➙About.
–Right-clicktheStartbuttonandthenselectSystem.
Memory
•Doubledatarate4(DDR4)synchronousdynamicrandomaccessmemory(SDRAM)
Storagedevice
•M.2solid-statedrive
Display
•Multi-touchtechnology
•Displaysize:317.5mm(12.5inches)
•Displayresolution:1920x1080pixelsor1366x768pixels,dependingonthemodel
•Colordisplaywiththethin-filmtransistor(TFT)technology
•Brightnesscontrol
Keyboard
•Functionkeys
•Six-row,backlight,andspill-resistant
•Keyboardframetravelfunction
•ThinkPadpointingdevice
10ThinkPadY oga260UserGuide
Page 27

Interface
•AlwaysOnUSB3.0connector
•Audioconnector
•HDMIconnector
•Micro-SD-cardslot
•Micro-SIM-cardtray(availableonsomemodels)
•MiniDisplayPortconnector
•OneLink+connector
•Smartcardreader(availableonsomemodels)
•USB3.0connector
•Volume-controlbuttons
Integratedwirelessfeatures
•Bluetooth
•NFC(availableonsomemodels)
•WirelessLAN
•WirelessWAN(availableonsomemodels)
•WirelessGigabit(WiGig)(availableonsomemodels)
Securityfeature
•Fingerprintreader(availableonsomemodels)
•Security-lockslot
•TrustedPlatformModule(TPM)(availableonsomemodels)
Others
•Ambientlightsensor
•Camera(availableonsomemodels)
•Microphones(availableonsomemodels)
•Windowsbutton
Specifications
Size
•Width:309.9mm(12.2inches)
•Depth:220mm(8.7inches)
•Height:from17.8mm(0.7inch)to19.6mm(0.8inch),dependingonthemodel
Heatoutput
•45W(154Btu/hr)maximumor65W(222Btu/hr)maximum,dependingonthemodel
Powersource(acpoweradapter)
•Sine-waveinputat50to60Hz
•Inputratingoftheacpoweradapter:100to240Vac,50to60Hz
Chapter1.Productoverview11
Page 28

Operatingenvironment
Environment
•Maximumaltitudewithoutpressurization:3048m(10000ft)
•Temperature
–Ataltitudesupto2438m(8000ft)
–Operating:5.0°Cto35.0°C(41°Fto95°F)
–Storage:5.0°Cto43.0°C(41°Fto109°F)
–Ataltitudesabove2438m(8000ft)
Maximumtemperaturewhenoperatingundertheunpressurizedcondition:31.3°C(88°F)
Note:Whenyouchargethebattery,theambienttemperaturemustbeatleast10°C(50°F).
•Relativehumidity:
–Operating:8%to95%atwetbulb:23℃(73℉)
–Storage:5%to95%atwetbulb:27℃(81℉)
Ifpossible,placeyourcomputerinawell-ventilatedanddryareawithoutdirectexposuretosunshine.
Attention:Keepelectricalappliancessuchasanelectricfan,radio,high-poweredspeakers,anair
conditioner,andamicrowaveovenawayfromyourcomputer.Thestrongmagneticfieldsgeneratedby
electricalappliancescandamagethemotoranddataonthestoragedevices.
Donotplaceanybeveragesontopoforbesidethecomputerorotherattacheddevices.Ifliquidisspilledon
orinthecomputeroranattacheddevice,ashortcircuitorotherdamagemightoccur.
Donoteatorsmokeoveryourkeyboard.Particlesthatfallintoyourkeyboardcancausedamage.
Lenovoprograms
YourcomputercomeswithLenovoprogramstohelpyouworkeasilyandsecurely.
Note:Theavailableprogramsaresubjecttochangewithoutnotice.
TolearnmoreabouttheprogramsandothercomputingsolutionsofferedbyLenovo,goto:
http://www.lenovo.com/support
AccessingLenovoprograms
ToaccessLenovoprogramsonyourcomputer,dothefollowing:
1.ClicktheStartbuttontoopentheStartmenu.Locateaprogrambytheprogramname.
2.IftheprogramisnotdisplayedontheStartmenu,clickAllprograms(Windows7)orAllapps(Windows
10)todisplayallprograms.
3.Ifyoustilldonotfindtheprogramintheprogramlist,searchfortheprograminthesearchbox.
Note:IfyouareusingtheWindows7operatingsystem,someLenovoprogramsarereadytobeinstalled.
Youcannotfindtheseprogramsthroughtheabovemethodsunlessyouhaveinstalledthemfirst.T oinstall
theseLenovoprograms,accesstheLenovoPCExperienceprogram,clickLenovoT ools,andthenfollow
theinstructionsonthescreen.
12ThinkPadY oga260UserGuide
Page 29

AnintroductiontoLenovoprograms
ThistopicprovidesabriefintroductiontoLenovoprograms.Dependingonyourcomputermodel,someof
theprogramsmightnotbeavailable.
AccessConnections™
(Windows7)
ActiveProtectionSystem™
(Windows7andWindows10)
AutoScrollUtility
(Windows7)
CommunicationsUtility
(Windows7)
LenovoTouchFingerprint
Software
(Windows7)
HotkeyFeaturesIntegration
(Windows7andWindows10)
LenovoCompanion
(Windows10)
TheAccessConnectionsprogramisaconnectivityassistantprogramfor
creatingandmanaginglocationprofiles.Eachlocationprofilestoresallthe
networkandInternetconfigurationsettingsneededforconnectingtoanetwork
infrastructurefromaspecificlocationsuchasahomeoranoffice.
Byswitchingbetweenlocationprofilesasyoumoveyourcomputerfromplace
toplace,youcanquicklyandeasilyconnecttoanetworkwithnoneedto
manuallyreconfigureyoursettingsandrestartthecomputereachtime.
TheActiveProtectionSystemprogramprotectsyourinternalstoragedrive(such
asharddiskdrive)whentheshocksensorinsideyourcomputerdetectsa
conditionthatcoulddamagethedrive,suchassystemtilt,excessivevibration,
orshock.
Theinternalstoragedriveislessvulnerabletodamagewhenitisnotoperating.
Thisisbecausewhentheinternalstoragedriveisnotoperating,thesystem
stopsitfromspinning,andmightalsomovethereadandwriteheadsofthe
drivetoareasthatdonotcontaindata.
Assoonastheshocksensorsensesthattheenvironmentisstableagain
(minimalchangeinsystemtilt,vibration,orshock),itturnsontheinternal
storagedrive.
Thisprogramenhancesyourexperiencewithwindowoperation.Thewindow
positionofaforegroundapplicationisautomaticallyadjusted.Thescrollbaron
auserinterfaceisalsoautomaticallyadjusted.
TheCommunicationsUtilityprogramenablesyoutoconfiguresettingsforthe
integratedcameraandaudiodevices.
Ifyourcomputercomeswithafingerprintreader,theprogramenablesyou
toenrollyourfingerprintandassociateitwithyourpasswords.Asaresult,
fingerprintauthenticationcanreplaceyourpasswordsandenablesimpleand
secureuseraccess.
HotkeyFeaturesIntegrationisautilitypackagethatenablesyoutoselectand
installutilityprogramsspecificallyforthespecialkeysandbuttonsonyour
computer.Thespecialkeysandbuttonsaredesignedtomeetaccessibilityand
usabilityrequirements.Installingrelatedutilityprogramsenablesfullfunctionality
ofthespecialkeysandbuttons.
Yourcomputer’sbestfeaturesandcapabilitiesshouldbeeasytoaccessand
understand.WithLenovoCompanion,theyare.
UseLenovoCompaniontodothefollowing:
•Optimizeyourcomputer’sperformance,monitoryourcomputer’shealth,
andmanageupdates.
•Accessyouruserguide,checkwarrantystatus,andviewaccessories
customizedforyourcomputer.
•Readhow-toarticles,exploreLenovoforums,andstayup-to-dateon
technologynewswitharticlesandblogsfromtrustedsources.
LenovoCompanionisfilledwithexclusiveLenovocontenttohelpyoulearn
aboutwhatyoucandowithyourcomputer.
Chapter1.Productoverview13
Page 30

LenovoID
(Windows10)
LenovoPCExperience
(Windows7andWindows10)
LenovoSettings
(Windows10)
LenovoSolutionCenter
(Windows7andWindows10)
MobileBroadbandConnect
(Windows7andWindows10)
MessageCenterPlus
(Windows7)
PasswordManager
(Windows7)
PowerManager
(Windows7)
RecoveryMedia
(Windows7andWindows10)
RescueandRecovery
(Windows7)
SystemUpdate
(Windows7)
WRITEit
(Windows10)
TheLenovoIDprogramenablesyoutocreateandmanageyourLenovoID.With
aLenovoID,youcanconnecttoeverythingLenovothroughasingleaccount.
UseyourLenovoIDforquickandsimpleauthenticationandthenenjoythe
variousservicesprovidedbyLenovo.Suchservicesincludeonlineshopping,
appdownload,personalizeddevicesupport,specialpromotionaloffers,Lenovo
forums,andsoon.
TheLenovoPCExperienceprogramhelpsyouworkmoreeasilyandsecurelyby
providingeasyaccesstovariousprograms,suchasActiveProtectionSystem
andLenovoSolutionCenter.
Note:OntheWindows10operatingsystem,thisprogramcannotbefoundfrom
theallprogramlistorsearchbox.Toaccessthisprogram,gotoControlPanel.
ViewControlPanelbyCategory,clickHardwareandSound➙Devicesand
Printers,andthendouble-clickthedevicewithyourcomputername.
TheLenovoSettingsprogramenablesyoutoenhanceyourcomputing
experiencebyturningyourcomputerintoaportablehotspot,configuring
cameraandaudiosettings,optimizingyourpowersettings,andcreatingand
managingmultiplenetworkprofiles.
TheLenovoSolutionCenterprogramenablesyoutotroubleshootandresolve
computerproblems.Itcombinesdiagnostictests,systeminformationcollection,
securitystatus,andsupportinformation,alongwithhintsandtipsforoptimal
systemperformance.
TheMobileBroadbandConnectprogramenablesyoutoconnectthecomputer
tothemobilebroadbandnetworkthroughasupportedwirelessWANcard.
TheMessageCenterPlusprogramautomaticallydisplaysmessagestoinform
youaboutimportantnoticesfromLenovo,suchasalertsonsystemupdates
andalertsonconditionsthatrequireyourattention.
ThePasswordManagerprogramautomaticallycapturesandfillsin
authenticationinformationforWindowsprogramsandWebsites.
ThePowerManagerprogramprovidesconvenient,flexible,andcompletepower
managementforthecomputer.Itenablesyoutoadjustyourcomputerpower
settingstoachievethebestbalancebetweenperformanceandpowersaving.
TheRecoveryMediaprogramenablesyoutorestorethecontentsofthehard
diskdrivetothefactorydefaultsettings.
®
TheRescueandRecoveryprogramisaone-buttonrecoveryandrestore
solution.Itincludesasetofself-recoverytoolstohelpyoudiagnosecomputer
problems,gethelp,andrecoverfromsystemcrashes,evenifyoucannotstart
theWindowsoperatingsystem.
TheSystemUpdateprogramenablesyoutokeepthesoftwareonthecomputer
up-to-datebydownloadingandinstallingsoftwarepackages,includingdevice
drivers,UnifiedExtensibleFirmwareInterface(UEFI)basicinput/outputsystem
(BIOS)updates,andotherthird-partyprograms.
WRITEitgivesyouinstanthandwritinginputwhereveryouneedit.Youcanwrite
directlyinanyappandtextfield,edittextinreal-time,seeyourfullscreen,and
convertyourhandwritingintodigitaltext.
14ThinkPadY oga260UserGuide
Page 31

Chapter2.Usingyourcomputer
Thischaptercontainsthefollowingtopics:
•“Registeringyourcomputer”onpage15
•“Frequentlyaskedquestions”onpage15
•“Usingthemulti-touchscreen”onpage17
•“Specialkeys”onpage21
•“ThinkPadpointingdevice”onpage30
•“Powermanagement”onpage34
•“Connectingtothenetwork”onpage37
•“Usinganexternaldisplay”onpage41
•“Usingaudiofeatures”onpage43
•“Usingthecamera”onpage43
•“Usingasmartcard”onpage44
Registeringyourcomputer
Whenyouregisteryourcomputer,informationisenteredintoadatabase,whichenablesLenovotocontact
youincaseofarecallorothersevereproblem.Inaddition,somelocationsofferextendedprivilegesand
servicestoregisteredusers.
WhenyouregisteryourcomputerwithLenovo,youalsowillreceivethefollowingbenefits:
•QuickerservicewhenyoucallLenovoforhelp
•Automaticnotificationoffreesoftwareandspecialpromotionaloffers
ToregisteryourcomputerwithLenovo,gotohttp://www.lenovo.com/registerandfollowtheinstructionson
thescreentoregisteryourcomputer.
Frequentlyaskedquestions
ThistopicprovidesafewtipsthatwillhelpyouoptimizetheuseofyourThinkPadnotebookcomputers.
Toensurethatyoureceivethebestperformancefromyourcomputer,browsethefollowingWebpagetofind
informationsuchasaidsfortroubleshootingandanswerstofrequentlyaskedquestions:
http://www.lenovo.com/support/faq
CanIgetmyuserguideinanotherlanguage?
•Todownloadtheuserguideinanotherlanguage,gotohttp://www.lenovo.com/support.Thenfollow
theinstructionsonthescreen.
Howtoturnoffmycomputer?
•ForWindows7:OpentheStartmenu,thenclickShutdown.
•ForWindows10:OpentheStartmenu,click
Power,andthenclickShutdown.
HowdoIaccessControlPanel?
©CopyrightLenovo2016
15
Page 32

•ForWindows7:OpentheStartmenu,thenclickControlPanel.
•ForWindows10:Right-clicktheStartbutton,thenclickControlPanel.
HowdoIusebatterypowermoreeffectivelywhenIamonthego?
•Toconservepower,ortosuspendoperationwithoutexitingprogramsorsavingfiles,see“Power-saving
modes”onpage36
.
•Toachievethebestbalancebetweenperformanceandpowersaving,changepowerplansettings.See
“Managingthepowerplan”onpage36.
•Ifyourcomputerwillbeturnedoffforanextendedperiodoftime,andfollowtheinstructionsin“Disabling
thebuilt-inbattery”onpage123todisablethebuilt-inbatterysoastopreventbatterypowerfromdraining.
HowdoIsecurelydisposeofdatastoredonthestoragedevices?
•StudyChapter5“Security”onpage61tofindouthowyoucanprotectyourcomputerfromtheftand
unauthorizeduse.
•UsethePasswordManagerprogramtoprotectthedatastoredonyourcomputer.Formoreinformation,
seethehelpinformationsystemoftheprogram.
•Beforeyoudisposeofthedataonthestoragedevices,besuretoreadthetopic“Noticeondeletingdata
fromyourstoragedevices”onpage70.
HowdoIgivepresentationsorattachanexternalmonitor?
•Ensurethatyoufollowtheprocedureinthetopic“Usinganexternaldisplay”onpage41.
•WiththeExtenddesktopfunction,youcandisplayoutputonboththecomputerdisplayandtheexternal
monitor.See“Usinganexternaldisplay”onpage41.
Ihavebeenusingthecomputerforsometimealready,anditisgettingslower.WhatshouldIdo?
•Followthe“Generaltipsforpreventingproblems”onpage93
.
•Diagnoseproblemsyourselfbyusingthepreinstalleddiagnosticsoftware.See“Diagnosingproblems”
onpage99.
•Arecoverytoolisprovidedonyourcomputerinthestoragedevices.Formoreinformation,seeChapter
9“Recoveryoverview”onpage115.
Printthefollowingsectionsandkeepthemwithyourcomputerincaseyouareunabletoaccessthis
onlinehelpwhennecessary.
•“Installinganewoperatingsystem”onpage73
•“Computerstopsresponding”onpage99
•“Powerproblems”onpage112
16ThinkPadY oga260UserGuide
Page 33

Usingthespecialbuttons
Thecomputerisequippedwithspecialbuttonsasshowninthefollowingillustration.Youcancontrolsome
functionsofyourcomputerthroughthespecialbuttons,withouttheuseofthekeyboard.
1Powerbutton:Pressthepowerbuttontoturnonthecomputer.
2Volume-upbutton:Pressthevolume-upbuttontoincreasethespeakervolume.
3Volume-downbutton:Pressthevolume-downbuttontodecreasethespeakervolume.
4Windowsbutton:PresstheWindowsbuttontoopentheStartmenuortowakeupthecomputer
fromsleepmode.
GettinghelpabouttheWindowsoperatingsystem
TheWindowshelpinformationsystemprovidesyouwithdetailedinformationaboutusingtheWindows
operatingsystemtohelpyougetthemostofyourcomputer.ToaccesstheWindowshelpinformation
system,dooneofthefollowing:
•ForWindows7:OpentheStartmenu,andthenclickHelpandSupport.
•ForWindows10:OpentheStartmenu,andthenclickGetstarted.Additionally,youcansearchfromthe
taskbartofindhelp,apps,files,settings,andsoon.
Usingthemulti-touchscreen
Thistopicprovidesinstructionsonhowtousethemulti-touchscreenthatisavailableonsomemodels.
Notes:
•Y ourcomputerscreenmightlookdifferentfromthefollowingillustrations.
•Dependingontheappyouuse,somegesturesmightnotbeavailable.
Thefollowingtableintroducessomefrequentlyusedgestures.
Chapter2.Usingyourcomputer17
Page 34

Touchgesture(touchmodels
only)
Description
Touch:T ap.
Mouseaction:Click.
Function:Openanapporperformanactiononanopenapp,suchasCopy,
Save,andDelete,dependingontheapp.
Touch:T apandhold.
Mouseaction:Right-click.
Function:Openamenuwithmultipleoptions.
Touch:Slide.
Mouseaction:Scrollthemousewheel,movethescrollbar,orclickthescroll
arrow.
Function:Scrollthroughitems,suchaslists,pages,andphotos.
Touch:Draganitemtothedesiredlocation.
Mouseaction:Click,hold,anddraganitem.
Function:Moveanobject.
Touch:Movetwofingersclosertogether.
Mouseaction:PresstheCtrlkeywhilescrollingthemousewheelbackward.
Function:Zoomout.
Touch:Movetwofingersfartherapart.
Mouseaction:PresstheCtrlkeywhilescrollingthemousewheelforward.
Function:Zoomin.
Touch:Puttwoormorefingersonanitemandthenrotateyourfingersclockwise
orcounterclockwise.
Mouseaction:Iftheappsupportsrotation,clicktherotationicon.
Function:Rotateanitem.
18ThinkPadY oga260UserGuide
Page 35

ThefollowingtableintroducessometouchgesturesontheWindows10operatingsystem.
Touchgesture(touchmodels
only)
Description
Touch:Swipeinfromtherightedge.
Mouseaction:ClicktheactioncentericonintheWindowsnotificationarea.
Function:Opentheactioncentertoseeyournotificationsandquickactions.
Touch:Swipeinfromtheleftedge.
Mouseaction:Clickthetask-viewicononthetaskbar.
Function:Viewallyouropenwindowsintaskview.
Touch:Swipeinfromthebottomtotopforfull-screenedapp.
Mouseaction:MoveyourcursortotheWindowsnotificationareaatthebottom
ofthescreen.
Function:Viewthetaskbar.
Note:Thefullscreenfeatureisavailableonlyonsomeapps.Toopenanapp
infullscreen,click
onthetitlebar.
•Shortsnapforfull-screenedapporwhenyourcomputerisintabletmode
Touch:Swipedownwardsshortlyfromthetopedge.
Mouseaction:Moveyourcursortothetopedgeofthescreen.
Function:Showahiddentitlebar.
•Longswipewhenyourcomputerisintabletmode
Touch:Swipeinfromthetopedgetothebottomedge.
Mouseaction:Fromthetopedgeofthescreen,clickandhold,movethe
pointertothebottomofthescreen,andthenrelease.
Function:Closethecurrentapp.
Tipsonusingthemulti-touchscreen
•Themulti-touchscreenisaglasspanelcoveredwithaplasticfilm.Donotapplypressureorplaceany
metallicobjectonthescreen,whichmightdamagethetouchpanelorcauseittomalfunction.
•Donotusefingernails,glovedfingers,orinanimateobjectsforinputonthescreen.
•Regularlycalibratetheaccuracyofthefingerinputtoavoidadiscrepancy.
Tipsoncleaningthemulti-touchscreen
•Turnoffthecomputerbeforecleaningthemulti-touchscreen.
•Useadry,soft,andlint-freeclothorapieceofabsorbentcottontoremovefingerprintsordustfromthe
multi-touchscreen.Donotapplysolventstothecloth.
•Gentlywipethescreenusingatop-downmotion.Donotapplyanypressureonthescreen.
Chapter2.Usingyourcomputer19
Page 36

ThinkPadPenPro
SomecomputermodelsareequippedwiththeThinkPadPenPro(anelectronicpen).TheThinkPadPenPro
enablesyoutoinputtextinanaturalmannerinthefollowingsituations:
•Whenyoutakenotes
•WhenyouannotatePortableDocumentFormat(PDF)files
•Whenyoudrawgraphicstogetherwithapplicationscapableofeditingandsketching
WhenyoudraworwritewiththeThinkPadPenPro,keepthepenperpendiculartothecomputerdisplayto
achievethebestlinequality.
UsetheThinkPadPenProinsteadofyourfingerinconditionssuchasthefollowing:
•Y ouneedpreciseanddetailedinput,suchasdrawingapictureorusingthehandwritingmode.
•Toomanyelementsarecrowdedonthescreen,forexample,whenyouplaygames.
•Y ouwanttokeepyourscreenfreefromsmudges.
•Y ouhavelongfingernailsanditisdifficultforyoutotype.
Notes:
•TheThinkPadPenProisnotwaterproof.Takecarenottosoakitordipitinwater.
•IfyourcomputerdoesnotcomewithaThinkPadPenPro,yourcomputerdoesnotsupporttheuse
ofthepen.
•TopurchasetheThinkPadPenPro,gototheLenovoSupportWebsite:
http://www.lenovo.com/accessories
UsingtheThinkPadPenPro
ThefollowingillustrationshowstheThinkPadPenPro.
1Tip
2Eraserbutton
3Clickbutton
YoucanperformthefollowingoperationswiththeThinkPadPenPro:
•Toclickormakeaselection,tapthecomputerdisplayoncewiththepen.
•Todouble-click,taptwicewithoutpausing.
•Toright-click,tapthetip1onthecomputerdisplayandholdthepenthereforonesecond.T oright-click,
youalsocanpressandholdtheclickbutton3andthentapthetip1onthecomputerdisplay.
20ThinkPadY oga260UserGuide
Page 37

•Toeraseink,pressandholdtheeraserbutton2,andthentapthetip1onthecomputerdisplay.Then
dragthepenacrosstheinkyouwanttoerase.
TheThinkPadPenProisstoredintheslotonthebottomsideofthecomputer(asshowninthefollowing
illustration).Toremovethepen,slidetheendofthepenoutandthencompletelypullthepenoutoftheslot.
Tochargethepen,insertthepenslightlyintotheslotuntilitsnapsintoposition.Thepenwillbefully
chargedinaboutfiveminutes.
Note:Ensurethatyourcomputerison.Otherwise,thepenwillnotbecharged.
Specialkeys
Thekeyboardhasseveralspecialkeystohelpyouworkmoreeasilyandeffectively.
Notes:
•Dependingonthemodel,yourcomputermightlookdifferentfromtheillustrationsinthistopic.
•Inthestandmode,tabletmode,andtentmode,thekeyboard,thetrackpad,andtheTrackPointpointing
stickareautomaticallydisabled.
Chapter2.Usingyourcomputer21
Page 38

1Windowskey
PresstheWindowskey1toopentheStartmenu.
YoualsocanusetheWindowskeytogetherwithanotherkeytoachieveotherfunctions.Formore
information,refertothehelpinformationsystemoftheWindowsoperatingsystem.
2Fnkey
3Functionkeys
YoucanconfiguretheFnkeyandfunctionkeysintheKeyboardPropertieswindowbydoingthefollowing:
1.GotoControlPanelandthenchangetheviewofControlPanelfromCategorytoLargeiconsorSmall
icons.
2.ClickKeyboard.InthedisplayedKeyboardPropertieswindow,clicktheFnandfunctionkeysor
ThinkPadF1–F12keystab.
3.Selecttheoptionsofyourpreference.
•+EnablesordisablestheFnLockfunction.
WhentheFnLockfunctionisenabled:TheFnLockindicatorison.T oinputF1–F12,pressthefunction
keysdirectly.T oinitiatethespecialfunctionprintedasanicononeachkey,presstheFnkeyandthe
correspondingfunctionkey.
WhentheFnLockfunctionisdisabled:TheFnLockindicatorisoff.Toinitiatethespecialfunction
printedasanicononeachkey,pressthefunctionkeydirectly.ToinputF1–F12,presstheFnkeyandthe
correspondingfunctionkey.
•Mutesorunmutesthespeakers.Whenthespeakersaremuted,theindicatoronthekeyison.
Ifyoumutethesoundandturnoffyourcomputer,thesoundwillremainmutedwhenyouturnonyour
computeragain.Toturnonthesound,pressthevolume-downkeyorvolume-upkey.
•Decreasesthespeakervolume.
•Increasesthespeakervolume.
22ThinkPadY oga260UserGuide
Page 39

•Mutesorunmutesthemicrophones.Whenthemicrophonesaremuted,theindicatoronthe
microphone-mutekeyison.
•
Darkensthecomputerdisplay.
•Brightensthecomputerdisplay.
•
Switchesthedisplayoutputlocationbetweenthecomputerdisplayandanexternalmonitor.
•Enablesordisablesthewirelessfeatures.
•
–ForWindows7:OpensControlPanel.
–ForWindows10:OpenstheSettingswindow.
•
–ForWindows7:OpensWindowsSearch.
–ForWindows10:OpenstheCortana
®
searchbox.
•Viewsalltheprogramsthatyouhaveopened.
•
–ForWindows7:OpensComputer.
–ForWindows10:Viewsalltheprograms.
•Fn+Spacebar:Controlsthekeyboardbacklight.PressFn+Spacebartochangethemodeofthekeyboard
backlight.
Note:IfyourcomputerisinstalledwiththeLenovoSettings3.0programorlaterversion,thereare
fourmodesforthekeyboardbacklight:Off,Low,High,andAuto.Otherwise,therearethreemodes
forthekeyboardbacklight:Off,Low,andHigh.
•Fn+B:HasthesamefunctionastheBreakkeyonaconventionalkeyboard.
•Fn+K:HasthesamefunctionastheScrLKkeyontheconventionalkeyboard.
•Fn+P:HasthesamefunctionasthePausekeyontheconventionalkeyboard.
•Fn+S:HasthesamefunctionastheSysRqkeyontheconventionalkeyboard.
•Fn+4:Putsyourcomputerintosleepmode.Toreturntonormaloperation,presstheFnkeyonly.
Operatingmodes
Thissectionprovidesinformationabouttheoperatingmodesofyourcomputer.Yourcomputerprovides
thenotebookmode,standmode,tabletmode,andtentmodethatenableyoutoworkmoreconveniently
inyourworkingenvironment.
Thissectioncontainsthefollowingtopics:
•“Rotatingthecomputerdisplay”onpage24
•“Enablingtheoperatingmodes”onpage24
•“Notebookmode”onpage25
•“Standmode”onpage25
•“Tabletmode”onpage26
•“Tentmode”onpage27
Chapter2.Usingyourcomputer23
Page 40

Enablingtheoperatingmodes
Toprovideyourcomputertheflexibilityofbeingusedinvariousoperatingmodes,enabletheoperating
modesfirst.
FortheWindows7operatingsystem,dooneofthefollowingtoenabletheoperatingmodes:
•WhenyouentertheWindows7operatingsystemforthefirsttime,theEnablesensorswindowis
displayed.ThenclickEnablethissensor.
•GotoControlPanel.ClickAllControlPanelItems➙LocationandOtherSensors.Thenselectthe
checkboxforSTMicroelectronicsSensorHub.
FortheWindows10operatingsystems,theoperatingmodesareenabledbydefault.
Rotatingthecomputerdisplay
Thistopicprovidesinstructionsonhowtorotatethedisplayofyourcomputerproperly.Thistopicalso
providesinformationontheoperatingmodesofyourcomputerandcorrespondingdisplayangleranges.
Youcanopenthecomputerdisplaytoanyanglewithinarangeofupto360degreesasshowninthe
followingillustration.
Attention:Donotrotatethecomputerdisplaywithtoomuchforce,otherwisethecomputerdisplay
orhingesmightgetdamaged.Donotapplytoomuchforcetotheupper-rightorupper-leftcornerof
thecomputerdisplay.
Displayangleforeachoperatingmode
Theanglebetweenthefrontofthecomputerdisplayandthekeyboardisdifferentineachoperatingmode.
Thefollowingtableliststheanglerangeforeachoperatingmode.
24ThinkPadY oga260UserGuide
Page 41

Table1.Displayangleforeachoperatingmode
Notebookmode
nomorethan190degreesmorethan190degreesand
Standmode
lessthan350degrees
TabletmodeTentmode
360degreesnolessthan270degrees
andnomorethan340
degrees
Notebookmode
Youcanusethecomputerinthenotebookmodeinscenariosthatrequireusingakeyboardandamouse,
suchaseditingdocumentsandwritinge-mails.
Attention:Donotrotatethecomputerdisplaywithtoomuchforce,otherwisethecomputerdisplay
orhingesmightgetdamaged.Donotapplytoomuchforcetotheupper-rightorupper-leftcornerof
thecomputerdisplay.
Openthecomputerdisplayslowlyasshowninthefollowingillustration.Yourcomputerisnowinthe
notebookmode.
Standmode
Youcanuseyourcomputerinthestandmodeinscenariosthatrequirelimitedinteractionwiththescreen,
suchasviewingphotosandplayingvideos.
Attention:Donotrotatethecomputerdisplaywithtoomuchforce,otherwisethecomputerdisplay
orhingesmightgetdamaged.Donotapplytoomuchforcetotheupper-rightorupper-leftcornerof
thecomputerdisplay.
Ifyourcomputerisinthenotebookmode,dothefollowingtoturnthecomputerfromthenotebookmode
intothestandmode:
Chapter2.Usingyourcomputer25
Page 42

1.Slowlyrotatethedisplayclockwiseuntilthebackofthedisplayisfacingthebasecover.
2.Positionyourcomputerasshown.Y ourcomputerisnowinthestandmode.
Inthestandmode,thekeyboard,thetrackpad,andtheTrackPointpointingstickareautomaticallydisabled.
However,youcancontrolsomefunctionsofyourcomputerthroughthespecialbuttonsandthemulti-touch
screen.Formoreinformation,referto“Usingthetabletbuttons”onpage17
screen”onpage17.
and“Usingthemulti-touch
Tabletmode
Youcanusethecomputerinthetabletmodeinscenariosthatrequirefrequentinteractionwiththescreen,
suchasbrowsingtheWebsite.
Attention:Donotrotatethecomputerdisplaywithtoomuchforce,otherwisethecomputerdisplay
orhingesmightgetdamaged.Donotapplytoomuchforcetotheupper-rightorupper-leftcornerof
thecomputerdisplay.
26ThinkPadY oga260UserGuide
Page 43

Ifyourcomputerisinthestandmode,dothefollowingtoturnthecomputerfromthestandmodeinto
thetabletmode:
1.Positionyourcomputerasshownandslowlyrotatethecomputerdisplayclockwise.
2.Positionyourcomputerasshown.Yourcomputerisnowinthetabletmode.Bydefault,theautorotate
featureisenabled.
Inthetabletmode,thekeyboard,thetrackpad,andtheTrackPointpointingstickareautomaticallydisabled.
However,youcancontrolsomefunctionsofyourcomputerthroughthespecialbuttonsandthemulti-touch
screen.Formoreinformation,referto“Usingthetabletbuttons”onpage17
screen”onpage17.
and“Usingthemulti-touch
Tentmode
Youcanuseyourcomputerinthetentmodeinscenariosthatrequirelimitedinteractionwiththescreen,
suchasviewingphotosandmakingapresentation.
Attention:Donotrotatethecomputerdisplaywithtoomuchforce,otherwisethecomputerdisplay
orhingesmightgetdamaged.Donotapplytoomuchforcetotheupper-rightorupper-leftcornerof
thecomputerdisplay.
Ifyourcomputerisinthetabletmode,dothefollowingtoturnthecomputerfromthetabletmodeintothe
tentmode:
Chapter2.Usingyourcomputer27
Page 44

1.Slowlyrotateyourcomputerdisplayanticlockwisetoanyanglewithinarangeof190degreesto359
degrees.Thedegreesrefertotheangledegreesbetweenthecomputerdisplayandthekeyboard.
2.Positionyourcomputerasshown.Y ourcomputerisnowinthetentmode.
Inthetentmode,thekeyboard,thetrackpad,andtheTrackPointpointingstickareautomaticallydisabled.
However,youcancontrolsomefunctionsofyourcomputerthroughthespecialbuttonsandthemulti-touch
screen.Formoreinformation,referto“Usingthetabletbuttons”onpage17and“Usingthemulti-touch
screen”onpage17
.
Usingthekeyboard
Yourcomputerkeyboardfeaturestheframetravelfunction.Thistopicprovidesinformationonthebehavior
ofthekeyboard.
Note:Inthestandmode,tabletmode,andtentmode,thekeyboard,thetrackpad,andtheTrackPoint
pointingstickareautomaticallydisabled.
Behaviorofthekeyboard
Theframeofthekeyboardtravelsupwardwhenyourotatethecomputerdisplayfrom190degreesto360
degrees.Thefollowingaresomescenariosforusingthekeyboard:
28ThinkPadY oga260UserGuide
Page 45

•Theframeofthekeyboarddoesnottravelwhenyourotatethecomputerdisplayfrom10degreesto190
degrees.Thefollowingillustrationshowsthatthekeyboardframedoesnottravel.
•Whenyourotatethecomputerdisplayfrom190degreesto360degrees,theframeofthekeyboard
travelsupwardforabout2.0mm(0.08inch).Thefollowingillustrationshowsthatthekeyboardframe
travelsupward.
Customizingthekeyboardsettings
Youcancustomizethekeyboardsettingstoachievetheextendedfunctionsofthekeyboard.
Tocustomizethekeyboardsettings,dothefollowing:
1.GotoControlPanel.EnsurethattheviewofControlPanelisCategory.
Chapter2.Usingyourcomputer29
Page 46

2.ClickHardwareandSound➙DeviceManager➙Keyboards➙StandardPS/2keyboardandthen
followtheinstructionsonthescreen.
ThinkPadpointingdevice
TheThinkPadpointingdeviceenablesyoutoperformallthefunctionsofatraditionalmouse,suchas
pointing,clicking,andscrolling.WiththeThinkPadpointingdevice,youalsocanperformavarietyoftouch
gestures,suchasrotatingandzoominginorout.
TheThinkPadpointingdeviceconsistsofthefollowingtwodevices:
1TrackPointpointingdevice
2Trackpad
Bydefault,boththeTrackPointpointingdeviceandthetrackpadareactivewiththetouchgesturesenabled.
Tochangethesettings,see“CustomizingtheThinkPadpointingdevice”onpage33
.
TrackPointpointingdevice
TheTrackPointpointingdeviceenablesyoutoperformallthefunctionsofatraditionalmouse,suchas
pointing,clicking,andscrolling.
30ThinkPadY oga260UserGuide
Page 47

TheT rackPointpointingdeviceconsistsofthefollowingfourcomponents:
1Pointingstick
2Left-clickbutton(primary-clickbutton)
3Right-clickbutton(secondary-clickbutton)
4Scrollbar
TousetheTrackPointpointingdevice,refertothefollowinginstructions:
Note:Placeyourhandsinthetypingpositionanduseyourindexfingerormiddlefingertoapplypressureto
thepointing-sticknonslipcap.Useeitherthumbtopresstheleft-clickbuttonorright-clickbutton.
•Point
Usethepointingstick1tomovethepointeronthescreen.Tousethepointingstick,applypressureto
thepointing-sticknonslipcapinanydirectionparalleltothekeyboard.Thepointermovesaccordingly
butthepointingstickitselfdoesnotmove.Thespeedatwhichthepointermovesdependsonthe
amountofpressureyouapplytothepointingstick.
•Left-click
Presstheleft-clickbutton
2toselectoropenanitem.
•Right-click
Presstheright-clickbutton3todisplayashortcutmenu.
•Scroll
Pressandholdthedottedscrollbar4whileapplyingpressuretothepointingstickintheverticalor
horizontaldirection.Thenyoucanscrollthroughthedocument,Website,orapps.
Trackpad
Theentiretrackpadissensitivetofingertouchandmovement.Y oucanusethetrackpadtoperformallthe
pointing,clicking,andscrollingfunctionsofatraditionalmouse.
Chapter2.Usingyourcomputer31
Page 48

Thetrackpadcanbedividedintotwozones:
1Left-clickzone(primary-clickzone)
2Right-clickzone(secondary-clickzone)
Tousethetrackpad,refertothefollowinginstructions:
•Point
Slideonefingeracrossthesurfaceofthetrackpadtomovethepointeraccordingly.
•Left-click
Presstheleft-clickzone
1toselectoropenanitem.
Youalsocantapanywhereonthesurfaceofthetrackpadwithonefingertoperformtheleft-clickaction.
•Right-click
Presstheright-clickzone2todisplayashortcutmenu.
Youalsocantapanywhereonthesurfaceofthetrackpadwithtwofingerstoperformtheright-clickaction.
•Scroll
Puttwofingersonthetrackpadandmovethemintheverticalorhorizontaldirection.Thisactionenables
youtoscrollthroughthedocument,Website,orapps.Ensurethatyoupositionyourtwofingersslightly
apartfromeachother.
Withthetrackpad,youalsocanperformavarietyoftouchgestures.Forinformationaboutusingthetouch
gestures,see“Trackpadtouchgestures”onpage32
.
Trackpadtouchgestures
Theentiretrackpadsurfaceissensitivetofingertouchandmovement.Y oucanusethetrackpadtoperform
thesamepointandclickactionsasyouwouldusingatraditionalmouse.Y oualsocanusethetrackpad
toperformavarietyoftouchgestures.
Thistopicintroducesthefrequentlyusedtouchgesturessuchastapping,dragging,scrolling,androtating.
Formoregestures,seethehelpinformationsystemoftheThinkPadpointingdevice.
Notes:
•Whenusingtwoormorefingers,ensurethatyoupositionyourfingersslightlyapart.
•SomegesturesarenotavailableifthelastactionwasdonefromtheTrackPointpointingdevice.
•Somegesturesareonlyavailablewhenyouareusingcertainapps.
32ThinkPadY oga260UserGuide
Page 49

Tap
Tapanywhereonthetrackpad
withonefingertoselectoropen
anitem.
Two-fingertap
Tapanywhereonthetrackpadwith
twofingerstodisplayashortcut
menu.
Two-fingerscroll
Puttwofingersonthetrackpad
andmovethemintheverticalor
horizontaldirection.Thisaction
enablesyoutoscrollthroughthe
document,Website,orapps.
Two-fingerzoomin
Puttwofingersonthetrackpad
andmovethemfartherapartto
zoomin.
Two-fingerzoomout
Puttwofingersonthetrackpadand
movethemclosertogethertozoom
out.
ThefollowingsectionintroducessometouchgesturesavailableonlyontheWindows10operatingsystem.
Swipethreefingersup
Putthreefingersonthetrackpad
andmovethemuptoopenthe
taskviewtoseeallyouropen
windows.
Swipethreefingersdown
Putthreefingersonthetrackpad
andmovethemdowntoshowthe
desktop.
CustomizingtheThinkPadpointingdevice
YoucancustomizetheThinkPadpointingdevicesoyoucanuseitmorecomfortablyandefficiently.For
example,youcanchoosetoenabletheTrackPointpointingdevice,thetrackpad,orboth.Y oualsocan
disableorenablethetouchgestures.
TocustomizetheThinkPadpointingdevice,dothefollowing:
1.GotoControlPanel.
2.ClickHardwareandSound➙Mouse.TheMousePropertieswindowisdisplayed.
3.IntheMousePropertieswindow,followtheinstructionsonthescreentocompletethecustomization.
Replacingthecaponthepointingstick
Thecap1ontheendofthepointingstickisremovable.Afteryouusethecapforaperiodoftime,you
mightconsiderreplacingthecapwithanewone.
Togetanewcap,contactLenovo.ForinformationaboutcontactingLenovo,seeChapter11“Getting
support”onpage137
Note:Ensurethatyouuseacapwithgroovesaasshowninthefollowingillustration.
.
Chapter2.Usingyourcomputer33
Page 50

Powermanagement
Thepowertorunyourcomputercancomeeitherfromacpowerorfromthebattery.
Usingtheacpower
Yourcomputercomeswithanacpoweradapterandapowercord.
•acpoweradapter:Convertsacpowerfornotebookcomputeruse.
•Powercord:Connectstheacoutletandtheacpoweradapter.
Whileyouuseacpower,thebatterychargesautomatically.
Connectingtoacpower
Toconnectthecomputertoacpower,dothefollowing:
Attention:Usinganimproperpowercordmightcauseseveredamagetoyourcomputer.
Note:Ensurethatyouperformtheactionsintheorderinwhichtheyarelisted.
1.Connectthepowercordtotheacpoweradapter.
2.Connecttheacpoweradaptertothepowerconnectorofthecomputer.
3.Connectthepowercordintoanelectricaloutlet.
Tipsforusingtheacpoweradapter
•Whentheacpoweradapterisnotinuse,disconnectitfromtheelectricaloutlet.
•Donotbindthepowercordtightlyaroundtheacpoweradaptertransformerpackwhenitisconnectedto
thetransformer.
•Beforeyouchargethebattery,makesurethatitstemperatureisatleast10°C(50°F).
•Y oucanchargethebatterywhentheacpoweradapterisconnectedtothecomputer.Youneedto
chargethebatteryinanyofthefollowingsituations:
–WhenthebatteryiconintheWindowsnotificationareashowsalowpercentageofbatterypower
remaining.
–Whenthebatteryhasnotbeenusedforalongtime
34ThinkPadY oga260UserGuide
Page 51

Usingthebatterypower
Beforeyouusethebatterypower,ensurethatyoureadthefollowingnotices:
•“Generalbatterynotice”onpagex
•“Noticeforbuilt-inrechargeablebattery”onpagex
Itishardtopredictthebatterylifebetweencharges.Differentcomputercomponentsconsumepowerat
differentrates.Somecomponentsconsumepowerveryquickly,forexample,thecomputerdisplay,the
microprocessor,andthewirelessradios.Themoreyouusethepower-intensivecomponents,thefasteryou
consumepower.
Thebatteryisaconsumablesupply.Ifyourbatterybeginstodischargetooquickly,youmightconsider
gettinganewonefromLenovo.TocontactLenovo,seeChapter11“Gettingsupport”onpage137
Checkingthebatterystatus
Moveyourpointertothebattery-statusiconintheWindowsnotificationareatocheckthebatterystatus.
Thebattery-statusicondisplaysthepercentageofbatterypowerremainingandhowlongyoucanuse
yourcomputerbeforeyoumustchargethebattery.
Therateatwhichyouusebatterypowerdetermineshowlongyoucanusethebatteriesofyourcomputer
betweencharges.Becauseofdifferentuserhabitsandneeds,itisdifficulttopredicthowlongabattery
chargewilllast.Therearetwomainfactors:
•Howmuchenergyisstoredinthebatterywhenyoubegintowork.
•Thewayyouuseyourcomputer.Forexample:
.
–Howoftenyouaccessthestoragedrive.
–Howbrightyoumakethecomputerdisplay.
–Howoftenyouusethewirelessfeatures.
Chargingthebattery
Itisrecommendedthatyouchargethebatterywhenthebatterypowerremainingislow.Forexample:
•Whenyoufindthatthepercentageoftheremainingpowerislow.
•Whenthepoweralarmalertsyou.
Tochargethebattery,see“Usingtheacpower”onpage34
Dependingonthebatterysizeandthephysicalenvironment,thebatterywillbefullychargedinaboutthree
tosixhours.Youcancheckthebatterychargingstatusatanytimethroughthebattery-statusiconin
theWindowsnotificationarea.
Note:Tomaximizethelifeofthebattery,thecomputerdoesnotstartrechargingthebatteryiftheremaining
powerisgreaterthan95%.
.
Maximizingthebatterylife
Tomaximizethelifeofthebattery,dothefollowing:
•Usethebatteryuntilthechargeisdepleted.
•Rechargethebatterycompletelybeforeusingit.Youcanseewhetherthebatteryisfullychargedfromthe
battery-statusiconintheWindowsnotificationarea.
•Alwaysusepower-savingmodes,suchassleepmodeandhibernationmode.
Chapter2.Usingyourcomputer35
Page 52

Power-savingmodes
Thereareseveralmodesthatyoucanuseatanytimetoconservepower.Thissectionintroduceseach
modeandgivestipsontheeffectiveuseofbatterypower.
•Screenblankmode(forWindows7only)
Thecomputerdisplayrequiresconsiderablebatterypower.Toturnoffthepowertothedisplayandmake
thecomputerenterscreenblankmode,right-clickthebattery-gaugeiconinthewindowsnotificationarea
andselectPoweroffdisplay.
•Sleepmode
Insleepmode,yourworkissavedtomemory,andthenthesolid-statedrive,harddiskdrive,orhybrid
drive,andthecomputerdisplayareturnedoff.Whenyourcomputerwakesup,yourworkisrestored
withinseconds.
Toputyourcomputerintosleepmode,pressFn+4.
Youalsocanputthecomputerintosleepmodebydoingthefollowing:
–ForWindows7:OpentheStartmenu,thenclickthearrownexttotheShutdownbutton.Click
Sleepfromthemenudisplayed.
–ForWindows10:OpentheStartmenu,click
Formoreinformationabouttheprograms,see“Lenovoprograms”onpage12.
•Hibernationmode
Byusingthismode,youcanturnoffyourcomputercompletelywithoutsavingfilesorexitingany
programsthatarerunning.Whenthecomputerentershibernationmode,allopenprograms,folders,and
filesaresavedtothestoragedevices,andthenthecomputerturnsoff.
Toputthecomputerintohibernationmode,dothefollowing:
Power,andthenclickSleep.
–ForWindows7:OpentheStartmenu,thenclickthearrownexttotheShutdownbutton.Click
Hibernatefromthemenudisplayed.
–ForWindows10:Definewhatthepowerbuttondoesfirst,thenpressthepowerbuttontoputthe
computerintohibernationmode.Formoreinformation,see“Frontview”onpage1.
Ifyouputyourcomputerintohibernationmodewiththewake-upfunctiondisabled,thecomputerdoes
notconsumeanypower.Thewake-upfunctionisdisabledbydefault.Ifyouputyourcomputerinto
hibernationmodewiththewake-upfunctionenabled,thecomputerconsumesasmallamountofpower.
Toenablethewake-upfunction,dothefollowing:
1.GotoControlPanelandclickSystemandSecurity.
2.ClickAdministrativeTools.
3.ClickTaskScheduler.Ifyouarepromptedforanadministratorpasswordorconfirmation,typethe
passwordorprovideconfirmation.
4.Fromtheleftpane,selectthetaskfolderforwhichyouwanttoenablethewake-upfunction.The
scheduledtasksaredisplayed.
5.Clickascheduledtask,andthenclicktheConditionstab.
6.UnderPower,selectthecheckboxforWakethecomputertorunthistask.
•Wirelessoff
Whenyouarenotusingthewirelessfeatures,suchasBluetoothorwirelessLAN,turnthemoff.Thishelps
conservepower.Toturnoffthewirelessfeatures,pressthewireless-radioscontrolkey.
Managingthepowerplan
Powerplanscanhelpyoumaximizeyourcomputer’sperformanceorconserveenergy.Y oucanselecta
powerplanorcustomizeitbychangingitspowersettings.Toachievethis,dothefollowing:
36ThinkPadY oga260UserGuide
Page 53

1.Fromthedesktop,clickthebattery-statusiconintheWindowsnotificationareaonthetaskbar.
2.ClickMorepoweroptions.
3.Followtheinstructionsonthescreen.
Notes:UseLenovoprogramsforadvancedpowersettings.
•ForWindows7:UsethePowerManagerprogram.
•ForWindows10:UsetheLenovoSettingsprogram.
Formoreinformation,see“Lenovoprograms”onpage12
.
Connectingtothenetwork
YourcomputerhasoneormorenetworkcardsthatenableyoutoconnectyourcomputertotheInternet
orothernetworkconnections.
Ethernetconnections
YoucanconnectyourcomputertoalocalnetworkorabroadbandconnectionthroughtheThinkPad
OneLink+toRJ45AdapterorasupportedThinkPadOneLink+Dock.
DANGER
Toavoidtheriskofelectricalshock,donotconnectthetelephonecabletotheEthernetconnector
ontheThinkPadOneLink+toRJ45AdapterortheThinkPadOneLink+Dock.
Wirelessconnections
Wirelessconnectionisthetransferofdatawithouttheuseofcablesbutbymeansofradiowavesonly.
Dependingonthewirelessdevicesinstalledonyourcomputer,youmightbeabletousethefollowing
wirelessnetworks:
•WirelessLANconnection
•WirelessWANconnection
•Bluetoothconnection
UsingtheAirplanemode
AirplanemodeissupportedontheWindows10operatingsystem.IftheAirplanemodeisenabled,all
wirelessfeaturesaredisabled.
ToenableordisabletheAirplanemode,dothefollowing:
1.OpentheStartmenu.
2.ClickSettings.IfSettingsisnotdisplayed,clickAllappstodisplayallprograms.
3.ClickSettings➙Network&Internet➙Airplanemode.
4.SlidethecontrolforAirplanemodetoturnitonoroff.
UsingthewirelessLANconnection
Awirelesslocalareanetwork(LAN)coversarelativelysmallgeographicarea,suchasanofficebuildingora
house.Devicesbasedonthe802.11standardscanconnecttothistypeofnetwork.
Chapter2.Usingyourcomputer37
Page 54

Yourcomputercomeswithabuilt-inwirelessnetworkcardandaconfigurationutilitytohelpyouestablish
wirelessconnectionsandmonitortheconnectionstatus.Thisenablesyoutostayconnectedtoyournetwork
whileyouareattheoffice,inameetingroom,orathome,withnoneedforawiredconnection.
ToestablishawirelessLANconnection,dothefollowing:
1.Clickthewireless-network-connection-statusiconintheWindowsnotificationarea.Alistofavailable
wirelessnetworksisdisplayed.
2.Double-clickanetworktoconnecttoit.Providerequiredinformationifneeded.
Thecomputerautomaticallyconnectstoanavailablewirelessnetworkwhenthelocationchanges.Formore
information,refertotheWindowshelpinformationsystem.
TipsforusingthewirelessLANfeature
Toachievethebestconnection,usethefollowingguidelines:
•PlaceyourcomputersothatthereareasfewobstaclesaspossiblebetweenthewirelessLANaccess
pointandthecomputer.
•Openyourcomputerdisplaytoanangleofslightlymorethan90degrees.
•Ifyouusethewirelessfeature(the802.11standards)ofyourcomputersimultaneouslywithaBluetooth
option,thedatatransmissionspeedcanbedelayedandtheperformanceofthewirelessfeaturecanbe
degraded.
Checkingthewireless-LANconnectionstatus
Youcancheckthewireless-LANconnectionstatusthroughthewireless-network-connection-statusiconin
theWindowsnotificationarea.Themorebarsencompassed,thebetterthesignalis.
FortheWindows7operatingsystem,youalsocanchecktheAccessConnectionsgauge,theAccess
Connectionsstatusicon,ortheAccessConnectionswirelessstatusiconintheWindowsnotificationarea.
AccessConnectionsgauge:
•Powertothewirelessradioisoffornosignal.
•Powertothewirelessradioison.Thesignalstrengthofthewirelessconnectionispoor.To
improvesignalstrength,moveyourcomputerclosertothewirelessaccesspoint.
•Powertothewirelessradioison.Thesignalstrengthofthewirelessconnection
ismarginal.
•Powertothewirelessradioison.Thesignalstrengthofthewirelessconnection
isexcellent.
AccessConnectionsstatusicon:
•Nolocationprofileisactiveornoneexists.
•Currentlocationprofileisdisconnected.
•Currentlocationprofileisconnected.
AccessConnectionswirelessstatusicon:
•Powertothewirelessradioisoff.
•Powertothewirelessradioison.Noassociation.
•Powertothewirelessradioison.Nosignal.
38ThinkPadY oga260UserGuide
Page 55

•Powertothewirelessradioison.Thesignalstrengthofthewirelessconnectionisexcellent.
•Powertothewirelessradioison.Thesignalstrengthofthewirelessconnectionismarginal.
Powertothewirelessradioison.Thesignalstrengthofthewirelessconnectionispoor.T oimprove
•
signalstrength,moveyourcomputerclosertothewirelessaccesspoint.
UsingthewirelessWANconnection
Wirelesswideareanetwork(WAN),whichusescellularnetworksfordatatransmission,enablesyou
toestablishwirelessconnectionsoverremotepublicorprivatenetworks.Theseconnectionscanbe
maintainedoveralargegeographicalarea,suchasacityoranentirecountry,byuseofmultipleantenna
sitesorsatellitesystemsmaintainedbywirelessserviceproviders.
SomeThinkPadnotebookcomputerscomewithabuilt-inwirelessWANcardintegratedwithsomewireless
WANtechnologies,suchas1xEV-DO,HSPA,3G,GPRS,orLTE.Byusingthebuilt-inwirelessWANcardand
theconfigurationutilitythatcomeswithyourcomputer,youcanestablishwirelessWANconnectionsand
monitortheconnectionstatus.
Note:ThewirelessWANserviceisprovidedbyauthorizedserviceprovidersinsomecountries.
TipsforusingthewirelessWANfeature
Toachievethebestconnection,usethefollowingguidelines:
•Keepyourcomputerawayfromyourbody.
•Placeyourcomputeronaflatsurfaceandopenyourcomputerdisplaytoanangleofslightlymore
than90degrees.
•Placeyourcomputerawayfromconcreteorbrickwallsthatmightdampencellularsignals.
•Bestreceptionwillbeavailablenearwindowsandotherlocationswherecellularphonereceptionisthe
strongest.
Checkingthewireless-WANconnectionstatus
Youcancheckthewireless-WANconnectionstatusthroughthewireless-network-connection-statusiconin
theWindowsnotificationarea.Themorebarsencompassed,thebetterthesignalis.
FortheWindows7operatingsystem,youalsocanchecktheAccessConnectionsgauge,theAccess
Connectionsstatusicon,ortheAccessConnectionswirelessstatusiconintheWindowsnotificationarea.
AccessConnectionsgauge:
•Nosignal
•Weaksignal
•Mediumsignal
•
AccessConnectionsstatusicon:
•
•
•Currentlocationprofileisconnected.
AccessConnectionswirelessstatusicon:
Strongsignal
Nolocationprofileisactiveornoneexists.
Currentlocationprofileisdisconnected.
Chapter2.Usingyourcomputer39
Page 56

•PowertotheWANradioisoff
•Noassociation
•Nosignal
•Weaksignal
•Mediumsignal
•Strongsignal
UsingtheBluetoothconnection
Bluetoothcanconnectdevicesashortdistancefromoneanother,andiscommonlyusedforconnecting
peripheraldevicestoacomputer,transferringdatabetweenhand-helddevicesandapersonalcomputer,or
remotelycontrollingandcommunicatingwithdevicessuchasmobilephones.
Dependingonthemodel,yourcomputermightsupporttheBluetoothfeature.T otransferdatathrough
theBluetoothfeature,dothefollowing:
Note:Ifyouusethewirelessfeature(the802.11standards)ofyourcomputersimultaneouslywitha
Bluetoothoption,thedatatransmissionspeedcanbedelayedandtheperformanceofthewirelessfeature
canbedegraded.
1.EnsurethattheBluetoothfeatureisenabled.
•ForWindows7:Pressthewireless-radioscontrolkeyandturnontheBluetoothfeature.
•ForWindows10:Dooneofthefollowing:
–OpentheStartmenuandthenclickSettings.IfSettingsisnotdisplayed,clickAllappstodisplay
allprograms,andthenclickSettings➙Devices➙Bluetooth.TurnontheBluetoothfeature.
–OpentheStartmenuandthenclickSettings.IfSettingsisnotdisplayed,clickAllappsto
displayallprograms,andthenclickSettings➙Network&Internet➙Airplanemode.T urnon
theBluetoothfeature.
2.Right-clickthedatathatyouwanttosend.
3.SelectSendTo➙BluetoothDevices.
4.SelectaBluetoothdevice,andthenfollowtheinstructionsonthescreen.
Formoreinformation,refertotheWindowshelpinformationsystemandtheBluetoothhelpinformation
system.
UsingtheNFCdevices
Dependingonthemodel,yourcomputermightcomewiththeNearfieldcommunication(NFC)feature.Near
fieldcommunicationisahigh-frequencyandshort-rangewirelesscommunicationstechnology.Byusingthe
NFCfeature,youcanestablishtheradiocommunicationsbetweenyourcomputerandanotherNFC-enabled
deviceoverafewcentimeters.SomeLenovoappsareusingtheNFCfeature.
ThissectionprovidesthebasicinstructionsonparingyourcomputerwithanNFCdevice.Formore
informationaboutdatatransfer,refertothedocumentationoftheNFCdevice.
Attention:
•BeforehandlingtheNFCcard,touchametaltableoragroundedmetalobject.Otherwisethecardmight
getdamagedbythestaticelectricityfromyourbody.
•Duringthedatatransfer,donotputyourcomputerorNFC-enabledsmartphoneintosleepmode;
otherwise,yourdatacouldgetdamaged.
40ThinkPadY oga260UserGuide
Page 57

PairingyourcomputerwithanNFCcard
PairingyourcomputerwithanNFC-enabledsmartphone
Beforeyoustart,ensurethatthecardisinNFCDataExchange
Format(NDEF),otherwisethecardcannotbedetected.Thendo
thefollowing:
1.PositionthecardcloselyabovetheNFClabelasshown.Align
theshorteredgeofthecardwiththehorizontalextensionline
forthecenteroftheNFClabel.
2.Slowlymovethecardinthedirectiontowardscomputerdisplay
withina0.5cm(0.20inch)distance.Thenholdthecard
forsecondsuntilyouarepromptedthatthecardhasbeen
successfullydetected.
Beforeyoustart,ensurethatthesmartphonescreenisfacing
upward.Thendothefollowing:
1.PositionthesmartphonecloselyabovetheNFClabelasshown.
Aligntheshorteredgeofthesmartphonewiththehorizontal
extensionlineforthecenteroftheNFClabel.
2.Slowlymovethesmartphoneinthedirectiontowardsthe
computerdisplaywithina5cm(1.97inches)distance.Then
holdthesmartphoneforsecondsuntilyouarepromptedthat
thesmartphonehasbeensuccessfullydetected.
EnablingtheNFCfeature
Bydefault,theNFCfeatureisenabled.IftheNFCfeatureofyourcomputerisdisabled,dothefollowingto
enabletheNFCfeature:
•ForWindows7:
1.StarttheThinkPadSetupprogram.See“Securitymenu”onpage82.
2.SelectSecurity➙I/OPortAccess.
3.SettheNFCdeviceoptiontoEnabled.
•ForWindows10:
1.OpentheStartmenuandthenclickSettings.IfSettingsisnotdisplayed,clickAllappstodisplayall
programs,andthenclickSettings➙Network&Internet➙Airplanemode.
2.TurnofftheAirplanemode.
3.TurnontheNFCfunction.
Usinganexternaldisplay
Youcanuseanexternaldisplaysuchasaprojectororamonitortogivepresentationsortoexpandyour
workspace.Thistopicintroduceshowtoconnectanexternaldisplay,choosedisplaymodes,andchange
displaysettings.
Yourcomputersupportsthefollowingvideoresolution,providedthattheexternalmonitoralsosupportsthat
resolution.
•Upto4096x2304pixels,withanexternaldisplayconnectedtotheminiDisplayPortconnector
•Upto4096x2160pixels,withanexternaldisplayconnectedtotheHDMIconnector
Formoreinformationabouttheexternaldisplay,refertothemanualsprovidedwithit.
Chapter2.Usingyourcomputer41
Page 58

Connectinganexternaldisplay
Youcanuseeitherawireddisplayorawirelessdisplay.ThewireddisplaycanbeconnectedtotheHDMI,
VGA,orminiDisplayPortconnectorbyacable.ThewirelessdisplaycanbeaddedthroughtheWi-Dior
Miracastfunction.
•Connectingawireddisplay
Note:Whenyouconnectanexternalmonitor,avideointerfacecablewithaferritecoreisrequired.
1.Connecttheexternaldisplaytoanappropriatevideoconnectoronyourcomputer,suchastheVGA
connector,miniDisplayPortconnector,orHDMIconnector.
2.Connecttheexternaldisplaytoanelectricaloutlet.
3.Turnontheexternaldisplay.
Ifyourcomputercannotdetecttheexternaldisplay,dothefollowings:
–ForWindows7:Right-clickonthedesktop,thenclickScreenresolution➙Detect.
–ForWindows10:Right-clickonthedesktop,thenclickDisplaysettings➙Detect.
•Connectingawirelessdisplay
Note:Touseawirelessdisplay,ensurethatbothyourcomputerandtheexternaldisplaysupportthe
Wi-DiorMiracastfeature.
–ForWindows7
StarttheIntel
onthescreen.
–ForWindows10
Dooneofthefollowing:
®
Wi-Diprogram.Selectthedesiredwirelessdisplayinthelistandfollowtheinstructions
–OpentheStartmenuandthenclickSettings.IfSettingsisnotdisplayed,clickAllappstodisplay
allprograms,andthenclickSettings➙Devices➙Connecteddevices➙Addadevice.
–ClicktheactioncentericonintheWindowsnotificationarea.ClickConnect.Selectthedesired
wirelessdisplayandfollowtheinstructionsonthescreen.
Formoreinformation,seetheWindowshelpinformationsystems.
Choosingadisplaymode
Youcandisplayyourdesktopandappsonthecomputerdisplay,theexternaldisplay,orboth.Tochoose
howtodisplaythevideooutput,pressthedisplay-modeswitchingkeyandthenselectadisplay
modeyouprefer.
Therearefourdisplaymodes:
•Disconnect:Displaysthevideooutputonlyonyourcomputerscreen.
Note:Dependingonthesituation,youmightseeDisconnect,PCscreenonly,Computeronly,or
Disconnectprojector.
•Duplicate:Displaysthesamevideooutputonbothyourcomputerscreenandanexternaldisplay.
•Extend:Extendsthevideooutputfromyourcomputerdisplaytoanexternaldisplay.Y oucandragand
moveitemsbetweenthetwodisplays.
•Projectoronly:Showsthevideooutputonlyonanexternaldisplay.
Note:Dependingonthesituation,youmightseeProjectoronlyorSecondscreenonly.
42ThinkPadY oga260UserGuide
Page 59

Note:IfyoushowDOSorprogramsusingDirectDraworDirect3D
®
infull-screenmode,onlythemain
displayshowsthevideooutput.
Changingdisplaysettings
Youcanchangethesettingsforboththecomputerdisplayandtheexternaldisplay.Forexample,you
candefinewhichoneisthemaindisplayandwhichoneisthesecondarydisplay.Youalsocanchange
theresolutionandorientation.
Tochangedisplaysettings,dothefollowing:
1.Right-clickonthedesktopandselectScreenResolution(Windows7)orDisplaysettings(Windows
10).
2.Selectthedisplaythatyouwanttoconfigure.
3.Changedisplaysettingsasyouwant.
Note:Ifyousetahigherresolutionforthecomputerdisplaythantheexternaldisplay,onlypartofthescreen
canbeshownontheexternaldisplay.
Usingaudiofeatures
Yourcomputerisequippedwiththefollowingitems:
•Built-inmicrophones
•Built-inspeakers
•Comboaudioconnector,3.5mm(0.14inch)indiameter
Yourcomputeralsohasanaudiochipthatenablesyoutoenjoyvariousmultimediaaudiofeatures,such
asthefollowing:
•PlaybackofMIDIandMP3files
•RecordingandplaybackofPCMandWAVfiles
•Recordingfromvarioussoundsources,suchasaheadsetattached
Thefollowingtableshowswhichfunctionsoftheaudiodevicesattachedtotheconnectorsonyourcomputer
ordockingstationaresupported.
Table2.Audiofeaturelist
Connector
Comboaudioconnector
Headsetwitha3.5mm
(0.14–inch)4-poleplug
Headphoneand
microphonefunctions
supported
ConventionalheadphoneConventionalmicrophone
Headphonefunction
supported
Notsupported
Toconfigurethemicrophoneforoptimalsoundrecording,usetheConexantSmartAudioprogram.Tostart
theprogram,gotoControlPanelandclickHardwareandSound➙SmartAudio.
Usingthecamera
Ifyourcomputerhasacamera,youcanusethecameratopreviewyourvideoimageandtakeasnapshot
ofyourcurrentimage.
Tostartthecamera,dothefollowing:
Chapter2.Usingyourcomputer43
Page 60

•ForWindows7:StarttheCommunicationsUtilityprogram.See“AccessingLenovoprograms”on
page12
•ForWindows10:OpentheStartmenu,andclickCamerafromtheallappslist.
Whenthecameraisstarted,thegreencamera-in-useindicatorturnson.
Youalsocanusetheintegratedcamerawithotherprogramsthatprovidefeaturessuchasphotographing,
videocapturing,andvideoconferencing.Tousetheintegratedcamerawithotherprograms,openoneofthe
programsandstartthephotographing,videocapturing,orvideoconferencingfunction.Then,thecamera
willstartautomaticallyandthegreencamera-in-useindicatorwillturnon.Formoreinformationaboutusing
thecamerawithaprogram,refertothehelpinformationsystemoftheprogram.
Configuringcamerasettings
Youcanconfigurethecamerasettingstomeetyourneeds,suchasadjustingthequalityofthevideooutput.
Toconfigurethecamerasettings,dothefollowing:
•ForWindows7:StarttheCommunicationsUtilityprogramandconfigurethecamerasettingsasdesired.
•ForWindows10:Dooneofthefollowing:
–OpentheCameraapp,clickthesettingsiconintheupper-rightcorner.Followtheinstructionsonthe
–ClickLenovoSettingsfromtheStartmenu.ThenclickCamera.Followtheinstructionsonthe
.
screentoconfigurethecamerasettingsasdesired.
screentoconfigurethecamerasettingsasdesired.
Usingasmartcard
Dependingonthemodel,yourcomputermightcomewithasmartcardreader.
Thissectionprovidesinformationaboutthesupportedsmartcardtypeandinstructionsonhowtoinstall
orremoveasmartcard.Formoreinformationaboutusingthesmartcard,refertothedocumentation
thatcamewiththesmartcard.
Supportedsmartcardtype
Thesmartcardreader(ifavailableonyourcomputer)onlysupportsthesmartcardofthefollowing
specifications:
•Length:85.60mm(3.37inches)
•Width:53.98mm(2.13inches)
•Thickness:0.76mm(0.03inch)
Attention:Smartcardwithslitsisnotsupported.Donotinsertsuchasmartcardintothesmartcardreader
ofyourcomputertoavoiddamagetothereader.
44ThinkPadY oga260UserGuide
Page 61

Installingorremovingasmartcard
Attention:Beforeinstallingorremovingasmartcard,ensurethatyouobservethefollowingprecautions:
•Beforeyoustart,read“Staticelectricityprevention”onpage123
.
•Whendataisbeingtransferred,donotputyourcomputerintosleeporhibernationmodeanddonot
performanyinstallationorremovalactions.Otherwise,yourdatacouldgetdamaged.
•Donotremoveasmartcardwhilethecomputerisinsleeporhibernationmode.Otherwise,thesystem
mightnotrespondwhenyoutrytoresumeoperation.
Toinstallasmartcard:Holdthesmartcardincorrectorientationandtheninsertitfirmlyintotheslotin
thesmartcardreader.
Toremoveasmartcard:Exitallprogramsthatareworkingwiththesmartcardfirst.Otherwise,data
onthesmartcardmightgetdamagedorlost.Pullthesmartcardoutwardalittlebitandthenslideit
completelyoutoftheslot.
Afteryouinstallasmartcard,dothefollowingtoenabletheplug-and-playfeatureforthesmartcard:
1.GotoControlPanel,andensurethatyouviewControlPanelbyCategory.
2.ClickHardwareandSound.
3.ClickDeviceManager.Ifyouarepromptedforanadministratorpasswordorconfirmation,typethe
passwordorprovideconfirmation.
4.FromtheActionmenu,selectAddlegacyhardware.TheAddHardwareWizardstarts.
5.Followtheinstructionsonthescreen.
Chapter2.Usingyourcomputer45
Page 62

46ThinkPadY oga260UserGuide
Page 63

Chapter3.Enhancingyourcomputer
Thischapterprovidesinstructionsonhowtousehardwaredevicestoexpandyourcomputercapabilities.It
includesthefollowingtopics:
•“FindingThinkPadoptions”onpage47
•“ThinkPadOneLink+Dock”onpage47
FindingThinkPadoptions
Ifyouwanttoexpandthecapabilitiesofyourcomputer,Lenovohasanumberofhardwareaccessoriesand
upgradestomeetyourneeds.Optionsincludememorymodules,storagedevices,networkcards,docking
stations,batteries,poweradapters,printers,scanners,keyboards,mice,andmore.
YoucanshopatLenovo24hoursaday,7daysaweekdirectlyovertheWorldWideWeb.Allyouneedisan
Internetconnectionandacreditcard.
ToshopatLenovo,goto
http://www.lenovo.com/essentials
ThinkPadOneLink+Dock
TheThinkPadOneLink+Dock(hereafterreferredtoasdock)isanoptionaldevicethatLenovodesigned
specificallyforyourcomputer.Thedockprovidesconvenienceandmakesyourcomputereasiertouse
forwork,study,andentertainment.Ifyourcomputerdoesnotcomewiththedock,youcanpurchaseone
fromLenovoathttp://www.lenovo.com/accessories.
Thistopicprovidesbasicinformationaboutthedock.Fordetailedinformationaboutusingthedock,refer
tothedocumentationthatcomeswiththedock.
Frontview
1Security-lockslot:Toprotectyourdockfromtheft,purchaseasecuritycablelockthatfitsthis
security-lockslottolockyourdocktoastationaryobject.
2Audioconnector:Usedtoconnectheadphonesoraheadsetthathasa3.5-mm(0.14-inch),4-poleplug.
3USB3.0connector:UsedtoconnectdevicesthatarecompatiblewithUSB3.0andUSB2.0.
4AlwaysOnUSBconnector:Bydefault,theAlwaysOnUSBconnectorenablesyoutochargesome
mobiledigitaldevicesandsmartphoneswhenthedockisinthefollowingsituations:
©CopyrightLenovo2016
47
Page 64
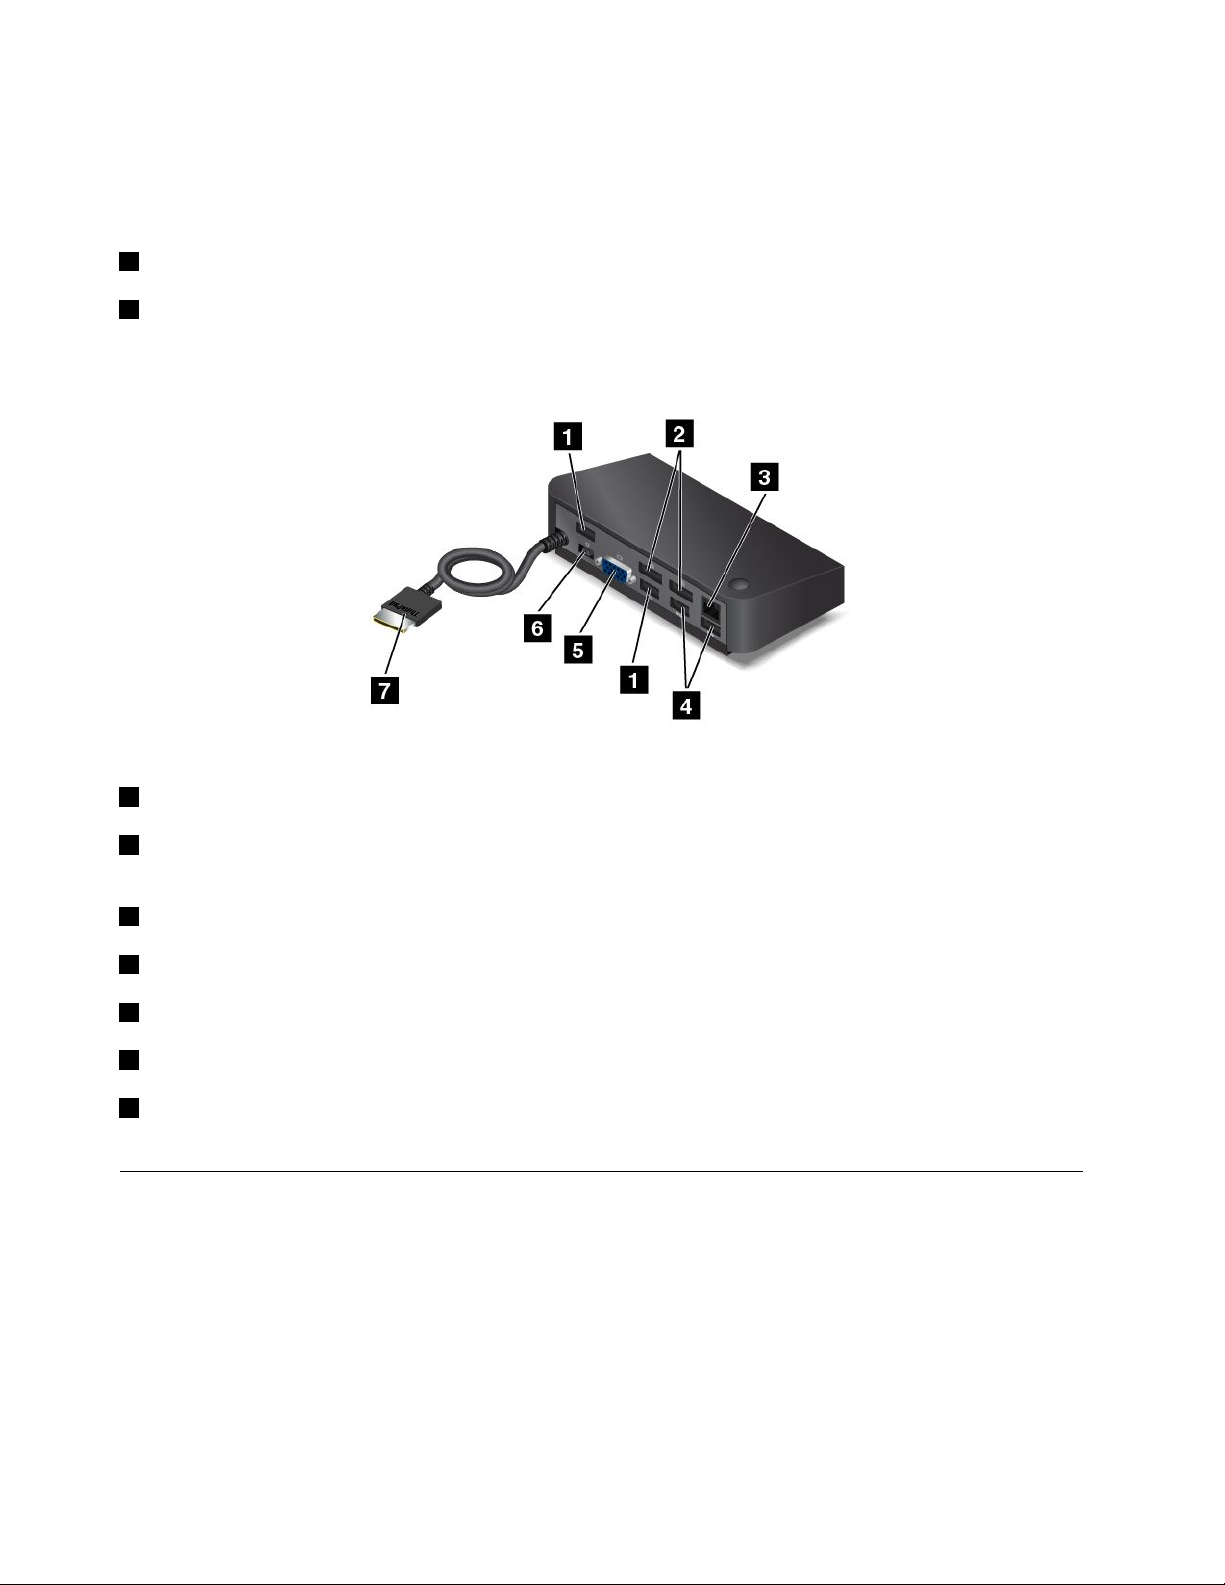
•Whenthedockisinsleeporhibernationmode
•Whenthedockisturnedoff
Formoreinformation,refertothedocumentationthatcomeswiththedock.
5Powerbutton:Thepowerbuttononthedockfunctionsthesameastheoneonthecomputer.
6System-statusindicator:TheindicatorontheilluminatedThinkPadlogofunctionsthesameastheones
onthecomputer.Fordetails,see“Statusindicators”onpage6.
Rearview
1USB2.0connectors:UsedtoconnectdevicesthatarecompatiblewithUSB2.0.
2DisplayPortconnectors:Usedtoattachahigh-performancemonitor,adirect-drivemonitor,orother
devicesthatuseaDisplayPortconnector.
3Ethernetconnector:UsedtoconnectthedocktoanEthernetLAN.
4USB3.0connectors:UsedtoconnectdevicesthatarecompatiblewithUSB3.0andUSB2.0.
5VGAconnector:UsedtoconnecttoaVGA-compatiblevideodevice,suchasaVGAmonitor.
6Powerconnector:Usedtoconnecttheacpoweradapter.
7OneLink+connector:ConnecttheOneLink+connectortothecomputer.Tolocatethecorresponding
OneLink+connectoronthecomputer,see“Left-sideview”onpage4.
ThinkPadWiGigDock
TheWirelessGigabit(WiGig)technologyenableswirelesscommunicationsbetweennearbydevicesat
multi-gigabitspeeds.SomecomputermodelshaveawirelessLANcardwithbuilt-inWiGigfeature.These
computermodelscanworkwiththeThinkPadWiGigDockwirelesslytoexpandcomputingcapabilities.
Locatingcontrols,connectors,andindicators
ThissectionintroducesthehardwarefeaturesoftheThinkPadWiGigDocktogiveyouthebasicinformation
youneedtostartusingthedock.
48ThinkPadY oga260UserGuide
Page 65

Frontview
1Statusindicator:TheindicatorintheThinkPadlogoshowsthestatusofthedock.Theindicatorissolid
onwhenthedockison(innormalmode).
Sideview
12USB2.0connectors:ConnectdevicesthatarecompatiblewithUSB2.0,suchasaUSBkeyboard
oraUSBmouse.
3Audioconnector:Connectheadphonesoraheadsetthathasa3.5-mm(0.14-inch)4-poleplugtothe
audioconnectortolistentothesoundfromthecomputer.
4Power/Connectionbutton:T urnonorturnoffthedock.Youcanalsopressthebuttontoconfirm
connection.
5USB3.0connector:ConnectUSBcompatibledevices,suchasaUSBkeyboard,USBmouse,or
USBstoragedevice.Forfasterandoptimaldatatransfer,ensurethatyouconnectaUSB3.0deviceto
theUSB3.0connector.
68AlwaysOnUSB3.0connector:ConnectUSBcompatibledevicesorchargesomemobiledigital
devicesandsmartphoneswhenyourcomputerisinsleeporhibernationmode.
Chapter3.Enhancingyourcomputer49
Page 66
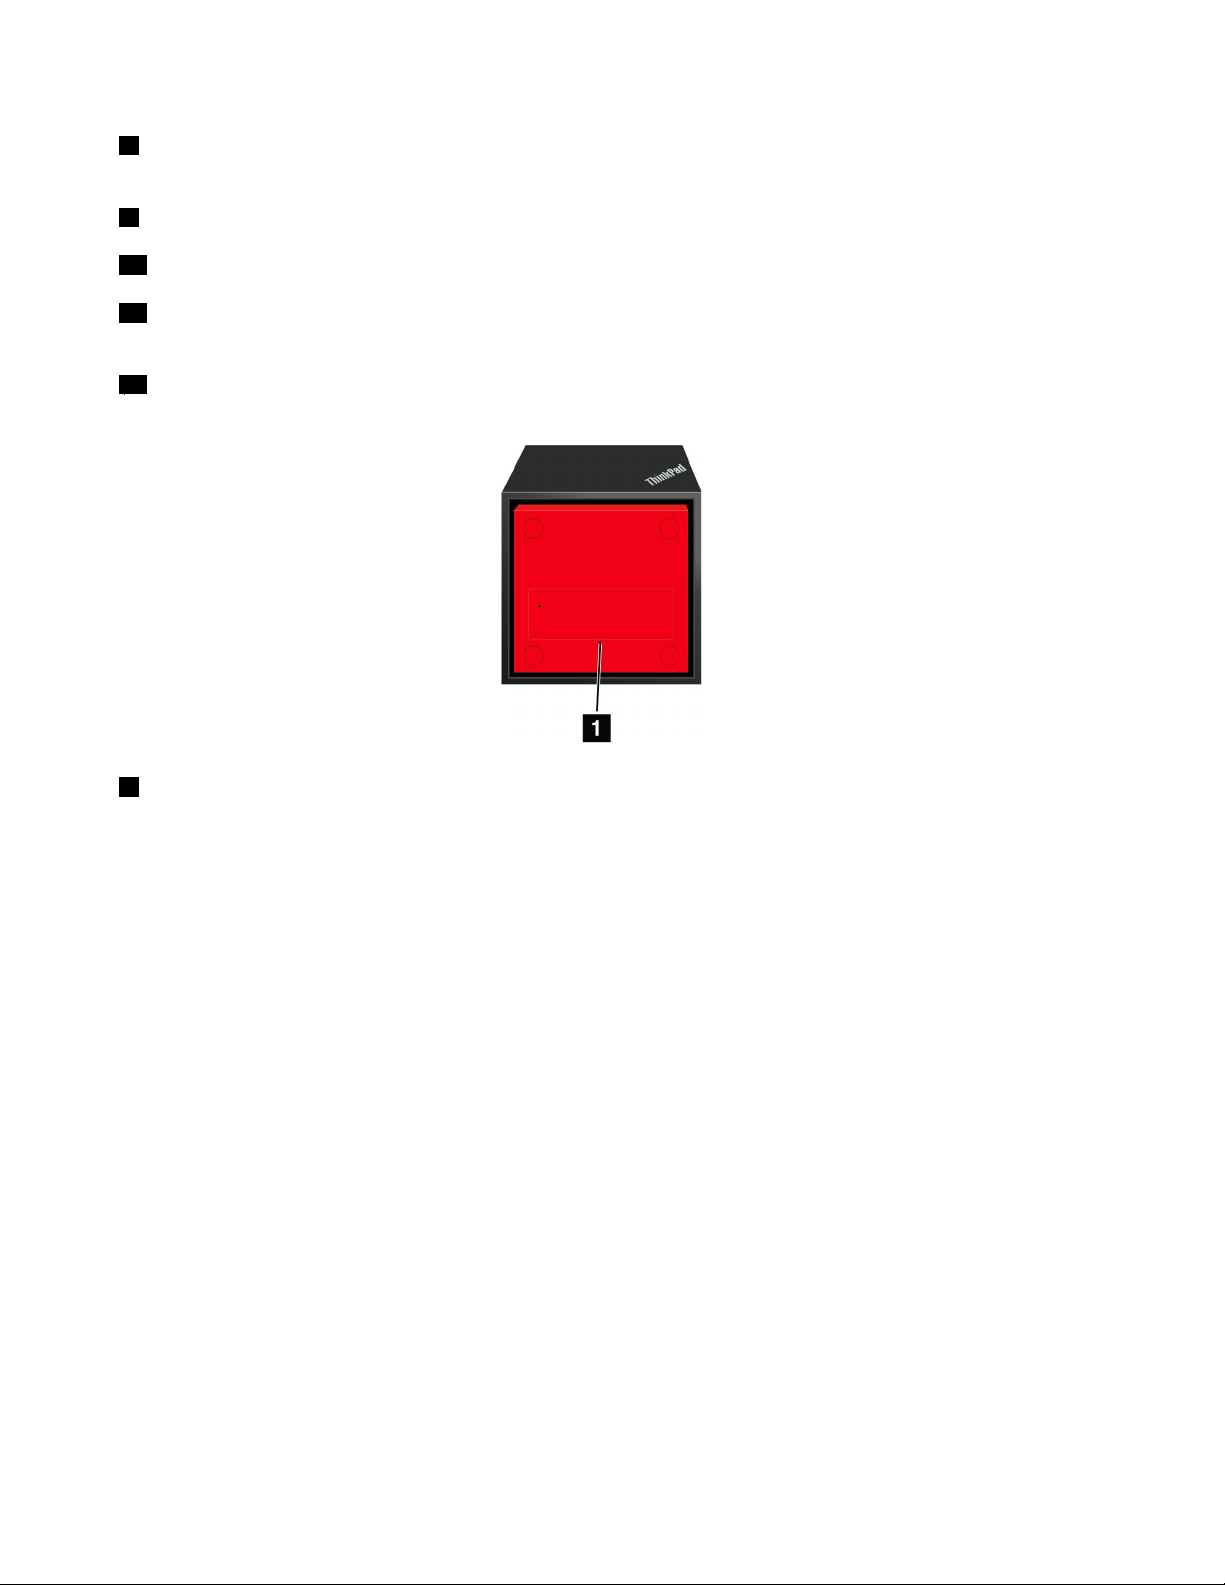
7Security-lockslot:Toprotectyourdockfromtheft,purchaseasecuritycablelockthatfitsthis
security-lockslottolockyourdocktoastationaryobject.
9acpowerconnector:Connecttheacpoweradapter.
10HDMIconnector:Connectahigh-definitiontelevision.
11DisplayPortconnector:Connectahigh-performancemonitor,adirect-drivemonitor,orotherdevices
thatuseaDisplayPortconnector.
12Ethernetconnector:ConnectthedocktoanEthernetLAN.
Bottomview
1Emergency-resethole:Ifyourdockstopsresponding,holddownthepowerbuttonforseveralseconds
toturnoffthedock.Ifthedockstillcannotbeturnedoff,removetheacpoweradapterfirst.Theninserta
straightenedpaperclipintotheemergency-resetholetoresetthedock.
SettinguptheThinkPadWiGigDock
TosetupyourThinkPadWiGigDock,dothefollowing:
50ThinkPadY oga260UserGuide
Page 67

1.Connectthepowercordtotheacpoweradapter.
2.Connecttheacpoweradaptertothepowerconnectorofthedock.
3.Connectthepowercordtoanelectricaloutlet.
4.Turnonthedockbypressingthepowerbutton.
5.Ifanexternaldisplayisavailable,connecttheexternaldisplaytotheappropriateconnector(HDMIor
DisplayPortconnector)onthedock.Theexternaldisplayshowssomewirelesspairinginstructionswhen
youconnectyourcomputertotheWiGigdock.
6.PositionyourcomputerclosetotheThinkPadWiGigDock,within0.9m(3ft).Thedockalsomustbe
withina120-degreesectorregionrelativelytotherearofthecomputerdisplay.Ensurethatnoobjects
arebetweenthedockandthecomputer.
Chapter3.Enhancingyourcomputer51
Page 68

UsingtheThinkPadWiGigDock
Thissectionintroduceshowtouseandmanagethedock.
ConnectingtotheThinkPadWiGigDock
ToconnectyourcomputertotheThinkPadWiGigdock,dothefollowing:
1.Afterthesetupandpreparation,turnonyourcomputerandthedock.Thendothefollowing:
•ForWindows7:StarttheWirelessDockManagerprogram.Forinstructionsonhowtostartthe
WirelessDockManagerprogram,see“AccessingLenovoprograms”onpage12.
•ForWindows10:ClicktheactioncentericonintheWindowsnotificationarea.ClickConnect.
2.Selectyourdockfromthelistofavailabledevices.
3.Whenprompted,pressthepower/connectionbuttononthedocktoconfirmthepairing.
4.Followtheinstructionsonthescreentocompletetheconnection.
Afterestablishingtheinitialconnection,youcanmakeconfigurationssothatwheneverthecomputercomes
withintherequiredrange,itautomaticallygetsconnectedtothedock.
DisconnectingfromtheThinkPadWiGigDock
TodisconnectyourcomputerfromtheThinkPadWiGigDock,dothefollowing:
1.Dothefollowing:
•ForWindows7:StarttheWirelessDockManagerprogram.Forinstructionsonhowtostartthe
WirelessDockManagerprogram,see“AccessingLenovoprograms”onpage12.
•ForWindows10:Clicktheactioncentericon
openthedevicelist.
2.LocatetheThinkPadWiGigDockandclickDisconnect.
3.Holddownthepowerbuttononthedockforseveralsecondsuntilthedockisturnedoff.
ManagingtheThinkPadWiGigDock
TheWirelessDockManagerprogramenablesyoutomanagethedock.Youcanchangethenameofthe
dock,changetheradiochanneltooptimizethesignalstrength,andsetapasswordtomanagethedock
settings.
52ThinkPadY oga260UserGuide
intheWindowsnotificationarea.ClickConnectto
Page 69

TomanagetheThinkPadWiGigDock,dothefollowing:
1.StarttheWirelessDockManagerprogram.ForinstructionsonhowtostarttheWirelessDockManager
program,see“AccessingLenovoprograms”onpage12.
2.ClickDockManagement.
3.Followtheinstructionsonthescreentoconfigurethesettingsasdesired.
Formoreinformation,refertothemanualsthatcomewiththedockandthehelpinformationsystemof
theWirelessDockManagerprogram.
Chapter3.Enhancingyourcomputer53
Page 70

54ThinkPadY oga260UserGuide
Page 71

Chapter4.Youandyourcomputer
Thischaptercontainsthefollowingtopics:
•“Accessibilityandcomfort”onpage55
•“Travelingwithyourcomputer”onpage59
Accessibilityandcomfort
Goodergonomicpracticeisimportanttogetthemostfromyourpersonalcomputerandtoavoiddiscomfort.
Arrangeyourworkplaceandtheequipmentyouusetosuityourindividualneedsandthekindofwork
thatyouperform.Inaddition,usehealthyworkhabitstomaximizeyourperformanceandcomfortwhile
usingyourcomputer.
Thefollowingtopicsprovideinformationaboutarrangingyourworkarea,settingupyourcomputer
equipment,andestablishinghealthyworkhabits.
Lenovoiscommittedtoprovidingthelatestinformationandtechnologytoourcustomerswithdisabilities.
Refertotheaccessibilityinformationthatoutlinesoureffortsinthisarea.See“Accessibilityinformation”
onpage56
Ergonomicinformation
Workinginthevirtualofficemightmeanadaptingtofrequentchangesinyourenvironment.Forexample,
adaptingtothesurroundinglightsources,properseating,andtheplacementofyourcomputerhardware,
canhelpyouimproveyourperformanceandachievegreatercomfort.
.
Thefollowingexampleshowssomeoneinaconventionalsetting.Evenwhennotinsuchasetting,youcan
followmanyofthesetips.Developgoodhabits,andtheywillserveyouwell.
Generalposture:Makeminormodificationsinyourworkingposturetodetertheonsetofdiscomfort
causedbylongperiodsofworkinginthesameposition.Frequentshortbreaksfromyourworkalsohelp
topreventminordiscomfortassociatedwithyourworkingposture.
Display:Positionthedisplaytomaintainacomfortableviewingdistanceof510-760mm(20-30inches).
Avoidglareorreflectionsonthedisplayfromoverheadlightingoroutsidesourcesoflight.Keepthedisplay
screencleanandsetthebrightnesstolevelsthatenableyoutoseethescreenclearly.T oadjustdisplay
brightness,pressthebrightness-downkey
Headposition:Keepyourheadandneckinacomfortableandneutral(vertical,orupright)position.
Chair:Useachairthatgivesyougoodbacksupportandseatheightadjustment.Usechairadjustmentsto
bestsuityourdesiredposture.
,orbrightness-upkey.
©CopyrightLenovo2016
55
Page 72

Armandhandposition:Keepyourforearms,wrists,andhandsinarelaxedandneutral(horizontal)position.
Typewithasofttouchwithoutpoundingthekeys.
Legposition:Keepyourthighsparalleltothefloorandyourfeetflatonthefloororonafootrest.
Whatifyouaretraveling?
Itmightnotbepossibletoobservethebestergonomicpracticeswhenyouareusingyourcomputerwhile
onthemoveorinacasualsetting.Regardlessofthesetting,trytoobserveasmanyofthesetipsas
possible.Sittingproperlyandusingadequatelighting,forexample,willhelpyoumaintaindesirablelevels
ofcomfortandperformance.
Questionsaboutvision?
ThevisualdisplayscreensofThinkPadnotebookcomputersaredesignedtomeetthehigheststandards
andtoprovideyouwithclear,crispimagesandlarge,brightdisplaysthatareeasytosee,yeteasyonthe
eyes.Ofcourse,anyconcentratedandsustainedvisualactivitycanbetiring.Ifyouhavequestionsoneye
fatigueorvisualdiscomfort,consultavisioncarespecialistforadvice.
Comfort
Observethefollowingguidelinestoachievegreatercomfortandimproveperformance.
Activesittingandrestbreaks:Thelongeryousitandworkwithyourcomputer,themoreimportantitisto
observeyourworkingposture.Follow“Ergonomicinformation”onpage55
avoiddiscomfortassociatedwithyourworkingpostures.Makingminorvoluntaryposturalchangesand
takingshortfrequentworkbreaksarethekeyingredientsforhealthycomputing.Y ourcomputerislightand
mobile;youcaneasilyrepositionyourworkingsurfacetoaccommodatemanyposturemodifications.
andpractice“activesitting”to
Workareasetupoptions:Familiarizeyourselfwithallofyourofficefurnituresothatyouknowhowtoadjust
yourworksurface,seat,andotherworktoolstoaccommodateyourpreferencesforcomfort.Ifyourwork
areaisnotinanofficesetting,besuretotakespecialnoteofemployingactivesittingandtakingwork
breaks.ManyThinkPadproductsolutionsareavailabletohelpyoumodifyandexpandyourcomputerto
bestsuityourneeds.Youcanfindsomeoftheseoptionsathttp://www.lenovo.com/essentials.Exploreyour
optionsfordockingsolutionsandexternalproductsthatprovidetheadjustabilityandfeaturesthatyouwant.
Accessibilityinformation
Lenovoiscommittedtoprovidinguserswhohavehearing,vision,andmobilitylimitationswithgreater
accesstoinformationandtechnology.Thissectionprovidesinformationaboutthewaystheseuserscanget
themostoutoftheircomputerexperience.Youalsocangetthemostup-to-dateaccessibilityinformation
fromthefollowingWebsite:
http://www.lenovo.com/accessibility
Keyboardshortcuts
Thefollowingtablecontainskeyboardshortcutsthatcanhelpmakeyourcomputereasiertouse.
Note:Dependingonyourkeyboard,someofthefollowingkeyboardshortcutsmightnotbeavailable.
KeyboardshortcutFunction
Windowslogokey+U
RightShiftforeightseconds
ShiftfivetimesTurnonorturnoffStickyKeys
OpenEaseofAccessCenter
TurnonorturnoffFilterKeys
56ThinkPadY oga260UserGuide
Page 73

KeyboardshortcutFunction
NumLockforfivesecondsTurnonorturnoffToggleKeys
LeftAlt+LeftShift+NumLock
LeftAlt+LeftShift+PrtScn(orPrtSc)TurnonorturnoffHighContrast
TurnonorturnoffMouseKeys
Formoreinformation,gotohttp://windows.microsoft.com/,andthenperformasearchusinganyofthe
followingkeywords:keyboardshortcuts,keycombinations,shortcutkeys.
EaseofAccessCenter
EaseofAccessCenterontheWindowsoperatingsystemenablesuserstoconfiguretheircomputersto
suittheirphysicalandcognitiveneeds.
TouseEaseofAccessCenter,dothefollowing:
1.GotoControlPanel,andensurethatyouviewControlPanelusingCategory.
2.ClickEaseofAccess➙EaseofAccessCenter.
3.Choosetheappropriatetoolbyfollowingtheinstructionsonthescreen.
EaseofAccessCentermainlyincludesthefollowingtools:
•Magnifier
Magnifierisausefulutilitythatenlargestheentirescreenorpartofthescreensothatyoucansee
theitemsbetter.
•Narrator
Narratorisascreenreaderthatreadswhatisdisplayedonthescreenaloudanddescribeseventssuchas
errormessages.
•On-ScreenKeyboard
Ifyouprefertotypeorenterdataintoyourcomputerusingamouse,joystick,orotherpointingdevice
insteadofaphysicalkeyboard,youcanuseOn-ScreenKeyboard.On-ScreenKeyboarddisplaysavisual
keyboardwithallthestandardkeys.Youcanselectkeysusingthemouseoranotherpointingdevice,or
youcantaptoselectthekeysifyourcomputersupportsmulti-touchscreen.
•HighContrast
HighContrastisafeaturethatheightensthecolorcontrastofsometextandimagesonyourscreen.Asa
result,thoseitemsaremoredistinctandeasiertoidentify.
•Personalizedkeyboard
Adjustkeyboardsettingstomakeyourkeyboardeasiertouse.Forexample,youcanuseyourkeyboard
tocontrolthepointerandmakethekeyboardeasiertotypecertainkeycombinations.
•Personalizedmouse
Adjustmousesettingstomakeyourmouseeasiertouse.Forexample,youcanchangethepointer
appearanceandmakeyourmouseeasiertomanagewindows.
SpeechRecognition
SpeechRecognitionenablesyoutocontrolyourcomputerbyvoice.
Usingonlyyourvoice,youcanstartprograms,openmenus,clickobjectsonthescreen,dictatetextinto
documents,andwriteandsende-mails.Everythingyoudowiththekeyboardandmousecanbedonewith
onlyyourvoice.
TouseSpeechRecognition,dothefollowing:
Chapter4.Y ouandyourcomputer57
Page 74

1.GotoControlPanel,andensurethatyouviewControlPanelusingCategory.
2.ClickEaseofAccess➙SpeechRecognition.
3.Followtheinstructionsonthescreen.
Screen-readertechnologies
Screen-readertechnologiesareprimarilyfocusedonsoftwareprograminterfaces,helpinformationsystems,
andvariousonlinedocuments.Foradditionalinformationaboutscreenreaders,seethefollowing:
•UsingPDFswithscreenreaders:
http://www.adobe.com/accessibility.html?promoid=DJGVE
•UsingtheJAWSscreenreader:
http://www.freedomscientific.com/jaws-hq.asp
•UsingtheNVDAscreenreader:
http://www.nvaccess.org/
Screenresolution
Youcanmakethetextandimagesonyourscreeneasiertoreadbyadjustingthescreenresolutionofyour
computer.
Toadjustthescreenresolution,dothefollowing:
1.Right-clickanemptyareaofthedesktopandselectScreenresolution.
2.Followtheinstructionsonthescreen.
Note:Settingaresolutiontoolowmightpreventsomeitemsfromfittingonthescreen.
Customizableitemsize
Youcanmaketheitemsonyourscreeneasiertoreadbychangingtheitemsize.
•Tochangetheitemsizetemporarily,usetheMagnifiertoolinEaseofAccessCenter.See“Easeof
AccessCenter”onpage57
.
•Tochangetheitemsizepermanently,dothefollowing:
–Changethesizeofalltheitemsonyourscreen.
1.GotoControlPanel,andensurethatyouviewControlPanelusingCategory.
2.ClickAppearanceandPersonalization➙Display.
3.Changetheitemsizebyfollowingtheinstructionsonthescreen.
4.ClickApply.Thischangewilltakeeffectthenexttimeyoulogintotheoperatingsystem.
–ChangethesizeoftheitemsonaWebpage.
PressandholdCtrl,andthenpresstheplus-signkey(+)toenlargeortheminus-signkey(-)to
reducethetextsize.
–Changethesizeoftheitemsonthedesktoporawindow.
Note:Thisfunctionmightnotworkonsomewindows.
Ifyourmousehasawheel,pressandholdCtrl,andthenscrollthewheeltochangetheitemsize.
Industry-standardconnectors
Yourcomputerprovidesindustry-standardconnectorsthatenableyoutoconnectassistivedevices.
Formoreinformationaboutthelocationandfunctionoftheconnectors,see“Locatingcomputercontrols,
connectors,andindicators”onpage1
.
58ThinkPadY oga260UserGuide
Page 75

Documentationinaccessibleformats
Lenovoprovideselectronicdocumentationinaccessibleformats,suchasproperlytaggedPDFfilesor
HyperTextMarkupLanguage(HTML)files.Lenovoelectronicdocumentationisdevelopedtoensure
thatvisuallyimpaireduserscanreadthedocumentationthroughascreenreader.Eachimageinthe
documentationalsoincludesadequatealternativetextsothatvisuallyimpaireduserscanunderstandthe
imagewhentheyuseascreenreader.
Travelingwithyourcomputer
Thistopicprovidesinformationtohelpyouworkwithyourcomputerwhenyouaretraveling.
Traveltips
Usethefollowingtraveltipstotravelmoreconfidentlyandefficientlywithyourcomputer.
•Althoughitissafetoallowyourcomputertogothroughthex-raymachinesatairportsecuritystations,it
isimportanttokeepyoureyesonthecomputeratalltimestopreventtheft.
•Considerbringinganelectricaladapterforuseinanairplaneorautomobile.
•Ifyoucarryanacpoweradapter,detachtheaccordfromittoavoiddamagingthecord.
Traveltipsonairplanes
Ifyoucarryyourcomputerintoanairplane,takenoteofthefollowingtips:
•Ifyouintendtouseyourcomputerorwirelessservices(suchasInternetandBluetooth),checkwiththe
airlineforrestrictionsandavailabilityofservicesbeforeboardingtheairplane.Iftherearerestrictions
ontheuseofcomputerswithwirelessfeaturesontheairplane,youmustabidebythoserestrictions.If
necessary,enabletheAirplanemodebeforeboarding.IntheAirplanemode,allwirelessfeaturesare
disabled.T oenabletheAirplanemodeintheWindows10operatingsystem,dothefollowing:
1.OpentheStartmenu.
2.ClickSettings.IfSettingsisnotdisplayed,clickAllappstodisplayallprograms.
3.ClickSettings➙Network&Internet➙Airplanemode.
4.TurnontheAirplanemode
•Becarefulabouttheseatinfrontofyouonairplanes.Angleyourcomputerdisplaysothatitdoesnotget
caughtwhenthepersoninfrontofyouleansback.
•Whentakingoff,remembertoturnoffyourcomputerorputitintohibernationmode.
Travelaccessories
Thefollowingisachecklistofitemstoconsiderpackingwhenyouaregoingtotravel:
•ThinkPadacpoweradapter
•MiniDisplayPorttoHDMIadapter
•Externalmouse(ifyouareaccustomedtousingone)
•Aqualitycarryingcasethatprovidesadequatecushionandprotection
•Ethernetcable
•Externalstoragedevice
•HDMIcable
•ThinkPadOneLink+toRJ45Adapter
•ThinkPadOneLink+Dock
•ThinkPadOneLink+toVGA/RJ45Adapter
Chapter4.Y ouandyourcomputer59
Page 76

Ifyouaretravelingtoanothercountry,youmightwanttoconsideranacpoweradapterforthecountryto
whichyouaretraveling.
Topurchasetravelaccessories,gotohttp://www.lenovo.com/accessories.
60ThinkPadY oga260UserGuide
Page 77

Chapter5.Security
Thischaptercontainsthefollowingtopics:
•“Usingpasswords”onpage61
•“Harddisksecurity”onpage65
•“Settingthesecuritychip”onpage66
•“Usingthefingerprintreader”onpage67
•“Noticeondeletingdatafromyourstoragedevices”onpage70
•“Usingfirewalls”onpage70
•“Protectingdataagainstviruses”onpage71
Usingpasswords
Youcanhelppreventyourcomputerfromunauthorizedusebyusingpasswords.Onceyousetapassword,
apromptisdisplayedonthescreeneachtimeyouturnonthecomputer.Enteryourpasswordattheprompt.
Youcannotusethecomputerunlessyoutypethecorrectpassword.
Ifyouhavesetapower-onpassword,asupervisorpassword,oraharddiskpassword,itunlocks
automaticallywhenthecomputerresumesfromsleepmode.
Note:IfaWindowspasswordhasbeenset,youwillbepromptedtoenterit.
Typingpasswords
Whenthisiconisdisplayed,typeapower-onpasswordorasupervisorpassword.
Whenthisiconisdisplayed,typeauserharddiskpassword.Totypeamasterharddiskpassword,
pressF1.Whentheiconchangesto
Note:Toreturntotheicon
,pressF1again.
,typethemasterharddiskpassword
Power-onpassword
Youcansetapower-onpasswordtohelpprotectyourcomputeragainstaccessbyunauthorizedusers.
Ifyousetapower-onpassword,thepasswordpromptisdisplayedonthescreenwheneveryouturnonthe
computer.Youmustenterthecorrectpasswordtostartusingthecomputer.
Setting,changing,orremovingapower-onpassword
Beforeyoustart,printtheseinstructions.
Toset,change,orremoveapower-onpassword,dothefollowing:
1.Restartthecomputer.Whenthelogoscreenisdisplayed,pressF1tostarttheThinkPadSetupprogram.
2.SelectSecurity➙Password➙Power-onPasswordbyusingthedirectionalkeys.
©CopyrightLenovo2016
61
Page 78

3.Dependingonyourneed,dooneofthefollowing:
•Tosetapassword,dothefollowing:
a.IntheEnterNewPasswordfield,typeadesiredpasswordandpressEnter.
b.IntheConfirmNewPasswordfield,retypethepasswordandpressEnter.
•Tochangeapassword,dothefollowing:
a.IntheEnterCurrentPasswordfield,typethecurrentpower-onpasswordandpressEnter.
b.IntheEnterNewPasswordfield,typethenewpower-onpasswordandpressEnter;thenretype
thepasswordintheConfirmNewPasswordfieldandpressEnter.
•Toremoveapassword,dothefollowing:
a.IntheEnterCurrentPasswordfield,typethecurrentpower-onpasswordandpressEnter.
b.LeavetheEnterNewPasswordandConfirmNewPasswordfieldsblank.PressEntertwice.
4.ASetupNoticewindowisdisplayed.PressEntertocontinue.
5.PressF10.ASetupConfirmationwindowisdisplayed.SelectYestosavetheconfigurationchanges
andexittheThinkPadSetupprogram.
Note:Y oumightwanttorecordyourpasswordandstoreitinasafeplace.Otherwise,ifyouforgetthe
password,youhavetotakeyourcomputertoaLenovoreselleroramarketingrepresentativetohave
thepasswordcanceled.
Supervisorpassword
ThesupervisorpasswordprotectsthesysteminformationstoredintheThinkPadSetupprogram.Ifyouhave
setasupervisorpassword,noonecanchangetheconfigurationofthecomputerwithoutthepassword.It
providesthefollowingsecurityfeatures:
•Ifonlyasupervisorpasswordisset,apasswordpromptisdisplayedwhenyoutrytostarttheThinkPad
Setupprogram.UnauthorizeduserscannotaccesstheThinkPadSetupprogramwithoutthepassword.
•Thesystemadministratorcanusethesupervisorpasswordtoaccessacomputereveniftheuserofthat
computerhassetapower-onpassword.Thesupervisorpasswordoverridesthepower-onpassword.
•Ifbothasupervisorpasswordandapower-onpasswordareset,youcandothefollowingonlyifyou
havethesupervisorpassword:
–Changingordeletingthepower-onpassword
–Changingordeletingthesupervisorpassword
–Changingdateandtime
–Specifyingtheminimumlengthforpower-onpasswordandharddiskpassword
–Changingthesettingforthesecuritychip
–ChangingthesettingfortheVirtualization
–ChangingthesettingfortheI/Oportaccess
–ChangingthesettingfortheAnti- Theft
–ChangingthesettingfortheSecureBoot
–Erasingthefingerprintdata
–Enablingordisablingthefollowingfeatures:
–LockUEFIBIOSSettings
–Passwordatunattendedboot
–BootDeviceListF12Option
62ThinkPadY oga260UserGuide
Page 79

–BootOrderLock
–FlashBIOSUpdatingbyEnd-Users
–SecureRollBackPrevention
–ExecutionPrevention
–Securitymode
–Fingerprintreaderpriority
Notes:
•ThesystemadministratorcansetthesamesupervisorpasswordonmanyThinkPadnotebookcomputers
tomakeadministrationeasier.
•WhenLockUEFIBIOSSettingsoptionisenabled,allBIOSsettingscannotbechanged.T ochange
thesettings,asupervisorpasswordisrequired.
Setting,changing,orremovingasupervisorpassword
Beforeyoustart,printtheseinstructions.
Onlyasystemadministratorcanset,change,orremoveasupervisorpassword.Toset,change,orremovea
supervisorpassword,dothefollowing:
1.Restartthecomputer.Whenthelogoscreenisdisplayed,pressF1tostarttheThinkPadSetupprogram.
2.SelectSecurity➙Password➙SupervisorPasswordbyusingthedirectionalkeys.
3.Dependingonyourneeds,dooneofthefollowing:
•Tosetapassword,dothefollowing:
a.IntheEnterNewPasswordfield,typeadesiredpasswordandpressEnter.
b.IntheConfirmNewPasswordfield,retypethepasswordandpressEnter.
•Tochangeapassword,dothefollowing:
a.IntheEnterCurrentPasswordfield,typethecurrentsupervisorpasswordandpressEnter.
b.IntheEnterNewPasswordfield,typethenewsupervisorpasswordandpressEnter;thenretype
thepasswordintheConfirmNewPasswordfieldandpressEnter.
•Toremoveapassword,dothefollowing:
a.IntheEnterCurrentPasswordfield,typethecurrentsupervisorpasswordandpressEnter.
b.LeavetheEnterNewPasswordandConfirmNewPasswordfieldsblank.PressEntertwice.
4.ASetupNoticewindowisdisplayed.PressEntertocontinue.
5.PressF10.ASetupConfirmationwindowisdisplayed.SelectYestosavetheconfigurationchanges
andexittheThinkPadSetupprogram.
Note:Y oumightwanttorecordyourpasswordandstoreitinasafeplace.Thenexttimeyouopenthe
ThinkPadSetupprogram,youwillbepromptedtotypeyoursupervisorpasswordtoproceed.Ifyouforget
yoursupervisorpassword,Lenovocannotresetyourpassword.Y oumusttakeyourcomputertoaLenovo
reselleroraLenovomarketingrepresentativetohavethesystemboardreplaced.Proofofpurchaseis
required,andafeewillbechargedforpartsandservice.
Harddiskpasswords
Thefollowingtwotypesofharddiskpasswordscanhelpprotecttheinformationstoredonthestoragedevies:
•Userharddiskpassword
Chapter5.Security63
Page 80

Ifauserharddiskpasswordhasbeenset,butnomasterharddiskpasswordhasbeen,theusermust
entertheuserharddiskpasswordtoaccessfilesandapplicationsontheharddiskdrive.
•Masterharddiskpassword
Themasterharddiskpasswordalsorequiresauserharddiskpassword.Themasterharddiskpassword
isusuallysetandusedbyasystemadministrator.Itenablestheadministratortoaccessanyharddisk
driveinasystemlikeamasterkey.Theadministratorsetsthemasterpassword;thenassignsauser
passwordforeachcomputerinthenetwork.Theusercanthenchangetheuserpasswordasdesired,but
theadministratorstillcangetaccessbyusingthemasterpassword.
Whenamasterharddiskpasswordisset,onlytheadministratorcanremovetheuserharddiskpassword.
Settingaharddiskpassword
Beforeyoustart,printtheseinstructions.
Tosetaharddiskpassword,dothefollowing:
1.Restartthecomputer.Whenthelogoscreenisdisplayed,pressF1tostarttheThinkPadSetupprogram.
2.SelectSecurity➙Password➙HarddiskxPasswordbyusingthedirectionalkeys.
3.Apasswordwindowisdisplayed.YouarepromptedtoselectUserorUser+Master.SelectUserif
youwanttosetonlyoneharddiskpassword.SelectUser+Masterifyouwanttosetauserharddisk
passwordandamasterharddiskpassword,forexampleifyouareanadministratororasupervisor.
•IfyouselectUser,dothefollowing:
a.Whenawindowfortypingthenewpasswordopens,typeyournewpasswordintheEnterNew
PasswordfieldandpressEnter.
b.IntheConfirmNewPasswordfield,retypethepasswordyoujustenteredandpressEnter.
•IfyouselectUser+Master,dothefollowing:
a.First,setauserharddiskpassword.Whenamessagewindowpromptsyoutosettheuserhard
diskpassword,pressEntertocontinue.TypeyournewuserharddiskpasswordintheEnter
NewPasswordfieldandpressEnter.RetypethepasswordintheConfirmNewPassword
fieldandpressEnter.
b.Then,setamasterharddiskpassword.Whenamessagewindowpromptsyoutosetthemaster
harddiskpassword.PressEntertocontinue.Typeyournewmasterharddiskpasswordinthe
EnterNewPasswordfieldandpressEnter.RetypethepasswordintheConfirmNewPassword
fieldandpressEnter.
4.ASetupNoticewindowisdisplayed.PressEntertocontinue.
5.PressF10.ASetupConfirmationwindowisdisplayed.SelectYestosavetheconfigurationchanges
andexittheThinkPadSetupprogram.
Thenexttimeyouturnonyourcomputer,typetheuserormasterharddiskpasswordtostartyourcomputer
andaccesstheoperatingsystem.
Changingorremovingaharddiskpassword
Tochangeorremovetheharddiskpassword,dothefollowing:
•IfyouareinUser+Masterharddiskmode,youcanselecteitherUserHDPorMasterHDPtochange
thepassword,dependingonyourneeds.
–IfyouselectUserHDPmode,followthefollowingstepstochangetheuserharddiskpassword:
1.TypethecurrentuserharddiskpasswordintheEnterCurrentPasswordfieldandpressEnter.
2.TypethenewpasswordintheEnterNewPasswordfieldandpressEnter;thenretypethe
passwordintheConfirmNewPasswordfieldandpressEnter.
64ThinkPadY oga260UserGuide
Page 81

3.ASetupNoticewindowisdisplayed.PressEnteragaintocontinue.Theuserharddiskpassword
ischanged.
Note:TheharddiskpasswordcannotberemovedinUserHDPmode.
–IfyouselectMasterHDPmode,followthefollowingstepstochangethemasterharddiskpassword:
1.TypethecurrentmasterharddiskpasswordintheEnterCurrentPasswordfieldandpressEnter.
2.TypethenewmasterharddiskpasswordintheEnterNewPasswordfieldandpressEnter;then
retypethenewpasswordyoujustenteredintheConfirmNewPasswordfieldandpressEnter.
3.ASetupNoticewindowisdisplayed.PressEntertocontinue.Themasterharddiskpasswordis
changed.
Note:IfyouleavetheEnterNewPasswordandConfirmNewPasswordfieldsblankandpressEnter
twice,boththeuserandmasterharddiskpasswordsareremoved.
•IfyouareinUserharddiskmode,followthefollowingstepstochangetheuserharddiskpassword:
1.Followsteps1through7in“Settingaharddiskpassword”onpage64,typingyourpasswordto
starttheThinkPadSetupprogram.
2.TypethecurrentuserharddiskpasswordintheEnterCurrentPasswordfieldandpressEnter.
3.TypethenewpasswordintheEnterNewPasswordfieldandpressEnter;thenretypethenew
passwordintheConfirmNewPasswordfieldandpressEnter.
4.ASetupNoticewindowisdisplayed.PressEnteragaintocontinue.Theuserharddiskpasswordis
changed.
Note:IfyouleavetheEnterNewPasswordandConfirmNewPasswordfieldsblankandpressEnter
twice,theuserharddiskpasswordisremoved.
Tipsonusingtheharddiskpasswords
•Y oucansettheminimumlengthofaharddiskpasswordthroughtheSecuritymenu.
•Ifyousetaharddiskpasswordofoversevencharacters,theharddiskdrivecanbeusedonlywitha
computerthatcanrecognizeaharddiskpasswordofoversevencharacters.Ifyoutheninstallthe
harddiskdriveinacomputerthatcannotrecognizeaharddiskpasswordthatcontainsmorethan
sevencharacters,youcannotaccessthedrive.
•Recordyourpasswordandstoreitinasafeplace.Ifyouforgettheuserharddiskpassword,orbothuser
andmasterharddiskpasswords,Lenovocannotresetyourpasswordsorrecoverdatafromtheharddisk
drive.Y oumusttakeyourcomputertoaLenovoreselleroramarketingrepresentativetohavethedrive
replaced.Proofofpurchaseisrequired,andafeewillbechargedforpartsandservice.
Notes:TheeDrivestoragedrivesorTrustedComputingGroup(TCG)Opal-compliantstoragedrivesprovide
self-encryptioncapabilitiestosecureyourdata.
•IfaTCGOpal-compliantstoragedriveandaTCGOpalmanagementsoftwareprogramareinstalled,and
theTCGOpalmanagementsoftwareprogramisactivated,theharddiskpasswordisnotavailable.
•IfaneDrivestoragedriveisinstalledinyourcomputer,andyourcomputerispreinstalledwiththe
Windows10operatingsystem,theharddiskpasswordisnotavailable.
Harddisksecurity
Toprotectpasswordsfromunauthorizedsecurityattacks,refertothefollowingtipstomaximizesecurity:
•Setapower-onpasswordaswellasaharddiskpasswordforyourinternalstoragedevice.Refertothe
proceduresin“Power-onpassword”onpage61and“Harddiskpasswords”onpage63.Forsecurity,
alongerpasswordisrecommended.
Chapter5.Security65
Page 82

•ToprovidereliablesecurityfortheUEFIBIOS,usethesecuritychip.Referto“Settingthesecuritychip”
onpage66
Note:TheWindows7operatingsystemssupportstheTPMmanagementfeature.
•IfaDiskEncryptionstoragedriveisinstalledinyourcomputer,besuretoprotectthecontentsofyour
computermemoryfromunauthorizedaccessesbyuseofdriveencryptionsoftware,suchasMicrosoft
WindowsBitLocker
•Beforeyoudisposeof,sell,orhandoveryourcomputer,deletedatastoredonit.Formoreinformation,
referto“Noticeondeletingdatafromyourstoragedevices”onpage70.
TheharddiskdrivebuiltintoyourcomputercanbeprotectedbytheUEFIBIOS.
UsingWindowsBitLockerDriveEncryption
Tohelpprotectyourcomputeragainstunauthorizedaccess,usethedriveencryptionsoftware,suchas
WindowsBitLockerDriveEncryption.
WindowsBitLockerDriveEncryptionisanintegralsecurityfeatureofsomeeditionsoftheWindows
operatingsystem.Itcanhelpyouprotecttheoperatingsystemanddatastoredonyourcomputer,even
ifyourcomputerislostorstolen.BitLockerworksbyencryptingalluserandsystemfiles,includingthe
swapandhibernationfiles.
BitLockerusesaTrustedPlatformModuletoprovideenhancedprotectionforyourdataandtoensureearly
bootcomponentintegrity.AcompatibleTPMisdefinedasaV1.2TPM.
.
®
DriveEncryption.See“UsingWindowsBitLockerDriveEncryption”onpage66.
TochecktheBitLockerstatus,gotoControlPanel,andclickSystemandSecurity➙BitLockerDrive
Encryption.
FormoreinformationaboutWindowsBitLockerDriveEncryption,seethehelpinformationsystemofthe
Windowsoperatingsystem,orsearchfor“MicrosoftWindowsBitLockerDriveEncryptionStep-by-Step
Guide”ontheMicrosoftWebsite.
DiskEncryptionharddiskdrive,Encryptionsolid-statedrive,orEncryptionhybriddrive
SomemodelscontaintheDiskEncryptionharddiskdrive,Encryptionsolid-statedriveorEncryptionhybrid
drive.Thisfeaturehelpstoprotectyourcomputeragainstsecurityattacksonmedia,NANDflash,ordevice
controllersbyuseofahardwareencryptionchip.Fortheefficientuseoftheencryptionfeature,seta
harddiskpasswordfortheinternalstoragedevice.
Settingthesecuritychip
Strictsecurityrequirementsareimposedonnetworkclientcomputersthattransferconfidentialinformation
electronically.Dependingontheoptionsyouordered,yourcomputermighthaveanembeddedsecurity
chip,acryptographicmicroprocessor.Withthesecuritychip,youcandothefollowing:
•Protectyourdataandsystem
•Strengthenaccesscontrols
•Securecommunications
Beforeyoustart,printtheseinstructions.
TosetanitemontheSecurityChipsubmenu,dothefollowing:
1.Turnoffyourcomputer.Waitforaboutfiveseconds,andthenturnonyourcomputeragain.
2.Whenthelogoscreenisdisplayed,pressF1tostarttheThinkPadSetupprogram.
66ThinkPadY oga260UserGuide
Page 83

3.SelectSecurity➙SecurityChipbyusingthedirectionalkeys.
4.PressEnter.TheSecurityChipsubmenuopens.
5.Movetoanitemyouwanttosetbyusingthedirectionalkeys.Whentheitemishighlighted,pressEnter.
6.Setotheritemsthatyouwanttoset.
7.PressF10.ASetupConfirmationwindowisdisplayed.SelectYestosavetheconfigurationchanges
andexit.
Notes:
•EnsurethatthesupervisorpasswordhasbeensetinThinkPadSetup.Otherwiseanyonecanchangethe
settingsforthesecuritychip.
•Ifthesecuritychipisinactiveordisabled,theClearSecurityChipoptionwillnotbedisplayed.
•Whenyouclearthesecuritychip,turnoffyourcomputerandthenturnitonagainafteryousetthe
securitychiptoActive.Otherwise,theClearSecurityChipoptionisnotdisplayed.
Usingthefingerprintreader
Dependingonthemodel,yourcomputermighthaveafingerprintreader.Fingerprintauthenticationcan
replaceyourpasswords,suchastheWindowspassword,power-onpassword,andharddiskpassword.In
thisway,youcanlogintoyourcomputersimplyandsecurely.
Toenablefingerprintauthentication,enrollyourfingerprintsfirst.Duringtheenrollment,thefingerprintsare
associatedwiththeWindowspasswordautomatically.Toassociateyourfingerprintswithyourpower-on
passwordandharddiskpassword,manuallycreateaconnection.
Enrollingyourfingerprints
Itisrecommendedthatyouenrollmorethanonefingerprintincaseofanyinjuriestoyourfingers.To
enrollyourfingerprints,dothefollowing:
•ForWindows7
1.Startthefingerprintprogram.Forinstructionsonhowtostartthefingerprintprogram,see“Lenovo
programs”onpage12
2.EntertheWindowspasswordasrequired.
3.Followtheinstructionsonthescreentofinishtheenrollment.
Formoreinformationonhowtousethefingerprintreader,refertothehelpsystemofthefingerprint
program.
•ForWindows10
1.OpentheStartmenuandthenclickSettings.IfSettingsisnotdisplayed,clickAllappstodisplayall
programs,andthenclickSettings➙Accounts➙Sign-inoptions.
2.Followtheinstructionsonthescreentofinishtheenrollment.
.
Chapter5.Security67
Page 84

Scanningyourfinger
Toscanyourfinger,tapthefingerprintreaderwiththetopjointofyourfingerandholdyourfingertherefor
oneortwosecondswithalittlepressure.Thenliftthefingertocompleteonescan.
Behaviorofthefingerprintreaderindicator
IndicatorbehaviorDescription
1Off
2Solidgreen
3Amber,blinking
Thefingerprintreaderisnotreadyfortapping.
Thefingerprintreaderisreadyfortapping.
Thefingerprintcannotbeauthenticated.
Associatingyourfingerprintswithyourpower-onpasswordandharddiskpassword
Toassociateyourfingerprintswithyourpower-onpasswordandharddiskpassword,dothefollowing:
1.Turnoffandthenturnonthecomputer.
68ThinkPadY oga260UserGuide
Page 85

2.Whenprompted,scanyourfingeronthefingerprintreader.
3.Enteryourpower-onpassword,harddiskpassword,orbothasrequired.Theconnectioniscreated.
Whenyoustartthecomputeragain,youcanuseyourfingerprintstologintothecomputerwithnoneedto
enteryourWindowspassword,power-onpassword,andharddiskpassword.
Attention:Ifyoualwaysuseyourfingerprinttologintothecomputer,youmightforgetyourpasswords.
Writedownyourpasswords,andkeeptheminasafeplace.Ifyouforgetyourpower-onpassword,
youmusttakeyourcomputertoaLenovoauthorizedserviceroramarketingrepresentativetohavethe
passwordcanceled.Ifyouforgetyourharddiskpassword,Lenovocannotresetyourpasswordorrecover
datafromthestoragedrive.YoumusttakeyourcomputertoaLenovoauthorizedserviceroramarketing
representativetohavethestoragedrivereplaced.Proofofpurchaseisrequired,andafeewillbecharged
forpartsandservice.
Settingthefingerprintreader
Youcansetthefingerprintreaderinthefingerprintprogramifavailable.Y oualsocanchangethefollowing
settingsintheThinkPadSetupprogram:
•PredesktopAuthentication:Enablesordisablesfingerprintauthenticationbeforetheoperatingsystem
isloaded.
•ReaderPriority:Definesthepriorityforthefingerprintreadersifanexternalfingerprintreaderisattached.
•SecurityMode:Specifiesthesettingsofthesecuritymode.
•PasswordAuthentication:Enablesordisablesthepasswordauthentication.
Note:ThisitemisdisplayedonlyifHighsecuritymodeisenabled.
•ResetFingerprintData:Selectthisitemtoeraseallofthefingerprintdatastoredineithertheinternal
orexternalfingerprintreader.
TochangethesettingsintheThinkPadSetupprogram,see“UsingtheThinkPadSetupprogram”onpage75.
Maintainingthefingerprintreader
Thefollowingactionscoulddamagethefingerprintreaderorcauseitnottoworkproperly:
•Scratchingthesurfaceofthereaderwithahard,pointedobject
•Scrapingthesurfaceofthereaderwithyourfingernailoranythinghard
•Usingortouchingthereaderwithadirtyfinger
Ifyounoticeanyofthefollowingconditions,gentlycleanthesurfaceofthereaderwithadry,soft,lint-free
cloth:
•Thesurfaceofthereaderisdirtyorstained.
•Thesurfaceofthereaderiswet.
•Thereaderoftenfailstoenrollorauthenticateyourfingerprint.
Ifyourfingerhasanyofthefollowingconditions,youmightnotbeabletoregisterorauthenticateit:
•Y ourfingeriswrinkled.
•Y ourfingerisrough,dry,orinjured.
•Y ourfingerisstainedwithdirt,mud,oroil.
•Thesurfaceofyourfingerisdifferentfromtheonewhenyouenrolledyourfingerprint.
•Y ourfingeriswet.
•Y ourfingerthatyouarecurrentlyusinghasnotbeenenrolledbefore.
Chapter5.Security69
Page 86

Toimprovethesituation,trythefollowing:
•Cleanorwipeyourhandstoremoveanyexcessdirtormoisturefromthefingers.
•Enrollanduseadifferentfingerforauthentication.
Noticeondeletingdatafromyourstoragedevices
Someofthedatastoredonthestoragedevicesmightbesensitive.Handingyourcomputerovertosomeone
elsewithoutdeletingtheloadedsoftware,suchasoperatingsystemsandapplicationsoftware,mighteven
violatelicenseagreements.Besuretodeletedatastoredonthestoragedevicesbeforeyoudisposeof,sell,
orhandoveryourcomputer.
Youcanusethefollowingmethodstodeletedatafromthestoragedevices:
•MovethedatatotheRecycleBin,andthenemptytheRecycleBin.
•Deletethedata.
•Formatyourstoragedevices,usingthesoftwareforinitializingit.
•UsetherecoveryprogramprovidedbyLenovotobringthestoragedevicesbacktothefactorydefault
settings.
Theseoperations,however,onlychangethefilelocationofthedata;theydonotdeletethedataitself.In
otherwords,thedataretrievalprocessingisdisabledunderanoperatingsystemsuchasWindows.The
dataisstillthere,eventhoughitseemstobelost.Thus,itissometimespossibletoreadthedatabyuseof
specialsoftwarefordatarecovery.Thereisariskthatpeopleofbadfaithmightreadandmisusethecritical
dataonharddiskdrives,solid-statedrives,orhybriddrivesforunexpectedpurposes.
Topreventleakageofdata,itisimportantthatyoudeleteallthedatafromthestoragedeviceswhen
youdisposeof,sell,orhandoveryourcomputer.Y oucandestroythedataphysicallybysmashingthe
storagedeviceswithahammer,ormagneticallybymeansofstrongmagneticpower,thusmakingthedata
unreadable.Butitisrecommendedthatyouusethesoftware(payware)orservice(payservice)developed
forthatpurpose.Theprocessmighttakeseveralhours.
Fordisposingofdataonthesolid-statedrive,LenovoprovidesDriveEraseUtilityforResettingthe
CryptographicKeyandErasingtheSolidStateDrivetool.Fordisposingofdataonthestoragedevices,
LenovoprovidestheSecureDataDisposal™tool.Gotohttp://www.lenovo.com/supporttodownload
thesetools.
IfanEncryptionhybriddrive,Encryptionsolid-statedriveoraDiskEncryptionharddisk
driveissupportedandinstalledinyourcomputer,youcanlogicallydisposeofallthedata
onthedriveinashorttimebyerasingthecryptographickey.Thedataencryptedwiththe
oldkeyisnotphysicallyerasedbutremainsonthedrive;however,itcannotbedecrypted
withouttheoldkey.ThisfeatureisalsoavailablewiththeDriveEraseUtilityforResettingthe
CryptographicKeyandErasingtheSolidStateDrivetool.
Usingfirewalls
Ifyoursystemispreinstalledwithafirewallprogram,itprotectsagainstcomputerInternetsecuritythreats,
unauthorizedaccesses,intrusions,andInternetattacks.Italsoprotectsyourprivacy.
Formoreinformationabouthowtousethefirewallprogram,refertothehelpinformationsystemthat
comeswiththeprogram.
70ThinkPadY oga260UserGuide
Page 87

Protectingdataagainstviruses
Yourcomputerispreinstalledwithanantivirusprogramsoyoucandetectandeliminateviruses.The
antivirusprogramisdesignedtohelpyoudetectandeliminateviruses.
Lenovoprovidesafullversionofantivirussoftwareonyourcomputerwithafree30-daysubscription.After
30days,youmustrenewthelicensetocontinuereceivingtheantivirussoftwareupdates.
Formoreinformationabouthowtouseyourantivirussoftware,refertothehelpinformationsystemof
yourantivirussoftware.
Chapter5.Security71
Page 88

72ThinkPadY oga260UserGuide
Page 89

Chapter6.Advancedconfiguration
Thischapterprovidesthefollowinginformationtohelpyouconfigurethecomputer:
•“Installinganewoperatingsystem”onpage73
•“Installingdevicedrivers”onpage75
•“UsingtheThinkPadSetupprogram”onpage75
•“Usingsystemmanagement”onpage89
Installinganewoperatingsystem
Insomesituations,youmightneedtoinstallanewoperatingsystem.Thistopicprovidesinstructionson
howtoinstallanewoperatingsystem.
InstallingtheWindows7operatingsystem
Beforeyoustart,printtheseinstructions.
Attention:Theprocessofinstallinganewoperatingsystemdeletesallthedataonyourstoragedevices,
includingthedatathatwerestoredinahiddenfolder.
ToinstalltheWindows7operatingsystem,dothefollowing:
1.CopyallthesubdirectoriesandfilesintheC:\SWTOOL Sdirectorytoaremovablestoragedevice.
•ThesupplementfilesfortheWindows7operatingsystemareintheC:\SWTOOL S\OSFIXESdirectory.
•ThedevicedriversareintheC:\SWTOOLS\DRIVERSdirectory.
•ThepreinstalledprogramsareintheC:\SWTOOLS\APPSdirectory.
2.StarttheThinkPadSetupprogram.See“UsingtheThinkPadSetupprogram”onpage75.
3.SelectStartup➙BoottodisplaytheBootPriorityOrdersubmenu.
4.Selectthedrivethatcontainstheoperatingsysteminstallationprogram,forexample,USBHDD.
ThenpressEsc.
5.SelectStartup➙UEFI/LegacyBoot.Thendooneofthefollowing:
•ToinstalltheWindows7(32-bit)operatingsystem,selectLegacyOnlyorBoth.
•ToinstalltheWindows7(64-bit)operatingsysteminLegacymode,selectLegacyOnly.
•ToinstalltheWindows7(64-bit)operatingsysteminUEFImode,selectUEFIOnly.
Note:Forcomputerswithanon-volatilememory(NVM)Expressdrive,youcaninstalltheWindows
7operatingsystemontothedriveonlyinUEFImode.Inthiscase,ensurethatyoualwaysselect
UEFIOnly.
6.PressF10toexittheThinkPadSetupprogram.
7.InserttheWindows7operatingsysteminstallationDVDintotheopticaldrive,andrestartthecomputer.
Notes:
•IfyouarestartingtheinstallationDVDimagefromanexternalUSBdeviceorifyourcomputerhasan
NVMExpressdriveinstalled,doadditionalconfigurationsbeforeyoustart.Formoreinformation,go
to:http://www.lenovo.com/support/installwin7viausb3.
•IfanNVMExpressdriveisinstalled,additionaldriversalsoarerequired.Formoreinformation,goto
https://support.microsoft.com/en-us/kb/2990941.
©CopyrightLenovo2016
73
Page 90

8.RestoretheC:\SWTOOLSdirectorythatyoubackedupbeforeinstallingtheWindows7operatingsystem.
9.Installthedevicedrivers.See“Installingdevicedrivers”onpage75.
10.InstalltheWindows7fixmodules.YoucanfindtheWindows7fixmodulesintheC:\SWTOOL S\OSFIXES\
directory.Formoreinformation,gototheMicrosoftKnowledgeBasehomepageat:
http://support.microsoft.com/
11.Installtheregistrypatches,forexampletheEnablingWakeonLANfromStandbyforENERGYSTAR
patch.Todownloadandinstalltheregistrypatches,gototheLenovoSupportWebsiteat:
http://www.lenovo.com/support
Note:Afterinstallingtheoperatingsystem,donotchangetheinitialUEFI/LegacyBootsettinginthe
ThinkPadSetupprogram.Otherwisetheoperatingsystemwillnotstartcorrectly.
WhenyouinstalltheWindows7operatingsystem,youmightneedoneofthefollowingcountryorregion
codes:
CountryorregionCodeCountryorregionCode
ChinaSC
DenmarkDKNorway
FinlandFI
FranceFR
GermanyGR
ItalyIT
JapanJP
NetherlandsNL
SpainSP
SwedenSV
TaiwanandHongKong
UnitedStatesUS
NO
TC
InstallingtheWindows10operatingsystem
Beforeyoustart,printtheseinstructions.
Attention:Theprocessofinstallinganewoperatingsystemdeletesallthedataonyourinternalstorage
drive,includingthedatathatwerestoredinahiddenfolder.
ToinstalltheWindows10operatingsystem,dothefollowing:
1.StarttheThinkPadSetupprogram.See“UsingtheThinkPadSetupprogram”onpage75.
2.SelectStartup➙BoottodisplaytheBootPriorityOrdersubmenu.
3.Selectthedrivethatcontainstheoperatingsysteminstallationprogram,forexampleUSBHDD.Then
pressEsc.
4.SelectRestartandensurethatOSOptimizedDefaultsisenabled.ThenpresstheF9keytoload
defaultsettings.
5.PresstheF10keytoexittheThinkPadSetupprogram.
6.Connectthedrivethatcontainstheoperatingsysteminstallationprogramtothecomputer,andrestart
thecomputer.
7.Installthedevicedriversandnecessaryprograms.See“Installingdevicedrivers”onpage75.
8.Afterinstallingthedevicedrivers,applyWindowsUpdatetogetthelatestmodules,forexamplethe
securitypatches.
9.Dependingonyourpreference,installLenovoprograms.ForinformationaboutLenovoprograms,
see“Lenovoprograms”onpage12.
Note:Afterinstallingtheoperatingsystem,donotchangetheinitialUEFI/LegacyBootsettinginthe
ThinkPadSetupprogram.Otherwise,theoperatingsystemwillnotstartcorrectly.
74ThinkPadY oga260UserGuide
Page 91

WhenyouinstalltheWindows10operatingsystem,youmightneedoneofthefollowingcountryorregion
codes:
CountryorregionCodeCountryorregionCode
ChinaSC
DenmarkDKNorway
FinlandFI
FranceFR
GermanyGR
ItalyIT
JapanJP
NetherlandsNL
SpainSP
SwedenSV
TaiwanandHongKong
UnitedStatesUS
NO
TC
Installingdevicedrivers
Devicedriveristheprogramthatoperatesaparticularhardwaredeviceofthecomputer.Ifadevicedoes
notperformwelloryouinstallanewdevice,youneedtoinstallorupdatethecorrespondingdevicedriver.
Forexample,ifyouusetheWindows7operatingsystem,tousetheUSB3.0connector,youneedto
downloadandinstalltheUSB3.0driver.
Todownloadthelatestdevicedrivers,dothefollowing:
1.Gotohttp://www.lenovo.com/ThinkPadDrivers.
2.Selectyourproductnametoviewallthedevicedriversforyourcomputer.
3.Selectthedevicedriversyouthatyouneed,andfollowtheinstructionsonthescreen.
Attention:DonotdownloadthedevicedriversfromtheWindowsUpdateWeb.Alwaysdownloadthedevice
driversfrom:
http://www.lenovo.com/ThinkPadDrivers
IfyouusetheWindows7operatingsystem,youalsocanfindthedevicedriversintheC:\SWTOOLS\DRIVERS
directoryonyourstoragedevices.Formoreinformation,see“Reinstallingpreinstalledprogramsanddevice
drivers”onpage118
.
UsingtheThinkPadSetupprogram
TheThinkPadSetupprogramenablesyoutoselectvarioussetupconfigurationsforyourcomputerthrough
configuringtheBIOS.
ToconfiguretheBIOSofyourcomputer,dothefollowing:
1.Restartthecomputer.Whenthelogoscreenisdisplayed,pressF1tostarttheThinkPadSetupprogram.
Note:Ifyouarerequiredtoenterthesupervisorpassword,enterthecorrectpassword.Youalsocan
pressEntertoskipthepasswordpromptandstarttheThinkPadSetupprogram.Ifyoudonotenterthe
password,youcannotchangetheconfigurationsthatareprotectedbythesupervisorpassword.For
moreinformation,referto“Usingpasswords”onpage61.
2.Usethecursorkeystoselectatab;orusethecursorkeystolocateanitemandpressEntertoselectit.
Thenasubmenuisdisplayed.
Note:Somemenuitemsaredisplayedonlyifthecomputersupportsthecorrespondingfeatures.
3.Setthevalueofanitembydoingoneofthefollowing:
•PressF6tochangetoahighervalue.
Chapter6.Advancedconfiguration75
Page 92

•PressF5tochangetoalowervalue.
Note:Defaultvaluesareinboldface.
4.Tochangeotherconfigurations,presstheEsckeytoexitthesubmenuandreturntotheparentmenu.
5.Whenyoucompletetheconfiguration,pressF10.ASetupConfirmationwindowisdisplayed.ClickYes
tosavetheconfigurationandexittheThinkPadSetupprogram.YoualsocanselecttheRestarttabin
theThinkPadSetupmenu,andrestartyourcomputerwithoneoftheprovidedoptions.
Note:YoucanpressF9torestoretothedefaultsettings.
Mainmenu
WhenyouentertheThinkPadSetupprogram,youwillfirstseetheMainmenuasfollows:
•UEFIBIOSVersion
•UEFIBIOSDate
•EmbeddedControllerVersion
•MEFirmwareVersion
•MachineT ypeModel
•System-unitserialnumber
•Systemboardserialnumber
•AssetT ag
•CPUT ype
•CPUSpeed
•Installedmemory
•UUID
•MACAddress(InternalLAN)
•Preinstalledoperatingsystemlicense
•UEFISecureBoot
•OA3ID
•OA2
Configmenu
Tochangetheconfigurationofyourcomputer,selecttheConfigtabfromtheThinkPadSetupmenu.
ThefollowingtableliststheConfigmenuitems.Defaultvaluesareinboldface.Themenuitemsmight
changewithoutnotice.Dependingonthemodel,thedefaultvaluemightvary.
Attention:Thedefaultconfigurationsarealreadyoptimizedforyou.Improperchangeoftheconfigurations
mightcauseunexpectedresults.
76ThinkPadY oga260UserGuide
Page 93

Table3.Configmenuitems
Menuitem
Network
Submenuitem
WakeOnLAN
EthernetLANOptionROM
(forLegacyOnlyboot
modeorBothwithLegacy
first)
UEFIIPv4NetworkStack
(forUEFIOnlybootmode
orBothwithUEFIfirst)
UEFIIPv6NetworkStack
(forUEFIOnlybootmode
orBothwithUEFIfirst)
UEFIPXEBootPriority
(forUEFIOnlybootmode
andBothbootmodewith
UEFIfirstbootmode,and
IPv6andIPv4stacksare
bothenabled.)
WakebyWiGigDock
Value
•Disabled
•AConly
•ACandBattery
•Disabled
•Enabled
•Disabled
•Enabled
•Disabled
•Enabled
•IPv6First
•IPv4First
•Disabled
•Enabled
Comments
Enablethecomputer
topoweronwhenthe
Ethernetcontrollerreceives
amagicpacket(aspecial
networkmessage).
IfyouselectACOnly,Wake
onLANfunctionisenabled
onlywhentheacpower
adapterisattached.
IfyouselectACand
Battery,WakeonLAN
functionisenabledwithany
powersources.
Notes:
•Themagicpackettype
WakeonLANrequires
acpower.
•TheWakeonLAN
functiondoesnot
workwhenaharddisk
passwordisset.
LoadtheEthernetLAN
OptionROMtoenable
startupfromanintegrated
networkdevice.
EnableordisableInternet
ProtocolVersion4(IPv4)
networkstackforUEFI
environment.
EnableordisableInternet
ProtocolVersion6(IPv6)
networkstackforUEFI
environment.
Selectnetworkstack
priorityforUEFIPXEboot.
Enableordisablethe
wake-upfeaturebythe
ThinkPadWiGigDockfrom
low-powermode(sleepor
hibernation).Ifyouselect
Enabled,thebatterylife
mightbecomeshorter.
Chapter6.Advancedconfiguration77
Page 94

Table3.Configmenuitems(continued)
Menuitem
USB
Keyboard/Mouse
Submenuitem
USBUEFIBIOSSupport
Always-onUSB
-ChargeinBatteryMode
TrackPoint•Disabled
Value
•Disabled
•Enabled
•Disabled
•Enabled
•Disabled
•Enabled
•Enabled
Comments
Enableordisableboot
supportforUSBstorage
devices.
IfyouselectEnabled,the
externalUSBdevicescan
bechargedthroughUSB
connectorsevenwhenthe
computerisinlow-power
mode(sleep,hibernate,or
power-off).
Note:Thisitemisavailable
onlywhentheAlwaysOn
USBissetasEnabled.
IfyouselectEnabled,
externalUSBdevicescan
bechargedthroughUSB
connectorsevenwhenthe
systemisinhibernation
mode,orispower-offand
inbatteryoperation.
Enableordisablethe
built-inTrackPointpointing
device.
Trackpad•Disabled
FnandCtrlKeyswap
FnStickykey
Note:Ifyouwanttouse
anexternalmouse,select
Disabled.
Enableordisablethe
•Enabled
•Disabled
•Enabled
•Disabled
•Enabled
built-intrackpad.
Note:Ifyouwanttouse
anexternalmouse,select
Disabled.
EnableexchangesofFn
andCtrlkeyactionatthe
bottom-leftofthekeyboard.
Disabled:FnkeyandCtrl
keybehaviorisasprinted
onthekeyboard.
Enabled:Fnkeyworksas
Ctrlkey.Ctrlkeyworksas
Fnkey.
Whentheoptionisenabled,
youcanpresstheFnkey
tokeepitinapressed
condition;thenpressthe
desiredfunctionkey.The
actionisequivalentto
pressingtherequiredkey
simultaneouslywiththeFn
key.Whenyoupressthe
Fnkeytwice,thestateis
78ThinkPadY oga260UserGuide
Page 95

Table3.Configmenuitems(continued)
Menuitem
Display
Submenuitem
F1–F12asprimaryfunction
BootDisplayDevice
Value
•Disabled
•Enabled
•ThinkPadLCD
•DisplayPort
•HDMI
•Displayondock
Comments
lockeduntilyoupressthe
Fnkeyagain.
EnabletheF1-F12function
orthespecialfunction
printedasanicononeach
keyastheprimaryfunction.
Enabled:Executesthe
F1-F12function.
Disabled:Executesthe
specialfunction.
Totemporarilyswitchthe
abovetwooptions,press
Fn+EsctoenableFnLock.
TheFnLockindicatorison
whenFnLockisenabled.
Selectavideodevicefor
boot.
DisplayPort:Mini
DisplayPort(TM)connector
onThinkPad.
SharedDisplayPriority
TotalGraphicsMemory
BootTimeExtension•Disabled
•HDMI
•Displayondock
•256MB
•512MB
•1second
•2seconds
•3seconds
•5seconds
•10seconds
HDMI:HDMIconnectoron
ThinkPad.
Displayondock:Display
connectorsondock.
Bootscreenisclonedtoall
displaysondock.
Selecttheprioritybetween
shareddisplayoutputs.
HDMIandDockdisplays
shareasingledisplay
output.Thisoption
chooseswhichoneis
prioritized.
Allocatethetotalmemory
whichIntelinternalgraphics
shares.
Note:Ifyouselect512
MB,themaximumusable
memorymightbereduced
on32–bitoperatingsystem.
Thisoptiondefinesthe
amountoftimetoextend
thebootprocess,in
seconds.
Thesystemcannotdetect
someexternalmonitors
duringbootbecausethey
needafewsecondstobe
Chapter6.Advancedconfiguration79
Page 96

Table3.Configmenuitems(continued)
Menuitem
Power
Submenuitem
IntelSpeedStep
technology
AdaptiveThermal
Management
Value
Comments
ready.Trythisoptionifthe
monitorbeinguseddoes
notdisplaythebootscreen.
®
•Disabled
•Enabled
ModeforAC
•MaximumPerformance
•BatteryOptimized
ModeforBattery
•MaximumPerformance
•BatteryOptimized
SelectthemodeofIntel
SpeedSteptechnologyat
runtime.
MaximumPerformance:
Alwaysthehighestspeed.
BatteryOptimized:Always
thelowestspeed.
Disabled:Thehighest
speed,andruntimeisnot
supported.
SchemeforAC
•MaximizePerformance
Selectathermal
managementscheme
touse.
•Balanced
MaximizePerformance:
SchemeforBattery
•MaximizePerformance
•Balanced
Reducemicroprocessor
throttling.
Balanced:Balance
sound,temperature,and
performance.
CPUPowerManagement
PowerOnwithACAttach
Note:Eachschemeaffects
fansound,temperature,
andperformance.
•Disabled
•Enabled
Enableordisablethe
power-savingfeaturethat
stopsthemicroprocessor
clockautomaticallywhen
therearenosystem
activities.Normally,it
isnotnecessarytochange
thesetting.
•Disabled
•Enabled
Enableordisablethe
featurethatpowersonthe
systemwhentheacpower
adapterisattached.
IfyouselectEnabled,the
systemispoweredonwhen
theacpoweradapteris
attached.Ifthesystemisin
hibernatestate,thesystem
resumesnormaloperation.
IfyouselectDisabled,the
systemisnotpoweredon
norresumedwhentheac
poweradapterisattached.
80ThinkPadY oga260UserGuide
Page 97

Table3.Configmenuitems(continued)
Menuitem
BeepandAlarm
IntelAMT
Submenuitem
DisableBuilt-inBattery•Y es
PasswordBeep•Disabled
KeyboardBeep•Enabled
IntelAMTControl
Value
•No
•Enabled
•Disabled
•Disabled
•Enabled
•PermanentlyDisabled
Comments
Temporarilydisable
thebuilt-inbatteryfor
servicingthecomputer.
Afterselectingthisitem,
thecomputerwillbe
automaticallypoweredoff.
Note:Thebatterywillbe
automaticallyre-enabled
whentheacpoweradapter
isreconnectedtothe
computer.
Enablethisoptiontohave
abeepsoundwhenthe
systemiswaitingfora
power-on,harddisk,or
supervisorpassword.
Differentbeepswillsound
whentheenteredpassword
matchesordoesnotmatch
theconfiguredpassword.
Enableordisablekeyboard
beepwhenunmanageable
keycombinationsare
pressed.
IfyouselectEnabled,
IntelActiveManagement
Technology(AMT)is
configuredandadditional
setupitemsareprovidedin
ManagementEngineBIOS
Extension(MEBx)Setup.
IfyouselectPermanently
Disabled,youwillneverbe
abletoenableitagain.Be
cautiouswhenyouwantto
usethisoption.
Note:Youcanenterthe
MEBxSetupmenuby
pressingtheCtrl+Pkey
combinationintheStartup
InterruptMenuwindow.
TodisplaytheStartup
InterruptMenuwindow,
presstheblackbutton
orEnterkeyduringthe
power-onself-test(POST).
CIRATimeout
0-255
Setthetimeoutoptionfor
CIRAconnectiontobe
Note:Thedefaultvalueis
60seconds.
established.Selectable
secondvaluesarefrom1to
254.
Chapter6.Advancedconfiguration81
Page 98

Table3.Configmenuitems(continued)
Menuitem
Submenuitem
ConsoleT ype•PCANSI
Value
•VT100+
•PC-ANSI
•VT-UTF8
Comments
Ifyouselect0,use60
secondsasthedefault
timeoutvalue.
Ifyouselect255,the
waitingtimeforestablishing
aconnectionisunlimited.
Selecttheconsoletypefor
AMT.
Note:Thisconsoletype
shouldmatchtheIntelAMT
remoteconsole.
DateandTimemenu
Tochangethedateortimeofyourcomputer,selecttheDate/TimetabfromtheThinkPadSetupmenu.
Thendothefollowing:
1.UsethecursorkeystoselectSystemDateorSystemTime.
2.Typeadateortime.
Securitymenu
Tochangethesecuritysettingsofyourcomputer,selecttheSecuritytabfromtheThinkPadSetupmenu.
ThefollowingtableliststheSecuritymenuitems.Defaultvaluesareinboldface.Themenuitemsmight
changewithoutnotice.Dependingonthemodel,thedefaultvaluemightvary.
Attention:Thedefaultconfigurationsarealreadyoptimizedforyou.Improperchangeoftheconfigurations
mightcauseunexpectedresults.
Table4.Securitymenuitems
Menuitem
Password
Submenuitem
Supervisor
Password
LockUEFIBIOS
Settings
Passwordat
Unattendedboot
Value
•Disabled
•Enabled
•Disabled
•Enabled
•Disabled
•Enabled
Comments
Formoreinformation,see“Supervisor
password”onpage62
Enableordisablethefunctionthatprotects
itemsinThinkPadSetupfrombeingchanged
byauserwhodoesnothavethesupervisor
password.Bydefault,thisissettoDisabled.
Ifyousetthesupervisorpasswordandenable
thisfunction,noonebutyoucanchangethe
itemsinThinkPadSetup.
IfyouselectandenablePasswordat
unattendedboot,apasswordpromptis
displayedwhenthecomputeristurnedon,from
eitherapower-offstateorhibernationstate,by
anunattendedeventsuchasaWakeonLAN
attempt.IfyouselectDisabled,nopassword
promptisdisplayed;thecomputergoesahead
andloadstheoperatingsystem.T oprevent
.
82ThinkPadY oga260UserGuide
Page 99

Table4.Securitymenuitems(continued)
Menuitem
Fingerprint
Submenuitem
Value
PasswordatRestart•Disabled
•Enabled
PasswordatBoot
DeviceList
PasswordCount
ExceededError
SetMinimumLength
•Disabled
•Enabled
•Disabled
•Enabled
•Disabled
•xcharacters
(4≤x≤12)
Power-OnPassword
•Disabled
•Enabled
HardDisk1
Password
Predesktop
Authentication
•Disabled
•Enabled
•Disabled
•Enabled
ReaderPriority•External➙
Internal
•InternalOnly
SecurityMode
•Normal
•High
Password
Authentication
•Disabled
•Enabled
Comments
unauthorizedaccess,settheuserauthentication
ontheoperatingsystem.
IfyouselectandenablePasswordatrestart,
apasswordpromptisdisplayedwhenyou
restartthecomputer.IfyouselectDisabled,no
passwordpromptisdisplayed;thecomputer
goesaheadandloadstheoperatingsystem.
Topreventunauthorizedaccess,settheuser
authenticationontheoperatingsystem.
IftheSecuritypasswordisset,thisoptionis
usedtospecifywhethertheSecuritypassword
mustbeenteredtodisplaytheF12bootdevice
list.
SelectEnabledtopromptfortheSecurity
password.SelectDisabledtoproceedwithout
anyuseractionrequired.
SelectEnabledtoshowthePOST0199error
andpromptfortheSecuritypassword.Select
DisabledtohidethePOST0199errorand
proceedwithoutanyuseractionneeded.
Specifyaminimumlengthforpower-on
passwordsandharddiskpasswords.Ifyou
setthesupervisorpasswordandspecifya
minimumlengthforpasswords,noonebutyou
canchangethelength.
Formoreinformation,see“Power-onpassword”
onpage61.
Formoreinformation,see“Harddisk
passwords”onpage63.
Note:HardDisk1meanstheharddiskdriveis
builtintoyourcomputer.
Enableordisablefingerprintauthentication
beforetheoperatingsystemisloaded.
IfExternal➙Internalisselected,anexternal
fingerprintreaderisusedifattached.Otherwise,
aninternalfingerprintreaderisused.IfInternal
Onlyisselected,aninternalfingerprintreader
isused.
Iffingerprintauthenticationfails,youstillcan
startthecomputerbyenteringapassword.If
youhaveselectedNormal,enterapower-on
passwordorasupervisorpassword;ifyouhave
selectedHigh,enterasupervisorpassword.
Note:Thisitemisavailableonlywhenthe
SecurityModeissetasHigh.
Enableordisablepasswordauthentication.This
itemisavailablewhenhighsecuritymodeis
selected.
Chapter6.Advancedconfiguration83
Page 100

Table4.Securitymenuitems(continued)
Menuitem
SecurityChip
Submenuitem
ResetFingerprint
Data
SecurityChip
Selection
SecurityChip
ClearSecurityChip
Value
•Enter
•DiscreteTPM
•IntelPTT
•Active
•Inactive
•Disabled
(ForDiscreteTPM)
•Enabled
•Disabled
(ForIntelPTT)
•Enter
Comments
Thisoptionisusedtoeraseallfingerprintdata
storedinthefingerprintreaderandresetsettings
tothefactorystate.Asaresult,anypower-on
securityfeaturespreviouslyenabledwillnotbe
abletoworkuntiltheyarere-enabledinthe
fingerprintsoftware.
IfyouselectDiscreteTPM,youcanusea
discreteTPMchipwithTPM1.2mode.Ifyou
selectIntelPTT,youcanuseIntelPlatform
Trustedtechnology(PTT)withTPM2.0mode.
Note:
IntelPTTcanbeusedwithWindows8orlater
operatingsystem.
IfyouselectActive,thesecuritychipis
functional.IfyouselectInactive,theSecurity
Chipisvisible,butthesecuritychipisnot
functional.IfyouselectDisabled,theSecurity
Chipishiddenandthesecuritychipisnot
functional.
IfyouselectEnabled,thesecuritychipis
functional.IfyouselectDisabled,thesecurity
chipishiddenandnotfunctional.
Cleartheencryptionkey.
Intel(R)TXTFeature
Intel(R)TXTFeature
PhysicalPresence
forProvisioning
PhysicalPresence
forClear
Note:Thisitemisdisplayedonlyifyouhave
selectedActivefortheSecurityChipoption.
•Disabled
•Enabled
•DisabledNote:ThisitemisunselectablewhenIntelPTT
•Disabled
•Enabled
•Disabled
•Enabled
EnableordisabletheIntelT rustedExecution
Technology.
Note:Thisitemisdisplayedonlyifyouhave
selectedActivefortheSecurityChipoption.
isenabled.
UnselectableforIntelPPT.
Enableordisabletheconfirmationmessage
whenyouchangethesettingsofthesecurity
chip.
Enableordisabletheconfirmationmessage
whenyouclearthesecuritychip.
84ThinkPadY oga260UserGuide
 Loading...