

Page 1

UserGuide
ThinkPad10
Page 2

Note:Beforeusingthisinformationandtheproductitsupports,besuretoreadandunderstandthefollowing:
•Safety,Warranty,andSetupGuide
•RegulatoryNotice
•“Importantsafetyandhandlinginformation”onpageiii
•AppendixD“Notices”onpage87
ThelatestSafety,Warranty,andSetupGuideandtheRegulatoryNoticeareavailableontheLenovoSupport
Websiteathttp://www.lenovo.com/UserManuals.
FirstEdition(May2014)
©CopyrightLenovo2014.
LIMITEDANDRESTRICTEDRIGHTSNOTICE:IfdataorsoftwareisdeliveredpursuantaGeneralServicesAdministration
“GSA”contract,use,reproduction,ordisclosureissubjecttorestrictionssetforthinContractNo.GS-35F-05925.
Page 3

Contents
Readthisfirst.............iii
Importantsafetyandhandlinginformation.....iii
Chapter1.Productoverview......1
Tabletlayout................1
Frontviewandsideview..........1
Rearview................3
Accessories.................4
Features..................5
Specifications................6
Operatingenvironment............6
Lenovoprograms..............7
Chapter2.Usingyourtablet......9
Initialsetupinstructions............9
Usingthemulti-touchscreen..........9
Powermanagement............12
Chargingthebattery..........13
Extendingthebatterylifebetweencharges..13
Checkingthebatterystatus........14
UsingtheT abletDigitizerPen.........14
UsingtheOn-ScreenKeyboardorthetouch
keyboardandhandwritingpanel........15
Changingthestartupbehaviortoopeneitherthe
desktoportheStartscreen..........16
Downloadinggamesandapplications.....16
Usingthefingerprintreader..........16
UsingtheThinkPad10QuickshotCover....18
Usingthecameras.............20
Usingthemicro-SD-cardreader........21
Usingasmartcard.............23
UsingHDMIdevices............25
Usingsynchronizationsolutions........25
UsingtheGPSsatellitereceiver........25
Chapter3.Wirelessnetworksand
devices................27
InstallingandremovingthemicroSIMcard...27
Determiningwhichmobilenetworkyouareusing.29
ConnectingtoaWi-Finetwork........29
Connectingtoamobilenetwork........30
SharingyourInternetconnection.......31
UsingBluetoothdevices...........31
UsingtheNFCconnection..........32
Chapter4.Youandyourtablet....33
Comfortandaccessibility..........33
Usingyourtabletmorecomfortably....33
Accessibilityinformation.........33
Gettingupdates..............36
Travelingwithyourtablet...........36
Traveltips...............36
Travelaccessories...........36
Careandmaintenance...........37
Chapter5.ThinkPad10options....39
ThinkPad10UltrabookKeyboard.......39
UsingtheThinkPad10UltrabookKeyboard...40
ThinkPad10TouchCase...........43
UsingtheThinkPad10TouchCase......44
ThinkPadTabletDock............46
UsingtheThinkPadTabletDock........48
Chapter6.Security..........51
Usingpasswords..............51
Passwordsandsleepmode........51
Supervisorpassword..........51
Usingthesecuritychip...........52
Usingfirewalls...............53
Protectingdataagainstviruses........53
Chapter7.Advancedconfiguration..55
Installingdevicedrivers...........55
ThinkPadTabletSetup...........55
Mainmenu..............56
Configmenu..............56
Securitymenu.............57
Startupmenu.............59
Restartmenu.............60
UpdatingyoursystemUEFIBIOS.....61
Usingsystemmanagement..........61
Systemmanagement..........61
Chapter8.Troubleshooting
problems...............63
Diagnosingproblems............63
Troubleshooting..............63
Recoveringfromaseveresoftwareproblem...64
Errormessages..............65
Errorswithoutmessages...........65
Chapter9.Recoveryinformation...67
Refreshingyourtablet............67
©CopyrightLenovo2014
i
Page 4

Resettingyourtablettothefactorydefault
settings.................67
Usingtheadvancedstartupoptions......68
RecoveringyouroperatingsystemifWindows8.1
failstostart................68
Creatingandusingrecoverymedia......68
Chapter10.Gettingsupport.....71
Lenovotechnicalsupport..........71
Lenovouserforums.............72
FindingThinkPadoptions..........73
Purchasingadditionalservices........73
AppendixA.Regulatory
information..............75
Wirelessrelatedinformation.........75
LocatingtheUltraConnect™wireless
antennas...............76
Locatingwirelessregulatorynotices....76
Exportclassificationnotice..........77
Electronicemissionnotices..........77
FederalCommunicationsCommission
DeclarationofConformity........77
IndustryCanadaClassBemissioncompliance
statement...............77
EuropeanUnion-Compliancetothe
ElectromagneticCompatibilityDirective...77
GermanClassBcompliancestatement...78
KoreaClassBcompliancestatement....78
JapaneseVCCIClassBstatement.....79
Japancompliancestatementforproducts
whichconnecttothepowermainswithrated
currentlessthanorequalto20Aperphase.79
Lenovoproductserviceinformationfor
Taiwan................79
Eurasiancompliancemark..........79
Brazilregulatorynotice...........79
Mexicoregulatorynotice...........79
AppendixB.WEEEandrecycling
information..............81
ImportantWEEEinformation.........81
RecyclinginformationforJapan........81
RecyclinginformationforBrazil........82
BatteryrecyclinginformationforTaiwan.....82
BatteryrecyclinginformationfortheUnitedStates
andCanada................83
BatteryrecyclinginformationfortheEuropean
Union..................83
ChinarecyclinginformationforWasteElectrical
andElectronicEquipment(WEEE).......83
AppendixC.RestrictionofHazardous
SubstancesDirective(RoHS).....85
EuropeanUnionRoHS...........85
ChinaRoHS................85
TurkishRoHS...............85
UkraineRoHS...............86
IndiaRoHS................86
AppendixD.Notices..........87
Trademarks................88
iiUserGuide
Page 5

Readthisfirst
Besuretofollowtheimportanttipsgivenheretogetthemostuseandenjoymentoutofthetablet.Failureto
dosomightleadtodiscomfortorinjury,orcausethetablettofail.
Importantsafetyandhandlinginformation
Toavoidpersonalinjury,propertydamage,oraccidentaldamagetoyourThinkPad
thetablet),readalloftheinformationinthissectionbeforeusingit.
Fordetailedoperatinginstructions,refertotheThinkPad10UserGuide(thispublication).Youcan
accesstheThinkPad10UserGuidebyusingoneofthefollowingmethods:
•Gotohttp://www.lenovo.com/UserManualandfollowtheinstructionsonthescreen.
•Startthetablet.T apLenovoSupportontheStartscreen.ThentapUserGuide.
•OpenWindows
Foradditionaltipstohelpyouoperatethetabletsafely,goto:
http://www.lenovo.com/safety
®
HelpandSupport.ThentapLenovoUserGuide.
Handleyourtabletwithcare:
Donotdrop,bend,puncture,insertforeignobjects,orplaceheavyobjectsonyourtablet.Sensitive
componentsinsidemightbecomedamaged.
®
10(hereaftercalled
Yourtabletscreenismadeofglass.Theglassmightbreakifthetabletisdroppedonahardsurface,is
thesubjectofahighimpact,oriscrushedbyaheavyobject.Iftheglasschipsorcracks,donottouch
thebrokenglassorattempttoremoveitfromthetablet.Stopusingthetabletimmediatelyandcontact
Lenovo
®
technicalsupportforrepair,replacement,ordisposalinformation.
Donotdisassembleormodifyyourtablet:
Yourtabletisasealedunit.Therearenoend-userserviceablepartsinside.Allinternalrepairsmustbedone
byaLenovo-authorizedrepairfacilityoraLenovo-authorizedtechnician.Attemptingtoopenormodifyyour
tabletwillvoidthewarranty.
Generalbatterynotice
DANGER
PersonalcomputersmanufacturedbyLenovocontainacoincellbatterytoprovidepowerto
thesystemclock.Inaddition,manymobileproducts,suchasnotebookcomputers,utilizea
rechargeablebatterypacktoprovidesystempowerwheninportablemode.Batteriessuppliedby
Lenovoforusewithyourproducthavebeentestedforcompatibilityandshouldonlybereplaced
withapprovedparts.
Neverattempttoopenorserviceanybattery.Donotcrush,puncture,orincineratebatteriesor
shortcircuitthemetalcontacts.Donotexposethebatterytowaterorotherliquids.Onlyrecharge
thebatterypackstrictlyaccordingtoinstructionsincludedintheproductdocumentation.
Batteryabuseormishandlingcancausethebatterytooverheat,whichcancausegassesorflame
to“vent”fromthebatterypackorcoincell.Ifyounoticeanysignsofbulging,leakageorcorrosion
ontheexterioroftheproduct,thismaybetheresultofaninternalbatteryfault.Ifthisoccurs,stop
©CopyrightLenovo2014
iii
Page 6
usingtheproductimmediatelyandpleasecontacttheLenovoSupportteamforfurtherinstructions.
Factoryreplacementofthebatteriesmayberequired.
Batteriescandegradewhentheyareleftunusedforlongperiodsoftime.Forsomerechargeable
batteries(particularlyLithiumIonbatteries),leavingabatteryunusedinadischargedstatecould
increasetheriskofabatteryshortcircuit,whichcouldshortenthelifeofthebatteryandcanalso
poseasafetyhazard.DonotletrechargeableLithium-Ionbatteriescompletelydischargeorstore
thesebatteriesinadischargedstate.
Donotattempttoreplacetheinternalbattery:
ReplacementoftheinternalrechargeablebatterymustbedonebyaLenovo-authorizedrepairfacilityora
Lenovo-authorizedtechnician.Lenovo-authorizedrepairfacilitiesortechniciansrecycleLenovobatteries
accordingtolocallawsandregulations.
Built-inrechargeablebatterynotice
DANGER
Donotattempttoreplacetheinternalrechargeableorlithiumcoin-cellbatteries.ContactLenovo
Supportforfactoryreplacement.
Preventyourtabletandadapterfromgettingwet:
Donotimmerseyourtabletinwaterorleaveitinalocationwhereitcangetsaturatedwithwaterorother
liquids.
Usesupportedchargingmethodsonly:
Youcanuseanyofthefollowingchargingmethodstorechargetheinternalbatteryofyourtabletsafely:
Attention:UseonlyLenovo-approvedacpoweradapters.Unauthorizedacpoweradapterscouldseverely
damagethetablet.
•acpoweradaptershippedwithyourtablet
•ThinkPadTabletDockandtheacpoweradaptershippedwiththedock
Note:TheThinkPadTabletDockisanoptionaldevicethatLenovodesignedspecificallyfortheThinkPad
10tablet.TopurchasetheoptionfromLenovo,goto:
http://www.lenovo.com/accessories/services/index.html
Chargingdevicesmightbecomewarmduringnormaluse.Ensurethatyouhaveadequateventilationaround
thechargingdevice.Unplugthechargingdeviceifanyofthefollowingoccurs:
•Thechargingdevicehasbeenexposedtorain,liquid,orexcessivemoisture.
•Thechargingdeviceshowssignsofphysicaldamage.
•Youwanttocleanthechargingdevice.
Lenovoisnotresponsiblefortheperformanceorsafetyofproductsnotmanufacturedorapprovedby
Lenovo.
Preventhearingdamage:
Yourtablethasacomboaudioconnectorthatyoucanuseforheadphones(alsocalledaheadset)or
earphones.
ivUserGuide
Page 7

CAUTION:
Excessivesoundpressurefromearphonesandheadphonescancausehearingloss.Adjustmentof
theequalizertomaximumincreasestheearphoneandheadphoneoutputvoltageandthesound
pressurelevel.Therefore,toprotectyourhearing,adjusttheequalizertoanappropriatelevel.
Excessiveuseofheadphonesorearphonesforalongperiodoftimeathighvolumecanbedangerousif
theoutputoftheheadphoneorearphoneconnectorsdonotcomplywithspecificationsofEN50332-2.
TheheadphoneoutputconnectorofyourtabletcomplieswithEN50332-2Subclause7.Thisspecification
limitsthetablet'smaximumwidebandtrueRMSoutputvoltageto150mV.Tohelpprotectagainsthearing
loss,ensurethattheheadphonesorearphonesyouusealsocomplywithEN50332-2(Clause7limits)fora
widebandcharacteristicvoltageof75mV.UsingheadphonesthatdonotcomplywithEN50332-2canbe
dangerousduetoexcessivesoundpressurelevels.
Ifyourtabletcamewithheadphonesorearphonesinthepackage,asaset,thecombinationofthe
headphonesorearphonesandthetabletalreadycomplieswiththespecificationsofEN50332-1.Ifdifferent
headphonesorearphonesareused,ensurethattheycomplywithEN50332-1(Clause6.5Limitation
Values).UsingheadphonesthatdonotcomplywithEN50332-1canbedangerousduetoexcessive
soundpressurelevels.
Takecarewhenusingyourtabletinamotorvehicleoronabicycle:
Alwaysprioritizeyoursafetyandthesafetyofothers.Followthelaw.Locallawsandregulationsmight
governhowyoucanusemobileelectronicdevices,suchasyourtablet,whileyoudriveamotorvehicle
orrideabicycle.
Disposeaccordingtolocallawsandregulations:
Whenyourtabletreachestheendofitsusefullife,donotcrush,incinerate,immerseinwater,ordisposeof
yourtabletinanymannercontrarytolocallawsandregulations.Someinternalpartscontainsubstances
thatcanexplode,leak,orhaveanadverseenvironmentalaffectifdisposedofincorrectly.
SeeAppendixB“WEEEandrecyclinginformation”onpage81foradditionalinformation.
Keepyourtabletandaccessoriesawayfromsmallchildren:
Yourtabletcontainssmallpartsthatcanbeachokinghazardtosmallchildren.Additionally,theglassscreen
canbreakorcrackifdroppedonorthrownagainstahardsurface.
Protectyourdataandsoftware:
Donotdeleteunknownfilesorchangethenameoffilesordirectoriesthatwerenotcreatedbyyou;
otherwise,yourtabletsoftwaremightfailtowork.
Beawarethataccessingnetworkresourcescanleaveyourtabletvulnerabletoviruses,hackers,spyware,
andothermaliciousactivitiesthatmightdamageyourtablet,software,ordata.Itisyourresponsibilityto
ensurethatyouhaveadequateprotectionintheformoffirewalls,antivirussoftware,andanti-spyware
softwareandkeepthissoftwareuptodate.
Keepelectricalappliancessuchasanelectricfan,radio,high-poweredspeakers,airconditioner,and
microwaveovenawayfromyourtabletbecausethestrongmagneticfieldsgeneratedbytheseappliances
candamagethescreenandthedataonthetablet.
©CopyrightLenovo2014
v
Page 8

Beawareofheatgeneratedbyyourtablet:
Whenyourtabletisturnedonorthebatteryischarging,somepartsmightbecomehot.Thetemperature
thattheyreachdependsontheamountofsystemactivityandthelevelofchargeinthebattery.Extended
contactwithyourbody,eventhroughclothing,couldcausediscomfortorevenaskinburn.Avoidkeeping
yourhands,yourlap,oranyotherpartofyourbodyincontactwithahotsectionofthetabletforany
extendedtime.
PolyvinylChloride(PVC)cableandcordnotice
WARNING:Handlingthecordonthisproductorcordsassociatedwithaccessoriessoldwiththisproduct
willexposeyoutolead,achemicalknowntotheStateofCaliforniatocausecancer,andbirthdefectsor
otherreproductiveharm.Washhandsafterhandling.
viUserGuide
Page 9
Chapter1.Productoverview
Thischapterprovidesanoverviewofthetablet,includingthelocationsofconnectorsandcontrols,tablet
features,accessories,specifications,operatingenvironment,andpreinstalledLenovoprograms.
Tabletlayout
Thistopicintroducesthetablethardwarefeaturestogiveyouthebasicinformationyouneedtostart
usingthetablet.
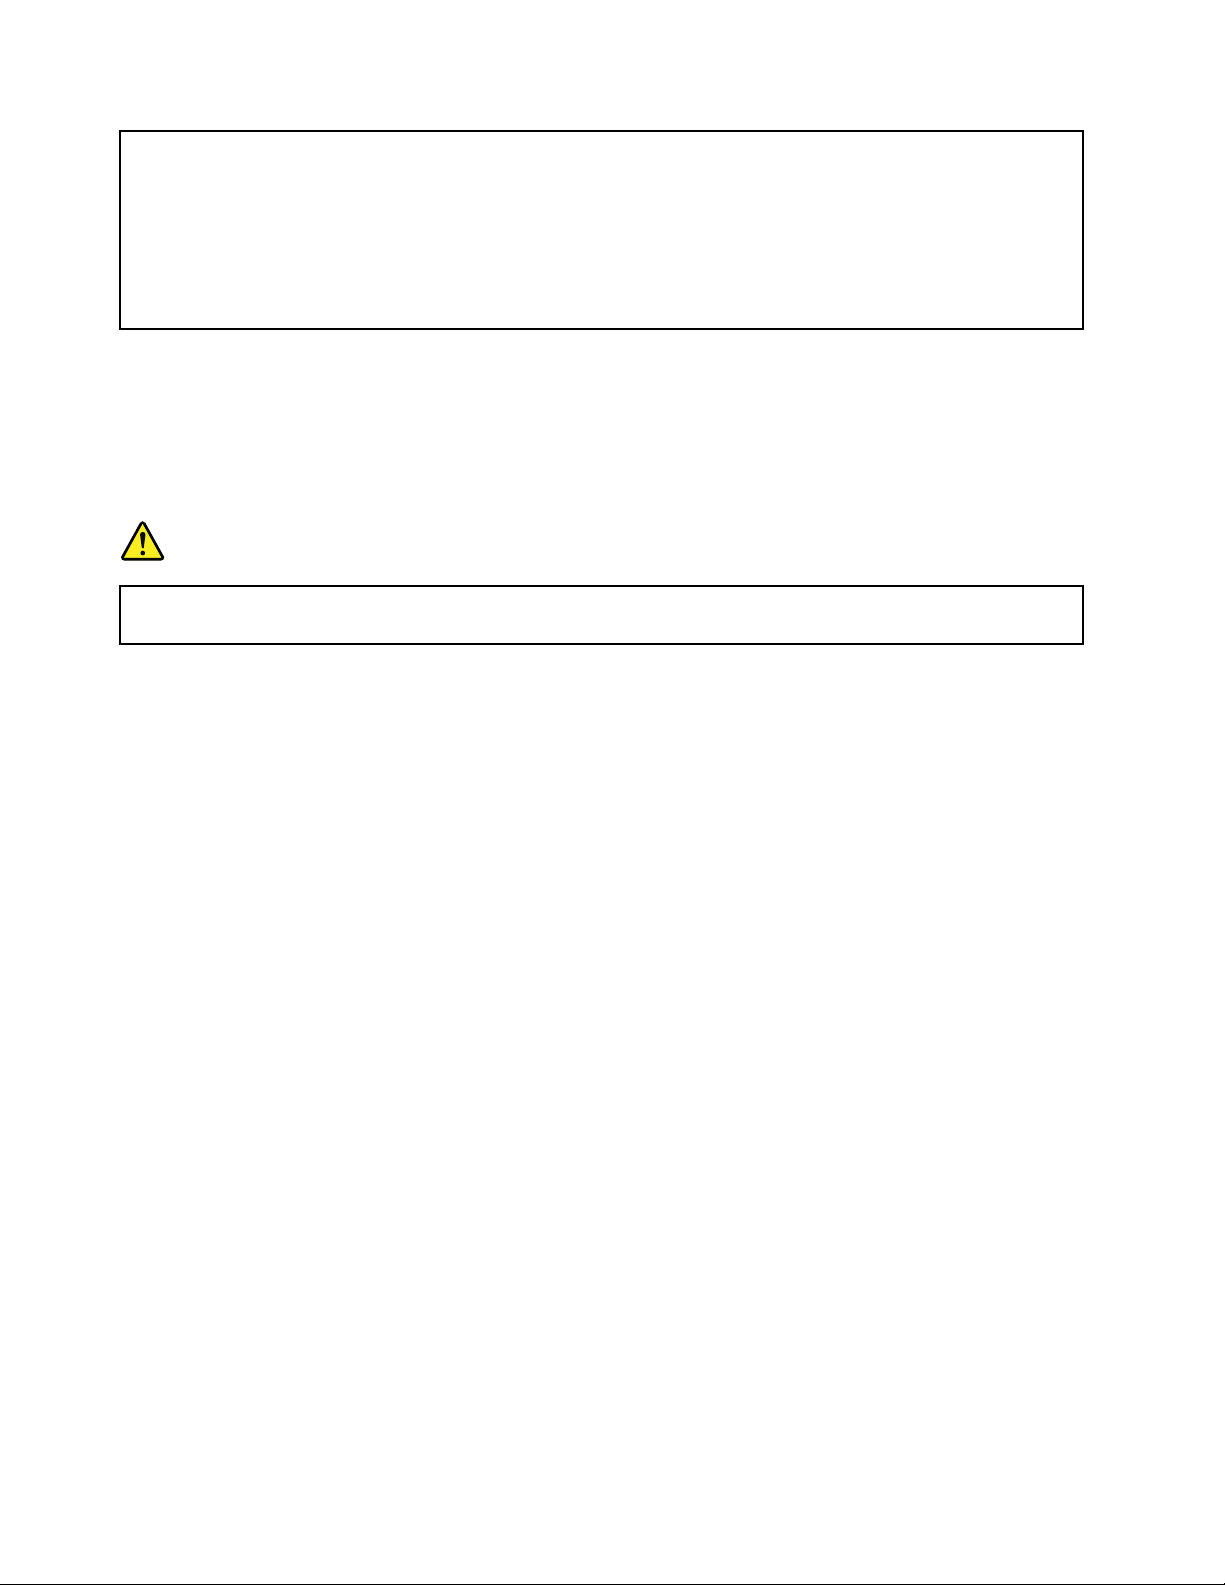
Frontviewandsideview
1Microphones2Ambientlightsensor
3Front-facingcamera
5Powerbutton
7Volume-controlbuttons8Emergency-resethole
9NFClogo(onsomemodels)10Micro-SIM-cardslot
11Micro-SD-cardslot
13WindowsStartscreencontrol
15Dockconnector16Multi-touchscreen
17Powerconnector
©CopyrightLenovo2014
4Screen-rotation-lockbutton
6Comboaudioconnector
12MicroHDMI
14Keyboardconnector
18USB2.0connector
TM
connector
1
Page 10

1Microphones
Thebuilt-inmicrophonescapturesoundandvoicewhentheyareusedwithanapplicationcapableof
handlingaudio.
2Ambientlightsensor
Theambientlightsensordetectsthebrightnessoftheenvironment.Thescreenbrightnessautomatically
adjustsdependingontheambientlightconditionsdetectedbytheambientlightsensor.
3Front-facingcamera
Yourtablethasa2-megapixelfront-facingcamera.Youcanusethecameratotakepictures,create
videos,ormakevideocallsincollaborationwithWebapplications.Whenthecameraisstarted,thegreen
camera-in-useindicatorturnson.Formoreinformation,see“Usingthecameras”onpage20.
4Screen-rotation-lockbutton
Pressthebuttontodisablethescreenauto-rotationfunction.Pressthebuttonagaintoenableit.
5Powerbutton
Pressthepowerbuttontoturnonthetablet.
Toturnoffthetablet,swipeinfromtherightedgeofthescreentodisplaythecharms.ThentapSettings➙
Power➙Shutdown.
Ifthetabletstopsrespondingandyoucannotturnitoff,pressandholdthepowerbuttonforfourseconds
ormore.Ifthetabletstillisnotresponding,removetheacpoweradapterandusetheemergency-reset
holetoresetthetablet.
Youalsocanprogramthepowerbuttonsothatbypressingthepowerbuttonyoucanshutdownthe
tabletorputitintosleeporhibernationmode.Toachievethis,youmustchangeyourpowerplansettings.
Toaccesspowerplansettings,dothefollowing:
1.Fromthedesktop,tapthebattery-statusiconintheWindowsnotificationarea.
2.T apMorepoweroptions.
3.Inthenavigationpanel,tapChoosewhatthepowerbuttondoes.
4.Followtheinstructionsonthescreentochangethesettingsaccordingtoyourpreference.
6Comboaudioconnector
Connectheadphonesoraheadsettolistentostereosoundfromthetablet.Y oualsocanconnectaheadset
torecordaudioormakecalls.
Note:Thecomboaudioconnectordoesnotsupportaconventionalmicrophone.
7Volume-controlbuttons
Pressthevolume-uporvolume-downbuttontoadjustthetabletvolume.
8Emergency-resethole
Ifthetabletstopsrespondingandyoucannotturnitoffbypressingandholdingthepowerbutton,remove
theacpoweradapterandinsertastraightenedpaperclipintotheemergency-resetholetoresetthetablet.
9NFClogo(onsomemodels)
Ifyoufindanearfieldcommunication(NFC)logoonthedisplaynearthevolume-controlbuttons,itindicates
thatyourtabletcomeswithanNFCcard.FormoreinformationabouttheNFCfeature,see“Usingthe
NFCconnection”onpage32.
2UserGuide
Page 11

10Micro-SIM-cardslot
OpentheprotectivecovertoaccessthemicroSubscriberIdentificationModule(SIM)cardslot.Inserta
microSIMcardtoestablishawirelesswideareanetwork(WAN)connection.Forinstructionsonhowto
installamicroSIMcard,see“InstallingandremovingthemicroSIMcard”onpage27
.
Note:Themicro-SIM-cardslotisnotfunctionalonWi-Fi-onlymodels.
11Micro-SD-cardslot
Opentheprotectivecovertoaccessthemicrosecuredigital(SD)cardreader.InsertamicroSDcardinto
themicro-SD-cardslotfordataaccessorstorage.See“Usingthemicro-SD-cardreader”onpage21
moreinformation.
for
12MicroHDMI
TM
connector
YourtablethasamicroHigh-DefinitionMultimediaInterface(HDMI)connector,whichisadigitalaudioand
videointerfacethatcanconnectacompatibledigitalaudiodeviceorvideodisplaysuchasahigh-definition
television(HDTV).Formoreinformation,see“UsingHDMIdevices”onpage25
13WindowsStartscreencontrol
.
TaptheWindowsStartscreencontroltogototheStartscreen.
14Keyboardconnector
UsethisconnectortoconnectaThinkPad10TouchCaseoraThinkPad10UltrabookKeyboard.The
ThinkPad10TouchCaseandtheThinkPad10UltrabookKeyboardareavailableasoptionsfromLenovoat
http://www.lenovo.com/accessories/services/index.html.Formoreinformation,see“ThinkPad10Ultrabook
Keyboard”onpage39
15Dockconnector
and“ThinkPad10TouchCase”onpage43.
UsethisconnectortoconnectaThinkPadTabletDock.TheThinkPadTabletDockisavailableasan
optionfromLenovoathttp://www.lenovo.com/accessories/services/index.html.Formoreinformation,
see“ThinkPadTabletDock”onpage46
16Multi-touchscreen
.
Tapthescreentousethecontrolsonthescreenincludingicons,menuitems,andtheon-screenkeyboard.
Formoreinformation,see“Usingthemulti-touchscreen”onpage9.
17Powerconnector
Usethisconnectorwiththesuppliedpowercordandtheacpoweradaptertochargethetabletwhen
thebatterypowerislow.
Formoreinformation,see“Chargingthebattery”onpage13.
18USB2.0connector
TheUSB2.0connectorisusedforconnectingUSB-compatibledevices,suchasaUSBprinteroradigital
camera.
Attention:WhenyouattachaUSBcabletothisUSBconnector,ensurethattheUSBmarkisfacingupward.
Otherwisetheconnectormightgetdamaged.
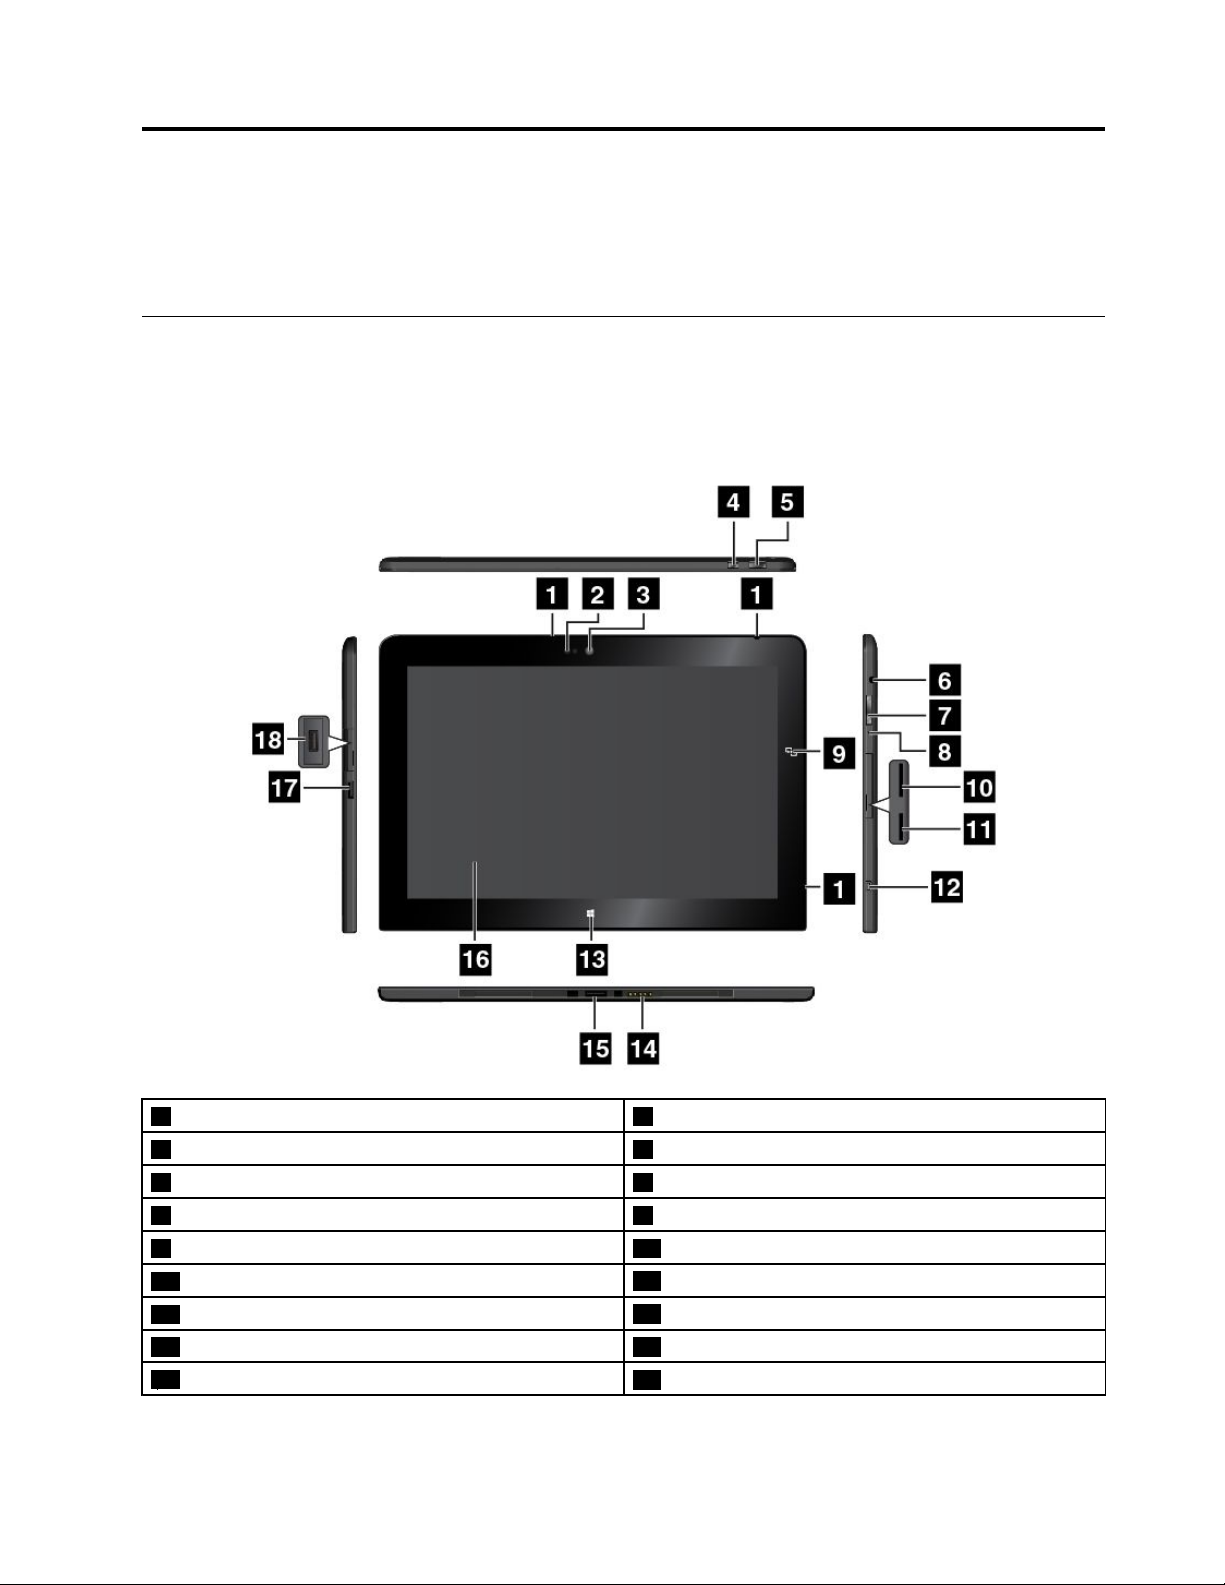
Rearview
Note:Yourtabletmightlookslightlydifferentfromthefollowingillustration.
Chapter1.Productoverview3
Page 12
1Rear-facingcamerawithaflash
3System-statusindicator4Speakers
5Fingerprintreader(onsomemodels)
1Rear-facingcamerawithaflash
2Smartcardslot(onsomemodels)
Yourtablethasan8-megapixelrear-facingcamerawithaflash.Youcanusethecameratotakepicturesand
createvideos.Formoreinformation,see“Usingthecameras”onpage20.
2Smartcardslot(onsomemodels)
Yourtabletmighthaveasmartcardslot.Formoreinformation,see“Usingasmartcard”onpage23.
3System-statusindicator
TheilluminateddotintheThinkPadlogoonthebacksideofthetabletworksasasystem-statusindicator.
•Blinksthreetimes:Thetabletisconnectedtoapowersource.
•On:Thetabletisonandinuse.
•Off:Thetabletisoff,insleepmode,orinhibernationmode.
4Speakers
Theintegratedspeakersprovideaudiooutputforvideoandmusicplayback.
5Fingerprintreader(onsomemodels)
Fingerprintauthenticationtechnologyprovidessimpleandsecureuseraccessbyassociatingyourfingerprint
withapassword.Formoreinformation,see“Usingthefingerprintreader”onpage16.
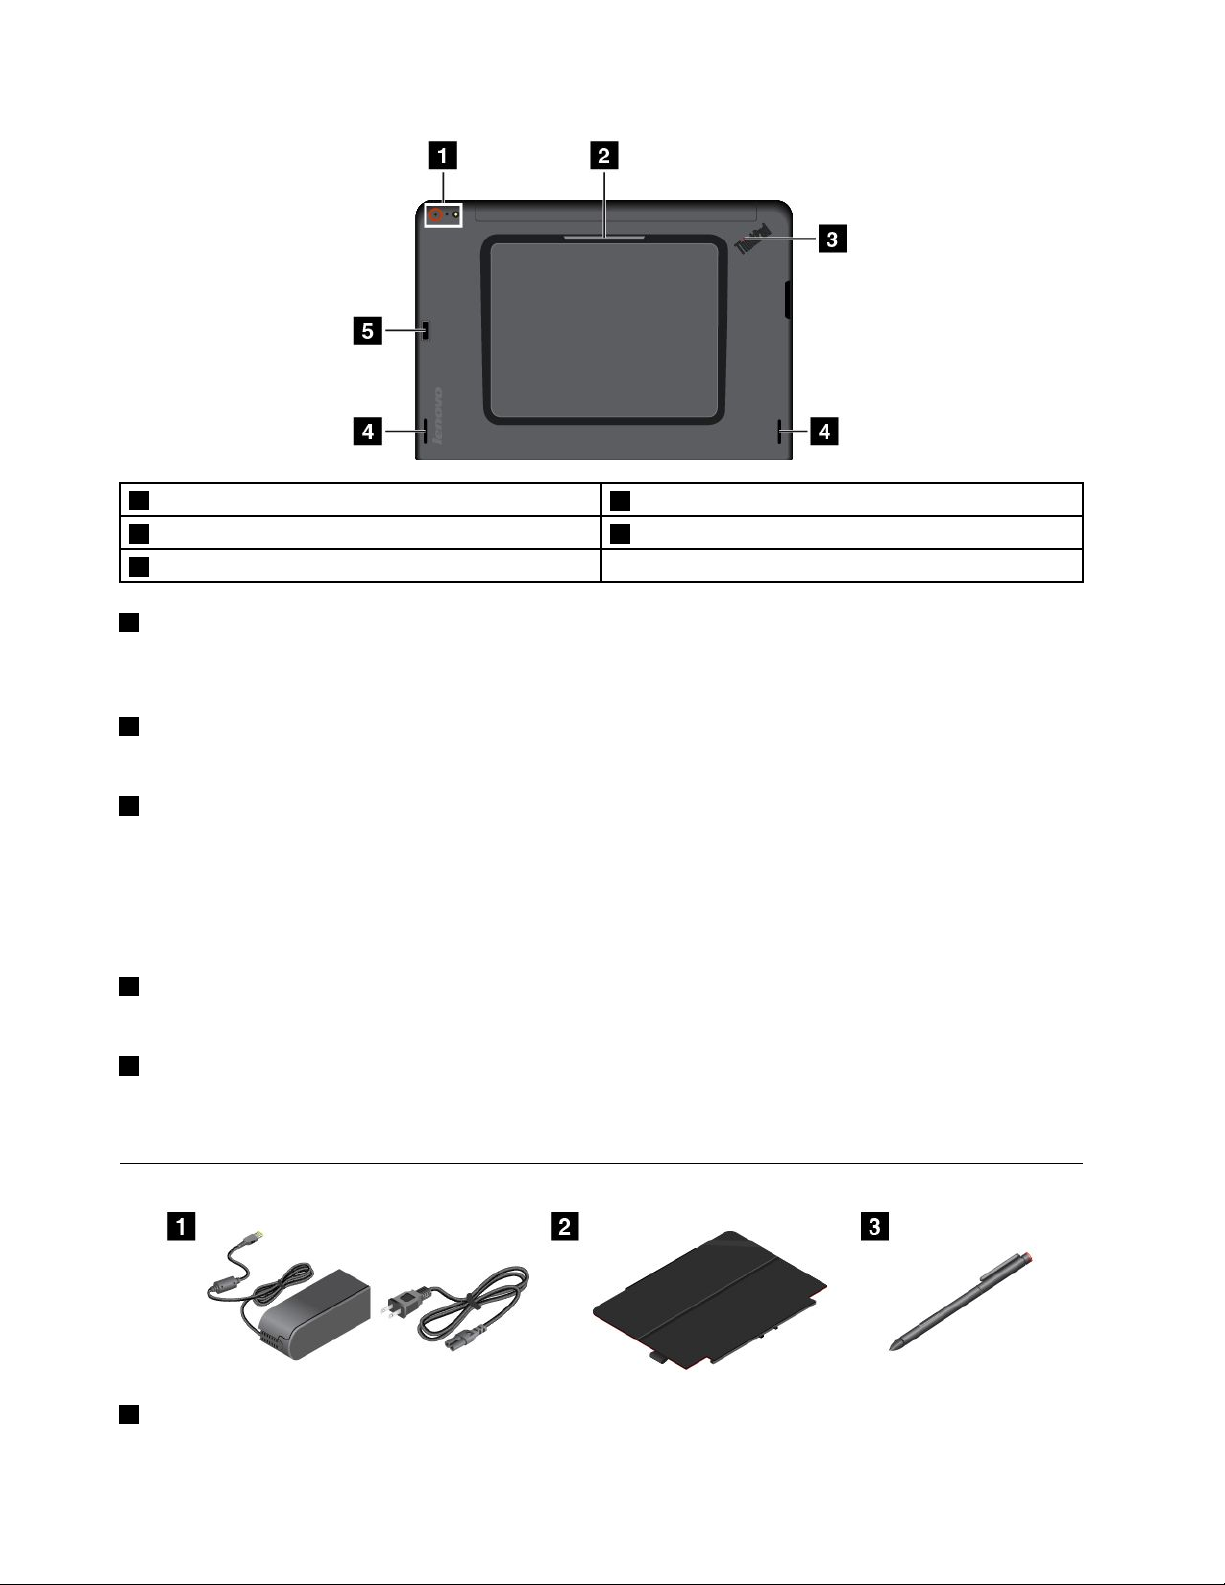
Accessories
1Powercordandacpoweradapter:Usethepowercordtogetherwiththeacpoweradaptertoprovide
acpowertoyourtabletandchargethebattery.
4UserGuide
Page 13

2ThinkPad10QuickshotCover(onsomemodels):TheThinkPad10QuickshotCover(hereaftercalled
thecover)attachestothetabletmagnetically.Usethecovertodothefollowing:
•Protectthetabletscreen.
•Wakeupthetabletorputthetabletintosleepmodeconveniently.
•Launchthecamera.
•Serveasastandforthetablet.
Formoreinformation,see“UsingtheThinkPad10QuickshotCover”onpage18.
3T abletDigitizerPen(onsomemodels):SometabletsareequippedwithaTabletDigitizerPen.Usethe
TabletDigitizerPentoinputtextordrawgraphicsinanaturalmannerandperformotheroperationswithout
tappingthescreenwithyourfinger.Formoreinformation,see“UsingtheT abletDigitizerPen”onpage14.
Features
Processor
•Intel
Operatingsystem
•Microsoft
Memory
•2GBor4GB
®
Atom™quad-coreprocessor,Z3795,2.4GHz
®
Windows8.1(32-bitor64-bit)
Internalstorage
•EmbeddedMultiMediaCard(eMMC):64GBor128GB(dependingonthemodel)
Display
•Anti-reflective,GorillaGlass
•Size:256.5mm(10.1inches)
•Screenresolution:1920x1200pixels
•Automaticbrightnesscontrol(ambientlightsensor)
•In-planeswitchingtechnologyforfastresponsetime,wideviewingangle,andhigh-qualitycolor
reproduction
•Light-emittingdiode(LED)backlighttechnology
•Multi-touchtechnology
Integratedcameras
•Front-facingcamera,twomegapixels
•Rear-facingcamerawithaflash,eightmegapixels,auto-focus
Connectors
•Onecomboaudioconnector
•Onepowerconnector
•Onekeyboardconnector
•OnemicroHDMIconnector
Chapter1.Productoverview5
Page 14

•Onedockconnector
•OneUSB2.0connector
Cardslotorcardreader
•OneMicro-SIM-cardslot
•OneMicro-SD-cardslot
•Onesmartcardslot(onsomemodels)
Wirelessfeatures
•Bluetooth4.0
•WirelessLAN(802.11a/g/n)
•WirelessWAN(onsomemodels)
•NFC(onsomemodels)
•GlobalPositioningSystem(GPS)satellitereceiver
Securityfeatures
Fingerprintreader(onsomemodels)
Specifications
Size
•Width:256.5mm(10.1inches)
•Depth:177mm(7.0inches)
•Height:
–Formodelswithoutasmartcardslot:8.95mm(0.35inch)
–Formodelswithasmartcardslot:16.95mm(0.67inch)
Battery
•33WhLi-Polymerbattery
Powersource(acpoweradapter)
•Sine-waveinputat50Hzto60Hz
•Inputratingoftheacpoweradapter:100Vacto240Vac
Operatingenvironment
•Maximumaltitudewithoutpressurization:5000m(16404ft)
•Temperature:
–Ataltitudesupto2438m(8000ft)
Operating:5.0°Cto35.0°C(41°Fto95°F)
Storage:5.0°Cto43.0°C(41°Fto109°F)
–Ataltitudesabove2438m(8000ft)
•Relativehumidity:
6UserGuide
Maximumtemperaturewhenoperatingunderunpressurizedconditions:31.3°C(88°F)
Page 15

–Operating:8%to80%
–Storage:5%to95%
Ifpossible,placeyourtabletinadry,well-ventilatedareawithoutdirectexposuretosunshine.Donotuseor
storeyourtabletindusty,dirtyareas,orextremelyhotorcoldareas.
Lenovoprograms
YourtabletcomeswithLenovoprogramstohelpyouworkmoreeasilyandsecurely.
ToaccessLenovoprograms,swipeinfromtherightedgeofthescreentodisplaythecharms.Thentapthe
Searchcharmtosearchforthedesiredprogram.
ThefollowingtableprovidesabriefintroductiontosomeLenovoprogramsthatmightbepreinstalledon
yourtablet.
Note:PreinstalledLenovoprogramsvarybygeographiclocationsandaresubjecttochange.
LenovoProgramDescription
LenovoCloud
Storagepowered
byHightail
LenovoCompanionGetinformationaboutaccessoriesforyourtablet,viewblogsandarticlesaboutyourtablet,
LenovoQuickCastAquickandeasywaytosendfilesanduniformresourcelocators(URLs)betweentwodevices.
Lenovo
QuickDisplay
LenovoReachEnhanceyourcloudexperience.LenovoReachkeepsyouconnectedatalltimesandenables
LenovoSettings
LenovoSolution
Center
LenovoSupport
LenovoTools
SystemUpdate
Uploadallofyourfavoritedocumentstothecloudsoyoucanaccessthemfromwhereveryou
are.Data-encryptionandfile-sharingcontrolsensurethatyouneverhavetoworryaboutthe
safetyofyourinformation.GetstartedbycheckingoutthepreinstalledHightailforLenovo
applicationonyourtablet.FormoreinformationabouttheLenovoCloudStorageprogram,go
to:
https://www.hightail.com/partners/lenovo/promo1
andcheckforrecommendedprograms.
Establishaconnectionbetweenyourcomputerandawirelessdisplayorprojector.This
providesyouwithaquickandeasywaytomakepresentations.
youtoaccessallyourfavoriteitemsfrompersonalcomputers,smartphones,ortablets.With
LenovoReach,youcanaddyourfavoriteWebservicestoyourclouddesktop;stayloggedin
toWebsiteswiththecloudpasswordmanager;andaccess,edit,andshareyourfilesfrom
anywhere.
Enhanceyourcomputingexperiencebyconfiguringcameraandmicrophonesettings,
optimizingyourpowersettings,andcreatingandmanagingmultiplenetworkprofiles.
Troubleshootandresolvetabletproblems.Itcombinesdiagnostictests,systeminformation
collection,securitystatus,andsupportinformation,alongwithhintsandtipsformaximum
systemperformance.
RegisteryourtabletwithLenovo,viewusermanualsforyourtablet,getthewarrantyinformation
foryourtablet,andexplorehelpandsupportinformation.
ProvideseasyaccesstovariousLenovoapplications,suchasSystemUpdate,LenovoSolution
Center,andsoon.
Keepthesoftwareonyourtabletup-to-datebydownloadingandinstallingsoftwarepackages,
includingLenovoprograms,devicedrivers,UnifiedExtensibleFirmwareInterface(UEFI)basic
input/outputsystem(BIOS)updates,andotherthird-partyprograms.
Chapter1.Productoverview7
Page 16

8UserGuide
Page 17

Chapter2.Usingyourtablet
Thischapterprovidesinstructionsonhowtousesomebasicapplicationsandtabletfeatures.
Initialsetupinstructions
Tousethetabletthefirsttimeafteryoutakeitoutofthebox,ensurethatyoufollowtheinstructionsbelow:
1.Usethesuppliedpowercordandacpoweradaptertoconnectthetablettoanelectricaloutlet.
2.Pressandreleasethepowerbuttontoturnonthetablet.
3.Followtheinstructionsonthescreentocompletetheinitialsetup.
Usingthemulti-touchscreen
Thistopicprovidesinstructionsonhowtousethemulti-touchscreen.
Note:Yourtabletscreenmightlookdifferentfromthefollowingillustrations.
©CopyrightLenovo2014
9
Page 18

TasksTouchgestures
Openanapplicationorperformanactiononanopen
application,suchasCopy,Save,andDelete,depending
ontheapplication.
Scrollthroughitems,suchaslists,pages,andphotos.Slide.
Moveanobject.Draganitemtothedesiredlocation.
Tap.
Zoomout.
Zoomin.
Rotateanitem.
Movetwofingersclosertogether.
Movetwofingersfartherapart.
Puttwoormorefingersonanitem,andthenrotateyour
fingers(supportedonlyonsomemodels).
10UserGuide
Page 19

TasksTouchgestures
Openamenuwithmultipleoptions.
Tapandhold.
Displaythecharmsthatcontainsystemcommands,such
Swipeinfromtherightedge.
asStart,Settings,Search,Share,andDevices.
Cyclethroughandswitchtoopenapplications.Swipeinfromtheleftedge.
Viewtherecentlyusedapplicationsorselectanactive
Swipeinandoutontheleftedge.
applicationfromthelist.
ViewallapplicationsontheStartscreen.•Swipeuptothetopedge.
•Tapthedownwardarrow()locatednearthe
bottom-leftcorneroftheStartscreen.
Chapter2.Usingyourtablet11
Page 20

TasksTouchgestures
CustomizetilesontheStartscreen,oruninstallan
application.
Viewtheapplicationcommandsonanopenapplication,
suchasCopy,Save,andDelete,dependingonthe
application.
Closethecurrentapplication.Swipeinfromthetopedgetothebottom.
•Swipeinfromthetoporbottomedge,
tapCustomize,andthentapthedesiredicon.
•Pressandholdthedesiredicon.
Swipeinfromthetoporbottomedge.
Tipsonusingthemulti-touchscreen
•Themulti-touchscreenisaglasspanelcoveredwithaplasticfilm.Donotapplypressureorplaceany
metallicobjectonthescreenthatmightdamagethetouchpanelorcauseittomalfunction.
•Donotusefingernails,glovedfingers,orinanimateobjectsotherthananapprovedTabletDigitizer
Penforinputonthescreen.
Tipsoncleaningthemulti-touchscreen
•Turnoffthetabletbeforecleaningthemulti-touchscreen.
•Useadry,soft,andlint-freeclothorapieceofabsorbentcottontoremovefingerprintsordustfromthe
multi-touchscreen.Donotapplysolventstothecloth.
•Gentlywipethescreenusingatop-downmotion.Donotapplyanypressureonthescreen.
Powermanagement
Thissectionprovidesinstructionsonhowtochargethebattery,extendthebatterylifebetweencharges,
andcheckthebatterystatus.
12UserGuide
Page 21

Chargingthebattery
Thetabletisshippedwithanacpoweradapterandapowercordtochargethetabletfromanystandard
acpoweroutlet.
Note:Thebatteryisnotfullychargedwhenshipped.
Tochargethebattery,dothefollowing:
1.Plugthepowercordintoastandardacpoweroutlet1.
2.Connectthepowercordtotheacpoweradapter2.Thenconnectthepowerconnectoroftheacpower
adaptertothepowerconnectoronthetablet3.
3.Disconnecttheacpoweradapterfromyourtabletwhenthebatterypowerisfull,orleavetheacpower
adapterconnectedtooperatefromacpower.
Alternatively,youcanusetheThinkPadT abletDockandtheacpoweradaptershippedwiththedockto
rechargetheinternalbatteryofyourtabletsafely.
Attention:UseonlyLenovo-approvedacpoweradapters.Unauthorizedacpoweradapterscouldseverely
damagethetablet.
Note:TheThinkPadTabletDockisanoptionaldevicethatLenovodesignedspecificallyfortheThinkPad10
tablet.TopurchasetheoptionfromLenovo,goto:
http://www.lenovo.com/accessories/services/index.html
Extendingthebatterylifebetweencharges
Whenyouaretravelingwithyourtabletandacpowerisnotavailable,youcanextendthebatterylife
bydoingthefollowing:
•TurnoffWi-Fi,mobilenetwork,andBluetoothwhennotinuse.
ToturnoffWi-Fi,mobilenetwork,andBluetooth,dothefollowing:
1.Swipeinfromtherightedgeofthescreentodisplaythecharms.
2.T apSettings➙ChangePCsettings.
3.Inthenavigationpanel,tapNetwork➙Airplanemode.
Chapter2.Usingyourtablet13
Page 22

4.IntheAirplanemodesection,slidethecontroltotherighttoturnonAirplanemodetodisable
allwirelessdevices.
•Turnoffautomaticsynchronizationifyoudonotneedit.
Toturnofftheautomaticsynchronizationfunction,dothefollowing:
1.Swipeinfromtherightedgeofthescreentodisplaythecharms.
2.T apSettings➙ChangePCsettings.
3.Inthenavigationpanel,tapSkyDrive➙Syncsettings.
4.SwitchoffSyncsettingswithSkyDrive.
•Lowerthebrightnesslevelofthescreen.
Tolowerthebrightnesslevelofthescreen,dothefollowing:
1.Swipeinfromtherightedgeofthescreentodisplaythecharms.
2.T apSettings➙Brightness.
3.Slidethecontroldowntolowerthebrightness.
•Entersleepmodewhenthetabletistemporarilynotinuse.
Toentersleepmode,dooneofthefollowing:
–ClosetheThinkPad10QuickshotCover.
–Toentersleepmodefromtheoperatingsystem,dothefollowing:
1.Swipeinfromtherightedgeofthescreentodisplaythecharms.
2.T apSettings➙Power➙Sleep.
•Turnoffyourtabletifyouarenotgoingtouseitforawhile.
Toturnoffyourtablet,dothefollowing:
1.Swipeinfromtherightedgeofthescreentodisplaythecharms.
2.T apSettings➙Power➙Shutdown.
Checkingthebatterystatus
Gettheapproximatestatusofyourbatteryatanytimebycheckingthedesktopbattery-statusiconin
theWindowsnotificationarea.
Tocheckfortheaccuratestatusandadjustyourtabletpowersettingstoachievethebestbalancebetween
performanceandpowersaving,dothefollowing:
1.FromtheStartscreen,tapLenovoSettings➙Power.
2.Checkyourbatterystatusandconfiguresettings.
UsingtheTabletDigitizerPen
SomemodelsareequippedwithaTabletDigitizerPenasastandardfeature.TheTabletDigitizerPenenables
youtoinputtextinanaturalmanner,takenotes,annotatePortableDocumentFormat(PDF)files,anddraw
graphicstogetherwithapplicationscapableofeditingandsketching.
Note:Thispenisnotwaterproof.Takecarenottosoakitordipitinwater.
14UserGuide
Page 23

TheT abletDigitizerPenconsistsofatip1,aclickbutton2,andanerasertip3.Holdthepenandpoint
thetipatthedisplaytomovethepointer.Theerasertip
supportthisfunction.
Tomakeaselection(singleclick),tapthedisplayoncewiththepen.Todouble-click,tapthedisplaytwice
withthepenwithoutpausingbetweentaps.T oright-click,dooneofthefollowing:
•Tapandholdthetipofthepenonthedisplayforonesecondandthenliftthepenfromthedisplay.
•Pressandholdtheclickbutton2andtapthetiponthedisplay.
FormoreinstructionsaboutusingthepenwithThinkPad10UltrabookKeyboardorThinkPad10TouchCase,
see“ThinkPad10UltrabookKeyboard”onpage39
3functionslikeaneraserinprogramsthat
or“ThinkPad10TouchCase”onpage43.
UsingtheOn-ScreenKeyboardorthetouchkeyboardandhandwriting panel
UsetheOn-ScreenKeyboardorthetouchkeyboardandhandwritingpaneltotypetext,numbers,symbols,
andothercharacters.Youalsocanusethetouchkeyboardandhandwritingpaneltoperformhandwriting.
Whenyourotatethetablet,theOn-ScreenKeyboardorthetouchkeyboardandhandwritingpanel
automaticallyrotatestothecorrespondingportraitorlandscapeview.
ToopentheOn-ScreenKeyboard,dothefollowing:
1.Swipeinfromtherightedgeofthescreentodisplaythecharms.
2.T aptheSearchcharmtosearchforOn-ScreenKeyboard.
3.T apOn-ScreenKeyboard.
Toopenthetouchkeyboardandhandwritingpanel,dooneofthefollowing:
•Onthedesktop,tapthekeyboardiconintheWindowsnotificationarea.
•OntheStartscreen,thetouchkeyboardandhandwritingpanelisdisplayedautomaticallyanytimeyou
type.
•OntheDesktoportheStartscreen,dothefollowing:
1.Swipeinfromtherightedgeofthescreentodisplaythecharms.
2.T aptheSettingscharm.
3.T apKeyboard➙Touchkeyboardandhandwritingpanel.
Toconfiguretheinputlanguage,dothefollowing:
1.Fromthedesktop,swipeinfromtherightedgeofthescreentodisplaythecharms.
2.T apSettings➙ControlPanel.
Chapter2.Usingyourtablet15
Page 24

3.T apClock,Language,andRegion➙Changeinputmethods.
4.Followtheinstructionsonthescreentoconfiguretheinputlanguage.
ChangingthestartupbehaviortoopeneitherthedesktoportheStart screen
YoucansetthetablettoopeneitherthedesktoportheStartscreenbydefault.Tosetthedefaultstartup
screen,dothefollowing:
1.Onthedesktop,tapandholdonthetaskbar.Amenuisdisplayed.
2.T apProperties.TheT askbarandNavigationpropertieswindowisdisplayed.
3.OntheNavigationtab,locatetheStartscreensection,andthendooneofthefollowing:
•Tosetthedesktopasyourdefaultstartupscreen,selectWhenIsigninorcloseallappsona
screen,gotothedesktopinsteadofStartsoacheckisvisible.
•TosettheStartscreenasyourdefaultstartupscreen,removethecheckfromtheWhenIsigninor
closeallappsonascreen,gotothedesktopinsteadofStartcheckbox.
4.T apOKtosavethenewsetting.
Downloadinggamesandapplications
Toextendthefunctionalityofyourtablet,downloadandinstalladditionalapplicationsfromtheWindows
Store.TheWindowsStoreprovidesaneasyandquickwayforyoutoshopforgamesandmobile
applications.
TodownloadorbuyanapplicationoragamefromWindowsStore,tapStorefromtheStartscreen,andthen
followtheinstructionsonthescreen.
Usingthefingerprintreader
Dependingonthemodel,yourtabletmighthaveafingerprintreader.Fingerprintauthenticationcanreplace
yourWindowspassword.Inthisway,youcanlogontoyourtabletsimplyandsecurely.T oenablefingerprint
authentication,enrollyourfingerprintsfirst.
Enrollingyourfingerprints
Toenrollyourfingerprints,dothefollowing:
1.Swipeinfromtherightedgeofthescreentodisplaythecharms.
2.T apSettings➙ChangePCsettings.
3.Inthenavigationpanel,tapAccounts➙Sign-inoptions.
4.IntheFingerprintsection,tapAdd.The“Addafingerprinttothisaccount”windowisdisplayed.
5.EntertheWindowspasswordasrequired.Thenfollowtheinstructionsonthescreentoenrollyour
fingerprint.
Note:Itisrecommendedthatyouenrollmorethanonefingerprintincaseofanyinjuriestoyourfingers.
Swipingyourfingeroverthefingerprintreader
Toswipeyourfingeroverthefingerprintreader,dothefollowing:
Note:Yourtabletmightlookslightlydifferentfromtheillustrationsinthistopic.
16UserGuide
Page 25

1.Placethetopjointofyourfingeronthesensor.
2.Applylightpressureandswipeyourfingertowardyouacrossthereaderinonesmoothmotion.Donot
liftyourfingerwhenyouareswipingit.
Maintainingthefingerprintreader
Thefollowingactionscoulddamagethefingerprintreaderorcauseitnottoworkproperly:
Chapter2.Usingyourtablet17
Page 26

•Scratchingthesurfaceofthereaderwithahard,pointedobject.
•Scrapingthesurfaceofthereaderwithyourfingernailoranythinghard.
•Usingortouchingthereaderwithadirtyfinger.
Ifyounoticeanyofthefollowingconditions,gentlycleanthesurfaceofthereaderwithadry,soft,lint-free
cloth:
•Thesurfaceofthereaderisdirtyorstained.
•Thesurfaceofthereaderiswet.
•Thereaderoftenfailstoenrollorauthenticateyourfingerprint.
Ifyourfingerhasanyofthefollowingconditions,youmightnotbeabletoregisterorauthenticateit:
•Yourfingeriswrinkled.
•Yourfingerisrough,dry,orinjured.
•Yourfingerisstainedwithdirt,mud,oroil.
•Thesurfaceofyourfingerisdifferentfromwhenyouenrolledyourfingerprint.
•Yourfingeriswet.
•Afingerisusedthathasnotbeenenrolled.
Toimprovethesituation,trythefollowing:
•Cleanorwipeyourhandstoremoveanyexcessdirtormoisturefromthefingers.
•Enrollanduseadifferentfingerforauthentication.
•Ifyourhandsaredry,applylotiontothem.
UsingtheThinkPad10QuickshotCover
Dependingonthemodel,yourtabletmightcomewithaThinkPad10QuickshotCover.Thistopicprovides
instructionsonhowtousetheThinkPad10QuickshotCover(hereaftercalledthecover).
Note:TheThinkPad10QuickshotCoverisspecificallydesignedforThinkPad10tabletsthatarenot
equippedwithasmartcardslot.
18UserGuide
Page 27

Tousethecover,attachthecovertothetabletfirstasshown.Thecoverwillbeattachedtothetablet
magnetically.
Putthetabletintosleepmodeorwakeupthetablet
Ifthecoverisopenandthetabletison,thetablet,bydefault,enterssleepmodeautomaticallyafteryou
closethecover.
Ifthecoverisclosedandthetabletisinsleepmode,thetablet,bydefault,resumesnormaloperation
whenyouopenthecover.
Chapter2.Usingyourtablet19
Page 28

Youalsocanchangethesettingssothatbyclosingthecoveryoucanshutdownthetablet,putthetabletinto
hibernationmode,ordonothing.T oachievethis,youmustchangeyourlidsettingsbydoingthefollowing:
1.Fromthedesktop,swipeinfromtherightedgeofthescreentodisplaythecharms.
2.T apSettings➙ControlPanel➙HardwareandSound➙PowerOptions.
3.Inthenavigationpanel,tapChoosewhatclosingtheliddoes.
4.Followtheinstructionsonthescreentochooseanoptionaccordingtoyourpreference.
Launchthecamera
Whenyouusethetabletwiththecoveropentoanangleof360degrees,youcanflipoverthemagnetictab
ofthecoverasshowntolaunchthecameraautomatically.Thisfunctionisenabledbydefault.
Ifyouwanttodisablethisfunction,dothefollowing:
1.FromtheStartscreen,tapLenovoSettings➙Camera.
2.IntheQuickshotsection,slidethecontroltothelefttodisablethefunction.
Serveasastandforthetablet
Thecovercanserveasastandforthetabletasshown.Inthisway,youcanusethetablettowatchmovies,
viewphotos,ormakeapresentationconveniently.
Usingthecameras
Yourtablethastwocameras,afront-facingcameraandarear-facingcamera.Therear-facingcamerahasa
flashandanauto-focusfeaturethatenablesyoutocapturehigh-qualitypicturesandvideos.
Tolaunchacameraandconfigurethecamerasettings,dothefollowing:
20UserGuide
Page 29

1.FromtheStartscreen,tapLenovoSettings➙Camera.
2.Followtheinstructionsonthescreentoconfiguresettingsandusethecamera.
Toswitchbetweenthefront-facingcameraandtherear-facingcamera,dothefollowing:
1.FromtheStartscreen,tapLenovoSettings➙Camera.
2.IntheViewsection,selectFront-facingcameraorRear-facingcamerafromtheSelectacamera
drop-downlistboxtoswitchthecameras.
Youalsocanusethecamerawithotherapplicationsthatprovidefeaturessuchasphotographing,video
capturing,andvideoconferencing.Todownloadotherapplications,tapWindowsStorefromtheStart
screen.Thenfollowtheinstructionsonthescreen.
Usingthemicro-SD-cardreader
Yourtablethasamicro-SD-cardreaderthatprovidesamicro-SD-cardslotforyoutoinstallamicroSDcard.
Installingamicro-SD-card
Attention:BeforehandlingamicroSDcard,touchametaltableoragroundedmetalobject.Thisaction
reducesanystaticelectricityfromyourbody.Staticelectricitycandamagethecard.
ToinstallamicroSDcardintothemicro-SD-cardslot,dothefollowing:
1.Opentheprotectivecover.Thenlocatethemicro-SD-cardslota.
2.Ensurethatthemetalcontactsofthecardarefacingdownandpointingtowardthetablet.
Chapter2.Usingyourtablet21
Page 30

3.Insertthecardintothemicro-SD-cardslot.Thecardmightstopbeforeitiscompletelyinstalledintothe
cardreader.Ensurethatyouinsertthecardfirmlyuntilyouhearaclick.
RemovingamicroSDcard
ToremoveamicroSDcard,dothefollowing:
1.Opentheprotectivecover.
2.PushthemicroSDcardinwardalittleuntilyouhearaclick1.Then,releaseit.ThemicroSDcardejects.
3.Gentlyslidethecardoutofthecardslot2.
22UserGuide
Page 31

Usingasmartcard
Somemodelscomewithasmartcardslot.Thistopicprovidesinformationonhowtousethesmartcard.
Generally,smartcardscanprovideauthentication,datastorage,andapplicationprocessing.Smartcards
alsomightprovidestrongsecurityauthenticationforsinglesign-on(SSO)withinlargeorganizations.
Yourtabletsupportssmartcardswiththefollowingspecifications:
•Width:85.60mm(3.37inches)
•Depth:53.98mm(2.13inches)
•Height:0.76mm(0.03inch)
Thefollowingillustrationsshowbothsidesofasmartcard.Inillustration
arefacingupward.Inillustration2,themetalcontactsaofthecardarefacingdownward.
Note:Yoursmartcardmightlookslightlydifferentfromthefollowingillustrations.
Installingasmartcard
Attention:
•Beforeinstallingasmartcard,touchametaltableoragroundedmetalobject.Thisactionreducesany
staticelectricityfromyourbody.Staticelectricitycoulddamagethecard.
•Whiletransferringdatatoorfromasmartcard,donotputyourtabletintosleeporhibernationmode
beforethedatatransferfinishes;otherwise,yourdatacouldbecomedamaged.
1,themetalcontactsaofthecard
Toinstallasmartcard,dothefollowing:
1.Positionyourtabletasshownandensurethatthemetalcontactsaofthecardarefacingdownward
andpointingtowardthecardslot.
Chapter2.Usingyourtablet23
Page 32

2.Insertthecardintotheslotasshown.
Iftheplug-and-playfeatureisnotenabledfortheinstalledsmartcard,dothefollowingtoenablethefeature:
1.GotoControlPanel.
2.T apHardwareandSound.
3.T apDeviceManager.Ifyouarepromptedforanadministratorpasswordorconfirmation,typethe
passwordorprovideconfirmation.
4.FromtheActionmenu,tapAddlegacyhardware.TheAddHardwareWizardstarts.
5.Followtheinstructionsonthescreen.
Removingasmartcard
Attention:
•Beforeremovingasmartcard,stopthecardfirst.Otherwise,dataonthecardmightbedamagedorlost.
•Donotremovethesmartcardwhilethetabletisinsleepmodeorhibernationmode.Otherwise,the
systemmightnotrespondwhenyoutrytoresumeoperation.
Toremoveasmartcard,dothefollowing:
1.T apthetriangularicononthetaskbartoshowhiddenicons.Then,tapandholdtheSafelyRemove
HardwareandEjectMediaicon.
2.T aptheitemyouwanttoremovetostopthecard.
3.Pullthecardoutwardalittle,andgentlyslidethecardoutoftheslot.
24UserGuide
Page 33

Note:IfyoudonotremovethesmartcardfromyourtabletafteryouejectthecardfromtheWindows
operatingsystem,thecardcannolongerbeaccessed.T oaccessthecard,youmustremoveitfirst,
theninsertitagain.
UsingHDMIdevices
YourtablethasamicroHDMIconnectorthatyoucanusetoconnectanexternaldisplayforvideooutput.
TolocatethemicroHDMIconnector,see“Tabletlayout”onpage1
Toconfigurescreensettingsfortheexternaldisplay,dothefollowing:
1.Swipeinfromtherightedgeofthescreentodisplaycharms.
2.T aptheDevicescharm.
3.T apProject➙Secondscreen.
4.T aptoselectapresentationscheme.
.
Usingsynchronizationsolutions
Byusingsynchronizationsolutions,youcaneasilysynchronizesettingsbetweenyourtabletandother
personalcomputer.
SynchronizingsettingsbyusingtheWindowssynchronizationsolution
ToaccessWindowssynchronizationsolution,dothefollowing:
1.Swipeinfromtherightedgeofthescreentodisplaythecharms.
2.T apSettings➙ChangePCsettings.
3.Inthenavigationpanel,tapSkyDrive➙Syncsettings.
4.Configuresettingsasdesired.
UsingtheGPSsatellitereceiver
Yourtabletmighthaveaglobalpositioningsystem(GPS)satellitereceiverthatenablesyoutopinpointyour
locationdowntothestreetlevel.Uselocation-basedapplicationstofindyourcurrentlocation,getdirections
toyourdestination,andfindotherlocation-basedinformation.
Note:Bydefault,theGPSsatellitereceiverisenabled.Foralongerbatterylife,disabletheGPSsatellite
receiverwhennotinuse.
TodisabletheGPSsatellitereceiver,dothefollowing:
1.Swipeinfromtherightedgeofthescreentodisplaythecharms.
2.T apSettings➙ChangePCsettings.
3.Inthenavigationpanel,tapNetwork➙Airplanemode.
4.IntheGNSSsection,slidethecontroltothelefttodisabletheGPSsatellitereceiver.
Chapter2.Usingyourtablet25
Page 34

26UserGuide
Page 35

Chapter3.Wirelessnetworksanddevices
Yourtabletcanconnecttoavarietyofnetworksanddevices,includingmobilenetworks(3Gor4G),Wi-Fi
datanetworks,andBluetoothdevices.
Note:Sometabletmodelscanconnecttobothmobilenetworks(3Gor4G)andWi-Finetworks,whileothers
canconnecttoWi-Finetworksonly.IfyourtabletsupportsWi-Ficonnectiononly,theinformationrelated
tomobilenetworksdoesnotapplytoyourtablet.
InstallingandremovingthemicroSIMcard
Ifthetabletsupportsmobilenetworkconnection,itmightrequireamicroSIMcardtoconnecttoamobile
network.Dependingonthecountryorregionofdelivery,themicroSIMcardmightbeshippedwiththe
tabletoryouneedtopurchaseonefromtheservicecarrier.
Attention:WheninstallingorremovingthemicroSIMcard,donottouchthemicroSIMcardmetal
connectors.AlwaysholdthetabletinyourhandbeforeyouinstallorremovethemicroSIMcardtoavoid
electrostaticdischarges.
ToinstallthemicroSIMcard,dothefollowing:
1.T urnoffthetablet.
2.Opentheprotectivecover.Thenlocatethemicro-SIM-cardslota.
©CopyrightLenovo2014
27
Page 36

3.HoldthemicroSIMcardwiththemetalcontactsfacingdown,andtheninsertitfirmlyintothe
micro-SIM-cardslotasshownuntilyouhearaclick.
4.Closetheprotectivecoverandturnonyourtablet.
ToremovethemicroSIMcard,dothefollowing:
1.T urnoffthetablet.
2.Opentheprotectivecover.
28UserGuide
Page 37

3.PushthemicroSIMcardinwarduntilyouhearaclick1.ThemicroSIMcardejects.Gentlyslide
themicroSIMcardoutoftheslot
4.Closetheprotectivecover.
2.
Determiningwhichmobilenetworkyouareusing
Ifyouhaveconnectedtoanetwork,youcancheckthenetworknametoseewhichmobilenetworkyou
areusing.
Tocheckthenetworkname,dooneofthefollowing:
•Swipeinfromtherightedgeofthescreentodisplaythecharms.ThentaptheSettingscharm.The
networknameisdisplayedunderthenetworkicon.
•Onthedesktop,movethepointertothenetworkiconintheWindowsnotificationarea.Thenetwork
nameisdisplayed.
ConnectingtoaWi-Finetwork
Wi-Fiisawirelessnetworkingtechnologythatprovidesnetworkaccessatdistancesofupto100meters
(328feet)dependingontheWi-Firouterandyoursurroundings.
AWi-FiconnectionrequiresaccesstoafunctioningWirelessAccessPoint(WAP),alsocalledahotspot.
Somehotspotsareopentothepublic,butsomeothersimplementsecurityfeaturestolimitaccessto
specificgroupsorindividuals.
Note:TherangeandqualityoftheWi-Fisignalareaffectedbythenumberofconnecteddevices,the
infrastructure,andtheobjectsthroughwhichthesignalistransmitted.
ConnectingtoaWi-Finetwork
ToestablishaWi-Finetworkconnection,dothefollowing:
1.Swipeinfromtherightedgeofthescreentodisplaythecharms.
2.T aptheSettingscharm.
Chapter3.Wirelessnetworksanddevices29
Page 38

3.T apthenetworkicon.AlistofavailableWi-Finetworksisdisplayed.
4.T aptheIDofthenetworkyouwanttoconnect.
5.FollowtheinstructionsonthescreentoconnecttotheWi-Finetwork.
Toviewsecurity,address,andotherinformationabouttheWi-Finetworkyouareconnected,dothefollowing:
1.Swipeinfromtherightedgeofthescreentodisplaythecharms.
2.T apSettings➙ChangePCsettings.
3.Inthenavigationpanel,tapNetwork➙Connections.
4.IntheWi-Fisection,tapthenetworknametoviewtheinformation.
ThetabletsupportstheproxyfeatureforWi-Ficonnection.Theproxyfeatureenablesyoutoaccessmore
Web-basedsourceandbrowseInternetmoresecurely.Ifyouwanttoconfiguretheproxysettingswhenyou
areconnectingtoaWi-Finetwork,dothefollowing:
1.Swipeinfromtherightedgeofthescreentodisplaythecharms.
2.T apSettings➙ChangePCsettings.
3.Inthenavigationpanel,tapNetwork➙Proxy.
4.Followtheinstructionsonthescreentoconfiguretheproxysettings.
AddingaWi-Finetwork
IfyouwanttoaccessaWi-Finetworkthatdoesnotbroadcastitsnetworkname(alsocalledaserviceset
identifierorSSID),youmustaddthatWi-Finetworkbeforeyoucanconnecttoit.
ToaddaWi-Finetwork,dothefollowing:
1.Swipeinfromtherightedgeofthescreentodisplaythecharms.
2.T aptheSettingscharm.
3.T apthenetworkicon.AlistofavailableWi-Finetworksisdisplayed.
4.T apHiddennetwork.
5.FollowtheinstructionsonthescreentoaddaWi-Finetwork.
Addinganetworkprofile
EachlocationprofilestoresallthenetworkandInternetconfigurationsettingsneededforconnectingtoa
networkinfrastructurefromaspecificlocationsuchasahomeoranoffice.Byswitchingbetweenlocation
profilesasyoumoveyourtabletfromplacetoplace,youcanquicklyandeasilyconnecttoanetworkwith
noneedtoreconfigureyoursettingsmanuallyandrestartthetableteachtime.
Toaddanetworkprofile,dothefollowing:
1.FromtheStartmenu,tapLenovoSettings.
2.T apLocationAwareness.
3.Followtheinstructionsonthescreentoaddanetworkprofile.
Connectingtoamobilenetwork
AmicroSIMcardisrequiredtoconnecttoamobilenetwork.Referto“InstallingandremovingthemicroSIM
card”onpage27forinstructionsonhowtoinstallamicroSIMcard.
Note:SometabletssupportaccesstoWi-Finetworksonly.See“ConnectingtoaWi-Finetwork”onpage
29forinstructionsonconnectingtoaWi-Finetwork.
30UserGuide
Page 39

Toconnecttothemobilenetwork,dothefollowing:
1.Swipeinfromtherightedgeofthescreentodisplaythecharms.
2.T aptheSettingscharm.
3.T apthenetworkicon.Alistofavailablenetworksisdisplayed.
4.IntheMobilebroadbandsection,slidethecontroltotherighttoturniton.
5.T apthenetworkname.Amenuisdisplayed.
6.T apConnect.
Whenyouareconnectedtothemobilenetwork,settheactivemobilenetworkasmeteredconnectionto
reducetheamountofdatayousendandreceive.
Tosettheactivemobilenetworkasmeteredconnection,dothefollowing:
1.Swipeinfromtherightedgeofthescreentodisplaythecharms.
2.T apSettings➙ChangePCsettings.
3.Inthenavigationpanel,tapNetwork➙Connections.
4.IntheMobilebroadbandsection,tapthenetworkname.Amenuisdisplayed.
5.IntheSetasameteredconnectionsection,slidethecontroltotherighttoturniton.
Afteryousetyourmobilenetworkasameteredconnection,youcandisabletheDownloadovermetered
connectionsfeaturetopreventextracharges.
TodisabletheDownloadovermeteredconnectionsfeature,dothefollowing:
1.Swipeinfromtherightedgeofthescreentodisplaythecharms.
2.T apSettings➙ChangePCsettings.
3.Inthenavigationpanel,tapPCanddevices➙Devices.
4.IntheDownloadovermeteredconnectionssection,slidethecontroltothelefttoturnitoff.
SharingyourInternetconnection
YoucanshareyourmobilebroadbandInternetconnectionwithmultipledevices.
ToshareyourInternetconnection,dothefollowing:
1.Swipeinfromtherightedgeofthescreentodisplaythecharms.
2.T apSettings➙ChangePCsettings.
3.Inthenavigationpanel,tapNetwork➙Connections.
4.IntheMobilebroadbandsection,tapthenetworkname.Amenuisdisplayed.
5.IntheSharethisconnectionsection,slidethecontroltotherighttoturniton.
UsingBluetoothdevices
Bluetoothisashort-rangewirelesscommunicationstechnology.UseBluetoothtoestablishawireless
connectionwithanotherBluetooth-enableddeviceoveradistanceofabout10m(32.8ft).
PairingwithaBluetoothdevice
ToconnectandexchangedatawithanotherBluetoothdevice,pairyourtabletwiththeBluetoothdevice
bydoingthefollowing:
1.Swipeinfromtherightedgeofthescreentodisplaythecharms.
Chapter3.Wirelessnetworksanddevices31
Page 40

2.T apSettings➙ChangePCsettings.
3.Inthenavigationpanel,tapPCanddevices➙Bluetooth.
4.Slidethecontroltotherighttoturniton.ThetabletwillsearchforBluetoothdevices.
5.WhentheBluetoothdeviceyouwanttopairisfound,taptheIDoftheBluetoothdevice.
6.T apPair.
UnpairingaBluetoothdevice
TounpairaBluetoothdevice,dothefollowing:
1.Swipeinfromtherightedgeofthescreentodisplaythecharms.
2.T apSettings➙ChangePCsettings.
3.Inthenavigationpanel,tapPCanddevices➙Bluetooth.
4.T aptheIDoftheBluetoothdeviceyouwanttounpair.
5.T apRemovedevice.Anotificationpromptisdisplayed.
6.T apY es.
UsingtheNFCconnection
Nearfieldcommunicationisahigh-frequencyandshort-rangewirelesscommunicationstechnology.
Dependingonthemodel,yourtabletmightcomewiththeNFCfeature.ByusingtheNFCfeature,youcan
establishradiocommunicationsbetweenyourtabletandanotherNFC-enableddeviceoveradistanceno
morethanafewcentimeters.
Bydefault,theNFCfeatureisenabled.IftheNFCfeatureofyourtabletisdisabled,dothefollowingto
enabletheNFCfeature:
1.Swipeinfromtherightedgeofthescreentodisplaythecharms.
2.T apSettings➙ChangePCsettings➙Network➙Radiodevices.
3.SlidetheNFCcontroltotherighttoenabletheNFCfeature.
IfyoustillcannotenabletheNFCfeature,checktheNFCsettingintheThinkPadT abletSetupprogram
bydoingthefollowing:
1.StarttheThinkPadT abletSetupprogram.See“Securitymenu”onpage57.
2.T apSecurity➙I/OPortAccess.
3.SettheNFCoptiontoOn.
YoucanusetheNFCfeaturewithNFCsupportedprograms,suchastheLenovoQuickCastprogram
andtheLenovoQuickDisplayprogram.
32UserGuide
Page 41

Chapter4.Youandyourtablet
Thischapterprovidestheaccessibilityinformationaboutyourtablet,andinstructionsontravelingwith
thetabletandmaintainingthetablet.
Comfortandaccessibility
Readthistopictolearnhowtouseyourtabletmorecomfortablyandhowtousetheaccessibilityfeatures.
Usingyourtabletmorecomfortably
Withthehelpofalltheconveniencesandpowerfulfeaturesofyourtablet,youcancarryyourtabletallday
longforworkorentertainmentatmanyplaces.Thereforeitisimportantthatyouremainattentivetogood
posture,goodlighting,andproperseatingtoachievegreatercomfortwithyourtablet.
Activesittingandrestbreaks:Thelongeryousitandworkwithyourtabletthemoreimportantitisto
observeyourworkingposture.Makeminorvoluntaryposturalchangesandtakefrequent,shortbreakswhen
youusethetabletforalongtime.Y ourtabletisalightandmobilesystem;rememberthatitcaneasilybe
repositionedtoaccommodatemanyposturemodificationsyoumightwishtomake.
Workareasetupoptions:Familiarizeyourselfwithallofyourofficefurnituresothatyouknowhowtoadjust
yourworksurface,seat,andotherworktoolstoaccommodateyourpreferencesforcomfort.Ifyourwork
areaisnotinanofficesetting,besuretotakespecialnoteofemployingactivesittingandutilizingwork
breaks.NotethattherearemanyThinkPadproductsolutionsavailabletohelpyoumodifyandexpand
yourtablettobestsuityourneeds.AccesstheWebsitehttp://www.lenovo.com/essentialstoviewsome
oftheseoptions.Exploreyouroptionsfordockingsolutionsandexternalproductsthatcanprovidethe
adjustabilityandfeaturesthatyouwant.
Accessibilityinformation
Lenovoiscommittedtoprovidingpeoplewithdisabilitiesgreateraccesstoinformationandtechnology.
Sometechnologiesarealreadyprovidedinyouroperatingsystem.Otherscanbepurchasedthrough
vendors.
UsersalsocanusetheEaseofAccessCenterprovidedintheWindowsoperatingsystemtoconfiguretheir
tablettosuittheirphysicalandcognitiveneeds.TheEaseofAccessCenterisacentrallocationthatyoucan
usetoconfiguretheaccessibilitysettingsandprogramsavailableintheMicrosoftWindowsoperatingsystem.
TousetheEaseofAccessCenter,openControlPanelandtapEaseofAccess➙EaseofAccessCenter.
Thefollowinginformationprovideswaystohelpuserswhohavehearing,vision,andmobilitylimitationsget
themostoutoftheircomputerexperience.
On-screennotification
On-screennotificationhelpshearing-impairedpeoplebeawareofthestatusoftheirtablet.On-screen
notificationreplacessoundswithvisualcuesortextcaptionstoindicatethatactivityishappeningon
thetablet.Asaresult,systemalertsarenoticeableevenwhentheyarenotheard.Forexample,when
youselectoneobject,theobjectishighlighted.
Touseon-screennotification,openControlPanel,tapEaseofAccess➙EaseofAccessCenter,and
thentapUsetextorvisualalternativeforsounds.
©CopyrightLenovo2014
33
Page 42

Audionotification
Audionotificationhelpsvisuallyimpairedpeopleorpeoplewithweaksightbeawareofthestatusoftheir
tablet.
Touseaudionotification,openControlPanel,tapEaseofAccess➙EaseofAccessCenter➙Usethe
computerwithoutadisplay,andthenselectTurnonAudioDescription.
Narrator
Narratorisascreenreaderthatreadstextsonthescreenaloudanddescribeseventslikeerrormessages.
ToopenNarrator,dothefollowing:
1.SwipeinfromtherightedgeofthescreentodisplaythecharmsandtapSearch.
2.Inthesearchfiled,enterNarrator,andthen,inthelistofresults,tapNarrator.
FormoreinformationabouthowtouseandconfigureNarrator,seetheWindowsHelpandSupport
informationsystem.
Screen-readertechnologies
Screen-readertechnologiesareprimarilyfocusedonsoftwareprograminterfaces,helpinformationsystems,
andavarietyofonlinedocuments.Foradditionalinformationaboutscreenreaders,seethefollowing:
•UsingPDFswithscreenreaders:
http://www.adobe.com/accessibility.html?promoid=DJGVE
•UsingtheJAWSscreenreader:
http://www.freedomscientific.com/jaws-hq.asp
•UsingtheNVDAscreenreader:
http://www.nvaccess.org/
SpeechRecognition
SpeechRecognitionenablesyoutocontrolyourtabletbyvoice.
Usingonlyyourvoice,youcanstartprograms,openmenus,tapbuttonsandotherobjectsonthescreen,
dictatetextintodocuments,andwriteandsende-mails.
ToopenSpeechRecognition,dothefollowing:
1.SwipeinfromtherightedgeofthescreentodisplaythecharmsandtapSearch.
2.Inthesearchfiled,enterSpeechRecognition,andthen,inthelistofresults,tapSpeechRecognition.
FormoreinformationabouthowtouseandconfigureSpeechRecognition,seetheWindowsHelpand
Supportinformationsystem.
Customizabletextsize
Dependingonyourpreference,youcanchangeonlythetextsizeinsteadofchangingthesizeofeverything
onthedesktop.Tochangethetextsize,openControlPanelandtapAppearancesandPersonalization➙
Display.Then,gotoChangeonlythetextsizeandsetatextsizethatmeetsyourneeds.
Magnifier
YourtabletisequippedwiththeMicrosoftMagnifiertohelpvisuallyimpairedpeopleusethecomputermore
comfortably.Magnifierisausefulutilitythatenlargespartorallofyourscreensothatyoucanseethewords
andimagesbetter.MagnifierispartoftheEaseofAccessCenter.
34UserGuide
Page 43

ToopenMagnifier,dothefollowing:
1.SwipeinfromtherightedgeofthescreentodisplaythecharmsandtapSearch.
2.Inthesearchfiled,enterMagnier,andthen,inthelistofresults,tapMagnifier.
FormoreinformationabouthowtouseandconfigureMagnifier,seetheWindowsHelpandSupport
informationsystem.
Zoom
Youcanusethezoomfeaturetoenlargeorreducethesizeoftext,pictures,maps,orotherobjects.
•Zoomin:Movetwofingersfartherapartonthetouchscreentoenlargethesizeoftext,pictures,maps,
orotherobjects.
•Zoomout:Movetwofingersclosertogetheronthetouchscreentoreducethesizeoftext,pictures,
maps,orotherobjects.
Screenresolution
Youcanmakeyourdocumentseasiertoreadbyadjustingthescreenresolutionofyourtablet.T oadjust
thescreenresolution,tapandholdanywhereonthedesktop,tapScreenresolution,andthenadjustthe
settingsasyouprefer.
Note:Settingtoolowofaresolutionmightpreventsomeitemsfromfittingonthescreen.
Foralternativesonincreasingthesizeoftextandotherobjects,seethefollowing:
•“Customizabletextsize”onpage34
•“Magnifier”onpage34
•“Zoom”onpage35
On-ScreenKeyboard
On-ScreenKeyboarddisplaysavisualkeyboardwithallthestandardkeys.
ToopenOn-ScreenKeyboard,dothefollowing:
1.SwipeinfromtherightedgeofthescreentodisplaythecharmsandtapSearch.
2.Inthesearchfiled,enterOn-ScreenKeyboard,andthen,inthelistofresults,tapOn-ScreenKeyboard.
FormoreinformationabouthowtouseandconfigureOn-ScreenKeyboard,see“UsingtheOn-Screen
Keyboardorthetouchkeyboardandhandwritingpanel”onpage15ortheWindowsHelpandSupport
informationsystem.
Industry-standardconnectors
Yourtabletprovidesindustry-standardconnectorsthatenableyoutoconnectassistivedevices,ifneeded.
Formoreinformationonthelocationandfunctionofeachconnector,see“Tabletlayout”onpage1.
Documentationinaccessibleformats
Lenovoprovideselectronicdocumentationinaccessibleformats.Lenovoelectronicdocumentation,suchas
properlytaggedPDFfilesorHyperT extMarkupLanguage(HTML)files,isdevelopedtoensurethatvisually
impaireduserscanreadthedocumentationthroughascreenreader.Eachimageinthedocumentationalso
includesadequatealternativetexttoexplaintheimagesothatvisuallyimpaireduserscanunderstandthe
imagewhentheyuseascreenreader.
Chapter4.Y ouandyourtablet35
Page 44

Gettingupdates
YourtabletenablesyoutoupdatetheWindowsoperatingsystemandLenovoapplications.
GettingupdatesfromLenovo
YourtabletispreinstalledwithSystemUpdate.ThisprogramenablesyoutokeeptheLenovosoftwareon
yourtabletup-to-datebydownloadingandinstallingsoftwareupdates.
TostartSystemUpdate,dothefollowing:
1.Swipeinfromtherightedgeofthescreentodisplaythecharms.
2.T aptheSearchcharmtosearchforSystemUpdate.
3.T apSystemUpdate.
4.Followtheinstructionsonthescreen.
GettingupdatesfromMicrosoft
TocheckandkeepyourWindows,programs,ordevicedriversup-to-date,seetheWindowsHelpand
Supportformoreinformation.
Travelingwithyourtablet
Thistopicprovidesinformationtohelpyouworkwithandtransportyourtabletwhileyoutraveling.
Traveltips
Usethefollowingtraveltipstotravelmoreconfidentlyandefficientlywithyourtablet:
1.Whileitissafetoallowyourtablettogothroughthexraymachinesatairportsecuritystations,itis
importanttokeepyoureyesonthetabletatalltimestopreventtheft.
2.Putyourtabletinaprotectivecasewhennotinusetopreventdamageorscratching.
Traveltipsonairplanes
Ifyoucarryyourtabletintoanairplane,checkthefollowingtraveltips:
1.Ifyouaregoingtousethewirelessservice,checkwiththeairlineforanyrestrictionsbeforeboarding
theairplane.
2.Iftherearerestrictionsontheuseoftabletswiththewirelessfeatureonanairplane,enabletheAirplane
mode.Toenableit,dothefollowing:
a.Swipeinfromtherightedgeofthescreentodisplaythecharms.
b.TapSettings➙ChangePCsettings.
c.Inthenavigationpanel,tapNetwork➙Airplanemode.
d.SlidethecontroltotherighttoturnonAirplanemodetodisableallwirelessdevices.
3.Becarefulabouttheseatinfrontofyouontheairplane.Placeyourtabletinasafepositionsothatit
doesnotgetcaughtwhenthepersoninfrontofyouleansback.
Travelaccessories
Thefollowingisachecklistofthingstoconsiderpackingwhenyouaregoingtobeawayfromyourofficeor
home:
36UserGuide
Page 45

Travelessentials:
•Theacpoweradapterthatcomeswithyourtablet
•Thepowercordthatcomeswithyourtablet
•Aqualitycarryingcasethatprovidesadequatecushionandprotection
Ifyouaretravelingtoanothercountryorregion,youmightwanttoconsiderthefollowingitems:
•AThinkPadacpoweradapterforthecountryorregiontowhichyouaretraveling
•AmicroSIMcardforthelocalmobileservicesinthatcountryorregion
Otheritemsyoumightwanttoconsider:
•ThinkPadheadphones
•Additionalstoragedevicesorsmartcards
•TabletDigitizerPen
•ThinkPadTabletDock
•ThinkPad10TouchCase
•ThinkPad10QuickshotCover
•ThinkPad10UltrabookKeyboard
Careandmaintenance
Handleyourtabletwithcaresothatyoucanenjoythisproductforalongtime.
Cleaningyourtablet
Tocleanyourtablet,unplugallcablesandturnoffthetabletbypressingandholdingthepowerbuttonfora
fewseconds.Thenwipethetabletscreenwithasoft,lint-free,dryclothtoclearstainsandsmudges.
Note:Donotusescreencleaners,householdcleaners,aerosolsprays,solvents,alcohol,ammonia,or
abrasivestocleanyourtablet.
Protectingthescreenwithareplaceablefilm
Youcanpurchaseareplaceablefilmtoprotectthescreenfromscratchingandextendthelifeofyourtablet.
Touseareplaceablefilm,cleanthescreenfirstandthenapplythereplaceablefilmonthescreen.
Storingthetabletforextendedperiods
Ifyouarenotgoingtouseyourtabletforanextendedperiodoftime,removethemicroSIMcardfromyour
tablet,andthenpackyourtabletwithaprotectivecaseandstoreitinawell-ventilatedanddryareawithout
directexposuretosunshine.
Chapter4.Y ouandyourtablet37
Page 46

38UserGuide
Page 47

Chapter5.ThinkPad10options
TheThinkPad10UltrabookKeyboard,theThinkPad10T ouchCase,andtheThinkPadTabletDock
areoptionaldevicesthatLenovodesignedspecificallyfortheThinkPad10tablet.Theseoptions
provideconvenienceandmakeyourtableteasiertouseforwork,study,andentertainment.For
tabletsthatdonotcomewiththeseoptionaldevices,youcanpurchasethemfromLenovoat
http://www.lenovo.com/accessories/services/index.html.
Note:TheThinkPad10TouchCaseisspecificallydesignedforThinkPad10tabletsthatarenotequipped
withasmartcardslot.
ThinkPad10UltrabookKeyboard
ThefollowingillustrationshowstheoverviewoftheThinkPad10UltrabookKeyboard.
12T abletDigitizerPenslotcoverandTabletDigitizerPenslot
SomemodelscomewithaTabletDigitizerPenslotcover1.TostoretheTabletDigitizerPenintheT ablet
DigitizerPenslot,removetheT abletDigitizerPenslotcoverfromtheslotfirst.
Note:EnsurethatyoukeeptheTabletDigitizerPenslotcover.ReattachittotheTabletDigitizerPenslot
whenyouarenotstoringthepenintheslot.
3Keyboard
TheThinkPad10UltrabookKeyboardprovidesasix-rowkeyboard.Formoreinformation,see“Using
theThinkPad10UltrabookKeyboard”onpage40.
4Two-buttonclickpad
Thetwo-buttonclickpadisapointer-positioningdevicethatenablesyoutopoint,select,drag,andscroll,
likeyoudowhenusingamouse.
Formoreinformation,see“UsingtheThinkPad10UltrabookKeyboard”onpage40
©CopyrightLenovo2014
.
39
Page 48

5Specialkeys
Thespecialkeysenableyoutocontrolmanyfeaturesofyourtabletbypressingasinglekey.Formore
information,see“UsingtheThinkPad10UltrabookKeyboard”onpage40
.
UsingtheThinkPad10UltrabookKeyboard
ThistopicprovidesinstructionsonhowtousetheThinkPad10UltrabookKeyboard.
TousetheThinkPad10UltrabookKeyboard,installyourtabletintotheThinkPad10UltrabookKeyboard
first,asshowninthefollowingillustration.Ensurethatthetabletissecuredinplace.
Note:DonotdetachthetabletfromtheThinkPad10UltrabookKeyboardwhileusingtheThinkPad10
UltrabookKeyboard,otherwisetheThinkPad10UltrabookKeyboardwillbedisabled.
StoringandremovingtheTabletDigitizerPen
SomemodelsareequippedwithaTabletDigitizerPenasastandardfeature.Youcanstorethepeninthe
slotontherightsideoftheThinkPad10UltrabookKeyboard.RemovetheTabletDigitizerPenslotcover
first1,thenpushthepengentlyintotheslotuntilyouhearaclick2.
Note:TheT abletDigitizerPenslotcoverisavailableonsomemodels.
40UserGuide
Page 49

Toremovethepenfromtheslot,pressthepengentlyintotheslot1toreleaseit;thenpullthepenout2.
Note:Thepencontainspressuresensors.Donotpushthetipofthepenforanextendedperiodoftime.Do
notsubjectthepentoshockorvibration.
Formoreinformationaboutusingthepen,see“UsingtheTabletDigitizerPen”onpage14.
Usingthespecialkeys
TheThinkPad10UltrabookKeyboardhasseveralspecialkeys.Pressaspecialkeytoquicklycontrol
theassociatedfunction.
Volumeandmutecontrol
•Mutethespeakers.
•Turndownthespeakervolume.
•Turnupthespeakervolume.
•Mutethemicrophone.
Screencontrol
•Turndownthebrightness.
•Turnupthebrightness.
Applicationcontrol
•
OpentheSettingscharm.
•OpentheSearchcharm.
•
Viewallapplicationsthatyouhaveopened.
•Viewallapplications.
•Navigatetothetopwhenyouareviewinginformation,suchasadocumentoraWebpage.
•
Navigatetothebottomwhenyouareviewinginformation,suchasadocumentoraWebpage.
Chapter5.ThinkPad10options41
Page 50

Fnkeycontrol
+:PressFn+EsctoenableordisabletheFnLockfunction.
•WhentheFnLockfunctionisdisabled:TheFnLockindicatorisoff.Toinitiatethespecialfunction
ofeachkey,pressthefunctionkeydirectly.ToinputF1–F12,presstheFnkeyandthecorresponding
functionkey.
•WhentheFnLockfunctionisenabled:TheFnLockindicatorturnson.ToinputF1–F12,pressthe
correspondingfunctionkeydirectly.Toinitiatethespecialfunctionofeachkey,presstheFnkeyandthe
correspondingfunctionkey.
CarryingorstoringthetablettogetherwiththeThinkPad10UltrabookKeyboard
SometimesyoudonotneedtousethekeysontheThinkPad10UltrabookKeyboard,butyouwouldlike
tocarryorstorethetablettogetherwiththeThinkPad10UltrabookKeyboard.Inthissituation,youmight
considerthefollowingmethodsdependingonthemodelofyourtablet.
•Formodelsthatarenotequippedwithasmartcardslot,youcaninstallthetabletintotheThinkPad10
UltrabookKeyboardwiththetabletscreenfacingupward.T oachievethis,dothefollowing:
1.Positionthetabletwiththetabletscreenfacingupward.
2.Gentlyslideyourtabletasshown.ThetabletwillbeattachedtotheThinkPad10UltrabookKeyboard
magnetically.TheThinkPad10UltrabookKeyboardisdisabledinthissituation.
•Forallmodels,youcaninstallthetabletintotheThinkPad10UltrabookKeyboardwiththetabletscreen
facingdownward.Toachievethis,dothefollowing:
Note:Yourtabletmightlookslightlydifferentfromthefollowingillustrations.
42UserGuide
Page 51

1.Positionthetabletwiththetabletscreenfacingdownward.
2.Gentlyslideyourtabletasshown.ThetabletwillbeattachedtotheThinkPad10UltrabookKeyboard
magnetically.TheThinkPad10UltrabookKeyboardisdisabledinthissituation.
Formoreinformation,refertothedocumentationthatcamewiththeThinkPad10UltrabookKeyboard.
ThinkPad10T ouchCase
TheThinkPad10TouchCase(hereaftercalledthetouchcase)isdesignedforThinkPad10tabletmodels
thatarenotequippedwithasmartcardslot.
Note:Yourtouchcasemightlookslightlydifferentfromthefollowingillustrations.
Thefollowingillustrationsshowtheoverviewofthetouchcase.
Chapter5.ThinkPad10options43
Page 52

1Tabletholder(top)
Worksasaholdertothetabletsothatyourtabletcanseatsecurelyinthetouchcase.
2Camerahole
Youcanusethecamerathroughthisholewhenyouareusingthetabletwiththetouchcase.
3Tabletholder(bottom)
Worksasaholdertothetabletsothatyourtabletcanseatsecurelyinthetouchcase.
4Touchpad
Thetouchpadisapointer-positioningdevicethatenablestoyoutopoint,select,drag,andscroll,like
youdowhenusingamouse.
5Tablet-fixinggroove
Attachthetabletholder(bottom)tothetablet-fixinggroovemagnetically.Thenyoucaninstallthetabletinto
thetouchcase.
6TabletDigitizerPenslot
IfyourtabletcomeswithaTabletDigitizerPen.Y oucanstoretheTabletDigitizerPenintheslotontheleft
sideofthetouchcase.
UsingtheThinkPad10TouchCase
TheThinkPad10TouchCase(hereaftercalledthetouchcase)isdesignedforThinkPad10tabletmodels
thatarenotequippedwithasmartcardslot.
Note:Yourtouchcasemightlookslightlydifferentfromthefollowingillustrations.
Installingthetabletintothetouchcase
Tousethetouchcase,installyourtabletintothetouchcasefirst.T oinstallthetabletintothetouchcase,
dothefollowing:
44UserGuide
Page 53

1.Unfoldthetouchcase,andthenalignthetabletholder(bottom)withthetablet-fixinggroove.Thetablet
holder(bottom)willbeattachedtothetablet-fixinggroovemagnetically.Ensurethatthetabletholder
(bottom)issecurelyseatedinthetablet-fixinggroove.
2.Alignthekeyboardconnectoronthetabletwiththekeyboardconnectoronthetouchcasefirst,and
theninstallthetabletintothetouchcaseasshown.Ensurethatthetabletissecurelyseatedinboththe
tabletholder(top)andthetabletholder(bottom).Then,youcanusethetabletasanotebookcomputer.
Notes:
•Donotdetachthetabletholder(bottom)fromthetablet-fixinggroovewhileusingthekeyboard,otherwise
thekeyboardwillbedisabled.
•Donotremovethetabletfromthetabletholder(top)orthetabletholder(bottom)whileusingthe
keyboard,otherwisethekeyboardwillbedisabled.
Carryingthetabletwiththetouchcase
Tocarrythetabletwiththetouchcase,foldthetouchcasefirst.Tofoldthetouchcase,dothefollowing:
Chapter5.ThinkPad10options45
Page 54

1.Carefullyholdthetabletandtheuppersectionofthetouchcasewithyourfingersandgentlyreleasethe
tabletholder(bottom)fromthetablet-fixinggroove.
2.Foldthetouchcaseslowlyasshowninthefollowingillustration.
Then,youcancarrythetabletwiththetouchcase,whichalsoservesasaprotectioncaseforthetablet.
FormoreinformationabouttheThinkPad10TouchCase,refertothedocumentationthatcamethetouch
case.
ThinkPadT abletDock
TheThinkPadTabletDock(hereaftercalledthedock)holdsyourtabletinanuprightpositionandfreesyour
handstodoothertasks.ThedockalsoprovidesyouwitheasyaccesstoconnectorsforUSBdevices,file
transfers,charging,audioinput,audiooutput,andvideooutput.
46UserGuide
Page 55

Frontviewandleft-sideviewofthedock
1Dockconnector
Usedtoestablishtheconnectionbetweenthedockandtabletwhenyourtabletisseatedinthedock.
2Always-onUSBconnector(USB3.0connector)
Usedtochargesomemobiledigitaldevicesandsmartphonesbydefault,nomatterwhenyourtabletis
off,insleepmode,orinhibernationmode.Formoreinformation,refertothedocumentationthatcame
withthedock.
Note:ThisconnectoriscompatiblewiththeUSB2.0standard.
3Comboaudioconnector
Usedtoconnectheadphonesoraheadsettolistentostereosoundfromthetablet.Y oualsocanconnecta
headsettorecordaudioormakecalls.
Rearviewofthedock
1USB3.0connectors
UsedtoconnectdevicesthatarecompatiblewithUSB3.0andUSB2.0.
2HDMIconnector
Usedtoconnectacompatibledigitalaudiodeviceorvideodisplay.
3Ethernetconnector
UsedtoconnectthedocktoanEthernetLAN.
4Powerconnector
Usedtoconnecttheacpoweradaptershippedwiththedocktoprovidepowertothetabletandcharge
thebattery.
Chapter5.ThinkPad10options47
Page 56

UsingtheThinkPadTabletDock
Beforeusingthedock,ensurethatyouconnectthetablettothedockandthenconnectthedocktoan
electricaloutletbydoingthefollowing:
1.Positionyourtabletwiththedockconnectorsidefacingdownward.
2.Alignthedockconnectoronthetabletwiththeoneonthedock.
3.Gentlyslideyourtabletintothedockuntilitisseatedinplace.
4.Usetheacpoweradapterandpowercordshippedwiththedocktoconnectthedocktoanelectrical
outlet.
48UserGuide
Page 57

Afterthetabletisconnectedtothedock,youcan:
•Useyourtabletinanuprightpositionwithouthavingtoholdthetablet.
•UsethedocktoholdyourtabletuprightwhenusinganexternalUSBkeyboard.
•ConnectthedocktoyourpersonalUSBstoragedevicewiththesuppliedUSBcabletotransferfiles.
•Connectthedocktoastereosystemorspeakersusingastereoaudiocabletoplaymusic.
•Connectthedocktoanelectricaloutletusingtheacpoweradaptershippedwiththedocktocharge
thetabletbattery.
Chapter5.ThinkPad10options49
Page 58

50UserGuide
Page 59

Chapter6.Security
Thischapterprovidesinformationabouthowtoprotecttheinformationstoredonyourtablet.
Usingpasswords
Youcanhelppreventyourtabletfromunauthorizedusebyusingpasswords.Onceyousetapassword,a
promptisdisplayedonthescreeneachtimeyouturnonthetablet.Enteryourpasswordattheprompt.Y ou
cannotusethetabletunlessyoutypethecorrectpassword.
Passwordsandsleepmode
IfyouhavesetaWindowspasswordandyouputyourtabletintosleepmode,youwillbepromptedtoenter
thepasswordwhenresumingoperation.
IfyouuseyouremailaddressasauseraccounttosignintoWindows,enteryouremailpasswordwhen
resumingoperation.
Supervisorpassword
IfyouhavesetasupervisorpasswordintheThinkPadTabletSetupprogram,youwillbepromptedtoentera
supervisorpasswordwhenyoustarttheThinkPadT abletSetupprogram.
ThesupervisorpasswordprotectsthesysteminformationstoredinThinkPadTabletSetup.Withoutit,
noonecanchangetheconfigurationofthetablet.
Note:Thesystemadministratorcansetthesamesupervisorpasswordonmanytabletstomake
administrationeasier.
Setting,changing,orremovingasupervisorpassword
Onlyasystemadministratorcanset,change,orremoveasupervisorpassword.
Toset,change,orremoveasupervisorpassword,dothefollowing:
1.Printtheseinstructions.
2.Saveallopenfiles,andexitallapplications.
3.Pressthepowerbuttonandthevolume-upbuttonatthesametimewhenyouturnonthetablet.The
ThinkPadT abletSetupprogrammenuopens.
4.T apSecurity.
5.T apPassword.
6.Dependingonyourneeds,dooneofthefollowing:
•Tosetapassword,dothefollowing:
a.TapEnter.Awindowopens.IntheEnterNewPasswordfield,enteradesiredpassword.
b.IntheConfirmNewPasswordfield,reenterthepasswordandtapOK.
c.IntheChangeshavebeensavedwindow,tapOK.
•Tochangeapassword,dothefollowing:
a.TapEnter.Awindowopens.IntheEnterCurrentPasswordfield,enterthecurrentsupervisor
password.
©CopyrightLenovo2014
51
Page 60

b.IntheEnterNewPasswordfield,enteranewsupervisorpassword.
c.IntheConfirmNewPasswordfield,reenterthenewsupervisorpasswordandtapOK.
d.IntheChangeshavebeensavedwindow,tapOK.
•Toremoveapassword,dothefollowing:
a.TapEnter.Awindowopens.IntheEnterCurrentPasswordfield,enterthecurrentsupervisor
password.
b.LeavetheEnterNewPasswordandConfirmNewPasswordfieldsblank.T apOK.
c.IntheChangeshavebeensavedwindow,tapOK.
Attention:Itisrecommendedthatyourecordyourpasswordandstoreitinasafeplace.Ifyouforget
yoursupervisorpassword,Lenovocannotresetyourpassword.Y oumusttakeyourtablettoaLenovo
reselleroraLenovomarketingrepresentativetohavethesystemboardreplaced.Proofofpurchaseis
required,andafeewillbechargedforpartsandservice.
7.Saveconfigurationchangesandexit.
ThenexttimeyouopentheThinkPadTabletSetupprogram,youwillbepromptedtoenteryourpassword
toproceed.
Usingthesecuritychip
Strictsecurityrequirementsareimposedonnetworkclientcomputersthattransferconfidentialinformation
electronically.Y oucansetthesecuritychipinyourtablettoenhancecomputingsecurity.Somemodels
areequippedwithonesecuritychipcalledthefirmwareTPM(displayedas“T rustedPlatformModule
2.0”inDeviceManager).SomemodelsareequippedwithtwosecuritychipscalledthediscreteTPM
(displayedas“TrustedPlatformModule1.2”inDeviceManager)andthefirmwareTPM.Formodelswithtwo
securitychips,youcanselectwhichoneyouwanttouseintheThinkPadTabletSetupprogrambyusing
theinstructionsinthistopic.
Note:EnsurethatthesupervisorpasswordhasbeensetintheThinkPadT abletSetupprogram;otherwise
anyonecanchangethesettingsforthesecuritychip.
AbouttheSecurityChipmenu
TheSecurityChipmenuprovidesthefollowingitemsforyoutoconfiguretheembeddedsecuritychip.You
canfindtheSecurityChipmenufromtheSecuritymenuoftheThinkPadT abletSetupprogram.
•SecurityChipSelection:Selectthesecuritychipyouwanttouse.Thisitemisdisplayedonlyonsome
tabletmodels.
•SecurityChip:Enableordisablethesecuritychip.
•ClearSecurityChip:Cleartheencryptionkey.Thisoptionisnotdisplayedwhenthesecuritychipis
inactiveordisabled.T oclearthesecuritychip,ensurethatyouactivateorenablethesecuritychipfirst
sothatthisoptioncanbedisplayed.
Settingthesecuritychip
TosetthesecuritychipthroughtheSecurityChipmenu,dothefollowing:
1.Printtheseinstructions.
2.Saveallopenfilesandexitallapplications.Then,turnoffyourtablet.
3.Pressthepowerbuttonandthevolume-upbuttonatthesametimewhenyouturnonthetablet.The
ThinkPadT abletSetupprogrammenuopens.
4.T apSecurity.
5.T apSecurityChip.
52UserGuide
Page 61

6.Settheitems.
7.Saveconfigurationchangesandexit.
Usingfirewalls
Ifyoursystemispreinstalledwithafirewallprogram,itprotectsagainstcomputerInternetsecuritythreats,
unauthorizedaccess,intrusions,andInternetattacks.Italsoprotectsyourprivacy.
Formoreinformationabouthowtousethefirewallprogram,refertotheonlinehelpthatcomeswiththe
program.
Protectingdataagainstviruses
Yourtabletispreinstalledwithanantivirusprogramsoyoucandetectandeliminateviruses.Theantivirus
programisdesignedtohelpyoudetectandeliminateviruses.
Lenovoprovidesafullversionofantivirussoftwareonyourtabletwithafree30-daysubscription.After30
days,youmustrenewthelicensetocontinuereceivingtheantivirussoftwareupdates.
Formoreinformationabouthowtouseyourantivirussoftware,refertothehelpsystemofyourantivirus
software.
Chapter6.Security53
Page 62

54UserGuide
Page 63

Chapter7.Advancedconfiguration
IfyouneedtoupdateyoursystemUEFIBIOS,installnewdevicedrivers,thisinformationwillhelpyouhandle
yourtabletwithpropercareandkeepitintopworkingshape.
•“Installingdevicedrivers”onpage55
•“ThinkPadT abletSetup”onpage55
•“Usingsystemmanagement”onpage61
Installingdevicedrivers
Thedevicedriversareavailableathttp://www.lenovo.com/ThinkPadDrivers.Chooseyourtabletproduct
nametoviewallthedevicedriversforyourtablet.
Attention:Alwaysgotohttp://www.lenovo.com/ThinkPadDriversforthelatestdevicedrivers.Donot
downloadthemfromtheWindowsUpdateWebsite.
ThinkPadT abletSetup
YourtabletcomeswiththeThinkPadTabletSetupprogramthatenablesyoutoviewandconfigurevarious
setupparameters.
TostarttheThinkPadTabletSetupprogram,dooneofthefollowing:
•Pressthepowerbuttonandthevolume-upbuttonatthesametimewhenyouturnonthetablet.The
ThinkPadT abletSetupprogrammainmenuopens.
•TostarttheThinkPadT abletSetupprogramfromtheoperatingsystem,dothefollowing:
1.Swipeinfromtherightedgeofthescreentodisplaythecharms.
2.T apSettings➙ChangePCsettings.
3.Inthenavigationpanel,tapUpdateandrecovery➙Recovery.
4.IntheAdvancedstartupsection,tapRestartnow.
5.Thetabletrestartsandamenuisdisplayed.TapTroubleshoot➙Advancedoptions➙
UEFIFirmwareSettings➙Restart.
6.ThetabletrestartsandenterstheThinkPadT abletSetupprogram.
Note:Ifyouhavesetasupervisorpassword,theThinkPadT abletSetupprogrammenuwillbedisplayed
afteryouenterthepassword.
TheThinkPadT abletSetupprogramincludesthefollowingmenus:
•Mainmenu:Viewthesysteminformationandsetthedateandtimeforyourtablet.
•Configmenu:Viewandchangetheconfigurationsofyourtablet.
•Securitymenu:Setthesupervisorpasswordandconfigureothersecurityfeaturesofyourtablet.
•Startupmenu:Changethetabletstartupsettings.
•Restartmenu:ChooseanoptionforclosingtheThinkPadTabletSetupprogramandrestartingthe
system.
©CopyrightLenovo2014
55
Page 64

Oneachmenu,tapthedefaultvaluetoshowselectableoptionsandtapadesiredoptiontoselectit.You
canfollowtheinstructionsonthescreentoconfiguresettings.Afteryouchangethesettings,tapRestart,
andthentapyourdesiredoptiontorestartthetablet.
Notes:
•Someitemsaredisplayedonthemenuonlyifthetabletsupportsthecorrespondingfeatures.
•Thedefaultconfigurationsarealreadyoptimizedforyou.Incorrectchangeoftheconfigurationsmight
causeunexpectedresults.
Mainmenu
TheMainmenuisthefirstinterfaceyouseeafteryouentertheThinkPadTabletSetupprogram.Itdisplays
thefollowingconfigurationofyourtablet:
•SystemInformation
–UEFIBIOSVersion
–UEFIBIOSDate(Y ear-Month-Day)
–EmbeddedControllerVersion
–TXEFirmwareVersion
–MachineT ypeModel
–System-unitserialnumber
–UUID
–Systemboardserialnumber
–AssetT ag
–ProcessorT ype
–ProcessorSpeed
–T otalmemory
–Preinstalledoperatingsystemlicense
–UEFIsecureboot
•SystemDate
•SystemTime
Setthesystemdateandsystemtime
Ifyouneedtosetthecurrentdateandtimeofyourtablet,tapSystemDateorSystemTimefromthe
ThinkPadTabletSetupmenu.Oneofthefollowingsubmenusisdisplayed:
•SystemDate
•SystemTime
Tochangethedateandtime,dothefollowing:
1.T aptoselecttheitemtochangethedateortime.
2.T aptoselectafield.
3.Inputthedateortimebyusingtheonscreenkeyboard.
Configmenu
Ifyouneedtochangetheconfigurationofyourtablet,tapConfigfromtheThinkPadT abletSetupprogram
mainmenu.
56UserGuide
Page 65

ThefollowingtableliststheConfigmenuitems.
Notes:
•Defaultvaluesareinboldface.
•Oneachsubmenu,tapthedefaultvaluetoshowselectableoptionsandtapadesiredoption.
•Someitemsaredisplayedonthemenuonlyifthetabletsupportsthecorrespondingfeatures.
Table1.Configmenuitems
Menuitem
Network
Power
Startupoption
SubmenuitemSelectionComments
UEFIIPv4NetworkStack•Off
•On
UEFIIPv6NetworkStack•Off
•On
UEFIPXENetworkStack
Coolmode•On
BootDeviceListF12Option•On
BootOrderLock•On
•IPv6First
•IPv4First
•Off
•Off
•Off
EnableordisableNetwork
StackforPXEBoot.
EnableordisableNetwork
StackforPXEBoot.
EnableordisableNetwork
StackforPXEBoot.
Enableordisablecool
mode.
IfthisoptionissettoOn,
youcanopentheboot
devicemenubypressing
F12whenyouturnonthe
computer.
Enableordisableboot
orderlock.
Securitymenu
Ifyouneedtosetthesecurityfeaturesofyourtablet,tapSecurityfromtheThinkPadTabletSetupmenu.
ThefollowingtableliststheSecuritymenuitems.
Notes:
•Defaultvaluesareinboldface.Thedefaultsettingsarealreadyoptimizedforyou.Ifyouconsider
changingthetabletconfiguration,proceedwithextremecaution.Settingtheconfigurationincorrectly
mightcauseunexpectedresults.
•Ineachsubmenu,tapthedefaultvaluetoshowselectableoptionsandtapadesiredoption.
•Someitemsaredisplayedonthemenuonlyifthetabletsupportsthecorrespondingfeatures.
Table2.Securitymenuitems
Menuitem
Password
Submenuitem
SupervisorPasswordSee“Supervisor
PasswordStatus
Value
•Disabled
•Enabled
Chapter7.Advancedconfiguration57
Comments
password”onpage51.
Page 66

Table2.Securitymenuitems(continued)
Menuitem
SecureBoot
UEFIBIOSUpdate
Option
I/OPortAccess
Submenuitem
SecureBoot•On
PlatformMode
SecureBootMode•StandardMode
ResettoSetupMode
RestoreFactoryKeys•EnterThisoptionisusedto
SecureRollBackPrevention•On
WirelessLAN
WirelessWAN
Bluetooth
GPS•On
USBPort•On
Value
•Off
•UserMode
•SetupMode
•CustomMode
•EnterThisoptionisusedto
•Off
•On
•Off
•On
•Off
•On
•Off
•Off
•Off
Comments
EnableordisableUEFI
SecureBootfeature.
Specifythesystem
operatingmode.
IndicatesSecureBoot
modeisstandardmodeor
custommode.
clearthecurrentplatform
keyandputthesystem
intosetupmode.Youcan
installyourownplatform
keyandcustomizethe
SecureBootsignature
databasesinsetupmode.
SecureBootmodewillbe
settocustommode.
restoreallkeysand
certificatesinSecure
Bootdatabasestofactory
defaults.Anycustomized
SecureBootsettings
willbeerased,andthe
defaultplatformkeywill
bere-establishedalong
withtheoriginalsignature
databasesincluding
certificateforWindows8.1
operatingsystem.
IfyouselectOff,you
canflashtotheprevious
versionofUEFIBIOS.If
youselectOn,youcan
notflashtotheprevious
versionofUEFIBIOS.
IfyouselectOn,you
canusethewirelessLAN
device.
IfyouselectOn,youcan
usethewirelessWAN
device.
IfyouselectOn,youcan
useBluetoothdevices.
IfyouselectOn,youcan
useGPSdevices.
IfyouselectOn,youcan
useUSBconnectors.
58UserGuide
Page 67

Table2.Securitymenuitems(continued)
Menuitem
SecurityChip
Submenuitem
MemoryCardSlot•On
IntegratedCamera•On
NFC•On
Microphone
UltrabookKeyboard/TouchCase•On
ThinkPadTabletDock
Ethernet
USBPortonThinkPadT ablet
Dock
SecurityChipSelection
SecurityChip•On
ClearSecurityChip
Value
•Off
•Off
•Off
•On
•Off
•Off
•On
•Off
•On
•Off
•FirmwareTPM
•DiscreteTPM
•Off
•Enter
Comments
IfyouselectOn,youcan
usethememorycardslots.
IfyouselectOn,youcan
usetheintegratedcamera.
IfyouselectOn,youcan
usetheNFCconnection.
IfyouselectOn,you
canusethemicrophones
(internal,external,or
line-in).
IfyouselectOn,you
canusetheThinkPad10
UltrabookKeyboardorthe
touchcase.
IfyouselectOn,youcan
usetheEthernetLAN
deviceonThinkPadTablet
Dock.
IfyouselectOn,youcan
useUSBconnectorson
ThinkPadTabletDock.
Configurethesecurity
chip.Thisoptionis
availableonlyonmodels
thathaveboththe
firmwareTPMandthe
discreteTPM.
Enableordisablesecurity
chipfeature.
Cleartheencryptionkey.
Note:Thisitemis
displayedonlyifyou
haveselectedOnforthe
SecurityChipoption.
PhysicalPresencefor
Provisioning
PhysicalPresenceforClear•On
•Off
•On
•Off
Thisoptionenablesor
disablestheconfirmation
messagewhenyou
changethesettingsofthe
securitychip.
Thisoptionenablesor
disablestheconfirmation
messagewhenyouclear
thesecuritychip.
Startupmenu
Youmightneedtochangethetabletstartupsettings.T odoso,tapStartupfromtheThinkPadTablet
Setupmenu.
Chapter7.Advancedconfiguration59
Page 68

Attention:
•Afteryouchangeyourstartupsequence,youmustbeextremelycarefulnottospecifyawrongdevice
duringacopy,asave,oraformatoperation.Ifyouspecifyawrongdevice,yourdataandprograms
mightbeerasedoroverwritten.
•IfyouareusingtheBitLocker
®
driveencryption,youshouldnotchangethestartupsequence.BitLocker
driveencryptiondetectsthechangeofstartupsequenceandlocksthetabletfrombooting.
Changingthestartupsequence
Tochangethestartupsequence,dothefollowing:
1.T apBoot.Thedefaultbootlistisdisplayed,showingtheorderinwhichdeviceswillbestartedup.Even
devicesthatarenotattachedtoorinstalledonyourtabletarelisted.
2.FromtheBootsubmenu,tapthemenuitemtospecifythestartupsequencethatrunswhenyouturnon
thepower.
3.Savethechangesandrestartthesystem.
ThefollowingtableliststheStartupmenuitems.
Notes:
•Defaultvaluesareinboldface.
•Fromeachsubmenu,tapthedefaultvaluetoshowselectableoptionsandselectadesiredoption.
•Someitemsaredisplayedonthemenuonlyifthetabletsupportsthecorrespondingfeatures.
Table3.Startupmenuitems
MenuitemValue
Boot
InternalStorage•On
USBHDD•On
USBCD/DVD•On
USBFDD•On
NetworkAdapter
•Off
•Off
•Off
•Off
•On
•Off
Comments
See“Changingthestartupsequence”
onpage60.
ChangetheBootorderbydragging
anddroppingtheicon.
ChangetheBootorderbydragging
anddroppingtheicon.
ChangetheBootorderbydragging
anddroppingtheicon.
ChangetheBootorderbydragging
anddroppingtheicon.
ChangetheBootorderbydragging
anddroppingtheicon.
Restartmenu
IfyouwanttoclosetheThinkPadTabletSetupprogramandrestartthesystem,tapRestartfromthe
ThinkPadTabletSetupmainmenu.Thefollowingitemsaredisplayed:
•ExitSavingChanges:Exitsystemsetupandsavethechanges.
•ExitDiscardingChanges:Exitsystemsetupwithoutsavingthechanges.
•LoadSetupDefaults:Restoretothefactorydefaultsettings.
•DiscardChanges:Discardthechanges.
•SaveChanges:Savethechanges.
60UserGuide
Page 69

Note:Changesonthefollowingitemsaresavedautomaticallyduringyourconfiguration:
•AnyitemsincludedintheSecuritymenu
•Systemdateandtime
Thesechangescannotbediscardedevenyouselectanoptiontodiscardthechangesorrestoreto
thefactorydefaultsettingswhenexitingtheThinkPadTabletSetupprogram.Todiscardthechangesor
makenewchanges,youmustentertheThinkPadT abletSetupprogramagainandresetthecorresponding
itemsaccordingtoyourneeds.
UpdatingyoursystemUEFIBIOS
TheUnifiedExtensibleFirmwareInterface(UEFI)BIOSisapartofthesystemprogramsthatmakeup
thebasiclayerofsoftwarebuiltintoyourtablet.TheUEFIBIOStranslatestheinstructionsfromother
softwarelayers.
YoucanupdatetheUEFIBIOSandtheThinkPadT abletSetupprogrambystartingyourtabletwithaflash
updateapplicationrunningintheWindowsenvironment.
Insomeinstanceswhenyouaddsoftware,hardware,oradevicedriver,youmightbeinformedthatyou
needtoupdateyourUEFIBIOSinorderforthenewadditiontoworkproperly.
ToupdateyourUEFIBIOS,gotothefollowingWebsiteandfollowtheinstructionsonthescreen:
http://www.lenovo.com/ThinkPadDrivers
Usingsystemmanagement
Thissectionisintendedprimarilyfornetworkadministrators.
Yourtabletisdesignedformanageability,sothatyoucanredirectmoreofyourresourcestobettermeet
yourbusinessobjectives.
Thismanageability,or“TotalCostofOwnership”(TCO),enablesyoutoremotelyoperateclienttabletsin
thesamewayasyouoperateyourowntablet,suchasturningonaclienttablet,formattingharddisk
drive,andinstallingsoftware.
Oncethetabletisconfiguredandoperational,youcanmanageitbyuseofsoftwareandmanageability
featuresalreadyintegratedintotheclientsystemandthenetwork.
Systemmanagement
Readthistopictolearnmoreaboutfeaturesofsystemmanagement.
DesktopManagementInterface
ThesystemUEFIBIOSofyourtabletsupportsaninterfacecalledSystemManagementBIOSReference
Specification(SMBIOS)V2.6.1SMBIOSprovidesinformationaboutthehardwarecomponentsofyour
system.ItistheresponsibilityoftheBIOStosupplythisdatabasewithinformationaboutitselfandthe
devicesonthesystemboard.ThisspecificationdocumentsthestandardsforgettingaccesstothisBIOS
information.
AssetIDEEPROM
TheAssetIDEEPROMcontainsinformationaboutthesystem,includingitsconfigurationandtheserial
numbersofkeycomponents.Italsoincludesanumberofblankfieldsinwhichyoucanrecordinformation
abouttheendusersinyournetwork.
Chapter7.Advancedconfiguration61
Page 70

62UserGuide
Page 71

Chapter8.Troubleshootingproblems
Thischapterdescribesonwhattodoifyouexperienceaproblemwithyourtablet.
Diagnosingproblems
Ifyouexperienceproblemswithyourtablet,usetheLenovoSolutionCenterprogramasastartingpoint
forsolvingthem.
TheLenovoSolutionCenterprogramenablesyoutotroubleshootandresolvetabletproblems.Itcombines
diagnostictests,systeminformationcollection,securitystatus,andsupportinformation,alongwithhints
andtipsformaximumsystemperformance.
Note:TheLenovoSolutionCenterprogramcanbedownloadedfromhttp://www.lenovo.com/diags.
ToruntheLenovoSolutionCenterprogram,dothefollowing:
1.Swipeinfromtherightedgeofthescreentodisplaythecharms.
2.T aptheSearchcharmtosearchforLenovoSolutionCenter.
3.T apLenovoSolutionCenter.
Foradditionalinformation,refertotheLenovoSolutionCenterhelpsystem.
Note:Ifyouareunabletoisolateandrepairtheproblemyourselfafterrunningtheprogram,saveandprint
thelogfiles.YouwillneedthelogfileswhenyouspeaktoaLenovotechnicalsupportrepresentative.
Troubleshooting
Theproblemsandsolutionsdescribedinthissectionaremeantonlyasaguide.Theyarenotdefinitive
problemsolvingtechniques.Forsomeproblems,youmightneedhelpfromLenovo,yourreseller,oryour
serviceprovider.
Whenyouobserveaproblem,stopoperationimmediately,becausetakingfurtheractionmightresultindata
lossordamage.Takeanoteofwhatthesystemisdoingandwhatactionsyouperformedbeforetheproblem
occurred.ProvidedetailedinformationtoLenovooryourserviceproviderforquickerproblemresolution.
Internetproblem
•Problem:Unabletoconnecttothewirelessnetwork.
Suggestedsolution:Ensurethat:
–ThemicroSIMcardisvalidandworkableifyouareusingamobilenetwork(3Gor4G).
–Youarewithinthenetwork’sservicerangeandthesignalstrengthisgood.
–YourtabletisnotinAirplanemode.
Iftheproblempersists,contactLenovofortechnicalsupport.
Multi-touchscreenproblem
•Problem:Themulti-touchscreenrespondsslowlyorimproperly.
Suggestedsolution:Dothefollowing:
1.Ensurethatyourhandsarecleananddrywhentouchingthescreen.
2.Restartyourtablettotryagain.
©CopyrightLenovo2014
63
Page 72

Iftheproblempersists,contactLenovofortechnicalsupport.
Batteryproblem
•Problem:Thebatterydoesnotchargecorrectly.
Suggestedsolution:Checkiftheacpoweradapterisconnectedcorrectly.Iftheconnectionisgoodbut
thebatterystilldoesnotcharge,contactLenovotoreplacewithanewbattery.
Systemproblem
•Problem:Unabletoturnthetableton.
Suggestedsolution:Connectyourtablettoanacpoweroutlettoseeiftheproblemiscaused
byadrainedbattery.Iftheproblempersists,insertaneedleorastraightenedpaperclipintothe
emergency-resethole.Tolocatetheemergency-resethole,see“Frontviewandsideview”onpage1
Iftheproblemstillpersists,contactLenovofortechnicalsupport.
Mediaproblems
•Problem:Theaudioqualityispoororthereisnosoundoutput.
Suggestedsolution:Checkandensurethat:
–Thespeakerisnotcovered.
–Thespeakermutefunctionisdisabled.
–Ifyouareusingaheadset,unplugit,thenplugitinagain.
–Thevolumeisnotturnedtothelowestlevel.
Iftheproblempersists,contactLenovofortechnicalsupport.
•Problem:Asong,video,orothermediafilecannotbeplayed.
Suggestedsolution:Checkandensurethatthemediafileisnotcorrupted.
.
Externaldeviceconnectionproblems
•Problem:Aconnectionisnotestablishedwhenyouconnectthetablettoacomputer.
Suggestedsolution:EnsurethatthetabletUSBcableyouareusingistheonethatisshippedwith
yourtablet.
•Problem:Bluetoothdevicescannotbelocated.
Suggestedsolution:Ensurethat:
–YourtabletBluetoothisswitchedon.
–TheBluetoothfeatureisactivatedonthedevicetowhichyouwanttoconnect.
–YourtabletandtheBluetoothdevicearewithinthemaximumBluetoothrange(10m).
Iftheproblempersists,contactLenovofortechnicalsupport.
Recoveringfromaseveresoftwareproblem
Ifyourtabletstopsrespondingandyoucannotturnoffthetabletbypressingandholdingthepowerbutton,
insertaneedleorastraightenedpaperclipintotheemergency-resetholetoresetthetablet.Thenrestart
yourtablet.Tolocatetheemergency-resethole,see“Frontviewandsideview”onpage1
Ifyoustillencounterthesameproblemafteryourestartyourtablet,resetyourtabletandrestartitagain,
youcanperformafactorydataresetoperation.Formoreinformation,referto“Resettingyourtabletto
thefactorydefaultsettings”onpage67
.
.
64UserGuide
Page 73

Errormessages
Message:0183:BadCRCofSecuritySettingsinEFIVariable.EnterThinkPadTabletSetup.
Solution:ChecksumoftheSecuritysettingsintheEFIVariableisnotcorrect.EnterThinkPadT abletSetup
tocheckSecuritysettings,andrestartthesystem.Ifyoustillhaveaproblem,havethetabletserviced.
Message:0187:EAIAdataaccesserror
Solution:TheaccesstoEEPROMisfailed.Havethetabletserviced.
Message:0188:InvalidRFIDSerializationInformationArea.
Solution:TheEEPROMchecksumisnotcorrect(block#0and1).Thesystemboardshouldbereplaced,
andtheboxserialnumberneedstobereinstalled.Havethetabletserviced.
Message:0189:InvalidRFIDconfigurationinformationarea
Solution:TheEEPROMchecksumisnotcorrect(block#4and5).Thesystemboardshouldbereplaced,
andtheUUIDneedstobereinstalled.Havethetabletserviced.
Message:0190:Criticallow-batteryerror
Solution:Thetabletturnedoff,becausethebatteryislow.Connecttheacpoweradaptertothetablet
andchargethebattery.
Message:2200:MachineTypeandSerialNumberareinvalid.
Solution:MachineT ypeandSerialNumberareinvalid.Havethetabletserviced.
Message:2201:MachineUUIDisinvalid.
Solution:MachineUUIDisinvalid.Havethetabletserviced.
Message:2300:Built-inBatteryisbroken.
Solution:Replacethebuilt-inbattery.
Message:2301:Built-inBatteryneedstorecharge.
Solution:Rechargethebuilt-inbattery.
Message:2302:Built-inBatteryisnotdetected.
Solution:Attachorreplacethebuilt-inbattery.
Errorswithoutmessages
•Problem:MyscreenkeepsblankingwhenIdonotwantitto.
Solution:Y oucandisableanysystemtimers,suchastheLCDturn-offtimerortheblanktimerby
doingthefollowing:
1.Gothedesktopandtapthebattery-statusiconintheWindowsnotificationarea.
2.T apMorepoweroptions➙Balanced.
Chapter8.T roubleshootingproblems65
Page 74

•Problem:WhenIturnonthetablet,nothingisdisplayedonthescreenandthetabletdoesnotbeep
whilestartingup.
Note:Ifyouarenotsurewhetheryouheardanybeeps,turnoffthetabletbypressingandholdingthe
powerbuttonforfoursecondsormore.Turnitonandlistenagain.
Solution:Ensurethat:
–ThetabletisconnectedtotheacpoweradapterbythesuppliedUSBcableandtheacpoweradapter
ispluggedintoaworkingelectricaloutlet.
Thetabletisturnedon.(Turnthepowerbuttononagainforconfirmation.)
Iftheseitemsarecorrectlyset,andthescreenremainsblank,havethetabletserviced.
•Problem:WhenIturnonthetablet,onlyawhitepointerisdisplayedonablankscreen.
Solution:Dothefollowing:
1.T urnoffthetablet,andthenturnitonagain.
2.Ifyoustillseeonlythepointeronthescreen,usetherecoverysolutionstorestorethesystemto
thefactorystate.
Iftheproblempersists,havethetabletserviced.
•Problem:Myscreengoesblankwhilethetabletison.
Solution:Y ourscreensaverorpowermanagementmighthavebeenenabled.Doeitherofthefollowing:
–Tapthetabletscreentoexitthescreensaver.
–Pressthepowerbuttontoresumefromsleeporhibernationmode.
66UserGuide
Page 75

Chapter9.Recoveryinformation
Thissectionprovidesinformationabouttherecoverysolutions.
AWindowsrecoveryimageispreinstalledintherecoverypartitiononyourtablet.TheWindowsrecovery
imageenablesyoutorefreshyourtablet,orresetyourtablettothefactorydefaultsettings.
YoucancreaterecoverymediaasbackupsorreplacementfortheWindowsrecoveryimage.Withthe
recoverymedia,youcantroubleshootandfixtheproblemsonyourtabletevenifyoucannotstartthe
operatingsystem.Itisrecommendedthatyoucreaterecoverymediaasearlyaspossible.Formore
information,see“Creatingandusingrecoverymedia”onpage68.
Refreshingyourtablet
Ifyourtabletdoesnotperformwellandtheproblemmightbecausedbyarecentlyinstalledprogram,you
canrefreshyourtabletwithoutlosingyourpersonalfilesorchangingyoursettings.
Attention:Ifyourefreshyourtablet,theprogramsthatcamewithyourtabletandtheprogramsthatyou
installedfromWindowsStorewillbereinstalled,butallotherprogramswillberemoved.
Torefreshyourtablet,dothefollowing:
1.Swipeinfromtherightedgeofthescreentodisplaythecharms.
2.T apSettings➙ChangePCsettings.
3.Inthenavigationpanel,tapUpdateandrecovery➙Recovery.
4.IntheRefreshyourPCwithoutaffectingyourfilessection,tapGetstarted.
5.Followtheinstructionsonthescreentorefreshyourtablet.
Resettingyourtablettothefactorydefaultsettings
Ifyouwanttorecycleyourtabletorjuststartover,youcanresetyourtablettothefactorydefaultsettings.
Resettingthetabletwillreinstalltheoperatingsystem,reinstallalltheprogramsthatcamewithyourtablet,
andresetallthesettingstothefactorydefaultsettings.
Attention:Ifyouresetthetablettothefactorydefaultsettings,allyourpersonalfilesandsettingswillbe
deleted.Toavoiddataloss,makeabackupcopyofallthedatathatyouwanttokeep.
Toresetyourtablettothefactorydefaultsettings,dothefollowing:
1.Swipeinfromtherightedgeofthescreentodisplaythecharms.
2.T apSettings➙ChangePCsettings.
3.Inthenavigationpanel,tapUpdateandrecovery➙Recovery.
4.IntheRemoveeverythingandreinstallWindowssection,tapGetstarted.ThentapNexttoconfirm
theoperation.
5.Dependingonyourneeds,dooneofthefollowing:
•Toperformaquickformat,tapJustremovemyfilestostarttheprocess.Theprocesswilltake
severalminutes.
•Toperformacompleteformat,tapFullycleanthedrivetostarttheprocess.Theprocesswill
takeseveralhours.
6.Followtheinstructionsonthescreentoresetyourtablettothefactorydefaultsettings.
©CopyrightLenovo2014
67
Page 76

Usingtheadvancedstartupoptions
Withtheadvancedstartupoptions,youcanchangethefirmwaresettingsofthetablet,changethestartup
settingsoftheWindowsoperatingsystem,startthetabletfromanexternaldevice,orrestoretheWindows
operatingsystemfromasystemimage.
Tousetheadvancedstartupoptions,dothefollowing:
1.Swipeinfromtherightedgeofthescreentodisplaythecharms.
2.T apSettings➙ChangePCsettings.
3.Inthenavigationpanel,tapUpdateandrecovery➙Recovery.
4.IntheAdvancedstartupsection,tapRestartnow➙Troubleshoot➙Advancedoptions.
5.Selectadesiredstartupoption,thenfollowtheinstructionsonthescreen.
RecoveringyouroperatingsystemifWindows8.1failstostart
TheWindowsrecoveryenvironmentonyourtabletiscapableofoperatingindependentlyfromtheWindows
8.1operatingsystem.ThisenablesyoutorecoverorrepairtheoperatingsystemeveniftheWindows8.1
operatingsystemfailstostart.
Aftertwoconsecutivefailedbootattempts,theWindowsrecoveryenvironmentstartsautomatically.Then
youcanchooserepairandrecoveryoptionsbyfollowingtheinstructionsonthescreen.
Note:Ensurethatyourtabletisconnectedtoacpowerduringtherecoveryprocess.
Creatingandusingrecoverymedia
YoucancreaterecoverymediaasbackupsfortheWindowsrecoveryenvironmentandtheWindows
recoveryimage.Ifyoucannotstartthetablet,youcanuserecoverymediatotroubleshootandfixthe
problemsonyourtablet.
Itisrecommendedthatyoucreaterecoverymediaasearlyaspossible.Onceyoucreaterecoverymedia,
keeptheminasafeplaceanddonotusethemtostoreotherdata.
Creatingrecoverymedia
Tocreaterecoverymedia,youneedaUSBdrivewithatleast16GBofstorage.TherequiredUSBcapacity
dependsonthesizeoftherecoveryimage.
Attention:CreatingrecoverymediawilldeleteanythingstoredontheUSBdrive.T oavoiddataloss,makea
backupcopyofallthedatathatyouwanttokeep.
Tocreaterecoverymedia,dothefollowing:
Note:Ensurethatyourtabletisconnectedtoacpower.
1.Swipeinfromtherightedgeofthescreentodisplaythecharms.
2.T aptheSearchcharm.
3.T yperecoveryintheSearchfield.ThentapCreatearecoverydrive.
4.T apYesintheUserAccountControlwindowtoallowtheRecoveryMediaCreatorprogramtostart.
5.EnsurethatyouselecttheCopytherecoverypartitionfromthePCtotherecoverydrive.option.
ThentapNext.
68UserGuide
Page 77

Important:IfyoucleartheCopytherecoverypartitionfromthePCtotherecoverydrive.option,
youwillcreaterecoverymediawithouttherecoverypartitioncontent.Youstillcanstartthetablet
fromtherecoverymedia,butyoumightbeunabletorecoveryourtabletiftherecoverypartitionon
yourtabletisdamaged.
6.ConnectaproperUSBdrive,thentapNext.
7.T apCreateintheRecoveryDrivewindow.Thecreationoftherecoverymediastarts.
8.Whenthecreationoftherecoverymediafinishes,dooneofthefollowing:
•Tokeeptherecoverypartitiononyourtablet,tapFinish.
•Todeletetherecoverypartitiononyourtablet,tapDeletetherecoverypartition.
Attention:Ifyoudeletetherecoverypartitiononyourtablet,dokeeptherecoverymediainasafe
place.TheWindowsrecoveryimagewillnotbestoredinyourtabletanymore,andyouwillneedthe
recoverymediatorefreshorresetyourtablet.
9.RemovetheUSBdrive.Therecoverymediaarecreatedsuccessfully.
Usingrecoverymedia
Ifyoucannotstartyourtablet,orifyoucannotstarttheWindowsrecoveryimageonyourtablet,use
recoverymediatorecoveryourtablet.
Touserecoverymedia,dothefollowing:
Note:Ensurethatyourtabletisconnectedtoacpower.
1.Pressthepowerbuttonandthevolume-upbuttonatthesametimewhenyouturnonthetablet.The
ThinkPadT abletSetupprogrammenuopens.
2.T apStartup.
3.IntheBootsubmenu,dragtherecoverydrivetothefirstplacetoselectitasthebootdevice.
4.Saveconfigurationchangesandrestartthetablet.
5.Followingtheinstructionsonthescreentorecoverthetablet.
FormoreinformationabouttherecoverysolutionsprovidedbytheWindows8.1operatingsystem,goto:
http://go.microsoft.com/fwlink/?LinkID=263800
Chapter9.Recoveryinformation69
Page 78

70UserGuide
Page 79

Chapter10.Gettingsupport
ThischapterprovidesinformationaboutgettinghelpandsupportfromLenovo.
Lenovotechnicalsupport
AfteryoubuyaThinkPad10,registeryourtabletwithLenovo.Usingtheregisteredinformation,Lenovo
cancontactyouincaseofarecallorothersevereproblems.AfteryouregisteryourtabletwithLenovo,
youwillreceivequickerservicewhenyoucallLenovoforhelp.Inaddition,somelocationsofferextended
privilegesandservicestoregisteredusers.
ToregisteryourtabletwithLenovo,doeitherofthefollowing:
•Gotohttp://www.lenovo.com/registerandfollowtheinstructionsonthescreen.
•TapLenovoSupportfromtheStartscreen.ThentapRegistration.
TechnicalsupportinformationisavailableontheLenovoSupportWebsiteathttp://www.lenovo.com/support.
ThisWebsiteisupdatedwiththelatestsupportinformationsuchasthefollowing:
•Driversandsoftware
•Diagnosticsolutions
•Productandservicewarranty
•Productandpartsdetails
•Guidesandmanuals
•Knowledgebaseandfrequentlyaskedquestions
IfyouwanttocalltheLenovoCustomerSupportCenter,gotohttp://www.lenovo.com/support/phonefor
thelatesttelephonenumbersandhoursofoperation.
Duringthewarrantyperiod,youcangetthefollowingservicesfromtheCustomerSupportCenter:
•Problemdetermination:Trainedpersonnelareavailabletoassistyouwithdeterminingifyouhavea
hardwareproblemanddecidingwhatactionisnecessarytofixtheproblem.
•Lenovohardwarerepair:IftheproblemisdeterminedtobecausedbyLenovohardwareunderwarranty,
trainedservicepersonnelareavailabletoprovidetheapplicablelevelofservice.
•Engineeringchangemanagement:Occasionally,theremightbechangesthatarerequiredaftera
producthasbeensold.Lenovooryourreseller,ifauthorizedbyLenovo,willmakeselectedEngineering
Changes(ECs)thatapplytoyourhardwareavailable.
ForthetermsandconditionsoftheLenovoLimitedWarrantythatappliestoyourtablet,refertotheSafety,
Warranty,andSetupGuidethatcomeswithyourtablet.
©CopyrightLenovo2014
71
Page 80

Locatingthemachinetypeandmodel(MTM)numberandthesystemserialnumber
Whencallingfortechnicalassistance,youarerequestedtoprovidetheMTMnumberandthesystemserial
numberofyourtablet.T ogettheMTMnumberandtheserialnumber,checktheMTMlabelonyourtablet.
Note:Dependingonthemodel,yourtabletmightlookdifferent.
LocatingtheFCCIDandICCertificationnumbers
YoucanfindtheFCCIDandICCertificationnumbersfortheinstalledtransmittercardsonthebottomof
yourtablet.
Note:Dependingonthemodel,yourtabletmightlookdifferent.
Lenovouserforums
LenovoprovidesuserforumsontheWorldWideWebtoprovideyouwithaplacetosearchthecommunity
knowledgebaseforinformationaboutyourtablet,shareinformationwithotherusers,makesuggestionsto
Lenovo,askquestions,andgettechnicalsupportfromLenovo.
TogotoLenovouserforums,dooneofthefollowing:
•Procedure1
1.FromtheStartscreen,tapLenovoSupport.ThentapRegistration.Followtheinstructionsonthe
screentocreateanaccount.
2.FromtheStartscreen,tapLenovoSupport➙Community.
•Procedure2
1.Gotohttp://www.lenovo.com/registerandfollowtheinstructionsonthescreentocreateanaccount.
72UserGuide
Page 81

2.Gotohttp://www.lenovo.com/support.
3.T apCommunityForums.
FindingThinkPadoptions
Ifyouwanttoexpandthecapabilitiesofyourtablet,Lenovohasanumberofhardwareaccessoriesand
upgradestomeetyourneeds.
YoucanshopatLenovo24hoursaday,7daysaweekdirectlyovertheWorldWideWeb.Allyouneedisan
Internetconnectionandacreditcard.
ToshopatLenovo,goto:
http://www.lenovo.com/essentials
Purchasingadditionalservices
Duringandafterthewarrantyperiod,youcanpurchaseadditionalservices,suchassupportforLenovo
andnon-Lenovohardware,operatingsystems,andapplicationprograms;networksetupandconfiguration
services;upgradedorextendedhardwarerepairservices;andcustominstallationsservices.Service
availabilityandservicenamemightvarybycountry.
Formoreinformationabouttheseservices,goto:
http://www.lenovo.com/essentials
Chapter10.Gettingsupport73
Page 82

74UserGuide
Page 83

AppendixA.Regulatoryinformation
Thisappendixprovidesregulatoryinformation.
Wirelessrelatedinformation
Wirelessinteroperability
TheM.2wirelessLANcardisdesignedtobeinteroperablewithanywirelessLANproductthatisbased
onDirectSequenceSpreadSpectrum(DSSS),ComplementaryCodeKeying(CCK),and/orOrthogonal
FrequencyDivisionMultiplexing(OFDM)radiotechnology,andiscompliantto:
•The802.11b/gStandard,802.11a/b/gor802.11ndraft2.0onWirelessLANs,asdefinedandapprovedby
theInstituteofElectricalandElectronicsEngineers.
•TheWirelessFidelity(Wi-Fi)certificationasdefinedbytheWi-FiAlliance.
TheBluetoothcardinyourtabletisdesignedtobeinteroperablewithanyBluetoothproductthatiscompliant
toBluetoothSpecification4.0asdefinedbytheBluetoothSIG.Thefollowingprofilesaresupported
byyourBluetoothcard:
•AdvancedAudioDistributionProfile(A2DP)
•A/VRemoteControlProfile(AVRCP)
•Dial-UpNetworkingProfile(DUN)
•FileT ransferProfile(FTP)
•GenericAccessProfile(GAP)
•GenericA/VDistributionProfile(GAVDP)
•HardcopyCableReplacementProfile(HCRP)
•HeadsetProfile(HSP)
•Hands-FreeProfile(HFP)
•HumanInterfaceDeviceProfile(HID)
•MessageAccessProfile(MAP)
•ObjectExchangeProtocol(OBEX)
•ObjectPushProfile(OPP)
•PersonalAreaNetworkingProfile(PAN)
•PhoneBookAccessProfile(PBAP)
•ServiceDiscoveryProtocol(SDP)
•SynchronizationProfile(SYNC)
•VideoDistributionProfile(VDP)
•GenericAttributeProfile(GATT)
•ProximityProfile
Usageenvironmentandyourhealth
Integratedwirelesscardsemitradiofrequencyelectromagneticenergylikeotherradiodevices.However,
thelevelofenergyemittedisfarmuchlessthantheelectromagneticenergyemittedbywirelessdevices
suchasmobilephones.
©CopyrightLenovo2014
75
Page 84

Duetothefactthatintegratedwirelesscardsoperatewithintheguidelinesfoundinradiofrequencysafety
standardsandrecommendations,Lenovobelievestheyaresafeforusebyconsumers.Thesestandardsand
recommendationsreflecttheconsensusofthescientificcommunityandresultfromdeliberationsofpanels
andcommitteesofscientistswhocontinuallyreviewandinterprettheextensiveresearchliterature.
Insomesituationsorenvironments,theuseofintegratedwirelesscardsmightberestrictedbytheproprietor
ofthebuildingorresponsiblerepresentativesoftheorganization.Thesesituationsandareasmightfor
exampleinclude:
•Usingtheintegratedwirelesscardsonboardofairplanes,inhospitalsornearpetrolstations,blasting
areas(withelectro-explosivedevices),medicalimplantsorbody-wornelectronicmedicaldevices.
•Inanyotherenvironmentwheretheriskofinterferencetootherdevicesorservicesisperceivedor
identifiedasharmful.
Ifyouareuncertainofthepolicythatappliesontheuseofwirelessdevicesinaspecificorganization,you
areencouragedtoaskforauthorizationtouseintegratedwirelesscardspriortoturningonthetablet.
LocatingtheUltraConnect™wirelessantennas
ThinkPad10featuresanantennasystembuiltintothedisplayforoptimalreception,whichenablesyouto
establishwirelesscommunicationswhereveryouare.
Thefollowingillustrationshowsthelocationofeachbuilt-inwirelessantenna.
1Wireless-WANantenna(auxiliary)
2Wireless-WANantenna(main)
3Wireless-LANantenna(auxiliary)
4Wireless-LANantenna(main)
Note:Wireless-WANantennasareavailableonlyonsomemodels.
Locatingwirelessregulatorynotices
Formoreinformationaboutthewirelessregulatorynotices,refertotheRegulatoryNoticeshippedwith
thetablet.
IfthetabletisshippedwithouttheRegulatoryNotice,youcanfinditontheWebsiteat:
http://www.lenovo.com/UserManual
76UserGuide
Page 85

Exportclassificationnotice
ThisproductissubjecttotheUnitedStatesExportAdministrationRegulations(EAR)andhasanExport
ClassificationControlNumber(ECCN)of5A992.c.Itcanbere-exportedexcepttoanyoftheembargoed
countriesintheEARE1countrylist.
Electronicemissionnotices
FederalCommunicationsCommissionDeclarationofConformity
ThefollowinginformationreferstotheThinkPad10tablet,machinetypes20C1and20C3.
ThisequipmenthasbeentestedandfoundtocomplywiththelimitsforaClassBdigitaldevice,pursuant
toPart15oftheFCCRules.Theselimitsaredesignedtoprovidereasonableprotectionagainstharmful
interferenceinaresidentialinstallation.Thisequipmentgenerates,uses,andcanradiateradiofrequency
energyand,ifnotinstalledandusedinaccordancewiththeinstructions,maycauseharmfulinterference
toradiocommunications.However,thereisnoguaranteethatinterferencewillnotoccurinaparticular
installation.Ifthisequipmentdoescauseharmfulinterferencetoradioortelevisionreception,whichcanbe
determinedbyturningtheequipmentoffandon,theuserisencouragedtotrytocorrecttheinterferenceby
oneormoreofthefollowingmeasures:
•Reorientorrelocatethereceivingantenna.
•Increasetheseparationbetweentheequipmentandreceiver.
•Connecttheequipmentintoanoutletonacircuitdifferentfromthattowhichthereceiverisconnected.
•Consultanauthorizeddealerorservicerepresentativeforhelp.
Lenovoisnotresponsibleforanyradioortelevisioninterferencecausedbyusingotherthanspecifiedor
recommendedcablesandconnectorsorbyunauthorizedchangesormodificationstothisequipment.
Unauthorizedchangesormodificationscouldvoidtheuser'sauthoritytooperatetheequipment.
ThisdevicecomplieswithPart15oftheFCCRules.Operationissubjecttothefollowingtwoconditions:(1)
thisdevicemaynotcauseharmfulinterference,and(2)thisdevicemustacceptanyinterferencereceived,
includinginterferencethatmaycauseundesiredoperation.
ResponsibleParty:
Lenovo(UnitedStates)Incorporated
1009ThinkPlace-BuildingOne
Morrisville,NC27560
PhoneNumber:919-294-5900
IndustryCanadaClassBemissioncompliancestatement
ThisClassBdigitalapparatuscomplieswithCanadianICES-003.
CetappareilnumériquedelaclasseBestconformeàlanormeNMB-003duCanada.
EuropeanUnion-CompliancetotheElectromagneticCompatibility Directive
ThisproductisinconformitywiththeprotectionrequirementsofEUCouncilDirective2004/108/EConthe
approximationofthelawsoftheMemberStatesrelatingtoelectromagneticcompatibility.Lenovocannot
AppendixA.Regulatoryinformation77
Page 86

acceptresponsibilityforanyfailuretosatisfytheprotectionrequirementsresultingfromanonrecommended
modificationoftheproduct,includingtheinstallationofoptioncardsfromothermanufacturers.
ThisproducthasbeentestedandfoundtocomplywiththelimitsforClassBInformationTechnology
EquipmentaccordingtoEuropeanStandardEN55022.ThelimitsforClassBequipmentwerederived
fortypicalresidentialenvironmentstoprovidereasonableprotectionagainstinterferencewithlicensed
communicationdevices.
EUContact:Lenovo,Einsteinova21,85101Bratislava,Slovakia
GermanClassBcompliancestatement
DeutschsprachigerEUHinweis:
HinweisfürGerätederKlasseBEU-RichtliniezurElektromagnetischenVerträglichkeit
DiesesProduktentsprichtdenSchutzanforderungenderEU-Richtlinie2004/108/EG(früher89/336/EWG)zur
AngleichungderRechtsvorschriftenüberdieelektromagnetischeVerträglichkeitindenEU-Mitgliedsstaaten
undhältdieGrenzwertederEN55022KlasseBein.
Umdiesessicherzustellen,sinddieGerätewieindenHandbüchernbeschriebenzuinstallierenundzu
betreiben.DesWeiterendürfenauchnurvonderLenovoempfohleneKabelangeschlossenwerden.
LenovoübernimmtkeineVerantwortungfürdieEinhaltungderSchutzanforderungen,wenndasProdukt
ohneZustimmungderLenovoverändertbzw.wennErweiterungskomponentenvonFremdherstellernohne
EmpfehlungderLenovogesteckt/eingebautwerden.
Deutschland:
EinhaltungdesGesetzesüberdieelektromagnetischeVerträglichkeitvonBetriebsmitteln
DiesesProduktentsprichtdem„GesetzüberdieelektromagnetischeVerträglichkeitvonBetriebsmitteln“
EMVG(früher„GesetzüberdieelektromagnetischeVerträglichkeitvonGeräten“).DiesistdieUmsetzungder
EU-Richtlinie2004/108/EG(früher89/336/EWG)inderBundesrepublikDeutschland.
ZulassungsbescheinigunglautdemDeutschenGesetzüberdieelektromagnetischeVerträglichkeit
vonBetriebsmitteln,EMVGvom20.Juli2007(früherGesetzüberdieelektromagnetische
VerträglichkeitvonGeräten),bzw.derEMVEGRichtlinie2004/108/EC(früher89/336/EWG),für
GerätederKlasseB.
DiesesGerätistberechtigt,inÜbereinstimmungmitdemDeutschenEMVGdasEG-Konformitätszeichen
-CE-zuführen.VerantwortlichfürdieKonformitätserklärungnachParagraf5desEMVGistdieLenovo
(Deutschland)GmbH,Gropiusplatz10,D-70563Stuttgart.
InformationeninHinsichtEMVGParagraf4Abs.(1)4:
DasGeräterfülltdieSchutzanforderungennachEN55024undEN55022KlasseB.
KoreaClassBcompliancestatement
78UserGuide
Page 87

JapaneseVCCIClassBstatement
Japancompliancestatementforproductswhichconnecttothepower mainswithratedcurrentlessthanorequalto20Aperphase
LenovoproductserviceinformationforT aiwan
Eurasiancompliancemark
Модели,относящиесякнастоящейсерии(семейству)продуктовивпервыевыпущенныевобращение
до14февраля2013года,сертифицированыпотребованиямСистемысертификацииГОСТРи/или
потребованиямединойсистемысертификацииТ аможенногоСоюза,действовавшимвмомент
сертификации,имаркируютсязнакомсоответствияГОСТР .
Модели,относящиесякнастоящейсерии(семейству)продуктовивпервыевыпущенныевобращение
после14февраля2013года,сертифицированывединойсистемесертификацииТаможенногоСоюза
насоответствиетребованиямприменимыхТ ехническихРегламентовимаркируютсязнакомEAC.
Brazilregulatorynotice
Ouvirsonscommaisde85decibéisporlongosperíodospodeprovocardanosaosistemaauditivo.
Mexicoregulatorynotice
Advertencia:EnMexicolaoperacióndeesteequipoestásujetaalassiguientesdoscondiciones:(1)es
posiblequeesteequipoodispositivonocauseinterferenciaperjudicialy(2)esteequipoodispositivodebe
aceptarcualquierinterferencia,incluyendolaquepuedacausarsuoperaciónnodeseada.
AppendixA.Regulatoryinformation79
Page 88

80UserGuide
Page 89

AppendixB.WEEEandrecyclinginformation
Lenovoencouragesownersofinformationtechnology(IT)equipmenttoresponsiblyrecycletheirequipment
whenitisnolongerneeded.Lenovooffersavarietyofprogramsandservicestoassistequipmentownersin
recyclingtheirITproducts.ForinformationonrecyclingLenovoproducts,goto:
http://www.lenovo.com/recycling
ImportantWEEEinformation
TheWEEEmarkingonLenovoproductsappliestocountrieswithWEEEande-wasteregulations(forexample,
EuropeanDirective2012/19/EU,IndiaE-WasteManagement&HandlingRules,2011).Appliancesare
labeledinaccordancewithlocalregulationsconcerningwasteelectricalandelectronicequipment(WEEE).
Theseregulationsdeterminetheframeworkforthereturnandrecyclingofusedappliancesasapplicable
withineachgeography.Thislabelisappliedtovariousproductstoindicatethattheproductisnottobe
thrownaway,butratherputintheestablishedcollectivesystemsforreclaimingtheseendoflifeproducts.
Usersofelectricalandelectronicequipment(EEE)withtheWEEEmarkingmustnotdisposeofendof
lifeEEEasunsortedmunicipalwaste,butusethecollectionframeworkavailabletothemforthereturn,
recycle,andrecoveryofWEEEandtominimizeanypotentialeffectsofEEEontheenvironmentand
humanhealthduetothepresenceofhazardoussubstances.ForadditionalWEEEinformationgoto:
http://www.lenovo.com/recycling
RecyclinginformationforJapan
CollectingandrecyclingadisusedLenovocomputerormonitor
IfyouareacompanyemployeeandneedtodisposeofaLenovocomputerormonitorthatistheproperty
ofthecompany,youmustdosoinaccordancewiththeLawforPromotionofEffectiveUtilizationof
Resources.Computersandmonitorsarecategorizedasindustrialwasteandshouldbeproperlydisposed
ofbyanindustrialwastedisposalcontractorcertifiedbyalocalgovernment.InaccordancewiththeLaw
forPromotionofEffectiveUtilizationofResources,LenovoJapanprovides,throughitsPCCollectingand
RecyclingServices,forthecollecting,reuse,andrecyclingofdisusedcomputersandmonitors.Fordetails,
visittheLenovoWebsiteathttp://www.lenovo.com/recycling/japan.
PursuanttotheLawforPromotionofEffectiveUtilizationofResources,thecollectingandrecyclingof
home-usedcomputersandmonitorsbythemanufacturerwasbegunonOctober1,2003.Thisservice
isprovidedfreeofchargeforhome-usedcomputerssoldafterOctober1,2003.Fordetails,goto
http://www.lenovo.com/recycling/japan.
©CopyrightLenovo2014
81
Page 90

DisposingofLenovocomputercomponents
SomeLenovocomputerproductssoldinJapanmayhavecomponentsthatcontainheavymetalsorother
environmentalsensitivesubstances.Toproperlydisposeofdisusedcomponents,suchasaprintedcircuit
boardordrive,usethemethodsdescribedaboveforcollectingandrecyclingadisusedcomputerormonitor.
DisposingofdisusedlithiumbatteriesfromLenovocomputers
Abutton-shapedlithiumbatteryisinstalledinsideyourLenovocomputertoprovidepowertothecomputer
clockwhilethecomputerisoffordisconnectedfromthemainpowersource.Ifyouneedtoreplaceitwitha
newone,contactyourplaceofpurchaseorcontactLenovoforservice.Ifyouneedtodisposeofadisused
lithiumbattery,insulateitwithvinyltape,contactyourplaceofpurchaseoranindustrial-waste-disposal
operator,andfollowtheirinstructions.
Disposalofalithiumbatterymustcomplywithlocalordinancesandregulations.
DisposingofadisusedbatterypackfromLenovonotebookcomputers
YourLenovonotebookcomputerhasalithiumionbatterypackoranickelmetalhydridebatterypack.Ifyou
areacompanyemployeewhousesaLenovonotebookcomputerandneedtodisposeofabatterypack,
contacttheproperpersoninLenovosales,service,ormarketing,andfollowthatperson'sinstructions.You
alsocanrefertotheinstructionsathttp://www.lenovo.com/jp/ja/environment/recycle/battery/.
IfyouuseaLenovonotebookcomputerathomeandneedtodisposeofabatterypack,you
mustcomplywithlocalordinancesandregulations.Youalsocanrefertotheinstructionsat
http://www.lenovo.com/jp/ja/environment/recycle/battery/.
RecyclinginformationforBrazil
DeclaraçõesdeReciclagemnoBrasil
DescartedeumProdutoLenovoForadeUso
Equipamentoselétricoseeletrônicosnãodevemserdescartadosemlixocomum,masenviadosàpontosde
coleta,autorizadospelofabricantedoprodutoparaquesejamencaminhadoseprocessadosporempresas
especializadasnomanuseioderesíduosindustriais,devidamentecertificadaspelosorgãosambientais,de
acordocomalegislaçãolocal.
ALenovopossuiumcanalespecíficoparaauxiliá-lonodescartedessesprodutos.Casovocêpossua
umprodutoLenovoemsituaçãodedescarte,ligueparaonossoSACouencaminheume-mailpara:
reciclar@lenovo.com,informandoomodelo,númerodesérieecidade,afimdeenviarmosasinstruções
paraocorretodescartedoseuprodutoLenovo.
BatteryrecyclinginformationforTaiwan
82UserGuide
Page 91

BatteryrecyclinginformationfortheUnitedStatesandCanada
BatteryrecyclinginformationfortheEuropeanUnion
Notice:ThismarkappliesonlytocountrieswithintheEuropeanUnion(EU).
BatteriesorpackagingforbatteriesarelabeledinaccordancewithEuropeanDirective2006/66/EC
concerningbatteriesandaccumulatorsandwastebatteriesandaccumulators.TheDirectivedeterminesthe
frameworkforthereturnandrecyclingofusedbatteriesandaccumulatorsasapplicablethroughoutthe
EuropeanUnion.Thislabelisappliedtovariousbatteriestoindicatethatthebatteryisnottobethrown
away,butratherreclaimeduponendoflifeperthisDirective.
InaccordancewiththeEuropeanDirective2006/66/EC,batteriesandaccumulatorsarelabeledtoindicate
thattheyaretobecollectedseparatelyandrecycledatendoflife.Thelabelonthebatterymayalso
includeachemicalsymbolforthemetalconcernedinthebattery(Pbforlead,Hgformercury,andCdfor
cadmium).Usersofbatteriesandaccumulatorsmustnotdisposeofbatteriesandaccumulatorsasunsorted
municipalwaste,butusethecollectionframeworkavailabletocustomersforthereturn,recycling,and
treatmentofbatteriesandaccumulators.Customerparticipationisimportanttominimizeanypotential
effectsofbatteriesandaccumulatorsontheenvironmentandhumanhealthduetothepotentialpresenceof
hazardoussubstances.Forpropercollectionandtreatment,goto:
http://www.lenovo.com/recycling
ChinarecyclinginformationforWasteElectricalandElectronic Equipment(WEEE)
AppendixB.WEEEandrecyclinginformation83
Page 92

84UserGuide
Page 93

AppendixC.RestrictionofHazardousSubstancesDirective (RoHS)
EuropeanUnionRoHS
LenovoproductssoldintheEuropeanUnion,onorafter3January2013meettherequirementsofDirective
2011/65/EUontherestrictionoftheuseofcertainhazardoussubstancesinelectricalandelectronic
equipment(“RoHSrecast”or“RoHS2”).
FormoreinformationaboutLenovoprogressonRoHS,goto:
http://www.lenovo.com/social_responsibility/us/en/RoHS_Communication.pdf
ChinaRoHS
TurkishRoHS
TheLenovoproductmeetstherequirementsoftheRepublicofTurkeyDirectiveontheRestrictionoftheUse
ofCertainHazardousSubstancesinElectricalandElectronicEquipment(EEE).
©CopyrightLenovo2014
85
Page 94

UkraineRoHS
IndiaRoHS
RoHScompliantasperE-Waste(Management&Handling)Rules,2011.
86UserGuide
Page 95

AppendixD.Notices
Lenovomightnotoffertheproducts,services,orfeaturesdiscussedinthisdocumentinallcountries.
ConsultyourlocalLenovorepresentativeforinformationontheproductsandservicescurrentlyavailablein
yourarea.AnyreferencetoaLenovoproduct,program,orserviceisnotintendedtostateorimplythatonly
thatLenovoproduct,program,orservicemightbeused.Anyfunctionallyequivalentproduct,program,or
servicethatdoesnotinfringeanyLenovointellectualpropertyrightmightbeusedinstead.However,itisthe
user'sresponsibilitytoevaluateandverifytheoperationofanyotherproduct,program,orservice.
Lenovomighthavepatentsorpendingpatentapplicationscoveringsubjectmatterdescribedinthis
document.Thefurnishingofthisdocumentdoesnotgiveyouanylicensetothesepatents.Youcansend
licenseinquiries,inwriting,to:
Lenovo(UnitedStates),Inc.
1009ThinkPlace-BuildingOne
Morrisville,NC27560
U.S.A.
Attention:LenovoDirectorofLicensing
LENOVOPROVIDESTHISPUBLICATION“ASIS”WITHOUTWARRANTYOFANYKIND,EITHEREXPRESS
ORIMPLIED,INCLUDING,BUTNOTLIMITEDTO,THEIMPLIEDWARRANTIESOFNON-INFRINGEMENT,
MERCHANTABILITYORFITNESSFORAPARTICULARPURPOSE.Somejurisdictionsdonotallow
disclaimerofexpressorimpliedwarrantiesincertaintransactions,therefore,thisstatementmightnot
applytoyou.
Thisinformationcouldincludetechnicalinaccuraciesortypographicalerrors.Changesareperiodically
madetotheinformationherein;thesechangeswillbeincorporatedinneweditionsofthepublication.
Lenovomightmakeimprovementsand/orchangesintheproduct(s)and/ortheprogram(s)describedinthis
publicationatanytimewithoutnotice.
Theproductsdescribedinthisdocumentarenotintendedforuseinimplantationorotherlifesupport
applicationswheremalfunctionmightresultininjuryordeathtopersons.Theinformationcontainedinthis
documentdoesnotaffectorchangeLenovoproductspecificationsorwarranties.Nothinginthisdocument
shalloperateasanexpressorimpliedlicenseorindemnityundertheintellectualpropertyrightsofLenovo
orthirdparties.Allinformationcontainedinthisdocumentwasobtainedinspecificenvironmentsandis
presentedasanillustration.Theresultobtainedinotheroperatingenvironmentsmightvary.
Lenovomightuseordistributeanyoftheinformationyousupplyinanywayitbelievesappropriatewithout
incurringanyobligationtoyou.
Anyreferencesinthispublicationtonon-LenovoWebsitesareprovidedforconvenienceonlyanddonotin
anymannerserveasanendorsementofthoseWebsites.ThematerialsatthoseWebsitesarenotpartof
thematerialsforthisLenovoproduct,anduseofthoseWebsitesisatyourownrisk.
Anyperformancedatacontainedhereinwasdeterminedinacontrolledenvironment.Therefore,theresult
obtainedinotheroperatingenvironmentsmightvarysignificantly.Somemeasurementsmighthavebeen
madeondevelopment-levelsystemsandthereisnoguaranteethatthesemeasurementswillbethesame
ongenerallyavailablesystems.Furthermore,somemeasurementsmighthavebeenestimatedthrough
extrapolation.Actualresultsmightvary.Usersofthisdocumentshouldverifytheapplicabledatafortheir
specificenvironment.
©CopyrightLenovo2014
87
Page 96

Trademarks
ThefollowingtermsaretrademarksofLenovointheUnitedStates,othercountries,orboth:
Lenovo
ThinkPad
UltraConnect
MicrosoftandWindowsaretrademarksoftheMicrosoftgroupofcompanies.
IntelandIntelAtomaretrademarksofIntelCorporationintheU.S.and/orothercountries.
iPhoneisatrademarkofAppleInc.,registeredintheU.S.andothercountries.
ThetermsHDMIandHDMIHigh-DefinitionMultimediaInterfacearetrademarksorregisteredtrademarksof
HDMILicensingLLCintheUnitedStatesandothercountries.
Othercompany,product,andservicenamesmaybetrademarksorservicemarksofothers.
88UserGuide
Page 97

Page 98

 Loading...