

Page 1

UserGuide
ThinkPadS230u
Page 2

Notes:Beforeusingthisinformationandtheproductitsupports,besuretoreadandunderstandthe
following:
•Safety,Warranty,andSetupGuide
•RegulatoryNotice
•“Importantsafetyinformation”onpageiv
•AppendixD“Notices”onpage121
TheSafety,Warranty,andSetupGuideandtheRegulatoryNoticehavebeenuploadedtotheWebsite.T o
refertothem,gotohttp://www.lenovo.com/ThinkPadUserGuidesandclickUserGuides&Manuals,then
followtheinstructionsonthescreen.
FirstEdition(August2012)
©CopyrightLenovo2012.
LIMITEDANDRESTRICTEDRIGHTSNOTICE:IfdataorsoftwareisdeliveredpursuantaGeneralServicesAdministration
“GSA”contract,use,reproduction,ordisclosureissubjecttorestrictionssetforthinContractNo.GS-35F-05925.
Page 3

Contents
Readthisrst.............iii
Importantsafetyinformation..........iv
Conditionsthatrequireimmediateaction...v
Safetyguidelines.............v
Chapter1.Productoverview......1
Locatingcomputercontrols,connectors,and
indicators..................1
Frontview................1
Right-sideview..............3
Left-sideview..............4
Bottomview...............6
Statusindicators.............6
Locatingimportantproductinformation......8
Machinetypeandmodellabel........8
FCCIDandICCerticationnumberlabel...9
Features..................9
Specications...............10
Operatingenvironment...........11
Lenovoprograms.............11
Chapter2.Usingyourcomputer...13
Registeringyourcomputer..........13
Frequentlyaskedquestions.........13
Tabletmode................14
Usingtabletmode...........14
Usingthemulti-touchscreen.......17
Usingthetabletbuttons.........19
Specialkeysandbuttons..........19
UsingtheUltraNavpointingdevice.......21
UsingtheTrackPointpointingdevice....22
Usingthetouchpad...........23
DisablingtheUltraNavpointingdevice...23
AddingtheUltraNavicontotheWindows
noticationarea............24
Powermanagement............24
Usingthebatterypower.........24
Usingtheacpower...........25
Managingthepowerplans........26
Power-savingmodes..........26
Connectingtothenetwork..........26
Ethernetconnections..........27
Wirelessconnections..........27
PresentationsandMultimedia.........28
Changingthedisplaysettings.......28
Usinganexternaldisplay.........29
Usingaprojector............30
Usingaudiofeatures............30
Usingtheintegratedcamera.........31
Usingamediacard.............31
Insertingamediacard..........32
Removingamediacard.........32
Chapter3.Youandyourcomputer..33
Accessibilityandcomfort..........33
Ergonomicinformation..........33
Comfort...............34
Accessibilityinformation.........34
Travelingwithyourcomputer.........35
Traveltips...............35
Travelaccessories...........35
Chapter4.Security..........37
Attachingamechanicallock.........37
Usingpasswords..............37
Passwordsandsleepmode........37
Typingpasswords...........37
Power-onpassword...........38
Harddiskpasswords..........38
Supervisorpassword..........40
Harddisksecurity.............42
Settingthesecuritychip...........43
Noticeondeletingdatafromyourharddiskdrive
orsolid-statedrive.............44
Usingrewalls...............44
Protectingdataagainstviruses........44
Chapter5.Recoveryoverview....47
Chapter6.Replacingdevices.....49
Staticelectricityprevention..........49
Disablingthebuilt-inbattery.........49
ReplacingtheSIMcard...........49
Replacingtheharddiskdriveorsolid-statedrive.51
Replacingthekeyboard...........53
ReplacingaMiniPCIExpressCardforwireless
LANconnection..............57
InstallingorreplacingthewirelessWANcard...60
Chapter7.Advancedconguration..65
Installinganewoperatingsystem.......65
InstallingtheWindows8operatingsystem..65
Installingdevicedrivers...........66
ThinkPadSetup..............66
Mainmenu..............66
©CopyrightLenovo2012
i
Page 4

Congmenu..............67
Date/Timemenu............71
Securitymenu.............71
Startupmenu.............75
Restartmenu.............77
UpdatingyoursystemUEFIBIOS.....77
Usingsystemmanagement..........77
Systemmanagement..........78
Settingmanagementfeatures.......78
Chapter8.Preventingproblems...81
Generaltipsforpreventingproblems......81
Makingsuredevicedriversarecurrent.....82
Takingcareofyourcomputer.........83
Cleaningthecoverofyourcomputer....84
Chapter9.Troubleshootingcomputer
problems...............87
Diagnosingproblems............87
Troubleshooting..............87
Computerstopsresponding.......87
Spillsonthekeyboard..........88
Errormessages............88
Errorswithoutmessages.........90
Beeperrors..............91
Memorymoduleproblems........91
Networkingproblems..........92
Problemswiththekeyboardandotherpointing
devices................94
Problemswiththedisplayandmultimedia
devices................95
Batteryandpowerproblems.......99
Problemswithdrivesandotherstorage
devices................102
Asoftwareproblem...........103
Problemswithportsandconnectors....104
Chapter10.Gettingsupport....105
BeforeyoucontactLenovo..........105
Gettinghelpandservice...........105
Usingdiagnosticprograms........106
LenovoSupportWebsite.........106
CallingLenovo.............106
FindingThinkPadoptions........107
Purchasingadditionalservices........107
AppendixA.Regulatory
information.............109
Wirelessrelatedinformation.........109
LocationoftheUltraConnectwireless
antennas...............110
Locatingwirelessregulatorynotices....111
Exportclassicationnotice..........111
Electronicemissionnotices..........111
FederalCommunicationsCommission
DeclarationofConformity........111
IndustryCanadaClassBemissioncompliance
statement...............111
EuropeanUnion-Compliancetothe
ElectromagneticCompatibilityDirective...112
GermanClassBcompliancestatement...112
KoreaClassBcompliancestatement....112
JapanVCCIClassBcompliancestatement..113
Japancompliancestatementforproducts
whichconnecttothepowermainswith
ratedcurrentlessthanorequalto20Aper
phase................113
Lenovoproductserviceinformationfor
Taiwan................113
AppendixB.WEEEandrecycling
statements.............115
ImportantWEEEinformation.........115
Japanrecyclingstatements.........115
RecyclinginformationforBrazil........116
BatteryrecyclinginformationfortheEuropean
Union..................116
BatteryrecyclinginformationforTaiwan.....117
BatteryrecyclinginformationfortheUnitedStates
andCanada................117
AppendixC.ENERGYSTARmodel
information.............119
AppendixD.Notices.........121
Trademarks................122
AppendixE.RestrictionofHazardous
SubstancesDirective(RoHS)....123
ChinaRoHS................123
TurkishRoHS...............123
UkraineRoHS...............123
IndiaRoHS................124
iiUserGuide
Page 5
Readthisrst
Besuretofollowtheimportanttipsgivenheretogetthemostuseandenjoymentoutofyourcomputer.
Failuretodosomightleadtodiscomfortorinjury,orcauseyourcomputertofail.
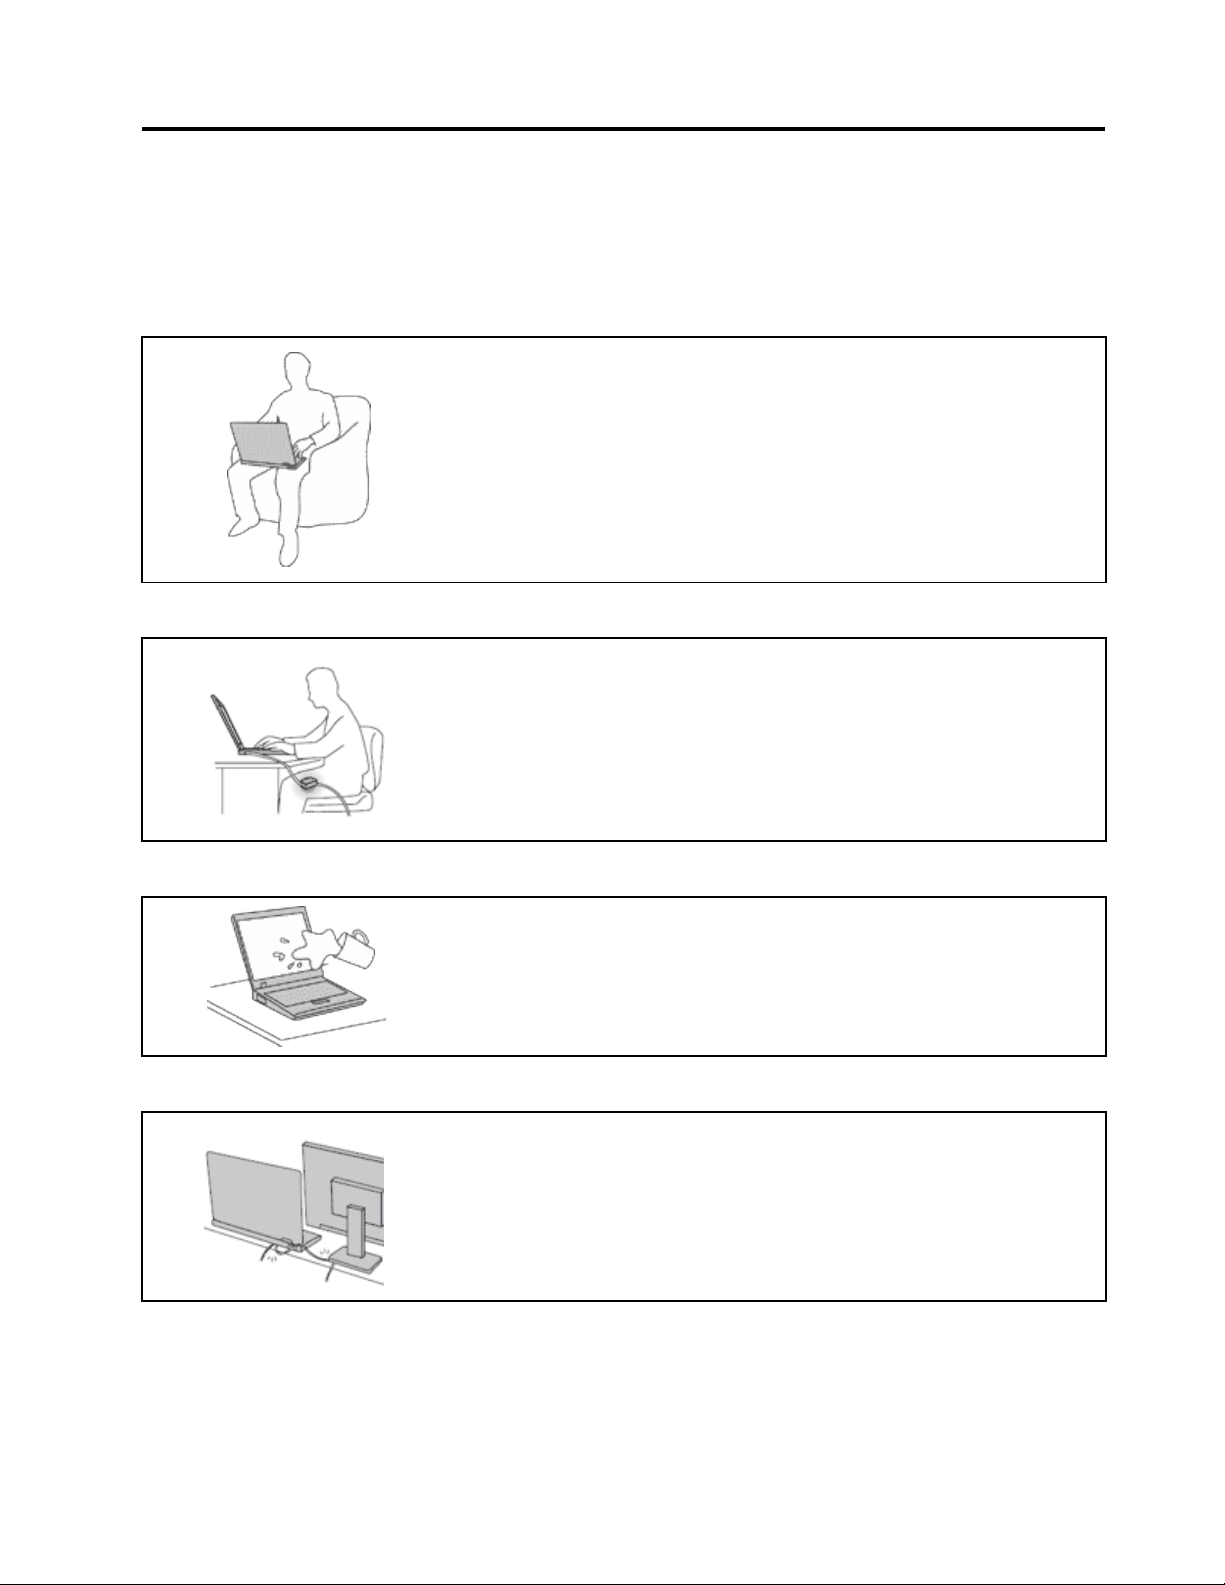
Protectyourselffromtheheatthatyourcomputergenerates.
Whenyourcomputeristurnedonorthebatteryischarging,thebase,thepalm
rest,andsomeotherpartsmaybecomehot.Thetemperaturetheyreach
dependsontheamountofsystemactivityandthelevelofchargeinthebattery.
Extendedcontactwithyourbody,eventhroughclothing,couldcause
discomfortorevenaskinburn.
•Avoidkeepingyourhands,yourlap,oranyotherpartofyourbodyin
contactwithahotsectionofthecomputerforanyextendedtime.
•Periodicallytakehandsfromusingthekeyboardbyliftingyourhandsfrom
thepalmrest.
Protectyourselffromtheheatgeneratedbytheacpoweradapter.
Whentheacpoweradapterisconnectedtoanelectricaloutletandyour
computer,itgeneratesheat.
Extendedcontactwithyourbody,eventhroughclothing,maycauseaskin
burn.
•Donotplacetheacpoweradapterincontactwithanypartofyourbody
whileitisinuse.
•Neveruseittowarmyourbody.
Preventyourcomputerfromgettingwet.
Protectthecablesfrombeingdamaged.
Toavoidspillsandthedangerofelectricalshock,keepliquidsawayfromyour
computer.
Applyingstrongforcetocablesmaydamageorbreakthem.
Routecommunicationlines,orthecablesofanacpoweradapter,amouse,a
keyboard,aprinter,oranyotherelectronicdevice,sothattheycannotbewalked
on,trippedover,pinchedbyyourcomputerorotherobjects,orinanyway
subjectedtotreatmentthatcouldinterferewiththeoperationofyourcomputer.
©CopyrightLenovo2012
iii
Page 6
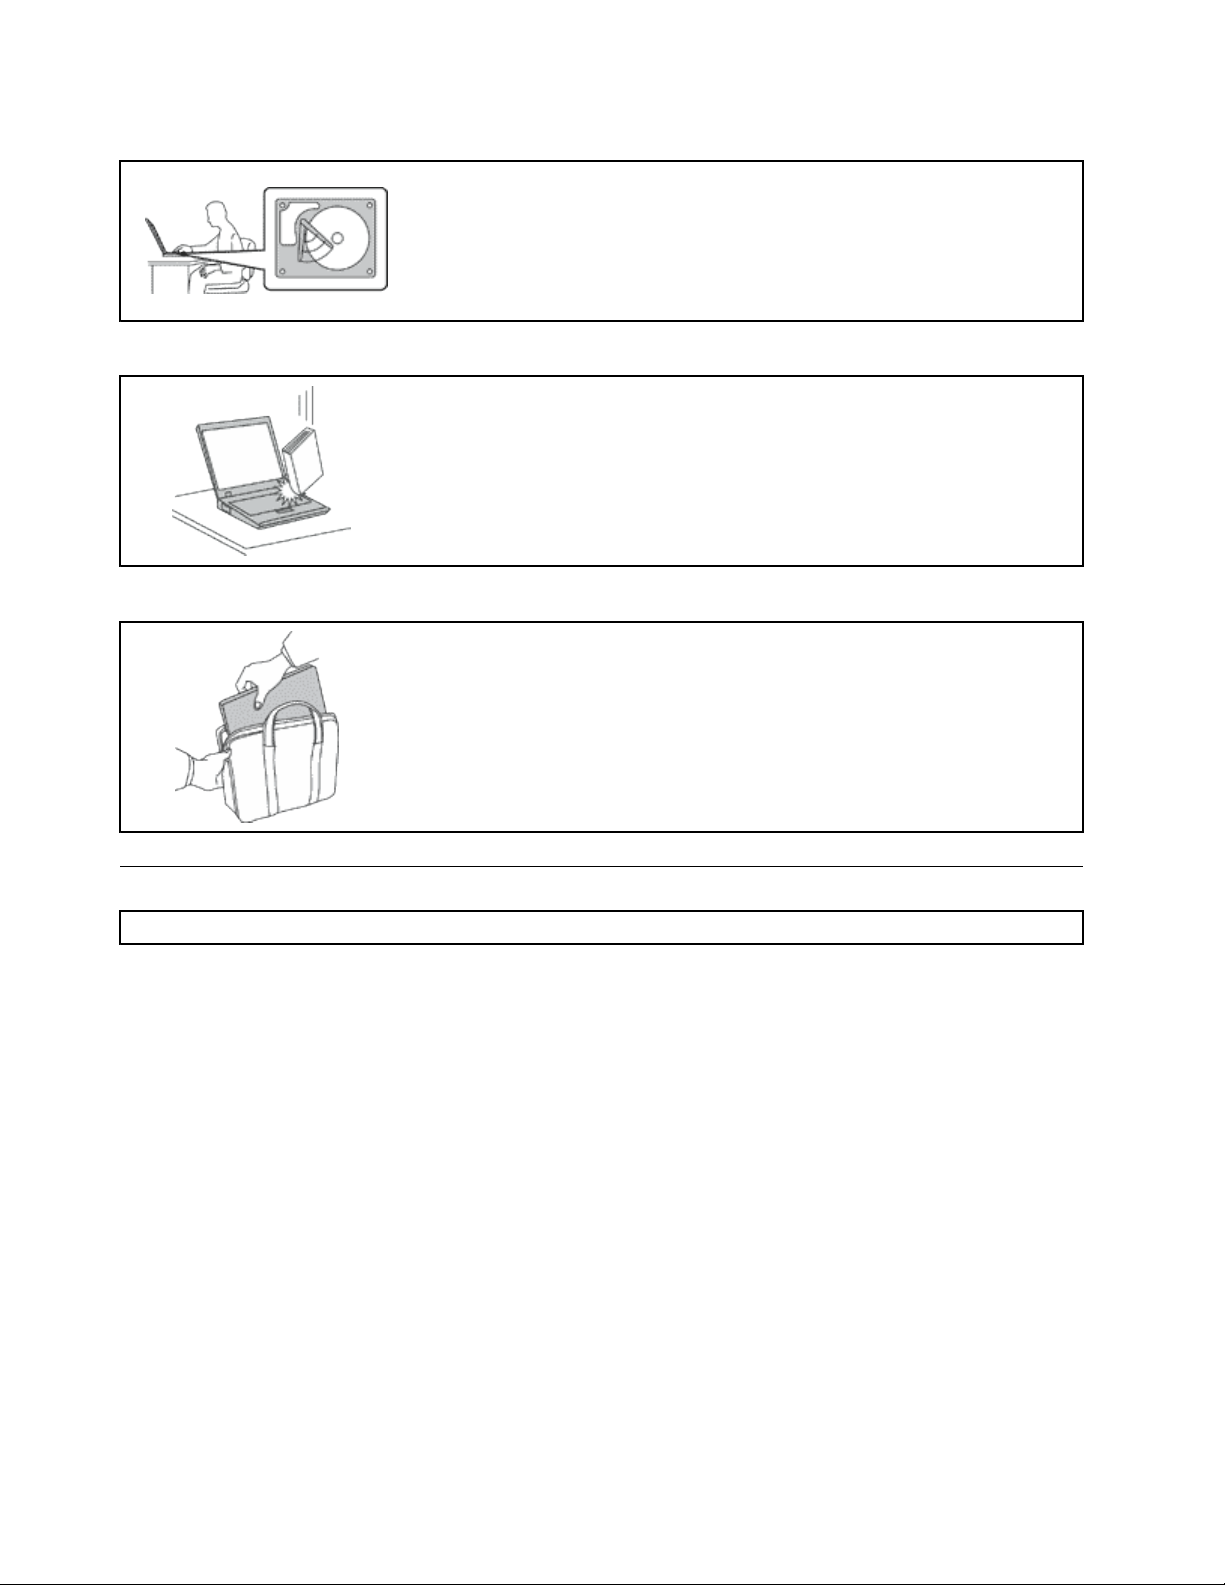
Protectyourcomputeranddatawhenmovingit.
Beforemovingacomputerequippedwithaharddiskdrive,dooneofthe
following,andensurethatthepowerbuttonisofforisblinking:
•Turnitoff.
•Putitinsleepmode.
Thiswillhelptopreventdamagetothecomputer,andpossiblelossofdata.
Handleyourcomputergently.
Donotdrop,bump,scratch,twist,hit,vibrate,push,orplaceheavyobjectson
yourcomputer,display,orexternaldevices.
Carryyourcomputercarefully.
•Useaqualitycarryingcasethatprovidesadequatecushioningandprotection.
•Donotpackyourcomputerinatightlypackedsuitcaseorbag.
•Beforeputtingyourcomputerinacarryingcase,ensurethatitisoff,insleep
mode.Donotputacomputerinacarryingcasewhileitisturnedon.
Importantsafetyinformation
Note:Readtheimportantsafetyinformationrst.
Thisinformationcanhelpyousafelyuseyournotebookcomputer.Followandretainallinformationincluded
withyourcomputer.Theinformationinthisdocumentdoesnotalterthetermsofyourpurchaseagreement
ortheLenovo
andSetupGuidethatcomeswithyourcomputer.
Customersafetyisimportant.Ourproductsaredevelopedtobesafeandeffective.However,personal
computersareelectronicdevices.Powercords,poweradapters,andotherfeaturescancreatepotential
safetyrisksthatcanresultinphysicalinjuryorpropertydamage,especiallyifmisused.Toreducethese
risks,followtheinstructionsincludedwithyourproduct,observeallwarningsontheproductandinthe
operatinginstructions,andreviewtheinformationincludedinthisdocumentcarefully.Bycarefullyfollowing
theinformationcontainedinthisdocumentandprovidedwithyourproduct,youcanhelpprotectyourself
fromhazardsandcreateasafercomputerworkenvironment.
Note:Thisinformationincludesreferencestopoweradaptersandbatteries.Inadditiontonotebook
computers,someproducts(suchasspeakersandmonitors)shipwithexternalpoweradapters.Ifyouhave
suchaproduct,thisinformationappliestoyourproduct.Inaddition,computerproductscontainacoin-sized
internalbatterythatprovidespowertothesystemclockevenwhenthecomputerisunplugged,sothe
batterysafetyinformationappliestoallcomputerproducts.
®
LimitedWarranty.Formoreinformation,see“WarrantyInformation”intheSafety,Warranty,
ivUserGuide
Page 7

Conditionsthatrequireimmediateaction
Productscanbecomedamagedduetomisuseorneglect.Someproductdamageisseriousenough
thattheproductshouldnotbeusedagainuntilithasbeeninspectedand,ifnecessary,repairedby
anauthorizedservicer.
Aswithanyelectronicdevice,paycloseattentiontotheproductwhenitisturnedon.Onveryrare
occasions,youmightnoticeanodororseeapuffofsmokeorsparksventfromyourproduct.Oryou
mighthearsoundslikepopping,crackingorhissing.Theseconditionsmightmerelymeanthatan
internalelectroniccomponenthasfailedinasafeandcontrolledmanner.Or ,theymightindicate
apotentialsafetyissue.However,donottakerisksorattempttodiagnosethesituationyourself.
ContacttheCustomerSupportCenterforfurtherguidance.ForalistofServiceandSupportphone
numbers,seethefollowingWebsite:
http://www.lenovo.com/support/phone
Frequentlyinspectyourcomputeranditscomponentsfordamageorwearorsignsofdanger.Ifyou
haveanyquestionabouttheconditionofacomponent,donotusetheproduct.ContacttheCustomer
SupportCenterortheproductmanufacturerforinstructionsonhowtoinspecttheproductand
haveitrepaired,ifnecessary.
Intheunlikelyeventthatyounoticeanyofthefollowingconditions,orifyouhaveanysafetyconcerns
withyourproduct,stopusingtheproductandunplugitfromthepowersourceandtelecommunication
linesuntilyoucanspeaktotheCustomerSupportCenterforfurtherguidance.
•Powercords,plugs,poweradapters,extensioncords,surgeprotectors,orpowersuppliesthatare
cracked,broken,ordamaged.
•Signsofoverheating,smoke,sparks,orre.
•Damagetoabattery(suchascracks,dents,orcreases),dischargefromabattery,orabuildupofforeign
substancesonthebattery.
•Acracking,hissingorpoppingsound,orstrongodorthatcomesfromtheproduct.
•Signsthatliquidhasbeenspilledoranobjecthasfallenontothecomputerproduct,thepowercordor
poweradapter.
•Thecomputerproduct,powercord,orpoweradapterhasbeenexposedtowater.
•Theproducthasbeendroppedordamagedinanyway.
•Theproductdoesnotoperatenormallywhenyoufollowtheoperatinginstructions.
Note:Ifyounoticetheseconditionswithaproduct(suchasanextensioncord)thatisnotmanufacturedfor
orbyLenovo,stopusingthatproductuntilyoucancontacttheproductmanufacturerforfurtherinstructions,
oruntilyougetasuitablereplacement.
Safetyguidelines
Alwaysobservethefollowingprecautionstoreducetheriskofinjuryandpropertydamage.
Serviceandupgrades
DonotattempttoserviceaproductyourselfunlessinstructedtodosobytheCustomerSupportCenteror
yourdocumentation.OnlyuseaServiceProviderwhoisapprovedtorepairyourparticularproduct.
Note:Somecomputerpartscanbeupgradedorreplacedbythecustomer.Upgradestypicallyare
referredtoasoptions.ReplacementpartsapprovedforcustomerinstallationarereferredtoasCustomer
ReplaceableUnits,orCRUs.Lenovoprovidesdocumentationwithinstructionswhenitisappropriatefor
customerstoinstalloptionsorreplaceCRUs.Youmustcloselyfollowallinstructionswheninstallingor
replacingparts.TheOffstateofapowerindicatordoesnotnecessarilymeanthatvoltagelevelsinsidea
productarezero.Beforeyouremovethecoversfromaproductequippedwithapowercord,alwaysensure
©CopyrightLenovo2012
v
Page 8

thatthepoweristurnedoffandthattheproductisunpluggedfromanypowersource.Ifyouhaveany
questionsorconcerns,contacttheCustomerSupportCenter.
Althoughtherearenomovingpartsinyourcomputerafterthepowercordhasbeendisconnected,the
followingwarningsarerequiredforyoursafety.
CAUTION:
Hazardousmovingparts.Keepngersandotherbodypartsaway.
CAUTION:
BeforereplacinganyCRUs,turnoffthecomputerandwaitthreetoveminutestoletthecomputer
coolbeforeopeningthecover.
Powercordsandpoweradapters
DANGER
Useonlythepowercordsandpoweradapterssuppliedbytheproductmanufacturer.
Thepowercordsshallbesafetyapproved.ForGermany,itshallbeH05VV-F,3G,0.75mm
better.Forothercountries,thesuitabletypesshallbeusedaccordingly.
Neverwrapapowercordaroundapoweradapterorotherobject.Doingsocanstressthecordin
waysthatcancausethecordtofray,crack,orcrimp.Thiscanpresentasafetyhazard.
Alwaysroutepowercordssothattheywillnotbewalkedon,trippedover,orpinchedbyobjects.
Protectpowercordsandpoweradaptersfromliquids.Forinstance,donotleaveyourpowercord
orpoweradapternearsinks,tubs,toilets,oronoorsthatarecleanedwithliquidcleansers.
Liquidscancauseashortcircuit,particularlyifthepowercordorpoweradapterhasbeenstressed
bymisuse.Liquidsalsocancausegradualcorrosionofpowercordterminalsand/ortheconnector
terminalsonapoweradapter,whichcaneventuallyresultinoverheating.
Alwaysconnectpowercordsandsignalcablesinthecorrectorderandensurethatallpowercord
connectorsaresecurelyandcompletelypluggedintoreceptacles.
Donotuseanypoweradapterthatshowscorrosionattheacinputpinsorshowssignsof
overheating(suchasdeformedplastic)attheacinputpinsoranywhereonthepoweradapter.
2
,or
Donotuseanypowercordswheretheelectricalcontactsoneitherendshowsignsofcorrosionor
overheatingorwherethepowercordappearstohavebeendamagedinanyway.
viUserGuide
Page 9
Extensioncordsandrelateddevices
Ensurethatextensioncords,surgeprotectors,uninterruptiblepowersupplies,andpowerstripsthatyouuse
areratedtohandletheelectricalrequirementsoftheproduct.Neveroverloadthesedevices.Ifpowerstrips
areused,theloadshouldnotexceedthepowerstripinputrating.Consultanelectricianformoreinformation
ifyouhavequestionsaboutpowerloads,powerrequirements,andinputratings.
Plugsandoutlets
DANGER
Ifareceptacle(poweroutlet)thatyouintendtousewithyourcomputerequipmentappearstobe
damagedorcorroded,donotusetheoutletuntilitisreplacedbyaqualiedelectrician.
Donotbendormodifytheplug.Iftheplugisdamaged,contactthemanufacturertoobtain
areplacement.
Donotshareanelectricaloutletwithotherhomeorcommercialappliancesthatdrawlargeamounts
ofelectricity;otherwise,unstablevoltagemightdamageyourcomputer,data,orattacheddevices.
Someproductsareequippedwithathree-prongedplug.Thisplugtsonlyintoagrounded
electricaloutlet.Thisisasafetyfeature.Donotdefeatthissafetyfeaturebytryingtoinsertitinto
anon-groundedoutlet.Ifyoucannotinserttheplugintotheoutlet,contactanelectricianforan
approvedoutletadapterortoreplacetheoutletwithonethatenablesthissafetyfeature.Never
overloadanelectricaloutlet.Theoverallsystemloadshouldnotexceed80percentofthebranch
circuitrating.Consultanelectricianformoreinformationifyouhavequestionsaboutpowerloads
andbranchcircuitratings.
Besurethatthepoweroutletyouareusingisproperlywired,easilyaccessible,andlocatedclose
totheequipment.Donotfullyextendpowercordsinawaythatwillstressthecords.
Besurethatthepoweroutletprovidesthecorrectvoltageandcurrentfortheproductyouare
installing.
Carefullyconnectanddisconnecttheequipmentfromtheelectricaloutlet.
Powersupplystatement
DANGER
Neverremovethecoveronapowersupplyoranypartthathasthefollowinglabelattached.
Hazardousvoltage,current,andenergylevelsarepresentinsideanycomponentthathasthislabel
attached.Therearenoserviceablepartsinsidethesecomponents.Ifyoususpectaproblemwith
oneoftheseparts,contactaservicetechnician.
©CopyrightLenovo2012
vii
Page 10
Externaldevices
CAUTION:
DonotconnectordisconnectanyexternaldevicecablesotherthanUSBcablewhilethecomputer
powerison;otherwise,youmightdamageyourcomputer .Toavoidpossibledamagetoattached
devices,waitatleastvesecondsafterthecomputerisshutdowntodisconnectexternaldevices.
Generalbatterynotice
DANGER
PersonalcomputersmanufacturedbyLenovocontainacoincellbatterytoprovidepowerto
thesystemclock.Inaddition,manymobileproducts,suchasnotebookcomputers,utilizea
rechargeablebatterypacktoprovidesystempowerwheninportablemode.Batteriessuppliedby
Lenovoforusewithyourproducthavebeentestedforcompatibilityandshouldonlybereplaced
withapprovedparts.
Neverattempttoopenorserviceanybattery.Donotcrush,puncture,orincineratebatteriesor
shortcircuitthemetalcontacts.Donotexposethebatterytowaterorotherliquids.Onlyrecharge
thebatterypackstrictlyaccordingtoinstructionsincludedintheproductdocumentation.
Batteryabuseormishandlingcancausethebatterytooverheat,whichcancausegassesorame
to“vent”fromthebatterypackorcoincell.Ifyounoticeanysignsofbulging,leakageorcorrosion
ontheexterioroftheproduct,thismaybetheresultofaninternalbatteryfault.Ifthisoccurs,stop
usingtheproductimmediatelyandpleasecontacttheLenovoSupportteamforfurtherinstructions.
Factoryreplacementofthebatteriesmayberequired.
Batteriescandegradewhentheyareleftunusedforlongperiodsoftime.Forsomerechargeable
batteries(particularlyLithiumIonbatteries),leavingabatteryunusedinadischargedstatecould
increasetheriskofabatteryshortcircuit,whichcouldshortenthelifeofthebatteryandcanalso
poseasafetyhazard.DonotletrechargeableLithium-Ionbatteriescompletelydischargeorstore
thesebatteriesinadischargedstate.
Built-inrechargeablebatterynotice
DANGER
Donotattempttoreplacetheinternalrechargeablelithiumionbatteries.ContactLenovoSupport
forfactoryreplacement.
Lithiumcoincellbatterynotice
DANGER
Dangerofexplosionifbatteryisincorrectlyreplaced.
Whenreplacingthelithiumcoincellbattery,useonlythesameoranequivalenttypethatis
recommendedbythemanufacturer.Thebatterycontainslithiumandcanexplodeifnotproperly
used,handled,ordisposedof.
Donot:
•Throworimmerseintowater
•Heattomorethan100°C(212°F)
viiiUserGuide
Page 11

•Repairordisassemble
Disposeofthebatteryasrequiredbylocalordinancesorregulations.
ThefollowingstatementappliestousersinthestateofCalifornia,U.S.A.
CaliforniaPerchlorateInformation:
Productscontainingmanganesedioxidelithiumcoincellbatteriesmaycontainperchlorate.
PerchlorateMaterial-specialhandlingmayapply,See
www.dtsc.ca.gov/hazardouswaste/perchlorate
Heatandproductventilation
DANGER
Computers,acpoweradapters,andmanyaccessoriescangenerateheatwhenturnedonandwhen
batteriesarecharging.Notebookcomputerscangenerateasignicantamountofheatduetotheir
compactsize.Alwaysfollowthesebasicprecautions:
•Whenyourcomputeristurnedonorthebatteryischarging,thebase,thepalmrest,andsome
otherpartsmaybecomehot.Avoidkeepingyourhands,yourlap,oranyotherpartofyour
bodyincontactwithahotsectionofthecomputerforanyextendedlengthoftime.Whenyou
usethekeyboard,avoidkeepingyourpalmsonthepalmrestforaprolongedperiodoftime.
Yourcomputergeneratessomeheatduringnormaloperation.Theamountofheatdependson
theamountofsystemactivityandthebatterychargelevel.Extendedcontactwithyourbody,
eventhroughclothing,couldcausediscomfortorevenaskinburn.Periodicallytakebreaks
fromusingthekeyboardbyliftingyourhandsfromthepalmrest;andbecarefulnottouse
thekeyboardforanyextendedlengthoftime.
•Donotoperateyourcomputerorchargethebatterynearammablematerialsorinexplosive
environments.
•Ventilationslots,fansand/orheatsinksareprovidedwiththeproductforsafety,comfort,and
reliableoperation.Thesefeaturesmightinadvertentlybecomeblockedbyplacingtheproducton
abed,sofa,carpet,orotherexiblesurface.Neverblock,cover,ordisablethesefeatures.
•Whentheacpoweradapterisconnectedtoanelectricaloutletandyourcomputer ,itgenerates
heat.Donotplacetheadapterincontactwithanypartofyourbodywhileusingit.Neverusethe
acpoweradaptertowarmyourbody.Extendedcontactwithyourbody,eventhroughclothing,
maycauseaskinburn.
Foryoursafety,alwaysfollowthesebasicprecautionswithyourcomputer:
•Keepthecoverclosedwheneverthecomputerispluggedin.
•Regularlyinspecttheoutsideofthecomputerfordustaccumulation.
•Removedustfromventsandanyperforationsinthebezel.Morefrequentcleaningsmightbe
requiredforcomputersindustyorhigh-trafcareas.
•Donotrestrictorblockanyventilationopenings.
•Donotoperateyourcomputerinsidefurniture,asthismightincreasetheriskofoverheating.
•Airowtemperaturesintothecomputershouldnotexceed35°C(95°F).
©CopyrightLenovo2012
ix
Page 12

Electricalcurrentsafetyinformation
DANGER
Electriccurrentfrompower,telephone,andcommunicationcablesishazardous.
Toavoidashockhazard:
•Donotuseyourcomputerduringalightningstorm.
•Donotconnectordisconnectanycablesorperforminstallation,maintenance,orreconguration
ofthisproductduringanelectricalstorm.
•Connectallpowercordstoaproperlywiredandgroundedelectricaloutlet.
•Connecttoproperlywiredoutletsanyequipmentthatwillbeattachedtothisproduct.
•Wheneverpossible,useonehandonlytoconnectordisconnectsignalcables.
•Neverturnonanyequipmentwhenthereisevidenceofre,water,orstructuraldamage.
•Disconnectallattachedcablesanddisablebatteriesbeforeopeninganyaccessibledevice
coversunlessinstructedotherwiseintheinstallationandcongurationprocedures.
•Donotuseyoucomputeruntilallinternalpartsenclosuresarefastenedintoplace.Neveruse
thecomputerwheninternalpartsandcircuitsareexposed.
DANGER
Connectanddisconnectcablesasdescribedinthefollowingprocedureswheninstalling,moving,
oropeningcoversonthisproductorattacheddevices.
Toconnect:
1.TurneverythingOFF .
2.First,attachallcablestodevices.
3.Attachsignalcablestoconnectors.
4.Attachpowercordstooutlets.
5.TurndevicesON.
Todisconnect:
1.TurneverythingOFF .
2.First,removepowercordsfromoutlets.
3.Removesignalcablesfromconnectors.
4.Removeallcablesfromdevices.
Thepowercordmustbedisconnectedfromthewalloutletorreceptaclebeforeinstallingallother
electricalcablesconnectedtothecomputer .
Thepowercordmaybereconnectedtothewalloutletorreceptacleonlyafterallotherelectrical
cableshavebeenconnectedtothecomputer.
Liquidcrystaldisplay(LCD)notice
CAUTION:
Theliquidcrystaldisplay(LCD)ismadeofglass,androughhandlingordroppingthecomputercan
causetheLCDtobreak.IftheLCDbreaksandtheinternaluidgetsintoyoureyesoronyour
hands,immediatelywashtheaffectedareaswithwaterforatleast15minutes;ifanysymptomsare
presentafterwashing,getmedicalcare.
Note:Forproductswithmercury-containinguorescentlamps(forexample,non-LED),theuorescentlamp
intheliquidcrystaldisplay(LCD)containsmercury;disposeofaccordingtolocal,state,orfederallaws.
xUserGuide
Page 13
Usingheadphonesorearphones
CAUTION:
Excessivesoundpressurefromearphonesandheadphonescancausehearingloss.Adjustmentof
theequalizertomaximumincreasestheearphoneandheadphoneoutputvoltageandthesound
pressurelevel.Therefore,toprotectyourhearing,adjusttheequalizertoanappropriatelevel.
Excessiveuseofheadphonesorearphonesforalongperiodoftimeathighvolumecanbedangerousifthe
outputoftheheadphoneorearphoneconnectorsdonotcomplywithspecicationsofEN50332-2.The
headphoneoutputconnectorofyourcomputercomplieswithEN50332-2Subclause7.Thisspecication
limitsthecomputer’smaximumwidebandtrueRMSoutputvoltageto150mV.Tohelpprotectagainst
hearingloss,ensurethattheheadphonesorearphonesyouusealsocomplywithEN50332-2(Clause7
limits)forawidebandcharacteristicvoltageof75mV.UsingheadphonesthatdonotcomplywithEN
50332-2canbedangerousduetoexcessivesoundpressurelevels.
IfyourLenovocomputercamewithheadphonesorearphonesinthepackage,asaset,thecombinationof
theheadphonesorearphonesandthecomputeralreadycomplieswiththespecicationsofEN50332-1.
Ifdifferentheadphonesorearphonesareused,ensurethattheycomplywithEN50332-1(Clause6.5
LimitationValues).UsingheadphonesthatdonotcomplywithEN50332-1canbedangerousdueto
excessivesoundpressurelevels.
Additionalsafetyinformation
DANGER
Plasticbagscanbedangerous.Keepplasticbagsawayfrombabiesandchildrentoavoiddanger
ofsuffocation.
Noticefortabletpersonalcomputerusers
SafetynoticeforusersinAustralia
DANGER
Donotconnectphonelinewhileusingtabletmode.
NoticeforusersintheU.S.A.
Manypersonalcomputerproductsandaccessoriescontaincords,cablesorwires,suchaspowercordsor
cordstoconnecttheaccessorytoapersonalcomputer.Ifthisproducthassuchacord,cableorwire,then
thefollowingwarningapplies:
WARNING:Handlingthecordonthisproductorcordsassociatedwithaccessoriessoldwiththisproduct
willexposeyoutolead,achemicalknowntotheStateofCaliforniatocausecancer,andbirthdefectsor
otherreproductiveharm.Washhandsafterhandling.
Savetheseinstructions.
©CopyrightLenovo2012
xi
Page 14

xiiUserGuide
Page 15
Chapter1.Productoverview
Thischapterprovidesinformationaboutthelocationsofconnectors,locationsofimportantproductlabels,
computerfeatures,specications,operatingenvironment,andthepreinstalledLenovoprograms.
Thischaptercontainsthefollowingtopics:
•“Locatingcomputercontrols,connectors,andindicators”onpage1
•“Locatingimportantproductinformation”onpage8
•“Features”onpage9
•“Specications”onpage10
•“Operatingenvironment”onpage11
•“Lenovoprograms”onpage11
Locatingcomputercontrols,connectors,andindicators
Thissectionintroducesthecomputerhardwarefeaturestogiveyouthebasicinformationyouwillneed
tostartusingthecomputer.
Frontview
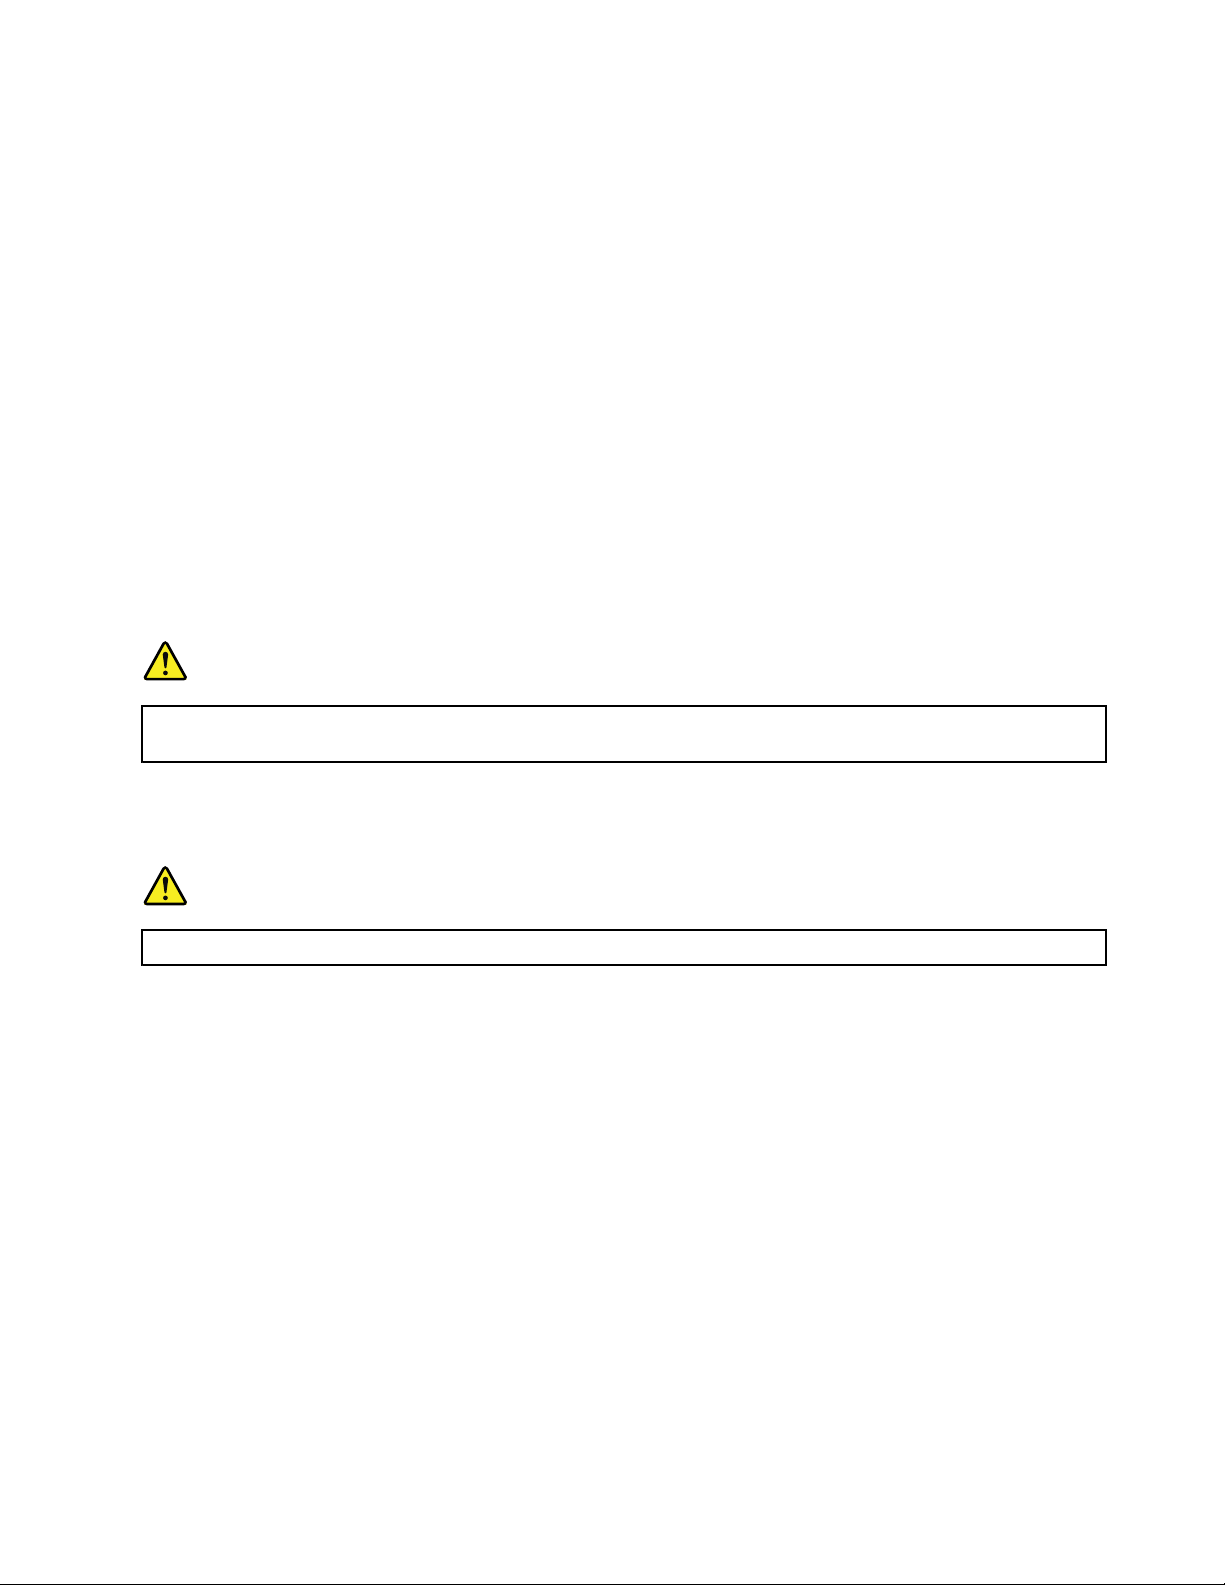
Figure1.ThinkPadS230ufrontview
1Integratedcamera
2Built-inmicrophones7TrackPoint
3Ambientlightsensor8Touchpad
4Volumecontrolbuttons9TrackPointpointingstick
5Built-instereospeakers10Windows
©CopyrightLenovo2012
6Systemstatusindicator(illuminatedThinkPad
®
logo)
®
buttons
®
button
1
Page 16

1Integratedcamera
Usethecameratotakepicturesorholdavideoconference.Fordetails,see“Usingtheintegratedcamera”
onpage31.
2Built-inmicrophones
Thebuilt-inmicrophonescapturesoundandvoicewhenusedwithanapplicationprogramcapableof
handlingaudio.
3Ambientlightsensor
Theambientlightsensordetectsthesurroundinglightconditions.Thenthecomputeradjuststhescreen
brightnessaccordingly.
4Volumecontrolbuttons
Thevolumecontrolbuttonsenableyoutoadjustthevolumewhileyouareusingyourcomputerinthe
tabletmode.
5Built-instereospeakers
Yourcomputerisequippedwithapairofbuilt-instereospeakers.
6Systemstatusindicator(illuminatedThinkPadlogo)
TheilluminatedThinkPadlogoonthepalmrestfunctionsasasystemstatusindicator.Yourcomputerhas
severalstatusindicators.Forthedetailedinformationaboutthelocationandmeaningofeachindicator,see
“Systemstatusindicators”onpage6
.
UltraNav
7TrackPointbutton
8T ouchpad
9T rackPointpointingstick
®
pointingdevice
ThekeyboardcontainstheLenovouniqueUltraNavpointingdevice.Pointing,selecting,anddragging
areintegralprocessthatyoucanperformwithoutmovingyourngersfromatypingposition.Formore
information,see“UsingtheUltraNavpointingdevice”onpage21
10Windowsbutton
.
PresstheWindowsbuttontoswitchbetweenthecurrentworkspaceandtheStartscreen.
2UserGuide
Page 17
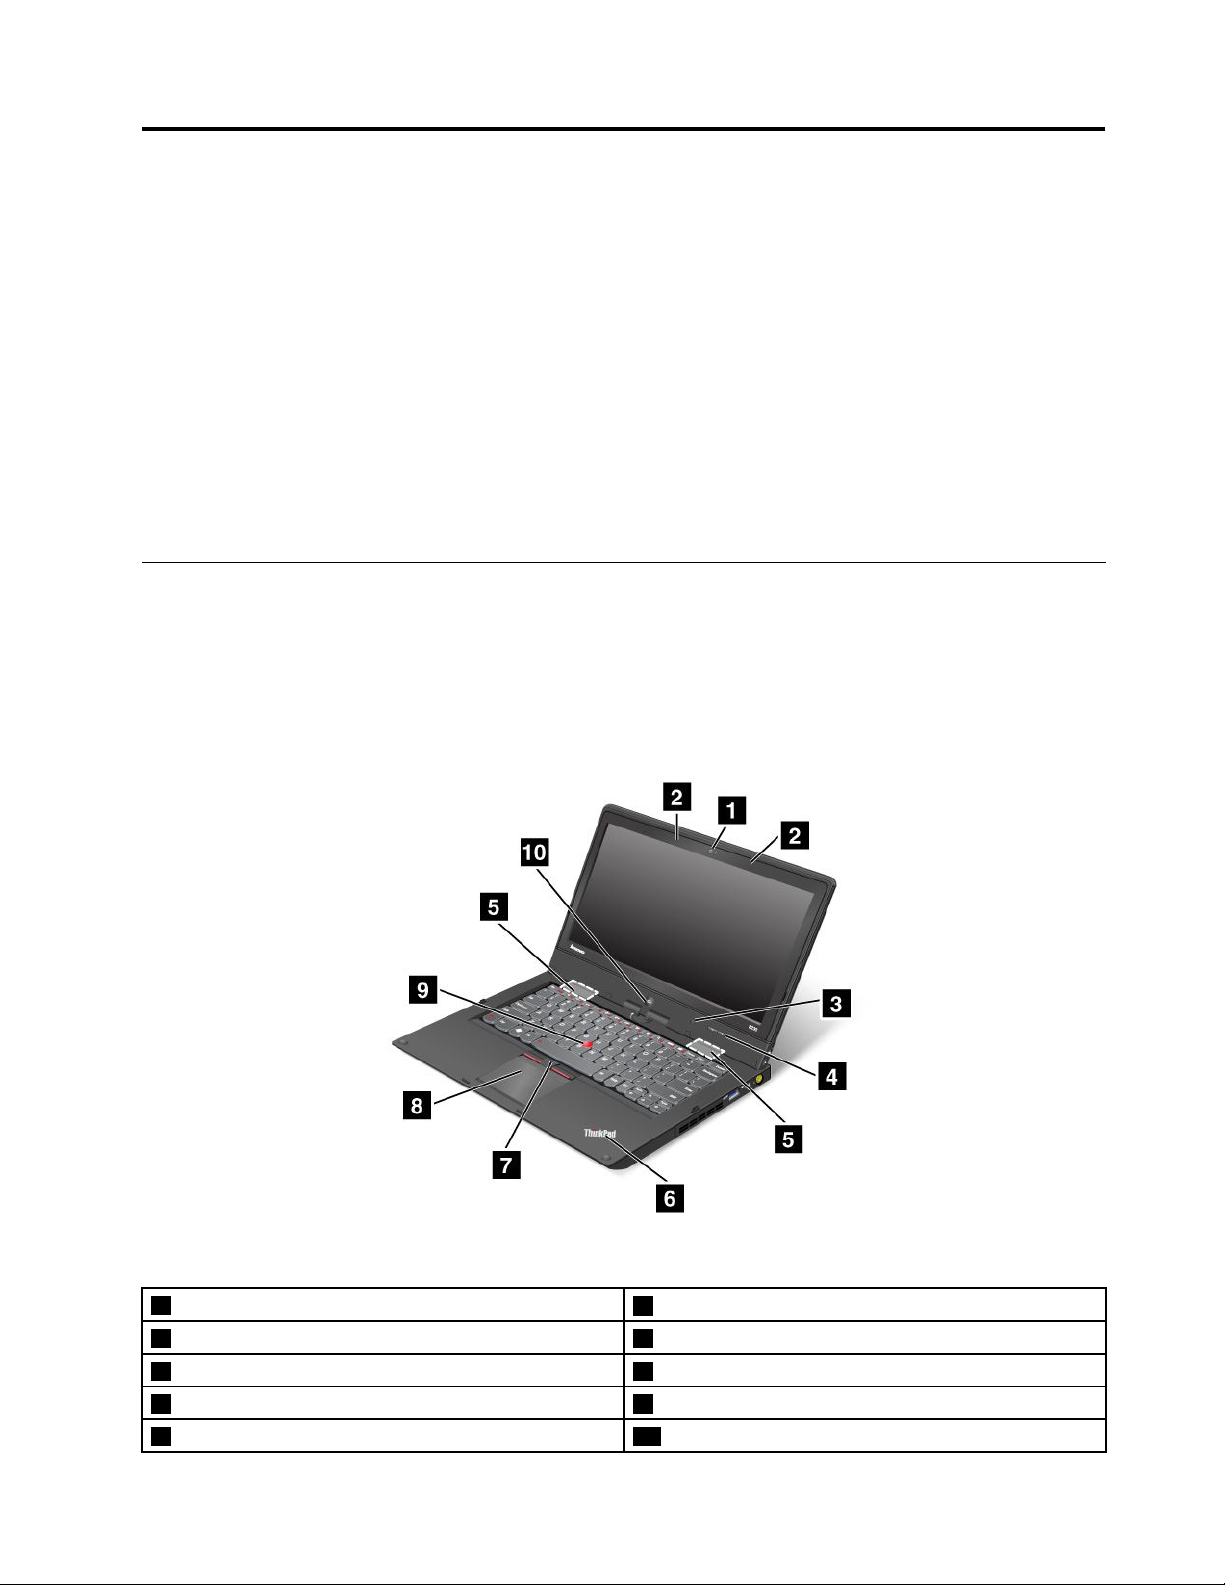
Right-sideview
Figure2.ThinkPadS230uright-sideview
Note:Yourcomputerkeyboardmightlookdifferentfromtheillustrationabove.
1Harddiskorsolid-statedrivebay5Powerstatusindicator
2Fanlouvers
3USB3.0connector
4MiniDisplayPortconnector
6acpowerconnector
7Powerbutton
8Screenrotationlockbutton
1Harddiskorsolid-statedrivebay
Dependingonmodels,yourcomputermighthavealarge-capacity,customer-upgradableharddiskdrive
thatcanmeetavarietyofstoragedemands.
Somemodelsareequippedwithasolid-statedrivefordatastorage,makingyourcomputerlighter,smaller,
andfaster.
2Fanlouvers
Theinternalfanandlouversenableairtocirculateinthecomputerandcoolthecentralprocessor.
Note:Toavoidimpedingtheairow,donotplaceanyobstacleinfrontofthefan.
3USB3.0connector
TheUSB3.0connectorisusedforconnectingdevicescompatiblewithaUSBinterface,suchasaUSB
printeroradigitalcamera.
Attention:WhenyouattachaUSBcabletotheconnector,ensurethattheUSBmarkisfacingupward.
Otherwisetheconnectormightbedamaged.
4MiniDisplayPortconnector
UsetheminiDisplayPortconnectortoconnectyourcomputertoacompatibleprojector,externalmonitor,or
high-denitiontelevision.
Chapter1.Productoverview3
Page 18
5Powerstatusindicator
Thepowerstatusindicatorshowsthestatusofacpower.
6acpowerconnector
Connecttheacpoweradaptertotheacpowerconnectortoprovideacpowertothecomputerandcharge
thebattery.
7Powerbutton
Usethepowerbuttontoturnonthecomputer.Toturnoffthecomputer,dothefollowing:
1.Movethecursortothetop-rightorbottom-rightcornerofthescreentodisplaythecharms.
2.ClickSettings➙Power➙Shutdown.
Ifyourcomputerstopsrespondingandyoucannotturnitoff,pressandholdthepowerbuttonforfour
secondsormore.Ifthecomputerstillisnotresponding,detachtheacpoweradaptertoresetthecomputer.
Youalsocanprogramthepowerbuttonsothatbypressingthepowerbuttonyoucanshutdownthe
computerorputitintosleeporhibernationmode.Todenethepowerbutton,clickthebatterystatusiconin
theWindowsnoticationarea,andthenclickMorepoweroptions➙Choosewhatthepowerbuttonsdo.
8Screenrotationlockbutton
Usethescreenrotationlockbuttontolockthescreenrotationfunction.
Left-sideview
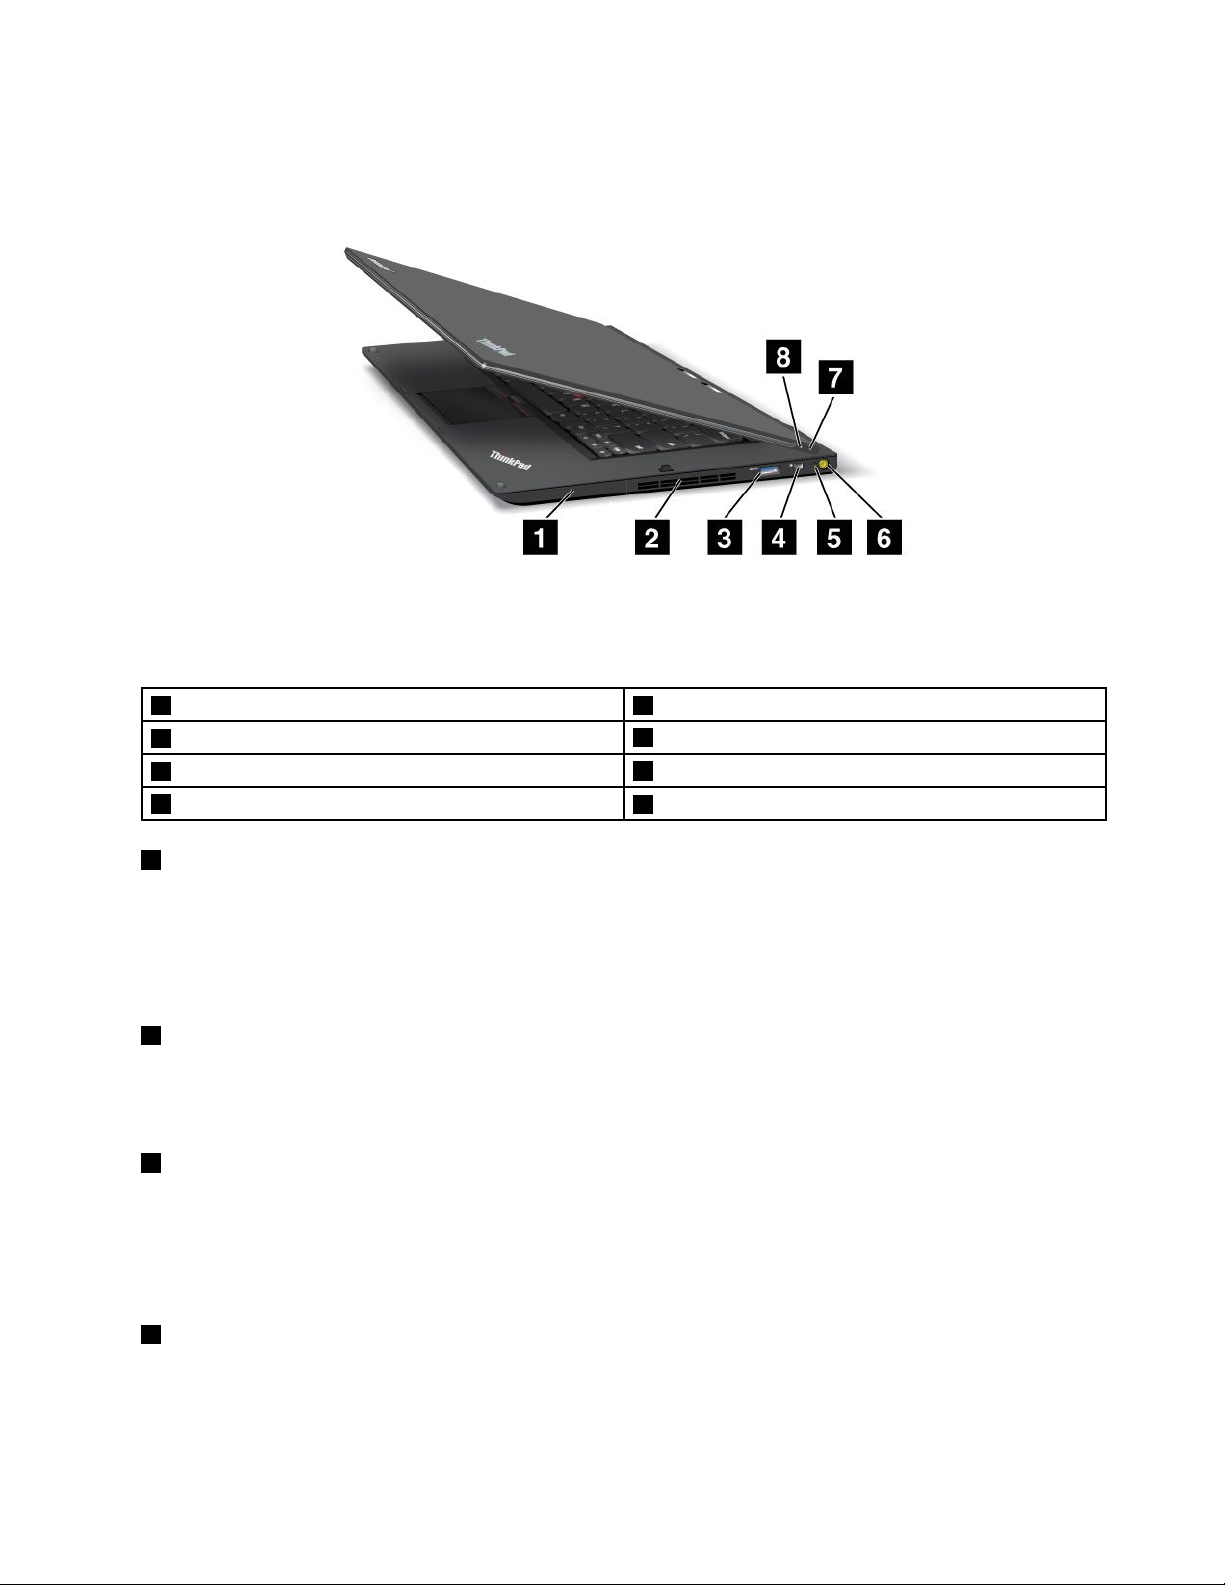
Figure3.ThinkPadS230uleft-sideview
Note:Yourcomputerkeyboardmightlookdifferentfromtheillustrationabove.
1Comboaudiojack
2USB3.0connector6SubscriberIdenticationModule(SIM)cardslot
3MiniHDMIconnector
4Ethernetconnector
5Mediacardreaderslot
7Securitykeyhole
4UserGuide
Page 19

1Comboaudiojack
Tolistentothesoundfromyourcomputer,youcanconnectaheadphoneoraheadsetthathasa3.5mm
4-poleplugtothecomboaudiojack.
Notes:
•Ifyouareusingaheadsetwithafunctionswitch,forexample,aheadsetforamobiledigitaldevice,do
notpressthisswitchwhileusingtheheadset.Ifyoupressit,theheadsetmicrophonewillbedisabled,
andtheintegratedmicrophonesonthecomputerwillbeenabledinstead.
•Thecomboaudiojackdoesnotsupportaconventionalmicrophone.Formoreinformation,see“Using
audiofeatures”onpage30
2USB3.0connector
.
TheUSB3.0connectorisusedforconnectingdevicescompatiblewithaUSBinterface,suchasaUSB
printeroradigitalcamera.
Attention:WhenyouattachaUSBcabletotheconnector,ensurethattheUSBmarkisfacingupward.
Otherwisetheconnectormightbedamaged.
3MiniHDMIconnector
Yourcomputercomeswithaminihigh-denitionmultimediainterface(HDMI)connector,adigitalaudioand
videointerfacethatcanconnectacompatibledigitalaudiodeviceorvideomonitor,suchasahigh-denition
television..
4Ethernetconnector
ConnectyourcomputertoaLANwiththeEthernetconnector.
DANGER
Toavoidtheriskofelectricalshock,donotconnectthetelephonecabletotheEthernetconnector.
YoucanonlyconnectanEthernetcabletothisconnector.
Twoindicators,tothebottom-rightandleftoftheconnector,showthestatusofthenetworkconnection.
WhenyourcomputerconnectstoaLANandasessionwiththenetworkisavailable,thebottomyellow
indicatorissteadygreen.Whiledataisbeingtransmitted,thebottom-rightindicatorblinksgreen.
5Mediacardreaderslot
Dependingonthemodel,yourcomputermighthaveamediacardreaderslot.Formoreinformationabout
thesupportedcards,see“Usingamediacard”onpage31
6SubscriberIdenticationModule(SIM)cardslot
.
IfyourcomputerhasthewirelessWANfeature,itmightrequireaSIMcardtoestablishwirelessWAN
connections.Dependingonthecountryofdelivery,theSIMcardmightbealreadyinstalledintheSIM
cardslot.
7Securitykeyhole
Purchaseasecuritycablelockthattsthiskeyholetolockyourcomputertoastationaryobjecttoprotect
yourcomputerfromtheft.
Chapter1.Productoverview5
Page 20
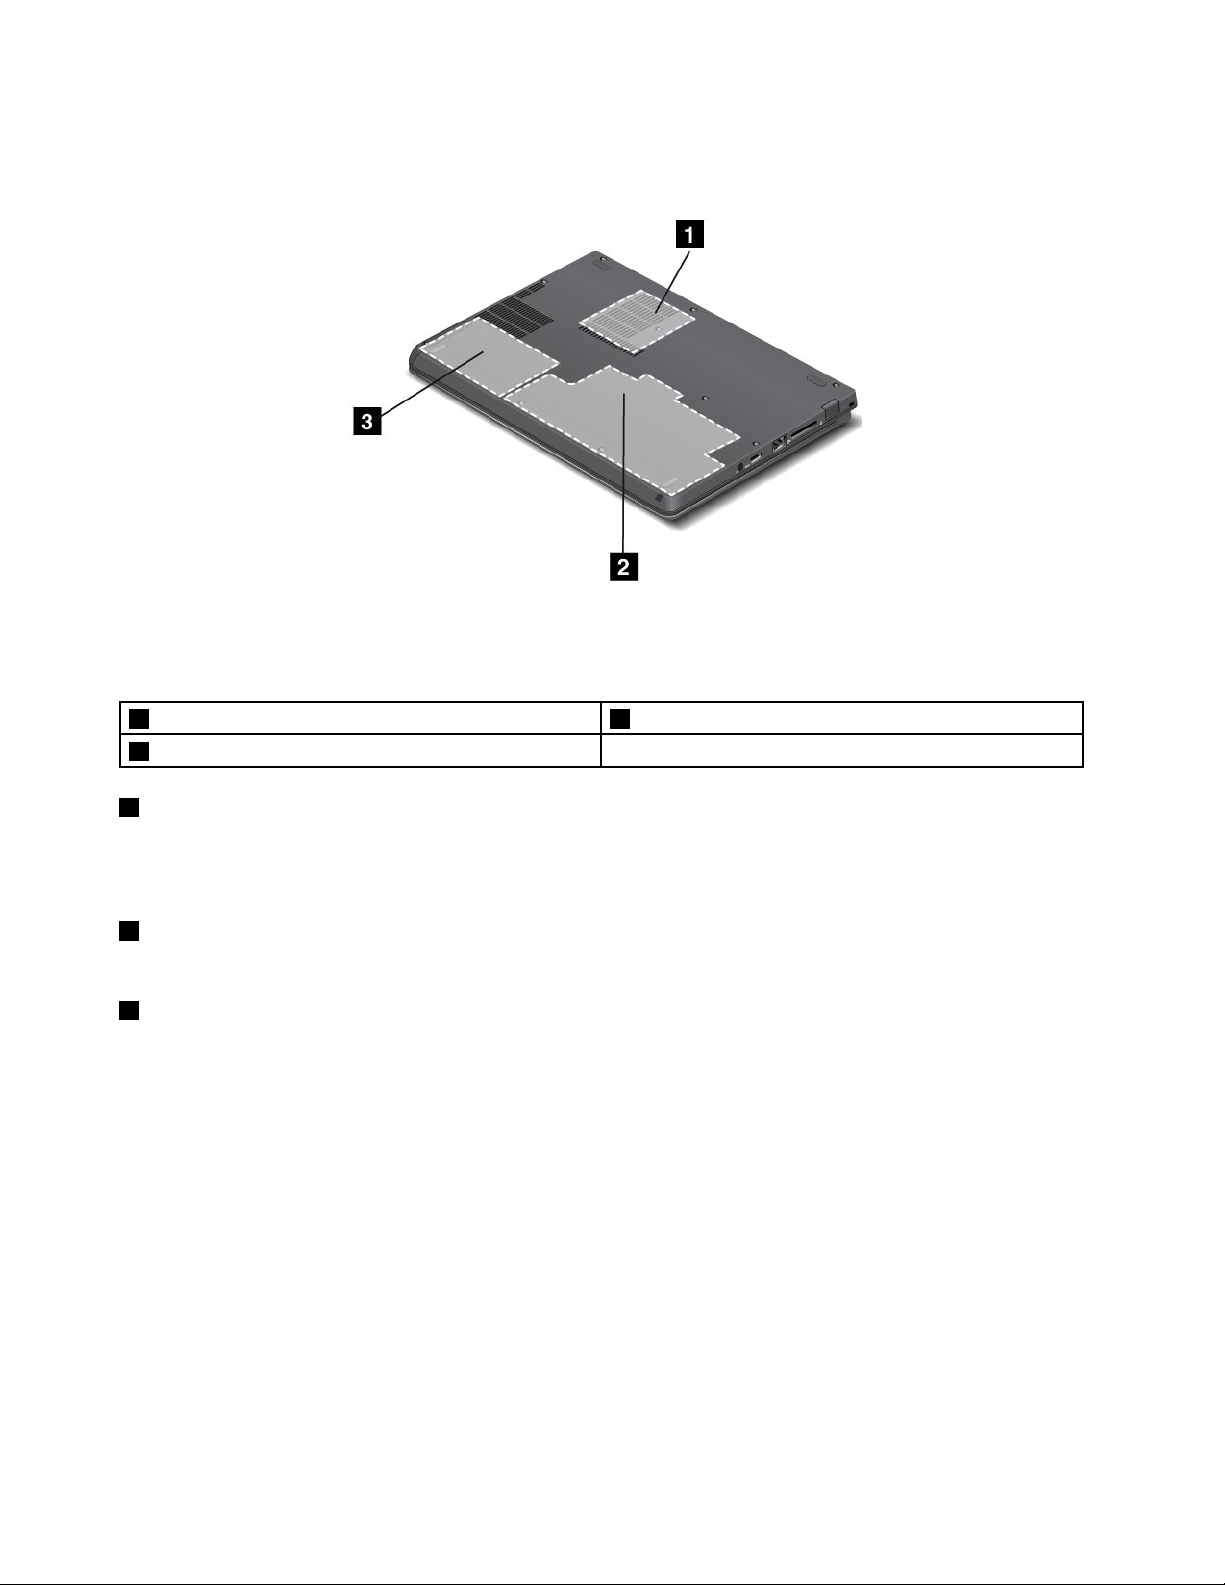
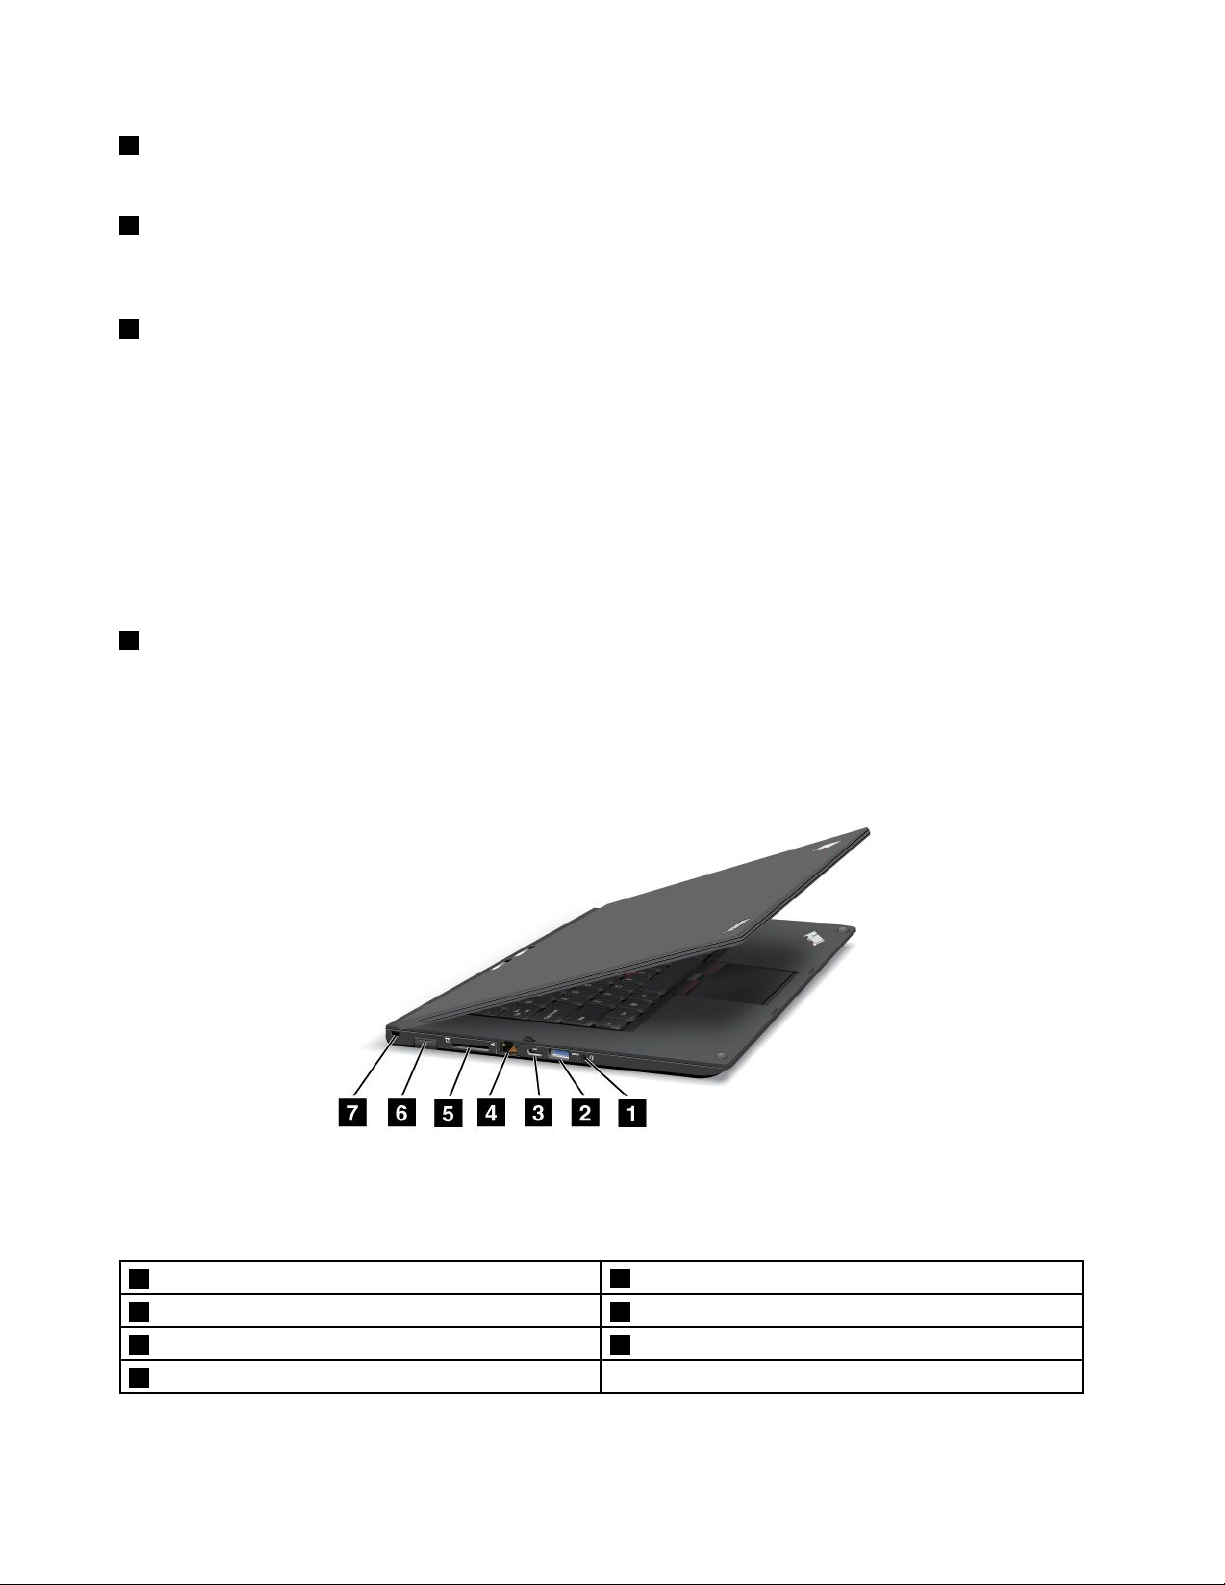
Bottomview
Figure4.ThinkPadS230ubottomview
Note:Yourcomputerbottomviewmightlookslightlydifferentfromtheillustrationabove.
1Fanlouvers3Harddiskdriveorsolid-statedrive
2Integratedbattery
1Fanlouvers
Theinternalfanandlouversenableairtocirculateinthecomputerandcoolthecentralprocessor.
Note:Toavoidimpedingairow,donotplaceanyobstacleinfrontofthefan.
2Integratedbattery
Useyourcomputerwiththebatterypowerwheneveracpowerisunavailable.
3Harddiskdriveorsolid-statedrive
Dependingonmodels,yourcomputermighthavealarge-capacity,customer-upgradableharddiskdrive
thatcanmeetavarietyofstoragedemands.
Somemodelsareequippedwithasolid-statedrivefordatastorage,makingyourcomputerlighter,smaller,
andfaster.
Note:Thehiddenservicepartitionisthereasonwhythereislessfreespacethanexpectedonyourhard
diskdriveorsolid-statedrive.Thisreductionismorenoticeableonthesolid-statedrivebecauseofits
smallercapacity.
Statusindicators
Thestatusindicatorsshowthecurrentstatusofyourcomputer.
Systemstatusindicators
TheilluminateddotintheThinkPadlogoontheouterlidofyourcomputerandonthepalmrestworks
asasystemstatusindicator.
6UserGuide
Page 21
Note:Yourcomputerkeyboardmightlookdifferentfromtheillustrationabove.
Themeaningoftheindicatorisasfollows:
•Red:Thecomputerison(innormalmode).
•Fastblinkingred:Thecomputeristurningoff.
•Slowblinkingred:Thecomputerisinsleepmode.
•Off:Thecomputerisoff.
Powerstatusindicator
Yourcomputerhasanindicatorthatshowsthestatusofacpower.
Chapter1.Productoverview7
Page 22
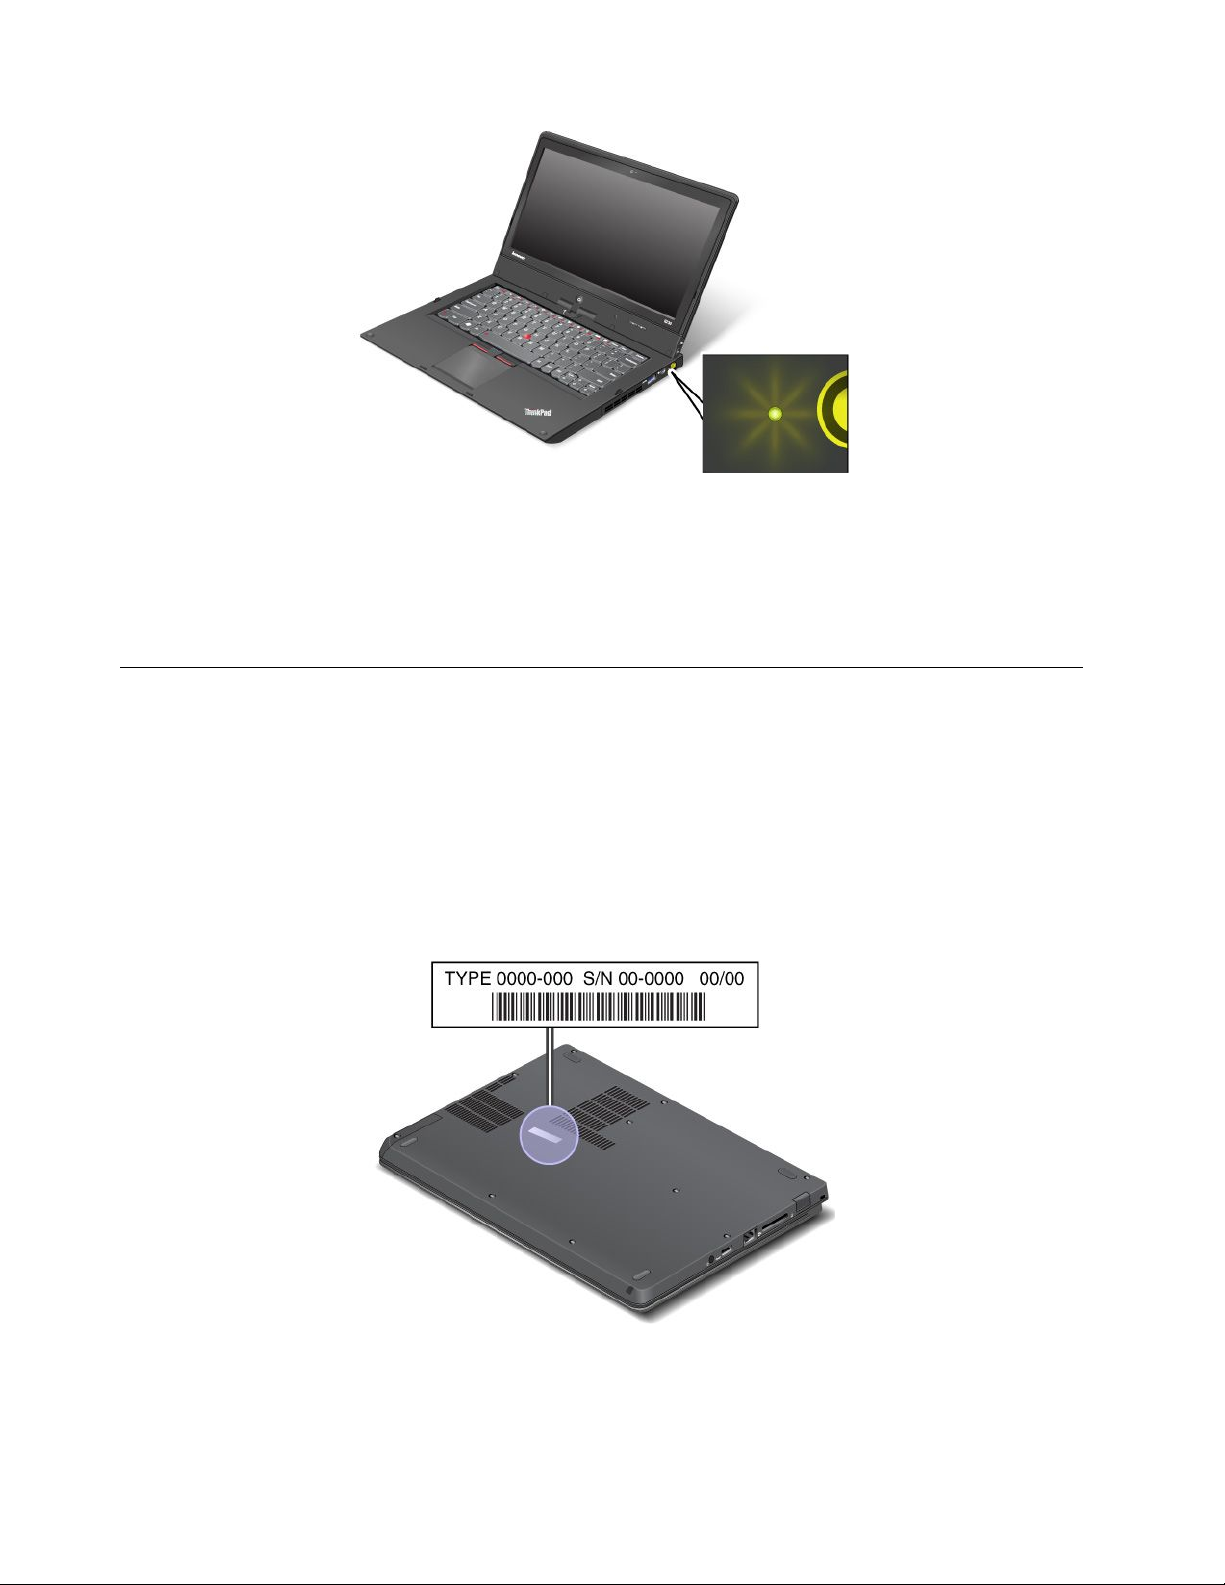
Note:Yourcomputerkeyboardmightlookdifferentfromtheillustrationabove.
Themeaningoftheindicatorisasfollows:
•Green:Theacpoweradapterisconnected.
•Off:Theacpoweradapterisnotconnected.
Locatingimportantproductinformation
Thissectionprovidesinformationtohelpyoulocateyourmachinetypeandmodellabel,FCCIDandIC
Certicationlabel,andtheWindowsCerticateofAuthenticity(COA)label.
Machinetypeandmodellabel
Themachinetypeandmodellabelidentiesyourcomputer.WhenyoucontactLenovoforhelp,themachine
typeandmodelinformationhelpssupporttechnicianstoidentifyyourcomputerandprovidefasterservice.
Youcanndthemachinetypeandmodelofyourcomputeronthelabelasshownbelow:
8UserGuide
Page 23
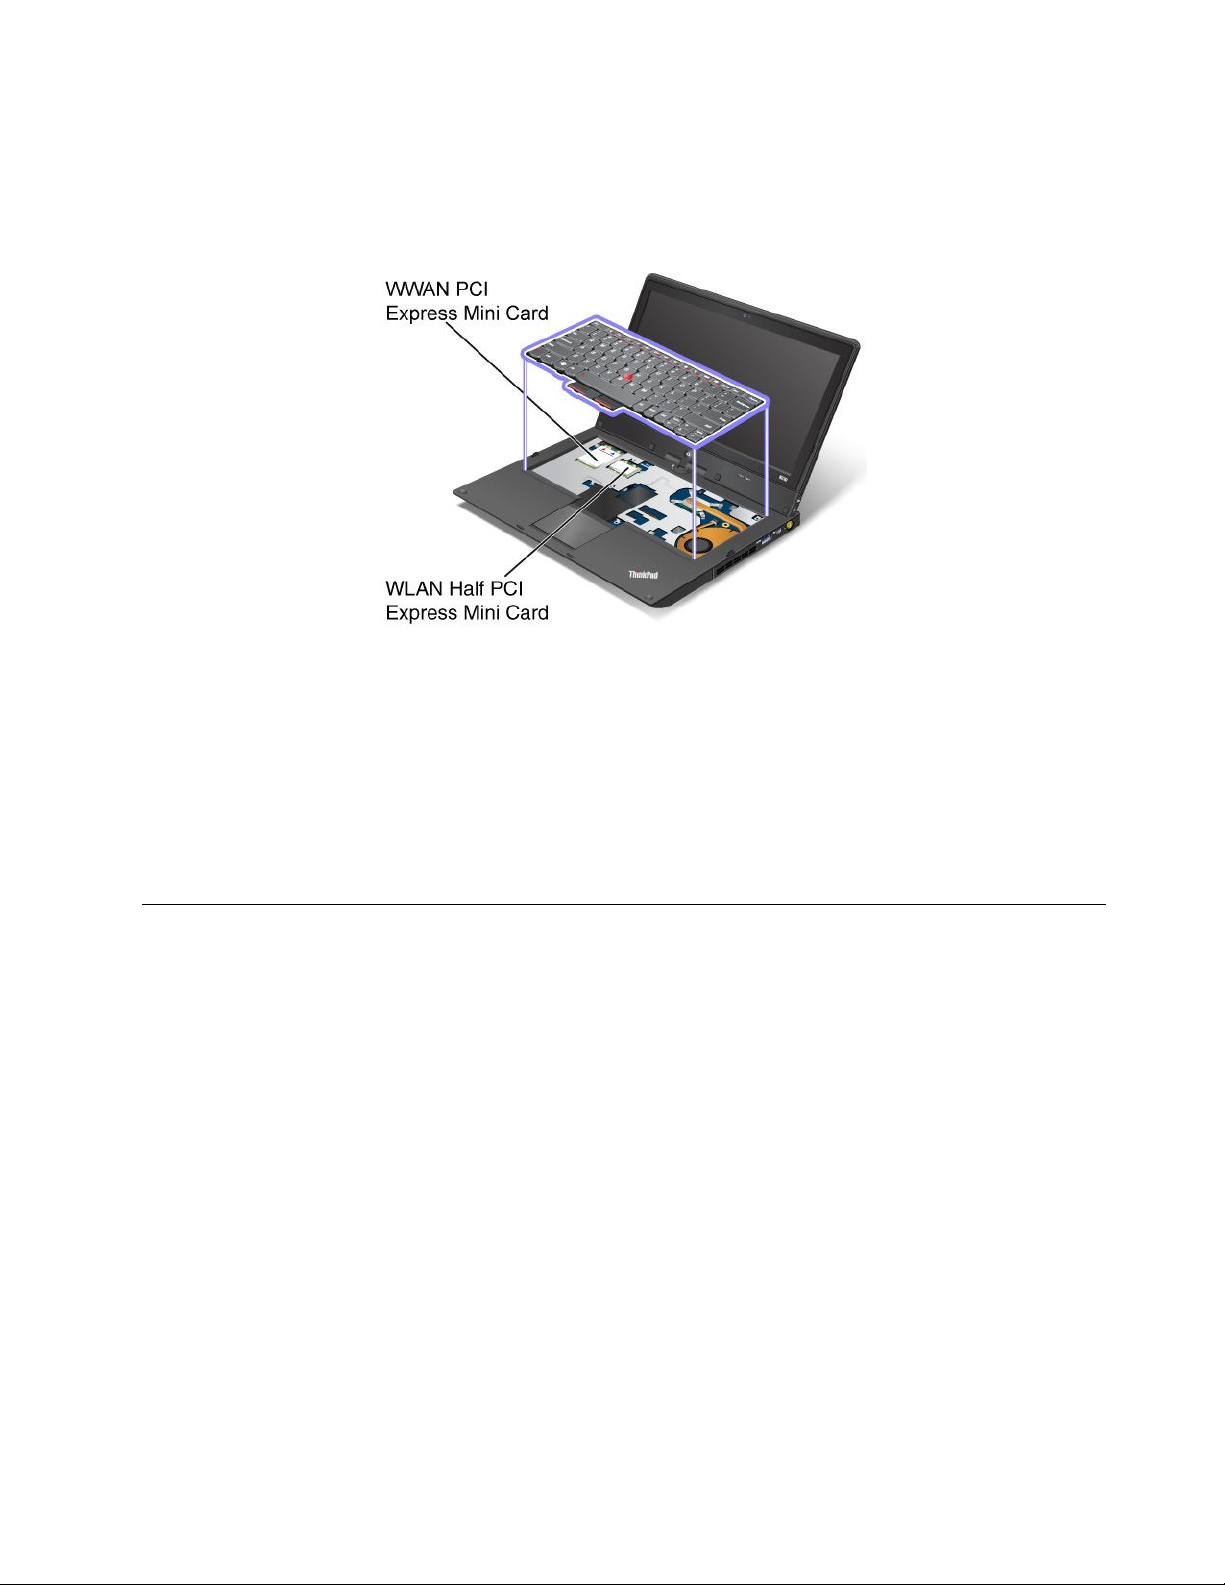
FCCIDandICCerticationnumberlabel
ThereisnoFCCIDorICCerticationnumberforthePCIExpressMiniCardshownontheenclosureof
yourcomputer.TheFCCIDandICCerticationnumberlabelisafxedonthecardinstalledinthePCI
ExpressMiniCardslotofyourcomputer.
IfyouneedtoremovetheWirelessLANcardforrepairorreplacement,followtheprocedurein“Replacinga
MiniPCIExpressCardforwirelessLANconnection”onpage57.IfyouhavepurchasedawirelessWAN
enabledcomputer,thewirelessWANPCIExpressMiniCardispreinstalledatthefactory.Ifyouneedto
removethiscardforrepairorreplacement,followtheprocedurein“Installingorreplacingthewireless
WANcard”onpage60
.
Note:OnlyLenovoauthorizedwirelessLANorwirelessWANcardsareallowedtobeusedinyourcomputer.
IfyouinstallanunauthorizedPCIExpressMiniCardthatisnotapprovedforuseinyourcomputer,the
computerwillnotstart,butwillonlydisplayanerrormessageandemitaudiblebeeps.
Features
Thistopicliststhefeaturesofyourcomputer.
Tabletfeatures
•Multi-touchscreen
•Volumecontrolbuttons
•Screenrotationlockbutton
•Windowsbutton
Processor
Toviewthesystempropertiesofyourcomputer,gotoyourdesktopandmovethecursortothetop-rightor
bottom-rightcornerofthescreentodisplaythecharms.Then,clickSettings➙PCinfo.
Memory
Doubledatarate3synchronousdynamicrandomaccessmemorymodules(DDR3SDRAM)
Storagedevice
2.5-inch(7mmheight)harddiskdriveorsolid-statedrive
Chapter1.Productoverview9
Page 24

Display
ThecolordisplayusestheThinFilmTransistor(TFT)technology.
•Size:12.5inches(317.50mm)
•Resolution:
–LCD:1366x768
–Externalmonitor:upto2560x1600
•Brightnesscontrol
•Integratedcamera
•Built-inmicrophones
Keyboard
•6-rowkeyboard
•UltraNavpointingdevice(TrackPointpointingdeviceandmulti-touchtouchpad)
•Fnkey
Interface
•MiniHDMIport
•MiniDisplayPortconnector(onsomemodels)
•Comboaudiojack
•USB3.0connectors
•RJ45Ethernetconnector
•4-in-1mediacardreader
•SIMcardslot
Wirelessfeatures
•IntegratedwirelessLAN
•IntegratedwirelessWAN(onsomemodels)
Specications
Thissectionliststhephysicalspecicationsforyourcomputer.
Size
•Width:12.32inches(313mm)
•Depth:9.37inches(238mm)
•Height:0.80inch(20.4mm)
Heatoutput
65W(222Btu/hr)maximumor90W(307Btu/hr)maximum,dependingonthemodel
Powersource(acpoweradapter)
•Sine-waveinputat50to60Hz
•Inputratingoftheacpoweradapter:100to240Vac,50to60Hz
10UserGuide
Page 25

Batterypack
Integratedlithium-ion(Li-Ion)batterypack
Batterylife
Forthepercentageoftheremainingbatterypower,refertothebatterystatusiconintheWindowsnotication
area.
Operatingenvironment
Thissectionprovidesinformationaboutyourcomputeroperatingenvironment.
Environment:
•Maximumaltitudewithoutpressurization:3048m(10000ft)
•Temperature
–Ataltitudesupto2438m(8000ft)
–Operating:5.0°Cto35.0°C(41°Fto95°F)
–Storage:5.0°Cto43.0°C(41°Fto109°F)
–Ataltitudesabove2438m(8000ft)
–Maximumtemperaturewhenoperatingundertheunpressurizedcondition:31.3°C(88°F)
Note:Whenyouchargethebatterypack,itstemperaturemustbeatleast10°C(50°F).
•Relativehumidity:
–Operating:8%to80%
–Storage:5%to95%
Ifpossible,placeyourcomputerinawell-ventilatedanddryareawithoutdirectexposuretosunshine.
Keepelectricalappliancessuchasanelectricfan,radio,airconditioner,andmicrowaveovenawayfrom
yourcomputerbecausethestrongmagneticeldsgeneratedbytheseappliancescandamagethemonitor
anddataontheharddiskdrive.
Donotplaceanybeveragesontopoforbesidethecomputerorotherattacheddevices.Ifliquidisspilledon
orinthecomputeroranattacheddevice,ashortcircuitorotherdamagemightoccur.
Donoteatorsmokeoveryourkeyboard.Particlesthatfallintoyourkeyboardcancausedamage.
Lenovoprograms
YourcomputercomeswithLenovoprogramstohelpyouworkmoreeasilyandsecurely.
Note:TolearnmoreabouttheprogramsandothercomputingsolutionsofferedbyLenovo,goto
http://www.lenovo.com/support.
ToaccessLenovoprograms,presstheWindowskeytogototheStartscreen.ClickaLenovoprogramto
launchit.Ifyoucannotndtheprogramyouneed,movethecursortothebottom-rightcornerofthescreen
tobringupthecharms.ThenclicktheSearchcharmtosearchforthedesiredprogram.
YoucomputermightbepreinstalledwiththefollowingLenovoprograms.
Chapter1.Productoverview11
Page 26

ActiveProtectionSystem™
TheActiveProtectionSystemprogramprotectsyourharddiskdrivewhentheshocksensorinsideyour
computerdetectsaconditionthatcoulddamagethedrive,suchassystemtilt,excessivevibration,orshock.
Theharddiskdriveislessvulnerabletodamagewhenitisnotoperating.Thisisbecausewhentheharddisk
driveisnotoperating,thesystemstopsitfromspinning,andmightalsomovethereadandwriteheadsof
thedrivetoareasthatdonotcontaindata.Assoonastheshocksensorsensesthattheenvironmentis
stableagain(minimalchangeinsystemtilt,vibration,orshock),itturnstheharddiskdriveon.
FingerprintSoftware
Ifyourcomputercomeswithangerprintreader,theFingerprintSoftwareprogramenablesyoutoenroll
yourngerprintandassociateitwithyourWindowspassword.Asaresult,thengerprintauthenticationcan
replaceyourpasswordandenablesimpleandsecureuseraccess.
LenovoCloudStorage
TheLenovoCloudStorageprogramenablesyoutouploadandstoreyourlocallestoaremoteLenovo
server.Youcanviewanddownloadthestoredlesatanytime.
LenovoCompanion
ThroughtheLenovoCompanionprogram,youcangettheinformationabouttheaccessoriesforyour
computer,viewbolgsandarticlesaboutyourcomputer,andcheckforrecommendedprograms.
LenovoSettings
UsetheLenovoSettingsprogramtoenhanceyourcomputingexperiencebyturningyourcomputerinto
aportablehotspot,conguringcameraandaudiosettings,optimizingyourpowersettings,andcreating
andmanagingmultiplenetworkproles.
LenovoMobileAccess
TheLenovoMobileAccessprogramenablesyoutomanageyourmobilebroadbandconnection.Youcan
createanaccount,addmoneytotheaccount,andpurchasemobilebroadbandsessionsusingyouraccount.
LenovoSolutionCenter
TheLenovoSolutionCenterprogramenablesyoutotroubleshootandresolvecomputerproblems.It
combinesdiagnostictests,systeminformationcollection,securitystatus,andsupportinformation,along
withhintsandtipsformaximumsystemperformance.
LenovoSupport
TheLenovoSupportprogramenablesyoutoregisteryourcomputerwithLenovo,checkthecomputerhealth
conditionandthebatterystatus,downloadandviewusermanualsforyourcomputer,getthewarranty
informationofyourcomputer,andexplorehelpandsupportinformation.
PasswordManager
ThePasswordManagerprogramautomaticallycapturesandllsinauthenticationinformationforWindows
programsandWebsites.
SystemUpdate
TheSystemUpdateprogramhelpsyoukeepthesoftwareonyourcomputerup-to-datebydownloading
andinstallingsoftwareupdatepackages(Lenovoprograms,devicedrivers,UEFIBIOSupdates,andother
thirdpartyapplications).
Note:Dependingonyourcomputermodel,someoftheprogramsmightnotbeavailable.Lenovoprograms
varybygeographiclocationsandaresubjecttoupdate.
12UserGuide
Page 27

Chapter2.Usingyourcomputer
Thischapterprovidesinformationonusingsomeofthecomputercomponents.
Thischaptercontainsthefollowingtopics:
•“Registeringyourcomputer”onpage13
•“Frequentlyaskedquestions”onpage13
•“Tabletmode”onpage14
•“Specialkeysandbuttons”onpage19
•“UsingtheUltraNavpointingdevice”onpage21
•“Powermanagement”onpage24
•“Connectingtothenetwork”onpage26
•“Usinganexternaldisplay”onpage29
•“PresentationsandMultimedia”onpage28
•“Usingaprojector”onpage30
•“Usingaudiofeatures”onpage30
•“Usingtheintegratedcamera”onpage31
•“Usingamediacard”onpage31
Registeringyourcomputer
Whenyouregisteryourcomputer,informationisenteredintoadatabase,whichenablesLenovotocontact
youincaseofarecallorothersevereproblem.AfteryouregisteredyourcomputerwithLenovo,youwill
alsoreceivequickerservicewhenyoucallLenovoforhelp.Inaddition,somelocationsofferextended
privilegesandservicestoregisteredusers.
ToregisteryourcomputerwithLenovo,dooneofthefollowing:
•ConnectyourcomputertotheInternet.LaunchthepreinstalledLenovoSupportprogram.Thenclick
Registrationandfollowtheinstructionsonthescreentoregisteryourcomputer.
•Gotohttp://www.lenovo.com/register,andfollowtheinstructionsonthescreentoregisteryourcomputer.
Frequentlyaskedquestions
Thefollowingareafewtipsthatwillhelpyouoptimizetheuseofyourcomputer.
Toensurethatyoureceivethebestperformancefromyourcomputer,gotothefollowingWebpage
tondinformationsuchasaidsfortroubleshootingandanswerstofrequentlyaskedquestions:
http://www.lenovo.com/support/faq
CanIgetmyuserguideinanotherlanguage?
•Todownloadtheuserguideinanotherlanguage,goto:http://www.lenovo.com/support.Thenfollow
theinstructionsonthescreen.
Howtousethebatterypowermoreeffectively?
•Toconservethepowerofyourcomputer,see“Power-savingmodes”onpage26
©CopyrightLenovo2012
.
13
Page 28

•Toachievethebestbalancebetweenperformanceandpowersaving,see“Managingthepowerplans”
onpage26.
Concernedaboutsecurityorneedtosecurelydisposeofdatastoredonyourharddiskdriveor
solid-statedrive?
•StudyChapter4“Security”onpage37tondouthowyoucanprotectyourcomputerfromtheftand
unauthorizeduse.
•UsethePasswordManagerprogramtoprotectthedatastoredonyourcomputer.
•Beforeyoudisposeofthedataontheharddiskdriveorsolid-statedrive,besuretoread“Noticeon
deletingdatafromyourharddiskdriveorsolid-statedrive”onpage44
Isgettingconnectedindifferentlocationsachallenge?
•Totroubleshootawirelessnetworkingissue,gotohttp://www.lenovo.com/support/faq.
•Tolearnmoreaboutusingthewirelessfeaturesofyourcomputer,referto“Wirelessconnections”on
page27.
•Totravelmorecondently,besuretocheckthetipsin“Travelingwithyourcomputer”onpage35.
•PressF8toenableordisablethewirelessfeatures.
Needtogivepresentationsorattachanexternalmonitoroften?
.
•Ensurethatyoufollowtheprocedurefor“Usinganexternaldisplay”onpage29
•WiththeExtenddesktopfunction,youcandisplayoutputonboththecomputerdisplayandanexternal
monitor.
Needtoattachorreplaceadevice?
•SeeChapter6“Replacingdevices”onpage49
yourcomputer.
Youhavebeenusingyourcomputerforsometimealready,anditisgettingslower?
•Follow“Generaltipsforpreventingproblems”onpage81.
•Youcandiagnoseproblemsyourselfbyusingthepreinstalleddiagnosticsoftware.
•CheckforrecoverysolutionsinChapter5“Recoveryoverview”onpage47.
Printthefollowingsectionsandkeepthemwithyourcomputerincaseyouareunabletoaccessthisonline
userguidewhennecessary.
•“Installinganewoperatingsystem”onpage65
•“Computerstopsresponding”onpage87
•“Powerproblems”onpage100
formoreinformationaboutreplacingthedevicesof
.
Tabletmode
Yourcomputercanbeusedintabletmode.Thissectionintroduceshowtouseyournotebookcomputerin
tabletmode.
Usingtabletmode
Intabletmode,youcanuseyourcomputerinacreativeandintuitivewaybyfoldingdownthecomputer
displaytoturnyourcomputerintoatablet.
14UserGuide
Page 29
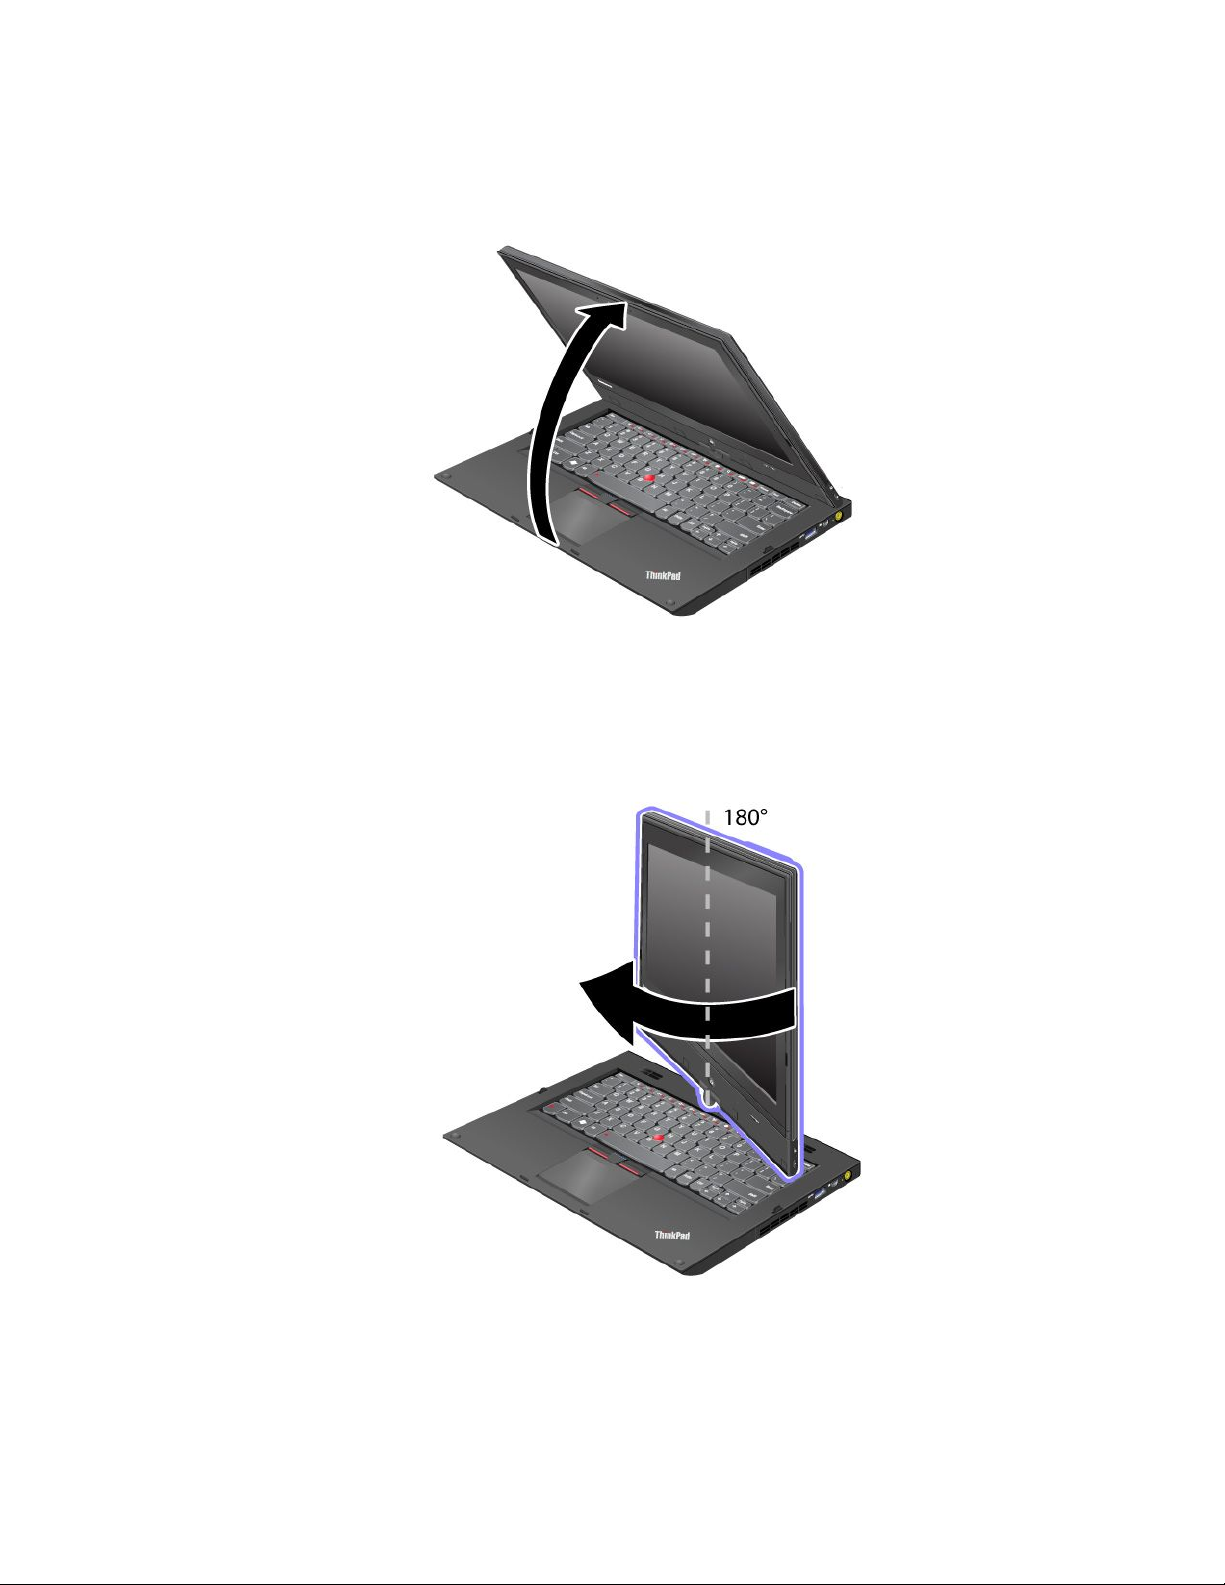
Touseyourcomputerintabletmode,dothefollowing:
1.Openthecomputerdisplayslowly,holdingtheupperleftandrightsidesofthecomputerdisplaywith
bothhands.Yourcomputerisnowinnotebookmode.
2.Openthecomputerdisplaybyatleast45degrees,preferablyby90degrees.Graspthecenterofone
sideofthecomputerdisplaywithonehandwhileholdingthekeyboardbezelwiththeotherhand;then
rotatethedisplayslowlyclockwiseuntilthebackofthedisplayisfacingthekeyboard.Yourcomputeris
nowinpictureframemode.
Note:Whilerotatingthedisplay,donotpresstheupperedgeofeithersideofthedisplay.
3.Closethecomputerdisplayslowly,holdingtheupperleftandrightsideswithbothhands.
Note:Makesurethatthedisplayisrotatedat180degrees,sothatthebackofthedisplayfacesthe
keyboard.
Chapter2.Usingyourcomputer15
Page 30
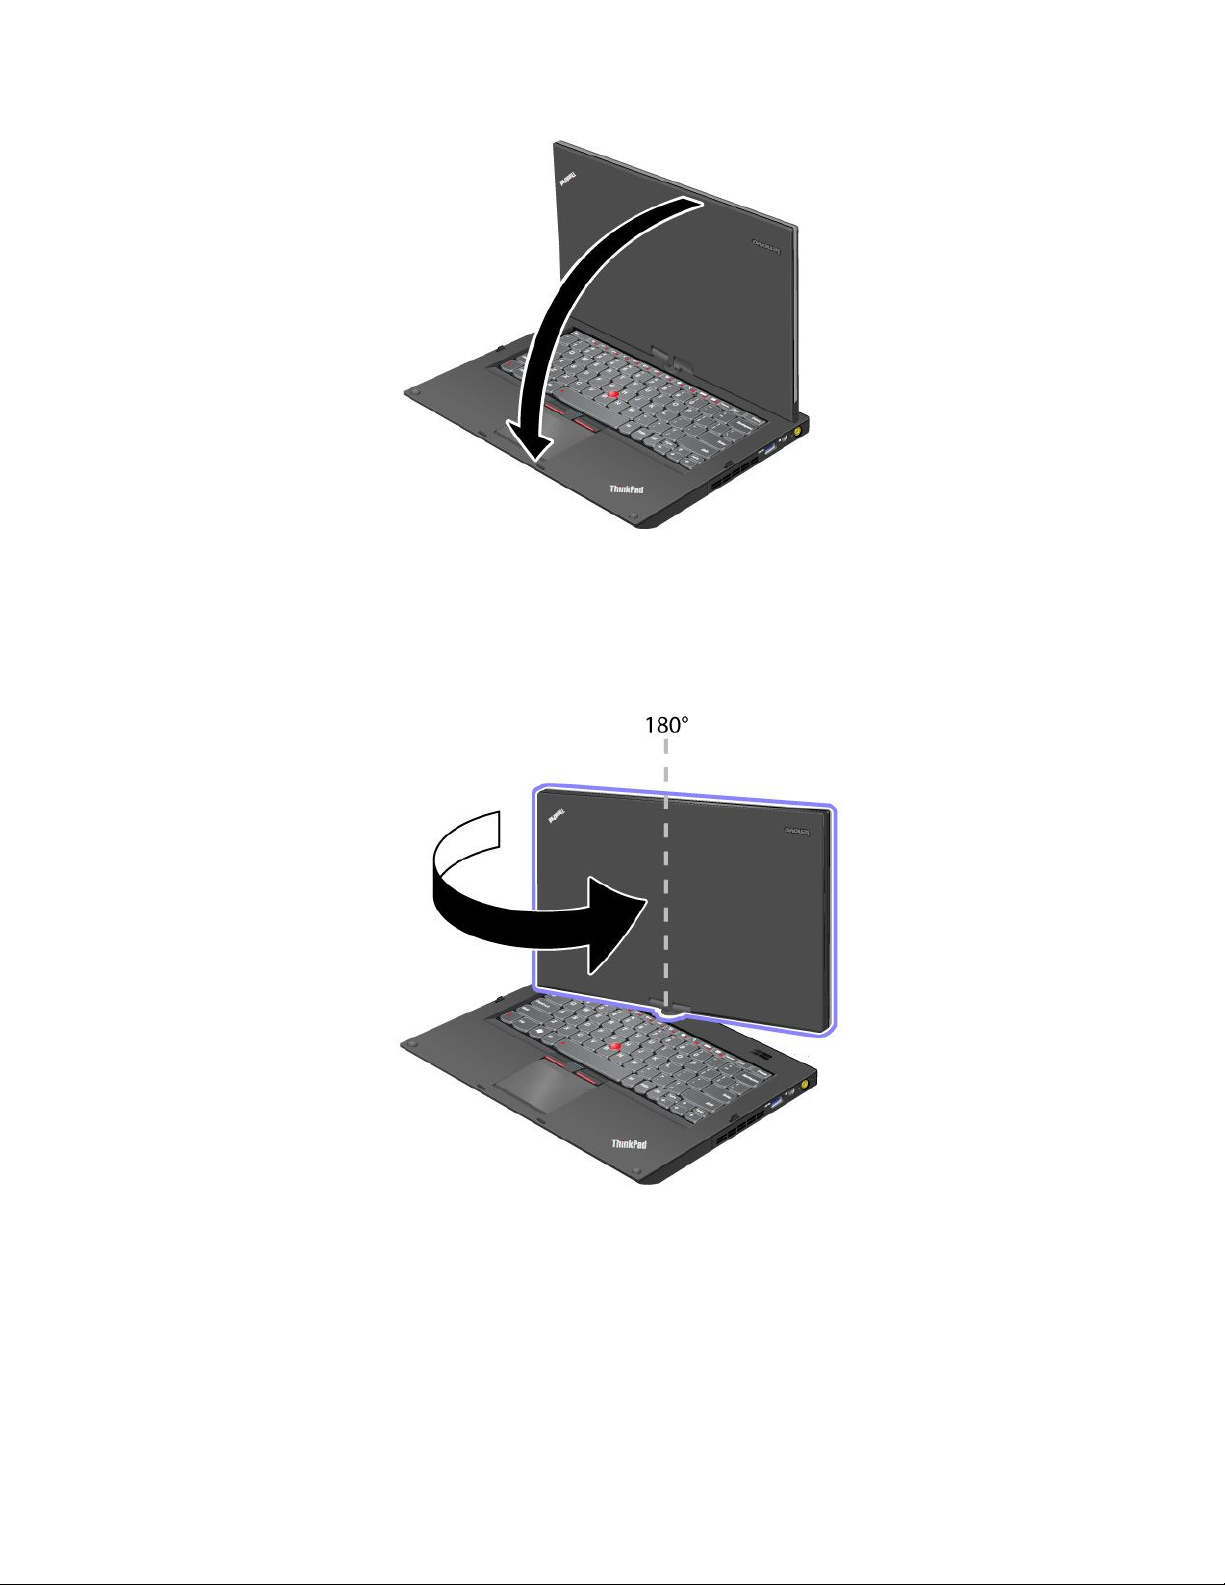
4.Y ourcomputerisnowintabletmode.
Toswitchyourcomputerfromtabletmodetonotebookmode,dothefollowing:
1.Openthedisplaybyatleast45degrees,preferablyby90degrees.
2.Rotatethedisplayslowlycounter-clockwiseuntilthefrontofthedisplayisfacingthekeyboard.
Yourcomputerisnowinnotebookmode.
Tipsonusingyourcomputerintabletmode
•Toclosethecomputerdisplay,rstmakesurethatthedisplayeitherfacesthekeyboardorispositioned
at180degreestothekeyboard,sothatthebackofthedisplayfacesthekeyboard.
•Donotpickuporholdthecomputerbythedisplayonly.
•Donothit,vibrate,orbumpthecomputerdisplay.
16UserGuide
Page 31

•Toallowfreeventilation,donotplaceanyobstacle,suchasathick-piledcarpetorasoftcushion,in
frontofthefan.
•Whenyouusethecomputerinpictureframemode,holdthedisplaywithonehandandusetheTablet
DigitizerPen.
•Ifyouholdthecomputerwithonehandwhileusingitintabletmode,donotexposeittoexcessive
vibration,shock,orrotation.
•Whenusingcomputeroutdoors,protectagainstexposuretorainormoisture.
•Ifyouputyourcomputerinacarryingcase,putitintonotebookmodeandclosethedisplay.
Usingthemulti-touchscreen
Thistopicprovidesinstructionsonhowtousethemulti-touchscreen.
Tap
Taponceonanitemtoselectoropenit.Thisoperationissimilartoaclickonamouse.
Pressandhold
Pressandholdanitemtodisplayinformationaboutit,ortoopenthecontextmenu.Thisoperation
issimilartoaright-clickonamouse.
Zoominorzoomout
Moveyourngersclosertogetheronthescreentozoomin,ormovetwongersapartonthescreento
zoomout.
Rotate
Puttwoormorengersonanitemandthenrotateyourngers.Thisoperationenablesyoutorotatethe
item.Onlysomeitemscanberotated.
Slidetoscroll
MoveyourngeronthescreentoscrollthroughitemssuchasWebpages,photos,andlists.Thisoperation
issimilartothescrollingoperationonamouse.
Slidetorearrange
Draganiteminthedirectionoppositetohowyouwouldscroll.Forexample,ifyouwouldscrollleftorright,
dragtheitemupordown.Afteryouhavemovedtheitemtoadesiredlocation,releaseit.
Swipetoselect
Swipeanitemashortdistanceinadirectionoppositetohowthepagescrollstoselecttheitem.Aquickand
shortmovementworksbest.Thisoperationenablesyoutoselectanitemsuchasaphoto,aprogramtile,
orthetext.
Swipefromedge
Swipeinwithyourngerstartingfromanedgeofthescreen.
•Swipinginfromtherightedgeofyourscreentodisplaythecharms.
•Swipinginfromtheleftedgeofyourscreentoachieveanyofthefollowing:
–Displayanopenprogram.
–Snapaprogram.Swipeinfromtheleftedgeofyourscreen,anddragtheprogramuntilaborderis
displayed.Then,movetheprogramtoadesiredposition.
Chapter2.Usingyourcomputer17
Page 32

–Displayalistofrecentlyopenedprograms.Swipeinfromtheleftedgeofyourscreenwithoutlifting
yournger,andthendragtheprogrambacktotheleftedge.Thenalistofrecentlyopenedprogramsis
displayed.
–Closeaprogram.Swipeinfromtheleftedgeofyourscreen,anddragtheprogramtothebottom
ofyourscreen.
•Swipinginfromthetopedgeofyourscreentoachieveanyofthefollowing
–Displaythemenucommands,suchasSave,Edit,andDelete.
–Closeaprogram.Swipeinfromthetopedgeofyourscreen,anddragtheprogramtothebottom
ofyourscreen.
•Swipinginfromthebottomedgeofyourscreentodisplaythemenucommands,suchasSave,Edit,
andDelete.
Tipsonusingthemulti-touchscreen
•Themulti-touchscreenisaglasspanelcoveredwithaplasticlm.Forinputyoucanuseanynger.Do
notapplypressureorplaceanymetallicobjectonthescreen.Otherwise,thescreenmightbedamaged
ormalfunction.
•Beforeyouputyourcomputerinacarryingcase,putitintonotebookmodeandclosethedisplay.Do
notputyourcomputerinacarryingcasewhenitisintabletmode.
•Regularlycalibratetheaccuracyofthengerinputtoavoidadiscrepancy.
Cleaningthemulti-touchscreen
Tocleanthemulti-touchscreen,dothefollowing:
1.T oremovengerprintsordustfromthemulti-touchscreen,useadry,soft,lint-freeclothorapieceof
absorbentcotton.Donotapplysolventstothecloth.
2.Gentlywipeforeignparticlesanddustfromthemulti-touchscreenwithonesideofthecloth.
3.Wipesmudgesorngerprintswiththeothersideofthecloth,orwithacleancloth.
4.Afterusingthecloth,washitwithaneutraldetergent.
18UserGuide
Page 33

Usingthetabletbuttons
Onthedisplaybezelnearthescreenisarowofbuttonswithwhichyoucancontrolyourcomputerintablet
mode,withouttheuseofthekeyboard.
1ScreenRotationbutton:Pressittolockthescreenrotationfunction.
2Powerbutton:Pressittoturnonthecomputer.
3Speakervolumeupbutton:Pressittoincreasethespeakervolume.
4Speakervolumedownbutton:Pressittodecreasethespeakervolume.
5Windowsbutton:PressittoswitchbetweenthecurrentworkspaceandtheStartscreen.
Specialkeysandbuttons
Yourcomputerhasseveralspecialkeysandbuttonstohelpyouworkmoreeasilyandeffectively.
Thefollowinggureshowsthelocationsofthespecialkeysandbuttonsonyourcomputer.
Chapter2.Usingyourcomputer19
Page 34

1Functionkeys
Volumeandmutekeys
•F1:Mutesorunmutesthespeakers.
Ifyoumutethesoundandturnoffyourcomputer,thesoundwillremainmutedwhenyouturnonyour
computeragain.Toturnonthesound,pressF2orF3.
•F2:Decreasesthespeakervolume.
•F3:Increasesthespeakervolume.
•F4:Mutesorunmutesthemicrophones.
Displaymanagementkeys
•F5:Thecomputerdisplaybecomesdimmer.
•F6:Thecomputerdisplaybecomesbrighter.
Youcantemporarilychangethecomputerdisplaybrightnessbypressingthesetwokeys.Tochangethe
defaultbrightnesslevel,right-clickthebatterystatusiconintheWindowsnoticationarea,thenclickAdjust
screenbrightnessandmakechangesasdesired.
•F7:Switchesthedisplayoutputlocationbetweenthecomputerdisplayandanexternalmonitor.
Otherfunctions
•F8:EnablesordisablestheAirplanemode.
TheAirplanemodedisablesthewirelessfeaturesofyourcomputertocomplywithairlineregulations.
Whenyoupressthiskey,alistofwirelessconnectionsisdisplayed.Youcanquicklyturnonorturnoff
allthewirelessnetworkconnections.
•F9:OpenstheSettingscharm.
•F10:OpenstheSearchcharm.
•F11:Pressthiskeytoviewtheprogramsthatyouhaveopened.
•F12:Pressthiskeytoviewallprograms.
•FnLock(Esc):OpenstheThinkPadKeyboardsPropertieswindowwhereyoucantoggletheF1-F12
keyfunctionality.
•Fn+B:HasthesamefunctionastheBreakkey.
20UserGuide
Page 35

•Fn+P:HasthesamefunctionasthePausekey.
•Fn+S:HasthesamefunctionastheSysRqkey.
•Fn+K:HasthesamefunctionastheScrLKkey.
YoucantoggletheThinkPadF1-F12keyfunctionalitytousethekeysindefaultmodeorinlegacymode.In
defaultmode,youcaninitiatethespecialfunctionsillustratedoneachkeybypressingthecorresponding
keydirectly.Inlegacymode,toinitiatethespecialfunctionsillustratedoneachkey,pressandholdtheFn
keyandthenpressthedesiredfunctionkey,thenreleasebothkeys.
TotoggletheF1-F12keyfunctionalityintheWindowsenvironment,dothefollowing:
1.OpentheThinkPadKeyboardPropertieswindowbypressingtheFnlockkey.
2.Congurethesettingsfollowingtheinstructionsonthescreen.
TotoggletheF1-F12keyfunctionalitythroughtheThinkPadSetupprogram,dothefollowing:
1.Startthecomputer.WhentheThinkPadlogoscreenisdisplayed,pressF1.TheThinkPadSetup
programmainmenuopens.
2.SelectCong➙Keyboard/Mouse➙ChangetoF1-F12keys.
3.Congurethesettingsfollowingtheinstructionsonthescreen.
4.Savechangesandexit.
2Windowskey
PressthiskeytoswitchbetweenthecurrentworkspaceandtheStartscreen.
ForinformationaboutusingtheWindowskeywithotherkeys,refertothehelpinformationsystemofthe
Windowsoperatingsystem.
UsingtheUltraNavpointingdevice
YourcomputercomeswiththeUltraNavpointingdevice.TheUltraNavpointingdeviceconsistsofthe
TrackPointpointingdeviceandthetouchpad,eachofwhichisitselfapointingdevicewithbothbasicand
extendedfunctions.Y oucancongurebothdevicesbychoosingthesettingsyouprefer.
•SetboththeTrackPointpointingdeviceandthetouchpadaspointingdevices.
•SettheTrackPointpointingdeviceasthemainpointingdeviceandthetouchpadforscrolling,tap
zones,andslow-motionpointerfunctionsonly.
•SettheTrackPointpointingdeviceasthemainpointingdevice,anddisablethetouchpad.
•Setthetouchpadasthemainpointingdevice,anddisabletheTrackPointpointingdevice.
ChangingtheUltraNavpointingdevicesettings
TochangetheUltraNavpointingdevicesettings,dothefollowing:
1.Movethecursortothetop-rightorbottom-rightcornerofthescreentodisplaythecharms.Click
Settings➙ControlPanel.
2.ClickHardwareandSound➙Mouse➙UltraNav.
3.Changethesettingsasyoudesire.
YoualsocanchangetheUltraNavpointingdevicesettingsbyclickingtheUltraNaviconintheWindows
noticationarea.TodisplaytheUltraNaviconintheWindowsnoticationarea,see“AddingtheUltraNav
icontotheWindowsnoticationarea”onpage24.
Chapter2.Usingyourcomputer21
Page 36
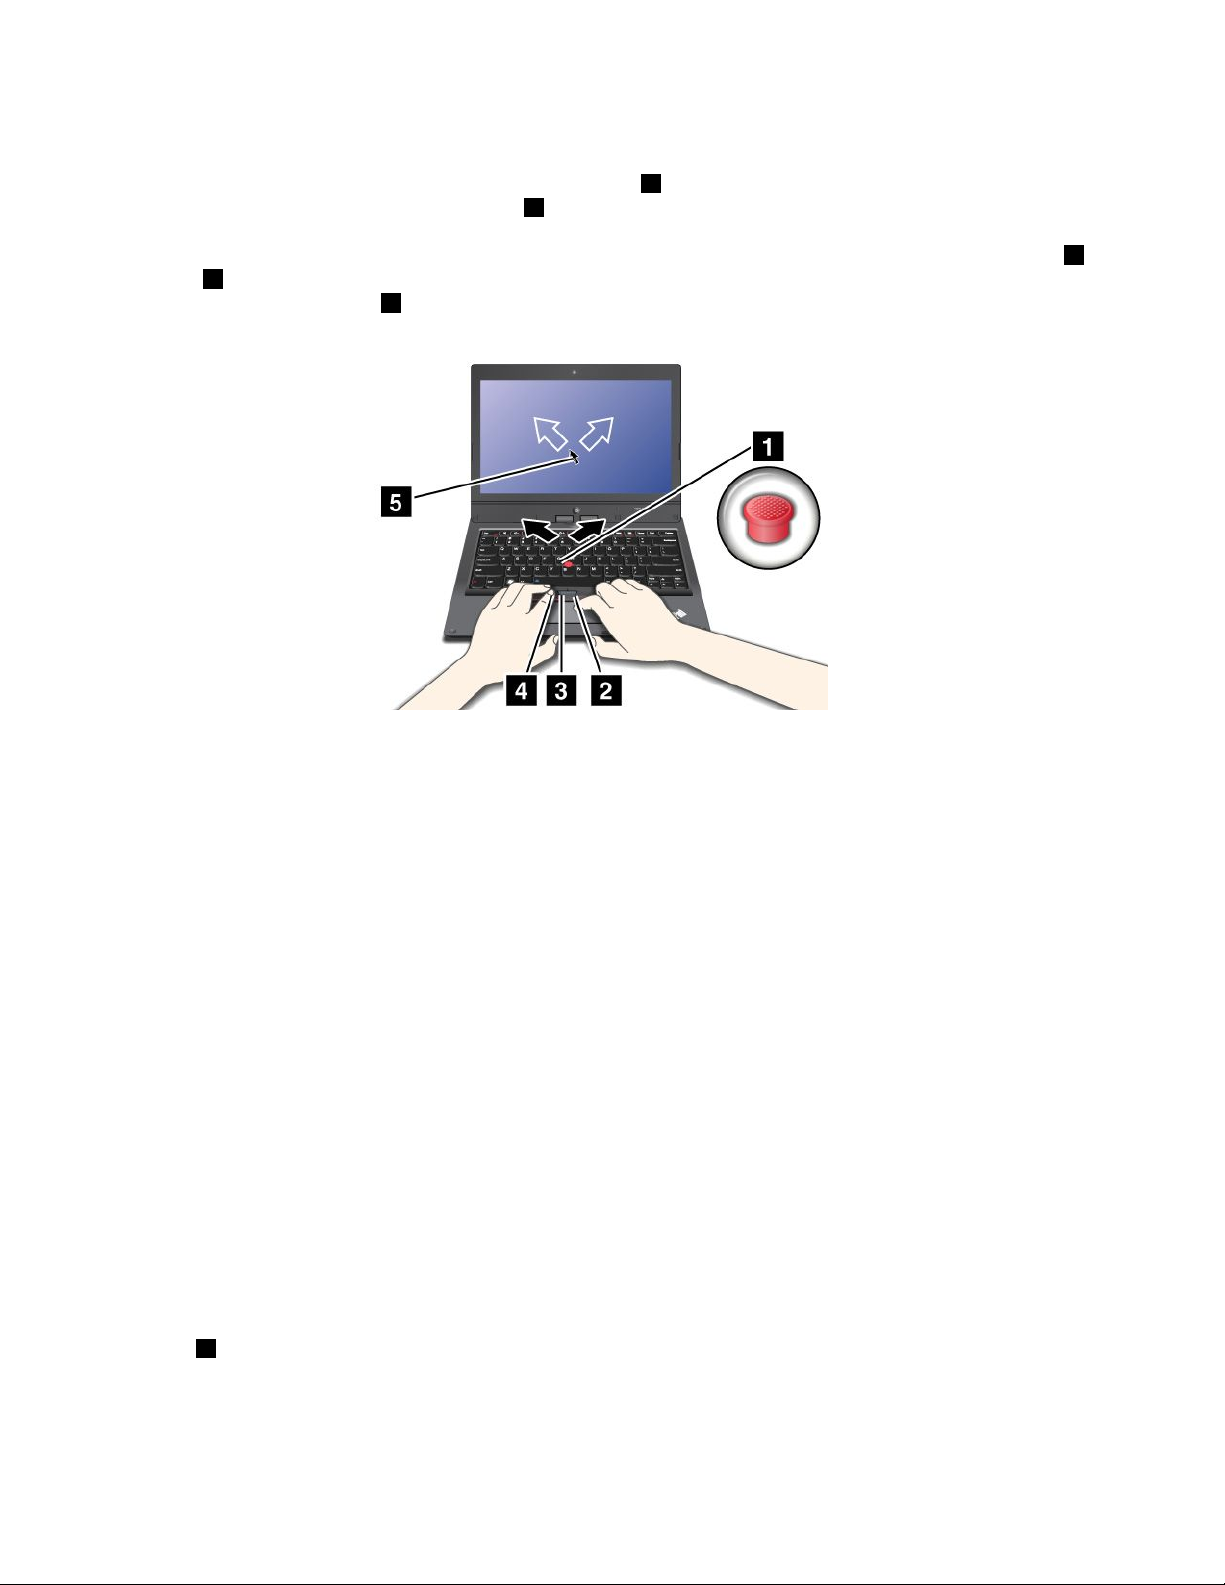
UsingtheTrackPointpointingdevice
TheTrackPointpointingdeviceconsistsofapointingstick1onthekeyboardandthreeclickbuttonsatthe
bottomofthekeyboard.T omovethepointer5onthescreen,youapplypressuretothenonslipcaponthe
pointingstickinanydirectionparalleltothekeyboard;thepointingstickitselfdoesnotmove.Thespeedat
whichthepointermovesdependsonthepressureyouapplytothepointingstick.Thefunctionsoftheleft
andright2clickbuttonscorrespondtothoseoftheleftandrightmousebuttonsonaconventionalmouse.
TheTrackPointcenterbutton3,calledthescrollbar,enablesyoutoscrollWebpagesordocumentsinany
directionwithnoneedtousethegraphicscrollbarsonthesideofthewindow.
4
Note:Yourcomputerkeyboardmightlookslightlydifferentfromtheillustrationabove.
IfyouarenotfamiliarwiththeTrackPointpointingdevice,theseinstructionswillhelpyougetstarted:
1.Placeyourhandsinthetypingposition,andpressgentlywithanindexngeroramiddlengeronthe
pointingstickinthedirectioninwhichyouwantthepointertomove.
Tomovethepointer,pressthepointingstickawayfromyoutomoveitup,towardyoutomoveit
down,toonesideortheothertomoveitsideways.
Note:Thepointermightdrift.Thisisnotadefect.StopusingtheTrackPointpointingdeviceforafew
seconds;thepointerwillstopmoving.
2.T oselectanddragasrequiredbyyoursoftware,presstheleftorrightclickbuttonwitheitherthumb
andmovetheTrackPointpointingstick.
CustomizingtheTrackPointpointingdevice
YoucancustomizetheTrackPointpointingdeviceanditsbuttonsasfollows:
•Switchthefunctionsoftheleftandrightbuttons.
•ChangethesensitivityoftheTrackPointpointingdevice.
•EnabletheTrackPointScrollingTips.
TochangetheTrackPointpointingdevicesettings,see“ChangingtheUltraNavpointingdevicesettings”
onpage21
Changingthecap
Thecap1ontheendoftheTrackPointpointingstickisremovable.Youcanreplaceitasshownbelow.
.
22UserGuide
Page 37

Note:Ifyoureplacethekeyboard,anewkeyboardisshippedwiththedefaultcap.Ifyouwish,youcan
keepthecapfromyouroldkeyboardanduseitonthenewone.
Usingthetouchpad
Thetouchpadisapad1belowtheT rackPointbuttonsatthebottomofthekeyboard.Tomovethepointer
2onthescreen,slideyourngertipoverthepadinthedirectioninwhichyouwantthepointertomove.
Note:Yourcomputerkeyboardmightlookslightlydifferentfromtheillustrationabove.
Thetouchpadofyourcomputersupportsmulti-touchwithwhichyoucanzoomin,zoomout,scroll,or
rotateonthescreenwhilebrowsingtheInternetorreadingoreditingadocument.
Fordetails,refertothehelpinformationsystemoftheUltraNavpointingdevice.
Customizingthetouchpad
Tochangethetouchpadsettings,see“ChangingtheUltraNavpointingdevicesettings”onpage21.
DisablingtheUltraNavpointingdevice
YoucanusetheexternalmousesimultaneouslywiththeUltraNavpointingdevice.Ifyouwanttodisablethe
UltraNavpointingdevice,dothefollowing:
Chapter2.Usingyourcomputer23
Page 38

1.OpentheMousePropertieswindow.See“ChangingtheUltraNavpointingdevicesettings”onpage21.
2.T odisabletheTrackPointpointingdeviceortouchpad,clearthecheckboxforEnableTrackPoint
orEnableTouchPad.
3.ClickOK.
AddingtheUltraNavicontotheWindowsnoticationarea
ForeasyaccesstotheUltraNavproperties,youcanenablethedisplayoftheUltraNaviconintheWindows
noticationarea.
ToenablethedisplayoftheUltraNaviconintheWindowsnoticationarea,dothefollowing:
1.Movethecursortothetop-rightorbottom-rightcornerofthescreentodisplaythecharms.Click
Settings➙ControlPanel.
2.ClickHardwareandSound➙Mouse➙UltraNav.
3.SelectthecheckboxforShowUltraNavicononthesystemtray.
4.ClickOK.
YoucannowchangethepropertiesoftheUltraNavpointingdevicebyclickingtheUltraNaviconinthe
Windowsnoticationarea.
Powermanagement
Whenyouuseyourcomputerawayfromelectricaloutlets,youdependonbatterypowertokeepyour
computerrunning.Differentcomputercomponentsconsumepoweratdifferentrates.Themoreyouusethe
power-intensivecomponents,thefasteryouconsumebatterypower.Mobilityhasrevolutionizedbusiness
byallowingyoutotakeyourworkwhereveryougo.WithThinkPadbatteries,youwillbeabletoworklonger
withoutbeingtiedtoanelectricaloutlet.
Usingthebatterypower
Youcanuseyourbatterypowermoreefcientlywiththehelpofthisintroduction.
Checkingthebatterystatus
ThebatterystatusiconintheWindowsnoticationareadisplaysthepercentageofbatterypowerremaining.
Therateatwhichyouusebatterypowerwilldeterminehowlongyoucanusethebatteryofyourcomputer
betweencharges.Becauseeachcomputeruserhasdifferenthabitsandneeds,itisdifculttopredicthow
longabatterychargewilllast.Therearetwomainfactors:
•Howmuchenergyisstoredinthebatterywhenyoubegintowork.
•Thewayyouuseyourcomputer:
–Howoftenyouaccesstheharddiskdrive.
–Howbrightyoumakethecomputerdisplay.
Tocheckfordetailedbatterystatusinformation,dooneofthefollowing:
•OpentheLenovoSupportprogramandclickBatteryHealth.
•OpentheLenovoSettingsprogramandclickPower.
24UserGuide
Page 39

Chargingthebattery
Whenyoundthatthepercentageofpowerremainingislow,forexample,thebatteryalarmgoesoff,you
needtochargeyourbatterybyconnectingyourcomputertoacpower.Thebatterywillbefullychargedin
aboutsixhours.Thisisaffectedbythebatterysizeandthephysicalenvironment.
Toincreasethelifeofthebattery,thecomputerdoesnotstartrechargingthebatteryiftheremaining
powerisgreaterthan95%.
Maximizingthebatterylife
Tomaximizethelifeofthebattery,dothefollowing:
•Usethebatteryuntilthechargeiscompletelydepleted;thatis,usethebatteryuntilthebatterystatus
indicatorstartsblinkingorange.
•Rechargethebatterycompletelybeforeusingit.Thebatteryisfullychargedifthebatteryindicator
showsgreen.
•Alwaysusepowersavingmode.
Usingtheacpower
Thepowertorunyourcomputercancomeeitherfromthelithium-ion(Li-ion)batterypackprovidedwithit,
orfromacpowerthroughtheacpoweradapter.
Theacpoweradapterthatcamewithyourcomputerhastwobasiccomponents:
•Thetransformerpackthatconvertsacpoweradapterforusewiththecomputer.
•Thepowercordthatplugsintotheacoutletandintothetransformerpack.
Attention:Usinganimproperpowercordcouldcauseseveredamagetoyourcomputer.
Connectingtheacpoweradapter
Tousetheacpoweradapter,dothefollowing:
Note:Besuretoperformthestepsinthegivenorder.
1.Connecttheacpoweradaptertotheacpowerconnectorofyourcomputer.
2.Connectthepowercordtothetransformerpack.
3.Plugthepowercordintoanelectricaloutlet.
Tipsonusingtheacpoweradapter
•Whentheacpoweradapterisnotinuse,disconnectitfromtheelectricaloutlet.
•Donotbindthepowercordtightlyaroundtheacpoweradaptertransformerpackwhenitisconnectedto
thetransformer.
•Beforeyouchargethebattery,ensurethatitstemperatureisatleast10°C(50°F).
•Youcanchargethebatterywhentheacpoweradapterisconnectedtothecomputerandthebatteryis
installed.Youneedtochargeitinanyofthefollowingconditions:
–Whenanewbatteryisinstalled
–Ifthebatterychargeislow
–Ifthebatteryhasnotbeenusedforalongtime
Chapter2.Usingyourcomputer25
Page 40

Managingthepowerplans
Youcanmanageyourpowerplanstoachievethebestbalancebetweenperformanceandpowersaving.To
changethepowerplan,dothefollowing:
1.ClickthebatterystatusiconintheWindowsnoticationarea.
2.ClickMorepoweroptions.
3.Selectthepowerplanyoudesirefollowingtheinstructionsonthescreen.
Power-savingmodes
Youcanusethefollowingpower-savingmodestoconservethepowerofyourcomputer.
•Sleep:Insleepmode,yourworkissavedtomemory.Then,thedisplayandthesolid-statedriveorthe
harddiskdriveareturnedoff.Whenyourcomputerwakesup,yourworkisrestoredwithinseconds.
•30DayStandbyfunction:Dependingonthecomputermodel,yourcomputermightsupportthe30Day
Standbyfunction.Whenthisfunctionisenabled,thecomputerconsumesevenlesspowerinthesleep
modeandtakesonlysecondstoresumenormaloperationwhenyoupressthepowerbutton.Toenable
the30DayStandbyfunction,opentheLenovoSettingsprogramandclickPower.
•AlwaysOnUSBfunctionoff:TheAlwaysOnUSBdrainsyourbatterypower.Youcandisableit
whenyoudonotneedit.TodisabletheAlwaysOnUSBfunction,opentheLenovoSettingsprogram
andclickPower.
•Wirelessoff:Ifyoudonotneedthewirelessfeatures,likeBluetoothandwirelessLAN,turnthemoff.This
willhelpconservepower.T oturnoffthewirelessfeatures,pressFn+F8.
Enablingthewakeupfunction
Toenablethewakeupfunction,dothefollowing:
1.Movethecursortothetop-rightorbottom-rightcornerofthescreentodisplaythecharms.Thenclick
Settings➙ControlPanel.
2.ClickSystemandSecurity➙Scheduletasks.Ifyouarepromptedforanadministratorpasswordor
conrmation,typethepasswordorprovideconrmation.
3.Fromtheleftpane,selectthetaskfolderforwhichyouwanttoenablethewakeupfunction.The
scheduledtasksaredisplayed.
4.Double-clickascheduledtask,andthenclicktheConditionstab.
5.InthePowerpane,selectthecheckboxforWakethecomputertorunthistask.
Settingtheactionsforcriticalandlowpower
Whenyourbatterypowerfallsbelowacertainlevel,someactionswillbetriggered.Forexample,thealarm
willgoofforyourcomputerwillgointosleepmodeorpoweroff.
Tochangethecriticalandlowpowerlevel,andthecorrespondingactionstriggered,dothefollowing:
1.ClickthebatterystatusiconintheWindowsnoticationarea,andthenclickMorepoweroptions.
2.ClickChangeplansettings➙Changeadvancedpowersettings➙Battery.
3.ChangethesettingsasyoudesireintheBatterylist.
Connectingtothenetwork
YourcomputerhasoneormorenetworkcardsthatenableyoutoconnectyourcomputertotheInternet
andothernetworkconnections.
26UserGuide
Page 41

Ethernetconnections
Youcanconnecttoalocalnetworkorabroadbandconnectionbyusingthebuilt-inEthernetfeatureofyour
computer.
DANGER
YourcomputerhasanEthernetconnector.T oavoidtheriskofelectricalshock,donotconnect
thetelephonecabletotheEthernetconnector.
Wirelessconnections
Wirelesscommunicationisthetransferofdatawithouttheuseofcablesbymeansofradiowavesonly.
Dependingonthewirelessdeviceusedinyourcomputer,youmightbeabletoconnecttothefollowing
categoriesofwirelessnetworks.
WirelessLAN
Awirelesslocalareanetwork(LAN)coversarelativelysmallgeographicarea,suchasanofcebuildingora
house.Devicesbasedonthe802.11standardscanconnecttothisnetwork.
Yourcomputercomeswithabuilt-inwirelessLANcardandacongurationutilitytohelpyoumakewireless
connectionsandmonitorthestatusofyourconnection,sothatyoucanstayconnectedtoyournetwork
whileyouareintheofce,inameetingroom,orathome,withnoneedforawiredconnection.
WirelessWAN
WirelessWideAreaNetwork(wirelessWAN)coversabroadergeographicarealikeacityoranentirecountry.
Cellularnetworksareusedforthedatatransmission.
Note:WirelessWANserviceisprovidedbyauthorizedserviceprovidersinsomecountries.
SomeThinkPadnotebookcomputerscomewithabuilt-inwirelessWANcardintegratingsomewireless
WANtechnologies,suchas1xEV-DO,HSPA,3GorGPRS.Byusingthebuilt-inwirelessWANcardand
thecongurationutilitythatcomeswithyourcomputer,youcanestablishwirelessWANconnectionsand
monitorthestatusofyourconnection.
Bluetooth
Bluetoothisoneofanumberoftechnologiesusedtocreateawirelesspersonalareanetwork.Bluetooth
canconnectdevicesashortdistancefromoneanother,andiscommonlyusedforconnectingperipheral
devicestoacomputer,transferringdatabetweenhand-helddevicesandapersonalcomputer,orremotely
controllingandcommunicatingwithdevicessuchasmobilephones.
UsingthewirelessLANandwirelessWANconnections
Youcancheckyourwirelessconnectionstatusandsignalstrengththroughthewirelessnetworkiconin
theWindowsnoticationarea.
Toenableordisableyourwirelessfeature,pressF8.Whenyoupressthiskey,alistofwirelessconnections
isdisplayed.Youcanquicklyturnonandturnoffallthewirelessnetworkconnections.
TheLocationsAwarenessprogramenablesyoutomanageyourlocationproles.Byswitchingbetween
locationprolesasyoumoveyourcomputerfromplacetoplace,youcanquicklyandeasilyconnecttoa
networkwithnoneedtorecongureyoursettingsmanuallyandrestartthecomputereachtime.Toaccess
theLocationAwarenessprogram,opentheLenovoSettingsprogramandclickLocationAwareness.
Chapter2.Usingyourcomputer27
Page 42

Attention:Ifyouwanttouseyourcomputeronanairplane,checkthewirelessserviceswiththeairline
beforeboarding.
•Ifyoucarryyourcomputerwiththewirelessfeatureintoanairplane,checktheserviceswiththeairline
beforeboardingtheairplane.
•Iftherearerestrictionsontheuseofcomputersonanairplanewiththewirelessfeature,youneed
todisableitbeforeboarding.
Tolocatethewirelessantennasonyourcomputer,see“LocationoftheUltraConnectwirelessantennas”on
page110
Tipsforusingthewirelessconnectionfeature
Toachievethebestconnection,usethefollowingguidelines:
•PlaceyourcomputersothatthereareasfewobstaclesaspossiblebetweenthewirelessLANaccess
•Toachievethebestwirelessconnection,openyourcomputerdisplaytoanangleslightlygreaterthan
•Ifyouusethewirelessfeature(the802.11standard)ofyourcomputersimultaneouslywithaBluetooth
Note:Y oucanpurchaseawirelessnetworkcardasanoptionfromLenovoat
http://www.lenovo.com/accessories/services/index.html.
.
pointandthecomputer.
90degrees.
option,thedatatransmissionspeedcanbedelayedandtheperformanceofthewirelessfeaturecanbe
degraded.
UsingBluetooth
TosenddatatoaBluetooth-enableddevice,dothefollowing:
1.Right-clickthedatathatyouwanttosend.
2.SelectSendT o➙BluetoothDevices.
Toreceivethedata,clicktheBluetoothiconintheWindowsnoticationarea,andclickReceiveaFile.
TocongureaBluetoothdeviceormanageconnectionsettings,dothefollowing:
1.ClicktheBluetoothiconintheWindowsnoticationarea,andthenclickOpenSettings.
2.ConguretheBluetoothsettingsasyoudesire.
Fordetails,refertotheWindowshelpinformationsystem.
Note:Ifyouusethewirelessfeature(the802.11standard)ofyourcomputersimultaneouslywithaBluetooth
option,thedatatransmissionspeedcanbedelayedandtheperformanceofthewirelessfeaturecanbe
degraded.
PresentationsandMultimedia
Youcanconnectyourcomputertoaprojectortogivepresentationsoryoucanconnectyourcomputer
toanexternalmonitortoexpandyourworkspace.
Changingthedisplaysettings
Tochangethedisplaysettingslikethedisplayresolutionandfontsize,dothefollowing:
1.Movethecursortothetop-rightorbottom-rightcornerofthescreentodisplaythecharms.Thenclick
Settings➙ControlPanel.
2.ClickAppearanceandPersonalization➙Display.
28UserGuide
Page 43

3.Selectthedisplayyouwanttocongure.Followtheinstructionsonthescreentochangethedisplay
settings.
Usinganexternaldisplay
Ifanexternalmonitorisconnectedtoyourcomputer,youcanswitchthedisplayofyourcomputeroutput
betweenthecomputerdisplayandtheexternalmonitor.Youalsocandisplaythesameoutputonbothor
displaydifferentoutputoneach.
Note:Ifyouattachanexternalmonitor,avideointerfacecablewithaferritecoreinstalledonthecable
isrequired.
Touseanexternalmonitor,dothefollowing:
1.ConnecttheexternalmonitortoyourcomputerthroughtheVGAconnector,theMiniDisplayPort
connector,ortheHDMIconnector.Connecttheexternalmonitortoanelectricaloutlet.
Note:IfthemonitorconnectorisnotcompatiblewiththeMiniDisplayPortconnectorortheHDMI
connectoronyourcomputer,youcanuseaconvertcabletoestablishtheconnection.Convertcables
areavailableasoptionsfromLenovoathttp://www.lenovo.com/accessories/services/index.html.
2.T urnontheexternalmonitor.
3.ChangethedisplayoutputlocationbypressingF7.Thisenablesyoutoviewoutputontheexternal
monitor,thecomputerdisplay,orbothmonitors.
Note:Ifyourcomputercannotdetecttheexternalmonitor,right-clickonthedesktop,thenselectScreen
resolution.ClicktheDetectbutton.
Yourcomputersupportsamaximumvideoresolutionofupto2560x1600,providedthattheexternal
monitoralsosupportsthatresolution.Formoredetails,refertothemanualsprovidedwithyourmonitor.Y ou
cansetanyresolutionforeitherthecomputerdisplayortheexternalmonitor.Whenyouusebothatthe
sametime,theresolutionofbothisthesame.Ifyousetahigherresolutionforthecomputerdisplay,you
canseeonlypartofthescreenatatime.YoucanseeotherpartsbymovingtheimagewiththeTrackPoint
pointingdeviceoranotherpointingdevice.
Considerationsforusinganexternalmonitor
•Wheninstallinganoperatingsystem,youmustinstallthedisplaydriverforyourmonitorthatissupplied
withthecomputer,andthemonitorINFlethatissuppliedwiththeexternalmonitor.
•Ifyousetaresolutionhigherthantheresolutionyouareusingonthecomputermonitor,andusean
externalmonitorthatdoesnotsupportthatresolution,takeadvantageofthevirtualscreenfunction,
whichenablesyoutodisplayonlyapartofthehigh-resolutionscreenimageyourcomputerproduces.
YoucanseeotherpartsoftheimagebymovingthescreenwiththeTrackPointpointingdeviceoranother
pointingdevice.
•Iftheexternalmonitoryouareusingisoutdated,theresolutionandtherefreshratemightbelimited.
•IfyouwanttoshowDOSfull-screenwhileintheExtendmode,onlythemaindisplayshowsDOS;the
otherdisplayisblackedout.
•IfyouareusingtheExtendmode,whenanapplicationusingDirectDraworDirect3Displayedin
full-screenmode,itisshownonlyonthemaindisplay.
Settingthemaindisplay
IfyourcomputerhastheIntel
®
graphicscard,youcandesignatetheotherdisplayasthemaindisplay
bydoingthefollowing:
1.Right-clickonyourdesktop,andthenclickScreenresolution.
2.Selectthedisplaywhichyouwanttosetasmain.ThenselecttheMakethismymaindisplaycheck
box.
Chapter2.Usingyourcomputer29
Page 44

Settingthemonitortype
Tosetyourmonitortype,dothefollowing:
1.Right-clickonthedesktop,andclickScreenresolution.
Note:Ifyourcomputercannotdetecttheexternalmonitor,clicktheDetectbutton.
2.Clicktheiconforthedesiredmonitor.
3.SetResolution.
4.ClickAdvancedSettings.
5.ClicktheMonitortab.Checkthemonitorinformationwindowtoensurethatthemonitortypeiscorrect.
Ifitis,clickOKtoclosethewindow;otherwiseproceedwiththefollowingsteps.
6.Ifmorethantwomonitortypesaredisplayed,selectGenericPnPMonitororGenericNon-PnP
Monitor.
7.ClickProperties.Ifyouarepromptedforanadministratorpasswordorconrmation,typethepassword
orprovideconrmation.
8.ClicktheDrivertab.
9.ClickUpdateDriver.
10.ClickBrowsemycomputerfordriversoftware,andthenclickLetmepickfromalistofdevice
driversonmycomputer.
11.CleartheShowcompatiblehardwarecheckbox.
12.SelectManufacturerandModelforyourmonitor.Ifyoucannotndyourmonitoronthelist,stopthe
installationofthisdriverandusethedrivershippedwithyourmonitor.
13.Afterupdatingthedriver,clickClose.
14.ClickOK.
Usingaprojector
Tomakepresentations,youcanattachaprojectortoyourcomputerthroughtheMiniDisplayPortconnector
ortheThunderboltconnectoronyourcomputer.
Note:IftheprojectorconnectorisnotcompatiblewiththeMiniDisplayPortconnector
ortheThunderboltconnectoronyourcomputer,youcanpurchaseaconvertercableon
http://www.lenovo.com/accessories/services/index.html.
Itmighttakeseveralsecondsbeforetheprojectordisplaystheimage.Ifyoudonotseeyourdesktop
displayedafter60seconds,pressF7toswitchbetweendifferentdisplayoutputlocations.
Yourprojectormighthaveoneormoreaudio-inputconnectors.T oprojectsound,youwillneedtoattachthe
comboaudiojackonyourcomputertotheseconnectors,usinganaudiocable(commerciallyavailable).
Usingaudiofeatures
Yourcomputerisequippedwiththefollowing:
•Comboaudiojack,1/8inch(3.5mm)indiameter
•Built-instereospeakers
•Built-indigitalmicrophone
Yourcomputeralsohasanaudiochipthatenablesyoutoenjoyvariousmultimediaaudiofeatures:
•CompliantwithIntelHighDenitionAudio
30UserGuide
Page 45

•RecordingandplaybackofPCMandWAVlesin16-bitor24-bitformat
•PlaybackofaWAVleatasamplerateof44.1KHzto192KHz
•PlaybackofMIDIlesthroughaWavetablesynthesizerunderMicrosoftWindowsoperatingsystems
•PlaybackofMP3lesthroughtheWindowsMediaPlayerorasoftwareMP3player
•Recordingfromvarioussoundsources
Note:Thecomboaudiojackdoesnotsupportaconventionalmicrophone.
Thefollowingtableshowswhichfunctionsoftheaudiodevicesattachedtothejacksonyourcomputerare
supported.
Table1.Audiofeaturelist
JackHeadsetwitha3.5mm
4-poleplug
Comboaudiojack
Headphoneand
microphonefunctions
supported
Conventional
headphone
Headphonefunction
supported
Conventional
microphone
Notsupported
Conguringforsoundrecording
Tocongurethemicrophoneforoptimizedsoundrecording,opentheRealtekHDAudioManagerwindow
bydoingthefollowing:
1.Movethecursortothetop-rightorbottom-rightcornerofthescreentodisplaythecharms.Click
Settings➙ControlPanel.
2.ClickHardwareandSound➙RealtekHDAudioManager.
Usingtheintegratedcamera
Ifyourcomputerhasanintegratedcamera,youcanusethecameratopreviewyourvideoimageandtakea
snapshotofyourcurrentimage.Tostartthecamera,pressF6toopentheLenovoSettingsprogram,and
thenclickCamera.Whenthecameraisstarted,thegreencamera-in-useindicatorturnson.
Youalsocanusetheintegratedcamerawithotherprogramsthatprovidefeaturessuchasphotographing,
videocapturing,andvideoconferencing.Tousetheintegratedcamerawithotherprograms,openoneofthe
programsandstartthephotographing,videocapturing,orvideoconferencingfunction.Then,thecamera
willstartautomaticallyandthegreencamera-in-useindicatorwillturnon.Formoreinformationaboutusing
thecamerawithaprogram,refertothehelpinformationsystemoftheprogram.
Conguringcamerasettings
Tocongurethecamerasettings,dooneofthefollowing:
•Congurethecamerasettingsdirectlyfromtheprogramthatisusingthecamera.Fordetails,seethe
helpinformationsystemoftheprogram.
•ClickLenovoSettingsfromtheStartscreen,andthenclickCamera.Followtheinstructionsonthe
screen.
Usingamediacard
Yourcomputerhasonemediacardreaderslot.Themediacardreaderslotsupportsthefollowingfour
typesofcards:
•SecureDigital(SD)card
Chapter2.Usingyourcomputer31
Page 46

•SecureDigitalHigh-Capacity(SDHC)card
•SecureDigitaleXtended-Capacity(SDXC)card
•MultiMediaCard(MMC)
Note:Whiletransferringdatatoorfromamediacard,suchasanSDcard,donotputyourcomputerinto
sleepmodebeforethedatatransferiscompleted;otherwise,yourdatacouldbecomedamaged.
Formoreinformationonmediacards,refertoanyofthefollowingtopics:
Insertingamediacard
Attention:Beforeyoustartinstallinganyofthefollowingcards,touchametaltableoragroundedmetal
object.Thisactionreducesanystaticelectricityfromyourbody.Thestaticelectricitycoulddamagethecard.
Toinsertamediacardintothe4-in-1mediacardreaderslot,dothefollowing:
1.Ensurethatthecardiscorrectlyoriented.
2.Insertthecardrmlyintothe4-in-1mediacardreaderslot.Pressthecardrmlyintotheslot.
Ifthemediacardisnotplugandplay,dothefollowing:
1.Movethecursortothetop-rightorbottom-rightcornerofthescreentodisplaythecharms.Click
Settings➙ControlPanel.
2.ClickHardwareandSound➙DeviceManager.
3.FromtheActionmenu,selectAddlegacyhardware.TheAddHardwareWizardstarts.
4.Followtheinstructionsonthescreen.
Removingamediacard
Attention:
•Beforeremovingthecard,stopthecardrst.Otherwise,dataonthecardmightbecorruptedorlost.
•Donotremovethecardwhilethecomputerisinsleepmode.Otherwise,thesystemmightnotrespond
whenyoutrytoresumeoperation.
Toremoveamediacard,dothefollowing:
1.ClickShowhiddeniconsintheWindowsnoticationarea.
2.Right-clicktheSafelyRemoveHardwareandEjectMediaicon.
3.SelectthecorrespondingitemtoejectthecardfromtheWindowsoperatingsystem.
4.Pressthecardtoejectitfromyourcomputer.
5.Removethecardfromyourcomputerandstoreitsafelyforfutureuse.
Note:IfyoudonotremovethecardfromyourcomputerafteryouejectthecardfromtheWindows
operatingsystem,thecardcannolongerbeaccessed.Toaccessthecard,youmustremoveitonce,
theninsertitagain.
32UserGuide
Page 47

Chapter3.Youandyourcomputer
Thischapterprovidesinformationaboutaccessibility,comfort,andtravelingwithyourcomputer.
•“Accessibilityandcomfort”onpage33
•“Travelingwithyourcomputer”onpage35
Accessibilityandcomfort
Goodergonomicpracticeisimportanttogetthemostfromyourpersonalcomputerandtoavoiddiscomfort.
Arrangeyourworkplaceandtheequipmentyouusetosuityourindividualneedsandthekindofwork
thatyouperform.Inaddition,usehealthyworkhabitstomaximizeyourperformanceandcomfortwhile
usingyourcomputer.
Thefollowingtopicsprovideinformationaboutarrangingyourworkarea,settingupyourcomputer
equipment,andestablishinghealthyworkhabits.
Lenovoiscommittedtoprovidingthelatestinformationandtechnologytoourcustomerswithdisabilities.
Refertoouraccessibilityinformationwhichoutlinesoureffortsinthisarea.
Ergonomicinformation
Workinginthevirtualofcemightmeanadaptingtofrequentchangesinyourenvironment.Forexample,
adaptingtothesurroundinglightsources,properseating,andtheplacementofyourcomputerhardware
canhelpyouimproveyourperformanceandachievegreatercomfort.
Thisexampleshowssomeoneinaconventionalsetting.Evenwhennotinsuchasetting,youcanfollow
manyofthesetips.Developgoodhabits,andtheywillserveyouwell.
Generalposture:Makeminormodicationsinyourworkingposturetodetertheonsetofdiscomfortcaused
bylongperiodsofworkinginthesameposition.Frequentshortbreaksfromyourworkalsohelptoprevent
minordiscomfortassociatedwithyourworkingposture.
Display:Positionthedisplaytomaintainacomfortableviewingdistanceof20-30inches(510-760mm).
Avoidglareorreectionsonthedisplayfromoverheadlightingoroutsidesourcesoflight.Keepthedisplay
©CopyrightLenovo2012
33
Page 48

screencleanandsetthebrightnesstolevelsthatenableyoutoseethescreenclearly.PressF5orF6
toadjustdisplaybrightness.
Headposition:Keepyourheadandneckinacomfortableandneutral(vertical,orupright)position.
Chair:Useachairthatgivesyougoodbacksupportandseatheightadjustment.Usechairadjustmentsto
bestsuityourdesiredposture.
Armandhandposition:Ifavailable,usethearmrestsoranareaonyourworkingsurfacetoprovideweight
supportforyourarms.Keepyourforearms,wrists,andhandsinarelaxedandneutral(horizontal)position.
Typewithasofttouchwithoutpoundingthekeys.
Legposition:Keepyourthighsparalleltotheoorandyourfeetatontheoororonafootrest.
Whatifyouaretraveling?
Itmightnotbepossibletoobservethebestergonomicpracticeswhenyouareusingyourcomputer
whileonthemoveorinacasualsetting.Regardlessofthesetting,trytoobserveasmanyofthetipsas
possible.Sittingproperlyandusingadequatelighting,forexample,willhelpyoumaintaindesirablelevels
ofcomfortandperformance.
Questionsaboutvision?
ThevisualdisplayscreensofThinkPadnotebookcomputersaredesignedtomeetthehigheststandards
andtoprovideyouwithclear,crispimagesandlarge,brightdisplaysthatareeasytosee,yeteasyonthe
eyes.Ofcourse,anyconcentratedandsustainedvisualactivitycanbetiring.Ifyouhavequestionsoneye
fatigueorvisualdiscomfort,consultavisioncarespecialistforadvice.
Comfort
Observethefollowingguidelinestoachievegreatercomfortandimproveperformance.
Activesittingandrestbreaks:Thelongeryousitandworkwithyourcomputer,themoreimportantitisto
observeyourworkingposture.Follow“Ergonomicinformation”onpage33
avoiddiscomfortassociatedwithyourworkingpostures.Makingminorvoluntaryposturalchangesand
takingshortfrequentworkbreaksarethekeyingredientsforhealthycomputing.Y ourcomputerislightand
mobile;youcaneasilyrepositionyourworkingsurfacetoaccommodatemanyposturemodications.
Workareasetupoptions:Familiarizeyourselfwithallofyourofcefurnituresothatyouknowhowto
adjustyourworksurface,seat,andotherworktoolstoaccommodateyourpreferencesforcomfort.
Ifyourworkareaisnotinanofcesetting,besuretotakespecialnoteofemployingactivesitting
andtakingworkbreaks.ManyThinkPadproductsolutionsareavailabletohelpyoumodifyandexpand
yourcomputertobestsuityourneeds.AccessthefollowingWebsitetoviewsomeoftheseoptions:
http://www.lenovo.com/accessories/services/index.html.Exploreyouroptionsfordockingsolutionsand
externalproductsthatprovidetheadjustabilityandfeaturesthatyouwant.
andpractice“activesitting”to
Accessibilityinformation
Lenovoiscommittedtoprovidingpeoplewithdisabilitiesgreateraccesstoinformationandtechnology.
Asaresult,thefollowinginformationprovideswaystohelpusersthathavehearing,vision,andmobility
limitationsgetthemostoutoftheircomputerexperience.
Assistivetechnologiesenableuserstoaccessinformationinthemostappropriateway.Someofthese
technologiesarealreadyprovidedinyouroperatingsystem.Otherscanbepurchasedthroughvendors,or
accessedthroughtheWorldWideWebhttp://www.lenovo.com/healthycomputing.
34UserGuide
Page 49

Assistivetechnologies
SomeaccessibilitytechnologiesareavailablethroughtheAccessibilityOptionsprogram.Depending
onyouroperatingsystem,thenumberofaccessibilityoptionsavailablevaries.Ingeneral,accessibility
optionsenhancethewayuserswithhearing,vision,ormobilitylimitationsnavigateandusetheircomputer.
Forexample,someusersmightnothavethenemotorskillsrequiredtouseamouseorselectkey
combinations.Otherusersmightrequirelargerfontsorhigh-contrastdisplaymodes.Insomecases,
magniersandbuilt-inspeechsynthesizersareavailable.Fordetailedinformationabouteachofthese
features,consulttheMicrosofthelpinformationsystem.
TousetheAccessibilityOptionsprogram,dothefollowing:
1.Movethecursortothetop-rightorbottom-rightcornerofthescreentodisplaythecharms.Click
Settings➙ControlPanel.
2.ClickHardwareandSound➙EaseofAccess➙EaseofAccessCenter.
Screenreadertechnologies
Screenreadertechnologiesareprimarilyfocusedonsoftwareapplicationinterfaces,helpinformation
systems,andavarietyofonlinedocuments.However,inthecasewhereascreenreadercannotread
documents,thedocumentmustrstgothroughaconversionprocess.OnesolutionconvertsAdobe
PDFlesintoaformatthatisreadbythescreen-readerprograms.ThissolutionisaWeb-basedservice
providedbyAdobeSystemsIncorporated.Throughhttp://access.adobe.com,AdobePDFdocumentscan
beconvertedtoHTMLorplaintextinmanylanguages.OneconversionoptionconvertsPDFdocuments
ontheInternet.AsecondoptionenablesuserstosubmittheURLofanAdobePDFlethroughe-mailto
convertittoHTMLorASCIItext.AdobePDFlesonalocalharddiskdrive,localCD-ROM,orLANalsocan
beconvertedbyattachingtheAdobePDFletoane-mailmessage.
Travelingwithyourcomputer
Thistopicprovidesinformationtohelpyouworkwithyourcomputerwhenyouaretraveling.
Traveltips
Usethefollowingtraveltipstotravelmorecondentlyandefcientlywithyourcomputer.
•Althoughitissafetoallowyourcomputertogothroughthex-raymachinesatairportsecuritystations,it
isimportanttokeepyoureyesonthecomputeratalltimestopreventtheft.
•Considerbringinganelectricaladapterforuseinanairplaneorautomobile.
•Ifyoucarryanacpoweradapter,detachtheaccordfromittoavoiddamagingthecord.
Traveltipsonairplanes
Ifyoucarryyourcomputerintoanairplane,takenoteofthefollowingtips:
•Ifyouintendtouseyourcomputerorwirelessservices(suchasInternetandBluetooth),checkwiththe
airlineforrestrictionsandavailabilityofservicesbeforeboardingtheairplane.Iftherearerestrictions
ontheuseofcomputerswithwirelessfeaturesontheairplane,youmustabidebythoserestrictions.If
necessary,disablewirelessfeaturesbeforeboarding.
•Becarefulabouttheseatinfrontofyouonairplanes.Angleyourcomputerdisplaysothatitdoesnotget
caughtwhenthepersoninfrontofyouleansback.
•Whentakingoff,remembertoturnoffyourcomputer.
Travelaccessories
Thefollowingisachecklistofitemstoconsiderpackingwhenyouaregoingtotravel:
Chapter3.Youandyourcomputer35
Page 50

•ThinkPadacpoweradapter
•ThinkPadAC/DCcomboadapter
•Externalmouse(ifyouareaccustomedtousingone)
•Ethernetcable
•Extrachargedbattery
•Aqualitycarryingcasethatprovidesadequatecushionandprotection
•Externalstoragedevice
Ifyouaretravelingtoanothercountry,youmightneedtoconsideranacpoweradapterforthecountryto
whichyouaretraveling.
Topurchasetravelaccessories,gotohttp://www.lenovo.com/accessories.
36UserGuide
Page 51

Chapter4.Security
Thischapterprovidesinformationabouthowtoprotectyourcomputerfromtheftandunauthorizeduse.
•“Attachingamechanicallock”onpage37
•“Usingpasswords”onpage37
•“Harddisksecurity”onpage42
•“Settingthesecuritychip”onpage43
•“Noticeondeletingdatafromyourharddiskdriveorsolid-statedrive”onpage44
•“Usingrewalls”onpage44
•“Protectingdataagainstviruses”onpage44
Attachingamechanicallock
Youcanattachamechanicallocktoyourcomputertohelppreventitfrombeingremovedwithoutyour
permission.
Attachamechanicallocktothekeyholeofthecomputer;thensecurethechainonthelocktoastationary
object.Refertotheinstructionsshippedwiththemechanicallock.
Note:Y ouareresponsibleforevaluating,selecting,andimplementingthelockingdevicesandsecurity
features.Lenovomakesnocomments,judgments,orwarrantiesaboutthefunction,quality,orperformance
oflockingdevicesandsecurityfeatures.
Usingpasswords
Byusingpasswords,youcanhelppreventyourcomputerfrombeingusedbyothers.Onceyouseta
password,apromptisdisplayedonthescreeneachtimeyouturnonthecomputer.Enteryourpasswordat
theprompt.Youcannotusethecomputerunlessyoutypethecorrectpassword.
Passwordsandsleepmode
Ifyouhavesetpasswordsandyouputyourcomputerintosleepmode,theprocedureforresuming
operationisasfollows:
•Youarenotpromptedtotypethepasswordwhenresumingoperation.
•Ifanyharddiskdriveorsolid-statedrivehasapassword,itisunlockedautomaticallywhenyouresume
operation.
Note:IfaWindowspasswordhasbeenset,youwillbepromptedtoenterit.
Typingpasswords
Ifthisiconisdisplayed,typeapower-onpasswordorasupervisorpassword.
Ifthisiconisdisplayed,typeauserharddiskpassword.Ifyouwanttotypeamasterharddisk
password,dothefollowing:
1.PressF1.Theiconchangestothis:
©CopyrightLenovo2012
37
Page 52

2.T ypethemasterharddiskpassword.
Note:Toreturntotheicon,pressF1again.
Ifthisiconisdisplayed,typeasupervisorpassword.
Note:PresstheBackspacekeyifyouenterawrongpasswordwhileyouaretypingyourpassword.
Power-onpassword
Youcansetapower-onpasswordtohelpprotectyourcomputeragainstaccessbyunauthorizedusers.
Ifyousetapower-onpassword,thepasswordpromptisdisplayedonthescreenwheneveryouturnonthe
computer.Youmustenterthecorrectpasswordtostartusingthecomputer.
Settingapower-onpassword
1.Printtheseinstructions.
2.Saveallopenles,andexitallapplications.
3.T urnyourcomputeroffandthenturnitonagain.
4.Whenthelogoscreenisdisplayed,pressF1.TheThinkPadSetupprogrammainmenuopens.
5.SelectSecurity,usingthecursordirectionalkeystomovedownthemenu.
6.SelectPassword.
7.SelectPower-onPassword.
8.IntheEnterNewPasswordeld,typeadesiredpassword,andpressEnter.
9.IntheConrmNewPasswordeld,retypethepasswordandpressEnter.
Attention:Y oumightwanttorecordyourpasswordandstoreitinasafeplace.Otherwise,ifyou
forgetit,youhavetotakeyourcomputertoaLenovoreselleroramarketingrepresentativetohave
thepasswordcanceled.
10.IntheSetupNoticewindowthatisdisplayed,pressEntertocontinue.
11.PressFn+F10.TheSetupConrmationwindowopens.SelectYestosavecongurationchanges
andexit.
Changingorremovingthepower-onpassword
Tochangethepower-onpassword,followsteps1through7.Enteryourcurrentpassword.WhentheEnter
NewPasswordeldisdisplayed,typeanewpasswordintheeldandthenretypeittoverify.Toremove
thepassword,followsteps1through7.Typeyourcurrentpassword.WhentheEnterNewPasswordeld
isdisplayed,leaveitblankandpressEntertwice.
Harddiskpasswords
Twotypesofharddiskpasswordshelpprotecttheinformationstoredontheharddiskdrive:
•Userharddiskpassword
•Masterharddiskpassword,whichrequiresauserharddiskpassword
Ifauserharddiskpasswordhasbeenset,butnomasterharddiskpasswordhasbeen,theusermustenter
theuserharddiskpasswordinordertogainaccesstolesandapplicationsontheharddiskdrive.
38UserGuide
Page 53

Themasterpasswordcanbesetandusedonlybyasystemadministrator.Likeamasterkey,itenablesthe
administratortogetaccesstoanyharddiskdriveinasystem.Theadministratorsetsthemasterpassword;
nooneelseknowsit.Thentheadministratorsetsauserpasswordforeachcomputerinthenetwork,and
tellseachuserthepasswordforhisorhercomputer.Theusercanthenchangetheuserpasswordas
desired,buttheadministratorstillcangetaccessbyusingthemasterpassword.
Note:Whenamasterharddiskpasswordisset,onlytheadministratorcanremovetheuserharddisk
password.
Settingaharddiskpassword
1.Printtheseinstructions.
2.Saveallopenles,andexitallapplications.
3.T urnyourcomputeroffandthenonagain.
4.Whenthelogoscreenisdisplayed,pressF1.TheThinkPadSetupprogrammainmenuopens.
5.SelectSecurity,usingthecursordirectionalkeystomovedownthemenu.
6.SelectPassword.
7.SelectHardDisk1Password.
8.Apasswordwindowopens.YouarepromptedtoselectUserorUser+Master.SelectUserifyouwant
tosetonlyoneharddiskpassword.Ifyouareanadministratororsupervisor,youcanselectUser+
Mastertosettwopasswords.(Theusercanchangetheuserpasswordlater.)
•IfyouselectUser+Master,dothefollowing:
a.Whenawindowfortypingthenewuserharddiskpasswordopens,typeyournewpasswordin
theEnterNewPasswordeld.PressEnter.
b.IntheConrmNewPasswordeld,retypethepasswordyoujustenteredtoverifyit.PressEnter.
c.Amessagewindowopensandpromptsyoutosetthemasterharddiskpassword.PressEnterto
continue.
d.Awindowfortypingthenewmasterharddiskpasswordopens.Typeyournewpasswordin
theEnterNewPasswordeld.PressEnter.
e.IntheConrmNewPasswordeld,retypethepasswordyoujustenteredtoverifyit.PressEnter.
•IfyouselectUseronly,dothefollowing:
a.Whenawindowfortypingthenewpasswordopens,typeyournewpasswordintheEnterNew
Passwordeld.PressEnter.
Notes:
–YoucansettheminimumlengthofaharddiskpasswordthroughtheSecuritymenu.
–Ifyousetaharddiskpasswordofoversevencharacters,theharddiskdrivecanbeusedonly
withacomputerthatcanrecognizeaharddiskpasswordofoversevencharacters.Ifyouthen
installtheharddiskdriveinacomputerthatcannotrecognizeaharddiskpasswordthat
containsmorethansevencharacters,youcannotgetaccesstothedrive.
b.IntheConrmNewPasswordeld,retypethepasswordyoujustenteredtoverifyit.PressEnter.
Attention:Y oumightwanttorecordyourpasswordandstoreitinasafeplace.Otherwise,ifyou
forgettheuserpassword,orbothuserandmasterpasswords,Lenovocannotresetyourpasswordsor
recoverdatafromtheharddiskdrive.YoumusttakeyourcomputertoaLenovoreselleroramarketing
representativetohavetheharddiskdrivereplaced.Proofofpurchaseisrequired,andafeewillbe
chargedforpartsandservice.
9.IntheSetupNoticewindowthatisdisplayed,pressEntertocontinue.
Chapter4.Security39
Page 54

10.PressFn+F10.TheSetupConrmationwindowopens.SelectYestosavecongurationchanges
andexit.
Thenexttimeyouturnonyourcomputer,youwillhavetotypetheuserormasterharddiskpasswordin
ordertostartyourcomputerandgetaccesstoyouroperatingsystem.
Changingorremovingaharddiskpassword
Followsteps1through7in“Settingaharddiskpassword”onpage39,typingyourpasswordtogetaccess
totheThinkPadSetupprogram.
Tochangeorremovetheuserharddiskpassword,dothefollowing:
•Tochangetheharddiskpassword,typethecurrentpasswordintheEnterCurrentPasswordeld.Then
typethenewpasswordintheEnterNewPasswordeld,andretypethepasswordyoujustenteredto
verifyitintheConrmNewPasswordeld.PressEnter,andaSetupNoticewindowisdisplayed.Press
EntertoexitfromtheSetupNoticewindow.Theuserharddiskpasswordwillbechanged.
•Toremovetheharddiskpassword,typethecurrentpasswordintheEnterCurrentPasswordeld.Then
leavetheEnterNewPasswordandConrmNewPasswordeldsblank,andpressEnter.ASetup
Noticewindowisdisplayed.PressEntertoexitfromtheSetupNoticewindow.Theuserharddisk
passwordwillberemoved.
TochangeorremovetheUser+Masterharddiskpasswords,selectUserHDPorMasterHDP.
IfyouchooseUserHDP,dothefollowing:
•Tochangetheuserharddiskpassword,typethecurrentuserharddiskpasswordorthecurrentmaster
harddiskpasswordintheEnterCurrentPasswordeld.Thentypethenewuserharddiskpasswordin
theEnterNewPasswordeld,andretypethepasswordyoujustenteredtoverifyitintheConrmNew
Passwordeld.PressEnter,andaSetupNoticewindowisdisplayed.PressEntertoexitfromtheSetup
Noticewindow.Theuserharddiskpasswordischanged.
•Toremovetheuserharddiskpassword,typethecurrentmasterharddiskpasswordintheEnterCurrent
Passwordeld.ThenleavetheEnterNewPasswordandConrmNewPasswordeldsblank,and
pressEnter.ASetupNoticewindowisdisplayed.PressEntertoexitfromtheSetupNoticewindow.
Theuserharddiskpasswordwillberemoved.
IfyouchooseMasterHDP,dothefollowing:
•Tochangethemasterharddiskpassword,typethecurrentmasterharddiskpasswordintheEnter
CurrentPasswordeld.ThentypethenewmasterharddiskpasswordintheEnterNewPassword
eld,andretypethepasswordyoujustenteredtoverifyitintheConrmNewPasswordeld.Press
Enter,andaSetupNoticewindowisdisplayed.PressEntertoexitfromtheSetupNoticewindow.The
masterharddiskpasswordischanged.
•Toremovethemasterharddiskpassword,typethecurrentmasterharddiskpasswordintheEnter
CurrentPasswordeld.ThenleavetheEnterNewPasswordandConrmNewPasswordeldsblank,
andpressEnter.ASetupNoticewindowisdisplayed.PressEntertoexitfromtheSetupNoticewindow.
Boththeuserandmasterharddiskpasswordswillberemoved.
Supervisorpassword
ThesupervisorpasswordprotectsthesysteminformationstoredinThinkPadSetup.Withoutit,noonecan
changethecongurationofthecomputer.Itprovidesthefollowingsecurityfeatures:
•Ifasupervisorpasswordisset,apasswordpromptisdisplayedwhenyoutrytostarttheThinkPadSetup
program.Unauthorizeduserscannotgetaccesstocongurationdata.
40UserGuide
Page 55

•Thesystemadministratorcanusethesupervisorpasswordtogetaccesstoacomputereveniftheuserof
thatcomputerhassetapower-onpassword.Thesupervisorpasswordoverridesthepower-onpassword.
•Ifbothasupervisorpasswordandapower-onpasswordareset,youcandothefollowingonlyifyou
havethesupervisorpassword:
–Deletingthepower-onpassword
–Changingordeletingthesupervisorpassword
–EnablingordisablingtheWakeonLANfeature
–EnablingordisablingtheInternalNetworkOptionROMfeature
–Changingdateandtime
–EnablingordisablingtheLockUEFIBIOSSettingsfeature
–EnablingordisablingthePasswordatunattendedbootfeature
–Specifyingtheminimumlengthforpower-onpasswordsandharddiskpasswords
–Changingthesettingforthesecuritychip
–EnablingordisablingtheBootDeviceListF12Optionfeature
–EnablingordisablingtheBootOrderLockfeature
–EnablingordisablingtheFlashBIOSUpdatingbyEnd-Usersfeature
–Enablingordisablingtheinternalnetworkdevice
–Enablingordisablingtheinternalwirelessdevice
–EnablingordisablingtheinternalBluetoothdevice
–EnablingordisablingtheinternalwirelessWANdevice
–EnablingordisablingtheSecuritymode
Notes:
•ThesystemadministratorcansetthesamesupervisorpasswordonmanyThinkPadnotebookcomputers
tomakeadministrationeasier.
•ByenablingtheLockUEFIBIOSSettingsfeatureonthePasswordmenuwhenyousetthesupervisor
password,youmakeitimpossibleforanyonebutyoutomakechanges.
Setting,changing,orremovingasupervisorpassword
Onlyasystemadministratorcanset,change,orremoveasupervisorpassword.
Toset,change,orremoveasupervisorpassword,dothefollowing:
1.Printtheseinstructions.
2.Saveallopenles,andexitallapplications.
3.T urnyourcomputeroffandthenturnitonagain.
4.Whenthelogoscreenisdisplayed,pressF1.TheThinkPadSetupprogrammainmenuopens.
5.SelectSecurity,usingthecursordirectionalkeystomovedownthemenu.
6.SelectPassword.
7.SelectSupervisorPassword.
8.Awindowopens,promptingyoutoenteranewpassword.Dependingonyourneeds,dooneofthe
following:
•Tosetapassword,dothefollowing:
a.IntheEnterNewPasswordeld,typeadesiredpasswordandpressEnter.
Chapter4.Security41
Page 56

b.IntheConrmNewPasswordeld,retypethepasswordandpressEnter.
•Tochangeapassword,dothefollowing:
a.IntheEnterCurrentPasswordeld,typethecurrentsupervisorpasswordandpressEnter.
b.IntheEnterNewPasswordeld,typethenewsupervisorpassword;thenretypethepassword
youjustenteredtoverifyitintheConrmNewPasswordeld.PressEnter.
•Toremoveapassword,dothefollowing:
a.IntheEnterCurrentPasswordeld,typethecurrentsupervisorpasswordandpressEnter.
b.LeavetheEnterNewPasswordandConrmNewPasswordeldsblank.PressEnter.
Attention:Youmightwanttorecordyourpasswordandstoreitinasafeplace.Ifyouforgetyour
supervisorpassword,Lenovocannotresetyourpassword.YoumusttakeyourcomputertoaLenovo
reselleroraLenovomarketingrepresentativetohavethesystemboardreplaced.Proofofpurchaseis
required,andafeewillbechargedforpartsandservice.
9.IntheSetupNoticewindowthatisdisplayed,pressEntertocontinue.
10.PressFn+F10.TheSetupConrmationwindowopens.SelectYestosavecongurationchanges
andexit.
ThenexttimeyouopentheThinkPadSetupprogram,youwillbepromptedtotypeyourpasswordtoproceed.
Harddisksecurity
Toprotectpasswordsfromunauthorizedsecurityattacks,severalofthelatesttechnologiesandalgorithms
areintegratedintoUEFIBIOSandhardwaredesignofThinkPadnotebookcomputers.
Tomaximizesecurity,dothefollowing:
•Setapower-onpasswordaswellasaharddiskpasswordforyourinternalsolid-statedriveorharddisk
drive.Refertotheproceduresin“Power-onpassword”onpage38
.Forsecurity,alongerpasswordisrecommended.
38
•ToprovidereliablesecurityforUEFIBIOS,usethesecuritychipandasecurityapplicationwithaTrusted
PlatformModule(TPM)managementfeature.Referto“Settingthesecuritychip”onpage43.
•Ifaharddiskdriveorsolid-statedrivewithencryptiontechnologyisinstalledonyourcomputer,besure
toprotectthecontentsofyourcomputermemoryfromunauthorizedaccessbyuseofdriveencryption
software,suchasMicrosoftWindowsBitLocker
DriveEncryption”onpage42
•Beforeyoudisposeof,sell,orhandoveryourcomputer,besuretodeletedatastoredonit.Referto
“Noticeondeletingdatafromyourharddiskdriveorsolid-statedrive”onpage44.
Note:TheharddiskdrivebuiltintoyourcomputercanbeprotectedbyUEFIBIOS.
UsingWindowsBitLockerDriveEncryption
Tohelpprotectyourcomputeragainstunauthorizedaccess,besuretousedriveencryptionsoftware,such
asWindowsBitLockerDriveEncryption.
WindowsBitLockerDriveEncryptionisanintegralsecurityfeatureofWindows8.ItissupportedinthePro
andEnterpriseeditionsoftheWindows8operatingsystem.Itcanhelpyouprotecttheoperatingsystem
anddatastoredonyourcomputer,evenifyourcomputerislostorstolen.BitLockerworksbyencrypting
alluserandsystemles,includingtheswaples.
.
®
DriveEncryption.See“UsingWindowsBitLocker
and“Harddiskpasswords”onpage
BitLockerusesaTrustedPlatformModuletoprovideenhancedprotectionforyourdataandtoensureearly
bootcomponentintegrity.AcompatibleTPMisdenedasaV1.2TPM.
42UserGuide
Page 57

TochecktheBitLockerstatusontheWindows8operatingsystem,dothefollowing:
1.Movethecursortothetop-rightorbottom-rightcornerofthescreentodisplaythecharms.Click
Settings➙ControlPanel.
2.ClickSystemandSecurity➙BitLockerDriveEncryption.
FordetailsaboutWindowsBitLockerDriveEncryption,seetheWindows8HelpandSupportprogram,or
searchfor“MicrosoftWindowsBitLockerDriveEncryptionStep-by-StepGuide”ontheMicrosoftWebsite.
DiskEncryptionharddiskdriveandEncryptionsolid-statedrive
SomemodelscontaintheDiskEncryptionharddiskdriveorEncryptionsolid-statedrive.Thisfeature
helpstoprotectyourcomputeragainstsecurityattacksonmedia,NANDashordevicecontrollersbyuse
ofahardwareencryptionchip.Fortheefcientuseoftheencryptionfeature,besuretosetaharddisk
passwordfortheinternalstoragedevice.
Settingthesecuritychip
Strictsecurityrequirementsareimposedonnetworkclientcomputersthattransfercondentialinformation
electronically.Dependingontheoptionsyouordered,yourcomputermighthaveanembeddedsecurity
chip,acryptographicmicroprocessor.Withthesecuritychip,youcandothefollowing:
•Protectyourdataandsystem
•Strengthenaccesscontrols
•Securecommunications
Settingthesecuritychip
ThechoicesofferedontheSecurityChipsubmenuundertheSecuritymenuofThinkPadSetupareas
follows:
•SecurityChip:activate,inactivate,ordisablethesecuritychip.
•SecurityReportingOptions:enableordisableeachsecurityreportingoption.
•ClearSecurityChip:cleartheencryptionkey.
Notes:
1.EnsurethatthesupervisorpasswordhasbeensetinThinkPadSetup.Otherwiseanyonecanchange
thesettingsforthesecuritychip.
2.Ifthesecuritychipisremovedorreplaced,oranewonehasbeenadded,thecomputerwillnotstart.
Youwillhearfourcyclesoffourbeepseach.
3.Ifthesecuritychipisinactiveordisabled,theClearSecurityChipoptionwillnotbedisplayed.
4.Whenyouclearthesecuritychip,besuretoturnyourcomputeroffandthenturnitonagainafteryou
setthesecuritychiptoActive.Otherwise,theClearSecurityChipoptionisnotdisplayed.
TosetanitemontheSecurityChipsubmenu,dothefollowing:
1.Printtheseinstructions.
2.Saveallopenles,andexitallapplications.
3.T urnyourcomputeroffandthenturnitonagain.
4.Whenthelogoscreenisdisplayed,pressF1.TheThinkPadSetupprogrammainmenuopens.
5.Usingthecursorkeys,movetoSecurity.TheSecuritymenuopens.
6.Usingthecursorkeys,movetoSecurityChip,andpressEnter.TheSecurityChipsubmenuopens.
7.Usingthecursorkeys,movetoanitemyouwanttoset.Whentheitemishighlighted,pressEnter.
Chapter4.Security43
Page 58

8.Setotheritemsthatyouwanttoset.
9.PressFn+F10tosavechangesandexit.
10.PressEnterintheSetupConrmationwindowtoconrmtheexit.
Noticeondeletingdatafromyourharddiskdriveorsolid-statedrive
Ascomputersspreadintoeverycorneroflife,theyprocessmoreandmoreinformation.Thedataonyour
computer,someofwhichmightbesensitive,isstoredonaharddiskdriveorsolid-statedrive.Beforeyou
disposeof,sell,orhandoveryourcomputer,besuretodeletedatastoredonit.
Handingyourcomputerovertosomeoneelsewithoutdeletingtheloadedsoftware,suchasoperating
systemsandapplicationsoftware,mightevenviolatelicenseagreements.Y ouareadvisedtocheckthe
termsandconditionsofthoselicenseagreements.
Therearemethodsthatseemtodeletethedata:
•Movethedatatotherecyclebin,andthenclickEmptyrecyclebin.
•UsetheDeleteoption.
•Formatyourharddiskdriveorsolid-statedrive,usingthesoftwareforinitializingit.
•Usingtherecoveryprogramonyourcomputer,bringtheharddiskdriveorsolid-statedrivebackto
thefactorydefaultsettings.
Theseoperations,however,onlychangetheleallocationofthedata;theydonotdeletethedataitself.In
otherwords,thedataretrievalprocessingisdisabledunderanoperatingsystemsuchasWindows.The
dataisstillthere,eventhoughitseemstobelost.Thus,itissometimespossibletoreadthedatabyuseof
specialsoftwarefordatarecovery.Thereisariskthatpeopleofbadfaithmightreadandmisusethecritical
dataonharddiskdrivesorsolid-statedrivesforunexpectedpurposes.
Topreventleakageofdata,itbecomesveryimportantthatyoutakeresponsibilityfordeletingallthedata
fromtheharddiskdriveorsolid-statedrivewhenyoudisposeof,sell,orhandoveryourcomputer.Y ou
candestroythedataphysicallybysmashingtheharddiskdriveorsolid-statedrivewithahammer,or
magneticallybymeansofstrongmagneticpower,thusmakingthedataunreadable.Butwerecommend
thatyoumakeuseofthesoftware(payware)orservice(payservice)specicallydevelopedforthepurpose.
Fordisposingofdataontheharddiskdriveorsolid-statedrive,LenovoprovidestheSecureDataDisposal
tool.Todownloadtheapplication,goto:
http://www.lenovo.com/support
Note:Runningeitherapplicationwilltakeacoupleofhours.
Usingrewalls
Ifyoursystemispreinstalledwitharewallprogram,itprotectsagainstcomputerInternetsecuritythreats,
unauthorizedaccesses,intrusions,andInternetattacks.Italsoprotectsyourprivacy.
Formoreinformationabouthowtousetherewallprogram,refertothehelpinformationsystemthat
comeswiththeprogram.
Protectingdataagainstviruses
Yourcomputerispreinstalledwithanantivirusprogramsoyoucandetectandeliminateviruses.The
antivirusprogramisdesignedtohelpyoudetectandeliminateviruses.
44UserGuide
Page 59

Lenovoprovidesafullversionofantivirussoftwareonyourcomputerwithafree30-daysubscription.After
30days,youmustrenewthelicensetocontinuereceivingtheantivirussoftwareupdates.
Formoreinformationabouthowtouseyourantivirussoftware,refertothehelpinformationsystemof
yourantivirussoftware.
Chapter4.Security45
Page 60

46UserGuide
Page 61

Chapter5.Recoveryoverview
Thissectionprovidesinformationabouttherecoverysolutionsprovidedonyourcomputer.
Refreshingyourcomputer
Ifyourcomputerdoesnotperformwellandtheproblemmightbecausedbyarecentlyinstalledprogram,
youcanrefreshyourcomputerwithoutlosingyourpersonallesorchangingyoursettings.
Attention:Ifyourefreshyourcomputer,theprogramsthatcamewithyourcomputerandtheprogramsthat
youinstalledfromWindowsStorewillbereinstalled,butallotherprogramswillberemoved.
Torefreshyourcomputer,dothefollowing:
1.Movethecursortothetop-rightorbottom-rightcornerofthescreentodisplaythecharms.Click
Settings➙ChangePCsettings➙General.
2.IntheRefreshyourPCwithoutaffectingyourlessection,clickGetstarted.
Resettingyourcomputertothefactorydefaultsettings
Youcanresetyourcomputertothefactorydefaultsettings.Resettingthecomputerwillreinstallthe
operatingsystem,andreinstallalltheprogramsandsettingsthatcamewithyourcomputer.
Attention:Ifyouresetyourcomputer,allyourpersonallesandsettingswillbedeleted.Toavoiddataloss,
makeabackupcopyofallthedatathatyouwanttokeep.
Toresetyourcomputer,dothefollowing:
1.Movethecursortothetop-rightorbottom-rightcornerofthescreentodisplaythecharms.Click
Settings➙ChangePCsettings➙General.
2.IntheRemoveeverythingandreinstallWindowssection,clickGetstarted.
Advancedstartupoptions
AdvancedstartupoptionsenableyoutochangethestartupsettingsofyourWindowsoperatingsystem,
startthecomputerfromanexternaldevice,orrestoretheWindowsoperatingsystemfromasystemimage.
Tousetheadvancedstartupoptions,dothefollowing:
1.Movethecursortothetop-rightorbottom-rightcornerofthescreentodisplaythecharms.Click
Settings➙ChangePCsettings➙General.
2.IntheAdvancedstartupsection,clickRestartnow➙Troubleshoot➙Advancedoptions.
3.Restartyourcomputerfollowingtheinstructionsonthescreen.
Formoredetailsabouttherecoverysolutions,refertothehelpinformationsystemoftheWindows8
operatingsystem.
©CopyrightLenovo2012
47
Page 62

48UserGuide
Page 63

Chapter6.Replacingdevices
Thischapterprovidesinstructionsonhowtoinstallorreplacehardwareforyourcomputer.
•“Staticelectricityprevention”onpage49
•“Disablingthebuilt-inbattery”onpage49
•“ReplacingtheSIMcard”onpage49
•“Replacingtheharddiskdriveorsolid-statedrive”onpage51
•“Replacingthekeyboard”onpage53
•“ReplacingaMiniPCIExpressCardforwirelessLANconnection”onpage57
•“InstallingorreplacingthewirelessWANcard”onpage60
Staticelectricityprevention
Staticelectricity,althoughharmlesstoyou,canseriouslydamagecomputercomponentsandoptions.
Improperhandlingofstatic-sensitivepartscancausedamagetothepart.Whenyouunpackanoptionor
aCRU,donotopenthestatic-protectivepackagecontainingthepartuntiltheinstructionsdirectyou
toinstallit.
WhenyouhandleoptionsorCRUs,orperformanyworkinsidethecomputer,takethefollowingprecautions
toavoidstatic-electricitydamage:
•Limityourmovement.Movementcancausestaticelectricitytobuilduparoundyou.
•Alwayshandlecomponentscarefully.Handleadapters,memorymodules,andothercircuitboardsbythe
edges.Nevertouchexposedcircuitry.
•Preventothersfromtouchingcomponents.
•Whenyouinstallastatic-sensitiveoptionorCRU,touchthestatic-protectivepackagecontainingthe
parttoametalexpansion-slotcoverorotherunpaintedmetalsurfaceonthecomputerforatleasttwo
seconds.Thisreducesstaticelectricityinthepackageandyourbody.
•Whenpossible,removethestatic-sensitivepartfromthestatic-protectivepackagingandinstallthepart
withoutsettingitdown.Whenthisisnotpossible,placethestatic-protectivepackagingonasmooth,
levelsurfaceandplacethepartonit.
•Donotplacethepartonthecomputercoverorothermetalsurface.
Disablingthebuilt-inbattery
BeforereplacinganyCRU,ensurethatyouhavedisabledthebuilt-inbatterybydoingthefollowing:
1.T urnoffyourcomputeranddisconnecttheacpoweradapterandallcablesfromthecomputer.
2.T urnonyourcomputer.WhentheThinkPadlogoisdisplayed,pressF1toenterThinkPadSetup.
3.SelectCong➙Power.ThePowersubmenuisdisplayed.
4.SelectDisableBuilt-inBattery.
5.ClickY esintheSetupWarningwindow,thenthecomputerwillbeturnedoffautomatically.Waitthreeto
veminutestoletthecomputercool.
ReplacingtheSIMcard
Beforeyoustart,printtheseinstructions.
©CopyrightLenovo2012
49
Page 64
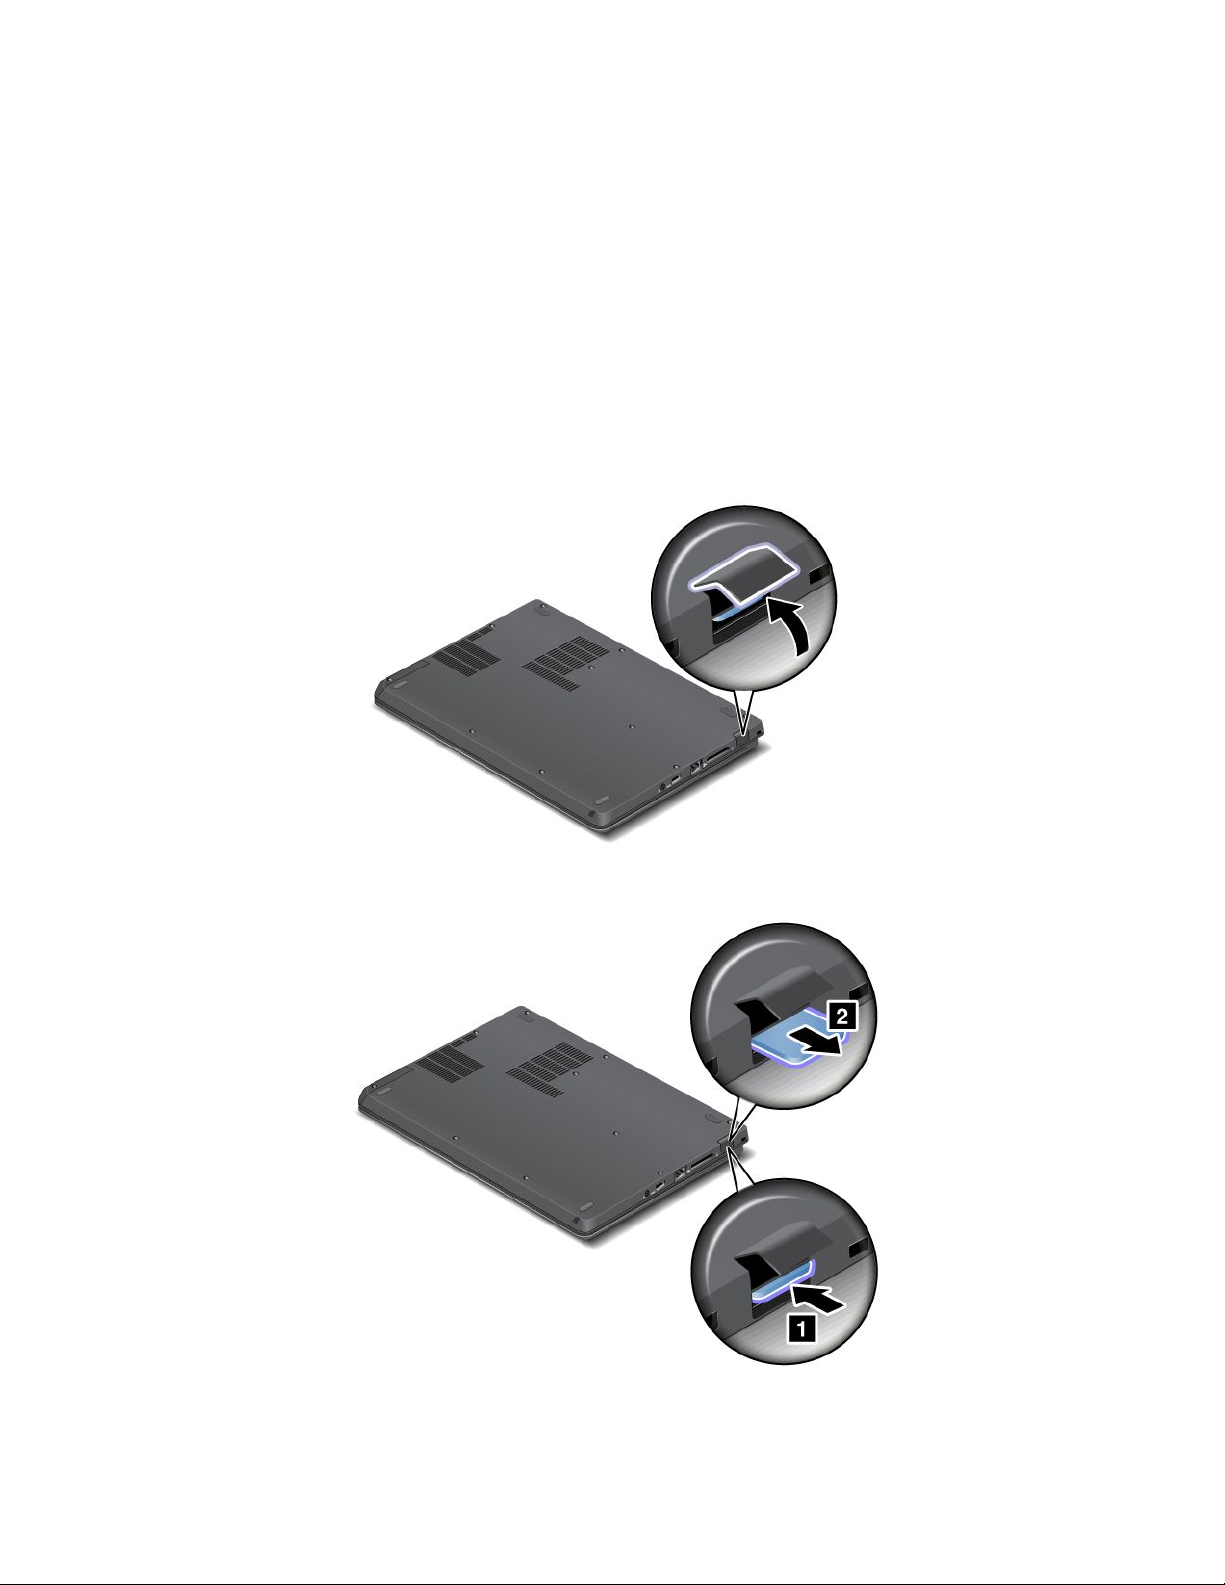
YourcomputermightrequireaSIMcardtoestablishwirelessWANconnections.Dependingonthecountry
ofdelivery,youmightneedtopurchaseaSIMcard,oraSIMcardmightalreadybeinstalledinyour
computer,ortheSIMcardispartoftheshippingcontentsthatcomewithyourcomputer.
IfyoundaSIMcardincludedintheshippingcontents,adummycardisinstalledintheSIMcardslot.Then
proceedwiththefollowinginstructions.
Note:TheSIMcardisidentiedbytheICchipmountedononesideofthecard.
ToreplacetheSIMcard,dothefollowing:
1.Disablethebuilt-inbattery.See“Disablingthebuilt-inbattery”onpage49.
2.Closethecomputerdisplay,andturnitover.
3.LocatetheSIMcarddoorattherearofthecomputer.GentlypivottheSIMcarddoorupwards.
4.Gentlypushthecardtoremoveitfromthecomputer.
50UserGuide
Page 65

5.Holdthenewcardwiththemetalcontactfacingdownwards.Then,insertthecardrmlyintotheslot
untilyouhearaclick.
6.ClosetheSIMcarddooruntilitsnapsintoposition.
7.T urnthecomputeroveragain.Connecttheacpoweradapterandallcables.
Replacingtheharddiskdriveorsolid-statedrive
Beforeyoustart,printtheseinstructions.
Attention:Theharddiskdriveisverysensitive.Incorrecthandlingcancausedamageandpermanentloss
ofdata.Observethefollowingguidelines:
•Replacetheharddiskdriveorsolid-statedriveonlyifyouupgradeitorhaveitrepaired.Theconnectors
andslotoftheharddiskdriveorsolid-statedrivearenotdesignedforfrequentchanges,ordrive
swapping.
•Donotdroptheharddiskdriveorsolid-statedriveorsubjectittophysicalshocks.Puttheharddiskdrive
orsolid-statedriveonamaterial,suchassoftcloth,thatabsorbsanyphysicalshocks.
•Donotapplypressuretothecoveroftheharddiskdriveorsolid-statedrive.
•Donottouchtheconnector.
Chapter6.Replacingdevices51
Page 66

•Beforeremovingtheharddiskdriveorsolid-statedrive,makeabackupcopyofalltheinformation
onit,andthenturnthecomputeroff.
•Neverremovetheharddiskdriveorsolid-statedrivewhilethecomputerisoperating,insleepmode.
Toreplacetheharddiskdriveorsolid-statedrive,dothefollowing:
1.Disablethebuilt-inbattery.See“Disablingthebuilt-inbattery”onpage49.
2.Closethecomputerdisplay,andturnthecomputerover.
3.Loosenthescrew1thatsecurestheharddiskdriveslotcover,thenremovetheharddiskdriveslot
cover.
4.Removetheharddiskdriveorsolid-statedrivebypullingoutthetab.
52UserGuide
Page 67

5.Insertthenewharddiskdriveorsolid-statedriveintotheslotandslidetheharddiskdriveorsolid-state
drivermlyintoplace.
6.Reinstalltheharddiskdriveorsolid-statedrivedoor1.Thentightenthescrew2.
7.T urnthecomputeroveragain.Connecttheacpoweradapterandallcables.
Replacingthekeyboard
Beforeyoustart,printtheseinstructions.
DANGER
Duringelectricalstorms,donotconnectthecabletoordisconnectitfromthetelephoneoutlet
onthewall.
DANGER
Electriccurrentfrompower,telephone,andcommunicationcablesishazardous.Toavoidshock
hazard,disconnectthecablesbeforeopeningthecoverofthisslot.
Chapter6.Replacingdevices53
Page 68

Toremovethekeyboard,dothefollowing:
1.Disablethebuilt-inbattery.See“Disablingthebuilt-inbattery”onpage49.
2.Closethecomputerdisplay,andturnthecomputerover.
3.Removethetwoscrewsthatsecurethekeyboardatthebottom.
4.T urnthecomputeroverandopenthedisplay.
5.Pushhardinthedirectionshownbythearrows1tounlatchthefrontsideofthekeyboard.The
keyboardwillbedetachedslightly.
Note:Yourcomputerkeyboardmightlookdifferentfromtheillustrationabove.
54UserGuide
Page 69
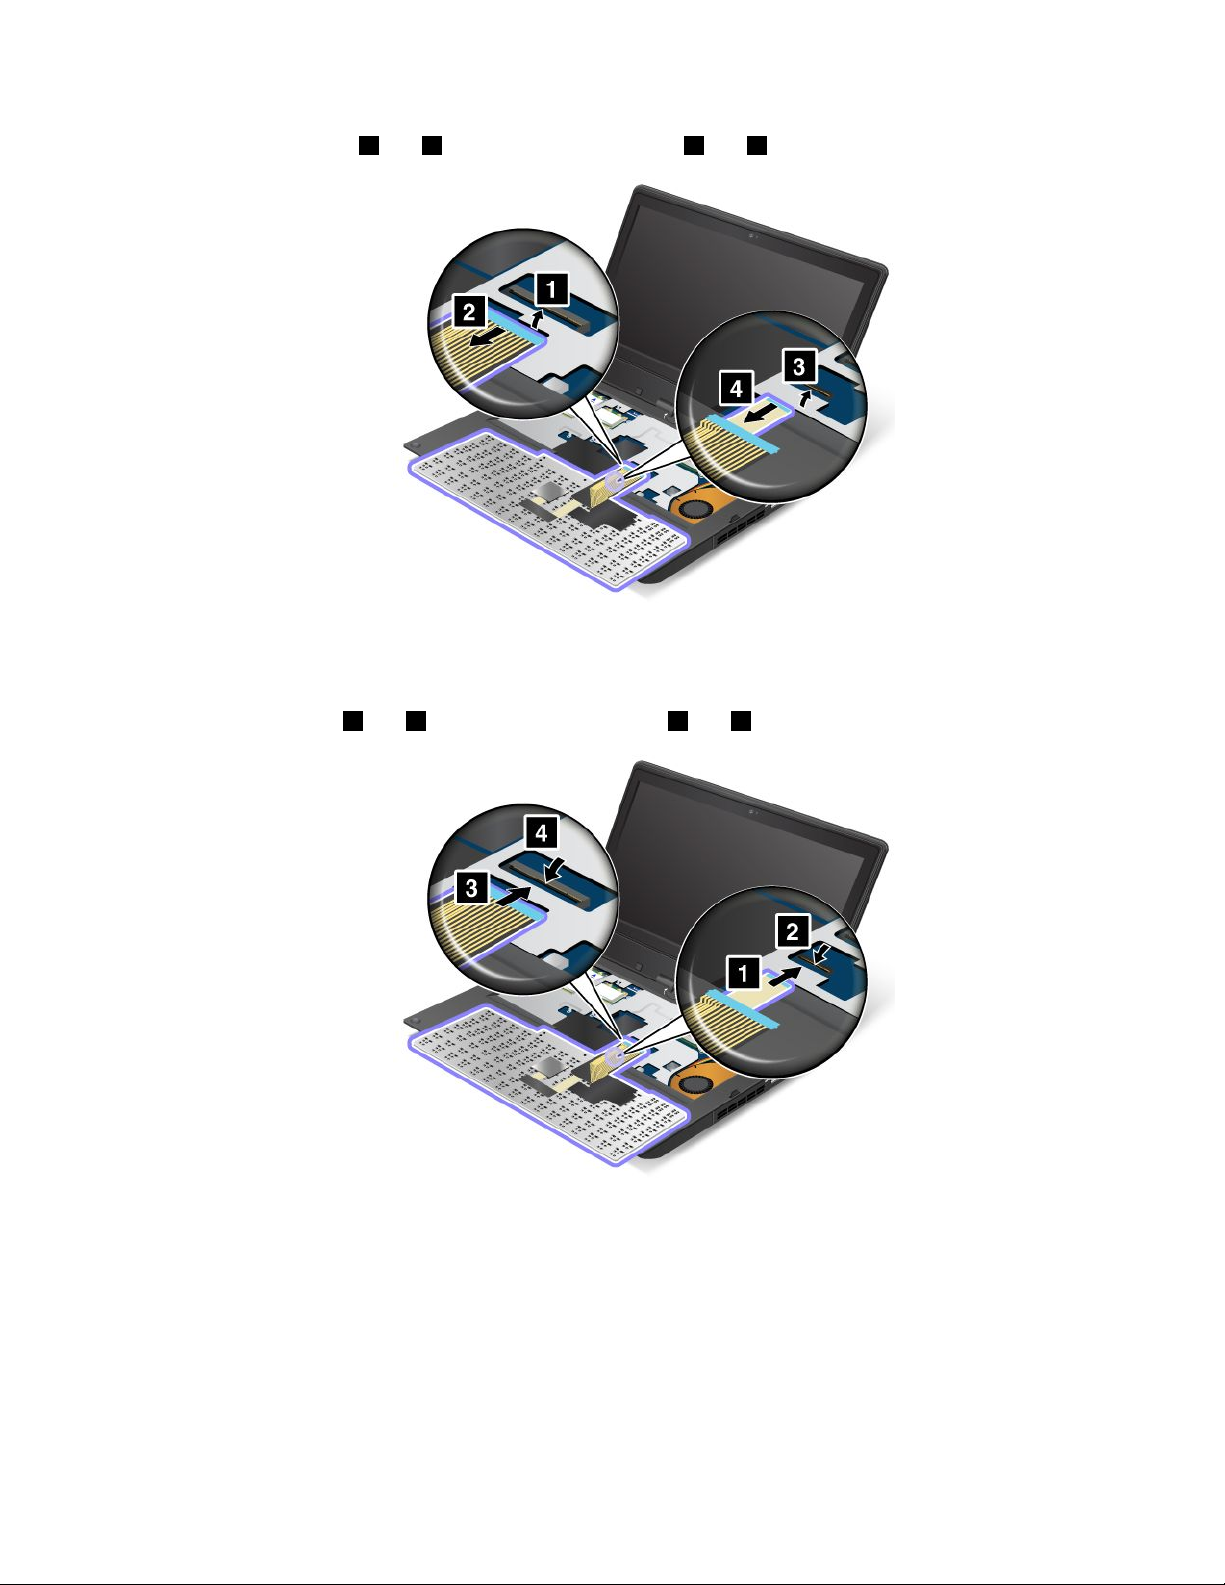
6.Removethecables2and4byippingtheconnectors1and3upwards.
Note:Yourcomputerkeyboardmightlookdifferentfromtheillustrationabove.
Toinstallthekeyboard,dothefollowing:
1.Attachthecables1and3byippingtheconnectors2and4downwards.
Note:Yourcomputerkeyboardmightlookdifferentfromtheillustrationabove.
Chapter6.Replacingdevices55
Page 70

2.Insertthekeyboard.Ensurethatthefrontedgeofthekeyboardisundertheframe.
Note:Yourcomputerkeyboardmightlookdifferentfromtheillustrationabove.
3.Slidethekeyboardintoplaceinthedirectionshownbythearrows.
Note:Yourcomputerkeyboardmightlookdifferentfromtheillustrationabove.
56UserGuide
Page 71

4.Closethecomputerdisplayandturnthecomputerover.Reinstallthetwoscrewsatthebottom.
5.T urnthecomputeroveragain.Connecttheacpoweradapterandallcables.
ReplacingaMiniPCIExpressCardforwirelessLANconnection
Beforeyoustart,printtheseinstructions.
DANGER
Duringelectricalstorms,donotconnectthecabletoordisconnectitfromthetelephoneoutlet
onthewall.
DANGER
Electriccurrentfrompower,telephone,andcommunicationcablesishazardous.Toavoidshock
hazard,disconnectthecablesbeforeopeningthecoverofthisslot.
Attention:BeforeyoustartinstallingaMiniPCIExpressCard,touchametaltableoragroundedmetal
object.Thisactionreducesanystaticelectricityfromyourbody.Thestaticelectricitycoulddamagethecard.
ToreplacethewiressLANcard,dothefollowing:
1.Disablethebuilt-inbattery.See“Disablingthebuilt-inbattery”onpage49.
2.Closethecomputerdisplay,andturnthecomputerover.
3.Removethekeyboard.See“Replacingthekeyboard”onpage53.
Chapter6.Replacingdevices57
Page 72

4.Ifatoolforremovingconnectorsisincludedinthepackagewiththenewcard,useittodisconnectthe
cablesfromthecard.Ifnosuchtoolisincluded,disconnectthecablesbypickinguptheconnectors
withyourngersandgentlyunpluggingthem.
5.Removethescrew.Thecardpopsup.
58UserGuide
Page 73

6.Removethecard.
7.AlignthecontactedgeofthenewPCIExpressMiniCardwiththecorrespondingsocket.
Chapter6.Replacingdevices59
Page 74

8.Pivotthecarduntilitsnapsintoplace1.Securethecardwiththescrew2.
9.ConnecttheantennacablestothenewPCIExpressMiniCardasshowninthefollowinggure.Besure
toattachthegraycabletotheconnectormarked“MAIN”or“M”onthecard,andtheblackcableto
theconnectormarked“AUX”or“A”.
10.Reinstallthekeyboard.See“Replacingthekeyboard”onpage53.
11.T urnthecomputeroveragain.Connecttheacpoweradapterandallcables.
InstallingorreplacingthewirelessWANcard
Beforeyoustart,printtheseinstructions.
Dependingonmodels,yourcomputermighthaveawirelessWANcardinstalledintheMiniPCIExpressCard
slot.Toinstallorreplaceit,readthefollowinginstructions.
PrerequisitesforreplacingorinstallingawirelessWANcard
DANGER
Duringelectricalstorms,donotconnectthecabletoordisconnectitfromthetelephoneoutlet
onthewall.
60UserGuide
Page 75

DANGER
Electriccurrentfrompower,telephone,andcommunicationcablesishazardous.Toavoidshock
hazard,disconnectthecablesbeforeopeningthecoverofthisslot.
Attention:BeforeyoustartinstallingaMiniPCIExpressCard,touchametaltableoragroundedmetal
object.Thisactionreducesanystaticelectricityfromyourbody.Thestaticelectricitycoulddamagethecard.
ToinstallorreplacethewirelessWANcard,dothefollowing:
1.Disablethebuilt-inbattery.See“Disablingthebuilt-inbattery”onpage49.
2.Closethecomputerdisplay,andturnthecomputerover.
3.Removethekeyboard.See“Replacingthekeyboard”onpage53.
4.Ifatoolforremovingconnectorsisincludedinthepackagewiththenewcard,useittodisconnectthe
cablesfromthecard.Ifnosuchtoolisincluded,disconnectthecablesbypickinguptheconnectors
withyourngersandgentlyunpluggingthem.
Note:Dependingonthesystemcongurationofyourcomputer,thecardmighthaveonlyoneconnector.
5.Removethescrew.Thecardwiththebracketpopsup.
Chapter6.Replacingdevices61
Page 76
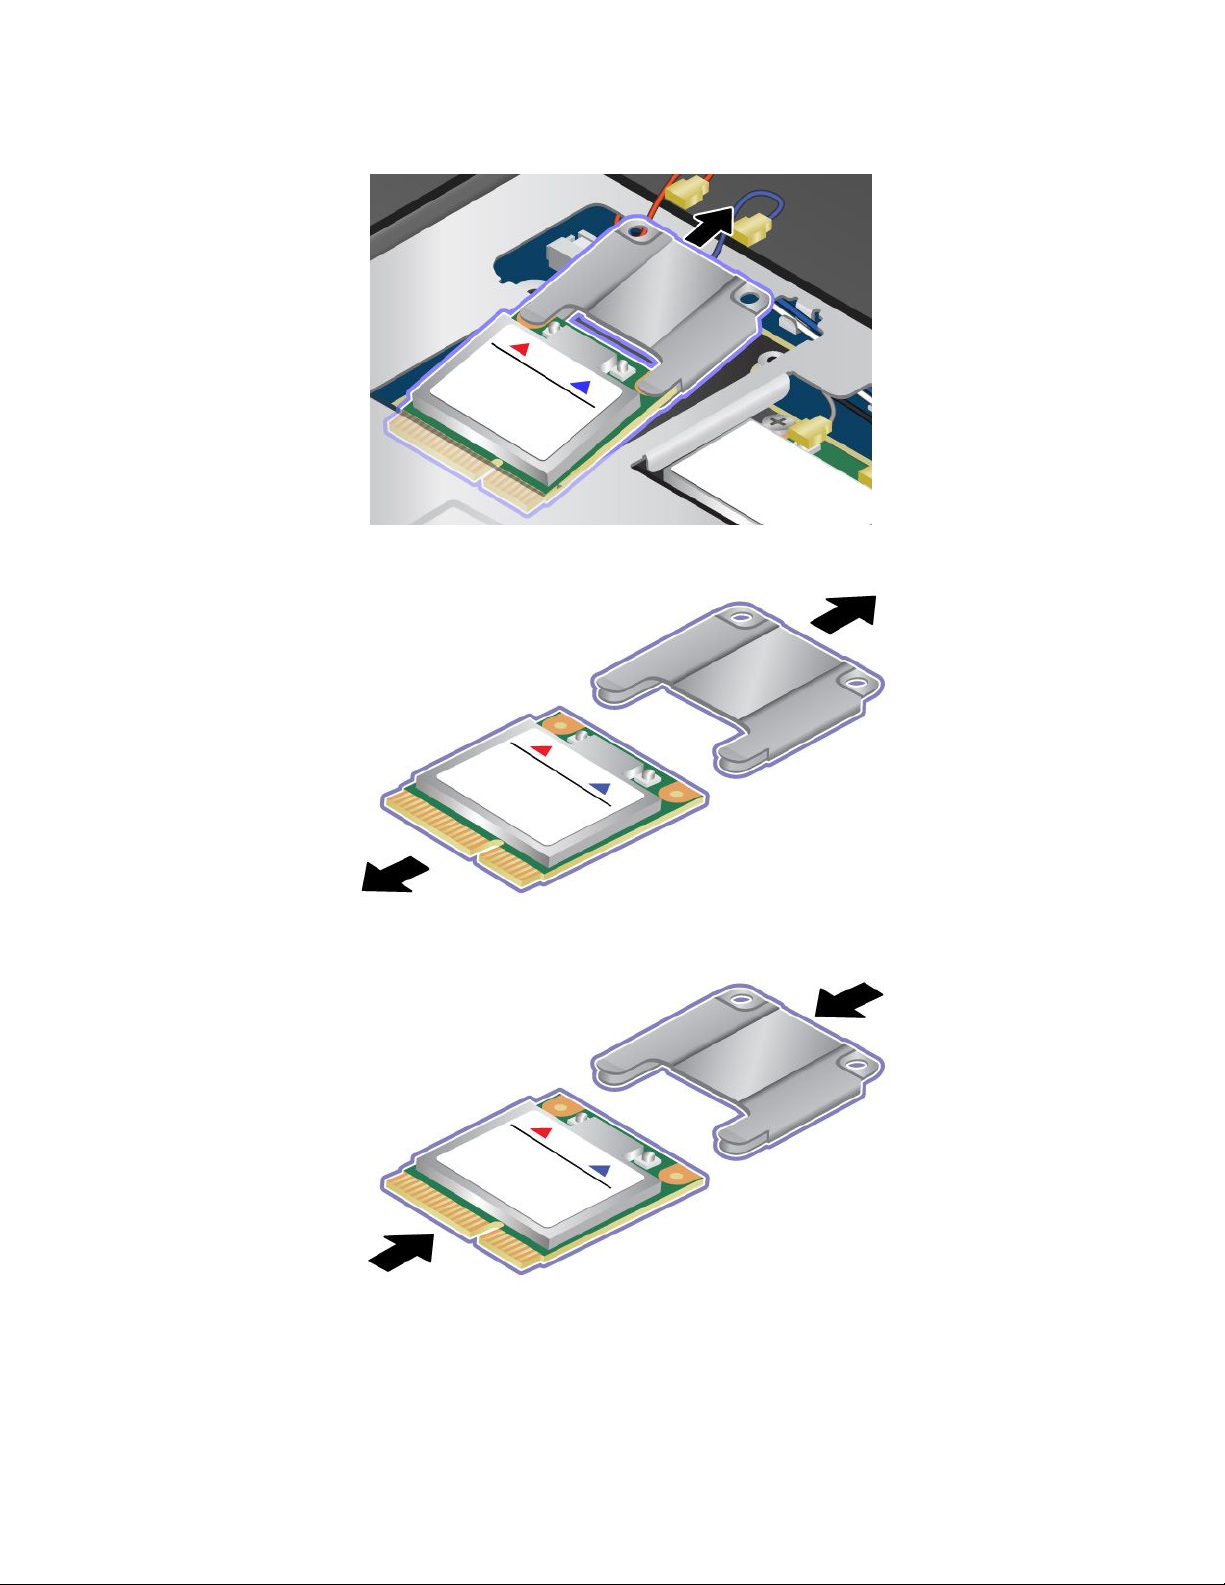
6.Removethecardwiththebracket.
7.Pullthecardoutofthebracket.
8.Insertthenewcardintothebracket.
62UserGuide
Page 77

9.AlignthecontactedgeofthenewPCIExpressMiniCardwiththecorrespondingsocket.
10.Pivotthecarduntilitsnapsintoplace1.Securethecardwiththescrew2.
11.ConnecttheantennacablestothenewPCIExpressMiniCardasshowninthedrawing.Besureto
attachtheredcabletotheconnectormarked“MAIN”or“M”onthecard,andthebluecabletothe
connectormarked“AUX”or“A”.
12.Reinstallthekeyboard.See“Replacingthekeyboard”onpage53.
Chapter6.Replacingdevices63
Page 78

13.T urnthecomputeroveragain.Connecttheacpoweradapterandallcables.
64UserGuide
Page 79

Chapter7.Advancedconguration
Ifyouneedtoinstallanewoperatingsystem,updateyoursystemUEFIBIOS,installnewdevicedrivers,
orrecoverpreinstalledsoftware,thisinformationwillhelpyouhandleyourcomputerwithpropercareand
keepitintopworkingshape.
•“Installinganewoperatingsystem”onpage65
•“Installingdevicedrivers”onpage66
•“ThinkPadSetup”onpage66
•“Usingsystemmanagement”onpage77
Installinganewoperatingsystem
Ifyouinstallanewoperatingsysteminyourcomputer,youneedtoinstallthesupplementlesandThinkPad
devicedriversforitatthesametime.Formoreinformation,see“Installingdevicedrivers”onpage66
Beforeyouinstalltheoperatingsystem,printtheinstructionsyouwilluse.
Notes:
•TheUEFIBIOSfeaturesaresupportedonlyonthe64-bitversionoftheWindows7andWindows8
operatingsystem.
•BesuretosetapreferredsettingfortheUEFI/LegacyBootoptioninThinkPadSetup.
•Afterinstallingthenewoperationsystem,youshouldnotchangetheinitialUEFI/LegacyBootsettingin
ThinkPadSetup.TheUEFI/LegacyBootsettingmustbethesameasitwaswhentheWindowsoperating
systemimagewasinstalled.Otherwise,thenewoperatingsystemwillnotbootproperly.
.
Forthecountryorregioncoderequiredintheinstallation,useoneofthefollowing:
Countryorregion:Code
China:SC
Denmark:DK
Finland:FI
France:FR
Germany:GR
Italy:IT
Japan:JP
Netherlands:NL
Norway:NO
Spain:SP
Sweden:SV
TaiwanandHongKong:TC
UnitedStates:US
InstallingtheWindows8operatingsystem
Beforeyoustart,printtheseinstructions.
ToinstalltheWindows8operatingsystemanditsrelatedsoftwareonyourcomputer,dothefollowing:
1.StartThinkPadSetup.
2.SelectStartup➙Boot.
©CopyrightLenovo2012
65
Page 80

3.ChangethebootpriorityordertobootyourcomputerfromthedrivethatcontainstheWindows
8operatingsysteminstaller.
4.PressF10.
5.ConnectthedrivethatcontainstheWindows8operatingsysteminstallertoyourcomputer,and
restartthecomputer.
6.InstalltheIntelChipsetSupportforWindows2000/XP/Vista/7/8.
7.Installdevicedrivers.See“Installingdevicedrivers”onpage66.
InstallingtheWindows8xmodule
TodownloadandinstallaWindows8xmodule,gototheMicrosoftKnowledgeBasehomepageat
http://support.microsoft.com/,typethenumberofthexmoduleyouneedinthesearcheld,andclick
Search.
Installingdevicedrivers
Thedevicedriversareavailableathttp://www.lenovo.com/ThinkPadDrivers.Clickyourcomputerproduct
nametoviewallthedevicedriversforyourcomputer.
Attention:Alwaysgotohttp://www.lenovo.com/ThinkPadDriversforthelatestdevicedrivers.Donot
downloadthemfromtheWindowsUpdateWebsite.
ThinkPadSetup
YourcomputercomeswiththeThinkPadSetupprogramtoenableyoutoselectvarioussetupparameters.
TostartThinkPadSetup,dothefollowing:
1.T urnonthecomputer.Whenthelogoscreenisdisplayed,presstheF1key.theThinkPadSetup
programmainmenuopens.
Ifyouhavesetasupervisorpassword,theThinkPadSetupprogrammainmenuwillbedisplayed
afteryouenterthepassword.Y oucanstartThinkPadSetupbypressingEnterinsteadofenteringthe
supervisorpassword.However,youcannotchangetheparametersthatareprotectedbythesupervisor
password.Formoreinformation,referto“Usingpasswords”onpage37
2.Usethecursorkeystomovetoanitemthatyouwanttochange.Whentheitemishighlighted,press
Enter.Asubmenuisdisplayed.
3.Changetheitemsyouwanttochange.T ochangethevalueofanitem,pressthe+or–key.Iftheitem
hasasubmenu,youcandisplayitbypressingEnter.
4.PressEsctoexitfromthesubmenu.
5.Ifyouareonanestedsubmenu,pressEscrepeatedlyuntilyoureachtheThinkPadSetupprogram
mainmenu.
6.SelectRestart.Movethecursortotheoptionyouwanttorestartyourcomputer;thenpressEnter.
Yourcomputerrestarts.
Ifyouneedtorestorethesettingstotheoriginalstateasofthetimeofpurchase,pressFn+F9toload
thedefaultsettings.Y oualsocanselectanoptionontheRestartsubmenutoloadthedefaultsettings
ordiscardthechanges.
Note:YoucannotrestorethesettingsundertheSecuritymenubypressingFn+F9.
.
Mainmenu
TheMainmenuistherstinterfaceyouseeafteryouenterThinkPadSetup.Itdisplaysthefollowing
congurationofyourcomputer:
66UserGuide
Page 81

•UEFIBIOSVersion
•UEFIBIOSDate(Year-Month-Day)
•EmbeddedControllerVersion
•MachineTypeModel
•System-unitserialnumber
•Systemboardserialnumber
•AssetT ag
•CPUT ype
•CPUSpeed
•Installedmemory
•UUID
•MACaddress(InternalLAN)
•PreinstalledOSLicense
•UEFISecureBoot
Congmenu
Ifyouneedtochangethecongurationofyourcomputer,selectCongfromtheThinkPadSetupmenu.
Notes:
•Defaultvaluesareinboldface.Thedefaultsettingsarealreadyoptimizedforyou.Ifyouconsider
changingthecomputerconguration,proceedwithextremecaution.Settingthecongurationincorrectly
mightcauseunexpectedresults.
•Oneachsubmenu,pressEntertoshowselectableoptionsandselectadesiredoption,ortypedesired
valuesfromthekeyboarddirectly.
•Someitemsaredisplayedonthemenuonlyifthecomputersupportsthecorrespondingfeatures.
ThefollowingtableliststheCongmenuitems.
Table2.Congmenuitems
Menuitem
Network
SubmenuitemSelectionComments
WakeOnLAN
•Disabled
•ACOnly
•ACandBattery
EnablethesystemtoPoweron
whentheEthernetcontroller
receivesamagicpacket(a
specialnetworkmessage).
IfyouselectACOnly,theWake
onLANfunctionisenabledonly
whentheacpoweradapteris
attached.
IfyouselectACandBattery,
theWakeonLANfunctionis
enabledwithanypowersources.
Note:ACpowerisrequiredwith
magicpackettypeWakeon
LAN.
Chapter7.Advancedconguration67
Page 82

Table2.Congmenuitems(continued)
Menuitem
SubmenuitemSelectionComments
EthernetLANOptionROM
UEFIIPv4NetworkStack
UEFIIPv6NetworkStack
•Disabled
•Enabled
•Disabled
•Enabled
•Disabled
•Enabled
Note:TheWakeonLANfunction
doesnotworkwhenaharddisk
passwordisset.
IfyouselectDisable,itloads
theEthernetLANOptionROM
toenablestartupfromthe
integratednetworkdevice.This
optionmustbeenabledto
displaytheMACAddressforthe
integratednetwork.
Note:EthernetLANOption
ROMsubmenuappearswhen
LegacyOnlyorLegacyFirstwith
BothmodeisselectedinStartup
Page.
EnableordisableInternet
ProtocolVersion4(IPv4)
networkstackfortheUEFI
environment.
Note:UEFIIPv4NetworkStack,
UEFIIPv6NetworkStackand
UEFIPXEBootPrioritymenus
appearwhenUEFIOnlyorUEFI
FirstwithBothmodeisselected
inStartupPage.
EnableordisableUEFIIPv6
NetworkStackForUEFI
environment.
UEFIPXEBootPriority•IPv6First
•IPv4First
WirelessLANRadio
•On
•Off
Note:UEFIIPv4NetworkStack,
UEFIIPv6NetworkStackand
UEFIPXEBootPrioritymenus
appearwhenUEFIOnlyorUEFI
FirstwithBothmodeisselected
inStartupPage.
SelectNetworkStackpriorityfor
UEFIPXEBoot.
Note:UEFIIPv4NetworkStack,
UEFIIPv6NetworkStackand
UEFIPXEBootPrioritymenus
appearwhenUEFIOnlyorUEFI
FirstwithBothmodeisselected
inStartupPage.
IfyouselectOn,theinternal
wirelessradioisturnedon.Ifyou
selectOff,theinternalwireless
radioisturnedoff.
68UserGuide
Page 83

Table2.Congmenuitems(continued)
Menuitem
USB
Keyboard/Mouse
SubmenuitemSelectionComments
USBUEFIBIOSSupport
•Disabled
•Enabled
USB3.0Mode
•Disabled
•Enabled
•Auto
FnandCtrlKeyswap
•Disabled
•Enabled
Enableordisablebootsupport
fromUSBstoragedevices.
SettheUSB3.0controllermode
fortheportssharedbetween
USB2.0andUSB3.0controller.
IfyouselectAuto,itenablesyou
toconnectandrouteappropriate
USB3.0orUSB2.0connectors.
IfyouselectEnabled,itenables
theUSB3.0modeandallows
theUSB3.0tobesupported
intheWindows8operating
system.
IfyouselectDisabled,it
disablesandhidesthetheUSB
3.0controller,andtheUSB3.0
connectorswillworkasUSB2.0
connectors.
IfyouselectEnabled,theFnkey
worksastheCtrlkey,andthe
CtrlkeyworksastheFnkey.
FnKeyLock•Disabled
Changeto“F1-F12keys”
Note:EvenwhenEnabledis
selected,youneedtopressthe
Fnkeytoresumethecomputer
fromsleepmodetonormal
operation.
EnableordisabletheFnkey
•Enabled
lock.
IfyouselectEnabled,youcan
presstheFnkeyoncetokeep
itinapressedcondition,then
pressthedesiredkey.This
isequivalenttopressingthe
desiredkeysimultaneouslywith
theFnkey.IfyoupresstheFn
keytwice,thestateislocked
untilyoupresstheFnkeyagain.
•Default
•Legacy
IfyouselectDefault,youcan
pressF1-F12directlytoinitiate
specialfunctionsillustrated
oneachkey.Ifyouselect
LegacyyouneedtopressFn
andthecorrespondingkey
simultaneouslytoinitiatethe
specialfunctionsillustratedon
eachkey.
Chapter7.Advancedconguration69
Page 84

Table2.Congmenuitems(continued)
Menuitem
SubmenuitemSelectionComments
DisplayBootDisplayDevice
Power
Intel(R)SpeedStep
technology
CPUPowerManagement
Inter(R)RapidStart
Technology
DisableBuilt-inBattery
•ThinkPadLCD
•HDMI
•DisplayPort
•Disabled
•Enabled
•Disabled
•Enabled
•Disabled
•Enabled
Enterafter:
•Immediately
•1minute
•2minutes
•5minutes
•10minutes
•15minutes
•30minutes
•1hour
•2hours
•3hours
Selectthedisplaydevicetobe
activatedatboottime.This
selectioniseffectiveforboot
time,passwordprompt,and
ThinkPadSetup.
SelectthemodeofIntel
SpeedStep
®
technologyat
runtime.
•MaximumPerformance:
Alwayshighestspeed
•BatteryOptimized:Always
lowestspeed
•Disabled:Noruntime
support,lowestspeed
Enableordisablethepower
savingfeaturethatstops
themicroprocessorclock
automaticallywhenthereareno
systemactivities.
Tousethisfeature,aspecial
partitiononthesolid-statedrive
isrequired.
Whenenabled,youcanenable
the30DayStandbyfunction
throughtheLenovoSettings
program.Thefunctionenables
thecomputertoenteralower
powerstateafterthespecied
timeinsleepstate.Alsoittakes
onlysecondstoresumenormal
operation.
Note:Tousethisfeature,
aspecialpartitiononthe
solid-statedriveisrequired.
Usethisfeaturetotemporarily
disablethebuilt-inbattery.The
systemwillbeautomatically
poweredoffafteryouselect
thisitem.Thenthecomputeris
readytobeserviced.
70UserGuide
Note:Theacpoweradapter
mustbedisconnectedtoperform
thisoperation.Thebuilt-in
batterywillbeautomatically
enabledwhentheacpower
adapterisreconnected.
Page 85

Table2.Congmenuitems(continued)
Menuitem
BeepandAlarm
SerialAT A(SA T A)SATAControllerMode
CPU
SubmenuitemSelectionComments
PasswordBeep•Disabled
KeyboardBeep•Disabled
Option
CoreMulti-Processing
Intel(R)Hyper-Threading
Technology
Enablethisoptiontohavea
•Enabled
•Enabled
•Compatibility
•AHCI
•Disabled
•Enabled
•Disabled
•Enabled
beepsoundwhenthesystem
iswaitingforapower-on,hard
disk,orsupervisorpassword.
Differentbeepswillbesounded
whentheenteredpassword
matchesordoesnotmatchthe
conguredpassword.
Enableordisablethekeyboard
beepwhenunmanageablekey
combinationsarepressed.
SelectSATAcontroller
operationmode.Ifyou
selectCompatibility,the
SATAcontrolleroperatesin
compatibilitymode.
Enableordisableadditional
executioncoreunitswithina
CPU.
Note:Ifyouareusinga
computerwithasingle-core
processor,thisitemisnot
available.
Enableordisableadditional
logicalprocessorswithina
processorcore.
Date/Timemenu
Ifyouneedtosetthecurrentdateandtimeofyourcomputer,selectDate/TimefromtheThinkPadSetup
programmainmenu.Thefollowingsubmenuisdisplayed:
•SystemDate
•SystemTime
Tochangethedateandtime,dothefollowing:
1.Usingtheupanddownarrowkeystoselecttheitemtochangethedateortime.
2.PressT ab,Shift+T ab,orEntertoselectaeld.
3.T ypethedateortime.
Note:Anotherwaytoadjustthedateandtimeisbypressing+or–.
4.PressFn+F10tosavethechangesandrestartthesystem.
Securitymenu
Ifyouneedtosetthesecurityfeaturesofyourcomputer,selectSecurityfromtheThinkPadSetupmenu.
Notes:
•Defaultvaluesareinboldface.Thedefaultsettingsarealreadyoptimizedforyou.Ifyouconsider
changingthecomputerconguration,proceedwithextremecaution.Settingthecongurationincorrectly
mightcauseunexpectedresults.
Chapter7.Advancedconguration71
Page 86

•Oneachsubmenu,pressEntertoshowselectableoptionsandselectadesiredoption,ortypedesired
valuesfromthekeyboarddirectly.
•Someitemsaredisplayedonthemenuonlyifthecomputersupportsthecorrespondingfeatures.
ThefollowingtableliststheCongmenuitems.
Table3.Securitymenuitems
Menuitem
Password
SubmenuitemSelectionComments
SupervisorPassword
PasswordStatus
LockUEFIBIOSSettings
Passwordatunattended
boot
Passwordatrestart•Disabled
SetMinimumLength
Power-OnPassword
PasswordStatus
HardDisk1Password
PasswordStatus
•Disabled
•Enabled
•Disabled
•Enabled
•Disabled
•Enabled
•Enabled
•Disabled
•xcharacters
(4≤x≤12)
•Disabled
•Enabled
•Disabled
•Enabled
Referto“Supervisorpassword”on
page40.
Enableordisablethefunctionthat
protectsitemsintheThinkPad
Setupprogramfrombeingchanged
byunauthorizedusers.Bydefault,
thisissettoDisabled.Ifyouset
thesupervisorpasswordandenable
thisfunction,noonebutyoucan
changetheitemsintheThinkPad
Setupprogram.
IfyouselectandEnablePassword
atunattendedboot,apassword
promptisdisplayedwhenthe
computeristurnedon,froma
power-offstate.Ifyouselect
Disabled,nopasswordpromptis
displayed;thecomputergoesahead
andloadstheoperatingsystem.To
preventunauthorizedaccess,you
cansettheuserauthenticationon
theoperatingsystem.
IfyouselectandEnablePassword
atrestart,apasswordpromptis
displayedwhenyourestartthe
computer.IfyouselectDisabled,
nopasswordpromptisdisplayed;
thecomputergoesaheadandloads
theoperatingsystem.Toprevent
unauthorizedaccess,youcanset
theuserauthenticationonthe
operatingsystem.
Specifyaminimumlengthfor
power-onpasswordsandharddisk
passwords.Ifyousetthesupervisor
passwordandspecifyaminimum
lengthforpasswords,noonebut
youcanchangethelength.
Referto“Power-onpassword”on
page38
Referto“Harddiskpasswords”on
page38.
.
72UserGuide
Page 87

Table3.Securitymenuitems(continued)
Menuitem
SecurityChip
SubmenuitemSelectionComments
HardDisk2Password
PasswordStatus
SecurityChip
•Disabled
•Enabled
•Active
•Inactive
•Disabled
SecurityReporting
Options
ClearSecurityChip
Enter
Referto“Harddiskpasswords”on
page38.
IfyouselectActive,thesecurity
chipisfunctional.Ifyouselect
Inactive,theSecurityChipoption
isvisible,butthesecuritychip
isnotfunctional.Ifyouselect
Disabled,theSecurityChipoption
ishiddenandthesecuritychipis
notfunctional.
Enableordisablethefollowing
SecurityReportingOptions:
•BIOSROMStringReporting:
BIOStextstring
•CMOSReporting:CMOSdata
•NVRAMReporting:Security
datastoredintheAssetID
•SMBIOSReporting:SMBIOS
data
Cleartheencryptionkey.
PhysicalPresencefor
Provisioning
PhysicalPresencefor
Clear
UEFIBIOSUpdateOption
FlashUEFIUpdatingby
End-Users
SecureRollBack
Prevention
MemoryProtectionExecutionPrevention•Disabled
Note:Thisitemisdisplayedonly
ifyouhaveselectedActiveforthe
SecurityChipoption.
•Disabled
•Enabled
Thisoptionenablesordisablesthe
conrmationmessagewhenyou
changethesettingsofthesecurity
chip.
•Disabled
•Enabled
•Disabled
•Enabled
Thisoptionenablesordisablesthe
conrmationmessagewhenyou
clearthesecuritychip.
IfyouselectEnabled,allusers
canupdatetheUEFI.Ifyouselect
Disabled,onlythepersonwho
knowsthesupervisorpasswordcan
updatetheUEFIBIOS.
•Disabled
•Enabled
IfyouselectDisabled,youcanash
theolderversiontheUEFIBIOS.
Somecomputervirusesandworms
•Enabled
causememorybufferstooverow.
ByselectingEnabledyoucan
protectyourcomputeragainst
attacksbysuchvirusesandworms.
Ifyoundthatanapplication
programdoesnotruncorrectlyafter
choosingEnabled,selectDisabled
andresetthesetting.
Chapter7.Advancedconguration73
Page 88

Table3.Securitymenuitems(continued)
Menuitem
Virtualization
I/OPortAccess
Anti-Theft
SubmenuitemSelectionComments
Intel(R)Virtualization
Technology
Intel(R)VT-dFeature
EthernetLAN•Disabled
WirelessLAN•Disabled
WirelessWAN•Disabled
Bluetooth•Disabled
USBPort
MemoryCardSlot
IntegratedCamera
Microphone•Disabled
IntelA TModuleActivation
Currentsetting
Computrace
Currentsetting
•Disabled
•Enabled
•Disabled
•Enabled
•Enabled
•Enabled
•Enabled
•Enabled
•Disabled
•Enabled
•Disabled
•Enabled
•Disabled
•Enabled
•Enabled
•Disabled
•Enabled
•Permanently
Disabled
•Disabled
•Enabled
•Permanently
Disabled
IfyouselectEnabled,aVirtual
MachineMonitor(VMM)canutilize
theadditionalhardwarecapabilities
providedbyVirtualization
Technology.
IntelVT-dstandsforIntel
VirtualizationTechnologyfor
directedI/O.Whenenabled,aVMM
canutilizetheplatforminfrastructure
forI/Ovirtualization.
IfyouselectEnabled,youcanuse
theEthernetLANdevice.
IfyouselectEnabled,youcanuse
theWirelessLANdevice.
IfyouselectEnabled,youcanuse
theWirelessWANdevice.
IfyouselectEnabled,youcanuse
theBluetoothdevice.
IfyouselectEnabled,youcanuse
theUSBconnectors.
IfyouselectEnabled,youcanuse
thememorycardslotforaSDcard
oraMultiMediaCard.
IfyouselectEnabled,youcanuse
theintegratedcamera.
IfyouselectEnabled,youcanuse
themicrophone(internal,external,
orline-in).
EnableordisabletheUEFIBIOS
interfacetoactivatetheIntelAT
module,whichisanoptionalthe
anti-theftservicefromIntel.
Note:IfyousettheIntelAT
moduleactivationtoPermanently
Disabled,youwillbeunableto
enablethissettingagain.
EnableordisabletheUEFIBIOS
interfacetoactivatethecomputrace
module.Computraceisanoptional
monitoringservicefromAbsolute
Software.
74UserGuide
Note:Ifyousetthecomputrace
moduleactivationtoPermanently
Disabled,youwillbeunableto
enablethissettingagain.
Page 89

Table3.Securitymenuitems(continued)
Menuitem
SecureBoot
SubmenuitemSelectionComments
SecureBoot
PlatformMode
ResettoManufacturing
Default
CertNamesWin8Certicate
•Disabled
•Enabled
UserMode
EnterResetsecurebootvariablestothe
EnablesordisablestheUEFIsecure
bootfeature.
Enableordisablethisfunctionto
forbidorallowanunauthorized
operatingsystemtorunatboot
time.
Note:ToenabeSecureBoot,you
needtosetthestartupsettingas
UEFIOnlyandsetCSMSupport
asNo.
Thisindicatesthattheplatformis
operatinginsetupmodeoruser
mode.
manufacturingdefault
Startupmenu
Tochangethecomputerstartupsettings,selectStartupfromtheThinkPadSetupmainmenu.
Attention:
•Afteryouchangethestartupsequence,youmustbeextremelycarefulnottospecifyawrongdevice
duringacopy,save,orformatoperation.Ifyouspecifyawrongdevice,yourdataandprogramsmightbe
erasedoroverwritten.
•IfyouareusingtheBitLockerdriveencryption,youshouldnotchangethestartupsequence.BitLocker
driveencryptiondetectsthechangeofstartupsequenceandlocksthecomputerfrombooting.
Changingthestartupsequence
Tochangethestartupsequence,dothefollowing:
1.SelectBootorNetwork,thenpressEnter.Thedefaultbootlistisdisplayed,showingtheorderinwhich
deviceswillbestartedup.Evendevicesthatarenotattachedtoorinstalledonyourcomputerarelisted.
•UsetheBootsubmenutospecifythestartupsequencethatrunswhenyouturnonthepower.
•UsetheNetworksubmenutospecifythestartupsequencethatrunswhenWakeonLANisenabled.
WakeonLANiscommonlyusedbyLANadministratorsincorporatenetworkstogetremoteaccess
toyourcomputer.
2.Setthestartupsequencebyusingthefollowingkeys:
•Usecursorkeystoselectadevice.
•UseF6orthecombinationofShiftand+tomovethedeviceuptoahigherpriority.
•UseF5or–tomovethedevicedowntoalowerpriority.
3.PressFn+F10tosavethechangesandrestartthesystem.
Tochangethestartupsequencetemporarilysothatthesystemstartsupfromadifferentdrive,dothe
following:
1.T urnoffthecomputer.
Chapter7.Advancedconguration75
Page 90

2.T urnonthecomputer,then,whiletheThinkPadlogoisdisplayedatthelower-leftofthescreen,
pressF12.
3.Selectthedeviceyouwanttostartrst.
Note:TheBootmenuwillbedisplayedwhenthesystemcannotbootfromanydeviceortheoperating
systemcannotbefound.
ThefollowingtableshowsthecontentsoftheStartupmenuitems.
Notes:
•Defaultvaluesareinboldface.
•Oneachsubmenu,pressEntertoshowselectableoptionsandselectadesiredoption.
•Someitemsaredisplayedonthemenuonlyifthecomputersupportsthecorrespondingfeatures.
ThefollowingtableliststheStartupmenuitems.
Table4.Startupmenuitems
Menuitem
Boot
NetworkBoot
UEFI/LegacyBoot•UEFIOnly
UEFI/LegacyBootPriority
CSMSupport
BootMode
OptionKeyDisplay
SelectionComments
•USBCD
•USBFDD
•ATAHDD0
•ATAHDD1
•ATAHDD2
•USBHDD
•PCILAN
•Both
•LegacyOnly
•UEFIFirst
•LegacyFirst
•No
•Yes
•Quick
•Diagnostics
•Disabled
•Enabled
Referto“Changingthestartup
sequence”onpage75.
SelecttoppriorityoftheBootPriority
OrderwhenwakingfromLAN.
EnabletheUEFI/Legacyboot.
Selectpriorityofbootoptionbetween
UEFIandLegacy.
CompatibilitySupportModule(CSM)is
denedinUEFIspec.
TheQuickbootisintendedtobootthe
operatingsystemassoonaspossible
byreducingthePOSTelapsedtime.The
Diagnosticsbootistobeusedforthe
problemdeterminationbyperforming
testsofthedevices.
IfyouselectDisabled,thenthemessage
“Tointerruptnormalstartup,pressEnter”
isnotdisplayedduringthePOST.
76UserGuide
Page 91

Table4.Startupmenuitems(continued)
Menuitem
BootDeviceListF12Option
BootOrderLock
SelectionComments
•Disabled
•Enabled
•Disabled
•Enabled
F12keyisusedtoinvokeapop-upBoot
deviceList.
Thisoptionisonlyavailablewhen
supervisorenterssetup.
IfyouselectDisabled,yourcomputer
willbootusingthedefaultpriority.Ifyou
selectEnabled,yourcomputerwillboot
usingthepriorityyouhavecustomized.
Restartmenu
IfyouneedtoclosetheThinkPadSetupprogramandrestartthesystem,selectRestartfromtheThinkPad
Setupprogrammainmenu.Thefollowingsubmenuoptionsaredisplayed:
•ExitSavingChanges:ExitSystemSetupandsaveyourchangestoCMOS.
•ExitDiscardingChanges:ExitSystemSetupwithoutsavingchanges.
•LoadSetupDefaults:LoadthedefaultvalueforallThinkPadSetupitems.
•DiscardChanges:Discardthechanges.
•SaveChanges:Savethechanges.
UpdatingyoursystemUEFIBIOS
TheUniedExtensibleFirmwareInterface(UEFI)BIOSisapartofthesystemprogramsthatmakeupthe
basiclayerofsoftwarebuiltintoyourcomputer.TheUEFIBIOStranslatestheinstructionsfromother
softwarelayers.
YourcomputersystemboardhasamodulecalledEEPROM,alsoreferredtoasashmemory.Youcan
updatetheUEFIBIOSandtheThinkPadSetupprogrambystartingyourcomputerwithaashupdate
opticaldiscorashupdateapplicationrunningintheWindowsenvironment.
Insomeinstanceswhenyouaddsoftware,hardware,oradevicedriver,youmightbeinformedthatyou
needtoupdateyourUEFIBIOSinorderforthenewadditiontoworkproperly.
ToupdateyourUEFIBIOS,gotothefollowingWebsiteandfollowtheinstructionsonthescreen:
http://www.lenovo.com/ThinkPadDrivers
Usingsystemmanagement
Thissectionisintendedprimarilyfornetworkadministrators.
Yourcomputerisdesignedformanageability,sothatyoucanredirectmoreofyourresourcestobetter
meetyourbusinessobjectives.
Thismanageability,or“TotalCostofOwnership”(TCO),enablesyoutoremotelyoperateclientcomputers
inthesamewayasyouoperateyourowncomputer,suchasturningonaclientcomputer,formatting
harddiskdrive,andinstallingsoftware.
Oncethecomputerisconguredandoperational,youcanmanageitbyuseofsoftwareandmanageability
featuresalreadyintegratedintotheclientsystemandthenetwork.
Chapter7.Advancedconguration77
Page 92

Systemmanagement
Readthistopictolearnmoreaboutfeaturesofsystemmanagement:
DesktopManagementInterface
ThesystemUEFIBIOSofyourcomputersupportsaninterfacecalledSystemManagementBIOSReference
Specication(SMBIOS)V2.6.1SMBIOSprovidesinformationaboutthehardwarecomponentsofyour
system.ItistheresponsibilityoftheBIOStosupplythisdatabasewithinformationaboutitselfandthe
devicesonthesystemboard.ThisspecicationdocumentsthestandardsforgettingaccesstothisBIOS
information.
PrebooteXecutionEnvironment
PrebooteXecutionEnvironment(PXE)technologymakesyourcomputermoremanageable(itisPXE
2.1-compliant)byenablingittoboot(loadanoperatingsystemoranotherexecutableimage)froma
server.YourcomputersupportsthepersonalcomputerfunctionsthatPXErequires.Forexample,withthe
appropriateLANcard,yourcomputercanbebootedfromthePXEserver.
Note:RemoteProgramLoad(RPL)cannotbeusedwithyourcomputer.
WakeonLAN
AnetworkadministratorcanuseWakeonLANtoturnonacomputerfromamanagementconsole.
WhenWakeonLANisusedwithnetworkmanagementsoftware,manyfunctions,suchasdatatransfer,
softwareupdates,andFlashupdatesofUEFIBIOS,canbeperformedremotelywithoutremoteattendance.
Thisupdatingcanbedoneafternormalworkinghoursandonweekends,tosavetimeandincrease
productivity.Usersarenotinterruptedduringnormalworkinghours,andLANtrafciskepttoaminimum.
IfacomputeristurnedonbytheWakeonLANfunction,theNetworkbootsequenceisused.
AssetIDEEPROM
TheAssetIDEEPROMcontainsinformationaboutthesystem,includingitscongurationandtheserial
numbersofkeycomponents.Italsoincludesanumberofblankeldsinwhichyoucanrecordinformation
abouttheendusersinyournetwork.
Settingmanagementfeatures
Toenablethenetworkadministratortocontrolyourcomputerremotely,youmustcongurethenetwork
interfacebysettingthesystem-managementfeaturesintheThinkPadSetupprogram.Y oucancongure
thefollowingfunctionsintheprogram:
•WakeonLAN
•NetworkBootsequence
•Flashupdate
Ifanadministratorpassword(supervisorpassword)hasbeenset,youwillneedtospecifyitwhenyoustart
ThinkPadSetuptousethesefunctions.
WakeonLAN
WhentheWakeonLANfeatureisenabledonacomputerthatisconnectedtoaLAN,anetworkadministrator
canstartthecomputerremotelyfromamanagementconsole,usingremotenetwork-managementsoftware.
Whenyourcomputerisnotunderthenetworkadministrator'ssystemmanagement,youcandisableWake
onLAN.
78UserGuide
Page 93

ToenableordisableWakeonLAN,dothefollowing:
1.StartThinkPadSetup.
2.SelectCong.TheCongsubmenuisdisplayed.
3.SelectNetwork.TheNetworkitemsubmenuisdisplayed.
4.ForWakeOnLAN,selectoneofthefollowing:ACOnly,ACandBattery,orDisabled.
5.PressFn+F10tosavechangesandexit.
NetworkBootsequence
Whenyourcomputeristurnedonremotely,thesystemwilltrytobootfromthedevicethatisspeciedinthe
NetworkBootsetting,andthenfollowthebootorderlistontheBootmenu.
Todeneasequence,dothefollowing:
1.OntheThinkPadSetupprogrammenu,selectStartup.Thesubmenuisdisplayed.
2.SelectNetworkBootandpresstheEnterkey.Thebootdevicelistisdisplayed.
3.Selectabootdevicefromthelisttomakeitasthetopbootpriority.
4.PressFn+F10tosavechangesandexit.
Note:Ifyouwanttoinitializethesettingtoreturntothedefaultstartupsequence,pressF9.Thedefault
settingsareautomaticallyreloaded.
Flashupdate
Yournetworkadministratorcanremotelyupdatethesystemprogramsonyourcomputerfromamanagement
console.Thefollowingrequirementsmustbemet:
•YourcomputermustbestartedovertheLAN.
•YourcomputermustbeengagedinaPrebooteXecutionEnvironment.
•Network-managementsoftwaremustbeinstalledontheremoteadministrator'scomputer.
Chapter7.Advancedconguration79
Page 94

80UserGuide
Page 95

Chapter8.Preventingproblems
AnimportantpartofowningaThinkPadnotebookcomputerismaintenance.Withpropercare,you
canavoidcommonproblems.Thischapterprovidesinformationthatcanhelpyoukeepyourcomputer
runningsmoothly.
•“Generaltipsforpreventingproblems”onpage81
•“Makingsuredevicedriversarecurrent”onpage82
•“Takingcareofyourcomputer”onpage83
Generaltipsforpreventingproblems
1.IfyourcomputerisequippedwithbothaharddiskdriveandanmSATAsolid-statedrive,youarenot
recommendedtousethemSATAsolid-statedriveasabootabledevice.ThemSATAsolid-statedriveis
designedanddevelopedfor“cache”functionpurposeonly.IfyouusethemSATAsolid-statedriveasa
bootabledevice,itsreliabilityisnotguaranteed.
2.Checkthecapacityofyourharddiskdrivefromtimetotime.Iftheharddiskdrivegetstoofull,the
Windowsoperatingsystemwillslowdownandmightproduceerrors.Tochecktheharddiskdrive
capaity,opentheWindowsExplorerandclickComputer.
3.Emptyyourrecyclebinonaregularbasis.
4.Usediskdefragmenttoolregularlyonyourharddiskdrivetoimprovedataseekandreadtimes.
5.T ofreeupdiskspace,uninstallunusedapplicationprograms.
Note:Youalsomightwanttolookforapplicationprogramduplicationoroverlappingversions.
6.CleanoutyourInbox,Sent,andTrashfoldersfromyoure-mailclientprogram.
7.Backupyourdataatleastonceaweek.Ifcriticaldataispresent,itisagoodideatoperformadaily
backupoperation.Lenovohasmanybackupoptionsavailableforyourcomputer.Rewritableoptical
drivesareavailableformostmachinesandareeasilyinstalled.
8.Schedulesystemrestoreoperationstotakeasystemsnapshotperiodically.Formoreinformationabout
systemrestore,seeChapter5“Recoveryoverview”onpage47.
9.UpdatedevicedriversandUEFIBIOSwhenneeded.
10.Proleyourmachineathttp://www.lenovo.com/supporttokeepuptodatewithcurrentdriversand
revisions.
11.Ensuredevicedriversfornon-Lenovoperipheraldevicesarekeptuptodate.Youmightwanttoreadthe
devicedriverinformationreleasenotespriortoupdatingforcompatibilityorknownissues.
12.Keepalogbook.Entriesmightincludemajorhardwareorsoftwarechanges,driverupdates,minor
issuesyouhaveexperienced,andhowyouresolvedtheminorissues.
13.Ifyoueverneedtorunarecoveryonyourcomputertoreturnthepreloadontothemachine,the
followingtipsmighthelpalongtheway:
•Removeallexternaldevicessuchastheprinter,keyboard,andsoon.
•Ensurethatyourbatteryischargedandthatyouhavetheacpowerconnected.
•BootintoThinkPadSetupandloadthedefaultsettings.
•Restartthecomputerandstarttherecoveryoperation.
•Ifyouusediscstorecoverthecomputer,donotremovethediscfromthedriveuntilpromptedto
doso.
14.Forsuspectedharddiskdriveissues,referto“Diagnosingproblems”onpage87toruna
diagnostictestofthedrivebeforeyoucalltheCustomerSupportCenter.Ifyourcomputerdoes
notstartup,downloadthelestocreateabootableself-testmediafromthefollowingWebsite:
http://www.lenovo.com/hddtest.Runthetestandrecordanymessagesorerrorcodes.Ifthetest
©CopyrightLenovo2012
81
Page 96

returnsanyfailingerrorcodesormessages,calltheCustomerSupportCenterwiththecodesor
messagesandthecomputerinfrontofyou.Atechnicianwillassistyoufurther.
15.Ifrequired,youcanndyourcountry'sCustomerSupportCenterat:
http://www.lenovo.com/support/phone.WhencallingtheCustomerSupportCenter,ensurethatyou
haveyourmachinemodeltype,serialnumber,andthecomputerinfrontofyou.Also,ifthecomputeris
producingerrorcodes,itishelpfultohavetheerrorscreenonorthemessagewrittendown.
Makingsuredevicedriversarecurrent
Devicedriversareprogramsthatcontaininstructionsfortheoperatingsystemabouthowtooperateor
“drive”acertainpieceofhardware.Eachhardwarecomponentonyourcomputerhasitsownspecicdriver.
Ifyouaddanewcomponent,theoperatingsystemneedstobeinstructedonhowtooperatethatpiece
ofhardware.Afteryouinstallthedriver,theoperatingsystemcanrecognizethehardwarecomponent
andunderstandhowtouseit.
Note:Becausedriversareprograms,likeanyotherleonyourcomputer,theyaresusceptibletocorruption
andmightnotperformcorrectlyifcorruptionoccurs.
Itisnotalwaysnecessarytodownloadthelatestdrivers.However,youshoulddownloadthelatestdriver
foracomponentifyounoticepoorperformancefromthatcomponentorifyouaddedanewcomponent.
Thismighteliminatethedriverasthepotentialcauseoftheproblem.
GettingthelatestdriversfromtheWebsite
YoucandownloadandinstallupdateddevicedriversfromtheLenovoWebsitebydoingthefollowing:
1.Gotohttp://www.lenovo.com/ThinkPadDrivers.
2.ClicktheproductnameofyourcomputerintheCurrentThinkPadsystemslisttoseeallthedevice
driversforyourcomputer.
3.Clickthedriveryouwant,andfollowtheinstructionsonthescreen.
GettingthelatestdriversusingSystemUpdate
TheSystemUpdateprogramhelpsyoukeepthesoftwareonyoursystemup-to-date.Updatepackagesare
storedonLenovoserversandcanbedownloadedfromtheLenovoSupportWebsite.Updatepackagescan
containapplications,devicedrivers,UEFIBIOSashes,orsoftwareupdates.WhentheSystemUpdate
programconnectstotheLenovoSupportWebsite,theSystemUpdateprogramautomaticallyrecognizes
themachinetypeandmodelofyourcomputer,theinstalledoperatingsystem,andthelanguageofthe
operatingsystemtodeterminewhatupdatesareavailableforyourcomputer.TheSystemUpdateprogram
thendisplaysalistofupdatepackagesandcategorizeseachupdateascritical,recommended,oroptionalto
helpyouunderstandtheimportance.Y ouhavecompletecontrolofwhichupdatestodownloadandinstall.
Afteryouselecttheupdatepackagesyouwant,theSystemUpdateprogramautomaticallydownloadsand
installstheupdateswithoutanyfurtherinterventionfromyou.
TheSystemUpdateprogramispreinstalledonyourcomputerandisreadytorun.Theonlyprerequisiteis
anactiveInternetconnection.Youcanstarttheprogrammanually,oryoucanusetheschedulefeature
toenabletheprogramtosearchforupdatesautomaticallyatspeciedintervals.Y oualsocanpredene
scheduledupdatestosearchbyseverity(criticalupdates,criticalandrecommendedupdates,orallupdates)
sothelistyouchoosefromcontainsonlythoseupdatetypesthatareofinteresttoyou.
FormoreinformationabouthowtouseSystemUpdate,referto“Lenovoprograms”onpage11.
82UserGuide
Page 97

Takingcareofyourcomputer
Althoughyourcomputerisdesignedtofunctionreliablyinnormalworkenvironments,youneedtouse
commonsenseinhandlingit.Byfollowingtheseimportanttips,youwillgetthemostuseandenjoyment
outofyourcomputer.
Becarefulaboutwhereandhowyouwork
•Storepackingmaterialssafelyoutofthereachofchildrentopreventtheriskofsuffocationfromplastic
bags.
•Keepyourcomputerawayfrommagnets,activatedcellularphones,electricalappliances,orspeakers
(within13cmor5inches).
•Avoidsubjectingyourcomputertoextremetemperatures(below5°C/41°Forabove35°C/95°F).
•Someappliances,suchascertainportabledesktopfansorairpuriers,canproducenegativeions.Ifa
computerisclosetosuchanappliance,andisexposedforanextendedtimetoaircontainingnegative
ions,itmightbecomeelectrostaticallycharged.Suchachargemightbedischargedthroughyourhands
whenyoutouchthekeyboardorotherpartsofthecomputer,orthroughconnectorsonI/Odevices
connectedtoit.Eventhoughthiskindofelectrostaticdischarge(ESD)istheoppositeofadischargefrom
yourbodyorclothingtothecomputer,itposesthesameriskofacomputermalfunction.
Yourcomputerisdesignedandmanufacturedtominimizeanyeffectsofelectrostaticcharge.Anelectrostatic
chargeaboveacertainlimit,however,canincreasetheriskofESD.Therefore,whenusingthecomputer
closetoanappliancethatcanproducenegativeions,givespecialattentiontothefollowing:
•Avoiddirectlyexposingyourcomputertotheairfromanappliancethatcanproducenegativeions.
•Keepyourcomputerandperipheralsasfaraspossiblefromsuchanappliance.
•Whereverpossible,groundyourcomputertofacilitatesafeelectrostaticdischarge.
Note:Notallsuchappliancescauseasignicantelectrostaticcharge.
Begentlewithyourcomputer
•Avoidplacinganyobjects(includingpaper)betweenthedisplayandthekeyboardorthepalmrest.
•Yourcomputerdisplayisdesignedtobeopenedandusedatanangleslightlygreaterthan90degrees.
Donotopenthedisplaybeyond180degrees,asthismightdamagethecomputerhinge.
•Donotturnyourcomputeroverwhiletheacpoweradapterispluggedin.Thiscouldbreaktheadapter
plug.
Carryyourcomputerproperly
•Beforemovingyourcomputer,besuretoremoveanymedia,turnoffattacheddevices,anddisconnect
cordsandcables.
•Whenpickingupyouropencomputer,holditbythebottom.Donotpickuporholdyourcomputerby
thedisplay.
Handlestoragemediaanddrivesproperly
•Ifyourcomputercomeswithanopticaldrive,donottouchthesurfaceofadiscorthelensonthetray.
•WaituntilyouheartheCDorDVDclickintothecenterpivotofthedrivebeforeclosingthetray.
•Wheninstallingtheharddiskdrive,mSATAsolid-statedrive,followtheinstructionsshippedwithyour
hardware,andapplypressureonlywhereneededonthedevice.
•TurnoffyourcomputerifyouarereplacingtheharddiskdriveorthemSATAsolid-statedrive.
•Whenreplacingtheharddiskdrive,reattachthecoverofthedriveslot.
Chapter8.Preventingproblems83
Page 98

•Storeyourexternalandremovableharddiskdriveoropticaldrivesintheappropriatecontainersor
packagingwhentheyarenotbeingused.
•Beforeyouinstallanyofthefollowingdevices,touchametaltableoragroundedmetalobject.Thisaction
reducesanystaticelectricityfromyourbody.Thestaticelectricitycoulddamagethedevice.
–Memorymodule
–MiniPCIcard
–Memorycard,suchasSDcard,SDHCcard,SDXCcard,andMultiMediaCard
Note:Notalllisteddevicesareincludedinyourcomputer.
Thisactionreducesanystaticelectricityfromyourbody.Thestaticelectricitycoulddamagethedevice.
•Whiletransferringdatatoorfromamediacard,suchasanSDcard,donotputyourcomputerintosleep
modebeforethedatatransferiscompleted;otherwise,yourdatacouldbecomedamaged.
Takecareinsettingpasswords
Rememberyourpasswords.Ifyouforgetasupervisororharddiskpassword,Lenovowillnotresetit,and
youmighthavetoreplaceyoursystemboardorharddiskdrive.
Registeryourcomputer
RegisteryourThinkPadcomputerwithLenovoathttp://www.lenovo.com/register.Thiscanhelpauthorities
returnyourcomputertoyouifitislostorstolen.RegisteringyourcomputeralsoenablesLenovotonotify
youaboutpossibletechnicalinformationandupgrades.
Besurenottomodifyyourcomputer
•OnlyanauthorizedThinkPadrepairtechnicianshoulddisassembleandrepairyourcomputer.
•Donotmodifyortapethelatchestokeepthedisplayopenorclosed.
Cleaningthecoverofyourcomputer
Occasionallycleanyourcomputerbydoingthefollowing:
1.Prepareamixtureofagentlekitchen-usedetergent(onethatdoesnotcontainabrasivepowderor
strongchemicalssuchasacidoralkaline).Use5partswaterto1partdetergent.
2.Absorbthediluteddetergentintoasponge.
3.Squeezeexcessliquidfromthesponge.
4.Wipethecoverwiththesponge,usingacircularmotionandtakingcarenottoletanyexcessliquiddrip.
5.Wipethesurfacetoremovethedetergent.
6.Rinsethespongewithcleanrunningwater.
7.Wipethecoverwiththecleansponge.
8.Wipethesurfaceagainwithadry,soft,lint-freecloth.
9.Waitforthesurfacetodrycompletelyandremoveanybersfromthecloth.
Cleaningyourcomputerkeyboard
Tocleanthecomputerkeyboard,dothefollowing:
1.Applysomeisopropylrubbingalcoholtoasoft,dust-freecloth.
2.Wipeeachkeytopsurfacewiththecloth.Wipethekeysonebyone;ifyouwipeseveralkeysatatime,
theclothmighthookontoanadjacentkeyandpossiblydamageit.Ensurethatnoliquiddripsonto
orbetweenthekeys.
3.Allowtodry.
84UserGuide
Page 99

4.T oremoveanycrumbsordustfrombeneaththekeys,youcanuseacamerablowerwithabrush
orcoolairfromahairdryer.
Note:Avoidsprayingcleanerdirectlyontothedisplayorthekeyboard.
Cleaningyourcomputerdisplay
Tocleanthecomputerdisplay,dothefollowing:
1.Gentlywipethedisplaywithadry,softlint-freecloth.Ifyouseeascratchlikemarkonyourdisplay,
itmightbeastaintransferredfromthekeyboardortheTrackPointpointingstickwhenthecoverwas
pressedfromtheoutside.
2.Wipeordustthestaingentlywithasoft,drycloth.
3.Ifthestainremains,moistenasoft,lint-freeclothwithwaterora50-50mixtureofisopropylalcoholand
waterthatdoesnotcontainimpurities.
4.Wringoutasmuchoftheliquidasyoucan.
5.Wipethedisplayagain;donotletanyliquiddripintothecomputer.
6.Besuretodrythedisplaybeforeclosingit.
Chapter8.Preventingproblems85
Page 100

86UserGuide
 Loading...