

Page 1

Contents
MENU MAP
SAFETY ................................................................ 17
Traffic Safety......................................................... 17
Do Not Use in Hospitals....................................... 17
Do Not Use in Airplanes....................................... 17
Do Not Use in Gasoline Stations.......................... 17
Do Not Use in Explosive Sites.............................. 18
Operating Environment........................................ 18
Standard Usage .................................................... 18
Accessories ........................................................... 18
Appropriate Maintenance..................................... 18
Emergency Calls (SOS) ........................................ 18
Use with proper care to reduce electromagnetic
interference (EMI) ......................................................... 19
GETTING STARTED .......................................... 20
......................................................... 11
1
Page 2

PHONE OVERVIEW................................................... 20
INSTALLATION & REMOVING .................................. 21
Installing the battery.............................................. 21
Removing the battery ............................................. 21
Installing the SIM Card.......................................... 22
Removing the SIM Card......................................... 22
Connecting the Charger......................................... 23
Removing the Charger........................................... 24
KEYPAD DESCRIPTION ............................................ 24
ALPHANUMERIC MAPPING ...................................... 26
DISPLAY INDICATORS. ............................................. 28
BASIC OPERATION ........................................... 29
Making a Call ........................................................ 29
The SIM Card......................................................... 29
Battery and Charger .............................................. 29
Turning on the Phone............................................. 30
PIN and PIN2 (4 to 8 digits) .................................. 30
PUK1 and PUK2 (8 digits).................................... 31
Calling ................................................................... 31
Dialing Emergency Numbers................................. 31
2
Page 3

Changing an Entry................................................. 31
Answering a Call ................................................... 31
Recent Calls ........................................................... 32
Speed Dial.............................................................. 32
Holding a Call ....................................................... 32
Multi-party Calls.................................................... 33
Voice-activated Dialing.......................................... 33
Method of Input...................................................... 34
1. T9 English........................................................................... 35
MENU FUNCTION ............................................... 37
PHONE BOOK …….................................................. 37
Search .................................................................... 38
Add Entry ............................................................... 38
Edit......................................................................... 39
Delete..................................................................... 39
Copy....................................................................... 40
P.Book Setting........................................................ 40
1. Caller Group........................................................................ 40
2. Sorting................................................................................. 40
3. Display SIM Records.......................................................... 41
Memory .................................................................. 41
3
Page 4

MESSAGES…….…… ..........錯誤! 尚未定義書籤。
SMS.....................................
1. Write..................................................錯誤! 尚未定義書籤。
2. Inbox .................................................錯誤! 尚未定義書籤。
3. Outbox...............................................錯誤! 尚未定義書籤。
4. Delete................................................錯誤! 尚未定義書籤。
5. Free Count.........................................錯誤! 尚未定義書籤。
6. Setting ...............................................錯誤! 尚未定義書籤。
Pre-Message .....................................錯誤! 尚未定義書籤。
SMS Center ......................................錯誤! 尚未定義書籤。
Valid Time ........................................錯誤! 尚未定義書籤。
Auto Display.....................................錯誤! 尚未定義書籤。
Status Report.....................................錯誤! 尚未定義書籤。
Broadcast............................
1. Read ..................................................錯誤! 尚未定義書籤。
2. Filter..................................................錯誤! 尚未定義書籤。
3. Auto Display .....................................錯誤! 尚未定義書籤。
VOICE MAIL......................... 錯誤! 尚未定義書籤。
1. Call V-mail..............................
2. Voice Mail#.............................
AUDIO PROFILES…................................................. 57
錯誤! 尚未定義書籤。
錯誤! 尚未定義書籤。
錯誤! 尚未定義書籤。
錯誤! 尚未定義書籤。
Adjust ..................................................................... 57
1. Activate ............................................................................... 57
2. Ringtone and Volume.......................................................... 57
3. Key Sound........................................................................... 57
4. Crescendo............................................................................ 57
5. SMS Rec Tone..................................................................... 57
4
Page 5

6. Vibrator ............................................................................... 58
7. Service Tone........................................................................ 58
8. Auto Answer........................................................................ 58
9. Rename ............................................................................... 58
CALL LISTS.………. ............................................... 58
Missed Call ............................................................ 58
Incoming ................................................................ 59
Outgoing ................................................................ 59
Call Info ................................................................. 59
1. Last Call.............................................................................. 59
2. Total Calls ........................................................................... 59
3. 1-minute Beep..................................................................... 59
4. Charge Info.......................................................................... 59
Total Charge........................................................................ 60
Max Charge ........................................................................ 60
Unit Price............................................................................ 60
SETTINGS ……… ................................................... 61
Personal................................................................. 61
1. Language............................................................................. 61
2. Greetings............................................................................. 61
3. Power On/Off Melody......................................................... 61
4. Folder On/Off Melody......................................................... 61
5. Hot Key Setting................................................................... 61
6. Own Number....................................................................... 62
Clock...................................................................... 62
1. Set Date............................................................................... 62
2. Set Alarm............................................................................. 63
3. Power Off............................................................................ 63
5
Page 6

Screen..................................................................... 63
1. Standby mode...................................................................... 63
2. Color Theme........................................................................ 63
3. Network Name.................................................................... 63
4. Show Clock......................................................................... 63
5. Standby LED....................................................................... 63
6. Sub LCD Sleep Time.........................錯誤! 尚未定義書籤。
Call Setting ............................................................ 64
1. Call Waiting......................................................................... 64
Activate............................................................................... 64
Cancel................................................................................. 64
Status .................................................................................. 64
2. Divert .................................................................................. 64
Forward to .......................................................................... 64
Unreachable........................................................................ 64
If No Reply......................................................................... 64
All Calls .............................................................................. 64
If Busy................................................................................ 65
Status .................................................................................. 65
Cancel All ........................................................................... 65
3. Answer Mode...................................................................... 65
4. Present Number................................................................... 65
Network.................................................................. 65
1. Select Method...................................................................... 65
2. New Search......................................................................... 65
3. Select Sequence................................................................... 66
Security .................................................................. 66
1. Bar Calls.............................................................................. 66
All Out ................................................................................ 66
Out Intl ............................................................................... 66
Out X Home ....................................................................... 66
6
Page 7

All In................................................................................... 66
In If Abr .............................................................................. 66
Status .................................................................................. 66
Cancel All ........................................................................... 66
2. PIN Check........................................................................... 67
3. PIN Change......................................................................... 67
4. PIN2 Change....................................................................... 67
5. Fixed Numbers.................................................................... 67
6. SIM Lock ............................................................................ 67
Set Lock.............................................................................. 67
Change PCK....................................................................... 67
Reset Setting........................................................... 67
MMEDIA …… ........................................................ 68
File Manager ......................................................... 68
Open File............................................................................ 68
Send MMS.......................................................................... 68
Save as Wallpaper............................................................... 68
Save to P.Book.................................................................... 68
Rename............................................................................... 68
Delete.................................................................................. 68
Delete all file ...................................................................... 68
File Sort.............................................................................. 68
By Name .................................................................. 68
By Date..................................................................... 69
By Type .................................................................... 69
View.................................................................................... 69
List ............................................................................ 69
Icon........................................................................... 69
Detail Info........................................................................... 69
Image ..................................................................... 69
7
Page 8

Audio...................................................................... 69
Free Space ............................................................. 69
Game...................................................................... 69
1. Game................................................................................... 69
Puzzle ................................................................................. 70
Hostage Salvation............................................................... 70
Reversi................................................................................ 70
Coin Elf .............................................................................. 71
Tone Edit ................................................................ 71
1. Play ..................................................................................... 71
2. Edit...................................................................................... 71
Keypad functions................................................................ 71
Edit ..................................................................................... 72
3. Reset.................................................................................... 72
4. Tempo.................................................................................. 72
5. Instrument ........................................................................... 73
6. Rename ............................................................................... 73
CALCUATOR ............................................................73
Calendar.......................................................................... 74
1. View Day Note ........................................................... 74
2. Make Note.................................................................. 74
3. Erase Note ................................................................. 75
4. View All Notes............................................................ 75
5. Go To Date................................................................. 75
Exchange Rate ....................................................... 75
Voice Memos .......................................................... 76
1. Record................................................................................. 76
2. Playback.............................................................................. 76
8
Page 9

Playback ............................................................................. 76
Delete One.......................................................................... 76
Label................................................................................... 76
3. Options................................................................................ 76
Self Only............................................................................. 76
Other Party Only................................................................. 76
Both .................................................................................... 77
World clock ............................................................ 77
Set Location........................................................................ 77
Automatic................................................................. 77
Manual...................................................................... 77
WAP…. ................................................................. 77
Access WAP............................................................ 77
Favorites ................................................................ 78
1. New Bookmark ................................................................... 79
2. New Folder.......................................................................... 79
3. Delete all............................................................................. 80
4. Hotkeys ............................................................................... 80
Go To URL ............................................................. 80
WAP Settings.......................................................... 80
1. Connection.......................................................................... 81
Add New............................................................................. 81
Name ........................................................................ 81
Homepage ............................................................... 81
IP Address................................................................ 81
Bearer....................................................................... 81
User name ............................................................... 81
9
Page 10

Password................................................................. 81
DNS IP address. ..................................................... 81
Linger Time.............................................................. 82
APN .......................................................................... 82
Security .................................................................... 82
Store ......................................................................... 82
Add from List ..................................................................... 82
中華 WAP................................................................. 82
台哥大 WAP............................................................. 82
遠傳 WAP................................................................. 82
泛亞 WAP................................................................. 82
東信 WAP................................................................. 82
2. Color Scheme...................................................................... 82
3. Clear Cache......................................................................... 82
4. Reset all............................................................................... 82
GPRS Setting.......................................................... 83
1. Permanent......................................................................... 83
2. Needed ............................................................................. 83
STK( SIM TOOLKIT ). ......................................... 83
BATTERY ............................................................ 84
CARE AND MAINTENANCE ........................... 85
FCC Regulation ……………………………72
FCC RF Exposure Information ………...…73
10
Page 11

Menu Map
P. Book
Search
Add Entry
Edit
Delete
Copy
P. Book Setting
1. Caller Groups
2. Sorting
3. Display SIM Records
Memory Status
Messages
SMS
1. Write
2. Inbox
3. Outbox
4. Delete
5. Free Count
6. Setting
Pre-Message
SMS Center
Valid Time
Auto Display
Status Report
Broadcast
1. Read
2. Filter
3. Auto Dispaly
Voice Mail
1. Call V-mail
11
Page 12

2. Voice Mail#
Profile
Typ ical
Silent
Outdoor
Handsfree
Meeting
Customer
1. Activate
2. Ringtone and Volume
3. Key Sound
4. Crescendo
5. SMS Rec Tone
6. Vibrator
7. Service Tone
8. Auto Answer (Only in Handsfree mode)
9. Rename (Only in Customer mode)
Call Lists
Missed Call
Incoming
Outgoing
Call Info
1. Last Call
2. Total Calls
3. 1-minute Beep
5. Charge Info
Total Charge
Max Charge
Unit Price
Settings
Personal
1. Language
12
Page 13

2. Greetings
3. Power On/Off Melody
4. Folder On/Off Melody
5. Hot Key Setting
6. Own Number
Clock
1. Set Date/Time
2. Set Alarm
3. Power Off
Screen
1. Standby mode
Pic & Text
Digital Clock
Calendar
2. Color Theme
3. Network Name
4. Show Clock
5. Standby LED
Call Setting
1. Call Waiting
Activate
Cancel
Status
2. Divert
Forward to
Unreachable
If No Reply
All Calls
IF Busy
Status
Cancel All
3. Answer Mode
Normal answer
13
Page 14

Any key answer
Folder answer
4. Present Number
Network
1. Select Method
2. New Search
3. Select Sequence
Security
1. Bar Calls
All Out
Out Intl
Out x Home
All In
In If Abr
Status
Cancel All
2. PIN Check
3. PIN Change
4. PIN2 Change
5. Fixed Numbers
6. SIM Lock
Set Lock
Change PCK
Reset Setting
MMedia
File Manager
1. Image
Open file
Save as Wallpaper
Rename
Delete file
Delete all files
File Sort
14
Page 15

View
Detail Info
2. Audio
Open file
Rename
Delete file
Delete all files
File Sort
Detail Info
3. Free Space
Tone Edit
1. Play
2. Edit
Keypad function
Edit
Save
3. Reset
4. Tempo
5. Instrument
6. Rename
Game
1. Hostage Salvation
2. Reversi
PIM
Calculator
Calendar
1. View DayNote
2. Make Note
3. Erase Note
4. View All Notes
5. Go To Date
Exchange Rate
Voice Memos
15
Page 16

1. Record
2. Playback
Playback
Delete One
Rename
3. Options
Self Only
Other Party Only
Both
World Clock
Auto
Manual
WAP
Access WAP
Favorites
1. New Bookmark
2. New Folder
3. Delete all
4. Hotkeys
Go To URL
WAP Setting
1. Connection
Add New
Add from List
2. Color Scheme
3. Clear Cache
4. Reset all
GPRS Setting
1. Permanent
2. Needed
STK
16
Page 17

Safety
Safety
Read carefully the following important safety and regulations
before you use the phone. Failure of obeying these instructions
may lead to suspension of mobile telephone services, or broke
the law. Most of all, it will cause your personal in danger.
Always adhere to the following:
Traffic Safety
Avoid using a hand-held phone while driving. For your safety,
you should park the vehicle before making or answering a call.
Using a hand-free car kit or earpiece is recommended.
Do Not Use in Hospitals
The use of mobile telephones may interfere with the
functionality of some medical devices in the hospital. Check the
law and regulations or posted notices. To avoid
electromagnetic interference (EMI) with medical devices,
please power off your phone when it is necessary.
Do Not Use in Airplanes
The use of mobile phones in an aircraft may disrupt radio
transmissions and signals. This, therefore, can be dangerous to
the operation of the aircraft. Be sure to turn off your mobile
phone when on board an aircraft. It is recommended to detach
the battery pack from the handset to prevent accidentally
turning on the phone by miss-touching the power key.
Do Not Use in Gasoline Stations
It is advisable that users switch off their mobile phones when
refueling is in process. It is dangerous that any spark may
cause an explosion or fire.
17
Page 18

Safety
Do Not Use in Explosive Sites
The use of mobile phones should be restricted in potential
explosive atmosphere sites such as chemical plants, fuel
storage, or the area where blasting operations are in process.
Operating Environment
Mobile radio transmitting equipment, including mobile phones,
may be subject to interference and may cause danger.
Therefore, it is recommended that you follow any special
regulations in any area. Switch off your mobile phone whenever
the use is forbidden.
Standard Usage
For the satisfactory operation of the mobile phone, it should be
used in a normal operating position. Do not touch the antenna
while making a call.
Accessories
This phone can only be connected to approved accessories and
batteries. Do not connect the phone to incompatible products.
Appropriate Maintenance
Only qualified and authorized personnel should service the
mobile phone. Faulty installation or repair may be hazardous.
Emergency Calls (SOS)
An emergency call “112” can be made from the mobile phone
under any circumstances, and even the phone is locked. When
making an emergency call, you must be sure to give all the
necessary information, such as your name, your mobile phone
number, the location and the crisis situation, as accurately as
18
Page 19

Safety
possible. In order to deliver the sufficient information to a rescue
institute, do not disconnect your phone immediately.
Use with proper care to reduce
electromagnetic interference (EMI)
This product has passed the inspection of the
Directorate-General of Telecommunications, Ministry of
Transportation and Communication. The highest reported
SAR values which are: Head 1.15 W/kg; Body-worn 0.211 W/kg
are lower than the standard value at 1.6 W/kg, maximum.
19
Page 20

Getting Started
Phone Overview
Basic Operation
Warning: Please do not detach any parts and only use
manufacturer original component to keep the quality call phone.
20
Page 21

Basic Operation
Installation & Removing
Installing the battery
1. Press the lock on the bottom and then slide the battery cover
backward and lift up battery cover.
2. Hold the battery and wedge it under two up corners and
press the battery pack into place. Make sure that golden
connector are facing the connector on the phone.
3. Place the cover into the track and slide it forward and lock
with cover latch.
Removing the battery
1. Turn phone off and repeat the above item 1 to open the
battery cover.
2. Lift up the bottom of the battery pack and pull battery by
sliding backward to detach the battery from phone.
3. Repeat above item 3 to recover the battery cover.
21
Page 22
Basic Operation
Important! : Risk of explosion if battery is replaced
by an incorrect type.
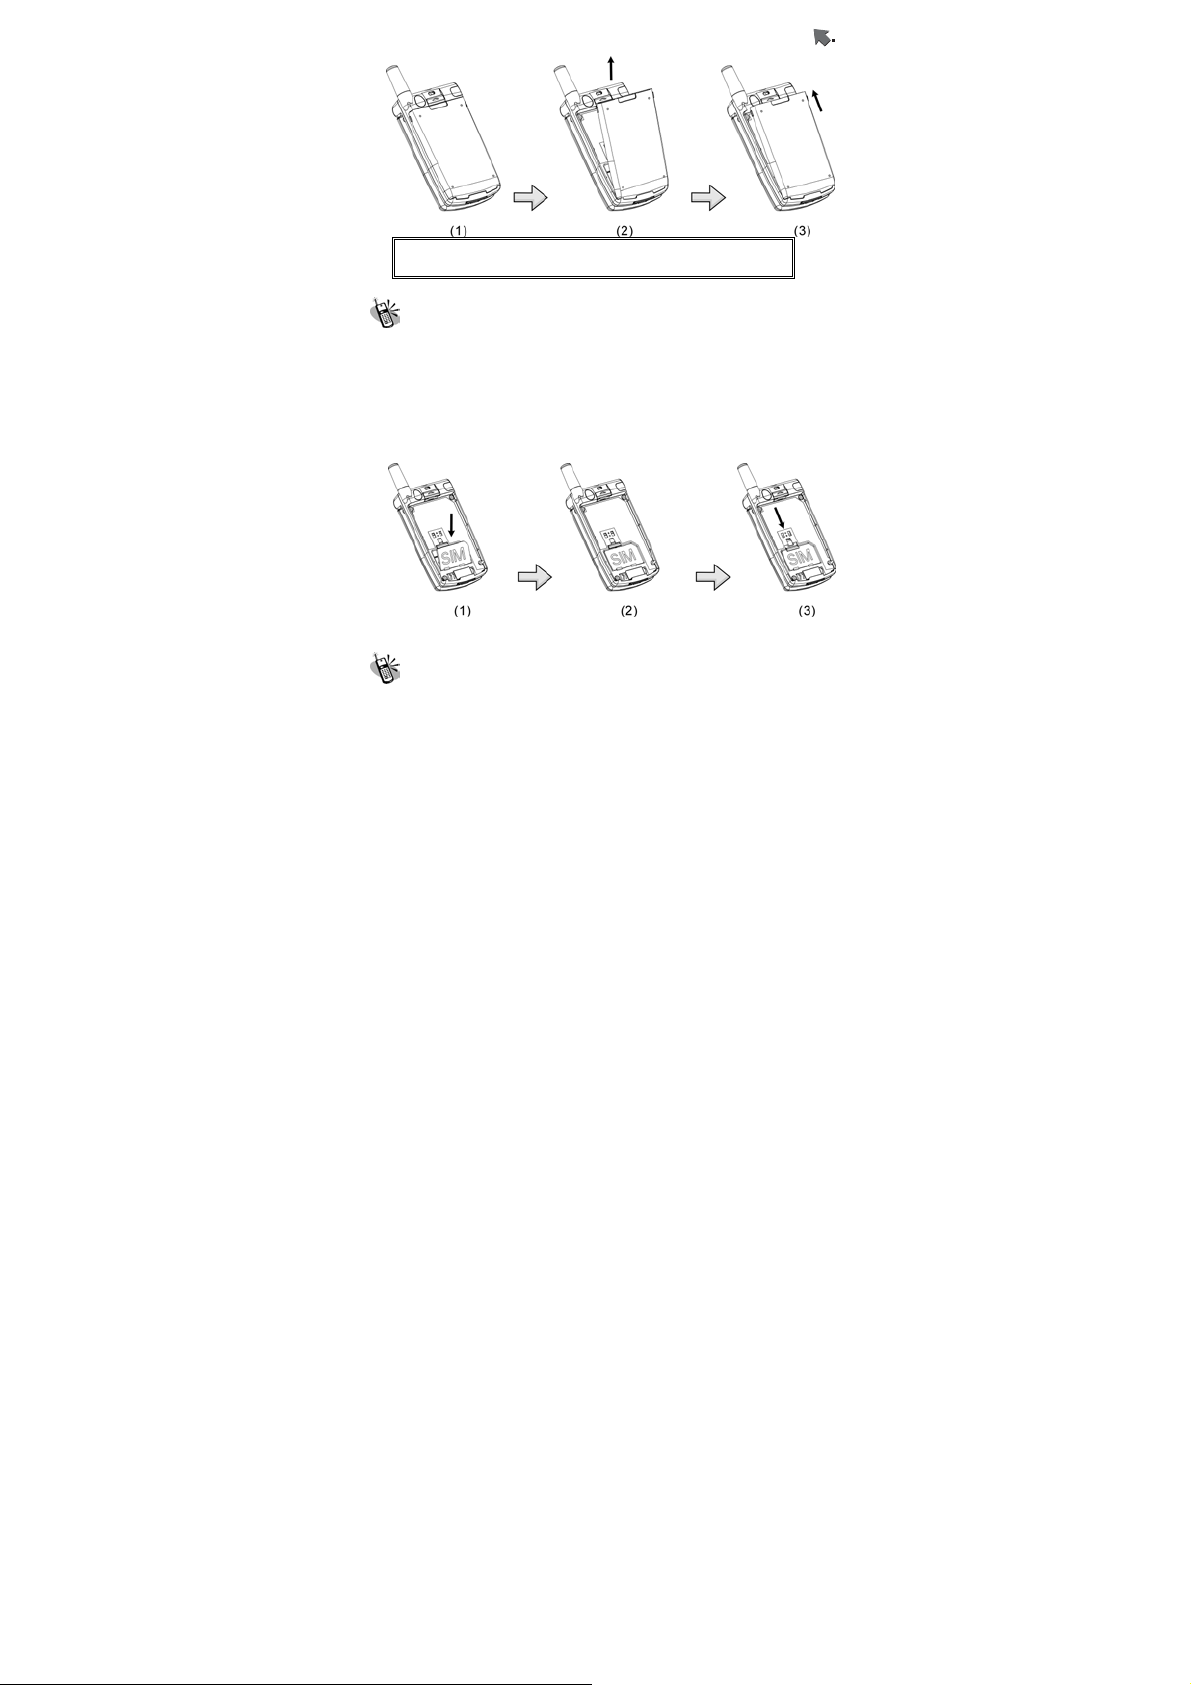
Installing the SIM Card
1. Power off the phone and remove the battery. Make the
SIM card golden contact points face downward and the
oblique-angle edge align to up left.
2. Hold the SIM around 30°
the SIM card bottom into the SIM card holder. Place the
card inside the SIM holder completely and make sure the
SIM latch fixes SIM card.
into SIM card slot and slight push
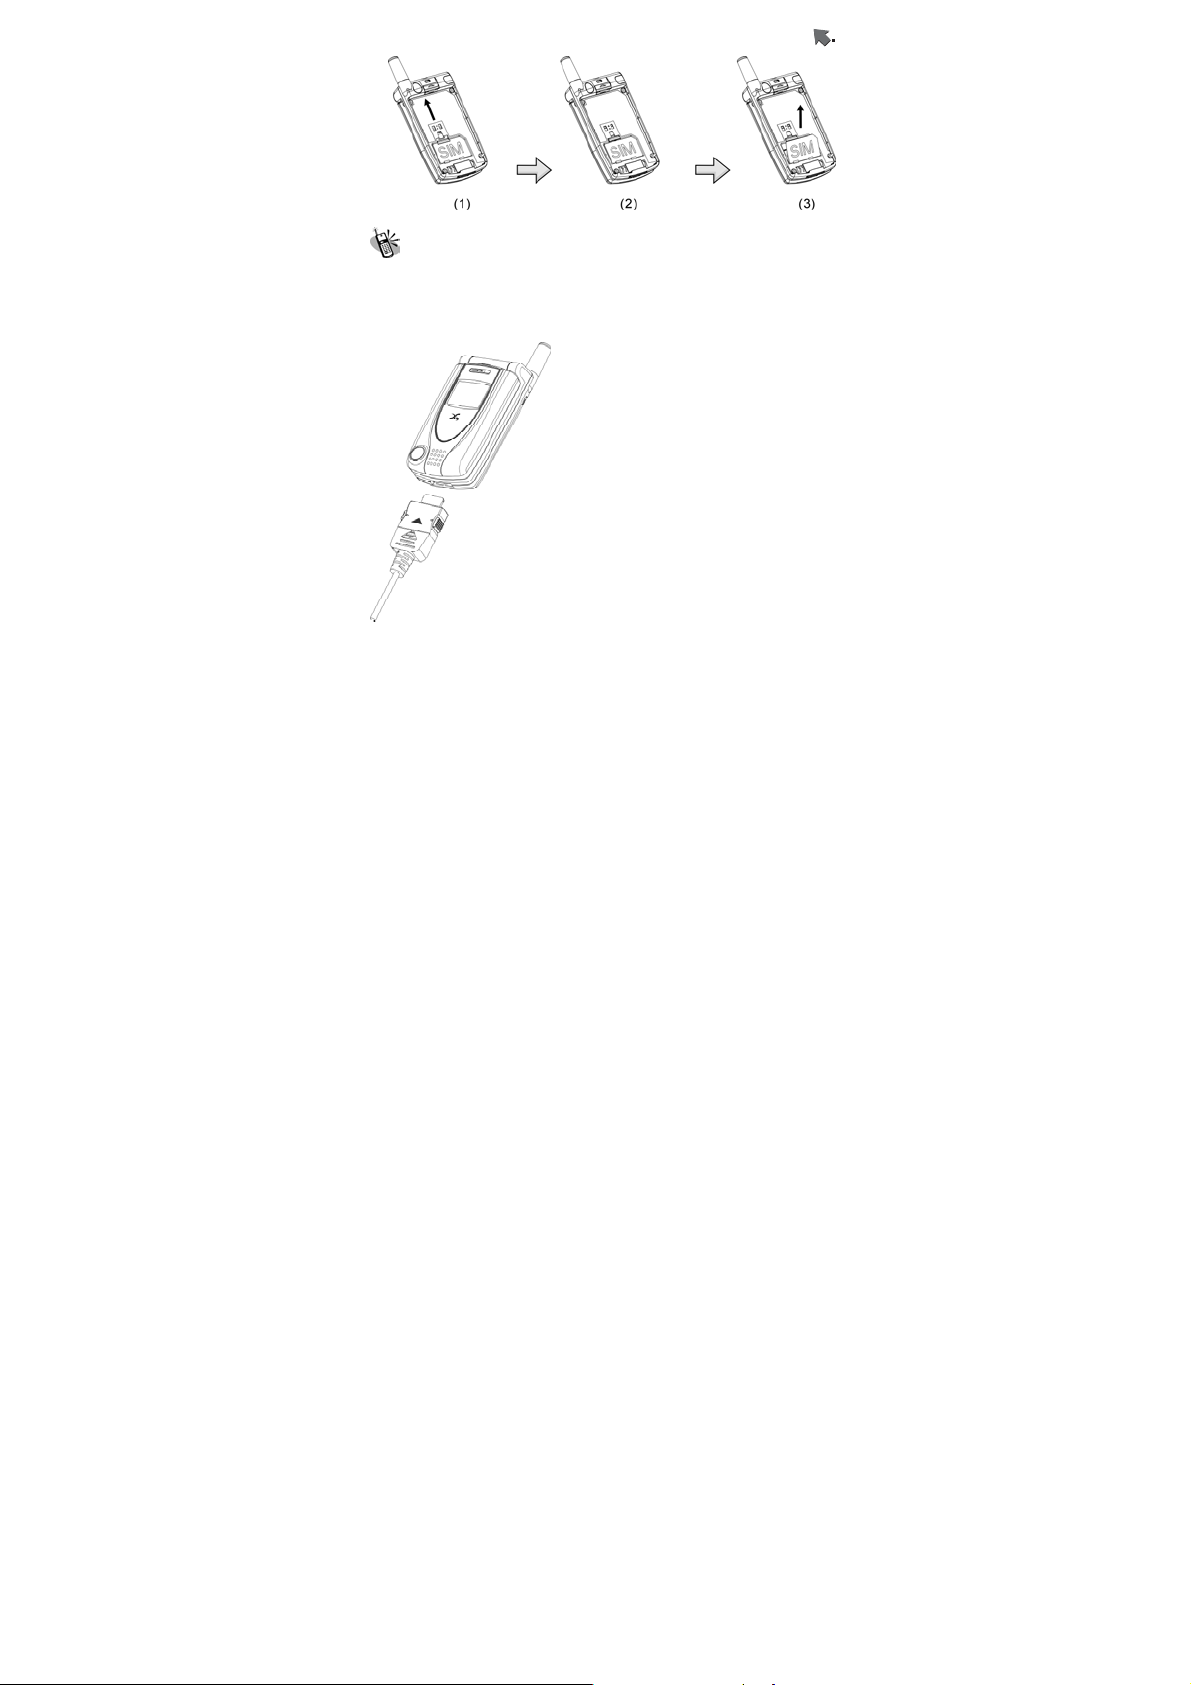
Removing the SIM Card
Power off the phone and remove the battery. Press down the
SIM latch and slide SIM upward to remove SIM from holder and
slot as shown in the figure.
22
Page 23
Basic Operation
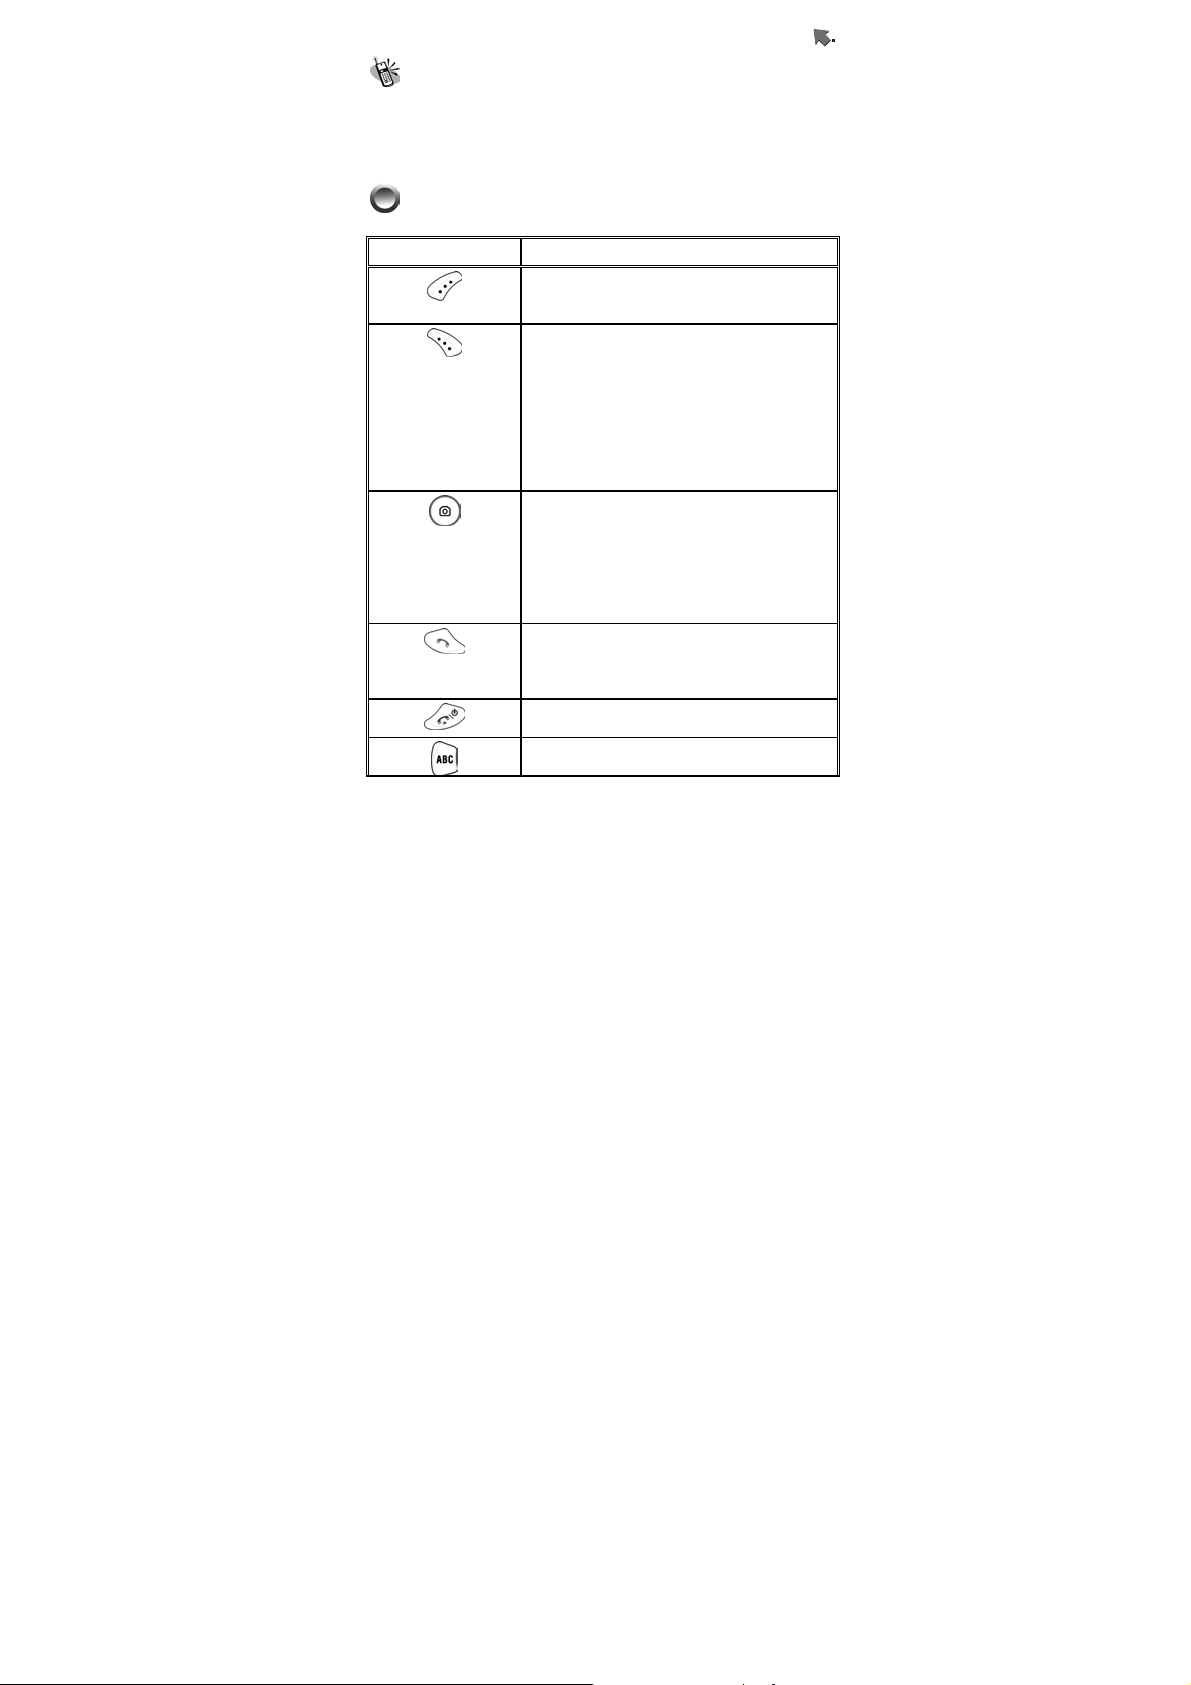
Connecting the Charger
To connect the travel charger to the mobile phone, you should
install the battery first. Follow the travel charger instruction, and
plug the connector with the ∩ sigh upside into mobile phone.
See below figure.
Note:
1. Do not remove your battery or SIM card while charging.
2. Use a compatible or appropriate charger for the phone.
3. Manipulate the charger carefully, the connector might be
damage easy.
23
Page 24
Basic Operation
Removing the Charger
When removing the charger from battery, disconnect the plug
from the electrical outlet. Press the release buttons on two
sides of the connector simultaneously and pull out the
connector from mobile phone.
Keypad Description
Button Description
Accept call and call hold.
Affirmative inputs: OK, Select, Call, save
and Reply.
Negative inputs: End, No, Cancel, Abort,
Quit.
As call is in progress, press this key to mute
the microphone so the other party would not
listen to your voice. Press again to
activate Microphone.
In standby mode, press the key to fast
access Inbox, Profile, hot key setting and
Softkey switch.
Affirmative inputs OK.
In standby mode, press the key to connect
to the internet to view and access Web and
WAP pages. (WAP connection should be
preset in advance.)。
Press the key to activate the voice recording
as call in progress.
Press this key to dial out a call.
In standby mode, press this key to view the
list of the last 30 phone numbers of
incoming, outgoing and missed calls.
End a call. Press and hold this key to turn
on/off your phone.
Press this key to swap input methods.
24
Page 25

Basic Operation
Button Description
Press this key to delete single character,
number, or symbol from the right to left.
Long press this key will enable to delete all
texts and phone numbers.
Push keys to scroll up, down, left and right
for entering function menus, submenus and
setup selections.
Short Cut functions:
Up –swap standby mode pictures.
Down – Phone book list
Left – stay in the 1
st
layer of SMS list menu.
Right – Melody list in Profile.
The symbol of numerals and letters.
Keypads 2~9 are set as hotkeys; refer to
hotkey setup instructions for details.
Push and hold this key for 2 seconds to
launch voice mail box function. Enter the
voice box number (general 3 digits) of your
service provider before using for the first
time.
Push and hold it for 2 seconds and the “+”
will be automatically turn to an international
dial-up code. If you are in Taiwan, “+”
represents the international dial-up code
“002”.
Press this key, and “#” sign will be shown on
the screen; then enter phonebook address
number (SIM: 1 to 3 digits, depend on SIM
capacity, Phone Memory: 2001~2250) and
press the
key to dial out this call as
the other quick way to making a call.
Press and hold it for 2 seconds and then “P”
sign will be shown on the screen; then to
launch Voice Dial function as a hotkey.
25
Page 26

Basic Operation
Button Description
Fast access to make a call with extension
number – Input phone number and long
press this key to pop-up character “P” then
key-in extension number and then press
dialing key.
In editing mode, press the key to switch
input methods.
Press this button to activate and disable
vibration function.
In English Mode, press this key to switch
English letter between upper and lower
case. In T9 input Method, press this key to
switch input methods and symbols.
Adjust volume during a call.
In folder close mode, press Up key to
activate the backlight of Sub_LCM.
Alphanumeric Mapping
The alphabetical and numerical keypad mapping relations are
listed on the following table:
Upper Case Mode Lower Case Mode
1 Space .: /\│1[]{}() Space .: /\│1[]{}()
2
A B C 2 Ä Å Æ ç a b c 2 ä å à æ ç
3
D E F 3 É d e f 3 é è
4
G H I 4 g h i 4 ì
J K L 5 J k l 5
5
26
Page 27

Upper Case Mode Lower Case Mode
MNO6ÑÖ m n o 6 ñ ö ò
6
7 P Q R S 7 β p q r s 7 β
8
T U V 8 Ü t u v 8 ü ù
9
W X Y Z 9 w x y z 9
0
Space + - * / ( ) 0 Space + - * / ( ) 0
*
: * . , “_ @ <> !; : * . , “_ @ <> !;
#
# / =? % # / =? %
Note:
Basic Operation
1. Press
case letters and symbols.
2. By pressing and holding
mode among Chinese input, English input, and numeric
key input.
3. Pressing a number key in the editing mode will result in the
character appeared on the display.
4. Press again the button immediately after releasing, and it
goes to the next character in sequence as above table.
Switching characters will depend upon the duration of the
key press.
5. After releasing the button and wait for a second, the cursor
will move to next spot for new input.
6. If there are any differences between the character sets
listed in the table and on the phone, please refer to the
displayed characters on the phone.
button to switch between upper and lower
, you can exchange the input
27
Page 28

Basic Operation
Display Indicators.
Indicator Description
The battery level indicator. The more the battery
cell is, the stronger the battery is charged. The
battery cell flashes right and left when charging,
until it is full.
The earpiece has been inserted and used.
Indicates that the phone is using a roaming
network.
The vibration function is on.
The mute function is activated. (with blue color)
Both mute and vibration functions are activated.
Alarm is activated.
New message is in mailbox.
Messages are full of inbox.
Shows the signal strength of network connection at
your current location. The more the bar is, the
stronger the signal is received. (The total is four
cell.)
Shows that the data transmission cord has been
inserted.
CSD Connection is on.
WAP browsing is in connection.
28
Page 29

Basic Operation
Basic Operation
Making a Call
1. Power off the phone and install your SIM card.
2. If the battery is out of power, you can still connect to your
travel charger and use the phone normally.
3. Press
key in the PIN number of your SIM card, (please refer to the
Manual provided by the telecommunication company for details)
and press
4. Key in the area code and telephone number, and press
to dial the number.
The SIM Card
Your telecommunication company provides the SIM card.
Please use a small SIM card to fit the design of this phone. For
the SIM installation, please refer to page 22
be used only with legally issued SIM cards and can receive or
send the calls only within the SIM network service range.
Battery and Charger
The Li-ion battery that comes with this phone is rechargeable.
Please use the charger and the battery provided by the original
manufacturer to ensure a long lifetime for the cellular phone.
1. Plug the charger into an appropriate outlet that meets the
requirements of this phone. The other end is connected to
the phone. While the phone is recharging, the screen will
automatically display the current power recharge status of
the battery via a flashing signal. The phone can still function
normally if it is turned on while being recharged. Once the
recharging process is finished, the flashing signal will stop.
2. Once the recharging process is completed, the charger can
to turn on. If the display indicates “Enter PIN ”,
.
. This phone can
29
Page 30

Basic Operation
be disconnected from the phone and electrical outlet.
3. Use only chargers certified by the original mobile phone
manufacturer. This is an international charger (Model:
KWS05C is subject to change in different countries). Read
instructions on the charger label before use.
4. A ‘battery low’ message will be displayed on the screen to
alert you of battery low condition. The mobile phone will
automatically shut down when the battery is exceptionally
low.
5. If the battery is totally out of power, the battery requires to be
recharged at least ten minutes. Otherwise, it might have
difficulty to turn on.
Turning on the Phone
To turn the phone on, hold the key for about 2~3
seconds. If the message “Enter PIN:” shows on the screen, the
preset “PIN:” code of the SIM card must be keyed in (please
refer to the Manual provided by the telecommunication
company for details). Then, press the
key.
PIN and PIN2 (4 to 8 digits)
A PIN (Personal Identification Number) code is stored in your
SIM card and is supplied by your SIM card network provider.
To prevent unauthorized use, your PIN1 code will be required
every time while you turn on your phone. Key-in the correct
PIN1 code and press
Important! :
1. If a wrong PIN code is entered three
consecutive times, the phone becomes
locked or disabled. You must ask for your
network provider to use the PUK code to
unlock or enable the phone again.
2. PIN2 code is for other functions, such as
certain number dialing and barring.
.
30
Page 31

Basic Operation
PUK1 and PUK2 (8 digits)
To enable a locked PIN code, the PUK (Personal Unblocking
Key) code is required. Check with your network provider for the
code. After getting the PUK1 code and unlocking the PIN1, you
can reset your PIN1.
Calling
Enter the area code and phone number, the press
button to dial out a call.
Dialing Emergency Numbers
1. Please turn the power on first. Enter an emergency
number 112; and press
2. Most networks allow users to make emergency calls
without inserting a SIM card. In the case of no SIM card,
you’ll see the
after turning on your phone.
3. In the case of SIM card inserted, SOS sign will be
displayed on the down-left corner and without enter 112
number, press
or keys to dial out.
to dial out.
indicator on the down-left corner
Changing an Entry
Pressing the will delete the last letter or number keyed
which you entered.
Answering a Call
Your phone rings or/and vibrates when receiving a call. Press
or to answer the call. Press to end the call.
If you are using an earpiece, you can press the button of the
earpiece to answer or terminate the call.
31
Page 32

Basic Operation
Recent Calls
The phone will record all the recent calls in which you received,
dial out, and unanswered calls. After pressing
to enter
menu and
out all recent calls. The recent calls can accommodate up to 30
numbers. Press either
and select a number to dial out by pressing
There are five choices you can select. They are “Call”, “Edit
Phonebook” and “Remove”.
to select submenu “Call List”, you can find
button to browse numbers
button.
Speed Dial
You may quickly search a number stored in SIM card by
entering the address (SIM Card: depend on SIM card capacity,
Phone memory address: 2001~2250) of a certain phone. Every
phone number comes with an address number in phone book.
Under standby mode, you can press
sign on the screen and type in the address of the phone number
which you want to dial after the “#” sign. Then, press
button to dial a call.
button to get a “#”
Holding a Call
Pressing allows you to put the on-line call on hold while
you make another call. When the second call is connected,
pressing
allows you to switch between these two calls.
32
Page 33

Basic Operation
Multi-party Calls
1. If, while talking to a party, you would like a third party to
join the conversation, press the
number of the third party. Once the call goes through,
press
2. If you would like to talk to a fourth party, repeat step one to
conduct a four-party call. (This system allows a maximum
6-party call.)
3. If you want to end the connection with any one of the
parties during a multi-party call, you can follow the steps
as below:
(1). Press
(2). Press the sequence number in which the party joined
the conversation. (For example, the sequence number of
the first call is 1 and the one of the second call is 2)
(3). After pressing
multi-party conversation.
Important! :
Before you make a multi-party call, make
and to conduct a three-party call.
, the party now can leave this
sure you do not have a call on hold.
key and dial the
Voice-activated Dialing
Steps for using voice-activated dialing:
1. Store phone data in the phone book.
2. To set up voice calling function:
In the phone book menu, select the number and enter Edit
mode. Use
voice-dial filed, press
key to switch each field. In the
right key to create a new
33
Page 34

Basic Operation
record of voice. The message “Say Name After Beep”
prompts up on the screen. Follow the instructions and voice
the name, in which you want to save, to microphone. After
first time input, the system will play back it for you to
recognize the voice. With your confirmation, the system will
request you to input the second time. If the voice-activated
name is already used in the phone book, then repeat the
above procedure and recreate it. After done, press
right key to Modify, Play and Delete.
3. Using the voice dialing:
(1). Press and hold
screen is on.
(2). After the beep, voice the name for the number you want
to call, into the phone.
(3). The mobile phone will play the sample first. After your
confirmation, the number will be dialed.
key for two seconds or when the
Method of Input
Only under edit mode, you can input the content by various
methods. This mobile phone has ten fields for edit; that is;
name field of Phonebook and name search, content of
Message, rename file name of tone edit, note making in the
calendar, notes for alarm, rename of voice memo files, power
on greeting, WAP file name, rename file name of customer in
the Profile, and the rename of audio and image file names in
File Manager. After enter these items, press
mode. According to the setup of language, you can have
default setting of input method in your own language.
However, if you want to change to other methods, press
enter submenu. For characters input, you can have T9
English, ABC(English), 123 (numeric), T9 Russian and
34
to enter edit
to
Page 35

Basic Operation
Symbols. By using key to select the input method you
want. No matter that T9 English or ABC English methods,
press
pressing and holding
pressing and holding
English, and Numeric methods.
turn on function for upper case and lower case。By
, you can switch to Symbols. By
, you can switch among Chinese,
1. T9 English
While inputting, you can only press the button of letter without
selecting particular one. The T9 English will smartly detect what
you want for written wording. Switch upper case and lower
case by press
first letter 『Eng』, or all in upper case 『ENG』, or all in lower
case 『eng』by switching
『123』.
Example:Smart
Button pressed as follows as below:
press once press once press
once
Only six steps to have a word “Smart” completely. After keying
in 7、6、2、7、8, two words can be selected. One is Smart and
; for example, you can have upper case of
and pressing numeric button
press once press once
the other is Roast. Press
such as “Roast”. Use
yellow highlight. If you want to re-highlight the whole wording,
to select the wording
right key to deselect the
35
Page 36

Basic Operation
press down key to recover it.
36
Page 37

Menu Function
Menu Function
For speedy access with certain options, press to proceed
with Inbox, Profile, Hot Key Setting, and Soft Key Switch. This
mobile phone provides different features and several options to
meet your needs by manipulating
Phone Book
The phonebook menu lets you save the
names and phone numbers in the SIM
card or in the memory of the phone,
press
also have Search, Add Entry, Edit,
Delete, Copy, P. Book Setting and
Memory Status. This menu will show the
records according to the sort you selected, and the detail window
will show the content of current record. Depended on the
selection of SIM or phone itself, phone memory module has 10
to enter this menu. You may
:
fields, and SIM module has 6 fields. You can use
move forward and backward to those fields. If you want to get into
the submenu, press
completely, press to save or discard this record. If
there are three sets of phone number, press
to select the one you want to dial out.
left/right key. With inputting
, and then press
37
to
Page 38

Menu Function
Search
In search function, the “search name” input window will be
displayed on the screen. After typing in the name that you want
to search for, then press
needed, press
in with your list, the first one will be highlighted and all matched
to enter it. When the first letter you typed fits
. If the input methods are
data will be listed down. You can use
view the rest data.
to browser and
Add Entry
After pressing key to launch the function, items of new
record including memory type SIM/Phone, name, tel. number,
caller groups, voice dial, e-mail, address record number, and
birthday, will be displayed on the screen. Blank is not allowed in
both name and phone fields.
1. The phone will automatically assign a memory location to
store the data on the SIM or phone itself according to your
selection.
2. You will need to enter both the phone number and name, and
no data will be stored if you leave any of these two items in
blank. In the name field, press
and press
page 34.
3. Empty filed is not allowed in phone number. Three sets of
phone numbers can be input for handset setting (NVM), and
one phone number is for SIM card setting
4. You may assign a caller group to a phone number, so that you
can identify it next time when it comes in. There are 7 default
again for input methods selection. See on
to enter text entry mode,
38
Page 39

Menu Function
choices accessible by pressing right/left key and
choosing from the submenu; that is, Family, VIP, Colleagues,
Friend, Classmates, Business, and None.
5. Move to the field of Voice Dial and press
this function to record the voice into your voice record. Refer
to page 33.
6. Enter E-mail address to the field with handset setting (NVM).
By pressing
found and entered into it
7. Normally, the phone will automatically generate an address
number on input field. If you want to assign a memory
address to the data, you may enter the address and the
phone will store the data to the address you assign. However,
if you put it empty, no data can be stored.
8. Enter the birthday and date format will be dd/mm/yyyy.
to search _ underscore, and ”.” dot can be
to start
Edit
This function is for you to modify or edit an existed record. Use
items should be manipulated as the same as above “New
function”. In the Voice Dial field, Modify, Play, and Delete can be
selected in the submenu to record the voice, play and remove the
voice from this field
to select the field you want to modify. All fields and
Delete
Select this function to remove the phone record from your
address book. After launching this function, three selections are
39
Page 40

Menu Function
“Delete One”, “Delete All in SIM Card”, and “Delete All in Phone”
in submenu by press
confirmation of this deletion before execute deleting. Press
to save data or
. A message prompt will ask for your
to discard.
Copy
You may use this function to copy single or all phone records to
SIM or handset memory at your will. On launching this function,
the system will automatically provide you an available position.
You may also give a designated position to save your data instead
of system assigned number.
P.Book Setting
1. Caller Group
It is for setting a ring tone in corresponsive with a specific
incoming call. After entering into this option, select one of the six
ring tone groups to setup such as Family, VIP, Colleagues,
Friends, Classmates, and Business by
key to enter this option, the key to select the ring
tone from the list, and press to play the tone. Press the
key to switch the selected tone.
key. Press the
2. Sorting
This function is for you to select the way phone number is sorted
40
Page 41

Menu Function
in your phone list. You may sort By Pinyin (Chinese Phonetic Alp)
or By Alphabet and save the sort setting into the handset.
3. Display SIM Records
There are two display modes. One is to display the phone
numbers that are restored in handset only. The other is to
display all the phone numbers no matter that are saved in handset
or SIM card. You can switch your screen to show the phone
numbers by handset only or by all at your willing.
Memory
This provides inquiry about the total number of records and the
empty spaces left for the phone records in the current SIM and the
memory of the handset. Also, you can know how many Voice Dial
numbers is in phone list.
At this stage, memory size of SIM is 100 records in total and that
of handset is 250. Voice Dial only is sum up to 20.
Camera
The camera is embedded on top of
the sub LCD screen. Press to
enter the camera function and setup
camera options. Press
enter directly into snap shoot mode.
key to
Snap Shoot Mode
You can take a picture when enter into this mode. Press to
take a picture, you can then hear the camera sound, the picture
taken will be save automatically info photo album then display on
the screen. Press
to select more options, which include
41
Page 42

Menu Function
save picture, delete picture, send MMS, save as wallpaper, save
as caller picture, browse photo album and re-name.
Photo Album
Enter this option to browse pictures in the photo album, use the up
and down directional key
Press
MMS, save as wallpaper, re-name, delete file, delete all files, sort
file, and view details.For more detailed descriptions on these
functions, please refer to page 52 on File Manager.
to select more options, which include open file,send
to scroll and view each picture.
Camera Settings
While in the snap shoot mode, press to enter camera
settings.
1. Night Shoot Mode
This function allows you to take picture in poor lighting conditions.
You can choose to enable or disable this option. When enable, the
indicator
2. Image Frame
This function allows you set frame for your picture; there are 10
sets of frames to choose from. You can choose to enable or
disable this function. When enable, you can press
switch between frames.
3. Special Effect
will be displayed on the top left corner of the screen.
to
42
Page 43

Menu Function
This function allows you to select different special effects for your
picture. These effects include embossment, negatives, sketch, oil
painting, black/white and sepia.
4. Continuous shoot
This function allows you to take four continuous shoots. You can
set the interval in between each shoot to 0.5 seconds, 1 second
and 1.5 seconds, then press
you can see the indicator
the screen. Press
had been taken, they will automatically be saved to the photo
album and then displayed on the screen. Press
more options, which include
open file, delete file, send MMS, save as wallpaper, save as caller
picture, browse photo album and
re-name.
to take the pictures, after all four pictures
to enable it. When it is enable,
displayed on the top left corner of
to select
5. Two stage snap shoot
When this function is enable, two pictures taken one after another
will be merge into one.
6. Image size and quality
Here you can choose between picture size of large (352 x 288
pixels),normal (128 x 143 pixels) and small ( 64 x72 pixels), the
default is set to normal. When image size is smaller, the less
storage is require, hence more pictures can be taken. However
please note that when the image size is set to format other than
normal size, the screen display of the picture will not be as it
should be .You can also choose between picture quality of low,
normal, and high, the default is set to low.
7. Advanced
Timer
43
Page 44

Menu Function
Timer can be set to 5, 10 or 15 seconds, the indicator will be
displayed on the
top left corner of the screen when this function is enable. Press
key again,the picture will be
taken after the timer run out.
Add date
Activate this option to show the date on the image.
Add Text
Enable/Disable this option
Set text position
Set the text to be position on the top, in the middle, or at
the bottom of the picture.
Set color
Press right or left directional key
palette then use
Input content
You could input the content after the cursor is position in
the input box,press
Set file name
Press key to enter the input box and enter the
desired file name.
Camera sounds
When switch on the camera sounds, a tone will be hear
when taking a shoot.
to enter
to select the desired color.
key to select input method。
44
Page 45

Menu Function
Info Display
When you switch on this option, you can then see
indicator displayed on the screen when different function
is enable; For example
、 、 、 、 etc.
Softkey display
Here you can choose whether to display the selection
keys and on the screen.
Reset settings
This will restore factory settings.
Messages
This phone allows you to send and
receive various kinds of messages.
Please contact with your network
operator for more details on which
service you could use.
SMS
Press to enter this menu, after you finished editing
your message and the recipient’s phone number, press
to enter into the sub menu that include options of
send, send & store, send & save to pre-message, and
store. Send option allows you to send out the
message. Send & store option allows you to store
then send the message at the same time. Send &
save to pre-message option allows you to store the
message as pre-message then send it out at the
45
Page 46

Menu Function
same time. Store will only store the message onto
the SIM card
1. Write
Press to enter the message editor. Press
while in the editor allows you to switch between input
methods. You can add text, pictures, animation, and
sounds into your message.
If you would like to add pre-message, pictures,
animation or sounds into the message,
Press
select the items, then press to
and use the directional keys to
confirm.
For details on how to use text input method, please
refer to page 17.
When entering the recipient’s phone number, you
can press the down directional key
to
enter
phonebook and search for the number directly or
enter it yourself. After that, simply select whether to
send, send &store, or store the message.
2. Inbox
When enter into the inbox, you will see a list of all
46
Page 47

Menu Function
message received (both on the phone and the SIM
card) including the name or phone number of the
message sender and the time you receive it. All
unread messages will be indicated by the”
Press
key to select and display the content of a
” icon.
message onto screen. For multiple pages message,
you can use the up and down directional key
to look through the entire message. Press
to select more options, which include; delete
message, forward, reply, call and store number.
Delete option allows you to delete this particular
message from the phone or SIM card. Reply option
allows you reply a message to the sender of this
message. Forward option allows you to send this
message to others. Call/Store option will list all the
numbers in the message and you can then select a
number to call out or store to the phonebook. To
delete all the messages in the inbox, you can select
the delete all option at the bottom of the list.
3. Outbox
Functions for outbox are the same as inbox. After
editing a message and select send &store, it will be
store in the outbox with the icon
with the icon
when select store only.
and indicate
4. Delete message
47
Page 48

Menu Function
Similar to the delete function above, press and
you will be prompted to confirm whether to delete the
selected message from inbox or outbox.
5. Free count
This function allows you to check the total amount of
messages that can be store plus the amount of free
space available currently on both the phone and the
SIM card. Message will be save onto the phone by
default, and will be save onto the SIM card once the
phone is full. The total amount of messages that can
be store on the phone is 100. The total amount of
messages that can be save onto the SIM card will
depend on each individual SIM card.
NOTE:
In situation where one or more messages in inbox/outbox are
long messages, each of these long messages will be
considered and calculated as two, three, or more messages.
Therefore, the free space available displayed will actually be
less than the total amounts of messages that can be store
deduct by the number of messages in inbox/outbox.
6. Settings
Pre - Message
Here you can add up to eight frequently used
messages and save them as pre-message.
These messages are all empty by default.
SMS Center
This menu item allows you to set the SMS center
48
Page 49

Menu Function
number. (Please contact your network operator for
details)
Validity Period
If your message can not be delivered, for example, if
the recipient has turned off the phone, your service
center can save the message to send it later or until
the valid time expired. You can set the validity period
to twelve hours, one day, one week, one month, or
maximum period.
Auto Display
When this option is enable, a notification will appears
after a message is received, you could then choose
whether to read it now or later. If this option is disable,
you will only see the indicator
display on the
screen plus a notify tone when a message is
received.
Status Report
When this option is enable, you will be notify by the
SMS center once the message sent has been
delivered to the recipient.
Storage Area
This allows you to choose whether to save the
message on the phone or on the SIM card.
MMS
Multimedia Messaging Service (MMS) allows you to send
message that contains text, pictures, animation, and sound
to other mobile phone and email account, the contents in
49
Page 50

Menu Function
the message will be presented as slides. This phone is
capable of sending a MMS of approximately 50K at a
time. The total storage on this phone is around 5 MB for
you to save all your text, pictures, animation and sounds.
1. Compose message
You can edit the MMS here. When enter into an input
area, press
methods, for example T9, ABC, numbers, emotional
icons and regularly used internet symbols. Use the
to quickly bring up a list of input
directional key
methods and press
to select from the different input
to confirm. The selected input
method will be display at the bottom right hand corner.
NOTE ∅ If the warning message “MMS connection
not set“” is display after you attempt to
compose a new message,please set up the MMS
connection by selecting your network operator
from the default connection list. (MMS Settings >
Connection > Add from list)
New
Here you can add text, image and sound into
the message by selecting each item using the
50
Page 51

Menu Function
directional key then press .
Press
to return to the previous menu.
In text input area, press
select a template you want to edit or start edit
a new message. Refer to the description on
the previous page on how to edit contents
while in input area. To add an image, you can
select which folder you want to add it from;
photo album or image folder. To add a sound,
simply select a sound file. To add a slide, use
the directional key
cursor to ”+” then press
go into next slide. Press
editing, you can choose to save it as draft
before leaving.
MMS menu options include;
Send message
Press to enter the option then press
again. When prompted with the dialog “Send
this 1K message” select “yes” to send the
and to
to move the
to confirm and
to exit from
51
Page 52

Menu Function
message. Use the directional key to
move the cursor onto “Address Book…” then
press
to select number from the phonebook
or you can enter into the input area. When
entering multiple addresses, they should be
separate by a space. After you complete the
inputs, press
to enter option menu. You can
use the directional key
cursor while in the menu. Options include send
MMS, send Email, cancel and advanced. Press
following four options; press
an option,press
previous menu.
a. Delivery time:Delivery time allows you to set
to move the
to select an option. Advanced include the
to enter into
to save and return to the
the date and time you want the
message to be delivered to the
recipient. Validity Period
allows you to set how long the
message will be available for
the recipient to download; you
can set it to
30 minutes, one
hour, six hours, one day and
52
Page 53

Menu Function
one week.
b. Message title:After select this option, press
key to enter the input area,
press
again to starting
editing. For detail description
on input method, please refer
to page 17.
c. Priority:This allows you to set the priority of
the message. There are three
kinds of priority to choose
from; low normal and high
Message class allows you to
set the class of the message,
which include personal,
advertisement and
informational.
d. Carbon copy(cc) and Blind carbon
copy(bcc) :Use the
directional key
move the cursor onto Cc…
to enter phonebook
Bcc…
to
或
directly or move it to the input
area and press
then press
key again to start
editing。For detail description
53
Page 54

Menu Function
on input method, please refer
to page 17.
Preview
You can preview the MMS here.
Save
You can save the contents of the message as draft
and complete it at anytime you want
or you can save it as templates.
Settings
You can use the directional keys to
move the cursor then press
to select from the
two options; slide duration, and slide format.
a. Slide duration:You can set the duration of
every slide in a MMS to be
display
b. Slide format:You can set how the image is
position on the screen from
four different options; image
at the bottom, image on the
top, image to the left or image
to the right.
Add slide
Delete slide
54
Page 55

Menu Function
From Templates
There are five defaults MMS templates to choose
from. Simply select and open the template you
wanted to start editing it.
Broadcast
Broadcast message are message send by the network
operator to all users in a certain area.
network operator for more details on whether they provide this
service.
Read
This allows you to read the last broadcast
message receives. Only the last message will be
store here.
Filter
This allows you to select the type of broadcast you
want to receive and filter out the un-wanted
one.
1. All: Receive all broadcast messages
2. None: Not to receive any broadcast messages.
3. List: List all the broadcast channel you want to
Please contact your
receive broadcast message from, different area will
have different broadcast channel number. You can
add and delete any channel from the list.
55
Page 56

Menu Function
Auto Display
This option allows you to set up whether to
automatically display broadcast messages onto
screen
upon receiving.
Voice Mail
Listen to voice message
Here you can dial out directly to your default voice
mailbox number. (You need to set up the number of
your mailbox before you use this function.)
Voice mailbox number
Here you can enter your voice mailbox number. The
number you enter will be save on the phone, so if
you change the SIM card (different network operator),
please also change the corresponding number;
otherwise you will not be able to successfully dial out.
If you have not set up your voice mailbox number
before, you will be prompted to enter it when you
press the voice mailbox hotkey
your network operator for the voice mailbox number.
Note
You could enter directly into your voice mailbox by press
and hold key while in standby mode。
. Please contact
56
Page 57

Menu Function
Profile
There are 6 profiles (Typical, Silent,
Outdoor, Handsfree, Meeting, and
Customer) to meet your different needs.
After selecting a suitable profile, push
Activate to enable profile. If you want to
personalize the profile, launch the
Adjust menu and select the item you
want to personalize.
Adjust
You can change the setting of the follow profiles with this function.
1. Activate
Activate all settings under the selected profile.
2. Ringtone and Volume
Using the keys allows you to select the ringing tone
pattern. When the tone is selected and is played, you can set up
the volume of tone at the same time. There are 34 different
ringing tones or melodies for your selection.
3. Key Sound
You can set on/off the volume of the keypad tones. They are
DTMF, Silent, Normal.
4. Crescendo
In this menu, the ring tone is adjusted to ascending. It can be
turn on or off.
5. SMS Rec Tone
57
Page 58

Menu Function
When receiving SMS message, the phone will alert you with ring.
You can select to turn it on or off.
6. Vibrator
You may switch on/off the vibrator. This feature depends on which
model you are using.
7. Service Tone
When this function is set on, the phone will generate a tone when
a network is available.
8. Auto Answer
Under this menu selection, you may enable or disable the auto
receiving function for incoming calls while you are using an
earpiece.
9. Rename (Only in Customer mode)
On the selected file, enter dialogue box to rename the file name.
Under the edit mode, press
34.
to enter Input Mode on page
Call Lists
This menu records the charges and
the length of time or duration of all
incoming and outgoing calls in hours,
minutes, and seconds. Please
contact with your telecommunication
company for providing charge
information.
Missed Call
After entering this menu selection, the screen will display all the
58
Page 59

Menu Function
missed call. You can use select one of records, press
to call, move to phonebook into your SIM or handset
memory for save and remove.
Launching the menu and listing all the missed call. One more
function is listed on the manual “Delete All” records of call lists.
Incoming
List all of answered calls. The functions are the same with above.
Outgoing
List all of dial-out calls. The function is the same with above.
Call Info
This menu records the charges and the length of time or duration
of all incoming and outgoing calls in hours, minutes, and seconds.
1. Last Call
This displays the duration of the last call.
2. Total Calls
This displays the total duration of all incoming and outgoing calls.
3. 1-minute Beep
This sends you a warning beep every minute (Beep will be
activated at the 55 seconds), while a call is in progress.
4. Charge Info
This function allows you to calculate telephone fee to facilitate
cost control.
Note : This function including Total Charge, Max Charge and
59
Page 60

Menu Function
Unit Price will be supported by telecommunication service
provider. Please contact with your supplier for detail.
Total Charge
This displays the total charge of all calls. Pressing allows
you to reset the value, but it requires entering PIN2 before you do.
Max Charge
This allows you to set a maximum limit to your total cost. You can’t
dial any number if you go over your limit until the total charge has
been reset. As similar to total charge, you need to enter PIN2 for
setting.
Unit Price
This allows you to enter the unit price. After entering your PIN 2
code you can input price and unit. Pressing
to select different entry fields.
60
allows you
Page 61

Menu Function
Settings
Your phone offers many options,
making it your best partner.
Personal
1. Language
You may select the display language in this menu. There are
English, and Russian.
2. Greetings
You may enter greeting words in the edit window so that the
phone will display greetings each time you turn it on.
3. Power On/Off Melody
You may select the melody that will play each time you turn the
phone on.
4. Folder On/Off Melody
You may select the melody that will play each time you open or
close the folder.
5. Hot Key Setting
Reset shortcut keys have the following functions:
Long Key 1 is predefined as Call Voice Mail Box.
2. Messages ------------------ Long Key 2
3. Silent ----------------------- Long Key 3
4. Show Clock ------------------- Long Key 4
5. Calendar -------------- Long Key 5
6. Calculator ------------------ Long Key 6
7. Record ----------------- Long Key 7
8. Voice Dial----------------- Long Key 8
9. Standby Mode ----------------- Long Key 9
61
Page 62

Menu Function
This function allows you to press a designated key for 2 seconds,
while in idle mode, to activate a function.
If users want to change the programming of shortcut keys, please
follow the procedures described below:
a. Enter the menu. Use
used for setting. Press
b. Then use
Press to confirm.
again to choose the function to be set.
to select the numeric key to be
to confirm.
6. Own Number
You may store the SIM number in the phone.
Clock
You may set time, date, alarm and auto on with the clock setting
function.
1. Set Date
After launching the menu, push the keys arrow to
select setting date, time, data format and time format. If you select
12-hour system, the cursor will stop at AM/PM, push the
arrow keys to select AM/PM. You may push the
62
Page 63

Menu Function
Available date formats: yy/ mm/ dd or dd/ mm/ yy or mm/ dd/ yy.
arrow keys to select date and time formats.
Available time formats: 24-hour or 12-hour
2. Set Alarm
It provides a set of alarm ring tone. The user may set the date,
time, melody, (貪睡鬧鈴)and note of the alarm by using
You may select three different modes: Disabled, Once, and
Daily.
3. Power Off
In this menu, you may set the function and the time of turning off
your handset daily.
Screen
1. Standby mode
There are 3 standby screen modes: picture and text, clock, digital
clock and calendar.
2. Color Theme
You may adjust the color background, and wording for the
subjects of menu functions.
3. Network Name
You can decide whether display the name of the networking
phone company on the screen.
4. Show Clock
Set “show clock” to display time and date on the screen.
5. Standby LED
.
63
Page 64

Menu Function
After this Standby LED function is enabled, the standby flash will
be around 5 Sec to discharge interval.
Call Setting
1. Call Waiting
You may set the call waiting function on and off in this menu.
Activate
After you have set the call waiting to Activate, you will be alerted
by audio and video signals when another call is coming in while
you are making a call.
Cancel
If you set this function to Cancel, the phone will not alert you of
another incoming call but directly divert that call to other number
or your voice mailbox.
Status
It reports current status for Activate or Cancel
2. Divert
Call divert is a common telecommunication service, when you are
unable to answer a call or the signal is out of service range, you
can divert all incoming calls to another number.
Forward to
Set the number you want your calls be diverted to and the Delay
before divert (default is 15 seconds). When a call comes in, the
phone will divert the call to the preset number after the delay time.
Unreachable
Set “divert when not reached” function on or off.
If No Reply
Set ‘divert if not answered’ function on or off.
All Calls
Set ‘divert all calls’ on or off.
64
Page 65

Menu Function
If Busy
Set ‘divert when busy’ function to on or off.
Status
Get status of all divert functions.
Cancel All
The function of this option will cancel the setting for diverting all
incoming calls.
3. Answer Mode
Press any key to receive the incoming call when this function is
enabled.
Normal answer
Press
Any key answer
Press any key to receive the incoming call.
Folder answer
Open folder to answer incoming call.
to answer when this function is enabled.
4. Present Number
This option sets the handset to show or not to show its phone
number when dialing out a call.
Network
This menu allows you to select and register with the network
that you want the phone to use.
1. Select Method
When the phone is switched on, it looks for available networks
and then selects one of them. You can also manually select the
desired network from the list.
2. New Search
You can search available networks and manually select one of
them.
65
Page 66

Menu Function
3. Select Sequence
You can add the networks by manually. Enter the Country Code
and Network Code to add the new network into the list.
Security
1. Bar Calls
Call barring is a telecommunication network function to enable
users to bar both incoming and outgoing calls in different
conditions. Enter the Supplementary Services Password
(obtainable from service provider) before setting up call barring.
Please set mailbox to OFF before applying call barring.
All Out
You may bar all out calls (except emergency call) with this
function.
Out Intl
You may bar all out international calls with this function.
Out X Home
You may bar all out international calls during roaming except calls
to home country.
All In
You may bar all ingoing calls with this function.
In If Abr
You may bar all ingoing calls (roaming) when you are abroad with
this function.
Status
You may check the status of call barring with this function.
Cancel All
You may cancel all barrings this function.
Note: The availability of barring services is subject to the
network functions.
66
Page 67

Menu Function
2. PIN Check
This function provides you with two options. One is to make PIN
Enable, and the other is to make PIN Disable.
3. PIN Change
Make sure that you have PIN enabled. When you switch the
power on, the phone will prompt you to input the PIN number.
4. PIN2 Change
Changes the PIN2 number. You need to input the original PIN2
number before you make changes. (Please contact your
telecommunication company for detail.)
5. Fixed Numbers
This function only dials the numbers in the fixed dialing
phonebook. (It needs the PIN2 number).
6. SIM Lock
This function allows you to lock the phone with a specific SIM card.
This feature is designed to prevent somebody else from using
your lost or stolen SIM card(s).
Set Lock
To activate the SIM lock function.
Change PCK
This allows you to change PCK code.
Note: The factory default PCK is supported by the
manufacturer is (0000).
Reset Setting
After entering into this option, you may select whether or not to
convert the settings of your handset to the reset settings.
67
Page 68

MMedia
File Manager
Under file manager menu, Image, Audio,
and OSD frames can be manipulated as
below functions.
Open File
On the selected file, press to open
it as full screen display.
Send MMS
Menu Function
By using to select the file, press to send MMS.
Refer to page 53
for detail.
Save as Wallpaper
You can save the file as wallpaper.
Save to P.Book
You can save the file as picture displayed when the call is coming.
Rename
On the selected file, enter dialogue box to rename the file name.
Under the edit mode, press
38. Chinese file name is not supported.
to enter Input Mode on page
Delete
Delete the selected file.
Delete all file
File Sort
Enables all files sorting.
By Name
68
Page 69

Menu Function
By Date
By Type
View
List
Press to display selected image.
Icon
Display 9 image files on the screen at the same time.
Detail Info.
The detail information will include image type, file name, file date,
and file size.
Image
In the phonebook, there are image files will be displayed on the
screen when you review or browse it or when you receive the
calls. Those images will be managed and stored under this
folder.
Audio
Ring tones or download audio file are stored under this folder.
Free Space
This menu tells you the total space stored and how much free
memory space is available.
Game
1. Game
69
Page 70

Menu Function
Puzzle
Choose your own picture from camera snapshot, last game, or file
manager to start game. By using
till the whole picture is well compiled. Press left soft key
for viewing the picture and press
the user to turn on or off the game sound.
to move empty grid
to exit the game. Enable
Hostage Salvation
Choose the picture for bad guy from camera snapshot, last game
or file manager to start game. By pressing 1 to 9 numeric keys,
shoot the bad guy and win 10 points for each shoot. In case
innocent figure shot, 5 points is deducted. Total time is 2
minutes. Enable the user to turn on or off the game sound.
Reversi
Before starting a game, the sequence order must be selected
(“Play First” or “Player Later”). When the game starts, you can use
the surrounding of white piece. When the chessboard is full of
pieces, if there are more blacks than whites, black wins the game.
The game under this section allow you to save and continue the
game without restart over every time. Press
score and pause. Press the same button
game. You may also save the score and exit the game by
pressing
game, select stored game to continue the game when you left last
time. Any incoming calls while playing games, you may press
keys to position the black piece. Press to confirm
to save your
to continue the
to leave. When you next time enter to the same
70
Page 71

Menu Function
button to answer the call and save the game that is been
played.
Coin Elf
Before the game, you can read the help. When the game start,
the coin should be selected on the screen, The money master will
follow the coin to move, the player have to move and lead the
money master to win the treasure. Press
to pause the
game,, and use
to move.
Tone Edit
Under this function, you can create your own tone and setup them
as your ring tone under Audio Profile. There are total 5 tones are
allowed you to edit. Press
edit, reset, tempo, instrument, and name。
1. Play
This section sllows you to display the edited melody from the
mobile phone. Press
system will exit until the melody is complete played.
2. Edit
Keypad functions
Numeric 1-7 represent the musical notation from Do toSi, 60
notes can be entered.
High octave
Delay in one beat for previous note
A res t
to enter edit mode including play,
to exit while playing. Otherwise, the
71
Page 72

Menu Function
Raise half tone or a dot to extend half beat for previous note.
One extend (half beat or a quarter beat) and lower.
Edit
follow the steps below:
a. Press numeric pads 1~7 to select note. Press
one beat for previous note, display on screen as”-“. Press
enter a rest note displayed as”0 “
b. Press
c. Press
on screen.
d. Press
and for lower octave “.” If higher octave is selected, there won’t be
any mark for lower octaves.
to switch into higher octave
to raise or lower half tone, “#” or “.” is displayed
to switch for long note “-half tone = a quarter tone”
to delay in
to
e. After a tone is edited, press
next position, and then continue editing the next tone.
f. If the setting is not correct, please move the cursor to the
incorrect symbol to have direct revision or move the cursor to last
the note and press
g. Once editing is complete, press
restore the original setting, press
to delete the note and re-enter.
to shift the cursor to the
to exit. If users want to
to cancel the editing.
3. Reset
After confirming to tone reset settings, the defined tone will be
clear.
4. Tempo
There are 5 modes: More slowly, Slowly, Normal, Fast, More fast.
You can select any of the modes to adjust the rhythm.
72
Page 73

Menu Function
5. Instrument
Select the instrument to edit the tone including BritePno, Marimba,
Harp, Crystal, and Banjo.
6. Rename
Allow you to enter the name for the tone. Under dialogue box,
press
page on page 38
to enter edit mode. For Input methods, refer to
.
PIM…..…….…….
Under this function, you can do simple
mathematical calculations and
currency exchanges.
Calcuator
1. When “ 0 ” is shown enter the
operational digits. (press
2. Choose operational sign: See on the screen
shown + ~addition; shown -~ subtraction,
key for decimal point)
3. Enter second number.
4. Press
during the operation, press
shown *~ multiplication, and /~division
or key to get the result. If a mistake is made
key to make a correction.
73
Page 74

Menu Function
Holding key for few seconds clears all the digits.
Calendar
You may check your reminders in this menu. First, the current
date will be displayed.
Push the
date, push
and push
the arrow keys to select a reminder, and then push
launch the selected reminder menu (View Day Note, Make Note,
Erase Note, View All Notes, Go To Date).
arrow keys to select
to launch calendar menu,
to exit menu. You may push
to
1. View Day Note
Select today’s reminder to view content, and push to edit
or erase content.
2. Make Note
You may select reminder type (reminder, phone, meeting,
Birthday).
Push the
including Meeting, Birthday, Anniversary, and Customize.
Set date:
Set time:
Set alarm: After the time and date of the reminder are keyed
arrow keys to select reminder types which
74
Page 75

Menu Function
in, press the key to set the alarm for the reminder, and
key to shut off the alarm of the reminder.
the
In the reminder field, you can input the memo. Refer to text input
methods on page 38
.
3. Erase Note
Select erase types: erase reminders of chosen day, erase one by
one, erase all, and auto delete. In auto delete, there are 3 items;
they are auto del 1 month before, auto del 2 month before, and
auto del 3 month before.
4. View All Notes
While checking all the notes, press
to enter the delete,
modify or move data menu option. Press
content of each individual note. If the content is over a page long,
press
key to change pages.
to view the
5. Go To Date
Enter the date on which you want to receive the reminder.
Exchange Rate
For first time users, push buttons to move cursor to Set
Rate to key in exchange rate for Domestic and Foreign. After
75
Page 76

Menu Function
setting, enter the Domestic currency value, the Foreign exchange
value will be automatically calculated on the screen.
Voice Memos
Voice reminder allows users to record a maximum 20-second
audio input. The main advantage of this function is to assist users
in record messages when they do not have a pen and paper at
hand.
1. Record
When users want to record messages, they simply enter this
menu and press the “Record” key to start the recording process.
2. Playback
Playback
When users want to play the messages, they simply enter this
menu and press the “Play” key to listen to the recorded message.
If there is a * mark before a certain record, it means the message
has not been played before.
Delete One
In this menu, users can delete the saved records individually.
Label
When users enter this menu, they can check the time, date and
record length when a certain record was recorded.
3. Options
In this menu, users can select one of the following methods of
recording:
Self Only
When this function is on, it can only record the conversation of this
phone content.
Other Party Only
When this function is on, it can only record the conversation of the
call content.
76
Page 77

Menu Function
Both
This function enables users to record directly from the callers and
the content of conversation.
Note: The ‘2-way recording’ (default) will be resumed after
each recording.
When on the line, press
to confirm recording.
to enter record item, and press
World clock
After entering into this option, you may press keys to
browse the current time of the place over the world.
Set Location
You may set your present location to browse the time in
different countries with the time display function.
Automatic
The mobile phone will automatically set the location for you.
Manual
You may select your own location
with the manual setup.
WAP
Access WAP
You can use this function to browse
the World Wide Web to get the latest
information. The data will appear in a special format compatible
with your mobile phone. You might have to register with your
77
Page 78

Menu Function
system service provider to be able to connect to the World Wide
Web.
Graphic and Message of Browser
Shows the version of OPENWAVE and Copyrights.
Definition of WAP Keys
Button General Long Key
Return to previous page
or clear figures.
When input words, use
shift to switch between
capital and small letters.
Call out My Favorite
End WAP
Return to previous page or
clear figures.
Call out browser menu
Favorites
You can connect with the Internet immediately by using the
bookmarks.
There are 1-12 my Favorites are set on screen. Browser them
78
Page 79

Menu Function
by using . On the selected item, press to access
internet.
Press
Folder, Delete all, and Hotkeys.
If there is not existed bookmark within folder, manipulate
to select other function such as New Bookmark, New
bookmark and Hotkeys. If the bookmark is existed, then it will
display with title, URL, and folder name that can be modified and
saved.
to move the cursor to the context, and build new
1. New Bookmark
Press numeric key 1, and enter Title and URL to save as a
bookmark. To enter the field of Title, press
first, and press button to select T9 English, symbol, numbers,
Emotions, and abc input method. You may also press
keys to select a exist Title. When using T9 English and
ABC method to input, you can press
and lower case or first letter capital.
Press
appears on screen, press
to go back to Bookmarks menu.
to go to the bottom of screen, a Save button
to save the bookmark; press
to enter edit mode
to switch upper case
2. New Folder
79
Page 80

Menu Function
Press to enter Folder edit mode. Press numeric key 2 to
create a new folder. After entering edit mode, use the same
input methods as above. After entering complete text, repeat
pressing
to save data. Or you can press button to go back to
Bookmark menu.
until a “Save” button shown on screen, press
3. Delete all
Allows you to delete all folders and bookmarks.
4. Hotkeys
There are 1-9 numeric keys enable to be set as hotkeys. If you
wan to assign numeric key 1 as a hotkey for the specific website,
use
button to go to bookmark list. Press to select that
specific website URL. Then press
to complete the hotkey setting.
to move the cursor to “1 Unassigned” and press
to select the bookmark
Go To URL
This allows you to set up the protocol web site.
WAP Settings
80
Page 81

Menu Function
After entering this menu selection, users can program the mobile
phone to search for the SIM card to see if it is equipped with
GPRS function.
1. Connection
You can select one of the six files preset in the menu to connect.
The connection will be made through the chosen file.
Add New
Name
Enter the “name” function screen, you can clear the preset file
(press the
Homepage
You can reset the homepage by pressing the key to
clear the preset Web address and keying in the new web
address you want.
IP Address
This function allows you to set the IP web address you want to
connect to.
Bearer
Supports both GPRS, and CSD.
User name
This function allows you to set a username to register to the WAP
website. The function need to be supported by your
telecommunication service provider.
Password
Set the password for logging in the WAP website.
DNS IP address.
Set DNS IP address to register to WAP website. The service is
provided by telecommunication company.
key), name and rename it.
81
Page 82

Menu Function
Linger Time
Modify Linger Time for connection, press button to enter
Linger Time field. The default setting is 90 seconds. (Unit:
second)
APN
If you select GPRS to browse, you need to input the Access Point
Name of your system service provider.
Security
This function provides the Internet security service, you can select
on or off.
Store
Save all settings.
Add from List
中華 WAP
台哥大 WAP
遠傳 WAP
泛亞 WAP
東信 WAP
2. Color Scheme
Color palette will provide three colors: Blue, Red and Green.
3. Clear Cache
This option allows you to clear all data from Cache temporary
memory.
4. Reset all
Select this option to go back to WAP default setting.
82
Page 83

Menu Function
GPRS Setting
Two functions under GPRS setting menu:
1. Permanent
2. Needed
STK( SIM
TOOLKIT ).
This selection menu can only be
displayed if your SIM card supports
Value-added Services. Regarding the
details as to how to use SIM services,
as well as price and other information,
please contact your telecommunication Service Company.
Important :
The STK service is provided by your
telecommunication company. The name of
menu, title, and content are defined by your
telecommunication company. Due to the
content size may be too big to fit into the
screen of your mobile phone, some of text
may not be displayed.
83
Page 84

Battery
The battery is rechargeable up to hundreds of times, but it
capacity will reduce. You may need to replace a new battery
when the operation duration (calling and standing duration)
reduces evidently.
Remove charger from the source each time after charging.
Over charging will shorten the life of the battery. Avoid
charging a battery for over 24 consecutive hours.
Use only batteries certified by the mobile phone
manufacturer.
Extreme temperatures will affect charging performance. The
desirable ambient temperature for charging is 0°C-45°C
(32°F-113°F).
Do not use damaged or old batteries.
Avoid contacts of the + and – poles of the battery with metals,
such as coins, scissors, and pens. It will damage or cause
short circuit to the battery. Place spare batteries in a safe
place or wrap them up with insulated materials before putting
inside your pocket or handbags.
Extreme temperatures will reduce the capacity or shorten the
life of batteries. Avoid placing batteries in extreme
temperatures, such as inside vehicles or near air-conditioner
outlets. The desirable battery storage temperature is
15°C-25°C (59°F-77°F). Batteries that have been charged
may not work properly in extreme temperatures.
Keep batteries away from water or fire.
Dispose batteries according to local environmental
regulations.
84
Page 85

Care and Maintenance
Follow the instructions below to take care of your mobile phone.
They will help you to enjoy life with this product.
Keep the mobile phone and its accessories out of children’s
reach.
Keep the mobile phone dry. Rain, moisture and liquid contain
minerals which will corrode the circuit of the mobile phone.
Keep the mobile phone away from dirt or dust.
Keep the mobile phone away from heat. Heat will shorten the
life of electronics, damage the battery, or even deform or
corrode the shell of the mobile phone.
Keep the mobile phone away from coldness. Condensation
takes place and the moisture will damage the circuit board
when the mobile phone resumes normal temperature.
Do not open the mobile phone. Non-professional treatment
may cause damage to the mobile phone.
Avoid falling, impact or vibration of the mobile phone.
Improper external force may damage the circuit of the mobile
phone.
Do not clean the mobile phone with chemical solutions or
detergents. Gently wipe the shell of the mobile phone with a
soft cotton cloth and clear water or mild soap.
Use accessories and batteries from the manufacturer.
Contact your nearest service station if the mobile phone is
out of order. Our well-trained technicians will provide you the
best service.
85
Page 86

FCC Regulations
Conditions of Use
Operation of this TG7C mobile phone is subject to the following two
conditions; (1) this device may not cause harmful interference, and (2)
this device must accept any interference received, including
interference that may cause undesired operation.
This TG7C mobile phone generates, uses and can radiate radio
frequency energy and, if not installed and used in accordance with the
instructions, may cause harmful interference to radio communications.
If this device does cause harmful interference to radio or television
reception, which can be determined by turning the device on and off,
the user is encouraged to try to correct the interference by one or more
of the following measures:
1). Reorient or relocate the receiving antenna.
2). Increase the distance between the device and receiver.
3). Connect the device into an outlet on a circuit different from that to
which the receiver is connected.
4). Consult the dealer or an experienced radio/TV technician for help.
The radiated output power of this internal wireless radio is far below
the FCC radio frequency exposure limits. Nevertheless, the wireless
radio shall be used in such a manner that the radio is 1.5 cm or further
from the human body. However, the user of wireless radios may be
restricted in some places or situations, such as aboard airplanes. If
you are unsure of restrictions, you are encouraged to ask for
authorization before turning on the wireless radio. Several restrictions
and cautions of using mobile phone are listed in the Safety.
86
Page 87

FCC RF Exposure Information
Read this information before using your handset
In August 1996 the Federal Communication Commission (FCC) of
the United States with its action in Report and Order FCC 96-326
adopted an updated safety standard for human exposure to radio
frequency (RF) electromagnetic energy emitted by FCC regulated
transmitters. Those guidelines are consistent with the safety
standard previously set by both U.S and international standards
bodies. The design of this phone complies with the FCC guidelines
and these international standards.
Use only the supplied or an approved antenna. Unauthorized
antennas, modifications, or attachments could impair call quality,
damage the phone, or result in violation of FCC regulations.
Do not use the phone with a damaged antenna. If a damaged
antenna comes into contact with the skin, a minor burn may result.
Please contact your local dealer for replacement antenna.
Body-worn Operation
This device was tested for typical body-worn operations. To comply
with FCC RF exposure requirements, a minimum separation
distance of 1.5 cm must be maintained between the user’s body
and the handset, including the antenna. Third-party belt-clips,
holsters, and similar accessories used by this device should not
contain any metallic components. Body-worn accessories that do
not meet these requirements may not comply with FCC RF
exposure requirements and should be avoided.
For more information about RF exposure, please visit the FCC
website at www.fcc.gov
87
 Loading...