

Page 1
Pocket PC e830 UG.book Page 16 Monday, September 22, 2003 10:57 AM
Basic Skills
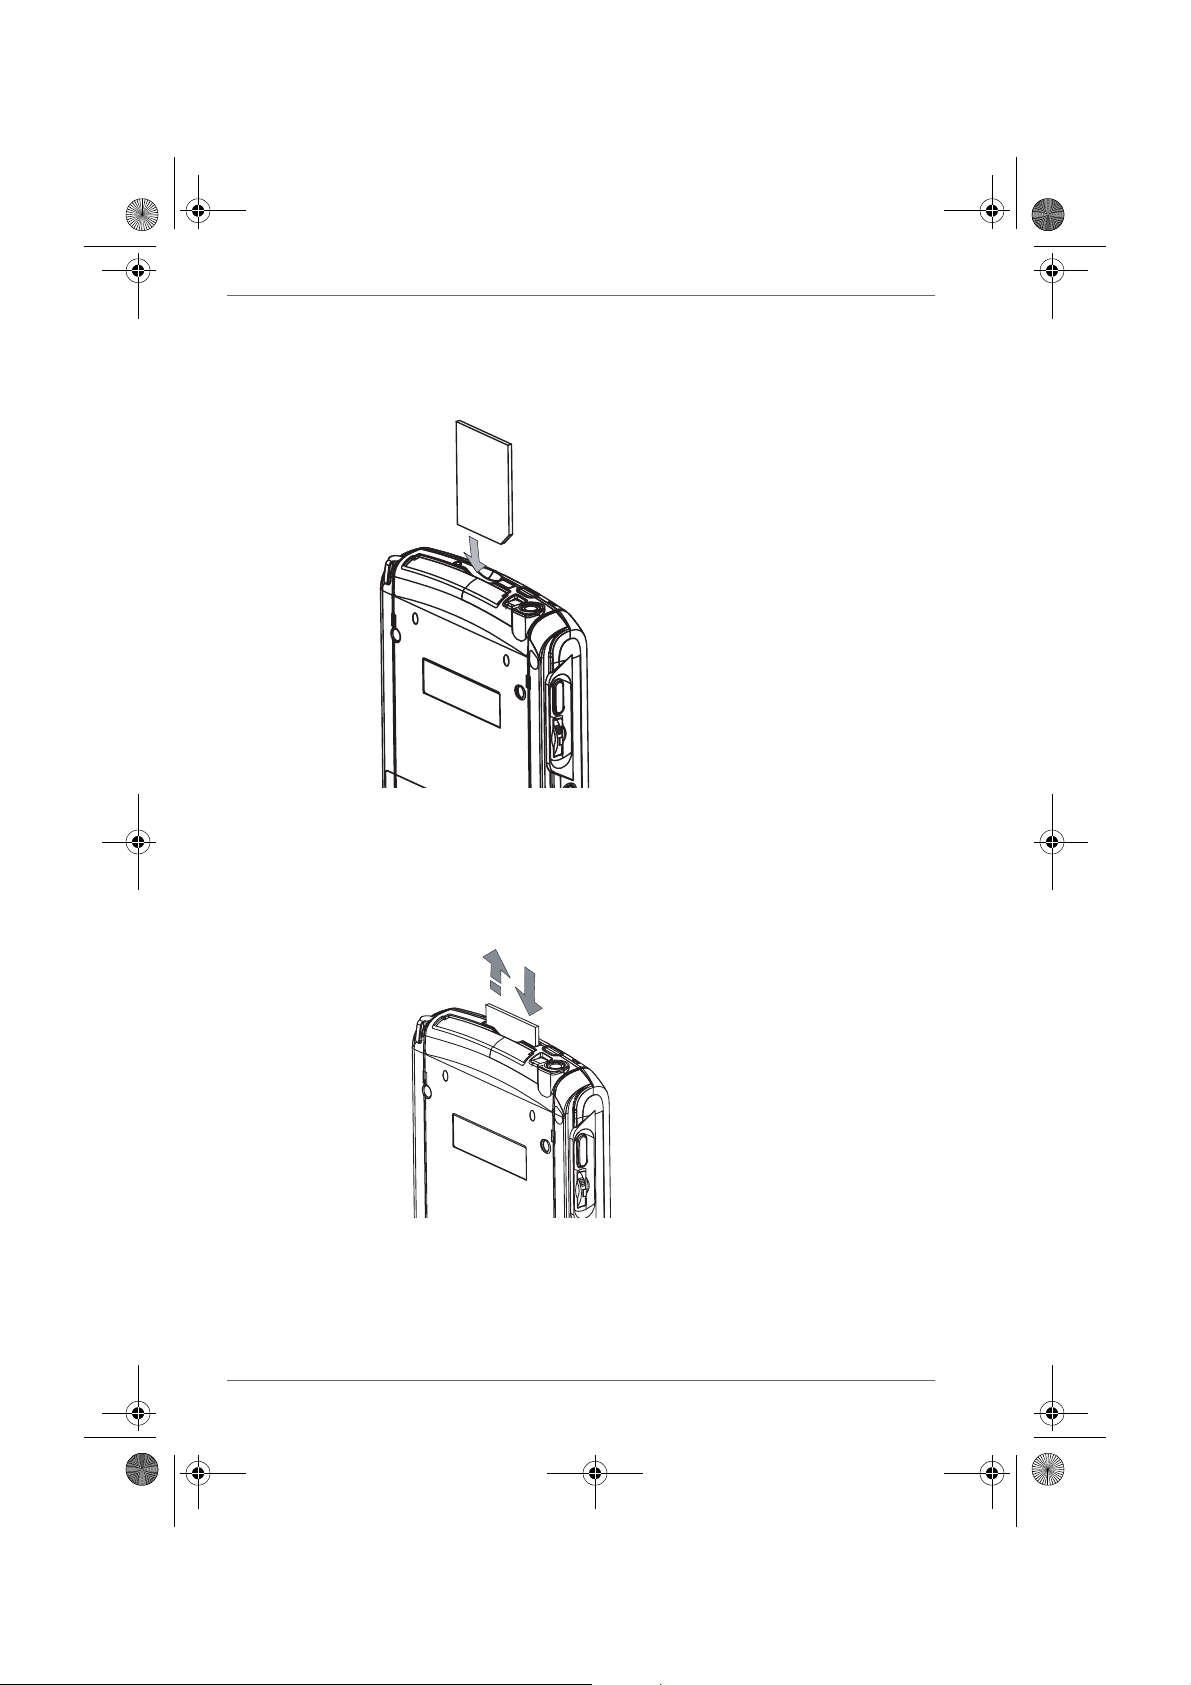
3. Insert the card with its contact surface (metal contact surface) facing the
back of the Toshiba Pocket PC e830.
4. Press down on the card until it clicks into place.
To remove a card:
1. Turn off the power.
2. Lightly press down the card until a clicking sound is heard. The card will
pop out slightly from the slot.
3. Pull the card straight up to remove.
2-16 User’s Manual
Page 2

Pocket PC e830 UG.book Page 17 Monday, September 22, 2003 10:57 AM
Connecting to a Computer
Before connecting your Toshiba Pocket PC e830 to a computer, check the
following.
■ ActiveSync has been installed on your computer. (See Chapter 3.)
■ The position of connecting port on the computer may differ according to
the computer type.
To Connect Using the Supplied Cradle:
1. Connect the USB cradle to your computer as shown below.
2. Insert the Pocket PC into the cradle.
Basic Skills
User’s Manual 2-17
Page 3

Pocket PC e830 UG.book Page 18 Monday, September 22, 2003 10:57 AM
Basic Skills
To connect directly using a connection cable:
Connect the Toshiba Pocket PC e830 directly to your computer using an
optional Serial Client cable.
When the Toshiba Pocket PC e830 is connected to another device via a
USB Sync Cable, do not plug the AC adapter directly into the Pocket PC
as this may lead to interference. Instead, plug the AC adapter into the port
on the USB Client cable connector.
2-18 User’s Manual
Page 4

Pocket PC e830 UG.book Page 19 Monday, September 22, 2003 10:57 AM
The following are some of the status icons you may see.
Status Icon Meaning
Turns all sounds on and off
Main battery is charging
Main battery is low
Main battery is very low
Main battery is full
Connection is active
Connection is inactive
Synchronization is occurring
Notification that one or more instant messages were
received
Basic Skills
Notification that one or more email messages were
received
If more notification icons need to be displayed than there is room to display
them, the Notification icon, , will display. Tap the icon to view all
notification icons.
Traffic Monitoring Utility (W-LAN model only)
Program
You can switch from one program to another by selecting it from the
menu. (You can customize which programs you see on this menu. For
information, see “Adjusting Settings” later in this chapter.) To access some
programs, you’ll need to tap , Programs, and then the program name.
You can also switch to some programs by pressing a program button. Your
device has one or more program buttons located on the front or side of the
device. The icons on the buttons identify the programs they switch to.
Some programs have abbreviated labels for check boxes and drop-down
menus. To see the full spelling of an abbreviated label, tap and hold the
stylus on the label. Drag the stylus off the label so that the command is not
carried out.
User’s Manual 2-19
Page 5
Pocket PC e830 UG.book Page 20 Monday, September 22, 2003 10:57 AM
Basic Skills
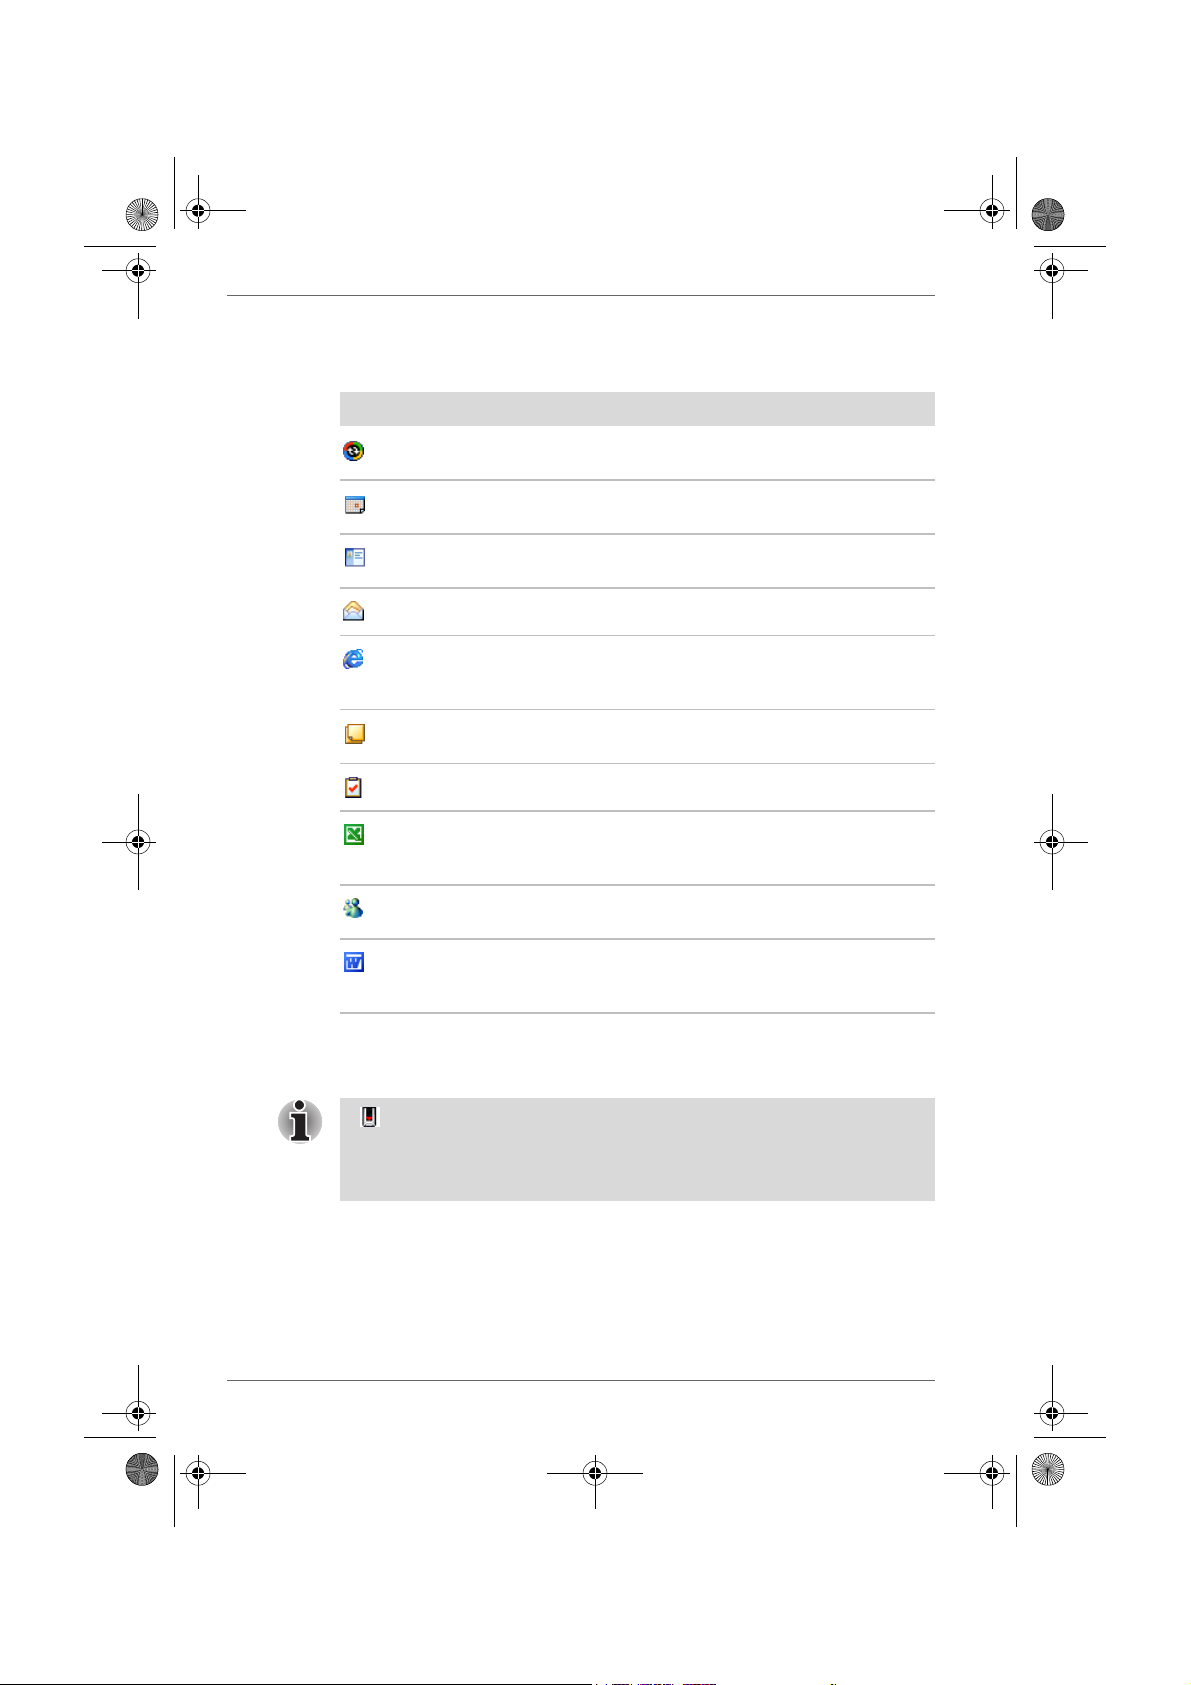
The following table contains a partial list of programs that are on your
device. Look on the Toshiba Pocket PC Companion CD for additional
programs that you can install onto your device.
Icon Program Description
ActiveSync Synchronize information between your
device and computer.
Calendar Keep track of your appointments and
Contacts Keep track of your friends and
Inbox Send and receive email messages.
Pocket Internet
Explorer
Notes Create handwritten or typed notes,
Tasks Keep track of your tasks.
Pocket Excel Create new workbooks or view and edit
MSN Messenger Send and receive instant messages with
Pocket Word Create new documents or view and edit
create meeting requests.
colleagues.
Browse Web and WAP sites, and
download new programs and files from
the Internet.
drawings, and recordings.
Excel workbooks created on your
computer.
your MSN Messenger contacts.
Word documents created on your
computer.
Customize Your Toshiba Pocket PC
A next to a file name indicates the file is saved on a storage card.
You can move files in File Explorer by tapping and holding the item you
want to move, and then tapping Cut or Copy and Paste on the pop-up
menu.
You can customize your device by adjusting device settings and installing
additional software.
2-20 User’s Manual
Page 6

Pocket PC e830 UG.book Page 21 Monday, September 22, 2003 10:57 AM
Adjusting Settings
You can adjust device settings to suit the way you work. To see available
options, tap , Settings, then the Personal or System tab located at the
bottom of the screen.
You might want to adjust the following:
■ Clock, to change the time or to set alarms
■ Menus, to customize what appears on the menu, and to enable a
pop-up menu from New
■ Owner Information, to enter your contact information
■ Password, to limit access to your device
■ Power, to maximize battery life
■ To d a y, to customize the look and the information that is displayed on
the Today screen
Adding or Removing Programs
Programs added to your device at the factory are stored in ROM (read-only
memory). You cannot remove this software, and you’ll never accidentally
lose ROM contents. ROM programs can be updated using special
installation programs with a *.xip extension. All other programs and data
files added to your device after factory installation are stored in RAM
(random access memory).
You can install any program created for your device, as long as your device
has enough memory. The most popular place to find software for your
device is on the Pocket PC Web site (http://www.microsoft.com/mobile/
pocketpc).
Basic Skills
To add programs using ActiveSync
You’ll need to install the appropriate software for your device on your
desktop computer before installing it on your device.
1. Determine your device and processor type so that you know which
version of the software to install.
Tap and then Settings. On the System tab, tap About. In the
Version tab, make a note of the information in Processor.
2. Download the program to your computer (or insert the CD or disk that
contains the program into your computer). You may see a single *.xip,
*.exe, or *.zip file, a Setup.exe file, or several versions of files for
different device types and processors. Be sure to select the program
designed for the Toshiba Pocket PC e800 and your device processor
type.
3. Read any installation instructions, Read Me files, or documentation that
comes with the program.
Many programs provide special installation instructions.
4. Connect your device and computer.
User’s Manual 2-21
Page 7

Pocket PC e830 UG.book Page 22 Monday, September 22, 2003 10:57 AM
Basic Skills
5. Double-click the *.exe file.
■ If the file is an installer, the installation wizard will begin. Follow the
directions on the screen. Once the software has been installed on
your computer, the installer will automatically transfer the software
to your device.
■ If the file is not an installer, you will see an error message stating
that the program is valid but it is designed for a different type of
computer. You will need to move this file to your device. If you
cannot find any installation instructions for the program in the Read
Me file or documentation, use ActiveSync Explore to copy the
program file to the Program Files folder on your device. For more
information on copying files using ActiveSync, see ActiveSync Help.
Once installation is complete, tap , Programs, and then the program
icon to switch to it.
To add a program directly from the Internet
1. Determine your device and processor type so that you know which
version of the software to install.
Tap and then Settings. On the System tab, tap About. In the
Version tab, make a note of the information in Processor.
2. Download the program to your device straight from the Internet using
Pocket Internet Explorer. You may see a single *.xip, *.exe or *.zip file, a
Setup.exe file, or several versions of files for different device types and
processors. Be sure to select the program designed for the Toshiba
Pocket PC e800 and your device processor type.
3. Read any installation instructions, Read Me files, or documentation that
comes with the program. Many programs provide special installation
instructions.
4. Tap the file, such as a *.xip or *.exe file. The installation wizard will
begin. Follow the directions on the screen.
2-22 User’s Manual
Page 8

Pocket PC e830 UG.book Page 23 Monday, September 22, 2003 10:57 AM
To add a program to the Start menu
Tap , Settings, Menus, the Start Menu tab, and then the check box for
the program. If you do not see the program listed, you can either use File
Explorer on the device to move the program to the Start Menu folder, or use
ActiveSync on the computer to create a shortcut to the program and place
the shortcut in the Start Menu folder.
■ Using File Explorer on the device: Ta p , Programs, File Explorer,
and locate the program (tap the folder list, labeled My Documents by
default, and then Local Device to see a list of all folders on the device).
Tap and hold the program and tap Cut on the pop-up menu. Open the
Start Menu folder located in the Windows folder, tap and hold a blank
area of the window, and tap Paste on the pop-up menu. The program
will now appear on the menu. For more information on using File
Explorer, see your online manual.
■ Using ActiveSync on the computer: Use the Explorer in ActiveSync
to explore your device files and locate the program. Right-click the
program, and then click Create Shortcut. Move the shortcut to the Start
Menu folder in the Windows folder. The shortcut now appears on the
menu. For more information, see ActiveSync Help.
To remove programs
■ Tap and then Settings. On the System tab, tap Remove
Programs.
If the program does not appear in the list of installed programs, use File
Explorer on your device to locate the program, tap and hold the program,
and then tap Delete on the pop-up menu.
Basic Skills
Setting a Password
You can protect data or settings from a third person by setting a password
which is requested when turning power on.
1. Tap and then Settings. On the Personal tab, tap Password.
2. Select the type of password you would like to use.
3. Enter a password and tap OK.
4. Tap YES on the confirmation screen. The password is saved and the
screen returns to the Personal tab screen
If you tap YES on the confirmation screen to return to the Personal tab
screen, it becomes necessary to enter the password even for displaying the
Password setting screen.
In case you forget the password, it is necessary to initialize the Pocket PC.
Please note that when initialization is executed, data or settings stored in
the Pocket PC are all deleted.
User’s Manual 2-23
Page 9
Pocket PC e830 UG.book Page 24 Monday, September 22, 2003 10:57 AM
Basic Skills
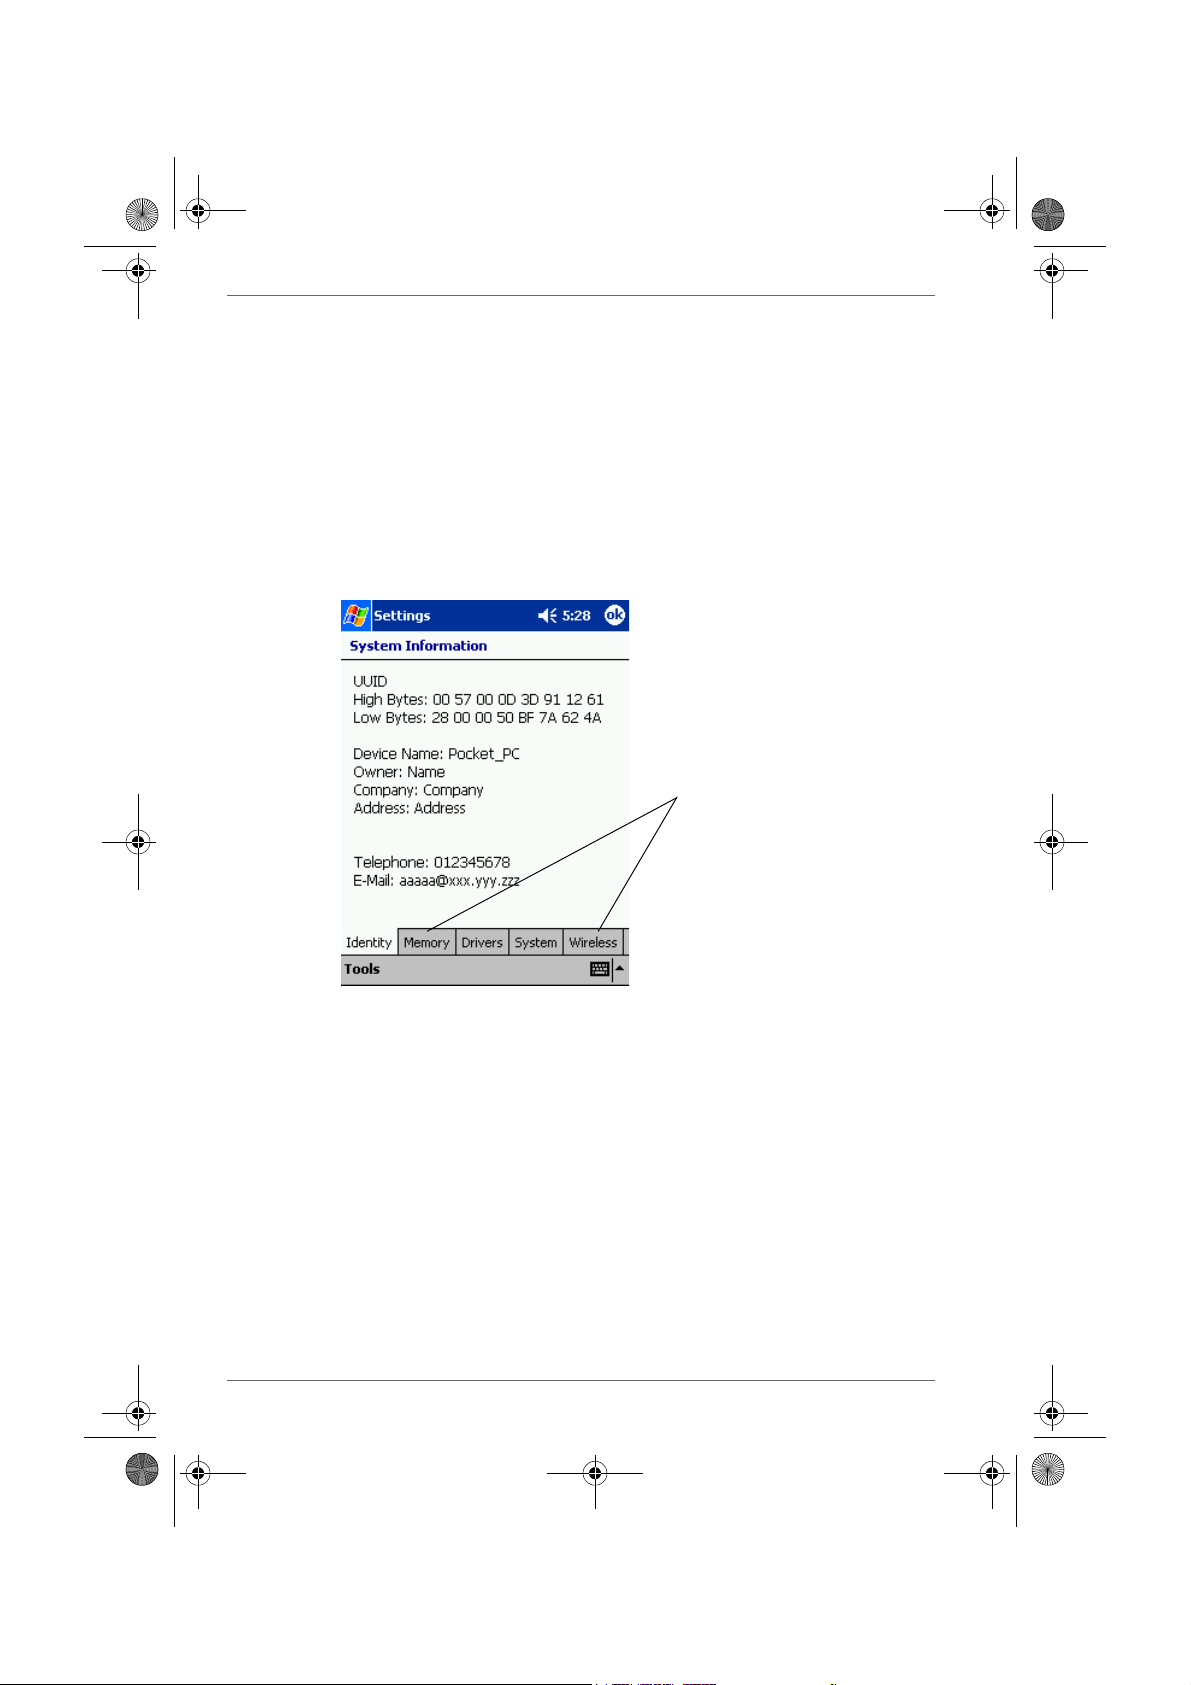
System Information
The System Information program displays the system information such as
CPU clock, CPU stepping, Boot Loader Version, OS Version, PIC Version,
MAC address (Wireless LAN model only), and UUID. The information is
displayed by accessing the Identity, Memory, Drivers, System, and
Wireless tabs.
To launch the program, tap Start, Settings, System, and then System
Information.
Identity Tab
The opening menu presents identification information for product service.
Tabs for accessing information about
Identity, Memory, Drivers, System,
and Wireless settings
Memory Tab
The Memory tab presents information about the systems RAM, ROM, and
Flash ROM Disk.
Drivers Tab
The Drivers tab displays the drivers used by the system’s software
applications.
System Tab
The System tab displays CPU, operating system, and other system
information.
2-24 User’s Manual
Page 10

Pocket PC e830 UG.book Page 25 Monday, September 22, 2003 10:57 AM
Wireless Tab
The Wireless tab displays information about the Built-in Wireless LAN
adapter.
Tools Menu
The Tools menu displays the system information and allows it to be
exported to a text (*.txt) file. Export exports all system information
parameters to a text (*.txt), and About displays the system information
version
.
Basic Skills
User’s Manual 2-25
Page 11

Pocket PC e830 UG.book Page 26 Monday, September 22, 2003 10:57 AM
Basic Skills
2-26 User’s Manual
Page 12

Pocket PC e830 UG.book Page 1 Monday, September 22, 2003 10:57 AM
TOSHIBA Pocket PC e830
Microsoft ActiveSync
Using ActiveSync, you can synchronize information between your device
and PC or server. Synchronization compares the data on your device with
your PC and updates both computers with the most recent information. For
example:
■ Keep Pocket Outlook data up-to-date by synchronizing your device with
Microsoft Outlook data on your PC.
■ Synchronize Microsoft Word and Microsoft Excel files between your
device and desktop computer.
Your files are automatically converted to the correct format.
Chapter 3
By default, ActiveSync does not automatically synchronize all types of
information. Use ActiveSync options to turn synchronization on and off for
specific information types.
With ActiveSync, you can also:
■ Change synchronization settings and synchronization schedule.
■ Copy files between your device and PC.
■ Back up and restore device information.
■ Add and remove programs on your device.
Before you begin synchronization, install ActiveSync on your PC from the
Toshiba Pocket PC Companion CD. For more information on installing
ActiveSync, see your Quick Start card. ActiveSync is already installed on
your device.
After installation is complete, the ActiveSync Setup Wizard helps you
connect your Pocket PC to your PC, set up a partnership so you can
synchronize information between your device and your desktop computer,
and customize your synchronization settings. Your first synchronization
process will automatically begin when you finish using the wizard.
After your first synchronization, take a look at Calendar, Contacts, and
Tasks on your device. You’ll notice that information you’ve stored in
Microsoft Outlook on your PC has been copied to your device, and you
didn’t have to type a word. Disconnect your device from your PC and you’re
ready to go!
User’s Manual 3-1
Page 13
Pocket PC e830 UG.book Page 2 Monday, September 22, 2003 10:57 AM
Microsoft ActiveSync
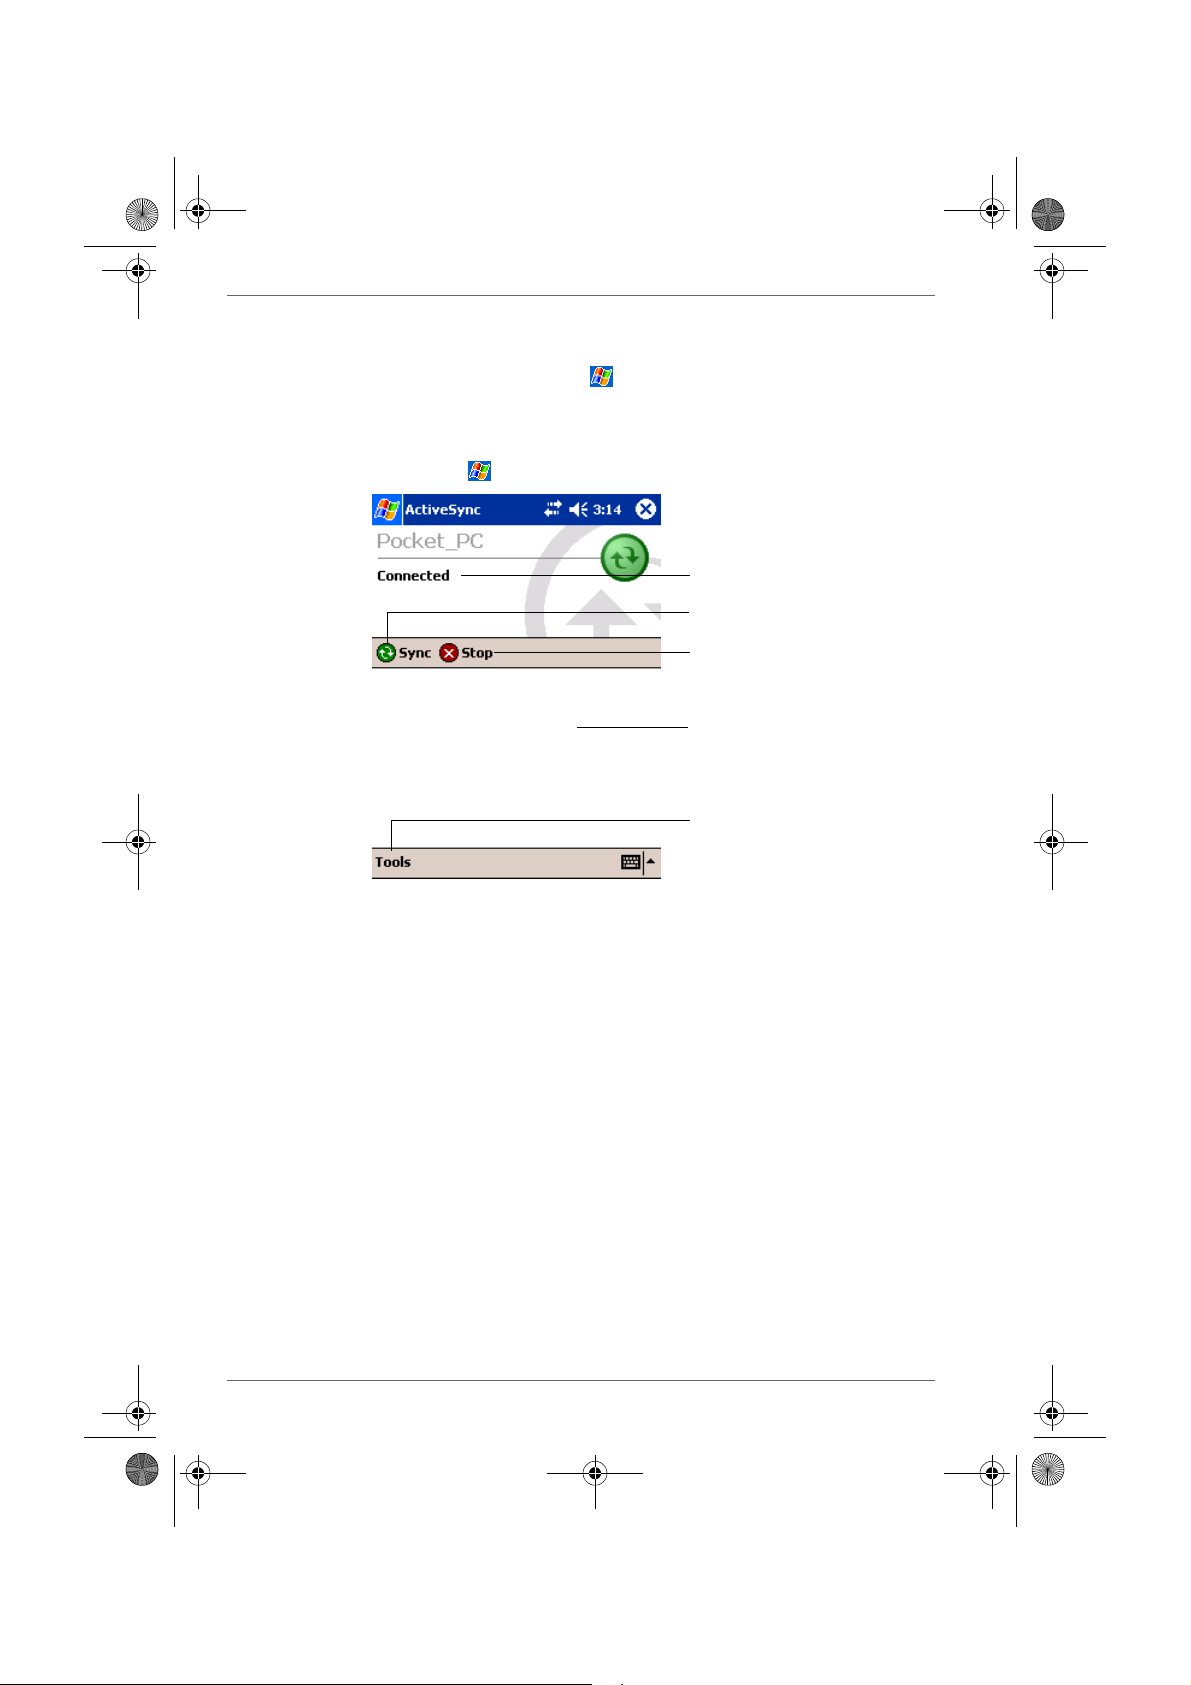
Once you have set up ActiveSync and completed the first synchronization
process, you can initiate synchronization from your device. To switch to
ActiveSync on your device, tap , and then tap ActiveSync.
For information about using ActiveSync on your PC, start ActiveSync on
your PC, and then see ActiveSync Help.
For more information about ActiveSync on your device, switch to
ActiveSync, tap , and then tap Help.
View connection status.
Tap to connect and synchronize.
Tap to stop synchronization.
View synchronization status.
Tap to synchronize via IR or
change synchronization settings.
Change the synchronization schedule
Using ActiveSync, you can schedule synchronization of your device on two
separate schedules. Use the peak times schedule to synchronize during
working hours or other times you experience higher mail volumes. Use the
off-peak schedule to synchronize during times when you experience lower
mail volumes.
In ActiveSync on the device, tap Tools, Options, then select the Mobile
Schedule tab.
1. To synchronize periodically during peak times, select the frequency of
synchronization in the During peak times, sync list.
2. To synchronize periodically during off-peak times, select the frequency
of synchronization in the During off-peak times, sync list.
3. To set the days and hours for peak times, tap Peak Times.
3-2 User’s Manual
Page 14

Pocket PC e830 UG.book Page 1 Monday, September 22, 2003 10:57 AM
TOSHIBA Pocket PC e830
Bluetooth
About Bluetooth Software
This chapter is valid for Bluetooth models only.
The Toshiba Pocket PC e830 has two types of Bluetooth software. One is
Toshiba Bluetooth software, the other is Microsoft standard Bluetooth
software. The Toshiba Bluetooth software is available on the integrated
Bluetooth model only. In other model, Microsoft Bluetooth icon and some
Bluetooth function appears, but these do not work without available
Bluetooth device.
This section describes only Toshiba Bluetooth software.
Chapter 4
Specifications
By enabling the Bluetooth device on your wireless Toshiba Pocket PC
e830, you will be able to communicate with Bluetooth-enabled PC's,
modems and other peripherals and chat with other Toshiba Pocket PC's.
You can use the Bluetooth to connect your Toshiba Pocket PC e830 to only
one device at a time.
The Toshiba Pocket PC e830 supports these Bluetooth services:
■ COM service (Serial Port Profile)
This service enables you to connect to a computer via a serial port to
send and receive data. COM service is also used when connecting to a
computer with ActiveSync and when chatting with other Toshiba Pocket
PCs.
■ DUN service (Dial-up Networking Profile)
■ LAP service (LAN Access Profile)
■ FTP service (File Transfer Protocol Profile)
This service enables you to transfer files to and from a device with FTP
service, such as a computer.
■ OPP service (Object Push Profile)
This service enables you to connect to another Toshiba Pocket PC or
cell phone and exchange address books and owner information.
The data formats and maximum size of receiving messages are as
follows.
User’s Manual 4-1
Page 15

Pocket PC e830 UG.book Page 2 Monday, September 22, 2003 10:57 AM
Bluetooth
Contact
(address book)
Business card
(owner
vCard
format
(vCard 2.1)
Other than memo 1,022 characters
Memo Approx. 32,700
characters
1
information)
Schedule vCalendar
format
(vCalendar
1.0)
Subject 4,096 characters
Location 1,023 characters
Category 1,023 characters
Attendees 1,022 characters
(per person)
Memo Approx. 2,500
characters
Task vToDo
format
Subject 4,095 characters
Category 1,023 characters
Memo Approx. 7,600
characters
1. Approximately 7,600 characters for Toshiba Pocket PCs with the
Microsoft® Pocket PC 2002 and Microsoft Pocket PC 2003 operating
systems.
Depending on the specifications of the device to which you are connected,
data sent and received may not be properly stored in the respective
device.
■ PAN service (Personal Area Networking Profile)
This service enables you to connect to the Bluetooth Access Point or
PC for using Internet or intranet
4-2 User’s Manual
Page 16
Pocket PC e830 UG.book Page 3 Monday, September 22, 2003 10:57 AM
Major specifications
Bluetooth
Profiles supported by
your Toshiba Pocket
PC e830
Bluetooth specification V1.1
■ The connection speed of the Bluetooth varies depending on the location
and orientation of the Toshiba Pocket PC e830, the communications
range, the operating environment, the performance of the other party’s
device, and other factors.
■ The Bluetooth software cannot be used to communicate with devices
for which it is unable to confirm the appropriate Bluetooth Service.
Serial Port Profile
Dial-up Networking Profile
Object Push Profile
File Transfer Profile
LAN Access Profile
Personal Area Networking Profile
General Access Profile
Not compatible with Bluetooth V1.0B devices.
Bluetooth Settings
Enabling Bluetooth on Your Toshiba Pocket PC e800
Enable Bluetooth on the Toshiba Pocket PC by using the “Wireless
Communication Switch.” The Bluetooth icon will appear (The icon will also
appear when the power is turned on using through a software switch using
the antenna icon on top of the screen).
Bluetooth Icon
User’s Manual 4-3
Page 17

Pocket PC e830 UG.book Page 4 Monday, September 22, 2003 10:57 AM
Bluetooth
Bluetooth Environmental Settings
Follow the procedure below to set the environmental settings, security
settings, and the device name of the Toshiba Pocket PC e830.
Once these settings are made, the setting information is stored. If you want
to use the previous settings, the settings do not need to be changed.
1. Tap Bluetooth icon and select Bluetooth Settings from the pop-up
menu.
When using Bluetooth Settings for the first time, or when a remote
device (connected partner) is deleted, the dialog box shown above
appears on the Bluetooth Settings. Tap OK.
The Bluetooth Settings screen appears. You can also display the
Bluetooth Settings screen by tapping Start, Programs, Bluetooth, and
then Bluetooth Settings.
2. Tap Options on the command bar.
The Options menu appears.
3. Tap Security Settings on the Options menu.
The Change Security Setting screen appears.
To change the security setting, tap the desired security setting and tap
OK.
You can select from four security settings: Office, Mobile, Home, and
Other. The default setting is Home.
4-4 User’s Manual
Page 18

Pocket PC e830 UG.book Page 5 Monday, September 22, 2003 10:57 AM
Advanced Settings
To change an advanced setting, select the desired setting and tap OK.
The default settings are as follows.
Discoverability
Mode
Office Discoverable Connectable Security On Yes
Mobile Non-
discoverable
Home Discoverable Connectable Non-secure No
Other Discoverable Connectable Security On Yes
■ In the default setting for Home, the Security Mode is set to Non-secure
and, therefore, unspecified devices may be able to connect to Local
Device. It is recommended that you set the Security Mode to Security
On.
■ If you want to set the Connectability Mode to Non-connectable and you
are operating your Toshiba Pocket PC e800 in an environment in which
there are three or more operating Bluetooth devices, you should also
set the Discoverability Mode to Non-discoverable.
■ Tap the Options menu and Local Device.
The Device Information screen for Local Device appears.
To change the name of the device, enter the new name in the Device
Name box and tap OK.
■ The default device name is Toshiba BT.
■ The device name can be a maximum of 248 alphanumeric characters.
■ If the device name exceeds 248 alphanumeric characters, an error
message appears.
The Bluetooth environmental settings are now complete.
Refer to the following for additional operations.
■ COM service, see “Using COM Service” on page 4-8.
■ DUN/LAP service, see “Using DUN/LAP Service” on page 4-9.
■ PAN service, see “Using PAN Service” on page 4-9.
■ OPP service, see “Using OPP Service” on page 4-11.
■ FTP service, see “Using FTP Service” on page 4-14.
Connectability
Mode
Nonconnectable
Bluetooth
Security Mode Encryption
Security On Yes
If the Bluetooth icon no longer appears in the program menu, it can be
recovered by executing following program in Explorer:
\windows\bt_rescue.exe
User’s Manual 4-5
Page 19
Pocket PC e830 UG.book Page 6 Monday, September 22, 2003 10:57 AM
Bluetooth
Preparing to Connect with Bluetooth
Follow the procedure below to make preparations for a Bluetooth
connection.
Search for peripheral devices
Bluetooth authentication and service update
1. Tap Bluetooth icon
When using Bluetooth Settings for the first time, or when a remote
device (connected partner) is deleted, the dialog box shown above
appears on the Bluetooth Settings. Tap OK.
The Bluetooth Settings screen appears.
You can also display the Bluetooth Settings screen by tapping Start,
Programs, Bluetooth, and then Bluetooth Settings.
2. Tap Bluetooth icon on the command bar, or tap the Tool s menu and
Devices Search.
The local Device searches for Bluetooth devices in the vicinity while a
message is displayed on the screen indicating that Local Device is
searching for peripheral devices.
It may take several minutes to complete the device search.
Once the search is completed, the remote device list will be updated
with the latest remote device information.
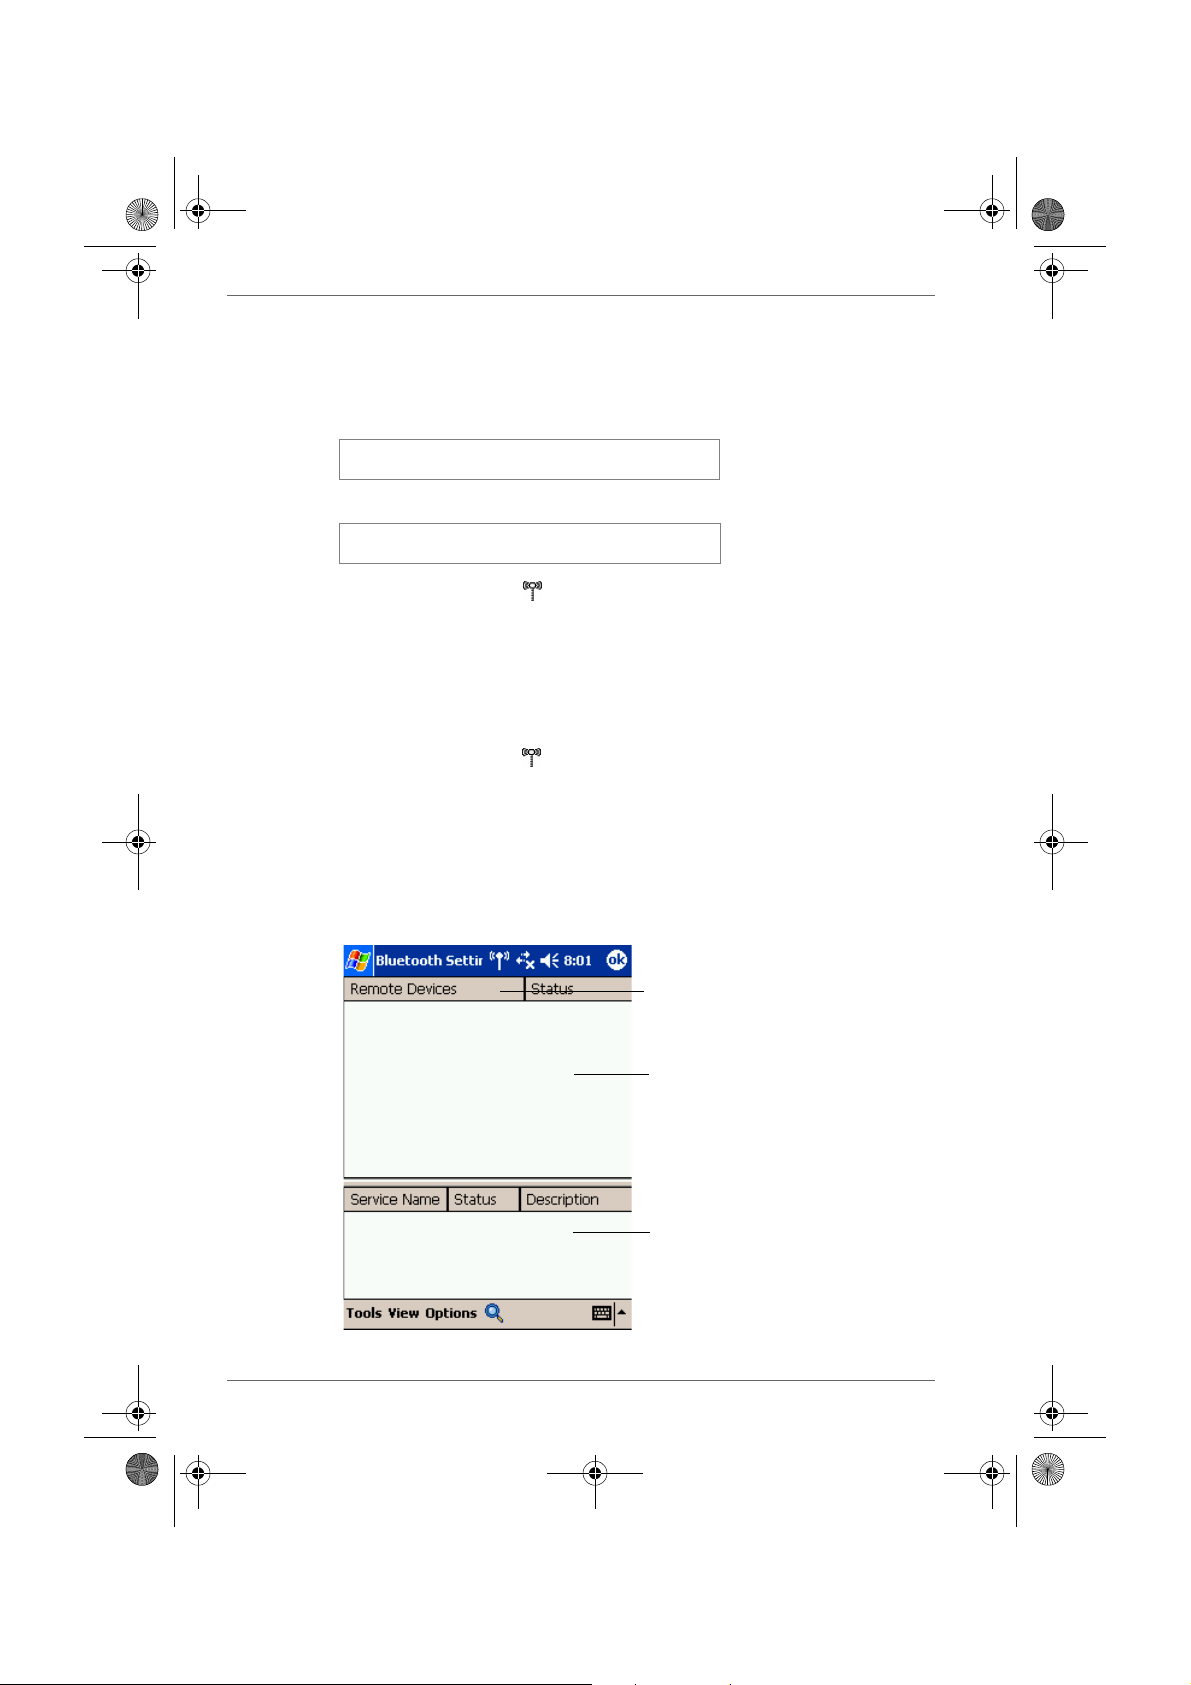
Types of displayed devices (Devices
selected using Filter in the View menu.)
Device list. A maximum of 255 devices
can be displayed.
Service list
4-6 User’s Manual
Page 20

Pocket PC e830 UG.book Page 7 Monday, September 22, 2003 10:57 AM
3. Tap and hold on the name of the device to which you want to connect,
then tap Update Service on the pop-up menu.
The Bluetooth Authentication screen appears on Local Device.
Enter the Bluetooth passkey (PIN Code) within 20 seconds and tap OK.
■ The Bluetooth passkey can be a maximum of 16 alphanumeric
characters. Depending on the remote device, the Bluetooth passkey
may be a fixed value with a limit on the number of digits, so be sure to
confirm these conditions.
If the Security Mode on either Local Device or the remote device is set to
Security On, authentication is performed to confirm the remote device
when connecting.
If either device has already been authenticated or the Security Mode on
either Local Device or the remote device is set to Non-secure, the
Bluetooth Authentication screen does not appear.
A message is displayed on the screen indicating that the service
information is being updated.
Bluetooth
It may take several minutes to complete the service update.
Now you are prepared to connect with Bluetooth.
User’s Manual 4-7
Page 21

Pocket PC e830 UG.book Page 8 Monday, September 22, 2003 10:57 AM
Bluetooth
Using COM Service
Establishing an ActiveSync connection with a computer
This section explains how to use COM service to connect to a computer.
Preparations
■ The computer to which you want to connect must be Bluetooth enabled
and have ActiveSync installed. Your Toshiba Pocket PC e800 must also
have been synchronized with the PC using a cradle or a cable at least
once to establish a “partnership' to the PC.
1. From the service list on the Bluetooth Settings screen, tap and hold on
the name of the COM service to which you want to connect, then tap
ActiveSync Registration or Connection Registration on the pop-up
menu. after this selection, an optional screen will appear.
If you select ActiveSync Auto Connect, ActiveSync will be performed
automatically and continuously. You need no more step.
When the connection registration is complete, the device and service
icons change to registered connection icons.
2. Tap OK.
The screen closes and the Today screen appears.
3. From the computer, set the port that you will use when you are
connecting with Bluetooth.
The computer is now ready to connect.
This operation may vary depending on the computer. Please refer to the
user's guide supplied with your computer for more information.
4. Tap Start, Programs, Bluetooth, and then Bluetooth Connection.
Your Toshiba Pocket PC e800 connects to the computer.
When the connection is complete, the Programs screen reappears.
4-8 User’s Manual
Page 22

Pocket PC e830 UG.book Page 9 Monday, September 22, 2003 10:57 AM
Using DUN/LAP Service
Connecting to the Internet
This section explains how to use DUN service to connect to the Internet by
connecting to a modem or cell phone.
LAP service uses the same method of connection.
Preparations
■ To connect to a Bluetooth-enabled modem, tap Start, Settings
Connection tab, and then Connections, in the My ISP area, tap Add a
new modem connection. The Make New Connection screen
appears. From the Select Modem list, select Bluetooth Card.
For operations of the modem or cell phone, please refer to the user's guide
of the respective device.
Any dial-up number can be used for LAP service. Select and enter the
desired number.
1. From the service list on the Bluetooth Settings screen, tap and hold on
the name of the DUN or LAP service to which you want to connect, then
tap Connection Registration on the pop-up menu.
The screen is connected to DUN service.
When you disconnect from the Internet or exit your email application,
the Bluetooth connection is also terminated.
2. Tap OK.
The screen closes and the Today screen appears.
For further operations, please refer to “Inbox: Sending and Receiving
Email Messages” on page 4-6.
When you disconnect from or exit the Internet or your email application,
the Bluetooth connection is also terminated.
Bluetooth
Using PAN Service
Connecting to the Network (Intranet, Internet or Peer-toPeer)
This section explains how to use PAN service to connect to the Network by
connecting to the Access Point or PC.
This service is alike to the DUN/LAP service. But this service does not need
complicated additional settings, like a modem and dialup settings.
1. From the service list on the Bluetooth Settings screen, tap and hold on
the name of the PAN service (GN or NAP) to which you want to
connect, then tap Connection Registration on the pop-up menu.
When the connection registration is complete, the device and service
icons change to registered connection icons.
2. Tap OK.
The screen closes and the Today screen appears.
User’s Manual 4-9
Page 23
Pocket PC e830 UG.book Page 10 Monday, September 22, 2003 10:57 AM
Bluetooth
3. Tap on the Bluetooth icon on the command bar.
The Bluetooth menu appears.
4. Tap Start Personal Area Networking on the Bluetooth menu.
My Device connects to the remote device.
For further operations, please refer to “Inbox: Sending and Receiving
Email Messages” on page 4-6.
Ending PAN service
1. Tap on the Bluetooth icon on the command bar of the Today screen.
The Bluetooth menu appears.
2. Tap End Personal Area Networking on the Bluetooth menu.
My Device disconnects from the remote device and the Bluetooth
connection is terminated.
Changing the network configuration for PAN service
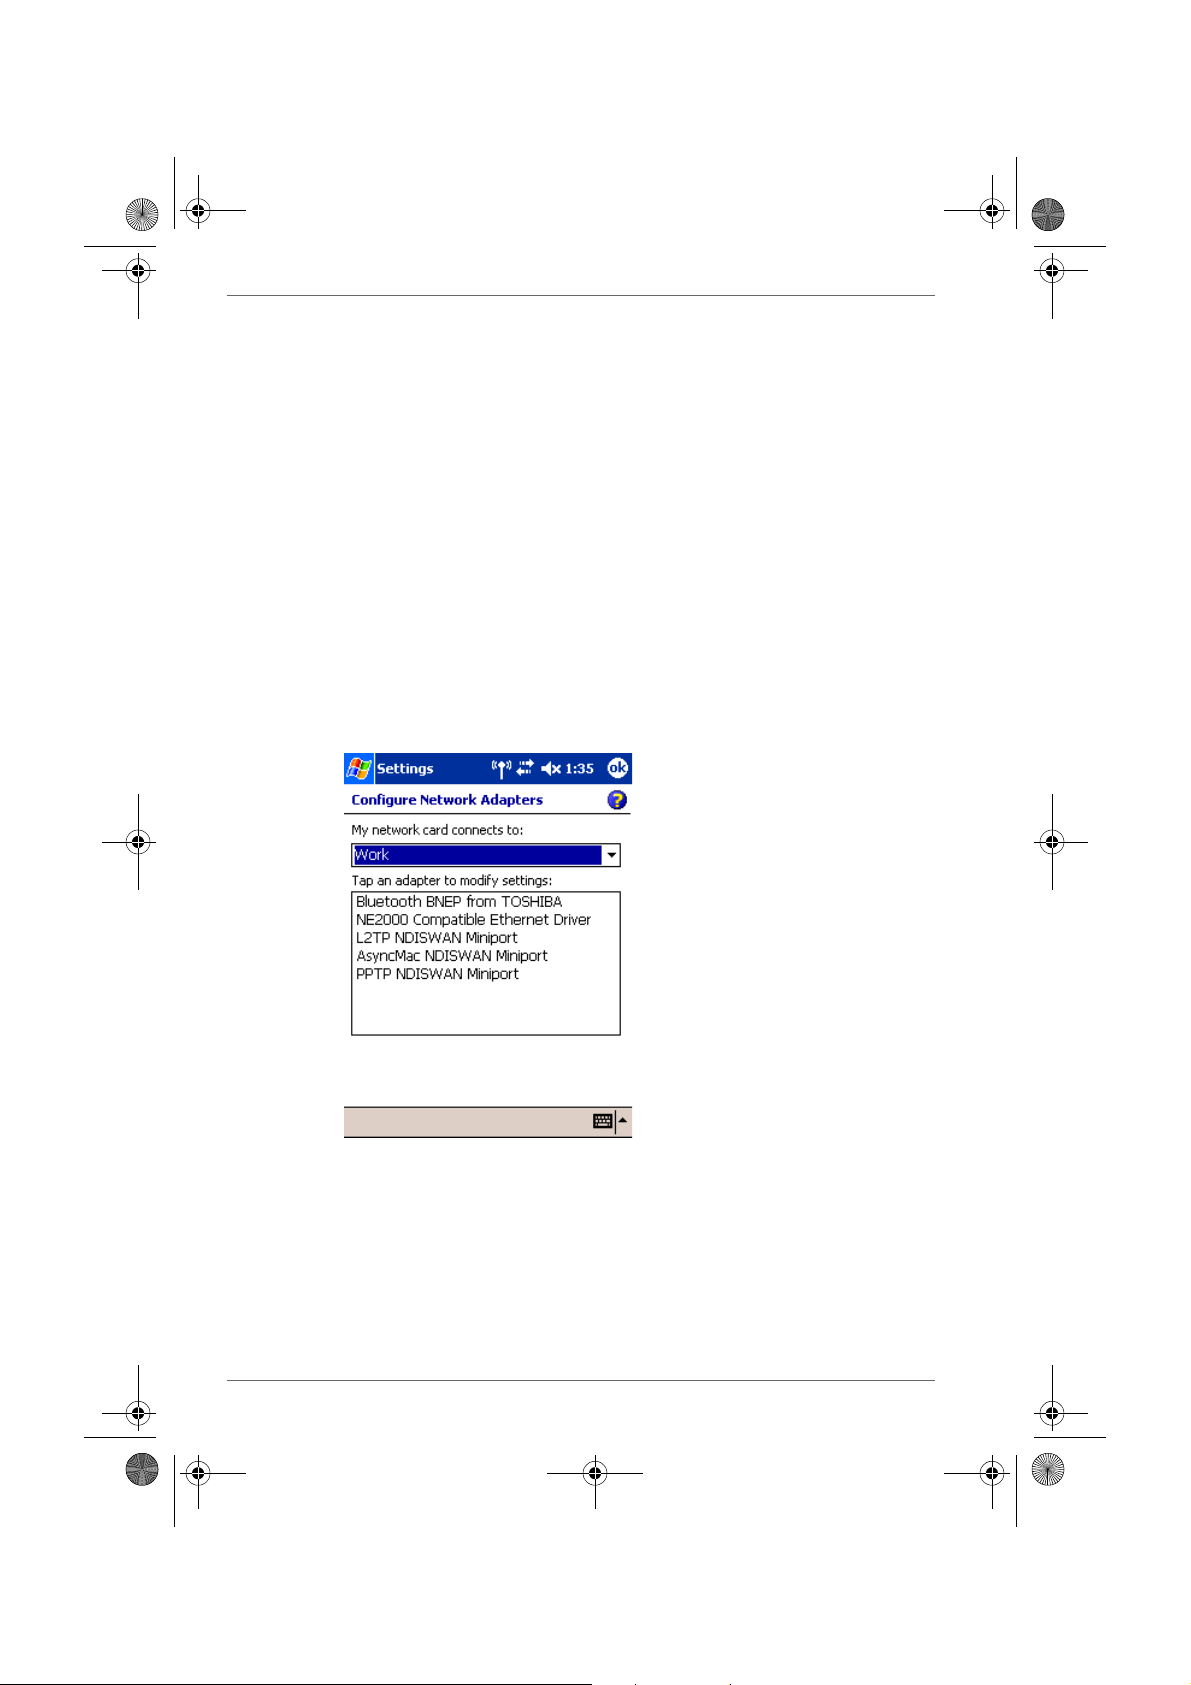
1. Tap Start, Settings, Connection tab, and then Network Adapter.
Configure Network Adaptors screen appears.
2. Tap Bluetooth BNEP from TOSHIBA to configure the network driver.
3. When the configuration screen appears, make the necessary network
changes.
4-10 User’s Manual
Page 24
Pocket PC e830 UG.book Page 11 Monday, September 22, 2003 10:57 AM
Using OPP Service
This section explains how to use OPP service to send and receive
contacts, schedules, tasks, and business cards to and from other Toshiba
Pocket PCs. “Business cards” here refers to Toshiba Pocket PC e830
owner information. Please be aware that you cannot send voice data or
handwritten data entered in the memo section.
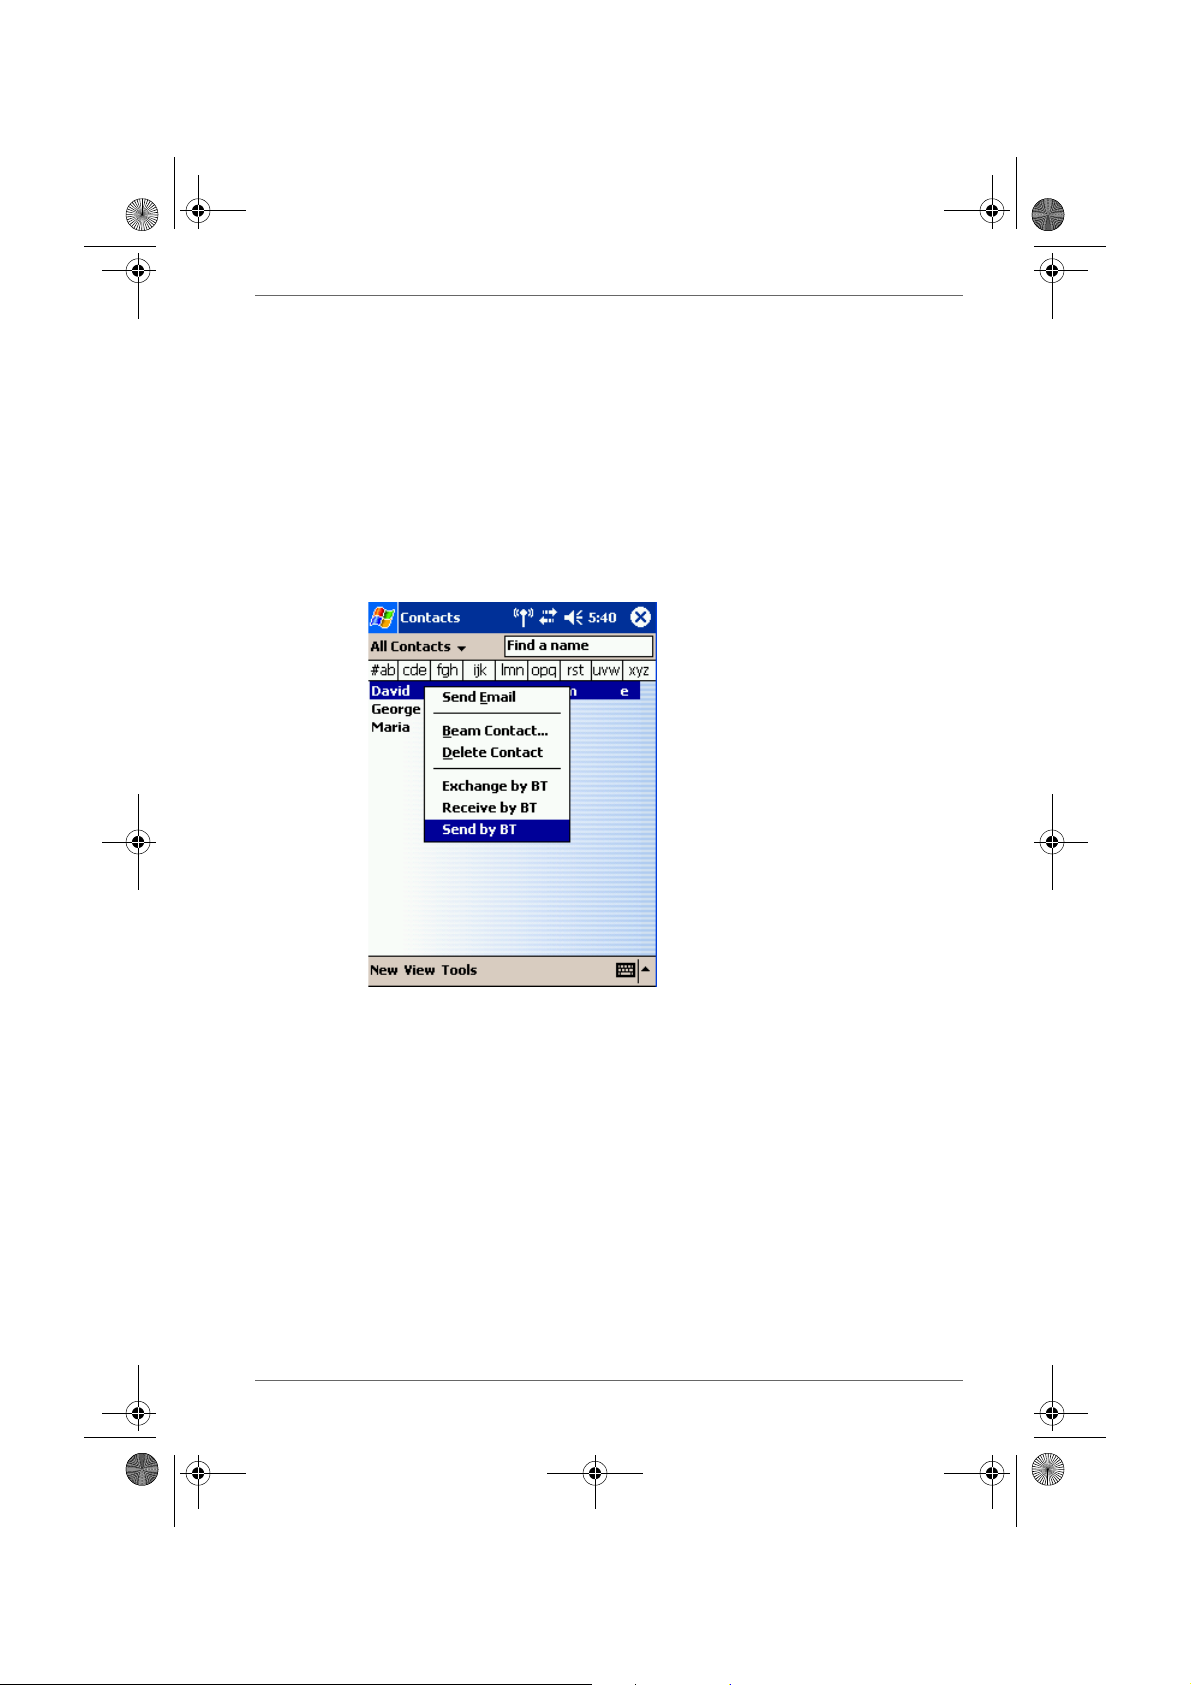
Sending a contact
1. Tap Start and Contacts, then tap and hold on the contact you want to
send.
A pop-up menu appears.
Bluetooth
2. You can select multiple contacts by dragging them.
You can also send a contact by tapping the Tools menu.
3. Tap Send by BT on the pop-up menu.
The device search screen appears.
4. Select View All Devices and tap Device Search.
The device list appears.
5. Select the device to which you want to connect by tapping the device
name, then tap Connect.
A message is displayed indicating that Local Device is now connected
to the remote device.
If the Bluetooth Authentication screen appears, enter the Bluetooth
passkey (PIN Code) to perform authentication.
A message is displayed indicating that the contact is being sent.
After the contact is successfully sent, a message is displayed indicating
this and the Bluetooth connection is terminated.
User’s Manual 4-11
Page 25
Pocket PC e830 UG.book Page 12 Monday, September 22, 2003 10:57 AM
Bluetooth
6. Tap Close to return to the contact list screen.
A message is displayed on the remote device indicating that the contact
has been received.
7. Tap Close to close the screen.
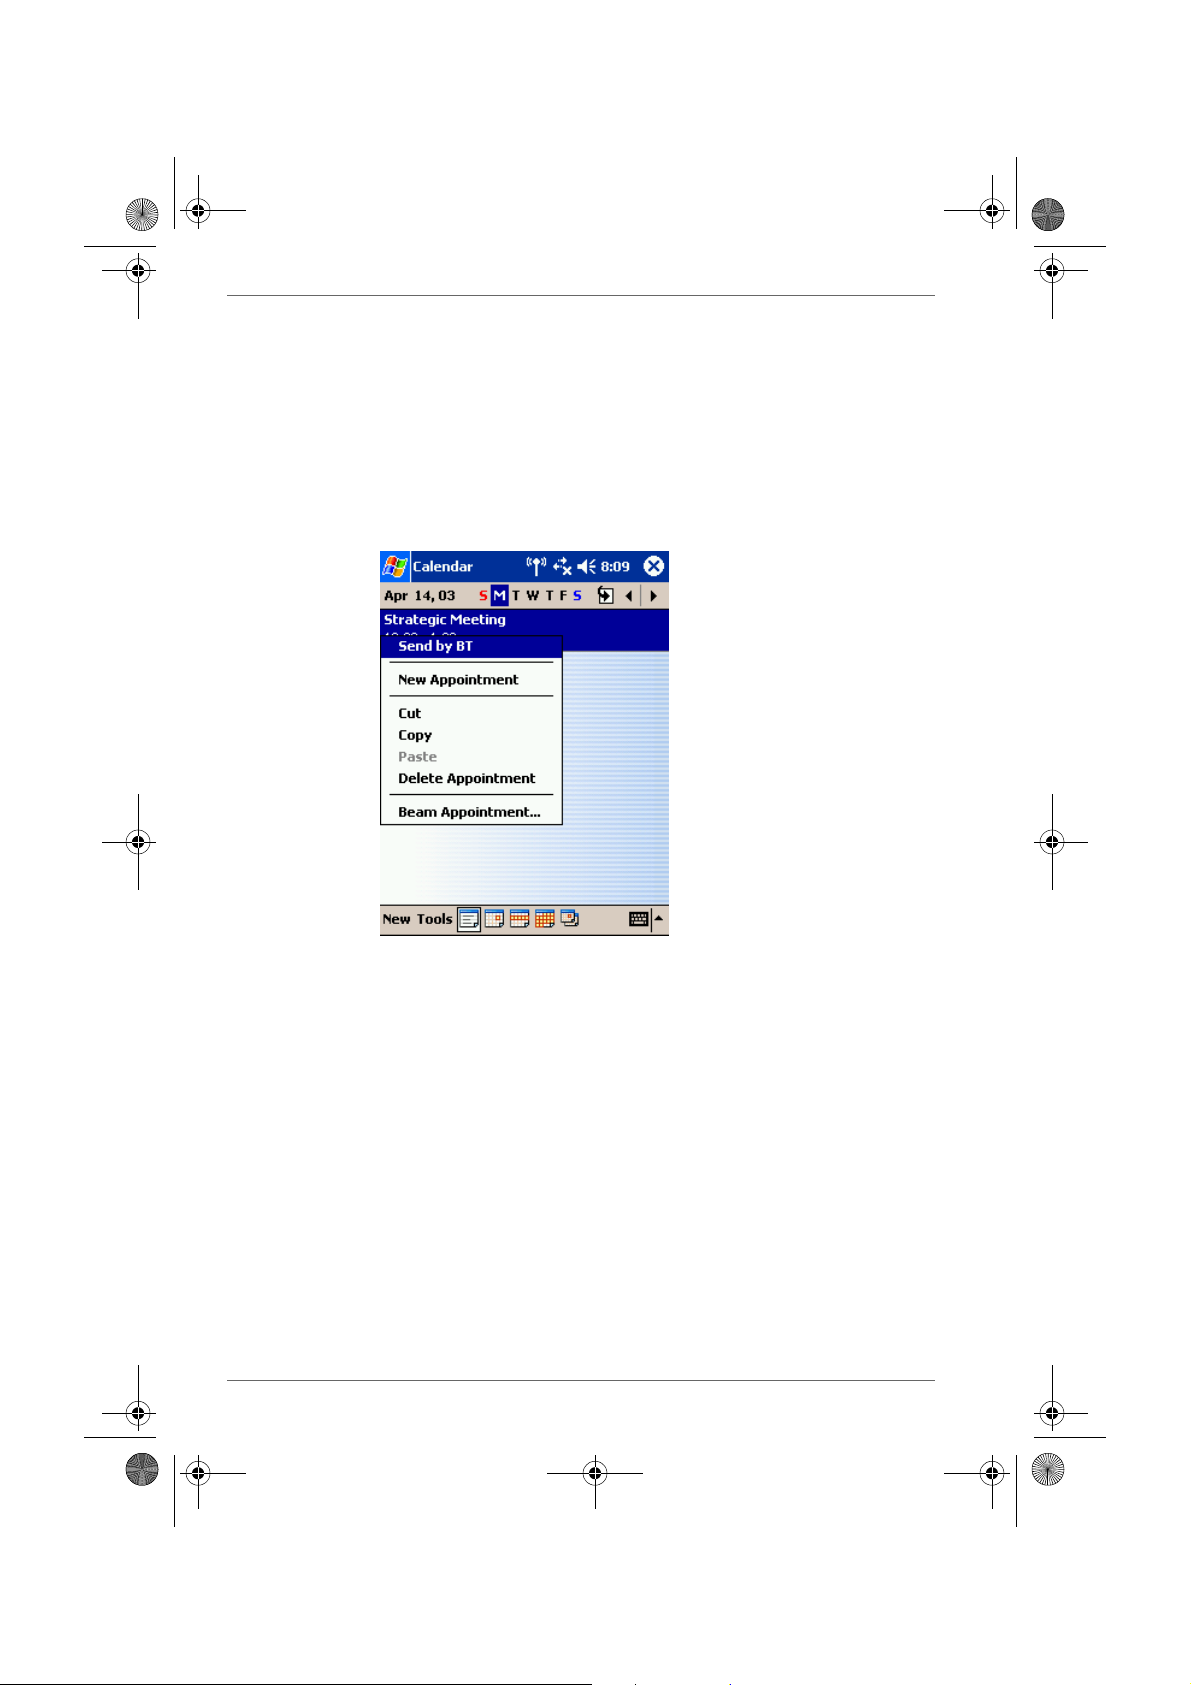
Sending a schedule
1. Tap Start and Calendar, then tap and hold on the schedule that you
want to send.
A pop-up menu appears.
2. You can also send a schedule by tapping the Tools menu.
3. Tap Send by BT on the pop-up menu.
The device search screen appears.
For further operations, follow steps 3 and 4 in “Sending a contact” on
page 4-11.
Sending a task
1. Tap Start, Ta sk, then tap and hold on the task that you want to send.
A pop-up menu appears.
You can also send a task by tapping the To ols menu.
2. Tap Send by BT on the pop-up menu.
The device search screen appears.
For further operations, follow steps 3 and 4 in “Sending a contact” on
page 4-11.
4-12 User’s Manual
Page 26

Pocket PC e830 UG.book Page 13 Monday, September 22, 2003 10:57 AM
Exchanging business cards
1. Tap Start, Contact, and then Too ls menu.
Bluetooth
2. Tap Exchange by BT.
The device search screen appears.
3. Select View All Devices and tap Device Search.
The device list appears.
4. Select the device to which you want to connect by tapping the device
name, then tap Connect.
A message is displayed indicating that Local Device is now connected
to the remote device.
If the Bluetooth Authentication screen appears, enter the Bluetooth
passkey (PIN Code) to perform authentication.
The exchange of business cards begins.
When the exchange of business cards is completed, the name, email
address, and phone number of the remote device user appears on the
screen, and the Bluetooth connection is terminated.
5. Tap Close to return to the contact list screen.
Receiving a business card
1. Tap Start, Contact, Tools menu.
2. Tap Receive by BT.
For further operations, follow steps 3 and 4 in “Exchanging business
cards” on page 4-13.
When the business card is received, the name, email address, and
phone number of the remote device user appears on the screen, and
the Bluetooth connection is terminated.
User’s Manual 4-13
Page 27

Pocket PC e830 UG.book Page 14 Monday, September 22, 2003 10:57 AM
Bluetooth
Using FTP Service
This section explains how to use FTP service to transfer files to and from
another Toshiba Pocket PC.
Starting Bluetooth FTP
1. Tap Start, Programs, Bluetooth, and then Bluetooth FTP.
The server selection screen appears.
2. Tap Search.
Local Device searches for Bluetooth devices in the vicinity while a
message is displayed on the screen indicating that Local Device is
searching for peripheral devices and obtaining device names.
The discovered devices are displayed
3. Tap the device to which you want to connect, then tap OK.
If the FTP Authentication screen appears, enter the FTP password.
The FTP password can be a
maximum of 16 alphanumeric
characters.
On Local Device, the FTP (Client) screen appears.
On the remote device, Bluetooth FTP starts automatically and the FTP
(Server) screen appears.
4-14 User’s Manual
Page 28

Pocket PC e830 UG.book Page 15 Monday, September 22, 2003 10:57 AM
Sending a file
1. In the Local Device window, tap and hold on the folder or file that you
want to send.
A pop-up menu appears.
Tap on the file to start the associated application.
You can also send a file by dragging that file to the remote device
window.
Send: This sends the file to the remote device.
Execute: This starts the associated application.
New Folder: This creates a new folder in the Local Device window.
Delete: This deletes a folder or file.
Rename: This enables you to rename a folder or file.
2. Tap Send on the pop-up menu.
The message Sending... appears.
3. To exit, tap the To o l s menu and Exit.
Receiving a file
1. In the remote device window, tap and hold on the folder or file that you
want to receive.
A pop-up menu appears.
When you tap the file that you want to receive, the message Send/
Execute Confirmation appears.
You can also receive a file by dragging that file to the Local Device
window.
Receive: This receives the file from the remote device.
Receive/Execute: This receives the file from the remote device and
starts the associated application.
New Folder: This creates a new folder in the remote device window.
Delete: This deletes a folder or file.
2. Tap Receive or Receive/Execute on the pop-up menu.
The message Receiving... appears.
When you tap Receive/Execute, Local Device receives the file from the
remote device and starts the associated application. If there is no
associated application, an error message appears.
3. To exit, tap the To o l s menu and Exit.
Bluetooth
User’s Manual 4-15
Page 29

Pocket PC e830 UG.book Page 16 Monday, September 22, 2003 10:57 AM
Bluetooth
FTP Authentication setting for Bluetooth FTP server
You can enable OBEX Authentication and enter the FTP password. A
password protects the personal information on your Pocket PC from remote
devices from unauthorized use.
Please refer to the Options menu of Bluetooth Settings.
To perform FTP authentication, enter a
password here. The password can be a
maximum of 16 alphanumeric characters
Enable this function to perform FTP
authentication when a request to connect is
received from a remote device. A check
mark indicates that authentication is
performed.
The FTP password is not registered in initial setting.
Before using it, we recommend you to set up the FTP password.
The Bluetooth Settings Screen
The command bar on the Bluetooth Settings screen features three menus:
Tools, View, and Options. You can use these menus to perform various
Bluetooth operations. This section explains the various features of these
menus.
Tools menu
Tap Tools on the command bar to display the Tools menu.
Searching for peripheral devices
When you tap Devices Search on the Tools menu, the Toshiba Pocket PC
e800 searches for Bluetooth devices in the vicinity while a message is
displayed on the screen indicating that the local device is searching for
peripheral devices.
All discovered devices are displayed in the device list of the Bluetooth
Settings screen.
4-16 User’s Manual
Page 30

Pocket PC e830 UG.book Page 17 Monday, September 22, 2003 10:57 AM
Updating service
Tap Update Service to display the updated service information of the
selected device in the service list of the Bluetooth Settings screen.
Tap Connection Registration to register a connection. The icons
displayed in the device and service lists change to registered connection
icons.
Tap Connecting Registrations in the pop-up menu of item in the service
list to register a connection.
Properties
Tap Properties to display the detailed information of the selected remote
device.
Delete
Tap Delete to delete the selected remote device from the device list,
service list, and database of discovered peripheral devices. The selected
device cannot be deleted if it is connected to Local Device.
Search options
Tap Search Options on the Tools menu to display a pop-up menu.
If you select Enable Device Name Search, the device names are
searched for during the search for peripheral devices and listed in the
device list.
If you select Disable Device Name Search, the device names are not
searched for during the search for peripheral devices, thereby reducing the
search time. In this case, only the device addresses are displayed in the
device list.
Bluetooth
Deleting ghost devices
Tap Delete Ghost Device on the Tools menu to delete all devices
displayed in the device list as ghosts.
View menu
Tap View on the command bar to display the View menu.
Details
Tap Details on the command bar to display the device names in the device
list.
Icons
Tap an icon on the command bar to display that icon in the device list.
Filter
The currently selected device is indicated with a black dot. Tap the desired
type of device.
User’s Manual 4-17
Page 31

Pocket PC e830 UG.book Page 18 Monday, September 22, 2003 10:57 AM
Bluetooth
Among the devices discovered using Devices Search in the Tools menu,
only the types of devices selected in this display menu are displayed in the
device list.
Options menu
Tap Options on the command bar to display the Options menu.
FTP Server Settings
Tap FTP Sever Settings on the Options menu to display the FTP Server
Settings screen.
You can enable OBEX Authentication and enter the FTP password.
Security Settings
Tap Security Settings on the Options menu to display the Change
Security Setting screen.
You can select from four security settings: Office, Mobile, Home, and Other.
The default setting is Home.
To change the security setting, tap the desired security setting and OK.
Advanced settings
The default settings are as follows.
Discoverability
Mode
Office Discoverable Connectable Security On Yes
Mobile Non-
discoverable
Home Discoverable Connectable Non-secure No
Other Discoverable Connectable Security On Yes
Connectability
Mode
Nonconnectable
Security Mode Encryption
Security On Yes
In the default setting for Home, the Security Mode is set to Non-secure and,
therefore, unspecified devices may be able to connect to Local Device. It is
recommended that you set the Security Mode to Security On.
If you want to set the Connectability Mode to Non-connectable and you are
operating your Toshiba Pocket PC e800 in an environment in which there
are three or more operating Bluetooth devices, you should also set the
Discoverability Mode to Non-discoverable.
You can also change the security setting by tapping and holding on
Bluetooth icon on the Today screen and tapping Change Security Setting.
A menu with the four security settings appears. Tap the desired security
setting.
4-18 User’s Manual
Page 32

Pocket PC e830 UG.book Page 19 Monday, September 22, 2003 10:57 AM
Registration History
Tap Registration History on the Options menu to display the Auto
Connection Registration History screen. Tap on the Category selection box
to display the list of category. Each list displays the latest registration which
can be a maximum of three items. The selected item is current available
connection registration. You can change current available item, if you mark
other item by tap to select.
Bluetooth
Select Category to display the last three
connection registered devices. If there are
more than five devices, those extra
devices are deleted, beginning with the
oldest device. Tap a device to select it and
set it as the current connection registered
device.
This displays detailed information of the
selected device.
You can also change the connection registered device by tapping on the
Bluetooth icon on the Today screen and tapping Registration History.
A menu with the last three connected devices appears by each category.
Tap a device to select it and set it as the current connection registered
device.
Local Device
Tap Local Device on the Options menu to display the Device Information
screen for Local Device.
To change the name of the device, enter a new name in the Device Name
box and tap OK.
The device name can be a maximum of 248 alphanumeric characters.
If the device name exceeds 248 alphanumeric characters, an error
message appears.
Function List
Tap Function List on the Options menu to display the Function List screen
of Local Device.
You can see the list of Bluetooth functions and current status of them
visual. And you can also change setting to disable or enable.
User’s Manual 4-19
Page 33

Pocket PC e830 UG.book Page 20 Monday, September 22, 2003 10:57 AM
Bluetooth
Version Information
Tap About on the Options menu to display the version information of
Bluetooth Settings.
4-20 User’s Manual
Page 34

Pocket PC e830 UG.book Page 1 Monday, September 22, 2003 10:57 AM
TOSHIBA Pocket PC e830
Optional Functions
How to Make a Backup
Periodical backup of your data is highly recommended. You can make a
backup of the Toshiba Pocket PC e830 data to a storage device.
Additionally, if you have backed up your data on a storage device, you can
restore that data in your Toshiba Pocket PC e830 as well as delete backup
file data from the storage device.
Data of the following three types can be backed up:
File: Includes a file created by Pocket Word, Pocket Excel, Notes, or an
additionally installed program.
Registry: Settings information on Windows Mobile 2003 or built-in
programs.
Database: Microsoft Pocket Outlook information.
Chapter 5
Data such as the password in Settings cannot be restored.
The data stored in the Flash ROM disk cannot be backed up.
Before backing up or restoring data, stop other applications, and connect
the AC adapter to the Toshiba Pocket PC e830.
If you make a backup to the CF/SD card or Flash ROM Disk using the
DataBackup Utility, please DO NOT: remove the CF/SD card, reset the
device, and/or turn off the device’s power until the backup is completed.
If you restore the data from the CF/SD card or Flash ROM Disk by
DataBackup Utility, please DO NOT: remove the CF/SD card, reset the
device, and/or turn off the device’s power until the restore is completed.
Failure to follow any of the above procedures may result in the loss of data.
User’s Manual 5-1
Page 35
Pocket PC e830 UG.book Page 2 Monday, September 22, 2003 10:57 AM
Optional Functions
Making a Backup
Before performing the backup or restore operations, do the following;
■ Check that there is enough space in the main unit’s memory and on the
storage device. If the storage device does not have enough free space,
you cannot save the backup data. The backup data is saved as a file
named backup.dat on your storage device.
■ Make sure the main unit’s power is off when loading and unloading the
CF/SD card.
■ Save current data in the main unit’s memory before backing it up on the
storage device.
1. To make a backup to the CF/SD card, insert a CF Card or SD Card.
Make sure to do so in the proper direction.
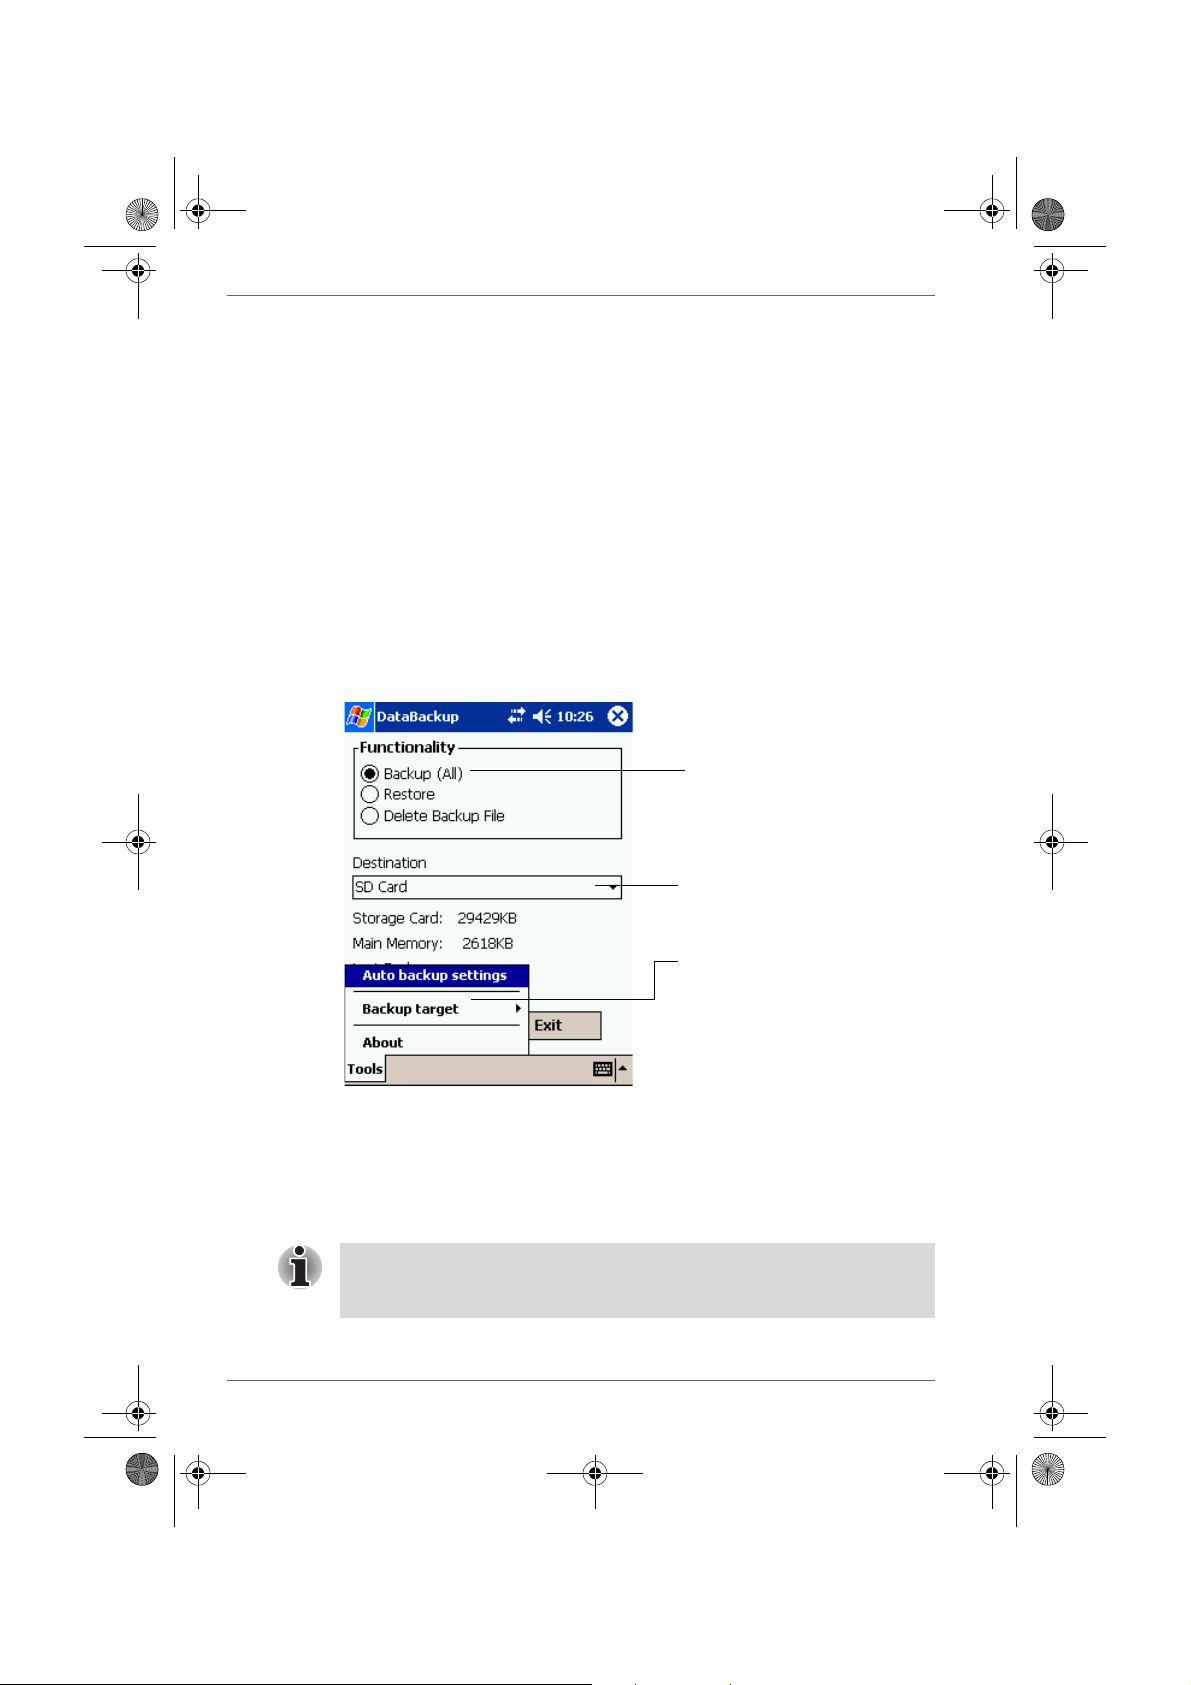
2. Tap Start, Programs, and then DataBackup to display the DataBackup
screen shown below.
3. Tap Backup from Functionality, and select the storage destination.
Tap to select Backup.
Tap to select the storage destination.
Tap to select:
All: All files stored in the main
memory, registry, and database.
PIM data: Pocket Outlook data
(Contacts, Calendar, and Task).
4. Tap Start. The screen for confirming that other applications have ended
appears.
5. To display the Backup password input screen, tap OK.
6. Enter a password. You can enter a password up to a maximum of 16
characters. Backup can be made even without entry of a password. If a
password is entered, that password is required at the time of restore.
If you forget the password, you cannot restore the backup data. Do not
forget your password. Write down the password and keep it in a safe place
where only you know.
5-2 User’s Manual
Page 36

Pocket PC e830 UG.book Page 3 Monday, September 22, 2003 10:57 AM
7. When finished, tap OK. The progress bar is displayed during the
backup process. When the backup is completed, the backup finish
message appears. The backup time that is displayed on screen is the
time that the backup was started.
8. Tap OK to return to the previous screen.
9. Tap Exit to close the DataBackup screen.
The backup process will stop if the storage device becomes full before
completing the backup. Before starting the backup, check the remaining
storage device capacity.
If the storage card is write-protected, you cannot save the backup data.
Cancel the write-protection before starting the backup.
Backups can also be made periodically. For more information, see “Making
an Auto Backup” on page 5-5.
Backup files are always overwritten.
Carrying Out the Restore Operation
To restore is to overwrite the backed up data from the storage device onto
the main memory of your Toshiba Pocket PC e830. Prior to restoring your
data, please consider the following:
■ If the same file name exists in the main memory of your Toshiba Pocket
PC e830, this file data is replaced with the backup data from the storage
device.
■ If files exist in the main memory but not in the backup file, they will not
be overwritten.
1. To restore from the CF/SD card, insert the CF/SD card that contains the
backup data into your Toshiba Pocket PC e830.
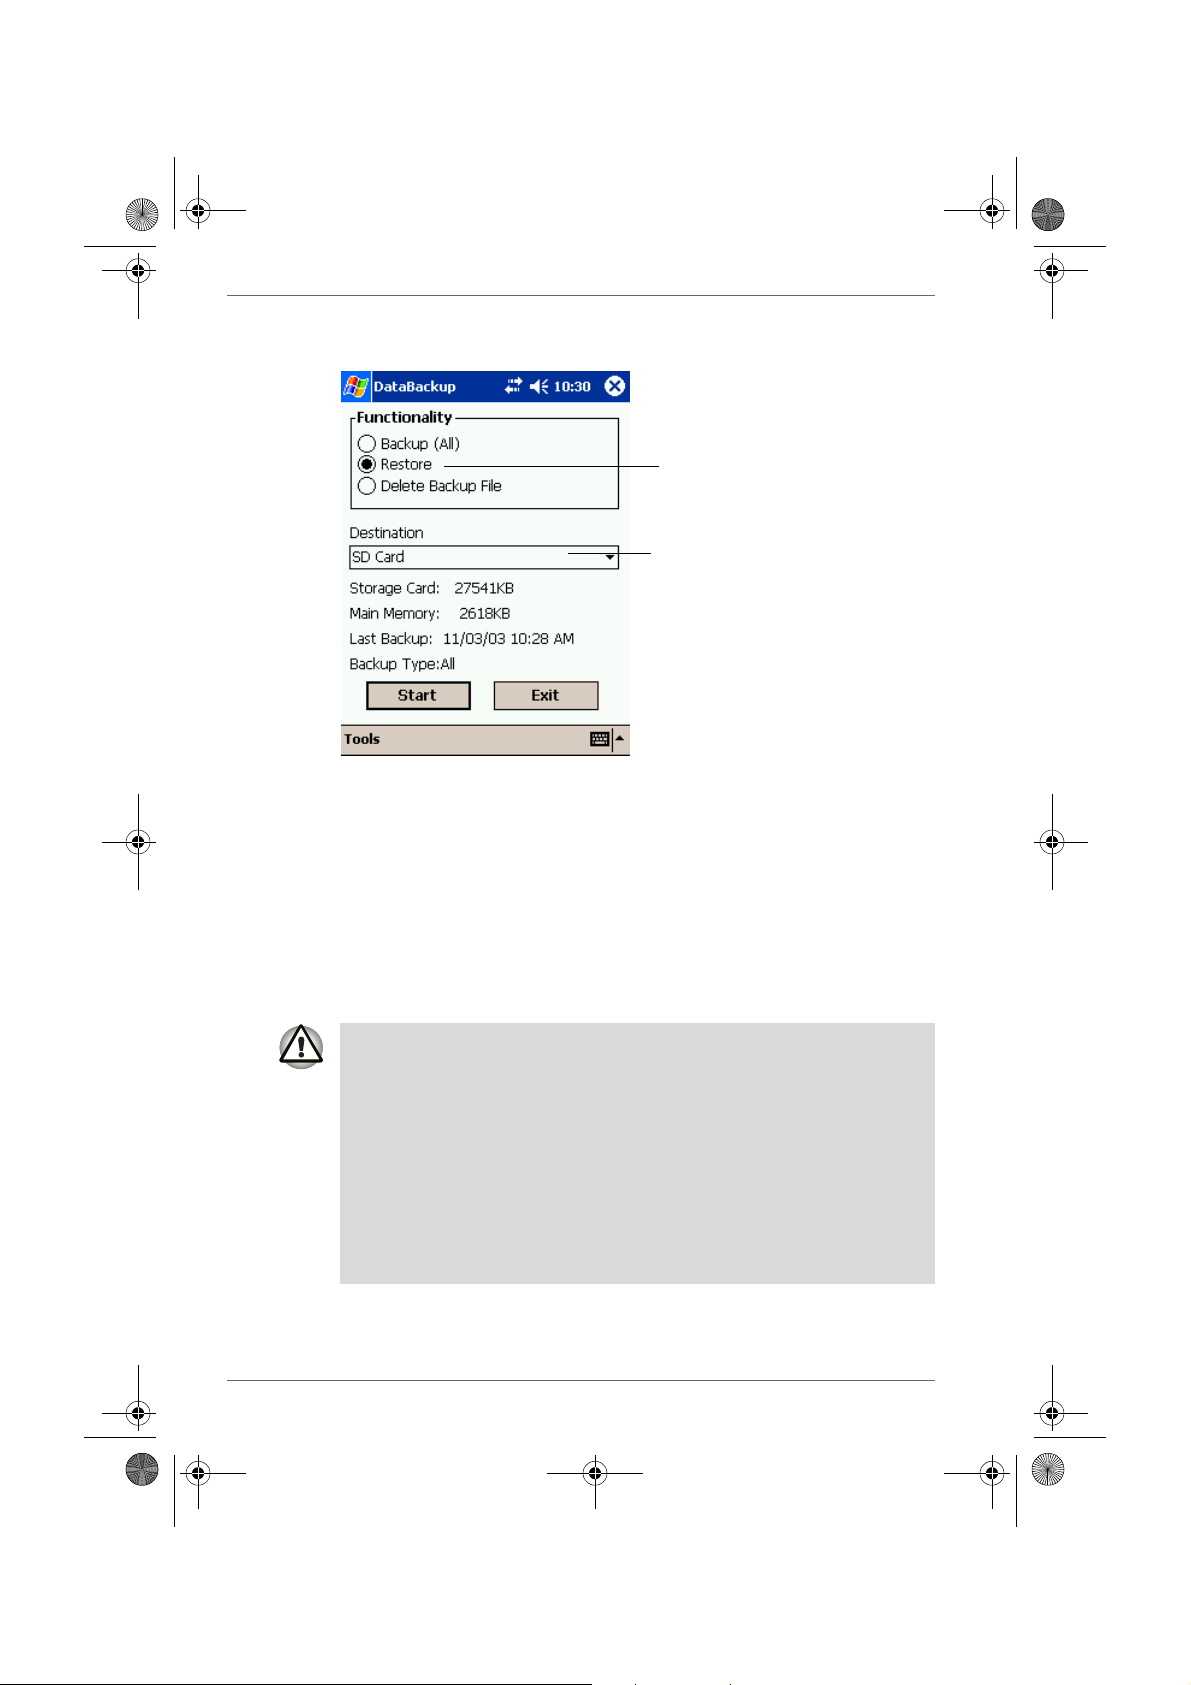
2. Tap Start, Programs, and then DataBackup to display the DataBackup
screen shown on the following page
Optional Functions
.
User’s Manual 5-3
Page 37
Pocket PC e830 UG.book Page 4 Monday, September 22, 2003 10:57 AM
Optional Functions
3. Tap Restore from Functionality, and select the storage destination.
4. Tap Start. The screen for confirming that other applications have ended
appears.
5. Tap OK to display the Restore password input screen.
6. Enter the password used when backing up the data (if the file was
previously created without a password, then a password is not
required).
7. When finished, tap OK. The progress bar is displayed during the restore
process. When the restore is completed, the restore finish message
appears.
8. Tap OK. Your Toshiba Pocket PC e830 is now reset and it will
automatically restart.
Ta p Restore.
Tap to select the storage destination.
If your Toshiba Pocket PC e830 memory becomes short of its capacity
during restore, the restore process stops. Increase the memory allocation
of the main memory of your Toshiba Pocket PC e830 (see “Customize
Your Toshiba Pocket PC” on page 2-20), and then restart the restore
procedure.
Data backed up on a legacy model Toshiba Pocket PC or another
manufacturer’s Pocket PC (simply called “other Pocket PC” from here on)
cannot be restored to your Toshiba Pocket PC e830. To load other Pocket
PC data to your Toshiba Pocket PC e830, use ActiveSync to synchronize
the personal computer with the other Pocket PC. Next, synchronize the
personal computer with Toshiba Pocket PC e830, and then load the data to
Toshiba Pocket PC e830.
5-4 User’s Manual
Page 38

Pocket PC e830 UG.book Page 5 Monday, September 22, 2003 10:57 AM
Deleting a Backup File
You can delete a backup file and replace it at another time or make room
for more data on your Toshiba Pocket PC e830.
To delete the backup data:
1. Insert the CF Card or the SD Card into your Toshiba Pocket PC e830.
2. To display the Backup screen, tap Start, Programs, then DataBackup.
3. Tap Delete Backup File from Functionality, and select the storage
destination.
4. Tap Start.
5. To delete the backup file, tap OK.
6. Tap Exit to close to the DataBackup screen.
Making an Auto Backup
You can set up your Toshiba Pocket PC e830 to automatically backup files
at a specified time intervals. Select the backup time, occurrence, and
frequency that best suits your needs.
Even if your Toshiba Pocket PC e830 is turned off, data is periodically
backed up.
Optional Functions
To make a backup automatically:
1. Insert a CF Card or a SD Card
2. To display the DataBackup screen, tap Start, Programs, then
DataBackup.
3. Tap Auto backup settings from the Tools menu. The Settings screen
is displayed.
User’s Manual 5-5
Page 39

Pocket PC e830 UG.book Page 6 Monday, September 22, 2003 10:57 AM
Optional Functions
4. Set the desired items.
5. Tap OK. The settings data is saved and periodical backups will be
made at the preset time.
6. Tap Exit to close to the Backup screen.
Select Run an auto backup.
If required, enter a password.
Tap to select the storage destination.
Select if power backups are required.
If the Run Auto backup only when power is off check box is not selected,
the auto backup confirmation screen will be displayed if your Pocket PC is
ON when the auto backup occurs. The backup will be automatically started
if you tap OK or about 30 seconds elapses after the confirmation screen is
displayed. Tap Cancel to stop the backup.
If the Run Auto backup only when power is off check box is selected, the
message screen will be displayed, and the backup will be started after
about 10 seconds if your Pocket PC is off when the auto backup occurs.
Auto backups will only occur if the AC Adapter is connected or the
remaining battery charge is 50% or more.
You can confirm whether or not auto backups have occurred by checking
when the last backup was made. Depending on the conditions, auto
backups may not occur.
Auto backups will not occur if the preset storage card is not inserted in the
card slot at the specified auto backup time.
Do not turn your Toshiba Pocket PC e800 off during an auto backup. Doing
so might damage the data or your Toshiba Pocket PC e830.
If the storage device runs out of data storage space during an auto backup,
the backup will end midway. Before an auto backup is made, check the
amount of free space on the storage device.
5-6 User’s Manual
Page 40
Pocket PC e830 UG.book Page 7 Monday, September 22, 2003 10:57 AM
Using TOSHIBA Text to Speech for Pocket PC
TOSHIBA Text to Speech for Pocket PC (simply called Text to Speech from
here on) synthesizes voice, and reads out emails, text files and text data on
the clipboard. Text to Speech consists of three applications, Mail Speech,
Text Speech and Speech Settings.
Mail Speech displays unread emails and reads them out. Text Speech picks
up text files in Toshiba Pocket PC e830 and reads them out. It also reads
out text data on clipboard. Speech Settings arranges the settings of Mail
Speech and Text Speech. You can use one application of Text to Speech at
a time. Please exit the current one to start another application.
To setup Text to Speech from Companion CD:
1. Make sure your Pocket PC is connected to your computer and that an
ActiveSync connection has been established.
2. Start the Text to Speech installation by running the Setup program.
3. Check your Toshiba Pocket PC e830 screen for any additional steps
required to complete the installation.
Mail Speech
To start Mail Speech:
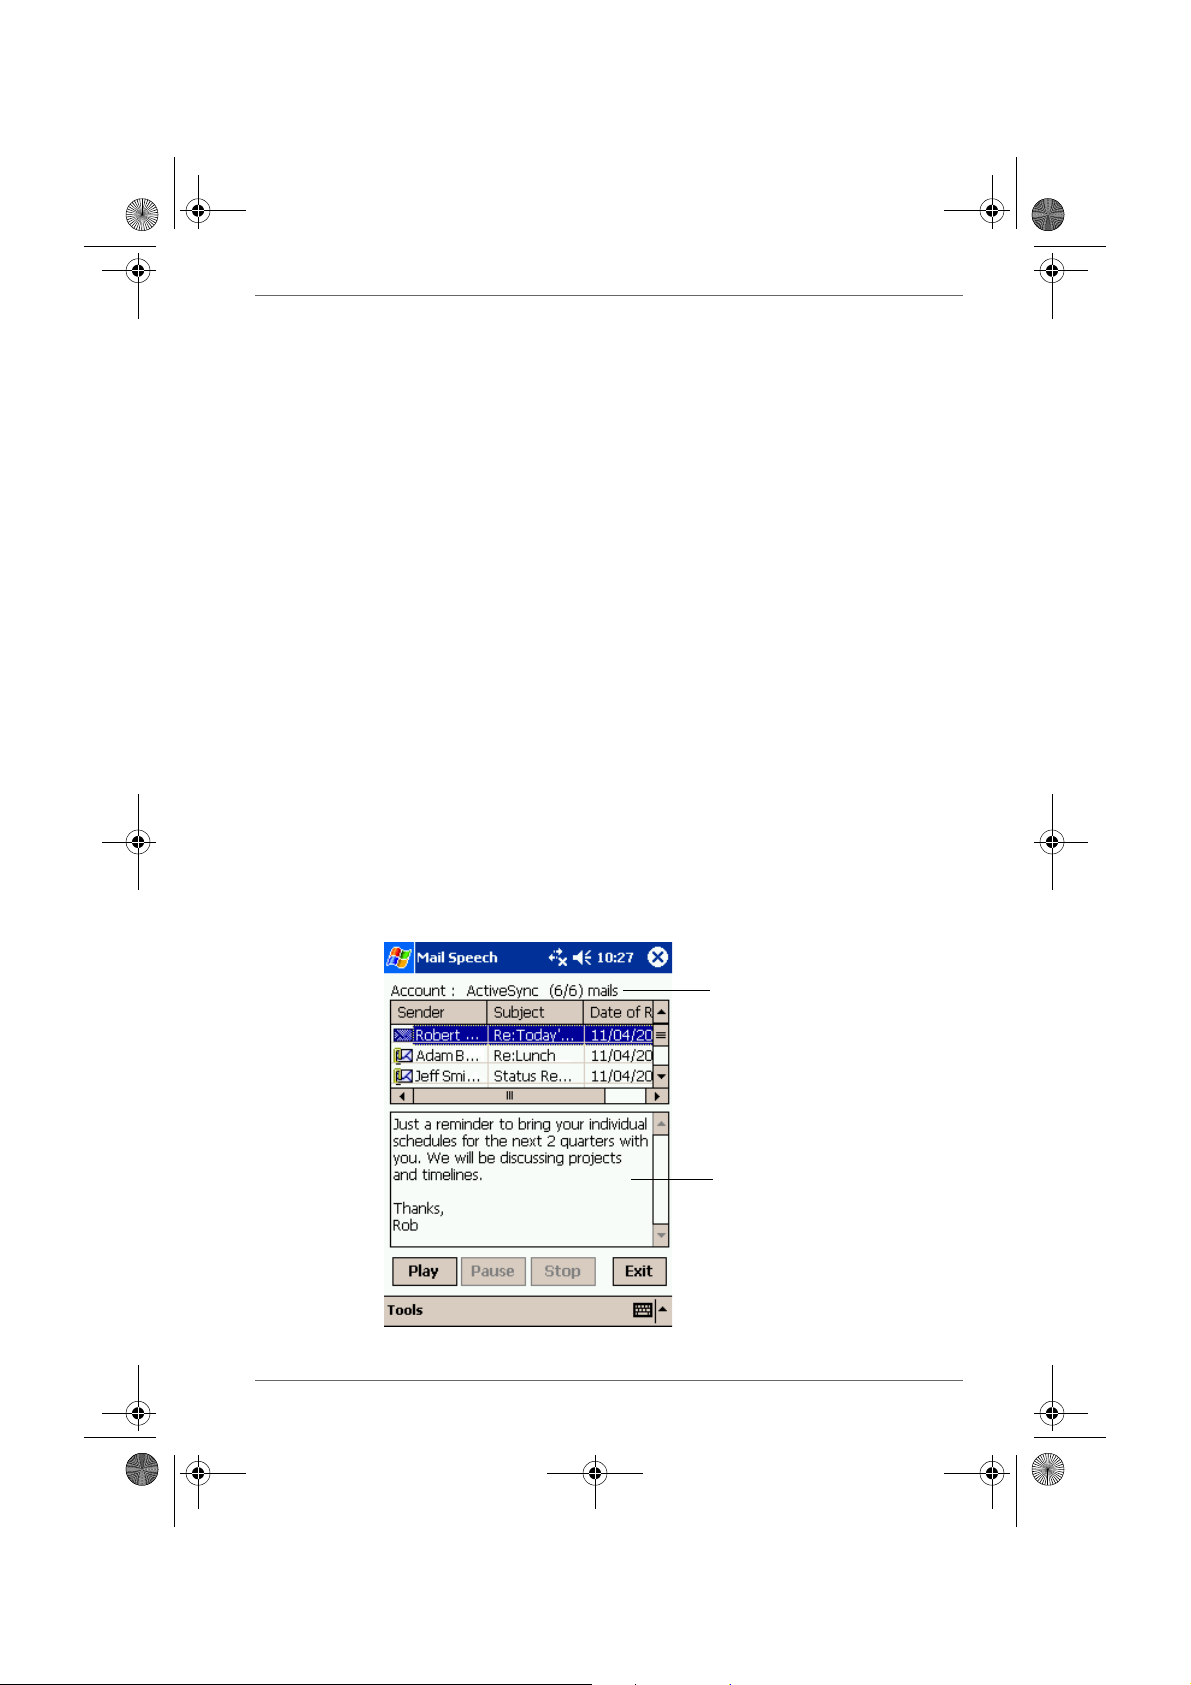
1. Open the Inbox, and set the mail account you want to read out
2. Tap Start, Programs, then Mail Speech.
Mail Speech starts reading the message from the header information of
unread email list. As the reading continues, the currently read phrase is
highlighted.
Optional Functions
Account name displays here.
Selected email text displays here.
User’s Manual 5-7
Page 41

Pocket PC e830 UG.book Page 8 Monday, September 22, 2003 10:57 AM
Optional Functions
3. Select any of the following:
■ Play: Starts reading out the text of the selected email.
■ Pause: Stops reading. If you tap Play after Pause, it will start from
the position where it was paused.
■ Stop: Stops reading the text.
■ Exit: Exits Mail Speech.
4. Tap Tools. Select any of the following:
■ Refresh: Refreshes the status of the email database.
■ Settings: Starts the Speech Settings.
■ Exit : Exits the program.
■ About : Displays the version information screen.
5. Tap and hold the selected words to display the pop-up Copy menu.
If tap a mail header in unread email list while reading, it starts reading
selected email.
Mail information displayed in the mail header information area is
descending order, that is the older mails are on the top and newer mails
are shown in the lower area.
When there is an attached file, the voice service announces, “with attached
file”. It does not announce the “TO” or “CC” of a mail header.
While reading an email, DO NOT synchronize your Toshiba Pocket PC
e800 with the PC.
The text may not be displayed correctly depending on the mailer of the
sender. US ASCII (us-ascii) and 8-bit Western Europe (iso-8859-x)
character code are supported.
This application supports base 64, quoted-printable and non-encoded. If
the text is encoded, it cannot to be displayed. UUENCODE is not
supported. When the text is longer than 2k bytes, the part over 2k bytes is
not read.
Text Speech
Text Speech reads a text file and the data stuck on the clip board.
5-8 User’s Manual
Page 42

Pocket PC e830 UG.book Page 9 Monday, September 22, 2003 10:57 AM
To read out a text file:
1. Tap Start, Programs, then Text Speech.
2. From the Tools of the command bar, tap Open. The list of the text files
stored in your Pocket PC e830 and storage device is displayed.
Optional Functions
File list.
3. Select any of the following:
■ Folder: Select the folder from the pull-down menu.
■ Cancel: Close the file selection screen and return to the Text
Speech screen.
■ Ty p e : Only text file (*.txt) is available.
■ File list: Display Name, Folder, Date, Size, Type and Location. The
file to read should be under \My Documents.
User’s Manual 5-9
Page 43

Pocket PC e830 UG.book Page 10 Monday, September 22, 2003 10:57 AM
Optional Functions
4. Tap the file you want read. The text is displayed.
5. Select any of the following:
■ Play: Starts reading the text.
■ Pause : Stops reading. If you tap Play after Pause, voice synthesis
will start from the position where it was paused.
■ Stop: Stops reading. If you tap Play after Stop, it will start from the
beginning of the text.
■ Exit: Exits the program.
Text area.
Reading status.
To read the text copied on the clipboard:
Copied data on clipboard can be read by Text Speech, including data from
Pocket Internet Explorer or Pocket Word.
1. Within Pocket Internet Explorer, copy the text data to the clipboard.
2. Tap Start, Programs, then Text Speech. If the Text Speech application
is already opened and a text data is displayed on text area, tap and hold
the text, then Clear All from the pop-up menu.
3. Tap and hold the text area, then select Paste from the pop-up menu.
The data on the clipboard is displayed on text area.
4. Tap Play.
You can input text directly in the text area, using the Input Panel.
The maximum size of a text file or clipboard data to be read is about
16,000 characters.
Text Speech starts reading from the cursor position.
5-10 User’s Manual
Page 44

Pocket PC e830 UG.book Page 11 Monday, September 22, 2003 10:57 AM
Speech Settings
To start Speech Setting, tap Start, Programs, then Speech Settings. You
can also start Speech Settings by tapping Tools, then Settings on the Mail
Speech or the Text Speech screen.
Reading Tab
Optional Functions
Select any of the following:
■ To n e : Changes the tone of the voice (default value: 0).
■ Speed : Changes the reading out speed (default value: 0).
■ Default Value: Reset all values to the default.
■ Not read more than 2/3 marks: If selected, the continuous marks
on the text are skipped when reading out. You can define the
skipping case (continuous 2 or 3 marks) from the pull-down list.
User’s Manual 5-11
Page 45

Pocket PC e830 UG.book Page 12 Monday, September 22, 2003 10:57 AM
Optional Functions
Mail Tab
■ The reading mail turns into a read: Once selected, the status of the
reading changes from read to unread.
■ Check at least one of the following: Read the name of the sender,
Read the subject, Read the date of receipt, or Read the message.
■ After reading wait for: Sets the time interval for reading the following
mail. To read the message while this setting is available, tap the
message area within the interval time. This message is only available
when the Read the message check box is cleared.
■ Default Va lue: Resets all the values to the default.
Using Voice Command
With Voice Command, you can operate Pocket PC “hands free” without
tapping or pressing buttons on your Toshiba Pocket PC e830.
The Voice Command application has 3 components:
■ Global Command: the command always available
■ User Command: the command that users can assign freely, always
available.
■ Command for each application: Command available only for the
foreground windows.
Installing the Voice Command
1. Make sure your Toshiba Pocket PC e830 is connected to your computer
and that an ActiveSync connection has been established.
2. Start the Voice Command installation by running the Setup program.
5-12 User’s Manual
Page 46

Pocket PC e830 UG.book Page 13 Monday, September 22, 2003 10:57 AM
3. After the program is installed successfully, a message displays to inform
you that the application has been allocated to the program button 5
(recording button) automatically.
4. After installation, the system requires resetting.
The Voice Command cannot “read” without the TOSHIBA Text to Speech
for Pocket PC installed. Installation of the TOSHIBA Text to Speech for
Pocket PC is highly recommended.
Once Voice Command is installed on your Toshiba Pocket PC e830, the
program button 5 (recording button at initial setting) is “assigned” and
recording with program button 5 is no longer available. If you want to use
program button 5 for recording while the Voice Command is assigned,
change the button assignment by tapping Start, Settings, and then
Buttons.
Setting Up Voice Command
Once installed on your Toshiba Pocket PC e830, the Voice Command
Settings icon is displayed on Today screen. Tap this icon to launch the
Voice Command Settings application.
Optional Functions
Tap to launch Voice Command Settings.
Global Command
1. Press the recording button and release immediately. The Voice
Command starts. Wait for a notification sound to start speaking.
2. Say one of the available voice commands. For example, to launch
Inbox, say “run Inbox”. When the command is successfully recognized,
a confirmation tone sounds, and the Inbox screen appears. If the
command is not recognized, a rejection tone sounds and the screen
does not change.
User’s Manual 5-13
Page 47

Pocket PC e830 UG.book Page 14 Monday, September 22, 2003 10:57 AM
Optional Functions
User Command
You can define voice commands on Command Settings.
There are two kinds of commands:
■ Commands to insert texts
■ Commands to launch applications.
To use the commands to insert texts:
1. On the User Commands tab in the Voice Command Settings, define a
phrase you like to a command. For example, define “Thank you for your
email about” for the command insert text one.
2. Open the Inbox, then tap New from the command bar. At the creating
the message screen, say “insert text one.” The “Thank you for your
email about” is displayed on the screen.
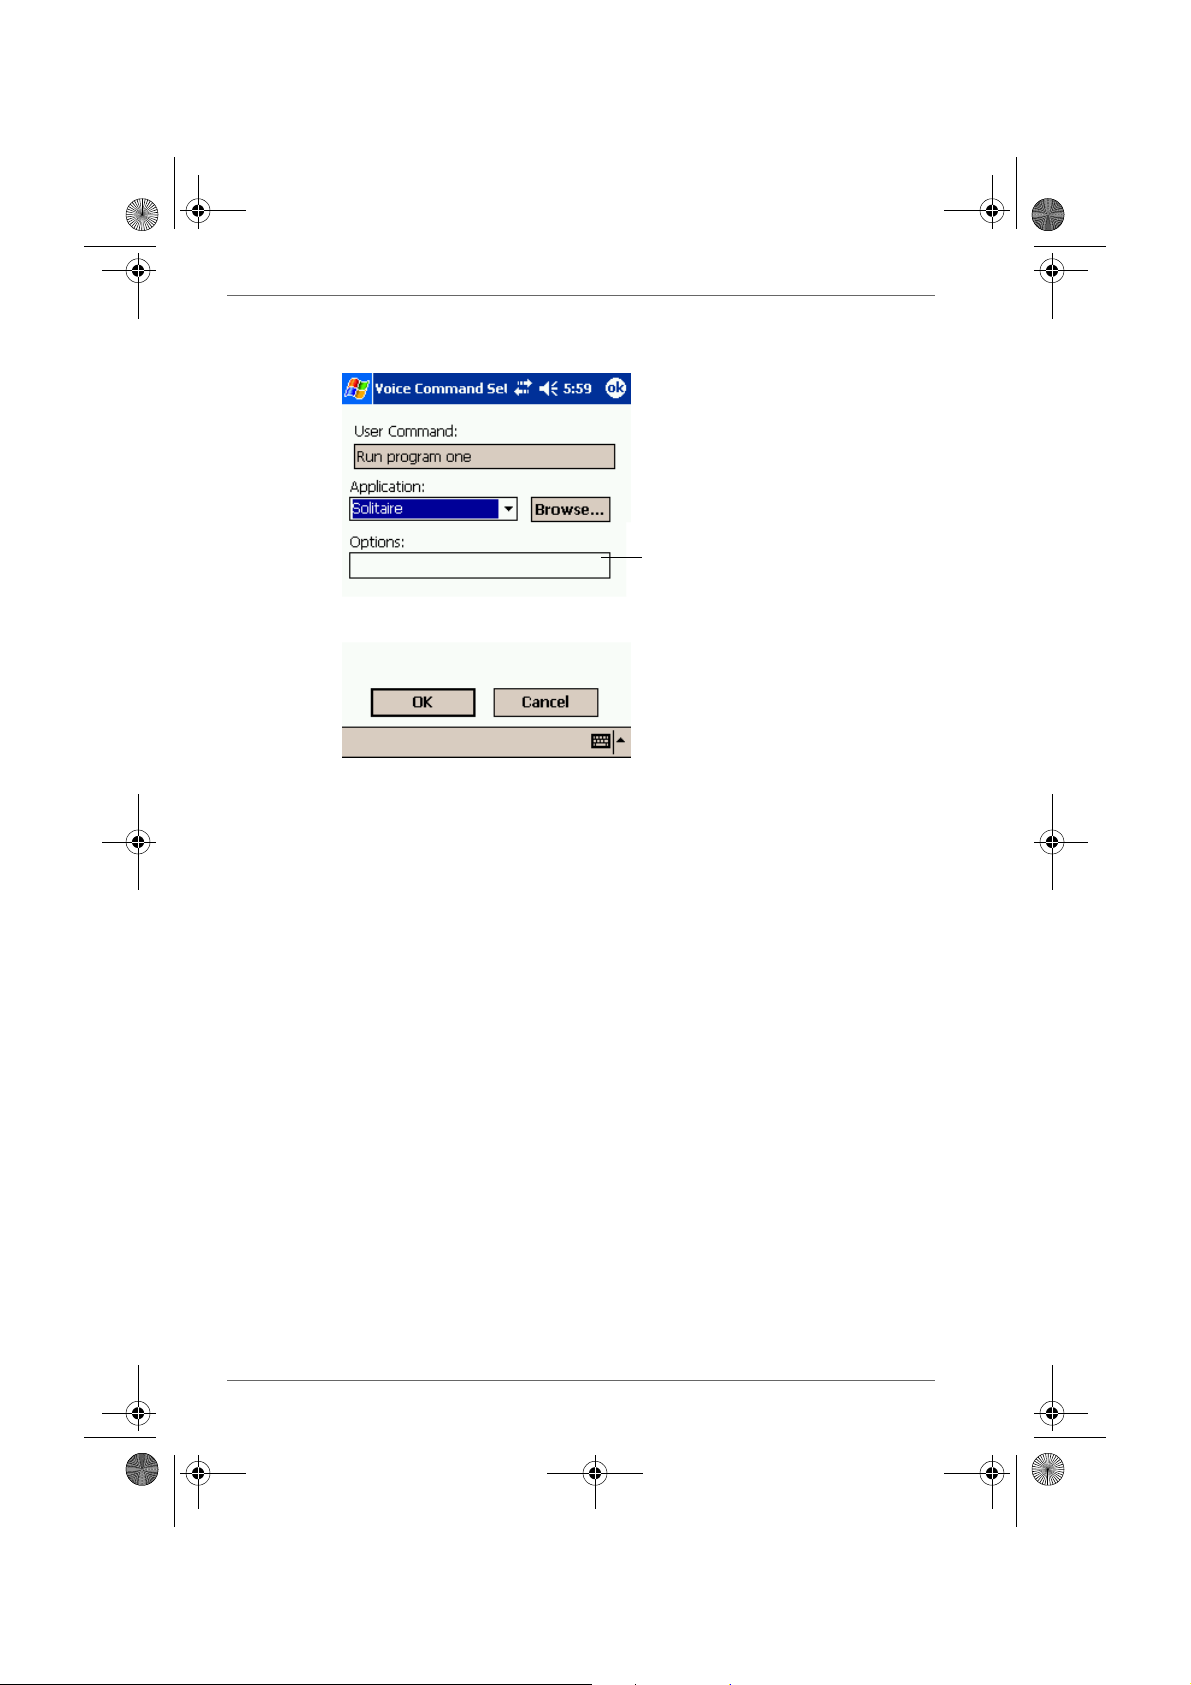
To use the commands to launch applications:
1. On the User Commands tab in the Voice Command Settings, assign
an application you like to a command. For example, assign Solitaire to
the command run program one.
2. Say “run program one.” The Solitaire screen is displayed.
When you say an undefined command, nothing happens even if the
command is recognized.
5-14 User’s Manual
Page 48

Pocket PC e830 UG.book Page 15 Monday, September 22, 2003 10:57 AM
Using Voice Command for Each Application
For example, you can use voice commands in the Calendar application.
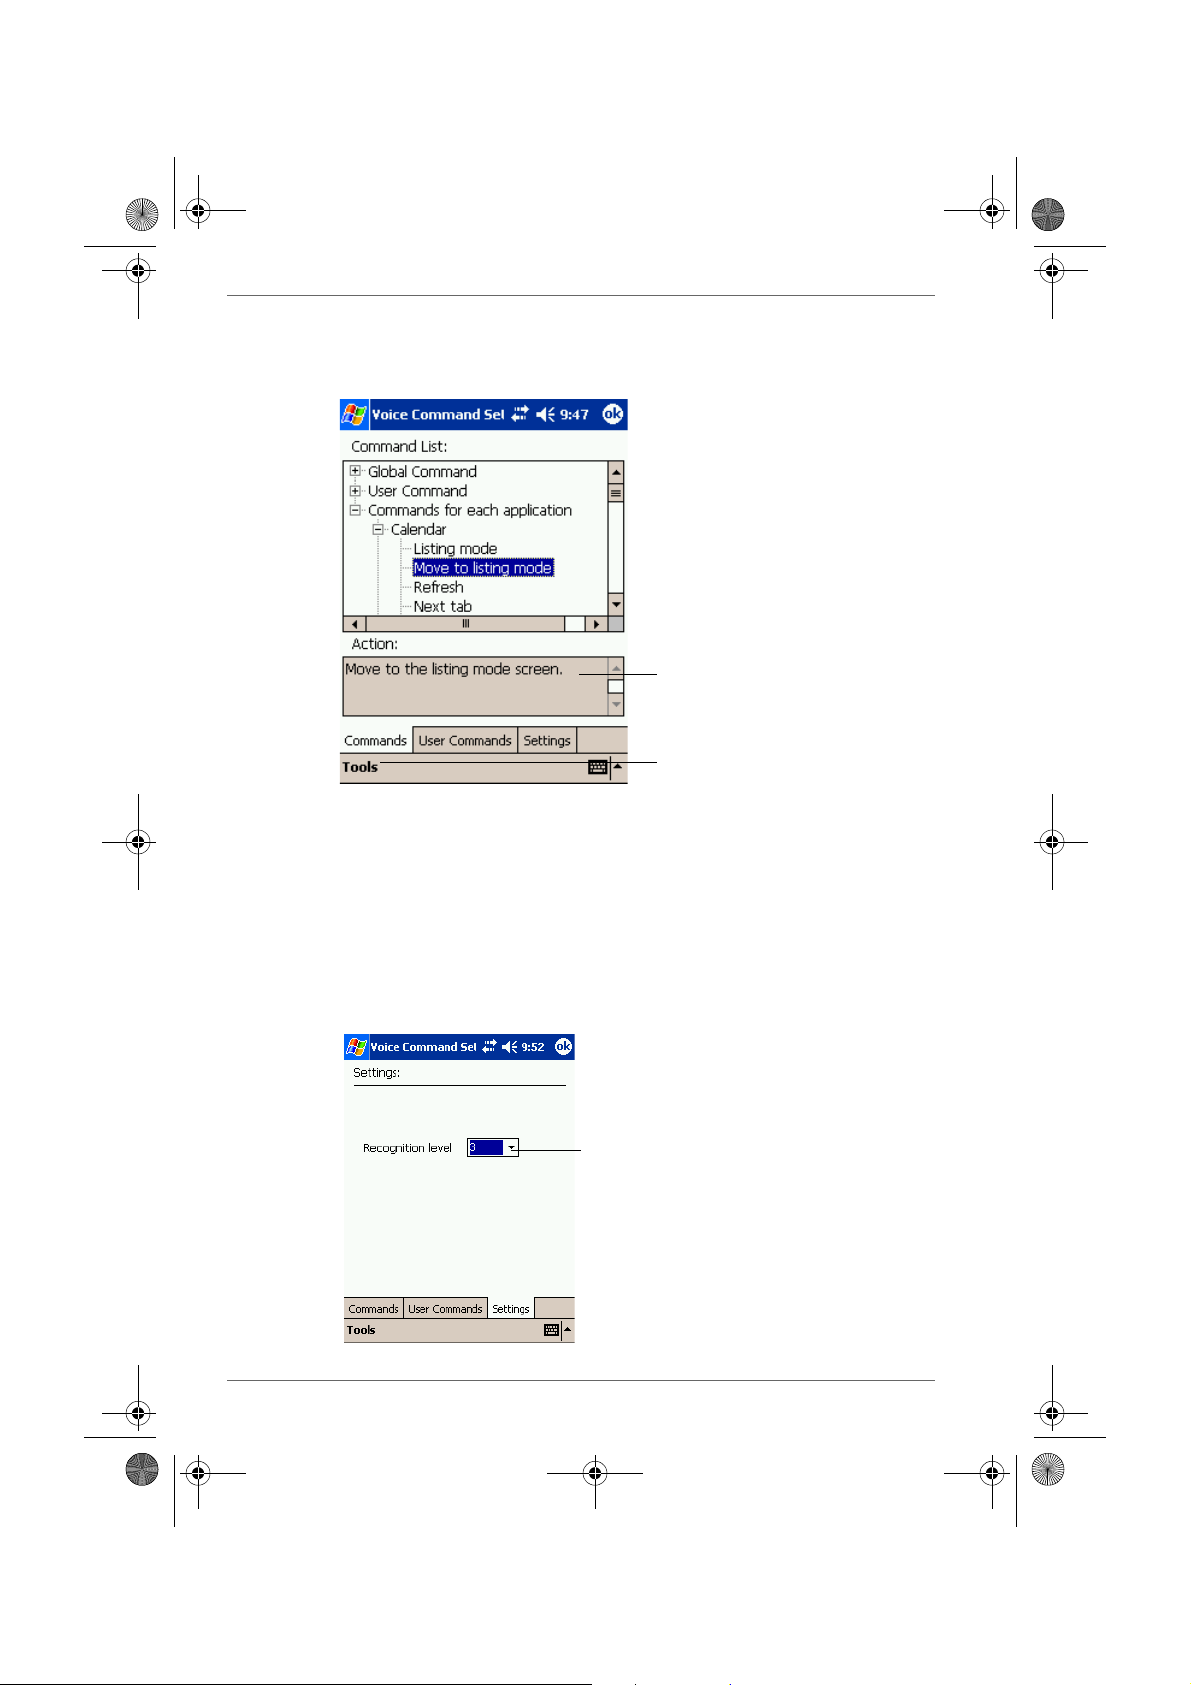
1. With the Calendar open, say “Very next appointment.” The listing mode
screen appears, and it starts reading out very next appointment. You
can display the screen also by saying, “Move to listing mode.” For detail
of the command list, refer to the Commands tab on the Voice Command
Settings.
Optional Functions
Tap to stop reading.
2. In listing mode, voice command for Calendar is active to current
focused appointment. For example, saying “read subject” reads the
subject of current focused appointment.
The target term of appointment is one month before to one month after,
based on current time.
For other commands, you can check the command from the Commands
tab of the Voice Command Settings.
Voice Command Settings
You can check the voice command list or arrange the settings of voice
command. To start the Voice Command Settings, tap Start, Programs, and
then Voice Command Settings.
User’s Manual 5-15
Page 49
Pocket PC e830 UG.book Page 16 Monday, September 22, 2003 10:57 AM
Optional Functions
Checking the Command List
On the Commands tab, you can select the all commands installed.
Displays information for the selected
command.
Tap Tools and then About to display
Voice Command Settings version
information.
Arrange the Recognition Level of Voice Command
1. Tap the Settings tab on the Voice Command Settings screen.
2. Set the recognition level as required. The higher level of recognition
that is set, the more sensitive the program is to the nuances of your
voice, and it makes it easier for your Toshiba Pocket PC e830 to
recognize the command. On the other hand, setting a higher level of
recognition may decrease voice recognition within noisy environments.
It is recommended to set lower level within noisy environments.
Tap and select the recognition level (1 to 5).
5-16 User’s Manual
Page 50

Pocket PC e830 UG.book Page 17 Monday, September 22, 2003 10:57 AM
To define the action for a User Command:
1. Tap User Command tab on the Voice Command Settings screen.
To define text for the command:
1. Tap and hold the command insert text xxx, then select Edit.
Optional Functions
Tap to clear the action that you defined for
the command.
You can only clear the action for the command. The command is not
deleted.
2. Input the text you want to define at the text area. For example, input
“Thank you for your email about “. Tap OK.
To assign a program to the command:
1. Tap and hold the command run program xxx, then select Edit.
2. Select the application you want to assign by tapping the Browse.
User’s Manual 5-17
Page 51
Pocket PC e830 UG.book Page 18 Monday, September 22, 2003 10:57 AM
Optional Functions
3. Tap OK.
Enter the parameter specific to the
application.
5-18 User’s Manual
Page 52

Pocket PC e830 UG.book Page 1 Monday, September 22, 2003 10:57 AM
TOSHIBA Pocket PC e830
Additional Information
Troubleshooting
Check the following guide for the possible cause of a problem and how to
correct it.
Symptom Cause Correction
Even if the power
button is pressed and
the power does not
turn on.
The power was
suddenly cut off.
Even if the battery is
completely charged, it
discharges after a
short period of time.
The battery power is
exhausted.
The main battery or the
High Capacity Battery
is not attached.
Battery Pack Lock is at
the Release side.
The battery power is
exhausted.
Automatic suspend is
active.
The battery is extinct. Replace the main
Chapter 6
Charge the battery.
Attach the main battery/
High Capacity Battery
and switch Battery Pack
Lock to the Lock side.
Switch Battery Pack
Lock to the Lock side.
Charge the battery.
Select , Settings,
System, Power to set
to alter the power shut
down time.
battery with a new one.
The screen was
tapped, but the correct
action was not
executed.
User’s Manual 6-1
Touch screen
adjustment is incorrect.
Select , Settings,
System, Screen, Align
Screen to adjust the
touch screen.
Page 53

Pocket PC e830 UG.book Page 2 Monday, September 22, 2003 10:57 AM
Additional Information
Symptom Cause Correction
The operation is slow
Insufficient memory Secure the free
in response.
Some malfunction. Reset the system. If no
memory. Quit the
application if it is not in
use.
action is observed after
resetting the system,
initialize the system.
(However, the data will
be deleted.)
The screen was
tapped, but there is no
response. The
operation button does
not work either.
Some malfunction. Reset the system. If no
action is observed after
resetting the system,
initialize the system.
(However, the data will
be deleted.)
The screen is dark. The screen light is off. Press and hold the
power button until the
screen light is turned
on.
The screen is hard to
see.
Brightness setting is
incorrect.
Select , Settings,
System, Screen Light
to adjust the screen
brightness for better
sight.
Cannot connect to your
— See Help of ActiveSync.
computer.
ActiveSync does not
function when your
Toshiba Pocket PC
The USB driver of your
computer may not be
compatible.
Reselect the USB
driver.
e800 is connected to
your computer with a
cradle or USB cable.
6-2 User’s Manual
Page 54

Pocket PC e830 UG.book Page 3 Monday, September 22, 2003 10:57 AM
Symptom Cause Correction
Cannot access the
Internet.
The connecting using a
specified cellular
phone connection
cable was not correct.
Additional Information
Check whether the
connecting using a
specified cellular
phone connection
cable is correct.
Following message is
displayed. “NOT
ENOUGH BATTERY
POWER. USB devices
can not be used.
Because PDA’s battery
power is low.”
Following message is
displayed.
“TOO MUCH USB
CONNECTION.
Connecting USB
devices are too much.”
Following message is
displayed.
“USB OVER
CURRENT DETECT
USB device is turned
off. Please disconnect
USB device.”
Radio waves of a
connected cellular
phone are getting
worse.
Carry out
communications where
radio wave conditions
are satisfactory.
Setting is incorrect. Carry out correct
setting.
The Battery power is
too low to use USB
Charge the battery or
connect AC adapter.
devices.
The total power
consumption of
connected USB
devices is too large.
This USB port supports
total 500mA USB
device. Confirm
connected USB
device.
The total power
consumption of
connected USB
devices is too large.
This USB port supports
total 500mA USB
device. Confirm
connected USB
device.
To enable USB port
again, turn off the
power of Pocket PC or
push Reset Switch.
User’s Manual 6-3
Page 55

Pocket PC e830 UG.book Page 4 Monday, September 22, 2003 10:57 AM
Additional Information
Resetting
Reset is equivalent to restarting a computer. Reset the Pocket PC e830
when a button or tapping the screen does not respond. When your Toshiba
Pocket PC e830 is reset, all data that was not stored during operation will
be deleted.
If the function cannot be restored even if the reset button is pressed,
initialize your Toshiba Pocket PC e830.
When the power is on, press the reset switch with the stylus, then
release.
Clear Memory
When you initialize your Toshiba Pocket PC e830, it returns to the status
when it was purchased.
When you initialize your Toshiba Pocket PC e830, all data stored in the
memory is deleted. Your Toshiba Pocket PC e830's initially installed
programs are not deleted.
Before initialization, remove all CF/SD cards.
1. Turn off the power.
2. Press the power button while pressing and holding the reset switch with
the stylus, and then release the power button.
3. When a screen appears, release the reset switch. When initialization is
completed, the Welcome screen appears. Set up the system according
to the screen as in the case of startup procedure.
6-4 User’s Manual
Page 56

Pocket PC e830 UG.book Page 5 Monday, September 22, 2003 10:57 AM
Troubleshooting for Wi-Fi
If you encounter some problems while using our product, please refer to
this troubleshooting section.
Problems Solutions
Cannot connect to the
network
The host computer
cannot wirelessly
connect with my
Toshiba Pocket PC
e830
■ Make sure the Wireless Communication
Switch is turned on.
■ Check if the SSID is correct (note that it is
case-sensitive)
■ Check Link Quality in Config Page. If the link
quality is poor, rescan and find another
Access Point.
■ Check if the operating mode is set properly
(see “Configure Wireless LAN Network” on
page 8-1).
■ Check if the WEP key is correctly entered.
■ Be sure you are in the range of a working
Access Point.
■ Make sure the channel been set is in the
range of 1 to 11.
■ Make sure you have setup the partnership for
your Toshiba Pocket PC e830 and your host
computer.
■ Make sure you are within the range of a
working network.
■ Make sure you have entered the IP address
of the host computer as the WINS server on
your Toshiba Pocket PC e830.
■ Reset your Handheld PC or Toshiba Pocket
PC e830 to make the TCP/IP settings take
effect.
■ Make sure the SSID, WEP keys and channel
for all devices in the network are set the
same.
■ Make sure the channel been set is in the
range of 1 to 11.
Additional Information
Cannot edit the
"Channel" field in
"Infrastructure" Mode?
The Toshiba Pocket
PC e830 freezes
User’s Manual 6-5
In Infrastructure mode, the channel is decided
by the Access Point. You can only join the
existing network formed by the working Access
Point, not to create a new Wireless Network.
Reset the Toshiba Pocket PC e830.
Page 57

Pocket PC e830 UG.book Page 6 Monday, September 22, 2003 10:57 AM
Additional Information
FAQ fo r W i- Fi
A. Compatibility
A1: Should I use equipment with the same brand as the IEEE802.11b
WLAN Adapter’s to enable the wireless communication?
This is not necessary. IEEE802.11b WLAN Adapter is Wi-Fi certified
which means that it will work well with differing brands of equipment as
long as the equipment is also Wi-Fi certified.
A2: Can I connect IEEE802.11b WLAN Adapter to other devices using
Bluetooth?
No, you can only connect the IEEE802.11b WLAN Adapter to other
IEEE802.11b equipment.
B. Wireless LAN Connectivity
B1: How do I form a wireless network?
Typically, you can form a wireless network by connecting Access
Points. Different Access Points should have different channels. Every
devices connected to the network should have the same SSID. When
you are using Access Points, set the mode to “Infrastructure” mode.
Without Access Points, you can still build a network where adapters
communicate peer-to-peer using a shared SSID. When you are not
using Access Points, change the operating mode to be “802.11Ad
Hoc”. To set the operating mode, click Start, Settings, System,
Wireless LAN Utility, then Config.
B2: How can I connect my Toshiba Pocket PC e830 to the usable
Wireless Network?
Click Start, Settings, System, Wireless LAN Utility, Scan to view Scan
Page where you can find the usable Wireless Network. If you cannot
see all the networks you are expecting, please click “Rescan” to see
the list of usable Wireless Networks. Choose one Wireless Network
you want and double click the BSSID to connect to the network. Once
the network is chosen, you need to configure the IEEE802.11b WLAN
adapter.
Click Start, Settings, Connections, Network Adapters, IEEE802.11b
WLAN Adapter, Properties, IP Address to set IP address, Subnet
mask and Default gateway settings. Click Start, Settings, System,
Wireless LAN Utility to edit other settings, such as Mode and SSID
etc. If the WEP Mode of the Wireless Network you selected is enabled
(64bit or 128bit WEP Mode), please choose the proper WEP KeyID
and the proper WEP Key value network.
6-6 User’s Manual
Page 58

Pocket PC e830 UG.book Page 7 Monday, September 22, 2003 10:57 AM
More Information
B4. What is 802.11 Ad Hoc Network? What should I do to form an
802.11 Ad Hoc Network?
B5. What is the difference between “Infrastructure” and “802.11 Ad
Hoc” Network Mode?
How do I choose?
B6. Could I use the 802.11 Ad Hoc Mode to access the LAN
resources? How can I access the LAN resource without an
Access Point?
B7. What should I do if my host computer cannot wirelessly connect
with my Toshiba Pocket PC e830?
E1. What is WEP?
E2. How many WEP security service mode does Wireless LAN sup-
port?
E3. How to set the WEP security service?
B3: How do I know whether or not my Pocket PC has already con-
nected to an AP successfully?
1. Check BSSID. When there is a link, the current Basic Service Set
ID of the Access Point been used will be shown in the BSSID
field in Link Page. When the adapter is disconnected with the
Access Point, “Non-associated” will appear in the BSSID field. To
view BSSID, from your Toshiba Pocket PC e830, click Start, Set-
tings, System, Wireless LAN Utility, then Link.
2. Check Link Quality. Link Quality shows how clearly the adapter
can hear the Access Point. If the quality is poor, it’s better to res-
can and find a better performance Access Point or re-arrange the
AP’s position for better performance. To view Link Quality, from
your Toshiba Pocket PC e830, click Start, Settings, System,
Wireless LAN Utility, Config.
B4: What is 802.11 Ad Hoc Network? What should I do to form an
802.11 Ad Hoc Network?
802.11 Ad Hoc Mode is used to create a peer-to-peer connection
without an Access Point. The SSID must be the same among stations
to enable the wireless communication within the local area network.
Additional Information
You need to choose a proper SSID and channel for the first 802.11 Ad Hoc
station. For other stations want to join the same SSID group, you could
only choose the same SSID as the first station for connection. The
Channel setting for the 802.11 Ad Hoc Network stations to join the existing
802.11 Ad Hoc Network will automatically be set as the channel number of
the network
User’s Manual 6-7
Page 59

Pocket PC e830 UG.book Page 8 Monday, September 22, 2003 10:57 AM
Additional Information
More Information
B5. What is the difference between “Infrastructure” and “802.11 Ad
Hoc” Network Mode?
How do I choose?
B6. Could I use the 802.11 Ad Hoc Mode to access the LAN
resources? How can I access the LAN resource without an
Access Point?
B7. What should I do if my host computer cannot wirelessly connect
with my Toshiba Pocket PC e830?
B5: What is the difference between “Infrastructure” and “802.11 Ad
Hoc” Network Mode?
How do I choose?
Infrastructure Mode is used to connect your Toshiba Pocket PC e800
with the Access Point. Usually, to form a Wireless Network, you can
connect your Access Point to the ADSL, Cable Model or LAN Ethernet
and then configure the Access Point base on the User Guide for the
Access Point to set the proper SSID, Channel and WEP security
service. After that, configure the IEEE 802.11b WLAN adapter. Set the
same SSID, Channel and WEP as the Access Point’s. 802.11 Ad Hoc
Mode allows your Toshiba Pocket PC e830 to form its own local
network where devices communicate peer-to-peer, using a shared
SSID, without Access Points. Under 802.11 Ad Hoc mode, the SSID
must be the same among stations so that the devices can
communicate properly within the Wireless Network. If you want to form
your network without any Access Points, you should choose 802.11
Ad Hoc mode.
B6: Could I use the 802.11 Ad Hoc Mode to access the LAN
resources? How can I access the LAN resource without an
Access Point?
Yes, you can access the LAN resources without an Access Point.
Follow the steps shown below:
(1) Make sure your host computer already successfully connect to
the LAN or Internet through the LAN Adapter or the Modem.
(2) Install the Wireless LAN Adapter into your Host computer suc-
cessfully and set 802.11 Ad Hoc Mode and the proper SSID to
form the 802.11 Ad Hoc Network. Install and enable the ICS
(Internet Sharing Software, such as “SyGate”...) function in your
host computer. (Note that the Windows 2K or later version, OS,
supports the ICS function in Local Area Connection Properties?
Sharing)
(3) Set your Toshiba Pocket PC e830 as 802.11 Ad Hoc Mode and
choose the same SSID to join the 802.11 Ad Hoc Network
(choose the DHCP to get the IP assigned).
(4) Check and make sure the Wireless LAN Adapter in the 802.11 Ad
Hoc Network have the same IP group. (You can “ping” each other
to make sure the connection is successful)
(5) Now you can access the LAN resource successfully.
6-8 User’s Manual
Page 60

Pocket PC e830 UG.book Page 9 Monday, September 22, 2003 10:57 AM
B7: What should I do if my host computer cannot wirelessly connect
with my Toshiba Pocket PC e830?
(1) Make sure you have setup the partnership for your Toshiba
Pocket PC e830 and your host computer.
(2) Make sure you are within the range of a working network.
(3) Make sure you have entered the IP address of the host computer
as the WINS server on your Toshiba Pocket PC e830.
(4) Reset your Toshiba Pocket PC e830 to make the TCP/IP settings
take effect
(5) Make sure the SSID, WEP keys and channel for all devices in the
network are set the same.
(6) Make sure the channel been set is in the range of 1 to 11.
C. Application
C1: What should I do to use the ActiveSync Function through Wire-
less Network?
(1) Make sure you have already setup the partnership for your
Toshiba Pocket PC e830 and your host computer through USB
Interface and the ActiveSync can work properly. (The ActiveSync
connection Interface should also choose the Ethernet interface
for Wireless LAN ActiveSync Connection)
(2) Make sure you are within the range of a working Wireless Net-
work.
(3) Make sure you can “ping” your Toshiba Pocket PC e830 from
your Host Computer. (Make sure the SSID, WEP keys and chan-
nel for all devices in the network are set the same.)
(4) Make sure you have entered the IP address of the host computer
as the WINS server on your Toshiba Pocket PC e830.
(5) Reset your Toshiba Pocket PC e830 to make the TCP/IP settings
take effect and execute the ActiveSync function in the Toshiba
Pocket PC e830 to enjoy the high speed ActiveSync Wirelessly.
C2: How do I wirelessly browse the Internet?
(1) If your network uses DHCP (Dynamic Host Configuration Proto-
col), an IP address and DNS (or WINS) will be assigned automat-
ically. On your Toshiba Pocket PC e800, simply click Start,
Setting, Connection, Network Adapters, IEEE802.11b WLAN
Adapter, then Properties to set the proper setting for Internet con-
nection.
(2) If your network does not use DHCP, you should enter the IP
address, subnet mask, gateway and DNS (or WINS).
IP Address is Internet Protocol Address; a numeric address
such as 10.37.238.100 that the domain name server translates
into a domain name. Each node on the IP network should have a
unique IP address.
Additional Information
User’s Manual 6-9
Page 61

Pocket PC e830 UG.book Page 10 Monday, September 22, 2003 10:57 AM
Additional Information
Subnet mask is a number used to identify a subnetwork when
multiple networks share one IP address. For example
255.255.255.0Gateway is a device used to forward IP packets to
and from a remote destination.
DNS stands for Domain Name System, a database system,
which translates addresses and domain names. For example, a
numeric address like 232.245.021.54 can become something like
cba.com.
WINS stands for Windows Internet Naming Service which has
two functions; one is a Microsoft Net BIO name server that
eliminates the broadcasts needed to resolve computer names to
IP addresses by providing a cache or database of translations.
The other one is to set the IP address of the host computer that
you already construct the partnership for Network adapter Active
sync purpose.
To set IP address, Subnet mask and Gateway, click Start,
Settings, Connections, Network Adapters, IEEE802.11b WLAN
Adapter, Properties, IP Address. To set DNS or WINS (Windows
Internet Naming Service), click Start, Settings, Connections,
Network Adapters, IEEE802.11b WLAN Adapter, Properties,
Name Servers.
(3) To ping your Toshiba Pocket PC e830 from your host computer.
In the Host Computer, open the DOS command mode window,
type the command “Ping” followed by the IP address, such as
“Ping 140.124.40.112”. If you can see the reply from this IP
address, the connection is complete. You are now ready to
browse the Internet using Internet Explorer on your Toshiba
Pocket PC e830.
C3: How do I check my email on my wireless Toshiba Pocket PC
e800?
(1) Please make sure that you can use the ActiveSync function
through USB Interface at first, and make sure you can use the
ActiveSync to receive and send email successfully. For corporate
email received and sent, please check with your network administrator for necessary connection settings.
(2) Make sure you have entered the IP address of the host computer
as the WINS server on your Toshiba Pocket PC e830.
(3) Reset your Toshiba Pocket PC e830 to make the TCP/IP settings
take effect and execute the ActiveSync function in Toshiba
Pocket PC e830 to enjoy the high speed, wireless ActiveSync to
receive and send email.
6-10 User’s Manual
Page 62

Pocket PC e830 UG.book Page 11 Monday, September 22, 2003 10:57 AM
D. Settings
D1: What is SSID? What should I set in the SSID field?
SSID stands for Service Set Identification, which is the ID to form the
Wireless Network. You can set up to 32 characters in the SSID field.
For the Infrastructure Mode, you should set the SSID the same as the
Access Point been connected with. To create a 802.11 Ad Hoc
Network, the SSID must be the same among stations to enable the
wireless communication within the local area network.
You need to choose a proper SSID and channel for the first 802.11 Ad Hoc
station. For other stations want to join the same SSID group, you could
only choose the same SSID as the first station, but the channel will not
take effect. The 802.11 Ad Hoc must enter the proper SSID. Blank SSID
for the 802.11 Ad Hoc Mode is not allowed. The stations want to join the
802.11 Ad Hoc Network must have the same SSID and are suggested to
have the same IP Address in the Network group.
D2: Why can’t I choose the “Channel” field in “Infrastructure” Mode?
For the Infrastructure Mode, the Channel is decided by the Access
Point. You can only join the existing Access Point formed Wireless
Network but not create a new Wireless Network. That is the reason
why you can’t set the “Channel” setting.
D3: When should I set the IP address, Subnet mask and Default gate-
way settings?
When the Wireless Network does not have the DHCP server, you
should set your own IP address, Submask and Default gateway for
Wireless Network connection. Otherwise, the OS might set the
different Network group IP address for you, which will cause the
disconnection for the Wireless Network.
D4: How can I set the IP address, Subnet mask and Default gateway
settings?
Click Start, Settings, Connections, Network adapter, IEEE802.11b
WLAN Adapter, Properties, IP Address to set IP address, Subnet
mask and Default gateway settings.
D5: What Transmit Rate should I choose for Wireless Connection?
Suggest you to use the “Fully Auto” option in the “Transmission Rate”
field for full Transmission Data Rate range to automatically adjust the
Best Communication Data Rate and to be compatible with other Low
speed 802.11 Wireless Device.
Additional Information
E. Security
E1: What is WEP?
WEP stands for Wired Equivalent Privacy, a security service, used to
prevent the unauthorized access to your wireless network.
User’s Manual 6-11
Page 63

Pocket PC e830 UG.book Page 12 Monday, September 22, 2003 10:57 AM
Additional Information
E2: How many WEP security service modes does my Wireless LAN
support?
WEP stands for Wired Equivalent Privacy that is the security service
for the Wireless Network. There are three WEP security service
modes available for “IEEE 802.11b WLAN Adapter” formed Wireless
Network. The first is “Disable” which will disable the WEP security
service; the second is “64bit” which will support 5 bytes Hexadecimal
value WEP security service; the third is “128bit” which will support 13
bytes Hexadecimal value WEP security service.
E3: How do I set the WEP security service?
Click Start, Settings, System, Wireless LAN Utility, and then Security
to view Security page where you can set the WEP security service.
Please choose the proper WEP Key Mode, WEP KeyID and WEP Key
value for the Wireless Network.
The WEP Mode, WEP KeyID and WEP Key value must be exactly the
same as your Wireless Network’s to enable the connection.
Example of setting the WEP:
You can choose
1. WEP Mode “64bit”, KeyID “1” and Key “1234567890”, or
2. WEP Mode “128bit”, KeyID “1” and Key
“12345678901234567890123456”,
or
3. WEP Mode “Disable” for connection
Troubleshooting for Toshiba IP Phone for Pocket PC
VLI Lookup Server Not Accessible
Check Internet connection (refer to “Troubleshooting for Wi-Fi”).
VLI Buddy Server Not Accessible
Check Internet connection (refer to “Troubleshooting for Wi-Fi”).
Your G-Number or Password is Wrong
Make sure you set your G-Number and password properly.
Cannot call an IP phone
Make sure you log on to VLI Buddy Server. If you log on to it properly, your
status (Online, Offline, Busy or Away) is shown.
Check contact information in your buddy list or of your buddy icon.
Confirm your party's status is not offline.
Cannot call a phone
Make sure you log on to VLI Buddy Server. If you log on to it properly, your
status (Online, Offline, Busy or Away) is shown.
You cannot hear your party's voice
Check speaker volume on your Pocket PC.
Your party cannot hear your voice
6-12 User’s Manual
Page 64

Pocket PC e830 UG.book Page 13 Monday, September 22, 2003 10:57 AM
Check microphone volume on your Pocket PC.
Make sure muting microphone is not activated. If Mute button color is red,
push Mute button again.
Cannot see your buddy list
Make sure you log on to VLI Buddy Server. If you log on to it properly, your
status (Online, Offline, Busy, or Away) is shown.
Additional Information
User’s Manual 6-13
Page 65

Pocket PC e830 UG.book Page 14 Monday, September 22, 2003 10:57 AM
Additional Information
Glossary for Bluetooth
General Bluetooth terms
Bluetooth Passkey
This is a password. It is also called a PIN Code.
Device Address
Each Bluetooth SD Card has a unique device address that is listed
on the card as BDA:XXX... X.
Local Device
In Bluetooth communications, this refers to the local Toshiba Pocket
PC. It is also called a client.
Profile
This refers to the specifications (services) used in Bluetooth
communications. The specifications (services) are determined by
the type of communications.
Remote Device
In Bluetooth communications, this refers to the connected partner
device. It is also called a server.
6-14 User’s Manual
Page 66

Pocket PC e830 UG.book Page 15 Monday, September 22, 2003 10:57 AM
Graphical User Interface (GUI) Bluetooth terms
Authentication Status
For remote devices that have performed Bluetooth authentication,
Pairable is displayed. For unauthenticated devices, Untrusted is
displayed.
Authentication
This is the process of confirming an authentication password to
allow a remote Bluetooth device to connect to Local Device. If the
authentication passwords on both devices do not match, the
connection is refused.
These are the following types of authentication:
■ Bluetooth
authentication
■ OPP authentication This is requested when trying to connect
■ FTP authentication This is requested when trying to connect
Auto Connect
■ For a COM service, the program using COM is started and a
connection is established with the connection registered Bluetooth
device using the Serial Port Profile.
■ For a DUN service, Dial-up Networking is started and a connection
is established with the connection registered Bluetooth device using
the Dial-up Networking Profile.
COM Service Device
This is a device that provides SPP (Serial Port Profile) service.
Connectability Mode
This setting determines whether Local Device can be connected to
by other Bluetooth devices in response to a connection request.
Connected Device
This is a remote device that currently has a Bluetooth connection to
Local Device.
Connection Registration
This function is used to register an automatic connection.
Connection Status
This displays the current connection status (Connected,
Discovered, or Ghost) of Bluetooth devices.
Delete Ghost Device
This function is used to delete ghost devices from the device list.
Device Address
This is the unique address given to each Bluetooth SD Card.
Device Class
This indicates the type of Bluetooth device (desktop computer, cell
phone, etc.). A Bluetooth SD Card is categorized as a PDA.
This is requested when trying to establish
a Bluetooth connection with a remote
device. You must enter the Bluetooth
passkey to connect.
to a remote device to send all contacts by
OPP service. You must enter the OPP
password.
to a remote device to start FTP service.
You must enter the FTP password.
Additional Information
User’s Manual 6-15
Page 67

Pocket PC e800 UG.book Page 16 Monday, September 22, 2003 10:57 AM
Additional Information
Device Name
This is the name of a Bluetooth device. It can be a maximum of 248
bytes (after UTF-8 code conversion).
Discoverability Mode
This setting determines whether Local Device can be discovered by
other Bluetooth devices.
Discovered
This is a device discovered during the search for peripheral devices.
DUN Service Device
This is a device that provides DUN (Dial-up Networking Profile)
service.
FTP Service Device
This is a device that provides FTP (File Transfer Profile) service.
Ghost
This is a device that was previously discovered, but is no longer
found during the search for peripheral devices.
LAP Service Device
This is a device that provides LAP (LAN Access Profile) service.
OPP Service Device
This is a device that provides OPP (Object Push Profile) service.
PIN Code
This is a password of up to 16 alphanumeric characters.
Depending on the remote device, the PIN Code might be a fixed
value with a limit on the number of digits, so be sure to confirm
these conditions.
It is also called a Bluetooth passkey.
Search for Peripheral Devices
This function is used to search for Bluetooth-enabled devices.
Security Mode
This setting determines whether authentication is performed when
connecting to a remote Bluetooth device, and whether data sent and
received is encrypted.
Security Settings
There are four security settings: Office, Mobile, Home, and Other.
Service Name
This indicates the type of service (profile) provided by a Bluetooth
device.
Service Update
This function is used to search for and update information on
services provided by a connected remote Bluetooth device.
6-16 User’s Manual
Page 68

Pocket PC e830 UG.book Page 17 Monday, September 22, 2003 10:57 AM
Specifications
Additional Information
External dimensions Approximately:
Operating conditions Temperature: 32°F to 104°F (0°C to 40°C),
Battery type Removable, rechargeable Lithium-Ion battery
Processor Intel® Bulverde 520 MHz
Memory RAM: 128 MB, ROM: 32 MB
5.3 in. (135 mm) x 3.0 in (77 mm) x 0.6 in.
(16.7 mm) (L x W x H)
relative humidity: 30% to 80% when only the
Toshiba Pocket e800 is operating. Temperature
capable of charging 41°F to 104°F (5°C to
40°C).
CPU performance in your computer product may
vary from specifications under the following
conditions:
■ use of certain external peripheral products
■ use of battery power instead of AC power
■ use of certain multimedia games or videos
with special effects
■ use of standard telephone lines or low speed
network connections
■ use of complex modeling software, such as
high end computer aided design applications
■ use of computer in areas with low air
pressure (high altitude >1,000 meters or
>3,280 feet above sea level)
■ use of computer at temperatures outside the
range of 5°C to 35°C (41°F to 95° F) or >25°C
(77°F) at high altitude (all temperature
references are approximate).
CPU performance may also vary from
specifications due to design configuration.
Under some conditions, your computer product
may automatically shut-down. This is a normal
protective feature designed to reduce the risk of
lost data or damage to the product when used
outside recommended conditions. To avoid risk
of lost data, always make back-up copies of data
by periodically storing it on an external storage
medium. For optimum performance, use your
computer product only under recommended
conditions.
Flash ROM Disk 32 MB
User’s Manual 6-17
Page 69

Pocket PC e830 UG.book Page 18 Monday, September 22, 2003 10:57 AM
Additional Information
Display 4.0” diagonal, TFT Color, LCD screen, 480
pixels x 640 pixels, up to 64K colors
Interfaces
DC-IN 5V/3A
Headphone 3.5 mm, stereo, mini-plug compatible
Microphone Integrated with 3.5 mm, stereo, mini-plug
SD card slot SD memory card, SD I/O card or Multimedia
card
The security function of the SD memory card is
disabled. Data encrypted by the SD memory
card security function compatible equipment is
not usable.
Infrared port Based on IrDA ver.1.3
Maximum data transmission speed: 115 kbps.
Cradle connection port RGB, USB Host/Client, RS232
Audio AC 97 codec, mono record, stereo playback, 8.0
KHz, 11.025 KHz, 22.05 KHz, and 44.1 KHz
sample rate. Full duplex record and playback.
On board microphone. on board speaker. Stereo
earphone/microphone jack. Software volume
control.
Accessories AC Adapter, USB client cable, serial client cable,
stylus pen, cradle, USB/serial cradle with USB
port, battery pack, high capacity battery pack,
battery charger.
Although the display is manufactured using an extremely high technology,
there may be a case that some dots do not light or always light. It is not a
malfunction.
6-18 User’s Manual
Page 70

This device complies with Part 15 of the FCC Rules. Operation is subject to the
following two conditions:
(1) This device may not cause harmful interference.
(2) This device must accept any interference received, including interference that
may cause undesired operation.
This equipment has been tested and found to comply with the limits for a class B
digital device, pursuant to part 15 of the FCC Rules. These limits are designed to
provide reasonable protection against harmful interference in a residential
installation.
This equipment generates, uses and can r adiate radio frequency energy and, if not
installed and used in accordance with the instructions, may cause harmful
interference to radio communications. However, there is no guarantee that
interference will not occur in a particular installat ion. If t his equipment does cause
harmful interference to radio or television reception, which can be determined by
turning the equipment off and on, the user is encouraged to try to correct the
interference by one or more of the following measures:
---Reorient or relocate the receiving antenna.
---Increase the separation between the equipment and receiver.
---Connect the equipment into an outlet on a circuit different from that to which the
receiver is connected.
---Consult the dealer or an experienced radio/TV technician for help
Installation and use of this Pocket PC must be in strict accordance with the
instructions included in the user documentation provided with the product. Any
changes or modifications (including the antennas) made to this device that ar e not
expressly approved by the manufacturer may void the user’s authority to operate
the equipment. The manufacturer is not responsible for any radio or television
interference caused by unauthorized modification of this device, or the
substitution of the connecting cables and equipment other than manufacturer
specified. It is the responsibility of the user to correct any interference caused by
such unauthorized modification, substitution or attachment. Manufacturer and its
authorized resellers or distributors will assume no liability for any damage or
violation of government regulations arising from failing to comply with these
guidelines.
Page 71

FCC RF Radiation Exposure Statement: This equipment complies with FCC RF
radiation exposure limits set forth for an uncontrolled environment. This PDA has
been tested and demonstrated compliance when Bluetooth and WLAN are
transmitting simultaneously. This PDA must not be co-located or operating in
conjunction with any other antenna or transmitter."
This device has been tested for compliance with FCC RF Exposure (SAR) limits in
typical flat configurations.
Page 72

frequency band 2400-2483,5 MHz
-outside the buildings with a power (WORSE *) maximum of 100 MW on the part 2400-2454 MHz
For the following equipment: Pocket PC
and with a power (WORSE *) maximum of 10 MW on the part 2454-2483 MHz
CE Declaration of Conformity
European standards dictate maximum radiated transmit power of 100mW EIRP
and frequency range 2.400-2.4835GHz. In France,
-inside the buildings with a power (WORSE *) maximum of 100 MW on all the
0984
Is herewith confirmed to comply with the requirements set out in the Council
Directive on the Approximation of the Laws of the Member States relating to
Electromagnetic Compatibility (89/336/EEC), Low-voltage Directive (73/23/EEC)
and the Amendment Directive (93/68/EEC), the procedures given in European
Council Directive 99/5/EC and 89/3360EEC.
The equipment was passed. The test was performed according to the following
European standards:
EN 300 328 V.1.4.1 (2003-04), EN 300 328-2 V1.2.1 ( 2001-08)
EN 301 489-1 V.1.4.1 (2002-04) / EN 301 489-17 V.1.2.1 (2002-04)
EN 50371: 2002
EN 60950: 2000
EN 55022: 1998
EN 55024: 1998
!
Page 73

To prevent radio interference to the licensed service, this device is intended to be
operated indoors and away from windows to provide maximum shielding.
Equipment (or its transmit antenna) that is installed outdoors is subject to
licensing.
Operation is subject to the following two conditions: (1) this dev ice may not cause
interference, and (2) this device must accept any interference, including
interference that may cause undesired operation of the device.
This Class B digital apparatus complies with Canada RSS-210.
Cet appareil numérique de la classe B est conforme à la norme CNR-210 du
Canada.
The abbreviation, IC, before the registration number signifies that registration was
performed based on a Declaration of Conformity indicating that Industry Canada
technical specifications were met. It does not imply that Industry Canada
approved the equipment. (DoC)
The term “IC:” before the certification/registration number only signifies that the
Industry Canada technical specifications were met.
 Loading...