

Page 1

November 26, 2003 11:47 am
Managing the Battery
Installing the Battery
Your iPAQ Pocket PC is shipped with the rechargeable battery
partially charged. It is recommended that you fully charge the
Pocket PC battery before setting up the unit, and recharge
regularly. Your Pocket PC uses some power to maintain files in
RAM and the clock. While working at your desk, keep the Pocket
PC and Charger Adapter connected through the desktop cradle.
When you travel, it is recommended that you carry the AC
Adapter, Charger Adapter plug, or an optional spare battery with
you.
10
CAUTION: Use only an HP approved battery for your iPAQ Pocket
PC. Inserting a battery that does not comply with HP requirements may
Ä
cause the Pocket PC to malfunction.
The iPAQ Pocket PC also ha s a small i nternal backup battery that
allows you to change the main battery without losing RAM data
(user-installed programs and data) as long as it is replaced
immediately.
User’s Guide 10–1
Page 2
November 26, 2003 11:47 am
Installing the Battery
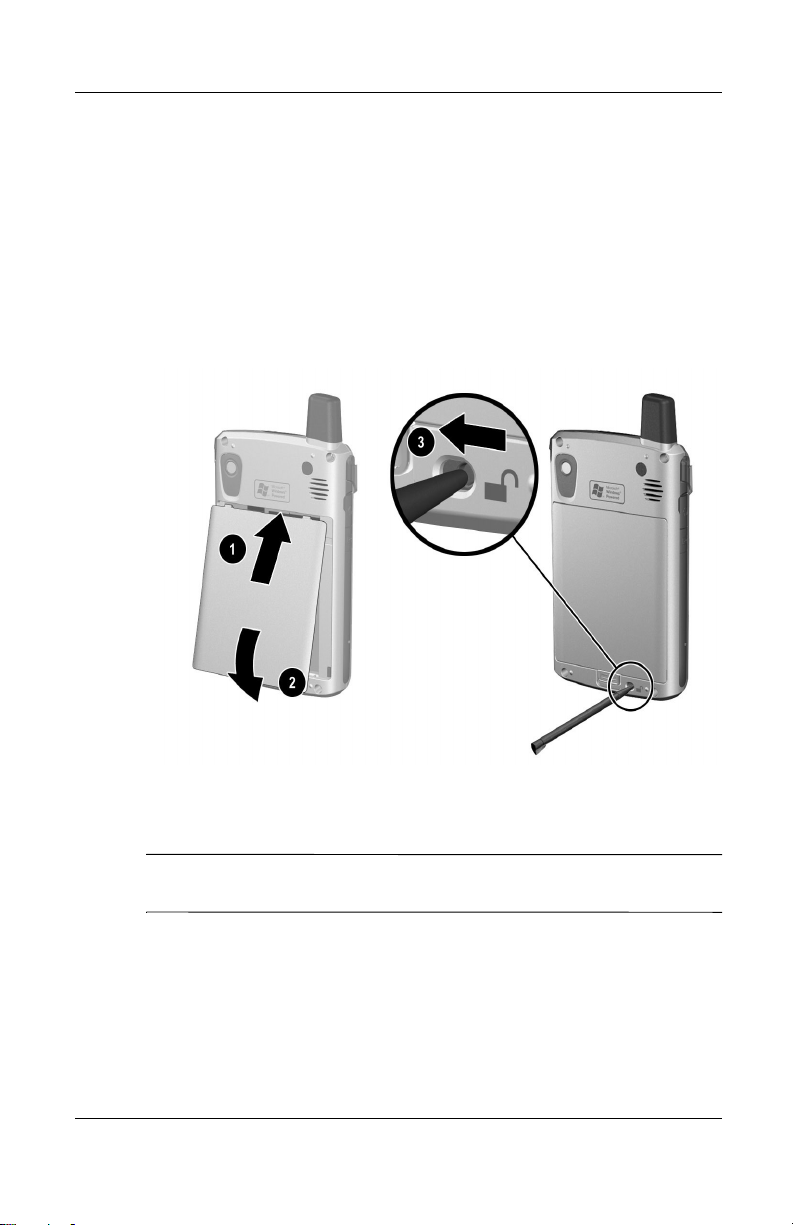
To install the removable/rechar geable battery in the HP iPAQ
Pocket PC h6300 Series:
1. Insert the two tabs 1 on the top of the battery into the
latches in the top of the battery compartment on the back
of the Pocket PC.
2. Snap the bottom of the battery into place 2.
Managing the Battery
3. Insert the stylus into the battery lock 3 and slide it to the left
or locked position.
CAUTION: The cover must be tightly latched in place and the battery
Ä
lock must be locked for the Pocket PC to operate.
User’s Guide 10–2
Page 3
November 26, 2003 11:47 am
NOTE: If the battery is not fully charged, you must connect the
AC Adapter to the Pocket PC to fully charge it before continuing.
It takes up to four hours to fully charge a completely drained
battery.
Removing the Battery
NOTE: Before removing the battery, use ActiveSync to back up
data on your Pocket PC. If you need to clear the memory during
the removal process, you will be able to restore the data.
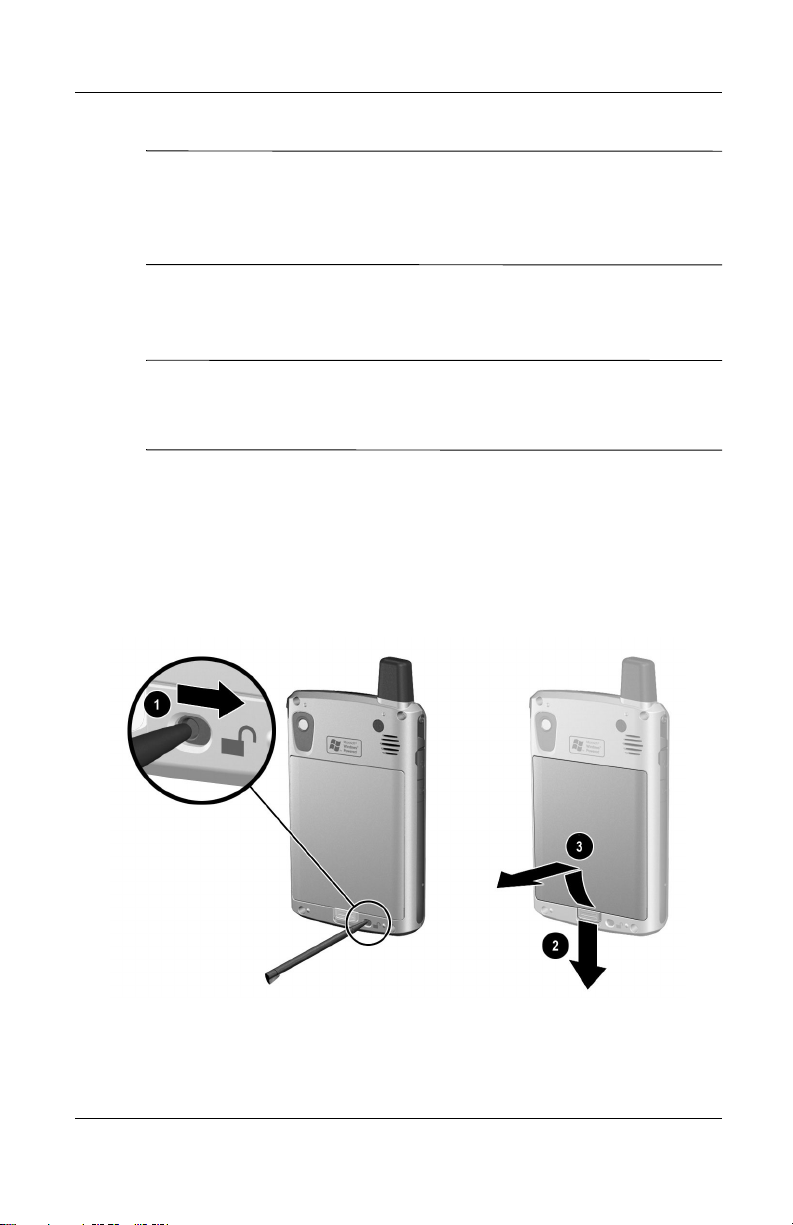
To remove the battery from the iPAQ Pocket PC h6300 Series:
1. Insert the stylus into the battery lock 1 and slide it to the
right or unlocked position.
2. Slide the battery latch down 2 to release the battery.
3. Remove the battery 3.
Managing the Battery
User’s Guide 10–3
Page 4

November 26, 2003 11:47 am
CAUTION: Because most of the applications and data you install on
your Pocket PC are held in memory (RAM), you will need to reinstall
Ä
them if the battery completely discharges or if the battery is removed
from the unit for more than 15 minutes. Otherwise, when fully charged,
the internal backup battery will save the user installed data for up to 15
minutes when the standard battery is removed. Before removing the
battery, check to see that the internal backup battery is fully charged by
tapping Start > Settings > System tab > Power Icon.
You do not need to reinstall applications and data installed in the iPAQ
File Store folder because they are saved in nonvolatile memory.
Charging the Battery
Battery Saving Tip: Leave your Pocket PC connected to AC
power at all times when you’re not using it.
Battery Saving Tip: You can program an Application Button
to turn off the screen when an MP3 is playing, saving battery
power used to run the screen. Tap Start > Windows Media >
Tools > Settings > Buttons. From the Select Function drop
down list, tap Screen Toggle. Press either the Calendar or
Inbox application buttons on the front of your iPAQ Pocket
PC, then tap OK.
Managing the Battery
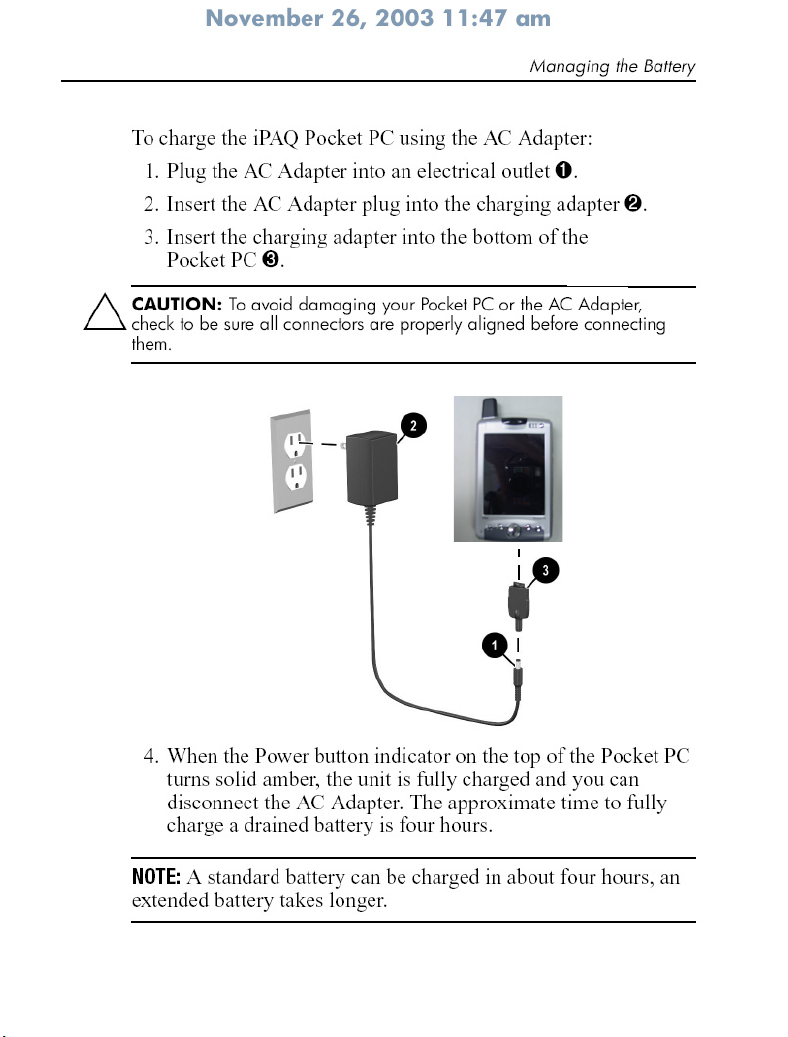
Charging with the AC Adapter
The standard AC Adapter works in any household outlet. You
can also charge your Pocket PC in your automobile with an
automobile adapter that works in your vehicle’s electrical
cigarette lighter or a 12-volt power outlet.
To purchase a car adapter, refer to the HP Web site at:
www.hp.com/products/pocketpc .
CAUTION: Use only HP recommended AC adapters.
Ä
User’s Guide 10–4
Page 5
Page 6
Page 7

November 26, 2003 11:47 am
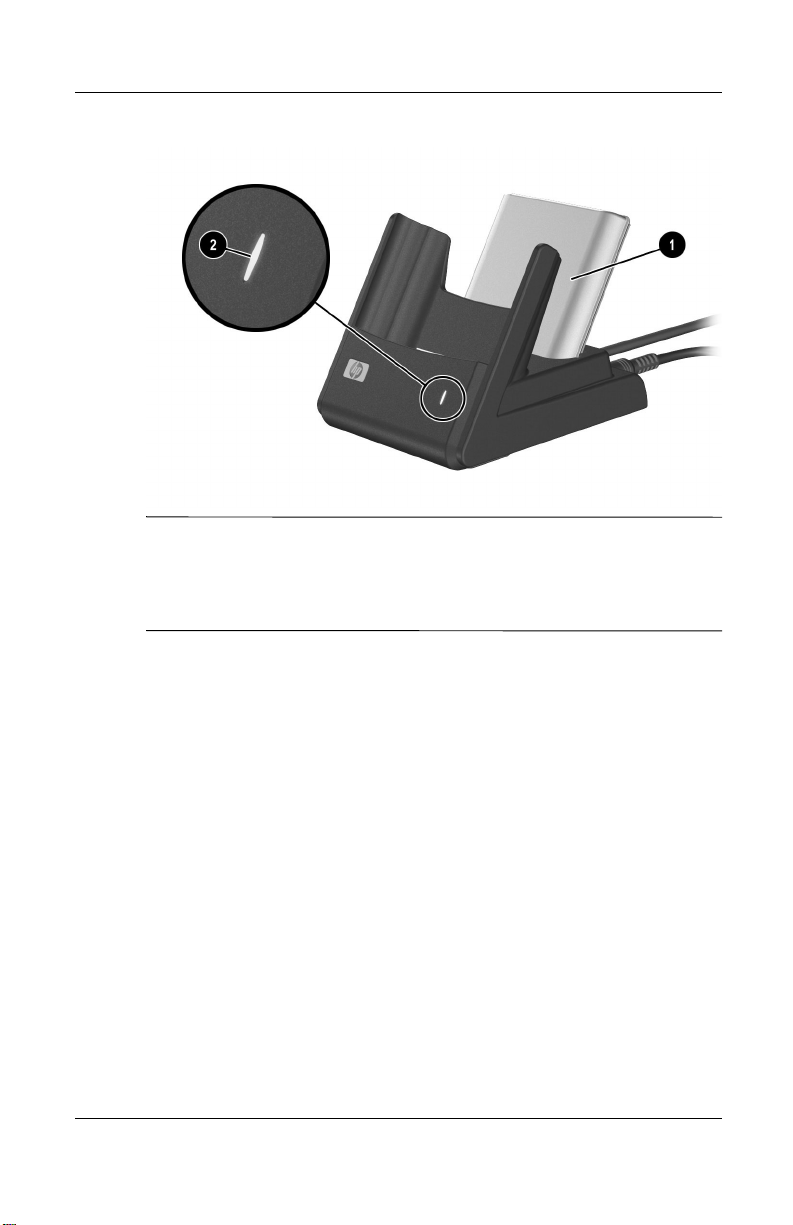
Charging a Spare Battery
Battery Saving Tip: To ensure you always have battery power
available, invest in an extra Standard Battery or Extended
Battery . These batteries can be charged in the desktop cradle.
To purchase an extra battery, refer to the HP Web site at
www.hp.com/products/pocketpc.
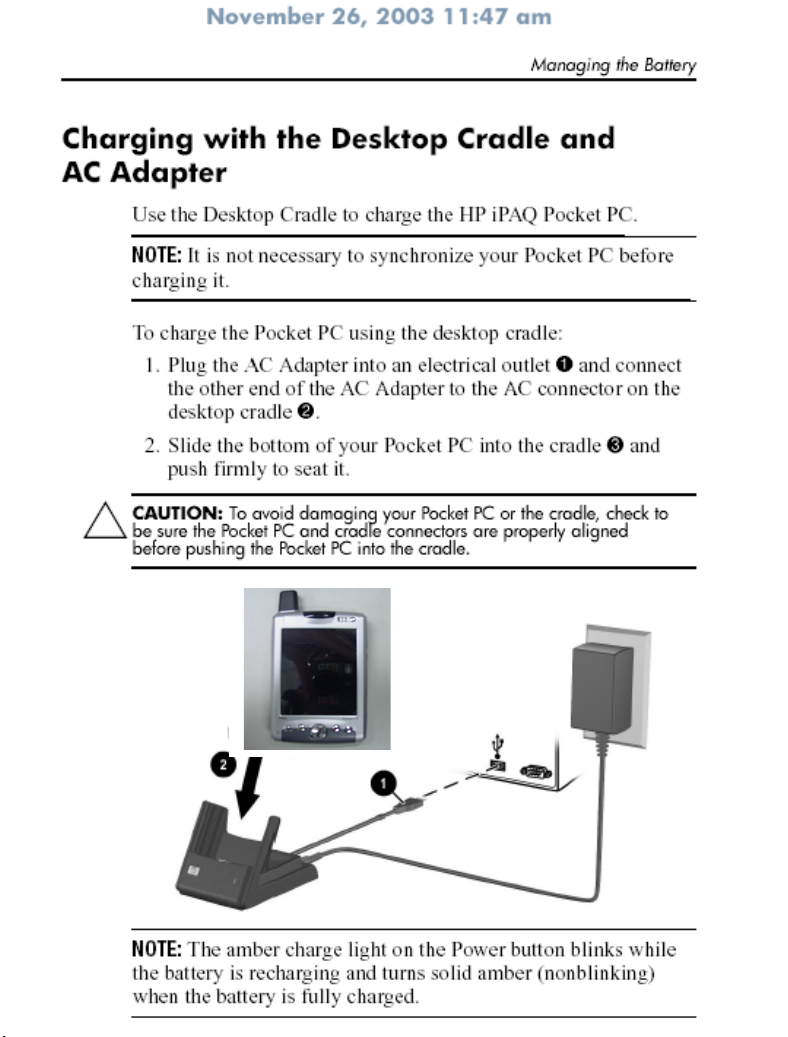
To charge an extra battery in the desktop cradle:
1. Plug the AC Adapter into an electrical outlet and connect the
other end of the AC Adapter to the AC connector on the
desktop cradle.
2. Insert the battery into the battery compartment 1 with the
connectors on the top of the battery lined up with the
connectors inside the battery compartment, and push in to
seat it.
3. When the battery light on the front of the desktop cradle 2 is
amber, the battery is charging. When the light is green, the
battery is completely charged and ready to use.
Managing the Battery
User’s Guide 10–7
Page 8
November 26, 2003 11:47 am
Managing the Battery
CHARGING TIP: When charging two batteries simultaneously, turn
off/suspend your Pocket PC by pressing the Power button once.
This allows two drained extended batteries to be charged within
eight hours.
Charging with the Optional USB
Autosync Cable
You can charge your iPAQ Pocket PC using the optional USB
Autosync Cable. Connect the Autosync Cable to the Pocket PC
and your personal computer. The Pocket PC will be charged
using power from the personal computer.
User’s Guide 10–8
Page 9

November 26, 2003 11:47 am
For more information on charging your Pocket PC using the
optional USB Autosync Cable, from the Today screen, tap
Start > Settings > System tab > Power > USB Charging tab,
and select Use USB Charging.
NOTE: USB charging is slower and provides less power when
compared to charging with the AC adapter. The USB Slow
Charge option can often deliver less power than is being
consumed by the Pocket PC resulting in the battery gradually
losing capacity instead of gaining it. If this happens, the charging
LED does not blink. To ensure the battery is being charged, turn
off/suspend your Pocket PC by pressing the power button once
during slow USB charging. Because of this, the USB Fast Char ge
option is recommended over the Slow Charge option.
Changing the Backlight Settings
To change the backlight settings in order to conserve more
battery power:
1. From the Start menu, tap Settings > System tab >
Backlight.
Managing the Battery
2. Select the following backlight settings:
■ Brightness
■ Battery Power
■ External Power
Battery Saving Tip: Set the backlight to go off quickly after
you stop using your Pocket PC, or move the slide bar to
Power Save mode to turn off the backlight completely. You
can also set the backlight to turn on when a button is pressed
or when the screen is tapped, or you can turn the backlight
back on (or off) b y pressing and holding the Power button for
three seconds.
User’s Guide 10–9
Page 10

November 26, 2003 11:47 am
Managing the Battery
Changing the Wireless LAN Power
Saving Modes
To change Wireless LAN (WLAN) power saving modes:
1. From the Start menu, tap Settings > System tab > Power >
Control tab.
2. For WLAN Power Save mode, select:
■ OFF—No WLAN Power Save. Use only if the absolute
highest WLAN throughput is required.
■ Auto—Automatically switches between Power Save and
no power save.
■ Extended—Uses the least battery power while
maintaining a WLAN connection. This mode
significantly reduces the WLAN data throughput.
It is not recommended for large file transfers.
Disabling the Application Buttons
Pressing the Contacts or Calendar Application Buttons on the
front of your Pocket PC will turn your device on by default.
Battery Saving Tip: To reduce incidence of accidentally
powering on the Pocket PC, you may choose to disable the
Application and Record Buttons Auto Power On feature.
To disable the Auto Power On function of the Application
Buttons or the Record Button:
1. Tap Start > Settings > Buttons > Lock tab.
2. Tap in the Disable the application buttons checkbox
AND/OR tap in the Disable the record button checkbox.
User’s Guide 10–10
Page 11

November 26, 2003 11:47 am
3. Tap OK.
Note: If you disable the Auto Power On feature for the
Application Buttons, the Power Button still turns the unit on.
Once the unit is turned on, all buttons will function according
to their programmed functions.
Manually Monitoring the Battery
To manually monitor the battery power:
1. From the Start menu, tap Settings > System tab >
Power icon.
2. Tap OK.
Battery Saving Tip: Tap Start > Settings > System tab > Power >
Control tab, then tap the On battery power checkbox and set
it to turn your Pocket PC off after a short time of not being used.
Managing the Battery
User’s Guide 10–11
Page 12

November 26, 2003 11:47 am
Managing the Battery
User’s Guide 10–12
Page 13

November 26, 2003 11:47 am
.
Learning the Basics
Using the Today Screen
When you first turn on your Pocket PC, the Today screen
displays. You can also display it by tapping Start, and Today.
Use the Today screen to view:
■ Date and time
■ Owner information
■ Upcoming appointments
■ Unread and unsent messages
11
■ Tasks that need to be completed
Tap to switch
to a program.
Tap to set Wireless connections.
T ap to change volume or mute all sounds
T ap to change date and time.
Tap to set appointment or
view existing appointments.
Tap to read e-mail.
Tap to add tasks.
Need New Screen
Tap to turn Bluetooth on/off
Tap to create a new item.
User’s Guide 11–1
Indicates unit is connected
to desktop cradle.
.
Page 14

November 26, 2003 11:47 am
Navigation Bar and Command Bar
The Navigation bar is located at the top of the screen. It displays
the active program and current time, and allows you to close
screens. Use the Start menu to select a program.
Tap to select a program you used recently.
Tap to select a program.
Need New Screen
Tap to see additional programs.
Tap to customize the settings.
Learning the Basics
Tap to view online Help.
Tap for Bluetooth features.
Within each program, use the Command bar located at the bottom
of the screen to perform tasks. Tap New to create a new item in
the current program.
New button
Menu
actions
User’s Guide 11–2
Buttons
Input panel button
Page 15

November 26, 2003 11:47 am
Status Icons
You may see the following status icons displayed on the
Navigation or Command bar. Tap the icon on the screen to view
more information related to the item.
Learning the Basics
Active connection to computer or wireless network.
Inactive connection to computer or wireless network.
Microsoft ActiveSync is synchronizing.
Speaker is on.
Speaker is off or in mute position.
Phone is powered on.
Phone is powered off.
Establishing a Wireless connection.
Active Wireless connection showing the signal strength.
Battery power is low.
Battery power is very low.
User’s Guide 11–3
Page 16

November 26, 2003 11:47 am
.
Icon room
E-mail received.
Instant messages received.
iPAQ Pocket PC is connected with the desktop cradle. This
icon appears only when there is an active connection.
Bluetooth power-on/off icon. When the Bluetooth icon is
blue, Bluetooth is active. When the Bluetooth icon is grayed
with a red X, Bluetooth is inactive.
Pop-Up Menus
Pop-up menus allow you to quickly perform an action. Use the
pop-up menu to cut, copy, rename, and delete an item, also send
an e-mail or send a file to another device.
To access a pop-up menu, tap and hold the stylus on the item on
which you want to perform the action. When the menu appears,
tap the desired action, or tap anywhere outside the menu to close
it without performing an action.
Learning the Basics
Tap and hold to display
the pop-up menu.
Tap the action you want.
Tap outside the menu to close
it without performing an action
User’s Guide 11–4
Page 17

November 26, 2003 11:47 am
Creating information
From the Today screen, you can create new information,
including:
■ Appointments
■ Contacts
■ Messages
■ Pocket Excel Spreadsheets
■ Notes
■ Tasks
■ Word documents
1. Tap , or from the Start menu, tap Today > New.
2. Tap an option to create a new item.
3. Tap OK after you finish creating a new item.
Learning the Basics
User’s Guide 11–5
Page 18

November 26, 2003 11:47 am
Customizing the Today Screen
From the Settings Today screen, you can:
■ Add a pic t ure as the background.
■ Select the information you see.
■ Set the order of the information.
■ Set when to see the Today screen.
1. Tap , or from the Start menu, tap Settings > Today.
2. Select Use this picture as the background checkbox.
Learning the Basics
3. Tap Browse to select a picture from File Explorer.
User’s Guide 11–6
Page 19

November 26, 2003 11:47 am
Learning the Basics
4. Tap the Items tab to select or reorder the information on the
Today screen.
5. Tap an item to highlight it.
6. Tap Move Up or Move Down to change the order of items on
the Today screen.
NOTE: You cannot change the placement of the Date on the
Today screen.
7. Tap the down arrow associated with Display Today screen if
device is not used for...hours checkbox to determine how
many hours must pass before the Today screen displays.
8. Tap OK.
User’s Guide 11–7
Page 20

November 26, 2003 11:47 am
Using Applications
Opening Applications
Open any application on your Pocket PC from the Start menu.
NOTE: You can also open an application by assigning it to one of
the two available Application Buttons. The Phone Application
Buttons cannot be reassigned. To assign Application Buttons,
from the Today screen, tap Start > Settings > Buttons.
To open an application:
1. Tap Start > Programs.
2. Tap the desired application title or logo.
Minimizing Applications
To minimize an open application, tap the x at the top right of the
screen.
Learning the Basics
Closing Applications
Applications automatically close based on available memory.
However, if your Pocket PC is running slowly, you can close
applications by manually closing them.
User’s Guide 11–8
Page 21

November 26, 2003 11:47 am
Closing Manually
1. From the Start menu, tap Settings > System tab >
Memory > Running Programs tab.
2. Tap Stop All or select a particular application, then tap Stop.
NOTE: To bring a currently running p r ogram to the foreground,
tap Activate.
Installing Applications
Install applications on your Pocket PC from your:
■ Computer by using Microsoft ActiveSync.
■ Pocket PC if the application file has a .cab extension.
■ Pocket PC or your computer by copying an application file
that has an .exe or .cef extension.
Learning the Basics
When installing applications, look for the correct version for your
HP iPAQ h6300 model or Microsoft Windows Mobile™ 2003
Software for Pocket PC Edition.
■ Follow the instructions provided with the application and by
the Installation Wizard to install applications from your
computer.
■ Tap the application file in File Explorer on your Pocket PC
and follow the instructions on the Installation Wizard to
install applications on your Pocket PC.
User’s Guide 11–9
Page 22

November 26, 2003 11:47 am
Backing Up Information
Use iPAQ Backup or Microsoft ActiveSync Backup to back up
and restore information on your Pocket PC.
NOTE: iPAQ Backup is already installed on the Pocket PC. You
must install ActiveSync on your computer before using
ActiveSync Backup.
T o help reduce the chance of losing information, you should back
up information on a regular schedule.
Backup/Restore using iPAQ Backup
iPAQ Backup saves yo ur data in a backup f ile. You may designate
a file name and a location for the file to be saved. iPAQ Backup
backs up to a memory card, main memory, or the iPAQ File Store
folder. Close all programs on your Pocket PC before backing
up or restoring your information.
Learning the Basics
CAUTION: Restoring your information replaces the current information
Ä
on your Pocket PC with the information saved in your backup.
To backup/restore using iPAQ Backup:
1. Tap , or from the Start menu, tap Programs > iPAQ
Backup.
2. Tap the Backup tab or the Restore tab.
3. Select the files and folders to be backed up or restored.
4. Select file location for backed-up data.
5. Set backup or restore options.
6. Press the Backup or Restore button, and press the Start
button on the next screen.
Backup/Restore Using ActiveSync
Close all programs on your Pocket PC before backing up or
restoring your information.
User’s Guide 11–10
Page 23

November 26, 2003 11:47 am
CAUTION: Restoring your information replaces the current information
Ä
on your Pocket PC with the information saved in your backup.
To backup/restore using ActiveSync:
1. Be sure the Pocket PC is connected to your computer.
2. From your computer, open Microsoft ActiveSync. From the
Start menu, click Programs > Microsoft ActiveSync.
3. From the Tools menu, click Backup/Restore.
4. Click the Backup or Restore tab, and select your options.
5. Click Backup Now or Restore Now.
Using iPAQ File Store Folder
You can install programs and save files to the iPAQ File
Store folder, which is accessed from File Explorer on your Pocket
PC.
Programs and files stored in iPAQ File Store are stored in ROM
and are saved if you perform a full reset of your Pocket PC or if
the battery discharges completely.
To save to iPAQ File Store:
1. Copy the files to be saved to the iPAQ File Store folder.
2. From the Start menu, tap Programs > File Explorer >
My Device > iPAQ File Store.
3. Paste the selected files.
Learning the Basics
NOTE: Before saving files to the iPAQ File Store folder, it is a
good idea to determine how much memory is available in the
folder. To view the amount of memory, from the Start menu, tap
Settings > System tab > Memory > Storage Card tab, then
select iPAQ File Store from the drop down menu.
User’s Guide 11–11
Page 24

November 26, 2003 11:47 am
Learning the Basics
User’s Guide 11–12
Page 25

Learning Input Methods
Using Input Software
CAUTION: To avoid damaging your HP iPAQ Pocket PC screen,
Ä
always use a stylus. Never use a pen or any type of metal pointer on
the screen.
T o input information to your Po cket PC, you can t ap the ke yboard
or write with the Letter Recognizer, Microsoft Transcriber, or
Block Recognizer in any application. You can use the stylus to
draw and write on the screen in the Notes application and from
any Notes tab in the Calendar, Contacts, and Tasks applications.
Changing Word Suggestion Options
As you type or write, the Pocket PC suggests words for you in a
box above the keyboard, Letter Recognizer, or Block Recognizer ,
but not in the Transcriber.
You determine:
12
■ If words are suggested.
■ The number of letters you enter before a word is suggested.
■ The number of words that are suggeste d per entry.
If you do not want any words suggested, remove the checkmark
by tapping the checkbox next to Suggest W ords When Entering
Text.
User’s Guide 12–1
Page 26

Learning Input Methods
To change settings for word suggestions:
1. From the Start menu, tap Settings > Input.
2. Tap the Word Completion tab.
3. Tap the down arrow associated with letters and select the
number of letters you want to type before a word is
suggested.
t
User’s Guide 12–2
Page 27

4. Tap the down arrow associated with words and select the
number of words you want suggested.
5. Tap OK.
Using the On-Screen Keyboard
Use the stylus to tap letters, numbers, and symbols on the
on-screen keyboard to enter typed text directly onto the screen.
1. From any application, tap the up arrow next to the Input
Panel icon.
Learning Input Methods
User’s Guide 12–3
Page 28

Learning Input Methods
2. Tap Keyboard to disp lay a keyboard on the screen.
NOTE: To see symbols, tap the 123 or Shift key.
3. Tap a letter, symbol, or number to enter information.
4. Tap OK.
Writing with the Stylus and the Letter
Recognizer
Use the stylus and Letter Recognizer to write letters, numbers,
and symbols on the screen. Create words and sentences by
writing in uppercase (ABC), lowercase (abc), and symbols (123)
as instructed here.
To write with the stylus and Letter Recognizer:
1. From any application, tap the up arrow next to the Input
Panel icon.
2. Tap Letter Recognizer.
3. Write a letter or symbol between the dashed line and
baseline.
a. To display in uppercase, write a letter between the hatch
marks labeled ABC.
b. To display in lowercase, write a letter between the hatch
marks labeled abc.
c. Write a number or draw a symbol between the hatch
marks labeled 123.
User’s Guide 12–4
Page 29

What you write will be converted to text.
NOTE: A question mark within a program indicates a Help file.
Tap the ? to open the Help file.
NOTE: For the Letter Recognizer to work effectively, write
characters between the dashed line and baseline.
■ If you are writing a letter like “p,” write the top portion
within the dashed line and baseline, and the tail portion
below the baseline.
■ If you writing a letter like “b,” write the bottom portion
within the dashed line and baseline, and the top portion
above the dashed line.
Writing with the Stylus and
Microsoft Transcriber
Use the stylus and Microsoft Transcriber to write words, letters,
numbers, and symbols anywhere on the screen.
1. From any application, tap the up arrow next to the Input
Panel icon.
Learning Input Methods
2. Tap Transcriber to display the Transcriber Intro screen.
3. Tap OK.
4. Tap New at the bottom of the screen.
5. Begin writing on the screen. What you write will be
converted to text.
NOTE: To “teach” Transcriber your style of writing, tap on the “a”
icon at the bottom of the screen to display the Letter Shapes
screen and follow the instructions.
User’s Guide 12–5
Page 30

Learning Input Methods
Writing with the Stylus and Block
Recognizer
Write letters, numbers, and symbols using the stylus and Block
Recognizer. Create words and sentences by writing letters and
numbers in specific areas.
1. From any application, tap the up arrow next to the Input
Panel button.
2. Tap Block Recognizer.
NOTE: For online Help, tap the ?
3. Write a word, letter, or symbol between the hatch marks.
a. To type text, write a letter between the hatch marks
labeled “abc.”
b. To type numbers or symbols, write a number or symbol
between the hatch marks labeled “123.”
What you write will be converted to text.
User’s Guide 12–6
Page 31

Learning Input Methods
Drawing and Writing on the Screen
Use the stylus as a pen to draw and write on the screen in the
Notes program or from the Notes tab in Calendar, Contacts,
or Tasks.
1. From the Start menu, tap Notes > New.
2. Draw and write on the screen.
3. Tap the Pen icon.
4. Tap OK.
Converting Writing to Text
You can convert your writing to text when you write with the
stylus in the Notes program or from the Notes tab in:
■ Calendar
■ Contacts
■ Tasks
To convert writing to text:
1. From the Start menu, tap Notes.
NOTE: Otherwise, tap the Notes tab in Calendar, Contacts, or
Tasks.
2. Tap a note to open it.
3. Tap Tools.
4. Tap Recognize.
NOTE: To convert a particular word or phrase, highlight it before
you tap Recognize. If a word is not recognized, it will not be
converted.
5. Tap OK.
User’s Guide 12–7
Page 32

Using the Removeable
Micro Keyboard
NOTE: Some iPAQ Pocket PC models may not include the
keyboard.
The HP iPAQ Micro Keyboard is a convenient, portable input
device for your HP iPAQ Pocket PC h6300 Series product. The
Micro Keyboard does not require batteries and it uses a very
small amount of power that is drawn from your Pocket PC.
With the Micro Keyboard, you can:
■ Easily type text into your iPAQ Pocket PC.
■ Quickly access your favorite iPAQ Pocket PC applications.
■ Enter c ommands with special function keys.
■ Use Send and End buttons for phone calls.
NOTE: If you regularly use an additional keyboard such as the HP
Foldable Keyboard with your iPAQ Pocket PC, you may need to
manually enable and disable the appropriate keyboards before
use.
Learning Input Methods
User’s Guide 12–8
Page 33

Page 34

1. Be sure the Micro Keyboard is securely connected to your
iPAQ Pocket PC.
2. If the connection is secure, go to Start > Programs > iPAQ
Micro Keyboard and be sure the Enable Keyboard check
box is checked.
3. If the box is checked, use your stylus to press the Reset
button on the left side of your iPAQ Pocket PC.
Disconnecting the Keyboard
To disconnect the keyboard from your iPAQ Pocket PC, push in
the two buttons on the side of the ke yboard to rel ease it, then pull
the Pocket PC from the keyboard.
Configuring the Keyboard
You can configure several features on your HP Micro Keyboard.
To customize your keyboard:
1. On your Pocket PC, select Start > Programs > iPAQ Micro
Keyboard.
2. Select the Settings tab.
3. Do one or more of the following:
Learning Input Methods
❏ Tap the Enable Keyboard check box to enable or
disable the keyboard functionality.
❏ Tap the Enable Sound check box to hear a click every
time you press a key.
❏ Tap and slide the Key Repeat Rate scale to change the
speed at which the keyboard repeatedly types a character
when the key is held down.
❏ Tap in the Test here: field to verify the keyboard settings
before exiting the iPAQ Micro Keyboard application.
User’s Guide 12–10
Page 35

Learning Input Methods
Using the Function and Shortcut Keys
The Micro Keyboard keys perform additional functions when
pressed in the combinations indicated.
The Orange Key (current prototype does not have an Orange key
and keyboard is not working on model unit)is the function (Fn)
key on the left side of the keyboard. The Blue Key is the Fn key
on the right side of the keyboard. Orange symbols are located on
the upper left portion of the keys. Blue symbols are located above
the keys.
NOTE: It is recommended that you print this table for future
reference.
Keystroke Combination Action
Blue Key + any key Enters characters printed on the
upper right of the key (indicated in
blue)
Blue Key pressed twice Toggles on blue keys. Press Blue
Key once to toggle off
Orange Key + any key Enters character on key (indicated in
orange)
Orange Key pressed twice Toggles on orange keys. Press
Orange Key once to toggle off
Orange Key + left arrow Opens the Start menu
Orange Key + Shift Opens the Tap and Hold menu
Orange Key + F Creates a hyphen between letters
(aa-bb)
Blue Key + down arrow Pag e down
Blue Key + up arrow Page up
Blue Key + N Creates an underscore between
letters (aa_bb)
(Continued)
User’s Guide 12–11
Page 36

Learning Input Methods
Keystroke Combination Action
Ctrl + C Copies highlighted selection
Ctrl + V Pastes
Ctrl + X Cuts highlighted selection
Ctrl + A Selects all
Ctrl + Z Undo
Ctrl + I Italicizes selection (toggle on/off)
Ctrl + B Bolds selection (toggle on/off)
Ctrl + U Underlines selection (toggle on/off)
Ctrl + N Creates a new document in the
current program
Shift hold + right arrow Highlights area to the right of the
cursor
Shift hold + left arrow Highlights area to the left of the
cursor
Shift hold + up arrow Highlights area from the cursor to
one row above the cursor
Shift hold + down arrow Highlights area from the cursor to
one row below the cursor
Application buttons
(Blue Key + R, T, Y, or U)
Launch user programmable shortcuts
to applications:
Blue Key + R: Calendar
Blue Key + T: Contacts
Blue Key + Y: Inbox
Blue Key + U: iTask
Accent Characters
To type any of the accent characters, press the Blue Key, then the
accent character, then the letter you require to be accented. For
example, pressing Blue Key, then W, then a will result in
User’s Guide 12–12
à.
Page 37

Learning Input Methods
To type a capital letter with an accent, press the Blue Key, then
the accent character, then Shift, then the letter you require to be
accented. For example, pressing Blue Key , then W, then Shift,
then A will result in
To add Ñ or ñ, press the Blue Key , then either the left a rrow
À.
or the right arrow.
Disabling the Micro Keyboard
If you would like to use a different keyboard with your iPAQ
Pocket PC, you need to disable the Micro Keyboard first.
To disable the Micro Key board :
1. Select Start > Programs > iPAQ Micro K e yb oard.
2. Select the Settings tab.
3. Clear the Enable Keyboard check box.
4. Tap OK.
5. Disconnect the keyboard.
You are now ready to install and connect another keyboard.
User’s Guide 12–13
Page 38

Learning Input Methods
User’s Guide 12–14
 Loading...