

Page 1
User Guide
COMPALCOMM
Penguin Lite
CAP8
Page 2

2
Contents
Your Phone ................................ 3
Home Screen ........................... 12
Text Entry ................................17
Calls .........................................23
Contacts ...................................26
Messaging ...............................31
Email ........................................36
Gmail ........................................41
Google Talk .............................. 44
Photos & Videos ......................46
Music .......................................55
Wireless Connections ..............58
USB Connections ..................... 61
Internet ....................................62
Maps ........................................66
Latitude ....................................70
Navigation ................................73
Android Manager Agent ........... 73
Android Market™ ..................... 73
YouTube™ ...............................75
Facebook ................................. 78
Twitter™ .................................. 81
News and Weather .................. 83
Quickoffice .............................. 85
Calendar ................................... 89
Clock ........................................ 92
FM Radio ................................. 94
Calculator ................................. 95
Sound Recorder ....................... 96
Speech Recorder ..................... 96
Voice Dialer .............................. 97
Settings ................................... 97
Safety & Regulatory ............... 107
Page 3
3 Your Phone
Your Phone
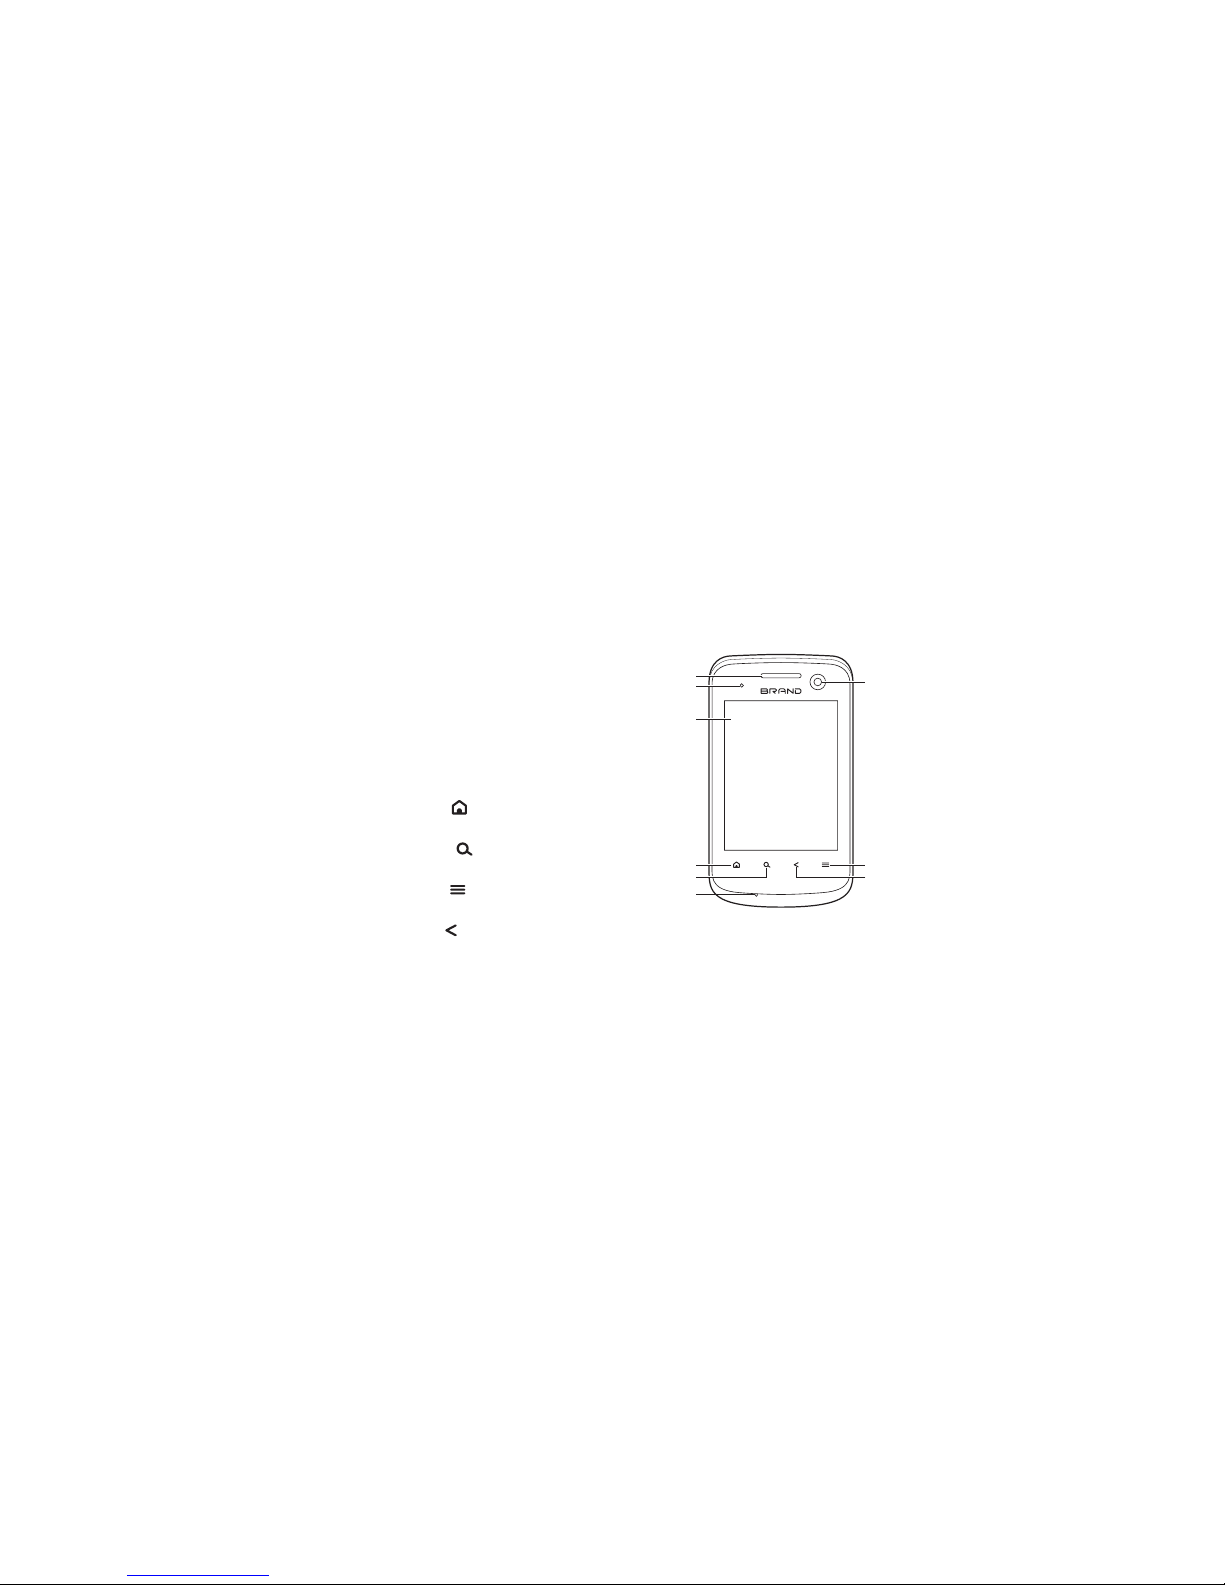
Phone Overview
1. Earpiece
Listen to the phone conversation from
here.
2. Camera
Use for video calls.
3. LED indicator
See “LED Indicator” on page 7.
4. Touch screen
5. Home key
Touch to go to the Home screen.
6. Search key
Touch to use Google search.
7. Menu key
Touch to open menu options.
8. Back key
Touch to go back the previous screen.
9. Microphone
1
3
4
2
7
5
9
6
8
Page 4
Your Phone 4
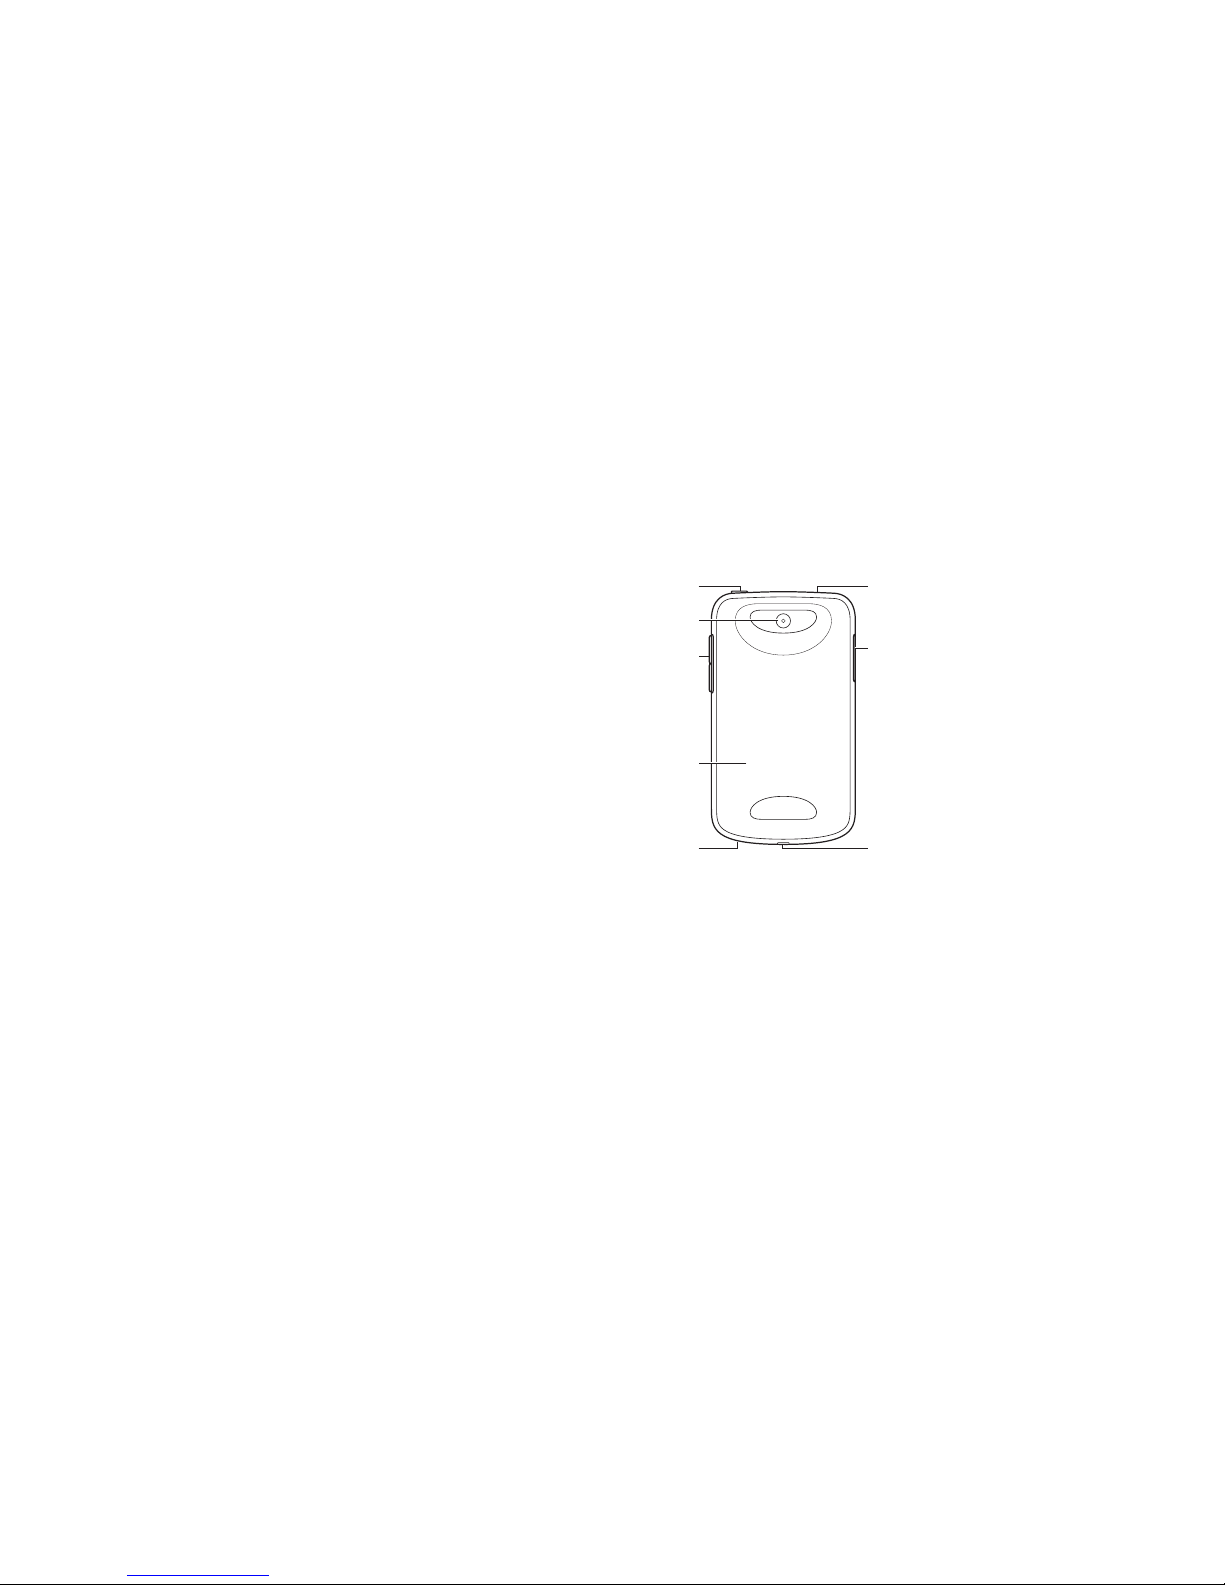
1. Power button
- Press and hold to turn the device on.
- When the device is turned on, press and
hold, then select Power off to turn the
device off.
- Press to turn the screen backlight on or off.
2. Earphone jack (3.5mm)
Connect the earphone for a hands-free
conversation or to listen to music.
3. Camera
See “Photos & Videos” on page 46.
4. Volume buttons
- Press up to raise or press down to lower
sound volume.
5. Back cover
6. Memory card slot
Insert a memory card to increase device memory. See “Storage Card” on
page 7.
7. Strap holder
8. USB connector
- Connect a USB cable to transfer files to and from a computer.
- Connect the Wall/USB charger to charge the battery.
3
4
5
2
6
1
7
8
Page 5
5 Your Phone
Package Contents
• Phone
• USB cable
• Wall/USB charger
• Battery
Battery
Your device comes with a Lithium-ion
battery. Battery consumption
depends on the signal strength,
running applications, and settings
used.
Note: Use only the supplied battery
or batteries recommended by the
manufacturer.
Before installing the battery, you
must remove the back cover first.
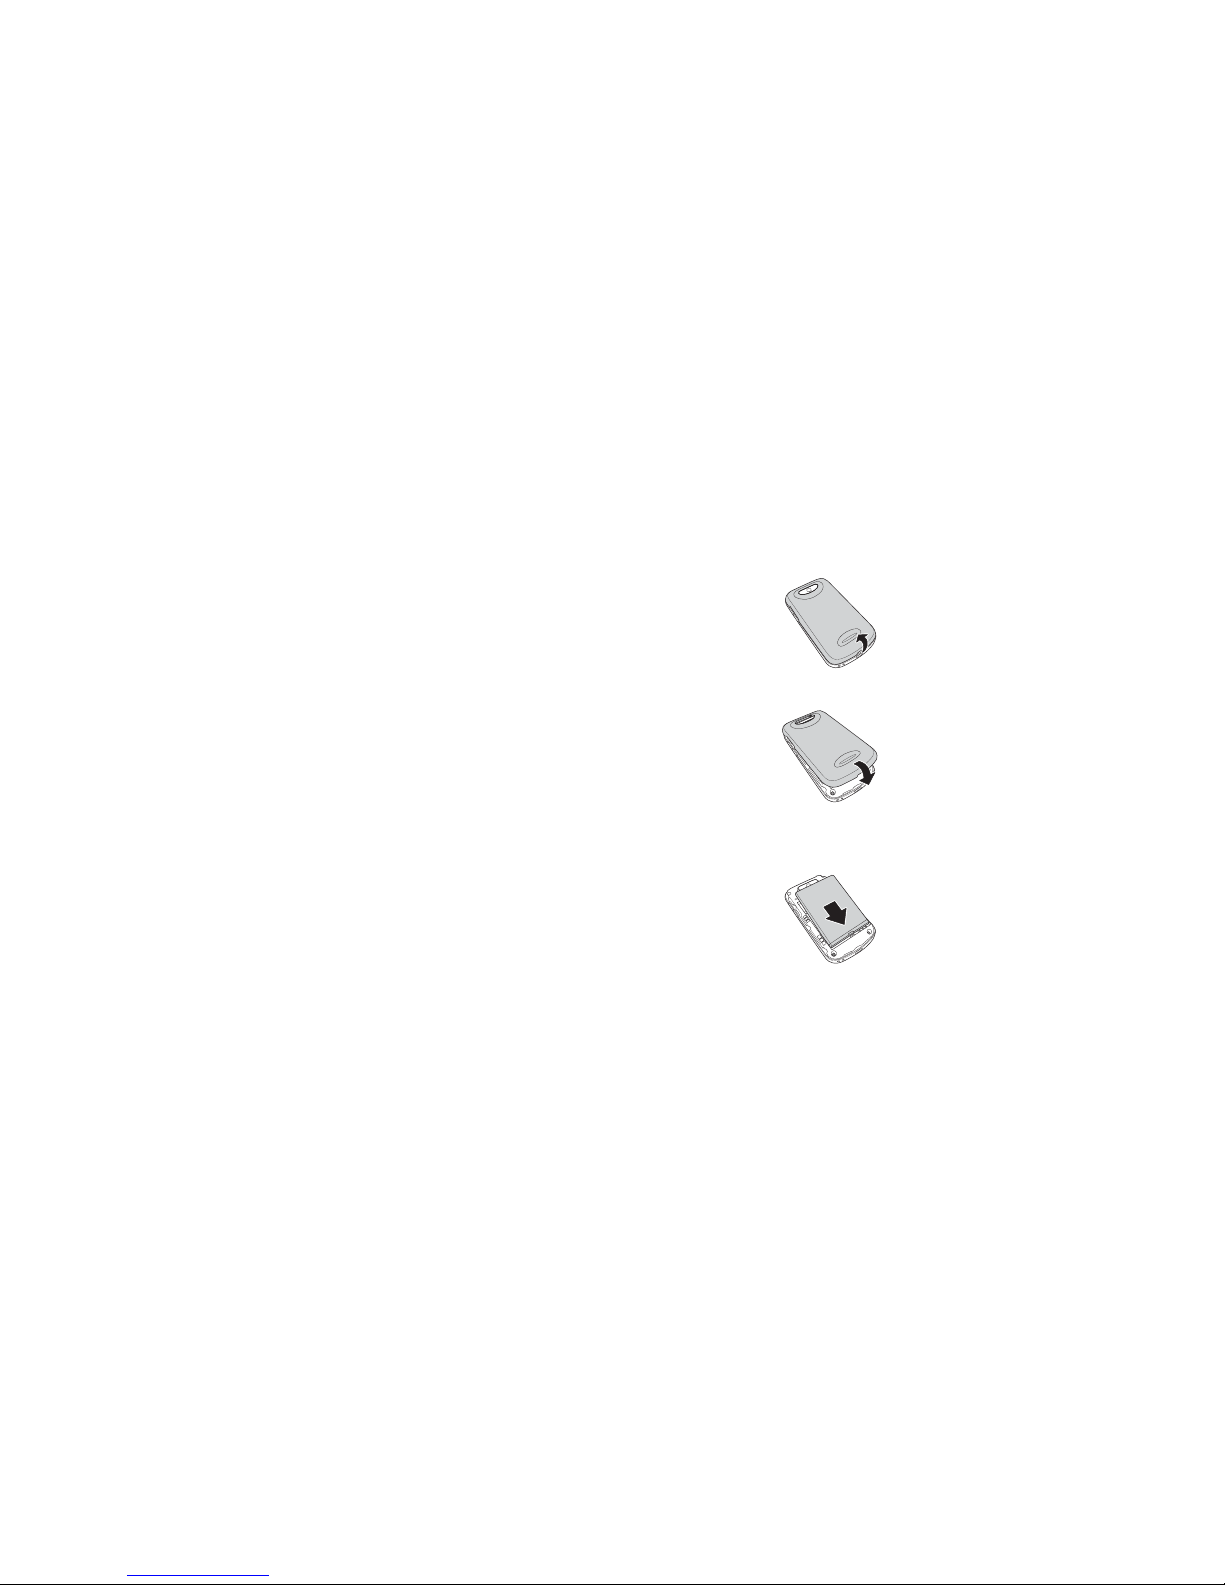
To remove the back cover
1. Hold the device face down.
2. Place your
fingernail on
the grip then lift
the back cover.
To replace the
back cover
Align the back
cover to the device
then press the back
cover until it snaps
into place.
Install the Battery
1. Remove the back cover.
2. Insert the
battery with
the metal
contacts facing
those on the
device.
Page 6

Your Phone 6
3. To replace the back cover.
Remove the battery
1. Make sure the device is turned
off.
2. Remove the back cover.
3. Place your
fingernail on
the grip then
lift to remove
the battery.
Charge the Battery
1. Connect the
USB cable to
the Wall/USB
charger, then
connect the
mini-USB side
of the cable to the connector on
the bottom of the device.
2. Plug the Wall/USB charger into a
wall outlet.
Note: You can also charge your
phone by plugging the USB cable into
your computer and the mini-USB side
into the device.
Warning:
• Do not remove the battery while
it is charging.
• Always remove the Wall/USB
charger from the wall outlet first
before removing the USB cable
from the device.
• Do not disassemble or open the
battery.
• Do not crush, bend, deform,
puncture, or shred the battery.
• Do not immerse the battery in
water or other liquid.
Page 7
7 Your Phone
LED Indicator
The LED indicator on your device
shows the battery charging status.
SIM Card
Your SIM card contains your
subscription information, phone
number and contacts.
Install the SIM Card
1. Remove the back cover.
2. Remove the battery.
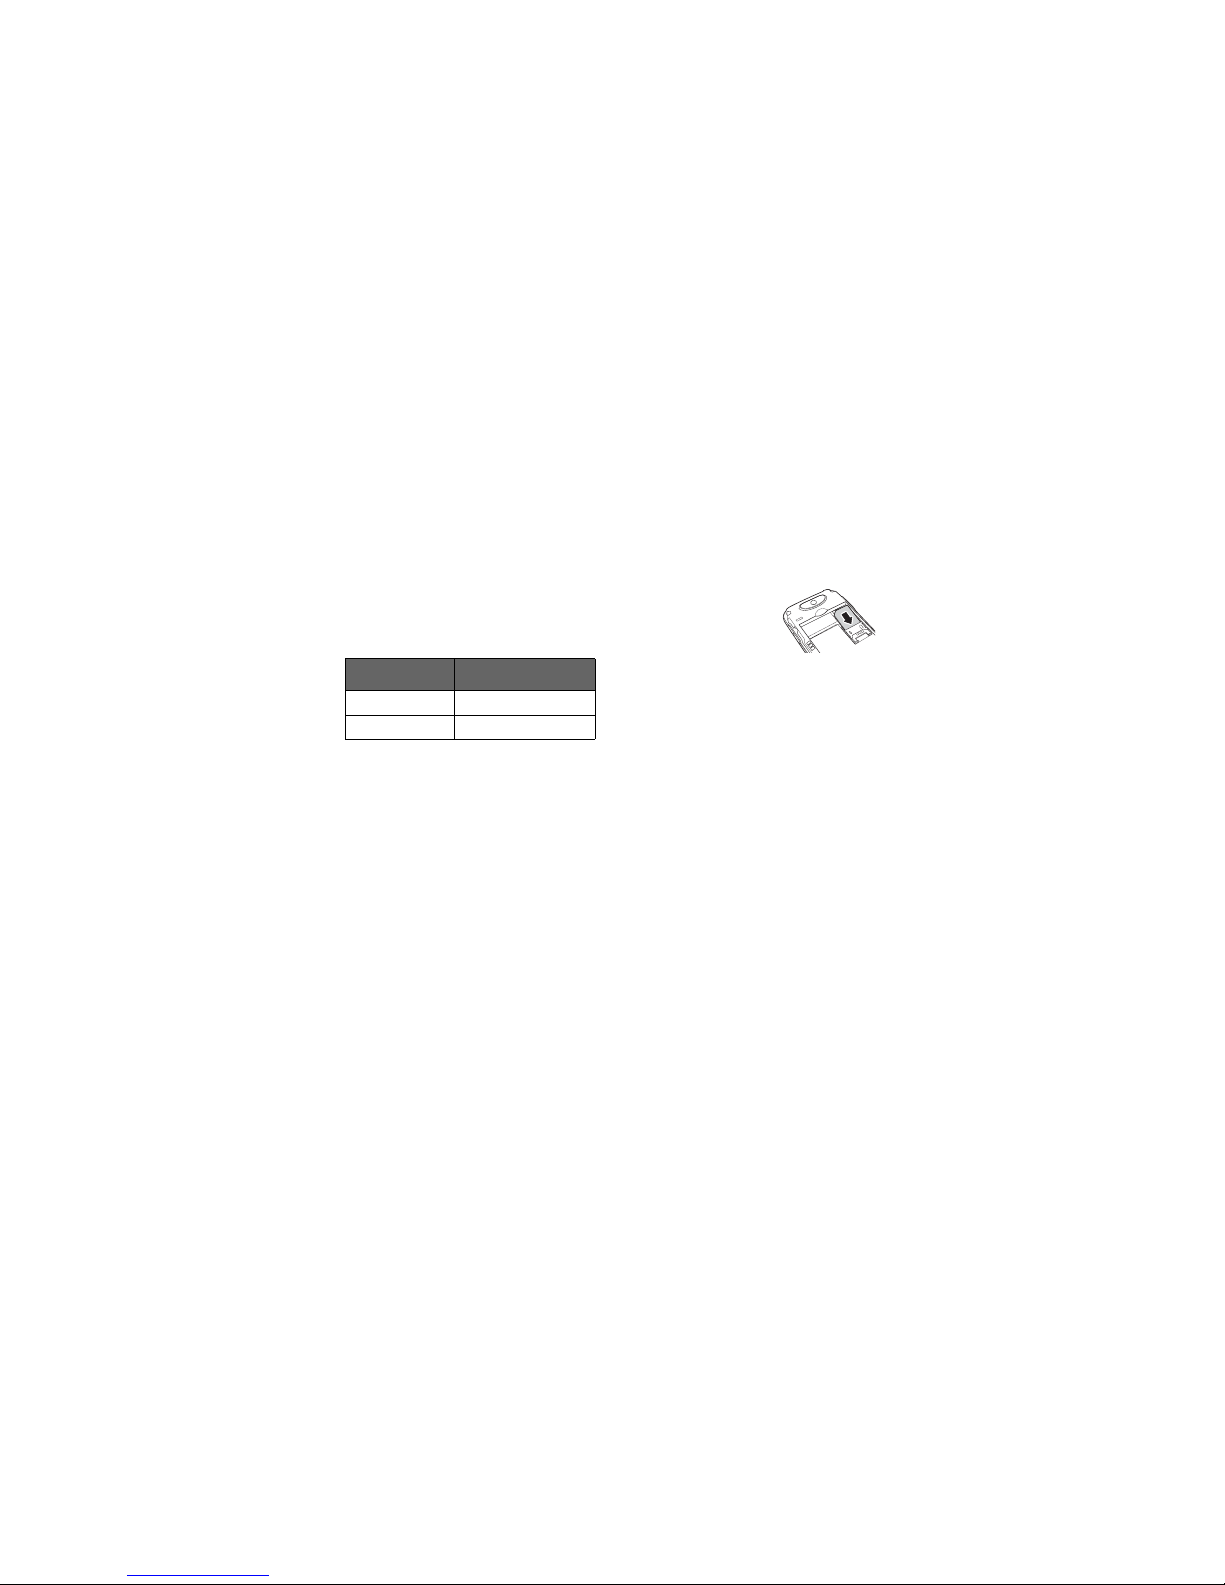
3. Insert the SIM
card into the
slot with the
metal contacts
facing the front
of the device.
Remove the SIM Card
1. Remove the back cover.
2. Remove the battery.
3. Slide the SIM card out of the slot.
Storage Card
Use a compatible microSD™ card for
additional storage space to save your
pictures, videos, and other files.
Install the Storage Card
1. Open the memory card slot
cover.
LED Indicator Status
Red Battery is charging.
Green Battery full.
Page 8

Your Phone 8
2. Insert the
microSD
™ card
into the slot
with the metal
contacts facing
the front of the
device.
3. Push the microSD
™ card until it
snaps into place.
Remove the Storage Card
1. Open the memory card slot
cover.
2. Push the microSD™ card into the
slot to eject card.
Note: Do not remove the memory
card while downloading or saving
files to it. Doing so may damage the
card and cause data loss.
Turn Device On and Off
• Press and hold the Power button
to turn on the device.
• When turned on, press and hold
the Power button, then touch
Power off to turn off the device.
Silent Mode
1. When turned on, press and hold
the Power button.
2. Touch Silent mode to set the
device to silent mode.
To undo silent mode, repeat the
above steps.
Airplane Mode
1. When turned on, press and hold
the Power button.
2. Touch Airplane mode to set the
device to airplane mode.
Page 9
9 Your Phone
To undo airplane mode, repeat the
above steps.
Note: For safety reasons, some
functions do not work in airplane
mode.
Sleep and Wake Device
To set the device to sleep mode,
press the Power button. The
backlight turns off.
To wake the device, press the Power
button again. The backlight turns on,
and the screen is locked.
Lock and Unlock Device
To avoid accidentally touching the
screen, set the Screen timeout
setting of your device to
automatically lock the screen after
being idle for a period of time. See
“Screen Timeout” on page 101.
To manually lock the touch screen,
press the Power button to set device
to sleep mode and lock the screen.
Unlock the Touch Screen
1. Press the Power button to turn
the backlight on.
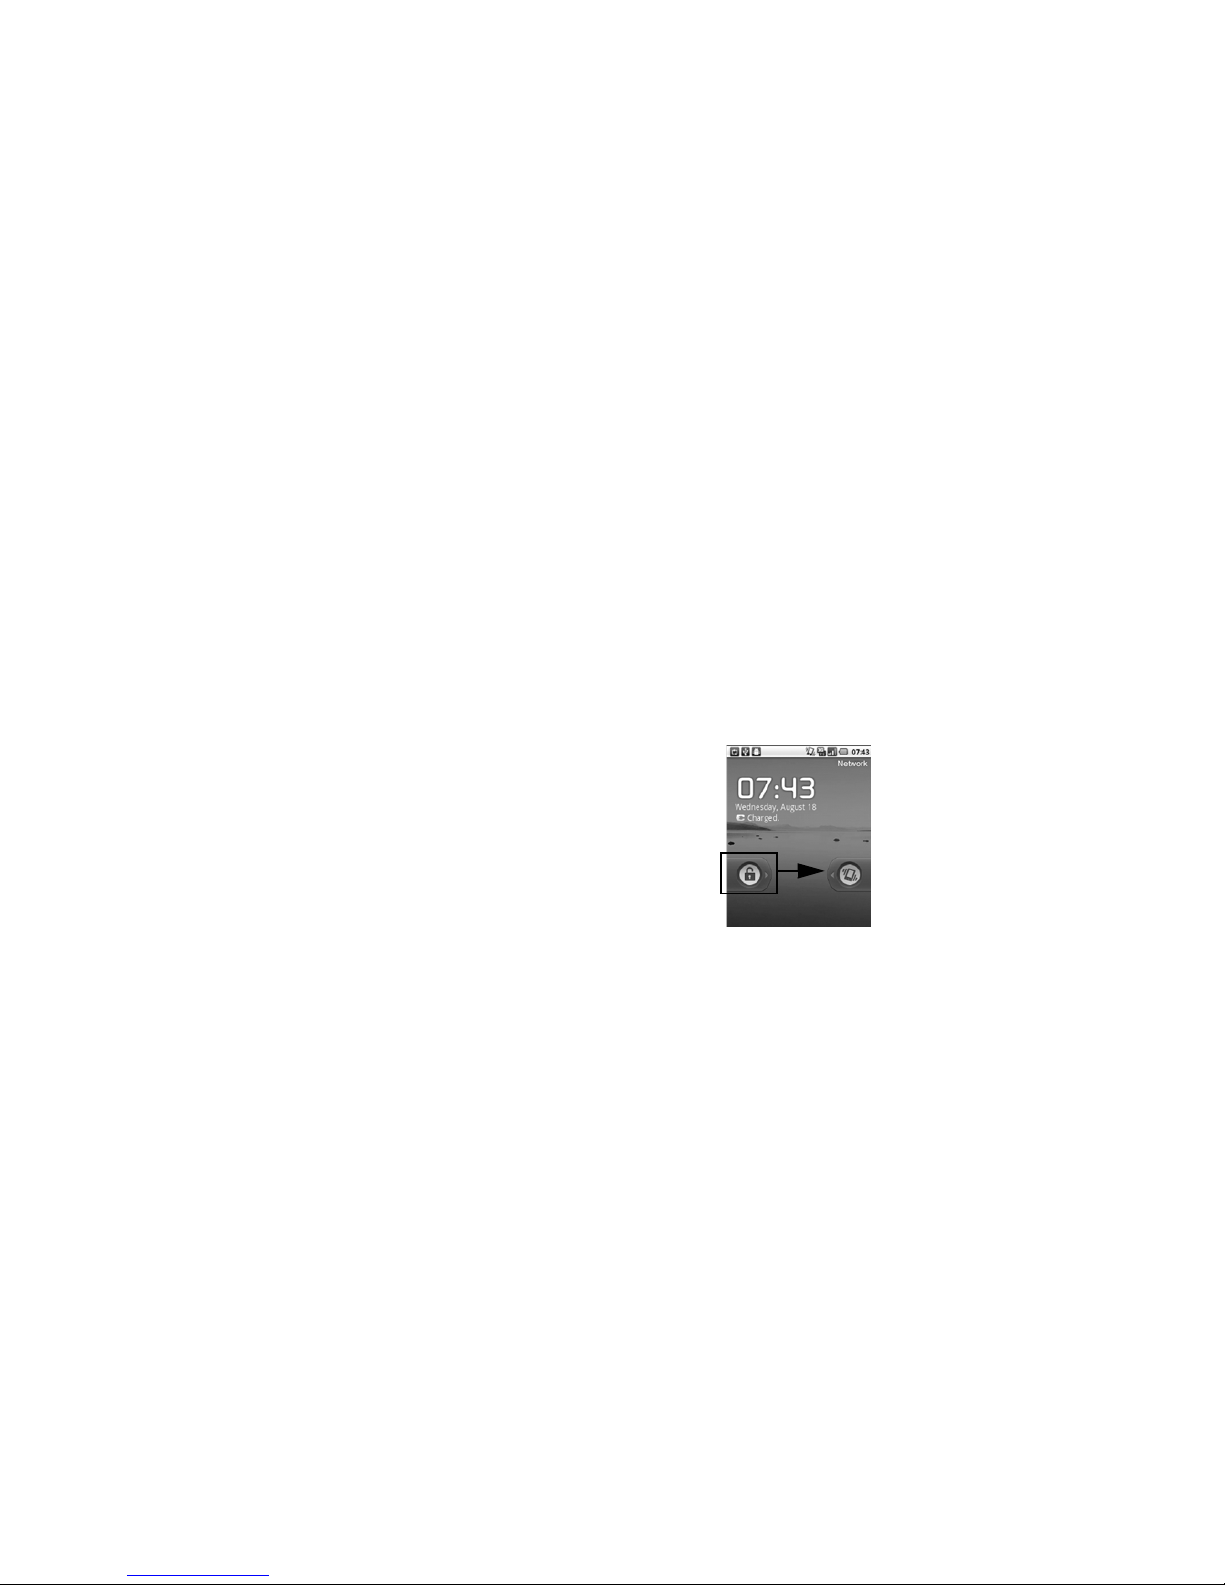
2. Drag the lock icon to the right of
the screen to unlock.
Drag to unlock.
Page 10

Your Phone 10
Adjust the Volume
Your device has the following system
volumes:
• Ringer: Sounds when there is an
incoming call or when a message
is received. Press the volume up /
down buttons to increase/
decrease volume.
• Media: Sounds when music or
video is played. During music or
video playback, press the volume
up/down buttons to increase/
decrease volume.
• In-call volume: The volume level
of a phone conversation. During a
call, press the volume up/down
buttons to increase/decrease
volume.
• Alarm: Sounds when the alarm
goes off. See “Clock” on
page 92.
Do the following steps to adjust the
volume at one time.
1. Touch > Settings > Volume.
2. Drag the Ringtone, Media, or
Alarm slider to adjust its volume.
Note: If “Use incoming call
volume for notifications” is
unchecked, the notification
volume can be adjusted
separately.
3. Touch O K.
Navigate Your Device
• Touch: Touch the screen with
your finger to highlight or select
items on screen or touch the
keys on your device
• Touch and hold: Touch and hold
an item to open its options
window.
Page 11

11 Your Phone
• Drag: Touch and hold an item
then drag to move it on the
screen.
• Swipe or slide: Touch and slide
your finger across the screen!
quickly. This action can be done
vertically such as scrolling
through a list or horizontally such
as browsing through pictures.
Rotate the Screen
By default, holding the device 90º
clockwise or counter-clockwise
automatically rotates the screen. To
disable this feature, disable the Autorotate screen settings.
Access it:
Menu > Settings >
Display > Auto-rotate screen.
Page 12
Home Screen 12
Home Screen
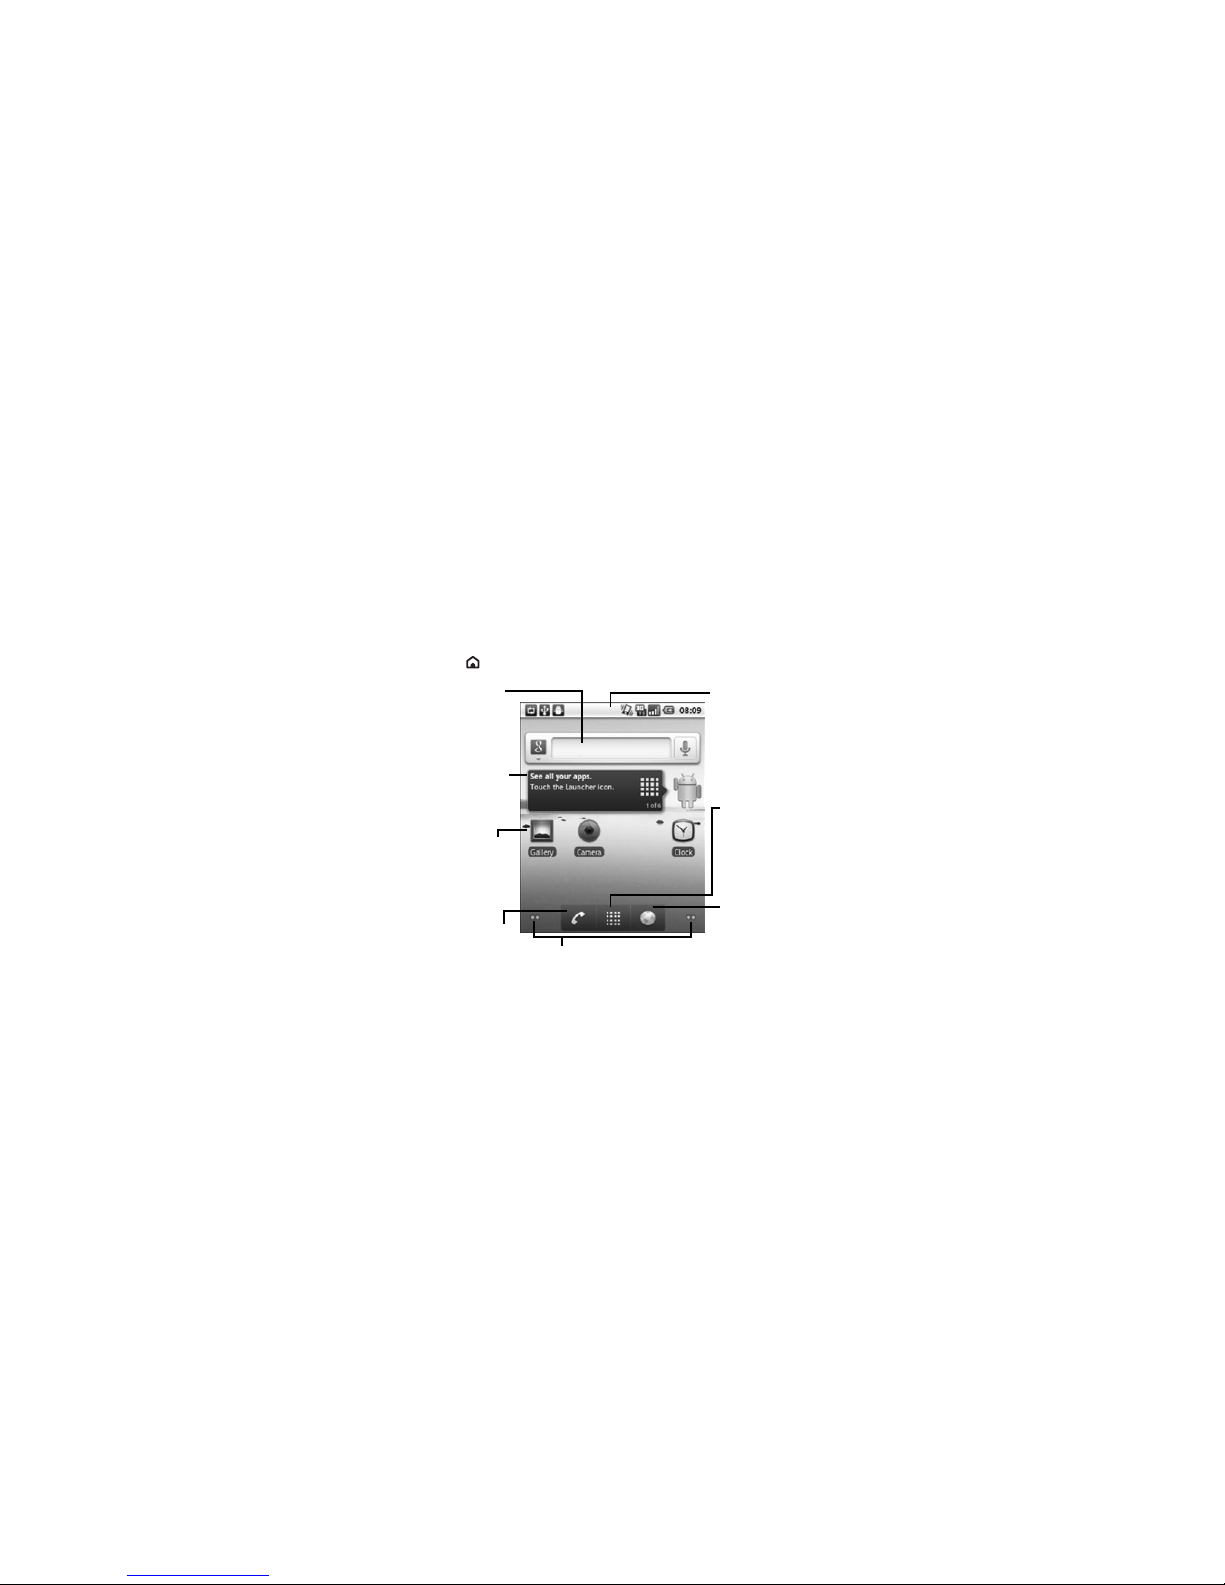
View notifications and access widgets, shortcuts and all other applications from
the Home screen.
Access it:
Home
Status Bar
Displays the time, battery and
signal status, and notification
icons. See “Status Bar” on
page 13.
Shortcuts
Touch an icon to access the
application. See “Shortcuts”
on page 15.
Phone Icon
Touch to open Phone. See
“Phone” on page 23.
Launcher Icon
Touch to see all the
applications on your device.
See “Applications” on
page 15.
Browser Icon
Touch to open Browser. See
“Internet” on page 62.
Search Bar
Use to search information on
your device or the Internet.
See “Search” on page 16.
Screen Panel Indicators
The dots indicate the number of screens on the left
or right side of the current screen.
Widgets
Tap a widget to open
application. See“Widgets” on
page 15.
Page 13
13 Home Screen
Move Items
Touch and drag an item to its new
location.
Remove Items
Touch and drag an item to the Trash
icon .
Screen Panels
The home screen has five screen
panels. Slide your finger left or right
to view the next or previous screen
panel.
Status Bar
The status bar displays icons that
indicate message or call notifications,
signal and battery status, and other
information.
Access it:
Menu >
Notifications
.
• To open the notification, touch it.
• To clear the notifications, touch
Clear.
• To close the notifications panel,
touch Back or touch and drag
the bottom of the notifications
panel upward.
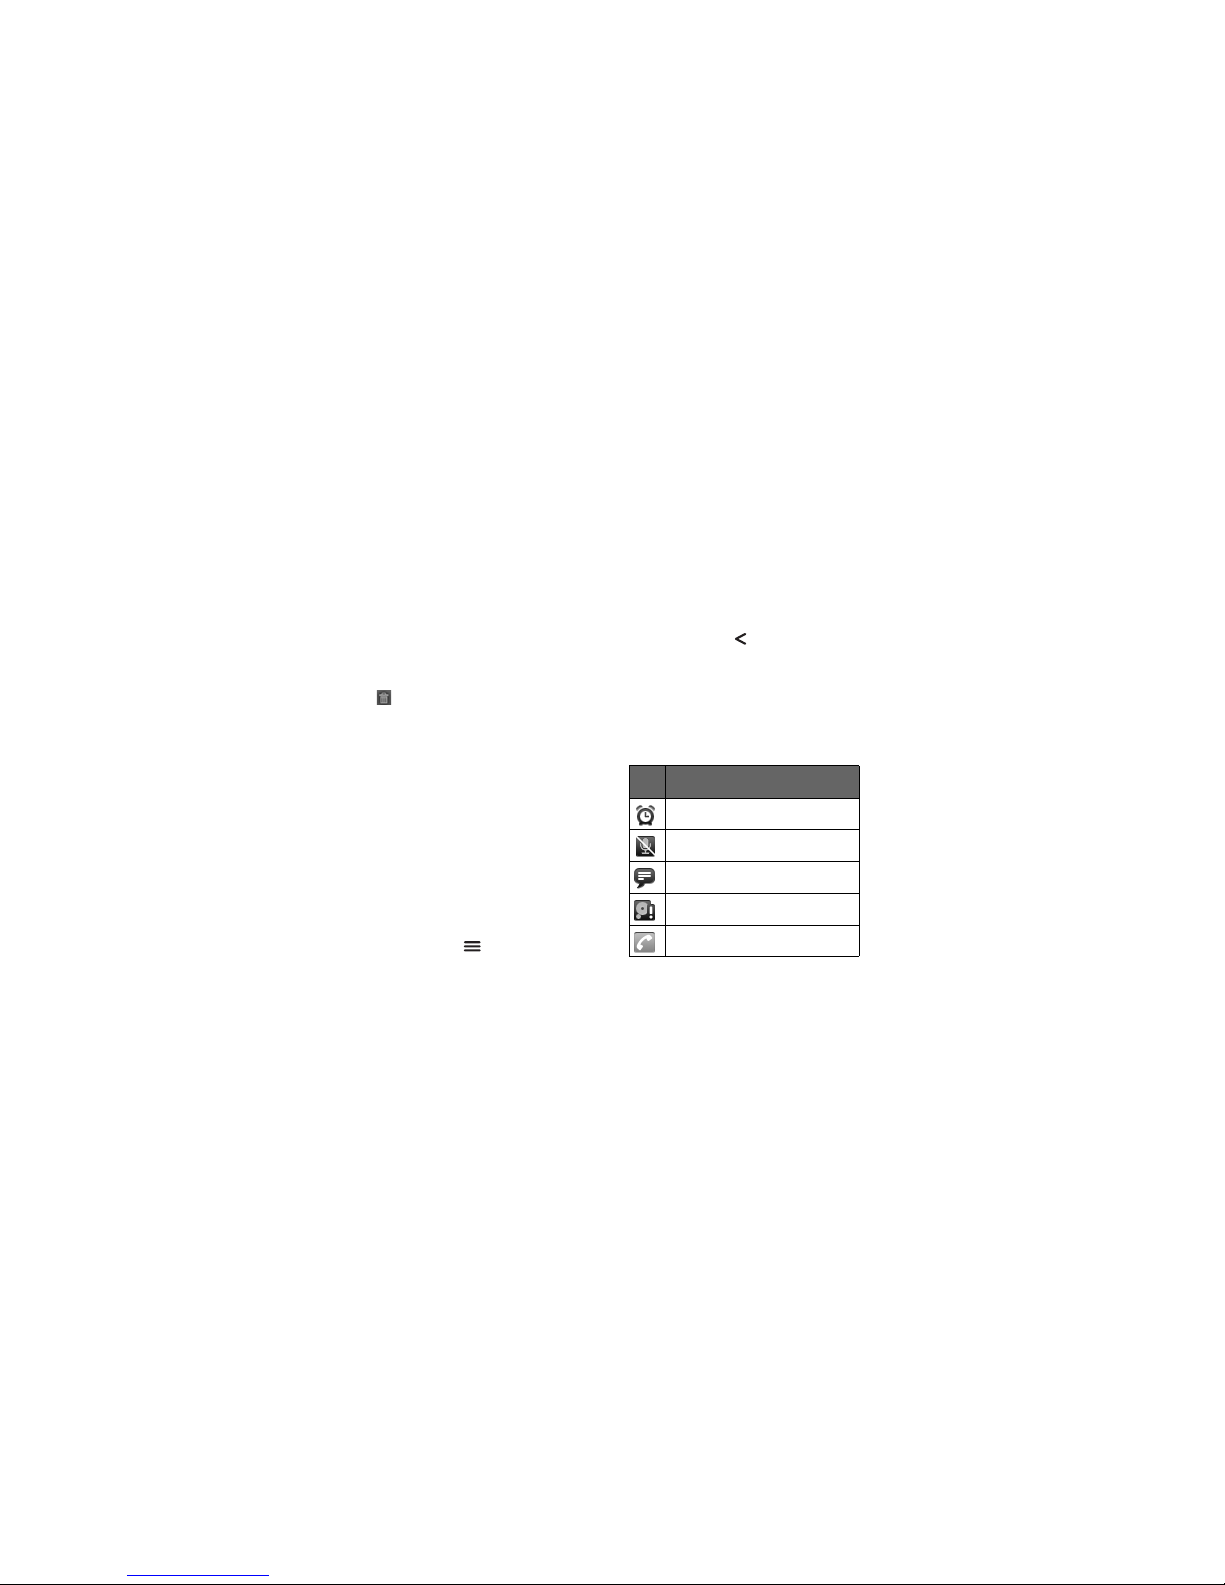
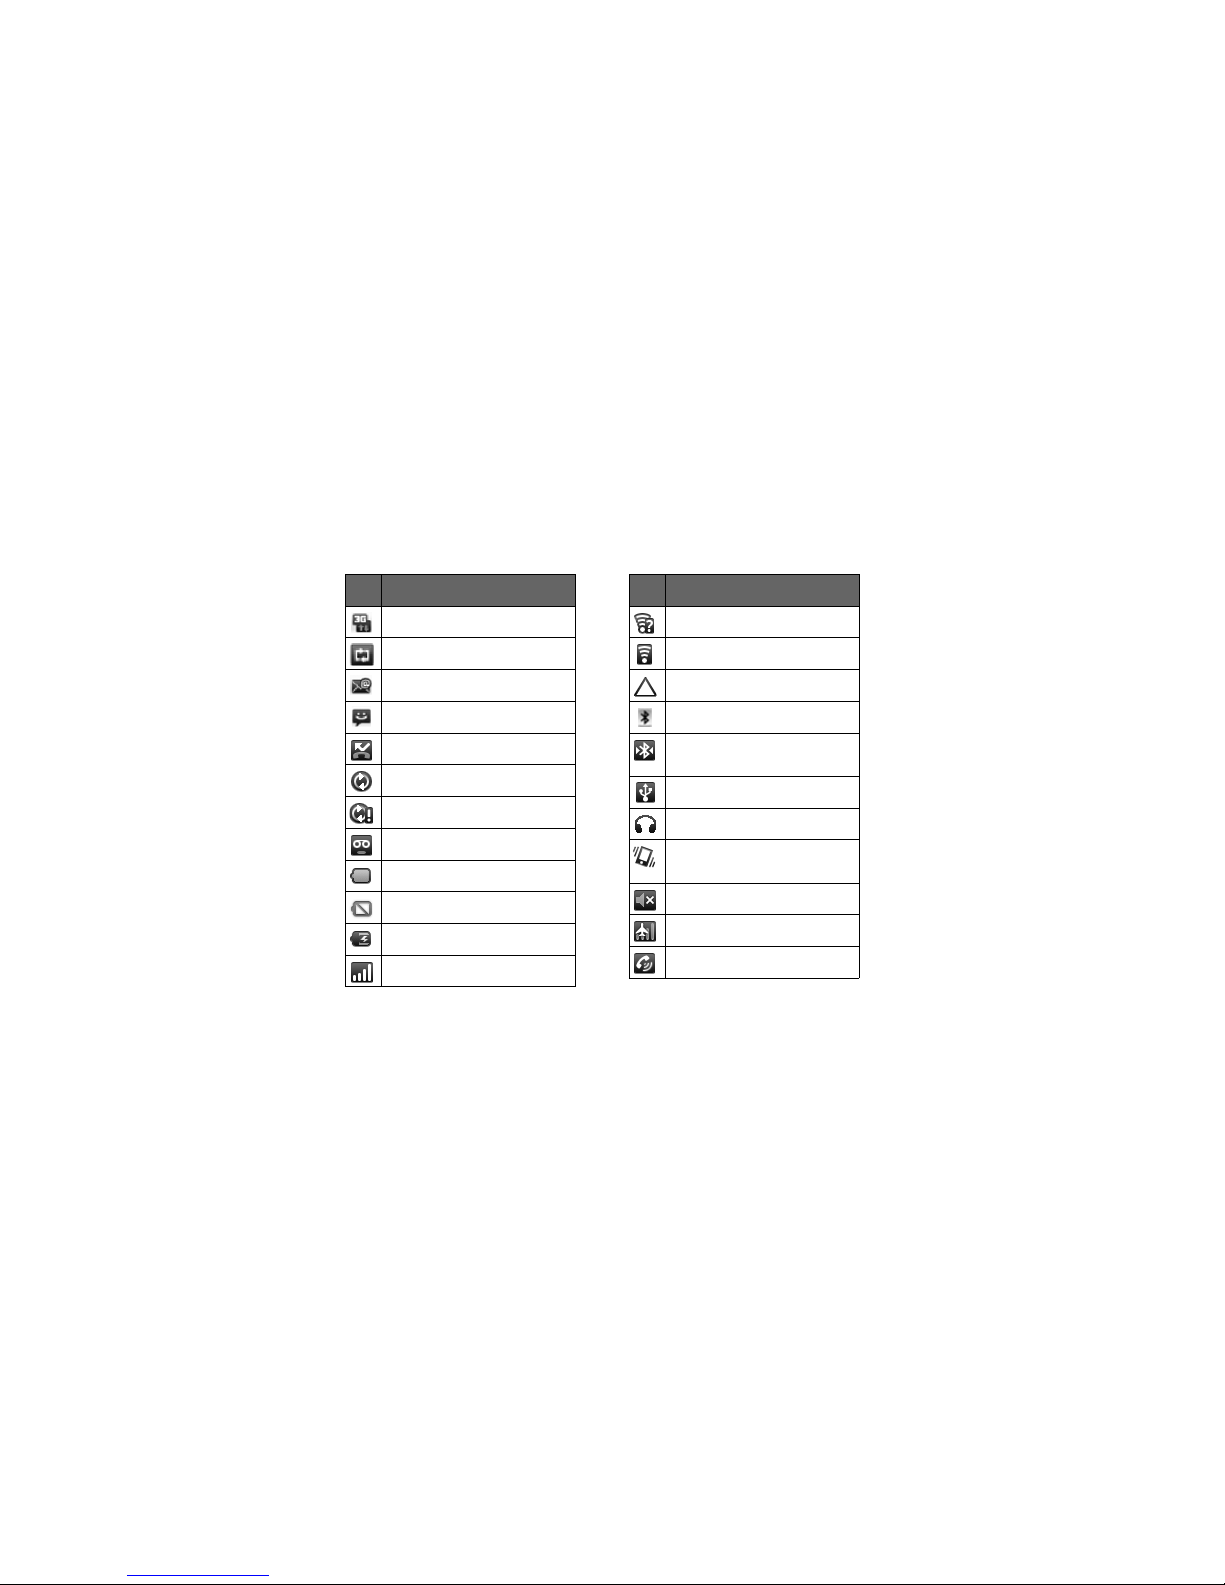
Status Bar Icons
The following icons may appear on
your device.
Icon Indication
Alarm is set.
Microphone is muted.
Chat is ongoing.
Memory is full.
Call in progress.
Page 14
Home Screen 14
3G is connected.
Android Manager available.
New email notification.
New message notification.
Missed call notification.
Synchronization is active.
Synchronization error.
Voicemail notification.
Battery is full.
Battery is empty.
Battery is charging.
Network signal level.
Icon Indication
Wi-Fi in range.
Wi-Fi signal level indicator.
Roaming in home network.
Bluetooth is enabled.
Bluetooth connection is
active.
USB is connected.
Headset is connected.
Silent mode and vibrate
mode are active.
Silent mode is active.
Airplane mode is active.
Speakerphone is enabled.
Icon Indication
Page 15
15 Home Screen
Shortcuts
You can add more application
shortcuts to the home screen.
1. Touch the Launcher icon .
2. Touch and hold an application
icon until the device vibrates.
Or, do the following to add shortcuts:
Access it:
Menu > Add >
Shortcuts > an application.
Widgets
You can add a widget, such as a
music or news and weather widget.
To open a widget, touch it.
To add widgets, touch Menu >
Add > Widgets.
Note: The add option may not be
available if your home screen is full.
Delete widgets or shortcuts to make
room.
Applications
Applications Menu
The application menu contains all the
applications that came with your
device and the ones that you
download and install.
To open the application menu, touch
the Launcher icon .
Applications
To open an application, touch an icon.
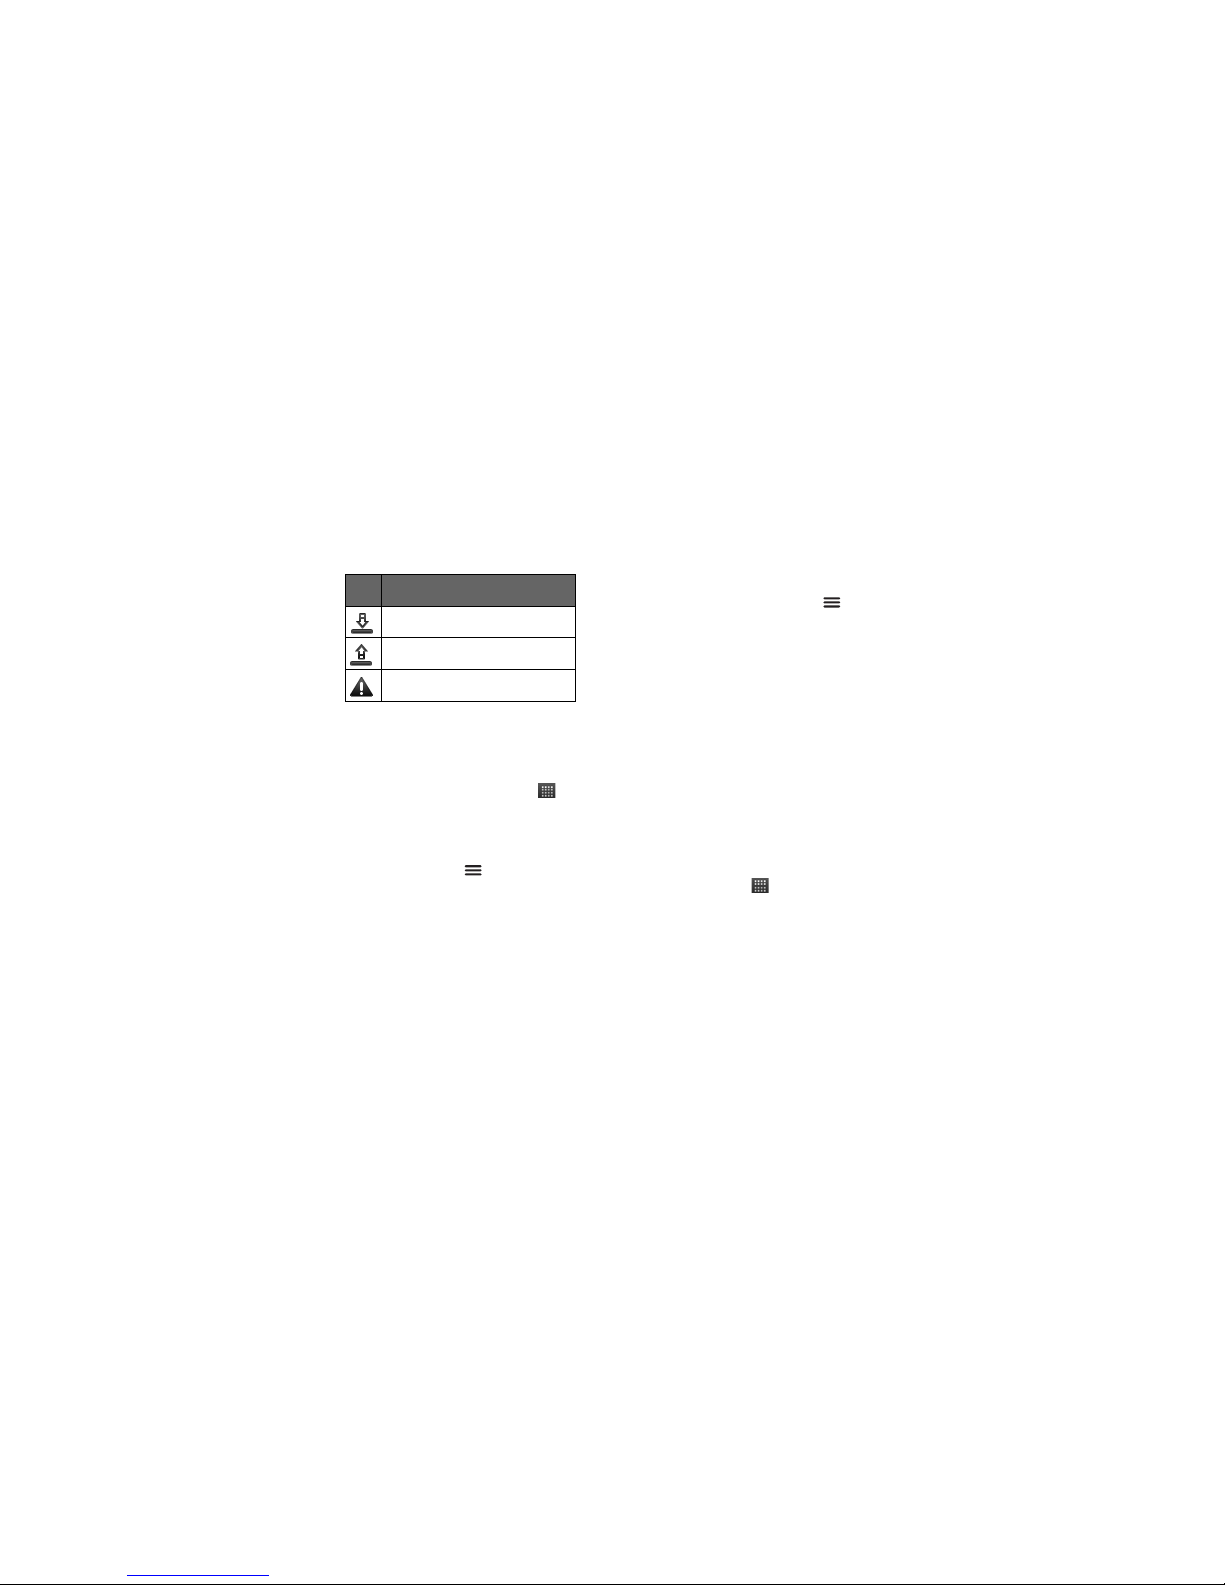
Download in progress.
Upload in progress.
Error notification.
Icon Indication
Page 16

Home Screen 16
Multiple Applications
Your device allows you to open
multiple applications at the same
time. When an application is already
open, do the following to open
another application:
1. Touch Home .
2. Touch the Launcher icon .
3. Touch an application to open.
Switch applications
When multiple applications are
opened, do the following to switch
applications:
1. Touch and hold Home to view
the Recent applications screen.
2. Touch an icon to return to that
application.
Search
Use the Search function to search
information such as a contact or a
music file on your device or on the
Internet.
Text Search
1. Touch Search or touch the
search bar. The Search bar is
highlighted on screen.
2. Enter the information to search.
As you type, matching items
from your device are displayed on
screen.
3. To select a matched item, touch
the item. To search the Internet,
touch .
Voice Search
This function allows you to say the
information you want to search.
1. Touch Search to access the
Search function.
Page 17
17 Text Entry
2. Touch .
3. Say the information to search.
Text Entry
On-Screen Keyboard
Use the on-screen keyboard to enter
text, numbers and symbols.
To activate the keyboard, touch a text
field.
To close the keyboard, touch Back .
Change Input Method
1. Touch and hold a text field.
2. Touch Input method.
3. Touch either Penpower Input
Method, XT9 Text Input, and
Android Keyboard.
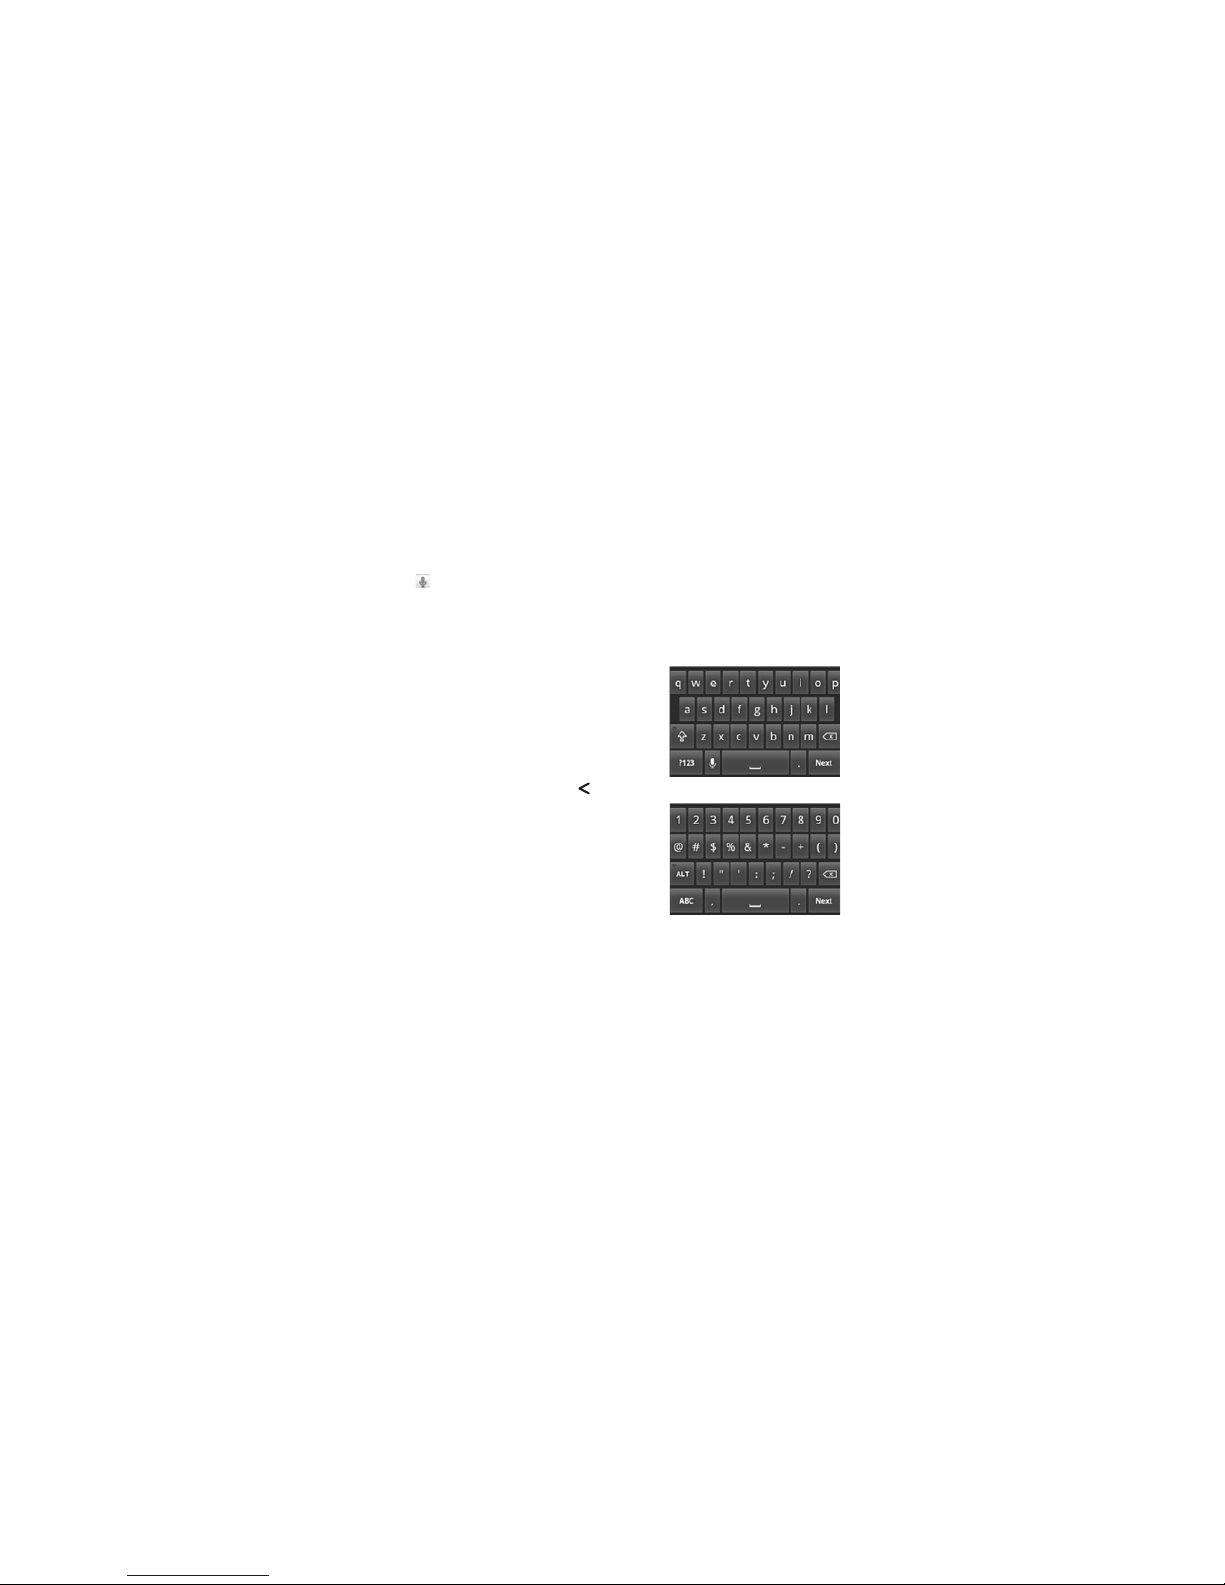
Android Keyboard
The Android Keyboard looks similar
to a standard keyboard.
• Touch the keys to enter text.
Alphabet Keyboard
Numeric and Symbols Keyboard
Page 18

Text Entry 18
• To toggle upper case, lower case,
and all caps text entry, touch ,
, or .
• To delete a character, touch .
• To delete an entire word, touch
and hold .
• To go to the next field, touch .
• To switch keyboard language,
touch the spacebar.
• To enter text by speaking the
word, touch .
• To insert a smiley, touch .
• To switch to numeric keyboard,
touch .
• To switch to symbols keyboard,
touch .
• To switch to alphabet keyboard,
touch .
Android Keyboard Settings
To access settings, touch and hold
or , then touch Android
keyboard settings.
• To vibrate when a key is pressed,
check Vibrate on keypress.
• To beep when a key is pressed,
check Sound on keypress.
• To automatically capitalize the
first word of a sentence, check
Auto-capitalization.
• To display voice icon on the
keyboard, touch Voice input.
• To select that languages to
switch when the spacebar is
touched, touch Input languages,
then check desired languages.
• To display suggested words as
you type, check Show
suggestions.
• To automatically insert a
highlighted word when a space or
Page 19
19 Text Entry
punctuation is added, check
Auto-complete.
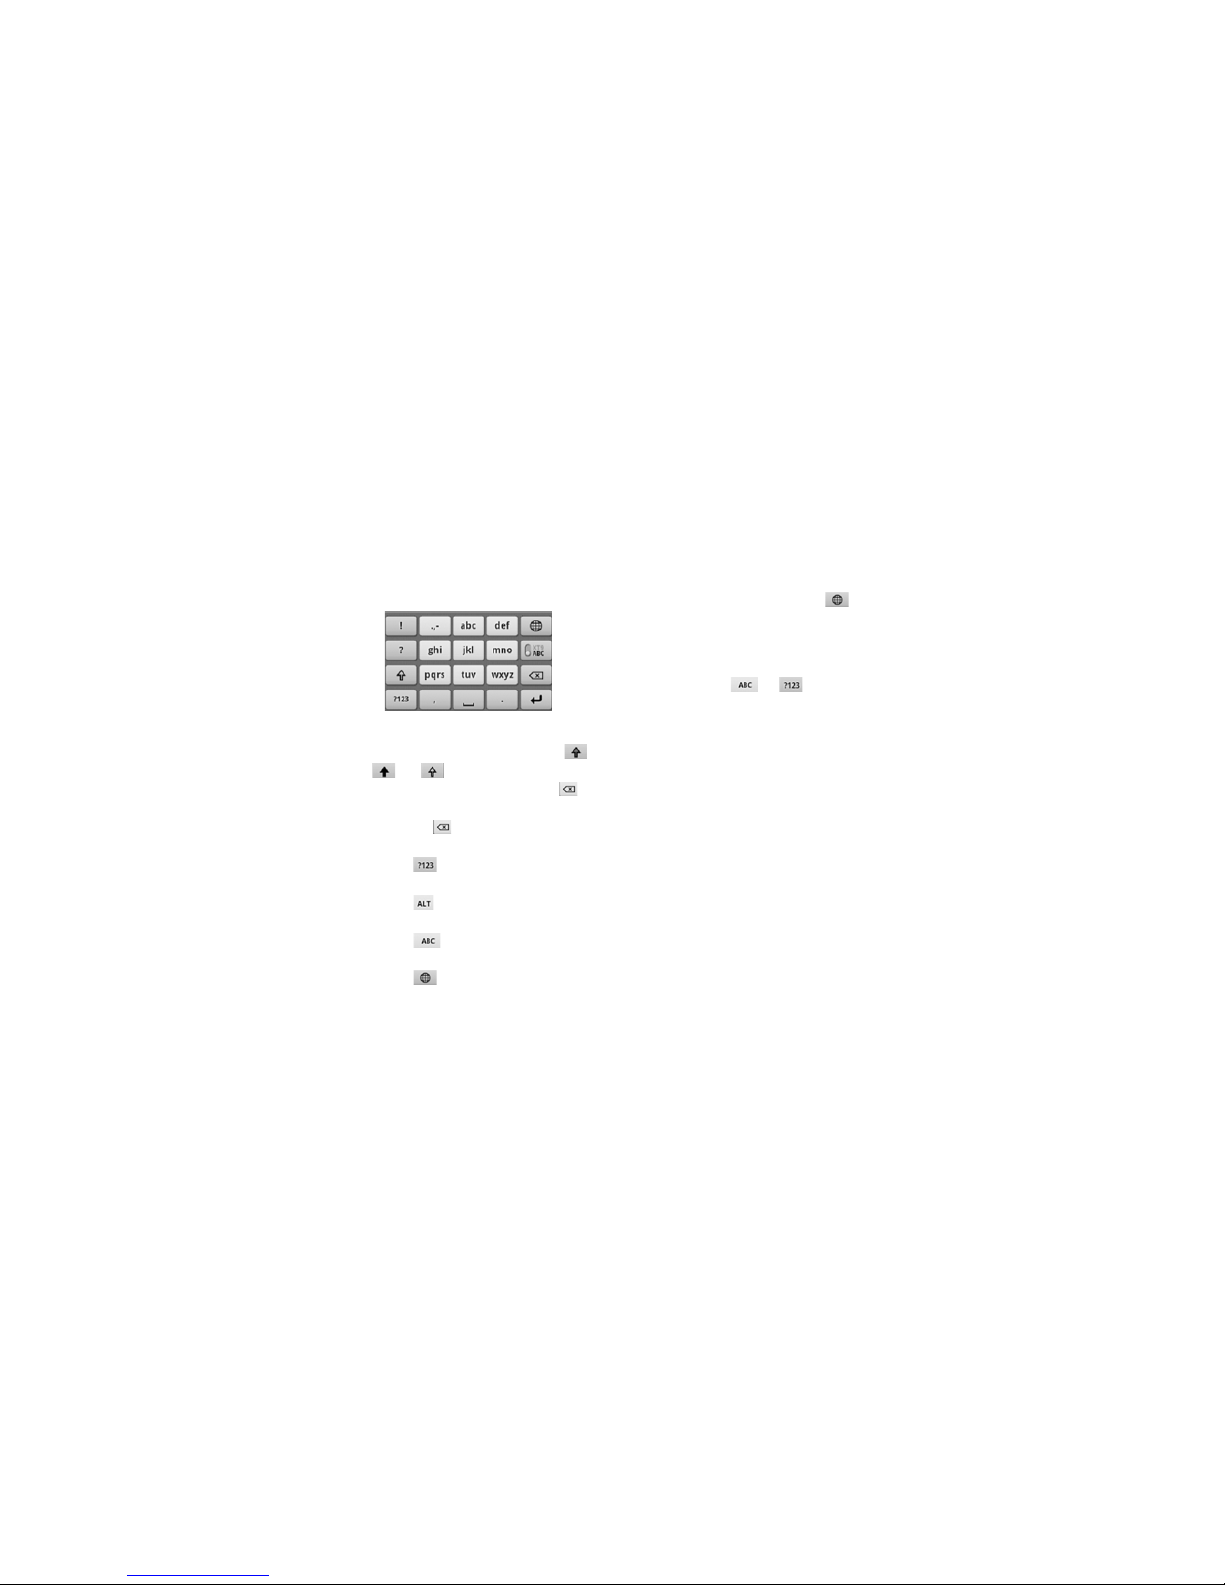
XT9 Keyboard
The XT9 keyboard has three keyboard
layout: Standard keyboard,
Reduced keyboard, and Phone
keypad.
Touch and hold or , then
touch XT9 Text Input settings >
Keyboard layouts, then select
desired keyboard layout.
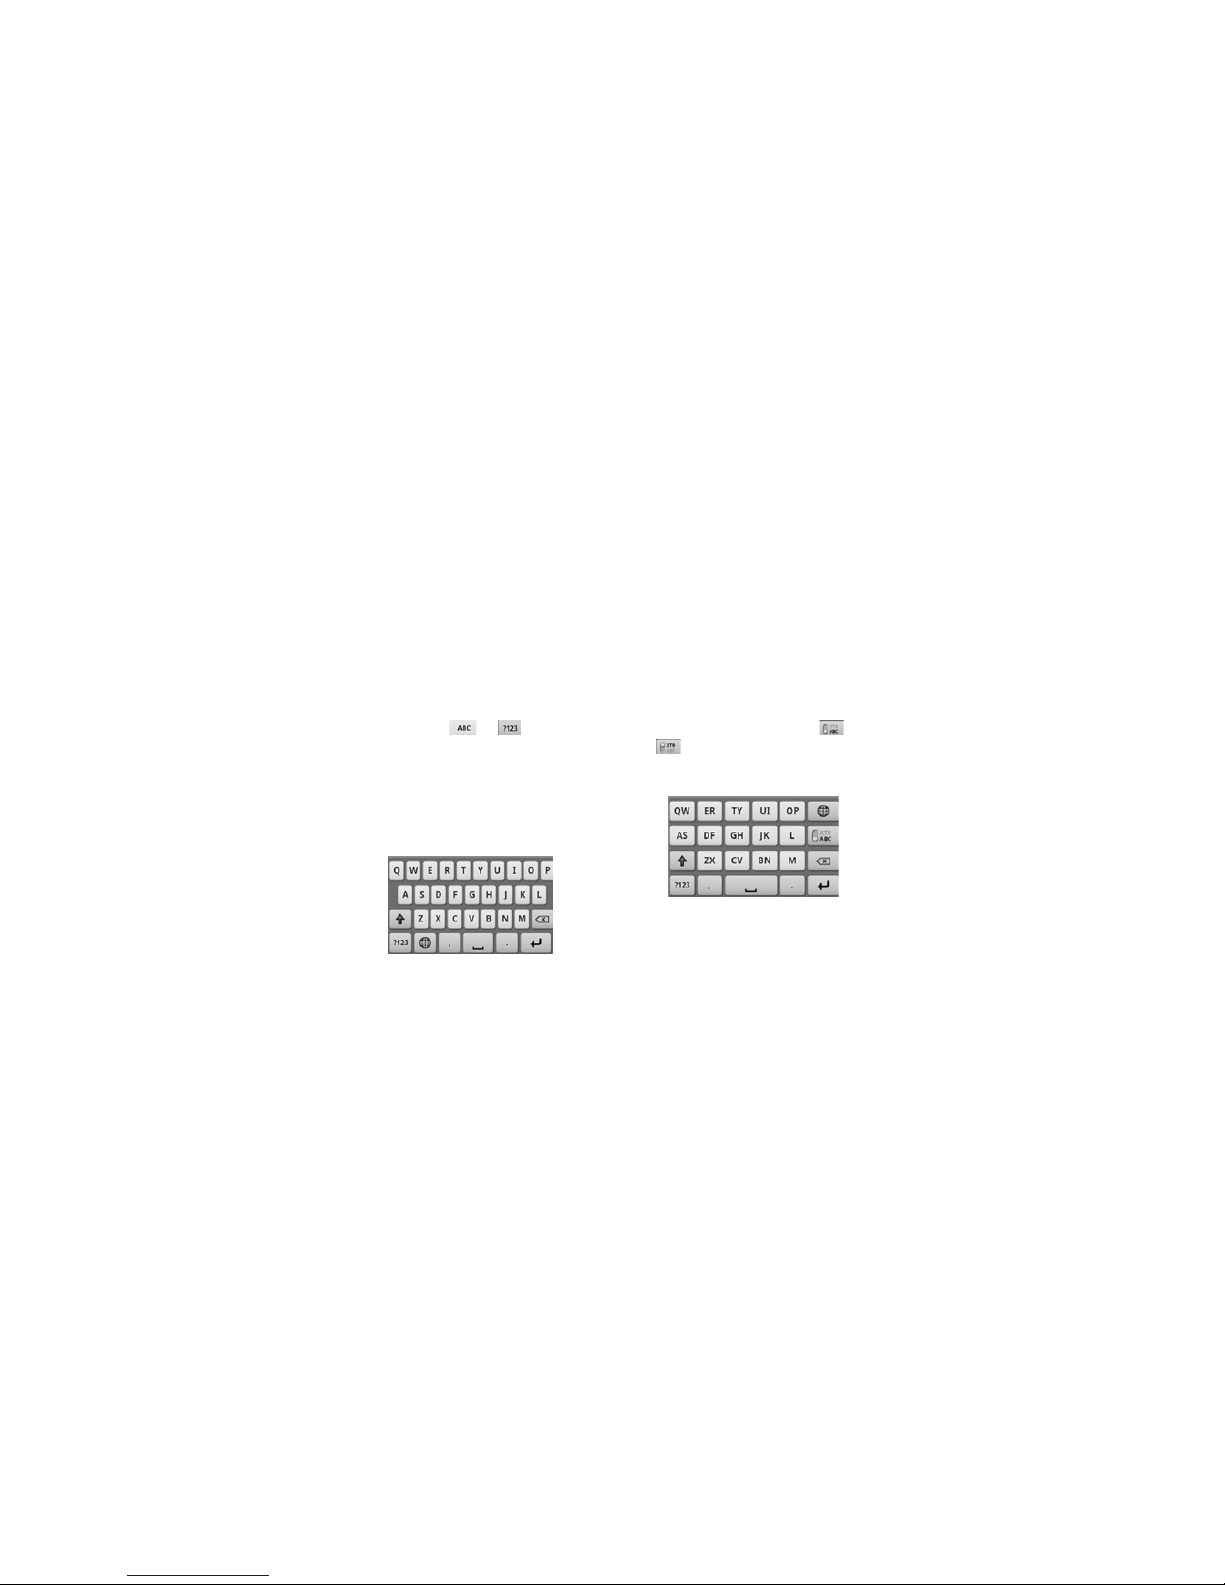
Standard Keyboard
Touch the keys to enter text just like a
standard keyboard.
Reduced Keyboard and Phone Keypad
Reduced keyboard and Phone keypad
has two modes: XT9 and ABC.
XT9 mode allows you to enter text by
tapping a key once for each letter.
ABC mode allows you to enter text
by tapping a key several times until
the desired letter is shown.
• To switch modes, touch or
.
Reduced Keyboard
Page 20
Text Entry 20
• To toggle upper case, lower case,
and all caps text entry, touch ,
, or .
• To delete a character, touch .
• To delete an entire word, touch
and hold .
• To switch to numeric keyboard,
touch .
• To switch to symbols keyboard,
touch .
• To switch to alphabet keyboard,
touch .
• To switch keyboard language,
touch .
• To change the keyboard
language, touch and hold
then select the language.
XT9 Keyboard Settings
To access XT9 keyboard settings,
touch and hold or , then
touch XT9 Text Input settings.
• To select the text input
languages, touch Languages.
• To change keyboard layout, touch
Keyboard layouts, then select
desired keyboard layout.
• To change text input preferences
like vibrate on keypress, autocomplete, and others, touch
Preferences.
Penpower Input Method
This input method allows you to write
text on the screen using your finger.
Phone Keypad
Page 21

21 Text Entry
• To enter letters, write the letter
on the Abc area.
• To enter numbers or symbols,
write the number in the 12# area.
• To hide the Penpower input
method screen, touch .
• To add space, touch .
• To toggle Android keyboard and
Penpower Input, touch .
• To toggle numeric and symbols
keyboard and Penpower Input,
touch .
• To delete an entry, touch .
• To go to the next line (email),
touch .
Penpower Input Method Settings
To access penpower input method
settings, touch and hold , then
touch Input Method Settings.
• To beep after a character is
written, check Sound on
keypress.
• To vibrate after a character is
written, check Vibrate on
keypress.
• To select the output character,
touch Output Character Set.
• To change the ink color, touch Ink
Color.
• To set the time for writing, touch
Timeout for Writing.
• To set the ink width, touch Ink
Width.
• To enable full shape characters,
check Full Shape.
• To enable infinity writing mode,
check Infinity Writing Mode.
• To enable full screen handwriting,
check Full Screen Handwriting.
Page 22

Text Entry 22
Edit Text
Select, Cut, or Copy
To select, cut, or copy an entire text
field entry, touch and hold the text
box to open the Edit text pop-up
menu, then touch either Select All,
Cut All, or Copy All.
To select the current word only or a
portion of text, do the following:
1. Touch the area to place the
cursor.
2. Touch and hold the text box to
open the pop-up menu.
3. Touch Select text.
4. Swipe your finger across the text
that you want to select.
5. Move the pins left or right to
highlight desired text.
6. Edit the text. To cut or copy the
highlighted text, touch and hold
the text to open the pop-up
menu, then select either Cut or
Copy.
Paste Text
1. Open the application where you
want to paste the text.
2. Touch and hold a text field to
open the pop-up menu.
3. To uc h Paste.
Page 23
23 Calls
Calls
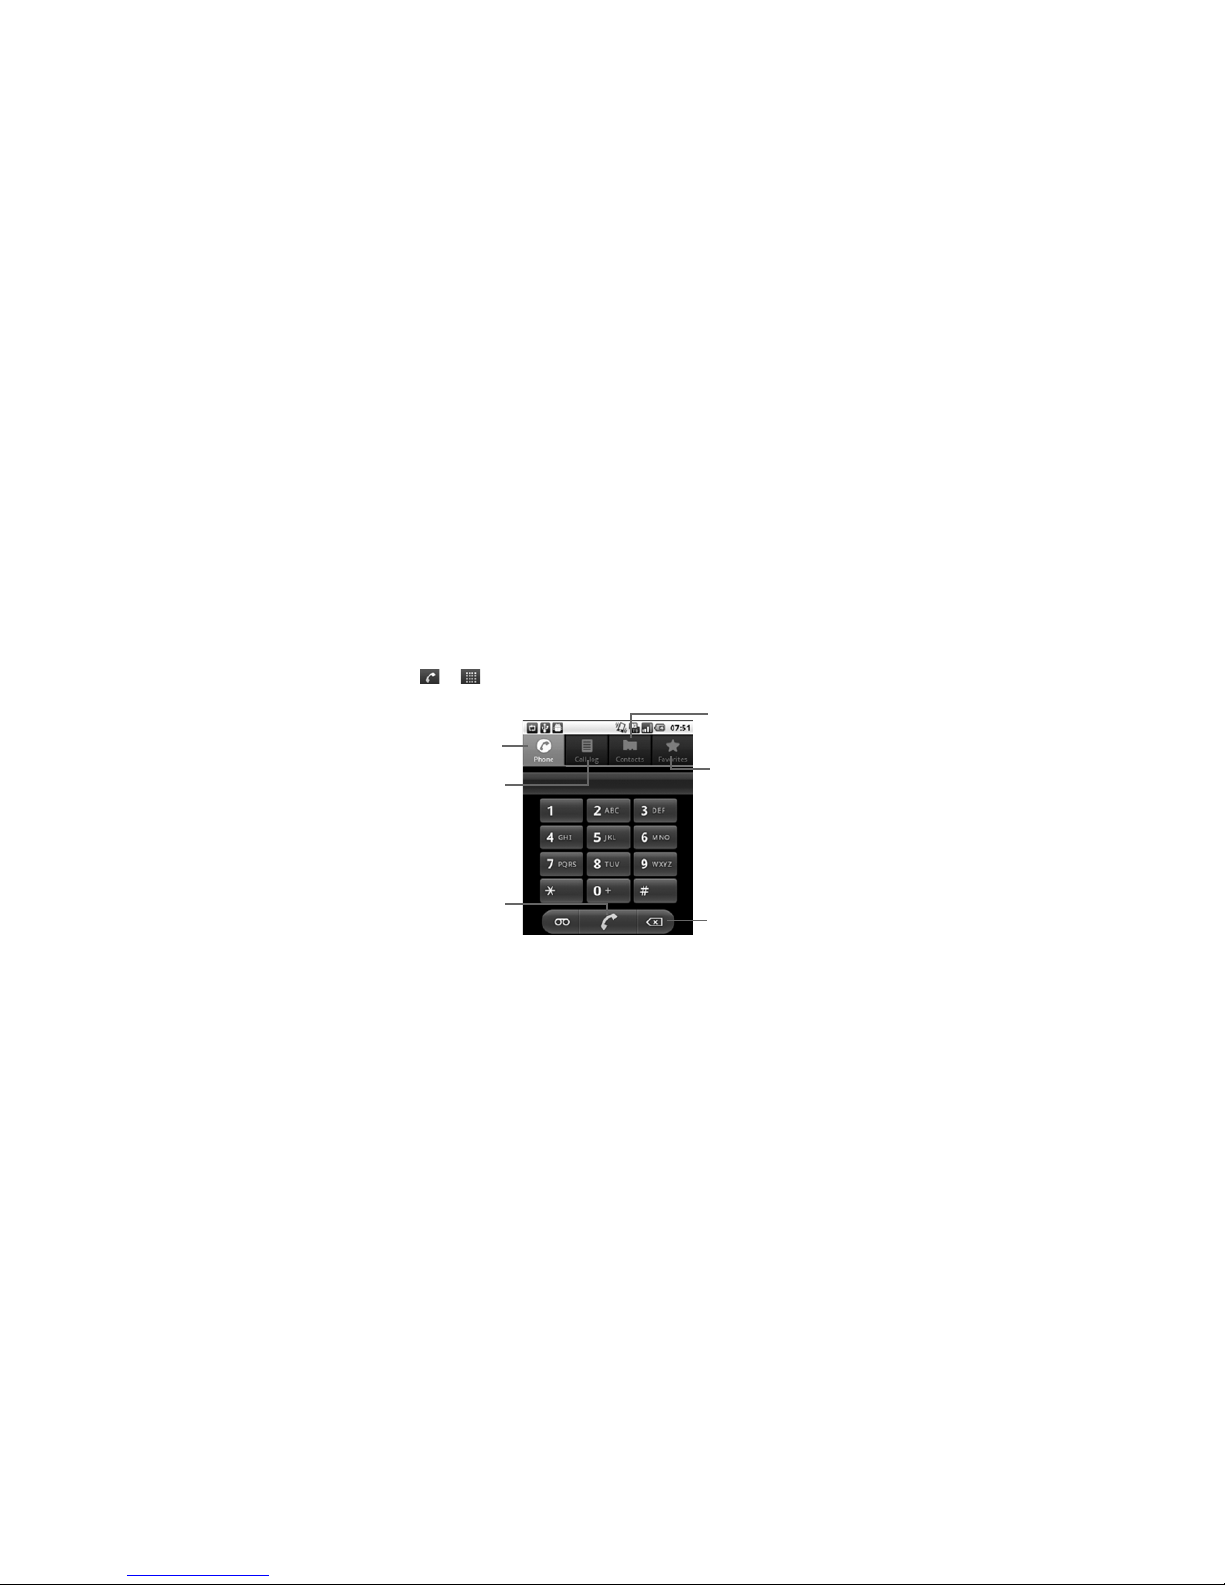
Phone
Use Phone to make calls.
Access it:
or > Phone
Phone
Touch to display the dialpad.
Call
Enter a phone number then
touch this to dial the number.
Call Log
Touch to open Call log. See
“Recent Calls” on page 25.
Contacts
Touch to open Contacts. See
“Call Contacts” on page 25.
Backspace key
Favorites
Touch to open Favorites. See
“Call Favorite Contacts” on
page 25.
Page 24
Calls 24
Make and Answer Calls
Make a Call
1. Enter a phone number.
2. Touch .
Answer a Call
To answer a call, drag to the right.
Reject a Call
To reject a call, drag to the left.
End a Call
To end a call, touch Menu > End
call.
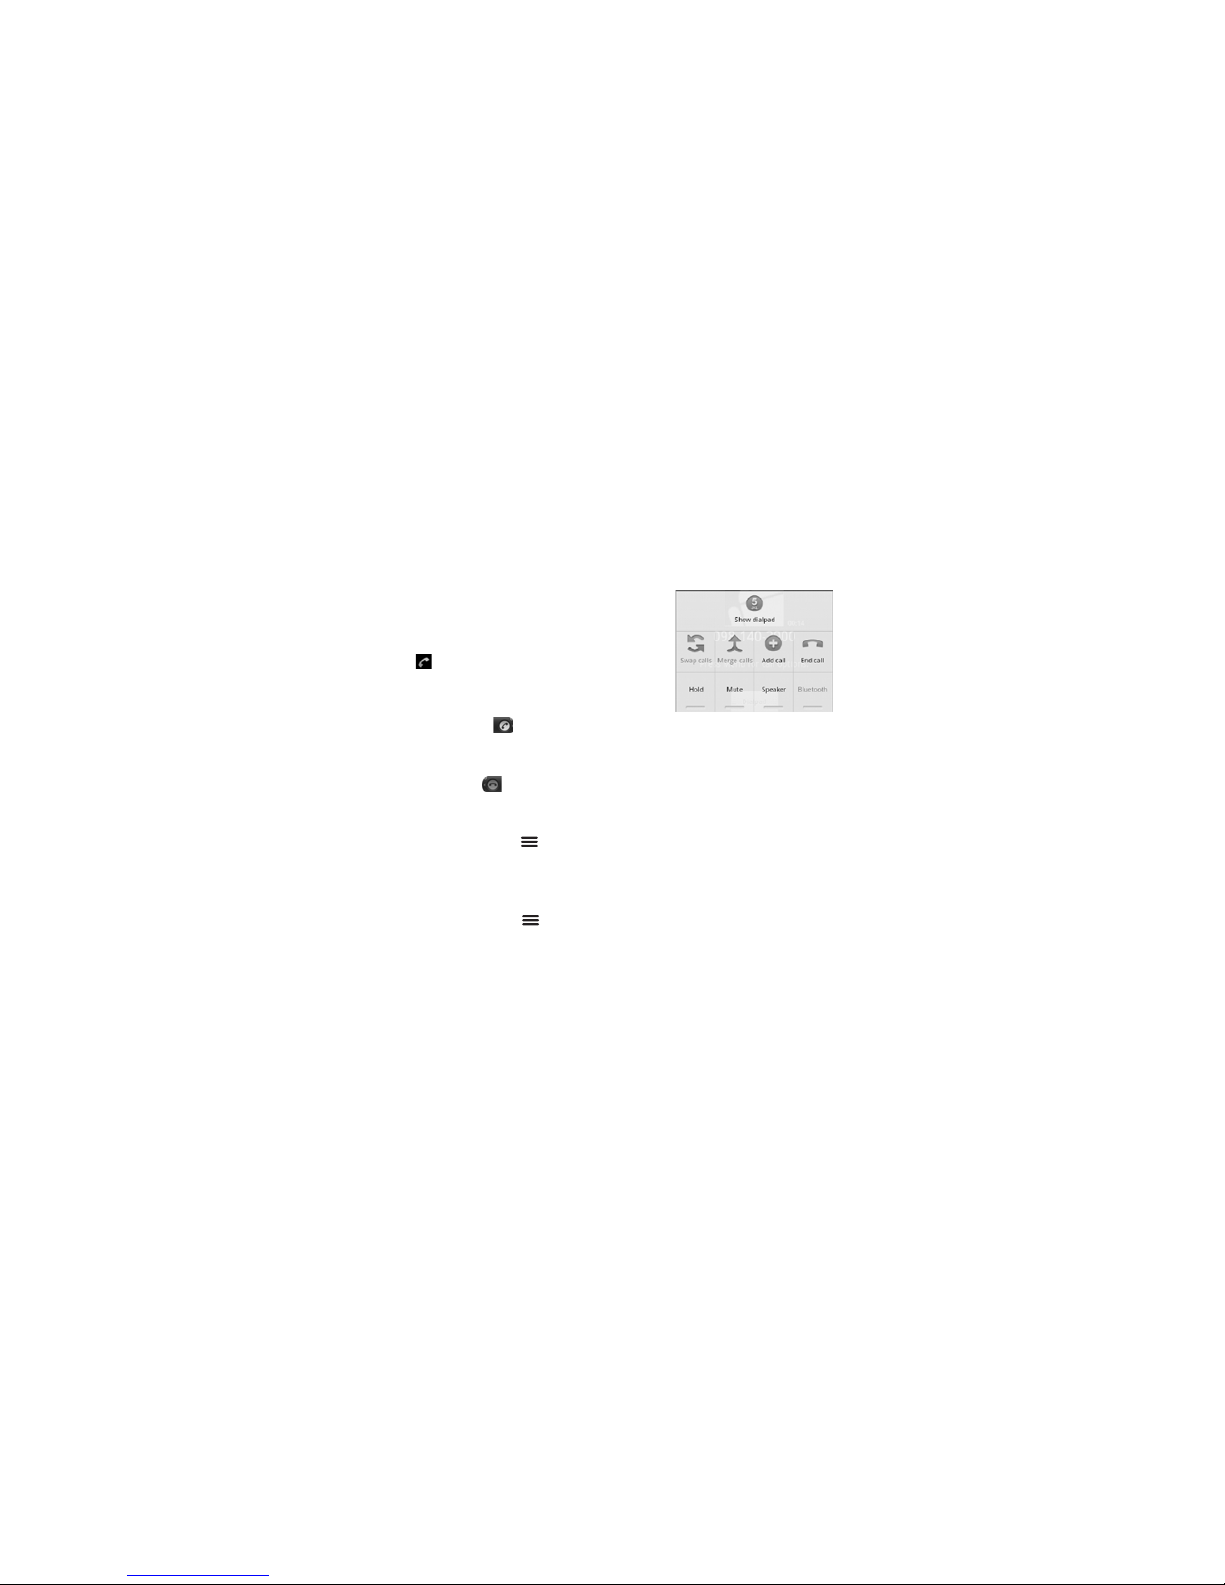
In-Call Options
During a call, touch Menu to
access the call menu.
• To enter numbers during a call,
touch Show dialpad. When the
call menu is hidden, drag the
Dialpad tab upwards.
• To place a call on hold, touch
Hold.
• To mute the call, touch Mute.
• To use the speakerphone, touch
Speaker.
• To use a Bluetooth device, touch
Bluetooth.
Note: The Bluetooth device must be
paired and connected first to
enable this feature.
Page 25

25 Calls
Recent Calls
Access it:
> Phone > Call log
• To call an entry, touch the
corresponding icon.
• To send a message, add to
contacts, and view call details,
touch the entry.
• To remove from call log and other
options, touch and hold an entry,
then touch an option.
• To clear the call log, touch Menu
> Clear call log.
Call Contacts
Access it:
> Phone > Contacts.
Touch and hold a contact, then touch
Call contact.
Note: If a contact has more than one
number, a pop-up window
appears, touch the number to
call.
Call Favorite Contacts
Access it:
> Phone > Favorites
Touch the corresponding icon to
call the favorite contact.
Note: If a contact has more than one
number, a pop-up window
appears, touch the number to
call.
Page 26
Contacts 26
Contacts
Access it:
> Contacts
• To scroll through the list, slide
your finger up or down the screen
or drag the scroll bar.
• To search for a contact, touch
Search , then type the name.
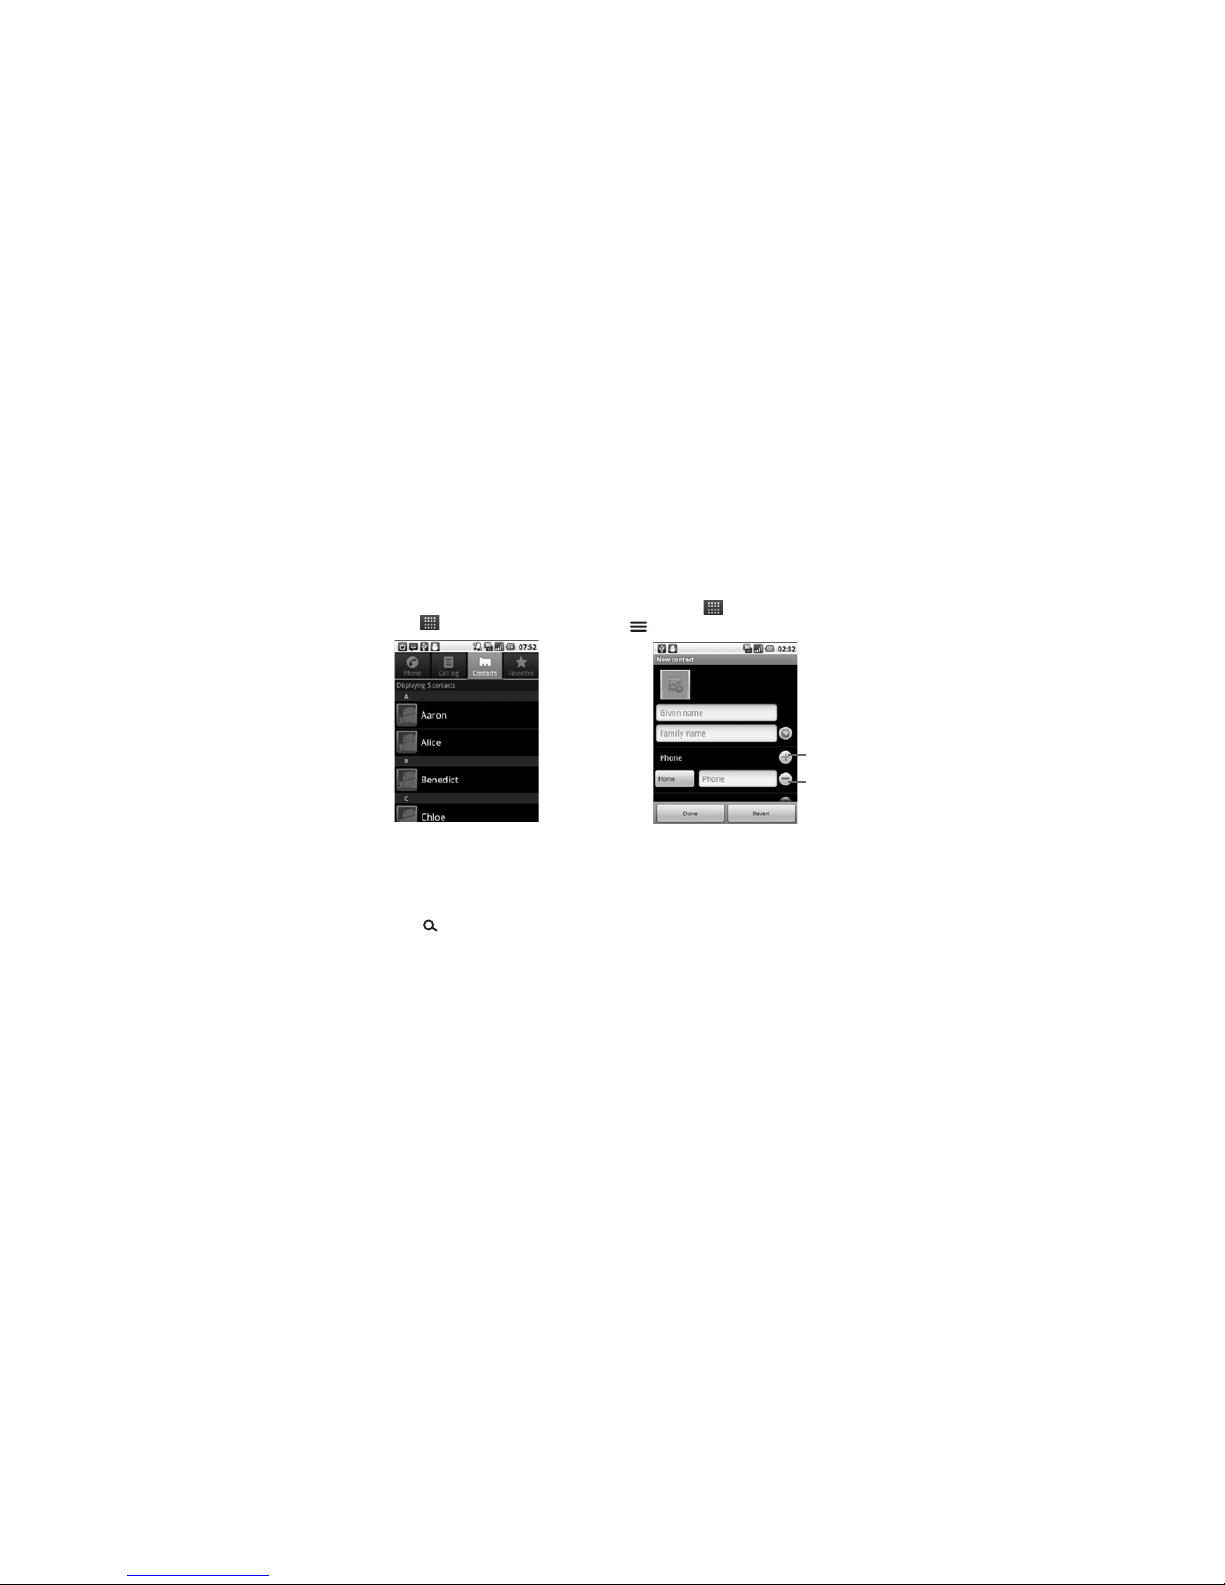
Create Contacts
Access it:
> Contacts >Menu
> New contact
• Enter contact information.
• To add a field for entry, touch Add
field button. To remove a field,
touch Remove field button.
• To change the field label, touch
the Field label button.
Add field
button
Remove
field button
Page 27
27 Contacts
• Scroll up and down to view more
contact details.
• To save the contact, touch Done.
Edit Contacts
Access it:
> Contacts
Touch and hold a contact, then touch
Edit contact.
Delete Contacts
Access it:
> Contacts
Touch and hold a contact, then touch
Delete contact.
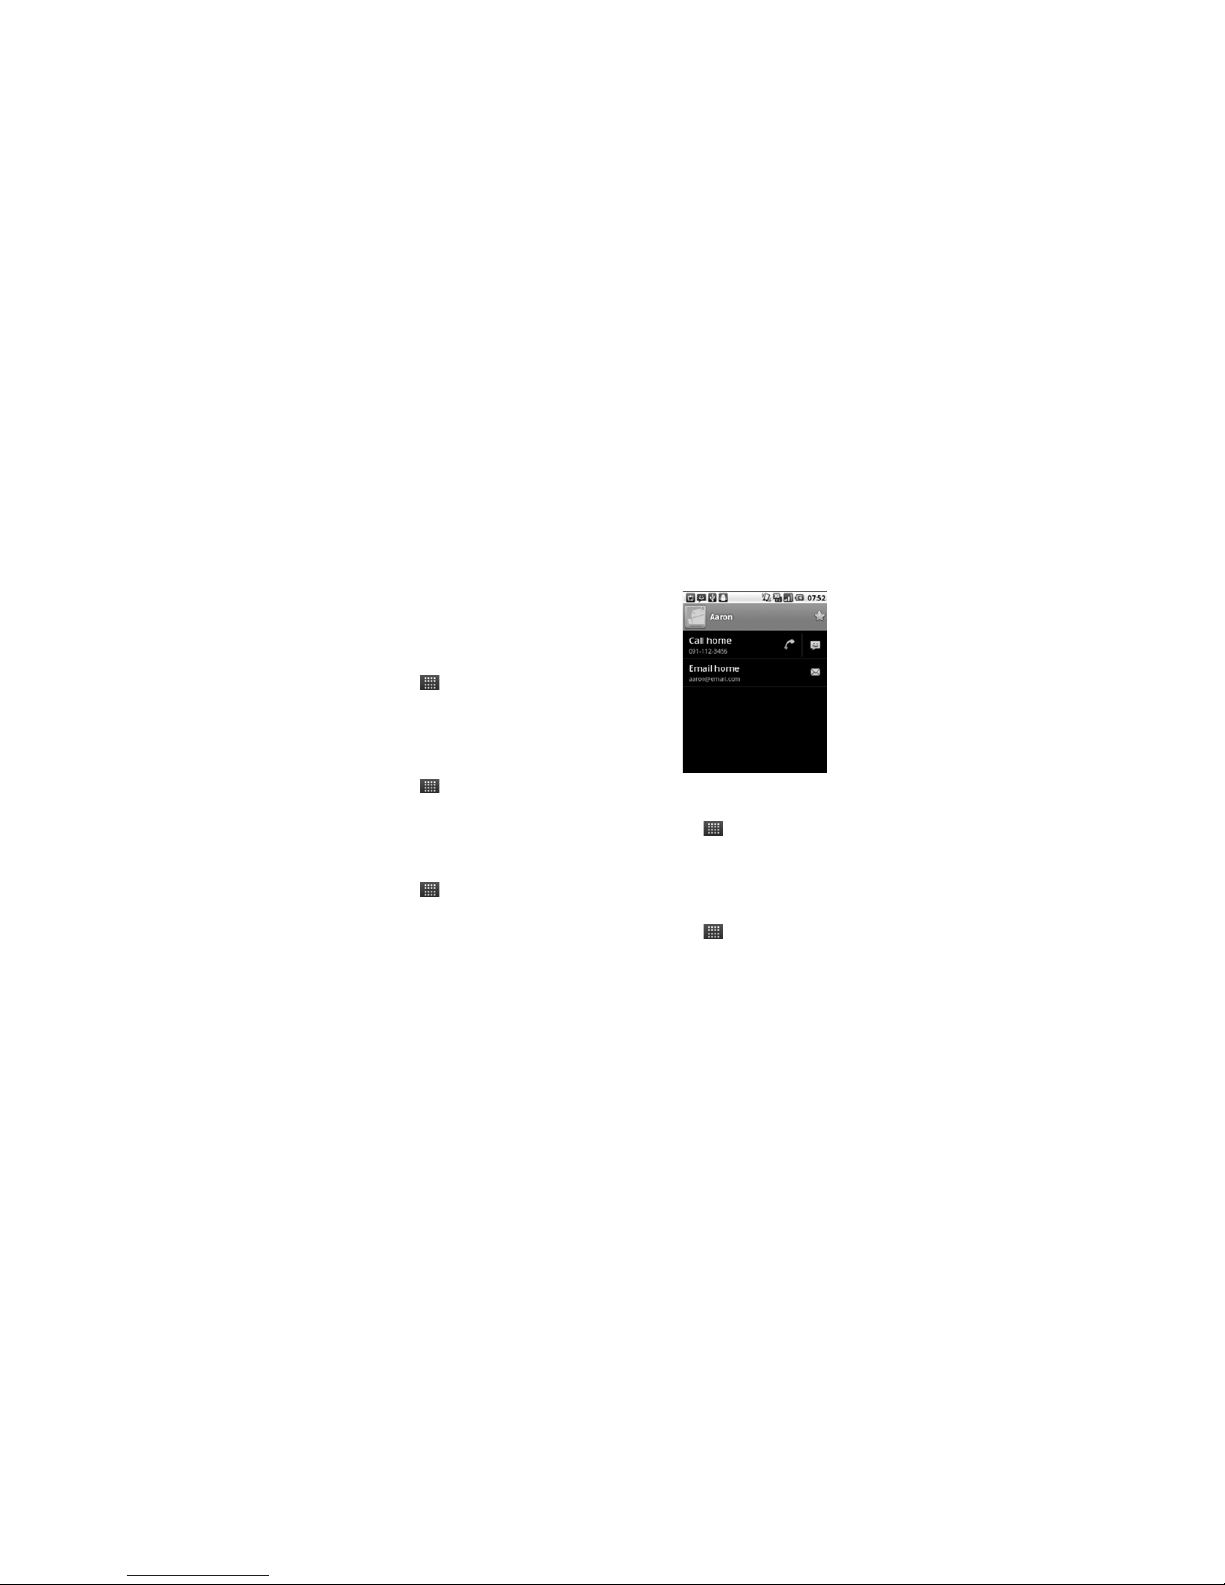
View Contact
Access it:
> Contacts
Touch a contact to view.
Call Contacts
Access it:
> Contacts
Touch and hold a contact, then touch
Call contact.
Text Contacts
Access it:
> Contacts
Touch and hold a contact, then touch
Text contact.
Page 28

Contacts 28
Email Contacts
Access it:
> Contacts
1. Touch a contact.
2. Touch .
3. Select an email account.
4. Complete your email then send.
See “Email” on page 36 for more
information.
Add Contact to Favorites
Access it:
> Contacts
1. Touch a contact.
2. Touch to add contact to
favorites.
Remove Contact From Favorites
Access it:
> Contacts
Touch and hold a favorite contact,
touch Remove from favorites.
Assign Contact Ringtone
Access it:
> Contacts
1. Touch a contact.
2. Touch Menu > Options >
Ringtone.
3. Touch a ringtone.
4. To uc h OK.
Divert Call to Voicemail
Your device allows you to divert all
incoming calls from a contact to your
voicemail.
Access it:
> Contacts
1. Touch a contact.
2. Touch Menu > Options >
Incoming calls.
Page 29

29 Contacts
Send Contact Information
Your device allows you to send
contact information via Bluetooth or
email.
Access it:
> Contacts
1. Touch a contact.
2. Touch Menu > Share.
3. Touch a sharing application to
send contact detail.
Merge Contact Information
Access it:
> Contacts
1. Touch and hold a contact.
2. Touch Edit contact.
3. Touch Menu > Join.
4. Touch a contact to join.
Import or Export Contacts
You can copy contacts from your
phone to your memory card, and vice
versa, and send your Contacts via
Bluetooth or email.
Access it:
> Contacts > Menu
> Import/Export
To copy contacts saved in the
memory card to your phone, touch
Import from SD card.
To copy contacts saved in your to the
memory card phone, touch Export to
SD card.
To send your Contacts via Bluetooth
or email, touch Share visible
contacts.
Sync Contacts
You can sync contacts from other
applications such as Exchange
Server, Facebook, Twitter, Roadsync,
and Google with your phone.
Access it:
> Contacts > Menu
> Accounts
Page 30

Contacts 30
To enable the function, click the
following boxes:
• Background data: Allows
applications to sync, send, and
receive data at any time.
• Auto-sync: Allows applications to
sync data automatically.
Add Account to Sync
1. Touch Add account.
2. Touch an application to sync your
contacts with.
3. Follow the on-screen instructions
to complete sync.
Display Options
Customize how you want your
Contacts to be displayed.
Access it:
> Contacts > Menu
> Display options
• To display only contacts with
phone numbers, touch Only
contacts with phones.
• To change sorting list, touch Sort
list by.
• To change how you want to view
contact names, touch View
contact names as.
Page 31
31 Messaging
Messaging
Your device can send and receive text
and multimedia messages.
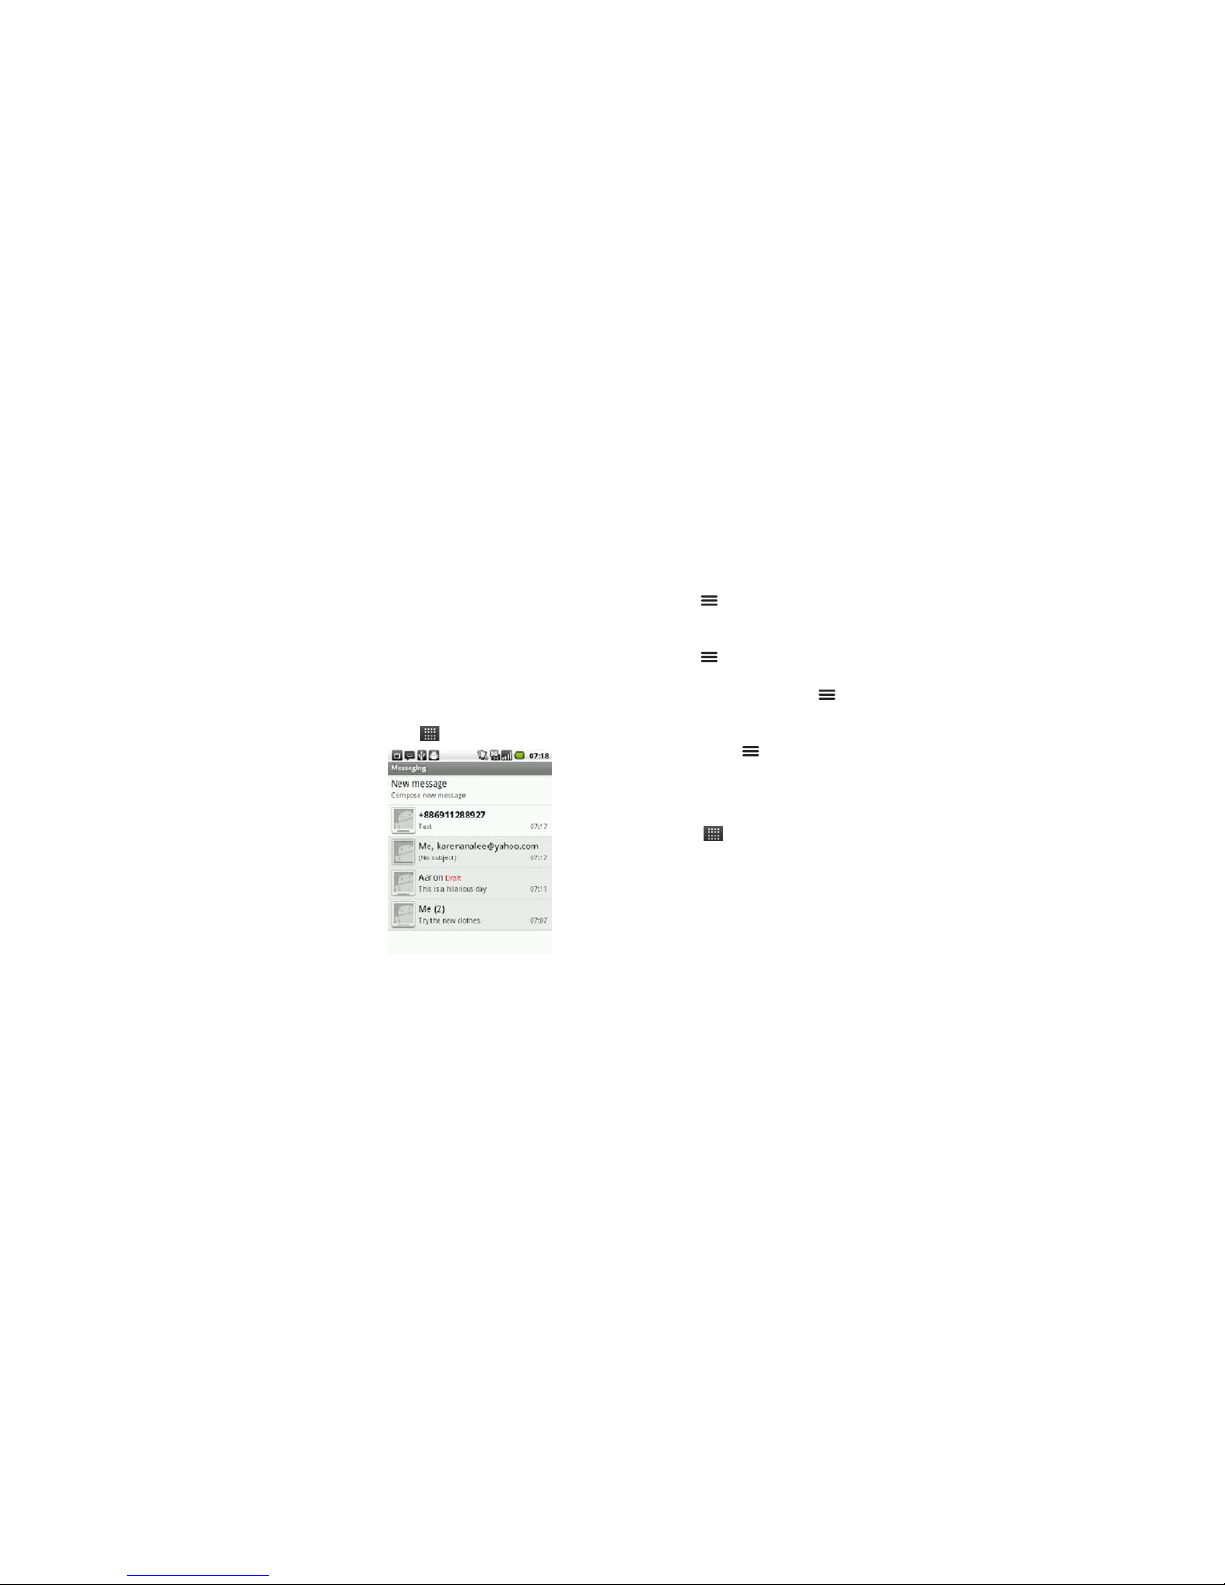
The Messaging screen groups and
displays messages exchanged
between you and another person
together as a message thread.
Access it:
> Messaging
• To create a new message, touch
Menu > Compose. See
“Create New Messages” below.
• To delete all messages, touch
Menu > Delete threads.
• To search a word from in your
messages, touch Menu >
Search.
• To change message settings,
touch Menu > Settings. See
“Message Settings” on page 35.
Create New Messages
Access it:
> Messaging
1. To uc h New message.
2. Enter the recipient on the To
field.
TIP: As you enter the recipient,
matching contacts are displayed.
Touch a contact to select it.
Page 32

Messaging 32
3. Enter your message. See “Text
Entry” on page 17 on using the
keyboard.
4. Touch Send to send your
message.
Add Subject and Smileys
To add a message subject, touch
Menu > Add subject. Your
message is automatically converted
to a multimedia message.
To insert smileys, touch Menu >
Insert smiley, then touch a smiley.
Attach Files
You can attach media files from your
device or the memory card or record
picture, video, or audio to attach to
your message. When files are
attached, the message is
automatically converted to a
multimedia message.
1. Touch Menu > Attach.
2. Touch an option:
• Pictures: Attach a picture file.
• Capture picture: Take a photo
to attach.
• Videos: Attach a video file.
• Capture video: Record video
to attach.
• Audio: Attach an audio file.
• Record audio: Record audio to
attach.
• Slideshow: Attach a slide.
3. Complete your message.
4. To uc h Send MMS.
Cancel Messages
To discard message, touch Menu >
Discard
.
Save as Draft
To send the message at a latter time,
touch Menu > All thread. This
Page 33

33 Messaging
action takes you back to the
Messaging screen and saves your
current message as draft.
Read and Reply to Messages
Access it:
> Messaging
1. Touch the message to open.
2. On the Type to compose field,
enter your message.
3. Touch Send.
Forward Messages
Access it:
> Messaging
1. Touch the message to open.
2. Touch and hold a message.
3. Touch Forward.
4. Enter the recipient and complete
your message.
5. Touch Menu > Send.
Copy and Paste Message Text
Access it:
> Messaging
1. Touch the message to open.
2. Touch and hold a message.
3. To uc h Copy message text.
4. Touch and hold the text box
where you want to paste the
text, then touch Paste.
Delete Messages
Your messages can be deleted by:
• Individual message
• Message thread exchanged with
one contact
• All message threads
Delete an Individual Message
Access it:
> Messaging
1. Touch the message to open.
2. Touch and hold a message.
3. To uc h Delete message.
Page 34

Messaging 34
4. Touch Delete to confirm.
Delete a Message Thread
Access it:
> Messaging
1. Touch and hold a message
thread.
2. Touch Delete thread.
3. Touch Delete to delete the
message thread.
Delete All Message Threads
Access it:
> Messaging
1. Touch Menu > Delete
threads.
2. Touch Delete to delete all
messages.
Message Options
Access it:
> Messaging > a
message
• To call the sender, touch Menu
> Call.
• To reply with a message subject,
touch Menu > Add subject.
• To reply with file attachment,
touch Menu > Attach.
• To insert a smiley in your reply,
touch Menu > Insert smiley.
• To delete the message thread,
touch Menu > More >
Delete thread.
• To view the messaging screen,
Menu > More > All threads.
This action saves your current
message as draft and takes you
back to the Messaging screen.
• To save the sender information to
contacts, touch Menu >
More > Add to Contacts.
• To lock or unlock a message,
touch and hold the message,
Page 35

35 Messaging
then touch Lock message or
Unlock message.
• To view the message details,
touch and hold a message, then
touch View message details.
Note: Depending on the type of
message, some options may not be
available.
Message Settings
Access it:
> Messaging >
Menu > Settings.
• To automatically delete old
messages when the limit is
reached, check Delete old
messages.
• To set the limit of a text message,
touch Text message limit.
• To set the limit of a multimedia
message, touch Multimedia
message limit.
• To display the messages stored
on your SIM card, touch Manage
SIM card messages.
• To request a delivery report for
each text or multimedia message
you send, check the
corresponding Delivery reports.
• To request a read report for each
multimedia message you send,
check Read reports.
• To automatically retrieve
messages, check Auto-retrieve.
• To automatically retrieve
message while roaming, check
Roaming auto-retrieve.
• To display message notification
icons on the status bar, check
Notifications.
• To set the message ringtone,
touch Select ringtone.
Page 36

Email 36
• To set vibrate mode when a
message is received, touch
Vibrate.
Email
You can send and receive emails from
corporate Exchange server accounts,
POP/IMAP accounts, or Internet
based email accounts.
Access it:
> Email
Set Up Email Accounts
Access it:
> Email
When setting up an email account for
the first time, the setup wizard is
automatically displayed.
1. Enter your Email address and
Password, then touch Next.
2. Read the notice, touch OK.
3. When setup is complete, enter
your account name and the name
you want to be displayed on
outgoing messages.
4. To uc h Done.
Page 37
37 Email
Note: To set up more accounts,
touch Menu > Accounts >
Menu > Add account.
View Email Accounts
Access it:
> Email
When you open Email, the last screen
you have viewed is displayed.
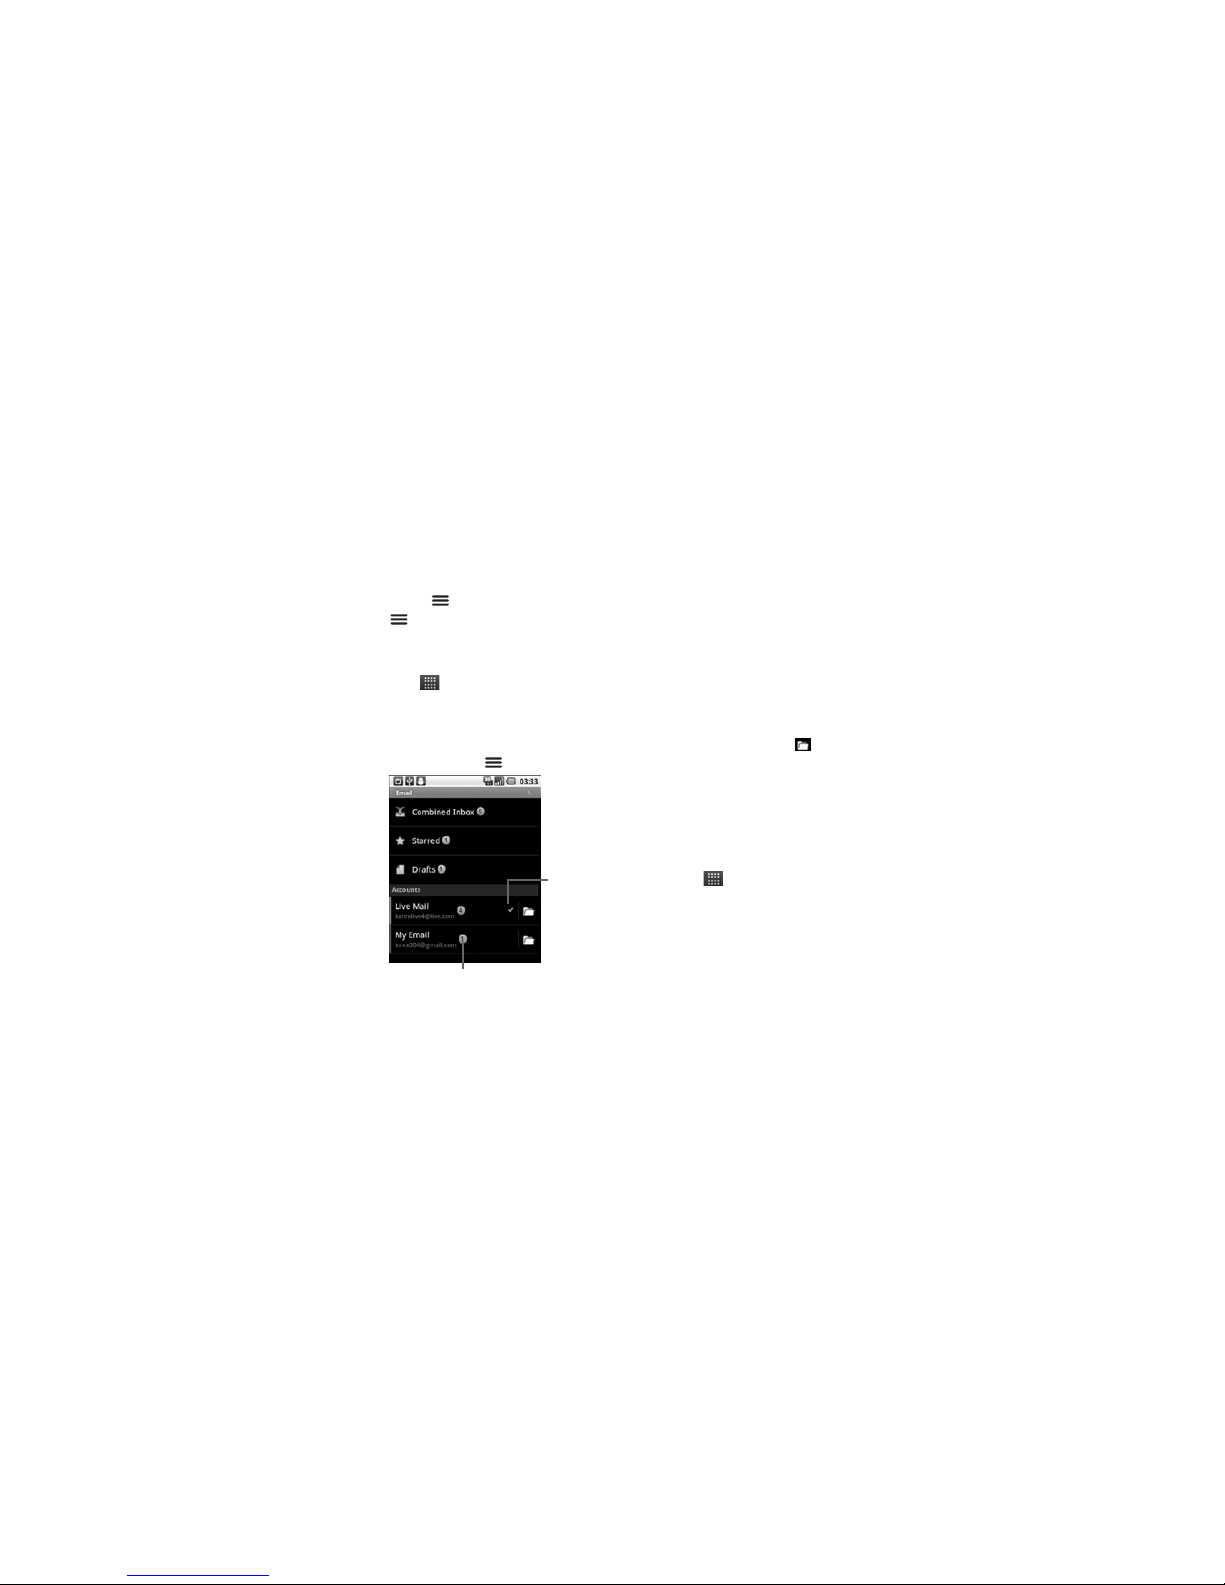
To view other accounts on the Email
screen, touch Menu > Accounts.
The Combined Inbox contains
received emails from all your email
accounts.
The Starred and Drafts folders are
displayed only if there are emails
saved in the folders.
To view the inbox of an account,
touch the email account.
To view the folders of an account,
touch the corresponding .
To access the account settings, touch
and hold an account, then touch
Account settings. See “Email
Account Settings” on page 40.
Remove Email Accounts
Access it:
> Email
1. Touch and hold an account.
2. To uc h Remove account.
3. To uc h OK to remove the account.
Number of unread mails.
Default
account
Page 38
Email 38
Compose and Send Emails
Access it:
> Email
The default account is used to
compose emails. To use other
accounts, select the account first.
1. Touch Menu > Compose.
2. Enter your recipient and type the
subject and your email.
TIP: To send to multiple
recipients, separate the email
address with a comma.
3. Touch Send to send email.
Add File Attachments
To attach files to your email, touch
Menu > Add attachment.
Add Cc/Bcc
To add CC/BCC, touch Menu >
Add Cc/Bcc.
Other Options
• To save email as draft, touch
Menu > Save as draft.
Emails are saved in the Drafts
folder.
•
To cancel email, touch Menu >
Discard
.
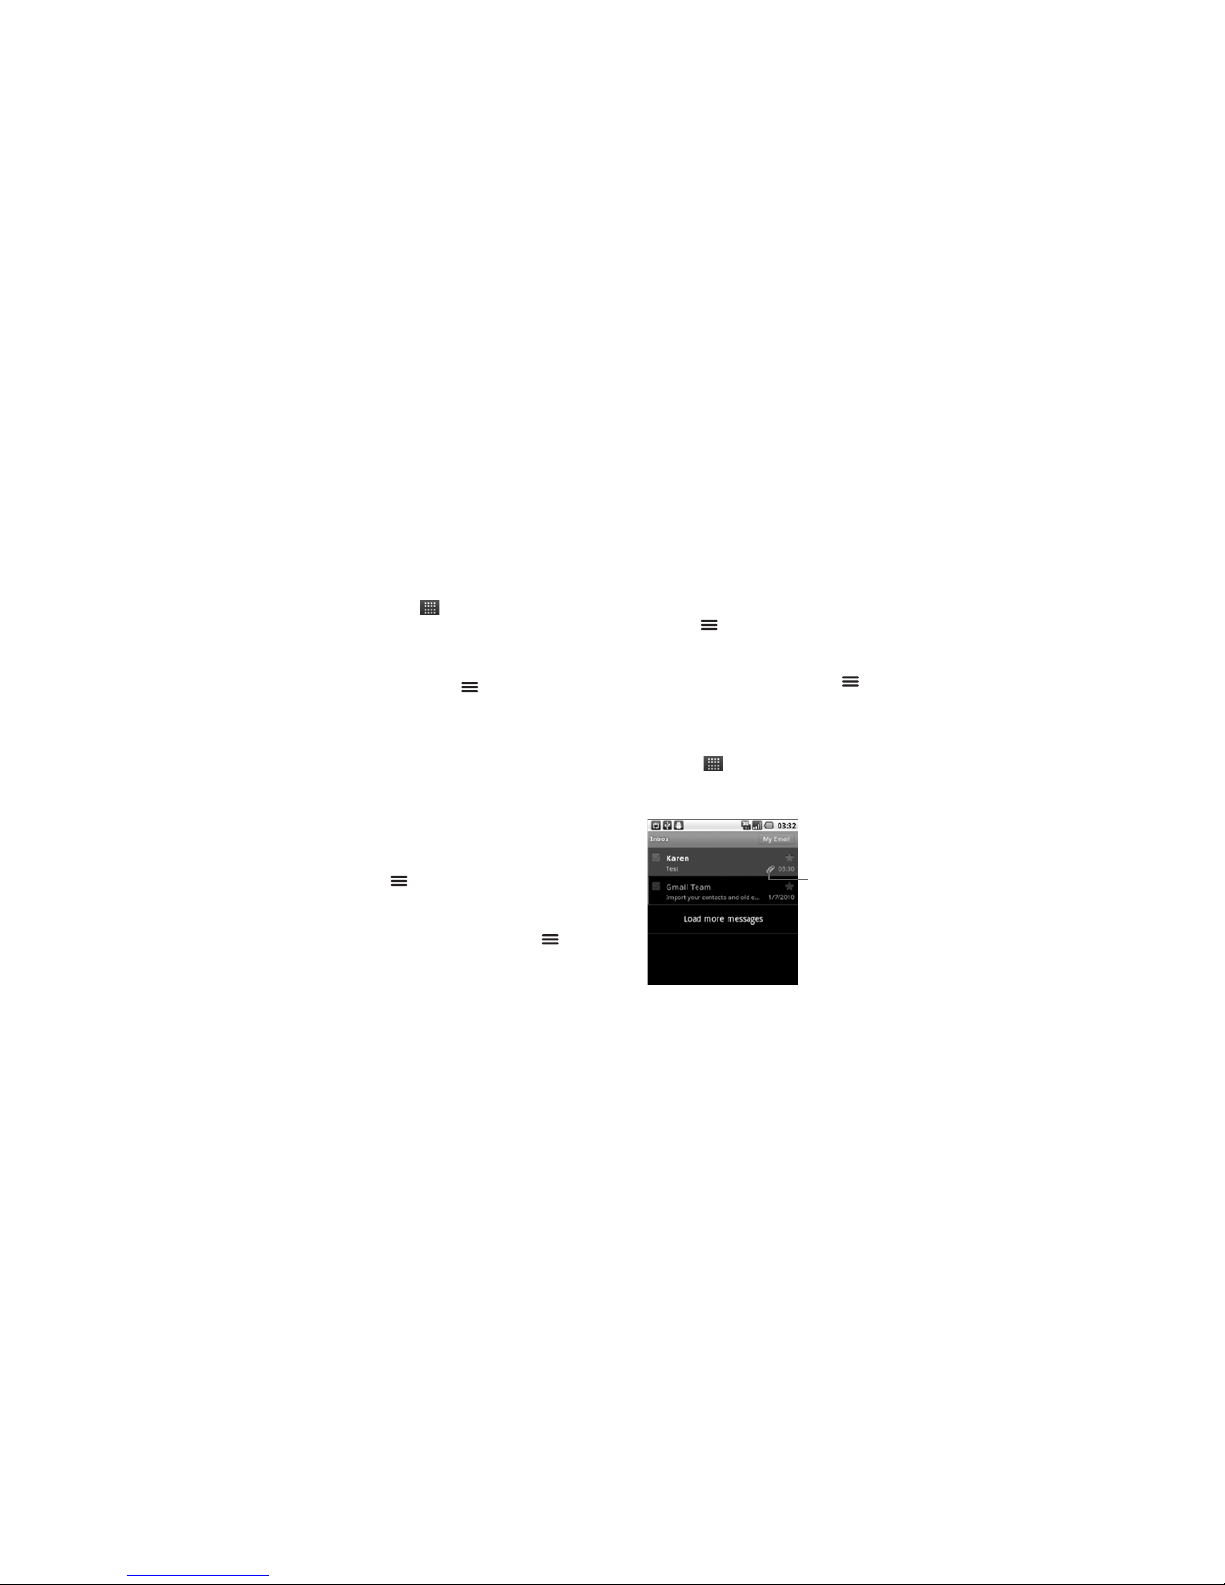
Check Emails
Access it:
> Email > an account
Your device automatically loads new
messages.
Contains file
attachment.
Page 39
39 Email
Unread messages are highlighted in
gray.
To load more messages, touch
Load
more messages
or touch Menu >
Refresh.
To open an email, touch the email.
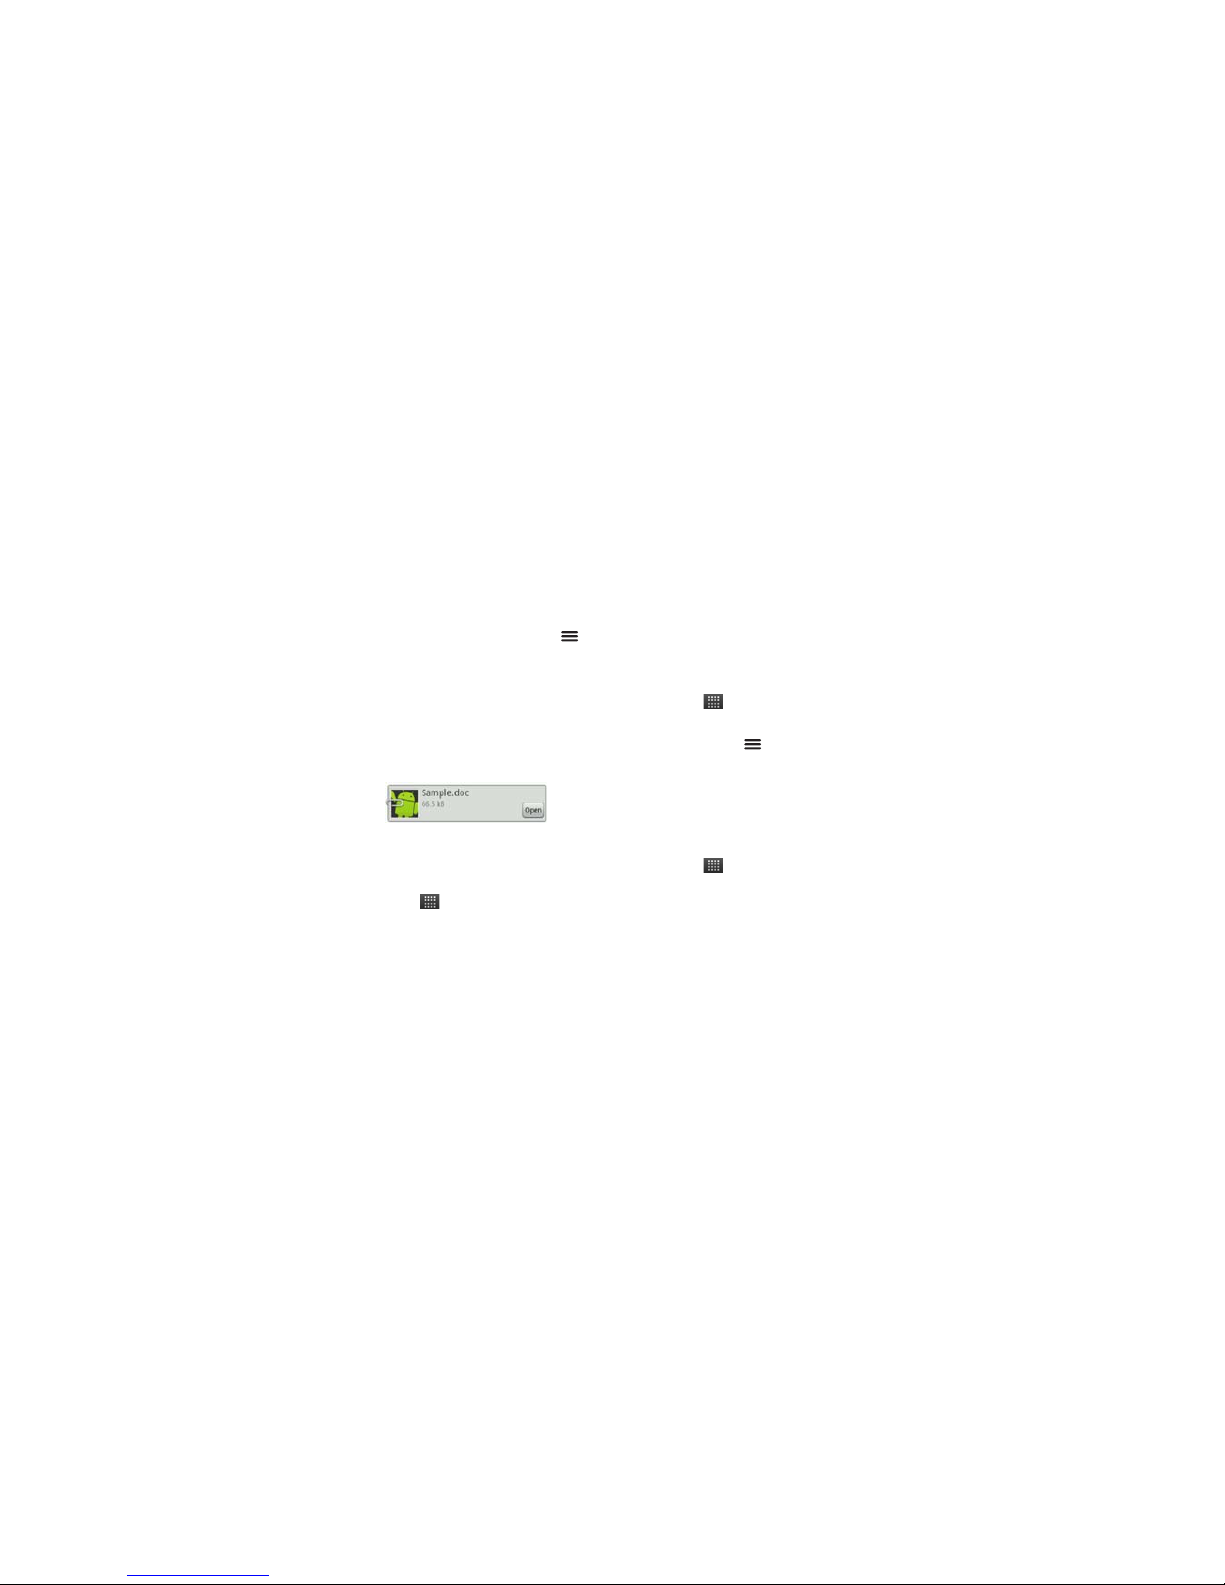
View Attached Files
1. Open the email and scroll through
the end of the email to see the
file.
2. Touch Open.
Reply to Emails
Access it:
>
Email
> an account
1. Touch an email to open.
2. Touch Reply to reply to the
sender or Reply all to reply to the
sender including all the email
recipients.
3. Compose your email.
4. To uc h Send.
Forward Emails
Access it:
>
Email
> an account
1. Touch an email to open.
2. Touch Menu > Forward.
3. Enter the recipient and complete
your email.
4. To uc h Send.
Delete Emails
Access it:
>
Email
> an account
1. Touch and hold an email.
2. To uc h Delete.
Page 40

Email 40
Mark Emails as Read or
Unread
Access it:
>
Email
> an account
1. Touch and hold an email.
2. Touch Mark as read or Mark as
unread.
Add Star to Emails
Access it:
>
Email
> an account
You can group important or favorite
emails by adding a star to it. When a
star is added, the email is saved in
the Starred folder. You can access
that email via its account Inbox or the
Starred folder.
To add a star, touch of an email.
Email Account Settings
Access it:
>
Email
Touch and hold an email account,
then touch Account settings.
• To change the account name,
touch Account name.
• To change the name that is
displayed to your emails, touch
Your name.
• To add a signature to your emails,
touch Signature.
• To set the frequency of checking
emails, touch Email check
frequency.
• To set the current account as the
default account, check Default
account.
• To display email notification icons
on the status bar, check Email
notifications.
Page 41

41 Gmail
• To set the ringtone when an
email is received, touch Select
ringtone.
• To set vibrate mode when an
email is received, touch Vibrate.
• To change the incoming server
settings, touch Incoming
settings.
• To change the outgoing server
settings, touch Outgoing
settings.
Gmail
Gmail comes preinstalled on your
device. You can synchronize your
Google account on the web with your
device.
Access it:
> Gmail
Create Google Account
If you do not have a Google account,
you can use your device to create
one.
1. To uc h Next.
2. To uc h Create.
3. Enter First name, Last name,
and preferred Username.
4. To uc h Next and follow the wizard
to complete setup.
Page 42

Gmail 42
Sign In to Gmail
Access it:
> Gmail
1. When setting up the account on
your device for the first time,
touch Next.
2. Touch Sign in.
3. Enter your Username and
Password.
4. Touch Sign in and follow the
wizard to complete setup.
Refresh Gmail
Access it:
> Gmail > Menu >
Refresh.
Create and Send Emails
Access it:
> Gmail
1. Touch Menu > Compose.
2. Enter the recipient.
TIP: To send to multiple
recipients, separate the email
address with a comma.
3. Type the subject and your email.
• To add Cc/Bcc, touch Menu
> Add Cc/Bcc.
4. To uc h Send to send your email.
Add File Attachments
To attach files to your email, touch
Menu > Add attachment.
Search Gmail
To search for text in Gmail, touch
Menu > Search.
Other Options
• To save email as draft, touch
Menu > Save as draft.
Emails are saved in the Drafts
folder.
Page 43

43 Gmail
•
To cancel email, touch Menu >
Discard
.
Reply to Emails
Access it:
>
Gmail
1. Touch an email to open.
2. Touch Reply to reply to the
sender or Reply all to reply to the
sender including all the email
recipients.
3. Compose your email.
4. Touch Send.
Forward Emails
Access it:
>
Gmail
1. Touch an email to open.
2. Touch Menu > Forward.
3. Enter the recipient and complete
your email.
4. Touch Send.
Delete Emails
Access it:
>
Gmail
1. Touch and hold an email.
2. To uc h Delete.
Mark Emails as Read or
Unread
Access it:
>
Gmail
1. Touch and hold an email.
2. To uc h Mark as read or Mark as
unread.
Gmail Account Settings
Access it:
>
Email
Touch and hold an email account,
then touch Account settings.
• To change the account name,
touch Account name.
Page 44

Google Talk 44
• To change the name that is
displayed to your emails, touch
Your name.
• To add a signature to your emails,
touch Signature.
• To set the frequency of checking
emails, touch Email check
frequency.
• To set the current account as the
default account, check Default
account.
• To display email notification icons
on the status bar, check Email
notifications.
• To set the ringtone when an
email is received, touch Select
ringtone.
• To set vibrate mode when an
email is received, touch Vibrate.
Google Talk
Google Talk is an instant messaging
program which allows you to chat
with other people who also have
Google accounts.
Note: You must have a Google
account before you can use this
feature.
Sign In
Access it:
> Talk
1. To uc h Sign in.
2. Enter your Username and
Password, then touch Sign in.
Follow the on-screen instructions
to complete.
To sign out, touch Menu >
Sign out.
Page 45

45 Google Talk
Start a Chat
> Talk
1. Touch a friend on the Friends list.
2. Type your message on the text
box, then touch Send.
3.
To close the chat, touch Menu >
End chat
.
Menu Options
• To add new friends, touch Menu
> Add friend.
• To view your invitations, touch
Menu > Invites.
• To accept or decline an invite,
touch Menu > Accept or
Cancel.
• To change your online status,
touch the online status icon, then
touch desired status.
• To access Google Talk settings,
touch Menu > Settings.
View Friends
• To list all your friends, touch
Menu > All friends.
• To view only the friends you
frequently chat with, touch Menu
> Most popular.
• To block or unblock friends, touch
and hold a friend, then touch
Block friend or Unblock friend.
Page 46
Photos & Videos 46
Photos & Videos
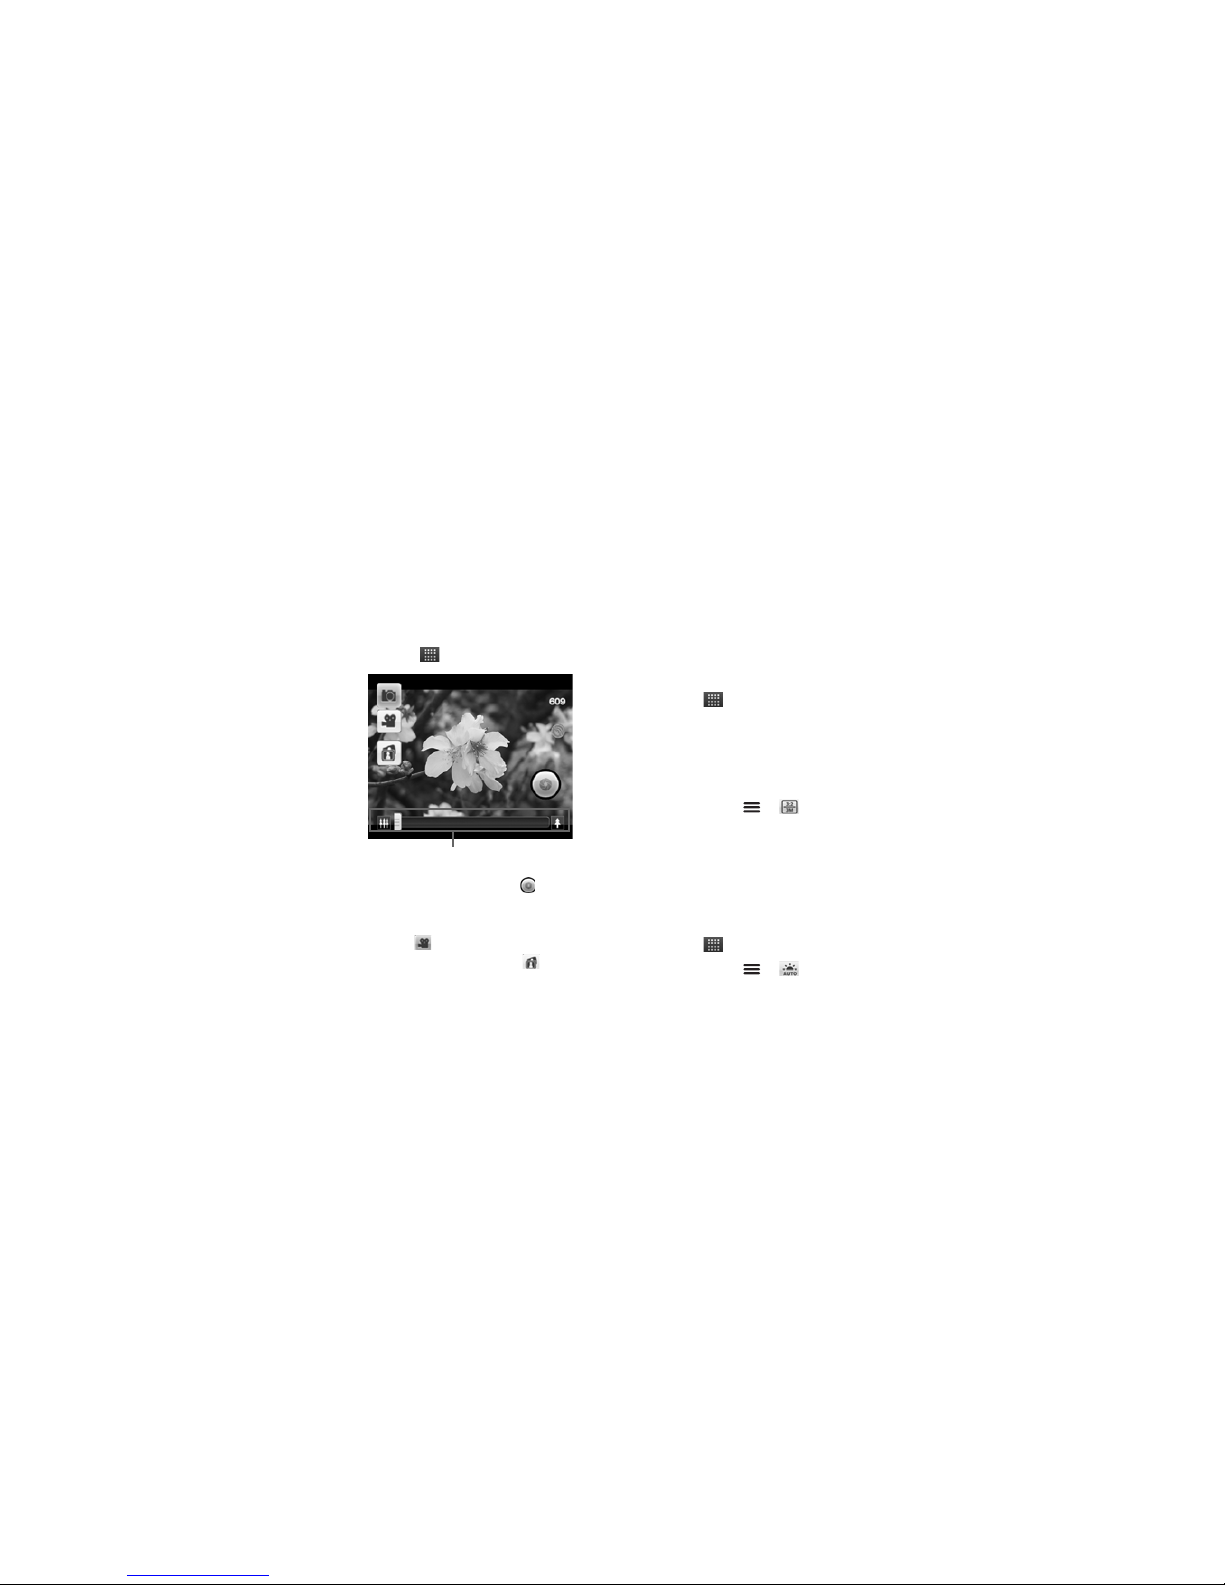
Take Photos
Access it:
> Camera
• To take photos, touch . Photos
are automatically saved in Gallery.
• To change to camcorder mode,
touch .
• To view Gallery, touch .
Zoom images
Touch the zoom controls or drag the
slider to zoom in or zoom out an
image.
Photo Size and Quality
Access it:
> Camera
Select either 4:3 or 3:2 size and photo
quality.
Note: To send photo via messaging,
reduce its size.
1. Touch Menu > .
2. Touch an option.
3. To uc h Done.
White Balance Setting
This setting compensates for color
differences.
Access it:
> Camera
1. Touch Menu > .
Zoom controls / slider
Page 47

47 Photos & Videos
2. Touch an option:
• Auto: The device automatically
adjusts the white balance
setting.
• Daylight: Ideally used
outdoors for sunny conditions.
• Cloudy: Ideally used for
outdoors for cloudy condition.
• Fluorescent: Ideally used
indoors with fluorescent
lighting.
• Incandescent: Ideally used
indoors for incandescent
lighting.
3. Touch Done.
Brightness Setting
Access it:
> Camera
1. Touch Menu > .
2. Drag the slider to adjust the
setting.
3. To uc h Done.
Advanced Settings
Access it:
> Camera >
Menu >
For more advanced settings, touch
one of the following, then touch an
option.
• Color effect: To add color effect.
• Review duration: To preview the
captured photo after shooting.
• Select ISO: To select an ISO
setting.
• Picture quality: To set the
picture quality.
• Auto Exposure: To set the auto
exposure.
• Geo-tagging: To turn Geo-
tagging on or off.
• Anti Banding: To change anti
banding setting.
Page 48

Photos & Videos 48
• Reset to default: Touch to reset
camera to default settings.
Preview Photos
Access it:
> Camera
You can preview a photo right after
capturing it if the Review duration
setting is not turned off.
• To go back to camera mode,
touch .
• To delete the photo, touch .
• To share the photo, touch .
• To set photo as a contact icon or
wallpaper, touch .
• To view the location information
of the photo, touch .
• To enlarge or shrink the photo,
touch or .
Page 49
49 Photos & Videos
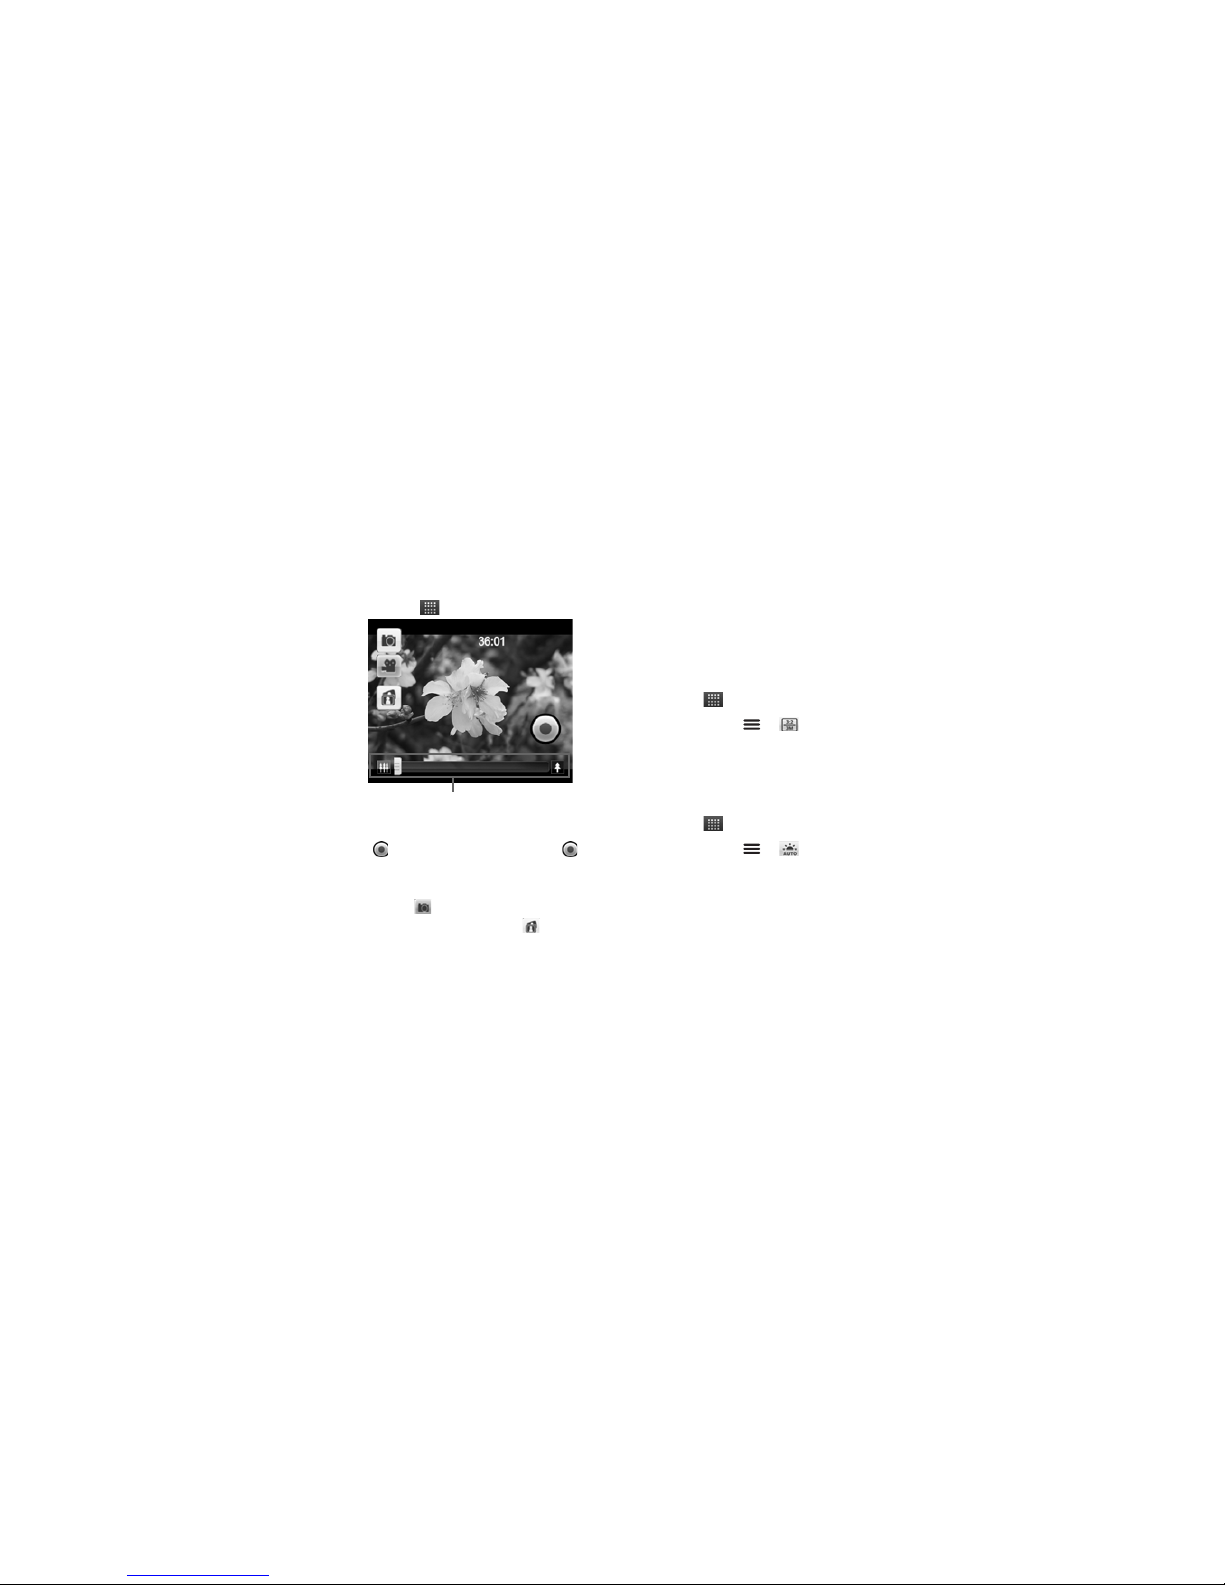
Record Videos
Access it:
> Camcorder
• To start recording videos, touch
. To stop recording, touch
again.
• To change to camera mode,
touch .
• To view Gallery, touch .
Zoom images
Touch the zoom controls or drag the
slider to zoom in or zoom out an
image.
Video Size and Quality
Access it:
> Camera
1. Touch Menu > .
2. Touch an option.
3. To uc h Done.
White Balance Setting
Access it:
> Camera
1. Touch Menu > .
2. Touch an option:
• Auto: The device automatically
adjusts the white balance
setting.
• Daylight: Ideally used
outdoors for sunny conditions.
Zoom controls / slider
Page 50
Photos & Videos 50
• Cloudy: Ideally used for
outdoors for cloudy condition.
• Fluorescent: Ideally used
indoors with fluorescent
lighting.
• Incandescent: Ideally used
indoors for incandescent
lighting.
3. Touch Done.
Advanced Settings
Access it:
> Camcorder >
Menu >
For more advanced settings, touch
one of the following, then touch an
option.
• Anti Banding: To change anti
banding setting.
• Video Encoder: To set video
encoder setting.
4. Reset to default: To reset the
camcorder to default settings.
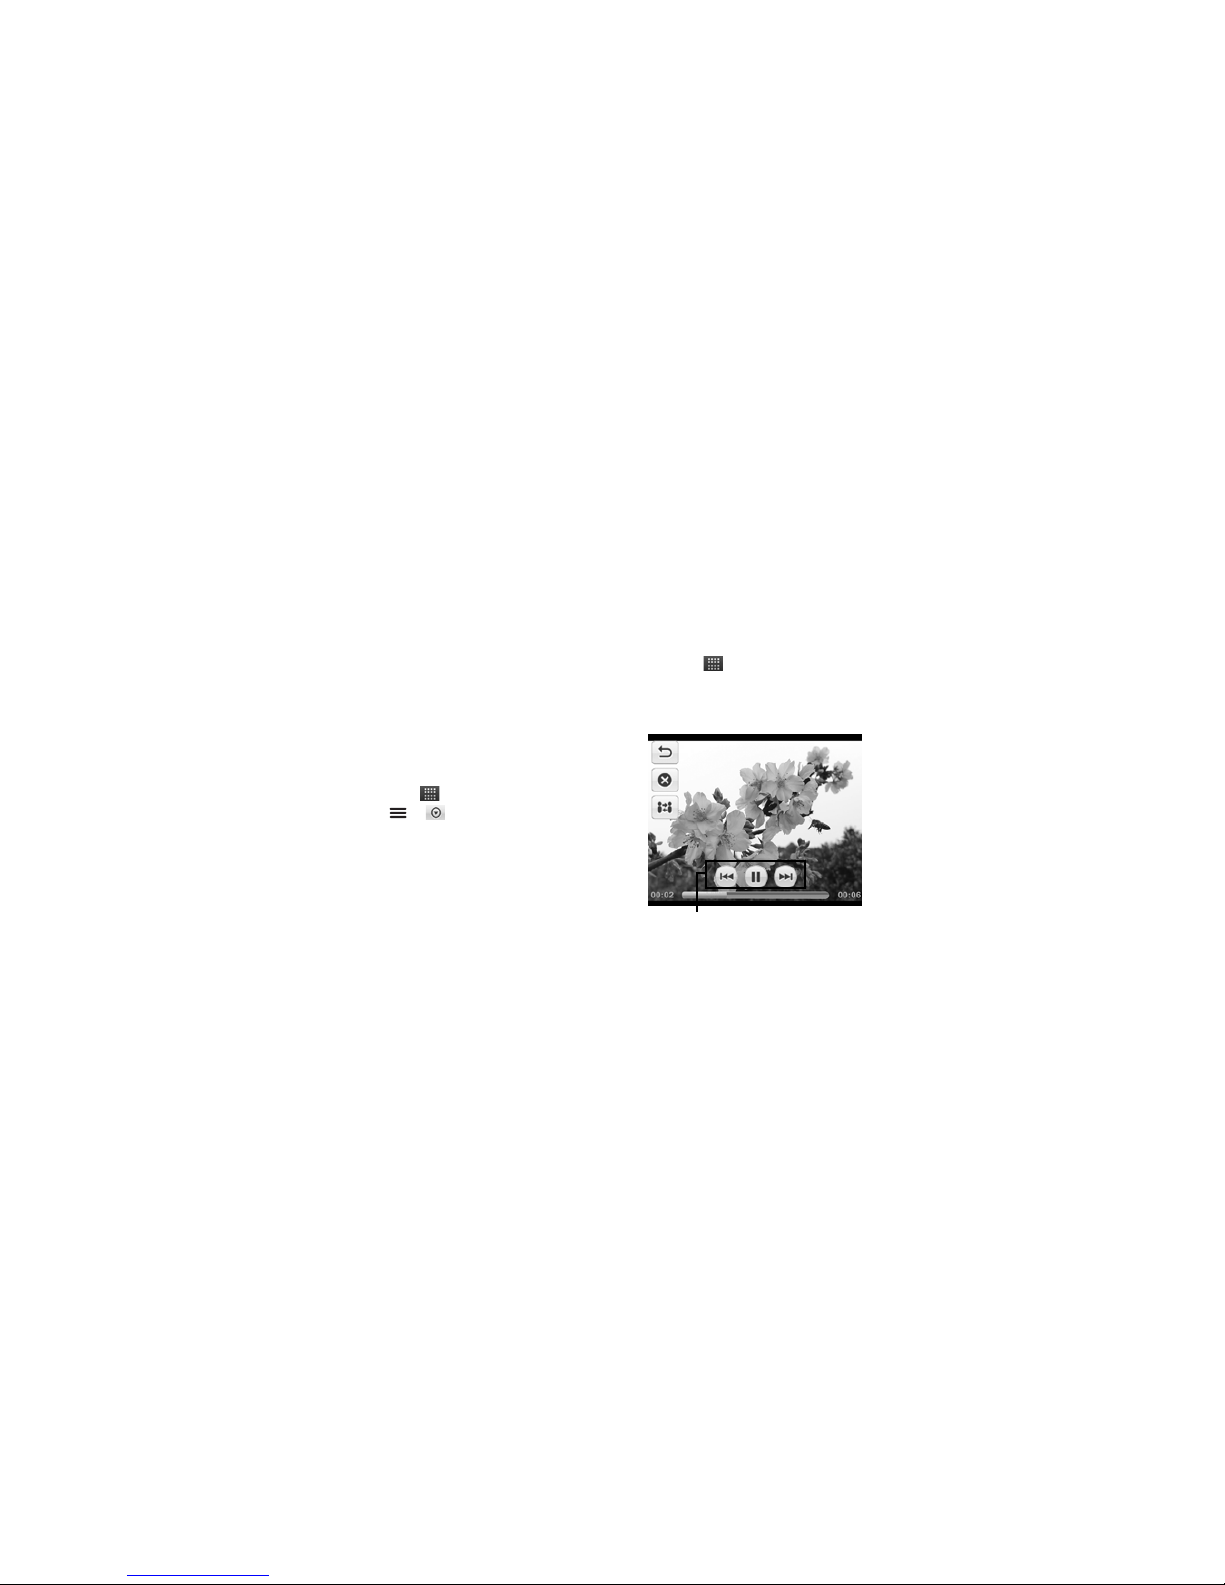
Preview Videos
Access it:
> Camcorder
After recording a video, the video
player automatically plays the
recording.
• To rewind, play/pause, or forward
video, touch the playback
controls.
Playback controls
Page 51
51 Photos & Videos
• To go back to camcorder mode,
touch .
• To delete the video, touch .
• To share the video, touch .
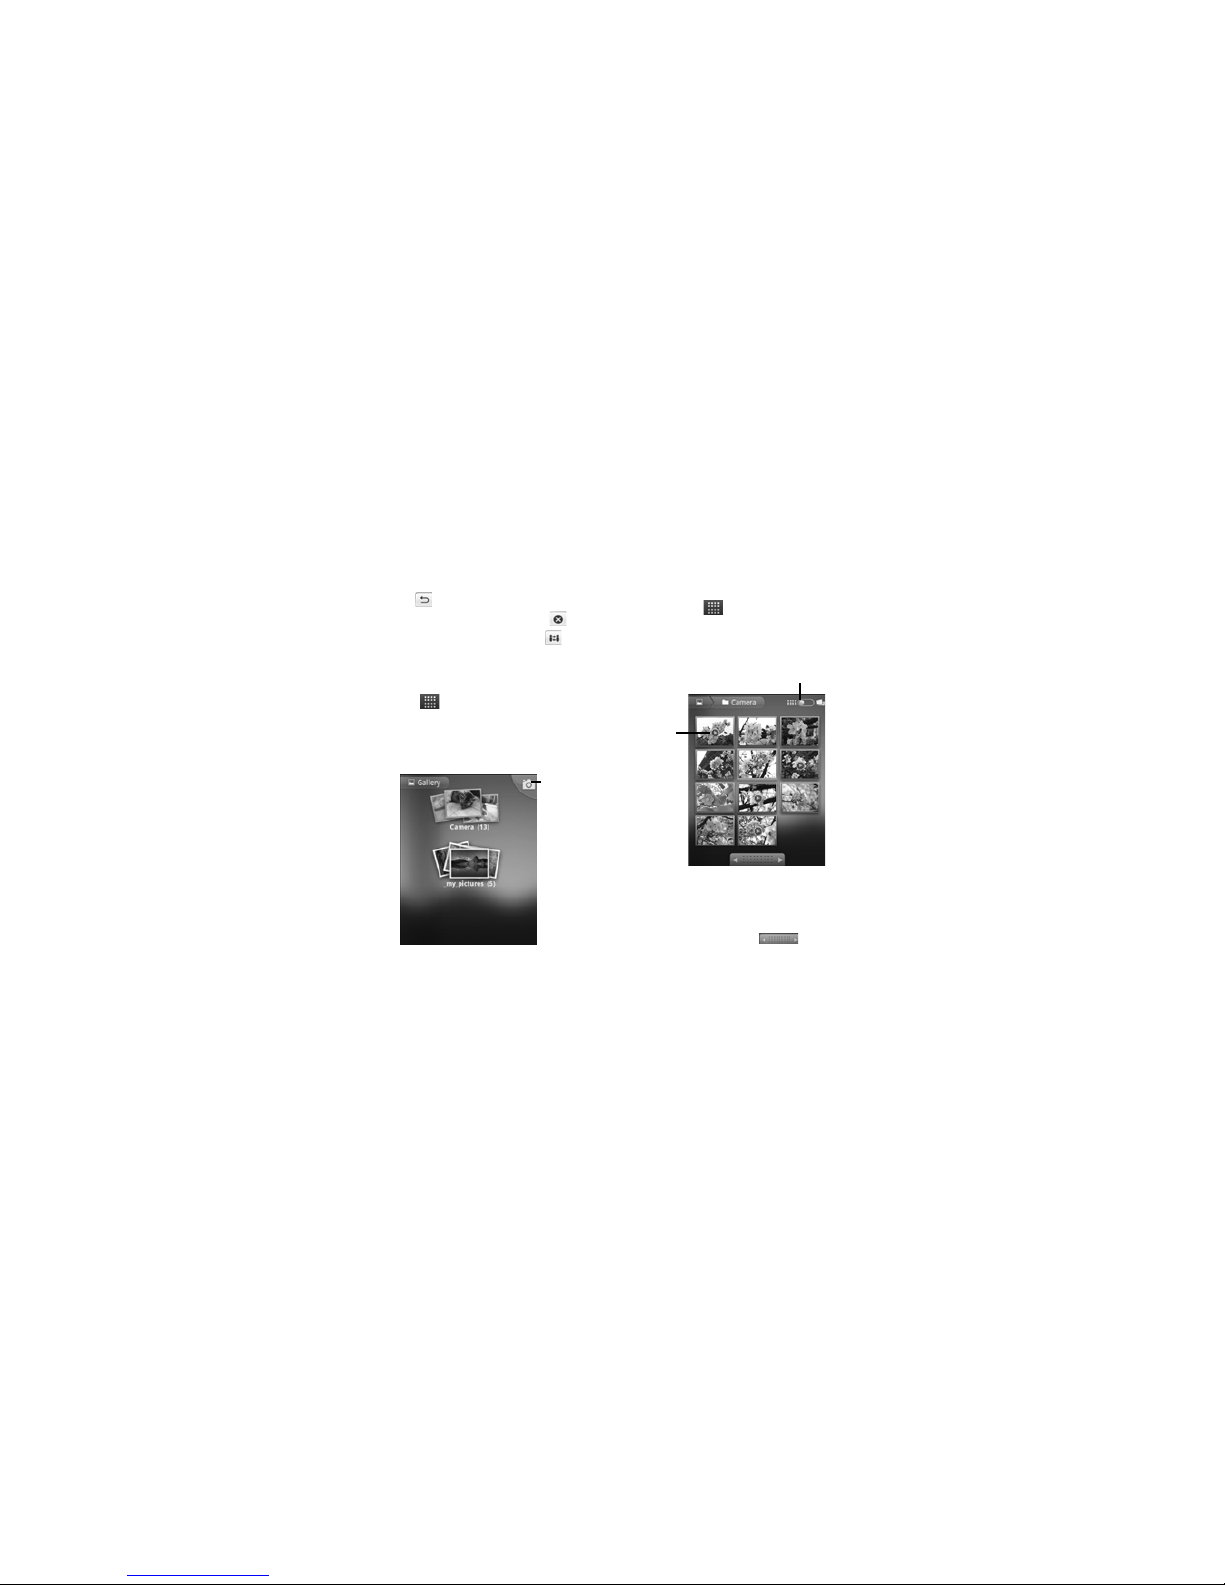
Gallery
Access it:
> Gallery
Use Gallery to view photos, and play
slideshows and videos saved on your
device or the memory card.
View Photos
Access it:
> Gallery
Thumbnail View
Touch a folder to view thumbnails.
• To toggle thumbnail and folder
view, slide the View Switch.
• To scroll left or right, touch the
arrows or slide .
• Touch a photo to view in full
screen.
To open
Camera
Video
File
View Switch
Page 52
Photos & Videos 52
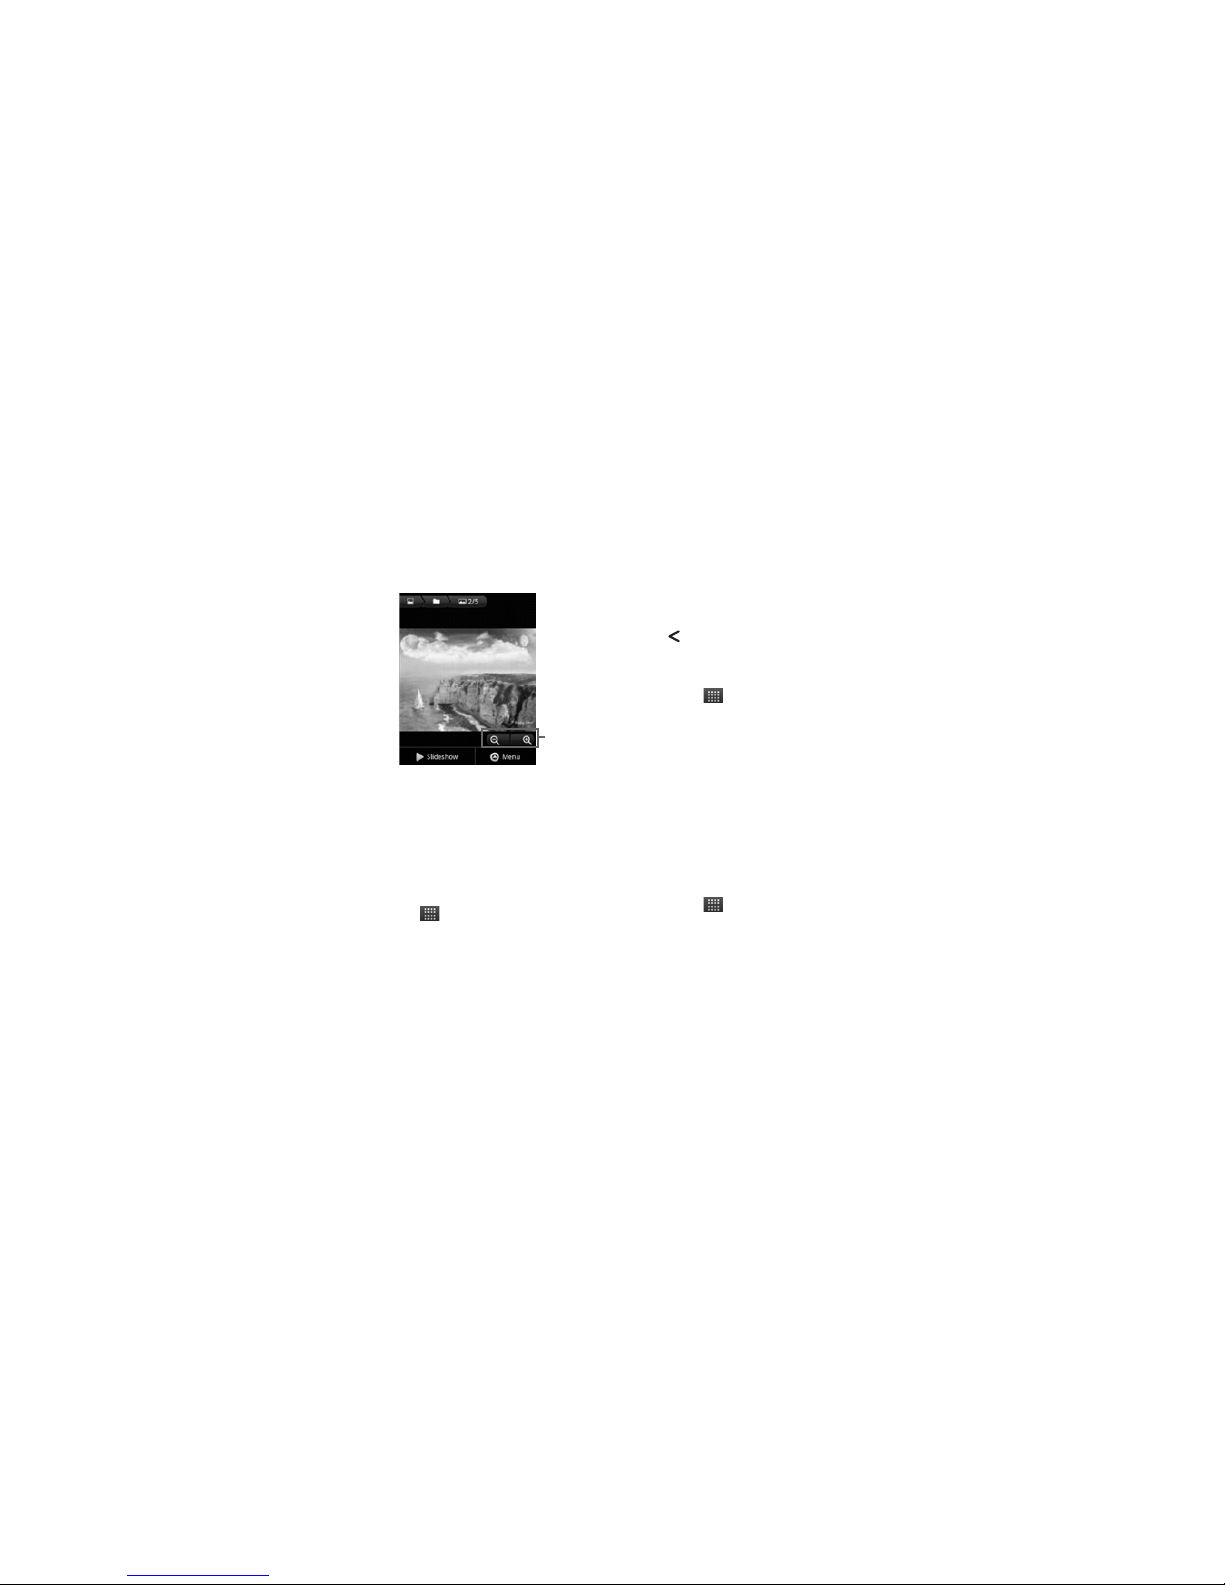
Full Screen View
When viewing in full screen mode,
swipe your finger to the right or left to
view the next or previous photo.
To enlarge or shrink the photo, touch
the zoom controls.
Play Slideshow
Access it:
> Gallery > a folder >
a photo
Tou ch Slideshow to start the
slideshow.
To stop the slideshow, touch the
screen.
To go back the previous screen, touch
Back .
Share Photos
Access it:
> Gallery > a folder
1. Touch and hold a photo.
Note: To share more than one
photo at one time, touch the
photos to check the thumbnails,
or touch Select All.
2. To uc h Share.
3. Touch an application for sharing.
Delete Photos
Access it:
> Gallery > a folder
1. Touch and hold a photo.
Note: To delete more than one
photo at one time, touch the
Zoom
controls
Page 53
53 Photos & Videos
photos to check the thumbnails,
or touch Select All.
2. Touch Delete.
3. Touch Confirm Delete.
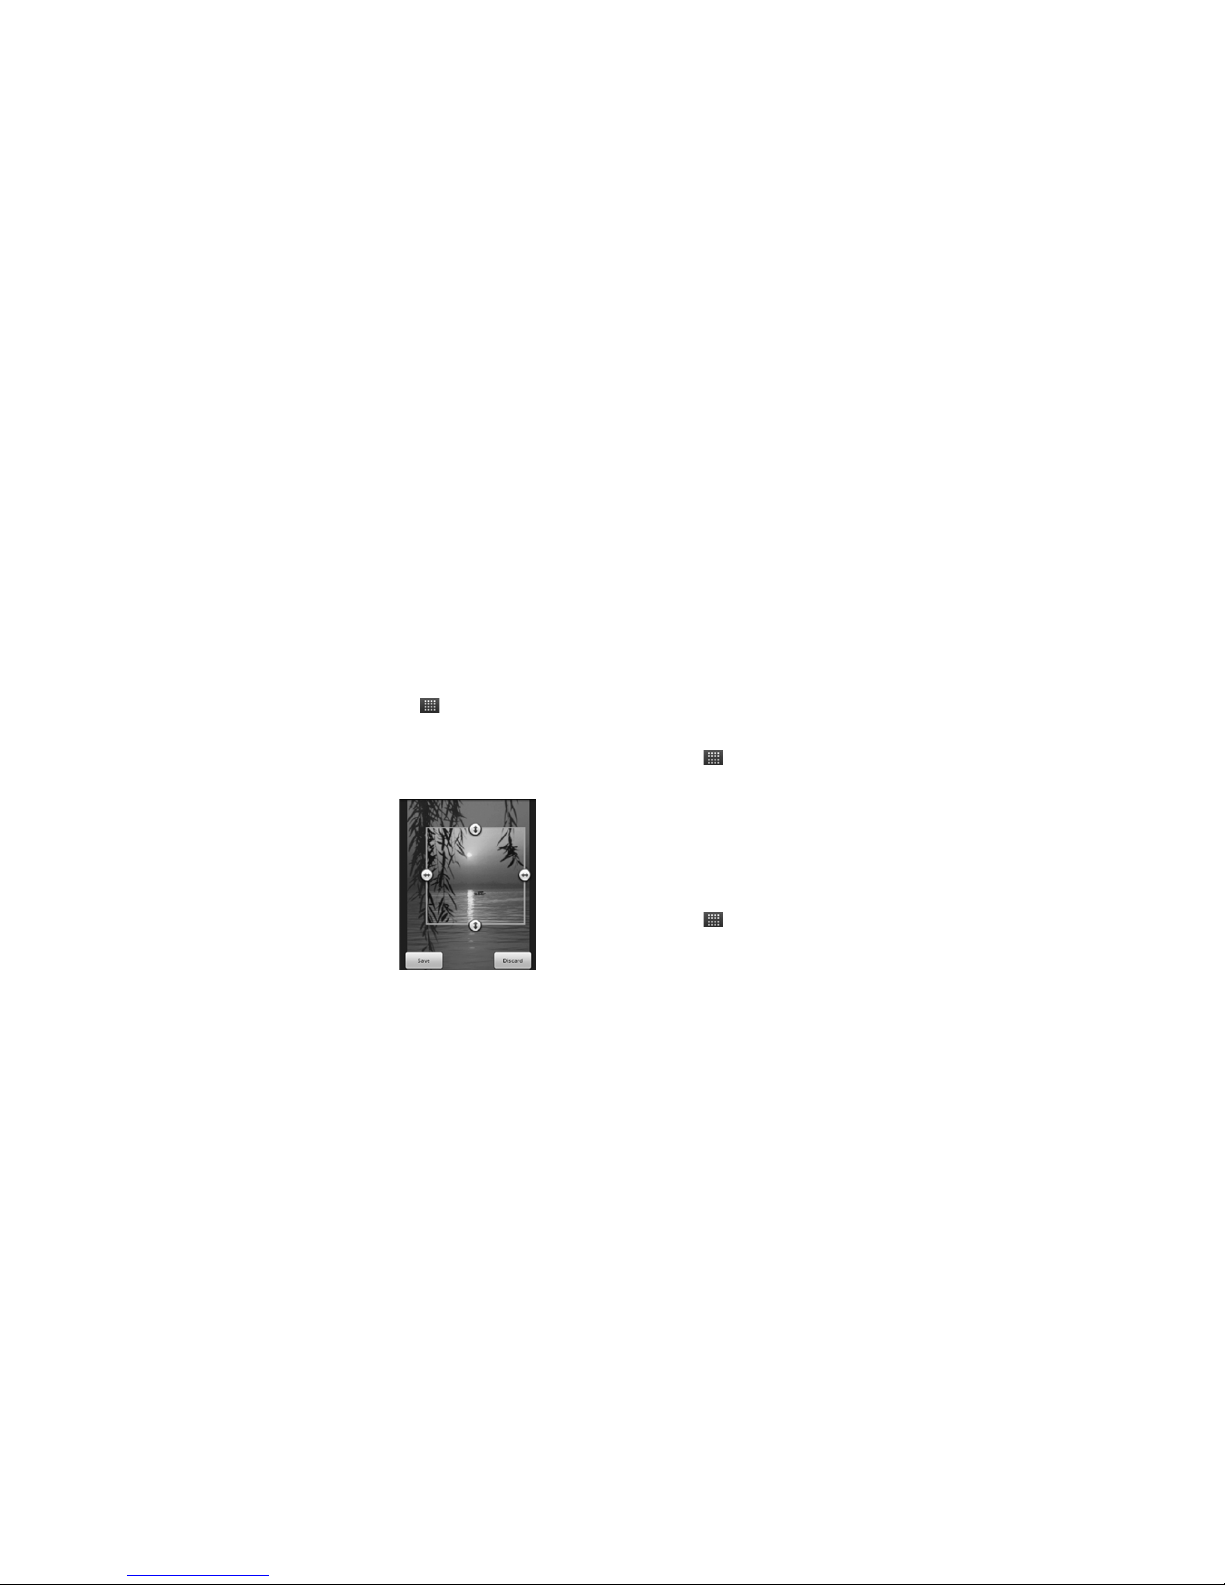
Crop Photos
Access it:
> Gallery > a folder
1. Touch and hold a photo.
2. Touch More > Crop.
3. Touch and hold an edge of the
frame to display sizing arrows,
then drag the arrows to change
the crop size.
4. Touch and drag the frame across
the screen to select the portion of
the photo that you want to crop.
5. When done, touch Save.
Set Photo as Contact Icon or
Wallpaper
Access it:
> Gallery > a folder
1. Touch and hold a photo.
2. To uc h More > Set as.
3. To set as contact icon, touch
Contact icon. To set as
wallpaper, touch Wallpaper.
Rotate Photos
Access it:
> Gallery > a folder
1. Touch and hold a photo.
Page 54

Photos & Videos 54
Note: To rotate more than one
photo at one time, touch the
photos to check the thumbnails,
or touch Select All.
2. Touch More > Rotate Left or
Rotate Right.
Play Videos
Access it:
> Gallery > a folder >
a video file.
Touch the screen to display the
playback controls and the progress
bar.
Progress Bar Playback Controls
Page 55
55 Music
Music
Browse Songs
Access it:
> Music
• Touch a category to browse
songs.
• To play songs, touch the song or
playlist.
•
To play all songs, touch Menu >
Play all
.
• To randomly play songs, touch
Menu >
Party shuffle
.
• To shuffle all songs, touch
Menu
>
Shuffle all
.
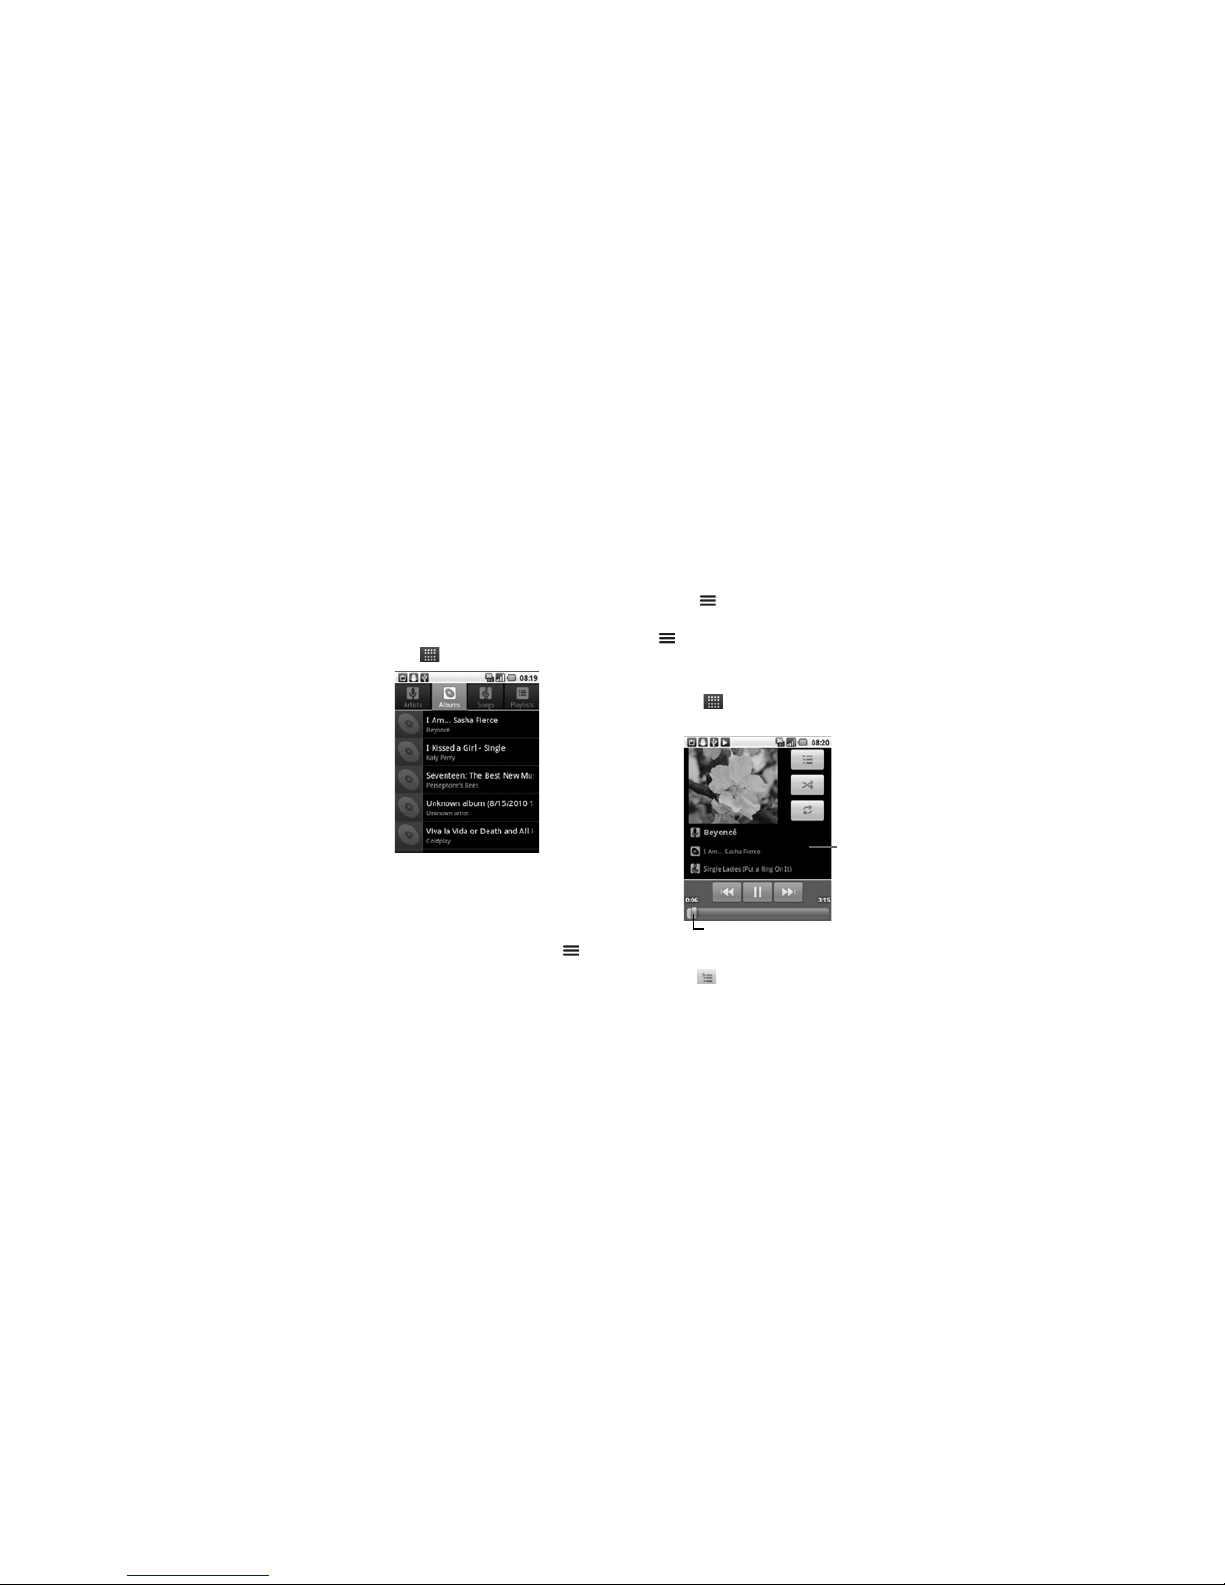
Play Songs
Access it:
> Music > a song or
playlist
• To view the Now Playing screen,
touch .
Progress bar
Song
details
Page 56

Music 56
• To toggle shuffle on or off, touch
.
• To scroll among the repeat
modes: Repeat all, Repeat
current song, and Repeat off,
touch .
• To play/pause, touch / .
• To go to the previous or the next
track, touch / .
• To rewind or fast-forward, touch
and hold / , or drag the
progress bar to the left or right.
• For menu options, touch Menu
.
Playlists
Create playlists to organize your
songs.
Add Songs to Playlist
Access it:
> Music
1. Touch and hold a song.
2. To uc h Add to playlist.
3. To uc h New to create a new
playlist or touch an existing
playlist.
To add a song to the playlist while
playing it in the music player, touch
Menu > Add to playlist.
Remove Songs From Playlist
Access it:
> Music > Playlists >
a playlist
Touch and hold a song, then touch
Remove song from playlist.
Play Playlists
Access it:
> Music > Playlists
Touch and hold a playlist, then touch
Play.
Page 57

57 Music
Delete Playlists
Access it:
> Music > Playlists
Touch and hold a playlist, then touch
Delete.
Rename Playlists
Access it:
> Music > Playlists
1. Touch and hold a playlist, then
touch Rename.
2. Enter the new name.
3. Touch Save.
Use Song as Ringtone
Access it:
> Music
Touch and hold a song, then touch
Use as phone ringtone.
Delete Songs
Access it:
> Music
1. Touch and hold a song, then
touch Delete.
2. To uc h OK to confirm.
Search for Song Info
Access it:
> Music
1. Touch and hold a song, then
touch Search.
2. Touch the application to search
for song info: Browser, Music, or
YouTube.
Page 58

Wireless Connections 58
Wireless Connections
Wi-Fi
Use Wi-Fi connections if you are
within 100 meters of a wireless
access point.
Turn Wi-Fi On or Off
Access it:
Menu > Settings >
Wireless & networks > Wi-Fi
Tip: To save battery power, turn off
Wi-Fi when not in use.
Scan for Wi-Fi Networks
Access it:
Menu > Settings >
Wireless & networks > Wi-Fi
settings
1. Turn on Wi-Fi.
2. Touch Menu > Scan.
Add Wi-Fi Networks
Access it:
Menu > Settings >
Wireless & networks > Wi-Fi
settings
1. To uc h Add Wi-Fi network.
2. Enter the Network SSID,
Security, and other security
settings.
3. To uc h Save.
Connect to Wi-Fi Networks
Access it:
Menu > Settings >
Wireless & networks > Wi-Fi
settings
1. Touch an available Wi-Fi network
on the list.
2. When prompted, enter the
security password.
3. To uc h Connect.
Page 59

59 Wireless Connections
Note: When Wi-Fi is turned on and
you are in range of Wi-Fi network you
have connected to before, your
device automatically reconnects to
that Wi-Fi network.
Bluetooth™ Connection
Use Bluetooth if you and another
Bluetooth-enabled device are within a
10-meter range.
Turn Bluetooth On or Off
Access it:
Menu > Settings >
Wireless & networks > Bluetooth
To make your device discoverable to
other devices for 120 seconds, check
Discoverable.
To change the name that is displayed
to other devices, touch Device
name.
Tip: To save battery power, turn off
Bluetooth when not in use.
Connect to New Devices
Access it:
Menu > Settings >
Wireless & networks > Bluetooth
settings
To connect to a device, you must pair
with it. You only need to pair with a
new device once.
1. Turn on Bluetooth and make your
device discoverable.
2. To uc h Scan for devices.
3. Touch a scanned device to
connect to.
4. When prompted, enter a pairing
passcode. The same passcode
must be entered on the other
device.
Note: For Bluetooth headsets,
try “1234” or “0000”. If pairing is
Page 60

Wireless Connections 60
unsuccessful, check the headset
documentation.
Reconnect to Devices
Access it:
Menu > Settings >
Wireless & networks > Bluetooth
settings
Turning on Bluetooth and making your
device discoverable automatically
reconnects your device to a paired
device.
To manually reconnect to a device,
touch a device name on the
Bluetooth devices list.
Disconnect Devices
Access it:
Menu > Settings >
Wireless & networks > Bluetooth
settings
Turning off Bluetooth automatically
disconnects Bluetooth from a paired
device.
To manually disconnect, touch and
hold a paired device, then touch
Unpair.
Page 61

61 USB Connections
USB Connections
You can transfer photos, videos,
music, and other files from your
computer to your device and vice
versa.
1. Ensure that the memory card is
inserted into the device.
2. Connect the micro USB cable to
the USB connector on your
device and the other end to the
USB port on your computer.
3. When connected, the USB
notification icon is displayed on
the status bar.
4. Touch Menu > Notifications
> USB connected > Turn on
USB storage.
Note: Some applications may not
work until you turn off USB
storage.
5. To uc h OK.
6. On your computer, locate and
double-click on the “Removable
Disk (drive letter)” to access the
memory card on your device.
7. Drag and drop files from your
computer to the folders on your
memory card.
8. When done, touch Turn off USB
storage on your device.
9. Touch Back to close the USB
connection screen.
Page 62
Internet 62
Internet
Your device can connect to the
Internet using a 3G or EDGE
connection or a wireless network
connection.
Note: Check with your network
provider for the availability of these
services. Additional charges may be
incurred when surfing or downloading
data from the Internet.
To connect to the Internet using a
Wi-Fi network, turn on Wi-Fi. See
“Turn Wi-Fi On or Off” on page 58.
Surf the Web
Access it:
> Browser
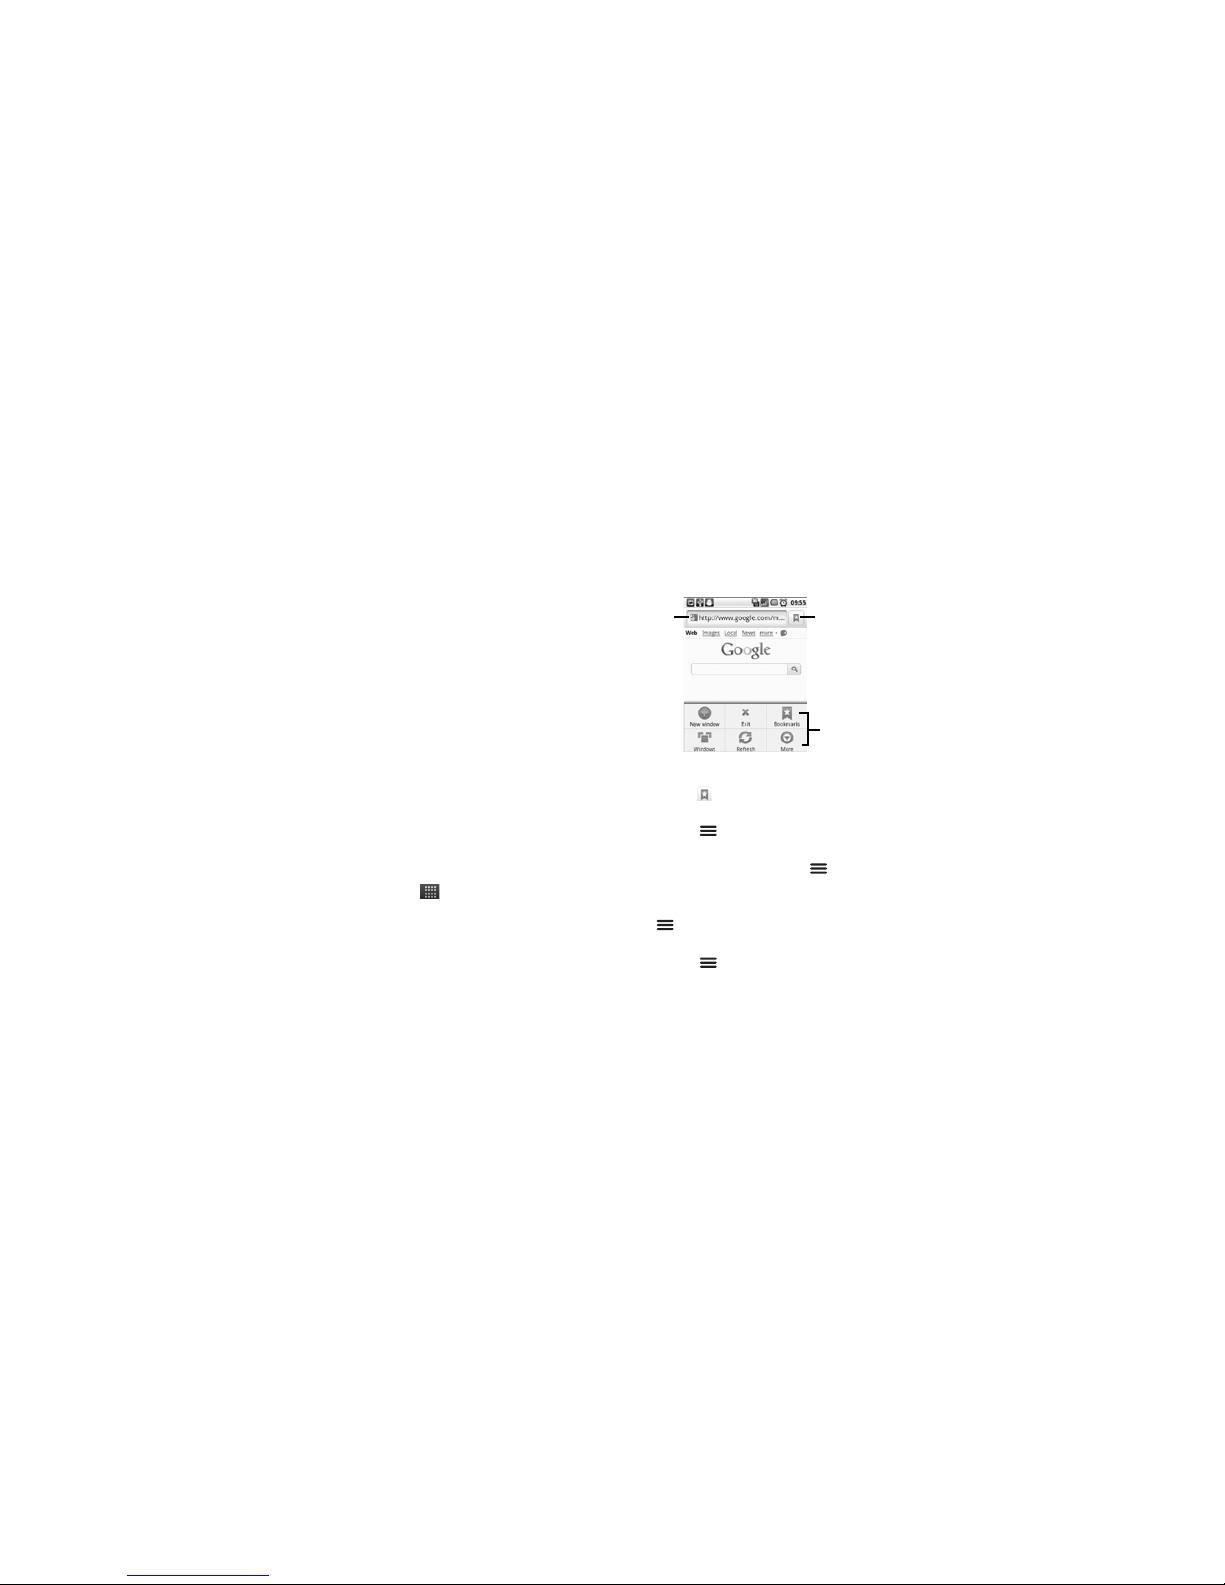
To visit a page, touch and enter the
web address on the Address field.
• To view the bookmark screen,
touch .
• To open a new window, touch
Menu > New window.
• To view opened browser
windows, touch Menu >
Windows.
• To refresh the page, touch Menu
> Refresh.
• To view the next page, touch
Menu > More > Forward.
Browser
Menu
Go to
Bookmark
Address
Field
Page 63

63 Internet
• To view the page information,
touch Menu > More > Page
info.
• To close Browser, touch Menu
> Exit.
Using Browser
Zoom Page
Touch and hold the screen to display
the zoom controls on the lower-right
corner of the screen.
To zoom in or zoom out the page,
double-tap on the screen or touch the
zoom controls.
Work With Links
Touch a link to go to that web page.
Touch and hold the link to open the
pop-up menu, and touch:
• Open: To go to that web page.
• Open in new window: To open
the web page in a new window.
• Bookmark link: To bookmark the
web page.
• Save link: To download the web
page.
• Share link: To send link via
Bluetooth, Messaging, Email, and
other applications for sharing.
• Copy link URL: To copy the web
address. To paste the web
address, touch and hold a text
field, then touch Paste.
Bookmark a Page
Access it:
> Browser >
1. To uc h Add.
2. Enter the bookmark Name.
Note: To bookmark a different
page, enter the Name and the
Location.
3. To uc h OK to save bookmark.
Page 64

Internet 64
Find Text on Page
Access it:
> Browser > Menu
> More > Find on page
Enter the text you want to find. As
you type, the match is displayed on
screen.
Select Text
Access it:
> Browser > Menu
> More > Select Text
Swipe your finger across the text that
you want to select. Text is copied to
the clipboard.
To paste the text, touch and hold a
text field, then touch Paste.
Share Page
Access it:
> Browser > Menu
> More > Share page
Touch desired sharing application to
use.
Downloads
View the download history and saved
pages.
Access it:
> Browser > Menu
> More > Downloads
To open a saved page, touch the
item.
To delete a saved page, touch and
hold the item, then touch Clear from
list.
To stop all downloads, touch Menu
> Cancel all downloads.
Browser Settings
Access it:
> Browser > Menu
> More > Settings
Touch to change the following
settings:
• Text size: Touch to set the text
size.
Page 65

65 Internet
• Default zoom: Touch to set
zoom when the screen is
touched twice.
• Open pages in overview: Check
to view the overview of a new
page
• Text encoding: Touch to set text
encoding.
• Block pop-up windows: Check
to block pop-ups.
• Load images: Check to display
images on web page.
• Auto-fit pages: Check to format
the web page to fit the screen.
• Landscape-only display: Check
to display pages only in landscape
screen orientation.
• Enable JavaScript: Check to
enable Java script.
• Enable plug-ins: Touch to enable
plug-ins.
• Open in background: Check to
open new windows behind the
current window.
• Set home page: Touch to set the
home page.
• Clear cache: Touch to clear
locally cached contents.
• Clear history: Touch to clear
browser navigation history.
• Accept cookies: Check to allow
sites to save and read cookies.
• Clear all cookie data: Touch to
clear all browser cookies.
• Remember form data: Check to
remember data you typed in
forms for later use.
• Clear form data: Touch to clear
all the saved form data.
• Enable location: Check to allow
sites to request access to your
location.
Page 66

Maps 66
• Clear location access: Touch to
clear location access for all
websites.
• Remember passwords: Check
to save your usernames and
passwords for websites.
• Clear passwords: Touch to clear
all saved passwords.
• Show security warnings: Check
to show warning if there is a
problem with a site’s security.
• Website settings: Touch to set
advanced settings for individual
websites.
• Reset to default: Touch to
restore browser to default
settings.
Maps
Google Maps™ allows you to keep
track of you and your friends’
location, find places, and view traffic
and transit information.
Access it:
> Maps
By default, Google Maps™ opens in
map mode. To change modes or
layers, see “Set Map Mode and
Layers” on page 68.
Page 67

67 Maps
• Touch and hold an area on the
map to view the address.
• Slide your finger on the screen to
scroll through the map.
• Touch the zoom controls to zoom
in or zoom out the map.
Set Your Location
Before you start using Google
Maps™, set your location first.
Your device can determine your
location using GPS satellites or by
identifying your mobile network.
Do the following to enable this
function:
1. From the Home screen, touch
Menu > Settings > Location
& security.
2. Check Use wireless networks
and Use GPS satellites.
Find Your Location
Access it:
> Maps > Menu >
My Location.
A blue dot indicates your current
location on the map.
Find Places
Access it:
> Maps
1. Touch Menu > Search.
2. Type the place you want to
search on the search box. You
can enter an address, a city, or an
establishment.
3. As you type, matching places are
listed, touch a matching item to
find that place on the map or
touch .
4. A callout appears on the map to
indicate the location. To view the
location details, touch the callout.
Page 68

Maps 68
Get Directions
Access it:
> Maps
1. Touch Menu > Directions.
2. Type a starting point address or
touch , then touch an option:
• My current location: To set
your current location as the
starting point.
• Contacts: To select a contact
address.
• Point on map: To touch a
starting point on the map.
3. Type an ending point address or
touch , then touch an option:
• Contacts: To select a contact
address.
• Point on map: To touch an
ending point on the map.
4. Touch a mode of transport: car
, public transport , or by
foot .
5. To uc h Go. The directions to your
destination are shown as a list.
Note: To view directions on the
map, touch Shown on map.
When you have reached your
destination, touch Menu >
More
>
Clear map
to reset the map.
Set Map Mode and Layers
Access it:
> Maps > Menu >
Layers
You can view the map in the following
modes:
• Traffic: Touch to view real-time
traffic conditions with roads
marked in color-coded lines to
indicate traffic conditions.
Note: May not be available in all
areas.
Page 69

69 Maps
• Satellite: Touch to view map on
aerial photo from Google Earth™.
The images are not real-time and
are approximately one to three
years old.
• Terrain: Touch to view the map
with 3D imagery and terrain from
Google Earth.
• Map: This is the default view.
This mode is used when Traffic,
Satellite, or Terrain are
unchecked.
You can add layers to view additional
information on the map.
• Buzz: Touch to view map with
comments posted by users about
a location.
• Latitude: Touch to see your
friends’ location and share yours
with them. You must sign in with
your Google account to use this
feature. See “Latitude” on
page 70.
To add more layers, such as My
Maps, Wikipedia, Transit Lines, and
Favorite Places, touch Menu >
Layers > More Layers.
To clear all your selections, touch
Menu > Layers > Clear Map.
Page 70

Latitude 70
Latitude
Latitude allows you to view your
friends’ location and share your
location with them on Google
Maps™.
Join Latitude
Access it:
> Maps > Menu >
Join Latitude
Read and accept the privacy policy,
then touch Allow & Share.
Add Friends
Access it:
> Maps > Menu >
Latitude
1. Touch Menu > Add friends.
2. Touch one of the following:
• Select from Contacts, then
touch a contact.
• Add via email address, then
enter the email address.
3. To uc h Add friends.
Share Your Location
Access it:
> Maps > Menu >
Latitude
When you receive a request to share
your location, touch one of the
following options:
• Accept and share back: Select
to see your friend’s location and
share yours to your friend.
• Accept, but hide my location:
Select to see your friend’s
location but hide yours from your
friend.
• Don’t accept: Select to disallow
sharing location between you and
your friend.
Page 71

71 Latitude
Set Your Location
Access it:
> Maps > Menu >
Latitude
1. Touch Menu > Privacy.
2. Touch one of the following:
• Detect your location: Select
to automatically update your
location.
• Set your location: Select to
manually set your location. You
can either enter an address,
choose address from contacts,
or point location on the map.
Managing Friends
Access it:
> Maps > Menu >
Latitude
Refresh Friends
Touch Menu > Refresh friends.
Show Friends on Map
Touch a friend, then touch Show on
map.
Remove Friends
1. Touch a friend.
2. To uc h Remove this friend.
3. To uc h OK.
Chat With Friends
Touch a friend, then touch Chat
using Google Talk.
Email Friends
Touch a friend, then touch Send
email.
Get Directions to Friends
Touch a friend, then touch Get
directions to view directions to a
friend’s location.
Page 72

Latitude 72
Set Shared Location
Use this function to set how you
want to share your location to a
particular friend.
1. Touch a friend.
2. Touch Sharing options.
3. Touch one of the following
options:
• Share best available
location: To allow this friend to
see your detailed location.
• Share only city level
location: To allow this friend to
see your city level location.
• Hide from this friend: This
friend cannot see your location.
Hide Your Location
Access it:
> Maps > Menu >
Latitude
Touch Menu > Privacy > Hide
your location to hide your location
from your friends.
Check Nearby Places
Use this function to check for
landmarks close to your friend’s
location.
Access it:
> Maps > Menu >
Latitude
1. Touch a friend.
2. To uc h What’s nearby?. Nearby
establishments are shown in a
list.
Turn Off Latitude
Access it:
> Maps > Menu >
Latitude > Menu > Privacy >
Turn off Latitude.
Page 73

73 Navigation
Navigation
Google Maps Navigation is an
Internet based GPS satellite which
allows you to search for destinations
by speaking it.
Access it:
> Navigation.
Android Manager Agent
Android Manager Agent allows you to
wirelessly synchronize your device
data, such as contacts, messages,
photos, videos, music, applications,
and calendar, with your computer via
Wi-Fi technology.
Access it:
> Android Manager
Agent
Android Market™
Android Market™ allows you to buy
and download games and other
applications to your device.
Access it:
> Market
When Android Market is opened for
the first time, the Terms of Service is
displayed. Touch Accept to continue.
To view available applications, touch a
category, then scroll through the list.
To view help, touch Menu > Help.
Search Applications
Access it:
> Market
1. Touch Menu > Search.
2. Type the application to search,
then touch .
Page 74

Android Market™ 74
Download Applications
Access it:
> Market
1. Touch the application that you
want to download.
2. Touch Install.
Remove Applications
Access it:
> Market
1. Touch the application that you
want to download.
2. Touch Uninstall.
3. Touch OK to confirm.
4. Touch a reason for removing the
application, then touch OK.
Update Applications
Access it:
> Market
1. Touch Menu > Downloads.
2. Touch and hold an application,
then touch Update to download
its updates.
Page 75

75 YouTube™
YouTube™
YouTube™ allows you to access and
watch instant videos and download or
upload videos to YouTube.
Note: Additional charges may be
incurred when using this feature.
Check with your network provider.
Access it:
> YouTube
You do not need an account to browse
and watch videos. However, you need
an account to upload videos. If you do
not have a YouTube account, visit
http://www.youtube.com
.
Watch Videos
Access it:
> YouTube
Videos are listed according to
categories: Most viewed, Most
discussed, and Top rated.
Touch a video to start playing it.
To see more video categories, touch
Menu > Categories.
Search Videos
Access it:
> YouTube
1. Touch on the upper-right
corner of the screen or touch
Menu > Search.
2. Type the video to search on the
search box, then touch .
3. Touch a video to watch it.
Manage Videos
View Video Comments
Access it:
> YouTube
Touch and hold a video, then touch
Comments.
Page 76

YouTube™ 76
Share Video Links
Access it:
> YouTube
1. Touch and hold a video, then
touch Share.
2. Touch an application for sharing.
View Videos Details
Access it:
> YouTube
Touch and hold a video, then touch
Details.
Rate Videos
Access it:
> YouTube
1. Touch and hold a video, then
touch Rate.
2. Touch a number of stars to rate
the video.
Note: You must sign in to YouTube to
use this function.
Add or Remove Favorite Videos
Access it:
> YouTube
Touch and hold a video, then touch
Favorite or Unfavorite.
Note: You must sign in to YouTube to
use this function.
Flag Videos
Access it:
> YouTube
Touch and hold a video, then touch
Flag.
Note: You must sign in to YouTube to
use this function.
Access Your Account
Some YouTube functions require you
to sign in to access them.
Page 77

77 YouTube™
Sign In or Create Account
Access it:
> YouTube > Menu
!?!My account.
If you have an existing YouTube
account, enter your username and
password to sign in. Otherwise,
follow the instructions on the screen
and create an account.
Upload Videos
Access it:
> YouTube > Menu
!?!My account.
1. To upload videos saved in Gallery,
touch Menu > Upload, then
browse and touch the video you
want to upload.
To record video to upload, touch
.
2. Enter a video title. If necessary,
touch More details and enter
other information.
3. When done, touch Upload.
Delete Uploaded Videos
Access it:
> YouTube > Menu
!?!My account.
Touch and hold uploaded video, then
touch Delete.
Page 78

Facebook 78
Facebook
Facebook is a social networking site
that comes preinstalled on your
device.
Login to Facebook
Access it:
> Facebook
1. Enter your username and
password.
2. Touch Login.
Note: If you do not have a
Facebook account, touch Sign
Up.
When using Facebook for the
first time, you may be prompted
to synchronize your contacts with
Facebook, touch desired option,
then touch Next. Read the
helpful tips, then touch Finish.
Use Facebook
Access it:
> Facebook
• News feed: Touch to view news
feeds page.
• Profile: Touch to view your
profile.
• Friends: Touch to view and
search for friends.
• Photos: Touch to view your
photos.
• Events: Touch to view upcoming
events.
• Message: Touch to read and
send messages.
• Requests: Touch to view and
accept invitations.
• Notifications: Touch and drag
the bar upwards to display
notifications.
Page 79

79 Facebook
Update Your Status
Access it:
> Facebook >
On the What’s on your mind? text
box, type your thoughts, then touch
Share.
Write on Friends’ Wall
Access it:
> Facebook > Friends
1. Touch a friend to open his/her
profile screen.
2. On the Write something... text
box, type your thoughts, then
touch Share.
Manage Photos
Access it:
> Facebook > Photos
1. Touch an album to view.
2. Touch a photo to enlarge it.
3. Touch the screen to display view
control icons.
• To set the photo as a contact
icon or wallpaper, touch Set
as.
• To share the photo, touch
Share.
• To add a comment to the
photo, touch Comment.
• To scroll photos in the album,
touch the left or right arrows.
• To enlarger or shrink the photo,
touch the zoom control icons.
• To write a caption, touch Menu
> Edit photo.
• To delete a photo, touch Menu
> Delete photo.
Create New Albums
Access it:
> Facebook > Photos
1. Touch Menu > Create new.
2. Enter the album name and other
information.
3. To uc h Create album.
Page 80

Facebook 80
Upload Photos
Access it:
> Facebook > Photos
1. Touch an album to upload photos.
2. Touch .
3. Touch one of the following:
• Choose from Gallery, then
touch a photo.
• Capture a photo, then take a
photo.
4. Touch Upload.
Facebook Settings
Access it:
> Facebook > Menu
> Settings
• Refresh interval: Touch to set
the refresh interval time.
• Notifications: Check to receive
notifications.
• If enabled, check the type of
notifications that you want to
receive: Messages, Friend
requests, Event invites.
• To uch Vibrate to set device to
vibrate when notifications are
received.
• To uch Phone LED to flash LED
when notifications are
received.
• To uch Notification ringtone to
set notification ringtone.
• Sync Contacts: Touch to sync
Facebook contacts with your
device contacts.
• Helpful tips: Touch to view tips.
Page 81

81 Twitter™
Twitter™
Twitter™ comes preinstalled on your
device
Note: Additional charges may be
incurred when using this feature.
Check with your network provider.
Access it:
> Twitter
Login to Twitter
Access it:
> Twitter
1. Enter your username or email and
password.
2. Touch Sign in.
Note: If you do not have a Twitter
account, touch Sign up now,
then follow the instructions on
screen.
When using Twitter for the first
time, you may be prompted to
synchronize your contacts with
Twitter, touch desired option,
then touch Done.
Using Twitter
Access it:
> Twitter
• Tweets: Touch to view and post
tweets.
• Lists: Touch to view and create
lists.
• Mentions: Touch to view
mentions.
• Retweets: Touch to view
retweets by categories.
• Direct messages: Touch to send
and receive direct messages.
• Profile: Touch to view and edit
your profile.
Page 82

Twitter™ 82
Update Tweets
Access it:
> Twitter >
On the What’s happening? text box,
type your thoughts, then touch
Update.
Twitter Settings
Access it:
> Twitter > Menu
> Settings
• Sync Contacts: Touch to sync
Twitter contacts with your device
contacts.
• Sync Twitter data: Check to
automatically sync Twitter data.
Note: The following settings are
available only when Sync Twitter
data is checked.
• Refresh interval: Touch to set
the refresh interval time.
• Notifications: Check to receive
notifications.
• If enabled, check the type of
notifications that you want to
receive: Tweets, Mentions,
Direct messages.
• To uch Vibrate to set device to
vibrate when notifications are
received.
• To uch Notification light to
flash LED when notifications
are received.
• To uch Notification ringtone to
set notification ringtone.
• Animate background: Check to
display animation on Twitter
background.
• Photo-upload service: Touch to
select the photo-upload service.
• URL-shortening service: Touch
to select the URL-shortening
service.
Page 83

83 News and Weather
News and Weather
News and Weather allows you to
view the weather in your location and
read the latest stories, sports, and
entertainment news headlines on
your device.
Access it:
> News and Weather
• Swipe your finger to the right or
left to browse the categories.
• Touch a headline to open
Browser and view the complete
story.
• To refresh News and Weather,
touch Menu > Refresh.
Settings
Access it:
> News and
Weather > Menu > Settings
Weather Settings
Touch Weather settings, then touch
the following options:
• Use my location: Check to
automatically determine your
location.
• Set location: Set your location
manually. To enable this function,
disable Use my location first.
• Use Celsius: Check to use
Celsius as the unit of
temperature; uncheck to use
Fahrenheit.
News Settings
Touch News settings, then touch
the following options:
• Select news topics: Select to
choose the type of news topics
to display on your device.
Page 84

News and Weather 84
• Prefetch articles: Check to
prefetch articles for faster
access.
• Prefetch images: Check to
prefetch images for faster
access.
Note: Prefetching articles or
images increases data and
battery usage.
• Display images: Check to
display images when reading
stories.
• News terms of service: Select
to view news terms of service.
Refresh Settings
Tou ch Refresh settings, then touch
the following options:
• Auto-refresh: Check to
automatically refresh news and
weather.
• Refresh interval: Select to set
the refresh interval time.
Page 85

85 Quickoffice
Quickoffice
Quickoffice allows you to open and
view Word files, Excel spreadsheets,
Power Point presentations, and PDF
files saved in your memory card or
downloaded from emails.
Access it:
> Quickoffice
• To browse for files in the memory
card, touch Browse.
• To search for files, touch Search.
• To add remote accounts, touch
Accounts.
• To check for Quickoffice updates,
touch UPDATE.
• To open the support web page,
touch SUPPORT.
• For an overview of Quickoffice,
touch EXPLORE.
Quickword
Access it:
> Quickoffice >
Quickword
Browse and touch a file to view.
View Documents
Zoom View
Touch the screen twice to display the
zoom controls.
Touch the zoom control icons to
zoom in or zoom out view.
Page or Reflow View
Touch Menu > Page View to
view the document by page.
Touch Menu > Reflow View to
view the document continuously.
Search Text
1. To search text in the document,
touch Menu > Search.
Page 86

Quickoffice 86
2. Type the text to search on the
Search box, then touch .
Other Options
• To open another document, touch
Menu > Open.
• To view the document properties,
touch Menu > Properties.
• To check for updates, touch
Menu > Updates.
• To view help, touch Menu >
More > Help.
Quicksheet
Access it:
> Quickoffice >
Quicksheet
Browse and touch the file to view.
View Worksheets
Zoom View
Touch the screen twice to display the
zoom controls.
Touch the zoom control icons to
zoom in or zoom out view.
Other Worksheet
1. Touch Menu > Worksheet.
2. Touch a worksheet name to view.
Go To Cells
1. Touch Menu > Go To Cell.
2. Enter the cell address.
3. To uc h OK.
Search Text
1. To search text in the file, touch
Menu > Search.
2. Type the text to search on the
Search box, then touch .
Page 87

87 Quickoffice
Other Options
• To open another file, touch Menu
> Open.
• To view the file properties, touch
Menu > Properties.
• To check for updates, touch
Menu > More > Updates.
• To view help, touch Menu >
More > Help.
Quickpoint
Access it:
> Quickoffice >
Quickpoint
Browse and touch the file to view.
View Slides
Zoom View
Touch the screen twice to display the
zoom controls.
Touch the zoom control icons to
zoom in or zoom out view.
Go To Slides
1. Touch Menu > Go To Slide.
2. Enter the slide number.
3. To uc h OK.
Play Slideshow
Touch Menu > Start Slideshow.
Touch the screen to display the
playback buttons. Touch the playback
buttons to go to the first slide, go to
the previous, play/pause, go to the
next slide, or go to the last slide.
To stop the slideshow, touch Menu
> Stop Slideshow.
Other Options
• To open another file, touch Menu
> Open.
Page 88

Quickoffice 88
• To view the file properties, touch
Menu > Properties.
• To check for updates, touch
Menu > Updates.
• To view help, touch Menu >
More > Help.
QuickPDF
Access it:
> Quickoffice >
QuickPDF
Browse and touch the file to view.
View PDF
Zoom View
Touch the screen twice to display the
zoom controls.
Touch the zoom control icons to
zoom in or zoom out view.
View Page
Scroll up or down to view the next or
previous page.
To go to a specific page, do the
following:
1. Touch Menu > Go To Page.
2. Enter the page number.
3. To uc h OK.
Fit Page or Fit Width
To view the whole page, touch Menu
> Fit Page.
To fit the page width, touch Menu
> Fit Width.
Other Options
• To open another file, touch Menu
> Open.
• To check for updates, touch
Menu > Updates.
• To view the file properties, touch
Menu > More > Properties.
• To view help, touch Menu >
More > Help.
Page 89

89 Calendar
Calendar
Use Calendar to view and schedule
events and set reminder alerts.
Access it:
> Calendar
Create Events
Access it:
> Calendar > Menu
> More > New event.
1. On any Calendar screen, touch
Menu > New event.
2. On the What box, type the event
name.
3. Do one of the following to set the
date and time.
• To set the date and time, touch
the From and To date and time
boxes. Touch the + or - buttons
to adjust the date and time,
then touch Set.
• If the event is an all day affair,
such as a birthday, check the
All day box. Touch the From
and To date boxes, touch the +
or - buttons to adjust the date,
then touch Set.
4. Enter the event location and
other information.
5. To set repetition, touch the
Repetition box, then touch a
repeat mode option.
6. To set a reminder alarm, touch
the Reminders box, then touch a
reminder option.
To add more reminders, touch the
+ button. You can add up to five
reminders.
7. To uc h Done.
Page 90

Calendar 90
View Events
Access it:
> Calendar
By default, the calendar is displayed
in month view mode.
To view the calendar by day, touch
Menu > Day.
To view the calendar by week, touch
Menu > Week.
To view listed events, touch Menu
> Agenda.
To go to today’s date, touch Menu
> Today.
Edit Events
Access it:
> Calendar
1. Touch a date to view scheduled
events.
2. Touch an event.
3. Touch Menu > Edit event.
4. Modify the necessary
information.
5. To uc h Done.
Delete Events
Access it:
> Calendar
1. Touch a date to view scheduled
events.
2. Touch an event.
3. Touch Menu > Delete event.
4. To uc h OK.
Sync Calendar
You can sync Calendar with your
email account.
Access it:
> Calendar > Menu
> More > Calendars
1. Select an email account to sync
Calendar.
Page 91

91 Calendar
2. Touch the email account icon to
scroll through the sync options:
• sync, visible
• synced, not visible
• not synced, not visible.
3. Touch OK.
4. Touch an event.
5. Touch Menu > Edit event.
Calendar Settings
Access it:
> Calendar > Menu
> More > Settings
The following settings are available:
• Hide declined events: Check to
hide declined events.
• Set alerts & notifications:
Touch to set alerts and
notifications.
• Select ringtone: Touch to set the
event notification ringtone.
• Vibrate: Touch to select vibrate
mode options.
• Default reminder time: Touch to
set the reminder time.
Page 92
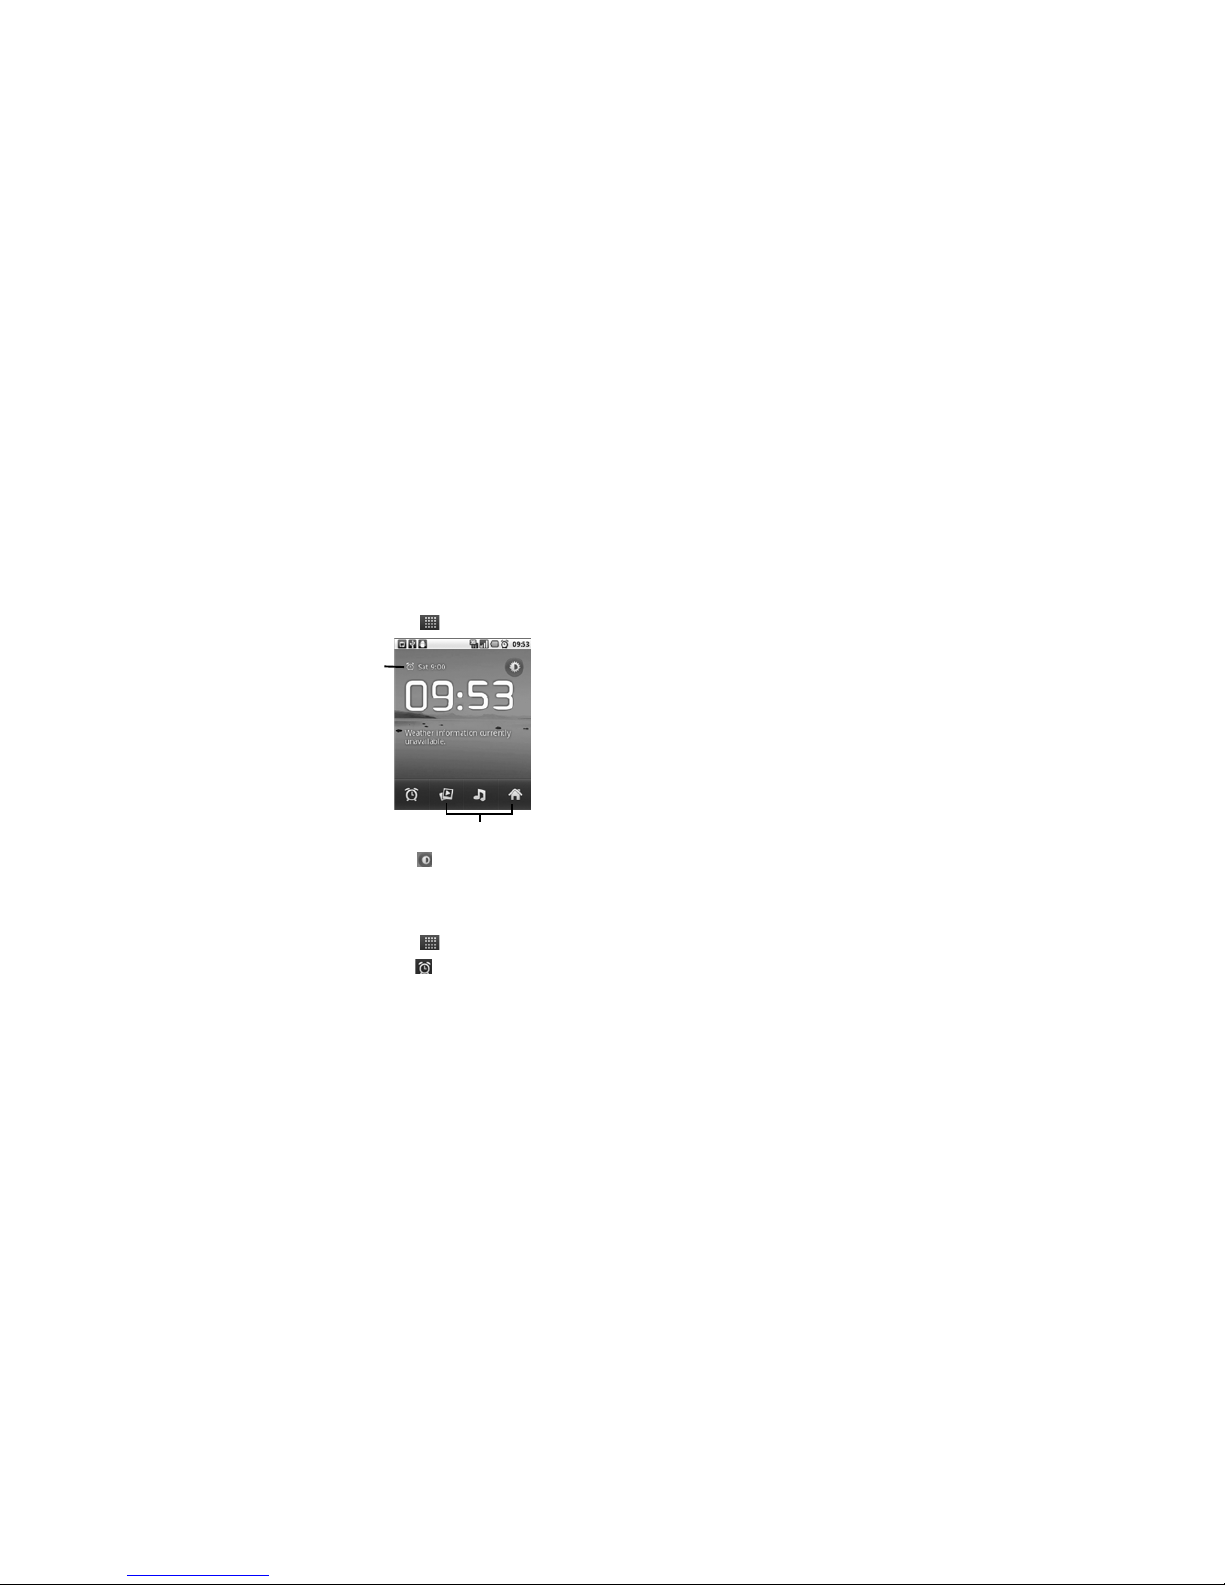
Clock 92
Clock
Access it:
> Clock
• Touch to turn the backlight on
or off.
Add Alarm
Access it:
> Clock
1. Touch .
2. To uc h Add alarm.
3. Touch the + and - icons to set the
alarm time.
4. To uc h Set.
5. To set repeat mode, touch
Repeat. Touch one or more
options, then touch OK.
6. To set the ringtone, touch
Ringtone, touch an option, then
touch OK.
7. To vibrate when alarm sounds,
check Vibrate.
8. To enter an alarm label, touch
Label.
9. To uc h Done.
Touch the icons to open its application.
Alarm
is set.
Page 93
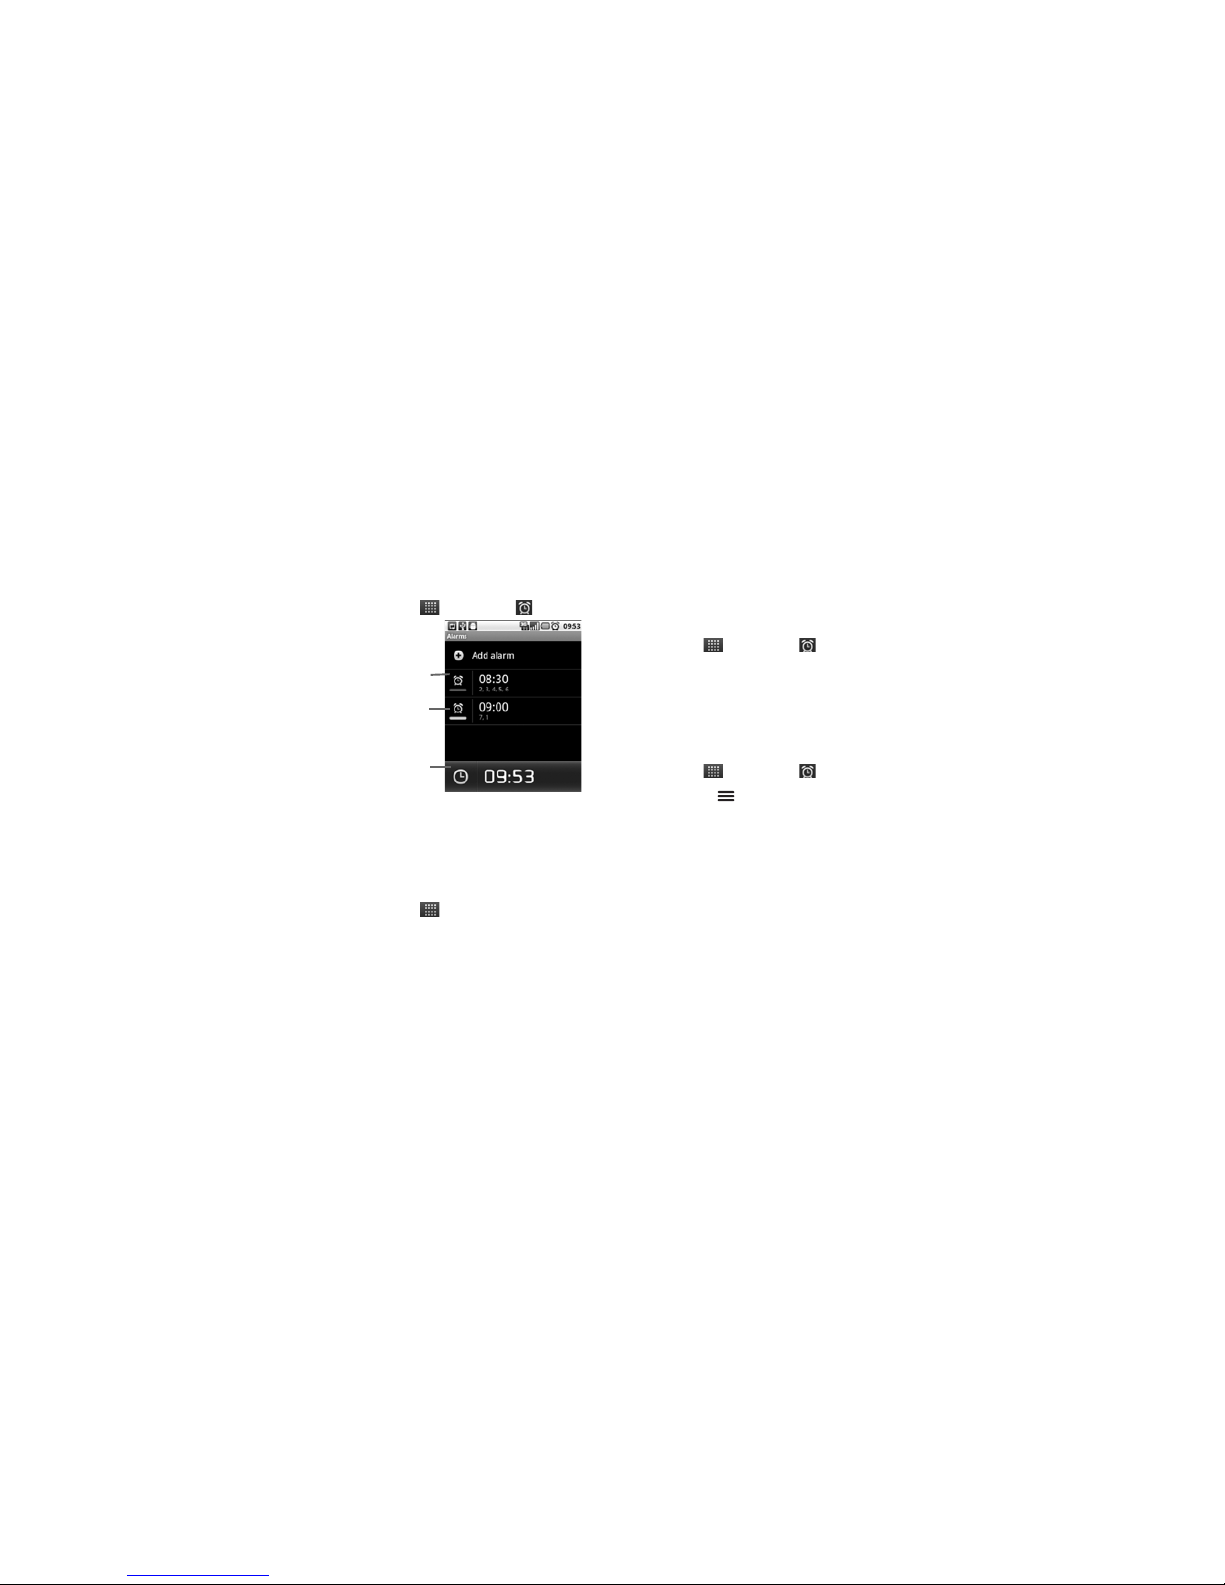
93 Clock
Turn On or Turn Off Alarm
Access it:
> Clock >
Touch the alarm icon to toggle alarm
on or off.
Edit Alarm
Access it:
> Clock
1. Touch and hold an alarm time.
2. Touch Edit alarm.
3. Modify the necessary details.
4. To uc h Done.
Delete Alarm
Access it:
> Clock >
1. Touch and hold an alarm time.
2. To uc h Delete alarm.
3. To uc h OK.
Clock Settings
Access it:
> Clock >
Touch Menu > Settings.
• Alarm in silent mode: Check to
sound alarm even in silent mode.
• Alarm volume: Touch to set the
alarm volume.
• Snooze duration: Touch to set
snooze duration.
• Volume and Camera: Touch to
set the action when the volume
Alarm icon
Alarm is
on.
Touch to
return to
Desk Clock
screen.
Page 94

FM Radio 94
buttons are pressed during an
alarm.
Dock Settings
You can dock your phone to serve as
a desk clock.
Note: The dock is an optional
accessory, contact your dealer to
purchase one. Use only the dock
recommended by the manufacturer.
Access it:
> Clock > Menu >
Dock settings
• Audio: Configure audio settings
when the phone is docked.
• Dock insertion sound: Check to
play sound when inserting or
removing the phone from the
dock.
FM Radio
Note: Before you open FM Radio,
plug the earphones to the earphone
jack first.
Access it:
> FM Radio
Touch the Power button icon to turn
the radio on or off.
To listen to radio using the phone
speakers, touch Menu > Enable
Speaker. To turn off speaker, touch
Menu > Disable Speaker.
Tune In to Stations
• Touch < or > to manually tune in
to a radio station.
• Touch and hold the frequency.
Touch + and - to set the
frequency, then touch Set.
Page 95

95 Calculator
Scan For Stations
• Touch << or >> to scan for the
preceding or succeeding radio
station.
• Touch Menu > Scan to
automatically scan for stations.
Add Station to Favorites
Touch + to add the current station to
favorites.
Touch |< or >| to tune in to the
previous or next favorite station.
Calculator
Access it:
> Calculator
Touch the keys to enter numbers and
symbols as you would do on a
standard calculator.
Basic vs. Advanced
For advanced calculations, touch
Menu > Advanced panel.
For basic calculations, Menu >
Basic panel.
Page 96

Sound Recorder 96
Sound Recorder
Access it:
> Sound Recorder
To start recording, touch .
To stop recording, touch .
To play recording, touch .
To save recording, touch Use this
recording.
To discard recording, touch Discard.
Speech Recorder
Access it:
> Speech Recorder
Speech Recorder allows you to
record voice commands, such as
“Call Bill”. When you utter these
voice commands the device will
execute the command, see “Voice
Dialer” on page 97.
To record voice commands, do the
following:
1. To uc h Record.
2. Say a command.
3. When the application recognizes
the command, it may prompt for
confirmation.
To redo recording, touch Redo.
Page 97

97 Voice Dialer
Voice Dialer
Access it:
> Voice Dialer
1. Say a command.
2. The application recognizes the
command and prompts you for
confirmation. Touch an option to
confirm.
Settings
Access it:
Menu > Settings
Wireless & Networks
Airplane mode
Check to disable all wireless
connections.
Wi-Fi
See “Wi-Fi” on page 58.
Bluetooth
See “Bluetooth™ Connection” on
page 59.
Tethering & Portable Hotspot
Touch to share your phone’s mobile
data connection via USB or as a
portable Wi-Fi hotspot.
Page 98

Settings 98
• USB tethering: Check to share
data connection via USB.
• Portable Wi-Fi hotspot: Check
to share data connection as a
portable Wi-Fi hotspot.
• Portable Wi-Fi hotspot
setting: Touch to configure
Wi-Fi hotspot.
VPN Settings
Touch to setup VPN.
Mobile Networks
• Disable data connection: Check
to disable using mobile data
network.
• Data roaming: Check to connect
to data services even when
roaming.
• 2G Network selection: Check to
activate 2G network to save
battery power.
• Access Point Names: Touch to
select an access point.
• Network operators: Touch to
select a network operator.
• Select radio band: Touch to set
the radio band.
Call Settings
Fixed Dialing Numbers
Allows you to restrict outgoing calls
from your phone to a preset list of
numbers.
• Enable FDN: Touch to the enter
SIM PIN2 of your phone to enable
FDN. You can obtain SIM PIN2
from your network provider.
Page 99

99 Settings
• Change PIN2: Touch to change
the SIM PIN2 code.
• FDN list: Touch to view the list.
Cell Broadcast SMS
• Cell Broadcast SMS: Check to
enable cell broadcast SMS.
• Channel list management:
Touch to add, remove, or edit
channel list.
• Language: Touch to select cell
broadcast language.
Voicemail Service
Touch to set the voicemail service.
Voicemail Settings
Touch to set the voicemail number.
My Phone Number
Touch to enter your phone number.
SMS Service Center
Touch to enter the SMS service
center number.
DTMF Tones
Touch to set the length of DTMF
tones.
GSM Call Settings
Touch to configure the following
settings:
• Call forwarding: Touch to
forward calls to your voicemail or
another phone number when the
following conditions are met:
Always forward, Forward when
busy, Forward when
unanswered, Forward when
unreachable.
• Call barring: Touch to restrict
outgoing calls. Touch All
Page 100

Settings 100
outgoing, Outgoing
international, Outgoing
international roaming, All
incoming, or Incoming when
roaming, then enter the
password to enable call barring.
To disable call barring, touch
Deactivate all.
To change the password, touch
Change password.
• Caller ID: Touch to display or
hide your phone number to the
recipient of your call.
• Call waiting: Check to activate
call waiting.
• Importing SIM contacts: Touch
to import one or all contacts from
the SIM card to your phone.
Advanced Settings
• TTY mode: Touch to set the TTY
mode when a teletype device is
connected to your phone.
• Hearing aids: Check to turn on
hearing aid compatibility.
Sound
Silent Mode
Check to activate silent mode.
Vibrate
Touch to select vibrate mode options.
Volume
Touch to set ringtone, media, and
alarm volume.
Phone Ringtone
Touch to set the phone ringtone.
 Loading...