

Page 1
USER MANUAL
May 2014
ENGLISH
Page 2

2
CONTENTS
BEFORE YOU START ........................................................................................... 5
Make sure you have everything ...................................................................................5
Familiarize yourself with the computer .......................................................................6
OPENING THE DISPLAY PANEL ..............................................................................6
FRONT OVERVIEW...................................................................................................7
LEFT SIDE OVERVIEW .............................................................................................9
RIGHT SIDE OVERVIEW ........................................................................................10
BACK OVERVIEW ...................................................................................................12
BOTTOM OVERVIEW..............................................................................................13
GETTING STARTED ............................................................................................ 14
Power Sources .............................................................................................................14
CONNECTING THE POWER ADAPTER ................................................................14
RECHARGING THE BATTERY ...............................................................................15
Starting Your Notebook ...............................................................................................16
POWER ON .............................................................................................................16
STATUS INDICATORS .............................................................................................17
USING FUNCTION KEYS ........................................................................................18
USING THE TOUCHPAD .........................................................................................19
USING USER DEFINED KEYS ...............................................................................20
REALTEK REALSPEED CONNECTION SPEED-UP UTILITY ................................23
HARD DRIVE ARRAY (RAID) CONFIGURATION ...................................................25
TROUBLESHOOTING ......................................................................................... 28
Identifying the Problem ...............................................................................................28
SPECIFICATIONS ................................................................................................ 30
Page 3
3
TAKING CARE OF YOUR NOTEBOOK PC
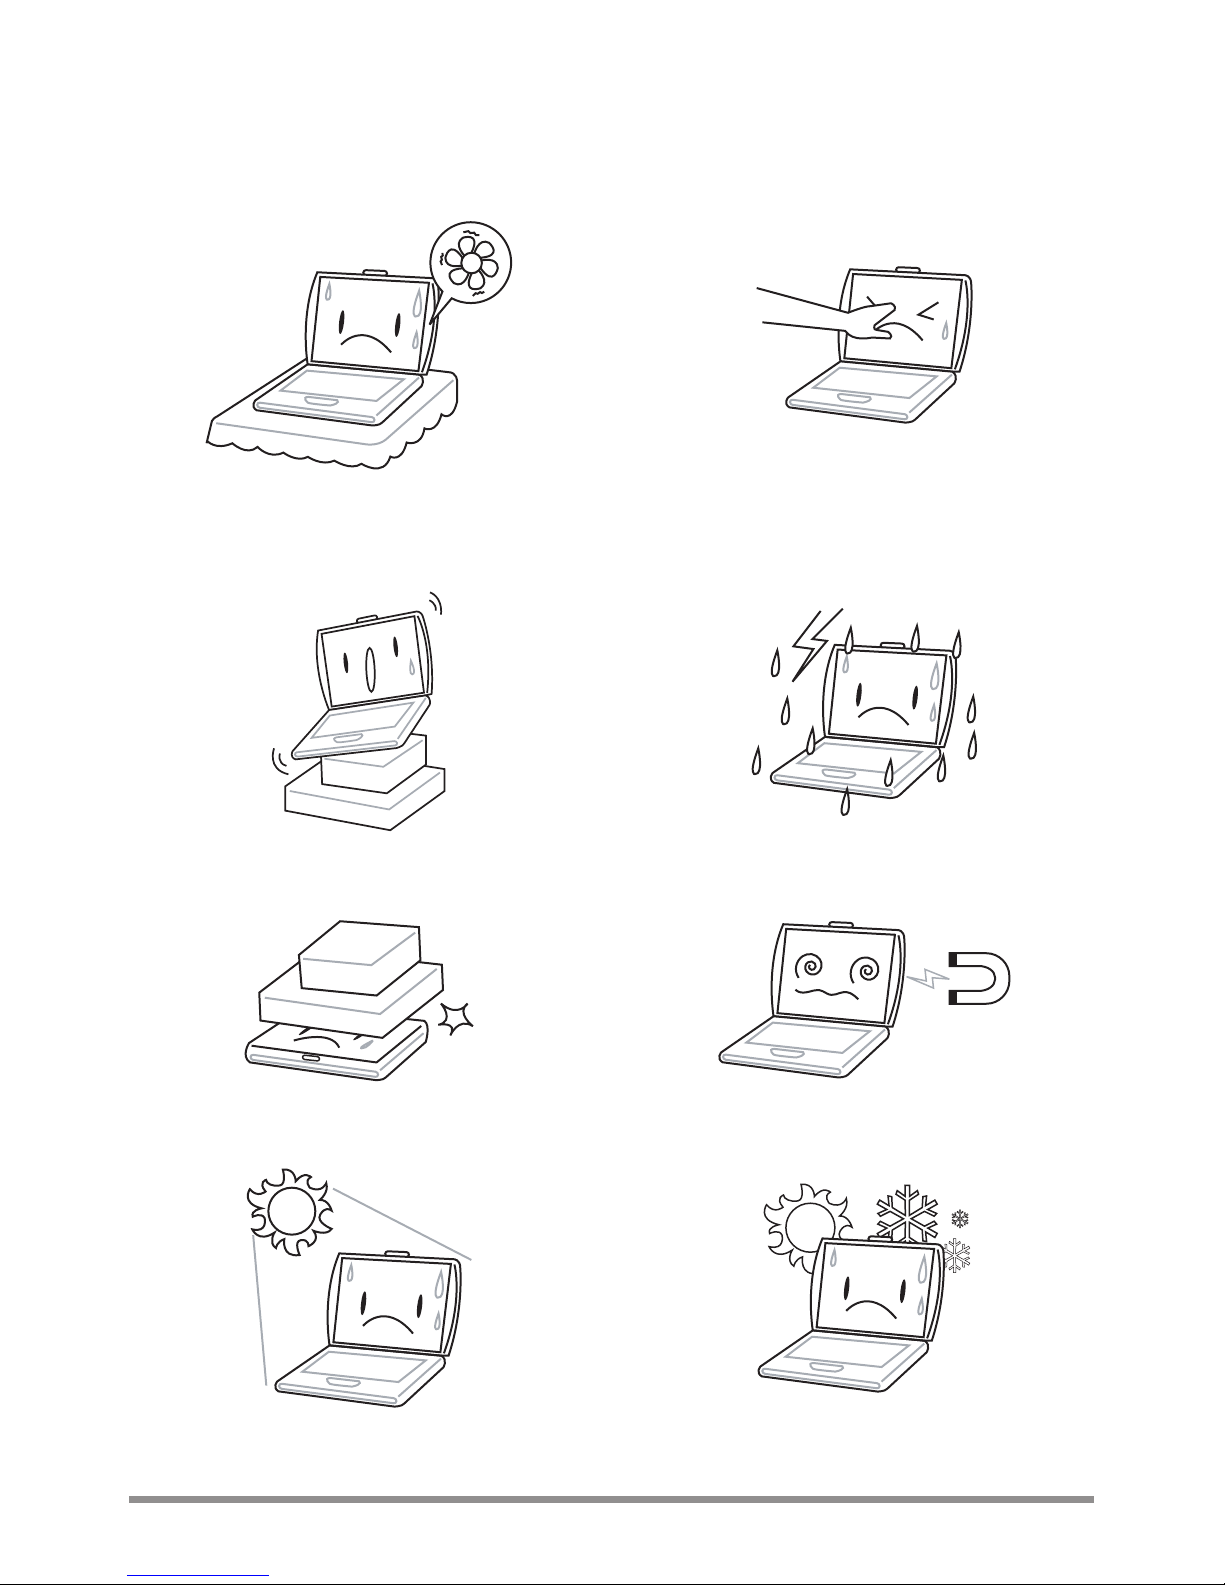
To prevent possible overheating of the computer’s
processor, make sure you don’t block the
openings provided for ventilation.
DO NOT press or touch the display panel.
DO NOT place on uneven or unstable work
surfaces.
DO NOT use your notebook computer under
harsh conditions.
DO NOT place or drop objects on the computer
and DO NOT apply heavy pressure on it.
DO NOT subject the computer to magnetic fields.
DO NOT expose to direct sunlight. DO NOT use or store in extreme temperatures.
Page 4
4
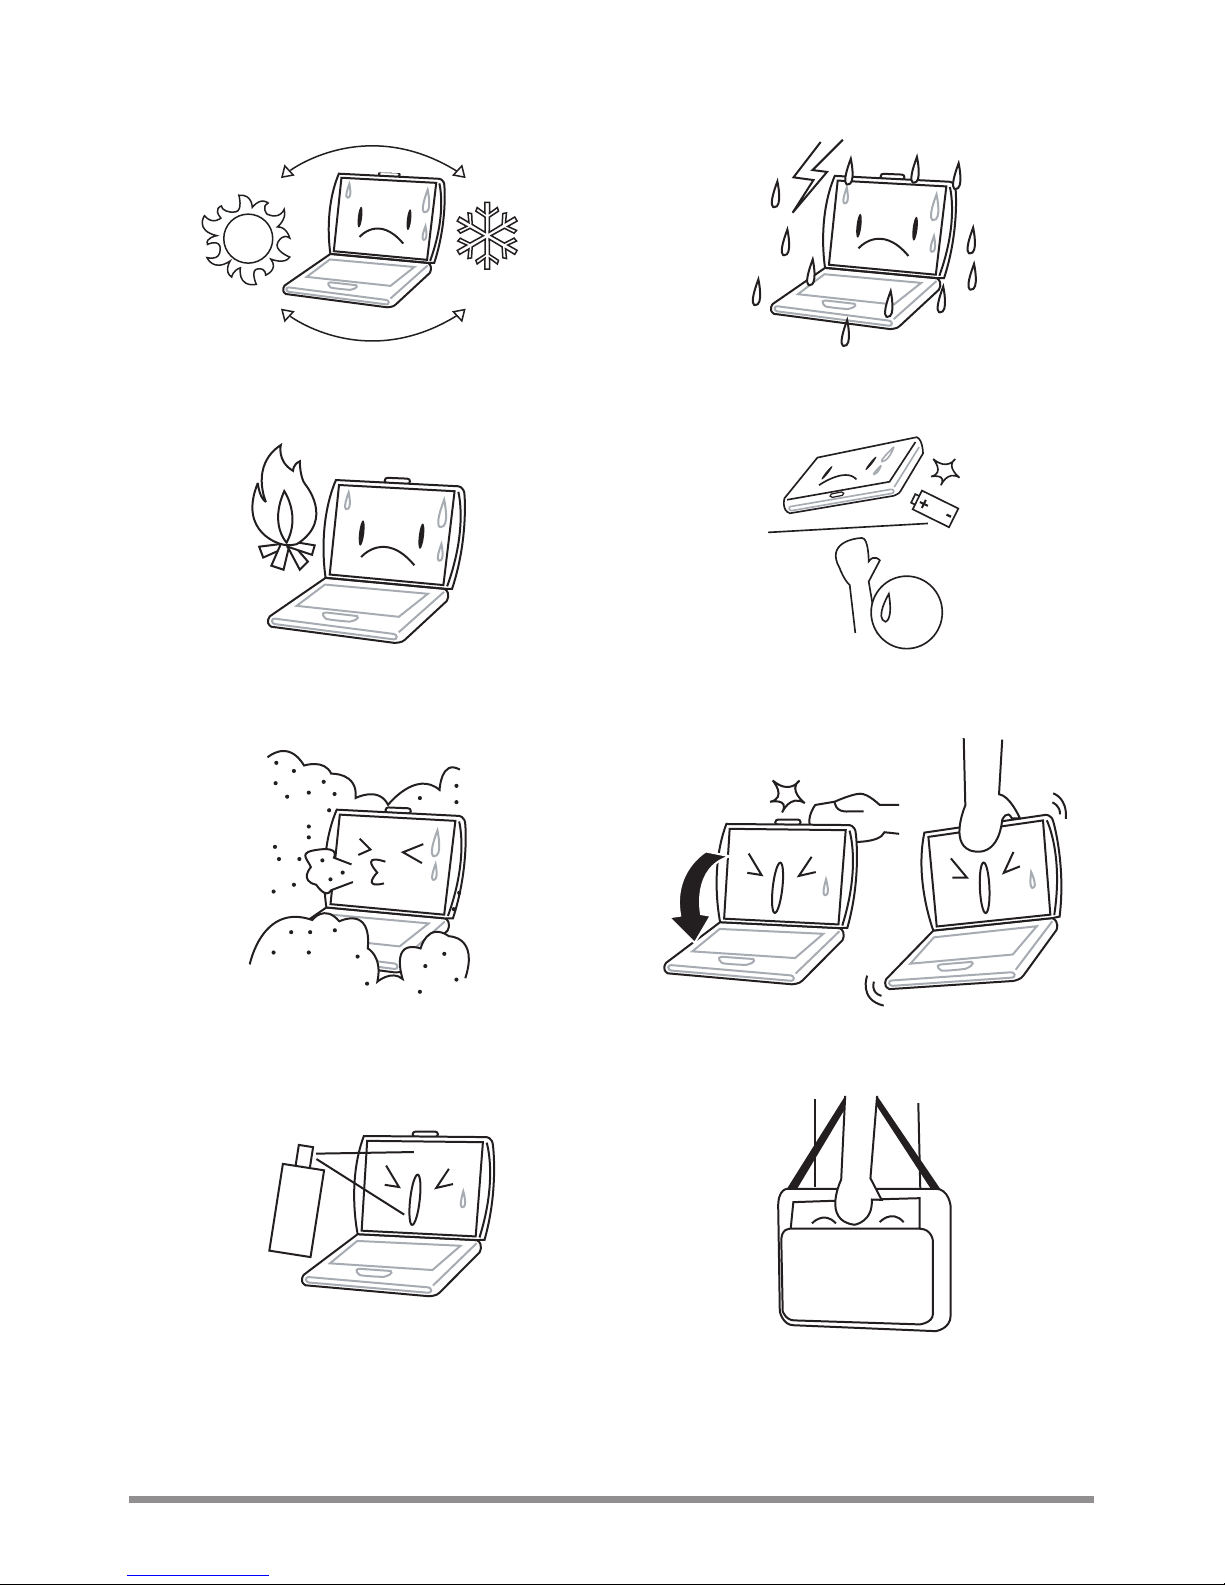
Avoid sudden changes in temperature or humidity
by keeping it away from A/C and heating vents.
DO NOT expose the computer to rain or
moisture.
DO NOT place near fire or other sources of heat. DO NOT tamper with the batteries. Keep them
away from children.
DO NOT expose to dust and/or corrosive
chemicals.
DO NOT slam your notebook shut and never pick
up or hold your notebook by the display.
DO NOT spray water or any other cleaning fluids
directly on the display.
If you are traveling with your computer, remember
to carry it as hand luggage. Do not check it in as
baggage.
Page 5

5
BEFORE YOU START
Make sure you have everything
When you receive your notebook PC, unpack it carefully, and check the packing list to make sure
your notebook system is complete.
Once you have checked and confirmed that your notebook system is complete, read through the
following pages to learn about all of your notebook components.
Depending on the model you purchased, the actual appearance of your notebook
may vary from that shown in this manual.
NOTE
Page 6
BEFORE YOU START
6
Familiarize yourself with the computer
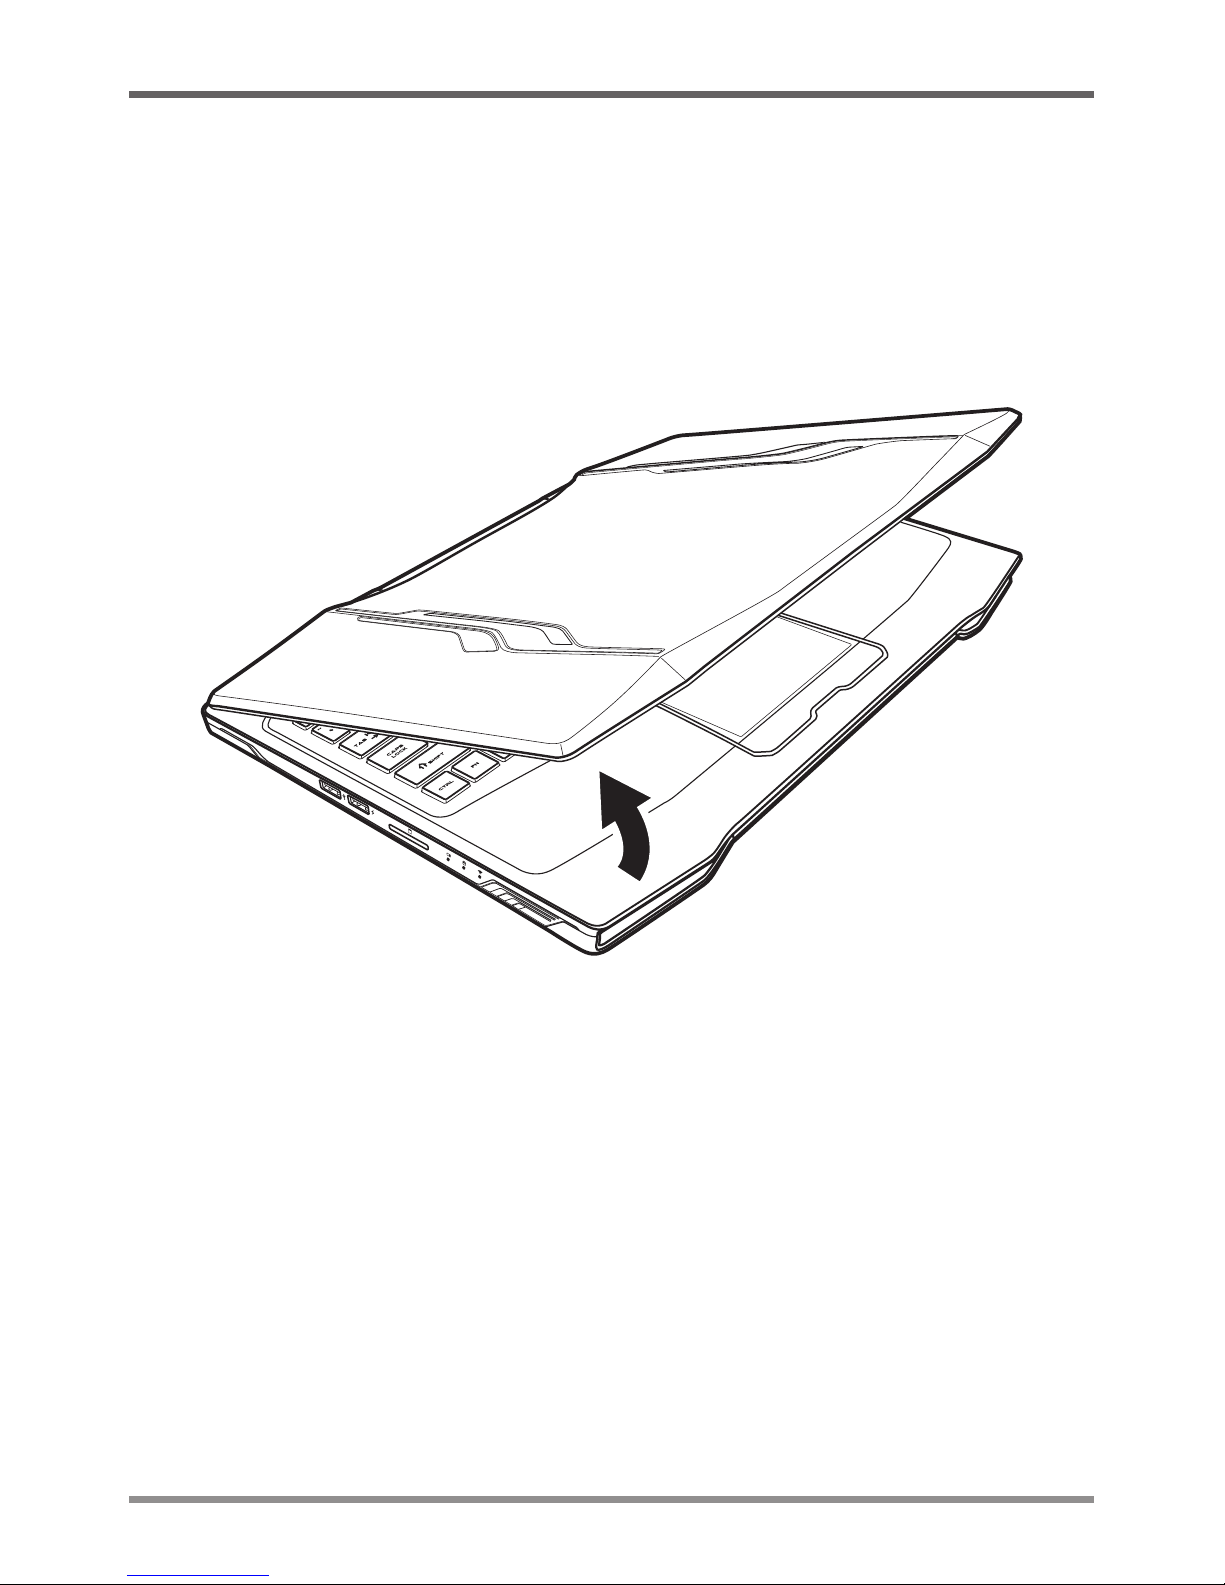
OPENING THE DISPLAY PANEL
To open the display panel, simply lift the lid up.
When closing it, be sure not to slam it shut.
Page 7
BEFORE YOU START
7
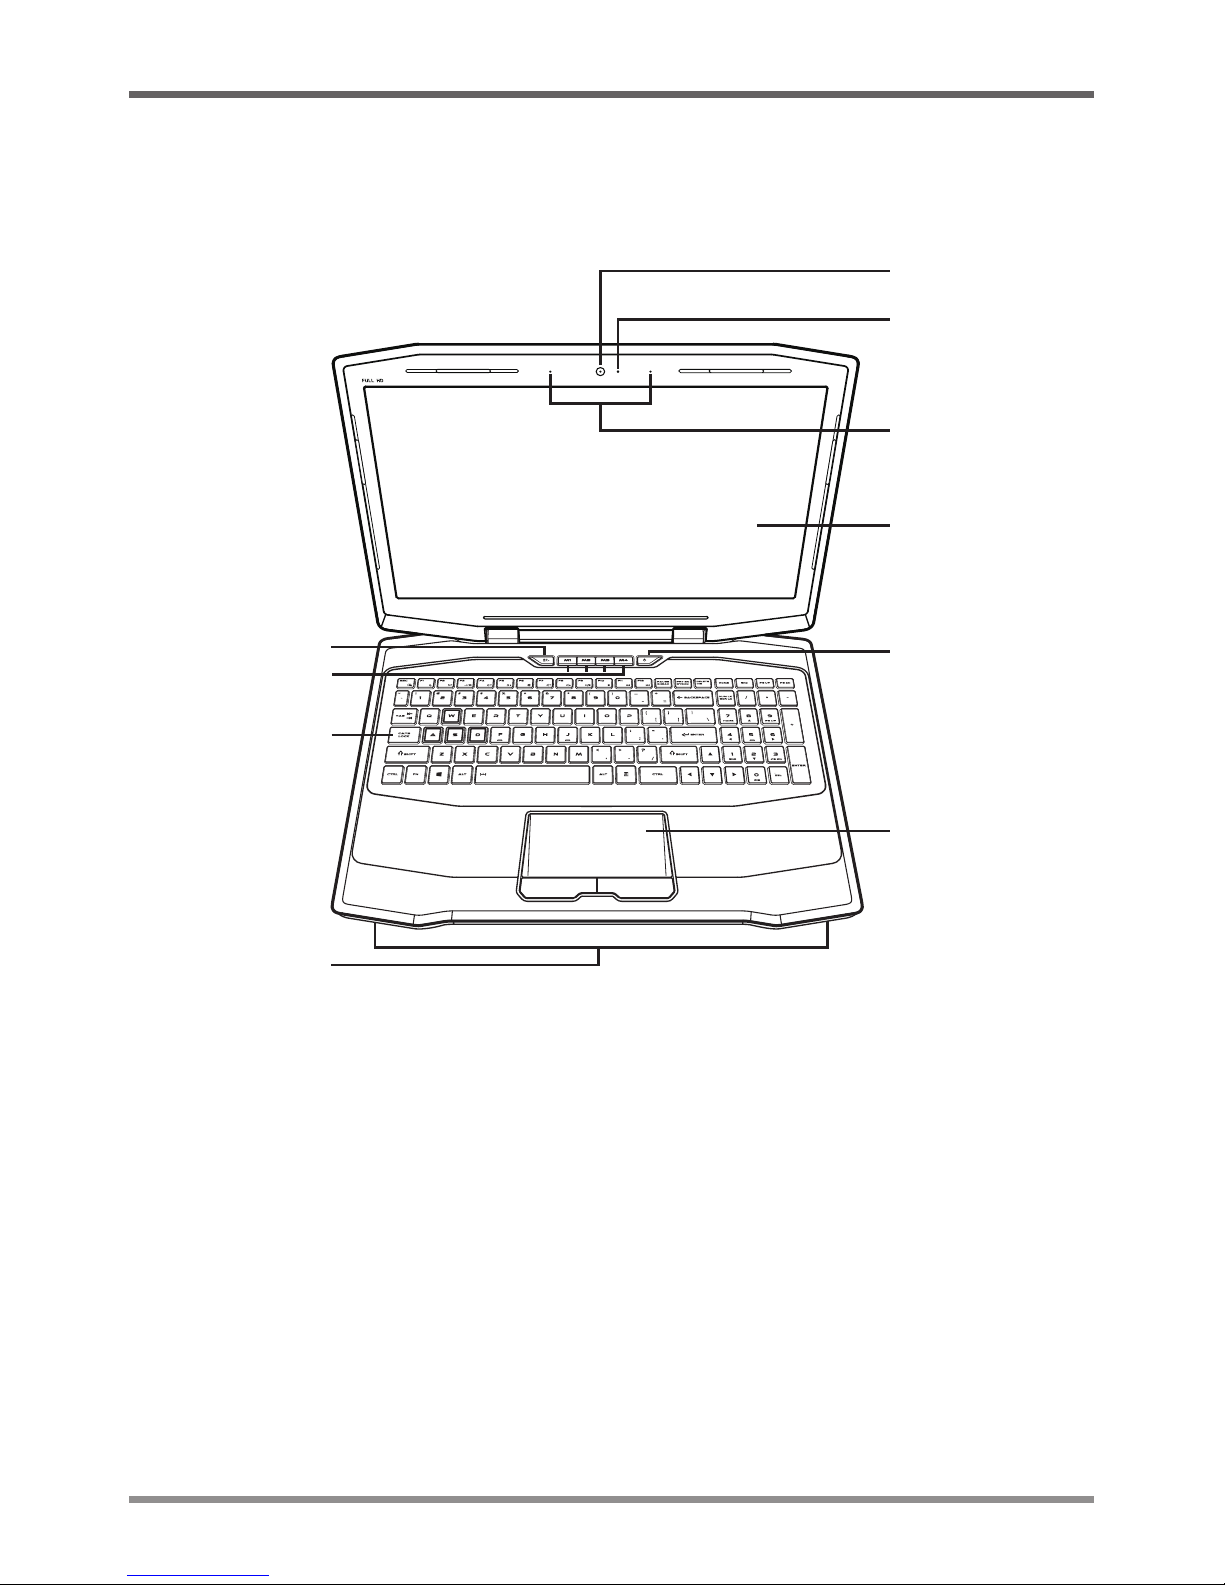
FRONT OVERVIEW
The following is an overview of the front of the notebook.
Display Panel
Suspend/Power On
Button
User Defined Keys
Backlight Button
Keyboard
Stereo Speakers
Touchpad Pointing
Device
Camera
Camera LED
Microphone
Camera
The built-in HD camera allows you to snap a photo or create a video chat or video conference
with just a click.
Camera LED
The camera LED indicates when the camera is enabled or disabled.
Microphone
The built-in microphone allows for the reception and transmission of voice and/or other audio data
to any program capable of accepting such input.
Page 8

BEFORE YOU START
8
Display Panel
The display panel is a color LCD panel with back lighting for the display of text and graphics.
Suspend/Power On Button
This button turns your notebook on and off or puts it to sleep. (See Suspend/Power On Button in
the Power On section for more information.)
Touchpad Pointing Device
The touchpad pointing device is a mouse-like cursor control with two buttons and a touch sensitive
movement pad.
Stereo Speakers
The built-in dual speakers allow for stereo sound and provide audio output for video and music
playback.
Keyboard
A full-size keyboard with numeric keys and dedicated Windows® keys.
User Defined Keys
The user defined keys are keyboard shortcuts for quick control of your notebook. You can program
your own sets of user defined keys. (See Using User Defined Keys section for more information.)
Backlight Button
The backlight button turns the LCD cover backlight and the touchpad backlight on and off.
Page 9
BEFORE YOU START
9
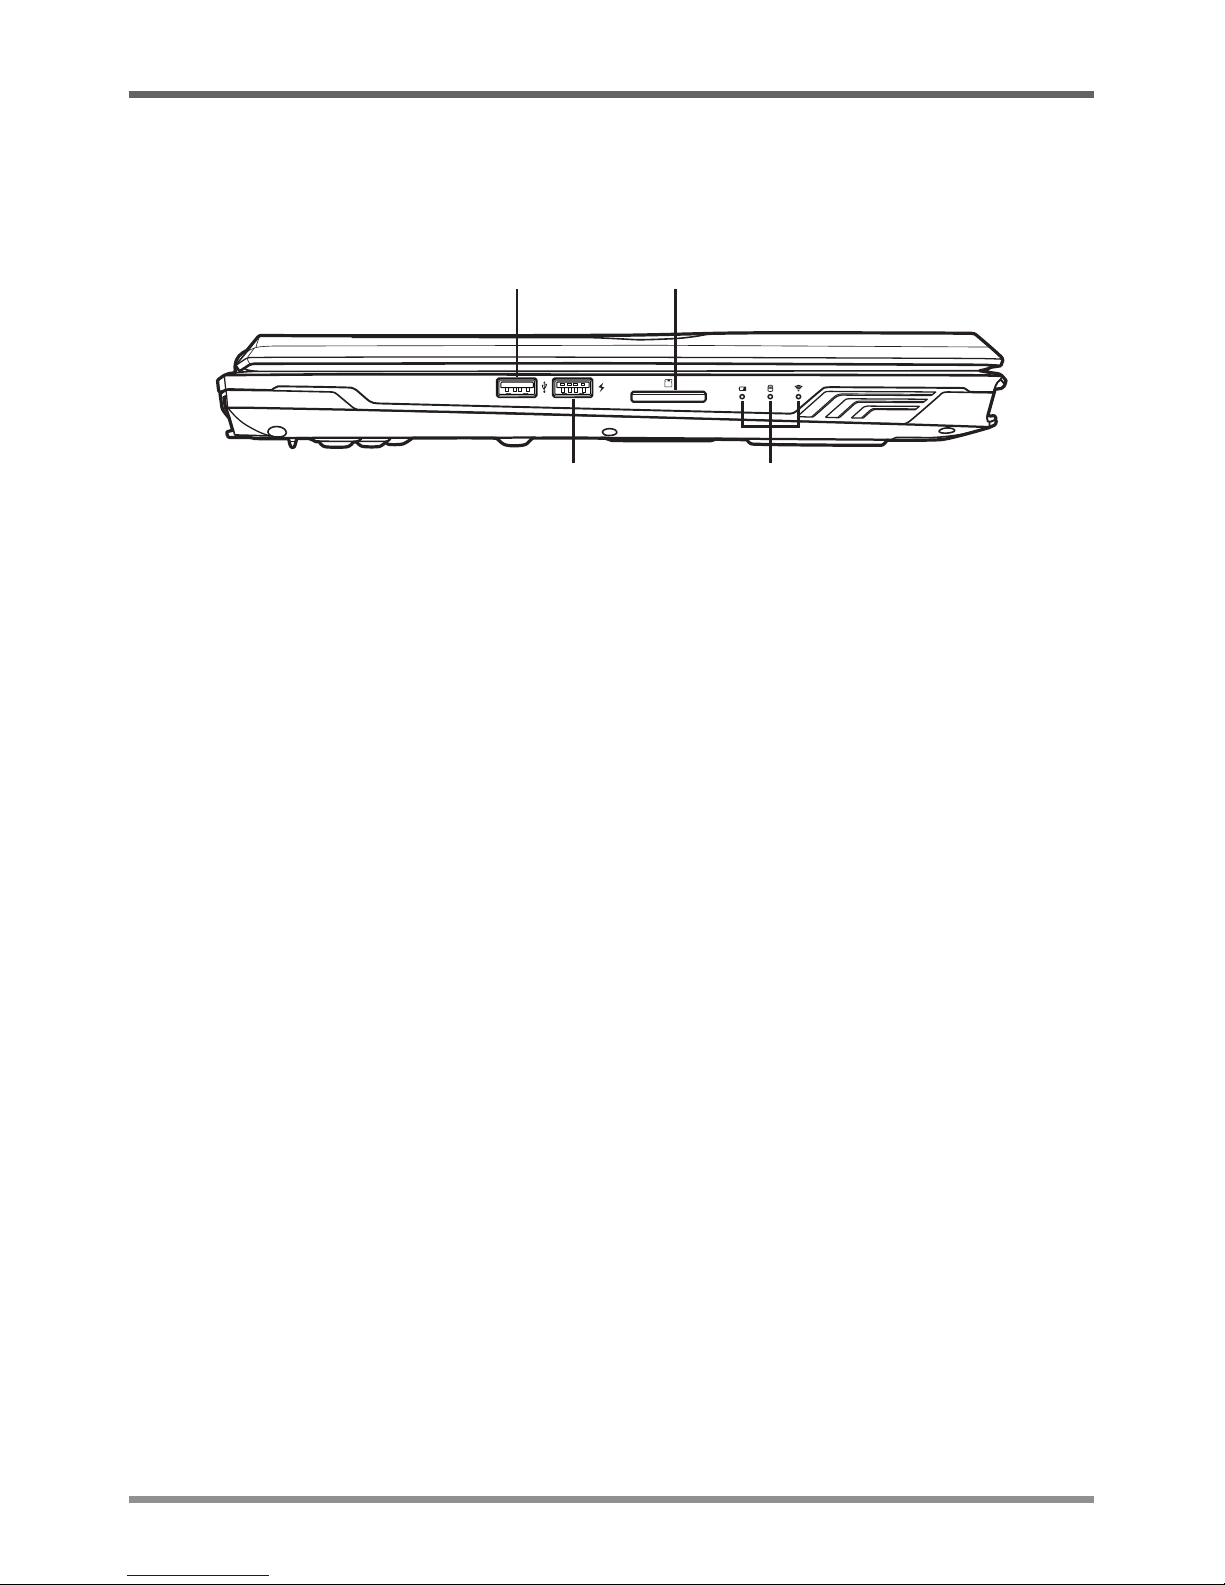
LEFT SIDE OVERVIEW
The following is a brief description of the left side of the notebook.
Memory Card ReaderUSB 3.0 Port
Status Indicator LightsUSB 2.0 Port
USB 3.0 Port
The USB 3.0 port allows you to connect Universal Serial Bus devices. It supports v3.0 of the USB
standard, which allows data exchange rates as high as 4.8 Gb/s. USB 3.0 is backwards compatible
with USB 2.0.
USB 2.0 Port
The USB 2.0 port allows you to connect Universal Serial Bus devices. It supports v2.0 of the USB
standard, which allows data exchange rates as high as 480 Mb/s. It also supports sleep-and-charge
functionality.
Memory Card Reader
The memory card reader offers a fast and easy way to transfer digital photos, music and data between
your notebook and flash compatible devices such as digital cameras, portable MP3 players, mobile
phones, tablets, and handheld devices.
Status Indicator Lights
The status indicator lights correspond to specific operating modes. These modes are: battery status,
hard disk drive (HDD) activity, and wireless LAN activity.
Page 10
BEFORE YOU START
10
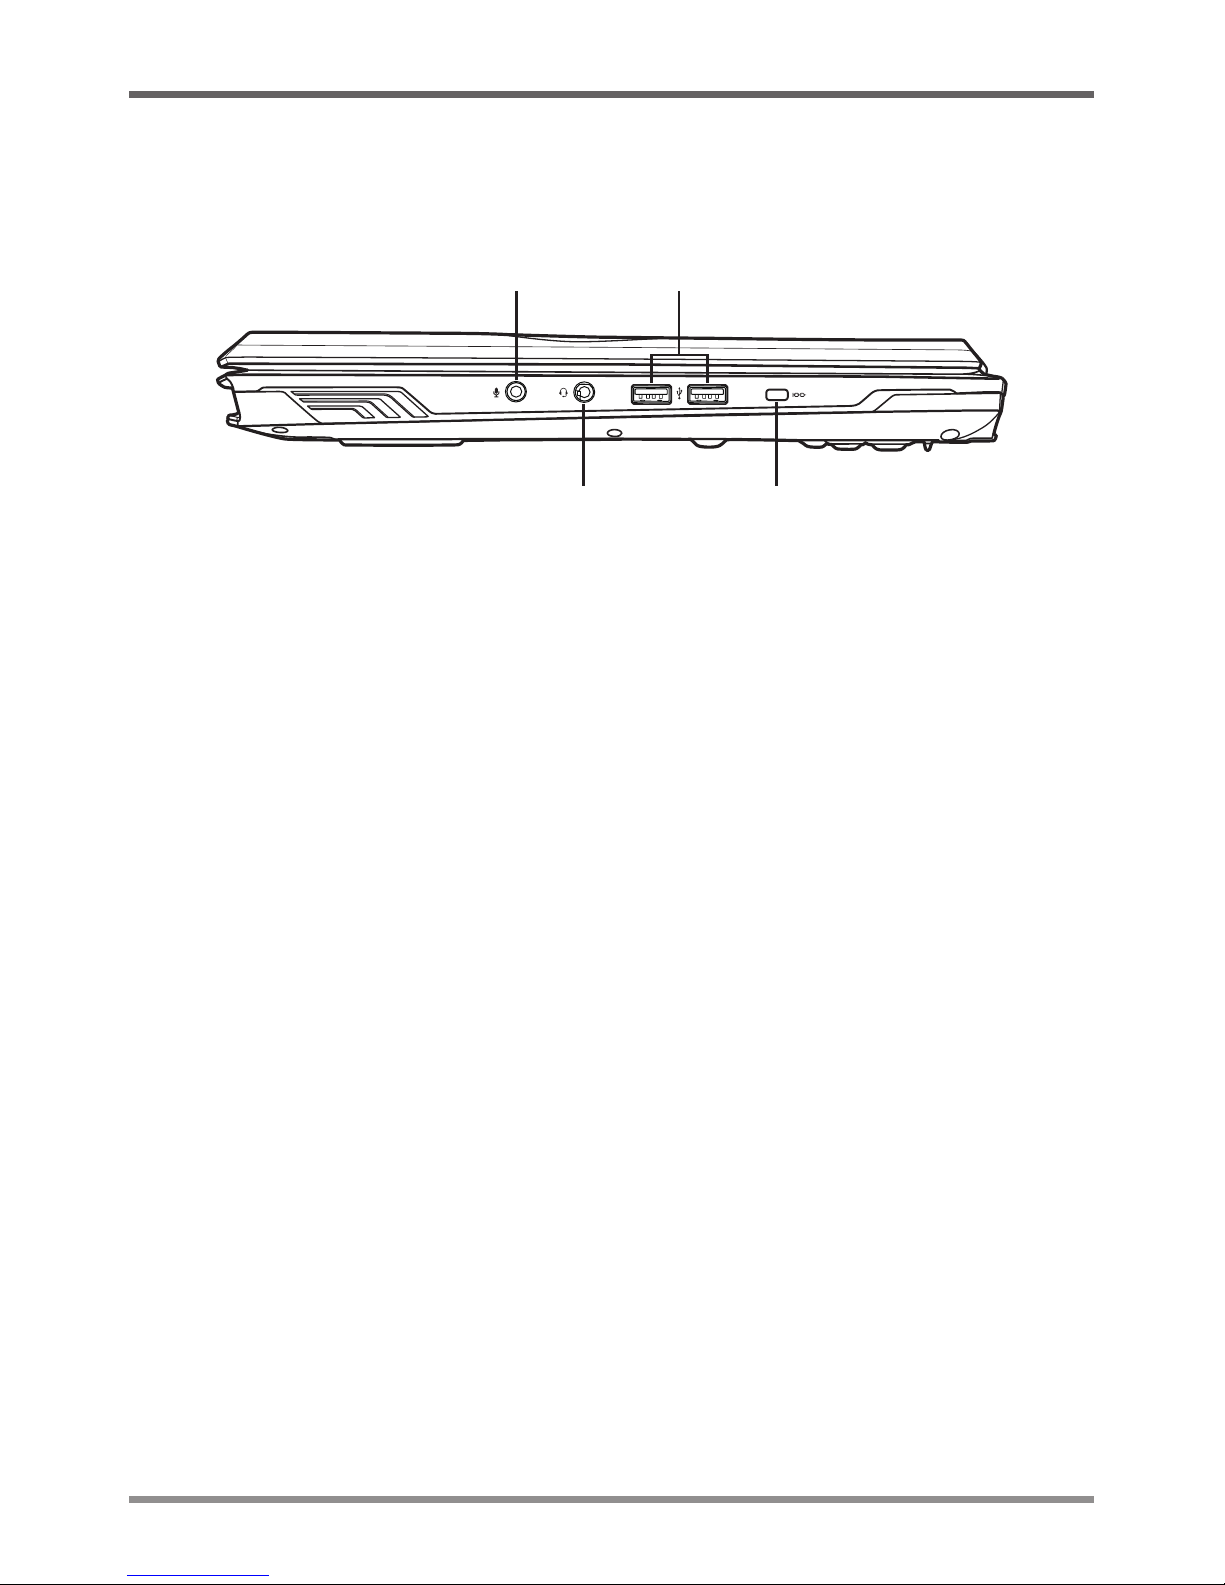
RIGHT SIDE OVERVIEW
The following is a brief description of the right side of the notebook.
USB 3.0 PortsMicrophone/SPDIF Jack
Kensington Lock Slot
Audio Combo Jack
(Headphone & Microphone)
Microphone/SPDIF Jack
The microphone/SPDIF jack allows you to connect an external mono microphone and SPDIF
compatible audio equipment.
Audio Combo Jack (Headphone & Microphone)
The audio combo jack allows you to connect headphones, external speakers, amplifiers or an
external mono microphone.
USB 3.0 Ports
The USB 3.0 ports allow you to connect Universal Serial Bus devices. They support v3.0 of
the USB standard, which allows data exchange rates as high as 4.8 Gb/s. USB 3.0 is backwards
compatible with USB 2.0.
Page 11
BEFORE YOU START
11
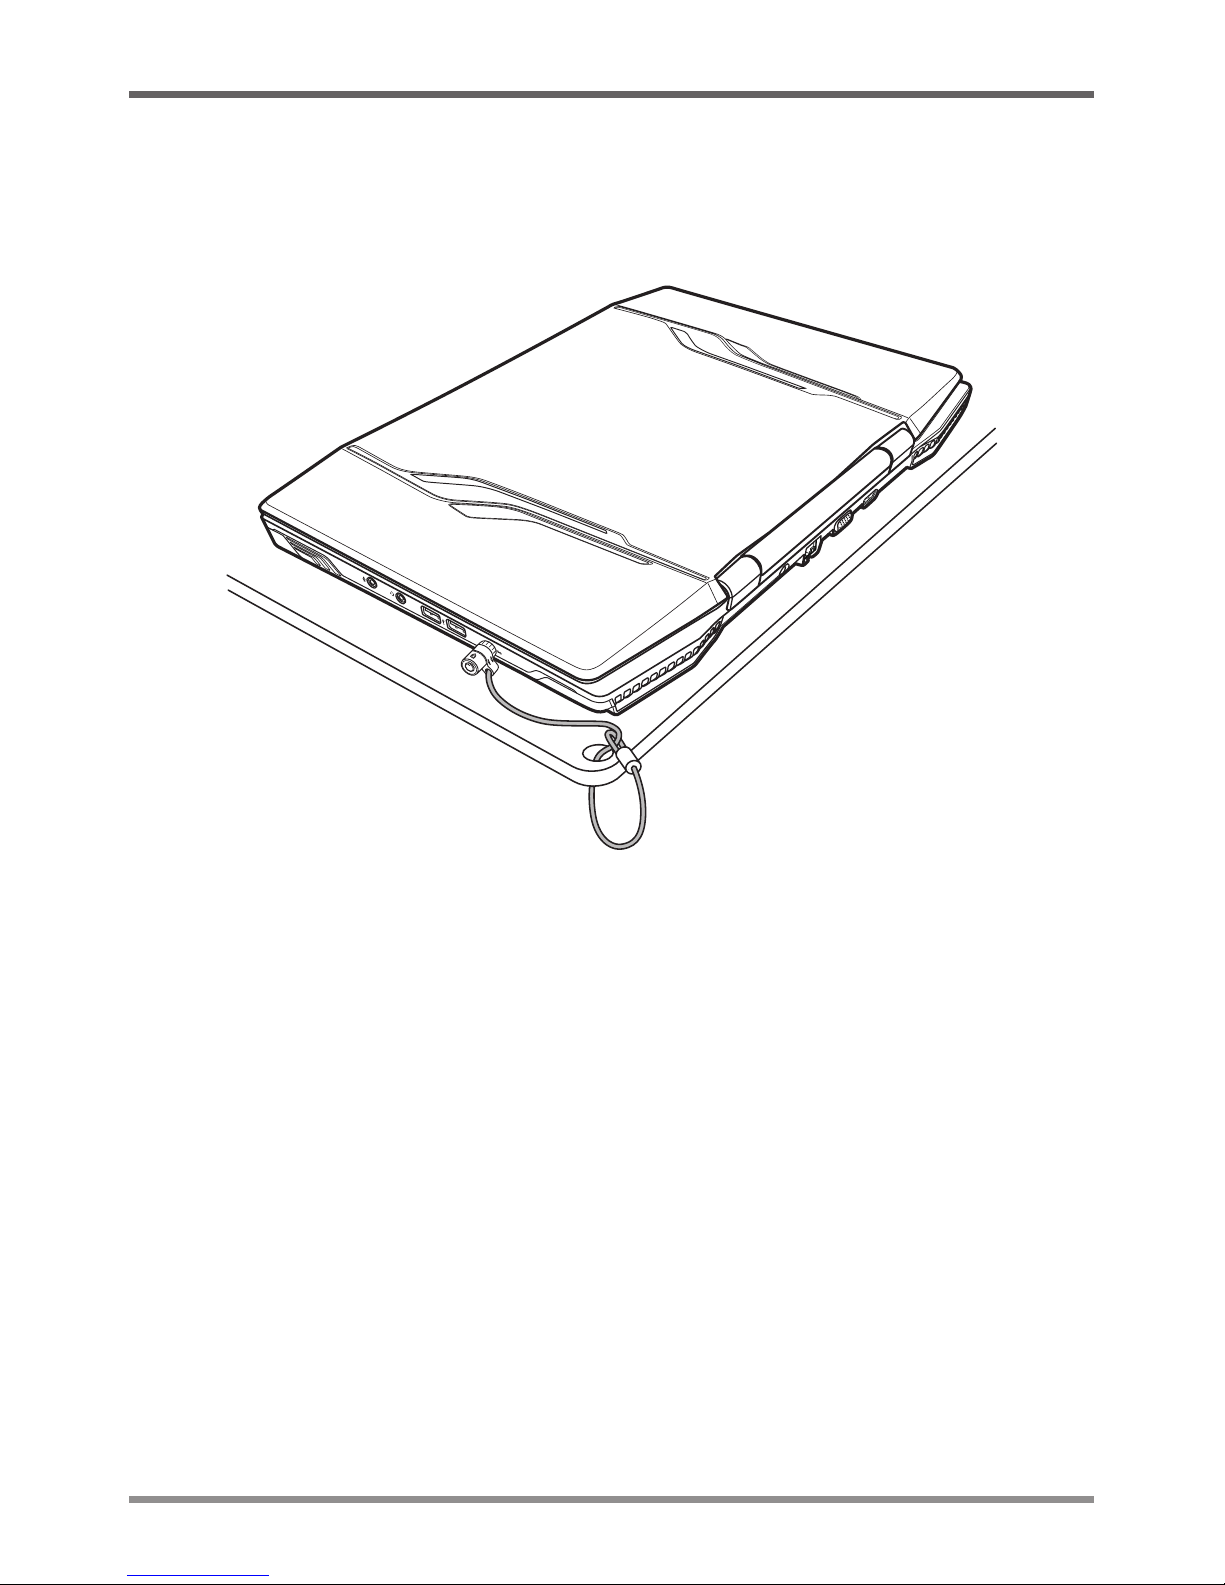
Kensington Lock Slot
The Kensington lock slot allows you to secure your notebook to an immovable object with an
optional security cable.
Page 12
BEFORE YOU START
12
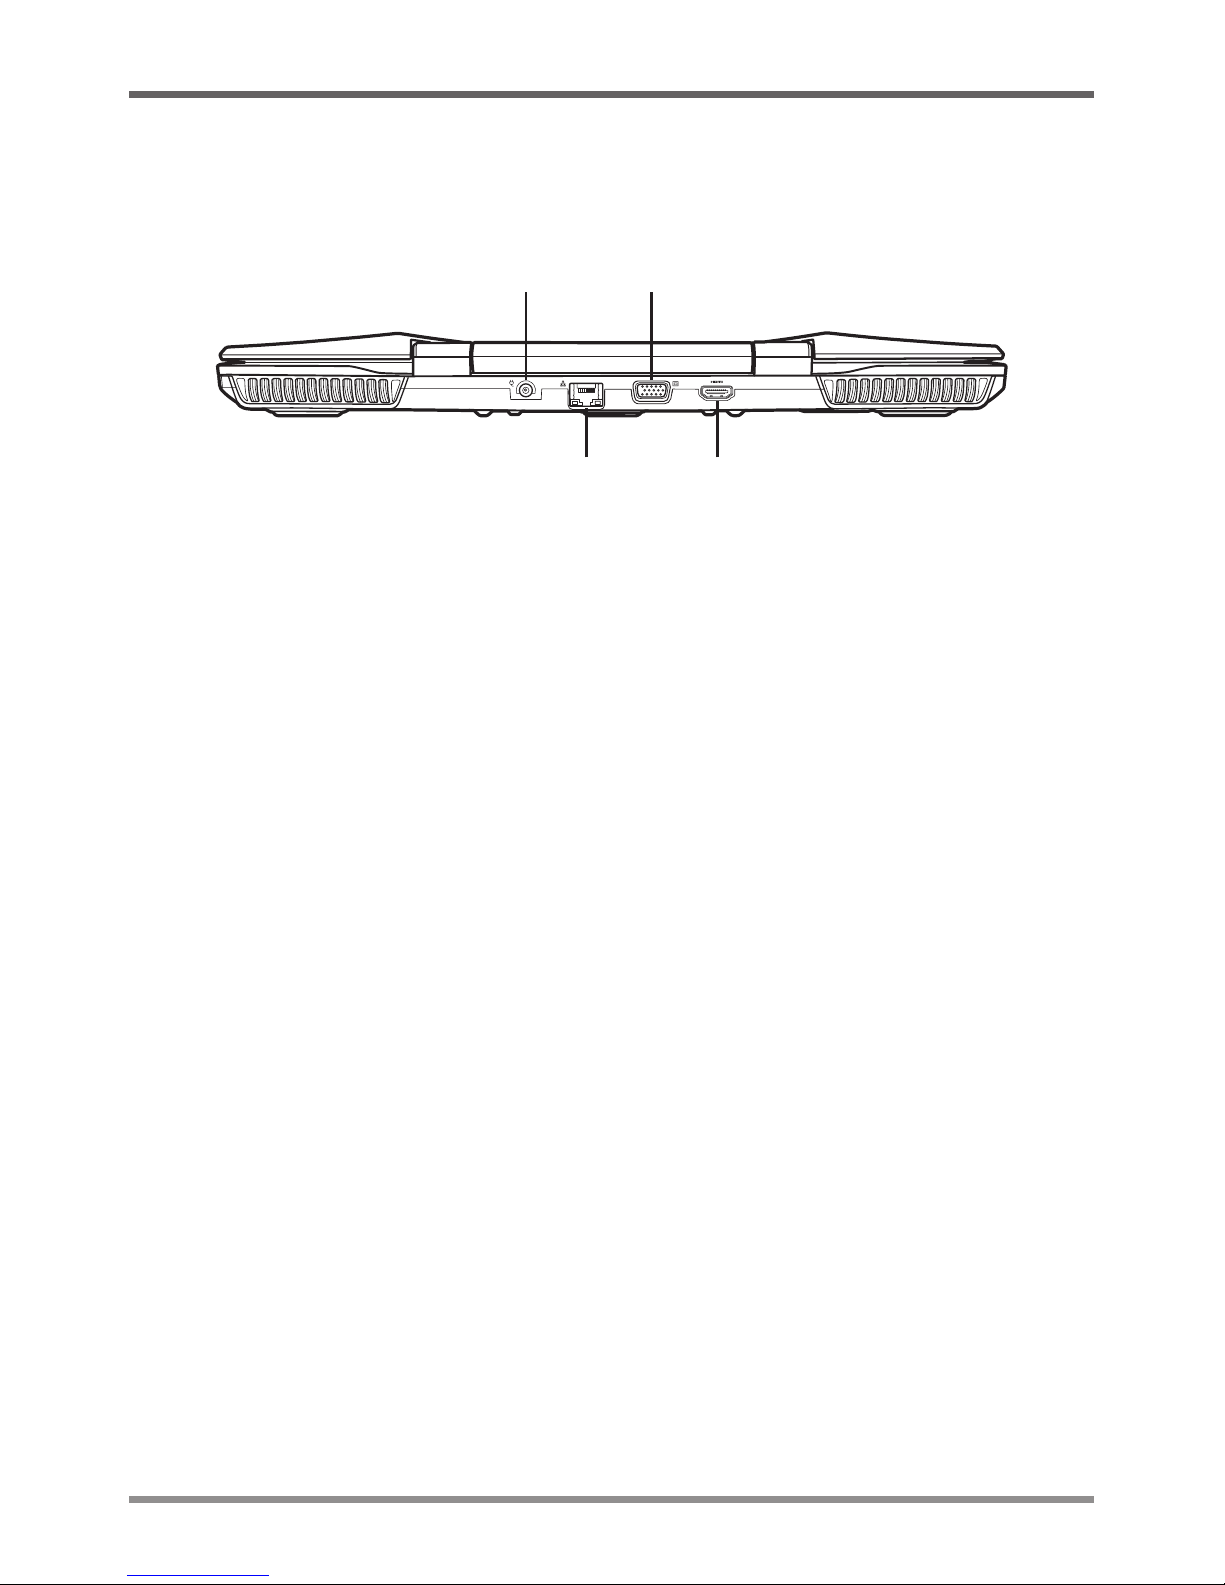
BACK OVERVIEW
The following is an overview of the back of the notebook.
External Monitor Port
Power Adapter Port
HDMI PortLAN (RJ-45) Port
Power Adapter Port
The power adapter port allows you to plug in the AC adapter to power your notebook and charge
the internal Lithium-Ion battery.
LAN (RJ-45) Port
The LAN port is designed to support a 10/100/1000 Base-T standard RJ-45 plug.
External Monitor Port
The external monitor port allows you to connect an external monitor.
HDMI Port
The HDMI port allows you to connect a video device such as a television, a projector, or a VCR
to your computer.
Page 13
BEFORE YOU START
13
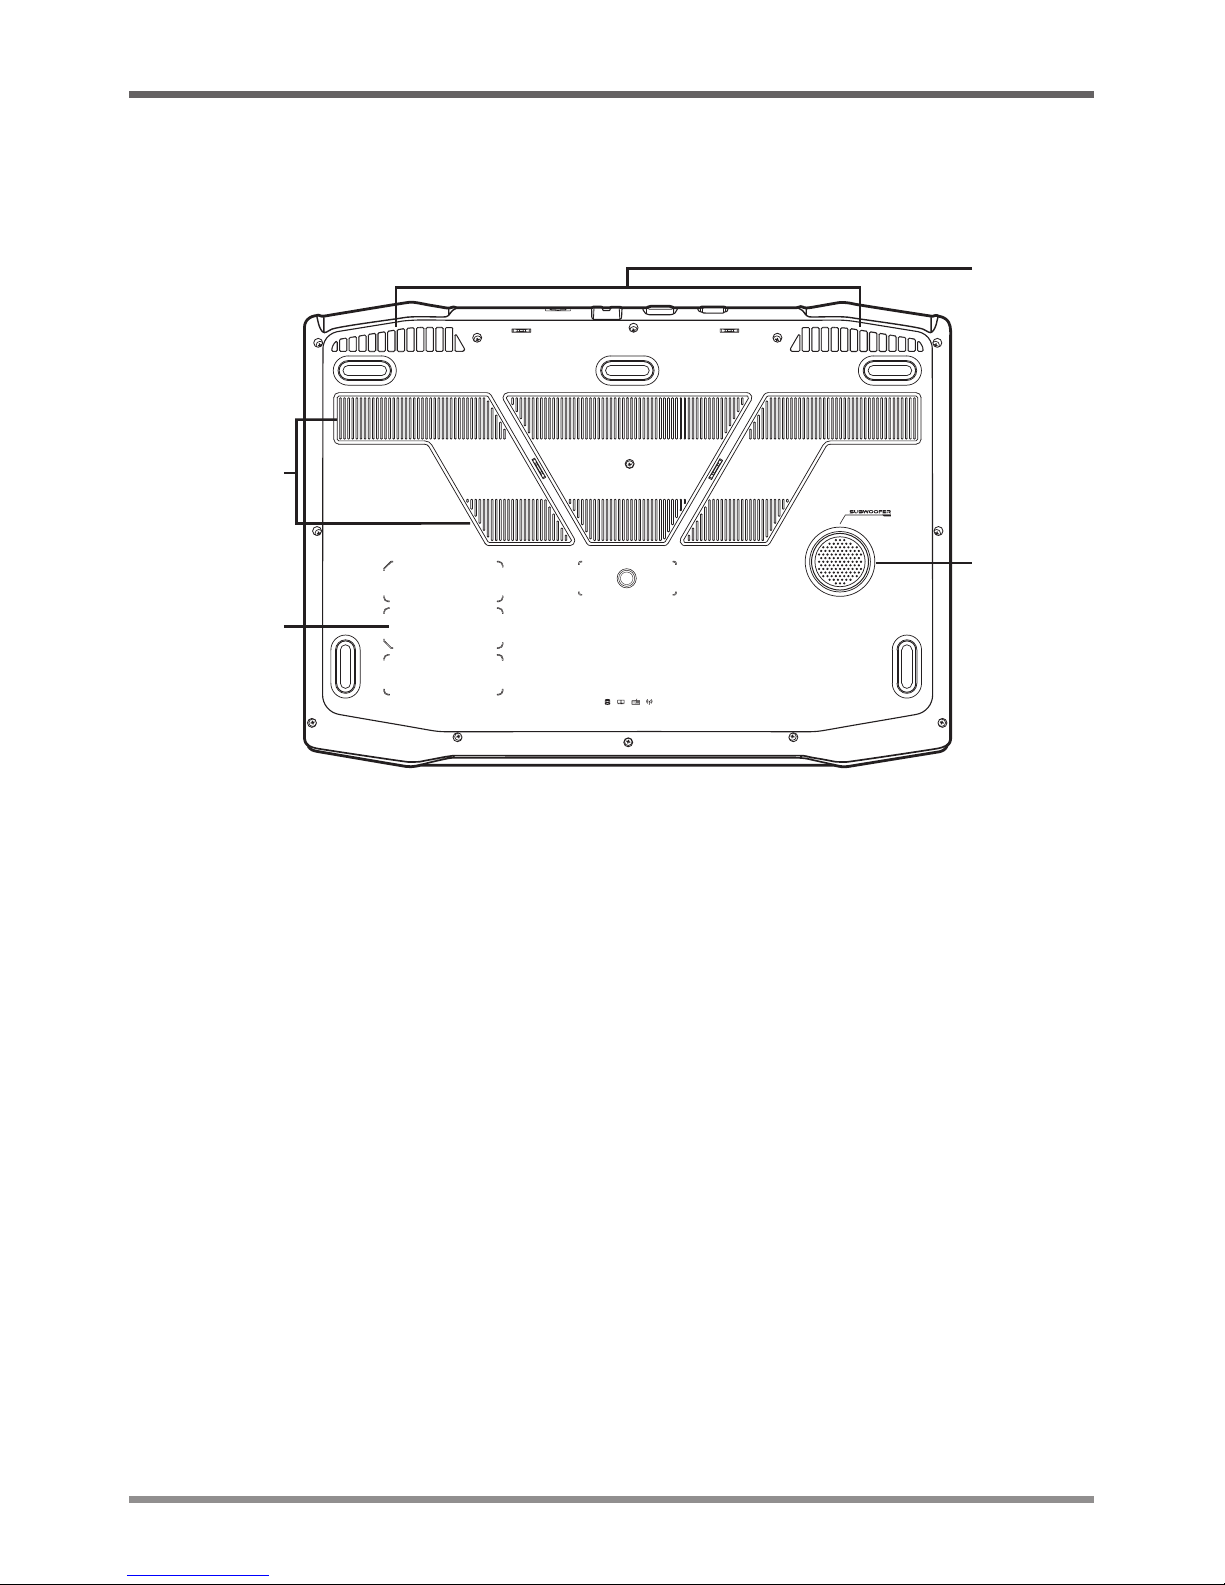
BOTTOM OVERVIEW
The following is an overview of the bottom of the notebook.
Subwoofer
Rating Label
Fan Outlets
Fan Outlets
Fan Outlets
These are open ports for the fan to dissipate heat from the computer’s internal components. Do not
block or place the computer in such a position that you inadvertently allow the outlet to become
blocked.
Subwoofer
The 3W subwoofer provides enhanced low-frequency tones (bass) to audio output from your
notebook.
Rating Label
The label shows the model number and other information about your notebook.
Page 14

14
GETTING STARTED
Power Sources
Your computer has two types of power source: a Lithium-Ion battery or an AC adapter.
CONNECTING THE POWER ADAPTER
The AC adapter provides power for operating your notebook PC and charging the battery.
Connecting the AC Adapter
1. Plug the DC output cable into the DC power jack of your notebook PC.
2. Plug the AC adapter into an AC electrical outlet.
Switching from AC Adapter Power to Battery Power
Remove the AC adapter. Your notebook will automatically switch to battery power.
The Lithium-Ion battery is not charged upon purchase. Initially, you will need to
connect the AC adapter to use your notebook PC.
NOTE
Page 15

GETTING STARTED
15
RECHARGING THE BATTERY
The Lithium-Ion battery is recharged internally using the AC adapter. To recharge the battery, make
sure the computer is connected to the AC.
There is no “memory effect” in Lithium-Ion batteries; therefore you do not need to discharge the
battery completely before recharging. The charge times will be significantly longer if your notebook
PC is in use while the battery is charging. If you want to charge the battery more quickly, put your
computer into Suspend mode, or turn it off while the adapter is charging the battery.
Low Battery State
When the battery charge is low, a notification message appears. If you do not respond to the low
battery message, the battery continues to discharge until it is too low to operate. When this happens,
your notebook PC goes into Suspend mode. There is no guarantee your data will be saved once
the notebook reaches this point.
To protect your computer from damage, use only the power adapter that came
with it because each power adapter has its own power output rating.
Once your computer goes into Suspend mode as a result of a dead battery you will be unable to
resume operation until you provide a source of power either from an adapter, or a charged battery.
Once you have provided power, you can press the Suspend/Power On button to resume operation.
In Suspend mode, your data is maintained for some time, but if a power source is not provided
promptly, the power indicator stops flashing and the goes out, in which case you have lost the
data that was not saved. Once you provide power, you can continue to use your computer while
an adapter charges the battery.
CAUTION
Page 16

GETTING STARTED
16
Starting Your Notebook
POWER ON
Suspend/Power On Button
The suspend/power on switch is used to turn on your notebook from its off state. Once you have
connected your AC adapter or charged the internal Lithium-Ion battery, you can power on your
notebook by pressing the suspend/power on button located above the keyboard. If you need to take
an extended break press the button again to turn it off.
Do not carry your notebook around with the power on or subject it to shocks or
vibration, as you risk damaging the hard disk.
When you power on your notebook, it will perform a Power On Self Test (POST) to check the
internal parts and configuration for correct functionality. If a fault is found, your computer emits
an audio warning and or displays and error message.
Depending on the nature of the problem, you may be able to continue by starting the operating
system or by entering the BIOS setup utility and revising the settings.
After satisfactory completion of the Power On Self Test (POST), your notebook loads the installed
operating system.
Never turn off your notebook during the Power On Self Test (POST), or an
unrecoverable error may occur.
CAUTION
CAUTION
Page 17
GETTING STARTED
17
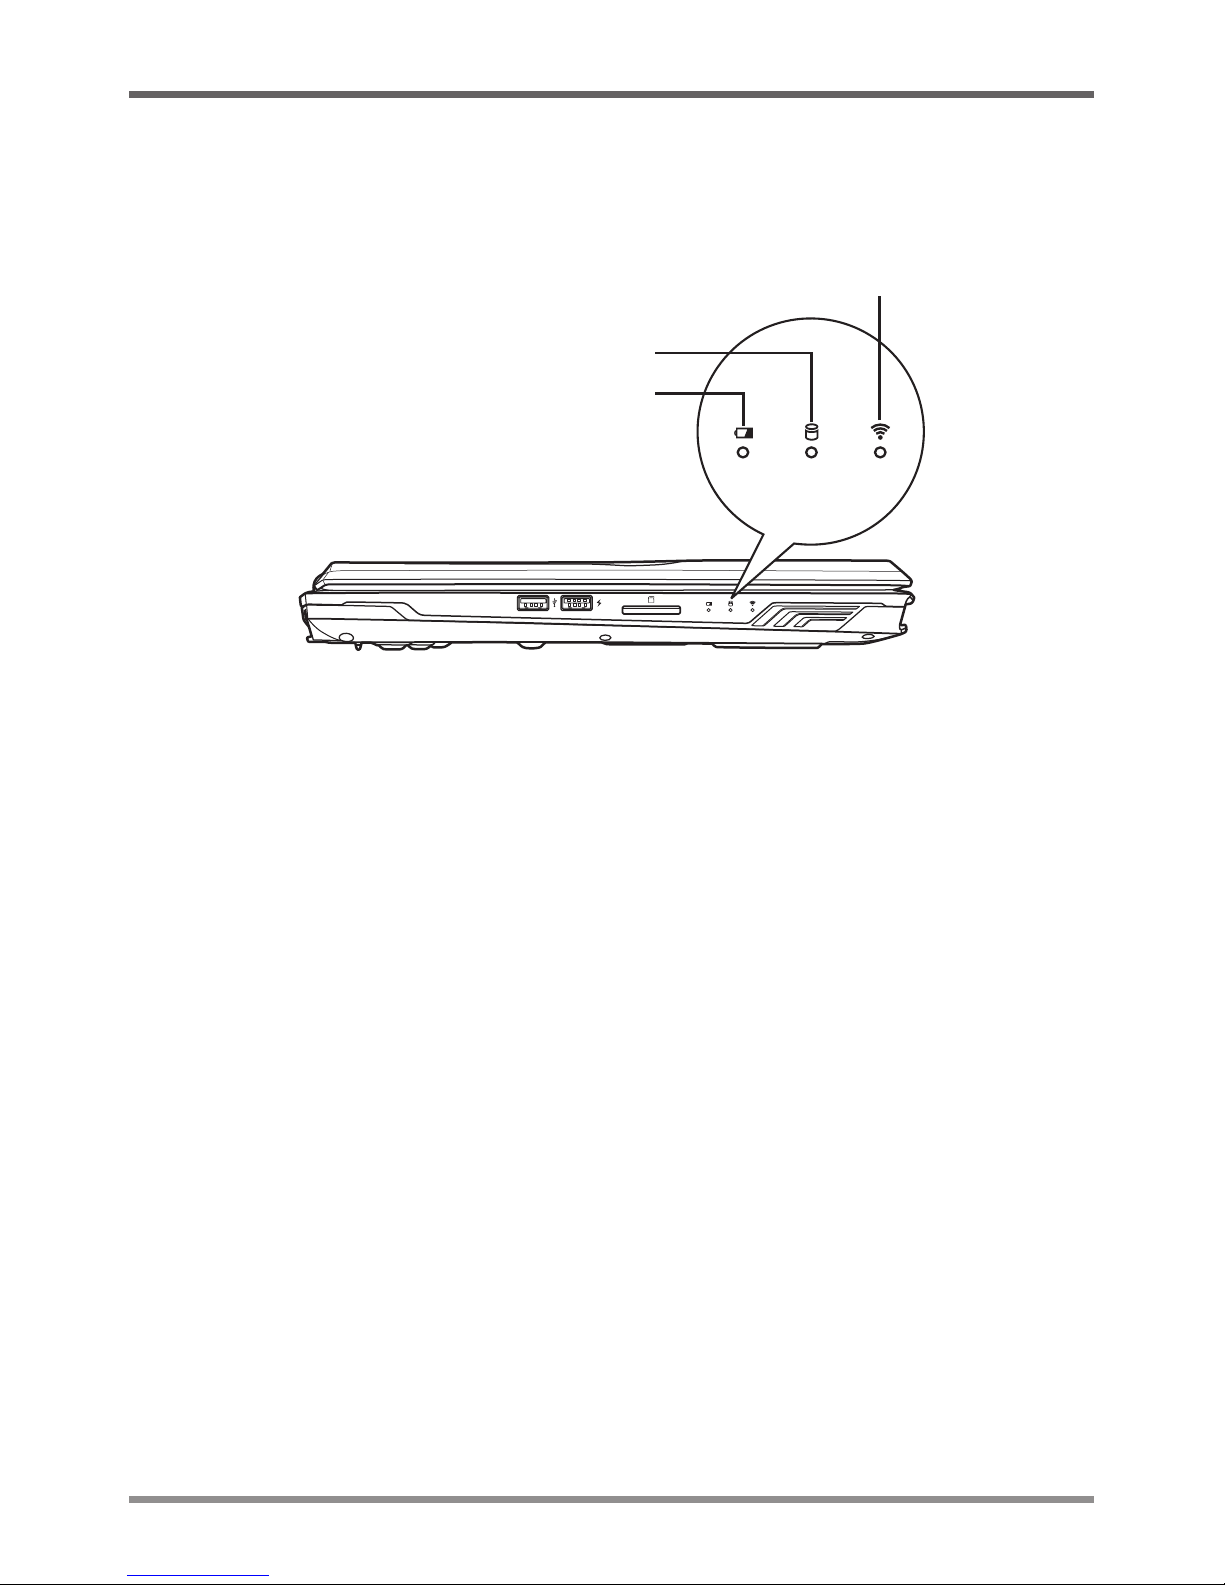
STATUS INDICATORS
The status indicator lights correspond to specific operating modes. These modes are: battery status,
hard disk drive (HDD) activity, and wireless LAN activity.
Wireless LAN Activity Indicator
Battery Status Indicator
Hard Disk Drive (HDD) Activity Indicator
Battery Status Indicator
The battery status indicator tells you the battery charge level.
• The light illuminates when the computer is operating from the battery, whether it is charging
or not.
• The light indicates:
▪ Solid White Light - Battery is above 90% capacity.
▪ Solid Amber Light - Battery is between 10% and 90% capacity.
▪ Blinking Amber Light - Battery is below 10% capacity.
▪ Fast Blinking Amber Light - Battery is at a critically low level and the system cannot be
powered on, plug the AC adapter into your notebook to charge the battery immediately.
• If the battery is not working correctly, the indicator will be off.
• Batteries subjected to shocks, vibrations or extreme temperatures can be permanently damaged.
Hard Disk Drive (HDD) Activity Indicator
The hard disk drive (HDD) activity indicator tells you whether your internal hard drive is
being accessed and, if so, how fast.
Wireless LAN Activity Indicator
The wireless LAN activity indicator tells you whether your computer is connected to a wireless
network or not.
Page 18

GETTING STARTED
18
USING FUNCTION KEYS
Your computer has 12 function keys, F1 through F12. The functions assigned to these keys differ
for each application. You should refer to your software documentation to find out how these keys
are used.
The [FN] key provides extended functions for the notebook and is always used in conjunction
with another key.
• [FN+Esc]: Enables or disables the touchpad function.
• [FN+F1]: Places the notebook in Suspend mode. Pressing the Power button returns it to active
mode.
• [FN+F2]: Enables or disables the wireless network connection.
• [FN+F3]: Allows you to change your selection of where to send your display video. Each
time you press the combination of keys you will step to the next choice. The choices, in order,
are: built-in display panel only, both built-in display panel and external monitor, or external
monitor only.
• [FN+F4]: Decreases the screen brightness.
• [FN+F5]: Increases the screen brightness.
• [FN+F6]: Mutes the computer’s volume.
• [FN+F7]: Decreases the computer’s volume.
• [FN+F8]: Increases the computer’s volume.
• [FN+F9]: Plays or pauses the current multimedia track.
• [FN+F10]: Stops the current multimedia track.
• [FN+F11]: Goes to the previous multimedia track.
• [FN+F12]: Goes to the next multimedia track.
• [FN]+Spacebar: Toggles the keyboard backlight between On (dim), On (bright), and Off.
Page 19
GETTING STARTED
19
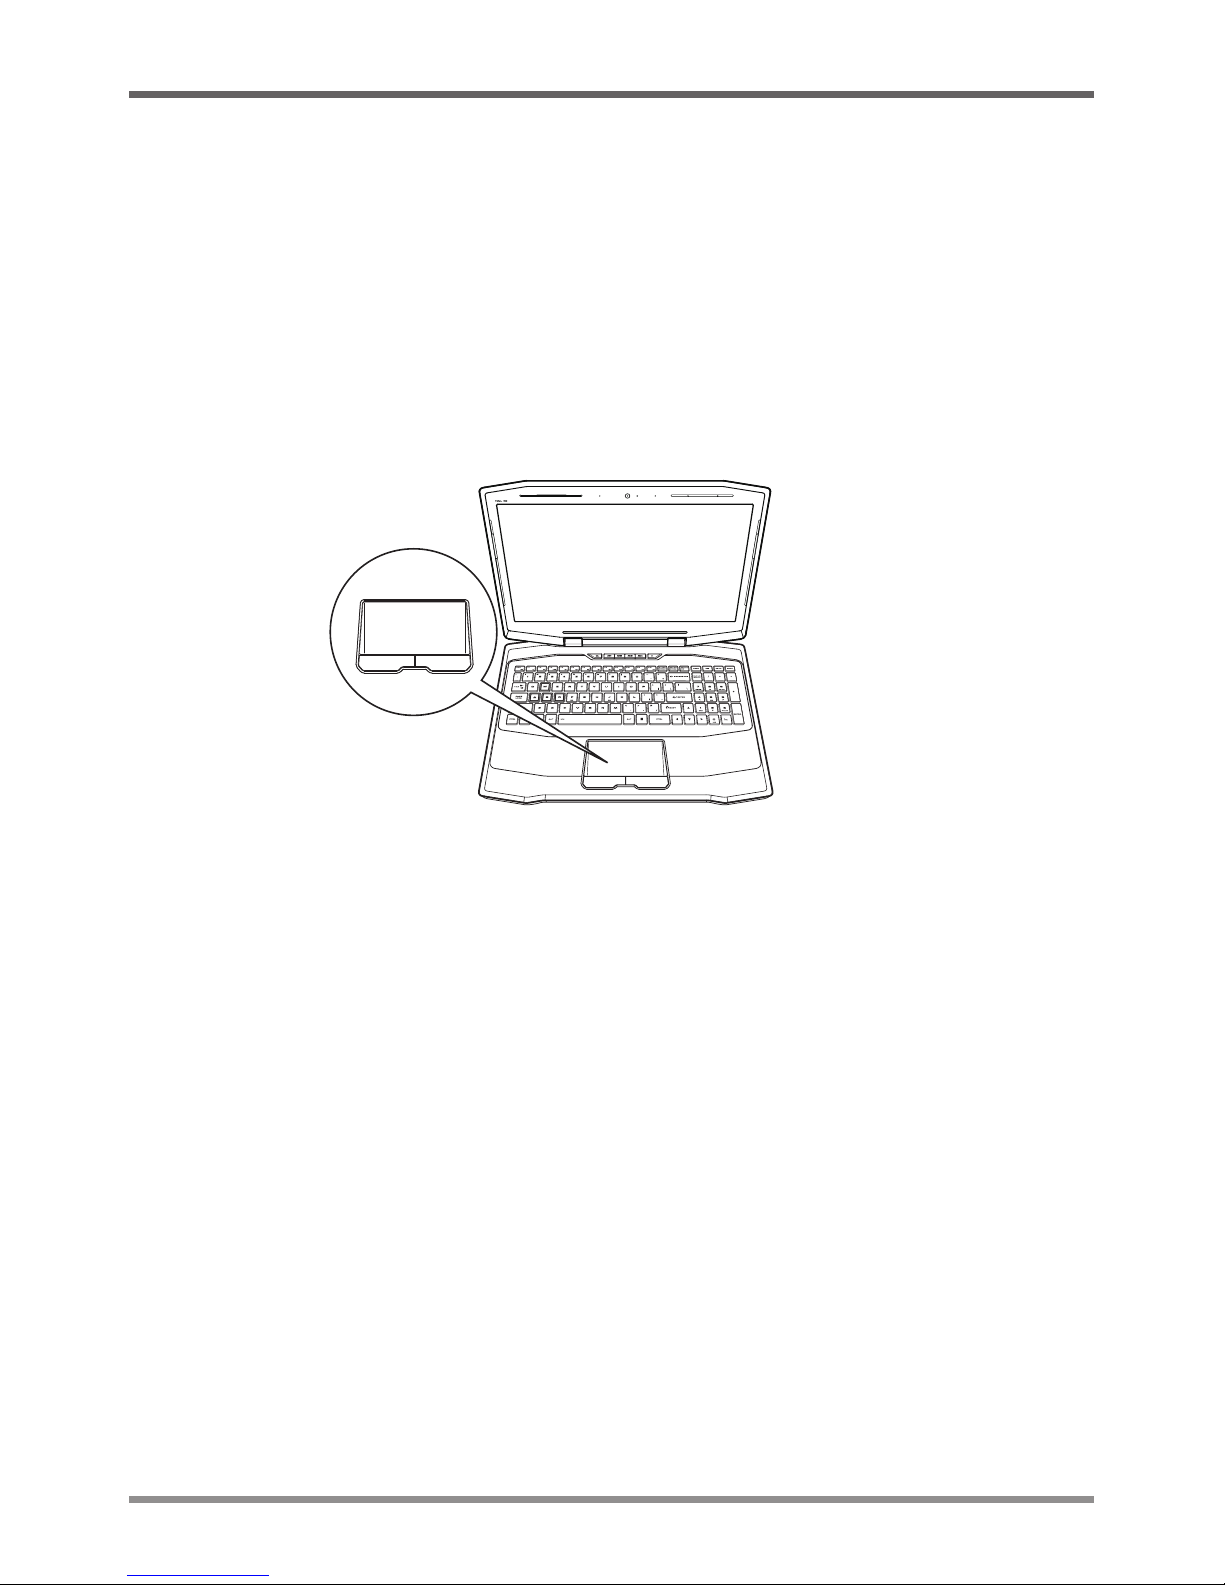
USING THE TOUCHPAD
A touchpad pointing device comes built into your computer. It is used to control the movement of
the pointer to select items on your display panel.
The touchpad consists of a cursor control, a left and right button, and a scroll bar. The cursor control
works the same way a mouse does, and moves the cursor around the display. It only requires light
pressure from the tip of your finger. The left and right buttons function the same as mouse buttons.
The actual functionality of the buttons may vary depending on the application that is being used.
Finally, the scroll bar allows you to navigate quickly through pages, without having to use the
on-screen cursor to manipulate the up and down scroll bars.
Clicking
Clicking means pushing and releasing a button. To left-click, move the cursor to the item you wish
to select, press the left button once, and then immediately release it. To right-click, move the mouse
cursor to the item you wish to select, press the right button once, and then immediately release it.
You also have the option to perform the clicking operation by tapping lightly on the touchpad once.
Double-Clicking
Double-clicking means pushing and releasing the left button twice in rapid succession. This
procedure does not function with the right button. To double-click, move the cursor to the item
you wish to select, press the left button twice, and then immediately release it. You also have the
option to perform the double-click operation by tapping lightly on the touchpad twice.
Dragging
Dragging means pressing and holding the left button, while moving the cursor. To drag, move
the cursor to the item you wish to move. Press and hold the left button while moving the item
to its new location and then release it. Dragging can also be done using only the touchpad. First,
tap the touchpad twice over the item you wish to move making sure to leave your finger on the
pad after the final tap. Next, move the object to its new location by moving your finger across
the touchpad, and then release your finger. Using the scroll bar allows you to navigate through a
document quickly without using the window’s scroll bars. This is particularly useful when you are
navigating through on-line pages.
Page 20

GETTING STARTED
20
USING USER DEFINED KEYS
Your computer has a row of user defined keys located above the keyboard, which help you access
common actions quickly. You can program these 4 user defined keys via the User Defined Key
application.
Programming User Defined Keys
Before defining the 4 keys, you need to install the User Defined Key application on your computer:
1. Once running the User Defined Key file, a user definition key window is displayed.
Page 21
GETTING STARTED
21
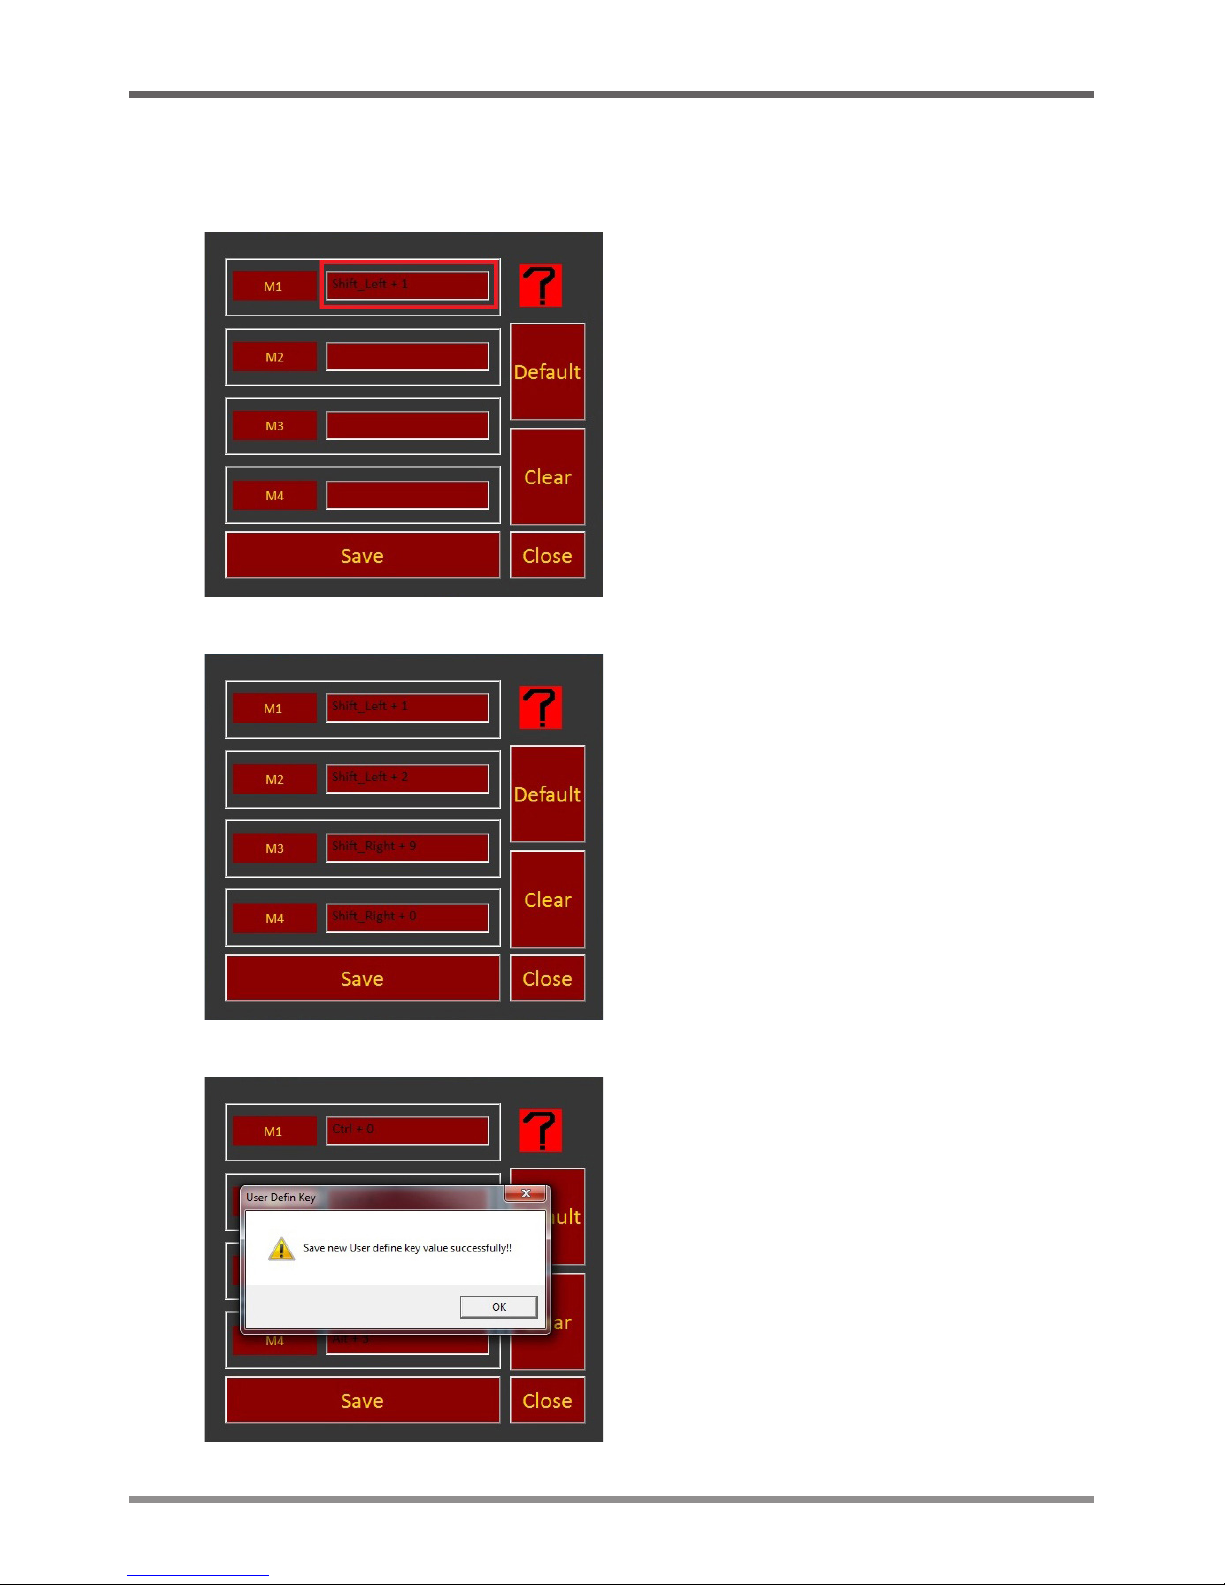
2. To change the default keys, move the mouse pointer over a user defined key field and press a
key or a combination of keys. For example, press and hold down the left [shift] key and then
press [1] key to set the M1 key as Shift_Left + 1 as shown in the user definition key window.
3. Repeat step 2 for each user defined key field you wish to define.
4. Click Save→OK to save your key definition settings.
Page 22

GETTING STARTED
22
5. To check the valid key and its example, click the ? button.
6. To clean all the defined key definitions, click Clear→OK.
7. To restore all user defined keys to their default value, click Default→OK. The default M1
key is [Ctrl]+[0], M2 is [Ctrl]+[1], M3 is [Alt]+[2], and M4 is [Alt]+[3].
8. To close the User Defined Key application, click Close→OK.
Page 23

GETTING STARTED
23
REALTEK REALSPEED CONNECTION SPEED-UP UTILITY
Realtek RealSpeed connection speed-up utility is a program which speeds up your internet
connection. It supports most connection types.
Before installing this program, you need to install the Setup.exe file on your computer:
1. To install RealSpeed, double-click the Setup.exe file and follow the step-by-step instructions
on screen to start the setup wizard.
2. When installation is complete, a notification is displayed and the RealSpeed icon appears on
the desktop.
3. Double-click the RealSpeed desktop icon to begin this program.
4. In the Mode menu screen, select the mode you wish to use and click Apply.
5. In the Application menu screen, you can view a list of the programs currently running on your
computer and their bandwidth usage.
Page 24
GETTING STARTED
24
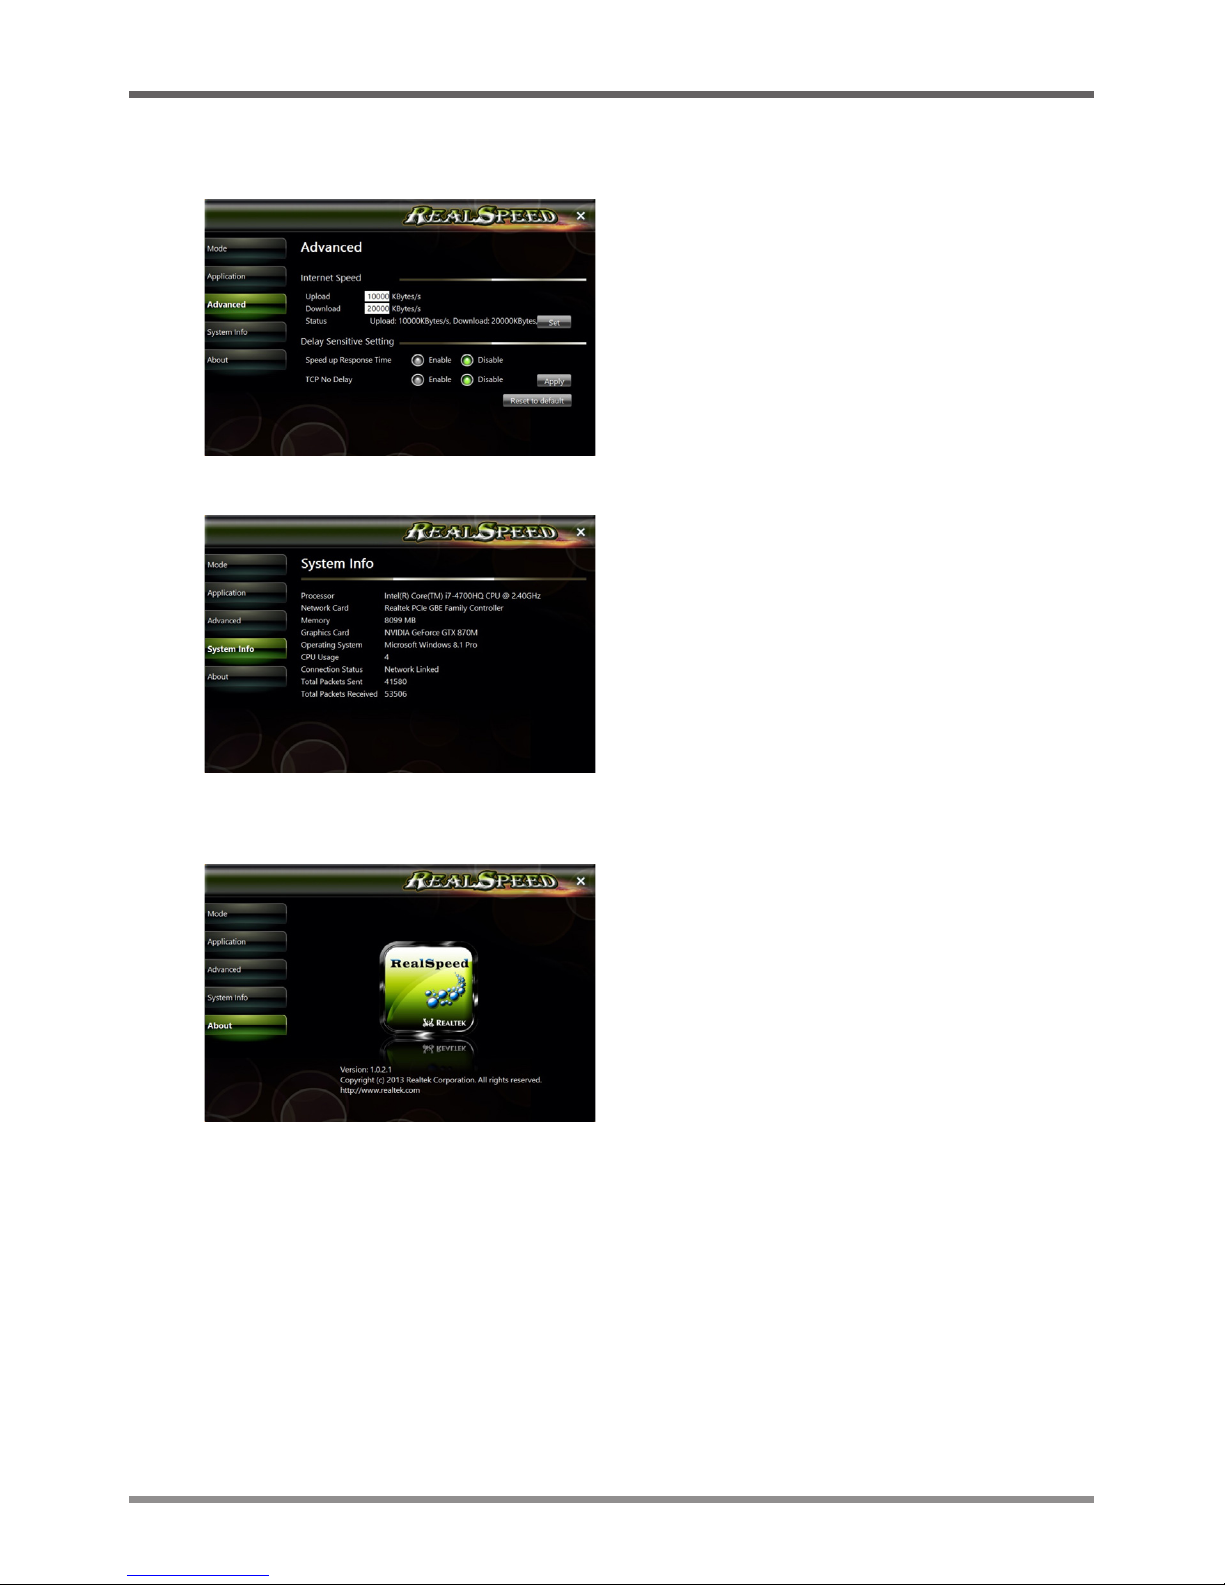
6. In the Advanced menu screen, you can manually set the upload/download speed and enable/
disable the Speed-up Response Time and TCP Delay.
7. In the System Info menu screen, you can check the system hardware specification.
8. In the About menu screen, you can find the current RealSpeed version and the name of the
manufacturer.
You can also quickly launch the RealSpeed program by right-clicking the RealSpeed icon in the
taskbar.
Page 25
GETTING STARTED
25
HARD DRIVE ARRAY (RAID) CONFIGURATION
To increase hard drive performance, you can spilt data across drives by setting up the RAID 0 hard
drive array. Please backup your data before you build a RAID 0 array on your computer.
RAID 0 needs two storage drives of the same specification installed in your
notebook. Storage drives of different capacities are acceptable.
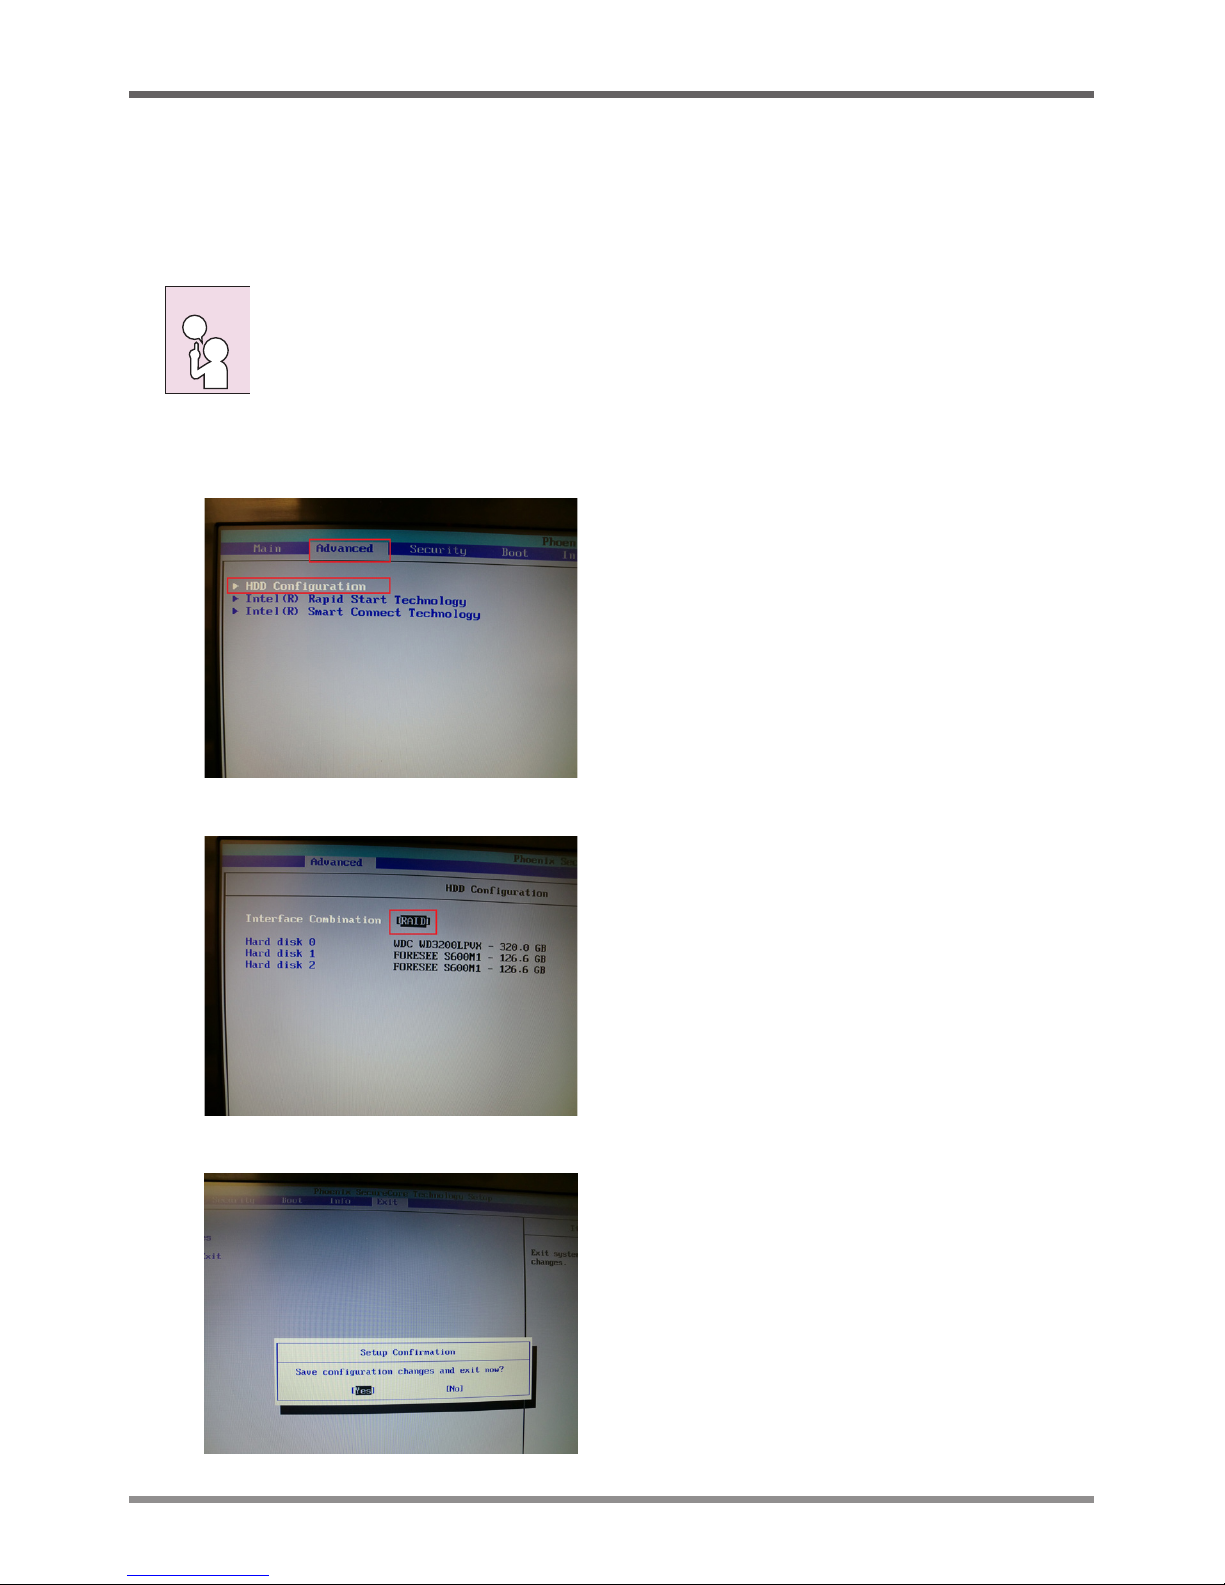
1. Power on your notebook and press [F2] when the system starts to enter the BIOS setup menu.
2. Go to Advanced→HDD configuration.
3. Change the Interface Combination field to [RAID].
4. Press [F10] and click [Yes] to save the changes and exit.
NOTE
Page 26
GETTING STARTED
26
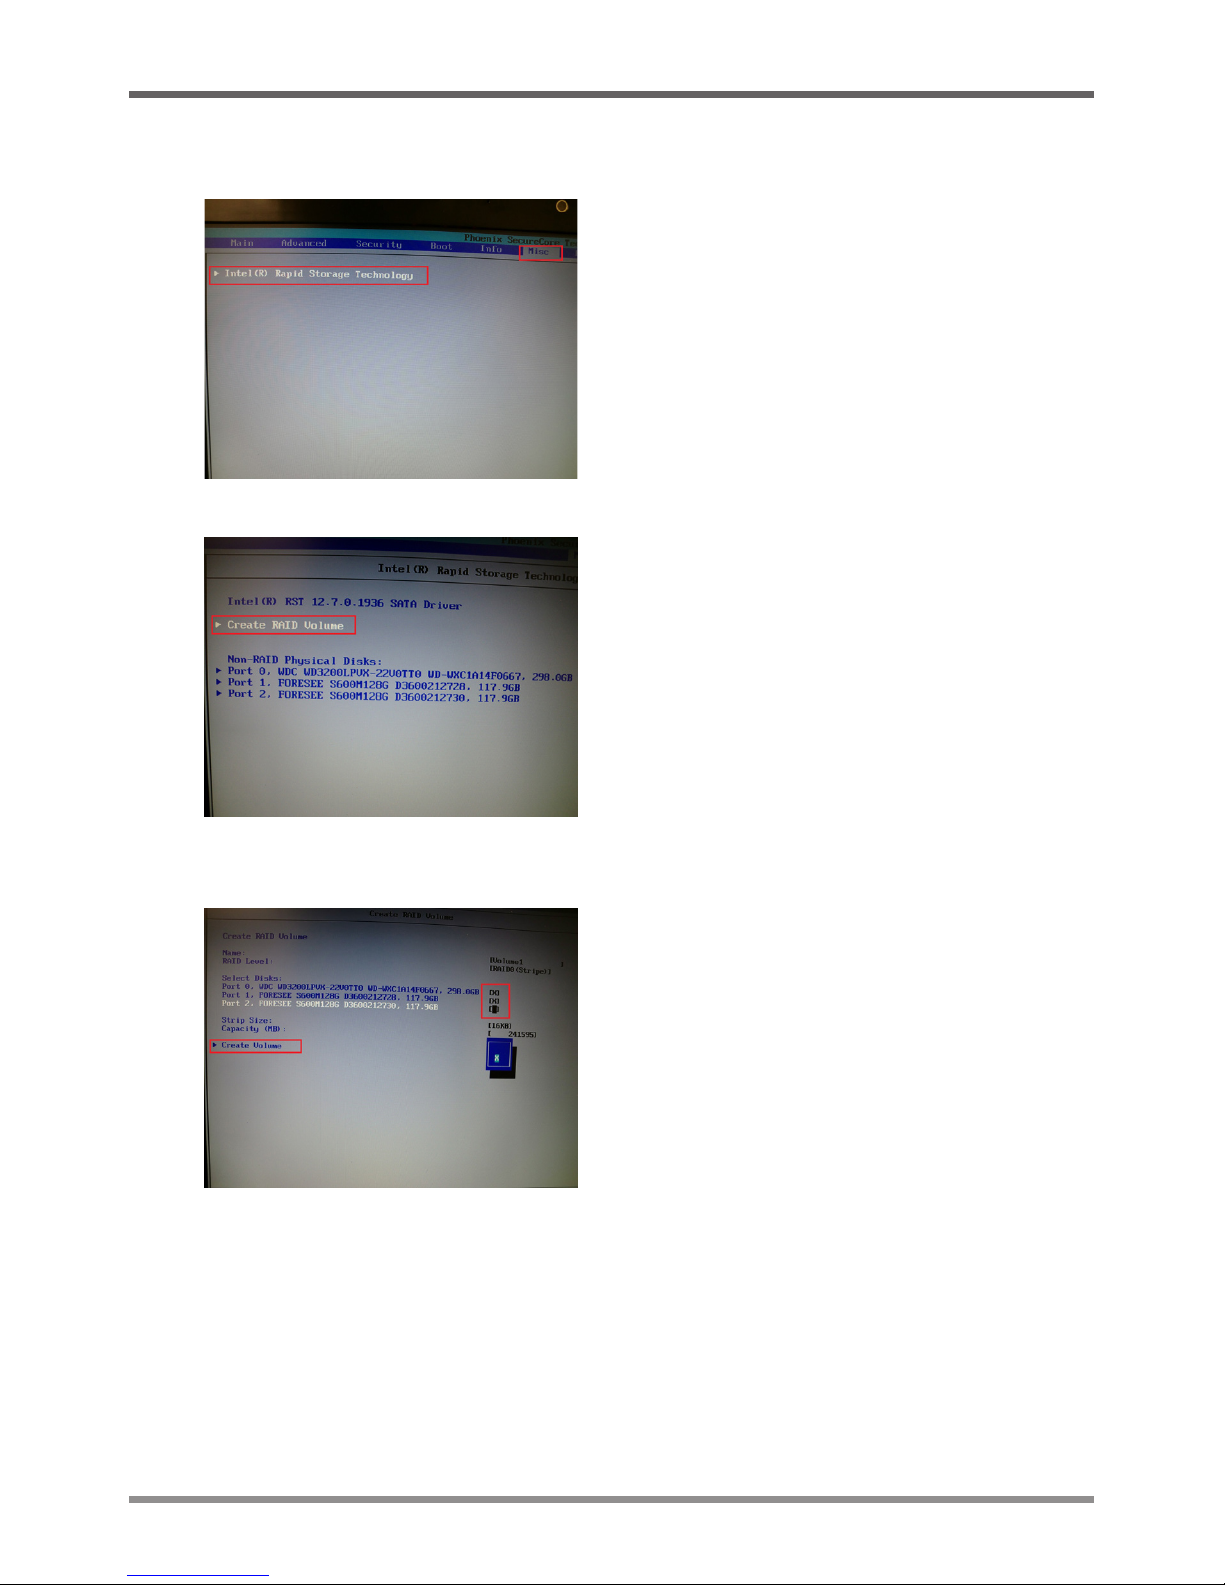
5. The system will restart automatically. Press [F2] to enter the BIOS setup menu again.
6. Go to Misc→ Intel(R) Rapid Storage Technology.
7. Go to Create RAID Volume.
8. To configure the disks to RAID, change the Port 0, Port 1 and Port 2 fields to [X] under Select
Disks. Go to Create Volume and press Enter.
Page 27

GETTING STARTED
27
9. When the process is complete, RAID Volumes information will appear on the BIOS setup
menu screen.
10. Press [F10] and click [Yes] to save the changes and exit. The RAID 0 hard drive array has been
created and configured to your system successfully.
Page 28

28
TROUBLESHOOTING
Your notebook PC is sturdy and subject to few problems in the field. However, you may encounter
simple setup or operating problems that you can solve on the spot, or problems with peripheral
devices, that you can solve by replacing the device. The information in this section helps you
isolate and resolve some of these straightforward problems and identify failures that require service.
Identifying the Problem
If you encounter a problem, go through the following procedure before pursuing complex
troubleshooting:
1. Turn off your notebook.
2. Make sure the AC adapter is plugged into your notebook and to an active AC power source.
3. Make sure that any card installed in any available card slots is seated properly. You can also
remove the card from the slot, thus eliminating it as a possible cause of failure.
4. Make sure that any devices connected to the external connectors are plugged in properly. You
can also disconnect such devices, thus eliminating them as possible causes of failure.
5. Turn on your notebook. Make sure it has been off at least 10 seconds before you turn it on.
6. Go through the boot sequence.
7. If the problem has not been resolved, contact your support representative.
Before you place the call, you should have the following information ready so that the customer
support representative can provide you with the fastest possible solution:
• Product name
• Product configuration number
• Product serial number
• Purchase date
• Conditions under which the problem occurred
• Any error messages that have occurred
• Hardware configuration
• Type of device connected, if any
See the Configuration Label on the bottom of your notebook for configuration and serial numbers.
Page 29

29
MEMO
Federal Communications Commission (FCC) Statement
This device complies with Part 15 of the FCC Rules. Operation is subject to the following two
conditions:
(1) This device may not cause harmful interference.
(2) This device must accept any interference received, including interference that maycause
undesired operation.
Any changes or modifications (including the antennas) made to this device that are not expressly
approved by the manufacturer may void the user’s authority to operate the equipment. FCC RF
Radiation Exposure Statement: This equipment complies with FCC RF radiation exposure limits
set forth for an uncontrolled environment. This device and its antenna must not be co-located or
operating in conjunction with any other antenna or transmitter. This equipment has been tested
and found to comply with the limits for a class B digital device, pursuant to part 15 of the FCC
Rules. These limits are designed to provide reasonable protection against harmful interference in
a residential installation.
This equipment generates, uses and can radiate radio frequency energy and, if not installed and
used in accordance with the instructions, may cause harmful interference to radio communications.
However, there is no guarantee that interference will not occur in a particular installation. If this
equipment does cause harmful interference to radio or television reception, which can be determined
by turning the equipment off and on, the user is encouraged to try to correct the interference by
one or more of the following measures:
• Reorient or relocate the receiving antenna.
• Increase the separation between the equipment and receiver.
• Connect the equipment into an outlet on a circuit different from that to which the receiver is
connected.
• Consult the dealer or an experienced radio/TV technician for help.
FCC RF Radiation Exposure Statement:
1. This Transmitter must not be co-located or operating in conjunction with any other antenna
or transmitter.
2. This equipment complies with FCC RF radiation exposure limits set forth for an uncontrolled
environment. To maintain compliance with FCC RF exposure compliance requirements, avoid
direct contact to the transmitting antenna during transmitting.
Page 30

30
SPECIFICATIONS
LCD 15.6” FHD (1920 × 1080) LCD (300-nits) with eTP interface
Platform Intel Haswell 4C (Lynx Point HM87 chipset)
Video nVidia N15P-GT, -GX, N15E-GT, 2/4G (6G for N15E) GDDR5 VRAM
Audio
Two built-in 2W stereo speakers and one 3W subwoofer
Built-in High Definition audio (2 channels)
Memory Two SO-DIMM memory sockets, support up to 16GB DDR3L 1600 MHz
Storage 2.5” 7/7.2/9.5 mm SATA HDD and two 128GB/256GB SSD (mSATA)
I/O Ports
Three USB 3.0 port
One USB 2.0 port with sleep-and-charge function
One HDMI port
One VGA port
One 4-in-1 memory card reader (SD/SDHC/SDXC/MMC)
One audio combo jack (Headphone-out & Microphone-in)
One DC-in jack for power adapter connection
One RJ-45 port for network connection
One microphone/SPDIF jack
Camera HD camera
Wireless Wi-Fi with integrated Bluetooth module
Battery 2600 mAH, 8-cell Li-Ion battery
Power 20V 120W/150W/180W Adapter
OS Windows 8.1 (64bits) compliance, Windows 7 (64bits) compliance
TPM No
Dimensions 387 × 274.5 × 30.9 mm
Weight ≤2.83kg
Page 31

BENUTZERHANDBUCH
Mai 2014
DEUTSCH
Page 32

2
INHALT
ZUM BEGINN ......................................................................................................... 5
Überprüfen der Lieferung auf Vollständigkeit ............................................................. 5
Lernen Sie das Notebook kennen ................................................................................6
ÖFFNEN DES BILDSCHIRMS ..................................................................................6
VORDERSEITE .........................................................................................................7
LINKE SEITE .............................................................................................................9
RECHTE SEITE .......................................................................................................10
RÜCKSEITE .............................................................................................................12
UNTERSEITE ..........................................................................................................13
ERSTE SCHRITTE ............................................................................................... 14
Stromversorgung .........................................................................................................14
ANSCHLUSS DES NETZTEILS ..............................................................................14
WIEDERAUFLADEN DES AKKUS ..........................................................................15
Einschalten des Notebooks ........................................................................................16
EINSCHALTEN ........................................................................................................16
STATUSANZEIGEN .................................................................................................17
DIE FUNKTIONSTASTEN .......................................................................................18
BENUTZEN DES TOUCHPADS ..............................................................................19
VERWENDUNG DER BENUTZERDEFINIERTEN TASTEN ...................................20
REALTEK REALSPEED PROGRAMM ZUR
VERBINDUNGSBESCHLEUNIGUNG .....................................................................23
FESTPLATTEN-ARRAY (RAID) KONFIGURATION ................................................25
FEHLERBEHEBUNG ........................................................................................... 28
Identifizieren eines Problems .....................................................................................28
TECHNISCHE DATEN ......................................................................................... 30
Page 33

3
PFLEGE DES NOTEBOOKS
Achten Sie darauf, dass die Lüftungsöffnungen
nicht verdeckt werden, um eine Überhitzung des
Prozessors zu vermeiden.
NICHT auf den Bildschirm drücken oder ihn
berühren.
NICHT auf unebene oder wacklige Unterlagen
stellen.
Das Notebook NICHT bei extremen Umgebungsbedingungen verwenden.
KEINE Gegenstände auf das Notebook stellen
oder legen und KEINE Gewalt auf das Gerät
ausüben.
Das Notebook KEINEN Magnetfeldern aussetzen.
Das Notebook KEINEM direkten Sonnenlicht
aussetzen.
NICHT bei extremen Temperaturen verwenden
oder lagern.
Page 34

4
Vermeiden Sie plötzliche Veränderungen von
Temperatur und Luftfeuchtigkeit, und stellen Sie
das Notebook nicht in die Nähe von Netzteilen und
Lüftungsöffnungen anderer Geräte.
Das Notebook KEINEM Regen oder Feuchtigkeit
aussetzen.
NICHT in der Nähe von Feuer und anderen
Wärmequellen aufstellen.
NICHT den Akku manipulieren. Von Kindern
fernhalten.
Das Notebook KEINEM Staub und/oder korrosiven
Chemikalien aussetzen.
Das Notebook NICHT zuschlagen und niemals
am Bildschirm hochheben.
KEIN Wasser oder andere Reinigungsflüssigkeiten
direkt auf den Bildschirm sprühen.
Wenn Sie das Notebook auf Reisen mitnehmen,
achten Sie darauf, es als Handgepäck mitzunehmen.
Checken Sie es nicht mit dem anderen Gepäck ein.
Page 35

5
ZUM BEGINN
Überprüfen der Lieferung auf Vollständigkeit
Wenn Sie das Notebook erhalten haben, packen Sie es vorsichtig aus, und überprüfen Sie, ob alle
nachfolgend aufgeführten Teile enthalten sind.
Wenn Sie sichergestellt haben, dass das Notebook-System vollständig ist, lesen Sie sich die
folgenden Seiten durch, um alles über die Komponenten des Notebooks zu erfahren.
Je nachdem, welches Modell Sie erworben haben, kann Ihr Notebook von dem in
diesem Benutzerhandbuch abgebildeten Notebook abweichen.
Page 36

ZUM BEGINN
6
Lernen Sie das Notebook kennen
ÖFFNEN DES BILDSCHIRMS
Klappen Sie einfach den Deckel hoch, um mit dem Gerät zu arbeiten.
Achten Sie beim Schließen darauf, dass der Deckel nicht zugeknallt wird.
Page 37

ZUM BEGINN
7
VORDERSEITE
Hier sehen Sie eine Ansicht des Notebooks von vorne.
Bildschirm
Standby/Ein/Aus-Taste
Benutzerdefinierte
Tasten
Hintergrundbeleuch-
tungstaste
Tastatur
Stereolautsprecher
Touchpad-Zeigegerät
Kamera
Kamera-LED
Mikrofon
Kamera
Mit der integrierten HD-Kamera können Sie mit nur einem Klick fotografieren oder einen VideoChat oder eine Videokonferenz aufbauen.
Kamera-LED
Die Kamera-LED zeigt an, ob die Kamera aktiviert oder deaktiviert ist.
Mikrofon
Das integrierte Mikrofon ermöglicht den Empfang und die Übertragung von Sprach- und/oder
anderen Audiodaten über jedes Programm, das solche Eingaben verarbeiten kann.
Page 38

ZUM BEGINN
8
Bildschirm
Beim Bildschirm handelt es sich um einen LCD-Farbmonitor mit Hintergrundbeleuchtung.
Standby/Ein/Aus-Taste
Mit dieser Taste schalten Sie das Notebook ein, aus und in den Ruhezustand. (Weitere Informationen
dazu finden Sie im Abschnitt Einschalten unter Standby/Ein/Aus-Taste.)
Touchpad-Zeigegerät
Das Touchpad-Zeigegerät ist eine Cursorsteuerung wie eine Maus mit zwei Tasten sowie einem
berührungsempfindlichen Bewegungspad.
Stereolautsprecher
Die integrierten Dual-Lautsprecher bieten Stereoton und Audioausgabe für Video- und
Musikwiedergabe.
Tastatur
Eine Volltastatur mit Zifferntasten und speziellen Windows®-Tasten.
Benutzerdefinierte Tasten
Die benutzerdefinierten Tasten sind Tastaturverknüpfungen für die schnelle Steuerung Ihres
Notebooks. Sie können Ihre eigenen Einstellungen für benutzerdefinierte Tasten vornehmen.
(Weitere Informationen darüber finden Sie im Abschnitt Benutzerdefinierte Tasten.)
Hintergrundbeleuchtungstaste
Die Hintergrundbeleuchtungstaste schaltet die Hintergrundbeleuchtung der LCD-Abdeckung und
des Touchpads ein und aus.
Page 39

ZUM BEGINN
9
LINKE SEITE
Hier folgt eine kurze Beschreibung der linken Seite des Notebooks.
SpeicherkartenleserUSB 3.0 Port
StatusanzeigelampenUSB 2.0 Port
USB 3.0 Port
Der USB 3.0 Port ermöglicht Ihnen den Anschluss von Geräten über den Universal Serial Bus. Er
unterstützt den v3.0 USB Standard, welcher Datenübertragungsraten von bis zu 4,8 Gb/s ermöglicht.
USB 3.0 ist rückwärts kompatibel mit USB 2.0.
USB 2.0 Port
Der USB 2.0 Port ermöglicht Ihnen den Anschluss von Geräten über den Universal Serial Bus.
Er unterstützt den USB-Standard v2.0 mit Datenübertragungsraten von bis zu 480 Mb/s. Zudem
unterstützt er die Standby-und-Aufladen Funktion.
Speicherkartenleser
Der Speicherkartenleser bietet eine schnelle und einfache Möglichkeit, digitale Fotos, Musik und
Daten zwischen Ihrem Notebook und anderen Flash-kompatiblen Geräten wie Digitalkameras,
MP3-Playern, Mobiltelefonen, Tablets oder mobilen Geräten zu übertragen.
Statusanzeigelampen
Die Statusanzeigelampen entsprechen den spezifischen Betriebsmodi. Diese Modi sind: Akkustatus,
Festplattenaktivität (HDD) und WLAN Aktivität.
Page 40

ZUM BEGINN
10
RECHTE SEITE
Hier folgt eine kurze Beschreibung der rechten Seite des Notebooks.
USB 3.0 PortsMikrofon/SPDIF Buchse
Öffnung für Kensington-Schloss
Kombinierter Audioanschluss
(Kopfhörer und Mikrofon)
Mikrofon/SPDIF Buchse
Die Mikrofon/SPDIF Buchse ermöglicht Ihnen den Anschluss eines externen Mono-Mikrofons
und SPDIF-kompatiblen Audiogeräten.
Kombinierter Audioanschluss (Kopfhörer und Mikrofon)
An den kombinierten Audioanschluss können Kopfhörer, externe Lautsprecher, Verstärker oder
ein externes Mono-Mikrofon angeschlossen werden.
USB 3.0 Ports
Die USB 3.0 Ports ermöglichen Ihnen den Anschluss von Geräten über den Universal Serial Bus.
Sie unterstützen den USB-Standard v3.0 mit Datenübertragungsraten von bis zu 4,8 Gb/s. USB 3.0
ist rückwärts kompatibel mit USB 2.0.
Page 41

ZUM BEGINN
11
Öffnung für Kensington-Schloss
Mit Hilfe eines optionalen Sicherheitskabels am Kensington-Schloss können Sie das Notebook an
einem festen Gegenstand befestigen und sichern.
Page 42

ZUM BEGINN
12
RÜCKSEITE
Hier sehen Sie eine Ansicht des Notebooks von hinten.
Externer Monitoranschluss
Netzteilanschluss
HDMI-AnschlussLAN-Port (RJ-45)
Netzteilanschluss
Hier wird das Netzteil für die Stromversorgung des Notebooks und das Aufladen des eingesetzten
Lithium-Ionen-Akkus angeschlossen.
LAN-Port (RJ-45)
Der LAN-Port ist für einen RJ-45-Stecker für den Standard 10/100/1000 Base-T vorgesehen.
Externer Monitoranschluss
Der externe Monitoranschluss ermöglicht Ihnen den Anschluss eines externen Monitors.
HDMI-Anschluss
Über den HDMI-Anschluss können Sie ein Videogerät wie etwa ein Fernsehgerät, einen Projektor
oder einen Videorekorder an das Notebook anschließen.
Page 43

ZUM BEGINN
13
UNTERSEITE
Hier sehen Sie eine Ansicht des Notebooks von unten.
Subwoofer
Konfigurations-
etikett
Lüftungsöff-
nungen
Lüftungsöffnungen
Lüftungsöffnungen
Dieses sind freie Anschlüsse für die Lüfter, die die Wärme von den internen Komponenten des
Notebooks ableiten. Legen Sie das Notebook immer so hin, dass die Lüftungsöffnungen nicht
verdeckt werden.
Subwoofer
Der 3W Subwoofer bietet verbesserte Niedrigfrequenztöne (Bass) für die Audioausgabe von Ihrem
Notebook.
Konfigurationsetikett
Auf dem Konfigurationsetikett sind die Modellnummer und andere Informationen über das
Notebook verzeichnet.
Page 44

14
ERSTE SCHRITTE
Stromversorgung
Das Notebook kann auf zwei Arten mit Strom versorgt werden: mit einem Lithium-Ionen-Akku
oder einem Netzteil, das an das Stromnetz angeschlossen wird.
ANSCHLUSS DES NETZTEILS
Das Netzteil versorgt das Notebook mit Strom und lädt gleichzeitig den Akku.
Anschluss des Netzteils
1. Schließen Sie das Netzkabel an die Netzteilbuchse des Notebooks an.
2. Verbinden Sie das Netzteil mit einer Steckdose.
Wechseln zwischen Netzstrom und Akkustrom
Trennen Sie das Netzteil ab. Das Notebook wechselt automatisch auf die Versorgung durch
Akkustrom um.
Der Lithium-Ionen-Akku ist beim Kauf nicht geladen. Wenn Sie das Notebook das
erste Mal benutzen möchten, muss es zunächst mit Netzstrom versorgt werden.
Page 45

ERSTE SCHRITTE
15
WIEDERAUFLADEN DES AKKUS
Der Lithium-Ionen-Akku wird im Gerät aufgeladen, wenn das Notebook an eine Steckdose
angeschlossen ist. Wenn Sie den Akku aufladen möchten, muss das Notebook an das Netzteil
angeschlossen sein.
Bei Lithium-Ionen-Akkus tritt kein “Memory-Effekt” auf, so dass Sie den Akku vor dem
Neuaufladen nicht erst vollständig entladen müssen. Die Ladedauer ist bedeutend länger, wenn
Sie während des Ladevorgangs mit dem Notebook arbeiten. Der Akku wird schneller aufgeladen,
wenn sich das Notebook im Suspend-Modus befindet oder ausgeschaltet ist.
Niedriger Akkuladestand
Wenn der Akkuladestand sehr niedrig ist, erscheint eine entsprechende Meldung. Nachdem die
Akkuwarnung erschienen ist, läuft das Gerät so lange weiter, bis die Ladung für einen weiteren
Betrieb nicht mehr ausreicht. In diesem Fall wechselt das Notebook in den Suspend-Modus. Wenn
das Notebook diesen Punkt erreicht hat, ist eine Datenspeicherung nicht mehr sicher.
Verwenden Sie nur das Netzteil, das Sie zusammen mit dem Notebook erhalten
haben, da dieses genau die benötigten Ausgabestromwerte hat. Wenn Sie andere
Netzteile verwenden, könnte das Notebook beschädigt werden.
Wenn das Notebook aufgrund niedriger Akkuladung in den Suspend-Modus versetzt wurde, kann es
erst wieder gestartet werden, wenn es entweder über das Netzteil an das Stromnetz angeschlossen,
oder wenn ein geladener Akku eingesetzt wird. Sobald das Gerät wieder mit Strom versorgt wird,
können Sie es durch Drücken der Standby/Ein/Aus-Taste wieder starten. Im Suspend-Modus
werden die Daten einige Zeit lang gespeichert. Wenn das Gerät aber nicht bald wieder mit Strom
versorgt wird, wird das Gerät abgeschaltet, die Stromanzeigelampe geht aus, und alle Daten, die
nicht gespeichert wurden, gehen verloren. Wenn Sie das Gerät über das Stromnetz mit Strom
versorgen, können Sie mit dem Notebook arbeiten, während gleichzeitig der Akku geladen wird.
Page 46

ERSTE SCHRITTE
16
Einschalten des Notebooks
EINSCHALTEN
Standby/Ein/Aus-Taste
Ist das Notebook ausgeschaltet, müssen Sie auf die Standby/Ein/Aus-Taste drücken, um es
einzuschalten. Das Notebook kann eingeschaltet werden, wenn es mit dem Netzteil an das Stromnetz
angeschlossen oder über den internen Lithium-Ionen-Akku mit Strom versorgt wird. Drücken Sie
zum Einschalten auf die Standby/Ein/Aus-Taste, die sich oberhalb der Tastatur befindet. Wenn Sie
eine längere Arbeitspause machen, drücken Sie noch einmal auf diese Taste, um das Notebook
auszuschalten.
Das Notebook darf nicht in eingeschaltetem Zustand transportiert und Stößen oder
Vibrationen ausgesetzt werden, da dabei die Festplatte beschädigt werden kann.
Wenn Sie das Notebook einschalten, wird zunächst ein POST-Test (Power On Self Test) ausgeführt,
bei dem überprüft wird, ob alle Bauteile und Konfigurationen einwandfrei funktionieren. Wird ein
Fehler gefunden, ertönt ein Warnsignal und/oder es wird eine Fehlermeldung angezeigt.
Je nach Art des Problems können Sie einfach fortfahren, indem Sie das Betriebssystem starten,
oder Sie müssen das BIOS-Programm aufrufen, um die entsprechenden Einstellungen zu ändern.
Nach erfolgreichem Abschluss des POST-Tests wird das installierte Betriebssystem geladen.
Schalten Sie das Notebook niemals während des POST-Tests aus, da dadurch nicht
behebbare Fehler auftreten können.
Page 47

ERSTE SCHRITTE
17
STATUSANZEIGEN
Die Statusanzeigelampen entsprechen spezifischen Betriebsmodi. Diese Modi sind: Akkustatus,
Festplattenaktivität (HDD) und WLAN Aktivität.
WLAN Aktivitätsanzeige
Akkustatusanzeige
Anzeige für Festplattenaktivität (HDD)
Akkustatusanzeige
Die Akkustatusanzeige zeigt Ihnen den Ladestand des Akkus an.
• Die Anzeige leuchtet, wenn das Notebook über den Akku betrieben wird, egal ob er aufgeladen
wird oder nicht.
• Die Anzeige leuchtet:
▪ Weiß - Akku hat mehr als 90% Kapazität.
▪ Orange - Akku hat zwischen 10% und 90% Kapazität.
▪ Blinkt orange - Akku hat weniger als 10% Kapazität.
▪ Blinkt schnell orange - Akku ist auf kritisch niedrigem Niveau und das System kann nicht
eingeschaltet werden. Schließen Sie umgehend das Netzteil an und laden Sie den Akku auf.
• Wenn der Akku nicht richtig funktioniert, wird die Anzeige nicht leuchten.
• Wenn Akkus Stößen, Vibrationen und extremen Temperaturen ausgesetzt werden, können sie
dauerhaft beschädigt werden.
Anzeige für Festplattenaktivität (HDD)
Die Anzeige für Festplattenaktivität (HDD) teilt Ihnen mit, ob und wie schnell auf Ihre interne
Festplatte zugegriffen wird.
WLAN Aktivitätsanzeige
Die WLAN Aktivitätsanzeige teilt Ihnen mit, ob das Notebook mit einen WLAN-Netzwerk
verbunden ist oder nicht.
Page 48

ERSTE SCHRITTE
18
DIE FUNKTIONSTASTEN
Das Notebook verfügt über 12 Funktionstasten, Taste F1 bis F12. Je nach Programm sind die
Funktionen, die diesen Tasten zugewiesen sind, unterschiedlich. In der Software-Dokumentation
finden Sie die Funktionen der jeweiligen Tasten.
Die Taste [FN] bietet dem Notebook zusätzliche Funktionen und wird immer zusammen mit einer
anderen Taste gedrückt.
• [FN+Esc]: Aktiviert bzw. deaktiviert die Touchpad-Funktion.
• [FN+F1]: Versetzt das Notebook in den Suspend-Modus. Durch Drücken der Ein/Aus-Taste
wird das Notebook wieder aktiviert.
• [FN+F2]: Aktiviert bzw. deaktiviert die WLAN-Verbindung.
• [FN+F3]: Hier wird festgelegt, auf welchem Gerät das Bild angezeigt werden soll. Bei jedem
Druck dieser Tastenkombination wird die nächste Option angezeigt. Die Reihenfolge ist: nur
interner Monitor, interner Monitor und externer Monitor, nur externer Monitor.
• [FN+F4]: Verringert die Helligkeit des Bildschirms.
• [FN+F5]: Erhöht die Helligkeit des Bildschirms.
• [FN+F6]: Stellt den Ton des Computers aus.
• [FN+F7]: Verringert die Lautstärke des Computers.
• [FN+F8]: Erhöht die Lautstärke des Computers.
• [FN+F9]: Startet die Wiedergabe bzw. unterbricht die Wiedergabe des aktuellen Multimediatitels.
• [FN+F10]: Stoppt die Wiedergabe des aktuellen Multimediatitels.
• [FN+F11]: Wechselt zum vorhergehenden Multimediatitel.
• [FN+F12]: Wechselt zum nächsten Multimediatitel.
• [FN]+Leertaste: Wechselt die Hintergrundbeleuchtung der Tastatur zwischen An (dunkel),
An (hell) und Aus.
Page 49

ERSTE SCHRITTE
19
BENUTZEN DES TOUCHPADS
Das Touchpad ist ein Zeigegerät, das in das Notebook integriert ist. Es kann zur Steuerung der
Cursorbewegungen auf dem Bildschirm verwendet werden.
Das Touchpad besteht aus der Cursorsteuerung, einer linken und einer rechten Taste sowie einer
Scroll-Leiste. Die Cursorsteuerung kann wie eine Maus den Cursor über den Bildschirm steuern.
Sie müssen dazu die Fläche nur ganz leicht mit den Fingerspitzen berühren. Die linken und rechten
Tasten funktionieren genau so wie Maustasten. Je nach Programm kann sich die Funktion der Tasten
unterscheiden. Mit der Scroll-Leiste können Sie ohne den Cursor oder die Scroll-Leisten bewegen
zu müssen schnell durch die Seiten blättern.
Klicken
Klicken bedeutet ein kurzes Drücken und wieder Loslassen einer Taste. Bei einem Linksklick
bewegen Sie den Cursor auf das Element, das Sie auswählen möchten, und drücken dann kurz auf
die linke Taste. Bei einem Rechtsklick bewegen Sie den Cursor auf das Element, das Sie auswählen
möchten, und drücken dann kurz auf die rechte Taste. Sie können auch klicken, indem Sie ein Mal
kurz das Touchpad berühren.
Doppelklicken
Beim Doppelklicken klicken Sie zwei Mal schnell hintereinander die linke Taste an. Der Doppelklick
funktioniert nur bei der linken Taste. Bei einem Doppelklick bewegen Sie den Cursor auf das
Element, das Sie auswählen möchten, und drücken dann kurz zwei Mal auf die linke Taste. Sie
können auch doppelklicken, indem Sie zwei Mal kurz das Touchpad berühren.
Verschieben
Beim Verschieben halten Sie die linke Taste gedrückt, während der Cursor verschoben wird.
Schieben Sie zunächst den Cursor auf das Element, das verschoben werden soll. Drücken Sie dann
auf die linke Taste und halten Sie diese gedrückt. Verschieben Sie dabei das Element an die neue
Position und lassen dann die Taste los. Auch mit Hilfe des Touchpads können Sie ein Element
verschieben. Schieben Sie den Cursor auf das Element, das verschoben werden soll. Berühren Sie
dann zwei Mal schnell hintereinander mit dem Finger das Touchpad. Nach dem zweiten Berühren
muss der Finger auf dem Pad liegen bleiben. Verschieben Sie dann das Element an die neue
Position, indem Sie den Finger über das Touchpad schieben. Nehmen Sie dann den Finger hoch,
um das Element loszulassen. Mit Hilfe der Scroll-Leiste können Sie ein Dokument ganz schnell
durchblättern, ohne die Scroll-Leisten des Fensters verschieben zu müssen. Das ist besonders dann
sinnvoll, wenn Sie Internetseiten durchblättern möchten.
Page 50

ERSTE SCHRITTE
20
VERWENDUNG DER BENUTZERDEFINIERTEN TASTEN
Ihr Notebook verfügt über eine Reihe von benutzerdefinierten Tasten über der Tastatur, mit denen
Sie schnell auf häufig genutzte Aktionen zugreifen können. Sie können diese 4 benutzerdefinierten
Tasten über die Anwendung User Defined Key programmieren.
Benutzerdefinierte Tasten programmieren
Vor der Programmierung der 4 Tasten müssen Sie die Anwendung User Defined Key auf dem
Notebook installieren:
1. Nach der Ausführung der User Defined Key Datei wird ein Fenster für benutzerdefinierte
Tasten angezeigt.
Page 51

ERSTE SCHRITTE
21
2. Wenn Sie die Standardtasten ändern möchten, verschieben Sie den Mauszeiger über ein
benutzerdefiniertes Tastenfeld und drücken Sie eine oder eine Kombination von Tasten. Halten
Sie zum Beispiel die linke [Umschalt] Taste gedrückt und drücken Sie anschließend auf die
[1] Taste, um die M1 Taste als Umschalt_Links + 1 wie im Fenster Benutzerdefinierte Tasten
angezeigt einzustellen.
3. Wiederholen Sie Schritt 2 für jede benutzerdefinierte Taste, die Sie programmieren möchten.
4. Klicken Sie auf Save→OK, um Ihre Tastenprogrammierungseinstellungen zu speichern.
Page 52

ERSTE SCHRITTE
22
5. Klicken Sie auf das ? um die gültige Taste und ihr Beispiel anzuzeigen.
6. Klicken Sie auf Clear→OK, um sämtliche programmierten Tasteneinstellungen zu löschen.
7. Klicken Sie auf Default→OK, um sämtliche programmierten Tasteneinstellungen auf ihre
Standardwerte zurückzusetzen. Die Standard M1 Taste ist [Strg]+[0], M2 ist [Strg]+[1], M3
ist [Alt]+[2] und M4 ist [Alt]+[3].
8. Klicken Sie auf Close→OK, um die Anwendung User Defined Key zu beenden.
Page 53

ERSTE SCHRITTE
23
REALTEK REALSPEED PROGRAMM ZUR
VERBINDUNGSBESCHLEUNIGUNG
Das Realtek RealSpeed Programm zur Verbindungsbeschleunigung ist ein Programm, das Ihre
Internetverbindung beschleunigt. Es unterstützt die meisten Verbindungstypen.
Vor der Installation dieses Programms müssen Sie die Setup.exe Datei auf dem Notebook installieren:
1. Wenn Sie RealSpeed installieren möchten, klicken Sie doppelt auf die Setup.exe Datei und folgen
Sie den Schritt-für-Schritt Anleitungen auf dem Bildschirm, um den Einrichtungsassistenten
zu starten.
2. Nach Abschluss der Installation wird eine Benachrichtigung und ein RealSpeed Symbol auf
dem Desktop angezeigt.
3. Klicken Sie doppelt auf das RealSpeed Desktop Symbol, um dieses Programm zu starten.
4. Im Mode Menübildschirm können Sie den gewünschten Modus auswählen und auf Apply
klicken.
5. Im Application Menübildschirm können Sie eine Liste der gerade auf dem Notebook laufenden
Programme und ihren Bandbreitenverbrauch sehen.
Page 54

ERSTE SCHRITTE
24
6. Im Advanced Menübildschirm können Sie die Upload/Download Geschwindigkeit manuell
einstellen und Speed-up Response Time und TCP Delay aktivieren/deaktivieren.
7. Im System Info Menübildschirm können Sie die Hardwarespezifikation des Systems überprüfen.
8. Im About Menübildschirm können Sie die aktuelle RealSpeed Version und den Namen des
Herstellers sehen.
Sie können das RealSpeed Programm auch durch einen Rechtsklick auf das RealSpeed Symbol
in der Taskleiste ausführen.
Page 55

ERSTE SCHRITTE
25
FESTPLATTEN-ARRAY (RAID) KONFIGURATION
Wenn Sie die Festplattenleistung erhöhen möchten, können Sie Daten durch Einrichtung eines
RAID 0 Festplatten-Arrays über Laufwerke verteilen. Bitte sichern Sie Ihre Daten, bevor Sie ein
RAID 0 Array auf Ihrem Notebook erstellen.
RAID 0 setzt voraus, dass zwei Speicherlaufwerke derselben Spezifikationen im
Notebook installiert sind. Speicherlaufwerke unterschiedlicher Kapazitäten sind
möglich.
1. Schalten Sie Ihr Notebook ein und drücken Sie auf [F2] wenn das System startet, um das BIOS
Setup Menü aufzurufen.
2. Gehen Sie zu Advanced→HDD configuration.
3. Ändern Sie das Feld Interface Combination auf [RAID].
4. Drücken Sie [F10] und auf [Yes], um die Änderungen zu speichern und die Einrichtung
abzuschließen.
Page 56

ERSTE SCHRITTE
26
5. Das System wird automatisch neu starten. Drücken Sie auf [F2], um das BIOS Setup Menü
erneut einzurichten.
6. Gehen Sie zu Misc→ Intel(R) Rapid Storage Technology.
7. Gehen Sie zu Create RAID Volume.
8. Um die Laufwerke für RAID zu konfigurieren, ändern Sie die Felder Port 0, Port 1 und Port 2
unter Select Disks zu [X]. Gehen Sie zu Create Volume und drücken Sie auf Enter.
Page 57

ERSTE SCHRITTE
27
9. Nach Abschluss des Vorgangs werden Informationen über RAID Volumes im BIOS Setup
Menübildschirm angezeigt.
10. Drücken Sie [F10] und auf [Yes], um die Änderungen zu speichern und die Einrichtung
abzuschließen. Das RAID 0 Festplatten-Array wurde erfolgreich auf Ihrem System erstellt
und konfiguriert.
Page 58

28
FEHLERBEHEBUNG
Das Notebook ist sehr robust und sollte in dieser Hinsicht keinen Anlass zu Beschwerden geben.
Es ist jedoch möglich, dass einfache Installations- und Betriebsprobleme auftreten, die Sie auf der
Stelle beheben können. Es kann auch Probleme mit Peripheriegeräten geben, die behoben werden
können, indem Sie das entsprechende Gerät austauschen. Die Informationen dieses Abschnitts sollen
Ihnen dabei helfen, die einfachen Probleme von den schwerwiegenden Fehlern zu unterscheiden
und selbst zu lösen.
Identifizieren eines Problems
Wenn Sie auf ein Problem stoßen sollten, führen Sie vor einer komplexen Fehlerbehebung zunächst
die folgenden Schritte aus:
1. Schalten Sie das Notebook aus.
2. Stellen Sie sicher, dass das Netzteil angeschlossen und es mit einer funktionierenden Steckdose
verbunden ist.
3. Stellen Sie sicher, dass alle in sämtlichen verfügbaren Kartensteckplätzen eingesteckten Karten
richtig eingeführt wurden. Sie können die Karte auch aus dem Steckplatz entnehmen und so
eine mögliche Fehlerquelle ausschließen.
4. Stellen Sie sicher, dass alle an die externen Anschlüsse angeschlossenen Geräte richtig
angeschlossen wurden. Sie können diese Geräte auch abtrennen, und so weitere mögliche
Fehlerquellen ausschließen.
5. Schalten Sie das Notebook ein. Es sollte nach dem Ausschalten mindestens 10 Sekunden lang
ausgeschaltet bleiben, ehe Sie es wieder einschalten.
6. Lassen Sie das Notebook den Bootvorgang ausführen.
7. Wenn das Problem weiterhin besteht, wenden Sie sich an den technischen Kundendienst.
Halten Sie für den Anruf die folgenden Daten zur Verfügung, so dass der Kundendienst Ihnen
schnellstmöglich helfen kann:
• Produktname
• Konfigurationsnummer des Produkts
• Seriennummer des Produkts
• Kaufdatum
• Bedingungen, bei denen das Problem aufgetreten ist
• Alle Fehlermeldungen, die angezeigt wurden
• Hardwarekonfiguration
• Art der angeschlossenen Geräte, falls zutreffend
Die Konfigurations- und Seriennummer des Gerätes finden Sie auf dem Konfigurationsetikett, das
sich auf der Unterseite des Notebooks befindet.
Page 59

29
MEMO
FCC-Erklärung
Dieses Gerät entspricht Abschnitt 15 der FCC-Vorschriften. Der Betrieb unterliegt den folgenden
zwei Bedingungen:
(1) Dieses Gerät darf keine Störungen verursachen.
(2) Das Gerät muss alle Störungen aufnehmen können, auch solche, die einen unerwünschten
Betrieb zur Folge haben können.
Alle Änderungen am Gerät (einschließlich an den Antennen), die nicht ausdrücklich vom Hersteller
genehmigt wurden, können zum Entzug der Betriebserlaubnis führen. FCC-Erklärung zur
Strahlenbelastung im Funkwellenbereich: Dieses Gerät entspricht den FCC-Grenzwerten für die
Strahlenbelastung im Funkwellenbereich in unkontrollierter Umgebung. Dieses Gerät und seine
Antenne dürfen sich nicht in der Nähe von anderen Antennen und Sendern befinden oder mit diesen
zusammen verwendet werden. Dieses Gerät wurde geprüft und entspricht gemäß Abschnitt 15 der
FCC-Vorschriften den Grenzwerten eines digitalen Geräts der Klasse B. Diese Grenzwerte dienen
einem angemessenen Schutz vor funktechnischen Störungen in Wohnräumen.
Dieses Gerät erzeugt und verwendet Hochfrequenzenergie und kann diese auch abstrahlen. Wenn
es nicht entsprechend den Anweisungen installiert und betrieben wird, können funktechnische
Störungen auftreten. Es kann jedoch nicht ausgeschlossen werden, dass in bestimmten Geräten
dennoch Störungen auftreten. Wenn dieses Gerät Störungen beim Radio- oder Fernsehempfang
verursachen sollte, was Sie feststellen können, indem Sie das Gerät aus- und wieder einschalten,
können Sie versuchen, diese Störungen durch eine oder mehrere der folgenden Maßnahmen beheben:
• Richten Sie die Empfangsantenne neu aus, oder stellen Sie sie an einen anderen Ort.
• Vergrößern Sie den Abstand zwischen dem Gerät und dem Empfänger.
• Schließen Sie das Gerät und den Empfänger an zwei unterschiedliche Stromkreise an.
• Wenden Sie sich an einen Fachhändler oder an einen Radio-/Fernsehtechniker.
FCC-Erklärung zur Strahlenbelastung im Funkwellenbereich:
1. Dieser Sender darf sich nicht in der Nähe von anderen Antennen und Sendern befinden oder
mit diesen zusammen verwendet werden.
2. Dieses Gerät entspricht den FCC-Grenzwerten für die Strahlenbelastung im Funkwellenbereich
in unkontrollierter Umgebung. Um den Anforderungen gemäß den FCC-Vorschriften zur
Strahlenbelastung im Funkwellenbereich zu entsprechen, vermeiden Sie während des
Sendevorgangs den direkten Kontakt mit der Sendeantenne.
Page 60

30
TECHNISCHE DATEN
LCD 15,6” FHD (1920 × 1080) LCD (300 Nits) mit eTP Schnittstelle
Plattform Intel Haswell 4C (Lynx Point HM87 Chipsatz)
Video nVidia N15P-GT, -GX, N15E-GT, 2/4G (6G für N15E) GDDR5 VRAM
Audio
Zwei integrierte 2W Stereolautsprecher und ein 3W Subwoofer
Integriertes High Definition Audio (2 Kanäle)
RAM
Zwei SO-DIMM Speichersockel mit Unterstützung von bis zu 16GB
DDR3L 1600 MHz
Speicher 2,5” 7/7,2/9,5 mm SATA HDD und zwei 128GB/256GB SSD (mSATA)
I/O Ports
Drei USB 3.0 Ports
Ein USB 2.0 Port mit Standby-und-Aufladen Funktion
Ein HDMI Port
Ein VGA Port
Ein 4-in-1 Speicherkartenleser (SD/SDHC/SDXC/MMC)
Ein kombinierter Audioanschluss (Kopfhörerausgang & Mikrofoneingang)
Eine Netzteilbuchse für den Anschluss des Netzteils
Ein RJ-45 Port für Netzwerkanschluss
Eine Mikrofon/SPDIF Buchse
Kamera HD-Kamera
WLAN WLAN mit integriertem Bluetooth-Modul
Akku 2600 mAH, 8-Zellen Li-Ion Akku
Stromversorgung 20V 120W/150W/180W Netzteil
OS Windows 8.1 (64bit) kompatibel, Windows 7 (64bit) kompatibel
TPM Nein
Abmessungen 387 × 274,5 × 30,9 mm
Gewicht ≤2,83kg
Page 61

사용 설명서
2014년 5월
한국어
Page 62

2
목차
시작하기 전에 ......................................................................................................... 5
내용물 확인 ......................................................................................................................5
컴퓨터 살펴보기 ...............................................................................................................6
디스플레이 패널 열기 .................................................................................................6
앞면 개요 ....................................................................................................................7
좌측면 개요 ................................................................................................................9
우측면 개요 ..............................................................................................................10
뒷면 개요 ..................................................................................................................12
밑면 개요 ..................................................................................................................13
시작하기 ............................................................................................................... 14
전원 ................................................................................................................................14
전원 어댑터 연결 ......................................................................................................14
배터리 충전 ..............................................................................................................15
노트북 시작하기 .............................................................................................................16
전원 켜기 ..................................................................................................................16
상태 표시등 ..............................................................................................................17
기능 키 사용 .............................................................................................................18
터치패드 사용 ...........................................................................................................19
사용자 정의 키 사용 .................................................................................................20
REALTEK REALSPEED CONNECTION SPEED-UP 유틸리티 ...............................23
하드 드라이브 어레이 (RAID) 구성 ...........................................................................25
문제 해결 .............................................................................................................. 28
문제 식별 .......................................................................................................................28
사양 ...................................................................................................................... 30
Page 63

3
노트북 PC의 올바른 취급법
컴퓨터의 프로세서가 과열되는 것을
방지하기 위해 통풍구를 차단하지 마십시오.
디스플레이 패널을 누르거나 만지지
마십시오.
평평하지 않거나 불안정한 면 위에 놓지
마십시오.
노트북 컴퓨터를 열악한 환경에서 사용하지
마십시오.
컴퓨터 위에 물건을 올려놓거나 떨어뜨리지
마십시오. 심한 압력을 가하지 마십시오.
컴퓨터를 자기장에 노출시키지 마십시오.
직사광선에 노출시키지 마십시오. 극한 온도에서 사용하거나 보관하지
마십시오.
Page 64

4
냉난방구로부터 멀리 두어 급격한 온도
또는 습도 변화를 피하십시오.
비 또는 습기에 노출시키지 마십시오.
화기 또는 기타 열원 근처에서 사용하지
마십시오.
배터리를 개조하지 마십시오. 어린이의
손이 닿지 않는 곳에 보관하십시오.
먼지 및 / 또는 부식제에 노출시키지
마십시오.
노트북을 세게 닫거나 디스플레이를 잡고
노트북을 들어 올리지 마십시오.
물 또는 기타 세척액을 디스플레이에 직접
분사하지 마십시오.
여행 시에는 컴퓨터를 반드시 직접
휴대하고, 수하물 속에 넣지 마십시오.
Page 65

5
시작하기 전에
내용물 확인
노트북 PC가 도착하면 조심해서 포장을 풀고 내용물 목록을 참고하여 노트북과 내용물이
모두 들어있는지 확인하십시오.
노트북과 내용물을 확인한 후에는 다음 페이지를 숙독하여 노트북의 각 구성 요소에
대해 숙지하도록 하십시오.
구입하신 모델에 따라 노트북의 실제 모습은 본 설명서에 예시된 그림과 다를
수 있습니다.
Page 66

시작하기 전에
6
컴퓨터 살펴보기
디스플레이 패널 열기
덮개를 위로 올려 디스플레이를 엽니다.
디스플레이를 닫을 때 세게 닫지 마십시오.
Page 67

시작하기 전에
7
앞면 개요
다음은 노트북의 앞면에 대한 개요입니다.
디스플레이 패널
대기/전원 버튼
사용자 정의 키
백라이트 버튼
키보드
스테레오 스피커
터치패드 포인팅
장치
카메라
카메라 LED
마이크
카메라
내장된 HD 카메라를 사용하여 한 번의 클릭만으로 사진을 찍거나 화상 채팅 또는 화상
회의를 할 수 있습니다.
카메라 LED
카메라 LED는 카메라의 활성화 또는 비활성화 상태를 표시합니다.
마이크
내장된 마이크는 음성 및/또는 기타 오디오 데이터를 수신하고 이러한 입력을 수용할 수
있는 프로그램으로 전송합니다.
Page 68

시작하기 전에
8
디스플레이 패널
백 라이트가 설치된 컬러 LCD 패널로, 문자와 그래픽을 표시합니다.
대기/전원 버튼
이 버튼으로 노트북을 켜거나 끄고, 대기 모드로 전환합니다. (자세한 내용은 전원 켜기
부분의 대기/전원 버튼을 참조하십시오.)
터치패드 포인팅 장치
터치패드 포인팅 장치는 마우스와 같은 커서 제어 장치로, 두 개의 버튼과 터치 감응 이동
패드로 구성됩니다.
스테레오 스피커
내장된 듀얼 스피커는 스테레오 사운드를 지원하고 비디오와 음악 재생을 위한 오디오
출력을 제공합니다.
키보드
숫자 키와 Windows® 전용 키가 포함된 풀사이즈의 키보드입니다.
사용자 정의 키
사용자 정의 키는 노트북을 빠르게 제어하기 위한 키보드 단축키입니다. 사용자
정의 키를 직접 설정할 수 있습니다. (자세한 내용은 사용자 정의 키 사용 부분을
참조하십시오.)
백라이트 버튼
백라이트 버튼으로 LCD 커버 백라이트와 터치패드 백라이트를 켜거나 끕니다.
Page 69

시작하기 전에
9
좌측면 개요
다음은 노트북의 좌측면에 대한 개요입니다.
메모리 카드 리더USB 3.0 포트
상태 표시등USB 2.0 포트
USB 3.0 포트
USB 장치를 연결할 수 있습니다. 이 포트는 데이터 전송 속도 4.8 Gb/s의 USB v3.0을
지원합니다. USB 3.0은 USB 2.0과 역호환됩니다.
USB 2.0 포트
USB 장치를 연결할 수 있습니다. 이 포트는 데이터 전송 속도 480 Mb/s의 USB v2.0을
지원합니다. 슬립앤차지 (sleep-and-charge) 기능도 지원합니다.
메모리 카드 리더
메모리 카드 리더는 노트북과 플래시 호환 장치(디지털 카메라, 휴대용 MP3 플레이어,
휴대폰, 태블릿 및 기타 휴대용 기기) 간에 디지털 사진, 음악 및 데이터를 빠르고 쉽게
전송하는 방법을 제공합니다.
상태 표시등
상태 표시등은 컴퓨터의 특정 작동 모드, 즉 배터리 상태, 하드 디스크 드라이브 (HDD)
활동, 무선 LAN 활동 등을 표시합니다.
Page 70

시작하기 전에
10
우측면 개요
다음은 노트북의 우측면에 대한 개요입니다.
USB 3.0 포트마이크/SPDIF 잭
켄싱턴 락 홀
오디오 콤보 잭
(헤드폰 & 마이크)
마이크/SPDIF 잭
외부 모노 마이크와 SPDIF 호환 오디오 장비를 연결할 수 있습니다.
오디오 콤보 잭(헤드폰 & 마이크)
헤드폰, 외부 스피커, 앰프 또는 외부 모노 마이크를 연결할 수 있습니다.
USB 3.0 포트
USB 장치를 연결할 수 있습니다. 이 포트는 데이터 전송 속도 4.8 Gb/s의 USB v3.0을
지원합니다. USB 3.0은 USB 2.0과 역호환됩니다.
Page 71

시작하기 전에
11
켄싱턴 락 홀
켄싱톤 락 홀에 보안 케이블(별도 구입)을 연결하여 노트북을 고정된 물체에 묶어 놓을 수
있습니다.
Page 72

시작하기 전에
12
뒷면 개요
다음은 노트북의 뒷면에 대한 개요입니다.
외부 모니터 포트
전원 어댑터 포트
HDMI 포트LAN (RJ-45) 포트
전원 어댑터 포트
전원 어댑터 포트에 AC 어댑터를 연결하여 노트북에 전원을 공급하고 내장된 리튬 이온
배터리를 충전할 수 있습니다.
LAN (RJ-45) 포트
LAN 포트는 10/100/1000 Base-T 표준 RJ-45 플러그를 지원합니다.
외부 모니터 포트
외부 모니터를 연결할 수 있습니다.
HDMI 포트
HDMI 포트를 사용하여 T V, 프로젝터, VCR과 같은 비디오 장치를 컴퓨터에 연결할 수
있습니다.
Page 73

시작하기 전에
13
밑면 개요
다음은 노트북의 밑면에 대한 개요입니다.
서브우퍼
구성 라벨
팬 환기구
팬 환기구
팬 환기구
컴퓨터의 내부 구성 요소에서 발생하는 열을 발산시키기 위해 설치된 팬을 위한
환기구입니다. 이 환기구를 막거나 부주의로 인해 이 환기구가 막히는 일이 없도록
컴퓨터를 설치하십시오.
서브우퍼
3W 서브우퍼는 노트북의 오디오 출력에 향상된 저주파 음조(베이스)를 제공합니다.
구성 라벨
노트북의 모델명 및 기타 정보가 표시되어 있습니다.
Page 74

14
시작하기
전원
전원으로 리튬이온 배터리 또는 AC 어댑터를 사용할 수 있습니다.
전원 어댑터 연결
AC 어댑터는 노트북 PC를 작동하고 배터리를 충전할 수 있도록 전원을 공급합니다.
AC 어댑터 연결
1. DC 출력 케이블을 노트북 PC의 DC 전원 잭에 연결합니다.
2. AC 어댑터를 AC 전기 콘센트에 연결합니다.
AC 어댑터 전원에서 배터리 전원으로 전환
AC 어댑터를 제거합니다. 노트북의 전원이 배터리 전원으로 자동 전환됩니다.
구입시 리튬이온 배터리는 충전되어 있지 않습니다. 처음에는 AC 어댑터를
연결하여 노트북 PC를 사용하십시오.
Page 75

시작하기
15
배터리 충전
내장된 리튬이온 배터리는 AC 어댑터를 사용하여 충전합니다. 배터리를 충전하려면
컴퓨터가 AC에 연결되어 있는지 확인하십시오.
리튬이온 배터리는“메모리 효과”가 없기 때문에 충전하기 전에 배터리를 방전할
필요가 없습니다. 배터리를 충전하는 동안 노트북 PC를 사용하면 충전 시간이 훨씬
오래 걸립니다. 배터리를 좀 더 빠르게 충전하려면 컴퓨터를 대기 모드로 전환하거나,
배터리를 충전하는 동안 컴퓨터를 끄십시오.
배터리 부족 상태
배터리 잔량이 부족하면 경고 메시지가 나타납니다. 배터리 부족 메시지가 나타나도
그대로 계속 사용하면 노트북을 작동할 수 없을 때까지 배터리가 방전됩니다. 이
경우에는 노트북 PC가 대기 모드로 전환됩니다. 노트북이 이 상태가 되면 데이터가
저장된다는 보장이 없습니다.
반드시 컴퓨터에 제공된 전원 어댑터를 사용하십시오. 전원 어댑터마다 정격
출력 전원이 다르기 때문에 다른 전원 어댑터를 사용하면 컴퓨터에 손상을 줄
수 있습니다.
배터리가 완전히 방전되어 컴퓨터가 대기 모드로 전환되면, 어댑터 또는 충전된
배터리로 전원이 공급될 때까지 컴퓨터를 다시 사용할 수 없습니다. 전원이 공급되면
대기/전원 버튼을 눌러 컴퓨터를 다시 사용할 수 있습니다. 대기 모드에서 데이터는
얼마동안은 유지되지만, 전원이 즉시 공급되지 않으면 점멸하던 전원 표시등이 꺼지고
저장하지 않은 데이터는 손실됩니다. 전원이 공급되면 어댑터로 배터리를 충전하면서
컴퓨터를 계속 사용할 수 있습니다.
Page 76

시작하기
16
노트북 시작하기
전원 켜기
대기/전원 버튼
대기/전원 버튼은 노트북을 켜는데 사용됩니다. AC 어댑터를 연결하거나 내장된
리튬이온 배터리를 충전하면 키보드 상단에 위치한 대기/전원 버튼을 눌러 노트북의
전원을 켤 수 있습니다. 노트북을 장시간 사용하지 않을 경우에 이 버튼을 다시 누르면
전원이 꺼집니다.
노트북을 켠 상태로 운반하거나, 노트북에 충격이나 진동을 가하지 마십시오.
하드 디스크가 손상될 수 있습니다.
노트북의 전원을 켜면 자기진단테스트(POST)가 실행되어 내부 구성 요소의 상태와
구성이 올바른지 확인합니다. 오류가 발견되면 경고음을 내거나 오류 메시지가
표시됩니다.
문제의 성질에 따라 운영 체제를 시작하거나 BIOS 설정 유틸리티에서 설정을 수정하여
계속 진행할 수 있습니다.
자기진단테스트(POST)가 완료되면 노트북은 설치된 운영 체제를 로드합니다.
자기진단테스트(POST) 중에 절대 노트북을 끄지 마십시오. 치명적인 오류가
발생할 수 있습니다.
Page 77

시작하기
17
상태 표시등
상태 표시등은 컴퓨터의 특정 작동 모드, 즉 배터리 상태, 하드 디스크 드라이브(HDD)
활동, 무선 LAN 활동 등을 표시합니다.
무선 LAN 활동 표시등
배터리 상태 표시등
하드 디스크 드라이브 (HDD) 활동 표시등
배터리 상태 표시등
배터리 상태 표시등은 배터리 잔량을 표시합니다.
• 이 표시등은 배터리 충전 여부와 상관없이 컴퓨터가 배터리 전원을 사용할 때
점등됩니다.
• 표시등 상태 표시:
▪흰색 점등 - 배터리 잔량이 90% 이상입니다.
▪황색 점등 - 배터리 잔량이 10% ~ 90% 입니다.
▪황색 점멸 - 배터리 잔량이 10% 미만입니다.
▪황색 빠르게 점멸 - 배터리 잔량이 매우 낮아 시스템을 켤 수 없습니다. 즉시 AC
어댑터를 노트북에 연결하여 배터리를 충전하십시오.
• 배터리가 올바르게 작동하지 않으면 표시등이 꺼집니다.
• 배터리에 충격 또는 진동을 가하거나 극한의 온도에 노출시키면 영구적으로 손상될
수 있습니다.
하드 디스크 드라이브 (HDD) 활동 표시등
하드 디스크 드라이브 (HDD) 활동 표시등은 내장된 하드 드라이브의
사용 여부와 속도를 표시합니다.
무선 LAN 활동 표시등
무선 LAN 활동 표시등은 컴퓨터가 무선 네트워크에 연결되어 있는지 여부를 표시합니다.
Page 78

시작하기
18
기능 키 사용
컴퓨터에는 F1에서 F12까지 12개의 기능 키가 있습니다. 이 키들의 기능은
응용프로그램에 따라 다릅니다. 기능 키의 사용 방법은 소프트웨어 문서를 참조하십시오.
다른 키와 결합하여 사용하는 [FN] 키는 노트북에 확장된 기능을 제공합니다.
• [FN+Esc]: 터치패드 기능을 활성화하거나 비활성화합니다.
• [FN+F1]: 노트북을 대기 모드로 전환합니다. 전원 버튼을 누르면 다시 활성화됩니다.
• [FN+F2]: 무선 네트워크의 연결을 활성화하거나 비활성화합니다.
• [FN+F3]: 디스플레이 장치 옵션을 변경합니다. 이 키 조합을 누를 때마다 다음 순서로
디스플레이 장치가 전환됩니다: 내장된 디스플레이 패널만, 내장된 디스플레이
패널과 외부 모니터, 외부 모니터만.
• [FN+F4]: 화면의 밝기를 감소합니다.
• [FN+F5]: 화면의 밝기를 증가합니다.
• [FN+F6]: 컴퓨터의 볼륨을 소거합니다.
• [FN+F7]: 컴퓨터의 볼륨을 낮춥니다.
• [FN+F8]: 컴퓨터의 볼륨을 높입니다.
• [FN+F9]: 현재 멀티미디어 트랙을 재생 또는 일시 정지합니다.
• [FN+F10]: 현재 멀티미디어 트랙을 정지합니다.
• [FN+F11]: 이전 멀티미디어 트랙으로 이동합니다.
• [FN+F12]: 다음 멀티미디어 트랙으로 이동합니다.
• [FN]+스페이스바: 키보드 백라이트를 켜기(어둡게), 켜기(밝게), 끄기 순으로
전환합니다.
Page 79

시작하기
19
터치패드 사용
터치패드 포인팅 장치는 컴퓨터에 내장되어 있습니다. 이 장치는 포인터를 움직여
디스플레이 패널에서 항목을 선택하는데 사용됩니다.
터치패드는 커서 제어, 왼쪽/오른쪽 버튼, 스크롤바로 구성됩니다. 커서 제어는 마우스와
똑같은 방식으로 디스플레이에서 커서를 움직입니다. 손가락 끝에 살짝 힘을 주기만
하면 됩니다. 왼쪽/오른쪽 버튼은 마우스 버튼과 똑같이 기능합니다. 이 버튼들의 실제
기능은 사용 중인 응용 프로그램에 따라 다를 수 있습니다. 마지막으로 스크롤바는 화면
위의 커서를 사용하여 상/하 스크롤바를 조작하지 않고도 페이지를 빠르게 탐색할 수
있습니다.
클릭
버튼을 한번 눌렀다 떼는 동작입니다. 왼쪽 클릭을 하려면 선택하려는 항목으로 커서를
옮긴 후 왼쪽 버튼을 한번 눌렀다 떼십시오. 오른쪽 클릭을 하려면 선택하려는 항목으로
커서를 옮긴 후 오른쪽 버튼을 한번 눌렀다 떼십시오. 터치패드를 가볍게 한 번 눌렀다
떼어 클릭 동작을 수행할 수도 있습니다.
두 번 클릭
왼쪽 버튼을 빠르게 연속 두 번 눌렀다 떼는 동작입니다. 이 동작은 오른쪽 버튼으로 할
수 없습니다. 두 번 클릭을 하려면 선택하려는 항목으로 커서를 옮긴 후 왼쪽 버튼을
빠르게 두 번 눌렀다 떼십시오. 터치패드를 가볍게 두 번 눌렀다 떼어 두 번 클릭 동작을
수행할 수도 있습니다.
끌기
왼쪽 버튼을 누른 상태에서 커서를 움직이는 동작입니다. 끌기를 하려면 이동하려는
항목으로 커서를 옮깁니다. 왼쪽 버튼을 누른 상태에서 항목을 새 위치로 이동한
다음 손가락을 버튼에서 떼십시오. 끌기 동작은 터치패드에서도 수행할 수 있습니다.
먼저, 이동하려는 항목 위에서 터치패드를 두 번 누르고 두 번째 누를 때 손가락을
터치패드에서 떼지 마십시오. 터치패드에서 손가락을 움직여 항목을 새 위치로 옮긴
다음 손가락을 떼십시오. 스크롤바를 사용하면 창의 스크롤바를 사용하지 않고 문서를
빠르게 탐색할 수 있습니다. 이 기능은 특히 온라인 페이지를 탐색할 때 유용합니다.
Page 80

시작하기
20
사용자 정의 키 사용
컴퓨터의 키보드 상단에는 일반적인 작업에 빠르게 액세스할 수 있는 사용자 정의 키가
위치합니다. User Defined Key 응용 프로그램을 통해 이 4개의 사용자 정의 키를 설정할 수
있습니다.
사용자 정의 키 설정
4개의 사용자 정의 키를 설정하려면
User Defined Key
응용 프로그램을 컴퓨터에 설치해야
합니다.
1.
User Defined Key
파일이 실행되면 사용자 정의 키 창이 표시됩니다.
Page 81

시작하기
21
2. 기본 키를 변경하려면 마우스 포인터를 사용자 정의 키 필드 위로 이동한 후, 원하는
키 또는 키 조합을 누릅니다. 예를 들어, 왼쪽 [shift] 키를 누른 상태에서 [1] 키를 눌러
M1 키를 설정하면 사용자 정의 키 창에 Shift_Left + 1이 표시됩니다.
3. 2 단계를 반복하여 원하는 사용자 정의 키 필드를 정의합니다.
4.
Save
→ OK를 클릭하여 키 정의 설정을 저장합니다.
Page 82

시작하기
22
5. 유효한 키와 그 예를 확인하려면 ? 버튼을 클릭합니다.
6. 설정된 키 정의를 모두 삭제하려면
Clear
→ OK를 클릭합니다.
7. 모든 사용자 정의 키를 기본 값으로 복원하려면
Default
→ OK를 클릭합니다. 기본 M1
키는 [Ctrl]+[0], M2는 [Ctrl]+[1], M3은 [Alt]+[2], M4는 [Alt]+[3]입니다.
8. User Defined Key 응용 프로그램을 닫으려면
Close
→ OK를 클릭합니다.
Page 83

시작하기
23
REALTEK REALSPEED CONNECTION SPEED-UP 유틸리티
Realtek RealSpeed connection speed-up 유틸리티는 인터넷 연결 속도를 향상시키는
프로그램입니다. 이것은 대부분의 연결 유형을 지원합니다.
이 프로그램을 설치하기 전에
Setup.exe
파일을 컴퓨터에 설치해야 합니다.
1.
RealSpeed
를 설치하려면
Setup.exe
파일을 두 번 클릭하고 화면 지시에 따라 설정
마법사를 시작합니다.
2. 설치가 완료되면 알림이 표시되고 바탕 화면에
RealSpeed
아이콘이 나타납니다.
3. 바탕 화면에서
RealSpeed
아이콘을 두 번 클릭하여 이 프로그램을 시작합니다.
4. Mode 메뉴 화면에서 사용하려는 모드를 선택하고
Apply
를 클릭합니다.
5. Application 메뉴 화면에서 현재 컴퓨터에서 실행 중인 프로그램 목록과 그 대역폭
사용량을 볼 수 있습니다.
Page 84

시작하기
24
6. Advanced 메뉴 화면에서 수동으로 upload/download 속도를 설정하고 Speed-up
Response Time 및 TCP Delay를 활성화/비활성화할 수 있습니다..
7. System Info 메뉴 화면에서 시스템 하드웨어 사양을 확인할 수 있습니다.
8. About 메뉴 화면에서 현재
RealSpeed
버전과 제조업체명을 확인할 수 있습니다.
작업 표시줄에서 RealSpeed 아이콘을 오른쪽 클릭하여
RealSpeed
프로그램을 빠르게
시작할 수도 있습니다.
Page 85

시작하기
25
하드 드라이브 어레이 (RAID) 구성
하드 드라이브의 성능 향상을 위해 RAID 0 하드 드라이브 어레이를 설정하여 데이터를
드라이브에 분산시킬 수 있습니다. 컴퓨터에 RAID 0 어레이를 구축하기 전에 데이터를
백업하십시오.
RAID 0은 동일한 사양의 저장소 드라이브 두 개가 노트북에 설치되어 있어야
합니다. 용량이 다른 저장소 드라이브도 가능합니다.
1. 노트북의 전원을 켜고 시스템이 시작할 때 [F2]를 눌러 BIOS 설정 메뉴로 들어갑니다.
2. Advanced → HDD configuration으로 이동합니다.
3. Interface Combination 필드를 [RAID]로 변경합니다.
4. [F10]을 누르고 [Yes]를 클릭하여 변경 내용을 저장하고 종료합니다.
Page 86

시작하기
26
5. 시스템이 자동으로 다시 시작됩니다. [F2]를 눌러 BIOS 설정 메뉴로 다시 들어갑니다.
6. Misc → Intel(R) Rapid Storage Technology로 이동합니다.
7. Create RAID Volume으로 이동합니다.
8. 디스크를 RAID로 구성하려면 Select Disks 아래에 있는 Port 0, Port 1 및 Port 2 필드를
[X] 로 변경합니다. Create Volume으로 이동하고 Enter를 누릅니다.
Page 87

시작하기
27
9. 절차가 완료되면 BIOS 설정 메뉴 화면에 RAID Volumes 정보가 나타납니다.
10. [F10]을 누르고 [Yes]를 클릭하여 변경 내용을 저장하고 종료합니다. 시스템에 RAID
0 하드 드라이브 어레이가 성공적으로 생성되고 구성되었습니다.
Page 88

28
문제 해결
이 노트북 PC는 매우 견고하고 안정된 시스템입니다. 그럼에도 불구하고 바로 해결이
가능한 단순한 설정 또는 작동 문제, 장치 교체로 해결할 수 있는 주변 장치 문제가
발생할 수 있습니다. 이 부분에 수록된 정보는 이러한 단순한 문제를 해결하고 수리가
필요한 문제를 식별하는데 도움이 될 것입니다.
문제 식별
문제가 발생하면 복잡한 문제 해결 절차를 수행하기 전에 다음 절차를 먼저
수행하십시오.
1. 노트북의 전원을 끕니다.
2. AC 어댑터가 노트북과 정상적으로 작동하는 AC 전원에 연결되어 있는지 확인합니다.
3. 카드 슬롯에 설치된 카드가 올바르게 설치되어 있는지 확인합니다. 슬롯에서 카드를
분리하여 오류의 원인을 제거할 수도 있습니다.
4. 외부 커넥터에 연결된 장치가 올바르게 연결되어 있는지 확인합니다. 이 장치들을
분리하여 오류의 원인을 제거할 수도 있습니다.
5. 노트북의 전원을 켭니다. 전원이 꺼지고 최소 10 초가 경과된 후에 전원을 켜야
합니다.
6. 부팅 절차를 실행합니다.
7. 문제가 해결되지 않았다면 고객 지원 센터에 문의하십시오.
신속한 지원을 받을 수 있도록 고객 지원 센터에 문의하기 전에 다음 정보를 미리
준비하십시오.
• 제품명
• 제품 구성 번호
• 제품 일련 번호
• 구입한 날짜
• 문제가 발생한 상황
• 표시된 오류 메시지
• 하드웨어 구성
• 연결된 장치 유형
구성 번호와 일련 번호는 노트북 밑면의 구성 라벨에 기재되어 있습니다.
Page 89

29
메모
미연방 통신 위원회 (FCC) 성명
본 장치는 FCC 규정 제 15조를 준수하며, 다음 두 조건 하에 작동됩니다.
(1) 본 장치는 유해한 간섭을 일으키지 않습니다.
(2) 본 장치는 원치 않는 작동을 일으킬 수 있는 간섭을 포함하여 수신하는 모든 간섭을
수용합니다.
제조업자가 명시적으로 승인하지 않은 본 장치에 대한 변경이나 개조(안테나 포함)
행위는 본 장치에 대한 사용자의 사용 권한을 무효화할 수 있습니다. FCC 방사 노출 성명:
본 장치는 통제되지 않은 환경에 대한 FCC 방사 노출 기준에 부합합니다. 본 장치와
안테나는 다른 안테나 또는 송신기와 함께 설치하거나 사용해서는 안 됩니다. 본 장비는
FCC 규정 제 15조에 의거하여 테스트되고 class B 디지털 장치 기준을 준수하는 것으로
판명되었습니다. 이러한 기준은 주거 환경에서 사용 시 발생할 수 있는 유해한 전파
간섭을 방지하기 위해 마련된 것입니다.
본 장비는 무선 주파수 에너지를 사용하고 방출하며, 지침과 다르게 설치하거나 사용할
경우, 무선 통신에 유해한 전파 간섭을 일으킬 수 있습니다. 그러나, 특정 설치에서 전파
간섭을 일으키지 않는다는 보장은 없습니다. 이 장비를 껐다가 켜서 라디오 또는 TV
수신에 전파 간섭을 일으키는지 확인한 후, 전파 간섭이 있으면 다음 방법으로 문제를
해결해 보십시오.
• 수신 안테나의 방향과 위치를 재조정합니다.
• 본 장비를 수신기에서 멀리 설치합니다.
• 본 장비를 수신기가 연결되어 있는 콘센트와 다른 회로를 사용하는 콘센트에
연결합니다.
• 대리점 또는 숙련된 라디오/TV 기술자에게 문의합니다.
FCC 방사 노출 성명:
1. 본 송신기는 다른 안테나 또는 송신기와 함께
설치하거나 사용해서는 안 됩니다.
2. 본 장치는 통제되지 않은 환경에 대한 FCC 방사 노출 기준에 부합합니다. FCC 방사
노출 요구 사항에 지속적으로 부합하려면, 송신 시 송신 안테나에 대한 직접적인
접촉을 피하십시오.
Page 90

30
사양
LCD 15.6" FHD (1920 × 1080) LCD (300-nits), eTP 인터페이스 탑재
플랫폼 Intel Haswell 4C (Lynx Point HM87 칩셋)
비디오
nVidia N15P-GT, -GX, N15E-GT, 2/4G (N15E의 경우 6G) GDDR5
VRAM
오디오
2W 스테레오 스피커 2개 및 3W 서브우퍼 1개 내장
HD 오디오(2 채널) 내장
메모리 SO-DIMM 메모리 소켓 2개, 최대 16GB DDR3L 1600 MHz 지원
저장소 2.5” 7/7.2/9.5 mm SATA HDD 및 128GB/256GB SSD(mSATA) 2개
I/O 포트
USB 3.0 포트 3개
슬립앤차지 기능 지원 USB 2.0 포트 1개
HDMI 포트 1개
VGA 포트 1개
4-in-1 메모리 카드 리더(SD/SDHC/SDXC/MMC) 1개
오디오 콤보 잭(헤드폰 출력 & 마이크 입력) 1개
전원 어댑터 연결용 DC-in 잭 1개
네트워크 연결용 RJ-45 포트 1개
마이크/PDIF 잭 1개
카메라 HD 카메라
무선 Wi-Fi/Bluetooth 통합 모듈
배터리 2600 mAH, 8셀 리튬이온 배터리
전원 20V 120W/150W/180W 어댑터
OS ,Windows 8.1(64비트) 호환 Windows 7(64비트) 호환
TPM 지원 안 함
크기 387 × 274.5 × 30.9 mm
무게 ≤ 2.83 kg
Page 91

ユーザーズマニュアル
2014 年 5 月
日本語
Page 92

2
目次
はじめる前に .......................................................................................................... 5
セット内容の確認 ............................................................................................................5
コンピュータをより良く理解するために ........................................................................6
ディスプレイパネルを開く ........................................................................................6
前面図 ........................................................................................................................7
左側面 ........................................................................................................................9
右側面 ......................................................................................................................10
背面図 ......................................................................................................................12
底面図 ......................................................................................................................13
はじめに ............................................................................................................... 14
電源 ................................................................................................................................14
電源アダプタの接続 .................................................................................................14
バッテリーの充電 ....................................................................................................15
ノートブックを使い始める ............................................................................................16
電源を入れる ............................................................................................................16
ステータスランプ ....................................................................................................17
機能キー ...................................................................................................................18
タッチパッドを使う .................................................................................................19
ユーザー定義キーを使う ..........................................................................................20
REALTEK REALSPEED 接続高速化ユーティリティ ..............................................23
ハードドライブアレイ (RAID) の構成 .....................................................................25
トラブルシューティング ...................................................................................... 28
問題を特定する ..............................................................................................................28
仕様 ...................................................................................................................... 30
Page 93

3
ノートブックコンピュータの取り扱い上のご注意
コンピュータの過熱を防ぐため、通気用の
穴などをふさがないようご注意ください。
ディスプレイパネルに触れたり、押したり
しないでください。
不安定な場所に設置しないでください。 コンピュータを劣悪環境でご使用にならな
いでください。
コンピュータ上に物を置いたり、落とし
たり、または強い圧力をかけないでくだ
さい。
コンピュータを電磁場に近づけないでくだ
さい。
コンピュータを直射日光に当てないでくだ
さい。
コンピュータを極端に低温または高温の場
所で使用したり、保管したりしないでくだ
さい。
Page 94

4
突然の温度変化や湿度変化を防ぐため、エ
アコンやヒーターなどの付近にコンピュー
タを設置しないでください。
コンピュータを雨や湿気にさらないでくだ
さい。
火気やその他の熱源に近づけないでくだ
さい。
バッテリーに手を加えないでください。ま
た、お子様の手の届かない場所に保管して
ください。
コンピュータをホコリや腐食性薬品に近づ
けないでください。
ノートブックのディスプレイを強く閉じた
り、ディスプレイ部分を持ってノートブッ
クを移動しないでください。
ディスプレイに直接水やその他の洗浄液を
スプレーすることはお止めください。
コンピュータをご旅行などにお持ちの際
は、必ず手荷物として扱ってください。荷
物と一緒に機内に預けないでください。
Page 95

5
はじめる前に
セット内容の確認
ノートブック PC がお手元に届きましたら、慎重に開封し、セット内容のリストを
チェックしてノートブックシステムがすべて揃っているかどうかお確かめください。
ノートブックシステムの内容を点検し、確認した後は、次からのページをよくお読み
の上、ノートブックコンピュータ各部についてよくご理解ください。
お買い上げのモデルによって、実際のノートブックの外観が本マニュアルに
示されたものと異なる場合があります。
Page 96

はじめる前に
6
コンピュータをより良く理解するために
ディスプレイパネルを開く
ディスプレイパネルを開くには、蓋を持ち上げるだけです。
カバーを閉じる際は、強い力を加えないようご注意ください。
Page 97

はじめる前に
7
前面図
以下はノートブックを正面から見た図です。
ディスプレイパネル
一時停止/電源オン
ボタン
ユーザー定義キー
バックライトボタン
キーボード
ステレオスピーカー
タッチパッドポイン
ティングデバイス
カメラ
カメラ LED
マイクロフォン
カメラ
内蔵 HD カメラを搭載、クリック 1 つで写真撮影やビデオチャットまたはビデオ会議
の作成ができます。
カメラ LED
カメラ LED はカメラが有効か無効かを表示します。
マイクロフォン
内蔵マイクロフォンで音声および(または)オーディオデータを取得したり、それら
の入力を許容する任意のプログラムに対し送信したりすることができます。
Page 98

はじめる前に
8
ディスプレイパネル
ディスプレイパネルは、テキストやグラフィックを表示するためのバックライトを搭
載したカラー LCD パネルです。
一時停止/ 電源オンボタン
このボタンでノートブックの電源をオンまたはオフにしたり、スリープ状態にしたり
することができます。(詳しくは、「電源を入れる」セクションの一時停止/電源オン
ボタンをご覧ください。)
タッチパッドポインティングデバイス
タッチパッドポインティングデバイスはマウスのようなカーソルコントロールで、2
つのボタンと、指の動きに反応するパッドが含まれます。
ステレオスピーカー
内蔵デュアルスピーカーが動画や音楽の再生時にステレオサウンドのオーディオを出
力します。
キーボード
テンキーと専用 Windows® キー搭載のフルサイズキーボードです。
ユーザー定義キー
ユーザー定義キーはノートブックをすばやくコントロールするためのキーボード
ショートカットです。ユーザー定義キーは自分でプログラムできます。(詳細情報は
「ユーザー定義キー」セクションをお読みください。)
バックライトボタン
バックライトボタンで LCD カバーバックライトとタッチパッドバックライトをオンま
たはオフにします。
Page 99

はじめる前に
9
左側面
以下はノートブックを左から見た図です。
メモリカードリーダUSB 3.0 ポート
ステータスランプUSB 2.0 ポート
USB 3.0 ポート
USB 3.0 ポートは、ユニバーサル シリアル バス デバイスの接続ができます。USB 規格
v3.0 に対応しており、4.8 Gb/s の高速データ転送が可能です。USB 3.0 は USB 2.0 と下
位互換性があります。
USB 2.0 ポート
USB 2.0 ポートは、ユニバーサル シリアル バス デバイスの接続ができます。USB 規格
v2.0 に対応しており、480 Mb/s の高速データ転送が可能です。また、スリープアンド
チャージ機能にも対応しています。
メモリカードリーダ
メモリカードリーダを使って、ノートブックとデジタルカメラや MP3 プレイヤー、携
帯電話、タブレット、携帯端末などのフラッシュ互換デバイス間でデジタル写真や音
楽、データを素早く簡単に転送することができます。
ステータスランプ
ステータスランプは各種操作モードに対応しています。これらのモードには、バッテ
リーステータス、ハードディスクドライブ (HDD) アクティビティ、ワイヤレス LAN
アクティビティが含まれます。
Page 100

はじめる前に
10
右側面
以下はノートブックを右から見た図です。
USB 3.0 ポートマイクロフォン/SPDIF ジャック
Kensington ロックスロット
オーディオコンボジャック
(ヘッドフォンとマイク)
マイクロフォン/SPDIF ジャック
マイクロフォン/SPDIF ジャックには、外付けモノラルマイクロフォンと SPDIF 対応
オーディオ機器を接続できます。
オーディオコンボジャック(ヘッドフォンとマイク)
オーディオコンボジャックを使い、ヘッドフォン、外付けスピーカー、アンプ、外付
けモノラルマイクを接続することができます。
USB 3.0 ポート
USB 3.0 ポートは、ユニバーサル シリアル バス デバイスの接続ができます。USB 規格
v3.0 に対応しており、4.8 Gb/s の高速データ転送が可能です。USB 3.0 は USB 2.0 と下
位互換性があります。
 Loading...