

Page 1
Service Manual
JHL90
Page 2

Page 3

Chapter 1
System Description
Specification
Page 4

Page 5

Contents
Chapter 1 System Description Specification
1. SCOPE................................................................................................... 1-2
1.1 One 2.5” W, 9.5mm H Hard Disk, Up to 250GB.............................1-2
1.2 Optical Disc Drive..........................................................................1-2
1.3 Touch Pad:.....................................................................................1-2
1.4 Keyboard.......................................................................................1-2
1.5 Display Device...............................................................................1-2
1.6 Camera..........................................................................................1-3
1.7 Keyboard.......................................................................................1-3
2. Communications..................................................................................... 1-4
2.1 Wireless LAN.................................................................................1-4
2.2 Modem...........................................................................................1-4
2.3 Bluetooth .......................................................................................1-4
3. Mechanical Specification ........................................................................ 1-5
3.1 Option Pack:.................................................................................. 1-5
3.2 Mechanical Function......................................................................1-5
3.3 Mechanical Material.......................................................................1-5
Page 6

Page 7

JHL90 Service Manual
IMPORTANT SAFETY INSTRUCTIONS
When using your telephone equipment, basic safety precautions should always be followed to
reduce the risk of fire, electric shock and injury to persons, including the following:
★ Do not use this product near water, for example, near a bathtub, washbowl, and kitchen
sink or laundry tub, in a wet basement or near a swimming pool.
★ Avoid using a telephone (other than a cordless type) during an electrical storm. There
may be a remote risk of electric shock from lightning.
★ Do not use the telephone to report a gas leak in the vicinity of the leak.
★ Use only the power cord indicated in this manual.
1-1
Page 8

JHL90 Service Manual
1. SCOPE
This document describes the functional specifications for the Compal Notebook
personal computer JHL90 series. The system is hardware and software
compatible with the IBM PC/ATX personal computer.
1.1 One 2.5” W, 9.5mm H Hard Disk, Up to 250GB
• Support SATA
• 5400RPM or 7200RPM
• Easily removable
• Capacity from 80GB to 250GB and bigger in future
1.2 Optical Disc Drive
• 12.7mmh, Combo (DVD/CD-RW) Drive
• 12.7mmh, DVD Super Multi Drive
• 12.7mmh, BD Combo Drive
1.3 Touch Pad:
• Length: 84±0.2mm
• Width: 42±0.2mm
• PCB Thickness: 1.0±0.15mm
• MAX Thickness: 3.4±0.15mm
1.4 Keyboard
• Length: 300+0.05-0.30mm
• Width: 108.9+0.05-0.20mm
• Height: 5.10+0.3-0. 3mm
• Stroke: 2.5+0-0.3mm
1.5 Display Device
LCD
• COLOR TFT/WXGA LCD (LPL LP154WX4-TLC4)
Dimensions: 344.0 (W) x 222 (H) x 6.2 (D) mm (max)
1280 x 800 WXGA Resolution
Brightness: 200 Nit (Type)
• COLOR TFT/WXGA LCD (CPT CLAA154WB05AN)
Dimensions: 344.5 (W) x 222.5 (H) x 6.0 (D) mm (max)
1-2
Page 9

1440 x 900 WXGA+Resolution
Brightness: 185 Nit (Type)
• COLOR TFT/WXGA LCD (CMO N154Z1-L02 Glare)
Dimensions: 344.5 (W) x 222.5 (H) x 6.5 (D) mm (max)
1680 x 1050 WSXGA+ Resolution
Brightness: 200 Nit (Type)
• COLOR TFT/WXGA LCD (LPL LP154WE2-TLA7)
Dimensions: 344.0 (W) x 222.0 (H) x 6.5 (D) mm (max)
1680 x 1050 WSXGA+ Resolution
Brightness: 200 Nit (Type)
1.6 Camera
• 2.0M CMOS module, fix-focus, camera module (Suyin CN2015-530B-OV01)
• 2.0M CMOS module, fix-focus, camera module (Chicony CNF7247)
1.7 Keyboard
• 86 / 87 keys with 101/102 key emulation
JHL90 Service Manual
• 2.5±0.15mm full stroke keys
• Phantom key auto detect
• Overlay numeric keypad
• Support independent pgdn/pgup/home/end keys
• Support reverse T cursor keys
• Factory-configurable different languages by OEM customer
• Window key supported
1-3
Page 10

JHL90 Service Manual
2. Communications
2.1 Wireless LAN
• Wireless LAN & WiMAX mini card: module maker: Intel
PCI Express base specification compliant
Wireless LAN mini card: 802.11 abgn,marker: shirley peak
2.2 Modem
• Internal Modem with MDC solution (MDC 3.3/1.5): module maker: Askey
2.3 Bluetooth
• Bluetooth module: module maker: Foxconn chipset: Broadcom Bluetooth
V2.1+EDR
2.4 TV tuner
• TV tuner module: module maker: YUAN chipset: Xceive
1-4
Page 11

3. Mechanical Specification
• FOR15.4” JHL90
14.11” (W) x 10.19” (D) x 1.54” (H) [358.5mm (W) x 259mm (D) x 39.2mm (H)]
5.8 lb~5.3 lb (including: HDD, CD-ROM, and BATT module)
3.1 Option Pack:
• AC adapter: 444g
• HDD Pack: 160g (9.5mm)
• BATT (Li-ion): 414g (6cell)
• BATT (Li-ion): 560g (9cell)
• ODD Module: 259 g
3.2 Mechanical Function
• Removable HDD
JHL90 Service Manual
• ODD Module
• Battery changeable (Li-ion)
• For security can use Kensington Lock
• Scissor type key board standard pitch 3.0 m/m travel length
• Express card sockets supported
• Fixed Web Camera
• Wireless switch Button
3.3 Mechanical Material
• Plastic PC+ABS (Mitsubishi, MB-8800 and TMB-1615)
1-5
Page 12

Page 13

Chapter 2
Software Specification
Page 14

Page 15

Contents
Chapter 2 Software Specification
1. System Components Summary.............................................................. 2-1
2. System Controls ..................................................................................... 2-5
2.1 Buttons ..........................................................................................2-5
2.2 System status indicators................................................................2-5
3. Core BIOS Features............................................................................... 2-6
3.1 Multi Boot.......................................................................................2-6
3.2 Quiet Boot......................................................................................2-6
3.3 Boot Block .....................................................................................2-6
4. Thermal management............................................................................. 2-7
5. Power Management for ACPI mode....................................................... 2-7
5.1 Introduction....................................................................................2-7
5.2 System Time-outs..........................................................................2-7
5.3 System Power Management..........................................................2-7
5.4 Device Power Management...........................................................2-7
5.5 Hibernation....................................................................................2-8
6. ACPI (Advanced Configuration and Power Interface)............................. 2-9
6.1 Introduction....................................................................................2-9
6.2 ACPI Sleep Status.........................................................................2-9
6.3 Fast Resume.................................................................................2-9
6.4 Power State Transition Diagram....................................................2-9
6.5 Storage Devices and Batteries ....................................................2-10
6.6 Bootable Device...........................................................................2-10
6.7 Embedded controller....................................................................2-10
7. PC2001..................................................................................................2-10
8. Miscellaneous Features.........................................................................2-11
8.1 Single BIOS ROM........................................................................2-11
8.2 USB Support................................................................................2-11
8.3 Flash utility - one BIOS ROM only...............................................2-11
8.4 Crisis Recovery ...........................................................................2-11
8.5 VGA Support................................................................................2-11
9. Customer Specific Features...................................................................2-12
9.1 Display of System Type and BIOS Version Number on Boot.......2-12
9.2 CMOS RAM management...........................................................2-12
9.3 System Management BIOS (SM BIOS) version 2.4 (DMI 2.0).....2-12
9.4 EEPROM.....................................................................................2-13
Page 16

10. System Setup ........................................................................................2-15
10.1 Invoking setup .............................................................................2-15
10.2 Setup screens..............................................................................2-15
11. OS Compatibility....................................................................................2-20
12. Software Specification for EC-FW..........................................................2-20
12.1 General purpose..........................................................................2-20
12.2 Features ......................................................................................2-20
12.3 Types of EC-FW provided............................................................2-20
12.4 Hot keys for system control .........................................................2-28
12.5 External Buttons status report and control...................................2-29
12.6 IOMP button.................................................................................2-29
12.7 Adapter loading control................................................................2-30
12.8 External LEDs status report and control......................................2-30
12.9 Battery status report and control..................................................2-32
12.10 EC-FW Power management support...........................................2-33
12.11 Thermal Status Report and Fan Control......................................2-34
12.12 Three host interface channels support.........................................2-35
12.13 Support three independent devices through PS/2 channel
simultaneously
12.14 Devices PnP configuration...........................................................2-35
12.15 ACPI EC interface Specification support ......................................2-36
12.16 Internal keyboard change Configuration......................................2-36
12.17 EC name space Configuration.....................................................2-37
12.18 Embedded Controller chipset ......................................................2-45
.............................................................................2-35
Page 17

1. System Components Summary
– Intel Penryn 45nm Standard Voltage:
2.8GHz, 1066MHz FSB, 6MB L2 cache
Processor
FSB
Core Logic
System Memory
Display
HDD
Optical Drives
2.53GHz. 1066MHz FSB, 6MB L2 cache
2.26GHz, 1066MHz FSB, 3MB L2 cache
2.40GHz. 1066MHz FSB, 3MB L2 cache.
– 667/800/1066 MHz FSB support
– Intel Montevina platform:
– JHL90/JHT00: Cantiga PM + ICH9M.
– HL91/JHT01: Cantiga GM + ICH9M.
– No on board memory
– Support DDR-II 667/800MHz
– Two SODIMM with 1GB/2GB modules
– Easy upgrade from bottom side for two SODIMM.
– Max. 4GB
– 15.4” (16:10) WXGA (1280x800) (glare/anti-glare and anti-
reflection)
– 15.4” (16:10) WXGA+ (1440x900) (glare/anti-glare and
anti-reflection)
– 15.4” (16:10) WSXGA+ (1680x1050) (glare/anti-glare and
anti-reflection)
– 14.1” (16:10) WXGA (1280x800) (glare/anti-glare and anti-
reflection)
– 9.5mm, 2.5” S-ATA HDD
– support with 80/120/160/250GB (5400rpm) capacity
– support with 120/160GB (7200rpm) capacity
– Easily removable no more than two screws
– Fixed 12.7mm height SATA ODD:
– Combo (CD-RW/DVD-ROM/DVD Dual) (8x)
DVD-RAM/-R/-RW readable
– DVD Super-Multi (DVD-RAM/-R/-RW/+R/+RW Super
Multi)
DVD-RAM/-R/-RW writable
Support Double-Layer Recording is required
High Definition Disc (BD-Multi ROM)
– Blue-Ray Writable
– Blue-Ray ROM
JHL90 Service Manual
2-1
Page 18

JHL90 Service Manual
Video Chip
Audio
On-board
Comms
Keyboard
Pointing Device
JHL91/JHT01
– Intel Cantiga GM for Int. Gfx
– Main Memory shared for Int. Gfx
– Default setting: VRAM 256MB shared from system
memory
JHL90/JHT00
Chipset Size Bus width Type
MXM-II NB9M-GS 256M 64bit 32M16*4
MXM-II NB9P-GS 512M 128bit 32M16*8
– Realtek ALC268
– HD Audio
– Microphone-in and headphone-out
– Two stereo speakers
– JHL90/JHT00:Two internal analog Microphone,
Microphone array supported
– JHL91/JHT01: One internal analog Microphone.
– Askey/AgereAM5/CastleNet/Moto
V.92/56K bps; V.90/56K bps
– JHL91/JHT01 LAN: 10/100Mbps, Realtek RTL8102e
– JHL90/JHT00 LAN: 10/100/1000Mbps, Realtek RTL8111c
– Wireless LAN, 802.11a/g/n, Intel Shirley Peak (option)
– 802.16e Mobile WiMAX and 802.11abgn, Intel Echo Peak
(TBC)
– Antenna: WiMAX x 2
– Bluetooth USB type, ver 2.1, Foxconn (Broadcom) (Option)
– 85/86 keys support with 101/102 key emulation without
stick-point.
– Windows key, Application key
– Standard pitch, 3.0mm travel length.
– Multi-Langue support.
– The plate of K/B for Intel is different with the plate for A30
customers
– The printing of K/B is same for both Intel and A30
– Touch pad with two buttons (left & right)
2-2
Page 19

JHL90 Service Manual
JHL90/JHT00:
– 2.0M pixel CMOS via USB 2.0 interface.
Auto-focus (ME dimension).
Face detect function (Compal SW).
Business card scanner.
Web Cam
I/O Ports
User keys
Security
Controls
AC adapter
A4 scanner.
JHL91/JHT01:
– 1.3M/2.0M pixel CMOS via USB 2.0 interface. (option)
Auto-focus (ME dimension).
Face detect function (Compal SW).
Business card scanner.
A4 scanner.
– PCI-Express Card, 34/54mm. x 1
– USB V2.0, x 3, Power USB V2.0 x 3
– RGB; VGA port x 1, 15pins
– S-Video in x 1
– Microphone-in x 1
– Headphone-out jack x 1
– DC-in jack x 1
– Mini Card x3 (JHL90) / Mini Card x2
(JHL91/JHT01/JHT00)
– Media Card Reader (SD/MMC/MS/MS pro) x 1
– RJ-11 jack x 1 for 56Kbps V.90/92 Modem x 1
– RJ-45 jack x 1
– Kensington lock x 1
– HDMI x 1
– RF-in x 1 (option)
– Power Button. x 1
– Magnetic Lid Switch. x 1
– Wireless switch x 1
– Power USB Button x 1
– Program DJ x 1
– JHL90/JHT00: Wow Video. Four modes: Movie, Photo,
Office, Nature x 1
– JHL90/JHT00: Wow Audio.
– JHL90/JHT00: Fingerprint
TPM 1.2 by Infineon/Winbond
Design ready for Windows Vista
– Kensington lock
– Power button x 1
– Magnetic lid switch control for system standby or suspend
– Universal AC Adapter, 19V DC, 3 pins 240V 90W and
65W
2-3
Page 20

JHL90 Service Manual
Battery
Software
Operating
System
Keyboard
Controller
– Life Cycle: 70% Design Capacity after 300 Cycles in 25
degrees C.
6-cell Li-On, 18650 type, 4800/5200mAh, CBB-look
A30.
9-cell Li-On, 18650 type, 7200/7800mAh.(Option for
JHL90)
– Phoenix First BIOS
– 2048KB Flash BIOS ROM
– Suspend to RAM/Disk
– No support APM
– USB memory Boot support
– Support SMBIOS 2.4, PCI2.2.
– ACPI 2.0 compliance with Intel Speed-step Support C-State
and S3, S4 for mobile CPU
– Windows Vista 32-bit/64-bit Premium design ready for
Discrete.
– Windows Vista 32-bit/64-bit Basic design ready for UMA.
– ENE KB926 K/B Controller
2-4
Page 21

2. System Controls
2.1 Buttons
2.1.1 Power Button
The activity of the power button is as follows:
• If system is Off/Hibernate: System will be turned on while Power switch is
depressed by more than 100 ms.
• If system is in Standby state: System will resume while Power switch is
depressed by more than 100 ms.
• If system on with legacy mode: depress this button will turn off power.
If system is running in ACPI OS, the power button acts as the sleep button, and
let OS controls the policy of power button which is defined in Power Option
under the OS.
2.1.2 Power Button Over-ride
JHL90 Service Manual
• Holding down the Power Button for 4 seconds will cause an unconditional
transfer to the off state without notifying the operating system.
2.1.3 Lid switch
If the system is running under legacy mode:
• Closing the lid will turn off LCD backlight.
If the system is running under ACPI mode:
• The operating system will determine what action to take when the lid is
opened and closed.
The function of lid switch will follow the OS setting in power management
(Nothing, Standby or Hibernate). If nothing, the backlight must turn off when the
lid is closed.
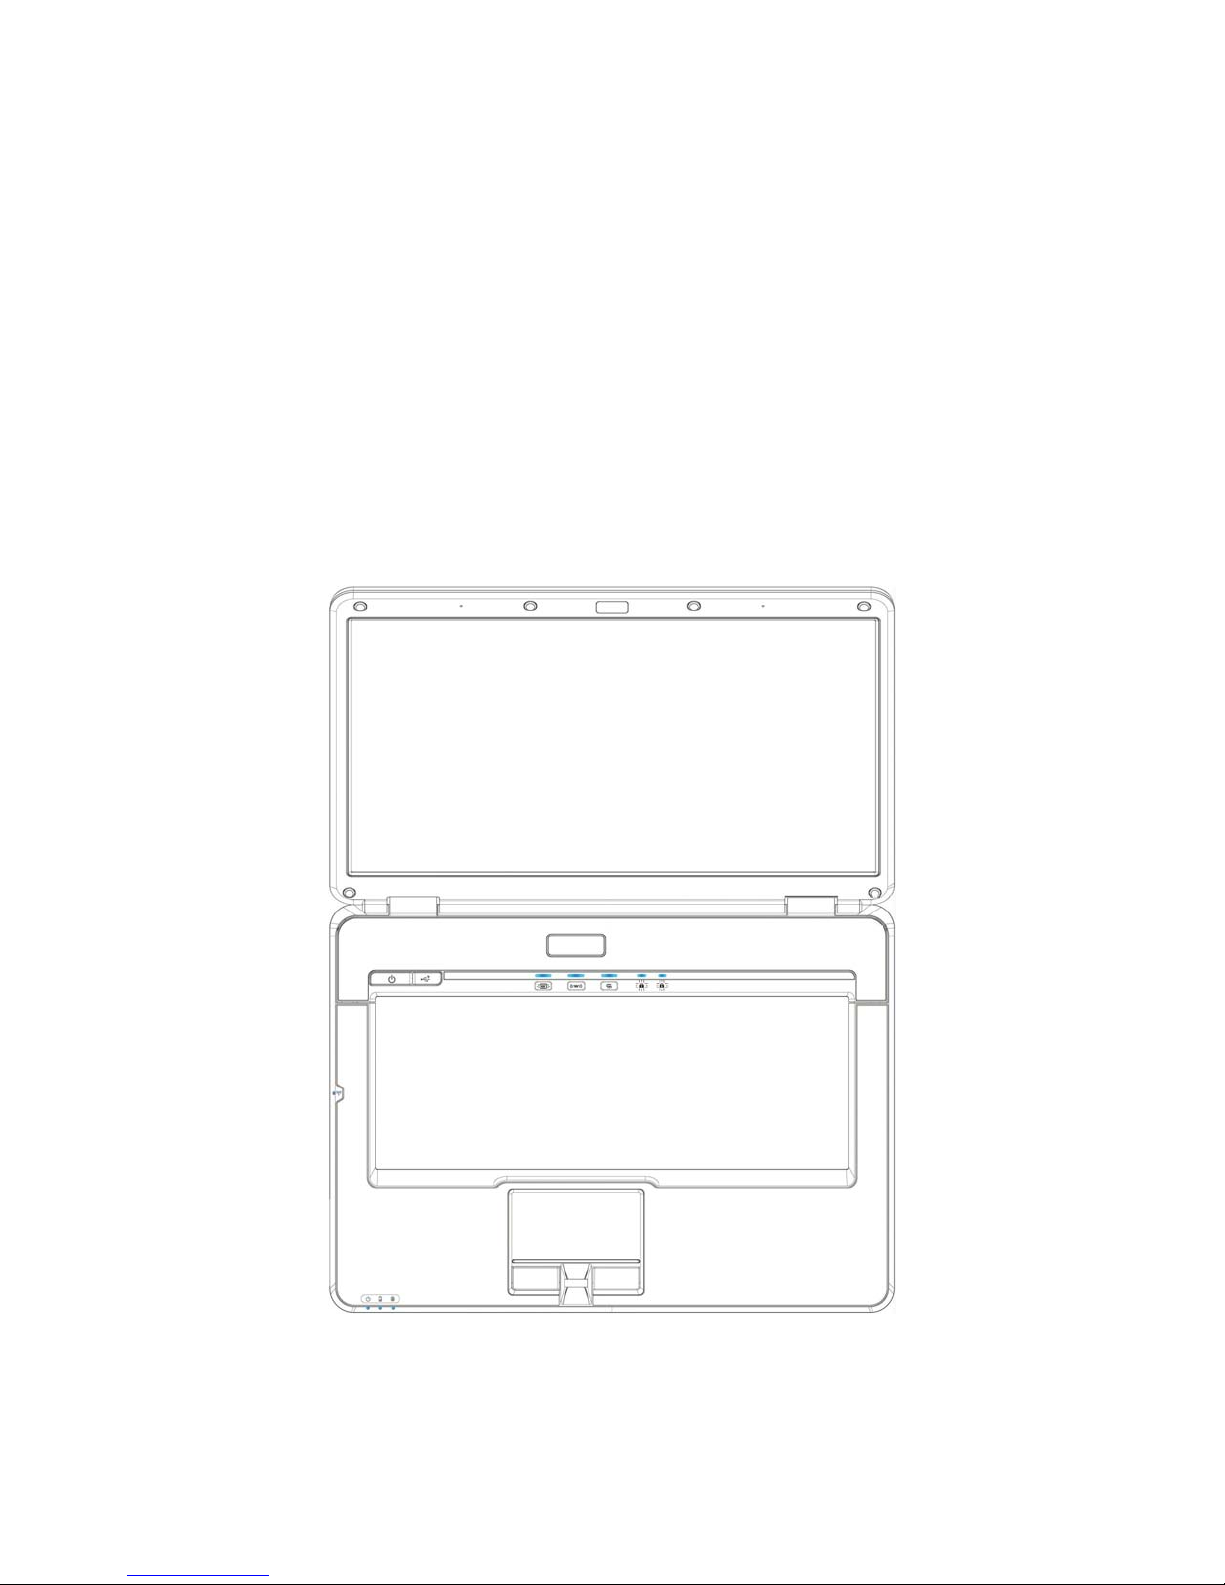
2.2 System status indicators
Please refer to Keyboard BIOS specification.
2-5
Page 22

JHL90 Service Manual
3. Core BIOS Features
3.1 Multi Boot
The notebook can support Multi-Boot for selecting the boot sequence of Hard
Drive, Removable Devices, CD-ROM/DVD Drive and Network in Setup.
3.2 Quiet Boot
Quiet Boot replaces the customary technical messages during POST with a more
visually pleasing and comfortable display (OEM screen). During POST, right
after the initialization of VGA, The notebook displays an illustration called the
OEM screen during system boot instead of the traditional POST screen that
displays the normal diagnostic messages.
The OEM screen stays up until just before the operating system loads unless:
• Pressing <Esc> to switch to the POST screen and the boot process will
continue until the end of POST.
• Pressing <F2> to enter Setup.
• Pressing <F12> to enter Boot Menu.
• Whenever POST detects a non-terminal error, it switches to the POST screen
near the end of POST, just prior to prompting for a password.
• If the BIOS or an option ROM request keyboard input, the system switches
over to the POST screen with prompts for entering the information. POST
continues from there with the regular POST screen.
3.3 Boot Block
The Flash ROM used in many systems today offer the customer the advantage of
electronically reprogramming the BIOS without physically replacing the BIOS
ROM. This advantage, however, does create a possible hazard: power failures or
fluctuations that occur during updating the Flash ROM can damage the BIOS
code, making the system unbootable. To prevent this possible hazard, many Flash
ROM include a special non-volatile region that can never be erased. This region,
called the boot block, contains a fail-safe recovery routine. If the boot block finds
corrupted BIOS, it prompts the end user to insert a diskette, from which it loads
several files that replace the corrupted BIOS on the Flash ROM with an
uncorrupted one.
2-6
Page 23

4. Thermal management
Please refer to Keyboard BIOS specification.
5. Power Management for ACPI mode
5.1 Introduction
The notebook supports ACPI. The system will dynamically switch to ACPI mode
for configuration and power management when an ACPI OS is loaded.
When ACPI is not loaded and enabled, the power management function will be
disabled.
5.2 System Time-outs
If the system is running in ACPI mode, system Time-outs is handled by the
operating system. BIOS time-outs are disabled. System time-outs are set using
the control panel power applet.
JHL90 Service Manual
5.3 System Power Management
The overall system can be in one of the system power states as described below:
ACPI mode Power Management
Mech. Off (G3) All devices in the system are turned off completely.
Soft Off (G2/S5) OS initiated shutdown. All devices in the system are
turned off completely.
Working (G0/S0) Individual devices such as the CPU and hard disk
may be power managed in this state.
S3 Sleeping State CPU set power down
VGA Suspend
New Card Suspend
Audio Suspend
Hard Disk Power Down
ODD Power Down
Super I/O Power Down
S4 Sleeping State System Saves all system states and data onto disk
prior to power off the whole system.
5.4 Device Power Management
Under ACPI mode, the device specific power management supported by this
notebook includes the CPU throttling, monitor power management and the hard
disk.
5.4.1 CPU power management
• ACPI mode
2-7
Page 24

JHL90 Service Manual
The operating system detects when the system is idle and places the CPU in one
of the 3 CPU low power states (C1, C2 or C3) depending on how much latency it
believes the system can afford.
The C1 state is simply the CPU halt instruction. The C2 state is the CPU stop
grant state. The C3 state is the CPU stops clock state. The CPU stays in this state
until an interrupt occurs.
5.4.2 Hard Disk
The operating system uses the spin down timer of the hard drive to set time-outs.
The BIOS time-out of the hard disk must be disabled in ACPI mode. The user can
sets the hard disk spin down time-out in the control panel power applet.
5.4.3 Display Device
The monitor can be turned off after a period of no activity based on the settings of
the OS.
5.4.4 System Wake Up Sources
The table below lists the wake up events for all low power states:
Events S3 S4 S5 Process required
Any key O X X X
Power button O O O X
LAN (On board) O O X O
RTC O O X O
Critical low battery O X X O
Field ‘Process Required’ identifies that further process for the occurred events
must be processed during wake up or resume procedure.
5.4.4.1 LAN
• LAN (On board)
The function of waking up the system from standby (DC/AC) / hibernation (AC
mode) is supported.
5.4.4.2 Real Time Clock Alarm
The Real Time Clock alarm interrupt will wake the system from Standby (DC/AC)
/ Hibernation (AC mode)
5.4.4.3 Critical Low Battery
Critical low battery event can wake the system from Standby (DC mode) in ACPI
mode.
5.5 Hibernation
To support the hibernate state, the save to disk partition or file will be created by
the operating system if the user select to enable the hibernation.
It is the responsibility of the operating system to save the system state to a disk
file and restore the system state when it is turned back on.
2-8
Page 25
JHL90 Service Manual
6. ACPI (Advanced Configuration and Power
Interface)
6.1 Introduction
The Advanced Configuration and Power Interface (ACPI) is a well-specified
power management and configuration mechanism. It evolves the existing
collection of power management codes, APM, PnP BIOS, and Etc.
6.2 ACPI Sleep Status
BIOS must support the following sleep states - S3, S4 and S5.
6.3 Fast Resume
BIOS must hands off the control to the operating system within the following
time limits:
Required
S3->S0 2 seconds
*Measured using the Microsoft BootVis tool.
In addition, total resume time from S3 must be completed within 5 seconds.
6.4 Power State Transition Diagram
The state transition diagram in ACPI mode is as follows:
From (State) Leave By Condition Enter (State)
S3
S4
S5 Power Button S0
S0
Power Button
On board LAN
Any key
Alarm
Critical low battery (Only in DC mode)
Power Button
On board LAN (Only in AC mode)
RTC (Only in AC mode)
Press Lid switch (depends on ACPI OS setting)
Standby icon in shutdown menu in Windows.
S0
S0
S3
ACPI OS timer expired
2-9
Page 26

JHL90 Service Manual
Critical low battery (depends on ACPI OS
setting)
Press Lid switch (depends on ACPI OS setting) S0
Press Power Button (depends on ACPI OS
setting)
Press Lid switch (depends on ACPI OS setting) S0
Press Power Button (depends on ACPI OS
setting)
6.5 Storage Devices and Batteries
Possible storage devices are FDD, HDD, CD-ROM and DVD-ROM
• Floppy Disk and Hard Disk, CD-ROM and DVD-ROM
The BIOS must report the correct types of these devices if the drive is installed in
the system during POST. Two devices, which belong to the same category, are
not supported in this notebook.
• Batteries
The BIOS must follow ACPI specification and report the correct number of the
installed battery and status.
S4
S5
6.6 Bootable Device
The system is capable of booting from onboard HDD, CD ROM, DVD-ROM,
external USB Floppy and USB ATA Flash device.
6.7 Embedded controller
The keyboard controller will act as the ACPI embedded controller and support the
ACPI EC protocol and interface.
7. PC2001
The notebook must meet Microsoft Logo requirements in accordance with the
PC2001 Guide and the Microsoft Logo test programs.
2-10
Page 27

8. Miscellaneous Features
8.1 Single BIOS ROM
The system BIOS and Keyboard BIOS share one single flash ROM. The size of
the flash ROM is 2MB.
8.2 USB Support
This feature allows the use of a USB keyboard to access BIOS Setup and to be
used in DOS without additional drivers.
USB floppy boot and Crisis Recovery from USB Flash Disk is also supported.
The driver provides other USB devices support after loading the operating system.
8.3 Flash utility - one BIOS ROM only
The flash utility can be used to program both system and keyboard BIOS at the
same time.
JHL90 Service Manual
8.4 Crisis Recovery
This feature provides an opportunity for system that cannot boot up. With a crisis
Flash Disk, the system can perform crisis recovery by using internal PS2
keyboard.
To perform crisis recovery using keyboard, do the following:
Power off the system.
Plug-in the USB Flash Disk with crisis image installed.
Hold down Fn + B keys.
Plug-in AC adapter and make sure it is powered.
Power on the system from off state (i.e. cold boot) while holding down <Fn+B>
key.
After POST, release <Fn+B> key. The system should boot from USB Flash Disk
and perform crisis recovery action.
8.5 VGA Support
This section describes the expected behavior when a video monitor is connected
to the VGA port on the notebook .The feature needs VGA driver support
The BIOS will use both the RGB and pin 11 methods to determine the presence of
an external VGA monitor.
2-11
Page 28

JHL90 Service Manual
• Video modes supported on the secondary display path (need VGA driver
support)
Supported video modes and timings please refer to the technical reference of
VGA vendor. In particular, text mode and standard VGA modes are not supported.
9. Customer Specific Features
9.1 Display of System Type and BIOS Version Number on Boot
BIOS Version V1.00*
Note: * The numbers of BIOS version will be changed.
9.2 CMOS RAM management
The BIOS will automatically update certain information in CMOS on each boot.
This information includes:
• DRAM size and configuration
• Hard disk configuration
• Always report the existence of one FDD.
If the CMOS RAM fails checksum or a power lost on CMOS battery is detected
during boot, an appropriate error message will be displayed:
Establishing default CMOS configuration
Run SETUP to change configuration
The system BIOS must automatically load default values defined in the setup
menu during POST when encounter these problems. The user must not be
required to take any action to continue the rest of POST (or entering SETUP).
9.3 System Management BIOS (SM BIOS) version 2.4 (DMI 2.0)
Limited DMI 2.0 BIOS information are provided:
BIOS version number is type 0 data item.
Type 1:
• System serial number - 64 alphanumeric characters with 12-character bundle
number
• System manufacturer name - 16 alphanumeric characters
• System product name - 32 alphanumeric characters
2-12
Page 29

JHL90 Service Manual
• System version - 32 alphanumeric characters
• UUID - 32 Hexadecimal numbers
Type 2:
• System manufacturer name - 16 alphanumeric characters
• Motherboard Product name - ‘JHL9X or JHT0X’
• System serial number - 64 alphanumeric characters with 12-character bundle
number
Type 3:
• System manufacturer name - 16 alphanumeric character
• System serial number - 64 alphanumeric characters with 12-character bundle
number
• Asset tag number - 128 alphanumeric characters
9.4 EEPROM
There is one EEPROM that is used to store many important system and user data
in the notebook (some data are reserved for future to use). The size of the
EEPROM is 2K bytes.
The EEPROM map is listing as below:
Name Offset Comments
System Serial Number 00h - 1Fh
Manufacturer name 40h - 4Fh 16 bytes for DMI type 1/2/3
System version 50h - 6Fh 32 bytes of System version for
UUID 70h - 7Fh 16 bytes for UUID for DMI type 1.
System product name 80h - 9Fh 32 bytes of System product name.
DMI type 11 A0h - DDh 62 bytes for DMI type 11
Unused DEh - DFh Unused
20h - 3Fh
32 bytes of Serial number.
32 bytes of Bundle number.
DMI type 1.
GUID E0h - E7h 8 bytes for GUID
Born On Date E8h - EAh 3 bytes for born on date
Reserved EBh - EFh Reserved
Keyboard type F0h Define for US/UK/JP keyboard
Keyboard BIOS used F1h 1 byte for Keyboard BIOS used
Branding F2h 1 byte for Branding.
Process ID for factory F3h - F4h Identification ID for test process
control
2-13
Page 30

JHL90 Service Manual
Reserved for keyboard F5h - F6h Reserved 2 bytes for key board used
Unused F7h - FDh Unused
EEPROM initialized flag FEh Set to AAh when the EEPROM get
Assettag number 200h - 23Fh 64 bytes for DMI Type 3
Reserved 240h - 7FFh Reserved
initialized.
2-14
Page 31

10. System Setup
10.1 Invoking setup
The setup function can be invoked by pressing F2 when “Press <F2> to enter
Setup” message is prompted on the bottom of screen during POST or by selecting
<Enter Setup> in Boot Menu after pressing F12.
During setup, all Fn function keys and power saving functions are disabled.
10.2 Setup screens
10.2.1 Main Menu
Main
System Time: [HH:MM:SS]
System Date: [MM/DD/YYYY]
JHL90 Service Manual
Phoenix SecureCore(tm) Setup Utility
Product Name: XXXXXXX
Serial Number: XXXXXXXXXXXXX
System Memory: 640 KB
Extended Memory: XXXX MB
BIOS Version: X.XX
UUID Number: XXXXXXXXXXXXX
XXXXXXXXXXXXX
F1 Help ↑↓ select Item F5/F6 Change Values F9 Setup Defaults
Esc Exit ←→ select menu Enter Select 4 Sub-Menu F10 Save and Exit
System Time and System Date
The hour is displayed with 24-hour format. The values set in these two fields take effect
immediately .
Product Name, Serial Number
Display product name, serial number.
2-15
Page 32

JHL90 Service Manual
System Memory
This field reports the memory size of system base memory. The size is fixed to 640KB.
Extended Memory
This field reports the memory size of the extended memory with an integer in the system, but
32Bit SMI will occupy 1 MB and UMA frame buffer (Integrated VGA uses only).
Extended Memory size = Total memory size - 1 MB - 1 MB - UMA frame buffer
BIOS Version
This field displays current version of the BIOS.
UUID
This field displays the platform UUID number .
2-16
Page 33

10.2.2 TPM State (JHL90/JHT00)
Phoenix SecureCore(tm) Setup Utility
TPM State
Current TPM State: Enabled/Disabled and Activated/Deactivated
Change TPM State: [No Change]
JHL90 Service Manual
F1 Help ↑↓ select Item F5/F6 Change Values F9 Setup Defaults
Esc Exit ←→ select menu Enter Select 4 Sub-Menu F10 Save and Exit
Current TPM State
Display current TPM state.
Change TPM State
This field will change if user select from the drop down list.
Change Option: No Change, Enable, Disable, Activate, Deactivate, Clear, Enable and Activate,
Deactivate and Disable, SetOwnerInstall with state=True, SetOwnerInstall with state=False,
Enable + Activate + SetOwnerInstall_True, Deactivate + Disable + SetOwnerInsstall_False, Clear
+ Enable + Activate
2-17
Page 34

JHL90 Service Manual
10.2.3 Exit
Phoenix SecureCore(tm) Setup Utility
Exit Saving Changes
Exit Discarding Changes
Load Setup Defaults
Discard Changes
Save Changes
F1 Help ↑↓ select Item F5/F6 Change Values F9 Setup Defaults
Esc Exit ←→ select menu Enter Select 4 Sub-Menu F10 Save and Exit
Exit Saving Changes
Allows the user to save changes to CMOS and reboot system. The following message is prompted
when user press “Enter” on the item.
Setup Confirmation
Save configuration changes and exit now?
[Yes] [No]
Yes: Exit SETUP and reboot
No: Return to SETUP
Exit Discarding Changes
Allows the user to discard changes to CMOS and reboot system. The following message is
prompted when user press “Enter” on the item.
Setup W arning
Configuration has not been saved!
Save before exiting?
[Yes] [No]
2-18
Page 35

JHL90 Service Manual
Yes: Save configuration and exit SETUP
No: Exit SETUP without saving changes and reboot.
Load Setup Defaults
Allows the user to load default configuration to CMOS. The following message is prompted when
user press “Enter” on the item.
Setup Confirmation
Load default configuration now?
[Yes] [No]
Yes: Load default configuration
No: Return to SETUP
Discard Changes
Allows the user to disc ard current changes and load previous configuration to CMOS. The
following message is prompted when user pr ess “Ent er” on t he item.
Setup Confirmation
Load previous configuration now?
[Yes] [No]
Yes: Load previous configuration
No: Return to SETUP
Save Changes
Allows the user to save current changes to CMOS. The following message is prompted when user
press “Enter” on the item.
Setup Confirmation
Save configuration changes now?
[Yes] [No]
Yes: Save current configuration
No: Return to SETUP
2-19
Page 36

JHL90 Service Manual
11. OS Compatibility
Windows Vista 32-bit
Windows Vista 64-bit
12. Software Specification for EC-FW
12.1 General purpose
• Define the standard interface, special OEM features and OEM EC commands
of EC BIOS.
12.2 Features
• Advanced Power Management 1.2 support
• ACPI2.0 b and PC2001 compliant
• Support SMBus specification V2.0
• Hot keys for system control
• Audio volume output control
• External LED control
• Battery scope report and control
• Sticky key support
• Power switch control
• Two host interface channels support
• Supports three independent devices
• Internal Keyboard country selection
• Wireless LAN on/off button
12.3 Types of EC-FW provided
• Standard version
• Support for US (87)/UK (88)/Japanese (90) keyboard.
• NOTE: The keyboard matrix of US and UK have already used the same
matrix.
• EC-FW command supported for SYSTEM-BIOS
2-20
Page 37

JHL90 Service Manual
12.3.1 Command set 40h-4Fh for OEM defined through Port60/64, Port62/66
and Port68/6C
• Command Set via port 60/64, 62/66 and 68/6C.
CMD DATA Description return
40h Boot fail restart
0x01-
0x7F
41h EC state notification
A0h Return core code version number One byte
A1h Return platform id ‘COMPAL’
A2h Return EEPROM Slave address One byte
A3h Return Thermal chip slave address One byte
42h Bank assign for EEPROM None
0x00-
0x07
43h 00h - FFh Get RAM value from EC, Host can use
44h None Get project ID 0x31
45h Hook for every projects (Define by
01h Check Thermal chip ID is SMSC or not 01 is Yes
A5h Set Wireless LAN and Blue Tooth aren’t
A6h Set Wireless LAN is existence, Blue
A7h Set Wireless LAN is not existence, Blue
A8h Set Wireless LAN and Blue Tooth are
A9h Set 3G is not existence None
AAh Set 3G is existence None
ABh Return M/B ID Byte
AEh Return DVD or MP3 key
B0h Select the CPU to CMT None
B1h Select the CPU to Penryn None
C0h When system BIOS want to detect
C1h After system infrom wireless and
C2h Enable Modem None
C3h Disable Modem None
C4h Set UMA mode None
C5h Set Discrete mode None
Boot fail restart, write in a byte to EC
and enable the timer. This command
called by BIOS and will cause the system
reboot after the byte count down to zero
if system still no reset the counter. It
could make sure the system success boot
up.
Bank assign for EEPROM, work with
4D/4E command replace 4B/4C
command
this command to send address to get
OEM RAM value. The address range are
from 00h to FFh.
project)
existence
Tooth is not existence
Tooth is existence
existence
wireless and bluetoth
bluetoth existence
None
None
One byte
00 is Not
None
None
None
None
None
None
2-21
Page 38

JHL90 Service Manual
CMD DATA Description return
46h fan speed read
81h Reading FAN speed from FAN1 One Word
82h Reading FAN speed from FAN2 None
84h Fan RPM control by EC None
default Fan RPM value, and Fan RPM control by
47h Speaker mute On/Off or LED control
80h Return back the control right to EC None
81h System Led on and control by OS None
82h Power management Led on and control
83h Charge Led on and control by OS None
84h Discharge LED on and control by OS None
85h Direct CD Led on and control by OS None
86h Blue Tooth Led on and control by OS None
87h One touch button Led on and control by
88h All LED off and control by OS None
89h Hdd LED on and control by OS None
8Ah Fdd LED on and control by OS None
8Bh MP3 LED on and control by OS None
8Ch 2ND battery LED on and control by OS None
8Dh Email LED on and control by OS None
8Eh Wireless LED on and control by OS None
8Fh Numlock LED Controlled by OS None
90h Padslock (Cursorlock) LED Control by
91h Capslock LED Control by OS None
92h Scrolllock LED Control by OS None
A7h Mute off None
A8h Mute on None
48h Reserved None
49h Thermal control notification
A0h FAN off and throttling disable None
A1h FAN speed level 1 on and throttling
A2h FAN speed level 2 on and throttling
A3h throttling enable None
A4h FAN speed level 3 on and throttling
A5h FAN speed level 3 on and throttling
If FAN_NUM ≥ 2
B0h FAN off None
B1h FAN on speed1 None
None
OS
None
by OS
None
OS
None
OS
None
disable
None
disable
None
disable
None
disable
B2h FAN on speed2 None
B3h Throttling enable None
B4h FAN on speed3 None
B5h FAN on speed4 None
If FAN_NUM ≥ 3 None
2-22
Page 39

JHL90 Service Manual
CMD DATA Description return
C0h FAN off None
C1h FAN on speed1 None
C2h FAN on speed2 None
C3h Throttling enable None
4Ah Auto into S2R (Delay about 4 Secs) or
S2D and resume by timeout, This
command provided engineer to verify
S2R or S2D and resume function is OK
or not
Resume count (second base), Range is
from 0x02 to 0x7F
Bit7 = 0 - > Enabled S2R function
1 - > Enabled S2D function
0x02-
0x7F
0x80-
0xFF
4Bh Write the data to device through SMBus
0 Slave address of device One byte
1 Lo byte address if device is EEPROM,
2 Hi byte address if device is EEPROM,
3 data byte for write One byte
4Ch Read data from devices through SMBus
0 get Device slave address One byte
1 Lo byte address if device is EEPROM
2 Hi byte address if device is EEPROM,
4Dh Write byte into EEPROM (00h-
00h-FFh EEPROM address One byte
00h-FFh Data byte for write byte One byte
4Eh Read byte from EEPROM (00h-
00h-FFh EEPROM address One byte
4Fh For R591 utility (00h->Success, FEh-
1Bh Get common ram value 256 bytes
1Ch Ger ex pansion I/O register 6 bytes
20h Get EC name space ram value 256 bytes
2Dh Get queue information from SMBus
2Fh Get project and customer ram value 256 bytes
30h Get BP ram value 32 bytes
33h Get fan 1 table information
If FAN_NUM ≥ 2
34h Get fan 2 table information
If FAN_NUM ≥ 3
35h Get fan 3 table information
40h Get debug data version One byte
Enabled S2R function None
Enabled S2D function None
interface (00h->Success, FEh->Fail)
otherwise is command or register.
otherwise is zero.
otherwise is command or register
otherwise is zero
>Success, FEh->Fail)
>Success, FEh->Fail)
>Fail)
One byte
One byte
One byte
One byte
2-23
Page 40

JHL90 Service Manual
CMD DATA Description return
41h Get battery information 19 bytes
12.3.2 Command set 50h-5Fh for OEM defined through Port60/64, Port62/66
and Port68/6C
Command Set (from system’s point of view) via 60/64, 62/66 and 68/6C.
CMD DATA Description return
50h Get Docking status.
A0h = No dock
A6h = simple docked
51h Get revision number of EC-FW
BIOS Rev. 3 bytes
Byte0:
Bit0-Bit2 = major number (0-7)
Bit3-Bit7 = type of EC-FW
e.g. 0 = A, 1=B and so on.
Byte1:
minor revision number (0-9)
Byte2:
Type of EC-FW from ‘A’ to ‘Z’
Byte3:
If it is 00h then system display “ROM”,
it is “T01” if set 01h and so on.
52h Get EC information
A0h Return project name
e.g. “IBL80”
A2h Return Project ID 0x31
A3h Return boot code size
Low nibble is for EC type
0x00:NS87570 0x01:NS87591S
0x02:NS87591L
0x03:NS87591E 0x04:NS97591V
0x05:KB910
0x06:KB910L 0x07:KB926
Others:To Be Defined
High nibble is for boot block size, 4K
bytes base
Boot block size are N*4K
A4h Get Critical Status
0x80: Crisis mode
0x00: Normal mode
53h Command to read SPI ROM One byte
0 High byte address One byte
1 Middle byte address One byte
2 Low byte address One byte
54h None Reserved None
55h None Reserved None
56h Get SMI trigger source One byte
No event 80h
DTS temperature update A0h
Decrease brightness event A1h
Increase brightness event A2h
One byte
Three bytes
Five Bytes
One byte
One byte
2-24
Page 41

JHL90 Service Manual
(
CMD DATA Description return
Lid open A5h
Lid closed A6h
External device plugged A7h
External device removed A8h
Bluetooth wake up event A9h
56h Input device event AAh
Scr expand event ABh
Display change (LCD, CRT) ACh
Cpu fast event ADh
Cpu slow event ADh
Battery life in critical low state (LLB) B2h
Battery life in low power state (LB) B3h
Battery Plug-In B5h
Docked in request BAh
Undock request BBh
Power button pressed C2h
AC power plug-in C7h
AC power plug-out C8h
Modem Ring In CAh
PME signal active CEh
Sleep button event D1h
57h None Module identification
Bit0: Main HDD exist
Bit1: Int. FDD exist
Bit2: CD_ROM exist
Bit3: 2nd HDD exist
Bit4: LS120 exist
Bit5: External FDD
Bit6: CRT plug In/Out:0=Out, 1=In
Bit7: ODD power on/off
58h 0x00-
0xFF
59h System state notification None
60h Enable FnKey of sticky key function
61h Disable FnKey of sticky key function
62h Fn key down (Support by
63h Fn Key Up (Support by
64h Enable scancode for test button None
65h Disable scancode for test button None
70h Sticky key mode enable (for no AP
71h Sticky key mode disable (for no AP
76h Enable FAN speed full on None
77h Disable Fan speed full on None
78h Disable FAN fine tune function None
79h Enable FAN fine tune function None
90h One touch button application allow to
Set flat panel type None
(Support by ToshibaPowerSaver)
(Support by ToshibaPowerSaver)
ToshibaPowerSaver)
ToshibaPowerSaver)
support used)
support used)
send scan code
userbutton) if user
One byte
None
None
None
None
None
None
None
2-25
Page 42

JHL90 Service Manual
CMD DATA Description return
91h One touch button application don’t
94h Mute on None
95h Mute off None
9Ah Disable AC power source None
9Bh Enable AC power source None
9Ch Enable LID switch resume function None
9Dh Disable LID switch resume function None
9Eh Disable Internal keyboard. None
A2h System shutdown None
A3h System enter beep mode for battery LB
A4h System enter quiet mode for battery LB
A5h Fan control by EC None
A8h Fan control by OS None
ADh Wireless LAN wakeup enable None
AEh Wireless LAN wakeup disable None
B1h System into standby None
B2h Resume from standby None
B3h LLB resume from S3 (enable) None
B4h LLB resume from S3 (disable) None
B5h VGA suspend enabl e None
B6h VGA suspend di sabl e None
B7h Modem ring enable None
B8h Modem ring disable None
B9h PME enable None
BAh PME disable None
BBh In S4 status None
BCh Resume form S4 status None
BDh RTC wake up enable None
BEh RTC wake up disable None
C1h Force battery pack auto learning
C2h Disable battery pack learning (Support
C3h SMI/SCI Trigger event enable None
C4h SMI/SCI Trigger event disable None
CBh PCMCIA suspend disable None
CCh PCMCIA suspend enable None
CDh Wake up LAN di sabl e None
CEh Wake up L AN enabl e None
D0h Disable IRQ1 None
D1h Enable IRQ1 None
D2h Beep alarm 200mS None
D5h PCMCIA reset on None
D6h PCMCIA reset off None
D7h Battery stop charge enable None
D8h Battery stop charge disable None
D9h Set system flag None
DAh Clear system flag None
pressed
None
allow to send scan code (user button) if
user pressed
None
state in CMOS setup
None
state in CMOS setup
None
(Support in battery learn mode)
None
in battery learn mode)
2-26
Page 43

JHL90 Service Manual
CMD DATA Description return
E1h Turn LCD back-lig ht on None
E2h Turn LCD back-lig ht off None
E4h Select EX keyboard Matrix None
E5h Select US keyboard Matrix None
E6h Select JP keyboard Matrix None
E7h Select UK keyboard Matrix None
E8h EC into ACPI mode None
E9h Non-ACPI mode (EC default) None
F1h Enter Idle mode None
F2h Enter flash mode None
F6h To get the System action flag None
F7h Restart system and Clear header of Boot
code
F8h Shut down system and Clear header of
Boot code
F9h Clear header of Boot code None
5Ah RTC update (No Support)
A0h Update Year of RTC, Year (00-99) BCD
format
Year which want to display None
A1h Update Month of RTC, Month (1. 12)
BCD format
Month which want to display None
A2h Update DAY of RTC, Day (01-07) BCD
format
Day which want to display None
A3h Update HOUR of RTC, Hour (00-23)
BCD format
Hour which want to display None
A4h Update Minute of RTC, Minute (0. 59),
BCD format
Minutes which want to display None
A5h Update Second of RTC, Second (0. 59),
BCD format
Seconds which want to display None
5Bh Reserved
5Ch None Get brightness level
Current brightness level (0x00-0x0a)
5Dh Set brightness level
0x00h-
0x07h
5Eh Get contrast level (No Support) One byte
5Fh Set contrast level (No Support)
0x00h-
0x3Fh
New brightness level None
New contrast level None
None
None
One byte
2-27
Page 44

JHL90 Service Manual
12.4 Hot keys for system control
• Definitions
All Fn Key will support Sticky key mode.
Function Description
Fn + Esc None
Fn + F1 Enters S3 sleep state
Fn + F2 Wireless/Bluetooth Turn on/off
Fn + F3 LCD/CRT/LCD+CRT Switch
Fn + F4 Brightness down
Fn+F5 Brightness up
Fn + F6 Mute
Fn + F7 Volume Down
Fn + F8 Volume Up
Fn + F9 Media Play/Pause
Fn + F10 Media Stop
Fn + F11 Media Play Backward
Fn + F12 Media Play Forward
After rebooting, pad lock is set to off and Num lock is also too. In this state, the
embedded cursor/number pad is not enabled on the notebook keyboard.
When the embedded keypad is on, holding down Fn will turn the embedded
keypad off.
Note 1: All hot key should be release Fn key after release F1~F12, and should be
press Fn+ (F1~F12) at the same time then function will work properly.
Note 2: About Fn+F2 will turn on/off wireless/Bluetooth which existence
device(s) (The detection by System BIOS).
Note 3: About Fn+F2 functions need AP for function propriety.
12.4.1 Kill switch relationship with Wireless LAN and Bluetooth
The following is two state of kill switch
1. Kill switch On:
When users press Fn+F2, AP will be showed. At this time, User can turn
on/off which Wireless LAN and Bluetooth.
If the devices just only have one whatever Wireless LAN or Bluetooth, the
AP won’t be showed anything.
2. Kill switch Off:
2-28
Page 45

In this status, when user pressed Fn+F2, AP will be showed user that cannot
turn on Wireless LAN and Bluetooth.
If the devices just only have one whatever Wireless LAN or Bluetooth, the
AP won’t be showed anything.
12.5 External Buttons status report and control
12.5.1 Power Switch (Push button)
If system is Off/S2D: System will be turned on while Power switch is depressed
by more than 500 ms with or without AC insert
• If system is in S2R/Standby state: System will resume while Power switch is
depressed by more than 100 ms
12.5.2 Mail Button (No Support)
• Open outlook or express AP.
12.5.3 Internet Button (No Support)
• Open Internet explorer AP.
JHL90 Service Manual
12.5.4 User defined Button (No Support)
• User can defined which function they want to use.
12.5.5 Program Button (No Support)
• User can defined which AP they want to use.
12.5.6 WOW Audio Button (Just support in high-end platform)
• Open WOW Audio’s AP.
12.5.7 WOW Video Button (Just support in high-end platform)
• Open WOW Video’s AP.
12.5.8 Smart Key Button
• Open Smart Key’s AP.
12.5.9 Power USB Button
In S3 mode AC + BATTERY AC only BATTERY only
JHT0x_JHL9x Support Support Support
• Power USB Button also be supported in S3 and S5 mode
12.6 IOMP button
12.6.1 Mode Button
• Open the Media player under Windows mode.
12.6.2 Next One Button
• Press/Release short than 2 sec: Next One
• Press/Release more than 2 sec: Volume Up
2-29
Page 46

JHL90 Service Manual
12.6.3 Play / Pause Button
• Press/Release short than 2 sec: Play / Pause
• Press/Release more than 2 sec: Stop
12.6.4 Last One Button
• Press/Release short than 2 sec: Last One
• Press/Release more than 2 sec: Volume Down
12.7 Adapter loading control
• If power that system need is more than adapter loading, EC will determine
this adapter is wrong power adapter and notifies as below:
• With battery, system will stop charge if battery is not full.
• Without battery, system will shutdown if system power on.
• Note: When EC determine the adapter is wrong power adapter, until adapter
plug-out or system off (Reset one time).
12.8 External LEDs status report and control
12.8.1 Definitions of Lock LEDs
• Caps lock LED (Blue): Caps Lock State of Keyboard
• Scroll Lock LED (80 Model: White or 80i/81/81i Model: Green): Scroll Lock
State of Keyboard (No Support)
• Number Lock LED (Blue): Number Lock State of Keyboard
• NOTE: In normal mode (Cursor and Num function are disable), when users
press Hot Key, the Cursor LED will be on. When users re-press Hot Key, the
Cursor LED will be off.
12.8.2 Definitions of System state LED
• Power LED and Suspend LED indicate the systems power states by their
combinations
• (Normal on is Blue / Blinking is Amber)
System Power State Power LED Suspend LED
S0 On Off
S3 Blinking Off
S4 Off Off
S5/G3 Off Off
The Power LED states blinking to indicate the system starts the process for
entering the S3 state and stop blinking and turns on when systems enters S3
state. On wake from S3, it blinking to indicate that system is waking up and
turns off when resume from S3 is completed
2-30
Page 47

12.8.3 Definitions of AC LED ( )
• Please refer PDD document.
JHL90 Service Manual
12.8.4 Definitions of HDD accessing state Blue LED (
• Please refer PDD document.
12.8.5 Definitions of Bluetooth state LED
• Please refer PDD document.
12.8.6 Definitions of Wireless State LED
• Please refer PDD document.
12.8.7 Definitions of Battery state LED (
• There is one dual-color LED indicator both of Blue and Amber color.
• LED colors and definition
• Blue color and Amber color defined for battery charging and discharging state.
The definition as below:
Battery State LED colors Description
Blue and blinking
(ON 1S, OFF 1S)
Blue solid on Battery full by AC charge and stop
Charging
Discharging
• When the battery is in critical low state, the system is protected and can’t be
re-powered on without the AC power connected. In this situation, the LED
will be in amber color for a short time to indicate this condition. Keep
depressing the power button, and the LED will be blinking in amber color
Amber and blinking
(ON 500mS, OFF
500mS)
Blue color off
Amber color off
Amber solid on Battery within low state.
)
Battery charging with AC.
charging.
Battery abnormal stop charging with
AC.
Abnormal stop charging: BadCell,
OverTemp, communication fail and
OVP.
Battery in discharge mode.
(Battery gas-gauge ≤8%)
)
12.8.8 Definitions of WOW Audio, Video, Smart Key state LED - High-end
platform
• Please refer PDD document.
12.8.9 Definitions of WOW Audio, Video, Smart Key state LED - Low-end
platform
• Please refer PDD document.
12.8.10 Definitions of Power USB state LED
• Please refer PDD document.
2-31
Page 48

JHL90 Service Manual
12.9 Battery status report and control
• Define the battery type and battery protection function.
12.9.1 Battery status
• There are four battery states for each battery pack depend on the status data
getting from Smart battery pack through SMBus: full, normal, low, critical
low.
• The battery gas-gauge and level of low power states should base on ‘current’
system configuration settings.
• Battery turn on system condition: gas gauge > 5%
Battery discharge/charging control
Charging Discharging Action
Sony and Panasonic T≥60°C
LIBP T≥45°C
Sony and Panasonic T≤55°C
LIBP T≤40°C
Set Flag-T
Clean Flag-T
T≥60
Sony and
Panasonic
LIBP T>57°C T>57°C LIBP
Fast Charge Time out: 12
Trickle Charge Time Out:
Voltage≥13.5V
T>70°C T>70°C Sony and
R.S.O.C. < 3% LLB
Battery Voltage ≤ 8.9V and temp. >
Or Battery Voltage ≤ 8.7V and temp.
R.S.O.C ≤ 5% during system is in
Hours
6 Hour.
R.S.O.C. ≤10% (Beeping under
20°C.
< 20°C.
S2R mode.
Stop charging
Battery Led off
Panasonic
DOS)
Dependent on OS
LLC
Shut down System
Wakeup
System
Battery BAD
Battery Led off
OverVoltage
Battery Led off
&
&
&
In ACPI mode
2-32
Page 49

• System should Save to Disk (S2D) or beeping (Low condition) depend on OS
setting.
12.9.2 Battery type
• The KB-BIOS will support for smart battery pack by SMBus protocol.
• ACPI1.0b and PC2001 Compliant, with PC2001 spec “A mobile system must
use a Smart Battery or an ACPI control method battery”, our currently design
is ACPI control method battery.
Li-ion Battery: 11.1V/7200mAH (9 cells: 3S3P & 6 cells 3S2P)
• Compatible with Intel’s SMBus and Philip’s I2C bus protocol.
12.9.3 Adaptor loading Protection
• When the power consumption of system over support by AC adaptor, EC will
notify system to do throttling. The protected point is different by CPU type
and speed. Below table was detail description.
AC adaptor status Protect point Action
JHL90 Service Manual
AC adaptor exist Voltage ≥ 1.22V (average
2.5 minute)
AC adaptor not
Clock throttling 12.5%.
The max level is 50%
exist
12.10 EC-FW Power management support
EC will support S1 (sleep mode), S3 (standby mode) and S4 (suspend to disk)
mode to save the power consumption.
12.10.1 Power states
• Sleep mode
LCD panel back-light off
• Save to RAM
Keyboard (int./ext.) scanning off
• Save to DISK
No actions except turning off system with AC exist or turn off KBC without AC.
12.10.2 SMI/SCI/SWI/SBS/SPB events
• The Following list is what events (SMI/SCI/SWI/SBS) will be generated
under different OS.
Function Description ON
mode
APM Mode ACPI mode
S2R
mode
S2D
mode
Trigger
event
S0
status
S1, S2,
S3
status
S4
status
S5
status
SCI
Event
SWI
Event
2-33
Page 50

JHL90 Service Manual
Brightness level
changed
Contrast level changed
SMI - - A1h SCI - - - 11h -
SMI - - A2h SMI - - - 12h -
CoverLid close
Display toggle
Battery in critical low
Battery in low state
Standby request
Battery pack plugin
Battery pack removed
Suspend To RAM
request
Save To DISK request
Docking in
AC plugin
AC removed
Modem ringin
PME signal active
SMI - - A6h SCI - - - 16h SMI - - Ach SCI - - - 1ch SMI SMI - B2h SCI SWI - - 22h SMI - - B3h SCI - - - 23h SMI - - B4h - - - - 24h SMI - - B5h SBS - - - 25h SMI - - B6h SBS - - - 25h SMI - - B8h SCI - - - 28h -
SMI - - B9h - - - - 29h SMI - - Bah SCI SWI - - 2ah SMI - - C7h SBS - - - 37h SMI - - C8h SBS - - - 38h SMI - - Cah - SWI - - 3ah 04
SMI SMI - Ceh SCI SWI - - 3eh 02
12.11 Thermal Status Report and Fan Control
EC will control fan on/off function according to the CPU temperature (EC will
get temperature from thermal sensor through SMBus). Fan will be off when
temperature below speed 1 speed down temperature, and if temperature over EC
Shutoff temperature five times, EC will auto turn off system to protect CPU. The
following table is detailed settings.
12.11.1.1 Fan control by Voltage
• EC will output voltage to control fan directly. (DTS/Tdiode Thermal Policy)
Speed stage Speed down
temperature (°C)
Speed 0 0 50 0
Speed 1 45 55 2500
Speed 2 53 60 3000
Speed 3 58 65 3400
Speed 4 63 70 3800
Speed 5 68 100 4200
Speed 6
(Throttling start)
95
Speed up
temperature (°C)
105 (DTS)
(Shutdown temp)
Fan 1
RPM
4200
2-34
Page 51

JHL90 Service Manual
• EC will output voltage to control fan directly. (VGA Thermal Policy)
Speed stage Speed down
temperature (°C)
Speed 0
Speed 1
Speed 2
Speed 3
Speed 4 75
Speed 5 65 94 4200
Speed 6
(Throttling start)
90
Speed up
temperature (°C)
105 (VGA)
(Shutdown temp)
12.12 Three host interface channels support
12.12.1 Keyboard and mouse interface transfer port
• One channel is dedicated for the keyboard and mouse data transfer (host
address 60h and 64h). The Keyboard and Mouse channel of KBC is
compatible to the legacy 8042 host interface. It is base on two registers:
Command/Data and Status
• The EC-FW interrupt generates IRQ1 (Keyboard) and IRQ12 (Mouse) for
system.
12.12.2 Power management interface transfer port
Fan 1
RPM
4200
• The other channel is for the power management function (host address 62h
and 66h). The Power Management channel of KBC structure and operation
are similar to those of the Keyboard/Mouse channel.
12.12.3 Extra transfer port
• This channel (host address 68h and 6Ch) was created to prevent conflict with
the other channels.
12.13 Support three independent devices through PS/2 channel
simultaneously
• The KBC provides three data transfer channels. Each channel has two quasi-
bidirectional signals that are used for the direct interface to an external
keyboard, mouse or any other PS/2 compatible pointing device.
• The three channels are identical and thus allow the connector ports to be
interchangeable.
12.14 Devices PnP configuration
12.14.1 Hot Plug-and-Play
• The KBC watches both external devices, checking if the devices have recently
been plugged in or unplugged. The Hot plug ability of external PS2 devices
feature detects the attachment or removal of these devices.
2-35
Page 52

JHL90 Service Manual
12.14.2 Hot swapping control
• When the device is plugged in, the software automatically initializes the state
of that device, checks port swapping, and setup the KBC to handle dualdevice operation. In dual-device operation, the internal device is set in the
same state as external device. When the external device is unplugged, the
internal device becomes the primary device.
12.15 ACPI EC interface Specification support
12.15.1 ACPI interface support
• The KBC provides support for Advance Configuration and Power Interface
specification (ACPI) Embedded Controller interface.
12.15.2 EC command support
• The 2nd (Power Management) host interface channel of the KBC is dedicated
to this function.
• All EC commands defined in the ACPI specification - Read/Write, Burst
Mode enable/disable and Query command - are supported.
12.16 Internal keyboard change Configuration
12.16.1 US/UK/JP country option
• The KBC supports three country selection by KBD_SEL application for
another country.
• You can key in KBD_SEL get the syntax for your option at DOS prompt.
e.q. KBD_SEL S US keyboard
KBD_SEL K UK keyboard
KBD_SEL J JP keyboard
12.16.2 Sticky key support
• Press shift key 5 times will enable sticky key function. Turns on Sticky Keys,
which allows you to press a modifier key (CTRL, ALT, or SHIFT), or the
windows logo key, and have it remain active until the next time you press a
key other then CTRL, ALT, SHIFT, or windows logo key. This is useful for
people who have difficulty pressing two keys simultaneously.
12.16.3 Internal Keyboard can support wake-up system to resume S3
• Press any key with internal keyboard in standby mode, system will resume
automatically.
12.16.4 Internal Key-Pad mode control
• The key pad mapping shows as below.
Number lock on Number lock off
Single key
2-36
7 7
8 8
9 9
Page 53

Number lock on Number lock off
* 0
4 U
5 I
6 O
- P
1 J
2 K
3 L
+ ;
0 M
, ,
. .
/ /
12.17 EC name space Configuration
12.17.1 Customer EC name space definition
Offset Description
JHL90 Service Manual
00h - 07h
Customer EC name space
12.17.2 Project EC name space definition
Offset Description
08h - 0Fh
Project EC name space
12.17.3 SMBus EC interface ACPI RAM definition
Offset Description
60h
61h
62h
63h
64h - 83h
84h
85h
SMBus protocol
SMBus statue
Bit0-Bit4 - Status
Bit5 - Reserved
Bit6 - ALARM
Bit7 - DONE
SMBus Address
SMBus Command
SMBus Data
SMBus BCNT
SMBus alarm address
86h
87h
SMBus alarm data 0
SMBus alarm data 1
2-37
Page 54

JHL90 Service Manual
12.17.4 External name space definition
Offset Description
94h
95h
96h
EXT_NAMESPACE_INDEX
EXT_NAMESPACE_BANK
EXT_NAMESPACE_DATA
12.17.5 Word registers to Emulate smart selector RAM definition
Offset Description
9Ah
9Bh
SEL_STATE0
Bit0 - PRESENT_A (Set if 1
Bit1 - PRESENT_B (Set if 2nd battery present)
Bit2 - PRESENT_C (Set if 3
Bit3 - PRESENT_D (Set if 4
Bit4 - CHARGE_A (Set if 1
Bit5 - CHARGE_B (Set if 2
Bit6 - CHARGE_C (Set if 3
Bit7 - CHARGE_D (Set if 4
st
battery present)
rd
battery present)
th
battery present)
st
battery be charging)
nd
battery be charging)
rd
battery be charging)
th
battery be charging)
SEL_STATE1
Bit0 - PWR_BY_A (Set if system power up by 1
Bit1 - PWR_BY_B (Set if system power up by 2
Bit2 - PWR_BY_C (Set if system power up by 3
Bit3 - PWR_BY_D (Set if system power up by 4
Bit4 - SMB_A (Set if 1
Bit5 - SMB_B (Set if 2
Bit6 - SMB_C (Set if 3
Bit7 - SMB_D (Set if 4
st
battery on SMBus)
nd
battery on SMBus)
rd
battery on SMBus)
th
battery on SMBus)
st
nd
rd
th
)
)
)
)
12.17.6 EC interface OEM common RAM definition
Offset Description
9Ch
9Dh
9Eh
2-38
ACPI_FLAG0
Bit0 - Main HDD (1:exist)
Bit1 - Internal FDD (1:exist)
Bit2 - Internal CD_COM (1:exist)
Bit3 - 2
ND
HDD (1:exist)
Bit4 - LS-120 (1:exist)
Bit5 - External FDD (1:exist)
Bit6 - CRT-PLUG (1:in)
ACPI_FLAG1
Bit0 - Sleep button (1:pressed)
Bit1 - Video out button (1:pressed)
Bit2 - Decrease Volume (1:pressed)
Bit3 - Increase Volume (1:pressed)
Bit4 - Mute button (1:pressed)
Bit5 - Contrast button (1:pressed)
Bit6 - Brightness button (1:pressed)
Bit7 - Save to disk button (1:pressed)
ACPI_FLAG2
Bit0 - ACPI entry S4 state
Page 55

Offset Description
Bit1 - password enable, set 1
Bit2 - beep alarm enable, set 1
Bit3 - touch pad button (1:enable)
Bit4 - Fn state (1: fn key down)
Bit5 - CD/DVD mode selected, set 1
Bit6 - Digitial mode selected, set 1
Bit7 - CD Lock mode enable, set 1
9Fh
A0h
A1h
A2h
SWI Event indicators
Bit1 - Lid open event (0=off, 1=on)
Bit2 - PME event (0=off, 1=on)
Bit3 - Power button event (0=off, 1=on)
Bit4 - Ring in event (0=off, 1=on)
Bit5 - Blue tooth wake up event (0=off, 1=on)
Bit6 - Dock in event (0=off, 1=on)
Throttling index
00: Nothing, 01: Thr 12.5%, 02: Thr 25%, 08: Thr 1 00 %
Bit6 - (1=SW Throttling active)
Bit7 - (Throttling status; 1=HW Throttling Pin active)
DCID: Customer ID
Bit0 - DockType0, Dock on or not (0=off, 1=on)
Bit1 - DockType1, reserved
Bit4 - OS_undock OK
Bit5 - OS dock OK
Bit6 - Safe Undock OK
Bit7 - DockChange, Ultra Base had changed from docked to
undock or undock to dock (0=no, 1=yes)
OS Shutdown Temp. For system read setting. (DTS).
JHL90 Service Manual
A3h
A4h
A5h
SYS_STATUS: System indicator
Bit0 - S1LED, S1 state LED (0=LED off, 1=LED on)
Bit1 - S3LED, S3 state LED (0=LED off, 1=LED on)
Bit2 - VGAQ, VGA H/W suspend (0=VGA on, 1=VGA suspend )
Bit3 - PCMQ, PCMCIA H/W suspend (0/1=PCMCIA on/suspend)
Bit4 - PCMR, PCMCIA H/W reset (0=disable, 1=enable)
Bit5 - ADP, Ac adapter (0=offline, 1=online)
Bit6 - SYSR6 (reserved)
Bit7 - SYSR7 (reserved)
WAKEUP_ENABLE: Enable wake up function
Bit0 - PMEWAKE (PME Wk Enable:0=Disable, 1=Enable)
Bit1 - MDMWAKE (Modem Wk Enable:0=Disable, 1=Enable)
Bit2 - LANWAKE (LAN wakeup enable:0=Disable, 1=Enable)
Bit3 - RTCWAKE (RTC wakeup Enable: 0=DIsable, 1=Enable)
Bit4 - WLANWAKE (Wireless LAN wakeup Enable:0=Disable,
1=Enable)
Bit5 - RESERVED
Bit6 - KEYWAKE (Keyboard wakeup enable:0=Disable,
1=Enable)
Bit7 - MOUSWAKE (Mouse wakeup enable:0=Disable, 1=Enable)
ACOFF_SOURCE: Enable AC_OFF signal
Bit0 - CHARGECURRENT (1 = AC_OFF for when stop charge
but have charge current)
2-39
Page 56

JHL90 Service Manual
Offset Description
Bit1 - ADPOVP (1 = AC_OFF for adaptor improper)
Bit2 - BATTLEARN (1 = AC_OFF for battery at learning mode)
Bit3 - CMD (1 = AC_OFF for Command)
Bit4 - BATTOVP (1 = AC_OFF for battery OVP)
Bit5 - LEAKCURRENT (1 = AC_OFF for Leakage current)
Bit6 - AIRADAPTOR (1 = AC_OFF for air-adaptor)
Bit7 - ACOFF (Control AC_OFF active, 0: enable, 1: disable)
A6h
Reserved
A7h
A8h
A9h
AAh
ABh
ACh
ADh
AEh
AFh
OS Throttling Temp. For system read setting.
OS Shutdown Temp. For system read setting.
Throttling Temp put a temp in for system throttling.
For Tcontrol temp, sysbios will put Tcontrol temp
THERMAL_STATUS
Bit0 - MODE (0=Local mode, 1=Remote mode)
Bit1 - FANSPDB0 (Fan on/off parameter0)
Bit2 - FANSPDB1 (Fan on/off parameter1)
Bit 2 1 (When control by OS)
0 0: Fan off
0 1: Fan on speed 1
1 0: Fan on speed 2
1 1: Fan on speed 3
Bit3 - INITOK (0:Control by OS 1:Cont rol by EC)
Bit4 - Fan1 Active
Bit5 - Fan2 Active
Bit6 - Fan speed timer init OK
Bit7 - SKINMODE
0=skin address 90
1=skin address 92
SHUTDOWNTEMP: Shundown temperature
FAN_STATUS1: Just for utility (low nibble: Fan’s speed step
number; high nibble: Fan’s number)
THROTTLING_INDEX
Bit 0~5: Throttling level
0 = No throttling
1 = throttling 12.5%
2 = throttling 25%
.
8 = throttling 100%
Bit6 - THRM_SW (1=SW Throttling active)
Bit7 - THRM_PIN (Throttling status; 1=HW Throttling Pin active)
THROTTLING_SOURCE
2-40
Bit0 - TS_THERMAL (1: Throttling for thermal)
Bit1 - TS_BATTCAP (1: Throttling for capacity)
Bit2 - TS_BATTCOMMFAIL (1: Throttling for communication
fail)
Bit3 - TS_PWRLOADING (1: Throttling for adaptor power
loading protect)
Bit4 - TS_BATTTEMP (1: Throttling for battery over temperature)
Bit5-Bit6 - Reserved
Page 57

Offset Description
Bit7 - THROTTLING (1: Control HW throttling active)
JHL90 Service Manual
B0h
B1h
B2h
B3h
B4h
B5h
B6h
B7h
B8h
B9h
BAh
BBh
BCh
CPU_TEMP: CPU current temperature
CPU_TEMP_LOCAL: CPU local temperature
SKIN_TEMP90: SKIN temperature address 90
OS Shutdown Temp. For system read setting. (VGA)
VGA_TEMP: VGA temperature
CPU_DTS: CPU DTS temperature
NorthBridge temperature
Reserved
Reserved
Lcd brightness value (0x00-0x07)
Lcd contrast value (0x00-0x1F)
Device module status
Bit0 - 1=Wirless LAN active, 0=Wirless LAN no active
Bit1 - 1=BlueTooth active, 0=BlueTooth n o acti ve
Bit2 - 1=Wirless LAN exist, 0=Wirless LAN no exist
Bit3 - 1=BlueTooth exist, 0=BlueTo ot h n o exi st
Bit4 - 1=Kill switch on, 0=Kill switch off
Bit5 - 1=WireLess LAN initial OK
KbProjectID: Project ID
BDh
BEh
BFh
CPU_TYPE: CPU type
Reserved
Reserved
12.17.7 Control method for 1st battery pack RAM definition
Offset Description
C0h
C1h
C2h-C3h
C4h-C5h
C6h-C7h
Battery status
Bit7 - Battery type
Battery Status
Bit0 - Discharging
Bit1 - Charging
Bit2 - Discharging and Now is critical low
Bit3 - Low battery
Bit7 - AC status
Remaining Capacity
Serial Number
Present Voltage
2-41
Page 58

JHL90 Service Manual
Offset Description
C8h-C9h
CAh-CBh
CCh-CDh
CEh
CFh
D0h-D1h
D2h-D3h
D4h
D5h
D6h
D7h
D8h-D9h
DAh
DBh
DCh
Design Voltage
Design Capacity
Full charge capacity
Gasgauge
Battery cycle counter
Battery current
Battery average current
System power comsumption
Battery Volt
Battery Temp
Battery Average Temp
Battery charge currrent
Battery current Temp sample counter
Battery Command index for read battery through SMBus
Count up to communicate battery
DDh
DEh-DFh
E0h
E1h
E2h
E3h-E4h
E5h-E6h
E7h-E8h
E9h-EAh
F0h
F1h
Count up if battery is arrived overtemp
SMBus status
Battery over voltage counter
Communicatiion fail counter
Battery voltage of ADC
Cell1 voltage
Cell2 voltage
Cell3 voltage
Cell4 voltage
Battery staus1
Bit0 - Battery exist
Bit1 - Battery full
Bit2 - Battery empty
Bit3 - Battery first in
Bit4-5 - reserved
Bit6 - Battery read complete
Bit7 - Use LI_ION or NI_MH#
Battery staus2
2-42
Bit0 - Low low battery
Bit1 - Check EDV1
Bit2 - Set EDV1
Page 59

Offset Description
Bit3 - Battery shutdown 5%
Bit4 - Start to read battery
Bit5 - Start to count communication counter
F2h
F3h
F4h-F5h
Battery stop charge status (low byte)
Bit0 - Battery fast charging timeout
Bit1 - Battery bad cell
Bit2 - Battery communication fail
Bit3 - Use for detect battery charging suspend
Bit4 - Battery command stop charge
Bit5 - Battery stop charge for Customer use
Bit6 - Battery over voltage
Bit7 - Battery over temperature
Battery stop charge status (high byte)
Bit0 - Battery trickle charging timeout
Bit1 - Stop charge of Adapter throttling
Bit2 - Stop charge of Sony battery
Bit3 - Stop charge of adapter loading
Bit4 - Stop charge of flash
ManufactureDate
JHL90 Service Manual
F6h-F7h
F8h
F9h-FFh
Charging Voltage
Battery Cell number
Bit0 - Set Battery is 3 cells
Bit1 - Set Battery is 4 cells
Bit2 - Set Battery is 6 cells
Bit3 - Set Battery is 8 cells
Bit4 - Set Battery is 9 cells
Bit5 - Set Battery is 12 cells
Reserved
12.17.8 Control method for 2nd battery pack RAM definition
Offset Description
20h
21h
22h-23h
Battery status
Bit7 - Battery type
Battery Status
Bit0 - Discharging
Bit1 - Charging
Bit2 - Discharging and Now is critical low
Bit3 - Low battery
Bit7 - AC status
Remaining Capacity
24h-25h
26h-27h
28h-29h
2Ah-2Bh
Serial Number
Present Voltage
Design Voltage
Design Capacity
2-43
Page 60

JHL90 Service Manual
Offset Description
2Ch-2Dh
2Eh
2Fh
30h-31h
32h-33h
34h
35h
36h
37h
38h-39h
3Ah
3Bh
3Ch
3Dh
3Eh-3Fh
Full charge capacity
Gasgauge
Battery cycle counter
Battery current
Battery average current
System power comsumption
Battery Volt
Battery Temp
Battery Average Temp
Battery charge currrent
Battery current Temp sample counter
Battery Command index for read battery through SMBus
Count up to communicate battery
Count up if battery is arrived overtemp
SMBus status
40h
41h
42h
43h-44h
45h-46h
47h-48h
49h-4Ah
50h
51h
Battery over voltage counter
Communicatiion fail counter
Battery voltage of ADC
Cell1 voltage
Cell2 voltage
Cell3 voltage
Cell4 voltage
Battery staus1
Bit0 - Battery exist
Bit1 - Battery full
Bit2 - Battery empty
Bit3 - Battery first in
Bit4-5 - reserved
Bit6 - Battery read complete
Bit7 - Use LI_ION or NI_MH#
Battery staus2
Bit0 - Low low battery
Bit1 - Check EDV1
Bit2 - Set EDV1
Bit3 - Battery shutdown 5%
Bit4 - Start to read battery
Bit5 - Start to count communication counter
2-44
Page 61

Offset Description
JHL90 Service Manual
52h
53h
54h-55h
56h-57h
58h
59h-5Fh
Battery stop charge status (low byte)
Bit0 - Battery fast charging timeout
Bit1 - Battery bad cell
Bit2 - Battery communication fail
Bit3 - Use for detect battery charging suspend
Bit4 - Battery command stop charge
Bit5 - Battery stop charge for Customer use
Bit6 - Battery over voltage
Bit7 - Battery over temperature
Battery stop charge status (high byte)
Bit0 - Battery trickle charging timeout
Bit1 - Stop charge of Adapter throttling
Bit2 - Stop charge of Sony battery
Bit3 - Stop charge of adapter loading
Bit4 - Stop charge of flash
ManufactureDate
Charging Voltage
Battery Cell number
Bit0 - Set Battery is 3 cells
Bit1 - Set Battery is 4 cells
Bit2 - Set Battery is 6 cells
Bit3 - Set Battery is 8 cells
Bit4 - Set Battery is 9 cells
Bit4 - Set Battery is 12 cells
Reserved
12.17.9 Battery information reading
Offset Description
10h-18Fh
19h-1Fh
Battery ManufactureName
Battery DeviceName
12.18 Embedded Controller chipset
12.18.1 ENE KB926
• The 8051 is an advanced, general-purpose, 8-bit microprocessor core. The
core is responsible for arithmetic and logic operations and program control.
12.18.2 Force to let EC to enter crisis mode
• To press “Fn+B” then plug-in the AC power
• EC has already enter crisis mode.
2-45
Page 62

Page 63

Chapter 3
Hardware
Page 64

Page 65

Contents
Chapter 3 Hardware
1. Top View................................................................................................. 3-1
2. Bottom view............................................................................................ 3-2
Page 66

Page 67

• Major Sub-assembly Specification
• System interconnection (For JHL90)
1. Top View
JHL90 Service Manual
Position Description Position Description
1 MB_PCB 26 F/P Board to MLB
2 USB/Board 27 Function Board to MLB
5 K/B to MLB (25 PIN) 28 Inverter Conn
7 EXP-CARD CONN 29 SPEAKER Conn
10 SATA HDD CONN 31 CIR CONN
20 Bluetooth Conn 32 Kill_SW
22 Power Board Conn 34 SW
23 Internal Mic Conn 35 Camera Conn
24 LED 36 Read Switch
25 T/P Board to MLB
3-1
Page 68

JHL90 Service Manual
2. Bottom view
Position Description Position Description
3 RJ45 15 Audio Jack (black)
4 ODD Conn 16 D-sub
6 FAN to MLB 17 MDC Conn
9 MXM Board Conn 18 Mini PCI Express Conn (H=4.0mm)
11 CPU SOCKET 19 Mini PCI Express Conn (H=9.9mm)
12 H5.2 DDRII 21 3 IN 1 CARD
13 H9.2 DDRII 30 HDMI CONN
14 LVDS 33 Battery Conn
3-2
Page 69

Chapter 4
DC-DC Converter
Page 70

Page 71

Contents
Chapter 4 DC-DC Converter
1. Power ..................................................................................................... 4-1
2. DC-DC CONVERTER............................................................................. 4-1
2.1 JHL90 Adapter Description............................................................4-2
2.2 Feature..........................................................................................4-2
2.3 Adapter Electrical Specification .....................................................4-2
3. DC-DC CONVERTER............................................................................. 4-3
3.1 Description..................................................................................... 4-3
3.2 Features ........................................................................................4-3
3.3 Electrical specification ...................................................................4-3
3.4 Temperature Range:......................................................................4-3
3.5 Charger..........................................................................................4-8
3.6 OVER Current protection:..............................................................4-8
3.7 OVER Voltage protection:..............................................................4-9
3.8 Under voltage protection:...............................................................4-9
3.9 Short circuit protection:..................................................................4-9
3.10 I/O ..................................................................................................4-9
3.11 BATTERY ....................................................................................4-10
4. INVERTER SPECIFICATION JHL90/91 15.4 inch inverter spec .........4-12
4.1 Features ......................................................................................4-12
4.2 Absolute maximum rating............................................................4-12
4.3 Electrical characteristic................................................................4-13
4.4 Electrical specification .................................................................4-15
4.5 Connector description..................................................................4-15
4.6 Safety Protection .........................................................................4-16
5. Reliability Requirements........................................................................4-17
5.1 Mean Time Between Failures (MTBF).........................................4-17
5.2 Reference Document...................................................................4-17
5.3 Electro-Static Discharge (ESD)....................................................4-17
6. Regulatory Compliance .........................................................................4-17
7. Power interface......................................................................................4-19
7.1 Power requirement ......................................................................4-19
7.2 Power/EE Interface definition: .....................................................4-19
7.3 Power Sequence .........................................................................4-20
8. Reset Map .............................................................................................4-23
9. PCI resource assignment.......................................................................4-24
10. EC SMBus Block ...................................................................................4-25
Page 72

Page 73

1. Power
• 6 cells Li-Ion 18650 size smart battery Pack with 53.28Wh capacity
• 6 cells Li-Ion 18650 size smart battery Pack with 57.72Wh capacity
• 9 cells Li-Ion 18650 size smart battery Pack with 79.92Wh capacity
2. DC-DC CONVERTER
JHL90/91 Series Power System block diagram
DC/DC M/B
GND
90W/65W ADAPTER
AC/DC
BATTERY
VIN
GND
(+VGA_CORE)
BATT+
BATT+
CNT1
CNT2
EC_SMCA
EC_SMDA
TS_A
GND
GND
B+
+5VALWP
+3VALWP
+1.5VP
+1.8VP
+1.05VSP
+CHGRTC
+CPU_CORE
+0.9VSP
(+1.8VSP)
+VSBP
RTCVREF
(+1.1VSP)
PMON
CHGVADJ
CLK_ENABLE#
SUSP
SUSP#
FSTCHG
51_ON#
CPU_VID[0...6]
ACOFF
H_DPRSTP#
VR_ON
H_PSI#
IREF
PM_DPRSLPVR
ADP_I
VGATE
BATT_TEMP
ACIN
MAINPWON
BATT_OVP
H_PROCHOT#
EC_SMB_DA1
EC_SMB_CK1
CLK_EN#
GND
PWM
DISPOFF#
DAC
_D
JHL90 Service Manual
B+
INVERTER
L
V
LCD
H
V
4-1
Page 74

JHL90 Service Manual
2.1
JHL90 Adapter Description
This specification defines the performance and characterist
power supply. It supplies a constant voltage 19V output source for JHL90 series
no ebook computer.
2.2 Fe
• Accepts universal input from
• Offers constant Voltage 19V out
• High efficiency 83% m
• Compact Size
2.3
Adapter Electrical Specification
• Input Voltage range: universal input, 9
• Inrush current: 1
• Input frequency range: 47~63Hz
• Input Current: 2.0Amax at 100 VAC
• Start-up time: ≤ 3sec Max. @115Vac
ic of 90W AC adapter
t
ature
90V AC to 264V AC
put source with 90W max output power
capacity.
in at 100Vac
0VAC to 264VAC
50A Peak and no damage @220Vac
• HOLD-UP time: 10ms min. @115VAC, full load condition
• OVP: 29V max. automatic shut down
• Short circuit protection: Output can be shorted without damage, and auto
recovery.
• OUTPUT Voltage Regulation: 18.5-20V inc
variation, load current, ripple and noise
• OUTPUT Current: Current: 0Am
• OUTPUT Voltage ripple: 380mv PK-PK for full load.
• OUTPUT Voltage Dynamic regulation: Output voltage within 18.5-19.9V,
load current 10%←→100%, fre
time≤1msec.
• DC OUTPUT PIN OUT:
PIN1 Center Pin Adapter +output
N
PI 2 Barrel (Ring) Adapter returns.
• Temperature Range:
Operating temperature: 0 °C to 40 °C
in, 4.74Amax continuous
quency 100Hz, 50% duty cycle, recover
luding the effects of line Voltage
Storage temperature: -20°C to 65 °C
4-2
Page 75

3. DC-DC CONVERTER
3.1 Description
JHL90 Service Manual
The DC-DC converter is designed to s
computer of Compal. It supply +5
+1.05VSP, +0.9VSP, +VGA_COREP, VG logical
CPU_CORE for CPU and supplies for the built-in KB926 microprocessor which
handles the keyboard and PMU control functions of the system.
ON/OFF is controlled by KB926. There is o a built-in charger power source. It
can pack her the computer is ON or OFF.
charge battery whet
3.2 Fe
atures
• High efficiency, up to 85% (using battery)
• Accept wide range DC input voltage from 8V to 19V
• Built-in charger power source
• The power ON/OFF is controlled by software
3.3 Electrical specification
Input Voltage/Current
• 8V to19V at the summing point of AC-DC and battery
• INPUT Current 10.8A max from 9-cell battery
upply the power for JHL90 series notebook
VALWP, +3VALWP, +1.8VP, +1.5VP,
A_1.8VSP for system, +
The power
als
• INPUT Current 9.6A max from 6-cell battery
• 4.74A max from 90W AC-DC Adapter.
3.4 Temperature Range:
• Operating temperature: 0°C to 40°C
• storage temperature range: - 20°C to 65°C DC/DC OUTPUT
• Fixed output voltage/Current
Item +5VALWP +CPU_CORE +VGA_COREP
Nominal voltage +5V depend on VID depend on VID
Min. current 0A 0A 0A
Max. current 4.9A 36A 16A
Peak current 7A 44A 22.8A
4-3
Page 76

JHL90 Service Manual
Total regulation 5V±5% depend on VCC static
and Transient
Tolerance--
Ripple voltage 100mVp-p max 20mVp-p max@36A 60mVp-p max
Item +0.9VSP +3VALWP +1.05VSP
nominal voltage +0.9V +3.3V +1.05V
Min. current 0A 0A 0A
Max. current 1.4A 5.5A 8.16A
Peak current 2A 7.85A 11.66A
Total regulation 0.9V±5% 3.3V±5% 1.05V±5%
Ripple voltage 40mVp-p max 100mVp-p max 60mVp-p max.
Item +1.8VP +1.5VSP VGA_1.8VSP
nominal voltage +1.8V +1.5V 1.8V
Min. current 0A 0A 0A
Max. current 6.1A 2.89A 2.56A
VGA_COREP±5%
Peak current 8.7A 4.13A 3.66A
Total regulation 1.8V±5% 1.5V±5% 1.8V±5%
Ripple voltage 100mVp-p max 100mVp-p max 100mVp-p max
• VOLTAGE IDENTIFICATION CODES
VID6 VID5 VID4 VID3 VID2 VID1 VID0 VDAC
0 0 0 0 0 0 0 1.5000
0 0 0 0 0 0 1 1.4875
0 0 0 0 0 1 0 1.4750
0 0 0 0 0 1 1 1.4625
0 0 0 0 1 0 0 1.4500
0 0 0 0 1 0 1 1.4375
0 0 0 0 1 1 0 1.4250
0 0 0 0 1 1 1 1.4125
0 0 0 1 0 0 0 1.4000
0 0 0 1 0 0 1 1.3875
0 0 0 1 0 1 0 1.3750
0 0 0 1 0 1 1 1.3625
4-4
Page 77

JHL90 Service Manual
0 0 0 1 1 0 0 1.3500
0 0 0 1 1 0 1 1.3375
0 0 0 1 1 1 0 1.3250
0 0 0 1 1 1 1 1.3125
0 0 1 0 0 0 0 1.3000
0 0 1 0 0 0 1 1.2875
0 0 1 0 0 1 0 1.2750
0 0 1 0 0 1 1 1.2625
0 0 1 0 1 0 0 1.2500
0 0 1 0 1 0 1 1.2375
0 0 1 0 1 1 0 1.2250
0 0 1 0 1 1 1 1.2125
0 0 1 1 0 0 0 1.2000
0 0 1 1 0 0 1 1.1875
0 0 1 1 0 1 0 1.1750
0 0 1 1 0 1 1 1.1625
0 0 1 1 1 0 0 1.1500
0 0 1 1 1 0 1 1.1375
0 0 1 1 1 1 0 1.1250
0 0 1 1 1 1 1 1.1125
0 1 0 0 0 0 0 1.1000
0 1 0 0 0 0 1 1.0875
1 0 0 0 1 0 1.164V
0 1 0 0 0 1 0 1.0750
0 1 0 0 0 1 1 1.0625
0 1 0 0 1 0 0 1.0500
0 1 0 0 1 0 1 1.0375
0 1 0 0 1 1 0 1.0250
0 1 0 0 1 1 1 1.0125
0 1 0 1 0 0 0 1.0000
0 1 0 1 0 0 1 0.9875
0 1 0 1 0 1 0 0.9750
0 1 0 1 0 1 1 0.9625
0 1 0 1 1 0 0 0.9500
0 1 0 1 1 0 1 0.9375
0 1 0 1 1 1 0 0.9250
0 1 0 1 1 1 1 0.9125
0 1 1 0 0 0 0 0.9000
4-5
Page 78

JHL90 Service Manual
0 1 1 0 0 0 1 0.8875
0 1 1 0 0 1 0 0.8750
0 1 1 0 0 1 1 0.8625
0 1 1 0 1 0 0 0.8500
0 1 1 0 1 0 1 0.8375
0 1 1 0 1 1 0 0.8250
0 1 1 0 1 1 1 0.8125
0 1 1 1 0 0 0 0.8000
0 1 1 1 0 0 1 0.7875
0 1 1 1 0 1 0 0.7750
0 1 1 1 0 1 1 0.7625
0 1 1 1 1 0 0 0.7500
0 1 1 1 1 0 1 0.7375
0 1 1 1 1 1 0 0.7250
0 1 1 1 1 1 1 0.7125
1 0 0 0 0 0 0 0.7000
1 0 0 0 0 0 1 0.6875
1 0 0 0 0 1 0 0.6750
1 0 0 0 0 1 1 0.6650
1 0 0 0 1 0 0 0.6500
1 0 0 0 1 0 1 0.6375
1 0 0 0 1 1 0 0.6250
1 0 0 0 1 1 1 0.6125
1 0 0 1 0 0 0 0.6000
1 0 0 1 0 0 1 0.5875
1 0 0 1 0 1 0.5750
1 0 0 1 0 1 1 0.5625
1 0 0 1 1 0 0 0.5500
1 0 0 1 1 0 1 0.5375
1 0 0 1 1 1 0 0.5250
1 0 0 1 1 1 1 0.5125
1 0 1 0 0 0 0
1 0 1 0 0 0 1 0.4875
1 0 1 0 0 1 0 0.4750
0.5000
1 0 1 0 0 1 1 0.4625
1 0 1 0 1 0 0 0.4500
1 0 1 0 1 0 1 0.4375
4-6
Page 79

JHL90 Service Manual
1 0 1 0 1 1 0 0.4250
1 0 1 0 1 1 1 0.4125
1 0 1 1 0 0 0 0.4000
1 0 1 1 0 0 1 0.3875
1 0 1 1 0 1 0 0.3750
1 0 1 1 0 1 1 0.3625
1 0 1 1 1 0 0 0.3500
1 0 1 1 1 0 1 0.3375
1 0 1 1 1 1 0 0.3250
1 0 1 1 1 1 1 0.3125
1 1 0 0 0 0 0 0.3000
1 1 0 0 0 0 1 0.2875
1 1 0 0 0 1 0 0.2750
1 1 0 0 0 1 1 0.2625
1 1 0 0 1 0 0 0.2500
1 1 0 0 1 0 1 0.2375
1
1 0 0 1 1 0 0.2250
1 1 0 0 1 1 1 0.2125
1 1 0 1 0 0 0 0.2000
1
1 1 0 1 0 1 0 0.1750
1
1
1 1 0 1 1 0 1 0.1375
1 1 0 1 1 1 0 0.1250
1 1 0 1 1 1 1 0.1125
1 1 1 0 0 0 0 0.1000
1 1 1 0 0 0 1 0.8750
1 1 1 0 0 1 0 0.7500
1 1 1 0 0 1 1 0.6250
1 1 1 0 1 0 0 0.5000
1 1 1 0 1 0 1 0.3750
1 1 1 0 1 1 0 0.2500
1 1 1 0 1 1 1 0.1250
1 1 1 1 0 0 0 0
1 1 1 1 0 0 1 0
1 0 1 0 0 1 0.1875
1 0 1 0 1 1 0.1625
1 0 1 1 0 0 0.1500
1 1 1 1 0 1 0 0
4-7
Page 80

JHL90 Service Manual
1 1 1 1 0 1 1 0
1 1 1 1 1 0 0 0
1 1 1 1 1 0 1 0
1 1 1 1 1 1 0 0
1 1 1 1 1 1 1 0
3.5 Charger
• Controlled by KB926 microprocessor from motherboard
• Temperature sense capability for the battery (charge active between 0°C ~
40°C)
• Fast charge current 3Amps (max.) for Li-Ion Battery at system off, approach
25W fast charge at system ON. (depend on system load)
• Trickle charge: Typical 600mA pre-charge current for Li-Ion Battery. All
trickle charge are controlled by KB926.
• Charge termination: When Fully-Charge bit is set, charger is terminated by
KB926
• When system is turned off, the charge time is 4.0 hrs typically from empty to
full for Li-Ion 9 cell battery. When system is turned off, the charge time is 3.5
hrs typically from empty to full for Li-Ion6 cell battery.
• Other battery services are presented by KB926 microprocessor includes
maximum charging timer, charging temperature range etc.
• Charger power:
Constant current mode: 3.0A±8%
Constant adapter current mode: 4.303A±6% (For 90W system)
Constant adapter current mode: 3.079A±6% (For 65W system)
BATT+ Constant Voltage mode: 12.6V±1% for Li-Ion Battery.
3.6 OVER Current protection:
• +3VALWP: >8.4A.
• +5VALWP: >8.4A.
• CPU_CORE: >48A.
• +1.8VP: >10.44A.
• +1.5VSP: >4.9A.
• +1.05VSP: >14A
• VGA_core: >27.36A
• VGA_1.8VSP: >4.39A
4-8
Page 81

3.7 OVER Voltage protection:
• +5VALWP: 5V +00mV of programmed VID level
• +1.8VP: 1.8V + (113% ~ 119%)
• +1.5VSP: 1.5V + (113% ~ 119%)
• +1.05VSP: 1.05V + (113% ~ 119%)
• +VGA_Corep: VGA_Corep* (113% ~ 119%)
• VGA_1.8VSP 1.8V* (113% ~ 119%)
3.8 Under voltage protection:
• +5VALWP: 5V* (65% ~ 75%)
• +3VALWP: 3.3V* (65% ~ 75%)
• +CPU_CORE: under 300mV of programmed VID level
• +1.8VP: 1.8V* (81% ~ 87%)
JHL90 Service Manual
• +1.5VSP: 1.5V* (81% ~ 87%)
• +1.05VSP: 1.05V* (81% ~ 87%)
• VGA_Corep: VGA_Corep* (81% ~ 87%)
• VGA_1.8VSP 1.8V* (81% ~ 87%)
3.9 Short circuit protection:
Latch mode for +5VALWP, +3VALWP, +CPU_CORE
3.10 I/O
3.10.1 DC-Jack
Pin 1, 2: Center pin Adapter power +input
Pin 3, 4: Barrel (Ring) Adapter power return
3.10.2 Battery Connector
Pin 1: BATT+
Pin 2: BATT+
Pin 3: CNT1 (ID)
Pin 4: CNT2 (B/I)
Pin 5: EC_SMCA (SMC)
Pin 6: EC_SMDA (SMD)
Pin 7: TS_A (TS)
Pin 8: GND
Pin 9: GND
4-9
Page 82

JHL90 Service Manual
3.10.3 Interface between Power with M/B
DC/DC
Signals I/O Voltage
Level
SUSP# I 0~3.3V Low Active, system suspend control signal
51ON# I 0~floating Low Active, POWER ON control signal.
FSTCHG I 0~3.3V High Active, ENE926 use this pin to control the fast charge of charge
ACOFF I 0~3.3V
ACIN O 0~3.3V High Active, provide to ENE926 to mean the Adaptor power is present
VGATE O 0~3.3V High Active, it will go high when +CPU_CORE is ready
VR_ON I 0~3.3V High Active, turn on/off the +CPU_COREP & VID_VCC
BATT_TEM
P
IREF I 0~3.3V Analog signal, ENE926 using this volt age f or setti ng c har ge cur rent
VID [0..6] I 0~3.3V The +CPU_CORE voltage depends on those PIN’s VID [6..0]
CHGRTC O 3.3V Charge RTC-battery power source
EC_SMB_
CK1,
EC_SMB_
DA1
SYSON I 0~3.3V High Active, ENE926 use this pin to control the SYSON signal
O 0~3.3V
I/O 0~5V
Description
High Active, turn off the Adaptor power for battery automatic learning
cycle
Analog signal, ENE926 using this voltage level to calculate battery’s
temperature
Interface of Smbus, communicate between ENE926 and smart battery
BATT_OV
P
PSI# I 0~1.05V Analog signal, enable CPU_CORE regulator at light load mode.
DPRSLPV
R
H_DPRST
P#
ADP_I I Analog signal, control CPU throttling in UMA SKU
CLK_ENA
BLE#
O 0~3.3V
I 0~1.05V
I 0~1.05V
O 0~3.3V
Analog signal, ENE926 using this voltage level for battery over voltage
protection
Analog signal, control CPU C3, C4 signal.
Analog signal, control CPU C3, C4 signal.
Analog signal, clock generator enable signal
3.11 BATTERY
3.11.1 Li-Ion smart
3.11.2 Battery Specification
1-1. EE information
6 cell 6 cell 9 cell
Battery Design Capacity
(mAH)
4800 5200 7200
4-10
Page 83

JHL90 Service Manual
Battery Configuration 3S2P 3S2P 3S3P
Battery Nominal Voltage
(V)
Single Cell Chemistry Li-ion Li-ion Li-ion
Single Cell Type 18650 18650 18650
Single Cell Capacity
(mAH)
Dumb/Smart Battery Smart Battery
Cycle Life 70% after 300
Nominal Charging
Voltage (V)
Nominal Charging Current
(A)
Protection Function OVP
11.1 11.1 11.1
2400 2600 2400
Smart Battery
(SMBus ver. 1.1.)
cycles
12.6 12.6 12.6
3 3 3
UVP
OTP
OCP
(SMBus ver. 1.1.)
70% after 300 cycles 70% afte r 300 cycles
OVP
UVP
OTP
OCP
Smart Battery
(SMBus ver. 1.1.)
OVP
UVP
OTP
OCP
1-2. Battery Connector Pin Assignment
Connector Male on M/B: TBD
Connector Female on Battery: SUYIN-200274FS009GX01ZU
Pin No. Symbol Comments
1 BATT+ Batt+, Battery Positive Terminal.
2 BATT+ Batt+, Battery Positive Terminal.
3
ID Identify pin (Note 1)
4 B/I Battery-In pin (Note 2)
5 SMC SMBus clock interface I/O pin.
6 SMD SMBus data interface I/O pin.
7 TS Connect to thermister (Note 3)
8 GND Battery Negative Terminal.
9 GND Battery Negative Terminal.
Note: 1. ID pin must be floating.
2. The battery can be charged/discharged only while this pin is connected to GND
by the system.
3. Thermister: DTN-C103F3H-SYS115A (or 103AT2 equivalent).
The other thermister Pin is connected GND.
4-11
Page 84

JHL90 Service Manual
3.11.3 On board RTC battery:
• Maxell ML1220T13 3V/14mAH Lithium
• Sanyo ML1220T28 3V/15mAH Lithium
• Panasonic ML1220/B 3V/17mAH Lithium
CAUTION
Danger of explosion if battery is incorrectly replaced.
Replace only with the same or equivalent type recommended by the manufacturer.
Dispose of used batteries according to the manufacturer’s instructions.
4. INVERTER SPECIFICATION
JHL90/91 15.4 inch inverter spec
Description
This inverter is designed to light up the CCFL of LCD for JHL90/91 notebook.
This inverter is designed to light up the CCFL of LCD for notebook. It should be
supported JHL90/91 15.4 LCD panels. There are two control signals that come
from system to control lamp brightness. One signal is named DAC_BRIG, which
limits current to meet LCD lamp current specification. Another one is named
PWM, which adjusts lamp brightness. This inverter brightness is adjusted by
PWM burst mode. The PWM burst mode is that turning on and off the lamp at a
rate of 150Hz. The effective brightness is a function of the duty cycle.
4.1 Features
• Wide range 9V to 21V input voltage
• Brightness adjustment by PWM burst mode.
• Close loop controls lamp current.
4.2 Absolute maximum rating
• Environment Temperature:
Operating temperature: 0°C ~ 55°C
4-12
Page 85

JHL90 Service Manual
Storage temperature: - 20°C ~ 70°C
Humidity: 0 ~ 90% without condensation
MTBF: MIN 50000 hours. (In Compal system)
4.3 Electrical characteristic
No Item Symbol Min. Typ. Max. Unit Comment
1 Input voltage INV_PWR 9 14.8 21 V
2 Input current Iin -- 0.33 -- A
3 Lamp current IL 3.0 -- 6.8 mA DAC=0V *Note 2
4 Lamp current IL 2.7 -- 6.3 mA 1.4.1.1.1 DAC=1V
5 Frequency F 45 55 65 KHz *Note 3
6 Output power Pout -- -- 4.5 W
7.5V (continuous) can work
*Note 1
7 Efficiency
8
9 Starting time Tvs 1 -- 1.5 Sec
10 Dispoff#
11
12
Starting
voltage
Limited lamp
maximum
current
PWM signal
*note 4
η
V
2.8 3.3 3.6 V Backlight on/off signal
0 V 0.5 0.8 Low level
DACBRIG
INV_PW
M
80% -- -- --
1600 -- -- V At 0’C
s
0 V *Note 2
142 150 158 Hz PWM signal frequency
3.0 3.3 3.6 V PWM signal amplitude
30 -- 100 %
3.3
Duty =
Period
lamp current
13
over-shoot
14
Waveform
Current
factor
-- 10 %
I
p
I
rms
1.27
1.56 Multiple
2
Line transient (10.8V to
21V/100us) and turn on
transient
I
−
OR
p
I
rms
Ton
*10
Unbalance
15
16
Rate
Turn off
current
(Hight side)
II
−
pp
−
I
rms
IHL -- -- 0 A PWM=30%
-10% 0 +10% Multiple
4-13
Page 86

JHL90 Service Manual
Turn off
17
18
19
voltage
(Low side)
Volt age Rise
time (Low
side)
Voltage fall
time (Low
side)
Notes:
• The inverter can work in 7.5V input voltae (continuous), but 7.5V electronic
characteristic will not be care. (Note: the display must be normal and can not
glitter or become dark)
• Limited lamp maximum current by DAC_BRIG signal:
When DAC_BRIG voltage is 0V and INV_PWM enables (100%), lamp has
max.-limited current.
When DAC_BRIG voltage is 3.3V and INV_PWM enables (100%), lamp has
min.-limited current.
Voff -- --
Trise -- -- 300us us PWM=30%
Tfall -- -- 300us us PWM=30%
150Vp-
p
V PWM=30%
When add 1V DAC, the 100% Lamp current will decrease 0.5mA.
DAC_BRIG signal comes from system chipset with internal resistance of 3KΩ.
• Inverter operating frequency should be within specification (45~65kHz) at
max. and min. brightness load.
• INV_PWM enable implies INV_PWM signal is High level (On duty cycle is
100%). It is a square wave of 150Hz to adjust backlight brightness that is a
function of PWM duty cycle. Backlight brightness is maximum value under
INV_PWM at 100% and brightness is minimum under INV_PWM at 30%.
• The system interface signals belong to 3.3V.
• Please make sure open lamp output voltage should be within starting voltage
specification.
• Inverter should pass human body safety test.
• Inverter should no smoking by any component open / short test
• Transformer voltage stress should not be over 85% under any condition (turn
on overshoot transient and line transient).
• Audio noise should be less than 36dB at 10 cm distance.
4-14
Page 87

JHL90 Service Manual
4.4 Electrical specification
4.4.1 Electrical specification
No Symbol Min. Typ. Max. Unit Comment
V
. -- 650 -- Vrms Lamp operating voltage (650+/-50)
oper
1
I
L
I
L
I
L
I
L
f 45 55 65 KHz
η
6.2 6.5 6.8 mArms DAC_BRIG: 0 V, PWM: 100%
3.0 3.3 3.6 mArms DAC_BRIG: 0 V, PWM:30%
5.7 6 6.3 mArms DAC_BRIG: 1 V, PWM: 100%
2.7 3 3.3 mArms DAC_BRIG: 1 V, PWM:30%
80% -- -- --
4.4.2 Thermal
All components on inverter board should follow below rules:
• Component using conditions (component stress) must be within component
specification including voltage rating, current rating, temperature etc.
• Component temperature should follow below:
Δ T < 30°C, at 25, 35°C.
Component temperature should be less than 70°C inside system at 35°C.
4.5 Connector description
4.5.1 Input Connector:
CN1: ACES 87213-0700; JST SM07B-SRSS-TB
Symbol Description
1 INV_PWR Input voltage (9V-21V)
2 INV_PWR Input voltage (9V-21V)
3 INV_PWM Adjust brightness by burst mode (3.3 V 150Hz)
4 DISOFF # Backlight on/off control, active HIGH (3.3V)
5 DAC_BRIG Max. current limit
6 GND Power system return
7 GND Power system return
4.5.2 Output Connector:
CN2: JST_SM02B_BHSS-1
4-15
Page 88

JHL90 Service Manual
Symbol Description
1 HV Connected to high voltage of LCD lamp
2 LV Connected to low voltage of LCD lamp
Note: Please mark “CAUTION HIGH VOLTAGE” around CN2
4.6 Safety Protection
4.6.1 Open lamp protection:
When inverter is on open lamp status, any component on inverter should be O.K
and inverter is no damaged, no fire and no arcing. If inverter can’t shunt down
during open lamp happen, inverter must pass below conditions:
• Human body test.
• Open lamp burning: Inverter burns for 24 hours at open lamp status. No parts
damage.
4.6.2 Human body safety test:
Short inverter output, transformer secondary output to GND by a 2KΩ resistor
which connects one end to GND and another one to those outputs. They should
meet output current limitation requirement as follow. Output current I is the
current that flows through 2KΩ resistor.
• Output current I ≤ 0.7mA, if frequency f ≤ 1KHz
• Output current I ≤ 0.7mA * f (kHz), if f ≥ 1KHz.
However, output current should be less than 70mA even frequency is more than
100KHz.
4.6.3 Abnormal test:
Any one component is short or open; inverter should be no fire, no arcing. And
result must meet output current limitation requirement.
4-16
Page 89

5. Reliability Requirements
5.1 Mean Time Between Failures (MTBF)
• 17,000 hours with 90% confidence level.
5.2 Reference Document
5.3 Electro-Static Discharge (ESD)
Performance Criteria
No soft error
Air Discharge +/- 10KV
Contact Discharge +/- 5KV
6. Regulatory Compliance
JHL90 Service Manual
UL 60950-1
CAN/CSA-22.2
No. 60950-01-03
EN 60950-1
IEC 60950-1
AS/NZS 60950
GB9254
GB4943
47 CFR, Part 15,
Subpart B, Class
B
CISPR 22
(Class B)
EN 55 022
(Class B)
Standard for safety of Information Technology Equipment
including Electrical Business Equipment.
Standard for safety of Information Technology Equipment
including Electrical Business Equipment.
Standard for safety of Information Technology Equipment
including Electrical Business Equipment.
Standard for safety of Information Technology Equipment
including Electrical Business Equipment.
Standard for safety of Information Technology Equipment
including Electrical Business Equipment.
EMI Standard of Information Technology Equipment
Safety Standard of Information Technology Equipment.
A digital device that is marketed for use in a residential
environment not withstanding use in commercial, business
and industrial environments
Limits and methods of measurement of radio interference
characteristics of information technology equipment
Specification for limits and methods of measurement of
radio interference characteristics of information technology
equipment.
EN 55024
Information technology equipment-Immunity
characteristics-Limits and Methods of measurement.
4-17
Page 90

JHL90 Service Manual
CSA C108.8
Electromagnetic Emission from Data Processing
Equipment and Electronic Office Machines.
EMC Directive
(89/336/EEC)
AS/NZS 3548
47 CFR Part 68
DOC/CS-03
JATE
EN55013
EN55020
CNS 13439
Council directive of 3 May 1989 on the approximation of the
laws of Member States relating to electromagnetic
compatibility.
Limits and methods of measurement of radio interference
characteristics of information technology equipment.
Connection of Terminal Equipment for the Telephone
Network.
Specification for Terminal Equipment, Terminal systems,
Network Protection Devices, Connection Arrangements and
Hearing Aids Compatibility.
JATE Rules on Technical Condition Approval (Analog
Terminal Equipment.
Sound and television broadcast receivers and associated
equipment: electromagnetic compatibility.
Electromagnetic immunity of broadcast receivers and
associated equipment.
Limits and methods of measurement of radio interference
characteristics of sound and television broadcast receivers
and associated equipment.
CNS 14336
Information technology equipment - Safety - General
requirements
4-18
Page 91

7. Power interface
7.1 Power requirement
JHL90 Service Manual
Item Description
1 +CPU_CORE
2 +0.9VS
3 +1.05VS
4 +1.5VS
5 +1.8V
6 +3VS
7 +3VALW
8 +5VALW
Load
Min. Max. Peak Normal
0 40A
0 0.75A 0.9V 5% SUSP
0 3A 1.05V 5% SUSP
0 6A 1.5V 5% SYSON
0 3A 1.8V 5% SYSON
0 0.3A 3V 5%: SUSP
0 5A 3V 5%
0 5A 5V 5%
Voltage
By VID
control
Ripple /
Noise
CPU spec. CPU spec. VR_ON
Tolerance
*1: Always on when AC exist no AC exist control by EC_ON
7.2 Power/EE Interface definition:
Voltage Rails
Power Plane Description S1 S3 S5
Control
signal
*1
Remark
VIN Adapter Power supply (19V) N/A N/A N/A
B+ AC or battery Power rail for power circuit. N/A N/A N/A
+CPU_CORE Core voltage for CPU ON OFF OFF
+0.9VS 0.9V switched power rail for DDR terminator ON OFF OFF
+1.05VS 1.05V switched pow er rail ON OFF OFF
+1.5VS 1.5V switched power rail ON OFF OFF
+1.8V 1.8V power rail for DDR ON ON OFF
+3VALW 3.3V always on power rail ON ON ON*
+3VS 3.3V switched power rail ON OFF OFF
+5VALW 5V always on power rail ON ON ON*
+5VS 5V switched power rail ON OFF OFF
+VSB VSB always on power rail ON ON ON*
+RTCVCC RTC power ON ON ON
SIGNAL
STATE
Full ON HIGH HIGH HIGH ON ON ON ON
S3 (Suspend to RAM) LOW HGH HIGH ON ON OFF OFF
S4 (Suspend to Disk) LOW LOW HIGH ON OFF OFF OFF
S5 (Soft OFF) LOW LOW LOW ON OFF OFF OFF
SLP_S3# SLP_S4# SLP_S5# +VALW +V +VS Clock
4-19
Page 92

JHL90 Service Manual
7.3 Power Sequence
7.3.1 AC exist
4-20
Page 93

7.3.2 Suspend/Resume Sequence
JHL90 Service Manual
4-21
Page 94

JHL90 Service Manual
Time Table
Item Min. Max. Spec. List
T1
T2
T3
T4
T5
T6
T7
T8
T9
REF. NO. Document Title REV. NO.
11450 Intel® I/O Controller Hub9 (ICH9) External Design Specification 1.1
11743 Mobile Intel® Pentium® 4 Processor-M and Intel® chipset
5ms ICH9 output 11450/Figure19-21, T able19-20, T173
50ns ICH9 output 11450/Figure19-21, T able19-21, T181
110ms ICH9 output 1 1450/Figure19-21, Table19-21, T182
110ms ICH9 output 1 1450/Figure19-21, Table19-21, T183
10ms 40ms EC control, SYSON active to
SUSP# active time.
50ns ICH9 output 11450/Figure19-21, T able19-21, T184
10ms 40ms EC control, SYSON active to
SUSP# active time.
10ms Base on system design 11450/Figure19-21, Table19-20, T176
1ms 10ms GMCH and ICH9 output
Reference document list
Platform Recommended Design & Debug Practices.
Control
0.7
4-22
Page 95

8. Reset Map
+2.5V
+1.5VS/+3VS/1.2VS
JHL90 Service Manual
VCH
PCIRST#
CH7011
+3V
GATE
VGATE
IAC_RST#
AC'97
IAC_RST#
MDC
SYS_PWROK
ICH_VGATE
CK408_PWRGD#
14
+3VS
4
SYS_PWROK
SYS_PWROK
ICH_VGATE
PM_SLP_S3#
PM_SLP_S5#
RTCCLK
+3VALW/+1.5VALW
IAC_RST#
3
MGCH
+3VS/+1.5VS
+3V V/+1.5
ICH4 - 1
KBRST#
PCIRST#
PCIRST#
H_RESET#
17
SYSRST#
+3VALW
H_RESET#
16
PCIRST#
15
H_PWRGD H_PWRGD
GATE
CBRST#
+H E_CPUCOR
+CPU_CORE
P4 CPU
VID
12
13
PWM
CBRST#
IEEE1394
TSB43AB21
PCIRST#
CBRST#
CardBus
PCIRST#
OZ6933
CardBus
CBRST#
OZ2206
PCIRST#
LAN
8100BL
PCIRST#
Mini PCI
S1_RST#
S2_RST#
Slot-S1
Slot-S2
CLK
CLK_PWRDWN#
AND
ON/OFF
+3VALW
RTCCLK
PM_SLP_S5#
PM_SLP_S3#
PM_SLP_S1#
9
EC_RST #
1
+3VALW
PC87591
+5VALW/+3VALW/+1.5VALW/+2.5VALW
PCIRST#
2
PBTN_OUT#
PM_RSMRST#
VR_ON
5
SYSON
+5VS/+1.5VS/+2.5VS/+3VS
7
SUSP#
1110
+1.2VP
Regulator
6
PWR
+5V/+1.5V/+2.5V/+3V
Switch
8
PWR
+5VS/+1.5VS/+2.5VS/+3VS
Switch
PIDERST#
SIDERST#
PCIRST#
GATE
PCIRST#
GATE
Super I/O
PCIRST#
FDC47N227
SD
PCIRST#
W83L518D
PIDE_RST#
SIDE_RST#
HDD
OZ168
4-23
Page 96

JHL90 Service Manual
9. PCI resource assignment
North Bridge- GMCH
• Bus 0, Device 0, Function 0: Host-Hub interface bridge/DRAM controller
• Bus 0, Device 1, Function 0: Host-AGP bridge
South Bridge- ICH9
• Bus 0, Device 31, Function 0: PCI-LPC bridge
• Bus 0, Device 31, Function 1: IDE controller
• Bus 0, Device 31, Function 3: SMBus controller
• Bus 0, Device 31, Function 5: AC’97 Audio
• Bus 0, Device 31, Function 6: AC’97 Modem
PS. This portion will be designed by BIOS team.
4-24
Page 97

10. EC SMBus Block
+5VALW
The rmal Sensor
1
1
R363
4.7K_0402_5%
2
2
2
D
2
M
C
S
_
M
C
S
_
E
C
E
R364
4.7K_0402_5%
EMC1402
ADM1032AR
+5VS
D
Q51
2N7002
+5VCD
1
2
Q50
2N7002
1
3
S
D
G
3
2
S
G
R432
100K_0402_5%
JHL90 Service Manual
OZ168
R433
100K_0402_5%
EC_SMD2
SM-BUS 2
EC_SMC2
EC
+5VALW
+5VALW
2
2
R381
R382
4.7K_0402_5%
4.7K_0402_5%
1
1
+5VALW
EC_SMC1
SM-BUS 1
EC_SMD1
PR28
100_0603_5%
PR29
100_0603_5%
EC_SMDA
BATTBIOS EE-PROM
EC_SMCA
4-25
Page 98

Page 99

Chapter 5
Disassembly Guide
Page 100

 Loading...