


molinos de café
coffee grinders
moulins à café
kaffeemühlen
macinadosatori
moinhos de café
к о ф е м о л к и
μαδοι αδσησ καε
Manual de Instrucciones · Instructions Manual · Manuel d’Instructions
Bedienungshandbuch · Manuale d’Uso ·
Manual de instruçoes
ИНСТРУКЦИЯ ПО ЭКСПЛУАТАЦИИ · ΕΓΧΕΙΡΙΔΙΟ ΟΔΗΓΙΩΝ ΧΡΗΣΗΣ
K-6
K-6 Silenzio
K-6 Professional Barista
K-8
K-8 Silenzio
K-10 Conic
K-10 Conic WBC

Índice
1 – Descripción del molino
2 – Manual de instrucciones
3 – Identificación
4 – Características técnicas
5 – Componentes externos
6 – Instalación
7 – Regulación
8 – Funcionamiento
9 – Limpieza
10 – Mantenimiento
11 – Medidas de seguridad
12 – Declaración de Conformidad CE

1
ESPAÑOL
Descripción
1
V. 12/2008
El molino de café que ha adquirido ha sido diseñado aplicando los más innovadores sistemas
informáticos y de ingeniería. El resultado es un producto de alta calidad que le ofrece la
máxima garantía. En su proceso de fabricación se han utilizado materias nobles (aluminio,
acero, etc.) idóneas para el contacto con alimentos. Para un óptimo funcionamiento de los
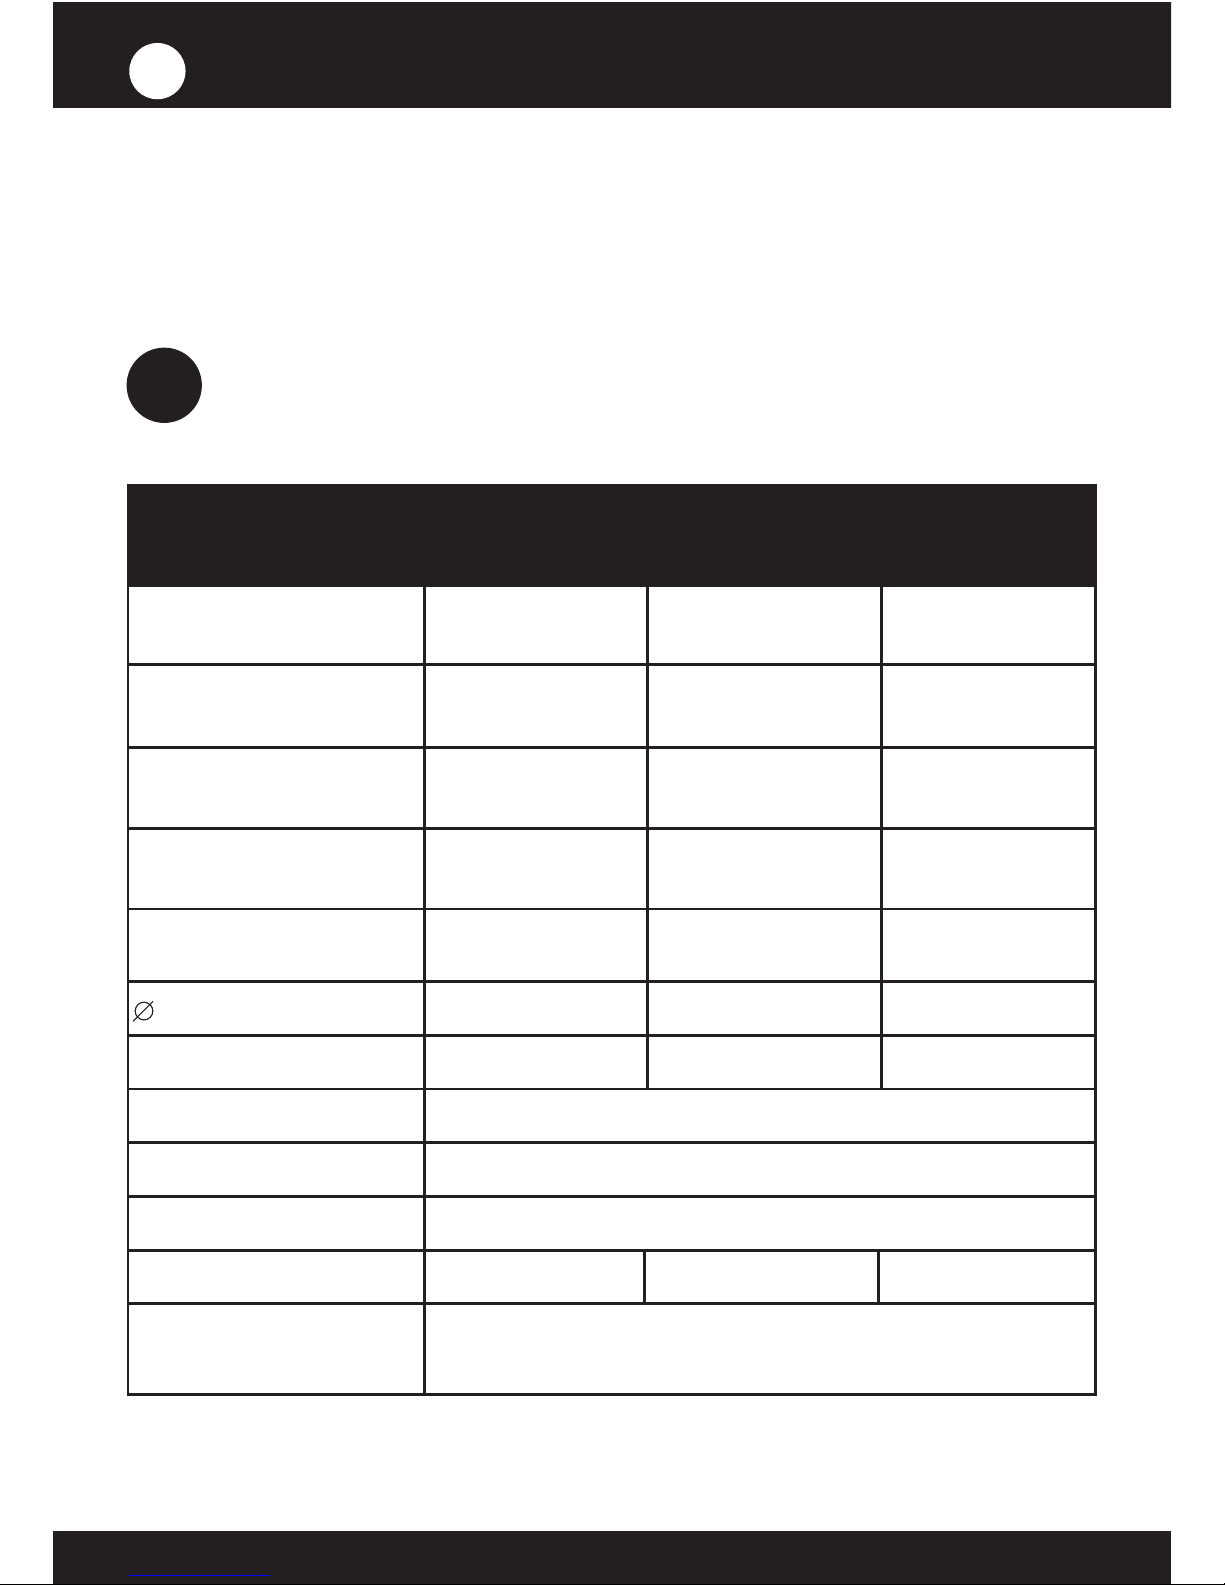
molinos descritos en este manual los ciclos de trabajo máximos son:
2.1. La finalidad de este manual es proporcionar la información necesaria para una
correcta instalación, manipulación y mantenimiento del aparato, así como destacar las
precauciones que se deben tener en cuenta por el operador. Para garantizar el mejor
uso de los molinos de café, esencial seguir atentamente las instrucciones suministradas
en este manual. En el caso de que surgiera cualquier tipo de inconveniente, contactar
con el servicio técnico más cercano. Este manual debe ser conservado hasta el
cambio de máquina y debe estar siempre a disposición del operador.
2.2. En este manual se han utilizado algunos términos especiales, como:
– Caracteres en negrilla para resaltar la importancia de algunos términos.
– Números entre paréntesis después de una palabra, que indican la posición de
ese artículo en el dibujo de al lado o en el dibujo de componentes externos.
Ejemplo: (1) Tapa Tolva.
– Iconos: (información, atención)
Manual de Instrucciones
2
K-6 Silenzio / K-6 Professional Barista / K-8 / K-8 Silenzio / K-10 Conic
K-10 Conic WBC
FUNCIÓN
PARO
10 min.
3 min.
5 min.
5 min.
CICLO
MODELO
información atención
!
i
Identificación
3
En la placa de características técnicas
fabricada en material indeleble se
informa de los siguientes datos:
NOTA: El fabricante se
reserva el derecho de variar
los componentes de la
máquina, según las exigencias
de cada mercado, así como
por los avances tecnológicos.
MODELO
NÚMERO SERIE
DATOS ELÉCTRICOS
FECHA DE FABRICACIÓN
OPCIONES
TEL.: FAX:
i
PROC-CAL/002/03

4.1. Campo de aplicación
Los molinos de café están destinados a comercios y comunidades en los que es
necesaria la utilización de café molido, o en pequeños comercios de venta de café.
Este molino sólo debe ser utilizado para moler café en grano. Todo uso diferente a
este debe considerarse impropio y peligroso.
*NOTA: El fabricante no se hace responsable del daño producido a personas, cosas o a la propia máquina, si no se cumplen las normas de seguridad
mencionadas en este manual, o por usos incorrectos.
Características técnicas
4
i
*Esta producción es tomando como base un café de tueste medio y punto de molienda espresso.
Fresas (in / mm) 2.5 / 64 3.3 / 83 2.7 / 68
Producción (lb/h Kg/h)* 24.2 / 11 33 / 15 37.4 / 17
Capacidad tolva (lb / gr) 3.74 / 1.700
Peso neto (lb / kg) 31.9 / 14.5 33.4 / 15.2 37.5 / 17
Altura x Anchura x Profundidad 25 x 8.2 x 14.4 in
(in / mm) 635 x 210 x 365 mm
110 v
60 hz
200w/100w
1100 rpm
470w/245w
1540 rpm
440w/245w
1300 rpm
260w/120w
1400 rpm
400w/245w
1390 rpm
220 v
60 hz
230 v
50 hz
240 v
50 hz
380 v
50 hz
Capacidad dispensador (lb / gr) 0.66 / 300
Posición maneta dosificador Derecha o izquierda
280w/150w
1030 rpm
470w/245w
1540 rpm
380w/200w
1300 rpm
245w/140w
870 rpm
420w/250w
920 rpm
680w/370w
265 rpm
760w/370w
270 rpm
730w/450w
340 rpm
730w/450w
340 rpm
490w/300w
340 rpm
K-6 / 6.4 M
6.4 A / K-6 Professional
Barista / K-8
K-8 Silenzio
K-10 Conic
K-10 Conic WBC
MODELO

Componentes externos
5
12
9
8
6
5
3
2
1
Tapa tolva
Tolva para
café en grano
Rulina
seguridad
tolva
Regulador de
molido
Ta pa
dosificador de
café molido
Perno
regulación
dosificador
Prensa café
13
Horquilla
apoyo
15
Bandeja
recoge-café
11
10
7
4
Protector
manos
Obturador
tolva
Dosificador
de café
molido
Maneta
dosificador
Indicador
posición
bloqueo
de seguridad
14
Interruptor
luminoso
on-off
6
Instalación
6.1. Advertencias generales
El instalador deberá leer atentamente este manual de instrucciones antes
de efectuar la instalación de la máquina. La instalación del aparato debe ser
efectuada por personal cualificado y autorizado, y respetando las normas
de seguridad e higiene vigentes.
i

6.2. Advertencias importantes
El operador debe ser una persona adulta y responsable. Nunca un menor
o persona sin capacidad de aceptar dicha responsabilidad. Al manipular el
molino se deberán tener en cuenta las siguientes precauciones:
• No tener los pies desnudos.
• No tener las manos o pies mojados.
• No introducir el aparato en agua.
• No exponer el aparato al sol u otros agentes atmosféricos.
• No introducir nunca ningún objeto en la boca de entrada o salida de
café, mientras el aparato esté en marcha. (Debemos tener en cuenta que
al parar el molino, las fresas siguen girando unos instantes.)
• Para desconectar el molino, tirar siempre de la clavija y nunca del cable
de red para evitar un posible cortocircuito.
!
6.3. Ubicación para el uso
El aparato debe ser instalado sobre una superficie plana, consistente. Las
dimensiones mínimas del lugar de trabajo, para garantizar las mejores
prestaciones del aparato, deben ser como mínimo las siguientes:
6.4. Instalación del molino de café
Antes de conectar el molino de café, se deberá controlar lo siguiente:
• Que los datos de la etiqueta de características coincidan con las de
la red eléctrica.
• Que la clavija de conexión eléctrica, coincide con el enchufe donde
va conectada (*)
• Controlar que el caudal eléctrico de la instalación sea adecuado a la
potencia del aparato.
• El punto de conexión a la red eléctrica debe estar protegido con
fusibles de la potencia adecuada.
• El equipo debe ser conectado correctamente a una toma de tierra
según las normas de seguridad vigentes.
*Este molino de café debe ser utilizado en ambientes con una temperatura
inferior a 25/30 ºC (77/86ºF) y no se debe instalar en lugares (COMO
COCINAS INDUSTRIALES) en los que se prevea la limpieza mediante
chorros de agua.
i
i
i
K-6 / K-6 Silenzio
K-6 Prof. Barista / K-8
31.5 / 800 12.1 / 310 16 / 406
K-8 Silenzio / K-10 Conic
K-10 Conic WBC
MODELO Altura (in / mm) Anchura (in / mm) Profund. (in / mm)

7
Regulación
7.1. Preparación del molino de café
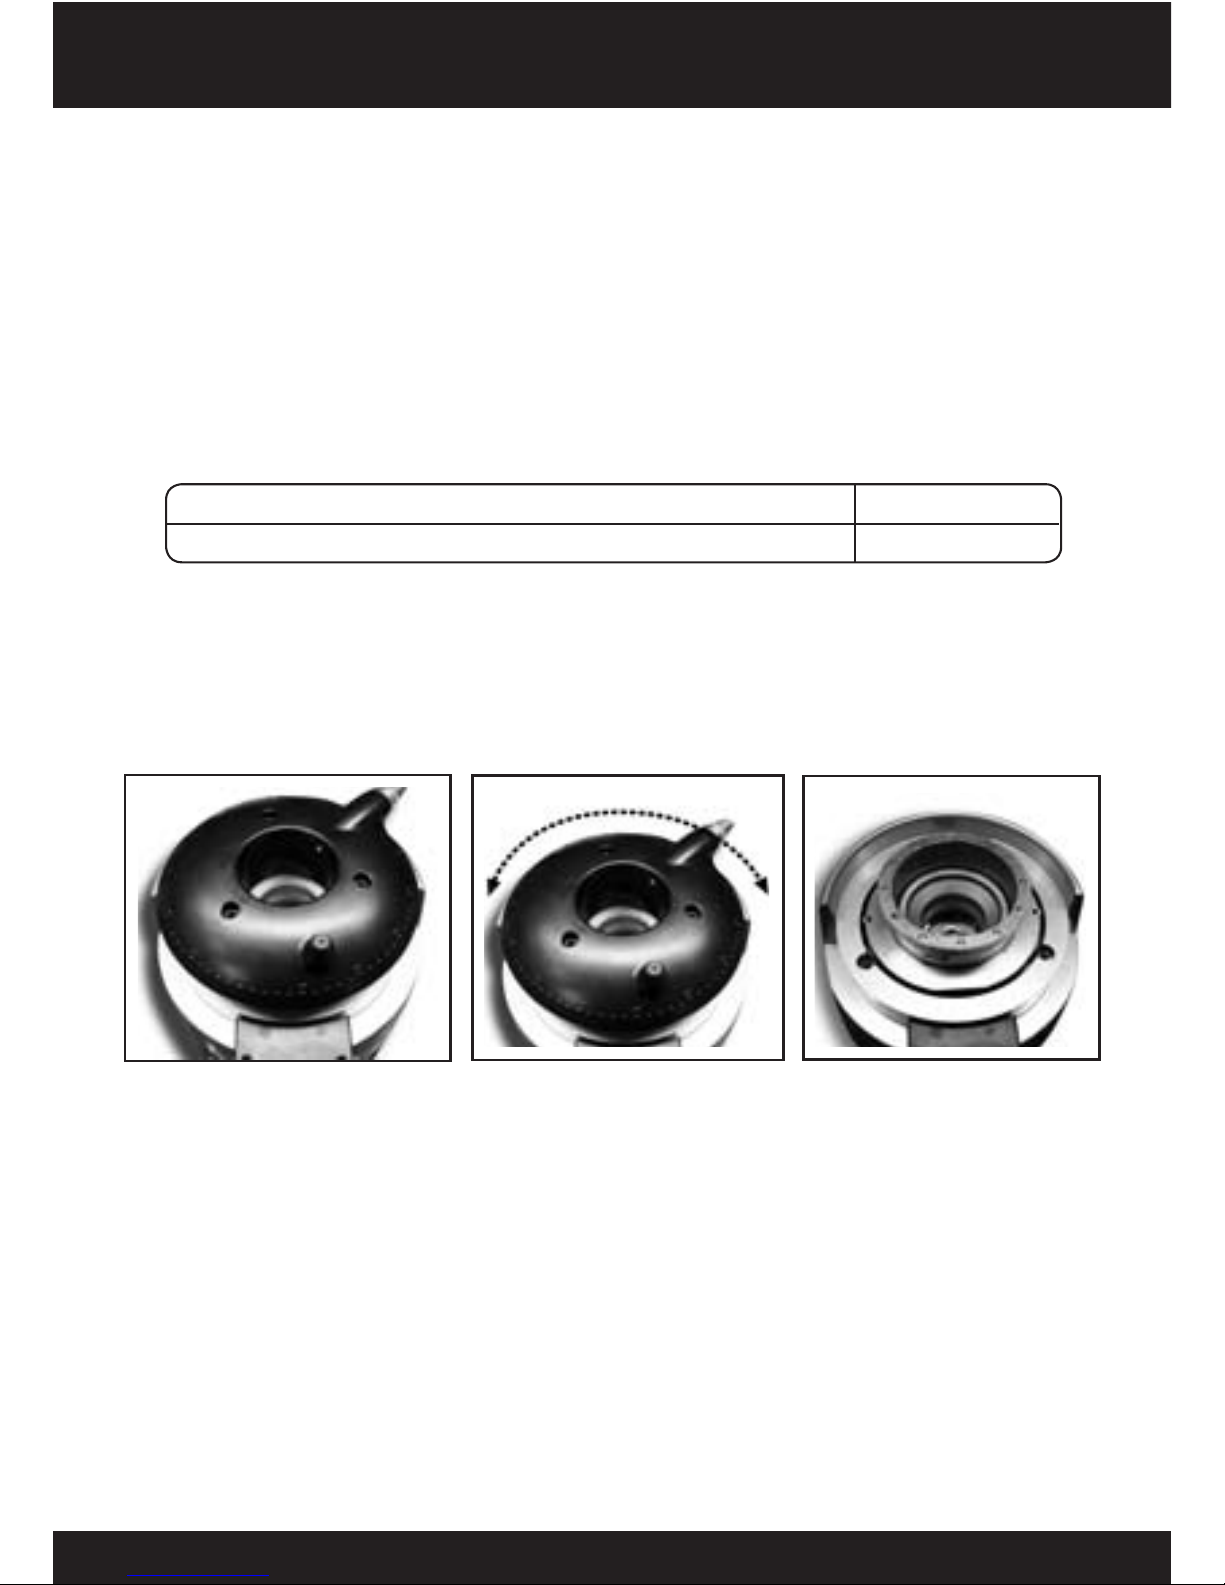
Colocar la tolva (2) sobre el regulador de molido (6) y comprobar que el obturador (4)
esté en posición de cerrado, como Fig. 1. Fijar la tolva apretando con un destornillador
plano el tornillo de seguridad y a mano terminar roscando la rulina seguridad tolva (5). Fig.
2. Sacar la tapa tolva (1), llenar la tolva (2) de café y volver a poner la tapa tolva. Fig.3.
Fig. 2
Fig. 1
Fig. 3
Café en
grano
AbiertoCerrado
Bloqueado
Desbloqueado
Conectar el aparato a la red, accionar el interruptor ON-OFF de puesta en marcha
(14) y abrir el obturador (4) para dejar paso al café. Sacar la tapa dosificador (8) y
girar el regulador de molido (6) hasta ajustarlo al punto de molido del café deseado.
Girando en el sentido de las agujas del reloj obtendremos un café molido más
grueso y girando en sentido anti-horario obtendremos un café molido más fino.
Note que sólo debe cambiar los puntos de molienda cuando la máquina está en
marcha. Si no sigue esta instrucción, las fresas acumularán café y necesitará limpieza.
Cambiando el punto de molienda cuando las fresas no están en marcha causará que
el molino produce un café molido muy grueso o ninguno. Fig. 4.
Por razones de seguridad, el regulador (6) está limitado a una sola vuelta.
En los modelos Bailarina, las posiciones de molienda están fijadas con la colocación
de los agujeros mostrados en Fig. 5. Utilizando estos agujeros, obtendrá seleccionar
la molienda deseada.
Grueso
Fino
Fig. 4
Fig. 5

NOTA : Si observamos que la erogación del café es muy lenta, es que el café
está molido muy fino. Si la erogación es muy rápida, es que el café está molido
muy grueso. Un espresso perfecto se consigue con el punto de molienda que
nos da 25 ml de café en 25 segundos.
i
7.2. Regulación de la dosis de café servida
El dosificador está calibrado de fábrica para
servir unos 7 gramos de café molido, pero
esta cantidad puede graduar entre 6 y 10 g,
de la siguiente forma: Sacar la tapa dosificador
(8) y girar el perno regulación (9); en sentido
horario obtendremos una dosis menor de café,
y en sentido anti-horario para obtener una dosis
mayor. Una vez regulada la dosis, volver a montar
la tapa del dosificador de café molido (8). Fig. 6.
Fig. 6
Mayor
Menor
8.1. Utilización
Poner el molino en marcha mediante el interruptor ON-OFF (14), el aparato
empieza a moler café. Si incorpora la opción de paro automático, el molino dejará
de moler café cuando el dosificador llegue al nivel máximo y se volverá a activar
después de servir 8 dosis de café, para volver a su nivel máximo. Si no incorpora
la opción de paro automático, recomendamos llenar el dosificador un 75% de
su capacidad para garantizar un servicio consistente. Para servir las dosis de café,
poner el portafiltro sobre la horquilla de apoyo (13), llevándolo hasta el fondo para
que quede debajo de la salida de café molido. Tirar de la palanca dosificador (11)
para obtener una dosis de café (una dosis corresponde a un café), y dejar que la
maneta vuelva a su posición sin acompañarla. Fig.7.
Llevar el portafiltro y encajarlo debajo del prensa café (12) haciendo presión hacia arriba para compactar el café. Fig. 8. En caso de montar la opción de prensa café telescópico,
apoyar el portafiltro sobre la horquilla y presionar el prensa café hacia abajo. Fig. 9.
Fig. 7
Fig. 8
Fig. 9
8
Funcionamiento

9
Limpieza
9.1. Advertencias generales
Para garantizar un buen funcionamiento del aparato, así como una buena calidad del
café molido, se debe tener en cuenta el realizar una limpieza periódica de las partes
que están en contacto con el café (al menos una vez por semana). Para realizar las
operaciones de limpieza debemos tener en cuenta las siguientes indicaciones:
• Apagar siempre el aparato mediante el interruptor ON-OFF (14).
• Desconectar el aparato de la red eléctrica.
• No sumergir el aparato en agua.
Recomendamos el uso diario de pastillas de limpieza para retirar los residuos de café.
9.2. Limpieza de la tolva de café en grano
Previamente consumir todo el café en grano que pudiera quedar en la tolva (2).
Aflojar a mano la rulina seguridad tolva (5) y destornillar con un destornillador plano
el tornillo de seguridad tolva. Sacar la tolva de café en grano (2) del regulador de
molido (6) como en Fig. 2 y lavarla con un paño húmedo o con agua y jabón, para
eliminar los residuos oleosos producidos por el café, enjuagarla cuidadosamente
y secarla. Volver a poner la tolva sobre el regulador de molido y apretar con un
destornillador plano el tornillo de seguridad tolva y a mano terminar roscando la
rulina seguridad tolva (5).
9.3. Limpieza del deposito de café molido
Para proceder a la limpieza del depósito de café molido, primero hemos de vaciar
todo el café que se encuentre en su interior. Sacar la tapa dosificador de café molido
(8) y con un pincel limpiar todo su interior.
9.4. Limpieza exterior
Para la limpieza exterior utilizar primero un pincel seco y posteriormente un trapo
ligeramente humedecido en agua y jabón.
NOTA: No utilizar nunca paños humedecidos para la limpieza del depósito de café
molido. Conservar el pincel en un lugar protegido y utilizarlo sólo para la limpieza del
molino, para evitar ensuciarlo de otras sustancia. El no efectuar dichas operaciones de
limpieza, repercutirá negativamente en el sabor y aroma del café.
10
Mantenimiento
i
10.1 Advertencias generales
Antes de efectuar cualquier tipo de operación de mantenimiento se deben
tener en cuenta las siguientes indicaciones:
• Apagar siempre el aparato mediante el interruptor ON-OFF (14).
• Desconectar el aparato de la red eléctrica.
En caso de avería o mal funcionamiento, apagar el aparato, jamás debemos intentar repararlo o intervenir directamente. Llamar al servio técnico más cercano.
NOTA: El no respetar esta advertencia puede comprometer la seguridad
tanto del aparato como del usuario.

10.2. Mantenimiento periódico
Para garantizar la eficacia y para que el molino funcione correctamente es indispensable seguir las indicaciones del fabricante, haciendo que este mantenimiento sea
realizado por personal cualificado. Se recomienda efectuar controles programados de
las partes que más se desgastan. Sobre todo se deberá controlar sistemáticamente el
nivel de desgaste de las fresas. El perfecto estado de las mismas permite obtener un
molido homogéneo del café, a baja temperatura, potenciando las cualidades de cada
origen o mezcla, así como disminuir el consumo eléctrico y limitar el recalentamiento
del motor y de las propias fresas.
NOTA: Suponiendo un uso de mezclas de café de dureza media, sugerimos
sustituir las fresas después de moler 300 kg/660 lb de café para los todos los
modelos excepto para el modelo K-10 Conic WBC que sugerimos sustituir cada
1500 Kg/3300 lb de café molido.
10.3. Mantenimiento del grupo de molienda
Para efectuar el mantenimiento del grupo de molienda se deben seguir las siguientes indicaciones:
Apagar el aparato mediante el interruptor ON-OFF (14). Desconectar el aparato de
la red eléctrica. Aflojar la rulina seguridad tolva (5), según Fig. 2., y sacar la tolva (2)
del regulador de molido (6). Soltar los tornillos del regulador de molienda (6) con
la ayuda de una llave Allen, según Fig. 10.
Girar el regulador de molido (6) en el sentido horario hasta sacarlo de su alojamiento.
Limpiar con ayuda de un pincel o aspiradora el interior de la cavidad de molienda.
Revisar el estado de las fresas y cambiar si procede. Si no es necesario, volver a poner
el regulador y roscar en el sentido anti-horario como Fig. 11. hasta que se toquen las
fresas y roscar los 3 tornillos.
10.4. Acceso a la cámara de molienda
Seguir las instrucciones en punto 10.3. para retirar el regulador de molienda, desenroscando los 3 tornillos descrito en Fig. 10. Una vez realizado, girar manualmente el
portafresas superior en sentido horario y retirarlo, según Fig. 12.
Después de cambiar las fresas, instalar el portafresas superior, girándolo en sentido antihorario, montar el regulador de molienda (6) y seguir las instrucciones en Fig. 10 & 11.
Fig. 10
Fig. 12
Fig. 11
#
#
#
Aflojar
Apretar

!
i
11
Medidas de seguridad
NOTA: El fabricante no podrá ser considerado responsable de los
daños producidos tanto por el uso impropio del aparato, como por
no seguir las medidas de seguridad indicadas.
Medidas de seguridad adicionales incorporadas en nuestro molinos:
• Protector de manos ubicado en el dosicador para evitar enganchar
las manos con las fresas.
• Tornillo especial para mantener jada la tolva.
Se ruega prestar atención a los usuarios sobre el respeto escrupuloso de las
siguientes indicaciones:
• Este molino de café deberá ser usado exclusivamente para las funciones para
las que ha sido concebido: molido de café en granos.
• No utilizar el molino para efectuar el molido de otros tipos de alimentos como
fruta seca o para moler más fino alimentos granulados como azúcar y otros.
• No permitir que el aparato sea utilizado por niños o personas discapacitadas.
• Cualquier otro uso será considerado impropio y peligroso.
• Evitar poner líquidos en contacto con supercies internas o externas mientras el apara-
to se encuentre encendido o apagado, salvo en aquellas partes expresamente previstas
en el punto “LIMPIEZA”. Si por cualquier causa esto ocurriera, quitar inmediatamente la
alimentación eléctrica y secar todas las superficies cuidadosamente. Si fuera necesario acceder a las partes interiores, donde se encuentran los componentes eléctricos, acudir al
servicio técnico más cercano.
• En caso de rotura de algún componente o para cualquier intervención recomendamos
contactar con los servicios técnicos, los cuales efectuarán la reparación o sustitución, garantizando el mantenimiento de los estándares de seguridad.
• Sólo un proveedor autorizado puede reemplazar el cable principal de cualquier molino.
Siguiendo la normativa arriba mencionada de la CE
las marcas han sido aplicadas. Todos los materiales
técnicos han sido adecuados y están preparados y
disponibles en nuestras oficinas.
04/108/CE sobre la aproximación de las legislaciones de los estados miembros relativas a la compatibilidad electromagnética.
98/37/CE por la que se modifica la Directiva
89/392/CE relativa a la aproximación de las legislaciones de los estados miembros sobre máquinas.
REG. 1935/2004 por la que se modifica la Directiva 89/109/CE relativa a la aproximación de las
legislaciones de los estados miembros sobre los
materiales y objetos destinados a entrar en contacto con productos alimenticios.
03/108/CE por la que se modifica la Directiva
02/96/CEE sobre residuos de aparatos eléctricos
y electrónicos (RAEE).
06/95/CE del12/12/2006 relativa a la aproximación
12
Declaración de Conformidad CE
de las legislaciones de los Estados miembros sobre equipamiento eléctrico diseñados para usos
con determinados límites de tensión.
02/96/CE del127/01/2003 relativa a la aproximación de las legislaciones de los Estados
miembros sobre residuos de aparatos eléctricos
y electrónicos (RAEE)
Medio ambiente
Cuando vaya a deshacerse de este
aparato, no lo tire con la basura
normal del hogar; deposítelo en un
punto de recogida oficial para su
reciclado. Al hacerlo, contribuirá a
preservar el medio ambiente.
El Representante Legal

Index
1 – Machine description
2 – Instructions manual
3 – Identification
4 – Technical characteristics
5 – External components
6 – Installation
7 – Regulation
8 – Operation
9 – Cleaning
10 – Maintenance
11 – Safety measures
12 – EC Conformity

Description
PROC-CAL/002/03
This coffee grinder has been designed using the latest computer and engineering
technology. The result is a high quality product offering exceptional grinding and
dispensing capabilities. It has been manufactured using high quality materials (aluminum,
steel, etc.) ideal for use with foodstuffs. For optimal operation of the grinder described
in this manual, maximum work duty cycles should be:
2.1. The purpose of this manual is to provide the necessary information for the
correct installation, handling and maintenance of the machine, and to emphasize
the precautions that should be taken into consideration by the operator. To ensure
the best use of the coffee grinder, it is essential to carefully follow the instructions
included in this manual. In the event of a problem, please contact your local technical
service. The manual should be kept until the machine is changed and should always
be available to the operator.
2.2. Different terms are used in the manual, such as:
– Characters in bold type, to emphasize importance.
– Numbers in brackets following a word, to indicate the position of the item shown
in the adjoining drawing or external compo-nents diagram.
Example:(1) Hopper lid.
- Icons (information,warning)
Instruction manual
1
2
V.12/2008
K-6 Silenzio / K-6 Professional Barista / K-8 / K-8 Silenzio / K-10 Conic
K-10 Conic WBC
WORK STOP
10 min.
3 min.
5 min.
5 min.
CYCLE
MODEL
information warning
!
i
ENGLISH
MODEL
SERIAL NUMBER
ELECTRICAL DATA DATE OF MANUFACTURE
OPTIONS
TEL.: FAX:
Identification
3
The following information is
printed indelibly on the technical
features plate:
NOTE: The manufacturer
reserves the right to modify
the components of the
machine according to the
requirements of specific
markets or due to the results
of technological advances.
i
4.1. Scope of application
The coffee grinders are intended for use on commercial premises and facilities
where ground coffee is required, or in small stores that sell coffee. The grinder
must only be used to grind coffee beans. Any use other than this will be considered
improper and dangerous.
*NOTE: The manufacturer is not responsible for any damage caused to
people, objects or the machine itself that results from improper use or
failure to comply with the safety guidelines described in this manual.
*Production is based on a medium-roasted coffee and an espresso grind.
Technical characteristics
4
Burrs (in / mm) 2.5 / 64 3.3 / 83 2.7 / 68
Production (lb/h Kg/h)* 24.2 / 11 33 / 15 37.4 / 17
Hopper capacity (lb / gr) 3.74 / 1.700
Net weight (lb / kg) 31.9 / 14.5 33.4 / 15.2 37.5 / 17
Height x width x depth 25 x 8.2 x 14.4 in
(in / mm) 635 x 210 x 365 mm
110 v
60 hz
200w/100w
1100 rpm
470w/245w
1540 rpm
440w/245w
1300 rpm
260w/120w
1400 rpm
400w/245w
1390 rpm
220 v
60 hz
230 v
50 hz
240 v
50 hz
380 v
50 hz
Ground coffee capacity (lb / gr) 0.66 / 300
Lever position Right or left
280w/150w
1030 rpm
470w/245w
1540 rpm
380w/200w
1300 rpm
245w/140w
870 rpm
420w/250w
920 rpm
680w/370w
265 rpm
760w/370w
270 rpm
730w/450w
340 rpm
730w/450w
340 rpm
490w/300w
340 rpm
K-6 / 6.4 M
6.4 A / K-6 Professional Barista / K-8
K-8 Silenzio
K-10 Conic
K-10 Conic WBC
MODEL
i

External components
5
12
9
8
6
5
3
2
1
Hopper lid
Coffee bean
hopper
Setting
roller
Grind
regulator
Dispenser lid
Dispenser
regulator
Tamper
13
Support
crutch
15
Coffee
collection
tray
11
10
7
4
Hand
protector
Hopper
shutter
Ground
coffee
dispenser
Dispenser
handle
Position
indicator &
safety block
14
On-Off
Switch
6
Installation
6.1. General warnings
The installer should read this instruction manual carefully before installing
the machine. The machine must be installed by qualified, authorized staff,
respecting the applicable safety and hygiene guidelines.
i

6.2. Important warnings
The operator must be a responsible adult and under no cir-cumstances a
minor or a person unable to deal with said respon-sibility.
When handling the grinder, the following precautions must be taken into
consideration:
• Do not handle with bare feet
• Hands or feet must not be wet
• Do not submerge the machine in water
• Do not expose the machine to sunlight or other atmospheric
conditions
• Never insert any object into the coffee input or output openings
when the machine is turned on. (Please bear in mind that when the
grinder stops, the burrs continue to turn for a few seconds.)
• To disconnect the grinder, always pull out the plug and never the
electrical cable, to avoid the possibility of a short circuit.
!
6.3. Putting the grinder into place
The grinder should be installed on a smooth flat surface. In order to
guarantee the optimum performance of the appliance, the minimum
dimensions of the work place should be as follows:
K-6 / K-6 Silenzio
K-6 Prof. Barista / K-8
31.5 / 800 12.1 / 310 16 / 406
K-8 Silenzio / K-10 Conic
K-10 Conic WBC
MODEL Height (in / mm.) Width (in / mm.) Depth (in / mm.)
6.4. Installation of the coffee grinder
Before connecting the coffee grinder, check the following:
• That the data on the features label coincides with those of the power supply.
• That the electrical current is appropriate for the machine.
• That the connection point to the power supply network is protected with
appropriate fuses.
• That the equipment is properly connected to a grounded so-cket in
accordance with the applicable safety guidelines.
*The coffee grinder should be used in areas with a room temperature
below 25/30ºC ( 77/86ºF ) and should not be installed in places (SUCH
AS INDUSTRIAL KITCHENS) where cleaning with water jets is used.
i
i
i

7
Regulation
7.1. Preparing the coffee grinder
Place the hopper (2) on the grind regulator (6) and check that the shutter (4) is closed,
as in Fig 1. Anchor the hopper by threading the hopper safety screw with help of a flathead screwdriver and finally adjusting the setting roller (5) by hand. Fig. 2. Remove the
hopper lid (1), fill the hopper (2) with coffee and replace hopper lid. Fig. 3.
Fig. 2
Fig. 1
Fig. 3
Coffee
beans
OpenClosed
Anchored
Free
Connect the machine to the power supply, press the On-Off switch (14) and open
the shutter (4) to let the coffee through. Remove the dispenser lid (8) and turn the
grind regulator (6) to the required grind setting. By turning it clockwise, the coffee
grind will be coarser and turning it counter-clockwise, the grind will be finer. Note
that you should only change grind settings when the machine is on and burrs are in
motion. If you do not do this, the burrs will gunk up and cleaning will be required.
Changing grind settings when the burrs are not in motion will cause the grinder to
only make very coarse grinds or no grinds at all. Fig. 4.
Coarse
Fine
Fig. 4
Fig. 5
For security reasons, the regulator (6) is limited to a single turn.
In the Stepped models, the grinding positions are set by the placement of the holes
shown in Fig. 5. Using these holes, select the grind point you desire.

NOTE: If the coffee comes out slowly, this is because the coffee is set to
grind very fine. If it comes out very fast, it is because the grind is very thick. A
perfect espresso is achieved with a grinding point of 25 ml of coffee brewed
in 25 seconds.
i
Fig. 6
More
Less
7.2. Regulating the coffee servings
The dispensers are factory adjusted to serve an
amount of approximately 7 g. of ground coffee, but
this quantity can be regulated between 6 and 10
g, as follows: Remove the ground coffee dispenser
lid (8) and turn the dispensing regulation screw (9)
clockwise to obtain a smaller amount of coffee, and
counter-clockwise to obtain a larger amount. Once
the quantity of each serving has been regulated,
replace the ground coffee dispenser lid (8). Fig. 6.
8
Operation
8.1. Use
To turn the machine on and off use the On-Off switch (14). The machine will start to grind
the coffee. If the automatic stop option is incorporated, the grinder will stop grinding when
the dispenser reaches the maximum level, and will restart after 8 portions of coffee have
been served, grinding again to the maximum level. If the machine does not incorporate
the automatic stop option, we recommend that you fill the doser 75% of its capacity in
order to guarantee consistent dosing. To serve the coffee servings, place the portafilter
on the support crutch (13) as far in as possible so that it is positioned under the ground
coffee discharge tube. Fig.1. Pull the dispensing handle (11) to obtain one coffee serving
(one serving is equal to one cup of coffee), and release it so it returns to its normal
position. Fig. 7.
Fig. 7
Fig. 8
Fig. 9
Take the portafilter and place it under the coffee tamper (12), pressing upwards to pack
the coffee. Fig. 8. When using the telescopic coffee press option, place the portafilter on
the crutch and push the coffee tamper downwards. Fig. 9.

9
Cleaning
9.1. General cleaning
To guarantee the correct operation of the machine as well as the quality of the
ground coffee, we should periodically clean the parts that come into contact with
the coffee (at least once a week).
Before performing any type of maintenance work, the following indications must
be taken into consideration:
• Always turn off the machine using the On-Off switch (14).
• Disconnect the machine from the power supply.
• Do not submerge the machine in water.
We recommend the use of cleaning tablet at the end of each day to remove
excess grounds.
9.2. Cleaning of the coffee bean hopper
Before cleaning, make sure that there are no beans left in the hopper (2).
Loosen by hand the setting roller (5) and, with the help of a flat-head screwdriver,
unthread the hopper safety screw. Remove the coffee bean hopper (2) from the
grind regulator (6) as in Fig. 2 and clean it with a damp cloth or soap and water to
eliminate the oil residues from the coffee, washing it carefully and then drying. Put
the hopper back on the grind regulator and thread the hopper safety screw with
the help of a flat-head screwdriver and adjust the setting roller (5) by hand.
9.3. Cleaning the ground coffee deposit
To clean the ground coffee holder, first empty all the coffee inside it. Remove the
ground coffee dispenser lid (8) and clean the inside, using a small brush.
9.4. Exterior cleaning
To clean the exterior, use a brush or a cloth dampened with a little bit of soap
and water.
NOTE: Never use damp clothes to clean the coffee deposit. Conserve the
brush in a protected place and only use it to clean the grinder to avoid it being
contaminated from other substances. Not following these instructions could affect
the taste and aroma of the coffee.
10
Maintenance
10.1. General warnings
Before performing any type of maintenance work, the following indications should
be taken into consideration:
• Always turn off the machine using the On-Off switch (14).
• Disconnect the machine from the power supply.
In the event of a breakdown or malfunction, turn the machine off. Do not try to
repair it or intervene directly. Please call your local technical service.
NOTE: Failure to respect this warning could endanger the safety of both the
machine and user.

10.2. Regular maintenance
To guarantee the efficiency and correct operation of the grinder, it is essential to
follow manufacturer instructions and ensure that all maintenance work is carried
out by qualified staff. Regular, programmed inspections are recommended of the
parts subject to wear and tear. Systematically check the usage level of the burrs. The
perfect condition of the burrs guarantees an even grind of the coffee and optimum
quality of the product served. It also reduces electrical consumption and the risk of
the motor and burrs overheating.
NOTE: Based on extensive experience and a medium-hard coffee blend, we
recommend replacing the burrs after grinding 300 Kg/660 Lb of coffee with the
K-6 / K-6 Silenzio / K-6 Professional Barista / K-8 / K-8 Silenzio / K-10 Conic
models and 1500 Kg/3300 Lb with the K-10 Conic WBC model.
10.3. Grinding group maintenance
For grinding group maintenance, follow these instructions:
Turn off the machine using the On-Off switch (14). Disconnect the machine from
the power supply. Loosen the setting roller (5), as shown in Fig. 2, and remove the
hopper (2) from the grind regulator (6). Release the 3 screws on the grind regulator (6) using an Allen key as shown in Fig. 10.
Turn the grind regulator (6) clockwise, until it lifts off. Using a small brush or vacuum, clean the inside of the grinding chamber. Check the condition of the burrs
and change them, if necessary. If not, put the regulator back in place, turning it
counter-clockwise as in Fig. 11 until the burrs touch and replace the 3 screws.
10.4. Accessing the burrs
Follow the instructions in 10.3. in order to remove the grind regulator, removing the
3 screws as explained in Fig. 10. Once this is done, you will have to manually turn the
upper burr holder clockwise to remove it from its housing as in Fig. 12.
After changing the burrs, assemble the upper burr holder by threading it counterclockwise, replace the grind regulator (6) and follow the instructions as shown in
Fig. 10 & 11.
Fig. 10
Fig. 12
Fig. 11
#
#
#
Unthreading
direction
Threading
direction

!
i
11
Safety measures
NOTE: The manufacturer cannot accept responsibility for any damage
caused by improper use of the machine or failure to respect the safety
measures indicated below.
Users are asked to pay careful attention to the following indications:
Additional safety elements incorpated into our grinder models:
• Hand protector located in the doser in order to avoid ngers accidentally
getting caught in the grinding burrs
• Special xing screw to hold the hopper in place
• The coffee grinder should only be used for grinding coffee beans.
• Do not use the machine to grind other types of foods such as nuts, dried
fruits or to fine-grind granulated foods such as sugar, etc.
• Do not allow minors or disabled people to use the machine.
• Any other use of the machine will be considered improper and dangerous.
• Do not allow liquids to come into contact with the internal or external surfaces of the
machine at any time, except for those parts that have been expressly referred to in the
“CLEANING” section. If, for any reason, this should occur, immediately disconnect the
machine from the power supply and dry all surfaces carefully. Should it be necessary to
access the internal parts of the machine, where the electrical components are located,
take the machine to your local technical service.
• In the event of any broken components or intervention, we recommend that you
contact your local technical service, who will repair or replace the part, guaranteeing the
maintenance of the safety standards.
• Replacement of the main power cable of any grinder model should only be done by
an authorized supplier.
In accordance with European commu-nity
directives, quality certificates have been applied.
All materials have been adapted and technical
reports are available at our offices.
04/108/EC on the approximation of the laws of
the Member States relating to electromagnetic
compatibility.
98/37/EC amending Directive 89/392/EC on the
approximation of the laws of the Member States
relating to machinery.
REG. 1935/2004 amending Directive 89/109/CE
on the approximation of the laws of the Member
States relating to material and objects destinated
to make contact with nutritional products.
03/108/EC amending Directive 2002/96/EC
on waste electrical and electronic equipment
(WEEE).
06/95/EC of 12/12/2006 on the harmonization
of the laws of Member States relating to
electrical equipment designed for use within
certain voltage limits.
02/96/EC of 27/01/2003 on the approximation
of the laws of the Member States on waste
electrical and electronic equipment (WEEE).
Environment
Do not throw the appliance
away with the normal household
waste; hand it in at an official recycling collection
point. By doing this, you will help to pre-serve
the environment.
The Legal Representative
12
Declaration of EC Conformity

Index
1 – Description de la machine
2 – Manuel d’instructions
3 – Identificatión
4 – Caracteristiques téchniques
5 – Composants externes
6 – Installation
7 – Menu afficheur et réglage
8 – Fonctionnement
9 – Nettoyage
10 – Maintenance
11 – Securité
12 – Declaration de conformité CE

FRANÇAIS
Description de la machine
PROC-CAL/002/03
1
V. 12/2008
Le moulin à café que vous venez d’acquérir a été conçu en appliquant les systèmes
informatiques d’ingénierie les plus innovateurs. Il en résulte un produit de grande qualité qui
vous offre une garantie maximale. Des matériaux nobles indiqués pour le contact avec les
aliments ont été utilisés lors de sa fabrication (aluminium, acier, etc.). Pour un fonctionnement
optimal des moulins décrits dans ce manuel, les cycles de travail les plus longs sont:
2.1. L’objectif de ce manuel est de fournir les informations nécessaires à l’installation,
l’utilisation et l’entretien corrects de l’appareil, et de souligner les précautions à
prendre par l’opérateur. Afin de garantir l’utilisation optimale des moulins à café, il est
essentiel de respecter attentivement les instructions fournies dans ce manuel. Dans
le cas où un type d’inconvénient quelconque venait à se produire, prendre contact
avec le service technique le plus proche. Ce manuel doit être conservé jusqu’au
changement de machine et il doit toujours être à la disposition de l’opérateur.
2.2. Dans ce manuel, certains sigles spécifiques ont été utilisés comme par exemple :
- des caractères en gras pour faire ressortir l’importance de certains termes.
- des numéros entre parenthèses après un mot qui indiquent l’emplacement de
l’article désigné sur le dessin contigu ou sur le dessin des composants externes.
Par exemple : (1) Couvercle de trémie
- des icônes (information, attention)
Manuel d’instructions
2
K-6 Silenzio / K-6 Professional Barista / K-8 / K-8 Silenzio / K-10 Conic
K-10 Conic WBC
FONCTION.
ARRET
10 min.
3 min.
5 min.
5 min.
CYCLE
MODEL
Information Attention
!
i
MODÈLE
Nº DE SÉRIE
CAR. ÉLECTRIQUES DATE DE FABRICATION
OPTIONS
TEL.: FAX:
Identificatión
3
La plaque des caractéristiques
techniques fabriquée en matériel
indélébile fournit les données
suivantes:
REMARQUE: Le fabricant se
réserve le droit de modifier
les composants de la machine,
en fonction des exigences de
chaque marché, ainsi que des
progrès technologiques.
i

4.1. Domaine d’application
Les moulins à café sont destinés à des commerces et à des communautés qui
utilisent du café moulu ou à des petits commerces de vente de café.
Ce moulin ne doit être utilisé que pour moudre du café en grains. Tout usage autre
que celui-ci doit être considéré impropre et dangereux.
REMARQUE : Le fabricant n’est pas responsable des dommages produits
à des personnes, des biens, ou à la propre machine si les normes de sécurité mentionnées dans ce manuel ne sont pas respectées, ou si un usage
incorrect de celle-ci est effectué.
* Cette production est fournie sur la base d’un café moyennement torréfié et avec
un point de mouture espresso.
Caractéristiques techniques
4
Meiles (en / mm) 2.5 / 64 3.3 / 83 2.7 / 68
Production (lb/h Kg/h)* 24.2 / 11 33 / 15 37.4 / 17
Capacité Trémie (lb / gr) 3.74 / 1.700
Poids net (lb / kg) 31.9 / 14.5 33.4 / 15.2 37.5 / 17
Hauteur-largeur-profondeur 25 x 8.2 x 14.4 en
(en / mm) 635 x 210 x 365 mm
110 v
60 hz
200w/100w
1100 rpm
470w/245w
1540 rpm
440w/245w
1300 rpm
260w/120w
1400 rpm
400w/245w
1390 rpm
220 v
60 hz
230 v
50 hz
240 v
50 hz
380 v
50 hz
Capacité café moulu (lb / gr) 0.66 / 300
Position manette du dosseur Droite, gauche
280w/150w
1030 rpm
470w/245w
1540 rpm
380w/200w
1300 rpm
245w/140w
870 rpm
420w/250w
920 rpm
680w/370w
265 rpm
760w/370w
270 rpm
730w/450w
340 rpm
730w/450w
340 rpm
490w/300w
340 rpm
K-6 / 6.4 M
6.4 A / K-6 Professional Barista / K-8
K-8 Silenzio
K-10 Conic
K-10 Conic WBC
MODEL
i

Composants externes
5
12
9
8
6
5
3
2
1
Couvercle
de trémie
Trémie de
café en grain
Molette
Régulateur de
mouture
Couvercle
du doseur de
café moulu
Boulon de
réglage du
doseur
Presse-café
13
Fourche
d’appui
15
Plateau de
récupération
du café
11
10
7
4
Protecteur
pour les mains
Obturateur
de trémie
Doseur du
café moulu
Manette
du doseur
Indicateur
de position
14
Interrupteur
lumineux
ON-OFF
6.1. Avertissements généraux
L’installateur devra lire attentivement ce Manuel d’instructions avant
d’effectuer l’installation de la machine. L’installation de l’appareil doit être
effectuée par personnel qualifié et agréé en respectant les normes de
sécurité et d’hygiène en vigueur.
i
6
Installation

6.2 Avertissements importants
L’opérateur doit être une personne adulte et responsable. En aucun cas
l’appareil doit être manipulé par des personnes irresponsables ou par
des enfants. Lors de l’utilisation du moulin, il faudra tenir compte des
précautions suivantes:
• Ne pas être pieds nus.
• Ne pas avoir les mains ou les pieds mouillés.
• Ne pas mettre l’appareil dans l’eau.
• Ne pas exposer l’appareil au soleil ou à d’autres agents atmosphériques.
• Ne jamais introduire d’objet dans le goulot d’entrée ou de sortie
du café lorsque l’appareil est en marche. (Il faut savoir que lorsque le
moulin s’arrête, les fraises continuent à tourner quelques instants).
• Pour débrancher le moulin, il faut toujours tirer sur la prise et jamais
sur le câble d’alimentation pour éviter de provoquer un court-circuit.
!
6.3 Emplacement d’utilisation
L’appareil doit être installé sur une surface plate, consistante et proche
de la machine à café. Les dimensions minimales de l’emplacement de
fonctionnement qui garantissent les prestations optimales de l’appareil
doivent être au minimum les suivantes:
K-6 / K-6 Silenzio
K-6 Prof. Barista / K-8
31.5 / 800 12.1 / 310 16 / 406
K-8 Silenzio / K-10 Conic
K-10 Conic WBC
MODEL Hauteur (en/mm) Largeur (en/mm) Profond. (en/mm)
6.4 Installation du moulin à café
Avant de brancher le moulin à café, il faudra vérifier les points suivants:
• Que les donnés de l’étiquettes des caractéristiques correspondent à
celles de l’installation électrique.
• Contrôler que le débit électrique de l’installation est approprié à la
puissance de l’appareil.
• Le point de branchement au réseau électrique doit être protégé avec
des fusibles de la puissance appropriée.
• L’équipement doit être branché correctement à une prise de terre
conformément aux normes de sécurité en vigueur.
Ce moulin à café doit être utilisé dans des milieux avec une température
inférieure à 25/30 ºC et ne peut pas être installé dans des lieux (CUISINES)
dont le nettoyage est prévu au jet d’eau..
i
i
i

Fig. 2
Fig. 1
Fig. 3
Café en
grain
OuvertFermé
Verrouillé
Déverrouillé
(+)
(-)
Fig. 4
Fig. 5
7
Réglages
7.1. Préparation du moulin à café
Placer la trémie (2) sur le régulateur de mouture (6) et vérifier que l’obturateur (4) soit
en position fermée. Fig. 1. Fixer la trémie en serrant la vis intérieure de sécurité avec un
tournevis plan et en serrant à la main la molette de sécurité (5) Fig. 2. Retirer le couvercle
de la trémie (1), remplir la trémie (2) de café puis remettre le couvercle. Fig.3.
Brancher l’appareil à la prise électrique, actionner l’interrupteur ON-OFF de mise
en marche (14) et ouvrir l’obturateur (4) pour laisser passer le café. Retirer le couvercle du doseur (8) et tourner le régulateur de mouture (6) pour l’ajuster sur le
degré de mouture souhaité. En le tournant dans le sens des aiguilles d’une montre,
nous obtiendrons un café moulu plus épais et dans le sens antihoraire, nous obtiendrons un café moulu plus fin. Veuillez noter que vous devez changer le point de
mouture autant que le moulin est en fonctionnement. Si cette instruction n’est pas
suivi, les meules accumuleront café et devront être nettoyées. En changeant le point
de mouture quand les meules ne tournent pas provoquera que le moulin produit
un café très gros ou nul café. Fig. 4.
Pour des raisons de sécurité, le régulateur de mouture est limité à un seul tour. Sur
les modèles avec le système de mouture “non-continu”, les différents dégrées de
mouture sont fixés avec l’installation des trous montrés sur Fig. 5. Moyennant ces
trous, vous obtiendrez le point de mouture souhaité.

REMARQUES: Si nous observons que la distribution du café est très lente,
cela signifie que la mouture est trop fine. Si la distribution est très rapide,
la mouture du café est trop épaisse. L’espresso parfait s’obtient avec un
dégrée de mouture qui nous donne 25 ml de café en 25 secondes.
i
7.2. Réglage de la quantité de café a doser
Le doseur est calibré d’usine pour doser 7 grammes de
café moulu, quantité laquelle peut être ajustée entre 6
et 10 gr, de la manière suivante : Retirer le couvercle du
doseur (8) et tourner le boulon de réglage (9) ; dans le
sens horaire nous obtiendrons une dose plus petite, et
dans le sens antihoraire une dose plus grande. Quand
la dose est réglée, remettre en place le couvercle du
doseur de café moulu (8). Fig. 6.
(-)
(+)
Fig. 6
8.1. Utilisation
Mettre le moulin en marche à l’aide de l’interrupteur ON-OFF (14), l’appareil commencera alors à moudre le café. S’il est équipé de l’option d’arrêt automatique, le
moulin arrêtera de moudre le café lorsque le doseur sera au niveau maximum et il
sera à nouveau activé après avoir servi 8 doses de café pour revenir au niveau maximum. S’il n’est pas équipé de l’option d’arrêt automatique, nous recommandons
de remplir le doseur un 75% de son capacité afin de garantir un service consistant.
Pour servir la dose de café, situer le porte-filtre sur la fourchette d’appui (13), et le
mettre jusqu’au fond de manière qu’il reste en dessous de la sortie de café moulu.
Tirer sur le levier du doseur (11) pour obtenir une dose de café (une dose correspond à un café), et laisser le levier revenir à sa position sans l’accompagner. Fig.7.
8
Fonctionnement
Fig. 7
Fig. 8
Fig. 9
Prendre le porte-filtre et l’engager sous le presse café (12) en faisant pression vers le
haut pour tasser le café (Fig. 8). Si l’option de presse-café télescopique est installée, appuyer le porte-filtre sur la fourchette et appuyer le tasser vers le bas. Fig. 9.

9
Nettoyage
9.1. Avertissements généraux
Pour garantir un bon fonctionnement de l’appareil et une bonne qualité du café
moulu, nous devons veiller à nettoyer régulièrement les pièces en contact avec le
café (au moins une fois par semaine).Pour effectuer les opérations de nettoyage, il
faut tenir compte des indications suivantes :
• Toujours éteindre l’appareil au moyen de l’interrupteur ON-OFF (14).
• Débrancher l’appareil de la prise électrique.
• Ne pas tremper l’appareil dans l’eau.
9.2. Nettoyage de la trémie de café en grain
Consommer d’abord tout le café en grain resté dans la trémie (2). Desserrer à
la main la molette de la trémie (5) et dévisser avec un tournevis plan la vis de
sécurité trémie. Retirer la trémie de café en grain (2) du régulateur de mouture (6)
comment expliqué sur Fig. 2 et la laver avec un chiffon humide ou à l’eau savonneuse
pour éliminer les résidus huileux produits par le café. La rincer soigneusement et la
sécher. Remettre la trémie sur le régulateur de mouture et visser avec un tournevis
plan la vis de sécurité de la trémie et visser à la main la molette de la trémie (5).
9.3. Nettoyage du doseur de café moulu
Au moyen d’un pinceau nettoyer le café qui pourrait avoir resté collé à l’intérieur
des chambres du doseur.
9.4. Nettoyage extérieur
Pour le nettoyage extérieur, utiliser un pinceau ou un chiffon légèrement humecté
d’eau savonneuse.
REMARQUE : Ne jamais utiliser de chiffons humectés pour le nettoyage du réservoir
de café moulu. Garder le pinceau dans un endroit protégé et l’utiliser exclusivement
pour le nettoyage du moulin afin d’éviter de le salir avec d’autres substances. Le fait
de NE PAS effectuer les opérations de nettoyage aura des conséquences négatives
sur la saveur et l’arôme du café, ainsi que sur la consistance et efcience du dosage.
10
Maintenance
10.1 Avertissements généraux
Avant d’effectuer tout type d’entretien quelconque, il faut tenir compte des
indications suivantes :
• Toujours éteindre l’appareil avec l’interrupteur ON-OFF (14).
• Débrancher l’appareil de la prise électrique.
En cas de défaut ou de mauvais fonctionnement, éteindre l’appareil : il ne
faut jamais essayer de le réparer ou d’intervenir directement. Appeler le
service technique le plus proche.
REMARQUE: Le fait de ne pas respecter ces avertissements peut
compromettre la sécurité de l’appareil et de l’utilisateur.
i
10.2. Entretien périodique
Pour garantir l’efficacité du moulin et pour qu’il fonctionne correctement,
il est indispensable de respecter les indications du fabricant, en faisant que cet
entretien soit réalisé par du personnel qualifié. Il est recommandé d’effectuer des
contrôles programmés des parties qui s’usent le plus. Il faudra surtout contrôler
systématiquement le niveau d’usure des fraises. Le parfait état des fraises permet
d’obtenir une mouture homogène du café tout en augmentant la qualité de la
tasse, ainsi qu’aide à diminuer la consommation électrique, à limiter le chauffage du
moteur et des meules et, en conséquence, à limiter le chauffage du café moulu.
REMARQUE : Sur la base de notre expérience accumulée et en considérant l’usage
de mélanges de café de dureté moyenne, nous suggérons de remplacer les fraises
selon indication suivante :
10.3. Entretien du groupe de mouture
Pour effectuer l’entretien du groupe de mouture, il faut suivre les indications suivantes:
Éteindre l’appareil au moyen de l’interrupteur ON-OFF (14). Débranchez l’appareil de
la prise électrique. Desserrez la molette de sécurité trémie (5) et retirez la trémie (2)
du régulateur de mouture (6) comme indiqué sur Fig. 2. Dévisser les vises du régulateur
de mouture (6) à l’aide d’une clé Allen, selon Fig. 10.
Tournez le régulateur de mouture (6) dans le sens horaire jusqu’à le retirer de son logement. Nettoyez, avec l’aide d’un pinceau ou un aspirateur, l’intérieur de la cavité de
mouture. Réviser l’état des meules et les remplacer si nécessaire. S’il n’est pas nécessaire, remettre le porte-meules supérieur et le visser dans le sens antihoraire comment montré sur Fig. 11 jusqu’à ce que les fraises se touchent et visser les 3 vises.
10.4. Access à la chambre de mouture
Veuillez suivre les instructions du point 10.3. pour retirer le régulateur de mouture
(6), en desserrant les 3 vises décrits sur Fig. 10. Une fois réalisé, tourner manuellement le porte-meules supérieur dans le sens horaire et le retirer suivant Fig. 12.
Lors d’un remplacement des meules, installez le porte-meules supérieur, en tournant
ceci dans le sens antihoraire, montez le régulateur de mouture (6) et suivez les instructions indiquées sur Fig. 10 & 11.
K-6 / K-6 Silenzio / K-6 Professional Barista / K-8 / K-8 Silenzio / K-10 Conic
300 kg / 660 lb
K-10 Conic WBC
1500 kg / 3300 lb
Fig. 10
Fig. 12
Fig. 11
#
#
#
Dévissage
Vissage
!
i
11
Mesures de sécurité
Ce moulin compte avec un système de sécurité de façon que le moulin s’arrêt
si la trémie (2) est dehors de sa position.
REMARQUE : Le fabricant ne pourra pas être considéré responsable des
dommages produits par l’utilisation impropre de l’appareil, ni de ceux
consécutifs au non-respect des mesures de sécurité indiquées ci-dessus.
Il est demandé aux utilisateurs de respecter rigoureusement les indications suivantes:
• Ce moulin à café devra être utilisé exclusivement pour les fonctions pour
lesquelles il a été conçu: mouture de café en grains et son dosage.
• Ne pas utiliser le moulin pour moudre d’autres types d’aliments tels que des
fruits secs, ou pour moudre plus finement des aliments granulés tels que du
sucre entre autres.
• Ne pas permettre que l’appareil soit utilisé par des enfants ou des personnes
handicapées.
• Toute autre usage sera considéré impropre et dangereux.
• Éviter de mettre du liquide en contact avec les surfaces internes ou externes pendant
que l’appareil est allumé ou éteint, sauf les parties expressément indiquées dans le
paragraphe NETTOYAGE.
Si pour une raison quelconque cela se produisait, débrancher immédiatement l’appareil
et sécher soigneusement toutes les surfaces mouillées. S’il s’avérait nécessaire d’accéder
aux parties intérieures où se trouvent les composants électriques, s’adresser au service
technique le plus proche.
• En cas de rupture de l’un des composants ou pour toute autre intervention, nous
recommandons de se mettre en contact avec les services techniques qui effectueront la
réparation ou le remplacement, en garantissant le respect des normes de sécurité.
• Uniquement ou un fournisseur autorisé peut remplacer le câble principal du moulin.
12
Déclaration de conformité CE
Las marques ont été adaptées conformément
aux directives de l’UE indiquées ci-dessous.
Tous les matériaux techniques ont été adaptés et sont disponibles dans nos locaux.
Directive 04/108/CE concernant le rapprochement des législations des États relatives à
la compatibilité électromagnétique.
Directive 98/37/CE modifiant la directive
89/392/CEE concernant le rapprochement
des législations des États membres relatives
aux machines.
REG. 1935/2004 modifiant la directive
89/109/CE relative au rapprochement des
législations des États membres concernant
les matériaux et objets destinés à entrer en
contact avec des denrées alimentaires.
Directive 03/108/CE modifiant la directive
02/96/CEE relative aux résidus des appareils
électriques et électroniques (RAEE).
Directive 06/95/CE modifiant la directive
12/12/2006 rconcernant le rapprochement
des législations des États membres relatives
au matériel électrique destiné à être employé dans certaines limites de tension.
Directive 02/96/CE modifiant la directive
27/01/2003 relative aux résidus des appareils
électriques et électroniques /(RAEE).
Environnement
Ne jetez pas cet appareil
dans votre poubelle habituelle,
mais déposez-le dans un point de ramassage
officiel pour qu’il soit recyclé. Vous contribuerez
ainsi à la préservation de l’environnement.
Le Représentant juridique

Inhalt
1 – Beschreibung der maschine
2 – Bedienungshandbuch
3 – Identifikation
4 – Technische beschreibung
5 – Externe bauteile
6 – Aufstellung
7 – Menü und einstellung
8 – Betriebsweise
9 – Reinigung
10 – Wartung
11 – Sicherheitsvorschriften
12 – EG-konformitätserklärung

Beschreibung der Maschine
PROC-CAL/002/03
Die von Ihnen erworbene Kaffeemühle wurde unter Anwendung modernster
informationstechnischer und technologischer Verfahren entworfen. Das Ergebnis ist ein
hochwertiges Produkt, das Ihnen höchste Garantie bietet. Zur Herstellung wurden hochwertige
Materialien verwendet (Aluminium, Stahl etc.), die perfekt für den Kontakt mit Lebensmitteln
geeignet sind. Für einen optimalen Betrieb der in diesem Handbuch beschriebenen Kaffeemühlen
gelten folgende maximale Arbeitszyklen:
2.1. In diesem Handbuch finden Sie die notwendigen Informationen für die korrekte Aufstellung,
Bedienung und Wartung des Geräts sowie Hinweise zu den vom Bedienungspersonal
einzuhaltenden Sicherheitsvorschriften. Bitte befolgen Sie für einen bestmöglichen Betrieb der
Kaffeemühlen unbedingt die Anweisungen dieses Handbuchs. Wenden Sie sich bei eventuellen
Problemen bitte an einen Kundendienst in Ihrer Nähe. Dieses Handbuch ist bis zum Einsatz einer neuen
Maschine aufzubewahren und muss dem Bedienungspersonal jederzeit zur Verfügung stehen.
2.2. In diesem Handbuch werden einige spezielle Kennzeichnungen verwendet, wie z.B.:
– Fettgedruckte Ausdrücke sind besonders wichtig.
– Zahlen in Klammern gefolgt von einem Wort geben die Position des betreffenden Artikels in
der nebenstehenden Abbildung oder in der Abbildung der externen Bauteile an.
Beispiel: (1) Trichterdeckel.
- Icons (Informationen, Achtung).
Bedienungshandbuch
1
2
V. 12/2008
K-6 Silenzio / K-6 Professional Barista / K-8 / K-8 Silenzio / K-10 Conic
K-10 Conic WBC
FUNKTION
STOPP
10 min.
3 min.
5 min.
5 min.
ZYKLUS
MODELL
Informationen Achtung
!
i
DEUTSCH
Auf dem Typenschild aus
widerstandsfähigem Material
sind folgende Angaben zu finden:
HINWEIS: Der Hersteller behält
sich das Recht vor, die Bauteile
des Geräts je nach Erfordernis
des jeweiligen Marktes sowie
aus Gründen des technischen
Fortschritts zu ändern.
MODELL
SERIENNR.
ELEKTRISCHE ANGABEN
HERSTELLUNGSDATUM
OPTIONEN
TEL.: FAX:
i
Identifikation
3

4.1. Anwendungsbereich
Die Kaffeemühlen sind für Geschäfte und Gemeinschaften vorgesehen, in denen
gemahlener Kaffee verwendet wird, wie auch für kleine Coffeeshops. Mit dieser
Kaffeemühle dürfen nur Kaffeebohnen gemahlen werden. Jede andere Verwendung
ist unsachgemäß und gefährlich.
Technische Beschreibung
4
HINWEIS: Der Hersteller haftet nicht für Schäden an Personen, Gegen-
ständen oder an der Maschine selbst, die durch eine Nichtbeachtung der
erwähnten Sicherheitsvorschriften in diesem Handbuch oder durch unsachgemäßen Gebrauch entstehen.
*Dieser Durchsatz gilt für einen Kaffee mittlerer Röstung und einen Espressomahlgrad.
Mahlmesser (in / mm) 2.5 / 64 3.3 / 83 2.7 / 68
Durchsatz (lb/h Kg/h)* 24.2 / 11 33 / 15 37.4 / 17
Kapazität Fülltrichter (lb / gr) 3.74 / 1.700
Nettogewicht (lb / kg) 31.9 / 14.5 33.4 / 15.2 37.5 / 17
Höhe x Breite x Tiefe 25 x 8.2 x 14.4 in
(in / mm) 635 x 210 x 365 mm
110 v
60 hz
200w/100w
1100 rpm
470w/245w
1540 rpm
440w/245w
1300 rpm
260w/120w
1400 rpm
400w/245w
1390 rpm
220 v
60 hz
230 v
50 hz
240 v
50 hz
380 v
50 hz
Kapazität Kaffeepulver (lb / gr) 0.66 / 300
Positie Dosierhebel Recht / linker
280w/150w
1030 rpm
470w/245w
1540 rpm
380w/200w
1300 rpm
245w/140w
870 rpm
420w/250w
920 rpm
680w/370w
265 rpm
760w/370w
270 rpm
730w/450w
340 rpm
730w/450w
340 rpm
490w/300w
340 rpm
K-6 / 6.4 M
6.4 A / K-6 Professional Barista / K-8
K-8 Silenzio
K-10 Conic
K-10 Conic WBC
MODELL
i

Externe Bauteile
5
12
9
8
6
5
3
2
1
Deckel
Einfüllbehälter
Füllbehälter
Kaffeepulver
Zierkappe
Mahlregler
Deckel
Dosierer
Kaffeepulver
Regulierbolzen
Dosierer
Kaffeepresse
13
Stütze
15
Kaffeeauffangs-
chale
11
10
7
4
Fingerschutz
Abdichtung
Füllbehälter
Dosierer
Kaffeepulver
Dosierhebel
Positionsanzeige
14
Leuchtschalter
Ein-Aus
6
Aufstellung
6.1. Allgemeine Hinweise
Vor der Aufstellung des Geräts muss der Installateur dieses
Bedienungshandbuch sorgfältig durchlesen. Die Aufstellung des Geräts ist
von autorisiertem und qualifiziertem Fachpersonal unter Einhaltung der
geltenden Sicherheits- und Hygienevorschriften durchzuführen.
i

6.2. Wichtige Hinweise
Das Gerät darf nur von verantwortungsbewussten Erwachsenen in
Betrieb genommen werden, keinesfalls von Kindern.
Beim Umgang mit der Kaffeemühle sind folgende Vorsichtsmaßnahmen
zu beachten:
• Das Gerät nicht mit nackten Füßen in Betrieb nehmen.
• Das Gerät nicht mit nassen Händen oder Füßen in Betrieb nehmen.
• Das Gerät nicht in Wasser tauchen.
• Das Gerät nicht dem Sonnenlicht oder anderen Witterungseinüssen aussetzen.
• Keine Gegenstände in die Kaffebefüllungs- oder –austrittsöffnung geben,
während das Gerät läuft. (Dabei sollte beachtet werden, dass die Mahlmesser
sich beim Anhalten der Kaffeemühle noch einige Momente weiterdrehen.)
• Ziehen Sie stets am Netzstecker und nicht am Netzkabel, wenn Sie
die Kaffeemühle vom Netz trennen möchten.
!
6.3. Geeigneter Aufstellungsort
Das Gerät ist auf einer ebenen und festen Oberfläche aufzustellen. Es müssen
mindestens folgende Mindestmaße am Arbeitsplatz zur Verfügung stehen, um
einen bestmöglichen Betrieb zu garantieren:
6.4. Aufstellung der Kaffeemühle
Bitte stellen Sie Folgendes sicher, bevor Sie das Gerät einschalten:
• Die Angaben auf dem Typenschild müssen mit denen des
Stromnetzes übereinstimmen.
• Die Stromstärke der Anlage muss für die Geräteleistung geeignet ist.
• Der Netzanschluss muss durch Sicherungen mit adäquater Leistung
geschützt sein.
• Das Gerät muss gemäß den geltenden Sicherheitsvorschriften
korrekt an einen geerdeten Anschluss angeschlossen werden.
Diese Kaffeemühle darf nur bei Umgebungstemperaturen von weniger
als 25/30 °C verwendet und nicht an Orten (KÜCHEN) aufgestellt
werden, die mit Wasserstrahl gereinigt werden.
i
i
i
K-6 / K-6 Silenzio
K-6 Prof. Barista / K-8
31.5 / 800 12.1 / 310 16 / 406
K-8 Silenzio / K-10 Conic
K-10 Conic WBC
MODELL Höhe (in/mm) Breite (in/mm) Tiefe (in/mm)

7
Menü und Einstellung
7.1. Vorbereitung der Kaffeemühle
Den Fülltrichter (2) auf den Mahlregler (6) setzen und sicherstellen, dass sich die
Verschlussklappe (4) in Schließposition befindet (gemäß Abb. 1). Zur Befestigung des
Fülltrichters die Sicherheitsschraube mit einem Flachschraubenzieher anziehen und das
Sicherheitsrad des Trichters (5) festdrehen. Abb. 2. Den Deckel des Fülltrichters (1)
abnehmen, Fülltrichter (2) mit Kaffee befüllen und den Deckel wieder aufsetzen. Abb. 3
Abb. 2
Abb. 1
Abb. 3
Kaffeepulver
opengesloten
Gesloten
Geopend
(+)
(-)
Abb. 4
Abb. 5
Das Gerät ans Netz anschließen, den EIN/AUS-Schalter auf EIN stellen (14) und die
Verschlussklappe (4) für den gemahlenen Kaffee öffnen. Dosierdeckel (8) abnehmen
und durch Drehen des Mahlreglers (6) die gewünschte Mahlstärke des Kaffees einstellen. Durch Drehen im Uhrzeigersinn wird die Mahlstärke gröber und durch Drehen
in Gegenrichtung feiner. Die Mahlstärke darf nur bei laufender Maschine umgestellt
werden, da sich ansonsten Kaffee an den Mahlmessern festsetzen und eine Reinigung
erforderlich machen kann. Wird die Mahlstärke bei stillstehenden Mahlmessern verstellt,
so wird der Kaffee entweder sehr grob oder gar nicht gemahlen. Abb. 4
Aus Sicherheitsgründen ist der Mahlregler (6) auf eine Drehung beschränkt. Bei den
Bailarina Modellen werden die Mahlpositionen mithilfe der aus Abb. 5 ersichtlichen Löcher
festgelegt. Verwenden Sie diese Löcher, um die gewünschte Mahlstärke einzustellen.

HINWEIS: Dauert der Brühvorgang sehr lange, so ist der Kaffee zu fein
gemahlen. Bei einem sehr schnellen Brühvorgang ist der Kaffee zu grob
gemahlen. Einen perfekten Espresso erreicht man mit einer Mahlstärke, bei
der 25 ml Kaffee in 25 Sekunden aufgebrüht werden.
i
7.2. Einstellung der Kaffeeportion
Der Dosierer ist werkseitig auf eine Portion à 7 g
gemahlenem Kaffee eingestellt. Diese Menge kann
jedoch wie folgt auf 6 bis 10 g verstellt werden:
Dosierdeckel (8) abnehmen und Einstellzapfen (9) für
eine kleinere Kaffeeportion im Uhrzeigersinn und für
eine größere Portion in Gegenrichtung drehen. Nach
Einstellung der Kaffeeportion den Dosierdeckel des
gemahlenen Kaffees (8) wieder aufsetzen. Abb. 6.
(-)
(+)
Abb. 7
Abb. 8
Abb. 9
Abb. 6
8
Betriebsweise
8.1. Verwendung
Den EIN/AUS-Schalter (14) auf EIN stellen, um mit dem Mahlvorgang zu beginnen.Bei
vorhandener automatischer Stoppfunktion wird der Mahlvorgang automatisch beendet, wenn
der Mahldosierer die maximale Höhe erreicht, und nach der Ausgabe von 8 Kaffeeportionen
wieder aktiviert, um erneut die maximale Höhe zu erreichen. Verfügt das Gerät nicht über
eine automatische Stoppfunktion, so empfehlen wir Ihnen, den Mahldosierer zu 75% seines
Fassungsvermögens zu befüllen, um einen gleichmäßigen Mahlvorgang zu gewährleisten. Zur
Ausgabe der Kaffeeportionen befestigen Sie den Siebträger auf der Auflagegabel (13), indem
Sie ihn bis zum Ende unter den Austritt des gemahlenen Kaffees schieben. Ziehen Sie am
Dosierhebel (11), um eine Kaffeeportion zu erhalten (eine Portion entspricht einem Kaffee),
und lassen Sie ihn selbstständig in seine Position zurückkehren. Abb. 7
Siebträger unter der Kaffeepresse (12) einrasten. Dabei Druck nach oben ausüben, um den
Kaffee zusammenzupressen. Abb. 8. Bei einer vorhandenen verstellbaren Kaffeepresse den
Siebträger auf die Gabel setzen und den Kaffee nach oben drücken. Abb. 9.

9
Reinigung
9.1. Allgemeine Hinweise
Um einen korrekten Betrieb des Geräts und eine zufriedenstellende Qualität des
gemahlenen Kaffees zu garantieren, müssen die Teile, die mit dem Kaffee in Kontakt
kommen, regelmäßig gereinigt werden (mindestens einmal pro Woche).
Bitte beachten Sie hierzu folgende Hinweise:
• Das Gerät immer über den ON-OFF Schalter (14) ausschalten.
• Das Gerät vom Netz trennen.
• Das Gerät nicht in Wasser tauchen.
9.2. Reinigung des Fülltrichters für die Kaffeebohnen
Zuerst dafür sorgen, dass die im Fülltrichter (2) vorhandenen Kaffeebohnen
komplett vermahlen werden. Das Sicherheitsrad des Trichters (5) manuell lösen und
die Sicherheitsschraube mit einem Flachschraubenzieher losdrehen. Den Fülltrichter
für die Kaffeebohnen (2) aus dem Mahlregler (6) nehmen (siehe Abb. 2) und mit
einem feuchten Tuch oder mit Wasser und Seife reinigen, um ölige Kaffeereste
zu entfernen, sorgfältig abspülen und abtrocknen. Den Fülltrichter wieder auf
den Mahlregler setzen, die Sicherheitsschraube mit einem Flachschraubenzieher
anziehen und das Sicherheitsrad des Trichters (5) festdrehen.
9.3. Reinigung des Kaffeedosierers
Mit Hilfe eines Pinsels Kaffeereste entfernen, die eventuell noch an den Innenseiten
der Dosierkammern haften.
9.4. Außenreinigung
Verwenden Sie für die Außenreinigung einen Pinsel oder ein leicht mit Wasser und
Seife befeuchtetes Tuch.
HINWEIS: Verwenden Sie nie feuchte Tücher zur Reinigung des Behälters für den
gemahlenen Kaffee. Bewahren Sie den Pinsel an einem geschützten Ort auf und
verwenden Sie ihn nur zur Reinigung der Kaffeemühle, um ihn nicht mit anderen
Substanzen zu verunreinigen. Wenn Sie diese Reinigungsvorgänge NICHT durchführen,
hat dies negative Auswirkungen auf den Geschmack und das Aroma des Kaffees wie auch
auf die Konsistenz und Wiederholbarkeit der Dosierungen.
10
Wartung
i
10.1. Allgemeine Hinweise
Bitte beachten Sie die folgenden Hinweise, bevor Sie Wartungsarbeiten durchführen:
• Das Gerät immer über den EIN-AUS Schalter (14) ausschalten.
• Das Gerät vom Netz trennen.
Bei Schäden oder Betriebsstörungen das Gerät ausschalten. Versuchen Sie auf keinen Fall, es
selbst zu reparieren. Rufen Sie einen Kundendienst in Ihrer Nähe zu Hilfe.
HINWEIS: Die Nichtbeachtung dieses Hinweises kann die Sicherheit des
Geräts und des Benutzers gefährden.

10.2. Regelmäßige Wartung
Um die Wirksamkeit und den korrekten Betrieb der Kaffeemühle zu garantieren, müssen
die Anweisungen des Herstellers in jedem Fall eingehalten werden. Die Wartungsarbeiten
sind von qualifiziertem Fachpersonal durchzuführen. Es wird empfohlen, programmierte
Kontrollen der am meisten dem Verschleiß ausgesetzten Teile durchzuführen. Vor allem
der Verschleiß der Mahlmesser muss regelmäßig kontrolliert werden. Nur wenn die Mahlmesser in perfektem Zustand sind, kann eine gleichmäßige Mahlung des Kaffees erreicht
werden, wodurch gleichzeitig die Qualität des Kaffees verbessert, der Stromverbrauch
reduziert und einer Aufheizung des Motors, der Messer selbst und folglich auch des gemahlenen Kaffees entgegengewirkt wird.
HINWEIS: Aufgrund von Erfahrungswerten und ausgehend davon, dass Kaffeemischungen mittlerer
Härte verwendet werden, empfehlen wir einen Mahlmesserwechsel nach folgendem Schema:
10.3. Pflege der Mahlgruppe
Bitte beachten Sie folgende Pflegehinweise für die Mahlgruppe:
Das Gerät mithilfe des EIN/AUS-Schalters (14) ausschalten und vom Netz trennen. Das Sicherheitsrad des Trichters (5) gemäß Abb. 2 lösen und den Fülltrichter (2) aus dem Mahlregler (6)
nehmen. Die Schrauben des Mahlreglers (6) mit einem Inbusschlüssel gemäß Abb. 10 lösen.
Den Mahlregler (6) im Uhrzeigersinn drehen, bis er aus seiner Lagerung genommen
werden kann. Das Innere des Mahlbehälters mit einem Pinsel reinigen oder aussaugen.
Zustand der Mahlmesser prüfen und diese gegebenenfalls austauschen. Wenn dies nicht
notwendig ist, den Mahlregler wieder aufsetzen und gegen den Uhrzeigersinn gemäß Abb.
11 festdrehen, bis sich die Mahlmesser berühren, und die drei Schrauben befestigen.
K-6 / K-6 Silenzio / K-6 Professional Barista / K-8 / K-8 Silenzio / K-10 Conic
300 kg / 660 lb
K-10 Conic WBC
1500 kg / 3300 lb
Abb. 10
Abb. 12
Abb. 11
#
#
#
het ontrafe-
len richting
het inpassen van
richting
10.4. Zugang zur Mahlkammer
Gehen Sie nach den Anweisungen unter Punkt 10.3 vor, um den Mahlregler abzunehmen.
Hierzu die drei Schrauben gemäß Abb. 10 lösen. Dann manuell den oberen Mahlwerkhalter
im Uhrzeigersinn drehen und gemäß Abb. 12 herausnehmen. Nach Austausch der Mahlmesser den oberen Mahlwerkhalter durch Drehen gegen den Uhrzeigersinn wieder einsetzen,
Mahlregler (6) aufsetzen und die Hinweise der Abb. 10 und 11 befolgen.

!
i
11
Sicherheitsvorschriften
Die Kaffeemühle enthält ein Sicherheitssystem, mit dessen Hilfe der Mahlvorgang bei Herausnahme des Füllfilters (2) gestoppt wird.
HINWEIS: Der Hersteller haftet nicht für Schäden, die durch eine unsa-
chgemäße Verwendung des Geräts oder eine Nichtbefolgung der oben
genannten Sicherheitsvorschriften entstehen.
Die Benutzer müssen folgende Anweisungen unbedingt genau befolgen:
• Diese Kaffeemühle darf nur für die Zwecke eingesetzt werden, für die sie gebaut
wurde: Mahlen von Kaffeebohnen.
• Verwenden Sie die Kaffeemühle nicht, um andere Nahrungsmittel, wie z.B. Trockenobst, zu mahlen oder um bereits vermahlene Lebensmittel, wie z.B. Zucker etc.
feiner zu mahlen
• Das Gerät darf nicht von Kindern oder behinderten Personen benutzt werden.
• Jede andere Verwendung ist unsachgemäß und gefährlich.
• Bringen Sie keine Flüssigkeiten in Kontakt mit inneren oder äußeren Oberächen, während
das Gerät ein- oder ausgeschaltet ist, mit Ausnahme der Teile, die gemäß dem Punkt “REINIGUNG” ausdrücklich hierzu geeignet sind. Sollte dies aus irgendeinem Grund passieren, trennen Sie das Gerät sofort vom Netz und trocken Sie alle Oberflächen sorgfältig ab. Sollte ein
Zugriff auf die Innenteile, an denen sich die elektrischen Bauteile befinden, erforderlich sein,
rufen Sie einen Kundendienst in Ihrer Nähe zu Hilfe.
• Sollte ein Bauteil beschädigt oder ein sonstiger Eingriff erforderlich sein, wenden Sie sich
bitte an den Kundendienst, der die Reparatur oder den Austausch unter der garantierten
Einhaltung der Sicherheitsvorschriften vornehmen wird.
• Nur selbst oder ein von autorisierter Lieferant darf das Hauptkabel der Mühlen austauschen.
Hiermit bestätigen wir, das gemäß der oben
genannten EG-Vorschrift die Warenzeichen
angegeben wurden. Alle technischen Materialien wurden angepasst und stehen in unseren
Büros bereit.
04/108/EWG zur Angleichung der Rechtsvorschriften der Mitgliedstaaten über die elektromagnetische Verträglichkeit.
98/37/EWG zur Änderung der Richtlinie
89/392/EWG zur Angleichung der Rechtsvorschriften der Mitgliedstaaten für Maschinen.
REG. 1935/2004 Änderung Richtlinie 89/109/
CE auf dem Näherungswert der Gesetze der
Mitgliedsstaaten in Bezug auf Material und der
Gegenstände gekennzeichnet, um Kontakt
mit Nahrungsmitteln aufzunehmen.
03/108/EWG zur Änderung der Richtlinie
02/96/EWG über Abfälle aus elektrischen
und elektronischen Geräten (AEEG)
06/95/EWG von 12/12/2006 auf der Harmonisierung der Gesetze der Mitgliedsstaaten in Bezug auf elektrische Ausrüstung
entwarf für Gebrauch innerhalb bestimmter
Spannungsbegrenzungen.
702/96/EWG von l127/01/2003 über
Abfälle aus elektrischen und elektronischen
Geräten (AEEG)
Umwelt
Entsorgen Sie dieses Gerät nicht über den
normalen Hausmüll, sondern bringen Sie
es zu einem öffentlichen Wertstoffhof, wo es recycelt wird. So tragen Sie zum Umweltschutz bei.
Der Rechtsvertreter
12
EG-Konformitätserklärung

Indice
1 – Descrizione della macchina
2 – Manuale d’uso
3 – Identificazione
4 – Caratteristiche tecniche
5 – Componenti esterni
6 – Installazione
7 – Regolazione
8 – Funzionamento
9 – Pulizia
10 – Manutenzione
11 – Misure di sicurezza
12 – Dichiarazione di Conformità CE
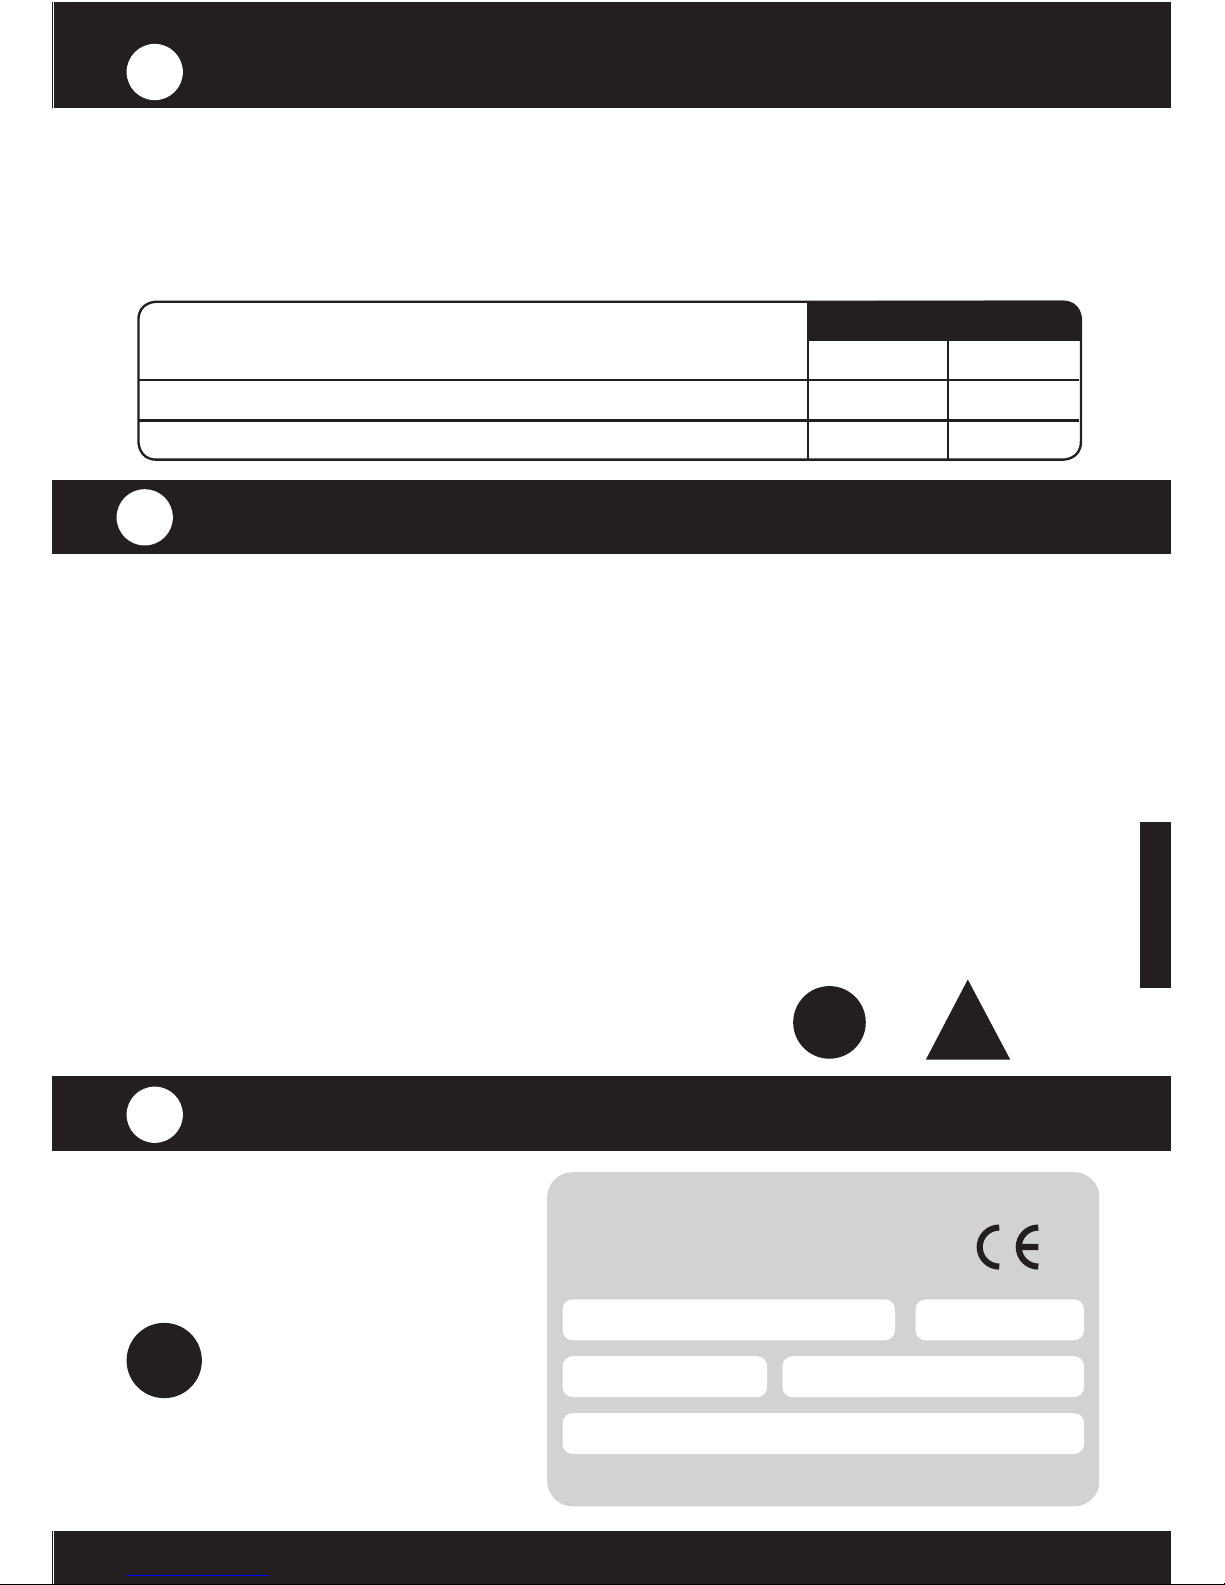
ITALIANO
Descrizione della macchina
PROC-CAL/002/03
Il macinacaffè acquistato è stato progettato secondo i sistemi informatici e di ingegneria più
innovativi. Il risultato è un prodotto di alta qualità che offre la massima garanzia nelle fasi di
macinazione e di dosaggio. Nel processo di produzione sono stati utilizzati i materiali migliori
(alluminio, ottone, ecc.), adatti a entrare in contatto con gli alimenti. Per un funzionamento
ottimale dei macinacaffè descritti nel presente manuale, si consiglia un uso ininterrotto di:
2.1. Il presente manuale ha lo scopo di fornire le informazioni necessarie per una
corretta installazione, gestione e manutenzione dell’apparecchio, nonché indicare le
precauzioni per l’operatore. Per garantire un uso corretto del macinacaffè, seguire
attentamente le istruzioni riportate nel presente manuale.
Per qualsiasi problema, rivolgersi al servizio di assistenza più vicino.
Conservare il presente manuale fino alla sostituzione della macchina e fare in modo
che sia sempre a disposizione dell’operatore.
2.2. Nel presente manuale sono utilizzati i seguenti termini speciali, quali:
- Caratteri in grassetto, per sottolineare l’importanza di alcuni termini.
- Numeri tra parentesi dopo una parola, che indicano la posizione di un componente
nel disegno affianco o nel disegno dei componenti esterni.
Esempio: (1) Coperchio tramoggia.
- Icone (informazione, attenzione).
Manuale d’uso
1
2
V. 12/2008
K-6 Silenzio / K-6 Professional Barista / K-8 / K-8 Silenzio / K-10 Conic
K-10 Conic WBC
FUNZION.
STOP
10 min.
3 min.
5 min.
5 min.
CICLO
MODELLI
informazione Attenzione
!
i
Identificazione
3
Sulla targhetta delle caratteristiche
tecniche, prodotta con materiale
indelebile, vi sono riportati i
seguenti dati:
NOTA: il produttore si
riserva il diritto di modificare
i componenti della macchina
in base alle esigenze di ciascun
mercato ed alle novità in
ambito tecnologico.
MODELLI
NUMERO DI SERIE
DATI ELETTRICI
DATA DI PRODUZIONE
OPZIONI
TEL.: FAX:
i

4.1. Campo di applicazione
I macinacaffè sono destinati a esercizi e comunità in cui è necessario utilizzare
del caffè macinato o a piccoli stabilimenti commerciali dediti alla vendita del caffè.
Questo macinacaffè deve essere utilizzato solo per macinare caffè in chicchi.
Qualsiasi altro uso è considerato improprio e pericoloso.
Caratteristiche tecniche
4
NOTA : il produttore non è responsabile dei danni provocati a persone, cose o
all’apparecchio se non vengono rispettate le norme di sicurezza riportate nel
presente manuale o se l’apparecchio non viene utilizzato correttamente.
* Questa produzione è stata determinata prendendo come base un caffè a media
tostatura e punto di macinatura espresso.
Frese (in / mm) 2.5 / 64 3.3 / 83 2.7 / 68
Produzione (lb/h Kg/h)* 24.2 / 11 33 / 15 37.4 / 17
Capacità tramoggia (lb / gr) 3.74 / 1.700
Peso netto (lb / kg) 31.9 / 14.5 33.4 / 15.2 37.5 / 17
Altezza x Ampiezza x Profondità 25 x 8.2 x 14.4 in
(in / mm) 635 x 210 x 365 mm
110 v
60 hz
200w/100w
1100 rpm
470w/245w
1540 rpm
440w/245w
1300 rpm
260w/120w
1400 rpm
400w/245w
1390 rpm
220 v
60 hz
230 v
50 hz
240 v
50 hz
380 v
50 hz
Capacità caffè macinato (lb / gr) 0.66 / 300
Posizione leva Destra o sinistra, a scelta
280w/150w
1030 rpm
470w/245w
1540 rpm
380w/200w
1300 rpm
245w/140w
870 rpm
420w/250w
920 rpm
680w/370w
265 rpm
760w/370w
270 rpm
730w/450w
340 rpm
730w/450w
340 rpm
490w/300w
340 rpm
K-6 / 6.4 M
6.4 A / K-6 Professional Barista / K-8
K-8 Silenzio
K-10 Conic
K-10 Conic WBC
MODELLI
i

Componenti esterni
5
12
9
8
6
5
3
2
1
Coperchio
tramoggia
Tramoggia per
caffé in chicchi
Pomello
sicurezza
contenitore
Regolatore del
grado di
macinatura
Tapo dosatore caffè
macinato
Perno di
regolazione
dosatore
Pressacaffè
13
Supporto
15
Vassoio
raccoglicaffè
11
10
7
4
Protezione
salvamani
Otturatore
tramoggia
Dosatore
di caffè
macinato
Levetta
di dosaggio
Indicatore
di posizione
14
Tasto
luminoso di
accensione/
spegnimento
6
Installazione
6.1. Avvertenze generali
L’installatore deve leggere attentamente il presente manuale d’uso prima
di installare l’apparecchio.
L’apparecchio deve essere installato da personale qualificato e autorizzato
nel rispetto delle norme di sicurezza e d’igiene vigenti.
i

6.2. Avvertenze importanti
La macchina deve essere utilizzata da una persona adulta e responsabile,
mai da persone irresponsabili o da bambini. Quando si utilizza la macchina,
tenere presenti le seguenti precauzioni:
• Non stare a piedi nudi.
• Non avere mani e piedi bagnati.
• Non mettere l’apparecchio in acqua.
• Non esporre l’apparecchio al sole o ad altri agenti atmosferici.
• Non introdurre oggetti nel foro di entrata o di uscita del
caffè mentre la macchina è in funzione. (Tenere presente che,
quando l’apparecchio si ferma, le frese continuano a ruotare
per alcuni istanti).
• Per scollegare l’apparecchio, afferrare alla spina, non tirare
mai dal cavo d’alimentazione, per evitare cortocircuiti.
!
6.3. Collocazione per l’uso
L’apparecchio deve essere installato su una superficie piana, stabile e
prossima alla macchina del caffè. Perché l’apparecchio funzioni in modo
ottimale, il luogo di utilizzo deve avere almeno le seguenti dimensioni:
6.4. Installazione del macinacaffè
Prima di collegare il macinacaffè, controllare quanto segue:
• I dati riportati sulla targhetta delle caratteristiche
devono coincidere con quelli della rete elettrica.
• La tensione elettrica nel luogo di utilizzo deve essere
adeguata alla potenza dell’apparecchio.
• Il punto di collegamento alla rete elettrica deve essere
protetto con fusibili della potenza adatta.
• L’apparecchio deve essere collegato correttamente
a una messa a terra secondo le norme di sicurezza in vigore.
Il macinacaffè deve essere utilizzato in ambienti con una temperatura
inferiore a 25/30° C e non deve essere installato in luoghi in cui la pulizia
viene eseguita con getti d’acqua.
i
i
i
K-6 / K-6 Silenzio
K-6 Prof. Barista / K-8
31.5 / 800 12.1 / 310 16 / 406
K-8 Silenzio / K-10 Conic
K-10 Conic WBC
MODELLI Altezza (in/mm) Ampiezza (in/mm) Profond. (in/mm)

7
Regolazione
7.1. Preparazione del macinadosatore.
Posizionare la tramoggia (2) sopra la ghiera di regolazione macinatura (6) e controllare
che la slitta (4) sia nella posizione di chiusura, come in Fig. 1. Bloccare la tramoggia con
la vite di fissaggio usando un cacciavite a taglio e terminando l’operazione avvitando
a mano la testa che ricopre la vite di fissaggio (5). Rimuovere il coperchio della
tramoggia (1) riempire la stessa (2) con il caffè in grani e richiudere. Fig. 3.
Collegare il macinadosatore all’alimentazione elettrica, azionare il macinadosatore premendo il tasto ON-OFF (14) ed aprire la slitta (4) per far entrare il caffè all’interno delle
macine. Rimuovere il coperchio del dosatore del caffè macinato (8) e ruotare la ghiera di
regolazione macinatura (6) fino al raggiungimento della macinatura desiderata. Girando la
ghiera in senso orario, la macinatura sarà più grossa, mentre in senso anti-orario otterremo
una macinaturà più fine. Nota che dovresti spostare la ghiera per aggiustare la macinatura,
solamente quando il macinadosatore è nella posizione ON e le macine stanno lavorando.
Se non si esegue questa procedura, le macine tenderanno a sporcarsi e di conseguenza
sarà richiesta una pulitura delle stesse. Inoltre, cambiando la macinatura quando le macine
non sono in movimento, produrrà una polvere di caffè molto grossa o addirittura, una
totale assenza di caffè macinato. Fig.4.
Per ragioni di sicurezza, la ghiera regolatrice (6) può effettuare un solo giro. Nel modello
con ruota dentata, la posizione della macinatura è fissata collocando il perno nei fori della
ruota stessa, come indicato nella foto. Fig.5. Utilizzando questi fori, si può selezionare il
punto di macinatura desiderato.
Fig. 2
Fig. 1
Fig. 3
Caffè en
chicchi
apertochiuso
Bloccato
Aperto
(+)
(-)
Fig. 4
Fig. 5

NOTA: Se il caffè esce lentamente, la macinatura è regolata troppo fine. Se
l’uscita del caffè avviene in maniera veloce, il grado di macinatura è troppo
grosso. L’espresso perfetto si raggiunge con una macinature che consente
di avere in 25 secondi, 25 ml di caffè.
i
7.2. Regolazione della dose di caffè macinato
Il dosatore è già regolato dalla fabbrica, per avere
una dose di circa 7 gr. di caffè macinato, però questa
quantità può essere regolata in un intervallo da 6
a 10 gr. secondo le seguenti istruzioni : Rimuovere
il coperchio del dosatore (8) e ruotare il perno di
regolazione (9); in senso orario per ottenere una
dose minore di caffè macinato, in senso anti-orario
per amentarla. Una volta regolata la quantità esatta
della dose di caffè, richiudere il dosatore del caffè
macinato con il suo coperchio (8). Fig 6.
(-)
(+)
Fig. 7
Fig. 8
Fig. 9
Fig. 6
8.1. Utilizzazione
Per accendere e spegnere il macinadosatore, usare l’interrutore ON – OFF (14).
La macchina incomincerà a macinare. Se è dotata dell’opzione automatico, il macinadosatore
terminerà la macinazione quando raggiungerà il massimo livello nel dosatore e riprenderà
la macinatura dopo aver servito 8 porzioni di caffè, raggiungendo sempre il massimo livello.
Se non dispone dell’opzione automatico, noi raccomandiamo di riempire il dosatore per il
75% del suo volume per poter avere una quantità consistente che garantirà il servizio. Per
servire la porzione di caffè nel portafiltro, porre il portafiltro stesso sull’apposito supporto
(13) direttamente sotto l’uscita del dosatore del caffè macinato. Tirare la leva dosatrice
(11) per ottenere una dose di caffè ( una dose corrisponde anche ad un caffè ), e rilasciare
la leva in modo tale che possa ritornare alla sua normale posizione. Fig.7.
Prendere il portafiltro, porlo sotto il pressino (12) pressare il caffè dal basso verso l’alto,
in modo da compattarlo.Fig.8. Nel caso in cui si dispone dell’opzione pressino telescopico,
posizionare il portafiltro sul supporto e premere il pressino verso il basso. Fig.9.
8
Funzionamento

9
Pulizia
9.1. Avvertenze generali
Perché l’apparecchio funzioni correttamente e per ottenere un caffè macinato di buona
qualità, è necessario eseguire una pulizia periodica dei componenti che si trovano a
contatto con il caffè (almeno una volta alla settimana).
Durante le operazioni di pulizia, tenere presente quanto segue:
• Spegnere sempre l’apparecchio utilizzando l’interruttore di accensione/spegnimento.
• Scollegare l’apparecchio dalla rete elettrica.
• Non immergere l’apparecchio in acqua.
9.2. Pulizia della tramoggia del caffé
Prima di iniziare la pulizia della tramoggia, accertarsi che non siano rimasti dei chicchi di
caffé all’interno. Allenater a mano la testa che ricopre la vite di fissaggio della tramoggia (5)
e svitare la vite di fissaggio sempre della tramoggia, usando un cacciavite a taglio. Togliere la
tramoggia con il caffè in grani(2) dalla ghiera di regolazione macinatura (6) come in Fig. 2
e lavarla con un panno umido oppure con acqua e sapone, questo per eliminare i residui
oleosi lasciati dal caffè in grani, risciacquarla attentamente ed asciugarla.
Riporre la tramoggia sopra la ghiera di regolazione della macinatura e bloccare la tramoggia
con la vite di fissaggio usando un cacciavite a taglio e terminando l’operazione avvitando a
mano la testa che ricopre la vite di fissaggio (5)
9.3. Pulizia del deposito di caffè macinato
Per pulire il deposito di caffè macinato, rimuovere dapprima tutto il caffè che si trova all’interno.
Rimuovere il coperchio dosatore di caffè macinato (8) e pulirne l’interno con un pennello.
9.4. Pulizia esterna
Per la pulizia esterna dell’apparecchio, utilizzare un pennello o un panno leggermente
inumidito con acqua e sapone.
NOTA: non utilizzare mai panni inumiditi per pulire il deposito di caffè macinato.
Conservare il pennello in un luogo protetto e utilizzarlo solo per pulire il macinacaffè, in modo che non si sporchi con altre sostanze. La mancata esecuzione di
queste operazioni influisce negativamente sul sapore e sull’aroma del caffè.
10
Manutenzione
i
10.1. Avvertenze generali
Prima di eseguire qualsiasi tipo di attività di manutenzione, è necessario prendere
in esame le seguenti indicazioni:
• Spegnere sempre l’apparecchio utilizzando l’interruttore di accensione/spegnimento (5).
• Scollegare l’apparecchio dalla rete elettrica.
In caso di guasto o di cattivo funzionamento, spegnere l’apparecchio e non cercare di ripararlo o intervenirvi direttamente. Rivolgersi al servizio di assistenza
tecnica più vicino.
NOTA: se queste avvertenze non vengono rispettate, la sicurezza
dell’apparecchio e dell’utente risultano compromesse.

10.2. Manutenzione periodica
Per garantire l’efficacia e il corretto funzionamento del macinacaffè, è indispensabile attenersi alle indicazioni del produttore, facendo in modo che la manutenzione venga eseguita
da personale qualificato.
Si consiglia di eseguire controlli programmati dei componenti soggetti a maggiore usura. In
particolare, è necessario controllare sistematicamente il livello di usura delle frese. Frese in
perfetto stato consentono di ottenere una macinatura omogenea del caffè, aumentando
la qualità della tazza, nonché un minore consumo elettrico evitando il surriscaldamento
del motore e delle frese.
NOTA: sulla base dell’esperienza acquisita e dando per scontato l’uso di miscele di caffè
di durezza media, si consiglia di sostituire le frese dopo aver macinato 300 kg di caffè.
10.3. Manutenzione del gruppo di macinatura
Per effettuare la manutenzione del gruppo di macinatura seguire la seguenti istruzioni :
Spegnere il macinadosatore utilizzando l’interrutore ON – OFF (14). Scollegare il macinadosatore dalla rete elettrica. Allentare la vite di fissaggio della tramoggia (5) come da Fig.
2. e togliere la tramoggia dalla ghiera di regolazione della macinatura (6). Svitare le viti del
regolatore di macinatura (6) utilizzando una chiave esagonale, come Fig. 10.
Ruotare il regolatore del macinadosatore (6) in senso orario, fino ad estrarlo dal suo
alloggio. Pulire l’interno della camera di macinatura, utilizzando un pennello oppure un
aspiratore. Verificare la condizione delle macine e, se necessario, sostituirle. Se non si è reso
necessario la sostituzione delle macine, riportare il dosatore di macinatura in posizione
di lavoro ruotandolo in senso anti – orario come in Fig. 11 fino a che le due macine si
toccano e a questo punto, riavvitare le tre viti esagonali.
Fig. 10
Fig. 12
Fig. 11
#
#
#
Senso di
avvita mento
Senso di
svitamento
10.4. Accesso alle macine
Seguire le istruzioni di rimozione del regolatore della macinatura descritte nel paragrafo
10.3. svitando la tre viti come descritto nella Fig.10. Fatto questo dovete manualmente
girare il ferma macine superiore in senso orario al fine di poterlo estrarre dalla propria
sede. , seguire Fig.12.
Una volta sostituite le macine, rimontare il porta macine superiore girando in senso anti
– orario, riposizionare il regolatore della macinatura (6) e quindi seguire le istruzioni come
da Fig. 10 e Fig. 11.

!
i
11
Misure di sicurezza
NOTA: il produttore non è da ritenere responsabile dei danni determinati
dall’uso improprio dell’apparecchio o dal mancato rispetto delle misure di sicurezza in precedenza indicate.
È necessario fare attenzione a quanto segue:
Questo macinacaffè deve essere utilizzato esclusivamente per le funzioni per le
quali è stato creato, ovvero macinatura di caffè in chicchi e relativo dosaggio.
• Non utilizzare il macinacaffè per macinare altri tipi di alimenti, quali frutta secca,
o per rendere più fini alimenti in grani, quali zucchero e simili.
• Non utilizzare il deposito di caffè macinato per conservare sostanze alimentari
anche se in polvere fine o grossa, né per dosarle.
• Non consentire l’utilizzo dell’apparecchio a bambini o a disabili.
• Qualsiasi altro uso sarà considerato improprio e pericoloso.
• Evitare il contatto di liquidi con le superci interne ed esterne se l’apparecchio
è acceso o spento, eccetto con quelle parti che possono entrare in contatto
con liquidi e indicate al punto “PULIZIA”. Se, per qualsiasi ragione, ciò avviene,
scollegare immediatamente l’alimentazione elettrica e asciugare con cura tutte
le superfici. Per accedere alle parti interne, dove si trovano componenti elettrici,
rivolgersi al servizio di assistenza più vicino.
• In caso di rottura di qualche componente o per qualsiasi intervento, si consiglia
di rivolgersi al servizio di assistenza tecnica, che provvederà alla riparazione o
sostituzione, garantendo il mantenimento degli standard di sicurezza.
• Il cavo dell’alimentazione dei macinacaffè può essere sostituito solo da un
fornitore autorizzato.
12
Dichiarazione di conformità CE
Le marcature sono state applicate in base alla
normativa della CE nominata qua sopra. Tutti i materiali tecnici sono stati adattati e sono pronti e
disponibili presso i nostri uffici.
Direttiva 04/108/CE per il ravvicinamento delle
legislazioni degli Stati membri relative alla compatibilità elettromagnetica.
Direttiva 98/37/CE concernente il ravvicinamento delle legislazioni degli Stati membri relative alle
macchine.
REG. 1935/2004 che modifica le direttive 89/109/
CE relativa al ravvicinamento delle legislazioni degli
Stati membri concernenti i materiali e gli oggetti
destinati a venire a contatto con i prodotti alimentari.
Direttiva 03/108/CE che modifica la direttiva
02/96/CEE sui rifiuti di apparecchiature elettriche
ed elettroniche (RAEE).
Direttiva 06/95/CE del12/12/2006 concernente il
ravvicinamento delle legislazioni degli Stati membri
relative al materiale elettrico destinato ad essere adoperato entro taluni limiti di tensione.
Direttiva 02/96/CE del127/01/2003 sui rifiuti
di apparecchiature elettriche ed elettroniche
(RAEE).
Ambiente
Non gettate questa
apparecchiatura nella
spazzatura normale,
depositatela nell’apposito
contenitore affinché possa essere riciclata. In
questo modo contribuirete alla preservazione
dell’ambiente.
Il Rappresentante Legale

Índice
1 – Descrição da máquina
2 – Manual de instruções
3 – Identificação
4 – Características técnicas
5 – Componentes externos
6 – Instalação
7 – Menu e regulação
8 – Funcionamento
9 – Limpeza
10 – Manutenção
11 – Medidas de segurança
12 – Declaração de Conformidade CE

Descrição da máquina
PROC-CAL/002/03
O moinho de café que adquiriu foi concebido aplicando os mais inovadores sistemas
informáticos e de engenharia. O resultado é um produto de alta qualidade que lhe
oferece a máxima garantia. No processo de fabrico foram utilizados materiais nobres
(alumínio, aço, etc.) idóneas para o contacto com alimentos. Para um funcionamento
ideal dos moinhos descritos neste manual, os ciclos de trabalho máximos são:
2.1. O objectivo deste manual é proporcionar as informações necessárias para uma
correcta instalação, manipulação e manutenção do aparelho, bem como destacar as
precauções que devem ser tidas em conta pelo operador. Para garantir a melhor utilização
dos moinhos de café, é essencial seguir atentamente as instruções fornecidas neste
manual. No caso de surgir qualquer tipo de inconveniente, contactar o serviço técnico
mais próximo. Este manual deve ser conservado até à substituição da máquina e deve
estar sempre à disposição do operador.
2.2. Neste manual utilizam-se alguns termos especiais, como:
– Caracteres a negrito para realçar a importância de alguns termos.
– Números entre parênteses depois de uma palavra, que indicam a posição desse artigo
no desenho ao lado ou no desenho de componentes externos.
Exemplo: (1) Tampa da tremonha.
– Ícones (informação, atenção).
Manual de instruções
1
2
V. 12/2008
K-6 Silenzio / K-6 Professional Barista / K-8 / K-8 Silenzio / K-10 Conic
K-10 Conic WBC
FUNÇAO
PARA GEM
10 min.
3 min.
5 min.
5 min.
CICLO
MODELO
Informação Atenção
!
i
PORTUGUÊS
MODELO
Nº SÉRIE
DADOS ELÉCTRICOS
DATA DE FABRICO
OPÇÕES
TEL.: FAX:
Identificação
3
Na placa de características técnicas
fabricada em material indelével
informam-se os seguintes dados:
NOTA: O fabricante
reserva-se o direito de
alterar os componentes
da máquina, de acordo
com as exigências de cada
mercado, bem como com
os avanços tecnológicos.
i

4.1. Campo de aplicação
Os moinhos de café destinam-se a comércios e comunidades em que é necessária
a utilização de café moído ou em pequenos comércios de venda de café. Este
moinho só deve ser utilizado para moer café em grão. Qualquer utilização diferente
desta deve ser considerada imprópria e perigosa.
Características técnicas
4
*NOTA: O fabricante não é responsável pelos danos resultantes a pessoas, coisas ou à própria máquina, se não forem cumpridas as normas de
segurança mencionadas neste manual, ou por utilizações incorrectas.
*Esta produção é definida tendo como base um café de torragem média e ponto
de moagem expresso.
Fresas (pol. / mm) 2.5 / 64 3.3 / 83 2.7 / 68
Produção (lb/h Kg/h)* 24.2 / 11 33 / 15 37.4 / 17
Capacidade tremonha (lb / gr) 3.74 / 1.700
Peso líquido (lb / kg) 31.9 / 14.5 33.4 / 15.2 37.5 / 17
Altura-largura-profundidade 25 x 8.2 x 14.4 pol.
(pol. / mm) 635 x 210 x 365 mm
110 v
60 hz
200w/100w
1100 rpm
470w/245w
1540 rpm
440w/245w
1300 rpm
260w/120w
1400 rpm
400w/245w
1390 rpm
220 v
60 hz
230 v
50 hz
240 v
50 hz
380 v
50 hz
Capacidade café moído (lb / gr) 0.66 / 300
Posição alavanca doseadora Direito, esquerdo
280w/150w
1030 rpm
470w/245w
1540 rpm
380w/200w
1300 rpm
245w/140w
870 rpm
420w/250w
920 rpm
680w/370w
265 rpm
760w/370w
270 rpm
730w/450w
340 rpm
730w/450w
340 rpm
490w/300w
340 rpm
K-6 / 6.4 M
6.4 A / K-6 Professional Barista / K-8
K-8 Silenzio
K-10 Conic
K-10 Conic WBC
MODELO
i

Componentes externos
5
12
9
8
6
5
3
2
1
Tampa da
tremonha
Tremonha de
café em grão
Tampa
Regulador de
moagem
Tampa
doseadora de
café moído
Perno de
regulação
doseador
Prensa café
13
Forquilha
de apoio
15
Bandeja de
recolha de café
11
10
7
4
Protector das
maõs
Obturador da
tremonha
Doseador
de café
moído
Alavanca
doseadora
Indicador
de posição
14
Interruptor
luminoso
ON-OFF
6
Instalação
6.1. Advertências gerais
O instalador deve ler atentamente este manual de instruções antes de
efectuar a instalação da máquina.
A instalação do aparelho deve ser efectuada por pessoal qualificado e
autorizado, e respeitando as normas de segurança e higiene vigentes.
i

6.2. Advertências importantes
O operador deve ser uma pessoa adulta e responsável. Nunca pessoas
irresponsáveis ou crianças.
Ao manipular o moinho devem ter-se em conta as seguintes precauções:
• Não ter os pés descalços.
• Não ter as mãos ou pés molhados.
• Não mergulhe o aparelho em água.
• Não expor o aparelho ao sol ou outros agentes atmosféricos.
• Nunca introduzir qualquer objecto na boca de entrada ou saída de café,
enquanto o aparelho estiver em funcionamento. (Devemos ter em conta
que ao parar o moinho, as fresas continuam a rodar alguns momentos.)
• Para desligar o moinho, puxar sempre pela cha e não pelo cabo de
ligação para evitar um possível curto-circuito.
!
6.3. Localização para utilização
O aparelho deve ser instalado sobre uma superfície plana, uniforme. As
dimensões mínimas do local de trabalho, para garantir as melhores prestações
de trabalho, devem ser no mínimo as seguintes:
K-6 / K-6 Silenzio
K-6 Prof. Barista / K-8
31.5 / 800 12.1 / 310 16 / 406
K-8 Silenzio / K-10 Conic
K-10 Conic WBC
MODELO
Altura (pol./mm) Largura (pol./mm) Profund. (pol./mm)
6.4. Instalação do moinho de café
Antes de ligar o moinho de café, deve controlar-se o seguinte:
• Que os dados da etiqueta de características coincidam com as da rede
eléctrica.
• Controlar que o caudal eléctrico da instalação seja adequado à potência
do aparelho.
• O ponto de ligação à rede eléctrica deve estar protegido com fusíveis da
potência adequada.
• O equipamento deve ser ligado correctamente a uma tomada de terra de
acordo com as normas de segurança vigentes.
*Este moinho de café deve ser utilizado em ambientes com uma temperatura
inferior a 25/30 ºC e não se deve instalar em locais (COZINHAS) em que se
preveja a limpeza através de jactos de água.
i
i
i

7
Menu e Regulação
7.1. Preparação do moinho de café
Colocar o depósito (2) sobre o regulador do moinho (6) e verificar se o obturador (4)
se encontra na posição fechado, como na Fig. 1. Fixar o depósito apertando o parafuso de
segurança com uma chave de fendas e terminar ajustando à mão o encaixe de segurança
do depósito (5). Fig. 2. Retirar a tampa do depósito (1), encher o depósito (2) com café e
voltar a colocar a tampa do depósito. Fig.3.
Fig. 2
Fig. 1
Fig. 3
Café
em grão
AbertoFechado
Fechado
Livre
(+)
(-)
Fig. 4
Fig. 5
Ligar o aparelho à corrente, ligar o interruptor ON-OFF para colocar em funcionamento
(14) e abrir o obturador (4) para deixar passar o café. Retirar a tampa do doseador (8) e
girar o regulador de moinho (6) até ajustar ao ponto desejado de moagem do café. Ao
girar no sentido dos ponteiros do relógio obtém um café moído mais grosso e girando
no sentido contrário obtém um café moído mais fino. Note que deve alterar os pontos
de moagem apenas e sempre que a máquina estiver em funcionamento. Se não seguir
esta indicação, o café acumula-se nas lâminas sendo necessário proceder a uma limpeza.
Se alterar o ponto de moagem quando as lâminas estiverem desligadas o moinho produz
um café moído muito grosso ou nenhum mesmo. Fig. 4.
Por razões de segurança, o regulador (6) está limitado a apenas uma volta.
Nos modelos Bailarina, as posições de moagem encontram-se fixadas com a colocação
dos orifícios exibidos na Fig. 5. Ao utilizar estes orifícios, selecciona a moagem desejada.

NOTA: Se verificar que a distribuição do café é muito lenta, é porque o café
está moído demasiado no. Se a distribuição é muito rápida, é porque o café
está a ser moído demasiado grosso. O café expresso é obtido com um ponto
de moagem que faz 25 ml de café em 25 segundos.
i
7.2. Regulação da dose de café servida
O doseador vem calibrado de fábrica para servir
7 gramas de café moído, mas esta quantidade
pode variar entre 6 e 10 g, da seguinte forma:
Retirar a tampa do doseador (8) e girar o pino de
regulação (9); no sentido dos ponteiros do relógio
obteremos uma dose menor de café, e no sentido
contrário para obter uma dose maior. Após regular
a dose, volte a montar a tampa do doseador de
café moído (8). Fig. 6.
(-)
(+)
Fig. 7
Fig. 8
Fig. 9
Fig. 6
8
Funcionamento
8.1. Utilização
Colocar o moinho em funcionamento através do interruptor ON-OFF (14), e o aparelho
começa a moer café. Integramos a opção de paragem automática, o moinho deixará de
moer café sempre que o doseador chegar ao nível máximo e voltará a ser activado depois de servir 8 doses de café, para voltar ao seu nível máximo. Caso não tenha a opção
de paragem automática, recomendamos que encha o doseador a cerca de 75% da sua
capacidade para garantir um serviço consistente. Para servir as doses de café, coloque o
porta-filtros sobre o apoio (13), empurrando até ao fundo para que fique abaixo da saída
do café moído. Puxe a alavanca do doseador (11) para obter uma dose de café (uma
dose equivale a um café), e deixe a maneta voltar à sua posição sem a acompanhar. Fig.7
Encaixar o porta-filtros por debaixo da prensa de café (12) fazendo pressão para cima
de forma a compactar o café. Fig. 8. Se montar a opção de prensa telescópica de café,
apoiar o porta-filtros sobre o apoio e pressionar a prensa de café para baixo. Fig. 9.

9
Limpeza
9.1. Advertências gerais
Para garantir um bom funcionamento do aparelho, bem como uma boa qualidade do
café moído, devemos ter em conta a realização de uma limpeza periódica das partes em
contacto com o café (pelo menos uma vez por semana).
Para realizar as operações de limpeza devemos ter em conta as seguintes indicações:
• Desligar sempre o aparelho através
do interruptor ON-OFF (14)
• Desligar o aparelho da rede eléctrica.
• Não mergulhar o aparelho em água.
9.2. Limpeza do depósito de café em grão
Antes deve consumir o café granulado todo do depósito (2). Soltar à mão o encaixe
de segurança do depósito (5) e desapertar com uma chave de fendas o parafuso de
segurança do depósito. Retirar o depósito de café em grão (2) do regulador do moinho
(6) como na Fig. 2 e lavar com um pano húmido ou com água e sabão, para eliminar
os resíduos oleosos produzidos pelo café, enxaguar cuidadosamente e secar. Voltar a
colocar o depósito sobre o regulador do moinho e apertar com uma chave de fendas o
parafuso de segurança do depósito e terminar apertando à mão o encaixe de segurança
do depósito (5).
9.3. Limpeza do doseador de café
Com ajuda de um pincel limpar os restos de café que possam ter ficado agarrados no
interior das câmaras do doseador.
9.4. Limpeza exterior
Para a limpeza exterior utilizar um pincel ou um pano ligeiramente humedecido em
água e sabão.
NOTA: Nunca utilizar panos humedecidos para a limpeza do depósito de café moído.
Conservar o pincel num local protegido e utilizá-lo apenas para a limpeza do moinho,
para evitar sujá-lo com outras substâncias. Caso NÃO realize as referidas operações
de limpeza, repercutirá negativamente no sabor e aroma do café, bem como na consistência e repetibilidade da dose.
10
Manutenção
10.1 Advertências gerais
Antes de efectuar qualquer tipo de operação de manutenção devem ter-se em
conta as seguintes indicações:
• Desligar sempre o aparelho através do interruptor ON-OFF (14).
• Desligar o aparelho da rede eléctrica.
Em caso de avaria ou mau funcionamento, desligar o aparelho, nunca tentar
repará-lo ou intervir directamente. Chamar o serviço técnico mais próximo.
NOTA: O não respeitar esta advertência pode comprometer a segurança
tanto do aparelho como do utilizador.
i

10.2. Manutenção periódica
Para garantir a eficácia do moinho e para que funcione correctamente é indispensável
cumprir as indicações do fabricante, fazendo com que esta manutenção seja realizada
por pessoal qualificado. Recomenda-se efectuar controlos programados das partes que
mais se desgastam. Especialmente deve-se controlar sistematicamente o nível de desgaste
das fresas. O perfeito estado das fresas permite obter uma moagem homogénea do café,
aumentando a qualidade da chávena, bem como diminuir o consumo eléctrico e limitar o
reaquecimento do motor, das próprias fresas e, em consequência do café moído.
NOTA: Baseando-nos na experiência acumulada e dando por suposto a utilização
de misturas de café de dureza média, sugerimos substituir as fresas de acordo com
a tabela seguinte:
10.3. Manutenção do conjunto de moagem
Para realizar a manutenção do conjunto de moagem, deve seguir as seguintes indicações:
Desligar a máquina no interruptor ON-OFF (14). Desligar a máquina da corrente eléctrica. Soltar o encaixe de segurança do depósito (5), como na Fig. 2., e retirar o depósito
(2) do regulador do moinho (6). Desapertar os parafusos do regulador de moagem (6)
com a ajuda de uma chave Allen, como na Fig. 10.
Rodar o regulador do moinho (6) no sentido dos ponteiros do relógio até o desencaixar. Limpar o interior da cavidade de moagem com ajuda de um pincel ou aspirador. Vericar o estado das lâminas e trocar se for o caso. Caso não seja necessário, voltar a colocar o regulador e enroscar no sentido contrário ao dos ponteiros
do relógio como na Fig. 11. até que as lâminas se toquem e aparafusar os 3 parafusos.
10.4. Acesso ao compartimento de moagem
Seguir as indicações do ponto 10.3. para retirar o regulador de moagem, desapertando os
3 parafusos conforme descrito na Fig. 10. Depois de o fazer, gire manualmente o porta-lâminas superior no sentido dos ponteiros do relógio para o retirar, como na Fig. 12. Depois
de trocar as lâminas, instale o porta-lâminas superior, girando no sentido contrário ao dos
ponteiros, montar o regulador de moagem (6) e seguir as indicações da Fig. 10 & 11.
K-6 / K-6 Silenzio / K-6 Professional Barista / K-8 / K-8 Silenzio / K-10 Conic
300 kg / 660 lb
K-10 Conic WBC
1500 kg / 3300 lb
Fig. 10
Fig. 12
Fig. 11
#
#
#
Orientação
de desenroscado
Orientação
de enroscado

!
i
11
Medidas de segurança
NOTA: O fabricante não poderá ser considerado responsável pelos danos
produzidos tanto pela utilização inadequada do aparelho como por não seguir
as medidas de segurança acima indicadas.
Recomenda-se prestar atenção aos utilizadores sobre o respeito escrupuloso
das seguintes indicações:
• Este moinho deve ser utilizado exclusivamente para as funções para as quais foi
concebido: moagem de café em grãos.
• Não utilizar o moinho para efectuar a moagem de outros tipos de alimentos como
fruta seca ou para moer alimentos granulados mais finos como açúcar ou outros.
• Não permitir que o aparelho seja utilizado por crianças ou pessoas incapacitadas.
• Qualquer outra utilização será considerada inadequada e perigosa.
• Evitar colocar líquidos em contacto com superfícies internas ou externas en-
quanto o aparelho se encontrar ligado ou desligado, excepto nas partes expressamente previstas no ponto “LIMPEZA”. Se por qualquer motivo isto ocorrer,
cortar imediatamente a alimentação eléctrica e secar todas as superfícies cuidadosamente. Se for necessário aceder às partes interiores, onde se encontram os
componentes eléctricos, recorrer ao serviço técnico mais próximo.
• Em caso de dano de algum componente ou para qualquer intervenção recomendamos contactar os serviços técnicos, os quais efectuarão a reparação ou
substituição, garantindo a manutenção das normas de segurança.
• Apenas a um fornecedor autorizado pode substituir o cabo principal de
qualquer moinho.
12
Declaração de conformidade CE
Seguindo a norma acima mencionada da CE,
as normas foram aplicadas. Todos os materiais
técnicos foram adequados e estão preparados
e disponíveis nas nossas oficinas.
04/108/CE sobre la aproximación de las legislaciones de los estados miembros relativas a la
compatibilidad electromagnética.
98/37/CE correcção à Directiva 89/392/CE
relativa à aproximação das leis dos Estadosmembros no que diz respeito a máquinas.
REG. 1935/2004 correcção à Directiva
89/109/CE relativa à aproximação das leis dos
Estados-membros no que diz respeito a materiais e artigos destinados a estar em contacto
com produtos alimentares.
03/108/CE correcção à Directiva 2002/96/CE
relativa a resíduos eléctricos e de equipamento
electrónico (REEE)
06/95/CE correcção à Directiva 12/12/2006
relativa à harmonização das leis dos Estadosmembros no que diz respeito ao equipamen-
to destinado a ser utilizado dentro de certos
limites de voltagem.
02/96/CE correcção à Directiva 127/01/2003
relativa à harmonização das leis dos Estadosmembros no que diz respeito a resíduos eléctricos e de equipamento electrónico (REEE)
Meio Ambiente
No final da vida do
aparelho, não o deite
fora juntamente com
os resíduos domésticos
normais. Deposite-o
num ponto oficial de recolha de resíduos
para reciclagem apropriado. Fazendo-o,
contribuirá para a preservação do meio
ambiente.
O Representante Legal

СОДЕРЖАНИЕ
1 - ОПИСАНИЕ МАШИНЫ
2 - ИНСТРУКЦИИ ПО ЭКСПЛУАТАЦИИ
3 - МАРКИРОВКА
4 - ТЕХНИЧЕСКИЕ ХАРАКТЕРИСТИКИ
5 - НАРУЖНЫЕ КОМПОНЕНТЫ
6 - УСТАНОВКА
7 - МЕНЮ И РЕГУЛИРОВКА
8 - ФУНКЦИОНИРОВАНИЕ
9 - ЧИСТКА
10 - ОБСЛУЖИВАНИЕ
11 - МЕРЫ БЕЗОПАСНОСТИ
12 - ДЕКЛАРАЦИЯ О СООТВЕТСТВИИ ИЗДЕЛИЯ
СТАНДАРТАМ ЕС
Описание прибора PROC-CAL/002/03
Кофемолка, которую вы приобрели, была создана с применением наиболее передовых
информационных и инженерно-технических систем. В результате перед вами находится
высококачественный продукт, предоставляющий максимальную гарантию. В процессе
изготовления были использованы благородные материалы (алюминий, сталь и т.д.), пригодные
для нахождения в контакте с продуктами питания. Для оптимальной работы кофемолок, описание
которых дается в данном сборнике инструкций, максимальные рабочие циклы таковы:
2.1. Целью данного руководства по эксплуатации является
предоставление всей необходимой информации для осуществления правильной установки и
использования прибора, а также по уходу за ним. Кроме того, в руководстве подчеркиваются
меры предосторожности, которые пользователь обязательно должен принять во внимание.
Для обеспечения наилучшего использования кофеварок, необходимо точно придерживаться
инструкций, представленных в настоящем руководстве по эксплуатации. В случае возникновения
какой-либо проблемы следует обращаться в ближайший к Вам центр технического обслуживания.
Данное руководство по эксплуатации необходимо сохранять на протяжении всего времени
пользования кофеваркой, и оно должно всегда быть под рукой у пользователя.
2.2. В настоящем руководстве по эксплуатации были использованы
некоторые специальные термины, такие как:
– Слова, выделенные жирным шрифтом, чтобы подчеркнуть важность некоторых терминов.
– Цифры, указанные в скобках сразу после слова, которые указывают на положение этого
компонента на рисунке рядом или на рисунке с изображением наружных компонентов.
Пример: Крышка Воронки (1).
– Используемые символы (информация, внимание).
Инструкция по эксплуатации
1
2
v. 12/2008
K-6 Silenzio / K-6 Professional Barista / K-8 / K-8 Silenzio / K-10 Conic
K-10 Conic WBC
РАБОТА
ОСТАНОВКА
10
мин.
3
мин.
5
мин.
5
мин.
ЦИКЛ
информация внимание
!
i
РУССКО
Маркировка
3
На идентификационной бирке с
техническими характеристиками,
выполненной из несмываемого материала,
указаны следующие данные:
ПРИМЕЧАНИЕ: Фирма-изготовитель
оставляет за собой право варьировать
составные части машины, в
зависимости от потребностей каждого
отдельного рынка, а также в связи с
развитием новых технологий.
i

4.1. Сфера применения
Данные кофемолки предназначены для использования в торговых точках и в общественных
местах, где необходимо употребление молотого кофе, а также для небольших магазинов по
продаже кофе. Эта кофемолка должна использоваться только для размола кофейных зерен. Любое
другое использование, отличное от вышеуказанного, будет считаться неправильным и опасным.
Технические характеристики
4
*ПРИМЕЧАНИЕ: Фирма-изготовитель не несет никакой ответственности за
ущерб, причиненный людям, предметам или самой машине в случае несоблюдения
мер безопасности, указанных в этом руководстве или вследствие неправильного
использования.
*Данная производительность берет за основу кофе средней степени обжарки и типа помола
«эспрессо».
Жерновов
(in / mm) 2.5 / 64 3.3 / 83 2.7 / 68
Производительность
(lb/h Kg/h)* 24.2 / 11 33 / 15 37.4 / 17
емкость хоппера
(lb / gr) 3.74 / 1.700
Вес-нетто
(lb / kg) 31.9 / 14.5 33.4 / 15.2 37.5 / 17
Высота x Вес x глубина
25 x 8.2 x 14.4 in
(in / mm) 635 x 210 x 365 mm
110 v
60 hz
200w/100w
1100 rpm
470w/245w
1540 rpm
440w/245w
1300 rpm
260w/120w
1400 rpm
400w/245w
1390 rpm
220 v
60 hz
230 v
50 hz
240 v
50 hz
380 v
50 hz
емкость распределителя
(lb / gr) 0.66 / 300
положение распределителя укротителя
право - лево
280w/150w
1030 rpm
470w/245w
1540 rpm
380w/200w
1300 rpm
245w/140w
870 rpm
420w/250w
920 rpm
680w/370w
265 rpm
760w/370w
270 rpm
730w/450w
340 rpm
730w/450w
340 rpm
490w/300w
340 rpm
K-6 / 6.4 M
6.4 A / K-6 Professional Barista / K-8
K-8 Silenzio
K-10 Conic
K-10 Conic WBC
Модель
i
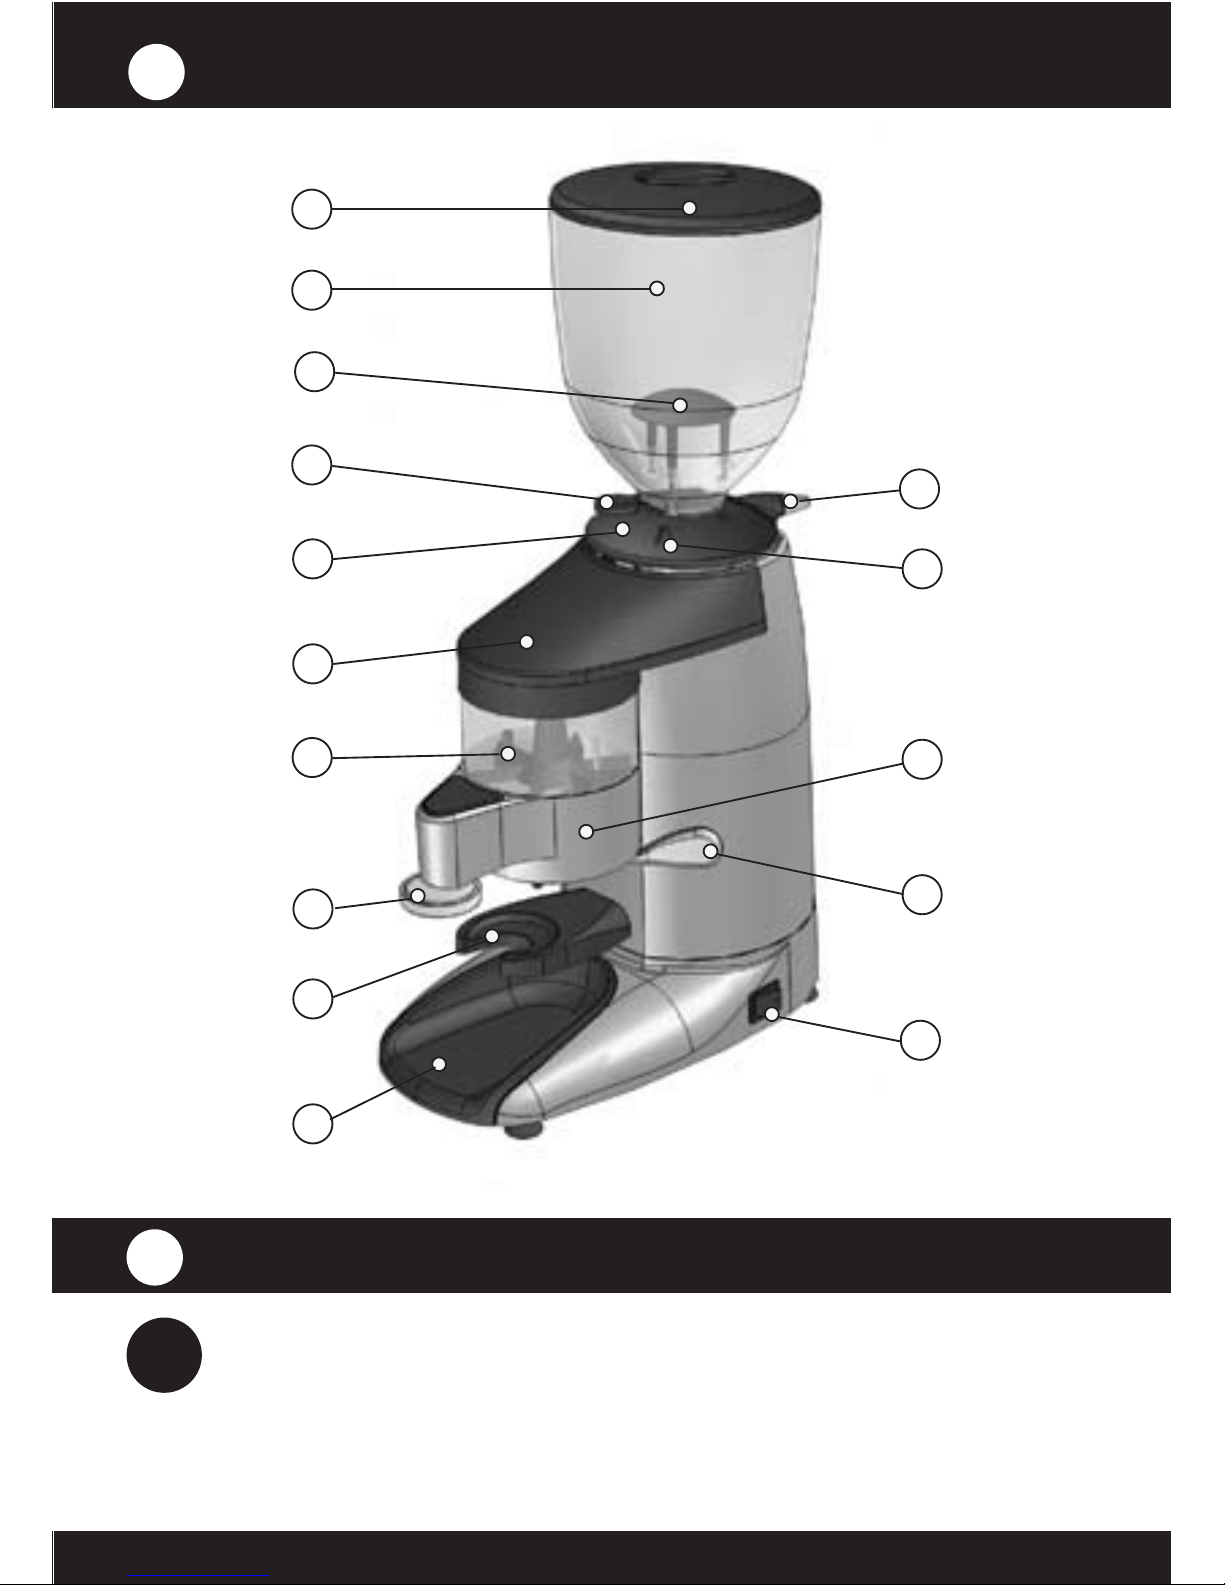
Наружные компоненты
5
12
9
8
6
5
3
2
1
Крышка
хоппера
Хоппер
кофейного
зерна
Ролик
установки
Регулятор
молотилки
Крышка
распределителя
Регулятор
распределителя
Шпалоподбойка
13
Костыль
поддержки
15
Поднос
собрания кофе
11
10
7
4
Протектор руки
Штарка
хоппера
Распределитель
земного кофе
Ручка
распределителя
Индикатор
положения и
блок
безопасности
14
ON-OFF
переключатель
6
Установка
6.1. Общие указания
Человек, осуществляющий установку данной машины, должен внимательно
прочесть данное руководство по эксплуатации перед началом работы. Установку
аппарата должен производить квалифицированный и уполномоченный персонал,
с соблюдением всех действующих норм безопасности, а также санитарногигиенических требований.
i

6.2. Важные указания
В качестве пользователя машины должен выступать взрослый и ответственный/
дееспособный человек. Ни в коем случае пользование аппаратом нельзя доверять
безответственному/недееспособному человеку либо ребенку. При пользовании
кофемолкой необходимо принять во внимание следующие меры предосторожности:
• Ноги всегда должны быть обутыми.
• Руки или ноги не должны быть мокрыми.
• Не погружать аппарат в воду.
• Не подвергать аппарат воздействию прямых солнечных лучей или других
атмосферных явлений.
• Ни в коем случае нельзя вводить никаких предметов во впускное или выпускное
отверстие для кофе, когда машина находится в режиме работы. (Следует иметь
в виду, что, после остановки кофемолки её жернова продолжают какое-то время
вращаться.)
• Для того чтобы выключить кофемолку из сети необходимо потянуть за штепсельную
вилку, ни в коем случае не тянуть сам провод, во избежание опасности короткого
замыкания.
!
6.3. Размещение кофеварки для использования
Аппарат должен быть установлен на ровной, твердой поверхности. Для обеспечения
наилучшей службы аппарата, размеры рабочего места должны быть, как минимум,
следующими:
6.4. Установка кофемолки
Перед подключением кофемолки к сети необходимо проверить следующее:
• Убедитесь в том, что данные, указанные на ярлыке с характеристиками, соответствует
параметрам электрической сети.
• Проконтролировать, чтобы при установке сетевое напряжение соответствовало
мощности аппарата.
• Точка подключения к электросети должны быть защищена с помощью предохранителей
соответствующей мощности.
• Устройство должно быть правильно заземлено, в соответствии с действующими
нормами техники безопасности.
*Данная кофемолка должна использоваться в помещениях с температурой, не
превышающей 25/30 ºC. Кроме того, запрещено устанавливать кофемолку в местах
(КУХНЯХ), где предусмотрена гидравлическая очистка.
i
i
i
K-6 / K-6 Silenzio
K-6 Prof. Barista / K-8
31.5 / 800 12.1 / 310 16 / 406
K-8 Silenzio / K-10 Conic
K-10 Conic WBC
Модель Высота (in / mm) Вес (in / mm) глубина (in / mm)

7
Регулировка
7.1 Подготовка кофемолки к работе
Установить контейнер для зёрен (2) поверх регулятора помола (6) и проверить, что затвор
(4) полностью закрыт, как показано на Рис. 1. Закрепить контейнер для зёрен, затянув
предохранительный винт при помощи плоской отвертки и затем завинчивая вручную
блокирующее устройство контейнера (5). Рис. 2. Открыть крышку контейнера (1), наполнить
контейнер (2) кофейными зёрнами, после чего закрыть крышку контейнера. Рис.3.
Рис. 2
Рис. 1
Рис. 3
Кофейные
зерна
открытозакрыто
замок
откройте
(+)
(-)
Рис. 4
Рис. 5
Подключить аппарат к электросети, включить переключатель запуска в ход ON-OFF (14) и
открыть затвор контейнера (4), чтобы пропустить кофе. Снять крышку дозатора (8) и вращать
регулятор помола (6) до тех пор, пока не добьетесь нужной степени помола кофе. Вращая
регулятор помола по часовой стрелке, Вы получите кофе более грубого помола, “отвинчивание”
же против часовой стрелки даст кофе с более мелкой степенью помола. При этом следует помнить,
что менять степень помола кофе нужно только тогда, когда машина находится в рабочем режиме.
При несоблюдении этой инструкции жернова создадут скопления кофе, и понадобится чистка
устройства. Произведение выбора нужной степени помола кофе в период, когда жернова не будут
находиться в рабочем режиме, приведет к тому, что кофемолка даст кофе очень грубого помола
или вообще немолотый. Рис. 4.
Из соображений безопасности регулятор помола ограничен (6) одним единственным оборотом.
В кофемолках модели шагнутая нужная степень помола кофе устанавливается при помощи
определенного расположения отверстий, показанных на Рис. 5. С помощью этих отверстий Вы
сможете добиться нужной степени помола кофе.

ПРИМЕЧАНИЕ: Если мы наблюдаем, что раздача кофе осуществляется очень
медленно, это обусловлено очень мелким помолом кофе. Если же раздача кофе
слишком быстрая, это обусловлено очень грубым помолом кофе. Чашка превосходного
“эспрессо” получается с использованием кофе с такой степенью помола, которое нам
дает соотношение: 25 мл кофе за 25 секунд.
i
7.2. Регулирование подаваемой порции кофе
В кофемолке установлено предварительно заданное
фабричное дозирование, при котором подаётся 7 граммов
молотого кофе в расчете на одну порцию. Однако это
количество можно регулировать от 6 до 10 гр. кофе
следующим образом: Снять крышку дозатора (8) и
вращать болт регулирования (9). При вращении болта
регулирования по часовой стрелке количество кофе в
расчете на одну порцию уменьшается, а при вращении
против часовой стрелки - порция увеличивается.
Добившись нужного количества кофе в расчете на одну
порцию, снова установите на место крышку дозатора
молотого кофе (8). Рис. 6.
(-)
(+)
Рис. 7
Рис. 8
Рис. 9
Рис. 6
8
Деятельность
8.1. Использование кофемолки
Нажмите переключатель ON-OFF (14), чтобы включить прибор. Кофемолка начнет работу.
Если Ваша кофемолка оснащена режимом автоматической остановки, то она перестанет
перемалывать кофейные зёрна в тот момент, когда дозатор достигнет уровня максимального
заполнения молотым кофе. Сделав 8 порций кофе, кофемолка вновь начнет размол зёрен, чтобы
заполнить дозатор до максимального уровня. Если в Вашей кофемолке отсутствует режим
автоматической остановки, советуем заполнять ёмкость дозатора молотым кофе на 75%, чтобы
обеспечить постоянное обслуживание. Чтобы получить порцию свежесмолотого кофе, необходимо
установить фильтродержатель в вилке (13) и продвинуть его вглубь, чтобы он оказался как раз
под выпускным отверстием для молотого кофе. Для получения одной порции свежесмолотого
кофе (одна порция соответствует одной чашке кофе) необходимо потянуть рукоятку дозатора (11),
после чего отпустить рукоятку; она сама вернется в исходное положение. Рис.7.
Поместить фильтродержатель под кофейный пресс (12) и нажать вверх, чтобы утрамбовать кофе. Рис.
8. В случае если Ваша кофемолка оснащена кофейным прессом телескопического типа, необходимо
будет установить фильтродержатель в вилке, после чего нажать кофейный пресс вниз. Рис. 9.

9
Чистка
9.1. Общие указания
Для обеспечения бесперебойной работы аппарата, а также получения отличного качества молотого
кофе следует не забывать проводить периодическую чистку составных частей кофемолки,
находящихся в контакте с кофе (как минимум, один раз в неделю). При проведении операций по
уходу за машиной необходимо принять к сведению нижеследующие указания:
• Всегда выключать аппарат посредством переключателя ON-OFF (11). За исключением случаев,
описанных в пункте 9.3.
• Отсоединить аппарат от электрической сети.
• Не погружать аппарат в воду.
9.2. Чистка контейнера для кофейных зёрен
Предварительно израсходовать весь кофе в зёрнах, который может оставаться в контейнере (2).
Ослабить вручную блокирующее устройство контейнера (5), после чего открутить
предохранительный винт при помощи плоской отвертки. Снять контейнер для кофейных зёрен
(2) с регулятора помола(6), как показано на Рис. 2. Протереть контейнер влажной тряпкой или
промыть его водой и мылом, чтобы удалить маслянистые остатки от кофе, после чего сполоснуть
чистой водой и дать высохнуть.
Вновь установить контейнер на регулятор помола и затянуть предохранительный винт при помощи
плоской отвертки, после чего завинтить вручную блокирующее устройство контейнера (5).
9.3. Чистка дозатора молотого кофе
Чистка, чтобы верхняя и нижняя крышки были открыты. С помощью кисточки вычистить остатки
кофе, которые могли прилипнуть внутри отделений дозатора.
9.4. Наружная чистка
Для наружной чистки кофеварки необходимо использовать кисточку или тряпку, слегка смоченную
в растворе мыльной воды.
ПРИМЕЧАНИЕ: Ни в коем случае не пользоваться влажными тряпками для чистки ёмкости
для молотого кофе. Хранить кисточку в хорошо защищенном месте и использовать её только
для чистки кофемолки, чтобы не загрязнить её другими веществами. НЕвыполнение указанных
операций по уходу за машиной негативно отразится на вкусовых качествах и аромате кофе, а
также на консистенции и повторяемости дозы.
10
Обслуживание
i
10.1 Общие предупреждения
Прежде чем выполнять любого рода операцию по обслуживанию, необходимо
обратить внимание на следующие указания:
• Всегда выключать аппарат посредством переключателя ON-OFF (11).
• Отсоединить аппарат от электрической сети.
В случае аварии или неисправности кофемолки, необходимо немедленно отключить
аппарат. Попытки самостоятельного ремонта и прямого вмешательства ни в коем случае
не допускаются. Обратиться в ближайший к вам центр технического обслуживания.
ПРИМЕЧАНИЕ: В результате несоблюдения этих указаний могут быть подвергнуты
опасности как сам аппарат, так и пользователь.

10.2. Периодическое обслуживание
Для гарантирования эффективной и исправной работы кофемолки необходимо строго
придерживаться указаний фирмы-изготовителя, вверив техническое обслуживание и ремонт
машины в руки квалифицированного персонала. Рекомендуется проводить запланированные
проверки состояния и работы тех составляющих частей машины, которые наиболее подвержены
износу. Особенно важно проводить систематический контроль степени износа жерновов.
Отличное рабочее состояние жерновов позволяет получить однородность помола кофе, повышая
качество чашечки кофе, а также снизить расход электроэнергии и ограничить нагревание
двигателя, непосредственно самих жерновов и, следовательно, молотого кофе тоже.
ПРИМЕЧАНИЕ: На основании накопленного опыта и используя кофейные смеси средней
твёрдости, предлагаем производить замену жерновов, руководствуясь следующей таблицей:
10.3 меля обслуживание группы
При проведении операций по уходу за блоком размола необходимо принять к сведению
нижеследующие указания:
Выключить аппарат посредством переключателя ON-OFF (14). Отсоединить аппарат от
электрической сети. Ослабить блокирующее устройство (5), как показано на Рис. 2, после чего
снять контейнер для зёрен (2) с регулятора помола (6).
Отвинтить болты, удерживающие регулятор помола (6), при помощи шестигранного ключа
Аллена, как показано на Рис. 10.
Вращать регулятор помола (6) по часовой стрелке до тех пор, пока он не освободится и его
можно будет снять. С помощью кисточки или пылесоса вычистить остатки кофе из внутренней
полости кофемолки. Проверить состояние жерновов и, в случае их износа, произвести замену.
Если результаты проверки показали, что жернова находятся в отличном рабочем состоянии,
необходимо вновь установить регулятор помола и закручивать его в направлении против
часовой стрелки, как показано на Рис. 11, до тех пор, пока он не начнет соприкасаться с
жерновами, после чего следует завинтить три болта.
K-6 / K-6 Silenzio / K-6 Professional Barista / K-8 / K-8 Silenzio / K-10 Conic
300 kg / 660 lb
K-10 Conic WBC
1500 kg / 3300 lb
Рис. 10
Рис. 12
Рис. 11
#
#
#
(-)
(+)
10.4 достигать заусенцев
Следовать инструкциям, указанным в пункте 10.3., чтобы снять регулятор помола, отвинтив для этого
три закрепительных болта, как показано на Рис. 10. После этого снять верхнюю фрезерную оправку,
откручивая её вручную по часовой стрелке, как показано на Рис. 12. После проведения замены жерновов
необходимо вновь установить верхнюю фрезерную оправку, вращая её в направлении против часовой
стрелки. Затем установить регулятор помола (6) и следовать инструкциям на Рис. 10 и 11.

!
i
11
Меры безопасности
Кофемолка включает в себя систему безопасности, которая действует таким
образом, что, если контейнер для зёрен (2) не находится на своем месте, кофемолка
прекратит перемалывать.
ПРИМЕЧАНИЕ: Фирма-изготовитель не несет ответственности за последствия,
связанные как с ненадлежащим использованием аппарата, так и с невыполнением мер
безопасности, указанных выше. Просим обратить пользователей особое внимание на
добросовестное соблюдение следующих указаний:
• Данная кофемолка должна использоваться исключительно для выполнения тех
функций, для которых она и была создана, а именно: для помола кофейных зёрен.
• Не использовать данную кофемолку для осуществления помола других типов
продуктов питания, таких как орехи, или для получения более тонкого помола
гранулированных продуктов, таких как сахар и другие.
• Не допускать использование аппарата со стороны детей или недееспособных лиц.
• Любое иное применение будет рассматриваться как использование не по назначению,
а также опасное использование.
• Избегать попадания жидкостей на внутренние или внешние поверхности, будь аппарат
включен или выключен, за исключением тех частей, которые прямо предусмотрены
в параграфе “ЧИСТКА”. Если по какой-то причине такое попадание жидкости
произошло, необходимо незамедлительно выключить электропитание и аккуратно
просушить все поверхности. Если нужен доступ к внутренним частям машины, где
располагаются её электрические компоненты, следует обращаться в ближайший центр
технического обслуживания.
• В случае повреждения какого-либо компонента машины или для осуществления
любого вмешательства в её механизм, настоятельно советуем обращаться в центры
технического обслуживания, которые и произведут необходимый ремонт или замену,
гарантируя обеспечение стандартов безопасности.
• Только компания или поставщик, уполномоченный со стороны, может производить
замену основного кабеля любой из моделей кофемолок.
12
Декларация о Соответствии Изделия Стандартам ЕС
Согласно указанному выше нормативу, на данные
изделия была нанесена EC-маркировка. Все технические
материалы были признаны соответствующими, они
подготовлены и имеются в наличии в наших офисах.
04/108/EC (Норма электромагнитной совместимости)
о сближении законодательств государств - участников в
части, касающейся электромагнитной совместимости
98/37/EC касается сближения законодательств
государств - участников в отношении машин
REG. 1935/2004 корректируя директив 89/109/EC на
приближении законов государство-членов касаясь
материала и предметов которому сужденно коснуться
с питательными продуктами.
03/108/EC, норма, которая модифицирует Директиву
02/96/EC относительно отходов электрических и
электронных аппаратов (RAEE)
06/95/EC касается сближения законодательств
государств - участников в отношении материалов,
контактирующих с пищевыми продуктами
02/96/EC 27/01/2003 на приближении законов
государство-членов на неныжное электрическом и
радиотехнической аппаратуре (WEEE).
Охрана окружающей среды
Когда вы соберетесь выбрасывать этот
электроприбор, позаботьтесь о том,
чтобы не выбрасывать его с обычными домашними отходами и
мусором; сдайте его на переработку в официальный пункт сбора
старых электроприборов. Этим вы внесёте свой посильный вклад
в дело охраны окружающей среды.
Юридический представитель

ΠΙΝΑΚΑΣ ΠΕΡΙΕΧΟΜΕΝΩΝ
1 - ΠΕΡΙΓΡΑΦΗ ΤΗΣ ΣΥΣΚΕΥΗΣ
2 - ΕΓΧΕΙΡΙΔΙΟ ΟΔΗΓΙΩΝ ΧΡΗΣΗΣ
3 - ΑΝΑΓΝΩΡΙΣΗ ΤΗΣ ΣΥΣΚΕΥΣΗΣ
4 - ΤΕΧΝΙΚΑ ΧΑΡΑΚΤΗΡΙΣΤΙΚΑ
5 - ΕΞΩΤΕΡΙΚΑ ΕΞΑΡΤΗΜΑΤΑ
6 - ΕΓΚΑΤΑΣΤΑΣΗ
7 - ΜΕΝΟΥ ΚΑΙ ΡΥΘΜΙΣΗ
8 - ΛΕΙΤΟΥΡΓΙΑ
9 - ΚΑΘΑΡΙΣΜΟΣ
10 - ΣΥΝΤΗΡΗΣΗ
11 - ΠΡΟΔΙΑΓΡΑΦΕΣ ΑΣΦΑΛΕΙΑΣ
12 - ΔΉΛΩΣΗ ΠΙΣΤΌΤΗΤΑΣ ΕΚ

ΕΛΛΗΝΙΚΑ
ΠΕΡΙΓΡΑΦΉ ΤΗΣ ΣΥΣΚΕΥΉΣ
PROC-CAL/002/03
Ο μύλος άλεσης καφέ που αγοράσατε σχεδιάστηκε εφαρμόζοντας τα πιο καινοτόμα συστήματα
πληροφορικής και μηχανικής. Το αποτέλεσμα είναι ένα προϊόν υψηλής ποιότητας που σας προσφέρει
τη μέγιστη εγγύηση. Κατά την κατασκευή του χρησιμοποιήθηκαν ευγενή υλικά (αλουμίνιο,
χάλυβας κ.λπ.) κατάλληλα να έρχονται σε επαφή με τρόφιμα. Για τη βέλτιστη λειτουργία των
μύλων άλεσης που περιγράφονται σε αυτό το εγχειρίδιο, οι μέγιστοι χρόνοι διαρκούς λειτουργίας
(κύκλοι λειτουργίας) είναι:
2.1. Σκοπός του παρόντος εγχειριδίου είναι να προσφέρει τις απαραίτητες
πληροφορίες για τη σωστή εγκατάσταση, χειρισμό και συντήρηση της συσκευής, καθώς και
να επισημάνει τις προφυλάξεις που θα πρέπει να λαμβάνονται υπόψη από το χειριστή. Για την
καλύτερη δυνατή χρήση των μύλων άλεσης καφέ, πρέπει να ακολουθείτε προσεκτικά τις οδηγίες
που περιέχονται σε αυτό το εγχειρίδιο. Εάν παρουσιαστεί οποιοδήποτε πρόβλημα, επικοινωνήστε
με το πιο κοντινό κέντρο τεχνικής υποστήριξης. Φυλάξτε το εγχειρίδιο αυτό μέχρις ότου αλλάξετε
συσκευή και κρατήστε το πάντα στη διάθεση του χειριστή.
2.2. Στο εγχειρίδιο αυτό χρησιμοποιούνται μερικοί ειδικοί όροι όπως:
– Έντονοι (bold) χαρακτήρες για να τονιστεί η σπουδαιότητα ορισμένων όρων.
– Αριθμοί σε παρένθεση ύστερα από μια λέξη, που δείχνουν τη θέση του συγκεκριμένου
εξαρτήματος στο σχέδιο πλευρικής όψης ή στο σχέδιο των εξωτερικών εξαρτημάτων.
Παράδειγμα: (1) Καπάκι χοάνης.
- Εικονίδια (πληροφορίες, προσοχή).
ΕΓΧΕΙΡΊΔΙΟ ΟΔΗΓΙΏΝ ΧΡΉΣΗΣ
1
2
v.12/2008
K-6 Silenzio / K-6 Professional Barista / K-8 / K-8 Silenzio / K-10 Conic
K-10 Conic WBC
ΛΕΙΤΟΥΡΓΙΑ ΠΑΥΣΗ
10
λεπτά
3
λεπτά
5
λεπτά
5
λεπτά
ΚΥΚΛΟΣ
ΜΟΝΤΈΛΟ
πληροφορίες προσοχή
!
i
ΑΝΑΓΝΏΡΙΣΗ ΤΗΣ ΣΥΣΚΕΥΉΣ
3
Στο πινακίδιο τεχνικών
χαρακτηριστικών κατασκευασμένο
από ανεξίτηλο υλικό αναγράφονται
τα ακόλουθα στοιχεία:
ΣΗΜΕΙΩΣΗ:
Ο κατασκευαστής διατηρεί
το δικαίωμα να διαφοροποιεί
τα εξαρτήματα της συσκευής
σύμφωνα με τις απαιτήσεις
της κάθε αγοράς, καθώς και
σύμφωνα με τις εξελίξεις της
τεχνολογικής προόδου.
i
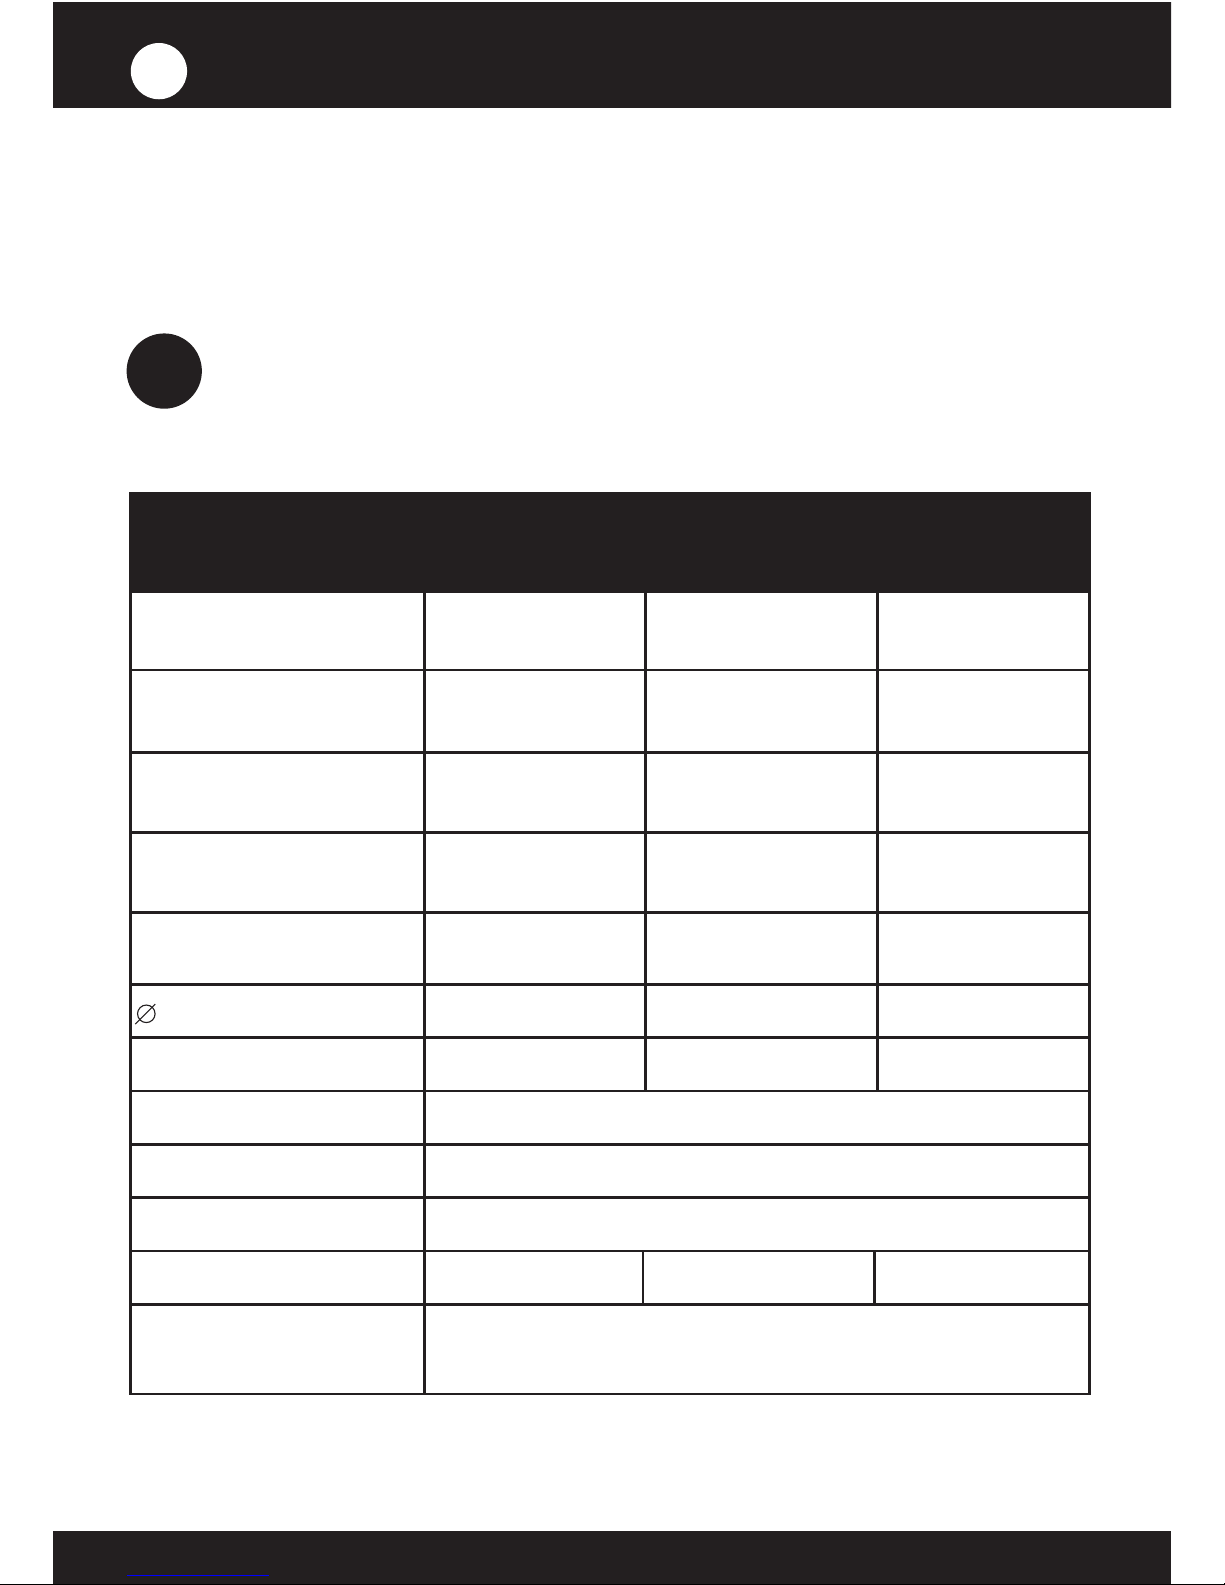
4.1 Πεδίο εφαρμογής
Οι μύλοι άλεσης καφέ προορίζονται για χρήση σε επιχειρήσεις και κοινότητες, στις οποίες η χρήση
αλεσμένου καφέ είναι απαραίτητη, ή σε μικρά καταστήματα πώλησης καφέ. Ο μύλος αυτός άλεσης
πρέπει να χρησιμοποιείται μόνο για την άλεση κόκκων καφέ. Οποιαδήποτε άλλη χρήση πρέπει να
θεωρείται ακατάλληλη και επικίνδυνη.
ΤΕΧΝΙΚΆ ΧΑΡΑΚΤΗΡΙΣΤΙΚΆ
4
*ΣΗΜΕΙΩΣΗ: Ο κατασκευαστής δεν αναλαμβάνει ευθύνη για ζημιές που
προκαλούνται σε άτομα, αντικείμενα ή στην ίδια τη συσκευή, εάν δεν πληρούνται
οι προδιαγραφές ασφάλειας που αναφέρονται σε αυτό το εγχειρίδιο, ή λόγω
ακατάλληλης χρήσης.
* Παραγωγή με βάση καφέ μέτριου βαθμού καβουρδίσματος και τύπου άλεσης espresso.
i
Δίσκοι
(in / mm) 2.5 / 64 3.3 / 83 2.7 / 68
Παραγωγή
(lb/h Kg/h)* 24.2 / 11 33 / 15 37.4 / 17
Χωρητικότητα χοάνης
(lb / gr) 3.74 / 1.700
Καθαρό βάρος
(lb / kg) 31.9 / 14.5 33.4 / 15.2 37.5 / 17
Ύψος-πλάτος-βάθος
25 x 8.2 x 14.4 in
(in / mm) 635 x 210 x 365 mm
110 v
60 hz
200w/100w
1100 rpm
470w/245w
1540 rpm
440w/245w
1300 rpm
260w/120w
1400 rpm
400w/245w
1390 rpm
220 v
60 hz
230 v
50 hz
240 v
50 hz
380 v
50 hz
Емкость земного кофе
(lb / gr) 0.66 / 300
θέση λαβών διανομέων
το δικαίωμα, έφυγε
280w/150w
1030 rpm
470w/245w
1540 rpm
380w/200w
1300 rpm
245w/140w
870 rpm
420w/250w
920 rpm
680w/370w
265 rpm
760w/370w
270 rpm
730w/450w
340 rpm
730w/450w
340 rpm
490w/300w
340 rpm
K-6 / 6.4 M
6.4 A / K-6 Professional Barista / K-8
K-8 Silenzio
K-10 Conic
K-10 Conic WBC
ΜΟΝΤΈΛΟ
φασολιών καφέ
Πλαστογράφηση
υποστήριξης
συλλογής καφέ
Παραθυρόφυλλο

ΕΞΩΤΕΡΙΚΆ ΕΞΑΡΤΉΜΑΤΑ
5
12
9
8
6
5
3
2
1
Καπάκι
χοανών
Χοάνη
φασολιών καφέ
Θέτοντας
κύλινδρος
Ρυθμιστής
αλέσματος
Καπάκι
διανομέων
Ρυθμιστής
διανομέων
Πλαστογράφηση
13
Δεκανίκι
υποστήριξης
15
Δίσκος
συλλογής καφέ
11
10
7
4
Προστάτης
χεριών
Παραθυρόφυλλο
χοανών
Διανομέας
επίγειου καφέ
Λαβή
διανομέων
Δείκτης θέσης
και ομάδα
δεδομένων
ασφάλειας
14
On-off
διακόπτης
6
ΕΓΚΑΤΆΣΤΑΣΗ
6.1 Γενικές προειδοποιήσεις
Πριν την εγκατάσταση της συσκευής, πρέπει να διαβάσετε με προσοχή αυτό το
εγχειρίδιο οδηγιών χρήσης. Η εγκατάσταση της συσκευής πρέπει να γίνει από
ειδικευμένο και εξουσιοδοτημένο προσωπικό και σύμφωνα με τις ισχύουσες
προδιαγραφές ασφάλειας και υγιεινής.
i

6.2. Σημαντικές προειδοποιήσεις
Ο χειριστής πρεπει να είναι άτομο ενήλικο και υπεύθυνο. Ποτέ ανεύθυνα άτομα ή
παιδιά. Κατά το χειρισμό του μύλου άλεσης πρέπει να λαμβάνονται οι ακόλουθες
προφυλάξεις:
• Μην είστε ξυπόλυτοι.
• Τα χέρια και τα πόδια σας πρέπει να είναι στεγνά.
• Μην εισάγετε τη συσκευή σε νερό.
• Μην τοποθετείτε τη συσκευή στο έδαφος και μην την εκθέτετε στην επίδραση
άλλων ατμοσφαιρικών παραγόντων.
• Μην εισάγετε αντικείμενα στο στόμιο εισόδου ή εξόδου καφέ, όταν η συσκευή
είναι σε λειτουργία. (Πρέπει να έχουμε υπόψη ότι κατά τη διακοπή της λειτουργίας
του μύλου, οι δίσκοι συνεχίζουν να περιστρέφονται για μερικά λεπτά).
• Κατά την αποσύνδεση του μύλου άλεσης από το ρεύμα και για την αποφυγή
βραχυκλώματος να τραβάτε πάντα το βύσμα και ποτέ το ηλεκτρικό καλώδιο.
!
6.3. Τοποθέτηση για χρήση
Η συσκευή πρέπει να εγκαθίσταται επάνω σε επίπεδη και στέρεη επιφάνεια. Για την
εξασφάλιση της βέλτιστης απόδοσης της συσκευής, οι ελάχιστες διαστάσεις του
χώρου εργασίας πρέπει να είναι τουλάχιστον:
6.4. Εγκατάσταση του μύλου άλεσης καφέ
Πριν να συνδέσετε το μύλο άλεσης καφέ στο ρεύμα, πρέπει να ελέγξετε τα
ακόλουθα:
• Ότι τα στοιχεία στην ετικέτα χαρακτηριστικών συμπίπτουν με αυτά του ηλεκτρικού
δικτύου.
• Ελέγξτε ότι η ένταση της ηλεκτρικής εγκατάστασης είναι συμβατή με την ισχύ της
συσκευής.
• Το σημείο σύνδεσης στο ηλεκτρικό δίκτυο πρέπει να είναι προστατευμένο με
ασφάλειες κατάλληλης ισχύος.
• Ο εξοπλισμός πρέπει να είναι σωστά συνδεδεμένος σε γείωση σύμφωνα με τις
ισχύουσες προδιαγραφές ασφάλειας.
*Αυτός ο μύλος άλεσης καφέ πρέπει να χρησιμοποιείτε σε χώρους όπου η
θερμοκρασία δεν ξεπερνά τους 25/30ºC και δεν πρέπει να εγκαθίσταται σε
χώρους (ΚΟΥΖΙΝΕΣ) για τον καθαρισμό των οποίων χρησιμοποιούνται
προβολές ύδατος.
i
i
i
K-6 / K-6 Silenzio
K-6 Prof. Barista / K-8
31.5 / 800 12.1 / 310 16 / 406
K-8 Silenzio / K-10 Conic
K-10 Conic WBC
ΜΟΝΤΈΛΟ Ύψος (in / mm) πλάτος (in / mm) βάθος (in / mm)
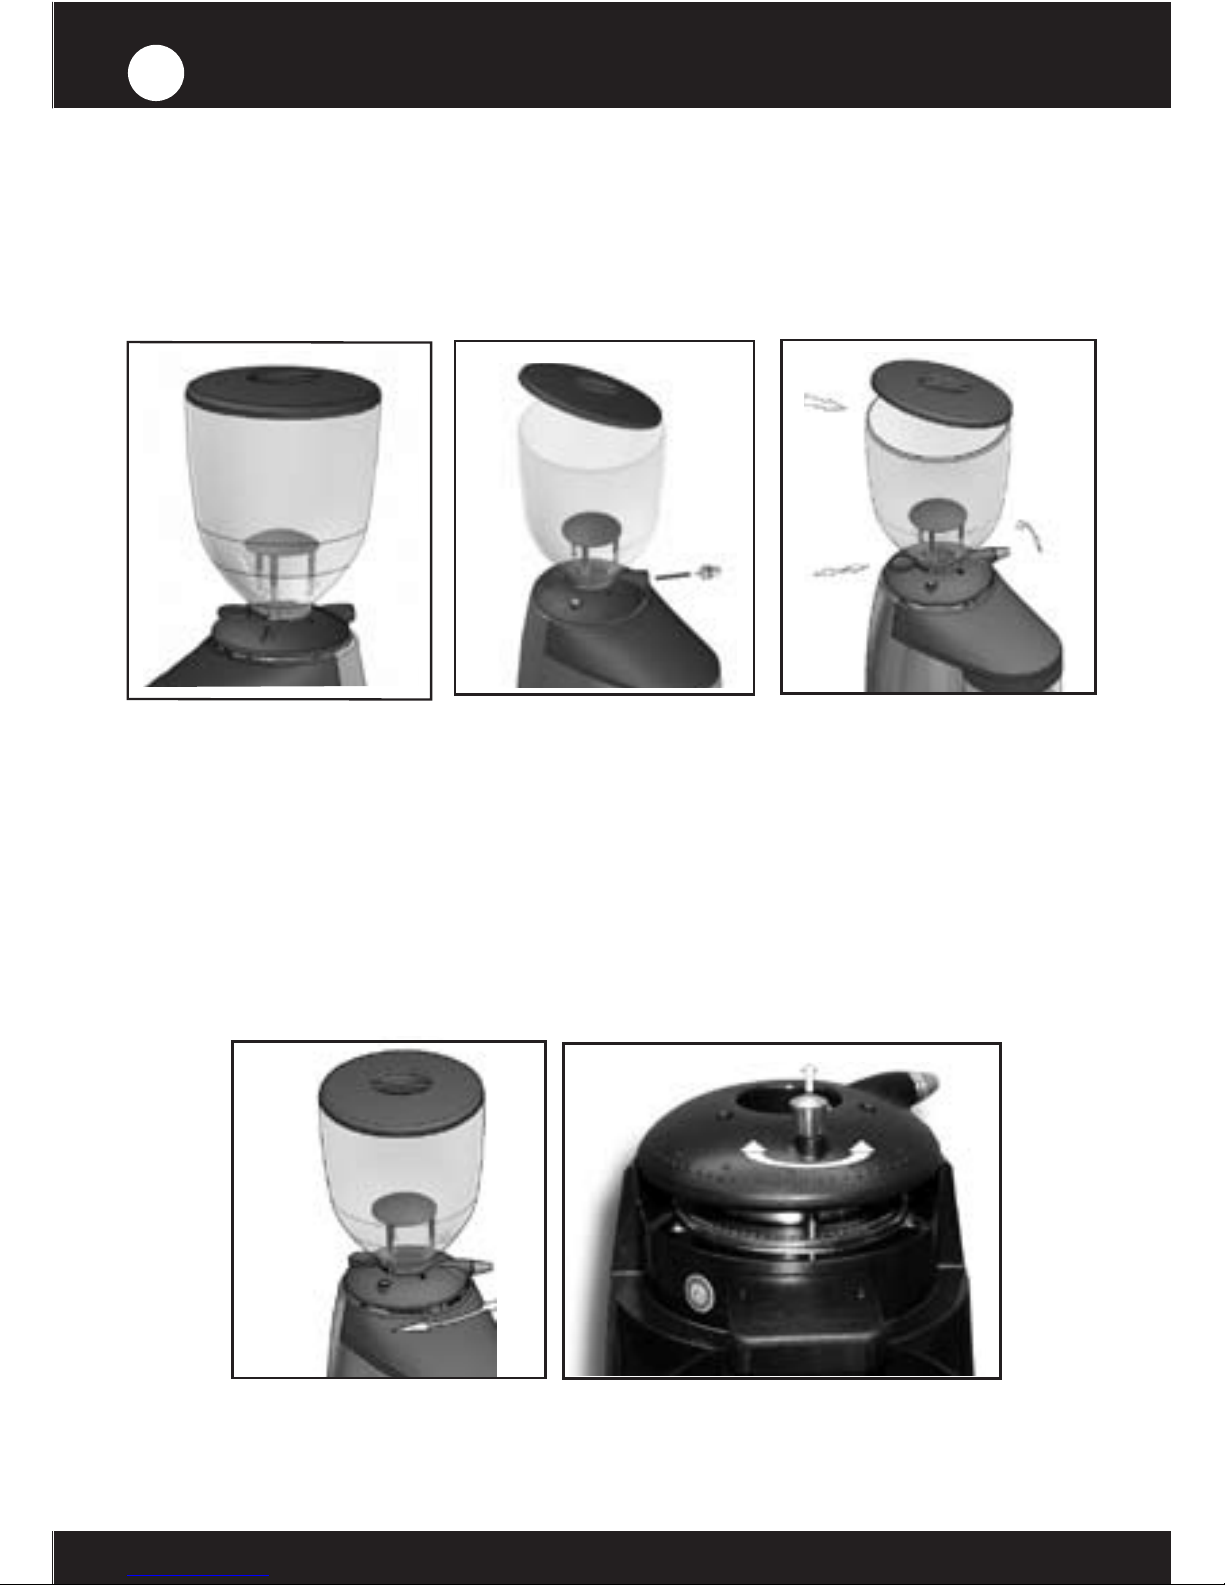
7
ΜΕΝΟΎ ΚΑΙ ΡΎΘΜΙΣΗ
7.1. Προετοιμασία του μύλου καφέ
Τοποθετήστε τη χοάνη (2) στο ρυθμιστή αλέσματος (6) και ελέγξτε ότι το παραθυρόφυλλο
(4) είναι κλειστό, όπως στο σύκο 1. Δέστε τη χοάνη με το πέρασμα κλωστής σε βελόνα της
βίδας ασφάλειας χοανών με τη βοήθεια ενός at-head κατσαβιδιού και τελικά τη ρύθμιση του
κυλίνδρου ρύθμισης (5) με το χέρι. Σύκο 2. Αφαιρέστε το καπάκι χοανών (1), γεμίστε τη χοάνη
(2) με τον καφέ και αντικαταστήστε το καπάκι χοανών. Σύκο 3.
Σύκο 2
Σύκο 1
Σύκο 3
Φασόλια
καφέ
ανοικτός
-
κλειστός
κλειδωμένος
ξεκλειδ
ωμένος
(+)
(-)
Σύκο 4
Σύκο 5
Συνδέστε τη μηχανή με την παροχή ηλεκτρικού ρεύματος, πιέστε το on-off διακόπτη (14) και ανοίξτε
το παραθυρόφυλλο (4) για να αφήσετε τον καφέ κατευθείαν. Αφαιρέστε το καπάκι διανομέων (8)
και γυρίστε το ρυθμιστή αλέσματος (6) στην απαραίτητη ρύθμιση αλέσματος. Με να γυρίσει το
δεξιόστροφα, το άλεσμα καφέ θα είναι πιό χονδροειδές και γυρίζοντας το αντίθετα προς τη φορά
των δεικτων του ρολογιού, το άλεσμα θα είναι λεπτότερο. Σημειώστε ότι πρέπει μόνο να αλλάξετε
τις τοποθετήσεις αλέσματος όταν είναι ανοικτή η μηχανή και τα σαλιάσματα είναι στην κίνηση. Εάν
δεν κάνετε αυτό, τα σαλιάσματα gunk επάνω και ο καθαρισμός θα απαιτηθεί. Οι μεταβαλλόμενες
τοποθετήσεις αλέσματος όταν δεν είναι τα σαλιάσματα στην κίνηση θα αναγκάσουν το μύλο για να
μην κάνουν μόνο το πολύ χονδροειδές άλεσμα ή κανένα άλεσμα καθόλου. Σύκο 4.
Για τους λόγους ασφαλείας, ο ρυθμιστής (6) περιορίζεται σε μια ενιαία στροφή. Στα περπατημένα
πρότυπα, οι θέσεις λείανσης τίθενται από την τοποθέτηση των τρυπών που παρουσιάζονται στο
σύκο 5. Χρησιμοποιώντας αυτές τις τρύπες, επιλέξτε σημείο αλέσματος που επιθυμείτε.
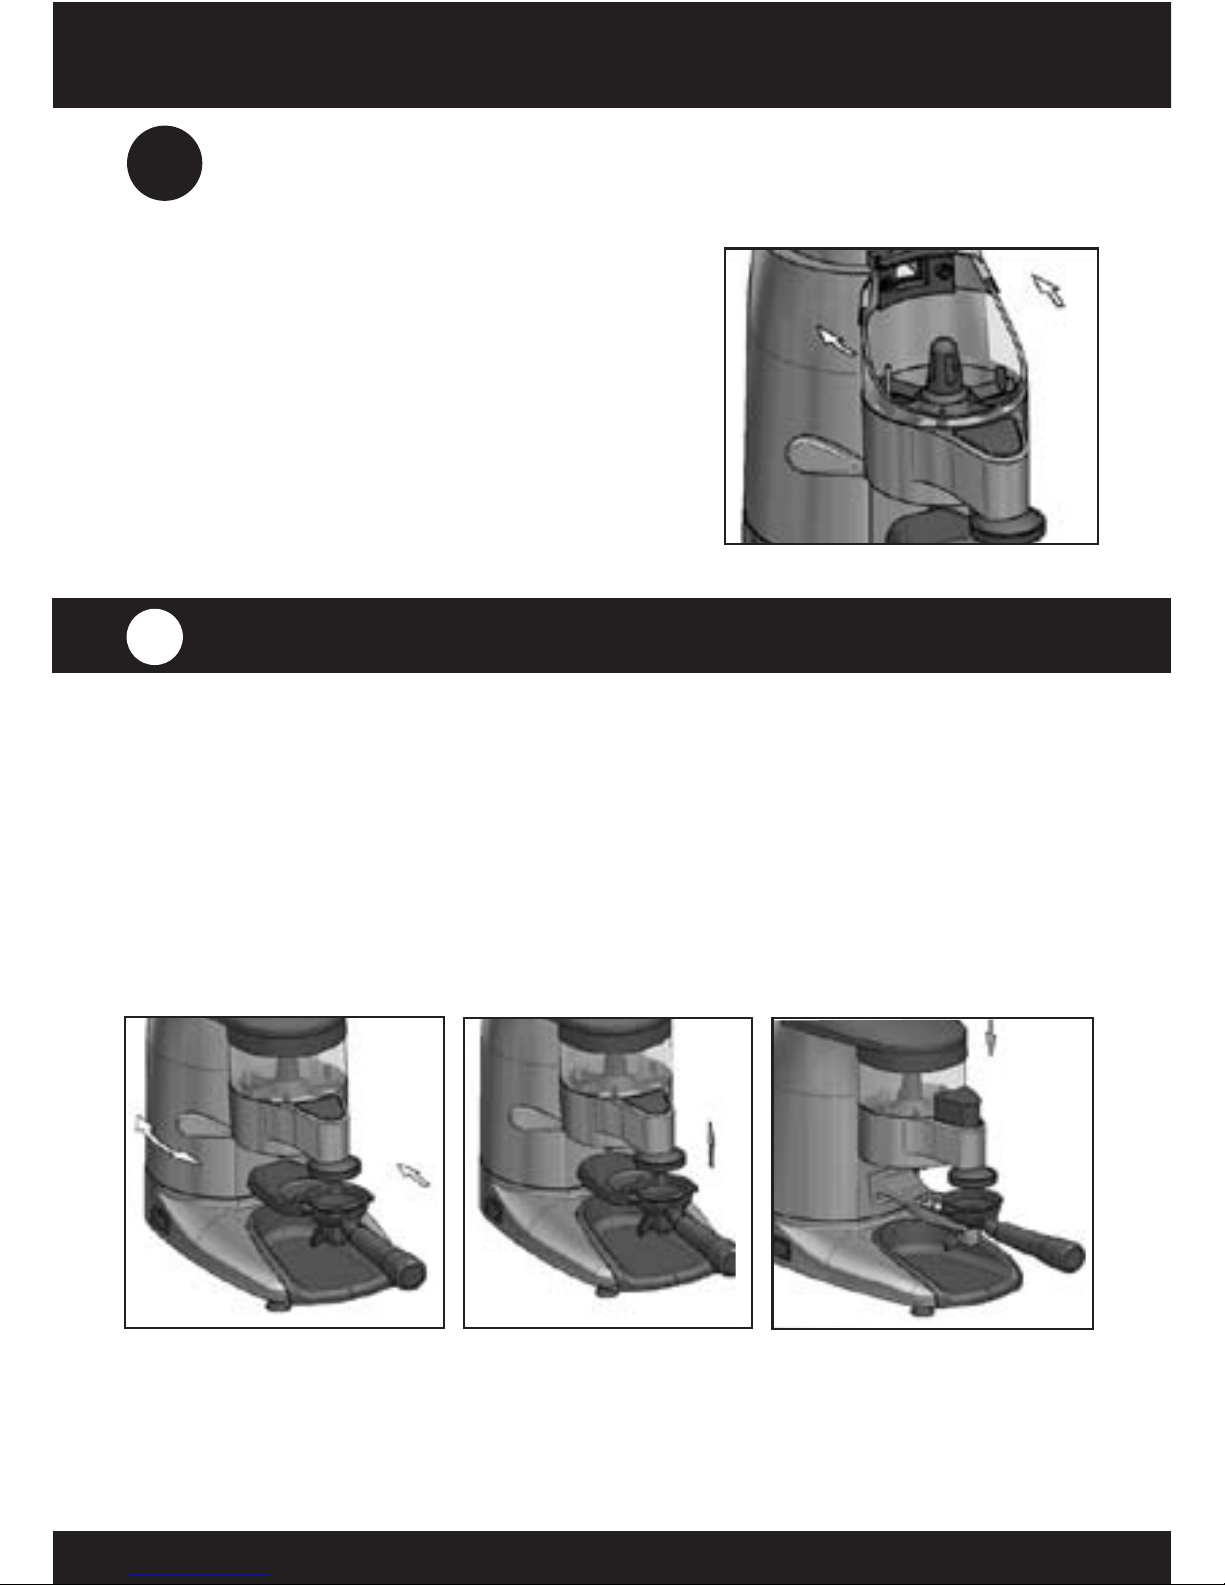
ΣΗΜΕΙΩΣΗ: Εάν ο καφές βγαίνει αργά, αυτό είναι επειδή ο καφές τίθεται ως στόχος να
αλέσει πολύ το πρόστιμο. Εάν βγαίνει πολύ γρήγορα, είναι επειδή το άλεσμα είναι πολύ
παχύ. Ένα τέλειο espresso επιτυγχάνεται με ένα αλέθοντας σημείο 25 μιλ. του καφέ που
παρασκευάζεται σε 25 δευτερόλεπτα.
i
7.2. Ρύθμιση servings καφέ
Οι διανομείς είναι εργοστάσιο που ρυθμίζεται για να
εξυπηρετήσει ένα ποσό περίπου 7 γ. του επίγειου καφέ, αλλά
αυτή η ποσότητα μπορούν να είναι ρυθμισμένος μεταξύ 6
και 10 γ, ως εξής: Αφαιρέστε το έδαφος το καπάκι διανομέων
καφέ (8) και γυρίζει τη βίδα κανονισμού διανομής (9)
δεξιόστροφα για να λάβει μια μικρότερη ποσότητα του καφέ,
και αντίθετα προς τη φορά των δεικτων του ρολογιού για να
λάβει ένα μεγαλύτερο ποσό. Μιά φορά η ποσότητα κάθε
μια η εξυπηρέτηση έχει ρυθμιστεί, αντικαθιστά το διανομέα
επίγειου καφέ καπάκι (8). Σύκο 6.
(-)
(+)
Σύκο 7
Σύκο 8
Σύκο 9
Σύκο 6
8
ΛΕΙΤΟΥΡΓΊΑ
8.1. Χρήση
Για να κλείσουν τη μηχανή σε και τη χρήση ο on-off διακόπτης (14). Η μηχανή θα αρχίσει να
αλέθει τον καφέ. Εάν η αυτόματη επιλογή στάσεων ενσωματώνεται, ο μύλος θα σταματήσει
όταν φθάνει ο διανομέας στο ανώτατο όριο, και θα ξαναξεκινήσει αφότου έχουν εξυπηρετηθεί
8 μερίδες του καφέ, αλέθοντας πάλι στο ανώτατο όριο. Εάν η μηχανή δεν ενσωματώνει
την αυτόματη επιλογή στάσεων, συστήνουμε ότι γεμίζετε doser 75% της ικανότητάς της
προκειμένου να εγγυηθεί η συνεπής χορήγηση της δόσης. Για να εξυπηρετήσετε servings καφέ,
τοποθετήστε το portalter στο δεκανίκι υποστήριξης (13) τόσο μακριά μέσα καθώς πιθανό έτσι
ώστε τοποθετείται κάτω από το σωλήνα απαλλαγής επίγειου καφέ. Σύκο.1. Τραβήξτε τη λαβή
διανομής (11) για να λάβετε έναν καφέ που εξυπηρετεί (ο ένας που εξυπηρετεί είναι ίσος με ένα
φλιτζάνι του καφέ), και τον απελευθερώστε έτσι επιστρέφει στην κανονική θέση του. Σύκο 7.
Πάρτε το portalter και το τοποθετήστε κάτω από την πλαστογράφηση καφέ (12), πιέζοντας
προς τα πάνω για να συσκευάσει τον καφέ. Σύκο 8. Κατά τη χρησιμοποίηση της τηλεσκοπικής
επιλογής Τύπου καφέ, τοποθετήστε το portalter στο δεκανίκι και ωθήστε την πλαστογράφηση
καφέ προς τα κάτω. Σύκο 9. Κατά χρησιμοποίηση WBC ή Κ-6 επαγγελματικών προτύπων, τη
συστήνουμε χρήση μιας χειρωνακτικής πλαστογράφησης.
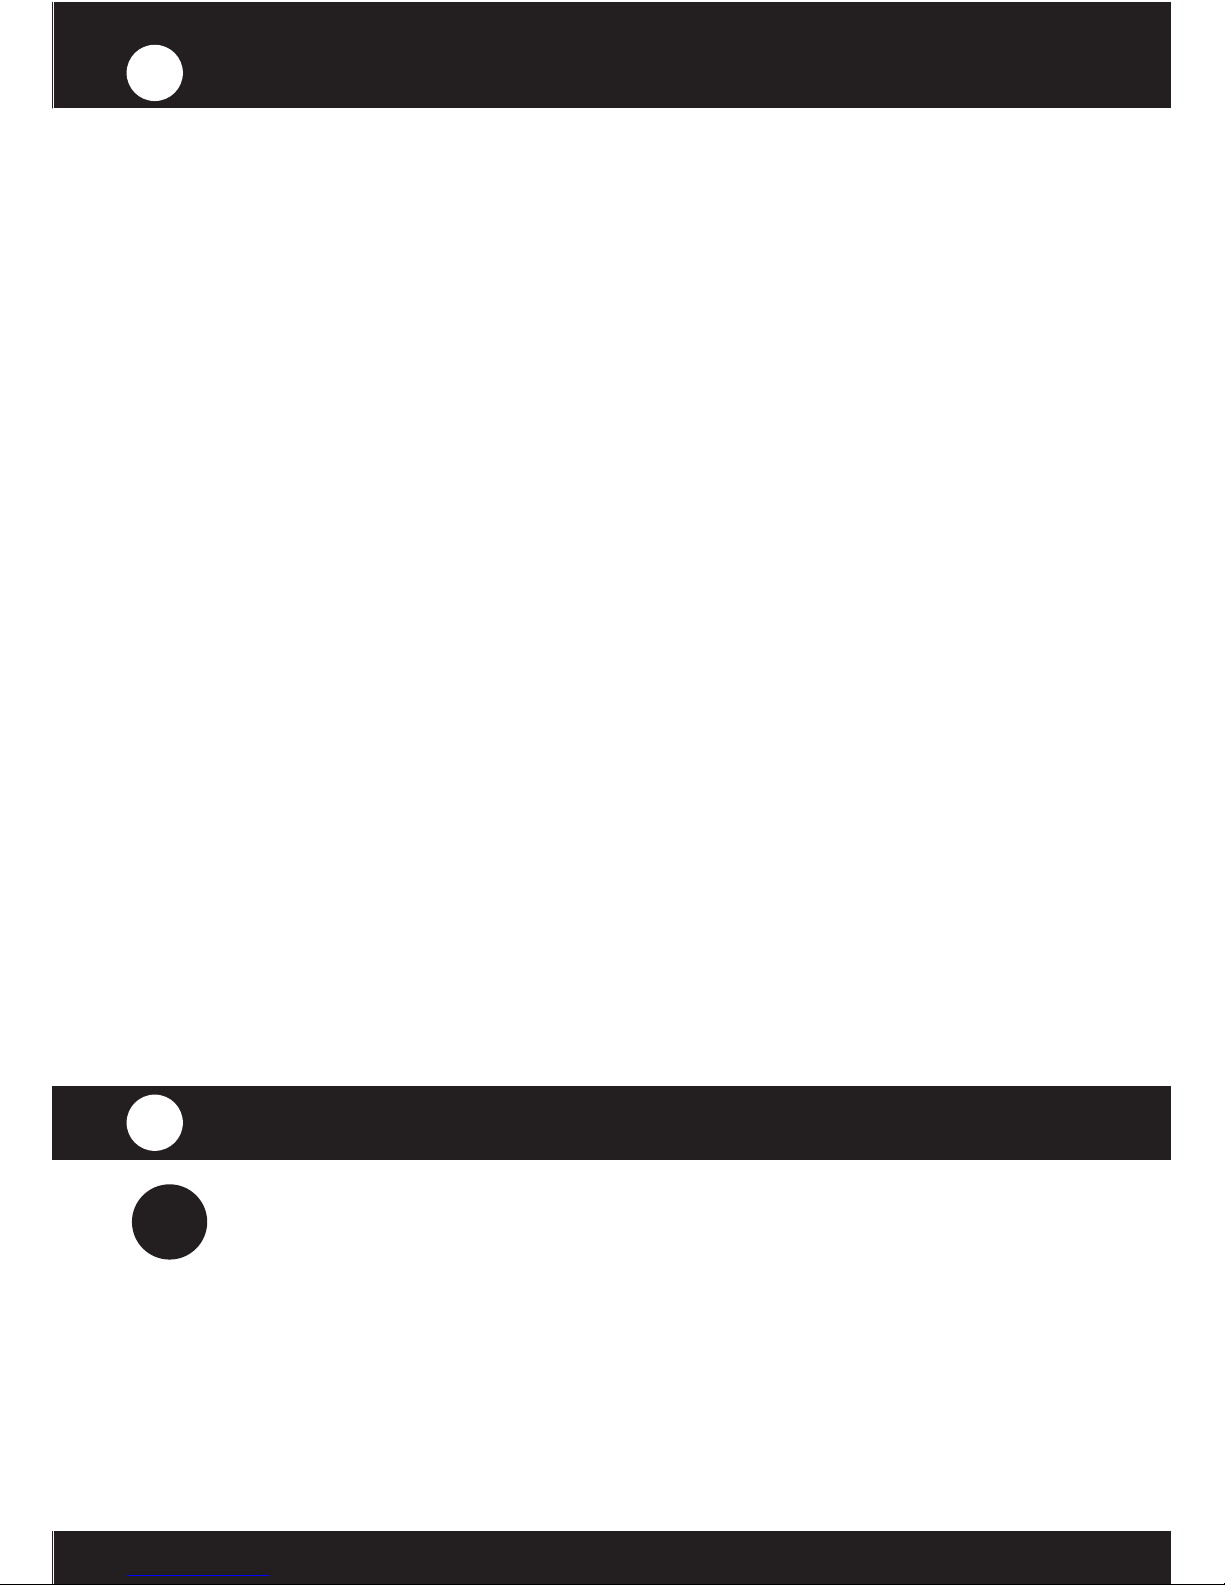
9
ΚΑΘΑΡΙΣΜΌΣ
9.1 Γενικές προειδοποιήσεις
Για να διασφαλίσετε την καλή λειτουργία της συσκευής, καθώς και την καλή ποιότητα του
αλεσμένου καφέ, πρέπει να καθαρίζετε τακτικά τα μέρη που βρίσκονται σε επαφή με τον καφέ
(τουλάχιστον μια φορά την εβδομάδα).
Για τον καθαρισμό της συσκευής πρέπει να ακολουθούνται οι παρακάτω οδηγίες:
• Σβήνετε πάντα τη συσκευή από το διακόπτη ON-OFF (14).
• Αποσυνδέστε τη συσκευή από το ηλεκτρικό δίκτυο.
• Μην εισάγετε τη συσκευή σε νερό.
9.2. Καθαρισμός της χοάνης φασολιών καφέ
Πρίν καθαρίζει, σιγουρευτείτε ότι δεν υπάρχει κανένα φασόλι που αφήνεται στη χοάνη (2).
Χαλαρώστε με το χέρι ο κύλινδρος ρύθμισης (5) και, με τη βοήθεια ενός athead κατσαβιδιού,
ξεμπλέξτε τη βίδα ασφάλειας χοανών. Αφαιρέστε η χοάνη φασολιών καφέ (2) από το ρυθμιστή
αλέσματος (6) όπως στο σύκο 2 και το καθαρίζει με ένα υγρό ύφασμα ή ένα σαπούνι και ποτίζει
για να αποβάλει τα υπολείμματα πετρελαίου από τον καφέ, που πλένει το προσεκτικά και έπειτα
που ξεραίνει.
9.3. Καθαρισμός του δοσομετρητή καφέ
Με τη βοήθεια ενός πινέλου καθαρίστε τα υπολείμματα καφέ που είναι πιθανόν προσκολλημένα
στο εσωτερικό των θαλάμων του δοσομετρητή.
9.4. Εξωτερικός καθαρισμός
Για τον εξωτερικό καθαρισμό της συσκευής χρησιμοποιείστε ένα πινέλο ή ένα πανί ελαφρώς
βρεγμένο με νερό και σαπούνι.
ΣΗΜΕΙΩΣΗ: Μη χρησιμοποιείτε ποτέ βρεγμένα πανιά για τον καθαρισμό του δοχείου
αλεσμένου καφέ. Φυλάξτε το πινέλο σε προστατευμένο χώρο και χρησιμοποιήστε το μόνο για
τον καθαρισμό του μύλου άλεσης, προκειμένου να μην το λερώσετε με άλλες ουσίες. Ο ΜΗ
καθαρισμός της συσκευής θα επηρεάσει αρνητικά τη γεύση και το άρωμα του καφέ, καθώς και
τη σύσταση και την αναπαραγωγή της δόσης.
10
ΣΥΝΤΉΡΗΣΗ
i
10.1 Γενικές προειδοποιήσεις
Πριν από οποιαδήποτε εργασία συντήρησης πρέπει να λαμβάνονται υπόψη οι
ακόλουθες οδηγίες:
• Σβήνετε πάντα τη συσκευή από το διακόπτη ON-OFF (14)
• Αποσυνδέστε τη συσκευή από το ηλεκτρικό δίκτυο.
Σε περιπτωση βλάβης ή ελατωματικής λειτουργίας, σβήστε τη συσκευή και μην
προσπαθήσετε ποτέ να την επιδιορθώσετε ή να επέμβετε άμεσα. Ειδοποιήστε το
κοντινότερο κέντρο τεχνικής υποστήριξης.
ΣΗΜΕΙΩΣΗ: Η μη τήρηση αυτής της προειδοποίησης μπορεί να θέσει σε
κίνδυνο την ασφάλεια τόσο της συσκευής όσο και του χρήστη.

10.2. Τακτική συντήρηση
Για την εξασφάλιση της απόδοσης του μύλου και για την ορθή λειτουργία του είναι απαραίτητο
να τηρούνται οι οδηγίες του κατασκευαστή, σύμφωνα με τις οποίες η συντήρηση αυτή πρέπει να
διενεργείται από ειδικευμένο προσωπικό. Συνιστάται η διεξαγωγή προγραμματισμένων ελέγχων
των πιο φθαρμένων τμημάτων της συσκευής. Πάνω απ’όλα θα πρέπει να ελέγχεται συστηματικά
ο βαθμός φθοράς των δίσκων. Η τέλεια κατάσταση των δίσκων επιτρέπει την παραγωγή
ομοιογενούς αλεσμένου καφέ αυξάνοντας την ποιότητα του περιεχομένου του φλιτζανιού.
Επίσης επιτρέπει τη μείωση της κατανάλωσης ενέργειας και την αποφυγή υπερθέρμανσης του
κινητήρα, των ίδιων των δίσκων και κατά συνέπεια του αλεσμένου καφέ.
ΣΗΜΕΙΩΣΗ: Βασιζόμενοι στη συσσωρευμένη πείρα και δεδομένης της χρήσης μειγμάτων καφέ
μέσης διάρκειας, συνιστούμε την αλλαγή των δίσκων σύμφωνα με τον ακόλουθο πίνακα:
10.3. Συντήρηση ομάδας λείανσης
Για τη συντήρηση ομάδας λείανσης, ακολουθήστε αυτές τις οδηγίες: Κλείστε τη μηχανή
χρησιμοποιώντας το on-off διακόπτη (14). Αποσυνδέστε τη μηχανή από την παροχή ηλεκτρικού
ρεύματος. Χαλαρώστε τον κύλινδρο ρύθμισης (5), όπως φαίνεται στο σύκο 2, και απομακρύνετε
τη χοάνη (2) από το ρυθμιστή αλέσματος (6). Απελευθερώστε τις 3 βίδες στο ρυθμιστή αλέσματος
(6) χρησιμοποιώντας ένα κλειδί Άλλεν όπως φαίνεται στο σύκο 10.
Γυρίστε το ρυθμιστή αλέσματος (6) δεξιόστροφα, έως ότου ανασηκώνει. Χρησιμοποιώντας
μια μικρό βούρτσα ή ένα κενό, καθαρίστε το εσωτερικό της αλέθοντας αίθουσας. Ελέγξτε
τον όρο των σαλιασμάτων και τους αλλάξτε, εάν είναι απαραίτητο. Εάν όχι, ξαναβάλτε
το ρυθμιστή στη θέση, που γυρίζει την αντίθετα προς τη φορά των δεικτων του ρολογιού
όπως στο σύκο 11 έως ότου αγγίζουν τα σαλιάσματα και αντικαθιστούν τις 3 βίδες.
10.4. Πρόσβαση των σαλιασμάτων
Ακολουθήστε τις οδηγίες σε 10.3. προκειμένου να αφαιρεθεί ο ρυθμιστής αλέσματος,
αφαιρώντας τις 3 βίδες όπως εξηγείται στο σύκο 10. Μόλις γίνει αυτό, θα πρέπει με το χέρι να
γυρίσετε τον ανώτερο κάτοχο σαλιασμάτων για να το αφαιρέσετε δεξιόστροφα από την κατοικία
της όπως στο σύκο 12.
Μετά από να αλλάξει τα σαλιάσματα, συγκεντρώστε τον ανώτερο κάτοχο σαλιασμάτων με να
περάσει κλωστή σε το αντίθετα προς τη φορά των δεικτων του ρολογιού, αντικαταστήστε το
ρυθμιστή αλέσματος (6) και ακολουθήστε τις οδηγίες όπως φαίνεται στο σύκο 10 & 11.
K-6 / K-6 Silenzio / K-6 Professional Barista / K-8 / K-8 Silenzio / K-10 Conic
300 kg / 660 lb
K-10 Conic WBC
1500 kg / 3300 lb
Σύκο 10
Σύκο 12
Σύκο 11
#
#
#
(-)
(+)

!
i
11
ΠΡΟΔΙΑΓΡΑΦΈΣ ΑΣΦΆΛΕΙΑΣ
ΣΗΜΕΙΩΣΗ: Ο κατασκευαστής δε φέρει καμία ευθύνη για ζημιές που
προκαλούνται είτε από την ακατάλληλη χρήση της συσκευής είτε από τη μη τήρηση
των προδιαγραφών ασφάλειας που αναφέρονται ανωτέρω.
Οι χρήστες παρακαλούνται να τηρούν επιμελώς τις ακόλουθες οδηγίες:
• Αυτός ο μύλος άλεσης καφέ πρέπει να χρησιμοποιείται αποκλειστικά για τις λειτουργίες
για τις οποίες σχεδιάστηκε: άλεση κόκκων καφέ.
• Μη χρησιμοποιείτε το μύλο ούτε για την άλεση άλλων τύπων τροφίμων όπως ξηροί
καρποί ούτε για την πιο λεπτή άλεση τροφών σε κόκκους όπως η ζάχαρη ή άλλων.
• Μην επιτρέψετε τη χρήση της συσκευής σε παιδιά ή άτομα με ειδικές ανάγκες.
• Οποιαδήποτε άλλη χρήση θεωρείται ακατάλληλη και επικίνδυνη.
• Αποφύγετε να φέρνετε οποιοδήποτε υγρό σε επαφή με τις εσωτερικές ή τις εξωτερικές
επιφάνειες, όταν η συσκευή είναι αναμμένη ή σβηστή, εκτός από ορισμένα μέρη που ορίζονται
ρητά στην παράγραφο “ΚΑΘΑΡΙΣΜΟΣ”. Εάν για οποιοδήποτε λόγο συμβεί κάτι τέτοιο,
διακόψτε αμέσως την παροχή του ρεύματος και σκουπίστε όλες τις επιφάνειες με προσοχή.
Εάν είναι απαραίτητη η πρόσβαση στο εσωτερικό μέρος της συσκευής όπου βρίσκονται τα
ηλεκτρικά εξαρτήματα, προστρέξτε στο κοντινότερο κέντρο τεχνικής υποστήριξης.
• Εάν σπάσει κάποιο εξάρτημα ή για οποιαδήποτε άλλη επέμβαση, συνιστούμε να
επικοινωνήσετε με τα κέντρα τεχνικής υποστήριξης, τα οποία θα διενεργήσουν την
επιδιόρθωση ή την αντικατάσταση σύμφωνα με τα πρότυπα ασφάλειας.
• Μόνο η ή οι προμηθευτές που είναι εξουσιοδοτημένοι από την μπορούν να
αντικαταστήσουν το κεντρικό καλώδιο οποιουδήποτε μύλου.
12
ΔΉΛΩΣΗ ΠΙΣΤΌΤΗΤΑΣ ΕΚ
Σύμφωνα με τον κανονισμό της ΕΕ που
αναφέρεται ανωτέρω εφαρμόστηκαν τα
κοινοτικά σήματα. Όλα τα υλικά ήταν
ενδεδειγμένα και ετοιμάστηκαν και διατίθενται
στα γραφεία μας.
04/108/ΕΚ για την προσέγγιση των
νομοθεσιών των κρατ ών μελών σχετικά με την
ηλεκτρομαγνητική συμβατότητα
98/37/ΕΚ για την προσέγγιση της νομοθεσίας
των κρατών μελών σχετικά με τις μηχανές
ΚΑΝΟΝΙΣΜΟΣ. 1935/2004 οδηγία 89/109/
EK τροποποίησης για την προσέγγιση των
νομοθεσιών των κρατών μελών σχετικά με το
υλικό και των αντικειμένων που προορίζονται
για να κάνουν την
03/108/ΕΚ για τροποποίηση της οδηγίας
2002/96/ΕΚ σχετικά με τα απόβλητα ειδών
ηλεκτρικού και ηλεκτρονικού εξοπλισμού
(AHHE)
06/95/ΕΚ για την προσέγγιση των νομοθεσιών
των κρατών μελών σχετικά με με το
ηλεκτρολογικό υλικό που προορίζεται να
χρησιμοποιηθεί εντός ορισμένων ορίων
τάσεως
02/96/EK του 27/01/2003 στην προσέγγιση
των νομοθεσιών των κρατών μελών στον
ηλεκτρικό και ηλεκτρονικό εξοπλισμό
αποβλήτων (WEEE).
Περιβάλλον
Κατά την απόρριψη της
συσκευής αυτής, μην την
πετάξετε σε έναν απλό κάδο αποριμμάτων,
αλλά σε επίσημο
σημείο συλλογής για να ανακυκλωθεί.
Με αυτόν τον τρόπο συμβάλλετε στην
προστασία του περιβάλλοντος.
Ο νομικός αντιπρόσωπος


 Loading...