

Page 1

1
www.comodo.com
Comodo Internet Security
Comodo Security Solutions Inc.
525 Washington Bvld,
Jersey City, NJ 07310
United States
www.comodo.com
Version 4.1
User Guide
Comodo Internet Security User Guide | © 2010 Comodo Security Solutions Inc. | All rights reserved.
Page 2

Table of Contents
1 Introduction to Comodo Internet Security.........................6
1.1 Special Features........................................................................................................................................... 10
1.2 System Requirements.................................................................................................................................. 13
1.3 Installation.................................................................................................................................................... 14
1.3.1 Installation Process................................................................................................................................. 14
1.3.2 Upgrading to CIS Plus or Pro.................................................................................................................. 25
1.3.3 CIS Complete – Installation and Activation ............................................................................................. 37
1.4 Starting Comodo Internet Security................................................................................................................ 58
1.4.1 Comodo Internet Security Tray Icon........................................................................................................ 58
1.4.2 Windows Desktop.................................................................................................................................... 58
1.4.3 Start Menu............................................................................................................................................... 58
1.5 Overview of Summary Screens.................................................................................................................... 59
1.5.1 Comodo Internet Security – Summary..................................................................................................... 59
1.5.2 Comodo Antivirus – Summary................................................................................................................. 62
1.5.3 Comodo Firewall – Summary.................................................................................................................. 65
1.6 Comodo Internet Security – Navigation .......................................................................................................67
1.7 Understanding Alerts.................................................................................................................................... 68
2 Antivirus Tasks Overview..................................................86
2.1 Common Tasks............................................................................................................................................. 86
2.1.1 Run a Scan.............................................................................................................................................. 87
2.1.2 Update Virus Database............................................................................................................................ 98
2.1.3 Quarantined Items................................................................................................................................... 99
2.1.4 View Antivirus Events............................................................................................................................ 101
2.1.5 Submit Files to Comodo for Analysis..................................................................................................... 114
2.1.6 Scheduled Scans................................................................................................................................... 116
2.1.7 Scan Profiles.......................................................................................................................................... 119
2.1.8 Scanner Settings................................................................................................................................... 124
2
www.comodo.com
Comodo Internet Security User Guide | © 2010 Comodo Security Solutions Inc. | All rights reserved.
Page 3

2.1.8.1 Real Time Scanning ...................................................................................................................... 125
2.1.8.2 Manual Scanning............................................................................................................................ 127
2.1.8.3 Scheduled Scanning ...................................................................................................................... 129
2.1.8.4 Exclusions...................................................................................................................................... 131
3 Firewall Tasks Overview..................................................133
3.1 Common Tasks........................................................................................................................................... 135
3.1.1 View Firewall Events.............................................................................................................................. 136
3.1.2 Define a New Trusted Application.......................................................................................................... 146
3.1.3 Define a New Blocked Application......................................................................................................... 147
3.1.4 Stealth Ports Wizard.............................................................................................................................. 148
3.1.5 View Active Connection......................................................................................................................... 152
3.1.6 My Blocked Network Zones................................................................................................................... 154
3.2 Advanced Tasks.......................................................................................................................................... 158
3.2.1 Network Security Policy......................................................................................................................... 158
3.2.1.1 General Navigation......................................................................................................................... 160
3.2.1.2 Application Rules............................................................................................................................ 160
3.2.1.3 Global Rules................................................................................................................................... 172
3.2.1.4 My Network Zones.......................................................................................................................... 174
3.2.1.5 My Port Sets................................................................................................................................... 178
3.2.2 Predefined Firewall Policies................................................................................................................... 181
3.2.3 Firewall Behavior Settings..................................................................................................................... 183
3.2.3.1 General Settings............................................................................................................................. 184
3.2.3.2 Alert Settings.................................................................................................................................. 186
3.2.3.3 Advanced Settings.......................................................................................................................... 188
4 Defense+ Tasks Overview...............................................190
4.1 Common Tasks........................................................................................................................................... 193
4.1.1 View Defense+ Events.......................................................................................................................... 194
4.1.2 My Protected Files................................................................................................................................. 202
4.1.3 My Blocked Files................................................................................................................................... 205
4.1.4 My Pending Files................................................................................................................................... 207
3
www.comodo.com
Comodo Internet Security User Guide | © 2010 Comodo Security Solutions Inc. | All rights reserved.
Page 4

4.1.5 My Own Safe Files................................................................................................................................ 210
4.1.6 View Active Process List........................................................................................................................ 211
4.1.7 My Trusted Software Vendors................................................................................................................ 212
4.1.8 My Protected Registry Keys.................................................................................................................. 218
4.1.9 My Protected COM Interfaces...............................................................................................................221
4.2 The Sandbox.............................................................................................................................................. 223
4.2.1 The Sandboxing Process....................................................................................................................... 224
4.2.2 Add a Program to the Sandbox.............................................................................................................. 226
4.2.3 Sandbox Settings.................................................................................................................................. 230
4.2.3.1 General Settings............................................................................................................................. 230
4.2.3.2 Alert Settings.................................................................................................................................. 233
4.2.4 Run Programs in the Sandbox............................................................................................................... 234
4.3 Advanced Tasks.......................................................................................................................................... 236
4.3.1 Computer Security Policy ..................................................................................................................... 237
4.3.2 Predefined Security Policies.................................................................................................................. 243
4.3.3 Image Execution Control Settings.........................................................................................................245
4.3.3.1 General Settings ............................................................................................................................ 245
4.3.3.2 Files to Check Settings................................................................................................................... 246
4.3.4 Defense+ Settings................................................................................................................................. 247
4.3.4.1 General Settings............................................................................................................................. 248
4.3.4.2 Monitor Settings.............................................................................................................................. 251
5 More... Options.................................................................254
5.1 Settings....................................................................................................................................................... 255
5.1.1 General Settings.................................................................................................................................... 256
5.1.2 Language Settings................................................................................................................................. 257
5.1.3 Parental Control Settings....................................................................................................................... 257
5.1.4 Themes.................................................................................................................................................. 259
5.1.5 Logging Settings.................................................................................................................................... 259
5.1.6 Connection Settings.............................................................................................................................. 260
5.1.7 Update Settings..................................................................................................................................... 261
4
www.comodo.com
Comodo Internet Security User Guide | © 2010 Comodo Security Solutions Inc. | All rights reserved.
Page 5

5.1.8 Threatcast Settings................................................................................................................................ 261
5.2 Manage My Configuration .......................................................................................................................... 262
5.2.1 Importing/Exporting and Managing Personal Configurations.................................................................264
5.3 Diagnostics................................................................................................................................................. 269
5.4 Check for Updates...................................................................................................................................... 270
5.5 Browse Support Forums............................................................................................................................. 272
5.6 Help ........................................................................................................................................................... 273
5.7 About.......................................................................................................................................................... 273
6 Live PC Support...............................................................275
6.1 Overview of the Services............................................................................................................................ 275
6.2 Live PC Support - 30 Day Free Trial........................................................................................................... 276
6.3 Launching The Client And Requesting The Service....................................................................................278
6.4 Uninstalling Live PC Support Client............................................................................................................ 280
7 TrustConnect Overview...................................................281
7.1 Microsoft Windows – Configuration and Connection .................................................................................282
7.2 Mac OS X – Configuration and Connection ...............................................................................................287
7.3 Linux / Open VPN – Configuration and Connection ................................................................................... 287
7.4 Apple iPhone / iPod Touch / iPad – Configuration and Connection.............................................................289
7.5 TrustConnect FAQ...................................................................................................................................... 291
8 Comodo Hopsurf..............................................................301
Appendix 1 Comodo Secure DNS Service.........................311
Router – Manually Enabling or Disabling Comodo Secure DNS Service...........................................................312
Windows XP – Manually Enabling or Disabling Comodo Secure DNS Service.................................................313
Windows Vista – Manually Enabling or Disabling Comodo Secure DNS Service..............................................319
About Comodo.....................................................................327
5
www.comodo.com
Comodo Internet Security User Guide | © 2010 Comodo Security Solutions Inc. | All rights reserved.
Page 6

1 Introduction to Comodo Internet
Security
Overview
Comodo Internet Security offers 360° protection against internal and
external threats by combining a powerful Antivirus protection, an enterprise class
packet filtering firewall, and an advanced host intrusion prevention system called
Defense+.
CIS version 4 sees a major leap forward in security and usability with the addition of the new sandbox feature - an
isolated operating environment for unknown applications. Under default settings, unknown applications are now
automatically sandboxed so that they cannot make permanent changes to other processes, programs or data on
your 'real' system. CIS is also available in Plus, Pro and Complete editions, each offering a range of additional
services to the core protection offered by the free version. These include services such us LivePCSupport
(Comodo support experts available 24/7 to fix any problem with your computer); TrustConnect (secure Internet
proxy service that ensures 128 bit encrypted connectivity from any public wireless hotspot); Online Backup (2GB of
online storage space) and the Comodo Guarantee (if your computer becomes damaged as a result of malware and
Comodo support services cannot return it to a working condition then we’ll pay the costs of getting it repaired. See
terms and conditions for full details. Available to USA residents only).
When used individually, each product delivers superior protection against its specific threat challenge. When used
together as a full suite they provide a complete 'prevention, detection and cure' security system for your computer.
6
www.comodo.com
Comodo Internet Security User Guide | © 2010 Comodo Security Solutions Inc. | All rights reserved.
Page 7

Comodo Internet Security Features:
• Antivirus - The proactive antivirus system that automatically detects and eliminates viruses, Worms and
Trojan horses.
• Firewall - The Firewall that constantly defends your system from inbound and outbound internet attacks
with a highly effective packet filtering firewall.
• Defense+ - A rules based intrusion prevention system that protects your critical operating system files from
malicious processes, internal attacks and blocks unknown malware before it ever gets a chance to install.
Defense+ now features automated sandboxing of unknown applications. The sandbox ensures untrusted
(but harmless) applications are allowed freedom to operate whilst untrusted (and genuinely malicious)
applications are prevented from accessing or infecting your computer.
• Live PC Support – Tier 1 (Pro version only) - a 24 x 7 support in which Comodo experts remotely access your
computer when you need it, for:
• Virus Diagnosis/ Removal;
• PC Tune-up;
• Internet Login Protection;
• Email Account Setup;
• Software Installation;
• Printer Setup/ Troubleshooting;
• Optimizing your computer's power settings;
• Computer Troubleshooting.
7
www.comodo.com
Comodo Internet Security User Guide | © 2010 Comodo Security Solutions Inc. | All rights reserved.
Page 8

• Live PC Support - Tier 1 + Tier 2 (Pro and Complete versions only) - a 24 x 7 online support service in
which Comodo experts remotely access your computer when you need it, for:
Virus Diagnosis/ Removal
PC Tune-up;
Internet Login Protection;
Email Account Setup;
Software Installation;
Printer Setup/ Troubleshooting;
Optimizing your computer's power settings;
Computer Troubleshooting.
• Secure Wireless Internet Connectivity (Plus, Pro and Complete versions only) - TrustConnect makes
surfing the web safe from any public Wi-Fi location (10 GB per month)
• Comodo Guarantee (Pro and Complete versions only) - If your computer becomes damaged as a result
of malware and Comodo support services cannot return it to a working condition then we’ll pay the costs of
getting it repaired. See terms and conditions for full details. Available to USA residents only.
• Online BackUp (Complete version only) - Back-up your important data to Comodo's highly secure
servers. Data is encrypted and can accessed only by the user from any Internet connected computer in the
world (2 GB storage space).
Comodo Internet Security can be used ‘out of the box’ - so even the most inexperienced users need not have to
deal with complex configuration issues after installation.
Comodo Internet Security alerts you whenever potential malware attempts to attack or gain access to your system.
The alerts are displayed as pop-ups at the right hand corner of your screen and allow you to allow or block the
unrecognized activities, processes and connection attempts of running applications (CIS now even protects against
'drive-by-download' buffer overflow attacks.) Apart from expert advice in the form of 'Security Considerations', each
alert now also features the innovative ThreatCast feature to help users arrive at an informed decision on how to
react to the alert. The ThreatCast system allows users to share their responses among the community of millions of
CIS users worldwide. Whenever an alert appears, it contains a report of how other users have responded to the
same alert. The report provides an additional guidance to even inexperienced users on making a decision to
respond to the alert.
Guide Structure
This introduction is intended to provide an overview of the basics of Comodo Internet Security and should be of
interest to all users.
• Introduction
• Special Features
• System Requirements
• Installing Comodo Internet Security
• Starting Comodo Internet Security
• General Navigation
• Understanding Alerts
The next four sections of the guide cover every aspect of the configuration of Comodo Internet Security. The final
8
www.comodo.com
Comodo Internet Security User Guide | © 2010 Comodo Security Solutions Inc. | All rights reserved.
Page 9

two sections contain configuration and technical help for the Live PC Support and TrustConnect.
• Antivirus Task Center
• Run a Scan
• Update a Virus Database
• Quaratined Items
• Viewing Antivirus Events
• Submit Files to Comodo for Analysis
• Scheduled Scans
• Scan Profiles
• Scanner Settings
• Firewall Task Center
• Overview of Task Interface
Common Tasks
• View Firewall Events
• Define a New Trusted Application
• Define a New Blocked Application
• Stealth Ports Wizard
• View Active Connections
• My Blocked Network Zones
Advanced
• Network Security Policy
• Predefined Firewall Policies
• Firewall Behavior Settings
• Defense+ Task Center
• Overview of Task Interface
Common Tasks
• View Defense+ Events
• My Protected Files
• My Blocked Files
• My Pending Files
• My Own Safe Files
• View Active Process List
• My Trusted Software Vendors
• My Protected Registry Keys
• My Protected COM Interfaces
The Sandbox
• Sandbox Overview
• Add a Program to the Sandbox
• Sandbox Settings
• Run a Program in the Sandbox
Advanced
• Computer Security Policy
9
www.comodo.com
Comodo Internet Security User Guide | © 2010 Comodo Security Solutions Inc. | All rights reserved.
Page 10

• Predefined Security Policies
• Image Execution Control Settings
• Defense+ Settings
• More... Options
• Overview of More Options Interface
• Settings
• Manage My Configurations
• Diagnostics
• Check For Updates
• Browse Support Forums
• Help
• About
• Live PC Support
• Live PC Support
• TrustConnect
• TrustConnect Overview
• Windows Configuration
• Mac OS X Configuration
• Linux / OpenVPN Configuration
• Apple iPhone / iPod Touch / iPad Configuration
• TrustConnect FAQ
• Comodo HopSurf
• Overview of Comodo HopSurf
• Accessing HopSurf Home Page
• Signing-up to HopSurf
• Make Quick Internet Searches
• Run an Online Antivirus Scan
• Uninstalling Hopsurf
• Appendix 1 Comodo Secure DNS Service
• Comodo Secure DNS Overview
• Windows XP Manually Enabling or Disabling Comodo Secure DNS Service
• Windows Vista Manually Enabling or Disabling Comodo Secure DNS Service
1.1 Special Features
Defense+ Host Intrusion Prevention System
• Virtually Bulletproof protection against root-kits, inter-process memory injections, key-loggers and more;
• Authenticates the integrity of every program before allowing it to load into your computer's memory;
• Alerts you every time an unknown or untrusted applications attempts to run or install;
• Blocks Viruses, Trojans and Spy-ware before they can ever get onto your system;
• Prevents unauthorized modification of critical operating system files and registry entries;
10
www.comodo.com
Comodo Internet Security User Guide | © 2010 Comodo Security Solutions Inc. | All rights reserved.
Page 11

• Includes new Sandbox feature to completely isolate untrusted files from the rest of your computer
Advanced Network Firewall Engine
The Firewall component of Comodo Internet Security offers the highest levels of perimeter security against inbound
and outbound threats - meaning you get the strongest possible protection against hackers, malware and identity
thieves. Now we've improved it again by adding new features like,
• Stealth Mode to make your PC completely invisible to opportunistic port scans;
• Wizard based auto-detection of trusted zones;
• Predefined Firewall policies allow you to quickly implement security rules;
• Diagnostics to analyze your system for potential conflicts with the firewall and much more.
Comprehensive Antivirus Protection
• Detects and eliminates viruses from desktops, laptops and network workstations;
• Employs heuristic techniques to identify previously unknown viruses and Trojans;
• Constantly protects with real-time, On-Access scanning;
• Highly configurable On-Demand scanner allows you to run instant checks on any file, folder or drive;
• Seamless integration into the Windows operating system allows scanning specific objects ‘on the fly’;
• Daily, automatic updates of virus definitions;
• Isolates suspicious files in quarantine preventing further infection;
• Built in scheduler allows you to run scans at a time that suits you;
• Simple to use - install it and forget it - Comodo AV protects you in the background.
Intuitive Graphical User Interface
• Summary screen gives an at-a-glance snapshot of your security settings;
• Easy and quick navigation between each module of the firewall;
• Simple point and click configuration - no steep learning curves;
• New completely redesigned security rules interface - you can quickly set granular access rights and
privileges on a global or per application. The firewall also contains preset policies and wizards that help
simplify the rule setting process.
Live PC Support (Plus, Pro and Complete versions only )
Comodo Internet Security Plus, Pro and Complete customers receive LivePCSupport - the easiest and most
comprehensive way of getting your computer problems fixed. The support services are delivered by a Comodo
security expert accessing your computer through a remote desktop. The services include:
• Virus Diagnosis/ Removal
• PC Tune-up
• Internet Login Protection
11
www.comodo.com
Comodo Internet Security User Guide | © 2010 Comodo Security Solutions Inc. | All rights reserved.
Page 12

• Email Account Setup
• Software Installation
• Printer Setup/ Troubleshooting
• Green PC
• Computer Troubleshooting
Please visit http://livepcsupport.com for full product details. Please visit http://personalfirewall.comodo.com to sign
up for a Plus or Pro package.
Comodo TrustConnect (Plus, Pro and Complete versions only )
Included with a Plus, Pro or Complete subscription, Comodo TrustConnect is a fast, secure internet proxy service
that makes surfing the web safe -
• At Coffee shops, Hotels and Airports;
• At any other public Wi-Fi location;
• At your home location;
• For Enterprises with remote workers and road-warriors that need secure access to internal networks
Comodo Internet Security - Extended Features
Highly Configurable Security Rules Interface
Comodo Internet Security offers more control over security settings than ever before. Users can quickly set
granular Internet access rights and privileges on a global or per application basis using the flexible and easy to
understand GUI. This version also sees the introduction of preset security policies which allow you to deploy a
sophisticated hierarchy of firewall rules with a couple of mouse clicks.
Application Behavior Analysis
Comodo Internet Security features an advanced protocol driver level protection - essential for the defense of your
PC against Trojans that run their own protocol drivers.
Event logging
Comodo Internet Security features a vastly improved log management module - allowing users to export records of
Antivirus, Firewall and Defense+ activities according to several user-defined filters. Beginners and advanced users
alike are greatly benefited from this essential troubleshooting feature.
Threatcast Functionality
Comodo Internet Security provides a report on how the others among millions if its users have reacted to each of
its pop-up alerts generated during different circumstances. This provides guidance to make a decision on allowing
or blocking an activity that has generated the alert. Comodo Internet Security has a savvy and technically
knowledgeable user base. Therefore, the responses of our intelligent user base are help to guide the novice users
who do not know how to react. Once signed up, your responses are also uploaded to the servers to guide others.
Memory Firewall Integration
Comodo Internet Security includes the buffer-overflow protection of Comodo Memory Firewall. On the attempt of a
buffer overflow attack, CIS raises a pop-up alert. This provides protection against data theft, computer crashes and
12
www.comodo.com
Comodo Internet Security User Guide | © 2010 Comodo Security Solutions Inc. | All rights reserved.
Page 13

system damage, which are possible consequences of a buffer overflow attack.
'Training Mode' and 'Clean PC' Mode
These modes enable the firewall and host intrusion prevention systems to automatically create 'allow' rules for new
components of applications you have decided to trust, so you won't receive pointless alerts for those programs you
trust. The firewall learns how they work and only warn you when it detects truly suspicious behavior.
Application Recognition Database (Extensive and proprietary application safe list)
The Firewall includes an extensive white-list of safe executables called the 'Comodo Safe-List Database'. This
database checks the integrity of every executable and the Firewall alerts you of potentially damaging applications
before they are installed. This level of protection is new because traditionally firewalls only detect harmful
applications from a blacklist of known malware - often-missing new forms of malware as might be launched in day
zero attacks.
The Firewall is continually updated and currently over 1,000,000 applications are in Comodo Safe list, representing
virtually one of the largest safe lists within the security industry.
Self Protection against Critical Process Termination
Viruses and Trojans often try to disable your computer's security applications so that they can operate without
detection. CIS protects its own registry entries, system files and processes so malware can never shut it down or
sabotage the installation.
Sandboxing as a security feature
Comodo Internet Security's new sandbox is an isolated operating environment for unknown and untrusted
applications. Running an application in the sandbox means that it cannot make permanent changes to other
processes, programs or data on your 'real' system. Comodo have integrated sandboxing technology directly into
the security architecture of CIS to complement and strengthen the Firewall, Defense+ and Antivirus modules.
Submit Suspicious Files to Comodo
Are you the first victim of a brand new type of spyware? Users can help combat zero-hour threats by using the built
in submit feature to send files to Comodo for analysis. Comodo then analyzes the files for any potential threats and
update our database for all users.
1.2 System Requirements
To ensure optimal performance of Comodo Internet Security, please ensure that your PC complies with the
minimum system requirements as stated below:
• Windows 7 (Both 32-bit and 64-bit versions), Windows Vista (Both 32-bit and 64-bit versions) or Windows
XP (Both 32-bit and 64-bit versions)
• Internet Explorer Version 5.1 or above
• 128 MB available RAM
• 210 MB hard disk space for both 32-bit and 64-bit versions
13
www.comodo.com
Comodo Internet Security User Guide | © 2010 Comodo Security Solutions Inc. | All rights reserved.
Page 14
1.3 Installation
Before you install Comodo Internet Security, read the installation instructions carefully and also review the system
requirements. Additional services and features such as activation of your LivePCSupport account and/or Comodo
Guarantee are carried out after the base installation has been completed.
Please note - the CIS software itself is identical for all customers regardless of the package type. All versions
(including free) include all security features, technologies and updates. The difference between the package types
lies in the availability of additional services such as LivePCSupport, TrustConnect, Online Storage and the Comodo
Guarantee. Activation of additional services is carried out after the base installation has been completed.
1.3.1 Installation Process
To install, download the Comodo Internet Security setup files to your local hard drive. (setup.exe can be
downloaded from http://www.personalfirewall.comodo.com)
Next, double click on the setup file to start the installation wizard and follow the process as shown below.
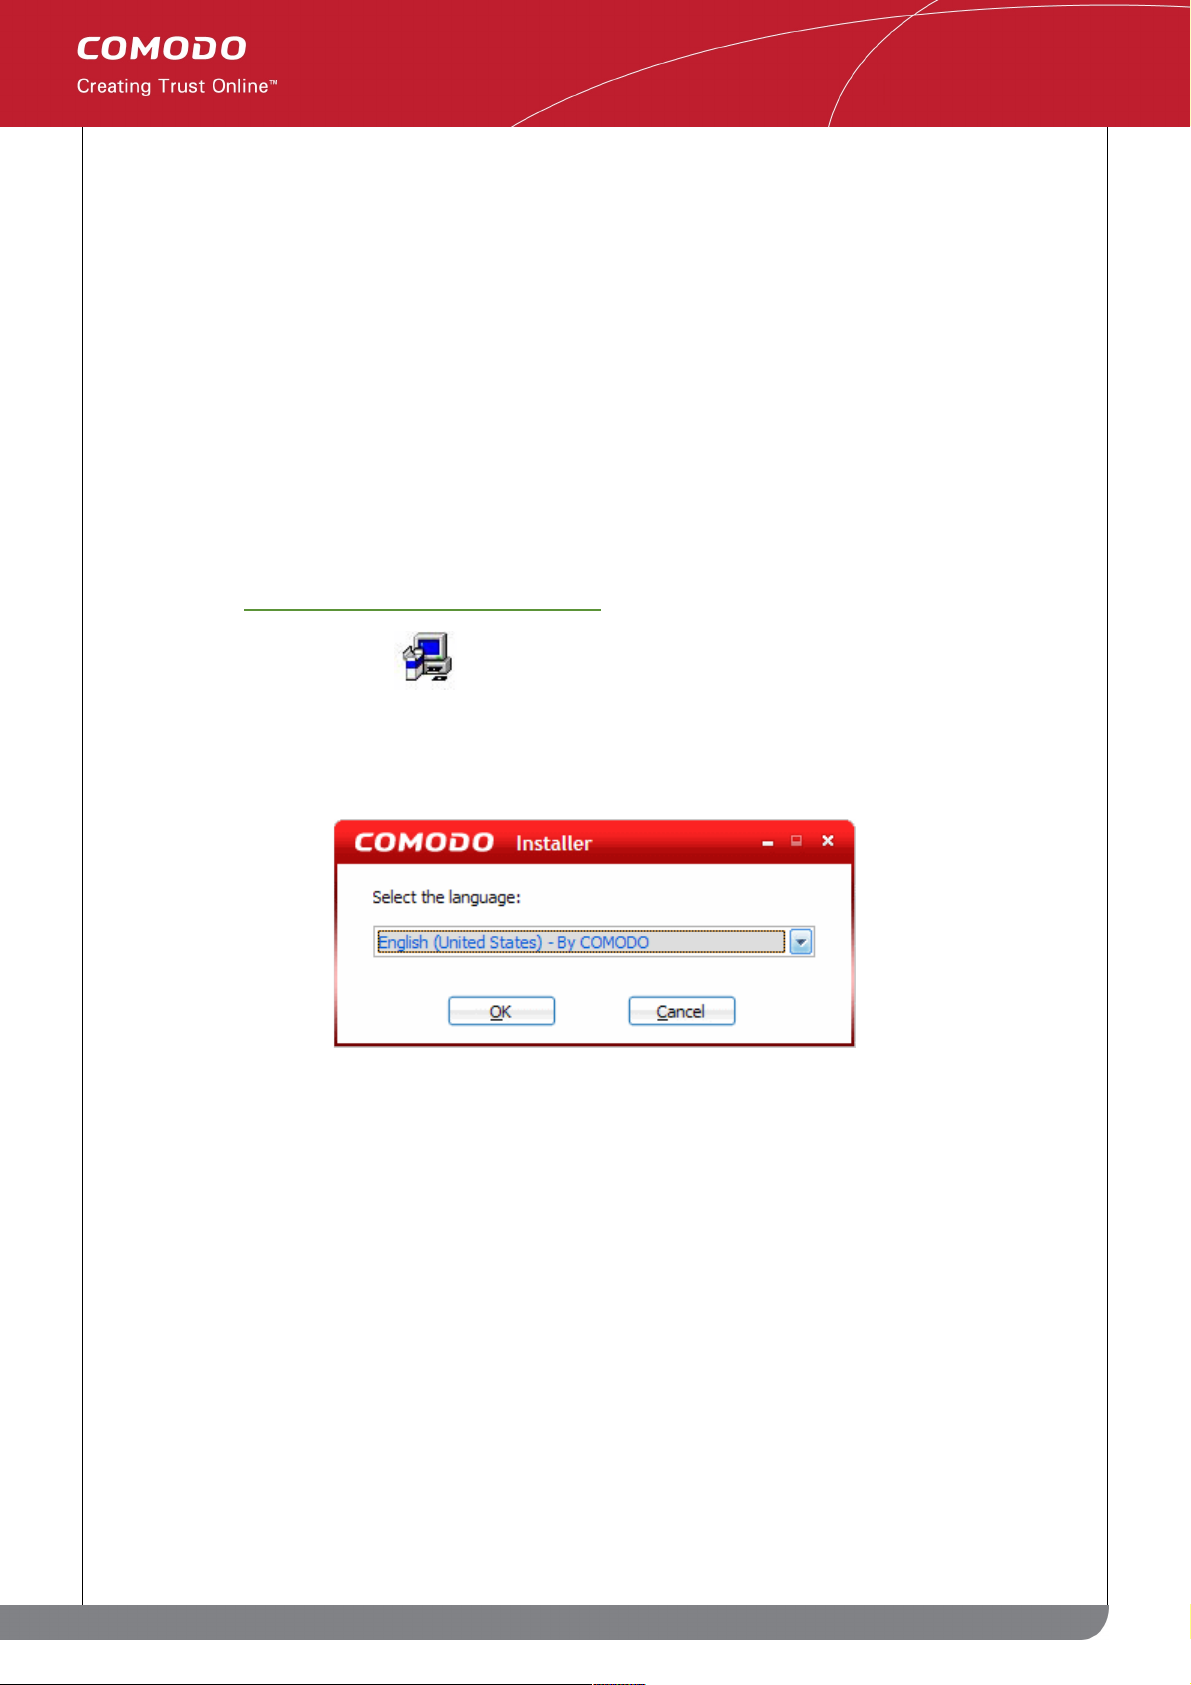
STEP 1: Select your installation language
Firstly, choose the installation language.
The language you choose here will determine the language you see during the rest of the installation process and
in all areas of the CIS 4 interface. Use the drop down to make your selection.
STEP 2: License Agreement
To continue with the installation, you must read then accept the End User License Agreement (EULA).
14
www.comodo.com
Comodo Internet Security User Guide | © 2010 Comodo Security Solutions Inc. | All rights reserved.
Page 15

Click 'I Accept' to agree to the terms and continue.
STEP 3: Product Registration
Next, the wizard will activate your free lifetime license. If you wish to sign up for news about Comodo products,
updates and offers then enter your email address in the space provided. This is optional. Click 'Next'.
15
www.comodo.com
Comodo Internet Security User Guide | © 2010 Comodo Security Solutions Inc. | All rights reserved.
Page 16
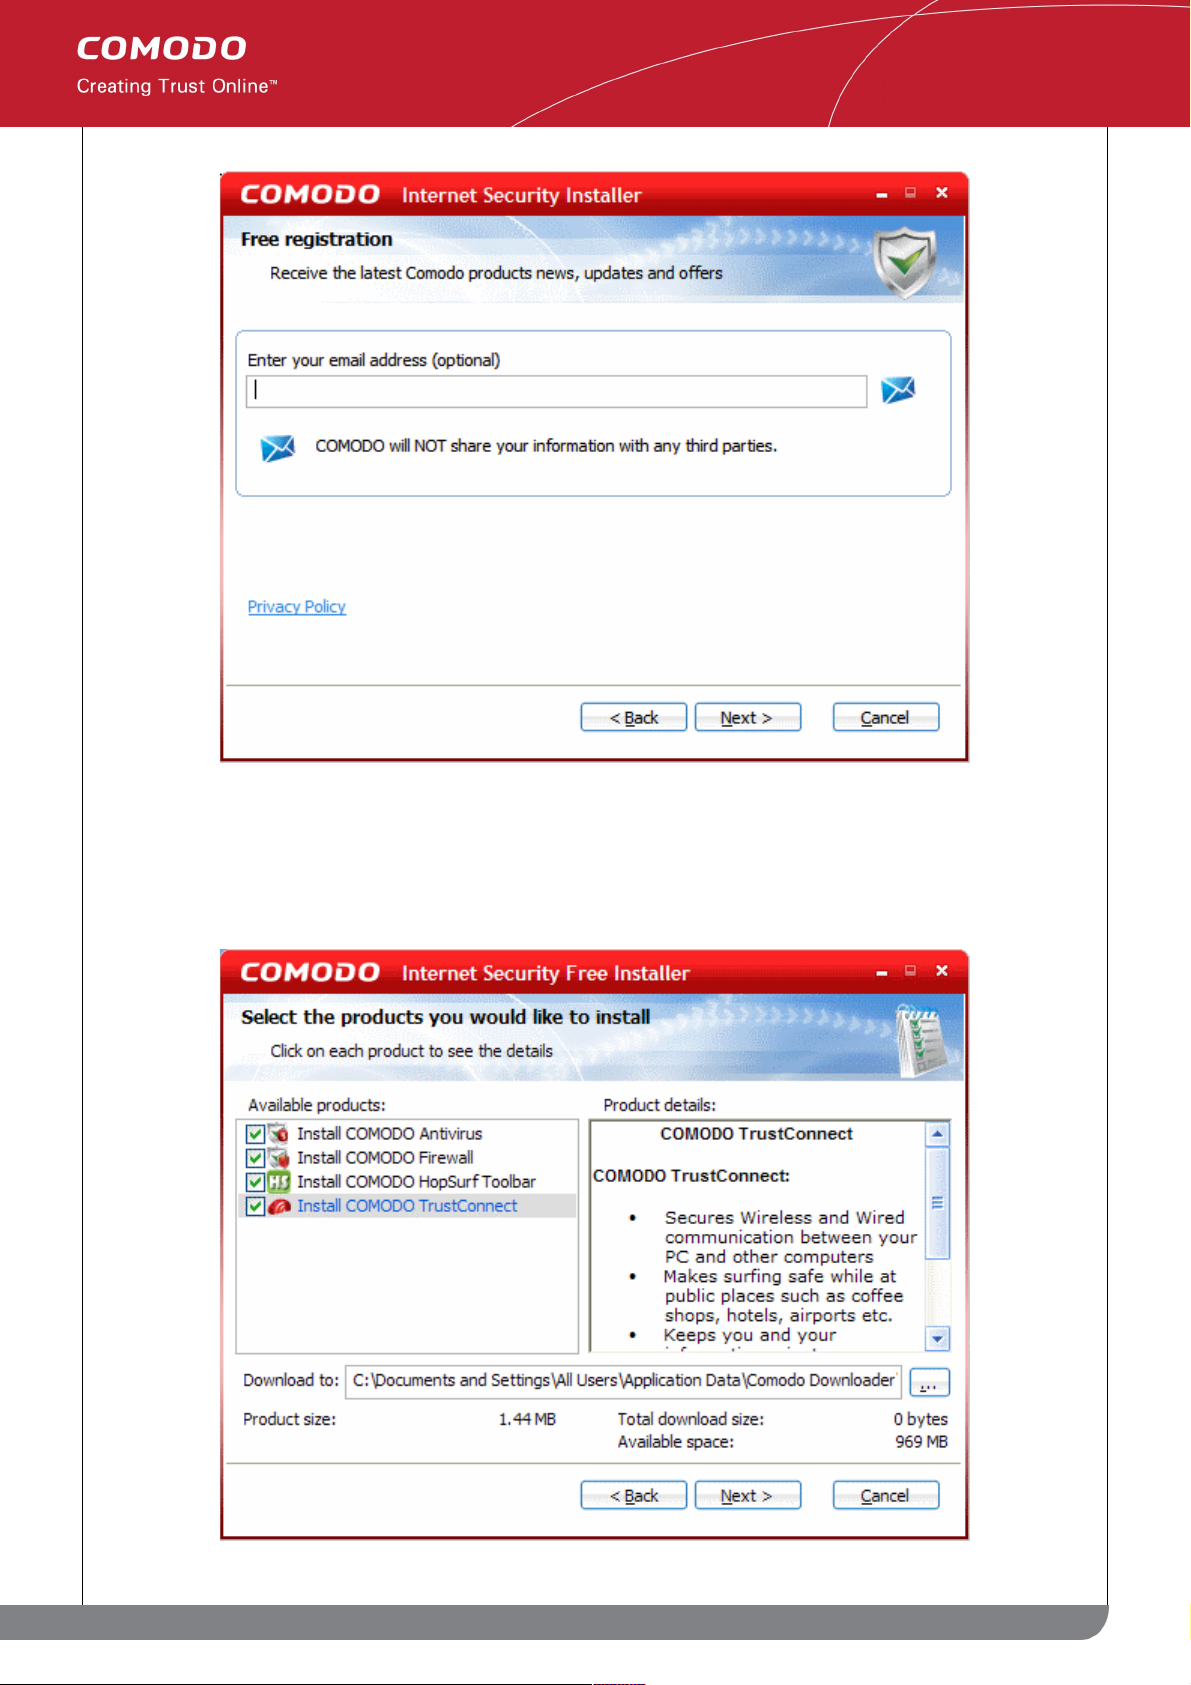
STEP 4: Select which components you wish to install
The next step is to choose which elements you would like to download and install. Details on each product can be
viewed in the right hand pane.
16
www.comodo.com
Comodo Internet Security User Guide | © 2010 Comodo Security Solutions Inc. | All rights reserved.
Page 17
In order to obtain maximum protection, Comodo recommends that you uninstall any third party personal Firewall
and Antivirus in your system and select both the Comodo Antivirus and Comodo Firewall options (installation of
both is mandatory for Plus, Pro and Complete customers). CIS Plus, Pro and Complete customers will also need to
install Comodo TrustConnect to take advantage of the service (this is optional for users of the free product).
Comodo HopSurf and Comodo Time Machine are optional installations for all users.
• Install COMODO Firewall - Selecting this option installs Comodo Firewall and Defense+ components. De-
select this option, if you already have third party Firewall protection activated in your computer system.
Installing Comodo Firewall is a mandatory requirement if you are a Plus, Pro or Complete customer. If you
choose to install the firewall BUT NOT the antivirus then you will be asked to configure the firewall security
settings in Step 5
• Install COMODO Antivirus - Selecting this option installs Comodo Antivirus and Defense+ components.
De-select this option, if you already have a third party virus protection activated in your computer system.
Installing Comodo Antivirus is a mandatory requirement if you are a Plus, Pro or Complete customer.
• Install COMODO HopSurf - Selecting this option installs the Comodo HopSurf browser toolbar to provide
fingertip access to the world's most exciting social network. This is optional for all users.
• Install COMODO TrustConnect - Selecting this option installs the client for Comodo's secure proxying
service - ensuring all wireless connections from public hotspots are encrypted and secure. This is optional
for free users and necessary for Pro, Plus and Complete users that wish to use the service.
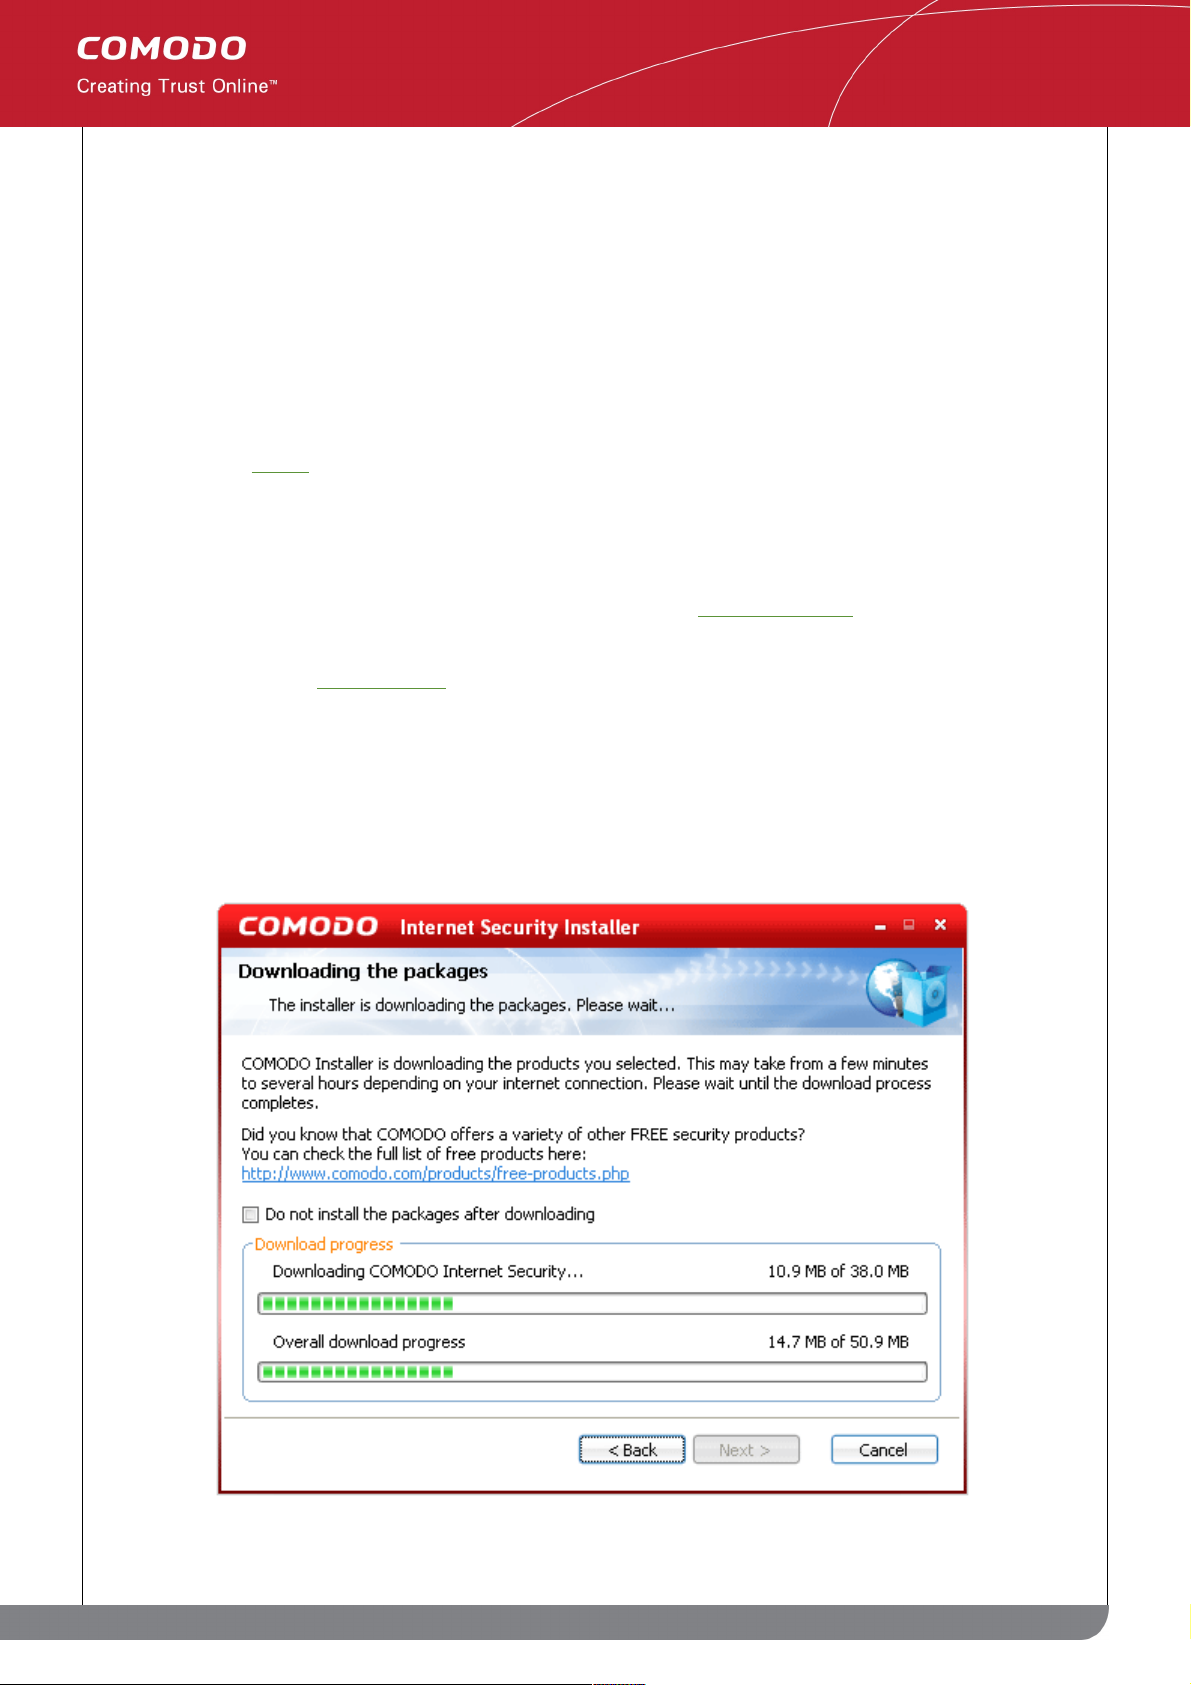
The lower part of the dialog indicates the location on your hard drive that the files will be download to; the current
size of the download based on the choices you have made and the amount of space you have available on the
drive to which you have decided to download. The installation process will vary slightly depending on the choices
you make here. Once you have made your choices, select 'Next to begin downloading the required components:
17
www.comodo.com
Comodo Internet Security User Guide | © 2010 Comodo Security Solutions Inc. | All rights reserved.
Page 18
Once downloaded, the installation process will automatically begin and you will be asked to choose which folder to
install to. If you do not wish installation to begin immediately after downloading is complete, then check the box 'Do
not install the packages after downloading.'
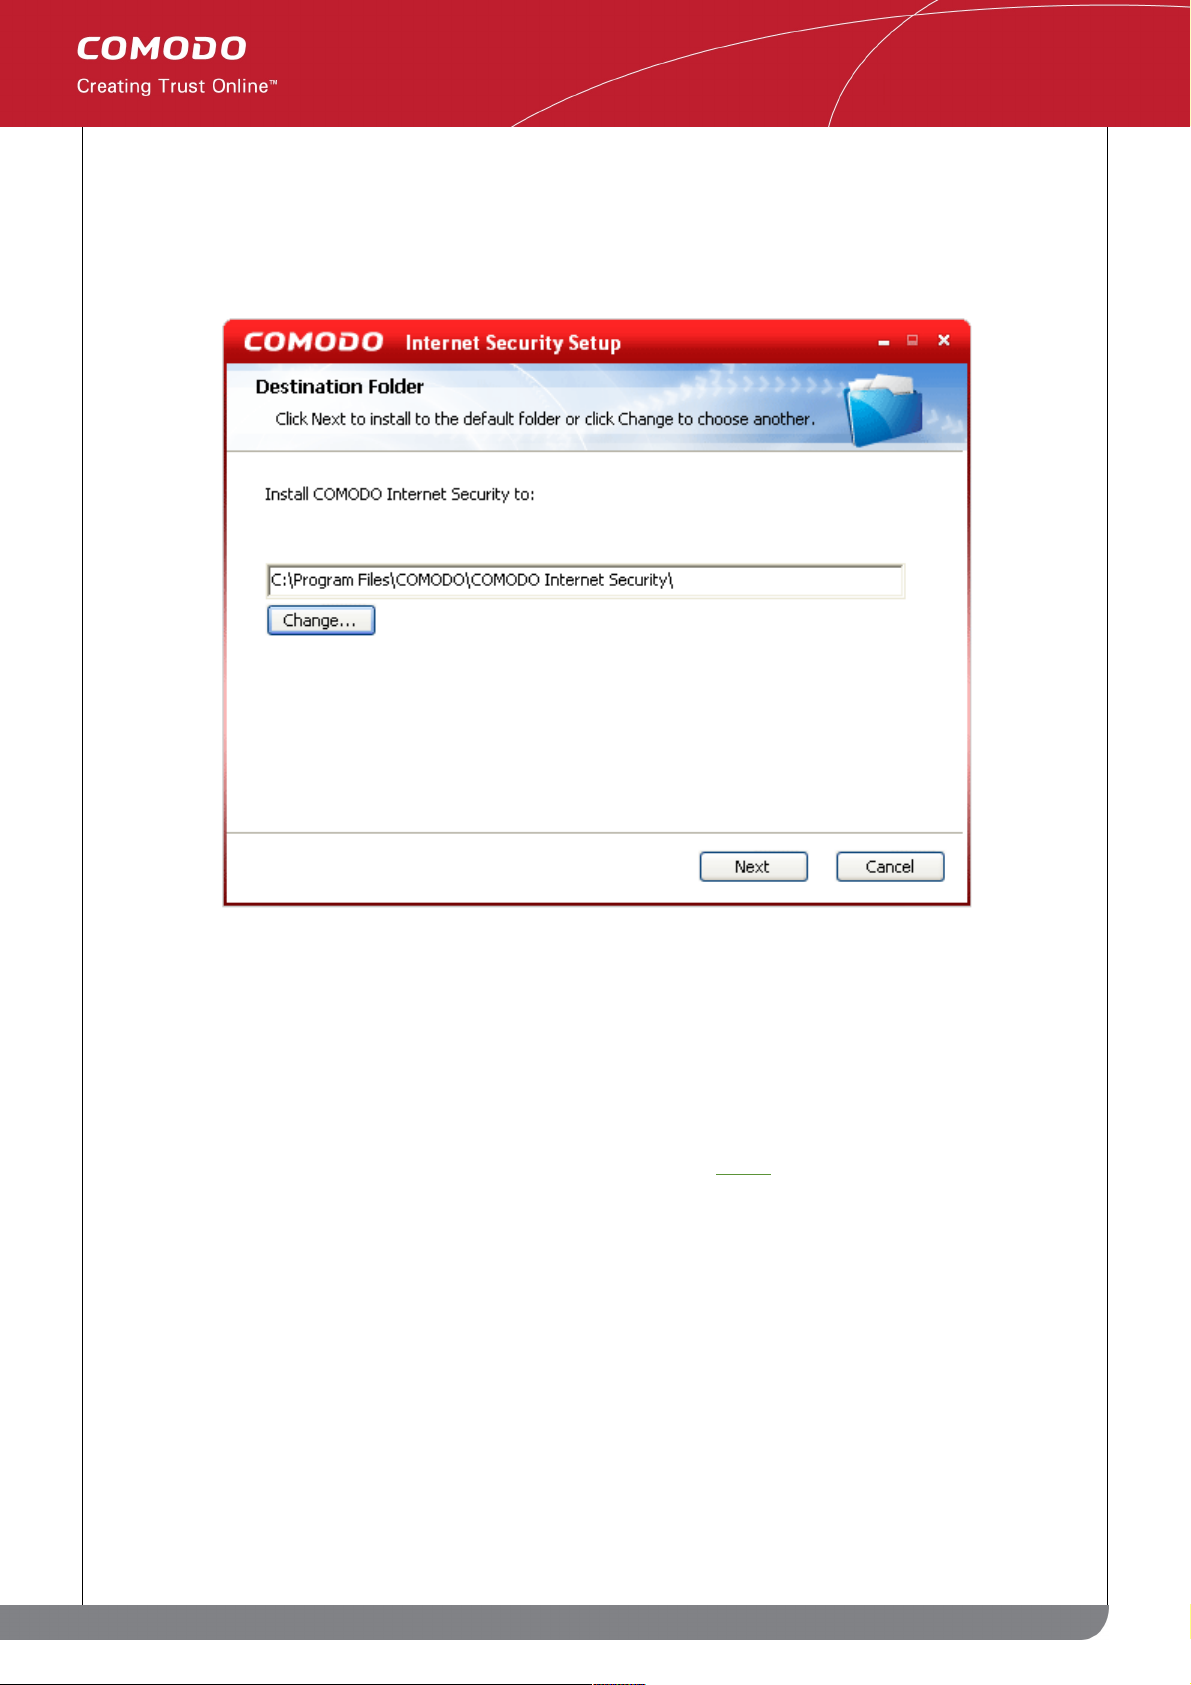
The default installation folder is C:\Program Files\COMODO\COMODO Internet Security.
If you do not wish to install Comodo Internet Security in the default location, click Change and select a different
folder for installation. Click 'Next' to install to the desired folder.
Step 5: Firewall Configuration
If you chose not to install the antivirus component then you are provided with the opportunity to set the security
level of the Firewall. This option should only be chosen when you have a third party Antivirus protection activated in
your system. If this step does not apply to you then click here to skip to step 6.
18
www.comodo.com
Comodo Internet Security User Guide | © 2010 Comodo Security Solutions Inc. | All rights reserved.
Page 19

The options available are;
Firewall only - This option is only recommended for experienced firewall users that have alternative Host
Intrusion Prevention software installed on their systems. Selecting this option will install ONLY the packet filtering
network firewall and not Defense+ (Defense+ is essential for blocking malicious software like worms and Trojans
from making outgoing connection attempts). This isn't to say this option is an unwise choice (the network firewall is
one of the strongest available - offering highly effective and configurable inbound and outbound protection) but it is
important to realize that, on it's own, it does not offer the host intrusion protection as afforded by Defense+.
Firewall with Optimum Proactive Defense - Selecting this option will install the packet filtering Comodo Firewall
with Defense+. Defense+ is installed with optimum protection settings. This also sets the default configuration for
security settings to optimum level. Click here for more details on default protection level.
Firewall with Maximum Proactive Defense - This is the most complete option and offers the greatest level of
security. Selecting this will install Comodo Firewall with Defense+. Defense+ settings are set to the highest
protection levels. This also sets the default configuration for security settings to maximum level. Click here for more
details on default protection level.
Select the option of your choice and click Next. The installation moves to Step 6.
STEP 6: Configure Comodo Threatcast
The Threatcast feature in Comodo Internet Security allows you to share your responses to CIS alerts - the
decisions made on whether allowing or blocking requests or activities, among the community of millions of CIS
users worldwide. The responses of every Threatcast user to this specific alert are collated - enabling you to see
how others have reacted as a percentage bar chart in the alert pop-up itself. This will provide an additional
guidance to you to make a decision on responding to the alert. Comodo Internet Security has an experienced and
technically knowledgeable user base and the responses of our intelligent user base can help guide novice users
19
www.comodo.com
Comodo Internet Security User Guide | © 2010 Comodo Security Solutions Inc. | All rights reserved.
Page 20
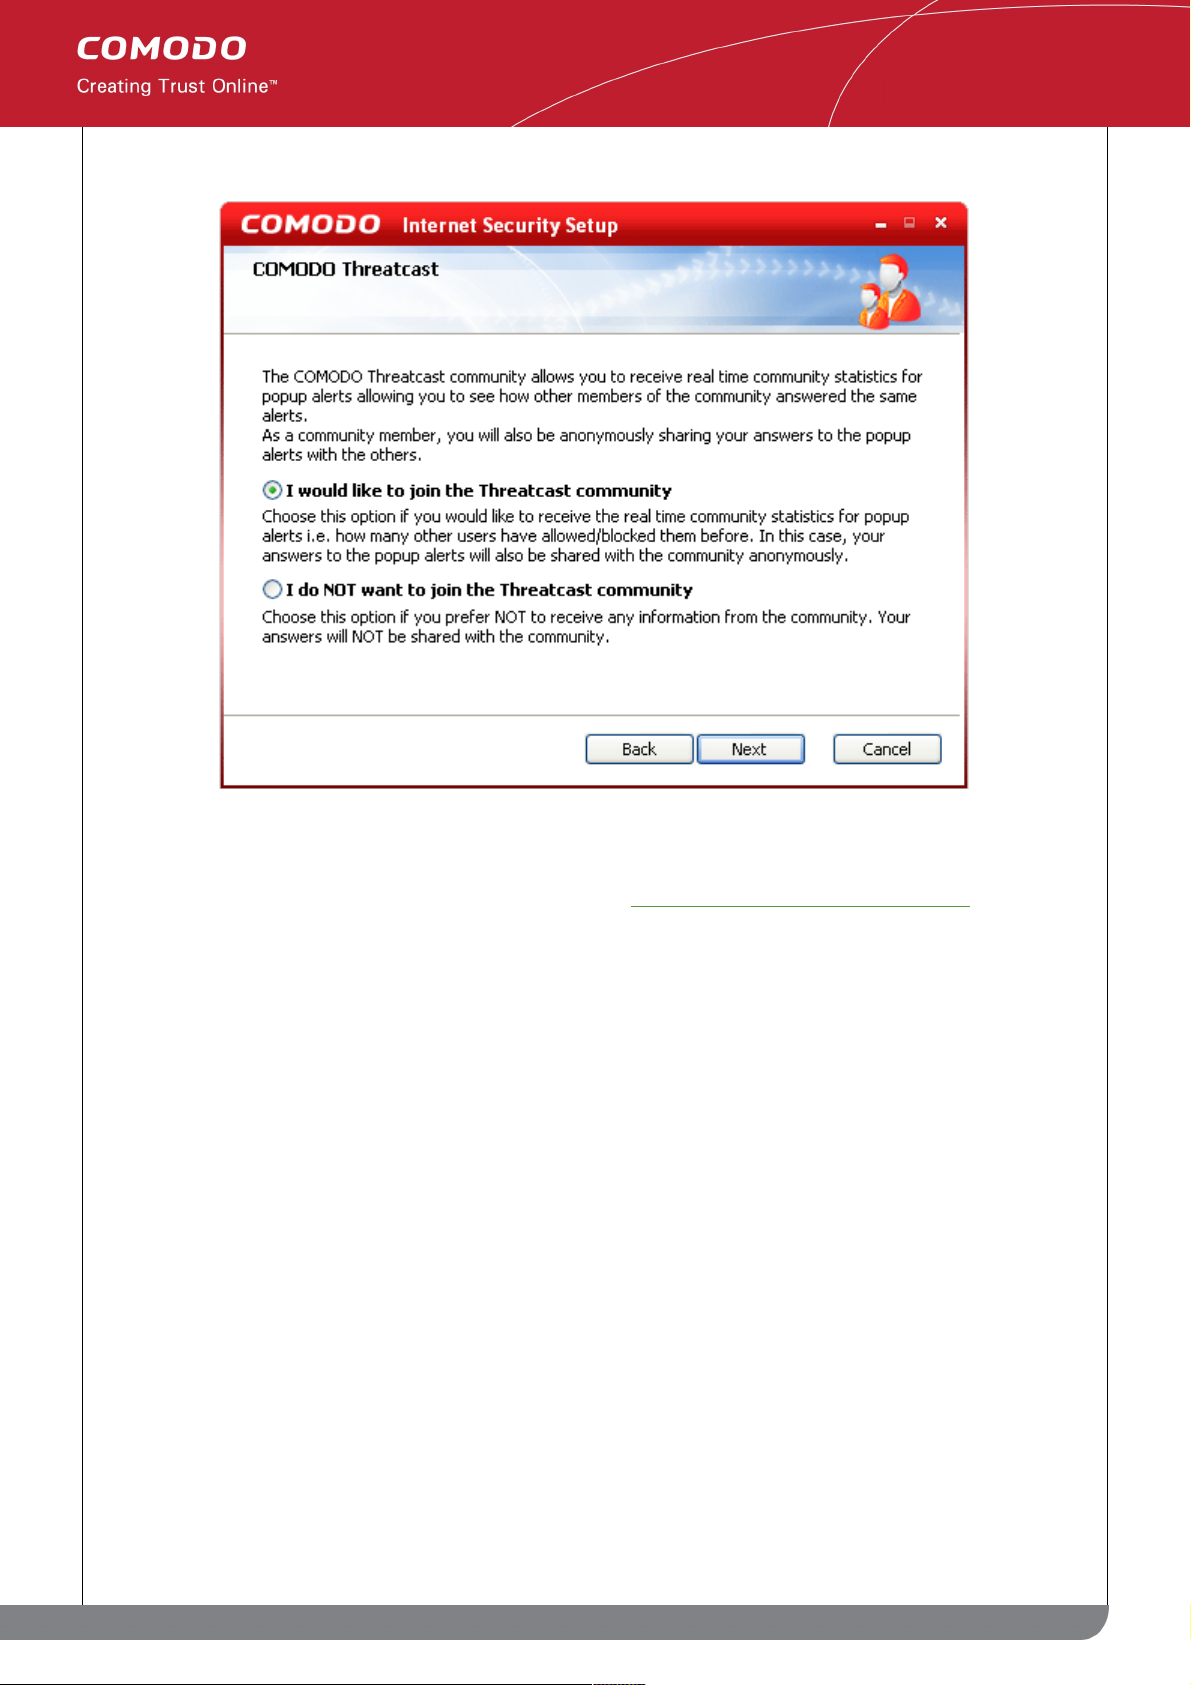
who may be unsure of how to react.
To join the Threatcast Community, select I would like to join Threatcast community and click Next. Otherwise,
select I do NOT want to join the Threatcast community and click Next.
You can change this setting even at a later time by accessing Miscellaneous > Settings > Threatcast
STEP 7: Configuring your DNS Settings
Comodo Secure DNS service replaces your existing Recursive DNS Servers and resolves all your DNS requests
exclusively through Comodo's proprietary Directory Services Platform. Comodo's worldwide network of redundant
DNS servers provide fast and secure Internet browsing experience without any hardware or software installation. In
this step of installation of Comodo Internet Security, the DNS settings of your computer can be changed
automatically to direct to our DNS servers. You can disable the service at anytime and revert to your previous
settings.
20
www.comodo.com
Comodo Internet Security User Guide | © 2010 Comodo Security Solutions Inc. | All rights reserved.
Page 21
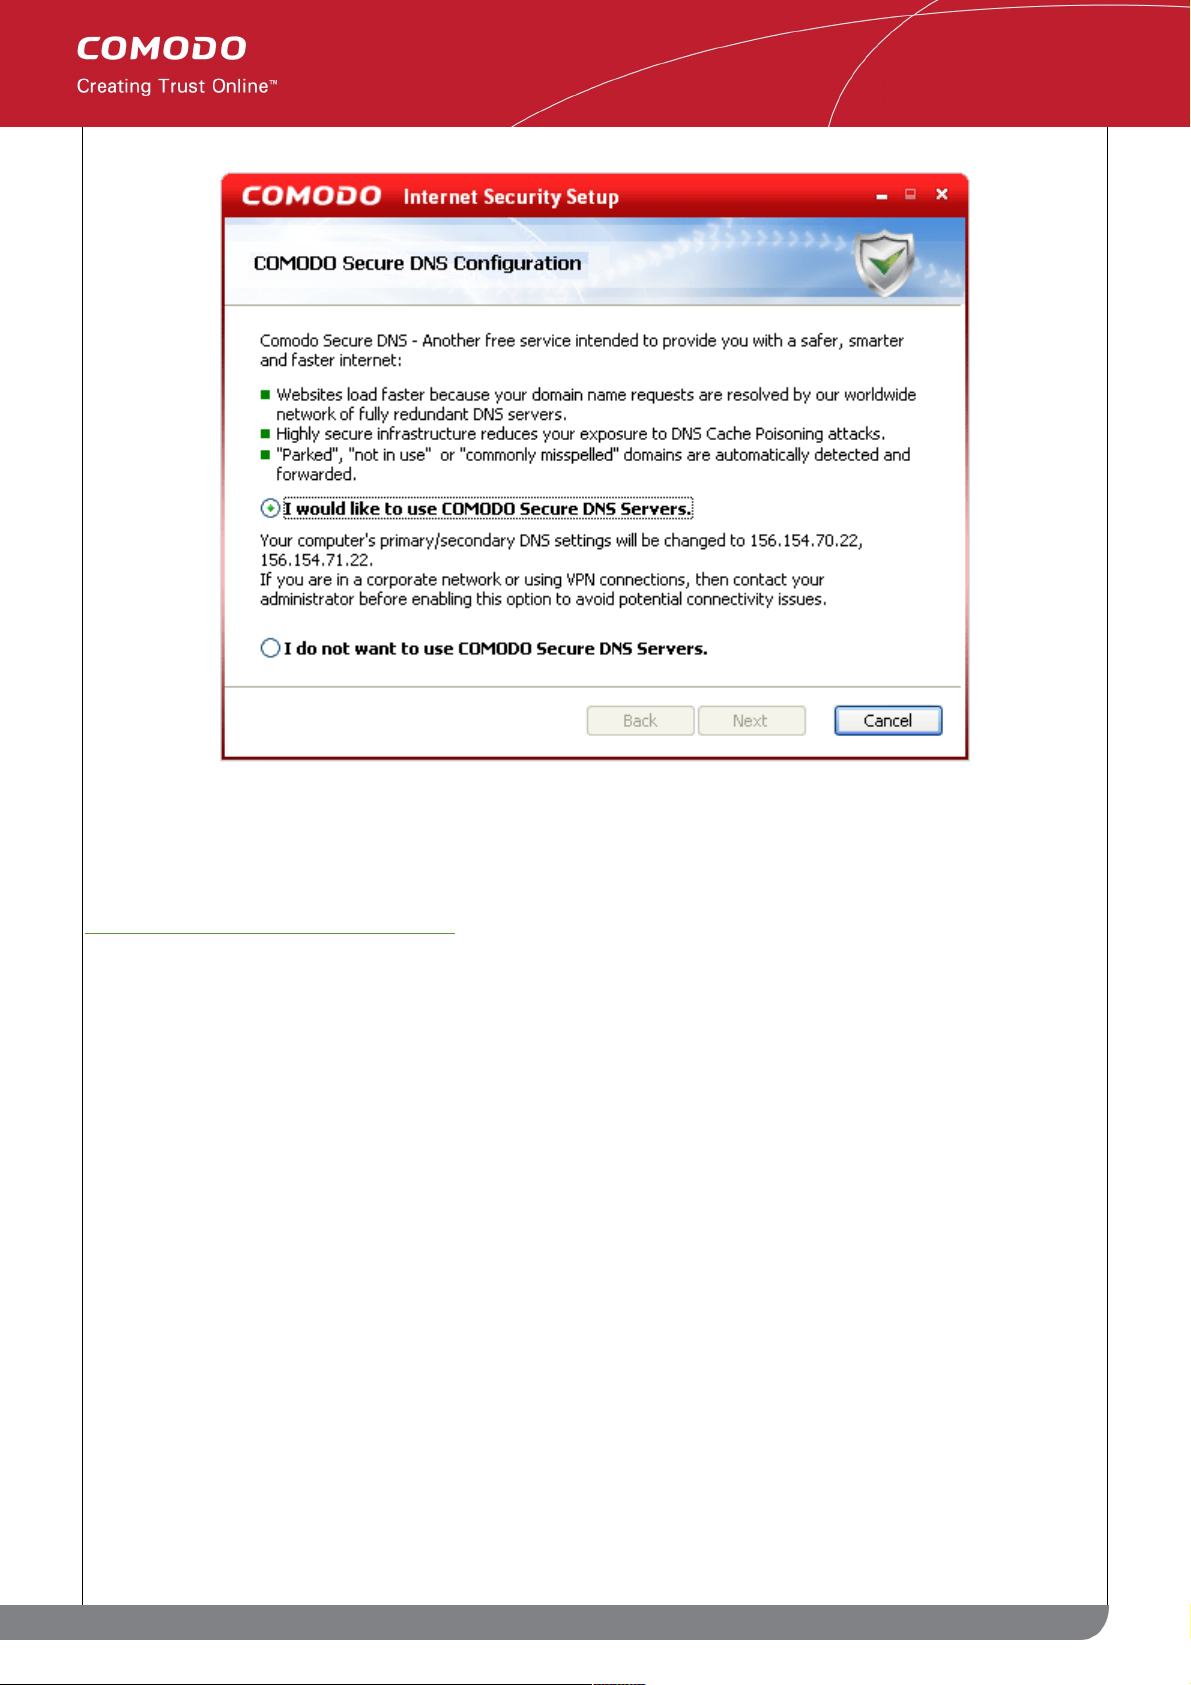
To enable the Comodo Secure DNS Service, select I Would like to use Comodo Secure DNS Servers and click
Next.
For more details on Comodo Secure DNS Service and to know how to enable or disable the service, refer to
Appendix 1 Comodo Secure DNS Service.
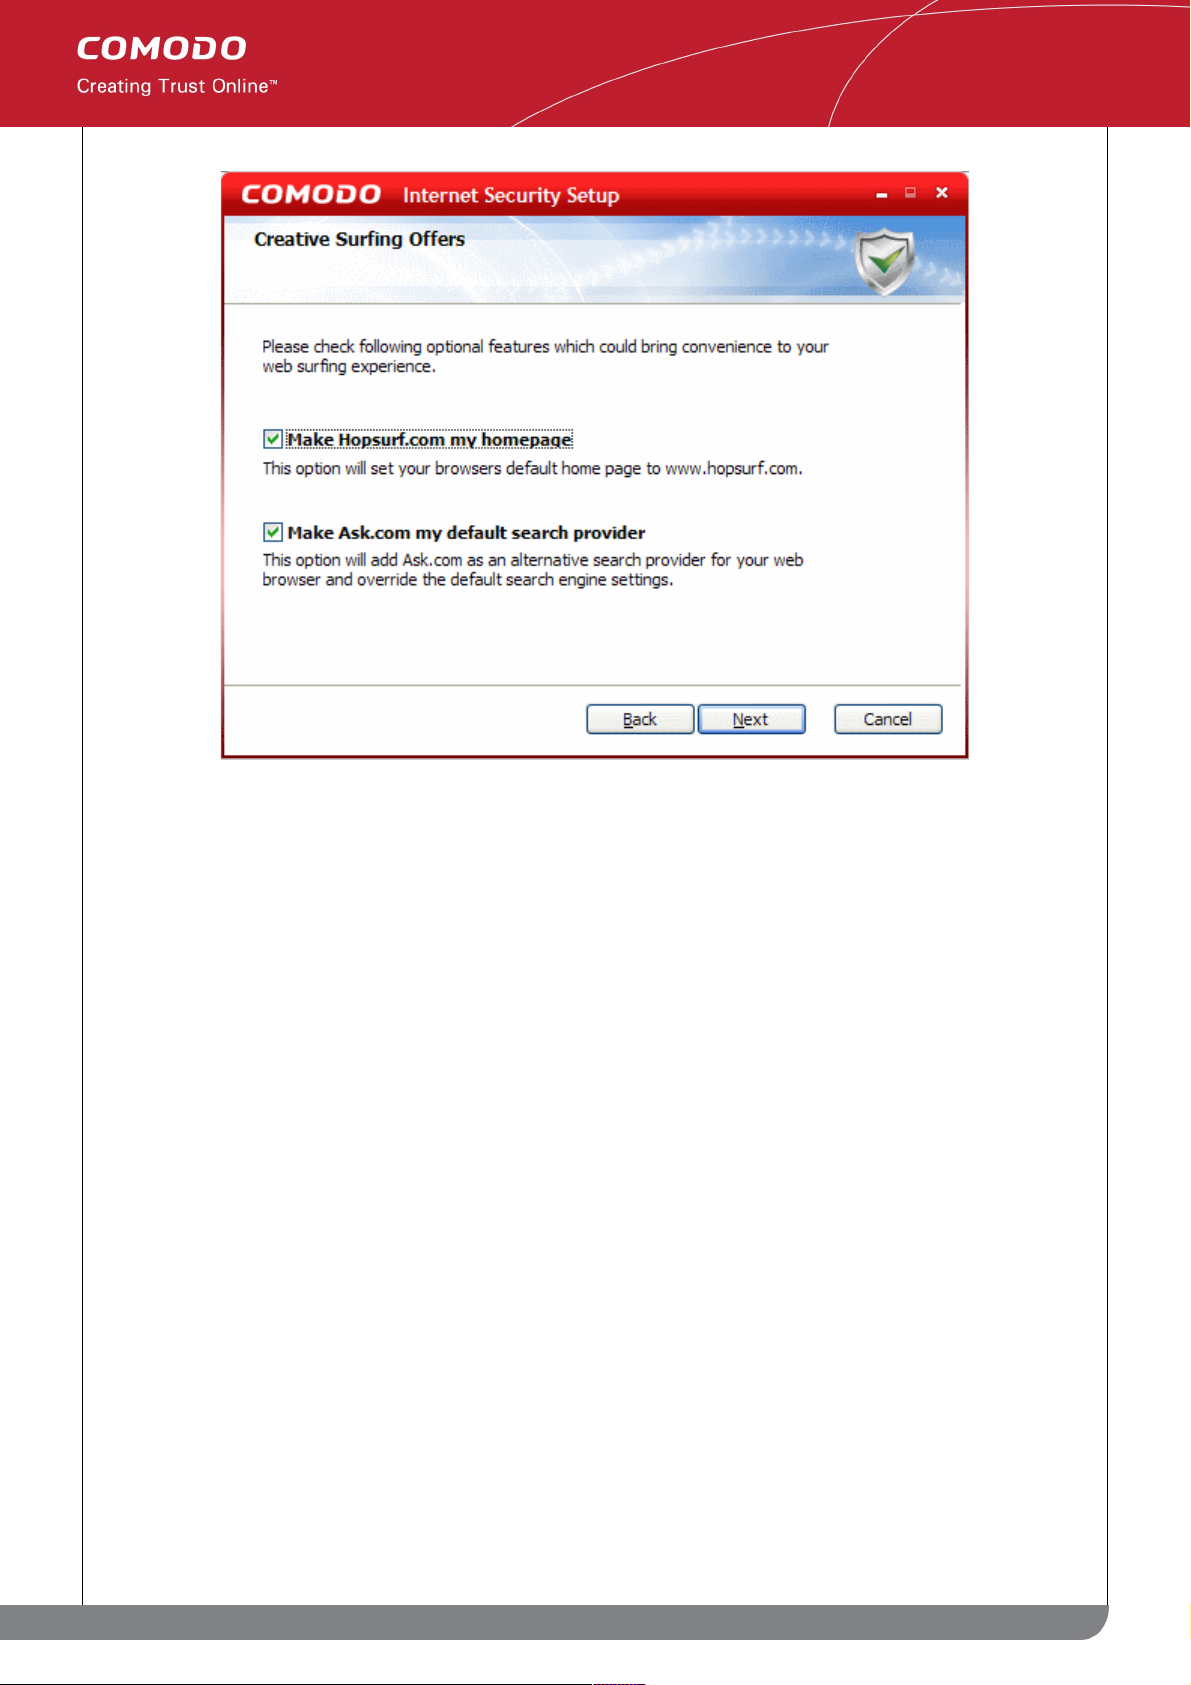
Step 8: Configuring your browser
The next step allows you to configure your browser settings, to have www.hopsurf.com as the homepage for your
default browser and Ask.com as your default search provider.
21
www.comodo.com
Comodo Internet Security User Guide | © 2010 Comodo Security Solutions Inc. | All rights reserved.
Page 22
Step 9: Installation and restarting your computer
After completing the configuration options to your satisfaction the setup wizard will ask for confirmation before
commencing the installation procedure.
Click the 'Back' button to review and/or modify any of settings you have previously specified. To confirm your
choices and begin the installation of Comodo Internet Security, click 'Install'.
22
www.comodo.com
Comodo Internet Security User Guide | © 2010 Comodo Security Solutions Inc. | All rights reserved.
Page 23
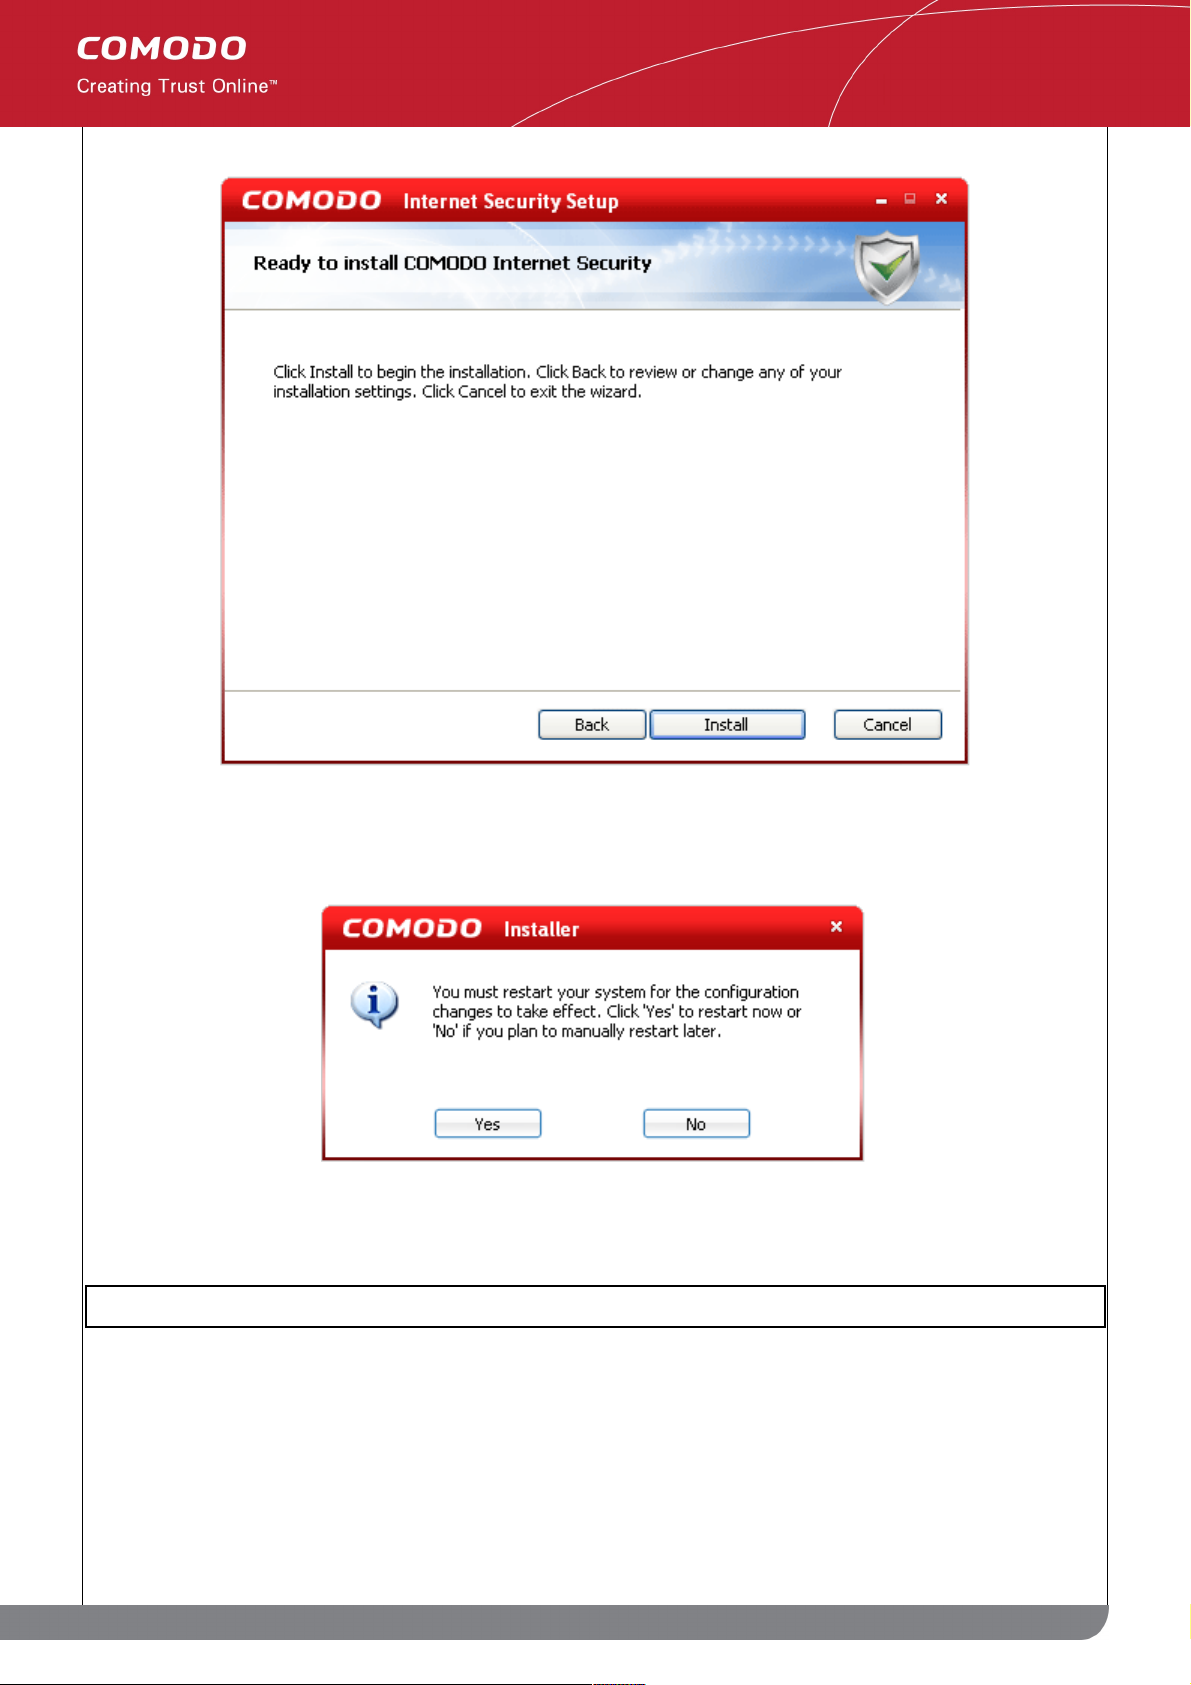
After installation is complete, you must restart your computer for CIS to become active.
Please save any unsaved data and click 'Yes' to restart the system. If you want to restart the system at a later time,
click 'No'.
Note: The installation will take effect only on the next restart of the computer.
Step 10: After restarting Your System
After restarting, if your computer is connected to a home or work network, then you are prompted to configure it at
the 'New Private Network Detected!' dialog:
23
www.comodo.com
Comodo Internet Security User Guide | © 2010 Comodo Security Solutions Inc. | All rights reserved.
Page 24
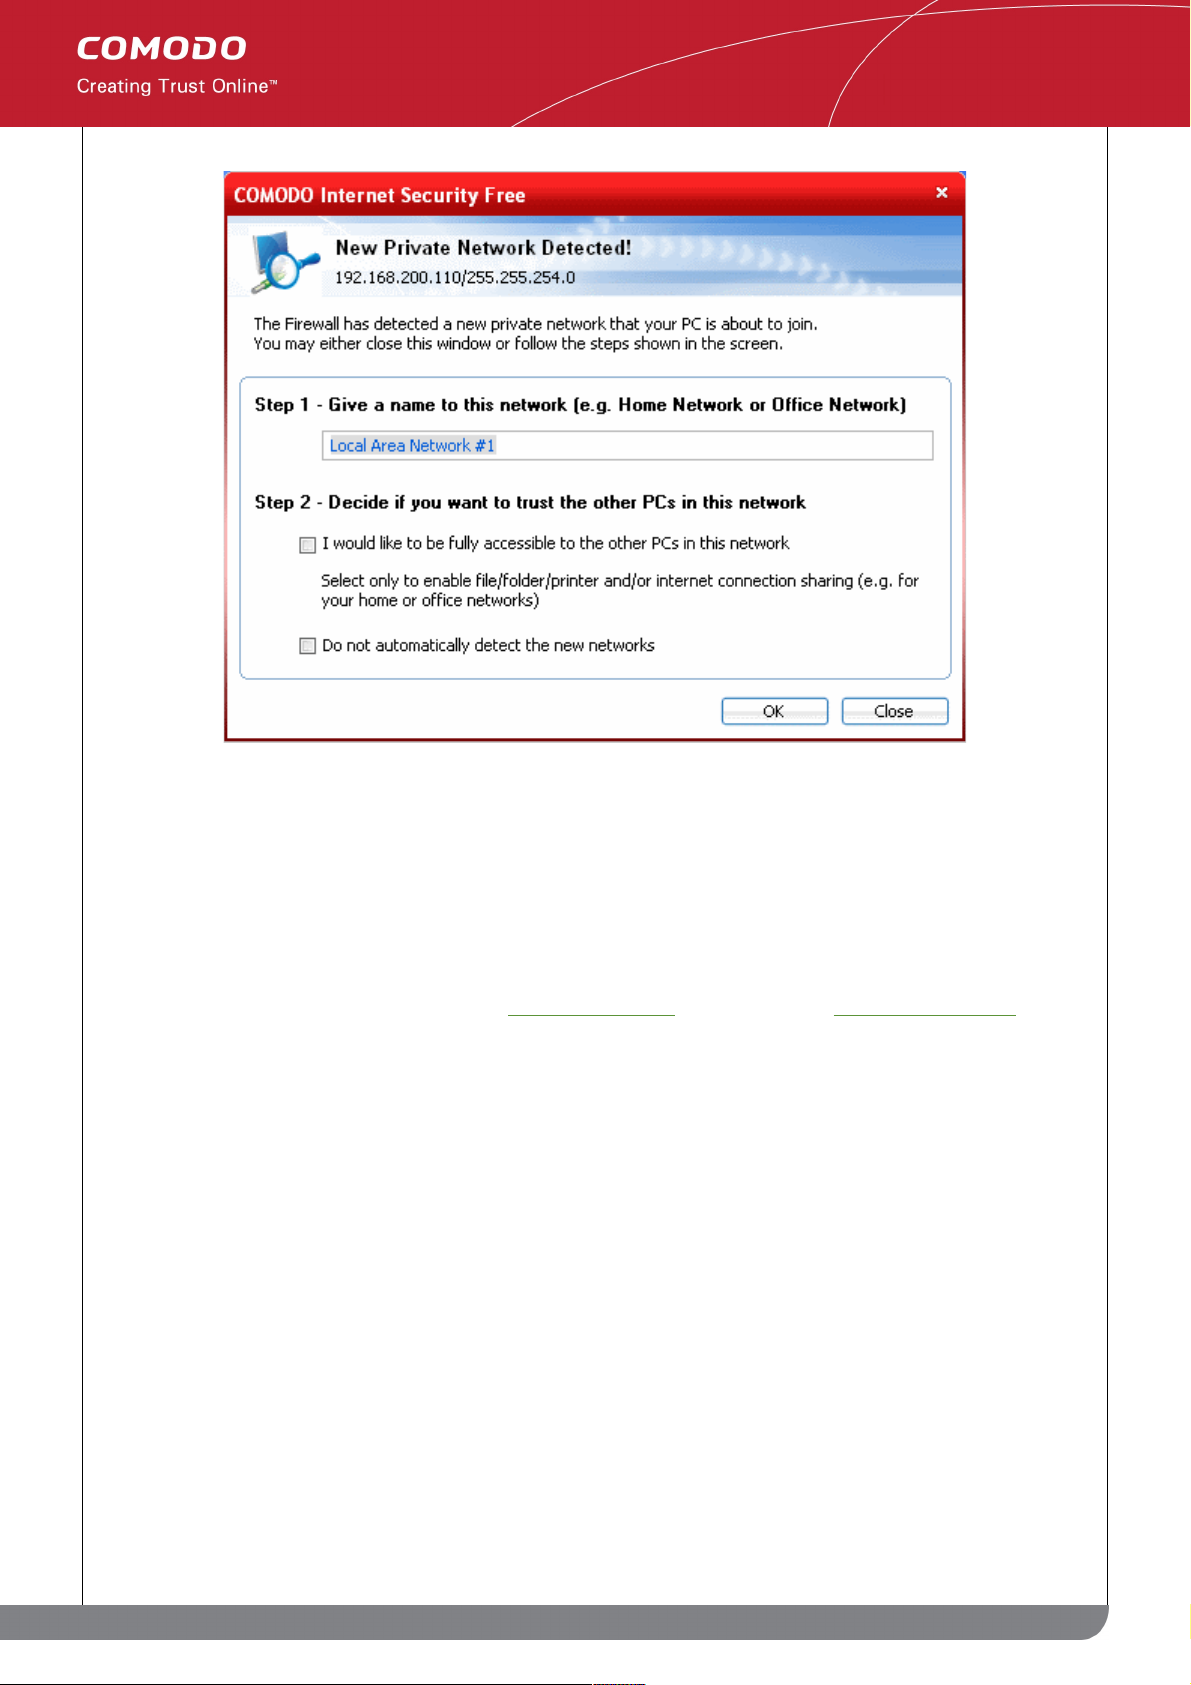
Step 1: Even home users with a single computer have to configure a home network in order to connect to Internet.
(this is usually displayed in the Step 1 text field as you network card). Most users should accept this name.
Step 2: If you wish your computer to accept connections from other PC's in this network or for printer sharing, then
also check this option (e.g. a work or home network). This then becomes a trusted network. Users that only have a
single home computer connecting to the Internet should avoid this setting.
Select 'Do not automatically detect new networks' If you are an experienced user that wishes to manually set-up
their own trusted networks (this can be done in 'My Network Zones' and through the 'Stealth Ports Wizard')
You must click 'OK' to confirm your choice. If you click on 'Close' button, all the network connections are blocked.
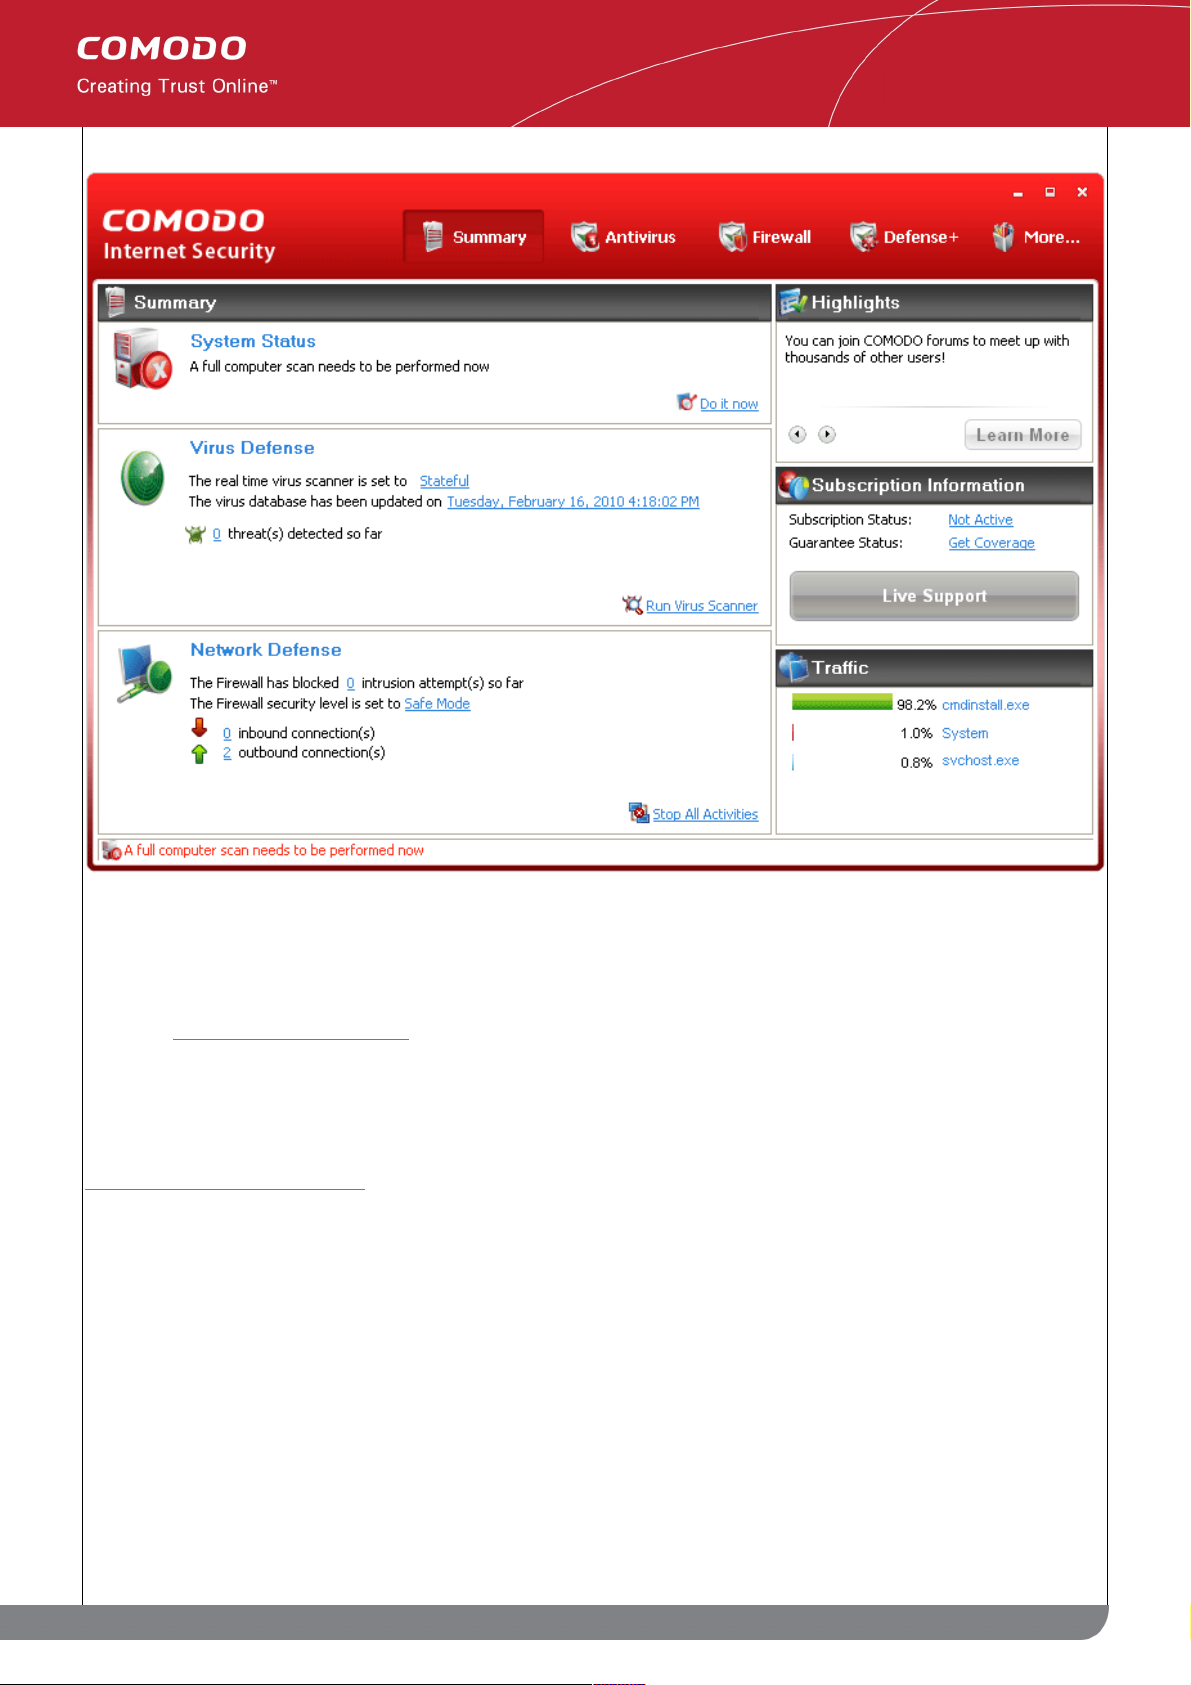
The main interface screen of Comodo Internet Security.
24
www.comodo.com
Comodo Internet Security User Guide | © 2010 Comodo Security Solutions Inc. | All rights reserved.
Page 25
Next
CIS Plus and CIS Pro customers should activate their additional services from the summary page of the CIS
interface. Click Here for more details.
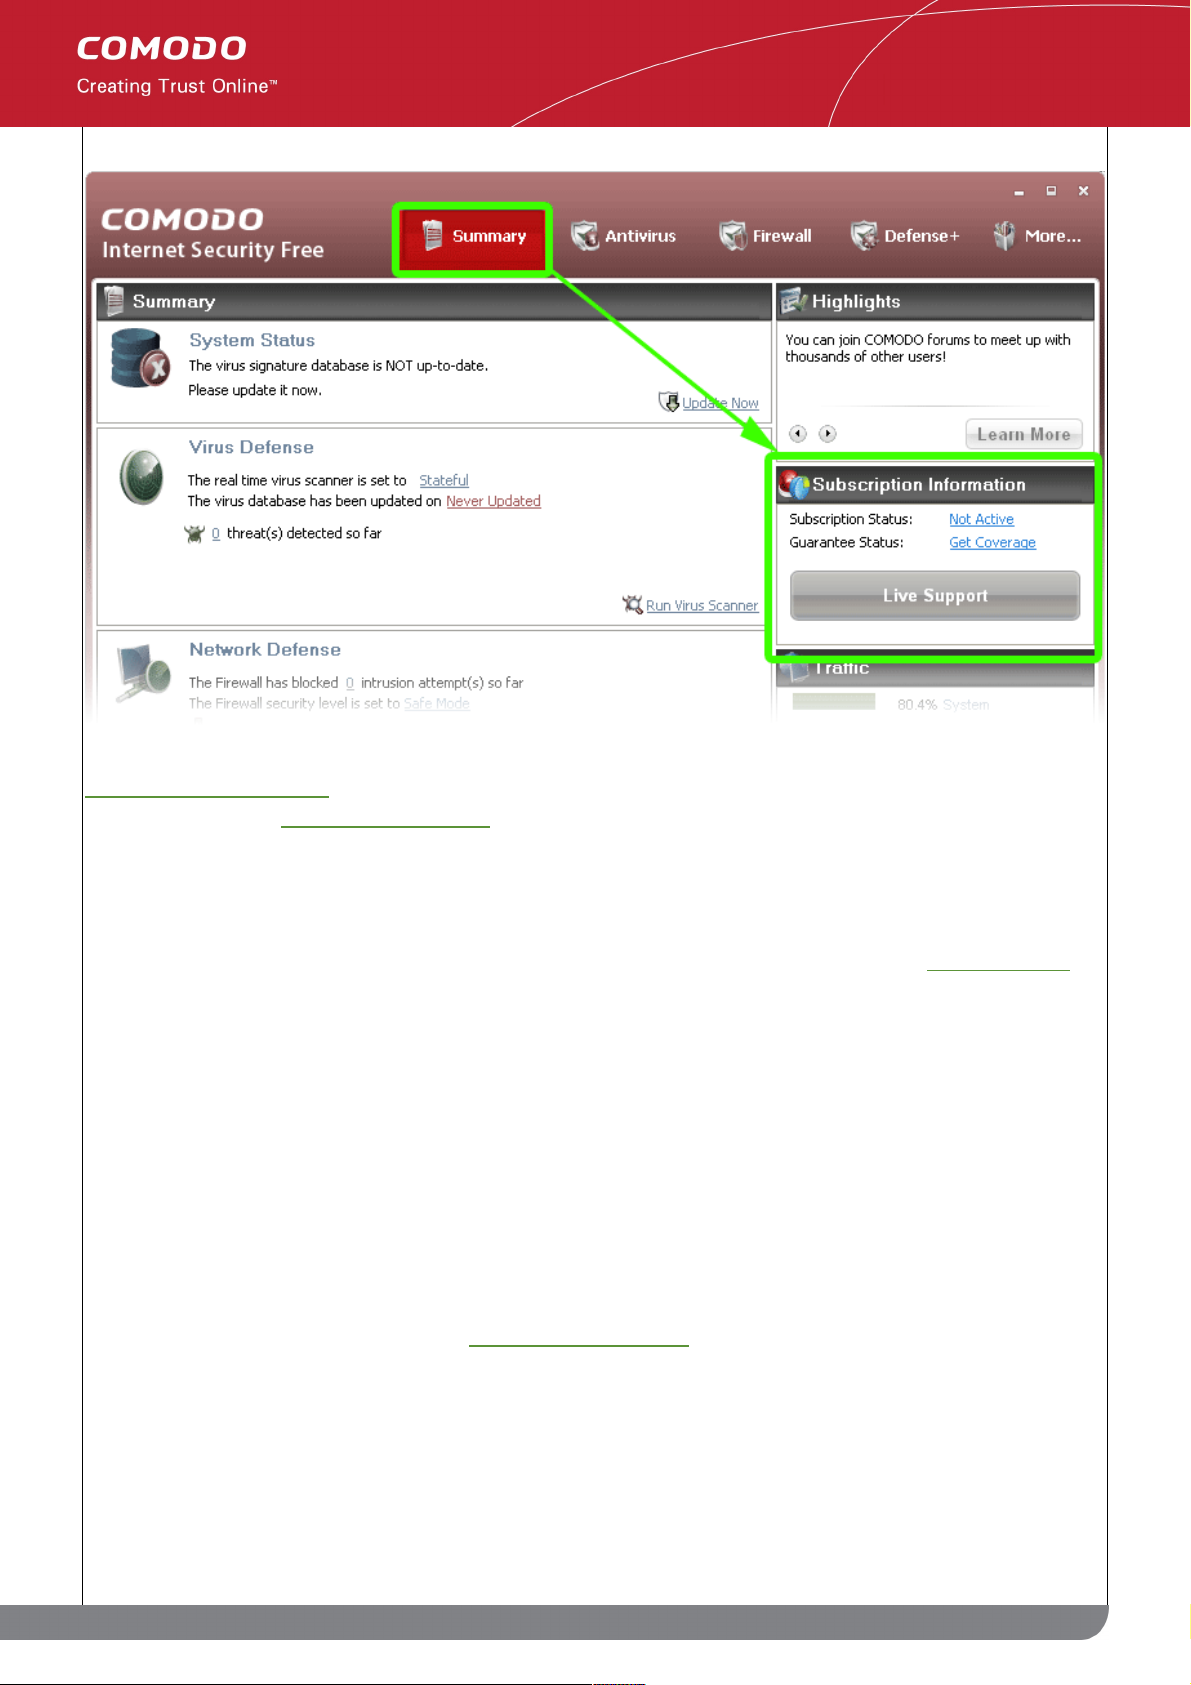
1.3.2 Upgrading to CIS Plus or Pro
Comodo Internet Security Plus and Pro packages contain additional services which need to be activated after
installation has been completed. Your current activation status can be viewed in the 'Subscription Information' box
on the CIS 'Summary' screen:
25
www.comodo.com
Comodo Internet Security User Guide | © 2010 Comodo Security Solutions Inc. | All rights reserved.
Page 26
Activating your subscription will enable LivePCSupport, TrustConnect and Online Storage. Pro customers will
subsequently need to activate their guarantee.
Comodo Internet Security Plus includes:
• LivePCSupport - Tier 1 (Virus Diagnosis and Removal Service. Includes scanning and removal of virus
and spyware from your computer for an unlimited number of incidents. LivePCSupport is carried out by
Comodo security experts through remote desktop connection. For more details refer to Live PC support)
• TrustConnect - (Encrypted Internet Proxy Service. Trustconnect makes surfing the web safe from any
public Wi-Fi location)
Comodo Internet Security Pro includes all of the above plus the following:
• LivePCSupport - Tier 2 (General PC Troubleshooting, PC Tune Up and Optimization, Internet Login
Protection, Email Account Setup, Software Installation, Printer Setup/Troubleshooting)
• Comodo Guarantee - (If your computer becomes damaged as a result of malware and Comodo support
services cannot return it to a working condition then we’ll pay the costs of getting it repaired. The guarantee
can only be activated if your computer meets certain prerequisites that qualify it as an eligible computer.
This means that it is currently free of malware, that certain Comodo applications are installed and that
certain CIS settings are enabled. These prerequisites are tested for and enabled by a wizard during the
guarantee activation process. See 'Activating the Guarantee' for more details)
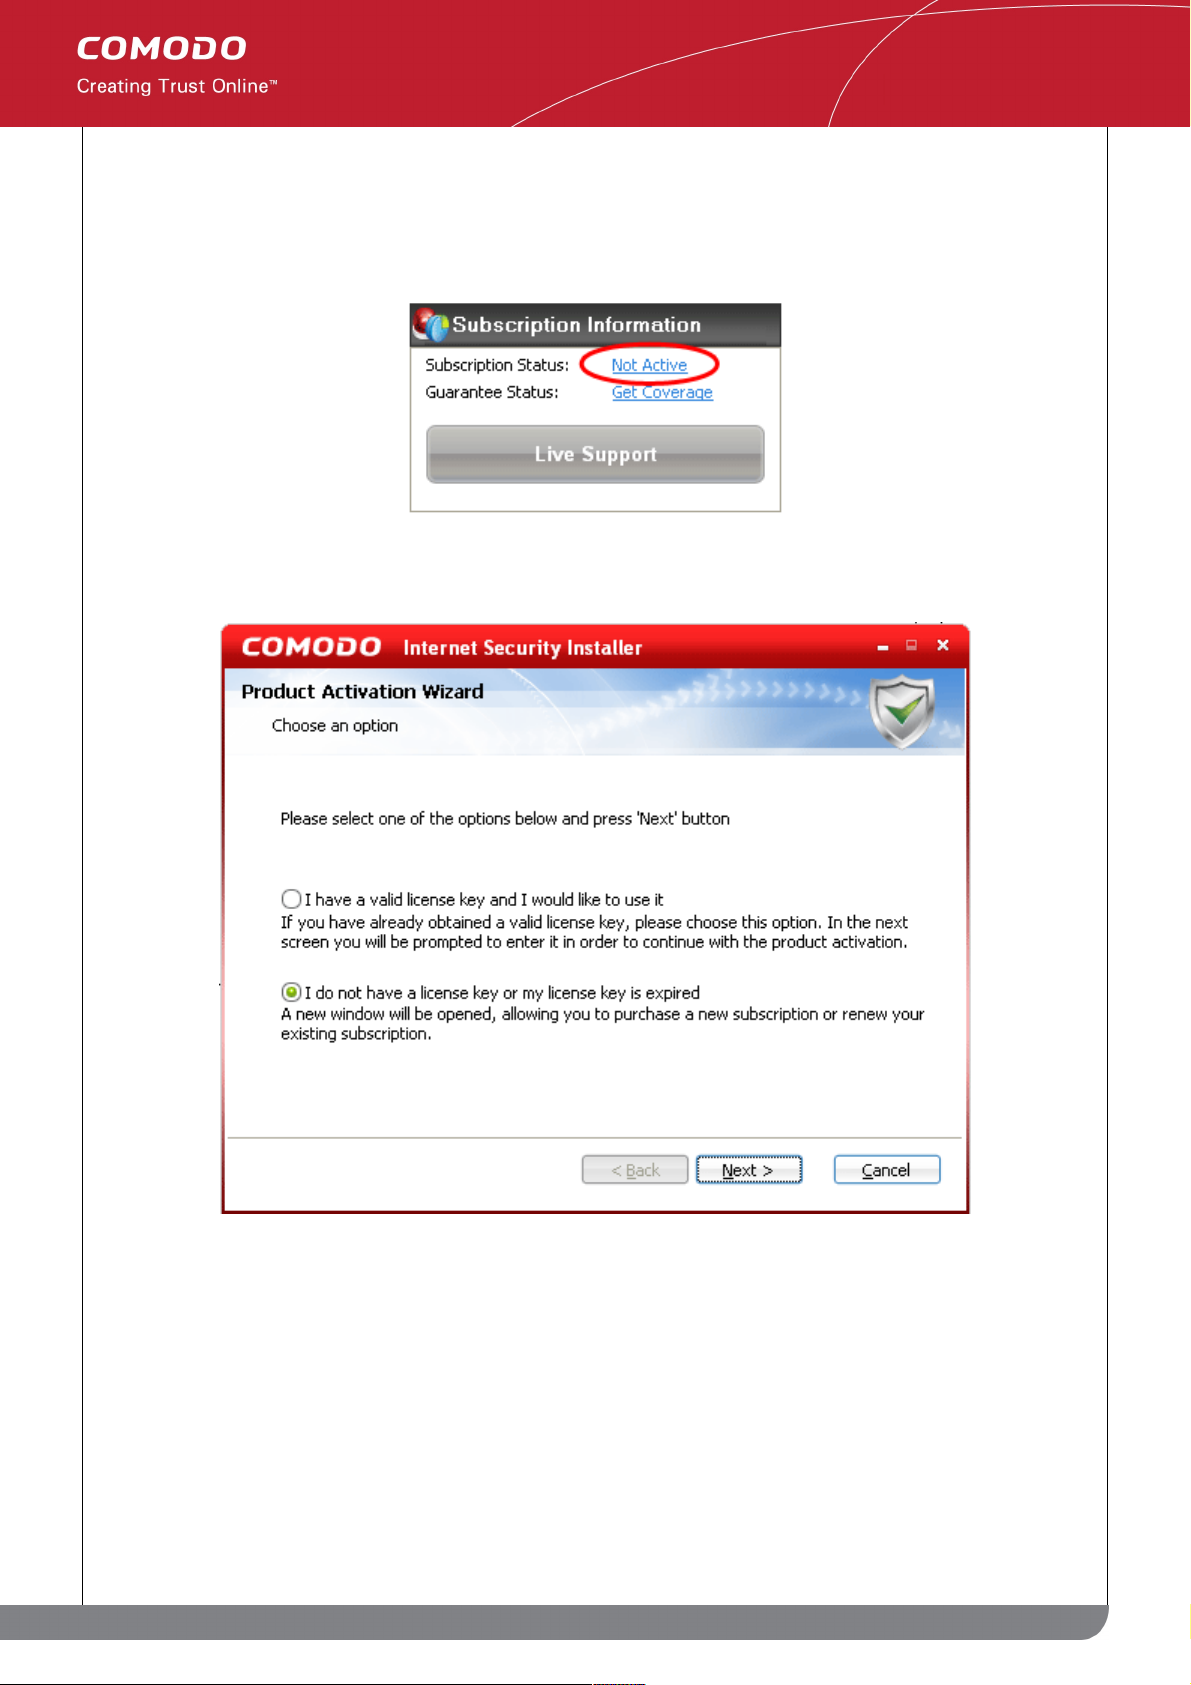
Activating Your Plus or Pro Subscription
Step 1: To activate your subscription, click the 'Not Active' link next to 'Subscription Status' in the 'Subscription
Information' box:
26
www.comodo.com
Comodo Internet Security User Guide | © 2010 Comodo Security Solutions Inc. | All rights reserved.
Page 27
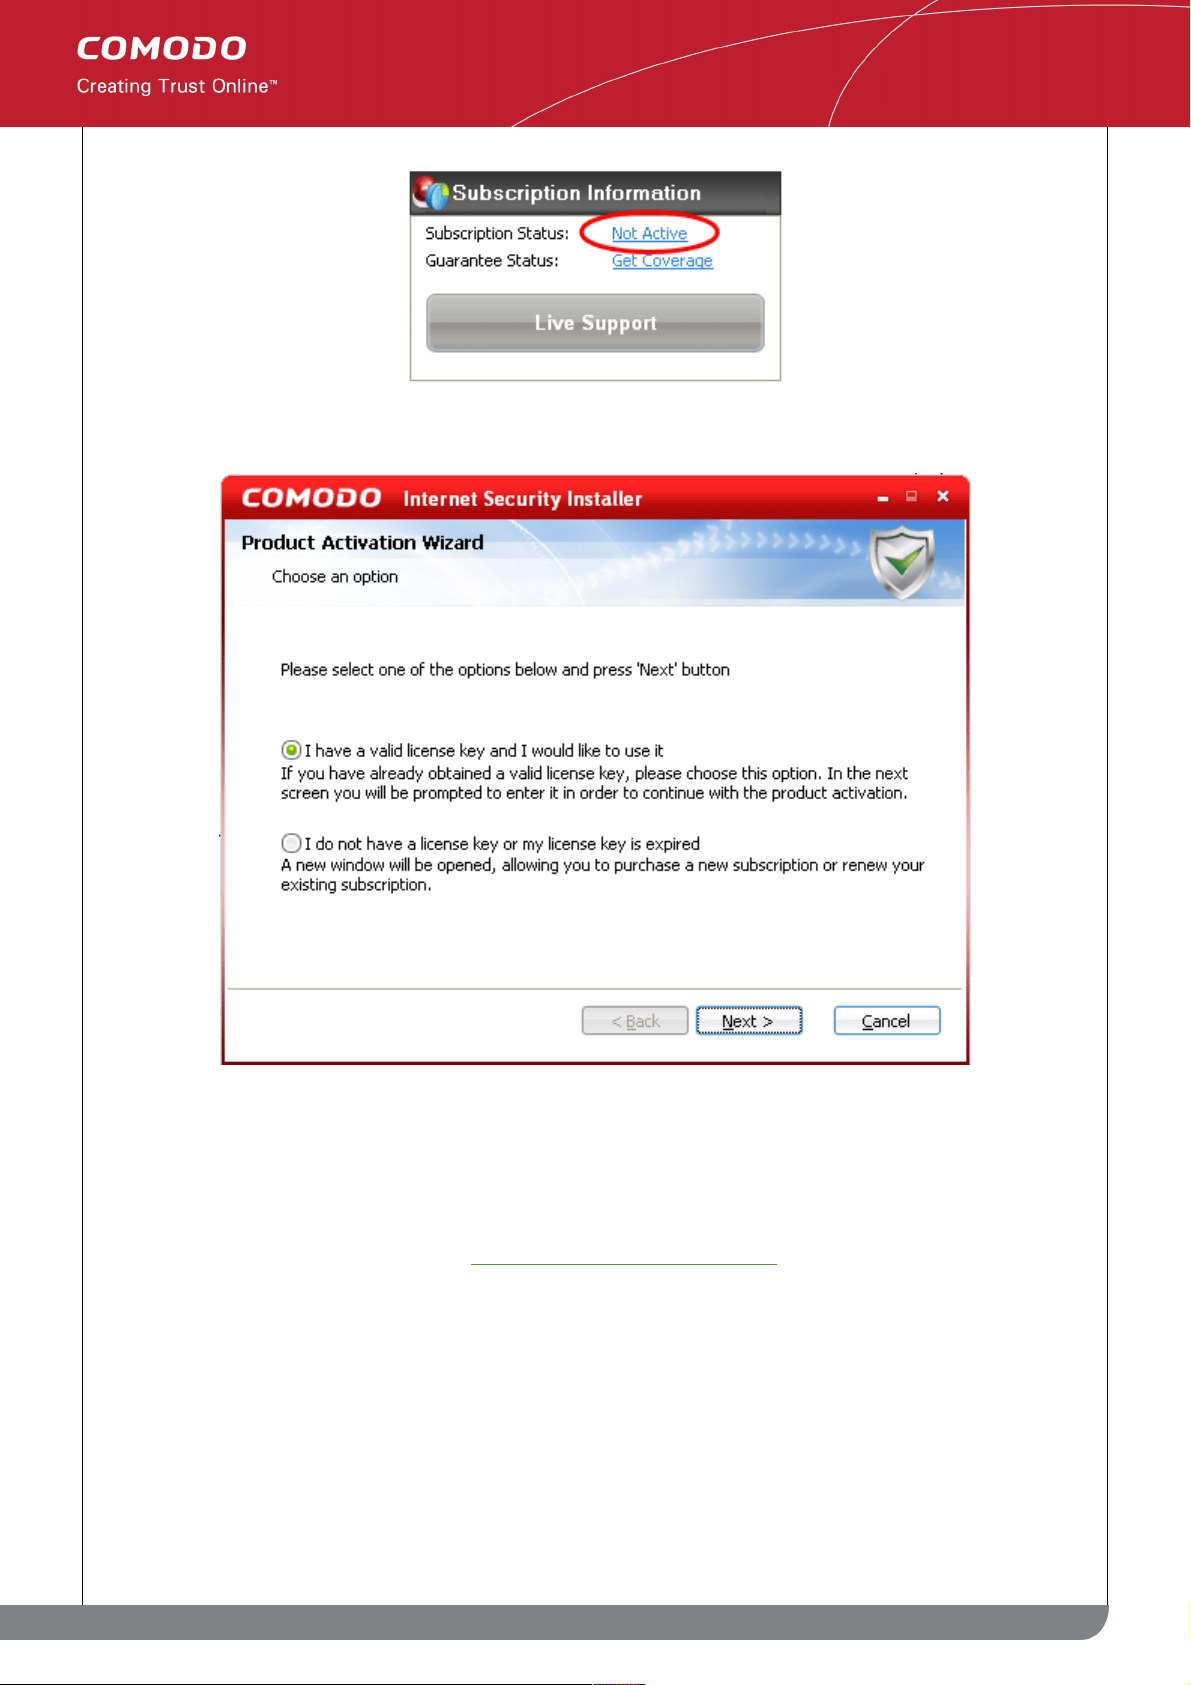
Step 2: The next stage is to select whether you wish to activate an account or sign up for an account:
• I have a valid license Key and I would like to use it. Select this option if you have already signed up for
either a Plus or Pro package. After signing up, you will have received a license key via email. Please have
this key ready as you will need it next to validate your subscription.
• I do not have a license key or my license key is expired. Select this option If you have not yet
subscribed and wish to do so. See 'Signing up for CIS Plus or CIS Pro' for more details.
Step 3: Enter your CIS Plus or CIS Pro license key:
27
www.comodo.com
Comodo Internet Security User Guide | © 2010 Comodo Security Solutions Inc. | All rights reserved.
Page 28
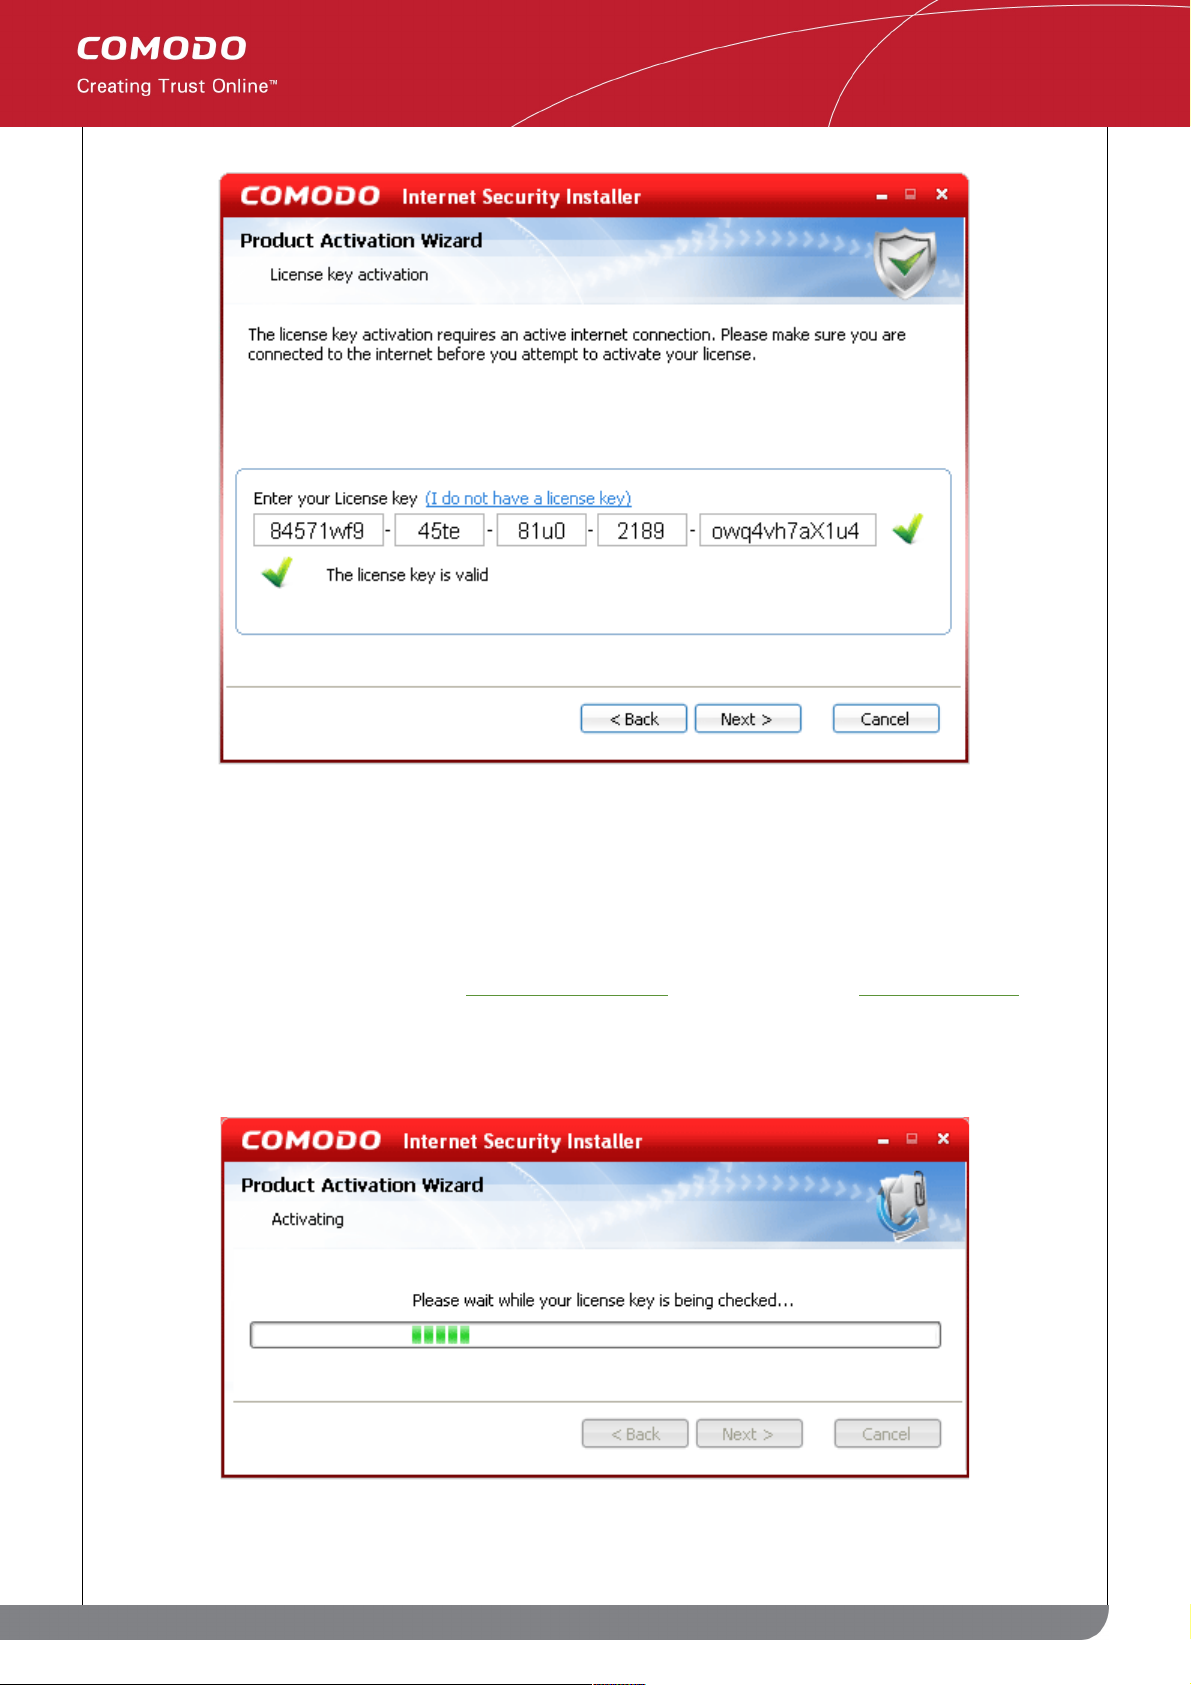
• Copy and paste your license key into the fields provided. Your license key is located in the confirmation
email that you received after signing up for a CIS Plus or CIS Pro account.
• After entering a valid subscription code you will see the message 'The license key is valid' and a green
check mark to the right of the license key fields (shown above). If your key is not accepted then please
double check that you copied and pasted the entire key correctly. If you are a valid license holder and your
key is still not accepted then email support@comodo.com. Please include your CIS serial number as this
will be required in order to identify your account.
• Click 'Next' to continue the activation process. The wizard will now contact Comodo servers to validate
your key. Note - you must be connected to the Internet.
28
www.comodo.com
Comodo Internet Security User Guide | © 2010 Comodo Security Solutions Inc. | All rights reserved.
Page 29
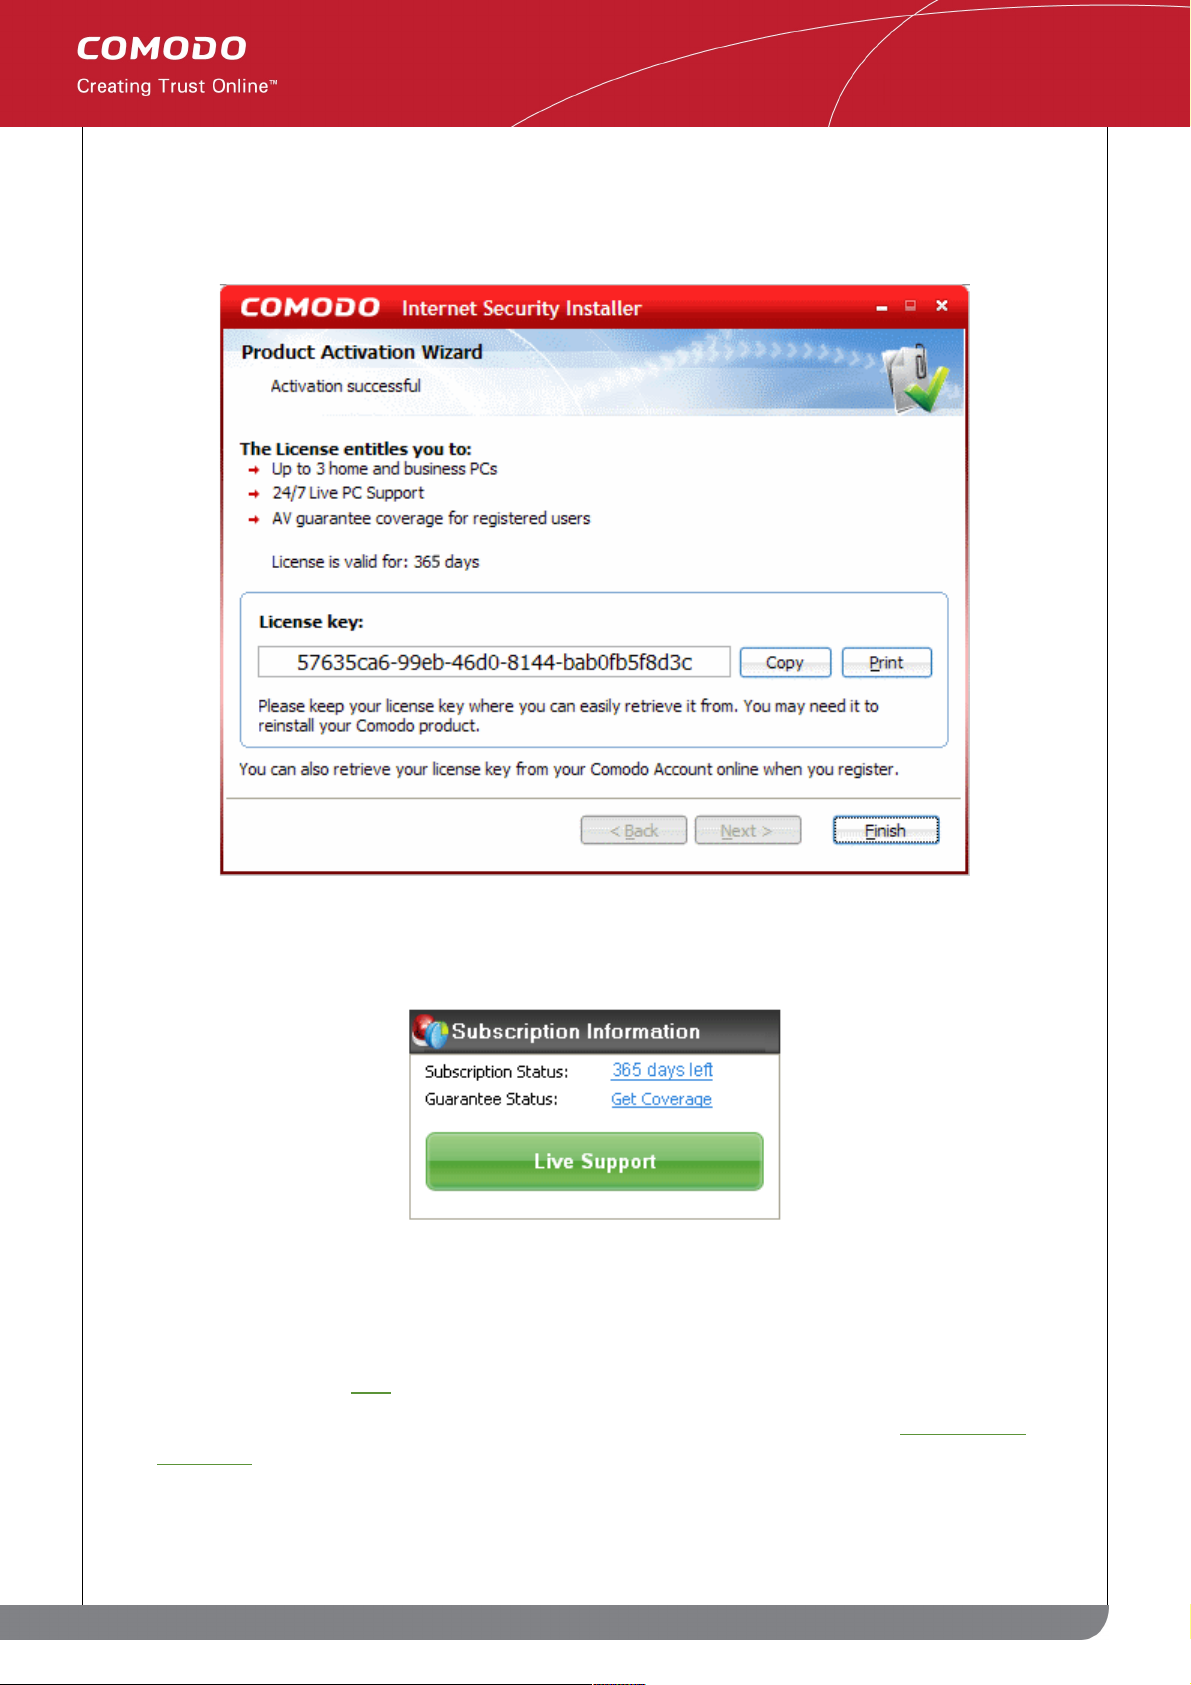
Step 4: Finalizing and confirming license activation
After your license key has been validated, you will see a final confirmation screen that summarizes your license
entitlements:
• Click 'Finish' to complete the activation wizard and return to the main CIS interface.
Successfully activating your license will change the information displayed in the 'Subscription Status' box:
• Subscription Status will now indicate how many days remain on your license.
• The 'Live Support' button will turn green and become active. Click this button at any time to initiate a
support session with a LivePCSupport expert. More details about LivePCSupport and using the chat
window can be found here.
• CIS Pro customers can now activate the guarantee by clicking 'Get Coverage'. See 'Activating the
Guarantee' if you would like help with this.
Signing Up for CIS Plus or CIS Pro
29
www.comodo.com
Comodo Internet Security User Guide | © 2010 Comodo Security Solutions Inc. | All rights reserved.
Page 30
• If you have already downloaded and installed the free version of CIS and wish to upgrade to CIS Plus or
CIS Pro then:
• On the summary screen of the CIS interface, click the 'Not Active' link in the 'Subscription Infomation'
box:
• Select 'I do not have a license key or my license key is expired' on the first screen of the activation
wizard and click 'Next':
• Clicking 'Next' will open your web browser at an online form where you can sign up for either a CIS
Plus or Pro account. The online form will also ask you to create a username and password for a
Comodo account (neccesary for billing, account management and for using Comodo products such as
TrustConnect and Comodo BackUp)
• After you have signed up for CIS Plus or Pro and created your Comodo account you will receive a
license key via email. This key will be used by CIS to activate the additional services that come with a
Plus or Pro account.
• Once you have signed up and received your license key you should return to the CIS summary screen
and click 'Not Active' again. This time, when the activation wizard opens, select 'I have a valid license
30
www.comodo.com
Comodo Internet Security User Guide | © 2010 Comodo Security Solutions Inc. | All rights reserved.
Page 31

key and I would like to use it'.
• You should now follow the activation process outlined earlier.
• If you have not yet installed any version of CIS (because, for example, you are reading the pdf version of
this guide) then we recommend you directly sign up for CIS Plus or Pro at
http://personalfirewall.comodo.com
Activating the Guarantee
The Comodo Guarantee is available to customers of CIS Pro and CIS Complete versions. Before enabling
guarantee coverage, customers should first have activated their subscription. Full details on activating a
subscription for CIS Pro can be found in Activating Your Pro or Plus Subscription.
For complete details on installation and activation of CIS Complete, refer to the page Comodo Internet Security
Complete - Installation and Activation.
• Please note that if you wish to use and activate the Comodo guarantee then you must have installed
Comodo Internet Security (both Antivirus and Firewall components) and Comodo LivePCSupport. You must
also have run and passed a Comodo Antivirus scan using the latest signature database. The guarantee is
only available if you are a resident of the United States.
Limits: The guarantee is limited to the lesser of:
• The actual cost of the computer;
• An aggregate total of $500 for all claims paid under a single license key, and
• The actual cost of a Comodo specified and authorized third party provider to repair the computer to an
operating condition (“Guarantee Limit”).
• The guarantee is limited to repairing the computer over the Internet to an operational state and excludes all
claims for lost or expected profits, lost or corrupted data, lost or deleted work, or lost or damaged personal
files. Comodo does not guarantee against the loss of any file or information. The guarantee is void if you
breached this agreement, failed to follow the procedures described in this Section 3 of the End User
License Agreement (EULA) or failed to pay any fees applicable to your use of the Software.
• Full Terms and Conditions on the Comodo Guarantee Coverage can be read in Section 3 of CIS EULA
(Step 2 of the Installation process).
Important Note: Before activating the guarantee, it is essential to run a full computer AV scan with the latest
version of the Comodo Virus database in order to ensure that your system is eligible for the Guarantee coverage.
Make sure that the virus database of your CIS installation has been updated to the latest one. The update status
is indicated next to 'Last Update' in the 'Virus Defence' box of the CIS main interface and with a green tick mark
and the text 'All Systems are active and running' in the lower left corner of the main interface. If your virus
database is not up-to-date, click the link next to 'Last Update' in the 'Virus Defence' box to update to the latest
version. Then run a full computer scan from the Antivirus Tasks interface of the CIS. For more details on running
an Antivirus Scan Click here.
Step 1: To activate your guarantee Coverage, click the Get Coverage link next to 'Guarantee status' in the
Subscription Information box in the CIS main interface.
31
www.comodo.com
Comodo Internet Security User Guide | © 2010 Comodo Security Solutions Inc. | All rights reserved.
Page 32

If you have not yet run a full virus scan with the latest signature database (as mentioned above), you will be asked
to do so. A full system scan to remove all known viruses is a mandatory requirement if your computer is to be
eligible for guarantee coverage. If this step has already been performed (and your system is clean), then the
process moves to step 2.
Click 'Yes' to run the scan.
• if any threats are discovered by the scanning, it will be indicated in the 'Scan Completed' dialog.
• Click the Results button to view the results...
32
www.comodo.com
Comodo Internet Security User Guide | © 2010 Comodo Security Solutions Inc. | All rights reserved.
Page 33

...and click the Clean button from the Results screen to remove the threats found and make your
system eligible for Guarantee Coverage.
• If No threats are found, Click the 'Close' button to return to the main CIS interface.
• Click the 'Get Coverage' link again to start the Guarantee Activation wizard.
Step 2: The next stage is to run the Guarantee Activation Wizard.
33
www.comodo.com
Comodo Internet Security User Guide | © 2010 Comodo Security Solutions Inc. | All rights reserved.
Page 34

• Click Next to continue. The wizard will check whether your computer meets the prerequisites for guarantee
coverage. The prerequisites are:
• Comodo Internet Security is fully installed (both Firewall and Antivirus)
• Comodo LivePCSupport is installed
• That your computer has undergone and passed a full virus scan using the latest signature database
If any of the items listed above are not detected then the next stage of the wizard will implement them (for example,
it will install any missing components and start a full virus scan). If all components are present then the process
moves to step 3.
34
www.comodo.com
Comodo Internet Security User Guide | © 2010 Comodo Security Solutions Inc. | All rights reserved.
Page 35

• Click 'Next' to continue. The wizard will start downloading and installing the components automatically.
Step 3: Enter your Account Details.
35
www.comodo.com
Comodo Internet Security User Guide | © 2010 Comodo Security Solutions Inc. | All rights reserved.
Page 36

• Enter your user and Comodo accounts details in the registration form. Make sure that the details that you
enter here are the same as the ones you entered while signing up for your Comodo account. The 'Login'
and 'Password' required here are the same user-name and password you created at the online form when
activating your Pro or Complete services. Click 'Next' to continue.
Step 4: Finalizing and confirming Guarantee Activation.
After your account details are been validated, you will see a final confirmation screen indicating successful
activation of the Guarantee.
36
www.comodo.com
Comodo Internet Security User Guide | © 2010 Comodo Security Solutions Inc. | All rights reserved.
Page 37

• Click 'Finish' to complete the activation wizard and return to the main CIS interface.
Successfully activating your Guarantee will change the information displayed in the 'Subscription Status' box:
The 'Guarantee Status' will now show a status of 'Activated'.
1.3.3 CIS Complete – Installation and Activation
Comodo Internet Security Complete is distributed on DVD and includes the following services:
• LivePCSupport - Tier 1 (Virus Diagnosis and Removal Service. Includes scanning and removal of virus
and spyware from your computer for an unlimited number of incidents. LivePCSupport is carried out by
Comodo security experts through remote desktop connection. For more details refer to Live PC support).
• LivePCSupport - Tier 2 (General PC Troubleshooting, PC Tune Up and Optimization, Internet Login
Protection, Email Account Setup, Software Installation, Printer Setup/Troubleshooting)
• TrustConnect - (Encrypted Internet Proxy Service. Trustconnect makes surfing the web safe from any
public Wi-Fi location)
• 2GB Online Storage Space - (Comodo Backup allows users to schedule regular backups to Comodo's
37
www.comodo.com
Comodo Internet Security User Guide | © 2010 Comodo Security Solutions Inc. | All rights reserved.
Page 38

highly secure servers. Data is encrypted and can accessed only by the user from any Internet connected
computer in the world)
• Comodo Guarantee - (If your computer becomes damaged as a result of malware and Comodo support
services cannot return it to a working condition then we’ll pay the costs of getting it repaired. See terms and
conditions for full details. The guarantee can only be activated if your computer meets certain preconditions that qualify it as an eligible computer. This means that it is currently free of malware, that certain
applications are installed and that certain CIS settings are enabled. These settings are tested for and
enabled by a wizard during the guarantee activation process. See 'Activating the Guarantee' for more
details). The Comodo guarantee is only available to residents of the USA.
After inserting the DVD, the setup program should automatically start. The following window is displayed.
Install Comodo Internet Security - If you have not yet installed CIS then you should first select 'Install Comodo
Internet Security'.
• Click here for more details on installing Comodo Internet Security
Acivate Your Services - Begins the activation processes for your LivePCSupport account and for your Comodo
Guarantee. Please locate your License Key before starting (this is either printed on the DVD itself or printed on an
insert included in the box packaging). After entering a valid license key, you will be taken to a Comodo web-form to
start the account registration process. Once created, your Comodo account is also to manage your online backup
storage space and TrustConnect services.
• Click here for full details on services activation
Install COMODO Backup - Begins the Comodo BackUp installation procedure. Once installed, you will be able to
schedule regular backups to local and network drives. You also get 2 GB of secure online backup space (access
this by entering your Comodo account username and password in the Comodo BackUp interface).
38
www.comodo.com
Comodo Internet Security User Guide | © 2010 Comodo Security Solutions Inc. | All rights reserved.
Page 39

• Click here for more details on installing Comodo Backup
• Click here if you wish to download the Comodo BackUp User Guide
Install COMODO TrustConnect - Begins the Comodo TrustConnect setup procedure. TrustConnect usage can be
managed by logging into your account at https://accounts.comodo.com.
• Click here to read more about TrustConnect
• Click here for more details on Installing Comodo TrustConnect .
Installing COMODO Internet Security
Click 'Install COMODO Internet Security' from the main COMODO Internet Security Installer screen. The set up
program starts automatically and the Select the language dialog will be displayed. Comodo Internet Security is
available in several languages. Select the preferred language from the drop-down list and click 'OK'.
To continue with the installation, you must read then accept the End User License Agreement (EULA).
39
www.comodo.com
Comodo Internet Security User Guide | © 2010 Comodo Security Solutions Inc. | All rights reserved.
Page 40

Click 'I Accept' to agree to the terms and continue.
The next step is entering the License key. The License key is printed on the DVD itself or printed on an insert
included in the box packaging.
Enter the License key and click 'Next'. Your License key will be validated.
40
www.comodo.com
Comodo Internet Security User Guide | © 2010 Comodo Security Solutions Inc. | All rights reserved.
Page 41

After your license key has been validated, you will see a final confirmation screen that summarizes your license
entitlements:
Click 'Next' to continue. The installation progress will be indicated.
41
www.comodo.com
Comodo Internet Security User Guide | © 2010 Comodo Security Solutions Inc. | All rights reserved.
Page 42

After installation is complete, you must restart your computer for CIS to become active.
Please save any unsaved data and click 'Yes' to restart the system. If you want to restart the system at a later time,
click 'No'.
Note: The installation will take effect only on the next restart of the computer.
After restarting, if your computer is connected to a home or work network, then you will be prompted to configure it
at the New Private Network Detected! dialog:
42
www.comodo.com
Comodo Internet Security User Guide | © 2010 Comodo Security Solutions Inc. | All rights reserved.
Page 43

Step 1: Even home users with a single computer will have to configure a home network in order to connect to
Internet. (this is usually displayed in the Step 1 text field as you network card). Most users should accept this name.
Step 2: If you wish your computer to accept connections from other PC's in this network or for printer sharing, then
also check this option (e.g. a work or home network). This will then become a trusted network. Users that only have
a single home computer connecting to the Internet should avoid this setting.
Select Do not automatically detect new networks If you are an experienced user that wishes to manually set-up
their own trusted networks (this can be done in 'My Network Zones' and through the 'Stealth Ports Wizard')
You must click OK to confirm your choice. If you click on Close button, all the network connections will be blocked.
Activating Guarantee Coverage: On completion of the Installation you need to activate the Guarantee Coverage.
Click here for explanations and guidance on Activating the Guarantee.
Activate Your Services
Click 'Activate Your Services' link from the CIS main interface. You will be prompted to enter the your license key in
the provided space.
43
www.comodo.com
Comodo Internet Security User Guide | © 2010 Comodo Security Solutions Inc. | All rights reserved.
Page 44

Enter the license key provided to you with the CIS product.
After the License key is verified, the Comodo Sign-Up Page is displayed. Enter the required field details and click
'Sign Up' button after selecting the 'I accept the Terms and Conditions' checkbox.
44
www.comodo.com
Comodo Internet Security User Guide | © 2010 Comodo Security Solutions Inc. | All rights reserved.
Page 45

45
www.comodo.com
Comodo Internet Security User Guide | © 2010 Comodo Security Solutions Inc. | All rights reserved.
Page 46

The Order Confirmation page is displayed. Click the 'Confirm' button to activate the service.
Clicking the 'Confirm' button displays the invoice generated for you. The invoice displays your details that you
entered while registering, the services you have ordered for, links for downloading the software, your license key
and other login related details.
Installing COMODO Backup
Click 'Install COMODO Backup' from the main COMODO Internet Security Installer screen.
The set up program starts automatically and the Select Setup language dialog is displayed. Comodo BackUp is
available in several languages. Select the preferred language from the list available and click 'OK'.
46
www.comodo.com
Comodo Internet Security User Guide | © 2010 Comodo Security Solutions Inc. | All rights reserved.
Page 47

Welcome screen of the setup wizard is displayed. Click 'Next' to continue.
Complete the initialization phase by reading and accepting the End User License Agreement (EULA). Click 'I
Accept' to continue installation.
47
www.comodo.com
Comodo Internet Security User Guide | © 2010 Comodo Security Solutions Inc. | All rights reserved.
Page 48

The next screen allows you to select the folder in your hard drive for installing COMODO BackUp. The default path
is C:\Program Files\COMODO\COMODO BackUp.
48
www.comodo.com
Comodo Internet Security User Guide | © 2010 Comodo Security Solutions Inc. | All rights reserved.
Page 49

This stage also allows you to check available disk space and how much of the disk space is going to be utilized by
Comodo BackUp in the different partitions of your hard drive. This is useful to decide on the destination folder
where you want to install the application. To check the disk space utilization, click the 'Disk Usage' button.
The available disk space and space required for the installation are displayed. Decide on the partition to install the
application and click 'OK'. If you want to install the application in a location other than the default location, click
'Browse' to choose a different location. Click 'Next' to continue.
49
www.comodo.com
Comodo Internet Security User Guide | © 2010 Comodo Security Solutions Inc. | All rights reserved.
Page 50

A setup status dialog box is displayed. You can see a progress bar indicating that the files are being installed.
50
www.comodo.com
Comodo Internet Security User Guide | © 2010 Comodo Security Solutions Inc. | All rights reserved.
Page 51

On completion of Installation, the product Activation dialog is displayed. Comodo BackUp is activated at free of cost
for lifetime usage. If you wish to sign up for news about Comodo products then enter your email address in the
space provided and select Sign me up for news about Comodo products. This is optional. Click 'Next'.
51
www.comodo.com
Comodo Internet Security User Guide | © 2010 Comodo Security Solutions Inc. | All rights reserved.
Page 52

The Installation Complete dialog is displayed indicating the successful completion of installation. For the installation
to take effect, the system has to be restarted. Please save any unsaved data and click 'Finish' to restart the
system. If you want to restart the system at a later time, un-check Restart the computer checkbox and click
'Finish'.
52
www.comodo.com
Comodo Internet Security User Guide | © 2010 Comodo Security Solutions Inc. | All rights reserved.
Page 53

Note: The installation is finalized only after restarting the computer.
Installing COMODO Trustconnect
Click 'Install COMODO TrustConnect' from the main COMODO Internet Security Installer screen.
This opens the 'Welcome to the Comodo TrustConnect Setup Wizard'. Click 'Next' to Continue.
53
www.comodo.com
Comodo Internet Security User Guide | © 2010 Comodo Security Solutions Inc. | All rights reserved.
Page 54

Select the 'I accept the agreement' radio button and click 'Next'.
The next screen allows you to select the folder in your hard drive for installing COMODO TrustConnect. The default
path is C:\Program Files\COMODO\TrustConnect. Click 'Next' after selecting the destination location.
54
www.comodo.com
Comodo Internet Security User Guide | © 2010 Comodo Security Solutions Inc. | All rights reserved.
Page 55

The next menu enables you select the location where the shortcut to TrustConnect application is placed in the Start
Menu. Click 'Next' after selecting the location.
The next screen enables you to have additional icons of TrustConnect in your system at the time of installation. You
55
www.comodo.com
Comodo Internet Security User Guide | © 2010 Comodo Security Solutions Inc. | All rights reserved.
Page 56

have options to create icons on the desktop or on the Quick Launch bar. Click 'Next' after selecting the icon
location.
The 'Ready to Install' page is displayed. Click 'Install' to continue.
56
www.comodo.com
Comodo Internet Security User Guide | © 2010 Comodo Security Solutions Inc. | All rights reserved.
Page 57

Clicking the 'Install' button enable the installation process.
After the installation is complete, the 'Completing the Comodo TrustConnect Setup Wizard' screen is displayed.
57
www.comodo.com
Comodo Internet Security User Guide | © 2010 Comodo Security Solutions Inc. | All rights reserved.
Page 58

Click 'Finish' to complete the installation process. 'Comodo TrustConnect' is now successfully installed in your
system. Full details on using Comodo TrustConnect can be found in the TrustConnect section of this guide.
1.4 Starting Comodo Internet Security
After installation, Comodo Internet Security automatically starts whenever you start Windows. In order to configure
and view settings within Comodo Internet Security, you need to access the management interface.
There are 3 different ways to access the management interface of Comodo Internet Security:
• System Tray Icon
• Windows Desktop
• Windows Start menu
1.4.1 Comodo Internet Security Tray Icon
• Just double click the shield icon to start the main interface.
Tip: By right-clicking on the tray icon, you can access short cuts to selected settings like Firewall Security Level,
Defense+ Security level and so on.
1.4.2 Windows Desktop
• Just double click the shield icon in the desktop to start Comodo Internet Security.
1.4.3 Start Menu
You can also access Comodo Internet Security via the Windows Start Menu.
• Click Start and select All Programs > Comodo > COMODO Internet Security > COMODO Internet
Security.
58
www.comodo.com
Comodo Internet Security User Guide | © 2010 Comodo Security Solutions Inc. | All rights reserved.
Page 59

1.5 Overview of Summary Screens
By default, the management interface displays the 'Summary' area information. You can access this area at any
time by selecting the 'Summary' tab as shown in General Navigation.
The specific layout of the summary screen that you see is dependent on the type of installation you chose. Click
the links below to view an outline of the summary screen that applies to your installation:
• COMODO Internet Security with both Antivirus and Firewall
• COMODO Firewall only or
• COMODO Antivirus only
1.5.1 Comodo Internet Security – Summary
59
www.comodo.com
Comodo Internet Security User Guide | © 2010 Comodo Security Solutions Inc. | All rights reserved.
Page 60

Summary screen shows the following
1. System Status
The System Status box displays the system's activities and recommendations on actions you need to perform.
2. Virus Defense
The Virus Defense box contains:
i. The status of real time virus scanning
The status of the virus scanning setting is displayed as a link (Stateful in this example). On clicking
this link, the Virus Scanner Settings panel is opened allowing you to quickly set the level of Real
Time Scanning, by moving the status slider. For more details on Virus Scanner Settings, refer
Scanner Settings.
ii. When the virus database was last updated
The day and time at which the virus database was last updated is displayed as a link. On clicking
the link, the update of the virus database is started and the current date and time are displayed on
completion of the process.
iii. Number of detected threats
The number of threats detected so far from the start of the current session of Comodo Internet
60
www.comodo.com
Comodo Internet Security User Guide | © 2010 Comodo Security Solutions Inc. | All rights reserved.
Page 61

Security is displayed here.
iv. Run Virus Scanner
The Run Virus Scanner link in this box allows you to Run an on-demand Scan, when clicked.
3. Network Defense
The Network Defense box contains:
i. Number of Blocked Intrusion Attempts
The total number of intrusion attempts blocked by firewall since the installation of Comodo Internet
Security is displayed here.
ii. Current Firewall Security Level
Your current Firewall Security Level (or 'Firewall Behavior Setting') is displayed as a link (Safe
Mode in this example). On clicking this link, the Firewall Behavior Settings panel is opened allowing
you to quickly customize the firewall security by moving the Firewall Security Level slider to preset
security levels. For more details on Firewall settings, refer Firewall Behavior Settings.
iii. Inbound/Outbound Connections
A numerical summary of currently active inbound and outbound connections to and from your
computer is displayed here. For more details on active connections, refer View Active Connections
and Traffic section.
iv. Stop All Activities/Restore All Activities
This link allows you to toggle network activity between on and off. Specifically, clicking Stop All
Activities instantly blocks all incoming and outgoing network connections, placing the firewall in
the Block All Mode of Firewall Behavior Settings. Similarly, clicking Restore All Activities reimplements your previous Firewall Security Level.
4. Highlights
The Highlights box displays information about Security Alerts and News related to Comodo Internet
Security and latest Critical security updates. Clicking the 'Learn More' button in the Highlights box takes
you to the Comodo Forums website at http://forums.comodo.com. Registration is free and you'll benefit
from the expert contributions of developers and fellow users alike.
5. Subscription Information
The subscription Information box contains:
i. Your Current Subscription Status
The status of your subscription to CIS Pro or CIS Plus is displayed here.
a) If you are using the CIS Free version, you can upgrade it to CIS Pro or CIS Plus by clicking the link
'Not Active' next to Subscription Status. Refer to Upgrading to CIS Plus or Pro for more details.
b) If the subscription is active, it indicates the number of days left for renewal.
ii. Your Guarantee Coverage Status
The status of Comodo Guarantee is displayed here, if you have subscribed to CIS Pro or
purchased CIS Complete.
If you are a CIS Pro or a CIS Complete customer and activated your license and did not activated
61
www.comodo.com
Comodo Internet Security User Guide | © 2010 Comodo Security Solutions Inc. | All rights reserved.
Page 62

the Guarantee, clicking the Get Coverage link next to Guarantee Coverage starts the activation
process. Click here for more details.
The status of your Comodo guarantee Coverage is displayed here.
iii. Live PC support
Clicking this button opens the chat window to get assistance through Live PC support. The button
is active only if you have subscribed for CIS Plus, CIS Pro or CIS Complete versions. Click here for
more details on Live PC Support.
6. Traffic
The Traffic box in the Summary screen of Comodo Internet Security displays a bar graph showing the
applications that are currently connected to the Internet and are sending or receiving data. The summary
also displays the % of total traffic each application is responsible for and the filename of the executable.
Clicking on any application name opens View Active Connections interface.
1.5.2 Comodo Antivirus – Summary
Summary screen shows the following
1. System Status
The System Status box displays the system's activities and recommendations on actions you need to
perform.
62
www.comodo.com
Comodo Internet Security User Guide | © 2010 Comodo Security Solutions Inc. | All rights reserved.
Page 63

2. Virus Defense
The Virus Defense box contains:
i. The status of realtime virus scanning
The status of the virus scanning setting is displayed as a link (Stateful in this example). On clicking
this link, the Virus Scanner Settings panel is opened allowing you to quickly set the level of Real
Time Scanning, by moving the status slider. For more details on Virus Scanner Settings, refer
Scanner Settings.
ii. When the virus database was last updated
The day and time at which the virus database was last updated is displayed as a link. On clicking
the link, the update of the virus database is started and the current date and time are displayed on
completion of the process.
iii. Number of detected threats
The number of threats detected so far from the start of the current session of Comodo Antivirus is
displayed here.
iv. Run Virus Scanner
The Run Virus Scanner link in this box allows you to Run a Scan, when clicked.
3. Proactive Defense
The Proactive Defense box contains:
i. Number of blocked suspicious attempts
The number of suspicious attempts blocked by Defense+ from the start of the current session is
displayed as a link . On clicking this link, View Defense+ events is opened. For more details on
viewing Defense+ events, refer View Defense+ events.
ii. Your Current Defense+ Security Level
Your current Defense+ security level (or Defense+ setting) is displayed as a link (Clean PC Mode in
this example). On clicking this link, the Defense+ settings panel is opened to allow you to quickly
customize the Defense+ security level by moving the Defense+ security level slider to preset
security levels. For a more details on Defense+ settings, refer Defense+ Settings.
iii. Number of Currently Active Processes
The number of all processes/applications that are running on your computer is displayed here as a
link. On clicking this link, Active Process List pop-up is displayed with details of each
process/application.
You can see in-depth details of all running processes by clicking View Active Processes in common
tasks of Defense+ Task center.
iv. Number of Files Waiting for Your Review
The number of files currently in the My Pending Files is displayed here. For more details on this
refer My Pending Files.
4. Highlights
The Highlights box displays information about Security Alerts and News related to Comodo Internet
63
www.comodo.com
Comodo Internet Security User Guide | © 2010 Comodo Security Solutions Inc. | All rights reserved.
Page 64

Security and latest Critical security updates. Clicking the 'Learn More' button in the Highlights box takes
you to the Comodo Forums website at http://forums.comodo.com. Registration is free and you'll benefit
from the expert contributions of developers and fellow users alike.
5. Subscription Information
The subscription Information box contains:
i. Your Current Subscription Status
The status of your subscription to CIS Pro or CIS Plus is displayed here.
a) If you are using the CIS Free version, you can upgrade it to CIS Pro or CIS Plus by clicking the link
'Not Active' next to Subscription Status. Refer to Upgrading to CIS Plus or Pro for more details.
b) If the subscription is active, it indicates the number of days left for renewal.
ii. Your Guarantee Coverage Status
a) The status of Comodo Guarantee is displayed here, if you have subscribed to CIS Pro or
purchased CIS Complete.
b) If you are a CIS Pro or a CIS Complete customer and activated your license and did not activated
the Guarantee, clicking the Get Coverage link next to Guarantee Coverage starts the activation
process. Click here for more details.
c) The status of your Comodo guarantee Coverage is displayed here.
iii. Live PC support
Clicking this button opens the chat window to get assistance through Live PC support. The button
is active only if you have subscribed for CIS Plus, CIS Pro or CIS Complete versions. Click here for
more details on Live PC Support.
6. Tip of the Day
This box contains helps you to use Comodo Antivirus to its maximum potential by displaying information
about features you may have missed. You can click Left and Right arrows to view previous and next Tips.
64
www.comodo.com
Comodo Internet Security User Guide | © 2010 Comodo Security Solutions Inc. | All rights reserved.
Page 65

1.5.3 Comodo Firewall – Summary
Summary screen shows the following
1. System Status
The System Status box displays the system's activities and recommendations on actions you need to
perform.
2. Network Defense
The Network Defense box contains:
i. Number of Blocked Intrusion Attempts
The total number of intrusion attempts blocked by firewall since start of current session of Comodo
internet Security is displayed here as a link. On clicking the link, Firewall Events panel is opened.
For more details on viewing Firewall events, refer View Firewall Events.
ii. Current Firewall Security Level
Your current Firewall Security Level (or 'Firewall Behavior Setting') is displayed as a link (Safe
Mode in this example). On clicking this link, the Firewall Behavior Settings panel is opened allowing
you to quickly customize the firewall security by moving the Firewall Security Level slider to preset
security levels. For more details on Firewall settings, refer Firewall Behavior Settings.
65
www.comodo.com
Comodo Internet Security User Guide | © 2010 Comodo Security Solutions Inc. | All rights reserved.
Page 66

iii. Inbound/Outbound Connections
A numerical summary of currently active inbound and outbound connections to and from your
computer is displayed here. The numbers are displayed as links. On clicking any number, Active
Connections panel is opened. For more details on viewing active connections, refer View Active
Connections and Traffic section on the summary screen.
iv. Stop All Activities/Restore All Activities
This link allows you to toggle network activity between on and off. Specifically, clicking Stop All
Activities instantly blocks all incoming and outgoing network connections, placing the firewall in
the 'Block All Mode' of Firewall Behavior Settings. Similarly, clicking Restore All Activities reimplements your previous Firewall Security Level.
3. Proactive Defense
The Proactive Defense box contains:
i. Number of Blocked Suspicious Attempts
The number of suspicious attempts blocked by Defense+ from the start of the current session is
displayed as a link . On clicking this link, View Defense+ events is opened. For more details on
viewing Defense+ events, refer View Defense+ events.
ii. Your Current Defense+ Security Level
Your current Defense+ security level (or Defense+ setting) is displayed as a link (Clean PC Mode in
this example). On clicking this link, the Defense+ settings panel is opened to allow you to quickly
customize the Defense+ security level by moving the Defense+ security level slider to preset
security levels. For a more details on Defense+ settings, refer Defense+ Settings.
iii. Number of Currently Active Processes
A numerical summary of all processes/applications that are running on your computer is displayed
here as a link. On clicking this link, Active Process List pop-up is displayed with details of each
process/application.
You can see in-depth details of all running processes by clicking View Active Processes in common
tasks of Defense+ Task center.
iv. Number of Files Waiting for Your Review
The number of files currently in the My Pending Files is displayed here. For more details on this
refer My Pending Files.
v. Switch to Installation Mode/ Switch to Previous Mode
This link allows you to quickly toggle between Defense+ Installation mode and your most recent
Defense+ Security Level. The installation mode allows you to quickly install or run an application
that you trust which is, as yet, unknown to Comodo Internet Security. For more refer Defense+
Settings.
4. Highlights
The Highlights box displays information about Security Alerts and News related to Comodo Internet
Security and latest Critical security updates. Clicking the 'Learn More' button in the Highlights box takes
you to the Comodo Forums website at http://forums.comodo.com. Registration is free and you'll benefit
from the expert contributions of developers and fellow users alike.
66
www.comodo.com
Comodo Internet Security User Guide | © 2010 Comodo Security Solutions Inc. | All rights reserved.
Page 67

5. Subscription Information
The subscription Information box contains:
i. Your Current Subscription Status
The status of your subscription to CIS Pro or CIS Plus is displayed here.
a) If you are using the CIS Free version, you can upgrade it to CIS Pro or CIS Plus by clicking the link
'Not Active' next to Subscription Status. Refer to Upgrading to CIS Plus or Pro for more details.
b) If the subscription is active, it indicates the number of days left for renewal.
ii. Your Current Warranty Status
a) The status of Comodo Guarantee is displayed here, if you have subscribed to CIS Pro or purchased
CIS Complete.
b) If you are a CIS Pro or a CIS Complete customer and activated your license and did not activated
the Guarantee, clicking the Get Coverage link next to Guarantee Coverage starts the activation
process. Click here for more details.
c) The status of your Comodo guarantee Coverage is displayed here.
iii. Live PC support
Clicking this button opens the chat window to get assistance through Live PC support. The button
is active only if you have subscribed for CIS Plus, CIS Pro or CIS Complete versions. Click here for
more details on Live PC Support.
6. Traffic
The Traffic box in the Summary screen of Comodo Firewall displays a bar graph showing the applications
that are currently connected to the Internet and are sending or receiving data. The summary also displays
the % of total traffic each application is responsible for and the filename of the executable. Clicking on any
application name opens View Active Connections interface.
1.6 Comodo Internet Security – Navigation
After installation, Comodo Internet Security automatically protects any computer on which it is installed. You do not
have to start the program to be protected.
See Starting Comodo Internet Security if you are unsure of how to access the main interface.
Persistent Navigation
Comodo Internet Security is divided into five main areas indicated by the links with respective icons at the top right
hand side of the main interface screen.
• Summary
• Antivirus
• Firewall
• Defense+
• More...
67
www.comodo.com
Comodo Internet Security User Guide | © 2010 Comodo Security Solutions Inc. | All rights reserved.
Page 68

Each of these areas contains several sub-sections that provide total control over configuration of the security Suite.
These icons are ever-present and can be accessed at all times.
• Summary - Contains at-a-glance details of important settings, activity and other information. The summary
screen differs for different types of installation, namely:
• Comodo Internet Security
• Comodo Antivirus
• Comodo Firewall
See the Overview of summary screens section for more details on this area.
• Antivirus - Clicking this icon opens Antivirus Tasks configuration screen.
• Firewall - Clicking this icon opens Firewall Tasks configuration screen. Advanced users are advised to first
visit the Network Security Policy area for an introduction to firewall policies and rule creation.
• Defense+ - Clicking this icon opens Defense+ configuration screen. Advanced users are advised to first
visit the Computer Security Policy area for an introduction to Defense+ policies and rule creation.
• More... - Clicking this icon opens More... options screen which contains several options relating to overall
configuration of Comodo Internet Security.
1.7 Understanding Alerts
After first installing Comodo Internet Security, it is likely to see a number of pop-up alerts. This is perfectly normal
and indicates that the security suite is learning the behavior of your applications and establishing which programs
need privileges such as Internet access and file access rights. Each alert provides information and options that
enable you to make an informed decision on whether you want to allow or block a request or activity. Alerts also to
allow you to instruct Comodo Internet Security on how it should behave in future when it encounters activities of the
same type.
Threatcast Feature - The innovative Threatcast feature in Comodo Internet Security allows you to share your
responses to the alerts among the community of millions of CIS users worldwide. Every response (allow/block)
provided by each signed up user is uploaded to Comodo servers. When you encounter an alert, you can see how
the others have reacted to the similar one as a percentage bar chart in the alert itself. This provides an additional
guidance to you to make a decision on responding to the alert. Comodo Internet Security has a savvy and
technically knowledgeable user base. Therefore, the responses of our intelligent user base are help to guide the
novice users who do not know how to react. Once signed up, your responses are also be to the servers to guide
others. To get this facility you should have selected I would like to join Threatcast community during installation.
Even if you have not done so, you can join the community by accessing Miscellaneous > Settings > Threatcast
from the main interface of CIS. Click here to know how to view Threatcast Rating.
Buffer Overflow Protection Feature - Buffer overflow attack occurs when a malicious program or script
deliberately sends more data to its memory buffer than the buffer can handle. Defense+ provides alerts on attempt
of most types of buffer overflow attacks and provides protection against data theft, computer crashes and system
68
www.comodo.com
Comodo Internet Security User Guide | © 2010 Comodo Security Solutions Inc. | All rights reserved.
Page 69

damage. For more details, please refer Image Execution Control Settings > Detect Shell Code Injections.
Alerts Overview
Comodo Internet Security alerts come in four main varieties, namely:
• Antivirus Alerts
• Firewall Alerts
• Defense+ Alerts (including Elevated Privilege Alerts)
• Sandbox Alerts
Broadly speaking, Antivirus alerts inform you when a virus or malware is executed into your system, Firewall alerts
inform you about network connection attempts and Defense+ alerts tell you about the behavior of application on
your system. In all the three cases, the alert can contain very important security warnings or may simply occur
because you are running an application for the first time. Your reaction should depend on the information that is
presented at the alert.
An example alert is shown below.
Type of Alert
Can be Firewall,
Defense+ or Antivirus
Color indicates
severity of the Alert
Both firewall and
Defense+ alerts are
color coded to the
risk level
Description of activity or
connection attempt
High visibility icons quickly inform
you which applications and
techniques are involved in an alert.
Clicking the name of the
executables here opens a window
containing more information about
the application in question
The information area
contains advice to
user on how to react
to the alert.
Select these choices
as required. These
options are
explained below
Clicking More Options expands the
lower panel and displays more
options to react to the alert
Click these buttons to allow or
block the request
Severity Level
The upper strip of both Defense+ and Firewall alerts are color coded according to risk level. This provides a fast,
at-a-glance, indicator of the severity of the alert. However, it cannot be stressed enough that you should still read
69
www.comodo.com
Comodo Internet Security User Guide | © 2010 Comodo Security Solutions Inc. | All rights reserved.
Page 70

the 'Security Considerations' section in order to reach an informed decision on allowing or blocking the activity.
Note: Antivirus alerts are not ranked in this way. They always appear with a red upper strip.
• Yellow Alerts - Low Severity - In most cases, you can safely approve these connection request or activity.
The 'Remember my answer for this application' option is automatically pre-selected for safe requests
• Orange Alerts - Medium Severity - Carefully read the ‘Security Considerations section before making a
decision. These alerts could be the result of a harmless process or activity by a trusted program or an
indication of an attack by malware. If you know the application to be safe, then it is usually okay to allow
the request. If you do not recognize the application performing the activity or connection request then you
should block it.
• Red Alerts - High Severity - These alerts indicate highly suspicious behavior that is consistent with the
activity of a Trojan horse, virus or other malware program. Carefully read the information provided when
deciding whether to allow it to proceed.
Information on the alert
Threatcast Rating tab: Clicking this tab opens the Threatcast Rating area. This area contains percentage bar
graphs showing how many of the other users have allowed this activity and how many have denied.
Note: You must be connected to Internet to get the Threatcast rating report.
Security Considerations tab: Clicking this tab opens the Security Considerations area. This area contains a
description of the nature of the alert. It tells you the name of the software/executable that caused the alert; the
action that it is attempting to perform and how that action could potentially affect your system. You can also find
helpful advice about how you should respond.
Note: Antivirus Alerts are not rated by the Threatcast system because the AV operates using a system of known,
blacklisted signatures. Unlike Defense+ and Firewall alerts, where there exists the possibility of equivocation
regarding the safety of an particular activity, AV alerts are definite indications that malware is present on your
system.
70
www.comodo.com
Comodo Internet Security User Guide | © 2010 Comodo Security Solutions Inc. | All rights reserved.
Page 71

More Options
Clicking the More Options in the alert expands the lower panel and displays more options for reacting to the alert.
The first three options enable you to select your reaction to the activity or connection attempt requested.
• Allow this request - Allows the requested activity or connection attempt
• Block this request - Denies the requested activity or connection attempt.
• Treat this application as - Enables you to select a predefined security policy to be deployed on to the
application in question. Select this option and select a predefined policy depending on the trustworthiness
and type of the application.
71
www.comodo.com
Comodo Internet Security User Guide | © 2010 Comodo Security Solutions Inc. | All rights reserved.
Page 72

Refer to Predefined Security Policies for more details.
The next three options allow you to take additional measures based on the nature of the alert.
• Remember my answer - Select this option if you want Firewall or Defense+ to implement the same
decision for identical requests in future - meaning you are not prompted if same type of activity or
connection attempt arises in future. The response you made this time is applied automatically to the all the
similar activities or connection attempts.
• Submit the files to COMODO for analysis - Select this option if you suspect that that the application that
has raised this alert as a malware. Comodo Internet Security sends the application to Comodo
automatically, irrespective of your Allow or Block response. Comodo analyzes the application and includes
it in the safe list or black list accordingly.
• Create a "Windows" system restore point - Selecting this option instructs your Windows Operating
System to create a restore point. This enables you to safely rollback your system to the previous system
state if you encounter problems because of allowing or blocking this request.
• If you have Comodo Time Machine (CTM) installed then CIS creates a Time Machine restore point.
• If you do not have Comodo Time Machine installed, then CIS creates a regular Windows System
Restore point.
Note: This option is only available if Windows System Restore is enabled in your system. You can check
whether system restore is enabled by visiting the Windows control panel:
• Click here if you are using Windows 7
• Click here if you are using Windows Vista
• Click here if you are using Windows XP
Windows 7
To ensure that Windows system restore is enabled
1. Click Start > Control Panel > System > System Protection
2. Make sure that the Protection status of the hard disk drive partition(s) is set to 'On' under 'Protection
Settings'.
72
www.comodo.com
Comodo Internet Security User Guide | © 2010 Comodo Security Solutions Inc. | All rights reserved.
Page 73

Windows Vista
To ensure that Windows system restore is enabled
1. Click Start > Control Panel > System > System Protection
2. Make sure that the checkbox(es) beside the hard disk drive partition(s) under 'Automatic restore points >
Create restore points automatically on the selected disks'' are selected.
73
www.comodo.com
Comodo Internet Security User Guide | © 2010 Comodo Security Solutions Inc. | All rights reserved.
Page 74

Windows XP
To ensure that Windows system restore is enabled
1. Click Start > Control Panel > System > System Restore tab
2. Make sure that the checkbox 'Turn off System Restore on all drives' is NOT selected.
If Comodo Time Machine (CTM) is installed in your system, the restore point is created by it irrespective of whether
the Windows Restore Point is enabled in your system or not.
Background Note: Comodo Time Machine is a powerful system rollback utility that allows you to quickly restore
74
www.comodo.com
Comodo Internet Security User Guide | © 2010 Comodo Security Solutions Inc. | All rights reserved.
Page 75

your computer to an earlier point in time. The software is free of charge and allows you to quickly recover your
computer to its last working state in the event of malware attacks or system crashes. Find out more and download
the application from http://www.comodo.com/home/data-storage-encryption/data-recovery.php.
Now that we've outlined the basic construction of an alert, lets look at how you should react to them:
Answering an Antivirus Alert
Comodo Internet Security generates an Antivirus alert whenever a virus or malware tries to be copied or executed
without your knowledge and displays the alert at the bottom right hand side of your computer screen. These alerts
are a valuable source of real-time information that helps the user to immediately identify which particular files are
infected or are causing problems and the choices for actions to be taken.
The alert contains the name of the virus detected and the location of the file or application infected by it.
You can take one of the following steps to answer the Antivirus alert.
• Move the file or application to Quarantined Items for later analysis, if you feel that the virus appears to be
suspicious.
• Disinfect the file if there exists a disinfection routine for the detected file.
• Delete the file or application from your system if you do not trust the application.
• Ignore the alert only if you trust the application or the source of application by clicking 'Ignore'.
To move the file or application to Quarantine
• Click the drop-down arrow beside the 'Clean' button and select 'Quarantine' from the 'Clean' options.
75
www.comodo.com
Comodo Internet Security User Guide | © 2010 Comodo Security Solutions Inc. | All rights reserved.
Page 76

To disinfect the file/application
• Click the drop-down arrow beside the 'Clean' button and select 'Disinfect' from the 'Clean' options.
To permanently delete the file or application
• Click the 'Clean' button
76
www.comodo.com
Comodo Internet Security User Guide | © 2010 Comodo Security Solutions Inc. | All rights reserved.
Page 77

To ignore the alert if you trust the file/application
• Click 'Ignore'. Selecting Ignore provides you with four options.
• Once. If you click 'Once', the virus is ignored only at that time only. If the same application invokes
again, an Antivirus alert is displayed.
• Add to My Own Safe Files. If you click 'Add to My Own Safe Files', the virus is moved to My Own
Safe Files area. The alert is not generated if the same application invokes again.
• Report this to COMODO as a False Alert. If you are sure that the file is safe, select 'Report this to
COMODO as a False Alert'. The Antivirus sends the file to Comodo for analysis. If the file is
trustworthy, it is added to the Comodo safelist.
• Add to Exclusions. If you click 'Add to Exclusions', the virus is moved to Exclusions list. The alert is
not generated if the same application invokes again.
Answering Firewall Alerts
Comodo Internet Security generates a Firewall alert on network connection attempts. The followings steps will help
77
www.comodo.com
Comodo Internet Security User Guide | © 2010 Comodo Security Solutions Inc. | All rights reserved.
Page 78

you answer a Firewall alert: :
1. Carefully read the 'Security Considerations' section. The Firewall can recognize thousands of safe
applications. (For example, Internet Explorer and Outlook are safe applications). If the application is known
to be safe - it is written directly in the security considerations section along with advice that it is safe to
proceed. Similarly, if the application is unknown and cannot be recognized you are informed of this. Also
click on the Threatcast Rating tab to see how others have reacted to the same alert.
If it is one of your everyday applications that you want to grant Internet access to then you should select
Allow This Request (it may be the case that the application has not yet been added to the safe application
database yet).
If you don't recognize the application then we recommend you select Block This Request, but do not
select the Remember My Answer option.
In all cases, clicking on the name of the application opens a properties window that can help you determine
whether or not to proceed:
2. If you are sure that it is one of your everyday application, try to use the Treat This Application As option
as much as possible. This deploys a predefined firewall policy on the target application. For example, you
may choose to apply the policy Web Browser to the known and trusted applications 'Internet Explorer',
'FireFox' and 'Opera'. Each predefined policy has been specifically designed by Comodo to optimize the
security level of a certain type of application.
78
www.comodo.com
Comodo Internet Security User Guide | © 2010 Comodo Security Solutions Inc. | All rights reserved.
Page 79

If you do not see the Treat this Application As option, you should click More Options. Remember to
check the box Remember My Answer.
3. If the Firewall alert reports a behavior, consistent with that of a malware in the security considerations
section, then you should block the request AND click Remember My Answer to make the setting
permanent.
Answering Defense+ Alerts
Comodo Internet Security generates a Defense+ Alert based on behavior of applications running in your system.
Following are the steps to be followed to answer a Defense+ alert:
1. As with Firewall Alerts, carefully read the 'Security Considerations' section. Comodo Internet Security can
recognize thousands of safe applications. If the application is known to be safe - it is written directly in the
security considerations section along with advice that it is safe to proceed. Similarly, if the application is
unknown and cannot be recognized you are informed of this. Also click on the Threatcast Rating tab to see
how others have reacted to the same alert.
If it is one of your everyday applications that you want to grant execution rights to then you should select
Allow This Request.
If you don't recognize the application then we recommend you select Block This Request but do not
select Remember My Answer check box.
2. Avoid using the Installer or Updater policy if you are not installing an application. This is because treating
an application as an 'Installer or Updater' grants maximum possible privileges onto to an application something that is not required by most 'already installed' applications. If you select 'Installer or Updater',
you may consider using it temporarily with Remember My Answer left unchecked.
79
www.comodo.com
Comodo Internet Security User Guide | © 2010 Comodo Security Solutions Inc. | All rights reserved.
Page 80

3. Pay special attention to Device Driver Installation and Physical Memory Access alerts. Again, not many
legitimate applications would cause such an alert and this is usually a good indicator of malware/rootkit like
behavior. Unless you know for a fact that the application performing the activity is legitimate, then Comodo
recommends blocking these requests.
80
www.comodo.com
Comodo Internet Security User Guide | © 2010 Comodo Security Solutions Inc. | All rights reserved.
Page 81

4. Protected Registry Key Alerts usually occur when you install a new application. If you haven't been
installing a new program and do not recognize the application requesting the access , then a 'Protected
Registry Key Alert' should be a cause for concern.
5. Run with elevated Privileges. CIS will display this kind of alert when the installer of an unknown
application requires administrator, or elevated, privileges to run. An installer that is allowed to run with
elevated privileges is permitted to make changes to important areas of your computer such as the registry.
• If you have good reason to trust the publisher of the software then you can click the 'Allow' button.
This will grant the elevated privilege request and allow the installer to run.
• If you are unsure of the safety of the software, then Comodo recommends that you run it in the
sandbox by clicking the 'Sandbox' button.
• If this alert is unexpected then you should abort the installation by clicking the 'Block' button (for
example, you have not proactively started to install an application and the executable does not
belong to an updater program that you recognize)
• If you select 'Always trust the publisher of this file' then CIS will treat all files from this installer as
safe and no future alerts will be generated when you run executables by this publisher.
• In all cases, please remember to select 'Submit this file to Comodo for analysis' so that our
researchers can establish whether the application is safe or not. If it is found to be safe, we shall
add it to the global safelist (whitelist). If it is found to be malicious we will add it to our global list of
malware signatures (blacklist). Comodo will then distribute the updated lists to all users of CIS.
81
www.comodo.com
Comodo Internet Security User Guide | © 2010 Comodo Security Solutions Inc. | All rights reserved.
Page 82

You will see this type of alert if:
• The sandbox is enabled
and
• 'Automatically detect and run installers outside the sandbox' is enabled. These settings can be modified in
Defense+ Tasks > Sandbox > Sandbox Settings.
There are two versions of this alert - one for unknown installers that are not digitally signed and the second for
unknown installers that are digitally signed but the publisher of the software has not yet been white-listed (they are
not yet a 'Trusted Software Vendor').
Unknown & not digitally signed Unknown & digitally signed but publisher not yet white-
listed (not yet a 'Trusted Software Vendor')
• Unknown and unsigned installers should be either sandboxed or blocked.
• Unknown but signed installers can be allowed to run if you trust the publisher, or may be sandboxed if you
would like to evaluate the behavior of the application.
• In both instances, select 'Submit the file to Comodo for analysis' so that we can effectively categorize the
file and add it to to our global white-list or blacklist.
Also see:
• 'Answering a Sandbox Alert' to see how CIS handles unknown applications that are not detected as being
an installer or updater program.
• 'The Sandbox Process' - to understand the decision making process behind why CIS chooses to sandbox
certain applications.
• 'Trusted Software Vendors' - for an explanation of digitally signed files and 'Trusted Software Vendors'.
82
www.comodo.com
Comodo Internet Security User Guide | © 2010 Comodo Security Solutions Inc. | All rights reserved.
Page 83

6. Protected File Alerts usually occur when you try to download or copy files or when you update an already
installed application.
Were you installing new software or trying to download an application from the Internet? If you are
downloading a file from the 'net, try to use Allow without Remembering option to cut down on the
creation of unnecessary rules within the firewall.
If an application is trying to create an executable file in the Windows directory (or any of its subdirectories)
then pay special attention. The Windows directory is a favorite target of malware applications. If you are not
installing any new applications or updating Windows then make sure you recognize the application in
question. If you don't, then select Block This Request without selecting Remember My Answer option.
If an application is trying to create a new file with a random filename e.g. "hughbasd.dll" then it is probably
a virus and you should block it permanently by selecting Treat As Isolated Application (fourth down in the
graphic below).
7. A Buffer overflow Alert is generated when an application tries to send more data to its memory buffer than
that the buffer can handle. This may be a possible hacking attempt.
If you click Terminate, the application is denied access to execute.
If you click Skip, the application is excluded from monitoring for the moment and is allowed access. But on
the next attempt of attack the alert is generated again.
If you select 'Skip this application in the future', and click Skip, the application is excluded from monitoring
83
www.comodo.com
Comodo Internet Security User Guide | © 2010 Comodo Security Solutions Inc. | All rights reserved.
Page 84

permanently and allowed access all the times. Do this only of the application is from a trusted vendor.
8. If a Defense+ alert reports a malware behavior in the security considerations section then you should
Block the request permanently by selecting Remember My Answer option. As this is probably a virus,
you should also submit the application in question, to Comodo for analysis.
9. Unrecognized applications are not always bad. Your best loved applications may very well be safe but not
yet included in the Comodo certified application database. If the security considerations section says “If xxx
is one of your everyday applications, you can allow this request”, you may allow the request permanently if
you are sure it is not a virus. You may report it to Comodo for further analysis and inclusion in the certified
application database.
10. If Defense+ is in Clean PC Mode, you probably are seeing the alerts for any new applications introduced to
the system - but not for the ones you have already installed. You may review the 'My Pending Files' section
for your newly installed applications and remove them from the list for them to be considered as clean.
11. Avoid using Trusted Application or Windows System Application policies for you email clients, web
browsers, IM or P2P applications. These applications do not need such powerful access rights.
Answering a Sandbox Alert
By default, CIS will display an alert whenever it runs an unknown application in the sandbox:
The top of the alert will show the name of the executable that has been isolated in the sandbox. Each alert contains
a More Options/Fewer Options link. Clicking More Options will open the following settings:
• Keep this application inside the Sandbox - This is the default setting and means CIS will continue to run
the application in the sandbox for the current runtime and any time that you run it in the future. CIS will
notify you with a similar alert every time you run this program (providing the application does not lose its
'unknown' status by being added to the the local or global safelist (trusted applications) or blacklist
(confirmed malware) - and providing the user does not disable Sandbox alerts or disable the Sandbox
entirely.) The application will remain in the 'Pending Files' list, ready for submission to Comodo.
• Do not run this application in the Sandbox again - The unknown application will still run in the Sandbox
84
www.comodo.com
Comodo Internet Security User Guide | © 2010 Comodo Security Solutions Inc. | All rights reserved.
Page 85

this time but next time it will outside of the Sandbox. Choose this setting if you are absolutely sure that the
executable is safe. Users are also reminded that they should submit such unknown applications to Comodo
via the 'My Pending Files' interface. This will allow Comodo to analyze the executable and, if it is found to
be safe, to add it to the global safe list. This will ensure that unknown but ultimately safe applications are
quickly white-listed for all users.
• Always trust the publisher of this file - Selecting this option in addition to 'Do not run this....' will mean all
executables by the publisher of this application will be trusted and not run inside the sandbox.
Also see:
• 'Run with elevated Privileges' alerts.
• 'The Sandbox Process' - to understand the decision making process behind why CIS chooses to sandbox
certain applications.
85
www.comodo.com
Comodo Internet Security User Guide | © 2010 Comodo Security Solutions Inc. | All rights reserved.
Page 86

2 Antivirus Tasks Overview
The Antivirus Task Center allows you to quickly and easily configure all
aspects of the Antivirus component of Comodo Internet Security (hereafter known
simply as ‘Comodo Antivirus’.)
Comodo Antivirus leverages multiple technologies, including Real-time/On-Access Scanning, On Demand
Scanning and a fully featured Scan Scheduler to immediately start cleaning or quarantining suspicious files from
your hard drives, shared disks, emails, downloads and system memory. The application also allows users to create
custom scan profiles which can be re-used across all scan types and features full event logging, quarantine and file
submission facilities.
Comodo Antivirus detects and removes threats that are present on your machine and forms an additional layer of
security on top of the threat prevention offered by the Firewall and Defense+ components. The heuristics scanning
capability of the application identifies previously unknown viruses and Trojans.
In order to maintain maximum security levels, Comodo advises you to run regular Antivirus scans.
On-Demand scanning is also seamlessly integrated into the Windows operating system. Users can scan specific
objects ‘on the fly’ by simply right-clicking on a file, folder or drive and selecting Scan with Comodo AntiVirus’
from the context sensitive menu.
The Antivirus tasks center can be accessed at all times by clicking on the Antivirus link from the
navigation panel.
2.1 Common Tasks
The ‘Common Tasks’ area provides easy access to all Comodo Antivirus settings.
Click the links below to see detailed explanations of each area in this section.
• Run a Scan
• Update Virus Database
• Quarantined Items
• View Antivirus Events
• Submit Files
• Scheduled Scans
• Scan Profiles
• Scanner Settings
86
www.comodo.com
Comodo Internet Security User Guide | © 2010 Comodo Security Solutions Inc. | All rights reserved.
Page 87

2.1.1 Run a Scan
When you want to check a disk or folder for possible infection from viruses and malware, you can launch an OnDemand Scan using the Run a Scan option. This executes an instant virus scan on the selected item. You can
also check a wide range of removable storage devices such as CD's, DVD's, external hard-drives, USB connected
drives, digital cameras - even your iPod!!
You have two options available when you choose to run an On-Demand Scan:
1. Scan a preselected area; or
2. Define a custom scan of the areas you choose, by creating a Scan Profile .
• Apart from running an On-Demand scan from Run a Scan interface, you can also scan specific objects
using Context Sensitive Scan.
Scanning Preselected Areas
Comodo Antivirus has two pre-defined scan profiles to run On-Demand Scan on preselected areas on your system.
They are:
i. My Computer - When this Profile is selected, Comodo Antivirus scans every local drive, folder and file
on your system.
87
www.comodo.com
Comodo Internet Security User Guide | © 2010 Comodo Security Solutions Inc. | All rights reserved.
Page 88

ii. Critical Areas - When this profile is selected, Comodo Antivirus scans the Program Files Folder and
WINDOWS Folder of the Operating System of your computer.
Custom Scan
You can run the virus scan on selected disks or folders by setting the scan profiles beforehand. For more details on
Scan profiles, refer to Antivirus Tasks > Common Tasks > Scan Profiles. You can also Create a Scan Profile from
the Run a Scan option.
Comodo Antivirus also scans the archive files such as .ZIP, .RAR, and so on, on running an on-demand scanning.
To start an On-Demand scanning
1. Click 'Run a Scan' in the main Antivirus Task Manager Screen.
The 'Run a Scan' panel appears.
From the Run a 'Scan' panel you can
• Run a scan one of the items listed in the panel
• Add a new item to scan by creating a new scan profile
• Save the Scan results as text file
• Move any threats identified by the scan into quarantine
• Disinfect the selected file/application if an exclusive disinfection routine is available
• Delete any infected files, folders or applications
• Exclude an application you consider as safe from the threat list
To scan your system for viruses and malware
88
www.comodo.com
Comodo Internet Security User Guide | © 2010 Comodo Security Solutions Inc. | All rights reserved.
Page 89

1. Click 'Run a Scan' in the Antivirus screen.
2. Select a Scan Profile name and click 'Scan'.
Comodo Antivirus checks for AV database updates and if available, updates the virus database in your
system.
Then Comodo Antivirus starts to scan the items, based on the scan profile you have selected.
On completion of scanning, the 'scanning completed' window is displayed.
89
www.comodo.com
Comodo Internet Security User Guide | © 2010 Comodo Security Solutions Inc. | All rights reserved.
Page 90

3. Click 'Results' to view the Scan Results window. If malicious executables are discovered on your system,
the scan results window displays the number of objects scanned and the number of threats (Viruses,
Malware and so on).
To save the Scan Results as a Text File
1. Click 'Save' and enter the location in the 'Save As' dialog box.
90
www.comodo.com
Comodo Internet Security User Guide | © 2010 Comodo Security Solutions Inc. | All rights reserved.
Page 91

To move selected executables detected with threats to Quarantined Items
1. Select the application from the results, click the drop-down button beside 'Clean' and select 'Quarantine'
91
www.comodo.com
Comodo Internet Security User Guide | © 2010 Comodo Security Solutions Inc. | All rights reserved.
Page 92

2. Click 'Yes' in the confirmation dialog box.
The selected application is moved to the Quarantined items. For more details on quarantined applications,
refer to Antivirus Tasks > Common Tasks > Quarantined Items.
To disinfect the file / application detected with a threat
1. Select the application from the results, click the drop-down button beside the 'Clean' button and select
'Disinfect'.
92
www.comodo.com
Comodo Internet Security User Guide | © 2010 Comodo Security Solutions Inc. | All rights reserved.
Page 93

2. Click 'Yes' in the confirmation dialog box.
The antivirus disinfects the file if there exists a disinfection routine defined for the file and the file is
recovered to its pre-viral state. If no any disinfection routine is available, the file is deleted permanently
from your system.
To delete an application detected with a threat
1. Select the application from the results, click the 'Clean' button.
93
www.comodo.com
Comodo Internet Security User Guide | © 2010 Comodo Security Solutions Inc. | All rights reserved.
Page 94

2. Click 'Yes' in the confirmation dialog box.
To exclude an application / file you consider as safe, from the threat list
1. Select the application from the results, click 'Ignore' and click 'Yes' in the dialog box.
94
www.comodo.com
Comodo Internet Security User Guide | © 2010 Comodo Security Solutions Inc. | All rights reserved.
Page 95

The selected application is moved to Exclusions list. For more details on Exclusions, refer to Antivirus
Tasks > Common Tasks > Scanner Settings > Exclusions.
Creating a Scan profile
Scan Profiles are the user-defined profiles containing specific areas on your system that you wish to scan and can
be re-used for all future scans.
To create a new scan profile
1. Click 'Create New Scan' in the 'Run a Scan' interface.
A configuration screen appears.
95
www.comodo.com
Comodo Internet Security User Guide | © 2010 Comodo Security Solutions Inc. | All rights reserved.
Page 96

2. Type a name for the scan profile to be created in the 'Name' box.
3. Click 'Add'.
A configuration screen appears, prompting you to select the locations to be scanned when the newly
created scan profile is selected.
96
www.comodo.com
Comodo Internet Security User Guide | © 2010 Comodo Security Solutions Inc. | All rights reserved.
Page 97

4. Select the locations from the left column, drag and drop to the right column or select the locations and click
right arrow to move selected folders to right column.
5. Click 'Apply'.
6. Repeat the process to create more Scan Profiles.
Note: You can also create new Scan Profiles by accessing Scan Profiles in the Antivirus Screen.
Context Sensitive Scan
You can right click any item i.e. a drive, folder or a file in Windows Explorer and select 'Scan with COMODO
Antivirus' from the context sensitive menu to perform a virus scan selectively on the item. This is useful when you
suspect a particular item might contain virus due to newly downloaded or copied folder/file.
97
www.comodo.com
Comodo Internet Security User Guide | © 2010 Comodo Security Solutions Inc. | All rights reserved.
Page 98

2.1.2 Update Virus Database
In order to guarantee the relevance of your antivirus software, it is imperative that your virus databases are
updated as regularly as possible.
Our anti-virus database is maintained and updated around the clock by a team of dedicated technicians, providing
you with the solutions to the latest virus outbreaks. Updates can be downloaded to your system manually or
automatically from Comodo's update servers.
To manually check for the latest virus Database and then download the updates
1. Click on the 'Update Virus Database' from the main Antivirus Task Manager Screen.
Note: You must be connected to Internet to download the updates.
A dialog box appears, showing you the progress of update process.
98
www.comodo.com
Comodo Internet Security User Guide | © 2010 Comodo Security Solutions Inc. | All rights reserved.
Page 99

On completion, your virus database is made up to date.
When infected or possibly infected files are found, if the anti-virus database has been not updated for a critically
long time, or your computer has not been scanned for a long time, the main window of Comodo Antivirus
recommends a course of action and gives a supporting explanation. We have customized our application to
achieve optimal performance based on the extensive expertise of Comodo in the anti-virus protection business.
Automatic Updates
Comodo AntiVirus checks for latest virus database updates from Comodo website and downloads the updates
automatically. You can configure Comodo Antivirus to download updates automatically in the Scanner Settings for
Real Time Scanning (On-Access Scanning) and Scheduled Scanning. Refer to Real Time Scanning Settings and
Scheduled Scanning Settings.
2.1.3 Quarantined Items
The quarantine facility removes and isolates suspicious files into a safe location before analyzing them for possible
infection. Any files transferred in this fashion are encrypted- meaning they cannot be run or executed. This isolation
prevents infected files from affecting the rest of your PC. If a file cannot be disinfected, then it provides a reliable
safe-house until the virus database is updated- neutralizing the impact of any new virus.
For adding executables to Quarantined items, refer to Antivirus Tasks > Common Tasks > Run a Scan. You can
also:
• Manually add applications, executables or other files, that you do not trust, as a Quarantined item
• Delete a selected quarantined item from the system
• Restore a quarantined item
• Delete all quarantined items
• Submit selected quarantined items to Comodo for analysis
99
www.comodo.com
Comodo Internet Security User Guide | © 2010 Comodo Security Solutions Inc. | All rights reserved.
Page 100

To view the list of Quarantined Items
• Click 'Quarantined Items' from the main Antivirus Task Manager Screen.
Column Descriptions
• Item - Indicates which application or process propagated the event;
• Location - Indicates the location where the application or the file is stored;
• Date/Time - Indicates date and time, when the item is moved to quarantine.
Manually adding files as Quarantined Items
If you have a file, folder or drive that you suspect may contain a virus and not been detected by the scanner, then
you have the option to isolate that item in quarantine.
To manually add a Quarantined Item
• Click Add and select the file from Open dialog box.
To delete a quarantined item from the system
• Select the item and Click 'Delete'.
This deletes the file from the system permanently.
To restore a quarantined item to its original location
• Select the item and click 'Restore'.
If the restored item does not contain a malware, it operates as usual. But if it contains a malware, it is detected as a
threat immediately, if the Real Time Scanning is enabled or during the next scan.
To remove all the quarantined items permanently
• Click 'Clear'.
This deletes all the quarantined items from the system permanently.
100
www.comodo.com
Comodo Internet Security User Guide | © 2010 Comodo Security Solutions Inc. | All rights reserved.
 Loading...