

Page 1
LBI-31693B
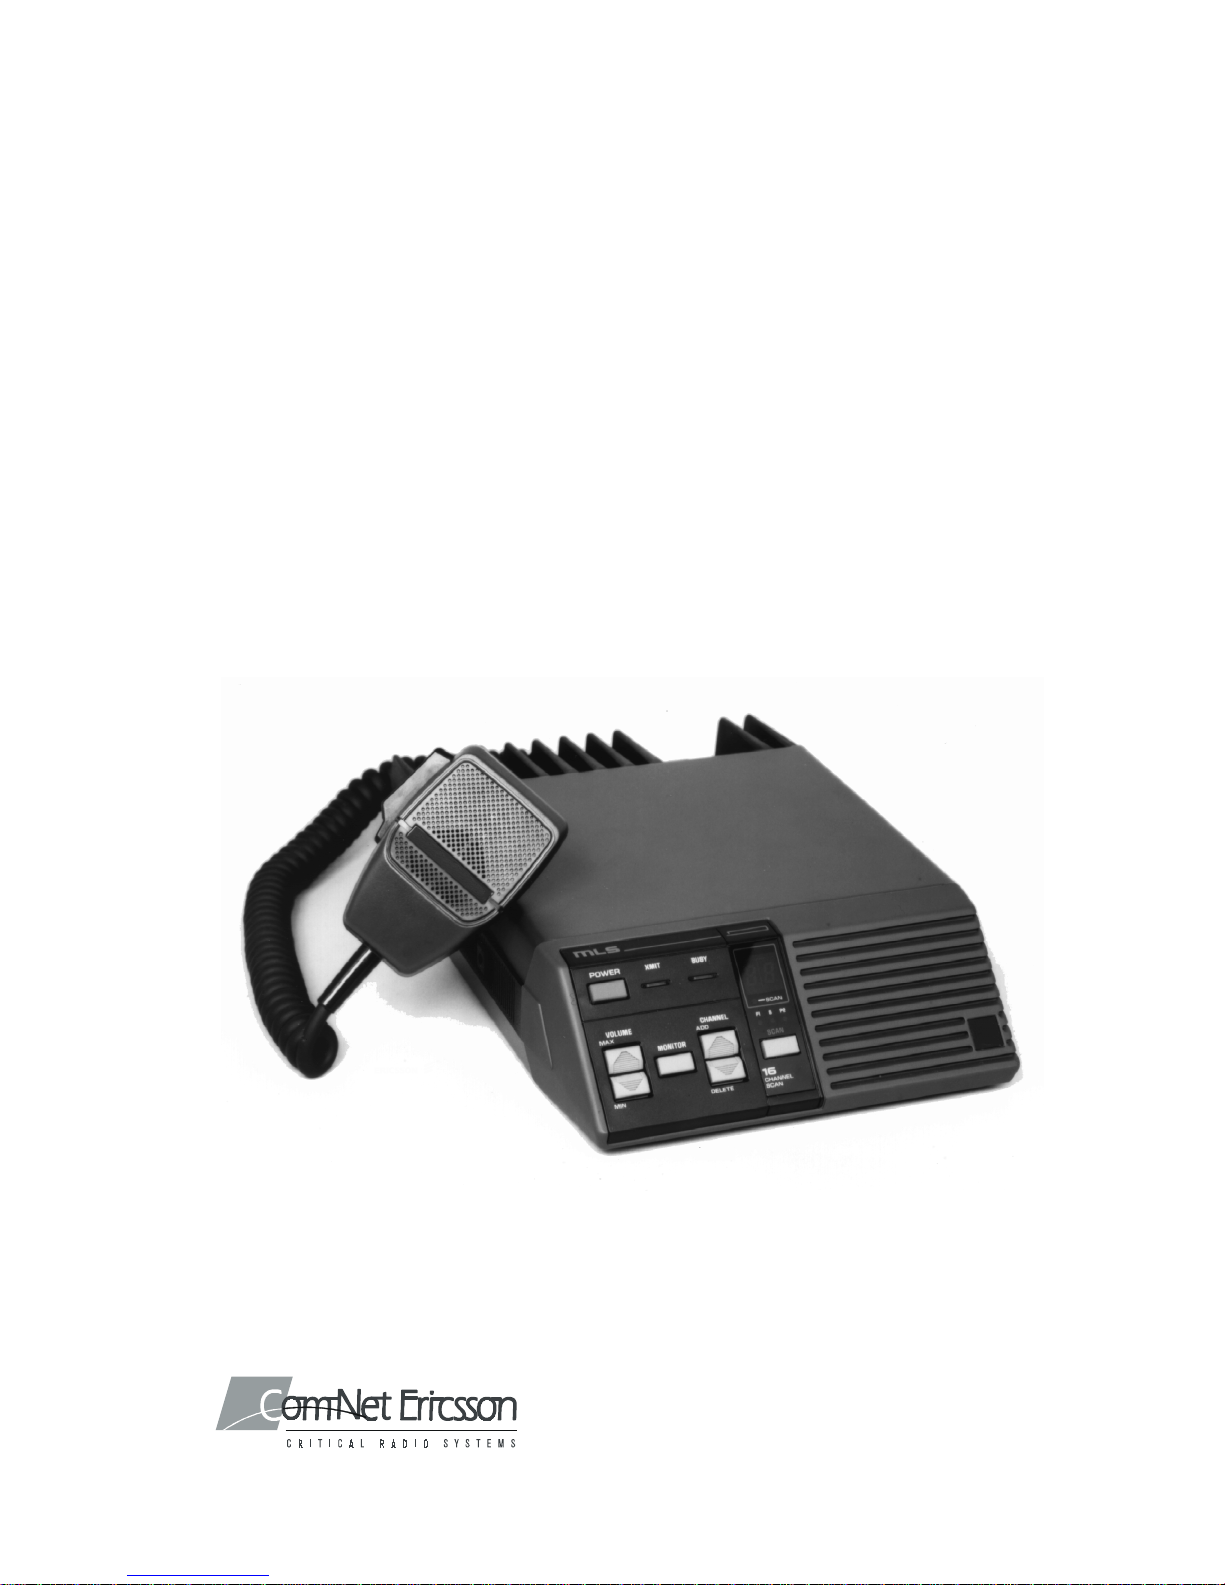
Operator’s Manual
MLS II
Mobile Radio
Page 2

This manual is published by Com-Net Ericsson Critical Radio Systems, Inc., without any
y
warranty. Improvements and changes to this manual necessitated by typographical errors,
inaccuracies of current information, or improvements to programs and/or equipment, may be made
by Com-Net Ericsson Critical Radio Systems, Inc., at any time and without notice. Such changes
will be incorporated into new editions of this manual. No part of this manual may be reproduced or
transmitted in any form or by any means, electronic or mechanical, including photocopying and
recording, for any purpose, without the express written permission of Com-Net Ericsson Critica l
Radio S
Copyright © 1986-2000 Com-Net Ericsson Critical Radio Systems, Inc. All rights reserved.
stems, Inc.
2
Page 3

TABLE OF CONTENTS
SAFETY INFORMATION..........................................................4
SAFE DRIVING RECOMMENDATIONS FOR USERS OF MOBILE
RADIOS RECOMMENDED BY AAA...............................................5
OPERATING RULES AND REGULATIONS.............................5
OPERATING STANDARD (TWO CHANNEL) RADIO ..............7
CONTROLS AND INDICATORS.....................................................8
CONTROLS..............................................................................8
INDICATORS............................................................................8
USING THE RADIO.........................................................................9
TO RECEIVE A MESSAGE ......................................................9
TO TRANSMIT A MESSAGE ...................................................9
OPERATING THE OPTIONAL 8 OR 16 CHANNEL RADIO...10
CONTROLS AND INDICATORS...................................................11
CONTROLS............................................................................11
INDICATORS..........................................................................12
USING THE OPTIONAL 8 OR 16 CHANNEL RADIO (WITHOUT
SCAN)............................................................................................13
TO RECEIVE A MESSAGE ....................................................13
TO TRANSMlT A MESSAGE..................................................13
SCAN OPERATION................................................................14
RECEIVE SCAN RATE...........................................................14
TRANSMIT IN SCAN MODE ..................................................15
TO PROGRAM SCAN CHANNELS AND SELECT PRIORITY.....15
USING THE OPTIONAL 8 OR 16 CHANNEL RADIO (WITH
SCAN)............................................................................................17
SCAN MODE ..........................................................................17
3
Page 4

SAFETY INFORMATION
The operator of any mobile radio should be aware of certain hazards common to
the operation of vehicular radio transmissions. A list of several possible
hazards is given:
1. Explosive Atmospheres - Just as it is dangerous to fuel a vehicle with the
motor running, similar hazards exist when operating a mobile radio . Be sur e
to turn the radio off while fueling a vehicle. Do not carry containers of fuel
in the trunk of a vehicle if the r adio is mounted in the trunk
2. Interference to Vehicular Electronics Systems - Electronic fuel injection
systems, electronic anti-skid braking systems, electronic cruise control
systems, etc., are typical electronic systems that may malfunction due to the
lack of protection from radio frequency energy present when transmitting. If
the vehicle contains such equipment, consult the dealer and enlist their aid
in determining the expected performance of electronic circuits when the
radio is transmitting.
3. Dynamite Blasting Caps - Dynamite blasting caps may be caused to
explode by operating a radio within 500 feet of the blasting caps. Always
obey the "Turn Off Two-Way Radios" signs posted where dynamite is
being used.
When transporting blasting caps in your vehicle:
•
Carry the blasting caps in a closed metal box with a soft lining.
•
Leave the radio OFF whenever the blasting caps are being put into
or removed from the vehicle.
4. Radio Frequency Energy - To prevent burns or related physical injury
from radio frequency energy, do not operate the transmitter when anyone
outside of the vehicle is within two feet of the antenna.
5. Liquefied Petroleum (LP) Gas Powered Vehicles - Mobile radio
installations in vehicles powered by liquefied petroleum gas with the LP gas
container in the trunk or other sealed-off space within the interior of the
vehicle must conform to the National Fire Protection Association standard
(NFPA) 58 requiring:
•
The space containing the radio equipment shall be isolated by a
seal from the space containing the LP gas container and its fittings.
•
Outside filling connections shall be used for the LP gas container.
•
The LP gas container shall be vented to the outside of the vehicle.
4
Page 5

SAFE DRIVING RECOMMENDATIONS FOR
USERS OF MOBILE RADIOS RECOMMENDED
BY AAA
∗ Read the literature on the safe operation of the radio.
Keep both hands on the steering wheel and the microphone in its hanger
∗
whenever the vehicle is in motion.
Place calls only when vehicle is stopped.
∗
∗ When talking from a moving vehicle is unavoidable, drive in the slower
lane. Kee p conversa tions brie f.
∗ If a conversatio n requires t aking notes or complex tho ught, stop the vehicle
in a safe place and continue the call.
Whenever using a mobile radio exercise caution.
∗
OPERATING RULES AND REGULATIONS
Two-way FM radio systems must be operated in accordance with the rules and
regulatio ns of the local , regional, or natio nal government.
In the United States, the radio must be operated in accordance with the rules and
regulations of the Federal Communications Commission (FCC). As an operator
of two-way radio equipment, you must be thoroughly familiar with the rules that
apply to your particular type of radio operation. Following these rules helps
eliminate confusion, assures the most efficient use of the existing radio channels,
and results i n a smoothly functioni ng radio network. Whe n using your t wo-way
radio, remember these rules:
1. It is a violation of FCC rules to interrupt any distress or emergency
message. As your radio operates in much the same way as a telephone
"party line", always listen to make sure that the channel is clear before
transmitting. Emergency calls have priority over all other messages. If
someone is sending an emergency message - such as reporting a fire or
asking for help in an accident - KEEP OFF THE AIR!
2. The use of p rofane or o bscene language i s prohibite d by Federal law.
3. It is against the law to send false call letters or false distress or emergency
messages. The FCC requires that you keep conversations brief and confine
them to business. To sa ve time, use coded messages whenever possible.
5
Page 6

4. Using your radio to send personal messages (exc ept in an emergency) is a
violation of FCC rules. You may send only those messages that are essential
for the operation of your business.
5. It is against Fed eral law to repeat or otherwise make known anything you
overhear on your radio. Conversatio ns between othe rs sharing your c hannel
must be regarded as confidential.
6. The FCC requires that you identify yourself at certain specific times by
means of your call letters. Refer to the rules that apply to your particular
type of operation for the proper procedure.
7. No changes or adjustments shall be made to the equipment except by an
authorized or certified electronic technician.
IMPORTANT
Under U.S. law, operation of an unlicensed radio transmitter within the
jurisdiction of the United States may be punishable by a fine of up to $10,000,
imprisonment for up to two years, or both.
WARNING
The 406 to 406.1 MHz frequency Band is reserved for use by distress
beacons.
6
Page 7
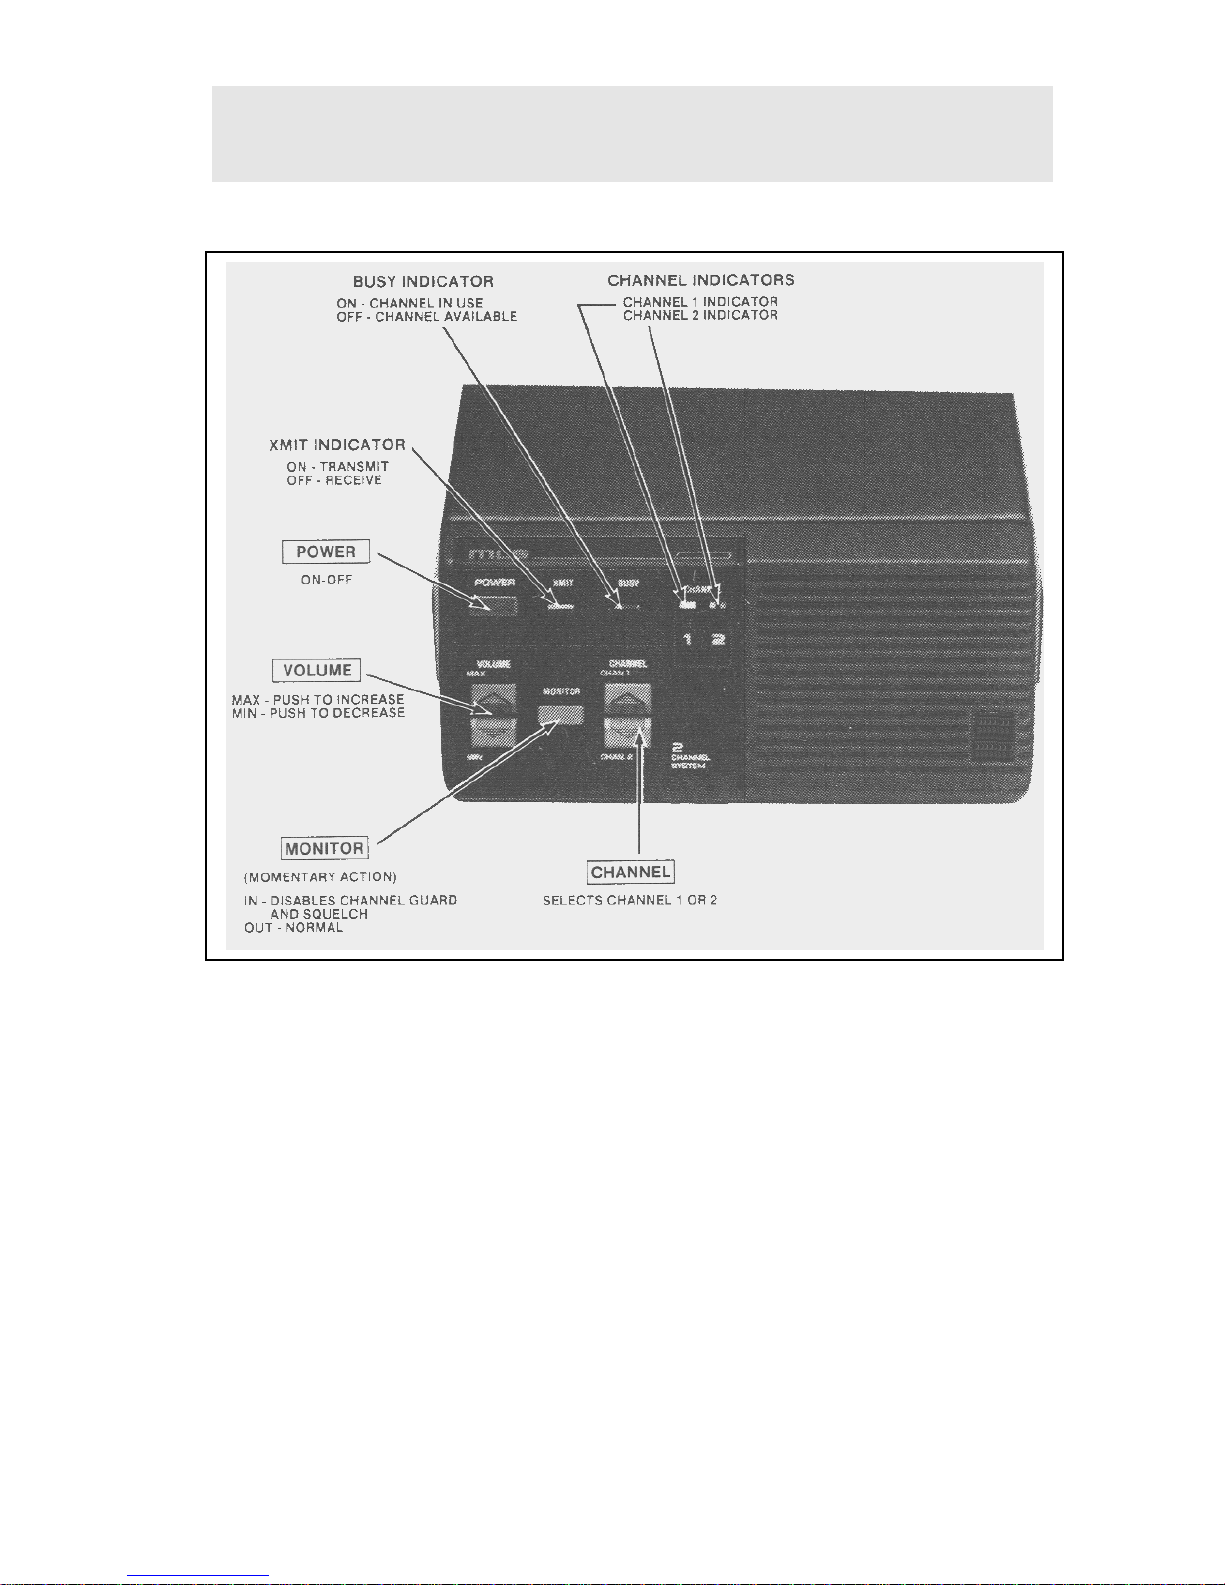
OPERATING STANDARD (TWO CHANNEL)
RADIO
STANDARD 2-CHANNEL RADIO
7
Page 8

CONTROLS AND INDICATORS
CONTROLS
POWER
VOLUME
CHANNEL
MONITOR
A momentary type switch to turn the radio on or off. Press
once to turn the radio on; press again to turn the radio off.
Power ON is indicated by an illuminated channel number on
the system module.
Momentary type switches to adjust the volume. Press and hold
the MAX (up arrow) to increase the volume. Press and hold
the MIN (down arrow) to decrease the volume.
Two push type switches. Press CHAN 1 (up arrow) to select
channel 1; press CHAN 2 (down arrow) to select channel 2.
The selected channel number will be illuminated on the
control module.
A momentary type switch to allow you to monitor the selected
channel before transmitting a message. It disables channel
guard and squelch and will allow you to hear noise if the
channel is not busy. This may be convenient when setting the
volume to the desired level.
INDICATORS
XMIT (transmit) Lights when your message is being transmitted.
BUSY Lights when the channel is in use.
CHANNEL Lights to indicate which channel has been selected
8
Page 9

USING THE RADIO
TO RECEIVE A MESSAGE
1. Turn the radio on (channel indicator lit). If not, press POWER switch.
2. Select the desired channel by pressing either the 1 or 2 switch.
3. Press and hold MONITOR switch and then adjust VOLUME controls for
the desired listening level. Release MONITOR switch.
4. Radio is now ready to receive a message.
TO TRANSMIT A MESSAGE
1. Confirm that the radio is turned on (channel indicator lit). If not, press
POWER switch.
2. Select the desired channel by pressing either the 1 or 2 switch.
3. Press and hold MONITOR switch and then adjust VOLUME controls for
the desired listening level. Release MONITOR switch.
4. Decide what you want to say. If you intend a lengthy message (or several
messages), the vehicle engine should be running to maintain the battery
charge.
5. Observe the BUSY indicator and press the MONITOR switch to assure that
the channel is not in use.
6. Remove microphone from hookswitch, press the PTT switch, and identify
yourself. The XMIT indicator will light each time the PTT switch is
pressed.
7. Release the PTT switch and wait for an answer to your call, then complete
your message.
NOTE:
Always speak in a normal voice. Hold the microphone cupped in
your hand and touching your cheek lightly. Speak across the face of
your microphone, not directly into if. Shouting will actually reduce
your radio range, so do not speak any lo uder than nor mal.
9
Page 10
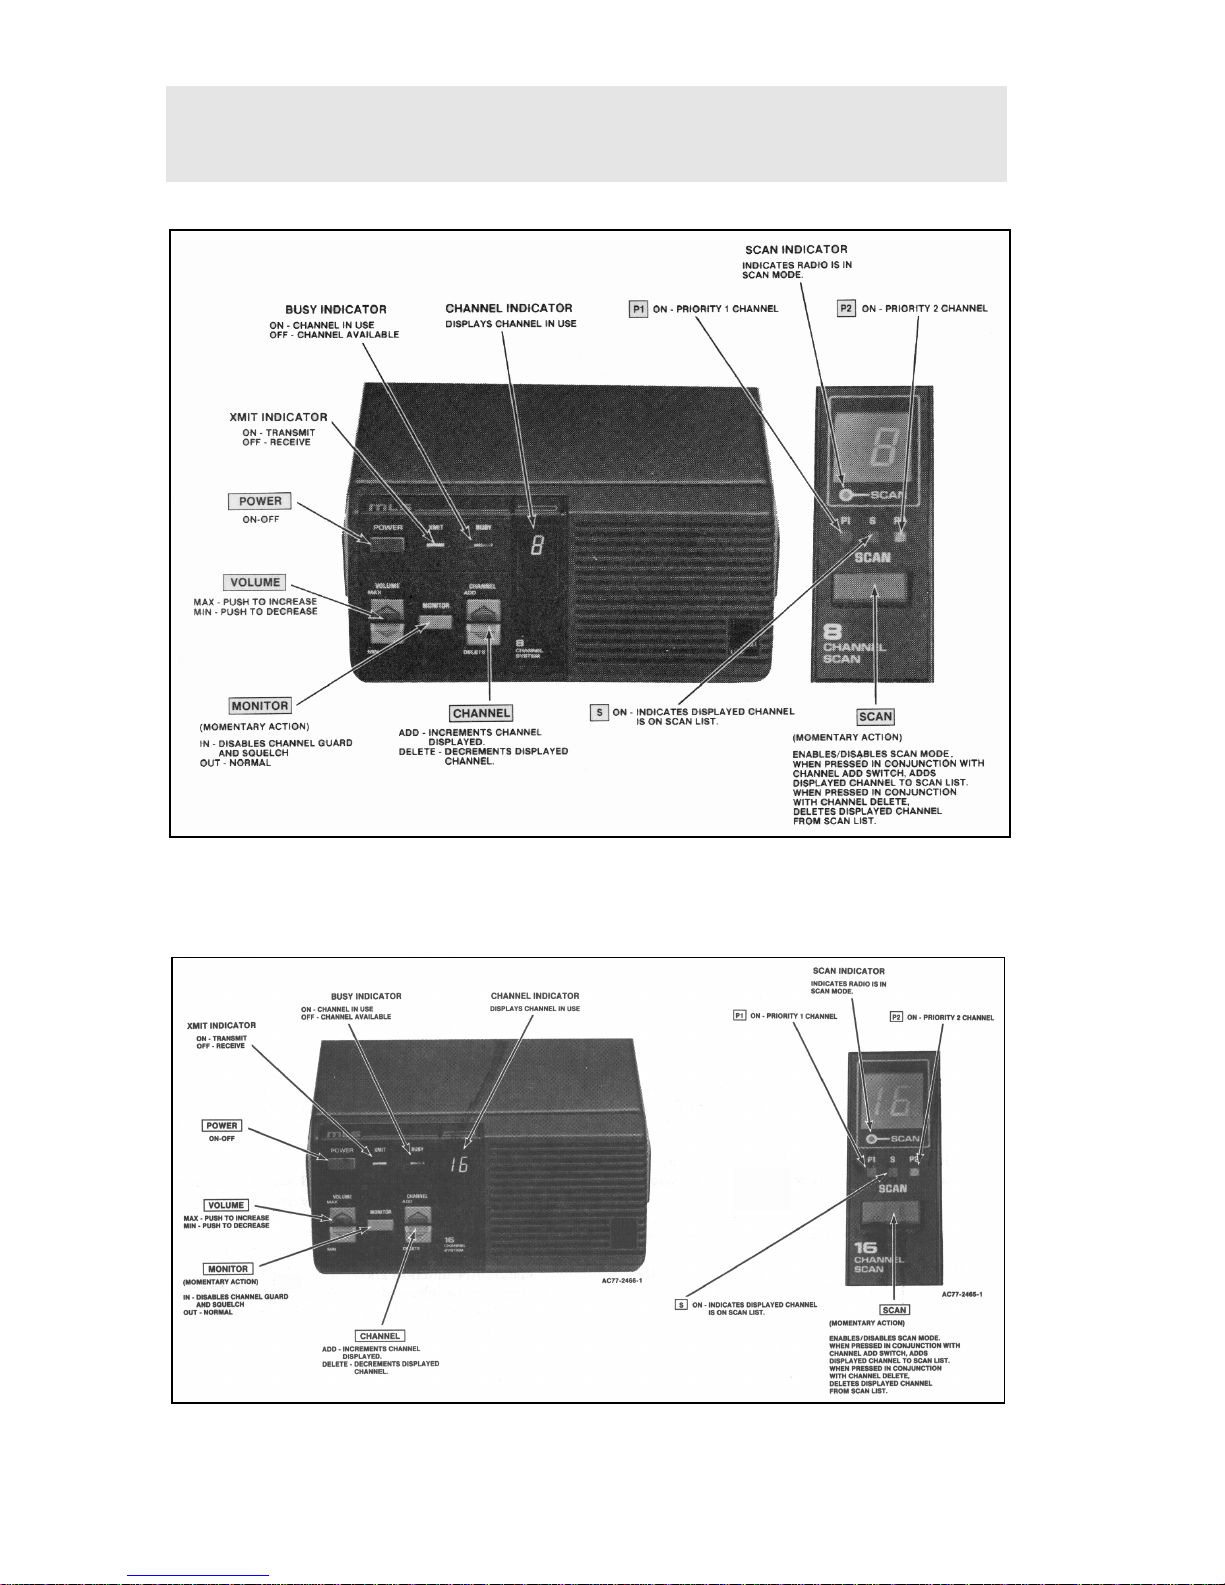
OPERATING THE OPTIONAL 8 OR 16
CHANNEL RADIO
8 CHANNEL RADIO WITHOUT SCAN/WITH SCAN
16 CHANNEL RADIO WITHOUT SCAN/WITH SCAN
10
Page 11

CONTROLS AND INDICATORS
CONTROLS
POWER
VOLUME
MONITOR
CHANNEL
A momentary type switch to turn the radio on or off. Press
once to turn the radio on; press again to turn the radio off.
Power ON is indicated by an illuminated channel number on
the system module.
Momentary type switches to adjust the volume. Press and hold
the MAX (up arrow) to increase the volume. Press and hold
the MIN (down arrow) to decrease the volume.
A momentary type switch to allow you to monitor the selected
channel before transmitting a message. It disables channel
guard and squelch and will allow you to hear noise if the
channel is not busy. This may be convenient when setting the
volume to the desired level.
Two momentary type switches to select channels
electronically. Press and hold the ADD switch to increase the
channel number; press and hold the DELETE switch to
decrease the channel number. The selected channel is
displayed by the 7-segment display.
ADD
DELETE
SCAN
When used in conjunction with the SCAN switch, adds
channels from the SCAN list.
When used in conjunction with the SCAN switch, deletes
channels from the SCAN list.
A momentary type switch to turn the scan function on or off.
When used in conjunction with the CHANNEL switch it
enables the ADD/DELETE function to allow the scan list to
be modified. When turned on, the scan indicator is
illuminated.
11
Page 12
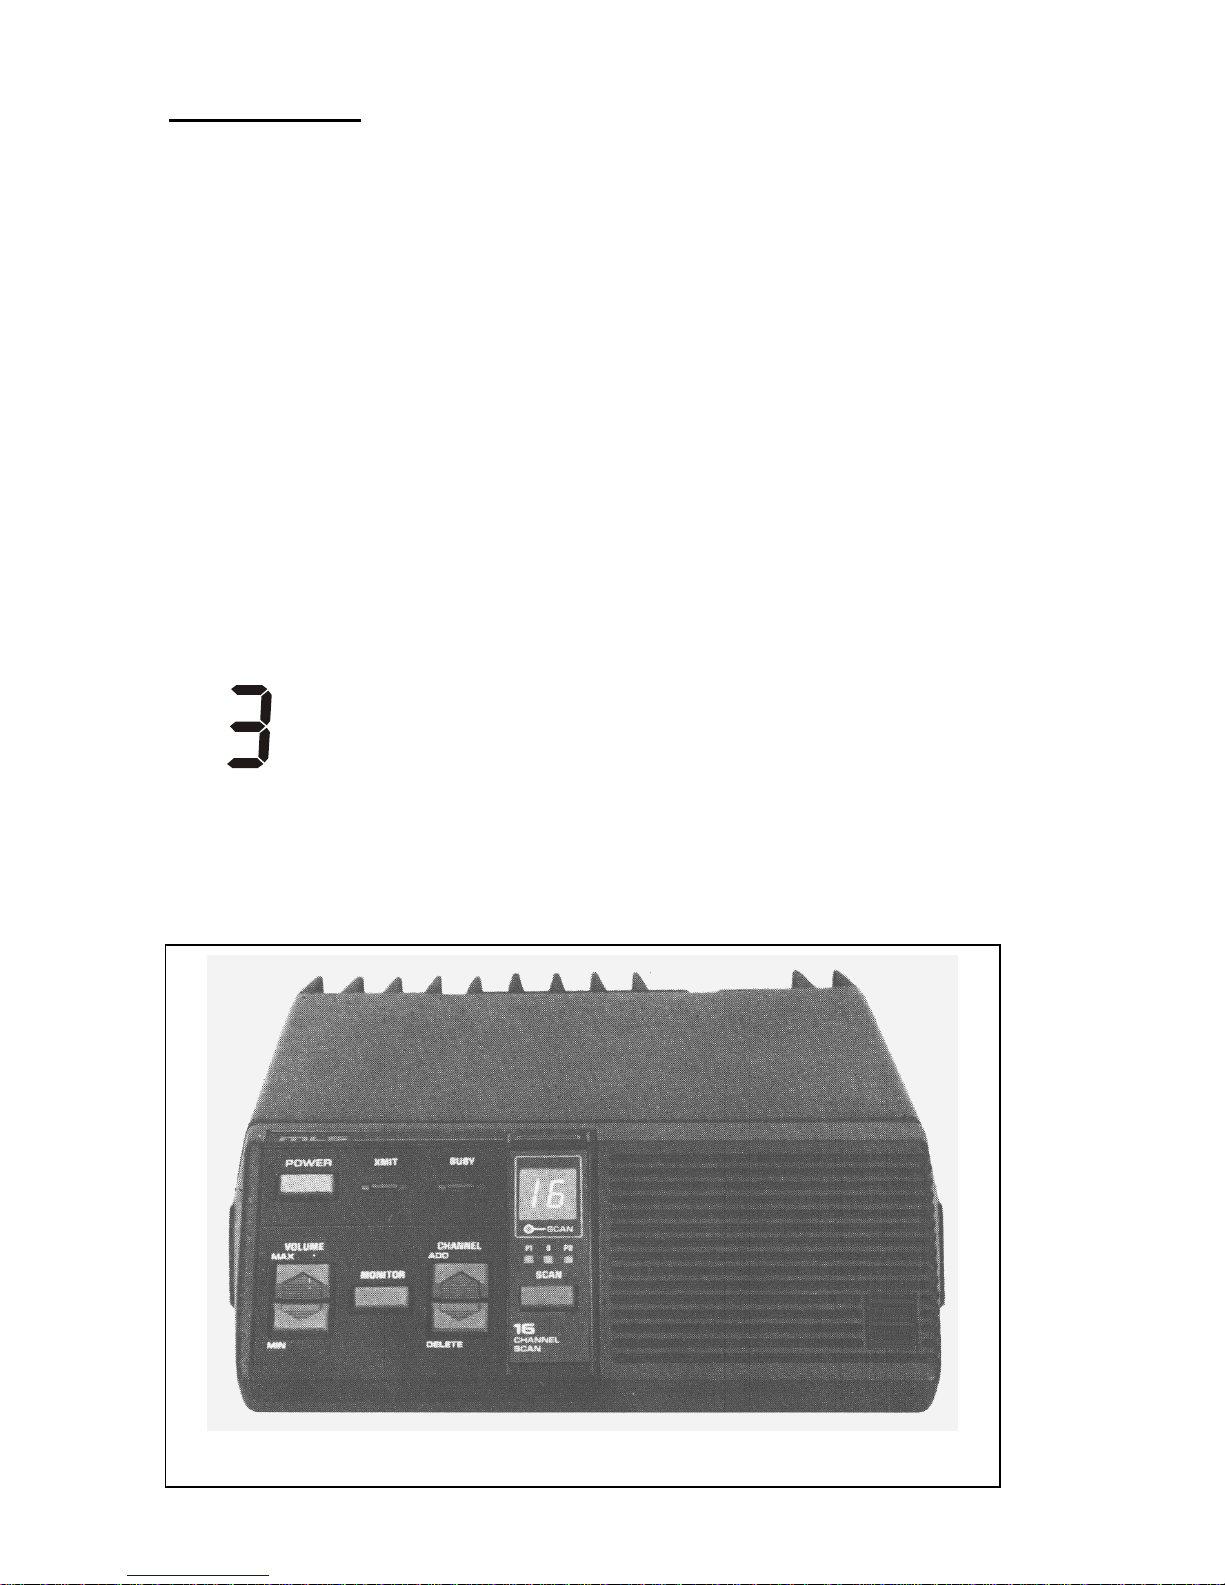
INDICATORS
XMIT
(transmit)
BUSY
CHANNEL
P1
P2
S
SCAN
Lights when your message is being transmitted.
Lights when the channel is in use.
Lights to indicate which channel has been selected.
When lit, indicates that the channel displayed is a Priority 1
scan channel.
When lit, indicates that the channel displayed is a Priority 2
scan channel.
When lit, indicates that the channel displayed is a non-priority
scan channel.
When lit, indicates that the radio is operating in the scan
mode.
The channel indicator displays the following conditions:
• When scan is off the selected channel is shown.
When scan is on, the last pre-scan selected channel is
•
shown when no signal is being received. When a scan
channel is being received and audio is present in the
speaker, the receive channel is shown.
12
Page 13

USING THE OPTIONAL 8 OR 16 CHANNEL
RADIO (WITHOUT SCAN)
TO RECEIVE A MESSAGE
1. Turn the radio on (channel indicator lit). If not, press POWER switch.
2. Select the desired channel by pressing either the ADD or DELETE switch.
3. Press and hold MONITOR switch and then adjust VOLUME control for the
desired listening level. Release MONITOR switch.
4. Radio is now ready to receive a message.
TO TRANSMlT A MESSAGE
1. Confirm that the radio is turned on (channel indicator lit). If not, press
POWER switch.
2. Select the desired channel by pressing either the ADD or DELETE switch.
3. Press and hold MONITOR switch and then adjust VOLUME controls for
the desired listening level. Release MONITOR switch.
4. Decide what you want to say. If you intend a lengthy message (or several
messages), the vehicle engine should be running to maintain the battery
charge.
5. Observe the BUSY indicator and press the MONITOR switch to assure that
the channel is not in use.
6. Remove microphone from hookswitch, press the PTT switch, and identify
yourself. The XMIT indicator will light each time the PTT switch is
pressed.
7. Release the PTT switch and wait for an answer to your call. Then, complete
your message.
NOTE:
Always speak in a normal voice. Hold the microphone cupped in
your hand and touching your cheek lightly. Speak across the face of
the microphone, not directly into it. Shouting will actually reduce
your radio range, speak not speak any louder than normal.
13
Page 14

SCAN OPERATION
The SCAN function allows monitoring of up to 8 or 16 receive channels
(depending upon which control module is being used). The scanned channels
may be any frequency within the frequency band limits of the radio and may be
Channel Guard protected. The radio messages will then be received only if the
correct Channel Guard signal is present.
Any channel may be scanned with or without priority level. One channel may be
programmed for Priority 1 (P1) and another for Priority 2 (P2) with any or all
remaining programmed channels being scanned as non-prio rity.
RECEIVE SCAN RATE
The scan rate for the radio will vary depending upon the number of channels
programmed into the scan memory and whether or not Channel Guard is
programmed. For a 16 channel radio the scan rate will vary from 1.1 to 4.4
seconds for non-priority channels and 0.3 to 1.2 seconds for Priority 1 and 2
channels. The scan rate will be faster when fewer channels are programmed into
scan memory.
Scan operation will be determined by the following conditions:
• Pr io rity 1, Priority 2, and Non-Priority Programmed*
The Priority 1, Priority 2, and up to six remaining channels in an 8 channel
radio or 14 channels in a 16 channel radio will be scanned. Once a carrier is
detected (or correct Channel Guard tone is decoded), the digital display will
indicate the Channel. Sampling of the Priority 1 and Priority 2 channels
continues while receiving a message on a non-priority channel. Should a
Priority 1 or 2 channel carrier (and correct Channel Guard) be detected
while a non-priority channel is being received, the applicable indicator, P1
or P2, lights and the channel is switched to the Priority 1 or 2 channel
regardless of what is being received on the non-priority channel.
If a Priority 2 channel is detected, sampling of the Priority 1 channel
continues. Once a carrier (and correct Channel Guard) is detected on the
Priority 1 channel, the channel is switched to the Priority 1 channel
regardless of what is being received on another channel (Non-priority or
Priority 2). No sampling occurs during transmit or if a Priority 1 channel is
receiving.
• Non-Priority Programmed
Up to 8/16 non-priority channels may be scanned. Once a carrier is detected
(or correct Channel Guard tone is decoded) the digital display will indicate
the channel. Scan will stop and remain on the channel until the carrier
disappears; after a few seconds scanning resumes. The channels will be
scanned in descending order.
14
Page 15

* The rate the P1 and P2 channels are sampled while listening to a nonpriority channel depends whether RF carrier is present or not. If no carrier
is present on P1 or P2, the scan rate is fast. If carrier is detected but
incorrect Channel Guard is present, the rate slows considerably. This
prevents the non-priority signal from being badly distorted by the larger
mute times needed to detect Channel Guard. If Channel Guard is not
programmed for P1 or P2 the scan rate remains fast.
TRANSMIT IN SCAN MODE
Several characteristics in the transmit mode occur if the radio has been placed in
the scan mode of operation.
∗ Radio is in scan mode but there is no carrier activity to stop the scan on any
channel. Removing the microphone from its hookswitch will stop the
scanning activity and the radio will revert to the pre-scan selected channel.
Replacing the microphone will enable the scan mode after a few seconds
delay.
∗ Radio is in scan mode and carrier activity on a channel has caused scan to
stop. Removing the microphone from its hookswitch will keep that channel
selected. When push-to-talk (PTT) is pressed on the microphone, the
transmit channel will be the displayed channel. The channel can be changed
during this time as needed but will be forgotten when scanning resumes.
Placing the microphone back on the hookswitch will cause scan to resume,
after a few seconds delay.
The Channel Guard decode is disabled whenever the microphone is
∗
removed from its hookswitch.
∗ During the scan mode the MONITOR and CHANNEL selection functions
are disabled if scan is not stopped on a channel.
TO PROGRAM SCAN CHANNELS AND SELECT
PRIORITY
The selection of scan channels and priority is front panel programmable using
the SCAN switch in conjunction with the ADD and DELETE switch.
NON-PRIORITY(S)
1. Confirm that radio is turned on (channel number is lit). If not, press the
POWER switch.
2. If SCAN indicator is lit, press and release the SCAN switch to disable scan
function.
3. Select desi red channel using t he ADD or DELETE switch.
4. Press and hold SCAN switch, then press the ADD switch once to add the
15
Page 16

channel to the scan list. The S indicator will light to indicate that the
channel is now in the scan program.
5. Release SCAN switch.
6. Repeat steps 2 thru 5 for each channel (up to 8/16) to be added to the scan
list.
PRIORITY 2 (P2)*
1. Perform Steps 1 thru 3 of the Non-Priority procedure.
2. Press and hold SCAN switch; then press the ADD switch twice. The
selected channel will now become the Priority 2 channel and the P2
indicator will fight to indicate that the channel is now in the scan program as
Priority 2.
3. Release SCAN switch.
PRIORITY 1 (P1)*
1. Perform Steps 1 thru 3 of the Non-Priority procedure.
2. Press and hold SCAN switch; then press the ADD switch three times. The
selected channel will now become the Priority 1 channel and the P1
indicator will light to indicate that the channel is now in the scan program as
Priority 1.
3. Release SCAN switch,
DELETE SCAN CHANNEL (S, P1, P2)
1. Confirm that radio is turned on (digital display lit). If not, press POWER
switch.
2. If indicator is lit, press and release SCAN switch to disable scan function.
3. Select the desired channel to be removed from the scan list using the ADD
or DELETE switch.
4. Press and hold SCAN switch; then press the DELETE switch once. This
removes the selected channel from the scan lit. All scan indicators (S, P1,
P2, and SCAN) will be off.
5. Release SCAN switch.
6. Repeat preceding Steps 2 thru 5 for each channel to be removed from the
scan program.
REVIEW
1. Confirm that radio is turned on (channel indicator lit). If not, press POWER
switch.
2. If SCAN indicator is lit, press and release SCAN switch to disable scan
16
Page 17

function.
3. Select each channel (one at a time) using the ADD or DELETE switch and
confirm channels included on the scan list. The scan indicators (S, P1, P2)
will light for each channel programmed.
∗ If a Priority 1 or 2 scan channel already exists when
programming a new Priority 1 or 2 scan channel, the old Priority
1 or 2 channel becomes a Non-Priority channel.
USING THE OPTIONAL 8 OR 16 CHANNEL
RADIO (WITH SCAN)
Perform the procedure listed in the paragraph “Using the Optional 8 or 16
Channel Radio Without Scan” on page 13.
SCAN MODE
Press and release SCAN switch to enable the scan function. The scan indicator
should light and the following conditions apply:
∗ Only programmed scan channels will be received.
∗ As long as no signal is being received, the digital display will indicate
the pre-scan selected banner. If S, P1, or P2 indicator is not lit, no
signal will be received on this channel, since it has not been
programmed for scan.
∗ When a signal is received the display indicates the channel received
and the priority level.
Removing microphone from hookswitch locks the radio onto the
∗
received scan channel. Pressing the PTT switch on the microphone
allows transmission on the received scan channel.
Scan resumes, after a few seconds delay, when the microphone is
∗
returned to the hookswitch. Pre-scan channel will again be displayed
and will be the transmit channel if user removes microphone from
hookswitch before another channel is detected.
Channel changes and other normal operations are allowed while off-
∗
hook but will be immediately forgotten when the microphone is placed
on hook.
17
Page 18

NOTES
18
Page 19

NOTES
19
Page 20

Com-Net Ericsson Critical Radio Systems, Inc.
P.O. Box 2000
Lynchburg, Virginia 24501
1-800-528-7711 (Outside USA, 804-592-7711) Printed In U.S.A.
 Loading...